

Page 1
SPEAKER SYSTEM
SX-L77
English
INSTRUCTIONS
LVT1283-002A
[U]
Page 2
38.0 kg
Thank you for purchasing a JVC speaker.
Before you begin using it, please read the instructions carefully
to be sure you get the best possible performance. If you have any
questions, consult your JVC dealer.
English
Warnings, Cautions and Others
7 Precautions for installation
•To avoid personal injury or accidentally
dropping the unit, have two persons unpack,
carry, and install the unit.
• Do not install the speakers on an uneven
surface or in a place subject to vibration;
otherwise, they may fall over, causing damage or injury.
–Take the occurrence of earthquakes or other physical
shocks into consideration when selecting the installation
place, and secure the speakers thoroughly.
•To prevent deformation or discoloration of the cabinet, do not
install the speakers where they are exposed to direct sunlight
or high humidity, and avoid installation near air conditioning
outlets.
• Speaker vibrations may cause howling. Place the speakers as
far away from the player as possible.
• The speakers are magnetically shielded to avoid color
distortions on TVs. However, if not installed properly, it may
cause color distortions. So, pay attention to the following when
installing the speakers.
– When placing the speakers near a TV set, turn off the TV’s
main power switch or unplug it before installing the
speakers.
Then wait at least 30 minutes before turning on the TV’s
main power switch again.
Some TVs may still be affected even though you have followed
the above. If this happens, move the speakers further away
from the TV.
•Tuner reception may become noisy or hissing if a speaker is
installed near the tuner. In this case, leave more distance
between the tuner and the speakers or use an outdoor
antenna for better tuner reception without interference from
the speakers.
• Do not lean against the speakers, as the speakers could fall
down or break, possibly causing an injury. Especially be
careful that children do not lean against them.
7 Precautions for daily use
•To maintain the appearance of the speakers
– Wipe with a dry, soft cloth if the cabinet should become
dirty.
If very dirty, wipe with a cloth applied a small amount of
water or neutral detergent, then wipe with a dry cloth.
– Do not use chemicals such as benzine and thinner for
cleaning the cabinet.
•To improve the sound field
– It is recommended to leave a space of more than 50 cm
between the speakers and the wall.
– If the speakers are facing a solid wall or glass door, etc., it is
recommended to furnish the wall with materials that absorb
sounds, for example by hanging up thick curtains, to prevent
reflections and standing waves.
•To use the speakers without any trouble
– Do not reproduce sounds at so high a volume that they are
distorted; otherwise, the speakers may be damaged by
internal heat buildup.
– When moving the speakers, do not pull the speaker cords;
otherwise, the speakers may fall over, causing damage or
injury.
Preparation
7 Checking the supplied accessories
• Speaker grille (1)
If any item is missing, contact your dealer immediately.
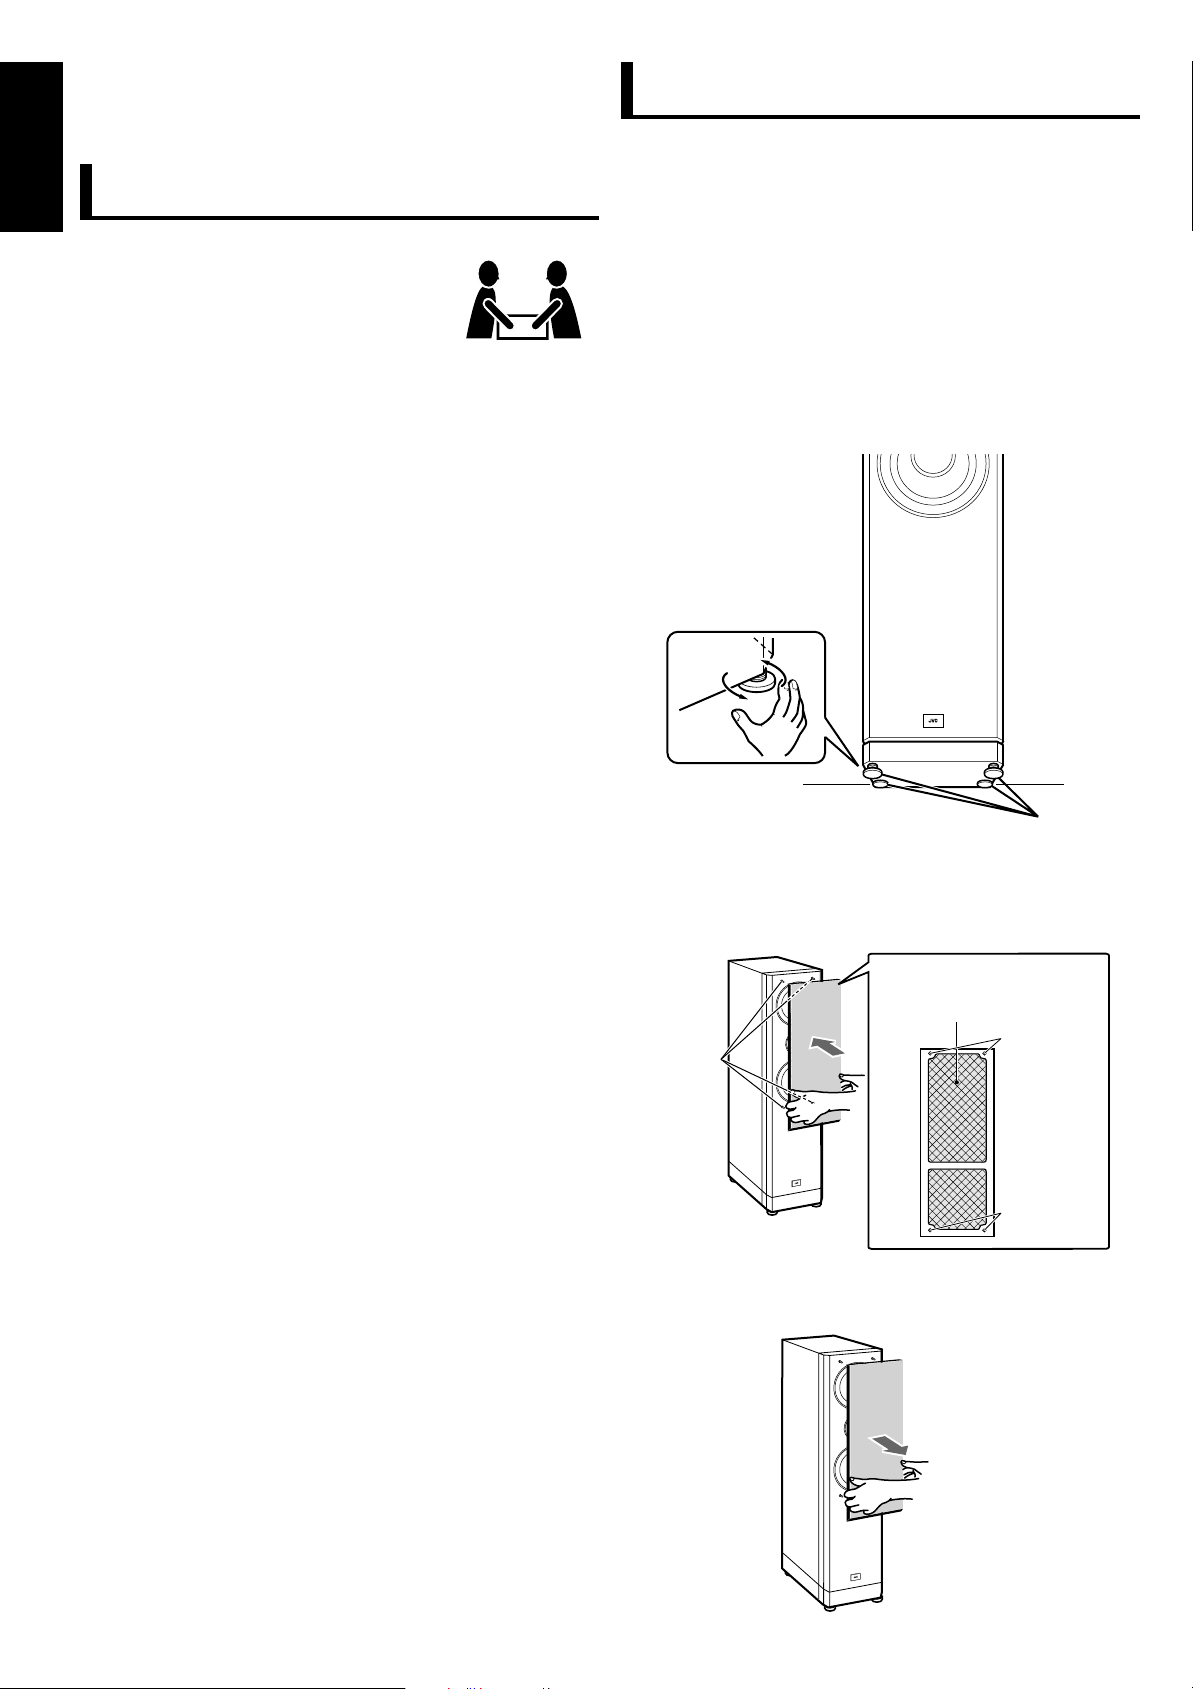
7 Adjusting the feet
If the speaker is unstable, adjust each foot until it stands stably.
•To avoid personal injury, and physical damage both to the
speaker and to the floor be careful not to drop the speaker on
your feet.
•Have two persons to adjust the feet to avoid falling off the
speaker.
• Do not touch the speaker units while adjusting the feet.
• When installing the speaker on the floor, be careful not to
place it over your hands.
Feet
7 About speaker grille
To attach the speaker grille, put the projections of the speaker
into the holes of the speaker grille.
• Do not press the speaker grille strongly.
Back of the speaker grille
The larger part should be
upper on the grille.
Holes
Projections
Holes
To remove the speaker grille, insert your fingers at the bottom
of the speaker grille, then pull upward.
2
Page 3

Connection
SPEAKERS
RIGHT
LEFT
LOW FREQUENCY
(
WOOFER ONLY
)
LOW FREQUENCY
(
WOOFER ONLY
)
SPEAKERS
RIGHT
LEFT
LOW FREQUENCY
(
WOOFER ONLY
)
HIGH FREQUENCY
LOW FREQUENCY
(
WOOFER ONLY
)
HIGH FREQUENCY
7 Connecting the speaker system to the amplifier
Before connecting:
• Make sure to match the polarity (ª and ·) when connecting
the speaker cords.
•Turn off the power to the amplifier before connecting the
speaker system; otherwise, the speakers may be damaged.
• The impedance of each speaker is 6 Ω.
If this does not match with the speaker impedance range
indicated on the amplifier, you cannot connect this system to
the amplifier.
• The maximum power handling capacity of the SX-L77 is
180 W. Excessive input will result in abnormal noise and
possible damage.
• Be sure to turn down the volume level on the amplifier to
prevent unwanted noise before performing following
operations:
–Turning on or off other components
– Operating the amplifier
–Tuning FM stations
–Fast-forwarding a tape
– Continuously reproducing high frequency oscillation or high
pitch electronic sounds
– Connecting or disconnecting a microphone
• When using a microphone, do not aim it at the speakers or
use it near the speakers; otherwise, the howling which occurs
may damage the speakers.
• Before replacing the cartridge, always turn off the power both
to the amplifier and to the turntable; otherwise, the clicking
noise may damage the speakers.
• Use speaker cords as follows;
– Buy thick speaker cords rather than thin cords, and make
them as short as possible for connection.
– Use speaker cords of the same length for both left and right
speakers.
– Do not use long speaker cords; otherwise, the sound quality
may deteriorate.
– Using a special speaker cord such as a litz wire, a coaxial
cable, or a cord which has the specified connecting
directionality may influence the sound quality.
7 Connecting the speaker cord
Connect the “INPUT” terminal of the speaker to the speaker
terminal of the amplifier.
7 Conventional connection
1
Loosen the knobs of the “FULL RANGE” terminals.
2
Fit the speaker cords into the grooves of the “FULL
RANGE” terminals, then tighten the knobs to secure the
speaker cords and short-circuit plates.
FULL RANGE terminals
Short-circuit
plates
Speaker cord
(not supplied)
7 Bi-wiring connection
This speaker is bi-wireable. Comparing with the conventional
connection, the bi-wiring connection makes the sound field
larger, deeper, and richer.
1
Loosen all speaker terminal knobs and detach the
short-circuit plates.
Short-circuit plates
2
Connect the “FULL RANGE” terminals and “LOW
FREQUENCY” terminals separately to the speaker
terminals of the amplifier.
LOW FREQUENCY terminals
FULL RANGE terminals
English
(Red)
Rotate the speaker terminal
knob counterclockwise and fit
(Black)
the speaker cord into the
groove. Then rotate the knob
clockwise to secure the cord.
(Red)
• Make sure to match the polarity (ª and ·); otherwise, the
surround effect will become less effective.
Speaker cord
(not supplied)
3
Page 4

Specifications
English
Type: 3-way 3-speaker bass-reflex type
Magnetically-shielded type
Speaker unit:
Woofer: 17.5 cm cone
Mid and low range: 17.5 cm cone
Tw eeter: 2.5 cm dome
Power handling Capacity: 180 W
Impedance: 6 Ω
Crossover frequency: 170 Hz, 3 000 Hz
Frequency range: 28 Hz to 70 000 Hz
Sound pressure level: 89 dB/W•m
Dimensions (W x H x D): 253 mm x 1 077 mm x 387 mm
Mass: 38.0 kg
Design and specifications subject to change without notice.
4
Page 5

SX-L77
SPEAKER SYSTEM
EN, CS
0105NSMMDWSAN© 2005 Victor Company of Japan, Limited
Page 6

Unpacking the speaker/拆開揚聲器的包裝
Precautions for unpacking:
• This speaker weights 42 kg total. Have two persons unpack for safe unpacking and installation.
• Make sure to keep enough space for unpacking.
mark on the package indicates the front side of the speaker. Open the package carefully not to damage the speaker.
Take off the bands, then peel off the tapes on the package.
1 3
• Be careful not to cut your hand or finger while taking off the bands.
拆封時的注意事項:
• 本揚聲器總重 42 kg。為保證拆封和安裝安全,拆封時需要由兩個人完成。
• 確保為拆封留置足夠的空間。
包裝上的
拆除封箱帶,然后撕下包裝上的膠帶。
• 拆除封箱帶時小心不要切到手或手指。
Cut the band with the cutter or scissors.
用刀或剪刀切斷封箱帶。
Band
封箱帶
Top side/頂面
Peel off the tape
撕下膠帶
Bottom side/底面
Side/側面
Bottom/底部
Tape/膠帶
Tape/膠帶
標記注明了揚聲器的前側。小心打開包裝,不要損壞揚聲器。
Remove the speaker from the protection pad.
• Do not touch the speaker units when holding the speaker.
從塑料泡沫中取出揚聲器。
• 握持揚聲器時,切勿觸碰揚聲器裝置。
Peel off the tape on the plastic bag and white sheet.
撕下塑料袋和白紙上的膠帶。
Tape/膠帶
Protection cover
保護蓋
Protection pad and carton
塑料泡沫和紙板
Cut the tape to separate the bottom and side of the
package.
切斷膠帶,把包裝的底部和側面分開。
Remove the package.
2
• To attach the speaker grille (inside the inner carton), refer to page 2 of the Instructions.
取下包裝。
• 想要裝上揚聲器罩网(內裝紙板中),請參閱使用說明書的第 5 頁。
Top cover
頂蓋
Inner carton
內裝紙板
Pull down the plastic bag and white sheet.
拉掉塑料袋和白紙。
Place the speaker on the floor.
4
• Be careful not to place the speaker over your hands.
將揚聲器放置在地板上。
• 注意不要被支腳夾到手。
Remove the protection cover.
取下保護蓋。
Speaker units
揚聲器裝置
Speaker unit
protection cover
揚聲器裝置
保護蓋
Refer to page 2 of the Instructions to adjust the feet.
想要調節支腳,請參閱使用說明書的第 5 頁。
LV35610-002A
Page 7

拆封手冊
拆封前,請仔細閱讀本手冊。
UNPACKING MANUAL
Before unpacking, read this manual carefully.
 Loading...