

Page 1
JVC
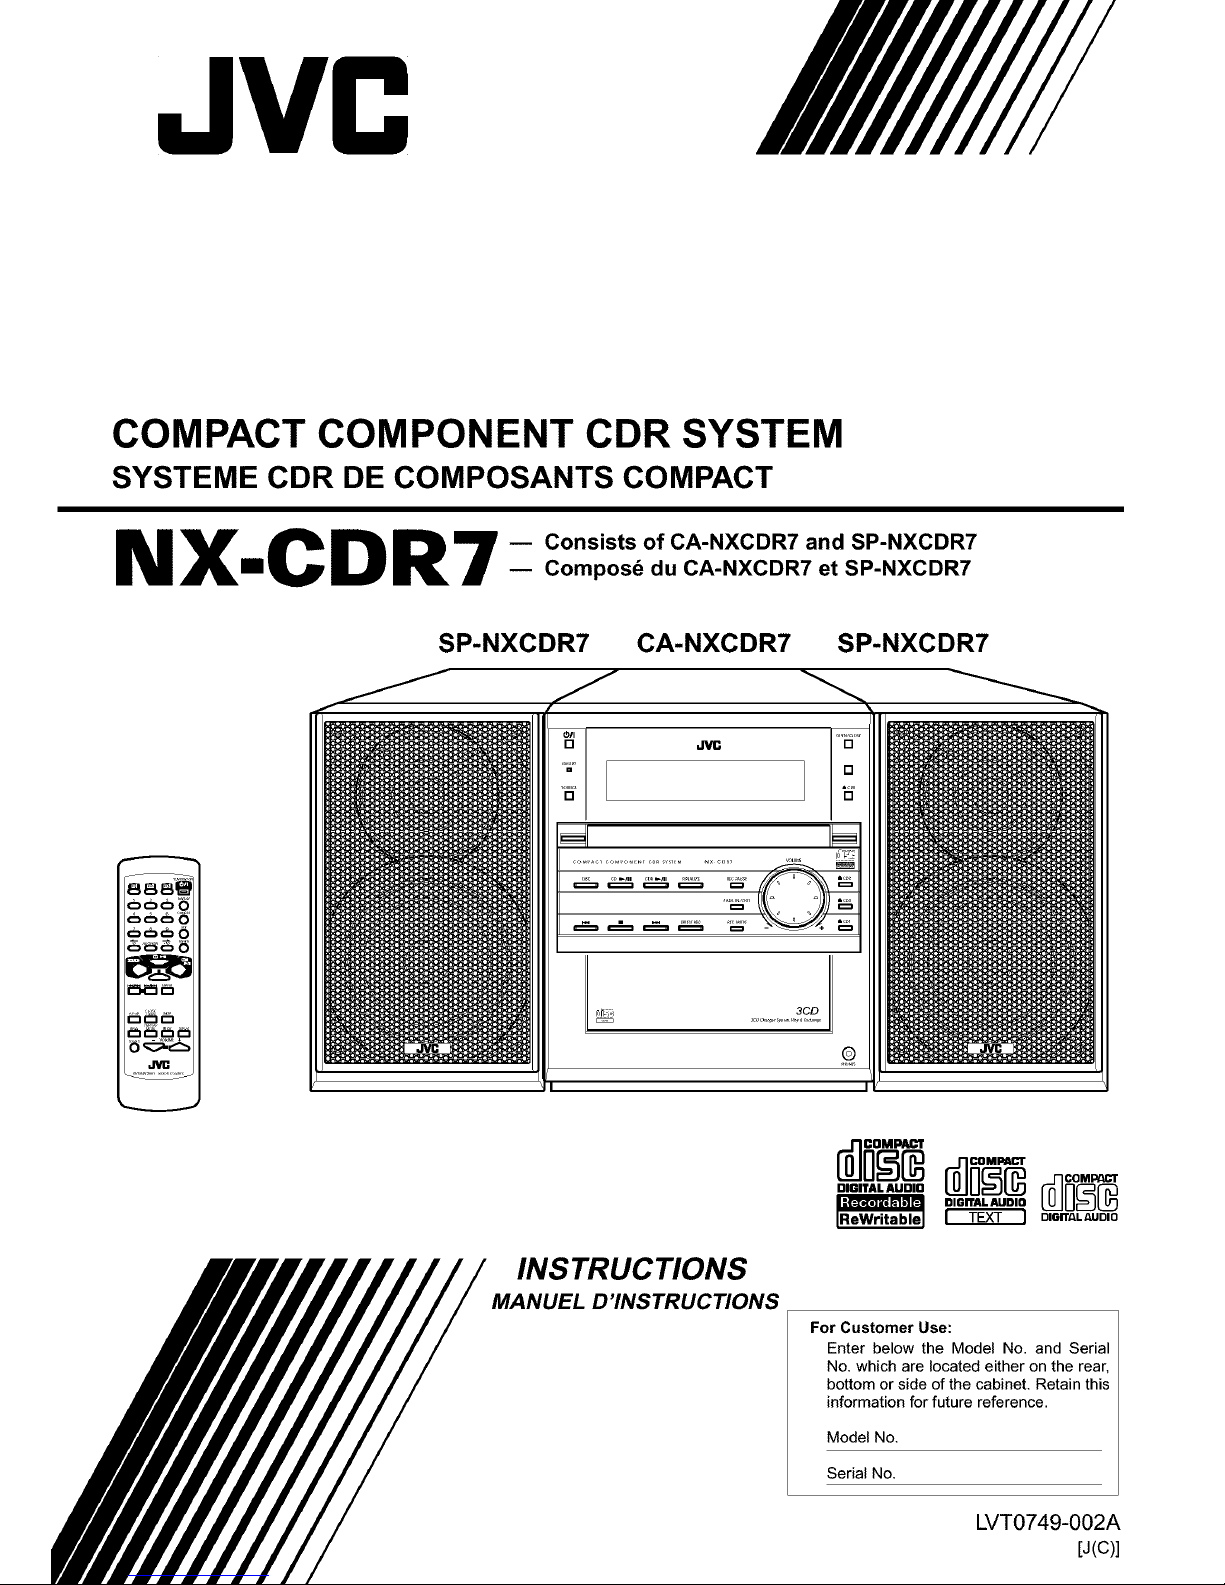
COMPACT COMPONENT CDR SYSTEM
SYSTEME CDR DE COMPOSANTS COMPACT
NX CDR7 - c°nsists °f cA'NXcDR7andsP'NxcDR7
m -- Compos_ du CA-NXCDR7 et SP-NXCDR7
888W
ooo_
SP-NXCDR7 CA-NXCDR7
INSTRUCTIONS
MANUEL D'INSTRUCTIONS
SP-NXCDR7
iReWritablel omrrAL_UD=O
For Customer Use:
Enter below the Model No. and Serial
No. which are located either on the rear,
bottom or side of the cabinet. Retain this
information for future reference.
Model No.
Serial No.
LVT0749-002A
[J(C)]
Page 2
Warnings, Cautions and Others
Mises en garde, precautions et indications diverses
CAUTION: TO REDUCE THE RISK OF ELECTRIC SHOCK,
DO NOT REMOVE COVER (OR BACK).
NO USER SERVICEABLE PARTS INSIDE.
REFER SERVICING TO QUALIFIED SERVICE PERSONNEL.
The lightning flash with arrowhead symbol,
within an equilateral triangle is intended to
alert the user to the presence of uninsulated
"dangerous voltage" within the product's
enclosure that may be of sufficient
magnitude to constitute a risk of electric
shock to persons.
The exclamation point within an equilateral
triangle is intended to alert the user to the
presence of important operating and
maintenance (servicing) instructions in the
literature accompanying the appliance.
WARNING: TO REDUCE THE RISK OF FIRE
OR ELECTRIC SHOCK, DO NOT EXPOSE
THIS APPLIANCE TO RAIN OR MOISTURE.
CAUTION
To reduce the risk of electrical shocks, fire, etc.:
1. Do not remove screws, covers or cabinet.
2. Do not expose this appliance to rain or moisture.
ATTENTION
Afin d'6viter tout risque d'61ectrocution, d'incendie, etc.:
1. Ne pas enlever les vis ni les panneaux et ne pas
ouvrir le coffret de I'appareil.
2. Ne pas exposer I'appareil a la pluie ni a I'humidit6.
Caution i STANDBY/ON 0/I button!
Disconnect the mains plugtoshutthe power offcompletely.
The STANDBY/ON O/I button in any position does not
disconnect the mains line. The power can be remote
controlled.
Attention i Commutateur STANDBY/ON O/1!
D6connecter la fiche de secteur pour couper
compl_tement le courant. Le commutateur STANDBY/
ON ©/I ne coupe jamais compl_tement la ligne de
secteur, quelle que soit sa position. Le courant peut _tre
t616command6.
IMPORTANT FOR LASER PRODUCTS
1. CLASS 1 LASER PRODUCT
2. DANGER: Invisible laser radiation when open and
interlock failed or defeated. Avoid direct exposure to
beam.
3. CAUTION: Do not open the top cover.There are no user
serviceable parts inside the Unit; leave all servicing to
qualified service personnel.
Note to CATV system installer:
This reminder is provided to call the CATV system
installer's attention to Section 820-40 of the NEC
which provides guidelines for proper grounding and,
in particular, specifies that the cable ground shall be
connected to the grounding system of the building, as
close to the point of cable entry as practical.
1. PRODUIT LASERCLASSE 1
2. ATTENTION: Radiation laser invisible quand I'appareil
est ouvert ou que le verrouillage est en panne ou
d6sactiv6. Eviter une exposition directe au rayon.
3. ATTENTION: Ne pas ouvrir le couvercle du dessus. II n'y
a aucune piece utilisable a I'int6rieur. Laisser a un
personnel qualifi6 le soin de r6parer votre appareil.
-G-1 -
Page 3
For U.S.A.
This equipment has been tested and found to comply with the limits
for a Class B digital device, pursuant to part 15 of the FCC Rules.
These limits are designed to provide reasonable protection against
harmful interference in a residential installation.
This equipment generates, uses and can radiate radio frequency
energy and, if not installed and used in accordance with the
instructions, may cause harmful interference to radio
communications. However, there is no guarantee that interference
will not occur in a particular installation. If this equipment does cause
harmful interference to radio or television reception, which can be
determined by turning the equipment off and on, the user is
encouraged to try to correct the interference by one or more of the
following measures:
Reorient or relocate the receiving antenna.
Increase the separation between the equipment and receiver.
Connect the equipment into an outlet on a circuit different from that
to which the receiver is connected.
Consult the dealer or an experienced radio/TV technician for help.
For Canada/pour le Canada
CAUTION: TO PREVENT ELECTRIC SHOCK, MATCH WIDE
BLADE OF PLUG TO WIDE SLOT, FULLY INSERT.
ATTENTION: POUR EVlTER LES CHOCS ELECTRIQUES,
INTRODUIRE LA LAME LA PLUS LARGE DE LA FICHE DANS
LA BORNE CORRESPONDANTE DE LA PRISE ET POUSSER
JUSQUAU FOND.
For Canada/pour le Canada
THIS DIGITAL APPARATUS DOES NOT EXCEED THE CLASS
B LIMITS FOR RADIO NOISE EMISSIONS FROM DIGITAL
APPARATUS AS SET OUT IN THE INTERFERENCE-CAUSING
EQUIPMENT STANDARD ENTITLED "DIGITAL APPARATUS,"
ICES-003 OF THE DEPARTMENT OF COMMUNICATIONS.
CET APPAREIL NUMERIQUE RESPECTE LES LIMITES DE
BRUITS RADIOELECTRIQUES APPLICABLES AUX APPAREILS
NUMIRIQUES DE CLASSE B PRESCRITES DANS LA NORME
SUR LE MATERIEL BROUILLEUR: "APPAREILS
NUMERIQUES", NMB-003 EDICTEE PAR LE MINISTRE DES
COMMUNICATIONS.
-G-2-
Page 4
Contents
Introduction .................................................... 2
About This Manual ................................................ 2
Precautions ............................................................. 2
Precautions on Disc Playback and Recording ....... 3
Location of the Buttons and Controls ........... 4
Remote Control ...................................................... 4
Main Unit ............................................................... 5
Display Window ..................................................... 6
Getting Started ................................................ 8
Unpacking .............................................................. 8
Connecting Antennas ............................................. 8
Connecting Speakers .............................................. 9
Connecting Other Components ............................ 10
Putting the Batteries into the Remote Control ..... 12
Basic and Common Operations ................... 13
Turning On the Power .......................................... 14
Saving the Power Consumption while
On Standby .................................................... 14
Selecting the Sources and Starting Play .............. 14
Adjusting the Volume ........................................... 15
Changing the Display Information ...................... 15
Reinforcing the Bass Sound ................................. 15
Selecting the Sound Modes .................................. 16
Creating Your Own Sound Modes
--MANUAL Modes ...................................... 16
Listening to FM and AM Broadcasts .......... 17
Tuning into a Station ............................................ 18
Presetting Stations ................................................ 18
Tuning into a Preset Station ................................. 19
Playing Back Discs on 3-CD Changer ........ 20
Loading Discs ...................................................... 21
Playing Back the Entire Discs
_ontinuous Play ......................................... 21
Basic Disc Operations .......................................... 22
Programing the Playing Order of the Tracks
--Program Play ............................................. 22
Playing at Random--Random Play ..................... 23
Repeating Tracks or Discs--Repeat Play ............ 24
Other Convenient Functions ................................ 24
Playing Back a Disc on CD Recorder ......... 26
Playing Back a Disc--Normal Play ..................... 27
Basic Disc Operations .......................................... 27
Repeating Tracks--Repeat Play .......................... 27
Recording on a CD-R/CD-RW .................... 28
Before You Start Recording ................................. 29
Recording Any Sound Source
--Standard Recording ................................... 31
Recording from 3-CD Changer
--CD Synchronized Recording ...................... 33
• CD Direct Recording ................................. 33
• First Track Recording ................................ 35
• Listening Edit Recording ........................... 36
Recording the External Components
--Sound Synchronized Recording ................ 37
Recording a Single Track during Play ................. 38
Finalizing a Disc_D-R/CD-RW ...................... 38
Other Convenient CDR Functions .............. 39
Recording Track Marks Manually
--Manual Track-Marking .............................. 40
Separating Recorded Tracks Automatically
--Auto-Track Space ...................................... 41
Turning On or Off Sampling Frequency Rate
Converter ....................................................... 41
Recording Skip Marks onto a CD-R/CD-RW ........ 42
Erasing Tracks (Only for CD-RW) ...................... 42
Erasing All Tracks (Only for CD-RW) ................ 43
Unfinalizing a Disc (Only for CD-RW) ............... 43
Using the Timers ........................................... 44
Setting the Clock .................................................. 45
Using Recording Timer ........................................ 45
Using Daily Timer ............................................... 47
Using Sleep Timer ............................................... 49
Using Auto Power Off .......................................... 49
Maintenance .................................................. 50
Glossary ......................................................... 51
Messages ........................................................ 52
Troubleshooting ............................................ 53
Specifications ................................................. 54
-1-
Page 5
Introduction
Continued IdL
We would like to thank you for purchasing one of our JVC products.
Before operating this unit, read this manual carefully and thoroughly to
obtain the best possible performance from your unit, and retain this manual
for future reference.
About This Manual Precautions
This manual is organized as follows:
• This manual mainly explains playback operations
using the remote control, and the other operation
such as recording and editing operations using the
buttons and controls on the unit.
You can use the buttons and controls both on the
remote control and on the unit for the same
operations if they have the same or similar names (or
marks), unless mentioned otherwise.
• Basic and common information that is the same for
many functions is grouped in one place, and is not
repeated in each procedure. For instance, we do not
repeat the information about turning on/off the unit,
setting the volume, changing the sound effects, and
others, which are explained in the section "Basic and
Common Operations" on pages 13 - 16.
• The following marks are used in this manual:
Gives you warning and caution to prevent
from damage or risk of fire/electric shock.
Furthermore, gives you information which
is not good for obtaining the best possible
performance from the unit.
Gives you information and hints you had
better know.
Installation
• Install in a place which is level, dry and neither too hot
nor too cold--between 5°C (41°F) and 35°C (95°F).
• Install the unit in a location with adequate ventilation to
prevent internal heat buildup in the unit.
• Leave sufficient distance between the unit and the TV.
• Keep the speakers away from the TV to avoid
interference with TV.
I
DO NOT install the unit in a location near heat
_ sources, or aplace subject to sunlight,
in
direct
excessive dust or vibration.
Power sources
• When unplugging the unit from the wall outlet, always
pull the plug, not the AC power cord.
I_ DO NOT handle the AC power cord with wet I
I
hands.
I
Moisture condensation
Moisture may condense on the lens inside the unit in the
following cases:
• After starting heating in the room
• In a damp room
• If the unit is brought directly from a cold to a warm place
Should this occur, the unit may malfunction. In this case,
leave the unit turned on for a few hours until the moisture
evaporates, unplug the AC power cord, then plug it in
again.
Others
• Should any metallic object or liquid fall into the unit,
unplug the AC power cord and consult your dealer before
operating any further.
• If you are not going to operate the unit for an extended
period of time, unplug the AC power cord from the wall
outlet.
I,_/_ DO NOT disassemble the unit since there are no I
I
I
user serviceable parts inside.
If anything goes wrong, unplug the AC power cord and
consult your dealer.
2
Page 6

PrecautionsonDiscPlaybackand Recording
Playback
This unit has been designed to play back discs bearing the
following logos:
OlalTALAUnlOCD ReWritable (CD-RW)
rd]_[_ CD Recordable (CD-R)
DIr-lfAL AUOIO
DIGn'AL AUDIO
In addition to
data recorded
Audio CD
CD Text
(Text information can be shown only when
playing on 3-CD Changer.)
the above discs, this unit can play back audio
on CD-G (CD Graphics) and CD-Extra.
Notes on playing a CD-R or CD-RW:
• The built-in CD Recorder can play back both finalized
and unfinalized CD-Rs/CD-RWs.
• The built-in 3-CD Changer can play back only
finalized CD-Rs/CD-RWs.
• Either on 3-CD Changer or on CD Recorder, you can
play back CD-Rs or CD-RWs recorded on a personal
computer only if they have been recorded in the CD
audio format.
• Neither on 3-CD Changer nor on CD Recorder, you can
play back MP3 discs.
• Some CD-Rs and CD-RWs may not be played back
either on 3-CD Changer or on CD Recorder because of
their disc characteristics, damage or stains.
Important notice:
• Continuous use of irregular-shaped discs (heart-shape,
octagonal, etc.) can damage the disc rotating mechanism.
x@ x@
CD-RWs may require a longer readout time. This is
caused by the fact that the reflectance of CD-RWs is
lower than for regular CDs.
Recording
This unit has been designed to record on the discs bearing
the following logos:
mmTAtAUOmCD ReWritable (CD-RW)
rd]_ CD Recordable (CD-R)
OIr-lfAL AUOIO
I=1:>:,1o _'!_1--1
In addition to the logos shown above, the words shown
below or their equivalent should also be indicated
somewhere on the package or accompanying
documentation.
• FOR CONSUMER
• FOR CONSUMER USE
• FOR MUSIC USE ONLY
The following discs cannot be used for recording:
• Discs bearing logos other than the above.
• Discs intended for professional use.
• Discs intended for recording computer data.
Important notice:
• The manufacturer assumes no liability whatsoever for
any damage resulting from missed opportunity or
accidental erasure that occurs while conducting
recording or playback operations due to malfunctioning
of or trouble in the unit, or for any incidental damage.
• Before recording on a CD-R, it is recommended to make
a test recording using a CD-RW.
• IfPCA (Power Calibration Area) or PMA (Program
Memory Area) of the disc is recorded fully, recording
cannot be performed on this disc even though there are
still unused memory spaces on the disc.
• DO NOT subject the unit to any shock or
vibration while recording.
• DO NOT use a dusty or scratched CD-R/CD-
RW for recording; otherwise, you cannot
obtain the satisfactory recording quality.
It should be noted that it may be unlawful to re-
record pre-recorded tapes, records, or discs without
the consent of the owner of copyright in the sound or
video recording, broadcast or cable programme and
in any literary, dramatic, musical, or artistic
embodied therein.
-3-
Page 7
Locationof the Buttonsand Controls
Become familiar with the buttons and controls on your unit.
Remote Control
[_,_
f
STANDt3Y/ON
4 5 6
7 8 9
CANC
SET
ENTEi
........................._ FM/PLAY PffCH REPEAT
SOUND -- VOLUME • ..........
JVC
_'_'_22
J
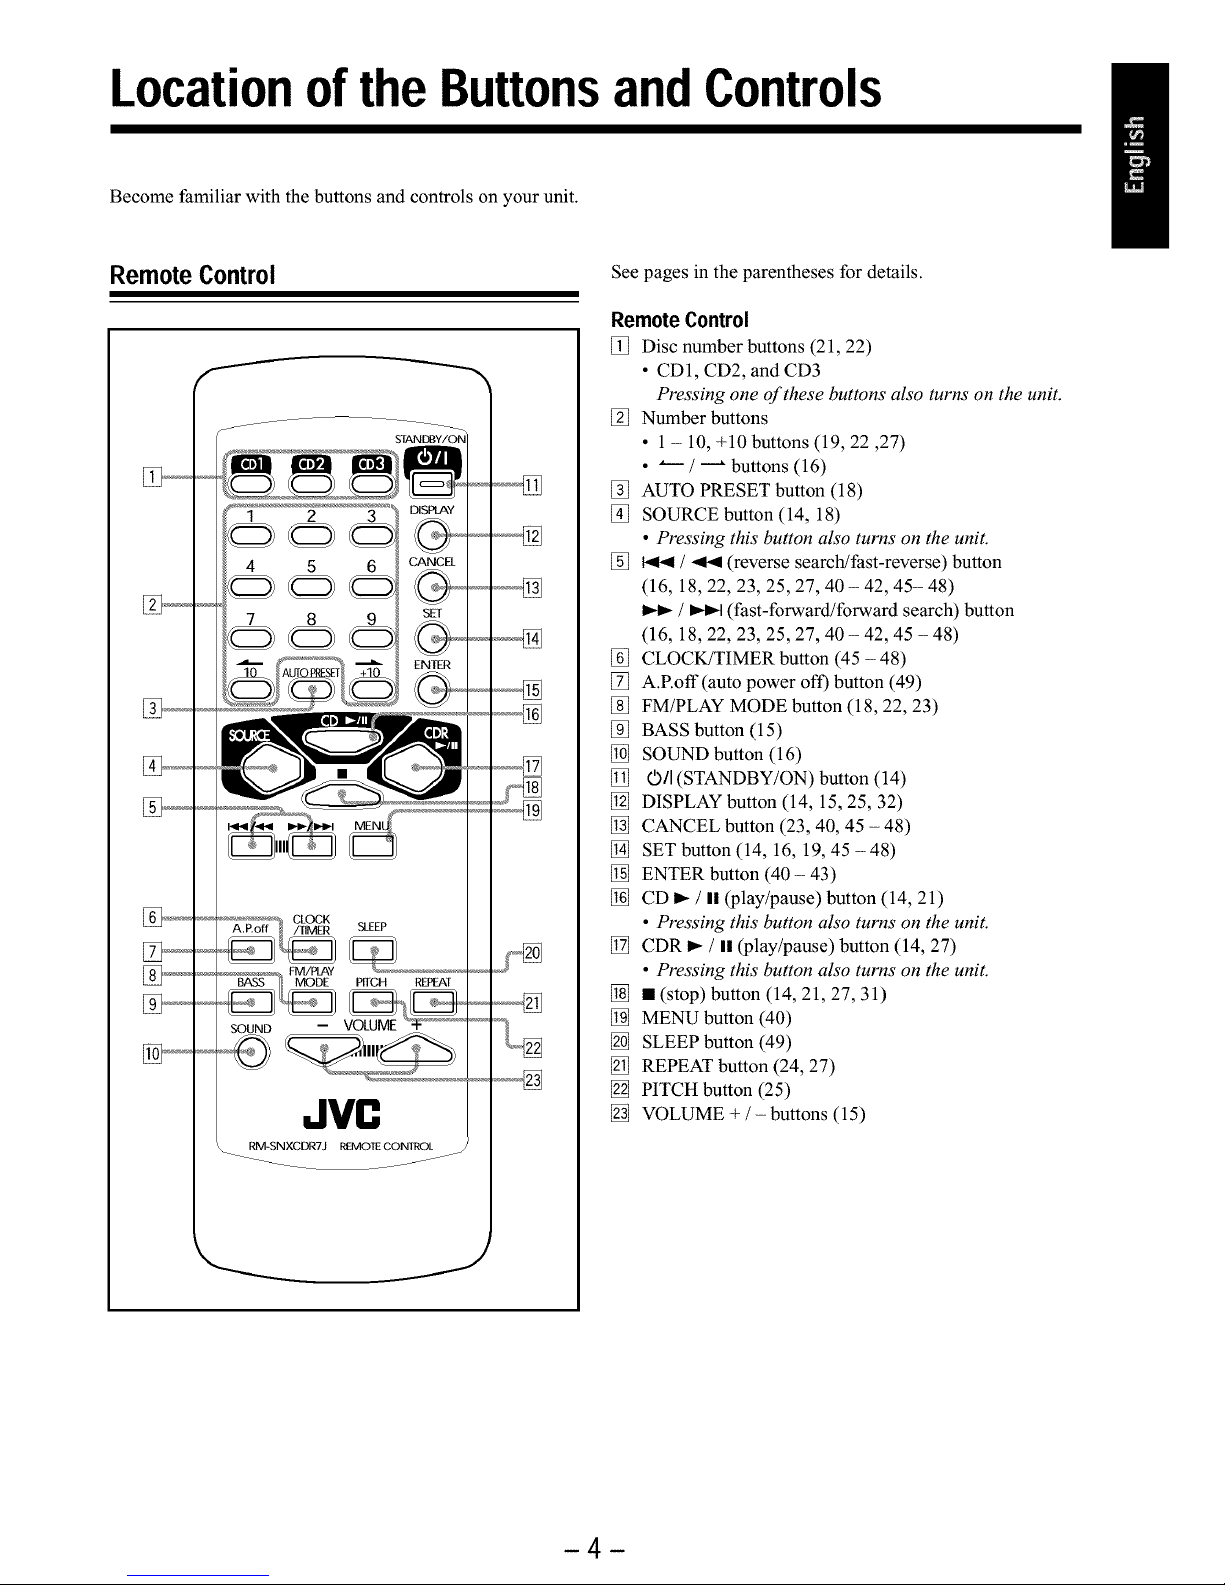
See pages in the parentheses for details.
RemoteControl
[_ Disc number buttons (21, 22)
• CD1, CD2, and CD3
Pressing one of these buttons also turns on the unit.
[_ Number buttons
• 1 - 10, +10 buttons (19, 22,27)
• _ / _ buttons (16)
[_ AUTO PRESET button (18)
[_ SOURCE button (14, 18)
• Pressing this button also turns on the unit.
[_ _ / _ (reverse search!fast-reverse) button
(16, 18, 22, 23, 25, 27, 40 - 42, 45- 48)
/ _t (fast-forward/forward search) button
(16, 18, 22, 23, 25, 27, 40 - 42, 45 - 48)
[_ CLOCK/TIMER button (45 - 48)
[_ A.Roff (auto power oft) button (49)
[_ FM/PLAY MODE button (18, 22, 23)
[_ BASS button (15)
[_ SOUND button (16)
[_ ©11 (STANDBY/ON) button (14)
[_ DISPLAY button (14, 15, 25, 32)
[_ CANCEL button (23, 40, 45 - 48)
[_ SET button (14, 16, 19, 45 -48)
[_ ENTER button (40 - 43)
[_ CD I_ / II _lay/pause) button (14, 21)
• Pressing this button also turns on the unit.
[_ CDR _ / I! _lay/pause) button (14, 27)
• Pressing this button also turns on the unit.
[_ • (stop) button (14, 21, 27, 31)
[_ MENU button (40)
[_ SLEEP button (49)
[_ REPEAT button (24, 27)
[_ PITCH button (25)
[_ VOLUME + / - buttons (15)
4
Page 8

Main Unit
0/I
STANDBY
SOURCE
Jvn
. . NORMAL ,..,
=PROGRAMRANDOM= HIGHSPEED_ I_ I1_
UNF[NALIZEDiSC PITCH SLEEP RECLEV£LI -_11dB_ UNFINAL_ZEDiSC
MONO MI, ill, IM, IM, MI, MI, MI, MI, MI, fill, MI, IM, IM, MI ,"l
S'rE_Oiiiii' iiii' iiiii'iiiii' iiiii'iiiii'iiiii' iiiii'iiiii'iiii' iiiii' iiiii' iiiii'iiiii :"
OPEN/ClOSE
D_
CDR
FINALIZE RECPAUSE
FADE IN/OUT
REC MU_'E
VOLUME
o %
@
3CD
CANCEL REC START
Press OPEN/CLOSE (_) to move down (or up) the sliding panel (_).
-5-
Page 9
Main Unit
[_ 0/I (Standby/On) button (14)
[_ STANDBY lamp (14)
[_ SOURCE button (14, 18)
• Pressing this button also turns on the unit.
[_ FINALIZE button (31, 38)
[_ CDR _ / II (play/pause) button (14, 27, 31)
• Pressing this button also turns on the unit.
[_ CD _ / II (play/pause) button (14, 21)
• Pressing this button also turns on the unit.
[_ DISC button (21, 22, 24)
[_ DIRECT REC button (33)
[_ _ (forward skip) button (18, 22, 27)
[_ • (stop) button (14, 21, 25, 27, 31)
[_ t_< (reverse skip) button (18, 22, 27)
[_ Display window
[_ OPEN/CLOSE button
• Pressing this button also turns on the unit.
[_ Remote sensor
[_ • (open/close) CDR button (27, 31)
• Pressing this button also turns on the unit.
Display Window
[_ CDR lamps (14, 27)
[_ CDR disc tray
[_ REC PAUSE button (25, 31)
[_ VOLUME control (15, 32)
[_ • (open!close) CD3 button (21)
• Pressing this button also turns on the unit.
[_ • (open/close) CD2 button (21)
• Pressing this button also turns on the unit.
[_ • (open/close) CD1 button (21)
• Pressing this button also turns on the unit.
[_ FADE IN/OUT button (31)
[_ REC MUTE button (32)
[_ Disc tray compartment--CD1, CD2, and CD3
[_ PHONES jack--stereo mini type (15)
[_ LINE REC SELECT button (31)
[_ REC SPEED button (33 - 36)
[_ REC MODE button (34 - 38)
[_ SET button (14, 36, 40 - 43)
[_ REC LEVEL button (32)
[_ REC START button (34 - 38)
[_ CANCEL button (23, 36, 40)
[_ Sliding panel
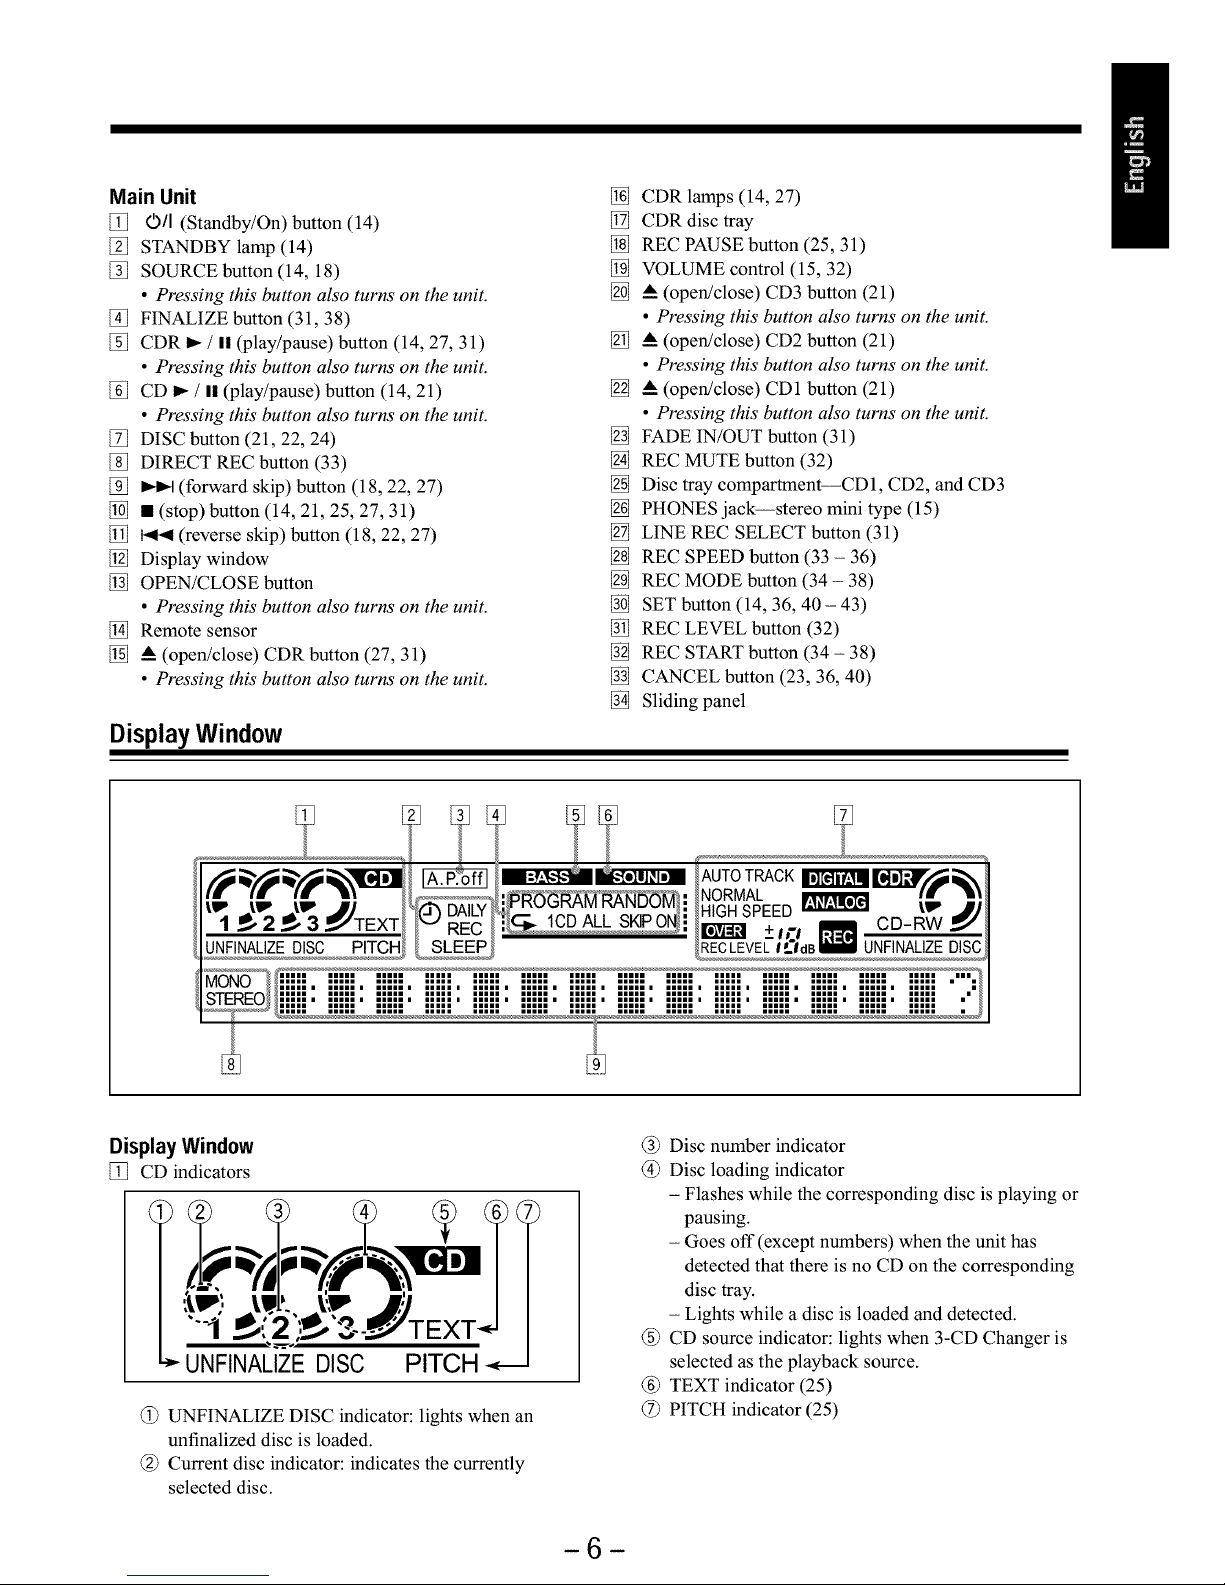
DisplayWindow
[_ CD indicators
UNFINALIZEDISC PITCH
@ UNFINALIZE DISC indicator: lights when an
unfinalized disc is loaded.
@ Current disc indicator: indicates the currently
selected disc.
@ Disc number indicator
@ Disc loading indicator
- Flashes while the corresponding disc is playing or
pausing.
- Goes off (except numbers) when the unit has
detected that there is no CD on the corresponding
disc tray.
- Lights while a disc is loaded and detected.
@ CD source indicator: lights when 3-CD Changer is
selected as the playback source.
@ TEXT indicator (25)
@ PITCH indicator (25)
-6-
Page 10
Display Window
AUTOTRACK
l_ J_ J_ JJ _.j(_DAILY_GR_MRANDO_}: NORMAL mere_
1 ._, 2 ._, :3_._,'TEXT! /v REC / : _HIGH SPEED_ tim jj
/E_! _+m _ CD-RW_"
UNFINALEDISC PITC _ SLEE _RECLEVELIL'IdBI UNFINALIZEDISC
%
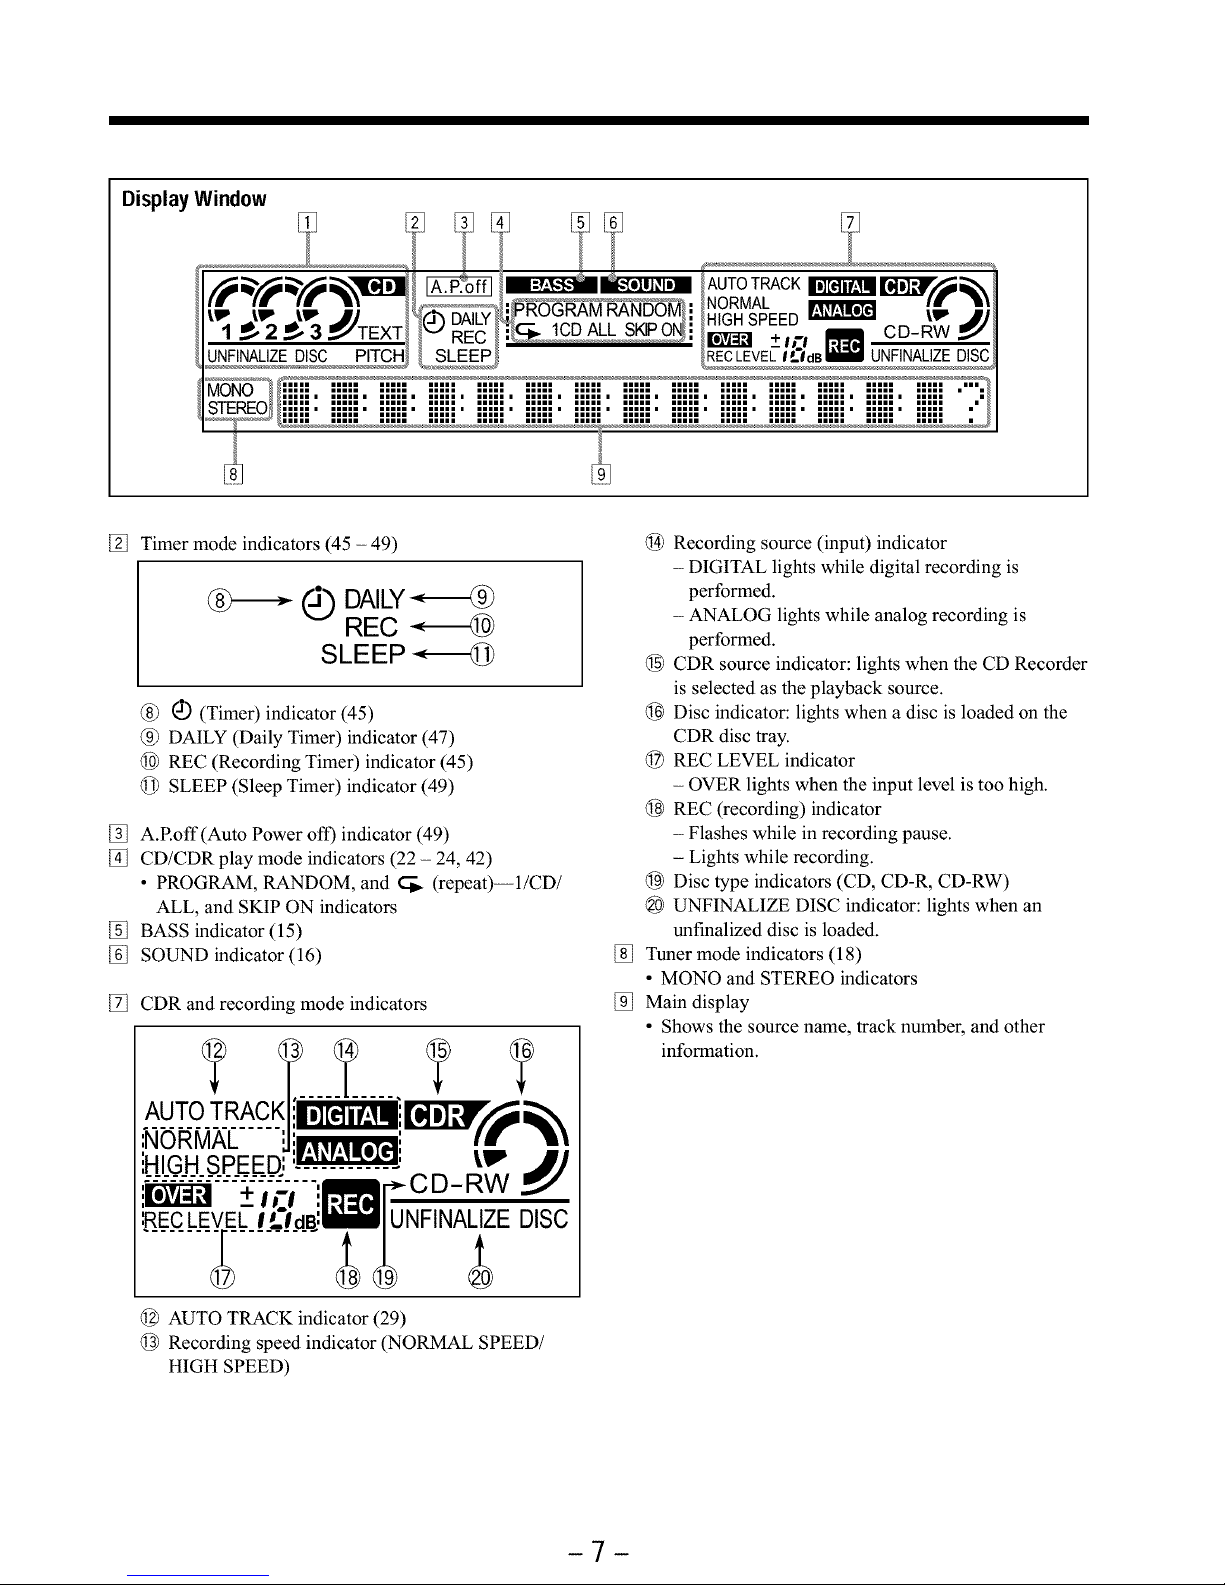
[_ Timer mode indicators (45 - 49)
J_ DAILY
REC
SLEEP
@ @ (Timer) indicator (45)
@ DAILY (Daily Timer) indicator (47)
@ REC (Recording Timer) indicator (45)
@ SLEEP (Sleep Timer) indicator (49)
[_ A.Roff(Auto Power off) indicator (49)
[_ CD/CDR play mode indicators (22 - 24, 42)
• PROGRAM, RANDOM, and _ (repeat)--l/CD/
ALL, and SKIP ON indicators
[_ BASS indicator (15)
[_ SOUND indicator (16)
[_ CDR and recording mode indicators
',NORMAL '.,It_ylml=_l', Ira' "!_
iHIGH SPEED,:"_: tim
_+i¢1 "!_C.-.._ CD-RW
:.R_.E.C_.L.E__LI_3dffl/1;UNFINA_.oZE DISC
@ AUTO TRACK indicator (29)
@ Recording speed indicator (NORMAL SPEED/
HIGH SPEED)
@ Recording source (input) indicator
- DIGITAL lights while digital recording is
performed.
- ANALOG lights while analog recording is
performed.
@ CDR source indicator: lights when the CD Recorder
is selected as the playback source.
@ Disc indicator: lights when a disc is loaded on the
CDR disc tray.
@ REC LEVEL indicator
- OVER lights when the input level is too high.
@ REC (recording) indicator
- Flashes while in recording pause.
- Lights while recording.
@ Disc type indicators (CD, CD-R, CD-RW)
@ UNFINALIZE DISC indicator: lights when an
unfinalized disc is loaded.
[_ Tuner mode indicators (18)
• MONO and STEREO indicators
[_ Main display
• Shows the source name, track number, and other
information.
-7-
Page 11

GettingStarted
Unpacking
After unpacking, check to be sure that you have all the
following items.
The numbers in the parentheses indicate the quantity of the
pieces supplied.
• AM loop antenna (1)
• FM antenna (1)
• Remote control (1)
• Batteries (2)
• Speaker cord (2)
If any item is missing, consult your dealer immediately.
Connecting Antennas
FM antenna
FM antenna (supplied)
Toconnectan outdoorFM antenna
Beforeconnecting it, disconnect the supplied FM antenna.
f
Outdoor FM antenna
(not supplied)
J
¢
b0AOP
jANI_N
A 75 _ antenna with coaxial type
connector should be used.
1 Attach the FM antenna to the FM (75 _) COAXIAL
terminal.
2 Extend the FM antenna.
3 Fasten it up in the position which gives you the best
reception.
_ About the supplied FM antenna
The FM antenna supplied with this unit can be used as temporary
measure. If reception is poor, you can connect an outdoor FM
antenna.
-8-
Page 12

AM antenna
FM......
(75n)
COAXIAL--
AM
LOOP --+
Hlll
AM loop antenna
(supplied)
EXT
2
Vinyl-covered wire
(not supplied)
2
3
If cords are covered with insulation, twist the core of
the cord at the end of each cord, then remove the
insulation.
Connect the AM loop antenna to the AM LOOP
terminals as illustrated.
Turn the AM loop antenna until you have the best
reception.
Toconnectan outdoorAMantenna
When reception is poor, connect a single vinyl-covered
wire to the AM EXT terminal and extend it horizontally.
Keep the AM loop antenna connected.
_For better reception of both FM and AM
• Make sure the antenna conductors do not touch any other
terminals andconnecting cords.
• Keep the antennas away from metallic parts of the unit,
connecting cords, and the AC power cord.
Connecting Speakers
You can connect the speakers using the speaker cords.
1
Red
R L
Black "'1] CAUTION:
R IMPEDANCE
-- 6_16_
.............+ea+ f
cord
,,_Red @
Black ,
i
Black
Red
Right Left
speaker speaker
1 If cords are covered with insulation, twist the core
of the cord at the end of each cord, then remove the
insulation.
2
3
4
Hold the clamp of the speaker terminal.
Insert the end of the speaker cord to the terminal.
Match the polarity of the speaker terminals: Red (+) to
red (+) and black (-) to black (-).
Release the finger from the clamp.
Use only speakers with the same speaker impedance as
indicated by the speaker terminals onthe rear of the unit.
-9-
Page 13
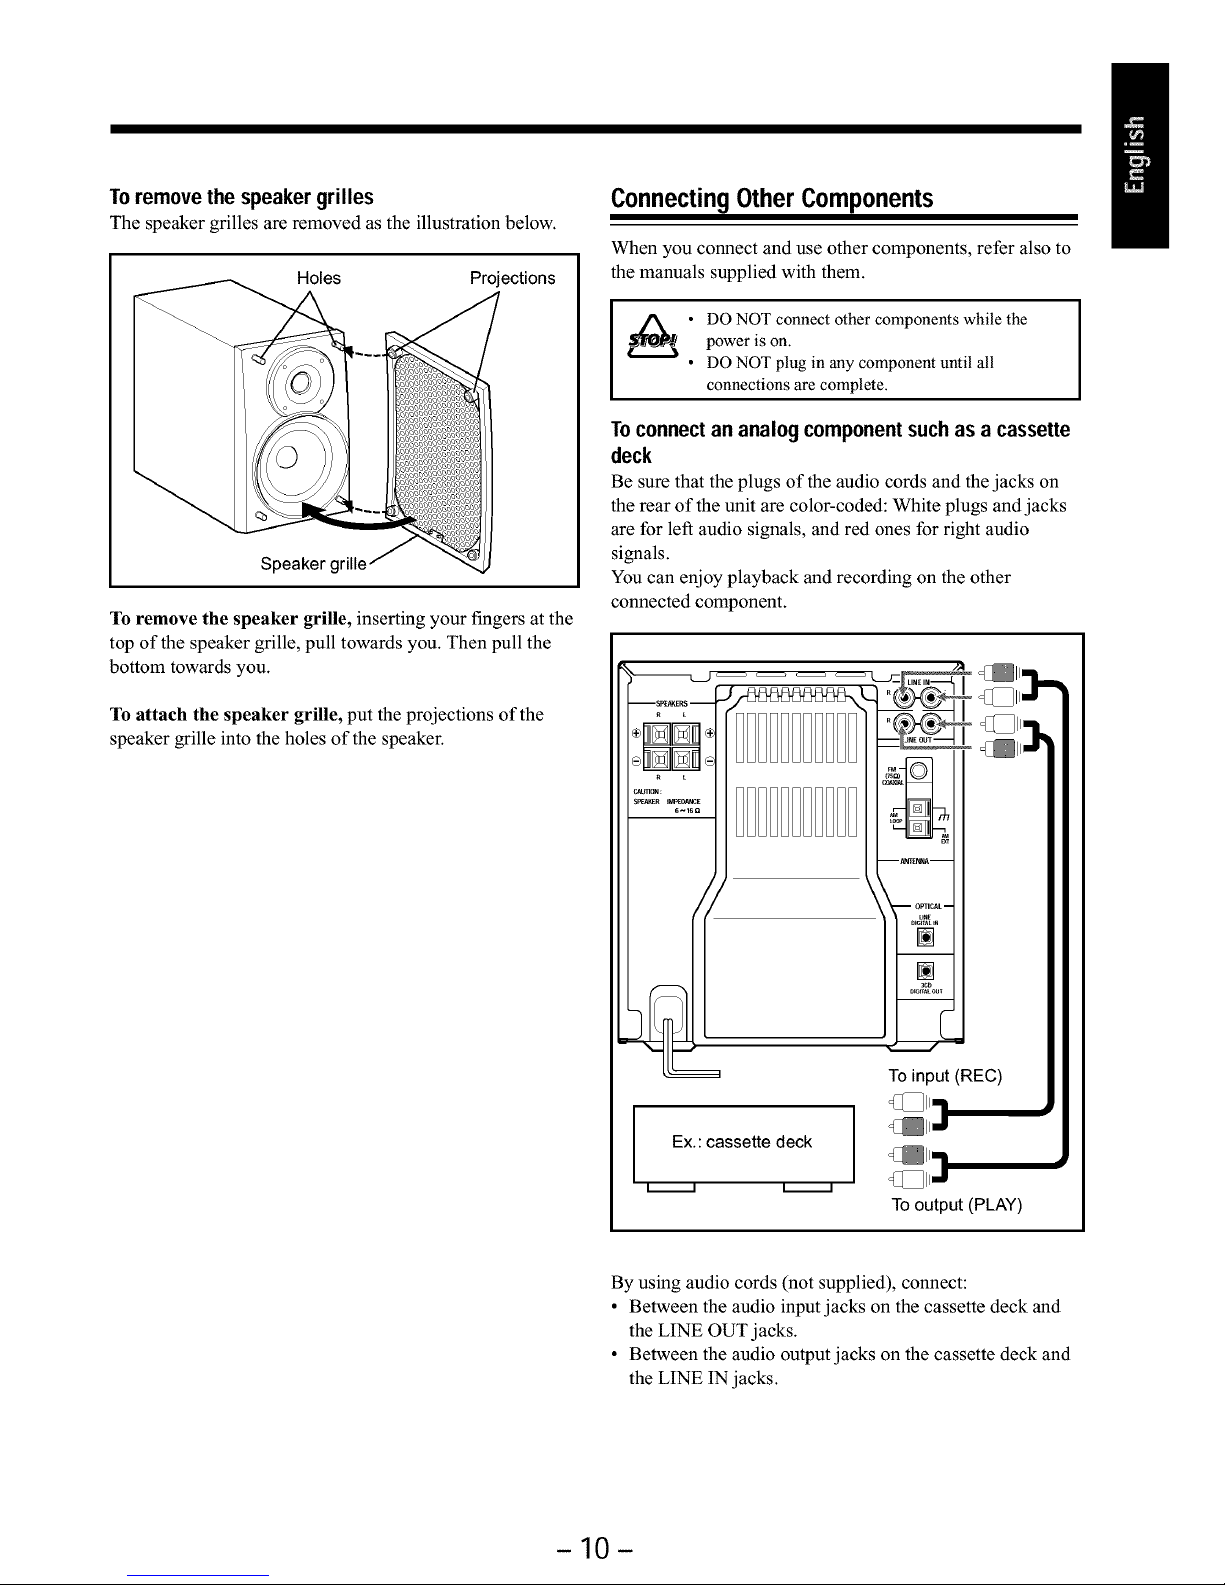
Toremovethespeakergrilles
The speaker grilles are removed as the illustration below.
Holes Projections
Speaker grille
To remove the speaker grille, inserting your fingers at the
top of the speaker grille, pull towards you. Then pull the
bottom towards you.
To attach the speaker grille, put the projections of the
speaker grille into the holes of the speaker.
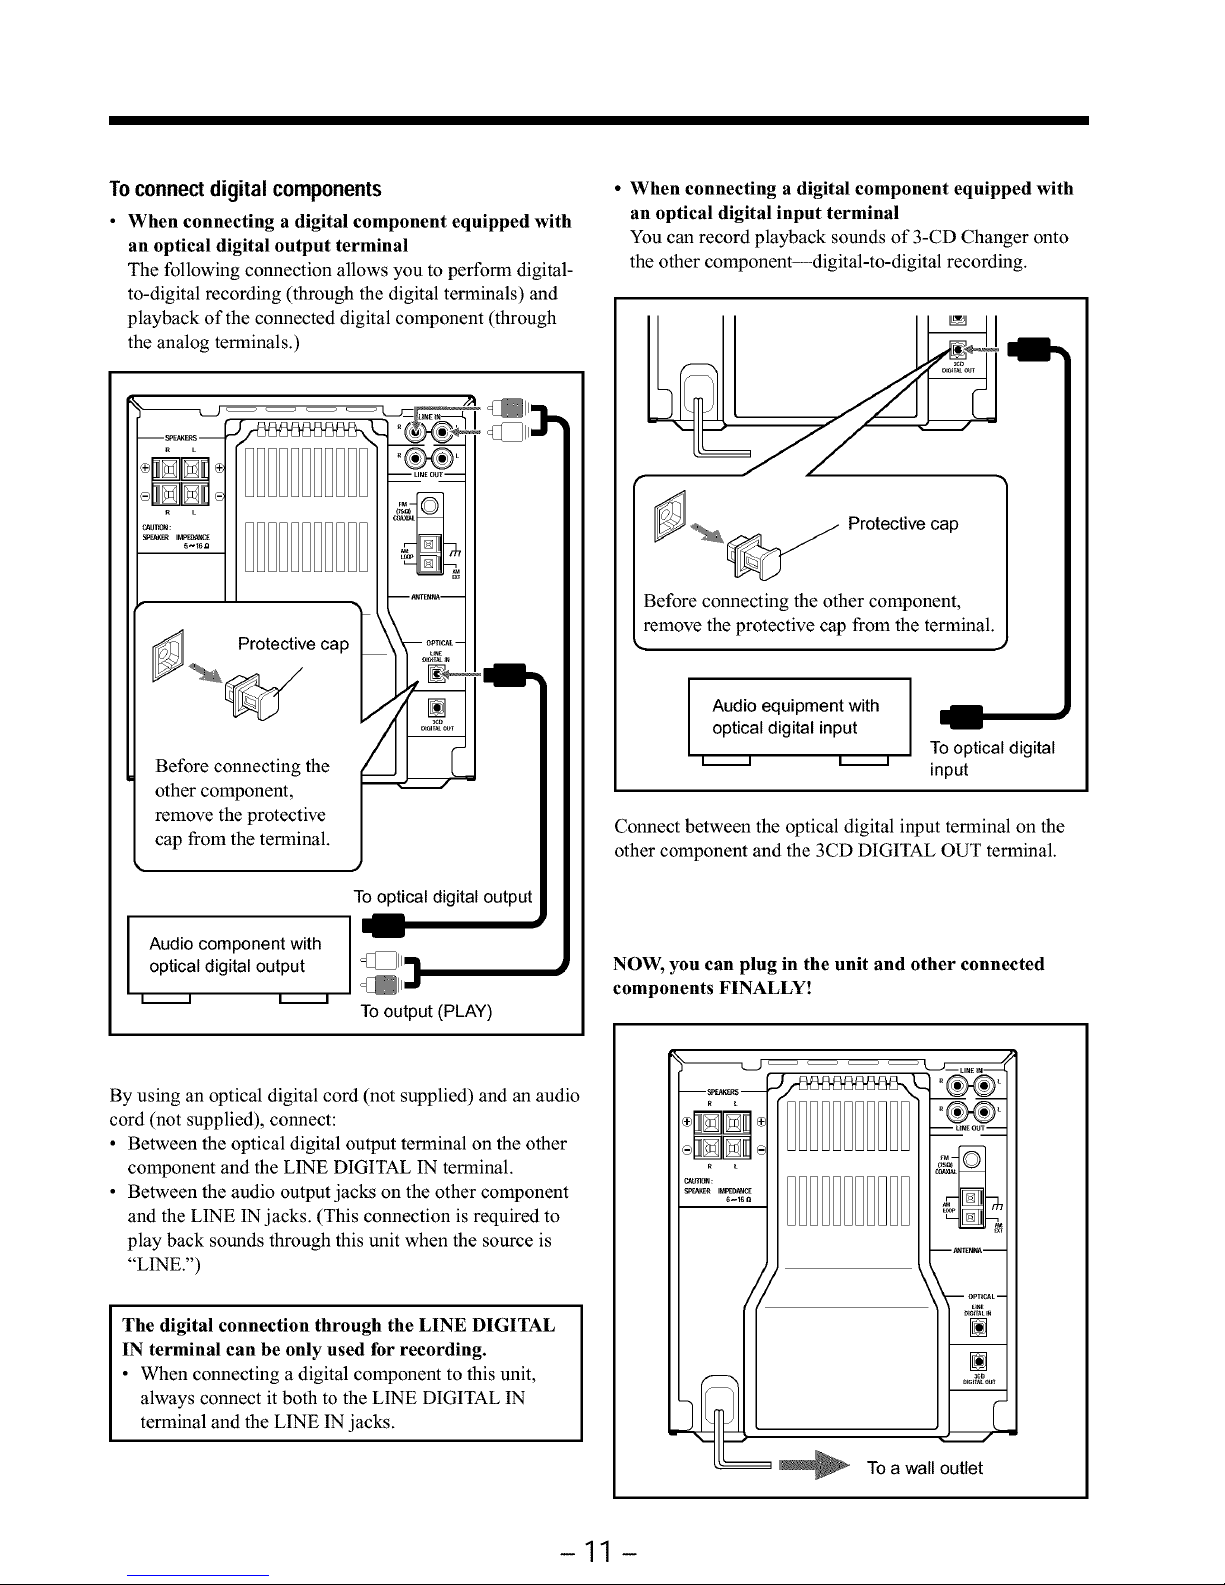
Connecting Other Components
When you connect and use other components, refer also to
the manuals supplied with them.
• O NOT connect other components while the
power is on.
• DO NOT plug in any component until all
connections are complete.
To connect an analog component such as a cassette
deck
Be sure that the plugs of the audio cords and the jacks on
the rear of the unit are color-coded: White plugs and jacks
are for left audio signals, and red ones for right audio
signals.
You can enjoy playback and recording on the other
connected component.
Ex.:cassette deck
To input (REC)
To output (PLAY)
By using audio cords (not supplied), connect:
• Between the audio input jacks on the cassette deck and
the LINE OUT jacks.
• Between the audio output jacks on the cassette deck and
the LINE IN jacks.
-10-
Page 14
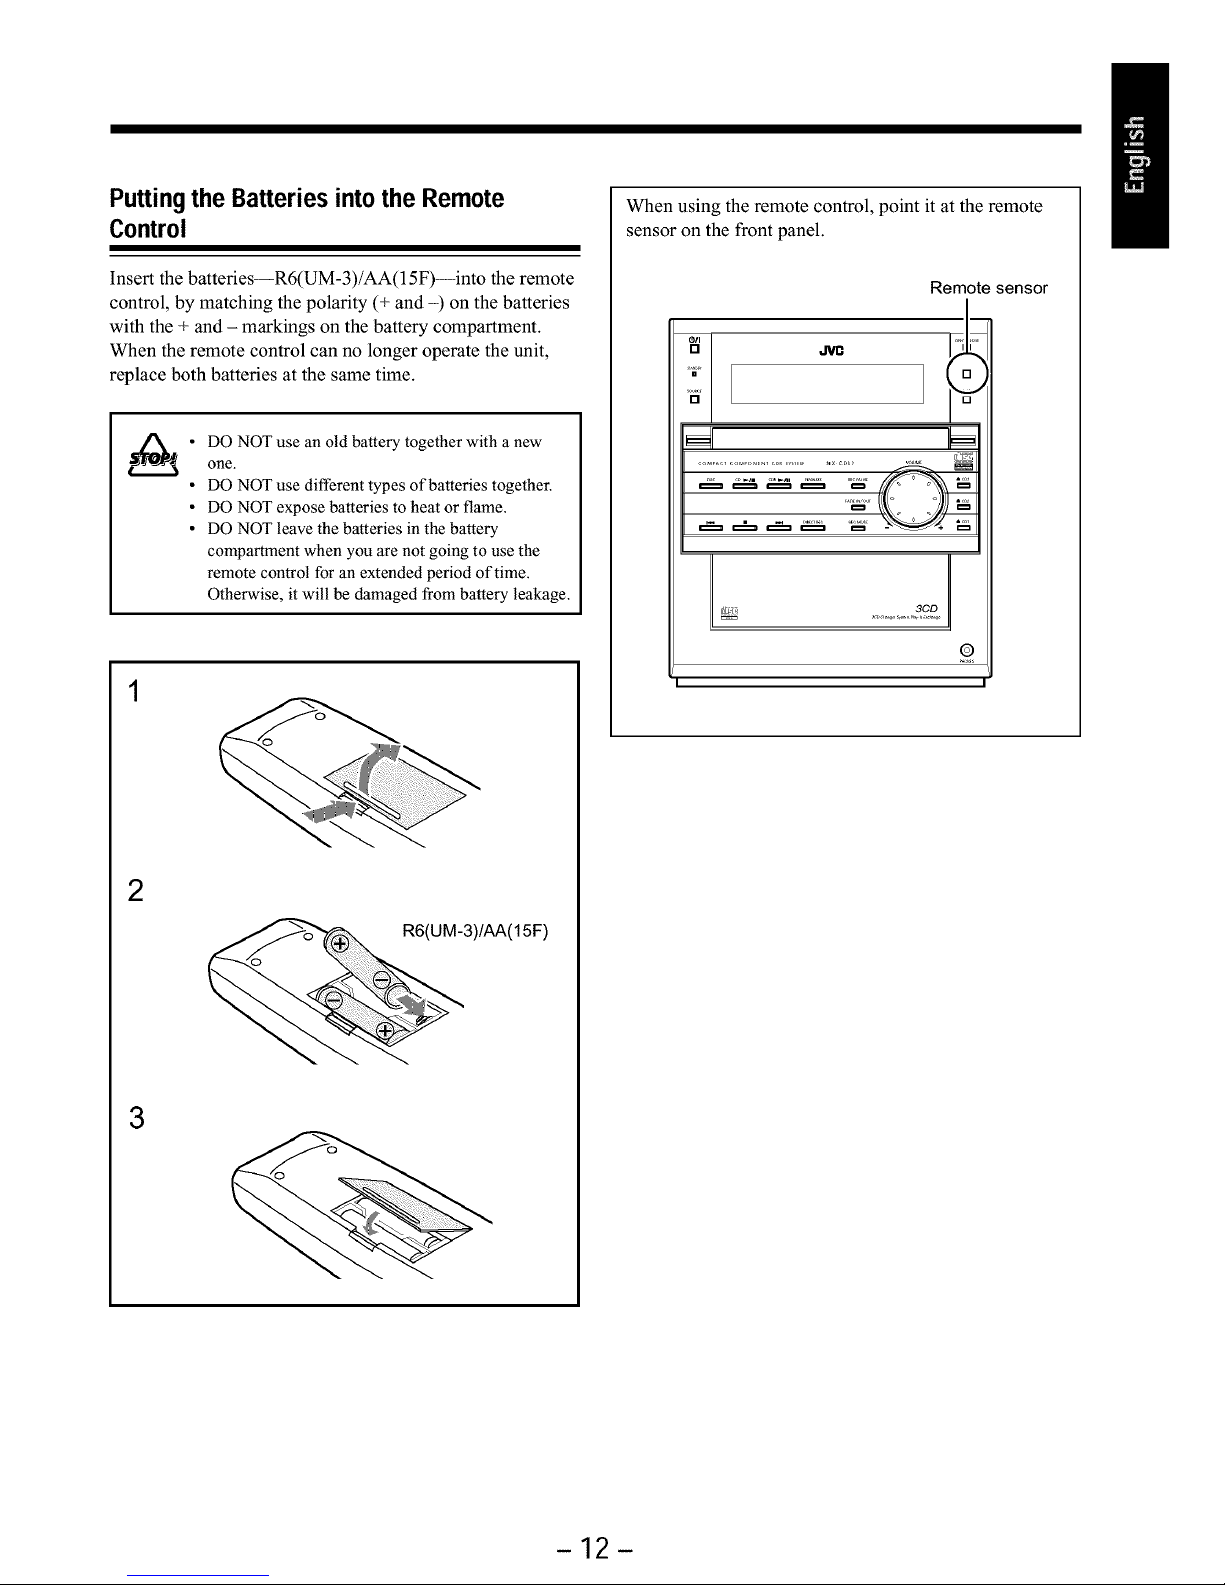
Toconnectdigital components
• When connecting a digital component equipped with
an optical digital output terminal
The following connection allows you to perform digital-
to-digital recording (through the digital terminals) and
playback of the connected digital component (through
the analog terminals.)
I
I
/"A
_. P_°tect_e cap _[__
Before co the
°2h2rc2_;t2; tive
cap from the terminal J
Audio component with
optical digital output
i i i i
To optical digital output
I'---
To output (PLAY)
• When connecting a digital component equipped with
an optical digital input terminal
You can record playback sounds of 3-CD Changer onto
the other component--digital-to-digital recording.
Protective cap
Before connecting the other component,
remove the protective cap from the terminal.
I
Audio equipment with
optical digital input
i i i i
To optical digital
input
Connect between the optical digital input terminal on the
other component and the 3CD DIGITAL OUT terminal.
NOW, you can plug in the unit and other connected
components FINALLY!
By using an optical digital cord (not supplied) and an audio
cord (not supplied), connect:
• Between the optical digital output terminal on the other
component and the LINE DIGITAL IN terminal.
• Between the audio output jacks on the other component
and the LINE IN jacks. (This connection is required to
play back sounds through this unit when the source is
"LINE.")
The digital connection through the LINE DIGITAL
IN terminal can be only used for recording.
• When connecting a digital component to this unit,
always connect it both to the LINE DIGITAL IN
terminal and the LINE IN jacks.
To a wall outlet
-11 -
Page 15
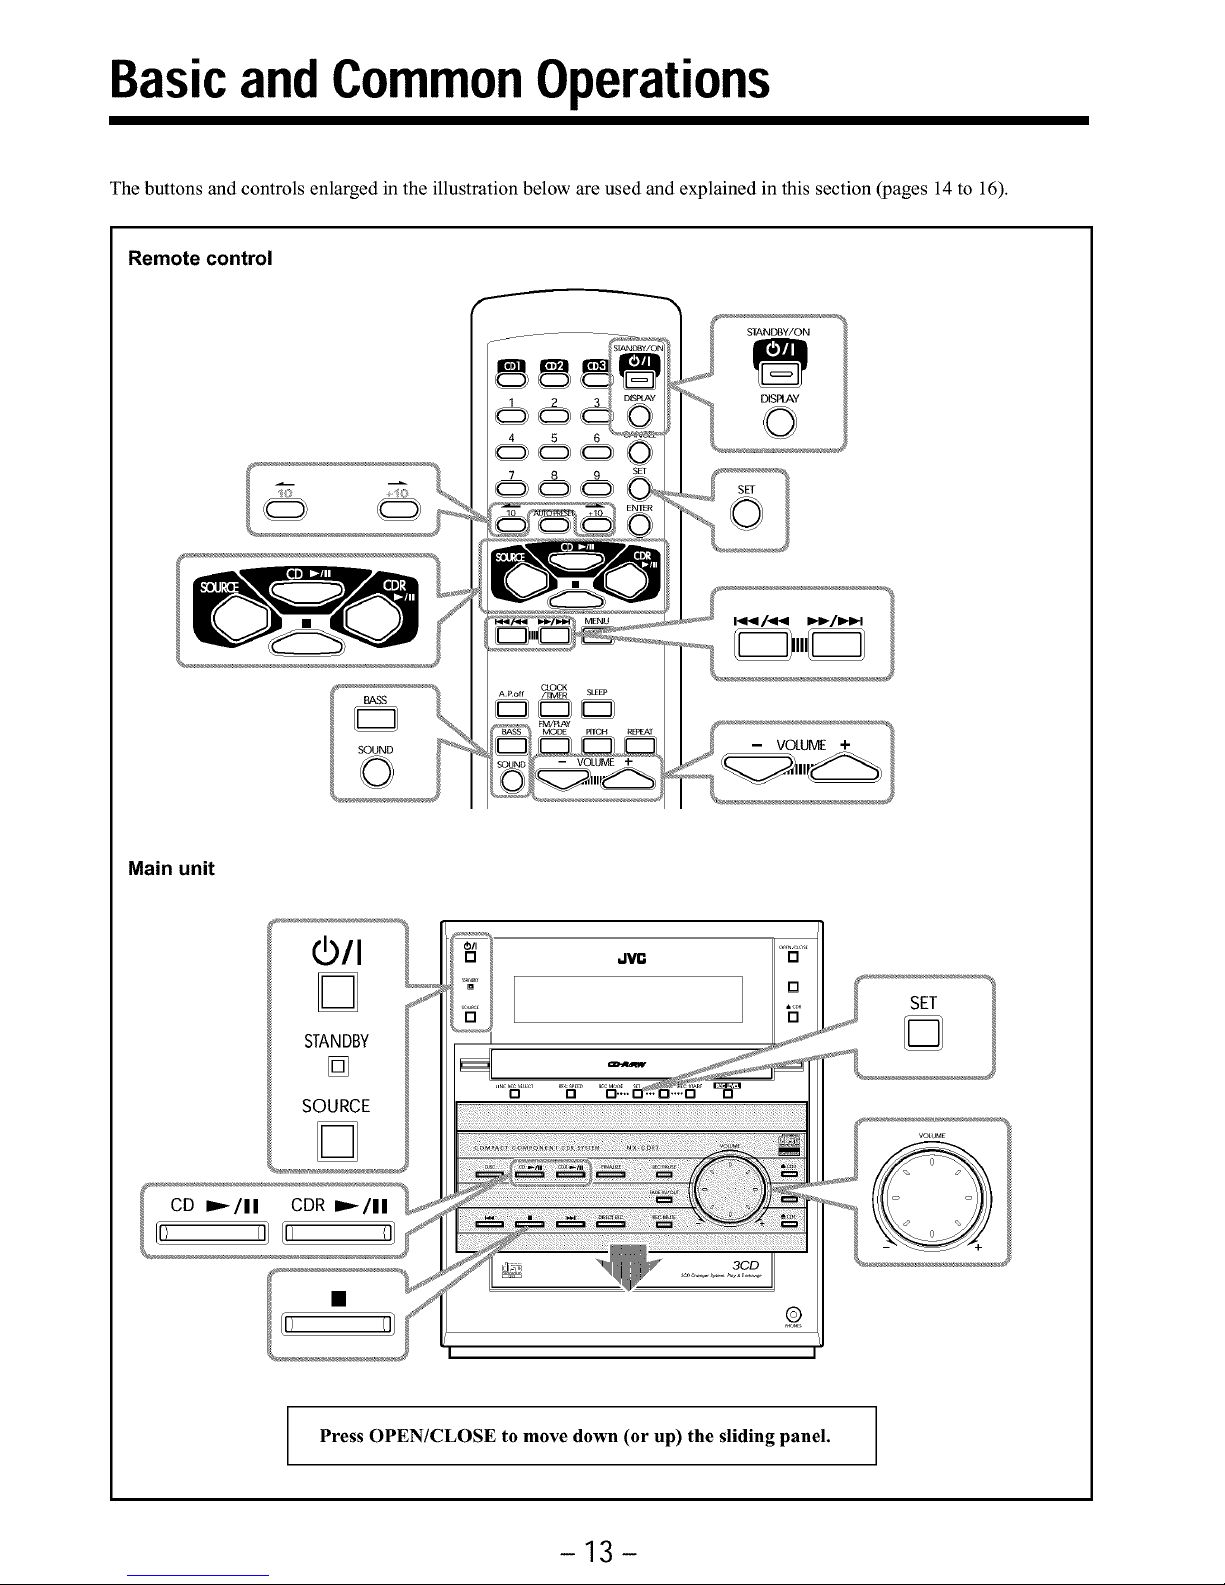
Puttingthe Batteriesintothe Remote
Control
Insert the batteries--R6(UM-3)/AA(15F)--into the remote
control, by matching the polarity (+ and -) on the batteries
with the + and - markings on the battery compartment.
When the remote control can no longer operate the unit,
replace both batteries at the same time.
• DO NOT use an old battery together with a new
one.
• DO NOT use different types of batteries together.
• DO NOT expose batteries to heat or flame.
• DO NOT leave the batteries in the battery
compartment when you are not going to use the
remote control for an extended period of time.
Otherwise, it will be damaged from battery leakage.
2
3)/AA(15F)
3
When using the remote control, point it at the remote
sensor on the front panel.
Remote sensor
[ _L_ 3CD !
©
I I
-12-
Page 16
BasicandCommonOperations
The buttons and controls enlarged in the illustration below are used and explained in this section Wages 14 to 16).
Remote control
SOUND
©
-- VOLUME +
Main unit
D
STANDBY
[]
SOURCE
D
SET
Q
Press OPEN/CLOSE to move down (or up) the sliding panel.
-13-
Page 17
Continued I_
Before operating the unit any further, first set the clock
built in this unit (see page 45).
TurningOn the Power
To turn on the unit without playing, press 0/I so that the
STANDBY lamp on the unit goes off, and the CDR lamps
light.
, , , = = , ,
! ! !.... L_ L... =... =
To turn offthe unit (on standby), press 0/I again so that
the STANDBY lamp lights red, and the CDR lamps go off.
="" F" ".... : : .'. : : J
.:::,1:::.i:::. "!" LJ U
• When the power is off (on standby), clock time appears
in the main display--initial setting when shipped from
the factory (see "Saving the Power Consumption while
On Standby" below).
• A little power is always consumed even while the unit is
in standby mode.
To switch off the power supply completely, unplug the
AC power cord from the AC outlet.
Savingthe PowerConsumptionwhile On
Standby
You can save the power consumption while the unit is
turned off by erasing the clock display.
To save the power consumption while on standby, press
DISPLAY on the remote control while the unit is turned off
(on standby--while the STANDBY lamp lights red).
1'","1',:::' 1:::,[ !:::!".J ¢"=1:::"i:::"
1... .1..... • = 1.... , , = ..... = ,
• Power consumption during standby is reduced (see
"Specifications" on page 54) and the clock will not be
shown while the unit is turned off (on standby).
To cancel the power consumption saving mode, press
DISPLAY again while the unit is turned off (on standby).
'...." " ""' "'" 0 i..i
= , = ..,, 1... = ,..., ...
1... .1..... • = 1.... , , =
_When you unplug power or power
the AC cord ifa
failure occurs
The power consumption saving mode ("DISPLAY OFF") will be
canceled.
Selectingthe SourcesandStartingPlay
To select 3-CD Changer as the source, press CD I_ / II.
The unit automatically turns on. (Play starts if a CD is on
the last selected disc tray.)
To stop play, press ll.
• For more detailed operations, see pages 20 to 25.
To select CD Recorder as the source, press CDR I_ / II.
The unit automatically turns on. (Play starts ifa disc is in
CD Recorder.)
To stop play, press ll.
• For more detailed operations, see pages 26 and 27.
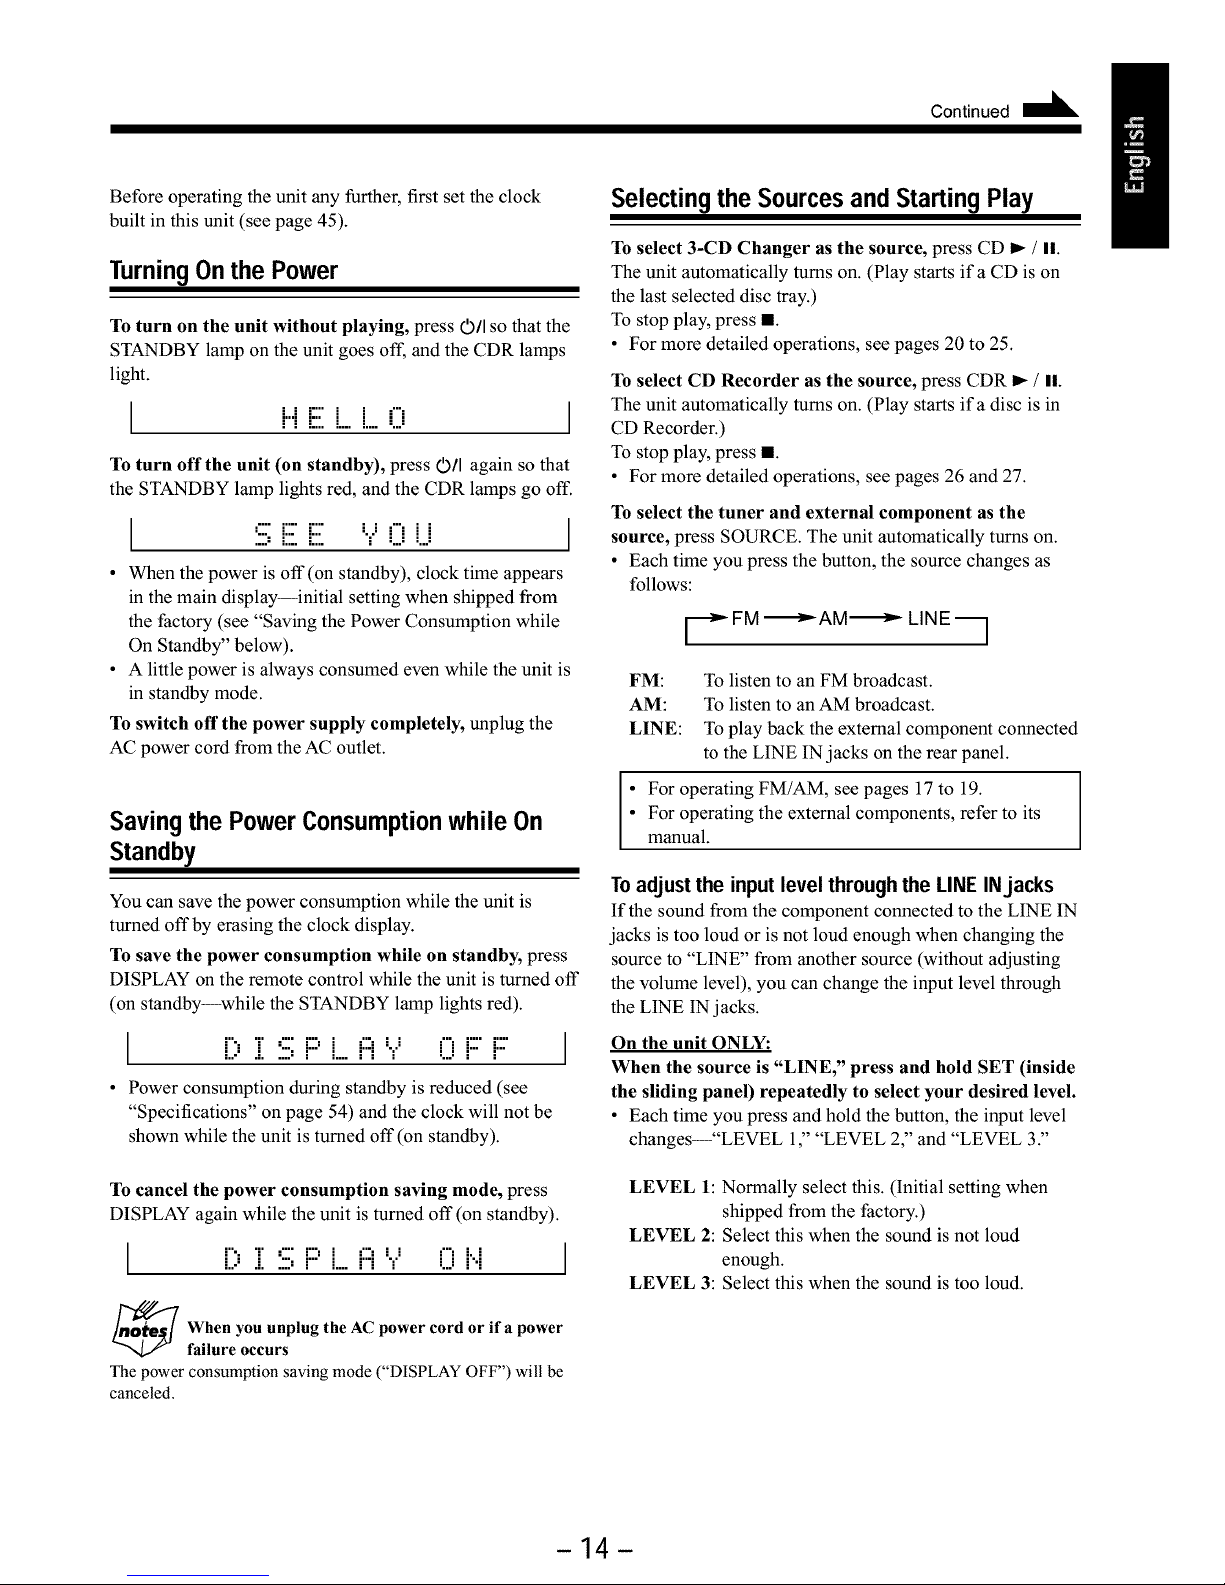
To select the tuner and external component as the
source, press SOURCE. The unit automatically turns on.
• Each time you press the button, the source changes as
follows:
[_FM -_AM-_ LINE
FM: To listen to an FM broadcast.
AM: To listen to an AM broadcast.
LINE: To play back the external component connected
to the LINE IN jacks on the rear panel.
• For operating FM/AM, see pages 17 to 19.
For operating the external components, refer to its
manual.
To adjust the input level through the LINE INjacks
If the sound from the component connected to the LINE IN
jacks is too loud or is not loud enough when changing the
source to "LINE" from another source (without adjusting
the volume level), you can change the input level through
the LINE IN jacks.
On the unit ONLY:
When the source is "LINE," press and hold SET (inside
the sliding panel) repeatedly to select your desired level.
• Each time you press and hold the button, the input level
changes--"LEVEL 1," "LEVEL 2," and "LEVEL 3."
LEVEL 1: Normally select this. (Initial setting when
shipped from the factory.)
LEVEL 2: Select this when the sound is not loud
enough.
LEVEL 3: Select this when the sound is too loud.
-14-
Page 18
Adjusting the Volume
You can adjust the volume level only while the unit is
turned on.
When using the remote control, press VOLUME + to
increase the volume or press VOLUME - to decrease it.
When using the unit, turn VOLUME clockwise to increase
the volume or counterclockwise to decrease it.
0 L. i...iME 2 0
Ex.: When setting the volume level to "20"
_For private listening
Connect a pair of headphones to the PHONES jack. No sound
comes out of the speakers. Be sure to turn down the volume before
connecting or putting on the headphones.
_If"CANNOT LISTEN" appears in the main display
During high-speed recording (see page 30), you cannot listen to
any source, and therefore, cannot adjust the volume level.
_For adjusting the recording level
Normally, the VOLUME control and VOLUME +/- buttons work
to adjust the playback sound volume.
If you want to adjust the recording level, see "To adjust the
recording input level" on page 32.
DO NOT turn off (on standby) the unit with the
volume set to an extremely high level; otherwise, the
sudden blast of sound can damage your hearing,
speakers and/or headphones when you turn on the
unit or start playing any source.
REMEMBER you cannot adjust the volume level
while the unit is in standby mode.
Changingthe DisplayInformation
You can change the information in the main display.
• For display information while recording, see "To change
the display information while recording" on page 32.
On the remote control ONLY:
Press DISPLAY repeatedly.
• Each time you press the button, the information in the
main display changes as follows:
When the source is CD Recorder:
• Before playing--
Total track number/ Remaining time
_" Total playing time "_ in the disc "_
/ /
Clock =_
• While playing--
Track number/ Clock
Elapsed playing time "_"
• When the source is other than CD Recorder:
Source
indications _ Clock
When the current playback source is a CD Text in 3-
CD Changer
See "To show the text information recorded on a CD Text" on page
25.
Reinforcing the Bass Sound
The richness and fullness of the bass sound is maintained
regardless of how low you set the volume--Active Bass.
• You can use this effect only for playback, but not for
recording.
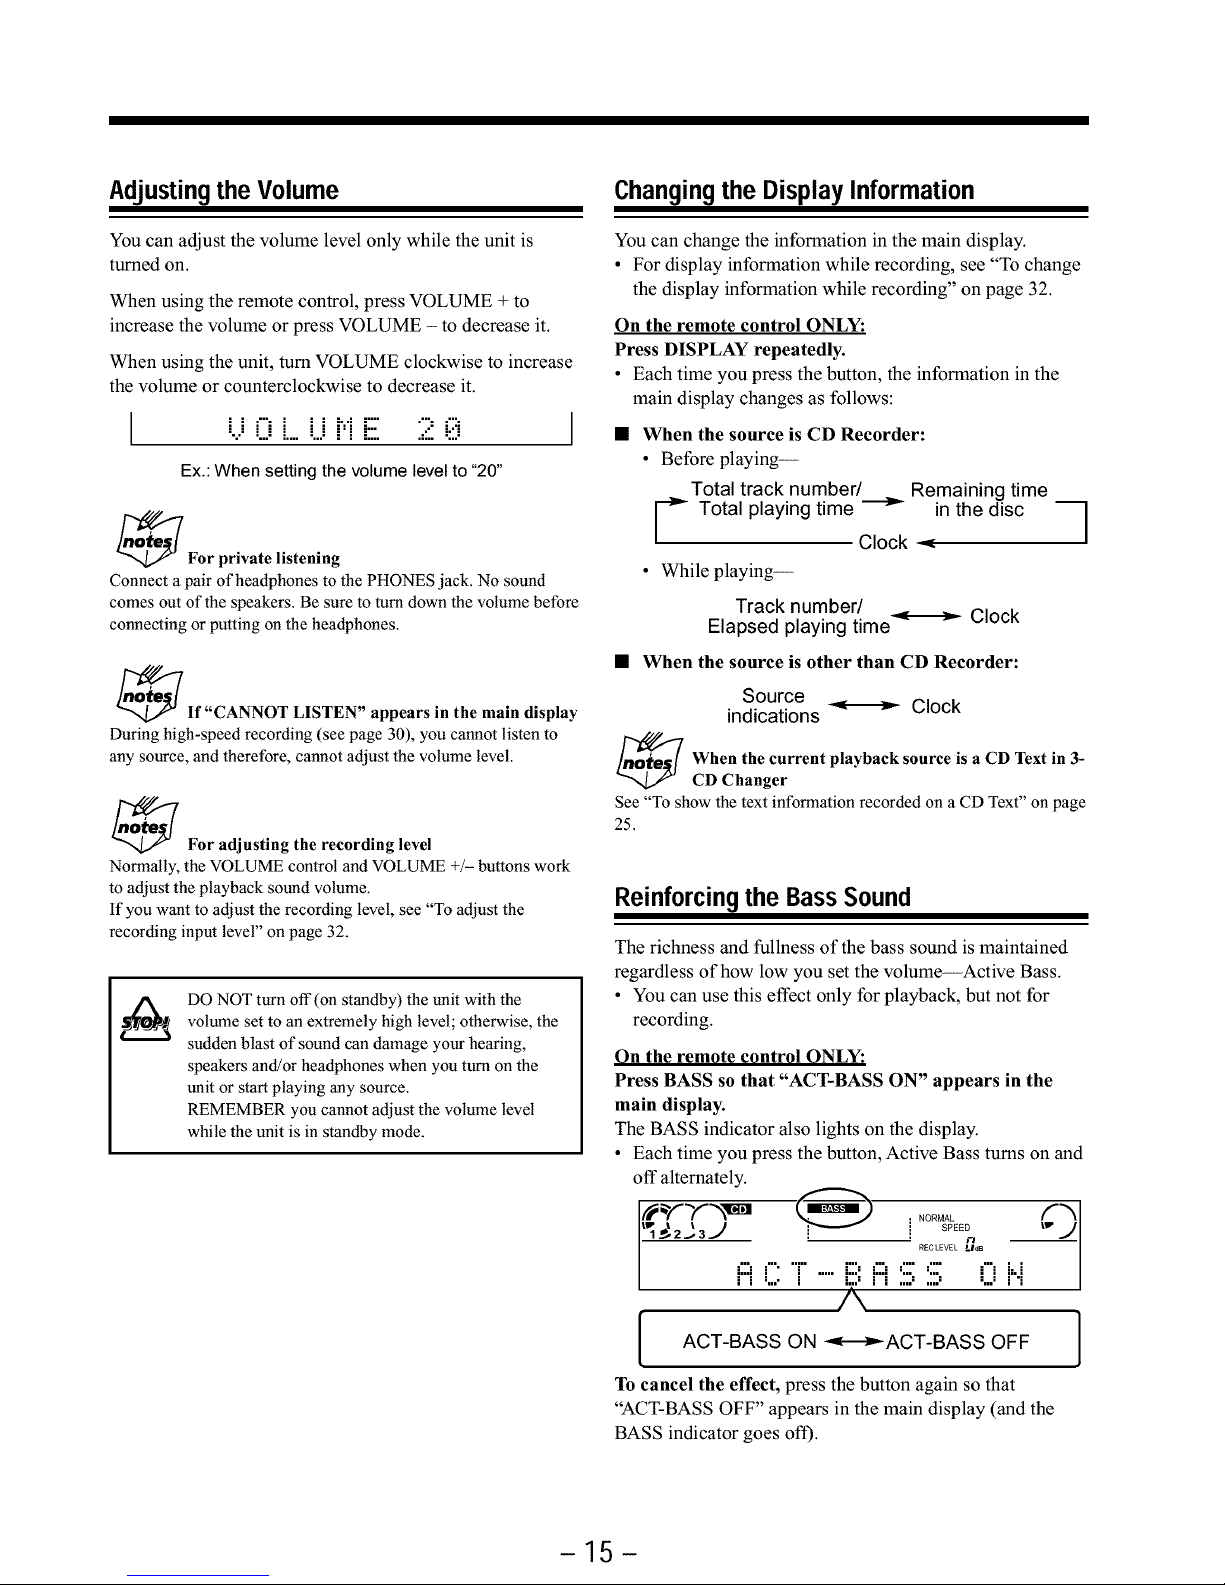
On the remote control ONLY:
Press BASS so that "ACT-BASS ON" appears in the
main display.
The BASS indicator also lights on the display.
• Each time you press the button, Active Bass turns on and
off alternately.
NORMAL
L_ I I SPEED_ I1 _J2..-3._ [ p
RfiCLEVEL LIdS
,:::,,. r .....E:,,:::,,:::,::: Eli)H
" i :,.." i ".,,: i i ,,..: ,,,.:
A
[ 1
To cancel the effect, press the button again so that
"ACT-BASS OFF" appears in the main display (and the
BASS indicator goes off).
-15-
Page 19

Selecting the Sound Modes
You can select one of the 5 preset sound modes and 2
manual modes.
• You can use this effect only for playback, but not for
recording.
On the remote control ONLY:
Press SOUND repeatedly until the sound mode you
want appears in the main display.
The SOUND indicator also lights on the display.
• Each time you press the button, the sound modes change
as follows:
,_,_.3J [) .. r: ! ! ! !::::
" A ............
[ oLuB HALLSTAOUM ROOK,]
F,LAT(Canceled) POPl
_SET""*MANUAL2 ?'_-SET""*MANUAL1 ?"<'J I
D. (Dance) CLUB: Increases resonance and bass.*
HALL: Adds depth and brilliance to the
sound.*
STADIUM: Adds clarity and spreads the sound, like
in an outdoor stadium.*
ROCK: Boosts low and high frequency.
Good for acoustic music.
POP: Good for vocal music.
SET--*MANUAL1 ?: Your individual mode stored in
memory without surround elements.**
SET-'*MANUAL2 ?: Your individual mode stored in
memory with surround elements.**
FLAT: Cancels the sound mode.
* Surround elements are added to create a being-there feeling
** See "Creating Your Own Sound Modes--MANUAL Modes" on
the right column
To check the sound mode currently selected, press
SOUND once while the SOUND indicator is lit.
The currently selected sound mode appears in the main
display.
Creating Your Own Sound Modes
mMANUAL Modes
You can create and store your own sound modes.
• There is a time limit in doing the following steps. If the
setting is canceled before you finish, start from step 1
again.
On the remote control ONLY:
1
ii
Press SET.
I
]ii.. l.iil l.Iil
Adjust the equalizer pattern.
1)
Press SOUND repeatedly until "SET-_MANUAL1 ?"
or "SET-_MANUAL2 ?" appears in the main
display.
The SOUND indicator also lights on the display.
'.:::=!:::.! ..i'.!'! !'"!!".!U !"!!.... 1.
Ex.: When selecting "SET-*MANUAL1 ?"
SET-*MANUAL1 ?: Select this when you want to
store your individual mode without surround
elements
SET-*MANUAL2 ?: Select this when you want to
store your individual mode with surround
elements
.....
!."!
.....
Press _l_ / _ or b_< / _ to select the
frequency range to adjust (LOW, MIDDLE,
HIGH).
Press -_ (+10) or _ (10) to adjust the level
(-3 to +3) of the selected frequency range.
H i D[;L.E +3
Ex.: When adjusting middle frequency range
Repeat steps 1) and 2) to adjust the level of the
other frequency ranges.
Press SET again (or wait until the above indication
disappears).
"MEMORY" appears in the main display and the
equalizer pattern you have created is stored in memory
I
Touseyourownsoundmode
See "Selecting the Sound Modes" on the left column.
-16-
Page 20

Listeningto FM andAM Broadcasts
The buttons and controls enlarged in the illustration below are used and explained in this section Wages 18 to 19).
Remote control
FM/P[AY
MODE
FMA:'tAY
MODE RTCH REPEAT
-- VOLUME +
1 2 3
4 5 6
7 8 9
10 AUTO PRESET +10
Main unit
SOURCE
I"<_
3CD I
©
-17-
Page 21

Continued I_
Tuning into a Station
Press SOURCE repeatedly until FM or AM is
selected.
The unit automatically turns on and tunes into the
previously received station (either FM or AM).
• Each time you press the button, the source changes as
follows:
[_ FM -_AM-_ LINE _
Tune into a station.
On the remote control:
Press and hold _ / _ or _-_ / _ until the
station frequencies start changing in the main
display.
On the unit:
Press and hold _ or 1.4.4 until the station
frequencies start changing in the main display.
• _ / _ (I_t): to increase the frequencies.
• 1.4.4 / _ (t_1_1):to decrease the frequencies.
The unit starts searching stations and stops when a
station of sufficient signal strength is tuned in.
• If an FM stereo program is received, the STEREO
indicator lights on the display.
To stop during searching, press the same button you have
pressed in step 2 above.
When you press the button briefly and repeatedly in
step 2
The frequency changes step by step.
Tochangethe FM receptionmode
On the remote control ONLY:
When an FM stereo broadcast is hard to receive or noisy,
press FM/PLAY MODE so that "MONO" appears in the
main display.
The MONO indicator also lights on the display. Reception
improves.
M(?i..i0
To restore the stereo effect, press FM/PLAY MODE again
so that "AUTO" appears in the main display.
In this stereo mode, you can hear stereo sounds when a
program is broadcast in stereo.
i:::" i i "i" ""i
: : : : : : :
Presetting Stations
You can preset 30 FM and 15 AM stations--using either
automatic presetting method or manual presetting method.
• You cannot store FM reception mode separately for each
preset station.
In some cases, test frequencies have been already memorized
for the tuner since the factory examined the tuner preset
function before shipment. This is not a malfunction. You can
preset the stations you want into memory by following the
presetting method.
To preset stations automatically--Automatic Presetting
You need to preset stations separately for the FM and AM
bands.
On
1
2
the remote control ONLY:
Press SOURCE repeatedly until FM or AM is
selected.
Press and hold AUTO PRESET for more than 4
seconds.
Automatic Presetting starts and local stations with
strong signals are searched and stored in memory
automatically.
When automatic presetting is over, the station stored in
preset number 1 is tuned in.
Repeat steps 1 and 2 to store stations of the other
band--FM or AM.
F:['i i 8 ?. !:5ili)i'[H z
When you cannot store stations you want
automatically
Stations with weak signals cannot be detected with this automatic
presetting method. To store such a station, use the manual
presetting method on page 19.
-18-
Page 22

To preset stations manually--Manual Presetting
On the remote control ONLY:
• There is a time limit in doing the following steps. If the
setting is canceled before you finish, start from step 2
again.
Tune into a station you want to preset.
• See "Tuning into a Station" on page 18.
_oFM 8 8. 3 0MH:;i::
Press SET.
The preset number appears and starts flashing.
_ _o F::M .....F::'
Press the number buttons to select a preset number.
/_'_'_,
Ex.:When selecting preset number "8"
Ex.: For preset number 5, press 5.
For preset number 15, press +10, then 5.
For preset number 20, press +10, then 10.
For preset number 30, press +10, +10, then 10.
Press SET again.
"MEMORY" appears in the main display, and the tuned
station in step 1 is stored in the preset number selected
in step 3.
• Storing a new station on a used number erases the
previously stored one.
When you unplug the AC power cord or ifa power
failure occurs
The preset stations will be erased in a few days. If this happens,
preset the stations again.
Tuning into a Preset Station
On the remote control ONLY:
Press SOURCE repeatedly until FM or AM is
;_ selected.
_o F::!"! ! 8 ..:::',, 5 0 !"!H ::!::
Ex.:When selecting FM
Press the number buttons to select a preset number.
_o F::i"[ ==iii: ==i?===iii:,, 3 0 ["i[i :;!'.:
Ex.:When selecting preset number "8"
Ex.: For preset number 5, press 5.
For preset number 15, press +10, then 5.
For preset number 20, press +10, then 10.
For preset number 30, press +10, +10, then 10.
-19-
Page 23

PlayingBackDiscson3-CDChanger
The buttons and controls enlarged in the illustration below are used and explained in this section Wages 21 to 25).
Remote control
1 2 3
4 5 6
7 8 9
10 +10
Main unit
[]
[]
CANCEL
CD3
........... • CD2
i_ CD1
Press OPEN/CLOSE to move down (or up) the sliding panel.
- 20-
Page 24

Continued I_
The built-in 3-CD Changer can play back only finalized
CD-Rs/CD-RWs. If you play back unfinalized CDs,
"UNFINALIZE" appears in the main display.
Loading Discs
On the unit ONLY:
Press one of the open!close buttons (A CD1, A CD2,
and A CD3) for the disc tray you want to load a CD
onto.
i • If the sliding panel is left open, it moves up
The unit automatically turns on and the selected disc
tray comes out.
automatically before the disc comes out.
tray
Place a disc correctly on the
circle of the disc tray, with
its label side up.
Good No good
• When using a CD single (8 cm), place it on the
inner circle of the disc tray.
Press the same open/close button (_A CD1, A CD2,
or A CD3) you have pressed in step 1.
The disc tray closes.
_When loading more than one disc continuously
Press the open/close button (A CD1, A CD2, or A CD3) for the
next tray you want to place a disc onto. The first disc tray
automatically closes and the next disc tray comes out.
PlayingBackthe EntireDiscs--Continuous
Play
You can play discs continuously.
1
2
Load discs into 3-CD Changer.
Select a disc, and start playback.
On the unit:
1 Press DISC repeatedly to select the disc you want.
2 Press CD _ / II.
On the remote control:
Press one of the disc number buttons (CD1, CD2,
and CD3).
tlw l t
1 ___2 ._ 3._)
:"" r',, .l
Disc No.
Track No.
"l
.1,
_'_°-, JI
RECLEVEL_ld_
Elapsed playing time
CD playback starts from the first track of the selected
disc.
• Without selecting the disc number, pressing
CD I_ / II starts playing back the currently selected
CD.
To stop playback for a moment, press CD _ / II.
To resume play, press CD _ / II again.
To stop during play, press ll.
To remove the disc, press the corresponding open/close
buttons (_ CD1, • CD2, or • CD3) on the unit.
_Disc playback sequence in 3-CD Changer
When 3 discs are loaded on the disc trays, they are played in one
of the following sequences.
• When CD 1 is pressed : CD 1 => CD 2 => CD 3 (then stops)
• When CD 2 is pressed : CD 2 => CD 3 => CD 1(then stops)
• When CD 3 is pressed : CD 3 => CD 1 => CD 2 (then stops)
• If no disc is on the disc trays, 3-CD Changer skips such an
empty tray.
_Ifthe current disc is a CD Text
You can change the information in the main display. See "To show
the text information recorded on a CD Text" on page 25.
-21 -
Page 25

Basic Disc Operations
Toexchangea discduringplaybackofanotherdisc
On the unit ONLY:
Press the open!close buttons (_ CD1, • CD2, or • CD3)
to eject a disc not currently playing.
If discs are exchanged during playback, playback will stop
after playing all newly inserted discs.
Tostartplayinga discduringplaybackofanother
disc
On the remote control:
Press CD1, CD2 or CD3.
The selected disc play starts.
On the unit:
Press DISC repeatedly.
Each time you press the button, the next disc is selected
and playback starts.
Tolocatea particularpoint in a track duringplay
On the remote control:
Press and hold _ / _ or 1_1_1/ -91.ql.
On the unit:
Press and hold _ or 1_1_1.
• _ / _ (l_q): Fast-forwards the tracks.
• 1_1_1/ _ (t_1_1):Fast-reverses the tracks.
Togotoanothertrack
On the remote control:
Press I_ / _ or 1_1_1/ _ repeatedly.
On the unit:
Press _ or 1_1_1repeatedly.
• _ / _ (l_q): Skips to the beginning of the next or
succeeding tracks.
• 1_1_1/ _ (t_1_1):Goes back to the beginning of the
current or previous tracks.
Togotoanothertrackdirectlyusingthe number
buttons
On the remote control ONLY:
Press the number button(s) allows you to start playing the
track number you want.
Ex.: For track number 5, press 5.
For track number 15, press +10, then 5.
For track number 20, press +10, then 10.
For track number 32, press +10, +10, +10, then 2.
ProgramingthePlayingOrderof the Tracks
--Program Play
You can arrange the order in which the tracks play before
you start playing. You can program up to 32 tracks.
On the remote control ONLY:
Load discs into 3-CD Changer.
• If the current playing source is not 3-CD Changer,
press CD I_ / II, then • before going to the next step.
Press FM/PLAY MODE repeatedly so that "CD
_i PROGRAM" appears in the main display.
The PROGRAM indicator also lights on the display.
1 °i
,"'.r'., ::' i:;? :;?i:::ii
.........' . ...............
• Each time you press the button, play mode changes
as follows:
Random Play
Program Play
[ /coPROGRAM//CORA"OOM/7
Continuous Play -:
Press one of the disc number buttons (CD1, CD2,
and CD3) to select the disc number you want to
illplay Tracknumber
Disc number
NO.MAL¢)
SPEED
REC LEVEL Lie8
i=' '":'
L I i::.i;
Programstep number
Ex.: Disc number 1 is selected
Press the number buttons to select a track from the
disc selected in the above step.
• For how to use the number buttons, see "To go to
another track directly using the number buttons" on
_; the left column.
I_I_%_1., ._o_ .o_MA_
LII_ t I l SPEED
1 _ 2 _._ 3 _ [ -- RECLEVEL t'_
C ill:,i •.... !1:5 F::' i
Ex.:Track number 5 is selected
- 22 -
Page 26

Continued IdL
Program other tracks you want.
• To program tracks from the same disc, repeat step 4.
To program tracks from a different disc, repeat steps
3 and 4.
Press CD I_ / II.
The tracks are played in the order you have programed.
Program Play stops when all the programed tracks are
played (unless Repeat Play is activated--see page 24).
To stop during play, press i.
To exit from Program Play mode, before or after play,
press FM/PLAY MODE once or twice so that the unit
enters another playback mode (Random Play or Continuous
Play).
To check the program contents
Before playing, you can check the program contents by
pressing I_ / _ or _1 / _ on the remote control.
• _ / _ : Shows the programed tracks in the
programed order.
• _1 / _ : Shows them in the reverse order.
Tomodify the program
Before playing, you can erase the last programed track by
pressing CANCEL.
Each time you press the button, the last programed track is
erased from the program.
• When you eject a disc, the tracks selected from that
ejected disc are also erased from the program.
• Turning off the unit also erases the entire program.
To add tracks to the program before playing, simply
select disc numbers and track numbers you want to add.
_ If you try to program a 33rd step
"MEMORY FULL" will appear in the main display.
_If your entry is ignored
You have tried to program a track from an empty tray, or a track
number that does not exist on the disc (for example, selecting track
14 on a disc that only has 12 tracks). Such entries are ignored.
Playing at Random--Random Play
The tracks of all loaded discs will play at random.
On the remote control ONLY:
Load discs into 3-CD Changer.
• If the currentplaying source is not 3-CD Changer,
press CD I_ / II, then • before going to the next step.
Press FM/PLAY MODE repeatedly so that "CD
RANDOM" appears in the main display.
The RANDOM indicator also lights on the display.
°i:
[..: L.? ?i
• Each time you press the button, play mode changes
as follows:
Program Play _ Random Play
F(CD PROGRAM) (CD RANDOM) 7
ContinuousPlay
Press CD _ / II.
The tracks are played atrandom.
Random Play stops when all the tracks are played once
(unless Repeat Play is activated--see page 24).
To stop during play, press i.
• Random Play also stops when you open a disc tray.
To exit from Random Play mode, before or after play,
press FM/PLAY MODE once or twice so that the unit
enters another playback mode (Continuous Play or
Program Play).
• Pressing CD1, CD2, or CD3 starts Continuous Play from
the first track of the selected disc.
• Pressing one of the number buttons will start Continuous
Play from the selected track of the currently selected
disc.
- 23 -
Page 27

RepeatingTracksorDiscs--Repeat Play
You can have all the discs, the program or the individual
track currently playing repeat as many times as you like.
• If an unfinalized CD-R or CD-RW is loaded, it will be
skipped and not be played back.
On the remote control ONLY:
Press REPEAT repeatedly during or before playing.
• Each time you press the button, Repeat Play mode
changes and appears in the main display as follows:
• .o_MAL ,.(''1
i
";_'_3_ !_. ooA,_,_ _°, -'/I
RECLEVEL _dB
,...,...., ,....,., , i::::[::,i:::iL J....
A
_ REPEAT CDALL--_ REPEAT 1CD 7
REPEAT OFF _ REPEAT 1_-_
(Canceled)
Ex.: When "REPEAT CDALI2' is selected
• REPEAT CDALL: Repeats all the tracks on all the discs
(continuously or at random), or all
the tracks in the program.
• REPEAT 1CD*: Repeats all the tracks on one disc.
• REPEAT 1: Repeats one track.
• REPEAT OFF: Cancels Repeat Play.
* REPEAT 1CD is not used for Program Play and Random Play.
Other Convenient Functions
The following functions can be used only for 3-CD
Changer.
To select the Continuous Play mode for 3-CD
Changer
This is not possible when the current source is 3-CD
Changer.
On the unit ONLY:
1 Press DISC while listening to a source other than
3-CD Changer.
• Each time you press the button, the following play
modes appear in the main display.
i::::[:;,:[ i:::'i i:::iY
A ........
" CD1 PLAY ? ---_ CD2 PLAY ? 7
/
CD3 PLAY ?
• CD1 PLAY ?
: Select this to start playback from the disc on the CD
1 tray.
• CD2 PLAY ?
: Select this to start playback from the disc on the CD
2 tray.
• CD3 PLAY ?
: Select this to start playback from the disc on the CD
3 tray.
2 Press CD I_ / II while the selected play mode still
remains in the main display.
Now the playback source is changed to 3-CD Changer
and Continuous Play starts.
- 24 -
Page 28

To show the text information recorded on a CD Text
On a CD Text, some information about the disc (its disc
title, performer, composer, arranger, etc.--shaded portion
in the illustration below) is recorded.
While the currently selected disc in 3 CD Changer is a CD
Text, the TEXT indicator lights on the display, and you can
show this text information in the main display.
On the remote control ONLY:
Press DISPLAY repeatedly.
• Each time you press the button, the following
information appear in the main display:
,o MAL
"; _2" _J_x, i SPEEO,., ,,"../
C [::,:[ •.... i .......t,°.?j:o0 3
Clock time _ (backto the beginning)
* Disc title appears before playing, and track title appears while
playing.
_If there is no data recorded for a particular item
Only recorded information will be shown. "NO DATA" will
appear.
To adjust the playback speed
You can change the disc playback speed up to 12% faster
or 12% slower when playing back a disc on 3-CD Changer.
This function will be useful when you want to enjoy
singing along. (Note, however, no microphone can be used
when you are using only this unit since no microphone
input jack is provided.)
• No signals are output through the 3CD DIGITAL OUT
terminal on the rear when playback speed is adjusted
(while the PITCH indicator is lit).
On the remote control ONLY:
1 Press PITCH during play.
The current setting appears in the main display--
"PITCH 0" (no effect) when shipped from the factory.
'_223J
l:::= T "T"7' l...l
= .,. = ..,,, = =
,o,,A,
SPEED
REOL_VEL_-?°°
:"::
"::."
2 Press _ / _ or 14_1 / _ while the current setting
still remains in the main display.
When playback speed (pitch) is adjusted and set to any
percentage otherthan "0," the PITCH indicator lights on
the display.
• _ / =H)q: to increase the playback speed (pitch) up
to 12% faster.
• )_1_1/ -(I.q: to decrease the playback speed (pitch)
down to 12% slower.
• If you press and hold the button, you can
continuously change the pitch setting until you
release the button.
• You can also change the pitch setting by pressing
=H)qor )_1_1on the unit repeatedly.
To restore normal speed playback, select "PITCH 0" so
that the PITCH indicator goes off.
• Do not forget to restore normal speed playback after you
have enjoyed this effect; otherwise, sounds you hear will
be strange.
• Turning off the unit also restores normal speed playback.
_ uring CD Synchronized Recording from 3-CD
Changer to CD Recorder
Playback speed (pitch) adjustment is automatically canceled
temporarily. (The PITCH indicator goes off.)
To prohibit disc ejection--Disc Lock
You can prohibit disc ejection both from 3-CD Changer
and from CD Recorder.
Notice you cannot move the sliding panel while Disc
Lock is in use. This means that you cannot use the
buttons inside the sliding panel.
On the unit ONLY:
To prohibit disc ejection, press • while holding
REC PAUSE with the unit set in standby mode.
"LOCKED" appears in the main display for a while, and
the loaded discs (both in 3-CD Changer and in CD
Recorder) and the sliding panel are locked.
= , , , • ,. = 1..
= , , , ,.. 1... = ,
1.............. ,.. 1.... 1...
_ If you try to eject the locked discs or the sliding
open
panel.
"LOCKED" appears to inform you that Disc Lock is inuse.
To cancel the prohibition and unlock the discs,
press • while holding REC PAUSE with the unit set in
standby mode. "UNLOCKED" appears for a while, and the
loaded discs (both in 3-CD Changer and in CD Recorder)
and the sliding panel are unlocked.
- 25 -
Page 29

Playing Backa Discon CD Recorder
The buttons and controls enlarged in the illustration below are used and explained in this section Wage 27).
Remote control
1 2 3
4 5 6
7 8 9
lO +1o
t_/<< ll_"_"/P_'Dr't
STAN_/_
C_OCK
APoff /TIMER SLEEP
DDD
_M/PLAy
BASS MODE PITCH _
-- VOLUME "1"
Main unit
Oll
[]
FINALIZE
©
- 26-
Page 30

Notice you cannot use Program Play and Random Play
while playing a disc on CD Recorder.
Playing Back a DiscmNormal Play
You can play back both finalized and unfinalized discs on
CD Recorder.
On the unit ONLY:
Press _A CDR.
The unit automatically turns on and the CDR disc tray
comes out.
• If the sliding panel is closed, it moves down
automatically before the CDR disc tray comes out.
Place a disc correctly on the circle of the disc tray,
with its label side up.
r®
• When using a CD single (8 cm), place it on the inner
t_ circle of the disc tray.
Press CDR I_ / II.
l; The CDR disc tray also closes and CD Recorder starts
playing the loaded disc. The CDR lamps start flashing.
• If you press _A CDR again in this step, the disc tray
closes, but playback does not start.
Track number
i cci::i:
Ex.: When an unfinalized GD-RW is leaded
To close the CDR disc tray, press • CDR again.
To stop playback for a moment, press CDR _ / II.
To resume play, press CDR _ / II again.
To stop during play, press ll.
To remove the disc, press • CDR on the unit.
• When you try to eject the unfinalized CD-R or CD-RW,
"FINALIZE ?" appears and flashes in the main display.
If you do not finalize the disc, press • CDR again.
If you do finalize the disc, press FINALIZE. (See also
"Finalizing a Disc_D-R/CD-RW" on page 38.)
Basic Disc Operations
Tolocatea particularpointin a track duringplay
On the remote control:
Press and hold _ / _ or 1_1_1/ -41_1.
On the unit:
Press and hold _ or 1_1_1.
• _ / _ (I_,t): Fast-forwards the tracks.
• _l_l / _ (t_1_): Fast-reverses the tracks.
Togoto anothertrack
On the remote control:
Press _ / _ or 1_1_ / _ repeatedly.
On the unit:
Press _ or 1_1_1repeatedly.
• _ / _ (I_,t): Skips to the beginning of the next or
succeeding tracks.
• 1_1_ / _ (t_1_): Goes back to the beginning of the
current or previous tracks.
Togotoanothertrack directlyusingthe number
buttons
On the remote control ONLY:
Press the number button(s) allows you to start playing the
track number you want.
Ex.: For track number 5, press 5.
For track number 15, press +10, then 5.
For track number 20, press +10, then 10.
For track number 32, press +10, +10, +10, then 2.
RepeatingTracksmRepeatPlay
You can repeat an individual track or all tracks in a disc
many times as you like.
On the remote control ONLY:
Press REPEAT repeatedly during or before playing.
• Each time you press the button, Repeat Play mode
changes and appears in the main display as follows:
i:;:'i:::"i:::'i::: i:::iT" ! [":['?
1.. h... , ,...._ , .........
/\
REPEAT OFF
(Canceled)
Ex.:When "REPEAT 1CD" is selected
• REPEAT 1CD: Repeats all the tracks.
• REPEAT 1: Repeats one track.
• REPEAT OFF: Cancels Repeat Play.
- 27 -
Page 31

Recordingona CD-R/CD-RW
The buttons and controls enlarged in the illustration below are used and explained in this section Wages 29 to 38).
For recording operations, you mainly use the buttons and controls on the unit.
Main unit
SOURCE OPEN/CLOSE
D Q
MODE SET CANCEL
Q....Q ... Q....Q
LINE REC SELECT REC SPEED
Q Q
REC
FADE IN/OUT
RECMUTE
t • DIRECT REC
Remote control
Press OPEN/CLOSE to move down (or up) the sliding panel.
CLOCK
A_off /TIMER S_EEP
BASS MODE PrrCH REmJ_T
DDDD
DISPLAY
O
£NIER
©
- 28-
Page 32

Continued IdL
Before You Start Recording
• When you record onto a partially recorded unfinalized CD-R or CD-RW, its contents are not erased or overwritten.
The recording starts from the point following the last recorded track of the disc.
For CD-RW only: If you want to record on such a CD-RW from the beginning, you have to erase its contents first
(see "Erasing All Tracks (Only for CD-RW)" on page 43). (You cannot erase the contents recorded on a CD-R.)
• When the data recordable memory area of an CD-R or CD-RW becomes fully while recording, recording will stop
automatically.
Optimum Power Control (OPC)
When an unfinalized CD-R or CD-RW is loaded in CD
Recorder, this CD Recorder automatically checks the
disc condition and automatically adjusts the laser output
level to obtain optimum recording on the disc before
recording.
While OPC is being performed (for about 10 seconds),
"UPDATE OPC" flashes in the main display (and the
REC indicator also lights on the display).
_If"OPC ERROR" appears in the main display
The disc inserted cannot be used for recording.
Sampling frequency rateconverter
The sampling frequency rate converter built in the CD
Recorder allows you to record a digital source having
sampling frequency (fs) of 32 kHz, 44.1 kHz, or 48 kHz.
• When you can record dts* CD or HDCD ®** signals
coming through the LINE DIGITAL IN terminal,
bypass the built-in sampling frequency rate converter.
To bypass the sampling frequency rate converter, see
"Turning On or Off Sampling Frequency Rate
Converter" onpage 41.
* dts is a trademark of Digital Theater Systems, Inc.
**HDCD "' is a registered trademark of Pacific Microsonic, Inc.
Auto track-marking
Whenever you turn on the unit, auto track-marking is
activated. (The AUTO TRACK indicator will light on
the display.)
When auto track-marking is activated
• Recording from 3-CD Changer:
Track marks are recorded automatically at the points
where the tracks change.
Recording an analog source--FM, AM, and
external component connected to the LINE IN
jacks:
No track mark is recorded on a disc. This means that,
when playing this disc, a CD player will regard the
entire recording as one track. However, if there is a
blank of 3 seconds or more, CD Recorder will
consider it as a blank separating 2 tracks and
consequently put a track mark.
Recording through the LINE DIGITAL IN
terminal:
- If the playback source DOES have track marks
recorded, they are recorded automatically at the
points where the tracks change.
- If the playback source DOES NOT have track
marks recorded, this unit functions in the same way
for recording an analog source.
To cancel auto track-marking and use manual track-
marking, see "Recording Track Marks Manually--
Manual Track-Marking" on page 40.
Auto track space
While recording from the 3-CD Changer onto CD
Recorder, you can use this function.
When this function is turned on, CD Recorder
automatically makes 2-second blank portion at the
beginning of each track on a recorded disc.
To use this function for your recording, see
"Separating Recorded Tracks Automatically--Auto
Track Space" on page 41.
- 29-
Page 33

Available recording modes--REC MODE
CD Recorder provides a variety of the recording
methods--called "Recording Modes."
Available recording modes vary according to the
playback source and its playback status.
By pressing REC MODE after all preparation for
recording is finished, you can select and use the
following recording modes.
• When the source is 3-CD Changer
--CD Synchronized Recording:
• CD Direct Recording (with orwithout
finalization)--See page 33.
• First Track Recording--See page 35.
• Listening Edit Recording (with or without
finalization)--See page 36.
During play, you can only perform a single track
recording--See page 38.
• When the source is the external component
• Sound Synchronized Recording--See page 37.
When recording is stopped or finished, CD
Synchronized Recording and Sound Synchronized
Recording are canceled automatically.
_ Digital recording or analog recording?
CD Recorder automatically selects appropriate recording--
either digital or analog--during CD Synchronized Recording.
When digital source is selected as the playback sound, it will
be recorded digitally unless it is a first-generation digital copy
(see "SCMS (Serial Copy Management System)" on page 51).
In this case, CD Recorder selects analog recording.
_ During CD Synchronized Recording
• Repeat Play will be canceled automatically.
• Auto track-marking is activated automatically.
_ Other recording methods
You can also use the REC PAUSE button to perform the
recording. See "Recording Any Sound Source--Standard
Recording" on page 31.
High-Speed Recording
When using some of the Recording Modes mentioned
on the left column, this unit allows you to change the
recording speed--normal speed and high speed.
For CD-R, high speed means 4 times normal speed and
for CD-RW, 2 times normal speed.
When you select high speed for your recording, you
cannot listen to the played-back sounds.
_ During high-speed recording
You cannot listen to any source, and therefore, cannot adjust
the volume level. ("CANNOT LISTEN" will flash in the main
display if you try to do.)
Finalization
This is the final process in recording on a CD-R or CD-
RW. "Finalizing a disc" means writing the TOC (Table of
Contents) on the recorded disc.
Only after this process is completed, a recorded CD-R or
CD-RW can be played back on a CD player compatible
with CD-R/CD-RW.
• It is also recommended to finalize a disc in order to
play it back on 3-CD Changer.
To finalize a disc, see "Finalizing a Disc--CD-R/CD-
RW" on page 38.
- 30-
Page 34

Continued IdL
RecordingAnySoundSource
--Standard Recording
The following recording method can be applied to any
sound source.
On the unit ONLY:
Select the source to record from.
• When recording from 3-CD Changer:
- Press CD I_ / II, then •. To select a disc, press
DISC repeatedly, then •.
You can also use the remote control. When using it,
press CD1, CD2, or CD3, then •.
- If the current play mode is either Program Play or
Random Play, press FM/PLAY MODE on the
remote control to select Continuous Play.
• When recording an FM/AM broadcast:
Press SOURCE repeatedly to select FM or AM, then
tune into a station you want.
• When recording from external equipment:
1 Press SOURCE repeatedly to select "LINE."
2 Press LINE REC SELECT (inside the sliding
panel) repeatedly to select either "ANALOG IN"
or "DIGITAL IN."
ANALOG IN: To record through the LINE IN
jacks (analog-to-digital recording).
DIGITAL IN: To record through the LINE
DIGITAL IN terminal (digital-to-
digital recording).
Insert a recordable CD-R or CD-RW on the CDR
disc tray.
Press REC PAUSE so that CD Recorder enters
recording pause mode.
The REC indicator starts flashing on the display, and
the CDR lamps also start flashing.
• If OPC (see page 29) is being performed, "UPDATE
OPC" flashes first in the main display.
Selected recording method--
digital or analog--is shown here.
IdTT' i i
1.._2.._.3._ " -- ----' ........... rl _ D_[
is o F=i"i il,.il,. ;:=:];:!55:!!!:18
Ex.: When recording an FM station
4
5
6
Adjust the recording input level if necessary.
See "To adjust the recording input level" on page 32.
Press CDR I_ / I|.
Recording starts.
If"7"f"'_
i F::i"i
_mm i,-j)l
i"l C D=RW,,_--_
REC LEVEL e.l_m UNFINALIZE DISC
7 3:!5',3
When recordin_ from 3-CD Chan_er:
Press CD I_ / II.
• Recording stops when a selected disc is recorded.
When recordin_ from the external comnonent:
Start playback.
• For details, see the manual supplied with your
component.
To stop recording for a moment, press REC PAUSE (or
CDR I_ / II) again.
To resume recording, press CDR I_ / II again. (A track
mark is recorded when you resume recording.)
To stop recording, press •.
• When recording from 3-CD Changer, both 3-CD
Changer and CD Recorder stop.
To remove the recorded disc, press • CDR.
"FINALIZE ?" flashes in the main display for a while.
• If you do finalize the disc, press FINALIZE.
Remember once you finalize a CD-R, no further
recording can be made on the disc. (For more details, see
"Finalizing a Disc_D-R/CD-RW" on page 38.)
• If you do not finalize the disc, press • CDR again.
Tofade in and fade out the recording
You can fade in and fade out the recording--for about 5
seconds--when using Standard Recording.
To start recording by fading in, press FADE IN/OUT on
the unit in step 5 of the Standard Recording procedure (in
other words, while CD Recorder is in recording pause).
To pause recording by fading out, press FADE IN/OUT
(instead of the • button) when you want to pause the
recording.
To stop recording, press I
-31 -
Page 35

Toadjustthe recordinginputlevel
You can adjust the recording input level.
Once adjustment is made, it is memorized, and will be
recalled when you record any source on CD Recorder,
using any recording method (except when high speed
recording is selected).
While adjusting the recording input level, the sounds
through the speakers and headphones also change so that
you can check the difference by your own ears.
On the unit ONLY:
1 While CD Recorder is in recording pause mode, press
REC LEVEL (inside the sliding panel).
Now the VOLUME control (and VOLUME +/- on the
remote) works to adjust the recording level.
#"t"'t""x AOTO_0K _
1.. 1.... ,,,.. ..... =.... ... ...... .... ...............
2 Turn the VOLUME control while listening to the
playback sound.
• Adjust the recording input level so that the OVER
indicator never lights.
Recording input level is also shown here
AUTO TI 'ACK
#"#'f "_ i '_ oo-
i i"" ii r" i = ,,i i i"=
j:;i:Jiii:(:: i....i::::=...=i:::.L.."," =..i.,:::ii:::,
• You can adjust the recording input level within the
range of+12 dB to -12 dB in 2 dB intervals.
Normally set it to 0 dB (initial setting at factory).
3 Press REC LEVEL again to finish the adjustment.
Now the VOLUME control (and VOLUME +/- on the
remote) works as usual to adjust the volume level.
4 Press • to cancel recording pause mode.
• If you press CDR _ / II, standard recording (see page
31) will start.
_When unplug the AC cord or ifa
you power power
failure occurs
Input level adjustment will be erased in a few days. If this happens,
adjust the input level again.
Tomake a silent portioninyourrecording
You can record a 4-second silence when using Standard
Recording. This is convenient when recording tracks from
many discs.
• This function can be used both for digital and analog
recording.
To make a silent portion in your recording, press REC
MUTE on the unit while recording.
Recording enters recording pause mode after recording a 4-
second silence. (You can also make a silent portion as long
as you want by holding the button.)
To resume recording, press CDR I_ / II. (A track mark is
recorded when you resume recording.)
To change the display information while recording
You can change the information in the main display.
• For display information during playback, see "Changing
the Display Information" on page 15.
On the remote control ONLY:
Press DISPLAY repeatedly.
• Each time you press the button, the information in the
main display changes as follows:
• When the source is 3-CD Changer:
• During Standard Recording
_.. Remainingtime Remainingtime
of theplayingtrack& inCD-R/CD-RW_t
Playback source CDtrack number
indication &CDRtracknumber
"_ Clock --_ (s_e _oelow)_
• During CD Synchronized Recording (see page 33)
_.. Remaining time Remaining time
of the playing track & in CD-R/CD-RW ----Iv
Clock CD track number
& CDR track number
Playback source
-- * _ indication
(see below)
* When the current playback source is a CD Text, CD Text
information will be shown. See "To show the text
information recorded on a CD Text" on page 25.
• When the source is other than 3-CD Changer:
Remaining time _ ......
--_ in CD-R/CD-RW _LJK track numoer_
Playback source
-- Clock _ indication
- 32 -
Page 36

Continued I_
Recording from 3-CD Changer
--CD Synchronized Recording
You have three methods to record from 3-CD Changer to
CD Recorder.
Using these synchronized recording methods, you can start
and playback and recording at the same time.
• CD Direct Recording--Records a disc in 3-CD
Changer (or the program you have made)--with or
without finalization.
• First Track Recording--Records the first track of each
disc in 3-CD Changer (see page 35).
• Listening Edit Recording--Records only tracks you
select while playing back discs in 3-CD Changer--with
or without finalization (see page 36).
Before starting any of the above recording, adjust the
recording input level if necessary.
See "To adjust the recording input level" on page 32.
CD Direct Recording
CD Direct Recording allows you to easily record a disc in
3-CD Changer onto a CD-R or CD-RW in CD Recorder.
• Usingthe DIRECTRECbutton
On the unit ONLY:
Prepare discs in 3-CD Changer.
• If the current playing source is not 3-CD changer,
press CD _ / II, then ll. To select a disc, press DISC
repeatedly, then II.
i You can make a program (see page 22) if you
You can also use the remote control. When using it,
press CD1, CD2, or CD3, then II.
] want. (But you cannot select Random Play.)
Z
m
Insert a recordable CD-R or CD-RW on the CDR
disc tray.
Press REC SPEED (inside the sliding panel) if
necessary.
• Each time you press the button, recording speed
alternates between normal speed and high speed*.
REC L_WL _lcB _dB
• For CD-R, 4 times normal speed; for CD-RW, 2 times
normal speed.
When high speed is selected, recording input level is reset
to "0" temporarily, and will not affect the recording.
Press DIRECT REC.
:", r'., .'=, .':,
•.... [...= [i=' ['='
SPEED_ I CD-I_
RECLEVa1_ U_
C [: F;I: F;;:E C
• IfOPC (see page 29) is being performed, "UPDATE
OPC" flashes first in the main display, then recording
starts.
AUTOT_DK_1 _1
NORMAL
_,v t _ SPEED _,_
i co-Rw l
REC LEVEL [I i_
,..........:.........., ii,.ii,. 5:' 4.:I
1
Remaining time of the Remaining time in the
currently playing track CD-R/CD-RW
Recording stops when a selected disc (or a program) is
recorded.
• Both 3-CD Changer and CD Recorder stop
automatically.
To confirm the recording contents, see "To change the
display information while recording" on page 32.
To stop recording, press ll. "STOP DUBBING" flashes
for a while.
• Both 3-CD Changer and CD Recorder stop
automatically.
To remove the recorded disc, press • CDR.
"FINALIZE ?" flashes in the main display for a while.
• If you do finalize the disc, press FINALIZE.
Remember once you finalize a CD-R, no further
recording can be made on the disc. (For more details, see
"Finalizing a Disc_D-R/CD-RW" on page 38.)
• If you do not finalize the disc, press • CDR again.
_ f"SHORT REM. OK ?" appears when you press
DIRECT REC
There is not enough remaining time left on the recordable disc.
Eject and change a disc or press DIRECT REC one more time to
start recording anyway (the entire source disc cannot be recorded
in this case).
_ If you press DIRECT REC while listening to any
other source than 3-CD Changer (and CD Recorder)
Recording will also start ifa recordable disc is on the CDR disc
tray. However, recording will not stop until you press I1.
_ During CD Direct Recording
Repeat Play will be canceled automatically.
- 33 -
Page 37

• UsingtheRECMODEbutton
On the unit ONLY:
Prepare discs in 3-CD Changer.
• If the current playing source is not 3-CD changer,
press CD D,_/ II, then l To select a disc, press DISC
repeatedly, then l
You can also use the remote control. When using it,
press CD1, CD2, or CD3, then l
You can make a program (see page 22) if you
want. (But you cannot select Random Play.)
Insert a recordable CD-R or CD-RW on the CDR
disc tray.
Press REC SPEED (inside the sliding panel) if
necessary.
• Each time you press the button, recording speed
alternates between normal speed and high speed*.
_V_L . U_
* For CD-R, 4 times normal speed; for CD-RW, 2 times
normal speed.
When high speed is selected, recording input level is reset
to "0" temporarily, and will not affect the recording.
Press REC MODE (inside the sliding panel) to select
"CD REC?" or "CD REC & FINALIZE ?"
• Each time you press the button, recording modes
change as follows:
........
UNRNAUZE D[ C
i'i'i i'=': i" i" _!
•.... :... : .. :......... _ .. _.
[I_D NE_ _l 1st Tr. REC? J-*[SET_LISTENING? _ [
]SET-*LISTENING _F-*
Canceled (back to the beginning)
• CD REC ?: Select this to perform CD Direct
Recording.
• CD REC & FINALIZE ?: Select this to
automatically finalize the disc after recording.
Press REC START (inside the sliding panel).
s_,_, co-_
RECLEVala_ U_C [::, ii,.ii,. C E:,F;?. i:;i:E C
• IfOPC (see page 29) is being performed, "UPDATE
OPC" flashes first in the main display, then recording
starts.
AUTO TRACK El _'_.I
'l i ;,=
....................., ii..ii.. .::i.:.1
Remaining time of the Remaining time in the
currently playing track CD-R/CD-RW
Recording stops when a selected disc (or a program) is
recorded.
• Both 3-CD Changer and CD Recorder stop
automatically.
To confirm the recording contents, see "To change the
display information while recording" on page 32.
To stop recording, press ll. "STOP DUBBING" flashes
for a while. (In this case, the disc will not be finalized even
if you have selected "CD REC & FINALIZE ?" in step 4.)
• Both 3-CD Changer and CD Recorder stop
automatically.
To remove the recorded disc, press • CDR.
"FINALIZE ?" flashes in the main display for a while if
you have selected "CD REC?" in step 4.
• If you do finalize the disc, press FINALIZE.
Remember once you finalize a CD-R, no further
recording can be made on the disc. (For more details, see
"Finalizing a Disc_D-R/CD-RW" on page 38.)
• If you do not finalize the disc, press • CDR again.
_If"SHORT REM. OK ?" when
appears you press
REC START
There is not enough remaining time left on the recordable disc.
Eject andchange a disc orpress REC START one more time to
start recording anyway (the entire source disc cannot be recorded
inthis case).
_ During CD Direct Recording
Repeat Play will be canceled automatically.
- 34 -
Page 38

Continued II_
FirstTrackRecording
First Track Recording allows you to record the first track of
each loaded disc in 3-CD Changer.
You can, for example, make a directory of all your best
CDs.
• Usingthe RECMODEbuttonONLY
On the unit ONLY:
Prepare discs in 3-CD Changer.
• If the current playing source is not 3-CD changer,
press CD I_ / II, then II. To select a disc, press DISC
repeatedly, then II.
You can also use the remote control. When using it,
press CD1, CD2, or CD3, then II.
• If the current play mode is either Program Play or
Random Play, press FM/PLAY MODE on the remote
control to select Continuous Play.
Insert a recordable CD-R or CD-RW on the CDR
disc tray.
Press REC SPEED (inside the sliding panel) if
necessary.
• Each time you press the button, recording speed
alternates between normal speed and high speed*.
@00
* For CD-R, 4 times normal speed; for CD-RW, 2 times
normal speed.
When high speed is selected, recording input level is reset
to "0" temporarily, and will not affect the recording.
Press REC MODE (inside the sliding panel) to select
"lst Tr. REC?"
• Each time you press the button, recording modes
change as follows:
_ _'_ AUTO TRACK _
[_, Ill" rm II NORMAL Iw I_
't _2_3_ SPEED_,oo___
RECLEVEL e.la8 °NFINALIZE DISC
................... '_..#
•l ...... l.. l ... l l l i • ,_" l_
i ", i. i r ' ,. r:: r" i . ,_ "
f _/\_ --
CD REC?
CD REC & ALIZE?
[ Canceled (back to the beginning)
Press REC START (inside the sliding panel).
• IfOPC (see page 29) is being performed, "UPDATE
OPC" flashes first in the main display, then recording
starts.
NORMAL II1_
"="!=" I';::' =::[':1
.......... ........... ! iI:. iI:.
Remaining time of the Remaining time in the
currently playing track CD-R/CD-RW
6
After the first track of the disc on the CD1 tray is
recorded, the first track of the CD on the CD2 tray will
be recorded. (If no disc is on the CD tray, itwill be
skipped.)
After the first tracks of all loaded discs are recorded,
First Track Recording stops.
Repeat steps 1, 4, and 5 to continuously record more
tracks using First Track Recording.
To confirm the recording contents, see "To change the
display information while recording" on page 32.
To stop recording, press ll. "STOP DUBBING" flashes
for a while.
• Both 3-CD Changer and CD Recorder stop
automatically.
To remove the recorded disc, press • CDR•
"FINALIZE ?" flashes in the main display for a while.
• If you do finalize the disc, press FINALIZE.
Remember once you finalize a CD-R, no further
recording can be made on the disc. (For more details, see
"Finalizing a Disc_D-R/CD-RW" on page 38.)
• If you do not finalize the disc, press • CDR again.
_ If"SHORT REM. OK ?" when
appears you press
REC START
There is not enough remaining time left on the recordable disc.
Eject and change a disc or press REC START one more time to
start recording anyway (the entire track cannot be recorded in this
case).
_ During First Track Recording
Repeat Play will be canceled automatically.
- 35 -
Page 39

ListeningEditRecording
Listening Edit Recording allows you to make a program
while listening and checking each track of the loaded discs
(up to 3 discs) in 3-CD Changer, then to start recording the
program.
• You can program up to 32 tracks.
• UsingtheRECMODEbuttonONLY
On the unit ONLY:
Prepare discs in 3-CD Changer.
• If the current playing source is not 3-CD changer,
press CD I_ / II, then =. To select a disc, press DISC
repeatedly, then =.
You can also use the remote control. When using it,
press CD1, CD2, or CD3, then =.
• If the current play mode is either Program Play or
Random Play, press FM/PLAY MODE on the remote
control to select Continuous Play.
Insert a recordable CD-R or CD-RW on the CDR
disc tray.
Press REC SPEED (inside the sliding panel) if
necessary.
• Each time you press the button, recording speed
alternates between normal speed and high speed*.
* For CD-R, 4 times normal speed; for CD-RW, 2 times
normal speed.
When high speed is selected, recording input level is reset
to "0" temporarily, and will not affect the recording.
Press REC MODE (inside the sliding panel) to select
"SET-_LISTENING?" or "SET-_LISTENING &
FINALIZE ?"
• Each time you press the button, recording modes
change as follows:
_(__',_'_ _l_l AOTOTaACK ,_l
[_, lit I_ NORMAL ew I_
RECLEVEL e.#eB UNF(NAL(ZE D_C]
="' i ...... r" .. i T =...... r" i"" i. i T i, i ='". ,_."'= ,,
.:::. [:::. [ ":" [..... L .:". [ [:::. ["[ .L ["[ i.::[ .......:' o,
[co ec 000
CDR_ _INE_: ISTENiN_;:i_:iNNiZN):F
Canceled (back to the beginning)
• SET-*LISTENING ?: Select this to perform
Listening Edit Recording.
• SET-*LISTENING & FINALIZE ?: Select this to
automatically finalize the disc after recording.
Press SET (inside the sliding panel).
t -CD Changer starts playing.
• Playback starts from the currently selected disc if two
or three discs are loaded.
Decide if you want to include the current track in
the program or to skip it.
To include the current playing track in the
program, press SET.
The current playing track is programed and the next
track starts playing. (After the last track of a disc is
programed, the first track of the next disc starts
playing.)
• To skip the current playing track, press CANCEL.
The current playing track is not programed and the
next track starts playing.
If you do not press either button while the current
track is playing, 3-CD Changer will skip the track
and play the next track.
Repeat step 6 to program other tracks.
When you finish checking all tracks or if there is no more
remaining time on the recordable CD-R or CD-RW,
Listening Edit Recording starts automatically.
• If the remaining time of the CD-R or CD-RW becomes
short, CD Recorder will search for a track fitting into the
remaining time. To include the track found in the
program, press SET. To find another, press CANCEL.
To stop during editing process and start recording, press
REC START.
To confirm the recording contents, see "To change the
display information while recording" on page 32.
To stop recording, press m. "STOP DUBBING" flashes
for a while. (In this case, the disc will not be finalized even
if you have selected "SET-*LISTENING & FINALIZE ?"
in step 4.)
• Both 3-CD Changer and CD Recorder stop
automatically.
To remove the recorded disc, press • CDR.
"FINALIZE ?" flashes in the main display for a while if
you have selected "SET-*LISTENING?" in step 4.
• If you do finalize the disc, press FINALIZE.
Remember once you finalize a CD-R, no further
recording can be made on the disc. (For more details, see
"Finalizing a Disc_D-R/CD-RW" on page 38.)
• If you do not finalize the disc, press • CDR again.
_ During Listening Edit Recording
Repeat Play will be canceled automatically.
- 36-
Page 40

Continued II_
Recording the External Components
--Sound Synchronized Recording
With this recording method, you can start recording
automatically- when the source sound comes into this unit
through the LINE IN jacks or the LINE DIGI'IAL IN
terminal.
Observe the following when recording from external
component through the LINE DIGHAL IN terminal.
• Make sure that it is connected correctly.
• Make sure to turn it on, and leave it turned on while
recording.
• Sound Synchronized Recording will stop automatically if
no sound comes in for more than 30 seconds.
On the unit ONLY:
Before recording, adjust the recording input level if
necessary.
See "l'o adjust the recording input level" on page 32.
Insert a recordable CD-R or CI)-RW on the CDR
l disc tray.
2 Press SOURCE repeatedly until "LINE" appears in
l the main display.
3 Press LINE REC SELECT (inside the sliding panel)
repeatedly to select either "ANALOG IN" or
"DIGITAL IN."
• ANALOG IN: Select this to record sounds through
the LINE IN jacks. The ANALOG
indicator lights on the display
(analog-to-digital recording).
• DIGITAL IN: Select this to record sounds through
the LINE DIGI'IAL IN terminal. The
DIGI'IAL indicator lights on the
display- (digital-to-digital recording).
4 Press REC MODE (inside the sliding panel) to select
"SOUND SYNC. REC?"
• Each time you press the button, Sound Synchronized
Recording turns on and off.
AUTO-.RACK
F"F"F"_ .o_,,,L _ _%
- rw GD RW _/
REC LEVEL Llcll UNF[RAL[ZE D[ (
:iii;0 i...ij..jj:::, ':::'..'_._"" '...''...'_"
,_," i "" ',,,' n i% i,,,, ',,Tb
/\
Illl_Canceled
5 Press REC START (inside the sliding panel).
The REC indicator flashes on the display- for a while.
r'FF, o-.RAoK
i:::,F: i:;i
RECLEVELI.S_
i....i N E
Ex.: When "ANALOG IN"is selected in step 3
Start playback on the selected external component.
Recording starts automatically- when the sound signals
come in.
F "F "F "_
1 ._. 2._ 3.,, )
[ T [..[ [:::"
1..... L i'i 1....
Remaining time in the
CD-RiCD-RW
'I0 confirm the recording contents, see '"1o change the
display- information while recording" on page 32.
To stop recording, press ll. "STOP DUBBING" flashes
for a while.
• Both 3-CD Changer and CD Recorder stop
automatically.
'IO remove the recorded disc, press • CDR.
"FINALIZE ?" flashes in the main display- for a while.
• If you do finalize the disc, press FINALIZE.
Remember once you finalize a CD-R, no further
recording can be made on the disc. (For more details, see
"Finalizing a Disc_D-RiCD-RW" on page 38.)
• If you do not finalize the disc, press • CDR again.
if Sound Synchronized Recording do not work
correctly when "ANALOG IN" is selected as the
input terminal
Use the Standat'd Recording method (see page 31).
Sound Synchronized Recording starts automatically when this unit
detects sound signals coming in. This means that, if sotmd signal is
too weak for this unit to detect, Sound Synchronized Recording
will not start (or will stop even while the soat'ce is being played).
When recording from a DAT deck using Sound
Synchronized Recording
Two track mat'ks may be recorded at the beginning of the
recording. If this occurs, record a skip mat'k so that either ll_ck
mat'k will be ignored during playback. (See page 42.)
- 37 -
Page 41

Recording a Single Track during Play Finalizing a Disc--CD-R/CD-RW
You can record the current track while playing back a disc
on 3-CD changer.
• Ira recordable disc is not loaded, "CDR NO DISC"
appears in the main display. Insert a recordable CD-R or
CD-RW.
• Using the DIRECT REC button
On the unit ONLY:
Press DIRECT REC while playing back or pausing a
track you want to record.
Playback of thattrack is stopped, and the same track starts
playing from the beginning again. This time, CD Recorder
starts recording the track.
Finalization is the final process in recording on a CD-R or
CD-RW. "Finalizing a disc" means writing the TOC (Table
of Contents) on the recorded disc.
Only after this process is completed, a recorded CD-R or
CD-RW can be played back on a CD player compatible
with CD-RiCD-RW.
Before you start ....
• Once a CDR has been finalized, no fta_her recording can be
made on the disc.
• If you unplug the power cord or"ira power failure occm's
during finalization process, recorded data will be lost and the
disc may not be utilized any more.
• Using the REC MODE button
On the unit ONLY:
/Press REC MODE (inside the sliding panel)
repeatedly, while playing back or pausing a track
you want to record until "l'Ir. REC ?" or "AUTO
LEVEL CONTROL REC ?" appears in the main
display.
• You cannot select "AUTO LEVEL CONI'ROL
REC ?" when high-speed recording is selected. If
this happens, press REC SPEED once to select
normal speed recording.
1'Ii'.REC ?:
Select this to record the current track without
input level adjustment.
AUTO LEVEL CONTROL REC ?:
Select this to record the current track with input
level adjustment.
2 Press REC S'IARI' (inside the sliding panel),
• VChen "lTr. REC ?" is selected: Playback of that
track is stopped, and the same track star-tsplaying
from the beginning again. This time, CD Recorder
starts recording the track.
• VChen "AUTO LEVEL CONTROL REC ?" is
selected: Playback of that track is stopped, and the
same track star-ts playing from the beginning again.
In the first playback, CD Recorder checks the
recording condition of the track and adjusts the
recording level without recording. ("LEVEL
ADJ USI"' flashes in the main display.)
Then when the second playback star-ts, CD Recorder
starts recording the track.
On
1
2
3
the unit ONLY:
Insert a disc you want to finalize on the CDR disc
tray.
• Ira disc is being played on 3-CD Changer, press • to
stop playback.
Press FINALIZE.
"FINALIZE ?" appears in the main display.
I 1_.2._3J OD F_W_._ I
[ +°+++i+
!..... !" !. ! :'": ! "!.... := !.... _"":
1" .L i"[ 1'"1[..... L ,::.. 1:::.
If you want to cancel t-maiization,press CANCEL.
Press FINALIZE again to finalize the disc.
The REC indicator lights and "FINALIZE" star-ts
flashing during finalization.
. '+°+'°+'
_,_...i=A=A.i.i _.1i.==_...A=._..iA.._d m_ /
_"-_._'-_-"_i......-_..-:j.._._
" ITTTITTITITTTTTTITT! "
• The finalization process requires about a few minutes
to complete (when finalized, the REC indicator goes
off and "FINALIZE" stops flashing and goes off).
'IO unfinalize a CD-RW, see "Unfmaiizing a Disc (Only-
for CD-RW)" on page 43.
After the track is recorded, both 3-CD Changer and CD
Recorder stop.
- 38-
Page 42

OtherConvenient CDR Functions
The buttons and controls enlarged in the illustration below are used and explained in this section (pages 40 to 43).
Remote control
[
- 39-
Page 43

By pressing MENU, you can use (or cancel) the following
convenient CD Recorder functions:
AUTO TRACK: Selects either auto-track marking or
manual track marking (see the right
column.)
TRACK SPACE: .Automatically places a 2-second blank
space at the beginning of each track on
a recorded disc (see page 41).
CONVERTER: Turns on or offthe built-in sampling
frequency- rate converter (see page 41).
TRACK SKIP: Records a skip mark to an unwanted
track so that it will be skipped (ignored
as if it does not exist) during play-(see
page 42).
TRACK ERASE: Erases the unwanted tracks on a CD-
RW (see page 42).
DISC ERASE: Erases all the recorded tracks on a CD-
RW (see page 43).
UNFINALIZE: Erases the TOC (Table of Contents) of a
finalized CD-RW (see page 43).
Recording Track Marks Manually
--Manual Track-Marking
When auto track-marking is activated (initial setting at the
factory-), track marks are recorded automatically (see "Auto
track-marking" on page 29 for more details).
To cancel auto-track marking and use manual track
marking, follow the procedure below.
On the remote control ONLY:
/Press MIENU repeatedly until "AUTO TRACK"
appears in the main display.
• Each time you press the button, the following menu
items appear as follows:
i:::i[ [ "T' f"i "r" 1:;:'i:::if" k"
lTRACKERASE0t DiSCERASEH UNFIN_
CO__ Canceled _ (back to the beginning)
Before using the following functions explained in this
section, make sure of the followlng.
• The following procedures are only possible when
CD Recorder is selected as the source and
playback is not started.
• To stop any time during the following procedures,
press CANCEL.
2
3
Press SET;
The current setting for auto-track marking appears.
I I
•::i [[ "F i'" "F D i=" i'" L." _," "..'.--
"! '...' " '...' ! !". !" '..." "". _._.kj2k"
" 1111 "
Ex.:When auto-track marking isactivated (initial setting)
Press _ / _ or _ / _,_ to select "AUTO
TRACK OFF" then press ENTER.
The AUfO TR!kCK indicator goes off from the display,
and auto track-marking is canceled, and now you can
put track marks manually during recording.
* 'Ib put track marks during recording, press SET at
the point where you want to put a track mark.
'Io restore auto track-marking, repeat steps 1 to 2 and
select "AUfO TR!kCK ON" then press ENfER in step 3.
* The AUfO TRACK indicator lights on the display.
_ About manual track-marking
• Tl_ck marks must be recorded apart from each other by 4
seconds. If you press SET twice within 4 seconds, the second
press of the button will be ignored (only one track m_u'kwill be
recorded where you press SET for the fu'st time).
• You cannot put tl_ck m_u'ks manually during CD Synctu'onized
Recording. (Auto U_ck-m_u-king is activated tempol_u'ily.)
- 40 -
Page 44

Continued II_
SeparatingRecordedTracks
Automatically--Auto-TrackSpace
While recording from the 3-CD Changer onto CD Recorder
using Standard Recording method (see page 31), CD
Recorder automatically places a 2-second blank space at
the beginning of each track in the recording.
When shipped from the factory, this function is turned
"ON."
* This function works when "AUIO TR!kCK"is set to
"ON." (See page 40.)
Io cancel Auto- lrack Space, follow the procedure below:
On the remote control ONLY:
/Press MIENU repeatedly until "TRACK SPACE"
appears in the main display.
• Each time you press the button, the following menu
items appear as follows:
T..........i:;?i:::ir: i.:: =.iii;1:::=i:::iC [iii
_IAUTO TRACK__-*
ICONVERTER1-*Canceled -* (back to the beginning)
2 Press SE'L
The current setting for Track Space appears.
I 'i F;I: :iii;i:::'i:::iC E --_..-"-'""-:._--
" If If "
Ex.:WhenTrack Space isactivated (initial setting)
I
3 Press _ / _ or 1.41.41/ _ to select "TR SPACE
OFF" then press ENTER.
'Io activate 'lrack Space, repeat steps 1 to 2 and select
"TR SPACE ON" then press ENI'ER in step 3.
Turning On or Off Sampling Frequency Rate
Converter
The sampling frequent2, rate converter built in the CD
Recorder allows you to record a digital source having
sampling frequency (fs) of 32 kHz, 44.1 kHz, or 48 kHz by
converting the fs of the source signals into 44.1 kHz
(required fs to record on CD Recorder).
When the sampling frequency converter is turned "OFF,"
digital signals are sent to CD Recorder bypassing the
sampling frequency converter (without conversion).
• Normally set it to "ON" (Initial setting at the factory).
Only when you record dts CD or HDCD signals coming
through the LINE DIGI'IAL IN terminal, turn off the
sampling frequency rate converter.
'IO turn off Converter, follow the procedure below:
On the remote control ONLY:
/Press MIENU repeatedly until "CONVERI'ER"
appears in the main display.
• Each time you press the button, the following menu
items appear as follows:
..............................L.:_...ii'i :...:i:::.i"( i i:::.i"::
TRACK ERASE H DISC ERASE _--_UNFINALIZE]-*
TRACK SKIPF*IAUTO TRACK F*ITRACK SPACE 1--*
_-* Canceled _ (back to the beginning)
2
Press SET;
'lqaecurrent setting for Converter appears.
....................................... ,._._,.id,
I ,....u r..i,...,t::.t,:: i i::::t,:: -.,,L...."__....'._.L=
- ffff -
Ex.:When Converter is activated (initial setting)
3 Press _ / _ or 1.41.41/ _ to select
"CONVERI'ER OFF" then press ENTER.
'Io activate Converter, repeat steps 1 to 2 and select
"CONVERTER ON" then press ENI'ER in step 3.
-41 -
Page 45

Recording Skip Marks onto a CD-PJCD-RW Erasing Tracks (Only for CD-RW)
Before finalizing a disc, you can record a skip mark to an
unwanted track so that it will be skipped (ignored as if it
does not exist) during play.
IMPORTANT
• Once skip mat'ks ate recorded, they cannot be erased (you
can only erase skip mat'ks by erasing the U_cks with skip
mat'ks).
• If you unplug the power cord or ifa power failure occurs
while "WRITE SKIP" is flashing in the main display (in
step 3), the disc may not be utilized any more.
Before finalizing a disc, you can erase recorded tracks--
from a selected track up to the last track--on a CD-RW at
a time.
• To erase recorded tracks on a finalized CD-RW,
unfinalize the disc first (see page 43).
IMPORTANT
• Once closure is performed, erased data cannot be restored.
• If you unplug the power cord o1"ifa power failure occurs
while "ERASE TRACK,' is flashing in the main display (in
step 4), the disc may not be utilized any more.
On the remote control ONLY:
1
Press MEN U repeatedly until "TRACK SKIP"
appears in the main display.
• Each time you press the button, the following menu
items appear as follows:
"[" [:;:."i:::if"' k" .'::::[.:"'["i:::."
: :,. : i ...,, i.. .... • :., ,:. 1
A
]
__IT_CK SPACEb"
CONVERTER 1-_Canceled-* (back to the beginning)
2 Press SE'L
The following indication appears in the main display.
,:::L r _:::, _,p,l:!_-""
I ...., "'...'. ! --__."..... -,,I--
- IAVfIVVI-
Track number flashes
3 Press _ / _ or I,<.,11/ _ to select a track you
want to skip (during play) then press ENTER.
The SKIP ON indicator lights on the display.
_,.A.Ai..A,0 i.D A...Oii l.A.,.i.Ai_.i0,,
_l: : : : : : : :.., l," l "...:_-
;,,,ii f_i,_ f_iii,_ i,,i,i,i'.
Repeat steps I to 3 until you record skip marks to
all unwanted tracks.
• You can record up to 21 skip marks on a disc.
_More about skip marks
• "Skipping tracks during, play" does not mean erasing recorded
data. Therefore the remaining time of the disc will not change.
• Tl_cks with skip mat'ks will be skipped only when playing the
disc on CD Recorder and other CD player which can read these
skip mat'ks.
On
1
the remote control ONLY:
Press MIEN U repeatedly until "TRACK ERASE"
appears in the main display.
• Each time you press the button, the following menu
items appear as follows:
"T'i:;?i:::if":i.::' i:::"i:?f::i'::::i:::'
/x
_-_DISC E_SE_IUNFINAUZE_]
IT_CKSKIPb-IAUTOTRACKb-T_U_C_cK
Canceled -* (back to the beginning)
2 Press SET;
The following indication appears in the main display.
-"-i.
i'" i'"I ¢"I ¢'" i.... ""I 'i I...I i,_.... 'j !:::!
i:::. r':. ['"[.:::: i:::, --i : :: ,."-
Erasure start track ' 'lf/_"
The last track
• Erasure start track number, when it appears, is the
same as the last track number. (In the above example,
18 tracks are recorded on the CD-RW.)
3 Press IH_ / _ or _ / _ to select the erasure
start track.
• You can also use the number buttons to select the
track. (See "To go to another track directly using the
number buttons" on page 27.)
.....................":'::" i ,,:::,,
I, [... 1.4i...['..., [... = '[ '...'_..
.................. ,,,_.__.._., ...... . ,
Ex.: When you erase the 12th track up to the last
4 Press ENTER.
While erasure is performed, "ERASE TRACK" flashes
in the main display-. (The REC indicator also lights on
the display-.)
&._.i_.._ii._,._.l!.._ii i i.A,._.l_..._i_...i_.i,,
_J:.'.'._l" _i"[":::,_-::._.... i__i'_':--'j_-.- _i'-_
" VVfVVVffVVVffVVVffVVVffVVVf"
-42 -
Page 46

Erasing All Tracks (Only for CD-RW)
You can erase all the recorded tracks on a CD-RW at a
time.
:Before you start .... ]
• Once erasure is performed, erased data cannot be restored, ]
• If you unplug the power cord or ifa power failure occurs ]
while "ERASE Disc" is flashing in the main display (in stepI
3), the disc may not be utilized any more. ]
On the remote control ONLY:
/Press MIEN U repeatedly until "DISC ERASE"
appears in the main display.
• Each time you press the button, the following menu
items appear as follows:
.............:,..,:. ..,,, ,... :,,.. :,,,....,, ,..., :....
I ; 1 "', I I'" ;'I' ;"I ", I"
A
[T_CK ERASE ]-*_ili__ ]
Canceled -* (back to the beginning)
2 Press SE'L
The confm"nation message appears.
¢_r'r',,
,_2_.,J l:::"l:? i:::i':::;l:::'
3 Press ENTER.
While erasure is performed (for about 90 seconds),
"ERASE DISC" flashes in the main display. (The REC
indicator also lights on the display.)
II t _'2._3 J / i -- cD awJJl
_t..ii.._ii...iAA..ii.._.AAi i...iAi...ii_1
-2: J":',!-_'...:-:...___J.-'__.i,_'...:-.._...= I
" 1111111111111111111111111 "
r'., 'i" C' i'" -"':' .'lp
'....'..........."_i¢
B i....i:::ii..iK [::,1::iii;C
IJnfinalizing a Disc (Only for CD-RW)
By erasing the TOC (Table of Contents) of a finalized CD-
RW, you will be able to record on the CD-RW again.
This erasing process of the TOC is called "Unfinalization?'
• Unfinalization is just to erase the TOC only, but not the
recorded music signals on the disc.
IMPORTANT
If you unplug the power cord or if a power failure occurs while
"Lq'qFINALIZE" is flashing in the main display (in step 3), the
disc may not be utilized any more.
On the remote control ONLY:
1
2
3
Press MEN U repeatedly until "UNFINALIZE"
appears in the main display.
• Each time you press the button, the following menu
items appear as follows:
i i i. i i..... i' i, i :"J i 'i.... :: i....
: : :..: :,.. : :..: :..,: : : ,, :.,,
•.,,, : : : ,:, : : : : :..... :.. :,,,. : ....
A
[T_CK ERASE _ _inlmllili_ ]
_L_gUf__
Canceled -* (back to the beginning)
Press SE'L
The confmnation message appears.
._.J_..,J [ _o_r_ I
•,..,, .....,.,..,...,, .,....:,....._'d.
•...,i'.ir" .i.i'i r"ii.....i..,.:..i:::."_i'#
Press ENTER.
While erasure is performed (for about 90 seconds),
"UNFINALIZE" flashes in the main display.
ii i'.i L. i i'.i L.J i 1 ..' L. m"-
-.-.--2._-__._.._-J_---.._..__.,._._,-..!..._..--I
" 1111111111111111111111111 "
-43 -
Page 47

UsingtheTimers
The buttons and controls enlarged in the illustration below are used and explained in this section (pages 45 to 49).
Remote control
oo
©_
db'_6 0
....6]
MC_F PI1CH :_F,_
_'3_D -- VOtljME "1"
O C;:i:;_,,_:2_
JVC
d STeddI_B%..ON
CANCEL
O
O
J
- 44 -
Page 48

Continued I_L
There are three timers available--Recording Timer, Daily
Timer, and Sleep Timer.
Before using these timers, you need to set the clock built in
the unit.
• In addition to these three timers, you can also use Auto
Power Offto shut off the power automatically.
Setting the Clock
You can set the clock whether the unit is turned on or off
(on standby).
• If you have activated the power consumption saving
mode ("DISPLAY OFF"), you cannot adjust the clock
while the unit is turned off(on standby). For details, see
page 14.
On remote control ONLY:
/Press CLOCK/TIMER.
The hour digit in the main display starts flashing.
I --L.",'," " "=" i:::ii::i I
"J_L_L].... ".-__.".J'_" ......
i i
r TTTTTTTTTTVTTT"
2 Press _ / _ or 1.41.41/ _ to adjust the hour, then
press SE'L
I I
[::; [.=.[ !:::: :: ".." ".qD.-
i i i "= =='_'_iiiT=:"=="'_X="-
• If you want to correct the hour after pressing SET,
press CANCEL.
The hour digit star-ts flashing again.
Press _ / _ or _ / _ to adjust the minute,
then press SE'L
The built-in clock starts working.
Toadjustthe clockagain
Once you have adjusted the clock, you need to press
CLOCKffIMER repeatedly- until the clock setting screen
appears in the main display- (the hour digit starts flashing).
When you unplug the AC power cord or ira power
failure occurs
The clock will be reset to ',AM 12:00" in about one minute.
UsingRecordingTimer
With Recording Timer, you can make an unattended
recording.
• You can set Recording Timer whether the unit is turned
on or off(on standby).
• To correct a misentry any-time during the process, press
CANCEL.
• To cancel the setting any-time during the process, press
CLOCK/TIMER.
How Recording Timer actually works
The unit automatically- turns on about 3 minutes before
timer recording starts, then turns off the volume and starts
recording on CD Recorder when the timer on-time comes.
When the timer off-time comes, the unit automatically
turns off (stands by).
• Recording Timer works only-once, but the timer settings
remain stored in memory.
Before you start ....
• Make sure that a recordable CD-R or CD-RW is
inserted on the CDR disc tray. If not, insert a
recordable CD-R or CD-RW.
• When you want to record from the external
component ("LINE"), make sure the input you want
to use is currently selected--either "ANALOG IN" or
"DIGFIAL IN." (See page 31 for more details.)
On remote control ONLY:
/Press CLOCK/TIMER repeatedly until the
Recording Timer on-time setting screen appears in
the main display.
The a(3)(Timer) indicator lights and the REC
(Recording Timer) indicator star-ts flashing on the
display.
• Each time you press the button, the timer mode
changes as follows:
&#
0 i..i i:::iH =i ...'.,..ii:::i
'7"\ ;__" ......
[_411lmlliml_ ON AM 12:00
IAM 12:00 _Canceled -*(back to the beginning) J
* ',AM 12:00" is the initial setting time at the factolN.
To be continued
-45 -
Page 49

2 Press _ / _ or I.<1.,9/ _ to set the hour of the
l on-time, then press SET;
3 Press _ / _ or I.<1.,9/ _ to set the minute of the
on-time, then press SET;
4 Press _ / _ or I.<1.,9/ _ to set the hour of the
i off-time, then press SET;
5 Press _ / _ or I.<1.,9/ _ to set the minute of the
i off-time, then press SET;
Press _ / _ or I.<1.,9/ _ to select the source,
then press SE'I_
The source changes as follows:
A
"," 2..t...tt.ld
• 7V"
[
FM: Tunes into an FM station.
AM: Tunes into an AM station.
LINE*: Selects the external component as the source
through the currently- selected input--
"ANALOG IN" or "DIGITAL IN."
* To operate the component with the Recording Timer,
it also needs to have the timer function.
lfvou have selected FM or AM as the source in
the above step. select a preset number.
Press _ / _ or _ / _ to select a preset station,
then press SET.
lfvou have selected LINE as the source in the
above step. simply press SET.
_) REC
l'he REC (Recording l'imer) indicator stops flashing,
and remains lit.
8 Press ©/I to turn offthe unit (on standby) if you
have set the timer _ith the unit turned on.
IMPORINNT: If you turn off the unit within 4
minutes before the timer on-time, timer recording
will not start.
Toturn on oroff RecordingTimerafter itssetting is
done
1 Press CLOCK/TIMER repeatedly until "REC"
appears in the main display.
A
L,,: L,,,i '
|", _ ;,,,'
_-*LON AM __ON AM_ 2:00]-,I
IAM 12:00l-_Canceled--*(backtothe beginning) J
* ',AM 12:00" is the initial setting time at the facto_T.
'IO turn offthe Recording Timer, press CANCEL to
select "REC OFF."
The 0._ (Timer) and REC (Recording Timer) indicators
go off from the display.
The Recording Timer is canceled, but the setting for the
Recording Timer remains in memory.
'IO turn on the Recording Timer, press SE'L
The (_ (Timer) and REC (Recording Timer) indicators
light on the display. The settings you have done are
shown in the main display-for your confirmation.
_ f you change the source or press CLOCK/TIMER
or SLEEP while a timer recording is being
performed
Recording Timer is canceled (but recording continues). The unit
does not turn off automatically.
• When you set Sleep Timer by pressing SLEEP, the unit turns
off as you set by Sleep Timer.
- 46 -
Page 50

Continued I_
UsingDailyTimer
With Daily Timer, you can wake up to your favorite music
or radio program.
• You can set Daily- Timer whether the unit is turned on or
off (on standby).
• To correct a misentry any-time during the process, press
CANCEL.
• To cancel the setting any-time during the process, press
CLOCK/TIMER.
How Daily Timer actually works
The unit automatically- turns on about 3 minutes before
Daily Timer playback star-ts,then starts playing the
specified source when the timer on-time comes. The
volume level increases to the preset level step by step.
When the timer off-time comes, the unit automatically
turns off (stands by).
• Daily Timer works every day, and the timer settings
remain stored in memory- until you reset them.
On remote control ONLY:
/Press CLOCK/TIMER repeatedly until the Daily
Timer on-time setting screen appears in the main
display,
The 0,_ (Timer) indicator lights and the DAILY (Daily
Timer) indicator starts flashing on the display.
° Each time you press the button, the timer mode
changes as follows:
_,ll 4
"V"
i'" i',J i:::" i'='J " ''= = "::i i'::i
,...,"'! !" "! -%'__.-:.,,-,. ,:.., ,:..,
.....
ON AM 12:00 DALLY
IAM 12:00 _ Canceled -*(back to the beginning)
* ',AM 12:00" is the initial setting time at the factolN.
2 Press _ / _ or _ / _ to set the hour of the
on-time, then press SE'I;
3 Press _ / _ or _ / _ to set the minute of the
-time, then press SE'I;
4
!
5
|
6
Press _ / _ or _ / _ to set the hour of the
off-tlme, then press SE'I;
Press _ / _ or _ / _ to set the minute of the
off-tlme, then press SE'I;
Press _ / _ or _ / _ to select the source,
then press SE'I;
• The source changes as follows:
1
_A.Ai...i_,
il i:.'
1
CD:
CDR:
LINE*:
FM:
AM:
Plays a disc in 3-CD Changer.
--*Prepare a disc, then go to step 7 to
select the disc number.
Plays a disc in CD Recorder.
--* Prepare a disc, then go to step 8.
Selects the external component connected
to the LINE IN jacks.
--* Make the external component ready-for
playback, then go to step 8.
Tunes into an FM station.
--* go to step 7 to select a preset station.
Tunes into an AM station.
--* go to step 7 to select a preset station.
* 'lb operate the component with the Daily Timer, it
also needs to have the timer function.
-47 -
Page 51

lfvou have selected "CD" as the source in the above
select a disc number.
Press _ / _ or 1,11,,11/ _ to select the disc number
(CD 1, CD 2, or CD 3), then press SET.
IMPORI'ANT: When selecting a disc number, make
sure that a disc is already loaded on the selected disc
number tray. If there is no disc on the tray, playback
will not start.
lfvou have selected "FM" or "AM" as the source in
the above stem select a preset station.
Press _ / _ or _ / _ to select a preset station,
then press SET.
8 Press _ / _ or _ / _ to adjust the volume
level, then press SEI.
The ]_)AILY(Daily Timer) indicator stops flashing and
remains lit.
_) DKkY
9 Press O/I to turn offthe unit (on standby) if you
have set the timer with the unit turned on.
IMPORI'ANT: If you turn off the unit within 4
minutes before the timer on-time, Daily Timer
playback will not start.
Toturn onor off Daily Timerafter itssetting is done
1 Press CLOCKfI'IMER repeatedly until "DAILY"
appears in the main display.
,A4
_ [Y_LYl_
r',, ¢": T i i i
l...' ! l/_! .... l
[_-_ ON AM 12:00 _ ON AM 12:00 _-_1
IAM 12:00 _ Canceled -*(back to the beginning) J
* ',AM 12:00" is the initial setting time at the factory.
'Ib turn offthe Daily 'Iimer, press CANCEL to select
"DAILY OFF."
The 0._ (Timer) and DALLY (Daily- Timer) indicators go
off from the display.
The Daily-Timer is canceled, but the setting for the Daily
Timer remains in memory-.
'IOturn on the Daily Timer, press SE'I_
The (_ (Timer) and DALLY (Daily Timer) indicators
light on the display. The settings you have done are
shown in the main display for your confirmation.
_ f the unit is kept turned on when the timer on-time
comes
Daily Timer does not work at all.
if you change the source or press CLOCK/TIMER
or SLEEP while Daily Timer playback is being
performed
Daily Timer is canceled and the unit does not turn off
automatically.
• When you set Sleep Timer by pressing SLEEP, the unit turns off
as you set by Sleep Timer.
- 48 -
Page 52

UsingSleepTimer
With Sleep Timer, you can fail asleep to your favorite
music or radio program.
• You can set Sleep Timer when the unit is turned on.
How Sleep Timer actually works
The unit automatically- turns off after the specified time
length passes.
On the remote control ONLY:
/Press SLEEI;
• Each time you press the button, the time length
changes as follows:
_A A4
_LEEPI_-
,,,,, tV1,_, :,,,, :,,,,
"", i i" "" ""'
....• :..., :,... :,,,. :
2Wait for about 5 seconds after specifying the time
length.
The display dims.
'IO check the remaining time until the shut-off time,
press SLEEP once. The remaining time until the shut-off
time appears for about 5 seconds.
'Io change the shut-off time, press SLEEP repeatedly until
the time length you want appears.
'Io cancel the setting, press SLEEP repeatedly so that the
SLEEP indicator goes oft.
• Sleep Timer is also canceled when you turnoff the unit.
_If SLEEP while Recording Timer or Daily
you press
Timer is operating
The operating timer will be canceled.
To sleep with the Sleep Timer and wake up with the
Daily Timer
The unit turns off when the shut-off time comes (set by
Sleep Timer), and turns on when the timer on-time (set by
Daily Timer) comes.
1 Set the Daily Timer (see pages 47 and 48).
2 Start playing back any source you want to listen to
until you sleep.
3 Set the Sleep Timer.
Using Auto Power Off
You can use this function only-while playing a disc either
on 3-CD Changer or on CD Recorder.
Auto Power Off automatically turns off the unit if no sound
comes in for more than about 3 minutes.
If any operation is done during this 3-minute period
(approximately-), Auto Power Off is canceled temporarily
even though no sound comes in.
On the remote control ONLY:
Press A.P.off so that the A.P.off indicator lights on the
display.
• Each time you press the button, Auto Power Off turns on
and oft,
• WhenAuto Power Offis activated, the A.P.offindicator
lights on the display-.
The A.P.off indicator star-tsflashing if no sound comes in.
When the remaining time until the shut-off time becomes
10 seconds, "AUIO P.OFF"appears and flashes in the
main display.
- 49 -
Page 53

Maintenance
To get the best performance of the unit, keep your discs and mechanism clean.
GeneralNotes
In general, you will have the best performance by keeping
your discs and the mechanism clean.
• Store discs in their cases, and keep them in cabinets or
on shelves.
• Keep the disc tray-sclosed when not in use.
To play new discs
New discs may- have some rough spots around the inner and
outer edges. If such a disc is used, this unit may-reject the
disc.
To remove these rough spots, rub the edges with a pencil or
ballpoint pen, etc.
Tohandlingdiscs
When removing a disc from its case, press clown the center
holder of the case and lift the disc out, holding it by the
edges.
• Always hold the disc by the edges. Do _JJ
not touch its recording surface.
When storing a disc into its case,
gently insert the disc around the center
holder (with the printed surface facing
up).
• Make sure to store discs into the cases
after use.
• Be careful not to scratch the surface
of the disc when placing it back in
its case.
• Avoid exposure to direct sunlight,
temperature extremes, and moisture.
Tocleanthedisc
Wipe the disc with a soft cloth in a straight line from center
to edge.
DO NOT use any solvent--such as conventionalrecord cleaner, splay, thinnel; or benzine---to clean
the disc.
Moisturecondensation
Moisture may- condense on the lens inside the unit in the
following cases:
• After star-ring the heater.
• When the unit is moved from the extremely hot place to
the extremely- cold place.
Should this occur, the unit may-malfunction. In this case,
eject the disc and leave the unit turned on for a few hours
until the moisture evaporates.
• DO NOT expose discs to dh-ect sunlight or any
heat source or place them in a place subject to
high tempel_ture and humidity.
• DO NOT leave discs in a car
To clean the unit
• Stains on the unit
Should be wiped offwith a soft cloth. If the unit is
heavily stained, wipe it with a cloth soaked in water-
diluted neutral detergent and wrung well, then wipe
clean with a dry cloth.
• Since the unit may deteriorate in quality, become
damaged or get its paint peeled off, be careful about
the follo_ngs.
--DO NOT wipe it with a hard cloth.
--DO NOT wipe it strong.
--DO NOT wipe it with thinner or benzine.
--DO NOT apply- any-volatile substance such as
insecticides to it.
--DO NOT allow any-rubber or plastic to remain in
contact with it for a long time.
- 50-
Page 54

Glossary
OPC (Optimum Power Control)
OPC is a function that checks the loaded disc and automatically- adjusts the laser for optimum recording setting before
recording through the Digital Optical Input terminal.
PCA (Power Calibration Area)
A space reserved at the beginning ofa CL)-RiCL)-RW for calibrating the laser output power required to record on that
disc.
PMA (Program Memory Area)
A temporar2, memory- area on a CL)-RiCL)-RW, where the information about the recordings on the disc--track numbers,
tracks' start points and end points, etc. is stored until the disc is finalized.
When the disc is finalized, this information is written in the TOC (see below).
SamplingFrequency
When analog signals are converted into digital signals, they- are divided into many- points and digitized. 'llais dividing
method is called "sampling." The sampling frequency- indicates how many- points one second is divided intw-for
example, for CD sound, one second is divided into 44 100 points since its sampling frequency- is 44.1 kHz.
SCMS (Serial Copy Management System)
Digital audio components, such as CL) recorder, MD (Mini-L)isc) recorder and L)_iI' (Digital Audio Tape) recorder, can
exchange audio signals in the digital forms through digital input/output terminals. The digital audio components allow
digital copy of music signals with little deterioration. This has made it necessary- to have a copy restriction rule for
protecting the copyright, and "SCMS (Serial Copy Management System)" has been established as a result.
To protect the copyright, the SCMS allows only- first-generation digital copies to be made from premastered software (like
CDs or prerecorded MDs).
OK
NO
TOC(Tableof Contents)
TOC is a kind of disc information containing sub-data (track number, playing time, etc.) that enables us to search for
tracks quickly- on the disc.
To write the TOC on a CD-R or CD-RW, you need to finalize the disc.
-51 -
Page 55

Messages
Message Signification
ALL SKIP TR Skip marks are recorded to all the tracks.
ALREADY FINAL You are trying to erase a track or add a skip mark on a finalized
disc.
ALREADY UNFIN. You are trying to unfinalize an unfmalized disc.
BLANK DISC Loaded disc is blank.
CANNOT ERASE Loaded disc is damaged. Erasure on this disc is impossible.
CANNOT FIN. Loaded disc is damaged. Finalization on this disc is impossible.
CANNOT LISTEN You are trying to adjust the volume during high-speed recording.
CANNOT REC Disc is damaged. Recording on this disc is impossible.
CANNOT UNFIN. Loaded disc is damaged. Unfinalization on this disc is
impossible.
CDR DISC NG Loaded CD-R is damaged.
DAO DISC You are trying to unfinalize a CD-RW which has been recorded
using the "Disc At Once" recording system.
DISC FULL You are trying to record on a fully-recorded CD-R or CD-RW.
NOT AUDIO IN Incoming digital signal is not of an audio format.
NOT REC MUfE You are trying to use the REC MUfE button during Synchro-
nized Recording.
NO AUDIO DISC Loaded disc is not an audio disc.
NO RW DISC You are trying to perform one of the functions which is only
possible on a CD-RW.
NO RiRW DISC You are trying to perform one of the functions which is only
possible on a CD-R or CD-RW.
OPC ERROR OPC cannot be performed. No recording or erasure can be
performed on this disc.
OPC FULL PCA is full. No recording or erasure can be performed on this
disc.
PMA FULL PMA is full. No recording or erasure can be performed on this
disc.
SCMS PROTECT Digital recording is prohibited in accordance with SCMS
regulations.
SHORT REMAIN The remaining time on a disc is shorter than the playing time of
the track you are trying to record.
SKIP FULL 21 skip marks are already- recorded.
TNO FULL 99 tracks have been recorded. No further recording is possible.
UNLOCK The external digital component is not connected properly- or is
turned off, or its signals are incompatible.
UPD_ifE OPC OPC is being performed before recording, ira disc is just
inserted in CD Recorder.
Solution
Replace the disc.
Replace the disc.
Replace the disc.
During high-speed recording, no
sound can be heard; therefore
you cannot adjust the volume.
Replace the disc.
Replace the disc.
Replace the disc.
Replace the disc.
Replace the disc.
Check the source played on the
external component connected to
the LINE DIGI]AL IN terminal.
You can only use the REC
MUfE button during Standard
Recording.
Replace the disc.
Load a CD-RW.
Load a CD-R or CD-RW.
Replace the disc.
Replace the disc.
Replace the disc.
See "SCMS" on page 51.
Check the connection, or
playback source.
This is normal. After OPC is
correctly- done, recording starts.
- 52 -
Page 56

Troubleshooting
If you are having a problem with your unit, check this list for a possible solution before calling for service.
If you cannot solve the problem from the hints given here, or the unit has been physically damaged, call a qualified person,
such as your dealer, for service.
Symptom
No sound is heard.
Unable to record on a CD-R or CD-
RW.
Poor radio reception.
Unable to operate the remote control.
Loaded discs cannot be ejected.
The disc does not play.
The disc play-skips.
Operations are disabled.
PossibleCause Action
• Connections are incorrect, or loose. • Check all connections and make
corrections. (See pages 8 - 11.)
• CD-ROM is loaded. • Replace the disc.
• CD-R or CD-RW has been loaded • Insert the disc correctly.
upside down. ("NO DISC" appears
on the display.)
Finalized CD-R or CD-RW has •
been loaded.
Disc is dirty- or scratched.
CD-R: Replace the disc.
CD-RW: Unfinalize the CD-RW
(see page 43).
Clean or replace the disc
(see page 50).
Reconnect the antenna securely.
• The antenna is not connected
correctly.
• The AM loop antenna is too close • Change the position and direction of
to the unit. the AM loop antenna.
• The FM antenna is not properly- • Extend FM antenna to the best
extended and positioned, reception position.
• The path between the remote • Remove the obstruction.
control and the remote sensor on
the unit is blocked.
• The batteries have lost their charge. • Replace the batteries. (See page 12.)
• The main AC power cord is not • Plug in the AC power plug.
plugged in.
• Disc Lock is in use. • TurnoffDisc Lock. (See page 25.)
The disc is upside down. Put the disc in with the label side up.
The disc is dirty-or scratched. Clean or replace the disc. (See page 50.)
The built-in microprocessor has Unplug the unit then plug it back in.
malfunctioned due to external electrical
interference.
IMPORTANT
• If you are going to record something important, always test-record first to check that the recording turns out properly before
proceeding with the actual recording.
° The manufacturer assumes no liability whatsoever for any damage resulting from missed opportunity or accidental erasure
that occurs while conducting recording or playback operations due to malfunctioning of or trouble in the unit, or for any
incidental damage.
- 53 -
Page 57

Specifications
Amplifier--CA-NXCDR7
Output Power:
28 W per channel, rain. RMS, driven into 6 _,
40 Hz to 20 kHz, _Jth no more than 10% total
harmonic distortion
Audio input sensitivity/Impedance (at 1 kHz)
Analog input:
LINE IN: 125 mVi47 k_) (at "LEVEL 2")
500 mVi47 k_) (at "LEVEL 1")
1.3 V/47 k_) (at "LEVEL 3")
Digital input:
LINE DIGI'IAL IN: OPTICAL
Signal wave length: 660 nm
Input level: -23 dBm to -15 dBm
(With the built-in sampling rate
converter, corresponding to 32 kHzi
44.1 kHzi48 kHz)
Audio output level/Impedance (at 1kHz)
Analog output:
LINE OUT: 160mV/2.2 k_)
Digital output:
3CD DIGI]AL OUT: OPTICAL
Signal wave length: 660 nm
Output level: -23 dBm to -15 dBm
Speakers/Impedance: 6 _)- 16 _)
Tuner
FM tuning range: 87.50 MHz -- 108.00 MHz
AM tuning range: 530 kHz -- 1 710kHz
CDplayer
CD Capacity-: 3 CDs
Dynamic range: 88 dB
Signal-to-noise ratio: 95 dB
Wow and flutter: Immeasurable
CDRecorder
System:
Sampling frequency-:
Dyaaamic range:
Signal-to-noise ratio:
Frequency response:
Wow and flutter:
Compact disc digital audio
recording system
44.1 kHz
91 dB
94 dB
20 Hz to 20 kHz
Immeasurable
General
Power requirement: AC 120 Vr_, 60 Hz
Power consumption: 70 W (at operation)
1 W (on standby: with Display Off)
3.3 W (on standby: with Display On)
Dimensions (approx.): 185 mmx 210 mmx 349 mm
(75/1_in. x 85h_in. x 133/4in.)
(W/HiD)
Mass (approx.): 7.4 kg (16.4 lbs)
Speaker--SP-NXCDR7
Speakers: 2-way Bass-Reflex Type
Woofer 10 cm (3W_6 in.)
Cone x 1
Tweeter 2 cm (13/16 in.)
Dome × 1
Power Handling Capacity-:
25 W
Impedance: 6 _
Frequencb, Range: 55 Hz to 20 000Hz
Dimensions (W x H x D):
130x210x231 mm
(5V8 in. x 85h6 in. x 9_18in.)
Sound Pressure Level: 84 dBiW.m
Mass: 2.0 kg (4.5 lbs) each
Suppliedaccessories
See page 8.
Design and specifications are subject to change without
notice.
- 54 -
Page 58

iiiiiiiiiiiiiiiiiiiiiiii
VICTOR COMPANY OF JAPAN, LIMITED
O0901MWMMDWJEM
 Loading...