

Page 1
COMPACT COMPONENT SYSTEM
POWERED SUBWOOFER
SP-DWF10
INSTRUCTIONS
For Customer Use:
Enter below the Model No. and Serial
No. which are located either on the rear,
bottom or side of the cabinet. Retain this
information for future reference.
Model No.
Serial No.
LVT1145-010A
[J]
Page 2
Thank you for purchasing a JVC speaker.
Before you begin using it, please read the instructions carefully to be sure
you get the best possible performance. If you have any questions, consult
your JVC dealer.
Warnings, Cautions and Others
CAUTION
RISK OF ELECTRIC SHOCK
DO NOT OPEN
CAUTION: TO REDUCE THE RISK OF ELECTRIC SHOCK.
DO NOT REMOVE COVER (OR BACK)
NO USER SERVICEABLE PARTS INSIDE.
REFER SERVICING TO QUALIFIED SERVICE PERSONNEL.
The lightning flash with arrowhead symbol,
within an equilateral triangle is intended to
alert the user to the presence of uninsulated
"dangerous voltage" within the product's
enclosure that may be of sufficient
magnitude to constitute a risk of electric
shock to persons.
The exclamation point within an equilateral
triangle is intended to alert the user to the
presence of important operating and
maintenance (servicing) instructions in the
literature accompanying the appliance.
Precautions for installation
• To prevent deformation or discoloration of the cabinet, do not
install the unit where it is exposed to direct sunlight or high
humidity, and avoid installation near air conditioning outlets.
• Speaker vibrations may cause howling. Place the unit as far
away from the player as possible.
• Take the occurrence of earthquakes or other physical shocks
into consideration when selecting the installation place, and
secure the unit thoroughly.
• Tuner reception may become noisy or hissing if this unit is
installed nearby the tuner. In this case, leave a more distance
between the tuner and this unit or use an outdoor antenna for
better tuner reception without interference from this unit.
• This unit is magnetically shielded to avoid color distortions on
TVs. However, if not installed properly, it may cause color
distortions. So, pay attention to the following when installing the
unit.
– When placing this unit near a TV set, turn off the TV’s main
power switch or unplug it before installing this unit.
Then wait at least 30 minutes before turning on the TV’s main
power switch again.
Some TVs may still be affected even though you have followed
the above. If this happens, move this unit away from the TV.
• When the TV screen shakes, move this unit away from the TV
to find a position where the screen doesn't shake and then set
the unit there.
WARNING: TO REDUCE THE RISK OF FIRE
OR ELECTRIC SHOCK, DO NOT EXPOSE
THIS APPLIANCE TO RAIN OR MOISTURE.
To reduce the risk of electrical shocks, fire, etc.:
1. Do not remove screws, covers or cabinet.
2. Do not expose this appliance to rain or moisture.
Caution—POWER switch
This apparatus is provided with the POWER switch to minimize
power consumption for safe use. Therefore,
1. Before doing initial settings, complete all the connections
required, connect the mains plug into the wall outlet, then set
the POWER switch to ON [ ❙ ].
2. When not in use, set the POWER switch to OFF [ ‡ ].
This disconnects the mains line.
Cautions
• Do not block the ventilation openings or holes.
(If the ventilation openings or holes are blocked by a
newspaper or cloth, etc., the heat may not be able to get out.)
• Do not place any naked flame sources, such as lighted candles,
on the apparatus.
• When discarding batteries, environmental problems must be
considered and local rules or laws governing the disposal of
these batteries must be followed strictly.
• Do not expose this apparatus to rain, moisture, dripping or
splashing and that no objects filled with liquids, such as vases,
shall be placed on the apparatus.
Precautions for Daily Use
• To maintain the appearance of the unit
Wipe with a dry, soft cloth if the cabinet or control panel should
become dirty.
If very dirty, apply a small amount of water or neutral detergent
to the cloth and wipe clean. Then wipe with a dry cloth.
• To improve the sound field
If the speakers are facing a solid wall or glass door, etc., it is
recommended to furnish the wall with materials that absorb
sounds, for example by hanging up thick curtains, to prevent
reflections and standing waves.
Checking the Supplied Accessories
Check to be sure you have the following supplied accessories.
The number in parenthesis indicates the quantity of the piece
supplied.
• Monaural audio cord (1)
If the item mentioned above is missing, contact your dealer
immediately.
Contents
Warnings, Cautions and Others ............................................. 2
Connections ............................................................................ 3
Operations ............................................................................... 3
Additional Information ............................................................ 4
– 2 –
Page 3
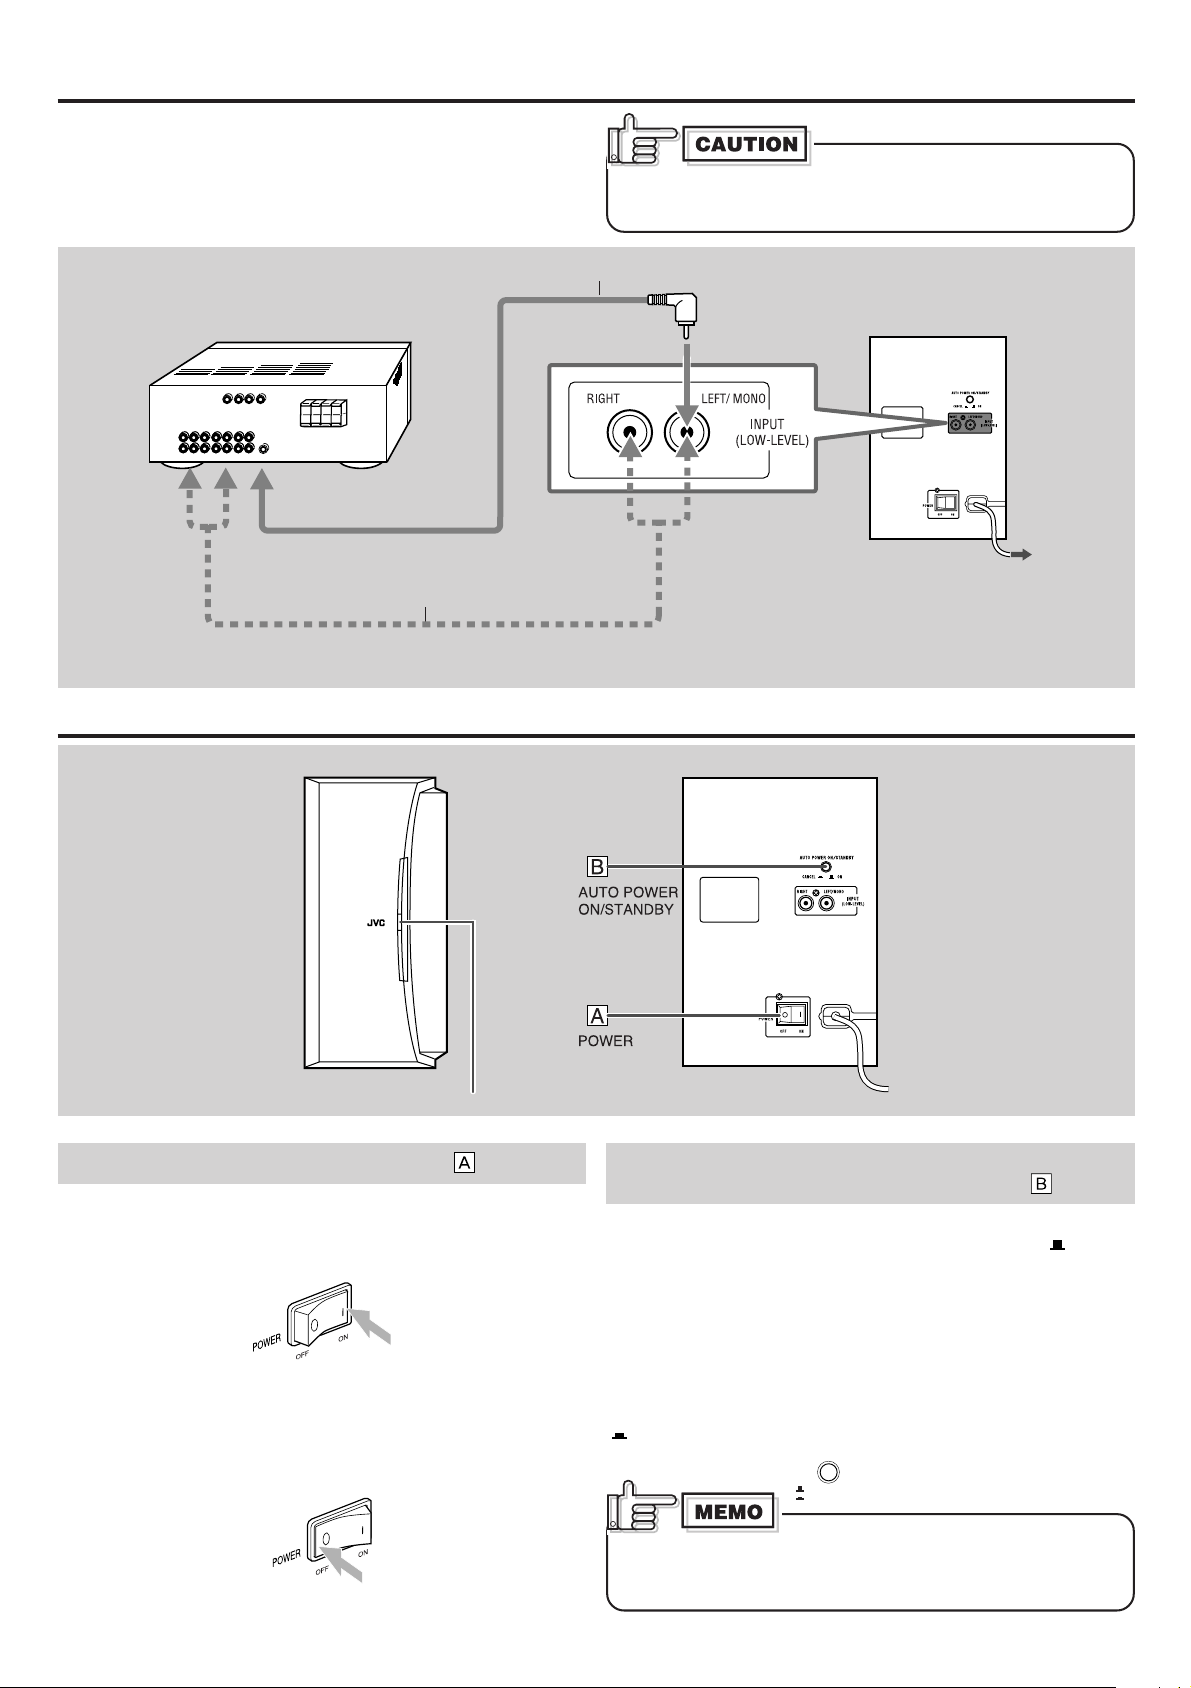
Connections
Before connecting this unit to the amplifier (or receiver), observe
the following carefully.
• Turn off the amplifier.
• Make all connections before plugging in this unit.
Monaural audio cord (Supplied)
Amplifier or Receiver
• DO NOT connect this unit to the REC OUT jacks of your
amplifier. It may damage your subwoofer.
To LINE OUT
Operations
To SUBWOOFER OUT
or MONO
To an AC outlet
Stereo audio cord (not Supplied)
In the case that the receiver dose not have the SUBWOOFER OUT or MONO terminal.
Front Rear
Turning On the Power—POWER
To turn on the power.
Press the POWER switch to the [ ❙ ] ON position.
• The power lamp lights in green.
To cut of the power.
Press the POWER switch to the [ ‡ ] OFF position.
• The power lamp goes out.
• This will disconnect the mains lead.
Power lamp
Operating the Unit Automatically According to the Incoming
Signals—AUTO POWER ON/STANDBY
To activate AUTO POWER ON/STANDBY.
Press the AUTO POWER ON/STANDBY switch to the [ ] ON
position.
• If no sound comes in for 5-10 minutes, the unit enters
standby mode. The power lamp lights in red.
• If the unit detects incoming signals, the unit starts
operating. The power lamp lights in green.
To cancel AUTO POWER ON/STANDBY.
Press out the AUTO POWER ON/STANDBY switch to set it to the
] CANCEL position.
[
When the volume level of the amplifier is so low or the
incoming signals are so weak that this unit cannot detect
sounds, Auto Power On/Standby may not work correctly.
– 3 –
AUTO POWER ON / STANDBY
ON
CANCEL
Page 4
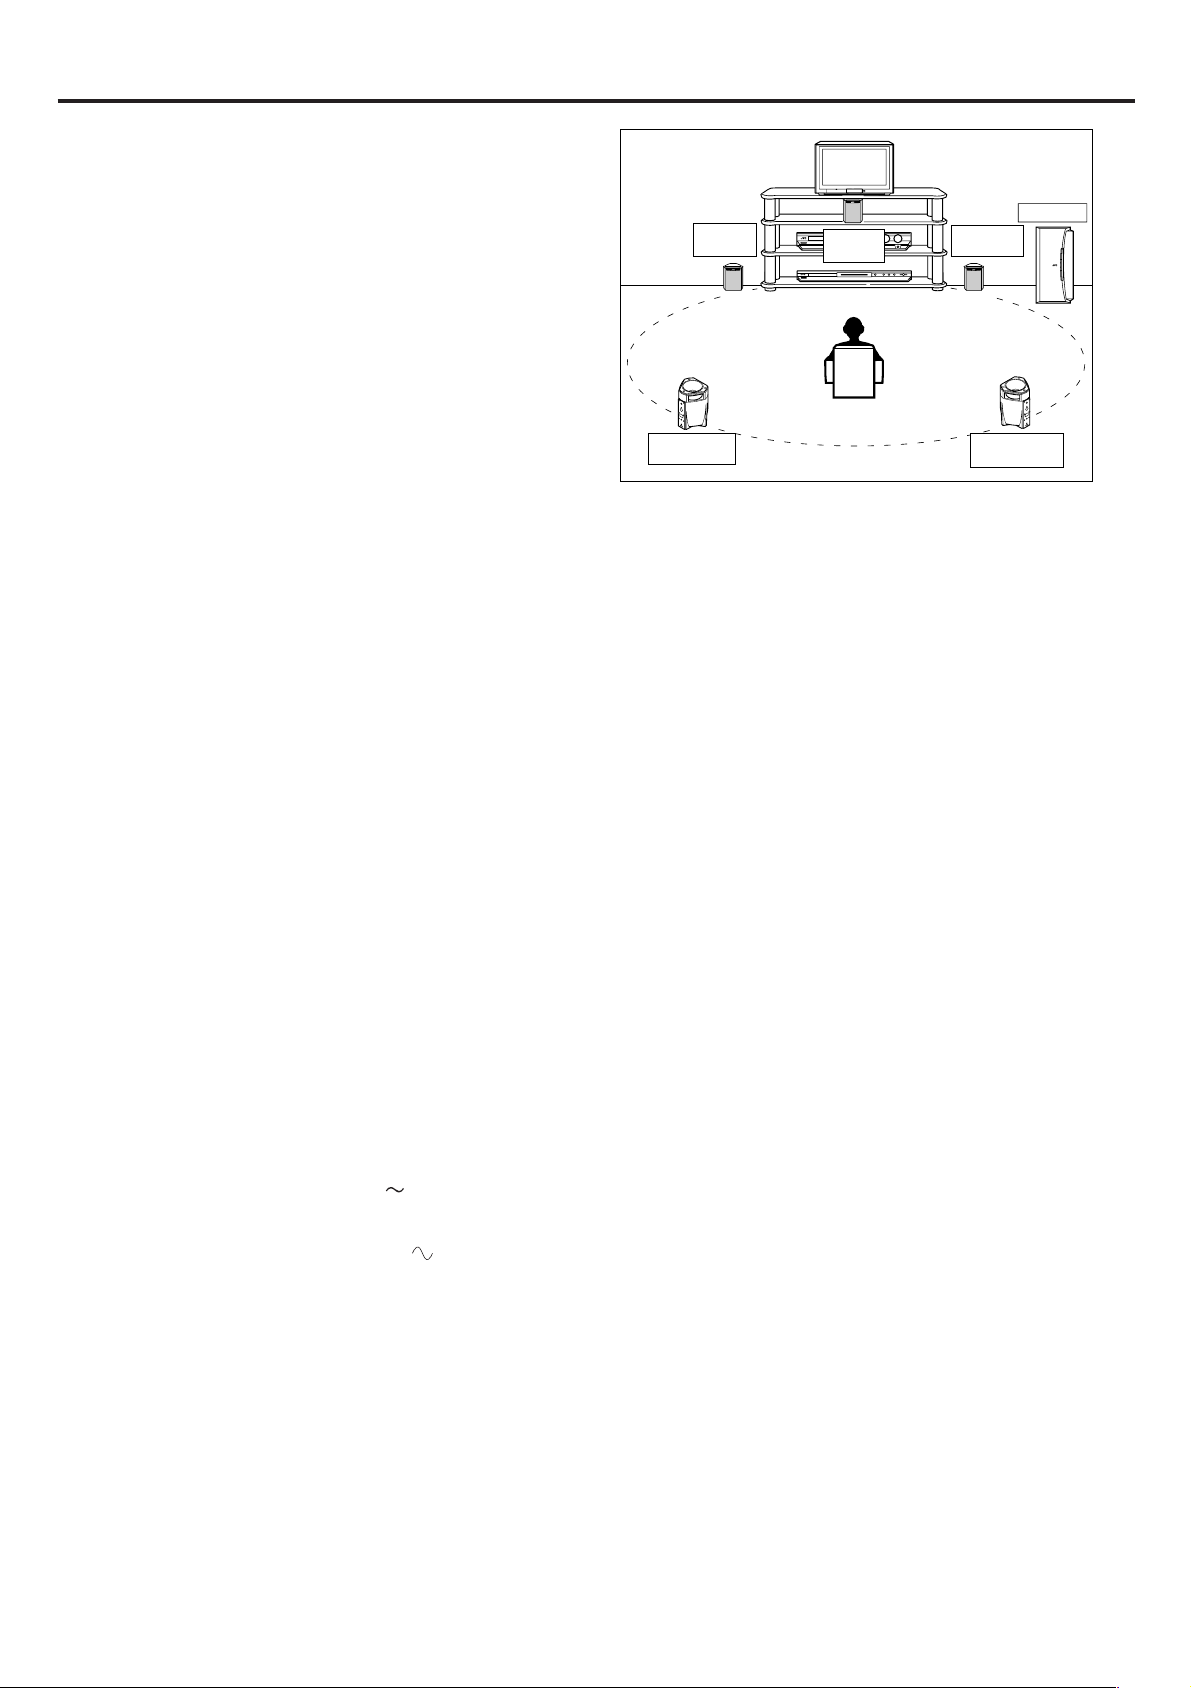
Additional Information
Subwoofer
Left front
speaker
Right front
speaker
Center
speaker
Listening position
Left surround
speaker
Right surround
speaker
Speaker layout
To obtain the best possible sound from your unit:
—Place a subwoofer wherever you like since bass sound is non-
directional. Normally place it in front of you.
—Place all the main speakers at the same distance from the
listening position.
—Be sure to place the powered subwoofer to the TV's right.
If you place the powered subwoofer to the TV's left, keep
sufficient distance between them to prevent the TV screen from
appearing mottled.
Troubleshooting
Use this chart to help you solve daily operational problems. If there is any problem you cannot solve, contact your dealer.
Power does not come on.
• Is the unit pugged in?
– Plug the AC power cord firmly into the AC outlet.
Auto Power On/Standby does not function correctly.
• Signals are too weak or volume level is too low.
– This is not a malfunction. If this happens, cancel Auto Power On/Standby.
No sound is heard.
• Connections are incorrect, or loose.
– Check the connections. If incorrect, redo the corrections. (See page 3.)
• Audio signals through the amplifier are extremely weak.
– Increase the volume level on the amplifier.
Sounds fluctuate (suddenly become loud or soft).
• The built-in protective circuit is working.
– Lower the volume level, then turn off and on the unit.
Suddenly no sound comes out. – the power lamp still lights in green.
• The volume of the playback source is too high.
– Turn down the volume of the playback source, turn off and on the source, then adjust the volume properly on the source.
Specifications
Type : Powered Subwoofer
Bass-reflex type
(magnetically shielded type)
Speaker : 16.0 cm cone × 1 (6-5/16")
Frequency Range : 32 Hz
Impedance : 4 Ω
Input terminals : INPUT (LOW-LEVEL)
Power requirements : AC 120 V
Output power of built-in amp : 100 W (45 Hz, 4 Ω, 10 % THD)
Power Handling Capacity : 25 W
Dimensions
(W × H × D) : 185 mm × 374 mm × 345 mm
(7-5/16" × 14-3/4" × 13-5/8")
Mass : 8.86 kg
(19.6 lbs)
Accessories : Monaural audio cord (× 1)
200 Hz
, 60 Hz
– 4 –
Page 5
LIMITED WARRANTY
JVC COMPANY OF AMERICA warrants this product and all parts thereof, except as set forth below ONLY TO THE
ORIGINAL PURCHASER AT RETAIL to be FREE FROM DEFECTIVE MATERIALS AND WORKMANSHIP from the date
of original retail purchase for the period as shown below. ("The Warranty Period")
PARTS LABOR
AUDIO-1
1 YR 1 YR
THIS LIMITED WARRANTY IS VALID ONLY IN THE FIFTY (50) UNITED STATES, THE DISTRICT OF COLUMBIA AND
IN COMMONWEALTH OF PUERTO RICO.
WHAT WE WILL DO:
If this product is found to be defective, JVC will repair or replace defective parts at no charge to the original owner.
Such repair and replacement services shall be rendered by JVC during normal business hours at JVC authorized service
centers. Parts used for replacement are warranted only for the remainder of the Warranty Period. All products and parts
thereof may be brought to a JVC authorized service center on a carry-in basis except for Television sets having a screen
size 25 inches and above which are covered on an in-home basis.
WHAT YOU MUST DO FOR WARRANTY SERVICE:
Return your product to a JVC authorized service center with a copy of your bill of sale. For your nearest JVC authorized
service center, please call toll free: (800) 537-5722.
If service is not available locally, box the product carefully, preferably in the original carton, and ship, insured, with
a copy of your bill of sale plus a letter of explanation of the problem to the nearest JVC Factory Service Center, the
name and location of which will be given to you by the toll-free number.
If you have any questions concerning your JVC Product, please contact our Customer Relations Department.
WHAT IS NOT COVERED:
This limited warranty provided by JVC does not cover:
1. Products which have been subject to abuse, accident, alteration, modification, tampering, negligence, misuse, faulty
installation, lack of reasonable care, or if repaired or serviced by anyone other than a service facility authorized by
JVC to render such service, or if affixed to any attachment not provided with the products, or if the model number
or serial number has been altered, tampered with, defaced or removed;
2. Initial installation and installation and removal for repair;
3. Operational adjustments covered in the Owner's Manual, normal maintenance, video and audio head cleaning;
4. Damage that occurs in shipment, due to act of God, and cosmetic damage;
5. Signal reception problems and failures due to line power surge;
6. Video Pick-up Tubes/CCD Image Sensor, Cartridge, Stylus (Needle) are covered for 90 days from the date of purchase;
7. Accessories
8. Batteries (except that Rechargeable Batteries are covered for 90 days from the date of purchase);
There are no express warranties except as listed above.
THE DURATION OF ANY IMPLIED WARRANTIES, INCLUDING THE IMPLIED WARRANTY OF MERCHANTABILITY, IS
LIMITED TO THE DURATION OF THE EXPRESS WARRANTY HEREIN.
JVC SHALL NOT BE LIABLE FOR THE LOSS OF USE OF THE PRODUCT, INCONVENIENCE, LOSS OR ANY OTHER
DAMAGES, WHETHER DIRECT, INCIDENTAL OR CONSEQUENTIAL (INCLUDING, WITHOUT LIMITATION, DAMAGE
TO TAPES, RECORDS OR DISCS) RESULTING FROM THE USE OF THIS PRODUCT, OR ARISING OUT OF ANY BREACH
OF THIS WARRANTY. ALL EXPRESS AND IMPLIED WARRANTIES, INCLUDING THE WARRANTIES OF MERCHANTABILITY AND FITNESS FOR PARTICULAR PURPOSE, ARE LIMITED TO THE WARRANTY PERIOD SET FORTH ABOVE.
Some states do not allow the exclusion of incidental or consequential damages or limitations on how long an
implied warranty lasts, so these limitations or exclusions may not apply to you. This warranty gives you specific
legal rights and you may also have other rights which vary from state to state.
JVC COMPANY OF AMERICA
DIVISION OF JVC AMERICAS CORP.
REFURBISHED PRODUCTS CARRY A SEPARATE WARRANTY, THIS WARRANTY DOES NOT APPLY. FOR DETAILS OF
REFURBISHED PRODUCT WARRANTY, PLEASE REFER TO THE REFURBISHED PRODUCT WARRANTY INFORMATION
PACKAGED WITH EACH REFURBISHED PRODUCT.
For customer use:
Enter below the Model No. which is located either on the rear, bottom or side of the cabinet. Retain this information
for future reference.
Model No. : Serial No. :
Purchase data : Name of dealer :
1700 Valley Road
Wayne, NJ 07470
– 5 –
Page 6

Authorized Service Centers
®
QUALITY SERVICE
HOW TO LOCATE YOUR JVC SERVICE CENTER
TOLL FREE: 1 (800) 537-5722
http://www.jvc.com
Dear Customer,
In order to receive the most satisfaction from your purchase,please read the instruction booklet before
operating the unit.In the event that repairs are necessary, please call 1 (800)537-5722 for your nearest
authorized servicer or visit our website at www.JVC.com
Remember to retain your Bill of Sale for Warranty Service.
Do not service the television yourself
Caution
To prevent electrical shock,do not open the cabinet.There are no user serviceable
parts inside.Please refer to qualified service personnel for repairs.
Accessories
To purchase accessories for your JVC product,please call toll free:1 (800)882-2345 or
on the web at www.JVC.com
BT-51001-5
(0301)
EN
©2004 VICTOR COMPANY OF JAPAN, LIMITED
0104NSMCREJSC
Page 7

COMPACT COMPONENT SYSTEM
POWERED SUBWOOFER
SP-DWF10
SP-PWE5
INSTRUCTIONS
LVT1145-007A
[A]
Page 8

Thank you for purchasing a JVC speaker.
Before you begin using it, please read the instructions carefully to be sure you get the best possible performance. If you have any
questions, consult your JVC dealer.
Precautions for installation
Warnings, Cautions and Others
To reduce the risk of electrical shocks, fire, etc.:
1. Do not remove screws, covers or cabinet.
2. Do not expose this appliance to rain or moisture.
Caution—POWER switch
This apparatus is provided with the POWER switch to minimize
power consumption for safe use. Therefore,
1. Before doing initial settings, complete all the connections
required, connect the mains plug into the wall outlet, then set
the POWER switch to ON [ ❙ or
2. When not in use, set the POWER switch to OFF [ ‡ or ].
This disconnects the mains line.
Cautions
• Do not block the ventilation openings or holes.
(If the ventilation openings or holes are blocked by a
newspaper or cloth, etc., the heat may not be able to get out.)
• Do not place any naked flame sources, such as lighted candles,
on the apparatus.
• When discarding batteries, environmental problems must be
considered and local rules or laws governing the disposal of
these batteries must be followed strictly.
• Do not expose this apparatus to rain, moisture, dripping or
splashing and that no objects filled with liquids, such as vases,
shall be placed on the apparatus.
].
• To prevent deformation or discoloration of the cabinet, do not
install the unit where it is exposed to direct sunlight or high
humidity, and avoid installation near air conditioning outlets.
• Speaker vibrations may cause howling. Place the unit as far
away from the player as possible.
• Take the occurrence of earthquakes or other physical shocks
into consideration when selecting the installation place, and
secure the unit thoroughly.
• Tuner reception may become noisy or hissing if this unit is
installed nearby the tuner. In this case, leave a more distance
between the tuner and this unit or use an outdoor antenna for
better tuner reception without interference from this unit.
• This unit is magnetically shielded to avoid color distortions on
TVs. However, if not installed properly, it may cause color
distortions. So, pay attention to the following when installing the
unit.
– When placing this unit near a TV set, turn off the TV’s main
power switch or unplug it before installing this unit.
Then wait at least 30 minutes before turning on the TV’s main
power switch again.
Some TVs may still be affected even though you have followed
the above. If this happens, move this unit away from the TV.
• Do not connect the AC power cord until all other connections
have been made.
< Only for SP-DWF10 >
• When the TV screen shakes, move this unit away from the TV
to find a position where the screen doesn't shake and then set
the unit there.
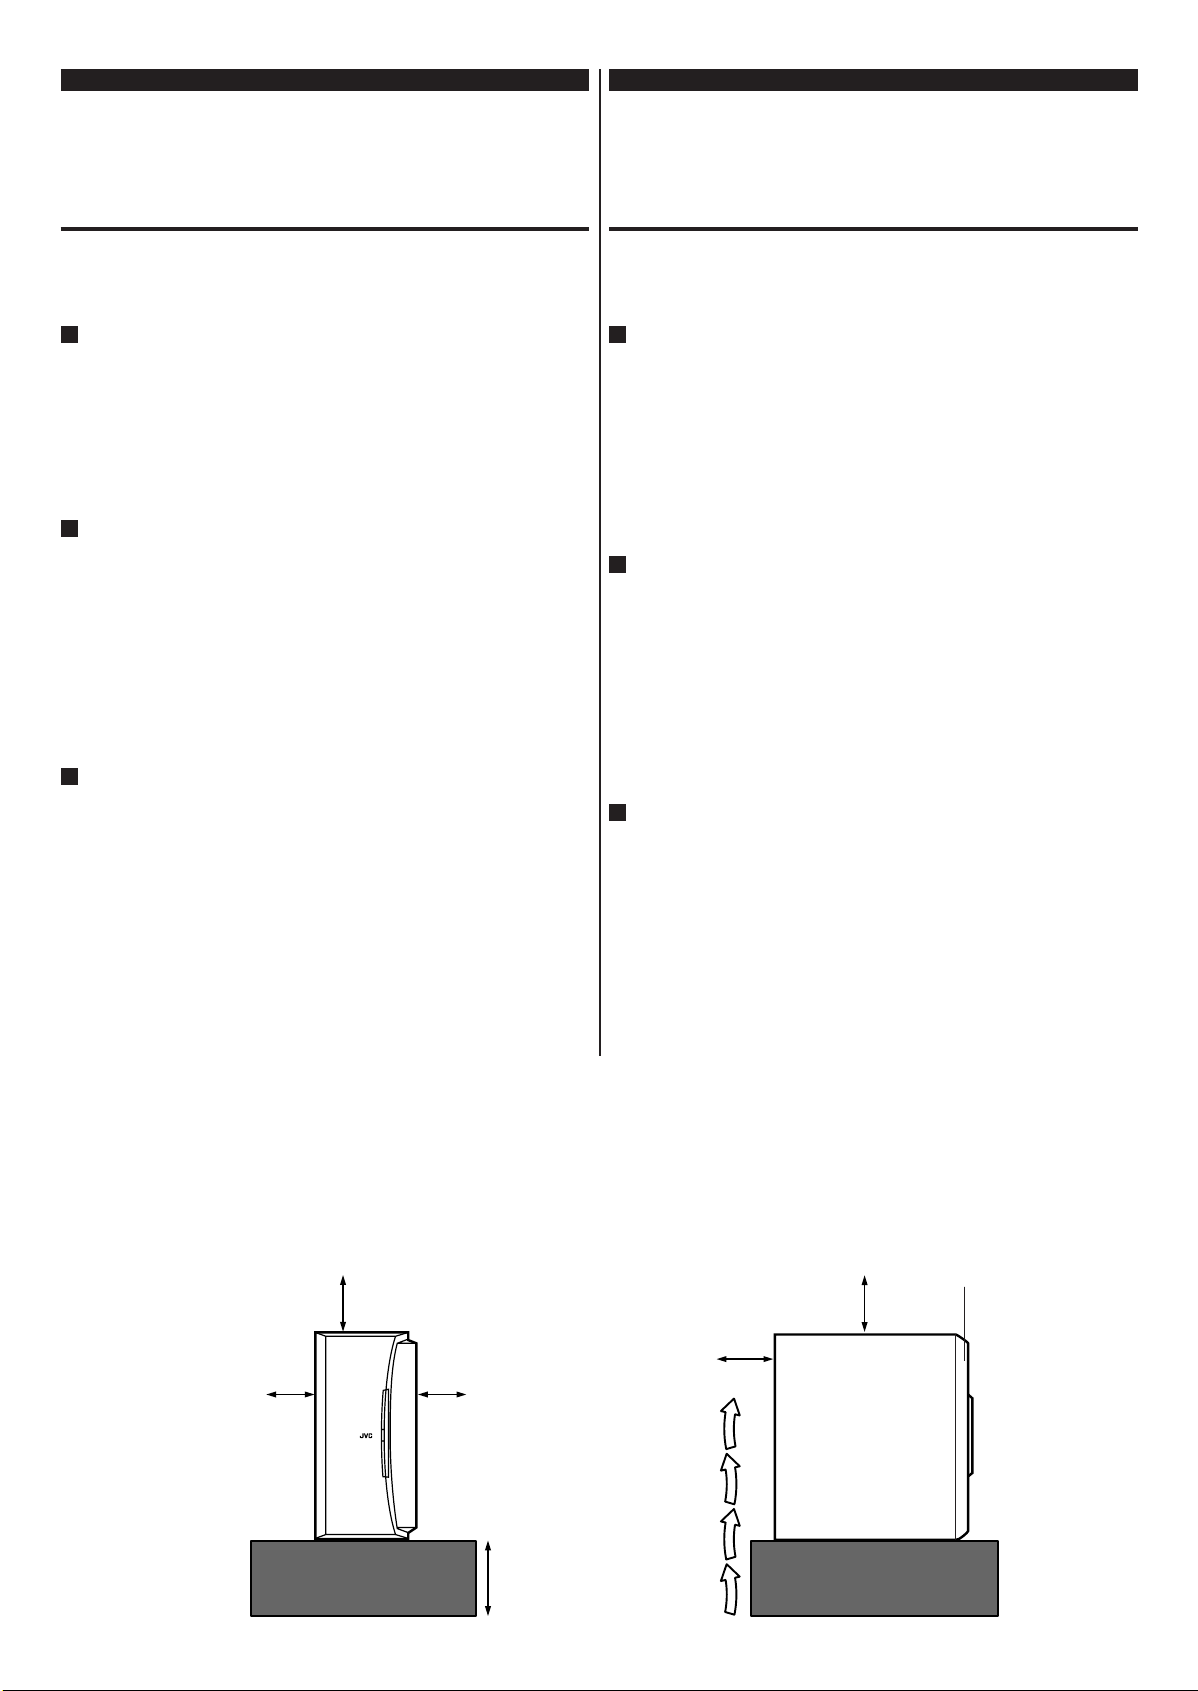
Caution—Proper Ventilation
To avoid risk of electric shock and fire, and to prevent damage,
locate the apparatus as follows:
1 Front:
No obstructions and open spacing.
2 Sides/ Top/ Back:
No obstructions should be placed in the areas shown by the
dimensions below.
3 Bottom:
Place on the level surface. Maintain an adequate air path for
ventilation by placing on a stand with a height of 10 cm or
more.
Front view Side view
20 cm
15 cm15 cm
20 cm
Front
20 cm
Precautions for Daily Use
• To maintain the appearance of the unit
Wipe with a dry, soft cloth if the cabinet or control panel should
become dirty.
If very dirty, apply a small amount of water or neutral detergent
to the cloth and wipe clean. Then wipe with a dry cloth.
• To improve the sound field
If the speakers are facing a solid wall or glass
door, etc., it is recommended to furnish the wall
with materials that absorb sounds, for example by
hanging up thick curtains, to prevent reflections
and standing waves.
Checking the Supplied Accessories
Check to be sure you have the following supplied accessories.
The number in parenthesis indicates the quantity of the piece
supplied.
• Monaural audio cord (1)
If the item mentioned above is missing, contact your dealer
immediately.
10 cm
Contents
Warnings, Cautions and Others .................................. 2
Connections .................................................................. 3
Operations ..................................................................... 3
Additional Information .................................................. 4
– 2 –
Page 9

Connections
Before connecting this unit to the amplifier (or receiver), observe
the following carefully.
• Turn off the amplifier.
• Make all connections before plugging in this unit.
Monaural audio cord (Supplied)
Amplifier or Receiver
• DO NOT connect this unit to the REC OUT jacks of your
amplifier. It may damage your subwoofer.
To LINE OUT
Operations
SP-PWE5 (Front) SP-DWF10 (Front)
To SUBWOOFER OUT
or MONO
To an AC outlet
SP-PWE5
Stereo audio cord (not Supplied)
In the case that the receiver dose not have the SUBWOOFER OUT or MONO terminal.
SP-PWE5 (Rear) SP-DWF10 (Rear)
Rear view
SP-DWF10
To an AC outlet
Power lamp
Turning On the Power—POWER
To turn on the power.
Press the POWER switch to the [ ❙ or ] ON position.
• The power lamp lights in green.
SP-PWE5 SP-DWF10
POWER
ON OFF
To cut of the power.
Press the POWER switch to the [ ‡ or ] OFF position.
• The power lamp goes out.
• This will disconnect the mains lead.
SP-PWE5 SP-DWF10
POWER
ON OFF
Power lamp
Operating the Unit Automatically According to the Incoming
Signals—AUTO POWER ON/STANDBY
To activate AUTO POWER ON/STANDBY.
Press the AUTO POWER ON/STANDBY switch to the [
position.
• If no sound comes in for 5-10 minutes, the unit enters
standby mode. The power lamp lights in red.
• If the unit detects incoming signals, the unit starts
operating. The power lamp lights in green.
To cancel AUTO POWER ON/STANDBY.
Press out the AUTO POWER ON/STANDBY switch to set it to the
] CANCEL position.
[
When the volume level of the amplifier is so low or the
incoming signals are so weak that this unit cannot detect
sounds, Auto Power On/Standby may not work correctly.
– 3 –
AUTO POWER ON / STANDBY
ON
CANCEL
] ON
Page 10

Additional Information
Subwoofer
Left front
speaker
Right front
speaker
Center
speaker
Listening position
Left surround
speaker
Right surround
speaker
Speaker layout
To obtain the best possible sound from your unit:
—Place a subwoofer wherever you like since bass sound is non-
directional. Normally place it in front of you.
—Place all the main speakers at the same distance from the
listening position.
< Only for SP-DWF10 >
—Be sure to place the powered subwoofer to the TV's right. If you
place the powered subwoofer to the TV's left, keep sufficient
distance between them to prevent the TV from appearing
mottled.
Troubleshooting
Use this chart to help you solve daily operational problems. If there is any problem you cannot solve, contact your dealer.
Power does not come on.
• Is the unit pugged in?
– Plug the AC power cord firmly into the AC outlet.
Auto Power On/Standby does not function correctly.
• Signals are too weak or volume level is too low.
– This is not a malfunction. If this happens, cancel Auto Power On/Standby.
No sound is heard.
• Connections are incorrect, or loose.
– Check the connections. If incorrect, redo the corrections. (See pages 3.)
• Audio signals through the amplifier are extremely weak.
– Increase the volume level on the amplifier.
Sounds fluctuate (suddenly become loud or soft).
• The built-in protective circuit is working.
– Lower the volume level, then turn off and on the unit.
Suddenly no sound comes out. – the power lamp still lights in green.
• The volume of the playback source is too high.
– Turn down the volume of the playback source, turn off and on the source, then adjust the volume properly on the source.
Specifications
SP-PWE5
Type : Powered Subwoofer
Bass-reflex type
(magnetically shielded type)
Speaker : 16.0 cm cone × 1
Frequency Range : 25 Hz
200 Hz
Impedance : 4 Ω
Input terminals : INPUT (LOW-LEVEL)
Power requirements : AC 240 V
, 50 Hz
Output power of built-in amp : 60 W (70 Hz, 4 Ω, 10 % THD)
Power Handling Capacity : 30 W
Dimensions
(W × H × D) : 214 mm × 299 mm × 340 mm
Mass : 8.1 kg
Accessories : Monaural audio cord (× 1)
SP-DWF10
Type : Powered Subwoofer
Bass-reflex type
(magnetically shielded type)
Speaker : 16.0 cm cone × 1
Frequency Range : 32 Hz
200 Hz
Impedance : 4 Ω
Input terminals : INPUT (LOW-LEVEL)
Power requirements : AC 240 V
, 50 Hz
Output power of built-in amp : 100 W (50 Hz, 4 Ω, 10 % THD)
Power Handling Capacity : 27 W
Dimensions
(W × H × D) : 185 mm × 374 mm × 345 mm
Mass : 8.86 kg
Accessories : Monaural audio cord (× 1)
EN
©2004 VICTOR COMPANY OF JAPAN LIMITED
0304NSMCREJSC
Page 11

POWERED SUBWOOFER
SUBWOOFER MOTRIZ
SUBWOOFER AUTO-ALIMENTADO
COMPACT COMPONENT SYSTEM
SP-DWF10
INSTRUCTIONS
MANUAL DE INSTRUCCIONES
MANUAL DE INSTRUÇÕES
LVT1145-004A
[US/UJ]
Page 12
Thank you for purchasing a JVC speaker.
Before you begin using it, please read the instructions carefully to
be sure you get the best possible performance. If you have any
questions, consult your JVC dealer.
ESPAÑOLENGLISH
Gracias por la compra de un altavoz JVC.
Para obtener el mejor rendimiento posible, por favor lea atentamente
las instrucciones antes de intentar el uso. Si tienenaluna pregunta,
acuda a su agente de JVC.
Warnings, Cautions and Others
To reduce the risk of electrical shocks, fire, etc.:
1.Do not remove screws, covers or cabinet.
2.Do not expose this appliance to rain or moisture.
Caution—POWER switch
This apparatus is provided with the POWER switch to minimize power
consumption for safe use. Therefore,
1.Before doing initial settings, complete all the connections required,
connect the mains plug into the wall outlet, then set the POWER
switch to ON [ ❙ ].
2.When not in use, set the POWER switch to OFF [ ‡ ].
This disconnects the mains line.
Cautions
• Do not block the ventilation openings or holes.
(If the ventilation openings or holes are blocked by a newspaper
or cloth, etc., the heat may not be able to get out.)
• Do not place any naked flame sources, such as lighted candles,
on the apparatus.
• When discarding batteries, environmental problems must be
considered and local rules or laws governing the disposal of these
batteries must be followed strictly.
• Do not expose this apparatus to rain, moisture, dripping or
splashing and that no objects filled with liquids, such as vases,
shall be placed on the apparatus.
Caution—Proper Ventilation
To avoid risk of electric shock and fire, and to prevent damage, locate
the apparatus as follows:
1 Front:
No obstructions and open spacing.
2 Sides/ Top/ Back:
No obstructions should be placed in the areas shown by the
dimensions below.
3 Bottom:
Place on the level surface. Maintain an adequate air path for
ventilation by placing on a stand with a height of 10 cm or more.
Advertencias, precauciones y notas
Para reducir el riesgo de incendios, descargas eléctricas, etc.:
1.No retire los tornillos, las cubiertas o la caja.
2.No exponga este aparato a la lluvia o la humedad.
Precaución—Interruptor POWER
Este aparato está provisto del interruptor POWER para reducir al
mínimo el consumo de electricidad y asegurar un uso seguro. Por
consiguinte,
1.Antes de realizar los ajustes iniciales, complete todas las
conexiones según se requiera, conecte el enchufe en el
tomacorriente mural, y luego ajuste el interruptor POWER a ON
[ ❙ ].
2.Cuando no esté en uso, ajuste el interruptor POWER a OFF [ ‡ ].
Con esto se desconectará la red principal.
Precaución
• No obstruya las rendijas o los orificios de ventilación.
(Si las rendijas o los orificios de ventilación quedan tapados con
un periódico, un trozo de tela, etc., no se podrá disipar el calor).
• No ponga sobre el aparato ninguna llama al descubierto, como
velas encendidas.
• Cuando tenga que descartar las pilas, tenga en cuenta los
problemas ambientales y observe estrictamente los reglamentos
o las leyes locales sobre disposición de las pilas.
• No exponga este aparato a la lluvia, humedad, goteos o
salpicaduras. Tampoco ponga recipientes conteniendo líquidos,
como floreros, encima del aparato.
Precaución—Ventilación apropiada
Para evitar riesgos de incendios o de descargas eléctricas u otros
daños, coloque el aparato de la siguiente manera:
1 Parte delantera:
Sin obstrucciones y con espacio abierto.
2 Laterales/ parte superior/ parte trasera:
No debe haber ninguna obstrucción dentro de las áreas indicadas
por las dimensiones de abajo.
3 Parte inferior:
Debe instalarse sobre una superficie nivelada. Para una ventilación
adecuada, colóquelo sobre un soporte de 10 cm o más de altura
para permitir el paso de aire.
Front view
Vista delantera
20 cm
Side view
Vista lateral
Front
Parte delantera
20 cm
20 cm
15 cm15 cm
10 cm
–
–
2
Page 13

Precautions for installation
• To prevent deformation or discoloration of the cabinet, do not install
the unit where it is exposed to direct sunlight or high humidity, and
avoid installation near air conditioning outlets.
• Speaker vibrations may cause howling. Place the unit as far away
from the player as possible.
• Take the occurrence of earthquakes or other physical shocks into
consideration when selecting the installation place, and secure
the unit thoroughly.
• Tuner reception may become noisy or hissing if this unit is installed
nearby the tuner. In this case, leave a more distance between the
tuner and this unit or use an outdoor antenna for better tuner
reception without interference from this unit.
• This unit is magnetically shielded to avoid color distortions on TVs.
However, if not installed properly, it may cause color distortions.
So, pay attention to the following when installing the unit.
– When placing this unit near a TV set, turn off the TV’s
main power switch or unplug it before installing this unit.
Then wait at least 30 minutes before turning on the TV’s
main power switch again.
Some TVs may still be affected even though you have followed
the above. If this happens, move this unit away from the TV.
• When the TV screen shakes, move this unit away from the TV to
find a position where the screen doesn’t shake and then set the
unit there.
• Do not connect the AC power cord until all other connections have
been made.
ESPAÑOLENGLISH
Precauciones sobre la instalación
• Para evitar la deformación o la alteración de color de la caja, no
instale la unidad en un sitio expuesto a la luz directa del sol o a la
alta humedad ni cerca de las bocas de salidas del aire
acondicionado.
• Las vibraciones del altavoz pueden producir aullido. Coloque la
unidad lo más lejos posible del tocadiscos.
• Al decidir el sitio de instalación de la unidad, tenga en cuenta las
eventualidades tales como los terremotos y otros golpes físicos y
asegúrela firmemente para evitar que se voltee.
• Si instalara esta unidad cerca del sintonizador, se podrían producir
ruidos o silbidos en la recepción del sintonizador. En tal caso,
deje una distancia mayor entre el sintonizador y esta unidad, o
utilice una antena exterior para mejorar la recepción, y prevenir
las interferencias de esta unidad.
• Esta unidad está blindada magnéticamente para evitar distorsiones
de color en los televisores. Sin embargo, si no está correctamente
instalada, se podrían producir distorsiones de color. Por lo tanto,
preste atención a lo siguiente cuando se instale la unidad.
– Si va a instalar esta unidad cerca de un televisor,
desconecte el interruptor de alimentación principal del
televisor o desenchúfelo antes de instalar esta unidad.
Luego espere por lo menos 30 minutos antes de volver a
conectar el interruptor de alimentación principal del
televiso.
Aunque siga las instrucciones de arriba, algunos televisores
podrían ser afectados. En tal caso, aleje esta unidad del televisor.
• Cuando vibre la pantalla del televisor, separe esta unidad del
televisor para encontrar una posición donde la pantalla no vibre,
y luego ponga la unidad en esa posición.
Precautions for Daily Use
• To maintain the appearance of the unit
Wipe with a dry, soft cloth if the cabinet or control panel should
become dirty.
If very dirty, apply a small amount of water or neutral detergent to
the cloth and wipe clean. Then wipe with a dry cloth.
• To improve the sound field
If the speakers are facing a solid wall or glass door, etc., it is
recommended to furnish the wall with materials that absorb sounds,
for example by hanging up thick curtains, to prevent reflections
and standing waves.
Checking the Supplied Accessories
Check to be sure you have the following supplied accessories.
The number in parenthesis indicates the quantity of the piece supplied.
• Monaural audio cord (1)
• AC plug adaptor (1)
If the item mentioned above is missing, contact your dealer
immediately.
• No conecte el cable de alimentación de CA hasta que se hayan
realizado todas las demás conexiones.
Precauciones durante el uso diario
• Para mantener la apariencia de la unidad
Si se ensucia la caja o el panel de control, limpie con un paño
suave y seco.
Si está muy sucio, limpie con un paño humedecido con agua o
detergente neutro, y seque con un paño seco.
• Mejoramiento del campo acústico
Si los altavoces están dirigidos hacia una pared maciza o una
puerta de vidrio, etc., se recomienda revestir la pared con
materiales amortiguadores de sonido, por ejemplo, instalando
cortinas pesadas, para evitar reverberaciones y ondas
estacionarias.
Comprobación de los accesorios suministrados
Compruebe que dispone del siguiente accesorio suministrado.
El número entre paréntesis indica la cantidad de piezas suministradas.
• Cordón de audio monofónico (1)
• Adaptador para clavija de CA (1)
Si no se le ha suministrado el elemento mencionado arriba,
póngase inmediatamente en contacto con su concesionario.
Contents
Warnings, Cautions and Others ........................................... 2
Connections ............................................................................ 6
Additional Information ........................................................... 6
Operations ............................................................................ 7
Contenido
Advertencias, precauciones y notas .................................. 2
Conexiones ............................................................................ 6
Operaciones ............................................................................ 6
Información adicional ............................................................ 7
–
–
3
Page 14

Connections
Before connecting this unit to the amplifier (or receiver), observe the following
carefully.
• Turn off the amplifier.
• Make all connections before plugging in this unit.
ESPAÑOLENGLISH
Conexiones
Antes de conectar esta unidad al amplificador (o receptor), tenga en cuenta
los puntos siguientes.
• Apague el amplificador.
• Haga todas las conexiones antes de enchufar esta unidad.
• DO NOT connect this unit to the REC OUT jacks of your amplifier. It
may damage your subwoofer.
English/Español
Monaural audio cord (Supplied)
Cordón de audio monofónico (Suministrado)
Amplifier or Receiver / Amplificador o receptor
To LINE OUT
A LINE OUT
In the case that the receiver dose not have the SUBWOOFER OUT or MONO terminal.
En el caso de que el receptor no tenga el terminal SUBWOOFER OUT o MONO.
To SUBWOOFER OUT or MONO
A SUBWOOFER OUT o MONO
Stereo audio cord (not Supplied)
Cordón de audio estéreo (no suministrado)
• NO conecte esta unidad a los jacks REC OUT de su amplificador ya
que de lo contrario podrá dañar su subwoofer.
To an AC outlet
A una toma de CA
Additional Information
Speaker layout / Disposición de los altavoces
To obtain the best possible sound from your unit:
—Place a subwoofer wherever you like since bass sound is
non-directional. Normally place it in front of you.
—Place all the main speakers at the same distance from the
listening position.
—Be sure to place the powered subwoofer to the TV’s right. If
you place the powered subwoofer to the TV’s left, keep
sufficient distance between them to prevent the TV from
appearing mottled.
Para obtener el mejor sonido posible de su unidad:
—Coloque un subwoofer en cualquier lugar deseado dado que
los sonidos graves son no direccionales. Normalmente
instálelo delante de usted.
—Coloque los altavoces principales a la misma distancia desde
la posición de audición.
—Asegúrese de colocar el altavoz de subgraves activo a la
derecha del televisor. Si coloca el altavoz de subgraves activo
a la izquierda del televisor, mantenga una distancia suficiente
entre ambos para evitar que aparezcan manchas en el
televisor.
Información adicional
Left front speaker
Altavoz delantero izquierdo
Left surround speaker
Altavoz delantero izquierdo
–
–
6
Center
speaker
Altavoz
central
Listening position
Posición de audición
Right front
speaker
Altavoz
delantero
derecho
Right surround speaker
Altavoz surround derecho
Subwoofer
Subwoofer
Page 15

Operations Operaciones
Front / Parte delantera Rear / Parte trasera
Power lamp
Lámpara de alimentación
ESPAÑOLENGLISH
English/Español
Turning On the Power—POWER
To turn on the power.
Press the POWER switch to the [ ❙ ] ON position.
• The power lamp lights in green.
To cut of the power.
Press the POWER switch to the [ ‡ ] OFF position.
• The power lamp goes out.
• This will disconnect the mains lead.
Operating the Unit Automatically According to the
Incoming Signals—AUTO POWER ON/STANDBY
To activate AUTO POWER ON/STANDBY.
Press the AUTO POWER ON/STANDBY switch to the [
position.
• If no sound comes in for 5-10 minutes, the unit enters
standby mode. The power lamp lights in red.
• If the unit detects incoming signals, the unit starts
operating. The power lamp lights in green.
To cancel AUTO POWER ON/STANDBY.
Press out the AUTO POWER ON/STANDBY switch to set it to the
[
] CANCEL position.
AUTO POWER ON / STANDBY
ON
CANCEL
] ON
Conexión de la alimentación—POWER
Para desconectar la alimentación.
Pulse el botón POWER y ajústelo a la posición ON [ ❙ ].
• La lámpara de la alimentación se enciende en verde.
Para cortar la alimentación.
Pulse el botón POWER y ajústelo a la posición OFF [ ‡ ].
• La lámpara de la alimentación se apaga.
• Esto desconectará el cordón de alimentación
Funcionamiento automático de la unidad de acuerdo con
las señales entrantes—AUTO POWER ON/STANDBY
Para activar AUTO POWER ON/STANDBY.
Pulse el botón AUTO POWER ON/STANDBY y ajústelo a la posición
ON [
• Si no hay sonido durante un periodo de 5-10 minutos, la unidad
• Si la unidad detecta señales entrantes, ésta empezará a funcionar.
Para cancelar AUTO POWER ON/STANDBY.
Pulse el botón AUTO POWER ON/STANDBY y ajústelo a la posición
CANCEL [
].
entra en el modo de espera. La lámpara de la alimentación se
enciende en rojo.
La lámpara de la alimentación se enciende en verde.
].
AUTO POWER ON / STANDBY
ON
CANCEL
When the volume level of the amplifier is so low or the incoming signals
are so weak that this unit cannot detect sounds, Auto Power On/Standby
may not work correctly.
Cuando el nivel de volumen del amplificador es muy bajo o las señales
entrantes son tan débiles que la unidad no puede detectar los sonidos,
es posible que el encendido/espera automático no funcione
correctamente.
–
–
7
Page 16

ESPAÑOLENGLISH
Troubleshooting
Use this chart to help you solve daily operational problems. If there
is any problem you cannot solve, contact your dealer.
Power does not come on.
• Is the unit pugged in?
– Plug the AC power cord firmly into the AC outlet.
Auto Power On/Standby does not function correctly.
• Signals are too weak or volume level is too low.
– This is not a malfunction. If this happens, cancel Auto Power On/Standby.
English/Español
No sound is heard.
• Connections are incorrect, or loose.
– Check the connections. If incorrect, redo the corrections. (See page 6.)
• Audio signals through the amplifier are extremely weak.
– Increase the volume level on the amplifier.
Sounds fluctuate (suddenly become loud or soft).
• The built-in protective circuit is working.
– Lower the volume level, then turn off and on the unit.
Suddenly no sound comes out. – the power lamp still lights in green.
• The volume of the playback source is too high.
– Turn down the volume of the playback source, turn off and on the source,
then adjust the volume properly on the source.
Specifications
Type : Powered Subwoofer
Bass-reflex type
Frequency Range : 32 Hz 200 Hz
Speaker : 16,0 cm cone (× 1)
Impedance :4 Ω
Input terminals : INPUT (LOW-LEVEL)
Power requirements : AC 110-240 V , 50/60 Hz
Output power of built-in amp : 100 W (50 Hz, 4 Ω, 10 % THD)
Power Handling Capacity : 27 W
Dimensions
(W × H × D) :185 mm × 374 mm × 345 mm
Accessories : Monaural audio cord (× 1)
(magnetically shielded type)
Mass : 8,86 kg
AC plug adaptor (× 1)
Localización y solución de problemas
Este cuadro le ayudará a resolver los problemas operacionales
diarios. Si hay algún problema que no puede resolver, póngase en
contacto con su concesionario.
La unidad no se encienda.
• ¿Está la unidad enchufada?
– Enchufe firmemente el cable de alimentación de CA en la toma de CA.
AUTO POEWR ON/STANDBY no funciona correctamente.
• Señales muy débiles o nivel de volumen demasiado bajo.
– Esto no es una anomalía. En este caso, cancele AUTO POEWR ON/
STANDBY.
No se escucha sonido.
• Las conexiones están mal hechas, o flojas.
– Compruebe las conexiones. Si están mal hechas, haga las correcciones
necesarias. (Consulte la página 6.)
• Las señales de audio que salen del amplificador son extremadamente
débiles.
– Aumente el nivel de volumen en el amplificador.
El sonido fluctúa (se vuelve repentinamente alto o bajo).
• Se ha activado el circuito de protección incorporado.
– Baje el nivel de volumen en el amplificador hasta eliminar el síntoma.
El sonido se interrumpe súbitamente. - la lámpara de alimentación se
enciende en verde.
• El volumen de la fuente de reproducción es demasiado alto.
– Baje el volumen de la fuente de reproducción, apague y vuelva a
encender la fuente, y luego ajuste correctamente el volumen de la fuente.
Especificaciones
Tipo : Subwoofer motriz Tipo bass-reflex
(tipo blindado magnéticamente)
Unidad de altavoz : Cono de 16,0 cm (× 1)
Gama de frecuencias : 32 Hz a 200 Hz
Impedancia de entrada :4 Ω
Terminales de entrada : INPUT (LOW-LEVEL)
Requerimientos de potencia : 110-240 V , 50/60 Hz
Potencia de salida del
amplificador inc : 100 W (50 Hz, 4 Ω, 10 %THD)
Consumo : 27 W
Dimensiones
(ancho × alto × fondo) : 185 mm × 374 mm × 345 mm
Peso : 8,86 kg
Accessorios : Cordón de audio monofónico (× 1)
Adaptador para clavija de CA (× 1)
–
–
8
Page 17

COMPACT COMPONENT SYSTEM
POWERED SUBWOOFER
SP-DWF10
INSTRUCTIONS
LVT1145-005A
[UX]
Page 18

Thank you for purchasing a JVC speaker.
Before you begin using it, please read the instructions carefully to be sure you get the best possible performance. If you have any
questions, consult your JVC dealer.
Precautions for installation
Warnings, Cautions and Others
To reduce the risk of electrical shocks, fire, etc.:
1. Do not remove screws, covers or cabinet.
2. Do not expose this appliance to rain or moisture.
Caution—POWER switch
This apparatus is provided with the POWER switch to minimize
power consumption for safe use. Therefore,
1. Before doing initial settings, complete all the connections
required, connect the mains plug into the wall outlet, then set
the POWER switch to ON [ ❙ ].
2. When not in use, set the POWER switch to OFF [ ‡ ].
This disconnects the mains line.
Cautions
• Do not block the ventilation openings or holes.
(If the ventilation openings or holes are blocked by a
newspaper or cloth, etc., the heat may not be able to get out.)
• Do not place any naked flame sources, such as lighted candles,
on the apparatus.
• When discarding batteries, environmental problems must be
considered and local rules or laws governing the disposal of
these batteries must be followed strictly.
• Do not expose this apparatus to rain, moisture, dripping or
splashing and that no objects filled with liquids, such as vases,
shall be placed on the apparatus.
• To prevent deformation or discoloration of the cabinet, do not
install the unit where it is exposed to direct sunlight or high
humidity, and avoid installation near air conditioning outlets.
• Speaker vibrations may cause howling. Place the unit as far
away from the player as possible.
• Take the occurrence of earthquakes or other physical shocks
into consideration when selecting the installation place, and
secure the unit thoroughly.
• Tuner reception may become noisy or hissing if this unit is
installed nearby the tuner. In this case, leave a more distance
between the tuner and this unit or use an outdoor antenna for
better tuner reception without interference from this unit.
• This unit is magnetically shielded to avoid color distortions on TVs.
However, if not installed properly, it may cause color distortions.
So, pay attention to the following when installing the unit.
– When placing this unit near a TV set, turn off the TV’s main
power switch or unplug it before installing this unit.
Then wait at least 30 minutes before turning on the TV’s main
power switch again.
Some TVs may still be affected even though you have followed
the above. If this happens, move this unit away from the TV.
• When the TV screen shakes, move this unit away from the TV
to find a position where the screen doesn’t shake and then set
the unit there.
• Do not connect the AC power cord until all other connections
have been made.
Precautions for Daily Use
• To maintain the appearance of the unit
Wipe with a dry, soft cloth if the cabinet or control panel should
become dirty.
If very dirty, apply a small amount of water or neutral detergent
to the cloth and wipe clean. Then wipe with a dry cloth.
• To improve the sound field
If the speakers are facing a solid wall or glass door, etc., it is
Caution—Proper Ventilation
To avoid risk of electric shock and fire, and to prevent damage,
locate the apparatus as follows:
1 Front:
No obstructions and open spacing.
2 Sides/ Top/ Back:
No obstructions should be placed in the areas shown by the
dimensions below.
3 Bottom:
Place on the level surface. Maintain an adequate air path for
ventilation by placing on a stand with a height of 10 cm or
more.
recommended to furnish the wall with materials that absorb
sounds, for example by hanging up thick curtains, to prevent
reflections and standing waves.
Checking the Supplied Accessories
Check to be sure you have the following supplied accessories.
The number in parenthesis indicates the quantity of the piece
supplied.
• Monaural audio cord (1)
• AC plug adaptor (1)
If the item mentioned above is missing, contact your dealer
immediately.
Front view Side view
20 cm
20 cm
15 cm15 cm
10 cm
Front
20 cm
Contents
Warnings, Cautions and Others................................... 2
Connections .................................................................. 3
Operations ..................................................................... 3
Additional Information .................................................. 4
– 2 –
Page 19

Connections
Before connecting this unit to the amplifier (or receiver), observe
the following carefully.
• Turn off the amplifier.
• Make all connections before plugging in this unit.
Monaural audio cord (Supplied)
Amplifier or Receiver
• DO NOT connect this unit to the REC OUT jacks of your
amplifier. It may damage your subwoofer.
English
To LINE OUT
Operations
To SUBWOOFER OUT
or MONO
To an AC outlet
Stereo audio cord (not Supplied)
In the case that the receiver dose not have the SUBWOOFER OUT or MONO terminal.
Front Rear
Turning On the Power—POWER
To turn on the power.
Press the POWER switch to the [ ❙ ] ON position.
• The power lamp lights in green.
To cut of the power.
Press the POWER switch to the [ ‡ ] OFF position.
• The power lamp goes out.
• This will disconnect the mains lead.
Power lamp
Operating the Unit Automatically According to the Incoming
Signals—AUTO POWER ON/STANDBY
To activate AUTO POWER ON/STANDBY.
Press the AUTO POWER ON/STANDBY switch to the [
position.
• If no sound comes in for 5-10 minutes, the unit enters
standby mode. The power lamp lights in red.
• If the unit detects incoming signals, the unit starts
operating. The power lamp lights in green.
To cancel AUTO POWER ON/STANDBY.
Press out the AUTO POWER ON/STANDBY switch to set it to the
] CANCEL position.
[
When the volume level of the amplifier is so low or the
incoming signals are so weak that this unit cannot detect
sounds, Auto Power On/Standby may not work correctly.
– 3 –
AUTO POWER ON / STANDBY
ON
CANCEL
] ON
Page 20

Additional Information
Speaker layout
To obtain the best possible sound from your unit:
English
—Place a subwoofer wherever you like since bass sound is non-
directional. Normally place it in front of you.
—Place all the main speakers at the same distance from the
listening position.
—Be sure to place the powered subwoofer to the TV’s right. If you
place the powered subwoofer to the TV’s left, keep sufficient
distance between them to prevent the TV from appearing
mottled.
Left front speaker
Center
speaker
Listening position
Left surround speaker Right surround speaker
Troubleshooting
Use this chart to help you solve daily operational problems. If there is any problem you cannot solve, contact your dealer.
Power does not come on.
• Is the unit pugged in?
– Plug the AC power cord firmly into the AC outlet.
Right front
speaker
Subwoofer
Auto Power On/Standby does not function correctly.
• Signals are too weak or volume level is too low.
– This is not a malfunction. If this happens, cancel Auto Power On/Standby.
No sound is heard.
• Connections are incorrect, or loose.
– Check the connections. If incorrect, redo the corrections. (See page 3.)
• Audio signals through the amplifier are extremely weak.
– Increase the volume level on the amplifier.
Sounds fluctuate (suddenly become loud or soft).
• The built-in protective circuit is working.
– Lower the volume level, then turn off and on the unit.
Suddenly no sound comes out. – the power lamp still lights in green.
• The volume of the playback source is too high.
– Turn down the volume of the playback source, turn off and on the source, then adjust the volume properly on the source.
Specifications
Type : Powered Subwoofer
Bass-reflex type
(magnetically shielded type)
Speaker : 16.0 cm cone (× 1)
Frequency Range : 32 Hz
Impedance : 4 Ω
Input terminals : INPUT (LOW-LEVEL)
Power requirements : AC 110-240 V
Output power of built-in amp : 100 W (50 Hz, 4 Ω, 10 % THD)
Power Handling Capacity : 27 W
Dimensions
(W × H × D) : 185 mm × 374 mm × 345 mm
Mass : 8.86 kg
Accessories : Monaural audio cord (× 1)
AC plug adaptor (× 1)
200 Hz
, 50/60 Hz
– 4 –
 Loading...