

Page 1
.
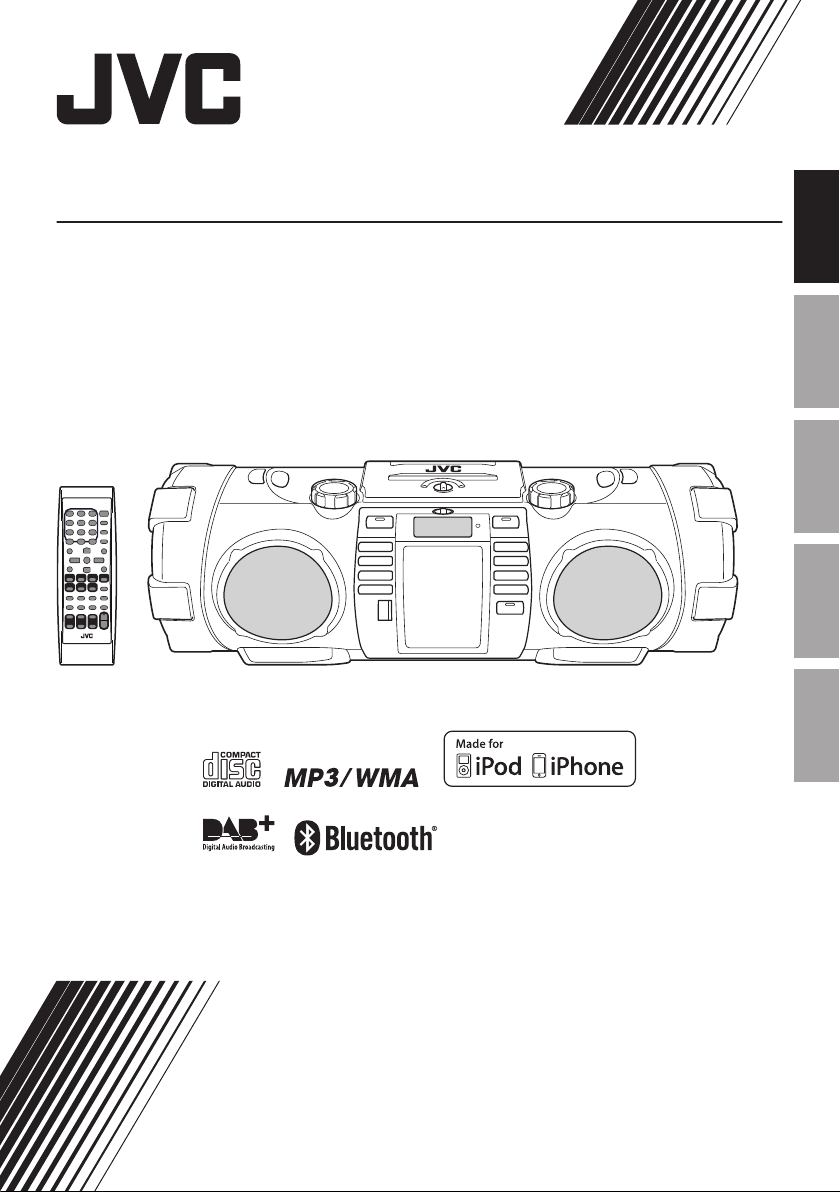
POWERED WOOFER CD SYSTEM
RV-NB100B
.
ENGLISHDEUTSCHFRANÇAISNEDERLANDSITALIANO
.
INSTRUCTIONS
LVT2488-001A
[E]
Page 2
Introduction
Auto power save function
When no operation is performed for 15 minutes, the System turns off automatically.
This function is enabled by default. For details, refer to “Auto power save mode”
p. 13.
In this manual...
0
The remote control buttons are used for explaining the operations unless mentioned otherwise.
However, if the System has buttons with the same or similar names, they can also be used for the
operations.
In this manual...
0
In this manual, “iPod” means iPod, iPod touch and iPhone device. When iPod touch or iPhone device
is specifically referred to, “iPod touch” or “iPhone” is used.
0
In this manual, the term “Android device” is referred to as a smartphone and a tablet device, that are
equipped with the Android OS.
0
In this manual, “file” and “track”, “folder” and “group” are used interchangeably.
Notes on using the System
0
Do not leave the front door open.
0
Do not press down on the front door when it is open as the System could fall and possibly cause an
injury.
A copy of the Declaration of Conformity with regard to the R&TTE Directive 1999/5/ EC can be
downloaded from the following Web sites. (http://www.jvc.co.jp/ecdoc/)
.
Hereby, JVC declares that this System [RV-NB100B] is in compliance with the essential requirements
and other relevant provisions of Directive 1999/5/EC.
IMPORTANT FOR LASER PRODUCTS
1. CLASS 1 LASER PRODUCT
2. CAUTION: Do not open the top cover or cabinet. There are no user serviceable parts inside the unit;
leave all servicing to qualified service personnel.
2
Page 3
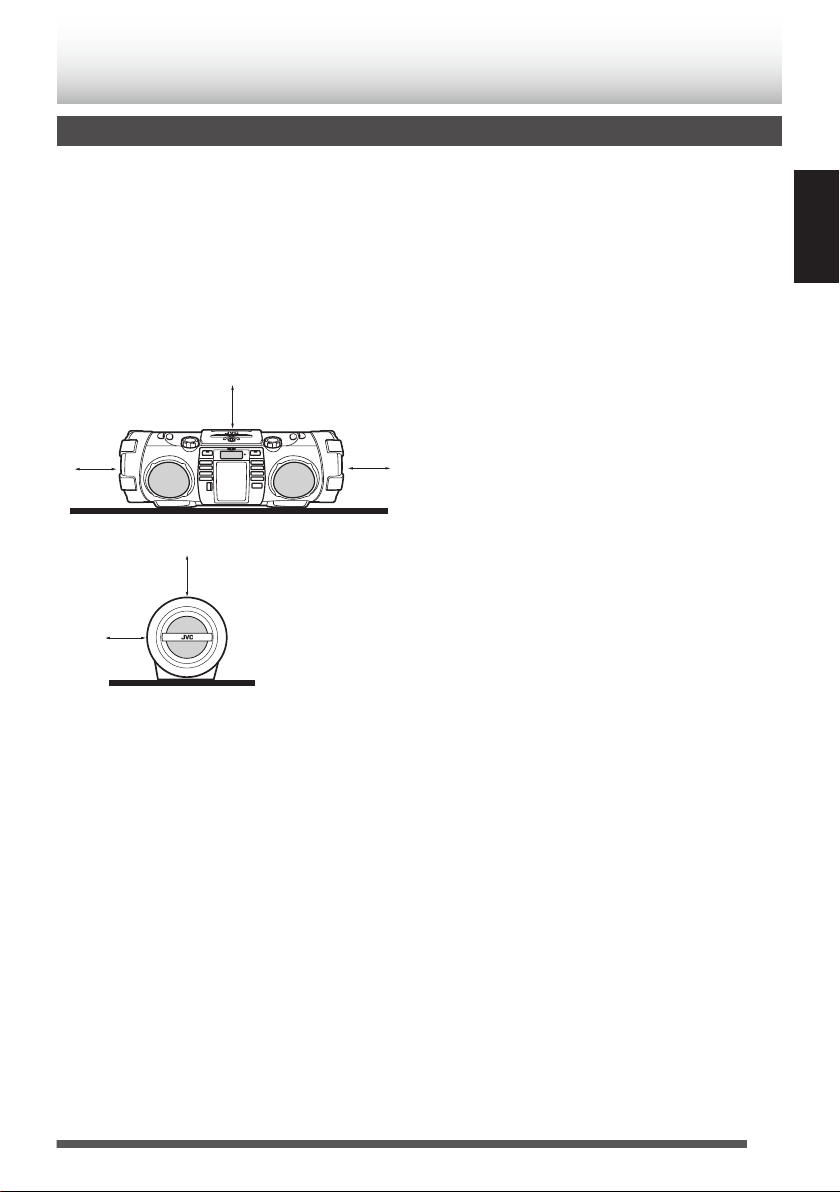
Preparation
15 cm
15 cm
15 cm
Rear of the
System
15 cm
15 cm
Caution: Proper Ventilation
To avoid the risk of electric shock and fire, and to prevent damage, locate the apparatus as follows:
1
Front:
No obstructions and open spacing.
2 Sides/Top/Back:
No obstructions should be placed in the areas indicated by the dimensions in the illustration below.
3 Bottom:
Place on a level surface.
Front view
.
Side view
.
ENGLISH
Notes on installation
Select a place which is level, dry and neither too hot nor too cold — between 5 ˚C and 35 ˚C.
3
Page 4

What you can do using the System
P. 1 2
Enjoy listening to music by adjusting the
super woofer (bass sound) volume and
the sound mode!
P. 2 8
Mixing with a source sound
using a microphone or guitar
Recording on USB device from
CD, FM radio or external device
P. 2 0
Play back MP3/WMA files on
a music CD or USB device
P. 1 7
Play back files on your BLUETOOTH
device by operating the System
P. 1 4
Play back files on your iPod or
iPhone by operating the System
P. 3 0
.
4
Page 5

Contents
Introduction ..................................... 2
Preparation ......................................................... 3
What you can do using the System ..................... 4
Preparation ...................................... 6
Accessories ........................................................ 6
Inserting batteries ............................................... 6
Carrying the System ............................................ 7
Index of parts and controls ............ 8
Front of the System ............................................. 8
Rear of the System .............................................. 9
Display window ................................................... 9
Remote control .................................................. 10
Connections .................................. 11
Connecting the power cord ............................... 11
Connecting headphones ................................... 11
Basic operations ........................... 12
Turning on/off the System ................................. 12
Setting the clock ................................................ 12
Displaying the clock .......................................... 12
Getting started .................................................. 12
iPod ................................................ 14
Connecting iPod ................................................ 14
Playback ........................................................... 15
Shuffle playback ................................................ 16
Repeat playback ............................................... 16
iPod menu operation ......................................... 16
Listening to a BLUETOOTH device
Connecting a BLUETOOTH device for the first time
Pairing (registering) other BLUETOOTH devices
Setting the System to BLUETOOTH standby
Using a remote control application
............................ 19
Playing back a disc/USB device
Preparation
Playback
Program playback
Random playback
Repeat playback
........................................................ 20
............................................................ 20
.............................................. 21
............................................... 22
................................................ 22
...... 17
..... 17
..... 18
.............. 19
..... 20
DAB ................................................ 23
Listening to DAB stations .................................. 23
FM ................................................... 25
Listening to FM stations .................................... 25
Presetting stations ............................................ 25
External device .............................. 26
Listening to an external device .......................... 26
Metronome ..................................... 27
Using the metronome function .......................... 27
Connecting a microphone/guitar
Microphone/guitar mixing
Adjusting the tone of a guitar
.................................... 28
............................... 28
... 28
Recording on a USB device ......... 30
Recording discs ................................................ 30
Recording other sources ................................... 32
Deleting a track ................................................. 34
Using the timer .............................. 35
Setting the sleep timer ...................................... 35
Setting the daily timer ........................................ 35
Setting the recording timer ................................ 37
About Discs/Files .......................... 39
Compatible iPod ................................................ 39
Playable BLUETOOTH devices ........................ 39
Playable discs/files ............................................ 39
Important for USB mass storage class devices
Recorded files created on the System .............. 40
About SCMS (Serial Copy Management System)
.... 40
.... 40
Others ............................................ 41
Maintenance ..................................................... 41
Trademarks ....................................................... 41
Troubleshooting ............................ 42
Specifications ................................ 44
5
Page 6
R20 (SUM-1)/D (13D) x 10
(not supplied)
Battery compartment
R6P (SUM-3)/AA
(15F) (supplied)
Preparation
Accessories
Check that you have all the following items,
which are supplied for the system.
0
Power cord (1)
0
Remote control RM-SRVNB100A (1)
0
Batteries (for the Remote control) (2)
0
Shoulder strap (1)
0
Buckle (2)
0
Stopper (2)
If any of these items are missing, contact your
dealer immediately.
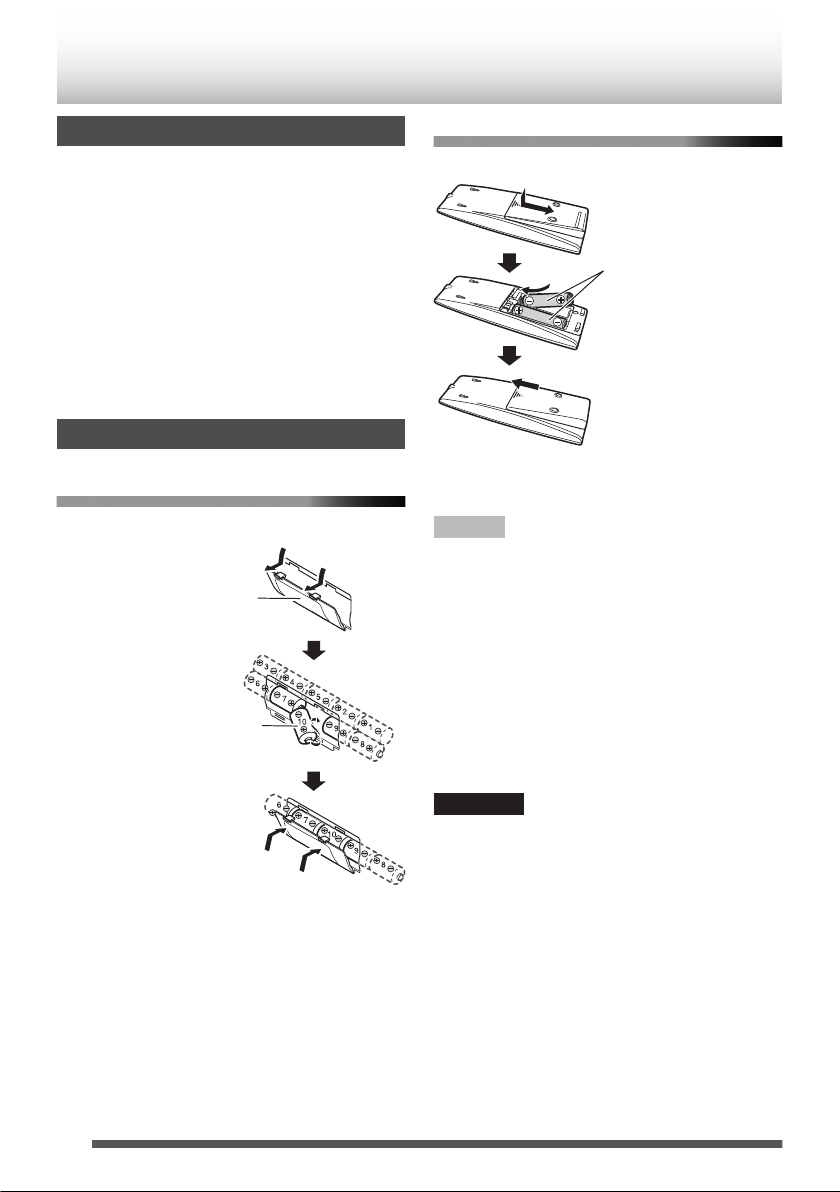
Inserting batteries
Main unit
0
Match the polarities (+ and –) of the batteries.
Remote control
0
Match the polarities (+ and –) of the batteries.
.
0
If the range or effectiveness of the remote control
decreases, replace the batteries.
NOTE
0
Store the battery in a place where children
cannot reach. If a child accidentally swallows the
battery, consult a doctor immediately.
0
The power will not be supplied through the
batteries when the power is supplied through the
AC outlet.
0
The battery is consumed more quickly than usual
when operating the System continuously or
operating it in a cold place.
0
When the power is supplied using the batteries, the
display will be blank when the System is turned off
(on standby) by pressing the [D] button. And, the
STANDBY indicator won’t be turned on.
.
6
CAUTION
To avoid battery leakage or explosion, handle
batteries properly.
0
If you are not going to use this System for a month
or more, remove the batteries from the battery
compartment.
0
Dispose of batteries in the proper manner,
according to federal, state, and local regulations.
0
Do not mix with batteries of different types or with
new and old ones.
0
Do not attempt to charge any batteries other than
rechargeable ones.
0
Discard leaky batteries immediately. Battery
leakage can cause skin burns or other personal
injuries.
0
If chemicals leak onto the System, clean the
System completely.
Page 7
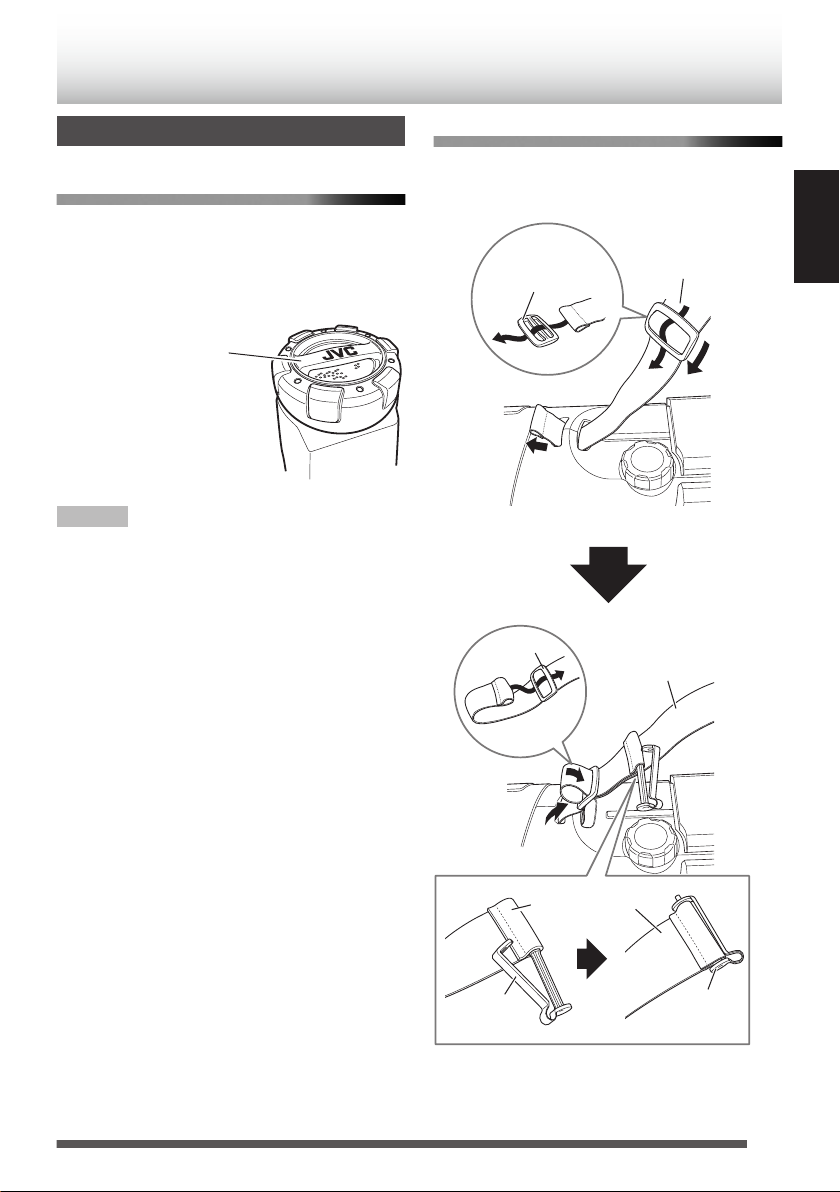
Carrying the System
Carrying handle
Stopper
Stopper
(supplied)
Main unit
Shoulder strap
Shoulder strap
Buckle
Front side
Shoulder strap
(supplied)
Buckle
(supplied)
Using the carrying handles
Be sure to hold both handles when you carry the
System.
If you carry the System by only one handle, the
other end may drag on the ground and be
damaged.
Using the shoulder strap
Attach the supplied shoulder strap (adjustable in
length) to each end of the System as illustrated
below.
ENGLISH
.
NOTE
0
Remove a disc, USB device or iPod from the
System.
0
Disconnect all the cords from the System.
0
The System is not waterproof or dust proof.
.
7
Page 8
12 34 5 6 7 89
0~
!@ # $%^ (*&
-=
Index of parts and controls
Front of the System
.
A
CD F button
B
iPod F button
C
STANDBY/ON D button
D
Shoulder strap hook
E
SUPER WOOFER VOLUME +/–
F
STANDBY indicator
G
Disc compartment door
H
BLUETOOTH button
I
BLUETOOTH indicator
J
VOLUME +/-
K
Shoulder strap hook
8
L
G /TEMPO + button
M
H /TEMPO - button
N
USB/iPod F button
O
METRONOME F button
P
USB connector/cover
Q
Connector for iPod/Front door
R
Remote control sensor
S
REC button
T
REC indicator
U
TUNER/AUDIO IN button
V
o button
Page 9
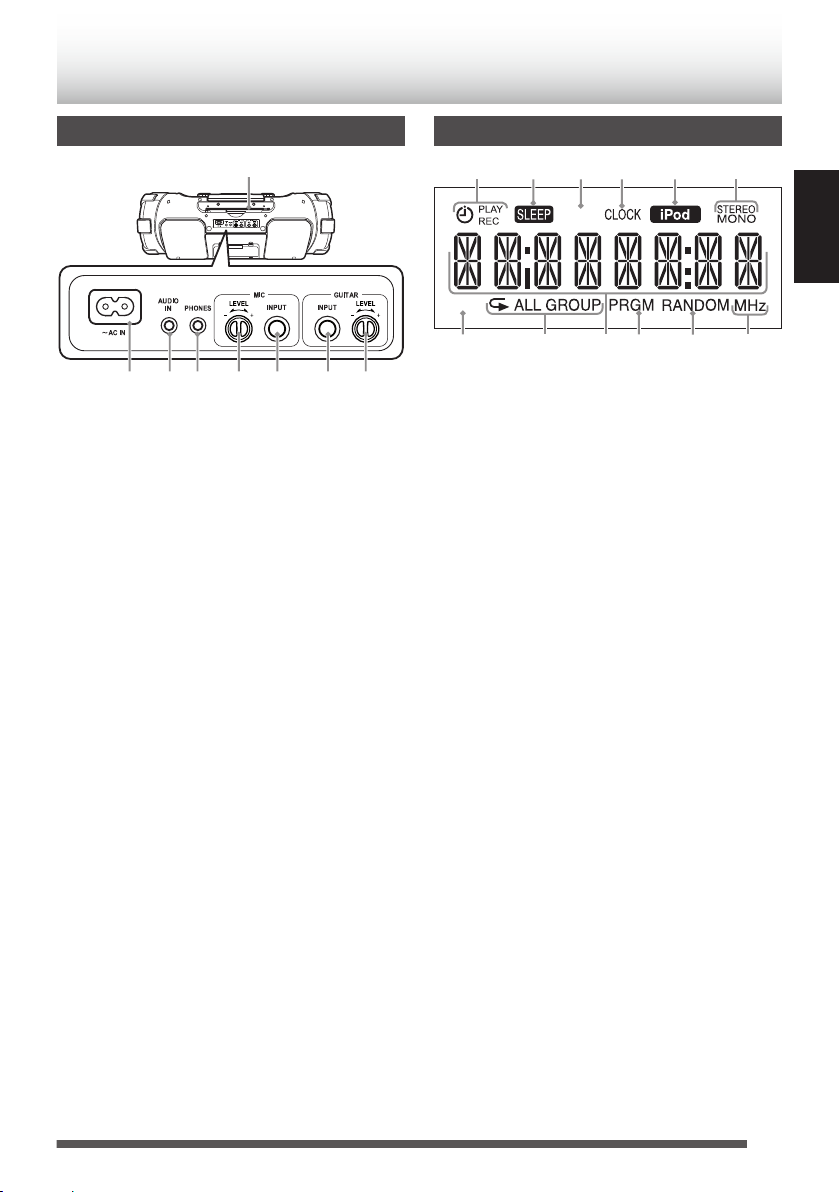
Rear of the System
12345 6
7
8
HIGH
A.P.S.
12345 6
7890-=
.
A
AC IN jack
B
AUDIO IN jack
C
PHONES jack
D
MIC LEVEL -/+
E
MIC INPUT connector
F
GUITAR INPUT connector
G
GUITAR LEVEL -/+
H
DAB/FM telescopic antenna
Display window
.
A
Timer indicators
A (timer), PLAY, REC
B
SLEEP indicator
C
A.P.S. (auto power save) indicator
D
CLOCK indicator
E
iPod indicator
F
FM mode indicators
STEREO, MONO
G
HIGH indicator
H
Repeat indicators
E, EALL,
EGROUP
I
Main display
J
PRGM (program) indicator
K
RANDOM indicator
L
Frequency unit display
ENGLISH
9
Page 10
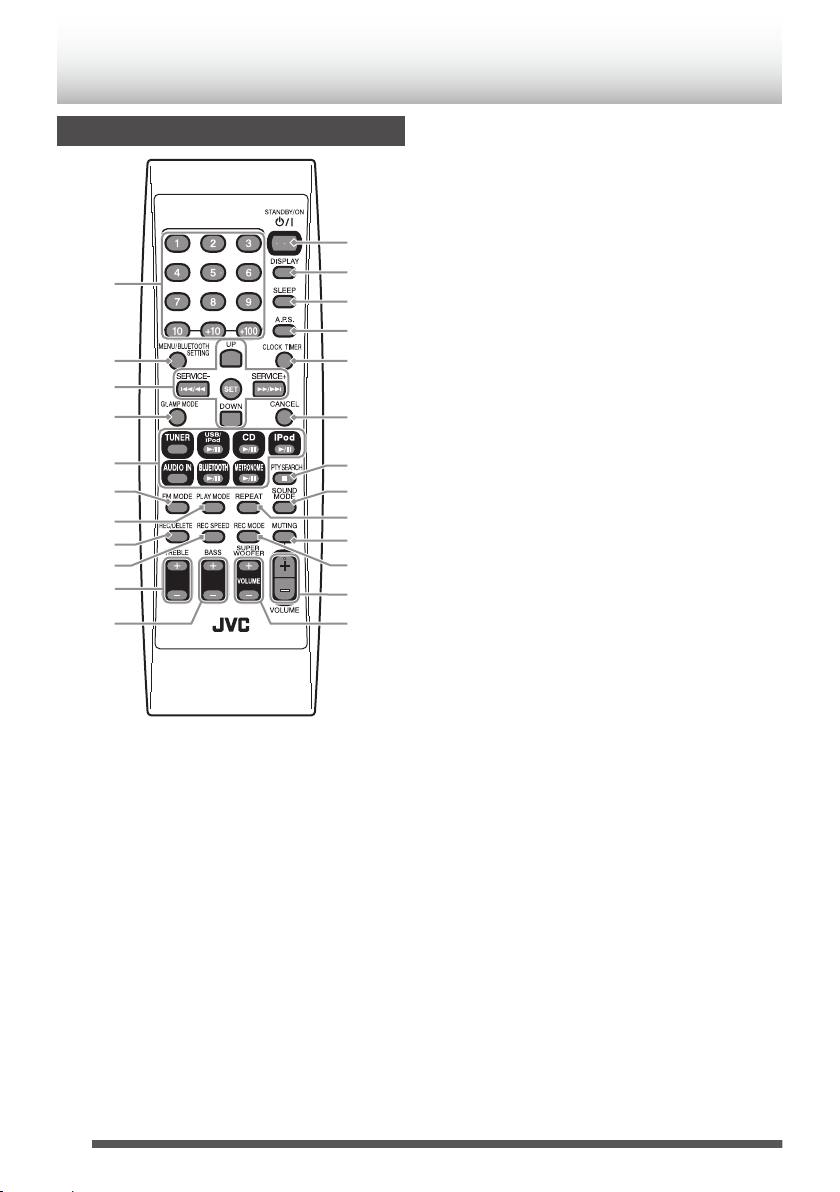
1
2
3
4
5
6
7
8
-
0
9
=
~
!
@
#
$
*
_
)
(
%
^
&
Remote control
.
0
The reference pages are mainly pages
containing descriptions of the respective parts.
A
Number buttons (p. 21)
B
MENU/BLUETOOTH SETTING button
C
Multi control buttons (p. 15 - 25)
• UP, DOWN
• J , SET, I
D
Gt.AMP MODE button (p. 28)
E
Source buttons (p. 15 - 26)
• TUNER, USB/iPod F, CD F,
iPod F, AUDIO IN,
BLUETOOTH F, METRONOME F
F
FM MODE button (p. 25)
G
PLAY MODE button (p. 16, 22)
H
REC/DELETE button (p. 31 - 34)
I
REC SPEED button (p. 30)
J
TREBLE+/- button (p. 13)
K
BASS+/- button (p. 13)
L
STANDBY/ON D button (p. 12)
(Power button)
M
DISPLAY button (p. 12, 13)
N
SLEEP button (p. 35)
O
A.P.S. (auto power save) button (p. 13)
P
CLOCK/TIMER button (p. 12, 35, 37)
Q
CANCEL button (p. 22, 36, 37)
R
PTY SEARCH/o button
(p. 20, p. 17 - p. 33)
S
SOUND MODE button (p. 13)
T
REPEAT button (p. 16, 22)
U
MUTING button (p. 12)
V
REC MODE button (p. 32)
W
VOLUME +/- button (p. 12)
X
SUPER WOOFER VOLUME +/- button
(p. 12)
10
Page 11
Battery compartment
AC outlet
Power cord
(supplied)
Headphones
(not supplied)
Stereo mini plug
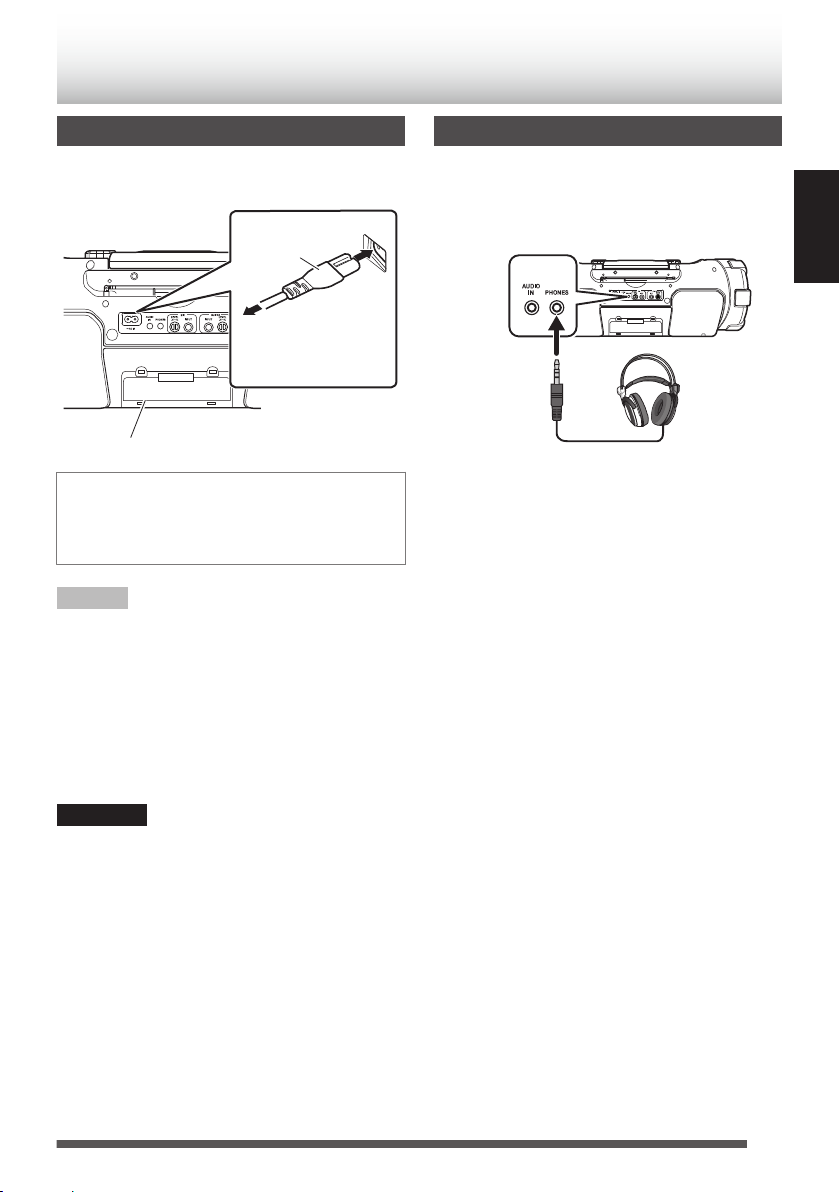
Connections
Connecting the power cord
Connect the power cord to a wall outlet only after
all other connections have been made.
.
Unplug the AC power cord from the System to
supply the power through the batteries in the
battery compartment; otherwise, the System
does not work.
NOTE
0
The power can also be supplied through the
batteries. (p. 6)
0
When the System is turned off using the
[STANDBY/ON D] button, the standby mode
is activated and the STANDBY indicator lights in
red.
0
A small amount of power is always consumed
even while on standby.
Connecting headphones
Be sure to turn down the volume before connecting
or putting on the headphones.
0
Connecting the headphones deactivates the
speakers.
.
ENGLISH
CAUTION
0
Only use JVC power cord provided for this
System to avoid malfunction or damage to the
System.
0
Remove all the batteries when using the power
cord.
0
Be sure to unplug the power cord from the outlet
when going out or when the System is not in use
for an extended period of time.
11
Page 12
0:00
CLOCK
/ / / / / /
Main unit
Remote control
Main unitRemote control
Basic operations
Turning on/off the System
Press [STANDBY/ON D].
.
The STANDBY indicator goes off.
Press the button again to turn off the System.
0
You can also turn on the System by pressing the
source buttons.
NOTE
When the power is supplied using the batteries, the
System is turned on by pressing [D] or the source
buttons on the main unit. You cannot turn on the
System using the remote control.
Setting the clock
1
Press [CLOCK/TIMER].
.
2
Press [UP] or [DOWN] to display
“CLOCK”.
3
Press [SET] to display the clock.
NOTE
0
The clock setting will be reset about an hour after
the AC power cord has been disconnected.
0
When the power is supplied through the
batteries, the clock does not appear on the
display when the System is turned off.
Getting started
To select a source
.
To adjust the volume
.
You can adjust the volume level between MIN 1 to
29, MAX.
To turn off the sound temporarily
.
0
When setting for the first time, press
[CLOCK/TIMER] once.
4
Press [UP] or [DOWN] to adjust the hour.
0
When you press and hold the button, the
hour digit changes continuously.
5
Press [SET].
6
Repeat 4 and 5 to adjust the minute.
0
To go back to the hour setting, press
[CANCEL].
Displaying the clock
Press [DISPLAY].
0
Each time you press the button, the clock and
normal indicator changes alternately.
12
.
Press [MUTING].
.
0
To restore the sound, press [MUTING] again or
adjust the volume.
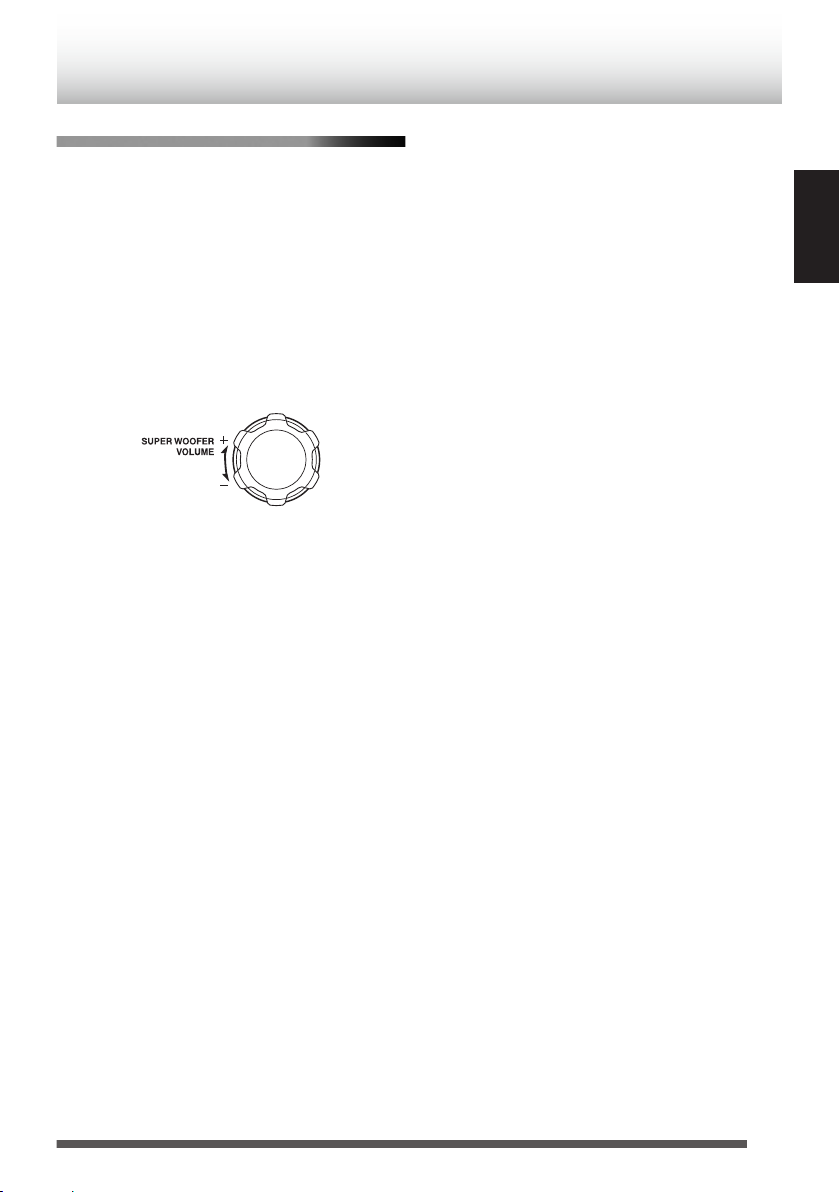
To adjust the super woofer volume
.
You can adjust the super woofer volume level
between BASS 1 and BASS 6.
0
If you have adjusted the tone of the guitar on the
System, press and hold [o] on the System for
more than 2 seconds to change to super woofer
volume adjustment. (p. 28)
Page 13
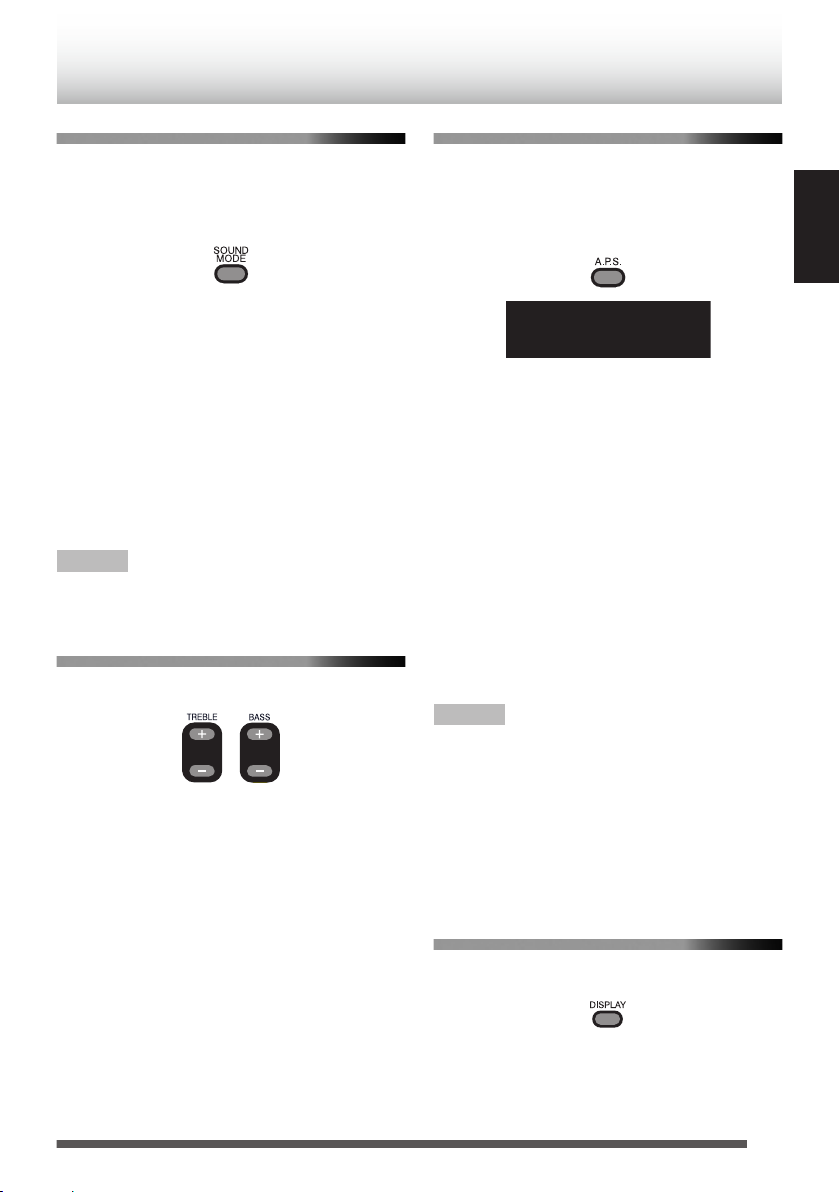
Sound mode
/
A.P.S.
Sound modes can be selected to enhance the type
of music being played.
Press [SOUND MODE] to select the sound
mode.
.
Each time you press the button, the sound mode
changes as follows:
“BEAT”
“POP”
Select this for music with a heavy
:
beat, such as rock and dance music.
Select this for light music including
:
popular and vocal music.
“CLEAR”:Select this for crisp and clear
sounding music.
“USER”
Select this for music with the
:
configured treble and bass settings.
Refer to the following for the setting
procedures.
“FLAT”
Select this to cancel the sound
:
mode.
NOTE
0
The sound mode setting also affects the sound
through the headphones.
To set your preferred sound quality
Press [TREBLE+/-] or [BASS+/-] repeatedly.
.
Each time you press the button, the bass/treble can
be adjusted in the following ranges:
Treble
Bass
0
The sound mode switches to “USER” and the
sound quality is adjusted to the configured
values when the [TREBLE+/-] or [BASS+/-]
button is pressed.
TREBLE -5 to TREBLE +5
:
BASS -5 to BASS +5
:
Auto power save mode
This function turns off the System automatically if
no operation is performed for about 15 minutes.
Each time you press [A.P.S.], the auto power save
function switches on and off.
This function is on at the initial setting.
.
Approximately 30 seconds before the power is
turned off, “A.P.S.” starts to blink.
The System will not turn off automatically in any of
the following conditions:
0
“CD”, “USB”, or “METRONOME” is selected as
the source, and playback is in progress or in
pause mode.
0
“FM” is selected as the source.
0
“DAB” is selected as the source, and a broadcast
is received.
0
“iPod” or “BLUETOOTH” is selected as the
source, and a device is connected.
0
“AUDIO IN” is selected as the source, and there
is sound input.
0
Recording is in progress.
0
When a microphone or guitar is connected.
NOTE
0
The 15-minute countdown restarts when you
operate any buttons.
0
This function operates even during daily timer
and sleep timer operations.
0
The System turns off automatically when the
volume level is set to “MIN” or when the sound is
muted even if a microphone or guitar is
connected. However, the System will not turn off
automatically while recording is in progress.
Display information
Each time you press the button, the display
information switches depending on the source.
ENGLISH
.
0
Tag information is shown on the display window
while an MP3/WMA file is played back.
0
If there is no tag information, “UNKNOWN” is
displayed.
0
“iPod” cannot show the track information.
13
Page 14
Front door
Open the front door
Movable part
USB cable for iPod
(not supplied)
iPod
You can operate iPod through the System.
See p. 39 for compatible iPod devices.
CAUTION
0
JVC is not responsible for any loss of or damage
to iPod that might result from the use of this
System.
0
Do not connect or disconnect iPod when the
System is turned on.
0
Do not carry the System with iPod connected. It
might cause damage to the dock or you might
drop iPod.
0
You cannot send any data to iPod from the
System.
NOTE
0
iPod is charged through the dock when the
System is turned on.
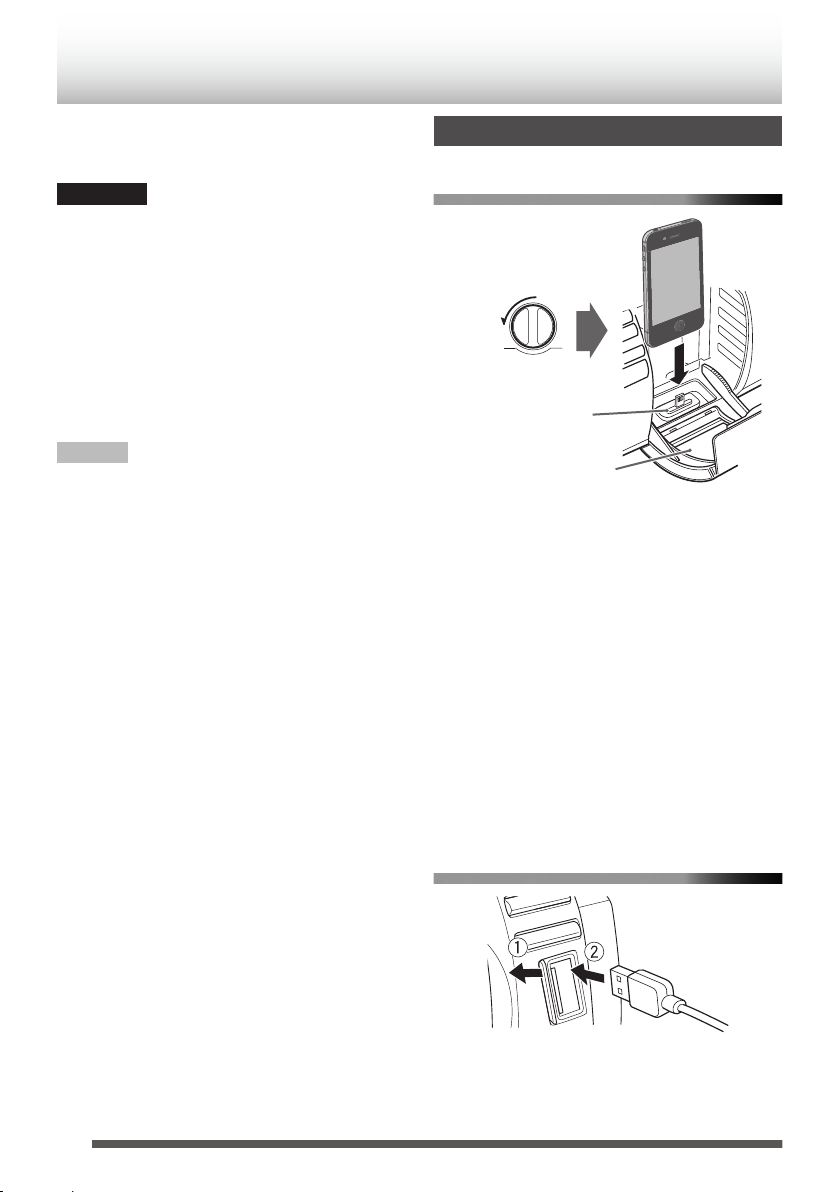
Connecting iPod
To connect to the iPod dock
.
0
A lightning connector is used for the iPod/iPhone
dock of the System. Only iPod nano (7th
generation), iPod touch (5th generation), iPhone
5s, iPhone 5c, and iPhone 5 support the
Lightning connector. iPod/iPhone other than the
above mentioned need to be connected to the
USB connector.
0
Take the protect case of iPod off before
connecting.
0
Connect iPod firmly.
0
Keep iPod in a straight position while connecting/
disconnecting it.
0
Do not touch or hit the terminal pins of iPod or
connector pins in the dock for iPod directly.
Doing so might cause damage to the connector
pins.
14
To connect to the USB connector
.
Page 15
Playback
/
iPod
iPod
iPod
USB
/
(Press and hold)
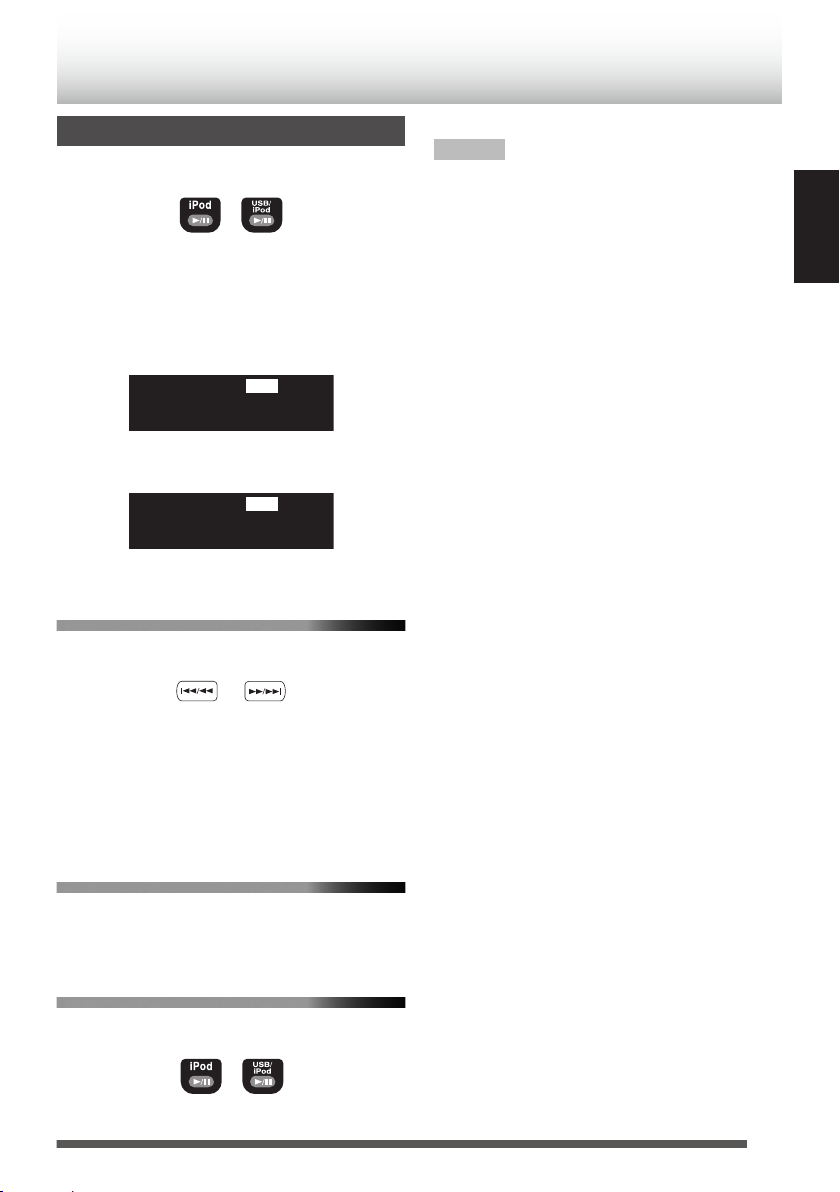
Press [iPod F] or [USB/iPod F].
.
Each time you press the button, playback is
started/paused.
0
Press [USB/iPod F] when iPod is connected
to the USB connector.
Display when connected to the iPod dock
.
Display when connected to the USB connector
.
To select a track
Press [J] or [I].
.
0
Press [I] once to skip to the beginning
of the next track.
0
Press [J] to skip to the beginning of the
track being played. Press [J] twice
quickly to skip to the beginning of the previous
track.
NOTE
0
Depending on the type of iPod, iPod may operate
differently.
0
If you are using an iPhone or iPod touch, operate
your iPhone or iPod touch in the following cases:
– when pressing the home button.
– when selecting application icons on the home
screen.
– when dragging the slider.
0
Sound distortion may occur when playing back
audio sources with high recording levels. If
distortion occurs, it is recommended to turn off
the equalizer of iPod.
0
For information on operating iPod, see the
instruction manual for iPod.
ENGLISH
To fast forward/reverse
Press and hold [J] or [I]
during playback.
To put your iPod on sleep mode
Press and hold [iPod F] or [USB/iPod F].
.
15
Page 16

Shuffle playback
iPod menu operation
You can play the tracks on iPod in random order.
Press [PLAY MODE].
Each time you press the button, the shuffle mode
turns on/off.
To exit from shuffle playback
Press [PLAY MODE] while shuffle playback is
in progress.
Repeat playback
Press [REPEAT].
Each time you press the button, the repeat mode
changes.
To exit from the repeat mode
Press [REPEAT] repeatedly until the repeat
mode is canceled.
1
Press [MENU] to display the menu.
Each time you press the button, the previous
menu is displayed.
.
2
Press [UP] or [DOWN] to select an item.
3
Press [SET].
NOTE
0
If iPod/iPhone is compatible with iOS 7.0.x, the
above menu operations cannot be available on
the System. Operate the menu on iPod/iPhone
itself.
16
Page 17

Main unitRemote control
BT READY
B T
Listening to a BLUETOOTH device
You can listen to music from your BLUETOOTH
device through the System.
When you connect your device for the first time, it
is necessary to register (pair) your BLUETOOTH
device and the System.
NOTE
0
In order to use these functions, the BLUETOOTH
device must support the AVRCP and A2DP
profiles.
0
Some BLUETOOTH devices may not be
available to the System.
Connecting a BLUETOOTH device for the first time
1
Press the [BLUETOOTH F] button.
.
.
2
Perform the pairing operation on the
target BLUETOOTH device.
On the target device, select “RV-NB100” (this
System) from the available BLUETOOTH
device list.
0
When the target device requests for
password during pairing, enter “0000”.
0
For information on operating the target
BLUETOOTH device, see the instruction
manual for the BLUETOOTH device.
Pairing is completed and the target
BLUETOOTH device is connected to the
System automatically. The BLUETOOTH
indicator lights up.
.
3
Start playback on the target BLUETOOTH
device.
The sound from the BLUETOOTH device is
emitted from the System. Playback may start
automatically with some BLUETOOTH
devices.
NOTE
0
Up to five BLUETOOTH devices can be
registered. When the sixth BLUETOOTH device
is registered, registration of the device with the
oldest connection history is deleted.
0
By pressing [BLUETOOTH F] while “BT
READY” appears on the display window, you
can reconnect the BLUETOOTH device that was
last connected to the System.
0
For the second and subsequent connections,
the BLUETOOTH device that was last
connected to the System will reconnect only
when its BLUETOOTH function is turned on
while “CONNECT” blinks on the display window.
To reconnect another BLUETOOTH device,
operate the BLUETOOTH device to connect
while “BT READY” appears on the display
window.
0
While “CONNECT” is blinking, you cannot
perform any operations except for turning the
System off.
To control the BLUETOOTH device from
the System
operation button
Play/Pause
Stop Press [o].
Skip
Fast Forward/
Fast Rewind
0
Operation may differ depending on the type of
BLUETOOTH device you are using.
Press the [BLUETOOTH F]
button.
Each time you press the button,
playback starts/pauses.
Press [J] or
[I].
Press and hold [J] or
[I].
ENGLISH
17
Page 18

To turn on/off the BLUETOOTH function
DISCNNCT
of the System
While the System is turned on
.
“BT OFF” : Turns off the BLUETOOTH
function of the System.
“BT ON” : Turns on the BLUETOOTH
function of the System.
The BT indicator lights up in blue when the System
is set to “BT ON”, and the System is connected to
a BLUETOOTH device.
Pairing (registering) other BLUETOOTH devices
1
When “BLUETOOTH” is selected as the
source, press and hold
[BLUETOOTH F] for more than 2
seconds.
Canceling of connection starts.
.
“BT READY” appears when the connection
has been canceled.
2
Perform the pairing operation on the
target BLUETOOTH device.
On the target device, select “RV-NB100” (this
System) from the available BLUETOOTH
device list.
0
When the target device requests for
password during pairing, enter “0000”.
0
For information on operating the
BLUETOOTH device, see the instruction
manual for the BLUETOOTH device.
Pairing is completed and the BLUETOOTH
device is connected automatically. The
BLUETOOTH indicator lights up.
NOTE
The connection is canceled automatically in the
following cases.
0
Connection is canceled on the BLUETOOTH
device, or BLUETOOTH function is set to “OFF”.
0
The System or the BLUETOOTH device is
turned off (except for BLUETOOTH standby)
CAUTION
0
The maximum distance for a possible
BLUETOOTH connection is 10 m. The distance
may be shorter depending on the usage
environment.
0
When the iPhone or smartphone is connected to
the System via BLUETOOTH, ring alert of phone
calls and mails can also be heard from the
speakers of the System.
0
This System is not equipped with a microphone
feature. To make a call, cancel the connection
with the System or use the microphone on the
iPhone or smartphone.
0
Some BLUETOOTH devices may not be
available to the System.
18
Page 19
Setting the System to
BT STBY
BLUETOOTH standby
You can turn on the System using the remote
control application on a BLUETOOTH-enabled
Android device.
To turn on the System via the BLUETOOTH device,
set the System to BLUETOOTH standby in
advance.
Set the System to BLUETOOTH standby.
While the power is turned off...
.
.
0
Press the button again to cancel BLUETOOTH
standby. The “BT STBY” indicator goes off.
0
To cancel BLUETOOTH standby, wait for about
10 seconds before performing the operation of
canceling.
0
When the System is set to BLUETOOTH
standby, the BLUETOOTH device can be
connected to the System when the connecting
operation is made on the BLUETOOTH device.
0
Pressing [BLUETOOTH F] during
BLUETOOTH standby turns on the System and
sets the source to “BLUETOOTH”.
0
When you use batteries to power the System,
BLUETOOTH standby cannot be set.
To control the power of the System
using remote control application
0
You need to install the remote control application
on your Android device.
Using a remote control application
You can control the System remotely by using “JVC
Audio Control BR1”, a special remote control
application on an Android device which is
compatible with BLUETOOTH.
To use the remote control application, it is
necessary to register (pair) your Android device
and the System. (p. 17)
NOTE
0
Search and download the application from
Google Play (Play store).
0
Screens and contents of the application are
subject to change.
0
To use the remote control application, your
Android device must be Android OS 2.3 or later,
and compatible with SPP (Serial Port Profile) of
the BLUETOOTH profile.
0
Some devices may not be recognized or may not
work properly.
The following operations can be performed using
the remote control application.
0
Turning on/off the System
0
Playing back music on a disc, USB device, or
iPod
0
Selecting radio stations
0
Setting the timer
0
Volume adjustment
0
Others
Refer to the help page of the remote control
application for operation details.
*The followings are examples of operation screen
of the remote control application.
ENGLISH
1
Set “Bluetooth” to “ON” on the
BLUETOOTH device.
0
Select “Bluetooth” in “Settings” on your
Android device,.
0
Refer to the instruction manual of your
device for further details.
2
Select “RV-NB100” from the device list.
3
Start the remote control application.
4
Control the power of the System using the
“Settings” icon that is located on the
bottom-right of the operation screen.
.
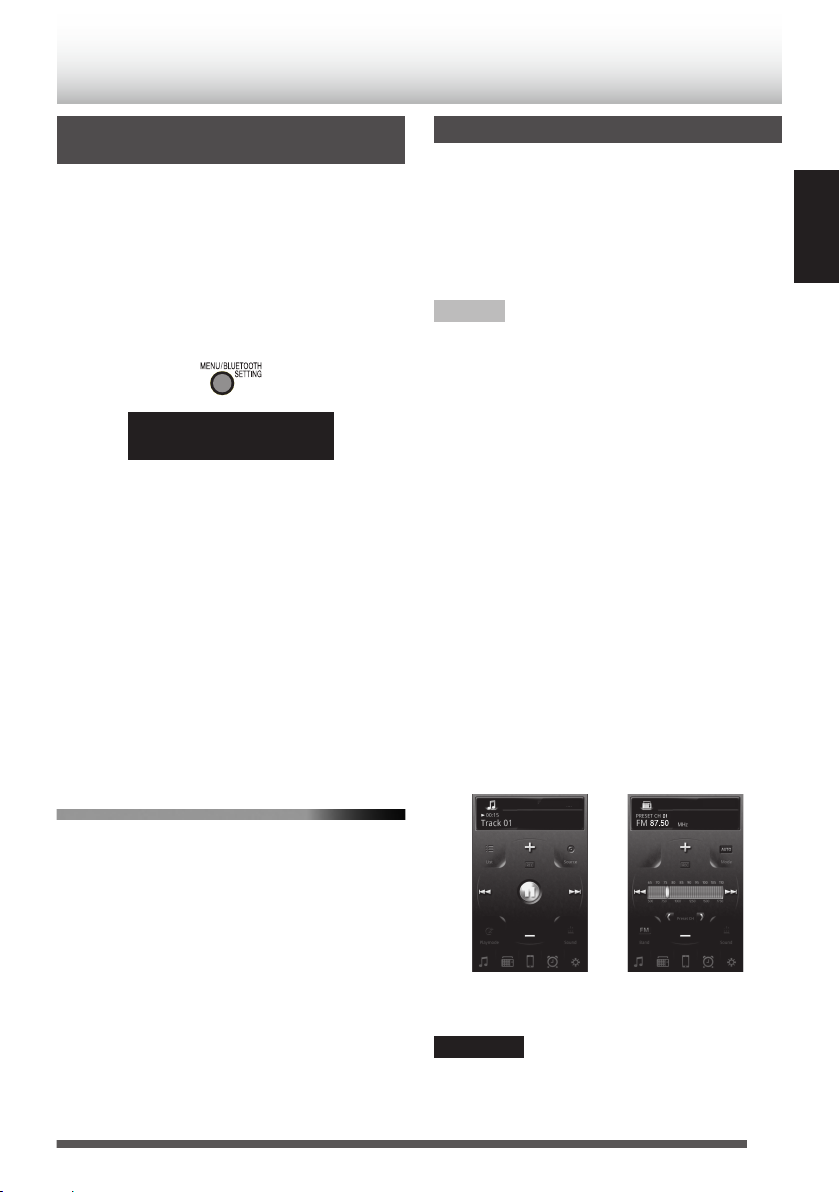
Left:Example of the CD operation screen
Right:Example of the FM operation screen
CAUTION
0
To turn on the System using the remote control
application, set the System to “BLUETOOTH
standby” in advance.
19
Page 20
USB cord
(not supplied)
USB memory
(not supplied)
or
10 0:45
Playback time
Current track
number
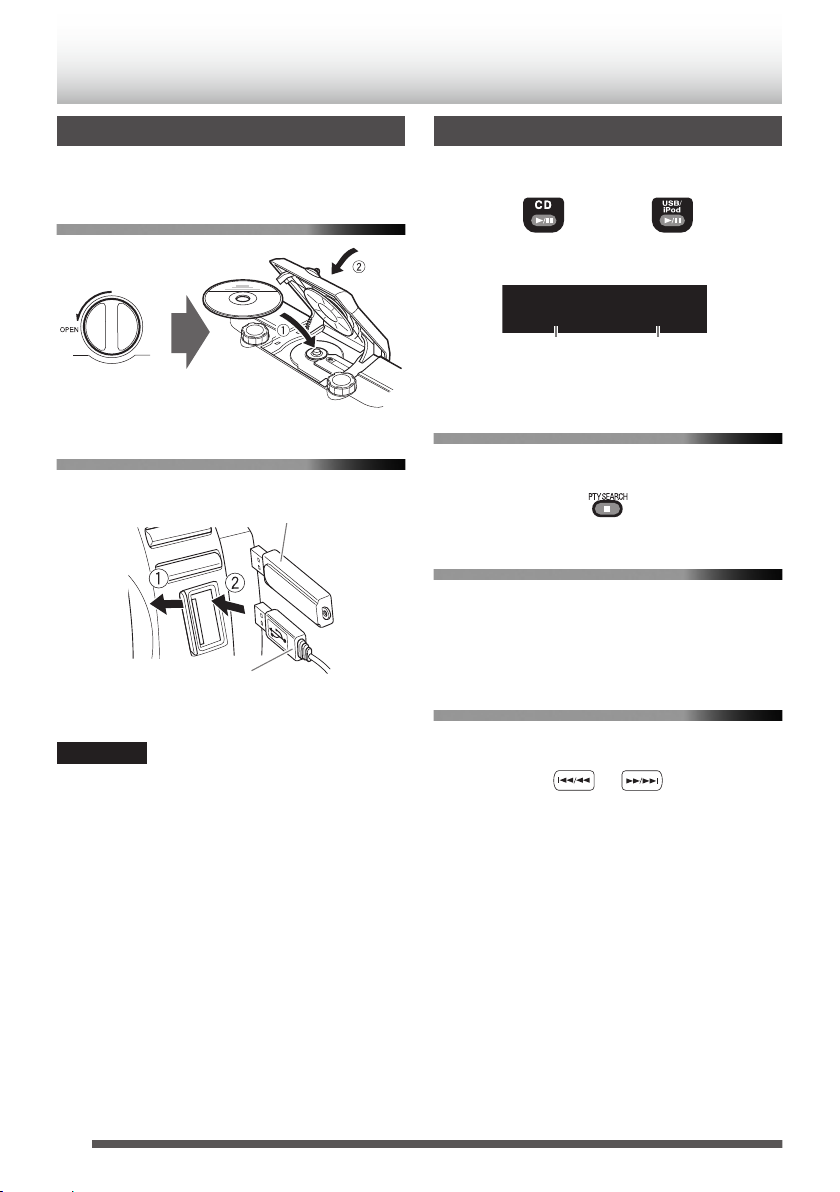
Playing back a disc/USB device
Preparation
Load a disc or connect a USB device.
Disc
.
USB device
.
Playback
Press [CD F] or [USB/iPod F].
.
Display during playback
.
To stop playback
Press [o].
.
To pause
Press [CD F] or [USB/iPod F].
0
To cancel pause, press the button again. Playback
continues from the point where it was paused.
To select a track
CAUTION
0
Disconnect the USB device after stopping
playback. Disconnecting the USB device during
recording/playback may cause some problem of
the USB device and its files.
20
Press [J] or [I].
.
0
Press [I] once to skip to the beginning
of the next track.
0
Press [
J
track being played. Press [
] to skip to the beginning of the
J
] twice
quickly to skip to the beginning of the previous track.
Page 21

To select a track using the remote control
– – P–01
PRGM
Examples:
0
To select number 5, press 5.
0
To select number 15, press +10 then 5.
0
To select number 20, press +10 then 10.
0
To select number 125, press +100, +10, +10
then 5.
To fast forward/reverse
Press and hold [J] or [I]
during playback.
Program playback
You can program up to 32 tracks from a disc or a
USB device in any desired order including the
same tracks.
1
Press [CD F] or [USB/iPod F].
2
Press [o] to stop playback.
3
Press [PLAY MODE].
ENGLISH
To select a group (for MP3/WMA)
Press [UP] or [DOWN].
.
0
Press [UP] to skip to the next group.
0
Press [DOWN] to skip to the previous group.
NOTE
0
When you have stopped playback of an
MP3/WMA file by pressing [o], pressing [F]
will start playback from the beginning of the
stopped file (Resume playback).
0
To cancel the Resume playback, press [o] when
playback is stopped.
0
Resume playback is canceled in the following
situations:
- during program playback
- during random playback
- when the disc compartment door is opened
- when another source is selected
.
4
Press the number buttons to select the
track to program.
0
While making a program, you cannot
specify a group number to select a track.
5
Press [SET].
.
6
Repeat step 4 and 5 to select other tracks
for the program.
7
Press [CD F] or [USB/iPod F].
Program playback starts.
To confirm the programmed tracks
While program playback is stopped, press
[UP] or [DOWN] repeatedly.
The tracks in the program will successively
appears on the display in the programmed order.
To add tracks in the program
Press the number buttons while program playback
is stopped, and then press [SET].
The track is added to the end of the program.
21
Page 22

To delete tracks in the program
10 0:45
RANDOM
To exit from the random mode
While program playback is stopped, press
[CANCEL].
0
Each time you press the button, the last track in
the program is erased.
0
All the programmed contents can be deleted by
holding the button.
0
The program is cleared in the following
situations:
- when the power is turned off
- when the disc compartment door is opened
- when the USB device is disconnected
- when another source is selected
- when program mode is exited
To exit from the program playback
Press [PLAY MODE] when playback is stopped
to select “NORMAL”.
The “PRGM” indicator goes off.
0
Programmed contents are also deleted.
Random playback
You can play all the tracks, on the disc or USB
device in random order.
Press [PLAY MODE] to select “RANDOM”
during playback.
.
0
All tracks are played in random order instead of
random playback within a group.
0
During random playback, you cannot go back to
the previous track even by pressing [J]
repeatedly.
Press [PLAY MODE] during random playback.
The “RANDOM” indicator goes off.
0
Random playback is also canceled when you
stop playback.
0
Random playback is canceled in the following
situations:
- when the power is turned off
- when the disc compartment door is opened
- when the USB device is disconnected
- when another source is selected
Repeat playback
You can repeat a track or tracks on the disc or USB
device as many times as you like.
Press [REPEAT].
Each time you press the button, the play mode
changes as follows:
“E” Æ “EGROUP” Æ “EALL” Æ goes off Æ
(back to the beginning)
“E”
“EGROUP”
“EALL”
“E” goes off
0
“EGROUP” can be selected only when playing
back MP3/WMA files.
NOTE
0
During program playback, only “E” and
“EALL” can be selected. Program playback is
repeated.
0
During random playback, only “EALL” can be
selected. Random playback is repeated.
0
Repeat playback is canceled in the following
situations:
- when the power is turned off
- when the disc compartment door is opened
- when the USB device is disconnected
- when another source is selected
: Repeats the current track.
: In normal play mode, repeats
all the tracks in a group.
: Repeats all the tracks on the
disc or USB device.
: Cancels repeat playback
22
Page 23
(Press repeatedly)
Main unit
Remote control
SCAN
DAB P-01
DAB
Listening to DAB stations
To listen to DAB/DAB+
1
Press [TUNER] repeatedly to select
“DAB”.
.
2
Select the service.
.
0
When you change the source to DAB for the first
time after plugging in the power cord or after
inserting batteries, the System automatically
performs the scanning for the DAB bands to pick
out available ensembles. It will take a few
minutes depending on the location.
.
0
When the scanning is complete, the System
starts playing the first service of the ensemble
found first.
0
When you move the System or adjust the
antenna position, perform the scanning. Press
and hold [SET] while DAB is selected as the
source.
0
Press [CANCEL] to stop scanning.
0
NOSIGNAL is displayed if scanning is
completed but no signal is found.
To select an ensemble
Press [UP] or [DOWN].
To search for ensembles
1
Press and hold [UP] or [DOWN].
While you press and hold the button, the
channel changes through all of the
ensembles regardless of their signal status.
2
Release the button at the desired channel
of the ensemble.
To preset services
You can preset up to 30 DAB services manually.
1
Tune in to the service you want to preset.
2
Press [SET].
.
3
Press the number button to select the
preset number you want to store.
0
You can also select by pressing [UP] or
[DOWN].
4
Press [SET] to store the station.
0
To cancel the presetting, press [CANCEL].
0
When you preset DAB services, you can only
preset primary services. If you select a
secondary service to store, its primary service is
stored instead.
To tune in to a preset service
You can select the preset station directly using the
number buttons.
ENGLISH
0
You can skip to the next/previous ensemble
found in the ensemble scanning.
0
It may take some time to change ensembles.
.
23
Page 24

To search for programs using PTY
codes (PTY search)
You can locate a particular kind of program from
among all the services you can receive by
specifying a PTY code.
1
Press [PTY SEARCH] to enter the PTY
code setting mode.
.
“PTY” blinks on the display window.
0
Perform the following steps while the
indication flashes.
2
Press [UP] or [DOWN] to select a PTY
code.
3
Press [SET].
The System starts searching for a program of
the selected type. The first one found is tuned
in.
0
To end the search and resume to the usual
display, press [CANCEL].
0
To continue searching after it has stopped on an
unwanted program, press [PTY SEARCH] while
the service label is flashing on the display
window.
0
If no program is found, “NOTFOUND” appears
on the display window.
To change the DAB Information
.
Each time you press the button, the display window
changes as follows:
Service name Æ Ensemble name Æ Channel
number Æ Frequency Æ Programme type (PTY) Æ
Dynamic Label Segment (DLS) Æ Digital Radio
Type/Audio Bit Rate Æ Preset number Æ Clock
(Non-DAB signal) Æ (back to the beginning)
0
“NOSIGNAL” appears if no signals are sent.
Adjusting the antenna
Adjust the DAB/FM telescopic antenna’s length,
angle and direction until the best reception is
obtained.
24
Page 25
(Press repeatedly)
Main unit
Remote control
FM 8750
MHz
FM P-01
FM
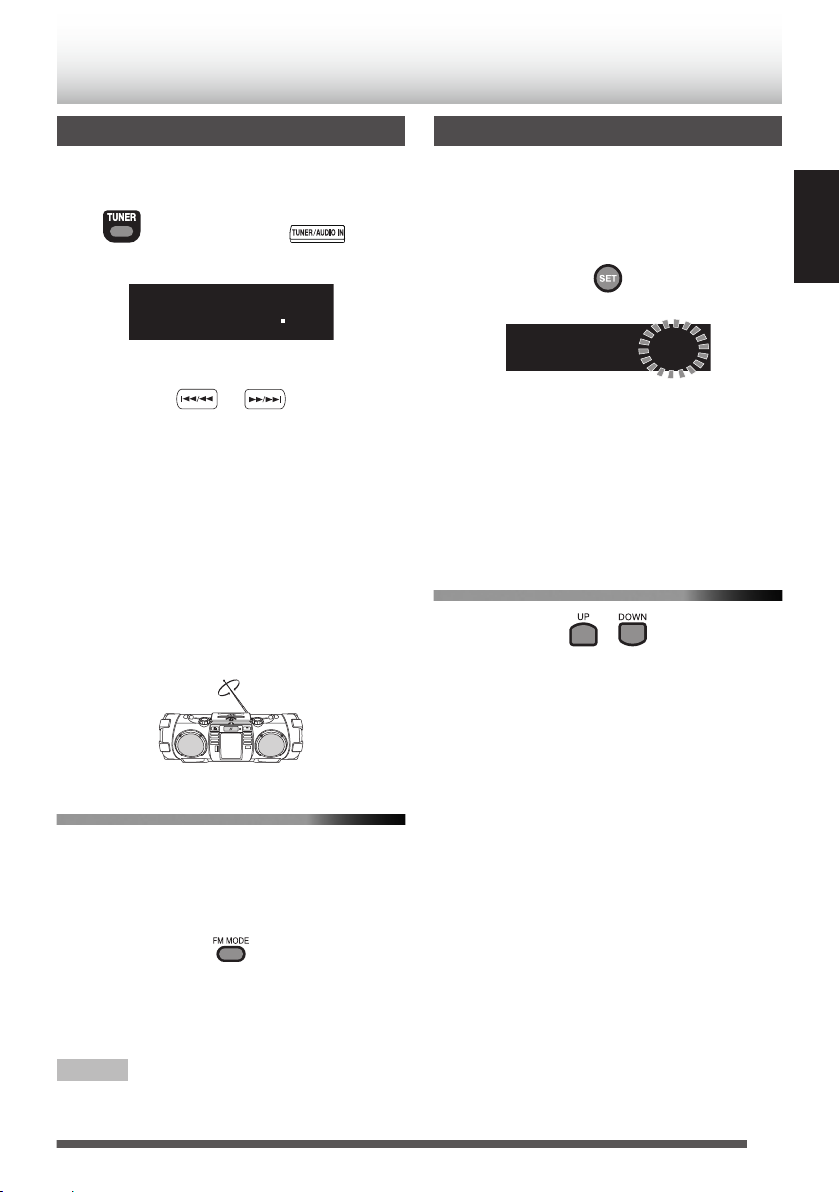
Listening to FM stations
1
Press [TUNER] repeatedly to select “FM”.
.
.
2
Select the station.
.
Press and hold [
J
change the frequency continuously until a
station of sufficient signal strength is tuned in.
0
To stop the search manually, press the
buttons again.
0
Pressing the button repeatedly changes
the reception frequency in steps of 50 kHz.
Adjusting the antenna
Adjust the DAB/FM telescopic antenna’s length,
angle and direction until the best reception is
obtained.
.
To improve the FM reception
When an FM stereo (FM) broadcast is hard to
receive or noisy, select the monaural reception
(MONO) mode.
I
] or [
Presetting stations
You can preset up to 30 FM stations manually.
1
Tune in to a station you want to preset.
2
Press [SET].
.
0
Perform the following steps while the
] to
indication flashes.
3
Press [UP] or [DOWN] to select the preset
number you want to store.
0
To cancel the presetting, press [CANCEL].
4
Press [SET].
To tune in to a preset station
.
Each time you press the button, you can select a
preset station.
0
You can select the preset station directly using
the number buttons.
Examples:
0
To select number 5, press 5.
0
To select number 15, press +10 then 5.
0
To select number 20, press +10 then 10.
ENGLISH
Press [FM MODE].
.
Each time you press the button, the setting
changes.
“AUTO” : Stereo auto reception
“MONO” : Monaural reception
NOTE
0
Monaural reception improves the reception but
the stereo effect is lost.
25
Page 26

Digital audio player, TV, or
other audio device
Headphone jack and
audio output jack
Stereo mini
plug cord
(not supplied)
Main unitRemote control
(Press repeatedly)
External device
Listening to an external device
1
Set the volume level of the System to
minimum.
2
Connect the external device.
Refer also to the instruction manual for the
external device.
.
3
Press [AUDIO IN] to select “AUDIO IN”.
.
4
Start playback of the external device.
5
Adjust the volume of the System and of
the external device.
Adjusting the audio input level
Adjust the audio input level when there is a contrast
between the volume of the external device
connected to the AUDIO IN jack and that of other
sources.
When “AUDIO IN” is selected as the source,
press [SET].
.
Each time you press the button, the input level
changes as follows:
“LEVEL1” Æ “LEVEL2” Æ “LEVEL3” Æ (back to
the beginning)
“LEVEL1” : Standard audio input level
“LEVEL2” : Higher level than “LEVEL1”
“LEVEL3” : Higher level than “LEVEL2”
The initial setting is “LEVEL3”.
26
Page 27

T120 B4
beat
tempo
Metronome
Using the metronome function
You can use the System as a metronome.
You can set the tempo and rhythm separately for
your guitar practice, etc.
1
Press [METRONOME F].
.
Rhythmical beeps are emitted from the
speakers.
Each time you press the button, beeps are
started/paused.
0
The beeps are also canceled when you
press [o].
2
Press [J] or [I] to select
the tempo.
0
You can select the tempo from 30 to 250.
0
When you press and hold the button, the
tempo changes continuously.
.
3
Press [UP] or [DOWN] to select the beat.
0
You can select from 1 to 7 beat.
0
When you press and hold the button, the
beat changes continuously.
ENGLISH
27
Page 28
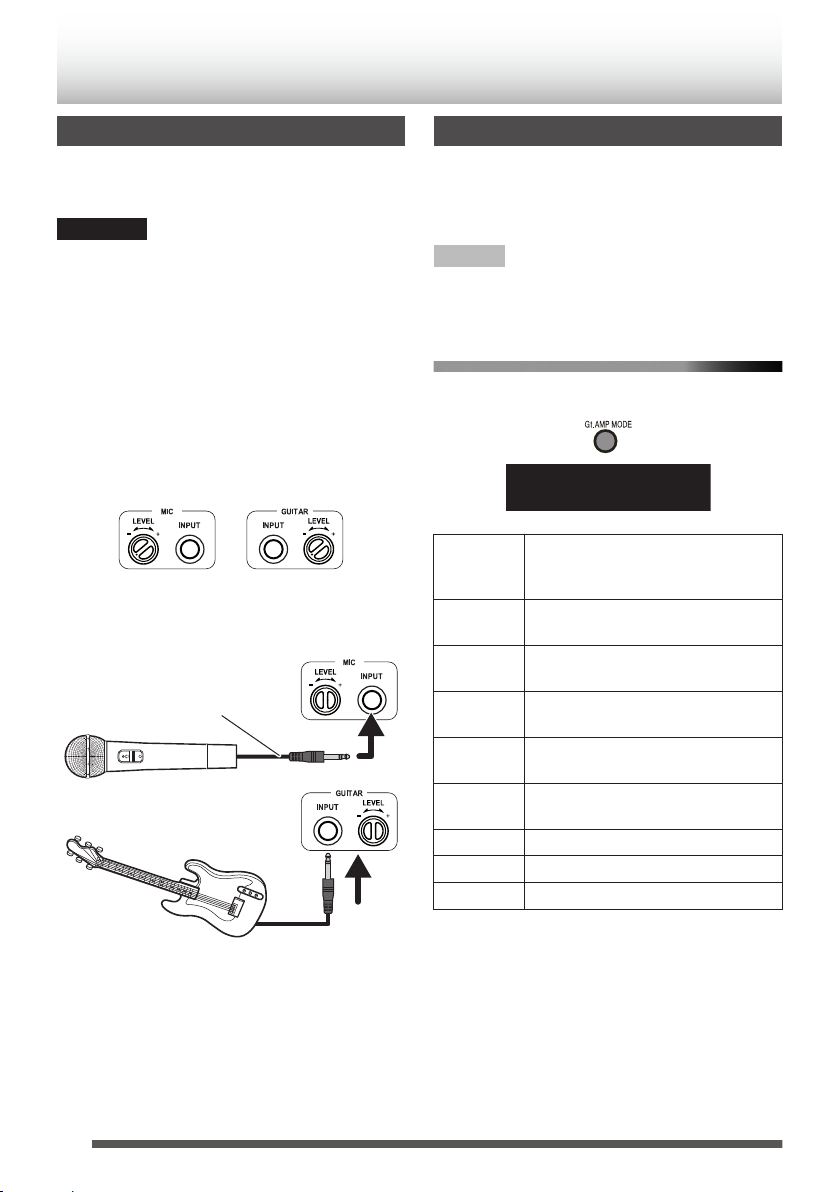
Microphone or guitar(not supplied)
φ 6.3 monaural
cable(not supplied)
CLEAN 1
Connecting a microphone/guitar
Microphone/guitar mixing
Using a microphone or a guitar, you can mix its
sound with a source sound.
CAUTION
0
DO NOT connect a bass guitar to the GUITAR
INPUT connector, it may damage the System.
0
If the output of the guitar is too high, sound
distortion may occur. Lower the GUITAR LEVEL.
0
To prevent sound distortion after mixing, the
volume level of the current playback source
becomes lower when a microphone or a guitar is
connected to the System. This is not
malfunction.
1
Turn the [LEVEL +/-] control fully
counterclockwise.
.
2
Connect a microphone or guitar to the
MIC INPUT or GUITAR INPUT connector
on the rear of the System.
Adjusting the tone of a guitar
Besides the sound mode of the main unit, you can
select the tone of the guitar. There are three
available tones, and the tone can be selected from
1 to 3 respectively. Set your preferred tone.
NOTE
0
When you increase the level, the amount of noise
also increases. This is due use of an analog
circuit, and is not malfunction.
Using the remote control
Press [Gt.AMP MODE] repeatedly.
.
CLEAN1 Produces a tone with the low frequencies cut
CLEAN2 Produces a tone with the low-mid frequencies
CLEAN3 Produces a tone with the mid frequencies
T-BOOST1 Produces a slightly distorted tone with the high
T-BOOST2 Produces a slightly distorted tone with the high
T-BOOST3 Produces a slightly distorted tone with the high
DISTORTION1 Produces a distorted tone of CLEAN1.
DISTORTION2 Produces a distorted tone of CLEAN2.
DISTORTION3 Produces a distorted tone of CLEAN3.
off and high frequencies boosted, as with
guitar amplifier in general.
boosted as compared to CLEAN1.
boosted as compared to CLEAN1.
frequencies of CLEAN1 boosted.
frequencies of CLEAN2 boosted.
frequencies of CLEAN3 boosted.
.
3
Start playback of the source.
4
Turn the [LEVEL +/-] control to adjust the
volume.
28
Page 29
Using the main unit
(Turn)
1
Press and hold the [o] button on main unit
for more than 2 seconds until “G AMP” is
displayed.
0
Each time you press and hold the button,
the function switches between super
woofer volume adjustment (“SW VOL”
appears on the display window) and the
guitar tone adjustment.
2
Turn the [SUPER WOOFER VOLUME]
control to the left or right to select the tone
of the guitar.
.
ENGLISH
29
Page 30

Recording on a USB device
To select the recording speed (only for
Recording discs
You can record a CD to a USB device in two ways,
digital recording and analog recording.
Generally, you can obtain better sound quality by
using digital recording than by using analog
recording.
However, by using analog recording, you can
record sound from a microphone or guitar
connected to the System at the same time (mixing
recording).
CAUTION
0
Before recording, connect the USB device with
enough free space to the USB connector.
(p. 20)
0
You cannot record from your iPod or
BLUETOOTH device.
0
Discs other than audio CD such as MP3/WMA
discs cannot be recorded.
0
Do not shake the System during the recording;
otherwise the tracks might not be recorded
properly.
0
You cannot record sound while the sleep timer
(p. 35) is activated.
digital recording)
You can set the recording speed when recording a
disc using the digital recording function.
1
Press [CD F].
2
Press [o] to stop playback.
3
Press [REC SPEED] to select the
recording speed.
“NORMAL” : Records in normal speed, and
“HIGH” : Records in high speed (about
.
sound can be heard during
recording.
two times the normal speed),
and sound cannot be heard
during recording.
The “HIGH” icon lights up during
clock setting.
NOTE
0
The volume setting and sound mode have no
effect on recording.
0
You cannot activate random playback or repeat
playback during recording.
0
The file is stored in MP3 format (bitrate: 192
kbps).
0
Refer to “Recorded files created on the System”
(p. 40) for the file and folder structures.
30
Page 31

To record a music disc using digital
Remote control
Main unit
RECS TART
Remote control
Main unit
recording
1
Press [CD F].
2
Press [o] to stop playback.
0
To record all tracks on the disc, skip Step 3
and proceed to Step 4.
3
Press [J], [I] to select
the track.
0
Recording starts from the selected track to
the last track. To record all tracks on the
disc, select the first track of the disc.
0
To record the tracks in your preferred order,
program the tracks beforehand, and stop
playback. (p. 21)
4
Press [REC/DELETE].
.
.
Digital recording of the selected tracks starts.
The “REC” indicator lights while recording.
0
In the “CD” folder in the “MUSIC” folder, a folder
such as “CD001” is created where the music files
are stored.
0
Recording stops automatically when playback
stops.
0
To stop recording manually, press [o].
To record one track from a music disc
using digital recording
You can only select one track to record.
1
Press [CD F].
2
Press [J], [I] to select
the track.
3
Press [CD F] to play back or pause.
4
Press [REC/DELETE].
.
Recording starts from the beginning of the
selected track.
ENGLISH
31
Page 32

To record a music disc using analog
Remote control
Main unit
recording
Use analog recording when digital recording
cannot be performed due to SCMS (p. 40).
0
Recording is performed in a normal speed.
Sound can be heard during recording.
1
Press [CD F].
2
Press [o] to stop playback.
0
To record all tracks on the disc, skip Step 3
and proceed to Step 4.
3
Press [J], [I] to select
the track.
0
Recording starts from the selected track to
the last track. To record all tracks on the
disc, select the first track of the disc.
0
To record the tracks in your preferred order,
program the tracks beforehand, and stop
playback. (p. 21)
4
Press and hold [REC/DELETE].
Analog recording mode is enabled and
“ANLG REC” blinks.
5
Press [REC/DELETE] while “ANLGREC” is
blinking.
Recording other sources
You can record an DAB/FM broadcast, metronome
or an external device.
You can divide a file according to the marking
setting. (see below)
You can record sound from a microphone or guitar
connected to the System at the same time.
0
To record from an external device, connect the
external device to the System, and adjust the
audio input level. (p. 26)
0
The music files are stored in the appropriate
folder (“DAB”, “FM”, “AUDIO IN” and
“METRONOME” folder) in the “MUSIC” folder.
0
Recording stops automatically when the file size
exceeds 2 GB (about 20 hours).
0
Recording is performed in a normal speed.
Sound can be heard during recording.
To select the marking setting
0
You can select the way files are divided.
0
Select the setting before recording.
Press [REC MODE] when “TUNER (DAB/FM)”,
“AUDIO IN” or “METRONOME” is selected as
the source.
.
Analog recording of the selected tracks starts.
NOTE
0
To record only one particular track, press and
hold [REC/DELETE] when the track is being
played back or paused.
0
You cannot set “HIGH” for “REC SPEED” when
recording a disc using the analog recording
function.
32
.
Each time you press the button, the setting
changes.
“MANUAL” : Divides a file each time you
press [SET].
“TIME” : Divides a file automatically
every 5 minutes.
0
Sound is interrupted for about one second when
the file is divided.
0
The setting will be memorized even if the System
is turned off.
Page 33

To record DAB/FM stations
Remote control
Main unit
RECS TART
To record the metronome
1
Press [TUNER].
2
Tune into the station you want to record.
3
Press [REC/DELETE].
.
.
Recording starts.
The “REC” indicator lights while recording.
4
Press [o] to stop recording.
To record an external device
1
Press [AUDIO IN].
2
Press [REC/DELETE].
Recording starts.
3
Start playback of the external device.
The “REC” indicator lights while recording.
4
Press [o] to stop recording.
1
Press [METRONOME].
Adjust the tempo and rhythm if necessary.
(p. 27)
2
Press [REC/DELETE].
Recording starts.
The “REC” indicator lights while recording.
3
Press [o] to stop recording.
To record sound from a microphone or
guitar
You can record sound from a microphone or guitar
connected to the System at the same time.
1
Connect a microphone or guitar to the
System.
2
Select a source to be recorded along with
a guitar or a microphone.
Digital recording is not available when “CD” is
selected as the source. Perform analog
recording. (p. 32)
3
Press [REC/DELETE].
Recording starts.
The “REC” indicator lights while recording.
4
Output sound from the microphone or
guitar.
5
Press [o] to stop recording.
ENGLISH
33
Page 34

Deleting a track
PUSH SET
You can delete a track recorded on a USB device.
0
Before deleting a track, connect the USB device
to the USB connector.
0
You cannot restore deleted files. Check the files
carefully when deleting.
1
Press the [USB/iPod F] button.
2
Press [J] or [I] to select
the track to delete, then play back or
pause.
3
Press [REC/DELETE].
.
Deleting is in standby.
0
You can cancel deletion by pressing
[CANCEL] or [o] while “PUSH SET” is
blinking.
4
Press [SET] or [REC/DELETE].
“DELETE” appears on the display window,
and deleting starts.
“FINISH” appears when deleting is complete.
34
Page 35

SLEEP 10
SLEEP
PLAY TMR
ON 0:00
Using the timer
Setting the sleep timer
The power of the System automatically turns off
after the shut-off time you set has elapsed.
Press [SLEEP] repeatedly.
.
Each time you press the button, the shutoff
time (in minute) changes as follows:
10 Æ 20 Æ 30 Æ 60 Æ 90 Æ 120 Æ 150 Æ 180
Æ OFF Æ (back to the beginning)
0
To cancel the sleep timer, press [SLEEP]
repeatedly to select “OFF”.
NOTE
0
This APS function (p. 13) operates even while
the sleep timer is on.
To check the remaining time until the
System shuts off
Press the [SLEEP] button once.
The remaining time is displayed for 5 seconds.
Setting the daily timer
Using the daily timer (Playback timer), you can
wake up with your favorite music.
By setting the daily timer, the System turns on
automatically one minute before the daily timer
starts.
NOTE
0
Set the clock before setting the recording timer.
(p. 12)
0
Tune into a DAB/FM station, load a disc, or connect
a USB device/iPod to the System, and make sure
that the source works properly beforehand.
0
Preset the desired DAB/FM station before
setting the daily timer. (p. 25)
0
Daily timer does not work when the power is
supplied through the batteries. Supply the power
through an AC outlet.
1
Press [CLOCK/TIMER].
2
Press [UP] or [DOWN] repeatedly until
“PLAY TMR” appears.
.
3
Press [SET].
4
Press [UP] or [DOWN] repeatedly until
“PLAY SET” appears.
5
Press [SET].
ENGLISH
.
6
Press [UP] or [DOWN] to adjust the “hour”
of the starting time.
0
When you press and hold the button, the
hour digit changes continuously.
7
Press [SET].
Continue on the next page
35
Page 36

8
TIMEROFF
Press [UP] or [DOWN] to adjust the
“minute” of the starting time, the “hour”
and “minute ” of the ending time, and
select the source and the volume.
0
Select “DAB”, “FM”, “CD”, “USB”, “iPod”, or
“AUDIO IN” as the source.
0
When “DAB/FM” tuner is selected as the
source, select a preset number using [UP]
or [DOWN] and then press [SET].
0
When “CD” or “USB” is selected as the
source, select a track number using [UP] or
[DOWN] and then press [SET].
9
Press [SET].
After setting up the volume, “PLAY SET” is
displayed, followed by the settings in order.
10
Press [D] to turn off the System.
0
The System turns on automatically one
minute before the daily timer starts.
0
The daily timer works only when the
System is turned off.
0
While the timer is set, the timer indicator
[B] lights up.
0
While the timer is working, [B] flashes.
0
Once set, the daily timer works every day.
0
You cannot set the same time for the
starting time and finish time.
To cancel the daily timer
After selecting “PLAY TMR” by performing
step 1 to 3 in “Setting the daily timer”, select
“PLAY OFF”, and then press [SET].
.
To set the daily timer with the same
settings again after canceling
After selecting “PLAY TMR” by performing
step 1 to 3 in “Setting the daily timer”, select
“PLAY ON”, and then press [SET].
“TIMER ON” is displayed, followed by the settings.
NOTE
0
To go back to the previous step, press
[CANCEL].
0
Auto power save function (p. 13) remains active
even while the daily timer is working.
0
The [SLEEP] button is disabled while the daily
timer is functioning.
36
Page 37

Setting the recording timer
REC TMR
ON 0:00
You can set the recording timer for DAB/FM
stations or an external device.
By setting the recording timer, the System turns on
automatically one minute before the recording
timer starts.
NOTE
0
Set the clock before setting the recording timer.
(p. 12)
0
Check the reception of the DAB/FM station and
the connection of the external device before
setting the recording timer.
0
Preset the desired DAB/FM station before
setting the recording timer. (p. 25)
0
Connect the USB device to the unit before
setting the recording timer.
0
The recording timer does not work when the
power is supplied through the batteries. Supply
the power through an AC outlet.
1
Press [CLOCK/TIMER].
2
Press [UP] or [DOWN] repeatedly until
“REC TMR” appears.
.
3
Press [SET].
4
Press [UP] or [DOWN] repeatedly until
“REC SET” appears.
5
Press [SET].
6
Press [UP] or [DOWN] to adjust the “hour”
of the starting time.
0
When you press and hold the button, the
hour digit changes continuously.
0
When you press and hold the
[UP] or [DOWN] button, the digit changes
continuously.
7
Press [SET].
8
Press [UP] or [DOWN] to adjust the
“minute” of the starting time, the “hour”
and “minute ” of the ending time, and
select the source and the volume.
0
Select “FM” or “AUDIO IN” as the source.
0
When DAB/FM tuner is selected as the
source, select a preset number using [UP]
or [DOWN] and then press [SET].
9
Press [SET].
After setting up the volume, “REC SET” is
displayed, followed by the settings in order.
10
Press [D] to turn off the System.
0
The System turns on automatically and
starts recording about one minute before
the starting time of the recording timer.
0
The “REC” indicator lights while recording.
0
The recording timer works only when the
System is turned off.
0
While the timer is set, the timer indicator
[C] lights up.
0
While the timer is working, [C] flashes.
0
The recording timer works only once.
(However, the settings are stored on the
System.)
0
You cannot set the same time for the
starting time and finish time.
ENGLISH
.
NOTE
0
To go back to the previous step, press
[CANCEL].
0
The [CLOCK/TIMER] and [SLEEP] buttons are
disabled while the recording timer is functioning.
37
Page 38

To cancel the recording timer
After selecting “REC TMR” by performing Step
1 to 3 in “Setting the recording timer”, select
“REC OFF”, and then press [SET].
To set the recording timer with the same
setting
After selecting “REC TMR” by performing Step
1 to 3 in “Setting the recording timer”, select
“REC ON”, and then press [SET].
“TIMER ON” is displayed, followed by the settings.
38
Page 39

CD-RW
CD-R
AUDIO CD
About Discs/Files
Compatible iPod
Made for Version*
iPod nano (7th generation) 1.0.2
iPod nano (6th generation) 1.2
iPod nano (5th generation) 1.0.2
iPod nano (4th generation) 1.0.4
iPod nano (3rd generation) 1.1.3
iPod nano (2nd generation) 1.1.3
iPod touch (5th generation) 7.0.2
iPod touch (4th generation) 6.1.3
iPod touch (3rd generation) 5.1.1
iPod touch (2nd generation) 4.2.1
iPod touch 3.1.3
iPod classic 2.0.4
iPhone 5s 7.0.2
iPhone 5c 7.0.2
iPhone 5 7.0.2
iPhone 4s 7.0.2
iPhone 4 7.0.2
iPhone 3GS 6.1.3
iPhone 3G 5.1.1
* Software version at the time of the operation
check.
0
A lightning connector is used for the iPod/iPhone
dock of the System. Only iPod nano (7th
generation), iPod touch (5th generation), iPhone
5s, iPhone 5c, and iPhone 5 support the
Lightning connector. iPod/iPhone other than the
above mentioned need to be connected to the
USB connector.
0
Reset your iPod/iPhone if your iPod/iPhone is not
playing back correctly. (Please visit Apple's
homepage for information about resetting your
iPod/iPhone.)
0
For details on the iPod/iPhone, check Apple's
web site. <http://www.apple.com>
0
To check the latest supporting status of the iPod/
iPhone, refer to the product information on our
home page.
Playable BLUETOOTH devices
0
To connect the device to this System via
BLUETOOTH, the device must be compatible
with the BLUETOOTH 2.1+EDR and the A2DP
and AVRCP profiles.
Playable discs/files
Discs
.
Files MP3/WMA
0
Some MP3/WMA files may not be played back
and will be skipped. This results from their
recording processes and conditions.
0
When making MP3/WMA discs, use ISO 9660
Level 1 for the disc format.
0
This system can play back MP3/WMA recorded
at the following sampling frequency and bitrate.
Bitrate: MP3 32 kbps – 320 kbps
WMA 32 kbps – 320 kbps
Sampling frequency: 32/ 44.1/ 48 kHz
0
This System cannot play “packet write” discs.
0
The System can display ID3 TAG VERSION1,2
(song title, artist and album name), names of the
files and folders (alphanumeric characters only,
lowercase letters are displayed as uppercase
letters).
0
Up to 128 characters can be displayed.
0
This System can recognize up to 99 folders and
999 files on a disc, and up to 300 folders and 999
files on a USB device.
ENGLISH
39
Page 40

Important for USB mass storage
2nd generation
1st generation
DIGITAL
DIGITAL DIGITAL
ANALOG
class devices
For connecting/disconnecting:
0
Disconnect the USB device after stopping
playback. Disconnecting the USB device during
recording/playback may cause some problem of
the USB device and its files.
0
When connecting with a USB cable, use a USB
2.0 cable less than 1 m in length.
0
You cannot connect a computer to the USB
MEMORY terminal of the System.
0
Do not use a USB hub.
0
When the power is supplied through the AC
outlet and USB is selected as the source, the
USB device is charged through the USB
MEMORY terminal.
0
Deactivate the security function of the USB
device before connecting.
For playing back:
0
The playing order of MP3/WMA files
‒ Groups are played in creation order. In a
group, tracks are played in recording order.
‒ The playing order may change if you change
a folder name or file name on the PC.
0
You cannot play back a file larger than 2
Gigabytes.
0
It is recommended to use USB mass storage
class devices that are less than 32 GB.
0
If your USB device is partitioned, only the first
partition is recognized.
0
Some USB devices may not be recognized or
may not work properly.
0
Copyrighted tracks (WMA-DRM tracks) cannot
be played back on the System.
0
Electrostatic shock at connecting a USB device
may cause abnormal playback of the device. In
this case, disconnect the USB device then reset
this System and the USB device.
0
JVC bears no responsibility for any loss of data
on the USB mass storage class device while
using this System.
Recorded files created on the System
0
Recorded files that are created on the System
are MP3 format with a bitrate of 192 kbps.
0
A “MUSIC” folder is created automatically in the
USB device, and the MP3 files are created in the
folder as follows:
.
About SCMS (Serial Copy Management System)
The System uses the Serial Copy Management
System which allows only first-generation digital
copies to be made of premastered software such
as regular CDs. If you try to record from a
duplicated CD-R or CD-RW onto a USB device,
“SCMS ERR” appears on the display.
.
It should be noted that it may be unlawful to
re-record pre-recorded tapes, records, or
discs without the consent of the owner of
copyright in the sound or video recording,
broadcast or cable programme and any
literary, dramatic, musical, or artistic work
embodied therein.
40
Page 41

Lens
Blower
Others
Maintenance
To get the best performance of the System, keep
your discs and mechanism clean.
Handling discs
0
Remove the disc from its case by holding it at the
edge while pressing the center hole lightly.
0
Do not touch the shiny surface of the disc, or
bend the disc.
0
Put the disc back in its case after use.
0
Be careful not to scratch the surface of the disc
when placing it back in its case.
0
Avoid exposure to direct sunlight, temperature
extremes, and moisture.
Cleaning discs
0
Wipe the disc with a soft cloth in a straight line
from center to edge.
Cleaning the System
0
Stains should be wiped off with a soft cloth. If the
System is heavily stained, wipe it with a cloth
soaked in water-diluted neutral detergent and
wrung well, then wipe clean with a dry cloth.
0
Since the System may deteriorate in quality,
become damaged or get its paint peeled off, be
careful about the following:
– DO NOT wipe it hard.
– DO NOT wipe it with thinner or benzine.
– DO NOT apply any volatile substances such
as insecticides to it.
– DO NOT allow any rubber or plastic to remain
in contact for a long time.
Cleaning the CD pickup lens
0
Keep the CD pickup lens clean, or the sound may
be degraded. Use a blower (available at a
camera store, etc.) to blow dust off the lens.
.
Trademarks
0
Microsoft and Windows Media are either
registered trademarks or trademarks of
Microsoft Corporation in the United States
and/or other countries.
0
“Made for iPod” and “Made for iPhone” mean that
an electronic accessory has been designed to
connect specifically to iPod or iPhone,
respectively, and has been certified by the
developer to meet Apple performance
standards. Apple is not responsible for the
operation of this device or its compliance with
safety and regulatory standards. Please note
that the use of this accessory with iPod or iPhone
may affect wireless performance.
0
iPhone, iPod, iPod classic, iPod nano and iPod
touch are trademarks of Apple Inc., registered in
the U.S. and other countries.
0
The Bluetooth® word mark and logos are
registered trademarks owned by Bluetooth SIG,
Inc. and any use of such marks by
JVC KENWOOD Corporation is under license.
0
Android is a trademark of Google Inc..
ENGLISH
41
Page 42

Troubleshooting
If you are having a problem with your System,
check this list for a possible solution before calling
for service.
If the following measures do not resolve the
problems:
The System works using a built-in microprocessor.
If buttons are not operative, disconnect the AC
power cord from the wall outlet, wait for a while,
then connect the cord again.
General
Power does not come on.
No power is supplied. Check the power cord
B
connection or change the batteries.
The System turns off automatically.
Auto power save function is functioning.
B
(p. 13)
Adjustments or settings are suddenly
canceled before you finish.
There is a time limit. Repeat the procedure.
B
While the power is supplied using the
batteries, sound from the speakers is
distorted or too quiet.
Batteries are exhausted. Change the batteries.
B
Unable to operate the System from the remote
control.
The path between the remote control and the
B
remote sensor on the System is blocked.
The batteries are exhausted.
B
iPod Operations
iPod does not play.
Connect the USB cable correctly.
B
Check the compatibility of your iPod. (p. 39)
B
The battery of iPod is low or exhausted.
B
Charge the battery of iPod.
Reset your iPod after disconnecting from the
B
System, and unplug the power of the System
and plug in again. (Please visit Apple's
homepage for further information on resetting
your iPod.)
BLUETOOTH Operations
Unable to pair.
Set the System in pairing standby, and perform
B
pairing from the target device, such as a
smartphone. (p. 17)
Unable to connect to BLUETOOTH device.
Check that the BLUETOOTH function of your
B
BLUETOOTH device is set to ON.
Your device does not support A2DP. A2DP
B
profile is necessary to stream music data.
Refer to the instruction manual of the
BLUETOOTH device.
Unable to operate BLUETOOTH device.
Your device does not support AVRCP. To
B
operate the BLUETOOTH device from the
System, AVRCP is required. Refer to the
instruction manual of the BLUETOOTH
device.
No sound is heard.
Adjust the volume.
B
Headphones are connected.
B
42
The sound is choppy. Noise is generated.
The System is out of the BLUETOOTH range
B
limitation, or there may be an equipment
interfering with the radio waves between the
System and the BLUETOOTH device. Try
placing the BLUETOOTH device nearer to the
System, or change location.
Page 43

Disc/USB Mass Storage Class Device
Operations
The disc/USB device does not play.
The disc is placed upside down. Place the disc
B
with the label side facing up.
The disc is scratched or dirty.
B
The disc is recorded with the “packet writing
B
(UDF file unit)”. It cannot be played. Check the
files you want to play back.
The USB device is not connected properly.
B
MP3/WMA groups and tracks are not played
back as you expect.
Playing order may change if you edit a file
B
name on the PC.
The disc sound is discontinuous.
The disc is scratched or dirty.
B
Play MP3/WMA files that are properly written.
B
Sounds from USB device are interrupted.
Noise and static electricity may stop the sound.
B
In this case, disconnect and connect the USB
device again after turning off the System.
Radio Operations
Timer Operations
Unable to set the sleep timer
Timer or recording timer is working. Turn off the
B
timer. During timer/recording timer is working,
sleep timer does not work.
Daily timer does not start working.
The clock needs to be set. Clock setting is
B
canceled when the AC power cord is
unplugged from the AC outlet, causing the
daily timer to stop functioning.
The System is turned on when the on-time
B
comes. Timer starts working only when the
System is turned off.
Recording timer does not function.
The System is turned on when the on-time
B
comes. Recording timer starts working only
when the System is turned off.
ENGLISH
Hard to listen to broadcasts because of noise.
The DAB/FM antenna is not properly extended
B
and positioned.
Recording Operations
Unable to record.
There is not enough free space in the USB
B
device.
Disable the write protection of the USB device.
B
Digital recording is prohibited due to SCMS.
B
Perform analog recording. (p. 40)
43
Page 44

Specifications
Disc player
CD capacity: 1CD
Signal-to-noise ratio: 85 dB
Dynamic range: 90 dB
Tuner
DAB tuning range
0
BAND III: 174.928 MHz - 239.200 MHz
FM tuning range: 87.50 MHz – 108.00 MHz
Antenna: Telescopic antenna
BLUETOOTH
BLUETOOTH version: BLUETOOTH 2.1 + EDR certified
Output power: BLUETOOTH power class 2
Service area: max. 10 m (10.9 yd.)*
* Communication range may vary depending on the environmental conditions.
Frequency band: 2.4 GHz (2.4000 GHz – 2.4835 GHz)
BLUETOOTH profile: A2DP (Advanced Audio Distribution Profile), AVRCP (Audio/
General
Speakers:
0
Full range: 8 cm cone ´ 2
0
Super woofer: 13 cm cone ´ 2
Output power: 40 W
Input terminal
0
USB MEMORY: Playable files:
0
Dock for iPod:
0
AUDIO IN: φ3.5
Video Remote Control Profile)
Speaker impedance:
16 K
Speaker impedance:
7 K
MP3, WMA
0
Compatible with USB 2.0 Full-Speed
0
Compatible device:
Mass storage class
0
Compatible system:
FAT16, FAT32
0
Output power: DC 5 V P 1A
DC 5 V P 1 A
44
Page 45

Input Sensitivity /Impedance (1 kHz):
0
MIC/GUITAR:
0
LEVEL 1: 500 mV /47 kK
0
LEVEL 2: 250 mV /47 kK
0
LEVEL 3: 125 mV /47 kK
0
MIC: 200 K - 2 kK (φ6.3)
0
GUITAR: 100 kK - 1 MK (φ6.3)
Output terminal
0
PHONES: φ3.5
32 K - 1 kK
15 mW/ch output into 32 K
Power supply
0
AC: AC 230 V H, 50 Hz
0
DC: DC 15 V (R20(SUM-1)/D (13D)-size batteries x 10)
Power consumption: 28 W (when powered on)
3.0 W or less (during BLUETOOTH standby)
0.50 W or less (during standby)
Dimensions: 666 mm ´ 235 mm ´ 248 mm (W x H x D)
Mass: 7.1 kg (without batteries stored in the battery compartment)
Design and specifications are subject to change without notice.
ENGLISH
45
Page 46

.
.
.
V EN
© 2013 JVC KENWOOD Corporation
Page 47

.
CD-SYSTEM MIT POWER WOOFER
RV-NB100B
.
DEUTSCH
.
BEDIENUNGSANLEITUNG
LVT2488-001A
[E]
Page 48

Einleitung
Automatische Energiesparfunktion
Wenn 15 Minuten lang keine Bedienung erfolgt, schaltet das System automatisch
aus. Diese Funktion ist standardmäßig aktiviert. Für weitere Informationen siehe
„Automatisches Energiesparen“ S. 13.
In dieser Bedienungsanleitung...
0
Beziehen sich Erklärungen, wenn nicht ausdrücklich anders angegeben, auf die
Fernbedienungstasten. Wenn sich an der Anlage jedoch Tasten mit gleichen oder ähnlichen Namen
befinden, können diese ebenfalls für die Bedienung verwendet werden.
In dieser Bedienungsanleitung...
0
In dieser Anleitung wird der Ausdruck „iPod“ sowohl für iPod als auch iPod touch und iPhone-Geräte
verwendet. Wenn ein iPod touch oder iPhone Gerät spezifisch beschrieben wird, wird der Ausdruck
„iPod touch“ bzw. „iPhone“ verwendet.
0
In dieser Bedienungsanleitung wird der Begriff „Android-Gerät“ für ein Smartphone und ein TabletGerät verwendet, die über das Android-Betriebssystem verfügen.
0
In dieser Anleitung werden die Ausdrücke „Datei“ und „Titel“, „Ordner“ und „Gruppe“ gleichbedeutend
verwendet.
Hinweise zur Verwendung der Anlage
0
Die Frontklappe nicht offen lassen.
0
Drücken Sie die Frontklappe in geöffneter Stellung nicht herunter, da sie herunterfallen und
möglicherweise Verletzungen verursachen könnte.
Eine Kopie der Übereinstimmungserklärung bezüglich der R&TTE-Richtlinie 1999/5/EG kann von den
folgenden Websites heruntergeladen werden. (http://www.jvc.co.jp/ecdoc/)
.
Hiermit erklärt JVC, dass sich dieses System [RV-NB100B] in Übereinstimmung mit den grundlegenden
Anforderungen und den übrigen einschlägigen Bestimmungen der Richtlinie 1999/5/EG befindet.
WICHTIG FÜR LASER-PRODUKTE
1. LASER-PRODUKT DER KLASSE 1
2. VORSICHT: Nicht die obere Abdeckung oder das Gehäuse öffnen. Das Gerät enthält keine Teile,
die vom Benutzer gewartet werden können; Wartungen nur von qualifiziertem Fachpersonal
durchführen lassen.
2
Page 49

Vorbereitung
15 cm
15 cm
15 cm
Rückseite
des Geräts
15 cm
15 cm
Achtung: Angemessene Ventilation
Stellen Sie das Gerät zur Verhütung von elektrischem Schlag und Feuer und zur Vermeidung von
Beschädigung wie folgt auf:
1
Vorderseite:
Offener Platz ohne Hindernisse.
2 Seiten/Oben/Hinten:
Innerhalb der in der Abbildung unten dargestellten Bereiche dürfen sich keine Hindernisse befinden.
3 Unterseite:
Auf eine ebene Oberfläche stellen.
Vorderansicht
.
Seitenansicht
.
DEUTSCH
Hinweise zur Aufstellung
Wählen Sie einen Ort, der eben, trocken und nicht zu heiß oder zu kalt ist—zwischen 5˚C und 35˚C.
3
Page 50

Was Sie mit dem System tun können
S. 12
Genießen Sie das Hören von Musik durch die
Einstellung der Lautstärke des Supertieftöners
(Bass-Sound) und des Sound-Modus!
S. 28
Mischen eines Quellensounds mit
einem Mikrofon oder einer Gitarre
Aufnahme von CD, UKW-Radio
oder einem externen Gerät auf
das USB-Gerät
S. 20
Wiedergabe von MP3/WMA-Dateien auf
einer Musik-CD oder einem USB-Gerät
S. 17
Abspielen von Dateien auf Ihrem
BLUETOOTH-Gerät über die
Bedienung des Systems
S. 14
Abspielen von Dateien auf Ihrem
iPod oder iPhone über das System
S. 30
.
4
Page 51

Inhalt
Einleitung ......................................... 2
Vorbereitung ....................................................... 3
Was Sie mit dem System tun können .................. 4
Vorbereitung .................................... 6
Zubehör .............................................................. 6
Batterien einsetzen ............................................. 6
Tragen der Anlage .............................................. 7
Index der Teile und Steuerungen
Vorderseite des Geräts
Rückseite des Geräts
Displayfenster
Fernbedienung
........................................... 8
............................................. 9
....................................................... 9
.................................................... 10
........ 8
Verbindungen ................................ 11
Anschließen des Netzkabels ............................. 11
Anschließen der Kopfhörer ............................... 11
Grundlegende Bedienungsverfahren
Ein-/Ausschalten des Systems
Einstellung der Uhr
Anzeige der Uhr
Erste Schritte
................................................ 12
.................................................... 12
........................................................ 12
................................. 12
... 12
iPod ................................................ 14
Anschließen des iPod ....................................... 14
Wiedergabe ...................................................... 15
Shuffle-Wiedergabe .......................................... 16
Wiedergabewiederholung ................................. 16
iPod-Menübedienung ........................................ 16
Ein BLUETOOTH-Gerät anhören
Erstmaliger Anschluss eines BLUETOOTH-Geräts
Pairing (Registrierung) anderer BLUETOOTH-Geräte
Einstellung des Systems auf BLUETOOTH-Standby
Verwendung einer Fernbedienungsanwendung
.... 17
...... 17
... 18
.... 19
... 19
Wiedergabe einer Disc/eines USB-
Geräts ............................................. 20
Vorbereitung ..................................................... 20
Wiedergabe ...................................................... 20
Programmwiedergabe ....................................... 21
Zufallswiedergabe ............................................. 22
Wiedergabewiederholung ................................. 22
DAB ................................................ 23
Hören von DAB-Sender .................................... 23
UKW ................................................ 25
Hören von UKW-Sendungen ............................ 25
Sender voreinstellen ......................................... 25
Externes Gerät .............................. 26
Hören von einem externen Gerät ...................... 26
Metronom ....................................... 27
Verwendung der Metronom-Funktion ................ 27
Verbinden eines Mikrofons/einer
Gitarre ............................................ 28
Mikrofon-/Gitarrenmischung .............................. 28
Einstellung des Tons einer Gitarre .................... 28
Aufnahme auf ein USB-Gerät ....... 30
Disks aufnehmen .............................................. 30
Andere Quellen aufnehmen .............................. 32
Einen Track löschen .......................................... 34
Verwendung des Timers .............. 35
Einstellung des Sleep-Timers ........................... 35
Einstellung des Tages-Timers ........................... 35
Einstellung des Aufnahme-Timers .................... 37
Über Disks/Dateien ....................... 39
Kompatibler iPod ............................................... 39
Abspielbare BLUETOOTH Geräte .................... 39
Abspielbare Discs/Dateien ................................ 39
Wichtig zur USB-Massenspeichergeräte .......... 40
Aufgezeichnete Dateien, die auf dem System
erstellt werden ................................................... 40
Über SCMS (Serial Copy Management System)
...... 40
Sonstiges ....................................... 41
Wartung ............................................................ 41
Warenzeichen ................................................... 41
Störungssuche .............................. 42
Technische Daten ......................... 44
5
Page 52

R20 (SUM-1)/D (13D) x 10
(nicht mitgeliefert)
Batteriefach
R6P (SUM-3)/AA
(15F) (mitgeliefert)
Vorbereitung
Zubehör
Überprüfen Sie ob folgende, mit der Anlage
mitgelieferten Artikel vorhanden sind.
0
Netzkabel (1)
0
Fernbedienung RM-SRVNB100A (1)
0
Batterien (für die Fernbedienung) (2)
0
Schulterriemen (1)
0
Schnalle (2)
0
Verriegelungslasche (2)
Falls Artikel fehlen, wenden Sie sich sofort an Ihren
Fachhändler.
Batterien einsetzen
Hauptgerät
0
Achten Sie auf die richtige Polung (+ und –) der
Batterien.
Fernbedienung
0
Achten Sie auf die richtige Polung (+ und –) der Batterien.
.
0
Wenn die Reichweite oder Wirksamkeit der
Fernbedienung abnimmt, müssen die Batterien
ausgewechselt werden.
HINWEIS
0
Legen Sie die Batterie an einem Ort ab, wo sie außer
Reichweiter kleiner Kinder ist. Falls ein Kind vesehentlich
die Batterie verschluckt, sofort einen Arzt rufen.
0
Die Stromversorgung über die Batterien wird
ausgeschaltet, wenn die Stromversorgung über
die Netzsteckdose erfolgt.
0
Die Batterie wird schneller als normal
verbraucht, wenn die Anlage kontinuierlich oder
an einem kalten Ort betrieben wird.
0
Wenn Betriebsstrom mittels Batterien angelegt
wird, ist die Anzeige leer, wenn das System per
Druck auf die [D]-Taste ausgeschaltet (auf
Standby geschaltet) wird. Und die STANDBYAnzeige wird nicht eingeschaltet.
.
6
VORSICHT
Um Auslaufen oder Explosion von Batterien zu vermeiden,
behandeln Sie die Batterien immer vorsichtig.
0
Wenn Sie die Anlage einen Monat oder länger
nicht verwenden wollen, entnehmen Sie die
Batterien aus dem Batteriefach.
0
Entsorgen Sie Batterien sachgemäß unter Beachtung
aller gesetzlichen und örtlichen Vorschriften.
0
Kombinieren Sie beim Batteriewechsel nicht Batterien
verschiedenen Typs oder alte und neue Batterien.
0
Versuchen Sie nicht, andere als Akkubatterien aufzuladen.
0
Entsorgen Sie leckende Batterien sofort.
Batterielecks können Hautverätzungen oder
andere Verletzungen verursachen.
0
Wenn Chemikalien auf die Anlage lecken,
reinigen Sie die Anlage vollständig.
Page 53

Tragen der Anlage
Tragegriff
Verriegelungslasche
Verriegelungslasche
(mitgeliefert)
Hauptgerät
Schulterriemen
Schulterriemen
Schnalle
Vorderseite
Schulterriemen
(mitgeliefert)
Schnalle
(mitgeliefert)
Gebrauch der Tragegriffe
Die Anlage beim Transportieren stets an beiden
Tragegriffen halten.
Wenn Sie die Anlage nur an einem Tragegriff
tragen, kann die andere Seite am Boden schleifen
und beschädigt werden.
Gebrauch des Schulterriemens
Bringen Sie den mitgelieferten Schulterriemen (in
der Länge einstellbar) an den beiden Enden der
Anlage an, wie in der Abbildung unten gezeigt.
.
HINWEIS
0
Nehmen Sie die Disc, das USB-Gerät bzw. den
iPod aus der Anlage heraus.
0
Ziehen Sie alle Kabel von der Anlage ab.
0
Die Anlage ist weder staub- noch wasserdicht.
DEUTSCH
.
7
Page 54

12 34 5 6 7 89
0~
!@ # $%^ (*&
-=
Index der Teile und Steuerungen
Vorderseite des Geräts
.
A
CD F-Taste
B
iPod F-Taste
C
STANDBY/ON D-Taste
D
Schulterriemen-Haken
E
SUPER WOOFER VOLUME +/–
F
STANDBY-Anzeige
G
Disk-Fachklappe
H
BLUETOOTH-Taste
I
BLUETOOTH-Anzeige
J
VOLUME +/–
K
Schulterriemen-Haken
8
L
G /TEMPO + –Taste
M
H /TEMPO - –Taste
N
USB/iPod F-Taste
O
METRONOME F-Taste
P
USB-Anschluss/Abdeckung
Q
Anschluss für iPod/Frontklappe
R
Fernbedienungssensor
S
REC-Taste
T
REC Anzeige
U
TUNER/AUDIO IN-Taste
V
o-Taste
Page 55

Rückseite des Geräts
12345 6
7
8
HIGH
A.P.S.
12345 6
7890-=
.
A
AC IN-Buchse
B
AUDIO IN-Buchse
C
PHONES-Buchse
D
MIC LEVEL -/+
E
MIC INPUT-Steckverbinder
F
GUITAR INPUT-Steckverbinder
G
GUITAR LEVEL -/+
H
DAB/FM-Teleskopantenne
Displayfenster
.
A
Timer-Anzeigen
A (Timer), PLAY, REC
B
SLEEP-Anzeige
C
A.P.S. (Automatische
Energiesparfunktion)-Anzeige
D
CLOCK-Anzeige
E
iPod-Anzeige
F
UKW-Modus-Anzeigen
STEREO, MONO
G
HIGH-Anzeige
H
Wiederhol-Anzeigen
E, EALL,
EGROUP
I
Hauptdisplay
J
PRGM (Programm)-Anzeige
K
RANDOM-Anzeige
L
Frequenzeinheit-Anzeige
DEUTSCH
9
Page 56

1
2
3
4
5
6
7
8
-
0
9
=
~
!
@
#
$
*
_
)
(
%
^
&
Fernbedienung
.
0
Die Referenzseiten sind hauptsächlich die
Seiten mit den Beschreibungen der jeweiligen
Teile.
A
Zifferntasten (S. 21)
B
MENU/BLUETOOTH SETTING-Taste
C
Multifunktionstasten (S. 15 - 25)
• UP, DOWN
• J , SET, I
D
Gt.AMP MODE-Taste (S. 28)
E
Quellentasten (S. 15 - 26)
• TUNER, USB/iPod F, CD F,
iPod F, AUDIO IN,
BLUETOOTH F, METRONOME F
F
FM MODE-Taste (S. 25)
G
PLAY MODE-Taste (S. 16, 22)
H
REC/DELETE-Taste (S. 31 - 34)
I
REC SPEED])
J
TREBLE+/- -Taste (S. 13)
K
BASS+/- -Taste (S. 13)
L
STANDBY/ON D-Taste (S. 12)
(Power-Taste)
M
DISPLAY-Taste (S. 12, 13)
N
SLEEP-Taste (S. 35)
O
A.P.S. (Automatische
Energiesparfunktion)-Taste (S. 13)
P
CLOCK/TIMER-Taste (S. 12, 35, 37)
Q
CANCEL-Taste (S. 22, 36, 37)
R
PTY SEARCH/o-Taste (S. 20, S. 17 - S. 33)
S
SOUND MODE-Taste (S. 13)
T
REPEAT-Taste (S. 16, 22)
U
MUTING-Taste (S. 12)
V
REC MODE-Taste (S. 32)
W
VOLUME +/- -Taste (S. 12)
X
SUPER WOOFER VOLUME +/- -Taste
(S. 12)
10
Page 57

Batteriefach
Netzsteckdose
Netzkabel
(mitgeliefert)
Kopfhörer
(nicht mitgeliefert)
StereoMinistecker
Verbindungen
Anschließen des Netzkabels
Schließen Sie das Netzkabel immer erst an die
Steckdose an, nachdem alle anderen Anschlüsse
hergestellt worden sind.
.
Wenn Sie die Anlage über Batterien im
Batteriefach betreiben wollen, ziehen Sie das
Netzkabel ab; andernfalls arbeitet die Anlage
nicht.
HINWEIS
0
Stromversorgung ist auch über die Batterien
möglich. (S. 6)
0
Wenn das System mit der [STANDBY/ON D]Taste ausgeschaltet wird, wird der StandbyModus aktiviert und die STANDBY-Anzeige
leuchtet rot.
0
Eine geringe Menge Strom wird immer
verbraucht, auch im Standby-Betrieb.
Anschließen der Kopfhörer
Stellen Sie die Lautstärke immer niedrig, bevor Sie
Kopfhörer anschließen oder aufsetzen.
0
Durch Anschließen der Kopfhörer werden die
Lautsprecher deaktiviert.
.
DEUTSCH
0
0
0
VORSICHT
Verwenden Sie nur das mitgelieferte JVC
Netzkabel, um Störungen oder Beschädigung
der Anlage zu vermeiden.
Entfernen Sie alle Batterien bei Verwendung des
Netzkabels.
Vergewissern Sie sich, dass Sie den
Netzstecker gezogen haben, bevor Sie das
Haus verlassen, oder wenn die Anlage für
längere Zeit nicht benutzt wird.
11
Page 58

0:00
CLOCK
/ / / / / /
Hauptgerät
Fernbedienung
HauptgerätFernbedienung
Grundlegende Bedienungsverfahren
Ein-/Ausschalten des Systems
Drücken Sie [STANDBY/ON D].
.
Die STANDBY-Anzeige erlischt.
Drücken Sie die Taste erneut zum Ausschalten.
0
Die Anlage kann auch durch Drücken einer der
Quellen-Tasten eingeschaltet werden.
HINWEIS
Wen Betriebsstrom mittels Batterien angelegt wird, wird
die Anlage durch Drücken von [D] oder den
Quellentasten am Hauptgerät eingeschaltet. Sie können
die Anlage nicht mit der Fernbedienung einschalten.
Einstellung der Uhr
1
Drücken Sie [CLOCK/TIMER].
.
2
Drücken Sie [UP] oder [DOWN], um die
„CLOCK“ anzuzeigen.
3
Drücken Sie [SET], um die Uhr anzuzeigen.
.
0
Drücken Sie bei der ersten Inbetriebnahme
ein Mal auf [CLOCK/TIMER].
4
Drücken Sie [UP] oder [DOWN] zum Einstellen
der Stunde.
0
Wenn Sie die Taste gedrückt halten, schaltet die
Stundenstelle kontinuierlich weiter.
5
Drücken Sie [SET].
6
Wiederholen Sie Schritt 4 und 5 zur
Einstellung der Minute.
0
Zum Zurückschalten zur Stundeneinstellung
drücken Sie [CANCEL].
HINWEIS
0
Die Uhreneinstellung wird nach etwa einer
Stunde wiederhergestellt, nachdem das
Netzkabel abgetrennt wurde.
0
Bei Batteriebetrieb erscheint die Uhranzeige nicht
im Display, wenn die Anlage ausgeschaltet ist.
Erste Schritte
Zum Auswählen einer Quelle
.
Lautstärke einstellen
.
Sie können die Lautstärke zwischen MIN, 1 und 29,
MAX einstellen.
Vorübergehendes Stummschalten des Tons
Drücken Sie [MUTING].
.
0
Zum Wiederherstellen der Lautstärke drücken Sie
[MUTING] erneut, oder stellen Sie die Lautstärke ein.
Lautstärke des Super-Tieftöners einstellen
Anzeige der Uhr
Drücken Sie [DISPLAY].
0
Bei jedem Drücken der Taste wird zwischen
Uhrzeitanzeige und normaler Anzeige umgeschaltet.
12
.
.
Sie können die Super-Tieftöner-Lautstärke
zwischen BASS 1 und BASS 6 einstellen.
0
Wenn Sie den Ton der Gitarre auf dem System
eingestellt haben, halten Sie [o] mindestens 2
Sekunden lang gedrückt, um die Lautstärke des
Supertieftöners einzustellen. (S. 28)
Page 59

Klangmodus
/
A.P.S.
Die Klangmodi sind abrufbar, um für den jeweiligen
Musikstil ein optimales Klangbild zu erzielen.
Drücken Sie [SOUND MODE] zum Wählen des
Klangmodus.
.
Bei jedem Drücken der Taste schaltet der
Klangmodus wie folgt um:
„BEAT“
„POP“
Empfohlen für Musik mit starkem
:
Beat, wie Rock- und Discomusik.
Empfohlen für leichte
:
Unterhaltungsmusik und
Gesangstitel.
„CLEAR“:Empfohlen für klare und deutliche
Musik.
„USER“
Dies für Musik mit den konfigurierten
:
Höhen- und Basseinstellungen
auswählen. Lesen Sie die folgenden
Informationen zu den Einstellungen.
„FLAT“
Zum Beenden des Klangmodus.
:
HINWEIS
0
Die Klangeinstellungen beeinflussen auch den
Klang über die Kopfhörer.
Um Ihre gewünschte Tonqualität
einzustellen
Automatische Energiesparfunktion
Diese Funktion schaltet das System automatisch
aus, wenn länger als etwa 15 Minuten keine
Bedienvorgänge durchgeführt werden.
Immer wenn Sie [A.P.S.] drücken, schaltet sich die
automatische Energiesparfunkion an und aus.
Diese Funktion ist bei der Anfangseinstellung aktiviert.
.
Etwa 30 Sekunden vor dem Ausschalten beginnt
„A.P.S.“ zu blinken.
Das System schaltet sich nicht automatisch aus,
wenn eine der folgenden Bedingungen erfüllt ist:
0
„CD“, „USB“ oder „METRONOME“ ist als Quelle ausgewählt,
und die Wiedergabe läuft oder ist angehalten.
0
„FM“ ist als Quelle ausgewählt.
0
„DAB“ ist als Quelle ausgewählt und es wird eine
Sendung empfangen.
0
„iPod“ oder „BLUETOOTH“ ist als Quelle
ausgewählt und es ist ein Gerät angeschlossen.
0
„AUDIO IN“ ist als Quelle ausgewählt, und es
wird Ton ausgegeben.
0
Eine Aufnahme läuft.
0
Wenn ein Mikrofon oder eine Gitarre angeschlossen ist.
DEUTSCH
Drücken Sie [TREBLE+/-] oder [BASS+/-]
wiederholt.
.
Bei jedem Drücken der Taste können Bass/Höhen
in den folgenden Bereichen eingestellt werden:
Höhen
Bässe
0
Schaltet auf den Sound-Modus „USER“ und die
TREBLE -5 zu TREBLE +5
:
BASS -5 zu BASS +5
:
Tonqualität wird auf die konfigurierten Werte
eingestellt, wenn die [TREBLE+/-]- oder [BASS
+/-]-Taste gedrückt wird.
HINWEIS
0
Der 15-Minuten-Countdown beginnt erneut,
wenn Sie irgendwelche Tasten betätigen.
0
Diese Funktion arbeitet auch während der Ausführung
des Tages-Timers und Sleep-Timers.
0
Das System schaltet sich automatisch aus, wenn der
Lautstärkepegel auf „MIN“ gestellt oder die
Stummschaltung aktiviert ist, selbst wenn ein Mikrofon
oder eine Gitarre angeschlossen ist. Das System
schaltet sich jedoch nicht automatisch aus, während
die Aufnahme läuft.
Display-Information
Wenn Sie diese Taste drücken, werden je nach Quelle
nacheinander im Display folgende Informationen angezeigt.
.
0
Die Tag-Informationen können im
Anzeigefenster angezeigt werden, während
eine MP3/WMA-Datei abgespielt wird.
0
Wenn keine Tag-Informationen vorhanden sind,
wird „UNKNOWN“ angezeigt.
0
Der „iPod“ kann die Titel-Informationen nicht anzeigen.
13
Page 60

Frontklappe
Die Frontklappe öffnen
Beweglicher Teil
USB-Kabel für iPod
(nicht mitgeliefert)
iPod
Sie können einen iPod über diese Anlage
bedienen.
Siehe S. 39 für kompatible iPod-Geräte.
VORSICHT
0
JVC übernimmt keine Haftung für jegliche
Verluste oder Schäden am iPod, die durch
Verwendung dieser Anlage verursacht werden
können.
0
Schließen Sie den iPod nicht an oder trennen ihn
ab, wenn die Anlage eingeschaltet ist.
0
Tragen Sie nicht die Anlage mit
angeschlossenem iPod. Hierdurch könnte das
Dock beschädigt werden oder der iPod könnte
herunterfallen.
0
Sie können keine Daten von dieser Anlage zu
Ihrem iPod übertragen.
HINWEIS
0
Wenn das System eingeschaltet ist, wird der
iPod durch das Dock geladen.
Anschließen des iPod
Zum Anschließen an das iPod-Dock
.
0
Ein leuchtender Steckverbinder wird für das
iPod/iPhone-Dock des Systems verwendet. Nur
iPod nano (7. Generation), iPod touch (5.
Generation), iPhone 5s, iPhone 5c und iPhone 5
unterstützen den leuchtenden Steckverbinder.
Die anderen als die oben genannten iPods/
iPhones müssen mit dem USB-Steckverbinder
angeschlossen werden.
0
Nehmen Sie die iPod-Schutzhülle vor dem
Anschließen ab.
0
Schließen Sie den iPod fest an.
0
Halten Sie den iPod in beim Anschließen/
Abtrennen in gerader Position.
0
Berühren Sie nicht die Steckerkontakte am iPod
oder die Anschlusskontakte in der DockingStation für iPod direkt. Dadurch könnten die
Steckerkontakte beschädigt werden.
14
Zum Anschließen an den USB-Steckverbinder
.
Page 61

Wiedergabe
/
iPod
iPod
iPod
USB
/
(Gedrückt halten)
Zum schnellen Vorlauf/Rücklauf
Drücken Sie [iPod F] oder [USB/iPod F].
.
Bei jedem Drücken der Taste wird die Wiedergabe
gestartet/gestoppt.
0
Drücken Sie [USB/iPod F] , wenn der iPod
am USB-Anschluss angeschlossen ist.
Anzeige, wenn an das iPod-Dock angeschlossen
wurde
.
Anzeige, wenn an den USB-Steckverbinder
angeschlossen wurde
.
Zum Wählen eines Tracks
Drücken Sie [J] oder [I].
.
0
Drücken Sie [I] einmal, um zum
Anfang des nächsten Tracks zu springen.
0
Drücken Sie [J], um zum Anfang des
spielenden Tracks zu springen. Drücken Sie
[J] zweimal schnell nacheinander, um
zum Anfang des vorhergehenden Tracks zu
springen.
Halten Sie die Taste [J] oder
[I] während der Wiedergabe
gedrückt.
Um Ihren iPod auf den Sleep-Modus zu
schalten
Halten Sie [iPod F] oder [USB/iPod F]
gedrückt.
.
HINWEIS
0
Je nach dem Typ des iPod, wird der iPod
unterschiedlich bedient.
0
Wenn Sie ein iPhone oder iPod touch
verwenden, benutzen Sie Ihr iPhone oder iPod
touch in den folgenden Fällen:
– Zum Drücken der Home-Taste.
– Zum Auswählen von Anwendungssymbolen
im Home-Bildschirm.
– Zum Ziehen des Schiebers.
0
Klangverzerrungen können auftreten,
Audioquellen mit hohen Aufnahmepegeln
wiedergegeben werden. Wenn Verzerrung
auftritt, wird empfohlen, den Equalizer am iPod
auszuschalten.
0
Für Information zur Bedienung des iPod siehe
Bedienungsanleitung des iPod.
DEUTSCH
15
Page 62

Shuffle-Wiedergabe
iPod-Menübedienung
Die Tracks auf dem iPod können in einer zufälligen
Reihenfolge wiedergegeben werden.
Drücken Sie [PLAY MODE].
Bei jedem Drücken der Taste wird der ShuffleModus an-/ausgeschaltet.
Zum Beenden des Abspielens in
willkürlicher Reihenfolge (Shuffle)
Drücken Sie [PLAY MODE] beim Abspielen in
willkürlicher Reihenfolge (Shuffle).
Wiedergabewiederholung
Drücken Sie [REPEAT].
Bei jedem Drücken der Taste schaltet der
Wiederholmodus um.
Zum Verlassen des Wiederholmodus
Drücken Sie wiederholt [REPEAT], bis der
Wiederholmodus abgebrochen wird.
1
Drücken Sie [MENU] zum Aufrufen des
Menüs.
Bei jedem Drücken der Taste wird das
vorherige Menü angezeigt.
.
2
Drücken Sie [UP] oder [DOWN] zum
Wählen eines Gegenstands.
3
Drücken Sie [SET].
HINWEIS
0
Wenn der/das iPod/iPhone kompatibel mit dem
iOS 7.0.x ist, können die obigen
Menübedienungen auf dem System nicht
verfügbar sein. Bedienen Sie das Menü auf dem
iPod/iPhone selbst.
16
Page 63

HauptgerätFernbedienung
BT READY
B T
Ein BLUETOOTH-Gerät anhören
Sie können über das System Musik von Ihrem
BLUETOOTH-Gerät anhören.
Wenn Sie Ihr Gerät zum ersten Mal anschließen,
ist es notwendig, Ihr BLUETOOTH-Gerät und das
System zu registrieren (pairen).
HINWEIS
0
Zur Nutzung dieser Funktionen muss das
BLUETOOTH-Gerät die AVRCP- und A2DPProfile unterstützen.
0
Einige BLUETOOTH-Geräte sind
möglicherweise für das System nicht verfügbar.
Erstmaliger Anschluss eines BLUETOOTH-Geräts
1
Drücken Sie die [BLUETOOTH F]Taste.
.
.
2
Führen Sie das Pairing auf dem ZielBLUETOOTH-Gerät durch.
Wählen Sie auf dem Zielgerät „RVNB100“ (dieses System) aus der Liste der
verfügbaren BLUETOOTH-Geräte aus.
0
Wenn das Zielgerät während des PairingVorgangs ein Passwort anfragt, geben Sie
„0000“ ein.
0
Für Informationen zur Bedienung des ZielBLUETOOTH-Geräts siehe die
Bedienungsanleitung des BLUETOOTH-Geräts.
Das Pairing ist abgeschlossen und das ZielBLUETOOTH-Gerät wird automatisch mit
dem System verbunden. Die BLUETOOTHAnzeige leuchtet auf.
.
3
Starten Sie die Wiedergabe auf dem ZielBLUETOOTH-Gerät.
Der Ton des BLUETOOTH-Geräts wird über
das System ausgegeben. Bei manchen
BLUETOOTH-Geräten startet die
Wiedergabe möglicherweise automatisch.
HINWEIS
0
Bis zu fünf BLUETOOTH Geräte können registriert
werden. Wenn ein sechstes BLUETOOTH-Gerät
registriert wird, wird die Registrierung des Geräts mit
der ältesten Verbindungsgeschichte gelöscht.
0
Durch Drücken von [BLUETOOTH F], während
„BT READY“ im Anzeigefenster erscheint, können Sie
das BLUETOOTH-Gerät, das zuletzt ans System
angeschlossen war, erneut anschließen.
0
Für den zweiten und die weiteren Anschlüsse, kann
das BLUETOOTH-Gerät, das zuletzt an das System
angeschlossen war, nur erneut angeschlossen
werden, wenn seine BLUETOOTH-Funktion
eingeschaltet ist, während „CONNECT“ im
Anzeigefenster blinkt. Um ein anderes BLUETOOTHGerät erneut anzuschließen, bedienen Sie das
anzuschließende BLUETOOTH-Gerät, während „BT
READY“ im Anzeigefenster erscheint.
0
Während „CONNECT“ blinkt, können Sie keine
Bedienung an der Anlage vornehmen, außer die
Anlage auszuschalten.
Zur Steuerung des BLUETOOTH-Geräts
über das System
Bedienung Taste
Wiedergabe/
Pause
Stopp Drücken Sie [o].
Überspringen
Schneller Vorlauf/
schnelles
Zurückspulen
0
Die Funktionen können je nach dem von Ihnen
verwendeten BLUETOOTH-Gerät variieren.
Drücken Sie die
[BLUETOOTH F]-Taste.
Bei jedem Drücken der Taste wird
die Wiedergabe gestartet/
gestoppt.
Drücken Sie [J] oder
[I].
Halten Sie [J] oder
[I] gedrückt.
DEUTSCH
17
Page 64

Um die BLUETOOTH-Funktion des
DISCNNCT
Systems ein-/auszuschalten
Während das System eingeschaltet ist
.
„BT OFF“ : Schaltet die BLUETOOTH-Funktion
des Systems aus.
„BT ON“ : Schaltet die BLUETOOTH-Funktion
des Systems ein.
Die BT-Anzeige leuchtet blau auf, wenn das
System auf „BT ON“ eingestellt und an ein
BLUETOOTH-Gerät angeschlossen ist.
Pairing (Registrierung) anderer BLUETOOTH-Geräte
1
Wenn „BLUETOOTH“ als Quelle gewählt
ist, halten Sie [BLUETOOTH F] länger
als 2 Sekunden gedrückt.
Abbrechen der Verbindung.
.
Es erscheint „BT READY“, wenn die
Verbindung abgebrochen wurde.
2
Führen Sie das Pairing auf dem ZielBLUETOOTH-Gerät durch.
Wählen Sie auf dem Zielgerät „RVNB100“ (dieses System) aus der Liste der
verfügbaren BLUETOOTH-Geräte aus.
0
Wenn das Zielgerät während des PairingVorgangs ein Passwort anfragt, geben Sie
„0000“ ein.
0
Informationen zur Bedienung des BLUETOOTHGeräts finden Sie in der Bedienungsanleitung für
das BLUETOOTH-Gerät.
Das Pairing wird beendet und das
BLUETOOTH-Gerät wird automatisch
verbunden. Die BLUETOOTH-Anzeige
leuchtet auf.
HINWEIS
Das Anschließen wird in den folgenden Fällen
automatisch abgebrochen.
0
Die Verbindung mit dem BLUETOOTH-Gerät
wird abgebrochen oder die BLUETOOTHFunktion wird auf „OFF“ gesetzt.
0
Das System oder das BLUETOOTH-Gerät ist
ausgeschaltet (außer bei BLUETOOTHStandby)
VORSICHT
0
Der maximale Abstand für einen möglichen
BLUETOOTH-Anschluss beträgt 10 m. Die
Entfernung kann in Abhängigkeit von den
Umgebungsbedingungen kürzer sein.
0
Wenn das iPhone oder Smartphone per
BLUETOOTH mit dem System verbunden ist,
können die Klingelsignale für Anrufe oder EMails auch über die Lautsprecher des Systems
gehört werden.
0
Dieses System ist nicht mit einer
Mikrofonfunktion ausgestattet. Um einen Anruf
zu tätigen, brechen Sie den Anschluss mit dem
System ab oder benutzen Sie das Mikrofon am
iPhone oder Smartphone.
0
Einige BLUETOOTH-Geräte sind
möglicherweise für das System nicht verfügbar.
18
Page 65

Einstellung des Systems auf
BT STBY
BLUETOOTH-Standby
Sie können das System per Fernbedienungsanwendung
auf einem BLUETOOTH-aktivierten Android-Gerät
einschalten.
Stellen Sie das System zunächst auf BLUETOOTHStandby, um das System via BLUETOOTH-Gerät
einzuschalten.
Stellen Sie das System auf BLUETOOTH-Standby.
Während die Stromversorgung ausgeschaltet ist...
.
0
.
Drücken Sie die Taste erneut, um das BLUETOOTHStandby abzubrechen. Die „BT STBY“-Anzeige erlischt.
0
Um das BLUETOOTH-Standby abzubrechen, warten Sie
etwa 10 Sekunden, bevor Sie das Abbrechen durchführen.
0
Wenn das System auf BLUETOOTH-Standby
eingestellt ist, kann das BLUETOOTH-Gerät an das
System angeschlossen werden, wenn der Anschluss
auf dem BLUETOOTH-Gerät durchgeführt wird.
0
Drücken von [BLUETOOTH F] während des
BLUETOOTH-Standby schaltet das System ein und
stellt die Quelle auf „BLUETOOTH“ ein.
0
Bei der Verwendung von Batterien zur
Stromversorgung des Systems kann BLUETOOTHStandby nicht eingestellt werden.
Um die Stromversorgung des Systems per
Fernbedienungsanwendung zu steuern
0
Sie müssen die Fernbedienungsanwendung auf
Ihrem Android-Gerät installieren.
1
Stellen Sie „Bluetooth“ auf „ON“ am
BLUETOOTH-Gerät.
0
Wählen Sie „Bluetooth“ in „Settings“ auf Ihrem
Android-Gerät.
0
Weiterführende Informationen dazu finden Sie
in der Bedienungsanleitung Ihres Geräts.
2
Wählen Sie „RV-NB100“ aus der Geräteliste aus.
3
Starten Sie die Fernbedienungsanwendung.
4
Steuern Sie die Stromversorgung des
Systems durch das „Settings“Anwendungssymbol unten rechts im
Anwendungsbildschirm.
Sie können das System über Fernzugriff per „JVC
Audio Control BR1“, eine spezielle
Fernbedienungsanwendung auf einem AndroidGerät, das mit BLUETOOTH kompatibel ist, steuern.
Um die Fernbedienungsanwendung zu benutzen,
müssen Sie Ihr Android-Gerät und das System
registrieren (paaren). (S. 17)
Die folgenden Vorgänge können mit der
Fernbedienungsanwendung ausgeführt werden.
Weiterführende Informationen dazu finden Sie auf der
Hilfeseite der Fernbedienungsanwendung.
*Die Folgenden sind Beispiele für den
Betriebsbildschirm der Fernbedienungsanwendung.
Links:Beispiel des Bildschirms für den CD-Player
Rechts:Beispiel für die UKW-Betriebsanzeige
Verwendung einer Fernbedienungsanwendung
HINWEIS
0
Suchen und laden Sie die Anwendung von Google
Play (Play Store) herunter.
0
Die Bildschirme und Inhalte der Anwendung
können sich ändern.
0
Um die Fernbedienungsanwendung zu nutzen,
muss Ihr Android-Gerät Android OS 2.3 oder neuer
und kompatibel mit SPP (serielles Port-Profil) des
BLUETOOTH-Profils sein.
0
Manche Geräte werden möglicherweise nicht
erkannt oder arbeiten nicht richtig.
0
Ein-/Ausschalten des Systems
0
Wiedergabe von Musik von einer Disc, einem USBGerät oder iPod
0
Auswählen von Radiosendern
0
Einstellung des Timers
0
Einstellung der Lautstärke
0
Sonstiges
.
VORSICHT
0
Stellen Sie das System zunächst auf
„BLUETOOTH Standby“, um das System via
Fernbedienungsanwendung einzuschalten.
DEUTSCH
19
Page 66

USB-Kabel
(nicht mitgeliefert)
USB-Speicher
(nicht mitgeliefert)
oder
10 0:45
Wiedergabezeit
Aktuelle
Tracknummer
Wiedergabe einer Disc/eines USB-Geräts
Vorbereitung
Setzen Sie eine Disc ein oder schließen ein USBGerät an.
Disc
.
USB-Gerät
Wiedergabe
Drücken Sie [CD F] oder [USB/iPod F].
.
Anzeige während der Wiedergabe
.
Wiedergabe stoppen
Drücken Sie [o].
.
Zum Pausieren
Drücken Sie [CD F] oder [USB/iPod F].
0
Zum Aufheben der Pause, drücken Sie die Taste
erneut. Die Wiedergabe wird ab der
Pausenstelle fortgesetzt.
.
VORSICHT
0
Trennen Sie das USB-Gerät ab, nachdem die
Wiedergabe gestoppt wurde. Das Trennen des
USB-Geräts während der Aufnahme/
Wiedergabe kann Probleme mit dem USB-Gerät
und den Dateien darauf verursachen.
20
Zum Wählen eines Tracks
Drücken Sie [J] oder [I].
.
0
Drücken Sie [I] einmal, um zum
Anfang des nächsten Tracks zu springen.
0
Drücken Sie [J], um zum Anfang des
spielenden Tracks zu springen. Drücken Sie
[J] zweimal schnell nacheinander, um
zum Anfang des vorhergehenden Tracks zu
springen.
Page 67

So wählen Sie einen Track über die
– – P–01
PRGM
Fernbedienung
Beispiele:
0
Zum Auswählen der Nummer 5 drücken Sie 5.
0
Zum Wählen der Nummer 15 drücken Sie +10
und dann 5.
0
Zum Wählen der Nummer 20 drücken Sie +10
und dann 10.
0
Zum Wählen der Nummer 125 drücken Sie
+100, +10, +10 und dann 5.
Programmwiedergabe
Sie können die Reihenfolge von bis zu 32 Tracks
von einer Disc oder einem USB-Gerät (auch
mehrfach gleiche Tracks) beliebig programmieren.
1
Drücken Sie [CD F] oder [USB/
iPod F].
2
Drücken Sie [o] zum Stoppen der
Wiedergabe.
3
Drücken Sie [PLAY MODE].
Zum schnellen Vorlauf/Rücklauf
Halten Sie die Taste [J] oder
[I] während der Wiedergabe
gedrückt.
Zum Wählen eine Gruppe (für MP3/
WMA)
Drücken Sie [UP] oder [DOWN].
.
0
Drücken Sie die Taste [UP], um zur nächsten
Gruppe zu springen.
0
Drücken Sie die Taste [DOWN], um zur
vorherigen Gruppe zu springen.
HINWEIS
0
Wenn Sie die Wiedergabe einer MP3/WMADatei durch das Drücken der Taste [o] gestoppt
haben, können Sie mit der Taste [F] die
Wiedergabe der gestoppten Datei vom Anfang
starten (Lesezeichen-Wiedergabe).
0
Zum Löschen der Lesezeichen-Wiedergabe,
drücken Sie bei gestoppter Wiedergabe die
Taste [o].
0
Die Wiedergabefortsetzung wird in den
folgenden Situationen automatisch
abgebrochen:
- bei der Programmwiedergabe
- während der Zufallswiedergabe
- wenn die Klappe des Diskfachs geöffnet ist
- wenn eine andere Quelle ausgewählt wird
.
4
Drücken Sie die Zifferntasten, um den zu
programmierenden Track zu wählen.
0
Bei der Erstellung eines Programms
können Sie nicht eine Gruppennummer zur
Wahl eines Tracks festlegen.
5
Drücken Sie [SET].
.
6
Wiederholen Sie Schritt 4 und 5 für alle
weiteren Tracks, die Sie programmieren
möchten.
7
Drücken Sie [CD F] oder [USB/
iPod F].
Die Programmwiedergabe startet.
Zur Bestätigung der programmierten Tracks
Drücken Sie während der Programmwiedergabe
wiederholt [UP] oder [DOWN].
Die Tracks im Programm erscheinen im Display
nacheinander in der programmierten Reihenfolge.
Um Titel zum Programm hinzuzufügen
Drücken Sie die Zifferntasten, während die
Programmwiedergabe gestoppt ist, und
drücken Sie dann [SET].
Der Titel wird an das Ende des Programms
hinzugefügt.
DEUTSCH
21
Page 68

Zum Löschen von Tracks im Programm
10 0:45
RANDOM
Zum Verlassen des Zufallswiedergabe-Modus
Drücken Sie während der gestoppten
Programmwiedergabe [CANCEL].
0
Bei jedem Drücken der Taste wird der jeweils
letzte Track im Programm gelöscht.
0
Alle programmierten Inhalte können durch
Gedrückthalten der Taste gelöscht werden.
0
Das Programm wird in den folgenden
Situationen gelöscht:
- wenn die Stromversorgung ausgeschaltet ist
- wenn die Disk-Fachklappe geöffnet ist
- wenn das USB-Gerät getrennt wird
- wenn eine andere Quelle gewählt ist
- wenn der Programmmodus beendet wird
Zum Verlassen der Programmwiedergabe
Drücken Sie [PLAY MODE] während einer
Pause, um „NORMAL“ auszuwählen.
Die „PRGM“-Anzeige erlischt.
0
Die programmierten Inhalte werden ebenfalls
gelöscht.
Zufallswiedergabe
Sie können alle Tracks auf der Disc oder dem USBGerät in zufälliger Reihenfolge abspielen.
Drücken Sie die Taste [PLAY MODE], um
während der Wiedergabe „RANDOM“ zu wählen.
.
0
Alle Titel werden in zufälliger Reihenfolge
wiedergegeben, anstelle der Zufallswiedergabe
innerhalb einer Gruppe.
0
Währende der Zufallswiedergabe können Sie
nicht zum vorherigen Track springen, auch wenn
Sie wiederholt die Taste [J] drücken.
Drücken Sie während der Zufallswiedergabe
[PLAY MODE].
Die „RANDOM“-Anzeige erlischt.
0
Die Zufallswiedergabe wird auch aufgehoben,
wenn Sie die Wiedergabe stoppen.
0
Die Zufallswiedergabe wird in den folgenden
Situationen abgebrochen:
- wenn die Stromversorgung ausgeschaltet ist
- wenn die Klappe des Diskfachs geöffnet ist
- wenn das USB-Gerät getrennt wird
- wenn eine andere Quelle ausgewählt wird
Wiedergabewiederholung
Sie können einen Track oder Tracks auf der Disc
oder dem USB-Gerät so oft wie gewünscht
wiederholen.
Drücken Sie [REPEAT].
Bei jedem Drücken der Taste schaltet der
Wiedergabemodus wie folgt um:
Æ
„E“
„EGROUP“
(zurück zum Anfang)
„E“
„EGROUP“
„EALL“
„E“ erlischt
0
„EGROUP“ kann nur ausgewählt werden,
wenn MP3/WMA-Dateien wiedergegeben
werden.
HINWEIS
0
Bei der Programmwiedergabe kann nur
„E“ und „EALL“ ausgewählt werden. Die
Programmwiedergabe wird wiederholt.
0
Während der Zufallswiedergabe kann nur
„EALL“ ausgewählt werden. Die
Zufallswiedergabe wird wiederholt.
0
Die Wiedergabewiederholung wird in den
folgenden Situationen abgebrochen:
- wenn die Stromversorgung ausgeschaltet ist
- wenn die Klappe des Diskfachs geöffnet ist
- wenn das USB-Gerät getrennt wird
- wenn eine andere Quelle ausgewählt wird
Æ
„EALL“
Wiederholt den aktuellen Track.
:
Bei Normalwiedergabe werden
:
Æ
erlischt
Æ
alle Tracks in einer Gruppe
wiederholt.
Wiederholt alle Tracks auf der
:
Disc oder dem USB-Gerät.
Bricht die wiederholte
:
Wiedergabe ab
22
Page 69

(Drücken Sie die Taste wiederholt)
Hauptgerät
Fernbedienung
SCAN
DAB P-01
DAB
Hören von DAB-Sender
Hören von DAB/DAB+
1
Drücken Sie [TUNER] wiederholt, um die
„DAB“ zu wählen.
.
2
Wählen Sie den Dienst.
.
0
Wenn Sie die Quelle nach dem Einstecken des
Netzkabels oder dem Einsetzen der Batterien zum
ersten Mal auf DAB stellen, sucht die Anlage
automatisch die DAB-Wellenbereiche nach
verfügbaren Ensembles ab. Dies dauert je nach Ort
einige Minuten.
.
0
Wenn die Sendersuche beendet ist, beginnt die
Anlage mit der Wiedergabe des ersten Dienstes
des zuerst gefundenen Ensembles.
0
Wenn Sie die Anlage umstellen oder die
Antennenposition ändern, führen Sie die Suche aus.
Halten Sie [SET] gedrückt, während DAB als Quelle
gewählt ist.
0
Drücken Sie [CANCEL], um die Suche abzubrechen.
0
NOSIGNAL wird angezeigt, wenn der Scanvorgang
abgeschlossen ist, aber kein Signal gefunden wird.
Zum Wählen eines Ensembles
Drücken Sie [UP] oder [DOWN].
0
Sie können zum nächsten/vorherigen Ensemble
wechseln, die durch die Ensemble-Abtastung
gefunden werden.
0
Das Umschalten der Ensembles dauert u.U.
mehrere Sekunden.
.
Suche nach Ensembles
1
Halten Sie [UP] oder [DOWN] gedrückt.
Währen Sie die Taste gedrückt halten,
wechselt der Kanal unabhängig vom
Signalstatus durch alle Ensembles.
2
Lassen Sie die Taste beim gewünschten
Kanal des Ensembles los.
Zum Vorwählen von Diensten
Sie können bis zu 30 DAB-Dienste manuell
eingeben.
1
Stimmen Sie einen als Festsender
einzugeben gewünschten Dienst ab.
2
Drücken Sie [SET].
.
3
Drücken Sie die Zifferntaste, um eine zu
speichern gewünschte
Festsendernummer zu wählen.
0
Sie können die Auswahl auch durch
Drücken von [UP] oder [DOWN]
vornehmen.
4
Drücken Sie [SET] um den Sender zu
speichern.
0
Um die Vorwahl abzubrechen, drücken Sie
[CANCEL].
0
Beim Vorwählen von DAB-Diensten können Sie
nur Primärdienste vorwählen. Wenn Sie einen
Sekundär-Dienst zur Speicherung wählen, kann
statt dessen sein Primär-Dienst gespeichert
werden.
So stimmen Sie einen Vorwahldienst ab
Sie können den Festsender direkt mit den
Zifferntasten wählen.
DEUTSCH
23
Page 70

Suchen von Sendungen mit PTY-Codes
(PTY-Suche)
Sie können ein bestimmtes Programm unter allen
Diensten, die durch Angabe einer PTY-Code
empfangen werden, aufsuchen.
1
Drücken Sie [PTY SEARCH] um auf den
PTY-Code-Einstellmodus zu schalten.
.
„PTY“ blinkt im Displayfenster.
0
Führen Sie die folgenden Schritte aus,
während die Anzeige blinkt.
2
Drücken Sie [UP] oder [DOWN] um einen
PTY-Code zu wählen.
3
Drücken Sie [SET].
Die Anlage startet die Suche nach einem
Programm des gewählten Typs. Beim ersten
gefunden Programm, bleibt der Suchlauf
stehen.
0
Drücken Sie [CANCEL], um die Suche zu
beenden und mit der normalen Anzeige
fortzufahren.
0
Zum Fortsetzen des Suchlaufs, nachdem bei
einem unerwünschten Programm gestoppt
wurde, drücken Sie [PTY SEARCH], während
die Dienst-Bezeichnung im Display blinkt.
0
Wenn kein Programm gefunden wird, erscheint
„NOTFOUND“ im Displayfenster.
Zum Ändern der DAB-Information
.
Bei jedem Drücken der Taste schaltet das
Displayfenster wie folgt um:
Dienstname Æ Ensemblename Æ Kanalnummer
Æ Frequenz Æ Programmtyp (PTY) Æ Dynamic
Label Segment (DLS) Æ Digital Radio-Typ/Audio
Bitrate Æ Festsendernummer Æ Uhr (NichtDABSignal) Æ (zurück zum Anfang)
0
„NOSIGNAL“ erscheint, wenn keine Signale
gesendet werden.
Ausrichten der Antenne
Stellen Sie Länge, Winkel und Richtung der
DAB/FM-Teleskopantenne ein, bis der beste
Empfang erzielt wird.
24
Page 71

(Drücken Sie die Taste wiederholt)
Hauptgerät
Fernbedienung
FM 8750
MHz
FM P-01
UKW
Hören von UKW-Sendungen
1
Drücken Sie [TUNER] wiederholt, um die
„FM“ zu wählen.
.
.
2
Wählen Sie den Sender.
.
Halten Sie die Taste [J] oder
[I] gedrückt, um die Frequenz
fortlaufend umzuschalten, bis ein Sender mit
ausreichender Signalstärke abgestimmt ist.
0
Drücken Sie die Tasten erneut, um die
Suche manuell zu beenden.
0
Wiederholtes Drücken der Taste ändert die
Empfangsfrequenz in Schritten von 50 kHz.
Ausrichten der Antenne
Stellen Sie Länge, Winkel und Richtung der
DAB/FM-Teleskopantenne ein, bis der beste
Empfang erzielt wird.
Sender voreinstellen
Sie können bis zu 30 UKW-Festsender manuell
eingeben.
1
Stimmen Sie einen als Festsender
einzugeben gewünschten Sender ab.
2
Drücken Sie [SET].
.
0
Führen Sie die folgenden Schritte aus,
während die Anzeige blinkt.
3
Drücken Sie [UP] oder [DOWN], um die
gewünschte Festsendernummer, die Sie
speichern möchten, auszuwählen.
0
Um die Vorwahl abzubrechen, drücken Sie
[CANCEL].
4
Drücken Sie [SET].
So stellen Sie einen Festsender ein
DEUTSCH
.
Zum Verbessern des FM-Empfangs
Wenn eine UKW-Stereosendung (FM) nur
schlecht zu empfangen ist oder rauscht, wählen
Sie den Mono-Empfangsmodus (MONO).
Drücken Sie [FM MODE].
.
Bei jedem Drücken der Taste schaltet die
Einstellung um.
„AUTO“
„MONO“
HINWEIS
0
Mono-Empfang verbessert den Empfang, aber
der Stereo-Effekt geht verloren.
Stereo-Autoempfang
:
Mono-Empfang
:
.
Bei jedem Drücken der Taste können Sie einen
Festsender umschalten.
0
Sie können den Festsender direkt mit den
Zifferntasten wählen.
Beispiele:
0
Zum Auswählen der Nummer 5 drücken Sie 5.
0
Zum Wählen der Nummer 15 drücken Sie +10
und dann 5.
0
Zum Wählen der Nummer 20 drücken Sie +10
und dann 10.
25
Page 72

Digitaler Audioplayer,
Fernsehgerät oder ein
anderes Audiogerät
Kopfhörerbuchse und
Audioausgabebuchse
StereoMinisteckerkabel
(nicht mitgeliefert)
HauptgerätFernbedienung
(Drücken Sie die Taste wiederholt)
Externes Gerät
Hören von einem externen Gerät
1
Stellen Sie den Lautstärkepegel der
Anlage auf Minimalstellung.
2
Schließen Sie das externe Gerät an.
Einzelheiten siehe auch
Bedienungsanleitung eines externen Geräts.
.
3
Drücken Sie [AUDIO IN], um „AUDIO
IN“ zu wählen.
.
4
Starten Sie die Wiedergabe des externen
Geräts.
5
Passen Sie die Lautstärke der Anlage und
des externen Geräts an.
Einstellen des Audio-Eingangspegels
Stellen Sie den Audioeingangspegel ein, wenn es
einen Unterschied in der Lautstärke zwischen dem
mit der AUDIO IN-Buchse angeschlossenem
externen Gerät und dem anderer Quellen gibt.
Wenn „AUDIO IN“ als Quelle gewählt ist,
drücken Sie [SET].
.
Bei jedem Drücken der Taste schaltet der
Eingangspegel wie folgt um:
„LEVEL1“ Æ „LEVEL2“ Æ „LEVEL3“ Æ (zurück
zum Anfang)
„LEVEL1“ : Standard-Audioeingangspegel
„LEVEL2“ : Höherer Wert als „LEVEL1“
„LEVEL3“ : Höherer Wert als „LEVEL2“
Die Anfangseinstellung ist „LEVEL3“.
26
Page 73

T120 B4
Beat
Tempo
Metronom
Verwendung der MetronomFunktion
Sie können das Gerät als Metronom verwenden.
Sie können für Ihre Gitarrenübungen etc. das
Tempo und den Rhythmus getrennt einstellen.
1
Drücken Sie [METRONOME F].
.
Aus den Lautsprechern ertönen rhythmische
Pieptöne.
Bei jedem Drücken der Taste werden die
Pieptöne gestartet/gestoppt.
0
Die Töne werden auch gestoppt, wenn Sie
die Taste [o] drücken.
2
Drücken Sie die Taste [J] oder
[I] um das Tempo einzustellen.
0
Sie können das Tempo von 30 bis 250
einstellen.
0
Wenn Sie die Taste gedrückt halten, ändert
sich das Tempo kontinuierlich.
DEUTSCH
.
3
Drücken Sie [UP] oder [DOWN], um den
Takt auszuwählen.
0
Sie können von 1 bis 7 Beats auswählen.
0
Wenn Sie die Taste gedrückt halten, ändert
sich der Takt kontinuierlich.
27
Page 74

Mikrofon oder Gitarre(nicht mitgeliefert)
φ 6,3 Mono-Kabel
(nicht mitgeliefert)
CLEAN 1
Verbinden eines Mikrofons/einer Gitarre
Mikrofon-/Gitarrenmischung
Bei Verwendung eines Mikrofons oder einer Gitarre, können
Sie dessen/deren Klang mit einem Quellklang mischen.
VORSICHT
0
Schließen Sie KEINE Bassgitarre an den
GUITAR INPUT-Steckverbinder an, dadurch
kann das System beschädigt werden.
0
Wenn der Output der Gitarre zu hoch ist, kann
das eine Verzerrung des Tons zur Folge haben.
Senken Sie den GUITAR LEVEL.
0
Um die Verzerrung des Tons nach dem Mischen
zu vermeiden, wird der Lautstärkepegel der
aktuell wiedergegebenen Quelle abgesenkt,
wenn ein Mikrofon oder eine Gitarre am System
angeschlossen ist. Dies ist keine Fehlfunktion.
1
Drehen Sie die [LEVEL +/-]-Steuerung
vollständig gegen den Uhrzeigersinn.
.
2
Schließen Sie ein Mikrofon oder eine Gitarre
an den MIC INPUT- oder GUITAR INPUTSteckverbinder hinten am System an.
.
3
Starten Sie die Wiedergabe der Quelle.
4
Drehen Sie [LEVEL +/-]-Steuerung, um die
Lautstärke anzupassen.
Einstellung des Tons einer Gitarre
Neben dem Sound-Modus des Hauptgeräts können Sie den
Ton der Gitarre auswählen. Es gibt drei verfügbare Töne,
und der Ton kann entsprechend von 1 bis 3 ausgewählt
werden. Stellen Sie Ihren bevorzugten Ton ein.
HINWEIS
0
Wenn Sie den Pegel erhöhen, erhöht sich auch
der Geräuschpegel. Dies liegt an der
Verwendung eines analogen Schaltkreises und
ist keine Fehlfunktion.
Gebrauch der Fernbedienung
Drücken Sie [Gt.AMP MODE] wiederholt.
.
CLEAN1 Erzeugt einen Ton mit den abgeschnittenen
CLEAN2 Erzeugt einen Ton mit den angehobenen
CLEAN3 Erzeugt einen Ton mit den angehobenen
T-BOOST1 Erzeugt einen leicht verzerrten Ton mit den
T-BOOST2 Erzeugt einen leicht verzerrten Ton mit den
T-BOOST3 Erzeugt einen leicht verzerrten Ton mit den
DISTORTION1 Erzeugt einen verzerrten Ton von CLEAN1.
DISTORTION2 Erzeugt einen verzerrten Ton von CLEAN2.
DISTORTION3 Erzeugt einen verzerrten Ton von CLEAN3.
tiefen Frequenzen und angehobenen hohen
Frequenzen, wie es beim Gitarrenverstärker
allgemein üblich ist.
mitteltiefen Frequenzen im Vergleich zu
CLEAN1.
mittleren Frequenzen im Vergleich zu
CLEAN1.
angehobenen hohen Frequenzen von
CLEAN1.
angehobenen hohen Frequenzen von
CLEAN2.
angehobenen hohen Frequenzen von
CLEAN3.
28
Page 75

Das Hauptgerät verwenden
(Drehen)
1
Halten Sie die [o]-Taste am Hauptgerät
mindestens 2 Sekunden lang gedrückt,
bis „G AMP“ angezeigt wird.
0
Jedes Mal wenn Sie die Taste gedrückt
halten, schaltet die Funktion zwischen der
Lautstärkeeinstellung des Supertieftöners
(„SW VOL“ erscheint im Anzeigefenster)
und der Einstellung des Gitarrentons um.
2
Drehen Sie den [SUPER WOOFER
VOLUME]-Regler nach links oder rechts,
um den Ton des Gitarre auszuwählen.
.
DEUTSCH
29
Page 76

Aufnahme auf ein USB-Gerät
Zur Auswahl der Aufnahmegeschwindigkeit
Disks aufnehmen
Die Aufnahme auf eine CD oder ein USB-Gerät
kann entweder digital oder analog erfolgen.
Im Allgemeinen erhalten Sie bei der digitalen
Aufnahme eine bessere Tonqualität als bei der
analogen Aufnahme.
Bei der analogen Aufnahme können Sie jedoch über
ein an die Anlage angeschlossenes Mikrofon oder
eine Gitarre gleichzeitig aufnehmen (Gemischte
Aufnahme).
VORSICHT
0
Schließen Sie vor der Aufnahme das USB-Gerät
mit ausreichendem Speicherplatz am USBSteckverbinder an. (S. 20)
0
Sie können nicht von Ihrem iPod oder
BLUETOOTH-Gerät aufnehmen.
0
Andere Disks als Audio CDs, wie MP3/WMADisks, können nicht aufgenommen werden.
0
Schütteln Sie die Anlage bei der Aufnahme nicht,
da ansonsten die Tracks nicht richtig
aufgenommen werden könnten.
0
Wenn der Einschlaf-Timer (S. 35) aktiviert ist,
kann keine Aufnahme erfolgen.
(nur für die digitale Aufnahme)
Sie können die Aufnahmegeschwindigkeit bei der
Aufnahme einer CD mithilfe der digitalen
Aufnahmefunktion einstellen.
1
Drücken Sie [CD F].
2
Drücken Sie [o] zum Stoppen der
Wiedergabe.
3
Drücken Sie [REC SPEED] zum Wählen
der Aufnahmegeschwindigkeit.
„NORMAL“ :
„HIGH“ :
.
Nimmt mit normaler Geschwindigkeit
auf, und der Ton kann während der
Aufnahme gehört werden.
Nimmt mit hoher Geschwindigkeit
auf (etwa das Doppelte der
normalen Geschwindigkeit), und
der Ton kann während der
Aufnahme nicht gehört werden.
Das „HIGH“-Symbol leuchtet
während der Uhreneinstellung auf.
HINWEIS
0
Die Lautstärkeneinstellung und der Ton-Modus
haben keinen Einfluss auf die Aufnahme.
0
Während der Aufnahme kann die Zufallswiedergabe
oder Wiedergabewiederholung nicht aktiviert werden.
0
Die Datei wird im MP3-Format gespeichert
(Bitrate: 192 kbps).
0
Die Datei- und Ordnerstrukturen finden Sie unter „Auf
dem System erstellte Aufnahmedateien“ (S. 40).
30
Page 77

Zur Aufnahme einer Musik-CD mithilfe
Fernbedienung
Hauptgerät
RECS TART
Fernbedienung
Hauptgerät
der digitalen Aufnahme
1
Drücken Sie [CD F].
2
Drücken Sie [o] zum Stoppen der
Wiedergabe.
0
Um alle Titel auf der CD aufzunehmen,
überspringen Sie Schritt 3 und fahren Sie
mit Schritt 4 fort.
3
Drücken Sie [J], [I] , um
den Titel auszuwählen.
0
Die Aufnahme startet vom ausgewählten
Titel bis zum letzten Titel. Um alle Titel auf
der CD aufzunehmen, wählen Sie den
ersten Titel auf der CD aus.
0
Um die Titel in der von Ihnen gewünschten
Reihenfolge aufzunehmen,
programmieren Sie die Titel im Voraus und
stoppen Sie die Wiedergabe. (S. 21)
4
Drücken Sie [REC/DELETE].
.
Zur Aufnahme eines Titels von einer MusikCD mithilfe der digitalen Aufnahme
Sie können nur einen Titel für die Aufnahme
auswählen.
1
Drücken Sie [CD F].
2
Drücken Sie [J], [I] , um
den Titel auszuwählen.
3
Drücken Sie [CD F], um die
Wiedergabe zu starten oder anzuhalten.
4
Drücken Sie [REC/DELETE].
.
Die Aufnahme startet vom Anfang des
ausgewählten Titels.
DEUTSCH
.
Die digitale Aufnahme der ausgewählten Titel
startet.
Während der Aufnahme leuchtet die „REC“-Anzeige.
0
Im Unterordner „MUSIC“ des „CD“-Ordners, wird
beispielsweise ein Ordner mit dem Namen
„CD001“ erstellt; hier werden die Musikdateien
gespeichert.
0
Die Aufnahme stoppt automatisch, wenn die
Wiedergabe stoppt.
0
Zum manuellen Stoppen der Aufnahme, drücken Sie [
o
].
31
Page 78

Zur Aufnahme einer Musik-CD mithilfe
Fernbedienung
Hauptgerät
der analogen Aufnahme
Verwenden Sie die analoge Aufnahme, wenn die
digitale Aufnahme wegen des SCMS (S. 40)
nicht möglich ist.
0
Die Aufnahme erfolgt mit normaler
Geschwindigkeit. Der Ton kann während der
Aufnahme gehört werden.
1
Drücken Sie [CD F].
2
Drücken Sie [o] zum Stoppen der
Wiedergabe.
0
Um alle Titel auf der CD aufzunehmen,
überspringen Sie Schritt 3 und fahren Sie
mit Schritt 4 fort.
3
Drücken Sie [J], [I] , um
den Titel auszuwählen.
0
Die Aufnahme startet vom ausgewählten
Titel bis zum letzten Titel. Um alle Titel auf
der CD aufzunehmen, wählen Sie den
ersten Titel auf der CD aus.
0
Um die Titel in der von Ihnen gewünschten
Reihenfolge aufzunehmen,
programmieren Sie die Titel im Voraus und
stoppen Sie die Wiedergabe. (S. 21)
4
Halten Sie [REC/DELETE] gedrückt.
Der analoge Aufnahmemodus ist aktiviert und
„ANLG REC“ blinkt.
5
Drücken Sie [REC/DELETE], während
„ANLGREC“ blinkt.
.
Die analoge Aufnahme der ausgewählten
Titel startet.
HINWEIS
0
Um nur einen bestimmten Titel aufzunehmen,
halten Sie [REC/DELETE] gedrückt, wenn der
Titel wiedergegeben wird oder angehalten ist.
0
Sie können „HIGH“ nicht für „REC
SPEED“ einstellen, wenn Sie eine Disc mithilfe
der analogen Aufnahmefunktion aufnehmen.
Andere Quellen aufnehmen
Sie können DAB/FM-Sendungen, ein Metronom
oder ein externes Gerät aufnehmen.
Eine Datei kann gemäß der Markierungseinstellung
geteilt werden. (siehe unten)
Sie können über ein an die Anlage
angeschlossenes Mikrofon oder eine Gitarre
gleichzeitig aufnehmen.
0
Um von einem externen Gerät aufzunehmen,
schließen Sie das externe Gerät an das System an
und stellen Sie den Audioeingangspegel ein. (S. 26)
0
Die Musikdateien werden im „MUSIC“-Ordner
im dazugehörigen Unterordner gespeichert
(„DAB“, „FM“, „AUDIO IN“ und
„METRONOME“ Ordner).
0
Die Aufnahme stoppt automatisch, wenn die
Dateigröße 2 GB (etwa 20 Stunden)
überschreitet.
0
Die Aufnahme erfolgt mit normaler
Geschwindigkeit. Der Ton kann während der
Aufnahme gehört werden.
Zum Wählen der Markierungseinstellung
0
Sie können die Art der Dateiteilung auswählen.
0
Wählen Sie vor der Aufnahme die Einstellung.
Drücken Sie [REC MODE], wenn als Quelle
„TUNER (DAB/FM) “, „AUDIO IN“ oder
„METRONOME“ ausgewählt ist.
.
Bei jedem Drücken der Taste schaltet die Einstellung um.
„MANUAL“ :
„TIME“ : Teilt eine Datei automatisch alle
0
Der Ton ist etwa eine Sekunde lang
unterbrochen, wenn die Datei aufgeteilt wird.
0
Die Einstellung wird auch gespeichert, wenn das
System ausgeschaltet wird.
Jedes Mal wenn Sie [SET] drücken,
wird eine Datei aufgeteilt.
5 Minuten.
32
Page 79

Zur Aufnahme von DAB/FM-Sendern
Fernbedienung
Hauptgerät
RECS TART
Zur Aufnahme des Metronoms
1
Drücken Sie [TUNER].
2
Stimmen Sie einen als Festsender
aufzunehmen gewünschten Sender ab.
3
Drücken Sie [REC/DELETE].
.
.
Die Aufnahme beginnt.
Während der Aufnahme leuchtet die „REC“-
Anzeige.
4
Drücken Sie [o] zum Stoppen der
Aufnahme.
Zur Aufnahme eines externen Geräts
1
Drücken Sie [AUDIO IN].
2
Drücken Sie [REC/DELETE].
Die Aufnahme beginnt.
3
Starten Sie die Wiedergabe des externen
Geräts.
Während der Aufnahme leuchtet die „REC“Anzeige.
4
Drücken Sie [o] zum Stoppen der
Aufnahme.
1
Drücken Sie [METRONOME].
Passen Sie gegebenenfalls das Tempo und
den Rhythmus an. (S. 27)
2
Drücken Sie [REC/DELETE].
Die Aufnahme beginnt.
Während der Aufnahme leuchtet die „REC“-
Anzeige.
3
Drücken Sie [o] zum Stoppen der
Aufnahme.
Zur Aufnahme von einem Mikrofon oder
einer Gitarre
Sie können über ein an die Anlage
angeschlossenes Mikrofon oder eine Gitarre
gleichzeitig aufnehmen.
1
Schließen Sie ein Mikrofon oder eine
Gitarre an das System an.
2
Wählen Sie eine Quelle aus, die
zusammen mit der Gitarre oder dem
Mikrofon aufgenommen werden soll.
Die digitale Aufnahme ist nicht verfügbar,
wenn „CD“ als Quelle ausgewählt ist. Machen
Sie eine analoge Aufnahme. (S. 32)
3
Drücken Sie [REC/DELETE].
Die Aufnahme beginnt.
Während der Aufnahme leuchtet die „REC“-
Anzeige.
4
Geben Sie den Ton vom Mikrofon oder der
Gitarre aus.
5
Drücken Sie [o] zum Stoppen der
Aufnahme.
DEUTSCH
33
Page 80

Einen Track löschen
PUSH SET
Ein auf einem USB-Gerät aufgenommener Track
kann gelöscht werden.
0
Schließen Sie vor dem Löschen eines Titels das
USB-Gerät am USB-Steckverbinder an.
0
Gelöschte Dateien können nicht
wiederhergestellt werden. Überprüfen Sie die
Dateien sorgfältig, die Sie löschen möchten.
1
Drücken Sie die [USB/iPod F] -Taste.
2
Drücken Sie [J] oder [I],
um den Titel auszuwählen, den Sie
löschen möchten, geben Sie ihn dann
wieder oder halten Sie die Wiedergabe an.
3
Drücken Sie [REC/DELETE].
.
Das Löschen ist einsatzbereit.
0
Das Löschen kann durch Drücken von
[CANCEL] oder [o] abgebrochen werden,
während „PUSH SET“ blinkt.
4
Drücken Sie [SET] oder [REC/DELETE].
Im Displayfenster erscheint „DELETE“ und
das Löschen wird ausgeführt.
Es erscheint „FINISH“, wenn das Löschen
beendet ist.
34
Page 81

SLEEP 10
SLEEP
PLAY TMR
ON 0:00
Verwendung des Timers
Einstellung des Sleep-Timers
Das System schaltet automatisch aus, nachdem
die von Ihnen eingestellte Ausschaltzeit
abgelaufen ist.
Drücken Sie [SLEEP] wiederholt.
.
Bei jeder Betätigung der Taste wird in der
oben angegebenen Reihenfolge zwischen
den verschiedenen Einstellungen der
Zeitdauer (in Minuten) wie folgt umgeschaltet.
10 Æ 20 Æ 30 Æ 60 Æ 90 Æ 120 Æ 150 Æ 180
Æ OFF Æ (zurück zum Anfang)
0
Zum Abbrechen des Sleep-Timers drücken Sie
[SLEEP] wiederholt, um „OFF“ auszuwählen.
HINWEIS
0
Diese APS-Funktion (S. 13) funktioniert auch,
wenn der Sleep-Timer eingeschaltet ist.
Um die Restzeit bis zum Ausschalten
des Systems zu prüfen
Drücken Sie die [SLEEP]-Taste einmal.
Die verbleibende Zeit wird für 5 Sekunden
angezeigt.
Einstellung des Tages-Timers
Bei Verwendung des Täglich-Timers (WiedergabeTimer) können Sie zu Ihrer Lieblingsmusik aufwachen.
Durch Einstellung des Tages-Timers schaltet sich
das System eine Minute, bevor der Tages-Timer
startet, automatisch ein.
HINWEIS
0
Stellen Sie die Uhrzeit vor der Einstellung des
Aufnahme-Timers ein. (S. 12)
0
Stimmen Sie vorher auf einen DAB/FM-Sender
ab, setzen eine Disc ein oder schließen ein USBGerät/iPod an der Anlage an, und stellen Sie
sicher, dass die Quelle richtig arbeitet.
0
Stellen Sie den gewünschten DAB/FM-Sender vorab
ein, bevor Sie den Tages-Timer einstellen. (S. 25)
0
Der Täglich-Timer funktioniert im Batteriebetrieb
nicht. Schließen Sie ein Netzkabel an.
1
Drücken Sie [CLOCK/TIMER].
2
Drücken Sie
[UP] oder [DOWN] wiederholt, bis die
Meldung „PLAY TMR“ erscheint.
.
3
Drücken Sie [SET].
4
Drücken Sie [UP] oder [DOWN]
wiederholt, bis die Meldung „PLAY
SET“ erscheint.
5
Drücken Sie [SET].
DEUTSCH
.
6
Drücken Sie [UP] oder [DOWN] zum
Einstellen der „Stunde“ der Startzeit.
0
Wenn Sie die Taste gedrückt halten, schaltet die
Stundenstelle kontinuierlich weiter.
7
Drücken Sie [SET].
Fortsetzung auf der nächsten Seite
35
Page 82

8
TIMEROFF
Drücken Sie [UP] oder [DOWN] , um die
„Minute“ der Startzeit, die „Stunde“ und
„Minute“ der Endzeit einzustellen, und
wählen Sie die Quelle und Lautstärke aus.
0
Wählen Sie „DAB“, „FM“, „CD“, „USB“,
„iPod“ oder „AUDIO IN“ als die Quelle aus.
0
Wenn der „DAB/FM“-Tuner als Quelle
ausgewählt ist, wählen Sie mit den Tasten
[UP] oder [DOWN] eine gespeicherte
Nummer und drücken Sie anschließend
[SET].
0
Wenn „CD“ oder „USB“ als Quelle gewählt
ist, wählen Sie mit den Tasten [UP] oder
[DOWN] eine Titelnummer und drücken
Sie dann [SET].
9
Drücken Sie [SET].
Nach der Einstellung der Lautstärke wird
„PLAY SET“, gefolgt von den Einstellungen
der Reihe nach, angezeigt.
10
Drücken Sie [D] zum Ausschalten des
Geräts.
0
Das System schaltet sich automatisch eine
Minute, bevor der Tages-Timer beginnt,
ein.
0
Der Täglich-Timer funktioniert nur bei
ausgeschalteter Anlage.
0
Während der Timer eingestellt wird,
leuchtet die Timer-Anzeige [B] auf.
0
Während der Timer arbeitet, blinkt [B].
0
Sobald der Täglich-Timer eingestellt ist,
funktioniert sie täglich.
0
Die Start- und Endzeit können nicht gleich sein.
Um den Tages-Timer zu unterbrechen
Wählen Sie nach Auswahl von „PLAY
TMR“ durch Ausführung der Schritte 1 bis 3 in
„Einstellung des Tages-Timers“ „PLAY OFF“,
und drücken Sie dann [SET].
.
Um den Tages-Timer nach dem
Abbrechen mit denselben
Einstellungen erneut zu stellen
Wählen Sie nach Auswahl von „PLAY
TMR“ durch Ausführung der Schritte 1 bis 3 in
„Einstellung des Tages-Timers“ „PLAY ON“,
und drücken Sie dann [SET].
„TIMER ON“ wird angezeigt, gefolgt von den
Einstellungen.
HINWEIS
0
Zum Zurückschalten zum vorherigen Schritt
drücken Sie [CANCEL].
0
Automatisches Energiesparen (S. 13) bleibt
auch aktiviert, während der Tages-Timer in
Betrieb ist.
0
Die [SLEEP]-Taste ist deaktiviert, während der
Tages-Timer in Betrieb ist.
36
Page 83

Einstellung des Aufnahme-Timers
REC TMR
ON 0:00
Sie können den Aufnahme-Timer für DAB/FMSender oder ein externes Gerät einstellen.
Durch Einstellung des Aufnahme-Timers schaltet
sich das System eine Minute, bevor der AufnahmeTimer startet, automatisch ein.
HINWEIS
0
Stellen Sie die Uhrzeit vor der Einstellung des
Aufnahme-Timers ein. (S. 12)
0
Überprüfen Sie den Empfang des DAB/FMSenders und die Verbindung des externen
Geräts, bevor Sie den Aufnahme-Timer
einstellen.
0
Stellen Sie den gewünschten DAB/FM-Sender
vorab ein, bevor Sie den Aufnahme-Timer
einstellen. (S. 25)
0
Verbinden Sie das USB-Gerät mit der Anlage,
bevor Sie den Aufnahme-Timer einstellen.
0
Der Aufnahme-Timer funktioniert im
Batteriebetrieb nicht. Schließen Sie ein
Netzkabel an.
1
Drücken Sie [CLOCK/TIMER].
2
Drücken Sie
[UP] oder [DOWN] wiederholt, bis die
Meldung „REC TMR“ erscheint.
.
3
Drücken Sie [SET].
4
Drücken Sie
[UP] oder [DOWN] wiederholt, bis die
Meldung „REC SET“ erscheint.
5
Drücken Sie [SET].
.
6
Drücken Sie [UP] oder [DOWN] zum
Einstellen der „Stunde“ der Startzeit.
0
Wenn Sie die Taste gedrückt halten, schaltet die
Stundenstelle kontinuierlich weiter.
0
Wenn Sie die [UP] - oder [DOWN] -Taste
gedrückt halten, ändert sich die Ziffer
kontinuierlich.
7
Drücken Sie [SET].
8
Drücken Sie [UP] oder [DOWN] , um die
„Minute“ der Startzeit, die „Stunde“ und
„Minute“ der Endzeit einzustellen, und
wählen Sie die Quelle und Lautstärke aus.
0
Wählen Sie „FM“ oder „AUDIO IN“ als Quelle.
0
Wenn der DAB/FM-Tuner als Quelle gewählt ist,
wählen Sie mit den Tasten [UP] oder [DOWN] eine
Festsendernummer und drücken Sie [SET].
9
Drücken Sie [SET].
Nach der Einstellung der Lautstärke wird
„REC SET“, gefolgt von den Einstellungen der
Reihe nach, angezeigt.
10
Drücken Sie [D] zum Ausschalten des Geräts.
0
Das System schaltet sich automatisch ein und
beginnt mit der Aufnahme etwa eine Minute vor
der Startzeit des Aufnahme-Timers.
0
Während der Aufnahme leuchtet die „REC“-Anzeige.
0
Der Aufnahme-Timer arbeitet nur bei
ausgeschalteter Anlage.
0
Während der Timer eingestellt wird,
leuchtet die Timer-Anzeige [C] auf.
0
Während der Timer arbeitet, blinkt [C].
0
Der Aufnahme-Timer arbeitet nur einmal.
(Die Einstellungen werden trotzdem in der
Anlage gespeichert.)
0
Die Start- und Endzeit können nicht gleich sein.
HINWEIS
0
Zum Zurückschalten zum vorherigen Schritt
drücken Sie [CANCEL].
0
Die [CLOCK/TIMER]- und [SLEEP]-Tasten ist deaktiviert,
während der Aufnahme-Timer in Betrieb ist.
DEUTSCH
37
Page 84

Zum Abbruch des Aufnahme-Timers
Wählen Sie nach der Auswahl von „REC
TMR“ durch Ausführung der Schritte 1 bis 3 in
„Einstellung des Aufnahme-Timers“ „REC
OFF“, und drücken Sie dann [SET].
Zur Einstellung der Aufnahme-Timers
mit der gleichen Einstellung
Wählen Sie nach der Auswahl von „REC
TMR“ durch Ausführung der Schritte 1 bis 3 in
„Einstellung des Aufnahme-Timers“ „REC
ON“, und drücken Sie dann [SET].
„TIMER ON“ wird angezeigt, gefolgt von den
Einstellungen.
38
Page 85

CD-RW
CD-R
AUDIO-CD
Über Disks/Dateien
Kompatibler iPod
Hergestellt für Version*
iPod nano (7. Generation) 1,0.2
iPod nano (6. Generation) 1,2
iPod nano (5. Generation) 1,0.2
iPod nano (4. Generation) 1,0.4
iPod nano (3. Generation) 1,1.3
iPod nano (2. Generation) 1,1.3
iPod touch (5. Generation) 7,0.2
iPod touch (4. Generation) 6,1.3
iPod touch (3. Generation) 5,1.1
iPod touch (2. Generation) 4,2.1
iPod touch 3,1.3
iPod classic 2,0.4
iPhone 5s 7,0.2
iPhone 5c 7,0.2
iPhone 5 7,0.2
iPhone 4s 7,0.2
iPhone 4 7,0.2
iPhone 3GS 6,1.3
iPhone 3G 5,1.1
* Software-Version zum Zeitpunkt der
Betriebsprüfung.
0
Ein leuchtender Steckverbinder wird für das
iPod/iPhone-Dock des Systems verwendet. Nur
iPod nano (7. Generation), iPod touch (5.
Generation), iPhone 5s, iPhone 5c und iPhone 5
unterstützen den leuchtenden Steckverbinder.
Die anderen als die oben genannten iPods/
iPhones müssen mit dem USB-Steckverbinder
angeschlossen werden.
0
Setzen Sie Ihr iPod/Phone zurück, wenn Ihr
iPod/iPhone nicht richtig abspielt. (Bitte
besuchen Sie die Apple-Homepage für
Informationen zum Zurücksetzen Ihres iPods/
iPhones.)
0
Für Details zum iPod/iPhone siehe die AppleWebsite. <http://www.apple.com/de/>
0
Den neusten Status zur Unterstützung des iPod/
iPhone finden Sie in den Produktinformationen
auf unserer Homepage.
Abspielbare BLUETOOTH Geräte
0
Zum Anschluss des Geräts an dieses System
per BLUETOOTH muss das Gerät kompatibel
mit dem BLUETOOTH 2.1+EDR und den A2DPund AVRCP-Profilen sein.
Abspielbare Discs/Dateien
Discs
.
Dateien MP3/WMA
0
Manche MP3/WMA-Dateien können nicht
wiedergegeben werden und werden
übersprungen. Das ist ein Resultat ihrer
Aufnahmeverfahren und Bedingungen.
0
Bei der Herstellung von MP3/WMA-Discs
verwenden Sie ISO 9660 mit Level 1 als DiscFormat.
0
Diese Anlage kann MP3/WMA abspielen, das
mit der folgenden Samplingfrequenz und Bitrate
aufgenommen wurde.
Bitrate: MP3 32 kbps – 320 kbps
WMA 32 kbps – 320 kbps
Samplingfrequenz: 32/ 44,1/ 48 kHz
0
Diese Anlage lässt keine sog. „packet
write“ Discs zu.
0
Das System kann ID3 TAG VERSION1,2 (Titel,
Interpret und Albumname), die Namen der
Dateien und Ordner (nur alphanumerische
Zeichen, Kleinbuchstaben werden als
Großbuchstaben angezeigt) anzeigen.
0
Bis zu 128 Zeichen können angezeigt werden.
0
Diese Anlage kann bis zu 99 Ordner und 999
Dateien auf einer Disc, bzw. 300 Ordner und 999
Dateien auf dem USB-Gerät erkennen.
DEUTSCH
39
Page 86

Wichtig zur USB-
Zweite Generation
Erste Generation
DIGITAL
DIGITAL DIGITAL
ANALOG
Massenspeichergeräte
Zum Anschließen/Abtrennen:
0
Trennen Sie das USB-Gerät ab, nachdem die Wiedergabe
gestoppt wurde. Das Trennen des USB-Geräts während der
Aufnahme/Wiedergabe kann Probleme mit dem USB-Gerät
und den Dateien darauf verursachen.
0
Beim Anschließen über ein USB-Kabel verwenden Sie
ein USB 2.0-Kabel mit einer Länge von weniger als 1 m.
0
Sie können nicht einen Computer an die USB
MEMORY-Klemme der Anlage anschließen.
0
Verwenden Sie keinen USB-Hub.
0
Bei Netzbetrieb und USB als Quelle, wird das USBGerät über das USB MEMORY-Terminal geladen.
0
Deaktivieren Sie die Sicherheitsfunktion des
USB-Geräts vor dem Anschließen.
Zur Wiedergabe:
0
Die Wiedergabereihenfolge von MP3/WMA-Dateien
‒
Gruppen werden in der erstellten Reihenfolge
wiedergegeben. In einer Gruppe werden Tracks in
der Aufnahmereihenfolge abgespielt.
‒ Die Wiedergabe-Reihenfolge kann sich
ändern, wenn Sie einen Ordner- oder
Dateinamen auf dem PC ändern.
0
Sie können nicht größere Dateien als 2 Gigabyte
abspielen.
0
Es wird empfohlen, USB-Massenspeichergeräte mit
weniger als 32 GB zu benutzen.
0
Wenn Ihr USB-Gerät partitioniert ist, wird nur die
erste Partition erkannt.
0
Manche USB-Geräte werden möglicherweise
nicht erkannt oder arbeiten nicht richtig.
0
Urheberrechtlich geschützte Tracks (WMADRM Tracks) können nicht auf der Anlage
abgespielt werden.
0
Ein elektrostatischer Schlag beim Anschließen
eines USB-Geräts kann anormale Wiedergabe
vom Gerät bewirken. In diesem Fall trennen Sie
das USB-Gerät ab, setzen diese Anlage und das
USB-Gerät zurück.
0
JVC übernimmt keine Verantwortung für
jeglichen Datenverlust in einem USBMassenspeichergerät bei der Verwendung
dieser Anlage.
40
Aufgezeichnete Dateien, die auf dem System erstellt werden
0
Die aufgezeichneten Dateien, die auf dem
System erstellt werden, haben das MP3-Format
mit einer Bitrate von 192 kbps.
0
Ein „MUSIC“-Ordner wird automatisch im USBGerät erstellt, und die MP3-Dateien werden wie
folgt in diesem Ordner erstellt:
.
Über SCMS (Serial Copy Management System)
Die Anlage verwendet das sogenannte Serial Copy
Management System, das nur die Erstellung einer
digitalen Kopiegeneration von pre-mastered
Material wie handelsüblichen CDs erlaubt. Wenn
Sie versuchen, von einer kopierten CD-R oder CDRW in das USB-Gerät aufzunehmen, erscheint
„SCMS ERR“ im Display.
.
It should be noted that it may be unlawful to
re-record pre-recorded tapes, records, or
discs without the consent of the owner of
copyright in the sound or video recording,
broadcast or cable programme and any
literary, dramatic, musical, or artistic work
embodied therein.
Page 87

Linse
Blaspinsel
Sonstiges
Wartung
Um beste Leistung mit der Anlage zu erzielen,
halten Sie Ihre Discs und Mechanismen immer
sauber.
Umgang mit Discs
0
Um eine Disc aus ihrem Behälter zu entfernen,
ergreifen Sie sie am Rand, drücken Sie leicht auf
das Mittelloch, und heben Sie die Disc heraus.
0
Berühren Sie nicht die glänzende Seite der Disc,
und biegen Sie die Disc nicht.
0
Setzen Sie die Disc nach der Verwendung in die
Hülle zurück.
0
Achten Sie beim Einlegen der Disc in ihren
Behälter sorgfältig darauf, die Oberfläche nicht
zu zerkratzen.
0
Schützen Sie die Disc for direktem Sonnenlicht,
extremen Temperaturen und Feuchtigkeit.
Reinigen von Discs
0
Wischen Sie die Disc mit einem weichen Lappen
gerade von der Mitte nach außen hin ab.
Reinigung der Anlage
0
Flecken müssen mit einem weichen Lappen
abgewischt werden. Bei schwerer
Verschmutzung der Anlage einen Lappen mit
wässriger, neutraler Spülmittellösung tränken,
gut auswringen, die Anlage abwischen, und
dann mit einem trockenen Lappen
trockenwischen.
0
Um Beeinträchtigung der Qualität der Anlage,
Beschädigung, oder Abpellen der Lackierung zu
vermeiden, auf folgendes achten:
– NICHT gewaltsam abwischen.
– NICHT mit Lösungsmitteln wie Verdünner
oder Benzol abwischen.
– NICHT flüchtige Substanzen wie etwa
Insektensprays darauf sprühen.
– NICHT Gummi- oder Plastikteile längere Zeit
in Berührung lassen.
Reinigen der CD-Tonabnehmerlinse
0
Halten Sie die CD-Tonabnehmerlinse sauber,
oder der Klang kann beeinträchtigt werden.
Verwenden Sie einen Blaspinsel (erhältlich im
Fotofachhandel, usw.), um den Staub von der
Linse zu entfernen.
.
Warenzeichen
0
Microsoft und Windows Media sind entweder
eingetragene Marken oder Marken der Microsoft
Corporation in den Vereinigten Staaten und/oder
anderen Ländern.
0
“Made for iPod” and “Made for iPhone” mean that
an electronic accessory has been designed to
connect specifically to iPod or iPhone,
respectively, and has been certified by the
developer to meet Apple performance
standards. Apple is not responsible for the
operation of this device or its compliance with
safety and regulatory standards. Please note
that the use of this accessory with iPod or iPhone
may affect wireless performance.
0
iPhone, iPod, iPod classic, iPod nano and iPod
touch are trademarks of Apple Inc., registered in
the U.S. and other countries.
0
Die Wortmarke und die Logos von Bluetooth®
sind eingetragene Warenzeichen der Bluetooth
SIG, Inc., und jegliche Verwendung solcher
Marken durch die JVC KENWOOD Corporation
geschieht unter Lizenz.
0
Android ist eine Handelsmarke von Google Inc..
DEUTSCH
41
Page 88

Störungssuche
Wenn Sie ein Problem mit Ihrer Anlage haben,
gehen Sie zunächst diese Liste durch, um hier eine
mögliche Lösung zu finden, bevor Sie das Gerät
zum Kundendienst einreichen.
Wenn durch die folgenden Schritte die
Probleme nicht behoben werden können:
Die Anlage funktioniert mit einen eingebauten
Mikroprozessor. Wenn die Tasten nicht richtig
funktionieren, ziehen Sie einmal den Netzstecker
ab, warten eine kurze Zeit lang und stecken dann
den Netzstecker wieder ein.
Allgemein
Die Anlage kann nicht eingeschaltet werden.
Keine Spannungsversorgung. Prüfen Sie, ob
B
der Netzstecker eingesteckt ist bzw. wechseln
Sie die Batterien aus.
Die Anlage schaltet sich automatisch ab.
Das automatische Energiesparen ist in
B
Betrieb. (S. 13)
Einstellungen oder Eingaben werden plötzlich
aufgehoben, bevor Sie fertig sind.
Es gibt eine Zeitgrenze. Wiederholen Sie das
B
Verfahren.
Während Betriebsstrom mittels Batterien
angelegt wird, ist der Ton von den
Lautsprechern verzerrt oder zu leise.
Die Batterien sind erschöpft. Tauschen Sie die
B
Batterien aus.
Unfähig, die Anlage von der Fernbedienung zu
steuern.
Es befindet sich ein Hindernis zwischen
B
Fernbedienung und dem
Fernbedienungssensor an der Anlage.
Die Batterien sind erschöpft.
B
iPod-Bedienverfahren
Es erfolgt keine Wiedergabe des iPods.
Schließen Sie das USB-Kabel korrekt an.
B
Überprüfen Sie die Kompatibilität Ihres iPods.
B
(S. 39)
Die Batterie des iPod ist schwach oder leer.
B
Laden Sie die Batterie des iPod.
Setzen Sie Ihren iPod nach dem Trennen vom
B
System zurück und unterbrechen Sie die
Stromzufuhr des Systems und stecken Sie
diesen dann erneut ein. (Bitte besuchen Sie die
Apple-Homepage für weitere Informationen
zum Zurücksetzen Ihres iPods/iPhones.)
BLUETOOTH Aktionen
Kann nicht gepaart werden.
Stellen Sie das System auf Pairing-Standby
B
und führen Sie das Pairing von einem
Zielgerät, wie etwa einem Smartphone, durch.
(S. 17)
Kann nicht mit dem BLUETOOTH-Gerät
verbinden.
Stellen Sie sicher, dass die BLUETOOTH-
B
Funktion Ihres BLUETOOTH-Geräts auf ON
gestellt ist.
Ihr Gerät unterstützt A2DP nicht. Zum
B
Streaming von Musikdaten ist ein A2DP-Profil
notwendig. Beziehen Sie sich auf die
Bedienungsanleitung des BLUETOOTHGeräts.
Kann das BLUETOOTH-Gerät nicht bedienen.
Ihr Gerät unterstützt AVRCP nicht. Um das
B
BLUETOOTH-Gerät vom System aus zu
bedienen, ist AVRCP erforderlich. Beziehen
Sie sich auf die Bedienungsanleitung des
BLUETOOTH-Geräts.
Kein Ton.
Einstellen der Lautstärke.
B
Kopfhörer sind angeschlossen.
B
42
Der Ton ist abgehackt. Rauschen wird erzeugt.
Das System ist außerhalb der BLUETOOTH-
B
Reichweitenbeschränkung oder ein Gerät
stört die Funkwellen zwischen dem System
und dem BLUETOOTH-Gerät. Versuchen Sie,
das BLUETOOTH-Gerät näher ans System zu
bringen, oder ändern Sie die Position.
Page 89

Disc/USB-MassenspeichergerätBedienverfahren
Die Disc/das USB-Gerät spielt nicht ab.
Die Disc ist umgekehrt eingesetzt. Setzen Sie die Disc
B
mit der Beschriftungsseite nach oben weisend ein.
Die Disc ist zerkratzt oder schmutzig.
B
Diese Disk ist im „Paketschreib-Verfahren (UDF-
B
Dateieinheit)“ aufgezeichnet worden. Sie kann nicht
wiedergegeben werden. Überprüfen Sie die
Dateien, die Sie wiedergeben möchten.
Das USB-Gerät ist nicht richtig
B
angeschlossen.
MP3/WMA-Gruppen und Tracks werden nicht
erwartungsgemäß abgespielt.
Die Wiedergabe-Reihenfolge kann sich ändern,
B
wenn Sie einen Dateinamen auf dem PC ändern.
Der Disc-Klang ist unterbrochen.
Die Disc ist zerkratzt oder schmutzig.
B
Spielen Sie MP3/WMA-Dateien ab, die
B
fehlerfrei aufgezeichnet wurden.
Ton vom USB-Gerät ist unterbrochen.
Rauschen und statische Elektrizität können
B
den Ton stoppen. In diesem Fall trennen Sie
das USB-Gerät ab, schalten die Anlage aus,
und schließen das USB-Gerät wieder an,
nachdem die Anlage wieder eingeschaltet ist.
Timer-Funktionen
Der Sleep-Timer kann nicht eingestellt werden
Der Timer oder Aufnahme-Timer läuft.
B
Schalten Sie den Timer aus. Während der
Timer/Aufnahme-Timer läuft, funktioniert der
Sleep-Timer nicht.
Täglich-Timer startet nicht.
Die Uhr muss eingestellt werden. Die
B
Uhreneinstellung wird abgebrochen, wenn
das Netzkabel von der Netzsteckdose
abgetrennt wird, was dazu führt, dass der
Tages-Timer nicht mehr in Betrieb ist.
Die Anlage war bei Erreichen der Einschaltzeit
B
bereits eingeschaltet. Der Timer arbeitet nur
bei ausgeschalteter Anlage.
Der Aufnahme-Timer funktioniert nicht.
Das System war beim Erreichen der
B
Einschaltzeit bereits eingeschaltet. Der
Aufnahme-Timer funktioniert nur, wenn das
System ausgeschaltet ist.
DEUTSCH
Bedienung des Radios
Schwer hörbare Sendungen wegen Rauschen.
Die DAB/FM-Antenne ist nicht richtig
B
ausgestreckt und platziert.
Aufnahmefunktionen
Kann nicht aufgezeichnet werden.
Es ist nicht genügend freier Speicherplatz auf
B
dem USB-Gerät.
Deaktivieren Sie den Schreibschutz des USB-Geräts.
B
Die digitale Aufnahme ist wegen des SCMS
B
untersagt. Machen Sie eine analoge
Aufnahme. (S. 40)
43
Page 90

Technische Daten
Disc-Player
CD-Kapazität: 1CD
Signal-Rauschabstand: 85 dB
Dynamikumfang: 90 dB
Tuner
DAB-Abstimmbereich
0
BAND III: 174,928 MHz – 239,200 MHz
UKW-Abstimmbereich: 87,50 MHz – 108,00 MHz
Antenne: Teleskopantenne
BLUETOOTH
BLUETOOTH-Version: BLUETOOTH 2.1 + EDR zertifiziert
Ausgangsleistung: BLUETOOTH Leistungsklasse 2
Betriebsbereich: max. 10 m (10,9 yd.) *
* Die Kommunikationsreichweite kann je nach Umgebungsbedingungen abweichen.
Frequenzband: 2,4 GHz (2,4000 GHz – 2,4835 GHz)
BLUETOOTH-Profil: A2DP (Advanced Audio Distribution Profile), AVRCP (Audio/
Allgemein
Lautsprecher:
0
Vollbereich: 8 cm Konus ´ 2
0
Super-Tieftöner: 13 cm Konus ´ 2
Ausgangsleistung: 40 W
Eingangsbuchse
0
USB MEMORY: Abspielbare Dateien:
0
Docking-Station für iPod:
0
AUDIO IN: φ3.5
Video Remote Control Profile)
Lautsprecherimpedanz:
16 K
Lautsprecherimpedanz:
7 K
MP3, WMA
0
Kompatibel mit USB 2.0 Full-Speed
0
Kompatibles Gerät: Massenspeichergerät
0
Kompatibles System: FAT16, FAT32
0
Ausgangsleistung: 5 V Gleichstrom P 1 A
5 V Gleichstrom P 1 A
44
Page 91

Eingangsempfindlichkeit /Impedanz (1 kHz):0LEVEL 1: 500 mV /47 kK
0
MIC/GUITAR:
0
LEVEL 2: 250 mV /47 kK
0
LEVEL 3: 125 mV /47 kK
0
MIC: 200 K - 2 kK (φ6,3)
0
GUITAR: 100 kK - 1 MK (φ6,3)
Ausgangsklemme
0
PHONES: φ3,5
32 K - 1 kK
15 mW/Kanal Ausgangsleistung bei 32 K
Stromversorgung
0
Wechselstrom: 230 V Wechselstrom H, 50 Hz
0
Gleichstrom: 15 V Gleichstrom (R20 (SUM-1)/D (13D)-Format-Batterien x 10)
Leistungsaufnahme: 28 W (wenn eingeschaltet)
3,0 W oder weniger (im BLUETOOTH-Standby)
0,50 W oder weniger (im Standby)
Abmessungen: 666 mm ´ 235 mm ´ 248 mm (B x H x T)
Gewicht: 7,1 kg (ohne im Batteriefach eingelegte Batterien)
Änderungen bei Design und technischen Daten bleiben vorbehalten.
DEUTSCH
45
Page 92

.
.
.
V GE
© 2013 JVC KENWOOD Corporation
Page 93

.
CHAIN CD A WOOFER AMPLIFIE
RV-NB100B
.
FRANÇAIS
.
MANUEL D’INSTRUCTIONS
LVT2488-001A
[E]
Page 94

Introduction
La fonction d’économie d’énergie automatique est en service.
Lorsque aucune opération n’est effectuée pendant 15 minutes, le système est mis
automatiquement hors tension. Cette fonction est activée par défaut. Pour plus de
détails, reportez-vous à “Mode Auto power save” p. 13.
Dans ce manuel...
0
Sauf mention contraire, les touches de la télécommande sont utilisées pour expliquer les opérations.
Toutefois, si l’appareil comporte des touches avec des noms identiques ou similaires, ils peuvent
aussi être utilisés pour le fonctionnement.
Dans ce manuel...
0
Dans ce manuel, “iPod” est utilisé à la fois pour iPod, iPod touch et pour iPhone. Quand on fait
référence en particulier à un iPod touch ou à un iPhone, “iPod touch” ou “iPhone” est utilisé.
0
Dans ce manuel, le terme “dispositif Android” désigne un smartphone et une tablette équipés de l’OS
Android.
0
Dans ce manuel, les mots “fichier” et “plage”, “dossier” et “groupe” sont utilisés de façon
interchangeable.
Remarques sur l’utilisation de l’appareil
0
Ne laissez jamais la porte avant ouverte.
0
Ne pas appuyez sur la trappe avant lorsqu’elle est ouverte car l’appareil pourrait tomber en panne et
éventuellement causer une blessure.
Une copie de la Déclaration de Conformité relative à la Directive R&TTE 1999/5/CE peut être
téléchargée à partir des sites Web suivants. (http://www.jvc.co.jp/ecdoc/)
.
Par la présente, JVC déclare que ce système [RV-NB100B] est conforme aux exigences essentielles
et aux autres dispositions pertinentes de la Directive 1999/5/CE.
IMPORTANT POUR LES PRODUITS LASER
1. PRODUIT LASER CLASSE 1
2. ATTENTION : Ne pas ouvrir le couvercle supérieur ni le coffret de l’appareil. Il n’y a aucune pièce
réparable par l’utilisateur à l’intérieur de l’appareil; confiez toute réparation à un personnel qualifié.
2
Page 95

Préparations
15 cm
15 cm
15 cm
Arrière de l’
appareil
15 cm
15 cm
Attention: Ventilation Correcte
Pour éviter tout risque de choc électrique et d’incendie, et pour éviter tout dommage, placez l’appareil en
respectant ce qui suit:
1
Avant:
Rien ne doit gêner le dégagement.
2 Flancs/Dessus/Arrière:
Aucun obstacle ne doit être placé dans les zones indiquées par les dimensions dans l’illustration cidessous.
3 Dessous :
Poser l’appareil sur une surface plate.
Vue avant
.
Vue latérale
FRANÇAIS
.
Remarques sur l’installation
Choisissez un endroit plat, sec, et ni trop chaud, ni trop froid—entre 5˚C et 35˚C.
3
Page 96

Ce que vous pouvez faire avec le système
P. 1 2
Faites-vous plaisir et écoutez de la
musique en réglant le volume du super
haut-parleur (basses) et le mode son !
P. 2 8
Mélange avec une source
sonore à l’aide d’un microphone
ou d’une guitare
Enregistrement sur un dispositif
USB à partir d’un CD, d’une radio
FM ou d’un dispositif externe
P. 2 0
Lire les fichiers MP3/WMA sur un
CD de musique ou un dispositif USB
P. 1 7
Lisez les fichiers sur votre dispositif
BLUETOOTH en actionnant le système
P. 1 4
Lire les fichiers sur votre iPod ou
iPhone en utilisant le système
P. 3 0
.
4
Page 97

Table des matières
Introduction ..................................... 2
Préparations ........................................................ 3
Ce que vous pouvez faire avec le système ......... 4
Préparations .................................... 6
Accessoires ........................................................ 6
Mise en place des piles ....................................... 6
Transport de l’appareil ........................................ 7
Index des pièces et des commandes
Avant de l’appareil
Arrière de l’appareil
Fenêtre d’affichage
Télécommande
.................................................... 8
................................................... 9
................................................... 9
...................................................... 10
........ 8
Connexions ................................... 11
Connexion du cordon d’alimentation ................. 11
Connexion d’un casque d’écoute ...................... 11
Opérations de base ...................... 12
Mise sous/hors tension du système .................. 12
Réglage de l’horloge ......................................... 12
Affichage de l’horloge ....................................... 12
Pour commencer ............................................... 12
iPod ................................................ 14
Connexion de iPod ............................................ 14
Lecture .............................................................. 15
Lecture aléatoire ............................................... 16
Lecture répétée ................................................. 16
Utilisation du menu d’iPod ................................. 16
Écouter un dispositif BLUETOOTH
Connexion d’un dispositif BLUETOOTH pour la première fois
Appairage (enregistrement) d’autres dispositifs BLUETOOTH
Réglage du système sur le mode veille BLUETOOTH
Utiliser une application de télécommande
......... 17
.. 17
. 18
....... 19
...................... 19
Pour reproduire un disque/un
dispositif USB ................................ 20
Préparations ...................................................... 20
Lecture .............................................................. 20
Lecture programmée ......................................... 21
Lecture aléatoire ............................................... 22
Lecture répétée ................................................. 22
DAB ................................................ 23
Écoute des stations DAB .................................. 23
FM ................................................... 25
Écoute des stations FM ..................................... 25
Présélection des stations .................................. 25
Métronome ..................................... 26
Écoute d’un appareil extérieur ........................... 26
Appareil extérieur ......................... 27
Utilisation de la fonction métronome ................. 27
Branchement d’un microphone/
guitare ............................................ 28
Mixage du microphone ou de la guitare ............ 28
Réglage de la tonalité d’une guitare .................. 28
Enregistrement sur un périphérique
USB ................................................. 30
Enregistrement de disques ............................... 30
Enregistrement d’autres sources ...................... 32
Suppression d’une plage .................................. 34
Utilisation de la minuterie ............ 35
Réglage du minuteur de mise en sommeil ........ 35
Réglage du minuteur journalier ......................... 35
Réglage de la minuterie d’enregistrement ......... 37
À propos des disques/des fichiers
iPod compatible
Dispositifs BLUETOOTH reproductibles
Disques/fichiers reproductibles
Important pour les périphériques USB à mémoire de
grande capacité
Fichiers enregistrés créés sur le système
À propos de SCMS (Serial Copy Management System -
Système de gestion de la copie en série)
................................................... 39
.............................. 39
................................................... 40
... 39
................. 39
................ 40
................ 40
Autres ............................................. 41
Entretien ............................................................ 41
Marques de commerce ..................................... 41
Guide de dépannage .................... 42
Spécifications ................................ 44
5
Page 98

R20 (SUM-1)/D (13D) x 10
(non fourni)
Logement des piles
R6P (SUM-3)/AA
(15F) (fournie)
Préparations
Accessoires
Vérifiez que tous les éléments suivants sont
bien présents, et qu’ils sont fournis avec
l’appareil.
0
Cordon d’alimentation (1)
0
Télécommande RM-SRVNB100A (1)
0
Piles (pour la télécommande) (2)
0
Bandoulière (1)
0
Boucle (2)
0
Butée (2)
Si un de ces éléments est absent, contactez
immédiatement votre revendeur.
Mise en place des piles
Appareil principal
0
Respectez les polarités (+ et –) des piles.
Télécommande
0
Respectez les polarités (+ et –) des piles.
.
0
Si la plage de fonctionnement de la
télécommande diminue, remplacez les piles.
REMARQUE
0
Rangez la pile dans un endroit hors d’atteinte
des enfants. Si un enfant avale accidentellement
la pile, consultez immédiatement un médecin.
0
L’alimentation n’est pas fournie par les piles si
elle est fournie par la sortie AC.
0
Les piles s’usent plus vite que normalement
quand l’appareil est utilisé de façon continu ou
dans un endroit froid.
0
Lorsque l’alimentation est fournie par les piles,
l’affichage reste vide lorsque le système est mis
hors tension (en veille) en appuyant sur la touche
[D]. Et l’indicateur STANDBY ne sera pas
activé.
.
6
ATTENTION
Pour évit er une fuite ou une explosion des piles,
manipulez-les correctement.
0
Si vous n’avez pas l’intention d’utiliser cet
appareil pendant un mois ou plus, retirez les
piles du logement des piles.
0
Mettez les piles au rebut correctement en
respectant la régulation fédérale, régionale ou
locale.
0
Ne mélangez pas des piles de type différent ou
une veille pile avec une nouvelle.
0
N’essayez pas de charger une pile qui n’est pas
rechargeable.
0
Mettez au rebut les piles qui fuient immédiatement.
Une fuite d’électrolyte des piles peuvent causer des
brûlures de peau ou d’autres blessures
personnelles.
0
Si de l’électrolyte des piles fuit dans l’appareil,
nettoyez l’appareil complètement.
Page 99

Transport de l’appareil
Poignée de transport
Butée
Butée
(fournie)
Appareil principal
Bandoulière
Bandoulière
Boucle
Avant
Bandoulière
(fournie)
Boucle
(fournie)
Utilisation des poignées de transport
Lorsque vous transportez l’appareil, assurez-vous
bien de le porter par les deux poignées.
Si vous transportez l’appareil avec une seule
poignée, l’autre extrémité peut glisser sur le sol et
être endommagé.
Utilisation de la bandoulière
Fixez la bandoulière fournie (ajustable en
longueur) à chaque bout de l’appareil, comme
montré sur l’illustration ci-dessous.
.
REMARQUE
0
Retirez le disque, le périphérique USB ou l’iPod
de l’appareil.
0
Débranchez tous les cordons de l’appareil.
0
L’appareil n’est pas étanche ni à l’épreuve de la
poussière.
FRANÇAIS
.
7
Page 100

12 34 5 6 7 89
0~
!@ # $%^ (*&
-=
Index des pièces et des commandes
Avant de l’appareil
.
A
Touche CD F
B
Touche iPod F
C
Touche STANDBY/ON D
D
Crochet de la bandoulière
E
SUPER WOOFER VOLUME +/–
F
Indicateur STANDBY
G
Trappe du compartiment à disque
H
Touche BLUETOOTH
I
Indicateur BLUETOOTH
J
VOLUME +/–
K
Crochet de la bandoulière
8
L
Touche de G /TEMPO +
M
Touche de H /TEMPO -
N
Touche USB/iPod F
O
Touche METRONOME F
P
Connecteur ou couvercle USB
Q
Connecteur pour iPod ou trappe avant
R
Capteur de télécommande
S
Touche REC
T
Indicateur REC
U
Touche TUNER/AUDIO IN
V
Touche o
 Loading...