

Page 1
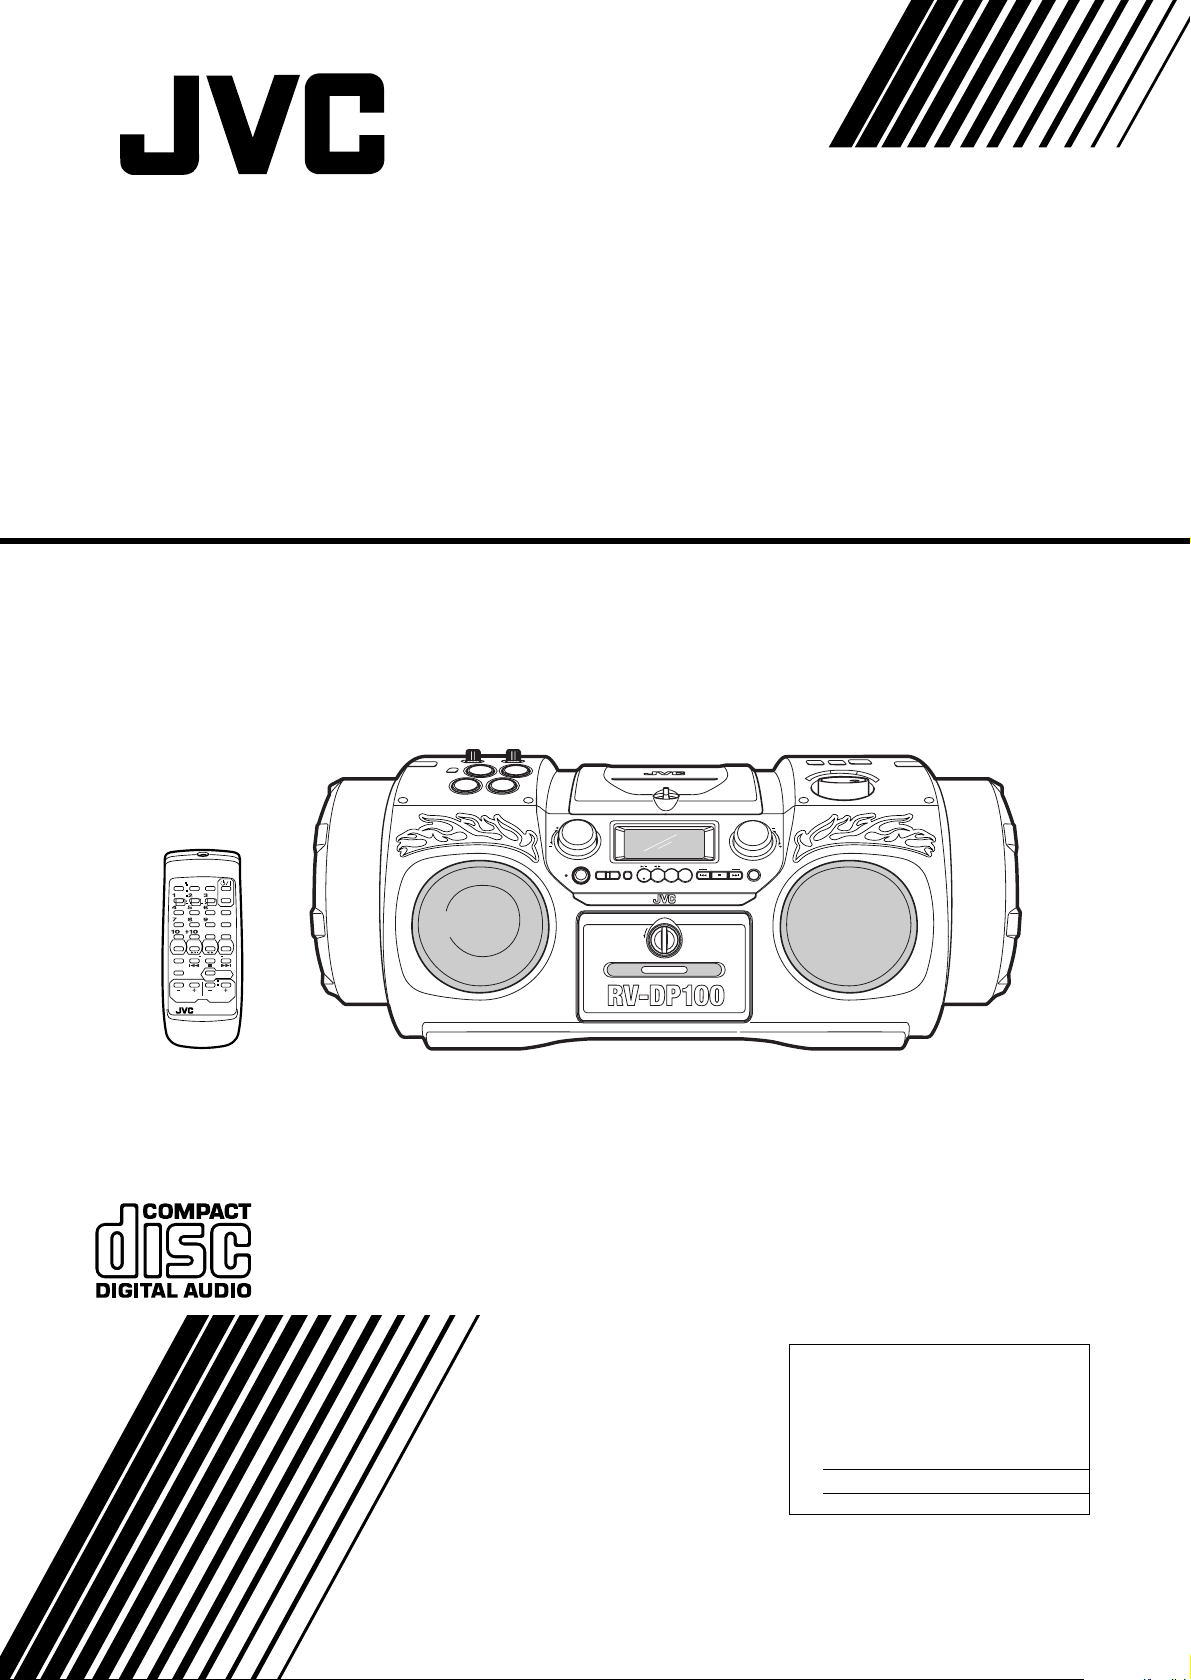
POWERED WOOFER CD SYSTEM
CD-SYSTEM MIT POWER WOOFER
CHAIN CD A WOOFER AMPLIFIE
CD-SYSTEEM MET POWER WOOFER
CD CON ALTAVOZ DE GRAVES Y AMPLIFICADOR INCORPORADO
SISTEMA POWERED WOOFER CD
RV-DP100BK
CLOCK
DOWN
AUX CD TAPE
REVERSE MODE
DISPLAY
SUPER WOOFER
VOLUME
TIMER
UP SET
REW
TIMER
ON/OFF
AUTO
PRESET
MULTI CONTROL
VOLUME
RM-SRVDP100E
REMOTE CONTROL
PROGRAM
RANDOM
TREBLE
SUPER WOOFER
VOLUME
PRESET
TUNING
STANDBY
SLEEP
REPEAT
TUNER
BAND
FM MODE
FF
MID /
STANDBY/ON
BAND
ONE TOUCH
MID
/
REC
TREBLE
CD TAPE%AUX
TUNER
REW STOP FF
OPEN
MULTI CONTROL
VOLUME
MID
TREBLE
/
INSTRUCTIONS
BEDIENUNGSANLEITUNG
MANUEL D’INSTRUCTIONS
GEBRUIKSAANWIJZING
MANUAL DE INSTRUCCIONES
ISTRUZIONI
For Customer Use:
Enter below the Model No. and Serial No.
which are located either on the rear, bottom or side of the cabinet. Retain this
information for future reference.
Model No.
Serial No.
LVT0439-003A
[E]
Page 2
Warnings, Cautions and Others / Warnung, Achtung und sonstige Hinweise /Mises en
garde, précautions et indications diverses /Waarschuwingen, voorzorgen en andere mededelingen/Avisos, precauciones y otras notas / Avvertenze e precauzioni da osservare
Caution –– switch!
Disconnect the mains plug to shut the power off completely. The
switch in any position does not disconnect the mains line. The power
can be remote controlled.
Achtung –– Schalter!
Den Netzstecker aus der Steckdose ziehen, um die Stromversorgung
vollkommen zu unterbrechen. Der Schalter unterbrichet in keiner
Stellung die Stromversorgung vollkommen. Die Stromversorgung
kann mit der Fernbedienung ein- und ausgeschaltet werden.
Attention –– Commutateur !
Déconnecter la fiche de secteur pour couper compltement le courant.
Le commutateur ne coupe jamais compltement la ligne de secteur,
quelle que soit sa position. Le courant peut tre télécommandé.
Voorzichtig –– schakelaar!
Om de stroomtoevoer geheel uit te schakelen, trekt u de stekker uit het
stopkontakt. Anders zal er altijd een geringe hoeveelheid stroom naar
het apparaat lopen, ongeacht de stand van de schakelaar. U kunt
het apparaat ook met de afstandsbediening aan- en uitschakelen.
Precaución –– Interruptor !
Desconectar el cable de alimentación para desactivar la alimentación
totalmente. Cualquier que sea la posición de ajuste del interruptor ,
la alimentación no es cortada completamente. La alimentación puede
ser controlada remotamente.
Attenzione –– L’interruttore !
Disinserire la spina del cavo di alimentazione dalla presa della rete
elettrica per staccare completamente l’alimentazione. L’interruttore
in nessuna posizione stacca la linea di alimentazione elettrica principale. È possibile il controllo remoto dell’alimentazione.
Per l’Italia:
"Si dichiara che il questo prodotto di marca JVC è conforme alle
prescrizioni del Decreto Ministeriale n.548 del 28/08/95 pubblicato sulla Gazzetta Ufficiale della Repubblica Italiana n.301 del
28/12/95."
CAUTION
To reduce the risk of electrical shocks, fire, etc.:
1. Do not remove screws, covers or cabinet.
2. Do not expose this appliance to rain or moisture.
ACHTUNG
Zur Verhinderung von elektrischen Schlägen, Brandgefahr, usw:
1. Keine Schrauben lösen oder Abdeckungen enlfernen und das
Gehäuse nicht öffnen.
2. Dieses Gerät weder Regen noch Feuchtigkeit aussetzen.
ATTENTION
Afin d’éviter tout risque d’électrocution, d’incendie, etc.:
1. Ne pas enlever les vis ni les panneaux et ne pas ouvrir le coffret de l’appareil.
2. Ne pas exposer l’appareil à la pluie ni à l’humidité.
VOORZICHTIG
Ter vermindering van gevaar voor brand, elektrische schokken, enz.:
1. Verwijder geen schroeven, panelen of de behuizing.
2. Stel het toestel niet bloot aan regen of vocht.
PRECAUCIÓN
Para reducir riesgos de choques eléctricos, incendio, etc.:
1. No extraiga los tornillos, los cubiertas ni la caja.
2. No exponga este aparato a la lluvia o a la humedad.
ATTENZIONE
Per ridurre il rischio di shock elettrici, incendi, ecc...
1. Non togliete viti, coperchi o la scatola.
2. Non esponete l’apparecchio alla piogggia e all’umidità.
G-1
Page 3
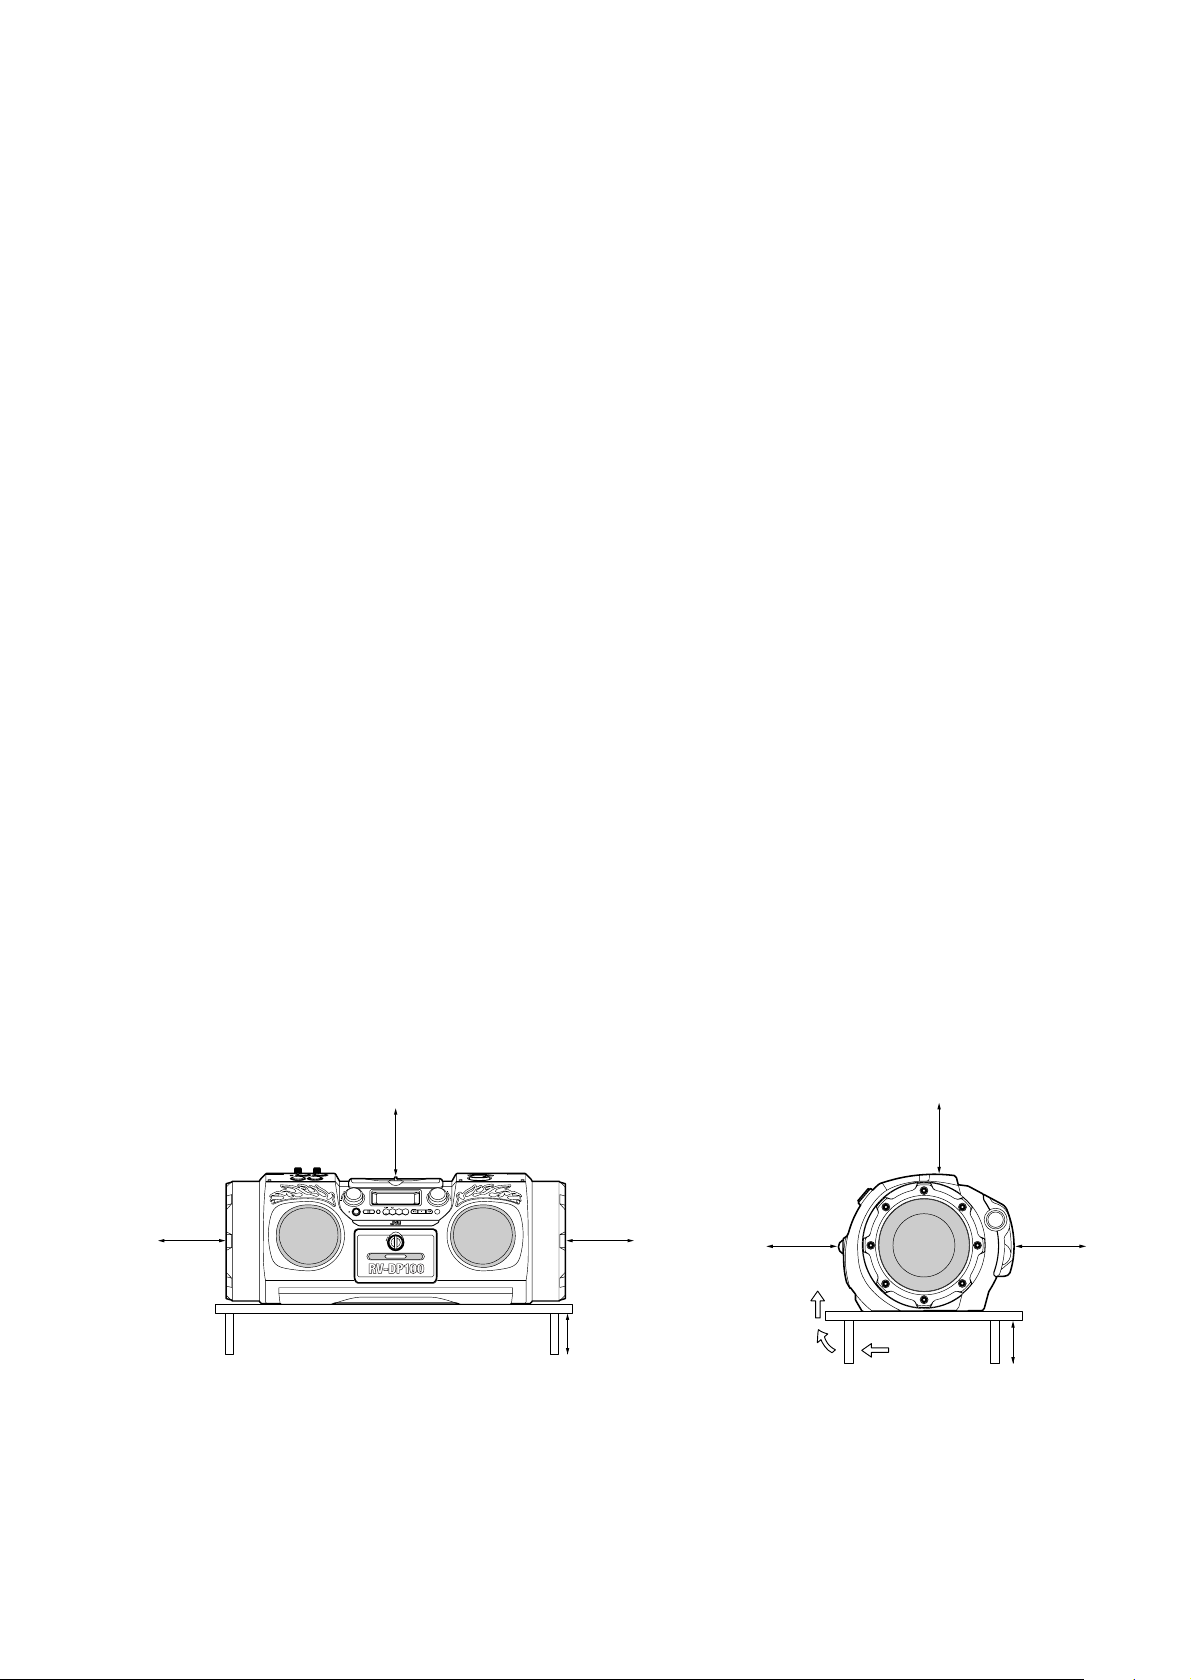
Caution: Proper Ventilation
To avoid risk of electric shock and fire, and to prevent damage, locate
the apparatus as follows:
1 Front:
No obstructions and open spacing.
2 Sides/ Top/ Back:
No obstructions should be placed in the areas shown by the
dimensions below.
3 Bottom:
Place on the level surface. Maintain an adequate air path for ventilation by placing on a stand with a height of 10 cm or more.
Voorzichtig: Goede ventilatie vereist
Om brand, elektrische schokken en beschadiging te voorkomen, moet
u het toestel als volgt opstellen:
1 Voorkant:
Geen belemmeringen en voldoende ruimte.
2 Zijkanten/boven-/onderkant:
Geen belemmeringen plaatsen in de hieronder aangegeven
zones.
3 Onderkant:
Op vlakke ondergrond plaatsen. Voldoende ventilatieruimte voorzien door het toestel op een onderstel met een hoogte van 10 cm of
meer te plaatsen.
Vorsicht: Ausreichende Belüftung
Zur Vermeidung von elektrischen Schlägen, Feuer und sonstigen
Schäden sollte das Gerät unter folgenden Bedingungen aufgestellt
werden:
1 Vorderseite:
Hindernisfrei und gut zugänglich.
2 Seiten- und Rückwände:
Hindernisfrei in allen gegebenen Abständen (s. Abbildung).
3 Unterseite:
Die Stellfläche muß absolut eben sein. Sorgen Sie für ausreichende Luftzufuhr durch Aufstellung auf einem Stand mit mindestens 10 cm Höhe.
Attention: Aération correcte
Pour prévenir tout risque de décharge électrique ou d’incendie et
éviter toute détérioration, installez l’appareil de la manière suivante:
1 Avant:
Bien dégagé de tout objet.
2 Côtés/dessus/dessous:
Assurez-vous que rien ne bloque les espaces indiqués sur le
schéma ci-dessous.
3 Dessous:
Posez l’appareil sur une surface plane et horizontale. Veillez à ce
que sa ventilation correcte puisse se faire en le plaçant sur un support d’au moins dix centimètres de hauteur.
Precaucion: ventilación correcta
Para evitar el riesgo de descargas eléctricas e incendio y prevenir
posibles daños, instale el equipo en un lugar que cumpla los siguientes requisitos:
1 Parte frontal:
Sin obstrucciones, espacio abierto.
2 Lados/parte superior/parte posterior:
No debe haber ninguna obstrucción en las áreas mostradas por
las dimensiones de la siguiente figura.
3 Parte inferior:
Sitúe el equipo sobre una superficie nivelada. Mantenga un espacio adecuado para permitir el paso del aire y una correcta ventilación, situando el equipo sobre un soporte de 10 o más cm de
allura.
Attenzione: Per una corretta ventilazione
Per prevenire il rischio di scosse elettriche e di incendio ed evitare possibili danni, collocare le apparecchiature nel modo seguente:
1 Parte anteriore:
Nessun ostacolo e spazio libero.
2 Lati/Parte superiore/R etro:
Lasciare libere le zone indicate dalle dimensioni di seguito.
3 Base:
Collocare su una superficie piana. Consentire un’adeguata ventilazione dell’impianto appoggiandolo su un tavolinetto alto almeno
10 cm.
Front view
Vorderansicht
Face
Vooraanzicht
Vista frontal
Vista frontale
15 cm
Side view
Seitenansicht
Côt
Zijaanzicht
Vista lateral
Vista laterale
15 cm
SUPER WOOFER
VOLUME
PRESET
ONE TOUCH
MID
/
TUNING
REC
TREBLE
STANDBY
STANDBY/ON
OPEN
CD TAPE%AUX
VOLUME
MID
TREBLE
/
BAND
MULTI CONTROL
TUNER
REW STOP FF
15 cm
10 cm
15 cm
15 cm
15 cm
10 cm
G-2
Page 4
IMPORTANT FOR LASER PRODUCTS/ WICHTIGER HINWEIS FÜR LASER-PRODUKTE / IMPORTANT POUR LES PRODUITS LASER /
BELANGRIJKE INFORMATIE VOOR LASERPRODUKTEN / IMPORTANTE PARA LOS PRODUCTOS LÁSER / IMPORTANTE PER I PRODOTTI LASER
REPRODUCTION OF LABELS/ANBRINGUNGSORTE FÜR LASER-PRODUKTE/REPRODUCTION DES ETIQUETTES/VERKLARING VAN
DE LABELS/REPRODUCCIÓN DE ETIQUETAS/RIPRODUZIONE DELLE ETICHETTE
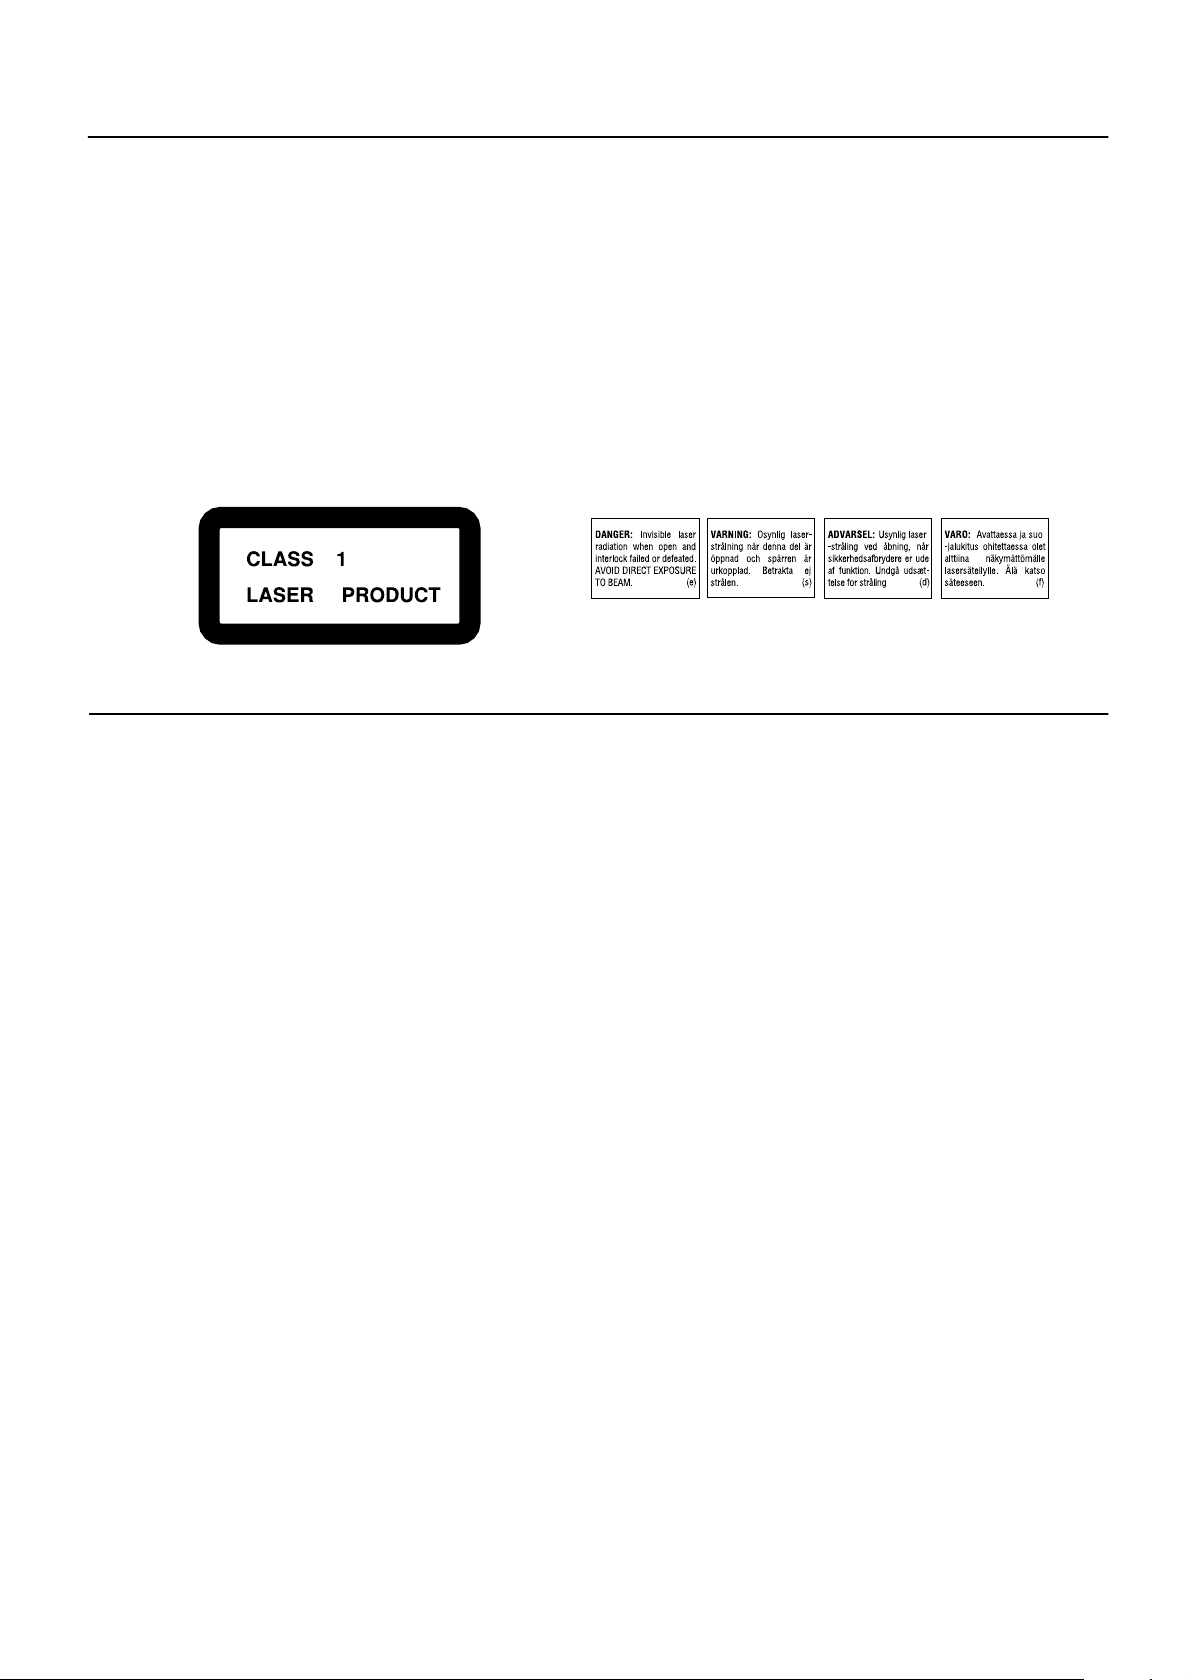
1 CLASSIFICATION LABEL, PLACED ON EXTERIOR SURFACE
2 WARNING LABEL, PLACED INSIDE THE UNIT
1 KLASSIFIZIERUNGSHINWEIS BEFINDET SICH AUF DER AUS-
SENSIETE
1 ÉTIQUETTE DE CLASSIFICATION, PLACÉE SUR LA SURFACE
EXTÉRIEURE
1 CLASSIFICATIE-ETIKET AAN DE BUITENKANT VAN HET APPA-
RAAT
1 ETIQUETA DE CLASIFICACION, PROVISTA SOBRE LA SUPER-
FICIE EXTERIOR
1 ETICHETTA DI CLASSIFICAZIONE POSTA ALL’ESTERNO
1. CLASS 1 LASER PRODUCT
2. DANGER: Invisible laser radiation when open and interlock failed
or defeated. Avoid direct exposure to beam.
3. CAUTION: Do not open the top cover. There are no user serviceable parts inside the Unit; leave all servicing to qualified service
personnel.
1. LASER-PRODUKT DER KLASSE 1
2. GEFAHR: Unsichtbare Laserstrahlung bei Öffnung und fehler-
hafter oder beschädigter Spre. Direkten Kontakt mit dem Strahl
vermeiden!
3. ACHTUNG: Das Gehäuse nicht öffnen. Das Gerät enthält keinerlei Teile, die vom Benutzer gewartet werden können. Überlassen
Sie Wartungsarbeiten bitte qualifizierten Kundendienst-Fachleuten.
2 WARNETIKETTE IM GERÄTEINNEREN
2 ETIQUETTE D’AVERTISSEMENT PLACÉE À L’INTERIEUR DE
L’APPAREIL
2 WAARSCHUWINGSLABEL, IN HET APPARAAT
2 ETIQUETA DE ADVERTENCIA, PEGADA EN EL INTERIOR DE
LA UNIDAD
2 ETICHETTA DI AVVERTENZA, SITUATA ALL’INTERNO
DELL’APPARECCHIO
1. KLAS 1 LASERPRODUKT
2. GEVAARLIJK: Onzichtbare laserstraling wanneer open en de
beveiliging faalt of uitgeschakeld is. Voorkom het direkt blootstaan
aan de straal.
3. VOORZICHTIG: De bovenkap niet openen. Binnenin het toestel
bevinden zich geen door de gebruiker te repareren onderdelen:
laat onderhoud over aan bekwaam vakpersoneel.
1. PRODUCTO LASER CLASE 1
2. PELIGRO: En el interior hay radiación láser invisible. Evite el contacto directo con el haz.
3. PRECAUCIÓN: No abra la tapa superior. En el interior de la
unidad no existen piezas reparables por el usuario; deje todo servicio técnico en manos de personal calificado.
1. PRODUIT LASER CLASSE 1
2. ATTENTION: Radiation laser invisible quand l’appareil est ouvert
ou que le verrouillage est en panne ou désactivé. Eviter une exposition directe au rayon.
3. ATTENTION: Ne pas ouvrir le couvercle du dessus. Il n’y a
aucune pièce utilisable à l’intérieur. Laisser à un personnel qualifié
le soin de réparer votre appareil.
1. PRODOTTO LASER CLASSE 1
2. PERICOLO: Radiazione laser invisibile quando l’apparecchio è
aperto ed il dispositivo di sicurezza è guasto o disattivato. Evitare
l’esposizione diretta ai raggi.
3. ATTENZIONE: Non aprire il coperchio superiore. Non vi sono parti
adoperabili dall’utente all’interno di questo apparecchio; lasciare
tutti i controlli a personale qualificato.
G-3
Page 5

Thank you for purchasing the JVC Powered Woofer CD System.
We hope it will be a valued addition to your home as well as your outdoor life, giving you years of enjoyment.
Be sure to read this instruction manual carefully before operating your new stereo system.
In it you will find all the information you need to set up and use the system.
If you have a query that is not answered by the manual, please contact your dealer.
Features
Here are some of the things that make your System both powerful and simple to use.
■ The controls and operations have been redesigned to make them very easy to use, freeing you to just enjoy the music.
• With JVC's COMPU PLAY you can turn on the System and automatically start the Radio, CD Player, or Casette
Deck with a single touch. (Only when AC power is used.)
■ The System is equipped with 16-cm dia. super woofers that provide powerful bass.
■ A 45-station preset capability (30 FM and 15 AM (MW/LW)) in addition to auto-seek and manual tuning.
■ CD options include repeat, random and program play.
■ Auto-reverse tape function
■ Rhythm Machine provides various rhythm patterns, scratch sounds, and drum pad patterns.
■ Timer functions; set the system to automatically come on, switch off.
How This Manual Is Organized
• Basic information that is the same for many different functions - e.g. setting the volume - is given in the section ‘Basic Operations', and
not repeated under each function.
• The names of buttons/controls and display messages are written in all capital letters: e.g. TUNER BAND, "NO DISC".
• System functions are written with an initial capital letter only: e.g. Normal Play.
Use the table of contents to look up specific information you require.
We've enjoyed making this manual for you, and hope it serves you in enjoying the many features built into your System.
English
IMPORTANT CAUTIONS
1. Where to place the System
■
• Select a place which is level, dry and neither too hot nor too cold. (Between 0°C and 40°C.)
• Leave sufficient distance between the System and a TV.
• Do not use the System in a place subject to vibrations.
2. Power cord
■
• Do not handle the power cord with wet hands!
• Some power is always consumed as long as the power cord is connected to the wall outlet.
• When unplugging the System from the wall outlet, always pull the plug, not the power cord.
3. When carrying the System
■
• Remove a CD from the System.
• Disconnect all the cords from the System.
4.Malfunctions, etc.
■
• There are no user serviceable parts inside. In case of system failure, unplug the power cord and consult your dealer.
• Do not insert any metallic object into the System.
■■
Table of Contents
Features................................................................................1
How This Manual Is Organized...........................................1
IMPORTANT CAUTIONS.................................................1
Getting Started ...................... ... .... ... ..........................2
Basic Operations.......................................................6
Using the Tuner..................................... .... ................8
Using the CD Player........................................... .... . 10
Using the Cassette Deck (Listening to a Tape) ....12
Using the Cassette Deck (Recording).................. 13
Using the Rhythm Machine................................... 15
Listening to an Auxiliary Equipment.................... 20
Using the Microphone/Guitar................................ 21
Using the Timers.................................................... 22
Care And Maintenance .......................................... 24
Troubleshooting..................................................... 25
Specifications......................................................... 26
1
Page 6
■■
CLOCK
DOWN
UP
SET
TIMER
TIMER
ON/OFF
SLEEP
PROGRAM
RANDOM
REPEAT
DISPLAY
VOLUME
SUPER WOOFER
VOLUME
RM-SRVDP100
REMOTE CONTROL
AUX CD TAPE
BAND
FM MODE
TUNER
AUTO
PRESET
REVERSE MODE
REW
MULTI CONTROL
FF
MID /
TREBLE
Getting Started
English
Accessories
Check that you have all of the following items, which are supplied with the System.
Power Cord (1)
Remote Control (1)
Batteries (2)
Shoulder Strap (1)
If any of these items are missing, contact your dealer immediately.
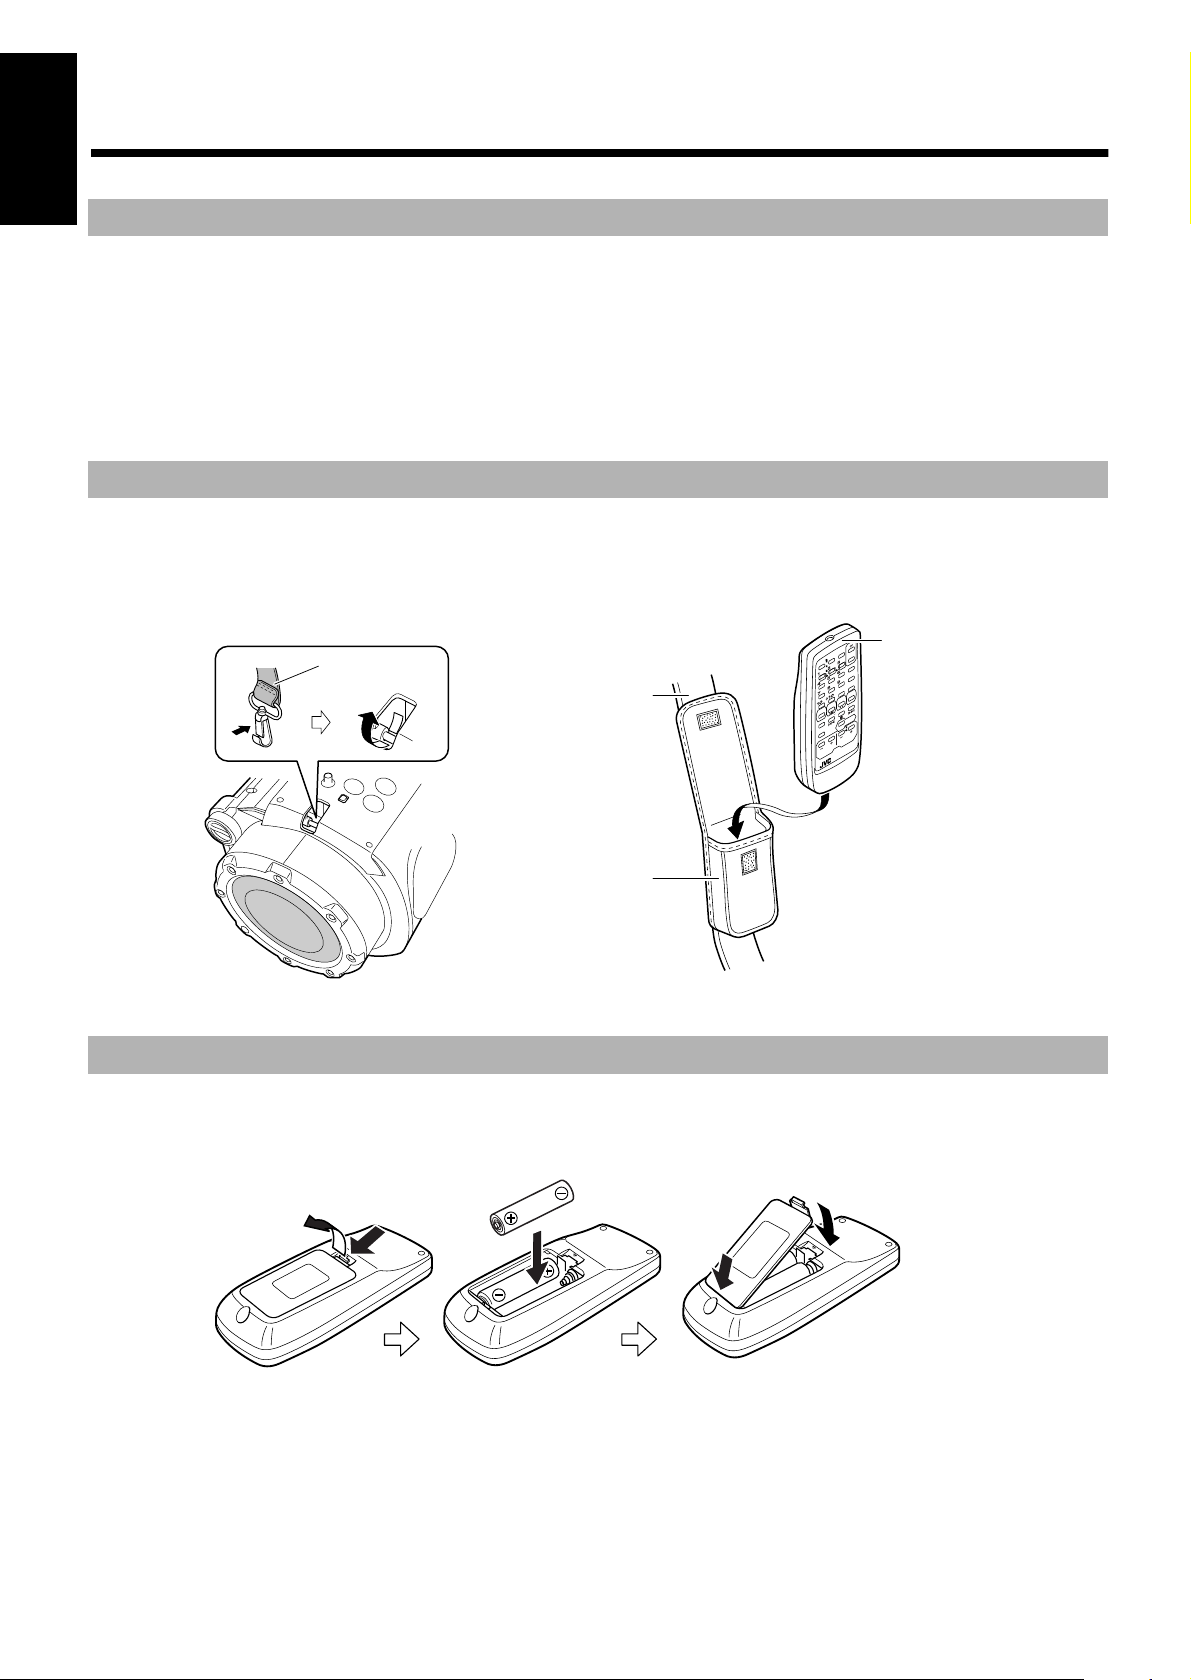
How To Carry the System
To carry the System, attach the supplied shoulder strap to each end of the System.
Press in the metal fitting of the shoulder strap and hook it over the shaft at each end of the System as shown in the figure.
To detach the shoulder strap, press in the metal fitting and unhook it from the shaft.
The shoulder strap is adjustable in length and has the remote control case.
Shoulder strap
Shoulder strap
Remote control unit
Remote control case
How To Put Batteries In the Remote Control
Match the polarity (+ and –) on the batteries with the + and – markings in the battery compartment.
R6P(SUM-3)/AA(15F)
2
1
CAUTION: Handle batteries properly.
To avoid battery leakage or explosion:
• Remove batteries when the Remote Control will not be used for a long time.
• When you need to replace the batteries, replace both batteries at the same time with new ones.
• Don't use an old battery with a new one.
• Don't use different types of batteries together.
1
2
2
Page 7
Using the Remote Control
The Remote Control makes it easy to use many of the functions of the System from a distance of up to 7m (23 feet) away.
You need to point the Remote Control at the remote sensor on the System's front panel.
Note: If you point the Remote Control from the slant direction, the above distance will be shortened.
English
SUPER WOOFER
VOLUME
PRESET
TUNING
STANDBY
STANDBY/ON
BAND
ONE TOUCH
MID
/
REC
TREBLE
CD TAPE%AUX
TUNER
OPEN
MULTI CONTROL
REW STOP FF
VOLUME
MID
TREBLE
/
Remote sensor
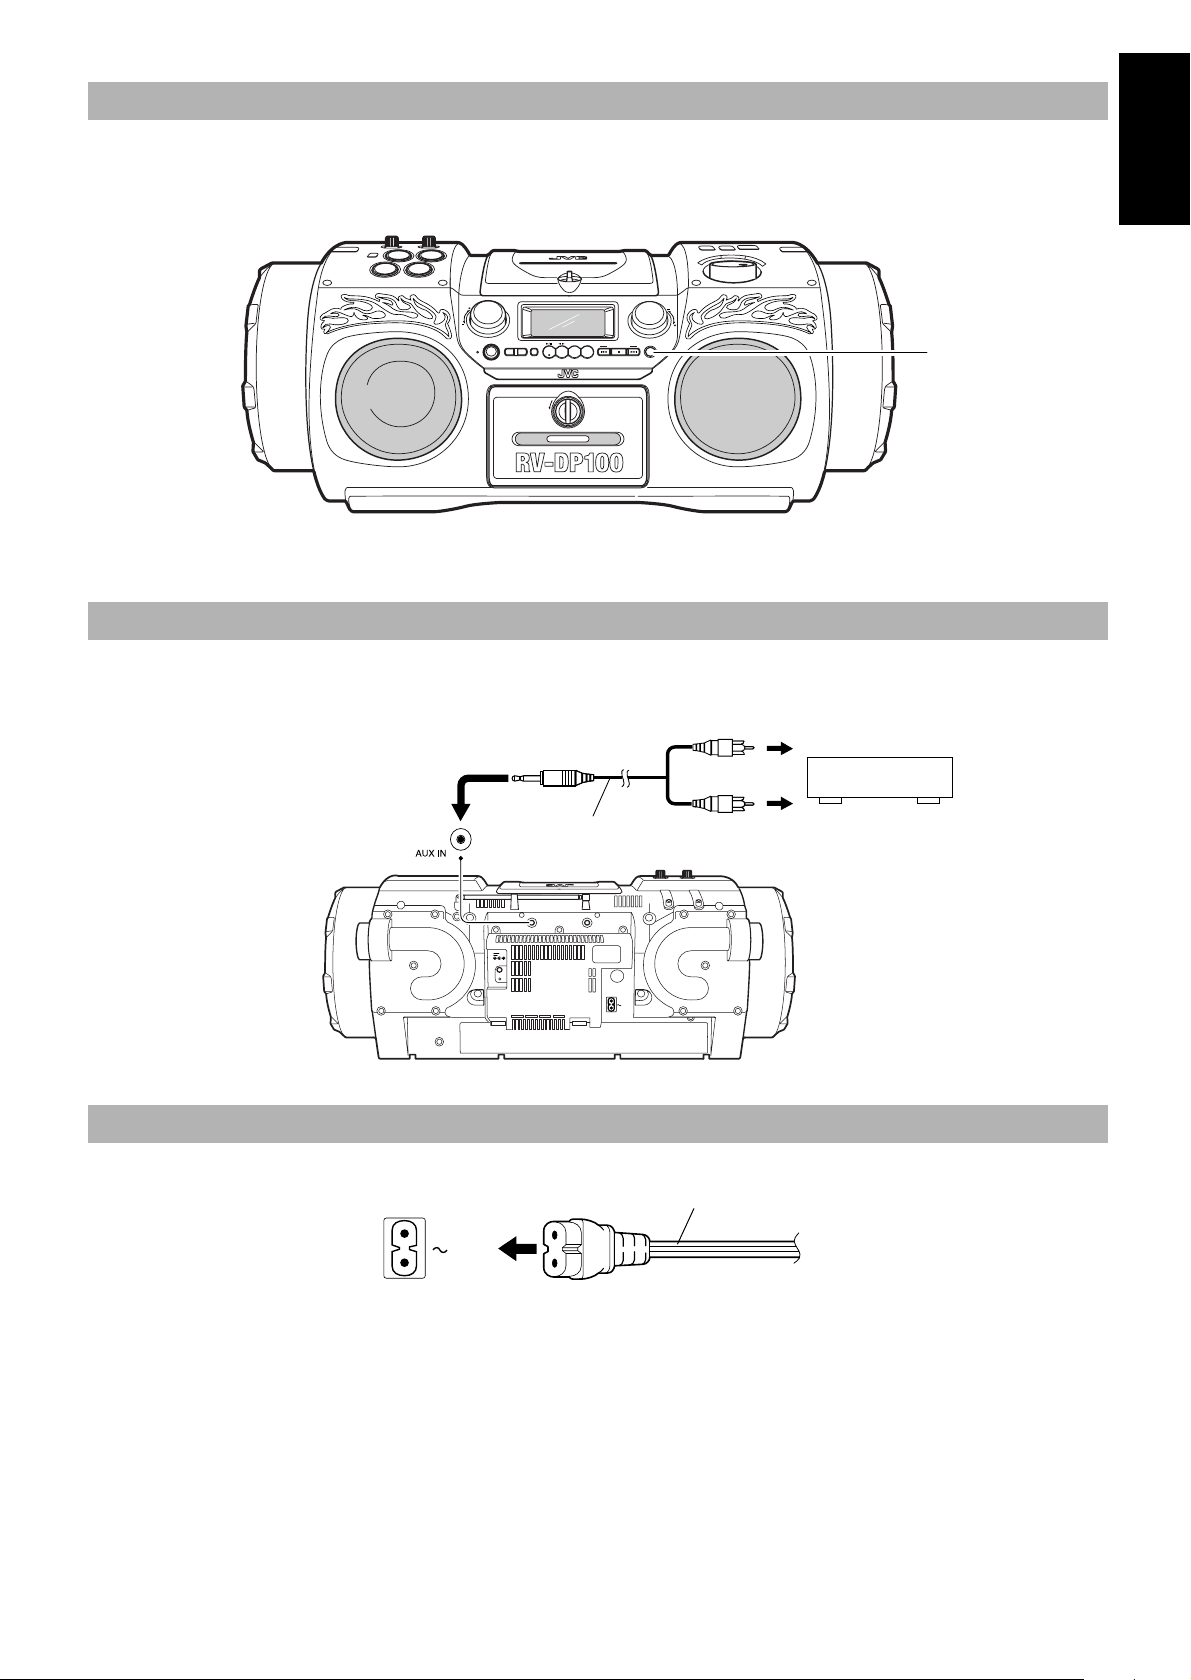
CAUTION: Make all connections before plugging the System into an AC power outlet.
Connecting Auxiliary Equipment
Connect a signal cord (not supplied) between the AUX IN terminal on the System and the output terminals of your auxiliary equipment (e.g.
turntable or MD player). You can listen to this source.
Stereo mini plug
Signal cord
(not supplied)
Pin-plug x 2
Turntable (with built-in equalizer) or
MD player (not supplied)
AUX IN
12V
DC IN
PHONES
AC IN
Connecting the AC Power Cord
Firmly insert the supplied AC power cord into the AC inlet on the back of the System.
Power cord
AC IN
CAUTIONS:
• ONLY USE THE JVC POWER CORD PROVIDED WITH THIS SYSTEM TO AVOID MALFUNCTION OR DAMAGE TO THE SYSTEM.
• BE SURE TO UNPLUG THE POWER CORD FROM THE OUTLET WHEN GOING OUT OR WHEN THE SYSTEM IS NOT IN USE FOR AN EXTENDED PERIOD OF TIME.
Now you can plug the AC power cord into the wall outlet, and your System is at your command!!
3
Page 8
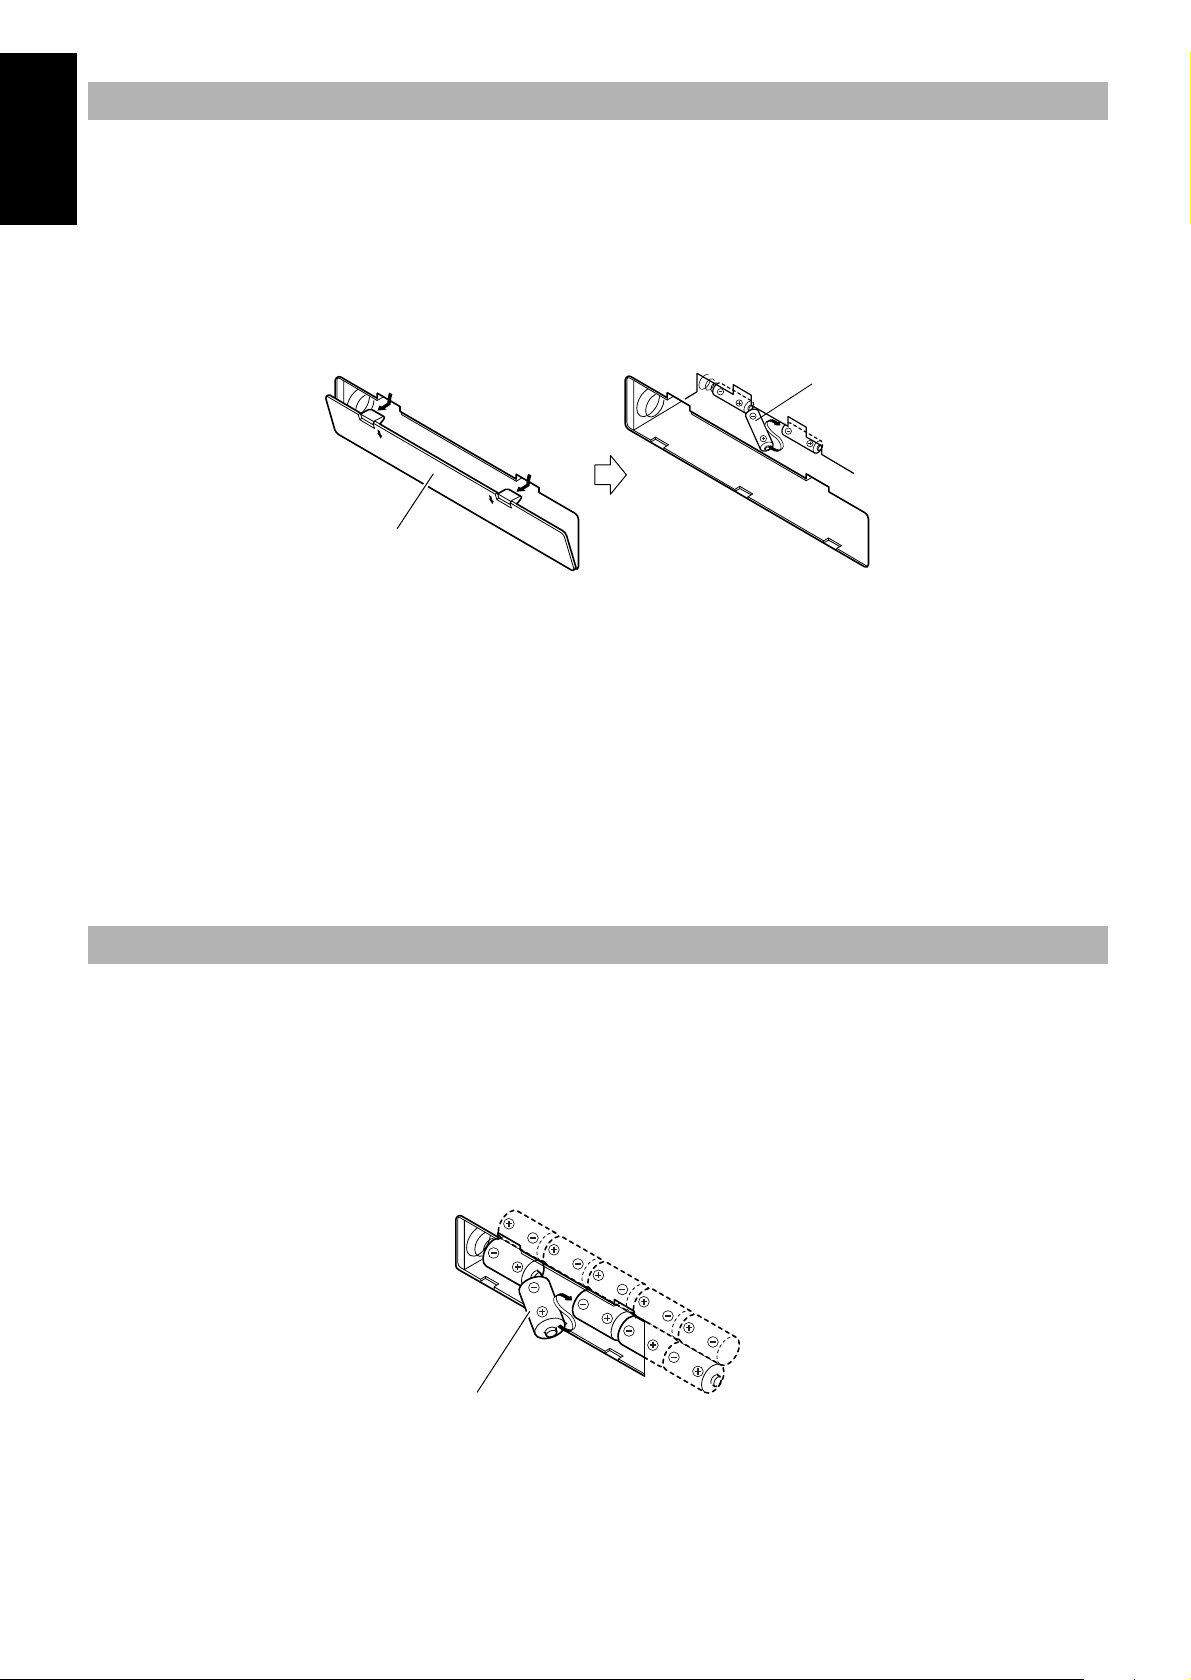
Memory Backup Batteries
It is recommended that memory backup batteries are loaded in the System to prevent the contents of the memory from being erased when a
power failure occurs.
English
1. Open the battery cover on the back of the System by pulling it toward you while pressing the
■
tabs as shown by the arrows.
2. Load three batteries (not supplied) in the battery compartment in the order of "1" to "3".
■
• Be careful to put the batteries with the "+" and "–" terminals positioned correctly.
3. Securely close the battery cover.
■
To remove the batteries, remove the battery "3" first.
2
3
Battery cover
Notes:
• The memory backup batteries will not be consumed as long as the power is supplied from an AC outlet, loaded 10 batteries, or car battery
(DC12V). However, if no power is supplied to the System, the memory backup batteries should be replaced with new ones approximately
every 12 months to securely maintain the contents of the memory.
• Before replacing the memory backup batteries, always connect the AC power cord to the System to prevent the contents of memory from
being erased.
• When a power failure occurs, the time indication disappears from the display to save the battery power of the memory backup batteries.
CAUTION: Handle batteries properly.
To avoid battery leakage or explosion:
• When you need to replace the batteries, replace all batteries at the same time with new ones. Before replacing, you need to supply AC power
to the System.
• Don't use an old battery with new ones.
• Don't use different types of batteries together.
"R6P (SUM-3) / AA (15F)" size batteries
1
How To Operate the System on Batteries
You can operate the System on 10 batteries.
1 Open the battery cover on the back of the System by pulling it toward you while pressing the
■
tabs as shown by the arrows.
2. Put 10 batteries (not supplied) in the battery compartment in the order of "1" to "10" as shown.
■
• Be careful to put the batteries with the "+" and "-" terminals positioned correctly.
3. Securely close the battery cover.
■
To remove the batteries, remove the battery "10" first.
4
5
9
10
"R20/D (13F)" size batteries
Notes:
• When you operate the System on mains (AC) power or on car battery (DC12V), the power source automatically switches from batteries to
AC or DC12V. However, you should remove the 10 batteries when operating on AC power or car battery (DC12V).
• When the batteries are exhausted, mistracking will occur during CD playback or sound will be distorted in termittently during tape playback.
You need to replace the batteries at a time.
• It is recommended that the AC power cord be used when recording important material or listening to a CD.
3
8
2
7
1
6
4
Page 9
CAUTION: Handle batteries properly.
To avoid battery leakage or explosion:
• Remove 10 batteries when the System will not be used for a long time.
• When you need to replace the batteries, replace all batteries at the same time with new ones.
• Don't use an old battery with new ones.
• Don't use different types of batteries together.
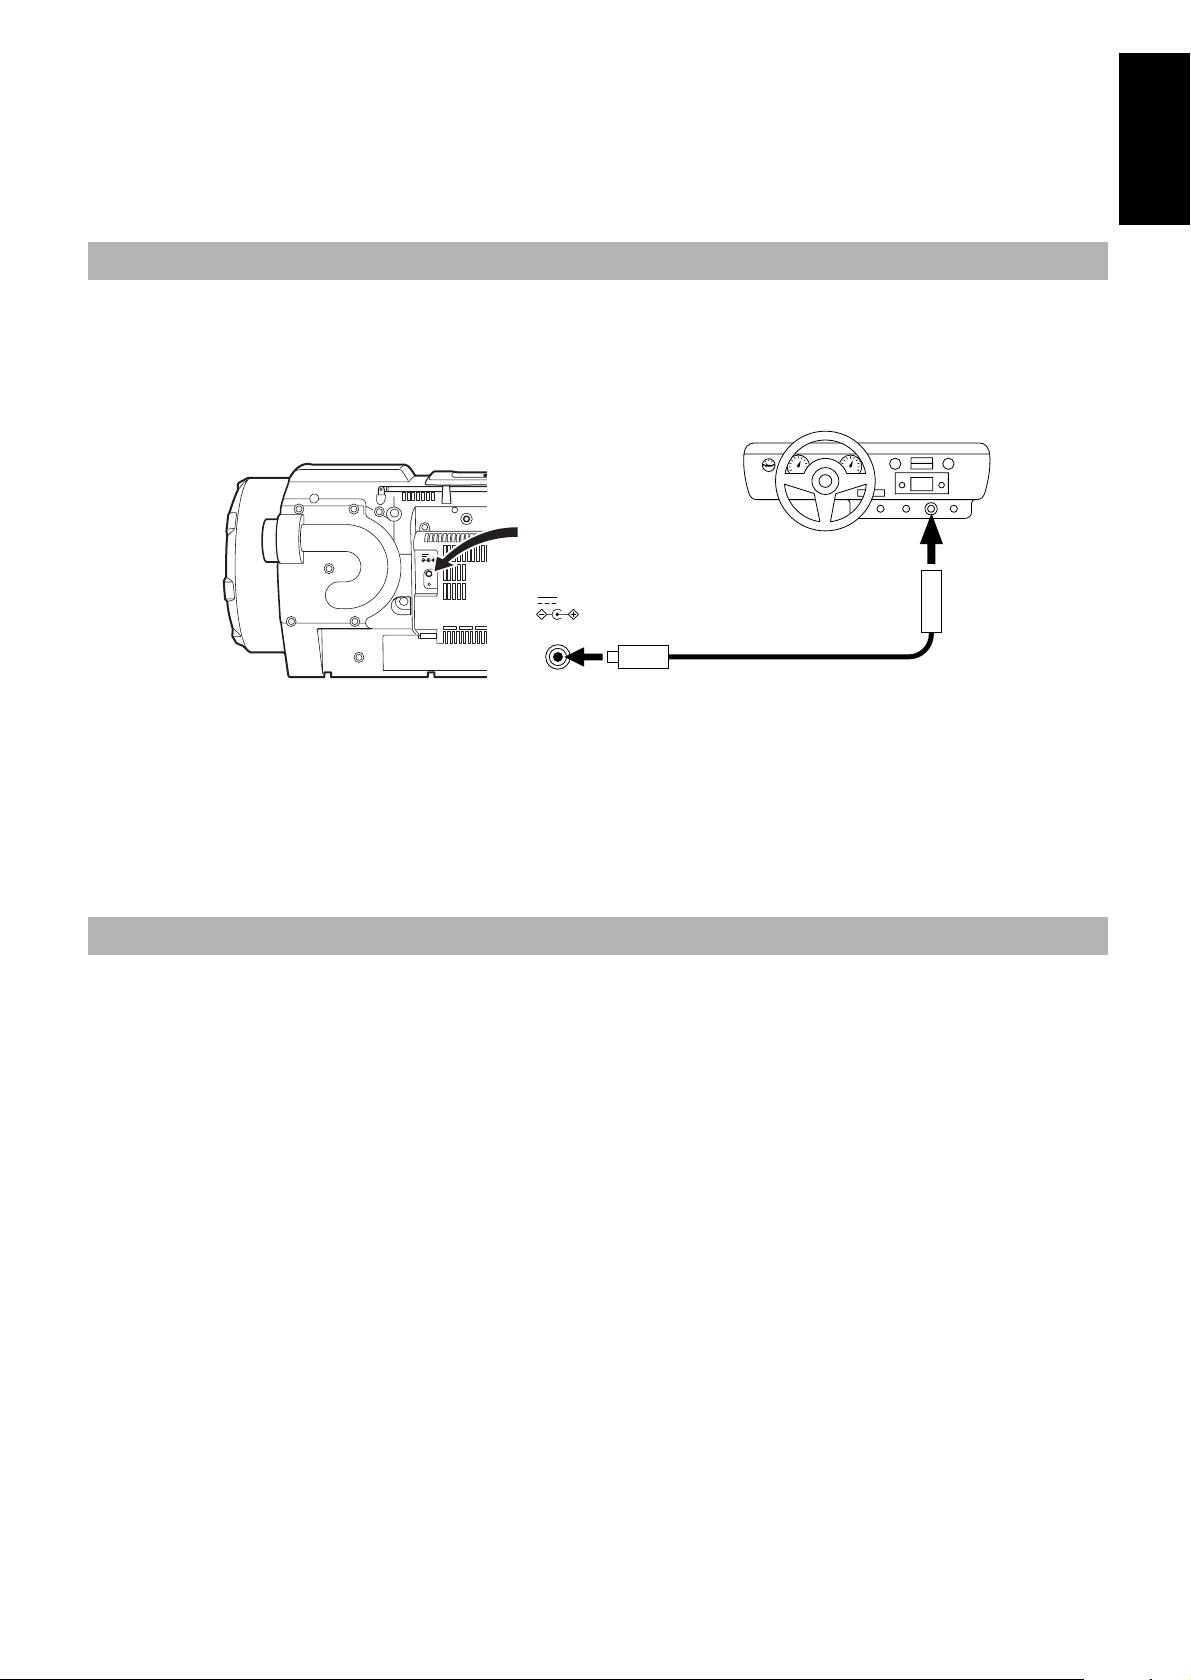
How To Operate the System on Car Battery (DC12V)
You can operate the Unit on car battery (DC12V).
1 First, connect the car adapter to the DC IN 12V jack on the back of the System, to avoid a
■
short-circuit of the car adapter.
2. Next, connect the car adapter to the cigarette lighter socket (DC12V) of the car.
■
English
AUX IN
12V
DC IN
PHONES
DC IN
12V
To car's cigarette lighter socket (DC12V)
AC IN
1
Optional exclusive car adapter (JVC model CA-R120E)
2
CAUTION: Use the System in a car properly.
• Be sure to use the specified car adapter (JVC model CA-R120E) to prevent mishaps or damage resulting from different polarity design.
• Unplug the AC power cord from the System when using the System with a car adapter.
• For safety, stop the car before performing operations.
• Be sure to start the engine when you use the car adapter, otherwise the car battery will be exhausted.
• During transport, stabilize the System in a box, etc.
• The Unit is not waterproof or dustproof. To prevent malfunctions, do not leave the System in a car for a long time.
COMPU PLAY
JVC's COMPU PLAY feature lets you control the most frequently used System functions with a single touch.
With One Touch Operation you can play a CD, a tape, or turn on the radio with a single press of the play button for that function. One Touch
Operation turns the power on for you, then starts the function you have specified. If the System is not ready (no CD in place, for example), the
System still powers on so you can insert a CD.
How One Touch Operation works in each case is explained in the section dealing with that function.
The COMPU PLAY buttons are:
On the Unit
CD 6 button
23
TAPE
TUNER BAND button
AUX button
On the Remote Control
CD 6 button
23
TAPE
TUNER BAND button
AUX button
Note: The COMPU PLAY feature is ineffective when the System is operated on batteries or car battery (DC12V).
5
Page 10
■■
English
DISPLAY
WOOFER
VOLUME+,–
Basic Operations
TIMER
CLOCK
TIMER
SUPER
DOWN
AUX CD TAPE
REVERSE MODE
REW
DISPLAY
SUPER WOOFER
VOLUME
ON/OFF
UP SET
AUTO
PRESET
MULTI CONTROL
VOLUME
RM-SRVDP100E
REMOTE CONTROL
SLEEP
PROGRAM
RANDOM
REPEAT
TUNER
BAND
FM MODE
MID /
TREBLE
FF
%
MID/
TREBLE
VOLUME+,–
SUPER
WOOFER
VOLUME+,–
STANDBY indicator
%
SUPER WOOFER
VOLUME
PHONES
AUX IN
12V
DC IN
VOLUME
MID
TREBLE
/
BAND
PRESET
ONE TOUCH
MID
/
TREBLE
CD TAPE%AUX
OPEN
MULTI CONTROL
TUNER
REW STOP FF
TUNING
REC
STANDBY
STANDBY/ON
VOLUME +, –
MID/
TREBLE
PHONES
AC IN
Turning the Power On and Off
Note: The lighting condition for the "STANDBY" indicator and
the display differs depending on the power source being
used, as follows:
Power source "STANDBY" indicator/Display
• The "STANDBY" indicator lights when
AC power
Batteries or car
battery (DC12V)
Turning the System On ——————
Press the
• When the System is operated on batteries or car battery
(DC12V), press the % button on the Unit.
The "STANDBY" indicator goes out when the System is operated
on AC power.
The display comes on and the System is ready to continue in the
mode it was in when the power was last turned off.
power is turned off.
• Backlighting of the display is illuminated
when power is turned on.
• The "STANDBY" indicator does not light.
• Backlighting of the display is not
illuminated.
%%%%
button.
%
or
STANDBY
■ Some power is always consumed even though power is turned
off (called Standby Mode).
■ To switch off the System completely, unplug the AC power
cord from the AC outlet. When you unplug the AC power cord,
the clock will be reset to "0:00" when no memory backup batteries are installed.
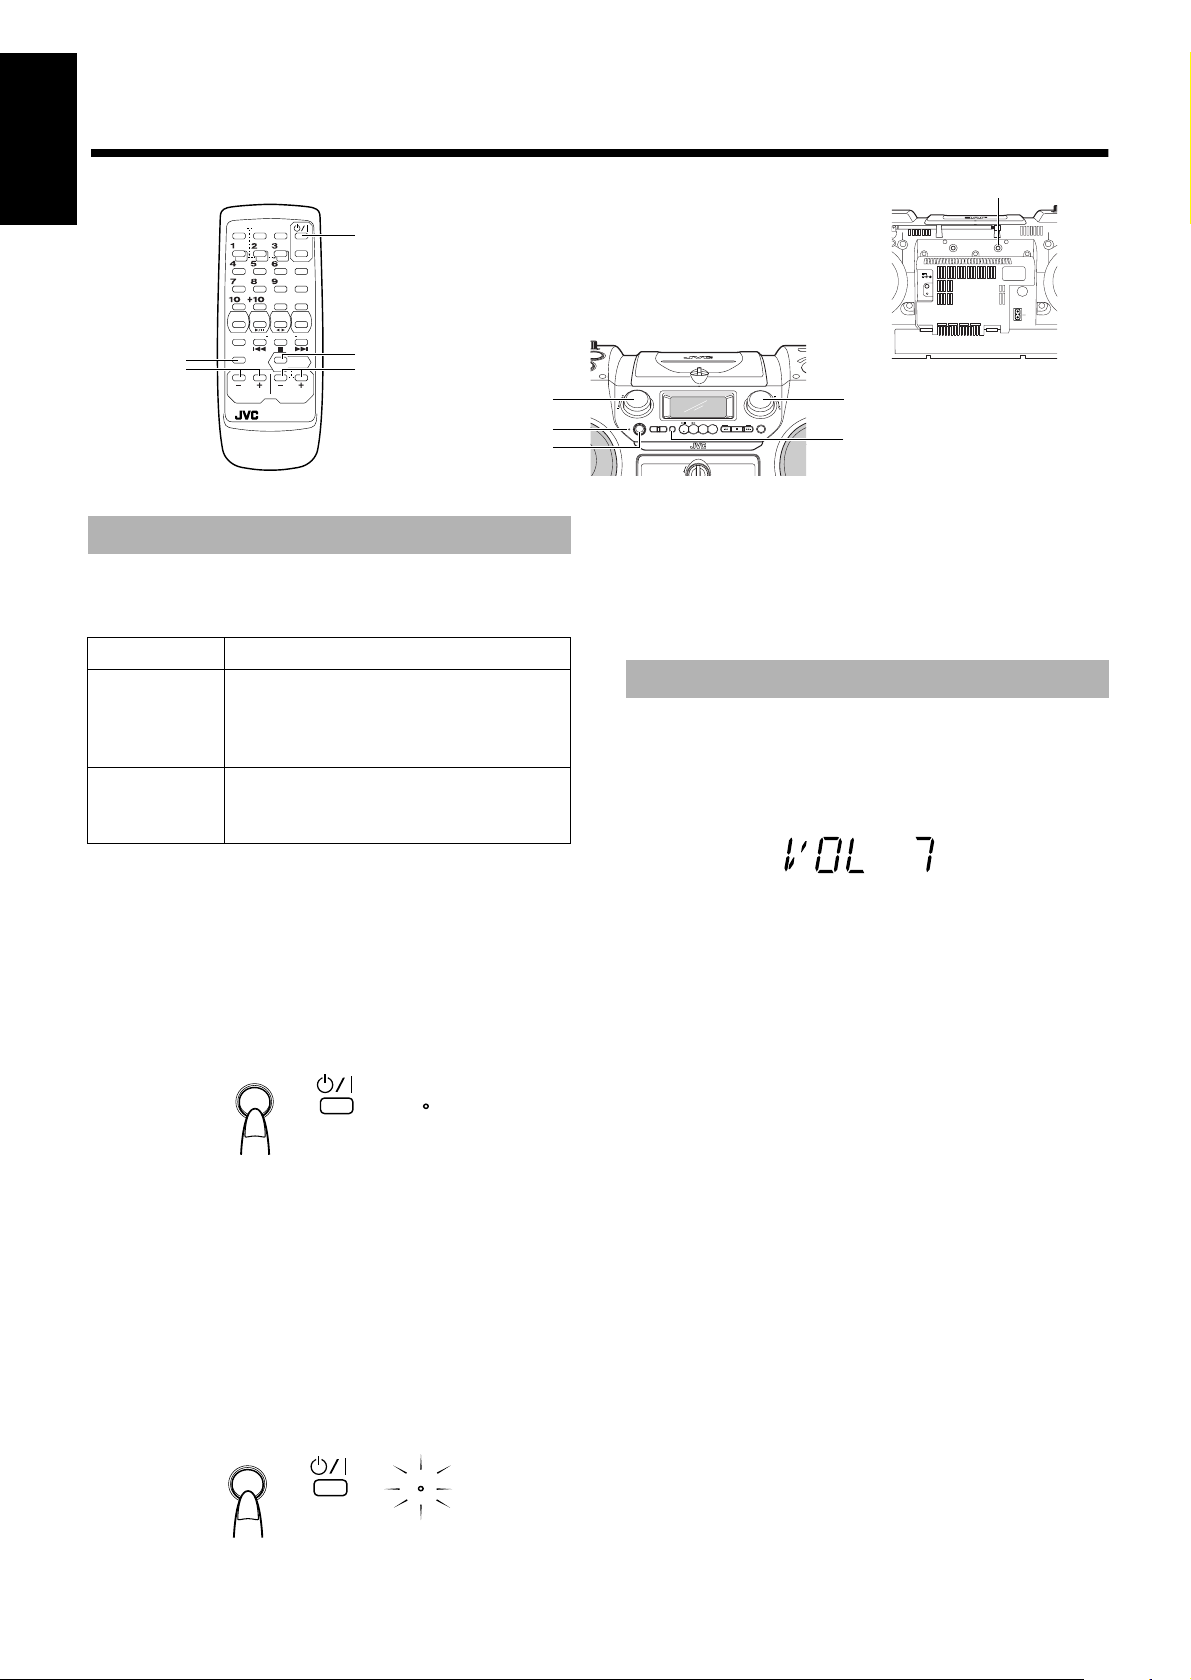
Adjusting the Volume
You can adjust the volume level between 0 and 50.
Using the Unit ————————————
Turn the VOLUME control clockwise to increase the volume or
turn it counterclockwise to decrease the volume.
Using the Remote Control —————
Press the VOLUME + button to increase the volume or press the
VOLUME – button to decrease it.
When you keep pressed the VOLUME + or – button, the volume
changes rapidly.
CAUTION: DO NOT start playing any source without first setting the volume to minimum, as a sudden blast of sound can damage your hearing,
speakers and/or headphones.
■ For example, if the last thing you were doing was listening to a
CD, you are now ready to listen to a CD again. If you wish, you
can change to another source.
■ If you were listening to the Tuner last, the Tuner comes on play-
ing the station it was last set to.
Turning the System Off ——————
Press the %%%% button.
The "STANDBY" indicator lights up when the System is operated
on AC power.
The contents of the display changes to the clock, and "CLOCK" indicator and the time are displayed without backlighting.
%
or
STANDBY
6
For private listening
Connect a pair of headphones to the PHONES jack. No sound
comes out of the speakers.
Be sure to turn down the volume before connecting or putting on
headphones.
Page 11

Adjusting the Super Woofer
(Within 5 seconds)
Volume
You can adjust the bass level between BASS 1 (minimum) and
BASS 6 (maximum). You can use this effect only for playback.
Using the Unit ———————————
Turn the SUPER WOOFER VOLUME control clockwise to increase the bass level or turn it counterclockwise to decrease the bass
level.
SUPER WOOFER
VOLUME
or
Using the Remote Control —————
Press the SUPER WOOFER VOLUME + button to increase the
bass level or press the SUPER WOOFER VOLUME – button to decrease it.
SUPER WOOFER
VOLUME
Using the Remote Control —————
1. Press the MID/TREBLE button to select MID
■
or TREBLE.
Each time you press the button, the display changes as follows:
MID=TREBLE=Currect sound source=(back to the
beginning)
2. Press the VOLUME + or VOLUME – button
■
within five seconds to adjust the mid or treble level.
MID /
TREBLE
VOLUME
Showing the Time (DISPLAY)
English
Note: This function is not effective when the headphones are in
use.
Tone Control (MID/TREBLE)
You can control the tone by changing the mid and the treble between –6 and +6. (0: Flat)
Using the Unit ———————————
1. Press the MID/TREBLE button to select MID
■
or TREBLE.
Each time you press the button, the display changes as follows:
MID=TREBLE=Currect sound source=(back to the
beginning)
2. Turn the VOLUME control clockwise or
■
counterclockwise within five seconds to
adjust the mid/treble level.
MID
/
TREBLE
(Within 5 seconds)
VOLUME
MID / TREBLE
In Standby mode, the backlight of the display goes out, and the
"CLOCK" indicator and the current time (clock) appear on the display.
While the power is turned on, you can see the current time (clock)
at any time, as follows:
Press the DISPLAY button on the Remote Control. Each time you
press the button, the display changes as follows:
Current sound source (e.g. FM103.50 MHz)=Clock=(back to the
beginning)
Note: To let work the clock, you need to set the clock first. (See
"Setting the Clock" on page 22.)
7
Page 12

■■
For FM
For AM (MW/LW)
English
Number
Keys
4
Using the Tuner
4
TIMER
CLOCK
TIMER
ON/OFF
SLEEP
DOWN
UP SET
PROGRAM
AUX CD TAPE
REVERSE MODE
DISPLAY
SUPER WOOFER
VOLUME
REW
MULTI CONTROL
REMOTE CONTROL
AUTO
PRESET
VOLUME
RM-SRVDP100E
TREBLE
RANDOM
REPEAT
MID /
TUNER
BAND
FM MODE
FF
AUTO PRESET
TUNER BAND
¢
When the System is in use, the display shows other items as well.
For simplicity, we show here only the items described in this section.
SUPER WOOFER
VOLUME
PRESET
ONE TOUCH
MID
/
TUNING
REC
TREBLE
STANDBY
CD TAPE%AUX
STANDBY/ON
OPEN
PRESET TUNING
BAND
TUNER
REW STOP FF
MULTI CONTROL
¢
VOLUME
MID
TREBLE
/
TUNER BAND
Band, Frequency, Preset channel
STEREO indicator
You can listen to FM and AM (MW/LW) stations. Stations can be
tuned in manually, automatically, or from preset memory storage.
■ Before listening to the radio:
• Fully extend the FM telescopic antenna.
One Touch Radio —————————
• This operation is effective only when the System is operated on
AC power.
Just press the TUNER BAND button to turn on the System and start
playing the station you were last tuned to.
■
You can switch from any other sound source to the radio by
pressing the TUNER BAND button.
Tuning In a Station
1. Press the TUNER BAND button.
■
The Band and Frequency you were last tuned to appear on the
display.
Each time you press the button, the band and FM mode change
as follows:
FM=FM-MONO=AM=(back to the beginning)
• In FM mode, when you tune in an FM broadcast and the
"STEREO" indicator lights up, you can hear stereo effects.
If an FM stereo broadcast is hard to receive or noisy, select
FM-MONO mode. The "STEREO" indicator will go out.
Reception improves, but you lose any stereo effect.
2. Select a station using one of the following
■
methods.
Manual Tuning
■
Press the
to frequency until you find the station you want.
Auto Tuning
■
If you press and hold the
more, the frequency changes down, or up, automatically until a
station is found.
4 or ¢ button repeatedly to move from frequency
OR
4 or ¢ button for one second or
OR
Preset Tuning (Possible only after presetting
■
stations)
Select the desired preset number (displayed as "P-XX" on the
display) using the PRESET TUNING button on the Unit or the
number keys on the Remote control. After 1 second, the display
will show the preset number's band and frequency.
(After 1 second)
PRESET TUNING button:Each time you press the button,
the preset number increases.
Number keys: To select P-5, press 5.
To select P-15, press +10 then 5.
To select P-20, press +10 once
then press 10.
3. Turn the FM antenna for the best reception.
■
For an AM (MW/LW) broadcast, turn the Unit to obtain the best
reception. Placing the Unit near the window, for example, will
improve AM reception.
SUPER WOOFER
VOLUME
PRESET
TUNING
STANDBY
STANDBY/ON
SUPER WOOFER
VOLUME
STANDBY
%
STANDBY/ON
VOLUME
TREBLE
/
BAND
ONE TOUCH
MID
/
MULTI CONTROL
REC
TREBLE
CD TAPE%AUX
TUNER
REW STOP FF
OPEN
VOLUME
MID
TREBLE
/
BAND
PRESET
ONE TOUCH
MID
/
MULTI CONTROL
TUNING
REC
TREBLE
CD TAPE AUX
TUNER
REW STOP FF
OPEN
8
Page 13

Presetting Stations
You can preset up to 30 FM stations and up to 15 AM (MW/LW)
stations.
Note: Preset numbers may have been set to factory test frequen-
cies prior to shipment. This is not a malfunction. You can
preset the stations you want into memory by following one
of the presetting methods below:
Manual Presetting —————————
TUNER
BAND
FM MODE
1. Select a band (either AM or FM/FM-MODE)
■
by pressing the TUNER BAND button.
2. Press the 4 or ¢ button to tune in a sta-
■
tion.
3. Press the number key for more than two
■
seconds to store in memory for the desired
preset number.
The preset number blinks for four seconds and then the preset
station for the preset number appears.
Example: To preset the tuned station to the preset number 15,
REW
MULTI CONTROL
press +10 then 5 for more than two seconds. The
display changes as follows.
FF
Number key
(For 2 seconds)
English
(Tuned
station)
(For 2 seconds)
4. Repeat above steps 1 to 3 for each station
■
you want to store in memory with a preset
number.
To change the preset stations, repeat the same steps as
above to overwrite a new station.
Auto Presetting ——————————
In each band, you can automatically preset FM-30, AM(MW/LW)15 stations. Preset numbers will be allocated as stations are found,
starting from the lowest station and moving up the frequency.
TUNER
BAND
FM MODE
1. Select a band (either AM or FM/FM-MODE)
■
by pressing the TUNER BAND button.
2. Press one of the following buttons.
■
On the Unit:
Press the PRESET TUNING button for more than two seconds.
On the Remote Control:
Press the AUTO PRESET button on the Remote Control for
more than two seconds.
AUTO
PRESET
(For 2 seconds)
3. Repeat steps 1 and 2 for the other band.
■
If you want to change the preset stations, carry out the Manual
■
Presetting for the desired preset numbers.
CAUTION: To prevent the preset stations from being erased because of a power failure, etc., install
memory backup batteries in the System. (See
page 4.)
9
Page 14

■■
Track number
Playback time
Total track number Total playback time
English
Number
Keys
CD
6
4
Using the CD Player
TIMER
CLOCK
TIMER
ON/OFF
SLEEP
DOWN
UP SET
AUX CD TAPE
REVERSE MODE
REW
DISPLAY
SUPER WOOFER
VOLUME
PROGRAM
AUTO
PRESET
MULTI CONTROL
TREBLE
VOLUME
RM-SRVDP100E
REMOTE CONTROL
RANDOM
REPEAT
TUNER
FM MODE
MID /
BAND
PROGRAM
RANDOM
REPEAT
FF
7
¢
CD 6
SUPER WOOFER
VOLUME
STANDBY
STANDBY/ON
PRESET
ONE TOUCH
TUNING
REC
%
When the System is in use, the display shows other items as well.
For simplicity, we show here only the items described in this section.
MID
/
TREBLE
CD TAPE AUX
OPEN
47¢
BAND
TUNER
MULTI CONTROL
REW STOP FF
VOLUME
MID
TREBLE
/
Track number, Playing
time, Preset number
Repeat
indicator
Play mode indicator
You can use Normal, Random, Program or Repeat Play. Repeat
Play can repeat all the tracks or just one of the tracks on the CD.
Here are the basic things you need to know to play a CD and locate
the different tracks on it.
The Quickest Way To Start a CD Is With the
One Touch Operation (effective only when
the System is operated on AC power)
■ Press the CD
• The power is automatically turned on. If a CD is already
inserted, it will start playing from the first track.
• If no CD is inserted, "NO DISC" appears on the display and the
CD Player remains in Stop mode.
6
button.
Setting a CD
1. Turn the CD cover knob counterclockwise
■
to open the CD cover.
2. Place a CD, with its label side up as shown
■
below.
CD cover
Knob
Basics of Using the
CD Player-Normal Play
To Play a CD—————————————
1. Set a CD.
■
2. Press the CD
■
The first track of the CD begins playing.
• The CD Player automatically stops when the last track of the
CD has finished playing.
To stop playing the CD, press the
The following information for the CD is displayed.
To pause, press the CD
the display.
To cancel pause, press the same button again. Play continues
from the point where it was paused.
Note: Do not open the CD cover during playback.
6
button.
7 button.
6 button. The playback time blinks on
3. Close the CD cover until it clicks.
■
To remove the CD, open the CD cover in Stop mode.
■ You can place an 8 cm (3'') CD without an adaptor.
■ If the CD cannot be read correctly (because it is scratched, for
example), " 0 0:00" appears on the display.
■ You can place a CD while listening to the other source.
10
Locating a Track with Remote Control Directly —————————————
During playback or in Stop mode, press the number keys on the Remote Control to directly play a track.
To directly play the track 5, press 5.
To directly play the track 15, press +10 then 5.
To directly play the track 20, press +10 once then press 10.
Page 15

To Select a Track —————————
During playback, press the 4 or ¢ button to select the track you
want.
The selected track starts playing.
•Press the
track.
•Press the
played. Press the 4 button twice quickly to skip to the beginning of the previous track.
You can also select a track in Stop mode with the same buttons.
When the button is pressed, the selected track and its playback time
appear on the display. To play the CD after selecting a track, just
press the CD 6 button.
¢ button once to skip to the beginning of the next
4 button to skip to the beginning of the track being
Search Play ————————————
Holding down the 4 or ¢ button, during playback, will fast for ward/backwards the CD so you can quickly find a particular passage in the track you are listening to. During Search Play, you can
hear the sound of approx. one forth level.
Programming the
Playing Order of the Tracks
You can program the playing order of the tracks using the Remote Control.
■ You can program up to 20 tracks in any desired order including
the same tracks.
■ You can only make a program when the CD Player is stopped.
1. Set a CD.
■
2. Press the CD6 button.
■
3. Press the 7 button to stop the CD.
■
4. Press the PROGRAM button.
■
The System enters the programming mode and the
"PROGRAM" indicator lights up.
PROGRAM
7. Press the CD 6 button.
■
The System plays the tracks in the order you have programmed
them.
■ You can skip to a particular program track by pressing the 4
or ¢ button during Program Play.
To confirm the programmed tracks while the CD player is
stopped, press the
program will successively be displayed in the programmed order.
To delete all the tracks in the program, press the 7 button repeatedly until all the tracks are cleared. Turning off the power will
also clear the programmed tracks.
To exit Program mode, while the CD Player is stopped, press
the PROGRAM button to turn off the "PROGRAM" indicator. To
restore Program mode, in Stop mode, press the same button to light
on the "PROGRAM" indicator.
Notes:
• If the total playback time of the programmed tracks exceeds 99
minutes 59 seconds, the total playback time will go out on the
display.
• When the CD contains more than 21 tracks:
When you try to program a track number exceeding 20 (for
example the 25th track), the total playback time indication will
go out, though programming is possible.
4 or ¢ button; the tracks making up the
To Modify the Program ———————
Modify the contents of the program while the CD Player is stopped.
Each time you press the 7 button, the last track in the program is deleted. To add new tracks to the end of the program, repeat above
steps 5 and 6.
Random Play
The tracks will play in no special order when you use this mode.
1. Press the RANDOM button on the Remote
■
Control.
The "RANDOM" indicator lights up on the display.
English
5. Press the number keys to select the track
■
to program.
To select the track 5, press 5.
To select the track 15, press +10 then 5.
To select the track 20, press +10 once then press 10.
Example: for track 2, press 2.
Program order number
(After 2 seconds)
Total playback time of the programmed tracks
6. Repeat step 5 to select the other tracks for
■
the program.
You can see the total playback time of the programmed tracks
on the display.
• To cancel the last track programmed, press the
once.
7 button
2. Press the CD6 button.
■
The tracks are played in random order once.
To skip a track during playback, press the ¢ button to jump
to the next track in the random sequence. Press the 4 button to
jump back to the start of a track being played.
To exit Random Play mode, press the RANDOM button to turn
off the "RANDOM" indicator after pressing the
CD Player, or turn off the power.
7 button to stop the
Repeating Tracks
You can repeat the tracks or individual track as many times as you
like.
Press the REPEAT button on the Remote Control.
The Repeat indicator changes with each press of the button, as
shown below.
= ALL =blank display = (back to the beginning)
: Repeats one track.
ALL : In Normal Play mode, repeats all the tracks.
In Program Play mode, repeats all the tracks in the
program.
In Random Play mode, repeats all the tracks in random order.
To exit Repeat mode, press the REPEAT button until the Repeat
indicator on the display goes out.
■ In Random Play, cannot be selected.
■ Repeat mode remains in effect even when you change the play
mode.
11
Page 16

■■
English
■■
Using the Cassette Deck
(Listening to a Tape)
TIMER
CLOCK
TIMER
ON/OFF
UP SET
AUTO
PRESET
REW
MULTI CONTROL
RM-SRVDP100E
REMOTE CONTROL
PROGRAM
RANDOM
REPEAT
MID /
TREBLE
VOLUME
SLEEP
TUNER
BAND
FM MODE
FF
TAPE 2 3
7
¢
TAPE 2 3
SUPER WOOFER
VOLUME
STANDBY
%
STANDBY/ON
4
REVERSE
MODE
DOWN
AUX CD TAPE
REVERSE MODE
DISPLAY
SUPER WOOFER
VOLUME
The Cassette Deck allows you to play and record audio tapes.
■ With Automatic Tape Detection, you can listen to type I, II or
IV tapes without having to change any settings.
The use of tapes longer than 120 minutes is not recommended,
since characteristic deterioration may occur and these tapes easily jam in the pinch-rollers and the capstans.
One Touch Play ——————————
This operation is effective only when the System is oper ated on AC
power.
By pressing the TAPE
button on the Unit or the Remote Con-
2 3
trol, the System will come on, "TAPE" appears on the display, and
if a tape is in the deck, it will start to play. If no tape is loaded, insert
a tape, or select other function.
Regular Play
Reverse mode indicator
7
¢
4
VOLUME
MID
TREBLE
/
BAND
PRESET
ONE TOUCH
MID
/
TUNING
REC
TREBLE
CD TAPE AUX
OPEN
MULTI CONTROL
TUNER
REW STOP FF
Reverse
Forward
To stop playing, press the ■ button.
To remove the tape, stop the tape, and open the cassette
holder by turning the cassette holder knob counterclockwise.
To Fast-Wind A Tape ————————
Press the ¢ or 4 button to fast-wind the tape. The Tape Direction indicator
• The Cassette Deck automatically stops when the tape reac hes its
end.
The following table shows the relationship between the Tape
Direction indicator and the actual tape travelling direction in
each mode. The tape travelling direction is indicated by the
blinking indicator.
[Tape Direction indicator and tape travelling direction in each mode]
3 or 2 will rapidly blink on the display.
Stop Playback
¢
FF
Tape Direction indicator
4
REW
When the power is already on, you can use this basic procedure:
1. Turn the cassette holder knob counter-
■
clockwise to open the cassette holder.
2. Put the cassette in, with the side you want
■
to listen facing toward you.
Knob
3. Close the holder gently until it clicks.
■
2 3
4. Press the TAPE
■
button.
The tape is played in the direction shown by the Tape Direction
indicator. The Tape Direction indicator 3 (Forward) or
(Re-
2
verse) blinks slowly.
3
(Forward playback):
The side of the tape facing you is played back.
2
(Reverse playback):
The opposite side of the tape is played back.
5. If you need to change the playback direc-
■
tion, press the TAPE
2 3
button.
The opposite side Tape Direction indicator lights up and the
tape playback direction changes.
12
Forward
Reverse
3
(Slow) (Rapid)
2
(Slow) (Rapid)
2
3
(Rapid)
(Rapid)
*Blinking indicator shows the tape travelling direction.
Reverse Mode
You can set a tape to play just one side, both sides in succession, or
both sides continuously.
Press the REVERSE MODE button on the Remote Control.
The Reverse mode indicator changes with each press of the button as
shown.
== = (back to the beginning)
OOOO
: The Cassette Deck automatically stops after playing
OOOO
one side of the tape.
: The Cassette Deck automatically stops after playing
both sides of the tape. (Stops when playback in the
reverse (
: The Cassette Deck continues to play both sides of the
tape until the e button is pressed.
2) direction is finished.)
Page 17

■■
■■
CD
6
REVERSE
MODE
Using the Cassette Deck
(Recording)
7
TIMER
CLOCK
TIMER
ON/OFF
UP SET
PRESET
REW
MULTI CONTROL
RM-SRVDP100E
REMOTE CONTROL
PROGRAM
RANDOM
AUTO
MID /
TREBLE
VOLUME
SLEEP
REPEAT
TUNER
BAND
FM MODE
SUPER WOOFER
VOLUME
PRESET
TUNING
FF
TAPE
7
TUNING
PRESET
2 3
STANDBY
STANDBY/ON
%
ONE
TOUCH
REC
BAND
ONE TOUCH
MID
/
REC
TREBLE
CD TAPE AUX
TUNER
OPEN
TAPE 2 3
Reverse mode indicator
MULTI CONTROL
REW STOP FF
VOLUME
MID
/
DOWN
AUX CD TAPE
REVERSE MODE
DISPLAY
SUPER WOOFER
VOLUME
When the System is in use, the display shows other items as well.
For simplicity, we show here only the items described in this section.
English
TREBLE
REC indicator
Forward
Tape Direction
indicator
Reverse
Recording onto a tape from any of the sound sources is simple. Just
place a tape in the Cassette Deck, have the source ready, make one
or two settings, and you're ready to record. For each source the procedure is a little bit different so we explain each separately. But first,
here are a few things to make your recordings better.
Things To Know Before You Start
Recording —————————————
■ It may be unlawful to record or playback copyrighted
material without the consent of the copyright owner.
■ When you want to record onto both sides of a tape, you can set
Reverse mode to do so. Recording automatically stops after recording in the reverse (
the tape direction is forward (
2) direction. Therefore, make sure that
3) when recording with Reverse
mode on.
■ The recording level, which is the volume at which the new tape
is being made, is automatically set correctly, so it is not affected
by the VOLUME control on the System. Nor is it affected by
adjusting the sound effects. Thus, during recording you can adjust the sound you are actually listening to without affecting the
recording level.
■ Two small tabs on the back of the cassette tape, one for side A
and one for side B, can be removed to prevent accidental erasure
or recording.
■ To record on a cassette with the tabs removed, you must cover
the holes with adhesive tape first. However, when a type II tape
is used, only cover part of the hole as shown, since the other part
of the hole (Type II detection slot) is used to detect the tape
type.
Type II detection
slot
Adhesive tape
■ Type I and Type II tapes can be used for recording.
Note: At the start and end of cassette tapes, there is lea d er ta pe
which cannot be recorded onto. Thus, before recording, wind on the
leader tape first to ensure getting the beginning of the recording.
CAUTION: If a recording you make has excessive
noise or static, the System may have been too
close to a TV which was on during the recording.
Either turn off the TV or increase the distance between the TV and the System.
Standard Recording
You can record any sound source to tape.
The sources are CD, Tuner, auxiliary equipment, Rhythm Machine,
microphone and guitar. The microphone sound and guitar sound can
be mixed with any source. Also, you can mix the sound from the
Rhythm Machine with the CD or auxiliary equipment.
1. Insert a blank or erasable cassette tape
■
into the Cassette Deck.
Be sure that the Tape Direction indicator and the tape insertion
direction are as follows:
[Forward recording]
Tape Direction indicator Tape insertion direction
3
(Forward)
(Front view)
*Recording will be made on the tape side facing you.
• If the Tape Direction indicator
2 3 button to change the direction. (In this case, since
TAPE
the tape is played, you need to press the ■ button. Then, press
the 4 button to rewind the tape. You may need to wind past
the leader tape which cannot be recorded onto.)
• If the inserted tape is not fully rewound, press the
rewind it. You may need to wind past the leader tape which cannot be recorded onto.
2 (Reverse) is lit, press the
4 button to
13
Page 18

2. If you want to record on both sides of the
■
tape, press the REVERSE MODE button on
the Remote Control to set the System in
Reverse mode.
English
Press the button until indicator is lit.
2. If you want to record on both sides of the
■
tape, press the REVERSE MODE button on
the Remote Control to set the System in
Reverse mode.
Press the button until indicator is lit.
3. Prepare the source, by, for example, tuning
■
in a radio station, playing the Rhythm
Machine, or turning on the connected auxiliary equipment.
Note: For CD recording, refer to "CD Direct Recording" de-
scribed below.
4. Press the ONE TOUCH REC button on the
■
Unit.
The "REC" indicator lights up and the System starts recording.
• If the tab of the cassette tape is removed to protect erasure
or recording, recording does not start.
TIP: When you want to record in the reverse direction, you should
set the Tape Direction indicator and the cassette tape as follows in step 1. Next, start from step 3.
[Reverse recording]
Tape Direction indicator Tape insertion direction
2
(Reverse)
(Front view)
*Recording will be made on the opposite side tape.
To stop at any time during the recording
process,
press the ■ button.
3. Set a CD.
■
4. Press the CD 6 button.
■
5. Press the 7 button.
■
• If you want to record specific tracks only, program the
tracks first. You can check their total playback time on the
display during programming. (See page 11.)
6. Choose whether to have pauses between
■
recorded selections.
• If nothing is done, a non-recorded pause of about four seconds will be automatically left between selections.
• If you do not want pauses between selections, do the following before proceeding to the next step.
Press the CD
7. Press the ONE TOUCH REC button on the
■
Unit.
The "REC" indicator lights up and the System starts recording.
• If you make a recording with Reverse mode on, the System
will record the last song at the end of the first side onto the
next side from its beginning when the song has been recorded more than 10 seconds on the first side.
If the last song has been recorded less than 10 seconds, then
the previous song will again be recorded on the next side as
it will not be completely recorded on the first side because
of leader tape.
• After the CD Player has played the entire CD, or all the programmed tracks, the tape automatically stops.
button twice to enter Pause mode.
6
Recording an AM station to tape
When recording an AM broadcast, beats may be produced which
are not heard when listening to the broadcast. If this happens, press
the PRESET TUNING button on the Unit to eliminate the beats.
1. Set to AM station and start recording.
2. Press the PRESET TUNING button to eliminate the beats.
Each time you press the button, the display changes as shown
below:
= CUT-2 = CUT-3 = CUT-4 =(back to the begin-
CUT-1
ning)
CD Direct Recording
Everything on the CD goes onto the tape in the order it is on the CD,
or according to the order you have set in a program.
1. Insert a blank or erasable cassette tape
■
into the Cassette Deck.
Be sure that the Tape Direction indicator and the tape insertion
direction are as follows:
(For details, refer to step 1 in "Standard Recording" on page 13.)
[Forward recording]
Tape Direction indicator Tape insertion direction
To stop at any time during the recording process, press the
e button. The tape stops after four seconds.
Note: When making SLEEP timer settings while doing CD Direct
recording, set enough time to allow for the CD to finish
playing, otherwise the power will go off before recording is
completed.
One Track Recording ————————
You can record the one CD track being played.
1. Insert a blank or erasable cassette tape
■
into the Cassette Deck.
2. Play the track on the CD you wish to
■
record.
3. Press the ONE TOUCH REC button on the
■
Unit.
The CD Player returns to the beginning of that track and the
track is recorded on the tape. After recording, the CD Player and
the Cassette Deck automatically stop.
3
(Forward)
(Front view)
*Recording will be made on the tape side facing you.
14
Page 19

■■
Using the Rhythm Machine
AMBIENT
SCRATCH
MIXING
PALETTE
MIC
PAD MODE
DRUM
PAD
PALETTE
MODE
PAD
MIN
GUITAR
MAX MIN MAX
POWERED WOOFER CD SYSTEM
OPEN
SCRATCH
RHYTHM ON/OFF
AMBIENT
O
M
E
D
V
E
E
L
L
T
E
E
M
D
O
M
H
R
/
Y
T
G
H
O
M
J
S
H
E
C
L
T
E
A
C
R
C
S
P
O
T
RHYTHM
ON / OFF
SCRATCH
&
RHYTHM
PALETTE
English
LEVEL
TEMPO
Drum Pads A to D
You can enjoy to play the Rhythm Machine that can generates many
sound patterns shown below.
• Ambient pattern : WAVES and BIRDS
• Rhythm pattern : 36 rhythm patterns
• Scratch sound :
2 scratch sounds using the Jog dial on the
Unit
• Drum pad pattern: 20 pad patterns using the Drum Pads A
to D on the Unit
[RHYTHM MACHINE]
SCRATCH & RHYTHM PALETTE
JOG DIAL
AMBIENT
• WAVES
•BIRDS
MODE
(36 RHYTHM PATTERNS)
•BASIC1 (8)
•BASIC2 (8)
•GROOVE1 (10)
•GROOVE2 (10)
SCRATCH
•SCRATCH (HIGH)
•SCRATCH (LOW)
(60 - 160)
SCRATCH SOUND (2)
WAVES OR BIRDS
TEMPO
RHYTHM PATTERN (36)
MODE
Jog dial
You can play the Rhythm Machine alone or you can play it while
the other music source except Tuner is played.
The following shows the functional block diagram of the Rhythm
Machine. As an example, signal flows that may be used are shown
with the thick gray lines. From this example, you can see that the
scratch sound and the drum pad pattern can be mixed with the
Rhythm pattern. Also, you can see that the music source (MIC and
guitar in this example) can be mixed with the output of the Rhythm
Machine.
Note: The Rhythm Machine does not work if Tuner is selected.
OFF
RHYTHM
ON
MUSIC SOURCE
(EXCEPT TUNER)
CD
MIX
LEVEL
(1 - 12)
MIX
MAIN
VOLUME
OUT
TAPE
DRUM PAD
CD
A
DRUM PAD PALETTE
PAD MODE
•STD DR
•PWR DR
•TOM+HI
B
•PERCUS
•VOICE
DRUM PAD PATTERN (20)
AUX
MIC
MIX
GUITAR
Limitation on Rhythm Pattern's Sound:
The Rhythm Machine has three sound sources and the maximum number of sounds that can be generated from the Rhythm Machine at a time
is three.
Since two or three sounds are used for playing the rhythm pattern, the available sounds for playing the rhythm pattern will be reduced when
you generate the pad pattern and/or scratch sound. In this case, the rhythm pattern's sound will be changed.
Example:
The 8 BEAT-1 rhythm pattern you are playing uses three sounds.
• When you generate the pad pattern by pressing the Drum Pad A or when you generate the scratch sound by turning the Jog dial, t he number
of sounds that will be assigned to the 8 BEAT-1 rhythm pattern will be reduced to two.
• When you generate the pad pattern and scratch sound at the same time, the number of sounds that will b e assigned to the 8 BEAT-1 rhythm
pattern will be reduced to one
15
Page 20

Basic Operation-Adjusting the
Rhythm Machine Volume
You can adjust the volume for the Rhythm Machine at any time ex-
English
cept when Tuner is selected.
H
R
/
Y
T
G
H
O
M
J
S
H
C
T
A
R
C
S
V
E
E
L
L
1. Press the LEVEL button on the Unit.
■
E
L
E
C
T
The current level will appear on the display for five seconds.
2. Within five seconds, turn the Jog dial to
■
increase or decrease the volume level.
You can adjust the volume level for the Rhythm Machine between 1 and 12.
Playing the Rhythm Pattern
You can play one of 36 rhythm patterns shown in the "36-Rhythm Pattern Table":
Playing the Ambient Pattern
You can generates WAVES and BIRDS.
Press the AMBIENT button on the Unit.
Each time you press the button, the display changes as follows:
WAVES
(back to the beginning)
WAVES : Waves beat upon the seashore.
BIRDS : Birds sing.
To stop playing the ambient pattern, press the AMBIENT
button until the display returns to the original one. Also, pressing
the RHYTHM ON/OFF button once or switching the music source
(e.g. from AUX to CD) will stop playing the ambient pattern.
Note: You cannot play the ambient pattern if Tuner is selected.
TIP: It may be a good idea that you use BIRDS and WAVES to
=BIRDS=cancelled (Original display)=
to fall asleep. For this setting, see "Setting the Sleep Timer"
on page 23.
[36-Rhythm Pattern Table 1/2]
TEMPO: Initial Setting
BASIC1 (8 patterns)
■
2/4/8 BEAT Basic Rhythm Group:
Can be used for rock, pop, jazz and other music genres.
Can also be used for instrument practice or dance instruction.
No. Pattern Name Tempo Contents/Character
1
8BEAT-1 120 8BEAT pattern No. 1. 8 Beat Basic Pattern, Ideal for rock and pop.
2 8BEAT-2 132 8BEAT pattern No. 2. 8 Beat With Fill-In. Ideal for Rock Type Interval Sections, etc.
3 8BEAT-3
120 8BEAT pattern No. 3. Medium Tempo 8 Beat. Ideal for Slow Rock.
4 8BEAT-4 120 8BEAT pattern No. 4. Medium Tempo 8 Beat. Ideal for After-Beat type.
5 2BEAT-1 120 2BEAT pattern No. 1. Power Type 2 Beat. Suited to Punk Rock.
6 2BEAT-2 120 2BEAT pattern No. 2. Suited to Hard Rock and Heavy Metal.
7 4BEAT-1 112 4BEAT pattern No. 1. Ideal for Modern Jazz and Bebop.
8 4BEAT-2 90 4BEAT pattern No. 2. Ideal for Modern Jazz. Accents with high hat.
BASIC2 (8 patterns)
■
Ideal for playing at parties or for background music for latin or ethnic music from Latin America.
No. Pattern Name Tempo Contents/Character
1
SAMBA 120 Suited to samba-like sound.
2 SALSA 120 Suited to salsa-like sound.
3 REGGAE
80 Suited to reggae-like sound.
4 JUNGLE1 140 Suited to ethnic music.
5 JUNGLE2 140 Suited to ethnic music.
6 16BEAT1 120
7 16BEAT2 120
8 16BEAT3 120
16 Beat Pattern No. 1
16 Beat Basic Pattern
16 Beat Pattern No. 2
Ideal for techno-type 16 beat/pops.
16 Beat Pattern No.3
Ideal for power type 16 beat.
16
Page 21

[36-Rhythm Pattern Table 2/2]
GROOVE1 (10 patterns)
■
Ideal for street performances with group music concentrating on "rap" or "house."
No. Pattern Name Tempo Contents/Character
1
DR'B-1
160
Drum & Bass Pattern No. 1
Abbreviation for Drum & Bass
2 DR'B-2 160 Drum & Bass Pattern No. 2
3 DR'B-3
160
4 RAP-1 120
Drum & Bass Pattern No. 3
Rap Pattern No. 1
Rap Music: Simple rhythms plus talking voice
5 RAP-2 120 Rap Pattern No. 2
6 RAP-3 120 Rap Pattern No. 3
7 HOUSE-1 94
House Pattern No. 1
Common name for House Made Music
8 HOUSE-2 120 House Pattern No. 2
9 HOUSE-3 120 House Pattern No. 3
10 G-BEAT 94
GROOVE2 (10 patterns)
■
Ground Beat Pattern
Low tone + slow tempo and high hat for a laid-back sound.
Ideal for creating and practicing the club sound which is popular now for group music concentrating on techno, funk and hip-hop.
No. Pattern Name Tempo Contents/Character
1
HIPHOP1 120
Hip-Hop Pattern No. 1
Hip-Hop Music
2 HIPHOP2 120 Hip-Hop Pattern No. 2
3 FUNK-1
120
Funk Pattern No. 1
Funk Music
4 FUNK-2 120 Funk Pattern No. 2
5 TECHNO1 120
6 TECHNO2 120
7 DANCE-1 120
8 DANCE-2 120
9 DANCE-3 120
Techno Pattern No. 1
Common name of Technology Music
Techno Pattern No. 2
Common name of Technology Music
Dance Pattern No. 1
Present dance scene. Image of Euro Disco type music.
Dance Pattern No. 2
Power Disco image
Dance Pattern No. 3
Street Dance image
10 MARIAN 120 Amusement Pattern with woman's voice (Marian).
English
H
R
/
Y
T
G
H
O
M
J
S
H
C
T
A
R
C
S
E
D
O
M
(Within 5 seonds) (Within 5 seonds)
1. Press the MODE button on the Unit to
■
E
L
E
C
T
RHYTHM ON/OFF
select your favorite Rhythm mode.
Each time you press the button, mode changes as follows.
BASIC1=BASIC2=GROOVE1=GROOVE2=
(back to the beginning)
• The display will return to the original one after five seconds.
2. Within five seconds, turn the Jog dial to
■
select your favorite rhythm pattern.
For example, if you select "BASIC1" in step 1, the pattern will
change as follows as you turn the Jog dial clockwise.
8BEAT-1
=8BEAT-2=... =4BEAT-2=
(back to the beginning)
3. Press the RHYTHM ON/OFF button on the
■
Unit.
The selected pattern will be repeatedly played.
To stop playing, press the RHYTHM ON/OFF button once
again. Switching the music source (e.g. from AUX to CD) will
also stops playing.
To restart playing, press the RHYTHM ON/OFF button
again, the current pattern appears on the display and playback
starts.
Note: You cannot play the rhythm pattern if Tuner is selected.
17
Page 22

Changing the Playing Rhythm
Pattern ———————————————
H
R
/
Y
T
G
H
O
M
J
S
H
E
C
L
T
E
A
R
C
(During playing the
English
rhythm pattern)
1. During playing the rhythm pattern, press
■
E
D
O
M
(Within 5 seconds)
S
C
T
(Playing rhythm
pattern changes.)
MODE button on the Unit to select your
favorite Rhythm mode.
2. Within five seconds, turn the Jog dial to
■
select your favorite rhythm pattern.
The selected rhythm pattern will be played.
Adjusting the Tempo During
Playback ——————————————
1. During playing the rhythm pattern, press
■
the TEMPO button on the Unit.
The current tempo appears on the display for five seconds.
1. Press the SCRATCH button on the Unit.
■
"SCRATCH" will appear on the display.
2. Turn the Jog dial to generate the scratch
■
sound.
When you turn the Jog dial clockwise or counterclockwise, the
scratch-high sound or scratch-low sound will be generated, respectively. When you turn the Jog dial rapidly, the scratch
sound will be generated continuously.
To stop the scratch sound generation, press the
SCRATCH button once again to display "OFF".
Note: You cannot generate the scratch sound if Tuner is selected.
Generating the Pad Pattern
You can generate 20 pad patterns by pressing the Drum Pads A to
D on the Unit. Pad patterns are assigned to the Drum Pads A to D in
each Pad mode as shown in the "Pad Pattern Table".
The pad pattern can be mixed with the following all sources together.
• BIRDS, WAVES, or rhythm pattern generated from the
Rhythm Machine
• Scratch sound generated from the Rhythm Machine
• Music source except Tuner
• MIC and Guitar inputs
2. Within five seconds, turn the Jog dial to
■
increase or decrease the tempo.
You can adjust the tempo between 60 and 160.
• The tempo you have changed will be maintained even when
the System is turned off. However, it will be reset to the initial value when you select other rhythm pattern.
Generating Scratch Sound
You can generate two kinds of scratch sound (scratch-high and
scratch-low) by turning the Jog dial.
The scratch sound can be mixed with the following all sources together.
• BIRDS, WAVES, or rhythm pattern generated from the
Rhythm Machine
• Dram pad pattern generated from the Rhythm Machine
• Music source except Tuner
• MIC and Guitar inputs
SCRATCH
[Pad Pattern Table]
H
R
/
Y
T
G
H
O
M
J
S
H
E
C
L
T
E
A
R
C
S
C
T
PAD MODE
1. Press the PAD MODE button on the Unit to
■
select Pad mode.
Each time you press the button, mode changes as follows.
STD DR=PWR DR=TOM+HI=PERCUS=VOICE=
OFF=(back to the beginning)
2. Press the Drum Pads A to D on the Unit.
■
Each time you press the Pad, corresponding pad pattern which
is shown in the "Pad Pattern Table" will be generated.
Note: You cannot play the Pad pattern if Tuner is selected.
PAD MODE
Pad
A
B
C
D
STD DR
(Standard Drum)
PWR DR
(Tom + Hihat)
TOM+HI
(Tom & Hihat)
PERCUS
(Percussion)
VOICE
(Voice, etc.)
Standard-Bass Drum Power-Bass Drum High Floor Tom High Agogo Marian —
Standard Snare Power Snare
Low Floor Tom
Low Agogo Yeh! —
Standard-Closed Hihat Power-Closed Hihat Open Hihat Open Hi Conga Gun —
Power-Crash Cymbal
Power-Crash Cym-
Pedal Hihat Hand Clap Engine —
bal
Abbreviations:
STD DR: Standard drum kit (bass, snare, high-hat, cymbal) PWR DR: Power drum kit TOM+HI: Tomtom and high-hat group
PERCUS: Percussion, ethnic percussion VOICE: Voice and onomatopoeic sounds
18
OFF
Page 23

Rhythm Machine Demo Mode
You can play the demo pattern repeatedly.
E
D
O
M
1. When the Rhythm Machine is stopped,
■
and
V
E
E
L
L
(For 2 seconds)
press and hold the MODE and LEVEL buttons on the Unit for more than two seconds.
Demonstration starts and a series of demo pattern is played.
ENGINE
=DR'B-1=DR'B-3=RAP-3=HIPHOP2=
FUNK-1=TECHNO1=HIPHOP1=DANCE2=
DANCE3=MARIAN= (back to the beginning)
2. Press the RHYTHM ON/OFF button on the
■
Unit to stop playing the demo pattern.
• Changing the music source (e.g. form AUX to CD) will also
stop playing.
Notes:
• You cannot change the level and tempo of the demo pattern.
• You cannot play the demo pattern if Tuner is selected.
English
19
Page 24

■■
Listening to an Auxiliary Equipment
English
TIMER
CLOCK
TIMER
ON/OFF
UP SET
PRESET
REW
MULTI CONTROL
REMOTE CONTROL
PROGRAM
RANDOM
AUTO
TREBLE
VOLUME
RM-SRVDP100E
SLEEP
REPEAT
TUNER
BAND
FM MODE
MID /
FF
AUX
DOWN
AUX CD TAPE
REVERSE MODE
DISPLAY
SUPER WOOFER
VOLUME
Listening to External
Equipment
You can listen to an auxiliary equipment.
■ First make sure that the auxiliary equipment is properly con-
nected to the System.(See page 3).
SUPER WOOFER
VOLUME
STANDBY
STANDBY/ON
VOLUME
MID
TREBLE
/
REC
MID
/
TREBLE
CD TAPE%AUX
OPEN
BAND
MULTI CONTROL
TUNER
REW STOP FF
PRESET
ONE TOUCH
TUNING
AUX
1. Set the volume level to minimum.
■
2. Press the AUX button.
■
"AUX" appears on the display.
■ To listen to the auxiliary equipment, start playing the auxiliary
equipment.
3. Adjust the volume to the desired listening
■
level.
4. Apply sound effects, if you wish.
■
■ Adjust the super woofer volume to reinforce the bass sound.
■ Adjust the MID/TREBLE to control the tone. (See "Tone Con-
trol (MID/TREBLE)" on page 7.)
Note: For operation of the auxiliary equipment, refer to its In-
structions.
20
Page 25

■■
Using the Microphone/Guitar
English
MIC jack (Use a 6.3 mm diameter plug)
GUITAR Jack (Use a 6.3 mm diameter plug)
MIXING
PALETTE
MIC
MIN
PAD
MODE
DRUM
PAD
PALETTE
MIC LEVEL
MAX MIN MAX
Microphone Mixing
Using a microphone (not supplied), you can mix the microphone
sound with a source sound.
1. Set the MIC LEVEL control to MIN by turn-
■
ing it fully counterclockwise.
2. Open the rubber cap and plug a micro-
■
phone into the MIC jack on the Unit.
3. Start a source: CD, tape, tuner, Rhythm
■
Machine, or other equipment.
4. Adjust the main volume and the MIC LEVEL
■
control, as you sing into the microphone.
GUITAR
GUITAR LEVEL
1. Follow the above steps 1-4.
■
2. To record, follow the steps in "Standard
■
To Record Guitar Mixing on a
Tape
Recording". (See page 13.)
To Record Microphone Mixing
on a Tape
1. Follow the above steps 1-4.
■
2. To record, follow the steps in "Standard
■
Recording". (See page 13.)
Note: If "howling" occurs, keep the microphone away from the
Unit.
Guitar Mixing
Using a guitar, you can mix the guitar sound with a source sound.
CAUTION: DO NOT connect a bass guitar to
the GUITAR jack, as it may damage the System.
1. Set the GUITAR LEVEL control to MIN by
■
turning it fully counterclockwise.
2. Open the rubber cap and plug a guitar into
■
the GUITAR jack on the Unit.
3. Start a source: CD, tape, tuner, Rhythm
■
Machine, or other equipment.
4. Adjust the main volume and the GUITAR
■
LEVEL control, as you play the guitar.
21
Page 26

■■
English
TIMER
CLOCK
DOWN
Using the Timers
TIMER
CLOCK
TIMER
DOWN
UP SET
AUX CD TAPE
REVERSE MODE
REW
DISPLAY
SUPER WOOFER
VOLUME
ON/OFF
PROGRAM
RANDOM
AUTO
PRESET
MULTI CONTROL
MID /
TREBLE
VOLUME
RM-SRVDP100E
REMOTE CONTROL
SLEEP
REPEAT
TUNER
FM MODE
BAND
FF
TIMER ON/OFF
SET
SLEEP
UP
■
TIMER
indicator
TIMER REC
indicator
When the System is in use, the display shows other items as well.
For simplicity, we show here only the items described in this section.
ON time/OFF time indicator
CLOCK indicator
ON time, OFF time, Source, Volume
SLEEP indicator
The timers let you control listening and recording functions automatically.
Setting the Clock
When you supply the power using one of the following ways, the
"CLOCK" indicator blinks and "0:00" appears on the display. You
need to set the clock.
• Plugging the AC power cord into the wall outlet
• Loading 10 batteries into the Unit
• Connecting car battery (DC12V)
Use the Remote Control to set the clock.
Notes:
• The clock must be correctly set for the timers to work.
• The procedure must be completed within two minutes. Oth-
erwise, the setting is cleared and must be repeated from the
beginning.
CLOCK
DOWN
or
1. Turn on the System.
■
2. Press the CLOCK button on the Remote
■
Control.
The time indication blinks on the display.
UP SET
Setting the Daily Timer
Once you have set the Daily Timer, the timer will be activated at the
same time every day, except for the Tuner REC timer which is used
to record a broadcast on the tape. It can be cancelled and reactivated
whenever you wish.
The Timer indicator ( ) on the display shows when the Daily
Timer you have set is in effect.
Use the Remote Control to set the Daily Timer.
Note: Perform each setting within 30 seconds. Otherwise, set-
ting is cleared and the procedure must be repeated from the
beginning.
1. Turn on the System.
■
2. Setting the ON time (Example: 12:15).
■
1. Press the TIMER button on the Remote Control.
The Timer indicator ( ) and "ON" indicator light up and
the current ON time blinks on the display.
2. Set the ON time by pressing the UP or DOWN button.
Pressing and holding the button will change the time rapidly.
3. Press the UP or DOWN button to set the
■
time.
Press the UP or DOWN button to increase or decrease the time.
Pressing and holding the button will change the time rapidly.
4. Press the SET button.
■
The selected time is set and the seconds start counting from 0.
Then, the display returns to the original one.
CAUTION: If memory backup batteries are exhausted or not installed, and the AC power cord is
plugged in again after being disconnected, or
power is restored after a power failure, "CLOCK"
indicator will blink on the display. Set the current
time (clock) again.
22
3. Press the SET button.
The current OFF time blinks on the display.
Page 27

3. Setting the OFF time (Example: 13:15).
■
1. Set the OFF time by pressing the UP or DOWN button.
Pressing and holding the button will change the time rapidly.
2. Press the SET button.
The music source "TUNER" blinks on the display.
4. Selecting the music source.
■
1. Press the UP or DOWN button to select the music source
you want to listen to. The display changes as shown below:
TUNER
(back to the beginning)
• When you select the "TUNER REC", the "REC" indica-
• When you select the "TUNER REC", the timer will be
2. Press the SET button.
The volume level set by the previous time setting blinks on
the display.
5. Setting the volume level.
■
1. Press the UP or DOWN button to select the volume level.
0 to 50: When the timer is turned on, the Volume will be
2. Press the SET button.
The timer setting is completed and the display returns to the
display before you set the timer. The Timer indicator ( )
remains lit.
6. Before turning off the System, prepare the
■
music source selected in step 4.
TUNER : Tune in to the desired station.
TUNER REC
CD : Set a CD.
TAPE : Insert a tape.
RHYTHM : Select your favorite pattern from the 36
=TUNER REC=CD=TAPE=RHYTHM=
tor appears on the display.
released after Tuner Recording has been finished.
— : The current volume level will be used.
automatically set to the selected level.
: Tune in to the desired station and insert a
cassette tape for recording the station.
rhythm patterns.
Setting the Sleep Timer
Use the Sleep Timer to turn the System off after a certain number of
minutes when it is playing. By setting the Sleep Timer, you can fall
asleep to music and know that your System will turn off by itself
rather than play all night.
You can only set the Sleep Timer when the System is on and a
■
source is playing.
1. Play a CD, tape, tune in to the desired sta-
■
tion, or play the Rhythm Machine.
If you play "WAVES" in the Rhythm Machine, you may fall
asleep to the waves that beat upon the seashore.
2. Press the SLEEP button on the Remote
■
Control.
The SLEEP indicator lights up on the display.
3. Set the length of time you want the source
■
to play before shutting off.
• Each time you press the SLEEP button, it changes the number
of minutes shown on the display in this sequence:
30 = 60 = 90 = 120 = Cancelled (Original display)=
=
(back to the beginning)
After setting the number of minutes for the Sleep Timer, the display
will stop blinking and return to the display as before setting the
Sleep Timer.
The System is now set to turn off after the number of minutes you
set.
To Confirm the Sleep Time:
When the SLEEP button is pressed, the remaining sleep time is displayed. Wait until the display returns to the original display.
To Cancel the SLEEP Timer Setting:
Press the SLEEP button until the original display appears on the display. Turning off the System also cancels the SLEEP Timer.
If you are setting the Daily Timer, the System will be turned on
■
at the set time to wake you up.
English
7. Turn off the System.
■
• When the timer turns on, the volume level gradually increases
from 0 (zero) to the preset level in step 5.
To cancel the operation, press the TIMER button until the display returns to the original one.
To cancel the timer, press the TIMER ON/OFF button. The Timer indicator ( ) goes out on the display.
To reactivate the cancelled timer, press the TIMER ON/OFF
button to light the Timer indicator ( ).
To confirm the timer settings, press the TIMER button. Then,
press the SET button repeatedly to see the current timer settings
(ON time, OFF time, source, and volume).
To change the timer setting, repeat the setting procedure from
the beginning.
CAUTION: If memory backup batteries are exhausted or not installed, and the AC power cord is
disconnected or there is a power failure, time settings will be erased from memory. If this happens,
set the current time (clock) and perform the timer
setting again.
23
Page 28

■■
Pinch-rollers
Record/play head
Capstans
Erase head
English
Handle your CDs carefully, and they will last a long time.
Care And Maintenance
Compact Discs
• Only CDs bearing this mark can be used with
this System. However, continued use of irregular shape CDs (heart-shape, octagonal, etc.)
can damage the System.
• If there are fingerprints, etc. on the lens, gently wipe clean with
a cotton swab.
• Remove the CD from its case by holding it at
the edges while pressing the case’s center hole
lightly.
• Do not touch the shiny surface of the CD, or
bend the CD.
• Put the CD back in its case after use to prevent
warping.
• Be careful not to scratch the surface of the CD
when placing it back in the case.
• Avoid exposure to direct sunlight, temperature
extremes, and moisture.
• A dirty CD may not play correctly. If a CD
does become dirty, wipe it with a sof t cloth in a
straight line from center to edge.
CAUTION: Do not use any solvent (for example,
conventional record cleaner, spray thinner, benzine, etc.) to clean a CD.
General Notes
In general, you will have the best performance by keeping your CDs
and the mechanism clean.
• Store CDs in their cases, and keep them in cabinets or on
shelves.
• Keep the system’s CD cover closed when not in use.
Moisture Condensation
Moisture may condense on the lens inside the
System in the following cases:
• After turning on heating in the room.
• In a damp room.
• If the System is brought directly from a cold
to a warm place.
Should this occur, the System may malfunction.
In this case, leave the System turned on for a
few hours until the moisture evaporates, unplug
the AC power cord, and then plug it in again.
Cassette Tapes
• If the tape is loose, it may get stretched, cut, or
caught in the cassette. Take up the slack by
inserting a pencil in one of the reels and rotating.
• Do not touch the tape surface.
• Do not store the tape:
- In dusty places
- In direct sunlight or heat
- In moist areas
- On a TV or speaker
- Near a magnet
Cleaning the lens
If the lens in the CD pickup is dirty, dropout, etc., could degrade
sound.
Open the CD cover and clean the lens as shown.
• Use a blower (available from a camera store) to blow dust off
the lens.
Blower
Lens
24
Cassette Deck
• If the heads, capstans, or pinch-rollers of the Cassette Deck
become dirty, the following may occur:
- Loss of sound quality
- Discontinuous sound
-Fading
- Incomplete erasure
- Difficulty recording
• Clean the heads, capstans, and pinch-rollers using a cotton
swab moistened with alcohol.
• If the heads become magnetized, the System will produce noise
or lose high frequency notes.
• To demagnetize the heads, turn off the System, and use a head
demagnetizer (available at electronics and record shops).
Page 29

■■
• If you are having a problem with your System, check this list for a possible solution before calling for service.
• If you cannot solve the problem from the hints gi v en here, or the System has been physically damaged, call a qualif ied person, such as your
dealer, for service.
Troubleshooting
Symptom Possible Cause Action
English
No sound is heard. • Connections are incorrect, or loose.
• Headphones are connected.
Unable to record. Cassette record protect tabs are removed. Cover the holes on the back edge of the cas-
Poor FM reception The FM telescopic antenna is not properly
extended and positioned.
The CD skips. The CD is dirty or scratched. Clean or replace the CD.
The CD does not play. The CD is upside down. Put the CD in with the label side up.
Unable to operate the Remote Control. • The path between the Remote Control
and the sensor on the Unit is blocked.
• The batteries have lost their charge.
Operations are disabled. The built-in microprocessor has malfunc-
tioned due to external electrical interference.
The cassette holder cannot be opened. During tape playing, the power cord was
unplugged.
• Check all connections and make corrections. (See page 3.)
• Disconnect the headphones.
sette with tape.
Fully extend the FM telescopic antenna and
turn it for the best reception.
• Remove the obstruction.
• Replace the batteries.
Unplug the System then plug it back in after
a few minutes.
Plug in the power cord and press the % button.
25
Page 30

■■
English
Specifications
Amplifier
Output Power (Max.)
20 W (10 W + 10 W) at 4 ohms (full range)
40 W (20 W + 20 W) at 4 ohms, 60Hz (woofer)
(10% THD)
10 W (5 W + 5 W) at 4 ohms (full range)
32 W (16 W + 16 W) at 4 ohms, 60Hz (woofer)
Input Sensitivity/Impedance (1 kHz)
AUX IN 300 mV/47 kohms
MIC 200 ohms - 2 kohms (6.3mm dia. plug)
GUITAR 100 kohms - 1 Mohm (6.3mm dia. plug)
Output Sensitivity/Impedance (1 kHz)
Phones 16 ohms - 1 kohm
0 - 12 mW/ch output into 32 ohms
Cassette Deck
Frequency Response
TypeII (CrO2) 60 Hz - 14 kHz
Wow and Flutter 0.15% (WRMS)
CD Player
Wow And Flutter Unmeasurable
Tuner
FM Tuner
Tuning Range 87.5 MHz - 108.0 MHz
AM Tuner
Tuning Range (MW) 522 kHz - 1,629 kHz
(LW) 144 kHz - 288 kHz
Antenna FM telescopic antenna
Ferrite core antenna for AM (MW/LW)
Speakers
Full range 8 cm × 2,4 444 ohms
Super woofer 16 cm × 2, 444 ohms
General
Dimensions 634 mm × 256.5 mm × 311 mm (W/H/D)
Mass 10.2 kg (without batteries)
Accessories
Power Specifications
Power Requirements AC 230 V ~ , 50 Hz
Power Consumption 44 watts (power on mode)
Design and specifications are subject to change without notice.
11.3 kg (with batteries)
Power Cord (1)
Remote Control (1)
Batteries R6P (SUM-3) / AA (15F) (2)
Shoulder Strap (1)
DC15V ("R20/D (13F)" batteries (10))
External DC12V (car battery via optional CA-120E car adaptor)
2 watts (in Standby mode)
26
Page 31

VICTOR COMPANY OF JAPAN, LIMITED
EN, GE, FR, NL, SP, IT 0200MNMCREJEIN
 Loading...