

Page 1
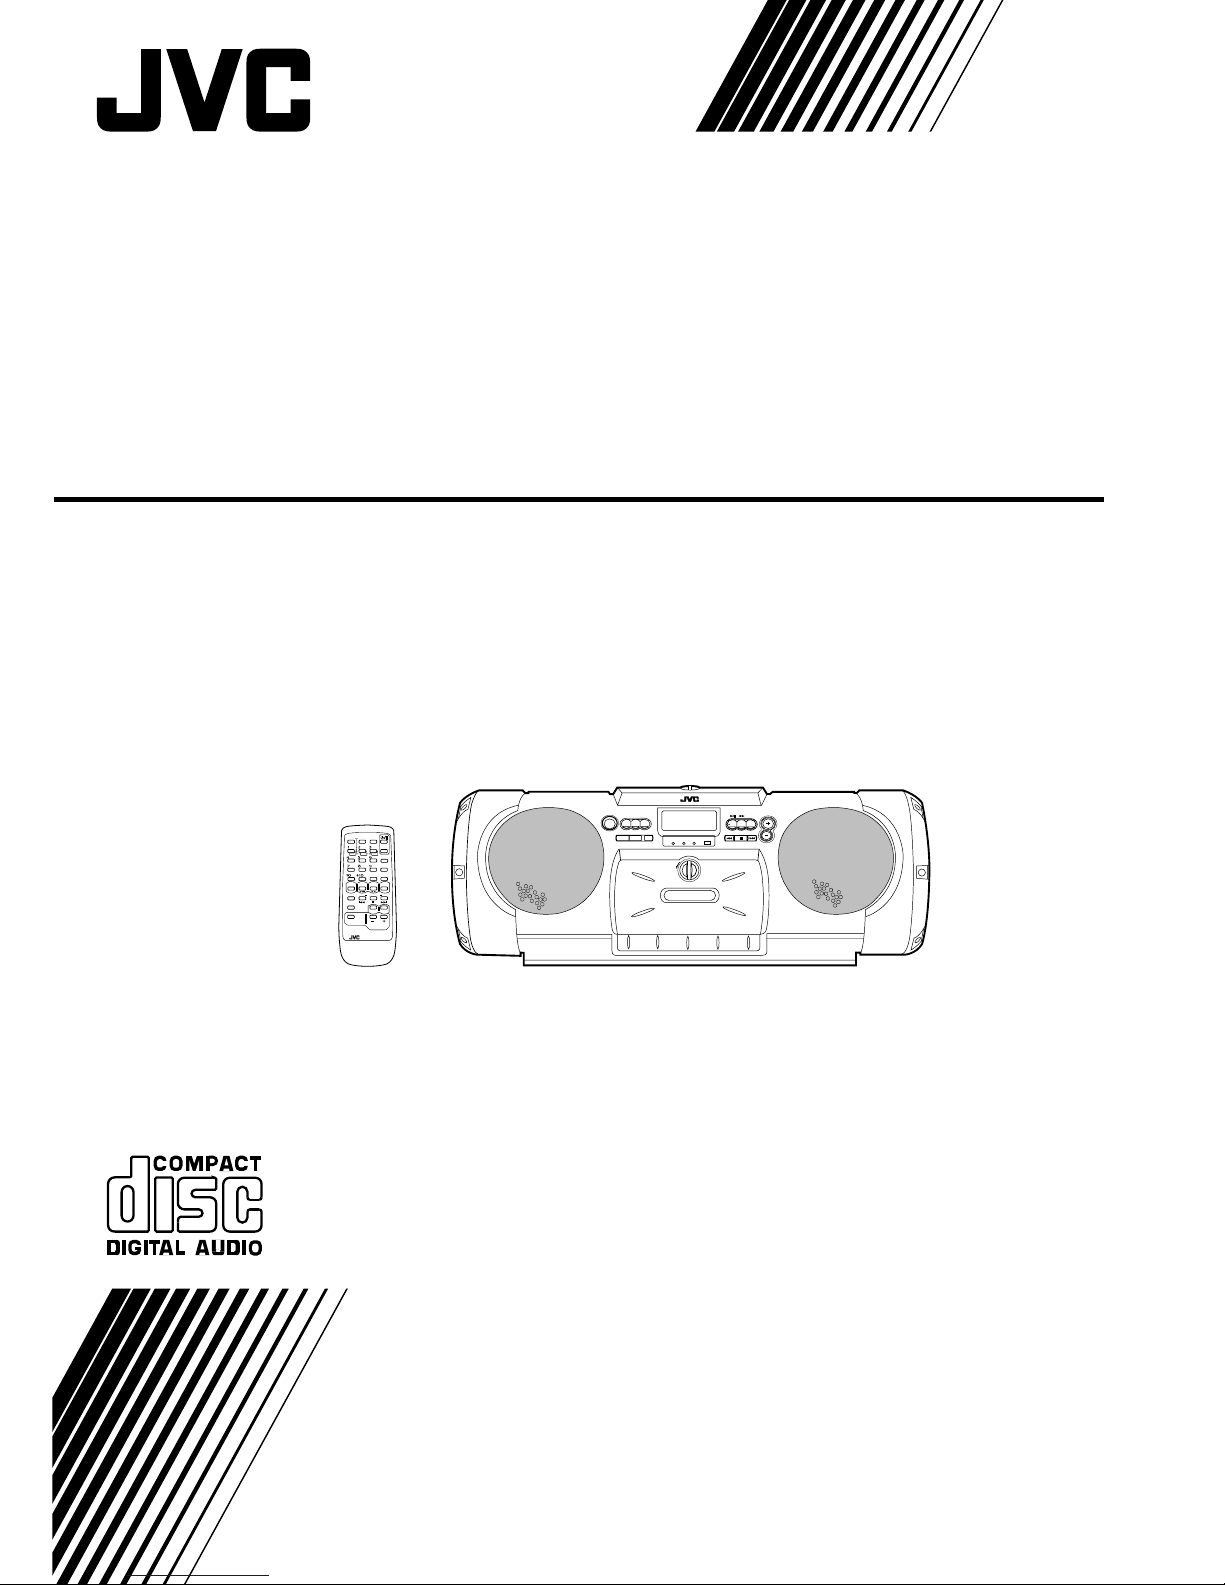
RV-B55 GY/BU/LTD
CD PORTABLE SYSTEM
INSTRUCTIONS
LVT0209-003A
[B]
SLEEP
CLOCK TIMER
TIMER
ON/OFF
PROGRAM
RANDOM
REPEAT
AUTO
PRESET
DISPLAY
REVERSE MODE
MULTI CONTROL
REW
FF
RM-RXVB55
REMOTE CONTROL
TAPE
TUNER
BAND
FM MODE
C D
DOWN UP SET
AUX
VOLUME
AHB PRO
SOUND
ACS
Page 2
2
DANGER: Invisible laser
radiation when op en and
interlock failed or defeated.
AVOID DIRECT EXPOSURE
TO BEAM. (e)
ADVARSEL: Usynlig laserstråling ved åbning, når
sikkerh edsafbryd ere e r u de
af funktion. Undgåudsættelse for stråling. (d)
VARNING: Osynlig laser-
strålning när denna del
är öppnad och spärren
är
urkopplad. Betrakta ej
strålen. (s)
VARO: Avattaessa ja suo-
jalukitus ohitettaessa olet
alttiina näkymättömälle
lasersäteilylle. Älä katso
säteeseen. (f)
CLASS 1
LASER PRODUCT
DANGER: Invisible laser
radiation when op en and
interlock failed or defeated.
AVOID DIRECT EXPOSURE
TO BEAM. (e)
ADVARSEL: Usynlig laserstråling ved åbning, når
sikkerh edsafbryd ere e r u de
af funktion. Undgåudsættelse for stråling. (d)
VARNING: Osynlig laser-
strålning när denna del
är öppnad och spärren
är
urkopplad. Betrakta ej
strålen. (s)
VARO: Avattaessa ja suojalukitus ohitettaessa olet
alttiina näkymättömälle
lasersäteilylle. Älä katso
säteeseen. (f)
Thank you for purchasing this JVC product. Please read these instructions
carefully before starting operation to be sure to obtain optimum
performance and a longer service life from the unit.
ENGLISH
CONTENTS
Features .................................................................................. 4
Safety precautions ................................................................. 4
Handling precautions ............................................................ 5
Shoulder strap attachment/detachment .............................. 5
Connections ........................................................................... 6
Power supply.......................................................................... 6
Names of parts and their functions...................................... 8
Remote control unit ............................................................. 10
Switching the power on/off ................................................. 11
Volume, sound mode and other controls .......................... 12
Handling CDs........................................................................ 13
Playing CDs .......................................................................... 14
Handling cassette tapes ...................................................... 16
Cassette playback................................................................ 17
Using with another audio unit............................................. 17
Radio reception .................................................................... 18
Recording ............................................................................. 20
Clock adjustment ................................................................. 22
Timer operations .................................................................. 23
Maintenance ......................................................................... 26
Troubleshooting................................................................... 27
Specifications....................................................................... 27
Warnings, Cautions and Others
IMPORTANT FOR LASER PRODUCTS
REPRODUCTION OF LABELS
1 CLASSIFICATION LABEL, PLACED ON EXTERIOR
SURFACE
1.CLASS 1 LASER PRODUCT
2.DANGER: Invisible laser radiation when open and interlock failed or
defeated. Avoid direct exposure to beam.
3.CAUTION: Do not open the top cover. There are no user serviceable
parts inside the unit; leave all servicing to qualified service personnel.
CAUTION — switch!
Disconnect the mains plug to shut the power off completely. The
switch in any position does not disconnect the mains line. The power can
be remote controlled.
CAUTION
To reduce the risk or electrical shocks, fire, etc.:
1 Do not remove screws, covers or cabinet.
2 Do not expose this appliance to rain or moisture.
RV-B55 GY/BU
RV-B55 LTD
2 WARNING LABEL, PLACED INSIDE THE UNIT
Page 3

3
IMPORTANT for the U.K.
DO NOT cut off the mains plug from this equipment. If the plug
fitted is not suitable for the power points in your home or the cable
is too short to reach a power point, then obtain an appropriate
safety approved extension lead or consult your dealer.
BE SURE to replace the fuse only with an identical approved type,
as originally fitted.
If nonetheless the mains plug is cut off ensure to remove the fuse
and dispose of the plug immediately, to avoid a possible shock
hazard by inadvertent connection to the mains supply.
If this product is not supplied fitted with a mains plug then follow
the instructions given below:
IMPORTANT:
DO NOT make any connection to the terminal which is marked
with the letter E or by the safety earth symbol or coloured green or
green-and-yellow .
The wires in the mains lead on this product are coloured in accordance with the following code:
Blue: Neutral
Brown: Live
As these colours may not correspond with the coloured markings
identifying the terminals in your plug proceed as follows:
The wire which is coloured blue must be connected to the terminal
which is marked with the letter N or coloured black.
The wire which is coloured brown must be connected to the terminal which is marked with the letter L or coloured red.
IF IN DOUBT – CONSULT A COMPETENT ELECTRICIAN.
SAFETY INSTRUCTIONS
“SOME DO’S AND DON’TS ON THE SAFE USE OF EQUIPMENT”
This equipment has been designed and manufactured to meet international safety standards but, like any electrical equipment, care must be
taken if you are to obtain the best results and safety is to be assured.
*********************************************
DO read the operating instructions before you attempt to use the equipment.
DO ensure that all electrical connections (including the mains plug, extension leads and interconnections between pieces of equipment) are properly
made and in accordance with the manufacturer’s instructions. Switch off and withdraw the mains plug when making or changing connections.
DO consult your dealer if you are ever in doubt about the installation, operation or safety of your equipment.
*********************************************
DO be careful with glass panels or doors on equipment.
DON’T continue to operate the equipment if you are in any doubt about it working normally, or if it is damanged in any way — switch off, withdraw the
mains plug and consult your dealer.
DON’T remove any fixed cover as this may expose dangerous voltages.
DON’T leave equipment switched on when it is unattended unless it is specifically stated that it is designed for unattended operation or has a standby
mode. Switch off using the switch on the equipment and make sure that your family knows how to do this. Special arrangements may need to
be made for infirm or handicapped people.
DON’T use equipment such as personal stereos or radios so that you are distracted from the requirements of road safety. It is illegal to watch television
whilst driving.
DON’T listen to headphones at high volume, as such use can permanently damage your hearing.
DON’T obstruct the ventilation of the equipment, for example with curtains or soft furnishings. Overheating will cause damage and shorten the life of
the equipment.
DON’T use makeshift stands and NEVER fix legs with wood screws — to ensure complete safety always fit the manufacturer’s approved stand or legs
with the fixings provided according to the instructions.
DON’T allow electrical equipment to be exposed to rain or moisture.
ABOVE ALL
— NEVER let anyone especially children push anything into holes, slots or any other opening in the case
— this could result in a fatal electrical shock;
— NEVER guess or take chances with electrical equipment of any kind
— it is better to be safe than sorry!
Page 4
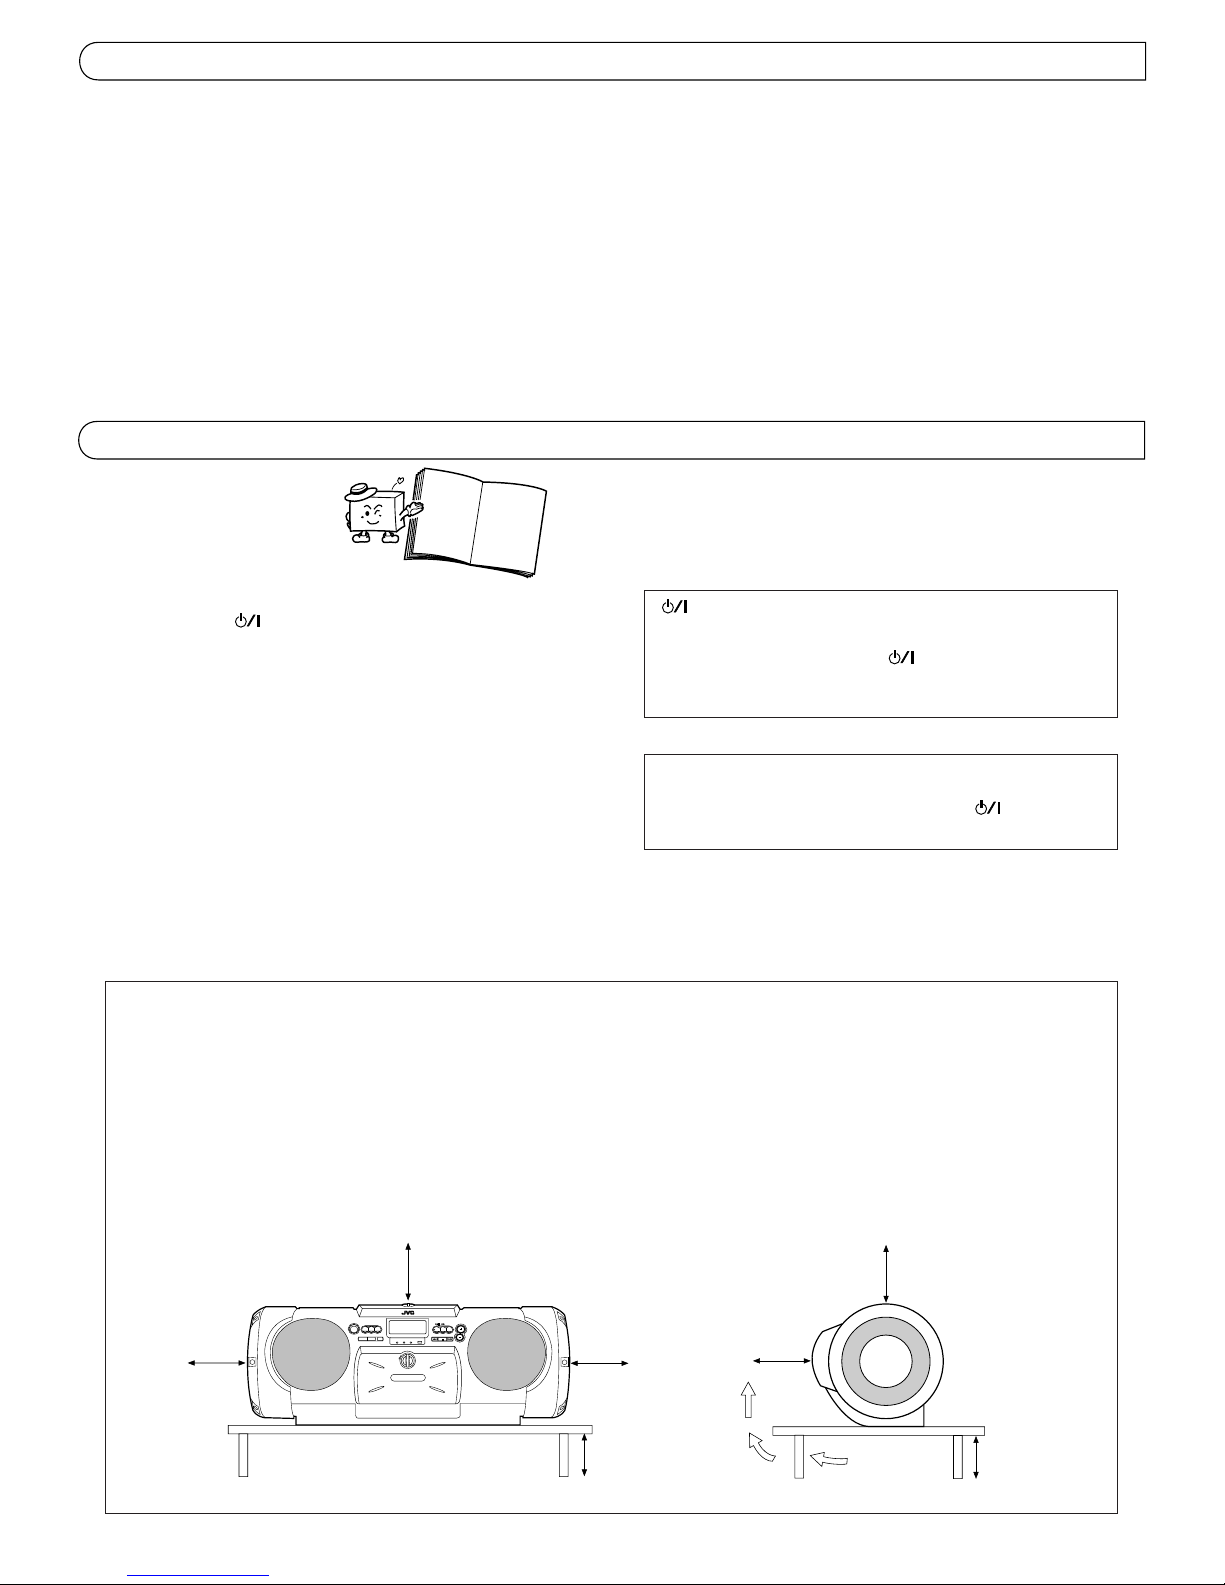
4
15 cm
15 cm
15 cm
15 cm
15 cm
10 cm
10 cm
ACTIVE
HYPER-BASS
Side viewFront view
Caution:
Proper Ventilation
T o avoid risk of electric shock and fire, and to prevent damage, locate
the apparatus as follows:
1. Front:
No obstructions and open spacing.
2. Sides/Top/Back:
No obstructions should be placed in the areas shown by the
dimensions below.
3. Bottom:
Place on a level surface. Maintain an adequate air path for
ventilation by placing on a table with a height of 10 cm or more.
RV-B55
RV-B55
Prevention of Electric Shocks, Fire Hazards and Damage
1. Even when the button is set to STANDBY, a very small current
will flow. To save power and for safety when not using the unit for an
extended period of time, disconnect the power cord from the household
AC outlet.
2. Do not handle the power cord with wet hands.
3. When unplugging from the wall outlet, always grasp and pull the plug,
not the power cord.
4. Consult your nearest dealer when damage, disconnection, or contact
failure affects the cord.
5. Do not bend the cord severely, or pull or twist it.
6. Do not modify the power cord in any manner.
7. To avoid accidents, do not remove screws to disassemble the unit
and do not touch anything inside the unit.
8. Unplug the power cord when there is a possibility of lightning.
9. If water gets inside the unit, unplug the power cord from the outlet and
consult your dealer.
10.Do not block the unit’s ventilation holes that allow heat to escape.
Do not install the unit in a badly ventilated place.
button
When the power cord is connected to a household AC wall outlet,
the power indicator lights in red indicating the STANDBY mode (only
when AC power is used). When the button is pressed, the power
indicator goes out and the display window lights (when using DC
power, it lights for only 5 seconds).
When this unit is plugged into an AC wall outlet, it consumes a small
current to operate the remote control and timer, or to back up the
memory of the microprocessor, even when the
button is set to
STANDBY.
FEATURES
÷ Active Hyper-Bass (AHB) Pro circuit for low-frequency sound
reproduction
÷ Active Clear Sound (ACS) circuit for enhanced sound reproduction
÷ Sound mode control
÷ One-touch operation (COMPU PLAY)
÷ 34-key remote control unit operates all CD, cassette deck and tuner
functions
÷ Skip Play/Search Play/Repeat Play/Random Play
÷ Programmed play of up to 20 tracks
÷ Full-logic cassette mechanism
÷ Auto reverse
÷ Auto tape select mechanism
÷ Metal (type IV) and CrO2 (type II) tape can be played back for superior
tone quality
÷ CrO2 (type II) tape recording capability
÷ 2-band digital synthesizer tuner with 45-station (30 FM and 15 AM (MW/
LW)) preset capability
÷ Seek/manual tuning
÷ Auto preset tuning
÷ Timer/Clock function
÷ Timer on/off with preset volume function
÷ Sleep timer can be set for up to 120 minutes
÷ Shoulder strap
÷ DC IN 12 V jack for car battery
SAFETY PRECAUTIONS
Page 5
5
÷ When abnormal operation occurs
* Unplug the AC power cord from the AC wall outlet and remove
all the batteries. Then reload the batteries after a few minutes,
reconnect the AC power cord and switch the power ON.
Do not use this unit in direct sunlight where it would be exposed to
high temperatures above 40°C (104°F).
1. Avoid installing in the following places
÷ Where it could be subject to vibrations.
÷ Where it is excessively humid, such as in a bathroom.
÷ Where it could be magnetized by a magnet or speaker.
2. Pay attention to dust
Be sure to close the CD door so that dust does not collect on the lens.
3. Condensation
In the following cases, condensation may occur in the unit, in which
case the unit may not operate correctly.
÷ In a room where a heater has just been switched on.
÷ In a place where there is smoke or high humidity.
÷ When the unit is moved directly from a cold to a warm room.
In these cases, set the
button to STANDBY and wait 1 or 2 hours
before use.
4. Volume setting
CDs produce very little noise compared with analog sources. If the
volume level is adjusted for these sources, the speakers may be
damaged by the sudden increase of output level. Therefore, lower the
volume before operation and adjust it as required during play.
5. Safety mechanism
This unit incorporates a safety interlock mechanism which switches
the laser beam on and off, so that when the CD door is open, the laser
beam stops automatically.
6. Do not place cassette tapes, etc. near the speakers
Since there are magnets in the speakers, do not place tapes or
magnetic cards on them as recorded data could be erased.
7. Keep this unit away from your TV
When this unit is used near a TV, the TV picture could be distorted. If
this happens, move this unit away from the TV . If this does not correct
the situation, avoid using this unit when the TV is turned on.
8. Cleaning the cabinet
If the cabinet gets dirty, wipe it with a soft, dry cloth. Never use benzine
or thinner as these could damage the surface finish.
9. When listening with headphones
÷ Do not listen at high volumes as this could damage your hearing.
÷ For safety, do not drive while listening to this unit.
10.Pay attention to the following
÷ Do not place the unit on an inclination.
÷ Do not apply shock to the unit.
÷ For safety, retract the antenna so that it doesn’t get hooked or broken
during transport.
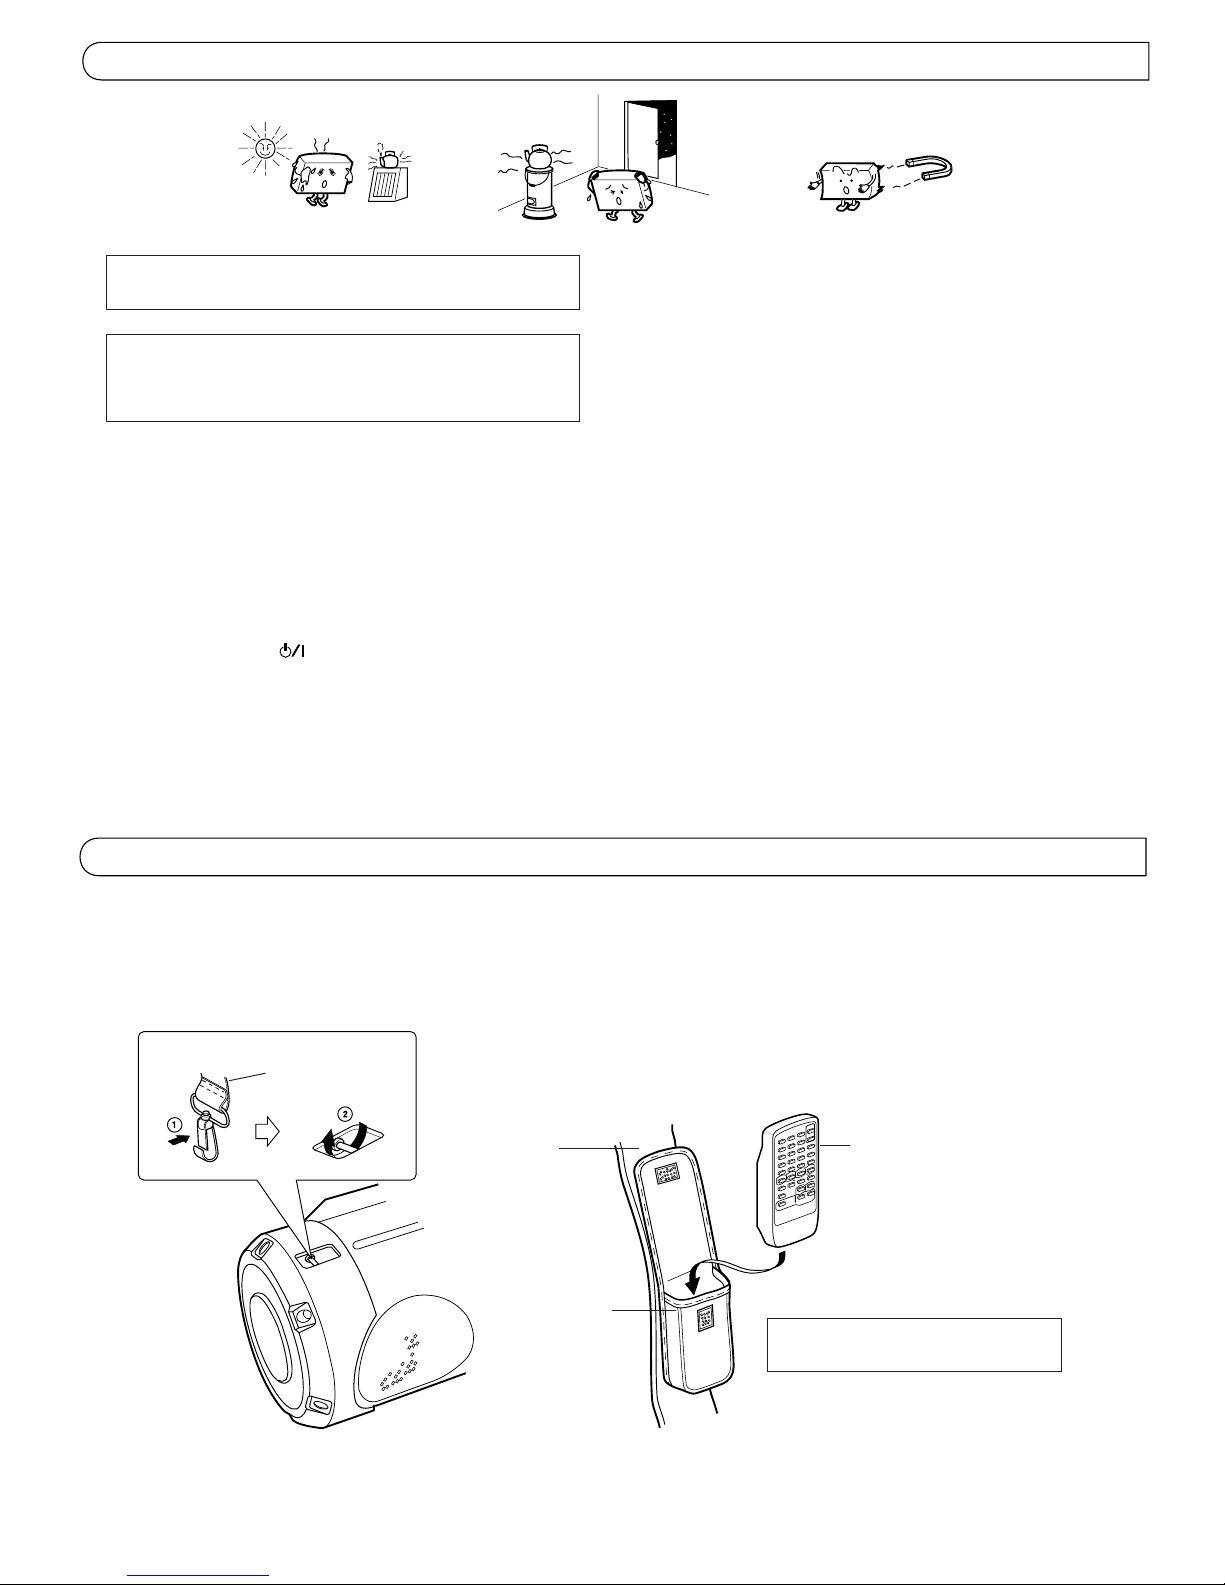
HANDLING PRECAUTIONS
ACTIVE
HYPER-BASS
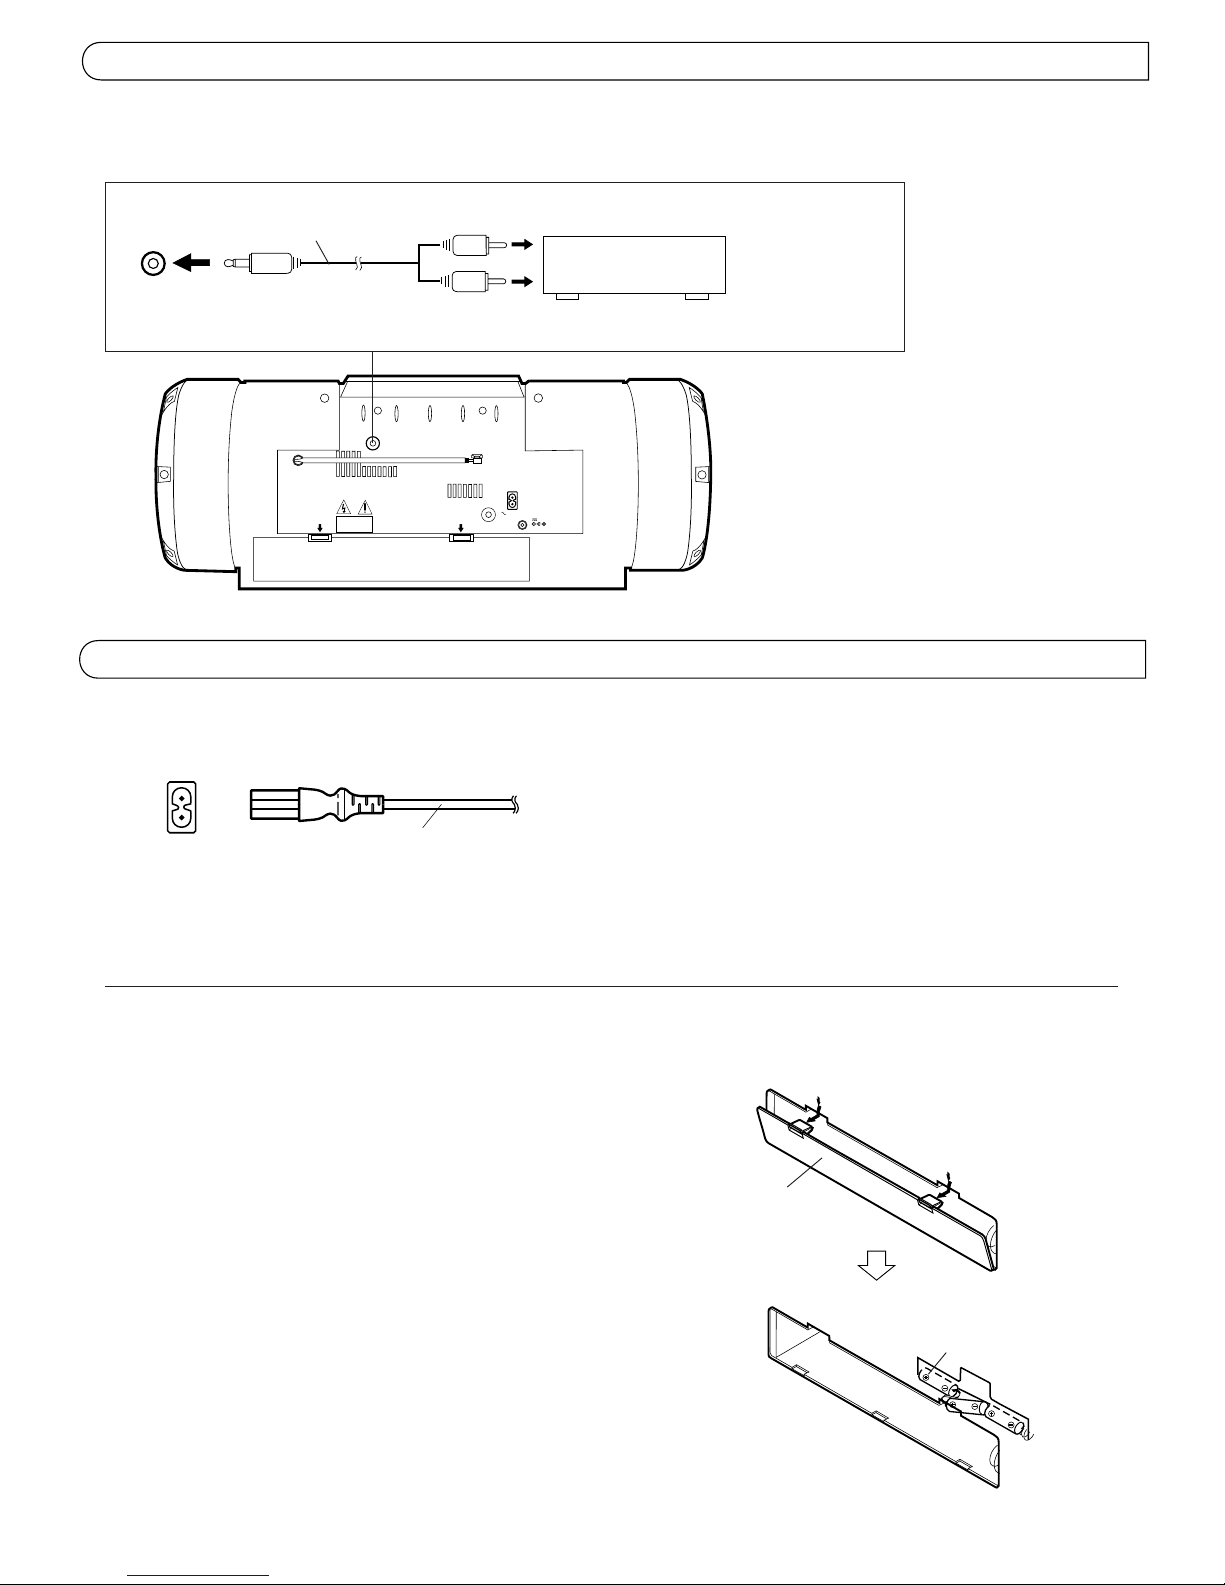
SHOULDER STRAP ATTACHMENT/DETACHMENT
Remote control unit
Shoulder strap
÷ Remote control unit may be stored in the
case.
Shoulder strap
Remote control case
÷ ATTACHMENT
As shown in the illustration below, press in the metal fitting at 1 and
hook over 2.
÷ DETACHMENT
Press in the metal fitting at 1 and unhook.
Page 6
6
1
3
2
L
R
AUX IN
AUX IN
PHONES
CAUTION
DC IN
12V
AC IN
Notes:
÷ The three “R6/AA (15F)” size batteries supply the power to the memory
back-up system which prevents the contents of the memory being lost
when there is a power failure, or the power cord is disconnected. Battery
power is not consumed when the power cord is connected to the
household AC wall outlet.
(When the memory backup function is activated, the time is not displayed
to reduce power consumption.)
÷ When the power cord is not connected or the “R20/D (13F)” size
batteries are not loaded, the batteries should be replaced with new
ones approximately every 12 months.
(Connect the AC power cord when replacing batteries in order to backup the memory.)
÷ Insert batteries with · end first in the order shown.
CONNECTIONS
÷ Do not switch the power on until all connections are completed.
Connection of external audio units
÷ Connection with a turntable or MD player, etc.
Connection cable (optional)
Turntable (with built-in equalizer, optional) or MD player (optional)
Pin-plug x 2
Stereo mini-plug
Note:
÷ Do not install the unit near a TV , otherwise the TV picture
color will become distorted. If this occurs, move the TV
away from the unit, then turn off the TV and turn it on
again after 15 to 30 minutes. The TV’s automatic
degaussing circuit will correct the picture.
Power cord
ÓAC IN
POWER SUPPLY
A. Operation on household AC
÷ Connect the AC power cord after all other connections have been
made.
CAUTIONS:
1. ONLY USE WITH JVC POWER CORD PROVIDED WITH THIS UNIT
TO AVOID MALFUNCTION OR DAMAGE TO THE UNIT.
2. BE SURE TO UNPLUG THE POWER CORD FROM THE OUTLET
WHEN GOING OUT OR WHEN THE UNIT IS NOT IN USE FOR AN
EXTENDED PERIOD OF TIME.
B. Batteries for memory back-up system
It is recommended that batteries are loaded to prevent the preset station
memory and timer, etc. from being erased when there is a power failure,
or when the AC power cord is disconnected.
÷ Loading batteries
Load three “R6/AA (15F)” size batteries (optional) into the battery
compartment.
÷ Open the battery cover by pulling it toward you while pressing the
sections marked with arrows.
Battery compartment cover
“R6/AA (15F)” size batteries
÷ When removing the batteries, remove battery number 3 first.
Page 7
7
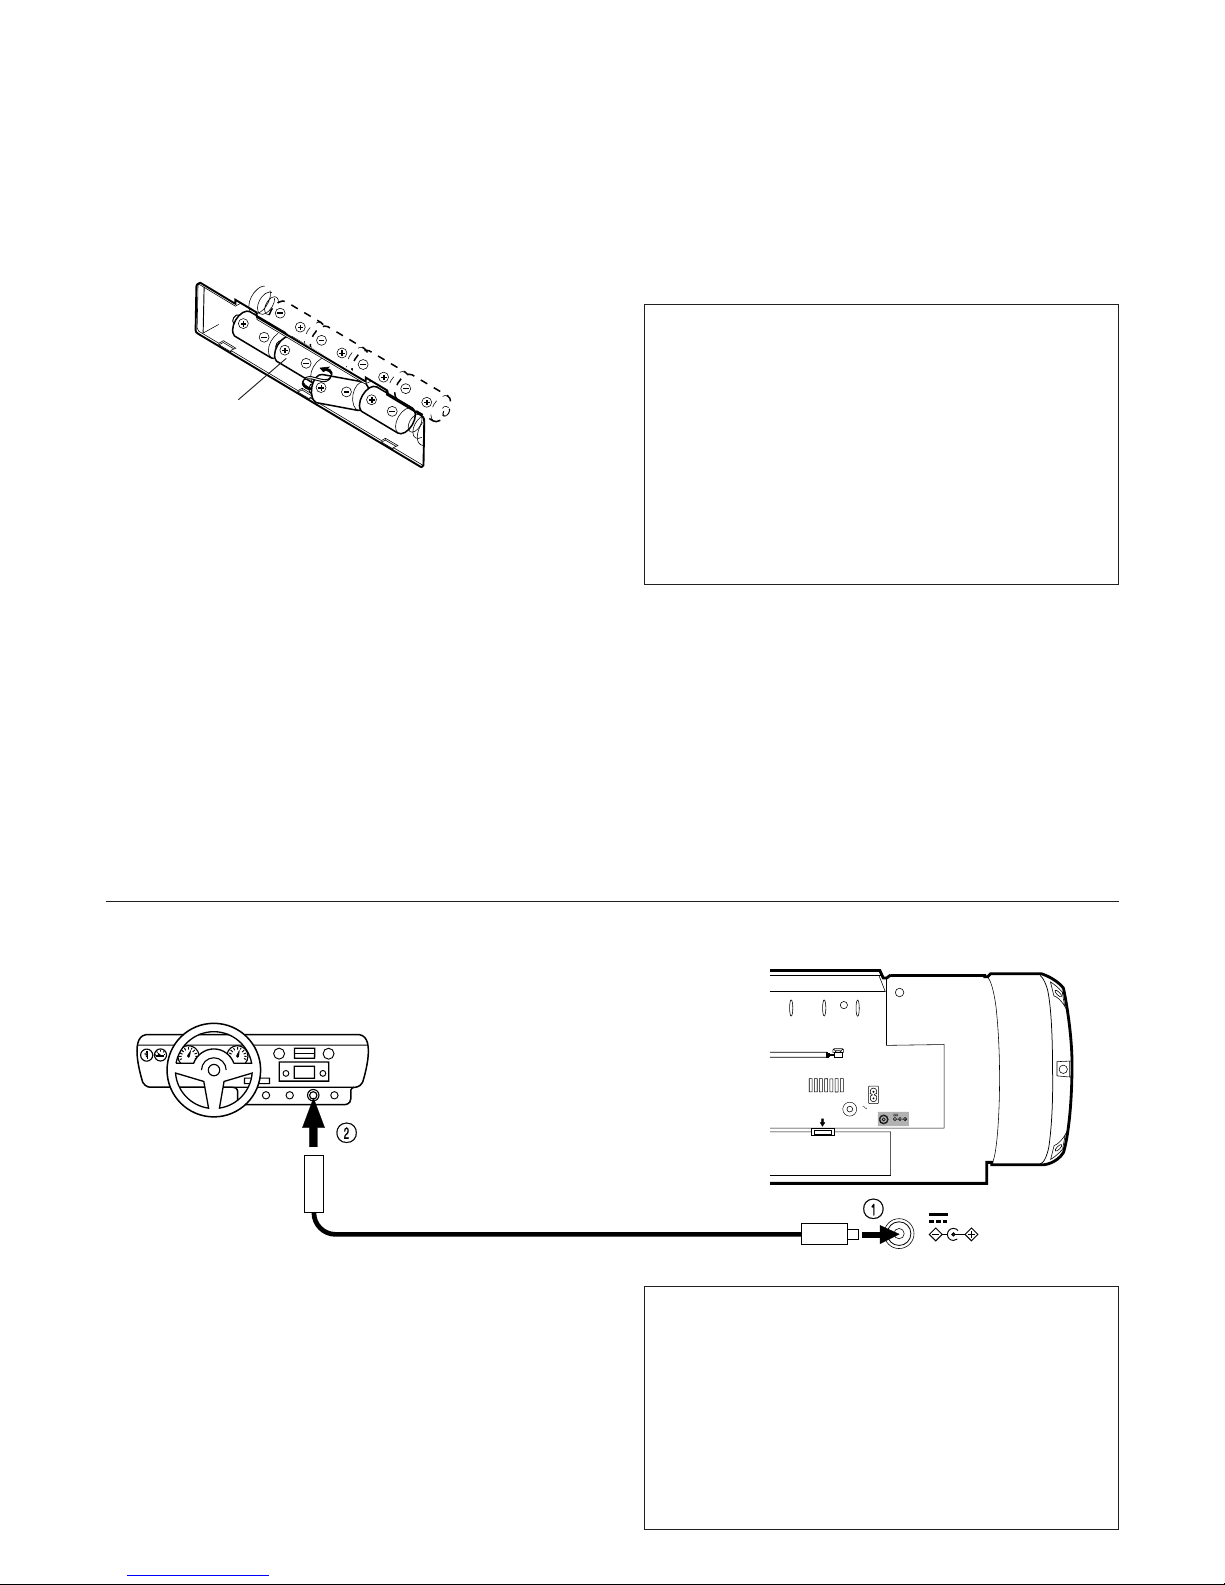
4
3
2
1
5
6
8
7
DC IN
12V
MIXING
MIC
AUX IN
PHONES
CAUTION
DC IN
12V
AC IN
C. Operation on batteries
÷ Loading batteries
1. Open the battery cover by pulling it toward you while pressing the
sections marked by the arrows.
2. Insert 8 “R20/D (13F)” size batteries (optional) as shown in the diagram.
* Be careful to insert the batteries with the ª and · terminals
positioned correctly.
3. Replace the cover.
CAUTIONS WHEN USING BATTERIES
When batteries are used incorrectly, it may result in the leakage of
chemicals from the batteries or they may explode. The following
care should be taken:
÷ Check that the positive ª and negative · terminals of the
batteries are positioned correctly and load them as shown in the
diagram.
÷ Do not mix new and old batteries together, or mix different types
of batteries.
÷ Do not try to recharge non-rechargeable batteries.
÷ Remove the batteries when the unit is not to be used for an
extended period of time.
If chemicals from the batteries come in contact with your skin, wash
them off immediately with water. If chemicals leak onto the unit,
clean the unit completely.
CAUTIONS:
÷ WHEN NOT USING THE UNIT FOR A LONG TIME (MORE THAN
TWO WEEKS) OR WHEN ALWAYS USING HOUSEHOLD AC,
REMOVE THE BATTERIES TO AVOID A MALFUNCTION OR
DAMAGE TO THE UNIT.
÷ WHEN THE JVC POWER CORD PROVIDED WITH THIS UNIT IS
CONNECTED, THE POWER IS AUT OMATICALLY SWITCHED FROM
THE BATTERIES TO THE HOUSEHOLD AC EVEN WHEN THE
BA TTERIES ARE LOADED. HOWEVER, REMOVE THE BATTERIES
WHEN USING THE POWER CORD.
CAUTIONS WHEN USING THIS UNIT IN A CAR
÷ When using a car battery, be sure to use the specified car adapter
(JVC model CA-R120E) to prevent mishaps or damage resulting
from different polarity design.
÷ For safety, stop the car before performing operations.
÷ Be sure to start the engine when you use the car adapter,
otherwise the car battery will be exhausted.
÷ During transport, stabilize the unit in a box, etc.
÷ This unit is not waterproof or dustproof. To prevent malfunctions,
do not leave the unit in a car for long periods.
÷ Unplug the power cord from the AC IN jack when using the unit
with a car adapter.
Optional exclusive car adapter (JVC model CA-R120E)
To car’s cigarette lighter socket (12 V)
Battery replacement
When the batteries are nearly exhausted, the following symptoms may
appear. In this case, replace the batteries with the fresh ones. (Do not
use fresh ones and old ones together.)
For the main unit
Mistracking occurs during CD playback or sound is distorted intermittently
during TAPE playback.
For the memory back-up
When the AC power cord is unplugged, the stored memory (timer/clock
setting/preset tuning) is erased.
It is recommended that the AC power cord be used when recording
important material or listening to a CD.
÷ For better battery usage
Continuous operation of the unit causes the battery power to be
consumed quicker than noncontinuous operation.
Operation of the unit in a cold place causes the battery power to be
consumed more quickly than in a warm place.
÷ For power supply
The use of household AC is recommended when continuous operation
of the unit is required over a longer period of time.
÷ First connect the car adapter to the DC IN 12 V jack, not the cigarette
lighter socket, because shorting of a plug on the car may cause the
fuse to blow out. In addition, be careful not to make a short-circuit
between the plugs.
D. Operation on car battery (DC 12 V)
“R20/D (13F)” size batteries
Page 8
8
NAMES OF PARTS AND THEIR FUNCTIONS
CD player/General section
9 Volume control buttons (+/–)
p AUX button
q STANDBY indicator
AHB PRO indicator
ACS indicator
w Remote sensor section
Remote control signals are received here.
e CD 3/8 button
Press to select the CD mode.
Press to play/pause.
Press to turn the power on.
r MULTI CONTROL buttons
(When the mode is set to CD)
4/¢: Press to locate the beginning of a track during skip play.
Press to fast-forward/rewind during search play.
7: Press to stop.
Press to cancel program play.
1 Shoulder strap hook
2 button
3 AHB (Active Hyper Bass) PRO button
4 ACS (Active Clear Sound) button
5 SOUND button
6 OPEN knob
Turn the OPEN knob to the left to open the CD door.
To close the CD door, press it down until it clicks shut.
7 CD door
8 Display window
1 Function/Track number display
2 Play time display
3 Repeat play indicator ( / ALL)
4 Program mode indicator (PROGRAM)
5 Random play indicator (RANDOM)
÷ See page 22 for clock adjustment display.
ALL
PROGRAM
RANDOM
TRACK
8
13
4
56
9
1
7
8
qwe
1
2
34
5
2
r
p
Page 9
9
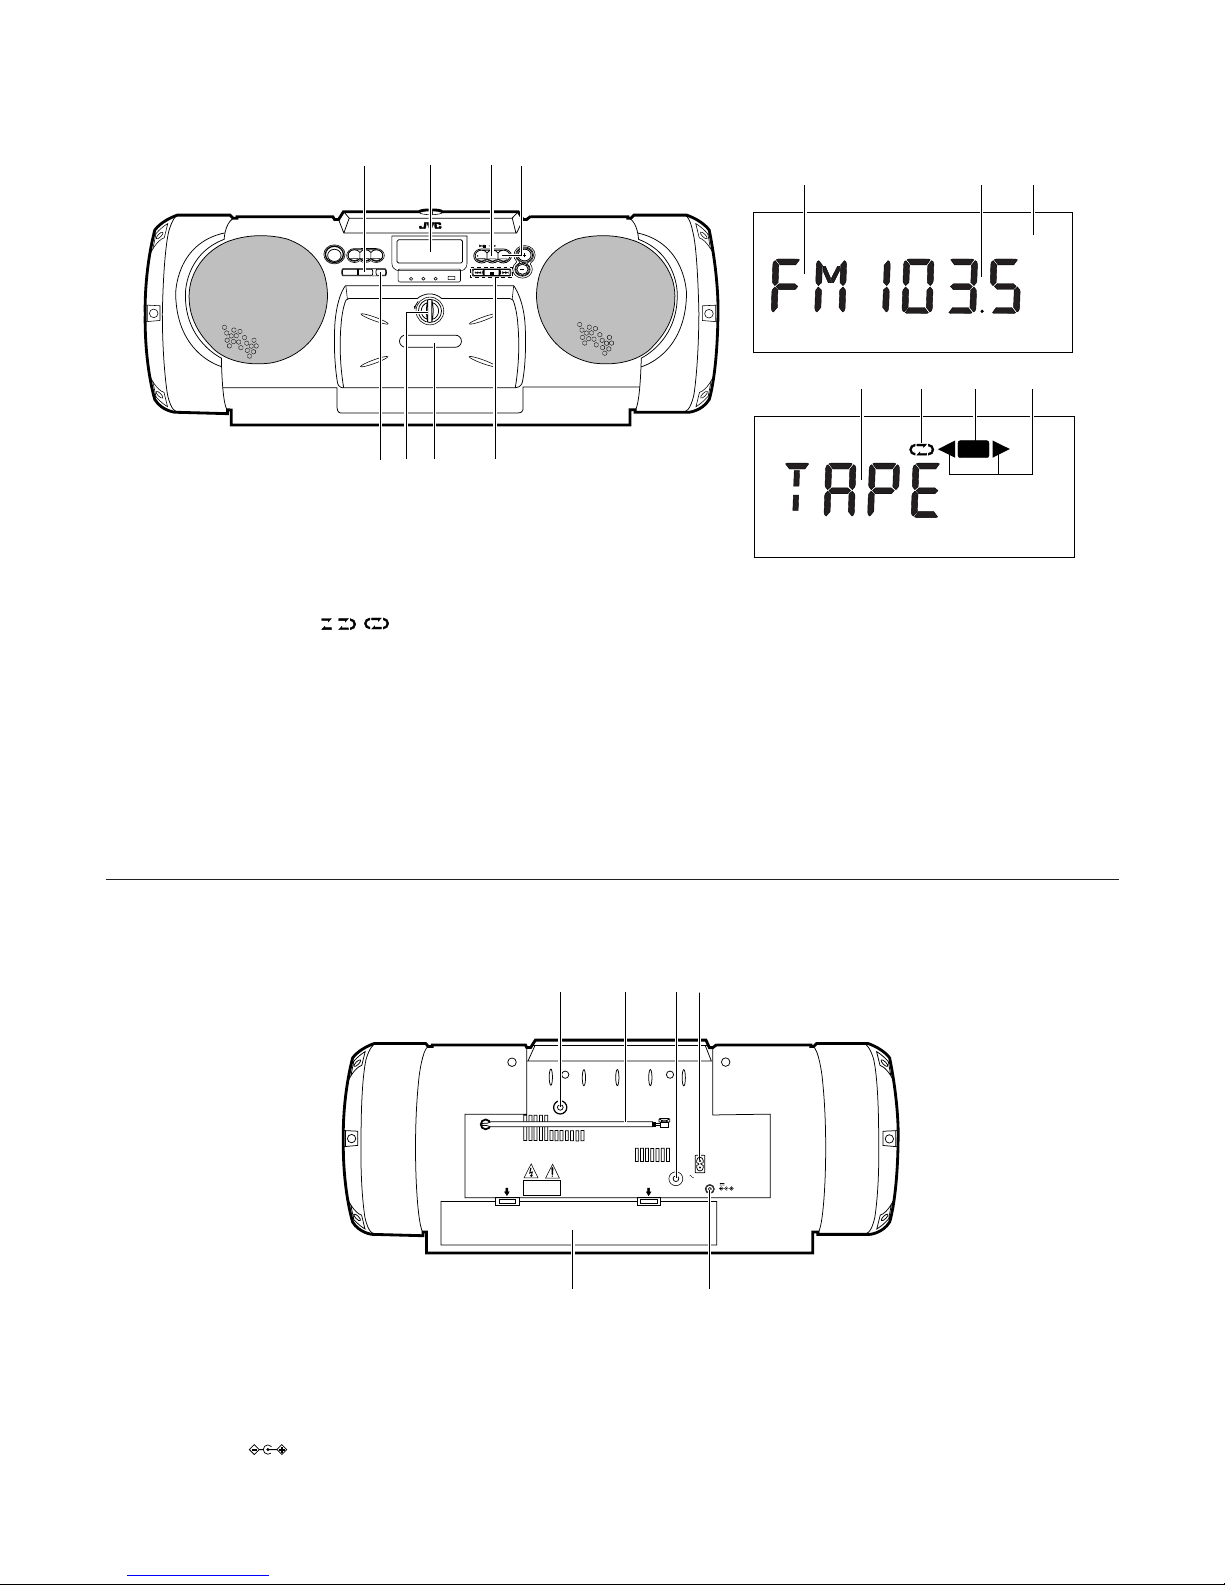
Tuner/Deck section
5
ONE TOUCH REC button
6 OPEN knob
Turn the OPEN knob to the left to open the cassette holder.
To close the cassette holder, press it until it clicks shut.
7 Cassette holder
8 MULTI CONTROL buttons
(When the mode is set to TAPE)
4 REW : Press to rewind the tape.
7 STOP : Press to stop the tape.
¢ FF : Press to fast-forward the tape.
(When the mode is set to TUNER)
4/¢ :Auto tuning/Manual tuning
1 PRESET TUNING/BEAT CUT button
2 Display window
1 Band display
2 Radio frequency display
3 Mode display during FM broadcast (STEREO/MONO)
4 Tape (TAPE) display
5 Reverse mode indicator ( / / )
6 Recording indicator (REC)
7 Tape direction indicators (2/3)
3 TAPE 23 button
Press to select the tape mode.
Press to select the tape direction.
Press to turn the power on.
4 TUNER BAND button
Press to select the tuner mode.
Press to select the band.
Press to turn the power on.
Rear panel
1
AUX IN (AUX input) jack
2 Telescopic antenna
3 Headphone jack (PHONES)
4 AC IN (AC input) jack
5 Battery compartment cover
6 DC IN 12 V jack ( )
MHz
STEREO
MONO
REC
2
5
8
1
2
3
456
7
2
3
41
67
3
MIXING
MIC
AUX IN
DIGITAL OUT
OPTICAL
MIC
LEVEL
PHONES
CAUTION
2
1
4
5
6
DC IN
12V
AC IN
Page 10

10
REMOTE CONTROL UNIT
Preparation before use
÷ Installing batteries in the remote control unit
1. Remove the battery cover from the back of the remote control unit.
2. Insert two “R6/AA (15F)” size batteries.
÷ Insert the batteries with the ª and · terminals matching the
indication inside the battery compartment.
3. Replace the cover.
Insert the · ends first.
The following operations can be performed using the remote control
unit.
÷ Check the operation button functions carefully and operate them
correctly.
÷ Battery replacement
When the remote control operation becomes unstable or the distance
from which remote control is possible decreases, replace the batteries.
Using the remote control unit
÷ Point at the remote sensor and operate within about 7 m (approx. 23 ft).
÷ The remote control range is less when the unit is used at an angle.
÷ Do not expose the remote sensor to strong direct sunlight or artificial
lighting.
÷ Make sure that there are no obstacles between the remote sensor and
the unit.
÷ If the radio reception is noisy, move the remote control unit away from
the main unit.
1 TIMER button
Press to change the mode to TIMER.
2 CLOCK button
Press to adjust the clock.
3 Number buttons (1-10, +10)
(When the mode is set to CD)
Press to play specific tracks or to program tracks.
(When the mode is set to TUNER)
Press to select preset stations.
÷ Buttons 1-3 are also used for clock adjustment and timer operation
(see page 22).
4 REVERSE MODE button
5 DISPLAY button
6 AHB PRO button
7 TIMER ON /OFF button
Press to cancel or reset the TIMER.
8 button
When the main unit power is supplied from batteries, pressing this
button will not turn on the main unit power. (In this case, press the
button on the main unit.)
9 SLEEP button
p PROGRAM button
Press to select the program play mode.
q RANDOM button
w REPEAT button
e AUTO PRESET button
r VOLUME buttons (+/–)
÷ Buttons not mentioned here have the same functions as those on
the main unit.
SLEEP
CLOCK TIMER
TIMER
ON/OFF
PROGRAM
RANDOM
REPEAT
AUTO
PRESET
DISPLAY
REVERSE MODE
MULTI CONTROL
REW
FF
RM-RXVB55E
REMOTE CONTROL
TAPE
TUNER
BAND
FM MODE
C D
DOWN UP SET
AUX
VOLUME
AHB PRO
SOUND
ACS
1
2
3
4
5
6
7
8
9
p
q
w
e
r
Page 11

11
ON/STANDBY
BEAT CUT
AHB PRO
ACS
AUX
PRESET
TUNING
ONE TOUCH
REC
SOUND
VOLUME
CD
TAPE
TUNER
MULTI CONTROL
REW
AHB PRO
ACS
STOP
FF
BAND
STANDBY
SWITCHING THE POWER ON/OFF
One touch operation (COMPU PLAY)
(only when AC power is used)
Even when the power is set to STANDBY, pressing the button shown
below switches on the power and selects the source.
Function mode
Operations
CD 3/8 button
TUNER/BAND button
button
Switching the power on/off
÷ Switching on:
The STANDBY indicator goes out.
÷ The display window lights. (when using DC power, it lights for only 5
seconds)
÷ Switching off:
The STANDBY indicator lights.
÷ The display window light goes off and only the clock time is displayed.
AUX
BAND
CD
TAPE
TUNER
When this button is pressed with a CD loaded, CD playback begins.
CD
TAPE
When this button is pressed with a tape loaded, tape playback begins.
TUNER When this button is pressed, the tuner is engaged.
AUX
A sound source connected to the AUX IN terminal can be engaged.
Notes:
÷ COMPU PLA Y doesn’t function when the unit is used with batteries or
a car adapter. Press the button to turn on. To avoid battery
exhaustion, the display window normally doesn’t light. However, when
the button is pressed to turn on or an operation button is pressed,
the display window lights for 5 seconds.
÷ When switching off the power, be sure to press the button.
÷ The COMPU PLAY function on the remote control has the same function
as that on the main unit.
AUX button
TAPE 23 button
STANDBY
ON/STANDBY
STANDBY
ON/STANDBY
Page 12

12
AHB PRO
AHB PRO
AHB PRO
SOUND
SOUND
VOLUME buttons
+ : Use to increase the volume.
– : Use to decrease the volume.
(Control range from VOL 0 to VOL 50.)
Sound mode button
Sound modes can be selected to enhance the type of music being played.
÷ Press the SOUND button to select the sound mode.
÷ Each time the SOUND button is pressed the sound mode changes as
follows:
VOLUME, SOUND MODE AND OTHER CONTROLS
VOLUME
VOLUME
Main unit Remote control unit
Remote control unit
Main unit
AHB PRO indicator lights in red when
AHB PRO is set to BASS 1/BASS 2.
AHB (Active Hyper Bass*) PRO button
BASS 1: The AHB PRO indicator lights up, and a mild bass boost is added to the
sound.
BASS 2: The AHB PRO indicator lights up, and a stronger bass boost is added to
the sound.
OFF : The AHB PRO indicator goes out. Set to this position when Active Hyper
Bass Pro sound is not required.
* Active Hyper Bass (AHB) Pro
The Active Hyper Bass Pro circuit reinforces the bass sound to maintain
rich, full bass at low volumes (playback only).
Main unit Remote control unit
÷ The factory-preset is “FLAT”. Each time the SOUND button is pressed, the
display changes as shown.
Sound mode selection
LIVE:
Set to this position for heavy metal or rock music.
POP:
Set to this position for light music including popular and vocal music.
CLEAR:
Set to this position for crisp and clear sounding music with transparent
highs.
FLAT (No sound effect (flat characteristics)):
Set to this position when listening to classical music.
Note:
The selected modes only affect the sound output from the speakers or
headphones. They do not affect the sound when recording.
ACS (Active Clear Sound*) button
Use the ACS button to enhance the sound reproduction. Press the ACS
button to turn it ON/OFF.
* Active Clear Sound (ACS)
The Active Clear Sound (ACS) circuit emphasizes high-frequency sound
without lowering the signal-noise ratio, while adjusting its output according
to the input signal level. This results in a better balance between the
high-frequency sound and the low-frequency heavy bass sound.
Note:
This fuction has no effect with monaural sound sources.
ACS
ACS
ACS
Main unit
Remote control unit
Lights in green when the ACS is ON.
Page 13

13
÷ Handling
÷ Removing the CD from its storage case and loading it.
Incorrect
Correct
Incorrect
÷ Cleaning
÷ Press to secure the CD.
÷ Press the center and lift out.
Note:
CDs shaped like a heart, flower, etc. (specially-shaped CDs) cannot
be used with this unit. If this type of CD is loaded, it may cause a
malfunction to occur.
Since dirty, damaged and warped CDs may damage the unit, take care
regarding the following:
1. Usable CDs
Use CDs with the Compact Disc mark shown below.
2. Notes on handling CDs
÷ Do not touch the reflective recorded surface.
÷ Do not stick or write anything on the label side.
÷ Do not bend CDs.
3. Storage
÷ After removing a CD from the unit, be sure to put it back in its case.
÷ Do not expose CDs to direct sunlight, high temperatures (such as
from a heater), high humidity, or dust.
4. Cleaning CDs
÷ Before loading a CD, wipe off any dust, dirt or fingerprints with a
soft cloth. CDs should be cleaned by wiping radially from the center
to the edge.
÷ Never use thinner, benzine, record cleaner or antistatic spray.
HANDLING CDs
Page 14

14
MULTI CONTROL
REW
STOP
FF
PLAYING CDs
Playing an entire CD
The following example of playing an entire CD assumes a CD with 12
tracks and a total playing time of 48 minutes 57 seconds.
Operate in the order shown
÷ When AC power is used
(When battery power is used, switch on the button first, then perform
operation):
To listen to the previous track...
Press the 4 button to skip to the beginning of the track being played.
Press twice quickly to skip to the beginning of the previous track.
Skip play
÷ During play, it is possible to skip forward to the beginning of the next
track or back to the beginning of the track being played or the previous
track; when the beginning of the required track has been located, play
starts automatically.
To listen to the next track...
Press the ¢ button once to skip to the beginning of the next track.
Keep pressing for fastreverse search.
Keep pressing for fastforward search.
÷ Hold down the button; search play starts slowly and then gradually
increases in speed.
÷ Since low-volume sound (at about one quarter of the normal level) can
be heard in the search mode, monitor the sound and release the button
when the required position is located.
Search play (to locate the required position on the CD)
÷ The required position can be located using fast-forward or reverse
search while playing a CD.
÷ To stop a CD temporarily
Press the CD 3/8 button to stop play temporarily (the play time display
blinks).
When pressed again, play resumes from the point where it was paused.
Note:
÷ The following indication may appear when a CD is dirty or scratched,
or when the CD is loaded upside down.
In such a case, check the CD and insert again after cleaning the CD or
turning it over.
or
÷ Do not use the unit at excessively high or low temperatures. The
recommended temperature range is from 5°C (41°F) to 35°C (95°F).
÷ After playback, unload the CD and close the CD door.
÷ If mistracking occurs during play, lower the volume.
÷ Take the disc out of the unit before transporting it.
÷ Do not place anything other than a CD in the CD player, as this may
cause damage to the unit.
÷ Do not apply shock to the unit or use the unit in an unstable position,
otherwise mistracking may occur.
1 Turn the OPEN knob to the left to open the CD door.
2 Load a CD with the label side facing up and close the CD door.
Press the CD door down.
3 Press to start play.
TRACK
CD
Track number
Elapsed playback time
4 Adjust the volume.
÷ 8-cm (3") CDs can be used in this unit without an adapter.
÷ To stop in the middle of a CD
During play, press the 7 STOP button to stop play.
÷ The total number of tracks and total playback time are displayed.
MULTI CONTROL
REW
STOP
FF
MULTI CONTROL
REW
STOP
FF
MULTI CONTROL
STOP
TRACK
OPEN
BEAT CUT
AHB PRO
ACS
AUX
PRESET
TUNING
ONE TOUCH
REC
SOUND
VOLUME
CD
TAPE
TUNER
MULTI CONTROL
REW
ACS
STOP
FF
BAND
STANDBY
4
3
1
2
ON/STANDBY
AHB PRO
1
2
OPEN
Page 15

15
PROGRAM
PROGRAM
TRACK
Direct access play (using the remote control unit)
÷ Pressing any of the track number buttons will start play from the
beginning of the designated track. (This function cannot be used during
programmed play .)
1 Press the CD 3/8 button to set to the CD mode.
2 Press the 7 button.
3 Designate the required track using the track number buttons.
÷ To designate track numbers 1 to 10, press the track number button
corresponding to the track number.
÷ To designate track number 11 or higher, press the +10 button* the
required number of times, then a track number button.
Example:
(To designate the 20th track)
Press the +10 button once, then press track number button 10.
(To designate the 25th track)
Press the +10 button twice, then press track number button 5.
* +10 button:
Each time this button is pressed, the number increases by 10. First
press this button to set the 10’s digit, then press the track number
button to set the 1’s digit.
÷ To skip to another track during play
When the required track number button is pressed, the display shows
the designated track number and play starts from the beginning of the
designated track.
SLEEP
CLOCK TIMER
TIMER
ON/OFF
PROGRAM
RANDOM
REPEAT
AUTO
PRESET
REVERSE MODE
MULTI CONTROL
REW
FF
TAPE
TUNER
BAND
FM MODE
C D
DOWN UP SET
AUX
3
1
2
To confirm the details of a program...
Press the PROGRAM button; the tracks making up the program will be
displayed in programmed order.
Program order number
Track number
PROGRAM
12
3
4
5
PROGRAM
TRACK
PROGRAM
TRACK
REC
SLEEP
PROGRAM
RANDOM
REPEAT
AUTO
PRESET
REVERSE MODE
MULTI CONTROL
REW
FF
TAPE
TUNER
BAND
FM MODE
C D
DOWN UP SET
AUX
1, 5
2
4
3
C D
C D
Programmed play (using the remote control unit)
÷ Up to 20 tracks can be programmed to be played in any required order.
The total playing time of programmed tracks is displayed (up to 99 minutes,
59 seconds).
(Example: When programming the 2nd track to be played first, and the
6th track next, then the 12th track, etc.)
The 12th track
The total playback time of programmed tracks is displayed.
To designate the 12th track.
1 Press the CD 3/8 button to set to the CD mode.
2 Press the 7 button.
3 Press the PROGRAM button to set to the programming mode.
4 Press to designate the required track number.
Designate the remaining tracks by pressing the track number buttons.
5 Press the CD 3/8 button when programming is completed.
Programmed play starts.
To clear the programmed tracks...
Press the 7 button before playing a CD. During programmed play, press
this button twice. When the CD door is opened, programmed tracks are
cleared automatically.
Notes:
÷ If the total playing time of the programmed tracks exceeds 99 minutes
59 seconds, the total playing time indication will go out.
÷ No more than 21 tracks can be programmed for playback.
÷ When programming tracks to be recorded, the previous step 5 is not
needed. Press the ONE TOUCH REC button instead of the CD 3/8
button.
÷ If the wrong track number is accidentally pressed, press the 7 button to
cancel it and perform the same operation from step 3.
÷ If the power is set to STANDBY, the program is erased.
Page 16

16
Repeat play (using the remote control unit)
Press the REPEAT button before or during play. A single track or all the
tracks can be repeated.
Whether a single track or all tracks are to be repeated can be specified.
Each time the REPEAT button is pressed, the mode will change from
single track ( ), to all tracks ( ALL), to clear mode, in this order.
Random play (using the remote control unit)
Press the RANDOM button.
“RANDOM” appears in the display window. After all tracks are played
back once in random order, playback stops and random play is released.
÷ Single track repeat (
)
The current or specified track will be played repeatedly.
÷ All tracks repeat ( ALL)
All tracks or the programmed tracks of a CD will be played repeatedly.
ALL
REPEAT
Goes off.
All tracks
Single track
Repeat playback is released.
Note:
If the power is switched off while a tape is running, it may be impossible
to remove the cassette. If this happens, switch the power on again before
attempting to remove the cassette.
Auto tape select mechanism
This unit has an Auto T ape Select mechanism which distinguishes between
different types of tape using detection holes in the cassette. After the
type of tape has been detected, bias and equalization suitable for the
tape are set.
÷ Cassettes with detection holes:
Metal tape (EQ: 70 µs) .................... Type IV
CrO2 (chrome) tape (EQ: 70 µs) ..... Type II
÷ Cassettes without detection holes:
Normal tape (EQ: 120 µs) ............... Type I
Metal/CrO2 tape detection holes
Turn the pencil to tighten the tape.
RANDOM
Note:
Move the unit as far away possible from a TV or other radio set. Otherwise,
the CD playback sound will be degraded or the TV picture may be
distorted.
Side “A”
Tab “B”
Side “B” Tab “A” Adhesive tape
HANDLING CASSETTE TAPES
Cassette tapes
1. Loose tape may cause trouble. Using a pencil or similar object, gently
tighten the tape as shown.
2. To prevent recordings from being erased accidentally, remove the
tab(s) with a screwdriver, etc. Reseal the slots with adhesive tape to
erase and re-record after the tabs have been removed.
3. C-120 cassettes are not recommended because they are prone to
malfunction.
Cassette loading
1. Turn the OPEN knob to the left to open the cassette holder.
2. Insert a cassette tape as shown on the next page.
3. Close the cassette holder.
Page 17

17
1
3
2
1
OPEN
OPEN
BEAT CUT
AHB PRO
ACS
AUX
PRESET
TUNING
ONE TOUCH
REC
SOUND
VOLUME
CD
TAPE
TUNER
MULTI CONTROL
REW
ACS
STOP
FF
BAND
STANDBY
ON/STANDBY
AHB PRO
CASSETTE PLAYBACK
Operate in the order shown
÷ When AC power is used
(When battery power is used, switch on the button first, then perform
operation):
USING WITH ANOTHER AUDIO UNIT
Operate in the order shown
÷ When AC power is used
(When battery power is used, switch on the button first, then perform
operation):
1 Connect the audio unit, turntable, MD player, etc. to the AUX IN jack
(see page 6).
2 Press the AUX button. (The power is switched on and the AUX mode
is engaged.)
3 Start playback on the connected audio unit.
(For more details, refer to the instruction manual of the connected
audio unit.)
4 Adjust the volume.
(The volume level is displayed in the display window.)
1 Load a cassette tape with side A facing out.
2 Press to start playback. (The power is switched on and the TAPE
mode is engaged to start tape playback.)
3 Adjust the volume.
÷ After loading a cassette tape, simply press the TAPE 23 button. The
power is switched on and the tape starts playback. (To select the
playback direction, press the T APE 23 button. The change in direction
can be checked with the tape direction indicator (2 or 3).)
÷ When the tape plays back with the reverse mode set to (single side
play) or (both sides play) mode, the tape stops automatically at the
end of the tape after playing one or both sides. When the reverse mode
is set to the (continuous play) mode, the tape continuously plays
one side after the other until you stop operation.
Notes:
÷ Place the unit on a level surface, otherwise the cassette holder may
not open when you turn the OPEN knob.
÷ Do not turn the OPEN knob until the tape mechanism has stopped
moving.
÷ When no tape is loaded in the deck, its tape playback direction cannot
be switched over.
How to fast-wind tapes
1. Press the TAPE 23 button (to set to TAPE mode).
2. Press the 4 (REW) or ¢ (FF) button.
Close the cassette holder.
Turn the OPEN knob to the
left to open the cassette
holder.
4
22
AUX
OPEN
BEAT CUT
AHB PRO
ACS
AUX
PRESET
TUNING
ONE TOUCH
REC
SOUND
VOLUME
CD
TAPE
TUNER
MULTI CONTROL
REW
ACS
STOP
FF
BAND
STANDBY
ON/STANDBY
AHB PRO
Page 18

18
MULTI CONTROL
REW
STOP
FF
RADIO RECEPTION
To listen to an FM stereo broadcast
FM stereo
Set to this position by pressing the TUNER BAND button when listening
to or recording an FM broadcast. If an FM stereo broadcast is received,
the “STEREO” indicator is lit in the display window, and the FM broadcast
can be heard in stereo.
FM mono
Set to this position by pressing the TUNER BAND button if FM stereo
reception is noisy. The “MONO” indicator is lit and the sound becomes
monaural, but the reception will be improved.
When another station is tuned to in this mode, the “MONO” indicator
goes off and the unit returns to FM stereo automatically.
Note:
AM broadcasts are monaural.
Seek tuning (auto tuning)
Press the 4 or ¢ button for one second or more. The unit enters the
seek tuning mode to tune in the nearest station automatically, so the
broadcast can be heard. In AM operation, the frequency moves
continuously from the MW to the LW band and vice versa.
Auto preset tuning
This function scans the current band, detecting frequencies used to
broadcast signals, and stores the first 30 FM frequencies and 15 AM
(MW/LW) frequencies in memory automatically.
(Using the main unit)
Press the PRESET TUNING button for more than 2 seconds.
(Using the remote control unit)
Press the AUTO PRESET button.
The frequencies of stations’ broadcasting signals are stored in memory
automatically in the order of increasing frequency. (30 stations in FM
band and 15 stations in AM (MW/LW) band.)
Notes:
÷ When seek tuning to the required station is not possible because the
broadcast signal is too weak, press the 4 or ¢ button momentarily
to perform manual tuning.
÷ When the power is set to STANDBY, or another mode (TAPE or CD) is
selected, the last tuned frequency is stored in memory . When the power
is switched on again and TUNER BAND button is pressed, the same
station will be tuned to.
Manual tuning
Each time the 4 or ¢ button is pressed, the unit steps through the
current frequency band. T uning is done in steps of 50 kHz for FM and
9 kHz for AM (MW/LW). In AM operation, the tuned frequency moves
continuously from the MW (522-1,629 kHz) to the L W (144-288 kHz) band
and vice versa.
Press to move to lower
frequencies.
Press to move to higher
frequencies.
Operate in the order shown
÷ When AC power is used
(When battery power is used, switch on the button first, then perform
operation):
4
5
12
3
OPEN
BEAT CUT
AHB PRO
ACS
AUX
PRESET
TUNING
ONE TOUCH
REC
SOUND
VOLUME
CD
TAPE
TUNER
MULTI CONTROL
REW
ACS
STOP
FF
BAND
STANDBY
ON/STANDBY
AHB PRO
1 Press the TUNER BAND button.
÷ The power is switched on.
2 Select the band by pressing the TUNER BAND button.
÷ Pressing this button switches between FM stereo, FM mono and
AM.
3 Tune to the required station.
÷ Seek tuning (auto tuning) and manual tuning are available (see “Seek
tuning (auto tuning)” and “Manual tuning” on this page for details).
4 Adjust the antenna (see page 19).
5 Adjust the volume.
Page 19

19
Presetting the desired stations (using the remote control unit)
30 stations in the FM band and 15 stations in the AM (MW/L W) band can
be preset as follows:
÷ Example: (Presetting an FM station broadcasting at 103.5 MHz to preset
button “15”)
1 Press the TUNER BAND/FM MODE button.
2 Select the FM band using the TUNER BAND/FM MODE button.
3 Tune to the required station.
4 Press preset button “+10”, then “5” for more than 2 sec.
(When “15” blinks in the preset station display, the station has been
stored.)
÷ Repeat the previous procedure for each of the other stations, using a
different preset button each time.
÷ Repeat the previous procedure for the other band.
÷ To change preset stations
Perform step 4 after tuning to the required station.
Notes:
÷ The previously stored station is erased when a new station is stored,
because the new station’s frequency replaces the previous frequency
in memory.
÷ When listening to an AM (MW/LW) broadcast, noise may be heard if
the remote control unit is used.
T o prevent the preset stations from being erased because of a power
failure, etc., install memory back-up batteries in the unit (see page 6).
Preset station tuning
(Receiving the preset stations)
÷ The stations must be preset before this operation can be performed.
(Using the main unit)
1 Press the TUNER BAND button.
2 Select the band using the TUNER BAND button.
3 Each time the PRESET TUNING button is pressed, the next preset
station is selected.
(Using the remote control unit)
1 Press the TUNER BAND/FM MODE button.
2 Select the band using the TUNER BAND/FM MODE button.
3 Press the required preset station buttons (No. 1 – No. 10 and +10).
÷ The preset station number and frequency corresponding to the button
pressed are shown.
FM: Adjust the telescopic antenna’s length, angle and
direction until optimum reception is received.
AM (MW/LW): Install the unit where suitable reception is possible (beside
a window, etc.) or change the direction of the unit.
Note:
The built-in ferrite core antenna can pick up interference from television
receivers in the neighborhood and thereby disturb AM (MW/L W) reception.
Using the antennas
MHz
SLEEP
PROGRAM
RANDOM
REPEAT
AUTO
PRESET
DISPLAY
REVERSE MODE
MULTI CONTROL
REW
FF
TAPE
TUNER
BAND
FM MODE
C D
DOWN UP SET
AUX
SOUND
ACS
4
1
2
3
AM (MW/LW)
FM
Page 20

20
Synchronized recording with the CD player
÷ In this system, the CD player starts play when the cassette deck enters
the recording mode.
Operate in the order shown
Note:
This unit has recording characteristics suitable for normal and CrO
2
tapes. Normal and CrO2 tapes have different characteristics from
metal tapes.
RECORDING
÷ During recording, the ALC (Automatic Level Control) circuit automatically
optimizes the recording level, so manual recording level adjustment is
unnecessary.
÷ Check that the safety tab on the cassette tape is not broken off.
Useful functions for recording
When the tape direction is set to 2 (reverse direction) after a cassette
tape is inserted...
1 Press the TAPE 23 button twice to change the tape direction to 3
(forward direction).
2 Press the 7 STOP button.
3 Change the mode to CD by pressing the CD 3/8 button.
(If a non-recorded tape with side A facing out is recorded in the reverse
direction (2), the recording is stopped immediately.)
When non-recorded sections between tunes are not required...
1 Press the CD 3/8 button twice. The CD player enters the pause
mode.
2 Press the ONE TOUCH REC button to start recording.
Note:
÷ Depending on the CD used, non-recorded sections of different lengths
may be left between tunes.
How to rewind a tape
1
Press the TAPE 23 button (to set to TAPE mode).
2 Press the 7 STOP button.
3 Press the 4 (REW) button.
To record one track...
Play the track to be recorded. Then, press the ONE T OUCH REC button
to locate the beginning of the track and enter the one track recording
mode. After the recording is finished, the CD player and cassette deck
both stop.
To record only on side B or in the middle of a tape...
1 Load the cassette with the required side facing out.
2 Set the reverse mode to with the remote control unit.
3 Press the ONE TOUCH REC button on the main unit.
Synchronized recording starts and the cassette deck stops automatically
when CD playback is completed.
1 Load a CD and close the CD door.
2 Press the CD 3/8 button to engage the CD mode, then press the
7 STOP button to enter the stop mode.
3 Load a cassette with side A facing out. (Wind past the tape leader
before starting recording.)
÷ Make sure the tape direction is set to 3 (forward direction).
4 Select the required reverse mode ( or ) using the remote
control unit.
÷ When programmed play is required, program the required tracks
using the remote control. (See page 15.)
÷ Select tracks with a total playing time which does not exceed the
tape length (refer to the liner notes).
5 Press the ONE TOUCH REC button; synchronized recording will start.
÷ Recording starts in the forward direction and CD play starts
automatically.
÷ The forward direction indicator (3) blinks and the REC indicator
lights up in the display window.
÷ Non-recorded sections of approx. 4 seconds are automatically left
between tunes.
÷ When the CD player stops, the tape deck stops automatically.
÷ T o stop recording in the middle, press the 7 STOP button. The cassette
deck also stops after 4 seconds.
Notes:
÷ During CD synchro recording, the CD 3/8 and (4, ¢) buttons do
not function.
÷ If a recording is completed in the reverse direction (2), it is possible to
continue recording without changing the direction to forward (3), until
the tape ends.
÷ If continuous play is selected, a recording in the reverse direction
(2) automatically stops at the end of the tape. The indicator appears
in the display window during recording.
÷ CD complete recording function (Synchro recording mode only)
If the tape is reversed while a CD is being played, recording will be
done on the reverse side of the tape as follows:
* When less than 10 seconds of the last tune on the forward side of the
tape have been recorded, recording on the other side of the tape will
start from the beginning of the previous track.
* When more than 10 seconds of the last tune on the forward side of
the tape have been recorded, recording on the other side of the tape
will start from the beginning of the current track.
2
5
3
1
SLEEP
PROGRAM
RANDOM
REPEAT
AUTO
PRESET
DISPLAY
REVERSE MODE
MULTI CONTROL
REW
FF
TAPE
TUNER
BAND
FM MODE
C D
DOWN UP SET
AUX
VOLUME
AHB PRO
SOUND
ACS
4
OPEN
BEAT CUT
AHB PRO
ACS
AUX
PRESET
TUNING
ONE TOUCH
REC
SOUND
VOLUME
CD
TAPE
TUNER
MULTI CONTROL
REW
ACS
STOP
FF
BAND
STANDBY
ON/STANDBY
AHB PRO
Page 21

21
Recording from the radio or an external source connected
to the AUX IN terminals
Operate in the order shown
1 Load a cassette with side A facing out.
(Wind past the tape leader before starting recording.)
÷ Make sure the tape direction is set to 3 (forward direction).
2 Select the source to be recorded.
TUNER: Press the TUNER BAND/FM MODE button.
Tune to the required station.
AUX: Press the AUX button.
3 Select the desired reverse mode.
4 Press the ONE TOUCH REC button.
÷ The recording starts from the beginning of side A.
BEAT CUT button
When recording an AM broadcast, beats may be produced which are not
heard when listening to the broadcast. In such case, set this button after
setting the deck to the record mode so that the beats are eliminated.
Normally set this button to "CUT-1".
Erasing
A recorded tape can be erased by recording new material over the
previous material.
To erase a tape without making a new recording.....
1. Press the TAPE 23 button to set to the TAPE mode.
2. Insert the cassette to be erased facing out.
3. Press the ONE TOUCH REC button.
It should be noted that it may be unlawful to re-record pre-recorded
tapes, records, or discs without the consent of the owner of copyright
in the sound or video recording, broadcast or cable program and in
any literary, dramatic, musical, or artistic work embodied therein.
BEAT CUT
PRESET
TUNING
2
4
1
SLEEP
PROGRAM
RANDOM
REPEAT
AUTO
PRESET
DISPLAY
REVERSE MODE
MULTI CONTROL
REW
FF
TAPE
TUNER
BAND
FM MODE
C D
DOWN UP SET
AUX
VOLUME
AHB PRO
SOUND
ACS
3
OPEN
BEAT CUT
AHB PRO
ACS
AUX
PRESET
TUNING
ONE TOUCH
REC
SOUND
VOLUME
CD
TAPE
TUNER
MULTI CONTROL
REW
ACS
STOP
FF
BAND
STANDBY
ON/STANDBY
AHB PRO
Page 22

22
12
3
4
CLOCK
DOWN UP
SET
CLOCK ADJUSTMENT
(USING THE REMOTE CONTROL UNIT)
Names of parts in the clock/timer section, and their functions:
Setting the current time (when this unit is used for the first
time)
(Example: To set the clock to 13:15.)
1 Timer mode indicator
2 Timer indicator (ON/OFF)
3 SLEEP indicator
4 CLOCK indicator
5 Time display
6 CLOCK button
7 TIMER button
8 TIMER ON/OFF button
9 DOWN/UP buttons
p SET button
q SLEEP button
SLEEP
CLOCK TIMER
TIMER
ON/OFF
PROGRAM
DOWN UP SET
ON
OFF
1
2
3
54
678
9
pq
Within 2 minutes.
Within 2 minutes.
÷ To confirm the time while listening to a CD or radio broadcast
Press the DISPLAY button briefly on the remote control unit. Press it
again to return to the previous display.
Notes:
÷ Before performing timer recording or playback, it is necessary to set
the current time.
÷ If memory back-up batteries are exhausted or not installed, and the
power cord is plugged in again after being disconnected, or power is
restored after a power failure, “CLOCK” will blink in the display . Set the
current time again.
1 Set the button to ON.
2 Press the CLOCK button; “ ” will blink in the display.
3 Set to 13:15 by pressing the DOWN/UP buttons.
(When the button is kept pressed, the minute/hour indication changes
continuously .)
4 Press the SET button; the time will light in the display.
÷ To set to the nearest second...
Press the SET button when you hear the time signal from a TV or
radio.
Page 23

23
Setting the timer
÷ The current time must be set before the timer can be used.
1 Set the button to ON.
2 Press the TIMER button.
3 Set the start time.
(Example: To set the timer to 12:15.)
TIMER OPERATIONS
(USING THE REMOTE CONTROL UNIT)
4
Set the stop time.
(Example: To set the timer stop time to 13:15.)
ON
OFF
DOWN UP
SET
Within 30 sec.
÷ Press to set the start time.
OFF
DOWN UP
SET
ON
TIMER
Within 30 sec.
Within 30 sec.
÷ Press to set the timer stop time.
5 Select the TIMER mode.
÷ The selected timer mode is shown in the display.
REC and appears on the display.
DOWN UP
When the UP button is pressed to select the timer mode, the mode changes from TUNER
(timer reception of a broadcast), to TUNER (timer recording of a broadcast), to CD (timer
play of a CD), to TAPE (timer playback of a tape), in this order.
SET
Within 30 sec.
DOWN UP
SET
6 Set the volume.
This shows that volume level 1 is selected.
÷ The unit enters the previously engaged mode when timer setting has been completed. (The indicator lights.)
÷ When the volume setting is set to “VOL -” (volume level is not specified),
the timer playback volume is at the level used before setting the timer.
÷ To confirm the timer setting
1 Press the SET button after pressing the TIMER button.
Each time the SET button is pressed, the timer setting can be
confirmed.
2. When the previously engaged mode is displayed, timer setting has
been completed.
Note:
÷ When the timer is set incorrectly or the correct mode is not selected,
perform “Setting the timer” from the beginning.
Page 24

24
Timer recording of broadcast
÷ The current time must be set before the timer can be used.
÷ Make sure that the safety tabs of the cassette have not been broken
off.
Operations
÷ To cancel timer operation
Press the TIMER ON/OFF button so that the timer mode indicator
(REC ) goes out.
If you do this, timer recording will not start at the timer start time.
Notes:
Once the timer has been set, the start and stop times, etc., are stored in
memory . When timer recording or playback is required at different times,
the timer must be set again.
÷ After setting the timer start and stop times, check that the tuner is tuned
to the required frequency.
÷ If memory back-up batteries are exhausted or not installed, and the
power cord is disconnected or there is a power failure, timer settings
will be erased from memory. If this happens, set the current time and
perform the timer setting again.
1 Set the button to ON.
2 Load a cassette.
÷ Insert the cassette with the side to be recorded facing out.
÷ Select the required reverse mode ( or ).
÷ Set the tape direction to 3 (forward) by pressing the TAPE 23
button.
3 Set the timer. (Refer to “Setting the timer” on page 23.)
÷ Set the timer about a minute before the broadcast to be recorded is
scheduled to start.
4 Tune to the station to be recorded. (Refer to page 18.)
5 Set the button to standby.
÷ Confirm that the timer mode indicator (REC ) is displayed in the
display window.
÷ Timer recording will start at timer start time and the power will be
switched off at timer stop time. (The timer mode is then released.)
÷ To repeat timer recording every day
Press the TIMER ON/OFF button to display the timer mode indicator
(REC ) in the display window.
15
2
4
SLEEP
CLOCK TIMER
TIMER
ON/OFF
PROGRAM
RANDOM
REPEAT
AUTO
PRESET
REVERSE MODE
MULTI CONTROL
REW
FF
TAPE
TUNER
BAND
FM MODE
C D
DOWN UP SET
AUX
3
OPEN
BEAT CUT
AHB PRO
ACS
AUX
PRESET
TUNING
ONE TOUCH
REC
SOUND
VOLUME
CD
TAPE
TUNER
MULTI CONTROL
REW
ACS
STOP
FF
BAND
STANDBY
ON/STANDBY
AHB PRO
Page 25

25
13
SLEEP
CLOCK TIMER
TIMER
ON/OFF
PROGRAM
DOWN UP SET
2
BEAT CUT
AHB PRO
ACS
AUX
PRESET
TUNING
ONE TOUCH
REC
SOUND
VOLUME
CD
TAPE
TUNER
MULTI CONTROL
REW
ACS
STOP
FF
BAND
STANDBY
ON/STANDBY
AHB PRO
SLEEP
Timer playback
÷ Timer playback of tapes, broadcasts and CDs is possible.
Operations
÷ Any source can be selected for sleep timer operation and timer playback.
For example;
• CD play for sleep timer operation and broadcast reception for timer
playback.
• Tuner play for sleep timer operation and CD play for timer playback.
However, when broadcast reception is selected for both sleep timer
operation and timer playback, the station you heard at night will be tuned
to the following morning.
SLEEP is shown in the display.
Source sound
CD play
Tape playback
Broadcast
1 Set the button to ON.
2 Set the timer. (Refer to “Setting the timer” on page 23.)
3 Set the button to STANDBY.
÷ Timer playback will start at the timer start time and the power will be
switched off at the timer stop time.
The unit remains in the same timer mode even after the power is
switched off. The same timer function will repeat at the same time on
the following day.
÷ When the timer mode is activated, the “ ” indicator blinks.
÷ When the power is switched on, the sound is faded up from volume
level 0 (zero) to the preset volume.
÷ To cancel timer operation
Press the TIMER ON/OFF button so that the timer mode indicator ( )
goes out.
Notes:
÷ When the volume setting is set to “VOL -” (volume level is not specified),
the timer playback volume is at the level used before setting the timer. (In
this case, the fade-in mode does not function.)
÷ To stop during timer playback, press the button to switch the unit
off.
Timer mode
CD
TAPE
TUNER
Operations
Load a disc.
Load a cassette tape.
Tune to the required station.
Source mode display (Releasing the sleep mode)
÷ Sleep time settings of 30, 60, 90 or 120 minutes can
be set. When you release the SLEEP button, the
source is displayed after 5 sec.
÷ The sleep timer operation will start and the power will be switched off
after the specified time.
÷ Checking the sleep time
When the SLEEP button is pressed, the remaining sleep time is
displayed. If it is pressed again, a new sleep time can be set.
÷ To cancel the sleep timer operation
Press the button to switch the power off or press the SLEEP button
until the sleep time indicator disappears.
SLEEP
Source mode display (Releasing the sleep mode)
Sleep timer operations (using the remote control unit)
A. Use this when you want to fall asleep while listening to a
tape, broadcast or CD.
1
Set to the required source and tune in a broadcast or play back a CD
or tape.
2 Press the SLEEP button to set the sleep time.
B. To fall asleep while listening to a tape, broadcast or CD
and to perform timer playback the following morning
1
Set the timer. (Refer to “Setting the timer” on page 23.)
2 Set to the required source (tape, broadcast or CD).
3 Press the SLEEP button to set the sleep time.
Page 26

26
MAINTENANCE
Cleaning the lens
If the lens in the CD pickup is dirty, dropout, etc., could degrade sound.
Open the CD door and clean the lens as shown.
÷ Use a blower (available from a camera store) to blow dust off the lens.
÷ If there are fingerprints, etc. on the lens, gently wipe clean with a cotton
swab.
Cleaning is important!
When the tape is running, magnetic powder and dust naturally accumulate
on the heads, capstan and pinch roller. When they become too dirty...
÷ Sound quality deteriorates.
÷ The output sound level drops.
÷ Previously recorded tape is not completely erased.
÷ Recording is not performed satisfactorily.
Therefore, you should clean the heads, etc. after every 10 hours of use
for optimal recording conditions.
Cleaning the heads, capstan and pinch roller
Open the cassette holder.
Clean the heads, pinch roller and capstan.
For effective cleaning, use a cleaning kit available from an audio store.
After cleaning, be sure that the cleaning fluid has dried completely before
loading a cassette.
Cautions:
1. Keep magnets and metallic objects away from the head.
If the head becomes magnetized, noise will increase and the sound
will deteriorate. Demagnetize the head every 20-30 hours of use with
a head eraser (available from an audio store). (When demagnetizing
the head, the
button should be set to STANDBY.)
2. Do not use anything other than alcohol for cleaning.
Thinner and benzine will damage the rubber pinch roller.
Capstan shaft(s)
Pinch roller(s)
Record/play headErase head
Blower
Lens
Page 27

27
TROUBLESHOOTING
(Tuner Section)
÷ Reception is noisy.
* Try adjusting the antenna.
* Is there a TV set or computer device near the unit?
(Timer Section)
÷ Timer operation does not start.
* Is the current time set correctly?
* Is the timer mode indicator ( ) displayed?
(Remote Control)
÷ Remote control is impossible.
* Are the batteries in the remote control exhausted?
* Is the remote sensor section exposed to bright light (direct sunlight,
etc.)?
Notes:
÷ When the above remedies do not help
Many operations of this unit are performed by the control of a
microprocessor. If none of the buttons function, unplug the power cord
and remove all the batteries, wait for a while, then load the batteries
again and plug it back in. Reset the correct values for the clock and
timer.
÷ Before making an important recording, be sure to make a test recording
first to check that the deck, etc. is working correctly.
What appears to be trouble is not always serious. First make sure....
÷ Power cannot be turned on.
*Is the power cord unplugged?
÷ No sound from the speakers.
*Are headphones connected?
÷ Clock time is blinking in the display.
* Was there a power failure?
* Was the power cord unplugged while the memory back-up batteries
were not installed?
(CD Player Section)
÷ The CD player does not play.
*Is the CD upside down?
*Is the CD dirty?
* Is there condensation on the lens? (See “Cleaning the lens” on page 26.)
÷ A certain portion of the CD does not play correctly.
*Is the CD scratched?
* Is there condensation on the lens?
÷ Operation stops.
*Switch to STANDBY and then to ON again.
(Cassette Deck Section)
÷ Playback sound is at a very low level.
*Is the head dirty?
÷ The ONE TOUCH REC button does not function.
*Have the safety tabs of the cassette been broken off?
SPECIFICATIONS
CD player section
Type : Compact disc player
Signal detection
system : Non-contact optical pickup
Number of channels : 2 channels
Frequency response : 20 Hz - 20,000 Hz
Signal-to-noise ratio : 90 dB
Wow & flutter : Less than measurable limit
Radio section
Frequency range : FM 87.5 - 108 MHz
AM: (MW) 522 - 1,629 kHz
(LW) 144-288 kHz
Antennas : Telescopic antenna for FM
Ferrite core antenna for AM (MW/LW)
Tape deck section
Track system : 4-track 2-channel stereo
Motor : Electronic governor DC motor for capstan
Heads : Hard permalloy head for recording/playback, 2 gap ferrite
head for erasure (Combination head)
Frequency response : 60 - 14,000 Hz
(with CrO
2 tape)
Wow & flutter : 0.15% (WRMS)
Fast wind time : Approx. 150 sec (C-60 cassette)
General
Speakers
(Impedance) Full range: 10 cm x 2 (4 Ω)
Power output : (Max.)
26 W (13 W +13 W) at 4 Ω
(10% THD)
20 W (10 W + 10 W) at 4 Ω
Input terminals : AUX IN (300 mV/47 kΩ)
Output terminals : PHONES (Output level: 0 - 12 mW/ch, 32 Ω, Matching
impedance: 16 Ω - 1 kΩ)
Power requirements : AC 230 V, 50 Hz
DC 12 V (“R20/D (13F)” batteries x 8)
Ext. DC 12 V (car battery via optional CA-R120E car
adapter)
Power consumption : 27 W (with
SW ON)
3.0 W (with
SW STANDBY)
Dimensions : 541 (W) x 215 (H) x 259 (D) mm, including knobs
Mass : RV-B55 GY/BU
6.2 kg (without batteries)
7.1 kg (with batteries)
RV-B55 LTD
6.3 kg (without batteries)
7.2 kg (with batteries)
Accessories provided : AC power cord x 1
Remote control unit (RM-RXVB55E) x 1
R6/AA (15F) batteries x 2
Shoulder strap x 1
Design and specifications are subject to change without notice.
Page 28

VICTOR COMPANY OF JAPAN, LIMITED
0399MNMUIAJEIN
EN
 Loading...