

Page 1
CD PORTABLE SYSTEM
SISTEMA PORTATIL CON CD
CHAINE PORTABLE A CD
RC-BZ6BU
REMOTE CONTROL RM-SRCBZ6
INSTRUCTIONS
MANUAL DE INSTRUCCIONES
MANUEL D’INSTRUCTIONS
For Customer Use:
Enter below the Model No. and Serial No.
which are located either on the rear, bottom or side of the cabinet. Retain this
information for future reference.
Model No.
Serial No.
LVT0490-001B
[J]
Page 2
Warnings, Cautions and Others
AVERTISSEMENT:
POUR REDUIRE LES RISQUES
D’INCENDIE OU D’ELECTROCUTION,
NE PAS EXPOSER L’APPAREIL A LA
PLUIE OU A L’HUMIDITE.
WARNING:
TO REDUCE THE RISK OF FIRE OR
ELECTRIC SHOCK, DO NOT EXPOSE
THIS APPLIANCE TO RAIN OR MOISTURE.
CAUTION
RISK OF ELECTRIC
SHOCK
CAUTION “TO REDUCE THE RISK OF ELECTRIC
SHOCK DO NOT REMOVE COVER (OR BACK)
NO USER SERVICEABLE PARTS INSIDE
REFER SERVICING TO QULIFIED SERVICE PERSONNEL.”
INFORMATION (For U.S.A)
This equipment has been tested and found to
comply with the limits for a Class B digital
device, pursuant to Part 15 of the FCC Rules.
These limits are designed to provide reasonable
protection against harmful interference in a residential installation. This equipment generates,
uses, and can radiate radio frequency energy
and, if not installed and used in accordance with
the instructions, may cause harmful interference to radio communications. However, there
is no guarantee that interference will not occur
in a particular installation. If this equipment
does cause harmful interference to radio or television reception, which can be determined by
turning the equipment off and on, the user is
encouraged to try to correct the interference by
one or more of the following measures:
– Reorient or relocate the receiving antenna.
– Increase the separation between the equip-
ment and receiver.
– Connect the equipment into an outlet on a
circuit different from that to which the
receiver is connected.
– Consult the dealer or an experienced radio/
TV technician for help.
ADVERTENCIA:
PARA EVITAR RIESGOS DE INCENDIOS O ELECTROCUCIONES, NO
EXPONGA ESTE APARATO A LA LLUVIA O A LA HUMEDAD.
The lightning flash with arrowhead symbol, within an equilateral triangle is intended to aler t the user to the presence of
uninsulated “dangerous voltage” within the product’s enclosure that may be of sufficient magnitude to constitute a risk
of electric shock to persons.
The exclamation point within an equilateral triangle is
intended to alert the user to the presence of important operation and maintenance (servicing) instr uctions in the literature accompanying the appliance.
IMPORTANT FOR LASER PRODUCTS
(For U.S.A only)
PRECAUTIONS
1 CLASS 1 LASER PRODUCT
DANGER:
2
and interlock falled or defeated. Avoid direct
exposure to beam.
CAUTION:
3
are no user serviceable parts inside the unit;
leave all servicing to qualified service personnel.
CAUTION:
4
ible laser radiation and is equipped with safety
switches which prevent the emission of radiation when the CD tray is open. It is dangero us to
defeat the safety switches.
CAUTION:
5
the performance of procedures other than those
specified herein may result in exposure to hazardous radiation.
Invisible laser radiation when open
Do not open the rear cover. There
The compact disc player uses invis-
Use of controls for adjustments and
Caution - POWER switch
Disconnect the mains plug to shut the power off
completely. The POWER switch in any position does
not disconnect the mains line. The power can be
remote controlled.
Attention - Commutateur POWER!
Déconnecter la fiche de secteur poru couper complètement le courant. Le commutateur POWER ne
coupe jamais complètement la ligne de secteur,
quelle que soit sa position. Le courant pe ut êt re t élécommandé.
!
G-1
(For CANADA)
CAUTION
TO PREVENT ELECTRIC SHOCK, MATCH
WIDE BLADE OF PLUG TO WIDE SLOT,
FULLY INSERT.
For Canada/pour le Canada
THIS DIGITAL APPARATUS DOES NOT EXCEED THE CLASS B LIMITS FOR
RADIO NOISE EMISSIONS FROM DIGITAL APPARATUS AS SET OUT IN THE
INTERRFERENCE-CAUSIING EQUIPMENT STANDARD ENTITLED “DIGITAL
APPARATUS,” ICES-003 OF THE DEPARTMENT OF COMMUNICATIONS.
CET APPAREIL NUMERIQUE RESPECTE LES LIMITES DE BRUITS RADIOELECTRIQUES APPLICABLES AUX APPAREILS NUMERIQUES DE CLASSE B
PRESCRITES DANS LA NORME SUR LE MATAERIEL BROUILLEUR: “APPAREILS NUMERIQUES”, NMB-003 EDICTEE PAR LE MINISTRE DES COMMUNICATIONS.
(Pour le CANADA)
PRECAUTION
POUR EVITER LES CHOCS ELECTRIQUES, INTRODUIRE LA LAME LA
PLUS LARGE DE LA
FICHEDANSLABORNE CORRESPONDANTE DE LA PRISE ET POUSSER
JUSQU’AU FOND.
Page 3

Thank you for purchasing the JVC CD Portable System.
We hope it will be a valued addition to your home as well as to your outdoor life, giving you years of enjoyment.
Be sure to read this instruction manual carefully before operating your new stereo system.
In it you will find all the information you need to set up and use the system.
If you have a query that is not answered by the manual, please contact your dealer.
Features
Here are some of the things that make your System both powerful and simple to use.
■ The controls and operations have been redesigned to make them very easy to use, freeing you to just enjoy the music.
• With JVC’s COMPU PLAY you can turn on the System and automatically start the Radio, CD Player, or Cas-
sette Deck with a single touch. (When power is supplied from AC)
■ Sound effects; BEAT, POP, and CLEAR.
■ The System incorporates AHB (Active Hyper Bass) PRO circuitry to faithfully reproduce low frequency sounds.
■ A 30-station preset capability (15 FM and 15 AM) in addition to auto-seek and manual tuning.
■ A user-friendly timer lets you wake or fall asleep to music.
How This Manual Is Organized
• Basic information that is the same for many different functions - e.g. setting the volume - is given in the section ‘Common Operations’,
and not repeated under each function.
• The names of buttons/controls are written in all capital letters: e.g. TUNER BAND.
• System functions are written with an initial capital letter only: e.g. Normal Play.
Use the table of contents to look up specific information you require.
We’ve enjoyed making this manual for you, and hope it serves you in enjoying the many features built into your System.
IMPORTANT CAUTIONS
English
1.When carrying the Unit
■
• Do not raise or lower the carrying handle of the Unit with the telescopic antenna extended in order to avoid damaging the antenna.
2.Where to place the Unit
■
• Select a place which is level, dry and neither too hot nor too cold (between 5°C/41°F and 35°C/95°F).
• Leave sufficient distance between the Unit and a TV.
• Do not use the Unit in a place subject to vibrations.
3.Power cord
■
• Do not handle the power cord with wet hands!
• Some power (2.8 W) is always consumed as long as the power cord is connected to the wall outlet.
• When unplugging the Unit from the wall outlet, always pull the plug, not the power cord.
4.Malfunctions, etc.
■
• There are no user serviceable parts inside. In case of system failure, unplug the power cord and consult your dealer.
• Do not insert any metallic object into the System.
■■
Features ............................................................................... 1
How This Manual Is Organized ..........................................1
IMPORTANT CAUTIONS ................................................1
Table of Contents
Care And Maintenance ......................................... 11
Troubleshooting .................................................... 12
Getting Started ..................... ... .... ... ..........................2
Common Operations ................................................3
Using the Tuner ........................................................5
Using the CD Player .................................................6
Using the Cassette Deck (Listening to a Tape) ....7
Using the Cassette Deck (Recording) ...... ... ... .... ...8
Using the Timers ..... .... .............................................9
Specifications .................................... .................... 12
1
Page 4
■■
Getting Started
English
Accessories
Check that you have all of the following items, which are supplied with the System.
Power Cord (1)
Remote Control (1)
If any of these items are missing, contact your dealer immediately.
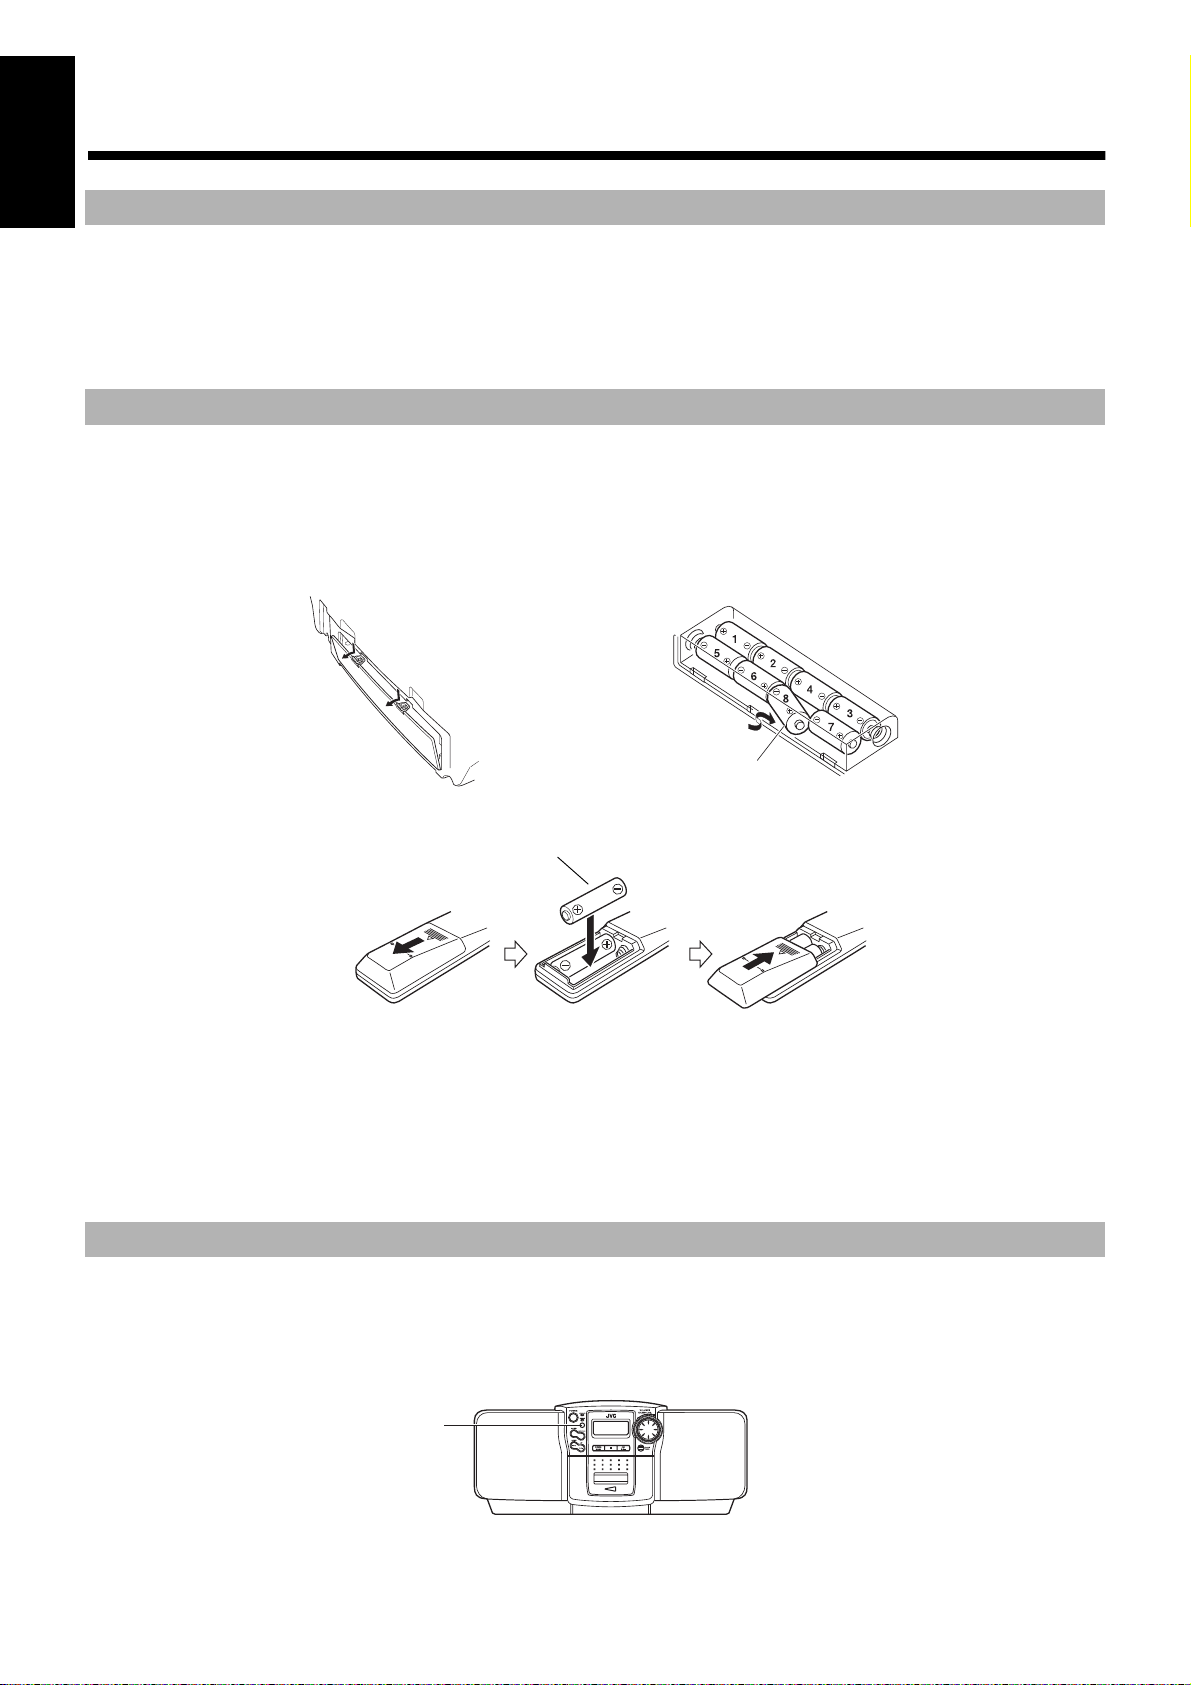
How To Put Batteries
How To Put Batteries In the Unit
1. Open the battery cover on the back of the Unit by pulling it toward you while pressing the tabs as shown by the arrows.
2. Put 8 batteries (not supplied) in the battery compartment in the order of “1” to “8” as shown.
3. Securely close the battery cover.
Note: When you operate your Unit on mains (AC) power, the power source switches automatically from batteries to AC. However, you should
remove the batteries when operating on AC power.
“R20/D (13F)” size batteries
How To Put Batteries In the Remote Control
Match the polarity (+ and –) on the batteries with the + and – markings in the battery compartment.
R6P(SUM-3)/AA(15F) (not supplied)
CAUTION: Handle batteries properly.
To avoid battery leakage or explosion:
• Remove batteries when the Unit or the Remote Control will not be used for a long time.
• When you need to replace the batteries, replace batteries at the same time with new ones.
• Do not use an old battery with new ones.
• Do not use different types of batteries together.
• Do not try to recharge non-rechargeable batteries.
Using the Remote Control
The Remote Control makes it easy to use many of the functions of the Unit from a distance of up to 7m (23 feet) away.
You need to point the Remote Control at the remote sensor on the Unit’s front panel.
Note: If you point the Remote Control from the slant direction, the above distance will be shortened.
2
Remote sensor
Page 5
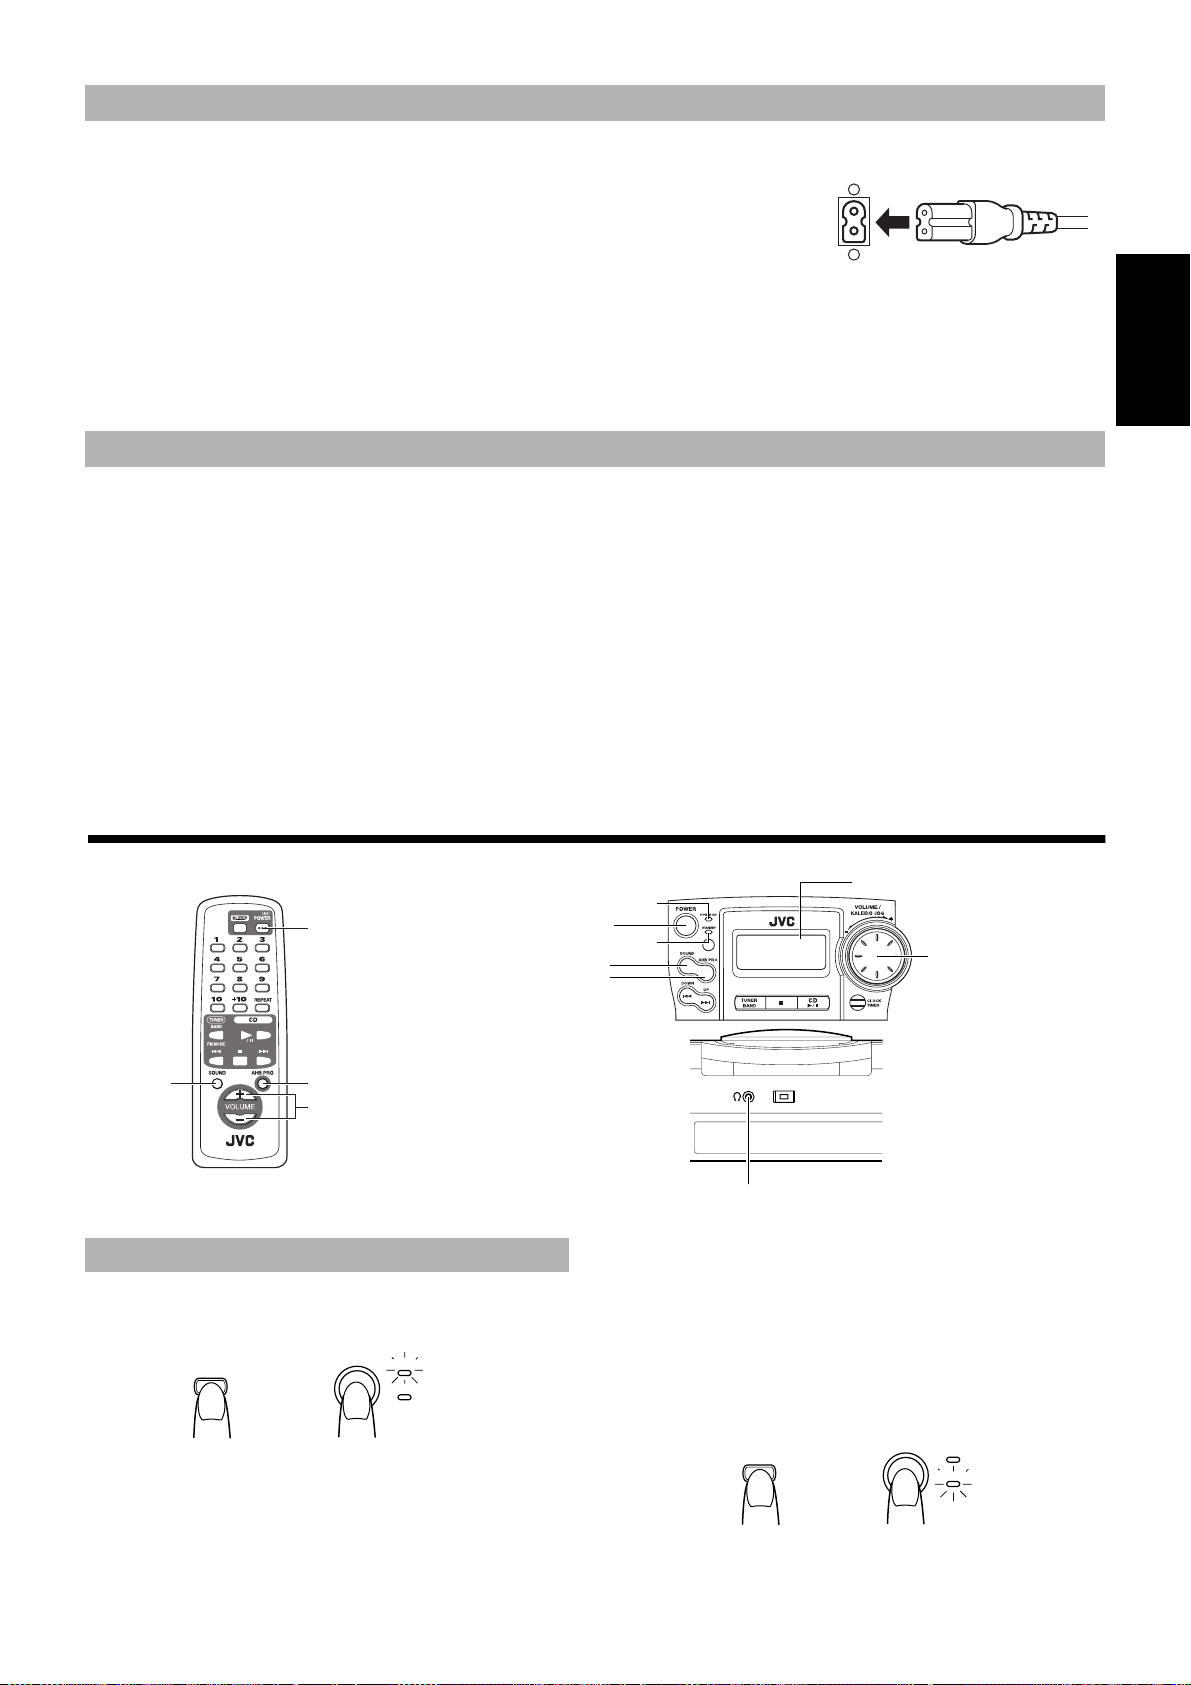
Connecting the AC Power Cord
PHONES
BEAT CUT
NORM-123
...
POWER
STANDBY
POWER ON
POWER
(AC)
or
Firmly insert the AC power cord supplied with the System into the AC inlet on the back of the Unit.
The provided AC power cord for this unit has certain one-way direction connections to prevent electric shock. Refer to the illustration for correct connection.
CAUTIONS:
• ONLY USE THE JVC POWER CORD PROVIDED WITH THIS SYSTEM IN
ORDER TO AVOID MALFUNCTION OR DAMAGE TO THE SYSTEM.
• BE SURE TO UNPLUG THE POWER CORD FROM THE OUTLET WHEN
GOING OUT OR WHEN THE SYSTEM IS NOT IN USE FOR AN EXTENDED PERIOD OF TIME.
Plug the AC power cord into the wall outlet, and your System is at your command!
COMPU PLAY (AC power only)
JVC’s COMPU PLAY feature lets you control the most frequently used System functions with a single touch.
With One Touch Operation you can play a CD or tape, or turn on the radio, with a single press of the play button for that function. On e Touch
Operation turns the power on for you, then starts the function you have specified. If the System is not ready (no CD in place), the System still
powers on so you can insert a CD.
How One Touch Operation works in each case is explained in the section dealing with that function.
The COMPU PLAY buttons are:
English
On the Unit
CD 6 button
TUNER BAND button
PLAY (TAPE) button
■■
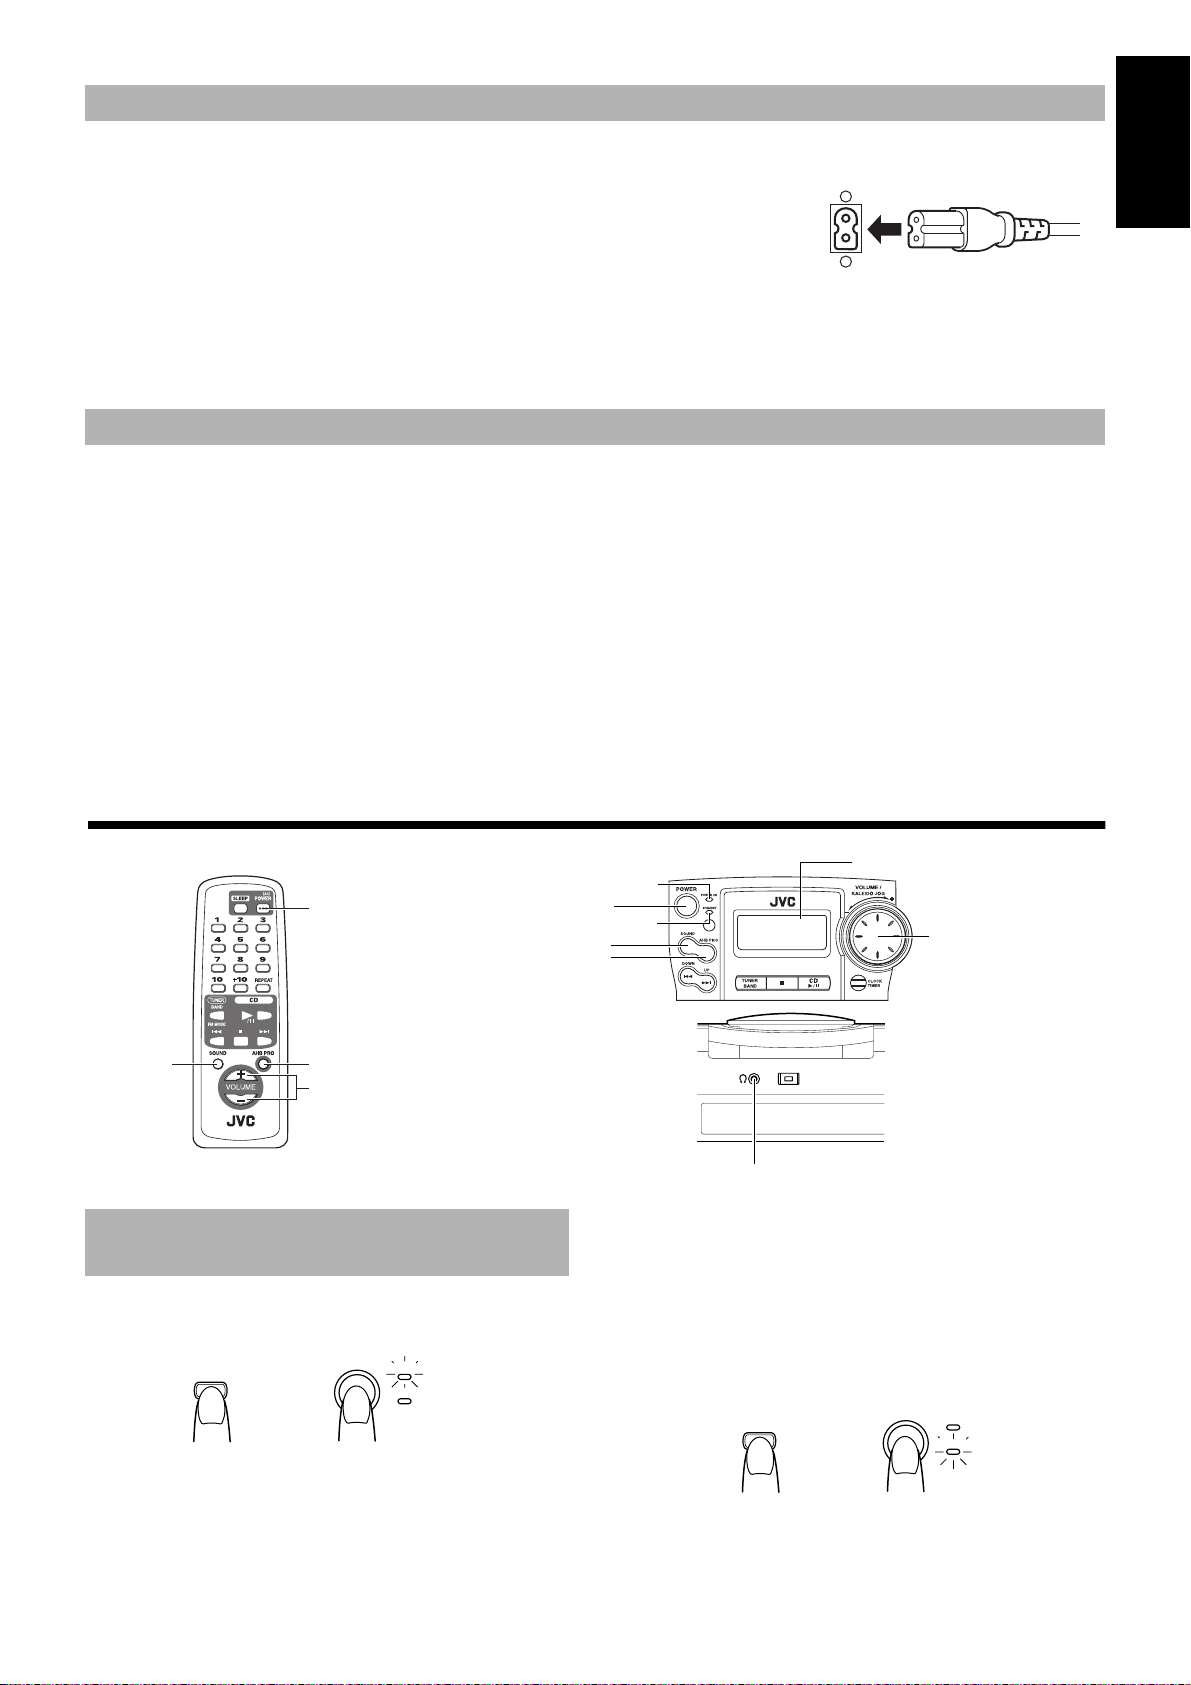
SOUND
Common Operations
REMOTE CONTROL RM-SRCBZ6
On the Remote Control
CD 6 button
TUNER BAND button
POWER
AHB PRO
VOLUME +, –
STANDBY indicator
Turning the Power On and
Sandby
Turning the Unit On ————————
Press the POWER button.
(AC)
POWER
POWER
POWER ON
or
STANDBY
POWER indicator
POWER
SOUND
AHB PRO
■ If you were listening to the Tuner last, the Tuner comes on play-
Note: When power is supplied from the batteries, the POWER but-
Turning the Unit Standby ——————
Press the POWER button again.
When operating on AC power:
Display
VOLUME control
PHONES
ing the station it was last set to.
ton on the Remote Control does not work.
The POWER ON indicator (green) lights up and the display comes
on.
The Unit comes on ready to continue in the mode it was in when the
power was last turned off.
■ For example, if the last thing you were doing was listening to a
CD, you are now ready to listen to a CD again. If you wish, you
can change to another source.
The STANDBY indicator lights up and the display is blank.
■ When in Standby mode, the Unit continues to a small amount of
power (2.8 W) to run the display.
■ To switch off the Unit completely, unplug the AC power cord
from the AC outlet.
3
Page 6
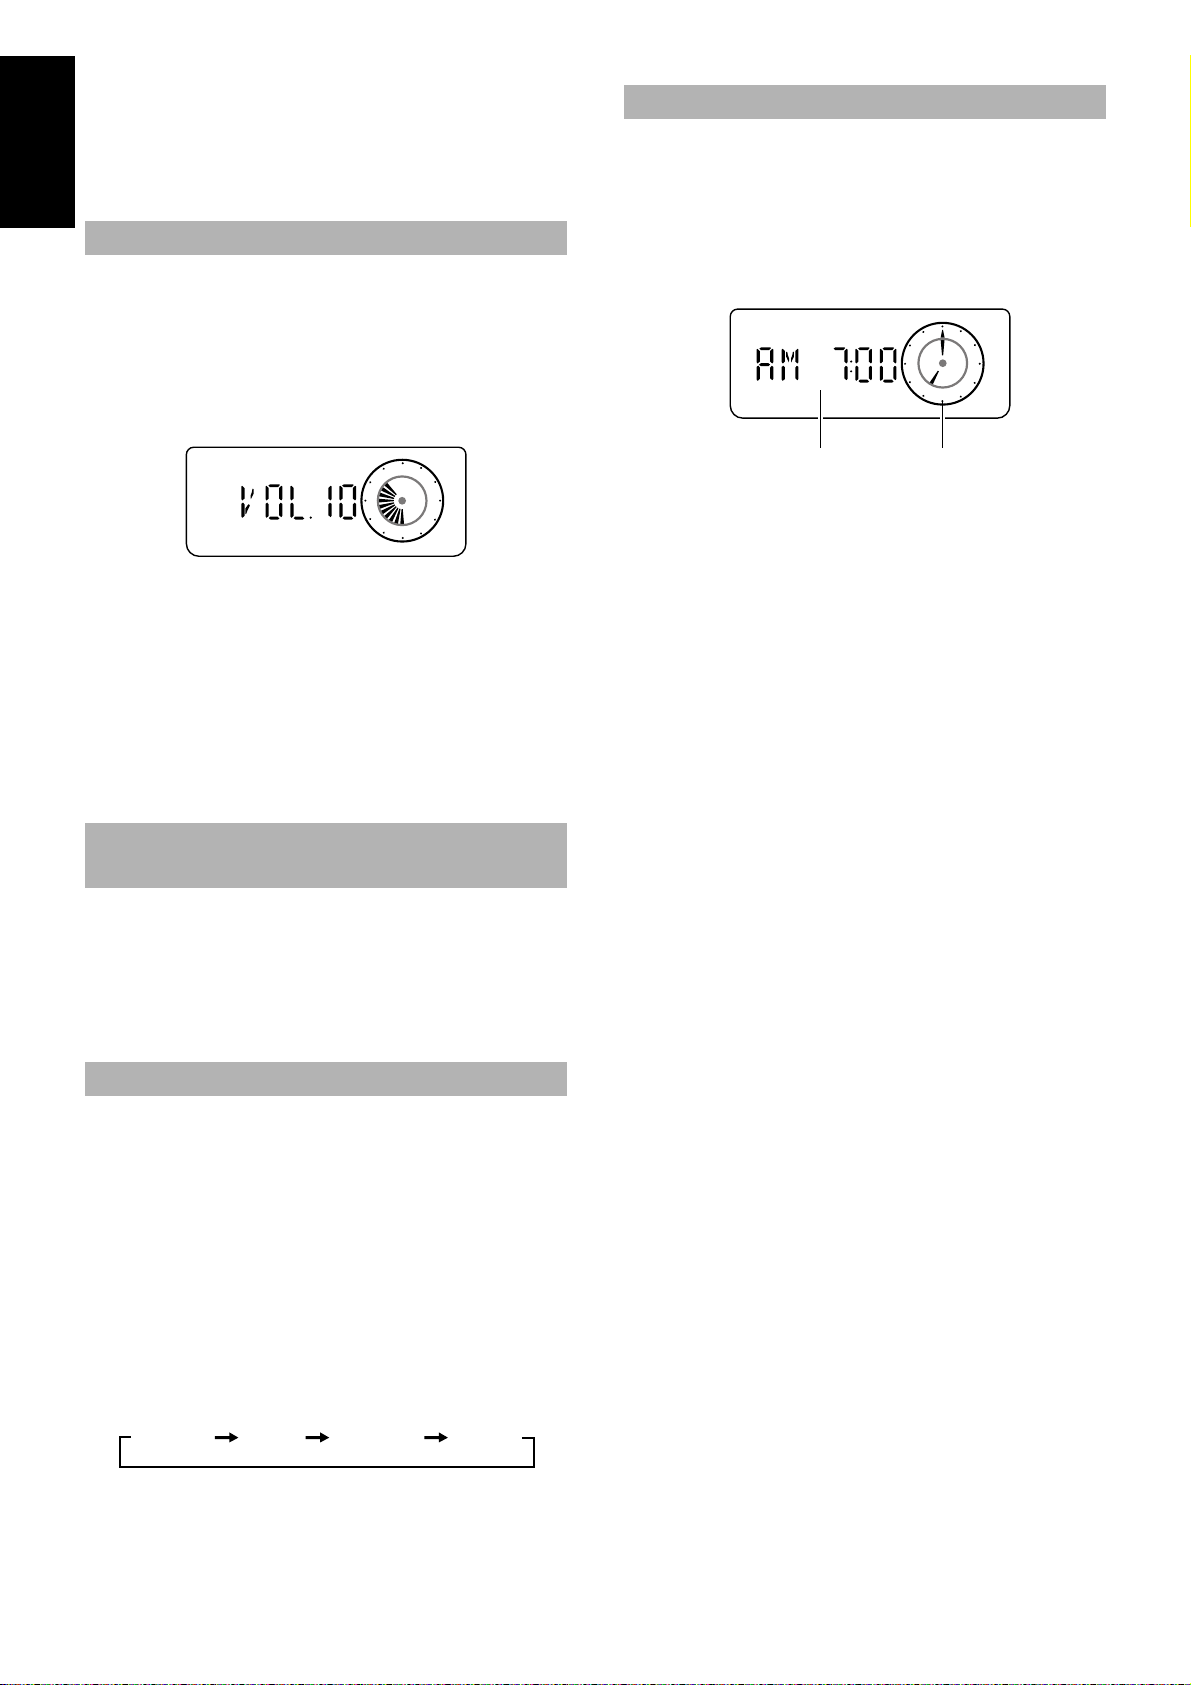
When power is supplied from the batteries:
Digital clock Analog clock
When the Unit is turned off with the POWER button on the Unit
(the POWER button on the Remote Control is ineffective), the
Standby indicator goes out and the display is blank.
English
To switch off the Unit completely, remove the batteries from the
Unit.
Adjusting the Volume
You can adjust the volume level between 0 and 25 when the Unit is
turned on.
Turn the VOLUME control on the Unit to the right or left to increase or decrease the volume level.
OR
Press the VOLUME + or – button on the Remote Control to increase
or decrease the volume level.
CAUTION: DO NOT turn on the Unit and/or start
playing any source without first setting the
VOLUME control to 0, as a sudden blast of sound
can damage your hearing, speakers and/or headphones.
Showing the Time (DISPLAY)
In standby mode, both a digital and an analogue are displayed.
In Standby mode, both clocks are displayed on the display.
When the Unit is turned on, the analogue clock only is displayed.
To display both clocks while the Unit is turned on, press
the CLOCK/TIMER button on the Unit.
To return to the original display, press the CLOCK/TIMER
button on the Unit once again.
Note: You need to set the clock first in order for it to work. (See
“Setting the Clock” on page 9.)
For private listening
Connect a pair of headphones to the PHONES jack. No sound
comes out of the speakers.
Be sure to turn down the volume before connecting or putting on
headphones.
Reinforcing the Bass Sound
(AHB PRO)
You can reinforce the bass sound to maintain rich, full bass at low
volume (you can use this effect only for playback):
To get the effect, press the AHB (Active Hyper Bass) PRO
button.
The “AHB PRO” indicator lights up on the display.
To cancel the effect, press the button again.
The “AHB PRO” indicator goes out.
Sound Effects (SOUND)
The System has the following preset sound effects that give you
control over the way your music sounds, so you can tailor it to the
acoustics of your room and the quality of your source. Test the
sound effects out to hear how each affects the music. Note that the
effects work only during playback.
Sound effects
FLAT: No sound effect.
BEAT: Boosts low and high frequencies.
POP: Good for vocal music.
CLEAR: For a wide, dynamic stereo sound.
To get an effect, press the SOUND button repeatedly until the
Sound mode you want appears on the display.
Each time you press the SOUND button, the display changes as
shown below:
FLATBEAT POP CLEAR
To cancel the effect, press the SOUND button until “FLAT” appears on the display.
4
Page 7
■■
For FM
For AM
Number keys
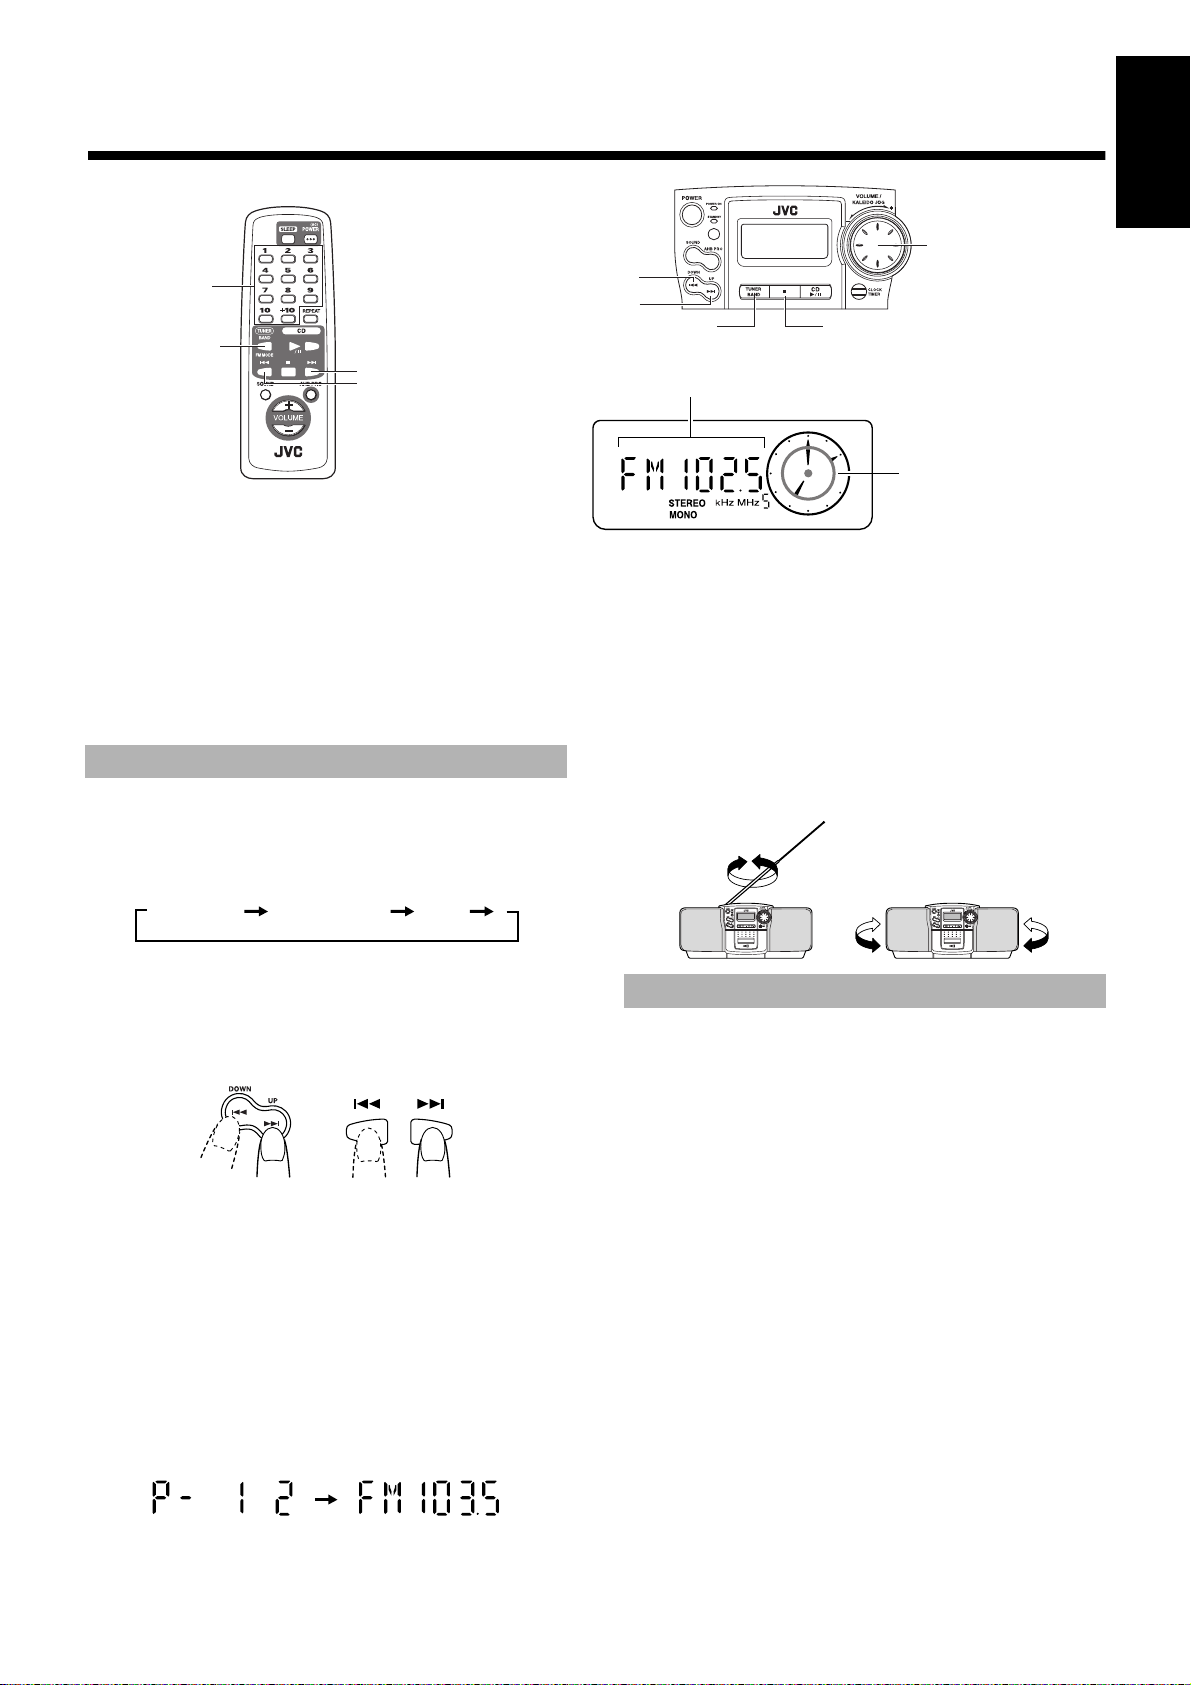
TUNER BAND
Using the Tuner
¢
4
Band display, Frequency display, Preset channel
4
¢
TUNER BAND
English
JOG dial
PRESET
REMOTE CONTROL RM-SRCBZ6
You can listen to FM and AM stations. Stations can be tuned in
manually, automatically, or from preset memory storage.
One Touch Radio (AC power only)—
Just press the TUNER BAND button to turn on the Unit and start
playing the station you were last tuned to.
■ You can also switch from any other sound source to the radio by
pressing the TUNER BAND button.
Tuning In a Station
1.Press the TUNER BAND button.
■
The Band and Frequency you were last tuned to appear on the
display.
Each time you press the button, the band changes as follows:
FM Auto FM MONO AM
2.Select a station using one of the following
■
methods.
■ Manual Tuning
Press the 4 or ¢ button repeatedly to move from frequency
to frequency until you find the station you want.
or
Analog clock
(Display when using the Tuner)
■ Preset Tuning using the Remote Control (Possible
only after presetting stations)
Select the station by entering its preset number on the number
keys.
• Example:For channel 5, press 5. For channel 15, press +10
then 5.
• The band and the frequency are displayed.
3.Turn the antenna for best reception.
■
• For FM broadcast, extend and turn the telescopic antenna.
• For AM broadcast, turn the Unit itself.
Presetting Stations
You can preset up to 15 FM stations and up to 15 AM stations into
memory using the Remote Control.
Auto Presetting (Using the Unit) ——
In each band, you can automatically preset FM-15, AM-15 stations.
Preset numbers will be allocated as stations are found, starting from
the station currently tuned to and moving up the frequency.
OR
■ Auto Tuning
If you press and hold the 4 or ¢ button for one second or
more, the frequency changes down, or up, automatically until a
station is found.
OR
■ Preset Tuning using the Unit (Possible only after pre-
setting stations)
Press the 7 PRESET button to select the preset station.
After you have selected the preset number, the band and the frequency are displayed.
• Example:Press the 7 PRESET button until the preset
number 12 “P- 12” appears.
OR
1.Select a band (AM or FM) by pressing the
■
TUNER BAND button.
2.Press the 7 PRESET button for more than
■
two seconds.
3.Repeat steps 1-2 for the other band.
■
■ If you want to change any of the auto preset stations, follow the
procedure for Manual Presetting.
CAUTION: If the Unit is unplugged or if a power
failure occurs, the preset stations will be erased
after approx. five minutes. If this happens, you
will need to preset the stations again.
5
Page 8
Manual Presetting (Using the Re-
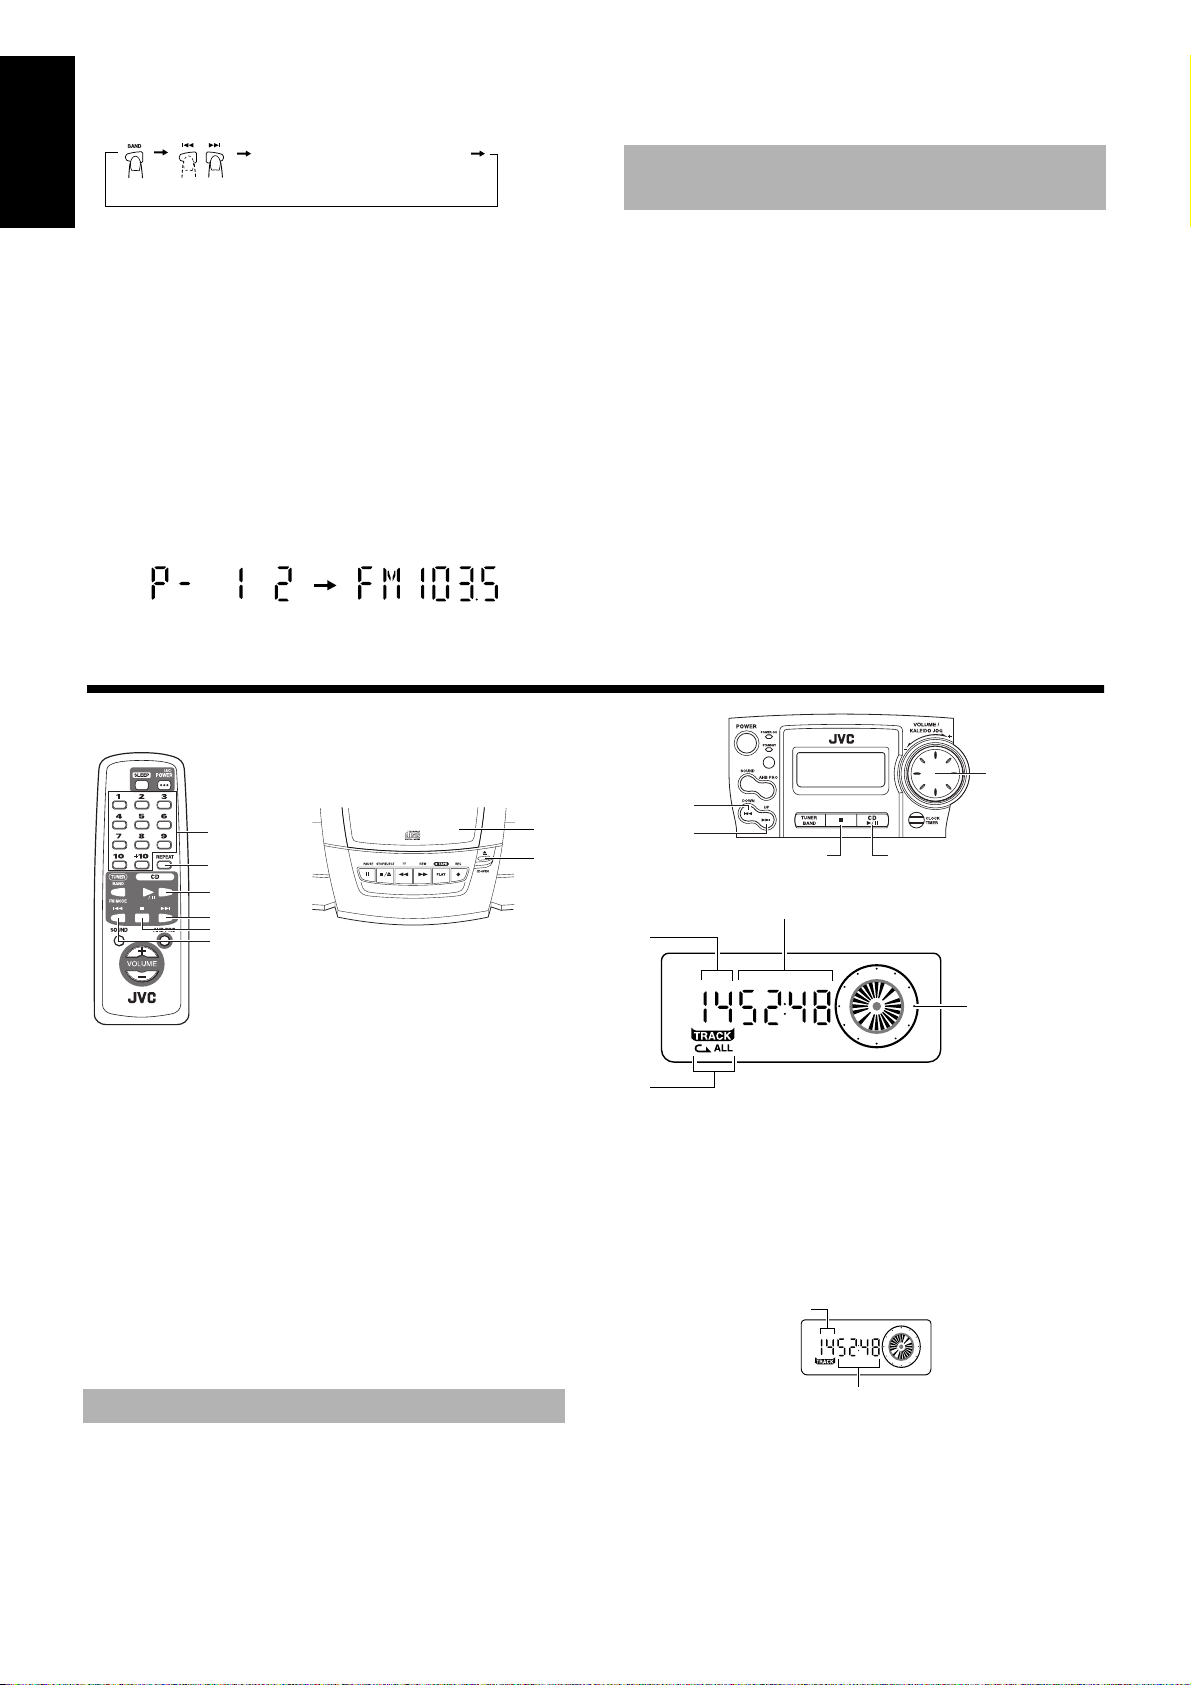
Playback time elapsed
Total number of tracks
mote Control) ———————————
Number key(s) (hold for 2 seconds)
English
1.Select a band by pressing the TUNER
■
BAND button.
2. Press the 4 or ¢ button to tune in a station.
■
3. Set the preset number by pressing and ho ld-
■
ing the number key on the Remote Contr ol.
• To preset numbers 1 to 10: Press the number key and hold
down for 2 seconds.
• To preset numbers 11 to 15: Press and release the +10 but-
ton, then press the second number key (1 to 5) and hold
down for 2 seconds.
When the preset display blinks, the setting is stored and you can
release the number key. The display returns to the normal band
and frequency display.
Example: Preset number = 12
4.Repeat steps 1 - 3 for each station.
■
To change the preset stations, repeat the same steps as above.
To Change the FM
Reception Mode
The “STEREO” indicator lights up and you can hear stereo effects,
when a program is broadcast in stereo.
However if an FM stereo broadcast is hard to receive or noisy, you
can select Monaural mode. Reception improves, but you lose any
stereo effect.
Press the TUNER BAND button to select FM
MONO mode.
The “MONO” indicator lights up on the display.
To restore the stereo effect, press the TUNER BAND button
to select FM Auto mode. The “MONO” indicator goes out.
■■
REMOTE CONTROL RM-SRCBZ6
You can use Normal or Repeat Play. Repeat Play can be set to repeat
all or just one of the tracks on the CD.
Using the CD Player
Number keys
REPEAT
/8
¢
7
4
CD holder
CD OPEN
One Touch CD Player
(AC power only) ——————————
Just press the CD 6 button.
■
• The power is automatically turned on. If a CD is already
inserted, “PLAY” is displayed and the CD will start playing from the first track.
• If no CD is inserted, “NO DISC” is displayed on the display and the CD Player remains in Stop mode.
Track number
Repeat indicator
The first track of the CD begins playing.
The CD Player automatically stops when the last track of the CD has
finished playing.
• During playback, the track number being played and the play-
To stop playing the CD, press the
The following information for the CD is displayed.
4
¢
7
Playing time, Preset number
(Display when using the CD Player)
back time elapsed are shown on the display.
6
7 button.
JOG dial
CD indicator/
Analog clock
Normal Play
1. Press the CD OPEN button on the Unit.
■
The CD holder opens.
2. Place a CD, with its label side up.
■
3. Gently close the CD holder by hand.
■
4. Press the CD 6 button.
■
6
To pause, press the CD
To cancel pause, press the CD
the point where it was paused.
Notes:
• You can place an 8 cm (3'') CD without an adaptor.
• If the CD cannot be read correctly (because it is scratched, for
example), “000000” appears on the display.
• Even if other function is selected during playing the CD, the
last track is memorized.
6.
6 again. Play continues from
Page 9
Skip Play (4 or ¢)————————
During playback, press the 4 or ¢ button to select the
track you want.
The selected track starts playing.
¢
• Press and release the
time.
• Press and release the
button to go forward one track at a
4
button to go back one track at a time.
Search Play ————————————
During playback, hold down the 4 or ¢ button.
This operation will fast forward/backwards the CD so you can
quickly find a particular passage in the track you are listening to (the
CD is played slowly for a moment and then the playback speed increases).
Locating a Track directly with the
Remote Control ——————————
Using the number keys on the Remote Control allows you can go
directly to the beginning of any track.
During playback, enter the number of the track you want
to listen to using the number keys.
The selected track starts playing.
• Example: For track 5, press 5. For track 15, press +10 then 5.
For track 20, press +10, then 10. For track 32, press +10 three
times, then 2.
Repeat Play
You can repeat one track or all the tracks on a CD.
During, or before playback, press the REPEAT butt on on
the Remote Control to select the Repeat mode.
The Repeat indicator changes with each press of the button, as
shown below.
=
ALL =blank display = (back to the beginning)
: Repeats one track.
ALL : Repeats all the tracks.
To exit Repeat mode, press the REPEAT button until the Repeat
indicator on the display goes out.
English
■■
The Cassette Deck allows you to play and record audio tapes
Notes:
• The Cassette Deck performs best with normal tapes (metal or
CrO
• The use of tapes longer than 120 minutes is not recommended,
since characteristic deterioration may occur and these tapes
easily jam in the pinch-roller and the capstan.
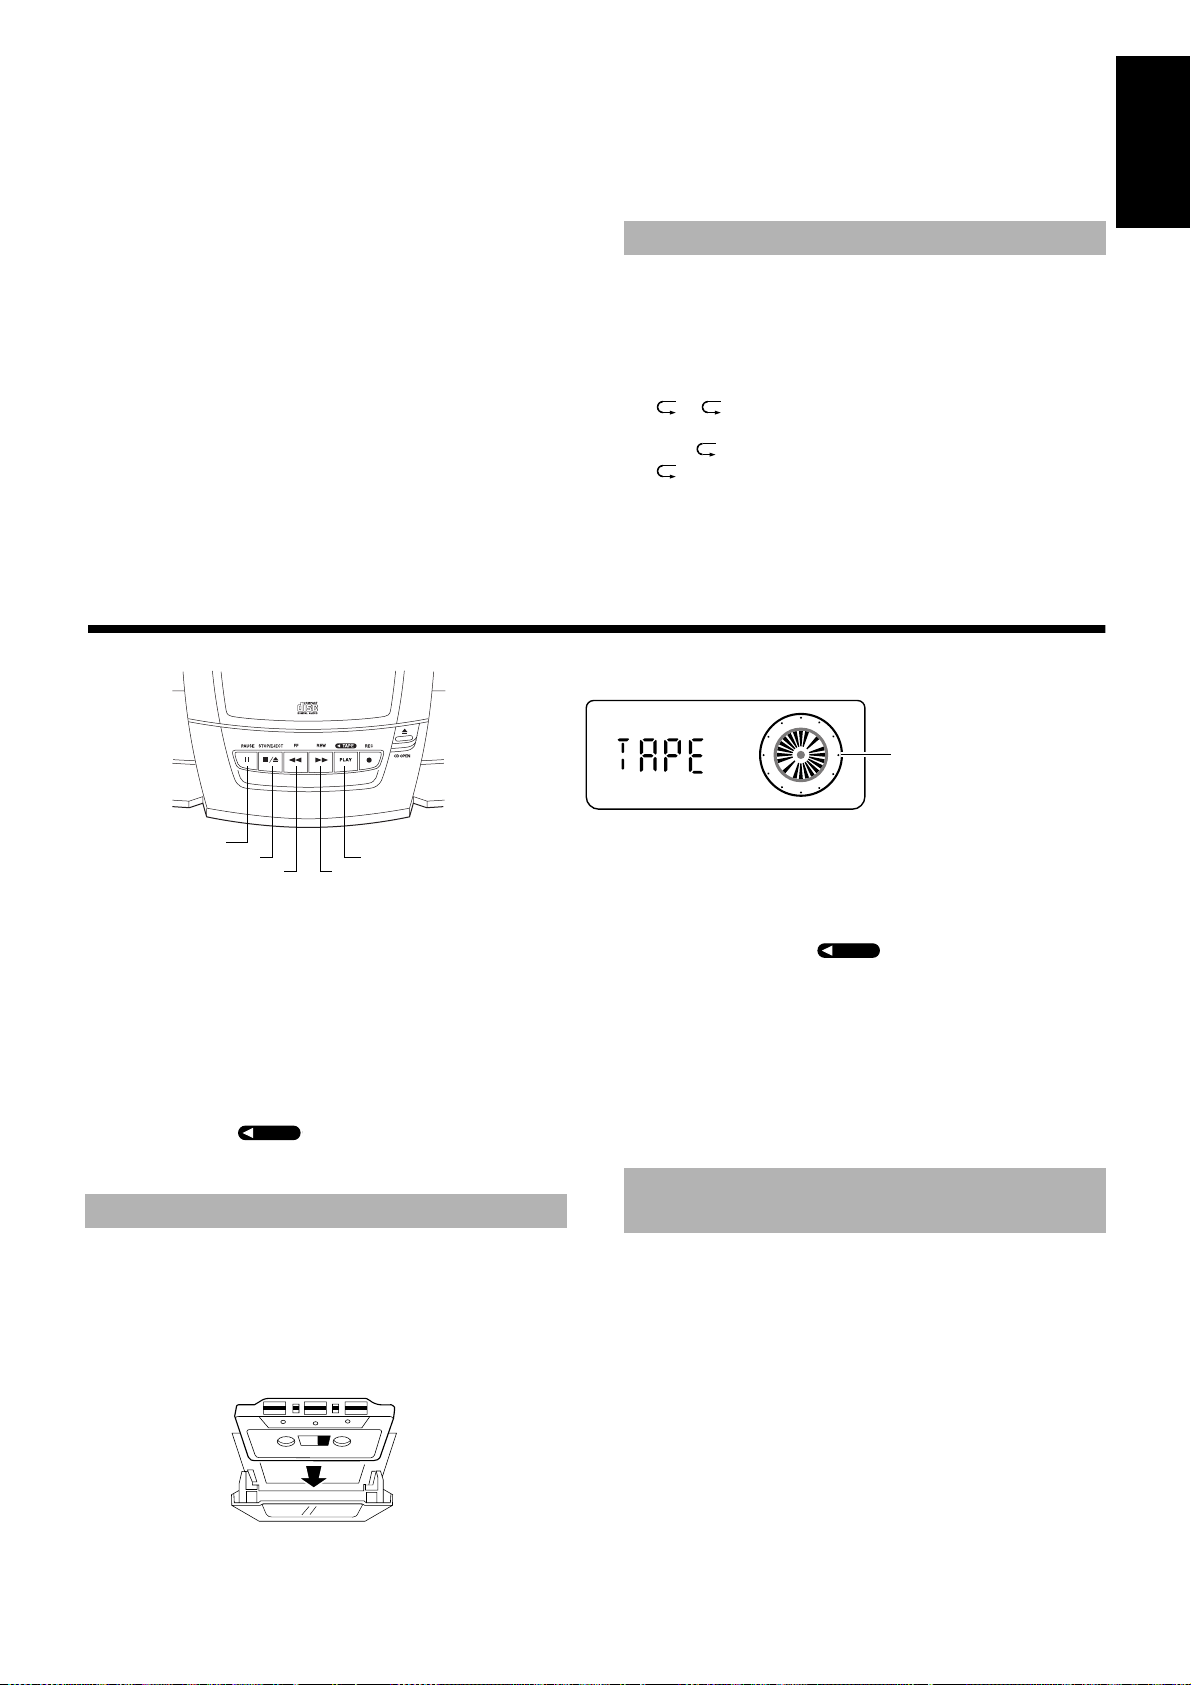
Using the Cassette Deck
8
§
1
tapes are not recommended).
2
PLAY
¡
One Touch Play (AC power only) —
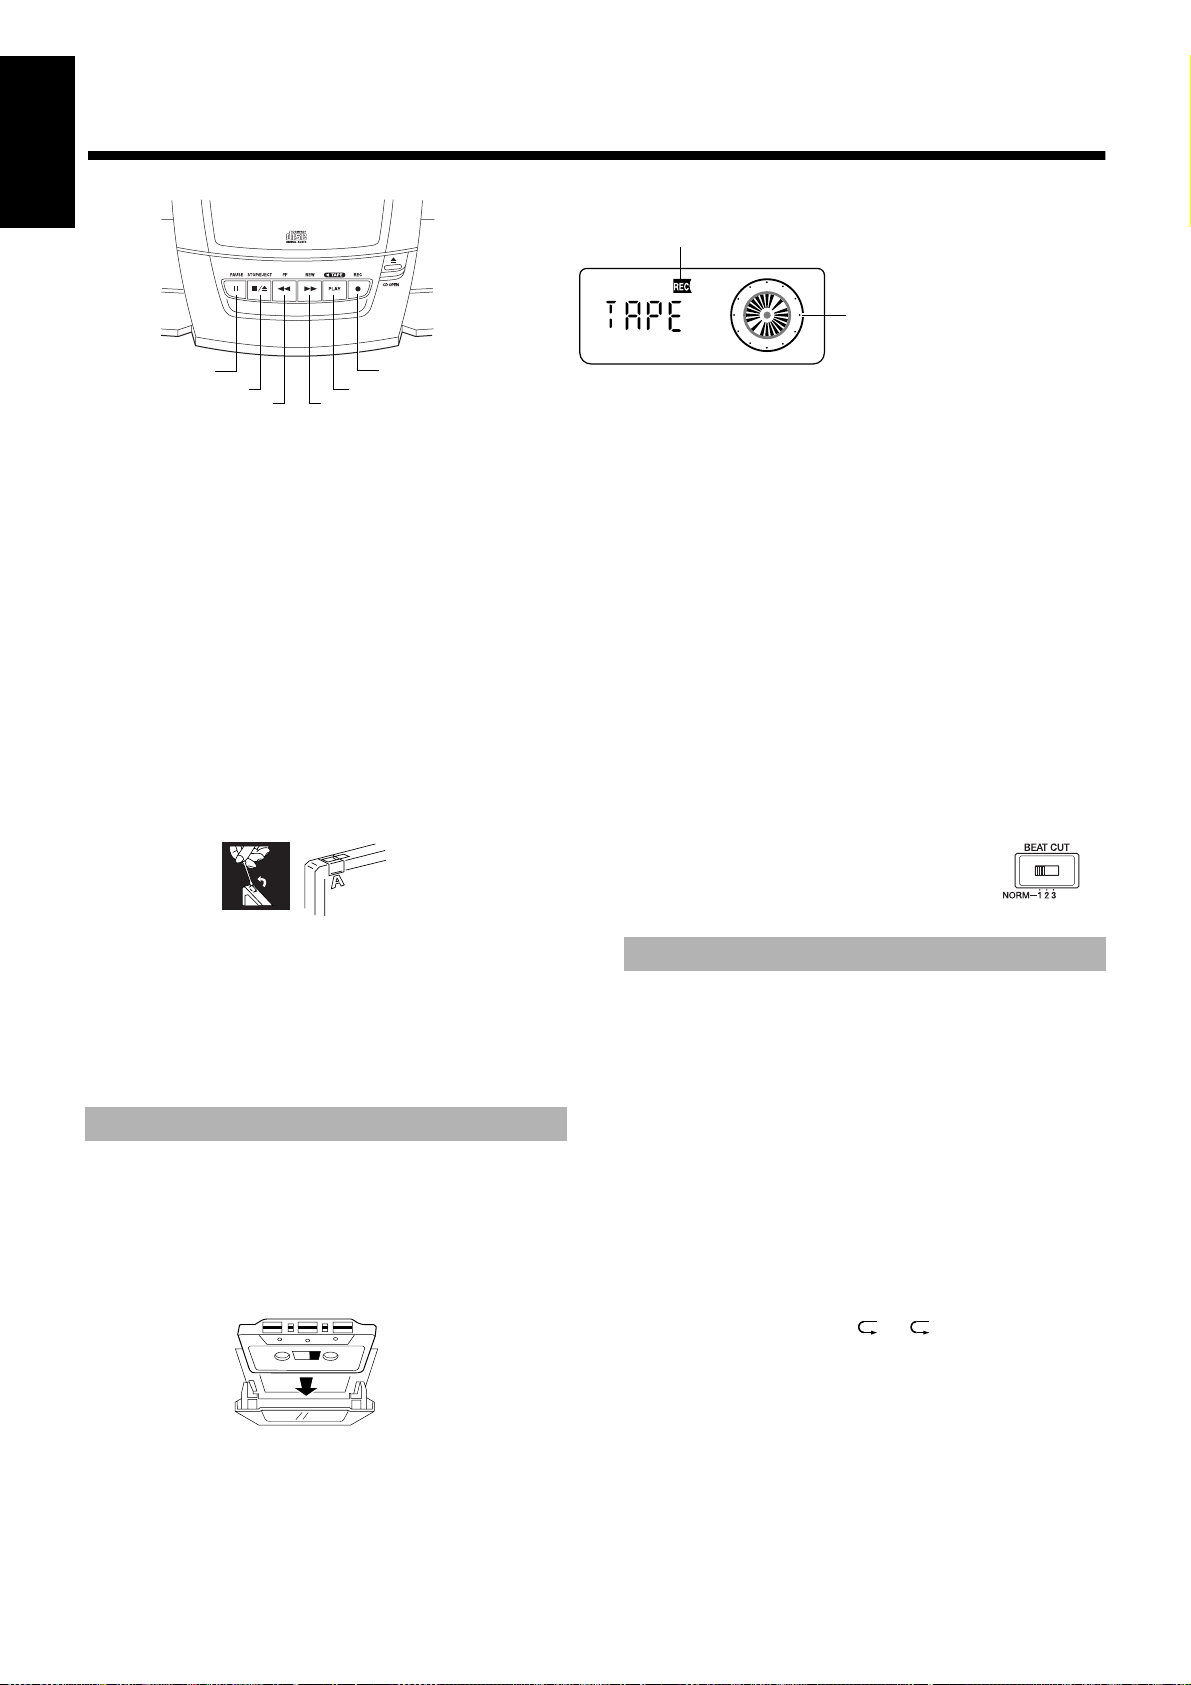
Just press the PLAY button on the Unit. The power is automatically turned on, “TAPE” is displayed, and if a tape is already
in the deck, it will start to play.
TAPE
TAPE
Playback
1.Press the
■
the cassette holder.
2.Insert a cassette tape with the exposed
■
side facing upward as shown below.
§
STOP/EJECT button to open
+ Forward direction
(Listening to a Tape)
TAPE indicator/Analog clock
(Display when using the Cassette Deck)
4.Press the PLAY button.
■
• The tape is played and then stops when it reaches the end.
• The T APE in dicator alw ays turns to the right when the tape
is travelling.
To pause, press the 8 PAUSE button on the Unit.
To cancel pause, press the 8 PAUSE button again. Play contin-
ues from the point where it was paused.
To stop playing, press the § STOP/EJECT button.
To remove the tape, stop the tape, and press the § STOP/
EJECT button again.
TAPE
To Fast-Forward and Rewind a
Tape
Press the 1 (fast-forward) button on the Unit to
fast-forward the tape.
Press the ¡ (rewind) button on the Unit to re-
wind the tape.
• The Cassette Deck automatically stops when the tape reaches
its end.
3.Close the holder gently until it clicks.
■
7
Page 10
■■
English
Using the Cassette Deck
REC indicator
(Recording)
TAPE indicator
Analogue clock
¡
PLAY
¶
(Display when using the Cassette Deck)
8
§
1
Things To Know Before You Start
Recording —————————————
■ It should be noted that it may be unlawful to re-record
pre-recorded tapes, records, or discs without the consent of the owner of copyright in the sound or video recording, broadcast or cable program and in any literary,
dramatic, musical, or artistic work embodied therein.
■ The correct recording level is automatically set by the ALC
(Automatic Level Control) function, and is not affected by the
VOLUME control on the Unit or by the use of sound effects.
■ Two small tabs on the back of the cassette tape, one for side A
and one for side B, can be removed to prevent accidental erasure
or recording.
■ To record on a cassette with the tabs removed, you must cover
the holes with adhesive tape as shown.
Notes:
• Use normal tapes (not metal or CrO
• At the start and end of cassette tapes, there is leader tape which
cannot be recorded onto.
• If a recorded tape you make has excessive noise or static, the
Unit may have been too close to a TV during the recording.
Either turn off the TV or increase the distance between the TV
and the Unit.
tapes) for recording.
2
Recording from the Radio
1.Press the § STOP/EJECT button to open
■
the cassette holder.
2. Insert a blank or erasable cassette tape
■
with the exposed side facing upward as
shown below and wind past the leader tape.
+ Forward direction
• The tape is recorded and then stops when it reaches the
end.
• The TAPE indicator always turns to the right when its tape
is travelling.
To pause the recording, press the 8 PAUSE button on the Unit.
To cancel pause, press the 8 PAUSE button again. Recording
continues from the point where it was paused.
To stop recording, press the § STOP/EJECT button.
To remove the tape, stop the tape, and press the § STOP/
EJECT button again to open the cassette holder.
Recording an AM station (BEAT CUT)
When recording an AM broadcast, beats may be produced which
are not heard when listening to the broadcast. If this happens, you
can use the BEAT CUT function.
Switch the BEAT CUT switch on
the back of the Unit from the
NORM-1 to 2 or 3.
Note: In regular use, the BEAT CUT switch
should be set to the NORM-1 position.
Recording from the CD
The CD Player can be started with the Cassette Deck for synchronous recording and everything on the CD recorded onto the tape in
the order it is on the CD.
1. Insert a cassette tape in the Cassette
■
Deck and wind past the leader tape.
2. Load a CD.
■
3. Press the CD 6 button.
■
4. Press the 7 button to stop the CD.
■
• You can check the number of tracks and the total playback time
of the CD on the display. (See page 6.)
5. Select the Repeat mode of the CD if
■
desired.
To select the Repeat mode ( or ALL), press the REPEAT button on the Remote Control.
3.Close the holder gently until it clicks.
■
4.Tune in to a radio station.
■
5.Press the ¶ REC button on the Unit.
■
The PLAY button is pressed at the same time, the “REC” indicator lights up, and the Unit begins recording.
8
6.Choose whether to have approx. four sec-
■
onds of blank tape between tracks.
If you want the blank section, skip this step.
If you do not want the blank section, perform the follow-
ing operation on the CD Player.
• Press the CD 6 button twice.
Page 11
7.Press the ¶ REC button on the Unit.
■
The PLAY button is pressed at the same time, the “REC” indicator lights up, and the synchronous recording begins.
• The tape is recorded and then stops when it reaches the end.
• To continue recording to the other side of the tape, perform the
following steps.
1. Reverse the cassette tape and wind past the leader tape.
2. Press the CD 6 button and then press the ¶ REC button.
Then, the synchronous recording begins from the beginning of the
last track that was stopped at the end of the first side of the tape.
To stop recording, press the § STOP/EJECT button.
To remove the tape, stop the tape, and press the § STOP/
EJECT button again to open the cassette holder.
Notes:
• If the CD reaches its end before the tape, the tape will continue
to run until stopped. Press § STOP/EJECT button to stop
the tape.
• During synchronous recording, the CD 6, 4, and ¢
buttons for the CD Player do not function.
• If you press the ¶ REC button during playback the CD, recording will start from the beginning of the track being played.
To Continue Recording to the Other
Side of the Tape———————————
When the tape reached its end and stopped, carry out the following
to continue recording to the other side of the tape.
1. Reverse the cassette tape and wind past the leader tape.
2. Press the ¶ REC button again.
The synchronous recording will begin from the last track
that was stopped at the end of the first side of the tape.
English
■■
REMOTE CONTROL RM-SRCBZ6
The timers let you control listening functions automatically.
Using the Timers
SLEEP
Setting the Clock
You can set the clock when the Unit is turned on.
Notes:
• The clock must be correctly set for the timers to work.
• When setting the timers, you have two minutes in which to
complete the procedure. Otherwise, the setting is cleared and
must be repeated from the beginning.
JOG dial
CLOCK/TIMER
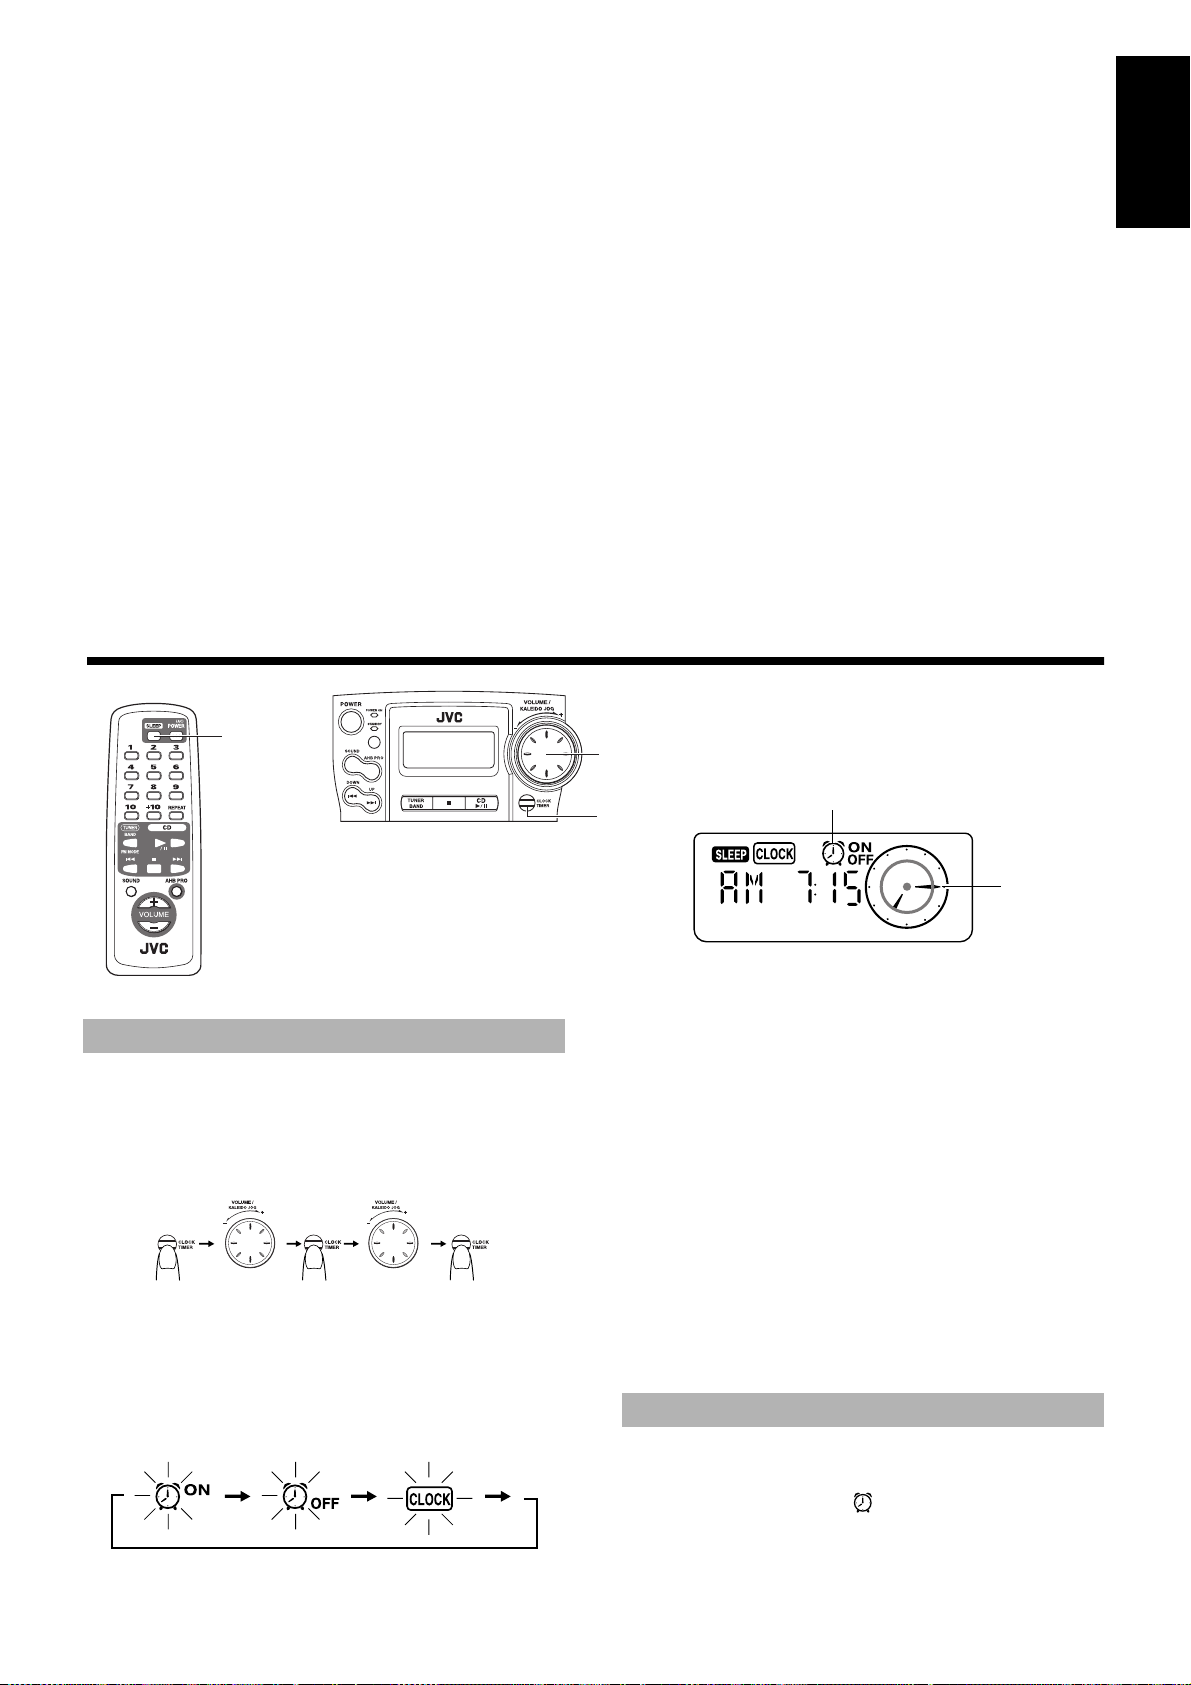
3.Press the CLOCK/TIMER button.
■
The “CLOCK” indicator stays lit. The Unit’s current set time
blinks on the display.
4.Turn the JOG dial to set the time.
■
Turn the JOG dial to the right or left to increase or decrease the
time. Turning it rapidly advances or decreases the time faster.
5.Press the CLOCK/TIMER button.
■
Then wait for 5 seconds or press the CLOCK/TIMER button
once again to return to the original display. The selected time is
set and the seconds start counting from 0.
Timer indicator
(Display when using the Timer)
Analog clock
(For 2 seconds)
1.Press the CLOCK/TIMER button on the Unit
■
and hold for more than two seconds.
2.Turn the JOG dial until the “CLOCK” indica-
■
tor blinks on the display.
The display changes as follows:
(For 2 seconds) (“CLOCK”indicator) (Select the time)
(Display “CLOCK”)(Select the time)
CAUTION: If there is a power failure, the clock
loses its setting after approx. five minutes. The
display shows “AM12:00” and the “CLOCK” indicator blinks, and the clock must be reset.
Setting the Daily Timer
Once you have set the Daily Timer. The timer will be activated at the
same time every day. You can cancel or re-activate the Daily Timer.
Note that the Timer indicator ( ) on the display shows that the
Daily Timer you have set is in effect.
Note: Perform each setting within 30 seconds. Otherwise, setting
is cleared and must be repeated from the beginning.
9
Page 12
1. Press the POWER button to turn on the Unit.
(Hold for 2 seconds)
(2 time)
■
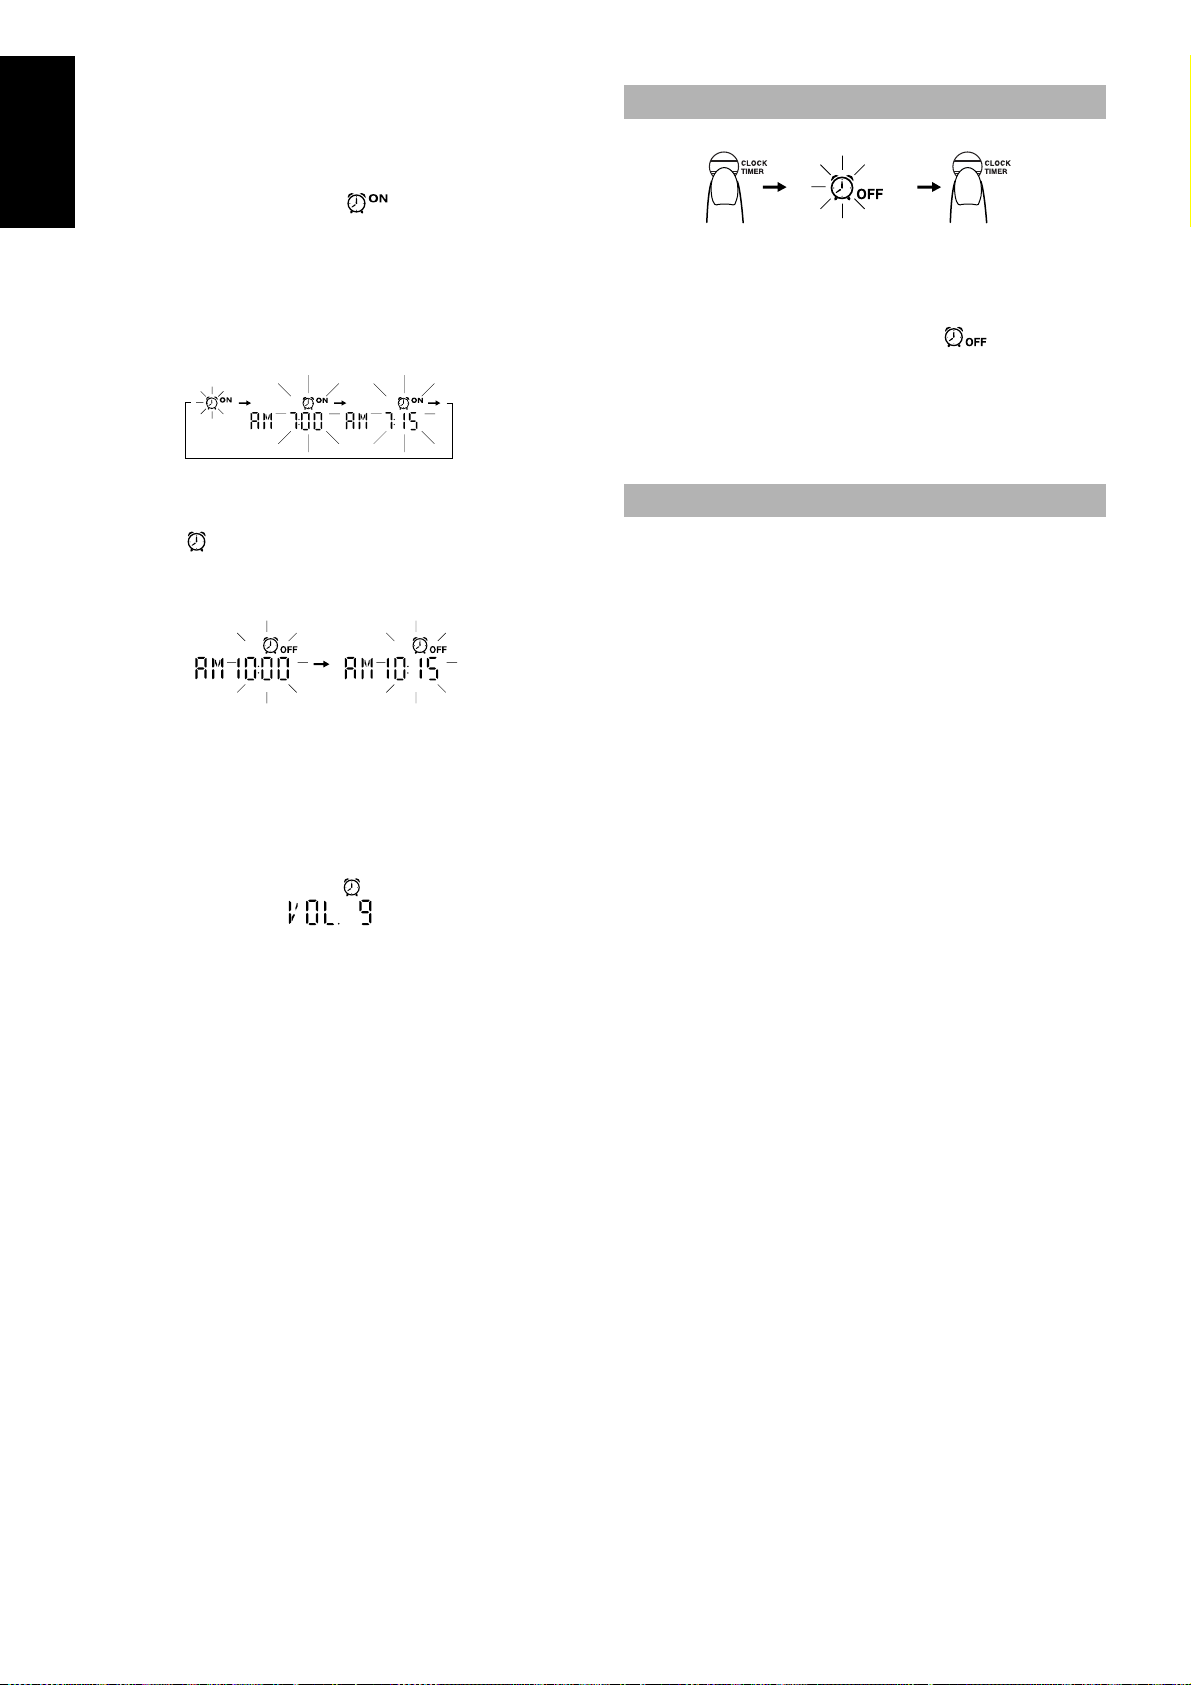
2.Setting the ON time (Example: AM7:00)
■
1. Press the CLOCK/TIMER button on the Unit and hold for
English
more than 2 seconds.
2. Turn the JOG dial until the “ ” indicator blinks on the
display.
3. Press the CLOCK/TIMER button.
The current ON time blinks on the display.
4. Turn the JOG dial to set the time you want the Unit to come on.
Turn the JOG dial to the right or left to advance or decrease
the time.
Turning it rapidly advances or decreases the time faster.
3.Setting the OFF time (Example: AM10:15)
■
1. Press the CLOCK/TIMER button on the Unit.
The “ ” indicator lights up and the current OFF time
blinks on the display.
2. Turn the JOG dial to set the time you want the Unit to be
turned off.
Cancelling the Daily Timer
To cancel the Daily Timer, turn off the Timer indicator as follows:
1.Press the CLOCK/TIMER button on the Unit
■
for more than 2 seconds.
2.Turn the JOG dial until the “ ” indicator
■
blinks on the display.
3.Press the CLOCK/TIMER button .
■
The Timer indicator and the CLOCK indicator go out.
To re-activate the cancelled timer, repeat the same steps as for
setting the Daily Timer.
Setting the SLEEP Timer
Use the Sleep Timer to turn the Unit off after a certain number of
minutes when it is playing. By setting the Sleep Timer, you can fall
asleep to music and know that your Unit will turn off by itself rather
than play all night.
You can only set the Sleep Timer when the Unit is on and a
■
source is playing.
4.Setting the volume level
■
1. Press the CLOCK/TIMER button on the Unit.
The Timer indicator is lit and the current volume setting
blinks on the display.
2. Turn the JOG dial to the right or left to increase or decrease
the volume level.
Volume setting range: 0 - 25 or –.
5.Press the CLOCK/TIMER button on the Unit.
■
The timer setting is completed and the display returns to the display before you set the timer. The Timer indicator stays lit.
6.Before turning off the Unit, prepare the
■
music source.
Tuner: Tune in to the desired station.
CD: Load a CD.
Tape: Load a prerecorded cassette tape.
7.Press the POWER button to turn off the
■
Unit.
To confirm the timer settings (ON/OFF time and volume
level), turn on the power, press the CLOCK/TIMER button for more
than 2 seconds, and press the CLOCK/TIMER button repeatedly.
To change the timer setting, repeat the setting procedure from
the beginning.
1. Play back a CD, tune in to a desired sta-
■
tion, or play back a tape.
2. Press the SLEEP button on the Remote
■
Control.
The “SLEEP” indicator lights up.
3. Set the length of time you want the source
■
to play before shutting off.
• Each time you press the SLEEP button, it changes the
number of minutes shown on the display in this sequence:
= 30 = 60 = 90 = 120 = Cancelled = (back to the begin-
ning)
The display will stop blinking after 5 seconds and return to the display before you set the Sleep Timer.
The Unit is now set to turn off after the number of minutes you have
set.
To Confirm the Sleep Time
When the SLEEP button is pressed, the remaining sleep time is displayed. After 5 seconds the original display returns.
To Cancel the SLEEP Timer Setting
Press the SLEEP button until the “SLEEP” indicator goes off on the
display.
Turning off the Unit also cancels the SLEEP Timer.
If you are setting the Daily Timer, the Unit will be turned on at
■
the set time to wake you up.
CAUTION: If the Unit is unplugged, or a power failure occurs, the timer setting will be lost after approx. five minutes. You will need to reset the
clock first, then the timer.
10
Page 13
■■
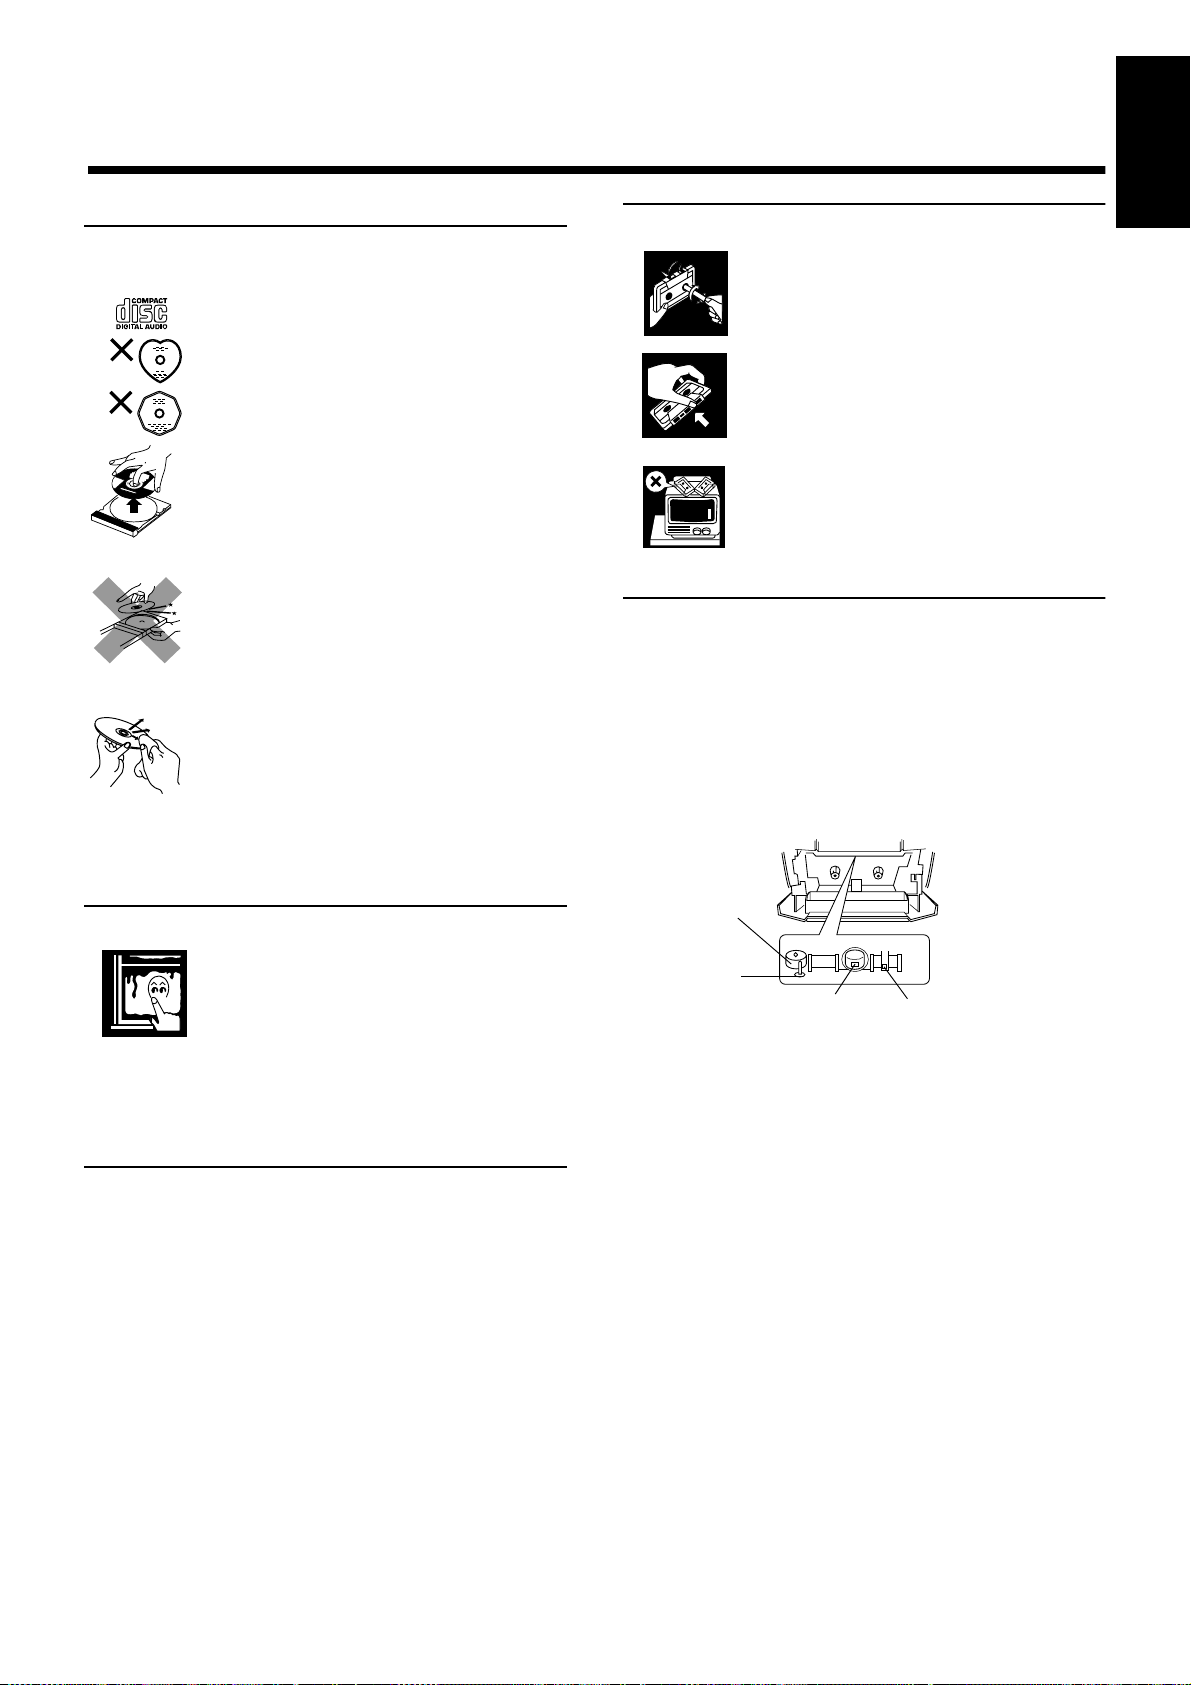
Erase head
Record/Play head
Capstan
Pinch roller
Handle your CDs carefully, and they will last a long time.
Care And Maintenance
Compact Discs
• Only CDs bearing this mark can be used with
this Unit.
• Continued use of irregularly shaped CDs
(heart-shape, octagonal, etc.) can damage the
Unit.
• Remove the CD from its case by holding it at
the edges while pressing the case's center hole
lightly.
• Do not touch the shiny surface of the CD, or
bend the CD.
• Put the CD back in its case after use to prevent
warping.
• Be careful not to scratch the surface of the CD
when placing it back in the case.
• Avoid exposure to direct sunlight, temperature
extremes, and moisture.
• A dirty CD may not play correctly. If a CD is
dirty, wipe it with a soft cloth in a straight line
from center to edge.
CAUTION: Do not use any solvent (for example,
conventional record cleaner, spray thinner, benzine, etc.) to clean a CD.
English
Cassette Tapes
• If a tape is loose, it may get stretched, cut, or
caught in the cassette. Take up the slack by
inserting a pencil in one of the reels and rotating in the right direction.
• Do not touch the tape surface.
• Do not store the tape:
- In dusty places
- In direct sunlight or heat
- In damp areas
- On a TV or speaker
- Near a magnet
Cassette Deck
• If the heads, capstan, or pinch-roller in the Cassette Deck
become dirty, you may experience:
- Loss of sound quality
- Discontinuous sound
-Fading
- Incomplete erasure
- Difficulty recording
• Clean the heads, capstans, and pinch-rollers using a cotton
swab moistened with alcohol.
Moisture Condensation
Moisture may condense on the lens inside the
Unit in the following cases:
• After turning on heating in the room.
• In a damp room.
• If the Unit is brought directly from a cold to
a warm place.
Should this occur, the Unit may malfunction. If
this happens, leave it turned on for a few hours
until the moisture evaporates, unplug the AC
power cord, and then plug it in again.
General Notes
To ensure top performance, keep your CDs and the mechanism clean.
• Store CDs in their cases, and keep them in cabinets or on
shelves.
• Keep the CD holder closed when not in use.
• If the heads become magnetized, the Unit will produce noise or
lose high frequency notes.
• To demagnetize the heads, turn off the Unit, and use a head
demagnetizer (available at electronics and record shops).
11
Page 14

■■
English
• If you have a problem with your System, check this list for a possible solution before calling for service.
• If you cannot solve the problem from the hints gi v en here, or the System has been physically damaged, call a qualified person, such as your
dealer, for service.
No sound is heard. • The power cord is disconnected.
Unable to record. Cassette record protect tabs are removed. Cover the holes on the back edge of the
Poor radio reception • The System is not properly posi-
The CD skips. The CD is dirty or scratched. Clean or replace the CD.
The CD does not play. The CD is upside down. Put the CD in with the label side up.
Troubleshooting
Symptom Possible Cause Action
• Connect it firmly
• The batteries in the Unit have lost
their charge.
• Headphones are connected.
tioned.
• The Antenna is not properly positioned.
• Replace the batteries.
• Disconnect the headphones.
cassette with tape.
• Turn the System to the best reception
position.
• Extend the Antenna and turn it to the
best reception position.
Unable to operate the Remote Control. • The path between the Remote Con-
Operations are disabled. The built-in microprocessor has mal-
The cassette door cannot be opened. During tape playing, the power cord was
■■
Amplifier
Output Power 3.6 watts per channel, min. RMS at 3 ohms,
Output Sensitivity/Impedance (1 kHz)
Phones 16 ohms - 1 kohm
Cassette Deck
Frequency Response 80 - 12,500 Hz
Wow and Flutter 0.15% (WRMS)
CD Player
Signal-To-Noise Ratio 90 dB
Wow And Flutter Unmeasurable
Specifications
from 150 Hz to 15 kHz, with no more than
10% total harmonic distortion
0 - 20 mW/ch output into 32 ohms
trol and the sensor on the Unit is
blocked.
• The batteries have lost their charge.
functioned due to external electrical
interference.
unplugged.
General
Dimensions 438 ✕ 175.5 ✕ 261.5 mm (W/H/D)
Mass Approx. 4.2 kg (9.3 lbs) (without batteries)
Accessories
Power Specifications
Power Requirements AC 120 V ~ , 60 Hz
Power Consumption 18 watts (power on mode)
Design and specifications are subject to change without notice.
• Remove the obstruction.
• Replace the batteries.
Unplug the Unit then plug it back in.
Plug in the power cord, press the
POWER button, and then press the §
STOP/EJECT button.
(17-1/4 ✕ 6-29/32 ✕ 10-5/16 inches)
Power Cord (1)
Remote Control (RM-SRCBZ6) (1)
2.8 watts (in Standby mode)
Tuner
FM Tuner
Tuning Range 87.5 - 108.0 MHz
AM Tuner
Tuning Range 530 - 1,710 kHz
Antenna Telescopic antenna for FM
Built-in ferrite core antenna for AM
Speakers 10 cm (3-15/16")
2, 3 ohms
✕
12
Page 15

Gracias por comprar el reproductor de CD portátil JVC.
Esperamos que lo disfrute al máximo y durante muchos años, esté donde esté, tanto dentro como fuera de casa.
Asegúrese de leer detenidamente este manual de instrucciones antes de utilizar el sistema estéreo.
En él encontrará toda la información que precisa para configurar y utilizar el sistema.
Si tiene alguna duda no tratada en este manual, póngase en contacto con su distribuidor.
Características
Aquí hay algunos de los aspectos que hacen que su sistema sea tan potente, así como fácil de utilizar.
■ Los mandos y las funciones han sido rediseñados para que resulten muy fáciles de utilizar y pueda dedicarse sólo a
disfrutar de la música.
• Con el COMPU PLAY de JVC puede poner en marcha el sistema y escuchar automáticamente la radio, la plati-
na de casete o el reproductor de CD con un simple toque. (Con el equipo enchufado a la corriente)
■ Efectos sonoros; BEAT, POP, y CLEAR.
■ El sistema incorpora el circuito de graves AHB PRO (“Active Hyper Bass”) para reproducir con fidelidad los sonidos de frecuencias bajas.
■ Posibilidad de presintonización de 30 emisoras de radio (15 FM y 15 AM) además de las funciones de autobúsqueda y sintonización manual.
■ Un temporizador de fácil uso que le permite despertarse o dormirse con música.
Cómo está organizado este manual
• En la sección “Funciones comunes” se da información básica común a muchas funciones distintas - p.ej. el ajuste del volumen - sin
repetirla luego debajo de cada función.
• El nombre de los botones y mandos aparecen todos en mayúsculas: por ejemplo TUNER BAND.
• Funciones del sistema están escritas sólo con una inicial mayúscula: por ejemplo: Reproducción Normal.
Utilice el índice para buscar la información específica que está buscando.
Hemos disfrutado haciendo este manual para usted y esperamos que le sirva para sacar el máximo provecho de las funciones que posee su sistema.
Español
PRECAUCIONES IMPORTANTES
1.Cuando transporte el equipo
■
• No suba ni baje el asa del equipo con la antena telescópica extendida, ya que podría dañarla.
2.Dónde colocar el equipo
■
• Elija un lugar nivelado, seco y no demasiado frío ni demasiado caliente (que oscile entre los 5°C y los 35°C o los 41°F y los 95°F).
• Deje espacio suficiente entre el equipo y un televisor.
• No utilice el equipo en un lugar sujeto a vibraciones.
3.Cable de alimentación eléctrica
■
• No manipule el cable de alimentación con las manos mojadas.
• Siempre se consume algo de corriente (2,8 W) mientras el equipo está enchufado a la corriente.
• Cuando desconecte el equipo de la toma de corriente, tire siempre del enchufe y no del cable.
4.Fallos, etc.
■
• No hay piezas reparables por el usuario en el interior. En caso de fallo del sistema, desconecte el cable principal de alimentación y contacte con su distribuidor.
• No inserte ningún objeto metálico en el sistema.
■■
Características .....................................................................1
Cómo está organizado este manual .....................................1
PRECAUCIONES IMPORTANTES..................................1
Índice
Uso de los temporizadores .................................... 9
Cuidado y mantenimiento .................................... 11
Cómo empezar ...................................................... ...2
Funciones comunes ................................................3
Uso del sintonizador ................................................5
Uso del reproductor de CD .....................................6
Uso de la platina de casete (Escuchar una cinta)..7
Uso de la platina de casete (Grabación).................8
Solución de problemas ......................................... 12
Especificaciones ................................................... 12
1
Page 16

■■
Cómo empezar
Accesorios
Compruebe que tiene todos los elementos siguientes, suministrados con el sistema.
Cable de alimentación (1)
Mando a distancia (1)
Si faltara alguno de estos artículos, contacte de inmediato con su proveedor.
Español
Cómo colocar las pilas
Cómo colocar las pilas en el mando a distancia
1. Abra la tapa del compartimento de las pilas (situado en la parte trasera de la unidad) apretando la pestaña como se muestra en la ilustración y tirando de la tapa hacia usted.
2. Inserte 8 pilas (no incluidas) en el compartimento de las pilas en el orden de “1” a “8” como muestra la figura.
3. Vuelva a poner la tapa en su sitio hasta que quede bien sujeta.
Nota: Cuando utilice el equipo enchufado a la corriente alterna (CA), la fuente de alimentación cambiará automáticamente de pilas a c orriente
alterna. Sin embargo, es preferible que le quite las pilas al equipo si lo va a utilizar enchufado a la corriente alterna (CA).
Pilas de tamaño “R20/D (13F)”
Cómo colocar pilas en el mando a distancia
Haga coincidir la polaridad de las pilas (+ y –) con las marcas + y – del compartimento de las pilas.
R6P(SUM-3)/AA(15F) (no incluidas)
CUIDADO: Manipule las pilas adecuadamente.
Para evitar que las pilas pierdan o exploten:
• Saque las pilas cuando no vaya a utilizar el equipo o el mando a distancia durante mucho tiempo.
• Cuando necesite cambiar las pilas, cámbielas todas al mismo tiempo.
• No mezcle pilas nuevas y pilas viejas.
• No utilice al mismo tiempo pilas de distinto tipo.
• No intente recargar pilas no recargables.
Uso del mando a distancia
El mando a distancia le facilita el uso de muchas funciones desde una distancia de hasta 7 m (23 pies).
Debe apuntar el mando a distancia hacia el sensor remoto en el panel frontal del sistema.
Nota: Si apunta con el mando a distancia en posición inclinada, la distancia indicada se reducirá.
Sensor remoto
2
Page 17
Conexión del cable de alimentación principal CA
PHONES
BEAT CUT
NORM-123
...
POWER
STANDBY
POWER ON
POWER
(AC)
or
o
Inserte el cable de alimentación principal CA (suministrado) firmemente en la toma CA de la parte
posterior del sistema.
Le cordon d'allmentetlon secteur fouml avec cet apparail ne peut étre branché qus dans un seul sens
afin d'avter tout nsque de choc électrique. Se rélérer á l'ilustration pour le racorder correctement.
CUIDADO:
• UTILICE SÓLO EL CABLE DE ALIMENTACIÓN PRINCIPAL DE JVC SUMI-
NISTRADO CON LA UNIDAD PARA EVITAR UN MAL FUNCIONAMIENTO
O DAÑOS EN EL SISTEMA.
• ASEGÚRESE DE DESENCHUFAR EL CABLE DE ALIMENTACIÓN PRINCIPAL CA DE LA TOMA DE CORRI-
ENTE CUANDO VAYA A SALIR O NO VAYA A UTILIZAR EL EQUIPO DURANTE CIERTO TIEMPO.
Conecte el cable de alimentación principal CA a la toma de corriente y su equipo estará bajo su control.
COMPU PLAY (Sólo corriente alterna)
La función COMPU PLAY de JVC le permite controlar las funciones más frecuentes utilizadas en el sistema con un simple botón.
Con el funcionamiento mediante un sólo botón puede reproducir una cinta o un CD o encender la radio con sólo presionar el botón “PLAY”.
El funcionamiento mediante un sólo botón enciende la unidad para usted y luego comienza la función elegida por usted. Si el sistema no está
listo (no hay CD insertado), el sistema sigue encendido así que usted puede insertar un CD.
El funcionamiento mediante un sólo botón se explica en cada caso en la sección relacionada con esta función.
Los botones COMPU PLAY son:
Español
En el equipo
Botón CD 6
Botón TUNER BAND (sintonizador/banda)
Botón PLAY (TAPE)
■■
SOUND
Funciones comunes
POWER
AHB PRO
VOLUME +, –
REMOTE CONTROL RM-SRCBZ6
En el mando a distancia
Botón CD 6
Botón TUNER BAND (sintonizador/banda)
Indicador POWER
POWER
Indicador STANDBY
SOUND
AHB PRO
PHONES
Pantalla
Mando VOLUME
Encendido y espera del equipo
Encendido del sistema———————
Presione el botón POWER.
(AC)
POWER
El indicador de encendido POWER ON (de color verde) se enciende y la pantalla se ilumina.
El sistema está listo para continuar en la función en que estaba cuando se apagó por última vez.
■ Por ejemplo, si lo último que hizo fue escuchar un CD, ahora es-
tará listo para continuar escuchando el CD. Si lo desea, puede
cambiar a otra fuente de audio.
POWER
POWER ON
o
or
STANDBY
■ Si estaba escuchando la radio, al encender se pondrá en marcha
el sintonizador en la emisora que tenía al apagar.
Nota: Si el equipo funciona con la alimentación a pilas, el botón
POWER del mando a distancia no responderá.
Estado de espera del sistema ———
presione de nuevo el botón POWER.
Si el equipo está enchufado a la corriente:
EL indicador de espera STANDBY se enciende y la pantalla queda
en blanco.
3
Page 18

■ Aunque esté en modo de espera, el equipo consume algo de en-
Reloj digital Reloj analógico
ergía (2,8 W) para mantener la pantalla en funcionamiento.
■ Para apagar el equipo completamente, desenchufe el cable de
alimentación de la toma de corriente.
Con el equipo alimentado a pilas
Cuando se apaga el equipo desde el botón POWER del panel frontal
(el botón POWER del mando a distancia no funciona) se apaga el
indicador de modo de espera (standby) y la pantalla se queda en
blanco.
Para apagar el equipo completamente, quítele las pilas.
Ajuste del volumen
Puede ajustar el nivel del volumen entre 0 y 25 con el equipo encen-
Español
dido.
Gire el mando VOLUME hacia la derecha o hacia la izquierda para
aumentar o reducir el volumen.
O
Presione el botón VOLUME + o – del mando a distancia para aumentar o reducir el nivel de volumen.
Para cancelar el efecto sonoro, presione el botón SOUND
hasta que aparezca en la pantalla el mensaje “FLAT”.
Presentación de la hora (Pantalla)
En modo de espera (standby), la pantalla mostrará tanto el reloj digital como el analógico.
En modo de espera (standby), los dos relojes aparecen en pantalla.
Cuando el equipo se enciende, la pantalla sólo muestra el reloj
analógico.
Para ver en pantalla ambos relojes con la unidad en marcha, presione el botón CLOCK/TIMER del equipo.
Para volver a la visualización anterior, presione de nuevo el
botón CLOCK/TIMER.
Nota: Para que el reloj funcione, tiene que ponerlo en hora antes.
(Consulte “Ajuste del reloj” en la página 9.)
PRECAUCION: NO ENCIENDA el equipo ni
comience la reproducción de una fuente de audio
sin haber bajado antes el VOLUME a 0, ya que un
inicio repentino a muy alto volumen puede dañar
los oídos, los altavoces y/o los auriculares.
Para una audición privada.
Conecte unos auriculares a la salida rotulada PHONES. No se oye
nada por los altavoces.
Asegúrese de bajar el volumen antes de conectar o de ponerse los
auriculares.
Refuerzo de los sonidos
graves (AHB PRO)
Puede reforzar los sonidos graves para mantener un buen nivel de
graves incluso a bajo volumen (sólo podrá utilizar este efecto en la
reproducción):
Para lograr este efecto, presione el botón AHB (Active Hyper
Bass) PRO.
En la pantalla se encenderá el indicador “AHB PRO”.
Para cancelar el efecto, presione de nuevo el botón.
Se apagará el indicador “AHB PRO”.
Efectos sonoros (SOUND)
El sistema cuenta con los efectos sonoros que se detallan a continuación. Con ellos podrá controlar las características de la música para
ajustarlas a la acústica de la sala y a la calidad de la fuente de audio.
Pruebe todos los efectos sonoros para saber de qué manera afectan
a la música. Recuerde que los efectos sonoros sólo funcionan durante la reproducción.
Efectos sonoros
FLAT: Sin efectos de sonido.
BEAT: Potencia las frecuencias bajas y altas.
POP: Ideal para piezas cantadas.
CLEAR: Para un sonido estéreo más amplio y dinámico.
Para activar un efecto sonoro, presione el botón SOUND hasta que aparezca en la pantalla el modo sonoro deseado.
Cada vez que presione el botón SOUND, la pantalla cambia en el
orden que se muestra a continuación:
4
FLATBEAT POP CLEAR
Page 19

■■
Para FM
Para AM
Tecla(s) numérica(s) (pulsar durante 2
segundos)
Teclas numéricas
TUNER BAND
Uso del sintonizador
4
¢
TUNER BAND
¢
4
Presentación de banda, presentación de f recuencia, canal de pr efijado
Mando giratorio JOG
PRESET
Español
REMOTE CONTROL RM-SRCBZ6
Podrá escuchar emisoras de FM y de AM. Las emisoras se pueden
sintonizar manualmente, automáticamente o desde las presintonías
almacenadas en la memoria.
Radio mediante un sólo botón (sólo
corriente alterna (CA))———————
Presione sólo el botón TUNER BAND para que el equipo se encienda y se escuche la emisora que tenía seleccionada cuando apagó el
equipo.
■ También puede cambiar desde cualquier otra fuente de audio a
la radio con sólo pulsar el botón TUNER BAND.
Sintonización de una emisora
1.Presione el botón TUNER BAND.
■
En la pantalla aparecerán la banda y la frecuencia sintonizadas
en último lugar.
Cada vez que presione el botón, la banda cambia del siguiente
modo:
FM Auto FM MONO AM
2.Seleccione una emisora con uno de los
■
métodos siguientes.
■ Sintonización manual
Presione el botón
frecuencia a frecuencia hasta encontrar la emisora deseada.
■ Sintonización automática
Si pulsa y mantiene pulsado el botón
gundo o más, la frecuencia cambiará, hacia abajo o hacia arriba,
automáticamente hasta encontrar una emisora .
■ Sintonización en el equipo de presintonías (sólo
cuando se hayan presintonizado emisoras)
Presione el botón
tonizada con anterioridad. Cuando haya seleccionado él número
de presintonía, la banda y la frecuencia correspondientes aparecerán en la pantalla.
Ejemplo: Presione el botón
4 o el botón ¢ varias veces para pasar de
o
or
O
4 o ¢ durante un se-
O
7 PRESET para seleccionar la emisora sin-
7 PRESET hasta que aparezca en
pantalla la presintonía nº 12 “P- 12”.
Reloj analógico
(Mostrar al usar el sintonizador)
■ Sintonice con el mando a distancia las presintonías
(sólo cuando se hayan presintonizado emisoras).
Seleccione la emisora introduciendo el número de presintonía
en las teclas numéricas.
• Ejemplo:Para el canal 5, presione el 5. Para el canal 15
presione +10 y luego el 5.
• Se visualizan la banda y la frecuencia.
3.Gire la antena para mejorar la recepción.
■
• Alargue y gire la antena telescópica para las emisoras FM.
• Para sintonizar emisoras AM basta con utilizar el equipo.
Presintonía de emisoras
Se pueden presintonizar hasta 15 emisoras de FM y hasta 15 emisoras de AM con el mando a distancia.
Presintonización automática (desde
el equipo) ——————————————
En cada banda puede prefijar automáticamente 15 emisoras FM y
15 AM. Los números presintonizados se distribuirán a medida que
se encuentren las emisoras empezando por la frecuencia en uso y
buscando hacia arriba.
1.Seleccione una banda (AM o FM) presio-
■
nando el botón TUNER BAND.
2.Presione el botón 7 PRESET durante más
■
de dos segundos.
3.Repita los pasos 1 y 2 para la otra banda.
■
■ Si desea realizar algún cambio en las emisoras presintonizadas
automáticamente, siga el procedimiento de presintonización
manual.
CUIDADO: si desenchufa el equipo o se va la corriente, las presintonías se borrarán transcurridos
aproximadamente cinco minutos. Si sucediera,
necesitará volver a programar las emisoras.
Presintonización manual (con el
mando a distancia) —————————
O
5
Page 20

1.Seleccione una banda con el botón TUNER
Tiempo de reproducción transcurrido
Número total de pistas
■
BAND.
2. Presione el botón 4 o el botón ¢ para sin-
■
tonizar una emisora.
3. Fije el número presintonizado pulsando y
■
manteniendo el botón del teclado numérico
en el mando a distancia.
• Para presintonizar los números del 1 al 10: Presione la tecla
numérica y manténgala pulsada durante 2 segundos.
• Para presintonizar los números del 11 al 15: Presione y
suelte el botón +10 y posteriormente la otra tecla (del 1 al
5) durante 2 segundos.
Cuando la presintonía se haya memorizado, la frecuencia par-
Español
padeará en la pantalla y ya podrá soltar la tecla numérica. La
pantalla vuelve a mostrar la información habitual con la banda
y la frecuencia.
Ejemplo: presintonía número = 12
4.Repita los pasos 1 a 3 para cada emisora.
■
Para cambiar las emisoras presintonizadas, repita los mismos pasos que arriba.
Para cambiar el Modo de recepción FM
El indicador “STEREO” se enciende y se puede oír el efecto estéreo
cuando se recibe una emisora que emite en estéreo.
Sin embargo, si una emisora estéreo FM se recibe mal o con ruidos
puede seleccionar modo monoaural. La recepción mejora, aunque
se pierde el efecto estéreo.
Presione el botón TUNER BAND hasta seleccionar el modo FM MONO.
El indicador “MONO” se enciende en la pantalla.
Para volver a activar el efecto estéreo, presione el botón
TUNER BAND para seleccionar el modo “FM Auto”. Se apagará
el indicador “MONO”.
■■
REMOTE CONTROL RM-SRCBZ6
Puede utilizar la función Normal o Repetida. La Reproducción
Repetida se puede ajustar para que repita todas las pistas o sólo una
de las pistas del CD.
Uso del reproductor de CD
Teclas numéricas
REPEAT
/8
¢
7
4
Indicador de función de repetición
Reproducción de CD mediante un sólo
botón (Sólo corriente alterna (CA)) —
Sólo tiene que presionar el botón 6 del CD.
■
• El equipo se enciende automáticamente. Si ya hay un CD
insertado, en la pantalla aparecerá el mensaje “PLAY” y
comenzará la reproducción desde la primera pista.
• Si no se ha insertado un CD, en la pantalla aparecerá “NO
DISC” y el reproductor de CD permanece en el modo Stop.
Reproducción normal
1. Presione el botón CD OPEN del equipo.
■
El reproductor de CD se abre.
2. Coloque un CD con la cara impresa hacia
■
arriba.
3. Cierre suavemente el compartimento del
■
CD con la mano.
4. Presione el botón 6 del CD.
■
Empieza la reproducción de la primera pista y el indicador de CD
gira hacia la derecha.
El reproductor de CD se parará automáticamente cuando acabe la
última pista del CD.
Compartimento del CD
CD OPEN
Número de pista
• Durante la reproducción, el número de pista que se está repro-
Para detener la reproducción del CD, presione el botón
En la pantalla aparece la siguiente información sobre el CD.
Para hacer una pausa, presione el botón
Para cancelar la pausa, presione de nuevo el botón 6 del CD.
Se reanuda la reproducción desde el punto en que se entró en la pausa.
Notas:
• Puede insertar un CD de 8 cm sin necesidad de adaptador.
• Si el CD no puede reproducirse correctamente (porque está
• La última pista se memoriza incluso si durante la reproducción
Para saltar de una pista a otra
(
4
Durante la reproducción, presione el botón 4 o el botón
¢ para seleccionar la pista que desee escuchar.
Empieza a oírse la pista seleccionada.
• Presione y suelte el botón
• Presione y suelte el botón
Mando
giratorio
4
¢
7
Tiempo de reproducción, número de presintonía
(Mostrar al usar el reproductor de CD)
duciendo y el tiempo de reproducción transcurrido se muestran
en pantalla.
rayado, por ejemplo) en la pantalla aparecerá “000000”.
del CD ha seleccionado otra función.
o
) ——————————————
¢
4 para retroceder una pista cada vez.
6
¢ para avanzar una pista cada vez.
JOG
Indicador de CD
Reloj analógico
6 del CD.
7.
6
Page 21

Reproducción con búsqueda ———
Durante la reproducción, mantenga pulsado el botón 4
o el botón
Este procedimiento hará que el CD avance o retroceda rápidamente
para que encuentre una sección de la pista que esté escuchando (el
disco compacto se reproduce a baja velocidad durante unos instantes y después aumenta de velocidad).
¢.
Cómo encontrar una pista directamente desde el mando a distancia —
Con el teclado numérico del mando a distancia se accede directamente al principio de cualquier pista del CD.
Durante la reproducción, introduzca el número de la pista que desee escuchar mediante el teclado numérico.
Empieza a oírse la pista seleccionada.
• Ejemplo: Para la pista 5, presione el 5. Para la pista 15 presione
+10 y luego el 5. Para la pista 20, presione +10 y luego 10. Para
la pista 32 presione +10 tres veces y luego 2.
Reproducción repetida
Puede repetir una pista o todas las pistas del CD.
Durante la reproducción, presione el botón REPEAT del
mando a distancia para seleccionar el modo de
repetición.
El indicador Repeat cambia cada vez que se pulsa el botón, como
muestra la figura.
= ALL =pantalla en blanco = (de vuelta al principio)
: Repite una pista.
ALL : Repite todas las pistas.
Para salir del modo de repetición, presione el botón REPEAT
hasta que el indicador REPEAT desaparezca de la pantalla.
Español
■■
La platina de casete le permite reproducir y grabar una cinta de audio.
Notas:
• La platina funciona mejor si se utilizan cintas normales (no se
recomienda el uso de cintas de metal o cromo).
• No se recomienda el uso de cintas de duración mayor a 120
minutos, ya que estas cintas se estropean fácilmente y se suelen
enrollar en el rodillo de presión y en el arrastre.
Uso de la platina de casete
8
§
1
¡
PLAY
Reproducción mediante un sólo
botón (sólo corriente alterna (CA))
Sólo tiene que presionar el botón PLAY de la unidad. El
equipo se enciende automáticamente y aparece el mensaje “TAPE”
en la pantalla; la reproducción se inicia si hay alguna ci nta en la platina.
TAPE
TAPE
Reproducción
1.Presione el botón § STOP/EJECT para
■
abrir el compartimento del casete.
2.Inserte la cinta con la cinta magnética
■
hacia arriba, como se muestra en la ilustración.
+ Hacia delante
(Escuchar una cinta)
Indicador TAPE/reloj analógico
(Mostrar al usar la platina de casete)
Para hacer una pausa, presione el botón 8 PAUSE del equipo.
Para cancelar la pausa, presione el botón 8 PAUSE otra vez.
Se reanuda la reproducción desde el punto en que se entró en la
pausa.
Para parar la reproducción, presione el botón § STOP/
EJECT.
Para sacar la cinta, pare la reproducción y presione de nuevo el
botón § STOP/EJECT.
Para avanzar rápidamente o
rebobinar una cinta
Presione el botón 1 (avance rápido) del equipo
para que la cinta avance rápidamente.
Presione el botón ¡ (rebobinado) del equipo
para que retroceda la cinta.
• La platina de casete se para automáticamente cuando la cinta
llega al final.
3.Cierre suavemente el compartimento hasta
■
oír un clic.
4.Presione el botón PLAY .
■
• La reproducción se detiene cuando la cinta llega al final de
la cara.
• El indicator TAPE siempre gira a la derecha cuando la cinta
se está moviendo.
TAPE
7
Page 22

■■
Uso de la platina de casete
Indicador de grabación REC
(Grabación)
Indicador de cinta TAPE
Reloj analógico
Español
8
§
1
¡
¶
PLAY
Cosas que debe saber antes de empezar a grabar ———————————
■
Es ilegal grabar o reproducir materiales con derechos
registrados sin la autorización del propietario.
■ El nivel de grabación correcto viene determinado de manera au-
tomática por la función ALC (Automatic Level Control), a la
que no le afectan ni el volumen (VOLUME) ni los efectos sonoros del equipo.
■ En la parte posterior del casete hay dos pequeñas pestañas, una
para la cara A y otra para la B, que pueden extraerse para evitar
un borrado o grabado accidental de la cinta.
■ Para grabar en una cinta con las pestañas eliminadas, antes de-
berá cubrir los orificios con cinta adhesiva.
Notas:
• Utilice cintas normales cuando grabe (no emplee cintas de
metal o cromo).
• Al principio y al final de las cintas hay una cinta guía que no
permite la grabación.
• Si la grabación realizada tiene mucho ruido o mucha estática, es
posible que el equipo estuviese demasiado cerca de un televisor
encendido durante la grabación. Apague el televisor o aumente
la distancia entre el televisor y el equipo.
Cómo grabar de la radio
1.Presione el botón § STOP/EJECT para
■
abrir el compartimiento del casete.
2. Inserte la cinta en blanco o que quiera bor-
■
rar con la cinta magnética hacia arriba y
avance la cinta hasta que pase la cinta guía.
3.Cierre suavemente el compartimento hasta
■
oír un clic.
4.Sintonice una emisora de radio.
■
5.Presione el botón de grabación ¶ REC en el
■
equipo
Al mismo tiempo queda accionado el botón de reproducción, se
enciende el indicador “REC” y el equipo empieza a grabar.
• La grabación se detiene cuando la cinta llega al final de la
cara.
• El indicator TAPE siempre gira a la derecha cuando la cinta
se está moviendo.
Para hacer una pausa en la grabación, presione el botón
PAUSE del equipo.
8
+ Hacia delante
(Mostrar al usar el reproductor de casete)
Para cancelar la pausa, presione el botón 8 PAUSE otra vez.
Se reanuda la grabación desde el punto en que se entró en la pausa.
Para parar la grabación, presione el botón § STOP/EJECT.
Para sacar la cinta, pare la grabación y vuelva a pulsar el botón
STOP/EJECT para que se abra el compartimento del casete.
§
Cómo grabar una emisora AM (con reducción de interferencias BEAT CUT)
Cuando se grabe una emisora de AM, se pueden producir pulsaciones no audibles mientras se escucha la emisora. Si ésto sucede,
utilice la función BEAT CUT.
Cambie el interruptor BEAT CUT
(reducción de interferencias) que
se encuentra en la parte trasera
del equipo de la posición NORM-1 a
la posición 2 ó 3.
Nota: En condiciones normales, el interruptor
BEAT CUT debería estar en posición NORM-1.
Cómo grabar del CD
Se puede hacer que el reproductor de discos compactos empiece a
funcionar al mismo tiempo que la platina para que la reproducción
sea sincronizada y todo el contenido del CD pase a la cinta, en el
mismo orden.
1. Inserte una cinta en la platina y avance
■
hasta pasar parte de la cinta.
2. Cómo cargar los CD.
■
3. Presione el botón 6 del CD.
■
4. Presione el botón 7 para detener el CD.
■
• Puede comprobar el número de pistas y el tiempo total de
reproducción del CD en la pantalla. (Consulte la página 6.)
5. Si lo desea, seleccione el modo de repro-
■
ducción repetida de CD.
Pa seleccionar el modo de repetición ( o el modo ALL),
presione el botón REPEAT del equipo.
6.Elija si quiere dejar un espacio en blanco
■
de aproximadamente cuatro segundos
entre pista y pista.
Si quiere que las pistas tengan ese espacio en blanco,
sáltese este paso.
Si no quiere que haya espacios en blanco entre las
pistas, lleve a cabo el siguiente procedimiento.
• Presione el botón 6 del CD dos veces.
7.Presione el botón ¶ REC en el equipo
■
Al mismo tiempo queda accionado el botón de reproducción, se enciende el indicador “REC” y comienza la grabación sincronizada.
• La grabación se detiene cuando la cinta llega al final de la cara.
• Para continuar grabando en la otra cara de la cinta, haga lo
siguiente:
1. Dele la vuelta a la cinta y aváncela hasta llegar a la
zona de grabación.
8
Page 23

2. Presione el botón 6 del CD y a continuación el
botón REC ¶.
De esta forma, la grabación sincronizada empezará desde el principio de la pieza que se interrumpió al final de la otra cara de la cinta.
Para parar la grabación, presione el botón § STOP/EJECT.
Para sacar la cinta, pare la grabación y vuelva a pulsar el botón
§ STOP/EJECT para que se abra el compartimiento del casete.
Notas:
• Si el CD se acaba antes que la cinta, ésta continuará avanzando
hasta que se pare. Presione el botón § STOP/EJECT para
parar la cinta.
• Durante la reproducción sincronizada, los botones 6 del CD,
4, y ¢ del reproductor de CD no funcionan.
¶
• Si presiona el botón
el equipo empezará a grabar desde el principio del tema que
REC durante la reproducción de un CD,
está sonando.
Para seguir grabando en la otra cara
de la cinta ——————————————
Cuando la cinta haya llegado al final y se haya detenido, lleve a cabo
el siguiente procedimiento para seguir grabando en la otra cara.
1. Dele la vuelta a la cinta y aváncela hasta pasar el espacio en blanco inicial.
¶
2. Vuelva a pulsar el botón de grabación
La grabación sincronizada se iniciará a partir del
último tema que quedó cortado al final de la primera
cara de la cinta.
(REC)
Español
■■
REMOTE CONTROL RM-SRCBZ6
Los temporizadores le permiten controlar automáticamente las funciones de reproducción.
Uso de los temporizadores
SLEEP
Ajuste del reloj
Sólo odrá fijar la hora con el equipo encendio.
Notas:
• Para que funcionen los temporizadores, el reloj debe estar bien
ajustado.
•
Cuando ajuste los temporizadores, deberá completar el procedimiento en dos minutos. Caso contrario, el ajuste se borra y debe
repetirse desde el principio.
CLOCK/TIMER CLOCK/TIMER
(Durante 2 segundos)
1. Presione el botón CLOCK/TIMER en el equipo
■
durante más de dos segundos.
2. Gire el mando “JOG” hasta que el indicador
■
“CLOCK” parpadee en la pantalla.
La pantalla cambia como se muestra:
(Durante 2 segundos) (Indicador “CLOCK”) (Ajuste la hora)
3. Presione el botón CLOCK/TIMER.
■
El indicador “CLOCK” permanece encendido. En la pantalla parpadea la hora actual.
4. Gire el mando giratorio para ajustar la hora.
■
Gire el mando giratorio hacia la derecha o hacia la izquierda para
aumentar o reducir las horas. Si lo mantiene girado, la hora avanzará más rápidamente.
VOLUME/
KALEIDO JOG
(Aparece “CLOCK”) (Ajuste la hora)
VOLUME/
KALEIDO JOG
CLOCK/TIMER
Mando giratorio JOG
CLOCK/TIMER
5. Presione el botón CLOCK/TIMER.
■
Ahora espere unos cinco segundos o presione el botón CLOCK/
TIMER de nuevo para volver a la pantalla anterior. Se fija la hora
seleccionada y los segundos comienzan a contar a partir de 0.
CUIDADO: si hay un fallo de corriente, el reloj perderá su ajuste después de unos cinco minutos. La
pantalla muestra “AM12:00” y el indicador
“CLOCK” parpadea. El reloj debe reajustarse.
Indicador del temporizador
(Mostrar al usar el temporizador)
Ajuste del temporizador Daily
Una vez haya ajustado el temporizador diario, este se activará cada
día a la misma hora. Si lo desea, puede cancelar o volver a activar el
temporizador diario.
Como comprobará, el indicador del temporizador( ) de la pantalla
indica que el temporizador diario está activado.
Nota:
Realice los ajustes en 30 segundos. Caso contrario, el ajuste
se borrará y deberá repetirse desde el principio.
1. Presione el botón POWER para poner en mar-
■
cha la unidad.
2. Cómo ajustar la hora de inicio (ON) (por
■
ejemplo: 7:00 AM)
1. Presione el botón CLOCK/TIMER en el equipo durante más
de dos segundos.
2. Gire el mando giratorio hasta que el indicador de activación
del ( ) parpadee en la pantalla.
3. Presione el botón CLOCK/TIMER.
En la pantalla parpadea la hora de inicio (ON) seleccionada
anteriormente.
4. Gire el mando giratorio para elegir la hora a la que quiere que se
encienda el equipo.
Gire el mando giratorio hacia la derecha o hacia la izquierda
para aumentar o reducir las horas.
Reloj analógico
9
Page 24

Si lo mantiene girado, la hora avanzará más rápidamente.
3. Cómo ajustar la hora de desconexión (OFF)
■
(por ejemplo: 10:15 AM)
1. Presione el botón CLOCK/TIMER en el equipo.
El indicador ( ) se encenderá y la hora de desconexión
(OFF) seleccionada anteriormente parpadeará en la pantalla.
2. Gire el mando giratorio para elegir la hora a la que quiere que
se desconecte el equipo.
Español
4. Cómo ajustar el nivel del volumen
■
1. Presione el botón CLOCK/TIMER en el equipo.
El indicador del temporizador se enciende y el nivel del volumen en uso parpadea en la pantalla.
2. Gire el mando giratorio hacia la derecha o hacia la izquierda
para aumentar o reducir el nivel del volumen.
El nivel del volumen oscila entre 0 y 25 o –.
5. Presione el botón CLOCK/TIMER en el equipo.
■
El ajuste del temporizador ha acabado y la pantalla vuelve a mostrar la información que tenía antes de pasar al temporizador. El
indicador del temporizador permanece encendido.
6. Prepare la fuente de audio antes del apagar
■
el equipo.
Sintonizador: Sintonice la emisora deseada.
CD: Cómo cargar los CD.
Cinta: Inserte una cinta de casete pregrabada.
7. Presione el botón POWER para apagar el
■
equipo.
Para confirmar los ajustes del temporizador (Hora de encendido y apagado ON/OFF y nivel del volumen),
la unidad, presione el botón CLOCK/TIMER durante más de 2 segundos y presione el botón CLOCK/TIMER repetidamente.
Para cambiar los ajustes del temporizador,
imiento de ajuste desde el principio.
CUIDADO: si desenchufa el equipo o se va la corriente, los ajustes del temporizador se borrarán
transcurridos aproximadamente cinco minutos.
Tendrá que fijar primero la hora y luego el temporizador de nuevo.
repita el proced-
encienda
Para volver a activar el temporizador ca ncelado,
ceso de activación del temporizador diario.
siga el pro-
Ajuste del temporizador SLEEP
Utilice el temporizador “Sleep” para apagar la unidad cuando hayan
transcurrido unos minutos. Al ajustar el temporizador “Sleep”,
puede dormirse escuchando música con la seguridad de que el equipo se apagará sólo y que no funcionará toda la noche.
Sólo podrá fijar el temporizador Sleep cuando el equipo esté en-
■
cendido y se esté escuchando música.
1. Inicie la reproducción de un CD o de una
■
cinta, o sintonice una emisora de radio.
2. Presione el botón SLEEP del equipo o del
■
mando a distancia.
Se enciende el indicador “SLEEP”.
3. Determine el tiempo durante el cual desea
■
que funcione el equipo antes de apagarse.
• Cada vez que pulsa SLEEP la cantidad de minutos cambia
en la pantalla en la secuencia siguiente:
= 30 = 60 = 90 = 120 = Cancelled =
La pantalla dejará de parpadear transcurridos cinco segundos y
volverá a mostrar la información previa al ajuste del temporizador
“Sleep”.
El equipo está ahora listo para apagarse al cabo de los minutos fijados.
Para confirmar la hora de la función Sleep
Cuando se pulsa el botón SLEEP se ve en el visor el tiempo restante
del modo SLEEP. La pantalla inicial vuelve después de 5 segundos.
Para cancelar el ajuste del temporizador SLEEP.
Presione el botón SLEEP hasta que se apague el indicador “SLEEP”
en la pantalla.
Al apagar el equipo se desactiva también el temporizador SLEEP
Si está realizando el ajuste del temporizador diario “Daily”, el
■
equipo se pondrá en marcha cuando llegue la hora a la que decidió despertarse.
(vuelta al principio)
Cómo cancelar el temporizador diario
Para cancelar el temporizador diario, apague el indicador del modo
siguiente:
CLOCK/TIMER CLOCK/TIMER
(presiónelo durante 2 segundos)
1. Presione el botón CLOCK/TIMER en el equipo
■
durante más de dos segundos.
2. Gire el mando "JOG dial" hasta que el indica-
■
dor ( ) parpadee en la pantalla.
3. Presione el botón CLOCK/TIMER.
■
El indicador del temporizador y el indicador CLOCK desaparecerán de la pantalla.
10
(2 veces)
Page 25

■■
Cabezal de borrado
Cabezal de grabación/reproducción
Arrastre
Rodillo de presión
Cuidado y mantenimiento
Si trata sus CD con cuidado, durarán mucho tiempo.
Discos compactos
• Sólo se pueden utilizar en este equipo los CD
que lleven este distintivo.
• El uso continuado de discos de perfil irregular
(en forma de corazón, octogonales, etc.) puede
dañar el equipo.
• Extraiga los discos de la caja sosteniéndolos
por el borde y haciendo un poco de presión en
la sujeción central de la caja.
• No toque la superficie brillante del CD ni lo
doble.
• Guarde los CD en sus respectivos estuches una
vez escuchados, para evitar que se estropeen.
• Procure no rayar la superficie del CD al guardarlo en el estuche.
• Evite exponerlos a luz solar directa, altas temperaturas y humedad.
• Un CD sucio no se reproducirá correctamente.
Si un CD se ensucia, límpielo con un paño
suave en pasadas desde el centro hacia afuera.
CUIDADO: No utilice disolventes (por ejemplo,
limpiador convencional de discos, diluyente en
atomizador, bencina, etc.) para limpiar el CD.
Cintas de casete
• Si la cinta está floja puede estirarse, cortarse o
engancharse en la platina. Elimine la holgura
insertando un lápiz en una de las bobinas y
girando en la dirección correcta.
• No toque la superficie de las cintas.
Español
• No guarde las cintas:
- En lugares polvorientos
- Bajo luz solar directa o mucho calor
- En zonas húmedas
- Sobre un televisor o altavoz
- Cerca de un imán
Platina de casete
• Si los cabezales, los arrastres o los rodillos metálicos se ensucian, puede suceder lo siguiente:
- Pérdida de la calidad del sonido
- Sonido discontinuo
- Desvanecimiento del sonido
- Borrado incompleto
- Grabación dificultosa
• Limpie los cabezales, los rodillos de arrastre y los de presión
con un bastoncillo de algodón humedecido con alcohol.
Condensación
Puede condensarse humedad en las lentes dentro del equipo en los casos siguientes:
• Después de poner en marcha la calefacción.
• En un cuarto húmedo.
• Si el equipo cambia directamente de una
zona fría a otra caliente.
Si ocurre, el equipo puede funcionar mal. En
este caso, deje el equipo encendido durante
unas horas hasta que la humedad se evapore,
desenchufe el cable de alimentación y vuélvalo
a enchufar.
Notas generales
Para que el funcionamiento del equipo sea el óptimo, asegúrese de
que los CD y el mecanismo estén siempre limpios.
• Guarde los CD en sus estuches y archívelos en cajas o estantes.
• Mantenga la tapa del compartimento del CD cerrada cuando no
esté en uso.
• Si los cabezales se magnetizan, el equipo producirá ruido y
perderá capacidad en las altas frecuencias.
• Para desmagnetizar los cab ezales apague la unidad y utilice un
desmagnetizador de cabezales (que puede adquirirse en tiendas
de material electrónico y de música).
11
Page 26

■■
• Si tiene problemas con su sistema, compruebe en esta lista la posible solución antes de acudir al servicio técnico.
• Si no puede solucionar el problema o si el sistema se ha dañado físicamente, avise a un técnico cualificado, como por ejemplo su distribuidor oficial, para que lleve a cabo la reparación.
No se oye ningún sonido. • El cable de alimentación principal
Español
No puede grabar. Se han eliminado las pestañas de protec-
La recepción de radio es pobre. • La unidad no está bien ubicada.
El CD salta. El CD está sucio o rallado. Limpie o sustituya el CD.
El CD no funciona. El CD está al revés. Coloque el CD con la etiqueta hacia
No se puede utilizar el mando a distancia.
Las funciones están deshabilitadas. El microprocesador incorporado ha fun-
No se abre el compartimento del casete. Durante la reproducción de la cinta se ha
Solución de problemas
Síntoma Causa posible Acción
• Conéctelo con firmeza
está desenchufado.
• Las pilas del equipo están descargadas.
• Están conectados los auriculares.
ción contra grabación del casete.
• La antena no está bien orientada.
• La comunicación entre el mando a
distancia y el sensor del equipo está
bloqueada.
• Las pilas están descargadas.
cionado mal debido a una interferencia
eléctrica externa.
desenchufado el cable de alimentación.
• Sustituya las pilas.
• Desconecte los auriculares.
Tape los agujeros en el borde posterior
del casete con cinta adhesiva.
• Gire la unidad hasta que la recepción
sea buena.
• Extienda la antena y gírela hasta que
se logre una buena recepción.
arriba.
• Elimine la obstrucción.
• Sustituya las pilas.
Desenchufe el equipo y vuélvalo a enchufar.
Enchufe el cable de alimentación, presione el botón POWER y después el
botón § STOP/EJECT.
■■
Amplificador
Potencia de salida 3,6 vatios por canal, RMS mín. a 3 ohmi-
Sensibilidad de salida/impedancia (1 kHz)
Auriculares 16 ohmios - 1 kohmio
Platina de casete
Respuesta en frecuencia 80 - 12,500 Hz
Fluctuación y trémolo 0,15% (WRMS)
Reproductor de CD
Relación señal/ruido 90 dB
Fluctuación y trémolo Inapreciable
Sintonizador
Sintonizador FM
Rango de sintonización 87,5 - 108,0 MHz
Sintonizador AM
Rango de sintonización 530 - 1,710 kHz
Antena Antena telescópica para FM
Altavoces 10 cm (3-15/16")
Especificaciones
os, de 150 Hz a 15 kHz, con una distorsión
armónica total máxima de 10%.
Salida de 0 - 20 mW/canal a 32 ohmios
Antena con núcleo de ferrita incorporada
para AM.
2, 3 ohmios
✕
En general
Dimensiones 438 ✕ 175,5 ✕ 261,5 mm (A/A/P)
(17-1/4
Peso Approx. 4,2 kg (9,3 libras) (sin baterías)
Accesorios
Cable de alimentación (1)
Mando a distancia (RM-SRCBZ6) (1)
Especificaciones eléctricas
Requisitos eléctricos CA 120 V ~ , 60 Hz
Consumo 18 vatios (modo encendido)
2,8 vatios (en modo de espera)
Diseño y especificaciones sujetos a cambios sin previo aviso.
6-29/32 ✕ 10-5/16 pulgadas)
✕
12
Page 27

Merci d’avoir fait l’acquisition de la chaîne portable avec lecteur CD de JVC.
Nous espérons qu’elle représentera un atout supplémentaire pour votre foyer ainsi que lors de vos sorties et qu’elle vous enchantera des années
durant.
Veuillez lire attentivement le présent manuel d’utilisation avant de faire fonctionner votre nouvelle chaîne stéréo.
Vous y trouverez toutes les informations nécessaires pour installer et utiliser la chaîne.
Si vous avez des questions auxquelles le manuel ne fournit pas de réponse, veuillez prendre contact avec votre revendeur.
Caractéristiques
Vous trouverez ci-dessous une explication de certaines des fonctions qui rendent votre chaîne si puissante et si simple à utiliser.
■ Les commandes et les opérations à effectuer ont été redéfinies pour les rendre encore plus accessibles, vous libérant
ainsi de toute contrainte afin que vous puissiez profiter pleinement de la musique.
• Grâce à la fonction COMPU PLAY de JVC, vous pouvez mettre la chaîne sous tension et démarrer automa-
tiquement la radio, la platine à cassettes ou le lecteur CD en activant une seule touche. (Lors de l’alimentation
secteur)
■ Effets sonores; BEAT, POP, et CLEAR.
■ La chaîne comprend des circuits AHB (Active Hyper Bass) PRO qui permettent de reproduire fidèlement les sons graves.
■ Possibilité de présélectionner jusqu’à 30 émetteurs (15 FM et 15 AM) en plus des fonctions de réglage automatique et manuel.
■ Une minuterie pratique pour l’utilisateur permet de s’éveiller ou de s’endormir agréablement en musique.
Structure du mode d’emploi
• Des informations de base identiques pour de nombreuses fonctions différentes – par exemple, le réglage du volume – sont traité es dans
le chapitre “Opérations communes” et ne sont pas répétées sous chaque fonction.
• Les noms des touches/des commandes sont indiqués entièrement en lettres majuscules : par ex. TUNER BAND.
• Les fonctions de la chaîne sont écrites avec une lettre majuscule initiale uniquement : par ex. Lecture Normale.
Utilisez la table des matières pour rechercher toute information requise.
Nous avons pris du plaisir à réaliser ce manuel pour vous et nous espérons qu’il vous aidera à apprécier les nombreuses fonctio ns que comprend
votre chaîne.
Français
AVERTISSEMENTS IMPORTANTS
1.Lors du transport de la chaîne
■
• Ne pas soulever ou abaisser la poignée de transport de la chaîne lorsque l’antenne télescopique est dépliée afin d’éviter de l’endommager.
2.Emplacement de la chaîne
■
• Choisissez une surface plane, horizontale, sèche, dans un endroit ni trop chaud ni trop froid (entre 5°C/41°F et 35°C/95°F).
• Laissez une distance suffisante entre la chaîne et un téléviseur.
• N’utilisez jamais l’appareil dans un endroit soumis à des vibrations.
3.Cordon d’alimentation
■
• Ne manipulez jamais le cordon d’alimentation avec les mains humides!
• La chaîne consomme toujours un certain courant (2,8 W) tant que le cordon d’alimentation est branché à la prise murale.
• Débranchez toujours l’appareil de la prise murale en tirant sur la fiche et non sur le cordon d’alimentation.
4.Mauvais fonctionnement, etc.
■
• Aucun élément interne n’est accessible à l’utilisateur. En cas de mauvais fonctionnement de la chaîne, débranchez le cordon d’alimentation et contactez votre revendeur.
• N’introduisez jamais d’objets métalliques dans l’appareil.
■■
Caractéristiques ...................................................................1
Structure du mode d’emploi ................................................1
AVERTISSEMENTS IMPORTANTS ...............................1
Pour commencer ......................................................2
Opérations communes ............................................3
Utilisation du tuner ..................................................4
Utilisation du lecteur CD .........................................6
Table des matières
Utilisation de la platine à cassettes
(Enregistrement) ..................................................... 8
Utilisation des minuteries ...................................... 9
Entretien - Divers .................................................. 11
Dépistage des défaillances .................................. 12
Caractéristiques .................................................... 12
Utilisation de la platine à cassettes
(Ecoute d’une cassette) ...........................................7
1
Page 28
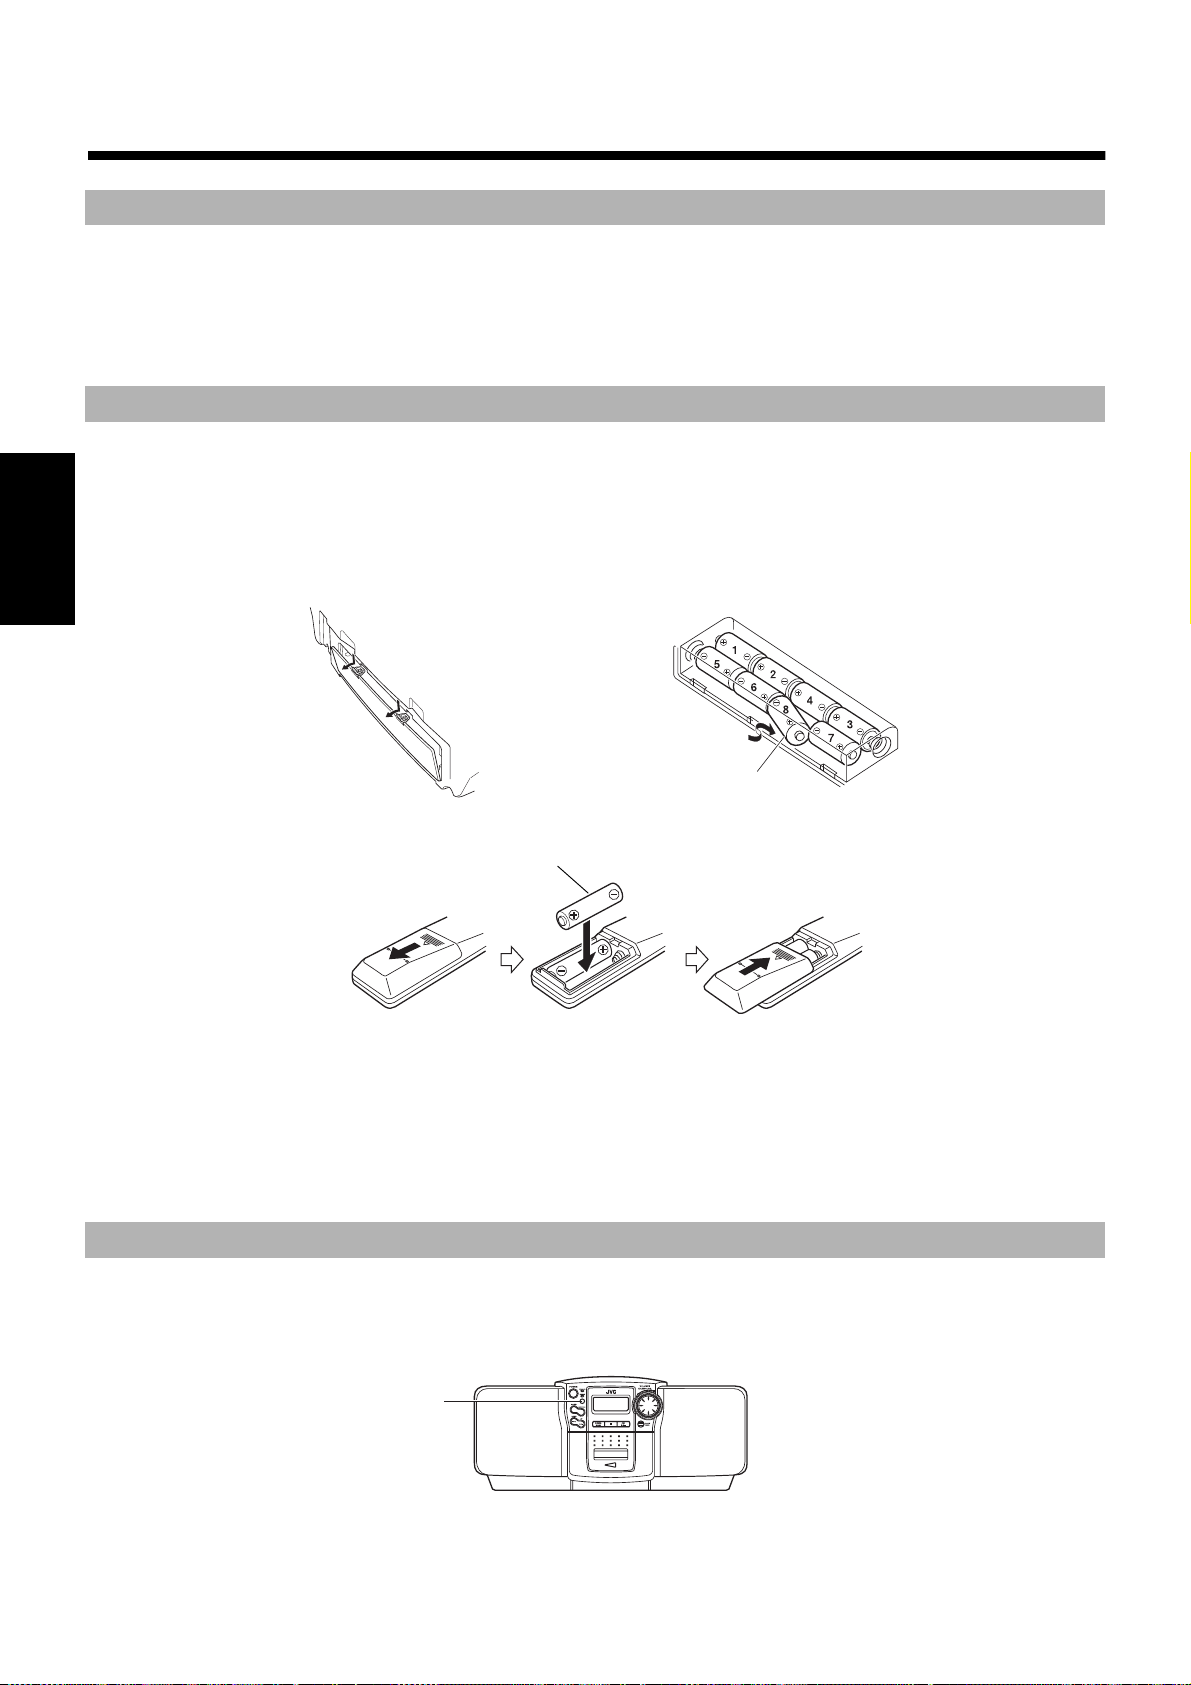
■■
Pour commencer
Accessoires
Vérifiez si tous les éléments suivants, fournis avec la chaîne, sont inclus.
Cordon d’alimentation (1)
Télécommande (1)
Si l’un de ces éléments fait défaut, veuillez contacter immédiatement votre revendeur.
Mise en place des piles
Comment installer les piles dans l’appareil
1. Ouvrir le couvercle du logement des piles à l’arrière de l’appareil en le tirant vers soi et en appuyant sur les languettes comme indiqué par
les flèches.
2. Mettre 8 piles (non fournies) dans le logement des piles, dans l'ordre “1” à “8” comme indiqué.
3. Refermer convenablement le couvercle du logement.
Remarque: Lorsque l’appareil fonctionne sur secteur (AC), la source d’alimentation commute automatiquement des piles au secteur. Nous
Français
conseillons néanmoins de retirer les piles lors du fonctionnement sur secteur.
Piles de format “R20/D (13F)
Comment installer les piles dans la télécommande
Faites correspondre la polarité des piles (+ et - ) avec les indications + et - de leur logement.
R6P(SUM-3)/AA(15F) (non fournies)
ATTENTION : Toujours manipuler les piles correctement.
Pour éviter que les piles coulent ou explosent :
• Retirez les piles lorsque l’appareil ou la télécommande ne doivent pas servir pendant un certain temps.
• Lorsque les piles doivent être remplacées, remplacez-les toutes en même temps.
• N’utilisez jamais une pile neuve avec des piles usées.
• Ne mélangez pas des piles de types différents.
• Ne jamais essayer de recharger des piles non rechargeables.
”
Utilisation de la télécommande
La télécommande permet d’utiliser la plupart des fonctions de l’appareil jusqu’à une distance d’environ 7 m (23 pieds).
Dirigez la télécommande vers le capteur situé sur la face avant de l’appareil.
Remarque: Si vous pointez la télécommande en la tenant sur son flanc, la distance indiquée ci-dessus est réduite.
2
Capteur à distance
Page 29

Raccordement du cordon d’alimentation secteur
PHONES
BEAT CUT
NORM-123
...
POWER
STANDBY
POWER ON
POWER
(AC)
or
ou
Introduisez fermement le cordon d’alimentation secteur fourni dans la borne secteur située au dos de
l’appareil.
Le cordon d'alimentation secteur fourni avec cet appareil ne peut étre branché que dans un seul sens
afin d'evier tout risque de choc électrique. Se référer á l'illustration pour le raccorder correctement.
ATTENTION :
• N’UTILISEZ PAS D’AUTRE CORDON D’ALIMENTATION QUE LE COR-
DON JVC FOURNI AVEC LE PRESENT APPAREIL POUR EVITER TOUT MAUVAIS FONCTIONNEMENT OU
DES DEGATS MATERIELS.
• DEBRANCHEZ TOUJOURS LE CORDON D’ALIMENTATION DE LA PRISE SECTEUR LORSQUE VOUS
PARTEZ OU QUE VOUS NE COMPTEZ PAS UTILISER L’APPAREIL PENDANT UN CERTAIN TEMPS.
Vous pouvez à présent brancher le cordon d’alimentation secteur dans la prise secteur et l’appareil est
prêt à recevoir vos commandes!
COMPU PLAY (alimentation secteur uniquement)
La fonction COMPU PLAY de JVC permet de commander les fonctions les plus utilisées de la chaîne à l’aide d’une seule touche.
Les opérations à une seule touche permettent d’écouter un CD ou une cassette, d’allumer la radio, etc. en appuyant simplement sur la touche
de lecture correspondant à cette fonction. La pression d’une seule touche met l’appareil sous tension pour vous et démarre la fonction demandée.
Si la chaîne n’est pas prête (par exemple, pas de CD dans le tiroir), elle se met malgré tout en marche pour vous permettre d’introduire un CD.
Le fonctionnement des opérations à une seule touche est expliqué pour chaque cas dans le chapitre qui traite de la fonction correspondante.
Les touches COMPU PLAY sont :
Français
Sur l’appareil
Touche CD 6
Touche TUNER BAND
Sur la télécommande
Touche CD 6
Touche TUNER BAND
Touche PLAY (TAPE)
■■
SOUND
Opérations communes
POWER
Témoin STANDBY
AHB PRO
VOLUME +, –
REMOTE CONTROL RM-SRCBZ6
Mettez sous et hors attente
Mise sous tension de l’appareil ——
Appuyez sur la touche POWER.
(AC)
POWER
ou
POWER
POWER ON
or
STANDBY
Témoin POWER
POWER
SOUND
AHB PRO
■ Si vous écoutiez le tuner, le dernier émetteur sélectionné revient
Remarque: Lors du fonctionnement sur piles, la touche POWER
Mettez l’appareil hors attente ———
Appuyez à nouveau sur la touche POWER.
Lors du fonctionnement sur secteur:
Affichage
Commande de VOLUME
PHONES
automatiquement.
de la télécommande ne fonctionne pas.
Le témoin “POWER ON” (vert) s’allume et l’affichage s’éclaire.
L’appareil se met en marche, prêt à continuer dans le mode où il se
trouvait lors de sa dernière mise hors tension.
■ Ainsi, si vous écoutiez un CD en dernier lieu, vous êtes prêt
pour écouter à nouveau un CD, mais vous pouvez changer pour
toute autre source si vous le souhaitez.
Le témoin STANDBY s’allume et les affichages s’effacent.
■ Lorsque l’appareil est en mode Standby, il continue à utiliser
une faible quantité d’énergie (2,8 W) pour l’affichage.
■ Pour éteindre complètement l’appareil, débranchez le cordon
d’alimentation de la prise secteur.
3
Page 30
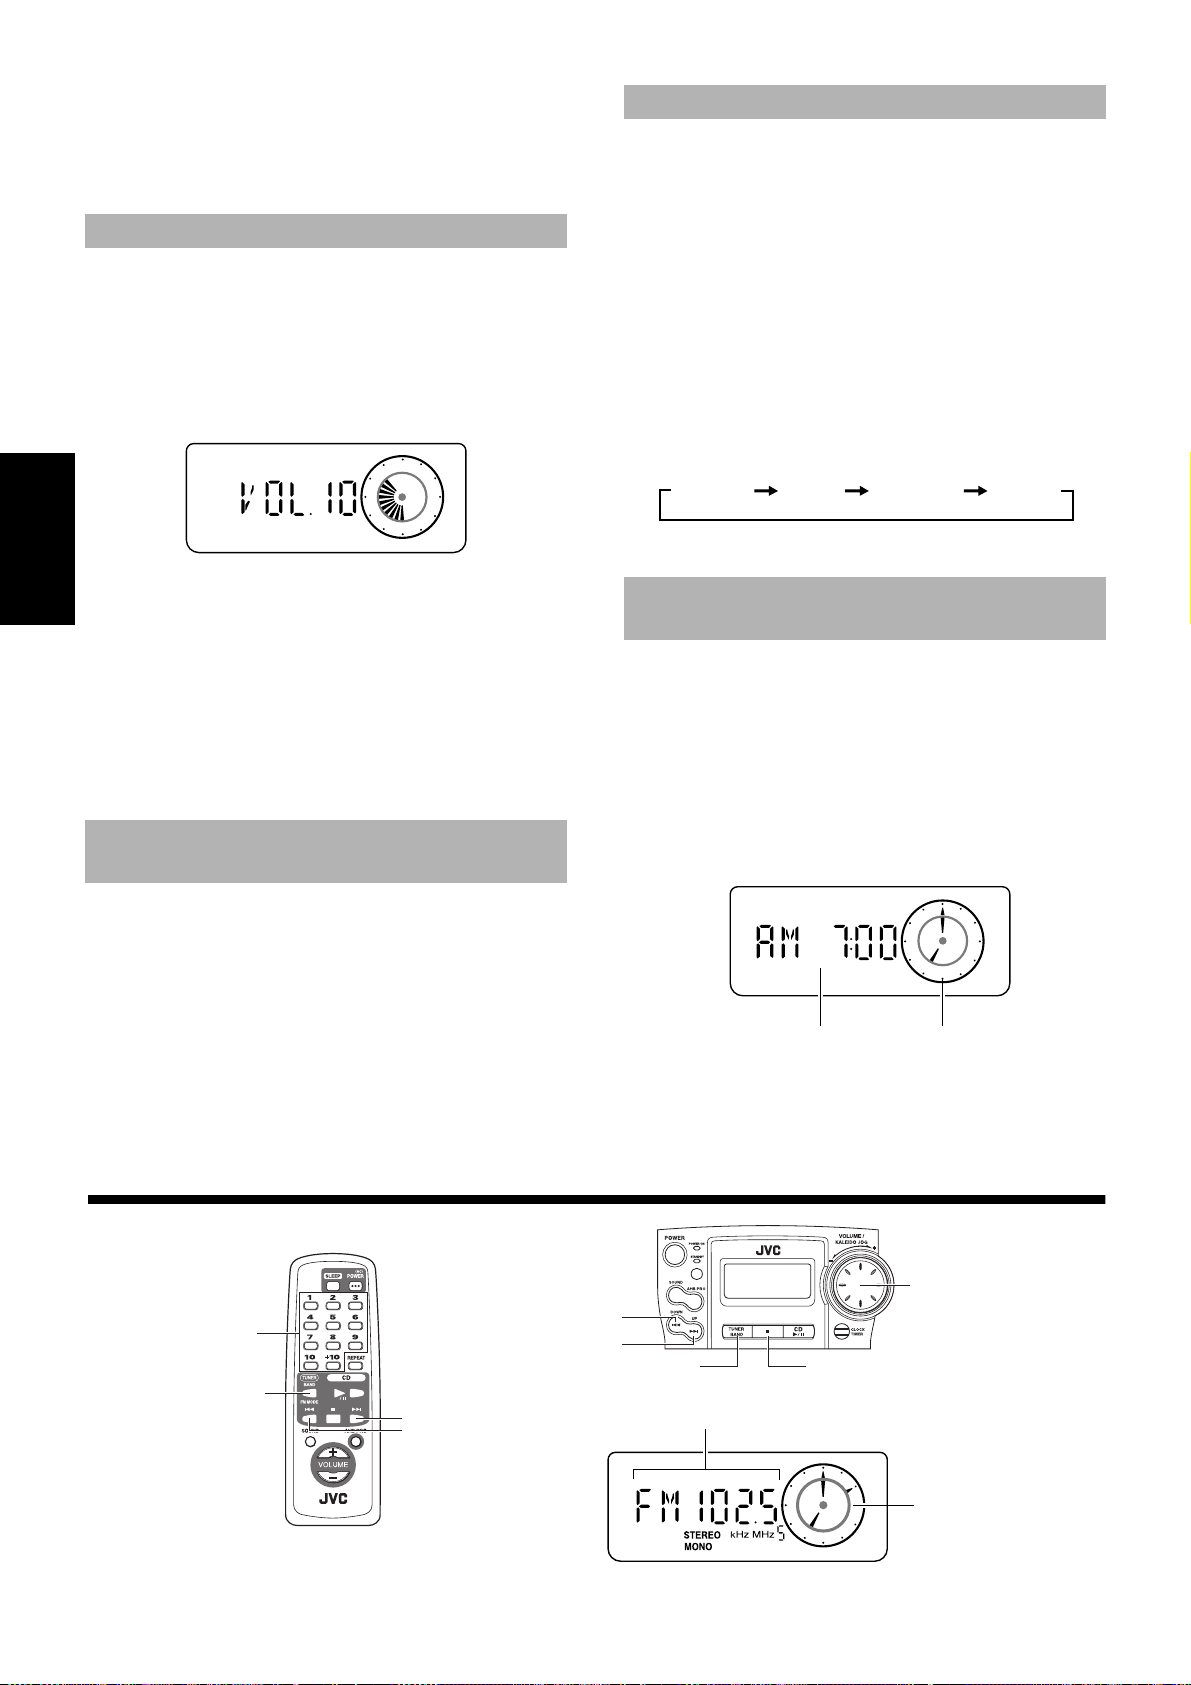
Lors du fonctionnement sur piles:
Horloge numérique Horloge analogique
Lorsque vous éteignez l’appareil à l’aide de sa touche POWER (la
touche POWER de la télécommande ne fonctionne pas), le témoin
Standby s’éteint et l’affichage est vierge.
Pour éteindre complètement l’appareil, retirez les piles du logement.
Réglage du volume
Vous pouvez régler le volume entre 0 et 25 lorsque l’appareil est
sous tension.
Tournez le bouton de VOLUME vers la droite ou vers la gauche
pour augmenter ou pour diminuer le volume.
OU
Appuyez sur la touche VOLUME + de la télécommande pour augmenter le volume ou sur la touche volume – pour diminuer le volume.
ATTENTION : NE JAMAIS mettre l’appareil sous
Français
tension et/ou démarrer la lecture d’une source
sans avoir au préalable réglé la commande de
VOLUME sur 0. Un éclat de son soudain risquerait
en effet d’endommager votre ouïe, les haut-parleurs et/ou le casque d’écoute.
Pour une écoute en privé
Raccordez un casque d’écoute à la prise PHONES. Dans ce cas, aucun son ne sort par les haut-parleurs.
Mettez toujours le volume sur le niveau minimum avant de brancher
ou d’utiliser un casque d’écoute.
Accentuation des sons graves
(AHB PRO)
Vous pouvez à présent accentuer les sons graves pour conserver
toute leur richesse à un faible volume (cet effet est uniquement disponible pour la lecture) :
Pour obtenir l’effet, appuyez sur la touche AHB (Active Hyper
Bass) PRO.
Le témoin “AHB PRO” s’allume sur l’affichage.
Pour supprimer l’effet, appuyez à nouveau sur la touche.
Le témoin “AHB PRO” s’éteint.
Effets sonores (SOUND)
La chaîne possède les présélections d’effets sonores suivantes afin
de mieux pouvoir contrôler le son de la musique; vous pouvez ainsi
l’adapter à l’acoustique de la pièce et à la qualité de la source.
Testez les effets sonores pour entendre l’influence de chacun sur la
musique. N’oubliez cependant pas que ces effets sont uniquement
opérationnels pendant la lecture.
Effets sonores
FLAT: Pas d’effet sonore.
BEAT: Accentue les graves et les aigus.
POP: Convient parfaitement à la musique vocale.
CLEAR: Pour un son stéréo vaste et dynamique.
Pour obtenir un effet, appuyez de manière répétitive sur la touche SOUND jusqu’à ce que le mode de son souhaité apparaisse sur
l’affichage.
Chaque fois que vous appuyez sur la touche SOUND, l’affichage
change et indique les informations dans l’ordre suivant :
FLATBEAT POP CLEAR
Pour supprimer l’effet, appuyez sur la touche SOUND jusqu’à
ce que “FLAT” apparaisse sur l’affichage.
Affichage de l’heure (Affichage)
En mode Standby, l’heure est affichée de manière numérique et
analogique.
En mode Standby, les deux horloges s’affichent.
Lors de la mise sous tension de l’appareil, seule l’horloge
analogique s’affiche.
Pour afficher les deux horloges lorsque l’appareil est
sous tension, appuyez sur la touche CLOCK/TIMER de l’appa-
reil.
Pour revenir à l’affichage d’origine, réappuyez sur la touche
CLOCK/TIMER de l’appareil.
Remarque: Vous devez d’abord mettre l’horloge à l’heure pour
qu’elle fonctionne. (Voir “Mise à l’heure de l’horloge”
à la page 9.)
■■
Utilisation du tuner
Touches
numériques
Touche TUNER
BAND
REMOTE CONTROL RM-SRCBZ6
4
¢
4
Bouton JOG
4
¢
PRESETTUNER BAND
Gamme d’ondes, fréquences, canal présélectionné
Horloge analogique
(Affichage lors de l’utilisation de la radio)
Page 31

Vous pouvez écouter les émetteurs en FM et AM. La syntonisation
Touche(s) numérique(s) (maintenir enfoncée(s) pendant 2 secondes)
peut se faire manuellement, automatiquement ou par présélections.
Commande radio à une touche (alimentation secteur uniquement) ——
Appuyez sur la touche TUNER BAND pour que la radio diffuse automatiquement le dernier émetteur écouté.
■ Vous pouvez passer à la radio à partir de n’importe quelle autre
source en appuyant simplement sur la touche TUNER BAND.
Recherche d’un émetteur
1.Appuyez sur la touche TUNER BAND.
■
L’onde et la fréquence du dernier émetteur sélectionné s’affichent.
Chaque fois que vous appuyez sur la touche, l’affichage indique
un type d’émetteur dans l’ordre suivant :
FM Auto FM MONO AM
2.Sélectionnez un émetteur en utilisant une
■
des méthodes suivantes.
■ Réglage manuel
Appuyez à plusieurs reprises sur la touche
passer de fréquence en fréquence jusqu’à ce que vous localisiez
l’émetteur souhaité.
ou
or
4 ou sur ¢ pour
Présélection des émetteurs
Vous pouvez ainsi présélectionner jusqu’à 15 émetteurs FM et jusqu’à
15 émetteurs AM à l’aide de la télécommande.
Présélection automatique (à l’aide
de l’appareil) ————————————
Dans chaque bande de fréquences, vous pouvez automatiquement
présélectionner 15 émetteurs FM et 15 émetteurs AM. Les numéros
présélectionnés seront attribués en premier aux stations de basse
fréquence puis aux stations de plus haute fréquence au fur et à
mesure que celles-ci seront localisées.
1.Sélectionnez une bande (AM ou FM) en
■
appuyant sur la touche TUNER BAND.
2.Appuyez sur la touche 7 PRESET pendant
■
plus de deux secondes.
3.Répétez les opérations 1-2 pour l’autre
■
bande de fréquences.
■ Pour changer un des émetteurs présélectionnés automatique-
ment, reportez-vous à la procédure expliquée pour les présélections manuelles.
ATTENTION : Si l’appareil est débranché ou en cas
de panne de courant, les émetteurs présélectionnés seront effacés après environ 5 minutes. Dans
ce cas, vous devrez à nouveau les présélectionner.
Présélection manuelle (à l’aide de la
télécommande)—————————————
Français
OU
■ Réglage automatique
Maintenez la touche
seconde; la fréquence diminuera ou augmentera automatiquement jusqu’à ce qu’un émetteur soit localisé.
4 ou ¢ enfoncée pendant plus d’une
OU
■ Recherche des présélections par l’appareil (Possible
uniquement après la présélection des émetteurs)
Appuyez sur la touche
présélectionné. Lorsque vous avez choisi le numéro de la
présélection, la bande s’affiche avec sa fréquence d’émission.
Exemple:Appuyez sur la touche
numéro de présélection 12 “P- 12” apparaisse.
■
Recherche des présélections à l’aide de la télécommande (Possible uniquement après la pr ésélection des
émetteurs)
Sélectionnez l’émetteur en entrant son numéro de présélection sur
les touches numériques.
• Exemple: Pour l’émetteur 5, appuyez sur 5. Pour l’émetteur
• Sa bande et sa fréquence s’affichent.
3. Tournez l’antenne pour localiser la meilleure
■
réception possible.
• Pour les émissions en FM, étendez l’antenne télescopique
et tournez-la.
•
Pour les émissions AM, tournez l’appareil.
Pour la
FM
15, appuyez sur +10 puis sur 5.
7 PRESET pour choisir un émetteur
7 PRESET jusqu’à ce que le
OU
Pour les
AM
1. Choisissez une bande de fréquences en appuy-
■
ant sur la touche TUNER BAND.
Appuyez sur la touche 4 ou ¢ pour localiser un
2.
■
émetteur.
3. Attribuez un numéro de présélection en appuy-
■
ant sur les touches numériques de la télécommande et en les maintenant enfoncées.
• Pour les numéros de présélection 1 à 10: appuyez sur la touche numérique et maintenez-la enfoncée pendant 2 secondes.
• Pour les numéros de présélection 11 à 15, appuyez sur la
touche +10 puis relâchez-la; appuyez ensuite sur la deuxième touche numérique (1 à 5) et maintenez-la enfoncée
pendant 2 secondes.
Lorsque le numéro de présélection clignote, le réglage est mémorisé et vous pouvez relâcher la touche numérique. L’affichage
normal de bande et de fréquence revient ensuite.
Exemple: Numéro de présélection = 12
4.Répétez les opérations 1 - 3 pour chaque
■
émetteur.
Pour changer les émetteurs présélectionnés, répétez les
opérations indiquées ci-dessus.
Changement du
mode de réception FM
Le témoin “STEREO” s’allume et vous pouvez alors entendre les
effets stéréo, quand un programme est émis en stéréo.
Si la réception d’une émission FM stéréo est difficile à capter ou
bruyante, vous pouvez sélectionner le mode monaural. La réception
s’améliore mais vous perdez l’effet stéréo.
Appuyez sur la touche TUNER BAND pour
sélectionner le mode FM MONO.
Le témoin “MONO” s’allume sur l’affichage.
Pour rétablir l’effet stéréo, appuyez sur la touche TUNER
BAND pour sélectionner le mode FM Auto. Le témoin “MONO”
s’éteint.
5
Page 32

■■
Utilisation du lecteur CD
Tiroir de disque
CD OPEN
4
¢
Touches numériques
REPEAT
/8
¢
7
4
Numéro de plage
Temps d’écoute, nombre de pas
Bouton JOG
7
6
Témoin CD/
Horloge analogique
REMOTE CONTROL RM-SRCBZ6
Français
Vous pouvez utiliser les fonctions de lecture normale ou de lecture
répétée. La lecture répétée permet de répéter toutes les plages ou
juste une plage du disque compact.
Lecture par une seule touche
(alimentation secteur uniquement) —
■ Appuyez sur la touche CD 6.
• L’appareil se met automatiquement sous tension. S’il y a un
CD dans le tiroir de disque, l’indication “PLAY” s’affiche et
la lecture commence à partir de la première plage.
•
S’il n’y a pas de CD dans le tiroir de disque, le message “NO
DISC” s’affiche et le lecteur CD reste en mode d’arrêt.
Lecture normale
1. Appuyez sur la touche CD OPEN de l’appar-
■
eil.
Le tiroir de disque s’ouvre.
2. Posez un disque dans le tiroir, avec les
■
inscriptions tournées vers le haut.
3. Refermez doucement le tiroir de disque à
■
la main.
4. Appuyez sur la touche CD 6.
■
La lecture de la première plage du CD commence.
Le lecteur CD s’arrête automatiquement après la lecture de la dernière plage du disque.
• Pendant la lecture, le numéro de la plage en cours et le temps
de lecture écoulé sont indiqués sur l’affichage.
Pour arrêter la lecture du CD, appuyez sur la touche
Les informations suivantes s’affichent pour le CD.
Nombre total de plages
Témoin de répétition
7.
(Affichage lors de l’utilisation du lecteur CD)
Saut de plages (
Pendant la lecture, appuyez sur la touche 4 ou ¢ pour
sélectionner la plage souhaitée.
La lecture de la plage choisie commence.
• Appuyez sur la touche
plage à la fois. Le témoin CD s’allume un peu plus vite à droite.
• Appuyez sur la touche
plage à la fois. Le témoin CD s’allume un peu plus vite à gauche.
ou
4
¢ puis relâchez-la pour avancer d’une
4 puis relâchez-la pour reculer d’une
) —————
¢
Recherche de passage ———————
Pendant la lecture, maintenez la touche 4 ou ¢ enfoncée.
Cette opération permet l’avance/le recul rapide de la lecture du CD.
Vous pouvez ainsi repérer un passage précis sur la plage que vous
écoutez (la lecture du CD se fait lentement pendant un instant, puis
elle augmente).
Repérer directement une plage avec
la télécommande ——————————
L’utilisation des touches numériques de la télécommande permet de
lire directement le début de n’importe quelle plage.
Pendant la lecture, entrez le numéro de la plage que vous
voulez écouter à l’aide des touches numériques.
La lecture de la plage choisie commence.
• Exemple : Pour la plage 5, appuyez sur 5. Pour la plage 15,
appuyez sur +10, puis sur 5. Pour la plage 20, appuyez sur +10,
puis sur 10. Pour la plage 32, appuyez trois fois sur +10, puis
sur 2.
Lecture répétée
Vous pouvez répéter une plage ou toutes les plages du CD.
Temps de lecture écoulé
Pour mettre en pause, appuyez sur la touche CD
Pour annuler le mode pause, réappuyez sur la touche CD
La lecture reprend là où elle s’était arrêtée.
Remarques:
• Vous pouvez placer dans le tiroir un CD de 8 cm sans
adaptateur.
• Si le lecteur ne parvient pas à lire correctement le CD (par
exemple, parce qu’il est griffé), le message “000000” apparaît
sur l’affichage.
• Même si une autre fonction est sélectionnée pendant la lecture
d'un CD, la dernière plage est mémorisée.
6.
6.
6
Pendant ou avant la lecture, appuyez sur la touche REPEAT de la télécommande pour sélectionner le mode de
répétition.
Le témoin de répétition change comme indiqué ci-dessous chaque
fois que vous appuyez sur la touche.
= ALL = affichage vierge = (retour au début)
: Répète une plage.
ALL : Répète toutes les plages.
Pour quitter le mode de répétition, appuyez sur la touche
REPEAT jusqu’à ce que le témoin “REPEAT” s’éteigne.
Page 33
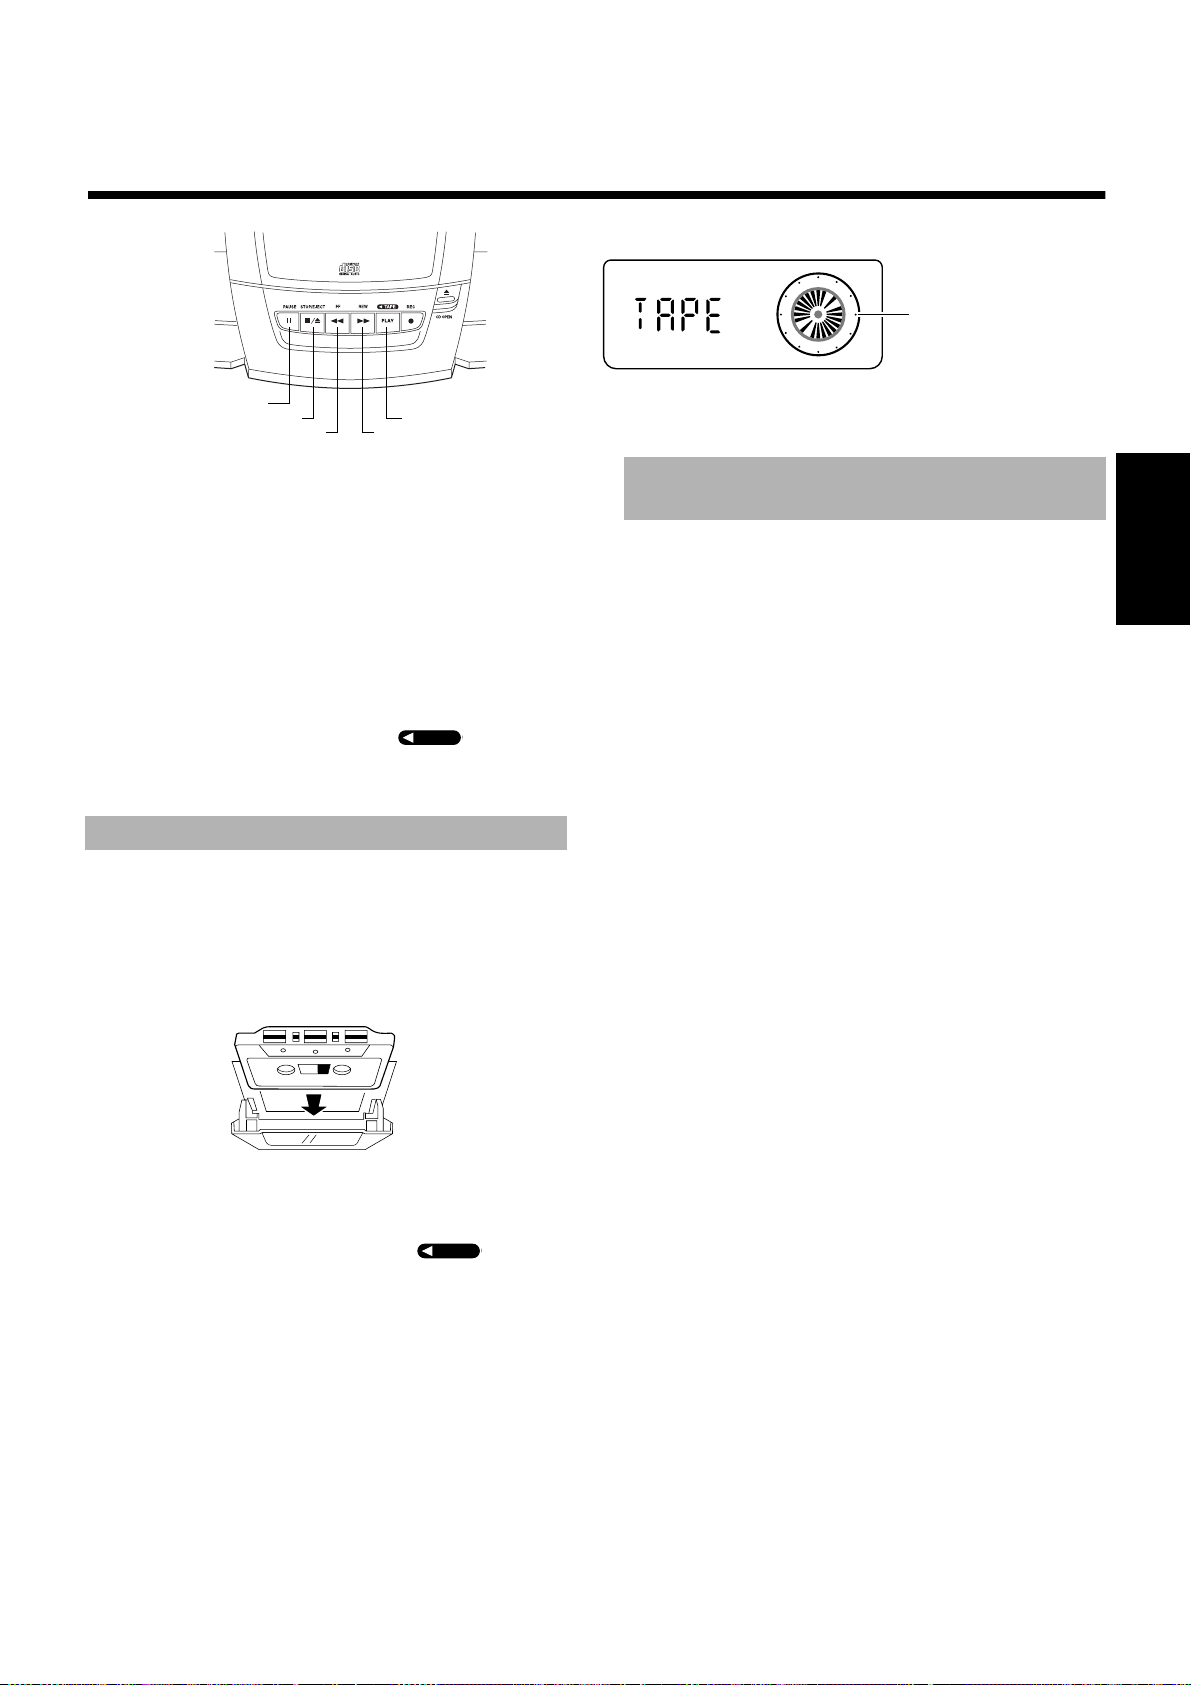
■■
Utilisation de la platine à cassettes
(Ecoute d’une cassette
)
■■
8
§
1
La platine à cassettes permet de lire et d’enregistrer des cassettes audio.
Remarques:
• La platine à cassettes donne de meilleurs résultats avec des cassettes normales (les cassettes métal ou CrO
seillées).
• Il est déconseillé d’utiliser des cassettes de plus de 120 minutes
car elles peuvent produire des déformations caractéristiques et
leurs bandes se coincent facilement dans les galets-presseurs et
dans les cabestans.
Lecture à une touche (alimentation
secteur uniquement)————————
Appuyez simplement sur la touche PLAY de l’appareil.
L’appareil se met automatiquement sous tension, “TAPE” s’affiche
et, si vous avez installé une cassette dans la platine, la lecture commence.
¡
PLAY
2
TAPE
TAPE
ne sont pas con-
Témoin de cassette TAPE/
Horloge analogique
(Affichage lors de l’utilisation de la platine à cassettes)
Avance et retour rapides
d’une cassette
Appuyez sur la touche
pareil pour faire avancer rapidement la cassette.
Appuyez sur la touche
reil pour rembobiner rapidement la cassette.
• La platine à cassettes s’arrête automatiquement à la fin de la
bande.
(avance rapide) de l’ap-
1
(retour rapide) de l’appa-
¡
Français
Lecture
1.Appuyez sur la touche § STOP/EJECT
■
pour ouvrir le porte-cassette.
2.Insérez une cassette avec la partie de la
■
bande exposée tournée vers le haut,
comme indiqué ci-dessous.
+ Direction avant
3.Fermez le porte-cassette doucement,
■
jusqu’à ce qu’il se mette en place avec un
déclic.
TAPE
4.Appuyez sur la touche PLAY .
■
• La lecture s’arrête à la fin de la bande.
• Le témoin TAPE s’allume toujours à droite quand la bande
défile.
Pour mettre en pause,
pareil.
Pour annuler le mode pause,
PAUSE. La lecture reprend là où elle s’était arrêtée.
8
Pour arrêter la lecture,
STOP/EJECT.
Pour sortir la cassette,
che § STOP/EJECT.
appuyez sur la touche
appuyez à nouveau sur la touche
appuyez une fois sur la touche
arrêtez-la et appuyez à nouveau sur la tou-
TAPE
PAUSE de l’ap-
8
§
7
Page 34

■■
■■
Utilisation de la platine à cassettes
(Enregistrement)
Témoin REC
Témoin de cassette TAPE
Horloge analogique
¡
¶
PLAY
8
§
1
Ce qu’il faut savoir avant de commencer
l’enregistrement————————————
■
Il paut eire illégal d’enraglstrer ou de reproduire des
oeuvres sous copyright sans le consentement du
détenteur des droite d’auteur.
■
Le niveau d’enregistrement correct est automatiquement sélec-
Français
tionné par la fonction ALC (contrôle de niveau automatique) et il
n’est pas affecté par la commande de VOLUME de l’appareil ni
par l’utilisation d’effets sonores.
■
Vous pouvez retirer les deux petites languettes à l’arrière de la
cassette, une pour la face A et l’autre pour la face B, pour éviter
tout effacement ou enregistrement accidentel.
■
Pour enregistrer sur une cassette dont on a retiré les languettes, recouvrez d’abord les orifices avec du ruban adhésif comme illustré.
Remarques:
•
Utilisez des cassettes normales (pas des cassettes métal or CrO2)
pour l’enregistrement.
• En début et en fin de bande, il y a une amorce sur laquelle il
n’est pas possible d’enregistrer.
• Si vos enregistrements sont excessivement bruyants ou contiennent trop de déclics d’électricité statique, il se peut que
l’appareil se trouve trop près d’un téléviseur, qui était allumé
pendant l’enregistrement. Eteignez le téléviseur ou éloignez
l’appareil.
Enregistrement à partir de la
radio
1. Appuyez sur la touche § STOP/EJECT pour
■
ouvrir le porte-ca ssette.
2. Insérez une cassette vierge ou effaçable avec
■
la partie de la bande exposée tournée vers le
haut, comme indiqué ci-dessous, et bobinez
l’amorce.
3. Fermez le porte-cassette doucement, jusqu’à
■
ce qu’il se mette en place avec un déclic.
4. Localisez un émetteur radio.
■
5. Appuyer sur la touche ¶ REC de l'appareil
■
La touche de lecture s'enfonce en même temps, le témoin d'enregistrement "REC" s'allume et l'appareil commence l'enregistrement.
• La cassette est enregistrée puis s’arrête à la fin de la bande.
• Le témoin TAPE s’allume toujours à droite quand la bande
défile.
+ Direction avant
(Affichage lors de l’utilisation de la platine à cassettes)
Pour arrêter provisoirement l’enregistrement, appuyez sur
la touche 8 PAUSE de l’appareil.
Pour annuler le mode pause, appuyez à nouveau sur la touche
PAUSE. L’enregistrement reprend là où il s’était arrêté.
8
Pour arrêter l’enregistrement, appuyez une fois sur la touche
STOP/EJECT.
§
Pour sortir la cassette, arrêtez-la et appuyez à nouveau sur la
touche § STOP/EJECT pour ouvrir le porte-cassette.
Enregistrement d’un émetteur AM
(BEAT CUT) —————————————
Lors de l’enregistrement d’une émission AM, vous pourriez entendre
des parasites qui ne sont pas audibles lorsque vous écoutez l’émission. Dans ce cas, vous pouvez utiliser la fonction BEAT CUT.
Faites passer l’interrupteur BEAT
CUT situé au dos de l’appareil de la
position NORM-1 à la position 2 ou 3.
Remarque: Normalement, l’interrupteur BEAT
CUT doit être mis sur la position
NORM-1.
Enregistrement à partir d’un CD
Le lecteur CD peut être démarré en même temps que la platine à
cassettes pour un enregistrement synchronisé et tout le contenu du
CD est alors enregistré sur la cassette dans l’ordre du CD.
1. Introduisez une cassette dans la platine à
■
cassettes et bobinez l’amorce.
2. Placez un CD dans le tiroir.
■
3. Appuyez sur la touche CD 6.
■
4. Appuyez sur la touche 7 pour arrêter le
■
disque CD.
• Vous pouvez vérifier le nombre de plages et le temps de lecture
total du CD sur l’affichage. (Voir page 6.)
5. Sélectionnez le mode de répétition du CD
■
si vous le souhaitez.
Pour sélectionner le mode de répétition ( ou ALL), appuyez sur la touche REPEAT de la télécommande.
6.Choisissez si vous souhaitez laisser envi-
■
ron quatre secondes de blanc sur la cassette entre les plages.
Si vous souhaitez conserver les blancs, sautez l’opération suivante.
Si vous ne souhaitez pas de blanc entre les plages, effectuez la manoeuvre suivante sur le lecteur CD.
• Appuyez deux fois sur la touche CD 6.
7.Appuyer sur la touche ¶ REC de l’appareil.
■
La touche de lecture s’enfonce en même temps, le témoin d’enregistrement “REC” s’allume et l’enregistrement synchronisé
commence.
• La cassette est enregistrée puis s’arrête à la fin de la bande.
8
Page 35
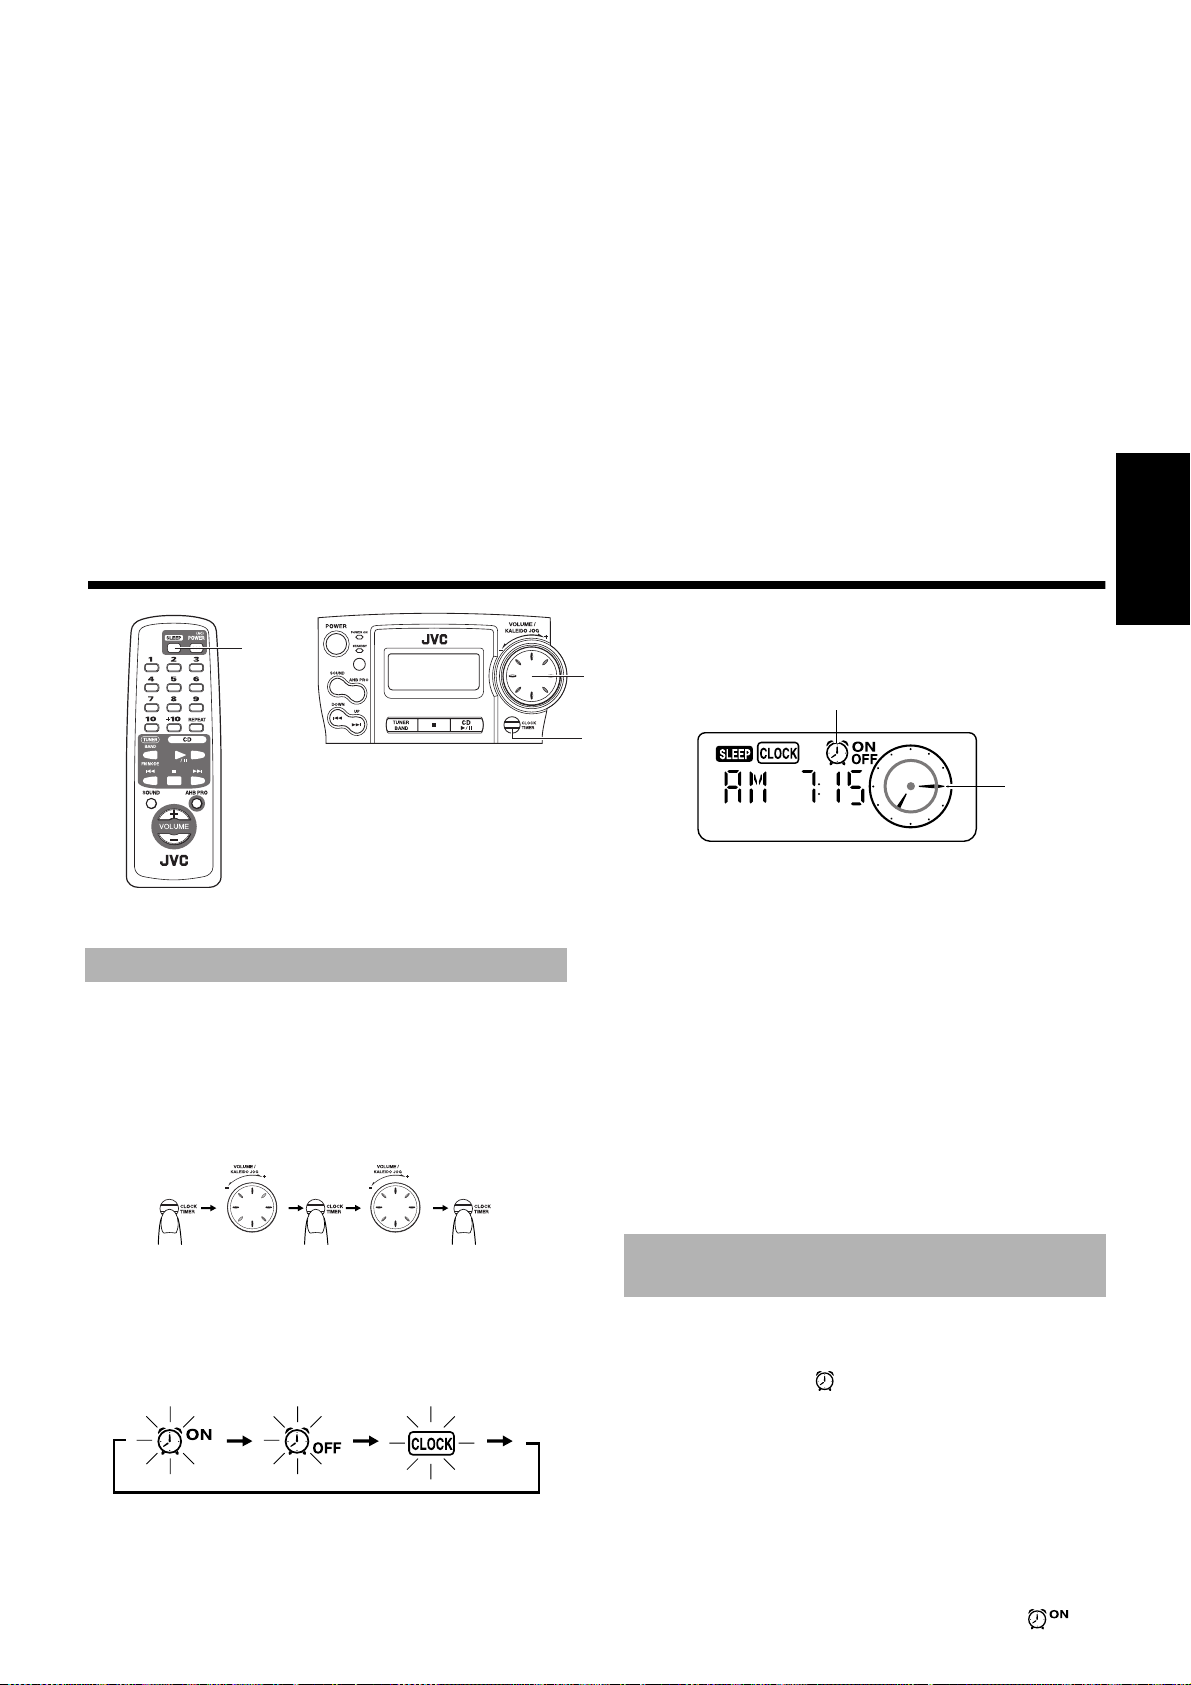
• Pour continuer l’enregistrement sur l’autre face de la cassette,
effectuez les opérations suivantes:
1. Retournez la cassette et bobinez l’amorce.
2. Appuyez sur la touche CD 6 puis sur la touche ¶ REC.
L’enregistrement synchronisé commencera à partir du début de
la dernière plage interrompue à la fin de la première face de la
cassette.
Pour arrêter l’enregistrement, appuyez sur la touche §
STOP/EJECT.
Pour sortir la cassette, arrêtez-la et appuyez à nouveau sur la
touche § STOP/EJECT pour ouvrir le porte-cassette.
Remarques:
• Si le CD s’arrête avant la cassette, la cassette continuera de
tourner jusqu’à ce que vous l’arrêtiez. Appuyez sur la touche
§ STOP/EJECT pour arrêter la cassette.
• Pendant l’enregistrement synchronisé, les touches CD 6,
4, et ¢ du lecteur CD ne fonctionnent pas.
• Si vous appuyez sur la touche REC ¶ pendant la lecture du CD,
l’enregistrement commencera à partir du début de la plage en
cours de lecture.
Pour continuer l'enregistrement sur
l’autre face de la cassette —————
Lorsque l’enregistrement a atteint la fin de la bande et s’est arrêté,
prenez les mesures suivantes pour continuer l’enregistrement sur
l'autre face.
1. Retournez la cassette et bobinez l’amorce.
2. Réappuyez sur la touche ¶ REC.
L’enregistrement synchronisé commencera à partir de
la dernière plage interrompue à la fin de la première
face de la cassette.
■■
Les minuteries permettent de programmer automatiquement les fonctions d’écoute.
Utilisation des minuteries
SLEEP
REMOTE CONTROL RM-SRCBZ6
Mise à l’heure de l’horloge
Vous ne pouvez régler l'horloge que lorsque l'appareil
est allumé.
Remarques:
• L’horloge doit être à l’heure pour que les minuteries puissent
fonctionner correctement.
• Lors de la programmation des minuteries, vous avez deux minutes pour accomplir toute la procédure. Sinon, le réglage est
effacé et doit être recommencé depuis le début.
Bouton JOG
Témoin de la minuterie
CLOCK/TIMER
Horloge
analogique
(Affichage lors de l’utilisation de la minuterie)
4. Tournez le bouton JOG pour régler l'heure.
■
Tournez le bouton JOG vers la droite ou la gauche pour avancer
ou retarder l'heure. En tournant le bouton rapidement, vous pouvez avancer ou retarder l'heure plus rapidement.
5. Appuyez sur la touche CLOCK/TIMER.
■
Attendez ensuite 5 secondes ou appuyez à nouveau sur la touche
CLOCK/TIMER pour revenir à l’affichage d’origine. L’heure
choisie est validée et les secondes commencent à avancer à partir de
0.
ATTENTION : En cas de coupure de courant, l’horloge perd ses réglages après envir
L’affichage indique “AM12:00” et le témoin
“CLOCK” clignote; l’horloge doit alors être remise
à l’heure.
o
n 5 minutes.
Français
(pendant 2 secondes)
1. Appuyez sur la touche CLOCK/TIMER de l’appa-
■
reil pendant plus de deux secondes.
2. Tournez le bouton JOG jusqu’à ce que le témoin
■
“CLOCK” clignote sur l’affichage.
L’affichage change comme illustré:
(pendant 2 secondes) (Témoin d’horloge
3. Appuyez sur la touche CLOCK/TIMER.
■
Le témoin “CLOCK” reste allumé. L’heure programmée sur l’appareil clignote sur l’affichage.
(Affichage de l’horloge
“CLOCK”)
“CLOCK”)
(Sélectionnez l’heure)
(Sélectionnez l’heure)
Réglage de la minuterie
Bonjour
Lorsque vous avez programmé la minuterie Bonjour, celle-ci s’enclenche tous les jours à la même heure. Vous pouvez la réactiver ou
la supprimer.
Le témoin de la minuterie ( ) présent sur l’affichage indique quand
la minuterie Bonjour est opérationnelle.
Remarque:
1. Appuyez sur la touche POWER pour mettre
■
l’appareil sous tension.
2. Programmation de l’heure d’enclenchement
■
“ON” (Exemple : AM 7:00)
1. Appuyez sur la touche CLOCK/TIMER de l’appareil pen-
2. Tournez le bouton JOG jusqu’à ce que le témoin
Effectuez chaque réglage dans les 30 secondes sinon,
le réglage est effacé et doit être recommencé depuis le
début.
dant plus de deux secondes.
()
cli-
9
Page 36
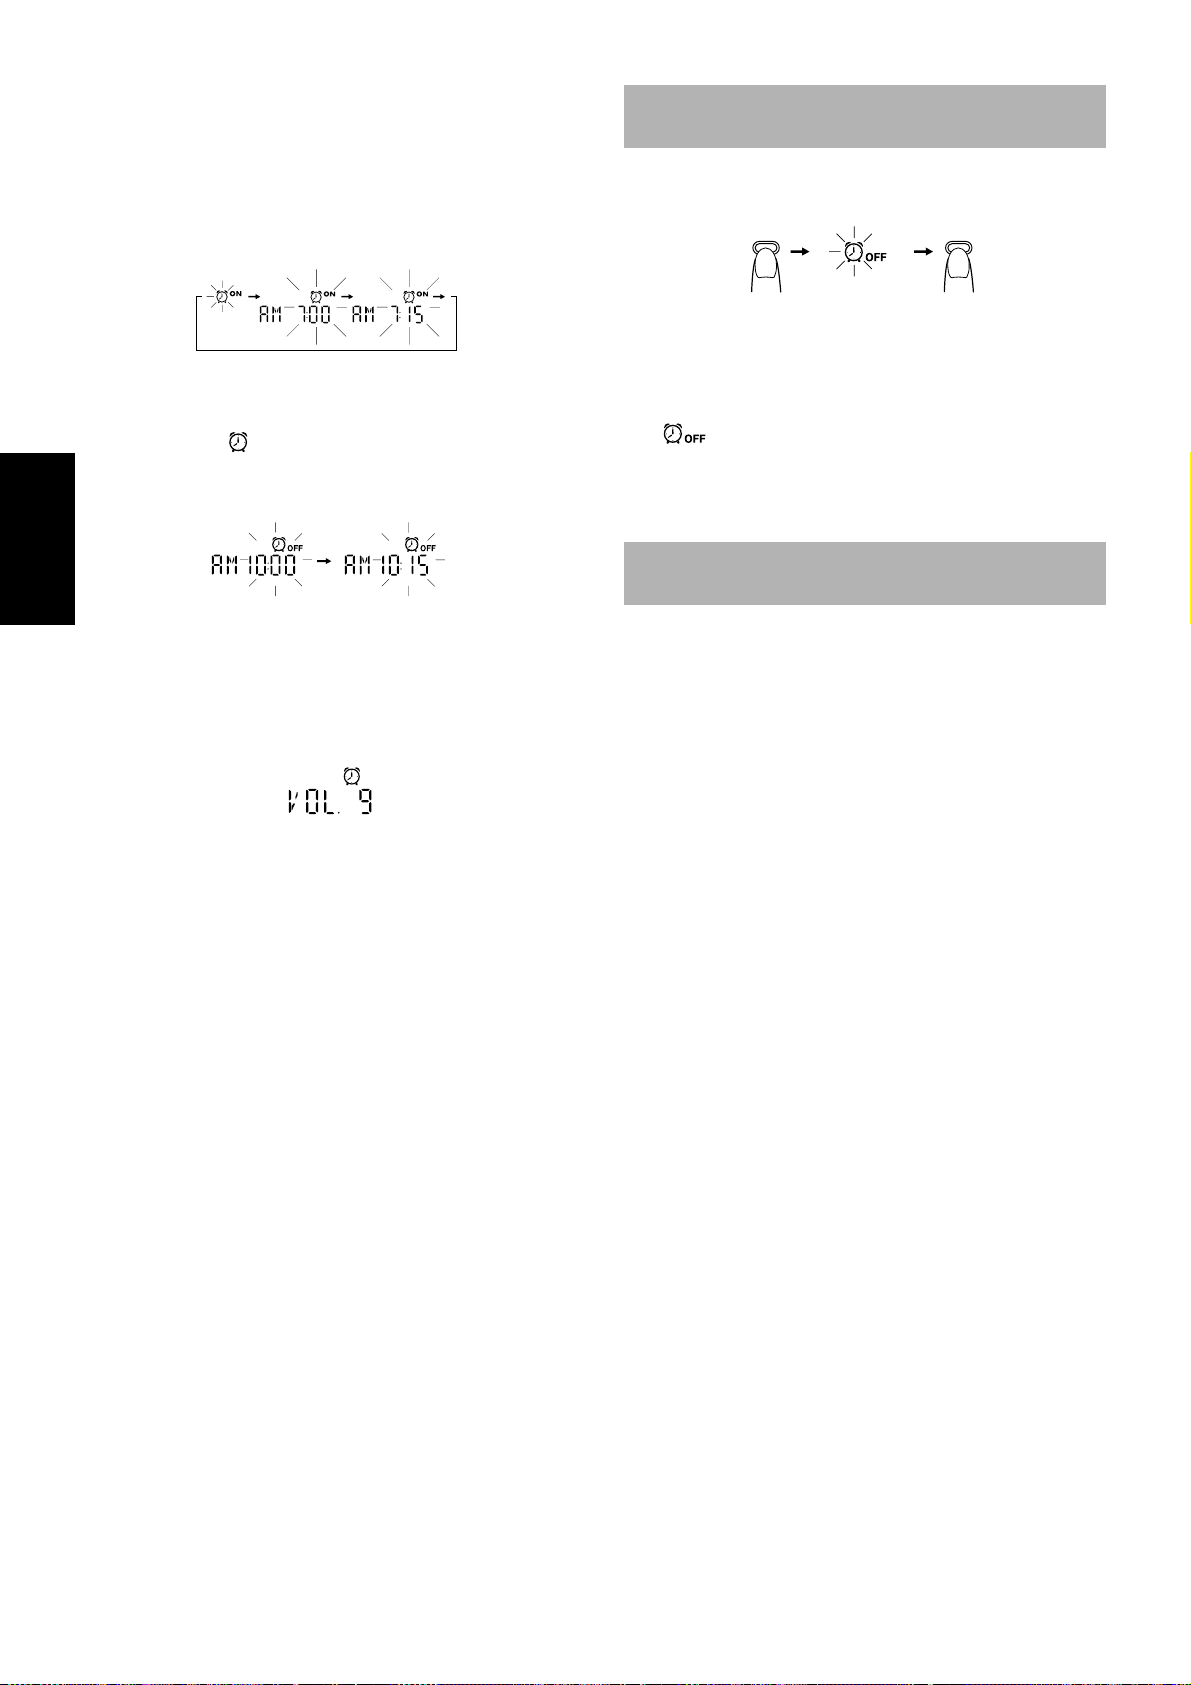
gnote sur l’affichage.
CLOCK/TIMER CLOCK/TIMER
(Maintenir enfoncée
pendant 2 secondes)
(2 fois)
3. Appuyez sur la touche CLOCK/TIMER.
L’heure ON programmée clignote sur l’affichage.
4. Tournez le bouton JOG pour régler l’heure à laquelle la minute-
rie doit s’enclencher.
Tournez le bouton JOG vers la droite ou vers la gauche pour
augmenter ou pour diminuer l’heure.
En tournant le bouton rapidement, vous pouvez avancer ou retarder
l'heure plus rapidement.
3. Programmation de l’heure d’extinction “OFF”
■
(Exemple : AM 10:15)
1. Appuyez sur la touche CLOCK/TIMER de l’appareil.
Le témoin ( ) s’allume et l’heure OFF programmée clignote sur l’affichage.
2. Tournez le bouton JOG pour régler l’heure à laquelle la minuterie doit se désactiver.
Suppression de la minuterie
Bonjour
Suppression de la minuterie Bonjour ——
Pour supprimer la minuterie Bonjour, éteignez le témoin de la minuterie en procédant de la manière suivante:
1. Appuyez sur la touche CLOCK/TIMER de l’appa-
■
reil pendant plus de deux secondes.
T ournez le bouton JOG jusqu’à ce que le témoin
2.
■
(
3. Appuyez sur la touche CLOCK/TIMER.
■
Les témoins de la minuterie et CLOCK s’éteignent.
Pour réactiver la minuterie supprimée,
opérations que pour la programmation de la minuterie Bonjour.
clignote sur l’affichage.
)
répétez les mêmes
Français
4. Réglage du volume
■
1. Appuyez sur la touche CLOCK/TIMER de l’appareil.
Le témoin de la minuterie est allumé et le niveau du volume
clignote sur l’affichage.
2. Tournez le bouton JOG vers la droite ou vers la gauche pour
augmenter ou pour diminuer le volume.
Plage de réglage du volume: 0 - 25 ou –.
5. Appuyez sur la touche CLOCK/TIMER de l’appa-
■
reil.
La programmation de la minuterie est terminée et l’affichage
précédent réapparaît. Le témoin de la minuterie reste allumé.
6. Avant d’éteindre l’appareil, préparez la source
■
de musique.
Tuner: Recherchez l’émetteur souhaité.
CD: Placez un CD dans le tiroir.
Cassette: Introduisez une cassette pré-enregistrée dans le
7. Appuyez sur la touche POWER pour mettre
■
l’appareil hors tension.
Pour valider la programmation de la minuterie (heure
d’enclenchement / de désactivation et niveau du volume),
pendant plus de 2 secondes, et appuyez plusieurs fois sur la touche
CLOCK/TIMER.
Pour modifier la programmation de la minuterie,
toute la procédure depuis le début.
ATTENTION : Si l’appareil est débranché ou en cas
de panne de courant, la programmation des minuteries sera effacée après environ 5 minutes. Vous
devrez alors remettre l’horloge à l’heure avant de
les reprogrammer.
porte-cassette.
allumez la chaîne, appuyez sur la touche CLOCK/TIMER
répétez
Réglage de la minuterie
Bonsoir
Utilisez la minuterie Bonsoir (SLEEP) pour éteindre l’appareil après
un certain nombre de minutes. Cette minuterie permet de s’endormir
agréablement en musique sans avoir à se soucier d’éteindre la chaîne.
Cette minuterie Bonsoir ne peut cependant être programmée que
■
si la chaîne est allumée et que vous écoutez une source.
1. Ecoutez un CD, localisez l’émetteur souhaité
■
ou écoutez une cassette.
2. Appuyez sur la touche SLEEP de l’appareil ou
■
de la télécommande.
Le témoin “SLEEP” s’allume.
3. Déterminez la durée d’écoute avant l’extinc-
■
tion de la chaîne.
• Chaque fois que vous appuyez sur la touche SLEEP, la
minuterie Bonsoir change le nombre de minutes affiché dans
l’ordre suivant :
= 30 = 60 = 90 = 120 = Annulé =
L’écran arrête de clignoter au bout de 5 secondes et il revient à l’affichage précédant le réglage de la minuterie Bonsoir.
L’appareil est à présent prêt à s’éteindre après le nombre de minutes
programmé.
Pour confirmer l’heure d’extinction
Lorsque vous appuyez sur la touche SLEEP, le temps restant avant
l’extinction s’affiche. L’affichage d’origine réapparaît après 5 secondes.
Pour supprimer la programmation de la minuterie Bonsoir
Appuyez sur la touche SLEEP jusqu’à ce que le témoin “SLEEP”
s’éteigne.
Si vous éteignez l’appareil, la minuterie Bonsoir est également déprogrammée.
Si vous avez programmé la minuterie Bonjour, l’appareil se met
■
en marche à l’heure de réveil programmée.
(retour au début)
10
Page 37

■■
Tête d’enregistrement/de lecture
Galets-presseurs
Cabestans
Tete d’effacement
Entretien - Divers
Prenez grand soin de vos CD afin d’assurer leur bon et long fonctionnement.
Disques compacts
• N’utilisez que les CD portant la marque ci-contre
avec cet appareil.
• L’utilisation continue de CD de formes
irrégulières (en forme de coeurs, octogonaux,
etc.) risque cependant d’endommager le lecteur.
• Retirez le CD de son boîtier en le tenant par les
bords et en appuyant légèrement sur l’orifice
central du boîtier.
• Ne touchez pas la surface brillante du CD et ne le
pliez pas.
• Rangez immédiatement le CD dans son boîtier
après l’écoute pour éviter toute détérioration.
• Veillez à ne pas rayer la surface du CD lorsque
vous l’enlevez de son boîtier ou que vous l’y
rangez.
• Evitez toute exposition aux rayons directs du
soleil, à des températures extrêmes ou à l’humidité.
• Si le CD est sale, sa lecture risque d’être
déformée. Dans ce cas, nettoyez-le avec un chiffon doux, en l’essuyant en mouvements rectilignes allant du centre vers le bord.
ATTENTION : Ne jamais utiliser de solvants (par
exemple des produits de nettoyage pour disques
vinyles, des liquides à pulvériser à base de thinner,
d’essence, etc.) pour nettoyer un CD.
Cassettes
• Si la bande n’est pas tendue, elle risque de
s’étirer, de se couper ou de se coincer dans le
mécanisme de la platine. Insérez alors un crayon
dans un des axes et tournez dans la bonne direction pour la retendre.
• Ne touchez jamais la surface sensible de la
bande.
• Ne rangez pas vos cassettes :
- Dans des endroits poussiéreux
- Au soleil ou près d’une source de chaleur
- Dans des endroits humides
- Sur un téléviseur ou un haut-parleur
- A proximité d’un aimant
Platine à cassettes
• Si les têtes, les cabestans ou les galets-presseurs de la platine
sont encrassés, vous risquez les problèmes suivants :
- Une diminution de la qualité sonore
- Des interruptions dans le son
- Des pertes de niveau
- Un effacement incomplet
- Des difficultés à obtenir un bon enregistrement
• Nettoyez les têtes, cabestans et rouleaux presseurs à l'aide d'un
coton-tige imbibé d'alcool.
Français
Condensation
Dans les cas suivants, de l’humidité peut se condenser sur la lentille à l’intérieur du lecteur :
• Après avoir allumé un chauffage dans la pièce.
• Dans une pièce humide.
• Si l’appareil est transporté directement d’une
pièce froide à une pièce chaude.
Dans ce cas, la lecture ne se fait pas normalement. Laissez alors l’appareil allumé pendant
quelques heures pour que l’humidité s’évapore.
Ensuite, débranchez la fiche de la prise de courant et rebranchez-la.
Divers
Pour les meilleurs résultats, conservez vos CD et le mécanisme toujours en bon état de propreté.
• Rangez les CD dans leurs boîtiers et conservez-les dans une
armoire ou sur une étagère.
• Veillez à fermer le tiroir de disque lorsque l’appareil n’est pas
utilisé.
• Si les têtes se magnétisent, la reproduction sonore comportera
davantage de bruit de fond et une perte des aigus.
• Pour démagnétiser les têtes, éteignez l’appareil et utilisez un
démagnétiseur de têtes (que vous trouverez chez les revendeurs
de matériel électronique ou dans les magasins de disques).
11
Page 38

■■
• Si votre chaîne présente certaines défaillances, vérifiez la liste ci-dessous pour y trouver un remède possible avant d’appeler le service
technique.
• Si vous ne parvenez pas à résoudre le problème a v ec ces indications, ou si la chaîne a été endommagée, demandez l’interv ention technique
d’une personne qualifiée, comme votre revendeur.
Dépistage des défaillances
Symptôme Cause possible Action
Pas de son. • Le cordon d'alimentation est
Impossible d’enregistrer. Les languettes de protection contre
Mauvaise réception radio. • La chaîne n'est pas correctement
Le son du CD saute. Le CD est sale ou rayé. Nettoyez ou remplacez le CD.
Français
Pas de lecture du CD. Le CD est placé à l’envers. Posez le CD avec les inscriptions vers le
La télécommande refuse de fonctionner. • Il y a un obstacle entre la télécom-
Les commandes sont inopérantes. Le microprocesseur interne est perturbé
Le porte-cassettes ne s’ouvre pas. La fiche secteur a été débranchée pen-
débranché.
• Les piles de l'appareil sont épuisées.
• Le casque écoute est branché.
l’enregistrement ont été brisées.
positionnée.
• L'antenne n'est pas correctement
positionnée.
mande et le capteur de l’appareil.
• Les piles sont épuisées.
par des interférences extérieures.
dant la lecture d’une cassette.
• Le raccorder correctement.
• Remplacer les piles.
• Débranchez le casque d’écoute.
Couvrez les orifices à l’arrière de la cas-
sette avec un ruban adhésif.
• Orientez la chaîne de façon à obtenir
la meilleure réception possible.
• Etendez l'antenne et orientez-la de
façon à obtenir la meilleure réception possible.
haut.
• Supprimez l’obstacle.
• Remplacez les piles.
Enlevez la fiche secteur de la prise de
courant puis rebranchez-la.
Branchez le cordon d’alimentation,
appuyez sur la touche POWER, puis sur
la touche § STOP/EJECT.
■■
Amplificateur
Puissance 3,6 watts par canal, min. efficace sous 3
Sensibilité/Impédance de sortie (1 kHz)
Casque d’écoute 16 ohms - 1 kohm
Platine à cassettes
Réponse en fréquence 80 - 12.500 Hz
Pleurage et scintillement 0,15% (WRMS)
Lecteur CD
Rapport signal/bruit 90 dB
Pleurage et scintillement Non mesurable
Tuner
Tuner FM
Bande de fréquence 87,5 - 108,0 MHz
Tuner AM
Bande de fréquence 530 - 1.710 kHz
Antenne Antenne télescopique pour la réception
Enceintes 10cm (3-15/16'')
Caractéristiques
ohms, de 150 Hz à 15 kHz, avec une distorsion harmonique totale inférieure à
10%
0 - 20 mW/sortie du canal dans 32 ohms
FM
Antenne avec noyau de ferrite incorporé
pour la réception AM
2, 3 ohms
✕
Caractéristiques générales
Dimensions 438 ✕ 175,5 ✕ 261,5 mm (L/H/P)
(17-1/4 ✕ 6-29/32 ✕ 10-5/16 pouces)
Poids Approx. 4,2 kg (9,3 liveres) (sans piles)
Accessoires
Cordon d’alimentation (1)
Télécommande (RM-SRCBZ6) (1)
Alimentation
Tension requise CA 120 V ~ , 60 Hz
Consommation 18 watts (allumé)
2,8 watts (en mode Standby)
Le modèle et les caractéristiques peuvent être sujets
à modifications sans avis préalable.
12
Page 39

VICTOR COMPANY OF JAPAN, LIMITED
RC-BZ6BU
CD PORTABLE SYSTEM
EN, SP, FR 0200IMMCREHIT
 Loading...