

Page 1
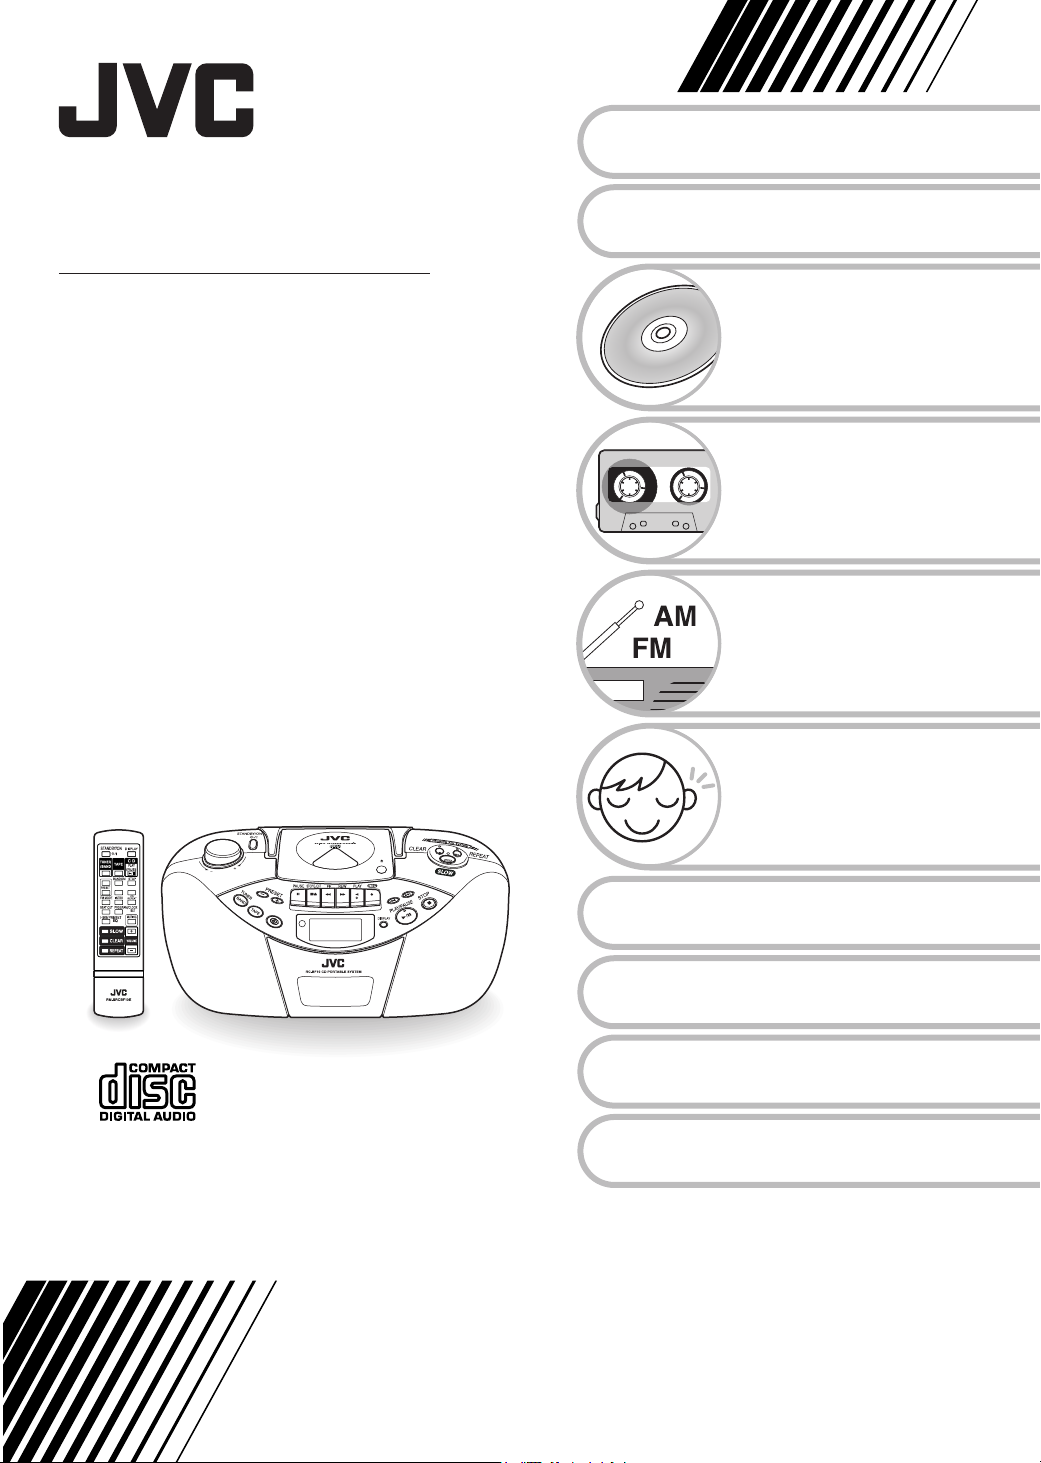
CD PORTABLE SYSTEM
Introduction
Preparation
RC-BF10
PUSH
Listening to CDs
Listening to
Cassette Tapes
Listening to
Radio Broadcasts
Hearing Aid
Functions
Convenient Functions
INSTRUCTIONS
Recording Sound
Troubleshooting
Reference
LVT1245-002A
[B]
Page 2
Warnings, Cautions and Others
IMPORTANT for the U.K.
DO NOT cut off the mains plug from this equipment. If the
plug fitted is not suitable for the power points in your home
or the cable is too short to reach a power point, then
obtain an appropriate safety approved extension lead or
consult your dealer.
BE SURE to replace the fuse only with an identical
approved type, as originally fitted.
If nonetheless the mains plug is cut off ensure to remove
the fuse and dispose of the plug immediately, to avoid a
possible shock hazard by inadvertent connection to the
mains supply.
If this product is not supplied fitted with a mains plug then
follow the instructions given below:
IMPORTANT:
DO NOT make any connection to the terminal which is
marked with the letter E or by the safety earth symbol or
coloured green or green-and-yellow.
The wires in the mains lead on this product are coloured in
accordance with the following code:
Blue : Neutral
Brown : Live
As these colours may not correspond with the coloured
markings identifying the terminals in your plug proceed as
follows:
The wire which is coloured blue must be connected to the
terminal which is marked with the letter N or coloured
black.
The wire which is coloured brown must be connected to
the terminal which is marked with the letter L or coloured
red.
IF IN DOUBT - CONSULT A COMPETENT ELECTRICIAN.
Caution –– STANDBY/ON button!
Disconnect the mains plug to shut the power off completely. The
STANDBY/ON button in any position does not disconnect
the mains line.
The power can be remote controlled.
CAUTION
To reduce the risk of electrical shocks, fire, etc.:
1. Do not remove screws, covers or cabinet.
2. Do not expose this appliance to rain or moisture.
IMPORTANT FOR LASER PRODUCTS
1. CLASS 1 LASER PRODUCT
2. CAUTION: Do not open the top cover. There are no user
serviceable parts inside the unit; leave all servicing to
qualified service personnel.
3. CAUTION: Visible and invisible laser radiation when open
and interlock failed or defeated. Avoid direct exposure to
beam.
4. REPRODUCTION OF LABEL: CAUTION LABEL, PLACED
INSIDE THE UNIT.
CAUTION - INVISIBLE LASER RADIATION WHEN OPEN AND INTERLOCKS
VORSICHT ! UNSICHTBARE LASERSTRAHLUNG TRITT AUS, WENN
VARNING - OSYNLIG LASERSTRÅLNING NÄR DENNA DEL ÄR ÖPPNAD
ADVARSEL - USYNLIG LASERSTRÅLING VED ÅBNING NÅR
CAUTION
• Do not block the ventilation openings or holes.
(If the ventilation openings or holes are blocked by a
newspaper or cloth, etc., the heat may not be able to get
out.)
• Do not place any naked flame sources, such as lighted
candles, on the apparatus.
• When discarding batteries, environmental problems
must be considered and local rules or laws governing
the disposal of these batteries must be followed strictly.
• Do not expose this apparatus to rain, moisture, drippimg
or splashing and that no objects filled with liquids, such
as vases, shall be placed on the apparatus.
DEFEATED. AVOID EXPOSURE TO BEAM.
DECKEL GEÖFFNET UND WENN SICHERHEITSVERRIEGELUNG
ÜBERBRÜCKT IST. NICHT DEM STRAHL AUSSETZEN!
OCH SPÄRR ÄR URKOPPLAD STRÅLEN ÄR FARLIG.
SIKKERHEDSAFBRYDERE ER UDE AF FUNKTION. UNDGÅ
UDSÆTTELSE FOR STRÅLING.
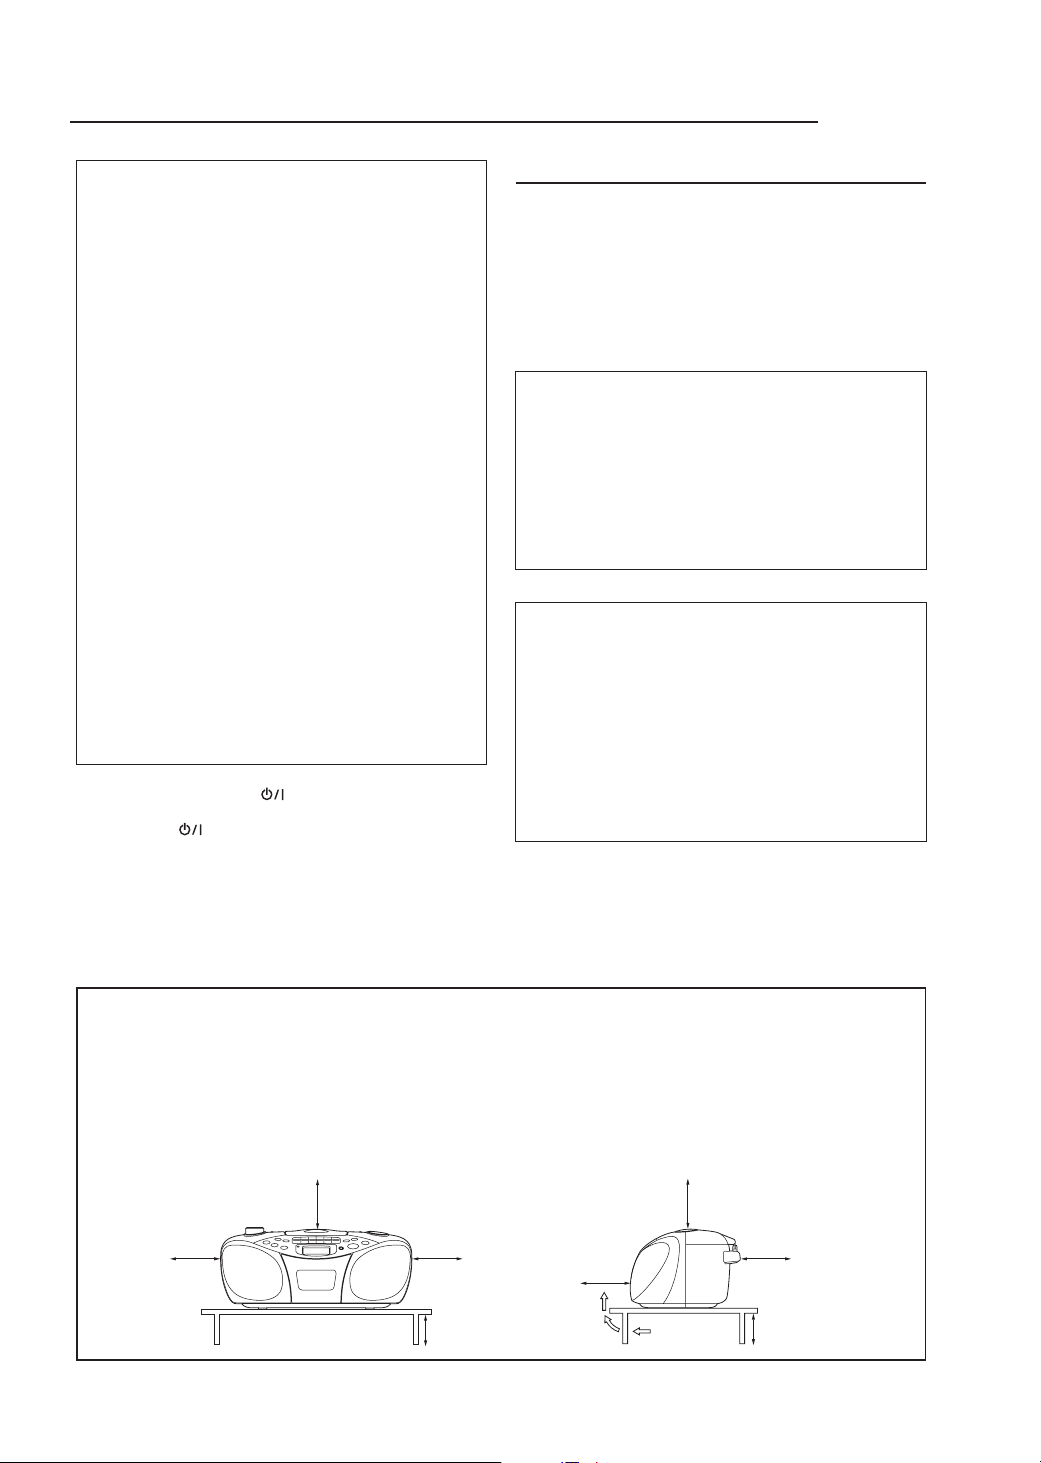
Caution: Proper Ventilation
To avoid risk of electric shock and fire, and to prevent damage, locate the apparatus as follows:
1 Front:
No obstructions and open spacing.
2 Sides/ Top/ Back:
No obstructions should be placed in the areas shown by the dimensions below.
3 Bottom:
Place on the level surface. Maintain an adequate air path for ventilation by placing on a stand with a height of
10 cm or more.
Front view
15 cm
15 cm
15 cm
10 cm
Side view
15 cm
G-1
15 cm
15 cm
10 cm
Page 3

SAFETY INSTRUCTIONS
“SOME DOS AND DON'TS ON THE SAFE USE OF EQUIPMENT”
This equipment has been designed and manufactured to meet international safety standards but, like any
electrical equipment, care must be taken if you are to obtain the best results and safety is to be assured.
★★★★★★★★★★★★★★★★★★★★★★★★★★★★★★★★★★★★★★★★★★★★★★★★
Do read the operating instructions before you attempt to use the equipment.
Do ensure that all electrical connections (including the mains plug, extension leads and interconnections
between pieces of equipment) are properly made and in accordance with the manufacturer's instructions.
Switch off and withdraw the mains plug when making or changing connections.
Do consult your dealer if you are ever in doubt about the installation, operation or safety of your equipment.
Do be careful with glass panels or doors on equipment.
★★★★★★★★★★★★★★★★★★★★★★★★★★★★★★★★★★★★★★★★★★★★★★★★
DON'T continue to operate the equipment if you are in any doubt about it working normally, or if it is
damaged in any way —
DON'T remove any fixed cover as this may expose dangerous voltages.
DON'T leave equipment switched on when it is unattended unless it is specifically stated that it is
designed for unattended operation or has a standby mode.
Switch off using the switch on the equipment and make sure that your family know how to do this.
Special arrangements may need to be made for infirm or handicapped people.
DON'T use equipment such as personal stereos or radios so that you are distracted from the
requirements of traffic safety. It is illegal to watch television whilst driving.
DON'T listen to headphones at high volume as such use can permanently damage your hearing.
DON'T obstruct the ventilation of the equipment, for example with curtains or soft furnishings.
Overheating will cause damage and shorten the life of the equipment.
DON'T use makeshift stands and NEVER fix legs with wood screws
fit the manufacturer's approved stand or legs with the fixings provided according to the instructions.
DON'T allow electrical equipment to be exposed to rain or moisture.
ABOVE ALL
NEVER let anyone, especially children, push anything into holes, slots or any other opening in the
—
case
— this could result in a fatal electlical shock.
—
NEVER guess or take chances with electrical equipment of any kind — it is better to be safe than sorry!
switch off, withdraw the mains plug and consult your dealer.
—
to ensure complete safety always
SAFETY PRECAUTIONS
Prevention of Electric Shocks, Fire Hazards
and Damages
• Even when the unit is in standby mode, a very
small current will flow. When the unit is turned on,
the display window lights in orange. When the unit is
in standby mode, the display window turns off.
(Note, however, that the display window does not
light even when the unit is turned on if the unit is
operated on batteries.) To save power and for safety
when not using the unit for an extended period of
time, disconnect the power cord from the household
AC outlet.
• Do not handle the power cord with wet hands.
• When unplugging from the wall outlet, always grasp
and pull the plug, not the power cord.
• Consult your nearest dealer when damage,
disconnection, or contact failure is found with the cord.
• Do not bend the cord sharply, or pull or twist it.
• Rating label is placed on the exterior of the bottom.
• Do not modify the power cord in any manner.
• Do not remove screws to disassemble the unit and do
not touch anything inside the unit to avoid accidents.
• Do not insert any metallic objects into the unit.
• Unplug the power cord when there is a possibility of
lightning.
• If water gets inside the unit, unplug the power cord
from the outlet and consult your dealer.
• Do not block the ventilation holes of the unit so that
heat can escape.
• Do not install the unit in a badly ventilated place.
G-2
Page 4

Table of Contents
Introduction
Notes on Operation ..................... 2
Supplied Accessories ........................2
Hearing Aid Functions................. 3
Part Names .................................4
Main Unit (Front View) ........................ 4
Main Unit (Rear View) ........................ 5
Display Window ................................. 5
Remote Control ..................................6
Preparation
Power Source and the Remote
Control ...................................... 7
Turning On/Off the Main Unit .... 11
Setting the Clock ....................... 12
Before Listening to Sound......... 13
Adjusting the Sound Volume and
Quality ...........................................13
Hearing Aid Functions ....... 21
Convenient Functions
Storing Radio Stations (Preset) .. 23
Various CD Playback Modes .... 25
Repeat Playback.............................. 25
Random Playback ............................ 27
Introduction Playback ......................29
Program Playback ........................... 31
Recording Sound
Recording Tracks from a CD .....34
Recording a Radio Broadcast ... 35
Erasing Recorded Sound
(Soundless Recording) ........... 36
Troubleshooting ................. 37
Reference
Listening to CDs................. 15
Maintenance ............................. 38
About CDs................................. 39
Listening to Cassette Tapes ...
Listening to Radio Broadcasts ...
Thank you for purchasing a JVC product.
Please read all instructions carefully before operation, to ensure your complete understanding and
to obtain the best possible performance from the unit.
17
19
About Cassette Tapes ............... 40
Specifications ............................ 41
FEATURES
1 Portable system incorporating CD player
• CD functions can be operated with the remote
control unit as well as on the main unit.
• 8-cm CD playback capability
2 Digital LCD (Liquid Crystal Display) indicates
general playback status.
3 Synchronized recording with CD playback
4 Hyper-bass sound effect
5 Hearing aid functions
1
Page 5
Notes on Operation
7
Suitable Locations for the Main Unit
To minimize the need for servicing and maintain the high quality of this product, do not
place the main unit in the following locations:
• In a position subject to high humidity or considerable dust
• On an uneven or unstable surface
• Near a heat source
• Near a computer, fluorescent light or other electric appliance
• In a small room with insufficient ventilation
• In a position exposed to direct sunlight
• In a position exposed to excessive cold
• In a position exposed to strong vibration
• Near a TV, amplifier or tuner
• Near a magnetic source
CAUTION
•
The operating temperature of this product is 5°C to 35°C. Use in temperatures outside this range
may cause a malfunction or damage the product.
7
Condensation
Under the following conditions, you may not be able to operate this product properly due
to condensation formed on the lens of the main unit:
• When you have just started an air conditioner to warm your room
• When you have placed the main unit at an area with high humidity
• When you have moved the main unit from a cold place to a warm place
When condensation forms, leave the main unit turned on, wait for approximately 1 or 2
hours, and then operate the main unit.
7
Cleaning the Main Unit
When the operation panel becomes dirty, dust it with a soft dry cloth. When the operation panel is very dirty, wipe it with a cloth dampened with a small amount of a neutral
detergent, and then wipe it with a soft dry cloth.
Introduction
CAUTION
•
Do not wipe the operation panel with thinners, benzenes or other chemical agents. Do not spray
insecticides onto the operation panel. These may cause discoloration and damage to the surface.
Supplied Accessories
Make sure that the dedicated accessories below are supplied with this product.
• Remote control (1)
• Batteries for the remote control (2)
• Power cord (1)
2
Page 6

Hearing Aid Functions
When using the hearing aid functions:
You can listen to sound that has been slowed down.
You can listen to sound that has been made clearer.
You can listen to the sound once again.
This system employs digital signal correction technology to make the
speaker’s voice sound clearer so that you can hear it easily.
7
Slow Function
Even rapid speech delivered by a news announcer is slowed down.
To make rapid speech easier to understand, the main unit lowers the speed at the beginning of
each sentence and gradually resumes the actual speed. Use of intervals between words (blank
time) produces slower but natural sound without changing the total time of each sentence.
7
Clear Function
You can easily catch sound that has been made clearer.
Aging people have trouble hearing small voices and feel discomforted by loud voices. The main
unit produces clearer sound by correcting voices to a level aging people can hear easily.
7
Repeat Function
Even if you miss a word or sentence, you can play back the sound once again.
By constantly storing the sound (10 seconds maximum) to memory, the main unit can repeat
portions you missed, including telephone numbers and unfamiliar words/phrases.
3
Page 7
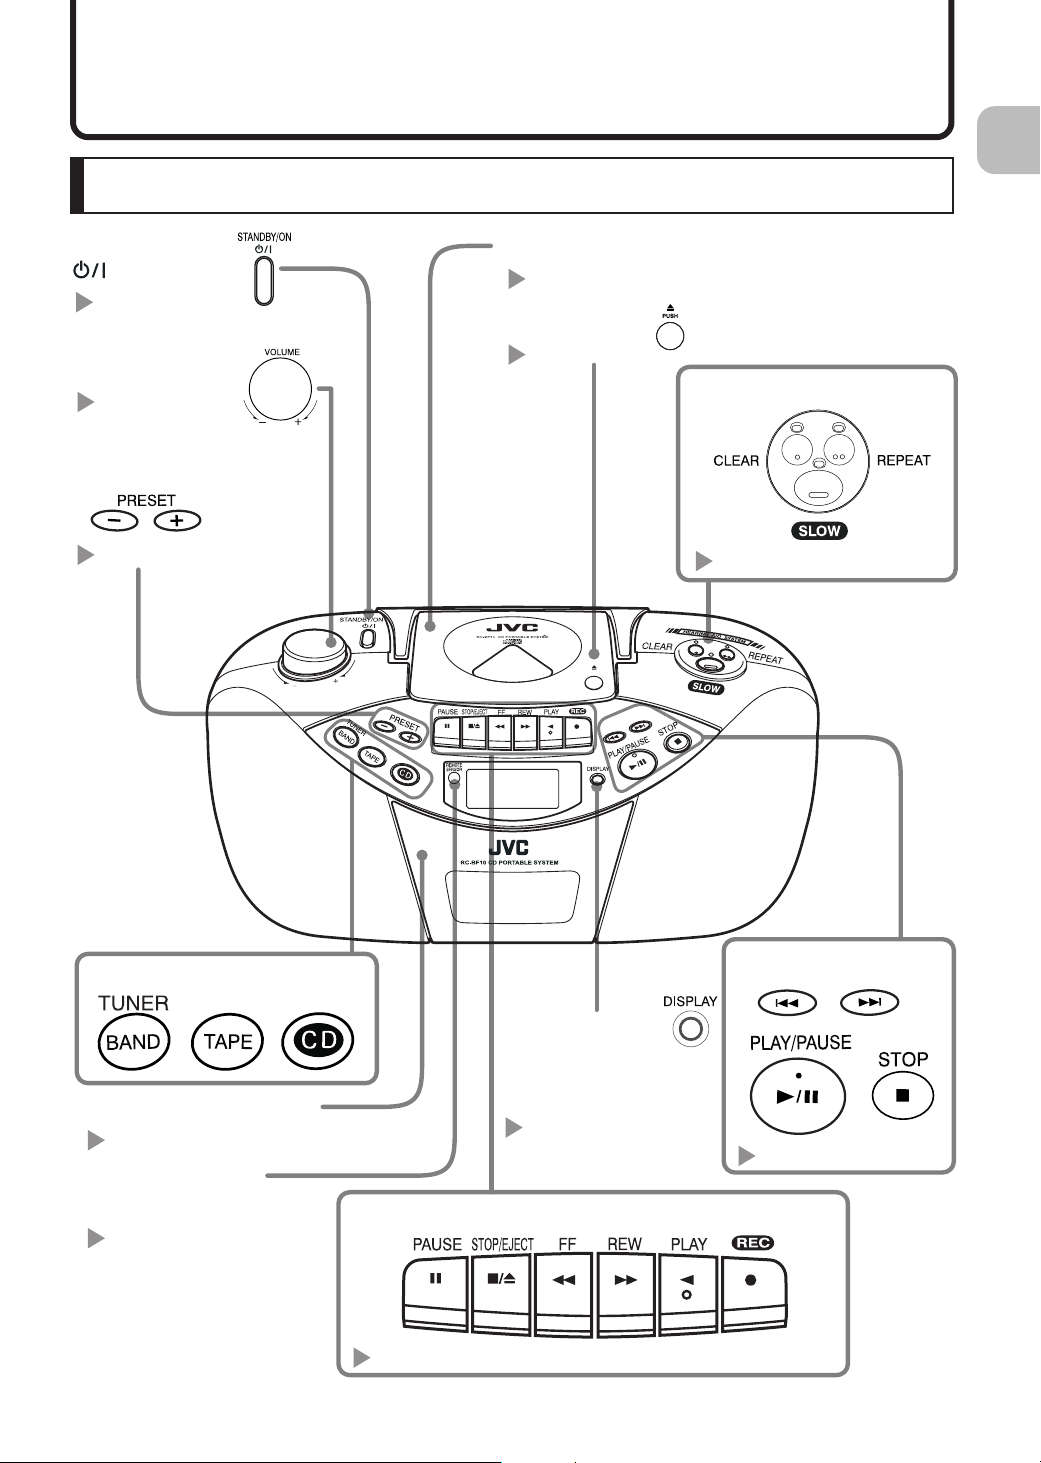
Part Names
Main Unit (Front View)
STANDBY/ON
button
page 11
Volume control
page 13
Preset buttons
page 20
CD door
page 15
CD eject part
page 15
PUSH
Introduction
Hearing aid buttons
pages 21 and 22
Source select buttons
Cassette tape holder
page 17
Remote control
sensor
page 10
Display button
Switches the display
between the regular
display and the time display.
page 12
Cassette tape operation buttons
pages 17 and 18
CD operation buttons
pages 15 and 16
4
Page 8
Part Names (continued)
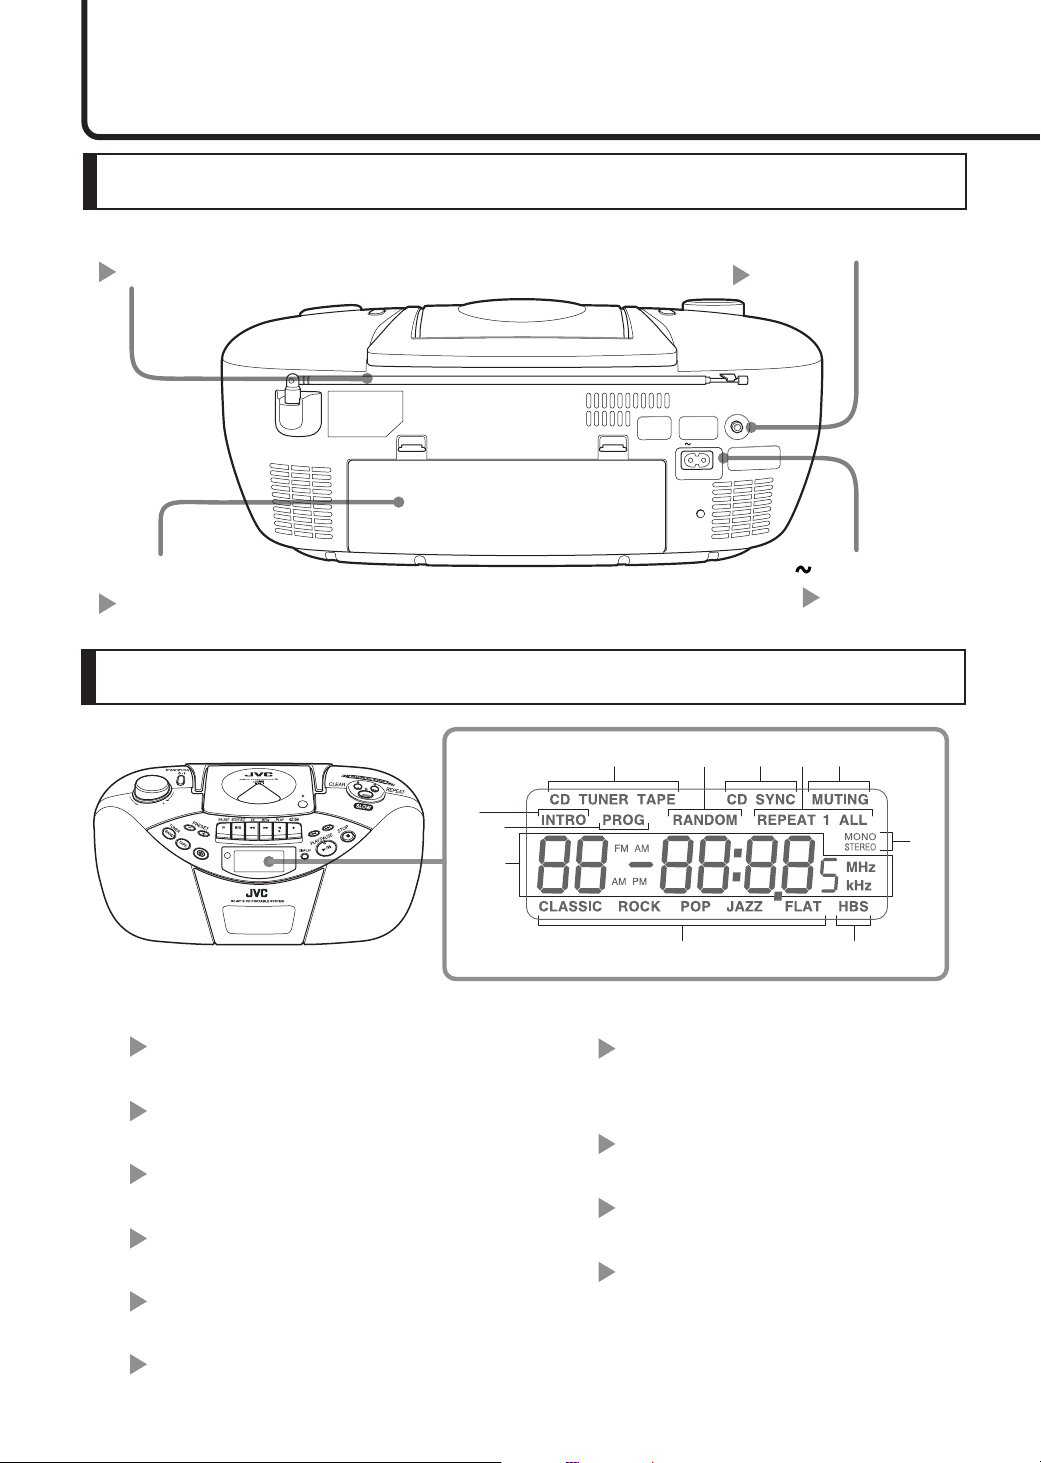
Main Unit (Rear View)
FM telescopic antenna
page 20
Battery cover
page 8
Display Window
PUSH
6
7
8
1
PHONES jack
page 14
AC IN
3
2
4
AC IN socket
page 7
5
q
1Sound source indicators
pages 15, 17 and 19
2Random playback indicator
page 28
3Synchronized recording indicator
page 34
4Repeat playback indicator
page 26
5Temporary mute indicator
page 13
6Introduction playback indicator
page 30
5
90
7Program playback indicator
page 32
8Main display
9Preset equalizer indicators
page 14
0Hyper-bass sound indicator
page 14
qFM band indicators
page 20
Page 9
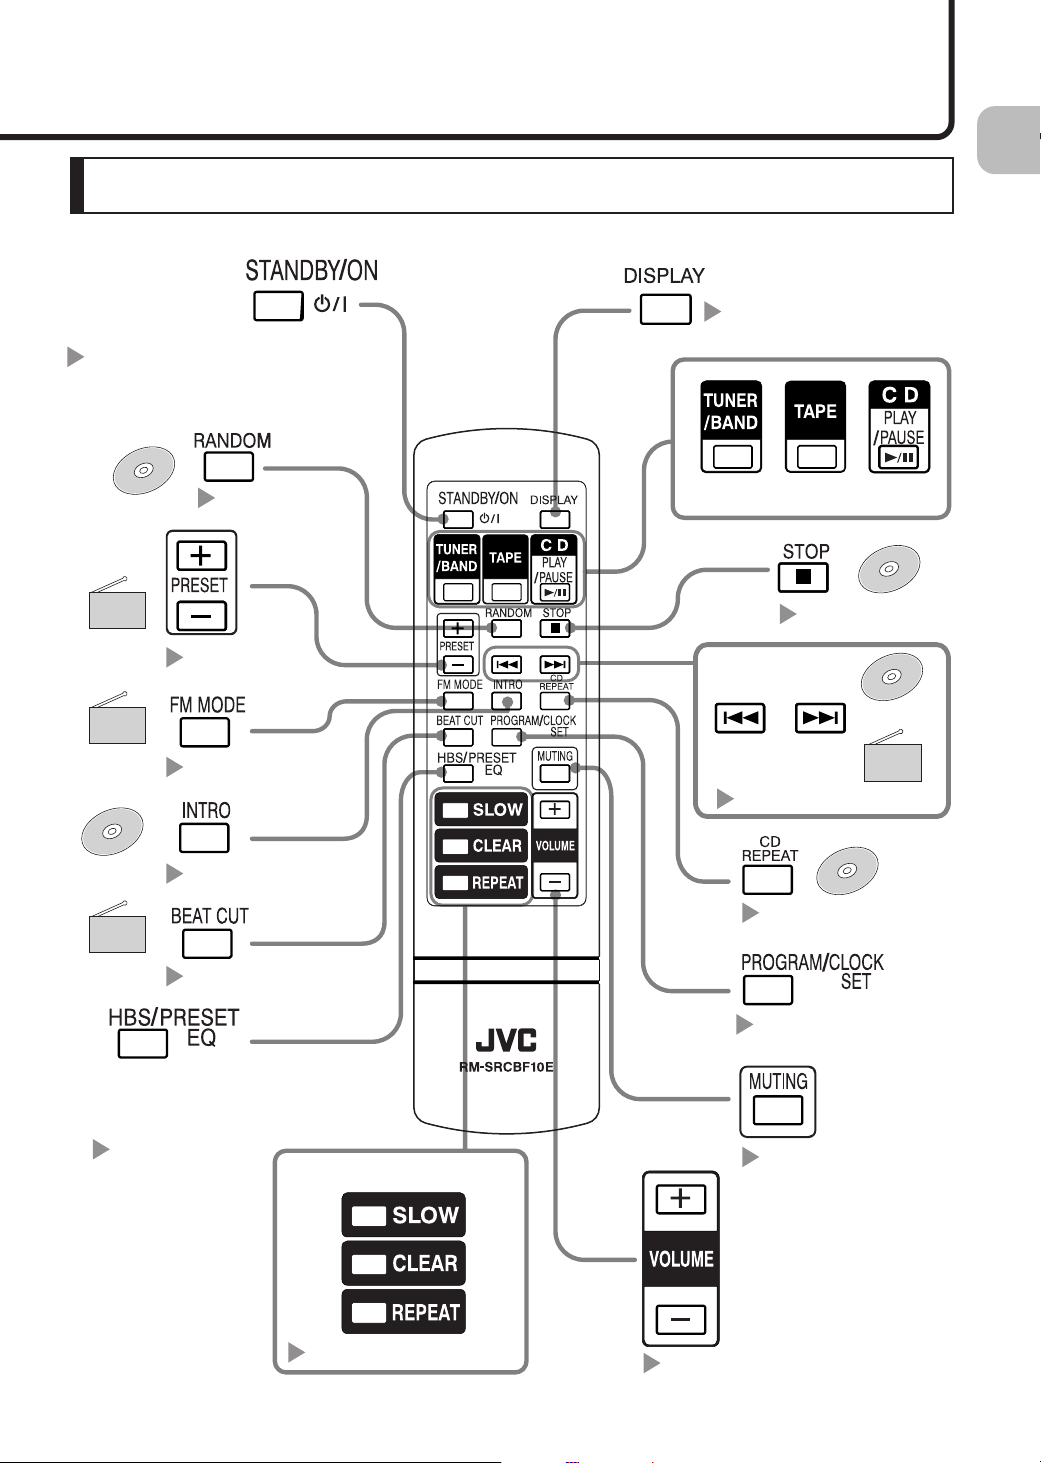
Remote Control
You cannot use this
button while this
product is running
on batteries.
page 11
page 12
Introduction
CD onlyCD only
Radio
Radio
only
only
page 20
FM
FM
only
only
page 20
CD onlyCD only
page 29
AM
AM
recording only
recording only
page 35
page 27
For selecting a sound source.
CD onlyCD only
page 16
CDCD
or
RadioRadio
pages 16 and 19
CD onlyCD only
page 25
pages 12 and 31
For enjoying hyper-bass
sound or selecting sound
quality to suit the music type.
page 14
Hearing aid buttons
page 21
page 13
page 13
6
Page 10
Power Source and the Remote Control
You can operate this product using either an AC outlet or batteries.
7
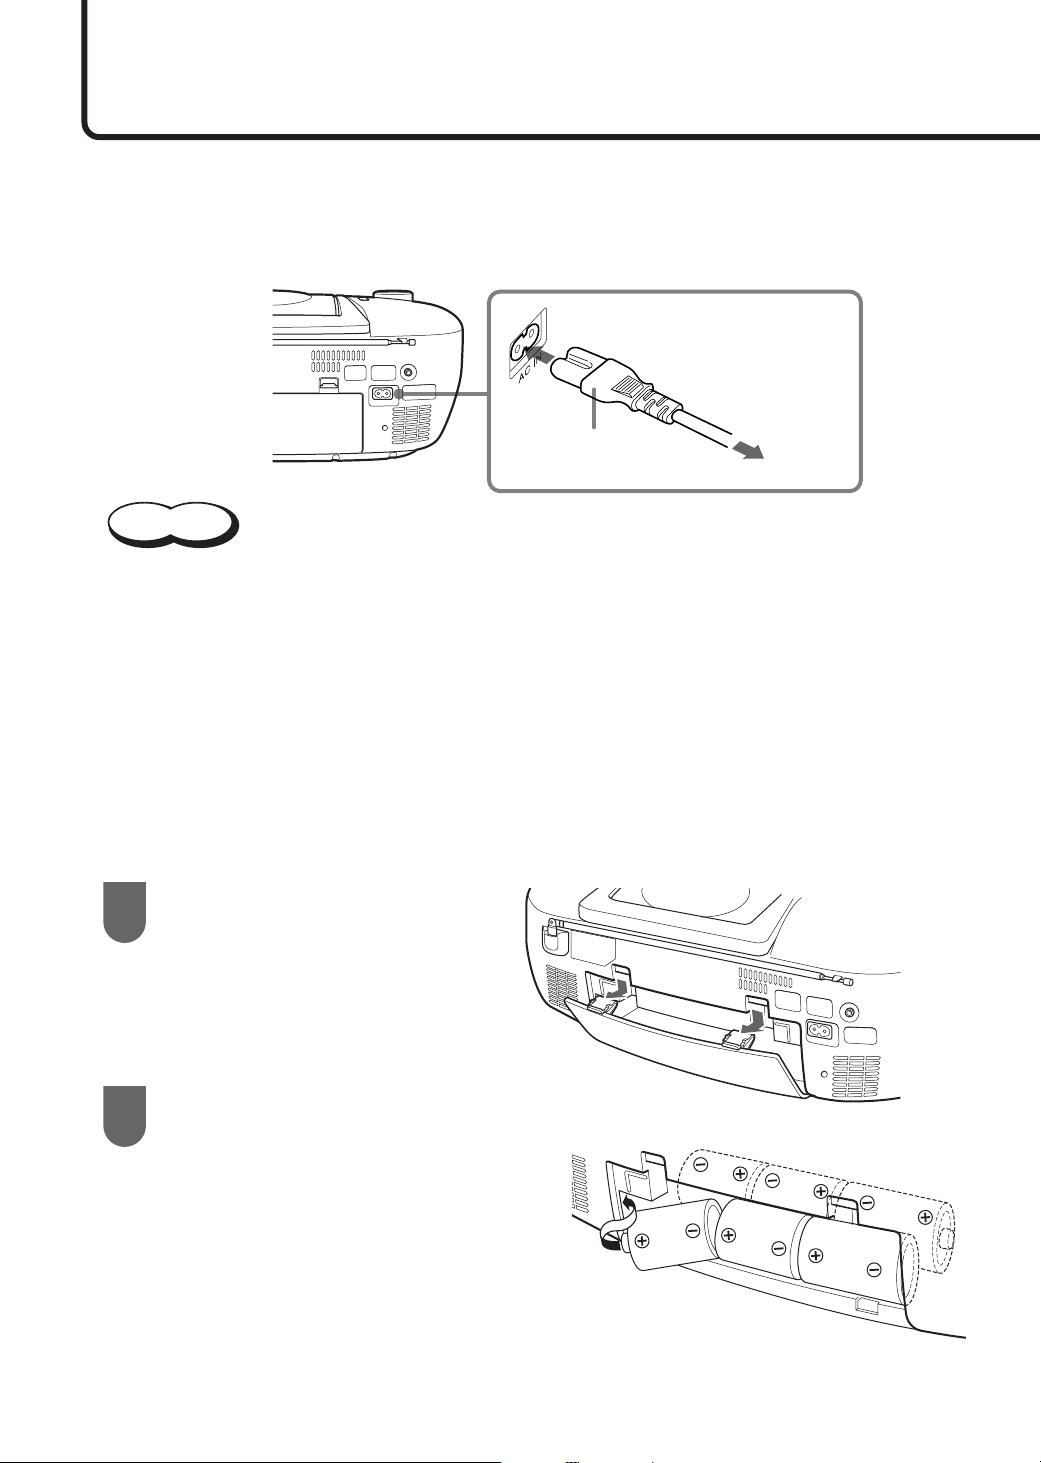
Connecting the Power Cord
Main unit
Supplied power cord
CAUTION
•
Use the main unit only with the power cord provided with this product to avoid malfunction or damage
to the main unit.
•
Be sure to disconnect the power cord from your AC outlet when going out or when not using this
product for a long period.
• Even though the main unit is turned off, while the power cord is connected, the main unit consumes a small amount of electricity.
7
Using Batteries
You cannot use batteries while the power cord is connected to the AC IN socket. When using the
main unit with batteries inserted, be sure to disconnect the power cord from the AC IN socket.
Open the battery cover.
1
AC outlet
7
Insert six batteries.
2
Insert the batteries, following the
diagram shown on the right to ensure
that the polarities match the marks ((+)
and (-)) inside the battery compartment.
1
6
R20P (SUM-1)/13D (D) (not supplied)
33
5
4
2
Page 11
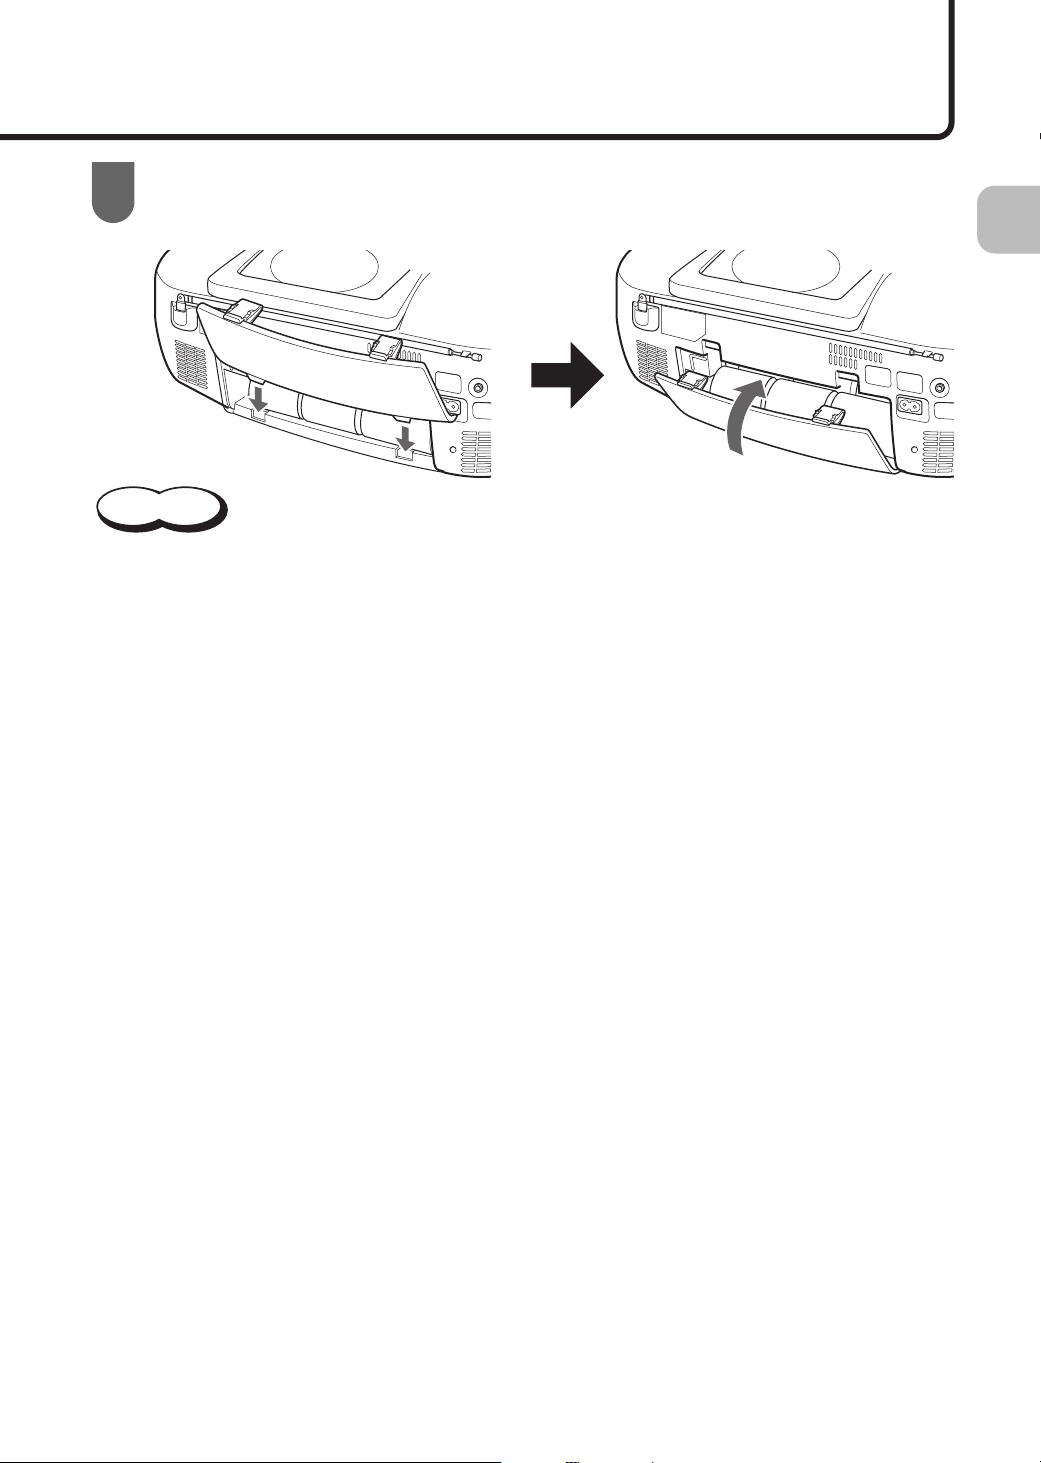
Replace the battery cover.
3
CAUTION
• When the batteries run low, sound may become smaller or distorted, or may not be produced. In
such a case, replace all of the six batteries with new batteries of the same type.
• If not using this product for a long period, take out the batteries.
• Wrap the front panel with a cushion (not supplied), steady the main unit, and then insert the
batteries.
• When making important recording, use new batteries (preferably alkaline batteries with long
service life) to avoid any possible failure.
• Continuous operation of this product consumes the battery power more quickly than noncontinuous operation does.
• Operation of this product in a cold place consumes the battery power more quickly than operation in a warm place.
• Incorrect use of batteries may cause leakage of chemicals from the batteries or battery explosion. Heed the following cautions.
• Do not use old batteries and new batteries at the same time. Do not use different type batteries at the same time.
• Do not attempt to charge non-rechargeable batteries.
• If chemicals from the batteries get on your skin, immediately wash them off with water. If
chemicals leak onto this product, clean the product completely.
Preparation
8
Page 12

Power Source and the Remote Control
7
Inserting Batteries into the Remote Control
Open the battery cover.
1
Insert two batteries.
2
R03 (UM-4)/ 24F (AAA) (supplied)
(continued)
Insert the batteries, making sure that the polarities match the marks ((+) and (-)) inside
the battery compartment.
Attach the battery cover.
3
Slide the battery cover in the direction of the arrow to close it.
CAUTION
• When the effective distance decreases, the batteries have run low. In such a case, replace the
two batteries with new batteries of the same type.
• Do not use old batteries and new batteries at the same time. Do not use different type batteries
at the same time.
• If not using the remote control for a long period, take out the batteries.
9
Page 13

7
Remote Control Operation
Remote control sensor
(REMOTE SENSOR)
PUSH
Preparation
• When operating the remote control, point it at the remote control sensor.
• The effective distance between the remote control and the remote control sensor is
approximately 7 m maximum. However, the effective distance decreases when you
are not directly facing the front of the main unit.
CAUTION
• Do not drop the remote control or subject it to excessive shock.
• If another radio causes noise, hold the remote control away from the radio.
• Make sure not to use the remote control under the following conditions. You may not be able to
operate the remote control.
• While the remote control is exposed to direct sunlight or other intense light
•
While an obstacle is in front of the remote control sensor and impedes the signal from the remote control
10
Page 14
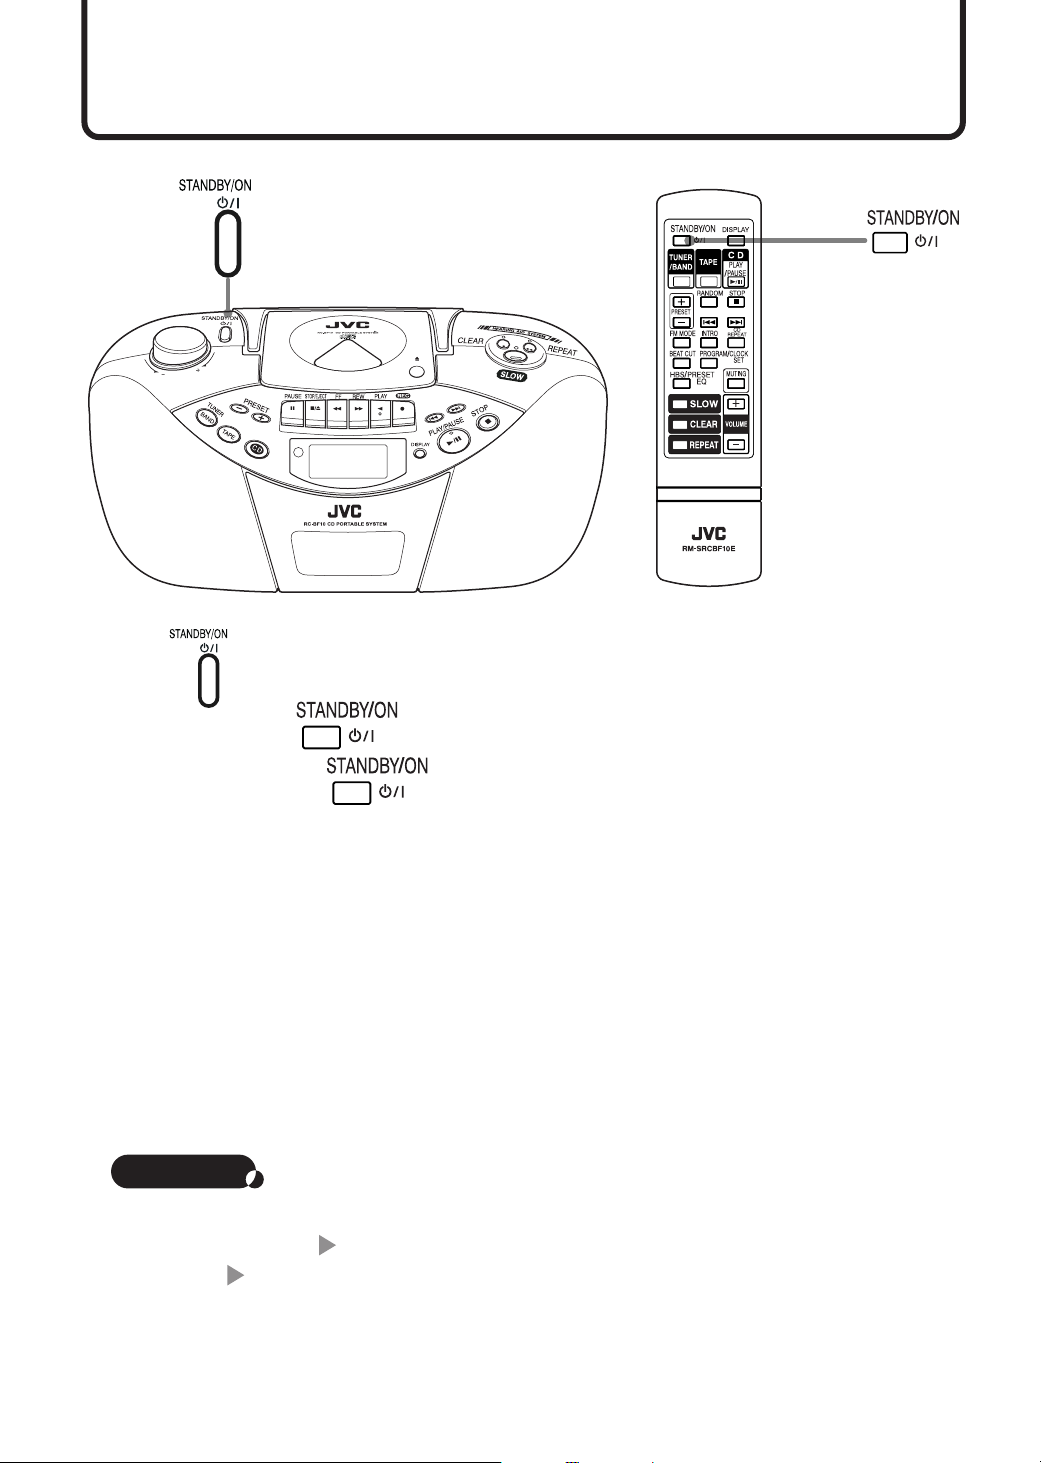
Turning On/Off the Main Unit
PUSH
Press on the main unit to turn on/off the main unit.
• You can also use
(You cannot operate
• The display window lights up when the main unit is turned on. (However, the display
window does not light up even when the main unit is turned on while the main unit is
running on batteries.)
• The main unit becomes ready to play back the sound source selected when the main
unit was last turned off.
7
Shutting Off the Power Supply Completely
Disconnect the power cord from the AC outlet.
If the batteries are inserted in the main unit, take out the batteries.
on the remote control to turn on/off the main unit.
while the main unit is running on batteries.)
NOTE
• When you disconnect the power cord or if a power cut occurs, the clock is reset to
“00:00” right away (
few days (
the clock again.
pages 20, 23 and 24). The clock display will keep flashing until you set
page 12) and the preset radio stations will be canceled in a
11
• Take out the batteries when carrying the main unit. This prevents the power from
being accidentally turned on thus, avoids wasteful battery consumption.
Page 15

Setting the Clock
Set the current time. The time display on the main unit is a 24-hour clock.
You can set the clock even while the main unit is turned off.
Clock display
PUSH
315
or
2 4 6
When the clock display is not displayed in the display window on the
1
main unit, press .
Press .
2
The hour display in the display window on the main
unit will flash.
3
Press
or to set the hour.
Preparation
Press .
4
The hour will be set, and then the minute display will flash.
Press
5
Press .
6
NOTE
• If a power cut occurs, the clock is reset to “00:00”.
or to set the minute.
12
Page 16

Before Listening to Sound
Adjusting the Sound Volume and Quality
You can adjust the sound volume and quality for listening to CDs, cassette
tapes and radio broadcasts. The adjustments do not affect recorded sound.
PUSH
7
Temporarily Muting Sound
Pressing mutes playback sound.
To return to the previous sound volume, press
again.
7
Adjusting the Sound Volume
Main unit Remote control
Up
Down
Down
You can adjust the sound volume within the range “00” to “30”.
CAUTION
Up
Example: Display while the sound
volume is “15”
13
• Do not turn off the main unit with the sound volume set to an extremely high level. Otherwise a sudden blast of sound could damage your hearing, the speakers or headphones,
next time you turn on the main unit or start playing back another sound source.
Page 17

7
Emphasizing Bass Sound
You can emphasize the bass sound.
Press and hold on the remote
control for one or more seconds until
“HBS” appears in the display window.
To cancel hyper-bass sound, press and
hold on the remote control until
“HBS” disappears from the display window.
7
Adjusting the Sound Quality
You can select the best possible sound quality
for your music type.
Each time you press on the remote
control, the indicators toggle as follows.
: For emphasizing treble sound.
: For emphasizing treble and bass sounds.
When “HBS” is on
Preparation
When “CLASSIC” is selected
: Adequate for songs and narrations.
:
For the uplifting feeling of being at a live performance.
: Returns to normal sound quality.
7
Using Headphones
Connect commercially available headphones to the PHONES jack on the rear of the main unit.
While the headphones are connected, the speakers do not produce any sound.
Before connecting the headphones, make sure to turn down the sound volume.
PHONES jack
14
Page 18

Listening to CDs
This section explains the basic operations for playing back CDs.
Before listening to a CD, refer to “About CDs” ( page 39).
For more details on the CD playback function, refer to “Various CD Playback Modes”
( page 25).
Turn on the main unit, and then follow the procedure below. ( page 11)
2 Insert a CD.
1
1Press .
“CD” will appear in the
display window on the
main unit.
Press to
open the CD
door.
PUSH
2
Insert a CD.
Insert a CD with the
label side facing up.
3
Close the CD
door.
Press the CD door
until it clicks shut.
PUSH
4 Adjust the volume.
Down Up
PUSH
3 Press .
Playback will start.
Track number Elapsed playing time
15
Page 19

7
Stopping Playback
Press .
The track number and total playing time will appear in the display window.
7
Pausing Playback
Press .
To resume playback, press once again.
7
Skipping to the Beginning of a Track
Each time you press , playback returns to the previous track. When you press
•
during playback, playback returns to the beginning of the current track. Press twice
to skip back to the beginning of the previous track.
Each time you press , playback skips to the next track.
•
7
Fast-forwarding/Fast-reversing during Playback (Search)
Press and hold during playback to fast-reverse a CD.
•
Press and hold during playback to fast-forward a CD.
•
NOTE
• Volume is low during fast forward and fast reverse.
• “Err” appears in the display window under
the following conditions. Insert the CD properly or use a playable CD.
- When the CD is scratched or dirty
- When the CD is inserted upside-down
- When an unplayable CD is inserted
• If you play back a CD while the main unit is subjected to strong vibration or excessive
shock, sound may be distorted or drift.
Listening to CDs
Some track types in a CD may cause sound dropout. If this occurs, turn down the volume.
•
•
Take out the CD before you carry the main unit.
16
Page 20

Listening to Cassette Tapes
This section explains the basic operations for playing back cassette tapes.
Before playing back a cassette tape, refer to “About Cassette Tapes” ( page 40).
For details on the recording operation, refer to “Recording Sound” ( pages 34 - 36).
Turn on the main unit, and then follow the procedure below. ( page 11)
2
Insert a cassette tape.
2
1
Press .
“TAPE” will appear in the
display window on the
main unit.
1
Press to
open the
cassette tape
holder.
Insert a cassette
tape.
Insert a cassette tape
with the side you want to
play back facing outward.
3
Close the
cassette tape
holder.
Press the cassette
tape holder until it
clicks shut.
4
Adjust the volume.
Down Up
PUSH
3
Press .
•
Playback will start.
•
When all tape has been played back, playback
will stop automatically.
17
Page 21

7
Stopping Playback
Press .
7
Pausing Playback
Press .
To resume playback, press once again.
7
Fast-forwarding/Fast-reversing
When the cassette tape is stopped, pressing fast-forwards the cassette tape.
•
When the cassette tape is stopped, pressing fast-rewinds the cassette tape.
•
NOTE
• Do not use long cassette tapes such as C-120 or C-150 as they may damage the
main unit.
• This product is compatible with normal cassette tapes (TYPE I). The product is not
compatible with high position cassette tapes (TYPE II) or metal cassette tapes (TYPE
IV). You cannot obtain proper playback sound.
•
Make sure that the cassette tape has no slack. If the cassette tape has slack, wind it up
( page 40)
• If you press while another source is selected, the cassette tape will roll but no
sound will be produced from the tape.
.
Listening to Cassette Tapes
18
Page 22

Listening to Radio Broadcasts
This section explains the basic operations for listening to radio broadcasts.
Turn on the main unit, and then follow the procedure below. ( page 11)
1
Press to select “FM” or “AM”.
To listen to an
FM broadcast
FM AM
To listen to an
AM broadcast
“FM” or “AM”
Frequency
PUSH
19
3
Adjust the volume.
Down Up
2
Select a radio station.
Press or to select a radio station (frequency).
Automatic tuning:
•
Press and hold or until the main unit starts
searching radio stations, and then release the button.
•
When a radio station of sufficient signal strength is
tuned in, the main unit stops searching automatically.
•
To stop searching manually, press or .
Manual tuning:
•
Each time you press or , the frequency
changes.
Page 23
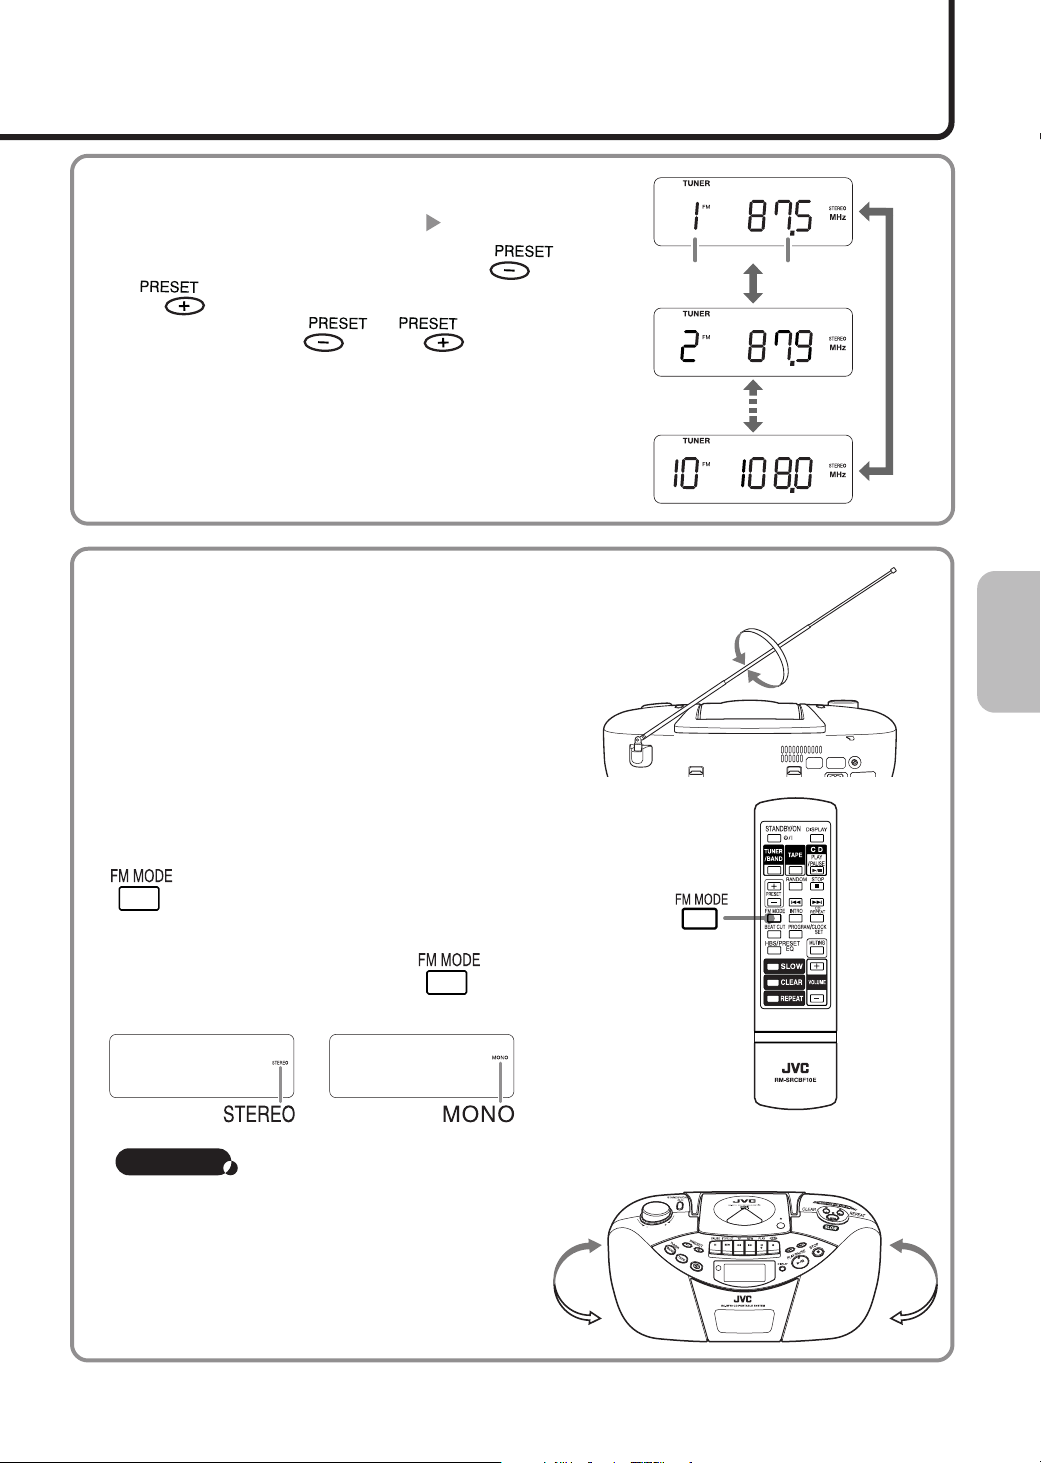
7
Tuning In to a Preset Radio Station
(Storing Radio Stations (Preset) page 23)
You can select a radio station by pressing
or .
Each time you press or , the preset
number toggles.
7
Improving Radio Reception
FM broadcasts
Adjust the FM telescopic antenna in length,
direction or angle to obtain the best possible
reception.
Placing the main unit near a window can facilitate reception.
When the main unit starts receiving an FM stereo
broadcast, “STEREO” appears.
If sound from an FM stereo broadcast is noisy, press
FrequencyPreset number
on the remote control. The sound will switch to
monaural reception (“MONO” appears.) and the noise
will reduce.
To return to stereo reception, press once again.
During stereo reception During monaural reception
NOTE
• The FM monaural reception is canceled
when you tune in another radio station.
AM broadcasts
An AM antenna is built into the main unit. Position
the main unit for the best possible reception.
Listening to Radio Broadcasts
PUSH
20
Page 24

Press
NOTE
When you cannot clearly hear speech
Clear function
The speech can be understood easily.
Pressing again turns off the lamp and cancels the
clear function.
•The clear function may produce no effect, if sound is affected
by noise.
PUSH
Hearing Aid Functions
These functions are especially useful when you want to learn another
language from the radio or confirm contact details.
NOTE
• The hearing aid functions apply not only to sound from radio broadcasts but also to
playback sound from CDs and cassette tapes. The hearing aid functions do not affect
recording sound.
• While one of the hearing aid functions is being used, sound is monaural.
• You can use the slow/clear/repeat functions at the same time.
21
Page 25

Repeat function
Press
You can listen to up to the last 10 seconds of sound again. While the lamp
is lighting up, the sound is repeated. Pressing again turns off the
lamp, cancels the repeat function and returns the sound to normal.
NOTE
•A one-second blank is inserted at the beginning of the repeated sound.
•If you press within 10 seconds of canceling the repeat function, the
repeat time is the time from cancellation to the point when the button is
pressed again.
When you want to listen to the last portion
of sound again
Slow function
Press
You can understand rapid speech easily because it has been slowed down.
Pressing again turns off the lamp, cancels the slow function and
returns the sound to normal speed.
NOTE
•The slow function may produce no effect with some sound types.
When you can hardly catch speech
because it is too fast
Hearing Aid Functions
22
Page 26

Storing Radio Stations (Preset)
You can store up to 10 FM radio stations and up to 10 AM radio stations.
Turn on the main unit, and then follow the procedure below. ( page 11)
1
4
2
53
23
Page 27

Press repeatedly to select “FM” or “AM”.
1
Press or to select
2
the radio station you want to store.
Press .
3
“PROG” and the preset number will flash in the display window.
While “PROG” and the preset number
4
Example: FM 87.5 MHz
Preset number
are flashing, press
preset number.
If you select a preset number where a radio station has already been stored, the new
radio station is stored in place of the previous radio station at that preset number.
Press .
5
The radio station will be stored. Repeat steps 2–4 to store the desired radio stations consecutively.
NOTE
• You can select a stored radio station by pressing on the remote control, or
or on the main unit. ( page 20)
• After the power cord has been disconnected (or the power has been cut) for a few
days, the stored settings will be canceled.
to select a
Convenient Functions
24
Page 28

Various CD Playback Modes
Repeat Playback
You can play one track or all tracks repeatedly.
Turn on the main unit, and then follow the procedure below. ( page 11)
1
PUSH
2
3
25
Page 29

Insert a CD.
1
Press
2
Press .
3
Each time you press , the indicator toggles as shown on the right.
Repeat playback will start.
7
Quitting Repeat Playback
.
Repeat indicator
All tracks repeat One track repeat
Repeat canceled
Press repeatedly to erase the repeat indicator.
Convenient Functions
26
Page 30

Various CD Playback Modes (continued)
Random Playback
This unit plays back tracks in random order.
Turn on the main unit, and then follow the procedure below. ( page 11)
1
PUSH
2
3
27
Page 31

Insert a CD.
1
Press
2
Press .
3
“RANDOM” will appear in the display window.
Random playback will start.
When all tracks have been played back, playback will stop automatically.
7
Quitting Random Playback
Press to erase the random indicator.
NOTE
• You can use random playback and all track repeat playback at the same time.
While the playback is stopped, you can also start random playback by pressing
•
.
.
Convenient Functions
28
Page 32

Various CD Playback Modes (continued)
Introduction Playback
You can listen to the first 10 seconds of each track consecutively.
Turn on the main unit, and then follow the procedure below. ( page 11)
1
PUSH
2
3
29
Page 33

Insert a CD.
1
Press
2
Press .
3
“INTRO” will appear in the display window, and introduction playback will start.
When the introductions of all tracks have been played back, playback will stop automatically.
7
Quitting Introduction Playback
Press to erase the introduction indicator.
NOTE
•
While the playback is stopped, you can also start introduction playback by pressing
.
.
Convenient Functions
30
Page 34

Various CD Playback Modes (continued)
Program Playback
This function allows you to play back the desired tracks in the desired
order. You can program up to 20 tracks.
Turn on the main unit, and then follow the procedure below. ( page 11)
1
PUSH
2 7
3
5
4 6
31
Page 35

Insert a CD.
1
Press .
2
Press .
3
Press .
4
“PROG” will flash in the display window on the main unit.
When “00” appears as the track number, the program playback is not set.
Press or
5
“PROG” and the program number will flash in the display window on the main unit.
Press .
6
The selected track number will be programmed (stored).
To continue to program (store) tracks, repeat steps 5 and 6.
When you have finished program setting, press
7
Playback will start in the programmed order. When playback finishes, the main unit stops
automatically.
NOTE
• You can use program playback and all track repeat playback at the same time.
to select a track number.
Selected track number Program number
.
Convenient Functions
Canceling programs
Confirming the program playback settings
NEXT PAGE
32
Page 36

Various CD Playback Modes (continued)
Canceling programs
While the CD is stopped and “PROG” is flashing in the display window, press .
Opening the CD door or changing the sound source also cancels the program playback setting.
Confirming the program playback settings
While the CD is stopped and “PROG” is flashing in the display window, press
repeatedly.
Each time you press , the program numbers and track numbers will be displayed in the programmed order.
Press .
Track number
Program number
Press .
Press .
•
•
•
•
•
•
Press .
When “00” appears as the track number, the program playback is not set.
When you press again, the program number will return to “1”.
33
When “Full” appears, the maximum number of the program playback has already been set
(20 tracks maximum). You cannot set the program playback for any more.
When you press again, the program number will return to “1”.
Page 37

Recording Tracks from a CD
Before recording sound to a cassette tape, refer to “About Cassette Tapes” ( page 40).
Turn on the main unit, and then follow the procedure below. (
2 1 4 3
PUSH
Insert a cassette tape for recording.
1
Both ends of a cassette tape are unrecordable parts (leader tapes). Before start recording, wind the tape past the leader part of the cassette tape.
Press .
2
page 11)
Press .
3
Press .
4
Sound-synchronized recording automatically starts CD playback and recording to the
cassette tape at the same time.
7
Quitting Recording
Press .
NOTE
• When the cassette tape stops, CD playback will be paused.
You can record tracks in the desired order by using the CD program playback function
•
( page 31)
• Do not press the other source buttons during recording. Another source will be se-
lected and recorded.
This product is compatible with normal cassette tapes (TYPE I). The product is not
•
compatible with high position cassette tapes (TYPE II) or metal cassette tapes (TYPE IV).
•
The sound input level during recording is automatically adjusted.
.
Recording Sound
•
Do not pause the tape for more than a few minutes. Press to stop the tape instead.
34
Page 38

Recording a Radio Broadcast
Before recording sound to a cassette tape, refer to “About Cassette Tapes” ( page 40).
Turn on the main unit, and then follow the procedure below. ( page 11)
2 1 4 3
PUSH
Insert a cassette tape for recording.
1
Both ends of a cassette tape are unrecordable parts (leader tapes). Before start recording, wind the tape past the leader part of the cassette tape.
Press to select “FM” or “AM”.
2
Select the desired radio station. ( pages 19, 20 and 23)
3
Press .
4
Recording will start.
7
Quitting Recording
Press .
NOTE
To record an
FM broadcast
FM AM
If a beeping sound disturbs your AM broadcast
Each time you press , the display toggles as
follows.
Select either item for better noise reduction.
To record an
AM broadcast
“FM” or “AM”
cut1 cut2
Frequency
35
• Do not press the other source buttons during recording. Another source will be selected and recorded.
•
The sound input level during recording is automatically adjusted.
•
Do not pause the tape for more than a few minutes. Press to stop the tape instead.
Page 39

Erasing Recorded Sound (Soundless Recording)
You can erase recorded sound from cassette tapes (soundless recording).
Before erasing recorded sound from a cassette tape, refer to “About Cassette Tapes” ( page 40).
Turn on the main unit, and then follow the procedure below. ( page 11)
2 1 3
PUSH
Insert the cassette tape containing the sound you want to erase.
1
Press .
2
Press .
3
7
Quitting Soundless Recording
Press .
NOTE
• Do not press the other source buttons during soundless recording. Another source
will be selected and recorded.
Recording Sound
36
Page 40

Troubleshooting
Check the following points before having the JVC service center repair this product.
General
CD
CDCD
Cassette
tape
Problem Possible cause Possible solution
No sound is produced.
The clock display in the
display window is flashing.
Playback does not start.
A certain point on a CD
cannot be played back
properly.
Playing time is displayed,
but no sound is produced.
The sound volume of
playback is low.
Headphones are
connected.
The main unit is off
because of a power cut.
The power cord is
disconnected (or no
batteries are installed).
The CD is upside-down.
There is condensation on
the lens.
The CD is scratched.
You are trying to play back
an MP3 disc or video CD
(VCD).
The head is dirty.
Disconnect the headphone
plug.
Reset the clock.
Insert the CD properly,
with the label side facing
up.
Leave the main unit turned
on, wait for several hours
until the moisture has
dried up, and then operate
the main unit.
Replace the CD.
Replace the CD.
Clean the head.
Page
14
12
15
2
39
39
38
37
Recording does not start
TapeTape
Radio
even when you press .
Radio reception is poor
with noise.
RadioRadio
Remote
control
7
Measures to Deal with an Irregularity (If this product does not function
You cannot operate the
remote control.
The write protect tags on
the cassette tape are
snapped off.
The antenna has not been
adjusted to the best
possible position.
The main unit is located
close to a TV, computer,
or other electric appliance.
The remote control
batteries are running low.
The remote control is
exposed to direct sunlight
or other intense light.
Cover the write protect tag
holes on the cassette tape
with adhesive tape.
Adjust the FM telescopic
antenna (FM). Position the
main unit again for the best
possible reception (AM).
Place the main unit away
from a TV, computer, or
other electric appliance.
Replace the batteries with
new batteries.
Operate the remote
control away from direct
sunlight, fluorescent light.
properly even after you have implemented the possible solutions given
above)
Many functions of this product are controlled by microcomputers. If the product does not function
properly when you press a button, disconnect the power cord from the AC outlet, wait for a while,
and then connect the power cord again.
40
20
2
9
10
Page 41

Maintenance
You are recommended to perform periodic maintenance on this product to
ensure that you can use it for many years to come.
7
Cleaning the Main Unit
When the operation panel becomes dirty, wipe it with a soft dry cloth.
When the operation panel is very dirty, wipe it with a cloth dampened with a small amount of a
neutral detergent, and then wipe it with a soft dry cloth.
CAUTION
• Do not wipe the operation panel with thinners, benzenes or other chemical agents. Do not spray
insecticides onto the operation panel. These may cause discoloration and damage to the
surface.
7
Cleaning the Tape Deck Head
Clean the head, pinch rollers and capstans
approximately every 10 hours of playback time
before the volume falls or sound quality deteriorates.
Pinch roller
Head
Useful cleaning kits (cotton-tipped swabs and
a cleaning agent) are commercially available.
Degaussing the head
When the head becomes magnetized, treble sound may be reduced or noise may be produced.
In such a case, degauss the head with a commercially available erasure head.
7
Cleaning the Lens of the CD Player
A dirty lens may cause sound dropout or
impede proper playback.
Open the CD door, and then clean the lens as
shown in the diagram.
Dust the lens with a blower brush of a commercially available cleaning kit.
If there are fingerprints on the lens, gently
wipe them with a cotton-tipped swab.
Capstan
Cotton-tipped swab
Blower
brush
Reference
Lens
38
Page 42

About CDs
7
Handling CDs
Available CD types
• Use a CD whose label side shows the ,
• Make sure not to use heart/flower shaped CDs or other irregularly shaped CDs. The use of such CDs damages
the main unit.
About CD-Rs/CD-RWs
You can play back a CD-R or CD-RW only when the disc is finalized.
• You can play back a CD-R or CD-RW which has been recorded in the music CD format. However, playback is
impossible in some cases due to the disc specifications or recording condition.
• Before using a CD-R or CD-RW, carefully read the cautions regarding the disc.
• Playback is impossible in some cases due to scratches or dirt on the disc, or dirt or condensation on the lens.
• To play back a CD-RW on this product, erase all tracks if the CD-RW was recorded in a format other than the
music CD format. Using the CD-RW without erasing all tracks may result in damage to the speakers or other
parts caused by sudden loud volume.
• This product does not support MP3s/WMAs.
7
Cleaning CDs
Before playing back a CD, dust the signal surface and wipe off any fingerprints with a soft dry
cloth. Make sure to wipe the CD from the center outward with a soft cloth.
or logo.
39
From the center
outward
CAUTION
• Make sure not to use thinners, benzenes, cleaners for analog records, or other chemical agents.
Scratches concentrated
on a certain part cause
sound dropout.
Page 43

About Cassette Tapes
IMPORTANT
• It should be noted that it may be unlawful to rerecord pre-recorded tapes, records, or discs
without the consent of the owner of copyright in the sound or video recording, broadcast
or cable program and in any literary, dramatic, musical, or artistic work embodied therein.
• If a recording you made has excessive noise, the main unit may have been too close to a TV
which was on during the recording. Either turn off the TV or increase the distance between the
TV and the main unit.
• This product is compatible with normal cassette tapes (TYPE I). The product is not compatible
with high position cassette tapes (TYPE II) or metal cassette tapes (TYPE IV).
7
Handling Cassette Tapes
• A slack tape may become caught in the inner part of
the main unit and damage the main unit. Before
using a cassette tape, wind up any slack in the
cassette tape as shown in the diagram.
• Do not use long cassette tapes such as C-120 or C-150. Long cassette tapes are useful for long playback/
recording but are thin and stretch easily, and may become tangled in the inner part of the main unit.
Rotate a pencil in the
direction of the arrow.
Leader tapes
• Both ends of a cassette tape are unrecordable parts
(leader tapes). Before start recording, wind the tape
past the leader part of the cassette tape.
Magnetic tape
(recordable part)
7
Preventing the Loss of Important Recorded Sound
Write protect tags are attached to a cassette tape for preventing the erasing of recorded sound.
• They enable you to avoid losing important record-
ings because once you snap off the write protect
tags, you cannot record to the cassette tape or
erase recorded material.
Write protect tag for side B
• When you want to use the cassette tape for record-
ing again, cover the tag holes with adhesive tape.
Adhesive tape
Leader tape
(translucent/unrecordable part)
Write protect tag for side A
Reference
40
Page 44

Specifications
<CD player>
System Compact disc digital audio system
Sampling frequency 44.1kHz
Number of channels 2 channels (Stereo)
Frequency feature 20 Hz – 20 kHz
<Tuner>
Frequency FM: 87.5 MHz – 108.0 MHz
AM: 522 kHz – 1,629 kHz
Antennas FM: Telescopic antenna
AM: Ferrite core antenna
<Cassette tape recorder>
Track method Compact cassette stereo
Erasing method Magnet erasing method
Head Erasing (Magnet)
Recording/playback (Hard permalloy, combination)
Winding speed Approximately 150 seconds
(for a 60 minute cassette tape)
Frequency response Normal: 60 Hz – 10,000 Hz
RC-BF10 CD PORTABLE SYSTEM
<General>
Clock display 24 hour display
Speakers 9 cm (round shape) × 2, 4 Ω
Output terminal Headphone (stereo mini × 1)
Output power 4W (2 W + 2 W) at 4 Ω (10% THD)
Power source AC 230 V , 50 Hz
Power consumption 15 W (during operation)
3 W (on standby)
Supplied accessories Remote control (1)
Batteries for the remote control (2)
Power cord (1)
Dimensions 420mm (W) × 178mm (H) × 250mm (D)
Weight Approximately 3.4 kg (without batteries)
Design and specifications are subject to change without notice.
EN
c
2004 Victor Company of Japan, Limited
0804NSMMODORI
 Loading...