

Page 1

ENGLISH
DEUTSCH
FRANÇAIS
NEDERLANDS
CASTELLANO
ITALIANO
PORTUGUÊS
AV28CT1EP / LCT1136-001A-U
VICTOR COMPANY OF JAPAN, LIMITED
$9&7(3
AV28CT1EP
COLOUR TELEVISION
INSTRUCTIONS
FARBFERNSEHGERÄT
BEDIENUNGSANLEITUNG
TELEVISEUR COULEUR
MANUEL D’INSTRUCTIONS
KLEURENTELEVISIE
GEBRUIKSAANWIJZING
TELEVISOR A COLOR
MANUAL DE INSTRUCCIONES
TELEVISORE A COLORI
ISTRUZIONI
TELEVISOR A CORES
INSTRUÇÕES
LCT1136-001A-U
0112-T-CR-JMUK
©2001 VICTOR COMPANY OF JAPAN, LIMITED
LCT1136-001A-U_All Cover.fm Page 1 Tuesday, December 18, 2001 1:25 PM
Page 2
Thank you for buying this JVC colour television.
To make sure you understand how to use your new TV, please read this manual thoroughly before you begin.
WARNING:
TO PREVENT FIRE OR SHOCK HAZARD, DO NOT EXPOSE THIS APPLIANCE TO RAIN OR
MOISTURE.
CAUTION:
TO ENSURE PERSONAL SAFETY, OBSERVE THE FOLLOWING RULES REGARDING THE
USE OF THIS UNIT.
1. Operate only from the power source specified (AC 220 – 240 V, 50 Hz) on the unit.
2. Avoid damaging the AC plug and power cord.
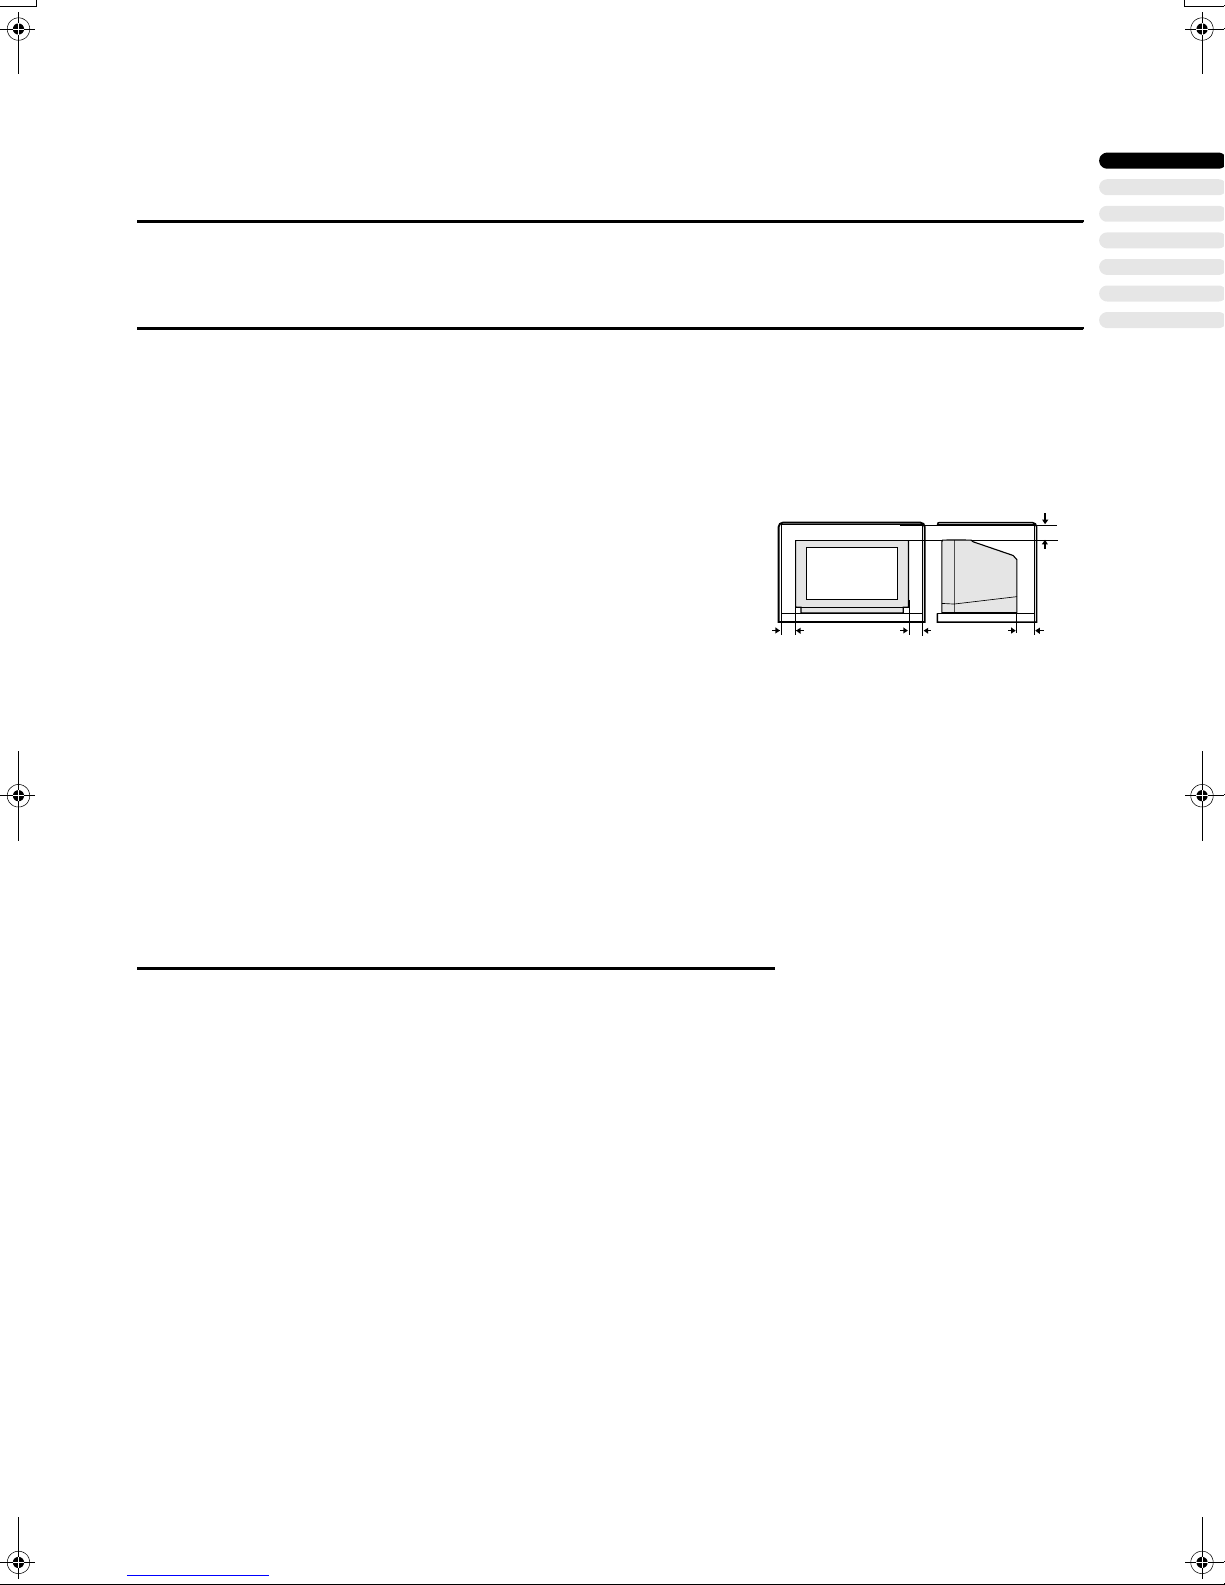
3. Avoid improper installation and never position the unit where good ventilation is unattainable.
When installing this television, distance recommendations must be maintained between the
15 cm
floor and wall, as well as instalment in a tightly
enclosed area or piece of furniture. Adhere to
the minimum distance guidelines shown for
10 cm 10 cm 15 cm
safe operation.
4. Do not allow objects or liquid into the cabinet openings.
5. In the event of a fault, unplug the unit and call a service technician. Do not attempt to repair it
yourself or remove the rear cover.
6. The surface of the TV screen is easily damaged. Be very careful with it when handling the TV.
Should the TV screen become soiled, wipe it with a soft dry cloth. Never rub it forcefully. Never
use any cleaner or detergent on it.
When you do not use this TV set for a long period of time, be sure to disconnect the power plug
from the AC socket.
ENGLISH
CONTENTS
PREPARATION . . . . . . . . . . . . . . . . . . . . . . . . . . . . . . . . . . . . . 2
T-V LINK FUNCTIONS . . . . . . . . . . . . . . . . . . . . . . . . . . . . . . . 5
BASIC OPERATION . . . . . . . . . . . . . . . . . . . . . . . . . . . . . . . . . 6
REMOTE CONTROL BUTTONS AND FUNCTIONS . . . . . . . . 9
MENU OPERATION . . . . . . . . . . . . . . . . . . . . . . . . . . . . . . . . 14
PICTURE SETTING. . . . . . . . . . . . . . . . . . . . . . . . . . . . . . . . . 15
PICTURE FEATURES. . . . . . . . . . . . . . . . . . . . . . . . . . . . . . . 16
SOUND SETTING . . . . . . . . . . . . . . . . . . . . . . . . . . . . . . . . . . 18
EXT SETTING . . . . . . . . . . . . . . . . . . . . . . . . . . . . . . . . . . . . . 19
FEATURES . . . . . . . . . . . . . . . . . . . . . . . . . . . . . . . . . . . . . . . 21
INSTALL . . . . . . . . . . . . . . . . . . . . . . . . . . . . . . . . . . . . . . . . . 23
DEMO . . . . . . . . . . . . . . . . . . . . . . . . . . . . . . . . . . . . . . . . . . . 27
ADDITIONAL MENU OPERATIONS . . . . . . . . . . . . . . . . . . . . 28
ADDITIONAL PREPARATION. . . . . . . . . . . . . . . . . . . . . . . . . 30
CH/CC NUMBER. . . . . . . . . . . . . . . . . . . . . . . . . . . . . . . . . . . 32
TV BUTTONS AND PARTS. . . . . . . . . . . . . . . . . . . . . . . . . . . 33
TROUBLESHOOTING. . . . . . . . . . . . . . . . . . . . . . . . . . . . . . . 34
SPECIFICATIONS. . . . . . . . . . . . . . . . . . . . . . . . . . . . . . . . . . 36
1111
Page 3

PREPARATION
PREPARATION
PREPARATIONPREPARATION
Connecting the Aerial and VCR
Connecting the Aerial and VCR
■■■■
Connecting the Aerial and VCRConnecting the Aerial and VCR
If connecting a VCR, follow A → B → C → D.
If not connecting a VCR, follow
*1: To operate T-V LINK functions, a T-V LINK compatible
VCR must be connected to the EXT-2 terminal on the TV.
For details about T-V LINK functions, see “T-V LINK
FUNCTIONS” on page 5.
Note:
For further details, refer to the manuals provided with the
•
devices to be connected.
The connecting cables are not provided.
•
A video can be viewed from the VCR without performing
•
C. For details, refer to your VCR instruction manual.
To connect additional external devices, please see “AD-
•
DITIONAL PREPARATION” on page 30.
When a decoder is connected to a T-V LINK compatible
•
VCR, set the DECODER (EXT-2) function to ON. For details, see “Using the DECODER (EXT-2) function” on
page 28. Otherwise, you will not be able to view scrambled channels.
1
→ 2.
AC Outlet
(AC 220 - 240 V,
50 Hz)
21-pin SCART Cable
VHF/UHF
Aerial
EXT-2
EXT-3
EXT-1
*1
EXT-3
EXT-2
S
S
EXT-1
75-ohm
Coaxial
Cable
Putting Batteries into the Remote Control
Putting Batteries into the Remote Control
■■■■
Putting Batteries into the Remote ControlPutting Batteries into the Remote Control
Use two AAA/R03 dry cell batteries.
Insert the batteries from the - end, making sure the + and polarities are correct.
To open the battery compartment, slide the door downwards
and lift off. Replace the door by sliding it upwards until it is secure.
Note:
Follow the warnings printed on the batteries.
•
Battery life is about six months to one year, depending on
•
your frequency of use.
If the remote control does not work properly, replace the
•
batteries.
The batteries we supply are only for setting up and test-
•
ing your TV, please replace them as soon as necessary.
Always use good quality batteries.
•
VCR
AV IN/OUT
Terminal
75-ohm Coaxial
Cable
To Aerial
Input
To Aerial
Output
2
Page 4
Initial Settings
Initial Settings
■■■■
Initial SettingsInitial Settings
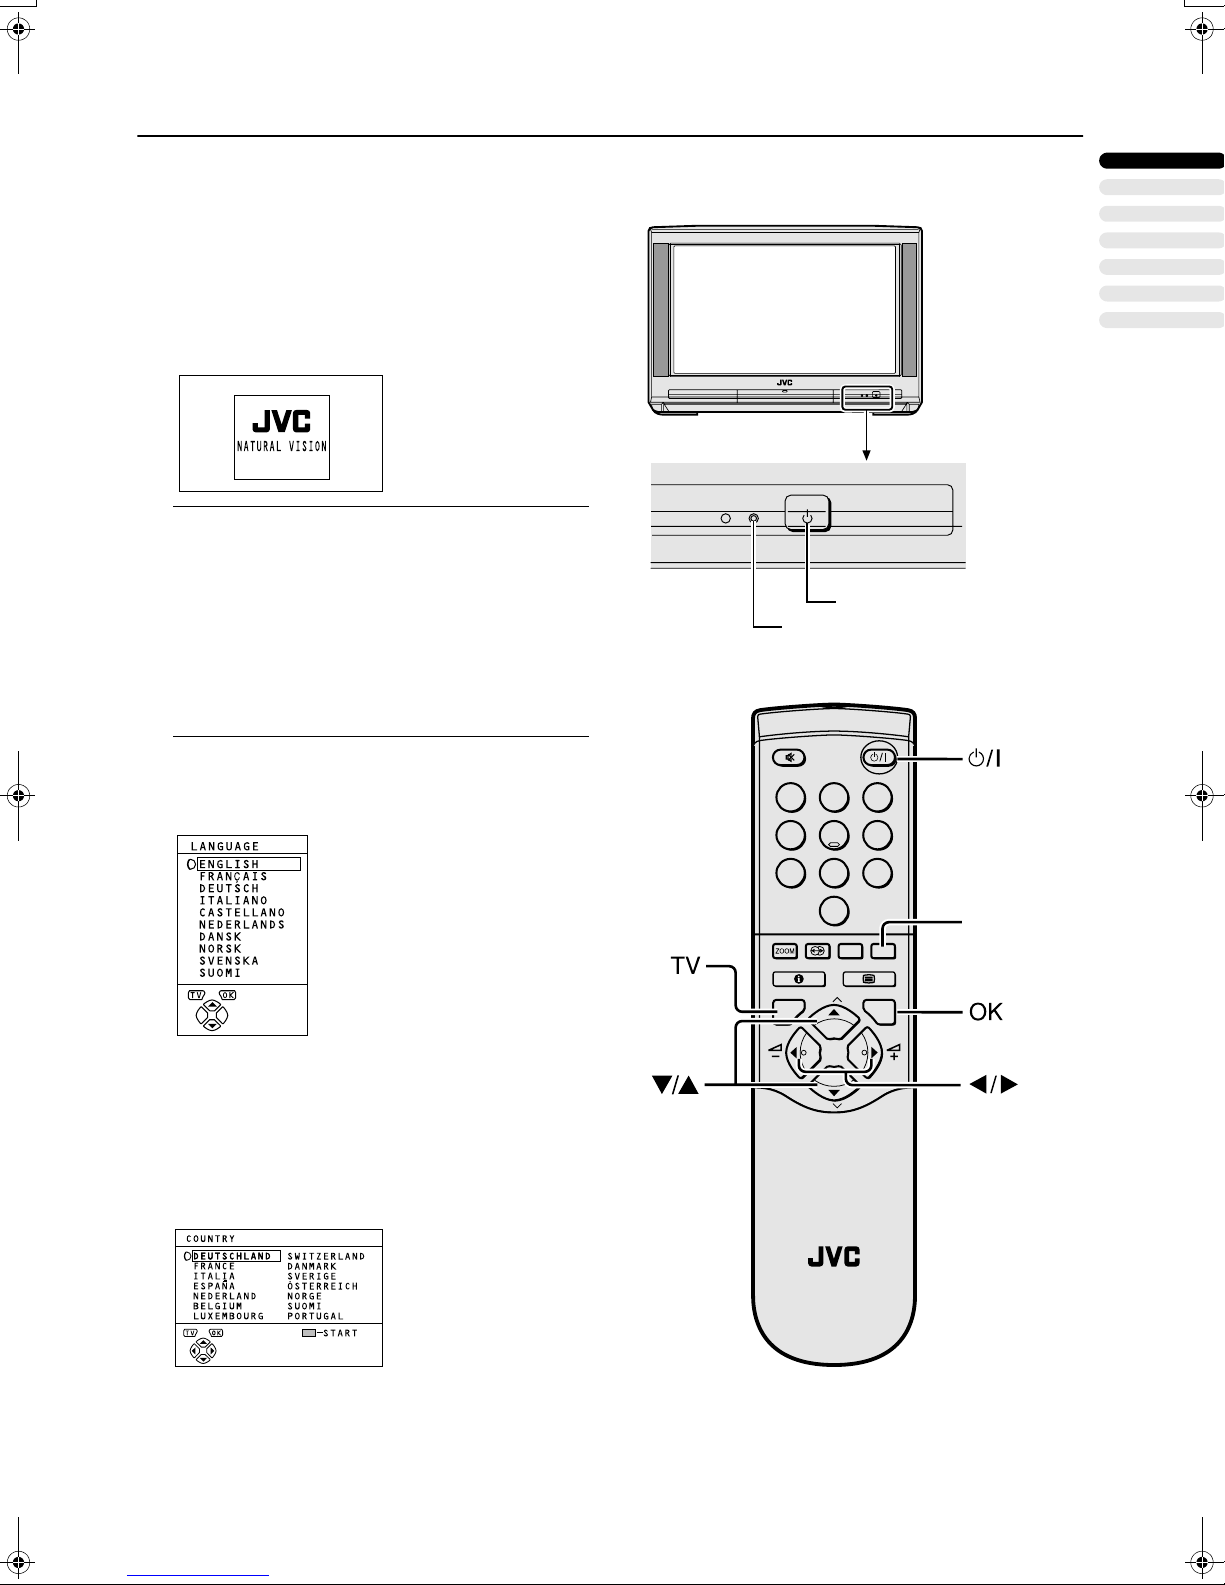
When the TV is first turned on, it enters the initial setting
mode, and the JVC logo is displayed. Follow the instructions
on the on-screen display to make the initial settings.
1
Press the Main power button on the TV.
The Power lamp lights red (for power on), then green (for
TV on) and the JVC logo is displayed.
Note:
If the power lamp stays red and does not change to
•
green:
Your TV is in the standby mode. Press the
(Standby) button on the remote control to turn your
TV on.
The JVC logo does not appear when your TV has
•
been turned on once.
In this case, use the “LANGUAGE” and “AUTO PRO-
GRAM” functions to make the initial settings. For details, see “INSTALL” on page 23.
#
PREPARATION
ENGLISH
Main power button
Power lamp
2
Press the
The LANGUAGE menu appears.
3
Press the 6
ENGLISH. Then press the
button.
aaaa
6 buttons to choose
66
aaaa
ton.
English is set for the on-screen display description. The
COUNTRY menu appears as a sub-menu of the AUTO
PROGRAM function.
but-
1 2 3
4 5 6
7 8 9
0
AV
MENU
P
TV OK
P
F
.T/L
FREEZE
SUB-P
TV
Blue button
4
Press the 5
5 and 6
55
6 buttons to
66
choose the country where you are
now located.
3
Page 5

PREPARATION
5
Press the blue button to start the
AUTO PROGRAM function.
The AUTO PROGRAM menu appears and received TV
channels are automatically registered in the Programme
numbers (PR).
To cancel the AUTO PROGRAM function:
Press the b button.
6
After the TV channels have been
registered in the Programme numbers (PR), the EDIT menu appears.
You can proceed to edit the Programme numbers (PR)
using the EDIT/MANUAL function. For details, see “ED-
IT/MANUAL” on page 24.
When not using the EDIT/MANUAL function:
If you do not need to use the EDIT/MANUAL function, go
to the next step.
Note:
When your TV can detect the TV channel name from
•
the TV channel broadcast signal, it automatically
registers the TV channel name (ID) to the Programme number (PR) in which the TV channel has
been registered.
If a TV channel you want to view is not set to a Pro-
•
gramme number (PR), manually set it using the
MANUAL function. For details, see “EDIT/MANUAL”
on page 24.
The TV channel is not registered in Programme
•
number PR 0 (AV). When you want to register a TV
channel to PR 0 (AV), manually set it using the MANUAL function. For details, see “EDIT/MANUAL” on
page 24.
7
Press the
button to display the
aaaa
T-V LINK menu.
8
Operate the T-V LINK menu according to the type of a VCR connected
to the EXT-2 terminal.
When a T-V LINK compatible VCR is not connected:
Press the b button to exit the T-V LINK menu.
The T-V LINK menu disappears.
When a T-V LINK compatible VCR is connected:
Follow the operating procedure “Downloading the data
to VCR” on page 28 to transmit the Programme number
(PR) data.
9
Now, the initial settings are complete, and you can watch the TV.
4
Page 6

T-V LINK FUNCTIONS
T-V LINK FUNCTIONS
T-V LINK FUNCTIONST-V LINK FUNCTIONS
When a T-V LINK compatible VCR is connected to the EXT2 Terminal on the TV, it is easier to set up the VCR and to
view videos. T-V LINK uses the following features:
To use T-V LINK functions:
A T-V LINK compatible VCR is necessary.
The VCR must be connected to the EXT-2 terminal on the TV
by a fully wired SCART cable.
Note:
A “T-V LINK compatible VCR” means a JVC VCR with the
•
T-V LINK logo or a VCR with one of the following logos.
However, these VCRs may support some or all of the features described below. For details, refer to your VCR instruction manual.
“Q-LINK” (a trademark of Panasonic Corporation)
“Data Logic” (a trademark of Metz Corporation)
“Easy Link” (a trademark of Phillips Corporation)
“Megalogic” (a trademark of Grundig Corporation)
“SMARTLINK” (a trademark of Sony Corporation)
Pre-set Download
Pre-set Download
■■■■
Pre-set DownloadPre-set Download
Download the registered data on the TV channels from the TV
to the VCR.
The Preset Download function automatically begins when the
initial setting is complete or whenever the AUTO PROGRAM
or EDIT/MANUAL operations are performed.
Note:
This function can be operated via VCR operation.
•
Note:
Operation via the TV is not possible.
•
Generally, the VCR cannot record a TV channel that can-
•
not be received properly by the VCR’s tuner, even though
you can view that TV channel on the TV. However, some
VCRs can record a TV channel by using the TV’s output
if that channel can be viewed on the TV, even though the
TV channel cannot be received properly by the VCR’s
tuner. For details, refer to your VCR instruction manual.
TV Auto Power On/VCR
TV Auto Power On/VCR
■■■■
TV Auto Power On/VCR TV Auto Power On/VCR
Image View
Image View
Image ViewImage View
When the VCR starts playing, the TV automatically turns on
and the images from EXT-2 terminal are displayed on the
screen.
When the VCR menu is operated, the TV automatically turns
on and the images from EXT-2 terminal are displayed on the
screen.
Note:
This function does not operate if your TV’s main power is
•
turned off. Set your TV’s main power to on (standby
mode).
ENGLISH
When “FEATURE NOT AVAILABLE” is displayed:
If “FEATURE NOT AVAILABLE” is displayed, the download
was not performed correctly. Before trying to download again,
ensure the following:
The VCR power is turned on.
•
The VCR is T-V LINK compatible.
•
The VCR is connected to the EXT-2 terminal.
•
The SCART cable is fully wired.
•
Direct Rec
Direct Rec
■■■■
Direct RecDirect Rec
“What You See Is What You Record”
You can record to VCR the images that you are currently
viewing on TV by a simple operation.
For details, read the manual for your VCR.
Operate via the VCR. “VCR IS RECORDING” is displayed.
In the following conditions, the VCR will stop recording if
the TV is turned off, if the TV channel or input is switched,
or if the menu is displayed on the TV:
When recording images from an external device connected
•
to the TV.
When recording a TV channel after it has been unscrambled
•
on a decoder.
When recording a TV channel by using the TV’s output be-
•
cause that TV channel cannot be properly received on the
VCR’s tuner.
5
Page 7

BASIC OPERATION
BASIC OPERATION
BASIC OPERATIONBASIC OPERATION
Turn the Main power on
Turn the Main power on
■■■■
Turn the Main power onTurn the Main power on
Press the Main power button on the TV.
The Power lamp lights red and your TV is in the standby mode.
Note:
If the Power lamp lights green, the TV is already on.
•
To turn the Main power off:
Press the Main power button again.
The Power lamp goes off.
Note:
•
To save energy, turn the main power off if you are not using the TV for a long period of time.
Turn the TV on from standby mode
Turn the TV on from standby mode
■■■■
Turn the TV on from standby modeTurn the TV on from standby mode
Main power button
Power lamp
Press the
button, the
(Standby) button, the
####
buttons or the Number
6
6
66
bbbb
buttons.
The Power lamp lights red to green and your TV will be turned on.
To turn the TV off:
Press the
The Power lamp changes from green to red and the TV enters
standby mode.
Choose a TV channel
Choose a TV channel
■■■■
Choose a TV channelChoose a TV channel
Choose a Programme number (PR) in which the desired Programme TV channel has been set.
Use the
Press the 6666 buttons to choose the desired Programme number (PR).
Use the Number buttons:
Enter the desired Programme number (PR) with the
Number buttons.
Use the PR LIST:
1 Press the h
(standby) button again.
####
buttons:
6666
Example
• PR12
• PR6
play the PR LIST.
→
press 1 and
→
press 6.
h (Information) button to dis-
hh
.
2222
1 2 3
4 5 6
7 8 9
0
AV
MENU
P
TV OK
P
F
.T/L
FREEZE
SUB-P
Number
buttons
6
TV
Page 8
BASIC OPERATION
Press the
2
5555
and
6666
buttons to choose a
Programme number (PR). Then press the
button.
aaaa
Note:
For Programme numbers (PR) with the CHILD
•
LOCK function set, the
displayed next to the Programme number (PR) in
the PR LIST.
You cannot use the
•
gramme number (PR) with the CHILD LOCK funtion set.
Even if you try to choose a Programme number
•
(PR) with the CHILD LOCK function set, the
(CHILD LOCK) mark will appear, and you cannot
watch the TV channel. To watch the TV channel,
see “CHILD LOCK” on page 21.
If you do not have a clear picture or no colour ap-
•
pears, change the colour system manually. See
“COLOUR SYSTEM” on page 16.
Adjust the volume
Adjust the volume
■■■■
Adjust the volumeAdjust the volume
5
Press the
5
buttons to adjust the vol-
55
(CHILD LOCK) mark is
nnnn
6666
buttons to choose a Pro-
nnnn
ume.
The Volume indicator appears and the volume changes as
you press the
Watch images from external
Watch images from external
■■■■
Watch images from external Watch images from external
devices
devices
devicesdevices
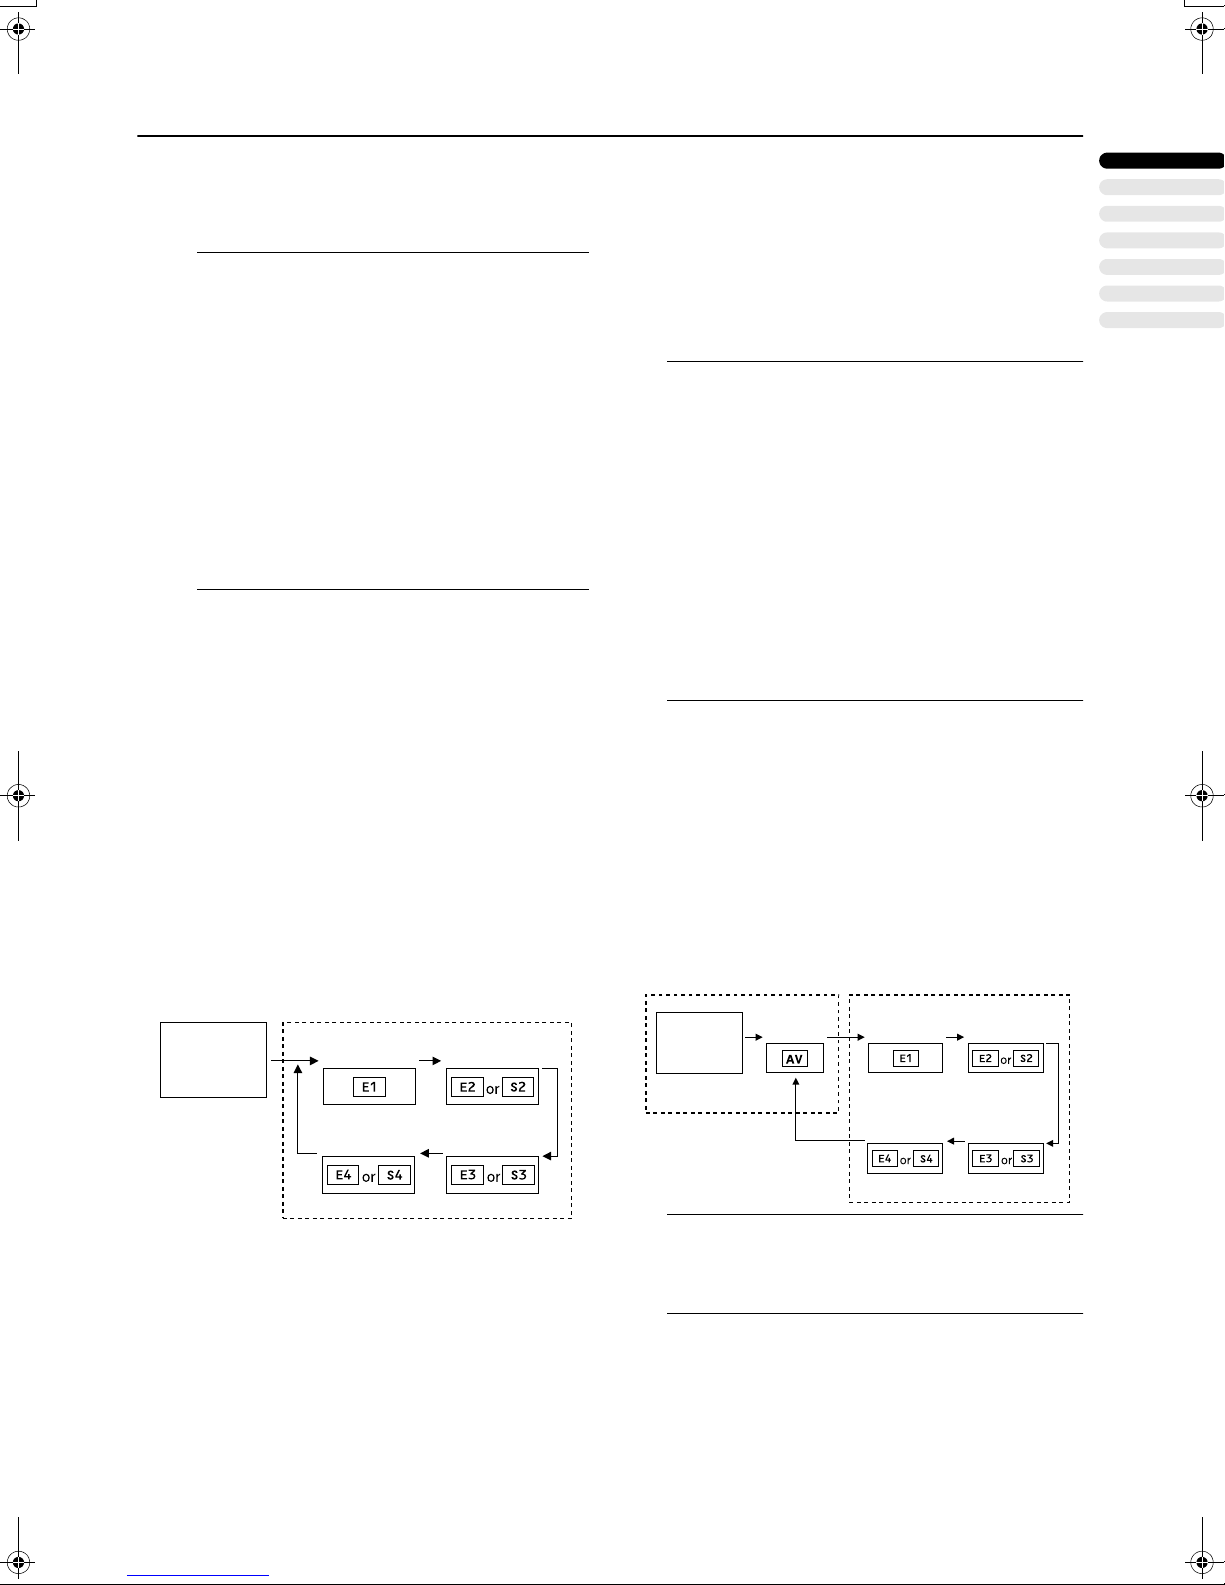
Choose an EXT terminal to which the desired external device
has been connected.
Use the
Press the
Pressing the
TV mode EXT modes
Programme
PR 1 – PR 99
o
o
oo
o
numbers
–/+
buttons.
button:
button to choose an EXT terminal.
button changes the choice as follows:
o
EXT-1
EXT-2
Use the
Press the
Use the PR LIST:
6666
buttons:
6666
buttons to choose an EXT terminal.
1 Press the
(Information) button to dis-
hhhh
play the PR LIST.
and
6666
buttons to choose an
aaaa button
y
2
Press the
5555
EXT terminal. Then press the
Note:
The EXT terminals are registered after the Pro-
•
gramme number PR 99.
You can choose a video input signal from the S-VID-
•
EO signal (Y/C signal) and regular video signal
(composite signal). For details, see “
input)” on page 19.
If you do not have a clear picture or no colour ap-
•
pears, change the colour system manually. See
“COLOUR SYSTEM” on page 16.
When choosing an EXT terminal with no input signal,
•
the EXT terminal number becomes fixed on the screen.
This TV set has a function which can automatically
•
change over the input according to a special signal
output from an external device.(The EXT-4 terminal
does not support it.)
To return to a TV channel:
Press the b button, the
tons.
6666
buttons or the Number but-
To use the Programme number PR 0 (AV):
When the TV and VCR are connected only by the Aerial
cable, choosing the Programme number PR 0 (AV) allows you to view images from the VCR. Set the VCR RF
channel to the Programme number PR 0 (AV) manually.
For details, see “EDIT/MANUAL” on page 24.
Pressing the o button changes the choice as follows:
TV mode
Programme
numbers
PR 1 – PR 99
EXT modes
EXT-1PR 0
EXT-2
.
ENGLISH
(S-VIDEO
EXT-4
EXT-3
EXT-4
Note:
The VCR RF channel is sent as the RF signal from
•
the VCR.
Also refer to your VCR instruction manual.
•
EXT-3
7
Page 9

BASIC OPERATION
Operating with the buttons on the TV
Operating with the buttons on the TV
■■■■
Operating with the buttons on the TVOperating with the buttons on the TV
1
Press the P p
p buttons to turn the
pp
TV on from standby mode.
2
Press the P p
p buttons to choose a
pp
Programme number (PR) or an EXT
terminal.
3
Press the
the q
q buttons to adjust the vol-
qq
rrrr
(Volume) button and
ume.
(Behind the front cover)
1 Press the
The volume level indicator appears.
2 Press the q
level indicator is displayed.
rrrr
(Volume) button.
q
buttons while the volume
qq
8
Page 10

REMOTE CONTROL BUTTONS AND FUNCTIONS
REMOTE CONTROL BUTTONS AND FUNCTIONS
REMOTE CONTROL BUTTONS AND FUNCTIONSREMOTE CONTROL BUTTONS AND FUNCTIONS
Muting Button
Muting Button
1
Muting ButtonMuting Button
You can turn the volume off instantly.
1 2 3
4 5 6
7 8 9
0
AV
MENU
P
TV OK
P
F.T/L
Press the
ume. Pressing the
(Muting) button to turn off the Vol-
llll
(Muting) button again
llll
resumes the previous Volume level.
Number Buttons
Number Buttons
2
Number ButtonsNumber Buttons
You can choose a Programme number (PR) by
entering the Programme number.
Example:
→
• PR12
• PR6
You can also press the o button repeatedly to choose
an EXT terminal.
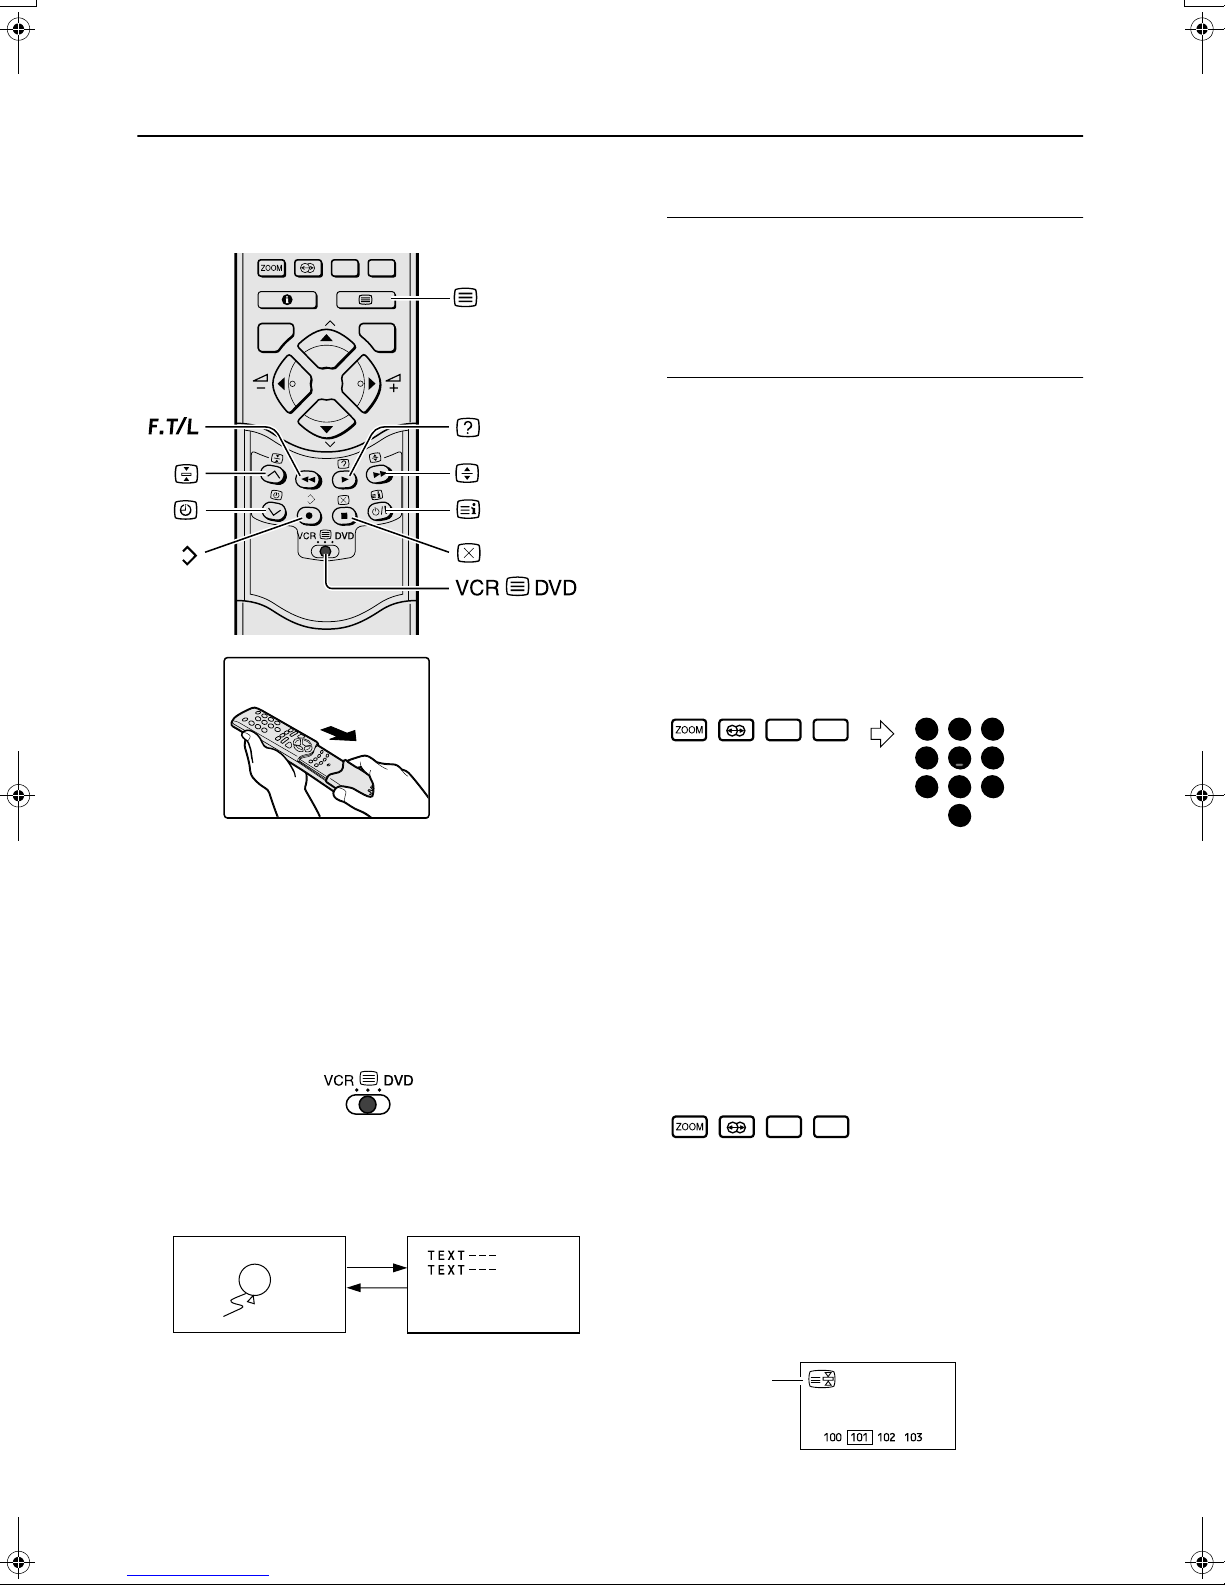
ZOOM Button
ZOOM Button
3
ZOOM ButtonZOOM Button
You can change the screen size according to the picture aspect ratio. Choose the optimum one from the following ZOOM
modes.
press 1 and 2.
→
press 6.
AUTO(WSS):
When a WSS (Wide Screen Signalling) signal, which shows
the aspect ratio of the picture, is included in the broadcast signal or the signal from an external device, the TV automatically
changes the ZOOM mode to 16:9 ZOOM mode or FULL
mode according to the WSS signal.
ENGLISH
TV
How to open the cover
If a WSS signal is not included, the picture is displayed in accordance with the ZOOM mode set with the 4:3 AUTO ASPECT function.
Note:
For details of the 4:3 AUTO ASPECT function, see “4:3
•
AUTO ASPECT” on page 17.
When the AUTO(WSS) mode does not function correctly
•
due to poor WSS signal quality or when you want to
change the ZOOM mode, press the
change to another ZOOM mode.
c button and
REGULAR:
Use to view a normal picture (4:3 aspect ratio) as its original
size is.
9
Page 11

REMOTE CONTROL BUTTONS AND FUNCTIONS
PANORAMIC:
This mode stretches the left and right sides of a normal picture (4:3 Aspect Ratio) to fill the screen, without making the
picture appear unnatural.
Note:
The top and bottom of the picture are slightly cut off.
•
14:9 ZOOM:
This mode zooms up the Wide Picture (14:9 Aspect Ratio) to
the upper and lower limits of the screen.
16:9 ZOOM:
This mode zooms up the Wide Picture (16:9 Aspect Ratio) to
the full screen.
2
Press the
mode. Then press the
The picture expands and the chosen ZOOM mode is displayed in about 5 seconds.
Note:
•
The ZOOM mode may be automatically changed
due to the control signal from an external device.
When you want to return to the previous ZOOM
mode, choose the ZOOM mode again.
Adjusting the visible area of the pic-
Adjusting the visible area of the pic-
Adjusting the visible area of the pic-Adjusting the visible area of the picture
ture
tureture
If subtitles or the top (or bottom) of the picture are cut off, adjust the visible area of the picture manually.
1
Press the
The ZOOM menu appears.
2
Press the
6666
buttons to choose a ZOOM
button.
aaaa
c
c
cc
aaaa
button.
button to display the ZOOM
mode indication.
Indicator is displayed.
16:9 ZOOM SUBTITLE:
This mode zooms up the Wide Picture (16:9 Aspect Ratio)
with subtitles to the full screen.
FULL:
This mode uniformly stretches the left and right sides of a normal picture (4:3 aspect ratio) to fill the wide TV screen.
Note:
Use for pictures with a 16:9 aspect ratio that have been
•
squeezed into a normal picture (4:3 aspect ratio), you
can restore their original dimensions.
Choose the ZOOM mode
Choose the ZOOM mode
Choose the ZOOM modeChoose the ZOOM mode
1
Press the
c
c
cc
button to display the
ZOOM menu.
3
While it is displayed, press the ∞/5 buttons to adjust the visible area vertically.
Note:
You cannot adjust the visible area in REGULAR or
•
FULL mode.
HYPER SOUND Button
HYPER SOUND Button
4
HYPER SOUND ButtonHYPER SOUND Button
You can enjoy sounds with a wider ambience.
Press the
(HYPER SOUND) button to turn
iiii
the HYPER SOUND function on or off.
Note:
The HYPER SOUND function does not work properly with
•
mono sound.
The HYPER SOUND function can be also turned on or off
•
by using the SOUND SETTING menu. For details, see
“HYPER SOUND” on page 18.
10
Page 12
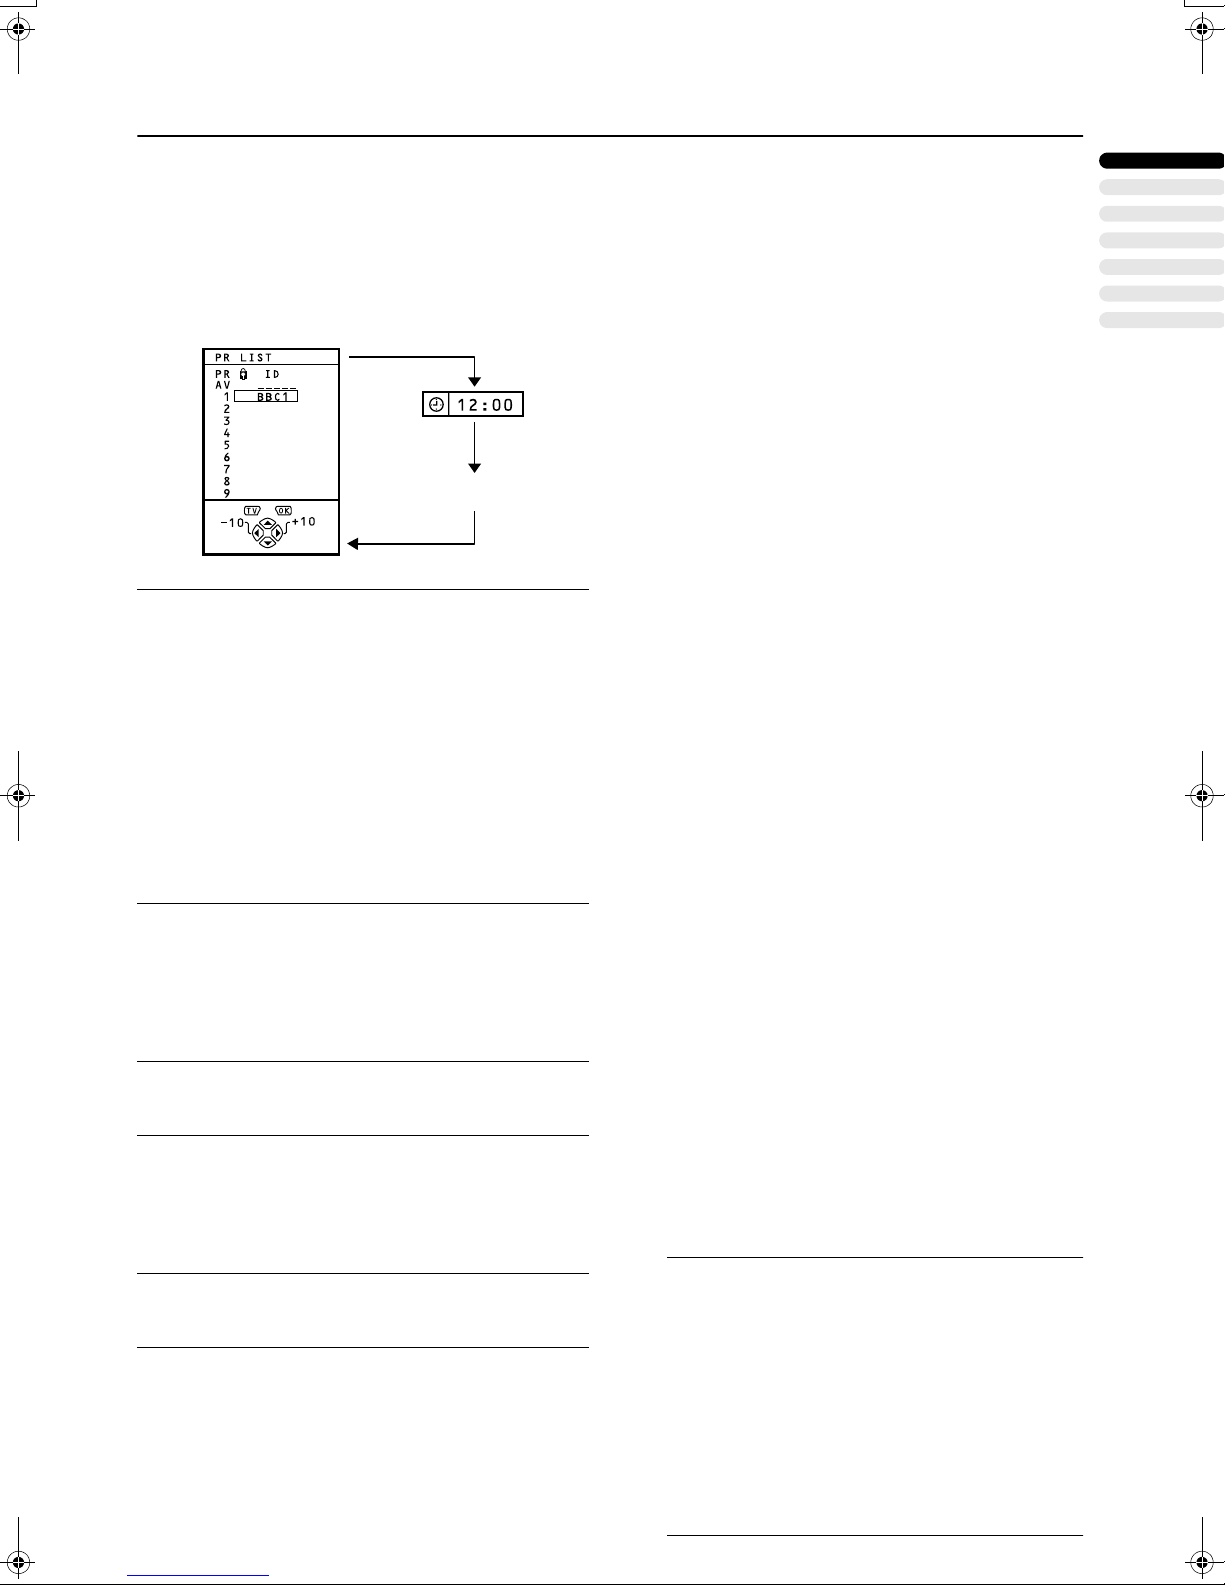
5 Information Button
Information Button
Information Button Information Button
You can display the PR LIST or the Current Time on the
screen.
Press the
Pressing the h (Information) button changes the display as
follows:
Note:
You can choose Programme numbers (PR) or EXT termi-
•
nals with the PR LIST. For details, see “Use the PR LIST:”
on page 6.
This TV uses teletext data to set the current time. If the TV
•
has not received a TV channel that has teletext programmes since it was turned on, the time display is blank.
To view the current time, choose a TV channel that has
teletext programmes. The time will still be displayed as
long as you do not turn off the TV, even if you choose other TV channels.
When watching videos, an incorrect current time is some-
•
times displayed.
The h (Information) button is also used to operate men-
•
us. For details, see “MENU OPERATION” on page 14.
TV Button
TV Button
6
TV ButtonTV Button
You can return to a TV channel instantly.
Press the
The TV returns to the TV mode and a TV channel appears.
Note:
The b button is also used to operate menus. For details,
•
see “MENU OPERATION” on page 14.
7
5
5
55
You can adjust the volume.
Press the
Note:
The
•
5555
tails, see “MENU OPERATION” on page 14.
(Information) button.
hhhh
button.
bbbb
Buttons
Buttons
Buttons Buttons
buttons to adjust the sound.
5555
buttons are also used to operate menus. For de-
No indication
REMOTE CONTROL BUTTONS AND FUNCTIONS
8 Standby Button
Standby Button
Standby ButtonStandby Button
Press the
on or off.
When the TV is turned on, the power lamp changes from red
to green.
Colour Buttons
Colour Buttons
9
Colour ButtonsColour Buttons
The colour buttons are used for the teletext operations or the
menu operations. For details, see “
tons and VCR P DVD Switch” on page 12 or “MENU OPERATION” on page 14.
OK Button
OK Button
0
OK ButtonOK Button
The a button is used to operate menus. For details, see
“MENU OPERATION” on page 14.
6
6
66
-
You can choose a Programme number (PR) or an EXT terminal.
Press the
gramme number (PR) or an EXT terminal.
The
For details, see “MENU OPERATION” on page 14.
=
These buttons can be used to operate a JVC brand VCR or
DVD player. Pressing the button having the same appearance as the original remote control button of a device makes
the function work in the same way as the original remote control.
buttons are also used to operate menus.
6666
VCR/DVD Control Buttons and
VCR/DVD Control Buttons and
VCR/DVD Control Buttons andVCR/DVD Control Buttons and
VCR
VCR PPPP DVD Switch
VCR VCR
1
Set the VCR PPPP DVD Switch to the VCR or
DVD position.
VCR:
When you are operating the VCR, set the switch to the
VCR position.
DVD:
When you are operating the DVD player, set the switch
to the DVD position.
(Text):
PPPP
When you are viewing Teletext programmes, set the
switch to the
2
Press the VCR/DVD Control Button to control your VCR or DVD player.
Note:
•
If your device is not made by JVC, these buttons
cannot be used.
Even if your device is made by JVC, some of these
•
buttons or any one of the buttons may not work, depending on the device.
You can use the
•
nel. The VCR will receive or choose the chapter the
DVD player plays back.
Some DVD player models use the
•
both operating of Fast forward/backward functions
and choosing the chapter. In this case, the 1/¡
buttons do not work.
(Standby) button to turn the TV
####
Teletext Control But-
~
Buttons
Buttons
Buttons Buttons
6666
buttons to choose an Pro-
DVD Switch
DVD Switch DVD Switch
(Text) position.
PPPP
buttons to choose a TV chan-
pppp
pppp
buttons for
ENGLISH
11
Page 13
REMOTE CONTROL BUTTONS AND FUNCTIONS
Teletext Control Buttons and VCR
■■■■
Teletext Control Buttons and VCR PPPP DVD
~
Teletext Control Buttons and VCR Teletext Control Buttons and VCR
MENU
P
TV OK
P
F.T/L
DVD Switch
DVD DVD
Note:
•
If you have trouble receiving teletext broadcasts,
consult your local dealer or the teletext station,
In the Text mode, the ZOOM mode is fixed to the
•
FULL mode.
No menu operations are possible when viewing a
•
teletext programme.
Using the List Mode
Using the List Mode
Using the List ModeUsing the List Mode
You can store the numbers of your favourite teletext pages in
memory and call them up quickly using the colour buttons.
Switch
Switch Switch
To store the page numbers:
Basic operation
Basic operation
Basic operationBasic operation
You can view three types of teletext broadcasts on the TV:
FLOF (Fastext), TOP and WST.
1
Choose a TV channel with a teletext broadcast.
2
Set the VCR PPPP DVD switch to the
(Text)
PPPP
position.
1
2
ss
Pre
The stored page numbers are displayed at the bottom of
the screen.
Press a Colour button to choose a posi-
B
B
BB
button
to engage the List mode.
tion. Then press the Number buttons to enter the page number.
1 2 3
4 5 6
7 8 9
0
AV
3
Press and hold down
The four page numbers blink white to indicate that they
are stored in memory.
(Store) button.
AAAA
To call up a stored page:
1
Press the
button to engage the List
B
B
BB
mode.
2
Press a colour button to which a page has
been assigned.
3
Press
(Text) button to display the tele-
gggg
text.
Pressing
4
Choose a teletext page by pressing the
6666
(Text) button changes the mode as follows:
gggg
TV mode
buttons, Number buttons or Colour
buttons.
To return to the TV mode:
Press the b button or
(Text) button.
gggg
12
Text mode
To exit the List mode:
Press the
Hold
Hold
HoldHold
You can hold a teletext page on the screen for as long as you
want, even while several other teletext pages are being received.
Press the
Hold indication
To cancel the Hold function:
Press C (Hold) button again.
button again.
B
(Hold) button.
CCCC
Page 14

Sub-page
Sub-page
Sub-pageSub-page
Some teletext pages include sub-pages that are automatically
displayed.
You can hold any sub-page, or view it at any time.
1
Press the
(Sub-page) button to operate
DDDD
the Sub-page function.
2
Press the Number buttons to enter a subpage number.
Example:
• 3rd sub-page
To cancel the Sub-page function:
Press the D (Sub-page) button again.
Note:
You can also choose a sub-page by pressing the
•
red or green button.
Reveal
Reveal
RevealReveal
Some teletext pages include hidden text (such as answers to
a quiz).
You can display the hidden text.
Each time you press the
→
press 0, 0, 0 and 3.
(Reveal) button,
EEEE
text is hidden or revealed.
REMOTE CONTROL BUTTONS AND FUNCTIONS
Cancel
Cancel
CancelCancel
You can search for a teletext page while watching TV.
1
Press the Number button to enter a page
number, or press a Colour button.
The TV searches for a teletext page.
2
Press
The TV programme appears. When the TV finds the
teletext page, its page number appears in the upper left
of the screen.
3
Press
text page when the page number is on the
screen.
Note:
The TV mode cannot be resumed even by pressing
•
the
rarily displayed instead of the teletext programme.
(Cancel) button.
HHHH
(Cancel) button to return to a tele-
HHHH
(Cancel) button. A TV programme is tempo-
H
ENGLISH
Size
Size
SizeSize
You can double the height of the teletext display.
Press the
Index
Index
IndexIndex
You can return to the index page instantly.
Press
FLOF (Fastext)/TOP/WST:
Returns to page 100 or a previously specified page.
List mode:
Returns to the page number displayed in the lower left area of
the screen.
FFFF
(size) button.
(Index) button.
GGGG
13
Page 15
MENU OPERATION
MENU OPERATION
MENU OPERATIONMENU OPERATION
This TV has a number of functions you can operate using
menus. To fully utilize all your TV’s functions, you need to understand the basic menu operating techniques fully.
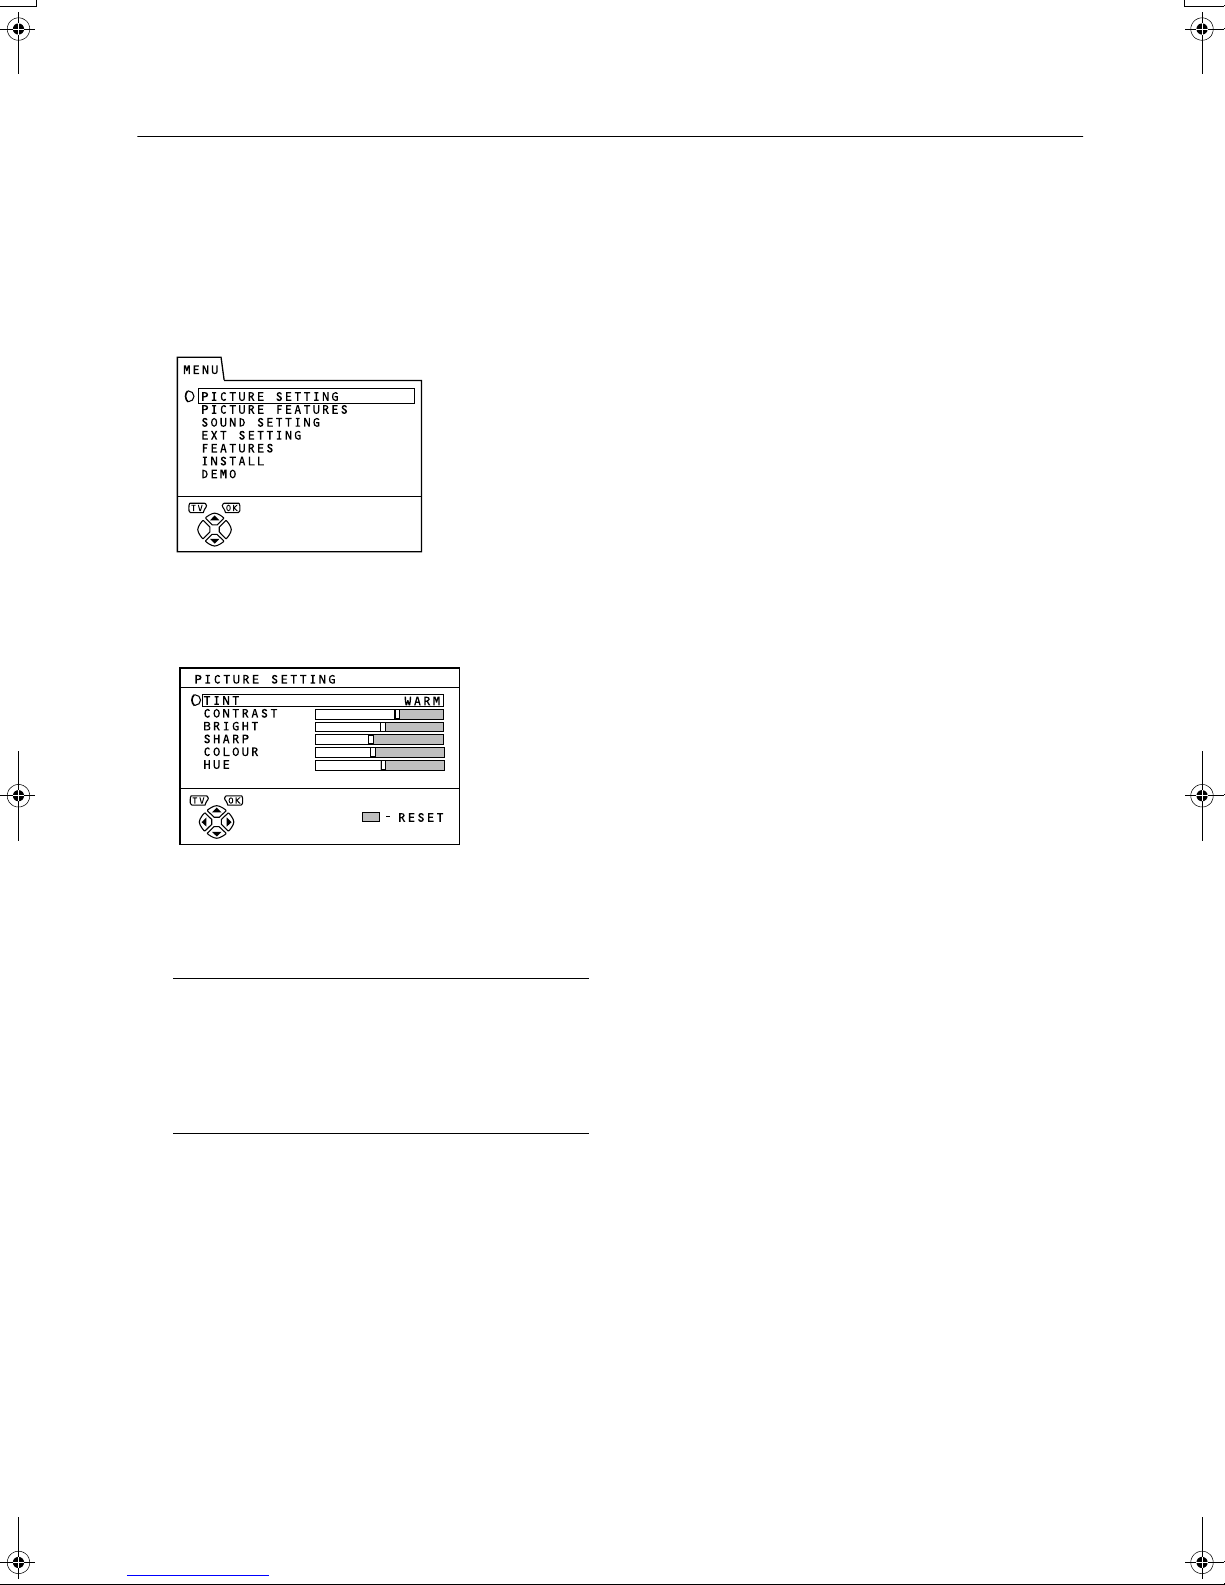
1
Press the
button to display the
aaaa
MENU (main menu).
The MENU (main menu) appears. In it, the titles of the
menus are displayed.
2
Press the
menu title, and press the
The menu appears.
buttons to choose a
6
aaaa
button.
3
Operate the menus according to the
operation description of each function.
Note:
•
For details, refer to the operation descriptions of
each function described for each menu which follows this “MENU OPERATION”.
The display appearing at the bottom of a menu indi-
•
cates a button on the remote controller you can use
when you operate a chosen function.
4
Press
button to complete the
aaaa
setting.
The menu disappears.
To return to the previous menu:
Press h (information) button.
To exit a menu instantly:
Press the b button.
14
Page 16

PICTURE SETTING
PICTURE SETTING
PICTURE SETTINGPICTURE SETTING
To display the PICTURE SETTING menu:
1
Press the
(main menu).
2
Press the 6 button to choose PICTURE
SETTING, and press the
TINT
TINT
■■■■
TINTTINT
You can select one of three TINT modes (three kinds of picture settings) to adjust the picture settings automatically.
1
Press the 6 buttons to choose TINT.
2
Press 5 buttons to choose a mode.
COOL:
A cool white colour base with a boost in the colour and
contrast levels that creates a more vivid picture.
WARM:
A warm orange/red colour base that creates the appropriate colour and contrast levels for watching films.
NORMAL:
A normal white colour base with normal colour and contrast levels.
button to display MENU
aaaa
button.
aaaa
Note:
•
You can change the HUE setting (picture hue) only
when the colour system is NTSC 3.58 or NTSC 4.43.
To return to the default settings in each TINT
mode:
Press the blue button.
Returns the picture settings in the currently chosen TINT
mode to the default settings, and stores them in the TINT
mode again.
3
Press the
tings.
The menu disappears.
button to complete the set-
aaaa
ENGLISH
3
Press the
ting.
The menu disappears.
Picture Adjustment
Picture Adjustment
■■■■
Picture AdjustmentPicture Adjustment
You can change the picture settings of each TINT mode as
you like.
The picture settings changed are stored in the TINT mode.
1
Press the 6 buttons to choose an item.
2
Press the 5 buttons to change the setting.
2
Lower
Darker
Softer
Lighter
Reddish
button to complete the set-
aaaa
Item
CONTRAST
(picture contrast)
BRIGHT
(picture brightness)
SHARP
(picture sharpness)
COLOUR
(picture colour)
HUE
(picture hue)
Greenish
3
Higher
Brighter
Sharper
Deeper
15
Page 17

PICTURE FEATURES
PICTURE FEATURES
PICTURE FEATURESPICTURE FEATURES
To display the PICTURE FEATURES menu:
1
Press the
(main menu).
2
Press the 6 button to choose PICTURE
FEATURES, and press the
AUTO VNR
AUTO VNR
■■■■
AUTO VNRAUTO VNR
The AUTO VNR function optimally reduces noise of the TV
automatically according to the noise of the current picture.
The function also adjusts the optimum Sharpness (SHARP).
1
Press the 6 buttons to choose AUTO
VNR.
2
Press the 5 buttons to choose AUTO.
MIN:
The AUTO VNR function is cancelled. When you set the
mode to AUTO but feel that the sharpness of the original
picture has not be reproduced fully, change the mode to
MIN. However, a noise remaining in the original picture
may be emphasized.
MAX:
This mode always maximizes the noise reduction effect
irrespective of state of the picture. When you set the
mode to AUTO but feel that the noise is remarkable,
change the mode to MAX. However, this may reduce the
sharpness of the picture.
3
Press the
ting.
The menu disappears.
aaaa
button to display MENU
aaaa
button.
aaaa
button to complete the set-
COLOUR SYSTEM
COLOUR SYSTEM
■■■■
COLOUR SYSTEMCOLOUR SYSTEM
The colour system is chosen automatically. However, if the
picture is not clear or no colour appears, choose the colour
system manually.
1
Press the 6 buttons to choose COLOUR
SYSTEM. Then press the
The Sub-menu of the COLOUR SYSTEM function appears.
2
Press the 5 buttons to choose the appropriate colour system.
PAL:
PAL system
SECAM:
SECAM system
NTSC 3.58:
NTSC 3.58 MHz system
NTSC 4.43
NTSC 4.43 MHz system
AUTO:
This function detects a colour system from the input signal. Only when you are viewing a picture from Programme number PR 0 (AV), or EXT terminal, you can
choose using the AUTO function.
3
Press the
ting.
The menu disappears.
Note:
The AUTO function may not function properly if you
•
have poor signal quality. If the picture is abnormal in
the AUTO function, choose another colour system
manually.
When in the Programme numbers PR 0 (AV) to PR
•
99, you cannot choose NTSC 3.58 or NTSC 4.43.
button to complete the set-
aaaa
aaaa
button.
16
Page 18
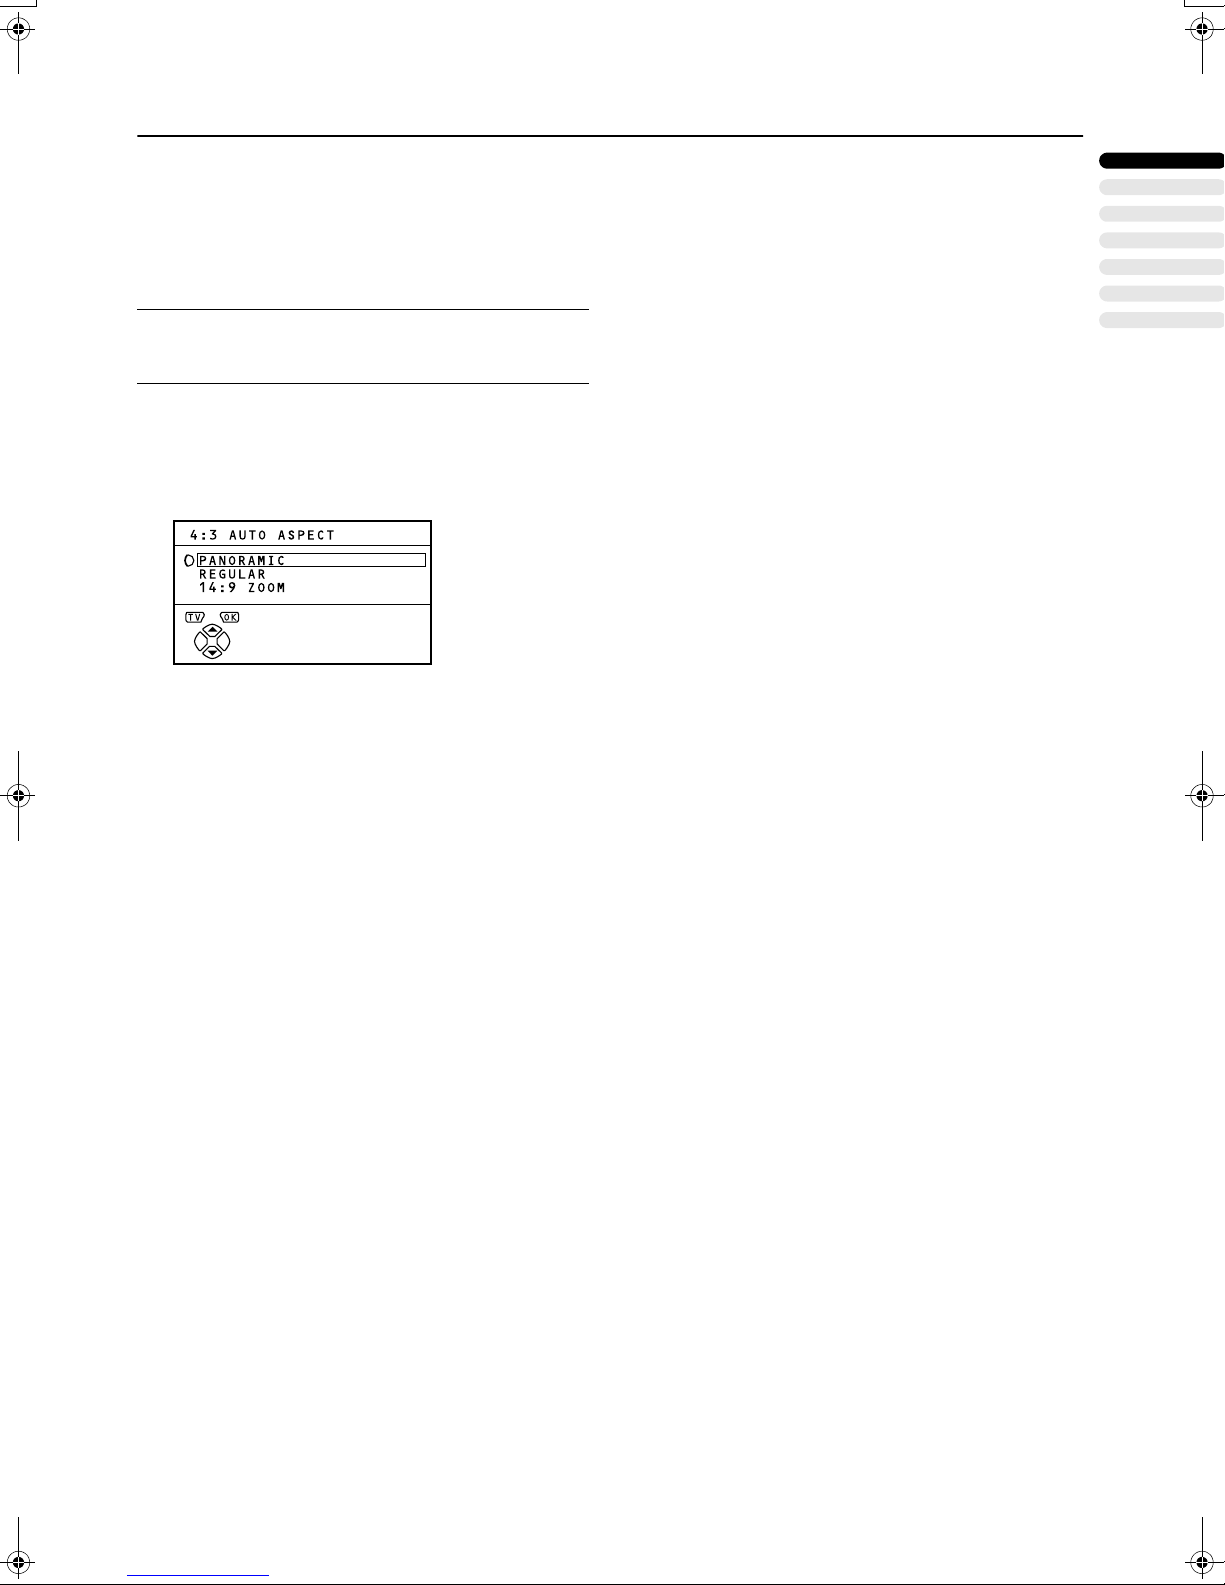
4:3 AUTO ASPECT
4:3 AUTO ASPECT
■■■■
4:3 AUTO ASPECT4:3 AUTO ASPECT
This function only works when the ZOOM mode is set to
AUTO (WSS) mode. It sets the ZOOM mode you want to use
for when a WSS signal is not included in the broadcast signal
or the signal from an external device. You can choose one of
three ZOOM modes.
Note:
For details of the AUTO(WSS) mode, see the “AU-
•
TO(WSS)” section within “3 ZOOM Button” on page 9.
Press the 6 buttons to choose 4:3 AUTO
1
ASPECT. Then press the
The Sub-menu of the 4:3 AUTO ASPECT function appears.
Press the 6 buttons to choose a ZOOM
2
aaaa
button.
mode.
PICTURE FEATURES
ENGLISH
Press the
3
aaaa
tings.
The menu disappears.
button to complete the set-
17
Page 19

SOUND SETTING
SOUND SETTING
SOUND SETTINGSOUND SETTING
To display the SOUND SETTING menu:
1
Press the
(main menu).
2 Press the
SETTING. Then press the
button to display MENU
aaaa
button to choose SOUND
6
button.
aaaa
HYPER SOUND
HYPER SOUND
■■■■
HYPER SOUNDHYPER SOUND
You can enjoy sounds with a wider ambience.
1
Press
SOUND.
2
Press 5 buttons to choose ON.
To cancel the HYPER SOUND function:
Press the 5 buttons to choose OFF.
3
Press the
ting.
The menu disappears.
buttons to choose HYPER
6
button to complete the set-
aaaa
STEREO / I•II
STEREO / I•II
■■■■
STEREO / I•IISTEREO / I•II
When you are viewing a bilingual broadcast programme, you
can choose the sound from Bilingual I (Sub I) or Bilingual II
(Sub II). When the stereo broadcasting is received poorly, you
can change from stereo to mono sound so that you can hear
the broadcast more clearly and easily.
1
Press 6 buttons to choose STEREO / I • II.
2
Press 5 buttons to choose a sound
mode.
:Stereo sound
s
:mono sound
v
:Bilingual I (sub I)
t
u
:Bilingual II (sub II)
3
Press the
ting.
The menu disappears.
Note:
The sound mode you can choose differs depending
•
on the TV programme.
This function does not work in the EXT modes. And
•
this function does not appear in the SOUND SETTING menu.
button to complete the set-
aaaa
Note:
The HYPER SOUND function does not work properly
•
with mono sound.
You can turn on or off the HYPER SOUND function
•
with a single press. For details, see “
SOUND Button” on page 10.
HYPER
4
Sound Adjustment
Sound Adjustment
■■■■
Sound AdjustmentSound Adjustment
You can adjust the sound to your liking.
1
Press the 6 buttons to choose an item.
2
Press the 5 buttons to adjust it.
2
Weaker
Weaker
Left
3
Press the
ting.
The menu disappears.
aaaa
Item
BASS
TREBLE
BALANCE
button to complete the set-
18
3
Stronger
Stronger
Right
Page 20
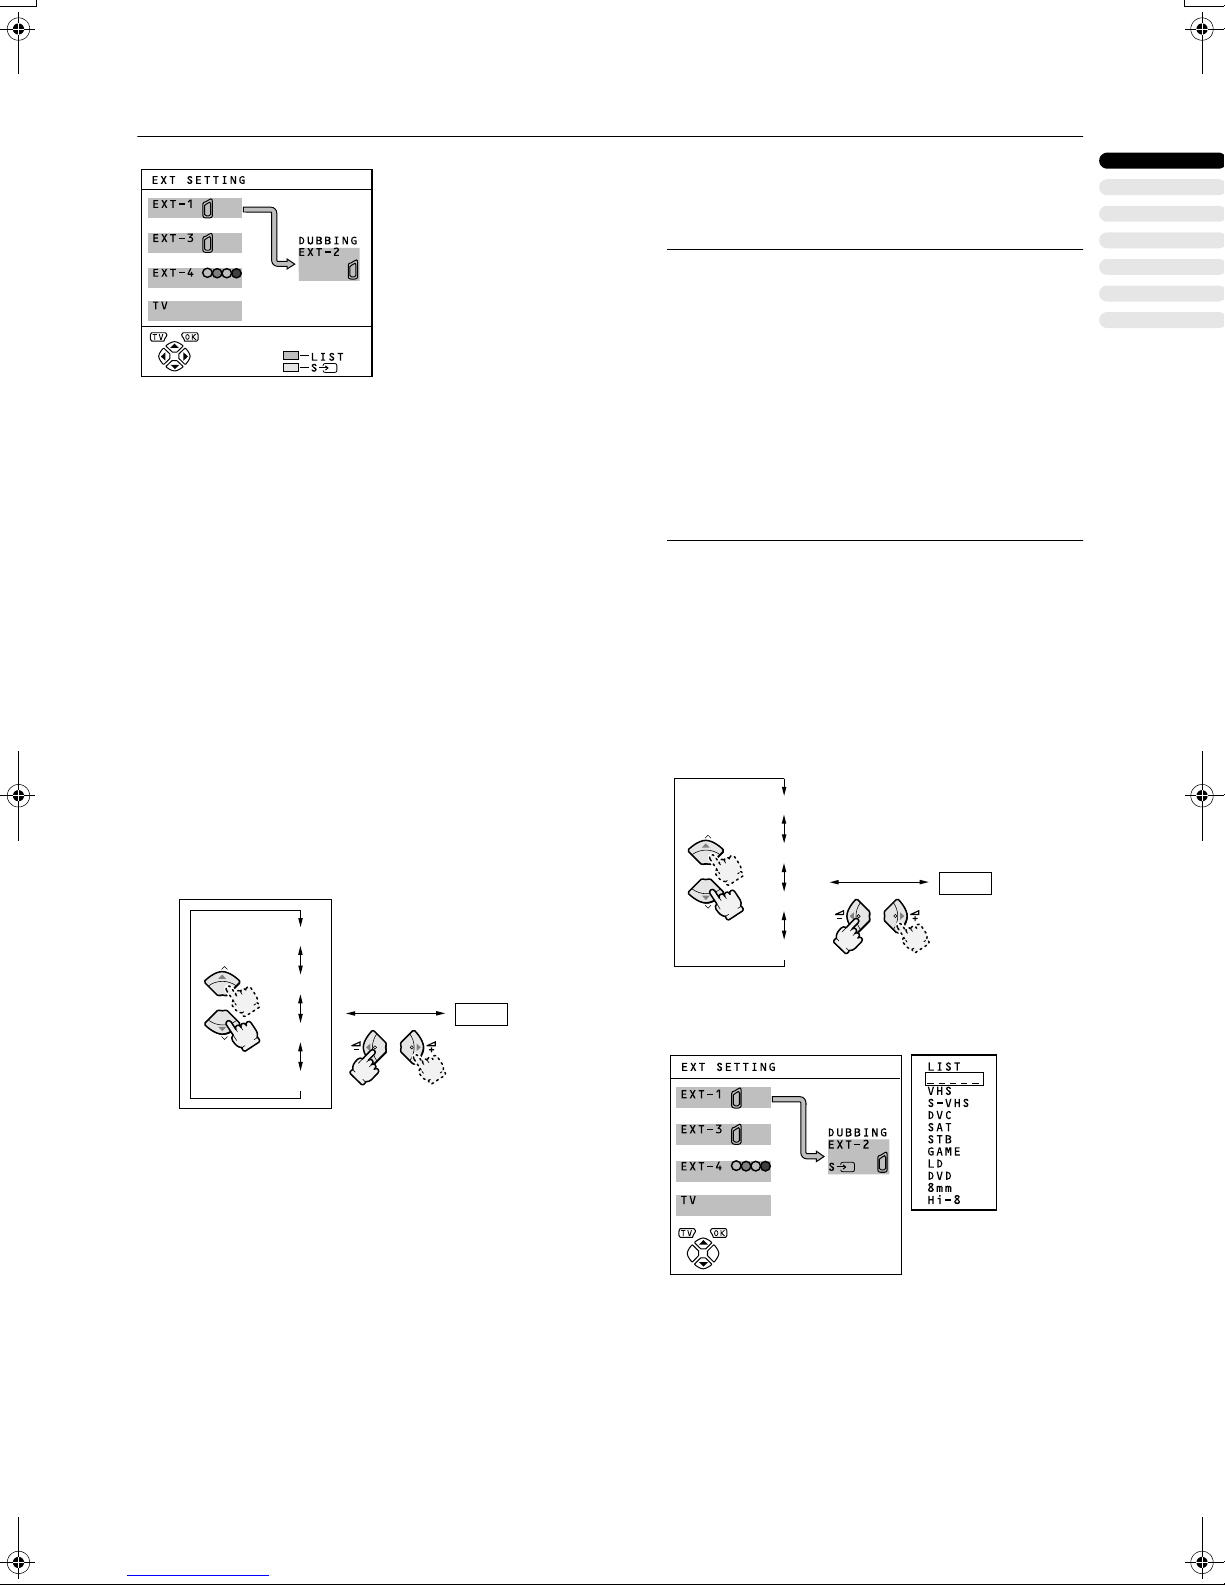
EXT SETTING
EXT SETTING
EXT SETTINGEXT SETTING
To display EXT SETTING menu:
1 Press the
button to display MENU
aaaa
(main menu).
2
Press the 6 button to choose EXT SETTING. Then press the
■■■■
y
y(S-VIDEO input)
(S-VIDEO input)
yy
(S-VIDEO input)(S-VIDEO input)
When connecting a device (such as S-VHS VCR) which enables an S-VIDEO signal (Y/C signal) to be output, you can enjoy high-quality picture of the S-VIDEO signal (Y/C signal).
Preparation:
At first, read the Device Instruction Manual and “ADDITION-
•
AL PREPARATION” on page 30 to connect the device to the
TV properly. Second, follow the Device Instruction Manual
to set the device so that a S-VIDEO signal (Y/C signal) can
be output to the TV.
Do not set
•
nected to a device which cannot output a S-VIDEO (Y/C signal). If it is set wrongly, a picture cannot appear.
1
Press the 6 buttons or 5 buttons to
(S-VIDEO input) to the EXT terminal con-
yyyy
aaaa
button.
choose an EXT terminal.
3
Press the
button to complete the set-
aaaa
ting.
The menu disappears.
Note:
The EXT-1 terminal does not support S-VIDEO signal
•
(Y/C signal) and you cannot set
in the EXT-1 terminal.
Setting
•
character from “E” to “S”. For example, “E2” is
changed to “S2”.
Even an device which enables the S-VIDEO signal (Y/
•
C signal) to be output may output a regular video signal (composite signal) depending on the device setting. If a picture cannot appear because
VIDEO input)
Instruction Manual carefully again to check for the device settings.
LIST
LIST
■■■■
LISTLIST
You can have a name corresponding to the devices connected for each EXT terminal. Giving a name to an EXT terminal
makes the EXT terminal number appear on the screen, together with the name.
1
Press the 6 buttons or 5 buttons to
yyyy
(S-VIDEO input) changes the head
setting has been made, read the device
yyyy
(S-VIDEO input)
yyyy
(S-
choose an EXT terminal.
EXT-1
P
P
EXT-3
EXT-2
EXT-4
ENGLISH
EXT-1
P
P
2
Press the yellow button and set the yyyy
EXT-3
EXT-2
EXT-4
TV
(S-VIDEO input).
A yyyy (S-VIDEO input) mark is displayed. You can view
an S-VIDEO signal (Y/C signal) instead of the regular
video signal (composite signal).
To cancel the
Press the yellow button and turn off yyyy (S-VIDEO input) mark.
The regular video signal (composite signal) pictures are
resumed.
(S-VIDEO input) setting:
yyyy
TV
2
Press the blue button to display the name
list (LIST).
19
Page 21

EXT SETTING
3
Press the 6 buttons to choose a name.
Then press the
The LIST disappears and the name is assigned to the
EXT terminal.
To erase a name assigned to the EXT terminal:
Choose a blank space.
4
Press the
aaaa
ting.
The menu disappears.
Note:
•
You cannot assign an EXT terminal name not found
in the name list (LIST).
DUBBING
DUBBING
■■■■
DUBBINGDUBBING
You can choose a signal source to be output from an EXT-2
terminal.
You can choose any one of the output signals of the device
connected to the EXT terminal and the picture and sound
from a TV channel you are currently viewing to output it to the
EXT-2 terminal.
button.
aaaa
button to complete the set-
1
Press the 5 buttons to choose the EXT-2
terminal.
2
Press the 6 buttons to choose an EXT
terminal or TV.
The arrow in the menu represents a signal flow. The left
side of the arrow denotes a signal source output from the
EXT-2 terminal.
EXT-1/EXT-3/EXT-4:
The output signal of the device connected to an EXT terminal passes through the TV and is output from the EXT2 terminal.
TV:
The picture and sound of the TV channel you are currently viewing are output from the EXT-2 terminal.
3
Press the
button to complete the set-
aaaa
ting.
The menu disappears.
Note:
•
During dubbing, you cannot turn off the TV. Turning
off the TV also turns off the output from the EXT-2 terminal.
When you choose an EXT terminal as an output, you
•
can view a TV programme or a picture from the other
EXT terminal while dubbing the picture from a device connected to the EXT terminal onto a VCR connected to the EXT-2 terminal.
The RGB signals from TV games cannot be out-
•
put.Teletext programmes cannot be output.
20
Page 22
FEATURES
FEATURES
FEATURESFEATURES
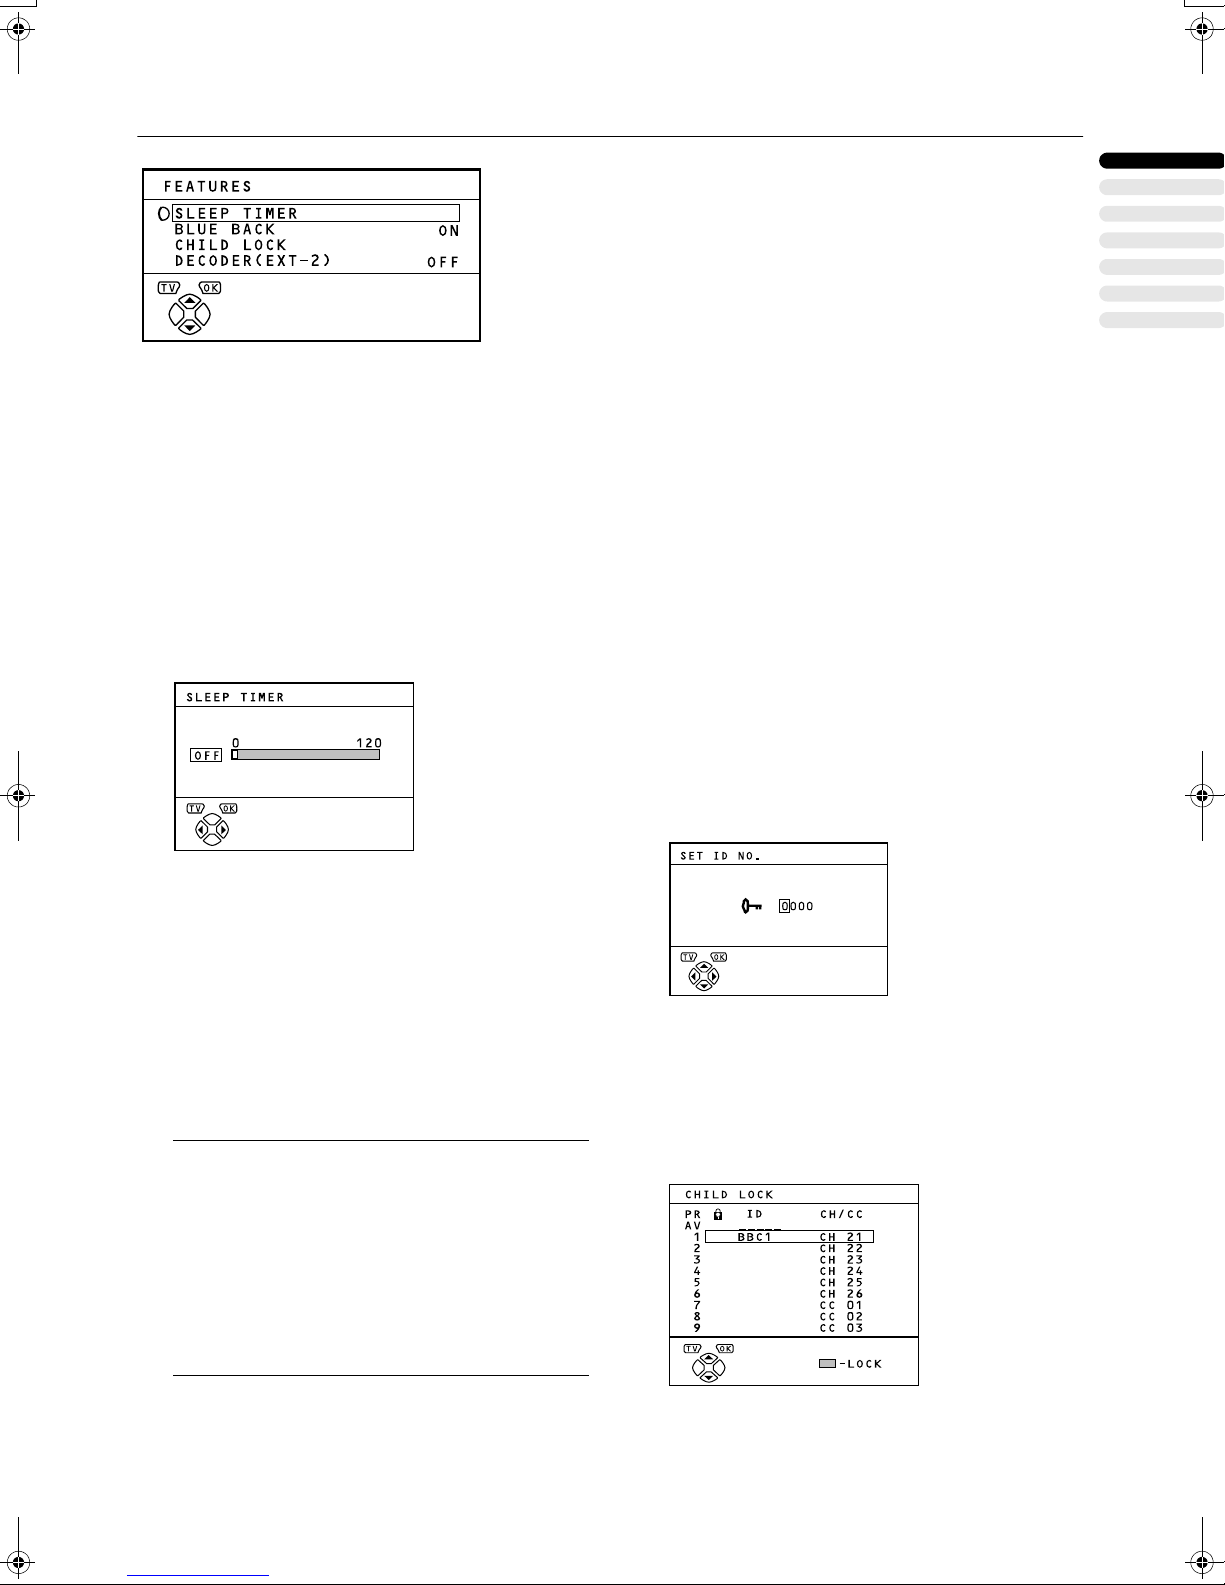
To display the FEATURES menu:
1 Press the
(main menu).
2 Press the
Then press the
SLEEP TIMER
SLEEP TIMER
■■■■
SLEEP TIMERSLEEP TIMER
You can set the TV to automatically turn off after a specified
period of time.
1
Press the 6 buttons to choose SLEEP
TIMER. Then press the
A Sub-menu of the SLEEP TIMER function appears.
button to display MENU
aaaa
button to choose FEATURES.
6
button.
aaaa
button.
aaaa
BLUE BACK
BLUE BACK
■■■■
BLUE BACKBLUE BACK
You can set the TV to automatically change to a blue screen
and mute the sound if the signal is weak or absent, or when
there is no input from an external device.
1
Press the 6 buttons to choose BLUE BACK.
2
Press the 5 buttons to choose ON.
To cancel the BLUE BACK function:
Press the 5 buttons to choose OFF.
3
Press the
The menu disappears.
CHILD LOCK
CHILD LOCK
■■■■
CHILD LOCKCHILD LOCK
When there is a TV channel you wish your children not to
watch, you can use the CHILD LOCK function to lock out the
TV channel. Even when a child chooses a Programme
number (PR) in which a locked TV channel has been registered, the screen will change to blue and displays
LOCK) so the TV channel cannot be viewed. Unless you enter a pre-set ID number by a special operation, the lock cannot be released and the child cannot view the TV channel
programs.
button to complete the setting.
aaaa
(CHILD
n
ENGLISH
2
Press the 5 buttons to set the period of
time.
You can set the period of time a maximum of 120 minutes (2 hours) in 10 minute increments.
To cancel the SLEEP TIMER function:
Press the 2 button to set a period of time to “OFF.”
3
Press the
tings.
The menu disappears.
Note:
One minute before the SLEEP TIMER function turns
•
off the TV, “GOOD NIGHT!” appears.
The SLEEP TIMER function cannot be used to turn
•
off the TV’s main power.
When the SLEEP TIMER function is on, you can dis-
•
play the Sub-menu of the SLEEP TIMER function
again to confirm and/or change the remaining period of time of the SLEEP TIMER function. Press the
button to exit the menu after confirming and / or
a
changing the remaining time.
button to complete the set-
aaaa
To set the CHILD LOCK function
To set the CHILD LOCK function
To set the CHILD LOCK functionTo set the CHILD LOCK function
1
Press the 6 buttons to choose CHILD
LOCK. Then press the
“SET ID NO.” (ID number setting screen) appears.
2
Set the ID number to your liking.
1 Press the
2 Press the
3
Press the
The Sub-menu of CHILD LOCK appears.
buttons to choose a number.
6
buttons to move the cursor.
5
button.
aaaa
o
o
oo
button.
4
Press the 6 buttons to choose a TV
channel.
Every time you press the 6 buttons, the Programme
number (PR) changes, and the picture of the TV channel
registered in the Programme number (PR) is displayed
on the screen.
21
Page 23
FEATURES
5
Press the blue button and set the CHILD
LOCK function.
(CHILD LOCK) appears and the TV channel is locked.
n
To reset the CHILD LOCK function:
Press the blue button again.
(CHILD LOCK) disappears.
n
6
Press the
ting.
The menu disappears.
Note:
To disable easy resetting of the CHILD LOCK func-
•
tion, the menu disappears by choosing the CHILD
LOCK function and pressing the
ordinary menu operation.
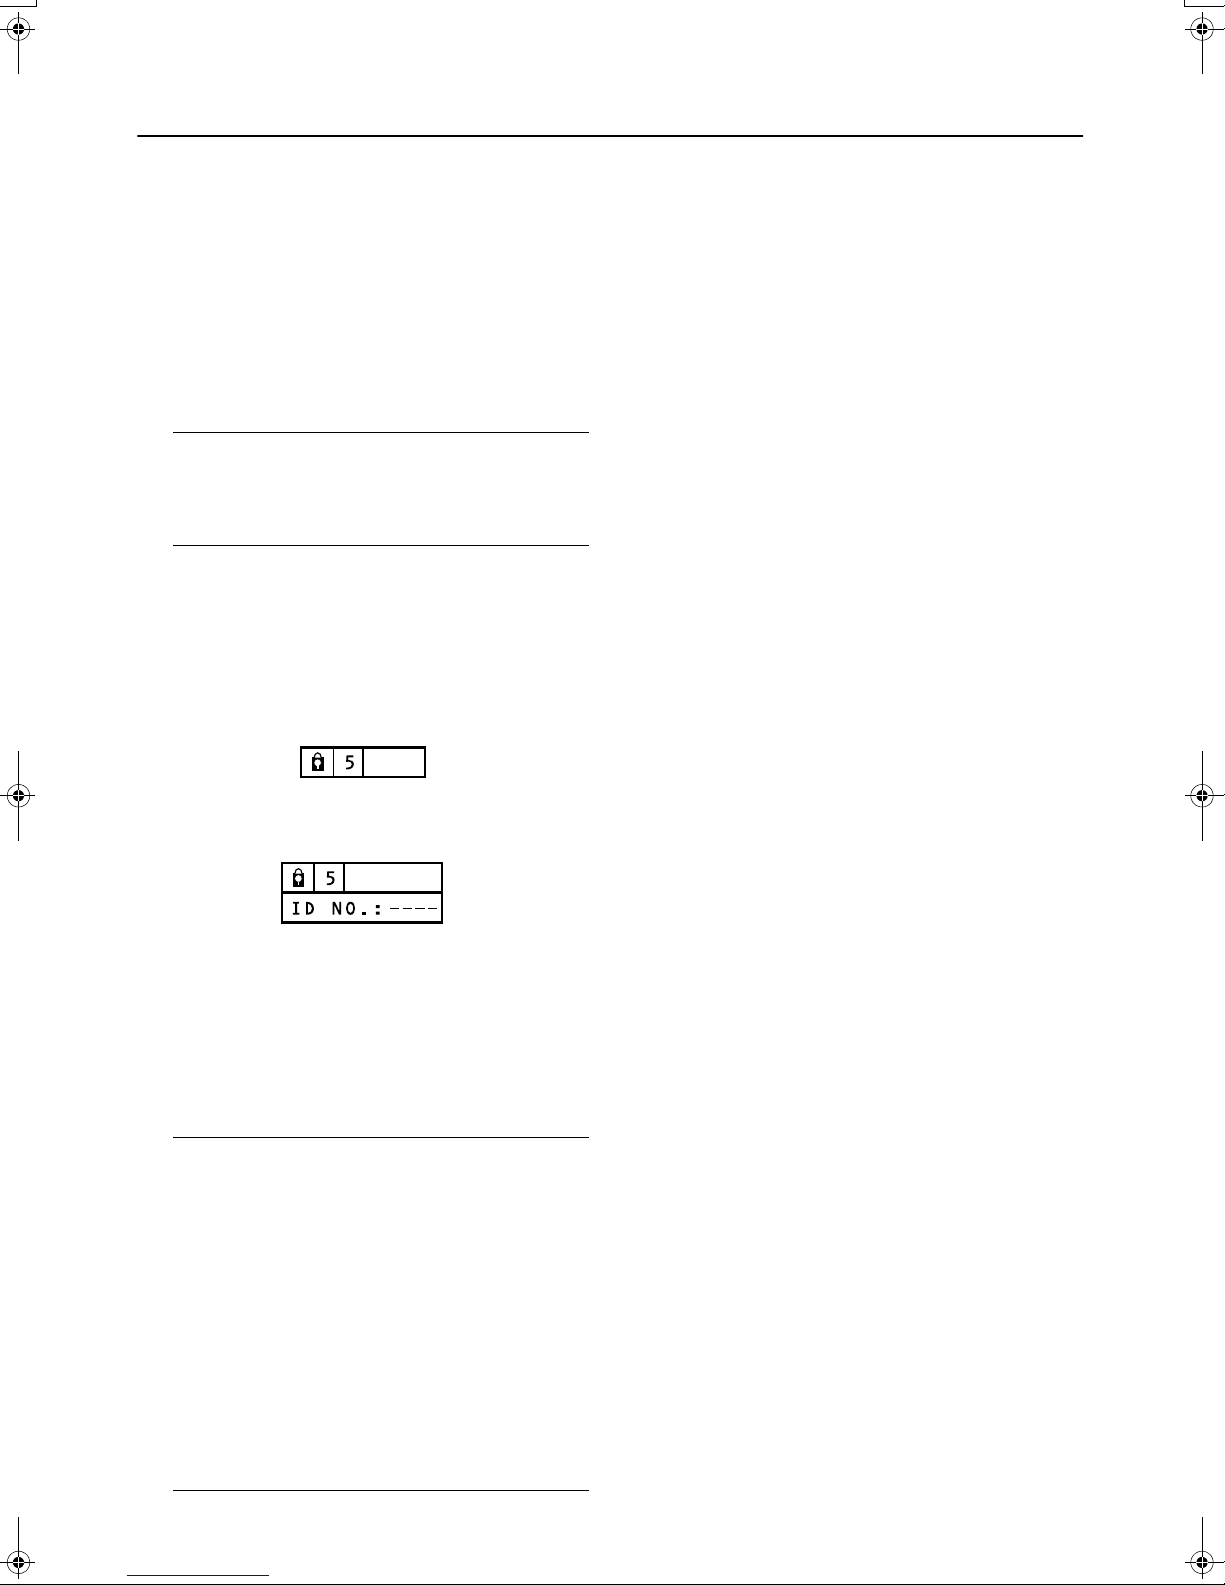
To view a locked TV channel
To view a locked TV channel
To view a locked TV channelTo view a locked TV channel
1
Choose a Programme number (PR) in
which a TV channel locked with the
Number buttons or PR LIST.
The screen changes to blue and the n (CHILD LOCK)
appears. You cannot view the TV channel.
button to complete the set-
aaaa
button as in the
a
DECODER (EXT-2)
DECODER (EXT-2)
■■■■
DECODER (EXT-2)DECODER (EXT-2)
Only when connecting a Decoder with a T-V LINK compatible
VCR connected to the EXT-2 terminal, you can use this function. To operate this function, see “Using the DECODER
(EXT-2) function” on page 28.
Caution:
If you have not connected
•
patible VCR connected to the EXT-2 terminal,
function to “ON” by mistake causes the picture/sound of a
TV channel you are currently viewing not to be issued.
a Decoder with a T-V LINK com-
setting this
2
Press the
(Information) button to dis-
hhhh
play “ID NO.” (ID No. input screen).
3
Press the Number buttons to enter the ID
number.
The lock is temporarily released so you can view the TV
channel.
If you have forgotten the ID number:
Perform step 1 of “To set the CHILD LOCK function”. After confirming the ID number, press the b button to exit
the menu.
Note:
Even if you reset the lock temporarily, it does not
•
mean that the CHILD LOCK function set for the TV
channel is cancelled. The next time anyone attempts to view the TV channel, it will be locked
again.
When you would like to cancel the CHILD LOCK
•
function, you must perform the operation “To set the
CHILD LOCK function” again.
To disable easy choosing of a Programme number
•
(PR) in which a locked TV channel has been registered, the Programme number (PR) has been set
that it cannot be chosen by the
operation buttons at the TV.
To disable easy resetting of the lock, “ID NO.” (ID
•
No. input screen) is set so that it cannot appear unless you press the h (Information) button.
buttons or the
6
22
Page 24
INSTALL
INSTALL
INSTALLINSTALL
3
Press the blue button to start the AUTO
PROGRAM function.
The AUTO PROGRAM menu appears and received TV
channels are automatically registered in the Programme
numbers (PR).
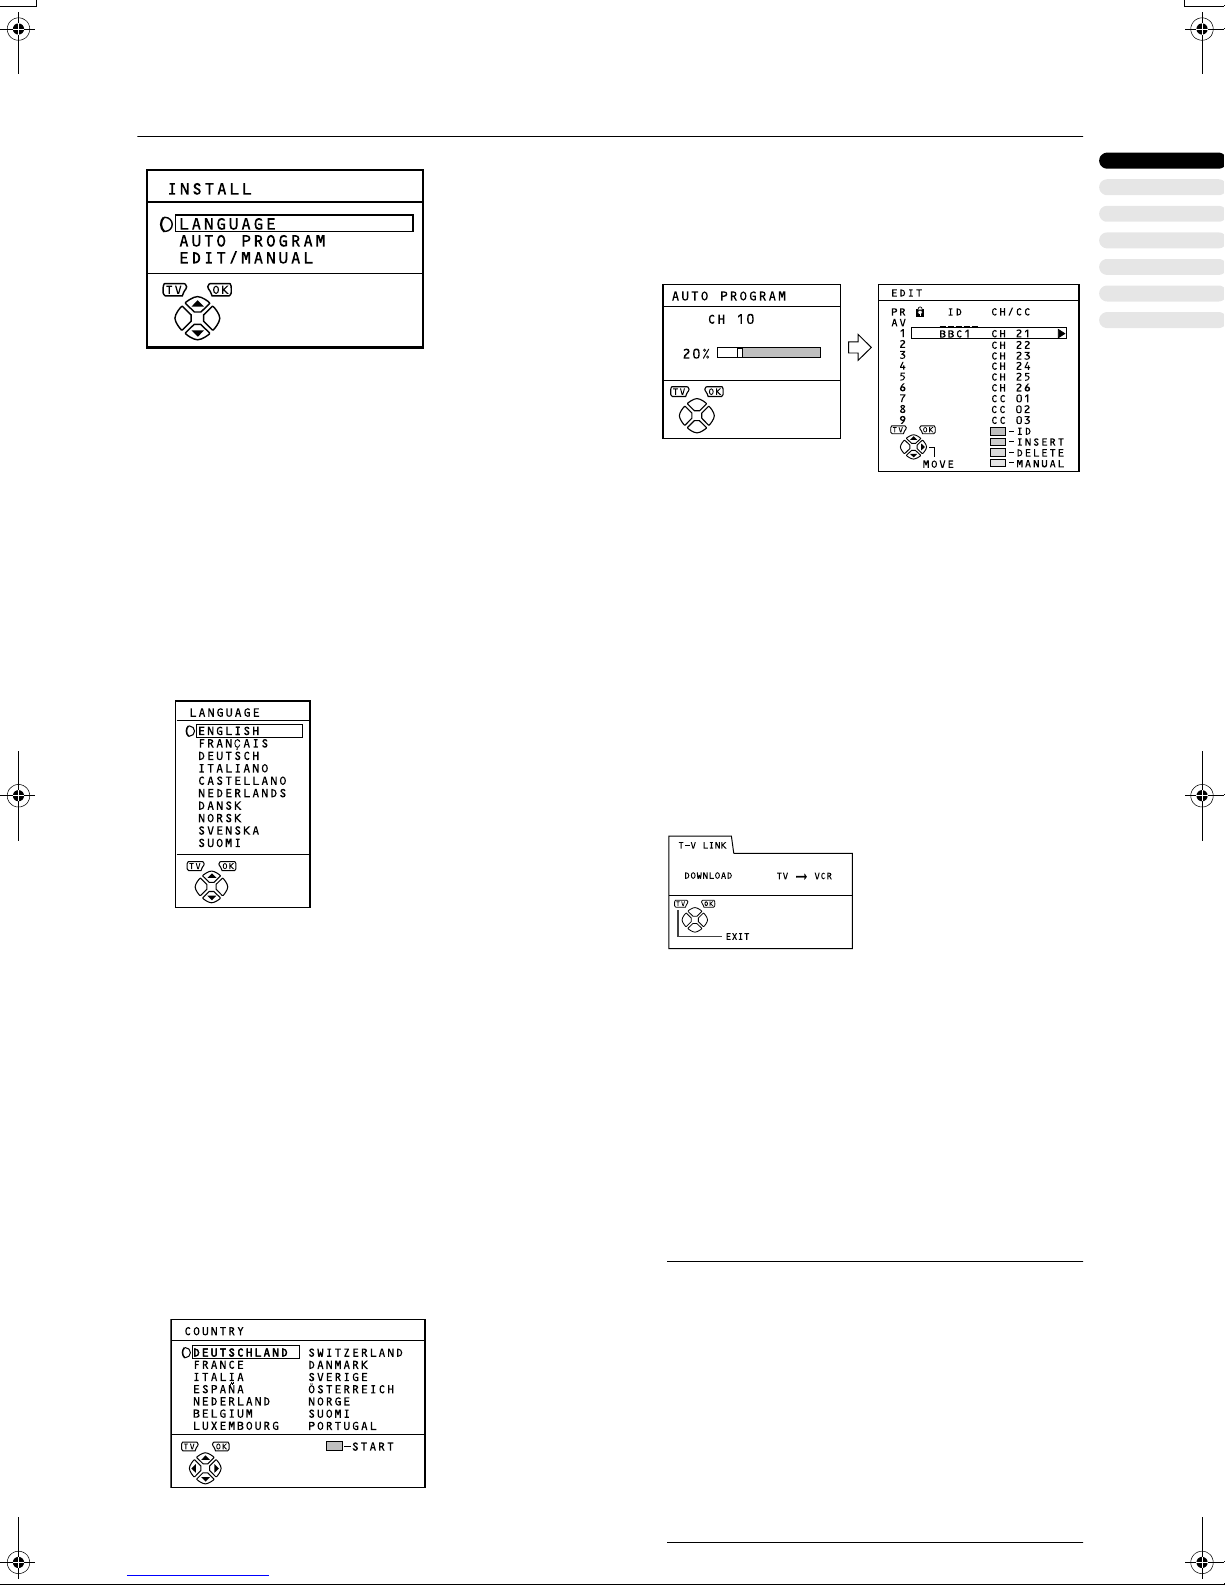
To display the INSTALL menu:
1 Press the
(main menu).
2 Press the
STALL menu. Then press the
LANGUAGE
LANGUAGE
■■■■
LANGUAGELANGUAGE
You can choose the language you want to use for the onscreen display from the language list in a menu.
1
Press the
GUAGE. Then press the
A sub-menu of the LANGUAGE function appears.
2
Press the
guage.
3
Press the
ting.
The menu disappears.
AUTO PROGRAM
AUTO PROGRAM
■■■■
AUTO PROGRAMAUTO PROGRAM
You can automatically register the TV channels which can be
received well at your residence in the TV’s Programme numbers (PR) by performing the following.
1
Press the
PROGRAM. Then press the
The COUNTRY menu appears as a sub-menu of the
AUTO PROGRAM function.
2
Press the
the country where you are now located.
6666
aaaa
5555
button to display MENU
aaaa
button to choose the IN-
6666
buttons to choose LAN-
6666
buttons to choose a lan-
button to complete the set-
buttons to choose AUTO
6666
and ∞/5 buttons to choose
aaaa
button.
aaaa
button.
button.
aaaa
To cancel the AUTO PROGRAM function:
Press the b button.
4
After the TV channels have been registered in the Programme numbers (PR), the
EDIT menu appears.
You can proceed to edit the Programme numbers (PR)
using the EDIT/MANUAL function. For details, see “ED-
IT/MANUAL” on page 24.
When not using the EDIT/MANUAL function:
If you do not need to use the EDIT/MANUAL function, go
to the next step.
5
Press the
LINK menu.
6
Operate the T-V LINK menu according to
the type of VCR connected to the EXT-2
terminal.
When a T-V LINK compatible VCR is not connected:
Press the b button to exit the T-V LINK menu.
The T-V LINK menu disappears, and all the settings are
completed.
When a T-V LINK compatible VCR is connected:
Follow the operating procedure “Downloading the data
to VCR” on page 28 to transmit the Programme number
(PR) data to the VCR.
Note:
•
When your TV can detect the TV channel name from
the TV channel broadcast signal, it automatically
registers the TV channel name (ID) to the Programme number (PR) in which the TV channel has
been registered.
If a TV channel you want to view is not set to a Pro-
•
gramme number (PR), manually set it using the
MANUAL function. For details, see “EDIT/MANUAL”
on page 24.
The TV channel is not registered in Programme number
•
PR 0 (AV). When you want to register a TV channel to PR
0 (AV) manually set it using the MANUAL function. For
details, see “EDIT/MANUAL” on page 24.
button to display the T-V
aaaa
ENGLISH
23
Page 25

INSTALL
EDIT/MANUAL
EDIT/MANUAL
■■■■
EDIT/MANUALEDIT/MANUAL
The EDIT/MANUAL functions are divided into two types: editing of the current Programme numbers (PR) (EDIT functions) and manual registration of a TV channel you want to
view to the Programme number (PR) (MANUAL function).
The details about these functions are as follows:
MOVE:
This function changes a Programme number (PR) of a TV
channel.
ID:
This function registers a Channel name (ID) to a TV channel.
INSERT:
This function adds a new TV channel in the current Programme numbers (PR) list by using the CH/CC number.
DELETE:
This function deletes an unnecessary TV channel.
MANUAL:
This function manually registers a new TV channel in a Programme number (PR).
Caution:
Using the MOVE, DELETE or INSERT function rewrites the
•
current Programme numbers (PR) list. Resultingly, the Programme number (PR) of some of the TV channels will
change.
Using the MANUAL function for a TV channel for which the
•
CHILD LOCK function has been set cancels the CHILD
LOCK function for the TV channel.
Using the MANUAL function for a TV channel for which the
•
DECODER (EXT-2) function has been set to ON returns the
setting of the DECODER (EXT-2) function for the TV channel to OFF.
When a TV channel has already been registered in PR 99,
•
using the INSERT function deletes the TV channel.
Follow the operation description of a func-
2
tion you want to use and operate the function.
Press the
3
button to complete the set-
aaaa
tings.
The T-V LINK menu appears.
Operate the T-V LINK menu according to
4
the type of VCR connected to the EXT-2
terminal.
When a T-V LINK compatible VCR is not connected:
Press the b button to exit the T-V LINK menu.
The T-V LINK menu disappears and all the settings are
completed.
When a T-V LINK compatible VCR is connected:
Follow the operating procedure “Downloading the data
to VCR” on page 28 to transmit the Programme number
(PR) data to the VCR.
MOVE
MOVE
MOVEMOVE
Press the
1
6666
buttons to choose a TV
channel.
Every time you press the
number (PR) is changed over, and the picture of the TV
channel registered in the Programme number (PR) appears on the screen.
6666
buttons, the Programme
Note:
For Programme number PR 0, “AV” appears in the Pro-
•
gramme numbers (PR) list.
An EXT terminal number does not appear in the Pro-
•
gramme numbers (PR) list.
The CH/CC number is a number unique to the TV and
•
corresponding to the Channel number of a TV channel.
For the relationship of a Channel number and a CH/CC
number, see “CH/CC NUMBER” on page 32.
You cannot use the INSERT function if you do not know a
•
Channel number of a TV channel. Use the MANUAL function to register a TV channel in the Programme number
(PR).
Press the
1
6666
buttons to choose EDIT/
MANUAL. Then press the
24
aaaa
button.
Press the
2
3333
button to start the MOVE func-
tion.
Press the
3
6666
buttons to choose a new
Programme number (PR).
To cancel the MOVE function:
Press the h (Information) button.
Press the
4
2222
button to change the Programme number (PR) of a TV channel to a
new Programme number (PR).
Page 26

ID
ID
IDID
1
Press the
6666
buttons to choose a TV
channel.
Every time you press the
number (PR) is changed over, and the picture of the TV
channel registered in the Programme number (PR) appears on the screen.
6666
buttons, the Programme
INSTALL
Note:
You can register your unique Channel name (ID) to
•
the TV channel. When step 3 is completed, do not
go to step 4, but press the
cursor and the
completing the Channel name (ID). Then press the
button to register the Channel name (ID) to the
a
TV channel.
6666
buttons to choose a character for
5555
buttons to move the
2
Press the red button to start the ID function.
3
Press the
6666
buttons to choose the first
character of a Channel name (ID) you want
to attach to the TV channel.
INSERT
INSERT
INSERTINSERT
Preparation:
A CH/CC number unique to this TV and corresponding to
•
the Channel number of a TV channel is required. Find the
corresponding CH/CC number from a table “CH/CC
NUMBER” on page 32. based on the Channel number of the
TV channel.
When the COUNTRY setting is not FRANCE, use a two-digit
•
CH/CC number. When the COUNTRY setting is FRANCE,
use a three-digit CH/CC number.
Only when you add a TV channel (SECAM-L system) from
•
a French station, be sure to set COUNTRY to FRANCE. If
the COUNTRY setting is not FRANCE, follow the description “Changing the COUNTRY setting” on page 28 to
change the COUNTRY setting to FRANCE, then start the
INSERT function.
1
Press the
6666
buttons to choose a Programme number (PR) for which you will
register a new TV channel.
2
Press the green button and start the INSERT function.
ENGLISH
4
Press the blue button to display the ID LIST
(channel name list).
5
Press the
6666
buttons to choose the Chan-
nel name (ID).
To cancel the ID function:
Press the h (Information) button.
6
Press the
button to register a Channel
aaaa
name (ID) to a TV channel.
3
Press the
6666
buttons to choose “CC” or
“CH” according to the CH/CC number of
the TV channel.
When the COUNTRY setting is FRANCE:
Choose “CH1”, “CH2”, “CC1” or “CC2”.
To cancel the INSERT function:
Press the h (Information) button.
4
Press the Number buttons to enter the remaining CH/CC number.
The TV shifts to registration mode.
When the registration is completed, the picture of the TV
channel appears on the screen.
Note:
The CH/CC number is a number indicating the
•
broadcast frequency to the TV. If the TV cannot detect the TV channel corresponding to the broadcast
frequency indicated by the CH/CC number, a picture in the no-signal state appears.
25
Page 27

INSTALL
DELETE
DELETE
DELETEDELETE
1
Press the 6666 buttons to choose a TV
channel.
Every time you press the 6 buttons, the Programme
number (PR) is changed over, and the picture of the TV
channel registered in the Programme number (PR) appears on the screen.
2
Press the yellow button to delete the TV
channel.
The TV channel is deleted from the Programme numbers (PR) list.
MANUAL
MANUAL
MANUALMANUAL
Preparation:
As long as you register the TV channel (SECAM-L system)
•
from a French station, be sure to set the COUNTRY setting
to FRANCE. If the COUNTRY setting is not FRANCE, follow
the description “Changing the COUNTRY setting” on page
28 to change the COUNTRY setting to FRANCE, then start
the MANUAL function.
1
Press the
6666
buttons to choose a Programme number (PR) to which you want to
register a new TV channel.
2
Press the blue button to activate the MANUAL function.
At the right side following the CH/CC number, the SYSTEM (broadcasting system) of the TV channel appears.
Other TV channels:
If you do not know the correct broadcasting system, set
the SYSTEM to “B/G”. If “B/G” is not correct, it results in
the fact that you will not hear the sound normally when
the TV detects a TV channel. In this case, retry to set the
SYSTEM again correctly so that no problem arises.
4
Press the green or red button to search for
a TV channel.
Scanning stops when the TV finds a TV channel. Then
the TV channel is displayed.
5
Press the green or red button repeatedly
until the TV channel you want appears.
If the TV channel reception is poor:
Press the blue or yellow button to fine-tune the TV channel.
If you cannot hear the normal sound even when
the picture of the TV channel appears normally:
The SYSTEM setting is wrong. Press the 3333 button and
choose a SYSTEM that has normal sound.
6
Press the
button and register the TV
aaaa
channel to a Programme number (PR).
The normal EDIT menu is resumed.
To cancel the MANUAL function:
Press the h (Information) button.
3
Press the
3333
button to choose the SYSTEM
(broadcasting system) for a TV channel
you want to register.
TV channel (SECAM-L system) from a French
station:
Set the SYSTEM to “L”. If it is set to one other than “L”,
you cannot receive the TV channel of the SECAM-L system.
26
Page 28

DEMO
DEMO
DEMODEMO
To display the DEMO menu:
1 Press the
(main menu).
2
Press the
press the
The DEMO function automatically demonstrates some of the
TV functions.
1
Press the
2
Press the
tings.
The DEMO function is set to ON, and the demonstration
will start.
To stop the demonstration:
Press one of the buttons on the remote control.
When the DEMO function is set to ON:
Each time the TV is turned on, the demonstration starts
automatically. If you do not want that to happen, perform
the following operations to cancel the DEMO function:
6666
aaaa
button to display MENU
aaaa
6666
button to choose DEMO. Then
button.
aaaa
buttons to choose ON.
button to complete the set-
1 Display the DEMO menu again.
2 Press the
3 Press the
function.
6666
buttons to choose OFF.
button to cancel the DEMO
aaaa
ENGLISH
27
Page 29
ADDITIONAL MENU OPERATIONS
ADDITIONAL MENU OPERATIONS
ADDITIONAL MENU OPERATIONSADDITIONAL MENU OPERATIONS
Downloading the data to VCR
Downloading the data to VCR
■■■■
Downloading the data to VCRDownloading the data to VCR
You can transmit to the latest Programme numbers (PR) data
to the VCR with the T-V LINK function.
Caution:
Only when the T-V LINK compatible VCR is connected to
•
the EXT-2 terminal, this operation is enabled.
Only when the T-V LINK menu is being displayed, this oper-
•
ation is enabled.
1
Turn on the VCR.
2
Press the
The data transmission begins.
The T-V LINK menu disappears once the data transmission ends.
When the T-V LINK menu is changed over to
another menu:
The menu operation at the TV side is completed and it is
shifted to the menu operation at the VCR side. Refer to
the VCR Instruction Manual and operate the VCR.
Note:
•
If “FEATURE NOT AVAILABLE” appears at the T-V
LINK menu, ensure the following three items are correct; then press the
mission.
Has the T-V LINK compatible VCR been connect-
−
ed to the EXT-2 terminal?
Has the VCR power been turned on?
−
Does the SCART cable that is connected to the
−
EXT-2 terminal to T-V LINK compatible VCR have
all proper connections?
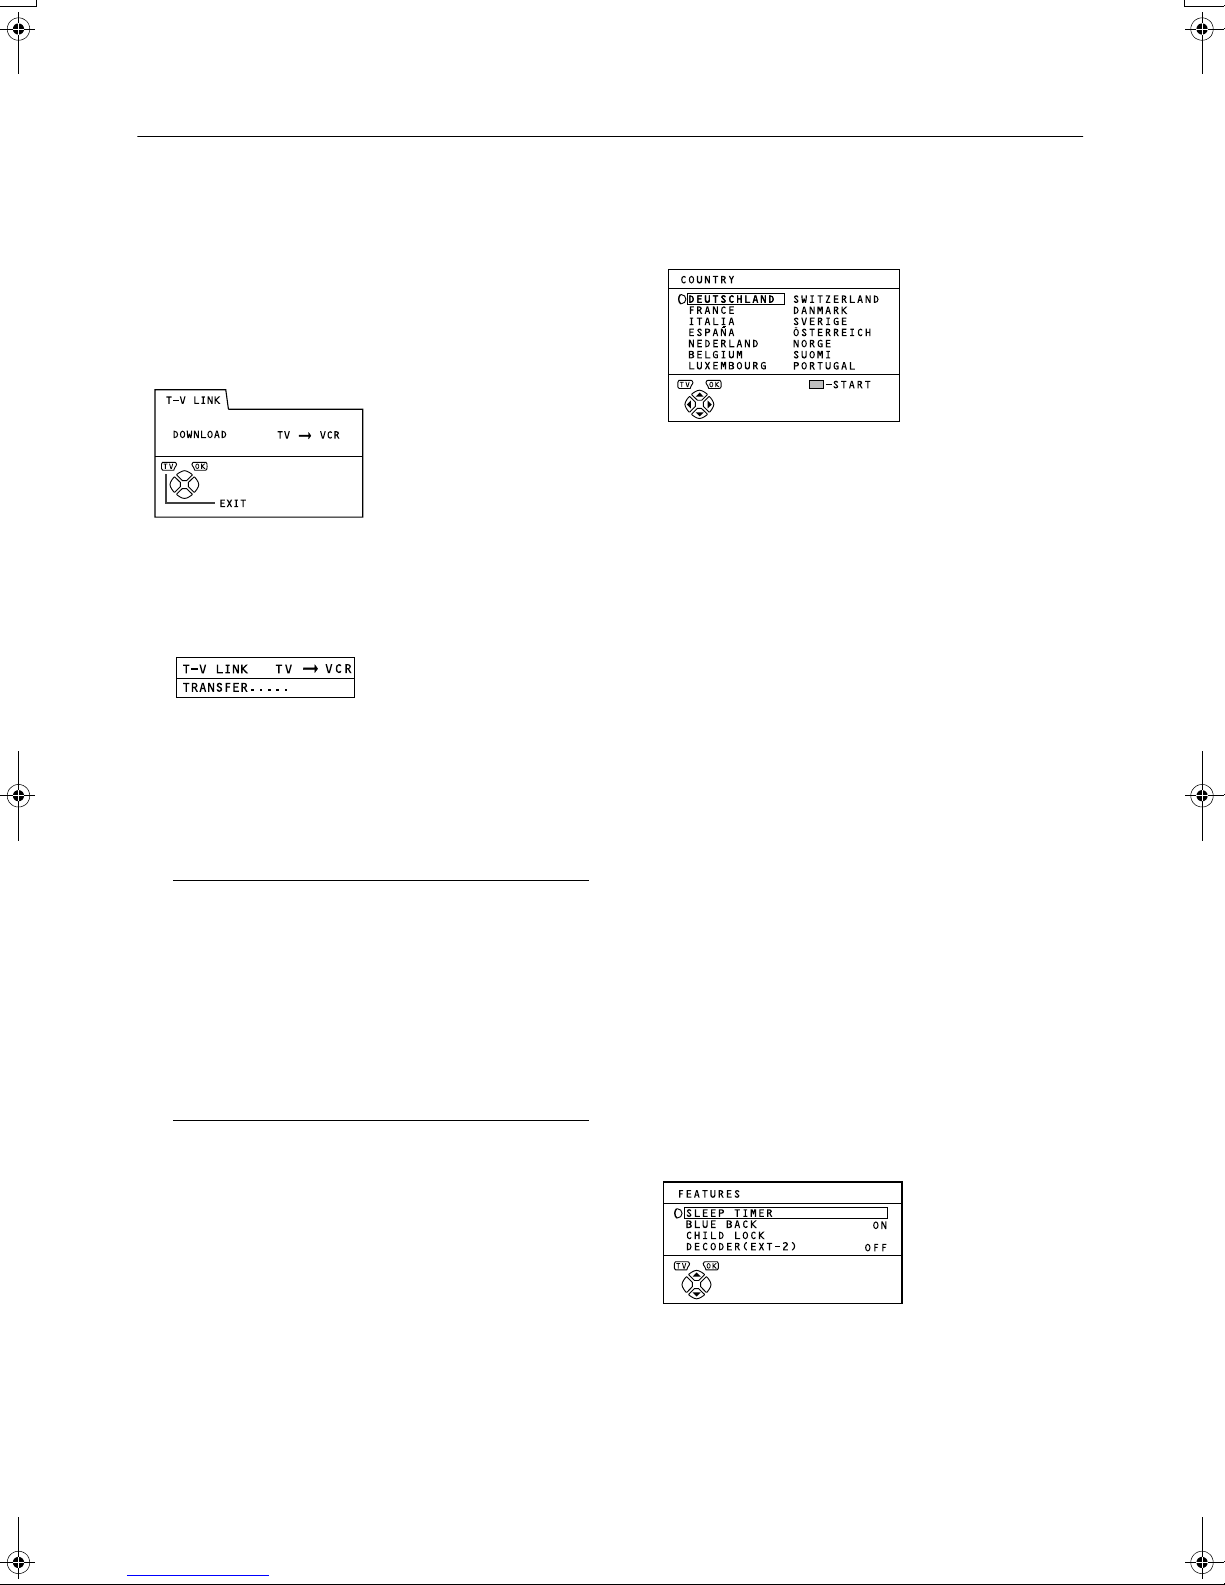
Changing the COUNTRY set-
Changing the COUNTRY set-
■■■■
Changing the COUNTRY set-Changing the COUNTRY setting
ting
tingting
After the AUTO PROGRAM function is completed, you can
change the country you have already set by using the AUTO
PROGRAM function.
When registering the TV channels for French broadcast
stations (SECAM-L system), perform this operation to change
the country.
1
Display the INSTALL menu.
When the EDIT menu is currently being displayed:
Press the h (Information) to return to the INSTALL
menu.
aaaa
button.
a
button to retry data trans-
2
Press the
PROGRAM. Then press the
A COUNTRY menu appears as a sub-menu of the
AUTO PROGRAM function.
3
Press the
choose a country.
4
Press the
ting.
The menu disappears.
To return to the INSTALL menu from the COUNTRY
menu:
Press the
ton.
Using the DECODER (EXT-2)
Using the DECODER (EXT-2)
■■■■
Using the DECODER (EXT-2) Using the DECODER (EXT-2)
function
function
functionfunction
When connecting a Decoder with a T-V LINK compatible VCR
connected to the EXT-2 terminal, use the DECODER (EXT-2)
function to unscramble the scrambled TV channels.
1
Turn on the Decoder power.
2
Display the TV channel capable of being
unscrambled with the Decoder on the TV.
Even if the Decoder is functioning, a scrambled picture
appears at this time.
3
Press the
The MENU (main menu) appears.
4
Press the
TURES. Then press the
The FEATURES menu appears.
5
Press the
ER (EXT-2) . Then press the
choose ON.
An unscrambled picture appears.
To cancel the DECODER (EXT-2) function:
Press the
6666
buttons to choose AUTO
button.
aaaa
5555
and the
button to complete the set-
aaaa
(Information) button instead of the a but-
h
button to display the MENU.
aaaa
buttons to choose FEA-
6666
buttons to choose DECOD-
6666
buttons to choose OFF.
5555
6666
buttons to
button.
aaaa
5555
buttons to
28
Page 30

6
Press the
button to complete the set-
aaaa
ting.
The T-V LINK menu appears.
7
Follow the operating procedure “Down-
loading the data to VCR” on page 28 to
transmit the Programme number (PR) data
to the VCR.
8
If you have another TV channel capable of
being unscrambled with a Decoder, repeat
steps 2 through 7.
Note:
If for some reason the DECODER (EXT-2) function
•
has been set to “ON” but the TV channel cannot be
unscrambled, check the following:
Has the Decoder been connected to the VCR
−
properly according to the VCR and Decoder Instruction Manuals?
Has the Decoder power been turned on?
−
Can the TV channel be unscrambled with a De-
−
coder?
Is it necessary to change the VCR settings in or-
−
der to connect the Decoder? Confirm that the
VCR is set properly by rechecking the VCR Instruction Manual.
ADDITIONAL MENU OPERATIONS
ENGLISH
29
Page 31

ADDITIONAL PREPARATION
ADDITIONAL PREPARATION
ADDITIONAL PREPARATIONADDITIONAL PREPARATION
Connecting the external devices
Connecting the external devices
■■■■
Connecting the external devicesConnecting the external devices
Connect the devices to the TV, paying attention to the Rear
panel connections and the Front panel connections.
Before connecting anything:
Read the manuals provided with the devices. Depending
•
on the devices, the connection method may differ from
the figure. In addition, the device settings may be
changed depending on the connection method to secure
proper operation.
Turn off all the devices including the TV.
•
The “SPECIFICATIONS” on page 36 contains the details
•
of the EXT terminals. If you are connecting a device not
listed in the following connection diagram, see the table
to choose the best EXT terminal.
Note that connecting cables are not supplied.
•
VCR (composite signal)
1
VCR (composite signal/S-VIDEO signal)
2
T-V LINK compatible VCR (composite signal/S-VIDEO sig-
3
nal)
Decoder
4
DVD player (composite signal/S-VIDEO signal)
5
DVD player (composite signal/RGB signal)
6
TV game (composite signal/RGB signal)
7
TV game (composite signal/S-VIDEO signal)
8
Headphones
9
Camcorder (composite signal/S-VIDEO signal)
0
SCART cable
-
Audio cable
=
Video cable
~
S-VIDEO cable
!
(Behind the door)
EXT-
2
EXT-
3
S
EXT-
1
EXT-
2
EXT-
3
S S
EXT-
1
30
Page 32

Devices which can output the
Devices which can output the
Devices which can output the Devices which can output the
S-VIDEO signal (Y/C signal) such as
S-VIDEO signal (Y/C signal) such as
S-VIDEO signal (Y/C signal) such asS-VIDEO signal (Y/C signal) such as
a S-VHS VCR
a S-VHS VCR
a S-VHS VCRa S-VHS VCR
Connect the device to an EXT terminal other than the EXT-1
terminal.
You can choose a video input signal from the S-VIDEO signal
(Y/C signal) and regular video signal (composite signal). For
details of how to operate the device, see “y(S-VIDEO input)” on page 19.
T-V LINK compatible VCR
T-V LINK compatible VCR
T-V LINK compatible VCRT-V LINK compatible VCR
Be sure to connect the T-V LINK compatible VCR to the EXT2 terminal. If not, the T-V LINK function will not work properly.
Note:
When connecting a T-V LINK compatible VCR to the EXT-
•
2 terminal, be sure to connect the Decoder to the VCR. If
not, the T-V LINK function may not work properly. After
you have registered TV channels to the Programme numbers (PR), set the DECODER (EXT-2) function for the Programme number (PR) to ON in order to unscramble a
scrambled TV channel. For details of operation, see “Us-
ing the DECODER (EXT-2) function” on page 28.
Connecting headphones
Connecting headphones
Connecting headphonesConnecting headphones
Connect the headphones with a stereo mini-jack (of 3.5mm in
diameter) to the headphone jack at the TV front panel.
ADDITIONAL PREPARATION
ENGLISH
Note:
When you connect the headphones, the TV speakers is-
•
sue no sound.
Video/sound signal output from the
Video/sound signal output from the
Video/sound signal output from theVideo/sound signal output from the
EXT-2 terminal
EXT-2 terminal
EXT-2 terminalEXT-2 terminal
You can arbitrarily change over the output of the video/sound
signal from the EXT-2 terminal. It is useful when you want to
dub the video/sound from another device on the VCR connected to the EXT-2 terminal. For details on how to do this operation, see “DUBBING” on page 20.
TV output from the EXT-1 terminal
TV output from the EXT-1 terminal
TV output from the EXT-1 terminalTV output from the EXT-1 terminal
The output of video/sound signal of a TV channel you are currently viewing is always output from the EXT-1 terminal.
Note:
Changing over a Programme number (PR) also changes
•
over the TV output from the EXT-1 terminal.
The video/sound signal from an EXT terminal cannot be
•
output.
Teletext programmes cannot be output.
•
31
Page 33

CH/CC NUMBER
CH/CC NUMBER
CH/CC NUMBERCH/CC NUMBER
When you want to use the INSERT function on page 25, find the CH/CC number corresponding to the Channel number of the TV
channel from this table.
CH Channel
CH 02 / CH 202 E2
CH 03 / CH 203 E3, ITALY A
CH 04 / CH 204 E4, ITALY B
CH 05 / CH 205 E5, ITALY D
CH 06 / CH 206 E6, ITALY E
CH 07 / CH 207 E7, ITALY F
CH 08 / CH 208 E8
CH 09 / CH 209 E9, ITALY G
CH 10 / CH 210 E10, ITALY H
CH 11 / CH 211 E11, ITALY H+1
CH 12 / CH 212 E12, ITALY H+2
CH 21 / CH 221 E21
CH 22 / CH 222 E22
CH 23 / CH 223 E23
CH 24 / CH 224 E24
CH 25 / CH 225 E25
CH 26 / CH 226 E26
CH 27 / CH 227 E27
CH 28 / CH 228 E28
CH 29 / CH 229 E29
CH 30 / CH 230 E30
CH 31 / CH 231 E31
CH 32 / CH 232 E32
CH 33 / CH 233 E33
CH 34 / CH 234 E34
CH 35 / CH 235 E35
CH 36 / CH 236 E36
CH 37 / CH 237 E37
CH 38 / CH 238 E38
CH 39 / CH 239 E39
CH Channel
CH 102 F2
CH 103 F3
CH 104 F4
CH 105 F5
CH 106 F6
CH 107 F7
CH 108 F8
CH 109 F9
CH 110 F10
CH 121 F21
CH 122 F22
CH 123 F23
CH 124 F24
CH 125 F25
CH 126 F26
CH 127 F27
CH 128 F28
CH 129 F29
CH 130 F30
CH 131 F31
CH 132 F32
CH 133 F33
CH 134 F34
CH 135 F35
CH 136 F36
CH 137 F37
CH 138 F38
CH 139 F39
CH 140 F40
CH Channel
CH 40 / CH 240 E40
CH 41 / CH 241 E41
CH 42 / CH 242 E42
CH 43 / CH 243 E43
CH 44 / CH 244 E44
CH 45 / CH 245 E45
CH 46 / CH 246 E46
CH 47 / CH 247 E47
CH 48 / CH 248 E48
CH 49 / CH 249 E49
CH 50 / CH 250 E50
CH 51 / CH 251 E51
CH 52 / CH 252 E52
CH 53 / CH 253 E53
CH 54 / CH 254 E54
CH 55 / CH 255 E55
CH 56 / CH 256 E56
CH 57 / CH 257 E57
CH 58 / CH 258 E58
CH 59 / CH 259 E59
CH 60 / CH 260 E60
CH 61 / CH 261 E61
CH 62 / CH 262 E62
CH 63 / CH 263 E63
CH 64 / CH 264 E64
CH 65 / CH 265 E65
CH 66 / CH 266 E66
CH 67 / CH 267 E67
CH 68 / CH 268 E68
CH 69 / CH 269 E69
CH Channel
CH 141 F41
CH 142 F42
CH 143 F43
CH 144 F44
CH 145 F45
CH 146 F46
CH 147 F47
CH 148 F48
CH 149 F49
CH 150 F50
CH 151 F51
CH 152 F52
CH 153 F53
CH 154 F54
CH 155 F55
CH 156 F56
CH 157 F57
CH 158 F58
CH 159 F59
CH 160 F60
CH 161 F61
CH 162 F62
CH 163 F63
CH 164 F64
CH 165 F65
CH 166 F66
CH 167 F67
CH 168 F68
CH 169 F69
CC Channel
CC 01 / CC 201 S1
CC 02 / CC 202 S2
CC 03 / CC 203 S3
CC 04 / CC 204 S4
CC 05 / CC 205 S5
CC 06 / CC 206 S6
CC 07 / CC 207 S7
CC 08 / CC 208 S8
CC 09 / CC 209 S9
CC 10 / CC 210 S10
CC 11 / CC 211 S11
CC 12 / CC 212 S12
CC 13 / CC 213 S13
CC 14 / CC 214 S14
CC 15 / CC 215 S15
CC 16 / CC 216 S16
CC 17 / CC 217 S17
CC 18 / CC 218 S18
CC 19 / CC 219 S19
CC 20 / CC 220 S20
CC 21 / CC 221 S21
CC 22 / CC 222 S22
CC 23 / CC 223 S23
CC 24 / CC 224 S24
CC 25 / CC 225 S25
CC 26 / CC 226 S26
CC 27 / CC 227 S27
CC 28 / CC 228 S28
CC 29 / CC 229 S29
CC 30 / CC 230 S30
CC
CC 110 116 - 124
CC 111 124 - 132
CC 112 132 - 140
CC 113 140 - 148
CC 114 148 - 156
CC 115 156 - 164
CC 116 164 - 172
CC 123 220 - 228
CC 124 228 - 236
CC 125 236 - 244
CC 126 244 - 252
CC 127 252 - 260
CC 128 260 - 268
CC 129 268 - 276
CC 130 276 - 284
CC 131 284 - 292
CC 132 292 - 300
CC 133 300 - 306
CC 141 306 - 311
CC 142 311 - 319
CC 143 319 - 327
CC 144 327 - 335
CC 145 335 - 343
CC 146 343 - 351
CC 147 351 - 359
CC 148 359 - 367
CC 149 367 - 375
CC 150 375 - 383
CC 151 383 - 391
Frequency
(MHz)
CC Channel
CC 31 / CC 231 S31
CC 32 / CC 232 S32
CC 33 / CC 233 S33
CC 34 / CC 234 S34
CC 35 / CC 235 S35
CC 36 / CC 236 S36
CC 37 / CC 237 S37
CC 38 / CC 238 S38
CC 39 / CC 239 S39
CC 40 / CC 240 S40
CC 41 / CC 241 S41
CC 75 / CC 275 X
CC 76 / CC 276 Y
CC 77 / CC 277 Z, ITALY C
CC 78 / CC 278 Z+1
CC 79 / CC 279 Z+2
CC
CC 152 391 - 399
CC 153 399 - 407
CC 154 407 - 415
CC 155 415 - 423
CC 156 423 - 431
CC 157 431 - 439
CC 158 439 - 447
CC 159 447 - 455
CC 160 455 - 463
CC 161 463 - 469
Frequency
(MHz)
Note:
When two CH/CC numbers correspond to one Channel number, choose either one according to the current COUNTRY set-
•
ting. When the COUNTRY setting is other than FRANCE, choose a two-digit CH/CC number. When the COUNTRY setting is
FRANCE, choose a three-digit CH/CC number.
Find the CH/CC number (CC110 to CC161) corresponding to the TV channel (SECAM-L system) from a French cable TV sta-
•
tion, based on the broadcast frequency of the TV channel. When you do not know the broadcast frequency, please contact
the cable TV station.
The CH/CC numbers of CH102-CH169 and CC110-CC161 correspond to the TV channels being broadcast by a SECAM-L
•
system. The other CH/CC numbers correspond to the TV channels being broadcast by a method other than a SECAM-L system.
32
Page 34

TV BUTTONS AND PARTS
TV BUTTONS AND PARTS
TV BUTTONS AND PARTSTV BUTTONS AND PARTS
Front Panel
Front Panel
■■■■
Front PanelFront Panel
Push to open
(Behind the cover)
ENGLISH
Remote control sensor
1
Headphone jack (mini jack) page 30
2
EXT-4 terminal pages 19 and 30
3
(Volume) button page 8
rrrr
4
P
5
6
7
buttons / qqqq buttons page 8
∨∨∨∨/∧
∧
∧ ∧
Power lamp pages 3 and 6
Main power button pages 3 and 6
Caution:
Do not grasp the TV by the front panel cover when moving the TV set. If you do, you may break the cover.
•
Rear Panel
Rear Panel
■■■■
Rear PanelRear Panel
EXT-2
EXT-3
S S
EXT-1
Aerial socket page 2
8
EXT-1 terminal pages 2, 19 and 30
9
EXT-1
EXT-2 terminal pages 2, 5, 19 and 30
0
EXT-3 terminal pages 19 and 30
-
33
Page 35

TROUBLESHOOTING
TROUBLESHOOTING
TROUBLESHOOTINGTROUBLESHOOTING
If a problem arises while you are using the TV, please read this “Troubleshooting” well before you request having the TV repaired.
You may be able to fix it easily by yourself. For example, if the AC plug is disconnected from the AC outlet, or the TV aerial has
problems, you may think there is a problem with the TV itself.
Important:
This Troubleshooting guide only covers problems whose cause are not easy to determine. If a question arises when you are
•
operating a function, read the page(s) corresponding to the operation of the function well, not this Troubleshooting guide.
After you have followed the Troubleshooting description or the operating description of the functions concerned without any suc-
•
cess, remove the AC plug from the AC outlet and request a repair of your TV. Do not attempt to repair the TV by yourself or
remove the rear cover of the TV.
Has COLOUR or BRIGHT been controlled properly? Follow
If you cannot turn on the TV
If you cannot turn on the TV
If you cannot turn on the TVIf you cannot turn on the TV
Is the AC plug connected to the AC outlet?
•
Is the Power lamp lit? If not, press the Main power button.
•
No picture/No sound
No picture/No sound
No picture/No soundNo picture/No sound
Have you chosen a TV channel whose reception is extreme-
•
ly bad? In this case, the BLUE BACK function will be activated, the entire screen becomes blue, and the sound is muted.
In spite of this, if you want to view the TV channel, follow the
description “BLUE BACK” on page 21 to try to change the
BLUE BACK function setting to OFF.
Have you connected the headphones to the TV? Connect-
•
ing the headphones to the TV causes sounds not to be issued from the TV speakers.
If the SYSTEM setting for a TV channel is incorrect, it may
•
prevent the sound from being issued. Follow the description
“EDIT/MANUAL” on page 24 to use the MANUAL function to
try to change the SYSTEM setting.
Poor picture
Poor picture
Poor picturePoor picture
If noise totally obscures the picture (snow), the aerial or aer-
•
ial cable may have trouble. Check the following to try to
solve the trouble:
Has the TV and aerial been connected properly?
Has the aerial cable been damaged?
Is the aerial pointed to the right direction?
Is the aerial itself faulty?
If the TV or aerial receives interference from the other devic-
•
es, stripes or noise may appear in the picture. Move such
devices as an amplifier, personal computer, or a hair drier
that can cause interference away from your TV, or try
changing its location. If the aerial suffers interference from a
radio tower or high-voltage wire, please contact your local
dealer.
If the TV receives interference from signals reflecting from
•
mountains or building, double-pictures (ghosting) will occur.
Try to change the aerial’s direction or replace the antenna
with the one with better directionality.
Is your COLOUR SYSTEM setting for the TV channels cor-
•
rect? Follow the description “COLOUR SYSTEM” on
page 16 to try to solve the trouble.
•
the description “Picture Adjustment” on page 15 to try to adjust them properly.
Videotaping teletext is not recommended because it may
•
not record correctly.
When a white and bright still image (such as a white dress)
•
is displayed on the screen, the white part may look as if it is
coloured. It is a phenomenon unavoidable due to the nature
of the picture tube itself, and not due to a TV failure. When
the picture disappears from the screen, the unnatural colours will also disappear.
Poor sound
Poor sound
Poor soundPoor sound
Have you adjusted BASS or TREBLE properly? If not, follow
•
the description “Sound Adjustment” on page 18 to try to ad-
just them properly.
When the TV channel reception is poor, it can be hard to
•
hear the stereo or bilingual sound. In this case, follow the
description “STEREO / I•II” on page 18 to hear the sound
more easily by changing it to a mono sound.
Operation disabled
Operation disabled
Operation disabledOperation disabled
Have the batteries of the remote control become exhaust-
•
ed? Follow the description “Putting Batteries into the Remote Control” on page 2 and replace them with new
batteries to try to solve the problem.
Have you attempted to use the remote control at the sides
•
or rear of the TV or at a location more than seven meters
apart from the TV location? Operate the remote control in
the front of your TV or a location less than seven meters
from your TV to try to solve the problem.
When you are viewing a teletext programme, you cannot op-
•
erate the menus. Press the
programme to the ordinary TV programme to try operating
the menus.
If the TV operation becomes disabled suddenly, press the
•
Main power button on the TV and turn off the main power.
Try to press the Main power button again to turn on the main
power. If the TV returns to a normal state, it is not a failure.
button to return the teletext
b
34
Page 36

Other concerns
Other concerns
Other concernsOther concerns
When the SLEEP TIMER function operates, the TV is auto-
•
matically turned off. If the TV is turned off suddenly, try to
press the
At this time, if the TV resumes a normal state, there is no
problem.
When a WSS signal is included in the broadcast signal or
•
the signal from an external device, or when the TV is receiving a control signal from an external device, the ZOOM
mode will change automatically. When you want to return to
the previous ZOOM mode, press the
choose the ZOOM mode again.
If you bring a magnetised device such as a speaker near to
•
your TV, a picture may be warped or unnatural colours appear at he corners of the screen. In this case, keep the device apart from your TV. If the speakers causes such
phenomena, use the magnetic-shielded speakers instead.
The TV may emit a crackling sound due to a sudden change
•
in temperature. It does not matter if a picture or sound does
not show any abnormality. If you hear crackling sounds frequently while you are viewing the TV, other causes may be
assumed. For precautionary purposes, request your service
technician to inspect it.
Touching the screen may cause you to feel a slight electric
•
shock due to its static electricity. It is an unavoidable phenomenon due to the construction of the picture tube. It is not
a problem with the TV. You can rest assured that this static
discharge does not have harmful influence over the human
body.
(Standby) button to turn on the TV once again.
#
button to
c
TROUBLESHOOTING
ENGLISH
35
Page 37

SPECIFICATIONS
SPECIFICATIONS
SPECIFICATIONSSPECIFICATIONS
Item
Broadcasting systems CCIR B/G, I, L
Colour systems PAL, SECAM
Channels and frequencies
Sound-multiplex systems A2 (B/G), NICAM (B/G, I, L) system
Teletext systems FLOF (Fastext), TOP, WST (World Standard System)
Power requirements 220 - 240 V AC, 50 Hz
Power consumption Maximum: 156 W, Average: 122 W, Standby: 0.8 W
Picture tube size Viewable area 66 cm (measured diagonally)
Audio output Rated Power output: 5 W + 5 W
Speakers (10 cm
EXT-1 terminal Euroconnector (21-pin, SCART)
EXT-2 terminal Euroconnector (21-pin, SCART)
EXT-3 terminal Euroconnector (21-pin, SCART)
EXT-4 terminal RCA connectors × 3
Headphone jack Stereo mini-jack (3.5 mm in diameter)
Dimensions (W
Weight 33.8 kg
Accessories Remote control unit
Model
The EXT terminals also support the NTSC 3.58/4.43 MHz system.
•
E2-E12, E21-E69, S1-S41, X, Y, Z, Z+1, Z+2, A-H, H+1, H+2, F2-F10, F21-F69
•
French cable TV channel of broadcast frequencies 116 - 172 MHz and 220 - 469 MHz
•
3 cm) oval × 2
×
Video input, Audio L/R inputs and RGB inputs are available.
•
TV broadcast outputs (Video and Audio L/R) are available.
•
Video input, S-VIDEO (Y/C) input and Audio L/R inputs are available.
•
Video and Audio L/R outputs are available.
•
T-V LINK functions are available.
•
Video input, S-VIDEO (Y/C) input and Audio L/R inputs are available.
•
S-VIDEO connector
Video input, S-VIDEO (Y/C) input and Audio L/R inputs are available.
•
H × D) 725 mm × 480 mm × 496 mm
×
AAA/R03 dry cell battery
1
×
1 (RM-C54 (Grey) or RM-C50 (Black) is supplied.)
×
2
×
AV28CT1EP*
A basic model number. The actual model number may have characters added (such as “S” denoting silver) indicating the colour
*
of the TV set.
Design and specifications subject to change without notice.
Pictures displayed on the screen using this TV’s ZOOM functions should not be shown for any commercial or demonstration purpose in public places (cafes, hotels, etc.) without the consent of the owners of copyright of the original picture sources, as this
constitutes an infringement of copyright.
36
VICTOR COMPANY OF JAPAN, LIMITED
Page 38

Vielen Dank für den Kauf dieses JVC Farbfernsehgerätes.
Damit Sie verstehen, wie dieser Fernseher funktioniert, lesen Sie diese Anleitung bitte sorgfältig
durch, bevor Sie das Gerät in Betrieb nehmen.
WARNUNG:
UM FEUER ODER ELEKTRISCHEN SCHLAG ZU VERMEIDEN, SOLLTEN SIE DIESES GERÄT KEINEM REGEN ODER FEUCHTIGKEIT AUSSETZEN.
VORSICHT:
DAMIT DIE SICHERHEIT ALLER BETROFFENEN PERSONEN GEWÄHRLEISTET IST, BEACHTEN SIE BITTE DIE FOLGENDEN REGELN ZUM UMGANG MIT DIESEM GERÄT.
1. Betreiben Sie das Gerät nur an einer Stromquelle der am Gerät angegebenen Spannung (220
– 240 V Wechselstrom, 50 Hz).
2. Achten Sie darauf, nicht das Stromkabel oder den Netzstecker zu beschädigen.
3. Vermeiden Sie die fehlerhafte Aufstellung; stellen Sie das Gerät nicht an Orten auf, die
schlecht belüftet sind.
Bei der Aufstellung dieses Fernsehers müssen die Abstandsangaben zu Boden und Wand eingehalten werden,
15 cm
und das Gerät darf nicht an einem engen Ort oder in einem Möbelstück aufgestellt werden. Beachten Sie bitte
die minimalen Abstände, damit ein sicherer Betrieb mög-
10 cm 10 cm 15 cm
lich ist.
4. Lassen Sie keine Gegenstände oder Flüssigkeiten in die Gehäuseöffnungen eindringen.
5. Bei einer Fehlfunktion ziehen Sie das Gerät aus der Steckdose und wenden Sie sich an einen
Service-Techniker. Versuchen Sie nicht, das Gerät selbst zu reparieren, und entfernen Sie
keinesfalls die hintere Abdeckung.
6. Die Oberfläche der Bildröhre wird leicht beschädigt. Das Fernsehgerät immer vorsichtig behandeln.
Sollte die Bildröhre verschmutzt sein, wischen Sie mit einem weichen, trockenen Tuch. Reiben Sie nicht zu stark. Benutzen Sie dabei niemals Wasch- oder Reinigungsmittel.
Wenn Sie dieses Fernsehgerät für längere Zeit nicht benutzen möchten, ziehen Sie auf jeden
Fall den Stecker aus der Steckdose.
DEUTSCH
INHALT
VORBEREITUNG . . . . . . . . . . . . . . . . . . . . . . . . . . . . . . . . . . . 2
T-V LINK FUNKTIONEN . . . . . . . . . . . . . . . . . . . . . . . . . . . . . . 5
ALLGEMEINE BEDIENUNG . . . . . . . . . . . . . . . . . . . . . . . . . . . 6
TASTEN UND FUNKTIONEN DER FERNBEDIENUNG. . . . . . 9
MENÜBEDIENUNG. . . . . . . . . . . . . . . . . . . . . . . . . . . . . . . . . 14
BILD EINSTELLUNG. . . . . . . . . . . . . . . . . . . . . . . . . . . . . . . .15
BILD VARIANTEN . . . . . . . . . . . . . . . . . . . . . . . . . . . . . . . . . . 16
SOUND EINSTELLUNG . . . . . . . . . . . . . . . . . . . . . . . . . . . . .18
EXT EINSTELLUNG . . . . . . . . . . . . . . . . . . . . . . . . . . . . . . . .19
FUNKTIONEN . . . . . . . . . . . . . . . . . . . . . . . . . . . . . . . . . . . . . 21
PROGRAMMIERUNG . . . . . . . . . . . . . . . . . . . . . . . . . . . . . . . 23
DEMO . . . . . . . . . . . . . . . . . . . . . . . . . . . . . . . . . . . . . . . . . . . 27
ZUSÄTZLICHE MENÜFUNKTIONEN . . . . . . . . . . . . . . . . . . .28
ZUSÄTZLICHE VORBEREITUNGEN . . . . . . . . . . . . . . . . . . .30
CH/CC-NUMMER . . . . . . . . . . . . . . . . . . . . . . . . . . . . . . . . . . 32
TV BEDIENUNGSELEMENTE UND TEILE . . . . . . . . . . . . . . 33
PROBLEMLÖSUNGEN . . . . . . . . . . . . . . . . . . . . . . . . . . . . . . 34
TECHNISCHE DATEN . . . . . . . . . . . . . . . . . . . . . . . . . . . . . . 36
Unsachgemäße Eingriffe,
insbesondere das Verän-
dern der Hochspannung
oder das Auswechseln
des Bildröhrentyps, kön-
nen dazu führen, daß
Röntgenstrahlung in erheblicher Stärke auftritt.
Ein so verändertes Gerät
entspricht nicht mehr dieser Zulassung und darf infolgedessen nicht mehr
betrieben werden.
1
Page 39

VORBEREITUNG
VORBEREITUNG
VORBEREITUNGVORBEREITUNG
Anschließen der Antenne und des Videorekorders
Anschließen der Antenne und des Videorekorders
■■■■
Anschließen der Antenne und des VideorekordersAnschließen der Antenne und des Videorekorders
Wenn Sie einen Videorekorder anschließen möchten, folgen
Sie
→ B → C → D.
A
Wenn Sie keinen Videorekorder anschließen möchten, folgen
Sie
→ 2.
1
*1: Um die T-V LINK-Funktionen zu bedienen, muß ein T-V
LINK-kompatibler Videorekorder am EXT-2-Anschluß des
Fernsehers angeschlossen werden. Für Einzelheiten zu
den T-V LINK Funktionen lesen Sie den Abschnitt “T-V
LINK FUNKTIONEN” auf Seite 5.
Hinweis:
Für weitere Einzelheiten lesen Sie auch die Anleitungen
•
Netzausgang
(220-240 V Wech-
selstrom, 50 Hz)
der anzuschließenden Geräte.
Die Anschlußkabel werden nicht mitgeliefert.
•
Sie können ein Video auf dem Videorekorder abspielen,
•
*1
ohne C durchzuführen. Näheres erfahren Sie in der Anleitung Ihres Videorekorders.
Für Anschluß weitere externer Geräte lesen Sie bitte den
•
Abschnitt “ZUSÄTZLICHE VORBEREITUNGEN” auf
Seite 30.
Wenn an einem T-V LINK-kompatiblen Videorekorder ein
•
Decoder angeschlossen werden soll, stellen Sie die DECODER (EXT-2) -Funktion auf EIN. Für Einzelheiten lesen
21-poliges SCART- Kabel
Sie den Abschnitt “Verwendung der DECODER (EXT-2) Funktion” auf Seite 28. Anderenfalls können Sie verschlüsselte Kanäle nicht betrachten.
Videorekorder
VCR
VHF/UHF Antenne
EXT-2
EXT-3
EXT-1
75-
Ohm-
EXT-2
S
EXT-1
EXT-3
S
75-OhmKoaxialkabel
Zum Antenneneingang
Koaxial-
kabel
Einsetzen der Batterien in die Fernbedienung
Einsetzen der Batterien in die Fernbedienung
■■■■
Einsetzen der Batterien in die FernbedienungEinsetzen der Batterien in die Fernbedienung
Verwenden Sie zwei AAA/R03 Trockenzellen-Batterien.
Legen Sie die Batterien am Ende - ein, und achten Sie darauf, daß die Polarität (+ und -) richtig ist.
Um das Batteriefach zu öffnen, schieben Sie die Abdeckung
nach unten und heben Sie sie an. Setzen Sie die Abdeckung
wieder auf und schieben sie aufwärts, bis sie sicher schließt.
Hinweis:
Beachten Sie die Warnhinweise auf den Batterien.
•
Die Batterielebensdauer beträgt etwa sechs Monate bis
•
über 1 Jahr, je nachdem, wie oft Sie das Gerät benutzen.
Wenn die Fernbedienung nicht mehr richtig funktioniert,
•
ersetzen Sie die Batterien.
Die mitgelieferten Batterien dienen nur zum Aufbau und
•
Testen Ihres Fernsehers; bitte ersetzen Sie diese so bald
wie möglich.
Benutzen Sie nur hochwertige Batterien oder RAM-Zel-
•
len.
AV IN/OUT-
Eingang
Zum Anten-
nenausgang
2
Page 40

Grundeinstellungen
Grundeinstellungen
■■■■
GrundeinstellungenGrundeinstellungen
Wenn der Fernseher zum ersten Mal eingeschaltet wird,
schaltet er in den Modus für die Grundeinstellungen, und das
JVC-Logo wird angezeigt. Befolgen Sie die Anweisungen auf
dem Bildschirm, um die Grundeinstellungen vorzunehmen.
1
Drücken Sie den Netzschalter des Fernsehgerätes.
Die Netz-LED leuchtet rot (für “Betriebsbereit”), dann
grün (für “Eingeschaltet”), und das JVC-Logo wird angezeigt.
Hinweis:
Wenn die Netz-LED weiterhin rot leuchtet und nicht
•
zu grün wechselt:
Ihr Fernseher befindet sich in Betriebsbereitschaft
(”Standby”). Schalten Sie das Gerät mit der Taste
(Standby) auf der Fernbedienung ein.
#
Das JVC-Logo erscheint nicht mehr, wenn das Ge-
•
rät bereits einmal eingeschaltet wurde.
Benutzen Sie in diesem Fall die Funktionen “SPRA-
CHE” und “AUTO”, um die Grundeinstellungen vorzunehmen. Für Einzelheiten lesen Sie den Abschnitt
“PROGRAMMIERUNG” auf Seite 23.
VORBEREITUNG
DEUTSCH
Netzschalter
Netz-LED
2
Drücken Sie Taste
Das Menü LANGUAGE erscheint.
3
Drücken Sie die Tasten 6
aaaa
.
6
66
DEUTSCHLAND zu wählen.
Drücken Sie dann die Taste
Als Sprache für die Bildschirm-Menüs ist “Deutschland”
voreingestellt. Das Menü LAND erscheint als Untermenü der Funktion AUTO.
aaaa
, um
.
1 2 3
4 5 6
7 8 9
0
AV
MENU
P
TV OK
P
F
.T/L
FREEZE
SUB-P
TV
Blaue Taste
4
Drücken Sie die Tasten 5
um das Land zu wählen, in dem Sie
sich momentan befinden.
5 und 6
55
6
66
,
3
Page 41

VORBEREITUNG
5
Starten Sie die Funktion AUTO mit der
blauen Taste.
Das Menü AUTO erscheint, und die empfangenen Fernsehkanäle werden automatisch auf die Programmnummern verteilt und gespeichert (PR).
Für Abbruch der AUTO Funktion:
Drücken Sie Taste
6
Sobald die Fernsehkanäle auf den Pro-
bbbb
.
grammnummern gespeichert sind,
(PR), erscheint das Menü SENDER
ORDNEN.
Sie können jetzt mit der Bearbeitung der Programmnummern (PR) in der Funktion SENDER ORDNEN/MAN.
fortfahren. Für Einzelheiten lesen Sie den Abschnitt
“SENDER ORDNEN/MAN.” auf Seite 24.
Wenn Sie die Funktion SENDER ORDNEN/
MAN. nicht benutzen möchten:
Wenn Sie die Funktion SENDER ORDNEN/MAN. nicht
benutzen möchten, fahren Sie mit den nächsten Schritten fort.
Hinweis:
Wenn Ihr Fernseher aus dem Sendesignal den Na-
•
men des Fernsehsenders lesen kann, speichert er
diesen automatisch (ID) unter der Programmnummer (PR), auf der der Kanal gespeichert wurde.
Wenn der gewünschte Fernsehkanal auf keiner Pro-
•
grammnummer (PR) gespeichert wurde, stellen Sie
diesen mit der Funktion MANUELL von Hand ein.
Für Einzelheiten lesen Sie den Abschnitt “SENDER
ORDNEN/MAN.” auf Seite 24.
Der Fernsehkanal ist nicht unter einer Programm-
•
nummer gespeichert PR 0 (AV). Wenn Sie einen
Fernsehkanal unter PR 0 (AV) einstellen möchten,
stellen Sie diesen mit der Funktion MANUELL von
Hand ein. Für Einzelheiten lesen Sie den Abschnitt
“SENDER ORDNEN/MAN.” auf Seite 24.
7
Drücken Sie die Taste
, so daß das
aaaa
Menü T-V LINK angezeigt wird.
8
Bedienen Sie das Menü T-V LINK entsprechend der Art des an der Buchse EXT-2
angeschlossenen Videorekorders.
Wenn kein T-V LINK-kompatibler Videorekorder angeschlossen ist:
Drücken Sie die Taste
verlassen.
Das Menü T-V LINK verschwindet.
Wenn ein T-V LINK-kompatibler Videorekorder
angeschlossen ist:
Befolgen Sie die Bedienungsschritte unter “Herunterla-
den (Download) der Daten zum Videorekorder” auf
Seite 28, um die Programmnummer-Daten zu übertragen (PR).
9
Jetzt sind die Grundeinstellungen ab-
bbbb
, um das Menü T-V LINK zu
geschlossen, und Sie können fernsehen.
4
Page 42

T-V LINK FUNKTIONEN
T-V LINK FUNKTIONEN
T-V LINK FUNKTIONENT-V LINK FUNKTIONEN
Wenn ein T-V LINK-kompatibler Videorekorder an der Buchse EXT-2 des Fernsehers angeschlossen wird, ist es einfacher, den Rekorder einzustellen und Videos zu betrachten. TV LINK besitzt die folgenden Funktionen:
Verwendung der T-V LINK-Funktionen:
Ein T-V LINK-kompatibler Videorekorder ist Voraussetzung.
Der Videorekorder muß mit einem voll belegten SCART-Kabel an der Buchse EXT-2 am Fernseher angeschlossen sein.
Hinweis:
“T-V LINK-kompatible Videorekorder ” sind z. B. JVC-Vi-
•
deorekorder mit dem Logo T-V LINK, oder ein Rekorder
mit einem der folgenden Logos. Diese Rekorder können
einige oder alle der folgend beschriebenen Funktionen
besitzen. Näheres erfahren Sie in der Anleitung Ihres Videorekorders.
“Q-LINK” (ein Warenzeichen der Firma Panasonic)
“Data Logic” (ein Warenzeichen der Firma Metz)
“Easy Link” (ein Warenzeichen der Firma Phillips)
“Megalogic” (ein Warenzeichen der Firma Grundig)
“SMARTLINK” (ein Warenzeichen der Firma Sony)
Herunterladen (Download)
Herunterladen (Download)
■■■■
Herunterladen (Download) Herunterladen (Download)
der Voreinstellungen
der Voreinstellungen
der Voreinstellungender Voreinstellungen
Hiermit können Sie die Daten der Programmnummern vom
Fernsehgerät zum Videorekorder übertragen.
Diese “Preset Download”-Funktion beginnt automatisch,
wenn die Grundeinstellungen abgeschlossen sind, oder
wenn die Funktionen AUTO oder SENDER ORDNEN/MAN.
durchgeführt werden.
Direktaufnahme
Direktaufnahme
■■■■
DirektaufnahmeDirektaufnahme
“Was Sie sehen, nehmen Sie auf”
Sie können mit einer einfachen Bedienung das Bildsignal auf
dem Videorekorder aufnehmen, das Sie momentan sehen.
Näheres erfahren Sie in der Anleitung Ihres Videorekorders.
Bedienung am Videorekorder. “RECORDER IN AUFNAHME”
wird angezeigt.
Unter folgenden Bedingungen wird der Rekorder die Aufnahme abbrechen, wenn der Fernseher ausgeschaltet
wird, wenn das Programm oder der Eingang umgeschaltet werden, oder, wenn das Menü auf dem Bildschirm angezeigt wird:
Bei der Aufnahme von Bildsignalen von externen Geräten,
•
die am Fernseher angeschlossen sind.
Bei der Aufnahme eines Fernsehsenders, nachdem er von
•
einem Decoder dekodiert wurde.
Bei der Aufnahme vom Ausgang des Fernsehers aufgrund
•
schlechten Empfangs des Senders am Videorekorder.
Hinweis:
Die Bedienung über das Fernsehgerät ist nicht möglich.
•
Generell kann der Videorekorder einen Sender, der von
•
dessen Empfangsteil nicht richtig empfangen wird, nicht
aufnehmen, auch dann, wenn Sie den Sender mit Ihrem
Fernseher einwandfrei empfangen können. Einige Rekorder können solche Sender über den Ausgang des Fernsehers aufnehmen, wenn der Sender am Fernseher zu
empfangen ist. Näheres erfahren Sie in der Anleitung Ihres Videorekorders.
DEUTSCH
Hinweis:
Diese Funktion kann auch am Videorekorder ausgeführt
•
werden.
Wenn “FUNKTION NICHT VERFÜGBAR” angezeigt wird:
Wenn “FUNKTION NICHT VERFÜGBAR” angezeigt wird,
war der Download nicht erfolgreich. Bevor Sie den Download
nochmals auslösen, vergewissern Sie sich folgender Dinge:
Der Videorekorder ist eingeschaltet.
•
Der Viderekorder ist T-V LINK-kompatibel.
•
Der Videorekorder ist an der Buchse EXT-2 angeschlossen.
•
Alle Pins des SCART-Kabels sind durchverbunden (fragen
•
Sie Ihren Händler).
Automatisches Einschalten
Automatisches Einschalten
■■■■
Automatisches Einschalten Automatisches Einschalten
per Videorekorder
per Videorekorder
per Videorekorder per Videorekorder
Bilddarstellung
Bilddarstellung
BilddarstellungBilddarstellung
Wenn die Wiedergabe am Videorekorder beginnt, schaltet
sich der Fernseher automatisch ein, und das Bildsignal an der
Buchse EXT-2 wird angezeigt.
Wenn das Menü des Videorekorders bedient wird, schaltet
sich der Fernseher automatisch ein, und das Bildsignal an der
Buchse EXT-2 wird angezeigt.
Hinweis:
Diese Funktion arbeitet nicht, wenn Ihr Fernseher kom-
•
plett ausgeschaltet ist. Schalten Sie Ihren Fernseher auf
Bereitschaft (Standby-Modus).
5
Page 43

ALLGEMEINE BEDIENUNG
ALLGEMEINE BEDIENUNG
ALLGEMEINE BEDIENUNGALLGEMEINE BEDIENUNG
Einschalten des Gerätes
Einschalten des Gerätes
■■■■
Einschalten des GerätesEinschalten des Gerätes
Drücken Sie den Netzschalter am Fernsehgerät.
Die Netz-LED leuchtet rot, und Ihr Fernseher ist betriebsbereit
(Standby).
Hinweis:
Wenn die Netz-LED grün leuchtet, ist das Gerät bereits
•
eingeschaltet.
Ausschalten des Geräts:
Drücken Sie nochmals den Netzschalter am Fernsehgerät.
Die Netz-LED erlischt.
Hinweis:
Um Energie zu sparen, schalten Sie das Gerät aus, wenn
•
Sie es längere Zeit nicht benutzen.
Einschalten des Fernsehers aus dem Standby-Modus
Einschalten des Fernsehers aus dem Standby-Modus
■■■■
Einschalten des Fernsehers aus dem Standby-ModusEinschalten des Fernsehers aus dem Standby-Modus
Netzschalter
Netz-LED
Drücken Sie die Taste
, die Tasten
bbbb
, oder die Ziffernta-
6
6
66
(Standby),
####
sten.
Die Netz-LED schaltet von rot auf grün um, und Ihr Fernseher ist
eingeschaltet.
Ausschalten des Gerätes:
Drücken Sie nochmals die Taste
Die Netz-LED schaltet von grün auf rot um, und Ihr Fernseher
ist wieder in Betriebsbereitschaft.
Fernsehsender wählen
Fernsehsender wählen
■■■■
Fernsehsender wählenFernsehsender wählen
Wählen Sie die Programmnummer (PR), auf der der gewünschte Fernsehkanal bzw. -sender gespeichert ist.
Mit den Tasten
Drücken Sie die Tasten 6666, um die gewünschte Pro-
grammnummer (PR) zu wählen.
Mit den Zifferntasten:
Geben Sie die gewünschte Programmnummer (PR) mit
den Zifferntasten ein.
Beispiel
• PR12
• PR6
Benutzen Sie PR LISTE:
→
→
drücken Sie 6.
:
6666
drücken Sie 1 und 2.
1 Drücken Sie die Taste h
daß PR LISTE. angezeigt wird.
(Standby).
####
h (Information), so
hh
1 2 3
4 5 6
7 8 9
0
AV
MENU
P
TV OK
P
F
.T/L
FREEZE
SUB-P
ZiffernTasten
6
TV
Page 44

ALLGEMEINE BEDIENUNG
Drücken Sie die Tasten
2
5555
und
6666
, um die
gewünschte Programmnummer (PR) zu
wählen. Drücken Sie dann die Taste
Hinweis:
Bei den Programmnummern (PR) und eingestellter
•
Funktion KINDERSICHERUNG wird das Symbol
(KINDERSICHERUNG) neben der Programmnummer dargestellt (PR) in der PR LISTE
Sie können die Tasten
•
ner Programmnummer benutzen (PR), wenn die
Funktion KINDERSICHERUNG aktiv ist.
Wenn Sie versuchen, eine Programmnummer
•
(PR) zu wählen, während KINDERSICHERUNG
aktiv ist, erscheint das Symbol
RUNG) ,und Sie können den Sender nicht sehen.
Wenn Sie die Kindersicherung ausschalten
möchten, lesen Sie bitte “KINDERSICHERUNG”
auf Seite 21.
Wenn kein klares Bild oder keine Farbe angezeigt
•
wird, schalten Sie die Fernsehnorm von Hand
um. Siehe “EMPFANGSSYSTEM” auf Seite 16.
Lautstärke einstellen
Lautstärke einstellen
■■■■
Lautstärke einstellenLautstärke einstellen
6666
nicht für die Anwahl ei-
Stellen Sie mit den Tasten
(KINDERSICHE-
nnnn
5
5
55
aaaa.
nnnn
die Laut-
stärke ein.
Die Lautstärkeanzeige erscheint, und die Lautstärke ändert
sich beim Drücken der Tasten
Bildsignale von externen Ge-
Bildsignale von externen Ge-
■■■■
Bildsignale von externen Ge-Bildsignale von externen Geräten betrachten
räten betrachten
räten betrachtenräten betrachten
Wählen Sie den EXT-Anschluß, an dem das externe Gerät
angeschlossen wurde.
Mit Taste
Drücken Sie die Taste
len.
Durch Drücken der Taste
umgeschaltet:
TV-Modus EXT-Modi
Programm-
nummern
PR 1 – PR 99
o
o
oo
:
o
o
oo
o
o
oo
.
qqqq
, um eine EXT-Buchse zu wäh-
wird die Auswahl wie folgt
EXT-1
EXT-2
oder
Mit den Tasten
Drücken Sie die Tasten
wählen.
Mit der PR LISTE:
1
Drücken Sie die Taste
6666
:
6666
, um eine der EXT-Buchsen zu
(Information), so
hhhh
daß die Programmliste (PR LISTE) angezeigt wird.
2
Wählen Sie mit den Tasten
5555
und
der EXT-Buchsen. Drücken Sie dann die
aaaa
Taste
Hinweis:
Die EXT-Buchsen finden Sie hinter der Programm-
•
nummer PR 99.
Sie können ein Video-Eingangssignal im Format S-
•
Video (Y/C-Signal) oder dem normalen Videosignal
(Composite-Signal) wählen. Näheres erfahren Sie
unter “
Wenn Sie kein klares bzw. kein Farbbild erhalten,
•
müssen Sie die Fernsehnorm von Hand umstellen.
Siehe “EMPFANGSSYSTEM” auf Seite 16.
Wenn Sie eine EXT-Buchse wählen, an der kein Signal
•
anliegt, ist die Nummer des EXT-Anschlusses auf dem
Bildschirm fixiert.
Dieses Gerät besitzt eine Funktion, die auf ein be-
•
stimmtes Signal von einem externen Gerät automatisch den Eingang umschaltet. (Die Buchse EXT-4
wird von dieser Funktion nicht unterstützt.)
.
y
(S-VIDEO-Eingang)” auf Seite 19.
Rückkehr zu einem Fernsehkanal:
Drücken Sie die Taste
Zifferntasten.
, dann die Tasten
bbbb
6666
Verwendung der Programmnummern PR 0 (AV):
Wenn Fernseher und Videorekorder nur per Antennenkabel verbunden sind, können Sie durch Auswahl der
Programmnummer PR 0 (AV) die Bildsignale Ihres Videorekorders empfangen. Stellen Sie den RF-Kanal des
Videorekorders manuell auf die Programmnummer PR 0
(AV) ein. Für Einzelheiten lesen Sie bitte “SENDER
ORDNEN/MAN.” auf Seite 24.
Durch Drücken der Taste
folgt umgeschaltet:
TV-Modus
Programm-
nummern
PR 1 – PR 99
wird die Auswahl wie
o
o
oo
EXT-Modi
EXT-1PR 0
EXT-2
6666
oder die
oder
eine
DEUTSCH
EXT-4
oder oder
EXT-3
EXT-4
oder oder
Hinweis:
Der RF-Kanal des Videorekorders wird als RF-Signal
•
vom Rekorder gesendet.
Näheres erfahren Sie in der Anleitung Ihres Videore-
•
korders.
EXT-3
7
Page 45

ALLGEMEINE BEDIENUNG
Bedienung mit den Tasten am Fernseher
Bedienung mit den Tasten am Fernseher
■■■■
Bedienung mit den Tasten am FernseherBedienung mit den Tasten am Fernseher
1
Drücken Sie die Tasten P p
p, um
pp
den Fernseher aus der Bereitschaft
einzuschalten.
p
2
Drücken Sie die Tasten P
Programmnummer (PR) oder einen Eingang EXT zu wählen.
3 Drücken Sie die Taste
und die Tasten
einzustellen.
1
Drücken Sie die Taste
Es erscheint die Lautstärkeanzeige.
2 Drücken Sie die Tasten
Lautstärkeanzeige dargestellt wird.
qqqq
, um die Lautstärke
p
pp
(Lautstärke)
rrrr
rrrr
(Lautstärke).
qqqq
, während die
, um eine
(Hinter der vorderen Abdeckung)
8
Page 46

TASTEN UND FUNKTIONEN DER FERNBEDIENUNG
TASTEN UND FUNKTIONEN DER FERNBEDIENUNG
TASTEN UND FUNKTIONEN DER FERNBEDIENUNGTASTEN UND FUNKTIONEN DER FERNBEDIENUNG
Stummschaltetaste (Muting)
Stummschaltetaste (Muting)
1
Stummschaltetaste (Muting)Stummschaltetaste (Muting)
Hiermit können Sie die Tonausgabe vorübergehend stummschalten.
1 2 3
4 5 6
7 8 9
0
AV
MENU
P
TV OK
P
F.T/L
Drücken Sie die Taste
auszuschalten. Wenn Sie die Taste
(Muting), um den Ton
llll
(Muting)
llll
nochmals drücken, wird wieder die vorherige
Lautstärke eingestellt.
Zifferntasten
Zifferntasten
2
ZifferntastenZifferntasten
Hier können Sie eine Programmnummer eingeben (PR).
Beispiel:
→
• PR12
• PR6
Sie können auch mehrmals die Taste o drücken, um
eine EXT-Buchse zu wählen.
ZOOM-Taste
ZOOM-Taste
3
ZOOM-TasteZOOM-Taste
Sie können die Bildgröße entsprechend dem Bildseitenverhältnis einstellen. Wählen Sie aus einem der Modi ZOOM die
optimale Größe aus.
drücken Sie 1 und 2.
→
drücken Sie 6.
AUTO(WSS):
Wenn ein WSS-Signal (Breitbildsignal), das das Bildseitenverhältnis angibt, im Sendesignal oder im Signal vom externen Gerät enthalten ist, schaltet das Fernsehgerät
automatisch den ZOOM-Modus auf den Modus 16:9 ZOOM
oder VOLLBILD um, je nach dem WSS-Signal.
DEUTSCH
TV
Öffnen der Abdeckung
Wenn kein WSS-Signal vorhanden ist, wird das Bild entsprechend dem ZOOM-Modus mit 4:3 AUTO ZOOM Funktion gezeigt.
Hinweis:
Einzelheiten zur 4:3 AUTO ZOOM Funktion siehe “4:3
•
AUTO ZOOM” auf Seite 17.
Wenn der AUTO(WSS) Modus aufgrund von schlechter
•
WSS-Signalqualität oder wenn der ZOOM-Modus geän-
dert werden soll nicht richtig funktioniert, die Taste
c drüken und auf einen anderen ZOOM-Modus um-
stellen.
NORMAL:
Hiermit sehen Sie das Normalbild (Verhältnis 4:3) in Originalgröße.
9
Page 47

TASTEN UND FUNKTIONEN DER FERNBEDIENUNG
PANORAMIC:
Dieser Modus erweitert die linken und rechten Ränder des
Normalbildes (4:3) so, daß der Bildschirm ausgefüllt wird,
ohne daß das Bild unnatürlich wirkt.
Hinweis:
•
Der obere und der untere Rand des Bildes werden leicht
angeschnitten.
14:9 ZOOM:
Dieser Modus vergrößert das Breitbild (Seitenverhältnis 14:9)
so, daß die oberen und unteren Ränder des Bildes die des
Bildschirms erreichen.
16:9 ZOOM:
Dieser Modus vergrößert das Breitbild (Seitenverhältnis 16:9)
so, daß der ganze Bildschirm ausgefüllt wird.
2
Drücken Sie die Tasten
6666
, um einen
ZOOM-Modus zu wählen. Drücken Sie
dann die Taste
Das Bild wird vergrößert, und der ZOOM-Modus wird
etwa 5 Sekunden lang angezeigt.
Hinweis:
Der ZOOM-Modus kann automatisch aufgrund ei-
•
nes Steuersignals von einem externen Gerät geä
ndert werde. Wenn Sie zum vorherigen ZOOM-Modus zurückschalten wäollen, whlen Sie den ZOOMModus erneut.
Einstellen des sichtbaren Bildbe-
Einstellen des sichtbaren Bildbe-
Einstellen des sichtbaren Bildbe-Einstellen des sichtbaren Bildbereichs
reichs
reichsreichs
Wenn Untertitel oder die oberen und unteren Bildränder ab-
geschnitten werden, können Sie den sichtbaren Bildbereich
manuell einstellen.
1
Drücken Sie die Taste
Das Menü ZOOM erscheint.
2
Drücken Sie die Taste
aaaa
.
c
c
cc
aaaa
.
, so daß der
ZOOM-Modus angezeigt wird.
Die Anzeige erscheint.
16:9 ZOOM UNTERTITEL:
Dieser Modus vergrößert das Breitbild (Seitenverhältnis 16:9)
samt Untertiteln so, daß der ganze Bildschirm ausgefüllt wird.
VOLLBILD:
Dieser Modus erweitert die linken und rechten Ränder des
Normalbildes (4:3) so, daß der Bildschirm ausgefüllt wird.
Hinweis:
Benutzen Sie dies, um Bilder im 16:9-Verhältnis, die auf
•
ein Normalbild (4:3) komprimiert wurden, auf deren Originalverhältnis zurückzubringen.
Wählen Sie den ZOOM-Modus
Wählen Sie den ZOOM-Modus
Wählen Sie den ZOOM-ModusWählen Sie den ZOOM-Modus
1
Drücken Sie die Taste
c
c
cc
, so daß das
Menü ZOOM angezeigt wird.
3
Drücken Sie währenddessen die Tasten
∞/5
, um den vertikal sichtbaren Bereich
von Hand einzustellen.
Hinweis:
•
Sie können den sichtbaren Bereich nicht in den
Modi NORMAL oder VOLLBILD einstellen.
HYPER SOUND-Taste
HYPER SOUND-Taste
4
HYPER SOUND-TasteHYPER SOUND-Taste
Hier können Sie den Klang akustisch “verbreitern”.
Drücken Sie die Taste
(HYPER SOUND),
iiii
um die Funktion HYPER SOUND ein- oder auszuschalten.
Hinweis:
Die Funktion HYPER SOUND arbeitet nicht richtig mit Mo-
•
nosignalen.
Die Funktion HYPER SOUND kann auch im Menü SOUND
•
EINSTELLUNG ein- und ausgeschaltet werden. Für Einzelheiten lesen Sie bitte “HYPER SOUND” auf Seite 18.
10
Page 48

5 Informationstaste
Informationstaste
Informationstaste Informationstaste
Sie können die PR LISTE oder die aktuelle Uhrzeit auf dem
Bildschirm darstellen lassen.
Drücken Sie die Taste
Wenn Sie die Taste h (Information) drücken, ändert sich die
Anzeige wie folgt:
Hinweis:
Mit PR LISTE können Sie Programmnummern (PR) oder
•
EXT Eingänge wählen. Für Einzelheiten lesen Sie bitte
“Benutzen Sie PR LISTE:” auf Seite 6.
Dieser Fernseher benutzt die Videotext-Daten zur Einstel-
•
lung der aktuellen Uhrzeit. So lange der Fernseher nach
dem Einschalten noch nicht auf einen Kanal gestellt war,
der Videotext sendet, bleibt die Zeitanzeige leer. Um die
aktuelle Zeit zu erfahren, wählen Sie einen Sender mit Videotext. Die Zeit wird weiterhin angezeigt, so lange Sie
das Gerät nicht ausschalten, auch dann, wenn Sie andere Sender wählen.
Beim Betrachten von Videos ist die angezeigte aktuelle
•
Uhrzeit gelegentlich nicht korrekt.
Die Taste h (Information) wird auch zur Menü-Bedie-
•
nung benutzt. Für Einzelheiten lesen Sie bitte “MEN-
ÜBEDIENUNG” auf Seite 14.
TV-Taste
TV-Taste
6
TV-TasteTV-Taste
Sie können immer auf einen TV-Kanal umschalten.
Drücken Sie Taste
Das Gerät schaltet in den Empfangsmodus, und es erscheint
der eingestellte Sender.
Hinweis:
Die Taste b
•
Für Einzelheiten lesen Sie bitte “MENÜBEDIENUNG” auf
Seite 14.
7
Sie können die Lautstärke einstellen.
b wird auch zur Menü-Bedienung benutzt.
bb
-Tasten
-Tasten
5
5
-Tasten-Tasten
55
Stellen Sie mit den Tasten
(Information).
hhhh
bbbb.
Keine Anzeige
die Lautstärke
5555
ein.
Hinweis:
Die Tasten
•
nutzt. Für Einzelheiten lesen Sie bitte “MENÜBEDIE-
NUNG” auf Seite 14.
werden auch zur Menü-Bedienung be-
5555
TASTEN UND FUNKTIONEN DER FERNBEDIENUNG
8 Standby-Taste
Standby-Taste
Standby-TasteStandby-Taste
Drücken Sie die Taste
Gerät ein- oder auszuschalten.
Wenn das Gerät eingeschaltet ist, wechselt die Farbe der
Netz-LED von rot zu grün.
Farbtasten
Farbtasten
9
FarbtastenFarbtasten
Die Farbtasten werden für die Videotext-Bedienung oder die
Menü-Bedienung benutzt. Für Einzelheiten lesen Sie bitte “
Tasten für die Videotext-Steuerung und VCR P DVD-Schalter” auf Seite 12 oder “MENÜBEDIENUNG” auf Seite 14.
OK-Tasten
OK-Tasten
0
OK-TastenOK-Tasten
Die Taste
heiten lesen Sie bitte “MENÜBEDIENUNG” auf Seite 14.
6
6
66
-
Hier können Sie eine Programmnummer eingeben (PR).
wird zur Menü-Bedienung benutzt. Für Einzel-
aaaa
-Tasten
-Tasten
-Tasten-Tasten
Drücken Sie die Tasten
te Programmnummer (PR) oder einen EXT-Eingang zu wählen.
Die Tasten
Für Einzelheiten lesen Sie bitte “MENÜBEDIENUNG” auf
Seite 14.
VCR/DVD Steuertasten und
VCR/DVD Steuertasten und
=
VCR/DVD Steuertasten und VCR/DVD Steuertasten und
VCR
VCR PPPP DVD-Schalter
VCR VCR
Mit diesen Tasten kann ein Videorekorder der Marke JVC
oder ein DVD-Player bedient werden. Wenn Sie eine Taste
mit dem gleichen Symbol wie auf der geräteeigenen Fernbedienung drücken, wird die entsprechende Funktion ausgelöst.
1
Stellen Sie den Schalter VCR PPPP DVD auf
werden auch zur Menü-Bedienung benutzt.
6666
DVD-Schalter
DVD-Schalter DVD-Schalter
eine der Positionen VCR oder DVD.
VCR:
Wenn Sie den Videorekorder bedienen, stellen Sie den
Schalter auf die Position VCR.
DVD:
Wenn Sie den DVD-Player bedienen, stellen Sie den
Schalter auf die Position DVD.
(Text):
PPPP
Wenn Sie Sender mit Videotext empfangen, stellen Sie
den Schalter auf die Position
2
Drücken Sie die Steuertaste VCR/DVD, um
Ihren VCR (Videorekorder) oder DVD-Player zu bedienen.
Hinweis:
Bei Geräten anderer Hersteller als JVC kann diese
•
Funktion nicht benutzt werden.
Auch dann, wenn Ihr Gerät von JVC hergestellt wur-
•
de, kann es je nach Gerät sein, daß einige oder gar
keine der Tasten funktionieren.
Sie können die Tasten
•
zu wählen; der Videorekorder empfängt oder wählt
den Abschnitt aus, den der DVD-Player wiedergibt.
Einige DVD-Player benutzen die Tasten
•
schnellen Vor-/Rücklauf und auch Wahl des Abschnitts.
In diesem Fall funktionieren die Tasten 1/¡ nicht.
####
(Standby), um das
6666
, um die gewünsch-
(Text).
P
benutzen, um einen Sender
pppp
sowohl für
pppp
~
DEUTSCH
11
Page 49

TASTEN UND FUNKTIONEN DER FERNBEDIENUNG
Tasten für die Videotext-Steuerung und VCR
■■■■
Tasten für die Videotext-Steuerung und VCR PPPP DVD
~
Tasten für die Videotext-Steuerung und VCR Tasten für die Videotext-Steuerung und VCR
Hinweis:
•
Wenn Sie beim Empfang von Videotext auf Probleme stoßen, wenden Sie sich an Ihren Händler oder
MENU
P
TV OK
an den betreffenden Sender.
Im Text-Modus ist der ZOOM-Modus auf den VOLL-
•
BILD-Modus fixiert.
Die Menübedienung ist nicht möglich, wenn Sie Vi-
•
deotext sehen.
DVD-Schalter
DVD DVD
-Schalter
-Schalter-Schalter
P
F.T/L
Allgemeine Bedienung
Allgemeine Bedienung
Allgemeine BedienungAllgemeine Bedienung
Sie können drei Arten von Videotext-Sendungen empfangen:
FLOF (Fastext), TOP und WST.
1
Wählen Sie einen Sender, der Videotext
sendet.
2
Stellen Sie den Schalter VCR PPPP DVD auf
die Position
(Text).
PPPP
Verwendung des Listenmodus
Verwendung des Listenmodus
Verwendung des ListenmodusVerwendung des Listenmodus
Sie können die Nummern Ihrer bevorzugten Videotext-Seiten
abspeichern und sie mit den Farbtasten abrufen.
Seitennummern speichern:
1
Drücken Sie die Taste
, um den Li-
B
B
BB
stenmodus zu starten.
Die gespeicherten Seitennummern erscheinen unten
auf dem Bildschirm.
2
Drücken Sie eine Farbtaste, um eine Position zu wählen. Drücken Sie dann die Zifferntasten, um die Seitennummer
einzugeben.
1 2 3
4 5 6
7 8 9
0
AV
3
Drücken und halten Sie die Taste
(Spei-
AAAA
chern).
Die vier Seitennummern blinken weiß, um anzuzeigen,
daß diese gespeichert wurden.
Aufrufen einer gespeicherten Seite:
3
Drücken Sie die Taste
gggg
deotext anzuzeigen.
Wenn Sie die Taste
wie folgt umgeschaltet:
Empfangsmodus
4
Wählen Sie eine Videotext-Seite, indem Sie
die Tasten
6666
(Text) drücken, wird der Modus
gggg
, die Ziffern- oder die Farbta-
sten drücken.
Zurückschalten auf Fernsehempfang:
Drücken Sie die Taste bbbb oder
12
(Text), um den Vi-
Textmodus
(Text).
gggg
1
Drücken Sie die Taste
, um den Li-
B
B
BB
stenmodus zu starten.
2
Drücken Sie eine der Farbtasten, der eine
Seite zugeordnet wurde.
Listenmodus verlassen:
Drücken Sie nochmals die Taste
Halten
Halten
HaltenHalten
Sie können eine Videotext-Seite beliebig lange auf dem Bildschirm halten, auch dann, wenn weitere Videotext-Seiten
empfangen werden.
Drücken Sie die Taste
Hold-Anzeige
Halten abbrechen:
Drücken Sie nochmals die Taste
(Halten).
CCCC
CCCC
B
B
BB
(Halten).
.
Page 50

Unter-Seiten
Unter-Seiten
Unter-SeitenUnter-Seiten
Einige Videotext-Seiten haben Unter-Seiten, die automatisch
angezeigt werden.
Sie können Unter-Seiten beliebig halten bzw. jederzeit betrachten.
1
Drücken Sie die Taste
(Unter-Seiten),
DDDD
um die Unter-Seiten-Funktion aufzurufen.
2
Geben Sie mit den Zifferntasten eine Unter-Seitennummer ein.
Beispiel:
• Dritte Unter-Seite
Unter-Seiten-Funktion abbrechen:
Drücken Sie erneut die Taste
Hinweis:
•
Sie können eine Unter-Seite auch anwählen, indem
Sie die rote oder die grüne Taste drücken.
Aufdecken
Aufdecken
AufdeckenAufdecken
Einige Videotext-Seiten enthalten versteckten Text (zum Beispiel die Antworten in einem Quiz).
Sie können den versteckten Text aufdecken.
Mit jedem Druck auf die Taste
→
drücken Sie 0, 0, 0 und 3.
(Unter-Seiten).
DDDD
(Aufdecken)
EEEE
wird der Text verborgen oder aufgedeckt.
TASTEN UND FUNKTIONEN DER FERNBEDIENUNG
Abbrechen
Abbrechen
AbbrechenAbbrechen
Sie können nach einer Videotext-Seite suchen lassen, während Sie fernsehen.
1
Drücken Sie die Zifferntasten zur Eingabe
der Seitennummer, oder drücken Sie eine
der Farbtasten.
Das Gerät sucht nach der Videotext-Seite.
2
Drücken Sie die Taste
Das Fernsehprogramm erscheint. Sobald das Gerät die
gewünschte Seite gefunden hat, erscheint die Seitennummer oben links im Bildschirm.
3
Drücken Sie
(Abbrechen), um zum Vi-
HHHH
deotext zu schalten, sobald die Seite angezeigt wird.
Hinweis:
•
Mit der Taste
rück in den Empfangsmodus schalten. Anstelle des
Videotextes wird vorübergehend ein Fernsehsender
angezeigt.
(Abbrechen) können Sie nicht zu-
HHHH
(Abbrechen).
HHHH
DEUTSCH
Größe
Größe
GrößeGröße
Sie können die Höhe der Videotext-Anzeige verdoppeln.
Drücken Sie die Taste
Inhalt
Inhalt
InhaltInhalt
Sie können immer zur Inhalts-Seite wechseln.
Drücken Sie die Taste
FLOF (Fastext)/TOP/WST:
Schaltet zurück auf Seite 100 oder eine zuvor angegebene
Seite.
Listenmodus:
Kehrt zu der Seitennummer zurück, die unten links im Bild
eingeblendet ist.
(Größe).
FFFF
(Inhalt).
GGGG
13
Page 51

MENÜBEDIENUNG
MENÜBEDIENUNG
MENÜBEDIENUNGMENÜBEDIENUNG
Dieses Gerät hat viele Funktionen, die per Menü bedient werden. Um alle Funktionen Ihres Fernsehers nutzen zu können,
sollten Sie die grundsätzliche Menübedienung sicher beherrschen.
1
Drücken Sie die Taste
, so daß
aaaa
das Menü MENUE (Hauptmenü) angezeigt wird.
Das Menü MENUE erscheint. Dort sind die Titel aller
Menüs aufgeführt.
2
Wählen Sie mit den Tasten
Menütitel, und drücken Sie dann die
Taste
Das Menü erscheint.
aaaa
.
6
einen
3
Bedienen Sie die Menüs entsprechend
den Funktionsbeschreibungen der einzelnen Funktionen.
Hinweis:
Für Einzelheiten lesen Sie die Funktionsbeschrei-
•
bungen der einzelnen Funktionen jedes Menüs
nach dieser “MENÜBEDIENUNG”.
Diem Anzeige unten in jedem Menü stellt eine Taste
•
auf der Fernbedienung dar, die Sie zur Bedienung
der ausgewählten Funktion benutzen können.
4
Drücken Sie die Taste
stellung abzuschließen.
Das Menü verschwindet.
Rückkehr zum jeweils zuletzt gewählten Menü:
Drücken Sie die Taste h (Information).
Sofortiges Verlassen eines Menüs:
Drücken Sie die Taste b.
14
, um die Ein-
aaaa
Page 52

BILD EINSTELLUNG
BILD EINSTELLUNG
BILD EINSTELLUNGBILD EINSTELLUNG
Anzeigen des BILD EINSTELLUNG-Menüs:
1
Drücken Sie die Taste
NUE-Menü (Hauptmenü) aufzurufen.
2 Drücken Sie die Taste
STELLUNG zu wählen, und drücken Sie
dann die Taste
FARBTEMP.
FARBTEMP.
■■■■
FARBTEMP.FARBTEMP.
Sie können einen von drei FARBTEMP.-Modi (drei verschiedene Bildeinstellungen) auswählen, so daß sich das Bild automatisch einstellt.
1
Drücken Sie die Tasten 6, um FARB-
aaaa
.
, um das ME-
aaaa
6
, um BILD EIN-
TEMP. zu wählen.
2
Wählen Sie mit den Tasten 5 einen Modus.
KÜHL:
Eine kühle, weiße Farbbasis mit einer Anhebung der
Farbintensität und des Kontrastes, wodurch ein lebendigeres Bild erzeugt wird.
WARM:
Eine warme, rot-orange Farbbasis, die die richtige Farbintensität und den besten Kontrast für Spielfilme einstellt.
NORMAL:
Eine neutrale, weiße Farbbasis mit natürlichen Farben
und normalem Kontrast.
3
Schließen Sie die Einstellung mit der Taste
ab.
aaaa
Das Menü verschwindet.
Hinweis:
•
Sie können die Einstellung FARBTON (Bildfarbintensität) nur ändern, wenn die Bildnorm auf NTSC 3.58
oder NTSC 4.43 eingestellt ist.
Aufrufen der Voreinstellungen jedes der FARBTEMP.-Modi:
Drücken Sie die blaue Taste.
Die Bildeinstellungen des momentan gewählten FARB-
TEMP.-Modus werden auf deren Vorgabe eingestellt
und gespeichert.
3
Schließen Sie die Einstellung mit der Taste
ab.
aaaa
Das Menü verschwindet.
DEUTSCH
Bildeinstellung
Bildeinstellung
■■■■
BildeinstellungBildeinstellung
Sie können die Bildeinstellungen jedes der FARBTEMP.Modi beliebig einstellen.
Die geänderten Einstellungen werden im FARBTEMP.-Modus gespeichert.
1
Drücken Sie die Tasten 6, um einen Eintrag zu wählen.
2
Ändern Sie die Einstellung mit den Tasten
5
.
2
Niedriger
Dunkler
Weicher
Blasser
Rötlich
Eintrag
KONTRAST
(Bildkontrast)
HELLIGKEIT
(Bildhelligkeit)
SCHÄRFE
(Bildschärfe)
FARBE
(Bildfarbintensität)
FARBTON
(Bildfarbton)
3
Höher
Heller
Schärfer
Intensiver
Grünlich
15
Page 53

BILD VARIANTEN
BILD VARIANTEN
BILD VARIANTENBILD VARIANTEN
Anzeigen des BILD VARIANTEN-Menüs:
1
Drücken Sie die Taste
NUE-Menü (Hauptmenü) aufzurufen.
2 Drücken Sie die Taste
ANTEN zu wählen, und drücken Sie dann die
Taste
AUTO VNR
AUTO VNR
■■■■
AUTO VNRAUTO VNR
Die Funktion AUTO VNR reduziert das Bildrauschen automatisch je nach dessen Stärke im Signal. Die Funktion wählt
auch die optimale Schärfe (SCHÄRFE).
1
Drücken Sie die Tasten 6, um AUTO VNR
zu wählen.
2
Drücken Sie die Tasten 5, um AUTO zu
wählen.
MIN:
Die Funktion AUTO VNR wird abgebrochen. Wenn Sie
den Modus auf AUTO gestellt haben, jedoch der Meinung sind, daß die Schärfe des Originalbildes nicht erreicht wird, ändern Sie den Modus auf MIN. Dabei kann
jedoch das Rauschen im Originalbild verstärkt werden.
MAX:
Dieser Modus maximiert die Wirkung der Rauschunterdrückung unabhängig vom Zustand des Bildes. Wenn
Sie den Modus auf AUTO gestellt haben, das Rauschen
Ihnen jedoch noch beträchtlich zu sein scheint, wählen
Sie den Modus MAX. Dies kann allerdings die Schärfe
des Bildes beeinträchtigen.
3
Schließen Sie die Einstellung mit der Taste
ab.
aaaa
Das Menü verschwindet.
aaaa
.
, um das ME-
aaaa
6
, um BILD VARI-
EMPFANGSSYSTEM
EMPFANGSSYSTEM
■■■■
EMPFANGSSYSTEMEMPFANGSSYSTEM
Die Fernsehnorm (bzw. das Farbsystem) wird automatisch
gewählt. Wenn das Bild jedoch nicht klar ist, oder keine Farbe
erscheint, wählen Sie die Fernsehnorm von Hand.
1
Drücken Sie die Tasten 6, um EMPFANGSSYSTEM zu wählen. Drücken Sie
dann die Taste
Das Untermenü der Funktion EMPFANGSSYSTEM erscheint.
2
Wählen Sie mit den Tasten 5 die richtige
Fernsehnorm.
PAL:
PAL-System
SECAM:
SECAM-System
NTSC 3.58:
NTSC 3.58-MHz-System
NTSC 4.43
NTSC 4.43-MHz-System
AUTO:
Diese Funktion erkennt die Fernsehnorm anhand des
Eingangssignals. Die AUTO-Funktion können Sie nur
benutzen, wenn Sie einen Sender empfangen (PR 0
(AV)), oder das Signal von einem EXT-Eingang betrachten.
3
Schließen Sie die Einstellung mit der Taste
ab.
aaaa
Das Menü verschwindet.
Hinweis:
Bei schlechter Signalqualität funktioniert AUTO
•
eventuell nicht richtig. Wenn das Bild im Modus
AUTO nicht in Ordnung ist, wählen Sie ein anderes
Farbsystem von Hand.
In den Programmnummern PR 0 (AV) bis PR 99 kön-
•
nen Sie NTSC 3.58 oder NTSC 4.43 nicht wählen.
aaaa
.
16
Page 54

4:3 AUTO ZOOM
4:3 AUTO ZOOM
■■■■
4:3 AUTO ZOOM4:3 AUTO ZOOM
Diese Funktion arbeitet nur, wenn der ZOOM-Modus auf AUTO(WSS) (Breitbild) gestellt ist. Sie stellt den ZOOM-Modus
ein, der gewünscht wird, wenn ein WSS-Signal nicht im Sendesignal oder dem Signal von einem externen Gerät enthal-
ten ist. Sie können einen der drei ZOOM-Modi wählen.
Hinweis:
Einzelheiten zum Modus AUTO(WSS) siehe Abschnitt
•
“AUTO(WSS)” unter “3 ZOOM-Taste” auf Seite 9.
Drücken Sie die Tasten 6, um 4:3 AUTO
1
ZOOM zu wählen. Drücken Sie dann die Taste
Das Untermenü der Funktion 4:3 AUTO ZOOM
erscheint.
aaaa
.
BILD VARIANTEN
BILD VARIANTEN
BILD VARIANTENBILD VARIANTEN
DEUTSCH
Drücken Sie die Tasten 6, um einen
2
ZOOM-Modus zu wählen.
Schließen Sie die Einstellung mit der Taste
3
ab.
aaaa
Das Menü verschwindet.
17
Page 55

SOUND EINSTELLUNG
SOUND EINSTELLUNG
SOUND EINSTELLUNGSOUND EINSTELLUNG
HYPER SOUND
HYPER SOUND
■■■■
HYPER SOUNDHYPER SOUND
Hier können Sie den Klang akustisch “verbreitern”.
1
Drücken Sie die Tasten 6, um HYPER
SOUND zu wählen.
Für Abbruch der HYPER SOUND Function:
Dücken Sie die Tasten 5555, um AUS zu wählen.
2
Anzeigen des SOUND EINSTELLUNG-Menüs:
1
Drücken Sie die Taste
NUE-Menü (Hauptmenü) aufzurufen.
2
Drücken Sie die Taste 6, um SOUND EINSTELLUNG zu wählen. Drücken Sie dann
die Taste
aaaa
.
, um das ME-
aaaa
Drücken Sie die Tasten 5, um EIN zu
wählen.
3
Schließen Sie die Einstellung mit der Taste
aaaa
Das Menü verschwindet.
ab.
STEREO / I•II
STEREO / I•II
■■■■
STEREO / I•IISTEREO / I•II
Wenn Sie eine zweisprachige Sendung (Zweikanalton) sehen, können Sie den Ton von Kanal I (Sub I) oder Kanal II
(Sub II) auswählen. Wenn die Stereosendung einen schlechten Tonempfang aufweist, können Sie von Stereo auf Mono
umschalten, so daß der Ton monaural, aber in besserer Qualität empfangen wird.
1
Drücken Sie die Tasten 6, um STEREO /
I • II zu wählen.
2
Wählen Sie mit den Tasten 5 einen Tonmodus.
:Stereo-Ton
s
v
:Monauraler Ton
:Zweikanalton I (Sub I)
t
: Zweikanalton II (Sub II)
u
3
Schließen Sie die Einstellung mit der Taste
ab.
aaaa
Das Menü verschwindet.
Hinweis:
Der wählbare Tonmodus hängt vom Fernsehpro-
•
gramm ab.
Diese Funktion arbeitet nicht in den Modi EXT. Die
•
Funktion erscheint nicht im Menü SOUND EINSTELLUNG.
Hinweis:
Die Funktion HYPER SOUND arbeitet nicht richtig
•
mit Monosignalen.
Sie können die Funktion HYPER SOUND mit einem
•
einzigen Tastendruck ein- und ausschalten. Für Einzelheiten lesen Sie bitte “
auf Seite 10.
HYPER SOUND-Taste”
4
Toneinstellungen
Toneinstellungen
■■■■
ToneinstellungenToneinstellungen
Sie können den Ton nach Ihrem Wunsch einstellen.
1
Drücken Sie die Tasten 6, um einen Eintrag zu wählen.
2
Ändern Sie die Einstellung mit den Tasten
.
5
2
Weicher
Weicher
Links
3
Schließen Sie die Einstellung mit der Taste
ab.
aaaa
18
Das Menü verschwindet.
Eintrag
TIEFEN
HÖHEN
BALANCE
3
Stärker
Stärker
Rechts
Page 56

EXT EINSTELLUNG
EXT EINSTELLUNG
EXT EINSTELLUNGEXT EINSTELLUNG
Anzeigen des Menüs EXT EINSTELLUNG:
1 Drücken Sie die Taste
, um das ME-
aaaa
NUE-Menü (Hauptmenü) aufzurufen.
2 Drücken Sie die Taste
,um EXT EIN-
6
STELLUNG zu wählen. Drücken Sie dann
die Taste
■■■■
y
y(S-VIDEO-Eingang)
(S-VIDEO-Eingang)
yy
(S-VIDEO-Eingang)(S-VIDEO-Eingang)
Wenn Sie ein Gerät anschließen (z. B. einen S-VHS-Videorekorder), der ein S-VIDEO-Signal (Y/C-Signal) ausgeben
kann, können Sie die hochwertige Bildqualität des S-VIDEO-
Signals (Y/C-Signal) genießen.
aaaa
.
3
Schließen Sie die Einstellung mit der Taste
ab.
aaaa
Das Menü verschwindet.
Hinweis:
Der Eingang EXT-1 unterstützt kein S-VIDEO-Signal
•
(Y/C-Signal), und Sie können nicht
Eingang) für EXT-1 einstellen.
Wenn Sie den
•
schaltet der Anfangsbuchstabe von “E” auf “S” um.
“E2” wird zum Beispiel zu “S2” geändert.
Auch ein Gerät, das ein S-VIDEO-Signal (Y/C-Signal)
•
senden kann, gibt eventuell ein gewöhnliches Videosignal (Composite) aus, je nachdem, wie es eingestellt ist. Wenn kein Bild erscheint, und die Einstellung
yyyy
(S-VIDEO-Eingang)
Sie in der Anleitung des betreffenden Geräts nach,
wie Sie die Einstellung ändern können.
LISTE
LISTE
■■■■
LISTELISTE
Sie können die EXT-Eingänge je nach angeschlossenem Gerät benennen. Daraufhin erscheint zusammen mit der Nummer des EXT-Eingangs auch der gespeicherte Name.
yyyy
(S-VIDEO-Eingang) umschalten,
gewählt wurde, schlagen
yyyy
(S-VIDEO-
DEUTSCH
Vorbereitung:
Lesen Sie zuerst die Anleitung des Gerätes und den Ab-
•
schnitt “ZUSÄTZLICHE VORBEREITUNGEN” auf Seite 30,
so daß Sie in der Lage sind, das Gerät richtig an Ihrem Fernseher anschließen zu können. Lesen Sie dann in der Anleitung des anderen Gerätes nach, um dort einzustellen, daß
ein S-VIDEO-Signal (Y/C-Signal) ausgegeben wird.
Stellen Sie nicht den
•
EXT-Eingang, an dem ein Gerät angeschlossen ist, das
kein S-VIDEO-Signal (Y/C-Signal) ausgeben kann. Wenn
dies falsch eingestellt ist, erscheint kein Bild.
1
Drücken Sie die Tasten 6 oder 5, um
yyyy
(S-VIDEO-Eingang) auf einen
einen EXT-Eingang zu wählen.
EXT-1
P
P
2
Drücken Sie die gelbe Taste und wählen
EXT-3
EXT-4
TV
Sie einen yyyy (S-VIDEO-Eingang).
Das Symbol yyyy (S-VIDEO-Eingang) wird angezeigt.
Sie können jetzt ein S-VIDEO-Signal (Y/C-Signal) anstelle des normalen Videosignals (Composite) betrachten.
Für Abbruch der Funktion
gang):
Drücken Sie die gelbe Taste, so daß das Symbol yyyy
(S-VIDEO-Eingang) verschwindet.
Der Eingang ist jetzt wieder auf das normale Videosignal
(Composite) eingestellt.
EXT-2
(S-VIDEO-Ein-
yyyy
1
Drücken Sie die Tasten 6 oder 5, um
einen EXT-Eingang zu wählen.
EXT-1
P
P
2
Drücken Sie die blaue Taste, so daß die Na-
EXT-3
EXT-2
EXT-4
TV
mensliste angezeigt wird (LISTE).
19
Page 57

EXT EINSTELLUNG
EXT EINSTELLUNG
EXT EINSTELLUNGEXT EINSTELLUNG
3
Drücken Sie die Tasten 6, um einen Namen auszuwählen. Drücken Sie dann die
Taste
Die LISTE verschwindet, und der Name wird dem EXTEingang zugeordnet.
Löschen eines gespeicherten EXT-Eingangsnamens:
Wählen Sie ein Leerzeichen.
4
Schließen Sie die Einstellung mit der Taste
aaaa
Das Menü verschwindet.
Hinweis:
•
Sie können keinen Namen für einen EXT-Eingang
vergeben, der nicht in der Liste auftaucht (LISTE).
ÜBERSPIELEN
ÜBERSPIELEN
■■■■
ÜBERSPIELENÜBERSPIELEN
Sie können eine Signalquelle an der Buchse EXT-2 ausgeben.
Sie können ein beliebiges Ausgangssignal eines der Geräte
an den EXT-Eingängen auswählen, oder Bild und Ton eines
Fernsehkanals, und diese Signale an der Buchse EXT-2 ausgeben.
ab.
aaaa
.
1
Drücken Sie die Tasten 5, um EXT-2Buchse zu wählen.
2
Drücken Sie die Tasten 6, um eine EXTBuchse oder TV zu wählen.
Der Pfeil im Menü stellt den Signalfluß dar. Das linke
Ende des Pfeils gibt einen Signalquellenausgang der
Buchse EXT-2 an.
EXT-1/EXT-3/EXT-4:
Das Ausgangssignal eines Gerätes, das an der EXTBuchse angeschlossen ist, durchläuft den Fernseher
und wird an der Buchse EXT-2 ausgegeben.
TV:
Bild und Ton des momentan gewählten Fernsehkanals
werden an der Buchse EXT-2 ausgegeben.
3
Schließen Sie die Einstellung mit der Taste
ab.
aaaa
Das Menü verschwindet.
Hinweis:
Während der Überspielung läßt sich das Gerät nicht
•
ausschalten. Wenn Sie das Gerät auf andere Weise
ausschalten, wird auch die Signalverbindung zur
Buchse EXT-2 ausgeschaltet.
Wenn Sie eine EXT-Buchse als Ausgang wählen,
•
können Sie eine Sendung oder ein Signal von einem
EXT-Eingang anschauen, während Sie die Signale
des EXT-Eingangs auf einem Videorekorder aufnehmen, der am Ausgang EXT-2 angeschlossen ist.
RGB-Signale von Videospielen sowie Videotext kön-
•
nen nicht ausgegeben werden.
20
Page 58

FUNKTIONEN
FUNKTIONEN
FUNKTIONENFUNKTIONEN
Anzeigen des FUNKTIONEN-Menüs:
1
Drücken Sie die Taste
NUE-Menü (Hauptmenü) aufzurufen.
2
Drücken Sie die Taste 6, um FUNKTIONEN zu wählen. Drücken Sie dann die Taste
.
aaaa
SLEEP TIMER
SLEEP TIMER
■■■■
SLEEP TIMERSLEEP TIMER
Sie können den Fernseher so einstellen, daß er sich nach einer bestimmten Zeit automatisch ausschaltet.
1
Drücken Sie die Tasten 6, um SLEEP
TIMER zu wählen. Drücken Sie dann die
Taste
Das Untermenü der Funktion SLEEP TIMER erscheint.
aaaa
.
, um das ME-
aaaa
BLAU-BILD
BLAU-BILD
■■■■
BLAU-BILDBLAU-BILD
Sie können das Gerät so einstellen, daß es automatisch auf
einen blauen Hintergrund umschaltet und den Ton stummschaltet, wenn nur ein schwaches oder überhaupt kein Signal
vorhanden ist, oder wenn kein Signal vom externen Gerät
ausgegeben wird.
1
Drücken Sie die Tasten 6, um BLAU-BILD
zu wählen.
2
Drücken Sie die Tasten 5, um EIN zu
wählen.
Für Abbruch der BLAU-BILD Funktion:
Drücken Sie die Tasten 5, um AUS zu wählen.
3
Schließen Sie die Einstellung mit der Taste
ab.
aaaa
Das Menü verschwindet.
KINDERSICHERUNG
KINDERSICHERUNG
■■■■
KINDERSICHERUNGKINDERSICHERUNG
Für Sender, die Ihre Kinder nicht sehen sollen, können Sie
die Funktion KINDERSICHERUNG benutzen, um den Kanal
zu sperren. Wenn Ihre Kinder einen Programmplatz (PR)
wählen,auf dem ein gesperrter Kanal gespeichert ist, schaltet
der Bildschirm auf blau und zeigt n (KINDERSICHERUNG)
an, und es ist kein Signal zu sehen. Wenn nicht mit einer besonderen Bedienung eine voreingestellte ID-Nummer eingegeben wird, läßt sich die Sicherung nicht umgehen, so daß
Ihre Kinder das Programm nicht zu sehen bekommen.
Einstellen der Funktion KINDERSI-
Einstellen der Funktion KINDERSI-
Einstellen der Funktion KINDERSI-Einstellen der Funktion KINDERSICHERUNG
CHERUNG
CHERUNGCHERUNG
1
Drücken Sie die Tasten 6, um KINDERSICHERUNG zu wählen. Drücken Sie dann
die Taste
“GEHEIM CODE” (ID-Nummer einstellen) Es erscheint
die Anzeige .
o
.
DEUTSCH
2
Stellen Sie mit den Tasten 5 die Zeitdauer ein.
Sie können maximal 120 Minuten (2 Stunden) einstellen,
in Schritten von 10 Minuten.
Für Abbruch der SLEEP TIMER Funktion:
Stellen Sie mit der Taste 2 die Zeitdauer “AUS” ein.
3
Schließen Sie die Einstellung mit der Taste
ab.
aaaa
Das Menü verschwindet.
Hinweis:
•
Eine Minute, bevor die Funktion SLEEP TIMER das
Gerät ausschaltet, erscheint “GUTE NACHT!”.
Mit der Funktion SLEEP TIMER kann nicht der
•
Hauptschalter des Gerätes ausgeschaltet werden.
Wenn die SLEEP TIMER-Funktion aktiv ist, können
•
Sie das Untermenü dieser Funktion aufrufen, um die
verbleibende SLEEP TIMER-Restzeit abzulesen
oder zu verändern. Drücken Sie die Taste
das Menü nach Ablesen bzw. nach Änderung zu
verlassen.
a
, um
2
Geben Sie eine beliebige ID-Nummer ein.
1 Drücken Sie die Tasten
mer zu wählen.
, um eine Num-
6
2 Bewegen Sie den Cursor mit den Tasten
.
5
3
Drücken Sie die Taste
Das Untermenü der Funktion KINDERSICHERUNG erscheint.
aaaa
.
21
Page 59

FUNKTIONEN
FUNKTIONEN
FUNKTIONENFUNKTIONEN
4
Wählen Sie mit den Tasten 6 einen Fernsehkanal.
Mit jedem Druck auf die Tasten 6 ändert sich die Programmnummer (PR), und das Bild des Senders mit dieser Programmnummer (PR) wird angezeigt.
5
Drücken Sie die blaue Taste und stellen
Sie die KINDERSICHERUNG-Funktion ein.
(KINDERSICHERUNG) erscheint, und der Kanal ist
n
gesperrt.
Rücksetzen der KINDERSICHERUNG-Funktion:
Drücken Sie die blaue Taste nochmals.
(KINDERSICHERUNG) verschwindet.
n
6
Schließen Sie die Einstellung mit der Taste
ab.
aaaa
Das Menü verschwindet.
Hinweis:
Um das einfache Rücksetzen der KINDERSICHE-
•
RUNG-Funktion zu verhindern, verschwindet das
Menü nach Anwahl der KINDERSICHERUNG-Funktion und Drücken der Taste
len Menübedienung.
Betrachten eines gesperrten Fern-
Betrachten eines gesperrten Fern-
Betrachten eines gesperrten Fern-Betrachten eines gesperrten Fernsehkanals
sehkanals
sehkanalssehkanals
1
Wählen Sie mit den Zifferntasten oder PR
wie bei der norma-
a
LISTE eine Programmnummer (PR), deren
Kanal gesperrt ist.
Der Bildschirm zeigt den blauen Hintergrund, und
(KINDERSICHERUNG) erscheint. Der Sender ist nicht
zu sehen.
n
Hinweis:
Wenn Sie die Sperrung vorübergehend aufheben,
•
bedeutet das nicht, daß die KINDERSICHERUNGFunktion ausgeschaltet wird. Beim nächsten Versuch, diesen Kanal zu sehen, ist die Sperrung wieder aktiv.
Um die KINDERSICHERUNG-Funktion auszuschal-
•
ten, müssen Sie die Bedienung “ wiederholen, um
die KINDERSICHERUNG-Funktion” wieder zu aktivieren.
Um den einfachen Aufruf der Programmnummern
•
(PR) mit gesperrten Kanälen zu verhindern, wurde
die Programmnummer (PR) so eingestellt, so daß sie
nicht mit den Tasten
sten am Fernseher aufgerufen werden kann.
Um das einfache Rücksetzen der Sperre zu verhin-
•
dern, ist der “GEHEIM CODE” (GEHEIM CODE-Ein-
gabebildschirm) so eingestellt, daß er nur durch
Drücken der Taste
den kann.
DECODER (EXT-2)
DECODER (EXT-2)
■■■■
DECODER (EXT-2)DECODER (EXT-2)
Nur bei Anschluß eines Decoders und einem am Eingang
EXT-2 angeschlossenen Videorekorder, der T-V LINK-kompatibel ist, können Sie diese Funktion benutzen. Für die Bedienung dieser Funktion lesen Sie bitte “Verwendung der
DECODER (EXT-2) -Funktion” auf Seite 28.
oder den Bedienungsta-
6
(Information) aufgerufen wer-
h
Vorsicht:
Wenn Sie keinen
•
Videorekorder an der Buchse EXT-2 angeschlossen haben,
kann es passieren, daß die versehentliche Einstellung dieser Funktion auf “EIN” dazu führt, daß Bild und Ton des gewählten Senders nicht mehr ausgegeben werden.
Decoder und einen T-V LINK-kompatiblen
2
Drücken Sie die Taste h (Information), so
daß “GEHEIM CODE” (GEHEIM CODE-Eingabebildschirm) angezeigt wird.
3
Geben Sie Ihre Geheimnummer mit den
Zifferntasten ein ID.
Die Sperrung wird vorübergehend aufgehoben, und Bild
und Ton sind freigeschaltet.
Wenn Sie die ID-Nummer vergessen haben:
Führen Sie Schritt 1 bis 3 von “Einstellen der Funktion
KINDERSICHERUNG”. Nachdem Sie die ID-Nummer
bestätigt haben, drücken Sie die Taste b, um das
Menü zu verlassen.
22
Page 60

PROGRAMMIERUNG
PROGRAMMIERUNG
PROGRAMMIERUNGPROGRAMMIERUNG
3
Starten Sie die Funktion AUTO mit der
blauen Taste.
Das Menü AUTO erscheint, und die empfangenen Fernsehkanäle werden automatisch auf die Programmnummern verteilt und gespeichert (PR).
Anzeigen des PROGRAMMIERUNG-Menüs:
1 Drücken Sie die Taste
NUE-Menü (Hauptmenü) aufzurufen.
2
Drücken Sie die Taste
PROGRAMMIERUNG zu wählen. Drücken
Sie dann die Taste
SPRACHE
SPRACHE
■■■■
SPRACHESPRACHE
Aus der Liste der Sprachen im Menü können Sie die Sprache
wählen, in denen die Menüs und Dialoge auf dem Bildschirm
erscheinen.
1
Drücken Sie die Tasten
zu wählen. Drücken Sie dann die Taste
Das Untermenü der Funktion SPRACHE erscheint.
2
Drücken Sie die Tasten
che zu wählen.
3
Schließen Sie die Einstellung mit der Taste
ab.
aaaa
Das Menü verschwindet.
AUTO
AUTO
■■■■
AUTOAUTO
Mit folgenden Schritten können Sie die Sender, die bei Ihnen
einwandfrei zu empfangen sind, automatisch auf den Programmnummern (PR) speichern.
1
Drücken Sie die Tasten
wählen. Drücken Sie dann die Taste
Das Menü LAND erscheint als Untermenü der Funktion
AUTO.
2
Drücken Sie die Tasten
das Land zu wählen, in dem Sie sich momentan befinden.
aaaa
6666
.
6666
6666
5555
, um das ME-
aaaa
, um das Menü
, um SPRACHE
, um eine Spra-
, um AUTO zu
6666
∞∞∞∞/5555
und
aaaa
aaaa
, um
DEUTSCH
Für Abbruch der AUTO Funktion:
Drücken Sie die Taste bbbb.
4
Sobald die Fernsehkanäle auf den Programmnummern gespeichert sind, (PR),
erscheint das Menü SENDER ORDNEN.
Sie können jetzt mit der Bearbeitung der Programmnummern (PR) in der Funktion SENDER ORDNEN/MAN.
fortfahren. Für Einzelheiten lesen Sie bitte “SENDER
ORDNEN/MAN.” auf Seite 24.
Wenn Sie die Funktion SENDER ORDNEN/
.
MAN. nicht benutzen möchten:
Wenn Sie die Funktion SENDER ORDNEN/MAN. nicht benutzen möchten, fahren Sie mit den nächsten Schritten fort.
5
Drücken Sie die Taste
aaaa
, so daß das Menü
T-V LINK angezeigt wird.
6
Bedienen Sie das Menü T-V LINK entsprechend der Art des an der Buchse EXT-2 angeschlossenen Videorekorders.
Wenn kein T-V LINK-kompatibler Videorekorder angeschlossen ist:
Drücken Sie die Taste bbbb, um das Menü T-V LINK zu
verlassen.
Das Menü T-V LINK verschwindet, und alle Einstellungen sind abgeschlossen.
Wenn ein T-V LINK-kompatibler Videorekorder
angeschlossen ist:
Befolgen Sie die Bedienungsschritte unter “Herunterla-
den (Download) der Daten zum Videorekorder” auf
.
Seite 28, um die Programmnummer-Daten an den Videorekorder zu übertragen (PR).
Hinweis:
•
Wenn Ihr Fernseher aus dem Sendesignal den Namen des Fernsehsenders lesen kann, speichert er
diesen automatisch (ID) unter der Programmnummer (PR), auf der der Kanal gespeichert wurde.
Wenn der gewünschte Fernsehkanal auf keiner Pro-
•
grammnummer (PR) gespeichert wurde, stellen Sie
diesen mit der Funktion MANUELL von Hand ein.
Für Einzelheiten lesen Sie bitte “SENDER ORDNEN/
MAN.” auf Seite 24.
Der Fernsehkanal ist nicht unter einer Programmnummer
•
gespeichert PR 0 (AV). Wenn Sie einen Fernsehkanal unter PR 0 (AV) einstellen möchten, stellen Sie diesen mit
der Funktion MANUELL von Hand ein. Für Einzelheiten lesen Sie bitte “SENDER ORDNEN/MAN.” auf Seite 24.
23
Page 61

PROGRAMMIERUNG
PROGRAMMIERUNG
PROGRAMMIERUNGPROGRAMMIERUNG
SENDER ORDNEN/MAN.
SENDER ORDNEN/MAN.
■■■■
SENDER ORDNEN/MAN.SENDER ORDNEN/MAN.
Die Funktionen SENDER ORDNEN/MAN. sind in zwei Gruppen eingeteilt: Bearbeitung der aktuellen Programmnummern
(PR) (SENDER ORDNEN-Funktionen) und manuelle Speicherung von Fernsehkanälen unter einer Programmnummer
(PR) (MANUELL-Funktion). Zu den Funktionen im einzelnen:
VERSCH.:
Diese Funktion ändert die Programnummer (PR) eines Fernsehkanals.
ID:
Diese Funktion speichert einen Sendernamen (ID) für einen
Fernsehkanal.
EINFÜGEN:
Diese Funktion fügt der aktuellen Liste der Programmnummern (PR) anhand der CH/CC-Nummer einen neuen Fernsehkanal hinzu.
LÖSCHEN:
Diese Funktion löscht einen nicht benötigten Sender.
MANUELL:
Mit dieser Funktion speichern Sie einen neuen Fernsehsender von Hand unter einer Programmnummer (PR).
Vorsicht:
Mit den Funktionen VERSCH., LÖSCHEN oder EINFÜGEN
•
überschreiben Sie die momentane Programmnummer-Liste
(PR). Dadurch ändern sich auch die Programmnummern
(PR) anderer Fernsehkanäle.
Wenn Sie die Funktion MANUELL bei einem Sender benut-
•
zen, der mit der Funktion KINDERSICHERUNG gesperrt
wurde, wird die Kindersicherung (KINDERSICHERUNG) für
diesen Kanal aufgehoben.
Wenn Sie die Funktion MANUELL bei einem Sender benut-
•
zen, bei dem DECODER (EXT-2) auf EIN gestellt ist, wird
die DECODER (EXT-2) -Einstellung für diesen Sender auf
AUS eingestellt.
Wenn ein Sender bereits in PR 99 gespeichert wurde, wird
•
der Fernsehkanal durch die Funktion EINFÜGEN gelöscht.
Hinweis:
Als Programmnummer erscheint PR 0, “AV” in der Liste
•
der Programmnummern (PR).
Die Nummer eines EXT-Anschlusses erscheint nicht in
•
der Liste der Programmnummern (PR).
Die CH/CC-Nummer gibt es ausschließlich in diesem
•
Fernsehgerät, und sie enspricht der Kanalnummer eines
Fernsehkanals. Für die Beziehung zwischen der Kanalnummer und der CH/CC-Nummer lesen Sie bitte “CH/
CC-NUMMER” auf Seite 32.
Die EINFÜGEN-Funktion können Sie nicht benutzen,
•
wenn Sie die Kanalnummer eines Fernsehsenders nicht
kennen. Benutzen Sie die MANUELL-Funktion, um einen
Fernsehkanal unter einer Programmnummer zu speichern (PR).
Folgen Sie den Bedienungsschritten für
2
die Funktion, die Sie bedienen möchten,
und führen Sie die Schritte aus.
Schließen Sie die Einstellung mit der Taste
3
ab.
aaaa
Das Menü T-V LINK erscheint.
Bedienen Sie das Menü T-V LINK entspre-
4
chend der Art des an der Buchse EXT-2 angeschlossenen Videorekorders.
Wenn kein T-V LINK-kompatibler Videorekorder angeschlossen ist:
Drücken Sie die Taste b, um das Menü T-V LINK zu
verlassen.
Das Menü T-V LINK verschwindet, und alle Einstellungen sind abgeschlossen.
Wenn ein T-V LINK-kompatibler Videorekorder
angeschlossen ist:
Befolgen Sie die Bedienungsschritte unter “Herunterla-
den (Download) der Daten zum Videorekorder” auf
Seite 28, um die Programmnummer-Daten an den Videorekorder zu übertragen (PR).
VERSCH.
VERSCH.
VERSCH.VERSCH.
Wählen Sie mit den Tasten
1
6666
einen Fern-
sehkanal.
Mit jedem Druck auf die Tasten
grammnummer (PR), und das Bild des Senders mit dieser Programmnummer (PR) wird angezeigt.
Drücken Sie die Taste
2
6666
ändert sich die Pro-
3333
, um die Funktion
VERSCH. auszulösen.
Drücken Sie die Tasten
1
ORDNEN/MAN. zu wählen. Drücken Sie
dann die Taste
aaaa
.
24
6666
, um SENDER
Drücken Sie die Tasten
3
6666
, um die gewünschte Programmnummer (PR) zu wählen.
Für Abbruch der VERSCH. Funktion:
Drücken Sie die Taste h (Information).
Drücken Sie die Taste
4
2222
, um die Programmnummer (PR) eines Fernsehkanals
auf eine andere Programmnummer (PR) zu
ändern.
Page 62

ID
ID
IDID
1
Wählen Sie mit den Tasten
6666
einen Fern-
sehkanal.
Mit jedem Druck auf die Tasten
grammnummer (PR), und das Bild des Senders mit dieser Programmnummer (PR) wird angezeigt.
2
Drücken Sie die rote Taste, um die ID-
6666
ändert sich die Pro-
Funktion zu starten.
3
Wählen Sie mit den Tasten
6666
das erste
Zeichen eines Sendernamens (ID), den Sie
dem Sender geben möchten.
4
Drücken Sie die blaue Taste, so daß die Liste der Kanalnamen angezeigt wird ID LISTE.
PROGRAMMIERUNG
PROGRAMMIERUNG
PROGRAMMIERUNGPROGRAMMIERUNG
Hinweis:
Sie können Ihren eigenen Sendernamen (ID) für ei-
•
nen Fernsehkanal speichern. Wenn 3 abgeschlossen ist, fahren Sie nicht mit Schritt 4 fort, sondern
5555
drücken Sie die Tasten
wegen, und die Tasten
wählen, bis der Name des Kanals eingegeben ist
(ID). Drücken Sie dann die Taste
dernamen (ID) im Fernsehkanal zu speichern.
EINFÜGEN
EINFÜGEN
EINFÜGENEINFÜGEN
Vorbereitung:
Es wird die CH/CC-Nummer benötigt, die ausschließlich in
•
diesem Fernsehgerät existiert und der Kanalnummer eines
Fernsehkanals enspricht. Suchen Sie die entsprechende
CH/CC-Nummer in einer Tabelle “CH/CC-NUMMER” auf
Seite 32. mit den Nummern aller Fernsehkanäle.
Wenn die Einstellung LAND nicht FRANCE ist, benutzen Sie
•
eine zweistellige CH/CC-Nummer. Wenn LAND auf FRANCE
steht, benutzen Sie eine dreistellige CH/CC-Nummer.
Nur dann, wenn Sie einen Fernsehkanal (SECAM-L-Sy-
•
stem) eines französischen Senders hinzufügen, achten Sie
darauf, daß LAND auf FRANCE steht. Wenn LAND nicht auf
FRANCE steht, begfolgen Sie die Erklärungen unter “Än-
dern der LAND-Einstellung” auf Seite 28 zur Änderung der
LAND-Einstellung auf FRANCE, und starten Sie dann die
Funktion EINFÜGEN.
1
Drücken Sie die Tasten
, um den Cursor zu be-
6666
, um ein Zeichen auszu-
, um den Sen-
aaaa
6666
, um eine Programmnummer (PR) zu wählen, unter der
Sie einen neuen Fernsehkanal speichern
möchten.
2
Drücken Sie die grüne Taste, und starten
Sie die Funktion EINFÜGEN.
DEUTSCH
5
Drücken Sie die Tasten
6666
namen zu wählen (ID).
Für Abbruch der ID Funktion:
Drücken Sie die Taste h (Information).
6
Drücken Sie die Taste
aaaa
namen (ID) für den Fernsehkanal zu speichern.
, um den Kanal-
, um den Kanal-
3
Drücken Sie die Tasten
6666
, um “CC” oder
“CH” zu wählen; entsprechend der Einstel-
lung der CH/CC-Nummer des Fernsehkanals.
Wenn LAND auf FRANCE eingestellt ist:
Wählen Sie “CH1”, “CH2”, “CC1” oder “CC2”.
Für Abbruch der EINFÜGEN Funktion:
Drücken Sie die Taste h (Information).
4
Drücken Sie die Zifferntasten, um die verbleibende CH/CC-Nummer einzugeben.
Das Fernsehgerät schaltet in den Aufzeichnungsmodus.
Wenn die Aufzeichnung beendet ist, erscheint das Bild
des Fernsehkanals auf dem Bildschirm.
Hinweis:
Die CH/CC-Nummer gibt die Sendefrequenz des Fern-
•
sehsenders an. Wenn das Gerät den Fernsehsender bei
der durch die CH/CC-Nummer angezeigten Frequenz
nicht erkennen kann erscheint das Bild für “kein Signal”.
25
Page 63

PROGRAMMIERUNG
PROGRAMMIERUNG
PROGRAMMIERUNGPROGRAMMIERUNG
LÖSCHEN
LÖSCHEN
LÖSCHENLÖSCHEN
1
Wählen Sie mit den Tasten 6666 einen Fernsehkanal.
Mit jedem Druck auf die Tasten 6 ändert sich die Pro-
grammnummer (PR), und das Bild des Senders mit dieser Programmnummer (PR) wird angezeigt.
2
Löschen Sie den Fernsehkanal mit der gelben Taste.
Der Fernsehkanal wird aus der Liste der Programmnummern (PR) gelöscht.
MANUELL
MANUELL
MANUELLMANUELL
Vorbereitung:
Nur dann, wenn Sie einen Fernsehkanal (SECAM-L-Sy-
•
stem) eines französischen Senders hinzufügen, achten Sie
darauf, daß LAND auf FRANCE steht. Wenn LAND nicht auf
FRANCE steht, befolgen Sie die Erklärungen unter zur “Än-
dern der LAND-Einstellung” auf Seite 28 auf FRANCE, und
starten Sie dann die Funktion MANUELL.
1
Drücken Sie die Tasten
6666
, um eine Programmnummer (PR) zu wählen, unter der
Sie einen neuen Fernsehkanal speichern
möchten.
2
Starten Sie die Funktion MANUELL mit der
blauen Taste.
Rechts neben der CH/CC-Nummer erscheint SYSTEM
(die Fernsehnorm) des Fernsehkanals.
Andere Fernsehkanäle:
Wenn Sie die Fernsehnorm eines Kanals nicht genau
kennen, stellen Sie SYSTEM auf “B/G”. Wenn “B/G”
nicht richtig ist, führt dies zu unnormaler Tonwiedergabe, wenn das Gerät einen Fernsehkanal erkennt. Stellen
Sie in diesem Fall SYSTEM erneut ein, so daß das Problem nicht fortbesteht.
4
Suchen Sie mit der grünen oder der roten
Taste einen Fernsehkanal.
Die Suche stoppt, sobald das Gerät einen Kanal gefunden hat. Daraufhin wird der Fernsehkanal angezeigt.
5
Drücken Sie so oft die grüne oder die rote
Taste, bis Sie den gewünschten Sender
gefunden haben.
Bei schlechtem Empfang:
Drücken Sie die blaue oder die gelbe Taste, um den Kanal feinabzustimmen.
Wenn bei normalem Fernsehbild der Ton verzerrt klingt:
Die Einstellung SYSTEM ist vermutlich falsch. Drücken
Sie die Taste
STEM, bei dem der Ton normal klingt.
6
Drücken Sie die Taste
3333
und wählen Sie einen Eintrag unter SY-
, und speichern
aaaa
Sie den Fernsehkanal unter einer Programmnummer (PR).
Es erscheint wieder das normale SENDER ORDNENMenü.
Für Abbruch der MANUELL Funktion:
Drücken Sie die Taste h (Information).
3
Drücken Sie die Taste
3333
, um das SYSTEM
(die Fernsehnorm) des zu speichernden
Fernsehkanals zu wählen.
Fernsehkanal (SECAM-L-System) eines franzö-
sischen Senders:
Stellen Sie die Funktion SYSTEM auf “L”. Wenn diese
Funktion nicht auf “L” gestellt ist, können Sie den Fernsehkanal des SECAM-L-Systems nicht empfangen.
26
Page 64

DEMO
DEMO
DEMODEMO
Anzeigen des DEMO-Menüs:
1 Drücken Sie die Taste
NUE-Menü (Hauptmenü) aufzurufen.
2 Drücken Sie die Taste
wählen. Drücken Sie dann die Taste
Die DEMO-Funktion führt automatisch einige der Funktionen
des Fernsehgerätes vor.
, um das ME-
aaaa
6666
,um DEMO zu
aaaa
.
DEUTSCH
1
Drücken Sie die Tasten
wählen.
2
Schließen Sie die Einstellung mit der Taste
ab.
aaaa
Die Funktion DEMO ist auf EIN eingestellt, und die Vorführung beginnt.
Vorführung stoppen:
Drücken Sie eine der Tasten auf der Fernbedienung.
Wenn die DEMO-Funktion auf EIN gestellt ist:
Bei jedem Einschalten dess Gerätes startet die Vorfüh-
rung automatisch. Um dies zu verhindern, führen Sie folgende Schritte aus:
6666
, um EIN zu
1 Rufen Sie wieder das DEMO-Menü auf.
2 Drücken Sie die Tasten
wählen.
3 Drücken Sie die Taste
DEMO zu verlassen.
6666
, um AUS zu
, um das Menü
aaaa
27
Page 65

ZUSÄTZLICHE MENÜFUNKTIONEN
ZUSÄTZLICHE MENÜFUNKTIONEN
ZUSÄTZLICHE MENÜFUNKTIONENZUSÄTZLICHE MENÜFUNKTIONEN
Herunterladen (Download)
Herunterladen (Download)
■■■■
Herunterladen (Download) Herunterladen (Download)
der Daten zum Videorekorder
der Daten zum Videorekorder
der Daten zum Videorekorderder Daten zum Videorekorder
Sie können die aktuellen Daten aller Programmnummern (PR)
mit der Funktion T-V LINK an den Videorekorder senden.
Vorsicht:
Nur wenn ein T-V LINK-kompatibler Videorekorder an der
•
Buchse EXT-2 angeschlossen ist, ist diese Funktion möglich.
Nur wenn das Menü T-V LINK angezeigt wird, ist diese
•
Funktion eingeschaltet.
1
Schalten Sie den Videorekorder ein.
2
Drücken Sie die Taste
Die Datenübertragung beginnt.
Das T-V LINK-Menü verschwindet, sobald die Übertra-
gung beendet ist.
Wenn vom Menü T-V LINK auf ein anderes
Menü gewechselt wird:
Die Menübedienung am Fernseher ist nun abgeschlossen, und es erfolgt die rekorderseitige Menübedienung.
Lesen Sie die Anleitung Ihres Videorekorders und fahren Sie mit dessen Bedienung fort.
Hinweis:
Wenn “FUNKTION NICHT VERFÜGBAR” im T-V
•
LINK-Menü erscheint, achten Sie darauf, daß die folgenden drei Einträge richtig sind, und drücken Sie
dann die Taste
neut zu beginnen.
Wurde ein T-V LINK-kompatibler Videorekorder
−
an der Buchse EXT-2 angeschlossen?
Ist der Videorekorder eingeschaltet?
−
Weist das SCART-Kabel, das den Anschluß EXT-
−
2 mit dem T-V LINK-kompatiblen Videorekorder
verbindet, alle richtigen Verbindungen auf?
, um die Datenübertragung er-
aaaa
aaaa
.
2
Drücken Sie die Tasten
wählen. Drücken Sie dann die Taste
Das Menü LAND erscheint als Untermenü der Funktion
AUTO.
3
Drücken Sie die Tasten
eine Sprache zu wählen.
4
Schließen Sie die Einstellung mit der Taste
ab.
aaaa
Das Menü verschwindet.
Für die Rückkehr zum PROGRAMMIERUNG-Menü
vom LAND-Menü aus:
Drücken Sie die Taste
.
ste
aaaa
Verwendung der DECODER
Verwendung der DECODER
■■■■
Verwendung der DECODER Verwendung der DECODER
(EXT-2) -Funktion
(EXT-2) -Funktion
(EXT-2) -Funktion(EXT-2) -Funktion
Wenn Sie einen Decoder anschließen, während am Eingang
EXT-2 ein T-V LINK-kompatibler Videorekorder angeschlossen ist, müssen Sie die Funktion DECODER (EXT-2) nutzen,
um die verschlüsselten Videosignale zu dekodieren.
1
Schalten Sie den Decoder ein.
2
Rufen Sie einen Fernsehkanal auf, den Ihr
Decoder in der Lage ist zu dekodieren.
Auch dann, wenn der Decoder funktioniert, erscheint zu
diesem Zeitpunkt noch ein verschlüsseltes Bild.
3
Drücken Sie die Taste
Menü MENUE angezeigt wird.
Das Menü MENUE erscheint.
4
Drücken Sie die Tasten
NEN zu wählen. Drücken Sie dann die Taste
Das Menü FUNKTIONEN erscheint.
aaaa
.
h
6666
, um AUTO zu
.
aaaa
5555
(Information) anstelle der Ta-
, so daß das
aaaa
6666
6666
und
, um FUNKTIO-
, um
Ändern der LAND-Einstel-
Ändern der LAND-Einstel-
■■■■
Ändern der LAND-Einstel-Ändern der LAND-Einstellung
lung
lunglung
Nachdem die Funktion AUTO abgeschlossen ist, können Sie
mit der Funktion AUTO das bereits eingestellte Land ändern.
Beim Speichern von Fernsehkanälen französischer Sender
(SECAM-L-System) müssen Sie mit dieser Funktion die Einstellung des Landes ändern.
1
Anzeigen des Menüs PROGRAMMIERUNG.
Wenn das Menü SENDER ORDNEN gerade angezeigt wird:
Drücken Sie die Taste h (Information), um zum PROGRAMMIERUNG-Menü zurückzukehren.
28
5
Drücken Sie die Tasten
(EXT-2) zu wählen. Drücken Sie die Tasten
, um EIN zu wählen.
5555
Das dekodierte Bild erscheint.
Für Abbruch der DECODER (EXT-2) Funktion:
Drücken Sie die Tasten
5555
, um DECODER
6666
, um AUS zu wählen.
Page 66

6
Schließen Sie die Einstellung mit der Taste
ab.
aaaa
Das Menü T-V LINK erscheint.
7
Befolgen Sie die Bedienungsschritte unter
“Herunterladen (Download) der Daten zum
Videorekorder” auf Seite 28, um die Programmnummer-Daten an den Videorekorder zu übertragen (PR).
8
Wenn es noch weitere Fernsehkanäle gibt,
die Ihr Decoder dekodieren kann, wiederholen Sie Schritte 2 bis 7.
Hinweis:
Wenn aus irgend einem Grund die DECODER (EXT-
•
2) -Funktion auf “EIN” gestellt wurde, der Kanal jedoch nicht dekodiert werden kann, prüfen Sie folgendes:
Wurde der Decoder nach den Anleitungen des
−
Rekorders und des Decoders richtig an den Videorekorder angeschlossen?
Ist der Decoder eingeschaltet?
−
Kann der betreffende Fernsehkanal von Ihrem De-
−
coder entschlüsselt werden?
Müssen eventuell noch Einstellungen am Video-
−
rekorder vorgenommen werden, damit der Decoder richtig verbunden ist? Lesen Sie nochmals in
der Anleitung des Videorekorders, ob dieser richtig angeschlossen ist.
ZUSÄTZLICHE MENÜFUNKTIONEN
ZUSÄTZLICHE MENÜFUNKTIONEN
ZUSÄTZLICHE MENÜFUNKTIONENZUSÄTZLICHE MENÜFUNKTIONEN
DEUTSCH
29
Page 67

ZUSÄTZLICHE VORBEREITUNGEN
ZUSÄTZLICHE VORBEREITUNGEN
ZUSÄTZLICHE VORBEREITUNGENZUSÄTZLICHE VORBEREITUNGEN
Anschluß externer Geräte
Anschluß externer Geräte
■■■■
Anschluß externer GeräteAnschluß externer Geräte
Schließen Sie die Geräte an Ihrem Fernseher an, und beachten Sie, welche Sie an der Rückseite und welche an der Vorderseite angeschlossen werden.
Bevor Sie Verbindungen herstellen:
Lesen Sie die Anleitungen aller beteiligten Geräte. Ab-
•
hängig von den Geräten unterscheidet sich die Anschlußmethode von den gezeigten Lösungen. Zusätzlich
is es eventuell erforderlich, Einstellungen an den Geräten
zu ändern, um eine einwandfreie Funktion zu gewährleisten.
Schalten Sie alle Geräte einschließlich des Fernsehers
•
aus.
Im Abschnitt “TECHNISCHE DATEN” auf Seite 36 erfah-
•
(Hinter der Tür)
ren Sie Einzelheiten zu den EXT-Anschlüssen. Wenn Sie
ein Gerät anschließen, das im folgenden Anschlußdia-
gramm nicht aufgeführt ist, schauen Sie in der Tabelle
nach, um den am besten geeigneten EXT-Anschluß zu
ermitteln.
Beachten Sie, daß die Anschlußkabel nicht mitgeliefert
•
werden.
Videorekorder (Composite-Signal)
1
Videorekorder (Composite-/S-VIDEO-Signal)
2
T-V LINK-kompatibler Videorekorder (Composite-/
3
S-VIDEO-Signal)
Decoder
4
DVD-Player (Composite-/S-VIDEO-Signal)
5
DVD-Player (Composite-/RGB-Signal)
6
Videospiel (Composite-/RGB-Signal)
7
Videospiel (Composite-/S-VIDEO-Signal)
8
Kopfhörer
9
Camcorder (Composite-/S-VIDEO-Signal)
0
SCART-Kabel
-
Audio-Kabel
=
Video-Kabel
~
S-VIDEO-Kabel
!
EXT-
2
EXT-
3
S
EXT-
1
EXT-
2
EXT-
3
S S
EXT-
1
30
Page 68

Geräte, die das S-VIDEO-Signal (Y/
Geräte, die das S-VIDEO-Signal (Y/
Geräte, die das S-VIDEO-Signal (Y/Geräte, die das S-VIDEO-Signal (Y/
C-Signal) z. B. von einem Videore-
C-Signal) z. B. von einem Videore-
C-Signal) z. B. von einem Videore-C-Signal) z. B. von einem Videorekorder S-VHS ausgeben können
korder S-VHS ausgeben können
korder S-VHS ausgeben könnenkorder S-VHS ausgeben können
Schließen Sie das Gerät an einen EXT-Anschluß (mit Ausnahme des EXT-1-Anschlusses) an.
Sie können ein Video-Eingangssignal aus dem S-VIDEO-Signal (Y/C-Signal) und dem normalen Videosignal (Composite
Video) auswählen. Für Einzelheiten zum Betrieb des Gerätes
lesen Sie bitte “y(S-VIDEO-Eingang)” auf Seite 19.
T-V LINK-kompatibler Videorekor-
T-V LINK-kompatibler Videorekor-
T-V LINK-kompatibler Videorekor-T-V LINK-kompatibler Videorekorder
der
derder
Achten Sie darauf, den T-V LINK-kompatiblen Videorekorder
an der Buchse EXT-2 anzuschließen. Wenn Sie dies nicht
tun, T-V LINK funktioniert der Rekorder nicht richtig.
Hinweis:
Achten Sie beim Anschluß eines T-V LINK-kompatiblen
•
Videorekorders an der Buchse EXT-2 darauf, daß der Decoder an den Rekorder angeschlossen wird. Wenn nicht,
arbeitet die T-V LINK-Funktion nicht richtig. Nachdem Sie
die Fernsehkanäle auf Programmnummern (PR) gespeichert haben, stellen Sie die Funktion DECODER (EXT-2)
bei der Programmnummer (PR) auf EIN, so daß ein verschlüsselter Kanal entschlüsselt wird. Näheres zur Bedienung erfahren Sie unter “Verwendung der DECODER
(EXT-2) -Funktion” auf Seite 28.
ZUSÄTZLICHE VORBEREITUNGEN
ZUSÄTZLICHE VORBEREITUNGEN
ZUSÄTZLICHE VORBEREITUNGENZUSÄTZLICHE VORBEREITUNGEN
DEUTSCH
Anschluß von Kopfhörern
Anschluß von Kopfhörern
Anschluß von KopfhörernAnschluß von Kopfhörern
Schließen Sie ein Paar Kopfhörer mit Miniklinkenstecker (3,5
mm Durchmesser) an der Kopfhörerbuchse an der
Gerätevorderseite an.
Hinweis:
Beim Anschluß der Kopfhörer wird der Ton aus den Fern-
•
sehlautsprechern stummgeschaltet.
Video-/Tonsignalausgabe an der
Video-/Tonsignalausgabe an der
Video-/Tonsignalausgabe an derVideo-/Tonsignalausgabe an der
Buchse EXT-2
Buchse EXT-2
Buchse EXT-2Buchse EXT-2
Sie können beliebig auf die Ausgabe des Video-/Tonsignal an
der Buchse EXT-2 umschalten. Dies ist sinnvoll, wenn Sie
das Video-/Audiosignal von einem anderen Gerät auf dem Vi-
deorekorder aufnehmen möchten, der am Anschluß EXT-2
angeschlossen ist. Näheres zur Bedienung erfahren Sie unter
“ÜBERSPIELEN” auf Seite 20.
Ausgabe des Fernsehsignals an der
Ausgabe des Fernsehsignals an der
Ausgabe des Fernsehsignals an derAusgabe des Fernsehsignals an der
Buchse EXT-1
Buchse EXT-1
Buchse EXT-1Buchse EXT-1
Bild und Ton des momentan gewählten Fernsehkanals werden ständig an der Buchse EXT-1 ausgegeben.
Hinweis:
Wenn Sie die Programmnummer (PR) umschalten, ändert
•
sich auch die Ausgabe an der Buchse EXT-1.
Das Video-/Tonsignal von einem EXT-Anschluß kann
•
nicht ausgegeben werden.
Videotext kann nicht ausgegeben werden.
•
31
Page 69

CH/CC-NUMMER
CH/CC-NUMMER
CH/CC-NUMMERCH/CC-NUMMER
Wenn Sie die EINFÜGEN-Funktion, beschrieben unter Seite 25 benutzen möchten, finden Sie mit Hilfe dieser Tabelle die CH/
CC-Nummer heraus, die der Kanalnummer des Fernsehkanals entspricht.
CH Kanal
Kan. 02 / Kan. 202 E2
Kan. 03 / Kan. 203 E3, ITALIEN A
Kan. 04 / Kan. 204 E4, ITALIEN B
Kan. 05 / Kan. 205 E5, ITALIEN D
Kan. 06 / Kan. 206 E6, ITALIEN E
Kan. 07 / Kan. 207 E7, ITALIEN F
Kan. 08 / Kan. 208 E8
Kan. 09 / Kan. 209 E9, ITALIEN G
Kan. 10 / Kan. 210 E10, ITALEN H
Kan. 11 / Kan. 211 E11, ITALIEN H+1
Kan. 12 / Kan. 212 E12, ITALIEN H+2
Kan. 21 / Kan. 221 E21
Kan. 22 / Kan. 222 E22
Kan. 23 / Kan. 223 E23
Kan. 24 / Kan. 224 E24
Kan. 25 / Kan. 225 E25
Kan. 26 / Kan. 226 E26
Kan. 27 / Kan. 227 E27
Kan. 28 / Kan. 228 E28
Kan. 29 / Kan. 229 E29
Kan. 30 / Kan. 230 E30
Kan. 31 / Kan. 231 E31
Kan. 32 / Kan. 232 E32
Kan. 33 / Kan. 233 E33
Kan. 34 / Kan. 234 E34
Kan. 35 / Kan. 235 E35
Kan. 36 / Kan. 236 E36
Kan. 37 / Kan. 237 E37
Kan. 38 / Kan. 238 E38
Kan. 39 / Kan. 239 E39
CH Kanal
Kan. 102 F2
Kan. 103 F3
Kan. 104 F4
Kan. 105 F5
Kan. 106 F6
Kan. 107 F7
Kan. 108 F8
Kan. 109 F9
Kan. 110 F10
Kan. 121 F21
Kan. 122 F22
Kan. 123 F23
Kan. 124 F24
Kan. 125 F25
Kan. 126 F26
Kan. 127 F27
Kan. 128 F28
Kan. 129 F29
Kan. 130 F30
Kan. 131 F31
Kan. 132 F32
Kan. 133 F33
Kan. 134 F34
Kan. 135 F35
Kan. 136 F36
Kan. 137 F37
Kan. 138 F38
Kan. 139 F39
Kan. 140 F40
CH Kanal
Kan. 40 / Kan. 240 E40
Kan. 41 / Kan. 241 E41
Kan. 42 / Kan. 242 E42
Kan. 43 / Kan. 243 E43
Kan. 44 / Kan. 244 E44
Kan. 45 / Kan. 245 E45
Kan. 46 / Kan. 246 E46
Kan. 47 / Kan. 247 E47
Kan. 48 / Kan. 248 E48
Kan. 49 / Kan. 249 E49
Kan. 50 / Kan. 250 E50
Kan. 51 / Kan. 251 E51
Kan. 52 / Kan. 252 E52
Kan. 53 / Kan. 253 E53
Kan. 54 / Kan. 254 E54
Kan. 55 / Kan. 255 E55
Kan. 56 / Kan. 256 E56
Kan. 57 / Kan. 257 E57
Kan. 58 / Kan. 258 E58
Kan. 59 / Kan. 259 E59
Kan. 60 / Kan. 260 E60
Kan. 61 / Kan. 261 E61
Kan. 62 / Kan. 262 E62
Kan. 63 / Kan. 263 E63
Kan. 64 / Kan. 264 E64
Kan. 65 / Kan. 265 E65
Kan. 66 / Kan. 266 E66
Kan. 67 / Kan. 267 E67
Kan. 68 / Kan. 268 E68
Kan. 69 / Kan. 269 E69
CH Kanal
Kan. 141 F41
Kan. 142 F42
Kan. 143 F43
Kan. 144 F44
Kan. 145 F45
Kan. 146 F46
Kan. 147 F47
Kan. 148 F48
Kan. 149 F49
Kan. 150 F50
Kan. 151 F51
Kan. 152 F52
Kan. 153 F53
Kan. 154 F54
Kan. 155 F55
Kan. 156 F56
Kan. 157 F57
Kan. 158 F58
Kan. 159 F59
Kan. 160 F60
Kan. 161 F61
Kan. 162 F62
Kan. 163 F63
Kan. 164 F64
Kan. 165 F65
Kan. 166 F66
Kan. 167 F67
Kan. 168 F68
Kan. 169 F69
CC Kanal
CC 01 / CC 201 S1
CC 02 / CC 202 S2
CC 03 / CC 203 S3
CC 04 / CC 204 S4
CC 05 / CC 205 S5
CC 06 / CC 206 S6
CC 07 / CC 207 S7
CC 08 / CC 208 S8
CC 09 / CC 209 S9
CC 10 / CC 210 S10
CC 11 / CC 211 S11
CC 12 / CC 212 S12
CC 13 / CC 213 S13
CC 14 / CC 214 S14
CC 15 / CC 215 S15
CC 16 / CC 216 S16
CC 17 / CC 217 S17
CC 18 / CC 218 S18
CC 19 / CC 219 S19
CC 20 / CC 220 S20
CC 21 / CC 221 S21
CC 22 / CC 222 S22
CC 23 / CC 223 S23
CC 24 / CC 224 S24
CC 25 / CC 225 S25
CC 26 / CC 226 S26
CC 27 / CC 227 S27
CC 28 / CC 228 S28
CC 29 / CC 229 S29
CC 30 / CC 230 S30
CC
CC 110 116 - 124
CC 111 124 - 132
CC 112 132 - 140
CC 113 140 - 148
CC 114 148 - 156
CC 115 156 - 164
CC 116 164 - 172
CC 123 220 - 228
CC 124 228 - 236
CC 125 236 - 244
CC 126 244 - 252
CC 127 252 - 260
CC 128 260 - 268
CC 129 268 - 276
CC 130 276 - 284
CC 131 284 - 292
CC 132 292 - 300
CC 133 300 - 306
CC 141 306 - 311
CC 142 311 - 319
CC 143 319 - 327
CC 144 327 - 335
CC 145 335 - 343
CC 146 343 - 351
CC 147 351 - 359
CC 148 359 - 367
CC 149 367 - 375
CC 150 375 - 383
CC 151 383 - 391
Frequenz
(MHz)
CC Kanal
CC 31 / CC 231 S31
CC 32 / CC 232 S32
CC 33 / CC 233 S33
CC 34 / CC 234 S34
CC 35 / CC 235 S35
CC 36 / CC 236 S36
CC 37 / CC 237 S37
CC 38 / CC 238 S38
CC 39 / CC 239 S39
CC 40 / CC 240 S40
CC 41 / CC 241 S41
CC 75 / CC 275 X
CC 76 / CC 276 Y
CC 77 / CC 277 Z, ITALIEN C
CC 78 / CC 278 Z+1
CC 79 / CC 279 Z+2
CC
CC 152 391 - 399
CC 153 399 - 407
CC 154 407 - 415
CC 155 415 - 423
CC 156 423 - 431
CC 157 431 - 439
CC 158 439 - 447
CC 159 447 - 455
CC 160 455 - 463
CC 161 463 - 469
Frequenz
(MHz)
Hinweis:
Wenn zwei CH/CC-Nummern ein und derselben Kanalnummer entsprechen, wählen Sie in Übereinstimmung mit der aktuellen
•
Einstellung unter LAND eine der beiden Nummern. Wenn die Einstellung LAND nicht FRANCE ist, benutzen Sie eine dreistellige CH/CC-Nummer. Wenn LAND auf FRANCE steht, benutzen Sie eine dreistellige CH/CC-Nummer.
Finden Sie die CH/CC-Nummer (CC110 bis CC161), die dem Fernsehkanal (SECAM-L-System) eines französischen Kabel-
•
senders entspricht, auf Grundlage der Sendefrequenz des Fernsehkanals. Wenn Sie die Sendefrequenz nicht kennen, wenden Sie sich bitte an den Kabelsender.
Die CH/CC-Nummern von CH102-CH169 und CC110-CC161 entsprechen den Fernsehkanälen, die im SECAM-L-System ge-
•
sendet werden. Die anderen CH/CC-Nummern entsprechen den Fernsehkanälen, die im SECAM-L-System gesendet wer-
den.
32
Page 70

TV BEDIENUNGSELEMENTE UND TEILE
TV BEDIENUNGSELEMENTE UND TEILE
TV BEDIENUNGSELEMENTE UND TEILETV BEDIENUNGSELEMENTE UND TEILE
Vorderseite
Vorderseite
■■■■
VorderseiteVorderseite
l
Zum Öffnen drücken
(Hinter der Abdeckung)
DEUTSCH
Fernbedienungssensor
1
Kopfhörerbuchse (Miniklinke) Seite 30
2
EXT-4-Anschluß Seiten 19 und 30
3
4
Taste
(Lautstärke) Seite 8
rrrr
P
5
6
7
-Tasten / qqqq-Tasten Seite 8
∨∨∨∨/∧
∧
∧ ∧
Netz-LED Seiten 3 und 6
Netzschalter Seiten 3 und 6
Vorsicht:
Ergreifen Sie das Gerät nicht am vorderen Bedienfeld, wenn Sie den Fernseher bewegen möchten. Dadurch könnte die Abdek-
•
kung brechen oder beschädigt werden.
Rückseite
Rückseite
■■■■
RückseiteRückseite
EXT-2
EXT-3
S S
EXT-1
EXT-1
Antennenbuchse Seite 2
8
EXT-1-Anschluß Seiten 2, 19 und 30
9
EXT-2-Anschluß Seiten 2, 5, 19 und 30
0
EXT-3-Anschluß Seiten 19 und 30
-
33
Page 71

PROBLEMLÖSUNGEN
PROBLEMLÖSUNGEN
PROBLEMLÖSUNGENPROBLEMLÖSUNGEN
Wenn bei der Benutzung Ihres Fernsehgerätes ein Problem auftreten sollte, lesen Sie bitte sorgfältig diese “Problemlösungen”
durch, bevor Sie das Gerät in Reparatur geben. Eventuell können Sie das Problem leicht selbst beheben. Wenn z. B. der Netzstecker nicht in der Steckdose steckt, oder, wenn es Probleme mit der Empfangsantenne gibt, könnten Sie irrtümlicherweise an-
nehmen, daß der Fernseher defekt ist.
Wichtig:
Diese Hinweise zu Problemlösungen gelten nur für Probleme, deren Gründe nicht leicht zu bestimmen sind. Wenn bei der Be-
•
dienung einer Funktion eine Frage auftaucht, lesen Sie die entsprechenden Seiten mit den Bedienungsschritten sorgfältig nach;
diese Beschreibungen finden Sie nicht hier unter den Problemlösungen.
Wenn Sie die hier und bei den Funktionsbeschreibungen gegebenen Abschnitte ohne Erfolg durchgelesen und nachvollzogen
•
haben, ziehen Sie den Netzstecker aus der Steckdose und lassen Sie Ihr Gerät reparieren. Versuchen Sie nicht, das Gerät
selbst zu reparieren, und entfernen Sie keinesfalls die hintere Abdeckung.
Wurde FARBE oder HELLIGKEIT richtig eingestellt? Folgen
Wenn Sie Ihr Fernsehgerät nicht ein-
Wenn Sie Ihr Fernsehgerät nicht ein-
Wenn Sie Ihr Fernsehgerät nicht ein-Wenn Sie Ihr Fernsehgerät nicht einschalten können
schalten können
schalten könnenschalten können
Ist der Netzstecker in einer stromführenden Netzsteckdose
•
eingesteckt?
Leuchtet die Netz-LED? Wenn nicht, drücken Sie den Netz-
•
schalter des Fernsehgerätes.
Kein Bild / kein Ton
Kein Bild / kein Ton
Kein Bild / kein TonKein Bild / kein Ton
Haben Sie einen Fernsehkanal gewählt, für den der Emp-
•
fang extrem schlecht ist? In diesem Fall schaltet sich die
Funktion BLAU-BILD ein, der Bildschirm wird blau, und der
Ton wird stummgeschaltet. Wenn Sie den Kanal trotz des
schlechten Empfangs sehen möchten, folgen Sie den
Schritten unter “BLAU-BILD” auf Seite 21, um die Einstellung der Funktion BLAU-BILD zu AUS zu ändern.
Haben Sie Kopfhörer am Gerät angeschlossen? Wenn Sie
•
Kopfhörer in die Buchse am Gerät einstecken, wird kein Ton
mehr an den Fernsehlautsprechern ausgegeben.
Wenn die Einstellung SYSTEM bei einem Fernsehkanal nicht
•
richtig ist, kann es passieren, daß der Ton für diesen Kanal
nicht ausgegeben wird. Folgen Sie den Beschreibungen unter “SENDER ORDNEN/MAN.” auf Seite 24 zum Aufruf der
MANUELL-Funktion, um die Einstellung SYSTEM zu ändern.
Schlechtes Bild
Schlechtes Bild
Schlechtes BildSchlechtes Bild
Wenn Bildrauschen (Schnee) das Bild stark beeinträchtigt, gibt
•
es ein Problem mit der Antenne oder dem Zuleitungskabel.
Prüfen Sie folgende Dinge, um dieses Problem zu beseitigen:
Sind Fernsehgerät und Antenne richtig miteinander verbunden?
Wurde das Antennenkabel beschädigt?
Ist die Antenne richtig ausgerichtet?
Ist die Antenne selbst eventuell defekt?
Wenn der Fernseher bzw. die Antenne Störungen von an-
•
deren Geräten empfängt, können Streifen oder Bildrauschen im Fernsehbild auftreten. Benutzen Sie Geräte wie
Verstärker, Computer, Geräte mit Elektromotoren (Föhn) in
größerem Abstand zu Ihrem Fernseher oder an anderen
Aufstellorten. Wenn die Antenne Störungen von einem Sendeturm oder einer Hochspannungsleitung empfängt, wenden Sie sich bitte an Ihren örtlichen Händler.
Wenn die Antenne Reflektionen von Signalen an Berg- oder
•
Hauswänden empfängt, können Doppelbilder (Geisterbild)
entstehen. Ändern Sie in diesem Fall die Ausrichtung der
Antenne, ooder ersetzen Sie die Antenne gegen eine andere mit besserer Richtwirkung.
Sie die Einstellungen der Fernsehkanäle bei EMPFANGS-
•
SYSTEM korrekt? Folgen Sie den Beschreibungen unter
“EMPFANGSSYSTEM” auf Seite 16, um das Problem zu
beseitigen.
•
Sie den Beschreibungen unter “Bildeinstellung” auf
Seite 15, um das Problem zu beseitigen.
Die Aufnahme von Videotext auf Videoband wird nicht emp-
•
fohlen, da dieses Signal eventuell nicht richtig aufgezeichnet wird.
Wenn ein helles, weißes Standbild (z. B. ein weißer Anzug)
•
angezeigt wird, kann die weiße Fläche farbig erscheinen.
Dieses Phänomen ist nicht zu vermeiden und liegt am Funktionsprinzip der Bildröhre; dieser Effekt stellt keine Fehlfunktion des Gerätes dar. Wenn ein anderes Bild gezeigt wird,
verschwinden auch die unnatürlichen Farben.
Schlechter Klang
Schlechter Klang
Schlechter KlangSchlechter Klang
Haben Sie die Werte für TIEFEN oder HÖHEN richtig einge-
•
stellt? Wenn nicht, folgen Sie den Beschreibungen unter
“Toneinstellungen” auf Seite 18, um das Problem zu beseitigen.
Bei schlechtem Fernsehempfang leidet auch die Übertra-
•
gung stereophoner oder zweikanaliger Tonsignale. Folgen
Sie in diesem Fall den unter “STEREO / I•II” auf Seite 18 gegebenen Schritten, um de Tonwiedergabe durch Umschaltung auf Mono zu verbessern.
Keine Bedienung möglich
Keine Bedienung möglich
Keine Bedienung möglichKeine Bedienung möglich
Sie die Batterien der Fernbedienung eventuell erschöpft?
•
Folgen Sie den Schritten unter “Einsetzen der Batterien in
die Fernbedienung” auf Seite 2 und ersetzen Sie die Batterien durch neue oder aufgeladene, um das Problem zu beseitigen.
Haben Sie versucht, den Fernseher mit der Fernbedienung
•
aus seitlicher Richtung oder von hinten zu bedienen, oder
waren Sie weiter als sieben Meter vom Gerät entfernt? Bedienen Sie Ihr Fernsehgerät von der Vorderseite aus, und
achten Sie dabei darauf, daß Sie sich nicht weiter als sieben
Meter vom Gerät entfernt befinden.
Wenn Sie Videotext sehen können Sie die Menüs nicht be-
•
dienen. Drücken Sie die Taste
Fernsehbetrieb zu schalten, so daß Sie die Menüs wieder
bedienen können.
Wenn der Betrieb des Fernsehgerätes plötzlich stoppt,
•
schalten Sie das Gerät am Netzschalter aus. Versuchen
Sie, das Gerät am Netzschalter wieder einzuschalten.
Wenn sich das Gerät nun wieder normal verhält, liegt keine
Fehlfunktion vor.
, um zurück auf normalen
b
34
Page 72

Verschiedenes
Verschiedenes
VerschiedenesVerschiedenes
Wenn die Funktion SLEEP TIMER aktiv ist, schaltet sich das
•
Gerät automatisch aus. Wenn dies passiert, drücken Sie die
Taste
ten. Wenn sich das Gerät nun wieder normal verhält, liegt
keine Fehlfunktion vor.
Wenn ein WSS-Signal im Sendesignal oder Signal vom ex-
•
ternen Gerät enthalten ist, oder wenn das Fernsehgerät ein
Steuersignal von einem externen Gerät erhält, wird der
ZOOM-Modus automatisch umgestellt. Wen Sie zum vorherigen ZOOM-Modus zurükschalten, drüken Sie die Taste
c
Wenn Sie einen magnetisierten Gegenstand wie z. B. einen
•
Lautsprecher an Ihr Fernsehgerät halten, kann das Bild verzerrt sein, oder es werden unnatürliche Farben an den Bildschirmrändern dargestellt. Achten Sie darauf, solche Geräte
nicht in die Nähe Ihres Fernsehgerätes zu bringen. Wenn
Ihre Lautsprecher derartige Phänomene hervorrufen, benutzen Sie stattdesse magnetisch abgeschirmte Lautsprecher.
Durch Temperaturänderungen kann es sein, daß Ihr Fern-
•
sehgerät ein Knacken erzeugt. Wenn Bild und Ton nach einem lauten Knacken weiterhin normal sind, ist dies kein
Grund zur Beunruhigung. Wenn Sie bei der Benutzung Ihres Fernsehers des öfteren Knackgeräusche hören, können
auch andere Gründe angenommen werden. Als Vorsichtsmaßnahme sollten Sie sich an einen Techniker wenden, der
dieses Phänomen begutachtet.
Wenn Sie die Bildröhre während des Betriebs berühren,
•
spüren Sie aufgrund der statischen Elektrizität einen leichten elektrischen Schlag. Dies ist ungefährlich und konstruktionsbedingt. Es stellt keine Fehlfunktion Ihres
Fernsehgerätes dar. Derartige statische Entladungen haben keinen schädlichen Einfluß auf den menschlichen Kör-
per.
(Standby), um den Fernseher wieder einzuschal-
#
zum erneuten Wählen des ZOOM-Modus.
PROBLEMLÖSUNGEN
PROBLEMLÖSUNGEN
PROBLEMLÖSUNGENPROBLEMLÖSUNGEN
DEUTSCH
35
Page 73

TECHNISCHE DATEN
TECHNISCHE DATEN
TECHNISCHE DATENTECHNISCHE DATEN
Eintrag
Sendesysteme CCIR B/G, I, L
Fernsehnormen PAL, SECAM
Kanäle und Frequenzen
Tonsysteme im MultiplexVerfahren
Videotextsysteme FLOF (Fastext), TOP, WST (Welt-Standardsystem)
Netzstromdaten 220-240 V Wechselstrom, 50 Hz
Leistungsaufnahme Maximum: 156 W, Mittelwert: 122 W, Bereitschaft: 0,8 W
Größe der Bildröhre Sichtbarer Bereich 66 cm (diagonal)
Tonausgabe Ausgangsleistung: 5 W + 5 W
Lautsprecher (10 cm
EXT-1-Anschluß Eurobuchse (21-Pol-SCART-Buchse)
EXT-2-Anschluß Eurobuchse (21-Pol-SCART-Buchse)
EXT-3-Anschluß Eurobuchse (21-Pol-SCART-Buchse)
EXT-4-Anschluß Cinch-Buchsen × 3
Kopfhörerbuchse Stereo-Miniklinke (3,5 mm Durchmesser)
Maße (B
Gewicht 33,8 kg
Zubehör Fernbedienungsgeber
H × T) 725 mm × 480 mm × 496 mm
×
Modell
Die Anschlüsse EXT unterstützen auch das NTSC 3.58/4.43 MHz-System.
•
E2-E12, E21-E69, S1-S41, X, Y, Z, Z+1, Z+2, A-H, H+1, H+2, F2-F10, F21-F69
•
Französischer Kabelkanal der Sendefrequenzen 116 - 172 MHz und 220 - 469 MHz
•
A2 (B/G), NICAM (B/G, I, L)-System
3 cm) Ovallautsprecher × 2
×
Videoeingang, Audioeingänge V/H und RGB-Eingänge stehen zur Verfügung.
•
Ausgänge für das Fernsehsignal (Video und Audio V/H) sind vorhanden.
•
Video-Eingang, S-VIDEO (Y/C) -Eingang und Audioeingänge V/H sind vorhanden.
•
Video- und Audioausgänge (V/H) sind vorhanden.
•
T-V LINK-Funktionen sind vorhanden.
•
Video-Eingang, S-VIDEO (Y/C) -Eingang und Audioeingänge V/H sind vorhanden.
•
S-VIDEO-Anschluß
Video-Eingang, S-VIDEO (Y/C) -Eingang und Audioeingänge V/H sind vorhanden.
•
AAA/R03 Trockenzellen-Batterien
1
×
1 (RM-C54 (Grau) oder RM-C50 (Schwarz) ist mitgeliefert.)
×
AV28CT1EP*
2
×
*
Dies ist die Basis-Modellnummer. Die Nummer des Modells kann noch einige Zeichen mehr beinhalten (wie z. B. “S”, für Sil-
ber), die die Farbe des Gerätes angeben.
Das Design und die Technischen Daten können sich ohne Ankündigung ändern.
Die Bilder, die mit Hilfe der Funktionen ZOOM auf diesem Fernsehgerät dargestellt werden, dürfen ohne Erlaubnis der Urheber
des Originalbildmaterials nicht für gewerbliche oder Demonstrationszwecke an öffentlichen Orten (Cafes, Hotels, etc.) gezeigt
werden, da dies eine Verletzung des Urheberrechts darstellt.
36
VICTOR COMPANY OF JAPAN, LIMITED
Page 74

Merci d’avoir fait l’acquisition de ce téléviseur couleurs JVC.
Pour être certain que vous comprenez comment utiliser votre nouveau téléviseur, nous vous
conseillons de lire attentivement le présent manuel avant de commencer.
AVERTISSEMENT:
POUR EVITER TOUT RISQUE D’INCENDIE OU D’ELECTROCUTION, NE JAMAIS EXPOSER
CET APPAREIL A LA PLUIE OU A L’HUMIDITE.
ATTENTION:
POUR VEILLER A LA SECURITE DES PERSONNES, VEUILLEZ RESPECTER LES INDICATIONS SUIVANTES CONCERNANT L’UTILISATION DE L’APPAREIL.
1. Faire fonctionner l’appareil uniquement sur la source d’alimentation spécifiée (CA 220 – 240 V, 50
Hz).
2. Eviter d’endommager la fiche secteur et le cordon d’alimentation.
3. Eviter toute installation inadéquate de l’appareil et ne jamais placer celui-ci là où il n’y a pas d’aération suffisante.
Lors de l’installation de ce téléviseur, toujours respecter
15 cm
les distances recommandées entre le sol et le mur ainsi
que les distances conseillées en cas d’installation dans
une petite pièce ou dans un meuble. Respecter les indica-
10 cm 10 cm 15 cm
tions de distances minimales données pour un fonctionnement en toute sécurité de l’appareil.
4. Ne jamais laisser pénétrer de corps étrangers ou de liquides par les ouvertures du boîtier.
5. En cas d’anomalie, débrancher l’appareil et appeler un technicien qualifié. Ne jamais essayer
de réparer soi-même ou de retirer la protection arrière.
6. La surface de l'écran du téléviseur s'abîme facilement. Faire très attention lorsqu'on manipule
le téléviseur.
Si l’écran du téléviseur est sale, l’essuyer avec un chiffon doux et sec. Ne jamais frotter fort.
Ne jamais utiliser de produit de nettoyage ou de détergent.
Si le téléviseur doit rester inutilisé pendant un certain temps, débrancher la fiche de la prise secteur.
FRANÇAIS
TABLE DES MATIERES
PREPARATION . . . . . . . . . . . . . . . . . . . . . . . . . . . . . . . . . . . . . 2
FONCTIONS T-V LINK . . . . . . . . . . . . . . . . . . . . . . . . . . . . . . . 5
FONCTIONNEMENT DE BASE . . . . . . . . . . . . . . . . . . . . . . . . 6
TOUCHES DE LA TELECOMMANDE ET LEURS FONCTIONS. . 9
FONCTIONNEMENT DES MENUS. . . . . . . . . . . . . . . . . . . . . 14
REGLAGE IMAGE. . . . . . . . . . . . . . . . . . . . . . . . . . . . . . . . . . 15
OPTIONS IMAGE . . . . . . . . . . . . . . . . . . . . . . . . . . . . . . . . . . 16
REGLAGE AUDIO . . . . . . . . . . . . . . . . . . . . . . . . . . . . . . . . . . 18
EXT REGLAGES . . . . . . . . . . . . . . . . . . . . . . . . . . . . . . . . . . . 19
OPTIONS. . . . . . . . . . . . . . . . . . . . . . . . . . . . . . . . . . . . . . . . . 21
INSTALLATION . . . . . . . . . . . . . . . . . . . . . . . . . . . . . . . . . . . . 23
DEMONSTRATION . . . . . . . . . . . . . . . . . . . . . . . . . . . . . . . . . 27
OPERATIONS SUPPLEMENTAIRES DES MENUS. . . . . . . . 28
PREPARATIFS SUPPLEMENTAIRES . . . . . . . . . . . . . . . . . . 30
NUMERO CH/CC. . . . . . . . . . . . . . . . . . . . . . . . . . . . . . . . . . . 32
TOUCHES ET ELEMENTS DU TELEVISEUR . . . . . . . . . . . . 33
GUIDE DE DEPANNAGE . . . . . . . . . . . . . . . . . . . . . . . . . . . . 34
SPECIFICATIONS TECHNIQUES . . . . . . . . . . . . . . . . . . . . . 36
1
Page 75

PREPARATION
PREPARATION
PREPARATIONPREPARATION
Raccordement de l’antenne et du magnétoscope
Raccordement de l’antenne et du magnétoscope
■■■■
Raccordement de l’antenne et du magnétoscopeRaccordement de l’antenne et du magnétoscope
En cas de raccordement d’un magnétoscope (VCR) suivre
les points
Si vous ne raccordez pas de magnétoscope, suivre les points
→ 2.
1
*1: Pour pouvoir utiliser les fonctions T-V LINK, il faut raccor-
der un magnétoscope compatibleT-V LINK à la borne
EXT-2 du téléviseur. Pour plus de détails concernant ces
→ B → C → D.
A
Sortie secteur (CA)
(CA 220 – 240 V,
50 Hz)
fonctions T-V LINK voir “FONCTIONS T-V LINK” à la
page 5.
Antenne
VHF/UHF
Remarque:
Pour plus de détails, consulter les manuels livrés avec les
•
appareils à raccorder.
Les câbles de connexions ne sont pas fournis.
•
Vous pouvez regarder une cassette vidéo à partir du ma-
•
gnétoscope sans effectuer l’opération C. Pour plus de
*1
détails, consulter le manuel d’utilisation de votre magnétoscope.
Pour le raccordement d’appareils extérieurs supplémen-
•
taires, veuillez vous reporter à la section “PREPARATIFS
SUPPLEMENTAIRES” à la page 30.
En cas de raccordement d’un décodeur à un magnétos-
•
cope compatible T-V LINK, régler la fonction DECODEUR (EXT-2) sur OUI. Pour plus de détails, voir
Câble SCART à 21
broches
“Utilisation de la fonction DECODEUR (EXT-2)” à la
page 28. Sinon, vous ne pourrez pas regarder les chaînes cryptées.
VCR
Mise en place des piles dans la télécommande
Mise en place des piles dans la télécommande
■■■■
Mise en place des piles dans la télécommandeMise en place des piles dans la télécommande
Utiliser deux piles sèches AAA/R03.
Insérer les piles en plaçant la partie ---- en premier et en s’as-
surant que les polarités ++++ et ---- sont respectées.
Pour ouvrir le logement des piles, faire glisser la porte vers le
bas et la soulever; refermer le logement en faisant glisser la
porte vers le haut jusqu’à ce qu’elle se bloque.
Borne AV
IN/OUT
EXT-2
EXT-3
EXT-1
Câble
EXT-2
S
EXT-1
EXT-3
S
Câble coaxial à
75 ohms
vers l’entrée
de l’antenne
vers la sortie
de l’antenne
coaxial
à 75
ohms
Remarque:
Respecter les avertissements indiqués sur les piles.
•
La durée de vie des piles va de six mois à un an, selon la
•
fréquence d’utilisation.
Si la télécommande ne fonctionne pas correctement, il
•
convient de remplacer les piles.
Les piles livrées servent uniquement à l’installation et au
•
test de votre téléviseur. Elles doivent être remplacées
dès que cela s’avère nécessaire.
Toujours utiliser des piles de bonne qualité.
•
2
Page 76

Réglages initiaux
Réglages initiaux
■■■■
Réglages initiauxRéglages initiaux
A la première mise sous tension du téléviseur, il se met en
mode de réglages initiaux et le logo JVC s’affiche. Suivre les
instructions qui apparaissent à l’écran pour configurer les ré-
glages initiaux.
1
Appuyer sur la touche d’alimentation principale du téléviseur.
Le témoin d’alimentation rouge s’allume (mise sous tension) puis devient vert pour signaler que le téléviseur est
sous tension et le logo JVC s’affiche.
Remarque:
Si le témoin lumineux reste rouge et ne passe pas au
•
vert:
Votre téléviseur se trouve en mode de veille. Appuyer sur la touche
mande pour mettre le téléviseur sous tension.
Le logo JVC n’apparaît pas lorsque votre téléviseur
•
a déjà été mis sous tension.
Dans ce cas, utiliser les fonctions “LANGAGE” et
“AUTO” pour effectuer les réglages initiaux. Pour
plus de détails, voir “INSTALLATION” à la page 23.
(Standby) de la télécom-
####
PREPARATION
Touche d’alimen-
tation principale
Témoin d’alimentaion
FRANÇAIS
2
Appuyer sur la touche
Le menu LANGUAGE apparaît.
3
Appuyer sur les touches 6
.
aaaa
6 pour sé-
66
lectionner FRANÇAIS. Appuyer ensuite
sur la touche
Le langage est défini pour la description des messages
à l’écran. Le menu PAYS apparaît en tant que sous-
menu de la fonction AUTO.
aaaa
.
1 2 3
4 5 6
7 8 9
0
AV
MENU
P
TV OK
P
F
.T/L
FREEZE
SUB-P
TV
Touche bleue
4
Appuyer sur les touches 5
pour choisir le pays où vous vous trouvez.
5 et 6
55
6
66
3
Page 77

PREPARATION
5
Appuyer sur la touche bleue pour dé-
marrer la fonction AUTO.
Le menu AUTO s’affiche et les chaînes TV reçues sont
automatiquement enregistrées sous les numéros de
programmes (PR).
Pour annuler la fonction AUTO:
Appuyer sur la touche b.
6
Lorsque les chaînes TV ont été enregistrées sous les numéros de programmes (PR), le menu EDITER s’affiche.
Vous pouvez procéder à l’édition des numéros de programmes (PR) à l’aide de la fonction EDITER/MANUEL.
Pour plus de détails, voir “EDITER/MANUEL” à la
page 24.
Lorsque vous n’utilisez pas la fonction EDITER/MANUEL:
Si vous n’avez pas besoin d’utiliser la fonction EDITER/
MANUEL, passer à l’étape suivante.
Remarque:
Lorsque votre téléviseur parvient à détecter le nom
•
de la chaîne à partir du signal d’émission de la chaî-
ne TV, il enregistre automatiquement ce nom (ID)
dans le numéro de programme (PR) sous lequel cette chaîne est enregistrée.
Si une chaîne TV que vous voulez regarder n’est pas
•
reprise dans un numéro de programme (PR), il faut
la régler manuellement à l’aide de la fonction MANUEL. Pour plus de détails, voir “EDITER/MANUEL”
à la page 24.
La chaîne TV n’est pas enregistrée sous le numéro
•
de programme PR 0 (AV). Pour enregistrer une chaî-
ne TV dans PR 0 (AV), la régler manuellement à
l’aide de la fonction MANUEL. Pour plus de détails,
voir “EDITER/MANUEL” à la page 24.
7
Appuyer sur la touche
pour afficher
aaaa
le menu T-V LINK.
8
Utiliser le menu T-V LINK en fonction
du type de magnétoscope raccordé à la
borne EXT-2.
Si le magnétoscope raccordé n’est pas compatible T-V LINK :
Appuyer sur la touche
LINK.
Le menu T-V LINK disparaît.
En cas de raccordement d’un magnétoscope
compatible T-V LINK :
Suivre les instructions de fonctionnement “Télécharge-
ment de données vers un magnétoscope” à la page 28
pour transmettre les données de numéro de programme
(PR).
9
Les réglages initiaux sont à présent
pour quitter le menu T-V
bbbb
terminés et vous pouvez regarder la té-
lévision.
4
Page 78

FONCTIONS T-V LINK
FONCTIONS T-V LINK
FONCTIONS T-V LINKFONCTIONS T-V LINK
Lorsqu’un magnétoscope compatible avec les fonctions T-V
LINK est raccordé à la borne EXT-2 du téléviseur, les procé-
dures d’installation du magnétoscope et de visualisation de
cassettes sont simplifiées. T-V LINK utilise les fonctions suivantes:
Pour utiliser les fonctions T-V LINK:
Vous devez avoir un magnétoscope compatible T-V LINK.
Le magnétoscope doit être raccordé à la borne EXT-2 du té-
léviseur par le biais d’un câble SCART où tous les fils sont utilisés.
Remarque:
Un magnétoscope compatible “T-V LINK ” signifie un ma-
•
gnétoscope JVC possédant le logo T-V LINK ou un magnétoscope muni d’un des logos suivants. Ces
magnétoscopes peuvent supporter certaines ou toutes
les fonctions décrites plus haut. Pour plus de détails,
consulter leur manuel d’utilisation.
“Q-LINK” (une marque commerciale de Panasonic Corporation)
“Data Logic” (une marque commerciale de Metz Corporation)
“Easy Link” (une marque commerciale de Phillips Corporation)
“Megalogic” (une marque commerciale de Grundig Corporation)
“SMARTLINK” (une marque commerciale de Sony Corporation)
Téléchargement des pré-sé-
Téléchargement des pré-sé-
■■■■
Téléchargement des pré-sé-Téléchargement des pré-sélections
lections
lectionslections
Télécharger les données enregistrées concernant les chaî-
nes TV du téléviseur au magnétoscope.
La fonction de téléchargement des présélections démarre
automatiquement lorsque les réglages initiaux sont terminés
ou lorsque les opérations AUTO ou EDITER/MANUEL sont
commandées.
Remarque:
Cette fonction peut être activée par l’intermédiaire du ma-
•
gnétoscope.
Lorsque l’indication “FONCTION NON DISPONIBLE”
s’affiche:
Si l’indication “FONCTION NON DISPONIBLE” s’affiche, le
téléchargement n’a pas eu lieu correctement. Avant de réessayer le téléchargement, vérifier les points suivants:
Le magnétoscope est-il sous tension?
•
Le magnétoscope est-il compatible T-V LINK?
•
Le magnétoscope est-il raccordé à la borne EXT-2?
•
Tous les fils du câble SCART sont-ils utilisés?
•
Enregistrement direct
Enregistrement direct
■■■■
Enregistrement directEnregistrement direct
“Vous enregistrez ce que vous voyez”
Vous pouvez enregistrer sur le magnétoscope les images
que vous voyez sur le téléviseur en appuyant simplement sur
une touche.
Pour plus de détails à ce sujet, veuillez lire le manuel de votre
magnétoscope.
Mise en fonctionnement par l’intermédiaire du magnétosco-
pe. L’indication “VCR EN ENREGISTREMENT” s’affiche.
Dans les circonstances suivantes, le magnétoscope s’ar-
rêtera d’enregistrer si le téléviseur est mis hors tension,
si vous changez de chaîne ou d’entrée ou si le menu s’af-
fiche sur le téléviseur:
Lors de l’enregistrement d’images provenant d’un appareil
•
externe raccordé aux bornes TV.
Lors de l’enregistrement d’une chaîne après son décryptage
•
par un décodeur.
Lors de l’enregistrement d’une chaîne en utilisant la sortie
•
du téléviseur car le magnétoscope ne la reçoit pas correctement.
Remarque:
La mise en fonctionnement par le biais du téléviseur n’est
•
pas possible.
En règle générale, le magnétoscope ne peut pas enre-
•
gistrer une chaîne qu’il ne peut pas recevoir correctement, même si vous pouvez voir les images de cette
chaîne sur le téléviseur. Certains magnétoscopes permettent cependant d’enregistrer une chaîne par le biais
de la sortie du téléviseur si la réception de cette chaîne
est correcte à l’écran, même si le magnétoscope ne parvient pas à la recevoir clairement. Pour plus de détails,
consulter le manuel d’utilisation de votre magnétoscope.
Mise sous tension automati-
Mise sous tension automati-
■■■■
Mise sous tension automati-Mise sous tension automatique du téléviseur/du magné-
que du téléviseur/du magné-
que du téléviseur/du magné-que du téléviseur/du magnétoscope Visualisation des
toscope Visualisation des
toscope Visualisation des toscope Visualisation des
images
images
imagesimages
Lorsque le magnétoscope se met en marche, le téléviseur se
met automatiquement sous tension et les images provenant
de la borne EXT-2 apparaissent à l’écran.
Lorsque le menu du magnétoscope est activé, le téléviseur se
met automatiquement sous tension et les images provenant
de la borne EXT-2 apparaissent à l’écran.
Remarque:
Cette fonction n’est pas opérationnelle si l’alimentation
•
principale du téléviseur est coupée. Mettre le téléviseur
sous tension (en mode de veille).
FRANCAIS
FRANÇAIS
5
Page 79

FONCTIONNEMENT DE BASE
FONCTIONNEMENT DE BASE
FONCTIONNEMENT DE BASEFONCTIONNEMENT DE BASE
Mettre l’appareil sous tension
Mettre l’appareil sous tension
■■■■
Mettre l’appareil sous tensionMettre l’appareil sous tension
Appuyer sur la touche d’alimentation
principale du téléviseur.
Le témoin d’alimentation rouge s’allume et le téléviseur est
alors en mode de veille.
Remarque:
•
Si le témoin d’alimentation vert s’allume, le téléviseur est
déjà sous tension.
Pour mettre l’appareil hors tension:
Réappuyer sur la touche d’alimentation principale du téléviseur.
Le témoin d’alimentation s’éteint.
Remarque:
Pour économiser de l’énergie, mettre le téléviseur hors
•
tension si vous ne comptez pas l’utiliser pendant un certain temps.
Mettre l’appareil sous tension à partir du mode de veille
Mettre l’appareil sous tension à partir du mode de veille
■■■■
Mettre l’appareil sous tension à partir du mode de veilleMettre l’appareil sous tension à partir du mode de veille
Appuyer sur la touche
sur la touche
, sur les touches 6
bbbb
(Standby),
####
6
66
Touche d’alimentation principale
Témoin d’alimentation
ou sur les touches numériques.
Le témoin d’alimentation rouge devient vert et votre téléviseur
s’allume.
Pour mettre le téléviseur hors tension:
Réappuyer sur la touche
Le témoin d’alimentation vert devient rouge et le téléviseur
passe en mode de veille.
Sélectionner une chaîne de
Sélectionner une chaîne de
■■■■
Sélectionner une chaîne de Sélectionner une chaîne de
télévision
télévision
télévisiontélévision
Choisir un numéro de programme (PR) sous lequel la chaîne
de télévision souhaitée a été programmée.
Utiliser les touches
Appuyer sur les touches 6666 pour sélectionner le numé-
ro de programme souhaité (PR).
Utiliser les touches numériques:
Entrer le numéro de programme souhaité (PR) à l’aide
des touches numériques.
Exemple
• PR12
• PR6
Utiliser la LISTE PROG.:
→
appuyer sur 1 et 2.
→
appuyer sur
1 Appuyer sur la touche h
pour afficher la LISTE PROG..
(standby).
####
:
6666
6666
.
h (Information)
hh
1 2 3
4 5 6
7 8 9
0
AV
MENU
P
TV OK
P
F
.T/L
FREEZE
SUB-P
Touches
numériques
6
TV
Page 80

FONCTIONNEMENT DE BASE
Appuyer sur les touches
2
5555
et
6666
pour sé-
lectionner un numéro de programme (PR).
Appuyer ensuite sur la touche
Remarque:
Pour les numéros de programmes (PR) pour les-
•
quels la fonction VERROUILLAGE est activée, le
repère
numéro de programme (PR) dans la LISTE
PROG..
Vous ne pouvez pas utiliser les touches
•
sélectionner un numéro de programme (PR) pour
lequel la fonction VERROUILLAGE est activée.
Si vous essayez de sélectionner un numéro de
•
programme PR pour lequel la fonction VERROUILLAGE est activée, le repère
ROUILLAGE) s’affiche et vous ne pourrez pas
visualiser les images de la chaîne. Pour pouvoir
regarder cette chaîne, se reporter aux explications concernant le “VERROUILLAGE” à la
page 21.
Si l’image n’est pas claire ou si les couleurs sont
•
absentes, changer le système couleur manuellement. Voir “SYSTEME COULEUR” à la page 16.
Réglage du volume
Réglage du volume
■■■■
Réglage du volumeRéglage du volume
(VERROUILLAGE) s’affiche à côté du
nnnn
Appuyer sur les touches
5
5
55
aaaa
.
6666
pour
(VER-
nnnn
pour ré-
gler le volume.
Le témoin de volume apparaît et le volume change à mesure
que vous appuyez sur les touches
Visualisation d’images pro-
Visualisation d’images pro-
■■■■
Visualisation d’images pro-Visualisation d’images provenant d’appareils externes
venant d’appareils externes
venant d’appareils externesvenant d’appareils externes
Sélectionner la borne EXT à laquelle l’appareil externe est
raccordé.
Utilisation de la touche
Appuyer sur la touche
EXT.
Appuyer sur la touche
me suit:
Mode TV
Numéros de
programmes
PR 1 – PR 99
o
o
oo
o
o
oo
o
o
oo
–/+
.
:
pour sélectionner une borne
pour changer la sélection com-
Modes EXT
EXT-1
EXT-2
Utilisation des touches
Appuyer sur les touches
EXT.
Utiliser la LISTE PROG.:
1
Appuyer sur la touche
6666
:
6666
pour sélectionner une borne
(Information)
hhhh
pour afficher la LISTE PROG..
2
Appuyer sur les touches 5555 et
6666
sélectionner une borne EXT. Appuyer ensuite sur la touche
Remarque:
•
Les bornes EXT sont enregistrées après le numéro
de programme PR 99.
Vous pouvez sélectionner un signal d’entrée vidéo
•
entre le signal S-VIDEO (signal Y/C) et un signal vidéo normal (signal composite).Pour plus de détails,
voir “
Si l’image n’est pas claire ou si les couleurs sont ab-
•
sentes, changer le système couleur manuellement.
Voir “SYSTEME COULEUR” à la page 16.
Lorsque vous choisissez une borne EXT sans signal
•
d’entrée, le numéro de la borne EXT reste fixe à
l’écran.
Ce téléviseur est équipé d’une fonction qui permet
•
de changer automatiquement d’entrée en fonction
de l’émission d’un signal spécial produit par l’appareil externe. (La borne EXT-4 n’accepte pas cette
fonction.)
(entrée S-VIDEO)” à la page 19.
y
aaaa
.
Pour revenir à une chaîne de télévision:
Appuyer sur la touche
les touches numériques.
, sur les touches
bbbb
Pour utiliser les numéros de programme PR 0
(AV):
Lorsque le téléviseur et le magnétoscope sont raccordés
uniquement par le biais du câble de l’antenne, la sélec-
tion du numéro de programme PR 0 (AV) vous permet
de visualiser les images du magnétoscope. Régler ma-
nuellement le canal du magnétoscope RF sur le numéro
de programme PR 0 (AV). Pour plus de détails, voir
“EDITER/MANUEL” à la page 24.
Appuyer sur la touche
comme suit:
Mode TV
Numéros de
programmes
PR 1 – PR 99
pour changer la sélection
o
o
oo
Modes EXT
EXT-1PR 0
EXT-2
pour
6666
FRANÇAIS
ou sur
EXT-4
EXT-3
EXT-4
Remarque:
La canal du magnétoscope RF est envoyé comme
•
signal RF du magnétoscope.
Pour plus de détails, consulter également le manuel
•
d’utilisation de votre magnétoscope.
EXT-3
7
Page 81

FONCTIONNEMENT DE BASE
Mise en fonctionnement à l’aide des touches du téléviseur
Mise en fonctionnement à l’aide des touches du téléviseur
■■■■
Mise en fonctionnement à l’aide des touches du téléviseurMise en fonctionnement à l’aide des touches du téléviseur
1
Appuyer sur les touches P p
p pour
pp
mettre le téléviseur sous tension à
partir du mode de veille.
p
2
Appuyer sur les touches P
sélectionner un numéro de programme
(PR) ou une borne EXT.
3
Appuyer sur la touche
q
sur les touches
lume.
Appuyer sur la touche
1
Le témoin de niveau de volume apparaît.
2 Appuyer sur les touches
le témoin de volume est affiché.
q
qq
rrrr
pour régler le vo-
rrrr
q
q
qq
p
pour
pp
(Volume) et
(Volume).
pendant que
(Derrière le couvercle avant)
8
Page 82

TOUCHES DE LA TELECOMMANDE ET LEURS FONCTIONS
TOUCHES DE LA TELECOMMANDE ET LEURS FONCTIONS
TOUCHES DE LA TELECOMMANDE ET LEURS FONCTIONS TOUCHES DE LA TELECOMMANDE ET LEURS FONCTIONS
Touche d’assourdissement
Touche d’assourdissement
1
Touche d’assourdissementTouche d’assourdissement
Vous pouvez couper le volume instantanément.
1 2 3
4 5 6
7 8 9
0
AV
MENU
P
TV OK
P
F.T/L
Appuyer sur la touche
(d’assourdissement)
llll
pour couper le volume. Réappuyer sur cette
touche
(d’assourdissement) pour rétablir le
llll
niveau de volume précédent.
Touches numériques
Touches numériques
2
Touches numériquesTouches numériques
Vous pouvez sélectionner un numéro de programme (PR) en entrant le numéro du programme.
Exemple:
→
• PR12
• PR6
Vous pouvez également appuyer de manière répétitive sur la
touche o
o pour sélectionner une borne EXT.
oo
Touche ZOOM
Touche ZOOM
3
Touche ZOOM Touche ZOOM
Vous pouvez modifier la taille de l’image à l’écran en fonction
du rapport de l’image. Choisir la taille optimale dans le mode
suivant ZOOM.
appuyer sur
→
appuyer sur
et
.
1111
2222
.
6666
AUTO (WSS):
Quand un signal WSS (Wide Screen Signalling - pour écrans
larges), qui indique le rapport d'image, est inclus dans le signal de diffusion ou le signal envoyé par un appareil externe,
le téléviseur commute automatiquement le mode ZOOM au
mode ZOOM 16:9 ou au mode PLEIN ECRAN conformément
au signal WSS.
S'il n'y a pas de signal WSS, l'image s'affiche conformément
au mode ZOOM réglé avec la fonction ZOOM AUTO 4:3.
FRANCAIS
FRANÇAIS
TV
Comment ouvrir le couvercle
Remarque:
Pour les détails sur la fonction ZOOM AUTO 4:3, voir
•
“ZOOM AUTO 4:3” à la page 17.
Si le mode AUTO(WSS) ne fonctionne pas correctement
•
en raison d'une mauvaise qualité du signal WSS ou si
vous voulez changer de mode ZOOM, appuyez sur la
touche c et passez à un autre mode ZOOM.
NORMAL:
Sert à visualiser une image normale (avec un rapport zoom
4:3), non modifiée.
9
Page 83

TOUCHES DE LA TELECOMMANDE ET LEURS FONCTIONS
PANORAMIC:
Ce mode étend les côtés gauche et droit d’une image normale afin qu’elle remplisse tout l’écran et sans que l’image paraisse irréelle.
Remarque:
Le haut et le bas de l’image sont légèrement coupés.
•
ZOOM 14:9:
Ce mode agrandit l’image large (Rapport zoom 14:9) jusqu’aux limites inférieure et supérieure de l’écran
ZOOM 16:9:
Ce mode agrandit l’image large (Rapport zoom 16:9) jusqu’à
ce qu’elle remplisse tout l’écran.
ZOOM 16:9 SOUS TITRES:
Ce mode agrandit l’image large (Rapport zoom 16:9) avec les
sous-titres jusqu’à ce qu’elle remplisse tout l’écran.
2
Appuyer sur les touches 6666 pour sélec-
tionner un mode ZOOM. Appuyer ensuite
sur la touche
L’image est agrandie et le mode ZOOM sélectionné s’affiche environ cinq secondes plus tard.
Remarque:
Il est possible que le mode ZOOM change automa-
•
tiquement sous l'effet du signal de commande d'un
appareil externe. Si vous voulez revenir au mode
ZOOM précédent, choisissez à nouveau le mode
ZOOM.
Réglage de la partie visible de l’ima-
Réglage de la partie visible de l’ima-
Réglage de la partie visible de l’ima-Réglage de la partie visible de l’image
ge
gege
Si les sous-titres ou le haut (le bas) de l’image sont coupés,
régler la partie visible de l’image manuellement.
1
Appuyer sur la touche c
Le menu ZOOM apparaît.
2
Appuyer sur la touche
aaaa
.
c.
cc
pour afficher le
aaaa
témoin du mode ZOOM.
Le témoin est affiché.
3
Pendant qu’il est affiché, appuyer sur les
touches 6666 pour régler la partie visible
verticalement.
PLEIN ECRAN:
Ce mode étend uniformément les côtés gauche et droit d’une
image normale (rapport zoom 4:3) afin qu’elle remplisse
l’écran large.
Remarque:
S’utilise pour les images avec un rapport zoom 16:9 qui
•
ont été réduites aux dimensions d’une image normale
(avec un rapport zoom 4:3), afin de rétablir leurs dimensions d’origine.
Sélectionner le mode ZOOM
Sélectionner le mode ZOOM
Sélectionner le mode ZOOM Sélectionner le mode ZOOM
1
Appuyer sur la touche
c
c
cc
pour afficher
le menu ZOOM.
Remarque:
Il n’est pas possible de régler la partie visible en
•
mode NORMAL ou PLEIN ECRAN.
Touche
Touche HYPER SOUND
4
ToucheTouche
Vous pouvez profiter de sons dans un environnement plus
étendu.
Appuyer sur la touche
HYPER SOUND
HYPER SOUNDHYPER SOUND
(HYPER SOUND)
iiii
pour activer ou désactiver la fonction HYPER
SOUND.
Remarque:
La fonction HYPER SOUND ne fonctionne pas correcte-
•
ment en mode mono.
Vous pouvez également activer ou désactiver la fonction
•
HYPER SOUND à l’aide du menu REGLAGE AUDIO. Pour
plus de détails, voir “HYPER SOUND” à la page 18.
10
Page 84

5 Touche Information
Touche Information
Touche Information Touche Information
Vous pouvez afficher la LISTE PROG. ou l’heure à l’écran.
Appuyer sur la touche
Appuyer sur la touche
ge comme suit:
Remarque:
Vous pouvez sélectionner les numéros de programmes
•
(PR) ou les bornes EXT à l’aide de la LISTE PROG. Pour
plus de détails, voir “Utiliser la LISTE PROG.:” à la
page 6.
Ce téléviseur se sert des données du télétexte pour défi-
•
nir l’heure exacte. S’il n’a pas reçu d’émetteur possédant
des données de télétexte depuis sa mise sous tension,
l’affichage de l’heure reste vierge. Pour voir l’heure, sélectionner un émetteur diffusant des données de télétex-
te. Tant que vous ne mettrez pas le téléviseur hors
tension, même si vous sélectionnez d’autres émetteurs,
l’heure restera affichée.
Lorsque vous regardez des cassettes vidéos, il se peut
•
qu’une heure erronée s’affiche.
La touche
•
nus. Pour plus de détails, voir “FONCTIONNEMENT DES
MENUS” à la page 14.
TV Touche
TV Touche
6
TV ToucheTV Touche
Vous pouvez revenir instantanément à une chaîne TV.
hhhh
(Information) sert également pour les me-
(Information) pour modifier l’afficha-
hhhh
Appuyer sur la touche
Le mode TV est rappelé et une chaîne TV s’affiche.
Remarque:
La touche
•
de détails, voir “FONCTIONNEMENT DES MENUS” à la
page 14.
7
Servent à régler le volume.
5
5
55
bbbb
sert également pour les menus. Pour plus
Touches
Touches
Touches Touches
Appuyer sur les touches
(Information).
hhhh
bbbb
.
5555
son.
Remarque:
Les touches
•
plus de détails, voir “FONCTIONNEMENT DES MENUS”
à la page 14.
servent également pour les menus. Pour
5555
TOUCHES DE LA TELECOMMANDE ET LEURS FONCTIONS
Pas d’indication
pour régler le
8 Touche Standby
Touche Standby
Touche Standby Touche Standby
Appuyer sur la touche
(Standby) pour met-
####
tre le téléviseur sous ou hors tension.
A la mise sous tension du téléviseur, le témoin rouge devient vert.
Touche de couleurs
Touche de couleurs
9
Touche de couleursTouche de couleurs
Les touches de couleurs servent pour les opérations du télé-
texte ou pour celles des menus. Pour plus de détails, voir “
Touches de commande du télétexte et sélecteur VCR P
DVD” à la page 12 ou “FONCTIONNEMENT DES MENUS” à
la page 14.
OK Touche
OK Touche
0
OK ToucheOK Touche
La touche
“FONCTIONNEMENT DES MENUS” à la page 14.
6
6
66
-
Vous pouvez sélectionner un numéro de programme (PR) ou
une borne EXT.
Appuyer sur les touches
sert pour les menus. Pour plus de détails, voir
aaaa
Touches
Touches
Touches Touches
6666
pour sélectionner
~
un numéro de programme PR ou une borne EXT.
Les touches
Pour plus de détails, voir “FONCTIONNEMENT DES MENUS” à la page 14.
Touches de commandes VCR/
Touches de commandes VCR/
=
Touches de commandes VCR/Touches de commandes VCR/
DVD et sélecteur VCR
DVD et sélecteur VCR PPPP DVD
DVD et sélecteur VCR DVD et sélecteur VCR
Ces touches peuvent servir à faire fonctionner un magnétos-
cope de la marque JVC ou un lecteur DVD Appuyer sur une
touche correspondant à celle de la télécommande pour obtenir la même fonction que celle commandée par la télécom-
mande d’origine.
1
Régler le sélecteur VCR PPPP DVD sur la po-
servent également pour les menus.
6666
DVD
DVD DVD
sition VCR ou DVD.
VCR:
Pour faire fonctionner le magnétoscope, régler le sélec-
teur sur la position VCR.
DVD:
Pour faire fonctionner le lecteur, régler le sélecteur sur la
position DVD.
(Texte):
PPPP
Pour regarder des programmes du télétexte, régler le
sélecteur sur la position
2
Appuyer sur la touche de commande VCR/
(Texte).
PPPP
DVD pour contrôler votre VCR (magnétos-
cope) ou le lecteur DVD.
Remarque:
•
Vous ne pouvez pas utiliser ces touches si votre appareil n’a pas été fabriqué par JVC.
Même s’il a été conçu par JVC, certaines de ces tou-
•
ches ou n’importe laquelle de celles-ci risquent de ne
pas fonctionner, en fonction de l’appareil utilisé.
Vous pouvez utiliser les touches
•
ner une chaîne TV que le magnétoscope recevra ou
pour choisir le chapitre que le lecteur DVD reproduit.
Certains modèles de lecteurs DVD utilisent les tou-
•
ches
tour rapide et pour choisir le chapitre. Dans ce cas,
les touches 1/¡ ne sont pas opérationnelles.
pour les deux opérations d’avance/de re-
pppp
pour sélection-
pppp
FRANÇAIS
11
Page 85

TOUCHES DE LA TELECOMMANDE ET LEURS FONCTIONS
Touches de commande du télétexte
Touches de commande du télétexte et sélecteur VCR
■■■■
~
Touches de commande du télétexte Touches de commande du télétexte
MENU
P
TV OK
Utilisation du mode Liste
Utilisation du mode Liste
P
F.T/L
Utilisation du mode ListeUtilisation du mode Liste
Vous pouvez mémoriser les numéros de vos pages de télé-
texte favorites pour pouvoir les rappeler rapidement à l’aide
des touches de couleurs.
Pour mémoriser les numéros des pages:
1
2
Fonctionnement de base
Fonctionnement de base
Fonctionnement de baseFonctionnement de base
Vous pouvez regarder trois types d’émissions de télétexte sur
le téléviseur:
FLOF (Fastext), TOP et WST.
1
Sélectionner une chaîne avec un télétexte.
2
Régler le sélecteur VCR PPPP DVD sur la position
(Texte).
PPPP
3
Pour rappeler une page mémorisée:
1
2
3
Appuyer sur la touche
cher le télétexte.
Appuyer sur la touche
dans l’ordre suivant:
Mode TV
4
Sélectionner une page de télétexte en ap-
gggg
puyant sur les touches
ches de numéros ou sur les touches de
couleurs.
Pour revenir au mode TV:
Appuyer sur la touche
bbbb
(Texte) pour affi-
gggg
(Texte) pour changer de mode
Mode Texte
6666
, sur les tou-
ou sur la touche
(Texte).
gggg
Conserver l’affichage
Conserver l’affichage
Conserver l’affichage Conserver l’affichage
Vous pouvez garder une page de télétexte affichée aussi
longtemps que vous le souhaitez, même pendant la réception
d’autres pages de télétexte.
Appuyer sur la touche
Pour annuler la fonction Hold:
Réappuyer sur la touche
et sélecteur VCR PPPP DVD
et sélecteur VCR et sélecteur VCR
Remarque:
•
Si vous avez des problèmes pour recevoir les émis-
sions de télétexte, consulter votre revendeur local
ou l’émetteur du télétexte.
En mode Texte, le mode ZOOM est réglé de maniè-
•
re fixe sur le mode PLEIN ECRAN.
Il n’est pas possible d’utiliser les menus lorsque
•
vous regardez une émission du télétexte.
Appuyer sur la touche
mode Liste.
Les numéros de pages mémorisés s’affichent dans le
bas de l’écran.
Appuyer sur une touche de couleurs pour
sélectionner une position. Appuyer ensuite sur les touches de numéros pour entrer
le numéro de la page.
Appuyer sur la touche
maintenir enfoncée.
Les quatre numéros de page blancs clignotent pour indiquer qu’ils sont mémorisés.
Appuyer sur la touche
mode Liste.
Appuyer sur une touche de couleurs à laquelle une page a été assignée.
Pour quitter le mode Liste:
Réappuyer sur la touche
Témoin Hold
CCCC
B
B
BB
(Hold).
CCCC
(Hold).
DVD
DVD DVD
pour activer le
B
B
BB
1 2 3
4 5 6
7 8 9
0
AV
(Mémoriser) et la
AAAA
pour activer le
B
B
BB
.
12
Page 86

TOUCHES DE LA TELECOMMANDE ET LEURS FONCTIONS
Page secondaire
Page secondaire
Page secondairePage secondaire
Certaines pages de télétexte comprennent des pages secondaires qui s’affichent automatiquement.
Vous pouvez conserver l’affichage de toute page secondaire
ou la regarder à tout moment.
1
Appuyer sur la touche
re) pour activer la fonction de page secondaire.
2
Appuyer sur les touches de numéros pour
entrer un numéro de page secondaire.
Exemple:
• Troisième page secondaire
et 3.
Pour annuler la fonction de page secondaire:
Réappuyer sur la touche
DDDD
(Page secondai-
DDDD
→
appuyer sur 0, 0,
(Page secondaire).
Annuler
Annuler
AnnulerAnnuler
Vous pouvez rechercher une page de télétexte tout en regardant la télévision.
1
Appuyer sur une touche de numéro pour
entrer un numéro de page ou appuyer sur
une touche de couleurs.
Le téléviseur recherche une page de télétexte.
2
Appuyer sur la touche H (Annuler).
Le programme TV apparaît. Lorsque le téléviseur a trouvé la page de télétexte, son numéro apparaît dans le
coin supérieur gauche de l’écran.
0
3
Appuyer sur la touche H (Annuler) pour
revenir à une page de télétexte quand son
numéro est affiché à l’écran.
FRANÇAIS
Remarque:
Vous pouvez également sélectionner une page se-
•
condaire en appuyant sur la touche rouge ou verte.
Révéler
Révéler
RévélerRévéler
Certaines pages de télétexte comprennent du texte caché
(comme les réponses à un jeu)
Vous pouvez afficher le texte caché.
Chaque fois que vous appuyez sur la touche
(Révéler), le texte est caché ou révélé.
EEEE
Dimension
Dimension
DimensionDimension
Vous pouvez doubler la hauteur de l’affichage du télétexte.
Appuyer sur la touche
FFFF
(taille).
Remarque:
•
Vous ne pouvez pas revenir au mode TV, même en
appuyant sur la touche
de TV s’affiche provisoirement à la place du programme du télétexte.
(Annuler). Une émission
H
Index
Index
IndexIndex
Vous pouvez revenir instantanément à la page d’index.
Appuyer sur la touche
FLOF (Fastext)/TOP/WST:
Revient à la page 100 ou à une page précisée précédemment.
Mode Liste:
Revient au numéro de page affiché dans la zone inférieure
gauche de l’écran.
(Index).
GGGG
13
Page 87

FONCTIONNEMENT DES MENUS
FONCTIONNEMENT DES MENUS
FONCTIONNEMENT DES MENUSFONCTIONNEMENT DES MENUS
Ce téléviseur est équipé d’un certain nombre de fonctions
que vous pouvez activer ou désactiver à l’aide de menus.
Pour tirer le meilleur parti de toutes ses fonctions, il vous faut
comprendre complètement le fonctionnement de base des
menus.
1
Appuyer sur la touche aaaa pour afficher
le MENU (menu principal).
Le MENU (menu principal) apparaît. Les titres des menus s’y inscrivent.
2
Appuyer sur les touches
lectionner le titre d’un menu puis appuyer sur la touche
Le menu s’affiche.
aaaa
.
6
pour sé-
3
Utiliser les menus conformément aux explications fournies pour chaque fonction.
Remarque:
•
Pour plus de détails, consulter les explications fournies pour chaque fonction dans chacun des menus
qui suit ce “FONCTIONNEMENT DES MENUS”.
L’affichage qui apparaît dans le bas d’un menu si-
•
gnale une touche de la télécommande qui peut être
utilisée pour effectuer la fonction choisie.
4
Appuyer sur la touche
le réglage.
Le menu disparaît.
Pour revenir au menu précédent:
Appuyer sur la touche h (information).
Pour quitter un menu immédiatement:
Appuyer sur la touche b.
pour valider
aaaa
14
Page 88

REGLAGE IMAGE
REGLAGE IMAGE
REGLAGE IMAGEREGLAGE IMAGE
Pour afficher le menu REGLAGE IMAGE:
1
Appuyer sur la touche
menu MENU (menu principal).
2 Appuyer sur la touche
ner REGLAGE IMAGE, et appuyer sur la
touche
TEINTE
TEINTE
■■■■
TEINTETEINTE
Vous pouvez sélectionner un des trois modes TEINTE (trois
sortes de réglages d’image) pour ajuster les réglages de
l’image automatiquement.
1
Appuyer sur les touches 6 pour sélec-
aaaa
.
pour afficher le
aaaa
6
pour sélection-
tionner TEINTE.
2
Appuyer sur les touches 5 pour sélectionner un mode.
FROIDE:
Vous obtiendrez une base de couleur blanche froide
avec une accentuation dans les niveaux de couleur et de
contraste qui crée une image plus vive.
CHAUDE:
Vous obtiendrez une base de couleur orange/rouge
chaude qui donne les niveaux de couleur et de contraste
appropriés pour regarder un film.
NORMALE:
Vous obtiendrez une base de couleur blanche normale
avec des niveaux de couleur et de contraste normaux.
2
Appuyer sur les touches 5 pour modifier
le réglage.
2
Inférieur
Plus sombre
Plus douce
Plus claire
Rougeâtre
Remarque:
Vous pouvez uniquement modifier le réglage TEIN-
•
TE NTSC (teinte de l’image) lorsque le système couleur est NTSC 3.58 ou NTSC 4.43.
Pour revenir aux réglages par défaut dans chaque mode TEINTE:
Appuyer sur la touche bleue.
Rappeler les réglages d’image par défaut dans le mode
TEINTE sélectionné et les remémoriser dans le mode
TEINTE.
3
Appuyer sur la touche
Elément
CONTRASTE
(contraste de l’image)
LUMIERE
(luminosité de l’image)
NETTETE
(netteté de l’image)
COULEUR
(couleur de l’image)
TEINTE NTSC
(teinte NTSC de l’image)
pour valider les
aaaa
3
Supérieur
Plus lumineuse
Plus nette
Plus intense
Verdâtre
réglages.
Le menu disparaît.
FRANCAIS
FRANÇAIS
3
Appuyer sur la touche
aaaa
réglage.
Le menu disparaît.
Réglage de l’image
Réglage de l’image
■■■■
Réglage de l’image Réglage de l’image
Vous pouvez modifier les réglages de l’image de chaque
mode TEINTE à votre convenance.
Les réglages d’image modifiés sont mémorisés dans le mode
TEINTE.
1
Appuyer sur les touches 6 pour sélectionner un élément.
pour valider le
15
Page 89

OPTIONS IMAGE
OPTIONS IMAGE
OPTIONS IMAGEOPTIONS IMAGE
Pour afficher le menu OPTIONS IMAGE:
1
Appuyer sur la touche
MENU (menu principal).
2
Appuyer sur la touche 6 pour sélection-
ner OPTIONS IMAGE, et appuyer sur la touche
VNR AUTO
VNR AUTO
■■■■
VNR AUTOVNR AUTO
La fonction VNR AUTO permet de réduire automatiquement
le bruit du téléviseur en fonction du bruit de l’image. La fonction permet également d’obtenir une netteté (NETTETE) op-
timale.
1
Appuyer sur les touches 6 pour sélec-
aaaa
.
pour afficher le
aaaa
tionner VNR AUTO.
2
Appuyer sur les touches 5 pour sélec-
tionner AUTO.
MINI:
La fonction VNR AUTO est annulée. Lorsque vous ré-
glez le mode sur AUTO et que vous avez l’impression
que la netteté de l’image d’origine n’est pas entièrement
reproduite, passer au mode MINI. Dans ce cas cependant, tout bruit restant dans l’image d’origine risque
d’être accentué.
MAXI:
Ce mode maximise toujours l’effet de réduction du bruit
sans tenir compte de l’état de l’image. Lorsque vous ré-
glez le mode sur AUTO et que vous percevez le bruit,
passez au mode MAXI Cette opération risque cependant de diminuer la netteté de l’image.
3
Appuyer sur la touche
pour valider le
aaaa
réglage.
Le menu disparaît.
SYSTEME COULEUR
SYSTEME COULEUR
■■■■
SYSTEME COULEURSYSTEME COULEUR
Le système couleurs est sélectionné automatiquement. Cependant, si l’image n’est pas nette ou si aucune couleur n’ap-
paraît, il convient de sélectionner le système couleurs
manuellement.
1
Appuyer sur les touches 6 pour sélec-
tionner SYSTEME COULEUR. Appuyer ensuite sur la touche
Le menu secondaire de la fonction SYSTEME COULEUR apparaît.
2
Appuyer sur les touches 5 pour sélec-
aaaa
.
tionner le système couleurs approprié.
PAL:
Système PAL
SECAM:
Système SECAM
NTSC 3.58:
NTSC 3.58 Système MHz
NTSC 4.43
NTSC 4.43 Système MHz
AUTO:
Cette fonction permet de détecter un système couleurs
à partir du signal entrant. Elle est uniquement disponible
lorsque vous regardez une image provenant d’un numé-
ro de programme PR 0 (AV) ou d’une borne EXT.
3
Appuyer sur la touche
pour valider le
aaaa
réglage.
Le menu disparaît.
Remarque:
La fonction AUTO risque de ne pas fonctionner cor-
•
rectement si le signal est de mauvaise qualité. Si
l’image est anormale avec la fonction AUTO, sélectionner un autre système couleurs manuellement.
Sous les numéros de programme PR 0 (AV) à PR 99,
•
vous ne pouvez pas sélectionner NTSC 3.58 ou
NTSC 4.43.
16
Page 90

ZOOM AUTO 4:3
ZOOM AUTO 4:3
■■■■
ZOOM AUTO 4:3ZOOM AUTO 4:3
Cette fonction n'est opérationnelle que si le mode ZOOM est
réglé sur AUTO(WSS). Elle règle le mode ZOOM que vous
voudrez utiliser au cas où il n'y aurait pas de signal WSS dans
le signal de diffusion d'un appareil externe. Vous avez le
choix entre trois modes ZOOM.
Remarque:
Pour les détails sur la fonction AUTO(WSS), voir la sec-
•
tion “AUTO (WSS):” à la page 9.
Appuyer sur les touches 6 pour sélec-
1
tionner ZOOM AUTO 4:3. Appuyer ensuite
sur la touche
Le menu secondaire de la fonction ZOOM AUTO 4:3 apparaît.
aaaa
.
OPTIONS IMAGE
FRANÇAIS
Appuyer sur les touches 6 pour sélec-
2
tionner un mode ZOOM.
Appuyer sur la touche
3
pour valider les
aaaa
réglages.
Le menu disparaît.
17
Page 91

REGLAGE AUDIO
REGLAGE AUDIO
REGLAGE AUDIOREGLAGE AUDIO
Pour afficher le menu REGLAGE AUDIO:
1
Appuyer sur la touche
MENU (menu principal).
2 Appuyer sur la touche
ner REGLAGE AUDIO. Appuyer ensuite sur
la touche
STEREO / I•II
STEREO / I•II
■■■■
STEREO / I•IISTEREO / I•II
Lorsque vous regardez une émission bilingue, vous pouvez
sélectionner Bilingue I (menu secondaire I) ou Bilingue II (menu secondaire 2). Lors d’une mauvaise réception d’une émis-
sion stéréo, vous pouvez passer du son stéréo au son mono
de sorte à pouvoir entendre l’émission plus clairement et plus
facilement.
1
Appuyer sur les touches 6 pour sélection-
ner STEREO / I • II.
2
Appuyer sur les touches 5 pour sélec-
tionner un mode audio.
s
: Son stéréo
: Son mono
v
: Bilingue I (menu secondaire I)
t
: Bilingue II (secondaire II)
u
aaaa
.
pour afficher le
aaaa
pour sélection-
6
HYPER SOUND
HYPER SOUND
■■■■
HYPER SOUNDHYPER SOUND
Vous pouvez profiter de sons dans un environnement plus
étendu.
1
Appuyer sur les touches 6 pour sélec-
tionner HYPER SOUND.
2
Appuyer sur les touches 5 pour sélec-
tionner OUI.
Pour annuler la fonction HYPER SOUND:
Appuyer sur les touches 5 pour sélectionner NON.
3
Appuyer sur la touche
réglage.
Le menu disparaît.
Remarque:
La fonction HYPER SOUND ne fonctionne pas cor-
•
rectement en mono.
Vous pouvez activer ou désactiver la fonction HYPER
•
SOUND en une seule opération. Pour plus de détails,
voir “4 Touche HYPER SOUND” à la page 10.
pour valider le
aaaa
3
Appuyer sur la touche
réglage.
Le menu disparaît.
Remarque:
Le mode audio que vous pouvez sélectionner varie
•
en fonction de l’émission de télévision.
Cette fonction n’est pas opérationnelle dans les mo-
•
des EXT. Et elle n’apparaît pas non plus dans le
menu REGLAGE AUDIO.
Réglage du son
Réglage du son
■■■■
Réglage du sonRéglage du son
Vous pouvez régler le son à votre convenance.
1
Appuyer sur les touches 6 pour sélec-
tionner un élément.
2
Appuyer sur les touches 5 pour modifier
le réglage.
2
Plus faible
Plus faible
Gauche
3
Appuyer sur la touche
réglage.
18
Le menu disparaît.
BALANCE
aaaa
Elément
GRAVES
AIGUS
aaaa
pour valider le
3
Plus fort
Plus fort
Droite
pour valider le
Page 92

EXT REGLAGES
EXT REGLAGES
EXT REGLAGESEXT REGLAGES
Pour afficher le menu EXT REGLAGES:
1 Appuyer sur la touche
pour afficher le
aaaa
MENU (menu principal).
2
Appuyer sur la touche 6 pour sélection-
ner EXT REGLAGES. Appuyer ensuite sur la
touche
■■■■
y
y(entrée S-VIDEO)
(entrée S-VIDEO)
yy
(entrée S-VIDEO)(entrée S-VIDEO)
Lors du raccordement d’un appareil (comme un magnétosco-
pe S-VHS) qui permet l’émission d’un signal S-VIDEO (signal
Y/C), vous pouvez apprécier l’image de haute qualité du signal S-VIDEO (signal Y/C).
Préparation:
Tout d’abord, lire le manuel d’utilisation de l’appareil et du
•
“PREPARATIFS SUPPLEMENTAIRES” à la page 30 afin
d’apprendre comment raccorder l’appareil correctement au
téléviseur. Ensuite, suivre le manuel d’utilisation de l’appareil pour le régler de sorte qu’il puisse émettre un signal SVIDEO (signal Y/C vers le téléviseur.)
Ne pas régler l’entrée
•
EXT raccordée à un appareil qui ne peut pas émettre un signal S-VIDEO (signal Y/C). Si les réglages sont incorrects,
aucune image n’apparaîtra.
aaaa
.
(entrée S-VIDEO) sur la borne
yyyy
3
Appuyer sur la touche
pour valider le
aaaa
réglage.
Le menu disparaît.
Remarque:
La borne EXT-1 n’accepte pas le signal S-VIDEO (si-
•
gnal Y/C) et vous ne pouvez pas régler
S-VIDEO) sur la borne EXT-1.
Le réglage de
•
ractère principal qui passe de “E” à “S” Par exemple, “E2” est changé en “S2”.
Même un appareil qui permet l’émission d’un signal S-
•
VIDEO (signal Y/C) peut diffuser un signal vidéo normal (signal composite) en fonction des réglages éta-
blis. Si une image ne peut pas s’afficher à cause du
réglage
vement le manuel d’utilisation pour revérifier les régla-
ges de l’appareil.
LISTE
LISTE
■■■■
LISTELISTE
Vous pouvez assigner un nom aux appareils raccordés à cha-
que borne EXT. L’attribution d’un nom à une borne EXT provoque l’affichage du numéro de cette borne EXT et de son
nom.
1
Appuyer sur les touches 6 ou 5 pour
yyyy
(entrée S-VIDEO) modifie le ca-
yyyy
(entrée S-VIDEO)
effectué, relire attenti-
yyyy
(entrée
sélectionner une borne EXT.
EXT-1
P
P
EXT-3
EXT-2
EXT-4
FRANCAIS
FRANÇAIS
1
Appuyer sur les touches 6 ou
5
sélectionner une borne EXT.
EXT-1
P
P
2
Appuyer sur la touche jaune et régler l’en-
EXT-3
EXT-2
EXT-4
TV
trée yyyy (entrée S-VIDEO).
Un repère yyyy (entrée S-VIDEO) s’affiche. Vous pouvez
voir un signal S-VIDEO (signal Y/C) au lieu du signal vidéo normal (signal composite).
Pour annuler le réglage
Appuyer sur la touche jaune pour effacer le repère yyyy
(entrée S-VIDEO).
Les images du signal vidéo normal (signal composite)
réapparaissent.
(entrée S-VIDEO):
yyyy
pour
TV
2
Appuyer sur la touche bleue pour afficher
la liste des noms LISTE.
19
Page 93

EXT REGLAGES
3
Appuyer sur les touches 6 pour sélec-
tionner un nom. Appuyer ensuite sur la
touche
La LISTE disparaît et le nom est assigné à la borne EXT.
Pour effacer un nom assigné à une borne EXT:
Sélectionner un espace vierge.
4
Appuyer sur la touche
réglage.
Le menu disparaît.
Remarque:
•
Vous ne pouvez pas assigner à la borne EXT un nom
qui n’apparaît pas dans la liste (LISTE).
COPIE
COPIE
■■■■
COPIECOPIE
Vous pouvez sélectionner la source d’un signal à diffuser par
une borne EXT-2
Vous pouvez sélectionner n’importe quel signal de sortie de
l’appareil raccordé à la borne EXT ainsi que l’image et le son
de la chaîne TV que vous regardez pour le diffuser par la borne EXT-2.
aaaa
.
pour valider le
aaaa
1
Appuyer sur les touches 5 pour sélec-
tionner la borne EXT-2.
2
Appuyer sur les touches 6 pour sélec-
tionner une borne EXT ou TV.
La flèche dans le menu représente le débit des signaux.
Le côté gauche de la flèche indique la diffusion d’une
source de signaux par la borne EXT-2.
EXT-1/EXT-3/EXT-4:
Le signal de sortie de l’appareil raccordé à une borne
EXT passe par le téléviseur et est diffusé par la borne
EXT-2.
TV:
L’image et le son de la chaîne TV que vous regardez
sont diffusés par la borne EXT-2.
3
Appuyer sur la touche
pour valider le
aaaa
réglage.
Le menu disparaît.
Remarque:
•
Pendant la copie, vous ne pouvez pas éteindre le té-
léviseur.La mise hors tension du téléviseur coupe-
rait également l’émission de signaux diffusés par la
borne EXT-2.
Lorsque vous sélectionnez une borne EXT comme
•
sortie, vous pouvez regarder une émission TV ou
l’image envoyée par l’autre borne EXT pendant la
copie de l’image d’un appareil raccordé à la borne
EXT sur un magnétoscope raccordé à la borne EXT-
2.
Les signaux RGB de jeux TV ne peuvent pas être
•
diffusés. Les programmes de télétexte ne peuvent
pas être diffusés non plus.
20
Page 94

OPTIONS
OPTIONS
OPTIONSOPTIONS
Pour afficher le menu OPTIONS:
1 Appuyer sur la touche
MENU (menu principal).
2 Appuyer sur la touche
ner OPTIONS. Appuyer ensuite sur la touche
SLEEP TIMER
SLEEP TIMER
■■■■
SLEEP TIMERSLEEP TIMER
Vous pouvez programmer le téléviseur pour qu’il s’éteigne
automatiquement après un certain temps.
1
Appuyer sur les touches 6 pour sélec-
tionner SLEEP TIMER. Appuyer ensuite
sur la touche
Le menu secondaire de la fonction SLEEP TIMER apparaît.
aaaa
.
.
aaaa
pour afficher le
aaaa
pour sélection-
6
FOND BLEU
FOND BLEU
■■■■
FOND BLEUFOND BLEU
Vous pouvez programmer le téléviseur pour que l’écran devienne automatiquement bleu et pour assourdir le son lors de
la réception d’un signal trop faible, lorsqu’aucun signal n’est
reçu ou lorsqu’il n’y a aucune entrée provenant d’un appareil
extérieur.
1
Appuyer sur les touches 6 pour sélec-
tionner FOND BLEU.
2
Appuyer sur les touches 5 pour sélec-
tionner OUI.
Pour annuler la fonction FOND BLEU:
Appuyer sur les touches 5 pour sélectionner NON.
3
Appuyer sur la touche
réglage.
Le menu disparaît.
VERROUILLAGE
VERROUILLAGE
■■■■
VERROUILLAGEVERROUILLAGE
Lorsque vous souhaitez que vos enfants ne regardent pas
certaines chaînes de télévision, vous pouvez utiliser la fonction VERROUILLAGE pour verrouiller ces chaînes. Lorsque
l’enfant sélectionne un numéro de programme (PR) sous lequel une chaîne verrouillée est mémorisée, l’écran devient
bleu et affiche
regarder cette chaîne. Seule une opération spéciale et l’entrée d’un numéro d’identification prédéfini permet de déverrouiller la chaîne; l’enfant ne peut donc pas la regarder.
Pour régler la fonction VER-
Pour régler la fonction VER-
Pour régler la fonction VER-Pour régler la fonction VERROUILLAGE
ROUILLAGE
ROUILLAGEROUILLAGE
1
Appuyer sur les touches 6 pour sélec-
tionner VERROUILLAGE. Appuyer ensuite
sur la touche
“REGLAGE NO. ID” (Ecran de réglage du numéro
NOMS) apparaît.
(VERROUILLAGE) de sorte qu’il ne peut pas
n
o
pour valider le
aaaa
.
FRANCAIS
FRANÇAIS
2
Appuyer sur les touches 5 pour régler le
laps de temps.
Vous pouvez définir ce laps de temps jusqu’à 120 minu-
tes maximum (2 heures), par pas de 10 minutes.
Pour annuler la fonction SLEEP TIMER:
Appuyer sur la touche 2 pour régler le laps de temps sur
“NON.”
3
Appuyer sur la touche
réglages.
Le menu disparaît.
Remarque:
Une minute avant que la fonction SLEEP TIMER
•
n’éteigne le téléviseur, l’indication “BONNE NUIT!”
s’affiche.
La fonction SLEEP TIMER ne peut cependant pas
•
servir à couper l’alimentation principale du téléviseur.
Lorsque la fonction SLEEP TIMER est activée, vous
•
pouvez réafficher le menu secondaire de cette fonction SLEEP TIMER pour confirmer et/ou changer le
laps de temps restant pour la fonction SLEEP TIMER. Appuyer sur la touche
menu après avoir confirmé et/ou modifié le temps
restant.
pour valider les
aaaa
pour quitter le
a
2
Régler le numéro ID qui vous convient.
1 Appuyer sur les touches
tionner un numéro.
2 Appuyer sur les touches
le curseur.
3
Appuyer sur la touche
Le menu secondaire de VERROUILLAGE apparaît.
aaaa
pour sélec-
6
pour déplacer
5
.
21
Page 95

OPTIONS
4
Appuyer sur les touches 6 pour sélec-
tionner une chaîne TV.
Chaque fois que vous appuyez sur les touches 6, le
numéro de programme (PR) change et l’image de la
chaîne TV mémorisée sous ce numéro de programme
(PR) apparaît à l’écran.
5
Appuyer sur la touche bleue pour régler la
fonction VERROUILLAGE.
(VERROUILLAGE) s’affiche pour indiquer que cette
n
chaîne TV est verrouillée.
Pour réinitialiser la fonction VERROUILLAGE:
Réappuyer sur la touche bleue.
(VERROUILLAGE) disparaît.
n
6
Appuyer sur la touche
réglage.
Le menu disparaît.
pour valider le
aaaa
Remarque:
La suppression provisoire du verrouillage ne signifie
•
pas que la fonction VERROUILLAGE est annulée
pour la chaîne TV. La prochaine fois que quelqu’un
essaye de regarder cette chaîne, elle sera de nouveau verrouillée.
Pour annuler cette fonction VERROUILLAGE, vous
•
devez à nouveau mener à bien l’opération “Pour ré-
gler la fonction VERROUILLAGE”.
Pour désactiver la sélection facile d’un numéro de
•
programme (PR) sous lequel une chaîne TV verrouillée est enregistrée, le numéro de programme
(PR) a été configuré de sorte à ne pas pouvoir être
sélectionné par le biais des touches
ches de commandes du téléviseur.
Pour désactiver la suppression facile du verrouilla-
•
ge, “NO. ID” (écran d’entrée du NO. ID) est réglé de
sorte à ne pas pouvoir apparaître si vous n’appuyez
pas sur la touche h (Information).
ou des tou-
6
Remarque:
Pour désactiver la réinitialisation facile de la fonction
•
VERROUILLAGE, le menu disparaît lors de la sélec-
tion de la fonction VERROUILLAGE et lorsque vous
appuyez sur la touche
tion normale de menus.
Pour regarder une chaîne TV ver-
Pour regarder une chaîne TV ver-
Pour regarder une chaîne TV ver-Pour regarder une chaîne TV verrouillée
rouillée
rouilléerouillée
1
Sélectionner un numéro de programme
comme dans une opéra-
a
(PR) correspondant à une chaîne TV verrouillée, à l’aide des touches de numéros
ou de LISTE PROG..
L’écran devient bleu et l’indication n (VERROUILLAGE)
apparaît. Vous ne pouvez pas regarder cette chaîne.
2
Appuyer sur la touche
(Information)
hhhh
pour afficher “NO. ID” (écran d’entrée du
NO. ID).
DECODEUR (EXT-2)
DECODEUR (EXT-2)
■■■■
DECODEUR (EXT-2)DECODEUR (EXT-2)
Vous pouvez uniquement utiliser cette fonction lorsque vous
raccordez un décodeur avec un magnétoscope compatible TV LINK à la borne EXT-2. Pour l’utiliser, se reporter à “Utilisa-
tion de la fonction DECODEUR (EXT-2)” à la page 28.
ATTENTION:
Si vous n’avez pas raccordé
•
toscope compatible T-V LINK à la borne EXT-2,
accidentel de cette fonction sur “OUI” provoque la suppression de l’image/du son de la chaîne TV que vous regardez.
de décodeur avec un magné-
le réglage
3
Appuyer sur les touches de numéros pour
entrer le numéro ID.
Le verrouillage est provisoirement levé afin que vous
puissiez regarder la chaîne TV.
Si vous avez oublié le numéro d’identification:
Mener à bien l’opération 1 de “Pour régler la fonction
VERROUILLAGE ” Après avoir vérifié le numéro ID, appuyer sur la touche b pour quitter le menu.
22
Page 96

INSTALLATION
INSTALLATION
INSTALLATIONINSTALLATION
Pour afficher le menu INSTALLATION:
1 Appuyer sur la touche
MENU (menu principal).
2 Appuyer sur la touche
ner le menu INSTALLATION. Appuyer ensuite sur la touche
LANGAGE
LANGAGE
■■■■
LANGAGELANGAGE
Vous pouvez sélectionner la langue que vous souhaitez utiliser pour les messages à l’écran dans la liste de langues du
menu.
1
Appuyer sur les touches
aaaa
.
pour afficher le
aaaa
pour sélection-
6666
pour sélec-
6666
tionner LANGAGE. Appuyer ensuite sur la
touche
Le menu secondaire de la fonction LANGAGE apparaît.
aaaa
.
3
Appuyer sur la touche bleue pour démar-
rer la fonction AUTO.
Le menu AUTO s’affiche et les chaînes TV reçues sont
automatiquement enregistrées sous les numéros de
programmes (PR).
Pour annuler la fonction AUTO:
Appuyer sur la touche b.
4
Lorsque les chaînes TV ont été enregistrées sous les numéros de programmes
(PR), le menu EDITER s’affiche.
Vous pouvez procéder à l’édition des numéros de pro-
grammes (PR) à l’aide de la fonction EDITER/MANUEL.
Pour plus de détails, voir “EDITER/MANUEL” à la page 24.
Lorsque vous n’utilisez pas la fonction EDITER/MANUEL:
Si vous n’avez pas besoin de la fonction EDITER/MANUEL, passez à l’étape suivante.
5
Appuyer sur la touche
pour afficher le
aaaa
menu T-V LINK.
FRANCAIS
FRANÇAIS
2
Appuyer sur les touches
tionner une langue.
3
Appuyer sur la touche
aaaa
réglage.
Le menu disparaît.
AUTO
AUTO
■■■■
AUTOAUTO
Vous pouvez mémoriser automatiquement les chaînes TV
que vous parvenez à recevoir correctement dans les numé-
ros de programmes du téléviseur ’ PR en effectuant les opé-
rations suivantes.
1
Appuyer sur les touches
6666
ner AUTO. Appuyer ensuite sur la touche
Le menu PAYS apparaît en tant que sous-menu de la
fonction AUTO.
2
Appuyer sur les touches
choisir le pays où vous vous trouvez.
pour sélec-
6666
pour valider le
pour sélection-
5
5
55
et
6666
pour
aaaa
6
Utiliser le menu T-V LINK en fonction du
type de magnétoscope raccordé à la borne
EXT-2.
Si le magnétoscope raccordé n’est pas compatible T-V LINK:
Appuyer sur la touche b pour quitter le menu T-V LINK.
Le menu T-V LINK disparaît et tous les réglages sont terminés.
En cas de raccordement d’un magnétoscope
compatible T-V LINK :
Suivre les instructions de fonctionnement “Télécharge-
ment de données vers un magnétoscope” à la page 28
pour transmettre les données de numéro de programme
(PR).
Remarque:
Lorsque votre téléviseur parvient à détecter le nom
•
.
de la chaîne TV à partir du signal d’émission, il enregistre automatiquement ce nom (ID) dans le numéro
de programme (PR) sous lequel cette chaîne TV est
enregistrée.
Si une chaîne TV que vous voulez regarder n’est pas
•
reprise dans un numéro de programme (PR), il faut
la régler manuellement à l’aide de la fonction MANUEL. Pour plus de détails, voir “EDITER/MANUEL”
à la page 24.
La chaîne TV n’est pas enregistrée sous le numéro de
•
programme PR 0 (AV). Pour enregistrer une chaîne TV
dans PR 0 (AV), la régler manuellement à l’aide de la
fonction MANUEL. Pour plus de détails, voir “EDITER/
MANUEL” à la page 24.
23
Page 97

INSTALLATION
EDITER/MANUEL
EDITER/MANUEL
■■■■
EDITER/MANUELEDITER/MANUEL
Les fonctions EDITER/MANUEL sont divisées en deux types:
l’édition des numéros de programme sélectionnés (PR) (fonctions EDITER) et l’enregistrement manuel d’une chaîne TV
que vous voulez regarder dans un numéro de programmePR
MANUEL. Vous trouverez ci-dessous tous les détails concer-
nant ces fonctions:
DEPLACER:
Cette fonction permet de changer le numéro de programme
(PR) d’une chaîne TV.
NOMS:
Cette fonction permet d’attribuer un nom de chaîne (ID) à un
émetteur TV.
INSERER:
Cette fonction permet d’ajouter une nouvelle chaîne TV à la
liste actuelle des numéros de programmes PR par le biais du
numéro CH/CC.
EFFACER:
Cette fonction permet de supprimer toute chaîne TV inutile.
MANUEL:
Cette fonction permet d’enregistrer manuellement une nouvelle chaîne TV dans un numéro de programme (PR).
Attention:
L’utilisation de la fonction DEPLACER, EFFACER ou INSE-
•
RER remplace la liste actuelle des numéros de programmes
(PR). Dès lors, les numéros de programmes (PR) de certaines chaînes TV vont changer.
L’utilisation de la fonction MANUEL pour une chaîne TV ver-
•
rouillée par le biais de la fonction VERROUILLAGE supprime le verrouillage pour cette chaîne TV.
L’utilisation de la fonction MANUEL pour une chaîne TV
•
dont la fonction DECODEUR (EXT-2) est réglée sur OUI remet le réglage de cette fonction DECODEUR (EXT-2) sur
NON pour cette chaîne TV.
Lorsqu’une chaîne TV est déjà programmée dans PR 99,
•
l’utilisation de la fonction INSERER supprime sa programmation.
Remarque:
Le numéro de programme PR 0, “AV” apparaît dans la lis-
•
te des numéros de programmes (PR).
Le numéro de borne EXT n’apparaît pas dans la liste des
•
numéros de programmes (PR).
Le numéro CH/CC est un numéro unique pour le télévi-
•
seur et il correspond au numéro de chaîne d’un émetteur
TV. En ce qui concerne les rapports entre un numéro de
chaîne et un numéro CH/CC voir “NUMERO CH/CC” à la
page 32.
Vous ne pouvez pas utiliser la fonction INSERER si vous
•
ne connaissez pas le numéro de chaîne d’un émetteur
TV. Utiliser la fonction MANUEL pour enregistrer une
chaîne TV sous le numéro de programme (PR).
Appuyer sur les touches
1
tionner EDITER/MANUEL. Appuyer ensuite
sur la touche
aaaa
.
6666
pour sélec-
Suivre les explications concernant la fonc-
2
tion que vous souhaitez utiliser.
Appuyer sur la touche
3
pour valider les
aaaa
réglages.
Le menu T-V LINK apparaît.
Utiliser le menu T-V LINK en fonction du
4
type de magnétoscope raccordé à la borne
EXT-2.
Si aucun magnétoscope compatible T-V LINK
n’est raccordé:
Appuyer sur la touche
LINK.
Le menu T-V LINK disparaît et tous les réglages sont ter-
minés.
pour quitter le menu T-V
bbbb
En cas de raccordement d’un magnétoscope
compatible T-V LINK :
Suivre les instructions de fonctionnement “Télécharge-
ment de données vers un magnétoscope” à la page 28
pour transmettre les données de numéro de programme
(PR) au magnétoscope.
DEPLACER
DEPLACER
DEPLACERDEPLACER
Appuyer sur les touches
1
6666
pour sélec-
tionner une chaîne TV.
Chaque fois que vous appuyez sur les touches
numéro de programme (PR) change et l’image de la
chaîne TV mémorisée sous ce numéro de programme
(PR) apparaît à l’écran.
Appuyer sur la touche
2
3333
pour démarrer la
fonction DEPLACER.
Appuyer sur les touches
3
6666
pour sélec-
tionner un nouveau numéro de programme
(PR).
Pour annuler la fonction DEPLACER:
Appuyer sur la touche h (Information).
6666
, le
24
Appuyer sur la touche
4
2222
pour changer le
numéro de programme (PR) d’une chaîne
TV et lui attribuer un nouveau numéro
(PR).
Page 98

NOMS
NOMS
NOMSNOMS
1
Appuyer sur les touches
6666
pour sélec-
tionner une chaîne TV.
Chaque fois que vous appuyez sur les touches
numéro de programme (PR) change et l’image de la
chaîne TV mémorisée sous ce numéro de programme
(PR) apparaît à l’écran.
2
Appuyer sur la touche rouge pour démar-
rer la fonction NOMS.
3
Appuyer sur les touches
6666
pour sélec-
tionner le premier caractère du nom de
chaîne (ID) que vous voulez attribuer à cette chaîne TV.
6666
, le
INSTALLATION
Remarque:
Vous pouvez attribuer un nom de chaîne unique (ID)
•
à cet émetteur TV. Lorsque l’opération 3 est terminée, ne pas passer directement à l’étape suivante;
appuyer sur les touches
seur et sur les touches
ractère afin de compléter le nom de la chaîne (ID).
Appuyer ensuite sur la touche
nom (ID) à la chaîne TV.
INSERER
INSERER
INSERERINSERER
Préparation:
Un numéro unique CH/CC à ce téléviseur et correspondant
•
au numéro de chaîne d’un émetteur TV est demandé. Localiser le numéro CH/CC correspondant dans le tableau “NU-
MERO CH/CC” à la page 32. basé sur les numéros de
chaînes des émetteurs TV.
Lorsque le réglage PAYS n’est pas FRANCE, utiliser un nu-
•
méro à deux chiffres CH/CC. Lorsque le réglage PAYS est
FRANCE, utiliser un numéro à trois chiffres. CH/CC.
Lorsque vous ajoutez une chaîne TV du système français
•
uniquement (système SECAM-L) toujours régler la fonction
PAYS sur FRANCE. Si le réglage PAYS n’est pas FRANCE,
suivre la description “Modification du réglage PAYS” à la
page 28 pour le modifier et le mettre sur FRANCE, puis dé-
marrer la fonction INSERER.
1
Appuyer sur les touches
tionner un numéro de programme (PR)
sous lequel vous souhaitez mémoriser une
nouvelle chaîne TV.
2
Appuyer sur la touche verte puis démarrer
la fonction INSERER.
5555
pour déplacer le cur-
6666
pour sélectionner un ca-
pour attribuer ce
aaaa
6666
pour sélec-
FRANÇAIS
4
Appuyer sur la touche bleue pour afficher
la liste des noms de chaînes LISTE.
5
Appuyer sur les touches
tionner le nom de la chaîne (ID).
Pour annuler la fonction NOMS:
Appuyer sur la touche h (Information).
6
Appuyer sur la touche
aaaa
un nom de chaîne (ID) à une chaîne TV.
6666
pour sélec-
pour attribuer
3
Appuyer sur les touches
6666
pour sélec-
tionner “CC” ou “CH” en fonction du numéro CH/CC de la chaîne TV.
Lorsque le réglage PAYS est mis sur FRANCE:
Sélectionner “CH1”, “CH2”, “CC1” ou “CC2”.
Pour annuler la fonction INSERER:
Appuyer sur la touche h (Information).
4
Appuyer sur les touches de numéros pour
entrer le numéro CH/CC restant.
Le téléviseur se met en mode mémorisation.
Lorsque la mémorisation est terminée, l’image de la
chaîne TV apparaît à l’écran.
Remarque:
Le numéro CH/CC indique la fréquence d’émission
•
au téléviseur. Si le téléviseur ne parvient pas à détecter la fréquence d’émission indiquée par le numéro
CH/CC, une image sans signaux (vierge) apparaît.
25
Page 99

INSTALLATION
EFFACER
EFFACER
EFFACEREFFACER
1
Appuyer sur les touches 6666 pour sélec-
tionner une chaîne TV.
Chaque fois que vous appuyez sur les touches 6, le
numéro de programme (PR) change et l’image de la
chaîne TV mémorisée sous ce numéro de programme
(PR) apparaît à l’écran.
2
Appuyer sur la touche jaune pour supprimer la chaîne TV.
La chaîne TV est alors effacée de la liste des numéros
de programmes (PR).
MANUEL
MANUEL
MANUELMANUEL
Préparation:
Lorsque vous ajoutez une chaîne TV du système français
•
(système SECAM-L) toujours régler la fonction PAYS sur
FRANCE. Si le réglage PAYS n’est pas mis sur FRANCE,
suivre les explications fournies dans “Modification du régla-
ge PAYS” à la page 28 pour mettre le réglage PAYS sur
FRANCE; démarrer ensuite la fonction MANUEL.
1
Appuyer sur les touches
6666
pour sélec-
tionner un numéro de programme (PR)
sous lequel vous souhaitez mémoriser une
nouvelle chaîne TV.
2
Appuyer sur la touche bleue pour démar-
rer la fonction MANUEL.
A droite, à la suite du numéro CH/CC, s’affiche l’indication SYSTEME (système d’émission) de la chaîne TV.
Autres chaînes TV:
Si vous ne connaissez pas le système d’émission correct, régler le sélecteur SYSTEME sur “B/G”. Si ce choix
de “B/G” n’est pas correct, vous n’entendrez pas le son
normalement lorsque le téléviseur détecte une chaîne
TV. Dans ce cas, réessayer de régler la fonction SYSTEME correctement afin qu’aucun problème ne se produise.
4
Appuyer sur la touche verte ou rouge pour
rechercher un émetteur.
Le balayage s’arrête lorsque le téléviseur a localisé un
émetteur. L’image de la chaîne TV apparaît ensuite à
l’écran.
5
Appuyer de manière répétitive sur la touche verte ou rouge jusqu’à ce que la chaî-
ne TV souhaitée apparaisse.
Si la réception de l’émetteur TV est mauvaise:
Appuyer sur la touche bleue ou jaune pour obtenir une
syntonisation précise de l’émetteur.
Si vous ne parvenez pas à entendre le son normal même quand l’image de la chaîne TV apparaît correctement:
Le réglage SYSTEME est erroné. Appuyer sur la touche
3333
pour sélectionner un SYSTEME où le son est normal.
6
Appuyer sur la touche
pour enregistrer
aaaa
la chaîne TV sous un numéro de programme (PR).
Le menu normal EDITER réapparaît.
Pour annuler la fonction MANUEL:
Appuyer sur la touche h (Information).
3
Appuyer sur la touche
3333
pour sélectionner
le SYSTEME (système d’émission) d’une
chaîne TV que vous voulez mémoriser.
Pour les chaînes TV provenant du système
français (système SECAM-L):
Régler la fonction SYSTEME sur “L” Si vous positionnez
le sélecteur sur une autre sélection que“L”, vous ne pouvez pas recevoir de chaîne TV par le système SECAM-L.
26
Page 100

DEMONSTRATION
DEMONSTRATION
DEMONSTRATIONDEMONSTRATION
Pour afficher le menu DEMONSTRATION:
1 Appuyer sur la touche
MENU (menu principal).
2
Appuyer sur la touche
ner DEMONSTRATION. Appuyer ensuite sur
la touche
La fonction DEMONSTRATION propose automatiquement
une démonstration de certaines des fonctions du téléviseur.
aaaa
.
pour afficher le
aaaa
6666
pour sélection-
FRANCAIS
FRANÇAIS
1
Appuyer sur les touches
tionner OUI.
2
Appuyer sur la touche
réglages.
La fonction DEMONSTRATION est ainsi réglée sur OUI
et la démonstration commence.
Pour arrêter la démonstration:
Appuyer sur une des touches de la télécommande.
Lorsque la fonction DEMONSTRATION est ré-
glée sur OUI:
A chaque mise sous tension du téléviseur, la démonstra-
tion démarre automatiquement. Si vous ne voulez pas
que cette opération ait lieu, prendre les mesures suivantes pour supprimer la fonction DEMONSTRATION:
6666
pour sélec-
pour valider les
aaaa
1 Réafficher le menu DEMONSTRATION.
2 Appuyer sur les touches
ner NON.
3 Appuyer sur la touche
la fonction DEMONSTRATION.
6666
pour sélection-
pour supprimer
aaaa
27
 Loading...