

Page 1
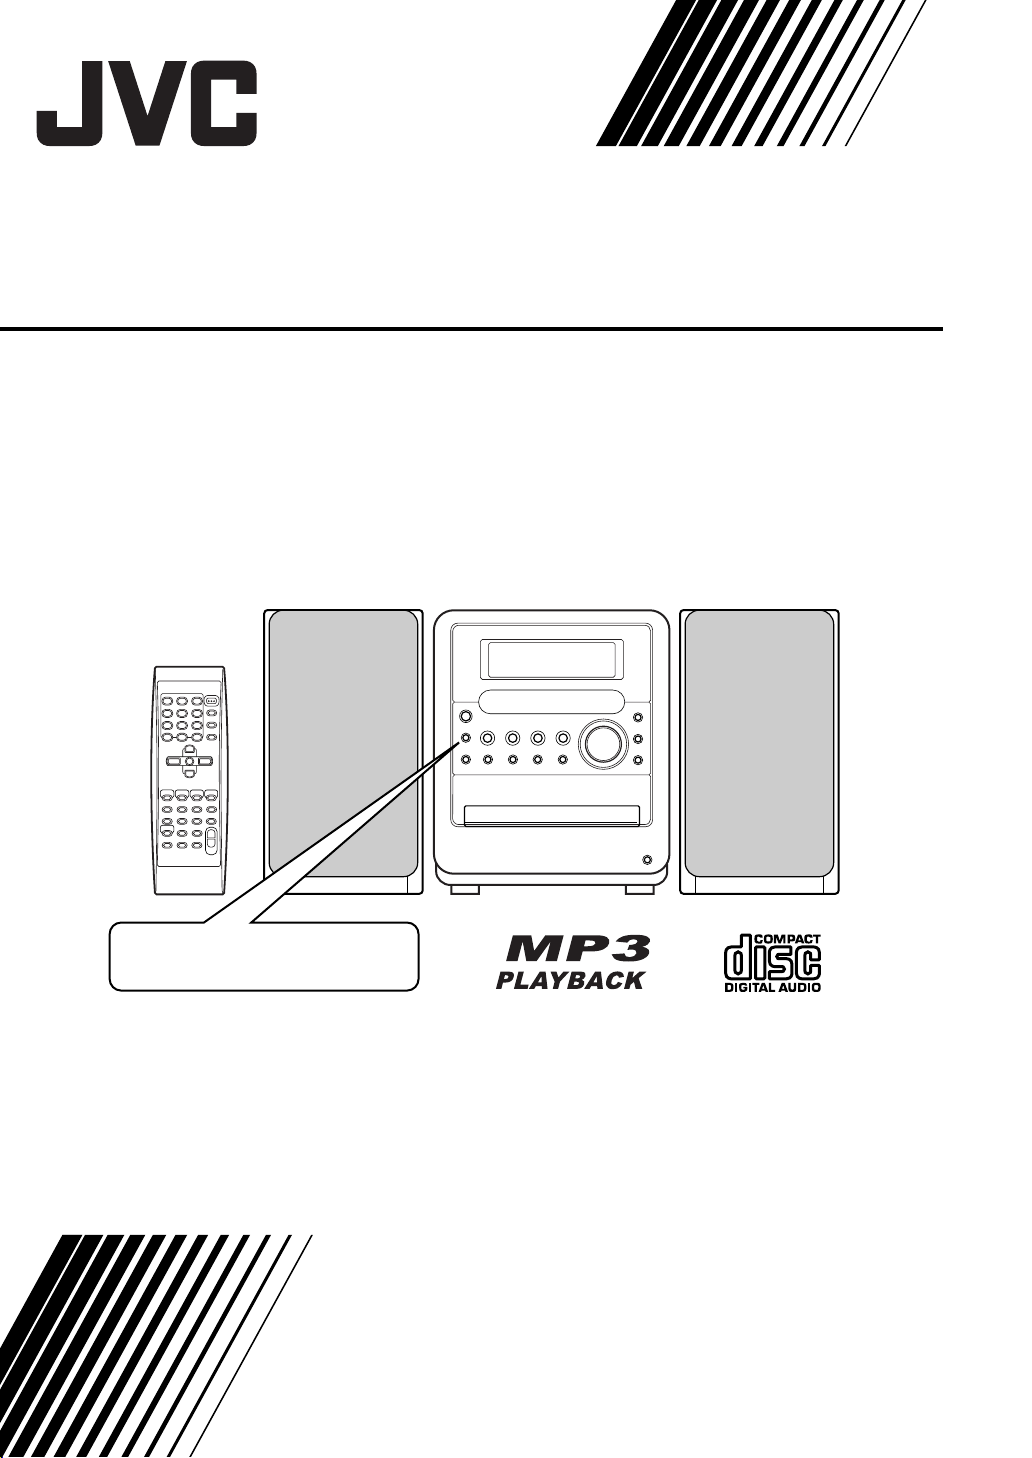
MICRO COMPONENT SYSTEM
UX-Q3S
Consists of CA-UXQ3S and SP-UXQ1S
For hiding the demonstration
display, refer to page 9.
INSTRUCTIONS
LVT1218-005A
[A]
Page 2
Introduction
Warnings, Cautions and Others
CAUTION
To reduce the risk of electrical shocks, fire, etc.:
1. Do not remove screws, covers or cabinet.
2. Do not expose this appliance to rain or moisture.
CAUTION — F button!
Disconnect the mains plug to shut the power off completely.
The F button in any position does not disconnect the mains line.
The power can be remote controlled.
CAUTION
• Do not block the ventilation openings or holes.
(If the ventilation openings or holes are blocked by a
newspaper or cloth, etc., the heat may not be able to get out.)
• Do not place any naked flame sources, such as lighted
candles, on the apparatus.
• When discarding batteries, environmental problems must be
considered and local rules or laws governing the disposal of
these batteries must be followed strictly.
• Do not expose this apparatus to rain, moisture, dripping or
splashing and that no objects filled with liquids, such as vases,
shall be placed on the apparatus.
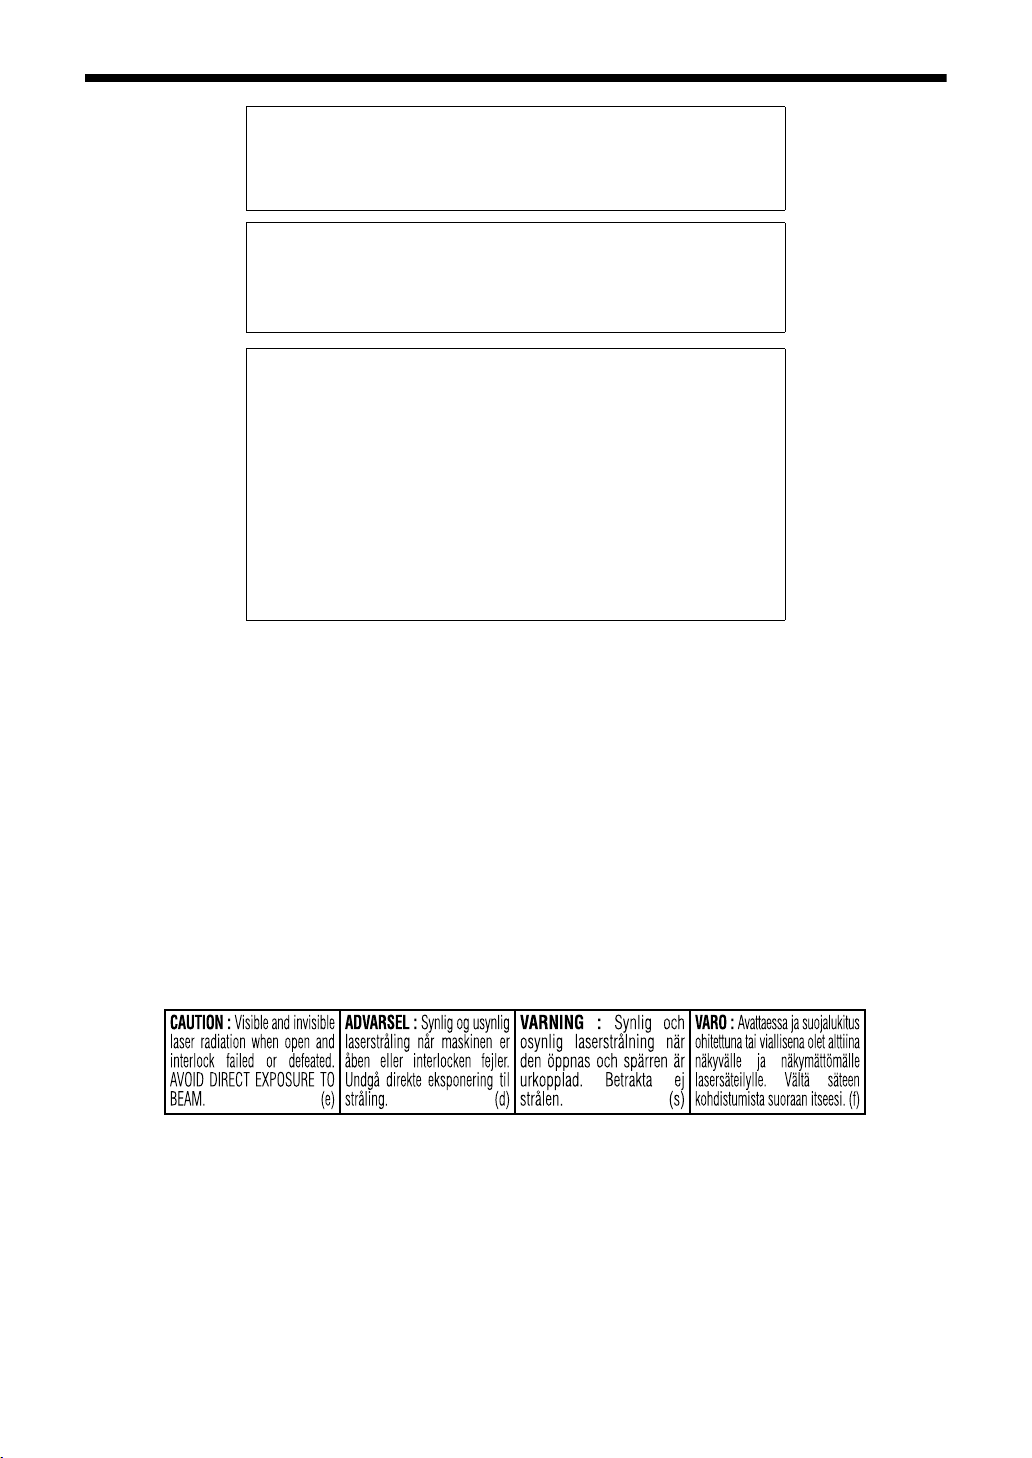
IMPORTANT FOR LASER PRODUCTS
1. CLASS 1 LASER PRODUCT
2. CAUTION: Do not open the top cover. There are no user
serviceable parts inside the unit; leave all servicing to
qualified service personnel.
3. CAUTION: Visible and invisible laser radiation when open
and interlock failed or defeated. Avoid direct exposure to
beam.
4. REPRODUCTION OF LABEL: CAUTION LABEL, PLACED
INSIDE THE UNIT.
G-1
Page 3
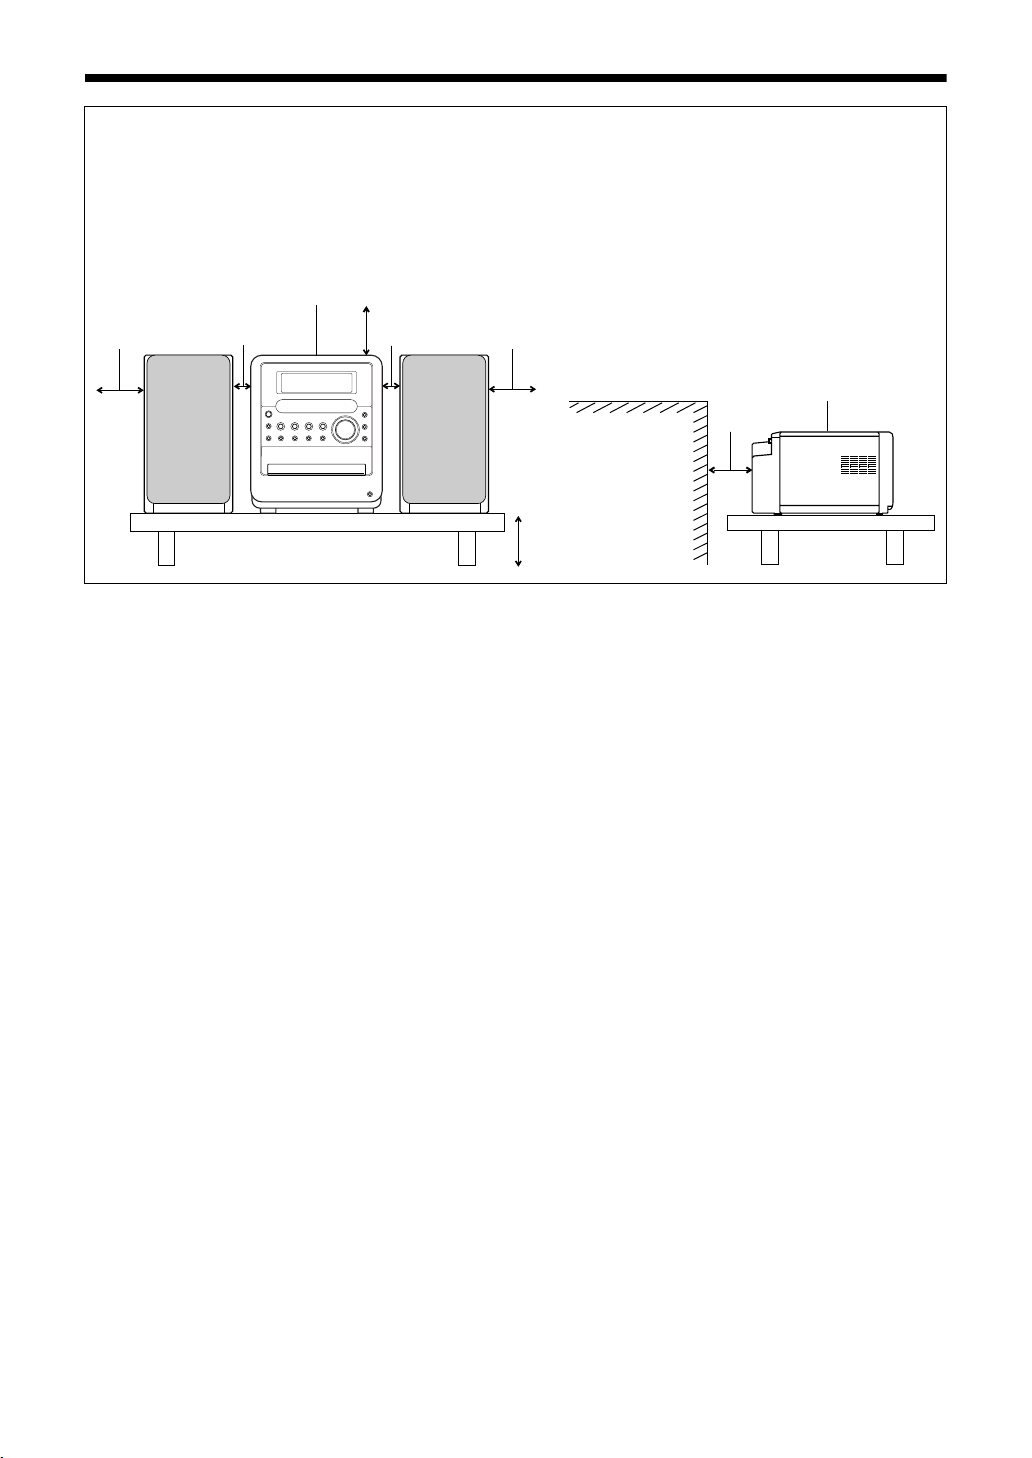
CAUTION — Proper Ventilation
To avoid risk of electric shock and fire and to protect from damage, locate the apparatus as follows:
Top/Front/Back/Sides: No obstructions should be placed in the areas shown by the dimensions below.
Bottom: Place on the level surface. Maintain adequate air path for ventilation by placing on
a stand with a height of 10 cm more.
In addition, maintain the best possible air circulation.
Front view Side view
Main unit
15cm
1cm
15cm
1cm
15cm
10cm
Wall or
obstructions
Main unit
15cm
Fron t
G-2
Page 4

Table of Contents
Introduction
Notes on Operation .............................. 2
Special Cautions................................... 3
Notes on Handling................................... 3
Supplied Accessories.............................. 3
Preparation
Part Description .................................... 4
Remote Control .................................... 5
Connections.......................................... 6
Basic Operations
Basic Operations ................................ 10
Setting the Clock ................................... 10
Turning On/Off the Main Unit ................ 11
Adjusting the Volume ............................ 11
Temporarily Turning Off the Sound
(FADE MUTING)............................... 11
Emphasizing Heavy Bass Sound
(AHB PRO) ....................................... 11
Sound Mode.......................................... 11
Adjusting the Sound Quality.................. 11
α Sound ................................................ 12
Changing the Color Patterns for
the Display Window and CD Tray ..... 12
Auto Standby......................................... 13
Listening to Other Equipment
Listening to Other Equipment..............20
Recording Sound
Recording Sound to
Cassette Tapes ................................21
Convenient Functions
Using the Timers .................................23
CD Ejection Lock.................................26
Reference
Handling CDs/Cassette Tapes ............27
CD Messages......................................28
Troubleshooting...................................28
Specifications ........................Back cover
Listening to Radio Broadcasts
Listening to Radio Broadcasts............ 14
Listening to CDs
Listening to CDs ................................. 16
Repeat Playback ................................... 17
Program Playback................................. 17
Random Playback ................................. 18
Notes on MP3s...................................... 18
Listening to Cassette Tapes
Listening to Cassette Tapes ............... 19
1
Page 5
Notes on Operation
Introduction
Suitable Locations for the
Main Unit
To minimize the need for servicing and maintain
the high quality of this product, do not place the
main unit in the following locations:
• In a position subject to high humidity or considerable dust
• On an uneven or unstable surface
• Near a heat source
• Near a computer, fluorescent light or other electric appliance
• In a small room with insufficient ventilation
• In a position exposed to direct sunlight
• In a position exposed to excessive cold
• In a position exposed to strong vibration
• Near a TV, amplifier, or tuner
• Near a magnetic source
CAUTION
• The operating temperature of this product is 5°C to
35°C. Use in temperatures outside this range may
cause a malfunction or damage the product.
Condensation
Under the following conditions, you may not be
able to operate this product properly due to condensation formed on the lens of the main unit:
• When you have just started an air conditioner to
warm your room
• When you have placed the main unit at an area
with high humidity
• When you have moved the main unit from a cold
place to a warm place
When condensation forms, leave the main unit
turned on, wait for approximately 1 or 2 hours, and
then operate the main unit.
Cleaning the Main Unit
When the operation panel becomes dirty, dust it
with a soft dry cloth. When the operation panel is
very dirty, wipe it with a cloth dampened with a
small amount of a neutral detergent, and then wipe
it with a soft dry cloth.
CAUTION
• Do not wipe the operation panel with thinners, benzenes or other chemical agents. Do not spray
insecticides onto the operation panel. These may
cause discoloration and damage to the surface.
Listener's Etiquette
When using headphones, keep the volume at a
moderate level so as not to over-stimulate your
ears.
■ When enjoying sound from the speakers,
adjust the volume to a suitable level to
avoid disturbing your neighbors.
Even low-volume sound carries a long way,
especially at night. Show consideration to
your neighbors by closing windows or using
headphones.
About CDs/CD-Rs/CD-RWs
Confirm the marks on CDs/CD-Rs/CD-RWs
Use a CD/a CD-R/a CD-RW whose letter-
printed surface shows the , or
logo. This product does not play back DVDs
or video CDs.
About CD-Rs/CD-RWs
You can play back a CD-R/a CD-RW only
when the disc is finalized.
• You can play back a CD-R/a CD-RW
which has been recorded in the audio CD
and MP3 formats.
However, playback is impossible in some
cases due to the disc characteristics,
recording condition, scratches or dirt on
the disc, or dirt or condensation on the
lens.
• Before using a CD-R/a CD-RW, carefully
read the cautions regarding the disc.
• This product does not support CD text
display of sound files such as MP3s.
• To play back a CD-RW on this product,
erase all tracks if the CD-RW was
recorded in a format other than the audio
and MP3 CD formats. Using the CD-RW
without erasing all tracks may result in
damage to the speakers or other parts
caused by sudden loud volume.
Introduction
2
Page 6
Special Cautions
Notes on Handling
■ Important cautions
Installation of the system
• Select a place which is level, dry and neither too
hot nor too cold; between 5°C and 35°C.
• Leave sufficient distance between the system
and the TV.
• Do not use the system in a place subject to
vibration.
Power cord
• Do not handle the power cord with wet hands!
• A small amount of power is always consumed
while the power cord is connected to the wall
outlet.
• When unplugging the power cord from the wall
outlet, always pull on the plug, not the power
cord.
To prevent malfunctions of the system
• There are no user-serviceable parts inside. If
anything goes wrong, unplug the power cord and
consult your dealer.
• Do not insert any metallic object into the system.
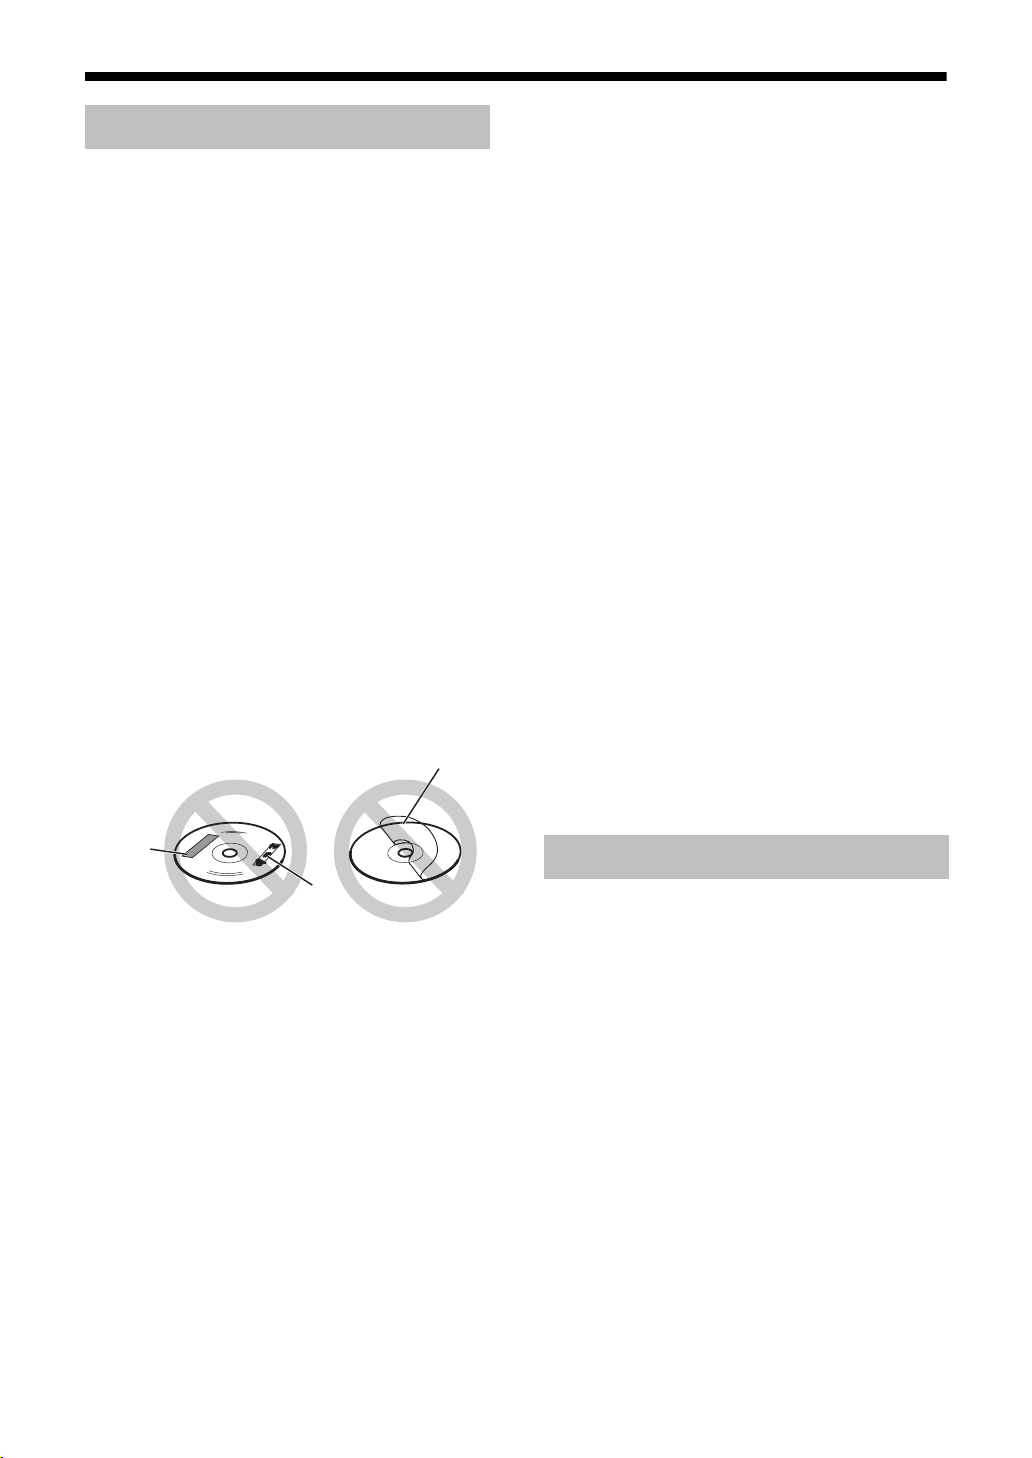
• Do not use any non-standard shape disc (like a
heart, flower or credit card, etc.) available on the
market, because it may damage the system.
• Do not use a disc with tape, stickers, or paste on
it, because it may damage the system.
Label sticker
Sticker
Avoid high temperatures
Do not expose the system to direct sunlight and do
not place it near a heating device.
When you are away
When away on travel or for other reasons for an
extended period of time, disconnect the power
cord plug from the wall outlet.
Do not block the vents
Blocking the vents may damage the system.
Care of the cabinet
When cleaning the system, use a soft cloth and follow the relevant instructions on the use of chemically-coated cloths. Do not use benzene, thinner or
other organic solvents including disinfectants.
These may cause deformation or discoloring.
If water gets inside the system
Turn the system off and disconnect the power cord
plug from the wall outlet, then call the store where
you made your purchase. Using the system in this
condition may cause fire or electrical shock.
■ When condensation or water drops adhere
to the lens
In any of the following cases, condensation or
water drops may adhere to the lens to prevent the
system from working properly:
• Immediately after roomheating starts
• When the system is installed in a steamy or
damp space
• When the system is suddenly moved from a cold
place to a warm space
In any of these cases, leave the system turned on
for 1 or 2 hours before use.
Supplied Accessories
Paste
Note about copyright laws
Check the copyright laws in your country before
recording from CDs. Recording of copyrighted
material may infringe copyright laws.
■ Safety precautions
Avoid moisture, water and dust
Do not place the system in moist or dusty places.
3
Check to be sure you have all of the supplied
accessories.
The number in parentheses is the quantity of the
pieces supplied. If anything is missing, contact
your dealer immediately.
Remote control (1)
Batteries (2)
FM antenna (1)
AM loop antenna (1)
Page 7

Preparation
Part Description
14
16
19, 22
16 14
Introduction
The numbers refer to the pages in which the parts are explained.
12
12
11
23, 25 11 13 17, 18
19 20
Cassette holder: 19
PUSH-OPEN
Preparation
11, 1 4
9, 12
Remote control sensor: 5
16, 22
16, 22
* This terminal is for connecting a pair of headphones equipped with a stereo mini plug (commercially avail-
able). While the headphones are connected, the speakers do not produce any sound.
16, 19
14, 16, 19
14, 16, 19
CD tray: 16
21
12
16
11
4
Page 8
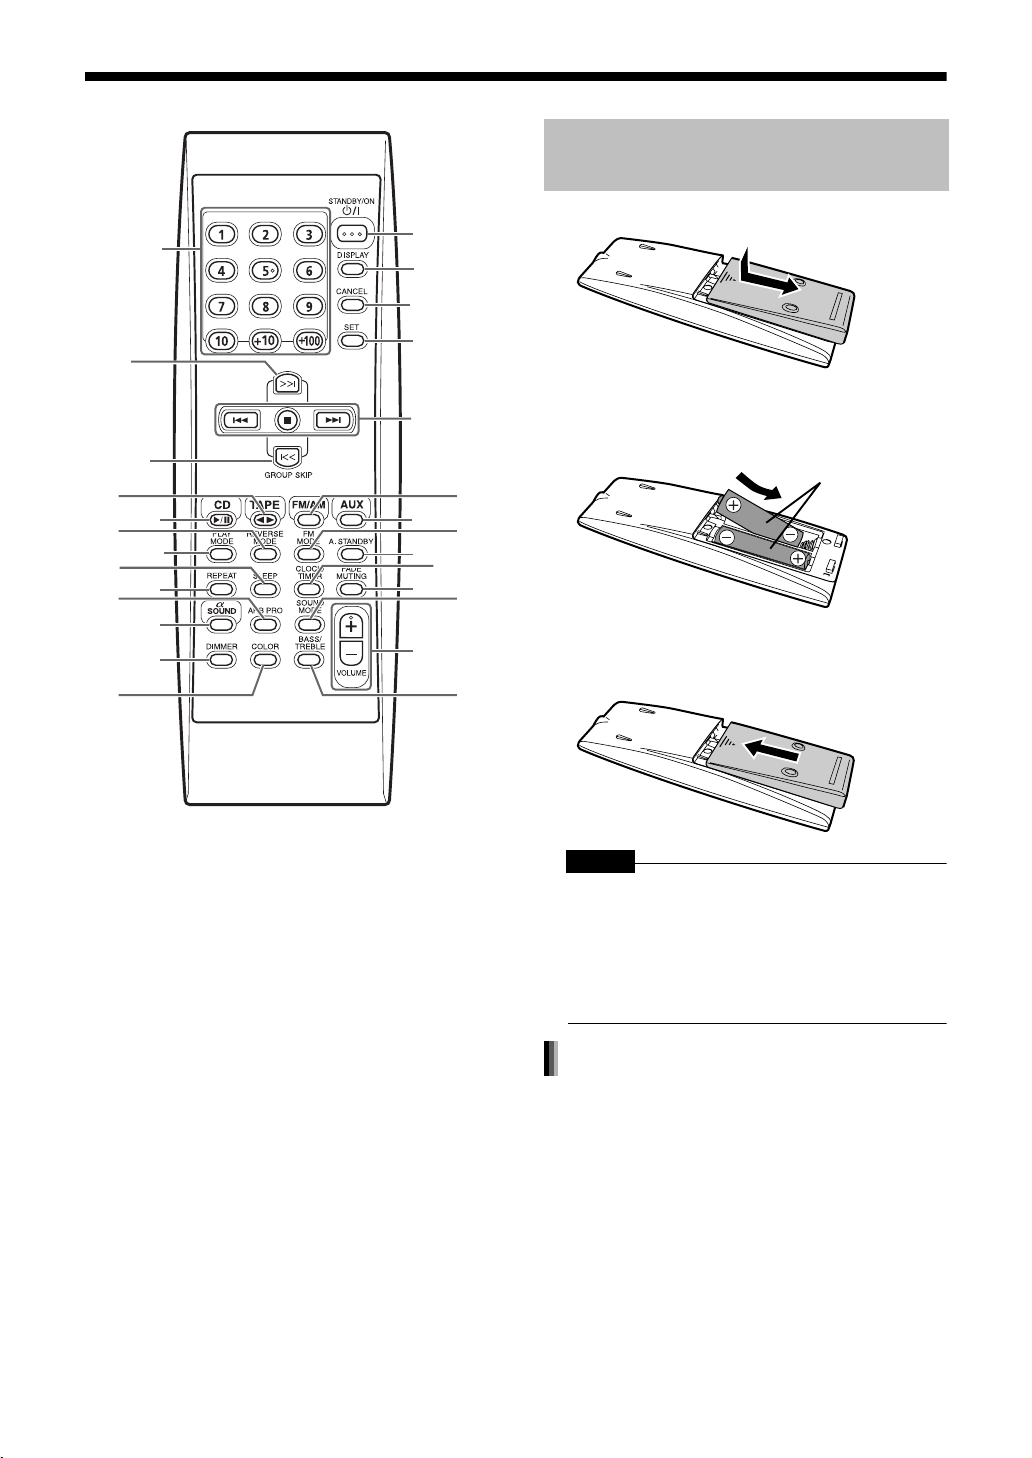
Remote Control
The numbers refer to the pages in which the parts are explained.
Inserting Batteries into the
Remote Control
10,15,
17
16, 22
16, 22
19
19
17, 18
23
11
16
17
12
13
11
10
17, 18,
24
15, 23
25
16, 19
20
13
10, 23
11
11
11
R6P(SUM-3)/
AA(15F) type dry-cell
batteries (2)
14
14
1112
CAUTION
• Do not use a used battery and a new battery
together.
• Do not use different types of batteries at the
same time.
• Take out the batteries if the remote control is not
to be used for a long time. Otherwise it may
cause a leakage.
Remote control operation
• When operating the remote control, point it at
the front panel of the main unit.
• The effective distance between the remote control and the remote control sensor on the main
unit is approximately 5 m maximum.
• When the effective distance decreases, replace
the batteries.
• Do not drop the remote control or subject it to
excessive shock.
5
Page 9
Introduction
Connections
Connect all necessary parts before connecting the power plug.
Connecting the Antennas
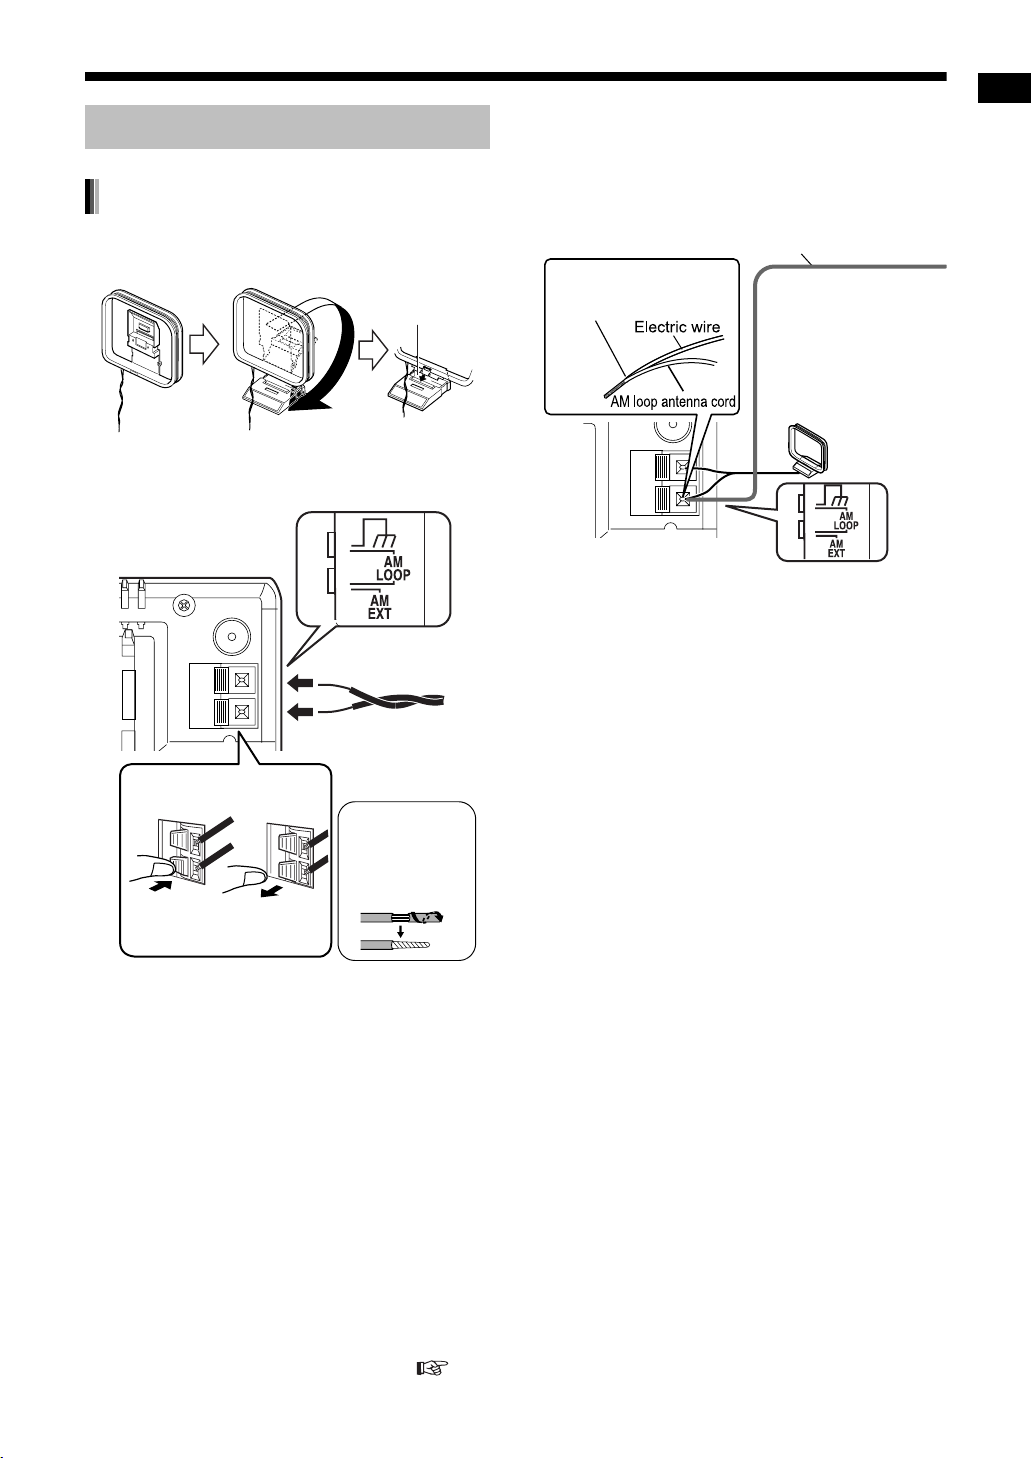
Connecting the AM antenna
1 Set up the AM loop antenna
(supplied).
Insert the tab into
the slot.
2 Connect the antenna cord.
Main unit (side view)
Main unit (rear view)
■ When radio reception with the supplied AM
loop antenna is poor
Electric wire: 3 - 5 m (commercially available)
Twist together electric
wire and the AM loop
antenna cord.
Main unit (rear view)
Stretch out the electric
wire horizontally,
preferably in a high place
such as above a window
or outdoors.
Connect the AM loop
antenna cord to the main
unit together with the
electric wire.
Preparation
Connecting the antenna
cord
When insulation
covers the tips of
the antenna cord,
twist and pull off
Connect the ends of
the antenna cord as
shown above.
the insulation.
3 Turn the AM loop antenna to find
the best position for radio
reception.
Place the AM loop antenna as far
from the main unit as possible.
• Do not place the AM loop antenna on a
metallic table or close to a TV, computer, or
other electric appliance. Doing so may affect
radio reception.
When positioning the antennas, find the best position for reception while listening to an actual radio program
(refer to "Listening to Radio Broadcasts" ( page 14)).
6
Page 10
(Continued)
Connections
Connect all necessary parts before connecting the power plug.
Connecting the FM antenna
Main unit (rear view)
FM antenna
(supplied)
Main unit (side view)
Stretch out the FM antenna to the best position for
radio reception, and then fix it with adhesive tape.
■ When radio reception with the supplied FM
antenna is poor, or when using a communal
antenna
Main unit (side view)
Main unit
(rear view)
Antenna cord (sold
separately)
or
Converter (sold
separately:
compatible with
300
Ω/75 Ω)
Depending on the radio reception
conditions, an FM feeder antenna (sold
separately: compatible with 300 Ω) can be
used. In the case, a converter (sold
separately) is required.
When using an antenna other than those supplied
with this product, refer to the operation manuals for
the antenna and converter for details of
connection.
Communal
antenna terminal
Outdoor FM antenna
(commercially
available)
Coaxial cable
(commercially
available)
When positioning the antennas, find the best position for reception while listening to an actual radio program
(refer to "Listening to Radio Broadcasts" ( page 14)).
7
Page 11

Connecting the Speakers
Introduction
There is no difference between the left and right
speakers.
Main unit (rear view)
Speaker cord
Speaker cord
Red
Black
After connecting the speakers, gently pull on the
speaker cords to make sure the cords are firmly
connected and do not pull out.
Speaker cord
Red
Black
Preparation
Right speaker (rear view)
CAUTION
• Do not short-circuit the and speaker terminals. Doing so may damage the speakers.
• Do not connect other speakers together with the
supplied speakers. The change in impedance
may damage the main unit and the speakers.
You can detach the speaker cover.
Speaker
cover
Left speaker (rear view)
NOTE
• Improper speaker cord connection spoils the stereo
effect and sound quality.
• The impedance of speakers connected to this
product must be within the range 4 Ω to 16 Ω.
• Cooling fan is built into the main unit for emitting
generated heat. When you turn on the main unit,
the internal cooling fan automatically starts
rotating. To ensure sufficient cooling, leave a
space of more than 1 cm between the main unit
and the speakers or other objects.
• The supplied speakers do not conform to magnetically shielded design. Place the speakers
enough distance from a TV so that they do not
cause color irregularity on the TV.
8
Page 12

(Continued)
Connections
Connect all necessary parts before connecting the power plug.
Connecting Other Equipment
Read this section when connecting other audio
equipment to this product.
Other audio
equipment
Audio cord
(not supplied)
Main unit (rear view)
CAUTION
• Before connecting other equipment, turn off both
the main unit and other equipment.
Connecting the Power Plug
AC outlet Main unit (rear view)
• After making all other necessary connections,
connect in the power plug.
Demonstration display function
When you connect the power plug into the AC outlet, "DEMO START!" appears in the display window and the demonstration display starts.
When you press on the main unit, "DEMO
OFF" appears in the display window and the demonstration display is canceled.
Turning on the main unit automatically cancels the
demonstration display.
Resuming the demonstration display
With the power turned off, press on the main
unit.
Hiding the demonstration display
With the power turned off, hold down
until "DEMO CLEAR" appears.
Disconnecting and then reconnecting the
power plug does not start the demonstration display.
To activate the demonstration display
again, hold down until "DEMO
START!" appears.
NOTE
• If not using this product for a long period, disconnect the power plug from the AC outlet for safety
and to save electricity.
9
Page 13

Basic Operations
Basic Operations
About this manual
• This manual explains the operations
assuming that you will use the remote control. Some buttons on the main unit are the
same as those on the remote control. You
can use either button in this case.
• Some diagrams in this manual are simplified or exaggerated for the purpose of
explanation.
• You can operate some functions differently
from the explanation given in this manual.
Number buttons
• You can use the number buttons to specify
the hour.
Refer to "Using the number buttons" shown
below.
Basic Operations
3 Press .
• To return to step 2, press .
4 Set the minute in the same manner
as steps 2 and 3.
Adjusting the clock
Press four times to display the clock, and then
adjust the clock starting from step 2.
Setting the Clock
You can set the clock while the main unit is turned
either on or off.
Example: To set the clock to 10:10 a.m.
1 Press .
2 Set the hour.
Displaying the clock while using the
main unit
Press repeatedly.
NOTE
• The time display on the main unit is a 24-hour
clock.
• The clock will gain or lose approximately 1
minute per month.
• Set the clock again after you have disconnected
the power plug or a power cut has occurred.
Using the number buttons
Examples:3:
13: →
20: →
23: → →
123: → → →
• is used when you select an MP3 track.
Back Next
• Holding down the button causes the hour to
increment.
10
Page 14

(Continued)
Basic Operations
Turning On/Off the Main Unit
Press (or on the main unit).
• With the power off, pressing either button
turns on the main unit.
Remote control:
Main unit:
Pressing one of these buttons other than
changes the sound source. When a
CD or cassette tape has been loaded, playback starts.
NOTE
• Cooling fan is built into the main unit for emitting
generated heat. When you turn on the main unit,
the internal cooling fan automatically starts rotating.
Adjusting the Volume
Press .
NOTE
• You can also adjust the volume by turning the VOLUME control on the main unit.
• You can adjust the volume within the range 0 to 40.
Temporarily Turning Off t he
Sound (FADE MUTING)
Sound Mode
Press .
• Each time you press , the display toggles as follows.
: For sharp sound.
: For soft sound.
: For background music.
: For refreshing sound.
: For melancholy sound.
: Cancels the sound
mode (factory setting).
• While the sound mode is set to an item other
than "NORMAL", is displayed in
the display window.
NOTE
• This function does not affect recording sound.
Sound mode
A combination of JVC sound technologies
enables you to select the desired sound
pattern.
Adjusting the Sound Quality
Press .
• "FADE MUTING" appears and the volume
reduces to "0".
• To return to the previous volume, press
again.
Emphasizing Heavy Bass
Sound (AHB PRO)
Press .
• Each time you press , AHB PRO
function toggles between "ON" and
"OFF".
• While AHB PRO function is activated,
is displayed in the display
window.
• "AHB PRO" stands for "Active Hyper
Bass PRO".
11
1 Press repeatedly to display
"NORMAL".
2 Press to display "BASS" or
"TREBLE".
: Adjusts the bass sound.
: Adjusts the treble sound.
3
While "BASS" or "TREBLE" is displayed in the display window, press
to adjust the sound quality.
• You can adjust the sound quality within the
range -5 to +5.
• The display returns to the sound source display in a few seconds.
Page 15

NOTE
• While the sound mode is activated, "NO OPERATE" is displayed and you cannot adjust the sound
quality ( page 11).
Canceling the sound mode returns both the bass
and treble sounds to "0".
α
Sound
Press .
Changing the Color Patterns
for the Display Window and
CD Tray
Press (or on the main unit).
Basic Operations
• Each time you press , the display toggles as follows.
• Each time you press , the display toggles as follows.
: Produces a natural sound
field.
: Produces a comfortable
sound field.
: Produces a deeper
sound field.
: Cancels α sound (factory
preset).
•While α sound is activated, is
displayed in the display window.
NOTE
• This function does not affect recording sound.
• While the sound mode is activated, using α
sound cancels the sound mode ( page 11).
Conversely, while α sound is activated, using the
sound mode cancels α sound.
α Sound
α (alpha) waves are regarded as one type
of brain wave that is emitted when a person
is relaxed. JVC's α DIMENSION SOUND
function is designed to produce natural and
comfortable sound that makes you feel
relaxed. The natural surround effect is
completed by
1) modulation which adds fluctuation with
the α wave frequency to subtracted
waves (left-right indirect sound)
2) sound correction for covering the middle
range of waves in music signals which
naturally tend to dissipate.
: For a rainbow-like
pattern.
: For a flower-image
pattern.
: Gradually changes
the color pattern in a
cycle of approximately
20 seconds.
: For an ocean-image
pattern.
: For a fantasy pattern.
: For the color of your
choice. (The setting
shown on the left is
factory setting.)
Setting your favorite color for the
display window and CD tray
1 Press repeatedly to display
"MANUAL".
2 Press or to select a com-
ponent color.
• Numerical value of the selected component
color flashes.
(Continued on the next page)
12
Page 16

(Continued)
Basic Operations
3 Press to adjust the intensity of
the component color.
• You can adjust the color intensity within the
range "0" to "3".
You cannot set all three component colors
(red, green, and blue) to "0" at the same
time.
NOTE
• You can also adjust the color intensity by turning
the VOLUME control on the main unit.
• After you have adjusted each component color,
the display returns to the sound source display in
approximately 8 seconds.
• You cannot set different colors for the display
window and CD tray.
• When you operate a button on the main unit or
remote control, the display window and CD tray
light in pale blue for approximately 2 seconds.
• When recording finishes, the color of the display
window and CD tray switches to the color set in
"MANUAL" to inform you that recording has
finished.
When you operate the main unit after recording
finishes, the color pattern for the display window
and CD tray returns to the selected pattern.
Changing the brightness of the
display window and CD tray
(DIMMER)
Press .
• Each time you press , the display tog-
gles as follows.
: Color pattern
becomes dimmer.
: Color pattern
becomes darker, and
switches to blue.
: Cancels the
brightness adj ustment
(factory setting).
NOTE
• Once you press to change the color pattern,
the brightness returns to the factory setting.
• When you turn off the main unit, the brightness
also returns to the factory setting.
• You cannot turn off the color pattern.
Auto Standby
If no sound is produced for 3 or more minutes
when the CD or cassette tape is selected as a
sound source, the main unit automatically turns off.
■ When the CD or cassette tape is selected
as a sound source
Press .
"A. STANDBY" stands for "Auto Standby".
Auto standby indicator
Auto standby performance
When playback or recording finishes, auto standby
starts the countdown (The "A.STANDBY" indicator
flashes). When no operation is carried out within 3
minutes, the main unit automatically turns off.
When you start playback or recording within 3 minutes, auto standby starts the countdown again
after playback or recording finishes.
When an operation other than playback and
recording finishes and no operation is carried out
within 3 minutes, the main unit automatically turns
off.
"A. STANDBY OFF" starts to flash 20 seconds
before the main unit is to turn off.
Canceling auto standby
Press once again.
NOTE
• Leaving the volume at "0" is not the same as producing no sound, and therefore does not start the
auto standby function.
13
Page 17

Listening to Radio Broadcasts
Listening to Radio Broadcasts
This product can receive FM and AM radio broadcasts.
Number buttons
Selecting a Radio Station
1 Press to select "FM" or "AM".
Example: Display while an FM radio broadcast
is received.
Stereo indicator
2 Press or repeatedly to
select a radio station (frequency).
• You can also select a radio station using the
automatic tuning.
Automatic tuning:
Hold down or until the frequency
starts changing, and then release the button.
When the main unit has received a broadcast,
the frequency automatically stops changing.
To quit the function while searching for a
broadcast, press or .
Preset number ( page 15)
Listening to Radio Broadcasts
Frequency
• When the main unit has received an FM ste-
reo broadcast, "STEREO" lights up.
NOTE
• If an FM stereo broadcast is difficult to hear
because of noise, you may be able to hear more
easily by pressing to switch the sound to mon-
aural reception. In this case, "MONO" lights up. To
return the sound to stereo reception, press
again or select another FM radio station.
14
Page 18

(Continued)
Listening to Radio Broadcasts
Storing Radio Stations
(Preset)
You can store up to 30 FM radio stations and up to
15 AM radio stations.
■ While the broadcast from the radio station
you want to preset is being received
1 Press .
• The preset number flashes for approximately 5 seconds.
2 While the preset number is flash-
ing, press the number buttons
( - or ) to select the
preset number you want to use.
• Refer to "Using the number buttons"
( page 10).
3 While the selected number is
flashing, press .
• "STORED" appears and the selected radio
station is stored.
NOTE
• When you store a radio station to a preset number
to which another radio station has previously been
stored, the newly set radio station replaces the previously stored radio station.
Tuning In to a Preset Radio
Station
■ While an FM or AM broadcast is being
received
Use the number buttons to select the
preset number of the radio station to
which you want to tune in.
Refer to "Using the number buttons"
( page 10).
15
Page 19

Listening to CDs
Listening to CDs
This product can play back CDs and finalized CDRs/CD-RWs (recorded in audio CDs or MP3 format).
Number buttons
2 Place a CD on the CD tray.
Listening to CDs
• When you want to listen to an 8 cm CD,
place it on the inner hollow of the CD tray.
3 Press .
■ Display during CD playback
CD indicator
(The CD indicator lights up while the CD is
stopped. The CD indicator flashes while the
CD is being played back or paused.)
Elapsed playing time
Track number
Operation
Stop
Pause
Skip
Fast forward/
Rewind
(Search)
Eject
Press .
Press during playback.
Pressing again resumes
playback.
Press the button repeatedly.
:
:
Repeatedly press or hold
:
down the button to skip
:
groups (only for MP3s).
You can also use on
the main unit to skip groups.
Hold down the button during
:
playback.
:
Press on the main unit.
1 Press on the main unit.
• The CD tray comes out.
■ Display while the CD is stopped
Total number of tracks
Total playing time
■ Display during MP3 disc playback
Group number
• At first, a track title (file name) is scrolled.
• Tag information (title/artist/album) is scrolled
followed by a track title.
• Only alphanumerical characters are displayed
properly as a track title or tag information.
Track number
Elapsed playing time
■ Display while the MP3 disc is stopped
Total number of tracks
Total number of groups
16
Page 20

(Continued)
Listening to CDs
Specifying the Track (Direct
Track Selection)
Press the number buttons to select
the track you want to listen to.
• Refer to "Using the number buttons" ( page
10).
Repeat Playback
This function allows you to repeatedly listen to the
same track.
During CD playback, press repeatedly to select the repeat mode.
• Each time you press , the display toggles as
follows.
Example: While "REPEAT ALL" is selected
Repeat indicator
Program Playback
This function allows you program up to 50 tracks.
1
Press , and then press .
2 Press to select "PROGRAM".
CD or MP3
Program indicator
3 Press the number buttons to
select the track numbers.
• Refer to "Using the number buttons" (
page 10).
For CDs
Track number Program number
: For repeating all tracks in a disc.
: For repeating one group (only
for MP3s).
: For repeating one track.
: For canceling repeat playback.
NOTE
• Ejecting the CD or turning off the main unit also
cancels repeat playback.
Total time for program playback
For MP3s
Track number
Program number
NOTE
• When you want to erase the program, press
while playback is stopped. Programmed tracks are
erased one by one from the last track. Holding
down erases all programmed tracks.
• When you try to program the 51st track, "MEMORY FULL" appears in the display window to
indicate that 51 or more tracks cannot be programmed.
• When total time for program playback reaches 1
hour 40 minutes, "--:--" appears.
• When you program tracks from an MP3, the total
time is not displayed.
4 Press .
17
Page 21

Confirming the programmed track
order
While playback is stopped, press
or repeatedly.
• You can add a track as the last track in the
program, or erase the last track.
( step 3 on page 17)
Canceling the random playback
While playback is stopped, press
repeatedly to display an item other
than "RANDOM".
NOTE
• Ejecting the CD or turning off the main unit also
cancels random playback.
Listening to CDs
Canceling the program playback
While playback is stopped, press
repeatedly to display an item other
than "PROGRAM".
• This operation does not erase the program.
Erasing the all programmed tracks
While playback is stopped, hold down
.
NOTE
• Ejecting the CD or turning off the main unit also
cancels the all programmed tracks. This operation
also cancels program playback.
Random Playback
This function allows you to listen to tracks in random order.
1
Press , and then press .
2 Press repeatedly to select
"RANDOM".
CD or MP3
Notes on MP3s
• This product will only recognize sound file
(tracks) types with "MP3" or "mp3" as extensions, which can be in any combination of upper
or lower case.
• It is recommended that you record MP3 tracks at
a 44.1 kHz sampling frequency, using a 128
kbps data transfer rate.
• Some MP3 tracks may not be played back
because of their characteristics or recording
conditions.
• You can playback the discs containing the tracks
in music CD format or MP3 files in ISO 9660 format.
• MP3 discs require a longer readout time than
normal discs.
Random indicator
3 Press .
NOTE
• Pressing repeatedly does not return playback to the previous track.
• Each track is played back once.
• This product recognizes up to 999 tracks on a
disc (or less depending on the recording condition of a disc).
18
Page 22

Listening to Cassette Tapes
Listening to Cassette Tapes
Cassette tape indicator
(The cassette tape indicator lights up while the cassette tape is stopped. The cassette tape indicator
flashes while the cassette tape is being played back.)
Operation
Stop
Fast forward/
Rewind
Press .
Press or .
When a cassette tape is played back in
the normal direction ( ), is fast
forward and is rewind.
When the cassette tape is played back
in the opposite direction ( ), is
fast forward and is rewind.
1 Insert a cassette tape.
Insert a cassette tape
Press .
with the side you want to
listen to facing up.
Cassette tape playback
direction ( : normal direction/ : opposite direction)
CAUTION
• Before using a cassette tape, wind up any slack in
the cassette tape. ( page 27)
• Do not use long cassette tapes such as C-120 or
C-150. Long cassette tapes are thin and stretch
easily, and may become tangled in the inner part
of the main unit.
• This product is compatible with playback of
TYPE I cassette tapes. Playback of TYPE II or
TYPE IV cassette tapes is not recommended,
because this product does not meet the specifications for these tapes. The main unit does not
produce the proper sound from these cassette
tape types.
Reverse mode
2 Press repeatedly to select the
reverse mode.
: For one return playback of both
sides.
: For repeated playback of both sides
(Playback continues until playback is
stopped.)
: For one-way playback of either side.
3 Press .
• Playback starts.
• When the main unit is turned off, pressing
automatically turns on the main unit.
• Each time you press , the cassette tape
playback direction changes. The initial playback direction after you have inserted a cassette tape is always the normal direction.
• The cassette tape playback direction indica-
tor facing right is displayed during normal
playback. The indicator facing left is displayed during reverse playback.
19
Page 23

Listening to Other Equipment
Listening to Other Equipment
You can listen to sound from other audio equipment connected to the AUX terminals on the rear
side of the main unit ( page 9).
1 Press .
2 Start other equipment playback.
• Refer to the operation manual for the connected equipment.
3 Adjust the volume and make other
necessary settings.
• For adjusting the volume and making other
necessary settings, refer to "Basic Opera-
tions" ( pages 11 - 13).
Adjusting the Sound Input
Level from Other Equipment
You can adjust the sound input level from the connected equipment.
• While the sound source is selected to AUX, you
can adjust the sound input level.
Listening to Cassette Tapes/Listening to Other Equipment
Hold down until the input level
appears.
• Each time you hold down , the display
toggles as follows.
For ordinary use. (factory setting)
For increasing the input level
from the connected equipment.
20
Page 24

Recording Sound
Recording Sound to Cassette Tapes
Main unit
Remote control
NOTE
• The sound input level during recording is
automatically adjusted.
• When you record tracks from a CD or MP3, a 4second blank is inserted between tracks in the
recording. You can record tracks with no blank
time. ( page 22)
CAUTION
• It may be unlawful to record or playback
copyright material without the consent of the
copyright owner.
• Do not use long cassette tapes such as C-120 or
C-150. Long cassette tapes are thin and stretch
easily, and may become tangled in the inner part
of the main unit.
• Since this product is not compatible with TYPE II
and TYPE IV cassette tapes, do not use these
types of cassette tapes. This product does not
meet the specifications for these tapes, so sound
is not properly recorded to these types of cassette tapes. You cannot obtain proper playback
sound.
• When you want to use the cassette tape for
recording again, cover the tag holes with adhesive tape.
Write protect
tag for side B
Write protect
tag for side A
1 Insert a cassette tape for
recording.
• Before inserting the cassette tape, wind the
tape past the leader part of the cassette
tape.
Magnetic tape
(recordable part)
Leader tape (unrecordable part)
2 Press to select the reverse
mode.
• Each time you press , the display toggles as follows.
: For one-way recording on either side.
: For one return recording on both sides.
: Pressing automatically starts
one return recording on both sides.
3
Select a sound source for recording.
Sound source Operation
CD or MP3
Radio broadcast
Sound from
other equipment (AUX)
Press , and then press .
(The CD is stopped.)
Select the radio station whose broadcast you want to record ( page 14).
Press and prepare playback on
the other equipment ( page 20).
Preventing recorded sound from
being erased
• Write protect tags are attached to a cassette
tape for preventing the erasing of recorded
sound. They enable you to avoid losing important recordings because once you snap off the
write protect tags, you cannot record to the cassette tape or erase recorded material.
21
4 Press on the main unit.
Page 25

Example: Display while CD sound is recorded.
• When all tracks from a CD or MP3 are
recorded to the cassette tape or the
cassette tape is fully wound, the recording
stops automatically.
• When you want to record sound from other
equipment, start playback on the connected
equipment.
• When recording finishes, the color pattern of
the display window and CD tray switches to
the color pattern set in "MANUAL" to inform
you that recording has finished (
12 and 13).
pages
Recording with No Blank Time
between Tracks
Before proceeding to step 4 on page
21, pause playback of a CD or MP3.
Erasing Recorded Sound
from a Cassette Tape
Select the sound from other equipment (AUX) in step 3 on page 21, and
then press .
• Do not play back any tracks on the connected equipment.
Recording Sound
Quitting Recording
Press .
Recording Only One Track
from a CD or MP3
Before proceeding to step 4 on page
21, play back the track you want to
record.
• Pressing in step 4 returns playback
to the beginning of the track and only that
track is recorded.
Recording the Second or
Subsequent Track to the Last
Track from a CD or MP3
Before proceeding to step 4 on page
21, select the starting track number
with or .
• Pressing in step 4 starts this product
recording from the selected track to the last
track.
• (Only for MP3s) You can also select the
starting group number by pressing or
. You can also use on the main
unit to skip groups.
NOTE
• If the cassette tape reverses direction while a track
is being recorded from a CD or MP3, this product
starts recording that track again from the beginning
onto the reverse side of the cassette tape. However, if 12 or less seconds of that track were
recorded onto the first side of the cassette tape,
recording to the reverse side of the cassette tape
starts from the beginning of the previous track.
Program Recording from a CD
or MP3
Before proceeding to step 4 on page
21, program the tracks you want to
record ( page 17).
22
Page 26

Convenient Functions
Using the Timers
Number buttons
Sleep Timer
Set the clock beforehand. ( page 10)
Confirming the sleep timer setting
(remaining time)
• With the sleep timer activated, press once.
Recording Timer
You can use the recording timer function to record
FM/AM broadcasts or sound from other equipment
to a cassette tape.
You can enter up to three timer settings in total for
the recording timer and the playback timer
( page 25).
NOTE
• Timer settings remain unchanged until the timer is
replaced by new setting.
1 Prepare the sound source.
Radio Preset the radio station whose
broadcast you want to record. (
page 15)
Other
equipment
Follow the operation manual for the
equipment.
When the specified time passes, the main unit
automatically turns off.
Press .
• Each time you press , the time display
(in minutes) toggles as follows.
Cancel (Sleep
indicator disappears.)
Example: To set the sleep timer to 60 minutes
Sleep indicator
NOTE
• When you set the sleep timer, the display window
automatically dims.
• Before the clock has been set (While "0:00" is
flashing), when you press , "CLOCK
ADJUST!" appears.
Changing the sleep timer setting
• Press repeatedly to select the time again.
2 Insert a cassette tape. ( page
19)
3 Press repeatedly to select
"TIMER1", "TIMER2" or "TIMER3".
Example: When "TIMER1" is selected
Timer number
4 Press .
5 Set the starting time and ending
time.
Example:To set the recording time from 6:30
a.m. to 6:45 a.m.
• For setting the clock, refer to "Setting the
Clock" ( page 10).
Entering the hour → → Entering the
minute →
23
Page 27

6 Press or to select
"ONCE" or "EVERYDAY".
ONCE : The recording timer works once.
EVERYDAY: The recording timer works every
day.
7 Press .
8 Press or to select "REC
TIMER".
• "REC" stands for "Recording".
9 Press .
10 Press or to select a
sound source.
Example: To record an FM broadcast to a
cassette tape
• When you want to record sound from other
equipment, you cannot use the recording
timer function to start playback on any
equipment other than this product.
■ When you want to record an FM/AM radio
broadcast
• Press , and then press , or
the number buttons to select the preset
number of the radio station whose broadcast you want to record. Refer to "Using
the number buttons" ( page 10).
NOTE
• During operation, you can return to the previous
step by pressing . You can quit the recording
timer settings by pressing . The settings are
not stored.
Canceling the recording timer
Convenient Functions
In step 3 on page 23, select the timer number you
want to cancel, and then press .
Even when you cancel the recording timer, the set-
ting remains stored.
Activating the recording timer again
In step 3 on page 23, select the timer number you
want to activate, and then press repeatedly
until all of the setting procedure finishes. Then turn
off the main unit.
NOTE
• When you want to activate two or three recording
timers, leave a blank time of 2 or more minutes
between the ending time of the first recording timer
and the starting time of the second recording timer.
If the blank time is less than 2 minutes, the second
recording timer does not work.
• When the power plug is disconnected or the
power is cut, the recording timer settings may be
lost. If the settings are lost, set the clock and
recording timer again.
11 Press .
• The settings appear in the display window.
Confirm the settings.
12 When the main unit is on, press
to turn off the main unit.
• While the recording timer is functioning, the
volume is set to "0" and no sound is produced from the speakers or headphones.
• The recording timer is available only when
the main unit is turned off.
24
Page 28

(Continued)
Using the Timers
Playback Timer
1 Prepare the sound source you
want to play back.
CD or MP3
Cassette
tape
Radio Preset the radio station whose broadcast
Other
equipment
Make sure that a CD is loaded. (
page 16)
Insert a cassette tape. ( page 19)
you want to listen to. ( page 15)
Follow the operation manual for the
equipment.
2 Press repeatedly to select
"TIMER1", "TIMER2" or "TIMER3".
Example: When "TIMER2" is selected
Timer number
3 Press .
4 Set the starting time and ending
time.
Example: When you want to set the playback
time from 7:00 a.m. to 7:30 a.m.
9 Press or to select the
sound source you want to play
back.
Example: When you want to listen to an AM
broadcast
• When you want to listen to sound from other
equipment, you cannot use the playback
timer function to start playback on any
equipment other than this product.
• You cannot use the playback timer function
together with program playback, repeat playback or random playback of a CD or MP3.
■ When you want to listen to an FM/AM radio
broadcast
• (With "FM" or "AM" selected) Press ,
and then press , or the number buttons to select the preset number
of the radio station whose broadcast you
want to listen to ( page 15). Refer to
"Using the number buttons"
( page 10).
■ When you want to play back a CD or MP3
• (With "CD" selected) Press , and then
press , or the number buttons
to select the number of the track you want
to play back first. Refer to "Using the
number buttons" ( page 10).
• For setting the clock, refer to "Setting the
Clock" ( page 10).
Entering the hour → → Entering the
minute →
5 Press or to select
"ONCE" or "EVERYDAY".
ONCE : The playback timer works once.
EVERYDAY: The playback timer works every
day.
6 Press .
7 Press or to select "PLAY
TIMER".
8 Press .
25
10 Press .
11 Press or to adjust the
playback volume.
12 Press .
• The settings appear in the display window.
13 When the main unit is turned on,
press to turn off the main unit.
• The playback timer is available only when
the main unit is off.
Page 29

NOTE
• During operation, you can return to the previous
step by pressing . You can quit the playback
timer settings by pressing . The settings are
not stored.
• When the playback timer starts, the volume gradually increases to the selected level.
Canceling the playback timer
function
In step 2 on page 25, select the timer number you
want to cancel, and then press .
Even when you cancel the playback timer, the set-
ting remains stored.
Activating the playback timer again
In step 2 on page 25, select the timer number you
want to activate, and then press repeatedly
until all of the setting procedure finishes. Then turn
off the main unit.
NOTE
• When you want to activate two or three playback
timers, leave a blank time of 2 or more minutes
between the ending time of the first playback timer
and the starting time of the second playback timer.
If the blank time is less than 2 minutes, the second
playback timer does not work.
• When the power plug is disconnected or the
power is cut, the playback timer settings may be
lost. If the settings are lost, set the clock and
playback timer again.
CD Ejection Lock
Convenient Functions
You can prohibit ejection of a CD.
■ When the main unit is turned off
While holding down , press
on the main unit.
Even if you press , "LOCKED" appears in the
display window and the CD does not come out.
In addition, when you press , while the main
unit is turned off, "LOCKED" appears in the display
window and the main unit does not turn on.
Canceling the CD ejection lock
■ When the main unit is turned off
Carry out the operation explained above once
again.
26
Page 30

Reference
Handling CDs/Cassette Tapes
Handling CDs
• Do not put adhesive tape or stickers, or write on
a CD.
• Do not bend a CD.
• Be sure not to use heart/flower shaped CDs or
other irregularly shaped CDs. The use of such
CDs damages the main unit.
Cleaning CDs
Signal surface
Wipe a CD from the
center outward with a
soft cloth.
• Be sure not to use thinners, benzenes, cleaners
for analog records, or other chemical agents.
Scratches concentrated
on a certain part cause
sound dropout.
Handling cassette tapes
• A slack tape may become
caught in the inner part of
the main unit and damage
the main unit. Before
using a cassette tape,
wind up any slack in
the cassette tape as
shown on the right. Do
not pull out the tape or touch the
tape's surface.
Cleaning the main unit cabinet
• Gently dust the cabinet surface with a soft dry
cloth. When the cabinet is very dirty, dampen the
cloth with a neutral detergent diluted with water,
wring out the cloth well, and then wipe the cabinet with the dampened cloth followed by a soft
dry cloth.
• Do not wipe the cabinet with thinners or benzenes. Wiping it with these agents may cause
discoloration of the cabinet or removal of the
paint. Do not spray insecticides or other highly
volatile agents onto the cabinet. Do not leave
pieces of rubber or plastic on the cabinet for a
long period.
Cleaning the tape deck head
Clean the head, pinch rollers and capstans
approximately every 10 hours of playback time
before the volume falls or sound quality deteriorates
Capstans
Pinch roller Head Pinch roller
Cotton-tipped
swab moistened
with alcohol
27
Page 31

CD Messages
CD message Meaning Possible solution
CANNOT PLAY You are trying to play back an unplayable CD or
a CD that has many scratches.
CD NO DISC No CD is loaded. Place a CD on the CD tray.
Replace the CD.
Troubleshooting
Check the following points before contacting the JVC service center.
Reference
Problem Possible cause Possible solution
No sound is produced
from the speakers.
The clock display is
flashing.
CD playback does not
start.
A certain point cannot be
played back properly.
Certain tracks on an MP3
disc cannot be played
back.
The volume of cassette
tape playback is low.
You cannot record
cassette tape playback.
A radio broadcast cannot
be received.
A whirring noise is
produced.
The timer does not
function.
You cannot operate the
remote control.
Improper connection. Connect all cords properly as in
Headphones are connected. Disconnect the headphone plug. 4
The MP3 disc is recorded utilizing
"packet writing".
The main unit is turned off
because of a power cut. The
power plug is disconnected.
The CD is upside down. Place the CD on the CD tray with the
Moisture has condensed on the
lens.
The CD is scratched or dirty. Clean or replace the CD. 27
These tracks were recorded in a
format other than MP3 format.
The head or capstans are dirty. Clean the head or capstans. 27
The cassette tape is writeprotected.
No antenna is connected. Connect an antenna. 6, 7
The main unit is located close to a
TV, computer, or other electric
appliance.
You did not set the clock. Set the clock. 10
The main unit is turned on. After setting the timer, turn off the main
The remote control batteries are
running low.
"Connections".
This product cannot play back this type
of MP3 disc. Replace the disc.
Reset the clock. 10
letter-printed surface facing up.
Leave the main unit turned on, wait for
approximately 1 or 2 hours, and then
operate the main unit.
This product cannot play back this type
of MP3 disc. Replace the disc.
Cover the write protect tag holes on the
cassette tape with adhesive tape.
Place the main unit away from a TV,
computer, or other electric appliance.
unit.
Replace the batteries with new
batteries.
Reference
page
8
–
16
2
–
21
2
24, 25
5
Operations are disabled. The built-in microprocessor may
When you turn on the
main unit, a noise comes
out from the rear of the
main unit.
malfunction due to external
electrical interference.
The internal cooling fan produces
the noise as it rotates.
Disconnect the power plug, and then
connect it back in.
The noise is not a malfunction. This is
to prevent excessive heat.
–
8, 11
28
Page 32

Specifications
Specifications are subject to change without prior notice.
■CD receiver (CA-UXQ3S)
Amplifier
Output power 20 W + 20 W at 4
Input terminals
<Analogue> AUX×1,
Output terminals
<Analogue> Speaker×1, 20 W/4
Tuner
Frequency FM:87.50 MHz - 108.00 MHz
CD player
Playable discs Audio CDs, MP3
Cassette deck
Frequency response
Normal (type I) 60 Hz - 14 000 Hz
Wow and flutter 0.15% (WRMS)
General
(10% THD)
500 mV/47 k
250 mV/47 k
Impedance 4 Ω - 16
Headphone (×1), 25 mW/32
Impedance 16 Ω - 1 k
AM:522 kHz - 1 710 kHz
Ω
Ω
Ω
:LEVEL1
:LEVEL2
Ω
Ω
■Speaker (SP-UXQ1S)
System 2-way bass reflex type
Speakers Woofer: 10 cm × 1
Power handling 2 0 W
capacity
Impedance 4
Frequency range 56 Hz - 20 kHz
Sound pressure 84 dB/W•m
Dimensions 135 mm (W) × 200.5 mm (H)
Ω
Ω
Mass (approx.) 1.9 kg
Tweeter: 4 cm × 1
Ω
level
× 211.5 mm (D)
(1 unit)
■Micro component system (UX-Q3S)
General
Dimensions 435 mm (W) × 200.5 mm (H)
× 355 mm (D)
Mass (approx.) 8.4 kg
Power requirement AC 240 V , 50 Hz
Power consumption 55 W (at operation)
1 W (on standby)
Dimensions 165 mm (W) × 200 mm (H)
Mass (approx.) 4.6 kg
× 355 mm (D)
29
 Loading...