

Page 1
L R
DVI OUTDVI AUDIO OUT
INPUT 3 INPUT 4
S-VIDEO
Y
P
B
PR
VIDEO
L
R
COMPONENT
AUDIO
Y
P
B
PR
VIDEO
L
R
COMPONENT
AUDIO
VIDEO
L
R
AUDIO
L
R
AUDIO
INPUT 5
/ INPUT 1
AUDIO
AUDIO
OUT
75 Ω
(VHF/UHF)
INPUT 1 INPUT 2
PHOTO
VIEWER
DIGITAL AUDIO
OPTICAL OUT
SERVICE
Back of the TV
Back of the TV
HDMI OUT
HDMI – HDMI
Cable
Coaxial Cable
CABLE or SATELLITE BOX
75Ω
CABLE IN
DVI – HDMI
Cable
Outside Cable Wire
or
HD Satellite Dish
Coaxial Cable
CABLE or SATELLITE BOX
Y PB PR
VIDEO OUT
L R
AUDIO OUT
75Ω
CABLE IN
Component Cables
Audio L/R Cables
Outside Antenna
or
Unscrambled Cable
Composite Cables
for
Analog Audio Only
OR
Outside Cable Wire
or
HD Satellite Dish
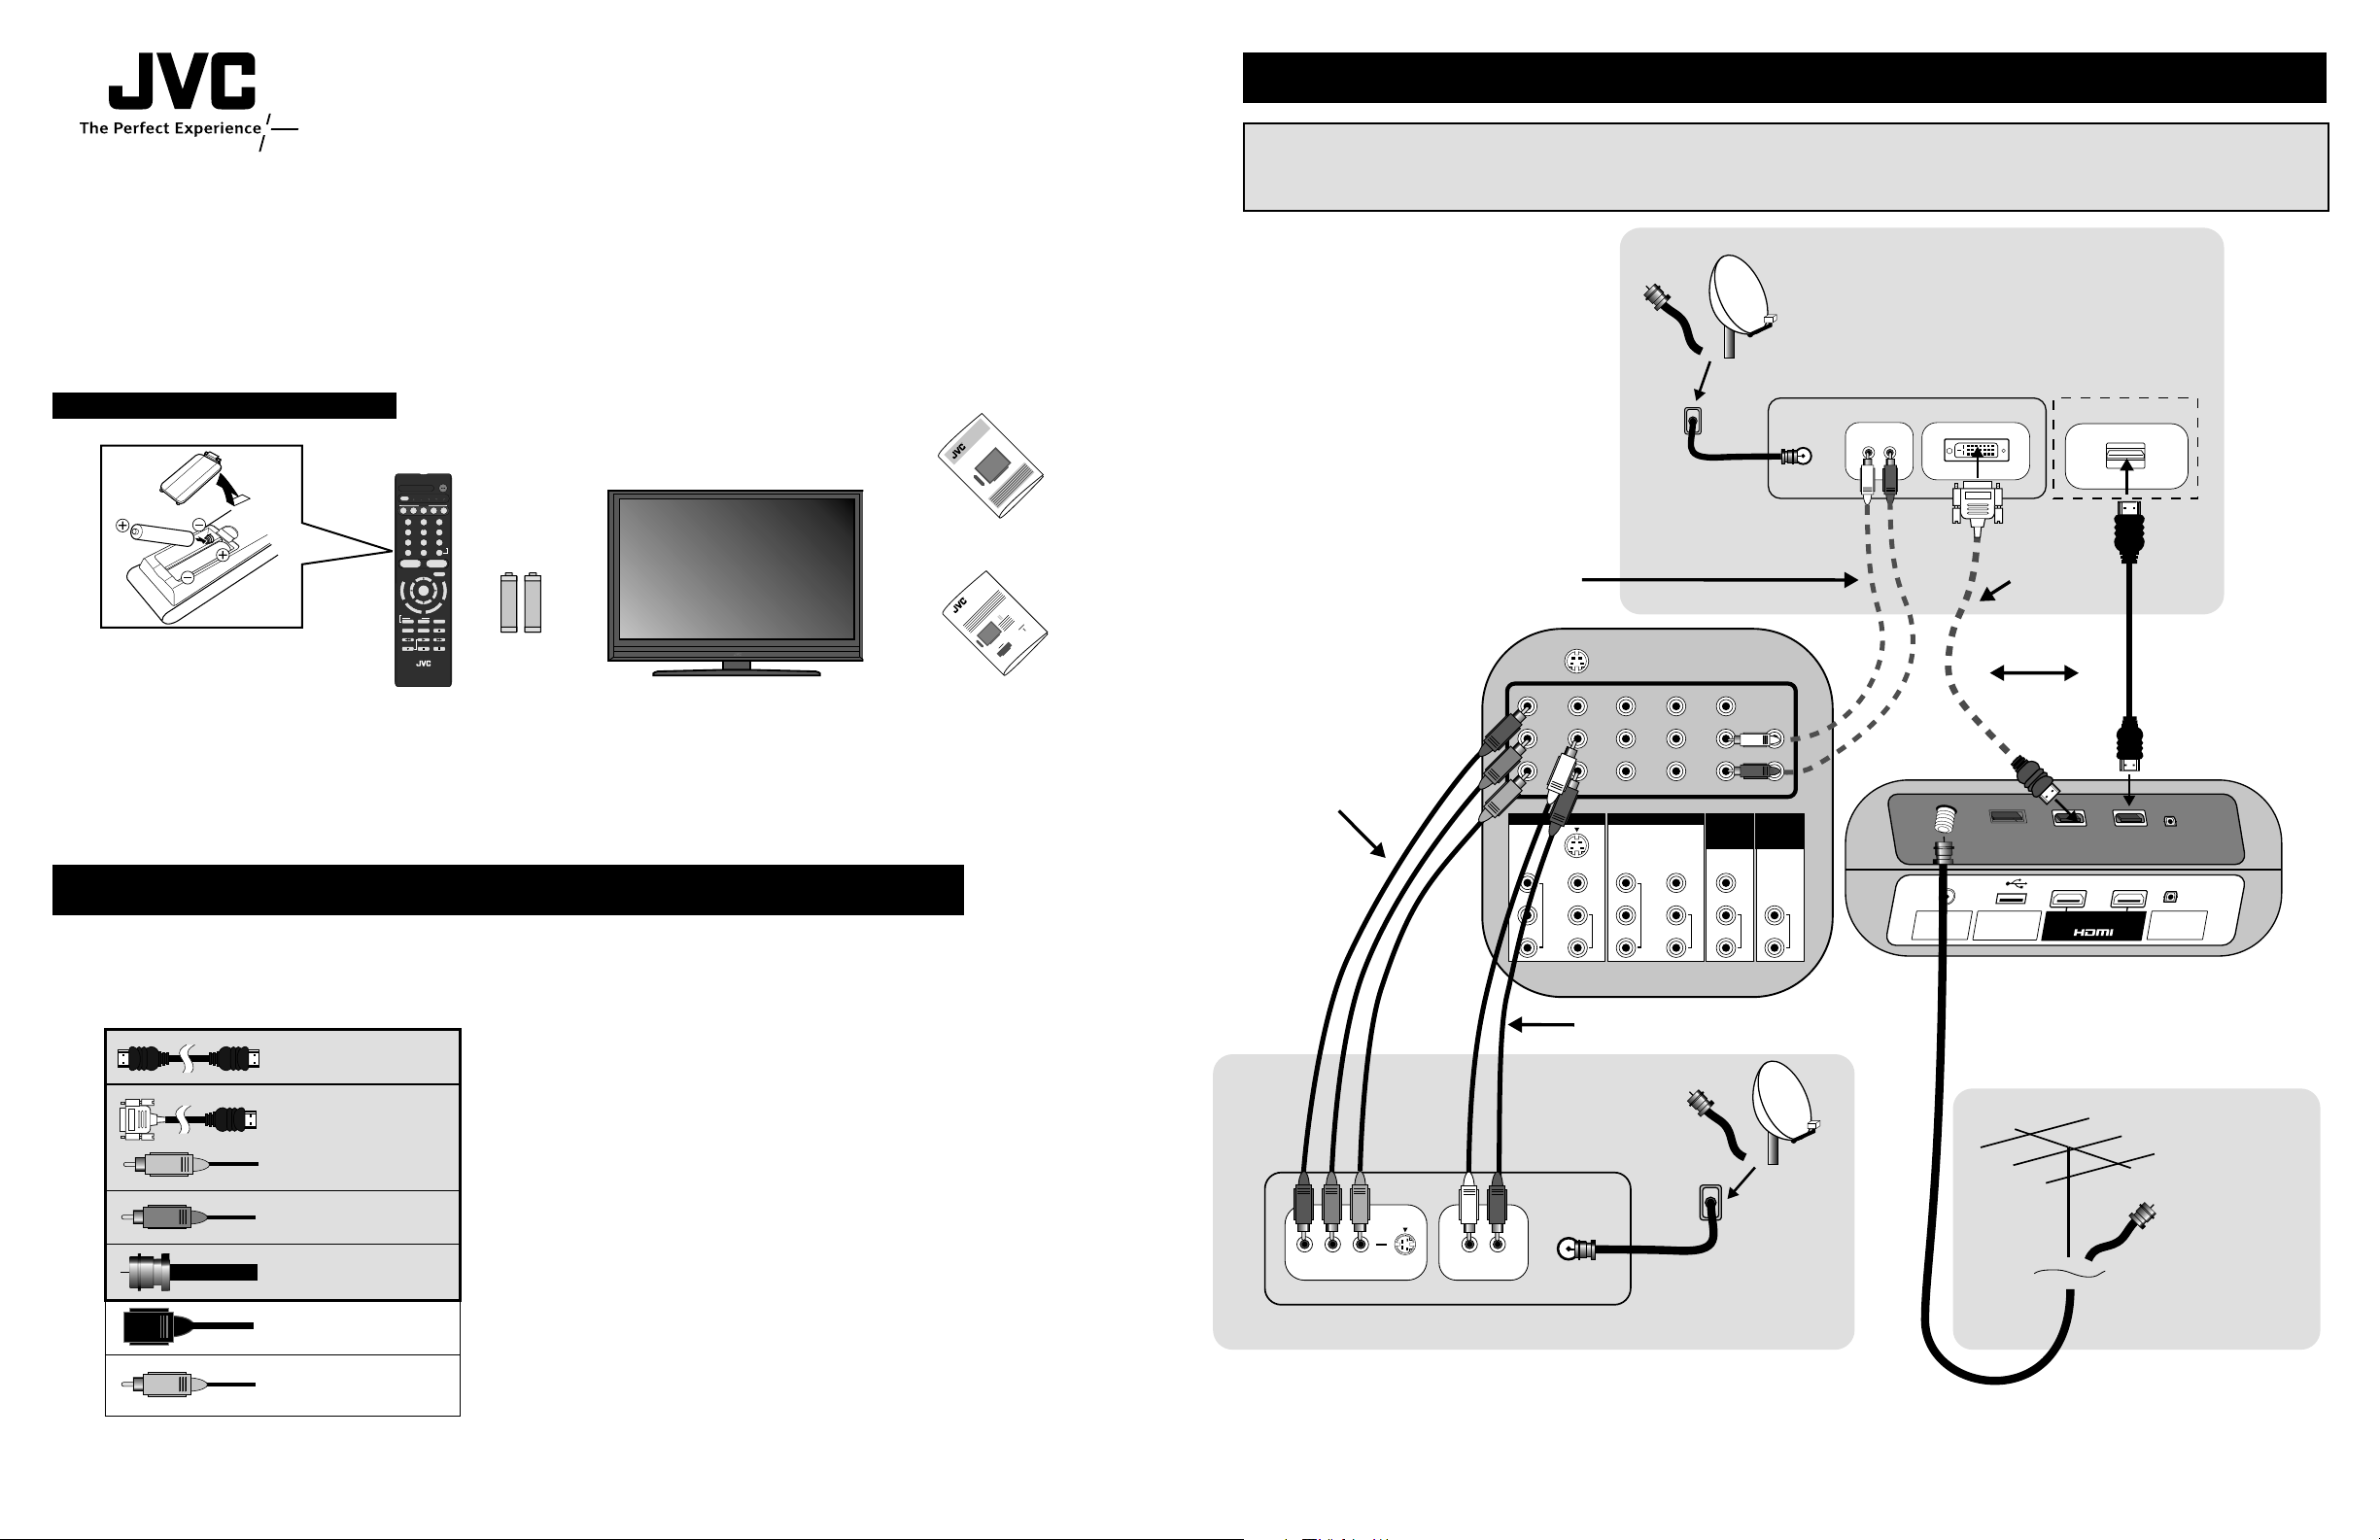
Connecting to an HD Signal
Notes:
• Please choose only one connection type.
• You cannot view HD quality signals with Composite or S-Video cables (Y/C).
1 HDMI to HDMI Cable connection - BEST
1 DVI to HDMI Cable and Audio L/R Cable connection - BETTER
3 Over-The-Air Antenna - OK
2 Component Cable and Audio L/R Cable connection - GOOD
General Note:
• Refer to your cable or satellite provider for more detailed information about their services, equipment and service costs.
Some channels may be unavailable if you are using DVI or HDMI connection.
Quick Setup Guide
Important Notes
• Please read the “Important Safety Precautions” and “Warnings” sections in your users guide before
you begin using your TV.
• Please visit www.jvc.com or call customer service at 1-800-252-5722 if you encounter a
problem with your TV, or to order additional cables or wall mounts.
Make sure you have the following
1 Television
POWER
Two AA
Batteries
+
AA Alkaline
–
+
AA Alkaline
–
1 Remote Control
POWER
MODE
TV STB VCR DVD AUDIO
INPUT
123
456
789
0
TUNE
TV
RETURN
+
MUTING
– CH + – VOL +
RM-C1450
TV
DVR
STATUS
VIDEO
GUIDE
TV/VCR
SUB T.
SUB CH C.C. DISPLAY
SLEEP ML/MTS
SOUND
OK
M
E
N
U
F
A
V
O
R
I
T
E
A
S
P
E
C
T
B
A
C
K
V1 V2 V3 V4 V5
Battery Installation
Satellite / Basic Cable / Cable Box / DVR / DVD Connections
Note:
• Refer to your optional device’s users guide for the best way (if applicable) to connect them as well as “Connecting Your Devices” in your TV users guide.
LCT2333-001A-A
0607FAI-II-IM
1 Users Guide
1 Quick Setup Guide
This HD Quick Setup Guide is intended to help you connect your TV to your HD signals.
* Coaxial Cable can receive over-the-air or unscrambled cable HD (ATSC/QAM)
transmissions when connected directly to the TV (not through a VCR/DVD).
* Component is best used for analog signal.
* Analog composite is better than analog coaxial.
Guide
TV Users
Guide
Quick Setup
HDMI
DVI to HDMI
(with Composite Audio
Cables)
Component
(Y, Pb, Pr, L, R)
*Coaxial 75 Ω (VHF/UHF)
S-Video
*Composite (V, L, R)
Page 2
The first time the TV is turned on, the interactive plug-in menu will appear. This lets you set your preferences for:
language, clock and Auto Tuner Setup.
We recommend you complete the interactive plug-in items before you start using your television.
Note:
• If you press the M
ENU button while setting up the interactive plug-in menu, it will skip over it.
Interactive Plug-in Menu
Use the π†
è
buttons to
move through the menus and
make your selections.
π† Moves to the next item
è
Makes a selection
“O
K“ confirms the operation.
“MENU” opens the menu system.
Set Clock (Automatically)
Language
Set Clock (Manually)
Or ...
Cable Users: After your auto tuner setup
is complete, you may, (depending on the
type of hookup), have only 1 channel,
usually 3 or 4 in the auto tuner memory.
This is normal.
“Now Programming ...” will
appear until it is finished.
Note:
• You can set the clock automatically
only if you are able to receive
broadcasts that contain time data.
This applies ONLY if you are using an
antenna, or cable with no cable box,
and are able to receive PBS (Public
Broadcasting Station). If not, then
you must set your clock manually
Navigating the Onscreen Menu System
Auto Tuner Setup
– VOL +: Raise/Lower the
volume.
– CH +: Move up/down
available channels.
Power
Plug-in Menu
Done
Aspect button
allows you to
adjust the size of
the picture on the
screen. When
using cable box
or satellite, screen
size adjustments
can be also be
performed there.
Connecting your other Digital Devices (Blu-ray / HD DVD / DVD)
INPUT 3 INPUT 4
S-VIDEO
Y
P
B
P
R
VIDEO
L
R
COMPONENT
AUDIO
Y
P
B
P
R
VIDEO
L
R
COMPONENT
AUDIO
VIDEO
L
R
AUDIO
L
R
AUDIO
INPUT 5
/ INPUT 1
AUDIO
AUDIO
OUT
75 Ω
(VHF/UHF)
INPUT 1 INPUT 2
PHOTO
VIEWER
DIGITAL AUDIO
OPTICAL OUT
SERVICE
Back of the TV
Back of the TV
HDMI OUT
HDMI to HDMI
Cable
Blu-ray / HD DVD Player
DVD Player / Recorder
Y PB PR
VIDEO OUT
L R
AUDIO OUT
OR
HDMI OUT
Component Cables
Panorama Zoom
Full
Full Native
Cinema Zoom
Slim
Possible HD Aspect Modes
• See
“Programming
Your Remote” in
your users guide
to program it to
use other devices.
• At first, to watch
your TV, select
the TV mode
by pressing the
M
ODE button on
the remote control
before you turn
the TV power on.
Language/Langue/ Idioma
English
OK
OperateSelect
Set Clock
Mode
Channel
Time
Time Zone
D.S.T.
OK
Operate
Manual
– –
10 : 30 AM
Atlanti c
On
Set
BACK
Back
Set
MENU
Exit
Set Clock
MENU
Mode
ExitSelect
Channel
Time
Time Zone
D.S.T.
OK
Operate
Auto (Analog)
– –
10 : 30 AM
Atlanti c
On
Set
BACK
Back
MENU
ExitSelect
TV STB VCR DVD AUDIO
MODE
V1 V2 V3 V4 V5
123
456
789
TUNE
– CH + – VOL +
U
N
E
M
F
A
V
O
R
I
T
E
DVR
STATUS
SOUND
SUB CH C.C. DISPLAY
TV/VCR
INPUT
RETURN
0
MUTING
OK
C
E
P
S
A
VIDEO
GUIDE
SUB T.
SLEEP ML/MTS
RM-C1450
TV
POWER
TV
T
+
B
A
C
K
Auto Tuner Setup
Tuner Mode
Scan Mode
Cable
Auto
Start
OK
Operate
BACK
Back
MENU
ExitSelect
 Loading...