

Page 1
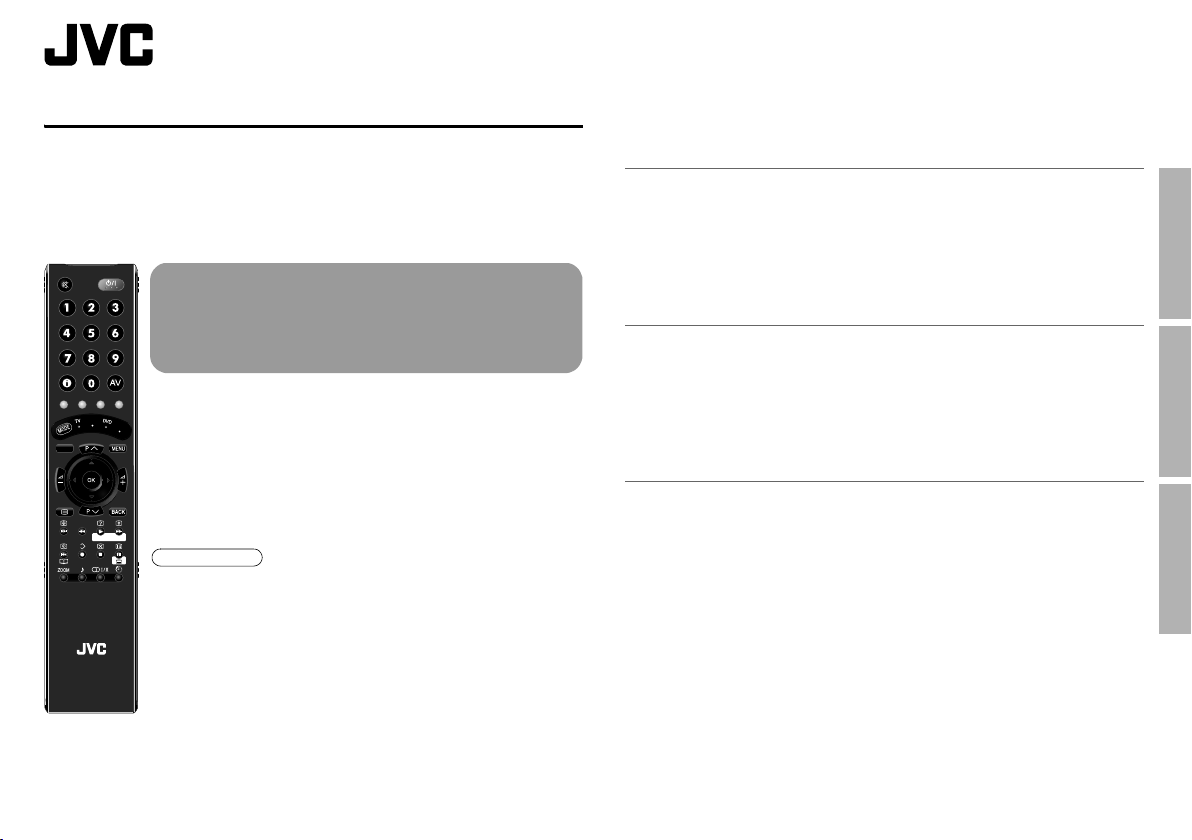
WATCHING DIGITAL CHANNELS
Before reading this manual
Read the separate user manual (INSTRUCTIONS), “Warning”
(P. 2), and understand how to use the TV safely. After that follow the
instructions in “Getting started” (P. 8) to connect the aerial and other
external devices to the TV, and configure the settings for the TV.
This manual only provides information on
watching digital channels. Other information is
explained in the “INSTRUCTIONS”. Please read
both this manual and the “INSTRUCTIONS”
manual.
Digital terrestrial broadcasting (DVB-T)
AUDIO
g Digital channels
Analogue terrestrial broadcasting (VHF / UHF) and
analogue cable TV
g Analogue channels
TV/RADIO
GUIDE
Note
z This TV can receive digital terrestrial broadcasting (DVB-T)
in the United Kingdom. Digital terrestrial broadcasting
(DVB-T) reception in other countries is not guaranteed.
z The on-screen displays (including DTV menus) are in
English. No other languages are available.
TV/DTV
TOP MENU
STB
F.T / L
GUIDE
LCD
Contents
Watching digital channels...........................................................2
Display the programme information .................................................... 4
View subtitles ...................................................................................... 4
Select audio language ........................................................................ 5
View teletext information..................................................................... 5
Using EPG (Electronic Programme Guide) ................................6
Customising your TV ..................................................................8
Edit PR (Edit PR List).......................................................................... 9
Timer................................................................................................. 10
Configuration.....................................................................................12
Setup.................................................................................................13
Installation......................................................................................... 14
Troubleshooting........................................................................16
Technical information ...............................................................17
USE
SETTING
TROUBLE?
GGT0207-003A-L
Page 2
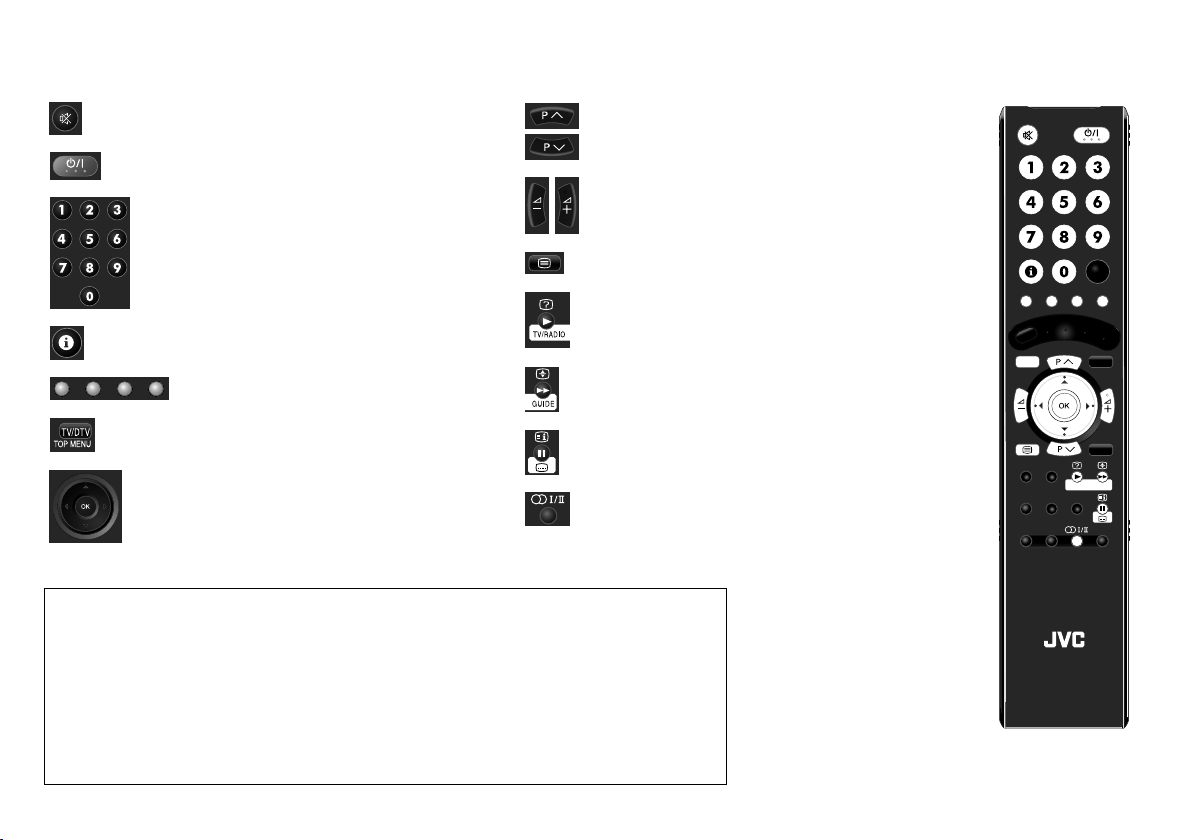
Watching digital channels
The remote control buttons that can be used when watching the digital channels are as follows.
2
Mute.
Select a channel.
Turn on / off (standby) the TV.
Volume control.
Enter channel / page number.
View teletext. (P. 5)
Switch between TV / Radio.
Display programme information. (P. 4)
Colour buttons.
Display the Electronic Programme Guide. (P. 6)
Switch between digital / analogue channels.
View subtitles. (P. 4)
Select a channel with PR List.
Select audio. (P. 5)
For more information, please read the user manual (INSTRUCTIONS).
z Buttons on the remote control unit or the TV buttons.
g “Remote control” (P. 4), “Names and functions of parts” (P. 6)
z To watch pay-TV digital channels.
g “Watch pay-TV digital channels” (P. 8)
z To soften the picture for daily use, change the “Picture Mode” setting in the “Picture” menu.
g “Picture Mode” (P. 26)
z Useful functions for everyday TV viewing.
g “Useful functions” (P. 22)
z Available functions in the menu.
g “Customising your TV” (P. 26)
TV/DTV
TOP MEN U
LCD
TV/RADIO
GUIDE
Page 3
Watching digital channels
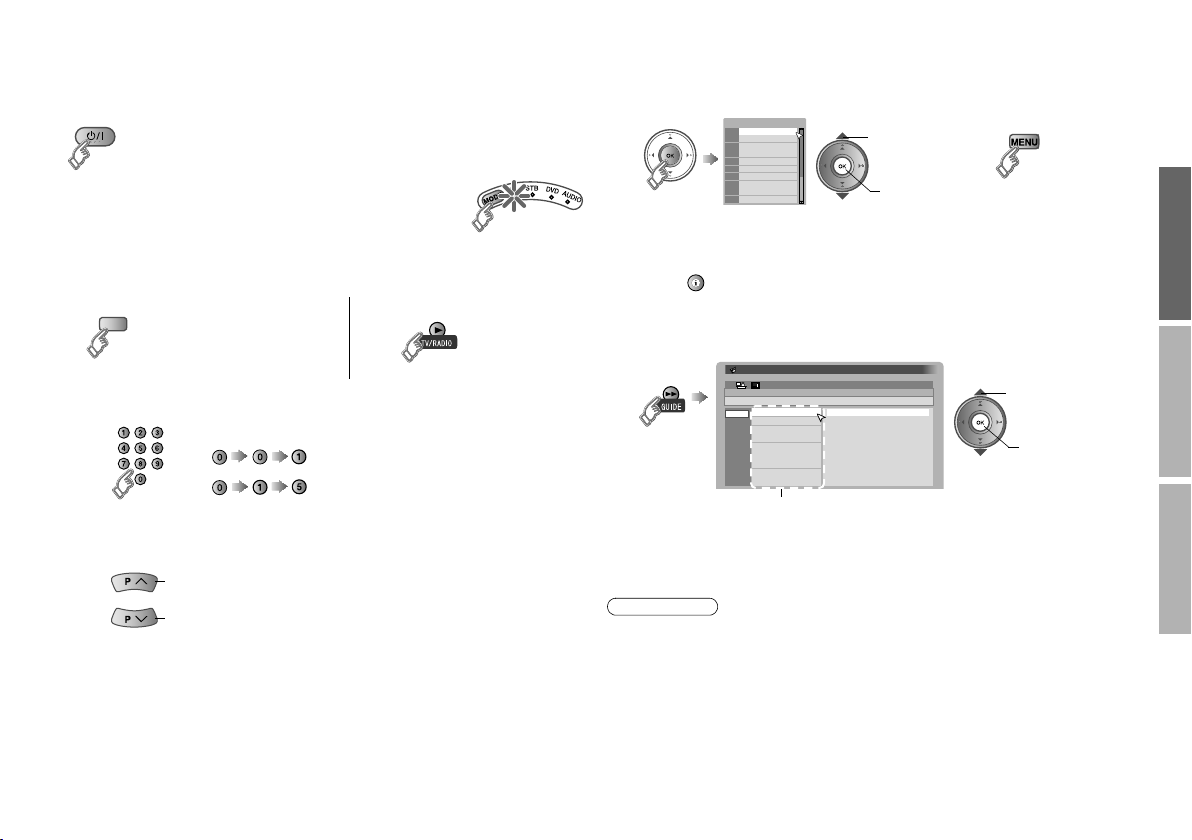
Turn on
1
z If the remote control doesn’t work, confirm that the
mode is set to “TV”.
z Press again to turn the screen off and put the TV into standby mode.
z To completely turn off the TV, unplug the power plug.
Switch to digital channels
2
Select a channel
3
䡵 Enter a channel number
䡵 Move up or down a channel
z You can select only from your favourite channels
The power lamp on the
TV lights.
TV/DTV
E.g.
1:
15:
up
down
g “Favourite Mode” (P. 12)
䡵 Switch TV/RADIO
䡵 Select with PR List
PR List
PR List
BBC ONE
1
BBC TWO
2
ITV1
3
Channel 4
4
five
5
ITV2
6
BBC THREE
7
BBC FOUR
8
ITV3
9
SKY THREE
10
z You can select only from your favourite channels
g “Favourite Mode” (P. 12)
z If you cannot display the PR List by pressing the “OK” button, press
A select
B view
z Close PR List
the “ ” button three times to display the PR List.
䡵 Select with EPG (Electronic Programme Guide)
1. BBC ONE
2. BBC TWO
3. ITV1
4. Channel 4
5. five
6. ITV2
7. BBC THREE
8. BBC FOUR
9. ITV3
EPG
14:00 News
15:00 Golf
17:00 News
17:15 Music
18:00 Weather forecast
18:20 News
18:50 Soccer
20:20 News
20:30 Weather forecast
14:00
05/05/2008
A select
B view
Electronic Programme Guide
BBC ONE
14:00-15:00 News
05/05
06/05
07/05
08/05
09/05
10/05
11/05
12/05
Channels
z Display only programmes which match your selected genre
g “Genre” (P. 7)
Note
z Add a new station. g “Service Scan” (P. 14)
z Edit the “PR List” (digital channel list) according to your liking.
g “Edit PR (Edit PR List)” (P. 9)
z Some digital channels cannot be watched on this TV. g (P. 17)
USE
SETTING
TROUBLE?
3
Page 4
Watching digital channels
4
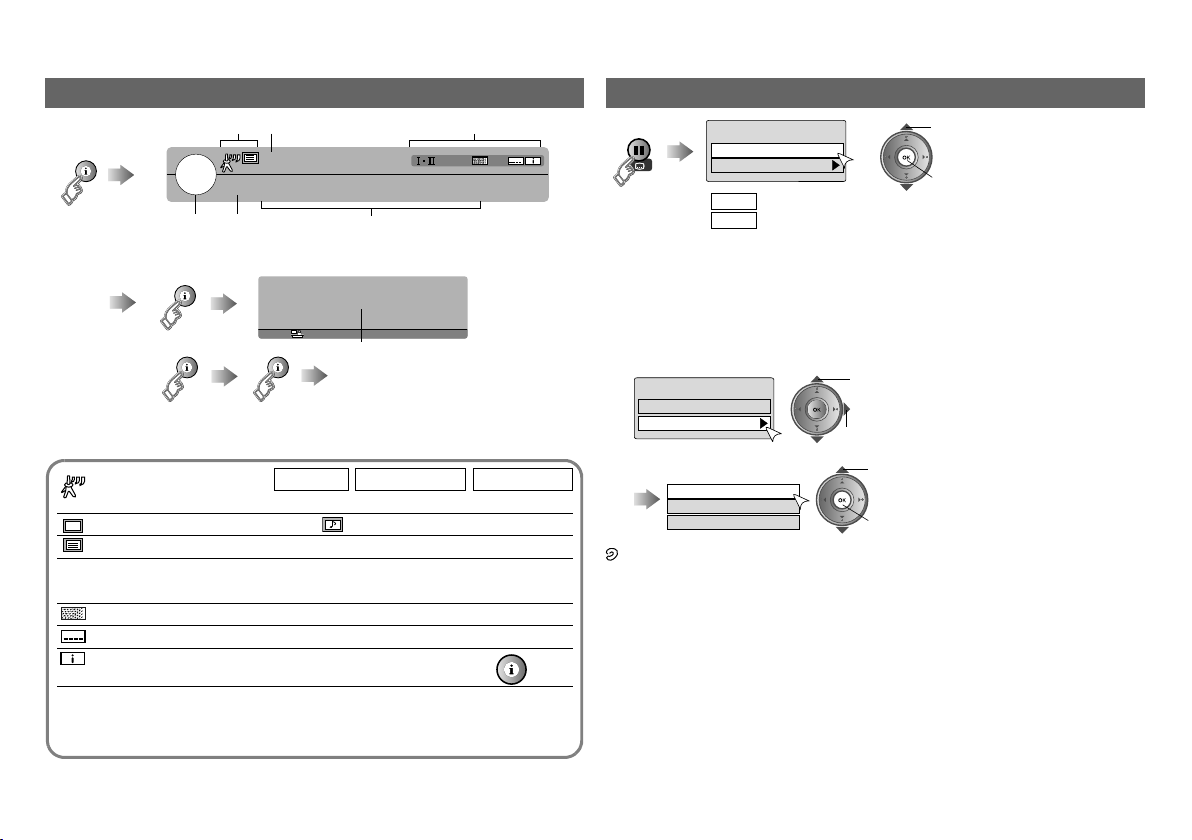
Display the programme information
Symbols
1
Channel
z Whenever changing the channel,
“Programme Information” is displayed.
䡵 Symbols description
: Reception level Red Yellow Green
: TV programme : Radio programme
: Teletext is available. (P. 5)
t·u :
tu::Audio in another language is not available.
Other audio languages are available. (P. 5)
: Pay-TV channel
: Subtitles are available. (P. 4)
: More information about the programme is available. g
Name of station
BBC ONE
Now
Clock
: 14:00 - 15:00
: 15:00 - 17:00
Next
Domestic news
World news
Economic information
Sport news flash
CH33
Programme
14:00
More information
(No indication)
z “PR List” appears.
: Poor : Acceptable : Excellent
News
Golf
Symbols
View subtitles
Subtitle Selection
Off
On
: Don’t display
Off
: Display
On
z By default, the language set in “Subtitle Language” (P. 12) is automatically
selected.
When not broadcast in that language, another broadcast language is
automatically selected.
z When no subtitles are broadcasted, “No Subtitles” is displayed.
䡵 Switch to another language
Subtitle Selection
Off
On
A select “On”
B next
A select
English
Gaelic
Welsh
B set
: Special subtitles for the hearing impaired
Undefined : When the subtitle’s language cannot be identified
z The language that can be selected depends on the broadcast.
A select
B set
Dolby Digital : Dolby Digital signal is output from the DIGITAL AUDIO
OUT terminal. (P. 18)
Page 5
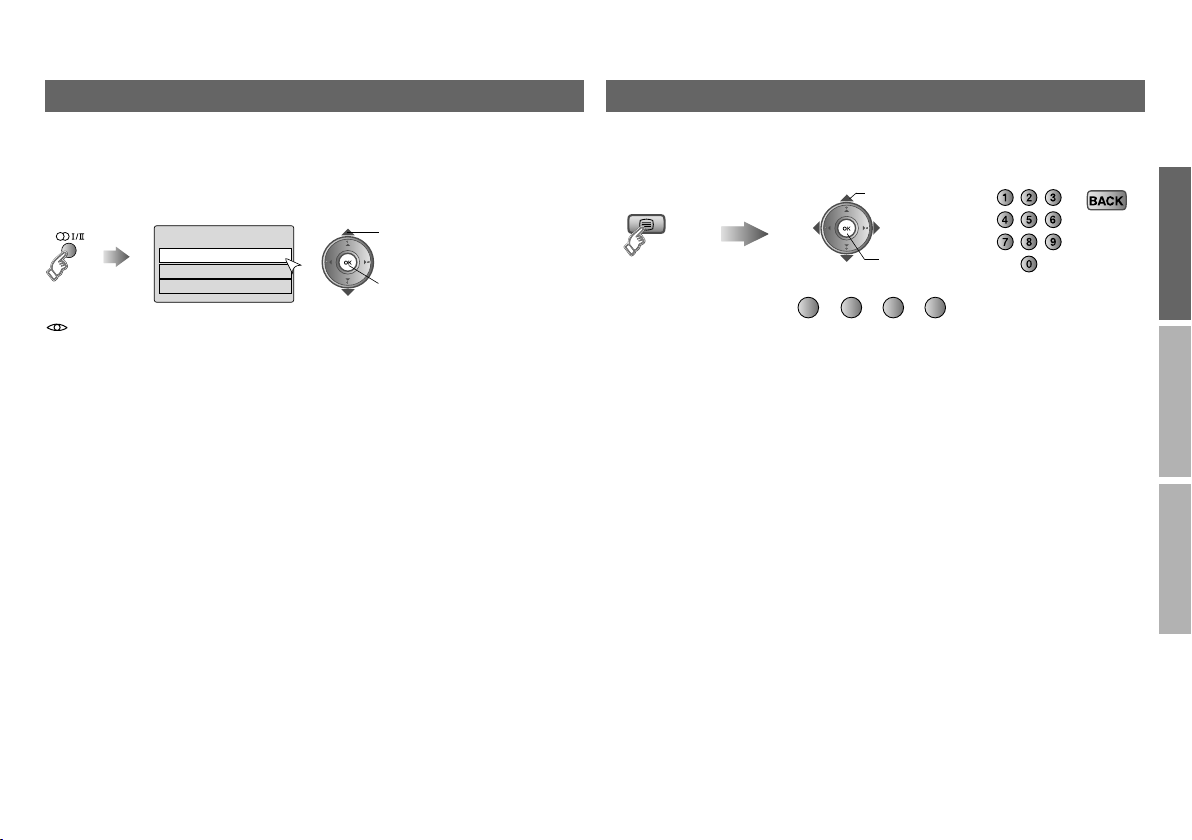
Select audio language
By default, the language set in “Audio Language” (P. 12) is automatically
selected.
When not broadcast in that language, another broadcast language is
automatically selected.
䡵 Switch to another language
Audio Selection
English
Gaelic
Welsh
: Special audio track for the visually impaired
Undefined: When the audio’s language cannot be identified
Dolby: Dolby Digital
z The language that can be selected depends on the broadcast.
z Please read ““Dolby Digital” output from the DIGITAL AUDIO OUT
terminal” (P. 18) before selecting “Dolby”.
A select
B set
Enter the
Teletext mode
View teletext information
Operate according to the screen indications.
You can use the buttons shown below.
A select
USE
B set
(red) (green) (yellow) (blue)
SETTING
TROUBLE?
5
Page 6
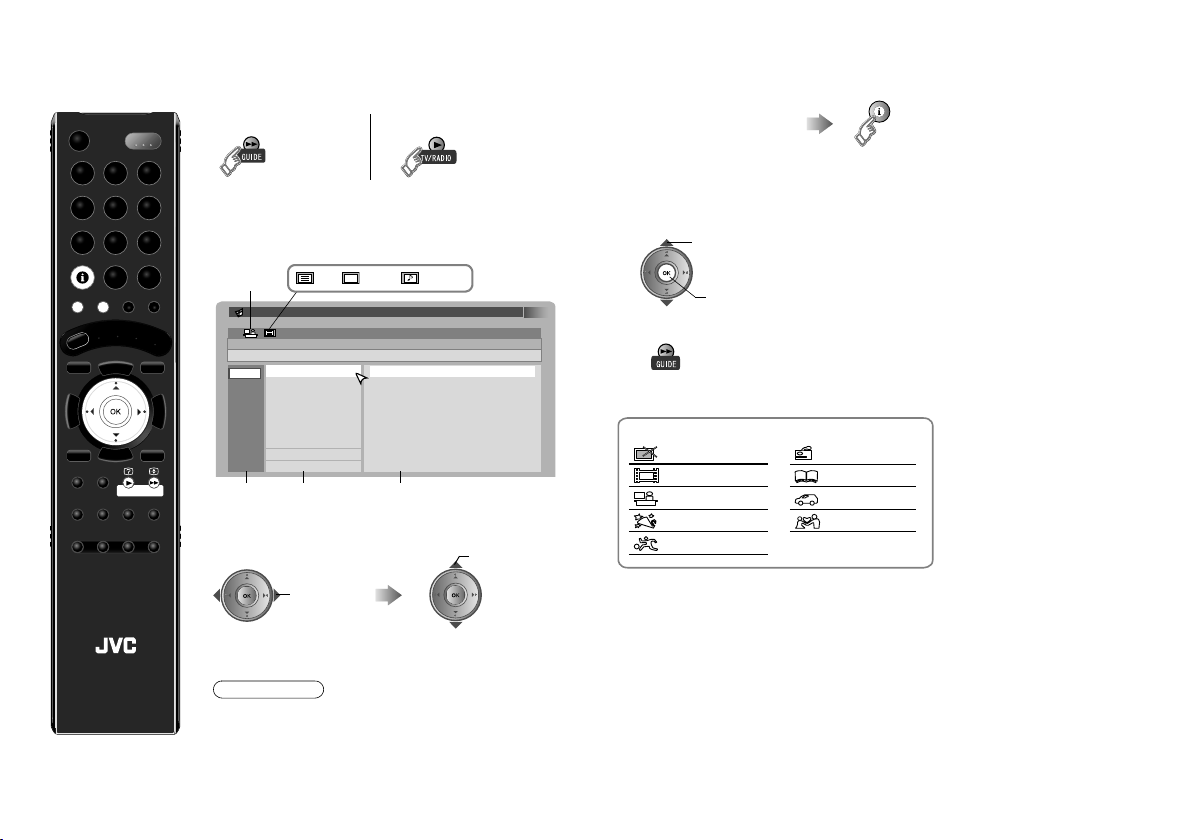
Using EPG (Electronic Programme Guide)
You can find a digital channel programme from an eight-day programme
guide, check its information, and make a reservation.
Display EPG
1
䡵 Switch TV/RADIO
z EPG will be displayed only when viewing digital
channels.
Find a programme
2
: TV : Radioor
14:00
05/05/2008
14:00 News
15:00 Golf
17:00 News
17:15 Music
18:00 Weather forecast
18:20 News
18:50 Soccer
20:20 News
20:30 Weather forecast
Select a date / a channel /
a programme
select
TV/RADIO
GUIDE
Genre
Electronic Programme Guide
BBC ONE
News
14:00-15:00
1. BBC ONE
05/05
2. BBC TWO
06/05
3. ITV1
07/05
4. Channel 4
08/05
5. five
09/05
6. ITV2
10/05
7. BBC THREE
11/05
8. BBC FOUR
12/05
9. ITV3
Date Channel Programme
Select a column
(Date / Channel /
Programme)
select
䡵 Check programme information
Select a programme
z The programme information cannot be displayed if no programme
information is received.
䡵 Watch / listen to the programme
䡵 Close EPG
g
Genre icon
General
Movie
News
Entertainment
Sports
6
A select a programme currently being broadcast
B view
Children
Education
Leisure
Drama
LCD
Note
z The channels and programme names shown in
the illustrations here are examples only.
Page 7

Genre Display only programmes which match your
selected genre
Display the genre list
1
(green)
Select a genre
2
Genre
All
General
Movie
News
Entertainment
Sports
Children
Education
Leisure
Drama
z More than one genre can be selected.
䡵 Single Select
A select
z Only one genre can be selected.
Find a programme
3
Electronic Programme Guide
BBC ONE
Golf
15:00-17:00
05/05
06/05
07/05
08/05
09/05
10/05
11/05
12/05
1. BBC ONE
2. BBC TWO
3. ITV1
4. Channel 4
5. five
6. ITV2
7. BBC THREE
8. BBC FOUR
9. ITV3
15:00 Golf
18:50 Soccer
22:30 Tennis
z Only programmes in the selected genre are displayed.
A select
B set / cancel
C search
(red)
B search
14:00
05/05/2008
Your selected genres are
displayed
Timer Reserve a programme to watch and record
Select a programme
1
Select a column
(Date / Channel / Programme)
select
Display the timer select menu
2
(red)
Set “Timer”
3
Record : Reserve a programme to record
Remind : Reserve a programme to watch
Please select timer
Record Remind
g Proceed to step 2 in “Timer” (P. 10)
Electronic Programme Guide
BBC ONE
14:00-15:00
News
1. BBC ONE
05/05
2. BBC TWO
06/05
3. ITV1
07/05
4. Channel 4
08/05
5. five
09/05
6. ITV2
10/05
7. BBC THREE
11/05
8. BBC FOUR
12/05
9. ITV3
14:00
14:00 News
15:00 Golf
17:00 News
17:15 Music
18:00 Weather forecast
18:20 News
18:50 Soccer
20:20 News
20:30 Weather forecast
05/05/2008
Select a date / a channel /
a programme
select
A select
B set
(red): Reserve to record
(blue): Reserve to watch
: Reserve to record
(Reservation time
is shorter than the
broadcasting time)
USE
SETTING
TROUBLE?
7
Page 8

Customising your TV
Display the DTV menu
1
Display the menu
bar
Select “DVB” (DTV)
A select
Close the menu
4
8
TV/DTV
TOP MENU
Note
z You cannot
display the DTV
menus while the
“Record” timer is
in progress.
B set
Note
z If you cannot display the DTV menu, switch
to digital channels.
Display the desired menu
2
Change the setting
3
Timer
Edit PR
Configuration
Setup
Installation
Configuration
Navigate
DTV Menu
OK
Select Exit
14:00 05
Country United Kingdom
Menu Language
Audio Language
Subtitle Language
Enter PIN code
Favourite Mode
/05/2008
English
English
English
Off
MENU
select
䡵 To the
select
change
䡵
To enter an item’s menu
select
(E.g. Service Scan)
Service Scan
Service
Navigate
(“Service Scan” menu)
previous
screen
g
14:00
Scan
Start Channel
Stop Channel
Mode
Start Scan
MENU
OK
Select Exit
05/05/2008
Automatic
TV/DTV
_ _
_ _
Add
䡵 When entering the PIN code
When watching digital channels or changing DTV menu settings, it
may be necessary for you to enter a PIN code.
Once a PIN code has been entered, there is no need to enter it again
until the TV is turned off.
This function is locked.
Please enter PIN code
z The default PIN code is “0000”.
z You can set your own PIN code. g “Enter PIN code” (P. 12)
䡵 When a message with option selections appears
Scan completed! Store services?
Yes No
A select
B set
䡵 When an information message appears
PIN code changed
OK
Page 9

Edit PR (Edit PR List)
A
Deleting unwanted channels, and changing the channel number or channel
name can be done in the PR List (digital channel list) according to your liking.
Edit PR List
Name Delete FavouritesNumber Lock
Select PR Select Function
Name Edit a channel name
Name
BBC ONE
Name
ABCDEFG
Number Change a channel number
Number
001
z The channels are rearranged in numerical order.
䡵 When the same channel number exists
PR exists! Move it?
OK Cancel
TV
1.
BBC ONE
2.
BBC TWO
ITV1
3.
Channel 4
4.
five
5.
ITV2
6.
BBC THREE
7.
BBC FOUR
8.
ITV3
9.
SKYE THREE
10.
OK
Edit PR Exit
14:00
05/05/2008
MENU
select character
Enter a number
A select “OK”
B move
1 Select edit function
select
2 Select channel
A select
B enter edit mode
B move position
Delete Delete a channel
The selected PR will be permanently
deleted. Do you want to proceed?
Ye s
No
A select “Yes”
B delete
Lock Stop children from watching specific channels
Edit PR List
Name Delete FavouritesNumber Lock
Select PR Select Function
z To enable “Lock” function, turn the TV off and on again.
z To watch the locked channels, the PIN code must be entered.
g “When entering the PIN code” (P. 8)
z Enter PIN code if needed
g “When entering the PIN code” (P. 8)
Favourites
Edit PR List
Name
Number
Select PR Select Function
z To move through only your favourite channels and have them appear
in the PR List.
g “Favourite Mode” (P. 12)
14:00
05/05/2008
TV
1.
BBC ONE
BBC TWO
2.
3.
ITV1
4.
Channel 4
5.
five
ITV2
6.
7.
8.
9.
10.
BBC THREE
BBC FOUR
ITV3
SKYE THREE
OK
Edit PR Exit
Lock icon
MENU
Register your favourite channel
14:00
05/05/2008
TV
1.
BBC ONE
BBC TWO
2.
ITV1
3.
Channel 4
4.
five
5.
ITV2
6.
BBC THREE
7.
BBC FOUR
8.
ITV3
9.
SKYE THREE
10.
Delete Favourites
Lock
OK
Edit PR Exit
Favourite icon
MENU
䡵 Release g
䡵 Release g
USE
SETTING
TROUBLE?
9
Page 10

Customising your TV
10
14:00
Timer
PR Start End Date Mode
Display the timer select menu
1
Timer list empty
SelectOKAdd Delete EPGNavigate
(red)
05/05/2008
Please select timer
Record Remind
Record : Reserve a programme to record
Remind : Reserve a programme to watch
Timer
䡵 Switch TV/RADIO
z Up to 20 programmes can be
reserved.
A select
B set
Programme the timer setting
2
z If you select the programme using “EPG” (P. 6), all items will be set
automatically. Change the setting if necessary.
Record
PR BBC ONE
Start 17:15
End 18:00
Date 05/05/2008
Mode Once
Audio PCM / Analogue
Subtitle Off
Remind
PR BBC ONE
Start 17:15
Date
Mode
05/05/2008
Once
PR : Select the channel
Start / End / Date : Enter the time and date
Mode : Select the reservation mode (Once, Daily,
Weekly)
Audio : Normally set to “PCM / Analogue”. For details,
see ““Dolby Digital” output from the DIGITAL
AUDIO OUT terminal” (P. 18).
Subtitle : Set subtitle recording (Off, On)
select
䡵 To enter time and date
select
䡵 Select a programme using “EPG”
(yellow)
Page 11

Set the timer
3
14:00
Timer
PR
1 : BBC ONE 17 : 15 18 : 00 05/05 /2008 Once
(red) Record
TV
z A message will be displayed if there is problem with the reservation.
z When you reserved the programme using EPG, EPG will be displayed.
z When “Remind” timer is set, “End” will be displayed as “----”.
Start
End Date Mode
(blue) Remind
Radio
05/05/2008
䡵 Cancel a reservation
select
(green)
A select “Yes”
B cancel reservation
䡵 Change a reservation
A select
Change the settings.
B display the menu
Prepare for recording before the timer starts
4
Record
䡵 If you use a “T-V LINK” compatible device, set it to the external input
mode then to the standby mode. At the start time, the device will start
recording automatically. Make sure the recording times of other
recordings on the recording device do not overlap with recording times
on the TV. Some “T-V LINK” devices may not work correctly. It is
recommended to do a recording test.
z “T-V LINK” compatible device refers to device with any of the
z Connect the “T-V LINK” compatible device to the EXT-2 terminal
z If error message appears on the TV screen, refer to
䡵 If you use a “T-V LINK” incompatible device, manually set the device’s
timer to record the external input at the same recording times set on the
TV. For details, refer to the device’s manual.
z When the TV is on, the power lamp on the TV will start blinking 3
minutes before the start time and a message “Timer Starting Soon”
appears on the screen.
At the start time, the power lamp will light up and the message will be
cleared. However, if the “Power Lamp” is set to “Off”, the power lamp
will not blink nor light. (Refer to “Power Lamp” (P. 29) on the user
manual “INSTRUCTIONS”.)
z When the TV is off, the power lamp will start blinking 3 minutes before
the start time. The power lamp will light up at the start time and goes
out at the end time.
z To stop the recording while a “Record” timer is in progress, press “ ”
to display the message “Stop Recording?”. Then press the “OK” button.
Remind
Set the recording device as follows. At the start time, the
programme will be output from the EXT-2 terminal to the
recording device.
following logos.
“T-V LINK” (JVC), “Q-LINK” (Panasonic), “Megalogic” (Grundig),
“Data Logic” (Metz), “SMARTLINK” (Sony), “Easy Link” (Philips)
using a fully wired SCART cable.
“Troubleshooting” (P. 16).
The “Remind” timer does not turn the TV on or off. Turn the
TV on before the timer starts. At the start time, a message
“Reminder Changing PR” will appear and the channel will
automatically change.
USE
SETTING
TROUBLE?
11
Page 12

Customising your TV
12
Configuration
Navigate
Country United Kingdom
Menu Language
Audio Language
Subtitle Language
Enter PIN code
Favourite Mode
OK
Select Exit
MENU
Country
Menu Language
Audio Language
Subtitle Language
Configuration
14:00 05
/05/2008
English
English
English
Off
Country of installation (United Kingdom only)
Language for on-screen displays when
watching digital channel including the DTV
menus
Select a default language for audio (English,
Gaelic, Welsh)
z For visually impaired
Select a default language for subtitle (English,
Gaelic, Welsh)
z For hearing impaired
Note
z When not broadcast in the
default language, on-screen
displays and audio output in
that language are not available.
In this case, the language that
can be displayed and heard
depends on the broadcast.
Enter PIN code
Input the current code
1
This function is locked.
Please enter PIN code
Change PIN code
z Default is “0000”.
z If you forget the code, input “0081”.
Input a new code twice
2
Enter new PIN code
Confirmation
Favourite Mode
z If you cannot select “On”, register channels in “Favourites” first.
g “Favourites” (P. 9)
z When you set “Favourite Mode” to “On”, you cannot change from TV to
Radio if no radio channel is registered to the favourite channels.
Enable your favourite channels (On / Off)
PIN code changed
OK
Page 13

Setup
Setup
Navigate
Select Exit
Digital Audio Output
PCM : The Linear PCM signal is output
Dolby Digital: The Dolby digital signal is output when the Dolby Digital
z Please read ““Dolby Digital” output from the DIGITAL AUDIO OUT
terminal” (P. 18) before setting.
Banner Duration
Receiver Upgrade
The TV will automatically search for new tuner software and run the
reception test (for digital channels) at midnight (3 AM) on a daily basis.
You can select the desired operation with this setting.
z
The Receiver Upgrade function works only when the TV is off (standby).
z If new software is available, the TV will automatically download and
upgrade the tuner software.
z If the TV detects channels that became receivable or if the TV was not
able to receive a certain channel, a message about updating the PR
List will be displayed when the TV is turned on.
g “Updating the PR List (Digital channel only)” (P. 17)
Auto :
The search for new software and the reception test will operate
at midnight. In addition, the TV will start searching for new
software whenever the TV is turned off. Normally set to “Auto”.
14:00
05/05/2008
Digital Audio Output
Banner Duration
Receiver Upgrade
Common Interface
Antenna Power
MENU
PCM
2 sec
Auto
No CI Module
Off
Output the digital signal from the DIGITAL
AUDIO OUT terminal.
signal is received
Select the display time for channel information
(2 sec / 5 sec / 8 sec)
Manual : Only the search for new software will operate at midnight. The
reception test will not be run. In addition, you can start
searching for new software whenever you want.
To start searching, select “Manual” and press “OK” button.
Software Version
0.31.01
OK
Search for new
Select “Search for new” and press “OK” button. Then, follow
the instructions on the screen.
In standby : Upgrade the software automatically when the TV
is turned off.
Common Interface
To watch pay-TV digital channels, use the CAM (Conditional Access
Module) menu. This function can only be used when pay-TV can be
received in your region.
When the CAM etc. is inserted after subscribing to the broadcasting
company, this function is available.
z “Watch pay-TV digital channels” g INSTRUCTIONS
P. 8
z If the CAM etc. is not inserted, “No CI Module” will be displayed and
this function cannot be used.
Press “OK” button to display the CAM menu and follow the instructions on
the screen.
z The content of the menu is different depending on the broadcasting
company.
g For details, consult your broadcasting company.
z The language shown in the menu may differ from the “Language” set
for the TV.
Antenna Power
When using an indoor aerial which requires external power, set
“Antenna Power” to “On”.
The TV will supply DC 5V, 50mA (max) from the aerial socket through the
cable to the aerial.
z “Power supply for the indoor aerial” g INSTRUCTIONS
P. 12
USE
SETTING
TROUBLE?
13
Page 14

Customising your TV
14
Installation
Installation
Service Scan
Signal Check
Factory Settings
Service Scan
Service Scan
Service
Navigate
Scan Select a “Scan” type
Automatic : Scan all receivable channels
Manual : Scan between the “Start channel” and “Stop channel”
Network : Scan all receivable channels, then you can select the
Start channel
Stop channel
Mode Select a “Mode”
Add : Register only new channels and update the PR list.
Reinstall : Re-install all channels. The current PR list settings and
Scan
Start Channel
Stop Channel
Mode
Start Scan
MENU
OK
Select Exit
broadcasting stations to register
If you select “Manual”, select the broadcast channel
numbers to start and stop scanning.
The current PR list settings will not be changed. No
channel will be deleted.
“Timer” settings will be cancelled. The channels which
the TV could not receive will be deleted.
Update the PR list
14:00
05/05/2008
Automatic
_ _
_ _
Add
䡵 To update the PR list
Set “Scan” to “Automatic” or “Network”. If you want to retain the
current PR list settings and “Timer” settings, set “Mode” to “Add”.
Then start “Service Scan”.
䡵 To start “Service Scan”.
Mode Add
Start Scan
A select “Start Scan”
B start scanning
Scan completed! Store services?
Yes No
A select “Yes”
B set
z If you set “Scan” to “Network”, the “Network” menu appears. Select
broadcasting stations from a list.
Network Name
BBC
ITV
A select
B registered / cancel
C set
Page 15

Signal Check
Signal Check
Service
BBC ONE
BBC TWO
BBC THREE
Signal Quality
Signal Strength
Navigate
MENU
Channel
Signal : Excellent
Exit
14:00
You can check the broadcast signal level of
the channel you are watching.
05/05/2008
Signal level: Poor < Acceptable < Excellent
33
z To check another
broadcast channel
select
The “Channel” is the frequency of the digital broadcasting. It differs from
the channel number displayed on the TV.
Factory Settings
All registered digital channels are deleted and the DTV menu settings
are initialised. Digital channels are reregistered.
Are you sure you want to delete the PR list and
reset all settings?
Yes No
A select “Yes”
B start
Initial setting will start again.
INSTRUCTIONS
“Initial settings” (P. 13)
USE
SETTING
z If “Attenuator” is set to “On”, “RF Attenuator” menu will appear during
initial setting. Select “On” or “Off” and press “OK” button.
For more details on “Attenuator” g
INSTRUCTIONS
“Attenuator” (P. 30)
TROUBLE?
15
Page 16

Troubleshooting
Messages Actions
16
Messages Actions
“Missing or
weak signal”
“Dolby Digital
selected!
No analogue
audio available”
“Services have
changed. Do
you want to
Update PR
list?”
“Stop
Recording?”
z Is the TV connected correctly to the aerial?
z Change the direction of the indoor aerial.
z Is there a digital channels transmission tower nearby?
gTurn “Attenuator” to “On”.
INSTRUCTIONS
“Attenuator” (P. 30)
z Check digital channels signal with “Signal Check”.
(P. 15)
z If you still cannot watch the digital channels after
following the steps above, there may be a problem with
your aerial or its cable. Or, the signal may be too weak.
g Consult your retailer.
z When “Dolby Digital” is selected in “Digital Audio
Output”, the sound of a programme containing “Dolby
Digital” signals cannot be output from the TV or the
audio system connected to the AUDIO OUT
terminal. (P. 18)
z When the channel is changed, a message will be
displayed for a few seconds.
z To listen with the TV or audio system
g Select a language without “Dolby” from “Audio
Selection”. (P. 5)
g Switch “Digital Audio Output” to “PCM”. (P. 13)
z Update the PR List (digital channels)
g “Updating the PR List” (P. 17)
z If the message appears even though PR List updating
is not required, set “Receiver Upgrade” to “Manual” to
cancel the reception test at midnight. (P. 13)
z The message appears when you perform operations
related to the digital channels while a “Record” timer is
in progress. Press the “TV/DTV” button to continue
recording or press the “OK” button to stop the
recording.
“No Recording”
(T-V LINK)
“No Recording
Media Problem”
(T-V LINK)
“No Recording
Device Busy”
(T-V LINK)
z A problem occurs at the recorder.
z The recorder is not ready for recording.
Check the videotape or DVD disc.
z The recorder is recording another programme, or is
playing.
Page 17

Technical information
Problem Actions
Remote control
stops working
Digital channel
screen is frozen
TV/RADIO
button do not
work
No picture, no
sound
Forgot my PIN
code!
Locked
channels can
be watched
without
inputting PIN
code
z Unplug TV, several minutes later plug it in again.
z Hold down “ ” and “ ” on the TV simultaneously
for three or more seconds to restart.
If your TV is not equipped with the “ ” and “ ”
buttons, refer to the “Digital channel screen is frozen”
(P. 33) problem under the “Troubleshooting” section on
the user manual (INSTRUCTIONS).
z Set the “Favourite Mode” to “Off” (P. 12) and register
both Radio and TV channels in “Favourites” (P. 9).
Then set “Favourite Mode” to “On”.
z Some digital channels cannot be watched on this TV.
“Technical information” (P. 17)
z The default PIN code is “0000”. If you forget the
numbers that you used to change the default PIN
code, first input “0081” in the “Enter PIN code” and
then register a new PIN code. (P. 12)
z Once the PIN code is input, the lock function is
released. If you want to use the lock functions again,
turn the TV off and then turn it on again.
If you encounter other problems, please read “Troubleshooting”
(P. 32) on the user manual (INSTRUCTIONS).
Digital channels that cannot be watched on this TV
If a digital channel service uses new formats (such as DVB-H or MPEG4,
etc.), or MHP, it cannot be watched even though the channel name
appears.
If the channel is selected, the picture will not appear and audio cannot be
heard.
z You can delete these channels by using the “Delete” in the “Edit PR”
g “Edit PR (Edit PR List)” (P. 9)
g
The TV will run the reception test (for digital channel) at midnight (3AM) on
a daily basis.
If the TV detects channels that became receivable or if the TV was not able
to receive a certain channel, a message about updating the PR List will be
displayed when the TV is turned on.
z The reception test will only operate when the TV is in standby. It will not
operate when the TV is turned on.
z The reception test will not operate when “Receiver Upgrade” (P. 13) is
set to “Manual”.
z If the TV does not detect any channels that need to be updated, a
message will not be displayed.
䡵 To update the PR List right away
䡵 To update the PR List later
Updating the PR List (Digital channel only)
Services have changed.
Do you want to update PR list?
Yes No
A select “Yes”
B next
A select “No”
B close
Run the “Service Scan” (P. 14)
z The “Service Scan” will take a
few minutes.
z Next time you turn on the TV, the
message will not be displayed.
But you can update the PR List
using “Service Scan” (P. 14)
whenever you want to.
USE
SETTING
TROUBLE?
17
Page 18

Technical information
18
“Dolby Digital” output from the DIGITAL AUDIO OUT terminal
Some digital channels are broadcasted with “Dolby Digital” signals.
In these cases, “Dolby Digital” signals can be output from the DIGITAL
AUDIO OUT terminal.
Connect an audio system with a “Dolby Digital” decoder to the
1
DIGITAL AUDIO OUT terminal.
INSTRUCTIONS
g
“Connecting your external devices” (P. 9)
Change the “Digital Audio Output” setting from “PCM” to “Dolby
2
Digital”. (P. 13)
z When changing the setting, the message “Dolby Digital selected!
No analogue audio available” may be displayed for a few seconds.
z Each time the channel is changed to a channel that is broadcast with
“Dolby Digital” signals, the message “Dolby Digital selected!
No analogue audio available” may be displayed for a few seconds.
z
Even if “Dolby Digital” is set, “linear PCM” signals will be output by a
channel that is not broadcast with “Dolby Digital” signals. Set the audio
system so that it is compatible with both “Dolby Digital” and “linear
PCM”. (For details, refer to the audio system instruction manual.)
䡵 Set “Digital Audio Output” to “PCM” in the following cases.
The sound of a channel broadcast with “Dolby Digital” signals cannot be
heard even when “Dolby Digital” is set.
z When listening with the TV speakers.
z When listening with an audio system that does not have a “Dolby
Digital” decoder.
z When listening with an audio system that is connected to the
AUDIO OUT terminal.
z When recording a programme.
䡵 When “(Dolby)” is displayed in the “Audio Selection” menu (P. 5),
selecting “(Dolby)” will change the “Digital Audio Output” setting to “Dolby
Digital” temporarily.
z A message recommending you to change the “Digital Audio Output”
setting to “Dolby Digital” is displayed for a few seconds.
䡵 If you want to record a “Dolby Digital” signal using timer-record (P. 10),
change “Audio” of the timer-record setting from “PCM / Analogue” to
“Dolby Digital”. However, if the setting is changed to “Dolby Digital”, you
cannot record analogue sound with a recording device that is connected
to the EXT-2 terminal.
z “Dolby” and the double-D symbol are trademarks of Dolby Laboratories.
For more information, please read “Technical information”
(P. 34) on the user manual (INSTRUCTIONS).
Page 19

Page 20

0708TKH-SW-BL© 2008 Victor Company of Japan, Limited
 Loading...