

JVC LT-19HA72U, LT-22HG72U, LT-28HA72U, LT-19HA52U, LT-22HG52U Operating Instructions Manual
...Page 1
LT-19HA72U
LT-22HG72U
LT-28HA72U
Operating Instructions
Mode d'emploi
Handleiding
Instrucciones de Funcionamiento
EnglishFrenchDutchSpanish
FREEZE
MENU
CH
VOL
REC
Page 2

EN
You get the smartcard from your cable supplier (CAMs are customary). Insert the
smartcard into the CAM, and then insert the CAM into the CI slot of your TV set.
modules
KESA Electricals SAS 37 Rue dela Victoire, 75009 Paris, France
EN
2
Page 3

Features...............................................................................................2
Contents...............................................................................................3
Important Safety Information...................................................................4-8
Installation............................................................................................9-12
Remote Control .....................................................................
Operation.............................................................................................
Troubleshooting table............................................................................
Specification.........................................................................................
License Information...............................................................................
................ 13-14
15-24
25-29
30
31
EN
EN
3
Page 4
EN
100-240V~50/60Hz
broken glass. You could be hurt or the unit could become damaged.
it is damaged.
to allow for air circulation.
EN
4
Page 5
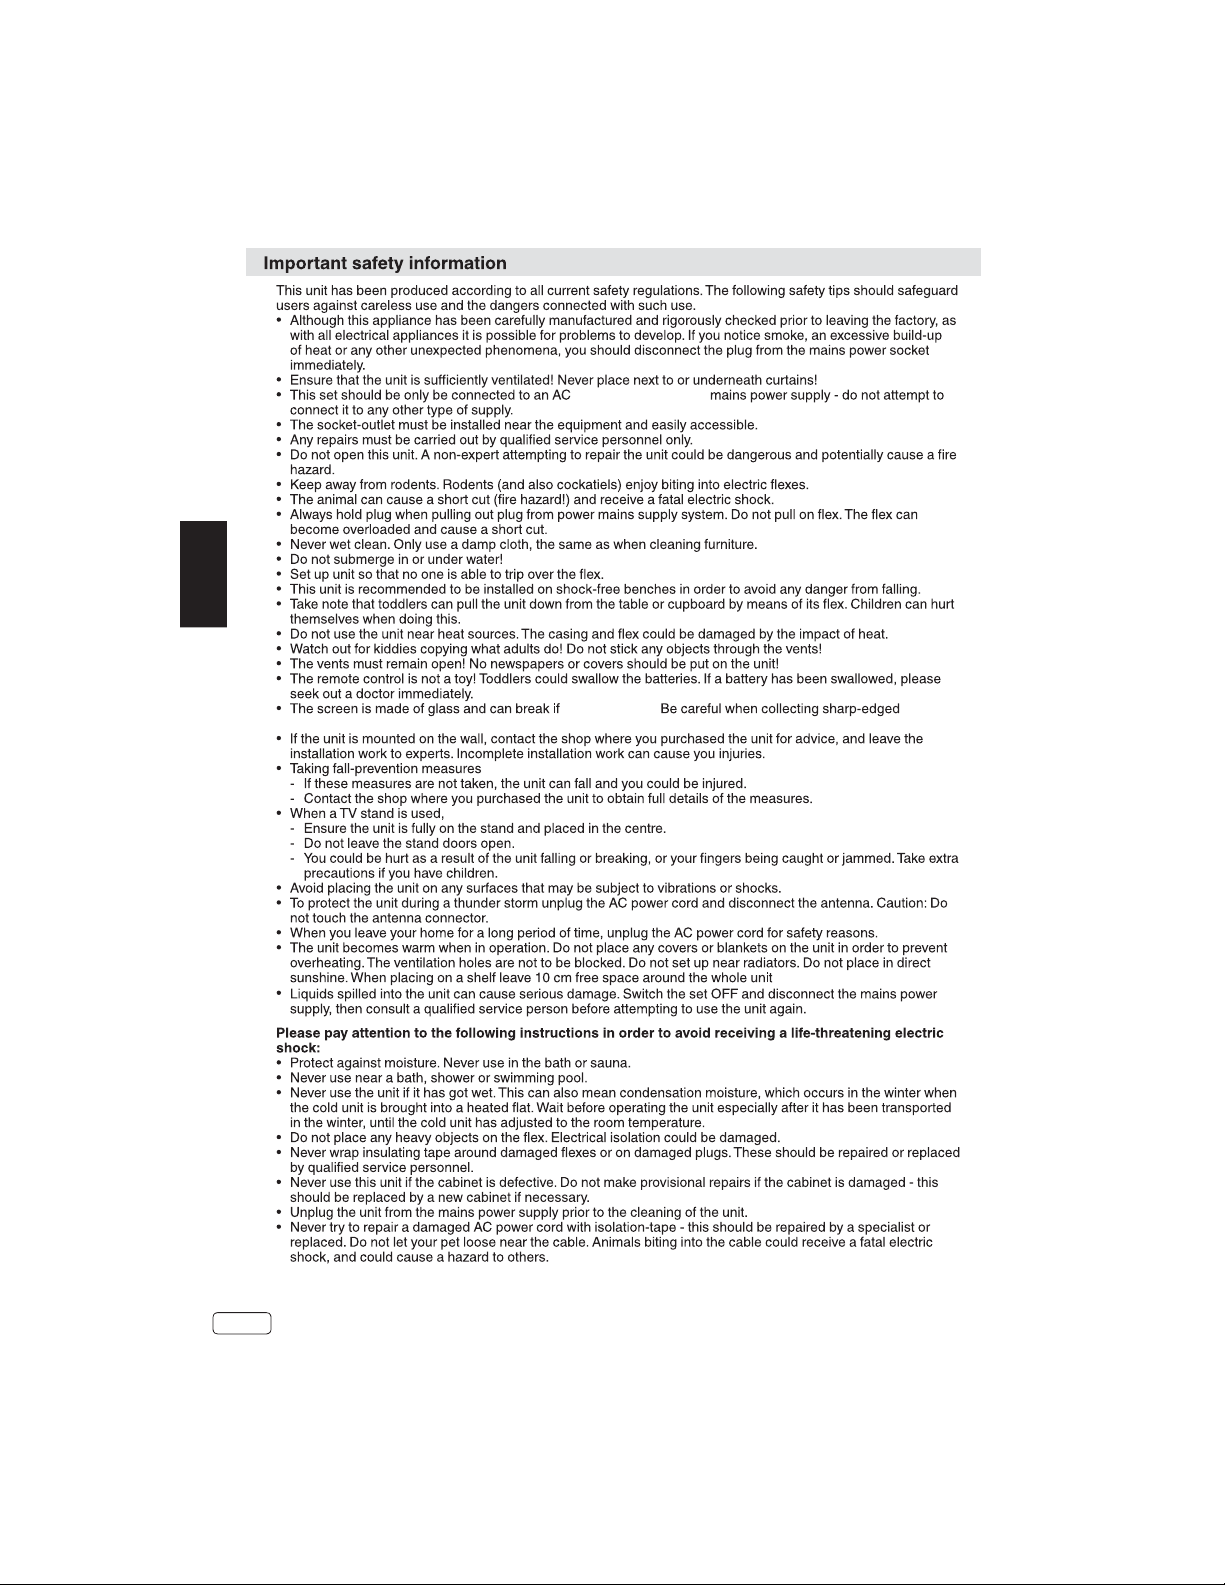
Carefully hold the base plate in position and secure it with screws.
fit in
LT-19../LT-22.... LT-28....
one screw(M4x20mm)
three screws(M4x10mm)
To detach the base plate,perform these steps in reverse order.
For wall mounting,the base must be dismantled.To do this,remove screws from the back.
(LT-19.../LT-22...:100x100mm,LT-28...:200x100mm).
Remove the stand as one piece by reversing the fixing procedure described above.
You can refit the screws to the stand for safe keeping, but tighten them only slightly.
FIXING SCREWS
2x4mmx 5mm (TOP HOLES)
2x4mmx 5mm (BOTTOM HOLES)
Protect the screen and lay the TV flat on its face, on a stable table, with the stand foot clear of the
table edge.
To ensure a safe installation, please observe the following when hanging the television on a wall:
Warning: This operation requires two people.
Check that the wall can support the weight of the television set and a VESA-standard wall mount
assembly (not supplied).
Be sure to use only screws suitable for the material of the wall.
In case of any doubt please contact a qualified installer.
Beware of electrical cables, gas and water pipes in the wall.
Follow the instructions provided with the wall mount.
The set must be installed on a vertical wall.
Make sure that cables are placed so that there is no danger of tripping over them or damaging
them.
three screws(M3x15mm)
four screws(M4x8mm)
EN
EN
5
Page 6
EN
scratching (such as rings, wrist-watch, etc.).
the
While cleaning, do not wear jewelry that could cause surface
it on the edge.
EN
6
Page 7
Safety Information
Safe use and care of your television
We have designed and made this television to meet
European Safety Standards, but as with any
electronic equipment you must take care, to stay
safe and get the best results. Here is some good
advice to help you do this.
Read these instructions carefully before you try to
use the television.
Protect the mains lead. You must ensure the mains
lead cannot be walked on, crushed, chafed, cut or
trapped.
Switch off the mains power or pull out the mains plug
when you leave the television unattended, unless
the function of the television requires a continuous
power supply.
Do not continue to use your television if you have
spilt liquids in it, if it is damaged in any way or if it
does not work normally. Immediately unplug the
television and get expert advice.
Avoid harsh conditions such as wet or damp places,
high humidity, strong vibration, extremely high or
low temperatures, strong sunlight and places that
are very dusty.
Never fit makeshift stands or legs to the television.
Never push objects into holes and ventilation slots.
To prevent electric shock do not remove any cover.
Do not touch the LED display as it gets warm when
in use, this is normal and is not a fault.
If anything goes wrong do not try to fix it yourself,
get a qualified service agent to look at it.
Pull out the mains plug and disconnect the aerial
lead during thunder storms.
Never allow water droplets to remain on the
screen as moisture can cause permanent
discolouration.
Greasy marks mu st only be remove d with a
commercial cleaner specifically recommended for
LED screens.
Mains Supply
This television is designed to operate from a 100240 Volts 50/60HzAC mains supply. Other power
sources
may damage it. Check that the rating plate (on the
back cover of the television) states 100-240V AC
before you plug it in for the first time.
The manufacturer accepts NO liability for damage
or injury caused by using the product with the
wrong mains voltage.
Dangerous voltage constituting a risk
of electric shock is present inside this
equipment.
This equipment is double insulated
and an earth connection is not
required.
This mark is applied to show the
equipment conforms to European
safety and electro-magnetic
compatibility standards.
EN
Cleaning
Disconnect the mains supply and use only a lightly
dampened soft cloth. Do not use chemical solvents
or strong detergents as these may damage the
cabinet or screen.
EN
7
Page 8
Safety Information (cont)
Eye Fatigue
When using this product as a computer monitor, health and safety experts recommend short
frequent breaks rather than occasional longer breaks. For example a 5-10 minute break after
an hour of continuous screen work is considered to be better than a 15 min break every 2 hours.
Do not use the monitor against a bright background or where sunlight or other bright light
sources will shine directly onto the screen.
EN
WARNINGS:
This appliance is intended for domestic household use only and should not be used for any
other purpose or on any other application, such as for non-domestic use or use in a commercial
environment.
If the supply cord is damaged it must be replaced by the manufacturer, its service agent or
similarly qualified persons in order to avoid a hazard.
This apparatus shall not be exposed to dripping or splashing and that no objects filled with
liquids, such as vases shall be placed on the apparatus.
No naked flame sources, such as lighted candles should be placed on the apparatus.
The ventilation should not be impeded by covering the ventilation openings, with items such as
newspapers, tablecloths, curtains etc.
WARNING: To prevent injury, this apparatus must be securely attached to the floor/wall in
accordance with the installation instructions.
EN
8
Page 9
Installation
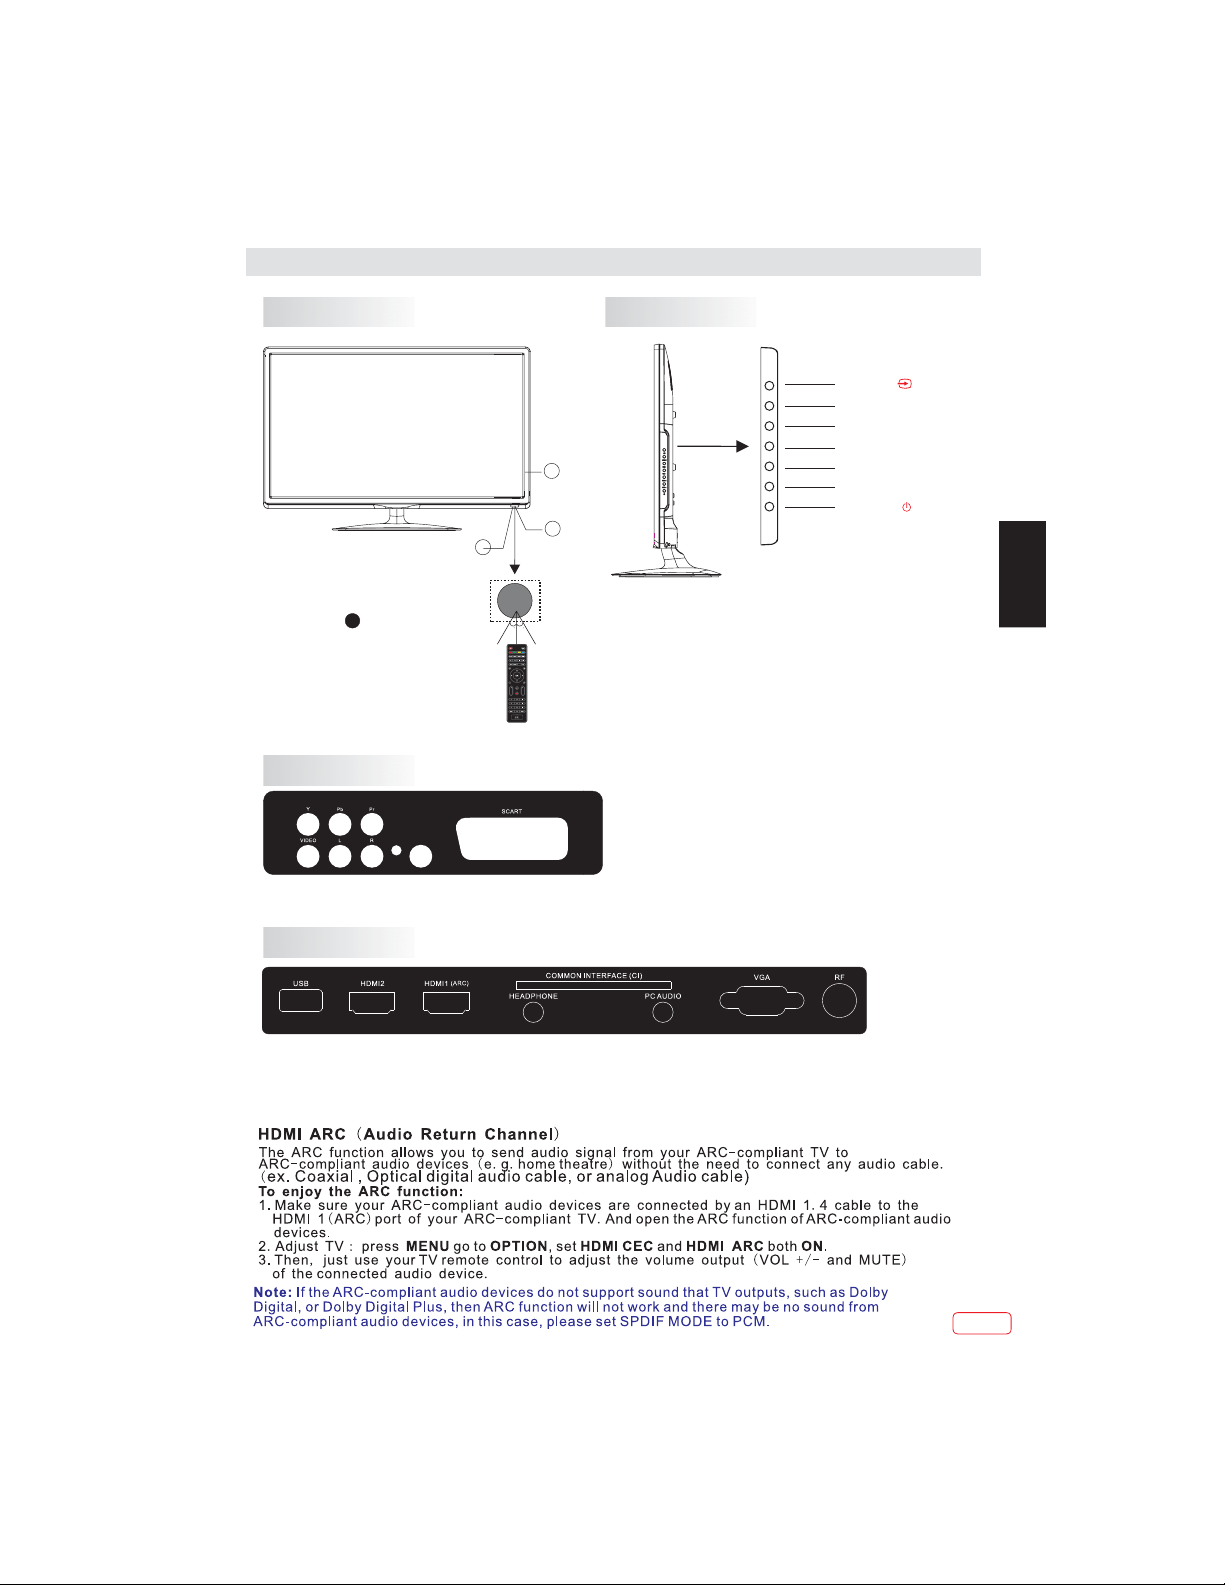
Front panel
3
KEYBOARD
SOURCE
MENU
CH+
CHVOL+
VOLSTANDBY
1
2
1: Remote Control Sensor.
Power Indicator LED:
2:
RED STANDBY.
3: Side buttons
REAR AV Connections
COAXIALOUTPUT
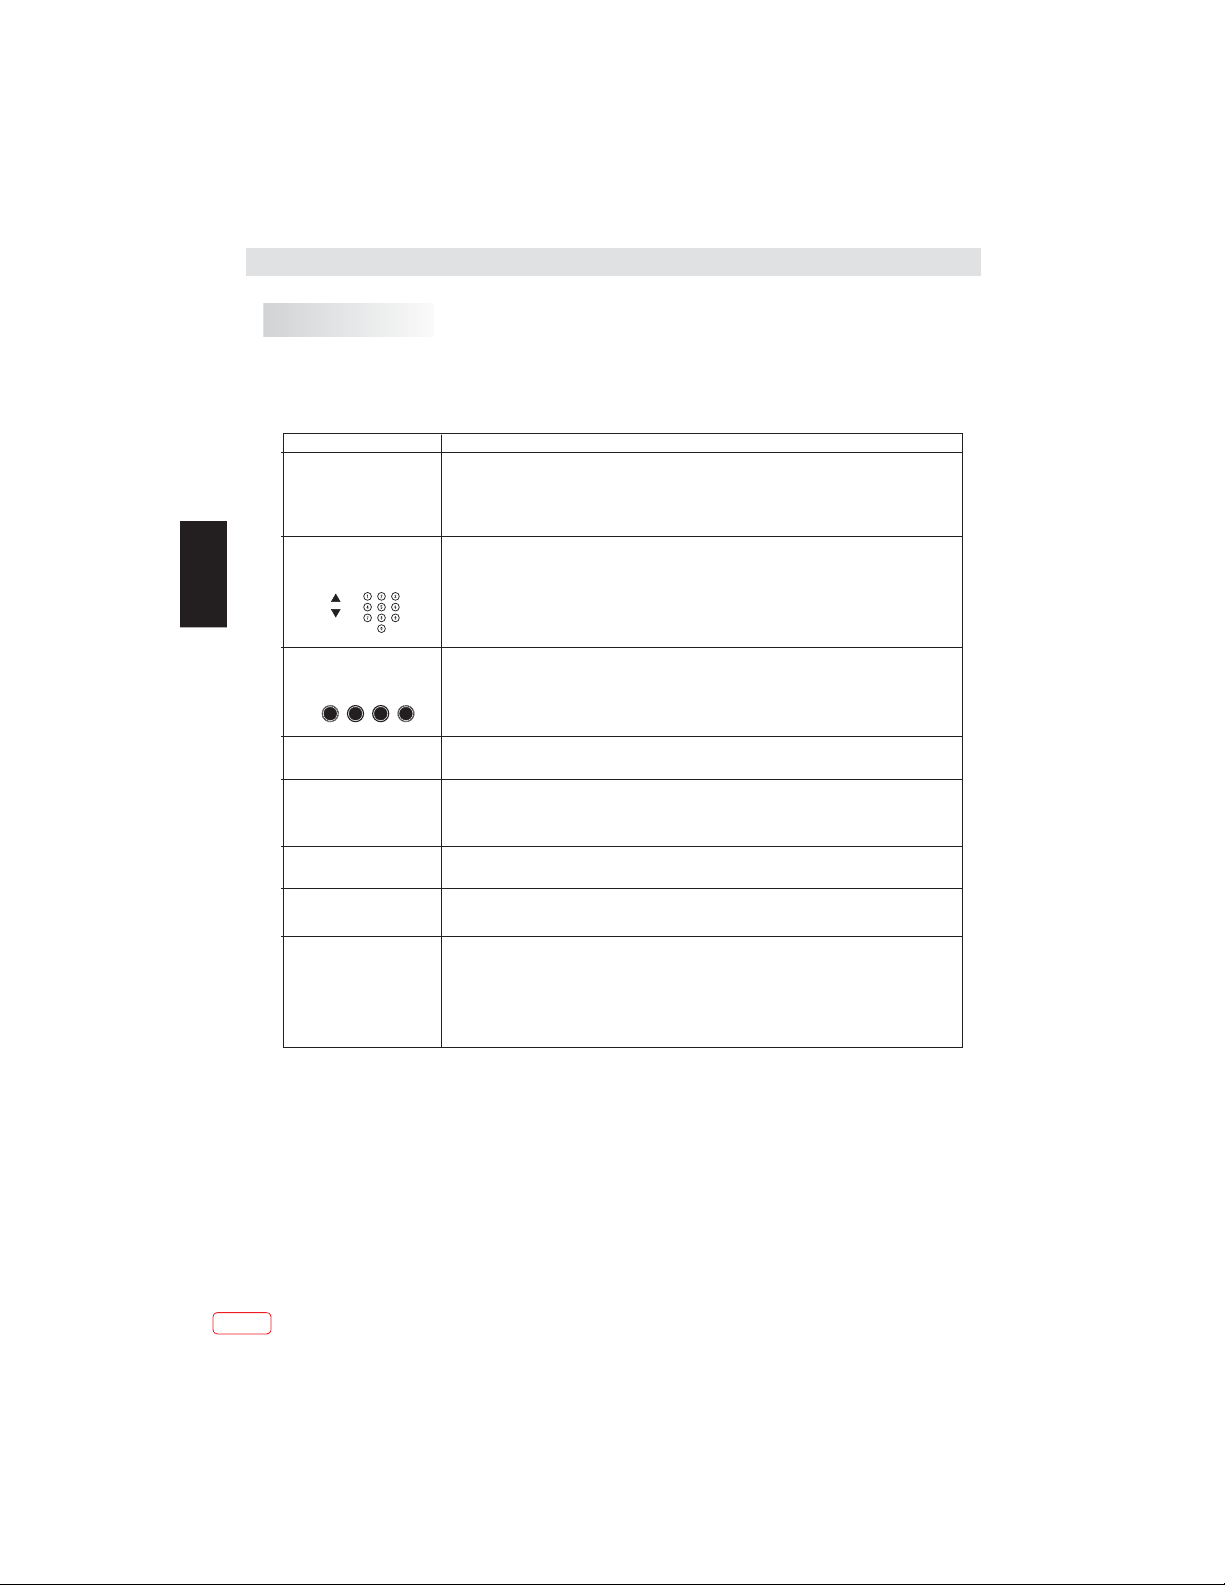
1. SOURCE:
30 30
FREEZE
EPG
CH
VOL
press repeatedly to move down the menu and
press "VOL-" or "VOL+" to select the required
source.
2. MENU:
3. CH+/CH-:
change the channel up and down. In MENU mode,
press "CH+" or "CH-" to select items. standby
mode, press "CH+" or "CH-" to turn on the TV.
4. VOL+/VOL-:
press "VOL+ " or "VOL- " to adjust the item that
you selected.
5. STANDBY:
from STANDBY mode. Press it again to turn the set
back to STANDBY.
Displays the input source menu;
Display main MENU.
In TV mode, press "CH+" or "CH-" to
In
Adjust sound level. In MENU mode,
Press this button to turn the unit ON
All the terminals are(from left to right):YPbPr INPUT,VIDEO,AUDIO INPUT,COAXIAL OUTPUT,SCART.
Note: VIDEO and YPbPr share one audio channel.
EN
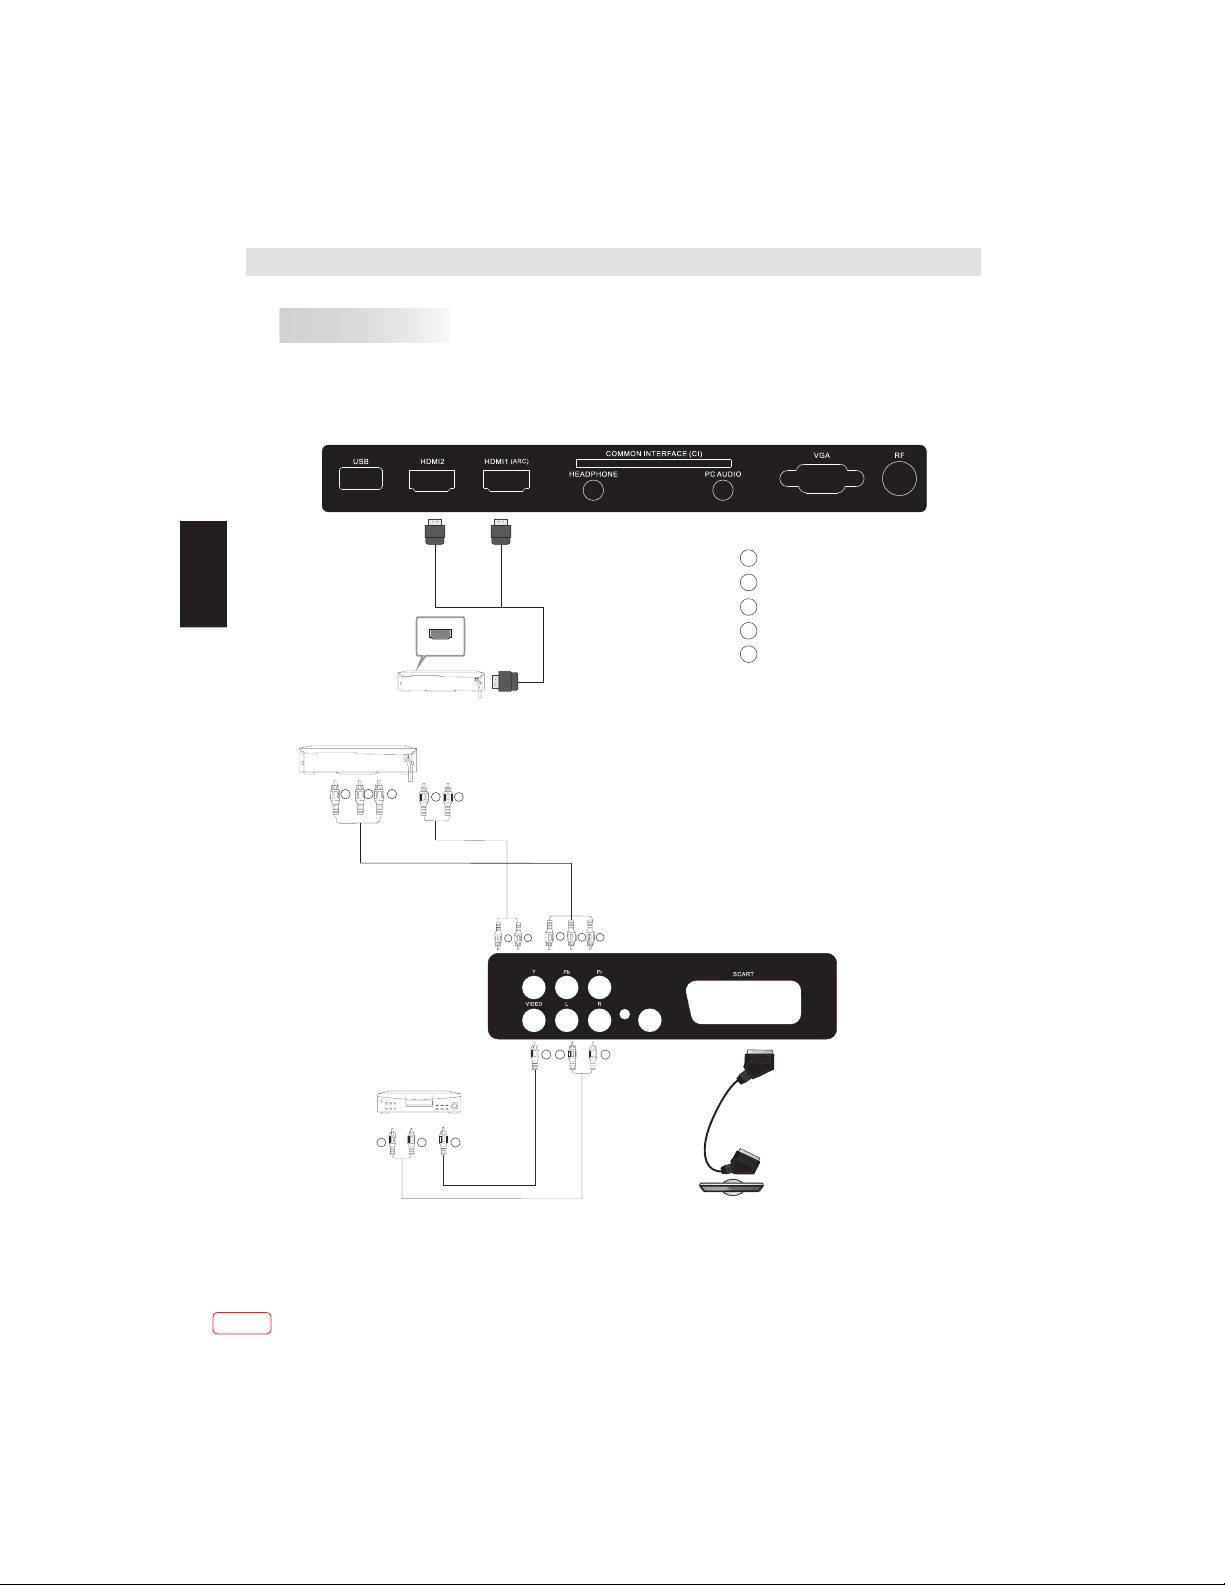
REAR AV Connections(SIDE)
All the terminals are(from left to right):
USB, HDMI2, HDMI1(ARC), HEADPHONE, CI, PC AUDIO, VGA, RF.
Note: 1.When HDMI port gets DVI signal ,the audio signal is received from the PC Audio channel.
2.Insert the plug of the earphone into the headphone jack on the unit.
The speakers are then muted.
EN
9
Page 10
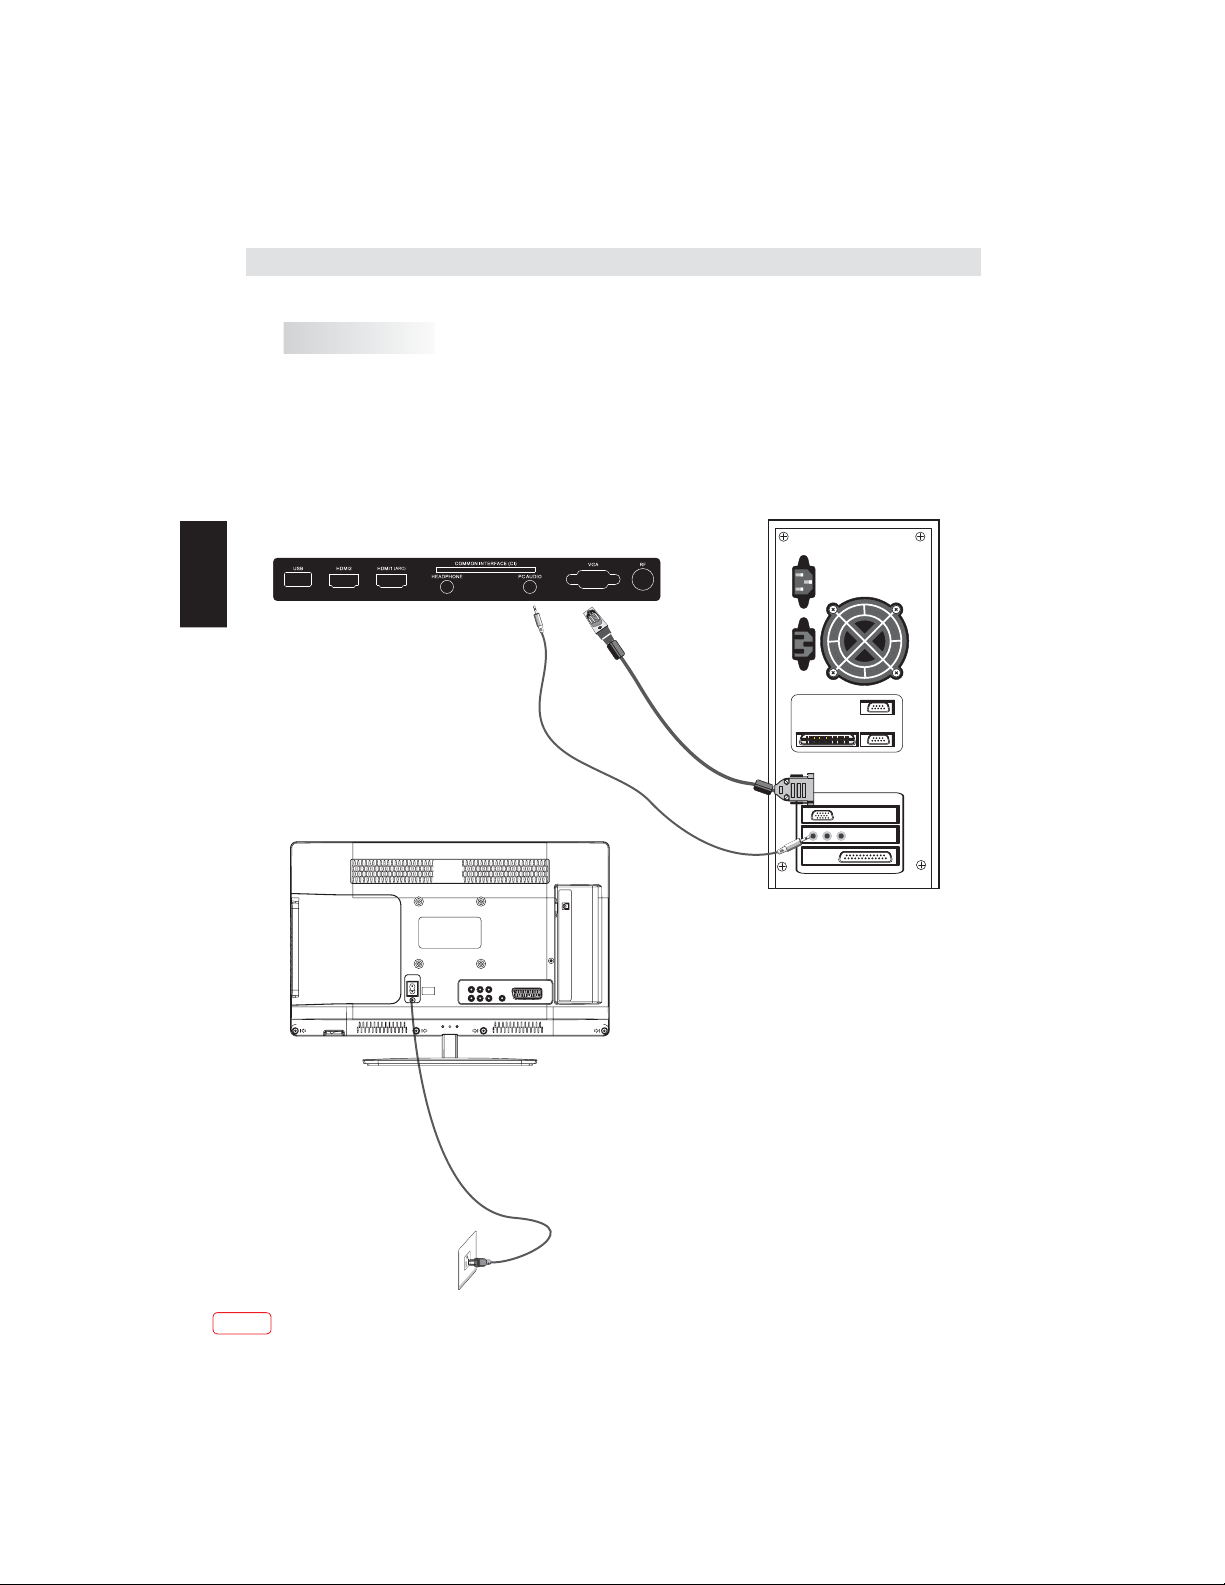
Installation
STEPS:
EN
PC
Be sure both the TV and co mputer are set to
Power off.
1.Connect VGAand audio cable.
2.Connect the power cord.
3.Power on the TV, switch to PC mode.
4.Power on the PC.
This sequence is very important.
EN
10
Page 11
Installation
PC
PRESET MODE
1
2
3
5
6
7
8
9
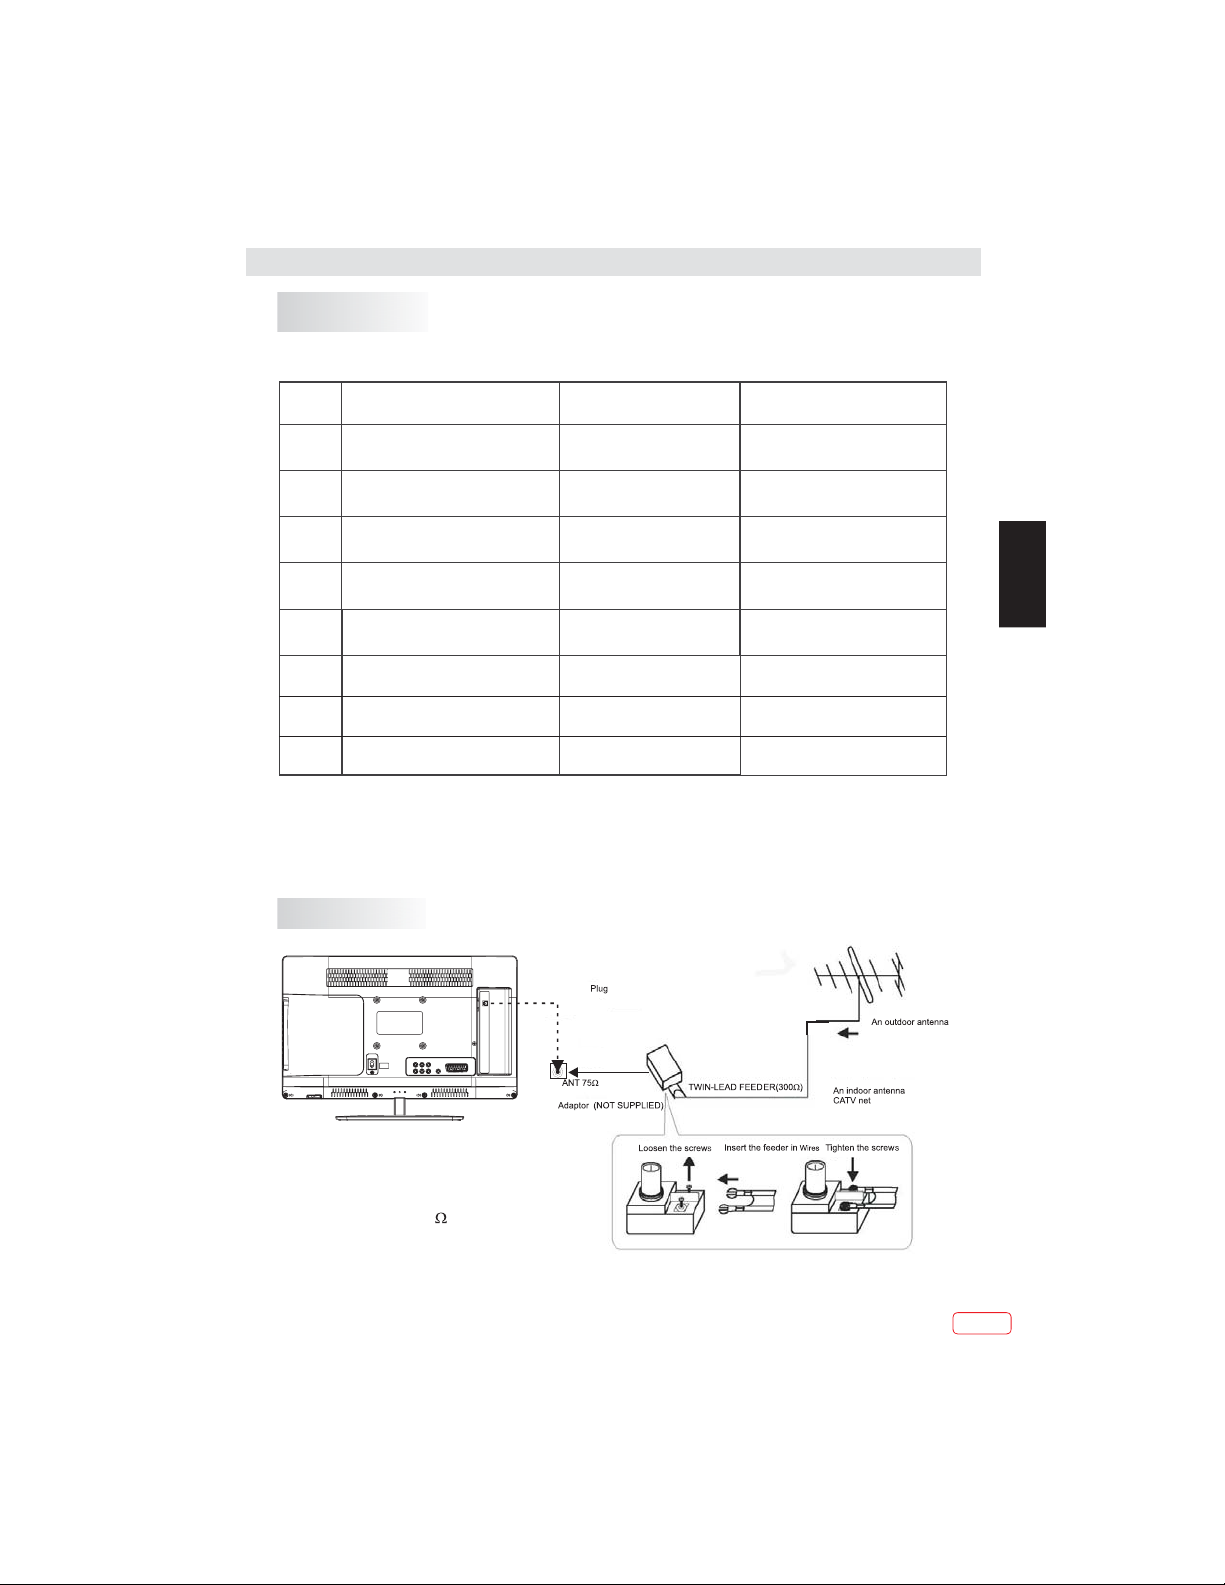
ANTENNA
RESOLUTION
800*600
640*480
1024*768
(recommended PC fomat for 19", 28")
1366*768
1920*1080
(recommended PC fomat for 22")
1280*960 60 60
1280*720 60 45
1360*768 60 47.7
V.Freq.(Hz) H.Freq.(KHz)
60
60
60
60
60
37.88
31.47
48.36
47.7
66.64
EN
Note:
Aerial connections: IEC(female).
Input impendance: 75 unbalanced.
11
EN
Page 12
Installation
AV EQUIPMENT
This TV provides one group of AV, one group of YPbPr and one SCART for convenient
connection to VCR, DVD or other video equipment. Please refer to the owners manual
of the equipment to be connected.
REAR AND SIDE CONNECTIONS
EN
HDMI
Y
Yellow (video)
W
White(audio L)
R
Red(audio R or Pr)
B
Blue(Pb)
G
Green(Y)
VIDEO EQUIPMENT with YPbPr
G B R
TO AUDIO OUTPUTS
It can be connected to the following appliances: VCR, multi disc player, DVD, camcorder,
video game or stereo system, etc.....
YPbPr can support these video formats: 480i,576i,480p,576p,720p,1080i,1080p.
W
VIDEO EQUIPMENT
W
R
R
Y
TO VIDEO
OUTPUTS
W R
G
R
B
COAXIALOUTPUT
W
R
Y
EN
12
Page 13
REMOTE CONTROL
1
28
2
3
4
5
6
7
MENU
8
9
10
11
12
FREEZE
16
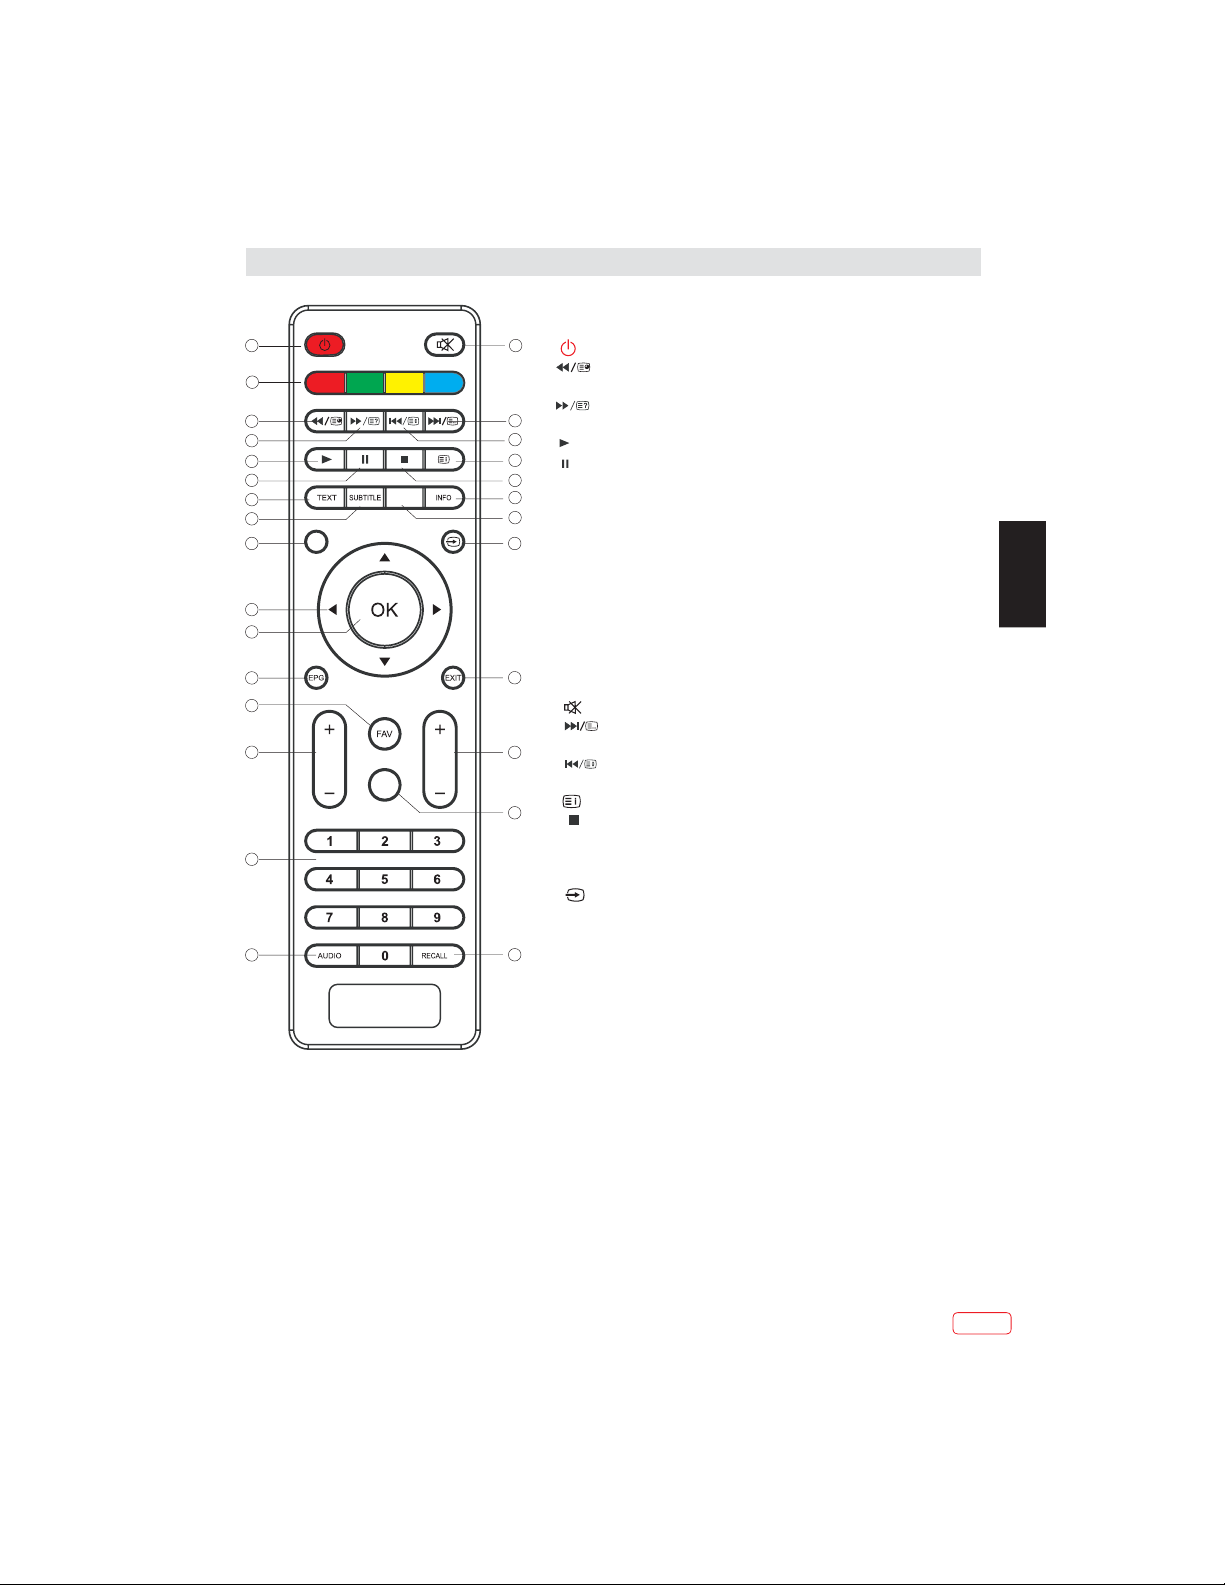
1: :To set the TV to standby or power on.
2: :In USB mode, used as reverse key, in teletext
mode used as subpage key.
3: : In USB mode, used as forward key, in teletext
17
18
19
20
21
22
23
mode used as reveal key.
4: : Press in USB Mode to begin or continueplayback.
5: : Press in USB Playback Mode to pause playback
TEXT
6: :To enter TELETEXT.
SUBTITLE
7: : To turn on subtitles press the subtitlebutton
in DTV mode.
MENU
8 : : Displays the main on-screen menu.
CURSOR
9 : : To move withinthe menu.
OK
10: : Confirms selection.
EPG
11: : To display information about the program beingviewed
and what's on next in TV mode.
FAV
12: :ToaccessyourfavouritechannelslistinTV mode.
VOL+/-
13: : To adjust sound level.
NUMERIC KEY
14: : For direct access to channels.
24
AUDIO
15: : To select the available audio language ofTV programs .
16: : To disable or enable the sound output.
.
EN
17: : In USB mode, used as next key, in teletext modeused as
13
VOL
CH
REC
25
18: : In USB mode, used as previous key, in teletext modeused
19: :
26
20: : Press to stop play in USB mode.
21: : To display the program information of the show you
14
22: Press to freeze the picture you are watching.
listkey.InTVmodeitlistsTVandRadiochannels.
as hold key.
In teletext mode used as index/shortcut button for PVR File System.
INFO
are watching, press the info button.
FREEZE:
23: : Press to display and select the available video sources.
EXIT
24: : To return to the previous menu orexit menu.
CH+/CH-
25: : To access the next or previous channels.
REC
26: :Press to record the TV program you are watching in
15
27
DTVMode.
RECALL
27: :TV Mode: Jumps to last channel viewed.
TELETEXT:
28. red, green yellow and blue buttons.
13
EN
Page 14
REMOTE CONTROL
TELETEXT
Teletext is an information system broadcast by certain channels which can be like a
newspaper. It also offers access to subtitles for viewers with hearing problems or who are not
familiar with the transmission language (cable networks, satellite channels, etc.)
read
EN
Press :
T
EXT
(BUTTON 6)
SELECTING A PAGE
DIRECT ACCESS
TO THE ITEMS
INDEX
(BUTTON 19)
SUB PAGE
(BUTTON 2)
HOLD
(BUTTON 18)
REVEAL
(BUTTON 3)
LIST
(BUTTON 17)
You will obtain :
This is used to enter or exit teletext mode. The summary appears with a
list of items that can be accessed. Each item has a corresponding 3 digit
page number.
Enter the number of the page required using the 0 to 9 up/down. Example:
page 120, enter 120. The number is displayed top left, the counter turns
and then the page is displayed. Repeat this operation to view another
page. If the counter continues to search, this means that the page is not
transmitted. Select another number.
Coloured areas are displayed at the bottom of the screen. The 4 coloured
keys are used to access the items or corresponding pages. The coloured
areas flash when the item or the page is not yet available.
This returns to the contents page (usually page 100).
Certain pages contain sub-pages which are automatically displayed
successively.This key is used to stop or resume sub-page
acquisition. The number appears top left.
To freeze the page.
To display or hide the concealed information (games solutions).
The user can set four favorite pages to be directly linked to the four colour
keys. The favorite page numbers should be stored and restored to/from
nonvolatile memory for each channel by the system software.
E
EN
14
Page 15
OPERATION
~
Espanol
EN
15
EN
Page 16

OPERATION
EN
EN
16
Page 17
OPERATION
EN
17
EN
Page 18
OPERATION
EN
EN
18
Page 19
OPERATION
EN
19
EN
Page 20
OPERATION
EN
EN
20
Page 21
OPERATION
EN
21
EN
Page 22

OPERATION
EN
EN
22
Page 23
OPERATION
EN
23
EN
Page 24
OPERATION
EN
EN
24
Page 25
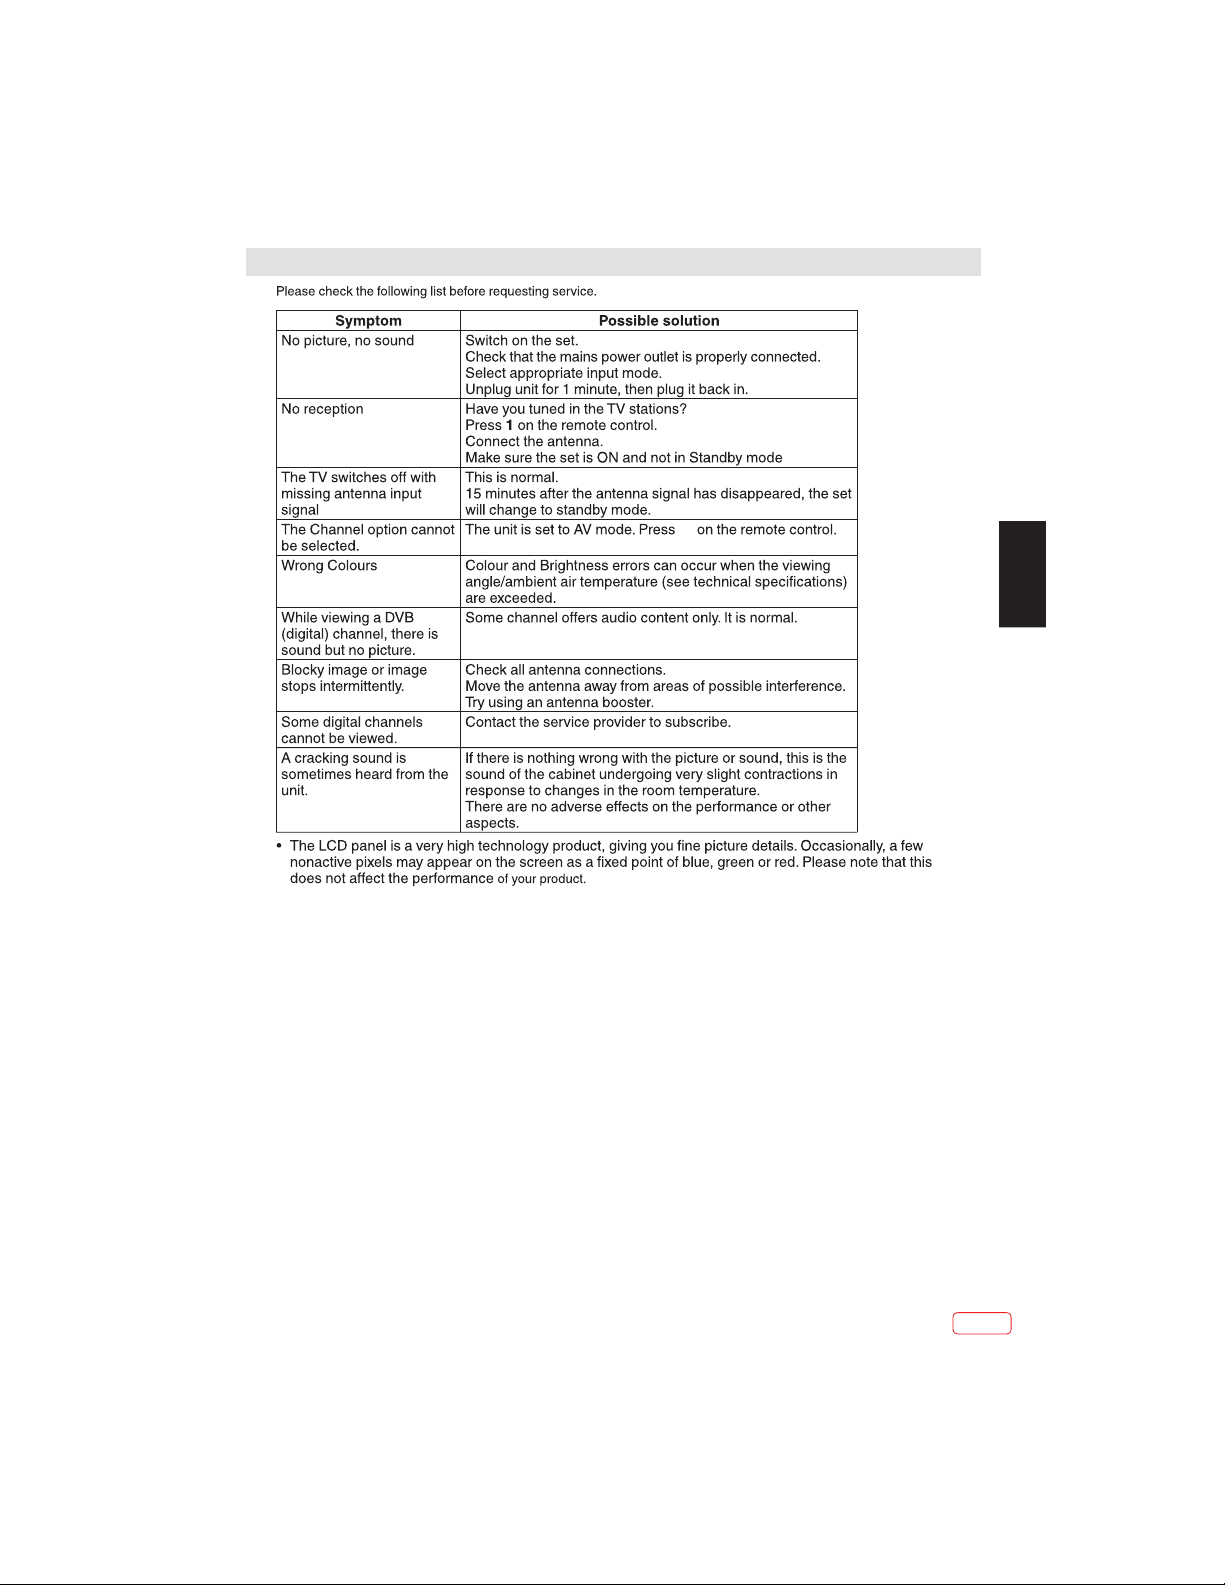
Troubleshooting table
TV Troubleshooter
A check through the guide below could save you the trouble of returning your purchase or waiting for a
service engineer. If you require assistance with operating this product you can phone our help line during
normal office hours.
Analogue TV & general
Symptoms
No sound
Crackling noises or distorted sound. nterference from cars, fluorescent lights,
Stereo switching to mono. Aweak signal or a mono broadcast. Check the signal and your aerial
No stereo sound from equipment
connected to the scart (AV) socket.
Analogue TV & general Picture
Symptoms
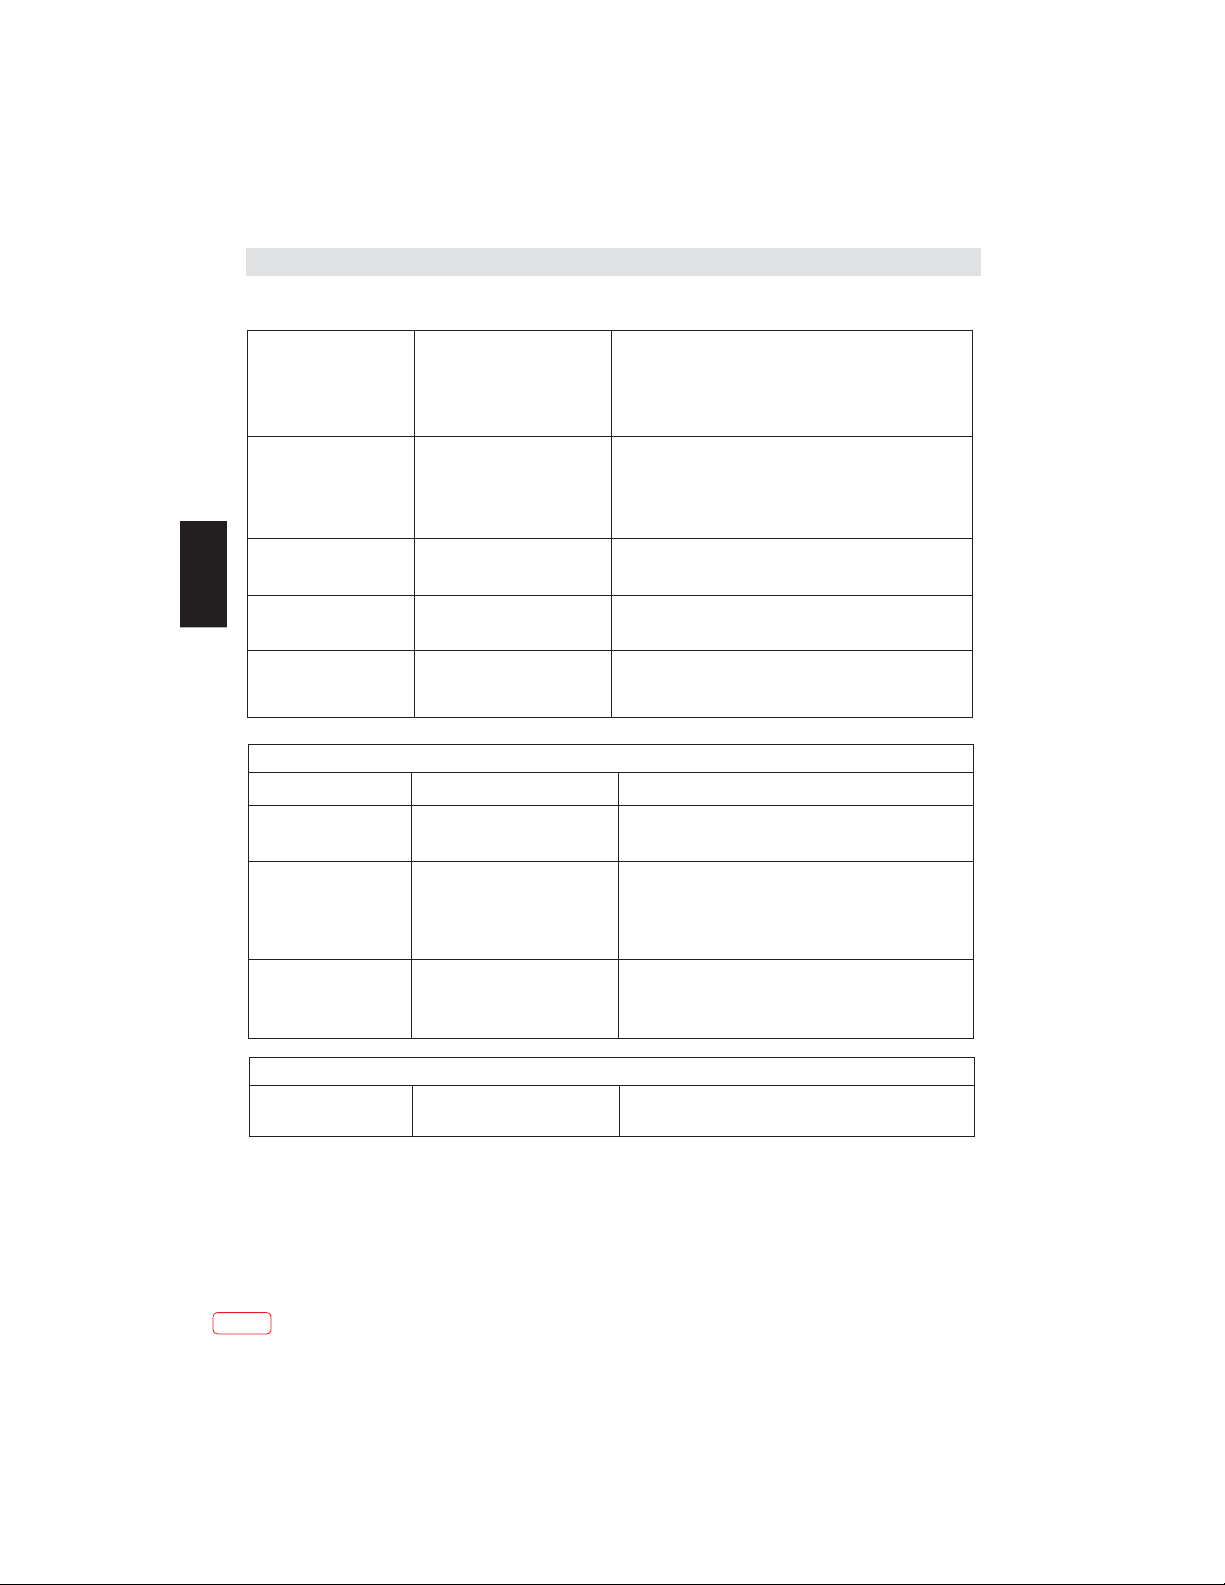
Grainy (snowy) picture
Sound
Possible causes
The volume is set to minimum. The mute is
switched on.
video recorder, a radio broadcast, personal
computer or other equipment.
A mono scart lead is being used to connect
the television. The signal being viewed is
connected through the aerial socket.
Possible causes
Cl disconnected.
Your video recorder could be faulty.
Transmitter trouble.
The outside aerial has moved, or is
damaged.
What to do
Turn the volume up. Press the mute
button to release 'mute'.
Turn off one piece of equipment at a
time to see if the interference clears.
See also what to do for picture
interference.
system.
Check that the scart lead is stereo.
Check the video recorder is
connected to the television through
an AV (scart) lead, then switch the
television toAV mode.
What to do
If you have a video recorder try
plugging the aerial directly into the
television. If the fault clears, the
video recorder is probably faulty.
Have your aerial system checked.
EN
Extra outlines on objects in the picture
(ghosts).
Picture interference like spots or
streaks.
Picture is the wrong size or the source
device (computer, DVD player, set top
box and so on) will not let you set up the
pixel resolution the display can
reproduce.
The aerial is receiving reflected signals
from hills or buildings. Faulty aerial
system.
Weak aerial signal. Interference from
electrical equipment such as power
tools and motors.
Settings for the digital video equipment
output do not match the monitors VGA
or DVI input specifications.
Source device has not read the set-up
data from the display. Connecting cable
does not have all the necessary
connections.
Try to tune in a better signal from
the same television station.
Get your aerial system checked.
Try to tune in a better signal from
the same television station. Get
your aerial system checked. Move
the interfering equipment further
away or ifpossible, turn it off.
Change the refresh rate or
resolution settings on the digital
equipment, if possible.
Avoid old cables and adapter
devices. Use only modern cables.
Re-start the source device after
connecting and powering up the
display. Change the graphics
adapter in your computer. Check
compatible video resolutions given
in these instructions.
25
EN
Page 26
Troubleshooting table
Picture looks squashed or
stretched even though the
aspect ratio controls are
set correctly (for example
4:3 or 16:9).
Picture interference like
wavy lines or patterns.
Sound or colour
interference may also be
present.
No picture. Brightness and contrast
Equipment feeding the
display is set to the wrong
aspect ratio.
Some other equipment is
using the same frequency.
Poor quality cable in the path
between the TV and the TV
aerial.Your aerial system is
receiving an unwanted signal
on the same frequency.
levels are set to minimum.
EN
Jumbled teletext
characters
When RGB input is
used there is a
distorted picture or no
picture.
Analogue TV & general Sound
Symptoms Possible causes What to do
Television seems 'dead' no lights come on and
nothing works.
The stand-by light is on
but the buttons don't seem
to work.
Local function buttons do
not work. Stuck on standby.
Poor quality signal
Synchronisation signal is
missing.
Mains supply missing. Main
power switch is off.
Blown fuse or circuit breaker.
Try the front panel
STANDBY/ON button: if TV
comes on then check "The
remote does not function".
Micro-controller confused by
electrical disturbance.
On the equipment feeding the TV choose the correct
output aspect r atio such as 4:3 or 1 6:9 to match the
TV. On digital equipment you might choose 1280 x
960 pixels to match 4:3 screens or
1280 x 768 pixels to match 16:9 screens.
Put other equipment on stand-by to see if the
interference stops: change the output frequency of
the equipment that is causing interference(see its
instructions). Get higher quality cable.
Get your aerial system checked.
Increase the brightness and contrast settings.
As for 'Snowy picture' and 'Ghosts'
Press theAV button to select the AV input which
receives the synchronisation signal.
Make sure it is not a general power cut.
Check the power switches on the television and at the
power outlet. Check the fuse or circuit breaker at your main
fuse box. Look for a possible cause of failure before you
replace or re-set it. Disconnect power supply, wait five
minutes and try front panel STANDBY/ON. If still no good,
disconnect power supply and assume the unit is faulty.
Switch off mains power and wait 10 minutes before trying
again. (Leave theTV unplugged and call a service
engineer if this does not work.)
Analogue TV & general Remote
Wrong functions or short
range.
EN
26
Batteries run down.
Obstacle in the way.
Insert new batteries
Remove any objects and aim from straight in front of the
remote sensor with a clear line of sight.
Page 27
Troubleshooting table
Digital Terrestrial TV Troubleshooter
Symptoms Possible causes What to do
Picture blocking or
freezing. Sound breaking
up.
Some channels are
missing.
Any or all of the above
faults.
Weak signal or wrong type of
aerial.
Not receiving one or more
digital multiplex frequencies.
Interference or other problem
caused by passing aerial signal
through other equipment.
Try re-tuning.
Aerial may not be suitable for digitalTV broadcasts.
You may be in a place which does not get a good digital TV
signal.
Get an aerial rigger to check the aerial system.
Try connecting the aerial directly to the digital TV receiver
and then re-tuning.
If some equipment has a radio frequency modulator, switch
it off or change the frequency of it and re-tune the analogue
TV. (Please see other equipments instructions for how to
do this.)
Multiplex
DVB-T (Digital Video Broadcasting -Terrestrial) is broadcast in groups of channels on one
common frequency. This arrangement is known as a Multiplex.
There are several multiplexes in the DVB-T system, each carrying a group of channels.
If the signal level on a particular multiplex frequency is poor you may lose the whole group
of channels on that multiplex.
EN
27
EN
Page 28
Troubleshooting table
Computer Monitor TV and HDMI Troubleshooter
Sound
Symptoms Possible causes Possible solutions
No sound
Symptoms
No picture.
EN
On-screen message
indicates video input is not
compatible.
Computer feeding theTV
does not offer you suitable
settings to match the TV
requirements.
Picture is not clear.
Picture is in the wrong
position.
Picture looks squashed
or stretched.
HDMI input is being fed through
a conversion connector from
equipment with a DVI output.
Possible causes Possible solutions
Settings for the digital video
equipment feeding theTV do
not match theTV input
requirements.
Computer has not exchanged
information with the television.
In older computers, the
graphics adaptor might be
obsolete.
Television needs to be set up for
the computer analogue RGB
input (also known as VGA - or sub).
Some input resolutions produce
a clearer picture than others.
the wrong aspect ratio
Equipment feeding the TV is
set to
.
Connect sound output from the DVI equipment to an
external amplifier.
Picture
Change the refresh rate or resolution settings of the
computer graphics adaptor or other digital equipment.
Re-start the computer while the television is still connected
to the power supply, then try again.
In exceptional cases, you may need to go into the
computer graphics adaptor settings and clear the check
box for Show only settings this monitor can support. For
Microsoft Windows this can be found byright-clicking on
the Desktop and following Properties - Display
Properties - Settings - advanced tab Monitor tab. The
availability of this function and the method of adjustment
varies with computer operating system.
Upgrade your graphics adaptor.
For computer analogue RGB input (also known as VGA-or
D-sub-, activate the automatic set-up function. The phase,
frequency, vertical and horizontal position controls might
also need slight adjustment.
Check information in the computer monitor section of these
instructions and try a different resolution setting.
For a TV with a computer monitor function fed from the
computer analogue RGB connector (also known as VGA or
D-sub, set up the computer graphics adaptor resolution to
have the same aspect ratio as theTV screen. (Aspect ratio
means the ratio of width to height, which in this case is
measured in pixels.)
We have made every effort to ensure these instructions are as accurate as possible, however
we apologize for any inconvenience caused by minor inconsistencies which may occur as a
result of product improvement and development.
EN
28
Page 29
Troubleshooting table
23
EN
29
EN
Page 30

EN
JVC/LT-19HA72U JVC/LT-22HG72U
1100
approx. 3W(MAX) x 2 approx. 8W(MAX) x 2
100-240V ~50/60Hz
JVC/LT-28HA72U
A
47cm /18.5 inch
28W 34W 38W
18W
26kWh
≤.0 30W
8W 8W 8W
55cm /21.5 inch 70cm /27.5 inch
22W
32kWh
27W
39kWh
EN
2.92kg2.47kg 5.3kg
44.5(W)x32.1(H)x16(D)cm 51.3(W)x36(H)x16(D)cm 64.2(W)x44.4(H)x20.9(D)cm
30
Page 31

EN
31
EN
Page 32

Caractéristiques
È
cran LCD 16/9
•
• Technologie Rétro-éclairage LED
• Tuner HD TV / DVB-C
• Tuner - Câble - analogique
• Guide de programme Électronique (EPG) pour DVB
Instructions pour les piles usées (valable uniquement dans l’UE)
Protégez l’environnement - contactez les autorités locales pour obtenir des conseils sur la façon
d'éliminer en toute sécurité les piles en fin de vie. Le symbole poubelle barrée indique que les piles
usagées ne doivent pas être jetées avec les ordures ménagères! Un système de collecte séparée des
piles usagées est en place afin de permettre un traitement et recyclage correct conformément à la
législation en vigueur. Pour plus d'informations sur les systèmes de collecte et recyclage dans votre
région, veuillez contacter votre mairie.
Instructions DVB-C
• Les programmes codés nécessitent une carte à puce et un module CA (CAM) pour le décodage.
Vous vous procurez la carte à puce auprès de votre fournisseur de câble (les CAM sont d'usage). Insérez la
carte à puce dans le CAM et insérez ensuite le CAM dans la fente CI de votre téléviseur.
La carte à puce que vous insérer dans le CAM.
• Actuellement environ 650 fournisseurs de câble offrent leur service en Allemagne. Le syntoniseur intégré ne
peut pas stocker automatiquement toutes les chaînes disponibles de tous le réseau câblé. Cette performance
ne peut pas être attendue, avec autant de fournisseurs individuels sur le marché. Veuillez utiliser le tableau
des canaux de votre fournisseur pour la syntonisation manuelle.
• Cette fente CI de la TV ne peut pas prendre en charge tous les modules Cl+ des 650 fournisseurs. Si le
module de votre fournisseur d’accès n'est pas pris en charge, veuillez demander à votre revendeur un autre
module CAou utilisez le décodeur de votre fournisseur d’accès pour décrypter.
FR
Information sur la fonction DVB-T
• Les fonctions relative à la télévision numérique (avec le logo DVB) ne sont disponibles que dans le pays ou
la région où ces signaux sont transmis. Vérifiez avec le vendeur s’il est possible de recevoir un signal DVB-T
dans la zone où vous habitez.
• Retirez le CAM pour la réception DVB-T.
• Une antenne DVB-T doit être raccordée pour les caractéristiques DVB-T, les transmissions numériques
futures DVB-T ou la compatibilité ne sont pas garanties.
• Certaines fonctions de la télévision numérique peuvent ne pas être disponibles dans certains pays.
• Le système DVB-T présent dans cet appareil est un service de diffusion télévision numérique sur ondes
hertziennes en clair.
• Lecteur Médias USB
• Mise hors tension automatique
• EVP (Enregistreur vidéo personnel)
• Time Shift (Décalage temporel)
• Nouveau cadre ultrafin*
L’appareil mis à la terre de l'installation électrique du bâtiment par le biais du raccordement au secteur ou
autres appareils avec un branchement mis à la terre – et à un système de distribution par câble utilisant un
câble coaxial, peut, dans certaines circonstances, provoquer un incendie. Le branchement à un système
de câblodistribution doit par conséquent être fourni par un dispositif fournissant une isolation électrique en
dessous d’une certaine plage de fréquences.
Cher client,
Cet appareil est conforme aux directives européennes en vigueur et normes en matière de compatibilité
électromagnétique et de sécurité électrique.
* Le cadre extra mince permet plus qu'une vue complète de l'écran du téléviseur. Même le bord de l'écran
noir (env. 3 mm) est désormais visible.
[Union européenne]
FR 2
Page 33

Sommaire
Caractéristiques.....................................................................................2
Sommaire..............................................................................................3
Renseignements importants sur la sécurité...............................................4-8
Installation.............................................................................................9-12
Commande à distance... .........................................................................13-14
Fonctionnement.....................................................................................
Tableau de dépannage............................................................................
Instructions............................................................................................
Numéro de licence..................................................................................
15-24
25-29
30
31
FR
3FR
Page 34

Renseignements importants sur la sécurité
Cet appareil a été produit selon toutes les normes de sécurité actuelles. Les conseils de sécurité suivants doivent
protéger les utilisateurs d’une utilisation imprudente et des dangers liés à cette utilisation.
• Bien que cet appareil ait été soigneusement, fabriqué et contrôlé rigoureusement avant sa sortie d'usine, comme
avec tous les appareils électriques il est possible que des problèmes se développent. Si vous remarquez une fumée,
une accumulation excessive de chaleur, ou tout autre phénomène inattendu, vous devez débrancher la fiche de la
prise de courant immédiatement.
• Assurez-vous que l'appareil est suffisamment ventilé ! Ne le posez jamais à côté ou sous les rideaux !
• Cet ensemble doit être uniquement branché à une alimentation électrique de – n'essayez pas
de le brancher à n'importe quel autre type d'alimentation.
• La prise de courant doit être installée près de l'appareil et facilement accessible.
• Toute réparation doit être uniquement effectuée par un technicien qualifié.
• N'ouvrez pas cet appareil. Un non-spécialiste essayant de réparer l'appareil pourrait être dangereux et risquerait de
provoquer un incendie.
• Éloignez les rongeurs. Les rongeurs (et aussi les calopsittes) aiment mordre dans les cordons électriques.
• L'animal peut provoquer un court-circuit (risque d'incendie!) et recevoir une décharge électrique mortelle.
• Tenez toujours la fiche lorsque vous retirez la fiche du système d'alimentation secteur. Ne tirez pas sur le cordon. Le
cordon peut être surchargé et provoquer un court-circuit.
• Ne lavez pas. Utilisez uniquement un chiffon humide, le même que lors de l'entretien du meuble.
• Ne le plongez pas dans ou sous l'eau !
• Mettez l’appareil en place de telle sorte que personne ne trébuche sur le cordon.
• Il est recommandé d’installer cet appareil sur des bancs à l’abri des chocs afin d'éviter tout danger de chute.
• Prenez note que les enfants en bas âge peuvent faire tomber l’appareil de la table ou du meuble par l’entremise de
son cordon. Les enfants peuvent se blesser en le faisant.
• N'utilisez pas l'appareil près des sources de chaleur. La carcasse et le cordon pourraient être endommagés par
l'impact de la chaleur.
• Méfiez-vous les enfants copient ce que les adultes font ! Ne collez pas d’objets dans les orifices de ventilation !
• Les orifices de ventilation doivent rester ouverts ! Ne posez pas de journaux ou couvertures sur l'appareil !
• La télécommande n'est pas un jouet ! Les enfants en bas âge pourraient avaler les piles. Si une pile a été avalée,
FR
appelez immédiatement un médecin.
• L'écran est en verre et peut se casser s’il est endommagé. Soyez prudent lors de la collecte des morceaux de verre
tranchants. Vous pouvez être blessé ou l’appareil peut être endommagé.
• Si l'appareil est fixé sur un mur, contactez le magasin où vous avez acheté l'appareil pour obtenir des conseils et
confiez les travaux d'installation à des experts. Des travaux d'installation incomplets risquent de vous blesser.
• Prenez des mesures de prévention des chutes
- Si ces mesures ne sont pas prises, l'appareil peut tomber et vous pourriez être blessé.
- Contactez le magasin où vous avez acheté l'appareil pour obtenir tous les détails des mesures.
• Lorsqu’un meuble de télévision est utilisé,
- Assurez-vous que l'appareil repose entièrement sur le socle et placé au centre.
- Ne laissez pas les portes du meuble ouvertes.
- Vous pourriez être blessé à la suite de la chute ou de la cassure de l'appareil, ou vos doigts pourraient se retrouver
coincés. Prenez des précautions supplémentaires si vous avez des enfants.
• Évitez de placer l'appareil sur des surfaces qui peuvent être soumises à des vibrations ou à des chocs.
• Pour protéger l'appareil pendant un orage, débranchez le cordon d'alimentation et déconnectez l'antenne. Attention :
ne touchez pas le connecteur d'antenne.
• Lorsque vous quittez votre domicile pour une longue période, débranchez le cordon d'alimentation pour des raisons
de sécurité.
• L'appareil chauffe quand il fonctionne. Ne recouvrez pas l'appareil de couvertures ou bâches afin d'éviter la
surchauffe. Les orifices de ventilation ne doivent pas être bloqués. Ne le placez pas près des radiateurs. Ne le placez
pas en plein soleil. Lorsque vous le placez sur une étagère, laissez 10 cm d'espace libre autour de l’appareil entier afin
de permettre une circulation d'air.
• Le déversement de liquides dans l'appareil peut entrainer des dommages graves. Mettez l'appareil hors tension et
débranchez l'alimentation électrique, puis faites appel à un technicien qualifié avant d'utiliser à nouveau l'appareil.
Respectez les instructions suivantes pour éviter de recevoir une décharge électrique mettant la vie en danger :
• Protégez-le de l'humidité. Ne l’utilisez jamais dans la salle de bain ou un sauna.
• Ne l’utilisez jamais près d'une baignoire, douche ou piscine.
• N'utilisez jamais l'appareil s’il a été mouillé. Cela peut aussi signifier l'humidité de condensation qui se produit en
hiver quand l’appareil froid est amené dans un appartement chauffé. Attendez avant de faire fonctionner l'appareil,
surtout en hiver quand il vient juste d’être transporté, jusqu'à ce que l’appareil froid se soit adapté à la température de
la pièce.
• Ne placez pas d'objets lourds sur le cordon. L’isolation électrique pourrait être endommagée.
• N’enroulez jamais de ruban isolant autour de flexions endommagées ou sur des fiches endommagées. Ceux-ci
devraient être réparés ou remplacés par un technicien qualifié.
• N’utilisez jamais cet appareil si le boitier est défectueux. Ne faites pas de réparations provisoires si le boîtier est
endommagé, il doit être remplacé par un boitier neuf si nécessaire.
• Débranchez l'appareil de la prise d'alimentation électrique avant le nettoyage de l'appareil.
• N'essayez jamais de réparer un cordon d'alimentation CAendommagé avec un ruban isolant - il doit être réparé par
un spécialiste ou remplacé. Ne laissez pas votre animal de compagnie lâché près du câble. Les animaux en mordant
dans le câble pourraient recevoir une décharge électrique mortelle et pourraient entraîner un danger pour les autres.
100 -240V CA ~ 50/60Hz
FR 4
Page 35

Renseignements importants sur la sécurité
Comment fixer le support
REMARQUE :
• Débranchez le cordon d’alimentation secteur.
• Avant d'effectuer les travaux, étalez un rembourrage sur la surface de la base pour y poser la TV.
• Ne soutenez pas la TV par l'écran car des objets pointus et trop de pression peuvent entrainer des
dommages.
• Respectez les instructions. Une installation incorrecte du support peut entraîner une chute de la TV.
1) Placez le téléviseur sur sa face sur une table.
2) Alignez la plaque de la base du support (fournie) tel qu’illustré ici.
EIle s'adaptera dans un seul sens. Assurez-vous que les chevilles de positionnement rentrent dans les
trous de fixation.
3) Maintenez soigneusement la plaque de la base en position et fixez-la avec les vis.
LT-19../LT-22.... LT-28....
une vis (M4x20mm)
REMARQUE :
Pour démontez la plaque de base, effectuez ces étapes dans l'ordre inverse.
Démontage de la base
Pour un montage mural, la base doit être démontée. Pour ce faire, retirez la vis de l’arrière.
(LT-19../LT-22….: 100x100mm, LT-28…: 200x100mm).
Notes lors du montage du téléviseur sur un mur
Enlevez le support comme une seule pièce en inversant la procédure de fixation décrite ci-
dessus.
Vous pouvez remettre les vis sur le support pour assurer la sécurité, mais ne les serrez que
légèrement.
VIS DE FIXATION
2 x 4 mm x 5 mm (TROUS DU HAU T)
2 x 4 mm x 5 mm (TROUS DU BAS )
Protégez l'écran et posez la TV à plat sur sa face sur une table stable, avec le pied du support qui
ressort du bord de la table.
Pour assurer une installation en toute sécurité, respectez les points suivants lors de la
suspension de la télévision à un mur :
Attention : cette opération nécessite deux personnes.
Vérifiez que le mur peut supporter le poids de l'ensemble télévision et support de montage mural
VESA standard (non fourni).
Assurez-vous de n'utiliser que des vis appropriées au matériau du mur.
En cas de doute, veuillez contacter un installateur qualifié.
Faites attention aux câbles électriques, conduites de gaz et d'eau dans le mur.
Suivez les instructions fournies avec le support mural.
L'ensemble doit être installé sur un mur vertical.
Assurez-vous que les câbles sont placés de telle sorte qu'il n'y a aucun risque de trébucher
dedans ou de les endommager.
Trois vis(M4x10mm)
Trois vis
(M3x15mm)
Quatre vis(M4x8mm)
FR
5FR
Page 36

Renseignements importants sur la sécurité
Afin d’éviter des dommages auditifs éventuels, ne pas écouter à un niveau sonore élevé
pendant une longue durée
FR
FR 6
Page 37

Renseignements importants sur la sécurité
Consignes de sécurité
Pour une utilisation en toute sécurité et un bon
entretien de votre téléviseur,
Nous avons conçu et fabriqué ce téléviseur pour
répondre aux normes de sécurité européennes,
mais comme pour tout appareil électronique, vous
devez en prendre soin, afin de rester en sécurité et
d'obtenir les meilleurs résultats. Voici quelques bons
conseils pour vous y aider.
Lisez attentivement ces instructions avant d’utiliser
la télévision.
Protégez le cordon d'alimentation. Vous devez vous
assurer que le câble d'alimentation ne peut pas être
piétiné, écrasé, usé, coupé ou coincé.
Coupez l'alimentation électrique ou débranchez la
prise secteur lorsque vous laissez la télévision, à
moins que la fonction de la télévision nécessite une
alimentation continue.
Ne continuez pas à utiliser votre téléviseur si vous
avez renversé du liquide dedans, s'il est
endommagé de quelque façon ou s’il ne fonctionne
pas normalement. Débranchez immédiatement le
téléviseur et obtenez les conseils d'un spécialiste.
Évitez les conditions difficiles telles que lieux
mouillés ou humides, une humidité élevée, de fortes
vibrations, des températures extrêmement élevés
ou faibles, un fort ensoleillement et les endroits très
poussiéreux.
Ne le posez jamais sur des supports improvisés ou
jambes. N'insérez jamais d'objets dans les trous et
les fentes d'aération. Afin d'éviter un choc électrique
n’enlevez aucune protection. Ne touchez pas l'écran
LED car il devient chaud lors
de l’utilisation, ceci est normal et n'est pas un
défaut.
Si quelque chose ne va pas, n'essayez pas de
réparer vous-même, faites appel à un agent de
service qualifié pour réparer.
Débranchez l'appareil et débranchez l’antenne
pendant les orages.
Ne laissez jamais des gouttelettes d'eau à l'écran
car l'humidité peut provoquer une décoloration
permanente.
Les marques grasses doivent seulement être
enlevées avec un nettoyant commercial
spécifiquement recommandé pour les écrans
LED.
Alimentation secteur
Ce téléviseur est conçu pour fonctionner à partir
d'une alimentation de 100 - 240 Volts 50 / 60Hz
ca. D’autres sources d'énergie
risqueraient de l'endommager. Vérifiez que la
plaque signalétique (au dos de la télévision)
indique 100-240VAC avant de la brancher pour la
première fois.
Le fabricant décline toute responsabilité pour les
dommages ou blessures causés par l'utilisation
du produit avec une mauvaise tension
d'alimentation.
Une tension dangereuse constituant un risque
d'électrocution est présente à l'intérieur de cet
appareil.
Cet appareilest à double isolation et la mise
à laterre n’est pas nécessaire.
Cette marqueest apposée pour indiquer
que l’appareilest conforme aux normes de
sécurité européenneset de compatibilité
électromagnétique.
FR
Nettoyage
Coupez l'alimentation secteur et utilisez uniquement
un chiffon doux légèrement humide. N'utilisez pas de
solvants chimiques ou détergents puissants qui
peuvent endommager la carcasse ou l'écran.
7FR
Page 38

Renseignements importants sur la sécurité
FR
FR 8
Page 39

Installation
Panneau avant
3
CLAVIER
SOURCE
MENU
CH+
CHVOL+
VOLVEILLE
1
2
1: Capteur de télécommande.
LED d'alimentation:
2:
ROUGE
VEILLE.
3: Boutons latéraux
30 30
FREEZE
EPG
CH
VOL
1. SOURCE :
affiche le menu de la source d'entrée ;
appuyez à plusieurs reprises pour faire descendre le
menu déroulant et appuyez sur « VOL-» ou « VOL + »
pour sélectionner la source souhaitée.
2. MENU :
3. CH + / CH- :
affiche le MENU principal.
en mode TV, appuyez sur « CH + » ou
« CH-» pour changer de chaîne vers le haut et vers le
bas. En mode MENU, appuyez sur « CH + » ou « CH-»
pour sélectionner des éléments. En mode veille,
Raccordements AV arrière
appuyez sur « CH + » ou « CH-» pour allumer la TV.
4. VOL + / VOL-:
réglez le niveau sonore. En mode
MENU, appuyez sur « VOL + » ou « VOL - » pour
régler l’élément que vous avez sélectionné.
COAXIALOUTPUT
5. Veille :
l'appareil à partir du mode VEILLE. Appuyez à nouveau
appuyez sur ce bouton pour allumer
pour le remettre VEILLE.
Les terminaux (de gauche à droite) : entrée YPbPr, entrée VIDÉO, AUDIO, sortie COAXIAL, PÉRITEL.
Remarque : VIDÉO et YPbPr partagent un canal audio.
Raccordements AV ARRIÈRE (côté)
FR
Les terminaux sont (de gauche à droite) :
USB, HDMI2, HDMI1(ARC), CASQUE, IC, PC AUDIO, VGA, RF.
Remarque :
1. Lorsque le port HDMI obtient le signal DVI, le signal audio est reçu à partir du canal Audio PC.
2. Insérez la fiche du casque dans la prise casque de l'appareil.
Les enceintes sont ensuite mises en sourdine.
HDMI ARC (Audio Return Channel)
La fonction ARC vous permet d'envoyer un signal audio de votre téléviseur compatible ARC à des appareils audio
compatibles ARC (ex : home cinéma) sans devoir brancher de câble audio (ex : câble coaxial, câble audio numérique
optique ou câble audio analogique).
Utilisation de la fonction ARC :
1. Vérifiez que les appareils audio compatibles ARC sont branchés via un câble HDMI 1.4 dans le port HDMI 2 (ARC)
de votre téléviseur compatible ARC. Et activez la fonction ARC des appareils audio compatibles ARC.
2. Réglez les paramètres du téléviseur : appuyez sur le bouton MENU, allez sélectionnez SETUP (REGLAGES) puis
activez HDMI CEC Control.
3. Puis utilisez la télécommande du téléviseur pour régler le niveau de volume de sortie (VOL+/- et MUTE) envoyé à
l'appareil audio branché.
Remarque : Si les a ppareils audi o compatibles AR C ne permettent pas d' obtenir le son du t éléviseur,
comme Dolby Dig ital ou Dolby Dig ital Plus, la fon ction ARC ne fonction nera pas et le son
pourra ne pas êtr e émis des appare ils audio compa tibles ARC. Dans ce c as, veuillez ré gler
la connexion co axiale sur PCM.
9FR
Page 40

Installation
PC
ETAPES :
Veillez à ce que le téléviseur et l'ordinateur soient hors tension.
1. Branchez le câble VGA et audio.
2. Branchez le cordon d'alimentation.
3. Allumez le téléviseur, passez en mode PC.
4. Allumez le PC.
Cette séquence est très importante.
FR
FR 10
Page 41

Installation
PC
MODE PRÉDEFINI
RÉSOLUTION
1
2
3
5
(format PC recommandé pour 19", 28")
6
(format PC recommandé pour 22")
7
8
9
800*600
640*480
1024*768
1366*768
1920*1080
1280*960 60 60
1280*720 60 45
1360*768 60 47.7
ANTENNE
V.Fréq.(Hz) H.Fréq.(KHz)
60
60
60
60
60
37.88
31.47
48.36
47.7
66.64
spina
FR
Adaptateur (non fourni)
Remarque :
Branchement de l’antenne : IEC (femelle).
Impédance d’entrée : 75 asymétrique.Ω
CHARGEUR JUMELÉ (300Ω)
Des serr ez l es vi s Insérezle chargeur
dans les fils
Une antenne intérieure
Une antenne extérieure
CATV net
Serrez les vis
11 FR
Page 42

Installation
ÈQUIPEMENTS AUDIO/VIDÉOS
Cette TV offre un groupe d’AV, un groupe YPbPr et une PERITEL pour un branchement facile au
magnétoscope, DVD ou autres équipements vidéo. Veuillez-vous référer au manuel du propriétaire de
l'appareil à raccorder.COLLEGAMENTI POSTERIORI E LATERALI
RACCORDEMENTS SUR LE CÔTÉ ET ARRIÈRE
Y
Jaune (vidéo)
W
Blanc (audio L)
R
Rouge (audio R ou Pr)
B
HDMI
Bleu (Pb)
G
Vert(Y)
FR
MATÉRIEL vidéo avec YPbPr
G B R
POUR SORTIESAUDIO
Il peut être relié aux appareils suivants : magnétoscope, lecteur multi-disque, DVD, caméscope, jeu vidéo ou
chaîne HI-FI, etc...
YPbPr peut prendre en charge les formats vidéo suivants : 480i, 576i, 480p, 576p, 720p, 1080i, 1080p.
W
QUIPEMENT VIDÉO
W
R
R
Y
POUR SORTIES
VIDÉOS
W R
G
R
B
COAXIALOUTPUT
W
R
Y
FR 12
Page 43

TÉLÉCOMMANDE À DISTANCE
1
28
2
3
4
5
6
7
MENU
8
9
10
FREEZE
16
Pour mettre le téléviseur en veille ou en marche.
1: :
2:
en mode USB, utilisé en tant que touche retour, enmode
télétexteutilisé en tant que touche sous-titre.
3: :
17
télétexte utilisé en tant que touche révèle.
18
4: :
19
5: :
20
6:TEXTE:
21
7: SOUS-TITRE :
22
sous-titre en mode télévision numérique.
8: MENU :
23
9:CURSEUR:
10: OK :
11:EPG :
en mode USB, utilisé en tant que touche avance, en mode
appuyez en Mode USB pour débuter ou poursuivre la lecture.
appuyez en Mode USB lecture pour mettre en pause la lecture.
pour entrer dans le TÉLÉTEXTE.
pour activer les sous-titres appuyez sur le bouton
affiche le menu à l'écran principal.
pour se déplacer dans le menu.
confirme la sélection.
pour afficher les informations sur le programme en cours de
visualisation et sur le programme suivant en mode télévision numérique.
12:FAV :
pour accéder à votre liste de chaînes favorites en mode TV ou
télévision numérique.
13: Vol +/- :
11
12
24
14: TOUCHES NUMÉRIQUES :
15: AUDIO :
pour régler le niveau sonore.
pour un accès direct aux chaînes.
pour sélectionner la langue audio disponible des
FR
programmes TV.
16: :
13
VOL
CH
REC
25
26
Pour désactiver ou activer la sortie audio.
17: :
En mode USB, utilisé comme touche «suivant», en mode
télétexte, utilisé commetouche de liste. En mode télévision numérique,
elle répertorie les chaînes de télévision et de Radio.
18: :
En mode USB, utilisée comme touche «précédent», en mode
télétexte utilisée
14
comme touche suspendre.
19: : En mode télétexte utilisée comme touche de raccourci/index
pour le système de fichiers EVP.
20: : Appuyez pour arrêter la lecture en modeUSB.
21:INFO:
vous regardez, appuyez sur la touche info.
15
27
22: PAUSE :
pour afficher les informations de programme du spectacle que
appuyez pour geler l'image que vous regardez.
23: : appuyez pour afficher et sélectionner les sources vidéo
disponibles.
24: SORTIE :
25: CH + / CH-:
26: REC :
pour revenir au menu précédent ou menu de sortie.
pour accéder aux chaînes suivantes ou précédentes.
appuyez pour enregistrer l'émission de TV que vous regardez
en
Mode télévision numérique.
27: RAPPEL :
Mode télévision numérique : passe à la dernière chaîne
regardée.
28. TÉLÉTEXTE :
boutons rouges, verts jaunes et bleus.
13 FR
Page 44

TÉLÉCOMMANDE À DISTANCE
TÉLÉTEXTE
Le télétexte est un système d'information diffusé par certaines chaînes, qui peut être lu comme
unjournal. Il offre également un accès aux sous-titres pour les téléspectateurs ayant des
problèmes d'audition ou qui neconnaissent pas parfaitement la langue de transmission (réseaux
câblés, chaînes satellites, etc.).
FR
Appuyez sur :
T EXTE
(TOUCHE 6)
SÉLECTION
D'UNE PAGE
ACCÈS DIRECT
AUX RUBRIQUES
INDEX
(TOUCHE 19)
SOUS-PAGE
(TOUCHE 2)
SUSPENDRE
(TOUCHE 18)
RÉVÉLER
(TOUCHE 3)
LISTE
(TOUCHE 17)
Vous obtiendrez :
Ceci est utilisé pour entrer ou sortir du mode télétexte. Le sommaire affiche
laliste des éléments accessibles. Chaque rubrique dispose d'un numéro de
page correspondantà 3 chiffres.
Saisissez le numéro de la page désiré à l'aide du sélecteur de 0 à 9.
Exemple :page 120, tapez 120. Le numéro est affiché en haut à gauche, le
compteur tourneet la page s'affiche. Répétez cette opération pour afficher
une autrepage. Si le compteur continue à chercher, cela signifie que la
page n'est pastransmise. Sélectionnez un autre numéro.
Les zones de couleurs sont affichées au bas de l'écran. Les 4 touches de
couleurservent à accéder aux rubriques ou aux pages correspondantes.
Les zones coloréesclignotent lorsque la rubrique ou la page n'est pas
encore disponible.
Cela renvoie à la page de contenu (généralement la page 100).
Certaines pages contiennent des sous-pages qui s'affichent
automatiquementsuccessivement. Cette touche est utilisée pour arrêter
ou reprendre l'acquisitionde la sous-page. Le numéro apparaît en haut à
gauche.
Pour figer la page.
Pour afficher ou masquer les informations cachées (solutions de jeux).
L'utilisateur peut définir quatre pages favorites à lier directement aux
quatretouches de couleur. Les numéros des pages favorites doivent être
stockés et restaurés de / à partir de lamémoire rémanente pour chaque
chaîne par le logiciel du système.
E
FR 14
Page 45

FONCTIONNEMENT
~
Espanol
FR
15 FR
Page 46

FONCTIONNEMENT
FR
FR 16
Page 47

FONCTIONNEMENT
FR
17 FR
Page 48

FONCTIONNEMENT
FR
FR 18
Page 49

FONCTIONNEMENT
FR
19 FR
Page 50

FONCTIONNEMENT
FR
FR 20
Page 51

FONCTIONNEMENT
FR
21 FR
Page 52

FONCTIONNEMENT
FR
FR 22
Page 53

FONCTIONNEMENT
FR
23 FR
Page 54

FONCTIONNEMENT
FR
FR 24
Page 55

Guide de dépannage
Dépannage TV
Une vérification grâce au guide ci-dessous pourrait vous épargner la peine de retourner votre achat, ou
d'attendre la venue d'uningénieur de service. Si vous avez besoin d'aide pour l'utilisation de ce produit, vous
pouvez contacter notre ligne d'assistance téléphonique auxheures normales de bureau.
TV analogique & générale
Symptômes
Pas de son
Grésillement ou son déformé
Le son passé de Stereo à mono. Signal trop faible ou diffusion en mono. Vérifiez l'antenne et le signal.
Aucun son stereo depuis le
périphérique connecté à la prisescart
(AV).
TV analogique et générale
Symptômes
Image granuleuse (neigeuse)
Les objets de l'image
apparaissent décalés (images
fantômes)
Son
Causes possibles
Le volume est réglé au minimum. La touche
« muet » estactivée.
Interférence des voitures, des lampes
fluorescentes,d'enregistreur vidéo, une
émission de radio, ordinateur personnelsou
autres appareils.
Une scart mono est utilisée pour
connecter la TV. Le signal en cours
de visualisation est relié par la prise
d'antenne.
Image
Causes possibles
Cl déconnectée.
Votre enregistreur vidéo est peut-être
défectueux.
Problème de transmission.
L'antenne a bougé, est endommagée ou
est mal branchée.
L'antenne reçoit des signaux
réfléchis par les collines ou les
bâtiments.
Antenne défectueuse
Que faire
Augmentez le volume. Appuyez sur
la touche « muet »pour enlever la
fonction « muet ».
Éteignez les appareils un par un
pour voir si les interférences
s'estompent. Consultez également
la section concernant les
interférences d'image.
Vérifiez quele cordon de péritel
est stéréo.
Vérifiez quel'enregistreur vidéo
est connectéà la télévision par
un cordon(péritel) AV, puis
bascule letéléviseuren mode AV
Que faire
Si vous avez un enregistreur
vidéo, essayez de brancher
l'antenne directement sur le
téléviseur. Si le défaut disparaît,
l'enregistreur vidéo est sans
doute à l'origine du problème.
Faites examiner l'antenne.
Essayez de syntoniser un
signal de meilleure qualité à
partir de la même station de
télévision.
Faites examiner l'antenne
FR
Taches ou bandes sur l'image.
L'image n'est pas à la bonne taille
ou l'appareil source (ordinateur,
lecteur DVD, décodeur etc.) ne
permet pas de régler la résolution
pixel pouvant être reproduite par
l'écran.
Mauvaise réception de l'antenne.
Interférences avec d'autres
appareils électriques (ex: moteurs,
machine-outil).
Les réglages des appareils vidéo
numériques ne sont pas adaptés
aux spécifications d'entrée
VGA/HDMI du moniteur.
L'appareil source n'a pas lu les
données de paramétrage de l'écran.
Le câble utilisé n'a pas toutes les
connexions requise
Essayez desyntoniser un signal
de meilleurequalité à partir de
la mêmestation de télévision.
Faites examinerl'antenne.
Éloignez l'appareilà l'origine
des interférencesou éteignez-le
si possible.
Modifiez lesparamètres du taux
d'actualisation oude résolution
de l'appareilnumérique, si
possible.
Évitez d'utiliser des vieux
câbles et des adaptateurs.
N'utilisez que des câbles
modernes.
Redémarrez l'appareil source
après avoir connecté et rallumé
l'écran.
Changez la carte graphique de
votre ordinateur.
Vérifiez les résolutions vidéo
compatibles indiquées dans ce
mode d'emploi.
25 FR
Page 56

Guide de dépannage
L'image semble étirée
ou aplatie, bien que le
format d'image soit
réglé correctement (par
exemple 4:3 ou 16:9).
Interférences visuelles
(lignes ondulées ou
bandes sur
l'image).Présence
possible d'interférences
sonores.
Pas d'image.
Caractères brouillés
dans le télétexte
Lorsque l'entrée RGB
est utilisée,
FR
l'image est distordue
ou inexistante.
TV analogique et générale
Symptômes Causes possibles Que faire
La télévision semble
"morte" : aucun t émoin
ne s'allume et rien ne
fonctionne.
La lumière de veille
est activée mai s les
touches ne semblent
pas fonctionner.
Les touchesde fonction
locales nefonctionnent
pas. Bloquéen veille.
L'appareil alimentant
l'écran n'est pas réglé sur le
bon format d'image
Un autre appareil utilise la
même fréquence.Câble de
mauvaise qualité entre le
téléviseur et l'antenne.
L'antenne reçoit un signal
parasite sur la même
fréquence.
La luminosité et le
contraste sont réglés au
minimum.
Mauvaise réception
Signal de synchronisation
manquant.
Son
L'appareil n'est pas sous
tension.La prise de courant
n'est pas sous
tension.Disjoncteur
déclenché ou fusible grillé.
Le fusible ou le disjoncteur a
sauté. Touche
STANDBY/ON : si la TV
s’allume puis vérifiez que la
télécommande ne
fonctionne pas.
Dysfonctionnement du
microcontrôleur lié à une
perturbation électrique.
Sur l'appareil alimentant le téléviseur, choisissez le
format de sortie qui convient, par exemple 4:3
(format conventionnel), 16:9, 1280 x 960 ou 1280 x
768 pixels pour les grands écrans.
Mettez les autres appareils en mode veille pour voir
si les interférences disparaissent; changez la
fréquence de sortie de l'appareil à l'origine des
interférences (voir mode d'emploi de cet appareil).
Procurez-vous un câble de meilleure qualité.
Faites examiner l'antenne
Augmentez les réglages de luminosité et de
contraste.
Comme pour "image neigeuse" et "images
fantômes".
Appuyez sur le boutonAV pour sélectionner l'entrée
AV qui reçoit le signal de synchronisation.
Vérifiez qu'il ne s'agit pas d'une coupure de
courant.
Vérifiez les interrupteurs d'alimentation sur la
télévision etla
Prise de courant. Vérifiez le fusible ou le
disjoncteur principal de votre
boîte à fusibles. Recherchez une cause possible
de l'échec avant
deremplacer ou de redéfinir. Coupez
l'alimentation, attendez cinq
minutes et essayez STANDBY / ON sur la face
avant. Si pas de changement, débranchez
l'alimentation et supposez que l'appareil est
défectueux.
Coupez l'alimentation secteur et attendez 10
minutes avant d'essayer ànouveau. (Laissez le
téléviseur débranché et appeler le service
de maintenance si cela ne fonctionne pas.)
TV analogique et générale
Dysfonctionnements ou
portée trop courte
FR 26
Remote
Piles épuisées.
Présence d'un obstacle
Mettez des piles neuves.
Enlevez tous les obstacles sur le passage et dirigez la
télécommande tout droit vers le capteur.
Page 57

Guide de dépannage
Télévision Numérique Terrestre
Symptômes Causes possibles Que faire
Blocage image ouimage
figée. Rupture de son
Certaines chaînes sont
manquantes.
Tout ou partie des
défauts qui
précédent.
Signal faible ou mauvais type de
d'antenne.
Ne reçoit pas une ou plusieurs
fréquences de multiplexes
numériques.
Brouillage ou tout autre problème
causé par le passage du signal
d'antenne à travers d'autres
équipements.
Essayez de syntoniser à nouveau.
L'antenne peut ne pas convenir pour les émissions de
TV numériques.
Vous pouvez être dans un endroit qui ne reçoit pas un bon
signal TV numérique.
Demandez à un installateur d'antenne de vérifier le
système aérien.
Essayez de connecter l'antenne directement au récepteur
de télévision numériqueet de resyntoniser.
Si un équipement a un modulateur de fréquence radio,
l'éteindre ou en changer la fréquence et re-syntoniser la
TVanalogique. (Voir les instructions des autres
équipements pour savoir commentprocéder.)
Multiplex
DVB-T (Télévision numérique terrestre) est diffusée en groupes de chaînes sur unefréquence commune.
Cette disposition s'appelle un Multiplex.
Il existe plusieurs multiplexes dans le système DVB-T, portant chacun un groupe de chaînes.
Si le niveau du signal sur une fréquence particulière de multiplex est mauvais vous risquez de perdre
l'ensemble du groupede chaînes sur ce multiplex.
FR
27 FR
Page 58

Guide de dépannage
Dépannage Moniteur TV d'ordinateur et HDMI
Son
Symptômes Causes possibles Solutions possibles
Pas de son
Symptômes
Pas d'image.
Message à l'écranindique
que l'entrée vidéo n'est
pas compatible.
L'ordinateur
alimentant la TV
ne vous offre pas les
FR
paramètres adaptés
pour répondre aux
exigences
de la TV.
L'image n'est pas
nette.
L'image est dans une
mauvaise
position.
L'image semble
écrasée
ou étirée.
L'entrée HDMI est alimentée par
un connecteur de conversion de
l'appareil avec une sortie DVI.
Causes possibles Solutions possibles
Les paramètres de l'appareil de
vidéo numériquealimentant laTV
necorrespondent pas aux
exigences d'entrée de votreTV.
L'ordinateur n'a pas
échangé
les informations avec la
télévision.
Dans les ordinateurs plus
anciens, l'adaptateur
graphique peut
êtreobsolète.
La télévision doit être configurée
pour une entrée ordinateur RVB
analogique
Également connusous le nom
(
de VGA- ou -sub).Certaines
résolutions d'entrée
produisentune imageplus claire
que lesautres.
Mauvais rapport d'aspect.
L'appareil alimentant la TV
est réglé pour
Connectez la sortie audio de l'équipement DVI à un
amplificateur externe.
Image
Modifier les paramètres de résolution ou de taux de
rafraichissement de
l'adaptateur graphiques d'ordinateur ou autre matériel
numérique.
Redémarrez l'ordinateur, alors que la télévision
est toujours connectéeà l'alimentation électrique,
puis essayez à nouveau.
Dans des cas exceptionnels, vous devrez entrer
dans les paramètres de l'adaptateur graphique de
l'ordinateur et effacer la case àcocher pour
afficher uniquement les paramètres que ce
moniteur peut prendre en charge. PourMicrosoft
Windows faites un clic droitsur Propriétés bureau
et suivantes - Affichage
Propriétés - Paramètres - onglet Avancé onglet
moniteur. Ladisponibilité de cette fonction et la
méthode de réglagevarient selon le système
d'exploitation.
Mise à niveau de votre adaptateur graphique.
Pour l'entrée RVB analogique d'ordinateur
(également connue sous le nom de VGA- ouD - sub, activez la fonction de réglage automatique. La
phase,la fréquence, les contrôles de la position
verticale et horizontale pourraientégalement
nécessiter un léger ajustement.
Consultez les informations dans la section du
moniteur d'ordinateur de cesinstructions et essayez
un paramètre de résolution différent.
Pour une TV avec une fonction de moniteur
d'ordinateur alimenté à partird'un connecteur RVB
analogique pour ordinateur (également connu sous
le nom de VGAouD-sub, configurez la résolution
de l'adaptateur graphique de l'ordinateur
pourobtenir le même rapport d'aspect que l'écran
du téléviseur. (Rapport d'aspectsignifie le rapport
largeur-hauteur, qui dans ce cas estmesuré en
pixels).
Nous mettons tout en œuvre pour garantir que ces instructions sont aussi précises que possible, toutefois,
nous nous excusons pour tout inconvénient causé par des incohérences mineures qui pourraient se produire
en conséquence de l'amélioration et du développement des produits.
FR 28
Page 59

Guide de dépannage
Veuillez consulter la liste suivante avant de faire appel au SAV.
Symptôme Solutions possibles
Aucune image, aucun son
Pas de réception
La TV s'éteint avec un signal
d’absence d'entrée
d'antenne
L'option de chaîne ne peut
pas être sélectionnée.
Mauvaises couleurs
Pendant que vous regardez
une chaine DVB (numérique),
vous avez du son mais
pas d'image.
Les images pixellisées ou
l’image s'arrête par
intermittence.
Certaines chaînes
numériques ne peuvent pas
être vues.
Un craquement se fait
entendre parfois de
l'appareil.
Allumez l’appareil.
Vérifiez que la prise d'alimentation secteur est correctement
branchée.Sélectionnez le mode d'entrée approprié.
Débranchez l'appareil pendant 1 minute, le rebranchez-le.
Avez-vous syntonisé dans les chaînes de télévision ?
Appuyez sur 1 sur la télécommande.
Connectez l'antenne.
Assurez-vous que l’appareil est en marche et non en mode veille.
Ceci est normal.
15 minutes après la disparition du signal d'antenne, l’appareil
passe au mode veille.
L'appareil est configuré en modeAV.Appuyez sur 23 sur la
télécommande.
Des erreurs de couleur et de luminosité peuvent se produire
lorsque les angles de vision / la température ambiante de l’air
(voir spécifications techniques) sont dépassés.
Certaines chaînes vous propose uniquement du contenu audio.
Ceci est normal.
Vérifiez tous les branchements de l'antenne.
Bougez l'antenne loin des zones d'interférence possible.
Essayez d'utiliser un amplificateur d'antenne.
Contactez le fournisseur de services pour vous abonner.
S’il n’y a pas de problème avec l'image ou le son, il s’agit du bruit
de la carcasse subissant des contractions très légères en réponse
aux changements detempérature de la pièce.
Cela n'a aucun effet néfaste sur les performances ou autres
aspects.
FR
L'écran LCD est un produit de très haute technologie, vous offrant des détails fins de
l’image. Parfois, quelques pixels inactifs peuvent apparaître sur l'écran comme un
point fixe de bleu, de vert ou de rouge. Veuillez noter que ceci n'affecte pas les
performances de votre produit.
29 FR
Page 60

Caractéristiques
Système :
Système de couleur vidéo :
Chaînes préréglées :
Plage de fréquence :
LCD
Entrée HDMI :
Puissance de sortie
audio :
GÉNÉRALITÉS
Source d’alimentation
FR
Classe d'efficacité énergétique :
Taille d'écran visible
(diagonale) :
Consommation d'énergie
(nominale) :
Consommation électrique
en mode :
Consommation d'énergie par an *¹:
Consommation d'énergie en
mode veille :*²
Consommation d’énergie en mode
d'enregistrement * ² :
Résolution de l'écran :
Poids :
Dimensions :
Température ambiante :
Humidité de fonctionnement :
JVC/LT-19HA72U JVC/LT-22HG72U
Analogique : PAL (B/G, D/K, I), SECAM (B/G, D/K)
• Ce produit n'est pas compatible avec la diffusion analogiqueSECAM L.
Numérique : DVB-T, DVB-T HD (H. 264), DVB-C, DVB-C HD (H.264)
PAL/SECAM/NTSC 3.58/NTSC 4.43/PAL 60Hz
Service de au total de l'analogique et numérique1100
Analogique : 45,75 ~ 858 MHz
Numérique : E2 ~ E69
LCD couleur TFT à matrice active basse-verre
Compatible HDMI (connecteurde typeA), compatible HDCP
Taux proposés de balayage : 50Hz: 576i/576p/720p/1080i/1080p
HDMI Audio : 2 canaux PCM, fréquence d'échantillonnage de32/44.1/48 kHz
16/20/24 bits paréchantillon
environ 3W (MAXI) x 2
100-240V ~50/60Hz
60Hz : 480i/480p/720p/1080i/1080p
JVC/LT-28HA72U
environ 8W (MAXI) x 2
A
47cm /18.5 pouces
28W 34W 38W
18W
26kWh
≤.0 30W
8W 8W 8W
1,366 pixel (horizontal) x
768 pixel (vertical)
44.5(L)x32.1(H)x16(P)cm 51.3(L)x36(H)x16(P)cm 64.2(L)x44.4(H)x20.9(P)cm
Fonctionnement : 5°~40°/ Stockage :-20°~60°
Inférieure à 80 % HR
55cm /21.5 pouces 70cm /27.5 pouces
22W
32kWh
1,920 x
pixel (horizontal) 1,366 x
1,080 pixel (vertical)
2.92kg2.47kg 5.3kg
27W
39kWh
pixel (horizontal)
768
pixel (vertical)
* 1 Consommation d'énergie par an, basée sur la consommation d'énergie de la télévision 4
heures par jour pendant 365 jours de fonctionnement.. La consommation d'énergie réelle
dépendra de l'utilisation de la télévision.
* 2 Basé sur la consommation électrique de l'appareil de télévision uniquement (lorsque la
TV n'exporte pas les images et signal sonore). N'inclut pas tous les autres périphériques
USB.
Le poids et les dimensions sont approximatives. Parce que nous nous efforçons
continuellement d'améliorer nos produits, nous pouvons modifier les spécifications et
modèles sans préavis.
FR 30
Page 61

Informations sur la licence
* DVB e t les logos DV B sont de s marques déposé es du projet DVB.
* Fabriqué sous licenc e de Dolby Laboratories. Dolby et le symbol e double-D sont des marques déposée s de Dolby
Laboratories.
* Ce produit est proté gé par certains droit s de propriété intellectuelle de Microso ft. L’utilisa tion ou la distributio n d'une
telle t echnologie en dehors de ce produi t est int erdite sans une licence d e Microsoft .
* CE PR ODUIT EST AUTORI SE SOUS LA LICENCE MPEG-4 VISUA L PATENT PORTFOLIO POUR L’UTILI SATION
PERSONNEL LE ET NON COMME RCIALE D’UN C ONSOMMATEUR POUR E NCODER (i) DE L A VIDÉO EN
CON FORMITÉ AVEC LA NORM E MPEG-4 VISUAL (« MPEG-4 VIDEO ») ET/OU (ii) LE D ECODAGE
A ÉTÉ CO DE PAR UN CONSOM MATEUR ENGAGE DA NS UNE ACTIVITÉ PERSONNE LLE ET NO N COMMERCIALE
ET/OU A ÉTÉ OBTENU E D’UNE VIDÉ O FOURNISSANT SOUS LI CENCE MPEG LA, L LC A FOURNIR LA VIDEO MPEG-
4. AUCUNE L ICENC E N’EST ACCORDÉE O U IMPLICI TE POUR TO UTE AUTRE UTILISATION. DES IN FORMATIONS
SUPPL ÉME NTAIRES N OTAMMENT CELLE S CONCERNANT LES UTILIS ATIONS PROMOTIONNE LLES, INTERNES
ET CO MMERCIALES ET DISPONIBL ES PEUVENT ÊTRE OBTENUES À PART IR DE MPEG LA LLC. SEE
HTTP://WWW. MPEGLA.COM .
* CE PR ODUIT EST SOUS LA LICE NCE DU PORTEFEU ILLE DE BREVE TAVC POUR L’UTILIS ATIO
D’UN CO NSOMM
POUR ENCO DER DES VID ÉOS C ONFORMÉMENT A LA NORME AVC (« VIDÉ O AVC ») ET/OU (ii) D ÉCODE R DES
VIDÉO SAV C QUI ONT ÉTÉ CODÉES PAR UN CONSOMM ATEUR EN GAGE DANS U NE ACTIVIT É PERSONNELLE
ET/OU A ÉTÉ OBTENU E D’UN FOURNISSEUR D E VIDÉO SOUS LICE NCE POU R FOURNIR DES VIDÉOS AV.
AUCUNE L ICENC E N’EST ACCORDÉE O U IMPLICI TE POUR TO UTE AUTRE UTILISATION. DES IN FORMATIONS
COM PLÉ MENTAIRES PEUVEN T ÊTRE OBTENUES AUP RÈS DE MPEG L A, L.L. C. SE E HTTP://WWW.MPEGLA.CO M.
* Les t ermes HDMI et le Log o HDMI et HDMI High Def
marques déposées de HDMI Licens ing, LL C aux Etats-Unis et autr es pays .
* Toutes le s autres marques son t la propriété de leurs propriétaires respecti fs.
ATEUR OU AU TRES UTILIS ATIONS DANS LESQUE LLES IL NE R EÇOIT PAS DE RÉMUNÉRATIO N (i)
initio n Multimedia Interfac e sont des marques commerciales ou des
MPEG-4 VID ÉO QUI
N PERSONNEL LE
FR
31 FR
Page 62

Kenmerken
• 16:9 LCD-scherm
• LED-schermverlichting technologie
• DVB-C/T-HDTV-tuner
• Kabel/analoge tuner
• Elektronische programmagids (EPG) voor DVB
Opmerking betreffende batterijen (alleen voor de EU)
Draag zorg voor het milieu. Neem contact op met uw plaatselijke overheid voor advies over het veilig
wegwerpen van lege batterijen. De doorkruiste vuilnisemmer geeft aan dat gebruikte batterijen niet bij het
gewone huisvuil thuishoren! Er bestaat een afzonderlijk inzamelsysteem voor lege batterijen, zodat deze
correct en volgens de huidige wetgeving behandeld en gerecycled kunnen worden. Neem contact op met uw
plaatselijke overheid voor details betreffende inzamel- en recyclesystemen in uw buurt.
Opmerking betreffende DVB-C
• Voor het decoderen van gecodeerde programma’s is een smartcard en een CA-module (CAM) vereist. U
kunt de smartcard bij uw kabelleverancier verkrijgen (CAM’s zijn gebruikelijk). Zet de smartcard in de CAM
en stop dan de CAM in de CI-sleuf van uw tv-toestel.
• Momenteel bieden in Duitsland alleen ongeveer 650 kabelleveranciers hun diensten aan. De ingebouwde
tuner is niet in staat alle beschikbare kanalen van alle bestaande kabelnetwerken automatisch opslaan. Dit
is een performance die niet kan worden verwacht, omdat er zoveel individuele providers op de markt zijn.
Gelieve waar nodig de zendertabel van uw provider te gebruikenom handmatig af te stemmen.
• De CI-sleuf van deze tv kan onmogelijk alle CI+ modules van alle 650 providers ondersteunen. Als de
module van uw provider niet wordt ondersteund, kunt u een andere CA-module in uw winkel vragen of de
settop-box van uw provider gebruiken voor het decoderen.
Informatie betreffende de functie DVB-T
• Functies die verband houden met digitale televisie (voorzien van het DVB-logo) zijn alleen beschikbaar
binnen het land of gebied waar dergelijke signalen worden uitgezonden. Vraag in uw winkelna of de
ontvangst van DVB-signalenin uw streek mogelijk is.
• Verwijder de eventueel ingezette CAM voor het ontvangen van DVB-T.
• Een DVB-T-antenne is vereist voor het ontvangen van DVB-T.
• Ondanks het feit dat de televisie voldoet aan de technische gegevens van DVB-T, kan de verenigbaarheid
NL
met toekomstige digitale DVB-T-uitzendingen niet worden gegarandeerd.
• Het is mogelijk dat bepaalde functies van digitale televisie in sommige landen niet beschikbaar zijn.
• Het DVB-T-systeem dat in dit apparaat is ingebouwd is FTA (Free-to-air of gratis ontvangst).
• USB-mediaspeler
• Automatisch uitschakelen
• PVR (persoonlijke videorecorder)
• Time-shift
• Nieuw smal-framedesign
Apparatuur die op de beveiligende aarding van een bouwinstallatie is aangesloten via een stopcontact
of via andere apparatuur met een aansluiting op de aarding en die tegelijkertijd is aangesloten op een
kabeldistributiesysteem met behulp van een coaxiale kabel, kan in sommige omstandigheden
brandgevaar inhouden. Daarom dient de aansluiting op een kabeldistributiesysteem te gebeuren via
een apparaat dat onder een bepaald frequentiebereik elektrisch geïsoleerd is.
Geachte klant,
Dit apparaat is conform de geldende Europese richtlijnen en normen betreffende elektromagnetische
congruentie en elektrische veiligheid.
* Het extrasmalle frame staat meer toe dan alleen een groter beeld op het tv-scherm. Ook de rand
(van ongeveer 3mm) van het gitzwarte scherm is nu zichtbaar.
NL
2
[Europese Unie]
Page 63

Inhoudsopgave
Kenmerken ……………………………………………………………….. 2
Inhoudsopgave ………………………………………………………….. 3
Belangrijke veiligheidsvoorschriften ………………………………….4-8
Installatie …………………………………………………………….......9-12
De afstandsbediening …………………………………………………..13-14
Bediening ……………………………………………………………......
Tabel voor het oplossen van problemen ………………………………
Technische gegevens ……………………………………………………
Informatie over licenties ………………………………………………..
15-24
25-29
30
31
NL
NL
3
Page 64

Belangrijke veiligheidsvoorschriften
Dit apparaat werd in overeenstemming met alle geldende veiligheidsvoorschriftenvervaardigd. De onderstaande tips
voor de veiligheid kunnen de consument beschermen tegen onachtzaam gebruik en de gevaren die daaraan zijn
verbonden.
• Hoewel dit apparaat met de grootste zorg is vervaardigd en grondig werd gecontroleerd voordat het de fabriek
verliet, is het zoals bij alle elektrische apparaten mogelijk dat zich toch problemen voordoen. Als u rook, hittevorming
of andere onverwachte fenomenen opmerkt moet u onmiddellijk de stekker uit het stopcontact halen.
• Zorg ervoor dat dit apparaat voldoende geventileerd wordt! Zet het nooit onder of naast gordijnen!
• Dit apparaat mag uitsluitend worden aangesloten op wisselstroom netvoeding van – probeer het
op geen enkele andere stroombron aan te sluiten.
• Het stopcontact moet zich dicht bij het apparaat bevinden en gemakkelijk bereikbaar zijn.
• Reparaties mogen uitsluitend door erkende reparateurs worden uitgevoerd.
• Maak dit apparaat niet open. Pogingen tot reparatie door niet-professionelen kunnen gevaarlijk zijn en brandgevaar
inhouden.
• Houd knaagdieren uit de buurt van het apparaat. Knaagdieren (en parkietsoorten) bijten graag in elektrische
snoeren.
• Dieren kunnen daardoor kortsluiting (brandgevaar!) veroorzaken en zelf een fatale elektrische schok krijgen.
• Houd altijd de stekker vast om deze uit het stopcontact te verwijderen en trek niet aan het snoer. Het snoer
zouhierdoor overbelast worden en kortsluiting kunnen veroorzaken.
• Reinig dit toestel nooit met vloeistof. Gebruik net zoals u meubilair reinigt uitsluitend een vochtige doek.
• Niet in water onderdompelen!
• Installeer dit apparaat zo dat niemand over het snoer kan struikelen.
• Dit apparaat kan best worden geïnstalleerd op schokvrije planken om gevaar door het vallen ervan te voorkomen.
• Vergeet niet dat peuters het apparaat aan de kabel van een tafel of uit een kast kunnen trekken. Kinderen kunnen
zichzelf daarbij verwonden.
• Gebruik het apparaat niet vlakbij warmtebronnen. De behuizing en het snoer kunnen door hitte beschadigd worden.
• Wees indachtig dat kinderen volwassenen na-apen! Stop geen voorwerpen in de openingen van het apparaat!
• De openingen van het apparaatmoeten vrij blijven! Leg geen kranten of afdekkingen bovenop het apparaat!
• De afstandsbediening is geen speelgoed! Peuters kunnen de batterijen ervan inslikken. Raadpleeg meteen een arts
als een batterij is ingeslikt.
• Het scherm is vervaardigd uit breekbaar glas. Wees voorzichtig als u gebroken glas met scherpe randen aanraakt. U
kunt zich ermee verwonden of het apparaat beschadigen.
• Om het apparaat tegen een wand te bevestigen neemt u contact op met de winkel waar u het apparaat kocht voor
advies en laat u het installatiewerk over aan specialisten. Onvolledig installatiewerk kan tot verwonding leiden.
• Tref maatregelen tegen het vallen van dit apparaat:
- Het apparaat kan vallen en u kunt verwondingen oplopen indien dergelijke maatregelen niet worden genomen.
NL
- Neem contact op met de winkel waar u het apparaat kocht voor de exacte afmetingen.
• Wanneer een tv-kast of sokkelwordt gebruikt:
- Zorg ervoor dat het apparaat volledig op en op het midden van de legplank staat.
- Laat de deuren van de kast niet open.
- U kunt verwondingen oplopen als het apparaat valt of breekt of als vingers geklemd komen te zitten. Tref extra
veiligheidsvoorzorgen als u kinderen heeft.
• Zet het apparaat niet neer op een ondergrond waar het aan schokken of trilling kan worden blootgesteld.
• Bescherm het apparaat bij onweer door de stekkeruit het stopcontact te hallen en de antenne los te koppelen. Let
op: raak de antenne-aansluiting niet aan.
• Haal omwille van de veiligheid de stekker uit het stopcontact als u uw woning voor een langere periode verlaat.
• Het apparaat warmt tijdens de werkingop. Leg geen dekens of afdekking op het apparaat om oververhitting te
voorkomen.
De ventilatieopeningen moeten vrij blijven. Zet het apparaat niet vlakbij radiatoren of onder rechtstreeks zonlicht.
Zorg voor minstens 10 cm vrije ruimte rondom het apparaat voor een goede luchtcirculatie.
• In het apparaat gemorste vloeistof kan ernstige schade veroorzaken. Schakel het apparaat meteen UIT, haal de
stekker uit het stopcontact en neem dan contact op met een erkende reparateur voordat u het apparaat opnieuw
probeert te gebruiken.
Let op de onderstaande zaken om levensgevaarlijke elektrische schokken te voorkomen:
• Bescherm het apparaat tegen vocht. Gebruik het nooit in een badkamer of sauna.
• Gebruik nooit vlakbij een bad, douche of zwembad.
• Gebruik het apparaat in geen geval als het is nat geworden. Dit houdt ook condensvorming in, die in de winter kan
voorkomen als een koud apparaat naar een verwarmde ruimte wordt verplaatst. Wacht ’s winters na verplaatsing om
het apparaat te gebruiken tot het apparaat op kamertemperatuur is gekomen.
• Zet geen zware voorwerpen op het snoer neer. Dit kan de elektrische isolatie ervan beschadigen.
• Wind nooitisolerende plakband rond beschadigde snoeren of stekkers. Deze moeten door een erkende reparateur
worden gerepareerd of vervangen.
• Gebruik dit apparaat niet als de behuizing beschadigd is. Improviseer geen reparaties aan een beschadigde
behuizing doch laat deze zo nodig vervangen.
• Haal de stekker van het apparaat uit het stopcontact voordat u het gaat reinigen.
• Probeer nooit een beschadigd wisselstroomsnoer te repareren met isolatietape. Dit moet worden gerepareerd of
vervangen door een erkend reparateur. Laat uw huisdieren niet bij de kabel komen. Dieren die in de kabel bijten
kunnen een fatale elektrische schok krijgen en een gevaar voor anderen betekenen.
100-240V~50/60Hz
NL
4
Page 65

Belangrijke veiligheidsvoorzorgen
De sokkel bevestigen
OPMERKINGEN:
• Haal de stekker uit het stopcontact.
• Spreid voordat u begint een zachte deken over het oppervlak waar u de tv gaat neerleggen.
• Houd de tv niet bij het scherm vast omdat scherpe voorwerpen en overmatigekracht het kunnen
beschadigen.
• Volg nauwgezet de instructies. Bij onjuiste installatie kan de tv omvallen.
1) Leg de tv met het scherm naar onder gericht neer op een tafel.
2) Stop de basisplaat van de (meegeleverde) sokkel in het apparaat alsaangegeven.
Deze past slechts op één manier in het apparaat. Let erop dat de pinnen in de gaten passen.
3) Houd de basisplaat voorzichtig op zijn plaats en bevestig dezemet schroeven.
LT-19../LT-22.... LT-28....
é n schroef (M4x20mm)é
OPMERKING:
• Voer de bovenstaande stappen in omgekeerde volgorde uit om de sokkel te verwijderen.
De sokkel demonteren
De sokkel moet worden verwijderd als u de tv tegen de wand gaat bevestigen. Verwijder hiervoor de
schroeven uit de achterzijde.
(LT-19../LT22..: 100x100mm, LT-28..: 200x100mm).
Opmerkingen bij wandmontage van de tv
Verwijder de sokkel als één geheel door de bovenstaande werkwijze van de montage in
omgekeerde richting uit te voeren.
U kunt de schroeven opnieuw in de sokkel vastmakenom deze niet te verliezen, doch draai ze niet
te vast.
BEVESTIGINGSSCHROEVEN
2x4mmx5mm (BOVENSTE GATEN)
2x4mmx5mm (ONDERSTE GATEN)
Dek het scherm af met een doek en leg de tv met het scherm naar onder zo op een stabiele tafel
neer dat de sokkel over de rand van de tafel komt te liggen.
Let bij wandmontage van de tv op de onderstaande punten voor een veilige installatie:
Waarschuwing: dit werk vergt twee personen.
Controleer of de wand het gewicht van het tv-toestel en een VESA-conforme wandhouder (niet
meegeleverd) kan dragen.
Gebruik uitsluitend schroeven die geschikt zijn voor het type wand.
Neem als u niet zeker bent contact op met een erkende installateur.
Wees voorzichtig voor elektrische kabels en gas- en waterleidingen in de wand.
Volg de instructies die met de wandhouder zijn meegeleverd.
Het toestel moet tegen een verticale wand worden bevestigd.
Let erop dat de kabels zo worden geleid dat niemand erover kan struikelen of deze kan
beschadigen.
drie schroeven (M4x10mm)
drie schroeven
(M3x15mm)
vier schroeven (M4x8mm)
NL
NL
5
Page 66

Belangrijke veiligheidsvoorzorgen
Waarschuwi ng be treffende ho ofd telefoons
Om gehoorbeschadiging te vermijden, luister niet gedurende een lange periode aan een hoog volumeniveau.
NL
NL
6
Page 67

Belangrijke veiligheidsvoorzorgen
NL
NL
7
Page 68

Belangrijke veiligheidsvoorzorgen
NL
NL
8
Page 69

Installatie
Voorpaneel
TOETSENBORD
3
1
2
1: Sensor van de afstandsbediening
LED-indicatorlampje:
2:
ROOD STAND-BY.
3: Toetsen op de zijkant
1. BRON:
30 30
FREEZE
EPG
CH
VOL
druk herhaaldelijk om neerwaarts in het menu te
verrollen en druk op VOL+ of VOL- om de gewenste
bron te selecteren.
2. MENU:
3. KAN+/KAN-:
geeft het menu met de ingangbronnen aan;
geeft het HOOFDMENU op het scherm aan.
druk in de tv-modus op KAN+ of KANom op of neer naar andere kanalen over te gaan. Druk
in de MENUMODUS op KAN+ of KAN- om items te
selecteren. Druk in de modus stand-byop KAN+ of
AV-aansluitingen op de ACHTERZIJDE
KAN- om de tv in te schakelen.
4. VOL+/VOL-:
om het geluidsniveau in te stellen. Druk
in de MENUMODUS op VOL+ of VOL- om een
geselecteerd item in te stellen.
COAXIALOUTPUT
5. STAND-BY:
toets om het apparaat in te schakelen. Druk nogmaals
druk in de modus STAND-BYop deze
om het tv-toestel weer in STAND-BY te schakelen.
De aansluitingen zijn (van links naar rechts): YPbPr-INGANG, VIDEO, AUDIO-INGANG, COAXIALE
UITGANG, SCART.
Opmerking: VIDEO en YPbPr delen eenzelfde geluidskanaal.
AV-aansluitingen op de ACHTERZIJDE (ZIJKANT)
BRON
MENU
KAN+
KANVOL+
VOLSTAND-BY
NL
De aansluitingen zijn (van links naar rechts):
USB, HDMI2, HDMI1(ARC), HOOFDTELEFOON, CI, PC-AUDIO, VGA, RF.
Opmerkingen:
1.Wanneer de HDMI1-poort een DVI-signaal ontvangt wordt het geluidssignaal ontvangen via het
pc-audiokanaal.
2.Stop de stekker van een hoofdtelefoon in het contact voor de hoofdtelefoon van het apparaat. De
luidsprekers zijn dan uitgeschakeld.
HDMI ARC (Audio Return Channel)
De ARC-functie stelt u in staat om audiosignalen vanaf uw ARC-compatibele TV naar uw ARC-compatibele audioapparaten
(bijv. home theatre-systeem) te sturen zonder een audiokabel (bijv. coaxiale, optische digitale audiokabel of analoge
audiokabel) te moeten aansluiten.
Om van de ARC-functie te genieten:
1. Zorg dat uw ARC-compatibele audioapparaten met de HDMI2 (ARC)-poort van uw ARC-compatibele TV zijn verbonden
door middel van een HDMI 1.4-kabel. Open vervolgens de ARC-functie van de ARC-compatibele audioapparaten.
2. TV aanpassen: Druk op MENU, ga naar OPTION, schakel CEC in.
3. Gebruik vervolgens uw TV-afstandsbediening om het volume (VOL +/- en MUTE) van het verbonden audioapparaat te
regelen.
Opmerking: Als de ARC-compatibel audio-apparaten het door de TV geproduceerde geluid niet ondersteunen,
zoals Dolby Digital of Dolby Digital Plus, zal de ARC-functie niet werken en komt er geen geluid uit de
ARC-compatibel audio-apparaten. In dit geval, stel coaxiaal in op PCM.
NL
9
Page 70

Installatie
PC
STAPPEN:
Zorg ervoor dat zowel de tv als de computer zijn
uitgeschakeld.
1. Sluit de VGA- en geluidskabel aan.
2. Sluit het netsnoer aan.
3. Schakel de tv in en schakel naar de pc-modus.
4. Schakel de pc in.
Deze volgorde is zeer belangrijk.
NL
NL
10
Page 71

Installatie
PC
PRESET-MODUS
RESOLUTIE
1
2
3
5
(aanbevolen PC-formaat voor 19", 28")
6
(aanbevolen PC-formaat voor 22")
7
8
9
800*600
640*480
1024*768
1366*768
1920*1080
1280*960 60 60
1280*720 60 45
1360*768 60 47.7
ANTENNE
V.Freq. (Hz) H.Freq. (KHz)
60
60
60
60
60
37.88
31.47
48.36
47.7
66.64
Stekker
NL
Adapter (NIET MEEGELEVERD)
Opmerkingen:
Antenneaansluitingen: IEC (vrouwelijk)
Ingang-impedantie: 75Ω niet-gebalanceerd.
LINTANTENNEAANSLUITING
(300Ω)
Draai de schroeven los Stop de kabels in
de aansluiting
Een buitenantenne
Een binnen-antenne
Kabel-tv-net
Maak de schroeven vast
11
NL
Page 72

Installatie
AV-UITRUSTING
Deze tv is uitgerust met een groep van AV, een groep van YPbPr en een SCART voor gemakkelijke
aansluiting op videorecorders, dvd-spelers of andere videoapparatuur. Raadpleeg de handleiding van
de aan te sluiten apparatuur.
AANSLUITINGEN OP DE ACHTER- EN ZIJKANT
Y
Geel (video)
W
Wit (audio L)
R
Rood (audio R of Pr)
B
HDMI
Blauw (Pb)
G
Groen (Y)
VIDEO-APPARAAT met YPbPr
NL
G B R
NAAR VIDEO-UITGANGEN
W
VIDEO-APPARAAT
W
R
R
Y
NAAR AUDIOUITGANGEN
W R
G
R
B
COAXIALOUTPUT
W
R
Y
Het tv-toestel kan op de volgende apparatenworden aangesloten: videorecorder, multidiskspeler,
dvd-speler, camcorder, videogame of stereosysteem, enz.
YPbPr ondersteunt de volgende videoformats: 480i, 576i, 480p, 576p, 720p, 1080i, 1080p.
NL
12
Page 73

DE AFSTANDSBEDIENING
1
28
2
3
4
5
6
7
MENU
8
9
10
FREEZE
16
1: :om de tv in stand-by of in te schakelen.
2: :wordt in de USB-modus gebruikt als achteruittoets, in de
teletekst-modus als subpagina-toets.
3: : wordt in de USB-modus gebruikt als vooruittoets, in de
17
teletekst-modus als toon-toets.
18
19
20
21
22
23
in de USB-modus indrukken om de weergave te starten of
4: :
verder te zetten.
in de USB-weergavemodus indrukken om de weergave tijdelijk
5: :
te onderbreken.
6: om TELETEKSTbinnen tegaan.
TEKST:
7: druk in de DTV-modus op deze toets om de
ONDERTITELING:
ondertiteling in te schakelen.
8
: om het hoofdmenu ophet scherm te zien.
MENU :
9
CURSOR: om binnen een menu te bewegen.
:
10
: om selecties te bevestigen.
OK:
11: om in de DTV-modus informatie over het bekeken programma
EPG:
en wat erna wordt uitgezonden op het scherm te zien.
12: omindeTV-modusdelijstvanuwfavorietezenders
FAV:
11
12
13
VOL
CH
REC
24
binnen te gaan.
13: om het geluidsniveau in te stellen.
VOL+/- :
14: voor rechtstreekse toegang tot zenders.
CIJFERTOETSEN:
15: om uit de beschikbare audiotalen van tv-programma’s te
AUDIO:
25
kiezen.
16: : om de geluiduitgang uit of weer in te schakelen.
17
: : wordt in de USB-modus gebruikt als volgende-toets, in de
26
teletekst-modus als lijst-toets. In de DTV-modus geeft deze toets de
NL
lijst van tv- en radiozenders aan.
14
18: :wordt in de USB-modus gebruikt als vorige-toets, in de
teletekst-modus als vasthoud-toets.
wordt in de teletekst-modus gebruikt als index/shortcut-toets voor
19: :
het PVR-bestandsysteem.
20: : in de USB-modus indrukken om de weergave te stoppen.
21: druk op de infotoets om informatie te zienover het
INFO:
15
27
programma dat u aan het bekijken bent.
22: indrukken om het huidige beeld op uw scherm te
BEVRIEZEN:
bevriezen.
23: : indrukken om de beschikbare videobronnen op het scherm te
zien en te selecteren.
24:
om terug te keren naar het voorgaande menu of het menute
EXIT:
verlaten.
25: om naar eenvolgend of voorgaand kanaal over te
KAN+/KAN-:
gaan.
REC:
26: in de DTV-modusindrukken om het bekeken tv-programma
op te nemen.
TERUGROEPEN:
27: om in DTV-modus te verspringen naar het laatst
bekeken kanaal.
TELETEKST:
28. rode, groene, geleen blauwe toetsen.
13
NL
Page 74

DE AFSTANDSBEDIENING
TELETEKST
Teletekst is een informatiesysteem dat door bepaalde zenders wordt uitgezonden en als een krant
kan worden gelezen. Het biedt ook toegang tot ondertiteling voor kijkers met gehoorproblemen of
die niet vertrouwd zijn met de taal van uitzendingen (kabelnetwerken, satellietzenders enz.).
NL
Druk op:
TEKST
(TOETS 6)
EEN PAGINA
SELECTEREN
RECHTSTREEKSE
TOEGANG TOT ITEMS
INDEX
(TOETS 19)
SUBPAGINA
(TOETS 2)
VASTHOUDEN
(TOETS 18)
TONEN
(TOETS 3)
LIJST
(TOETS 17)
U verkrijgt:
Deze toets wordt gebruikt om de teletekst-modus binnen te gaan of te
verlaten. Op het scherm verschijnt een samenvatting met een lijst van
items die u kunt binnengaan, waarbij elk item een overeenkomstig
paginanummer bestaande uit 3 cijfers heeft.
Voer het gewenste paginanummer in met behulp van de toetsen 0 tot 9 of
op/neer. Bijvoorbeeldvoor pagina 120: voer 120 in. Het nummer wordt
linksboven op het scherm aangegeven, de teller draait tot de pagina op
het scherm verschijnt. Herhaal deze bewerking om een andere pagina te
zien. De teller blijft zoekenals de pagina niet wordt uitgezonden, selecteer
dan een ander getal.
Onderaan het scherm worden gekleurde veldenaangegeven. De 4
gekleurde toetsen worden gebruikt voor toegang tot deze items of
overeenkomstige pagina’s. De gekleurde velden knipperen wanneer het
item of de pagina nog niet beschikbaar is.
Met deze toets keert u terug naar de pagina van de inhoudsopgave
(gewoonlijk pagina 100).
Sommige pagina’s omvatten ook subpagina’s, die automatisch
achtereenvolgens op het scherm verschijnen. Deze toets wordt gebruikt
om het verschijnen van subpagina’s te stoppen of hervatten. Het
nummer wordt linksboven aangegeven.
Om de pagina te bevriezen.
Om verborgen informatie (oplossingen van spellen) op het scherm te zien of
te verbergen.
De kijker kan vier favoriete pagina’s instellen die rechtstreeks aan de vier
kleurentoetsen zijn gelinkt. Deze favoriete paginanummers moeten door
de systeemsoftware worden opgeslagen of opnieuw opgeslagen in/vanuit
het niet-volatiele geheugen van elk kanaal.
E
NL
14
Page 75

BEDIENING
~
Espanol
15
NL
NL
Page 76

BEDIENING
NL
NL
16
Page 77

BEDIENING
17
NL
NL
Page 78

BEDIENING
NL
NL
18
Page 79

BEDIENING
19
NL
NL
Page 80

BEDIENING
NL
NL
20
Page 81

BEDIENING
21
NL
NL
Page 82

BEDIENING
NL
NL
22
Page 83

BEDIENING
23
NL
NL
Page 84

BEDIENING
NL
NL
24
Page 85

TABEL VOOR HET OPLOSSEN VAN PROBLEMEN
Problemen met de tv
Een controle aan de hand van de onderstaande gids kan u de moeite besparen van het terugsturen van uw
product of het wachten op een reparateur. U kunt tijdens de normale kantooruren ook onze hulplijn bellen als
u hulp nodig heeft bij het bedienen van dit apparaat.
Analoge tv & geluid algemeen
Symptomen
Geen geluid
Kraakgeluiden of vervormd geluid. Storing van auto’s, een TL-lampen,
Stereo schakelt over naar mono. Zwak signaal of een uitzending in mono. Controleer het signaal en uw
Geen stereogeluid uit het apparaat
dat op het scart-contact (AV) is
aangesloten.
Mogelijke oorzaken
Het volume is op het minimum ingesteld.
Het geluid is uitgeschakeld.
videorecorder, een radio-uitzending,
persoonlijke computer of andere
apparatuur.
U gebruikt een mono-scartkabel voor de
aansluiting naar de televisie. Het bekeken
signaal is aangesloten via het
antennecontact.
Wat u kunt doen
Zet het volume harder. Druk op de
toets Mute om het geluid in te
schakelen.
Schakel dergelijke apparaten één
voor één uit om na te gaan of de
storing verdwijnt. Kijk ook naar
wat te doen bij beeldstoringen.
antennesysteem.
Controleer of de scartkabel stereo is.
Controleer of de videorecorder met
behulp van eenAV (scart) kabel
op de tv is aangesloten en schakel
dan de televisie in de AV-modus.
Analoge tv & beeld algemeen
Symptomen
Korrelig (sneeuw) beeld.
Extra contouren rond objecten in
het beeld (spookbeelden).
Beeldstoringen zoals vlekken of
strepen.
Het beeld heeft de verkeerde
afmetingen of het bronapparaat
(computer, dvd-speler, set top-box e.d.)
staat u niet toe een pixelresolutie inte
stellen die het scherm kan
reproduceren.
Mogelijke oorzaken
CI losgekoppeld.
Uw videorecorder is wellicht defect.
Problemen met de zender.
De buitenantenne is verplaatst of
beschadigd.
De antenne ontvangt een dubbel signaal
door weerkaatsing van bergen of
gebouwen.
Defecte antenne.
Zwak antennesignaal. Storing van
elektrische apparatuur zoals werktuigen
of motoren.
De instellingen voor de digitale uitgang van
de videoapparatuur stemmen niet overeen
met de technische gegevens van de VGA
of DVI-ingang van de monitor.
Het bronapparaat heeft geen resoluties die
zijn opgegeven in deze handleiding.
De kabel van de aansluiting omvat niet alle
benodigde aansluitingen.
Wat u kunt doen
Als u een videorecorder heeft,
probeer dan de antenne
rechtstreeks op de televisie aan te
sluiten.
Als de fout hiermee wordt verholpen
is de videorecorder wellicht defect.
Laat uw antennesysteem nakijken.
Probeer op een beter signaal van
dezelfde tv-zender af te stemmen.
Laat uw antennesysteem nakijken.
Probeer op een beter signaal van
dezelfde tv-zender af te stemmen.
Laat uw antennesysteem nakijken.
Verplaats het apparaat dat storingen
veroorzaakt of schakel het indien
mogelijk uit.Pas indien mogelijk de
hernieuwingssnelheid of de
resolutie-instellingen van het
digitale apparaat aan.
Voorkom het gebruik van oude
kabels en adapters. Gebruik alleen
moderne kabels. Herstart het
bronapparaat na het aansluiten en
opstarten van de display. Gebruik
een andere grafische adapter in uw
computer.
Controleer de compatibele videoresoluties die in deze handleiding
zijn opgegeven.
NL
25
NL
Page 86

TABEL VOOR HET OPLOSSEN VAN PROBLEMEN
Het beeld ziet er
samengedrukt of uitgerekt
uit, ook al zijn de waarden
van de beeldafmetingen
correct ingesteld
(bijvoorbeeld 4:3 of 16:9).
Beeldstoring zoals
golvende lijnen of patronen.
Geluid- of kleurstoringen
kunnen ook aanwezig zijn.
Geen beeld. Helderheid en
Verwarde letters op
teletekst.
Wanneer de RGBingang wordt gebruikt
is er een vervormd of
geen beeld.
Analoge tv & geluid algemeen
Symptomen Mogelijke oorzaken Wat u kunt doen
NL
De televisie lijkt “dood” geen lichten branden en
niets werkt.
Het stand-by lampje
brandt maar de toetsen
lijken niet te werken.
Lokale functietoetsen
werken niet. Vastgelopen
in stand-by.
Het apparaat dat op de
display wordt weergegeven
is ingesteld op de
verkeerde beeldafmetingen.
Een ander apparaat gebruikt
dezelfde frequentie.
Kabel van slechte kwaliteit in
het pad tussen de tv en de tvantenne.
Uw antennesysteem ontvangt
een ongewenst signaal op
dezelfde frequentie.
contrastniveaus zijn op het
minimum ingesteld.
Signaal van slechte
kwaliteit.
Het synchronisatiesignaal
ontbreekt.
Geen stroomvoeding.
De hoofdschakelaar is
uitgeschakeld.
Gesprongen zekering van de
circuitonderbreking.
Probeer de toets STAND-BY/
AAN op het voorpaneel: als de tv
inschakelt, controleer dan
"De afstandsbediening werkt
niet".
Micro-controller in de war
door elektrische storing.
Kies de correcte beeldverhouding voor de uitgang
van het bronapparaat dat op de tv wordt
weergegeven, zoals 4:3 of 16:9 die bij de tv passen.
Kies op het digitale apparaat 1280 x 960 pixels voor
4:3-schermen of 1280 x 768 pixels voor 16:9schermen.
Schakel andere apparaten in stand-by om te zien of
de storing dan stopt: stel een andere
uitgangfrequentie in dan die van het apparaat dat
de storing veroorzaakt (zie de handleiding ervan).
Koop een kabel van betere kwaliteit.
Laat uw antennesysteem nakijken.
Verhoog de instelling van de helderheid en het
contrast.
Zelfde als voor “Sneeuw op het beeld” en
“Spookbeelden”.
Druk op de toetsAV om de AV-ingang te selecteren
die het synchronisatiesignaal ontvangt.
Controleer of het geen algemene stroomonderbreking is.
Controleer de stroomschakelaars van de televisie en het
stopcontact. Controleer de zekering van de
circuitonderbreking in uw zekeringkast. Zoek naar een
mogelijke oorzaak van het defect voordat u het toestel
vervangt of terugstelt. Haal de stekker uit het stopcontact,
wacht vijf minuten en probeer STAND-BY/AAN op het
voorpaneel. Als dit niet helpt laat u de stekker uit het
stopcontact en kunt u ervan uitgaan dat het apparaat
defect is.
Schakel de netvoeding uit en wacht 10 minuten voordat u
opnieuw probeert. (Laat de tv van de voeding losgekoppeld
en bel een reparateur indien dit niet helpt.)
Analoge tv & afstandsbediening algemeen
Verkeerde functies of
kort bereik.
NL
26
De batterijen zijn leeg.
Er zit een obstakel in de weg.
Zet nieuwe batterijen in.
Verwijder voorwerpen en obstakels die in de weg zitten en
richt van recht voor de afstandssensor in een rechte lijn.
Page 87

TABEL VOOR HET OPLOSSEN VAN PROBLEMEN
Problemen met de digitenne-tv
Symptomen Mogelijke oorzaken Wat u kunt doen
Het beeld blokkeert of
bevriest.
Het geluid is gebroken.
Sommige kanalen
ontbreken.
Eén van of alle
bovenstaande defecten.
Zwak signaal of verkeerd type
antenne.
De tv ontvangt één of meerdere
digitale multiplex-frequenties
niet.
Storing of ander probleem
veroorzaakt door een
voorbijkomend antennesignaal
van andere apparatuur.
Probeer opnieuw af te stemmen.
De antenne is wellicht niet geschikt voor digitale tvuitzendingen.
Het is mogelijk dat u zich op een plaats bevindt waar geen
goed digitaal tv-signaal kan worden ontvangen.
Laat uw antennesysteem nakijken door een antenneinstallateur.
Probeer de antenne rechtstreeks op de ontvanger van de
digitale tv aan te sluiten en dan opnieuw af te stemmen.
Als andere apparatuur is uitgerust met een
radiofrequentiemodulator, schakel die uit of stel er een
andere frequentie op in en stem de analoge tv opnieuw af.
(Verwijs naar de handleiding van de andere apparatuur om
te leren hoe dit te doen.)
Digitenne
DVB-T (digitale video-uitzending - terrestriaal) betekenthet uitzenden in groepen van kanalen
op één gemeenschappelijke frequentie. Deze regeling staat bekend als een multiplex of
digitenne.
Er zijn verschillende digitennes in het DVB-T-systeem, waarbij elk een groep kanalen draagt.
Als het signaalniveau op een bepaalde multiplexfrequentie te zwak is, is het mogelijk dat u de
hele groep van kanalen op deze digitenne verliest.
NL
27
NL
Page 88

TABEL VOOR HET OPLOSSEN VAN PROBLEMEN
Problemen met de computermonitor-tv en HDMI
Geluid
Symptomen Mogelijke oorzaken Mogelijke oplossingen
Geen geluid
Symptomen
Geen beeld.Een bericht op
het scherm geeft aan dat
de video-ingang niet
compatibel is.
De computer die op de tv is
aangesloten biedt u geen
geschikte instellingen die
met de vereisten van de tv
overeenstemmen.
Het beeld is niet duidelijk.
NL
Het beeld is in de
verkeerde positie.
Het beeld ziet er
samengedrukt of
uitgerekt uit.
HDMI-ingang wordt gevoed via
een conversie-aansluiting van
apparatuur met een DVI-uitgang.
Mogelijke oorzaken Mogelijke oplossingen
De instellingen voor het digitale
apparaat dat op de tv is
aangesloten stemmen niet
overeen met de vereisten van
de tv-ingang.
De computer heeft geen
informatie met de televisie
uitgewisseld.
Bij oudere computers is het
mogelijk dat de grafische adapter
verouderd is.
De televisie moet worden
ingesteld voor de analoge RGBingang van de computer (ook
bekend als VGA- of D-sub).
Sommige ingangresoluties
produceren een helderder beeld
dan andere.
Verkeerde beeldverhouding.
Het apparaat dat op de tv is
aangesloten is ingesteld op
Sluit de geluiduitgang van het DVI-apparaat aan op een
externe versterker.
Beeld
Stel een andere hernieuwingssnelheid of resolutie van de
grafische adapter van de computer of andere digitale
apparatuur in.
Herstart de computer terwijlde televisie nogop de
stroomvoeding is aangesloten enprobeer dan opnieuw.
In uitzonderlijke gevallen kanhet nodig zijnde instellingen
van de grafische adaptervan de computerbinnen te gaan en
het vakje “Toon alleen instellingen die deze monitor
ondersteunt” uit te vinken.Voor Microsoft Windows kandit
worden gevonden door rechtste klikken ophet Bureaublad
en dan “Eigenschappen –Display eigenschappen-Instellingen Geavanceerd tabblad - monitortabblad” te volgen.De
beschikbaarheid van deze functieen de methodevan
installeren kunnen variëren naargelanghet besturingssysteem
van de computer.Upgradeuw grafische adapter.
Voor de analoge RGB-ingang van de computer (ook bekend
als VGAof D-sub) activeert u de automatische instelfunctie.
De fase, frequentie, verticale en horizontale positie moeten
misschien ook een weinig worden aangepast.
Controleer de informatie in het hoofdstuk van de
computermonitor van deze handleiding en probeer een
andere instelling van de resolutie .
Voor een tv met computermonitorfunctie die wordt gevoed
via de analoge RGB-aansluiting van de computer (ook
bekend als VGAof D-sub), stelt u de resolutie van de
grafische adapter van de computer in op de zelfde
beeldverhouding als die van het tv-scherm.
(Beeldverhouding betekent de verhouding van de breedte
tot de hoogte, die in dit geval in pixels wordt uitgedrukt.)
Hoewel wij alle inspanningen hebben geleverd om deze handleiding zo nauwkeurig mogelijk op
te stellen, verontschuldigen wij ons voor eventueel ongemak als gevolg van kleine
onnauwkeurigheden, die in deze gebruiksaanwijzing kunnen voorkomen omdat wij onze
producten voortdurend ontwikkelen en verbeteren.
NL
28
Page 89

TABEL VOOR HET OPLOSSEN VAN PROBLEMEN
Gelieve de onderstaande lijst te controleren voordat u een reparatieservice inroept.
Symptoom Mogelijke oplossing
Geen beeld, geen geluid
Geen ontvangst
De tv schakelt uit als het
signaal van de antenneingang ontbreekt
Geen kanaaloptie
kan worden geselecteerd.
Foute kleuren
Wel geluid maar geen beeld
tijdens het bekijken van een
(digitaal) DVB-kanaal
Beeld in blokjes of
onderbroken.
Sommige digitale kanalen
zijn niet vindbaar.
U hoort soms een
kraakgeluid van het
apparaat.
Schakel het apparaat in.
Controleer of de stekker goed in het stopcontact zit.
Selecteer de juiste ingangmodus.
Laat de stekker 1 minuut uit het stopcontact en stop dan weer in.
Is de tv op tv-zenders afgestemd?
Druk op 1 van de afstandsbediening.
Sluit de antenne aan.Controleer of het apparaat is
INGESCHAKELD en niet in de modus Stand-by staat.
Dit is normaal.Het apparaat schakelt 15 minuten nadat het
antennesignaal is verdwenen naar de modus Stand-by.
Het apparaat is in deAV-modus geschakeld. Druk op 23 van
de afstandsbediening.
Foute kleuren en helderheid kunnen voorkomen wanneer de
maximale kijkhoek/omgevingstemperatuur wordt overtroffen
(zie Technische gegevens).
Sommige kanalen zenden alleen geluid uit. Dit is normaal.
Controleer alle antenne-aansluitingen.
Verplaats de antenne verder weg van mogelijke storingen.
Probeer een antenneversterker te gebruiken.
Neem contact op met uw serviceprovider voor een abonnement.
Als er niets aan de hand is met het beeld of geluid, is dit het
geluid van de behuizing die ietwat samentrekt door veranderingen
in de omgevingstemperatuur.
Dit heeft geen enkele invloed op de werking of andere aspecten
van uw tv.
NL
Het lcd-paneel is een zeer hoogtechnologisch product dat u fijne
beelddetails geeft.
Soms kunnen enkele niet-actieve pixels op het scherm verschijnen als
een vast punt
in blauw, groen of geel. Dit heeft geen enkele invloed op de werking van
uw product.
29
NL
Page 90

Technische gegevens
JVC/LT-28HA72U
ongeveer 8W (MAX.)x2
Systeem
Kleursysteem video
Preset-kanalen
Frequentiebereik
LCD
HDMI-ingang
Uitgangvermogen
audio
JVC/LT-19HA72U JVC/LT-22HG72U
Analoog: PAL (B/G, D/K, I), SECAM (B/G, D/K)
* Dit product is niet verenigbaar met analoge SECAM-uitzendingen.
Digitaal: DVB-T, DVB-T HD (H.264), DVB-C, DVB-C HD (H.264)
PAL/SECAM/NTSC 3.58/NTSC 4.43/PAL 60 Hz
1100 met inbegrip van analoge en digitale kanalen
Analoog: 45.75-858MHz
Digitaal: E2-E69
TFT Low-glas amoled-LCD
HDMI-verenigbaar (typeAaansluiting), HDCP-verenigbaar
Gesuggereerde scansnelheden:
50 Hz: 576i/576p/720p/1080i/1080p
60 Hz: 480i/480p/720p/1080i/1080p
HDMI-audio: 2 kanalen-PCM, 32/44. 1/48 bemonsteringsfrequentie
16/20/24 bits perbemonstering
bemonsteringsfrequentie, maximum bitsnelheid is 640kbps.
ongeveer 3W (MAX.)x2
6 kanalen AC-3, 32/44/48KHz,
ALGEMEEN
Stroombron
Energieklasse
Zichtbare schermgrootte
(diagonaal)
Stroomverbruik (nominaal)
Stroomverbruik in aanmodus
NL
Jaarlijks energieverbruik *¹
Stroomverbruik in stand-
bymodus
Stroomverbruik in
opnamemodus *²
Schermresolutie
Gewicht
Afmetingen
Omgevingstemperatuur
Omgevingsvochtigheid
100-240V ~50/60Hz
A
47cm /18.5 inch
28W 34W 38W
18W
26kWh
≤.0 30W
8W 8W 8W
1,366pixel(horizontaal)x
768 pixel (verticaal)
44.5(B)x32.1(H)x16(D)cm 51.3(B)x36(H)x16(D)cm 64.2(B)x44.4(H)x20.9(D)cm
Werking: 5-40ºC / Opslag: -20-60ºC
Minder dan 80%RV
55cm /21.5 inch 70cm /27.5inch
22W
32kWh
1,920pixel(horizontaal)x
1080pixel (verticaal)
2.92kg2.47kg 5.3kg
27W
39kWh
1,366pixel(horizontaal)x
768 pixel (verticaal)
*1 Het jaarlijkse energieverbruik is gebaseerd op het stroomverbruik als de televisie
365 dagen per jaar 4 uur per dag wordt gebruikt.Het eigenlijke stroomverbruik is
afhankelijk van de manier waarop de tv wordt gebruikt.
*2 Is gebaseerd op het stroomverbruik van het televisietoestel (zonder dat de tv een
beeld- of geluidssignaal uitbrengt). Andere USB-apparaten zijn niet meegerekend.
Het gewicht en de afmetingen zijn approximatief. Omdat wij voortdurend streven
naar verbetering van onze producten, is het mogelijk dat de uiteindelijke technische
gegevens en ontwerpen zonder voorafgaande kennisgeving zijn gewijzigd.
NL
30
Page 91

Informatie over licenties
• DVB en de DVB-logo’s zijn handelsmerken van het DVB-project.
• Vervaardigd onder licentie van Dolby Laboratories. Dolby en het dubbele-D-symbool zijn handelsmerken van
Dolby Laboratories.
• Dit product is beschermd door bepaalde intellectuele eigendomsrechten van Microsoft. Het zonder licentie van
Microsoft gebruiken of verdelen van deze technologie buiten dit product is verboden.
• DIT PRODUCT IS GELICENTIEERD ONDER DE MPEG-4 VISUELE PATENTPORTFOLIO LICENTIE VOOR
PERSOONLIJK EN NIET-COMMERCIEEL GEBRUIK DOOR DE CONSUMENT VOOR (i) HET CODEREN VAN
VIDEO IN OVEREENSTEMMING MET DE VISUELE STANDAARD MPEG-4 (“MPEG-4 VIDEO”) EN/OF (ii) HET
DECODEREN VAN MPEG-4 VIDEO DIE DOOR DE CONSUMENT GECODEERD WERD VOOR PERSOONLIJKE EN
NIET-COMMERCIELEACTIVITEITEN EN/OF VERKREGEN WERD VAN EEN VIDEOPROVIDER MET EEN
LICENTIE VAN MPEG LA VOOR HET LEVEREN VAN MPEG-4 VIDEO. GEEN LICENTIE WORDT VERLEEND
VOOR OF IS VAN TOEPASSING VOORANDER GEBRUIK. BIJKOMENDE INFORMATIE MET INBEGRIPVAN
INFORMATIE MET BETREKKINGTOTPROMOTIONEEL, INTERN EN COMMERCIEEL GEBRUIK EN
LICENTIEVERLENING KAN WORDEN VERKREGEN BIJ MPEG LA, LLC. ZIE http://WWW.MPEGLA.COM.
• DIT PRODUCT IS GELICENTIEERD ONDER DEAVC-PATENT PORTFOLIO LICENTIE VOOR PERSOONLIJK
GEBRUIK OFANDER GEBRUIK DOOR DE CONSUMENT WAARBIJ GEEN INKOMEN WORDT VERWORVEN UIT
(i) HET CODEREN VAN VIDEO IN OVEREENSTEMMING MET DE AVC-STANDAARD (“AVC VIDEO”) EN/OF (ii)
HET DECODEREN VANAVC VIDEO DIE DOOR EEN CONSUMENT GECODEERD IS VOOR PERSOONLIJKE
DOELEINDEN EN/OF VERKREGEN WERD VAN EEN VIDEOPROVIDER MET LICENTIE VOOR HET LEVEREN
VANAVC VIDEO. GEEN LICENTIE WORDT VERLEEND VOOR OF ZAL VAN TOEPASSING ZIJN OPANDER
GEBRUIK. BIJKOMENDE INFORMATIE KAN WORDEN VERKREGEN BIJ MPEG LA, L.L.C.. ZIE
http://WWW.MPEGLA.COM.
• De termenHDMI en HDMI High-Definition Multimedia Interface en het HDMI-logo zijn handelsmerken of
geregistreerde handelsmerken van HDMI Licensing LLC in de Verenigde Staten en andere landen.
• Alle andere handelsmerken zijn het eigendom van hun respectievelijke eigenaars.
31
NL
NL
Page 92

Prestaciones
Pantalla LCD 16:9 Reproductor multimedia-USB
Tecnología de Retroiluminación LED Desconexión Automática
Sintonizador DVB-C/T-HDTV PVR (Grabador Vídeo Personal)
Sintonizador-analógico-cable Time Shift
Guía Programación Electrónica (EPG) para DVB Nuevo diseño moldura-fina*
Advertencia sobre pilas (sólo válido en la UE)
Cuidemos del medio ambiente – consulte a las autoridades locales sobre el método para desechar
las pilas agotadas de modo seguro. ¡El símbolo de la papelera con ruedas tachada indica que las
pilas usadas no se deben tirar en la basura doméstica! Existe vigente un sistema separado de
recogida de pilas usadas que permite el tratamiento correcto y el reciclaje en cumplimiento de la
legislación actual. Consulte a las autoridades locales para obtener información sobre los programas
de recogida y reciclaje de residuos en su zona.
Notas DVB-C
Los programas codificados requieren una tarjeta Smartcard y un módulo CA(CAM) para proceder a
su descodificación.
Puede adquirir la tarjeta smartcard en su proveedor de televisión por cable (CAMs son productos
habituales). Introduzca la tarjeta smartcard en el CAM y después introduzca el CAM en la ranura CI
de su televisor. La tarjeta Smartcard se introduce en el CAM.
En la actualidad existen aproximadamente 650 proveedores de televisión por cable enAlemania. El
sintonizador incorporado no puede automáticamente memorizar todos los canales disponibles de
todas las redes de televisión por cable. Esta prestación no puede existir con tan elevada oferta de
televisión por cable. Utilice la tabla de canales de su proveedor de televisión por cable para
sintonizar manualmente los canales.
La ranura CI de este televisor no es compatible con todos los módulos CI+ de los 650 proveedores
de televisión por cable. Si el módulo de su proveedor no es compatible, solicite a su distribuidor otro
módulo CAo utilice el decodificador del proveedor para descodificar la programación.
Información sobre la función DVB-T
Cualquier función relativa a la televisión digital (con el logo DVB) está disponible en su país o zona
sólo si se transmite la señal de televisión digital. Verifique con el personal de la tienda que es posible
recibir la señal digital DVB-T en la zona donde usted reside.
Retire el CAM para poder recibir la señal de televisión digital, en caso de que se hubiera introducido
previamente.
Debe existir una antena DVB-T conectada para poder recibir las señal DVB-T.
Incluso cuando el televisor cumple las especificaciones DVB-T, no se puede garantizar la
compatibilidad de las transmisiones digitales DVB-T futuras.
Algunas funciones de televisión digital podrían no estar disponibles en algunos países.
ES
El sistema DVB-T incluido en este aparato es FTA (transmisión gratuita).
ES 2
Los aparatos conectados a la toma de tierra protectora de la instalación del edificio a través de la conexión a la red
eléctrica o la conexión a otros aparatos conectados a la toma de tierra – y a un sistema de distribución de cable
utilizando un cable coaxial, puede en algunas circunstancias generar un incendio. La conexión a un sistema de
distribución de cable debe ser realizada a través de un dispositivo que proporcione aislamiento eléctrico por
debajo de cierto rango de frecuencia.
Estimado Cliente,
Este aparato cumple las directivas y normas europeas vigentes referentes a compatibilidad
electromagnética y seguridad eléctrica.
El diseño de moldura extra-fina permite la visualización completa de la pantalla del televisor. Incluso el borde
súper-negro de la pantalla (aprox. 3mm) es visible.
Page 93

Índice
Prestaciones……………………………………………………………………………………2
Índice…………………………………………………………………………………………….3
Información Importante sobre Seguridad………………………………………………….4-8
Instalación………………………………………………………………………………………9-12
Mando a Distancia…………………………………………………………………………….13-14
Funcionamiento……………………………………………………………………………….
Tabla de resolución de problemas…………………………………………………………..
Especificaciones………………………………………………………………………………
Información sobre la Licencia……………………………………………………………….
15-24
25-29
30
31
3ES
ES
Page 94

Información importante sobre seguridad
Este aparato ha sido fabricado cumpliendo todas las normativas actuales de seguridad. Los siguientes consejos
sobre seguridad permitirán a los usuarios utilizar el producto correctamente y evitar situaciones de peligro durante
su uso.
Aunque este aparato ha seguido un cuidadoso proceso de fabricación y ha superado un riguroso control de
calidad en la fábrica, al igual que todos los aparatos eléctricos podría producirse algún problema. Si observa
humo, un excesivo calentamiento u otro fenómeno extraño, desenchufe inmediatamente el cable de
alimentación.
¡Compruebe que el aparato está suficientemente ventilado! ¡Nunca se debe colocar cerca o debajo de una
cortina!
Este aparato solo se debe conectar a una toma de corriente – no intente conectarlo a
ningún otro tipo de fuente de alimentación.
La toma de corriente utilizada debe estar instalada cerca del aparato y tener fácil acceso.
Todas las reparaciones deben ser efectuadas sólo por personal técnico cualificado.
No abrir el aparato. La apertura del aparato por una persona no profesional podría ser peligroso y provocar un
incendio.
Mantener fuera del alcance de roedores. Los roedores (y también las cacatúas) muerden los cables eléctricos.
Los animales pueden provocar un cortocircuito (¡peligro de incendio!) y recibir una descarga eléctrica.
Para desenchufar el cable de alimentación se debe tirar de la clavija. No tirar del cable. El cable podría
sobrecargarse y provocar un cortocircuito.
No limpiar con agua. Utilizar solo un paño húmedo, del mismo modo que se limpian los muebles.
¡No sumergir en agua!
El aparato se debe instalar de modo que nadie pueda tropezar con su cable de alimentación.
Se recomienda instalar el aparato en un soporte antigolpes para evitar su posible caída.
Recuerde que los niños podrían tirar el aparato desde una mesa o un mueble tirando de su cable de alimentación.
Los niños podrían sufrir daños al realizar esta acción.
No utilice el aparato cerca de fuentes de calor. La carcasa y el cable de alimentación podrían resultar dañados por
el calor.
¡Recuerde que los niños imitan a los adultos! ¡No introduzca ningún objeto por las ranuras de ventilación!
¡Los orificios de ventilación deben permanecer abiertos! ¡No colocar ningún periódico ni cubierta sobre el
aparato!
¡El mando a distancia no es un juguete! Los niños podrían ingerir las pilas. En caso de ingestión de una pila,
acuda inmediatamente al médico.
La pantalla está compuesta de cristal y podría romperse si sufre algún daño. Cuidado al recoger los cristales
rotos de bordes afilados. Podría sufrir daños personales o materiales.
Si desea instalar el aparato en la pared, consulte cómo hacerlo en la tienda donde lo adquirió y permita que la
instalación sea realizada por un técnico. La instalación incompleta podría provocar lesiones.
Adopte medidas adecuadas para evitar la caída del aparato
-Si estas medidas no se implementan, el aparato podría caer y provocar lesiones.
-Consulte en la tienda donde adquirió el televisor para que le faciliten sus dimensiones.
Cuando se utiliza un soporte para el televisor,
-Compruebe que el aparato está totalmente apoyado en el soporte y en la parte central del mismo.
-No deja abiertas las puertas del soporte
-Podría sufrir lesiones personales si el aparato sufre una caída o rotura, o podría pillarse los dedos. Extreme las
precauciones ante la presencia de niños.
No coloque el aparato en una superficie sometida a vibraciones o golpes.
ES
Para proteger el aparato durante una tormenta con aparato eléctrico, desenchufe el cable de alimentación y
desconecte la antena. Precaución: no tocar el conector de la antena.
Cuando vaya a estar fuera de casa durante un largo periodo de tiempo, desenchufe el cable de alimentación AC
por su seguridad.
El aparato se calienta durante su funcionamiento. No colocar ninguna cubierta o manta sobre el aparato para
evitar su sobrecalentamiento. No bloquear los orificios de ventilación. No instalar cerca de un radiador. No
colocar bajo la luz directa del sol. Al colocar el televisor en un estante deberá dejar10cm, de espacio libre
alrededor del aparato para facilitar la circulación de aire.
Si se derrama un líquido dentro del aparato se pueden producir daños graves.APAGUE el aparato y desenchufe
el cable de alimentación, después consulte al personal técnico antes de volver a encender el aparato.
Preste atención a las siguientes instrucciones para evitar una descarga eléctrica que podría ser mortal:
Proteja el aparato de la humedad. No utilizar en el cuarto de baño ni en la sauna.
No utilizar cerca de una bañera, ducha o piscina.
No utilizar el aparato después de que se haya mojado. Esta condición también incluye la humedad por
condensación, que se genera en invierno cuando el aparato frío se introduce en una vivienda caliente. Espere
antes de poner en funcionamiento el aparato, especialmente después de que haya sido transportado en invierno,
hasta que el aparato frío se haya adaptado a la temperatura de la habitación.
No colocar ningún objeto pesado sobre el cable de alimentación. Podría dañar el aislante eléctrico.
No enrollar cinta aislante alrededor del cable eléctrico o una clavija dañada. Deben ser reparados por personal
cualificado.
No utilizar este aparato si la carcasa está defectuosa. No realizar ninguna reparación provisional si la carcasa
está dañada – deberá sustituir la carcasa por otra nueva cuando sea necesario.
Desenchufe el aparato de la toma de corriente antes de proceder a su limpieza.
No intente reparar un cable de alimentación dañado utilizando cinta aislante – esta avería debe ser reparada o el
cable sustituido por un especialista. No deje a ningún animal doméstico suelto cerca del cable. Los animales
podrían morder el cable y recibir una descarga eléctrica mortal, provocando situaciones de riesgo para otros.
AC 100-240V~50/60Hz
ES
4
Page 95

Información importante sobre seguridad
Cómo instalar la base del televisor
NOTA:
Desenchufe el cable de alimentación.
Antes de realizar cualquier tarea coloque un cojín en la base para apoyar el televisor.
No sujete el televisor por la pantalla porque los objetos afilados o una excesiva presión podrían dañarlo.
Asegúrese de seguir las instrucciones. La instalación incorrecta de la base puede provocar la caída del
televisor.
1) Coloque el televisor apoyado encima de una mesa sobre la parte frontal.
2) Alinee la placa inferior de la base (suministrada) tal y como se indica en la ilustración.
Encajará en una sola dirección. Asegúrese de que las clavijas de sujeción encajan en los orificios de
sujeción.
3) Mantenga la placa inferior correctamente colocada y sujétela con los tornillos.
LT-19../LT-22.... LT-28....
Un tornillo (M4x20mm)
Tres tornillos (M4x10mm)
NOTA:
Para retirar la placa inferior de la base, siga los pasos anteriores en sentido inverso.
Desmontar la base
Para poder instalar el televisor en la pared, primero deberá desmontar la base. Para ello, retire los
tornillos de la parte posterior
(LT-19../LT-22..:100x100mm, LT-28…:200x100mm).
Notas sobre la instalación del televisor en la pared
Desmonte la base como una sola pieza siguiendo en orden inverso el proceso de instalación
descrito previamente.
Para evitar que los tornillos se pierdan, puede volver a instalarlos a la base, pero sin ajustarlos.
TORNILLOS DE INSTALACIÓN
2x4mmx5mm (ORIFICIOS SUPERIORES)
2x4mmx5mm (ORIFICIOS INFERIORES)
Proteja la pantalla y apoye el televisor horizontalmente sobre la cara frontal, encima de una
mesa estable, asegurando que los pies de la base fuera del borde de la mesa.
Para garantizar la instalación segura, respete las recomendaciones siguientes al colgar el
televisor en una pared:
Advertencia: Esta acción debe ser realizada por dos personas
Compruebe que la pared puede soportar el peso del televisor y delsoporte VESAde instalación
en la pared (no suministrado).
Asegúrese de utilizar tornillos adecuados para el material de la pared.
En caso de dudas, póngase en contacto con un instalador cualificado.
Cuidado con los cables eléctricos, las tuberías de gas y de agua instaladas en la pared.
Siga las instrucciones facilitadas con el soporte de instalación en la pared.
El aparato se debe instalar en una pared vertical.
Asegúrese de colocar los cables de modo que no exista peligro de tropezar con ellos o dañarlos.
tres tornillos (M3x15mm)
cuatro tornillos (M4x8mm)
ES
ES
5
Page 96

Información important e sobre seguridad
A fin de prevenir posibles lesiones auditivas, no escuche a niveles de volumen elevados por
largos periodos de tiempo.
ES
ES
6
Page 97

Información importante sobre seguridad
Información sobre Seguridad
Uso correcto y ma ntenimiento d el televisor
Este televiso r ha sido diseñad o y fabricado con forme a
las Normas Euro peas de Segurid ad, pero al igual q ue
cualquier apa rato electrón ico es importan te adoptar
unas precauci ones para evita r problemas y ase gurar
el funcionami ento óptimo. Es tas son algunas
recomendaci ones.
Antes de utiliz ar el televisor l ea detenidame nte estas
instruccion es.
Proteja el cabl e de alimentaci ón. Debe garant izar que
el cable eléctr ico no sea pisado , aplastado, da ñado,
cortado o pelli zcado.
Apague el apara to y desenchufe e l cable de
alimentació n antes de alejar se del televiso r, a menos
que el funciona miento del tele visor requier a el
suministro el éctrico conti nuo.
Interrumpa el u so del televiso r, cuando haya
derramado líq uido encima, el a parato esté dañ ado o
no funcione con n ormalidad. De senchufe el tel evisor
inmediatame nte y consulte a un t écnico.
Evite las condi ciones extrem as, por ejemplo l os
lugares mojad os, con elevada h umedad, fuert es
vibraciones , temperatura s extremadame nte elevadas
o bajas, la luz sol ar directa y luga res con mucho pol vo.
No instale al tel evisor ningun a base o pie provis ional.
No introduzca n ingún objeto en l os orificios o ra nuras
de ventilació n. Para evitar de scargas eléct ricas, no
abra ninguna cu bierta del apar ato. No toque la
pantalla LED po rque se calient a durante su
funcionamie nto, este fenóm eno es normal y no su pone
ninguna averí a.
Si algo funcion a incorrectam ente, no intent e arreglarlo
usted mismo, ac uda a un servicio t écnico oficia l.
Desenchufe el c able de aliment ación y el cable de l a
antena durant e las tormentas c on aparato eléc trico.
No permita que al guna gota de agua p ermanezca
en la pantalla po rque la humedad p uede provocar
la pérdida de col or permanente .
Los restos de gra sa se deben elimi nar solo con un
producto de lim pieza indicad o para pantalla s LED
y disponible a la v enta.
Alimentació n
Este televiso r ha sido diseñad o para funciona r
con un suminist ro eléctrico AC de 1 00-240 Voltios
50/60Hz. El uso d e cualquier otr a fuente de
alimentació n podría dañar el a parato. Antes de
conectar el tel evisor por prim era vez, compru ebe
que la placa de car acterística s (en la parte
posterior del t elevisor) ind ica 100-240V AC.
El fabricante N O será responsa ble de los daños o
lesiones prov ocados por el uso d el producto con
una fuente de ali mentación inc orrecta.
Clavija Eléct rica
El televisor es tá equipado con u na clavija
En el interior de este aparato existe
tensión eléctrica peligrosa que puede
provocar una descarga eléctrica.
Este aparato está doblemente
aislado y no es necesario utilizar
una conexión a tierra.
Esta señal indica que el aparato
cumple las normas europeas de
seguridad y compatibilidad
electromagnética
ES
Limpieza
Desconecte el a parato de la toma d e corriente y uti lice
solo un paño suav e ligeramente h umedecido. No
utilice ningu na sustancia qu ímica ni deterg entes
fuertes porqu e podrían dañar l a carcasa o la pant alla
del televisor.
ES
7
Page 98

Información importante sobre seguridad
ES
ES
8
Page 99

Instalación
Panel Frontal
3
TECLAS
FUENTE
MENÚ
CAN+
CAN-
VOL+
VOL-
ESPERA
1
2
1.Sensor del Control Remoto.
2.LED indicador de alimentación:
ROJO ESPERA.
3.
Botones laterales
Conexiones POSTERIORES AV
SALIDA COAXIAL
30 30
FREEZE
EPG
CH
VOL
1. FUENTE:
entrada; pulse varias veces para avanzar por el
menú y pulse “VOL-“ o “VOL+” para seleccionar la
fuente deseada.
2. MENÚ:
3. CAN+/CAN-:
“CAN-“ para incrementar o disminuir de canal. En
el modo MENÚ, pulse “CAN+” o “CAN-“ para
seleccionar las opciones. En el modo espera, pulse
“CAN+” o “CAN-“ para encender el televisor.
4. VOL+/VOL-:
En el modo MENÚ, pulse “VOL+” o “VOL-“ para
ajustar la variable seleccionada.
5. ESPERA:
televisor desde el modo de ESPERA. Púlselo de
nuevo para activar el modo de ESPERA del
televisor.
Permite ver el menú de fuente de
Permite ver el menú principal.
En el modo TV, pulse “CAN+” o
Permite ajustar el nivel de sonido.
Pulse este botón para ENCENDER el
Las tomas son (de izquierda a derecha): ENTRADA YPbPr, VÍDEO, ENTRADA AUDIO, SALIDA COAXIAL,
SCART.
NOTA: VÍDEO y YPbPr comparten el mismo canal audio.
Conexiones POSTERIORES AV (LATERAL)
ES
Las tomas son (de izquierda a derecha):
USB, HDMI2, HDMI1(ARC), AURICULARES, CI, PC AUDIO, VGA, RF.
Nota:
1.Cuando el puerto HDMI1 recibe la señal DVI, la señal audio se recibe desde el canal PC Audio.
2. Conecte la clavija de los auriculares en la toma de auriculares del aparato. Los altavoces quedarán
enmudecidos.
HDMI ARC (Canal de retorno de audio)
La función ARC le permite enviar señales de audio desde su televisor a otros dispositivos compatibles con esta
tecnología (p.ej. cine en casa) sin necesidad de conectar ningún cable de audio (p.ej. cable coaxial, cable óptico de
audio digital o cable de audio analógico).
Para poder disfrutar de la función ARC:
1. Compruebe que los dispositivos con tecnología ARC están conectados mediante un cable HDMI 1.4 al puerto
HDMI2 (ARC) de su televisor. A continuación, active la función ARC de estos dispositivos.
2. Ajuste el televisor: pulse MENU, vaya a OPCIONES y active CEC.
3. A continuación, utilice el mando a distancia de su televisor para ajustar el nivel del volumen (VOL+/- y MUTE) del
dispositivo de audio conectado.
Nota: Si los disp ositivos de aud io compatible s con A RC no admiten el so nido de salida de l televisor,
como puede ser Do lby Digital o Dol by Digital Plus , la función ARC no funci onará y tal vez no sa lga
ningún sonido d e los dispositi vos de audio comp atibles con ARC. En est e caso, estable zca
coaxial en PCM.
ES
9
Page 100

Instalación
ORDENADOR:
PASOS:
Compruebe que el televisor y el ordenador están
Apagados.
1. Conecte VGA y el cable audio.
2. Conecte el cable de alimentación.
3. Encienda el televisor, seleccione el modo PC.
4. Encienda el ordenador.
Es muy importante seguir el orden de estas instrucciones.
ES
ES
10
 Loading...