

Page 1

COLOUR TELEVISION
Contents
HV-34LPZ
HV-29LPZ
Setting up your TV
TV buttons and functions
Remote control buttons
and functions
Using the TV's menu
Basic operation
PICTURE SETTING menu
PICTURE FEATURES menu
SOUND SETTING menu
FEATURES menu
INSTALL menu
DEMO menu
Additional preparation
Troubleshooting
Specification
. . . . . . . . . . . . . 3
. . . . . . . . 6
. . . . . . . . . . . . 18
. . . . . . . . . . . . . . 18
. . . . . 20
. . . . . . 24
. . . . . . . . . . . 26
. . . . . . . . . . . . . . 29
. . . . . . . . . . . . . . . . 35
. . . . . . . . . . 36
. . . . . . . . . . . . . . 40
. . . . . . . . . . . . . . . . . 43
. . . 8
. . . 21
INSTRUCTIONS
© 2002 VICTOR COMPANY OF JAPAN, LIMITED
LCT1215-001A-H
0402-Ki-NV-JMT
Page 2

Thank you for b uying this JVC colour tele vision.
To make sure you understand ho w to use your new TV, please read this
manual thoroughly before you begin.
W ARNING:
TO PREVENT FIRE OR SHOCK HAZARD, DO NOT EXPOSE THIS APPLIANCE TO RAIN OR MOISTURE.
CAUTION:
TO ENSURE PERSONAL SAFETY, OBSERVE THE FOLLOWING
RULES REGARDING THE USE OF THIS TV.
1 Operate only from the power source indicated on the rear of the TV.
2 Avoid damaging the po wer cord and mains plug. When unpluging the TV,
grasp the mains plug. Do not pull on the power cord.
3 Never block or cover the ventilation openings.
Never install the TV where good ventilation is unattainnable.
When installing this TV, leave spaces for v entilation around the TV of more
than the minimum distances as shown.
15 cm
10 cm 10 cm 15 cm
4 Do not allow objects or liquid into the cabinet openings.
5 In the event of a fault, unplug the unit and call a service technician.
Do not attempt to repair it yourself or remove the rear co ver.
6 The surface of the TV screen is easily damaged. Be very careful with it
when handling the TV. Should the TV screen become soiled,
wipe it with a soft dry cloth. Ne ver use rub it forcefully .
Never use an y cleaner or detergent on it.
7 If you are not going to use this TV for a long preriod of time, be sure to
disconnect the AC plug from the AC sok et.
2
Page 3
Setting up your TV
CAUTION
• Turn off all the epuipment including the TV
before connecting anything.
1
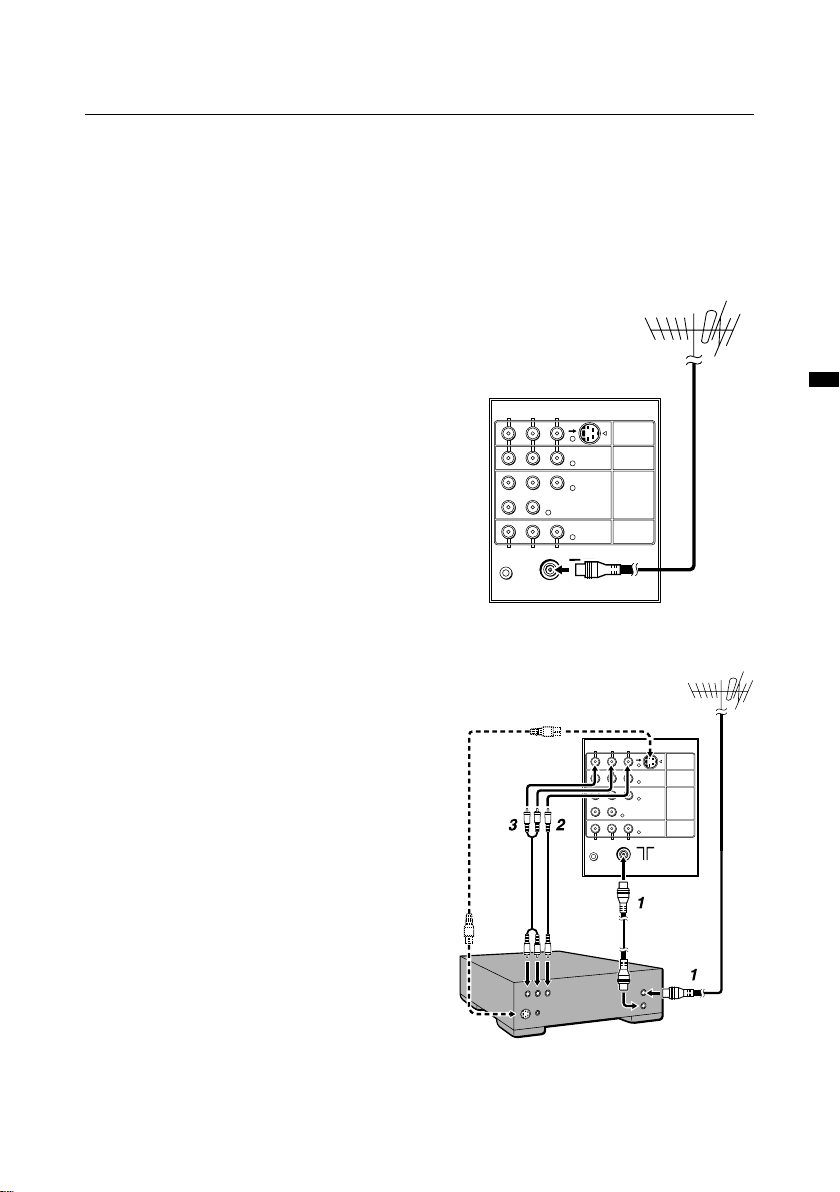
Connecting the aerial and VCR
• Aerial cable is not supplied. Use a good
quality 75-ohm coaxial cable.
• Read the manual that came with the VCR
before connecting.
Fig.A
If not connecting a VCR (see fig.A) :
Connect an aerial cable to the aerial socket
on this TV .
If connecting a VCR (see fig.B) :
1 Connect the aerial cable to the aerial
input socket on the VCR, and
connect the VCR and TV with
another aerial cable.
2 Connect the VCR's VIDEO OUT
(video output) jack and the TV's
VIDEO jack with a video cable.
To connect a VCR to the TV with an S-VIDEO
cable:
Connect the VCR's S-VIDEO OUT (S-VIDEO
output) connector and TV's S connector with an SVIDEO cable A, instead of connecting with a
video cable .
3 Connect the VCR's VIDEO OUT
(audio L/R output) jacks and the TV's
AUDIO jacks (L/MONO and R) with
an audio cable.
• If the VCR's audio output is in mono, connect
the VCR's AUDIO OUT (audio output) jack
and the TV's AUDIO L/MONO jack with an
audio cable.
• You can use the AV COMPU LINK function if
your VCR has an AV COMPU LINK terminal.
For details, see “Connecting AV COMPU LINK
Supported Devices” on page 38.
AV COMPULINK
Fig.B
Back of the TV
AUDIO
R
L/MONO
VIDEO
S
OVER
C
C Y/VIDEO
R
B
L/MONOR AUDIO
RL
VIDEO
AUDIO
A
AV COMPULINK
VIDEO-1
VIDEO-2
VIDEO-3/
COMPONENT
OUTPUT
Back of the TV
AUDIO
RRLL/MONO
VIDEO
OVER
C
C Y/VIDEO
R
B
L/MONOR AUDIO
VIDEO
AUDIO
S
VIDEO-1
VIDEO-2
VIDEO-3/
COMPONENT
OUTPUT
3
Page 4
Setting up your TV
2 Connecting the power cord
Connect the mains plug to the AC outlet.
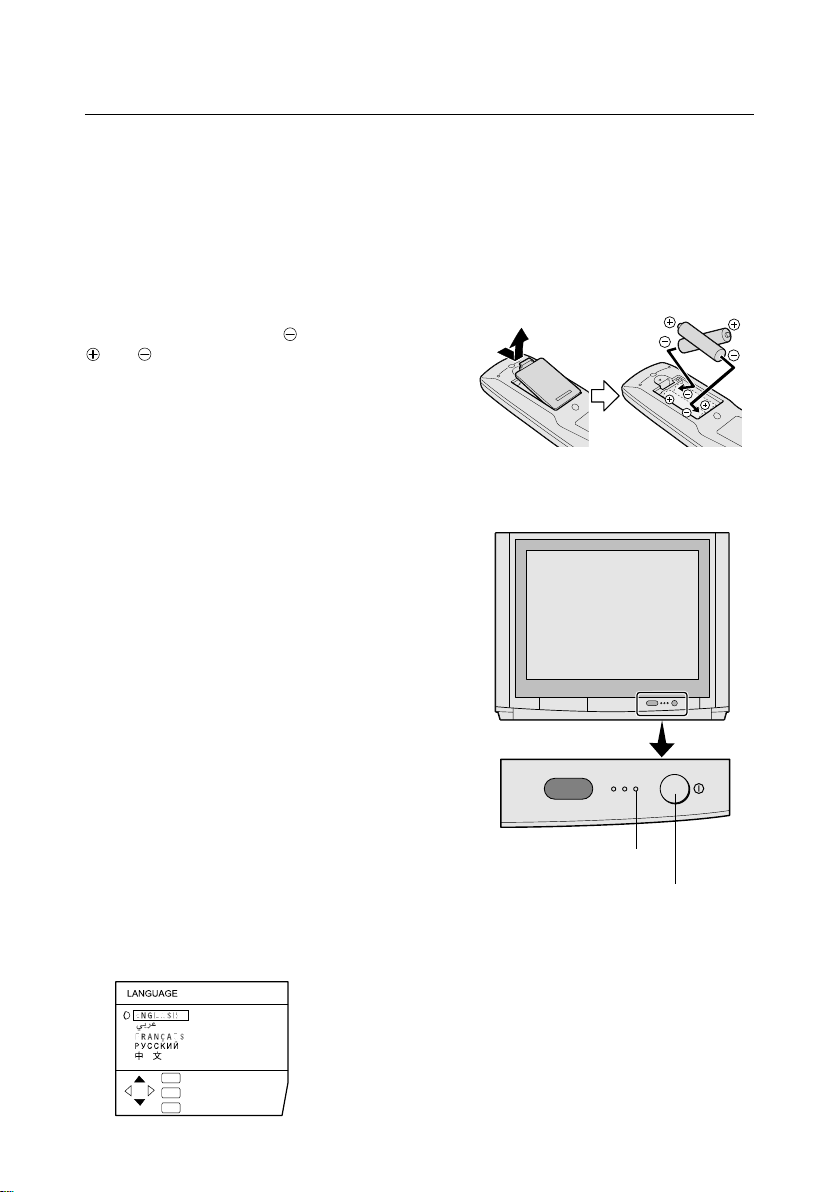
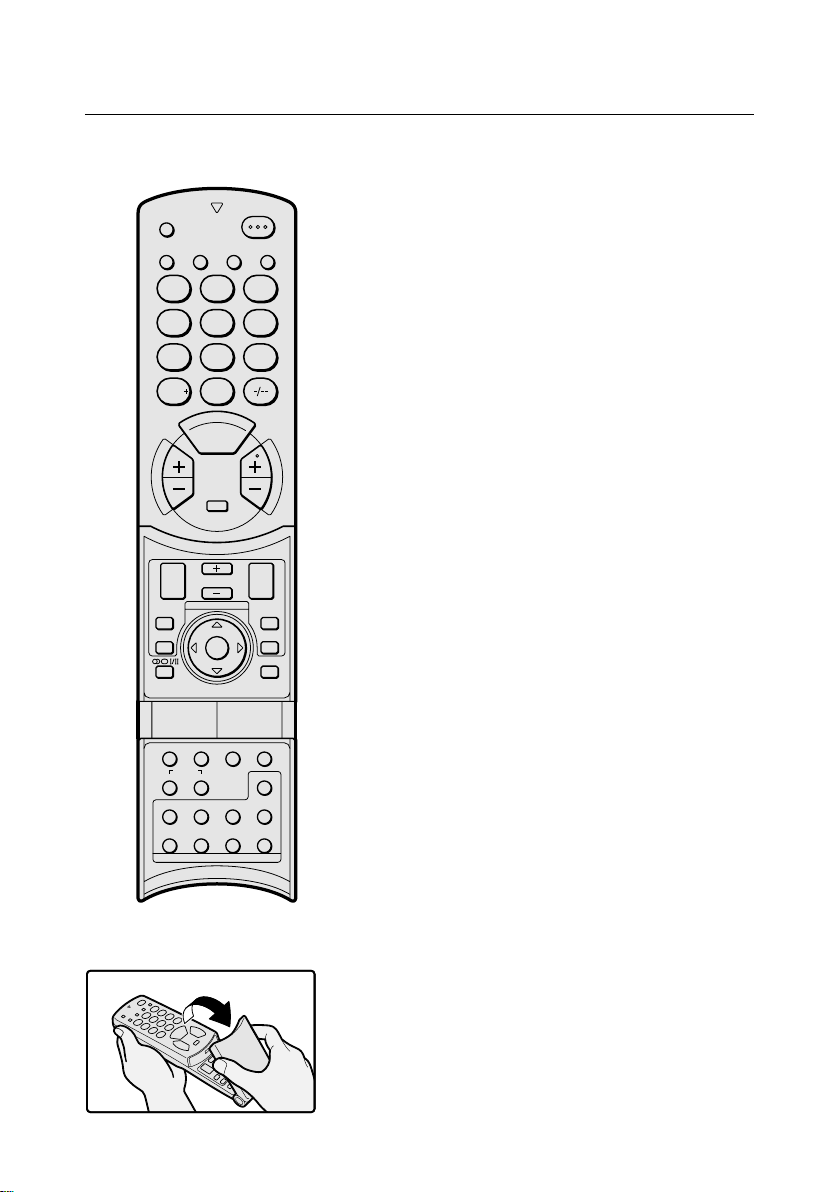
3 Putting the batteries into the
Remote control
Use two AA/R6 batteries.
Insert the batteries from the end, making sure the
and polaritiles are correct.
• Follow the warnings printed on the batteries.
• If the remote control does not work properly,
replace the batteries.
• The batteries we supply are only for setting up
and testing your TV. Please replace them as soon
as necessary.
4 Making the initial settings
When the TV is first turned on, it enters the initial
setting mode, and the JVC logo is displayed.
1 Press the main power button on the TV
The TV is turned on, and the JVC logo appears.
• If the power lamp on the TV lights red and does
not change to green, your TV is in the standby
mode. Press the POWER button on the remote
control to turn the TV on.
• If the JVC logo does not appear, your TV has
already been turned before. In this case,use the
"LANGUAGE" and "AUTO PROGRAM" functions
to make the initial settings. For details, see
"INSTALL menu" on page 29.
2 Press the MENU/OK button
The LANGUAGE menu appears. You can choose
a language for the on-screen language.
SPATIALIZER ECO POWER
POWER lamp
Main power button
OK
:OK
TV
:EXIT
DISP
:BACK
4
Page 5

Setting up your TV
3 Press the
buttons to choose
/
ENGLISH. Then press the MENU/OK
button.
The AUTO PROGRAM function starts.
The TV channels you receive are automatically
stored in the programme numbers list.
AUTO PROGRAM
CH 10
20%
OK
:OK
DISP
:BACK
• To cancel the AUTO PROGRAM function, press
the DISPLAY button.
4 After the TV channels have been
stored in the programme number (PR)
list, the EDIT menu appears.
EDIT
PR ID
AV
01
02
03
04
05
06
07
08
09
• You can proceed to edit the programme
numbers list using the EDIT/MANUAL function.
For details, see "EDIT/MANUAL" on page 30.
• If a TV cannel you want to view is not stored in
the programme numbers list, you can register it
using the MANUAL function.
For details, see "EDIT/MANUAL" on page 30.
• The AUTO PROGRAM function does not store a
TV channel to the programme number 0 (AV).
• If you do not need to use the EDIT/MANUAL
function, press the MENU/OK button to close the
EDIT menu.
DISP
CH/CC
21
CH
22
CH
23
CH
24
CH
25
CH
26
CH
01
CC
02
CC
03
CC
OK
:OK
TV
:EXIT
:BACK
MOVE
ID
INSERT
DELETE
MANUAL
TV/VIDEO
SPATIALIZER
BASS
ZOOM
12
456
789
RETURN
0
MULTI
L
E
N
N
A
H
C
MUTING
SUB-P
POSITION
FREEZE
PIP
MENU/
OK
SYSTEM
COLOUR
SOUND TV/TEXT
HOLD MODE REVEAL SIZE
SUBPAGE STORE CANCEL INDEX
TEXT
POWER
PICTURE
MODE
3
NEXTPIP
SWAP
STROBE
DISPLAY
V
O
L
U
M
E
Now, the setting up is complete.
Please enjoy your new JVC TV!
5
Page 6
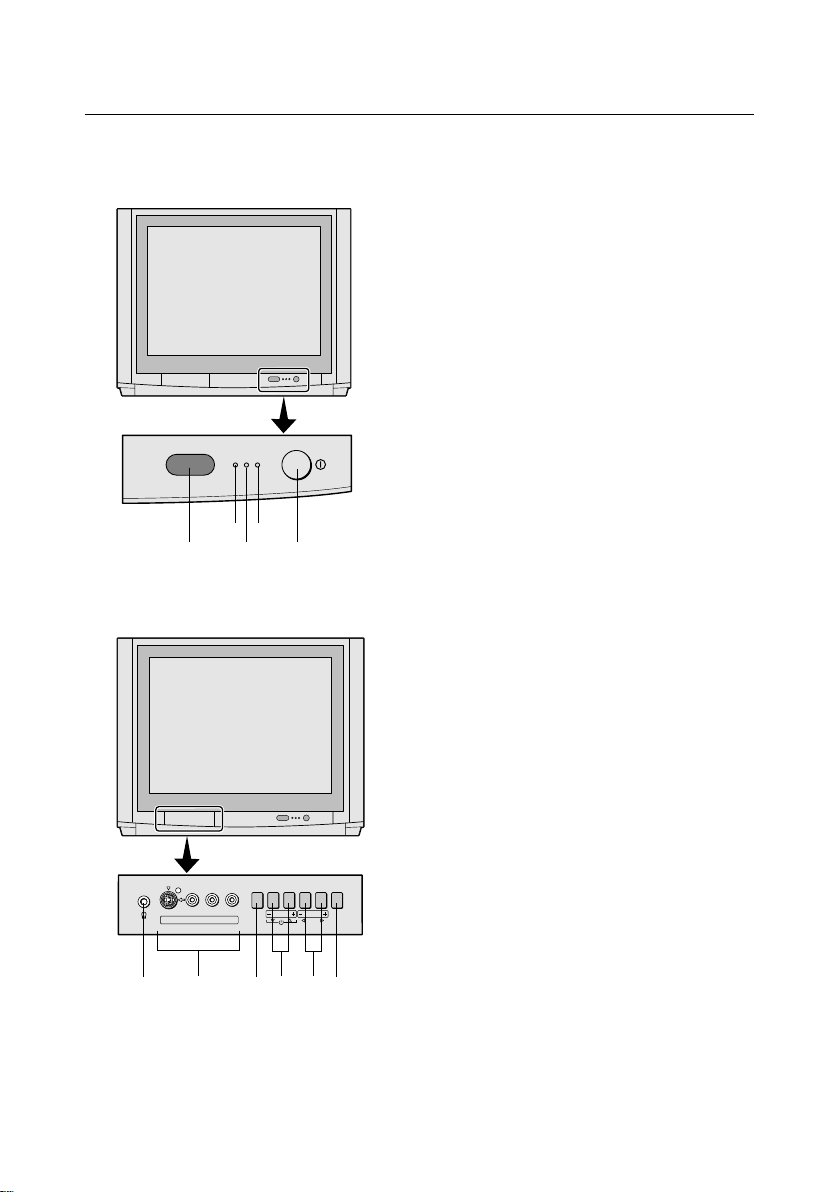
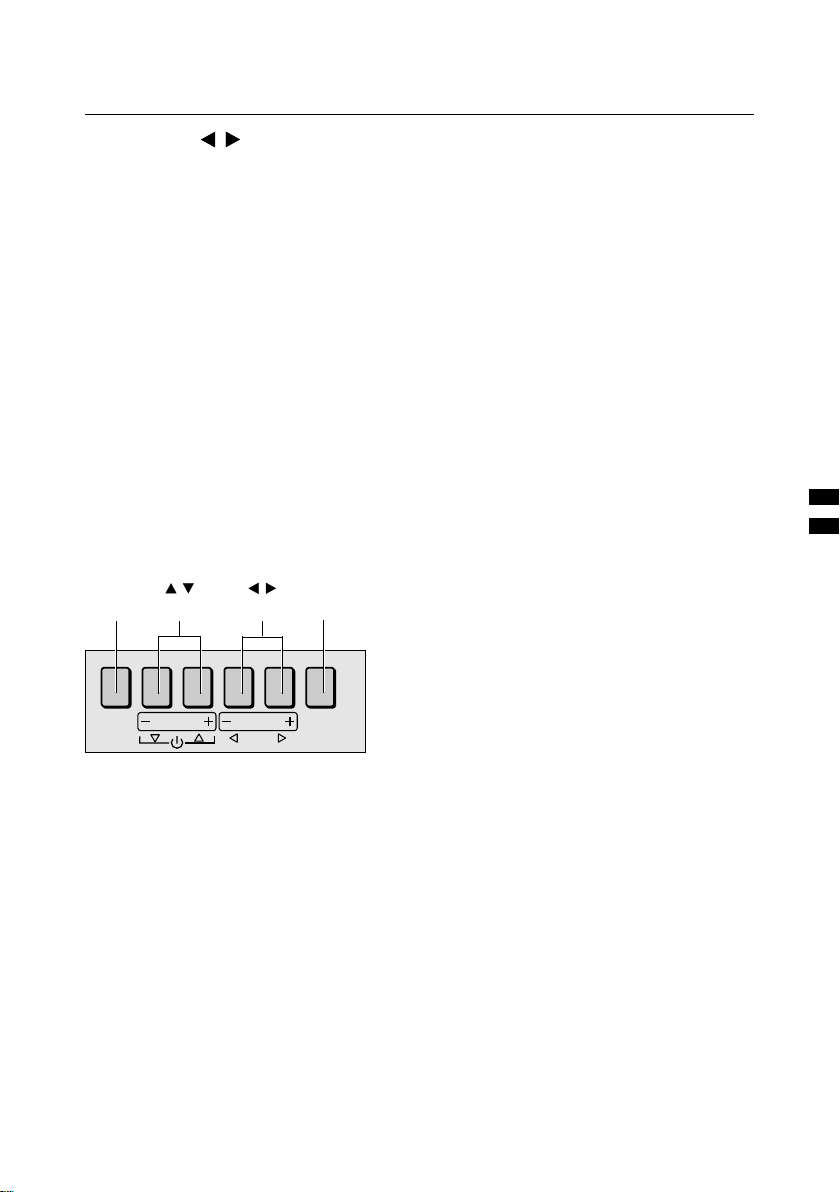
TV buttons and functions
Turn the main power on
Press the main power button 1 .
The POWER lamp 2 lights red and your TV is
in the standby mode.
To turn the main power off :
press the main power button again.
The POWER lamp 2 goes off.
Turn the TV on from standby
mode
Press the CHANNEL-/+ buttons 5 .
The POWER lamp 2 lights red to green and
your TV will be turned on.
Choose a TV channel
Press the CHANNEL-/+ buttons 5 .
Choose a VIDEO terminal
Press the TV/VIDEO button 3 or
CHANNEL-/+ buttons 5 .
9
SPATIALIZER ECO POWER
2
8
7
1
• You can also turn on the TV by pressing the
TV/VIDEO button 3 while it is in standby
mode.
Adjust the volume
Press the VOLUME-/+ buttons 4 .
The volume level indicater appears.
MENU button 6
(Behind the cover)
OVER
VR
L/MONO
S
IN (VIDEO-4)
MENU
OK
CHANEL VOLUME
TV/VIDEO
EXIT
Press to open the menu.
For details, see "Operation with the buttons on
the TV" on page 19.
Remote control sensor
and ECO sensor 9
36045-
6
ECO lamp 7
If you set the DIGITAL ECO SENSOR
function to ON or DISPLAY, the ECO lamp lights.
Page 7
TV buttons and functions
SPATIALIZER lamp 8
If you set the SPATIALIZER function to MONO
or LIVE,the SPATIALIZER lamp lights.
Headphone jack 0
Connect the headphones with a stereo
mini-jack (3.5mm in diameter).
When using the headphones, follow the
AUDIO
S
VIDEO
L/MONO
R
OVER
VIDEO-1
VIDEO-2
Y/VIDEOC
BCR
VIDEO-3
AUDIO
L/MONO
R
COMPONENT
OUTPUT
L
R
VIDEO
AUDIO
AV COMPU LINK
operation procedure "HEADPHONE" on
page 25.
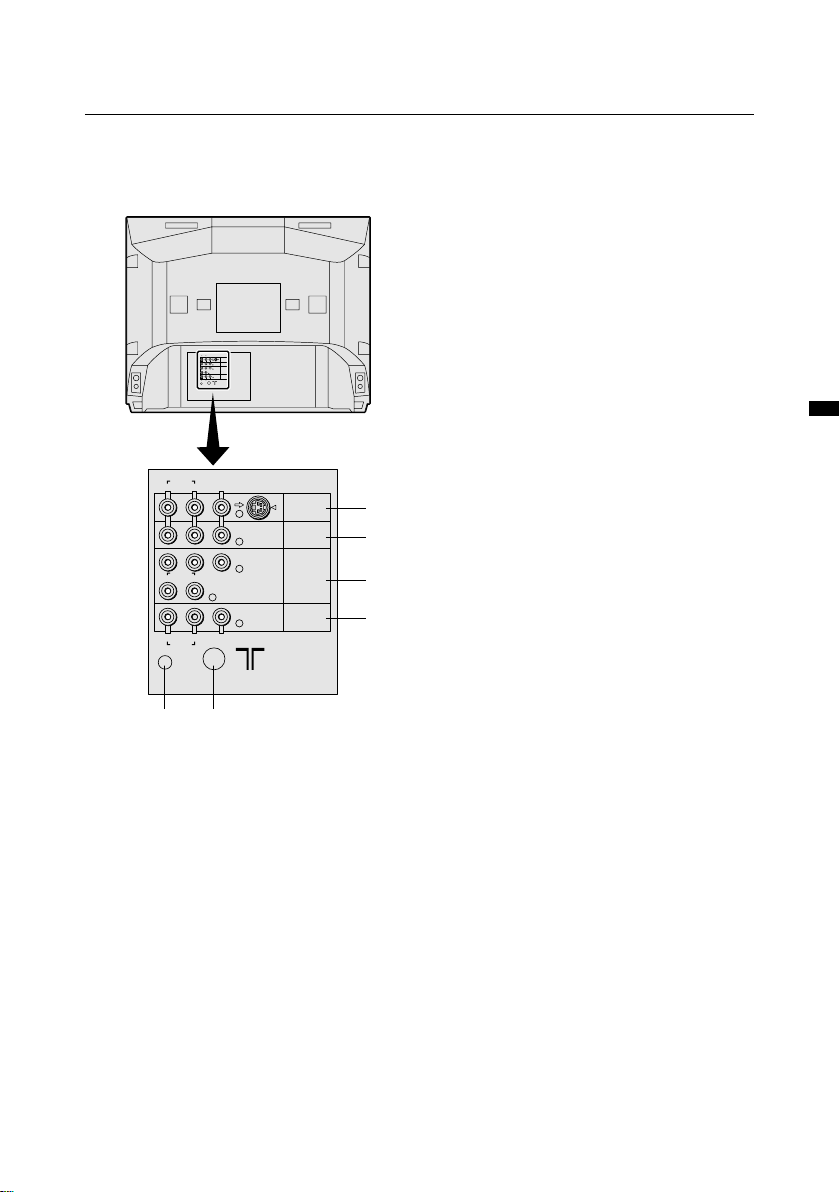
VIDEO-1 terminal =
• See page 3 and 36.
AUDIO
L/MONO
R
BCR
AUDIO
L/MONO
R
L
R
AUDIO
AV COMPU LINK
$ #
VIDEO
VIDEO
S
OVER
VIDEO-1
Y/VIDEOC
VIDEO-2
VIDEO-3/
COMPONENT
OUTPUT
=
~
!
@
VIDEO-2 terminal ~
• See page 36.
VIDEO-3/COMPONENT
terminal !
• See page 28 and 36.
VIDEO-4 terminal -
• See page 36.
OUTPUT terminal @
• See page 36.
Aerial socket #
Connect the aerial cable.
• See page 3.
AV COMPU LINK terminal $
• See page 36 and 38.
7
Page 8
Remote control buttons and functions
Turn the TV on from standby mode
Press the POWER button.
TV/VIDEO
SPATIALIZER
BASS
ZOOM
12
456
789
RETURN
0
MULTI
L
E
N
N
A
H
C
MUTING
SUB-P
PIP
POSITION
FREEZE
MENU/
OK
SYSTEM
COLOUR
SOUND TV/TEXT
HOLD MODE REVEAL SIZE
SUBPAGE STORE CANCEL INDEX
TEXT
POWER
PICTURE
MODE
3
NEXTPIP
SWAP
STROBE
DISPLAY
V
O
L
U
M
E
The POWER lamp lights red to green and your TV will be
turned on.
• You can turn on the TV from the standby mode by
pressing the TV/VIDEO button, the CHANNEL -/+
buttons or the number buttons.
To turn the TV off:
Press the POWER button again.
The POWER lamp changes from green to red and the TV
enters standby mode.
Choose a TV channel
Choose a programme number in which a TV channel has
been set.
Press the CHANNEL-/+ buttons or enter the
programme number (PR) with the number
buttons.
• If you want to put a two-digit channel into the TV,
press the -/--button to change to the two-digit entry
system.
• You can select a channel from the PR LIST. For
details, see "DISPLAY button" on page 11.
• If you do not have a clear picture or no colour
appears, follow the operation procedure "COLOUR
SYSTEM button" on page 11.
• If you cannot hear sound normally even when the
picture appears normally, follow the operation
procedure "SOUND SYSTEM button" on page 12.
Adjust the volume
Press the VOLUME-/+ buttons.
• You cannot adjust the volume of your headphones.
Follow the operation procedure "HEADPHONE" on
page 25.
8
Page 9
Remote control buttons and functions
Watch images from external
devices
Choose a VIDEO terminal to which the external
device has been connected.
Press the TV/VIDEO button.
• You can choose a VIDEO terminal with the
CHANNEL -/+ buttons or from the PR LIST.
To return to a TV channel:
Press the TV/VIDEO button, the CHANNEL-/+
buttons or the number buttons.
MUTING button
Press the MUTING button to turn off
the volume. Pressing the MUTING
button again resumes the previous
volume level.
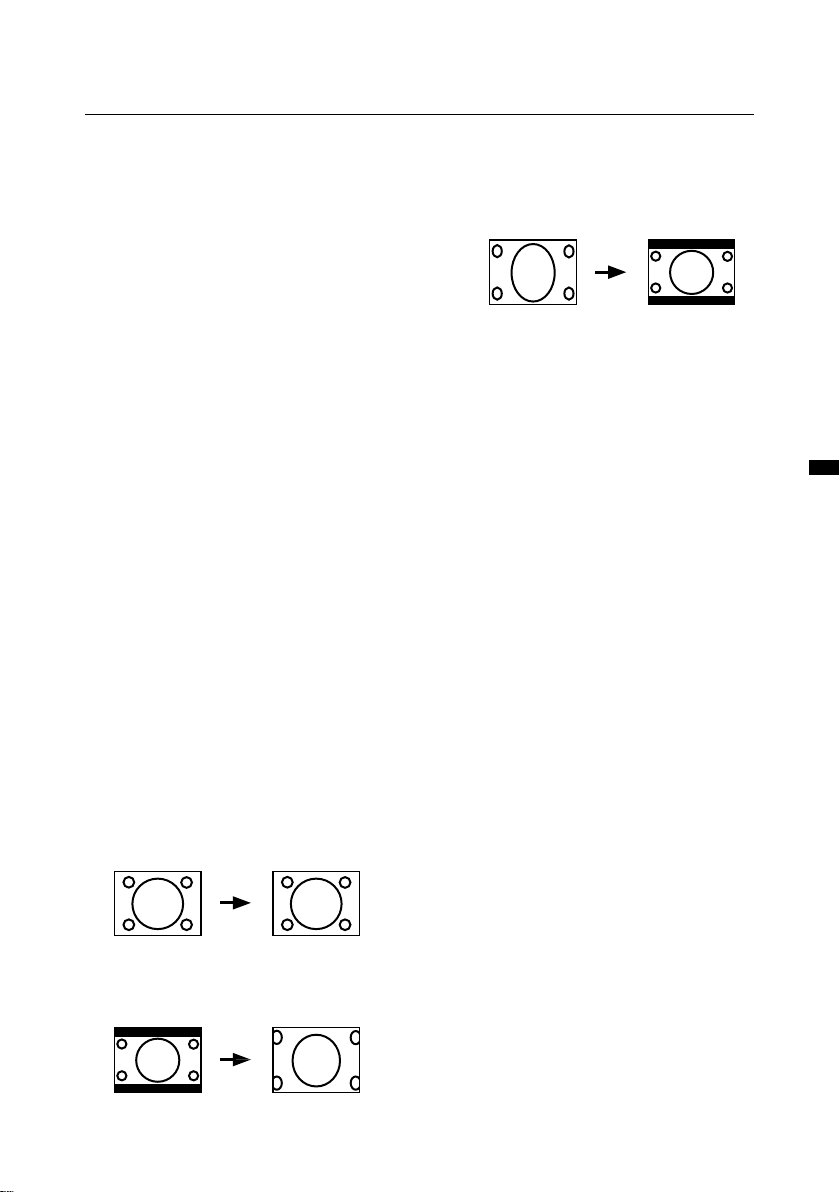
ZOOM button
You can change the screen size according to the
picture aspect ratio. Choose the optimum one
from the following ZOOM modes.
Press the ZOOM button to choose a
mode.
• If you press the ZOOM button when
receiving the Progressive Video Signal (525P
signal), “525P” appears on the screen and
the ZOOM function does not operate.
REGULAR
Use to view a normal picture (4:3 aspect ratio) as
its original size is.
ZOOM
You can zoom up the Wide picture (16:9 aspect
ratio) to fill the TV screen.
16:9
This mode converts a normal picture (4:3
aspect ratio) into a Wide picture (16:9 aspect ratio).
• Use for picture with a 16:9 aspect
ratio that have been squeezed into a
normal picture (4:3 aspect ratio), you
can restore their original demensions.
SPATIALIZER button
You can enjoy Surround sound with a
"live" effect by using the SPATIALIZER
function.
Press the SPATIALIZER button to
choose a mode.
LIVE :
Live allows you to enjoy normal stereo
sound converting it into surround sound
with added depth and ambience.
MONO :
Mono allows you to enjoy normal
monaural sound by converting it into a
stereo-like sound.
OFF :
This function is turned off.
• The LIVE mode works properly only
with stereo sound.
• The LIVE mode does not work
correctly with headphones.
• The MONO mode works properly only
with monaural sound.
The SPATIALIZER is manufactured under
lisense from Desper Products,Inc.
• The left side and right side of the Wide
picture (16:9 aspect ratio) will be cut off.
9
Page 10

Remote control buttons and functions
BASS button
You can enjoy a powerful bass sound by
using the SUPER BASS(Super Bass Reflex)
function.
Press the BASS button to turn the
SUPER BASS function on or off.
ON :
This function is turned on.
OFF :
This function is turned off.
PICTURE MODE button
You can choose one of three PICTURE
MODEs (three kinds of picture setting) to
adjust the picture settings automatically.
Press the PICTURE MODE button
choose a mode.
BRIGHT :
Heightens contrast and sharpness.
STANDARD :
Standardizes picture adjustment.
SOFT :
Softens contrast and sharpness.
RETURN+ button
The RETURN+ button has two functions;
the RETURN+ function and the RETURN
function. If a channel has been registerd as
the "Return Channel", the RETURN+
function operates. If there is no setting for
the "Return Channel", the RETURN
function operates.
RETURN+ function :
By registering a channel you frequently
view as the "Return Channel", you can
select that channel at any time simply by
pressing the RETURN+ button.
To register a TV channel as the
"Return Channel" :
Choose the Programme number to which
the channel you want to register has been
set, and press the RETURN+ button and
hold for more than 3 seconds continuously.
"RETURN PLUS PROGRAMMED!" is
displayed and the registration is completed.
To cancel register a TV channel as the
"Return Channel" :
while viewing any TV channel, press the
RETURN+ button and hold for more than 3
seconds continuously. "RETURN PLUS
CANCELED!" is displayed and the registration is cancelled.
• When you turn off the TV, the
registration for the "Return Channel" is
cancelled.
• If you want to view the "Return Channel"
and another TV channel alternately, first
choose a channel other than the
"Return Channel". and then press the
RETURN+ button to change the
channel to the "Return Channel" In this
way, you can view two channels
alternately by pressing the RETURN+
button.
RETURN function :
The TV temporarily memorises the TV
channel that was choosen right before the
current TV channel as the "Last Channel".
By pressing the RETUTN+ button, you can
alternately view the current TV channel and
the "Last Channel".
• If you want to view two channels
alternately by using the RETURN
function, first choose one TV channel
and then choose the other TV channel
with the Number buttons. If you choose
the TV channel without using the
Number buttons, there are cases where
a channel other than the one you first
chose is registered as the "Last
Channel".
10
Page 11
Remote control buttons and functions
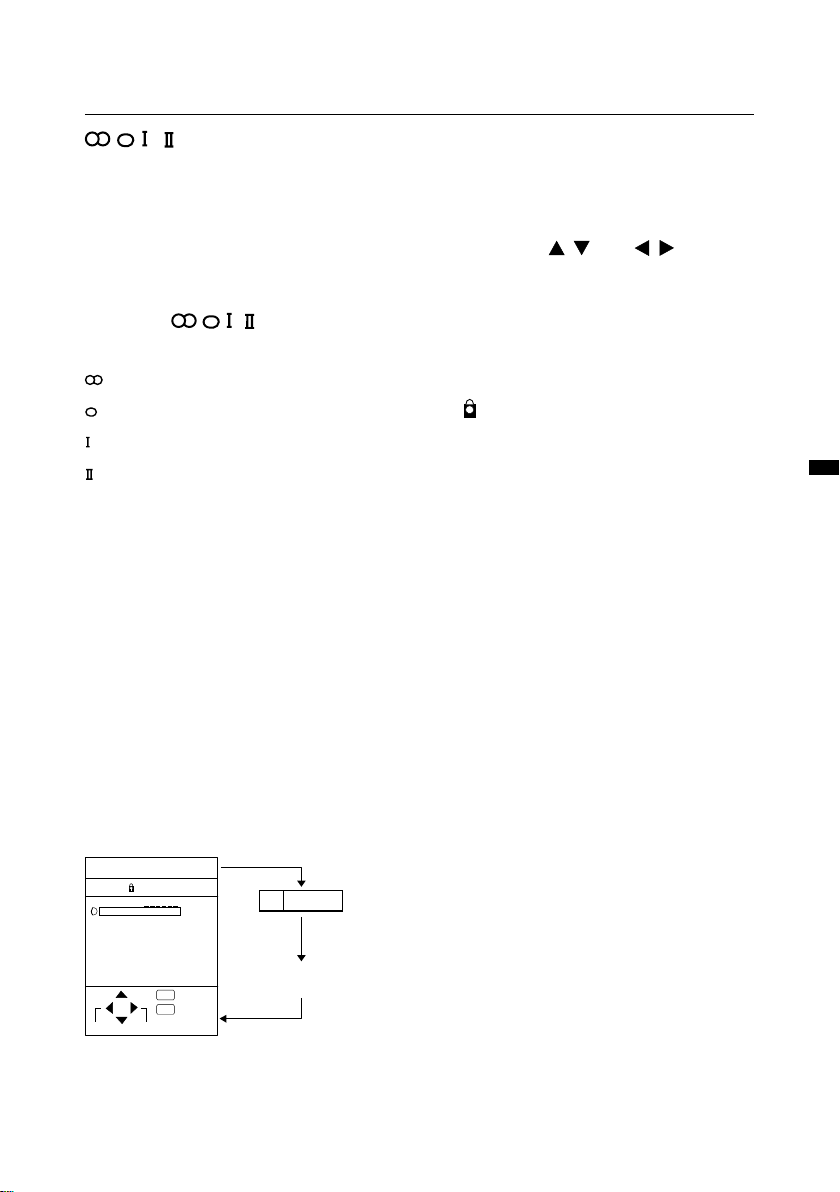
/ button
When you are viewing a bilingual broadcast
programme, you can choose the sound from
Bilingual I (Sub I) or Bilingual II (Sub II). When
the stereo broadcasting is received poorly,
you can change from stereo to mono sound
so that you can hear the broadcast more
clearly and easily.
Press the / button to
choose a sound mode.
: Stereo sound
: mono sound
: Bilingual I (sub I)
: Bilingual II (sub II)
MONO : Cancels the Multi Sound function,
and the sound becomes monaural.
• The sound mode you can choose differs
depending on the TV programme.
• This function does not work in the VIDEO
modes.
DISPLAY button
You can display the PR LIST, programme
number or VIDEO terminal number on the
screen.
Press the DISPLAY button.
Press the DISPLAY button changes the
display as follows:
PR LIST
PR ID
AV
01
02
03
04
05
06
07
08
09
+10-10
OK
:OK
TV
:EXIT
1
No indication
Choose a TV channel or a
VIDEO terminal
1 Press the DISPLAY button to
display the PR LIST.
2 Press the
/
and
buttons
/
to choose a programme number
or VIDEO terminal.
Then press the MENU/OK
button.
• For programme numbers with the
CHANNEL GUARD function set, the
(CHANNEL GUARD) mark is displayed
next to the programme number in the PR
LIST.
• The VIDEO terminals are registered after
the programme number PR99.
COLOUR SYSTEM button
The colour system is chosen automatically.
However, if the picture is not clear or no
colour appears, choose the colour system
manually.
Press the COLOUR SYSTEM button
to choose the appropriate colour
system.
AUTO :
This function detects a colour system from
the input signal.
• The AUTO mode may not function
properly if you have poor signal quality.
If the picture is abnormal in the AUTO
mode, choose another colour system
manually.
• The AUTO mode detects a colour system
from the input signal and chooses the
appropiate colour system automatically.
• When changing the COLOUR SYSTEM of
the SUB-picture, see "Change the colour
system of the SUB-picture" on page 15
for details.
11
Page 12

Remote control buttons and functions
• For the colour systems in each
country or region, see the table
"BROADCASTING SYSTEMS" on
page 12.
SOUND SYSTEM button
The sound system is chosen automatically. However, if you cannot hear the
sound normally even when the picture
appears normally, chooes the sound
system maunually.
Press the SOUND SYSTEM
button to choose the appropriate
sound system.
B/G : B/G system
I : I system
D/K : D/K system
M : M system
• This function does not work in the
VIDEO mode.
• For the sound systems in each
country or region, see the table
"BROADCASTING SYSTEMS" on
page 12.
BROADCASTING SYSTEMS
For sound sysytem colour system in your country
or rigion, refer to the table below.
COLOUR SYSTEM
Area
Asia,
Middle
East
Europe
Oceania Australia, New Zealand, etc
Africa
SOUND SYSTEM
Area Country or Region
Asia,
Middle
East
Europe
Oceania Australia, New Zealand, etc
Africa
Country or Region
Bahrain, Kuwait, Oman, Qatar,
United Arab Emirates, Yemen, etc.
Indonesia, Malaysia, Singapore,
Thailand, India, etc.
China, Vietnam, etc
Hong Kong, etc
Islamic Republic of Iran, Lebanon,
Saudi Arabia, etc.
Philippines, Taiwan, Myanmar, etc
Russia, etc
Czech Republic, Poland, etc
Germany, Holland, Belgium, etc
UK, etc
Republic of South Africa, etc
Nigeria, etc
Egypt, Morocco, etc
System
PAL
PAL
PAL
SECAM
NTSC
SECAM
PAL
PAL
PAL
PAL
PAL
PAL
SECAM
System
B/G
D/K
I
B/G
M
D/K
D/K
B/G
I
B/G
I
B/G
B/G
12
Page 13
Remote control buttons and functions
FREEZE button
You can view the Main picture's forzen image
as the SUB-picture.
Press the FREEZE button.
MAIN
Still pictures
To cancel the FREEZE function :
Press the FREEZE button again.
• You cannot use the FREEZE button when
the SUB-picture or the MAIN-picture are
displayed on the screen.
• If you press the FREEZE button when
receiving the Progressive Video Signal
(525P signal), “525P” appears on the
screen and the FREEZE function does
not operate.
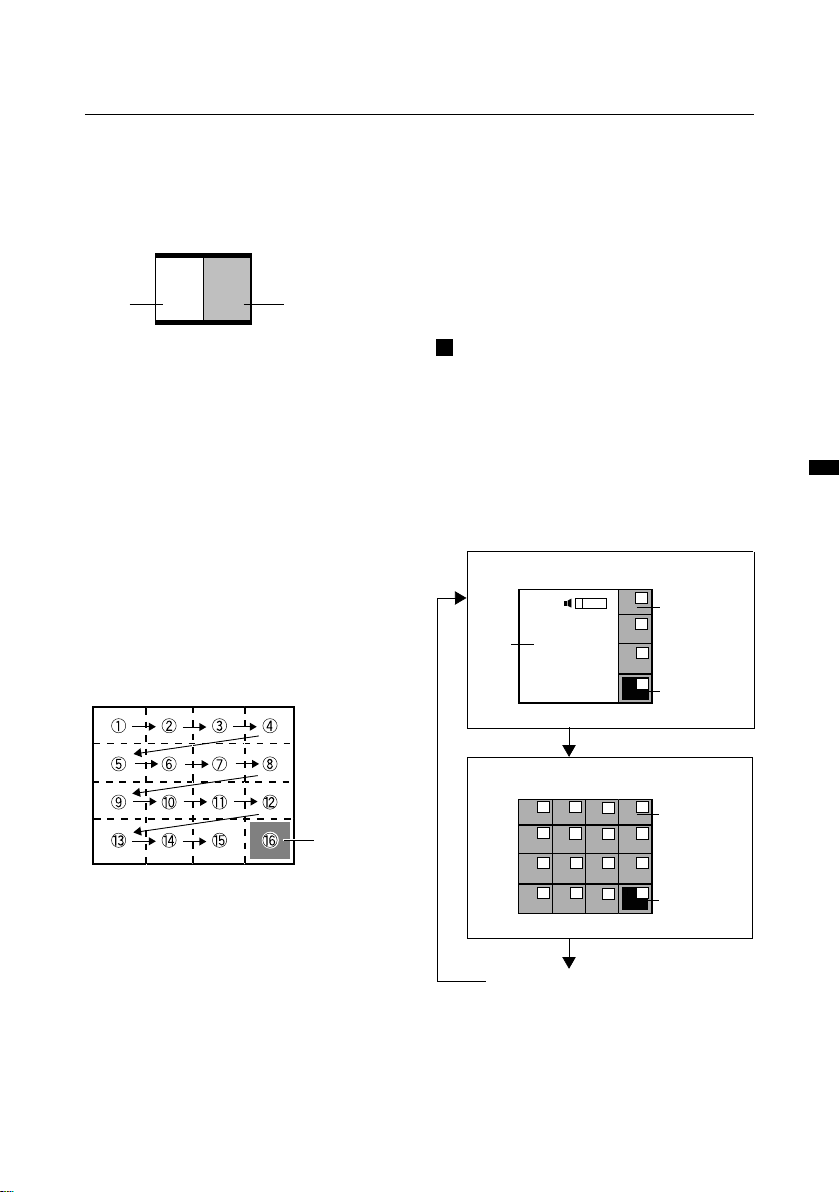
STROBE button
You can view the MAIN-picture as 15
consecutive still images.
Press the STROBE button.
• If you press the STROBE button when
receiving the Progressive Video Signal
(525P signal), “525P” appears on the
screen and the STROBE function does
not operate.
• You cannot change the TINT setting for
the still images on the screen even if
you are viewing a programme with
NTSC colour system.
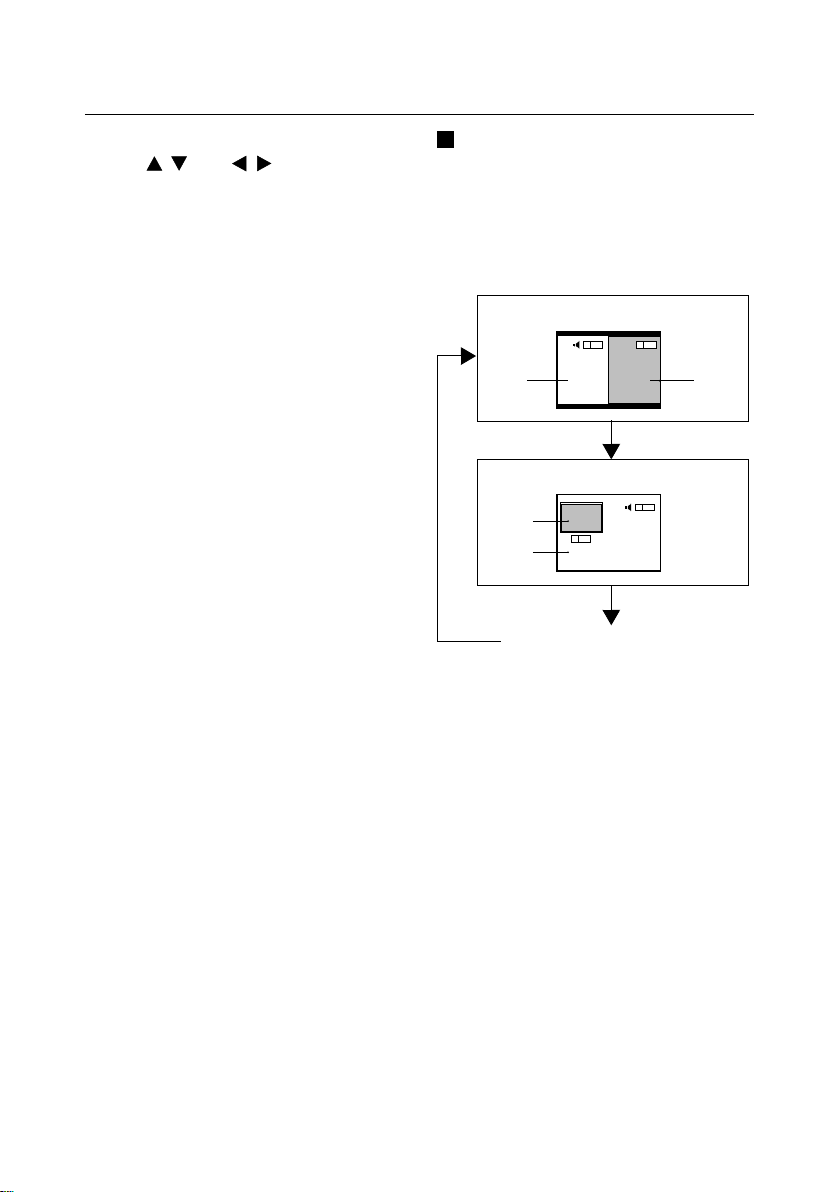
Using the MULTI
function
You can display multi-pictures that enable
you to easily find a program you want to
view.
1 Press the MULTI button.
Press the MULTI button changes the
display as follow:
5-pictures multi mode
2
1
1
MAIN
3
4
5
Still
pictures
Moving
picture
Moving
picture
To cancel the STROBE function:
Press the STROBE button to return to the
MAIN-picture.
• If signal level of the MAIN-picture is
weak, the still images become abnormal.
• You cannot use the STROBE button
when the SUB-picture or the MAINpicture are displayed on the screen.
16-pictures multi mode
1
2
5
6
9
10
13
14
4
3
Still
8
7
pictures
12
11
5
16
15
Moving
picture
Cancel the MULTI function
To display next Multi pictures :
Press the NEXT button.
13
Page 14
Remote control buttons and functions
2 Choose the desired picture with
the
/
and
buttons, and
/
then press the MENU/OK button.
The screen switches to the TV channel or
VIDEO mode of your choice.
• Any programme numbers to which no TV
channel has been registered, or
programme numbers to which
CHANNEL GUARD has been set is not
displayed.
• You cannot perform menu operations
such as headphone volume adjustment.
Cancel the MULTI function once to
perform menu operations.
• If you press the MULTI button when
receiving the Progressive Video Signal
(525P signal), “525P” appears on the
screen and the MULTI function does not
operate.
• During the short period that is required
for the Multi-pictures display to close no
sound comes from the television.
Using the PIP function
You can view two pictures (MAIN and SUB) at
the same time.
Press the PIP button.
Press the PIP button changes the display as
follows:
Twin pictures mode
2 5
MAIN
Picture in picture mode
SUB
MAIN
• You cannot view a picture from the same
programme number (or the same VIDEO
terminal) as both the MAIN-picture and
the SUB-picture at the same time.
• If the MAIN-picture signal is poor, then the
quality of the SUB-picture may also be
poor.
• If the picture standards of both pictures
are different, the top and bottom or one of
them may be missing.
• The ZOOM function does not operate
when viewing pictures using the PIP
function.
• The SUB-picture cannot be output from
TV.
• If you press the PIP button when receiving
the Progressive Video Signal (525P
signal), “525P” appears on the screen
and the PIP function does not operate.
5
Cancel the PIP function
2
SUB
14
Page 15
Remote control buttons and functions
Choose a TV channel for
the SUB-picture
Press the SUB-P -/+ button.
Listen to the sound of SUBpicture
You can listen to the sound of SUB-picture on
your headphones while listening to the sound
of MAIN-picture on the TV speakers.
For details, see "HEADPHONE" on page 25.
Change the colour system
of the SUB-picture
1 While the SUB-picture is dis-
played, press the MENU/OK
button to display the MENU
(main manu).
2 Press the
/
and
to choose PICTURE FEATURES,
and then press the MENU/OK
button.
3 Press the
buttons to
/
choose COLOUR SYSTEM, and
then press the MENU/OK button.
/
buttons
• You cannot change the COLOUR
SYSTEM of the SUB-picture using the
COLOUR SYSTEM button on the remote
control.
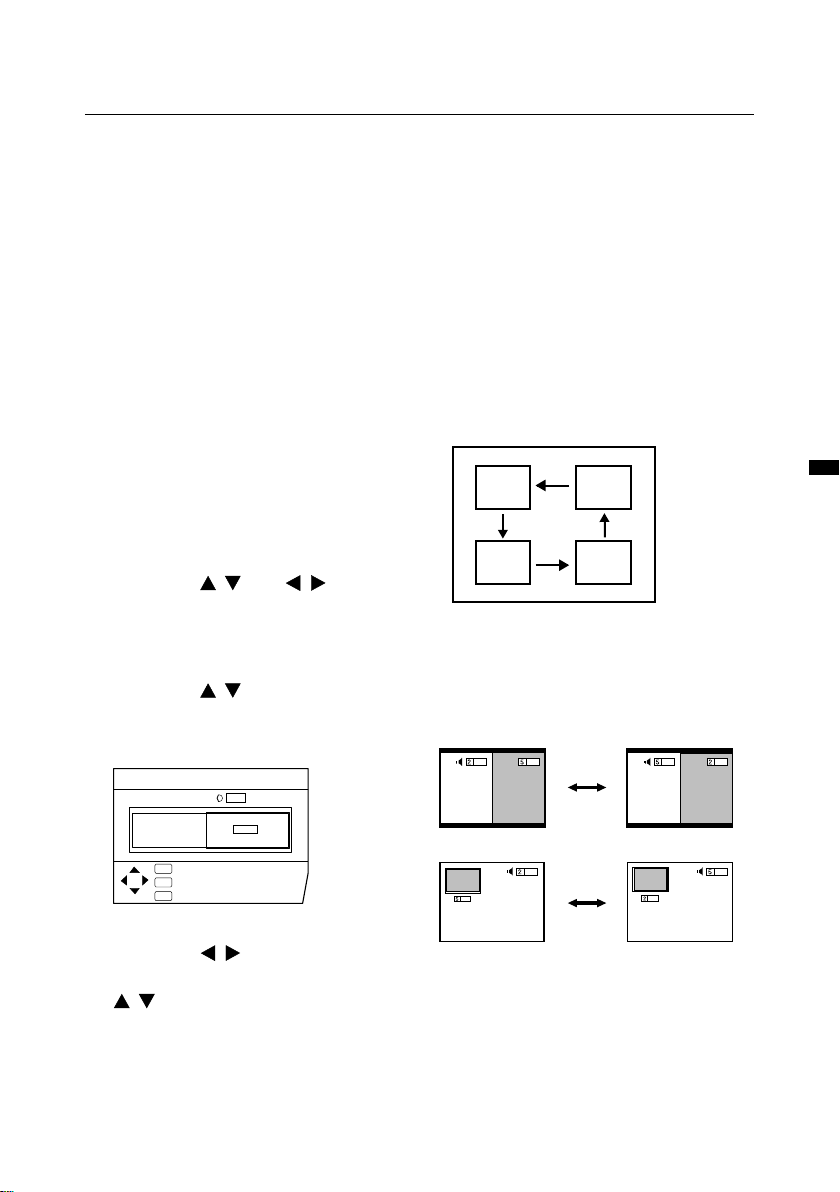
POSITION button
You can adjust the position of the SUBPicture when using the Picture in picture
mode.
Press the POSITION button
repeatedly.
Each time you press the button, the SUBPicture moves counterclockwise.
SWAP button
You can replace the MAIN-picture and the
SUB-picture with each other.
Press the SWAP button.
COLOUR SYSTEM
MAIN
NTSC 3.58
OK
TV
DISP
4 Press the
:OK
:EXIT
:BACK
SUB
AUTO
buttons to
/
choose SUB, and then press the
buttons to choose the
/
appropriate colour system. Then
press the MENU/OK button.
• Do not press the SWAP button while you
are recording the TV output on the VCR.
If you do, the output signal will change.
15
Page 16
Remote control buttons and functions
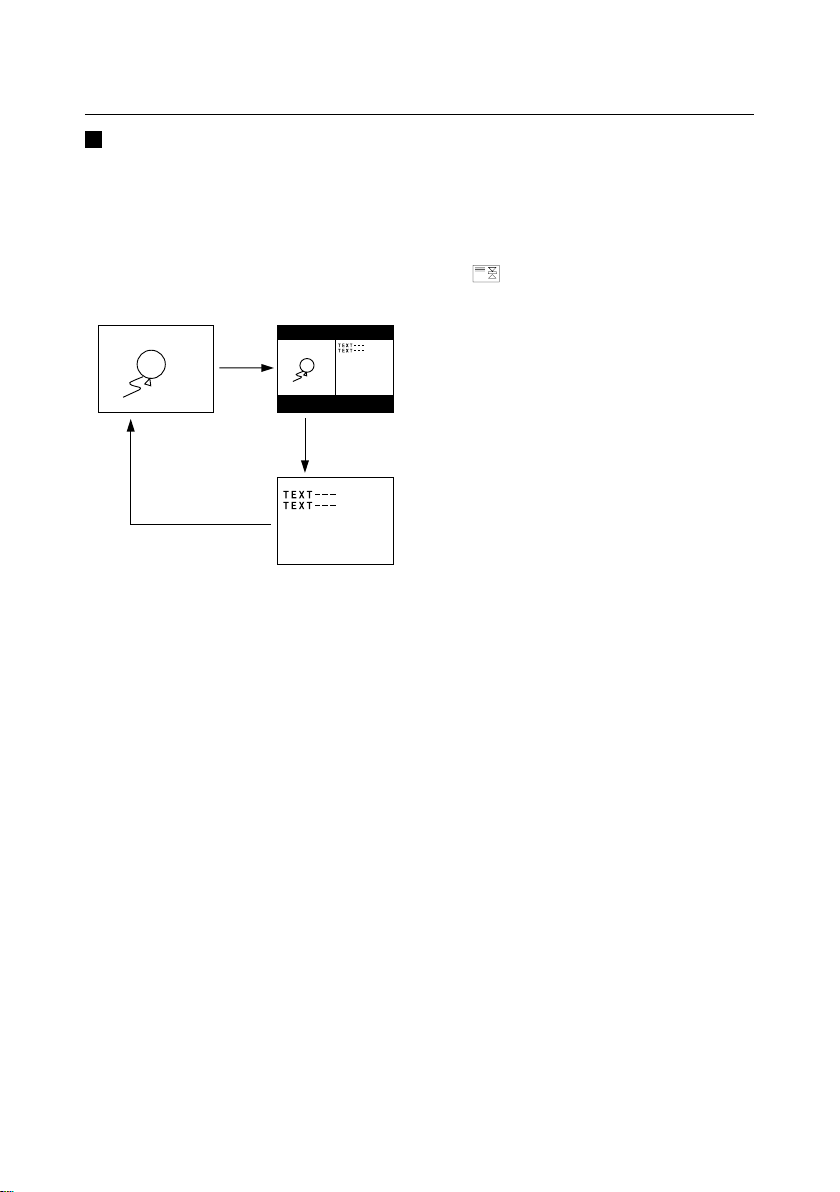
Viewing a teletext
programme
1 Choose a TV channel with a
teletext broadcast.
2 Press the TV/TEXT button.
Press the TV/TEXT button changes the
mode as follows:
TV mode
3 Choose a teletext page by
pressing the CHANNEL-/+
buttons, number buttons or
coloured buttons.
To return to the TV mode:
Press the TV/TEXT button or TV/VIDEO
button.
• If you have trouble receiving tetetext
broadcasts, consult your local dealer or
the broadcast station.
• In the Text mode, the ZOOM mode is
fixed to the REGULAR mode.
• No menu operations are possible when
viewing a teletext programme.
• If characters on a teletext programme do
not appear properly, change the
TELETEXT LANGUAGE setting. For
details, see “TELETEXT LANGUAGE” on
page 34.
TV and
Text mode
Text mode
HOLD button
You can hold a teletext page on the screen
for as long as you want, even while several
other teletext pages are being received.
Press the HOLD button.
The (hold) are displayed at the top left
of the screen.
To cancel the Hold function:
Press the HOLD button again.
REVEAL button
Some teletext pages include hidden text
(such as answers to a quiz).
You can display the hidden text.
Each time you press the REVEAL
button, text is hidden or revealed.
SIZE button
You can double the height of teletext
display.
Press the SIZE button.
INDEX button
You can return to the index page instantly.
Press the INDEX button.
• In the List mode, you can return to the
page number displayed in the lower left
area of the screen.
CANCEL button
You can serch for a teletext page while
watching TV.
1 Press the number button to
enter a page number, or press
the coloured button.
The TV searches for a teletext page.
16
Page 17

Remote control buttons and functions
2 Press the CANCEL button.
The TV programme appears. When the
TV finds the teletext page, its page
number appears in the upper left of the
screen.
3 Press the CANCEL button to
return to a teletext page when
the page number is on the
screen.
• You cannot return to the TV mode with
the CANCEL button.
SUBPAGE button
Some teletext pages include sub-pages that
are automatically displayed. You can hold
any sub-page, or veiw it at any time.
1 Press the SUBPAGE button to
operate the Sub-page function.
Sub-page numbers are displayed at the
left of the screen.
Colour* Meaning of sub-page number
Yellow Currently being displayed.
White Can be displayed.
Blue or Red
* : Background color of the sub-page
number.
2 Press the CHANNEL -/+ buttons
to choose a sub-page number.
To cancel the Sub-page function:
Press the SUBPAGE button again.
Cannot be displayed and
it is not sent.
Using the List mode
You can store the numbers of your favourite
teletext pages in memory and call them up
quickly using the coloured buttons.
To store the page numbers :
1 Press the MODE button to
engage the List mode.
The stored page numbers are displayed
at the buttom of the screen.
2 Press a coloured button to
choose a position. Then press
the number buttons to enter the
page number.
3 Press and hold down the
STORE button.
The four page numbers blink white to
indicate that they are stored in memory.
To call up a stored page :
1 Press the MODE button to
engage the List mode.
2 Press a coloured button to
which a page has been assigned.
To exit the List mode :
Press the MODE button again.
17
Page 18
Using the TV's menu
This TV has a number of functions you can operate using menus.
To fully utilize all your TV's functions, you need to understand the basic menu operating
techniques fully.
TV/VIDEO
ZOOM
SPATIALIZER
POWER
BASS
12
456
789
RETURN
0
MULTI
L
E
N
N
A
H
C
MUTING
SUB-P
PIP
POSITION
FREEZE
MENU/
OK
SYSTEM
COLOUR
SOUND TV/TEXT
HOLD MODE REVEAL SIZE
SUBPAGE STORE CANCEL INDEX
TEXT
PICTURE
MODE
3
NEXTPIP
SWAP
STROBE
DISPLAY
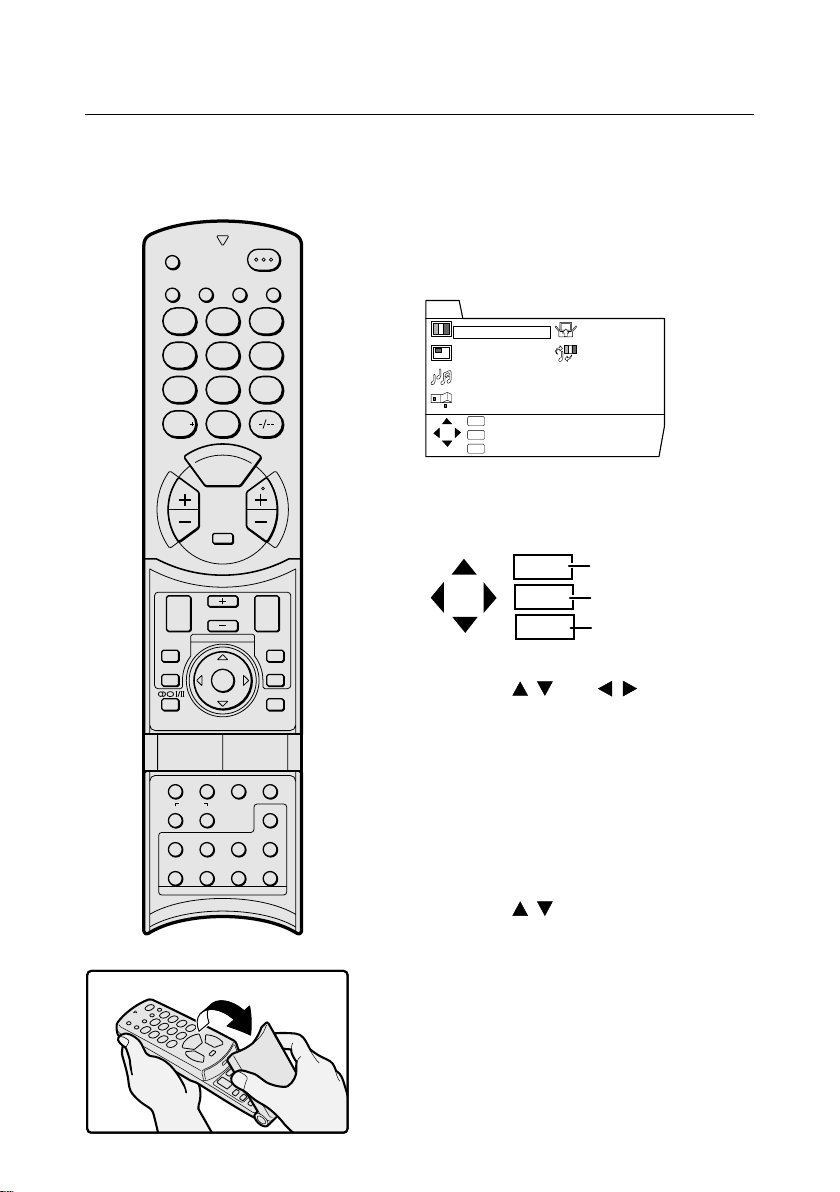
Basic operation
1 Press the MENU/OK button to display
the MENU (main menu).
MENU
PICTURE SETTING
PICTURE FEATURES
SOUND SETTING
FEATURES
OK
:OK
TV
:EXIT
DISP
:BACK
V
O
L
U
M
E
• The display appearing at the bottom of a menu
indicates buttons on the remote control you
can use when you operate a chosen function.
2 Press the
choose a menu title, and press the
MENU/OK button.
The menu appears.
To return to the previous menu:
Press the DISPLAY button.
To exit a menu instantly:
Press the TV/VIDEO button.
3 Press the
function.
• For details of the functions in the menus, see
the following pages.
INSTALL
DEMO
OK
TV
DISP.
/
/
MENU/OK button
TV/VIDEO button
DISPLAY button
and
buttons to
/
buttons to choose a
18
Page 19
Using the TV's menu
4 Press the
buttons to
/
choose the setting of that function.
• If you want to operate a function which
appears only with its name, follow the
descriptions of that function on the
following pages.
5 Press the MENU/OK button to
comple the setting.
The menu disappears.
• When watching the television with the
NTSC system, the menus are displayed
at about half of their normal verical size.
Operation with the
buttons on the TV
You can also operate the menus using the
buttons on the front panel of the TV.
OK
button
MENUOKCHANEL VOLUME
/
buttons
buttons
/
TV/VIDEO
button
TV/VIDEO
EXIT
• There is no button on the front panel of
the TV that has the function of the
DISPLAY or coloured buttons.
19
Page 20
Using the TV's menu
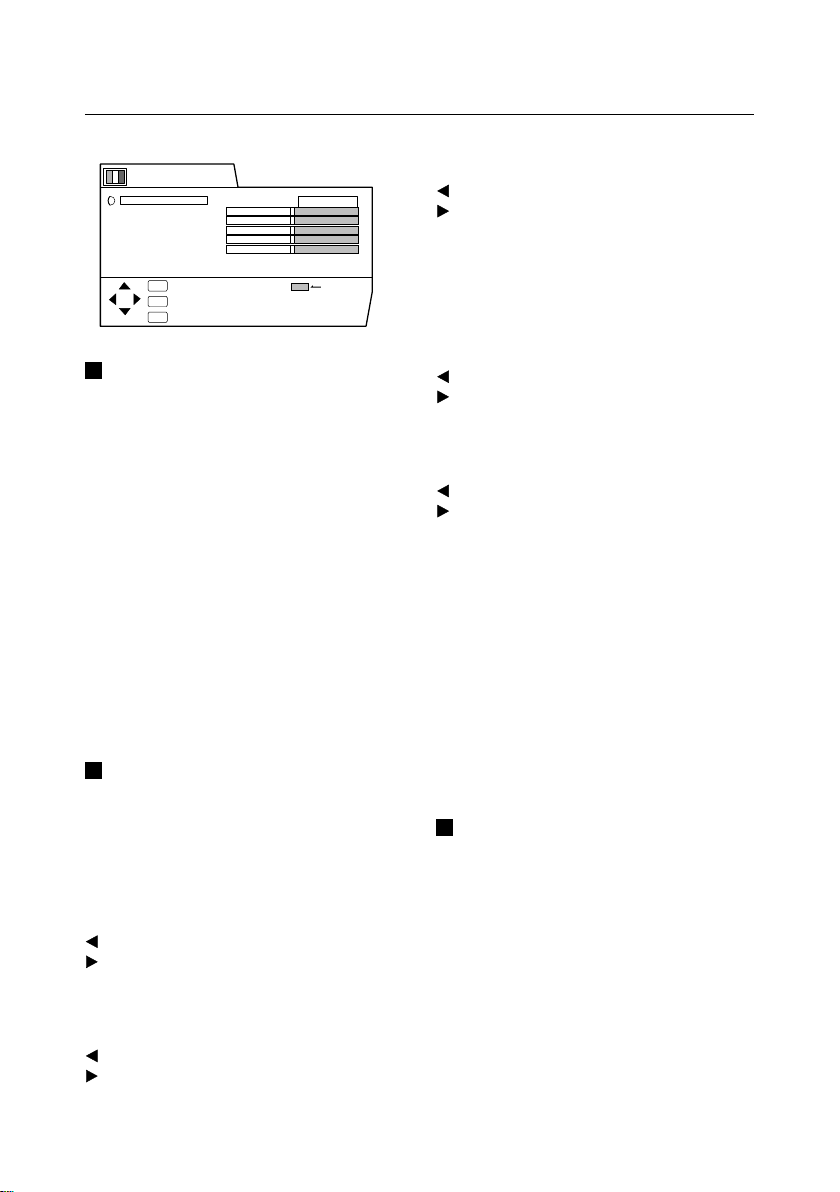
PICTURE SETTING menu
PICTURE SETTING
PICTURE MODE
CONTRAST
BRIGHT
SHARP
COLOUR
TINT
WHITE BALANCE
DIGITAL ECO SENSOR
OK
:OK
TV
:EXIT
DISP
:BACK
STANDARD
MID
ON
RESET
PICTURE MODE
You can choose one of three PICTURE
MODEs to adjust the picture settings
automatically.
BRIGHT:
Heightens contrast and sharpness.
STANDARD:
Standardizes picture adjustment.
SOFT:
Softens contrast and sharpness.
• You can also operate the PICTURE
MODE function with the PICTURE MODE
button on the remote control.
For details, see "PICTURE MODE button"
on page 10.
Adjusting the picture
You can change the picture settings of each
picture mode as you like. The picture settings
changed are stored in the picture mode.
CONTRAST
You can adjust the picture contrast.
: lower
: higer
BRIGHT
You can adjust the picture brighetness.
: darker
: brighter
SHARP
You can adjust the picture sharpness.
: softer
: sharper
• You cannot select the SHARP function
when receiving the Progressive Video
Signal (525P signal).
COLOUR
You can adjust the picture colour.
: lighter
: deeper
TINT
You can adjust the picture tint.
: reddish
: greenish
• You can change the TINT setting (picture
tint) only when the colour system is
NTSC 3.58 or NTSC 4.43.
• You cannot select the TINT function when
receiving the Progressive Video Signal
(525P signal).
To return to the default settings
in each PICTURE MODE :
Press the blue button. Returns the picture
settings in the currently chosen PICTURE
MODE mode to the default settings, and
stores them in the PICTURE MODE again.
WHITE BALANCE
You can select one of three WHITE
BALANCE modes (three tones of white) to
adjust the white balance of the picture. Since
white is the colour which is used as a
refernce for all the other colours, changing
the WHITE BALANCE mode affects the
appearance of all the other colours on the
screen.
COOL:
A bluish white. Using this mode when
watching bright pictures allows you to enjoy
a more vivid and bright picture.
20
Page 21

Using the TV's menu
DIGITAL VNR
DigiPure
PULL DOWN
COLOUR SYSTEM
ZOOM
PICTIRE TILT
AUTO
AUTO
AUTO
PICTURE FEATURES
:EXIT
:OK
OK
TV
:BACK
DISP
MID:
The normal white colour.
WARM:
A raddish white. Using this mode when
watching films allows you to enjoy colours
that are characteristic of films.
• You cannot select the WHITE BALANCE
When you set the DIGITAL ECO SENSOR
function to ON, the screen contrast is automatically adjusted to a setting suitable for the
brightness of your room. This reduces eye
strain for you and the power consumption of
the TV.
ON :
This function is turned on.
OFF :
This function is turned off.
DISPLAY :
This function is turned on. Further, clover
marks indicating the brightness of your
room are displayed for several seconds each
time the brightness changes. The number of
clover marks displayed on the screen
increases as your room becomes darker.
function in the Twin pictures mode or the
16:9 mode of the ZOOM function.
DIGITAL ECO SENSOR
PICTURE FEATURES menu
DIGITAL VNR
The DIGITAL VNR function cuts down the
amount of noise in the original picture.
• You cannot select the DIGITAL VNR
function when receiving the Progressive
Video Signal (525P signal).
AUTO:
The TV will be automatically adjust the level
of the DIGITAL VNR effect to match the
amount of noise in the picture, giving you the
best possible picture.
• If you set the DIGITAL VNR effect too
high it can make the picture less sharp.
It is recommended to use the AUTO
setting if you can.
MAX:
The level of the DIGITAL VNR effect is set to
the maximum. If you set the DIGITAL VNR
function to AUTO but still notice some noise,
change the setting from AUTO to MAX.
• The MAX setting is not suitable for highquality pictures which contain a lot of
noise.
MIN:
The level of the DIGITAL VNR effect is set to
the minimun. If you set the DIGITAL VNR
function to AUTO but feel that the sharpness
of the original picture has not been
reproduced fully, change the setting from
AUTO to MIN.
• The MIN setting is not suitable for lowquality pictures which contain a lot of
noise.
21
Page 22

Using the TV's menu
DigiPure
The Digipure function uses the latest in
digital technology to give you a natural
looking picture. The Digipure function
includes the following two functions.
Digipure function:
This function helps to create a natural looking
picture by eliminating unnecessary edges
from high-contrast and crisp images.
Conversely, for images with low-contrast,
edges are added to produce a sharper, more
detailed picture.
You can choose from the DigiPure function
settings of AUTO,MIN and MAX.
Picture motion compensation
function:
This function displays fast-moving pictures
(for example, the players or ball in a football
game) more smoothly and naturally on the
screen.
• You cannot select the Digipure function
when receiving the Progressive Video
Signal (525P signal).
AUTO:
The TV will automatically adjust the level of
the DigiPure effect to match the amount of
noise in the picture, giving the best possible
picture.
• If you set the DigiPure effect too high on
a low-quality picture that contains a lot of
noise, this may actually make the noise
worse. It is recommended to use the
AUTO setting if you can.
MIN:
The level of the DigiPure effect is set to the
minimun. When you set the DigiPure function
to AUTO and notice some noise, change the
setting from AUTO to MIN.
• The MIN setting is not suitable for highquality pictures which contain very little
noise.
OFF:
The DigiPure function is turned off.
PULL DOWN
The PULL DOWN function displays a cinema
film picture more smoothly and naturally on
the screen.
AUTO:
This function is turned on. Normally keep this
function set to AUTO.
OFF:
This function is turned off.
• The motion may appear unnatural when
viewing images with the NTSC colour
system. To make the motion smoother,
switch the PULL DOWN function from
AUTO to OFF.
• You cannot select this function in the
Twin pictures mode or the Picture in
picture mode.
MAX:
The level of the DigiPure effect is set to the
maximum. If you set the DigiPure function to
AUTO but feel that the original picture quality
has not been reproduced fully, change the
setting from AUTO to MAX.
• The MAX setting is not suitable for lowquality pictures which contain a lot of
noise.
22
Page 23

Using the TV's menu
COLOUR SYSTEM
The colour system is chosen automatically.
However, if the picture is not clear or no
colour appears, choose the colour system
manually.
1 Choose COLOUR SYSTEM, then
press the MENU/OK button.
COLOUR SYSTEM
PAL
OK
:OK
TV
:EXIT
DISP
:BACK
2 Press the
the appropriate colour system.
Then press the MENU/OK
button.
• When changing to the COLOUR
SYSTEM of the SUB-picture, see
"Change the colour system of the SUBpicture" on page 15 for details.
• You can also operate the COLOUR
SYSTEM function with the COLOUR
SYSTEM button on the remote control.
For details, see "COLOUR SYSTEM
button" on page 11.
/
buttons to choose
ZOOM
You can change the screen size according to
the picture aspect ratio. Choose the optimum
one of three ZOOM modes.
1 Choose ZOOM, then press the
MENU/OK button.
ZOOM
REGULAR
ZOOM
16:9
OK
:OK
TV
:EXIT
DISP
:BACK
2 Press the
buttons to
/
choose a ZOOM mode. Then
press the MENU/OK button.
The picture expands and the chosen
ZOOM mode is displayed in about 5
seconds.
• You can choose a ZOOM mode from
REGULAR, ZOOM or 16:9 modes. For
details, see " ZOOM button " on page 9.
• You cannot select the ZOOM function
when receiving the Progressive Video
Signal (525P signal).
PICTURE TILT
There are cases where the Earth's magnetic
force may make the picture tilt. If this
happens, you can correct the picture tilt.
1 Choose PICTURE TILT, then
press the MENU/OK button.
PICTURE TILT
OK
:OK
TV
:EXIT
DISP
:BACK
2 Press the
buttons until the
/
picture becomes level. Then
press the MENU/OK button.
23
Page 24
Using the TV's menu
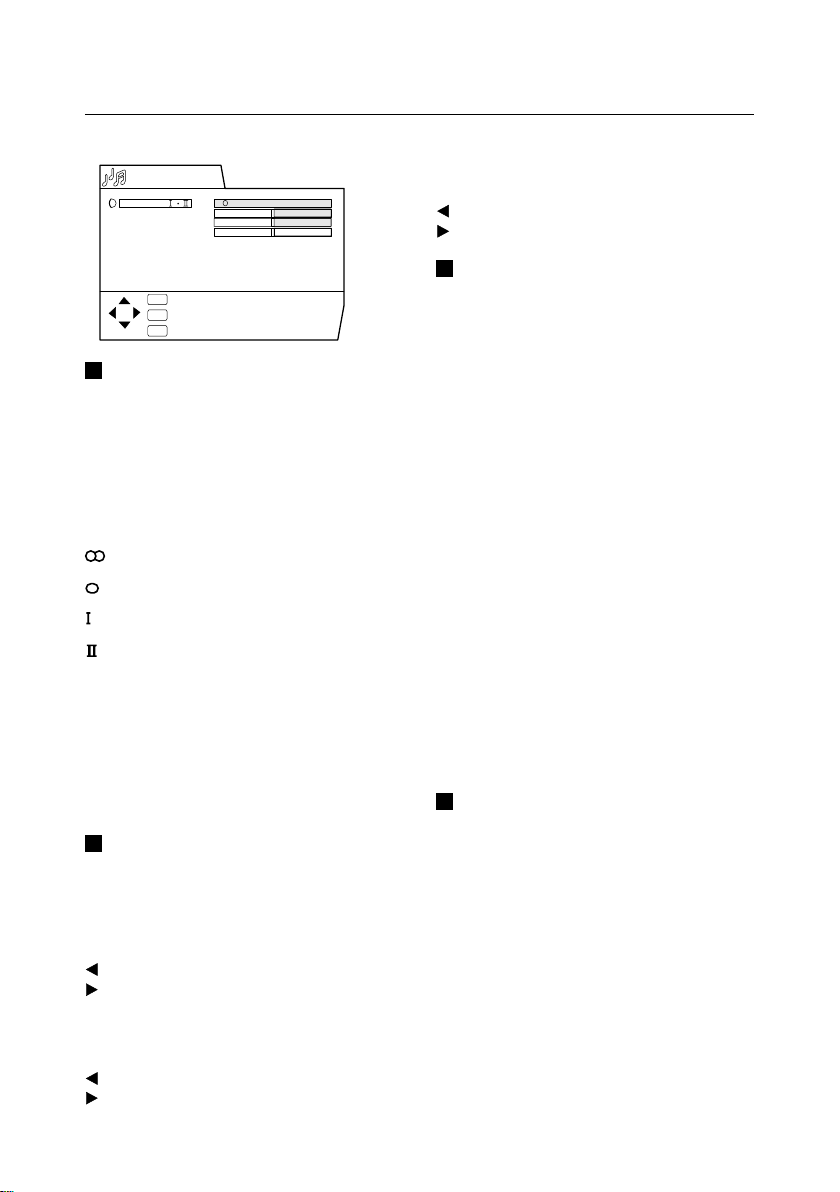
SOUND SETTING menu
SOUND SETTING
STEREO/
BASS
TREBLE
BALANCE
AI VOLUME
BBE
SPATIALIZER
SUPER BASS
HEADPHONE
OK
:OK
TV
:EXIT
DISP
:BACK
MONO
LIVE
ON
ON
ON
STEREO / I•II
When you are viewing a bilingual broadcast
programme, you can choose the sound from
Bilingual I (sub I) or Bilingual II (sub II). When
the stereo broadcasting is received poorly,
you can change from stereo to mono sound
so that you can hear the broadcast more
clearly and easily.
: Stereo sound
: mono sound
: Bilingual I (sub I)
: Bilingual II (sub II)
MONO: Cancels the Multi Sound function,
and the sound becomes monaural.
• The sound mode you can choose differs
depending on the TV programme.
• This function does not work in the VIDEO
modes.
Adjusting the sound
You can adjust the sound to your liking.
BASS
You can adjust the low tone of the sound.
: weaker
: stronger
BALANCE
You can adjust the volume balance between
the left and right speakers.
: turn the left speaker's volume level up.
: turn the right speaker's volume level up.
AI VOLUME
You can prevent the sudden increase or
decrease of sound that occurs when
changing the channel to another channel or
switching the VIDEO mode to another VIDEO
mode.
ON :
This function is turned on.
OFF :
This function is turned off.
• The AI VOLUME fnction for TV mode and
VIDEO mode can be set separetely.
For example, you can set it to be OFF in
TV mode and ON in VIDEO mode.
If you set the AI VOLUME function while
viewing images from a VIDEO terminal,
the setting is registered as the setting for
VIDEO mode.
• The AI VOLUME fnction may not operate
as expected if the sound input level from
a broadcast station (or video software) is
extremely low.
BBE
You can use the BBE function to enjoy easyto-listen sound that is faithful to the original
sound recorded.
ON :
This function is turned on.
OFF :
This function is turned off.
TREBLE
You can adjust the high tone of the sound.
: weaker
: stronger
24
Licenced by BBE Sound, inc. BBE
is a registered trademark of BBE
Sound, inc.
Page 25
Using the TV's Menu
SPATIALIZER
You can enjoy Surround sound with a "live"
effect by using the SPATIALIZER function.
You can choose one of two SPATIALIZER
modes.
• You can choose a SPATIALIZER mode
from LIVE, MONO or OFF modes.
For details, see " SPATIALIZER button "
on page 9.
The SPATIALIZER is manufactured under
lisense from Desper Products,Inc.
SUPER BASS
You can enjoy a powerful bass sound by
using the Super Bass (Super Bass Reflex)
function.
ON :
This function is turned on.
OFF :
This function is turned off.
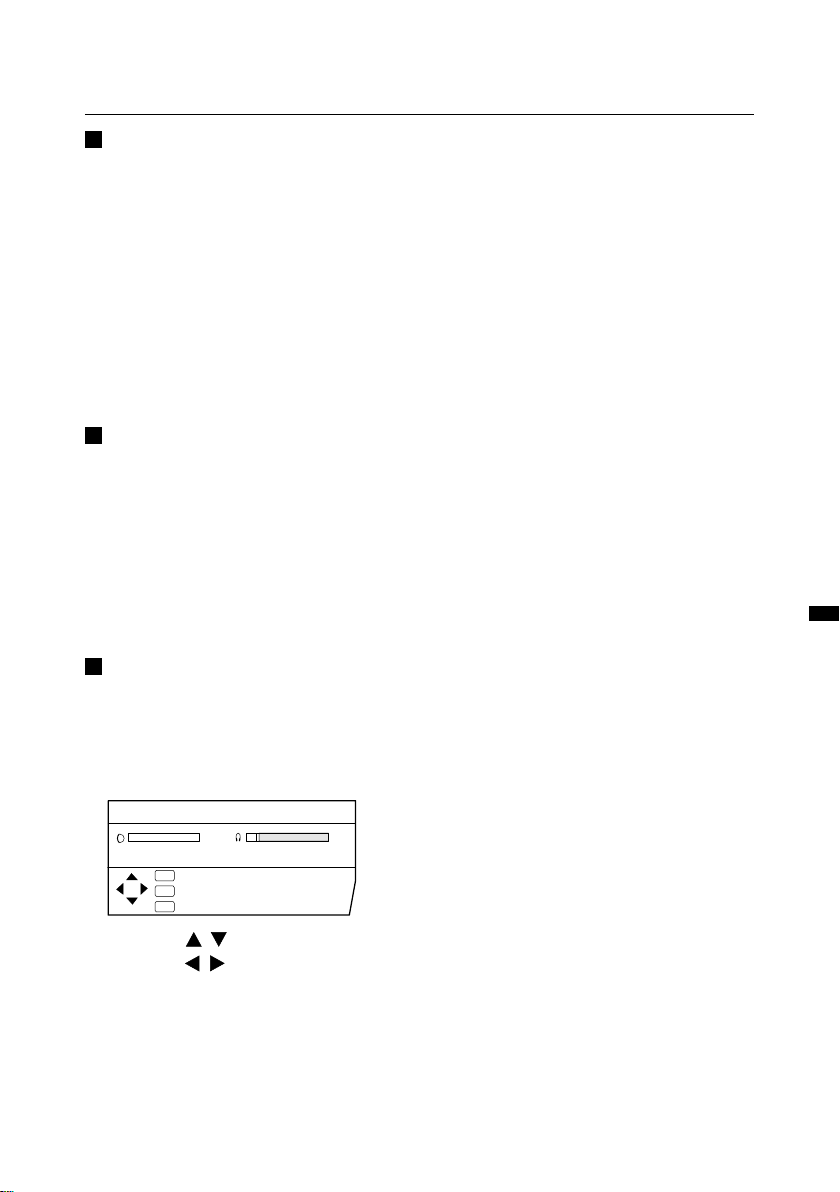
HEADPHONE
This function enables you to output the TV’s
sound from your headphones.
TV SPEAKER:
When this function is on, the TV’s speaker
does not shut off the sound even if headphones are connected.
If you set this function to off, the TV’s speaker
does not output the sound when the
headphones are connected.
OUTPUT:
You can choose the sound from the MAINpicture(MAIN) or the SUB-picture(SUB) when
using the headphones.
• The TV’s speaker does not put out the
sound from the SUB-picture.
• The sound of the SUB-picture is mono
only. You cannot use the STEREO/I·II
function for the sound of the SUB-picture.
1 Choose HEADPHONE, then
press MENU/OK button.
HEADPHONE
VOLUME
TV SPEAKER
OUTPUT
OK
TV
DISP
2 Use the
and the
:OK
:EXIT
:BACK
/
button to select,
/
button to set the
MAIN
05
ON
HEADPHONE function. Then
press the MENU/OK button.
VOLUME :
You can adjust the volume of the sound
output from your headphones.
25
Page 26
Using the TV's menu
FEATURES menu
FEATURES
SLEEP TIMER
BLUE BACK
CHILD LOCK
CHANNEL GUARD
AUTO SHUTOFF
VIDEO-3 SETTING
OK
:OK
TV
:EXIT
DISP
:BACK
COMPONENT
SLEEP TIMER
You can set the TV to automatically turn off
after a set time.
1 Choose SLEEP TIMER, then
press the MENU/OK button.
SLEEP TIMER
0120
OFF
OK
:OK
TV
:EXIT
DISP
:BACK
2 Press the
period of time.
The TV begins count down from the set
time.
• You can set the period of time a
maximum of 120 minutes (2 hours) in 10
minitue steps.
To cancel this function:
Press the button to set a period of time to
"OFF".
3 Press the MENU/OK button to
complete the setting.
The menu disappers.
• One minute before this function turns off
the TV, "GOOD NIGHT!" appears.
• This function cannot be used to turn off
the TV's main power.
• When this function is on, you can display
the SLEEP TIMER menu again to confirm
26
or change the remaining time.
buttons to set the
/
OFF
OFF
BLUE BACK
You can set the TV to automatically change
to a blue screen and mute the sound if the
ON
signal is weak or absent, or when there is no
input from an external device.
ON :
This function is turned on.
OFF:
This function is turned off.
CHILD LOCK
You can disable the front control buttons of
the TV. When this function is set to ON, the
TV can be operated only by using the remoto
control.
Use this function to prevent children from
operating the TV at their own discretion
(without parent consent).
ON :
This function is turned on.
OFF:
This function is turned off.
CHANNEL GUARD
When there is a TV channel you do not want
your children to watch, you can lock out the
channel. Even when a child chooses a
programme number for a locked out channel
the screen will change to blue and display
so the channel cannot be viewed.
To set this function
1 Choose CHANNEL GUARD, then
press the number 0 (AV) button.
SET ID NO.
000
0
OK
:OK
TV
:EXIT
DISP
:BACK
Page 27

Using the TV’s menu
2 Set the ID number you want.
To choose a number:
Press the / buttons.
To move a cursor:
Press the / buttons.
3 Press the MENU/OK button.
CHANNEL GUARD
PR ID
AV
01
02
03
04
05
06
07
08
09
OK
TV
DISP
4 Press the
:OK
:EXIT
:BACK
CH / CC
CH
21
CH
22
CH
23
CH
24
CH
25
CH
26
CC
01
CC
02
CC
03
buttons to
/
GUARD
choose a TV channel.
• The TV shows the TV programme which
the chosen TV channel is now
broadcasting.
5 Press the blue button to set this
function to the TV channel.
(CHANNEL GUARD) appears and the
TV channel is locked.
To cancel this function:
Press the blue button again.
(CHANNEL GUARD) disappears and
the lock is released.
6 Press the MENU/OK button to
complete the setting.
The menu disappears.
To view a locked TV
channel
1 Choose a programme number in
which a TV channel locked with
the number buttons or PR LIST.
The screen changes to blue and the
(CHANNEL GUARD) appears.
5
• You cannot choose a locked TV channel
with the / buttons.
2 Press the DISPLAY button to
display " ID NO. " (ID unmber
input screen).
5
ID NO.:
3 Press the number buttons to
enter the ID number.
The lock is temporarily released so you
can view the TV channel.
If you have forgotten the ID number:
Perform step 1 of "To set this function".
After confirming the ID number, press the
TV/VIDEO button to exit the menu.
• When you would like to cancel the
CHANNEL GUARD function, you must
perform the operation " To set this
function" again.
27
Page 28

Using the TV's menu
AUTO SHUTOFF
You can set your TV to turn off if no signal are
received for about 15 minutes or longer after
the end of a broadcast.
ON :
This function is turned on.
OFF :
This function is turned off.
• The AUTO SHUTOFF function does not
turn off the TV's main power.
• The AUTO SHUTOFF will not work for a
VIDEO mode.
VIDEO-3 SETTING
Set the VIDEO-3 SETTING correctly according to the video signal input from the external
device connected to the VIDEO-3 terminal. If
this setting is incorrect, images will not be
displayed.
VIDEO :
If a normal video signal (composite video
signal) is input.
COMPONENT :
If a Component video signal (Y/CB/C
signals) is input.
• For detailed connecting methods, see
" Additional preparation " on page 36.
• This Television is compatible with the
Progressive Video Signal (525P signal)
only when the component video signal is
input.
28
R
Page 29
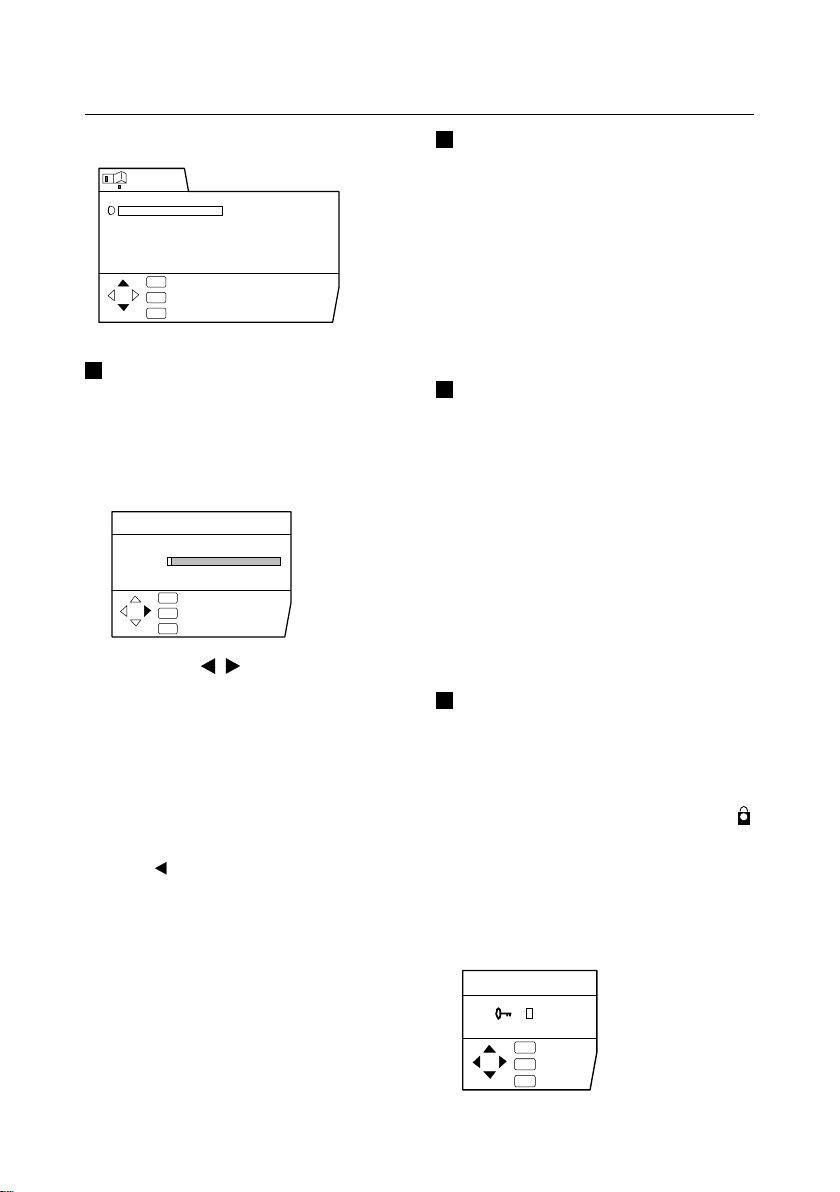
Using the TV’s menu
INSTALL menu
INSTALL
LANGUAGE
AUTO PROGRAM
EDIT/MANUAL
TELETEXT LANGUAGE
OK
:OK
TV
:EXIT
DISP
:BACK
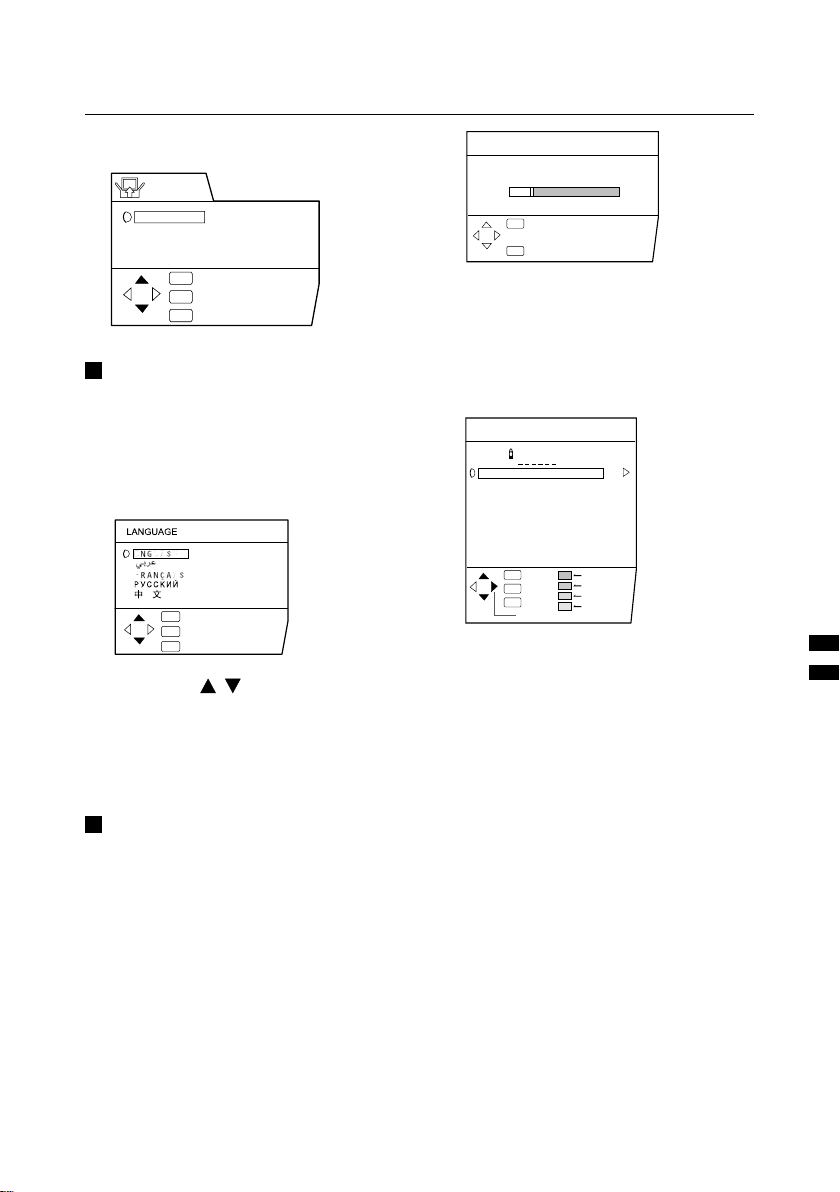
LANGUAGE
You can choose the language you want to
use for the on-screen display from the
language list in a menu.
1 Choose LANGUAGE, then press
the MENU/OK button.
OK
:OK
TV
:EXIT
DISP
:BACK
2 Press the
/
buttons to
choose a language.
3 Press the MENU/OK button to
complete the setting.
The menu disappers.
AUTO PROGRAM
You can automatically register the TV
channels which can be received well at
your residence in the TV's programme
numbers by performing the following.
1 Choose AUTO PROGRAM, then
press the MENU/OK button.
The AUTO PROGRAM function starts.
The TV channels you receive are
automatically stored in the programme
numbers list.
AUTO PROGRAM
CH 10
20%
OK
:OK
DISP
:BACK
• To cancel the AUTO PROGRAM function,
press the DISPLAY button.
2 After the TV channels have been
stored in the programme number
list, the EDIT menu appears.
EDIT
PR ID
AV
01
02
03
04
05
06
07
08
09
• You can proceed to edit the programme
numbers list using the EDIT/MANUAL
function. For details, see "EDIT/MANUAL"
on page 30.
• If a TV cannel you want to view is not
stored in the programme numbers list,
you can register it using the MANUAL
function.
For details, see "EDIT/MANUAL" on page
30.
• The AUTO PROGRAM function does not
store a TV channel to the programme
number 0 (AV).
• If you do not need to use the EDIT/
MANUAL function, press the MENU/OK
button to exit from the EDIT menu.
OK
TV
DISP
:OK
:EXIT
:BACK
MOVE
CH/CC
CH
CH
CH
CH
CH
CH
CC
CC
CC
21
22
23
24
25
26
01
02
03
ID
INSERT
DELETE
MANUAL
29
Page 30
Using the TV's menu
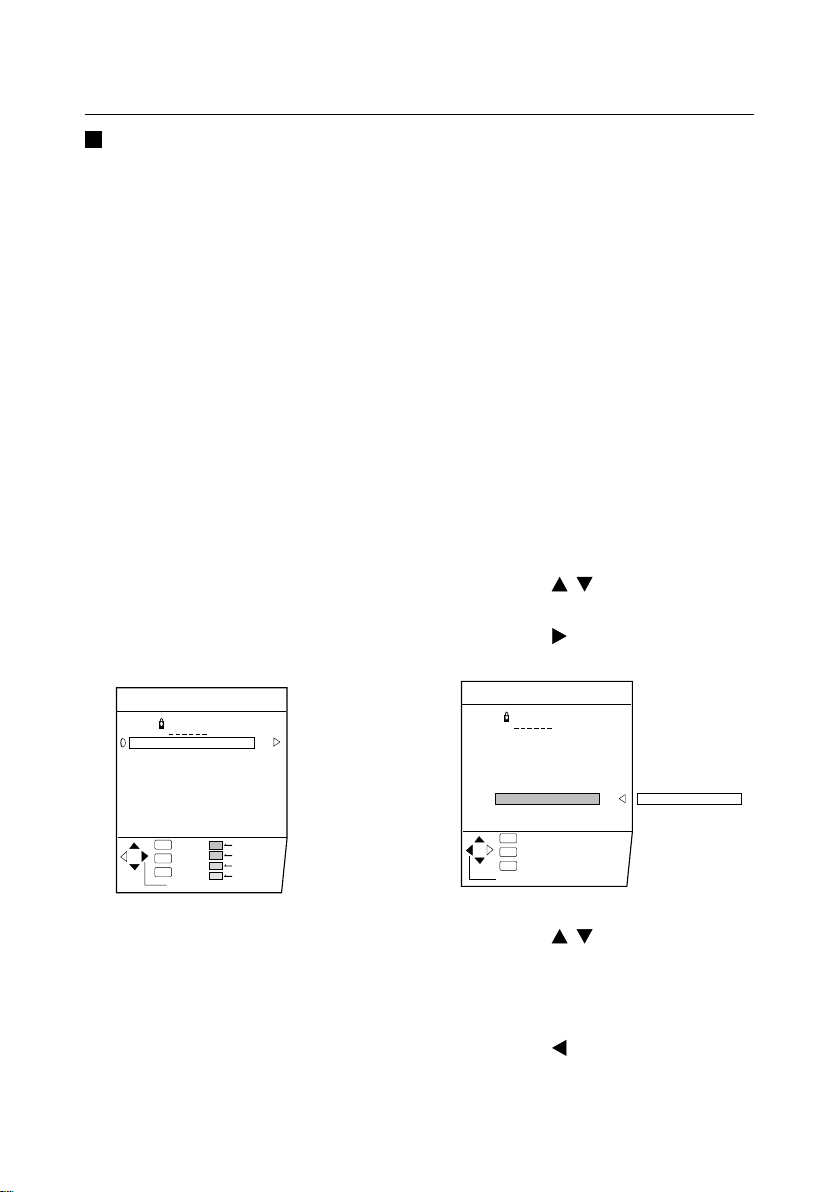
EDIT/MANUAL
The EDIT/MANUAL functions are divided into
two types:
editing of the current programme numbers
(EDIT functions) and manual registration of a
TV channel you want to view to the
programme number (MANUAL function).
CAUTION
• Using the MOVE,DELETE or INSERT
function rewrites the current programme
numbers list.
Resultingly, the programme number of
some of the TV channels will change.
• When a TV channel which has been
locked out using the CHANNEL GUARD
function, using the MANUAL function for
that TV channel cancels the CHANNEL
GUARD function.
• When a TV channel has already been
registered in PR 99, using the INSERT
function deletes the TV channel.
1 Choose EDIT/MANUAL, then
press the MENU/OK button.
EDIT
PR ID
AV
01
02
03
04
05
06
07
08
09
OK
TV
DISP
:OK
:EXIT
:BACK
MOVE
CH/CC
CH
CH
CH
CH
CH
CH
CC
CC
CC
21
22
23
24
25
26
01
02
03
ID
INSERT
DELETE
MANUAL
INSERT:
This function adds a new TV channel in the
current programme numbers list by using the
CH/CC number.
DELETE :
This function deletes a unnecessary TV
Channel.
MANUAL :
This function manually registers a new TV
channel in a programme number.
3 Press the MENU/OK button to
complete the setting.
• For programme number PR 0, "AV"
appears in the programme numbers list.
FUNCTIONS
MOVE
:OK
:EXIT
:BACK
STORE
/
buttons to
CH/CC
21
CH
22
CH
23
CH
24
CH
25
CH
26
CH
CH
02
CC
03
CC
CC 01
1 Press the
choose a TV channel.
2 Press the button to start the
MOVE function.
EDIT
PR ID
AV
01
02
03
04
05
06
07
08
09
OK
TV
DISP
2 Follow the operation description
of a function you want to use and
operate the function.
MOVE :
This function changes a programme number
of a TV channel.
ID :
This function registers a Channel name (ID)
to a TV channel.
30
3 Press the
buttons to
/
choose a new programe number.
To cancel the MOVE function:
Press the DISPLAY button.
4 Press the button to change the
programme number of a TV
channel to a new programme
number.
Page 31

Using the TV’s menu
ID
1 Press the
buttons to
/
choose a TV channel.
2 Press the red button to start the
ID function.
3 Enter a channel name (ID).
Press the
buttons to
/
choose a character.
press the
buttons to move
/
the cursor.
EDIT
PR ID
AV
01
02
03
04
05
06
07
08
09
OK
TV
DISP
M
:OK
:EXIT
:BACK
CH/CC
CH
CH
CH
CH
CH
CH
CC
CC
CC
21
22
23
24
25
26
01
02
03
To cancel the ID function:
Press the DISPLAY button.
4 Press the MENU/OK button to
register a channel name to a TV
channel.
DELETE
1 Press the
/
buttons to
choose a TV channel.
2 Press the yellow button to delete
the TV channel.
The TV channel is deleted from the
programme numbers list.
MANUAL
1 Press the
buttons to
/
choose a programme number to
which you want to register a new
TV channel.
2 Press the bule button to activate
the MANUAL function.
At the right side following the CH/CC
number, the SYSTEM (sound system) of
the TV channel appears.
MANUAL
PR ID
AV
01
02
03
04
05
06
07
08
09
DISP
OK
TV
:OK
:EXIT
:BACK
SYSTEM
CH/CC
CH
CH
CH
CH
CH
CH
CC
CC
CC
21
22
23
24
25
26
01(B/G)
02
03
SEARCH+
SEARCHFINE+
FINE-
To cancel the MANUAL function:
Press the DISPLAY button.
3 Press the button to choose the
system (sound system) for a TV
channel you want to register.
• For the sound systems in each country
or region, see the table
"BROADCASTING SYSTEMS" on page
12.
4 Press the green or red button to
search for a TV channel.
Scanning stops when the TV finds a TV
channel. Then the TV channel is
displayed.
5 Press the green or red button
repeatedly until the to TV channel
you want appears.
If the TV channel reception is poor:
Press the bule or yerrow button to
finetune the TV channel.
If you cannot hear the normal sound
even when the picture of the TV channel
appers normally:
The SYSTEM setting is worong. Press the
button and choose a SYSTEM that has
normal sound.
6 Press the MENU/OK button and
register the TV channel to a
programme number.
The normal EDIT menu is resumed.
31
Page 32

Using the TV's menu
INSERT
PREPARATION
• Find the CH/CC number corresponding
to the channel number of the TV channel
from the on page 33.
1 Press the
buttons to
/
choose a programme number for
which you will register a new TV
channel.
2 Press the green button to start
the INSERT function.
EDIT
PR ID
AV
01
02
03
04
05
06
07
08
09
DISP
3 Press the
OK
:OK `-9
TV
:EXIT
:BACK
CH/CC
CH/CC
21
CH
22
CH
23
CH
24
CH
25
CH
26
CH
**
CC
02
CC
03
CC
buttons to
/
choose "CC" or "CH" according
to the CH/CC number of the TV
channel.
To cancel the INSERT function:
Press the DISPLAY button.
4 Press the Number buttons to
enter the remaining CH/CC
number.
The TV shifts to registration mode.
When the registration is completed, the
picture of the TV channel appears on the
screen.
• The CH/CC number is a number
indicating the broadcast frequency to the
TV. If the TV cannot detect the TV
channel corresponding to the broadcast
frequency indicated by the CH/CC
number, a picture in the no-signal state
appears.
32
Page 33

Using the TV’s menu
CH/CC number
When you want to use the INSERT function on page 32, find the CH/CC number cor responding to the Channel
number of the TV channel from this table.
US : The US channel numbers are the channel numbers used in the United States, Philippines, etc.
CCIR: The CCIR channel numbers are the channel numbers used in the Middle East, Southeast Asia ,etc.
OIRT: The OIRT channel numbers are the channel numbers used in Easter n Europe,Russia, Vietnam, etc.
AUSTRALIA: The AUSTRALIA channel numbers are the channel numbers used in Australia, etc.
CH US CCIR OIRT
CH 02 US-2 E2 R1 AU-0
CH 03 US-3 E3 AU-1
CH 04 US-4 E4 R2 AU-2
CH 05 US-5 E5 R6 AU-6
CH 06 US-6 E6 R7 AU-7
CH 07 US-7 E7 R8 AU-8
CH 08 US-8 E8 R9 AU-9
CH 09 US-9 E9
CH 10 US-10 E10 R10 AU-10
CH 11 US-11 E11 R11 AU-11
CH 12 US-12 E12 R12
CH 13 US-13
CH 14 US-14
CH 15 US-15
CH 16 US-16
CH 17 US-17
CH 18 US-18
CH 19 US-19
CH 20 US-20
CH 21 US-21 E21
CH 22 US-22 E22
CH 23 US-23 E23
CH 24 US-24 E24
CH 25 US-25 E25
CH 26 US-26 E26
CH 27 US-27 E27
CH 28 US-28 E28
CH 29 US-29 E29
CH 30 US-30 E30
CH 31 US-31 E31
CH 32 US-32 E32
CH 33 US-33 E33
CH 34 US-34 E34
CH 35 US-35 E35
CH 36 US-36 E36
CH 37 US-37 E37
CH 38 US-38 E38
CH 39 US-39 E39
CH 40 US-40 E40
CH 41 US-41 E41
CH 42 US-42 E42
CH 43 US-43 E43
CH 44 US-44 E44
CH 45 US-45 E45
CH 46 US-46 E46
CH 47 US-47 E47
CH 48 US-48 E48
CH 49 US-49 E49
CH 50 US-50 E50
CH 51 US-51 E51
CH 52 US-52 E52
CH 53 US-53 E53
CH 54 US-54 E54
CH 55 US-55 E55
CH 56 US-56 E56
CH 57 US-57 E57
CH 58 US-58 E58
CH 59 US-59 E59
CH 60 US-60 E60
CH 61 US-61 E61
CH 62 US-62 E62
CH 63 US-63 E63
CH 64 US-64 E64
CH 65 US-65 E65
CH 66 US-66 E66
CH 67 US-67 E67
CH 68 US-68 E68
CH 69 US-69 E69
CH 70
Channel
AUSTRALIA
CC US CCIR OIRT
CC 01 S-1 AU-5
CC 02 S-2
CC 03 S-3
CC 04 S-4
CC 05 S-5
CC 06 S-6 AU-5A
CC 07 S-7
CC 08 S-8
CC 09 S-9
CC 10 S-10
CC 11 S-11
CC 12 S-12
CC 13 S-13
CC 14 A S-14
CC 15 B S-15
CC 16 C S-16
CC 17 D S-17
CC 18 E S-18
CC 19 F S-19
CC 20 G S-20
CC 21 H S-21
CC 22 I S-22
CC 23 J S-23
CC 24 K S-24
CC 25 L S-25
CC 26 M S-26
CC 27 N S-27
CC 28 O S-28
CC 29 P S-29
CC 30 Q S-30
CC 31 R S-31
CC 32 S S-32
CC 33 T S-33
CC 34 U S-34
CC 35 V S-35
CC 36 W S-36
CC 37 W+1 S-37
CC 38 W+2 S-38
CC 39 W+3 S-39
CC 40 W+4 S-40
CC 41 W+5 S-41
CC 42 W+6
CC 43 W+7
CC 44 W+8
CC 45 W+9
CC 46 W+10
CC 47 W+11
CC 48 W+12
CC 49 W+13
CC 50 W+14
CC 51 W+15
CC 52 W+16
CC 53 W+17
CC 54 W+18
CC 55 W+19
CC 56 W+20
CC 57 W+21
CC 58 W+22
CC 59 W+23
CC 60 W+24
CC 61 W+25
CC 62 W+26
CC 63 W+27
CC 64 W+28
CC 75 X
CC 76 Y R3
CC 77 Z R4 AU-3
CC 78 Z+1 R5
CC 79 Z+2 AU-4
CC 95 A-5
CC 96 A-4
CC 97 A-3
CC 98 A-2
CC 99 A-1
Channel
AUSTRALIA
33
Page 34

Using the TV's menu
TELETEXT LANGUAGE
There are 4 types of teletext language
groups. Set the teletext language group that
corresponds to the language of the teletext
program that you want to watch.
1 Choose TELETEXT LANGUAGE,
then press the MENU/OK button.
TELETEXT LANGUAGE
GROUP-1
GROUP-2
GROUP-3
GROUP-4
OK
:OK
TV
:EXIT
DISP
:BACK
2 Press the
choose a group.
Group Languages
GROUP-1
GROUP-2
/
buttons to
Turkish, Hungarian, English,
German, French, Italian,
Spanish, Portuguese, Greek,
Swedish, Finnish
Polish, Serbian, Croatian,
Slovenian, Czech, Slovak,
Rumanian, Hungarian,
German, French, Italian,
Swedish, Finnish
• Languages that are not included in the
teletext language group that you select,
the sub-titles of the teletext program will
not be displayed properly.
Russian, Bulgarian, Lettish,
Lithuanian, Estonian,
GROUP-3
Ukrainan, Serbian, Croatian,
Slovenian, Czech, Slovak,
English, German
Arabic, Czech, Slovak.
GROUP-4
Hungarian, English, German,
French, Italian, Spanish,
Portuguese, Swedish, Finnish
3 Press the MENU/OK button to
complete the setting.
34
The menu disappears.
Page 35

DEMO menu
DEMO
ON
OFF
OK
:OK
TV
:EXIT
DISP
:BACK
The DEMO function automatically demostrations some of the TV function.
When the DEMO function is set to
ON:
Each time the TV is turned on, the demonstration starts automatically.
If you do not want that to happen, set the
DEMO function to OFF.
1 Press the
choose ON.
To cancel the DEMO function,
choose off.
2 Press the MENU/OK button to
complete the settings.
The DEMO function is set to ON, and the
demostration will start.
/
buttons to
Using the TV's menu
To stop the demonstration:
Press one of the button on the remote
control.
35
Page 36

Additional preparation
Connecting the external
devices
Connect the devices to the TV, paying
attention to the following connection
diagram.
Before connecting anything:
• Read the manuals provided with the
devices. Depending on the devices, the
connection method may differ from the
figure. In addition, the device settings
may be changed depending on the
connection method to secure proper
operation.
• Turn off all the devices including the TV.
• The "Specifications" on page 43 contains
the details of the VIDEO terminals. If you
are connecting a device not listed in the
following connection diagram, see the
"Specifications" to choose the best
VIDEO terminal.
• Note that connecting cables are not
supplied.
• When connecting devices that are
supported by AV COMPU LINK, see
"Connecting AV COMPU LINK Supported
Devices" on page 38.
1 VCR (composite signal)
2 VCR (S-VIDEO signal; Y/C)
3 VCR for recording (composite signal)
4 DVD player (composite signal)
5 DVD player (S-VIDEO signal; Y/C)
6 DVD player (component video signals;
Y/CB/CR)
7 TV game (composite signal)
8 TV game (S-VIDEO signal; Y/C)
9 Camcorder (composite signal)
0 Camcorder (S-VIDEO signal; Y/C)
- Headphones
S
OVER
VRL/MONO
IN (VIDEO-4)
(Behind the cover)
AUDIO
S
VIDEO
L/MONO
R
OVER
VIDEO-1
VIDEO-2
Y/VIDEOC
BCR
VIDEO-3
AUDIO
L/MONO
R
COMPONENT
OUTPUT
L
R
VIDEO
AUDIO
AV COMPU LINK
AUDIO
RRLL/MONO
VIDEO
C
C Y/VIDEO
R
B
L/MONOR AUDIO
VIDEO
AUDIO
AV COMPULINK
S
OVER
VIDEO-1
VIDEO-2
VIDEO-3/
COMPONENT
OUTPUT
A AV COMPU LINK cable
36
Page 37

Additional preparation
Connecting methods
1 Connect the TV's VIDEO jack
and the device's VIDEO OUT
(video output) jack with a video
cable.
If connecting a device to the TV
with an S-VIDEO cabel :
Connect the VCR's S-VIDEO OUT (S-VIDEO
output) connector and the TV's "S" (S-VIDEO)
connector with an S-VIDEO cable, instead of
connecting with a video cable.
Note that the connection with a video cable
will be ignored in case you conect a VCR to
the TV with both video cable and S-VIDEO
cable.
If connecting a DVD player to the
TV with a component video
cable:
Connect three jacks (Y/VIDEO, CB and CR) in
the VIDEO-3 terminal and the DVD player's
COMPONENT (component video output)
jacks with a component video cables,
instead of connection with a video cable.
Then set the VIDEO-3 SETTING to COMPONENT, according to "VIDEO-3 SETTING" on
page 28.
• This Television is compatible with the
Progressive video signal (525P signal).
(When the component video signal is
input.)
If you have a DVD player that outputs
Progressive video signals (525P) as a
component video signal, then by
attaching the device to the television with
a component video cable you can see
the actual images that are recorded on a
DVD disc as an original image source.
• In the VIDEO-4 terminal, the VIDEO jack
is indicated by "V".
2 Connect the TV's AUDIO jacks
(L/MONO and R) and the
device's AUDIO OUT (audio L/R
output) jacks with an audio
cable.
If the device's sound output is in
mono :
Connect the device's AUDIO OUT jack and
the TV's L/MONO jack with an audio cable.
Connecting devices to the
OUTPUT terminal
The signals of the images and sound you are
currently viewing with this TV are output
through the OUTPUT terminal. By connecting
a VCR to the OUTPUT terminal, you can
record the currently shown image and sound
to that VCR. To do this, connect the VCR and
OUTPUT terminal following the steps below.
1 Connect the VIDEO jack in the
OUTPUT terminal and the VCR's
VIDEO IN (video input) jack with
a video cable.
2 Connect the AUDIO jacks (L and
R) in the OUTPUT terminal and
the VCR's AUDIO IN (audio L/R
input) jacks with an audio cable.
• When you turn off the TV, the signals from
the OUTPUT terminal are also turned off.
• The component signals input from the
VIDEO-3/COMPONENT terminal cannot
be output through the OUTPUT terminal.
If connecting a device to the
VIDEO-3/COMPONENT terminal
with a video cable:
Connect the TV's Y/VIDEO jack and the
device's VIDEO OUT (video output) jack with
a video cables.
Then set the VIDEO-3 SETTING to VIDEO
according to "VIDEO-3 SETTING" on page
28.
Connecting Headphones
Connect the headphones with a stereo mini
jack (of 3.5 mm in diameter) to the Headphone jack at the TV front panel.
37
Page 38

Additional preparation
Connecting AV COMPU
LINK Supported Devices
AV COMPU LINK remote control system is a
system in which related devices are
automatically controlled when you operate
one device.
If you apply this system to the TV, you can
have the TV automatically perform the
required operations by operating one
external device. You don't have to use the
TV's remoto control to turn on the TV or
change the VIDEO modes.
Examples of the AV
COMPU LINK remote
control system operations
Simply by pressing the PLAY button on a
VCR or a DVD player, you can view images
from the device.
Simply by inserting a pre-recorded tape (a
tape with the record safety tab removed) to a
VCR, you can view the tape.
Simply by operating the AV Control Receiver, you can have the TV turned on/off (in
standby mode) or the VIDEO mode changed
correctly.
• The performance of the AC COMPU
LINK remote control system varies
depending on the connected device.
See the device’s instruction manual.
• When you select "TV SOUND" as the
input source with the AV Control
Receiver, there are cases where the TV's
MUTING function automatically operates
and the sound from the TV's speakers is
muted.
In such cases, press the VOLUME-/+
buttons or the MUTING button on the
TV's remote control to cancel the MUTING function. You can regain the sound
from the TV's speakers.
Conditions to use the AV
COMPU LINK remote
control system
• A device equipped with an AV COMPU
LINK terminal is required.
• You must connect the TV and the device
with an AV COMPU LINK cable.
AV COMPU LINK cable is not supplied
with this TV. If an AV COMPU LINK cable
is unavailable, connect them with a cable
with dia. 3.5 mm (mono) male plugs at
both ends.
• You must connect the device to an
appropriate VIDEO terminal and set it up
correctly. Otherwise the AV COMPU LINK
remote control system will not function
correctly. For details, see “ Setting up the
AV COMPU LINK remote control
system”.
• The TV must be in standby mode (the
POWER lamp lighting red). If the TV’s
Main power is off (the POWER lamp off),
the AV COMPU LINK remote control
system does not function.
Setting up the AV COMPU
LINK remote control system
CAUTION:
• With some devices, the setup method
differs from the ones explained here.
Be sure to read the device’s instruction
manual thoroughly before setting it up.
1 Connect the device to the TV’s
VIDEO-1 or VIDEO-2 terminal.
If you want to connect a DVD
player to the TV with a component video cable :
Connect the DVD player to the TV’s VIDEO-3
terminal.
• For detailed connecting instructions, see
"Connecting the external devices" on
page 36.
38
Page 39

2 Connect the TV’s AV COMPU
LINK terminal and the device’s
AV COMPU LINK terminal with
an AV COMPU LINK cable.
3 Change the device’s setting
according to the VIDEO terminal
it is connected to.
If a VCR is connected to the
VIDEO-1 terminal :
Set the VCR’s remote control code to A code.
If a DVD player is connected to
the VIDEO-1 terminal:
Set the DVD player’s AV COMPULINK MODE
to DVD2.
If a VCR is connected to the
VIDEO-2 terminal:
Set the VCR’s remote control code to B code.
If a DVD player is connected to
the VIDEO-2 terminal:
Set the DVD player’s AV COMPULINK MODE
to DVD3.
Additional Preparation
If a DVD player is connected to
the VIDEO-3 terminal with a
component video cable:
Set the DVD player’s AV COMPULINK MODE
to DVD1.
• For instructions on how to change the
device’s setting, refer to the device’s
instruction manual.
• If the device you are connecting has
neither the remote control code nor the
AV COMPULINK MODE, then connect it
to the TV’s VIDEO-1 terminal.
39
Page 40

Troubleshooting
If a problem arises while you are using the TV, please read this "Troubleshooting" well before
you request having the TV repaired. You may be able to fix it easily by yourself. For example, if
the AC plug is disconnected from the AC outlet, or the TV aerial has problems, you may think
there is a problem with the TV itself.
Important:
• This Troubleshooting guide only covers problems whose cause are not easy to determine.
If a question arise when you are operating a function, read the page(s) corresponding to
the operation of the function well, not this Troubleshooting guide.
• After you have followed the Troubleshooting description or the operating description of the
functions concerned without any success, remove the AC plug from the AC outlet and re quest a repair of your TV. Do not attempt to repair the TV by yourself or remove the
rearcover of the TV.
the TV
40
If you cannot turn on
• Is the AC plug connected to the AC
outlet?
• Is the POWER lamp lit? If not, press the
Main power button.
No picture/No sound
• Have you chosen a TV channel whose
reception is extremely bad? In this case,
the BLUE BACK function will be activated, the entire screen becomes blue, and
the sound is muted. In spite of this, if you
want to view the TV channel, follow the
description "BLUE BACK" on page 26 to
try to change the BLUE BACK function
setting to OFF.
• Are your SOUND SYSTEM settings for
the TV channels correct?
Forrow the description “SOUND SYSTEM
Button” on page 12 to try to solve the
trouble.
Poor picture
• If noise totally obscures the picture (snow), the aerial or aerial cable may have
trouble. Check the following to try to
solve the trouble :
Has the TV and aerial been
connected properly?
Has the aerial cable been damaged?
Is the aerial pointed to the right direction?
Is the aerial itself faulty?
• If the TV or aerial receives interference
from the other devices, stripes or noise
may appear in the picture. Move such
device as an amplifier, personal computer, or a hair drier that can cause interference away from your TV, or try changing its location. If the aerial suffers interference from a radio tower or highvoltage wire, please contact your local
dealer.
• If the TV receives interferences from
signal reflecting from mountains or
building, double-pictures(ghosting) will
occur.
Try to change the aerial’s direction or
replace the antenna with the one with
better directionality.
• Are your COLOUR SYSTEM settings for
the TV channels correct? Follow the
description "COLOUR SYSTEM button"
on pege 11 to try to solve the trouble.
• Has COLOUR or BRIGHT been controlled properly? Follow the description
"Adjusting the picture" on page 20 to try
to adjust them properly.
• Videotaping teletext is not recommended
because it may not record correctly.
Page 41

Troubleshooting
• When a white and bright still image (such as a white dress) is displayed on the
screen, the white part may look as if it
were coloured.
It is a phenomenon unavoidable due to
the nature of the picture tube itself, and
not due to a TV failure.
When the picture disappears from the
screen, the unnatural colours will also
disappear.
• When viewing images from commercially
available video softwear products, or videos from videotapes which have been
recored improperly, the top of the image
may be distored.
This is due to the condition of the video
signal, and not because of malfunction.
Poor sound
• Have you adjusted BASS or TREBLE
properly? If not, follow the description
"Adjusting the Sound" on page 24 to try
to adjust them properly.
• When the TV channel reception is poor, it
can be hard to hear the stereo or
bilingual sound. In this case, follow the
description "STEREO / I • II" on page 24
to hear the sound more easily by
changing it to a mono sound.
Operation disabled
• Have the batteries of the remote control
become exhausted?
Follow the description "Putting the
Batteries into the Remote Control" on
page 4 and replace them with new
batteries to try solve the problem.
• Have you attempted to use the remote
control at the sides or rear of the TV or at
a location more than seven meters apart
from the TV location? Operate the remote
control in the front of your TV or a
location less than seven meters from
your TV to try to solve the ploblem.
• When you are viewing a teletext programme, you cannot operate the menus.
Press the TV/VIDEO button to return the
teletext programme to the ordinary TV
programme to try operating the menus.
• Is the CHILD LOCK function set to ON?
If the CHILD LOCK function is set to ON,
you cannot operate the TV with the front
control buttons of the TV. Follow the
description "CHILD LOCK" on page 26 to
try to set the CHILD LOCK function to OFF.
• If the TV operation becomes disabled
suddenly, press the Main power button
on the TV and turn off the main power.
Try to press the Main power button again
to turn on the main power. If the TV
returns to a normal state, it is not a
failure.
• The following functions do not operate
when receiving Progressive Video Signal
(525P signal);
Remote control function:
ZOOM, PIP, MULTI, FREEZE and
STROBE BUTTON
MENU function:
SHARP,
TINT, DIGITAL VNR, Digipure
and ZOOM
Other concerns
• When the SLEEP TIMER function or
AUTO SHUTOFF function operates, the
TV is automatically turned off.
If the TV is turned off suddenly, try to
press the POWER button to turn on the
TV once again. At this time, if the TV
resumes a normal state, there is no
problem.
• If you do not want sound emitted from
the TV’s speakers when using
headphones, change the TV SPEAKER
setting in the HEADPHONE menu to OFF.
For details, see “HEADPHONE” on page
25.
41
Page 42

Troubleshooting
• If you bring a magnetised device such
as a speaker near to your TV, a picture
may be warped or unnatural colours
appear at the corners of the screen.
In this case, keep the device apart from
your TV. If the speaker causes such
phenomena, use the magnetic-shielded
speaker instead.
• A picture may be tilted due to the influence of the earth's magnetism. In this
case, use the "PICTURE TILT" on page
23 to complete the tilt.
• It takes a short period of time from the
time an operation such as changing
channels is performed until an image is
displayed. This is not a malfunction.
This is the time required for the image to
stabilize before it can be displayed.
• The TV may emit a crackling sound due
to a sudden change in temperature. It
does not matter if a picture or sound
does not show any abnormality. If you
hear crackling sounds frequently while
you are viewing the TV, other causes may
be assumed.
For precautionary purposes, request
your service technician to inspect it.
• Touching the screen may cause you feel
a slight electric shock due to its static
electricity.
It is an unavoidable phenomenon due to
the construction of the picture tube. It is
not a problem with the TV.
You can rest assured that this static discharge does not have harmful influence
over the human boby.
42
Page 43

Specifications
Broadcasting systems B, G, I, D, K, K1, M
Colour systems PAL, SECAM, NTSC3.58/4.43MHz
Channels and frequencies VHF low channel (VL) =46.25 to 168.25 MHz
Sound-multiplex systems A2 (B/G), NICAM (B/G, I, D/K) system
Teletext systems FLOF(Fastext), WST(World Standard Text)
Lauguages displayed by Please see the table in the description
teletext "TELETEXT LANGUAGE" on page 34
Power requirements AC 110 to 240V, 50/60Hz
Audio output Rated Power output: 20W + 20W
VIDEO-1 terminal RCA connector X 3, S-VIDEO connector X 1
VIDEO-2 terminal RCA connector X 3
VIDEO-3/COMPONENT RCA connector X 5
terminal • Video input/Component video (Y/CB/CR) input and Audio
VIDEO-4 terminal RCA connector X 3, S-VIDEO connector X 1
OUTPUT terminal RCA connector X 3
Headphone jack Stereo mini-jack (3.5 mm in diameter)
Accessories Remote control unit X 1 (RM-C214)
Speakers HV-34LPZ : 12cm round X 2, 3.5cm round X 2
Power consumption HV-34LPZ : Maximum 255W Average 170W
Screen size HV-34LPZ : Picture tube 87cm Visible area 80cm
(measured diagonally) HV-29LPZ : Picture tube 73cm Visible area 68cm
Dimensions(W X H X D) HV-34LPZ : 898mm X 728mm X 579mm
Weight HV-34LPZ : 75kg
Design and specifications subject to change without notice.
Pictures displayed on the screen using this TV's ZOOM functions should not be shown for any
commercial or demonstration purpose in public places (cafes,hotels, etc.) without the consent
of the owners of copyright of the original picture sources, as this constitutes an infringement of
copyright.
VHF high channel (VH) =175.25 to 463.25 MHz
UHF channel (U) =471.25 to 863.25 MHz
Receives cable channels in mid band (X to Z+2, S1 to S10),
super band (S11 to S20) and hyper band (S21 to S41).
• Video input, S-VIDEO (Y/C) input and Audio L/R inputs
are available.
• Video input and Audio L/R inputs are available.
L/R inputs are available.
• Progressive video signal(525P signal) input is available.
• Video input, S-VIDEO (Y/C) input and Audio L/R inputs
are available.
• Video output and Audio L/R outputs are available.
AA/R6 dry cell battery X 2
HV-29LPZ : 10cm round X 2, 3.5cm round X 2
HV-29LPZ : Maximum 254W Average 170W
HV-29LPZ : 732mm X 588mm X 518mm
HV-29LPZ : 48kg
This TV does not conform to the PAL-D Chinese broadcasting system.
43
Page 44

VICTOR COMPANY OF JAPAN, LIMITED
HV-34LPZ / HV-29LPZ
Page 45

COLOUR TELEVISION
Contents
HV-34LPZ
HV-29LPZ
Setting up your TV
TV buttons and functions
Remote control buttons
and functions
Using the TV's menu
Basic operation
PICTURE SETTING menu
PICTURE FEATURES menu
SOUND SETTING menu
FEATURES menu
INSTALL menu
DEMO menu
Additional preparation
Troubleshooting
Specifications
. . . . . . . . . . . . . 3
. . . . . . . . 6
. . . . . . . . . . . . 16
. . . . . . . . . . . . . . 16
. . . . . 18
. . . . . . 22
. . . . . . . . . . . 24
. . . . . . . . . . . . . . 27
. . . . . . . . . . . . . . . . 32
. . . . . . . . . . 33
. . . . . . . . . . . . . . 37
. . . . . . . . . . . . . . . . 40
. . . 8
. . . 19
INSTRUCTIONS
© 2002 VICTOR COMPANY OF JAPAN, LIMITED
LCT1217-001A-H
0402-Ki-NV-JMT
Page 46

Thank you for buying this JVC colour television.
To make sure you understand how to use your new TV, please read this
manual thoroughly before y ou begin.
W ARNING:
TO PREVENT FIRE OR SHOCK HAZARD, DO NOT EXPOSE THIS APPLIANCE TO RAIN OR MOISTURE.
CAUTION:
TO ENSURE PERSONAL SAFETY, OBSERVE THE FOLLOWING
RULES REGARDING THE USE OF THIS TV.
1 Operate only from the power source indicated on the rear of the TV.
2 Av oid damaging the po w er cord and mains plug. When unpluging the TV,
grasp the mains plug. Do not pull on the power cord.
3 Never b loc k or cover the ventilation openings.
Never install the TV where good ventilation is unattainnable.
When installing this TV, leave spaces for v entilation around the TV of more
than the minimum distances as shown.
15 cm
10 cm 10 cm 15 cm
4 Do not allow objects or liquid into the cabinet openings.
5 In the event of a fault, unplug the unit and call a service technician.
Do not attempt to repair it yourself or remove the rear co ver.
6 The surface of the TV screen is easily damaged. Be very careful with it
when handling the TV. Should the TV screen become soiled,
wipe it with a soft dry cloth. Ne ver use rub it forcefully.
Never use an y cleaner or detergent on it.
7 If you are not going to use this TV for a long preriod of time, be sure to
disconnect the AC plug from the A C soket.
2
Page 47

Setting up your TV
CAUTION
• Turn off all the epuipment including the TV
before connecting anything.
1
Connecting the aerial and VCR
• Aerial cable is not supplied. Use a good
quality 75-ohm coaxial cable.
• Read the manual that came with the VCR
before connecting.
Fig.A
If not connecting a VCR (see fig.A) :
Connect an aerial cable to the aerial socket
on this TV .
If connecting a VCR (see fig.B) :
1 Connect the aerial cable to the aerial
input socket on the VCR, and
connect the VCR and TV with
another aerial cable.
2 Connect the VCR's VIDEO OUT
(video output) jack and the TV's
VIDEO jack with a video cable.
To connect a VCR to the TV with an S-VIDEO
cable:
Connect the VCR's S-VIDEO OUT (S-VIDEO
output) connector and TV's S connector with an SVIDEO cable A , instead of connecting with a
video cable.
3 Connect the VCR's VIDEO OUT
(audio L/R output) jacks and the TV's
AUDIO jacks (L/MONO and R) with
an audio cable.
• If the VCR's audio output is in mono, connect
the VCR's AUDIO OUT (audio output) jack
and the TV's AUDIO L/MONO jack with an
audio cable.
• You can use the AV COMPU LINK function if
your VCR has an AV COMPU LINK terminal.
For details, see “Connecting AV COMPU LINK
Supported Devices” on page 35.
AV COMPULINK
Fig.B
Back of the TV
AUDIO
R
L/MONO
VIDEO
S
OVER
C
C Y/VIDEO
R
B
L/MONOR AUDIO
RL
VIDEO
AUDIO
A
AV COMPULINK
VIDEO-1
VIDEO-2
VIDEO-3/
COMPONENT
OUTPUT
Back of the TV
AUDIO
RRLL/MONO
VIDEO
OVER
C
C Y/VIDEO
R
B
L/MONOR AUDIO
VIDEO
AUDIO
S
VIDEO-1
VIDEO-2
VIDEO-3/
COMPONENT
OUTPUT
3
Page 48

Setting up your TV
2 Connecting the power cord
Connect the mains plug to the AC outlet.
3 Putting the batteries into the
Remote control
Use two AA/R6 batteries.
Insert the batteries from the end, making sure the
and polaritiles are correct.
• Follow the warnings printed on the batteries.
• If the remote control does not work properly,
replace the batteries.
• The batteries we supply are only for setting up
and testing your TV. Please replace them as soon
as necessary.
4 Making the initial settings
When the TV is first turned on, it enters the initial
setting mode, and the JVC logo is displayed.
1 Press the main power button on the TV
The TV is turned on, and the JVC logo appears.
• If the power lamp on the TV lights red and does
not change to green, your TV is in the standby
mode. Press the POWER button on the remote
control to turn the TV on.
• If the JVC logo does not appear, your TV has
already been turned before .In this case,use
the "LANGUAGE" and "AUTO PROGRAM"
functions to make the initial settings. For details,
see "INSTALL menu" on page 27.
2 Press the MENU/OK button
The LANGUAGE menu appears. You can choose
a language for the on-screen language.
SPATIALIZER ECO POWER
POWER lamp
Main power button
LANGUAGE
OK
:OK
TV
:EXIT
DISP.
:BACK
4
Page 49

Setting up your TV
3 Press the
/
buttons to choose
ENGLISH. Then press the MENU/OK
button.
The AUTO PROGRAM function starts.
The TV channels you receive are automatically
stored in the programme numbers list.
AUTO PROGRAM
CH 10
20%
OK
:OK
DISP
:BACK
• To cancel the AUTO PROGRAM function,
press the DISPLAY button.
4 After the TV channels have been
stored in the programme number (PR)
list, the EDIT menu appears.
EDIT
PR ID
AV
01
02
03
04
05
06
07
08
09
DISP
• You can proceed to edit the programme
numbers list using the EDIT/MANUAL function.
For details, see "EDIT/MANUAL" on page 28.
• If a TV cannel you want to view is not stored in
the programme numbers list, you can register
it using the MANUAL function.
For details, see "EDIT/MANUAL" on page 28.
• The AUTO PROGRAM function does not store
a TV channel to the programme number 0
(AV).
• If you do not need to use the EDIT/MANUAL
function, press the MENU/OK button to close
the EDIT menu.
CH/CC
21
CH
22
CH
23
CH
24
CH
25
CH
26
CH
01
CC
02
CC
03
CC
OK
:OK
TV
:EXIT
:BACK
MOVE
ID
INSERT
DELETE
MANUAL
TV/VIDEO
SPATIALIZER
BASS
ZOOM
12
456
789
RETURN
0
MULTI
L
E
N
N
A
H
C
MUTING
SUB-P
COLOUR
SYSTEM
SOUND
PIP
MENU/
OK
POSITION
FREEZE
POWER
PICTURE
MODE
3
NEXTPIP
SWAP
STROBE
DISPLAY
V
O
L
U
M
E
Now, the setting up is complete.
Please enjoy your new JVC TV!
5
Page 50

TV buttons and functions
Turn the main power on
Press the main power button 1 .
The POWER lamp 2 lights red and your TV is
in the standby mode.
To turn the main power off :
press the main power button again.
The POWER lamp 2 goes off.
Turn the TV on from standby
mode
Press the CHANNEL-/+ buttons 5 .
The POWER lamp 2 lights red to green and
your TV will be turned on.
Choose a TV channel
Press the CHANNEL-/+ buttons 5 .
Choose a VIDEO terminal
Press the TV/VIDEO button 3 or
CHANNEL-/+ buttons 5 .
9
SPATIALIZER ECO POWER
2
8
7
1
• You can also turn on the TV by pressing the
TV/VIDEO button 3 while it is in standby
mode.
Adjust the volume
Press the VOLUME-/+ buttons 4 .
The volume level indicater appears.
MENU button 6
(Behind the cover)
OVER
VR
L/MONO
S
IN (VIDEO-4)
MENU
OK
CHANEL VOLUME
TV/VIDEO
EXIT
Press to open the menu.
For details, see "Operation with the buttons on
the TV" on page 17.
Remote control sensor
and ECO sensor 9
36045-
6
ECO lamp 7
If you set the DIGITAL ECO SENSOR
function to ON or DISPLAY, the ECO lamp lights.
Page 51

TV buttons and functions
SPATIALIZER lamp 8
If you set the SPATIALIZER function to MONO
or LIVE,the SPATIALIZER lamp lights.
Headphone jack 0
Connect the headphones with a stereo
mini-jack (3.5mm in diameter).
When using the headphones, follow the
AUDIO
S
VIDEO
L/MONO
R
OVER
VIDEO-1
VIDEO-2
Y/VIDEOC
BCR
VIDEO-3
AUDIO
L/MONO
R
COMPONENT
OUTPUT
L
R
VIDEO
AUDIO
AV COMPU LINK
operation procedure "HEADPHONE" on
page 23.
VIDEO-1 terminal =
• See page 3 and 33.
AUDIO
L/MONO
R
AUDIO
L/MONO
R
L
R
AUDIO
AV COMPU LINK
$ #
VIDEO
BCR
VIDEO
S
OVER
VIDEO-1
Y/VIDEOC
VIDEO-2
VIDEO-3/
COMPONENT
OUTPUT
=
~
!
@
VIDEO-2 terminal ~
• See page 33.
VIDEO-3/COMPONENT
terminal !
• See page 26 and 33.
VIDEO-4 terminal -
• See page 33.
OUTPUT terminal @
• See page 33.
Aerial socket #
Connect the aerial cable.
• See page 3.
AV COMPU LINK terminal $
• See page 33 and 35.
7
Page 52

Remote control buttons and functions
Turn the TV on from standby mode
Press the POWER button.
TV/VIDEO
SPATIALIZER
BASS
ZOOM
12
456
789
RETURN
0
MULTI
L
E
N
N
A
H
C
MUTING
SUB-P
PIP
POSITION
FREEZE
MENU/
OK
SYSTEM
COLOUR
SOUND
POWER
PICTURE
MODE
3
NEXTPIP
SWAP
STROBE
DISPLAY
V
O
L
U
M
E
The POWER lamp lights red to green and your TV will be
turned on.
• You can turn on the TV from the standby mode by
pressing the TV/VIDEO button, the CHANNEL -/+
buttons or the number buttons.
To turn the TV off:
Press the POWER button again.
The POWER lamp changes from green to red and the TV
enters standby mode.
Choose a TV channel
Choose a programme number in which a TV channel has
been set.
Press the CHANNEL-/+ buttons or enter the
programme number (PR) with the number
buttons.
• If you want to put a two-digit channel into the TV,
press the -/--button to change to the two-digit entry
system.
• You can select a channel from the PR LIST. For
details, see "DISPLAY button" on page 11.
• If you do not have a clear picture or no colour
appears, follow the operation procedure "COLOUR
SYSTEM button" on page 11.
• If you cannot hear sound normally even when the
picture appears normally, follow the operation
procedure "SOUND SYSTEM button" on page 12.
Adjust the volume
Press the VOLUME-/+ buttons.
• You cannot adjust the volume of your headphones.
Follow the operation procedure "HEADPHONE" on
page 23.
8
Page 53

Remote control buttons and functions
Watch images from external
devices
Choose a VIDEO terminal to which the external
device has been connected.
Press the TV/VIDEO button.
• You can choose a VIDEO terminal with the
CHANNEL -/+ buttons or from the PR LIST.
To return to a TV channel:
Press the TV/VIDEO button, the CHANNEL-/+
buttons or the number buttons.
MUTING button
Press the MUTING button to turn off
the volume. Pressing the MUTING
button again resumes the previous
volume level.
ZOOM button
You can change the screen size according to the
picture aspect ratio. Choose the optimum one
from the following ZOOM modes.
Press the ZOOM button to choose a
mode.
• If you press the ZOOM button when
receiving the Progressive Video Signal (525P
signal), “525P” appears on the screen and
the ZOOM function does not operate.
REGULAR
Use to view a normal picture (4:3 aspect ratio) as
its original size is.
ZOOM
You can zoom up the Wide picture (16:9 aspect
ratio) to fill the TV screen.
16:9
This mode converts a normal picture (4:3
aspect ratio) into a Wide picture (16:9 aspect ratio).
• Use for picture with a 16:9 aspect
ratio that have been squeezed into a
normal picture (4:3 aspect ratio), you
can restore their original demensions.
SPATIALIZER button
You can enjoy Surround sound with a
"live" effect by using the SPATIALIZER
function.
Press the SPATIALIZER button to
choose a mode.
LIVE :
Live allows you to enjoy normal stereo
sound converting it into surround sound
with added depth and ambience.
MONO :
Mono allows you to enjoy normal
monaural sound by converting it into a
stereo-like sound.
OFF :
This function is turned off.
• The LIVE mode works properly only
with stereo sound.
• The LIVE mode does not work
correctly with headphones.
• The MONO mode works properly only
with monaural sound.
The SPATIALIZER is manufactured under
lisense from Desper Products,Inc.
• The left side and right side of the Wide
picture (16:9 aspect ratio) will be cut off.
9
Page 54

Remote control buttons and functions
BASS button
You can enjoy a powerful bass sound by
using the SUPER BASS(Super Bass Reflex)
function.
Press the BASS button to turn the
SUPER BASS function on or off.
ON :
This function is turned on.
OFF :
This function is turned off.
PICTURE MODE button
You can choose one of three PICTURE
MODEs (three kinds of picture setting) to
adjust the picture settings automatically.
Press the PICTURE MODE button
choose a mode.
BRIGHT :
Heightens contrast and sharpness.
STANDARD :
Standardizes picture adjustment.
SOFT :
Softens contrast and sharpness.
RETURN+ button
The RETURN+ button has two functions;
the RETURN+ function and the RETURN
function. If a channel has been registerd as
the "Return Channel", the RETURN+
function operates. If there is no setting for
the "Return Channel", the RETURN
function operates.
RETURN+ function :
By registering a channel you frequently
view as the "Return Channel", you can
select that channel at any time simply by
pressing the RETURN+ button.
To register a TV channel as the
"Return Channel" :
Choose the Programme number to which
the channel you want to register has been
set, and press the RETURN+ button and
hold for more than 3 seconds continuously.
"RETURN PLUS PROGRAMMED!" is
displayed and the registration is completed.
To cancel register a TV channel as the
"Return Channel" :
while viewing any TV channel, press the
RETURN+ button and hold for more than 3
seconds continuously. "RETURN PLUS
CANCELED!" is displayed and the registration is cancelled.
• When you turn off the TV, the
registration for the "Return Channel" is
cancelled.
• If you want to view the "Return Channel"
and another TV channel alternately, first
choose a channel other than the
"Return Channel". and then press the
RETURN+ button to change the
channel to the "Return Channel" In this
way, you can view two channels
alternately by pressing the RETURN+
button.
RETURN function :
The TV temporarily memorises the TV
channel that was choosen right before the
current TV channel as the "Last Channel".
By pressing the RETUTN+ button, you can
alternately view the current TV channel and
the "Last Channel".
• If you want to view two channels
alternately by using the RETURN
function, first choose one TV channel
and then choose the other TV channel
with the Number buttons. If you choose
the TV channel without using the
Number buttons, there are cases where
a channel other than the one you first
chose is registered as the "Last
Channel".
10
Page 55

Remote control buttons and functions
/ button
When you are viewing a bilingual broadcast
programme, you can choose the sound from
Bilingual I (Sub I) or Bilingual II (Sub II). When
the stereo broadcasting is received poorly,
you can change from stereo to mono sound
so that you can hear the broadcast more
clearly and easily.
Press the / button to
choose a sound mode.
: Stereo sound
: mono sound
: Bilingual I (sub I)
: Bilingual II (sub II)
MONO : Cancels the Multi Sound function,
and the sound becomes monaural.
• The sound mode you can choose differs
depending on the TV programme.
• This function does not work in the VIDEO
modes.
DISPLAY button
You can display the PR LIST, programme
number or VIDEO terminal number on the
screen.
Press the DISPLAY button.
Press the DISPLAY button changes the
display as follows:
PR LIST
PR ID
AV
01
02
03
04
05
06
07
08
09
+10-10
OK
:OK
TV
:EXIT
1
No indication
Choose a TV channel or a
VIDEO terminal
1 Press the DISPLAY button to
display the PR LIST.
2 Press the
/
and
/
buttons
to choose a programme number
or VIDEO terminal.
Then press the MENU/OK
button.
• For programme numbers with the
CHANNEL GUARD function set, the
(CHANNEL GUARD) mark is displayed
next to the programme number in the PR
LIST.
• The VIDEO terminals are registered after
the programme number PR99.
COLOUR SYSTEM button
The colour system is chosen automatically.
However, if the picture is not clear or no
colour appears, choose the colour system
manually.
Press the COLOUR SYSTEM button
to choose the appropriate colour
system.
AUTO :
This function detects a colour system from
the input signal.
• The AUTO mode may not function
properly if you have poor signal quality.
If the picture is abnormal in the AUTO
mode, choose another colour system
manually.
• The AUTO mode detects a colour system
from the input signal and chooses the
appropiate colour system automatically.
• When changing the COLOUR SYSTEM of
the SUB-picture, see "Change the colour
system of the SUB-picture" on page 15
for details.
11
Page 56

Remote control buttons and functions
• For the colour systems in each
country or region, see the table
"BROADCASTING SYSTEMS" on
page 12.
SOUND SYSTEM button
The sound system is chosen automatically. However, if you cannot hear the
sound normally even when the picture
appears normally, chooes the sound
system maunually.
Press the SOUND SYSTEM
button to choose the appropriate
sound system.
B/G : B/G system
I : I system
D/K : D/K system
M : M system
• This function does not work in the
VIDEO mode.
• For the sound systems in each
country or region, see the table
"BROADCASTING SYSTEMS" on
page 12.
BROADCASTING SYSTEMS
For sound sysytem colour system in your country
or rigion, refer to the table below.
COLOUR SYSTEM
Area Country or Region
Bahrain, Kuwait, Oman, Qatar,
United Arab Emirates, Yemen, etc.
Indonesia, Malaysia, Singapore,
Asia,
Middle
East
Europe
Oceania Australia, New Zealand, etc
Africa
Thailand, India, etc.
China, Vietnam, etc
Hong Kong, etc
Islamic Republic of Iran, Lebanon,
Saudi Arabia, etc.
Philippines, Taiwan, Myanmar, etc
Russia, etc
Czech Republic, Poland, etc
Germany, Holland, Belgium, etc
UK, etc
Republic of South Africa, etc
Nigeria, etc
Egypt, Morocco, etc
SOUND SYSTEM
Area Country or Region
Bahrain, Kuwait, Oman, Qatar,
United Arab Emirates, Yemen, etc.
Indonesia, Malaysia, Singapore,
Asia,
Middle
East
Europe
Oceania Australia, New Zealand, etc
Africa
Thailand, India, etc.
China, Vietnam, etc
Hong Kong, etc
Islamic Republic of Iran, Lebanon,
Saudi Arabia, etc.
Philippines, Taiwan, Myanmar, etc
Russia, etc
Czech Republic, Poland, etc
Germany, Holland, Belgium, etc
UK, etc
Republic of South Africa, etc
Nigeria, etc
Egypt, Morocco, etc
System
PAL
PAL
PAL
SECAM
NTSC
SECAM
PAL
PAL
PAL
PAL
PAL
PAL
SECAM
System
B/G
D/K
I
B/G
M
D/K
D/K
B/G
I
B/G
I
B/G
B/G
12
Page 57

FREEZE button
You can view the Main picture's forzen image
as the SUB-picture.
Press the FREEZE button.
MAIN
Still pictures
To cancel the FREEZE function :
Press the FREEZE button again.
• You cannot use the FREEZE button when
the SUB-picture or the MAIN-picture are
displayed on the screen.
• If you press the FREEZE button when
receiving the Progressive Video Signal
(525P signal), “525P” appears on the
screen and the FREEZE function does
not operate.
STROBE button
You can view the MAIN-picture as 15
consecutive still images.
Press the STROBE button.
Remote control buttons and functions
•
If you press the STROBE button when
receiving the Progressive Video Signal
(525P signal), “525P” appears on the screen
and the STROBE function does not operate.
•
You cannot change the TINT setting for
the still images on the screen even if you
are viewing a programme with NTSC
colour system.
Using the MULTI
function
You can display multi-pictures that enable
you to easily find a program you want to
view.
1 Press the MULTI button.
Press the MULTI button changes the
display as follow:
5-pictures multi mode
2
1
1
MAIN
3
4
5
Still
pictures
Moving
picture
Moving
picture
To cancel the STROBE function:
Press the STROBE button to return to the
MAIN-picture.
• If signal level of the MAIN-picture is
weak, the still images become abnormal.
• You cannot use the STROBE button
when the SUB-picture or the MAINpicture are displayed on the screen.
16-pictures multi mode
1
2
5
6
9
10
13
14
4
3
Still
8
7
pictures
12
11
Moving
5
16
15
picture
Cancel the MULTI function
To display next Multi pictures :
Press the NEXT button.
13
Page 58

Remote control buttons and functions
2 Choose the desired picture with
the
/
and
/
buttons, and
then press the MENU/OK button.
The screen switches to the TV channel or
VIDEO mode of your choice.
• Any programme numbers to which no TV
channel has been registered, or
programme numbers to which
CHANNEL GUARD has been set is not
displayed.
• You cannot perform menu operations
such as headphone volume adjustment.
Cancel the MULTI function once to
perform menu operations.
• If you press the MULTI button when
receiving the Progressive Video Signal
(525P signal), “525P” appears on the
screen and the MULTI function does not
operate.
• During the short period that is required
for the Multi-pictures display to close no
sound comes from the television.
Using the PIP function
You can view two pictures (MAIN and SUB) at
the same time.
Press the PIP button.
Press the PIP button changes the display as
follows:
Twin pictures mode
2 5
MAIN
Picture in picture mode
SUB
MAIN
• You cannot view a picture from the same
programme number (or the same VIDEO
terminal) as both the MAIN-picture and
the SUB-picture at the same time.
• If the MAIN-picture signal is poor, then the
quality of the SUB-picture may also be
poor.
• If the picture standards of both pictures
are different, the top and bottom or one of
them may be missing.
• The ZOOM function does not operate
when viewing pictures using the PIP
function.
• The SUB-picture cannot be output from
TV.
• If you press the PIP button when receiving
the Progressive Video Signal (525P
signal), “525P” appears on the screen
and the PIP function does not operate.
5
Cancel the PIP function
2
SUB
14
Page 59

Remote control buttons and functions
Choose a TV channel for
the SUB-picture
Press the SUB-P -/+ button.
Listen to the sound of SUBpicture
You can listen to the sound of SUB-picture on
your headphones while listening to the sound
of MAIN-picture on the TV speakers.
For details, see "HEADPHONE" on page 23.
Change the colour system
of the SUB-picture
1 While the SUB-picture is dis-
played, press the MENU/OK
button to display the MENU
(main manu).
2 Press the
to choose PICTURE FEATURES,
and then press the MENU/OK
button.
3 Press the
choose COLOUR SYSTEM, and
then press the MENU/OK button.
COLOUR SYSTEM
MAIN
NTSC 3.58
and
/
buttons to
/
SUB
AUTO
buttons
/
• You cannot change the COLOUR SYSTEM
of the SUB-picture using the COLOUR
SYSTEM button on the remote control.
POSITION button
You can adjust the position of the SUBPicture when using the Picture in picture
mode.
Press the POSITION button
repeatedly.
Each time you press the button, the SUBPicture moves counterclockwise.
SWAP button
You can replace the MAIN-picture and the
SUB-picture with each other.
Press the SWAP button.
OK
:OK
TV
:EXIT
DISP
:BACK
4 Press the
buttons to
/
choose SUB, and then press the
buttons to choose the
/
appropriate colour system. Then
press the MENU/OK button.
• Do not press the SWAP button while you
are recording the TV output on the VCR.
If you do, the output signal will change.
15
Page 60

Using the TV's menu
This TV has a number of functions you can operate using menus.
To fully utilize all your TV's functions, you need to understand the basic menu operating
techniques fully.
TV/VIDEO
SPATIALIZER
BASS
ZOOM
12
456
789
RETURN
0
MULTI
L
E
N
N
A
H
C
MUTING
SUB-P
PIP
POSITION
FREEZE
MENU/
OK
SYSTEM
COLOUR
SOUND
POWER
PICTURE
MODE
3
NEXTPIP
STROBE
DISPLAY
SWAP
Basic operation
1 Press the MENU/OK button to display
the MENU (main menu).
MENU
PICTURE SETTING
PICTURE FEATURES
SOUND SETTING
FEATURES
OK
:OK
TV
:EXIT
DISP
:BACK
V
O
L
U
M
E
• The display appearing at the bottom of a menu
indicates buttons on the remote control you
can use when you operate a chosen function.
2 Press the
choose a menu title, and press the
MENU/OK button.
The menu appears.
To return to the previous menu:
Press the DISPLAY button.
OK
TV
DISP.
/
INSTALL
DEMO
MENU/OK button
TV/VIDEO button
DISPLAY button
and
buttons to
/
16
To exit a menu instantly:
Press the TV/VIDEO button.
3 Press the
buttons to choose a
/
function.
• For details of the functions in the menus, see
the following pages.
Page 61

Using the TV's menu
4 Press the
/
buttons to
choose the setting of that function.
• If you want to operate a function which
appears only with its name, follow the
descriptions of that function on the
following pages.
5 Press the MENU/OK button to
comple the setting.
The menu disappears.
• When watching the television with the
NTSC system, the menus are displayed
at about half of their normal verical size.
Operation with the
buttons on the TV
You can also operate the menus using the
buttons on the front panel of the TV.
OK
button
/
buttons
buttons
/
TV/VIDEO
button
MENUOKCHANEL VOLUME
• There is no button on the front panel of
the TV that has the function of the
DISPLAY or coloured buttons.
TV/VIDEO
EXIT
17
Page 62

Using the TV's menu
PICTURE SETTING menu
PICTURE SETTING
PICTURE MODE
CONTRAST
BRIGHT
SHARP
COLOUR
TINT
WHITE BALANCE
DIGITAL ECO SENSOR
OK
:OK
TV
:EXIT
DISP
:BACK
STANDARD
MID
ON
RESET
PICTURE MODE
You can choose one of three PICTURE
MODEs to adjust the picture settings
automatically.
BRIGHT:
Heightens contrast and sharpness.
STANDARD:
Standardizes picture adjustment.
SOFT:
Softens contrast and sharpness.
• You can also operate the PICTURE
MODE function with the PICTURE MODE
button on the remote control.
For details, see "PICTURE MODE button"
on page 10.
Adjusting the picture
You can change the picture settings of each
picture mode as you like. The picture settings
changed are stored in the picture mode.
CONTRAST
You can adjust the picture contrast.
: lower
: higer
BRIGHT
You can adjust the picture brighetness.
: darker
: brighter
SHARP
You can adjust the picture sharpness.
: softer
: sharper
• You cannot select the SHARP function
when receiving the Progressive Video
Signal (525P signal).
COLOUR
You can adjust the picture colour.
: lighter
: deeper
TINT
You can adjust the picture tint.
: reddish
: greenish
• You can change the TINT setting (picture
tint) only when the colour system is
NTSC 3.58 or NTSC 4.43.
• You cannot select the TINT function when
receiving the Progressive Video Signal
(525P signal).
To return to the default settings
in each PICTURE MODE :
Press the blue button. Returns the picture
settings in the currently chosen PICTURE
MODE mode to the default settings, and
stores them in the PICTURE MODE again.
WHITE BALANCE
You can select one of three WHITE
BALANCE modes (three tones of white) to
adjust the white balance of the picture. Since
white is the colour which is used as a
refernce for all the other colours, changing
the WHITE BALANCE mode affects the
appearance of all the other colours on the
screen.
COOL:
A bluish white. Using this mode when
watching bright pictures allows you to enjoy
a more vivid and bright picture.
18
Page 63

Using the TV's menu
DIGITAL VNR
DigiPure
PULL DOWN
COLOUR SYSTEM
ZOOM
PICTIRE TILT
AUTO
AUTO
AUTO
PICTURE FEATURES
:EXIT
:OK
OK
TV
:BACK
DISP
MID:
The normal white colour.
WARM:
A raddish white. Using this mode when
watching films allows you to enjoy colours
that are characteristic of films.
• You cannot select the WHITE BALANCE
When you set the DIGITAL ECO SENSOR
function to ON, the screen contrast is automatically adjusted to a setting suitable for the
brightness of your room. This reduces eye
strain for you and the power consumption of
the TV.
ON :
This function is turned on.
OFF :
This function is turned off.
DISPLAY :
This function is turned on. Further, clover
marks indicating the brightness of your
room are displayed for several seconds each
time the brightness changes. The number of
clover marks displayed on the screen
increases as your room becomes darker.
function in the Twin pictures mode or the
16:9 mode of the ZOOM function.
DIGITAL ECO SENSOR
PICTURE FEATURES menu
DIGITAL VNR
The DIGITAL VNR function cuts down the
amount of noise in the original picture.
• You cannot select the DIGITAL VNR
function when receiving the Progressive
Video Signal (525P signal).
AUTO:
The TV will be automatically adjust the level
of the DIGITAL VNR effect to match the
amount of noise in the picture, giving you the
best possible picture.
• If you set the DIGITAL VNR effect too
high it can make the picture less sharp.
It is recommended to use the AUTO
setting if you can.
MAX:
The level of the DIGITAL VNR effect is set to
the maximum. If you set the DIGITAL VNR
function to AUTO but still notice some noise,
change the setting from AUTO to MAX.
• The MAX setting is not suitable for highquality pictures which contain a lot of
noise.
MIN:
The level of the DIGITAL VNR effect is set to
the minimun. If you set the DIGITAL VNR
function to AUTO but feel that the sharpness
of the original picture has not been reproduced fully, change the setting from AUTO to
MIN.
• The MIN setting is not suitable for lowquality pictures which contain a lot of
noise.
19
Page 64

Using the TV's menu
DigiPure
The Digipure function uses the latest in
digital technology to give you a natural
looking picture. The Digipure function
includes the following two functions.
Digipure function:
This function helps to create a natural looking
picture by eliminating unnecessary edges
from high-contrast and crisp images.
Conversely, for images with low-contrast,
edges are added to produce a sharper, more
detailed picture.
You can choose from the DigiPure function
settings of AUTO,MIN and MAX.
Picture motion compensation
function:
This function displays fast-moving pictures
(for example, the players or ball in a football
game) more smoothly and naturally on the
screen.
• You cannot select the Digipure function
when receiving the Progressive Video
Signal (525P signal).
AUTO:
The TV will automatically adjust the level of
the DigiPure effect to match the amount of
noise in the picture, giving the best possible
picture.
• If you set the DigiPure effect too high on
a low-quality picture that contains a lot of
noise, this may actually make the noise
worse. It is recommended to use the
AUTO setting if you can.
MIN:
The level of the DigiPure effect is set to the
minimun. When you set the DigiPure function
to AUTO and notice some noise, change the
setting from AUTO to MIN.
• The MIN setting is not suitable for highquality pictures which contain very little
noise.
OFF:
The DigiPure function is turned off.
PULL DOWN
The PULL DOWN function displays a cinema
film picture more smoothly and naturally on
the screen.
AUTO:
This function is turned on. Normally keep this
function set to AUTO.
OFF:
This function is turned off.
• The motion may appear unnatural when
viewing images with the NTSC colour
system. To make the motion smoother,
switch the PULL DOWN function from
AUTO to OFF.
• You cannot select this function in the
Twin pictures mode or the Picture in
picture mode.
MAX:
The level of the DigiPure effect is set to the
maximum. If you set the DigiPure function to
AUTO but feel that the original picture quality
has not been reproduced fully, change the
setting from AUTO to MAX.
• The MAX setting is not suitable for lowquality pictures which contain a lot of
noise.
20
Page 65

Using the TV's menu
COLOUR SYSTEM
The colour system is chosen automatically.
However, if the picture is not clear or no
colour appears, choose the colour system
manually.
1 Choose COLOUR SYSTEM, then
press the MENU/OK button.
COLOUR SYSTEM
PAL
OK
:OK
TV
:EXIT
DISP
:BACK
2 Press the
choose the appropriate colour
system. Then press the MENU/
OK button.
• When changing to the COLOUR
SYSTEM of the SUB-picture, see
"Change the colour system of the SUBpicture" on page 15 for details.
• You can also operate the COLOUR
SYSTEM function with the COLOUR
SYSTEM button on the remote control.
For details, see "COLOUR SYSTEM
button" on page 11.
buttons to
/
ZOOM
You can change the screen size according to
the picture aspect ratio. Choose the optimum
one of three ZOOM modes.
1 Choose ZOOM, then press the
MENU/OK button.
ZOOM
REGULAR
ZOOM
16:9
OK
:OK
TV
:EXIT
DISP
:BACK
2 Press the
/
buttons to
choose a ZOOM mode. Then
press the MENU/OK button.
The picture expands and the chosen
ZOOM mode is displayed in about 5
seconds.
• You can choose a ZOOM mode from
REGULAR, ZOOM or 16:9 modes. For
details, see " ZOOM button " on page 9.
• You cannot select the ZOOM function
when receiving the Progressive Video
Signal (525P signal).
PICTURE TILT
There are cases where the Earth's magnetic
force may make the picture tilt. If this
happens, you can correct the picture tilt.
1 Choose PICTURE TILT, then
press the MENU/OK button.
PICTURE TILT
OK
:OK
TV
:EXIT
DISP
:BACK
2 Press the
/
buttons until the
picture becomes level. Then
press the MENU/OK button.
21
Page 66

Using the TV's menu
SOUND SETTING menu
SOUND SETTING
STEREO/
BASS
TREBLE
BALANCE
AI VOLUME
BBE
SPATIALIZER
SUPER BASS
HEADPHONE
OK
:OK
TV
:EXIT
DISP
:BACK
MONO
LIVE
ON
ON
ON
STEREO / I•II
When you are viewing a bilingual broadcast
programme, you can choose the sound from
Bilingual I (sub I) or Bilingual II (sub II). When
the stereo broadcasting is received poorly,
you can change from stereo to mono sound
so that you can hear the broadcast more
clearly and easily.
: Stereo sound
: mono sound
: Bilingual I (sub I)
: Bilingual II (sub II)
MONO: Cancels the Multi Sound function,
and the sound becomes monaural.
• The sound mode you can choose differs
depending on the TV programme.
• This function does not work in the VIDEO
modes.
Adjusting the sound
You can adjust the sound to your liking.
BASS
You can adjust the low tone of the sound.
: weaker
: stronger
BALANCE
You can adjust the volume balance between
the left and right speakers.
: turn the left speaker's volume level up.
: turn the right speaker's volume level up.
AI VOLUME
You can prevent the sudden increase or
decrease of sound that occurs when
changing the channel to another channel or
switching the VIDEO mode to another VIDEO
mode.
ON :
This function is turned on.
OFF :
This function is turned off.
• The AI VOLUME fnction for TV mode and
VIDEO mode can be set separetely.
For example, you can set it to be OFF in
TV mode and ON in VIDEO mode.
If you set the AI VOLUME function while
viewing images from a VIDEO terminal,
the setting is registered as the setting for
VIDEO mode.
• The AI VOLUME fnction may not operate
as expected if the sound input level from
a broadcast station (or video software) is
extremely low.
BBE
You can use the BBE function to enjoy easyto-listen sound that is faithful to the original
sound recorded.
ON :
This function is turned on.
OFF :
This function is turned off.
TREBLE
You can adjust the high tone of the sound.
: weaker
: stronger
22
Licenced by BBE Sound, inc. BBE
is a registered trademark of BBE
Sound, inc.
Page 67

Using the TV's Menu
SPATIALIZER
You can enjoy Surround sound with a "live"
effect by using the SPATIALIZER function.
You can choose one of two SPATIALIZER
modes.
• You can choose a SPATIALIZER mode
from LIVE, MONO or OFF modes.
For details, see " SPATIALIZER button "
on page 9.
The SPATIALIZER is manufactured under
lisense from Desper Products,Inc.
SUPER BASS
You can enjoy a powerful bass sound by
using the Super Bass (Super Bass Reflex)
function.
ON :
This function is turned on.
OFF :
This function is turned off.
HEADPHONE
This function enables you to output the TV’s
sound from your headphones.
1 Choose HEADPHONE, then
press MENU/OK button.
HEADPHONE
VOLUME
TV SPEAKER
OUTPUT
OK
:OK
TV
:EXIT
DISP
:BACK
MAIN
05
ON
TV SPEAKER:
When this function is on, the TV’s speaker
does not shut off the sound even if headphones are connected.
If you set this function to off, the TV’s speaker
does not output the sound when the
headphones are connected.
OUTPUT:
You can choose the sound from the MAINpicture(MAIN) or the SUB-picture(SUB) when
using the headphones.
• The TV’s speaker does not put out the
sound from the SUB-picture.
• The sound of the SUB-picture is mono
only. You cannot use the STEREO / I • II
function for the sound of the SUB-picture.
2 Use the
and the
button to select,
/
button to set the
/
HEADPHONE function. Then
press the MENU/OK button.
VOLUME :
You can adjust the volume of the sound
output from your headphones.
23
Page 68

Using the TV's menu
FEATURES menu
FEATURES
SLEEP TIMER
BLUE BACK
CHILD LOCK
CHANNEL GUARD
AUTO SHUTOFF
VIDEO-3 SETTING
OK
:OK
TV
:EXIT
DISP
:BACK
COMPONENT
SLEEP TIMER
You can set the TV to automatically turn off
after a set time.
1 Choose SLEEP TIMER, then
press the MENU/OK button.
SLEEP TIMER
0120
OFF
OK
:OK
TV
:EXIT
DISP
:BACK
2 Press the
period of time.
The TV begins count down from the set
time.
• You can set the period of time a
maximum of 120 minutes (2 hours) in 10
minitue steps.
To cancel this function:
Press the button to set a period of time to
"OFF".
3 Press the MENU/OK button to
complete the setting.
The menu disappers.
• One minute before this function turns off
the TV, "GOOD NIGHT!" appears.
• This function cannot be used to turn off
the TV's main power.
• When this function is on, you can display
the SLEEP TIMER menu again to confirm
24
or change the remaining time.
buttons to set the
/
OFF
OFF
BLUE BACK
You can set the TV to automatically change
to a blue screen and mute the sound if the
ON
signal is weak or absent, or when there is no
input from an external device.
ON :
This function is turned on.
OFF:
This function is turned off.
CHILD LOCK
You can disable the front control buttons of
the TV. When this function is set to ON, the
TV can be operated only by using the remoto
control.
Use this function to prevent children from
operating the TV at their own discretion
(without parent consent).
ON :
This function is turned on.
OFF:
This function is turned off.
CHANNEL GUARD
When there is a TV channel you do not want
your children to watch, you can lock out the
channel. Even when a child chooses a
programme number for a locked out channel
the screen will change to blue and display
so the channel cannot be viewed.
To set this function
1 Choose CHANNEL GUARD, then
press the number 0 (AV) button.
SET ID NO.
000
0
OK
:OK
TV
:EXIT
DISP
:BACK
Page 69

Using the TV’s menu
2 Set the ID number you want.
To choose a number:
Press the / buttons.
To move a cursor:
Press the / buttons.
3 Press the MENU/OK button.
CHANNEL GUARD
PR ID
AV
01
02
03
04
05
06
07
08
09
OK
TV
DISP
4 Press the
:OK
:EXIT
:BACK
CH / CC
CH
21
CH
22
CH
23
CH
24
CH
25
CH
26
CC
01
CC
02
CC
03
GUARD
/
buttons to
choose a TV channel.
• The TV shows the TV programme which
the chosen TV channel is now
broadcasting.
5 Press the blue button to set this
function to the TV channel.
(CHANNEL GUARD) appears and the
TV channel is locked.
To cancel this function:
Press the blue button again.
(CHANNEL GUARD) disappears and
the lock is released.
6 Press the MENU/OK button to
complete the setting.
The menu disappears.
To view a locked TV
channel
1 Choose a programme number in
which a TV channel locked with
the number buttons or PR LIST.
The screen changes to blue and the
(CHANNEL GUARD) appears.
5
• You cannot choose a locked TV channel
with the / buttons.
2 Press the DISPLAY button to
display " ID NO. " (ID unmber
input screen).
5
ID NO.:
3 Press the number buttons to
enter the ID number.
The lock is temporarily released so you
can view the TV channel.
If you have forgotten the ID number:
Perform step 1 of "To set this function".
After confirming the ID number, press the
TV/VIDEO button to exit the menu.
• When you would like to cancel the
CHANNEL GUARD function, you must
perform the operation " To set this
function" again.
25
Page 70

Using the TV's menu
AUTO SHUTOFF
You can set your TV to turn off if no signal are
received for about 15 minutes or longer after
the end of a broadcast.
ON :
This function is turned on.
OFF :
This function is turned off.
• The AUTO SHUTOFF function does not
turn off the TV's main power.
• The AUTO SHUTOFF will not work for a
VIDEO mode.
VIDEO-3 SETTING
Set the VIDEO-3 SETTING correctly according to the video signal input from the external
device connected to the VIDEO-3 terminal. If
this setting is incorrect, images will not be
displayed.
VIDEO :
If a normal video signal (composite video
signal) is input.
COMPONENT :
If a Component video signal (Y/CB/C
signals) is input.
• For detailed connecting methods, see
" Additional preparation " on page 33.
• This Television is compatible with the
Progressive Video Signal (525P signal)
only when the component video signal is
input.
26
R
Page 71

Using the TV’s menu
INSTALL menu
INSTALL
LANGUAGE
AUTO PROGRAM
EDIT/MANUAL
OK
:OK
TV
:EXIT
DISP
:BACK
LANGUAGE
You can choose the language you want to
use for the on-screen display from the
language list in a menu.
1 Choose LANGUAGE, then press
the MENU/OK button.
LANGUAGE
OK
:OK
TV
:EXIT
DISP.
:BACK
2 Press the
buttons to
/
choose a language.
3 Press the MENU/OK button to
complete the setting.
The menu disappers.
AUTO PROGRAM
You can automatically register the TV
channels which can be received well at
your residence in the TV's programme
numbers by performing the following.
1 Choose AUTO PROGRAM, then
press the MENU/OK button.
The AUTO PROGRAM function starts.
The TV channels you receive are
automatically stored in the programme
numbers list.
AUTO PROGRAM
CH 10
20%
OK
:OK
DISP
:BACK
• To cancel the AUTO PROGRAM function,
press the DISPLAY button.
2 After the TV channels have been
stored in the programme number
list, the EDIT menu appears.
EDIT
PR ID
AV
01
02
03
04
05
06
07
08
09
• You can proceed to edit the programme
numbers list using the EDIT/MANUAL
function. For details, see "EDIT/MANUAL"
on page 28.
• If a TV cannel you want to view is not
stored in the programme numbers list,
you can register it using the MANUAL
function.
For details, see "EDIT/MANUAL" on page
28.
• The AUTO PROGRAM function does not
store a TV channel to the programme
number 0 (AV).
• If you do not need to use the EDIT/
MANUAL function, press the MENU/OK
button to exit from the EDIT menu.
OK
TV
DISP
:OK
:EXIT
:BACK
MOVE
CH/CC
CH
CH
CH
CH
CH
CH
CC
CC
CC
21
22
23
24
25
26
01
02
03
ID
INSERT
DELETE
MANUAL
27
Page 72

Using the TV's menu
EDIT/MANUAL
The EDIT/MANUAL functions are divided into
two types:
editing of the current programme numbers
(EDIT functions) and manual registration of a
TV channel you want to view to the
programme number (MANUAL function).
CAUTION
• Using the MOVE,DELETE or INSERT
function rewrites the current programme
numbers list.
Resultingly, the programme number of
some of the TV channels will change.
• When a TV channel which has been
locked out using the CHANNEL GUARD
function, using the MANUAL function for
that TV channel cancels the CHANNEL
GUARD function.
• When a TV channel has already been
registered in PR 99, using the INSERT
function deletes the TV channel.
1 Choose EDIT/MANUAL, then
press the MENU/OK button.
EDIT
PR ID
AV
01
02
03
04
05
06
07
08
09
DISP
CH/CC
21
CH
22
CH
23
CH
24
CH
25
CH
26
CH
01
CC
02
CC
03
CC
OK
:OK
ID
:EXIT
:BACK
MOVE
INSERT
DELETE
MANUAL
TV
INSERT:
This function adds a new TV channel in the
current programme numbers list by using the
CH/CC number.
DELETE :
This function deletes a unnecessary TV
Channel.
MANUAL :
This function manually registers a new TV
channel in a programme number.
3 Press the MENU/OK button to
complete the setting.
• For programme number PR 0, "AV"
appears in the programme numbers list.
FUNCTIONS
MOVE
1 Press the
choose a TV channel.
2 Press the button to start the
MOVE function.
EDIT
PR ID
AV
01
02
03
04
05
06
07
08
09
OK
:OK
TV
:EXIT
DISP
:BACK
STORE
buttons to
/
CH/CC
21
CH
22
CH
23
CH
24
CH
25
CH
26
CH
CH
02
CC
03
CC
CC 01
2 Follow the operation description
of a function you want to use and
operate the function.
MOVE :
This function changes a programme number
of a TV channel.
ID :
This function registers a Channel name (ID)
to a TV channel.
28
3 Press the
/
buttons to
choose a new programme
number.
To cancel the MOVE function:
Press the DISPLAY button.
4 Press the button to change the
programme number of a TV
channel to a new programme
number.
Page 73

Using the TV’s menu
ID
1 Press the
/
buttons to
choose a TV channel.
2 Press the red button to start the
ID function.
3 Enter a channel name (ID).
Press the
/
buttons to
choose a character.
press the
/
buttons to move
the cursor.
EDIT
PR ID
AV
01
02
03
04
05
06
07
08
09
OK
TV
DISP
M
:OK
:EXIT
:BACK
CH/CC
CH
CH
CH
CH
CH
CH
CC
CC
CC
21
22
23
24
25
26
01
02
03
To cancel the ID function:
Press the DISPLAY button.
4 Press the MENU/OK button to
register a channel name to a TV
channel.
DELETE
1 Press the
buttons to
/
choose a TV channel.
2 Press the yellow button to delete
the TV channel.
The TV channel is deleted from the
programme numbers list.
MANUAL
1 Press the
/
buttons to
choose a programme number to
which you want to register a new
TV channel.
2 Press the bule button to activate
the MANUAL function.
At the right side following the CH/CC
number, the SYSTEM (sound system) of
the TV channel appears.
MANUAL
PR ID
AV
01
02
03
04
05
06
07
08
09
DISP
OK
TV
:OK
:EXIT
:BACK
SYSTEM
CH/CC
CH
CH
CH
CH
CH
CH
CC
CC
CC
21
22
23
24
25
26
01(B/G)
02
03
SEARCH+
SEARCHFINE+
FINE-
To cancel the MANUAL function:
Press the DISPLAY button.
3 Press the button to choose the
system (sound system) for a TV
channel you want to register.
• For the sound systems in each country or
region, see the table "BROADCASTING
SYSTEMS" on page 12.
4 Press the green or red button to
search for a TV channel.
Scanning stops when the TV finds a TV
channel. Then the TV channel is
displayed.
5 Press the green or red button
repeatedly until the to TV channel
you want appears.
If the TV channel reception is poor:
Press the bule or yerrow button to
finetune the TV channel.
If you cannot hear the normal sound
even when the picture of the TV channel
appers normally:
The SYSTEM setting is worong. Press the
button and choose a SYSTEM that has
normal sound.
6 Press the MENU/OK button and
register the TV channel to a
programme number.
The normal EDIT menu is resumed.
29
Page 74

Using the TV's menu
INSERT
PREPARATION
• Find the CH/CC number corresponding
to the channel number of the TV channel
from the on page 31.
1 Press the
/
buttons to
choose a programme number for
which you will register a new TV
channel.
2 Press the green button to start
the INSERT function.
EDIT
PR ID
AV
01
02
03
04
05
06
07
08
09
DISP
3 Press the
OK
:OK `-9
TV
:EXIT
:BACK
CH/CC
CH/CC
21
CH
22
CH
23
CH
24
CH
25
CH
26
CH
**
CC
02
CC
03
CC
buttons to
/
choose "CC" or "CH" according
to the CH/CC number of the TV
channel.
To cancel the INSERT function:
Press the DISPLAY button.
4 Press the Number buttons to
enter the remaining CH/CC
number.
The TV shifts to registration mode.
When the registration is completed, the
picture of the TV channel appears on the
screen.
• The CH/CC number is a number
indicating the broadcast frequency to the
TV. If the TV cannot detect the TV
channel corresponding to the broadcast
frequency indicated by the CH/CC
number, a picture in the no-signal state
appears.
30
Page 75

Using the TV’s menu
CH/CC number
When you want to use the INSERT function on page 30, find the CH/CC number corresponding to the Channel
number of the TV channel from this table.
US : The US channel numbers are the channel numbers used in the United States, Philippines, etc.
CCIR: The CCIR channel numbers are the channel numbers used in the Middle East, Southeast Asia ,etc.
OIRT: The OIRT channel numbers are the channel numbers used in Easter n Europe,Russia, Vietnam, etc.
CHINA: The CHINA channel numbers are the channel numbers used in china, etc.
AUSTRALIA: The AUSTRALIA channel numbers are the channel numbers used in Australia, etc.
CC US CCIR OIRT CHINA
CH 02 US-2 E2 R1 DS-1 AU-0
CH 03 US-3 E3 DS-2 AU-1
CH 04 US-4 E4 R2 DS-3 AU-2
CH 05 US-5 E5 R6 DS-7 AU-6
CH 06 US-6 E6 R7 DS-8 AU-7
CH 07 US-7 E7 R8 DS-9 AU-8
CH 08 US-8 E8 R9 AU-9
CH 09 US-9 E9 DS-10
CH 10 US-10 E10 R10 DS-11 AU-10
CH 11 US-11 E11 R11 DS-12 AU-11
CH 12 US-12 E12 R12 Z-8
CH 13 US-13
CH 14 US-14
CH 15 US-15
CH 16 US-16
CH 17 US-17
CH 18 US-18
CH 19 US-19
CH 20 US-20
CH 21 US-21 E21 DS-13
CH 22 US-22 E22 DS-14
CH 23 US-23 E23 DS-15
CH 24 US-24 E24 DS-16
CH 25 US-25 E25 DS-17
CH 26 US-26 E26 DS-18
CH 27 US-27 E27 DS-19
CH 28 US-28 E28 DS-20
CH 29 US-29 E29 DS-21
CH 30 US-30 E30 DS-22
CH 31 US-31 E31 DS-23
CH 32 US-32 E32 DS-24
CH 33 US-33 E33
CH 34 US-34 E34
CH 35 US-35 E35
CH 36 US-36 E36
CH 37 US-37 E37
CH 38 US-38 E38 DS-25
CH 39 US-39 E39 DS-26
CH 40 US-40 E40 DS-27
CH 41 US-41 E41 DS-28
CH 42 US-42 E42 DS-29
CH 43 US-43 E43 DS-30
CH 44 US-44 E44 DS-31
CH 45 US-45 E45 DS-32
CH 46 US-46 E46 DS-33
CH 47 US-47 E47 DS-34
CH 48 US-48 E48 DS-35
CH 49 US-49 E49 DS-36
CH 50 US-50 E50 DS-37
CH 51 US-51 E51 DS-38
CH 52 US-52 E52 DS-39
CH 53 US-53 E53 DS-40
CH 54 US-54 E54 DS-41
CH 55 US-55 E55 DS-42
CH 56 US-56 E56 DS-43
CH 57 US-57 E57 DS-44
CH 58 US-58 E58 DS-45
CH 59 US-59 E59 DS-46
CH 60 US-60 E60 DS-47
CH 61 US-61 E61 DS-48
CH 62 US-62 E62 DS-49
CH 63 US-63 E63 DS-50
CH 64 US-64 E64 DS-51
CH 65 US-65 E65 DS-52
CH 66 US-66 E66 DS-53
CH 67 US-67 E67 DS-54
CH 68 US-68 E68 DS-55
CH 69 US-69 E69 DS-56
CH 70 DS-57
Channel
AUSTRALLIA
CC US CCIR OIRT CHINA
CC 01 S-1 AU-5
CC 02 S-2 Z-1
CC 03 S-3 Z-2
CC 04 S-4 Z-3
CC 05 S-5 Z-4
CC 06 S-6 AU-5A
CC 07 S-7 Z-5
CC 08 S-8 Z-6
CC 09 S-9 Z-7
CC 10 S-10 DS-6
CC 11 S-11 Z-9
CC 12 S-12 Z-10
CC 13 S-13 Z-11
CC 14 A S-14
CC 15 B S-15 Z-12
CC 16 C S-16 Z-13
CC 17 D S-17 Z-14
CC 18 E S-18 Z-15
CC 19 F S-19 Z-16
CC 20 G S-20 Z-17
CC 21 H S-21 Z-18
CC 22 I S-22 Z-19
CC 23 J S-23 Z-20
CC 24 K S-24 Z-21
CC 25 L S-25 Z-22
CC 26 M S-26 Z-23
CC 27 N S-27 Z-24
CC 28 O S-28 Z-25
CC 29 P S-29 Z-26
CC 30 Q S-30 Z-27
CC 31 R S-31 Z-28
CC 32 S S-32 Z-29
CC 33 T S-33 Z-30
CC 34 U S-34 Z-31
CC 35 V S-35 Z-32
CC 36 W S-36 Z-33
CC 37 W+1 S-37 Z-34
CC 38 W+2 S-38 Z-35
CC 39 W+3 S-39 Z-36
CC 40 W+4 S-40 Z-37
CC 41 W+5 S-41
CC 42 W+6
CC 43 W+7
CC 44 W+8
CC 45 W+9
CC 46 W+10
CC 47 W+11
CC 48 W+12
CC 49 W+13
CC 50 W+14
CC 51 W+15
CC 52 W+16
CC 53 W+17
CC 54 W+18
CC 55 W+19
CC 56 W+20
CC 57 W+21
CC 58 W+22
CC 59 W+23
CC 60 W+24
CC 61 W+25
CC 62 W+26
CC 63 W+27
CC 64 W+28
CC 75 X
CC 76 Y R3 DS-4
CC 77 Z R4 DS-5 AU-3
CC 78 Z+1 R5
CC 79 Z+2 AU-4
CC 95 A-5
CC 96 A-4
CC 97 A-3
CC 98 A-2
CC 99 A-1
Channel
AUSTRALLIA
31
Page 76

Using the TV's menu
DEMO menu
DEMO
ON
OFF
OK
:OK
TV
:EXIT
DISP
:BACK
The DEMO function automatically demostrations some of the TV function.
When the DEMO function is set to
ON:
Each time the TV is turned on, the demonstration starts automatically.
If you do not want that to happen, set the
DEMO function to OFF.
1 Press the
choose ON.
To cancel the DEMO function,
choose off.
2 Press the MENU/OK button to
complete the settings.
The DEMO function is set to ON, and the
demostration will start.
buttons to
/
32
To stop the demonstration:
Press one of the button on the remote
control.
Page 77

Additional preparation
Connecting the external
devices
Connect the devices to the TV, paying
attention to the following connection
diagram.
Before connecting anything:
• Read the manuals provided with the
devices. Depending on the devices, the
connection method may differ from the
figure. In addition, the device settings
may be changed depending on the
connection method to secure proper
operation.
• Turn off all the devices including the TV.
• The "Specifications" on page 40 contains
the details of the VIDEO terminals. If you
are connecting a device not listed in the
following connection diagram, see the
"Specifications" to choose the best
VIDEO terminal.
• Note that connecting cables are not
supplied.
• When connecting devices that are
supported by AV COMPU LINK, see
"Connecting AV COMPU LINK Supported
Devices" on page 35.
1 VCR (composite signal)
2 VCR (S-VIDEO signal; Y/C)
3 VCR for recording (composite signal)
4 DVD player (composite signal)
5 DVD player (S-VIDEO signal; Y/C)
6 DVD player (component video signals;
Y/CB/CR)
7 TV game (composite signal)
8 TV game (S-VIDEO signal; Y/C)
9 Camcorder (composite signal)
0 Camcorder (S-VIDEO signal; Y/C)
- Headphones
S
OVER
VRL/MONO
IN (VIDEO-4)
(Behind the cover)
AUDIO
S
VIDEO
L/MONO
R
OVER
VIDEO-1
VIDEO-2
Y/VIDEOC
BCR
VIDEO-3
AUDIO
L/MONO
R
COMPONENT
OUTPUT
L
R
VIDEO
AUDIO
AV COMPU LINK
AUDIO
RRLL/MONO
VIDEO
C
C Y/VIDEO
R
B
L/MONOR AUDIO
VIDEO
AUDIO
AV COMPULINK
S
OVER
VIDEO-1
VIDEO-2
VIDEO-3/
COMPONENT
OUTPUT
A AV COMPU LINK cable
33
Page 78

Additional preparation
Connecting methods
1 Connect the TV's VIDEO jack
and the device's VIDEO OUT
(video output) jack with a video
cable.
If connecting a device to the TV
with an S-VIDEO cabel :
Connect the VCR's S-VIDEO OUT (S-VIDEO
output) connector and the TV's "S" (S-VIDEO)
connector with an S-VIDEO cable, instead of
connecting with a video cable.
Note that the connection with a video cable
will be ignored in case you conect a VCR to
the TV with both video cable and S-VIDEO
cable.
If connecting a DVD player to the
TV with a component video
cable :
Connect three jacks (Y/VIDEO, CB and CR) in
the VIDEO-3 terminal and the DVD player's
COMPONENT (component video output)
jacks with a component video cables,
instead of connection with a video cable.
Then set the VIDEO-3 SETTING to COMPONENT, according to "VIDEO-3 SETTING" on
page 26.
• This Television is compatible with the
Progressive video signal (525P signal).
(When the component video signal is
input.)
If you have a DVD player that outputs
Progressive video signals (525P) as a
component video signal, then by
attaching the device to the television with
a component video cable you can see
the actual images that are recorded on a
DVD disc as an original image source.
• In the VIDEO-4 terminal, the VIDEO jack
is indicated by "V".
2 Connect the TV's AUDIO jacks
(L/MONO and R) and the
device's AUDIO OUT (audio L/R
output) jacks with an audio
cable.
If the device's sound output is in
mono :
Connect the device's AUDIO OUT jack and
the TV's L/MONO jack with an audio cable.
Connecting devices to the
OUTPUT terminal
The signals of the images and sound you are
currently viewing with this TV are output
through the OUTPUT terminal. By connecting
a VCR to the OUTPUT terminal, you can
record the currently shown image and sound
to that VCR. To do this, connect the VCR and
OUTPUT terminal following the steps below.
1 Connect the VIDEO jack in the
OUTPUT terminal and the VCR's
VIDEO IN (video input) jack with
a video cable.
2 Connect the AUDIO jacks (L and
R) in the OUTPUT terminal and
the VCR's AUDIO IN (audio L/R
input) jacks with an audio cable.
• When you turn off the TV, the signals from
the OUTPUT terminal are also turned off.
• The component signals input from the
VIDEO-3/COMPONENT terminal cannot
be output through the OUTPUT terminal.
If connecting a device to the
VIDEO-3/COMPONENT terminal
with a video cable :
Connect the TV's Y/VIDEO jack and the
device's VIDEO OUT (video output) jack with
a video cables.
Then set the VIDEO-3 SETTING to VIDEO
according to "VIDEO-3 SETTING" on page
26.
34
Connecting Headphones
Connect the headphones with a stereo mini
jack (of 3.5 mm in diameter) to the Headphone jack at the TV front panel.
Page 79

Additional preparation
Connecting AV COMPU
LINK Supported Devices
AV COMPU LINK remote control system is a
system in which related devices are
automatically controlled when you operate
one device.
If you apply this system to the TV, you can
have the TV automatically perform the
required operations by operating one
external device. You don't have to use the
TV's remoto control to turn on the TV or
change the VIDEO modes.
Examples of the AV
COMPU LINK remote
control system operations
Simply by pressing the PLAY button on a
VCR or a DVD player, you can view images
from the device.
Simply by inserting a pre-recorded tape (a
tape with the record safety tab removed) to a
VCR, you can view the tape.
Simply by operating the AV Control Receiver, you can have the TV turned on/off (in
standby mode) or the VIDEO mode changed
correctly.
• The performance of the AV COMPU
LINK remote control system varies
depending on the connected device.
See the device’s instruction manual.
• When you select "TV SOUND" as the
input source with the AV Control
Receiver, there are cases where the TV's
MUTING function automatically operates
and the sound from the TV's speakers is
muted.
In such cases, press the VOLUME-/+
buttons or the MUTING button on the
TV's remote control to cancel the MUTING function. You can regain the sound
from the TV's speakers.
Conditions to use the AV
COMPU LINK remote
control system
• A device equipped with an AV COMPU
LINK terminal is required.
• You must connect the TV and the device
with an AV COMPU LINK cable.
AV COMPU LINK cable is not supplied
with this TV. If an AV COMPU LINK cable
is unavailable, connect them with a cable
with dia. 3.5 mm (mono) male plugs at
both ends.
• You must connect the device to an
appropriate VIDEO terminal and set it up
correctly. Otherwise the AV COMPU LINK
remote control system will not function
correctly. For details, see “ Setting up the
AV COMPU LINK remote control
system”.
• The TV must be in standby mode (the
POWER lamp lighting red). If the TV’s
Main power is off (the POWER lamp off),
the AV COMPU LINK remote control
system does not function.
Setting up the AV COMPU
LINK remote control system
CAUTION:
• With some devices, the setup method
differs from the ones explained here.
Be sure to read the device’s instruction
manual thoroughly before setting it up.
1 Connect the device to the TV’s
VIDEO-1 or VIDEO-2 terminal.
If you want to connect a DVD
player to the TV with a component video cable :
Connect the DVD player to the TV’s VIDEO-3
terminal.
• For detailed connecting instructions, see
"Connecting the external devices" on
page 33.
35
Page 80

Additional Preparation
2 Connect the TV’s AV COMPU
LINK terminal and the device’s
AV COMPU LINK terminal with
an AV COMPU LINK cable.
3 Change the device’s setting
according to the VIDEO terminal
it is connected to.
If a VCR is connected to the
VIDEO-1 terminal :
Set the VCR’s remote control code to A code.
If a DVD player is connected to
the VIDEO-1 terminal:
Set the DVD player’s AV COMPULINK MODE
to DVD2.
If a VCR is connected to the
VIDEO-2 terminal:
Set the VCR’s remote control code to B code.
If a DVD player is connected to
the VIDEO-2 terminal:
Set the DVD player’s AV COMPULINK MODE
to DVD3.
If a DVD player is connected to
the VIDEO-3 terminal with a
component video cable:
Set the DVD player’s AV COMPULINK MODE
to DVD1.
• For instructions on how to change the
device’s setting, refer to the device’s
instruction manual.
• If the device you are connecting has
neither the remote control code nor the
AV COMPULINK MODE, then connect it
to the TV’s VIDEO-1 terminal.
36
Page 81

Troubleshooting
If a problem arises while you are using the TV, please read this "Troubleshooting" well before
you request having the TV repaired. You may be able to fix it easily by yourself. For example, if
the AC plug is disconnected from the AC outlet, or the TV aerial has problems, you may think
there is a problem with the TV itself.
Important:
• This Troubleshooting guide only covers problems whose cause are not easy to determine.
If a question arise when you are operating a function, read the page(s) corresponding to
the operation of the function well, not this Troubleshooting guide.
• After you have followed the Troubleshooting description or the operating description of the
functions concerned without any success, remove the AC plug from the AC outlet and re quest a repair of your TV. Do not attempt to repair the TV by yourself or remove the
rearcover of the TV.
If you cannot turn on
the TV
• Is the AC plug connected to the AC
outlet?
• Is the POWER lamp lit? If not, press the
Main power button.
No picture/No sound
• Have you chosen a TV channel whose
reception is extremely bad? In this case,
the BLUE BACK function will be activated, the entire screen becomes blue, and
the sound is muted. In spite of this, if you
want to view the TV channel, follow the
description "BLUE BACK" on page 24 to
try to change the BLUE BACK function
setting to OFF.
• Are your SOUND SYSTEM settings for
the TV channels correct?
Forrow the description “SOUND SYSTEM
Button” on page 12 to try to solve the
trouble.
Poor picture
• If noise totally obscures the picture (snow), the aerial or aerial cable may have
trouble. Check the following to try to
solve the trouble :
Has the TV and aerial been
connected properly?
Has the aerial cable been damaged?
Is the aerial pointed to the right direction?
Is the aerial itself faulty?
• If the TV or aerial receives interference
from the other devices, stripes or noise
may appear in the picture. Move such
device as an amplifier, personal computer, or a hair drier that can cause interference away from your TV, or try changing its location. If the aerial suffers interference from a radio tower or highvoltage wire, please contact your local
dealer.
• If the TV receives interferences from
signal reflecting from mountains or
building, double-pictures(ghosting) will
occur.
Try to change the aerial’s direction or
replace the antenna with the one with
better directionality.
37
Page 82

Troubleshooting
• Are your COLOUR SYSTEM settings for
the TV channels correct? Follow the
description "COLOUR SYSTEM button"
on pege 11 to try to solve the trouble.
• Has COLOUR or BRIGHT been controlled properly? Follow the description
"Adjusting the picture" on page 18 to try
to adjust them properly.
• When a white and bright still image (such as a white dress) is displayed on the
screen, the white part may look as if it
were coloured.
It is a phenomenon unavoidable due to
the nature of the picture tube itself, and
not due to a TV failure.
When the picture disappears from the
screen, the unnatural colours will also
disappear.
• When viewing images from commercially
available video softwear products, or videos from videotapes which have been
recored improperly, the top of the image
may be distored.
This is due to the condition of the video
signal, and not because of malfunction.
Poor sound
• Have you adjusted BASS or TREBLE
properly? If not, follow the description
"Adjusting the Sound" on page 22 to try
to adjust them properly.
• When the TV channel reception is poor, it
can be hard to hear the stereo or
bilingual sound. In this case, follow the
description "STEREO / I • II" on page 22
to hear the sound more easily by
changing it to a mono sound.
• Have you attempted to use the remote
control at the sides or rear of the TV or at
a location more than seven meters apart
from the TV location? Operate the remote
control in the front of your TV or a
location less than seven meters from
your TV to try to solve the ploblem.
• Is the CHILD LOCK function set to ON?
If the CHILD LOCK function is set to ON,
you cannot operate the TV with the front
control buttons of the TV. Follow the
description "CHILD LOCK" on page 24
to try to set the CHILD LOCK function to
OFF.
• If the TV operation becomes disabled
suddenly, press the Main power button
on the TV and turn off the main power.
Try to press the Main power button again
to turn on the main power. If the TV
returns to a normal state, it is not a
failure.
• The following functions do not operate
when receiving Progressive Video Signal
(525P signal);
Remote control function:
ZOOM, PIP, MULTI, FREEZE and
STROBE BUTTON
MENU function:
SHARP,
TINT, DIGITAL VNR, Digipure
and ZOOM
38
Operation disabled
• Have the batteries of the remote control
become exhausted?
Follow the description "Putting the
Batteries into the Remote Control" on
page 4 and replace them with new
batteries to try solve the problem.
Page 83

Troubleshooting
Other concerns
•
When the SLEEP TIMER function or AUTO
SHUTOFF function operates, the TV is
automatically turned off.
If the TV is turned off suddenly, try to press
the POWER button to turn on the TV once
again. At this time, if the TV resumes a
normal state, there is no problem.
• If you do not want sound emitted from the
TV’s speakers when using headphones,
change the TV SPEAKER setting in the
HEADPHONE menu to OFF. For details,
see "HEADPHONE" on page 23.
• If you bring a magnetised device such
as a speaker near to your TV, a picture
may be warped or unnatural colours
appear at the corners of the screen.
In this case, keep the device apart from
your TV. If the speaker causes such
phenomena, use the magnetic-shielded
speaker instead.
• A picture may be tilted due to the influence of the earth's magnetism. In this
case, use the "PICTURE TILT" on page
21 to complete the tilt.
• It takes a short period of time from the
time an operation such as changing
channels is performed until an image is
displayed. This is not a malfunction.
This is the time required for the image to
stabilize before it can be displayed.
• The TV may emit a crackling sound due
to a sudden change in temperature. It
does not matter if a picture or sound
does not show any abnormality. If you
hear crackling sounds frequently while
you are viewing the TV, other causes may
be assumed.
For precautionary purposes, request
your service technician to inspect it.
• Touching the screen may cause you feel
a slight electric shock due to its static
electricity.
It is an unavoidable phenomenon due to
the construction of the picture tube. It is
not a problem with the TV.
You can rest assured that this static discharge does not have harmful influence
over the human boby.
39
Page 84

Specifications
Broadcasting systems B, G, I, D, K, K1, M
Colour systems PAL, SECAM, NTSC3.58/4.43MHz
Channels and frequencies VHF low channel (VL) =46.25 to 168.25 MHz
Sound-multiplex systems A2 (B/G), NICAM (B/G, I, D/K) system
Power requirements AC 110 to 240V, 50/60Hz
Audio output Rated Power output: 20W + 20W
VIDEO-1 terminal RCA connector X 3, S-VIDEO connector X 1
VIDEO-2 terminal RCA connector X 3
VIDEO-3/COMPONENT RCA connector X 5
terminal • Video input/Component video (Y/CB/CR) input and Audio
VIDEO-4 terminal RCA connector X 3, S-VIDEO connector X 1
OUTPUT terminal RCA connector X 3
Headphone jack Stereo mini-jack (3.5 mm in diameter)
Accessories Remote control unit X 1 (RM-C215)
Speakers HV-34LPZ : 12cm round X 2, 3.5cm round X 2
Power consumption HV-34LPZ : Maximum 255W Average 170W
Screen size HV-34LPZ : Picture tube 87cm Visible area 80cm
(measured diagonally) HV-29LPZ : Picture tube 73cm Visible area 68cm
Dimensions(W X H X D) HV-34LPZ : 898mm X 728mm X 579mm
Weight HV-34LPZ : 75kg
Design and specifications subject to change without notice.
Pictures displayed on the screen using this TV's ZOOM functions should not be shown for any
commercial or demonstration purpose in public places (cafes,hotels, etc.) without the consent
of the owners of copyright of the original picture sources, as this constitutes an infringement of
copyright.
VHF high channel (VH) =175.25 to 463.25 MHz
UHF channel (U) =471.25 to 863.25 MHz
Receives cable channels in mid band (X to Z+2, S1 to S10),
super band (S11 to S20) and hyper band (S21 to S41).
• Video input, S-VIDEO (Y/C) input and Audio L/R inputs
are available.
• Video input and Audio L/R inputs are available.
L/R inputs are available.
• Progressive video signal(525P signal) input is available.
• Video input, S-VIDEO (Y/C) input and Audio L/R inputs
are available.
• Video output and Audio L/R outputs are available.
AA/R6 dry cell battery X 2
HV-29LPZ : 10cm round X 2, 3.5cm round X 2
HV-29LPZ : Maximum 254W Average 170W
HV-29LPZ : 732mm X 588mm X 518mm
HV-29LPZ : 48kg
40
VICTOR COMPANY OF JAPAN, LIMITED
Page 85

HV-34LPZ
HV-29LPZ
. . . . . . . . . . . . . . . . . . . 3
. . . . . . . . . . . . . 6
. . . . . . . . . . . . . 8
. . . . . . . . . . . . . . . 16
. . . . . . . . . . . . . . . . . . . 16
. . . . . . . . . . . . . . . 18
. . . . . . . . . . . . . . . 19
. . . . . . . . . . . . . . . 22
. . . . . . . . . . . . . . . 24
. . . . . . . . . . . . . . . . . . 27
. . . . . . . . . . . . . . . . . . 32
. . . . . . . . . . . . . . . . . . . . 33
. . . . . . . . . . . . . . . . . . . . 37
. . . . . . . . . . . . . . . . . . . . 40
© 2002 VICTOR COMPANY OF JAPAN, LIMITED
LCT1217-001A-H
0402-Ki-NV-JMT
Page 86

非常感謝您惠購此JVC牌彩色電視機。
請在使用前熟讀此使用說明書,以掌握新電視機的使用方法。
警告:
為了防止發生火災或觸電的危險,請勿將本機曝露於雨中或受潮。
注意:
為了保證人身安全,請遵守下列有關使用本機的注意事項。
1 僅在電視機背面所示的電源範圍內使用。
2 防止損壞電源線和插頭。從電視機上拔下插頭時,請抓住插頭,勿拉電
源線。
3 切勿堵塞或遮蓋通風口。
切勿將本機放置在通風不良之處。
安裝電視機時,在電視機周圍應留有大於圖示的最小距離的空間,以便
通風。
15 cm
10 cm 10 cm 15 cm
4 請勿讓物體或液體進入本機的縫隙內。
5 本機發生故障時,請拔下插頭,讓維修服務人員修理。
請勿自行維修或拆下後蓋。
6 電視屏幕的表面易於損壞。操作電視機時請多加小心。如果電視屏幕弄
髒時,請用乾的軟布擦拭。切勿用力摩擦。切勿使用任何清潔劑或去垢
劑。
7 長期不使用電視機時,請務必將電源插頭從交流電源插座上撥下。
2
Page 87

安裝電視機
注意
• 連接前,請關閉包括本機在內的所有設備。
1 連接天線和錄像機
• 未附帶天線。請使用優質的75歐姆同軸線。
• 連接前,請閱讀錄像機的使用說明書。
如果不連接VCR(錄像機)時(參照圖A):
請將天線與電視機的天線插座連接。
圖A
如果連接VCR時(參照圖B):
1 將天線與VCR的天線輸入插座連接,
並用另一根天線連接VCR和電視機。
2 用視頻電纜將VCR的VIDEO OUT
(視頻輸出)插口和電視機的VIDEO
(視頻)插口連接起來。
用S-VIDEO(超級-視頻)電纜連接VCR和電視
機時:
用S-VIDEO電纜A來代替視頻電纜,將VCR的
S-VIDEO OUT(超級-視頻輸出)接口與電視機
的S接口連接起來。
3 用音頻電纜將VCR的VIDEO OUT
(音頻L/R輸出)插口和電視機的
AUDIO(音頻)插口(L/MONO和
R)連接起來。
• 如果VCR的音頻輸出為單聲道時,請用音頻
電纜將VCR的AUDIO OUT(音頻輸出)插口
和電視機的AUDIO L/MONO插口連接起來。
• 如果VCR帶有AV COMPU LINK端子,則可
使用AV COMPU LINK功能。詳細說明,請
參閱第35頁上的“連接支持AV COMPU
的裝置”。
LINK
圖B
AUDIO
R
C
R
RL
AUDIO
AV COMPULINK
L/MONO
L/MONOR AUDIO
VIDEO
OVER
C Y/VIDEO
B
VIDEO
A
S
RRLL/MONO
AUDIO
AV COMPULINK
AUDIO
C
R
VIDEO-1
VIDEO-2
VIDEO-3/
COMPONENT
OUTPUT
VIDEO
C Y/VIDEO
B
L/MONOR AUDIO
VIDEO
S
OVER
VIDEO-1
VIDEO-2
VIDEO-3/
COMPONENT
OUTPUT
3
Page 88

安裝電視機
2 連接電源線
將插頭插入交流電源插座。
3 將電池裝入遙控器
請使用兩節AA/R6/5號電池。
從負.極裝入電池,請勿搞錯正,極和負.極。
• 請遵守印刷在電池上的警告事項。
• 如果遙控器工作不正常,請更換電池。
• 附帶的電池僅供安裝和測試電視機之用,請盡
快換上新電池。
4 初始設定
首次打開電視機時,將進入初始設定模式,顯示
JVC標記。
1 按下電視機上的主電源按鈕。
打開電視機,顯示JVC標記。
• 如果電視機上的電源指示燈保持紅色而不變成
綠色,則說明電視機處在待機狀態。請按下遙
控器上的POWER按鈕來打開電視機。
• 如果不出現JVC標記,則說明電視機已被打開
過。此時,請利用“語言”和“自動程序”功
能進行初始設定。詳細說明,請參閱第27頁
上的“導入菜單”。
SPATIALIZER ECO POWER
2 按下MENU/OK按鈕。
出現語言菜單。可選擇用於在屏幕上顯示的語
言。
OK
:
TV
:
DISP.
:
4
POWER指示燈
主電源按鈕
Page 89

安裝電視機
3 按下
/
按鈕,選擇中文。然後按
下MENU/OK按鈕。
自動程序功能啟動。
接收到的電視頻道被自動登錄在節目號碼一覽
內。
CH 10
20%
OK
:
DISP.
:
• 要取消自動程序功能時,請按下DISPLAY按
鈕。
4 電視頻道被登錄在節目號碼(编排)
一覽內後,出現编缉菜單。
DISP.
CH/CC
21
CH
22
CH
23
CH
24
CH
25
CH
26
CH
01
CC
02
CC
03
CC
OK
TV
AV
01
02
03
04
05
06
07
08
09
TV/VIDEO
SPATIALIZER
BASS
ZOOM
12
456
789
RETURN
0
MULTI
L
E
N
N
A
H
C
MUTING
SUB-P
POSITION
FREEZE
PIP
MENU/
OK
POWER
PICTURE
MODE
3
NEXTPIP
SWAP
STROBE
DISPLAY
V
O
L
U
M
E
• 可利用編輯/手動功能編輯節目號碼一覽。詳
細說明,請參閱第28頁上的“編輯/手動”。
• 如果想觀看的電視頻道未被存儲在節目號碼一
覽內,請利用手動功能將其登錄。詳細說明請
參閱第28頁上的“編輯/手動”。
• 自動程序功能不會將電視頻道存儲在節目號碼
0(AV)內。
• 如果無需使用編輯/手動功能時,請按下
MENU/OK按鈕,關閉編輯菜單。
安裝結束,請欣賞新的JVC電視機。
COLOUR
SYSTEM
SOUND
5
Page 90

電視機按鈕和功能
SPATIALIZER ECO POWER
打開主電源
按下主電源按鈕 1。
POWER指示燈 2 亮紅燈,電視機變為待機模
式。
關閉主電源:
再次按下主電源按鈕。
POWER指示燈 2 熄滅。
從待機模式打開電視機
按下CHANNEL m 按鈕 5。
POWER指示燈 2 從紅色變為綠色,電視機被
打開。
• 在待機模式時,按下TV/VIDEO按鈕 3 也
可打開電視機。
9
OVER
VR
L/MONO
S
IN (VIDEO-4)
2
8
(蓋板後面)
7
MENU
OK
1
CHANEL VOLUME
TV/VIDEO
EXIT
36045-
選擇電視頻道
按下CHANNEL m 按鈕 5。
選擇視頻端子
按下TV/VIDEO按鈕 3 或CHANNEL
m 按鈕 5。
調節音量
按下VOLUME m 按鈕 4。
出現音量水準指示器。
MENU按鈕 6
按下可打開菜單。
詳細說明,請參閱第17頁上的“用電視機上的
按鈕進行操作”。
遙控器電子眼和ECO電子眼 9
ECO指示燈 7
如果將數字ECO電子眼功能設為開或顯示,則
ECO指示燈將亮燈。
SPATIALIZER指示燈 8
如果將環繞控制鍵功能設為單聲道或現場,則
SPATIALIZER指示燈將亮燈。
6
Page 91

電視機按鈕和功能
耳機插口 0
將耳機與立體聲微型插口(直徑3.5mm)相
連。
使用耳機時,請按照第23頁上的“耳機”的
步驟操作。
VIDEO-1端子 =
AUDIO
S
VIDEO
L/MONO
R
OVER
VIDEO-1
VIDEO-2
Y/VIDEOC
BCR
VIDEO-3
AUDIO
L/MONO
R
COMPONENT
OUTPUT
L
R
VIDEO
AUDIO
AV COMPU LINK
• 請參閱第3頁和第33頁。
VIDEO-2端子 ~
• 請參閱第33頁。
AUDIO
L/MONO
R
AUDIO
L/MONO
R
L
R
AUDIO
AV COMPU LINK
$ #
VIDEO
BCR
VIDEO
S
OVER
VIDEO-1
Y/VIDEOC
VIDEO-2
VIDEO-3/
COMPONENT
OUTPUT
=
~
!
@
VIDEO-3/COMPONENT
端子 !
• 請參閱第26頁和第33頁。
VIDEO-4端子 -
• 請參閱第33頁。
OUTPUT端子 @
• 請參閱第33頁。
天線插座 #
連接天線。
• 請參閱第3頁。
AV COMPU LINK端子 $
• 請參閱第33頁和第35頁。
7
Page 92

遙控器按鈕和功能
SOUND
0
MULTI
MUTING
SUB-P
PIP
MENU/
OK
BASS
POWER
PICTURE
MODE
3
NEXTPIP
SWAP
STROBE
DISPLAY
V
O
L
U
M
E
TV/VIDEO
ZOOM
SPATIALIZER
12
456
789
RETURN
L
E
N
N
A
H
C
POSITION
FREEZE
SYSTEM
COLOUR
從待機模式打開電視機
按下POWER按鈕。
POWER指示燈從紅色變為綠色,電視機被打開。
• 按下TV/VIDEO按鈕、CHANNEL m 按鈕或數字按
鈕也可從待機模式打開電視機。
關閉電視機:
再次按下POWER按鈕。
POWER指示燈從綠色變為紅色,電視機進入待機模式。
選擇電視頻道
選擇已設定電視頻道的節目號碼。
按下CHANNEL m 按鈕或用數字按鈕輸入節
目號碼(编排)。
• 如要將兩位數輸入電視機,請按下-/--按鈕,改為兩位
數輸入系統。
• 可從編排一覽中選擇頻道。詳細說明,請參閱第11頁
上的“DISPLAY(顯示)按鈕”。
• 如果畫面不清晰或無色彩時,請按照第11頁上的
“COLOUR SYSTEM(彩色制式)按鈕”的步驟操
作。
• 如果即使正常顯示圖像,也不能正常聽見聲音時,請
按照第12頁上的“SOUND SYSTEM(聲音制式)按
鈕”的步驟操作。
調節音量
按下VOLUME m 按鈕。
• 不可調節耳機的音量。請按照第23頁上的“耳機”的
操作步驟操作。
觀看來自外接裝置的圖像
選擇連接著外接裝置的VIDEO端子。
按下TV/VIDEO按鈕。
• 可用CHANNEL m 按鈕或從編排一覽選擇VIDEO端
子。
調回電視頻道:
按下TV/VIDEO按鈕、CHANNEL m 按鈕或數字按鈕。
8
Page 93

遙控器按鈕和功能
MUTING(靜音)按鈕
按下MUTING按鈕,關閉音量。再次按
下MUTING按鈕,可恢復至原先的音
量。
ZOOM(鏡頭)按鈕
可根據畫面縱橫比改變屏幕尺寸。請從下列鏡頭
模式中選擇最合適的一個。
按下ZOOM按鈕,選擇一個模式。
• 如果在接收Progressive視頻信號(525P信
號)時按下ZOOM按鈕,則會在屏幕上顯示
“525P”,鏡頭功能不起作用。
常规
用於以原有尺寸觀看普通圖像(4:3縱橫比)。
镜头
可將寬屏幕圖像(16:9縱橫比)充滿電視屏幕。
16:9
此模式將普通畫面(4:3縱橫比)轉變為
寬屏幕畫面(16:9縱橫比)。
• 用於被壓縮成普通畫面(4:3縱橫比)
的16:9縱橫比的畫面時,可恢復原來
尺寸。
SPATIALIZER(環繞控制
鍵)按鈕
利用環繞控制鍵功能,可欣賞帶有“現
場”效果的環繞聲音。
按下SPATIALIZER按鈕,選擇模
式。
现场:
利用現場模式,可欣賞被轉換成帶有深度
和周圍環境的環繞聲音的普通立體聲。
单声道:
利用單聲道模式,可欣賞被轉換成像立體
聲的普通單聲。
• 寬屏幕圖像(16:9縱橫比)的左側和右側將被
去掉。
关:
環繞控制鍵功能不工作。
• 現場模式僅在立體聲時正常工作。
• 使用耳機時,現場模式不能正常工
作。
• 單聲道模式僅在單聲時正常工作。
SPATIALIZER係經Desper
Products,Inc.
公司授權製造。
9
Page 94

遙控器按鈕和功能
BASS(低音)按鈕
利用超重低音(超重低音回聲)功能,可
欣賞強勁有力的低音。
按下BASS按鈕,打開或關閉超重
低音功能。
开:
打開此功能。
关:
關閉此功能。
PICTURE MODE(畫面模
式)按鈕
可選擇三種畫面模式(三種畫面設定)中
的一種,自動調節畫面設定。
按下PICTURE MODE按鈕,選擇
模式。
亮度:
增強對比度和銳度。
普通:
標準畫面調節。
柔和:
使對比度和銳度變得柔和。
將電視頻道登錄為“調回頻道”:
選擇已設定節目號碼的需登錄頻道的節目
號碼,並持續按住RETURN+按鈕3秒鐘
以上。將顯示“快退已設定!”,登錄結
束。
取消“調回頻道”的登錄:
觀看任一電視頻道時,持續按住RETURN+
按鈕3秒鐘以上。將顯示“快退已取消!”,
登錄被取消。
• 關閉電視機時,“調回頻道”的登錄被
取消。
• 如想交替觀看“調回頻道”和另一電視
頻道,請先選擇不是“調回頻道”的頻
道,然後按下RETURN+按鈕,將頻道
轉換為“調回頻道”。用這一方法,僅
需按下RETURN+按鈕,便可交替觀看
兩個頻道。
頻道調回功能:
電視機將當前電視頻道前選擇的電視頻道
作為“最後頻道”暫時記憶下來。按下
RETURN+按鈕,可交替觀看當前電視頻
道和“最後頻道”。
• 如想利用頻道調回功能交替觀看兩個頻
道,請先選擇一個電視頻道,然後用數
字按鈕選擇另一個電視頻道。如未用數
字按鈕選擇電視頻道,則有可能不是將
您先選擇的頻道登錄為“最後頻道”。
RETURN+(頻道調回+)
按鈕
RETURN+按鈕具有兩個功能:頻道調回
+功能和頻道調回功能。如果某個頻道被
登錄為“調回頻道”,則頻道調回+功能
起作用。如未設定“調回頻道”,則頻道
調回功能起作用。
頻道調回+功能:
將經常觀看的頻道登錄為“調回頻道”,
可在任何時候僅需按下RETURN+按鈕,
就可選擇此頻道。
10
Page 95

遙控器按鈕和功能
/ 按鈕
觀看雙重語言聲音廣播節目時,可從雙重語
言Ⅰ(副聲音Ⅰ)或雙重語言Ⅱ(副聲音
Ⅱ)中選擇聲音。若接收立體聲廣播節目不
理想時,可將立體聲改變為單聲,以便更清
楚地收聽廣播。
按下 / 按鈕,選擇聲音模
式。
: 立體聲
:單聲
: 雙重語言Ⅰ(副聲音Ⅰ)
: 雙重語言Ⅱ(副聲音Ⅱ)
單聲道 : 取消多聲道功能,聲音變成單聲
道。
• 可選擇的聲音模式由電視節目而定。
• 在視頻模式時,此功能不起作用。
DISPLAY(顯示)按鈕
可在屏幕上顯示編排一覽、節目號碼或視頻
端子號碼。
按下DISPLAY按鈕。
按下DISPLAY按鈕,如下所示地變換顯示:
1
-10
AV
01
02
03
04
05
06
07
08
09
OK
:
TV
:
+10
選擇電視頻道或視頻端子
1 按下DISPLAY按鈕,顯示编排一
览。
2 按下
和
/
按鈕,選擇節
/
目號碼或視頻端子。
然後按下MENU/OK按鈕。
• 對於設有頻道鎖定功能的節目號碼,則會
在編排一覽中的節目號碼旁顯示 (頻道
鎖定)標記。
• 視頻端子登錄在節目號碼編排 99之後。
COLOUR SYSTEM(彩色制
式)按鈕
自動選擇彩色制式。但是,如果圖像不清晰
或無色彩,請手動選擇彩色制式。
按下COLOUR SYSTEM按鈕,選
擇合適的彩色制式。
自动:
此功能從輸入信號中檢測彩色制式。
• 如果信號品質不佳,則自動功能可能不能
正常發揮作用。如在自動功能時畫面不理
想,請手動選擇其他彩色制式。
• 自動模式從輸入信號中檢測彩色制式,並
自動選擇合適的彩色制式。
• 需改變子畫面的彩色制式時,請參閱第
15頁上的“改變子畫面的彩色制式”的
詳細說明。
• 有關各國或各地區的彩色制式,請參閱第
12頁上的“廣播制式”。
11
Page 96

遙控器按鈕和功能
SOUND SYSTEM(聲音制
式)按鈕
自動選擇聲音制式。但是,當畫面正常而卻
不能正常地收聽聲音時,請手動選擇聲音制
式。
按下SOUND SYSTEM按鈕,選擇
合適的聲音制式。
B/G :B/G制式
I :I制式
D/K :D/K制式
M :M制式
• 在視頻模式時此功能不起作用。
• 有關各國或各地區的聲音制式,請參閱
第12頁上的“廣播制式”。
廣播制式
有關所在國家或地區的聲音制式和彩色制
式,請參閱下表。
PAL
PAL
PAL
SECAM
NTSC
SECAM
PAL
PAL
PAL
PAL
PAL
PAL
SECAM
B/G
12
D/K
I
B/G
M
D/K
D/K
B/G
I
B/G
I
B/G
B/G
Page 97

遙控器按鈕和功能
FREEZE(畫面暫停)按鈕
可像子畫面一樣觀看主畫面的暫停圖像。
按下FREEZE按鈕。
取消畫面暫停功能:
再次按下FREEZE按鈕。
• 當在屏幕上顯示子畫面或主畫面時,不
可使用FREEZE按鈕。
• 如果在接收Progressive視頻信號(525P
信號)時按下FREEZE按鈕,則會在屏幕
上顯示“525P”,畫面暫停功能不起作
用。
STROBE(頻閃)按鈕
可以15張連續的靜止圖像方式觀看主畫面。
按下STROBE按鈕。
• 如果在接收Progressive視頻信號(525P
信號)時按下STROBE按鈕,則會在屏幕
上顯示“525P”,頻閃功能不起作用。
• 即使是觀看NTSC彩色制式的節目,也不
能改變對屏幕上的靜態圖像的色彩微調
設定。
■使用多畫面功能
可顯示多個畫面,以便易於找到所需觀看的
節目。
1 按下MULTI按鈕。
按下MULTI按鈕,如下所示地改變顯
示。
5
2
1
1
3
4
5
16
1
2
5
6
9
10
13
14
4
3
8
7
12
11
5
16
15
取消頻閃功能:
按下STROBE按鈕,回到主畫面。
• 如果主畫面的信號水準較弱,則靜止圖
像不正常。
• 當在屏幕上顯示子畫面或主畫面時,不
可使用STROBE按鈕。
顯示下一個多畫面:
按下NEXT按鈕。
13
Page 98

遙控器按鈕和功能
2 用
和
/
按鈕,選擇所需
/
畫面,然後按下MENU/OK按
鈕。
屏幕跳至所選的電視頻道或視頻模式。
• 不顯示未登錄電視頻道的節目號碼或設
定頻道鎖定的節目號碼。
• 不能進行耳機音量調節等菜單操作。請
先取消多畫面功能後,再進行菜單操
作。
• 如果在接收Progressive視頻信號(525P
信號)時按下MULTI按鈕,則會在屏幕
上顯示“525P”,多畫面功能不起作
用。
• 關閉多畫面顯示的一瞬間,電視機不發
出聲音。
■使用PIP功能
可同時觀看兩個畫面(主畫面和子畫面)。
按下PIP按鈕。
按下PIP按鈕,如下所示地改變顯示:
2 5
2
5
PIP
• 不可同時從主畫面和子畫面觀看同一節
目號碼(或同一視頻端子)的圖像。
• 如果主畫面信號不佳,則子畫面的信號
品質可能也較差。
• 如果兩個畫面的畫面標準不同,則頂部
和底部或其中之一可能會沒有。
• 用PIP功能觀看畫面時,鏡頭功能不起作
用。
• 不能從電視機輸出子畫面。
• 如果在接收Progressive視頻信號(525P
信號)時按下PIP按鈕,則會在屏幕上顯
示“525P”,PIP功能不起作用。
14
Page 99

遙控器按鈕和功能
為子畫面選擇電視頻道
按下SUB-P m 按鈕。
收聽子畫面的聲音
在收聽機內揚聲器發出的主畫面的聲音的同
時,可用耳機收聽子畫面的聲音。
詳細說明,請參閱第23頁上的“耳機”。
改變子畫面的彩色制式
1 顯示子畫面時,按下MENU/OK按
鈕,顯示菜单(主菜單)。
2 按下
特征,然後按下MENU/OK按鈕。
3 按下
後按下MENU/OK按鈕。
和
/
/
按鈕,選擇彩色制式,然
NTSC 3.58
OK
:
TV
:
DISP.
:
按鈕,選擇画面
/
POSITION(位置)按鈕
利用畫中畫模式時,可調節子畫面的位置。
反復按下POSITION按鈕。
每按一次POSITION按鈕,子畫面按逆時針
方向移動一次。
SWAP(交換)按鈕
可將主畫面和子畫面互換。
按下SWAP按鈕。
4 按下
按下
/
按鈕,選擇子画面,然後
/
按鈕,選擇合適的彩色制
式。然後按下MENU/OK按鈕。
• 不能用遙控器上的COLOUR SYSTEM按鈕
改變子畫面的彩色制式。
• 在將電視機輸出錄製在錄像機上時,請
勿按下SWAP按鈕。如果按下SWAP按
鈕,將會改變輸出信號。
15
Page 100

使用電視機菜單
本電視機有許多可利用菜單進行操作的功能。
為了充分利用電視機的所有功能,需徹底理解基本的菜單操作技術。
TV/VIDEO
SPATIALIZER
BASS
ZOOM
12
456
789
RETURN
0
MULTI
L
E
N
N
A
H
C
MUTING
SUB-P
PIP
POSITION
FREEZE
MENU/
OK
SYSTEM
COLOUR
SOUND
POWER
PICTURE
MODE
3
NEXTPIP
STROBE
DISPLAY
SWAP
基本操作
1 按下MENU/OK按鈕,顯示菜单(主
菜單)。
OK
:
TV
:
DISP.
:
V
O
L
U
M
E
• 菜單底部的顯示說明操作所選功能時可使用的
遙控器的按鈕。
MENU/OK
TV/VIDEO
DISPLAY
按鈕,選擇菜單標
/
2 按下
OK
TV
DISP.
和
/
題,並按下MENU/OK按鈕。
出現菜單。
返回到前一菜單:
按下DISPLAY按鈕。
16
立刻退出菜單:
按下TV/VIDEO按鈕。
3 按下
按鈕,選擇功能。
/
• 有關菜單中的功能的詳細說明,請參閱下一頁
開始的說明。
 Loading...