

Page 1
9-INCH WIDESCREEN MONITOR WITH DVD PLAYER
9-ZOLL-BREITBILDMONITOR MIT DVD-PLAYER
MONITEUR COULEUR A ECRAN LARGE DE 9 POUCES AVEC
LECTEUR DE DVD
9-INCH BREEDBEELD-MONITOR MET DVD-SPELER
KV-MRD900
• This system cannot receive television broadcasts. Use the separately sold TV tuner unit KV-C1001 for
optional television broadcast reception.
• Dieses System kann keine Fernsehsignale empfangen. Verwenden Sie den separat erhältlichen
Fernsehtuner KV-C1001, um Fernsehsignale zu empfangen.
• Ce système ne peut pas recevoir les émissions de télévision . Utilisez le module de tuner de télévision
mobile KV-C1001 vendu séparément afin de pouvoir recevoir les émissions de télévision.
• Met dit systeem kunt u geen televisie-uitzendingen ontvangen. Gebruik de los verkrijgbare draagbare,
KV-C1001 TV-tuner voor ontvangst van televisie-uitzendingen.
ENGLISH
DEUTSCH
FRANÇAIS
NEDERLANDS
For installation and connections, refer to the separate manual.
Für den Einbau und die Anschlüsse siehe das eigenständige Handbuch.
Pour l’installation et les raccordements, référez-vous au manuel séparé.
Bijzonderheden over de installatie en aansluiting van het apparaat vindt u in de desbetreffende handleiding.
INSTRUCTIONS
BEDIENUNGSANLEITUNG
MANUEL D’INSTRUCTIONS
GEBRUIKSAANWIJZING
LVT1341-001B
[E]
Page 2
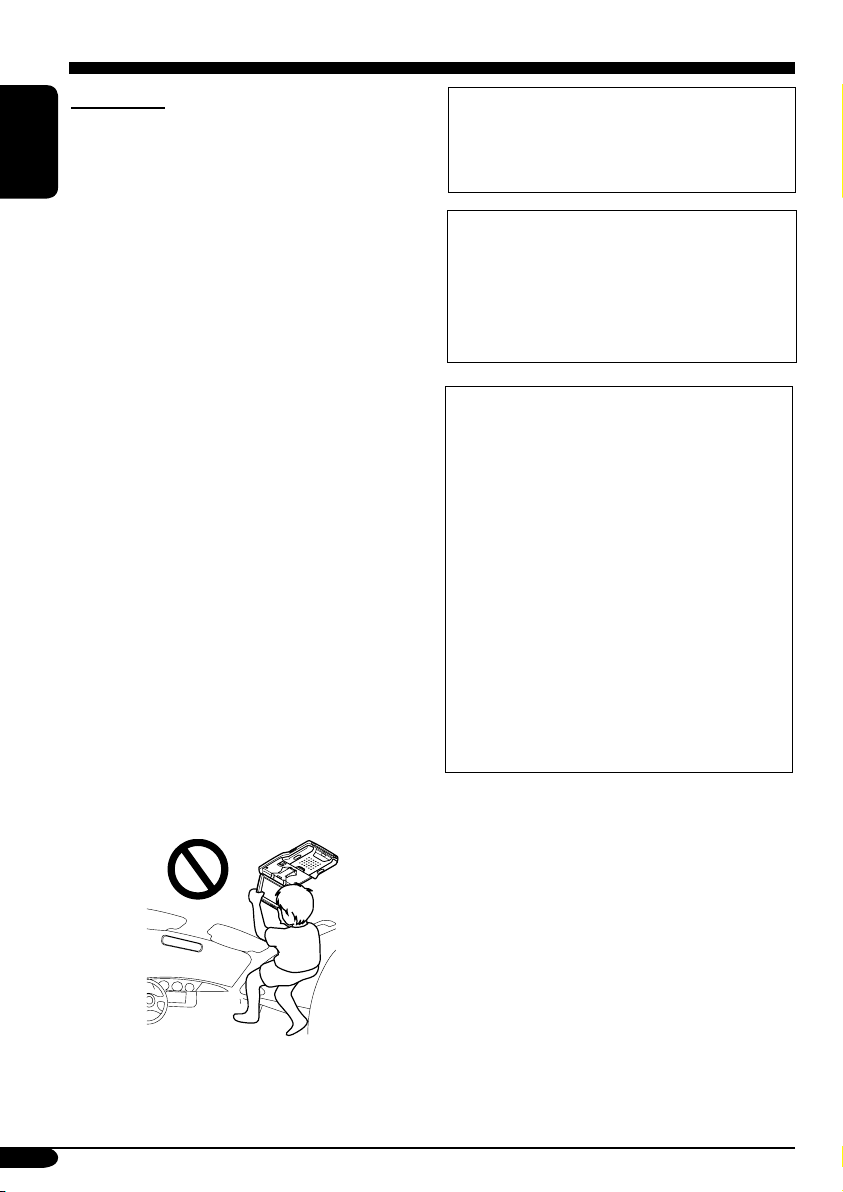
WARNINGS
• DO NOT INSTALL THE MONITOR IN A
LOCATION WHICH OBSTRUCTS DRIVING,
VISIBILITY, SAFETY DEVICE FUNCTION
SUCH AS AIR BAGS OR WHICH IS
ENGLISH
PROHIBITED BY APPLICABLE LAWS AND
REGULATIONS.
• There may be legal regulations defining the
permissible installation locations for the monitor
which differ by country or by state. Be sure
to install the monitor in a correct location
according to such laws.
• The driver must not operate the monitor while
driving.
* Stop your vehicle in a safe location when
operating the monitor.
• The driver must not watch the television or
playback pictures while driving.
If the driver does it while driving, it may lead to
carelessness and cause an accident.
• Keep the monitor at an appropriate sound level
while driving.
Driving with the sound at a level that prevents
you from hearing sounds outside of and around
the vehicle may cause an accident.
• Be sure not to let the monitor fall or be strongly
impacted since this may cause a malfunction or
fire.
• Do not use the monitor with the engine off.
Doing so with the engine off will consume
battery power and may prevent the engine from
starting.
• When not in use, close the liquid crystal panel
and store it into the compartment.
• Do not touch the surface of the liquid crystal
panel directly.
• Do not hang any object on the monitor or hang
down, as this may damage the monitor.
CAUTION:
This monitor should be used on DC 12 V only. To
prevent electric shocks and fire hazards, DO NOT
use any other power source.
Installation requires some special
knowledge.
Do not install the monitor yourself.
Consult a dealer having special
knowledge of this kind for safe and
reliable installation.
CAUTIONS on the supplied headphones
—KS-HP2:
• DO NOT leave the headphones in a place
exposed to direct sunlight for a long
time, such as a dashboard, as they may be
damaged.
• Keep the headphones away from a cellular
phone to avoid interference.
• DO NOT turn off the power with the
volume set at high level, as the sudden
blast of sound can damage your hearing
and/or headphones next time you use the
headphones.
• If you experience a ringing in your
ears, reduce volume or stop using the
headphones.
2
Page 3
Thank you for purchasing a JVC product.
Please read all instructions carefully before operation, to ensure your complete understanding and to
obtain the best possible performance from the unit.
IMPORTANT FOR LASER PRODUCTS
1. CLASS 1 LASER PRODUCT
2. CAUTION: Do not open the top cover. There are no user serviceable parts inside the unit; leave
all servicing to qualified service personnel.
3. CAUTION: Visible and invisible laser radiation when open and interlock failed or defeated.
Avoid direct exposure to beam.
4. REPRODUCTION OF LABEL: CAUTION LABEL, PLACED OUTSIDE THE UNIT.
ENGLISH
This product incorporates copyright
protection technology that is protected
by U.S. patents and other intellectual
property rights. Use of this copyright
protection technology must be authorized
by Macrovision, and is intended for home
and other limited viewing uses only unless
otherwise authorized by Macrovision.
Reverse engineering or disassembly is
prohibited.
Caution on volume setting:
Discs produce very little noise compared
with other sources. Lower the volume
before playing a disc to avoid damaging
the speakers by the sudden increase of the
output level.
3
Page 4
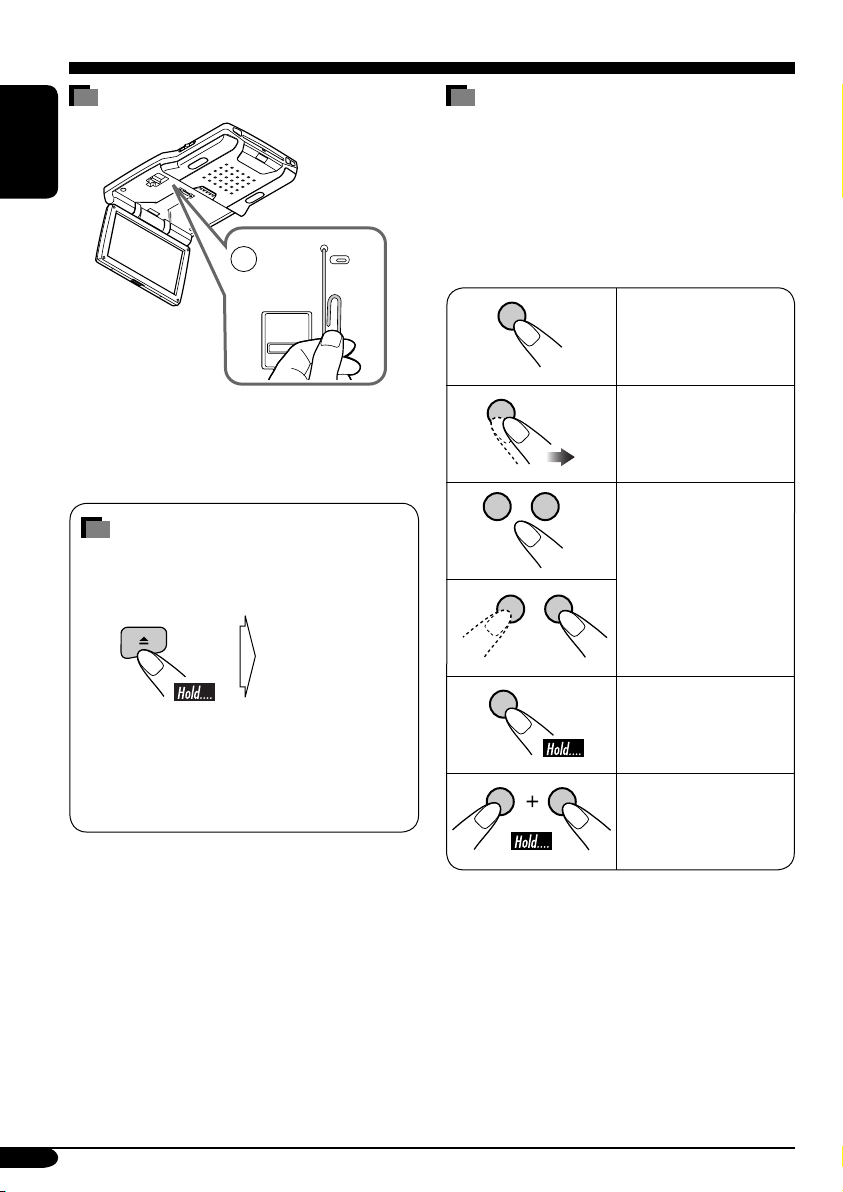
How to reset your monitor
ENGLISH
This will reset the microcomputer. Your preset
adjustments will also be erased.
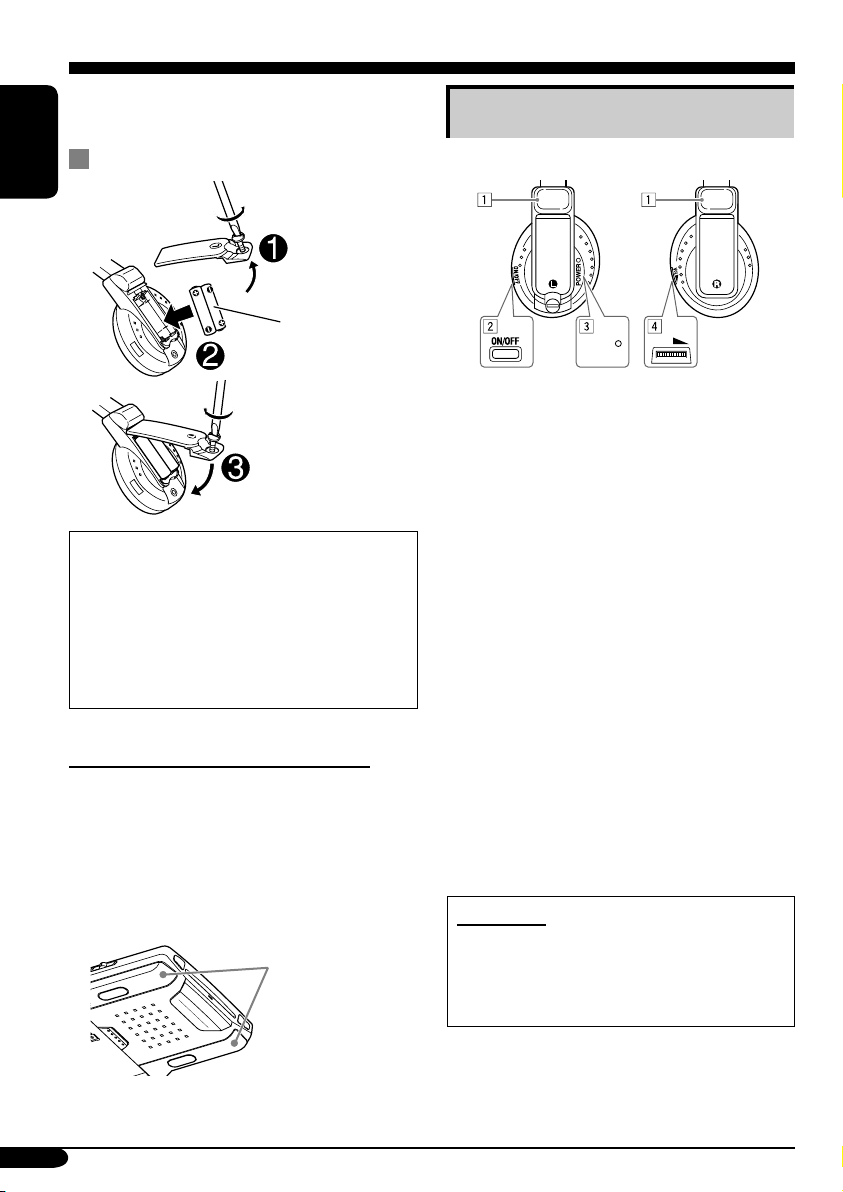
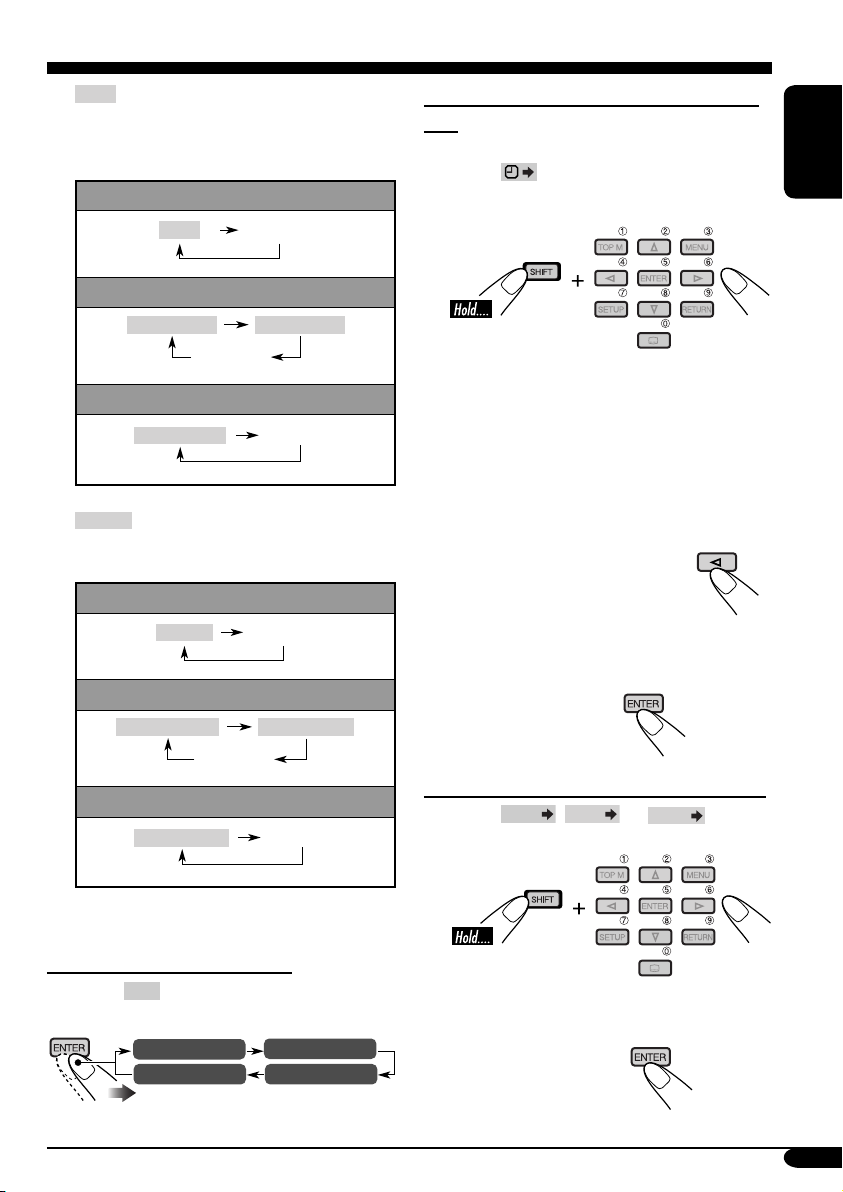
How to forcibly eject a disc
If a disc cannot be recognized by the monitor
or cannot be ejected...
Monitor
The disc comes
out.
How to read this manual
The following methods are used to make the
explanations simple and easy-to-understand:
• Some related tips and notes are explained in
“More about this monitor” (see pages
33 – 35).
• Button operations are mainly explained with
the illustrations as follows:
Press briefly.
Press repeatedly.
Press either one.
(for about 5 seconds
while power is on)
• If this does not work, reset your monitor.
• Be careful not to drop the disc when it
ejects.
4
Press and hold until
your desired response
begins.
Press and hold both
buttons at the same
time.
Page 5

Contents
How to reset your monitor ..................... 4
How to forcibly eject a disc ................... 4
How to read this manual ........................ 4
Precautions .................................... 6
Widescreen monitor ....................... 7
Parts identification ................................. 7
Remote controller — RM-RK230
Main elements and features ................... 8
Headphones — KS-HP2
Main elements and features ................... 10
Basic operations
.................... 10
............................. 11
....... 8
Adjustments .................................. 13
Using the monitor menu ........................ 13
Changing the aspect ratio ...................... 15
Playable discs ................................ 17
Disc operations .............................. 18
Playing a disc ................................. 18
Starting playback ................................... 18
Basic operations ..................................... 19
DVD/VCD/JPEG special functions ... 21
Selecting audio languages ..................... 21
Selecting subtitles .................................. 21
Selecting the multi-angle views ............. 21
Disc menu operations ............................ 22
Zoom in .................................................. 22
On-Screen disc operations ............... 23
Basic on-screen bar operations .............. 24
Basic control screen operations ............. 26
List screen operations ............................ 27
DVD setup menu ............................ 28
Basic setting procedure .......................... 28
Maintenance .................................. 31
Language codes .............................. 32
More about this monitor ................. 33
Troubleshooting ............................. 37
Specifications ................................. 39
ENGLISH
For safety....
• Do not raise the volume level too much, as
this will block outside sounds, making driving
dangerous.
• Stop the car before performing any
complicated operations.
Temperature inside the car....
If you have parked the car for a long time in
hot or cold weather, wait until the temperature
in the car becomes normal before operating the
unit.
5
Page 6
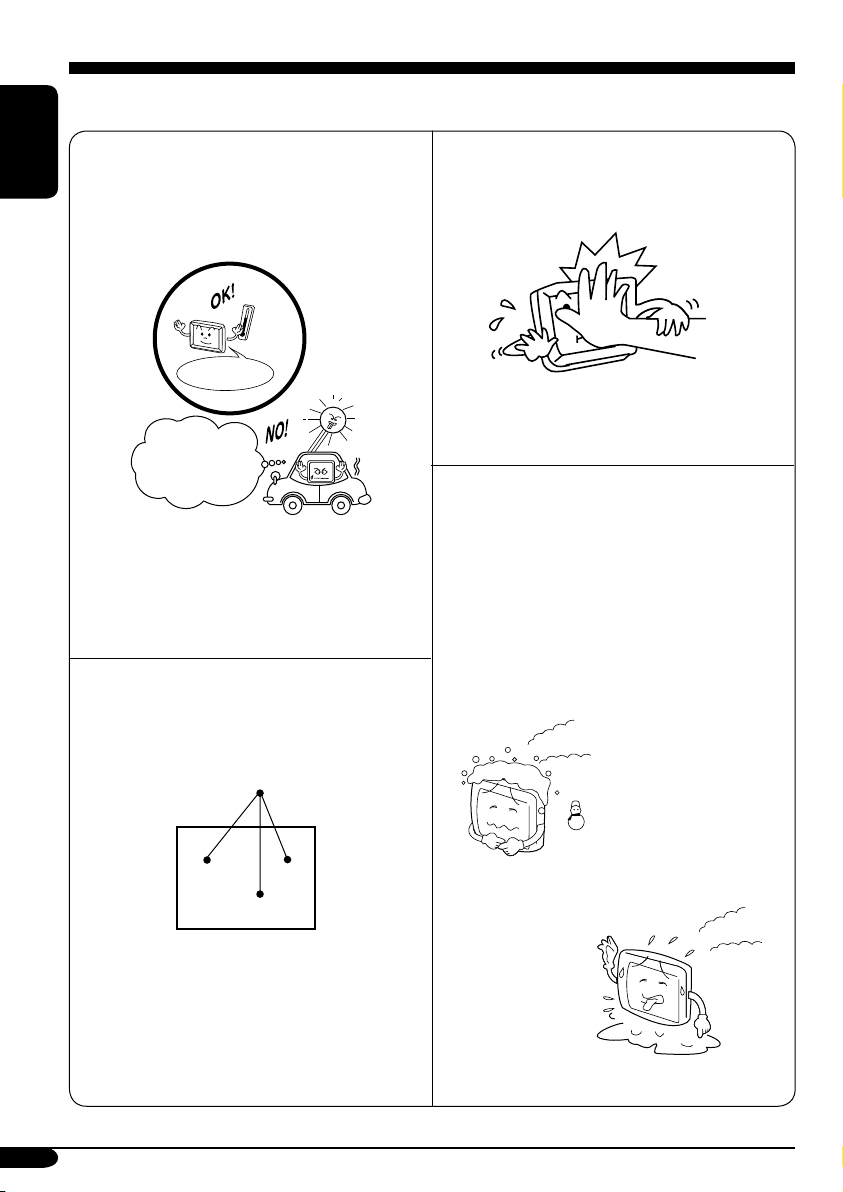
Precautions
Cautions for handling the liquid crystal panel
Do not expose the liquid crystal panel to direct
sunlight.
ENGLISH
• Storage temperature range: –20°C to +80°C
+80°C
–20°C
–20°C to +80°C
During the summer,
temperatures can
reach as high as
100°C.
When the liquid crystal panel reaches high
temperatures or low temperatures, chemical
changes occur within the liquid crystal panel
which may cause it to malfunction.
The red spots, blue spots and green spots on
the panel surface are a normal characteristic of
liquid crystal panels, and not a problem.
Do not drop the liquid crystal panel or strike
it sharply.
When the temperature is very cold or very
hot, the image may not appear clearly or may
move slowly.
The image may not be synchronized with
the sound or the image quality may decline
in such environments. Note that this is not a
malfunction or problem.
• Usage temperature range: 0°C to +40°C
Spots
Note:
The liquid crystal panel is built with very
high precision technology and has at least
99.99% effective image pixels. Be aware that
on 0.01% of the panel there may be missing or
constantly lit pixels.
6
0°C or colder
40°C or hotter
Page 7
Widescreen monitor
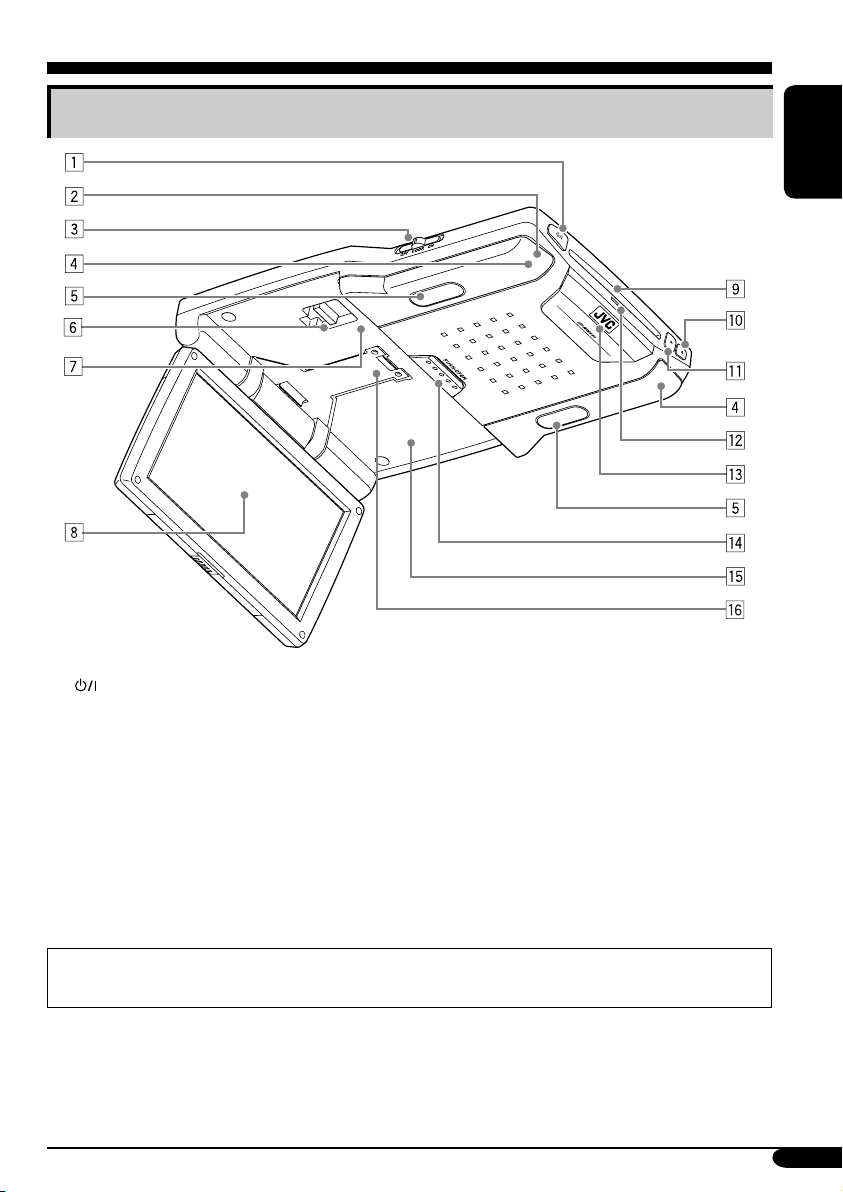
Parts identification
ENGLISH
1 (standby/on) buttons
• Turns on the power if pressed.
• Turns off the power if pressed and held.
2 Remote sensor
3 Dome light switch
• See “To activate the door sensor” on page
12.
4 IR transmitters
5 Dome lights
6 Arm lock lever
7 Reset button
When you watch the screen at an angle, the picture might not be clear. This is not a malfunction.
The finest picture can be seen when you watch the screen straight-on.
8 Screen (Liquid crystal panel)
9 Disc loading slot
p 0 (eject) button
q 3 (play) button
w Disc loading lamp
e White LED
r PUSH-OPEN button
t Screen compartment
y Screen arm
7
Page 8
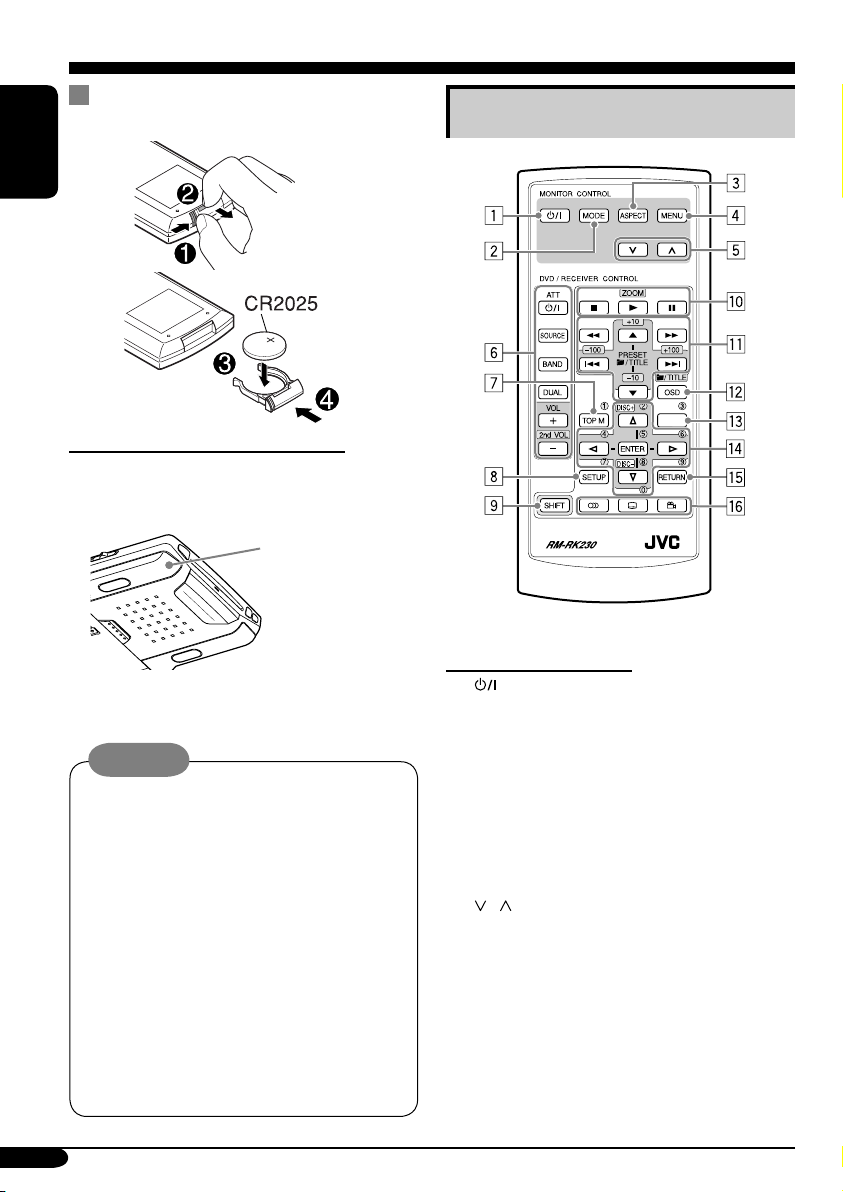
Remote controller — RM-RK230
Installing the lithium coin battery
(CR2025)
ENGLISH
Before using the remote controller:
• Aim the remote controller directly at the
remote sensor on the monitor. Make sure
there is no obstacle in between.
Remote sensor
• Do not expose the remote sensor to strong
light (direct sunlight or artificial lighting).
Warning:
• Do not install any battery other than
CR2025 or its equivalent; otherwise, it
may explode.
• Store the battery in a place where children
cannot reach to avoid risk of accident.
• To prevent the battery from over-heating,
cracking, or starting a fire:
– Do not recharge, short, disassemble, or
heat the battery or dispose of it in a fire.
– Do not leave the battery with other
metallic materials.
– Do not poke the battery with tweezers or
similar tools.
– Wrap the battery with tape and insulate
when throwing away or saving it.
Main elements and features
MENU
MONITOR CONTROL
1
(standby/on) button
• Turns on the power if pressed.
• Turns off the power if pressed and held.
2 MODE button
• Selects the playback source.
3 ASPECT button
• Changes the aspect ratio of the screen.
4 MENU button
• Calls up the menu, then selects the
adjustable menu items.
5
/ buttons
• Adjust the level of the selected item or
select an appropriate setting for selected
item.
8
Page 9
DVD/RECEIVER CONTROL
6 Receiver control buttons*
1
• (standby/on attenuator) button
• SOURCE button
• BAND button
• DUAL button
• VOL + / – (2nd VOL + / –) buttons
7 TOP M (menu) button*
2
• Displays the DVD and VCD*3 disc menu.
8 SETUP button*
2
9 SHIFT button
p Disc basic operation buttons
7 (stop), 3 (play), 8 (pause)
• 3 (play) button functions as ZOOM
button when pressed with SHIFT button.
q Advanced disc operation buttons
•
/TITLE 5 / ∞*
4
– Select the titles (for DVD) or folders
(for MP3/WMA/JPEG)*
• 4 / ¢ (reverse skip/forward skip)*
5
.
6
• 1 / ¡ (reverse search/forward
search)*
7
w OSD button
• Displays the on-screen bar.
• Also functions as the
/TITLE button
when pressed with SHIFT button.
– You can directly select folders (for
MP3/WMA/JPEG) or titles (for DVD)
using the number buttons (see right
column).
e MENU button*
2
• Displays the DVD and VCD*3 disc menu.
r Menu operation buttons*
2
• Cursor (% , fi , @ , #) and ENTER
t RETURN button*
2
y DVD/VCD special function buttons
• DVD/VCD:
• DVD:
(audio)
(subtitle), (angle)
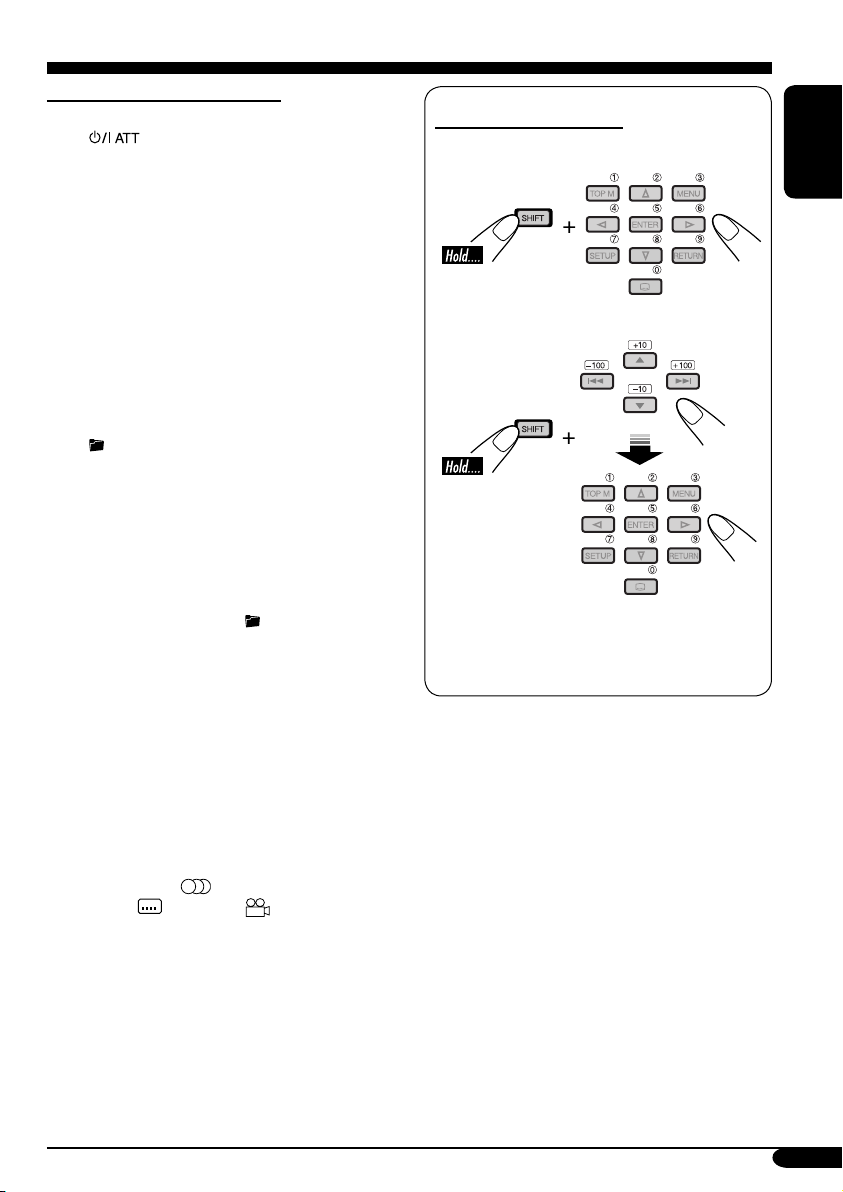
How to select a number
• To select a number from 0 – 9:
ENGLISH
• To select a number greater than 9:
• +100/–100 buttons used only for searching
MP3/WMA/JPEG tracks number greater
than 99.
1
*
Controllable only if your car receiver which
is connected to this monitor is one of the
JVC receivers.
2
*
These buttons function as the number
buttons when pressed with SHIFT button.
3
*
Only when PBC is not in use.
4
These buttons do not function as PRESET
*
5 / ∞.
5
*
These buttons function as the +10/–10
buttons when pressed with SHIFT button.
6
*
These buttons function as the +100/–100
buttons when pressed with SHIFT button.
7
*
Not used for MP3/WMA/JPEG operations.
9
Page 10
Headphones — KS-HP2
You can listen to the playback sounds with
cordless headphones—KS-HP2.
Main elements and features
Installing the batteries
ENGLISH
Batteries (R03/AAA)
— supplied only for
initial setup purpose
CAUTIONS:
• The supplied batteries are not rechargeable.
DO NOT recharge them; otherwise, battery
leakage or explosion may result.
• Insert the batteries with the correct polarity
“+” and “–” to prevent the battery leakage
or explosion.
Left side Right side
POWER
1 IR sensors
• DO NOT cover the IR sensors, as
reception will become poor.
2 ON/OFF button
• The power automatically shuts off in the
following cases:
– The headphones are used for about 4
hours.
– No signal is received for about 4
minutes.
• You can turn on the power again by
pressing the button.
3 POWER lamp
4 Volume control
VOL
Before using the cordless headphones:
The headphones give best results when used
within about 2 m from the transmitter.
These headphones need to receive infrared (IR)
signals sent from IR transmitters on the monitor.
Therefore, if you use the headphones where the
signals cannot be received in a straight line of
sight, noises may be generated.
IR transmitters
10
Playback sounds are transmitted through IR
transmitters to the cordless headphones.
When using the headphones, set the monitor
menu item “IR” to “ON.” (See page 14.)
WARNING:
DO NOT use the headphones while driving.
Shutting out all outside sounds while driving
is dangerous and may result in a traffic
accident.
Page 11
Basic operations
Preparation
Before operating the unit, make sure that all external components are correctly connected and
installed.
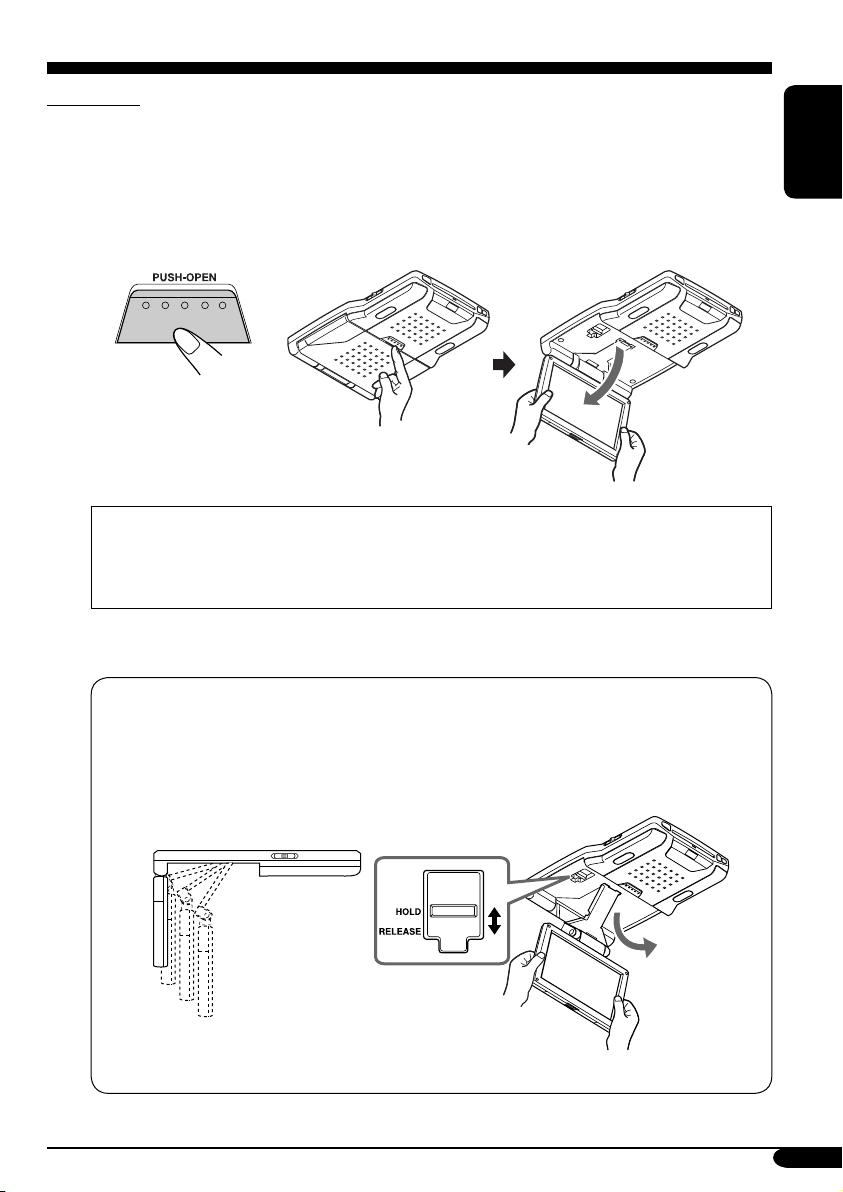
1 Open the liquid crystal panel.
Press PUSH-OPEN until the liquid crystal panel is unlocked, then open the liquid crystal
panel by both hands.
CAUTION:
• When not in use, close the liquid crystal panel and store it into the compartment;
otherwise it may obstruct the visibility through the rearview mirror.
• Do not touch the surface of the liquid crystal panel directly.
When closing the liquid crystal panel, store it in the screen compartment until it is locked.
To change the monitor position
You can select a monitor position from the four positions.
1 Slide the arm lock lever to RELEASE, then pull down or push up the monitor.
2 Slide the arm lock lever to HOLD, then remove the screen arm to the nearest locking
position.
ENGLISH
When closing the liquid crystal panel, push up the monitor to the highest position.
To be continued....
11
Page 12
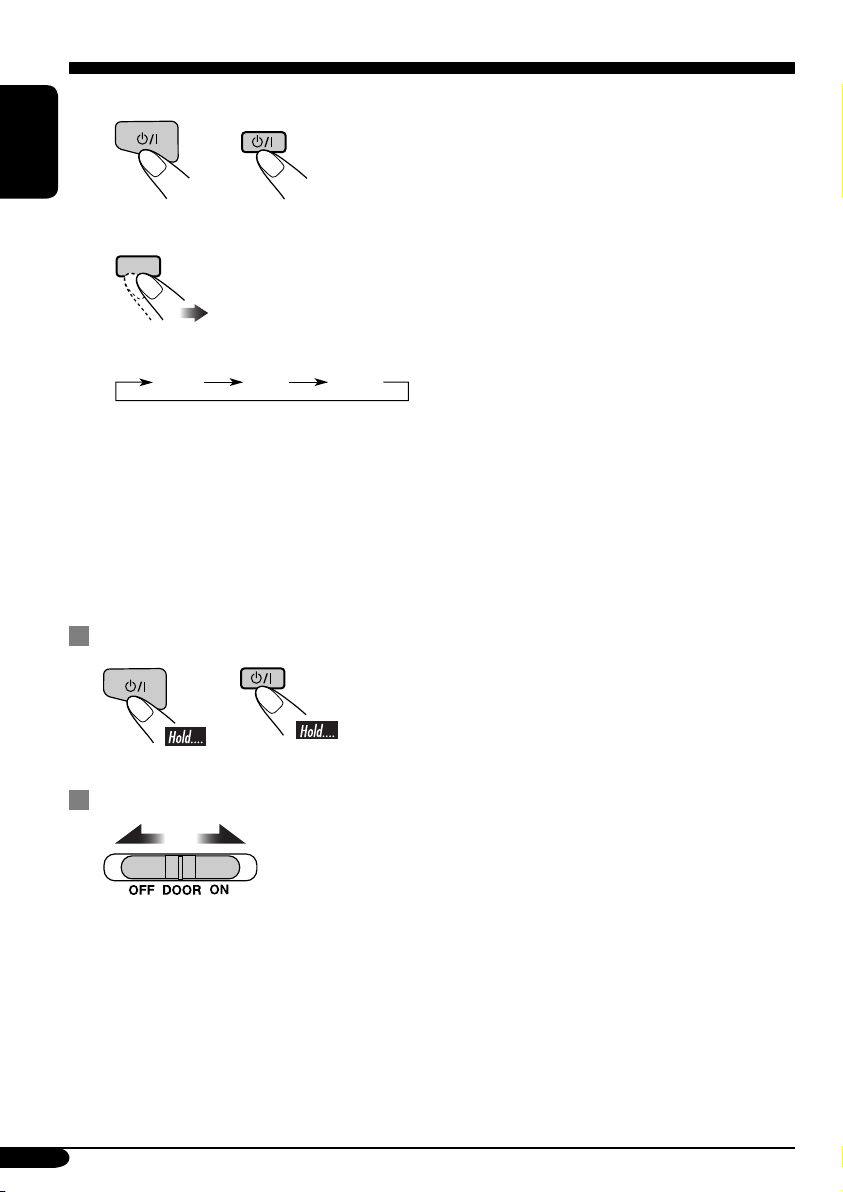
2 Turn on the power.
ENGLISH
Monitor Remote control
3 Select the playback source.
MODE
Each time you press the button, the playback source changes as follows:
AV 1 AV 2DISC
4 Operate the playback source you selected.
To operate the built-in DVD player, see “Disc operations” on page 18.
To operate the external components, refer to the manuals for the connected components.
5 Adjust the volume on the car receiver.
• When using the headphones, adjust its volume level.
To turn off the power
• When using the headphones, turn off the power after
turning off the headphones.
Monitor Remote control
To activate the door sensor
• OFF: Turns off the dome lights.
• DOOR: Activates the door sensor which turns on the dome lights when a door is open.
• ON: Turns on the dome lights.
12
Page 13

Adjustments
Using the monitor menu
You can make your own display or sound adjustments using the menu.
• For the adjustable items, see the next page.
The Remote controller—RM-RK230 has two MENU buttons.
In this section, using MENU button at MONITOR CONTROL.
Basic procedure
1
Call up the menu.
BRIGHT
CONTRAST
TINT
COLOR
IR ON
DIMMER
DVD SURROUND OFF
NTSC / PAL PAL
WHITE LED ON
Current menu item
Menu selection goes off if other operations are done or no operation is done for about 5
seconds.
2 Select an item you want to adjust.
MENU
ENGLISH
3 Adjust the level of the selected item (or select an appropriate setting for the
selected item).
Not used for changing the “DVD SURROUND” setting.
4 Exit from the menu.
Press the button repeatedly until the menu is erased.
MENU
13
Page 14

Adjustable items on the monitor menu
BRIGHT:
ENGLISH
CONTRAST:
TINT:
COLOR:
IR*:
DIMMER:
DVD SURROUND:
NTSC/PAL:
WHITE LED:
Adjust this if the picture is too bright or too dark.
• Adjustable range: –10 to +11
• Initial level: 0 (center)
Control the degree of difference between the lightest and darkest parts of
the picture.
• Adjustable range: –10 to +11
• Initial level: 0 (center)
Adjust this if the human skin color is unnatural.
• Adjustable range: –10 to +11
• Initial level: 0 (center)
Adjust the color of the picture—lighter or darker.
• Adjustable range: –10 to +11
• Initial level: 0 (center)
Set to “ON” when you listen to the playback sounds using the cordless
headphones.
• Selectable settings: ON, OFF
• Initial setting: ON
Adjust the light of the screen and the white LED when you turn on the
headlights.
• Adjustable range: –5 to +5
• Initial level: 0 (center)
This function allows you to get a surround effect from your stereo
system. When connecting a receiver incompatible with the multi-channel
sources, you can enjoy the virtual surround sound with your 2-channel
stereo system.
If you turn off the monitor, the setting is initialized.
• Selectable settings: OFF, ACTION, DRAMA, THEATER
– ACTION: Suitable for action movies and sports programs.
– DRAMA: Creates natural and warm sound. Enjoy movies in a
relaxed mood.
– THEATER: Enjoy sound effects like in a major theater.
• Initial setting: OFF
Select the color system to match to the incoming signals.
• Selectable settings: PAL, NTSC
• Initial setting: PAL
Turn off then on the power to activate a new setting when you change the
setting.
Light on or off the white LED when you turn on the monitor.
• Selectable settings: ON, OFF
• Initial setting: ON
* Turn off the headphones before changing the “IR” setting.
14
Page 15
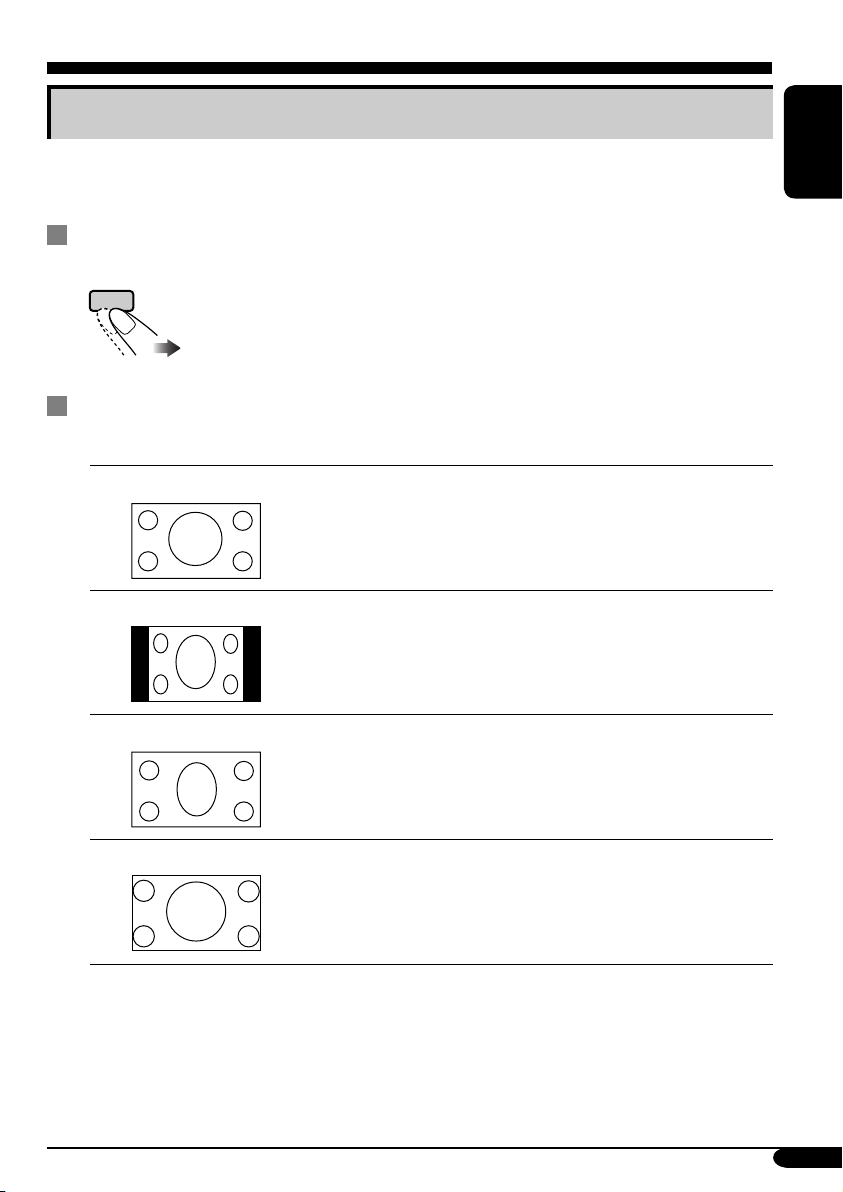
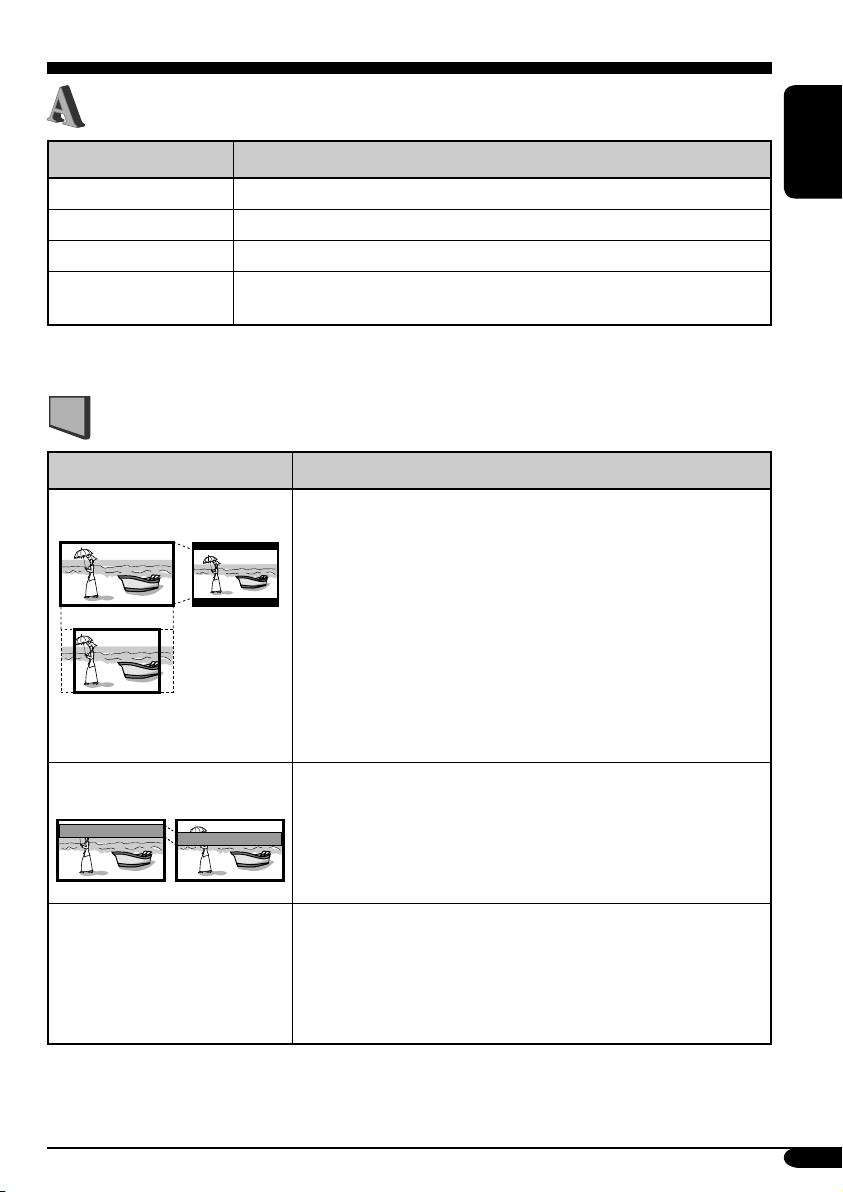
Changing the aspect ratio
You can select an appropriate aspect ratio for the playback video signals.
Basic procedure
Each time you press the button, aspect ratio change.
ASPECT
Changeable aspect ratio
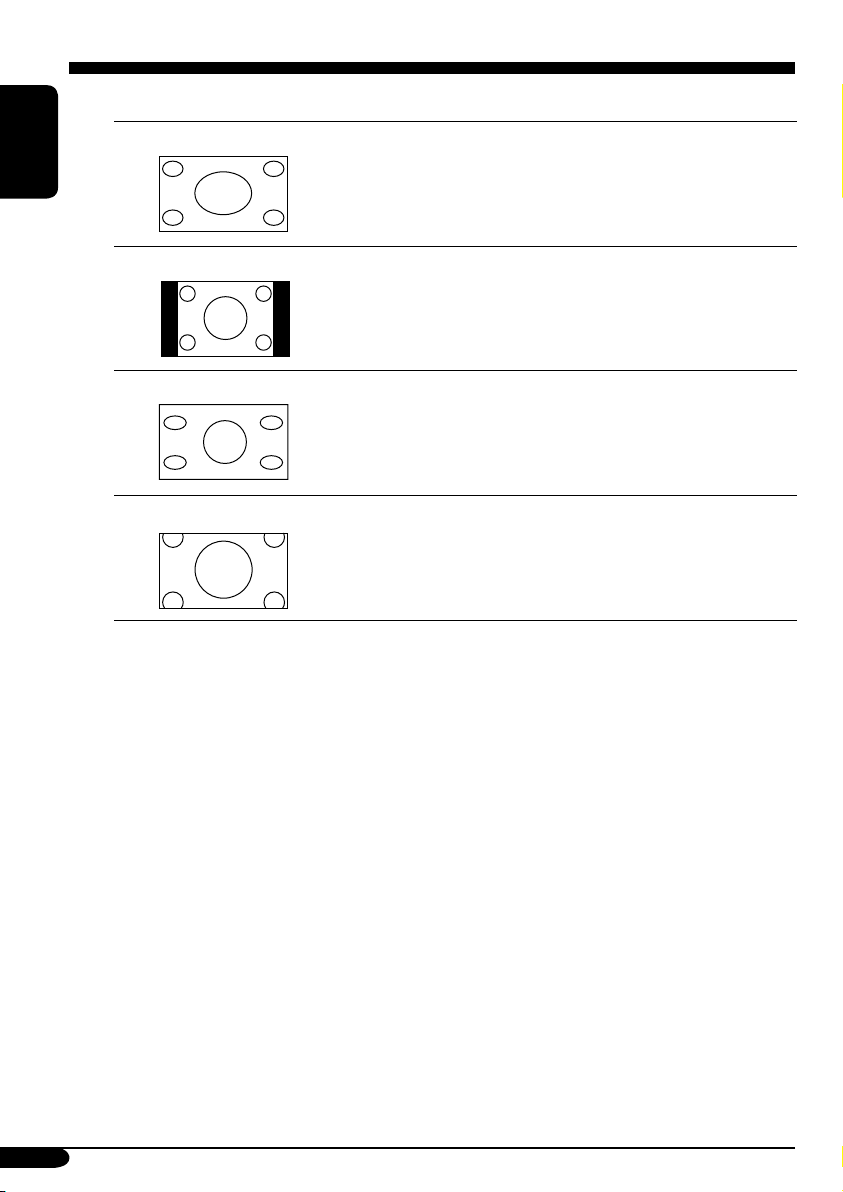
When incoming 16:9 video signal:
FULL:
NORMAL:
JUST:
Pictures are fully shown on the screen.
• In some cases, the black bars may be shown at the top and
bottom sides of the screen.
Pictures are reduced horizontally.
• The black bars will be shown at the left and right sides of
the screen.
• In some cases, the black bars may be shown also at the top
and bottom sides of the screen.
The middle of pictures are reduced horizontally, and the left
and right side of the picture enlarged horizontally.
• In some cases, the black bars may be shown at the top and
bottom sides of the screen.
ENGLISH
ZOOM:
Pictures are enlarged on the screen so that no black bars will
be shown on the screen. (The entire picture cannot be shown
on the screen.)
To be continued....
15
Page 16
When incoming 4:3 video signal:
FULL:
ENGLISH
NORMAL:
JUST:
ZOOM:
Pictures are enlarged horizontally and are fully shown on the
screen.
Pictures are shown at the center of the screen.
• The black bars will be shown at the left and right sides of
the screen.
Pictures are enlarged horizontally. The extension ratio
increases toward the both sides of the screen.
Pictures are enlarged on the screen so that no black bars will
be shown on the screen. (The entire picture cannot be shown
on the screen.)
16
Page 17
Playable discs
Discs you can play
You can play back the following discs—12 cm
and 8 cm—on the built-in DVD player:
• DVD Video: Recorded in the PAL color
system with Region Code “2” (see below).
– DVD-R/DVD-RW recorded in the DVD
Video format can also be played (see page
33).
• Video CD (VCD)/audio CD
• MP3/WMA/JPEG: Recorded either in CD-
R/CD-RW or DVD-R/DVD-RW/DVD-ROM.
– CD-R/CD-RW: Compliant with ISO 9660
Level 1, ISO 9660 Level 2, Romeo, and
Joliet.
– DVD-R/DVD-RW/DVD-ROM: Compliant
with UDF-Bridge Format*
1
.
On some discs, the actual operations may be
different from what is explained in this manual.
Discs cannot be played back
DVD-Audio, DVD-ROM (data), DVD-RAM,
DVD-R/DVD-RW recorded in the DVD-VR
format, CD-ROM, CD-I (CD-I Ready), Photo
CD, etc.
• Playing back these discs will generate noise
and damage the speakers.
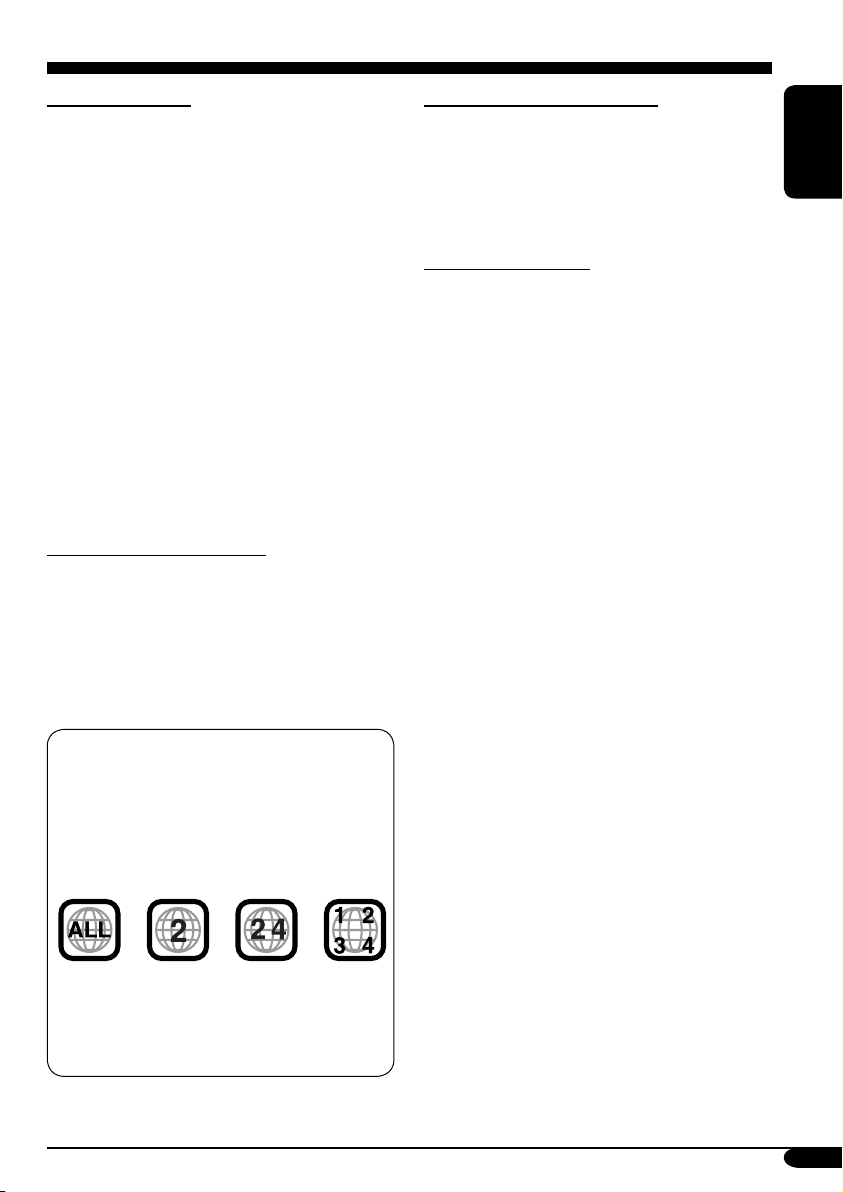
Note on Region Code:
DVD players and DVD Video discs have
their own Region Code numbers. This unit
can only play back DVD discs whose Region
Code numbers include “2.”
Examples:
If you insert a DVD Video disc of an
incorrect Region Code
“REGION CODE ERROR!” appears on the
screen. The disc will eject automatically.
Caution for DualDisc playback
• The Non-DVD side of a “DualDisc” does
not comply with the “Compact Disc Digital
Audio” standard. Therefore, the use of NonDVD side of a DualDisc on this product may
not be recommended.
Digital audio formats
The unit can play back the following digital
audio formats.
Linear PCM: Uncompressed digital audio,
the same format used for CDs and most studio
masters.
Dolby Digital *
developed by Dolby Laboratories, which
enables multi-channel encode to create the
realistic surround sound.
3
DTS *
(Digital Theater Systems):
Compressed digital audio, developed by Digital
Theater Systems, Inc., which enables multichannel like Dolby Digital. As the compression
ratio is lower than for Dolby Digital, it provides
wider dynamic range and better separation.
MPEG Audio: Another compressed digital
audio which also enables multi-channel encode
to create the realistic surround sound. However,
this System downmix the multi-channel signals
into 2 channels (decoded PCM) and play it
back.
1
*
A hybrid file system used to provide
compatibility with ISO 9660 for accessing
any type of files on the disc. (UDF stands for
Universal Disk Format.)
2
*
Manufactured under license from Dolby
Laboratories. “Dolby” and the doubleD symbol are trademarks of Dolby
Laboratories.
3
*
“DTS” and “DTS 2.0 + Digital Out” are
trademarks of Digital Theater Systems, Inc.
“DVD Logo” is a trademark of DVD Format/
Logo Licensing Corporation registered in the
US, Japan and other countries.
2
: Compressed digital audio,
ENGLISH
17
Page 18
Disc operations
Playing a disc
The disc type is automatically detected, and
playback starts automatically (for DVD:
ENGLISH
automatic start depends on its internal program).
If the current disc is an audio CD, CD Text,
MP3/WMA, JPEG, or VCD without PBC,
all tracks will be played repeatedly until you
change the source or eject the disc.
• If a title list or disc menu appears while
playing a DVD or VCD with PBC, see “Disc
menu operations” on page 22.
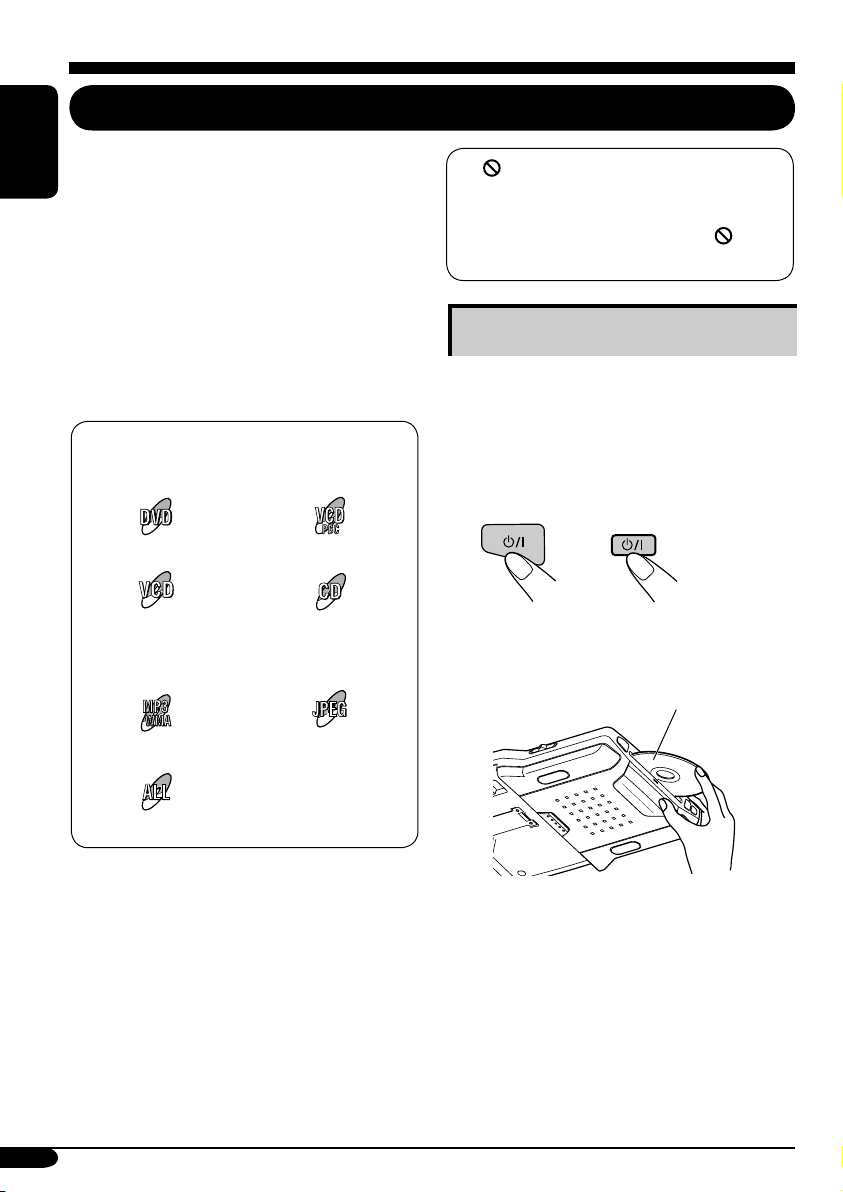
The following marks are used to indicate
the playable discs....
DVD Video Video CD with PBC
Video CD
with/without PBC
Audio CD/
CD Text
If “ ” appears on the monitor when
pressing a button, the disc cannot accept an
operation you have tried to do.
• In some cases, without showing “
operations will not be accepted.
,”
Starting playback
1 Open the liquid crystal panel.
• You can play a disc even if the monitor is
closed.
2 Turn on the power.
Monitor Remote control
3 Insert a disc into the loading slot.
Playback (shining) side facing down
MP3/WMA disc JPEG disc
All discs listed here
Before performing any operations, make
sure the following....
• For DVD playback, you can change the setup
menu setting as you like. (See pages 28 – 30.)
• For DVD/CD playback, using the remote
controller is more attractive. You can enjoy
more functions.
18
• When a disc is inserted into the loading
slot, the power comes on, then “DISC”
is selected as the playback source
automatically.
Page 19
Basic operations
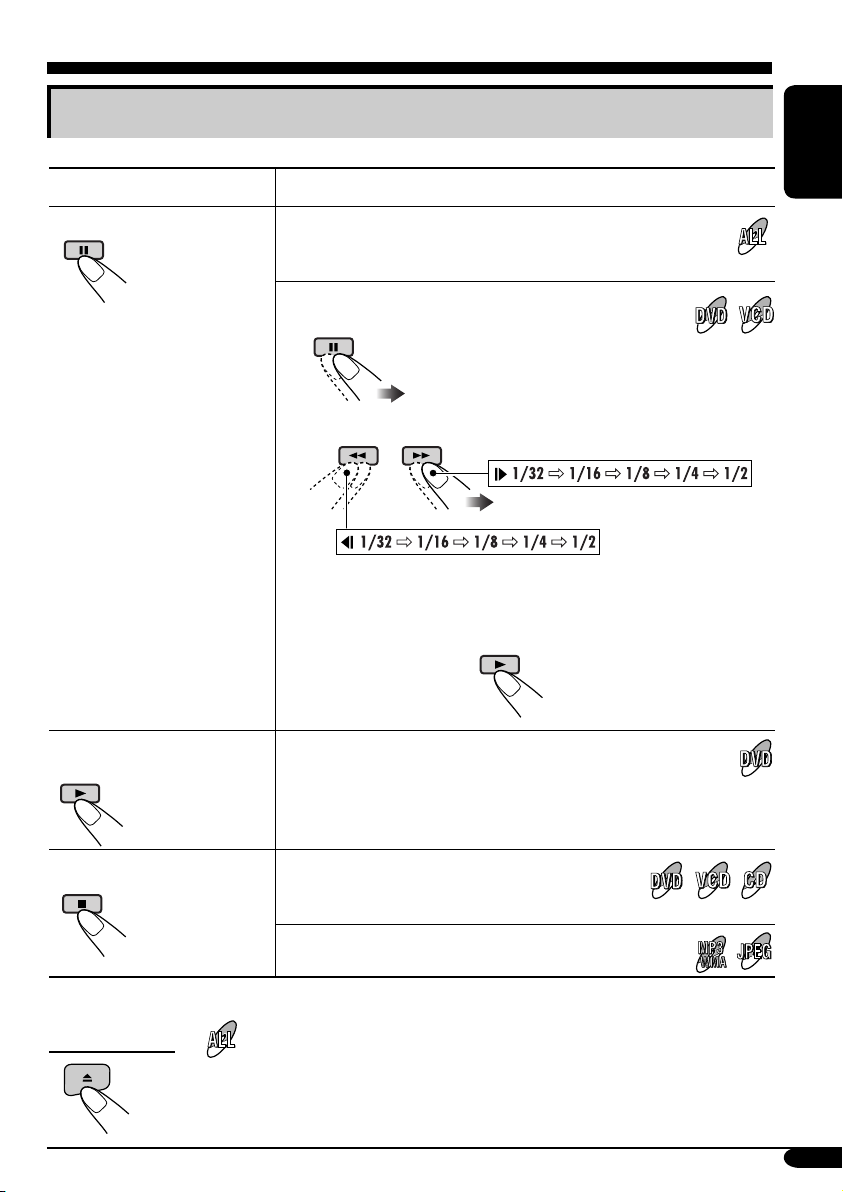
Operations Next operation
To stop play temporarily
To replay the previous
scenes—One Touch Replay
Playback pauses.
• For JPEG discs: pressing ENTER will also pause the
picture on the monitor.
A still picture appears.
A Frame by frame playback
B Slow motion playback
• No sound comes out during Slow Motion Playback.
• When playing a VCD, Reverse Slow Motion Playback is
prohibited.
To resume normal play:
The playback position moves back about 10 seconds before
the current position.
ENGLISH
• This function works only within the same title.
• For some DVDs, this function does not work.
To stop playback
• During play, on-screen guide icons appear on the monitor for a while (see page 35).
When you start playback again, playback
starts from where it has been stopped
(Resume play).
When you start playback again, playback starts from
the beginning of the last playing track.
To eject the disc
You can eject the disc even when the monitor is turned off.
To be continued....
19
Page 20
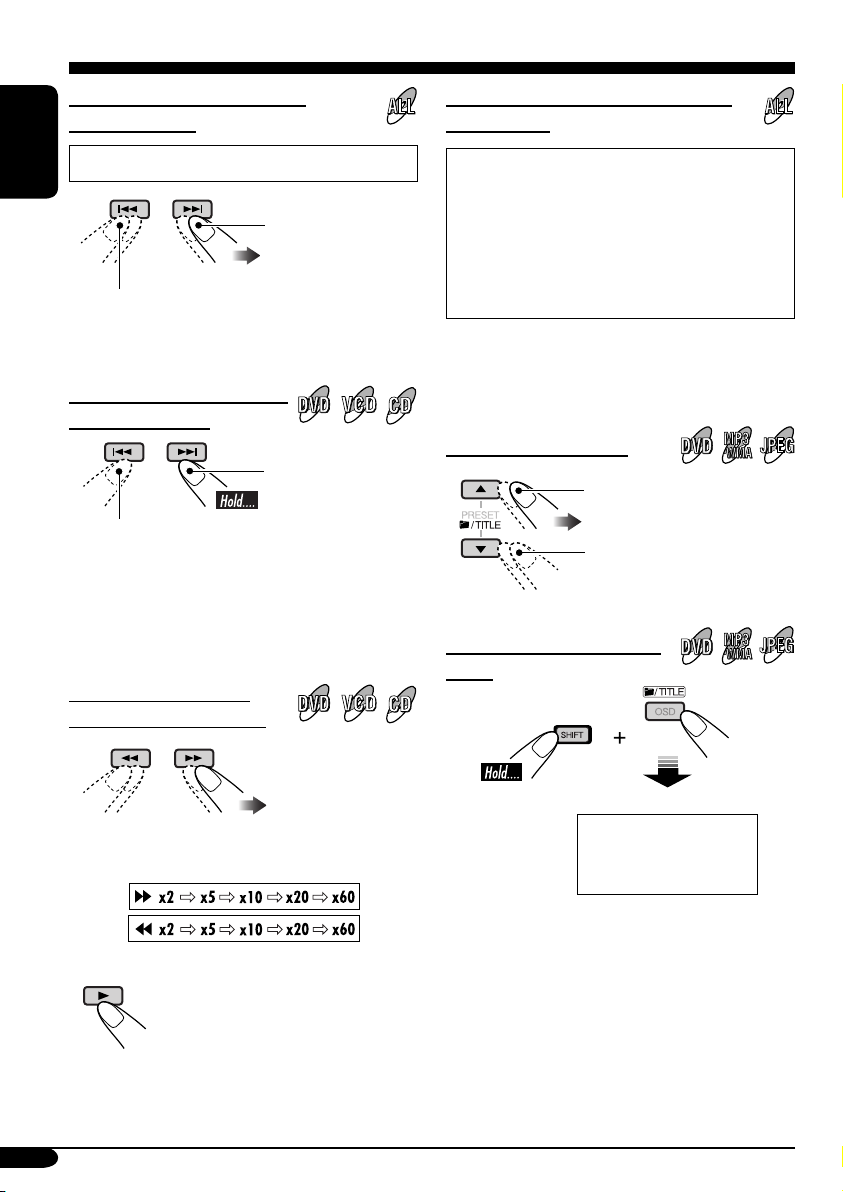
To go to the next or previous
chapters/tracks
To locate a particular title/chapter/
track directly
• For DVD: During play or pause
ENGLISH
To the following
chapters/tracks.
To go back to the beginning of the current
chapter/track, then the previous chapters/tracks.
To fast-forward or reverse
the chapter/track
Fast-forwards.
Reverses.
* The search speed changes to x2 ] x10 for all
discs (DVD, VCD, CD), but the information
shown on the monitor is only for DVD/VCD.
To forward or reverse
search the chapter/track
• For DVD: During play or pause—select a
chapter.
During stop—select a title.
• For VCD: While PBC (see page 22) is not
in use.
• For MP3/WMA/JPEG: Select a track
within the same folder.
Select the number corresponding to the item
you want (see page 9).
To locate a title/folder
To the next title/folder.
To the previous title/folder.
To locate a particular title/
folder
The information shown is only for DVD/VCD:
• To resume normal speed
20
Within 10 seconds,
press the number
buttons (see page 9).
• For MP3/WMA/JPEG discs: To directly
select the folders using the number button(s),
it is required that folders be assigned 2 digit
numbers at the beginning of their folder
names—01, 02, 03, and so on.
Page 21
DVD/VCD/JPEG special functions
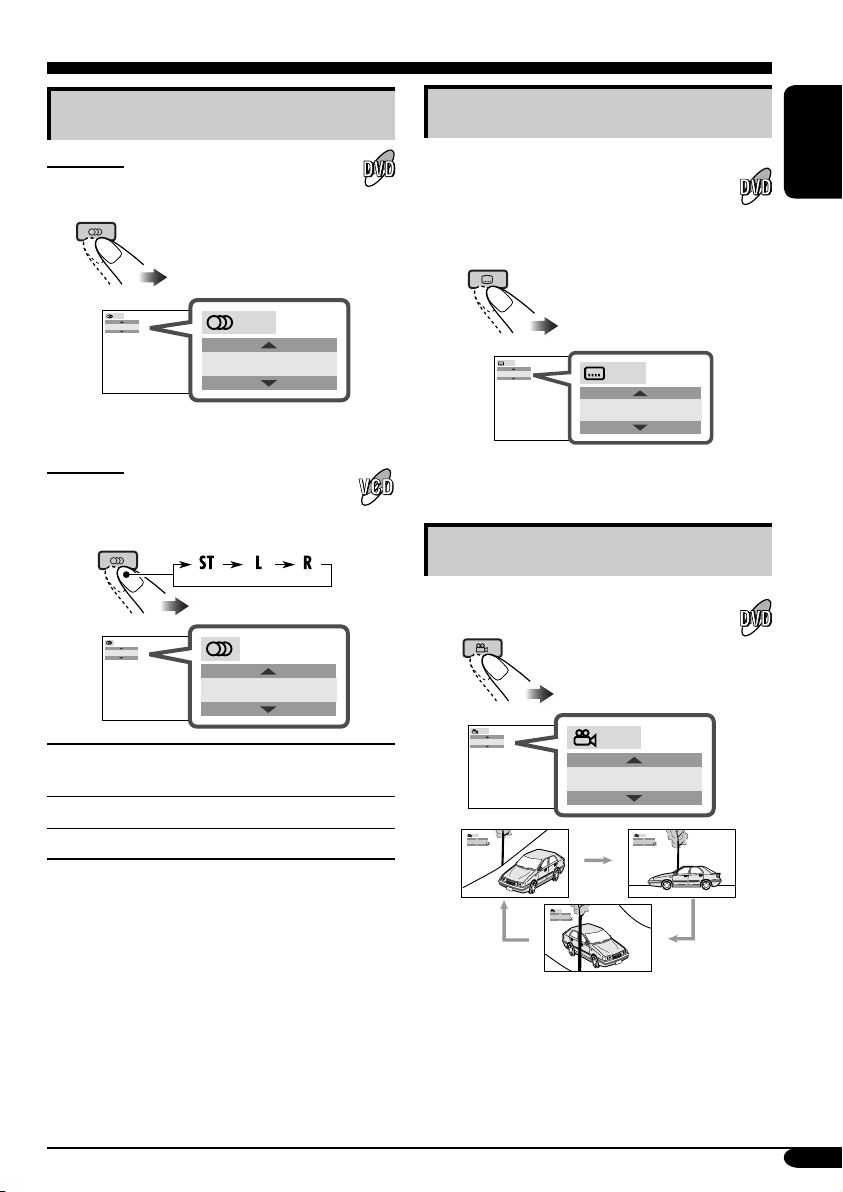
Selecting audio languages
For DVD:
You can select the language to listen to if
the disc has multiple audio languages.
1/3
ENGLISH
Ex.: When the disc has 3 options
For VCD:
You can select the audio channel to
play. (This is convenient when playing a
Karaoke VCD.)
ST
1/3
ENGLISH
ST
Selecting subtitles
You can select the language of the
subtitle to be shown on the monitor.
• You can set the initial subtitle
language using the setup menu (see
page 29).
1/3
ENGLISH
1/3
ENGLISH
Ex.: When the disc has 3 options
Selecting multi-angle views
You can view the same scene at different
angles if the disc has multi-angle views.
ENGLISH
To listen to normal stereo (left/right)
ST:
playback.
To listen to the L (left) audio channel.
L:
To listen to the R (right) audio channel.
R:
• For some DVDs and VCDs, changing the
subtitle language, audio language (or audio
channel) without using the disc menu is
prohibited.
1/3
1
1/3
1
1/3
1
1/3
3
Ex.: When the disc has 3 multi-angle views
1/3
2
21
Page 22

Disc menu operations
Menu-driven playback is possible while playing
back a DVD with menu-driven features or a
ENGLISH
VCD with the PBC (PlayBack Control).
While playing a DVD
1
A title list or disc menu will appear on the
monitor.
Canceling the PBC playback
1
2 Select a track to start normal playback using
the number buttons (see page 9).
To resume the PBC function
2 Select the item you want on the
menu.
Selected item starts playback.
• On some discs, you can also select items
using the corresponding number buttons.
While playing a VCD
• When a list of items is displayed on the
monitor.
• To select a number greater than 9, see “How
to select a number” on page 9.
To return to the previous menus
Zoom in
1
ZOOM 1 ZOOM 2 ZOOM 3 ZOOM 4
ZOOM OFF
• For JPEG disc (effective only when
pausing):
ZOOM 1 ZOOM 2
ZOOM OFF
2 Move the zoomed-in portion.
• For JPEG files:
You cannot move the zoomed-in position
when the entire picture is displayed on the
monitor.
ZOOM 5ZOOM 6
• For some discs, you can also move between
the menus by pressing 4 / ¢.
22
To cancel zoom, select “ZOOM OFF” in
step 1.
Page 23
On-Screen disc operations
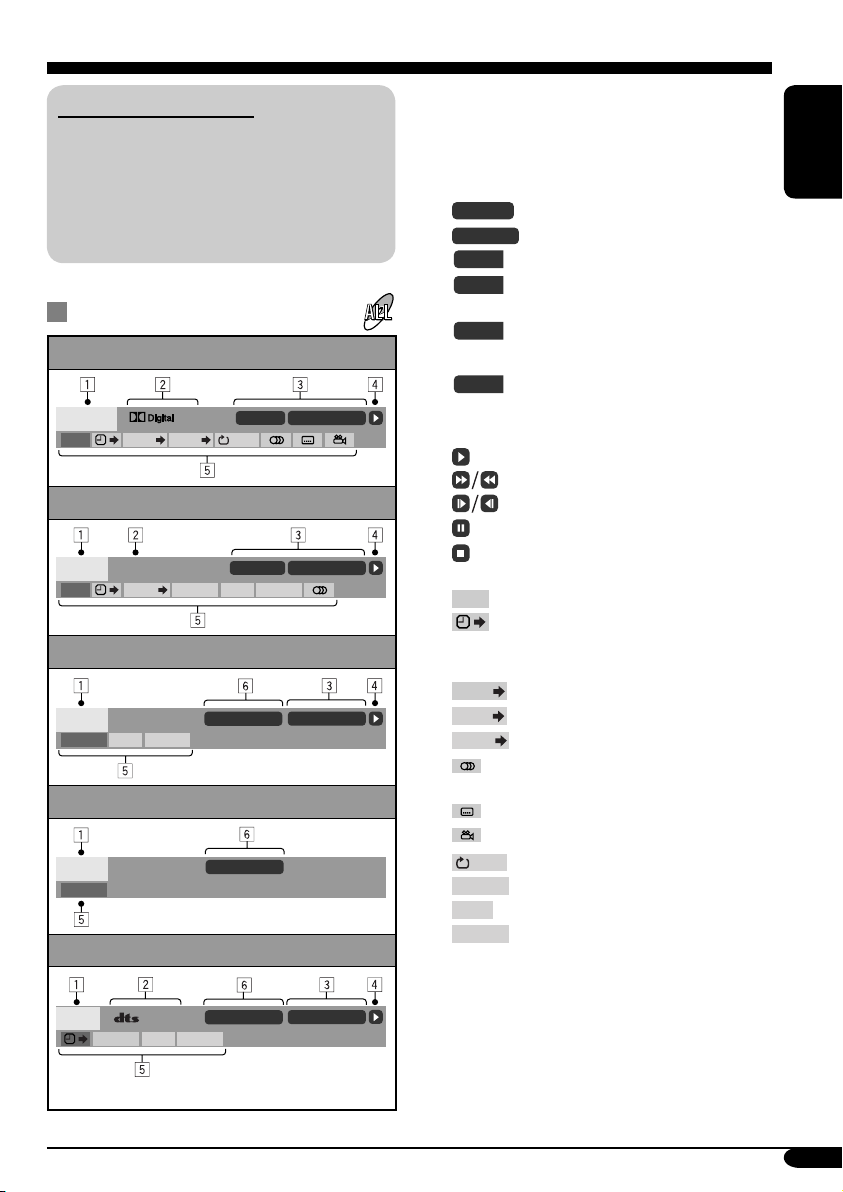
About the On-Screen Bar
You can check the disc information and use
some functions through the on-screen bar.
• For audio CD, CD Text, and MP3/WMA/
JPEG disc you can also use the control
screen and list screen (see pages 26 and
27).
On-Screen bars
DVD
DVD -V
TIME TITLE CHAP
VCD
PBC
VCD
TIME
TRACK REPEAT
MP3/WMA
FILE
REPEAT
RANDOMINTRO
JPEG
FILE
REPEAT
CD Text/audio CD
*
CD
5. 1ch
REPEAT
2ch
RANDOMINTRO
T02-C03 TOTAL 1:25:58
OFF
TRACK 01 TIME 00:36
RANDOMINTRO
REPEAT TRACK
REPEAT FOLDER
REPEAT TRACK
TIME 00:00:36
TIME 00:36
1 Disc type
2 • Audio signal format type (for DVD and
DTS audio CD)
• PBC (only for VCD)
3 Playback information
Current title/chapter
T02-C03
TRACK 01
TOTAL
T. REM
Current track
Elapsed playing time of the disc
Remaining disc time (for VCD)/
remaining title time (for DVD)
TIME
Elapsed playing time of the
current chapter/track
Remaining time of the current
REM
chapter/track
4 Playback condition
Playback
Forward/reverse search
Forward/reverse slow-motion
Pause
Stop
5 Operation icons
Time indication
TIME
Time Search—Enter the elapsed
playing time of the current title
or of the disc.
TITLE
Title Search
CHAP
Chapter Search
TRACK
Track Search
Change the audio language or
audio channel.
Change the subtitle language.
Change the view angle.
Repeat play (for DVD)
OFF
Repeat play (for other discs)
REPEAT
INTRO
Intro play
Random play
RANDOM
6 Current playback mode
ENGLISH
* Only for DTS audio CD
To be continued....
23
Page 24
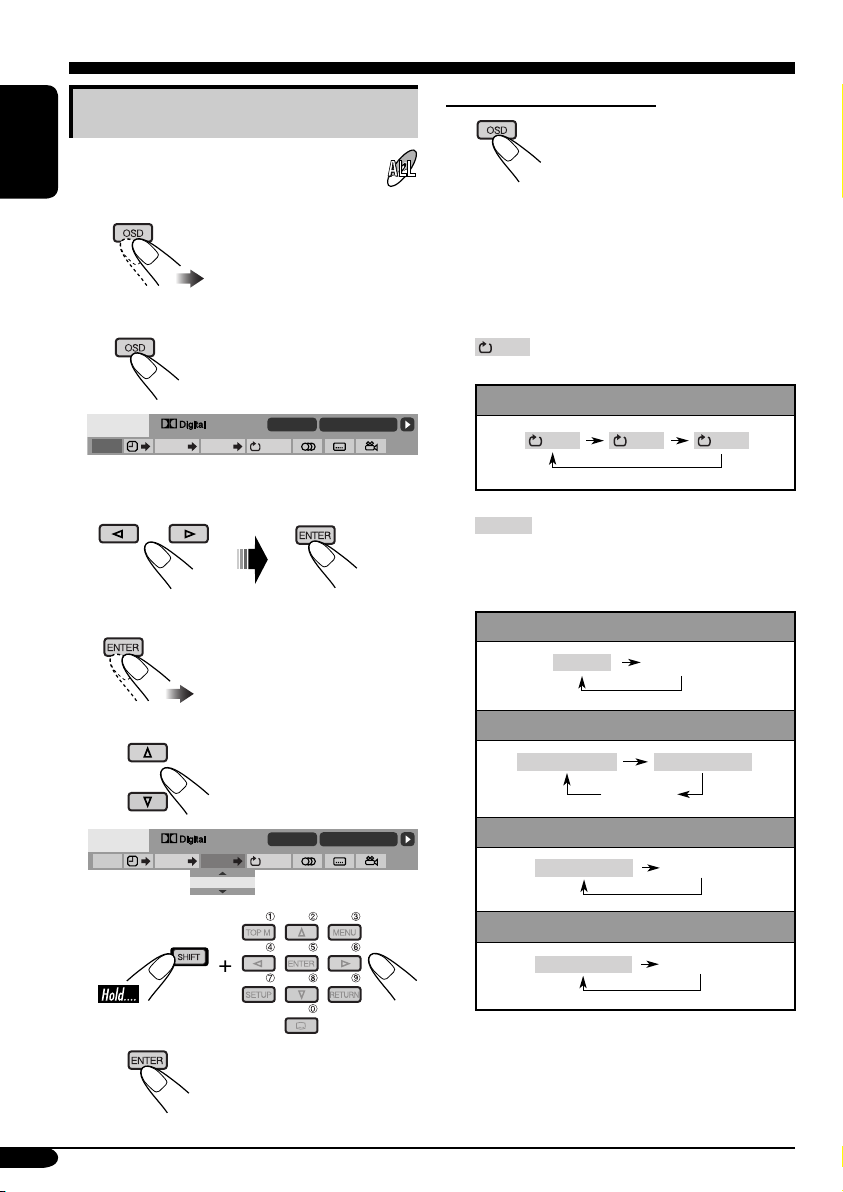
Basic on-screen bar operations
1 Display the on-screen bar.
ENGLISH
• For DVD/VCD:
To erase the on-screen bar
• The on-screen bar for a CD or MP3/WMA/
JPEG disc automatically disappears in a few
seconds after the last operation.
(twice)
• For other discs:
DVD -V
TIME TITLE CHAP
2ch
When a JPEG disc is loaded, skip to step 3.
T02-C03 TOTAL 1:25:58
OFF
2 Select an item.
3 Make a selection.
• If pop-up menu appears....
1
DVD -V
TIME TITLE CHAP
or
2ch
T02-C03 TOTAL 1:25:58
OFF
_ _
• The selectable options for Repeat/Intro/
Random plays:
OFF
You can repeat the current title or
chapter.
DVD (during play or pause):
OFF CHAP TITLE
REPEAT
You can repeat the current track
(except for JPEG) or the tracks in
the current folder (only for MP3/
WMA/JPEG).
VCD (while PBC is not in use):
REPEAT
(Canceled)
MP3/WMA:
REPEAT TRACK
REPEAT FOLDER
(Canceled)
JPEG:
REPEAT FOLDER
(Canceled)
CD Text/audio CD:
REPEAT TRACK
(Canceled)
24
2
Page 25
INTRO
You can play the first 15 seconds
of all tracks in the disc, or in the
current folder (only for MP3/
WMA).
VCD (while PBC is not in use):
INTRO
MP3/WMA:
INTRO TRACK
(Canceled)
CD Text/audio CD:
INTRO TRACK
RANDOM
You can randomly play all tracks
in the disc, or in the current folder
(only for MP3/WMA).
VCD (while PBC is not in use):
RANDOM
(Canceled)
INTRO FOLDER
(Canceled)
(Canceled)
To search for a particular point by playing
time
• For VCD: while PBC is not in use.
1 Select
2 Enter the elapsed playing time of the current
title or of the disc.
Ex.: • To enter 1 (hours): 02 (minutes): 00
• To enter 54 (minutes): 00 (seconds),
• It is always required to enter the hour
digit (even “0” hour), but it is not required
to enter trailing zeros (the last two digits
in the examples above).
• To correct a misentry, press...
• You can also specify the elapsed playing
time by using % / fi / @ / #.
.
(seconds), press 1, 0, 2, 0, then 0.
press 0, 5, 4, 0, then 0.
ENGLISH
MP3/WMA:
RANDOM FOLDER
(Canceled)
RANDOM DISC
CD Text/audio CD:
RANDOM DISC
(Canceled)
Refer also page 24 for the following operations.
To change the time information
1 Select
2 Change the time information.
TIME
.
TIME 0:00:58
REM 0:11:23
TOTAL 1:01:58T. REM 0:35:24
3 Finish the procedure.
To search for a particular title/chapter/track
1 Select
TITLE
2 Enter the number.
• To correct a misentry, press the number
button until the correct number is entered.
3 Finish the procedure.
,
CHAP
, or
TRACK
.
25
Page 26
Basic control screen operations
You can search for and play the desired items
through the control screen.
ENGLISH
For MP3/WMA/CD Text/audio CD:
The control screen automatically appears on the
monitor when you insert a disc.
JPEG:
Press TOP M (menu), MENU, or 7.
Playback stops and the control screen appears.
To select a folder or track
1 Select “Folder” column or “Track” column
on the control screen.
2 Select a folder or track.
• If playback does not start,
press 3 or ENTER.
• For JPEG discs: Pressing ENTER will pause
the selected picture on the monitor.
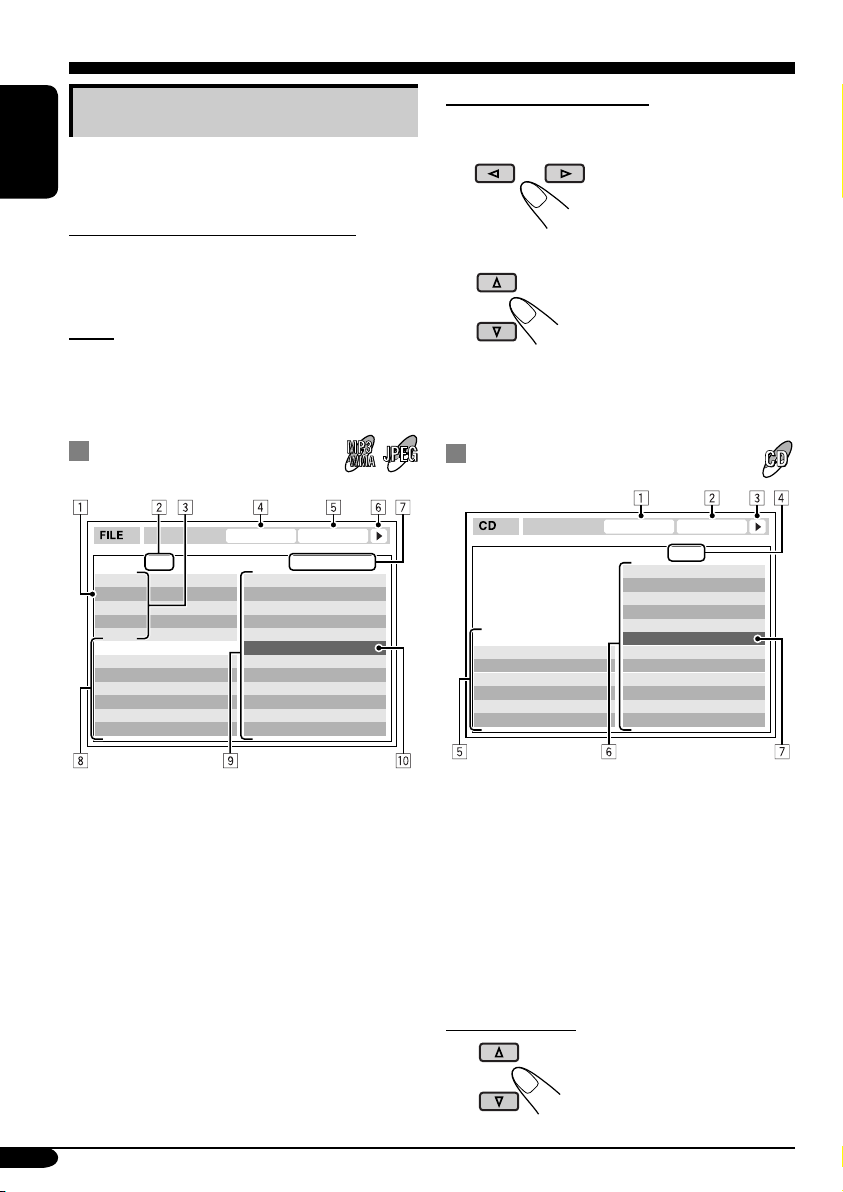
MP3/WMA/JPEG control
screen
TIME 00:00:14REPEAT TRACK
Folder : 2 / 3
01 Music
02 Music
03 Music
Track Information
Album
Weather
Artist
Robert M. Smith
Title
Rain
Ex.: Control screen for MP3/WMA
1 Current folder
2 Current folder number/total folder number
3 Folder list
4 Selected playback mode
5 Elapsed playing time of the current track
(only for MP3/WMA)
6 Operation mode icon (only for MP3/WMA)
‰ (play), 7 (stop), 8 (pause)
7 Current track number/total number of tracks
in the current folder (total number of tracks
on the disc)
8 Track information (only for MP3/WMA)
9 Track list
p Current track (highlighted bar)
Track : 5 / 14 (Total 41)
Cloudy.mp3
Fair.mp3
Fog.mp3
Hail.wma
Indian summer.mp3
Rain.mp3
Shower.mp3
Snow.mp3
Thunder.wma
Typhoon.mp3
Wind.mp3
Winter sky.mp3
CD Text/audio CD control
screen
REPEAT TRACK
Track Information
Album
Four seasons
Artist
Robert M. Smith
Title
Rain
1 Selected playback mode
2 Elapsed playing time of the current track
3 Operation mode icon
‰ (play), 7 (stop), 8 (pause), ¡ (fast-
forward), 1 (reverse)
4 Current track number/total number of tracks
on the disc
5 Track information
6 Track list
7 Current track (highlighted bar)
To select a track
• If playback does not start,
press 3 or ENTER.
TIME 00:14
Track : 5 / 14
Cloudy
Fair
Fog
Hail
Indian summer
Rain
Shower
Snow
Thunder
Typhoon
Wind
Winter sky
26
Page 27
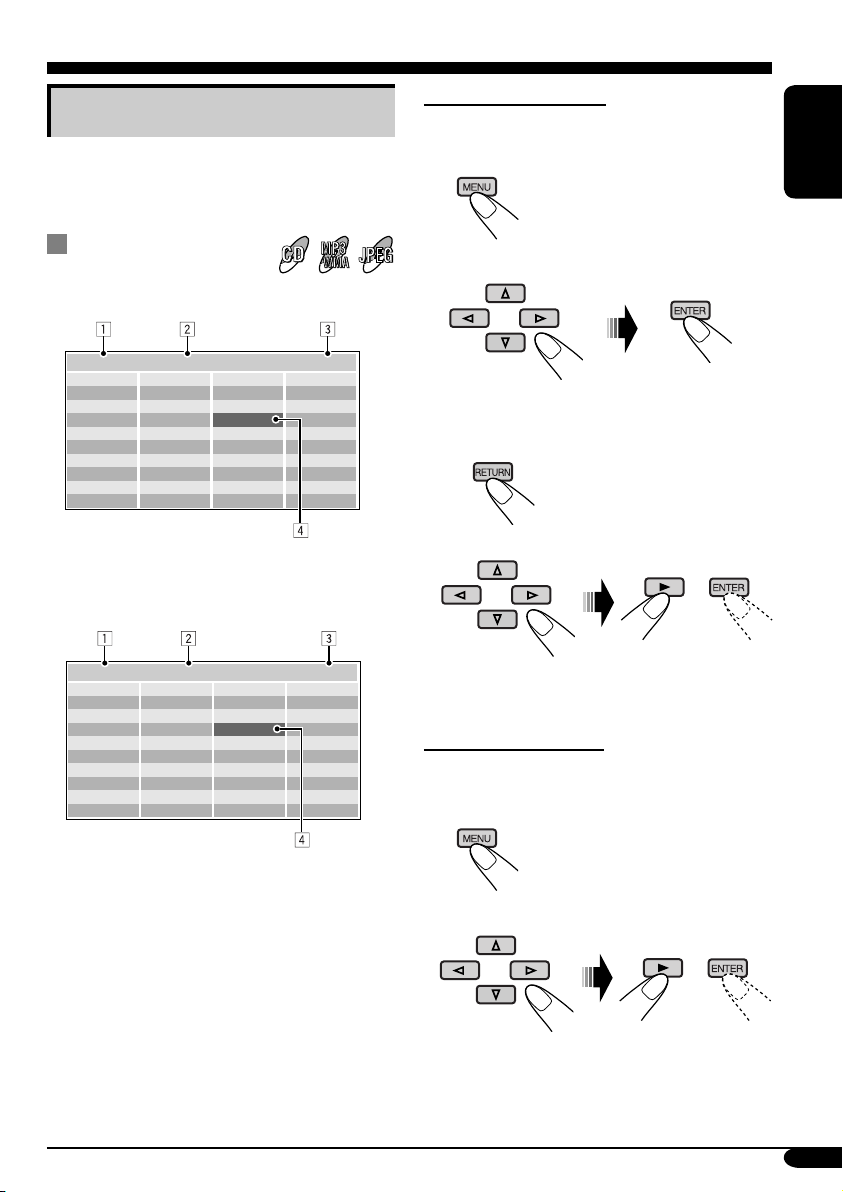
List screen operations
You can display the folder list/track list before
starting play. On this list, you can confirm the
contents and start playing a disc.
Folder/track list
screens
Folder list (MP3/WMA/JPEG)
For MP3/WMA/JPEG:
While stop...
1 Display the folder list.
Each time you press the button,
the list screen comes on and
goes off.
2 Select a folder on the list.
ENGLISH
Folder : 153/240 Track 154/198 Page : 4/6
fol130
fol131
fol132
fol133
fol134
fol135
fol136
fol137
fol138
fol139
fol140
fol141
fol142
fol143
fol144
fol145
fol146
fol147
fol148
fol149
fol150
fol151
fol152
fol153
fol154
fol155
fol156
fol157
fol158
fol159
fol160
fol161
fol162
fol163
fol164
fol165
fol166
fol167
fol168
fol169
Ex.: Folder list for MP3/WMA
Track list (MP3/WMA/JPEG/CD Text/audio
CD)
Folder : 153/240 Track 154/198 Page : 4/6
file0131.mp3
file0132.mp3
file0133.wma
file0134.mp3
file0135.mp3
file0136.wma
file0137.wma
file0138.mp3
file0139.mp3
file0140.wma
file0141.mp3
file0142.mp3
file0143.mp3
file0144.mp3
file0145.wma
file0146.mp3
file0147.wma
file0148.mp3
file0149.wma
file0150.wma
file0151.wma
file0152.mp3
file0153.wma
file0154.mp3
file0155.mp3
file0156.mp3
file0157.mp3
file0158.wma
file0159.wma
file0160.wma
Ex.: Track list for MP3/WMA
file0161.wma
file0162.mp3
file0163.wma
file0164.mp3
file0165.wma
file0166.wma
file0167.wma
file0168.wma
file0169.mp3
file0170.wma
1 Current folder number/total folder number
(only for MP3/WMA/JPEG)
2 Current track number/total number of tracks
in the current folder (for MP3/WMA/JPEG)
or in the disc (for CD Text/audio CD)
3 Current page/total number of the pages
included in the list
4 Current folder/track (highlighted bar)
The track list of the selected folder appears.
To go back to the folder list
3 Select a track on the list.
• For JPEG discs: Pressing ENTER will
pause the selected picture on the monitor.
For CD Text/audio CD:
While stop...
1 Display the track list.
Each time you press the button,
the list screen comes on and
goes off.
2 Select a track on the list.
27
Page 28
DVD setup menu
You can store the initial disc playback status.
• While playing, no change can be made on the
setup menu.
• When shipped from the factory, the on-screen
language is set to English. To change the
ENGLISH
language, see page 29.
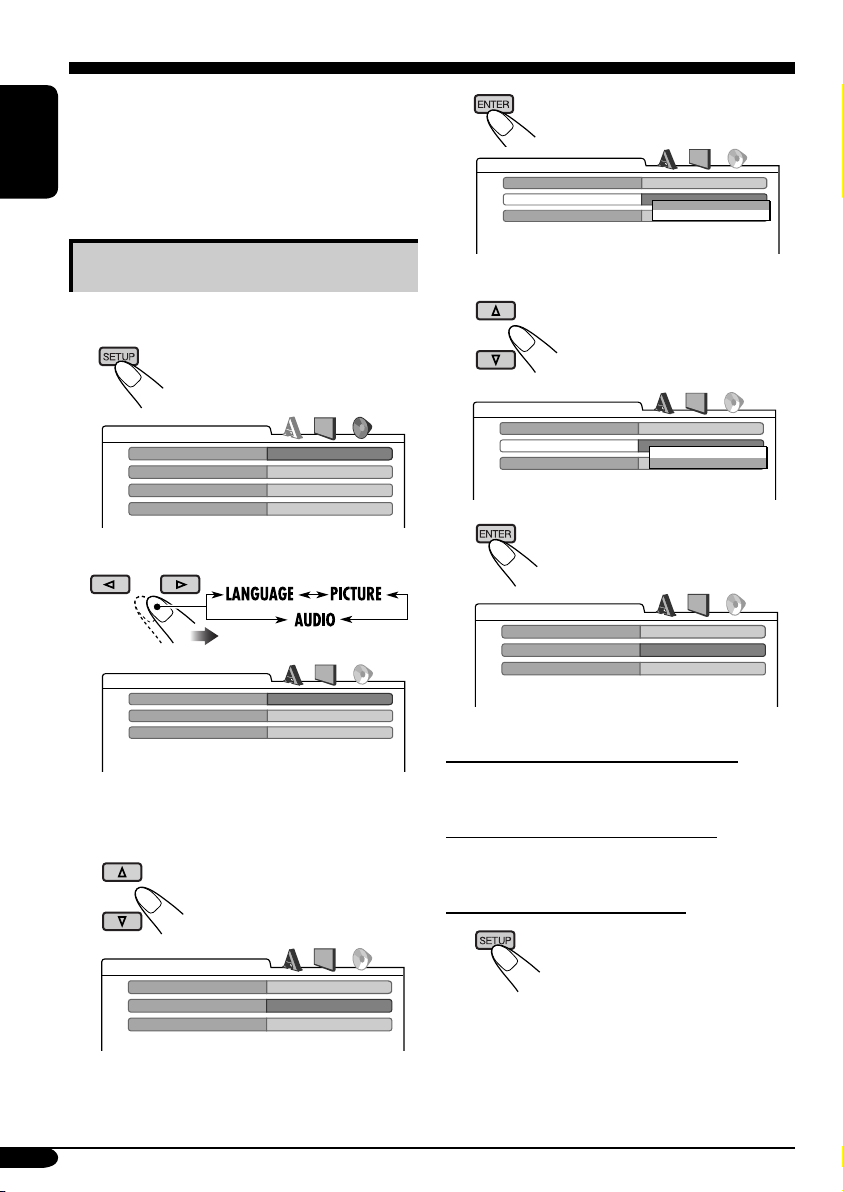
Basic setting procedure
While stop...
1
LANGUAGE
MENU LANGUAGE
AUDIO LANGUAGE
SUBTITLE
ON SCREEN LANGUAGE
2
AUDIO
DIGITAL AUDIO OUTPUT
DOWN MIX
D. RANGE COMPRESSION
Ex.: When selecting the “AUDIO” menu
3 Select an item you want to set up.
ENGLISH
ENGLISH
ENGLISH
ENGLISH
STREAM/PCM
STEREO
ON
4
AUDIO
DIGITAL AUDIO OUTPUT
DOWN MIX
D. RANGE COMPRESSION
STREAM/PCM
STEREO
DOLBY SURROUND
STEREO
ON
5 Select an option.
AUDIO
DIGITAL AUDIO OUTPUT
DOWN MIX
D. RANGE COMPRESSION
STREAM/PCM
STEREO
DOLBY SURROUND
STEREO
ON
6
AUDIO
DIGITAL AUDIO OUTPUT
DOWN MIX
D. RANGE COMPRESSION
To set other items on the same menu
Repeat steps 3 to 6.
To set other items on other menus
Repeat steps 2 to 6.
STREAM/PCM
DOLBY SURROUND
ON
28
AUDIO
DIGITAL AUDIO OUTPUT
DOWN MIX
D. RANGE COMPRESSION
STREAM/PCM
STEREO
ON
Ex.: When selecting “DOWN MIX”
To return to the normal screen
Page 29
LANGUAGE menu
Item Contents
MENU LANGUAGE
AUDIO LANGUAGE
SUBTITLE
ON SCREEN LANGUAGE
• For the LANGUAGE settings, see also the language codes list on page 32.
Select the initial disc menu language.
Select the initial audio language.
Select the initial subtitle language or erase the subtitle (OFF).
Select the language for the setup menu and some indications shown on
the monitor.
PICTURE menu
Item Contents
MONITOR TYPE
16:9 4:3 LETTER BOX
4:3 PAN SCAN
OSD POSITION
Position 1 Position 2
Select the monitor type to watch a wide screen picture on your
external monitor.
• 16:9 : Select this when the aspect ratio of your monitor is
16:9.
• 4:3 LETTER BOX : Select this when the aspect ratio of your
monitor is 4:3. While viewing a wide screen picture, the black
bars appear on the top and the bottom of the screen.
• 4:3 PAN SCAN : Select this when the aspect ratio of your
monitor is 4:3.
While viewing a wide screen picture, the black bars do not
appear; however, the left and right edges of the pictures will
not be shown on the screen.
Select the on-screen bar position on the monitor.
• 1 : Higher position
• 2 : Lower position (Help screen under the DVD setup menu
disappears.)
ENGLISH
MP3/JPEG
If both MP3/WMA files and JPEG files are recorded on a disc,
you can select which files to play.
• MP3 : Select this for playing MP3/WMA files.
• JPEG : Select this for playing JPEG files.
Eject the disc and insert it again to make the new setting
effective.
To be continued....
29
Page 30

AUDIO menu
Item Contents
ENGLISH
DIGITAL AUDIO OUTPUT
DOWN MIX
D. (Dynamic) RANGE
COMPRESSION
Select the signal format to be emitted through the DIGITAL OUT
(Optical) terminal. For details, see page 36.
• PCM ONLY : Select this when connecting an amplifier or a
decoder incompatible with Dolby Digital, DTS, MPEG Audio, or
connecting to a recording device.
• DOLBY DIGITAL/PCM : Select this when connecting an
amplifier or a decoder compatible with Dolby Digital.
• STREAM/PCM : Select this when connecting an amplifier or a
decoder compatible with Dolby Digital, DTS, or MPEG Audio.
When playing back a multi-channel DVD disc, this setting affects
the signals reproduced through the analog terminals—AV-OUT and
cordless headphones (and through the DIGITAL OUT terminal when
“PCM ONLY” is selected for “DIGITAL AUDIO OUTPUT”).
• DOLBY SURROUND : Select this when you want to enjoy multi-
channel surround audio by connecting an amplifier compatible with
Dolby Surround to this monitor.
• STEREO : Normally select this.
You can enjoy a powerful sound at low or middle volume levels while
playing a Dolby Digital software.
• AUTO : Select this to apply the effect to multi-channel encoded
software (excluding 1-channel and 2-channel software).
• ON : Select this to always use this function.
30
Page 31

Maintenance
To prevent damage to the exterior
• Do not apply pesticides, benzine, thinner or
other volatile substances to the monitor.
The cabinet surface primarily consists of
plastic materials.
• Do not wipe with benzine, thinner or similar
substances because this will results in
discoloration or removal of the paint.
• When a cloth with a cleansing chemical is
used, follow the caution points.
– Do not leave the unit in contact with rubber
or vinyl products for long periods of time.
– Do not use cleansers which have polishing
granules because this could damage the
cabinet.
Clean off dirt by wiping lightly with
a soft cloth
When the cabinet is very dirty, wipe with a
well-wrung cloth dipped in a kitchen cleanser
(neutral) thinned by water and then go over the
same surface with a dry cloth.
(Since there is the possibility of water drops
getting inside of the unit, do not directly apply
cleanser to the surface.)
Moisture condensation
Moisture may condense on the lens inside the
DVD player in the following cases:
• After starting the heater in the car.
• If it becomes very humid inside the car.
Should this occur, the DVD player may
malfunction. In this case, eject the disc and
leave the unit turned on for a few hours until the
moisture evaporates.
How to handle discs
When removing a disc from
its case, press down the center
holder of the case and lift the
disc out, holding it by the edges.
• Always hold the disc by the
edges. Do not touch its recording surface.
When storing a disc into its case, gently insert
the disc around the center holder (with the
printed surface facing up).
• Make sure to store discs into the cases after
use.
Center holder
To keep discs clean
A dirty disc may not play correctly.
If a disc does become dirty, wipe
it with a soft cloth in a straight line
from center to edge.
• Do not use any solvent (for
example, conventional record cleaner, spray,
thinner, benzine, etc.) to clean discs.
To play new discs
New discs may have some rough
spots around the inner and outer
edges. If such a disc is used, this
unit may reject the disc.
To remove these rough spots, rub
the edges with a pencil or ball-point pen, etc.
Do not use the following discs:
Warped
disc
ENGLISH
Sticker
Disc
Sticker
residue
Stick-on
label
31
Page 32

Language codes
Code Language Code Language Code Language
AA
AB
AF
ENGLISH
AM
AR
AS
AY
AZ
BA
BE
BG
BH
BI
BN
BO
BR
CA
CO
CS
CY
DZ
EL
EO
ET
EU
FA
FI
FJ
FO
FY
GA
GD
GL
GN
GU
HA
HI
HR
HU
HY
IA
IE
Afar
Abkhazian
Afrikaans
Ameharic
Arabic
Assamese
Aymara
Azerbaijani
Bashkir
Byelorussian
Bulgarian
Bihari
Bislama
Bengali, Bangla
Tibetan
Breton
Catalan
Corsican
Czech
Welsh
Bhutani
Greek
Esperanto
Estonian
Basque
Persian
Finnish
Fiji
Faroese
Frisian
Irish
Scots Gaelic
Galician
Guarani
Gujarati
Hausa
Hindi
Croatian
Hungarian
Armenian
Interlingua
Interlingue
IK
IN
IS
IW
JI
JW
KA
KK
KL
KM
KN
KO
KS
KU
KY
LA
LN
LO
LT
LV
MG
MI
MK
ML
MN
MO
MR
MS
MT
MY
NA
NE
NO
OC
OM
OR
PA
PL
PS
PT
QU
RM
Inupiak
Indonesian
Icelandic
Hebrew
Yiddish
Javanese
Georgian
Kazakh
Greenlandic
Cambodian
Kannada
Korean (KOR)
Kashmiri
Kurdish
Kirghiz
Latin
Lingala
Laothian
Lithuanian
Latvian, Lettish
Malagasy
Maori
Macedonian
Malayalam
Mongolian
Moldavian
Marathi
Malay (MAY)
Maltese
Burmese
Nauru
Nepali
Norwegian
Occitan
(Afan) Oromo
Oriya
Panjabi
Polish
Pashto, Pushto
Portuguese
Quechua
Rhaeto-Romance
RN
RO
RW
SA
SD
SG
SH
SI
SK
SL
SM
SN
SO
SQ
SR
SS
ST
SU
SW
TA
TE
TG
TH
TI
TK
TL
TN
TO
TR
TS
TT
TW
UK
UR
UZ
VI
VO
WO
XH
YO
ZU
Kirundi
Rumanian
Kinyarwanda
Sanskrit
Sindhi
Sangho
Serbo-Croatian
Singhalese
Slovak
Slovenian
Samoan
Shona
Somali
Albanian
Serbian
Siswati
Sesotho
Sundanese
Swahili
Tamil
Telugu
Tajik
Thai
Tigrinya
Turkmen
Tagalog
Setswana
Tonga
Turkish
Tsonga
Tatar
Twi
Ukrainian
Urdu
Uzbek
Vietnamese
Volapuk
Wolof
Xhosa
Yoruba
Zulu
32
Page 33

More about this monitor
Basic operations
Turning off the power
• If you turn off the power while listening to a
disc, disc play will start automatically, next
time you turn on the power.
Disc operations
General
• In this manual, words “track” and “file” are
interchangeably used when referring to MP3/
WMA/JPEG files and their file names.
• This unit can also playback 8 cm discs.
• This unit can only playback audio CD (CD-
DA) files if different type of files are recorded
in the same disc.
– The first track will be skipped if a different
type of file is detected first.
• When a disc has been loaded, selecting
“DISC” for the playback source starts disc
play.
Starting playback
• When a disc is inserted upside down, “NO
DISC” appears on the screen, then the disc
will automatically eject.
• You can play a disc even if the monitor is
closed.
Basic operations
• No sound comes out during slow motion
playback. When playing a VCD, reverse slow
motion playback is prohibited.
• One Touch Replay works only within the
same title. (For some DVDs, this function
does not work.)
• When playing a DVD/VCD, no sound comes
out during Search.
• Reverse search stops automatically when it
reaches the beginning of the disc. Playback
resumes at normal speed.
DVD/VCD/JPEG special functions
• For some DVDs and VCDs, changing the
subtitle language, audio language (or audio
channel) without using the disc menu is
prohibited.
• While zoomed in, the picture may look
coarse.
Playing a DVD-R/DVD-RW or CD-R/CDRW
• Use only “finalized” discs.
• This unit can play back only the files of the
same type which is first detected if a disc
includes both audio CD (CD-DA) files and
MP3/WMA/JPEG files.
• This unit can play back either MP3/WMA
files or JPEG files if a disc includes both kind
of files. Set the playback file type on DVD
setup menu (page 29) before playing back a
disc containing both kind of files.
• Only for CD-R/CD-RW: This unit can play
back multi-session discs; however, unclosed
sessions will be skipped while playing.
• Some DVD-R/DVD-RW or CD-R/CDRW may not play back on this unit because
of their disc characteristics, and for the
following causes:
– Discs are dirty or scratched.
– Moisture condensation occurs on the lens
inside the unit.
– The pickup lens inside the unit is dirty.
– CD-R/CD-RW on which the files are
written with “Packet Write” method.
– DVD-R/DVD-RW which are not written
in UDF-Bridge Format (eg. UDF format or
ISO format).
– There are improper recording conditions
(missing data, etc.) or media conditions
(stain, scratch, warp, etc.).
• DVD-RW/CD-RW may require a longer
readout time since the reflectance of DVDRW/CD-RW is lower than that of regular
discs.
ENGLISH
To be continued....
33
Page 34

• Do not use the following DVD-R/DVD-RW
or CD-R/CD-RW:
– Discs with stickers, labels, or protective seal
stuck to the surface.
– Discs on which labels can be directly
ENGLISH
printed by an ink jet printer.
Using these discs under high temperatures or
high humidities may cause malfunctions or
damages to discs.
Playing an MP3/WMA disc
• This unit can play back MP3/WMA files
with the extension code <.mp3> or <.wma>
(regardless of the letter case—upper/lower)
recorded in either CD-R/CD-RW or in
DVD-R/DVD-RW.
• This unit can show the names of albums,
artists (performer), and ID3 Tag (Version 1.0,
1.1, 2.2, 2.3, or 2.4) for MP3 files and WMA
files.
• This unit can display only one-byte
characters. No other characters can be
correctly displayed.
• This unit can play back MP3/WMA files
meeting the conditions below:
– Bit rate: MP3: 32 kbps — 320 kbps
WMA: 32 kbps — 192 kbps
– Sampling frequency:
48 kHz, 44.1 kHz, 32 kHz (for MPEG-1)
24 kHz, 22.05 kHz, 16 kHz (for MPEG-2)
48 kHz, 44.1 kHz, 32 kHz (for WMA)
– Disc format: ISO 9660 Level 1/ Level 2,
Romeo, Joliet, Windows long file name
• The maximum number of characters for file/
folder names vary among the disc format used
(includes 4 extension characters—<.mp3> or
<.wma>).
– ISO 9660 Level 1: up to 12 characters
– ISO 9660 Level 2: up to 31 characters
– Romeo: up to 128 characters
– Joliet: up to 64 characters
– Windows long file name: up to 128
characters
• This unit can recognize the total of
1100 files, 250 folders (maximum of 999 files
per folder).
• This unit can play back the files recorded in
VBR (variable bit rate).
The files recorded in VBR have a discrepancy
in elapsed time display, and do not show
the actual elapsed time. Especially, after
performing the search function, this
difference becomes noticeable.
• This unit cannot play back the following files:
–
MP3 files encoded with MP3i and MP3 PRO
format.
– MP3 files encoded in an unappropriated
format.
– MP3 files encoded with Layer 1/2.
– WMA files encoded with lossless,
professional, and voice format.
– WMA files which are not based upon
Windows Media
– WMA files copy-protected with DRM.
– WMA files recorded with MBR (Multiple
Bit Rate) format.
– Files which have the data such as WAVE,
ATRAC3, etc.
®
Audio.
Playing a JPEG disc
• This unit can play back JPEG files with the
extension code <.jpg> (regardless of the letter
case—upper/lower) recorded in either CD-R/
CD-RW or in DVD-R/DVD-RW.
• It is recommended that you record a file
at 640 x 480 resolution. (If a file has been
recorded at a resolution of more than 640 x
480, it will take a long time to be shown.)
• This System can play only baseline JPEG
files. Progressive JPEG files or lossless JPEG
files cannot be played.
Baseline JPEG format: Used for digital
cameras, web, etc.
Progressive JPEG format: Used for web.
Lossless JPEG format: An old type and rarely
used now.
• If progressive or lossless JPEG files are
played back, a black screen appears. In this
case, stop playback and select a baseline
JPEG file. Note that it may take a long time to
select another file.
34
Page 35

• Even if you try to pause the current picture,
it may be skipped, then the next picture will
pause.
• This unit can recognize the total of 1100
files, 250 folders (maximum of 999 files per
folder).
Changing the source
• If you change the source, playback also stops
(without ejecting the disc).
Next time you select “DISC” for the playback
source, disc play starts automatically.
Ejecting a disc
• If the ejected disc is not removed within
15 seconds, the disc is automatically inserted
again into the loading slot to prevent it from
dust. (Disc will not play this time.)
DVD setup menu
• When the language you have selected is not
recorded on a disc, the original language is
automatically used as the initial language. In
addition, for some discs, the initial languages
settings will not work as you set due to their
internal disc programming.
• While playing (or pausing), you cannot
change these languages.
After you change any of these language
settings, eject the disc and insert it (or another
disc) again so that your setting takes effect.
• When you select “16:9” for a picture whose
aspect ratio is 4:3, the picture slightly changes
due to the process for converting the picture
width.
• Even if “4:3 PAN SCAN” is selected, the
screen size may become
“4:3 LETTER BOX” with some DVDs. This
depends on how they are recorded.
On-screen guide icons
During play, the following guide icons may
appear for a while on the monitor.
: Appears at the beginning of a scene
containing multi-audio languages (for
DVD only).
: Appears at the beginning of a scene
containing multi-subtitle languages
(for DVD only).
: Appears at the beginning of a scene
containing multi-angle views (for
DVD only).
: Play
: Pause
: Forward slow motion playback
(for DVD and VCD only)
: Reverse slow motion playback
(for DVD only)
: Forward search
: Reverse search
ENGLISH
35
Page 36

About sounds reproduced through the terminals
• Through the analog terminals (AV-OUT/cordless headphones): 2-channel signal is emitted.
When playing a multi-channel encoded disc, multi-channel signals are downmixed.
(AUDIO—DOWN MIX: see page 30.)
ENGLISH
• Through DIGITAL OUT (optical):
Digital signals (Linear PCM, Dolby Digital, DTS, MPEG Audio) are emitted through this
terminal. (For more details, see table below.)
To reproduce multi-channel sounds such as Dolby Digital, DTS, and MPEG Audio, connect
an amplifier or a decoder compatible with these multi-channel sources to this terminal, and set
“DIGITAL AUDIO OUTPUT” correctly. (See page 30.)
Output signals through the DIGITAL OUT terminal
Output signals are different depending on the “DIGITAL AUDIO OUTPUT” setting on the setup
menu (see page 30).
DIGITAL AUDIO OUTPUT
Playback Disc
DVD
48 kHz, 16/20/24 bits Linear PCM
96 kHz, Linear PCM
with DTS DTS bitstream 48 kHz, 16 bits stereo Linear PCM
with Dolby Digital Dolby Digital bitstream
with MPEG Audio MPEG bitstream 48 kHz, 16 bits Linear PCM
Audio CD, Video CD 44.1 kHz, 16 bits stereo Linear PCM
Audio CD with DTS DTS bitstream 44.1 kHz, 16 bits stereo Linear PCM
MP3/WMA
STREAM/PCM DOLBY DIGITAL/PCM PCM ONLY
48 kHz, 16 bits stereo Linear PCM
32/44.1/48 kHz, 16 bits Linear PCM
Output Signals
48 kHz, 16 bits
stereo Linear PCM
36
Page 37

Troubleshooting
What appears to be trouble is not always serious. Check the following points before calling a service
center.
Symptoms Causes Remedies
• Colored spots (red, blue
and green) appear on the
screen.
• No picture appears and
sound is not heard.
• The unit does not work at
all.
General
• Remote controller does not
work.
• Cordless headphones do
not work.
• Howling occurs from
the speakers or the
headphones.
• “NO DISC” appears on the
screen.
• CD-R/CD-RW or DVD-R/
DVD-RW cannot be played
back.
• Tracks on the CD-R/
CD-RW or DVD-R/
DVD-RW cannot be
Disc playback
skipped.
• The left and right edges of
the picture are missing on
the screen.
This is a characteristic of
liquid crystal panels and is
not a malfunction.
The cord is not connected
correctly to the external
component.
Correct input mode is not
selected.
The built-in microcomputer
may have functioned
incorrectly due to noise, etc.
The battery has lost its
charge.
The sensor is exposed to
strong light.
It may be caused by a
camcorder connected to the
monitor.
Disc is inserted upside
down.
CD-R/CD-RW or DVD-R/
DVD-RW is not finalized.
“4:3 PAN SCAN” is
selected when viewing on
a conventional TV (aspect
ratio 4:3).
See “Note” on page 6.
Connect the cord correctly.
Select the correct input
mode.
Reset the unit (see page 4).
Install a new battery.
Do not expose the sensor to
strong light.
Camcorder is now in
recording mode. Deactivate
the recording mode.
Insert the disc correctly.
• Insert a finalized CDR/CD-RW or DVD-R/
DVD-RW.
•
Finalize the
RW or DVD-R/DVD-RW
with the component which
you used for recording.
Select “4:3 LETTER BOX.”
(See page 29.)
CD-R/CD-
ENGLISH
37
Page 38

Symptoms Causes Remedies
• Sound and picture are
sometimes interrupted or
ENGLISH
distorted.
Disc playback
• The playback pictures
cannot be shown correctly.
• Disc cannot be played
back.
• Noise is generated. The track played back is not
MP3/WMA/JPEG playback
You are driving on rough
roads.
Disc is scratched. Change the disc.
Connections are incorrect. Check the cords and
The color system (NTSC/
PAL) is not correct.
No MP3/WMA/JPEG tracks
are recorded on the disc.
MP3/WMA/JPEG tracks do
not have the extension code
<.mp3>, <.wma>, or <.jpg>
in their file names.
MP3/WMA/JPEG tracks are
not recorded in a compliant
format.
MP3/WMA/JPEG tracks
are recorded in DVD+R/
DVD+RW media.
an MP3/WMA file (although
it has the extension code
<.mp3> or <.wma>).
Stop playback while driving
on rough roads.
connections.
Set it correctly (see page
14).
Change the disc.
Add the extension code
<.mp3>, <.wma>, or <.jpg>
to their file names.
Change the disc.
Record MP3/WMA/JPEG
tracks using a compliant
application (see page 17).
Change the disc.
Record MP3/WMA/JPEG
tracks using DVD-R/DVDRW media.
Skip to another track or
change the disc. (Do not add
the extension code <.mp3>
or <.wma> to non-MP3 or
WMA tracks.)
38
• A longer readout time is
required.
• Tracks cannot be played
back as you have intended
them to play.
• Elapsed playing time is not
correct.
Readout time varies due to
the complexity of the folder/
file configuration.
Playback order is determined
when the files are recorded.
This sometimes occurs
during play. This is caused
by how the tracks are
recorded on the disc.
Do not use too many
hierarchies and folders.
Page 39

Specifications
WIDESCREEN MONITOR
Screen:
9 inch liquid crystal panel
Number of pixel:
336 960 pixels
(480 vertical × 234 horizontal × 3)
Drive method:
TFT (Thin Film Transistor) active matrix
format
Cordless audio:
Infrared audio transmitter
L-channel: 2.3 MHz
R-channel: 2.8 MHz
Effective listening angle: 30˚
Effective range: 2 m
Color system: NTSC/PAL
Input:
Video: RCA pin × 2 circuits
1 V(p-p), 75 Ω
Audio: RCA pin × 2 circuits
1.5 V(rms)
Output:
Video: RCA pin × 1 circuit
1 V(p-p), 75 Ω
Audio: RCA pin × 1 circuit
1.5 V(rms)
DIGITAL OUT: Optical
DVD/CD PLAYER SECTION
Signal detection system: Non-contact optical
pickup (semiconductor laser)
Number of channels: 2 channels (stereo)
Frequency response:
DVD, fs=48 kHz/96 kHz: 16 Hz to 22 000 Hz
VCD, CD: 16 Hz to 20 000 Hz
Dynamic range: 93 dB
Signal-to-noise ratio: 95 dB
Wow and flutter: Less than measurable limit
MP3 (MPEG Audio Layer 3):
Max. Bit Rate: 320 kbps
WMA (Windows Media
Max. Bit Rate: 192 kbps
®
Audio):
GENERAL
Power requirement:
Operating voltage:
DC 14.4 V (11 V to 16 V allowance)
Grounding system: Negative ground
Allowable operating temperature:
0°C to +40°C
Allowable storage temperature:
–20°C to +80°C
Dimensions (W × H × D):
Installation size (approx.):
250 mm × 49 mm × 374 mm
Mass (approx.):
2.9 kg (excluding accessories)
CORDLESS HEADPHONES
Type: Open-air type
Driver unit:
30 mm Mylarcone dynamic speaker
Impedance: 16 Ω
Frequency response: 20 Hz to 20 000 Hz
Infrared wavelength: 850 nm ± 50 nm
Power requirements:
DC 3 V (2.4 V to 3.3 V allowance)
(R03/AAA battery × 2)
Mass (approx.):
170 g (except batteries)
Allowable operating temperature:
–30°C to +65°C
Design and specifications are subject to change
without notice.
• Microsoft and Windows Media are either
registered trademarks or trademarks of
Microsoft Corporation in the United States
and/or other countries.
ENGLISH
39
Page 40

WARNUNGEN
• DEN MONITOR NICHT AN EINEM
ORT ANBRINGEN, WO ER BEIM
FAHREN STÖRT ODER DIE SICHT
BESCHRÄNKT, DIE FUNKTION VON
SICHERHEITSEINRICHTUNGEN WIE
AIRBAGS BEHINDERT ODER WO
ÖRTLICH GELTENDE GESETZE ODER
VORSCHRIFTEN DEN EINBAU VERBIETEN.
• Es gibt möglicherweise gesetzliche vorschriften,
mit denen zulässige installationsorte für den
monitor geregelt werden und die von staat
zu staat oder bundesland zu bundesland
DEUTSCH
unterschiedlich sein können. Vergewissern sie
sich aus diesem grund, dass sie den monitor
an einem ort installieren, der den gesetzlichen
vorschriften entspricht.
• Das monitorsystem darf vom fahrer nicht
während der fahrt betrieben werden.
* Halten sie das fahrzeug an einem sicheren ort an
und bedienen sie dann den monitor.
• Dem fahrer eines fahrzeugs ist das betrachten
von videos während der fahrt untersagt.
Dies könnte den fahrer ablenken und zu unfällen
führen.
• Stellen sie eine angemessene lautstärke während
der fahrt ein.
Bei zu hoher lautstärke werden geräusche aus
der umgebung übertönt, was zu unfällen führen
kann.
• Stellen sie sicher, dass der monitor nicht
fallengelassen und keine stössen ausgesetzt wird.
Andernfalls kann eine fehlfunktion oder ein
brand entstehen.
• Das monitorsystem nicht bei abgeschaltetem
motor betreiben.
Betreiben des monitors bei abgeschaltetem
motor verbraucht batterieleistung, so dass der
motor später unter umständen nicht anspringt.
• Bei Nichtbenutzung die Flüssigkristallanzeige
schließen und in dem vorgesehenen Fach
verstauen.
• Berühren Sie nicht die Oberfläche des
Flüssigkristalldisplays direkt.
• Hängen Sie keine Gegenstände an den Monitor
und ziehen Sie sich nicht daran hoch, da dieser
dadurch beschädigt werden kann.
VORSICHT:
Die Betriebsspannung für dieses Monitorsystem
beträgt 12 V Gleichstrom. Betreiben Sie es nicht
mit anderen Spannungen, um elektrischen Schlag
und Brand zu verhüten.
Die Installation erfordert entsprechende
Fachkenntnisse.
Installieren Sie das Monitorsystem
NICHT selbst. Wenden Sie sich für eine
sichere und fachgerechte Installation an
einen Vertragshändler.
VORSICHTSHINWEISE zu den
mitgelieferten Kopfhörern—KS-HP2:
• Lassen Sie den Kopfhörer NICHT an einem
Ort wie etwa auf einer Fensterablage liegen,
wo er längere Zeit direktem Sonnenlicht
ausgesetzt ist; dabei kann er beschädigt
werden.
• Halten Sie den Kopfhörer von
Mobiltelefonen fern, um Störungen zu
vermeiden.
• Schalten Sie die Anlage NICHT bei
sehr hoch eingestellter Lautstärke aus;
andernfalls kann der plötzlich einsetzende
laute Ton Ihr Gehör und oder den
Kopfhörer beschädigen, wenn er das
nächste Mal verwendet wird.
• Wenn Sie Ohrensausen spüren, stellen Sie
die Lautstärke niedriger ein oder nehmen
den Kopfhörer ab.
2
Page 41

Wir danken Ihnen für den Kauf eines JVC Produkts.
Bitte lesen Sie die Anleitung vollständig durch, bevor Sie das Gerät in Betrieb nehmen, um
sicherzustellen, daß Sie alles vollständig verstehen und die bestmögliche Leistung des Geräts
erhalten.
WICHTIG FÜR LASER-PRODUKTE
1. LASER-PRODUKT DER KLASSE 1
2. ACHTUNG : Die obere Abdeckung nicht öffnen. Das Gerät enthält keine Teile, die vom
Benutzer gewartet werden können. Wartungen nur von qualifziertem Fachpersonal durchführen
lassen.
3. ACHTUNG : Sichtbare und unsichtbare Laserstrahlung bei offenem Gerät und Defekt oder
Umgehen der Verriegelung. Setzen Sie sich dem Strahl nicht direkt aus.
4. ANBRINGEN DES ETIKETTS: WARNHINWEIS-ETIKETT, AUSSEN AM GERÄT
ANGEBRACHT.
DEUTSCH
Dieses Produkt beinhält urheberrechtlich
geschützte Technik mit dem Schutz von
U.S.-Patenten und anderen intellektuellen
Eigentumsrechten. Der Gebrauch dieser
urheberrechtlich geschützten Technik
ist durch Macrovision genehmigen zu
lassen und nur für den Heimgebrauch und
die Betrachtung in begrenztem Ausmaß
vorgesehen, soweit nicht ausdrücklich von
Macrovision genehmigt. Rückwärtige
Entwicklung oder Zerlegung ist verboten.
Achtung bei der Lautstärkeeinstellung:
Disks erzeugen im Vergleich zu anderen
Tonträgern sehr wenig Rauschen. Senken
Sie die Lautstärke vor dem Abspielen einer
Disk, um Beschädigung der Lautsprecher
durch plötzliche Tonspitzen zu vermeiden.
3
Page 42

Zurücksetzen des Geräts
DEUTSCH
Dadurch wird der Mikrocomputer
zurückgesetzt. Ihre vorgegebenen Einstellungen
werden ebenfalls gelöscht.
Zwangsweises Ausschieben
einer Disk
Wenn die Disk nicht vom Monitor erkannt
wird oder nicht ausgeschoben werden kann...
Monitor
Die Disk kommt
heraus.
Wie Sie diese Anleitung lesen
Die folgenden Methoden werden eingesetzt, um
die Erklärungen einfach und leichtverständlich
zu gestalten:
• Manche zugehörigen Tipps und Hinweise
werden später im Abschnitt „Weitere
Informationen zu diesem Monitor“ (siehe
Seite 33 – 35) gegeben.
• Tastenfunktionen werden im Wesentlichen
mit den folgenden Abbildungen erläutert:
Kurz drücken.
Wiederholt drücken.
Eine davon drücken.
(für etwa 5 Sekunden in
eingeschaltetem Zustand)
• Wenn dies nicht funktioniert, den Monitor
zurücksetzen.
• Achten Sie darauf, die Disk beim
Ausschieben nicht fallenzulassen.
4
Gedrückt halten,
bis die gewünschte
Reaktion beginnt.
Halten Sie die beide
Tasten gleichzeitig
gedrückt.
Page 43

Inhalt
Zurücksetzen des Geräts ........................ 4
Zwangsweises Ausschieben einer Disk
Wie Sie diese Anleitung lesen ............... 4
... 4
Vorsichtsmassnahmen .................... 6
Breitbildmonitor ............................. 7
Beschreibung der Teile .......................... 7
Fernbedienung
Hauptelemente und Merkmale ............... 8
Kopfhörer — KS-HP2
Hauptelemente und Merkmale ............... 10
— RM-RK230
....................... 10
............ 8
Grundbetrieb ................................. 11
Einstellungen ................................. 13
Verwendung des Monitor-Menüs .......... 13
Umschalten des
Bildseitenverhältnisses ...................... 15
Abspielbare Disks .......................... 17
Bedienung der Disk ........................ 18
Wiedergabe einer Disk .................. 18
Starten der Wiedergabe ......................... 18
Grundlegende Bedienung ...................... 19
DVD/VCD/JPEG-Spezialfunktionen
Wählen der Audiosprachen ................... 21
Wählen von Untertiteln ......................... 21
Wahl einer von mehreren Ansichten ..... 21
Disk-Menübedienung ............................ 22
Heranzoomen ......................................... 22
... 21
Bildschirm-Disk-Bedienung .............. 23
Grundlagen der Bildschirm-Balken-
Bedienung .......................................... 24
Grundlegende Steuerbildschirm-
Bedienvorgänge ................................. 26
Listen-Bildschirm-Bedienungen ............ 27
DVD-Setup-Menü ........................... 28
Grundlegendes Einstellverfahren .......... 28
Wartung ........................................ 31
Tabelle Der Sprachencodes .............. 32
Weitere Informationen zu diesem
Monitor ...................................... 33
Störungssuche ................................ 37
Technische Daten ............................ 39
DEUTSCH
Für die Sicherheit....
• Die Lautstärke nicht zu laut stellen, da
dadurch Außengeräusche überdeckt und das
Autofahren gefährlich wird.
• Das Auto vor dem Durchführen von
komplizierten Bedienschritten anhalten.
Temperatur im Auto....
Wenn Sie das Auto für lange Zeit in heißem
oder kaltem Wetter parken, bitte warten, bis
sich die Temperatur im Auto sich normalisiert
hat, bevor Sie das Gerät einschalten.
5
Page 44

Vorsichtsmassnahmen
Warnhinweise für die Handhabung der Flüssigkristallanzeige
Die Flüssigkristallanzeige nicht direktem
Sonnenlicht aussetzen.
• Lagertemperaturbereich: –20°C bis +80°C
DEUTSCH
Bei sehr hohen oder niedrigen Temperaturen
treten in der Flüssigkristallanzeige chemische
Veränderungen ein, die zu Störungen führen
können.
Rote, blaue und grüne Punkte auf der Anzeige
sind ein Merkmal von Flüssigkristallanzeigen
und stellen keine Fehlfunktion dar.
Die Flüssigkristallanzeige nicht fallenlassen
oder starken Stößen aussetzen.
Bei sehr niedrigen oder hohen Temperaturen
kann das Bild unklar werden oder sich
langsam bewegen.
Das Bild wird möglicherweise nicht synchron
mit dem Ton ausgegeben bzw. kann sich
die Bildqualität unter solchen Bedingungen
verschlechtern. Dieser Zustand deutet weder
auf eine Fehlfunktion noch ein Problem hin.
• Betriebstemperaturbereich: 0°C bis +40°C
Puntjes
Hinweis:
Der Flüssigkristallanzeige wurde mit
Präzisionstechnik hergestellt und verfügt über
mindestens 99,99% effektive Pixel. Denken Sie
daran, daß auf 0,01% der Bildschirmfläche
Pixel fehlen oder konstant leuchten können.
6
0°C oder kälter
40°C oder heißer
Page 45

Breitbildmonitor
Beschreibung der Teile
DEUTSCH
1 (Standby/Ein)-Taste
• Schaltet das Gerät ein, wenn einmal
gedrückt.
• Schaltet das Gerät aus, wenn gedrückt
gehalten.
2 Fernbedienungssensor
3 Deckenleuchtenschalter
• Siehe „Zum Aktivieren des Türsensors“
auf Seite 12.
4 Infrarot-Sender
5 Deckenleuchten
6 Armsperrhebel
7 Rückstelltaste
Wenn der Bildschirm von der Seite betrachtet wird, kann das Bild unklar erscheinen. Dies
ist keine Fehlfunktion. Das beste Bild erhalten Sie, wenn Sie den Bildschirm direkt von vorn
betrachten.
8 Bildschirm (Flüssigkristallanzeige)
9 Disk-Ladeschlitz
p 0 (Auswurf)-Taste
q 3 (Wiedergabe)-Taste
w Disk-Ladelämpchen
e Weiße LED
r PUSH-OPEN-Taste
t Staufach für Bildschirm
y Bildschirmarm
7
Page 46

Fernbedienung — RM-RK230
Einsetzen der Lithiumknopfbatterie
(CR2025)
DEUTSCH
Vor der Verwendung der Fernbedienung:
• Richten Sie die Fernbedienung direkt auf
den Fernbedienungssensor am Monitor.
Stellen Sie sicher, dass sich kein Hindernis
dazwischen befindet.
Fernbedienungs
-sensor
• Setzen Sie den Fernbedienungssensor nicht
intensiven Licht (direkte Sonneneinstrahlung
oder künstliches Licht) aus.
Warnung:
• Nicht eine andere Batterie als CR2025
oder entsprechende einsetzen; andernfalls
kann sie explodieren.
• Legen Sie die Batterie an einem Ort ab,
wo sie außer Reichweite kleiner Kinder ist,
um Unfallgefahr zu vermeiden.
• Um Überhitzen, Bersten oder Entzünden
der Batterie zu vermeiden:
– Die Batterie nicht aufladen,
kurzschließen oder erhitzen oder in
einem Feuer entsorgen.
– Die Batterie nicht zusammen mit
anderen Metallgegenständen ablegen.
– Die Batterie nicht mit Pinzetten oder
ähnlichen Werkzeugen anstoßen.
– Die Batterie mit Klebeband umwickeln
und isolieren, wenn sie entsorgt oder
aufbewahrt wird.
Hauptelemente und Merkmale
MENU
MONITOR CONTROL
1
(Standby/Ein)-Taste
• Schaltet das Gerät ein, wenn einmal
gedrückt.
• Schaltet das Gerät aus, wenn gedrückt
gehalten.
2 MODE (Modus)-Taste
• Wählt die Wiedergabequelle.
3 ASPECT-Taste
• Ändert das Seitenverhältnis des
Bildschirms.
4 MENU (Menü)-Taste
• Ruft das Menü auf und dient dann zum
Wählen der einstellbaren Menüpunkte.
5
/ -Tasten
• Stellt den Wert des gewählten Punkts ein
oder wählt eine geeignete Einstellung für
den gewählten Punkt.
8
Page 47

DVD/RECEIVER CONTROL
6 Receiver-Steuertasten*
1
• (Standby/Ein-Dämpfung)-Taste
• SOURCE-Taste
• BAND-Taste
• DUAL-Taste
• VOL + / – (2nd VOL +/–) -Tasten
7 TOP M (Menü)-Taste*
2
• Zur Anzeige von DVD- und VCD*3-DiskMenü
8 SETUP (Einrichten)-Taste*
2
9 SHIFT (Hochstellen)-Taste
p Grundlegende Disk-Bedienungstasten:
7 (Stopp), 3 (Wiedergabe), 8 (Pause)
• 3 (Wiedergabe)-Taste fungiert auch als
ZOOM-Taste, wenn zusammen mit der
SHIFT-Taste gedrückt.
q Tasten für erweiterte Disk-Funktionen
/TITLE 5 / ∞*
•
– Wählen der Titel (für DVD) oder Ordner
(für MP3/WMA/JPEG)*
• 4 / ¢ (Sprung rückwärts/Sprung
vorwärts)*
• 1 / ¡ (Rückwärts-Suche/VorwärtsSuche)*
7
4
5
.
6
w OSD-Taste
• Zur Anzeige des Bildschirm-Balkens.
• Fungiert auch als
/TITLE-Taste, wenn
zusammen mit der SHIFT-Taste gedrückt.
– Sie können direkt Titel (für DVD) oder
Ordner (für MP3/WMA/JPEG) mit den
Zifferntasten eingeben (siehe rechte
Spalte).
e MENU-Taste*
2
• Zur Anzeige von DVD- und VCD*3-DiskMenü.
r Menü-Bedienungstasten*
• Cursor (% , fi , @ , #) und ENTER
t RETURN-Taste*
2
2
y DVD/VCD spezial-Funktionstasten
• DVD/VCD:
• DVD:
(Audio)
(Untertitel), (Winkel)
Wählen einer Zahl
• Zum Wählen einer Zahl von 0 – 9:
• Zum Wählen einer Zahl über 9:
• +100/–100 Tasten dienen nur zum Suchen
von MP3/WMA/JPEG-Stücknummern über
99.
DEUTSCH
*1 Nur steuerbar, wenn Ihr an diesen Monitor
angeschlossenene Autoreceiver ein
JVC-Modell ist.
2
*
Diese Tasten fungieren auch als
Zifferntasten, wenn zusammen mit der
SHIFT-Taste gedrückt.
3
*
Wenn PBC nicht aktiviert ist.
4
Diese Tasten arbeiten nicht als
*
PRESET 5 / ∞.
5
Diese Tasten fungieren als +10/–10 Tasten,
*
wenn zusammen mit der SHIFT-Taste gedrückt.
*6 Diese Tasten fungieren als +100/–100
Tasten, wenn zusammen mit der
SHIFT-Taste gedrückt.
*
7 Nicht für MP3/WMA/JPEG-Bedienung
verwendet.
9
Page 48

Kopfhörer — KS-HP2
Sie können den Wiedergabeton mit schnurlosem
Kopfhörer hören—KS-HP2.
Hauptelemente und Merkmale
Batterien einsetzen
DEUTSCH
VORSICHTSMASSREGELN:
• Die mitgelieferten Batterien sind nicht
wiederaufladbar. NICHT wiederaufladen;
andernfalls können Batterielecks oder
Explosionen hervorgerufen werden.
• Die Batterien mit der richtigen Polung „+“
und „–“ einsetzen, um Batterielecks oder
Explosionen zu verhindern.
Batterien (R03/
AAA)—nur zur
anfänglichen Setup
mitgeliefert
Links Rechts
POWER
1 IR-Sensoren
• Decken Sie NICHT die IR-Sensoren ab,
da sonst der Empfang beeinträchtigt wird.
2 ON/OFF-Taste
• Die Betriebsstromversorgung wird
in den folgenden Fällen automatisch
ausgeschaltet:
– Die Kopfhörer werden etwa 4 Stunden
lang verwendet.
– Es wird etwa 4 Minuten lang kein Signal
empfangen.
• Sie können durch Drücken der Taste die
Stromversorgung wieder einschalten.
3 POWER-Lämpchen
4 Lautstärkeregler
VOL
Vor der Verwendung des schnurlosen
Kopfhörers:
Der Kopfhörer erzielt beste Ergebnisse, wenn er
innerhalb von ca. 2 m vom Sendeteil verwendet
wird.
Dieser Kopfhörer muss die Infrarotsignale (IR)
empfangen, die vom IR-Sendeteil am Monitor
ausgestrahlt werden.
Deshalb kann Rauschen auftreten, wenn Kopfhörer
an einer Stelle verwendet werden, wo keie freie
Sichtlinie zwischen Sende- und Empfangsteil
besteht.
Infrarot-Sender
10
Der Wiedergabeton wird über IR-Sender zum
schnurlosen Kopfhörer übertragen.
Bei Kopfhörerverwendung stellen Sie den MonitorMenüpunkt
„IR“
auf „ON“. (Siehe Seite 14.)
WARNUNG:
Verwenden Sie den Kopfhörer NICHT
beim Fahren. Das Abschirmen von
Außengeräuschen beim Fahren ist gefährlich
und kann zu Verkehrsunfällen führen.
Page 49

Grundbetrieb
Vorbereitung
Vor dem Betrieb des Geräts stellen Sie sicher, dass alle externen Komponenen richtig angeschlossen
und eingebaut sind.
1 Die Flüssigkristallanzeige öffnen.
Drücken Sie PUSH-OPEN, bis das Flüssigkristallpanel gelöst ist, und öffnen Sie das Flüssigkr
istalldisplaypanel dann mit beiden Händen.
ACHTUNG:
• Bei Nichtbenutzung die Flüssigkristallanzeige schließen und in dem vorgesehenen Fach
verstauen. Andernfalls kann der Monitor das Sichtfeld des Rückspiegels einschränken.
• Berühren Sie nicht die Oberfläche des Flüssigkristalldisplays direkt.
DEUTSCH
Beim Schließen des Flüssigkristalldisplaypanels schieben Sie es in das Bildschirmfach ein, bis
es einrastet.
So ändern Sie die Monitorposition
Sie können eine von drei Monitorpositionen wählen.
1 Schieben Sie den Sperrhebel auf RELEASE, und ziehen Sie dann den Monitor nach
unten oder drücken ihn nach oben.
2 Schieben Sie den Sperrhebel auf HOLD, und entfernen dann den Bildschirmarm zur
nächsten gesperrten Stellung.
Beim Schließen des Flüssigkristalldisplaypanels drücken Sie den Monitor in die höchste
Stellung.
Fortsetzung nächste Seite....
11
Page 50

2 Das Gerät einschalten.
Monitor Fernbedienung
3 Wählen Sie die gewünschte Wiedergabequelle.
MODE
DEUTSCH
Bei jedem Drücken der Taste schaltet die Wiedergabequelle wie folgt um:
AV 1 AV 2DISC
4 Bedienen Sie die gewählte Wiedergabequelle.
Zur Bedienung des eingebauten DVD-Players siehe „Bedienung der Disk“ auf Seite 18.
Siehe Anweisungen der angeschlossenen Komponenten bzgl. deren Betrieb.
5 Die Lautstärke am Auto-Receiver einstellen.
• Bei Verwendung des Kopfhörers stellen Sie den Lautstärkepegel ein.
So prüfen Sie die aktuelle Eingangsquelle
• Bei Verwendung der Kopförer schalten Sie den
Betriebsstrom nach dem Ausschalten der Kopfhörer aus.
Monitor Fernbedienung
Zum Aktivieren des Türsensors
• OFF: Schaltet die Deckenleuchte aus.
• DOOR: Aktiviert den Türsensor, welcher die Deckenleuchte bei geöffneter Tür einschaltet.
• ON: Schaltet die Deckenleuchte ein.
12
Page 51

Einstellungen
Verwendung des Monitor-Menüs
Sie können Ihr eigenes Displaybild erstellen oder Klangeinstellungen mit dem Menü vornehmen.
• Siehe nächste Seite bzgl. der einstellbaren Parameter.
Die Fernbedienung—RM-RK230 hat zwei MENU-Tasten.
In diesem Abschnitt wird die MENU-Taste bei MONITOR
CONTROL verwendet.
Grundverfahren
1
Rufen Sie das Menü auf.
DEUTSCH
BRIGHT
CONTRAST
TINT
COLOR
IR ON
DIMMER
DVD SURROUND OFF
NTSC / PAL PAL
WHITE LED ON
Aktueller Menüpunkt
Die Menüwahl erlischt, wenn andere Bedienungen ausgeführt werden oder etwa 5 Sekunden
lang keine Bedienung geschieht.
2 Wählen Sie einen Parameter aus, den Sie einstellen möchten.
MENU
3 Stellen Sie ausgewählten Parameter entsprechend ein (oder wählen Sie eine
geeignete Einstellung für den ausgewählten Parameter).
Nicht zum Ändern der Einstellung von „DVD SURROUND“ verwendet.
4 Verlassen Sie das Menü.
Betätigen Sie wiederholt diese Taste, bis das Menü ausgeblendet wird.
MENU
13
Page 52

Einstellpunkte im Monitormenü
BRIGHT:
CONTRAST:
TINT:
DEUTSCH
COLOR:
IR*:
DIMMER:
DVD SURROUND:
NTSC/PAL:
WHITE LED:
Diesen Parameter einstellen, wenn das Bild zu hell oder zu dunkel ist.
• Einstellbereich: –10 bis +11
• Anfangspegel: 0 (Mitte)
Regelung des Unterschieds zwischen den hellsten und dunkelsten Teilen
des Bildes.
• Einstellbereich: –10 bis +11
• Anfangspegel: 0 (Mitte)
Diesen Parameter einstellen, wenn die menschliche Hautfarbe
unnatürlich erscheint.
• Einstellbereich: –10 bis +11
• Anfangspegel: 0 (Mitte)
Diesen Parameter einstellen, wenn der Farbton zu hell oder zu dunkel ist.
• Einstellbereich: –10 bis +11
• Anfangspegel: 0 (Mitte)
Auf „ON“ stellen, wenn Sie den Wiedergabeton mit schnurlosem
Kopfhörer hören.
• Wählbare Einstellungen: ON, OFF
• Anfangseinstellung: ON
Einstellung der Bildschirmhelligkeit und der weißen LED beim
Einschalten der Scheinwerfer.
• Einstellbereich: –5 bis +5
• Anfangspegel: 0 (Mitte)
Diese Funktion erlaubt es, einen Surround-Effekt von der Stereoanlage
zu erhalten. Wenn ein mit Mehrkanalquellen inkompatibler Receiver
angeschlossen ist, können Sie virtuellen Surroundklang mit Ihrer
2-Kanal-Stereoanlage erhalten.
Wenn Sie den Monitor ausschalten, wird die Einstellung auf
Anfangswerte zurückgesetzt.
• Wählbare Einstellungen: OFF, ACTION, DRAMA, THEATER
– ACTION: Geeignet für Actionfilme und Sportprogramme.
– DRAMA: Erzeugt natürlichen und warmen Klang. Genießen Sie
Filme in entspannter Stimmung.
– THEATER: Genießen Sie Klangeffekte wie in einem modernen
Kino.
• Anfangseinstellung: OFF
Wählen Sie das Farbsystem entsprechend den Eingangssignalen.
• Wählbare Einstellungen: PAL, NTSC
• Anfangseinstellung: PAL
Schalten Sie ein und aus, um nach dem Ändern der Einstellung die neue
Einstellung zu aktivieren.
Aufleuchten oder Erlöschen der weißen LED beim Einschalten des
Monitors.
• Wählbare Einstellungen: ON, OFF
• Anfangseinstellung: ON
* Schalten Sie den Kopfhörer vor dem Ändern der „IR“-Einstellung aus.
14
Page 53

Umschalten des Bildseitenverhältnisses
Sie können ein geeignetes Bildseitenverhältnis für die Wiedergabe-Videosignale wählen.
Grundverfahren
Bei jedem Drücken der Taste schaltet das Bildseitenverhältnis um.
ASPECT
Veränderbares Bildseitenverhältnis
Beim Empfang von 16:9-Videosignalen:
DEUTSCH
FULL:
NORMAL:
JUST:
ZOOM:
Das Bild wird vollständig auf dem Bildschirm angezeigt.
• In manchen Fällen können schwarze Balken oben und
unten am Bildschirmrand erscheinen.
Bilder werden horizontal verkleinert.
• Die schwarzen Balken erscheinen links und rechts am
Bildschirmrand.
• In manchen Fällen können die schwarzen Balken aber auch
oben und unten am Bildschirmrand erscheinen.
Die Bildmitte wird horizontal verkleinert und die linke und
rechte Seite des Bilds wird horizontal vergrößert.
• In manchen Fällen können schwarze Balken oben und
unten am Bildschirmrand erscheinen.
Das Bild wird vergrößert, so daß keine schwarzen Balken auf
dem Bildschirm angezeigt werden. (Das gesamte Bild kann
nicht auf dem Bildschirm angezeigt werden.)
Fortsetzung nächste Seite....
15
Page 54

Beim Empfang von 4:3-Videosignalen:
FULL:
NORMAL:
DEUTSCH
JUST:
ZOOM:
Das Bild wird horizontal vergrößert und füllt somit den
gesamten Bildschirm aus.
Das Bild wird in der Mitte des Bildschirms angezeigt.
• Die schwarzen Balken erscheinen auf der linken und
rechten Seite des Bildschirms.
Bilder werden horizontal vergrößert. Das
Vergrößerungsverhältnis nimmt zu den Bildschirmrändern
hin zu.
Das Bild wird vergrößert, so daß keine schwarzen Balken auf
dem Bildschirm angezeigt werden. (Das gesamte Bild kann
nicht auf dem Bildschirm angezeigt werden.)
16
Page 55

Abspielbare Disks
Disks, die sie abspielen können
Der eingebaute DVD-Player eignet sich zur
Wiedergabe der folgenden Disks—12 cm und
8 cm:
• DVD Video: Bespielt im PAL-Farbsystem
mit dem Regionscode „2“ (siehe unten).
– DVD-R/DVD-RW, bespielt im DVD-
Video-Format, können ebenfalls abgespielt
werden (siehe Seite 33).
• Video CD (VCD)/audio CD
• MP3/WMA/JPEG: Aufgenommen entweder
auf CD-R/CD-RW oder DVD-R/DVD-RW/
DVD-ROM.
– CD-R/CD-RW: Konform mit ISO 9660
Level 1, ISO 9660 Level 2, Romeo und
Joliet.
– DVD-R/DVD-RW/DVD-ROM: Konform
mit UDF-Bridge-Format*
1
.
Bei manchen Disks können die tatsächlichen
Bedienverfahren von den Erläuterung in dieser
Anleitung abweichen.
Nicht abspielbare Disks
DVD-Audio, DVD-ROM (Daten), DVD-RAM,
DVD-R/DVD-RW bespielt im DVD-VRFormat, CD-ROM, CD-I (CD-I Ready), Photo
CD, usw.
•
Das Abspielen solcher Disks führt zu
Rauschen und Beschädigung der Lautsprecher.
Hinweis zum Regionalcode:
DVD-Spieler und DVD-Videodisks sind
durch spezifische Regionalcode-Nummern
gekennzeichnet. Dieses Gerät kann nur
DVD-Disks mit Regionalcode-Nummer „2“
wiedergeben.
Beispiel:
Bei Einlegen einer DVD-Videodisk mit
einem unzulässigem Regionalcode
Die Meldung „L
erscheint auf dem Display. Die Disk wird
automatisch ausgeschoben.
Ä
NDERCODEFEHLER“
Achtung bei DualDisc-Wiedergabe
• Die Nicht-DVD-Seite einer „DualDisc“
entspricht nicht dem „Compact Disc
Digital Audio“-Standard. Deshalb wird
die Verwendung der Nicht-DVD-Seite
einer DualDisc auf diesem Produkt nicht
empfohlen.
Digitale Audioformate
Das System ist zur Wiedergabe der folgenden
digitalen Audioformate ausgelegt.
Linear PCM: Dies ist ein unkomprimiertes
Digital-Audiosignal, wie es auf CDs sowie den
meisten Studio-Mastern verwendet wird.
Dolby Digital *
entwickeltes komprimiertes digitales
Audioformat, das Multikanalcodierung
zur Erzeugung eines realistisch wirkenden
Surroundklangs ermöglicht.
3
DTS *
(Digital Theater Systems):
Von von Digital Theater Systems, Inc.
entwickeltes komprimiertes digitales
Audioformat, das Multikanalverfahren wie
Dolby Digital ermöglicht. Aufgrund der
niedrigeren Kompressionsrate als bei Dolby
Digital ist ein breiterer Dynamikbereich und
damit eine bessere Kanaltrennung gewährleistet.
MPEG Audio: Weiteres komprimiertes
digitales Audioformat, ebenfalls für
einen realistischen Surroundklang durch
Multikanalcodierung. Das System mischt
aber das Mehrkanalsignal in 2 Kanäle ab
(decodiertes PCM) und spielt es ab.
1
*
Ein Hybrid-Dateisystem, das zur
Kompatibilität mit ISO 9660 zum Zugriff
auf jeden Dateityp auf der Disk dient.
(UDF steht für „Universal Disc Format“
(universelles Disk-Format).)
2
*
Hergestellt unter Lizenz von Dolby
Laboratories. „Dolby“ und das DoppelD-Symbol sind Warenzeichen von Dolby
Laboratories.
3
*
„DTS“ und „DTS 2.0 + Digital Out“ sind
Warenzeichen von Digital Theater Systems,
Inc.
„DVD Logo“ ist ein eingetragenes Warenzeichen
von DVD Format/Logo Licensing Corporation in
den USA, Japan und anderen Ländern.
2
: Von Dolby Laboratories
DEUTSCH
17
Page 56

Bedienung der Disk
Wiedergabe einer Disk
Der Disk-Typ wird automatisch erkannt,
und die Wiedergabe startet automatisch (bei
DVD: automatischer Start hängt vom internen
Programm ab).
Wenn die aktuelle Disk eine Audio-CD,
CD-Text, MP3/WMA, JPEG oder VCD
ohne PBC ist, werden alle Stück wiederholt
DEUTSCH
abgespielt, bis Sie die Quelle umschalten oder
die Disk entnehmen.
• Wenn eine Titelliste oder ein Disk-Menü bei
der Wiedergabe einer DVD oder VCD mit
PBC erscheint, siehe „Disk-Menübedienung“
auf Seite 22.
Die folgenden Kennzeichnungen beziehen
sich auf die abspielbaren Disks....
DVD-Video Video-CD mit
PBC
Video-CD
mit/ohne PBC
Audio CD/CD-Text
Erscheint „ “ auf dem Monitor, wenn eine
Taste gedrückt wird, so ist der Receiver
nicht für den gewünschten Bedienvorgang
ausgelegt.
• In manchen Fällen wird zwar „
angezeigt, aber der Bedienvorgang ist
dennoch nicht möglich.
“, nicht
Starten der Wiedergabe
1 Die Flüssigkristallanzeige öffnen.
• Disk-Wiedergabe ist auch bei
geschlossenem Monitor möglich.
2 Das Gerät einschalten.
Monitor Fernbedienung
3 Setzen Sie eine Disk in den Ladeschlitz
ein.
Wiedergabeseite (glänzend)
nach unten weisend
MP3/WMA-Disk JPEG-Disk
Alle hier aufgeführten
Disks
Vor Ausführen von Bedienvorgängen ist
unbedingt Folgendes sicherzustellen....
• Bei DVD-Wiedergabe können Sie die SetupMenü-Einstellung nach Wunsch ändern.
(Siehe Seite 28 – 30.)
• Zur DVD/CD-Wiedergabe ist die
Verwendung der Fernbedienung bequemer.
Sie können mehr Funktionen genießen.
18
• Wenn eine Disk in den Ladeschlitz
eingesetzt ist, schaltet die
Betriebsstromversorgung ein, und
dann wird „DISC“ automatisch als
Wiedergabequelle gewählt.
Page 57

Grundlegende Bedienung
Bedienung
Zum kurzzeitigen Stoppen der
Wiedergabe
Zur Wiederholung vorheriger
Szenen—Sofort-Replay
Nächste Bedienung
Die Wiedergabe wird angehalten
• Bei JPEG-Disks: Durch Drücken von ENTER wird das
Bild auf dem Monitor ebenfalls auf Pause geschaltet.
Ein Standbild erscheint.
A Wiedergabe mit Einzelbildern
B Zeitlupen-Wiedergabe
• Kein Ton kommt bei Zeitlupen-Wiedergabe.
• Bei der Wiedergabe einer VCD, ist Rückwärts-
Zeitlupenwiedergabe nicht möglich.
Zur Fortsetzung der normalen Wiedergabe:
Die Wiedergabeposition bewegt sich um etwa 10 Sekunden
von der aktuellen Position zurück.
DEUTSCH
• Diese Funktion arbeitet nur innerhalb des gleichen Titels.
• Bei manchen DVDs arbeitet diese Funktion nicht.
Zum Stoppen der Wiedergabe
• Während der Wiedergabe erscheinen ggf, die folgenden Hinweissymbole kurze Zeit auf dem
Monitor (siehe Seite 35).
Wenn Sie die Wiedergabe erneut starten, beginnt
die Wiedergabe an der Stelle wo sie gestoppt
wurde (Fortsetzungswiedergabe).
Wenn Sie die Wiedergabe erneut starten, beginnt die
Wiedergabe vom Anfang des letzten Stücks.
Zum Ausschieben der Disk
Sie können die Disk auch ausschieben, wenn der Monitor ausgeschaltet ist.
Fortsetzung nächste Seite....
19
Page 58

So springen Sie zum nächsten oder
vorherigen Kapitel/Stück
So suchen Sie einen bestimmten
Disktitel/Kapitel/Stück direkt auf
• Bei DVD: Während Wiedergabe oder
Wiedergabepause
Zu den folgenden
Kapiteln/Stücke.
DEUTSCH
Springt zurück zum Anfang des aktuellen
Kapitels/Stücks, und dann zu den
vorhergehenden Kapiteln/Stücke.
So spulen Sie Kapitel/Stück
vor oder zurück
Vorspulen.
Rückspulen.
* Die Suchgeschwindigkeit wechselt auf x2 ]
x10 für alle Disks (DVD, VCD, CD) um, aber
die im Monitor gezeigte Information gilt nur
für DVD/VCD.
• Bei DVD: Während Wiedergabe oder
Im Stoppbetrieb—wählen Sie
• Bei VCD: Wenn PBC (siehe Seite 22)
• Bei MP3/WMA/JPEG: Wählen Sie einen
Wählen Sie die Nummer, die dem gewünschten
Punkt entspricht (siehe Seite 9).
Wiedergabepause—wählen Sie
ein Kapitel.
einen Titel.
nicht aktiviert ist.
Stück innerhalb des gleichen
Ordners.
So suchen Sie einen
Disktitel/Ordner auf
Zum nächsten Disktitel/
Ordner.
Ordner.
Zum vorherigen Disktitel/
So suchen Sie einen
bestimmten Disktitel/
Ordner auf
So suchen Sie vorwärts
oder rückwärts durch
Kapitel/Stück
Die gezeigte Information gilt nur für DVD/VCD:
• Zum Rückstellen auf normale
Geschwindigkeit
20
Innerhalb von 10
Sekunden drücken Sie
die Zifferntasten (siehe
Seite 9).
• Bei MP3/WMA/JPEG-Disks: Zum direkten
Wählen der Ordner mit den Zifferntasten ist
es erforderlich, dass Ordner 2-stellige Zahlen
am Anfang ihrer Ordnernamen erhalten—01,
02, 03 und so weiter.
Page 59

DVD/VCD/JPEG-Spezialfunktionen
Wählen der Audiosprachen
Bei DVD:
Sie können die zu hören gew ünschte
Sprache wählen, wenn die Disk mehrere
Soundtrack-Sprachen hat.
1/3
ENGLISH
Beisp.: Wenn die Disk 3 Optionen hat
Bei VCD:
Sie können den gewünschten
Audiowiedergabekanal wählen. (Dies ist
bei Wiedergabe einer Karaoke-VCD praktisch.)
ST
1/3
ENGLISH
Wählen von Untertiteln
Sie können die Sprache der Untertitel zur
Anzeige im Monitor wählen.
• Sie können die anfängliche
Untertitelsprache mit dem Setup-Menü
einstellen (siehe Seite 29).
1/3
ENGLISH
1/3
ENGLISH
Beisp.: Wenn die Disk 3 Optionen hat
Wahl einer von mehreren Ansichten
Sie können dieselbe Szene aus
unterschiedlichen Winkeln betrachten,
wenn die Disk mit mehreren Sichtwinkeln
aufgezeichnet ist.
DEUTSCH
ST
Normale Stereo-Wiedergabe (linker/rechter
ST:
Kanal)
Wiedergabe auf dem L (linken) Audiokanal.
L:
Wiedergabe auf dem R (rechten) Audiokanal.
R:
• Bei manchen DVDs und VCDs ist Ändern der
Untertitel-Sprache, der Tonsprache (oder des
Soundtracks) ohne Verwendung des DiskMenüs unmöglich.
1/3
1
1/3
1
1/3
1
1/3
3
Beisp.: Wenn die Disk 3 Sichtwinkel hat
1/3
2
21
Page 60

Disk-Menübedienung
Die menügesteuerte Wiedergabe ist möglich
beim Abspielen von DVDs mit Menüsteuerung
oder VCDs mit PBC (PlayBack Control).
Während der Wiedergabe einer
DVD
1
DEUTSCH
Eine Disktitelliste oder ein Diskmenü
erscheint auf dem Monitor.
2 Wählen Sie den gewünschten
Parameter im Menü.
Der gewählte Parameter startet die Wiedergabe.
• Bei manchen Disks können Sie auch
die Parameter mit den entsprechenden
Zifferntasten wählen.
Beenden der PBC-Wiedergabe
1
2 Wählen Sie einen Stück zum Starten der
normalen Wiedergabe mit den Zifferntasten
(siehe Seite 9).
So setzene Sie PBC-Funktion fort
Heranzoomen
1
ZOOM 1 ZOOM 2 ZOOM 3 ZOOM 4
ZOOM OFF
ZOOM 5ZOOM 6
Während der Wiedergabe einer
VCD
• Wenn eine Liste von Menüparametern im
Monitor erscheint.
• Zum Wählen einer Zahl über 9 siehe „Wählen
einer Zahl“ auf Seite 9.
So kehren Sie zu vorherigen Menüs zurück
• Bei manchen Disks können Sie auch durch
Drücken von 4 / ¢ zwischen den Menüs
umschalten.
22
• Für JPEG-Disks (nur im Pause-Modus):
ZOOM 1 ZOOM 2
ZOOM OFF
2 Verschieben Sie den herangezoomten
Bildteil.
• Für JPEG-Dateien:
Sie können den vergrößerten Bildteil nicht
verschieben, wenn das gesamte Bild noch
im Monitor angezeigt wird.
Zum Aufheben von Zoom wählen Sie
„ZOOM OFF“ in Schritt 1.
Page 61

Bildschirm-Disk-Bedienung
Über den Bildschirm-Balken
Sie können die Disk-Information prüfen und
weitere Funktionen über den BildschirmBalken verwenden.
•
Bei Audio-CD, CD-Text und MP3/WMA/
JPEG-Disks können Sie auch das SteuerungSchirmbild und das Listen-Schirmbild
verwenden (siehe Seiten 26 und 27).
On-Screen-Balken
DVD
DVD -V
TIME TITLE CHAP
VCD
VCD
TIME
PBC
TRACK REPEAT
MP3/WMA
FILE
REPEAT
RANDOMINTRO
JPEG
FILE
REPEAT
CD-Text/Audio-CD
*
CD
5. 1ch
REPEAT
2ch
RANDOMINTRO
T02-C03 TOTAL 1:25:58
OFF
TRACK 01 TIME 00:36
RANDOMINTRO
REPEAT TRACK
REPEAT FOLDER
REPEAT TRACK
TIME 00:00:36
TIME 00:36
1 Disk-Typ
2 • Audiosignalformat-Typ (nur bei DVD
und DTS Audio-CD)
• PBC (nur bei VCD)
3 Wiedergabe-Information
Aktueller Titel/Kapitel
T02-C03
TRACK 01
TOTAL
T. REM
Aktueller Stück
Verflossene Spielzeit der Disk
Restliche Diskzeit (bei VCD)/
restliche Disktitelzeit (bei
DVD)
TIME
Bisherige Abspielzeit des
aktuellen Kapitels/Stücks
Restliche Abspielzeit des
REM
aktuellen Kapitels/Stücks
4 Wiedergabe-Zustand
Wiedergabe
Vorwärts-/Rückwärts-Suche
Vorwärts-/Rückwärts-Zeitlupe
Pause
Stopp
5 Bedienungssymbole
Zeitanzeige
TIME
Zeitsuche—Geben Sie die
abgelaufene Spielzeit des
aktuellen Titels oder der Disk
ein.
TITLE
Disktitel-Suche
CHAP
Kapitelsuche
TRACK
Titelsuche
Ändern Sie die Audio-Sprache
oder den Audio-Kanal.
Ändern Sie die Untertitel-
Sprache.
Ändern Sie den Sichtwinkel.
Wiederholungswiedergabe (für
OFF
DVD)
Wiederholungswiedergabe (für
REPEAT
andere Disks)
INTRO
Anspielfunktion
Zufallswiedergabe
RANDOM
6 Aktueller Wiedergabemodus
DEUTSCH
* Nur für DTS Audio-CD
Fortsetzung nächste Seite....
23
Page 62

Grundlagen der Bildschirm-Balken
-Bedienung
Zum Löschen des On-Screen-Balkens
1 Zur Anzeige des Bildschirm-
Balkens.
• Bei DVD/VCD:
DEUTSCH
(zweimal)
• Für andere Disks:
DVD -V
TIME TITLE CHAP
2ch
Wenn eine JPEG-Disk eingelegt ist, gehen
Sie gleich zu Schritt 3.
T02-C03 TOTAL 1:25:58
OFF
2 Wählen Sie einen Parameter.
3 Treffen Sie eine Wahl.
• Wenn das Popup-Menü erscheint....
1
DVD -V
TIME TITLE CHAP
oder
2ch
T02-C03 TOTAL 1:25:58
OFF
_ _
• Der On-screen-Balken für eine CD oder MP3/
WMA/JPEG-Disk verschwindet automatisch
einige Sekunden nach dem letzten Vorgang.
• Die wählbaren Optionen für Wiederhol-/
Anspiel-/Zufallswiedergabe:
OFF
Sie können den aktuellen Disktitel
oder das Kapitel wiederholen.
DVD (während Wiedergabe oder
Wiedergabepause):
OFF CHAP TITLE
REPEAT
Sie können das aktuelle Stück
wiederholen (ausgenommen
JPEG) oder die Stücke im
aktuellen Ordner (nur bei MP3/
WMA/JPEG).
VCD (wenn PBC nicht aktiviert ist):
REPEAT
MP3/WMA:
REPEAT TRACK
REPEAT FOLDER
JPEG:
REPEAT FOLDER
24
CD-Text/Audio-CD:
REPEAT TRACK
2
Page 63

INTRO
Sie können die ersten 15 Sekunden
aller Stücke auf der Disk oder im
aktuellen Ordner abspielen (nur
bei MP3/WMA).
VCD (wenn PBC nicht aktiviert ist):
INTRO
MP3/WMA:
INTRO TRACK
INTRO FOLDER
CD-Text/Audio-CD:
INTRO TRACK
RANDOM
Sie können alle Stücke auf der
Disk oder im aktuellen Ordner in
zufälliger Reihenfolge abspielen
(nur bei MP3/WMA).
VCD (wenn PBC nicht aktiviert ist):
RANDOM
MP3/WMA:
RANDOM FOLDER
RANDOM DISC
Zum Suchen eines bestimmten Punkts nach
Spielzeit
• Bei VCD: Wenn PBC nicht aktiviert ist.
1 Wählen Sie .
2 Geben Sie die abgelaufene Spielzeit des
aktuellen Titels oder der Disk ein.
Beisp.: • Zur Eingabe von 1 (Stunden):
• Es ist immer erforderlich, die
• Zur Korrektur einer
•
3 Beenden Sie den Vorgang.
02 (Minuten): 00 (Sekunden)
drücken Sie 1, 0, 2, 0 und dann 0.
• Zur Eingabe von 54 (Minuten): 00
(Sekunden) drücken Sie 0, 5, 4, 0
und dann 0.
Stundenstelle (auch „0“ Stunden)
einzugeben, aber es ist nicht erforderlich,
nachfolgende Nullen (die letzten beiden
Stellen in den obigen Beispielen)
einzugeben.
Fehleingabe drücken Sie...
Sie können auch die
abgelaufene Spielzeit festlegen.
Verwenden Sie dazu % / fi / @ / #.
DEUTSCH
CD-Text/Audio-CD:
REPEAT TRACK
Siehe auch Seite 24 für die folgenden
Bedienverfahren.
Zum Ändern der Zeitinformationen
1 Wählen Sie
2 Ändern Sie die Zeit-Information.
TIME
.
TIME 0:00:58
REM 0:11:23
TOTAL 1:01:58T. REM 0:35:24
So suchen Sie nach einem bestimmten
Disktitel/Kapitel/Stück
1 Wählen Sie
TITLE
2 Geben Sie die Nummer ein.
• Zur Korrektur einer Fehleingabe drücken
Sie die Zifferntaste, bis die korrekte
Nummer eingegeben ist.
3 Beenden Sie den Vorgang.
,
CHAP
, oder
TRACK
.
25
Page 64

Grundlegende Steuerbildschirm-
Bedienvorgänge
Sie können die gewünschten Gegenstände im
Steuerbildschirm suchen und abspielen.
Zum Wählen eines Ordners oder Stücks
1 Wählen Sie die Spalte „Folder“ oder die
Spalte „Track“ im Steuerbildschirm.
Bei MP3/WMA/CD-Text/Audio-CD:
Der Steuerbildschirm erscheint automatisch im
Monitor, wenn Sie eine Disk einsetzen.
DEUTSCH
JPEG:
Drücken Sie TOP M (Menü), MENU oder 7.
Die Wiedergabe stoppt, und das Steuerschirmbild
erscheint.
MP3/WMA/JPEG-
Steuerung
TIME 00:00:14REPEAT TRACK
Folder : 2 / 3
01 Music
02 Music
03 Music
Track Information
Album
Weather
Artist
Robert M. Smith
Title
Rain
Beispiel: Steuerschirmbild für MP3/WMA
1 Aktueller Ordner
Aktuelle Ordnernummer/Gesamt-Ordnerzahl
2
3 Ordnerliste
4 Gewählter Wiedergabemodus
5 Verflossene Spielzeit des laufenden Stücks
(nur bei MP3/WMA)
6 Bedienungsmodus-Symbol (nur bei MP3/
WMA)
‰ (Wiedergabe), 7 (Stopp), 8 (Pause)
7 Aktuelle Stücknummer/Gesamtzahl der
Stücke im aktuellen Ordner (Gesamtzahl
der Stücke auf der Disk)
8 Stück-Information (nur bei MP3/WMA)
9 Stückliste
p Aktueller Stück (hervorgehobener Balken)
Track : 5 / 14 (Total 41)
Cloudy.mp3
Fair.mp3
Fog.mp3
Hail.wma
Indian summer.mp3
Rain.mp3
Shower.mp3
Snow.mp3
Thunder.wma
Typhoon.mp3
Wind.mp3
Winter sky.mp3
2 Wählen Sie einen Ordner oder Stück.
• Wenn die Wiedergabe nicht
beginnt, drücken Sie 3 oder
ENTER.
• Bei JPEG-Disks: Durch Drücken von ENTER
wird das gewählte Bild auf dem Monitor auf
Pause geschaltet.
CD-Text/Audio-CD-
Steuerbildschirm
REPEAT TRACK
Track Information
Album
Four seasons
Artist
Robert M. Smith
Title
Rain
1 Gewählter Wiedergabemodus
2 Verflossene Spielzeit des laufenden Stücks
3 Bedienungsmodus-Symbol
‰ (Wiedergabe), 7 (Stopp), 8 (Pause),
¡ (Vorlauf), 1 (Rücklauf)
4 Aktuelle Stücknummer/Gesamtzahl der
Stücke auf der Disk
5 Stück-Information
6 Stückliste
7 Aktueller Stück (hervorgehobener Balken)
Zum Wählen eines Stücks
• Wenn die Wiedergabe nicht
beginnt, drücken Sie 3 oder
ENTER.
TIME 00:14
Track : 5 / 14
Cloudy
Fair
Fog
Hail
Indian summer
Rain
Shower
Snow
Thunder
Typhoon
Wind
Winter sky
26
Page 65

Listen-Bildschirm-Bedienungen
Sie können die Ordnerliste/Stückliste vor dem
Wiedergabebeginn anzeigen. In dieser Liste
können Sie die Inhalte bestätigen und die
Wiedergabe einer Disk beginnen.
Ordner-/Stücklisten-
Bildschirme
Ordnerliste (MP3/WMA/JPEG)
Bei MP3/WMA/JPEG:
Im Stoppbetrieb...
1 Zeigen Sie die Ordnerliste an.
Bei jedem Drücken der Taste
erscheint der Listenbildschirm
und wird wieder ausgeschaltet.
2
Wählen Sie den Ordner auf der Liste.
DEUTSCH
Folder : 153/240 Track 154/198 Page : 4/6
fol130
fol131
fol132
fol133
fol134
fol135
fol136
fol137
fol138
fol139
fol140
fol141
fol142
fol143
fol144
fol145
fol146
fol147
fol148
fol149
fol150
fol151
fol152
fol153
fol154
fol155
fol156
fol157
fol158
fol159
fol160
fol161
fol162
fol163
fol164
fol165
fol166
fol167
fol168
fol169
Beisp.: Ordnerliste bei MP3/WMA
Stückliste (MP3/WMA/JPEG/CD-Text/
Audio-CD)
Folder : 153/240 Track 154/198 Page : 4/6
file0131.mp3
file0132.mp3
file0133.wma
file0134.mp3
file0135.mp3
file0136.wma
file0137.wma
file0138.mp3
file0139.mp3
file0140.wma
file0141.mp3
file0142.mp3
file0143.mp3
file0144.mp3
file0145.wma
file0146.mp3
file0147.wma
file0148.mp3
file0149.wma
file0150.wma
file0151.wma
file0152.mp3
file0153.wma
file0154.mp3
file0155.mp3
file0156.mp3
file0157.mp3
file0158.wma
file0159.wma
file0160.wma
Beisp.: Stückliste bei MP3/WMA
file0161.wma
file0162.mp3
file0163.wma
file0164.mp3
file0165.wma
file0166.wma
file0167.wma
file0168.wma
file0169.mp3
file0170.wma
1 Aktuelle Ordnernummer/Gesamt-
Ordnerzahl (nur bei MP3/WMA/JPEG)
2 Aktuelle Stücknummer/Gesamtzahl der
Stück im aktuellen Ordner (MP3/WMA/
JPEG) oder auf der Disk (CD-Text/AudioCD)
3 Aktuelle Seite/Gesamtzahl der Seiten in der
Liste
4 Aktueller Ordner/Stück (hervorgehobener
Balken)
Die Stückliste des gewählten Ordners
erscheint.
Zum Zurückschalten zur Ordnerliste
3 Wählen Sie den Stück in der Liste.
• Bei JPEG-Disks: Durch Drücken von
ENTER wird das gewählte Bild auf dem
Monitor auf Pause geschaltet.
Bei CD-Text/Audio-CD:
Im Stoppbetrieb...
1 Zeigen Sie die Stückliste an.
Bei jedem Drücken der Taste
erscheint der Listenbildschirm
und wird wieder ausgeschaltet.
2 Wählen Sie den Stück in der Liste.
27
Page 66

DVD-Setup-Menü
Sie können die Anfangsbedingungen für die
Disk-Wiedergabe speichern.
• Während der Wiedergabe sind keine
Änderungen im Setup-Menü möglich.
• Bei Versand ab Werk ist die Bildschirmprache
auf Englisch eingestellt. Zum Ändern der
Sprache siehe Seite 29.
Grundlegendes Einstellverfahren
DEUTSCH
Im Stoppbetrieb...
1
SPRACHE
MENÜSPRACHE
AUDIO SPRACHE
UNTERTITEL
BILDSCHIRMMENÜ-SPRACHE
2
AUDIO
DIGITAL-AUDIO-AUSGANG
ABWÄRTSMISCHUNG
DYNAMIKBEREICH-KOMP.
DEUTSCH
DEUTSCH
DEUTSCH
DEUTSCH
BITSTROM/PCM
2-KANAL-STEREO
EIN
4
AUDIO
DIGITAL-AUDIO-AUSGANG
ABWÄRTSMISCHUNG
DYNAMIKBEREICH-KOMP.
BITSTROM/PCM
2-KANAL-STEREO
DOLBY-RAUMKLANG
2-KANAL-STEREO
EIN
5 Wählen Sie eine Option.
AUDIO
DIGITAL-AUDIO-AUSGANG
ABWÄRTSMISCHUNG
DYNAMIKBEREICH-KOMP.
BITSTROM/PCM
2-KANAL-STEREO
DOLBY-RAUMKLANG
2-KANAL-STEREO
EIN
6
AUDIO
DIGITAL-AUDIO-AUSGANG
ABWÄRTSMISCHUNG
DYNAMIKBEREICH-KOMP.
BITSTROM/PCM
DOLBY-RAUMKLANG
EIN
Beisp.: Beim Wählen des „AUDIO“-Menüs
3 Wählen Sie eine Parameter zur
Einstellung.
AUDIO
DIGITAL-AUDIO-AUSGANG
ABWÄRTSMISCHUNG
DYNAMIKBEREICH-KOMP.
Beisp.: Beim Wählen von „ABWÄRTSMISCHUNG“
28
BITSTROM/PCM
2-KANAL-STEREO
EIN
Zum Einstellen anderer Parameter im
gleichen Menü
Wiederholen Sie die Schritte 3 bis 6.
Zum Einstellen anderer Parameter in
anderen Menüs
Wiederholen Sie die Schritte 2 bis 6.
Zum Zurückschalten zum Normalbildschirm
Page 67

SPRACHE-Menü
Gegenstand Inhalt
MENÜSPRACHE
AUDIO SPRACHE
UNTERTITEL
BILDSCHIRMMENÜ-
SPRACHE
• Für die SPRACHE-Einstellungen siehe auch Sprachcode-Liste auf Seite 32.
Wählen Sie die anfängliche Disk-Menüsprache aus.
Wählen Sie die anfängliche Audio-Sprache aus.
Wählen Sie die anfängliche Untertitelsprache oder löschen Sie
Untertitel (AUS).
Sie können die Sprache für dieses Setup-Menü und einige der
Monitoranzeigen wählen.
BILD-Menü
Gegenstand Inhalt
MONITOR-TYP
16:9 4:3 LETTERBOX
4:3 PAN SCAN
OSD POSITION
Position 1 Position 2
Wählen Sie den Monitortyp zum Betrachten eines Breitbilds
auf Ihrem externen Monitor.
• 16:9 : Wählen Sie dies, wenn das Bildseitenverhältnis Ihres
Monitors 16:9 ist.
• 4:3 LETTERBOX : Wählen Sie dies, wenn das
Bildseitenverhältnis Ihres Monitors 4:3 ist. Bei
Breitbildanzeige erscheint am oberen und unteren
Bildschirmrand ein schwarzer Streifen.
• 4:3 PAN SCAN : Wählen Sie dies, wenn das
Bildseitenverhältnis Ihres Monitors 4:3 ist.
Bei Breitbildanzeige bleibt der Bildschirm zwar frei von
schwarzen Streifen, aber der linke und rechte Bildrand ist
nicht auf dem Schirm zu sehen.
Wählen Sie die Position des On-screen-Balkens im Monitor.
• 1 : Höhere Position
• 2 : Niedrigere Position (Hilfe-Schirmbild unter dem DVD-
Setup-Menü verschwindet.)
DEUTSCH
MP3/JPEG
Wen sowohl MP3/WMA-Dateien als auch JPEG-Dateien auf
einer Disk aufgezeichnet sind, können Sie wählen, welche
Dateien abgespielt werden sollen.
•
MP3 : Wählen Sie dies zur Wiedergabe von MP3/WMA-Dateien.
• JPEG : Wählen Sie dies zur Wiedergabe von JPEG-Dateien.
Werfen Sie die Disk aus, und legen Sie sie wieder ein, damit
die neue Einstellung wirksam wird.
Fortsetzung nächste Seite....
29
Page 68

AUDIO-Menü
Gegenstand Inhalt
DIGITAL-AUDIO-AUSGANG
DEUTSCH
ABWÄRTSMISCHUNG
DYNAMIKBEREICH-KOMP.
Wählen Sie das Signalformat zur Ausgabe über die Buchse DIGITAL
OUT (Optical) an der Rückseite. Einzelheiten siehe Seite 36.
• NUR PCM : Wählen Sie dies beim Anschluss eines Verstärkers
oder Decoders, der nicht mit Dolby Digital, DTS, MPEG Audio,
kompatibel ist oder bei Anschluss an ein Aufnahmegerät.
• DOLBY DIGITAL/PCM : Wählen Sie dies beim Anschluss eines
Verstärkers oder Decoders, der mit Dolby Digital kompatibel ist.
• BITSTROM/PCM : Wählen Sie dies beim Anschluss eines
Verstärkers oder Decoders, der mit Dolby Digital, DTS oder MPEG
Audio kompatibel ist.
Bei der Wiedergabe einer Mehrkanal-DVD-Disk beeinflusst diese
Einstellung die über die Analogbuchsen ausgegebenen Sigale—
AV-OUT und schnurloser Kopfhörer (und über die Buchse DIGITAL
OUT, wenn „NUR PCM“ für „DIGITAL-AUDIO-AUSGANG“
gewählt ist).
• DOLBY-RAUMKLANG : Wählen Sie dies, wenn Sie MehrkanalSurround-Audio durch Anschließen eines mit Dolby Surround
kompatiblen Verstärkers an diesen Monitor genießen wollen.
• 2-KANAL-STEREO : Wählen Sie im Normalbetrieb diese
Einstellung.
Sie können einen kraftvollen Klang auch bei niedriger oder mittlerer
Lautstärke genießen, wenn Sie mit Dolby Digital aufgenommenes
Material hören.
• AUTO : Wählen Sie dies zum Anlegen des Effekts an mehrkanalig
codiertes Material (ausgenommen 1-Kanal- und 2-Kanal-Material).
• EIN : Wählen Sie dies, um diese Funktion immer zu verwenden.
30
Page 69

Wartung
So vermeiden Sie Beschädigungen am
Gehäuse
• Bringen Sie das Gerät nicht mit Pestiziden,
Benzin, Lösungsmittel oder anderen
flüchtigen Stoffen in Berührung.
Das Gehäuse besteht vorwiegend aus
Kunststoff.
• Wischen Sie es nicht mit Benzin,
Lösungsmittel oder ähnlichen Stoffen ab, da
dies zu Verfärbungen oder zum Entfernen der
Farbschicht führt.
• Bei Reinigung mit einem Tuch und einem
chemischen Reinigungsmittel beachten Sie
folgende Sicherheitsmaßregeln.
– Achten Sie darauf, daß das Gerät nicht
längere Zeit mit Gegenständen aus Gummi
oder Vinyl in Berührung ist.
– Verwenden Sie keine Reinigungsmittel mit
Scheuerpartikeln, da dadurch das Gehäuse
beschädigt werden kann.
Schmutz mit einem weichen Tuch
vorsichtig abwischen
Bei sehr starker Verschmutzung tränken Sie
einen Lappen mit einer wässrigen Lösung
von Küchenspülmittel (neutral), wringen Sie
diesen Aus, wischen das Gehäuse damit ab und
wischen danach mit einem trockenen Lappen
trocken.
(Bringen Sie Reinigungsmittel nicht direkt auf
die Oberfläche auf, da dabei Wassertropfen ins
Innere des Geräts gelangen könnten.)
Umgang mit Disks
Beim Entnehmen einer Disk
aus ihrer Hülle immer
den Mittenhalter der Hülle
eindrücken und die Disk an den
Rändern haltend herausheben.
• Die Disk immer an den Rändern halten.
Berühren Sie nicht die Aufnahmeoberfläche.
Beim Einsetzen einer Disk in ihre Hülle die
Disk vorsichtig um den Mittenhalter eindrücken
(mit der beschrifteten Seite nach oben weisend).
• Denken Sie immer daran, die Disks nach
der Verwendung wieder in ihren Hüllen
abzulegen.
Mittenhalter
Sauberhalten der Disks
Eine verschmutzte Disk lässt
sich möglicherweise nicht richtig
abspielen.
Wenn eine Disk verschmutzt
wird, wischen Sie diese mit einem
weichen Lappen gerade von der Mitte nach
außen hin ab.
• Verwenden Sie keine Lösungsmittel (z.B.
Schallplattenreiniger, Spray, Terpentin,
Benzol usw.) zur Reinigung von Disks.
Wiedergabe neuer Disks
Neue Disks haben möglicherweise
rauhe Stellen an den Innen- und
Außenrändern. Wenn solch eine
Disk verwendet wird, kann sie
von diesem Receiver abgewiesen
werden.
Um solche rauhen Stellen zu beseitigen,
reiben Sie die Ränder mit einem Bleistift,
Kugelschreiber usw.
DEUTSCH
Feuchtigkeitskondensation
Auf der Linse im Inneren des DVD-Players
kann sich in den folgenden Fällen Kondensation
absetzen:
• Nach dem Einschalten der Heizung im Auto.
• Wenn es sehr feucht im Auto wird.
In diesem Fall können Fehlfunktionen im
DVD-Player auftreten. In diesem Fall
entnehmen Sie die Disk und lassen den
Receiver einige Stunden lang eingeschaltet, bis
die Feuchtigkeit verflogen ist.
Disks mit folgenden Mängeln dürfen nicht
verwendet werden:
Verzogene
Disk
Aufkleber
Disk
Aufkleberrest
Aufklebetikett
31
Page 70

Tabelle Der Sprachencodes
Code Sprache Code Sprache Code Sprache
AA
AB
AF
AM
AR
AS
AY
AZ
DEUTSCH
BA
BE
BG
BH
BI
BN
BO
BR
CA
CO
CS
CY
DZ
EL
EO
ET
EU
FA
FI
FJ
FO
FY
GA
GD
GL
GN
GU
HA
HI
HR
HU
HY
IA
IE
Afar
Abchasisch
Afrikaans
Amharisch
Arabisch
Assamesisch
Aymara
Aserbaidschanisch
Baschkirisch
Belorussisch
Bulgarisch
Biharisch
Bislamisch
Bengalisch
Tibetanisch
Bretonisch
Katalanisch
Korsisch
Tschechisch
Walisisch
Bhutani
Griechisch
Esperanto
Estnisch
Baskisch
Persisch
Finnisch
Fiji
Faröisch
Frisisch
Irisch
Schottisches Gälisch
Galizisch
Guarani
Gujaratisch
Haussa
Hindi
Kroatisch
Ungarisch
Armenisch
Interlingua
Interlingue
IK
IN
IS
IW
JI
JW
KA
KK
KL
KM
KN
KO
KS
KU
KY
LA
LN
LO
LT
LV
MG
MI
MK
ML
MN
MO
MR
MS
MT
MY
NA
NE
NO
OC
OM
OR
PA
PL
PS
PT
QU
RM
Inupiak
Indonesisch
Isländisch
Hebräisch
Jiddisch
Javanisch
Georgisch
Kasachisch
Grönländisch
Kambodschanisch
Kannada
Koreanisch (KOR)
Kaschmirisch
Kurdisch
Kirgisisch
Lateinisch
Lingalisch
Laotisch
Litauisch
Lettisch
Malagasisch
Maorisch
Mazedonisch
Malajalam
Mongolisch
Moldavisch
Marathi
Malaysisch (MAY)
Maltesisch
Burmesisch
Nauruisch
Nepalisch
Norwegisch
Okzitanisch
(Afan) Oromo
Orija
Pundjabisch
Polnisch
Paschtu
Portugiesisch
Quechua
Rätoromanisch
RN
RO
RW
SA
SD
SG
SH
SI
SK
SL
SM
SN
SO
SQ
SR
SS
ST
SU
SW
TA
TE
TG
TH
TI
TK
TL
TN
TO
TR
TS
TT
TW
UK
UR
UZ
VI
VO
WO
XH
YO
ZU
Kirundisch
Rumänisch
Kijarwanda
Sanskrit
Zinti
Sango
Serbokroatisch
Singhalesisch
Slowakisch
Slowenisch
Samoanisch
Shonisch
Somali
Albanisch
Serbisch
Swasiländisch
Sesothisch
Sudanesisch
Suaheli
Tamilisch
Telugu
Tadschikisch
Thai
Tigrinja
Turkmenisch
Tagalog
Sezuan
Tongaisch
Türkisch
Tsongaisch
Tatarisch
Twi
Ukrainisch
Urdu
Usbekisch
Vietnamesisch
Volapük
Wolof
Xhosa
Joruba
Zulu
32
Page 71

Weitere Informationen zu diesem Monitor
Grundlegende Bedienung
Ausschalten
• Wenn Sie das Gerät beim Hören einer Disk
ausschalten, startet die Disk-Wiedergabe
beim nächsten Einschalten automatisch.
Bedienung der Disk
Allgemeines
• Die Wörter „Stück“ und „Datei“ werden in
dieser Anleitung mit gleicher Bedeutung
verwendet, wenn die Rede von MP3/WMA/
JPEG-Dateien und ihren Dateinamen ist.
• Dieses Gerät kann auch Single-Disks (8 cm)
abspielen.
• Dieses Gerät kann nur Audio-CD (CD-DA)
Dateien abspielen, wenn andere Dateitypen
auf der gleichen Disk aufgezeichnet sind.
– Der erste Stück wird übersprungen, wenn
ein anderer Dateityp zuerst erkannt wird.
• Wenn bereits eine Disk eingelegt ist,
wird durch Wählen von „DISC“ als
Wiedergabequelle die Disk-Wiedergabe
gestartet.
Starten der Wiedergabe
• Wenn eine Disk umgekehrt herum eingesetzt
ist, erscheint die Meldung „NO DISC“ im
Bildschirm, und die Disk wird automatisch
ausgeschoben.
• Disk-Wiedergabe ist auch bei geschlossenem
Monitor möglich.
Grundlegende Bedienung
• Kein Ton kommt bei Zeitlupen-Wiedergabe.
Bei der Wiedergabe einer VCD, ist
Rückwärts-Zeitlupenwiedergabe nicht
möglich.
• Die Sofort-Replay-Funktion arbeitet nur
innerhalb des gleichen Titels. (Bei manchen
DVDs arbeitet diese Funktion nicht.)
• Bei der Wiedergabe einer DVD/VCD
kommt kein Ton beim Suchlauf mit den
Geschwindigkeiten Search.
• Der Rückwärts-Suchlauf stoppt automatisch,
wenn der Anfang der Disk erreicht wird. Die
Wiedergabe wird mit Normalgeschwindigkeit
wieder aufgenommen.
DVD/VCD/JPEG-Spezialfunktionen
• Bei manchen DVDs und VCDs ist Ändern der
Untertitel-Sprache, der Tonsprache (oder des
Soundtracks) ohne Verwendung des
Disk-Menüs unmöglich.
• In eingezoomtem Zustand sieht das Bild grob
aus.
Wiedergabe einer DVD-R/DVD-RW oder
CD-R/CD-RW
• Verwenden Sie nur „finalisierte“ Disks.
• Dieses Gerät kann nur Dateien des gleichen
Typs wie zuerst erkannt abspielen, wenn eine
Disk sowohl Audio CD (CD-DA)-Dateien als
auch MP3/WMA/JPEG-Dateien enthält.
• Dieser Gerät kann entweder MP3/WMAoder
JPEG-Dateien abspielen, die sich auf einer
Disk befinden. Stellen Sie den Typ der
wiederzugebenden Dateien im AV-SetupMenü (siehe Seite 29) ein, bevor Sie eine
Disk abspielen, die beide Dateitypen enthält.
• Nur bei CD-R/CD-RW: Dieses Gerät
kann Multi-Session-Disks abspielen, nicht
geschlossene Sessions werden aber bei der
Wiedergabe übersprungen.
• Manche DVD-R/DVD-RWs oder CD-R/
CD-RWs können sich auf diesem Gerät
aufgrund ihrer Disk-Eigenschaften aus den
folgenden Gründen nicht abspielen lassen:
– Disks sind schmutzig oder zerkratzt.
– Kondensationsbildung tritt auf der Linse im
Gerät auf.
–
Die Tonabnehmerlinse im Gerät ist verschmutzt.
– CD-R/CD-RW auf der die Dateien in der
„Packet Write“-Methode aufgezeichnet sind.
– DVD-R/DVD-RW, die nicht im UDF-
Bridge-Format beschrieben ist (z.B. UDFoder ISO-Format).
–
Es liegen falsche Aufnahmebedingungen
(fehlende Daten usw.) oder Medienbedingungen
(Flecken, Kratzer, Verwellungen usw.) vor.
• DVD-RW/CD-RW können eine längere
Auslesezeit erfordern, da die Reflektanz von
DVD-RW/CD-RW niedriger als die normaler
Disks ist.
Fortsetzung nächste Seite....
DEUTSCH
33
Page 72

• Verwenden Sie nicht die folgenden DVD-R/
DVD-RW oder CD-R/CD-RW:
– Disks mit Aufklebern, Etiketten oder
Schutzsiegeln auf der Oberfläche.
– Disks, auf denen Beschriftungen direkt
mit einem Tintenstrahldrucker aufgedruckt
werden können.
Bei Verwendung solcher Disks bei hohen
Temperaturen oder hoher Luftfeuchtigkeit
können Fehlfunktionen oder Schäden an den
Disks verursacht werden.
DEUTSCH
Wiedergabe einer MP3/WMA-Disk
• Dieses Gerät kann MP3/WMA-Dateien
mit der Erweiterung <.mp3> oder
<.wma> abspielen (ungeachtet der Groß/Kleinschreibung) aufgenommen entweder als
CD-R/CD-RW oder DVD-R/DVD-RW.
• Dieses Gerät kann die Namen von Alben,
Interpreten (Künstlern) sowie ID3-Tag
(Version 1,0, 1,1, 2,2, 2,3 oder 2,4) für MP3Dateien und WMA-Dateien anzeigen.
• Dieses Gerät kann nur Einzelbyte-Zeichen
anzeigen. Andere Zeichen können nicht
korrekt angezeigt werden.
• Dieses Gerät kann MP3/WMA-Dateien
abspielen, die den unten aufgeführten
Bedingungen entsprechen:
– Bit-Rate: MP3: 32 kbps — 320 kbps
WMA: 32 kbps — 192 kbps
– Samplingfrequenz:
48 kHz, 44,1 kHz, 32 kHz (für MPEG-1)
24 kHz, 22,05 kHz, 16 kHz (für MPEG-2)
48 kHz, 44,1 kHz, 32 kHz (für WMA)
– Disk-Format: ISO 9660 Level 1/ Level 2,
Romeo, Joliet, Windows lange Dateinamen
• Die maximale Zeichenzahl für Datei-/OrderNamen kann je nach verwendetem Diskformat
unterschiedlich sein (einschließlich 4
Erweiterungszeichen <.mp3> oder <.wma>).
– ISO 9660 Level 1: bis zu 12 Zeichen
– ISO 9660 Level 2: bis zu 31 Zeichen
– Romeo: bis zu 128 Zeichen
– Joliet: bis zu 64 Zeichen
– Lange Windows-Dateinamen: bis zu 128
Zeichen
• Dieses Gerät kann insgesamt 1100 Dateien,
250 Ordner (maximal 999 Dateien pro
Ordner) erkennen.
• Dieses Gerät kann die mit VBR (variabler
Bitrate) aufgenommenen Dateien abspielen.
Die mit VBR aufgenommenen Dateien
weisen eine Diskrepanz zwischen Anzeige
verflossener Zeit auf und zeigen nicht die
tatsächlich verflossene Zeit an. Insbesondere
nach Ausführung der Suchfunktion wird
dieser Unterschied merkbar.
• Dieses Gerät eignet sich nicht zur Wiedergabe
der folgenden Dateien:
–
MP3-Dateien, die in den Formaten MP3i
und MP3 PRO codiert sind.
– MP3-Dateien, die in einem unverwendeten
Format codiert sind.
MP3-Dateien, die mit Layer 1/2 codiert sind.
–
–
WMA-Dateien, die mit verlustfreien,
professionellen und Sprachformaten codiert sind.
– WMA-Dateien, die nicht auf Windows
– WMA-Dateien, die mit DRM
– WMA-Dateien, die im MBR-Format
–
®
Audio basieren.
Media
kopiergeschützt sind.
(Multiple Bit Rate) aufgenommen sind.
Dateien, die Daten wie WAVE, ATRAC3 usw.
enthalten.
Wiedergabe einer JPEG-Disk
• Dieses Gerät kann JPEG-Dateien mit der
Erweiterung <.jpg> abspielen (ungeachtet
der Groß-/Kleinschreibung), aufgenommen
entweder als CD-R/CD-RW oder DVD-R/
DVD-RW.
• Es wird empfohlen, Dateien mit einer
Auflösung von 640 x 480 zu speichern.
(Wenn eine Datei mit einer höheren
Auflösung als 640 x 480 aufgenommen
wurde, dauert die Anzeige sehr lange.)
Dieses System unterstützt ausschließlich
•
herkömmliche JPEG-Dateien. Progressive
JPEG-Dateien oder verlustfreie JPEGDateien können nicht wiedergegeben werden.
Herkömmliches JPEG-Format: Für digitale
Kameras, im Internet usw.
Progressive-JPEG-Format: Wird im Internet
verwendet. Lossless-JPEG-Format: Ein
veraltetes Format, dass heute kaum mehr
verwendet wird.
• Wenn Sie versuchen, eine Progressive- oder
Lossless-JPEG-Datei abzuspielen, wird ein
schwarzer Bildschirm angezeigt. In diesem
Fall müssen Sie die Wiedergabe anhalten und
eine herkömmliche JPEG-Datei auswählen.
Beachten Sie, dass die Auswahl einer anderen
Datei möglicherweise sehr lange dauert.
34
Page 73

• Auch wenn Sie versuchen, das aktuelle Bild
auf Pause zu schalten, kann es übersprungen
werden und die Pause beginnt beim nächsten
Bild.
• Dieses Gerät kann insgesamt 1100 Dateien,
250 Ordner (maximal 999 Dateien pro
Ordner) erkennen.
Ändern der Quelle
• Wenn Sie die Quelle ändern, stoppt die
Wiedergabe ebenfalls (ohne dass die CD
ausgeworfen wird).
Wenn Sie zum nächsten Mal „DISC“ als
Wiedergabequelle wählen, startet die
Disk-Wiedergabe automatisch.
Auswerfen einer Disk
• Wenn die ausgeworfene Disk nicht innerhalb
von 15 Sekunden entfernt wird, wird die
Disk automatisch wieder in den Ladeschlitz
eingezogen, um sie vor Staub zu schützen.
(Die Disk wird dabei nicht abgespielt.)
DVD-Setup-Menü
• Wenn die gewählte Sprache nicht auf der
Disk aufgezeichnet ist, wird automatisch
die Originalsprache als Anfangssprache
verwendet. Außerdem funktionieren
bei manchen Disks die anfänglichen
Spracheinstellungen aufgrund der internen
Diskprogrammierung nicht.
• Bei der Wiedergabe (oder im Pausebetrieb)
können Sie diese Sprachen nicht ändern.
Nachdem Sie solche Spracheinstellungen
ängern, werfen Sie die Disk aus und setzen
diese (oder eine andere Disk) erneut ein,
damit die Einstellung wirksam wird.
• Wenn Sie „16:9“ für ein Bild mit einem
Seitenverhältnis von 4:3 wählen ändert
sich das Bild wegen des Verfahrens zur
Bildbreitenumrechnung leicht.
• Auch wenn „4:3 PAN SCAN“ gewählt ist,
kann die Bildschirmgröße
„4:3 LETTERBOX“
davon ab, wie sie bespielt wurden.
bei manchen DVDs
werden. Dies hängt
Auf dem Schirm eingeblendete
Hinweissymbole
Während der Wiedergabe erscheinen ggf.
die folgenden Hinweissymbole kurze Zeit
auf dem Monitor.
: Erscheint am Beginn einer Szene mit
Soundtracks in mehreren Sprachen
(nur bei DVD).
: Erscheint am Beginn einer Szene mit
Untertiteln in mehreren Sprachen (nur
bei DVD).
: Erscheint am Beginn einer Szene mit
Ansichten aus mehreren Blickwinkeln
(nur bei DVD).
: Wiedergabe
: Pause
: Zeitlupenwiedergabe vorwärts
(nur bei DVD und VCD)
: Zeitlupenwiedergabe rückwärts
(nur bei DVD)
: Vorwärts-Suche
: Rückwärts-Suche
DEUTSCH
35
Page 74

Über von den Rückseitenbuchsen ausgegebenen Ton
• Über die Analogbuchsen (AV-OUT/schnurloser Kopfhörer): 2-Kanal-Signal wird ausgegeben.
Beim Abspielen einer mehrkanalig codierten Disk werden Mehrkanalsignale abgemischt.
(AUDIO—ABWÄRTSMISCHUNG: siehe Seite 30.)
• Über DIGITAL-AUDIO-AUSGANG (optisch):
Digitalsignale (Linear PCM, Dolby Digital, DTS, MPEG Audio) werden über diese Buchse
ausgegeben. (Weitere Einzelheiten siehe unten.)
Zur Wiedergabe von Mehrkanalton wie Dolby Digital, DTS und MPEG Audio schließen
DEUTSCH
Sie einen Verstärker oder Decoder an diese Buchse an, der mit diesen Mehrkanalquellen
kompatibel ist, und stellen Sie „DIGITAL-AUDIO-AUSGANG“ richtig ein (siehe Seite 30).
Ausgabe von Signalen über die Buchse DIGITAL OUT
Ausgangssignale unterscheiden sich je nach der Einstellung von „DIGITAL-AUDIO-AUSGANG“
im Setup-Menü (siehe Seite 30).
DIGITAL-AUDIO-AUSGANG
Wiedergabe-Disk
DVD
48 kHz, 16/20/24 Bit Linear-PCM
96 kHz, Linear-PCM
mit DTS DTS Bitstrom 48 kHz, 16 Bit Stereo-Linear-PCM
mit Dolby Digital Dolby Digital Bitstrom
mit MPEG Audio MPEG Bitstrom 48 kHz, 16 Bit Linear-PCM
Audio CD, Video CD 44,1 kHz, 16 Bit Stereo-Linear-PCM
Audio CD mit DTS DTS Bitstrom 44,1 kHz, 16 Bit Stereo-Linear-PCM
MP3/WMA
BITSTROM/PCM DOLBY DIGITAL/PCM NUR PCM
Ausgangssignale
48 kHz, 16 Bit Stereo-Linear-PCM
48 kHz, 16 Bit
Stereo-Linear-PCM
32/44,1/48 kHz, 16 Bit Linear-PCM
36
Page 75

Störungssuche
Was wie eine Betriebsstörung erscheint, muss nicht immer ein ernstes Problem darstellen. Gehen
Sie die folgenden Prüfpunkte durch, bevor Sie sich an den Kundendienst wenden.
Symptome Ursachen Abhilfen
• Auf dem Bildschirm
erscheinen (rote, blaue und
grüne) Farbpunkte.
• Es wird weder ein
Bild angezeigt, noch
werden Tonsignale
wiedergegeben.
• Das Gerät funktioniert
überhaupt nicht.
Allgemeines
• Die Fernbedienung
funktioniert nicht.
• Drahtlose Kopfhörer
funktionieren nicht.
• Heulgeräusche kommen
von den Lautsprechern
oder vom Kopfhörer.
• „NO DISC“ erscheint im
Display.
• CD-R/CD-RW oder
DVD-R/DVD-RW kann
nicht wiedergegeben
werden.
• Stück auf der CD-R/
CD-RW oder DVD-R/
DVD-RW können nicht
übersprungen werden.
Disk-Wiedergabe
• Der linke und rechte
Bildrand fehlt auf dem
Bildschirm.
Hierbei handelt es sich um
eine Eigenschaft von Flüss
igkristallbildschirmen, die
keine Fehlfunktion darstellt.
Das Kabel ist nicht richtig
an die externe Komponente
angeschlossen.
Der falsche Eingangsmodus
wurde ausgewählt.
Der eingebaute
Microcomputer kann
aufgrund von Rauschen usw.
falsch funktioniert haben.
Die Batterien sind entladen. Legen Sie neue Batterie ein.
Der Fernbedienungssensor
ist starkem Lichteinfall
ausgesetzt.
Dies kann durch einen am
Monitor angeschlossenen
Camcorder verursacht
werden.
Disk ist falsch eingesetzt. Setzen Sie die Disk richtig
CD-R/CD-RW oder
DVD-R/DVD-RW ist nicht
finalisiert.
„4:3 PAN SCAN“ ist
gewählt, während auf
einem herkömmlichen
TV (Seitenverhältnis 4:3)
gesehen wird.
Siehe „Hinweis“ auf Seite 6.
Schließen Sie das Kabel
richtig an.
Wählen Sie den richtigen
Eingangsmodus.
Das Gerät zurücksetzen
(siehe Seite 4).
Setzen Sie den
Fernbedienungssensor nicht
starkem Lichteinfall aus.
Der Camcorder ist nun
im Aufnahmemodus.
Deaktivieren Sie den
Aufnahmemodus.
ein.
• Setzen Sie eine finalisierte
CD-R/CD-RW oder
DVD-R/DVD-RW.
• Finalisieren Sie die
CD-R/CD-RW oder
DVD-R/DVD-RW mit
dem zur Aufnahme
verwendeten Gerät.
Wählen Sie „4:3
LETTERBOX“. (Siehe Seite
29).
DEUTSCH
37
Page 76

Symptome Ursachen Abhilfen
• Ton und -Bild werden
manchmal unterbrochen
oder verzerrt.
Disk-Wiedergabe
DEUTSCH
• Das Wiedergabebild kann
nicht korrekt gezeigt
werden.
• Die Disk kann nicht
wiedergegeben werden.
• Rauschen wird erzeugt. Der abgespielte Stück ist
MP3/WMA/JPEG-Wiedergabe
• Eine längere Auslesezeit
ist erforderlich.
• Stück können nicht so
abgespielt werden, wie Sie
es wollten.
• Verflossene Spielzeit ist
nicht richtig.
Sie fahren auf einer
holperigen Straße.
Disk ist zerkratzt. Wechseln Sie die Disk.
Verbindungen sind falsch. Prüfen Sie die Kabel und
Das Farbfernsehsystem
(NTSC/PAL) ist nicht
richtig.
Keine MP3/WMA/JPEGStück sind auf der Disk
aufgezeichnet.
MP3/WMA/JPEG-Stück
haben nicht die Erweiterung
<.mp3>, <.wma> oder
<.jpg> in ihren Dateinamen.
MP3/WMA/JPEG-Stück
sind nicht im geeigneten
Format codiert.
MP3/WMA/JPEG-Stück
sind aufgenommen auf
DVD+R/DVD+RWDatenträgern.
kein MP3/WMA-Titel
(obwohl er die Erweiterung
<.mp3> oder <.wma> hat).
Die Auslesezeit
unterscheidet sich wegen der
Komplexität der Ordner/
Datei-Konfiguration.
Die WiedergabeReihenfolge wird bestimmt,
wenn die Dateien
aufgezeichnet werden.
Dies kann manchmal bei der
Wiedergabe auftreten. Dies
liegt daran, wie die Stück auf
der Disk aufgezeichnet sind.
Stoppen Sie die Wiedergabe
beim Fahren auf einer
holperigen Straße.
Verbindungen.
Richtig einstellen (siehe
Seite 14).
Wechseln Sie die Disk.
Fügen Sie die Erweiterung
<.mp3>, <.wma> oder
<.jpg> zu ihren Dateinamen
hinzu.
Wechseln Sie die Disk.
Nehmen Sie MP3/WMA/
JPEG-Stück mit einer
konformen Anwendung auf
(siehe Seite 17).
Wechseln Sie die Disk.
Nehmen Sie MP3/WMA/
JPEG-Stück mit DVD-R/
DVD-RW-Datenträgern auf.
Springen Sie zu einem
anderen Stück weiter oder
wechseln Sie die Disk.
(Fügen Sie nicht den
Erweiterungscode <.mp3>
oder <.wma> zu Nicht-MP3
oder WMA-Stücke hinzu.)
Verwenden Sie nicht zu
viele Hierarchien und
Ordner.
38
Page 77

Technische Daten
BREITBILDMONITOR
Bildschirm:
9-Flüssigkristallanzeige
Anzahl der Pixel:
336 960 Pixel
(480 vertikal × 234 horizontal × 3)
Ansteuerungsverfahren:
TFT-Aktivmatrixformat
(Dünnschichttransistor)
Drahtloses audio:
Infrarot-Audiosender
Linker Kanal: 2,3 MHz
Rechter Kanal: 2,8 MHz
Effektiver Hörbereich: 30˚
Effektiver Bereich: 2 m
Farbsystem: NTSC/PAL
Eingang:
Video: 2 RCA-Buchsen
1 V(p-p), 75 Ω
Audio: 2 RCA-Buchsen
1,5 V(eff.)
Ausgang:
Video: 1 RCA-Buchse
1 V(p-p), 75 Ω
Audio: 1 RCA-Buchse
1,5 V(eff.)
DIGITAL OUT: Optisch
DVD/CD-SPIELER-SEKTION
Signalerkennungssystem: Kontaktfreier
optischer Tonabnehmer (Halbleiterlaser)
Kanäle: 2 Kanäle (Stereo)
Frequenzgang:
DVD, fs=48 kHz/96 kHz: 16 Hz
VCD, CD: 16 Hz
Dynamikumfang: 93 dB
Signal-Rauschabstand: 95 dB
Gleichlaufschwankungen: Unter der Messgrenze
MP3 (MPEG Audio Layer 3):
Max. Bitrate: 320 kbps
WMA (Windows Media® Audio):
Max. Bitrate: 192 kbps
bis
22 000 Hz
bis
20 000 Hz
ALLGEMEIN
Anschlußwerte:
Betriebsspannung:
DC 14,4 V (11 V bis 16 V Toleranz)
Erdungssystem: Negative Erdung
Zulässige Betriebstemperatur:
0°C bis +40°C
Zulässige Lagertemperatur:
–20°C bis +80°C
Abmessungen (B × H × T):
Einbaugröße (ca.):
250 mm × 49 mm × 374 mm
Gewicht (ca.):
2,9 kg (ohne Zubehör)
SCHNURLOSER KOPFHÖRER
Typ: „Open-Air“-Typ
Treibereinheit:
Dynamischer Mylarcone-Lautsprecher
mit 30 mm Durchmesser
Impedanz: 16 Ω
Frequenzgang: 20 Hz bis 20 000 Hz
Infrarot-Wellenlänge: 850 nm ± 50 nm
Betriebsstromanforderungen:
DC 3 V (2,4 V bis 3,3 V Toleranz)
(R03/AAA-Batterie × 2)
Gewicht: (ca.):
170 g (ohne Batterien)
Zulässige Betriebstemperatur:
–30°C bis +65°C
Änderungen bei Design und technischen Daten
bleiben vorbehalten.
• Microsoft und Windows Media sind entweder
eingetragene Marken oder Marken der
Microsoft Corporation in den Vereinigten
Staaten und/oder anderen Ländern.
DEUTSCH
39
Page 78

MISES EN GARDE
•
N’INSTALLEZ PAS LE MONITEUR DANS UN
ENDROIT OÙ IL PEUT GÊNER LA VISIBILITÉ
DU CONDUCTEUR OU LE FONCTIONNEMENT
D’UN DISPOSITIF DE SÉCURITÉ TEL QUE
LES COUSSINS GONFLABLES, OU DANS
UN ENDROIT INTERDIT PAR LES LOIS ET
RÈGLEMENTS EN PLACE.
• Dès lors que diffèrent suivant les pays les
règlements régissant les emplacements autorisés
pour l’installation des unités d’affichage, se
renseigner afin d’installer l’unité d’affichage
sur un emplacement autorisé par lesdites lois et
règlements.
•
Le conducteur ne doit jamais faire fonctionner ce
système de moniteur lorsqu’il conduit son véhicule.
* Arrêtez votre véhicule dans un endroit sûr avant
d’opérer votre moniteur.
FRANÇAIS
• Le conducteur ne doit jamais regarder la
télévision ou une vidéo lorsqu’il conduit.
Regarder la télévision ou une vidéo en
conduisant réduit considérablement la vigilance
du conducteur et multiplie les risques d’accident.
• Maintenir le moniteur à un niveau sonore
approprié en conduisant.
Conduire sous un niveau sonore assourdissant
qui empêcherait d’entendre les bruits
environnants peut causer des accidents.
• Veiller à ne jamais laisser tomber ni heurter
violemment le moniteur car cela risque de
provoquer des pannes ou un incendie.
• Ne pas regarder le moniteur lorsque le moteur
est arrêté.
Regarder le moniteur avec le contact moteur
coupé consomme beaucoup de batterie ce qui
pourrait empêcher le moteur de repartir.
• Quand l’appareil n’est pas utilisé, fermez
l’afficheur à cristaux liquides et conservez-le
dans son compartiment.
• Ne touchez pas directement la surface du
panneau à cristaux liquides.
• N’accrochez aucun objet ni ne vous pendez au
moniteur car cela risquerait de l’endommager.
AVERTISSEMENT :
Ce système de tuner de télévision ne peut être
utilisé seulement que sur du 12 V CC. Pour
éviter les risques de commotions électriques et
d’incendie, NE JAMAIS utiliser d’autre source
d’alimentation quelle qu’elle soit.
L’installation nécessite certaines
connaissances spéciales.
N’installez pas le moniteur vous-même.
Consultez un revendeur possédant les
connaissances spéciales nécessaires
pour une installation correcte et sûre.
PRÉCAUTIONS relatives au casque
d’écoute fourni—KS-HP2:
• NE LAISSEZ PAS le casque d’écoute dans
un endroit exposé aux rayons directs du
soleil, tel que sur le tableau de bord, car il
pourrait être endommagé.
• Tenez le casque d’écoute à l’écart des
téléphones portables pour éviter toute
interférence.
• NE METTEZ PAS le casque d’écoute hors
tension alors que le volume est réglé à un
niveau élevé, car la soudaine déflagration
de son peul endommager votre ouïe et/ou le
casque d’écoute la prochaine fois que vous
utiliserez le casque.
• Si entendez une sorte de sonnerie dans
vos oreilles, réduisez le volume ou arrêtez
d’utiliser le casque.
2
Page 79

Merci pour avoir acheté un produit JVC.
Veuillez lire attentivement toutes les instructions avant d’utiliser l’appareil afin de bien comprendre
son fonctionnement et d’obtenir les meilleures performances possibles.
IMPORTANT POUR PRODUITS LASER
1.
PRODUIT LASER CLASSE 1
2.
AT TE NTI ON : N’ouvrez pas le couvercle supérieur. Il n’y a aucune pièce réparable par
l’utilisateur à l’intérieur de l’appareil; confiez toute réparation à un personnel qualifié.
3.
ATTENTION: Risque de radiations laser visible et invisible quand l’appareil est ouvert et que
le système de verrouillage ne fonctionne pas ou a été mis hors service. Évitez toute exposition
directe au rayon.
4. REPRODUCTION DE L’ÉTIQUETTE: ÉTIQUETTE DE PRÉCAUTION PLACÉE À
L’EXTÉRIEUR DE L’APPAREIL.
FRANÇAIS
Ce produit intègre une technologie de
protection des droits d’auteur qui est
protégée par des brevets américains et
d’autres droits à la propriété intellectuelle.
L’utilisation de cette technologie de
protection des droits d’auteur doit
être autorisée par Macrovision et est
exclusivement destinée à une exploitation
à domicile et à d’autres usages limités,
sauf autorisation contraire de Macrovision.
L’ingénierie inverse et le désassemblage
sont interdits.
Précautions sur le réglage du volume:
Les disques produisent très peut de bruit
par rapport aux autres sources. Réduisez le
volume avant de reproduire un disque afin
d’éviter d’endommager les enceintes par la
soudaine augmentation du niveau de sortie.
3
Page 80

Comment réinitialiser votre
appareil
FRANÇAIS
Cette procédure réinitialise le micro-ordinateur.
Vos ajustements préréglés sont aussi effacés.
Comment éjecter le disque de
force
Si un disque ne peut pas être reconnu par le
monteur ou ne peut pas être éjecté...
Moniteur
Le disque sort.
Comment lire ce manuel
Les méthodes suivantes sont utilisées pour
rendre les explications simples et faciles à
comprendre.
• Certains conseils et remarques sont donnés
à la section “Pour en savoir plus sur votre
moniteur” (voir les pages 33 à 35).
• L’utilisation des touches est expliquée
principalement à l’aide d’illustrations, comme
montré ci-après:
Appuyez brièvement.
Appuyez
répétitivement.
Appuyez sur une de
ces touches.
(pendant environ 5
secondes pendant que
l’appareil est sous tension)
• Si cela ne fonctionne pas, réinitialisez
votre moniteur.
• Faites attention de ne pas faire tomber le
disque quand il est éjecté.
4
Maintenez pressée
jusqu’à ce que vous
obteniez la réponse
souhaitée.
Maintenez pressées
les deux touches en
même temps.
Page 81

Table des matières
Comment réinitialiser votre appareil ..... 4
Comment éjecter le disque de force ...... 4
Comment lire ce manuel ........................ 4
Précautions .................................... 6
Moniteur à écran large ................... 7
Identification des parties ........................ 7
Télécommande — RM-RK
Composants principaux et
caractéristiques .................................. 8
230
........... 8
Casque d’écoute — KS-HP2 ............. 10
Composants principaux et
caractéristiques ................................... 10
Fonctionnement de base .................. 11
Ajustements .................................. 13
Utilisation du menu du moniteur ........... 13
Changement du format d’image ............ 15
Disques reproductibles ..................... 17
Opérations des disques ................... 18
Lecture d’un disque ...................... 18
Démarrage de la lecture ......................... 18
Opérations de base ................................ 19
Fonctions spéciales pour les
DVD/VCD/JPEG ......................... 21
Sélection de la langue des dialogues ..... 21
Sélection des sous-titres ......................... 21
Sélection d’un angle de vue ................... 21
Utilisation du menu de disque ............... 22
Zoom ...................................................... 22
Commande des disques en utilisant
l’affichage sur l’écran .................. 23
Opérations de base de la barre sur
l’écran ................................................ 24
Opérations de base de l’écran de
commande .......................................... 26
Utilisation de l’écran de liste ................. 27
FRANÇAIS
Menu de réglage des DVD .............. 28
Procédure de réglage de base ................. 28
Entretien ....................................... 31
Codes de langue ............................. 32
Pour en savoir plus sur votre
moniteur ..................................... 33
Guide de dépannage ....................... 37
Spécifications ................................. 39
Pour sécurité....
• N’augmentez pas trop le volume car cela
bloquerait les sons de l’extérieur rendant la
conduite dangereuse.
• Arrêtez la voiture avant de réaliser toute
opération compliquée.
Température à l’intérieur de la voiture....
Si votre voiture est restée garée pendant
longtemps dans un climat chaud ou froid,
attendez que la température à l’intérieur de la
voiture redevienne normale avant d’utiliser
l’appareil.
5
Page 82

Précautions
Précautions à prendre avec l’afficheur à cristaux liquides
N’exposez pas l’afficheur à cristaux liquides
directement aux rayons du soleil.
• Plage des températures de rangement:
–20°C à +80°C
+80°C
–20°C
–20°C à +80°C
FRANÇAIS
Pendant l’été, la
temperature peut
s’élever jusqu’à
100°C.
Lorsque le panneau à cristaux liquides
atteint des températures, hautes ou basses,
excessives, les cristaux liquides peuvent
devenir le siège de transformations chimiques
qui en altèrent le bon fonctionnement.
Les taches rouges, bleues et vertes à la
surface de l’afficheur à cristaux liquides
sont normales et une caractéristique des
afficheurs à cristaux liquides et non un signe
de dysfonctionnement.
Taches
Ne faites pas tomber l’afficheur à cristaux
liquides ni ne le heurtez trop fort.
Si la température est trop élevée ou trop basse,
l’image peut ne pas apparaître tout à fait
nettement ou se mouvoir avec lenteur.
De même, l’image peut sembler
désynchronisée avec le son ou encore la
qualité d’image peut se détériorer dans ces
environnements extrêmes. Notez simplement
qu’il ne s’agit pas d’un défaut de conception
ni d’un mauvais fonctionnement.
• Limites de température d’utilisation:
0°C à +40°C
Remarque:
Le panneau à cristaux liquides est fabriqué
avec une technologie de très haute précision
et possède au moins 99,99% de pixels d’image
effectifs. Notez que sur 0,01% du panneau, il
peut avoir des pixels manquants ou des pixels
allumés constamment.
6
0°C ou plus froidr
40°C ou plus chaud
Page 83

Moniteur à écran large
Identification des parties
FRANÇAISFRANÇAISFRANÇAISFRANÇAISFRANÇAISFRANÇAIS
1 Touche (attente/sous tension)
• Appuyez sur cette touche pour mettre
l’appareil sous tension.
• Maintenez cette touche pressée pour
mettre l’appareil hors tension.
2 Capteur de télécommande
3 Commutateur du plafonnier
• Référez-vous à “Pour mettre en service le
capteur de porte” à la page 12.
4 Émetteur IR
5 Plafonniers
6 Levier de verrouillage du bras
7 Touche de réinitialisation
Si vous regardez l’écran avec un certain angle, l’image peut ne pas être claire. Ce n’est pas un
mauvais fonctionnement. La meilleure image peut être vue quand vous regardez l’écran de face.
8 Écran (Panneau à cristaux liquides)
9 Fente d’insertion du disque
p Touche 0 (éjection)
q Touche 3 (lecture)
w Témoin de présence du disque
e DEL blanche
r Touche d’ouverture PUSH-OPEN
t Compartiment d’écran
y Bras de l’écran
7
Page 84

Télécommande — RM-RK230
Mise en place de la pile-bouton au
lithium (CR2025)
FRANÇAISFRANÇAISFRANÇAISFRANÇAISFRANÇAISFRANÇAIS
Avant d’utiliser la télécommande:
•
Dirigez la télécommande directement sur le
capteur de télécommande du moniteur. Assurez-
vous qu’il n’y a pas d’obstacle entre les deux.
Capteur de
télécommande
Composants principaux et
caractéristiques
MENU
• N’exposez pas le capteur de télécommande à
une forte lumière (lumière directe du soleil ou
éclairage artificiel).
Avertissement:
• N’installez aucune autre pile qu’une
CR2025 ou son équivalent; Sinon, elle
pourrait exploser.
• Rangez la pile dans un endroit hors de la
portée des enfants afin d’éviter tout risque
d’accident.
• Pour éviter que la pile ne chauffe, ne se
fissure ou cause un incendie:
– Ne rechargez pas, ne court-circuitez pas,
ne chauffez pas la pile ni ne la jeter dans
un feu.
– Ne laissez pas la pile avec d’autres
objets métalliques.
– Ne piquez pas la pile avec des ciseaux
ou d’autres objets similaires.
Enveloppez la pile de ruban isolant avant
–
de la mettre au rebut ou de la ranger.
8
Commande du moniteur (MONITOR
CONTROL)
1 Touche
• Appuyez sur cette touche pour mettre
l’appareil sous tension.
• Maintenez cette touche pressée pour
mettre l’appareil hors tension.
2 Touche MODE
• Choisit la source de lecture.
3 Touche ASPECT
• Permet de changer le format d’image de
l’écran.
4 Touche MENU
• Appelle un menu sur lequel vous pouvez
choisir les options à régler.
5 Touches
• Permet d’ajuster le niveau de l’option
choisie ou de choisir un réglage approprié
pour l’option choisie.
(attente/sous tension)
/
Page 85

Commande du lecteur de DVD/autoradio
(DVD/RECEIVER CONTROL)
6 Touches de commande de l’autoradio*
1
• Touche (attente/sous tension,
atténuation)
• Touche SOURCE
• Touche BAND
• Touche DUAL
• Touches VOL + / – (2nd VOL + / – )
7 Touche TOP M (menu)*
• Affiche le menu de disque DVD et VCD*3.
8 Touche SETUP*
2
2
9 Touche SHIFT
p Touches de commande de base du disque:
7 (arrêt), 3 (lecture), 8 (pause)
• 3 (lecture) fonctionne aussi comme
touche ZOOM quand elle est pressée avec
la touche SHIFT maintenue enfoncée.
q Touches d’opérations avancées du disque
/TITLE 5 / ∞*
•
4
– Permet de choisir les titres (pour les
DVD) ou les dossiers (pour les disques
MP3/WMA/JPEG)*
• 4 / ¢ (saut vers l’arrière/saut vers
l’avant)*
6
• 1 / ¡ (recherche vers l’arrière/
recherche vers l’avant)*
5
.
7
w Touche OSD
• Affiche la barre sur écran.
• Fonctionne aussi comme touche
/TITLE
quand elle est pressée avec la touche
SHIFT maintenue enfoncée.
Vous pouvez choisir directement des
–
dossiers (pour les disques MP3/WMA/
JPEG) ou des titres (pour les DVD) en
utilisant les touches numériques (voir la
colonne de droite).
e Touche MENU*
• Affiche le menu de disque DVD et VCD*3.
r Touches de commande du menu*
• Curseur (% , fi , @ , #) et ENTER
t Touche RETURN*
2
2
2
y Touches de fonction spéciale DVD/VCD
• DVD/VCD:
• DVD:
1
*
Ces touches peuvent être utilisées
(audio)
(sous-titre), (angle)
uniquement si votre autoradio connecté à ce
moniteur est un autoradio JVC.
2
*
Ces touches fonctionnent comme touches
numériques quand elles sont pressées avec
la touche SHIFT enfoncée.
3
*
Seulement quand la fonction PBC n’est
service.
Comment choisir un numéro
•
Pour choisir un numéro compris entre 0 et 9:
• Pour choisir un numéro supérieur à 9:
• Les touches +100/–100 sont utilisées
uniquement pour la recherche de plages
MP3/WMA/JPEG supérieures à 99.
4
Ces touches ne fonctionnent pas comme
*
touches PRESET 5 / ∞.
5
*
Ces touches fonctionnent comme touches
+10/–10 quand elles sont pressées en
combinaison avec la touche SHIFT.
6
*
Ces touches fonctionnent comme touches
+100/–100 quand elles sont pressées en
combinaison avec la touche SHIFT.
7
*
Ne peuvent pas être utilisées dans le cas
d’un disque MP3/WMA/JPEG.
FRANÇAISFRANÇAISFRANÇAISFRANÇAISFRANÇAISFRANÇAIS
9
Page 86

Casque d’écoute — KS-HP2
Vous pouvez écouter les sons de lecture avec le
casque d’écoute sans fil—KS-HP2.
Mise en place des piles
Piles (R03/AAA) —
fournies uniquement
pour permettre les
réglages initiaux
FRANÇAISFRANÇAISFRANÇAISFRANÇAISFRANÇAISFRANÇAIS
PRÉCAUTIONS:
•
Les piles fournies ne sont pas rechargeables.
NE les rechargez PAS; sinon, les piles
pourraient fuir ou exploser.
• Insérez les piles en respectant les polarités
“+” et “–” avant d’éviter toute fuite ou
explosion des piles.
Composants principaux et
caractéristiques
Face gauche Face droite
POWER
1 Capteurs IR
• NE COUVREZ PAS les capteurs IR car la
réception serait détériorée.
2 Touche ON/OFF
• L’alimentation est coupée
automatiquement dans les cas suivants:
– Le casque d’écoute est utilisé pendant
environ 4 heures.
– Aucun signal n’est reçu pendant environ
4 minutes.
• Vous pouvez remettre le casque sous
tension en appuyant sur cette touche.
3 Témoin d’alimentation POWER
4 Réglage du volume
VOL
Avant d’utiliser le casque d’écoute sans fil:
Le casque d’écoute offre les meilleurs résultats
quand il est utilisé à moins de 2 mètres de
l’émetteur.
Ce casque d’écoute doit recevoir les signaux
infrarouges (IR) envoyés par l’émetteur IR sur
le moniteur. Par conséquent, si vous utilisez
le casque dans un endroit où les signaux ne
peuvent pas être reçus directement, en ligne
droite, du bruit peut se produire.
Émetteur IR
10
Les sons de lecture sont émis par les émetteur
IR jusqu’au casque d’écoute sans fil.
Lors de l’utilisation du casque d’écoute réglez
l’option “IR” du menu du moniteur sur “ON”.
(Voir page 14.)
ATTENTION:
N’UTILISEZ PAS le casque d’écoute en
conduisant. Couper les bruits extérieurs
lorsque vous conduisez est très dangereux et
peux entraîner un accident de la circulation.
Page 87

Fonctionnement de base
Préparation
Avant d’utiliser le système, assurez-vous que tous les appareils extérieurs sont connectés
et installés correctement.
1 Ouvrez le panneau à cristaux liquides.
Poussez sur PUSH-OPEN jusqu’à ce que le panneau à cristaux liquides soit déverrouillé, puis
ouvrez le panneau en utilisant les deux mains.
ATTENTION:
• Lorsque vous ne l’utilisez pas, refermez le panneau à cristaux liquides et rangez-le dans
son compartiment; sinon, il peut géner la visibilité du rétroviseur.
• Ne touchez pas directement la surface du panneau à cristaux liquides.
Lorsque vous refermez le panneau à cristaux liquides, rangez-le dans le compartiment de
l’écran jusqu’à ce qu’il se verrouille.
FRANÇAIS
Pour changer la position du moniteur
Vous pouvez une des quatre positions disponibles pour le moniteur.
1 Mettez le levier de verrouillage sur la position RELEASE, puis tirez vers le bas ou
poussez vers le haut le moniteur.
2 Mettez le levier de verrouillage sur la position HOLD, puis engager le moniteur dans la
position de verrouillage la plus proche.
Pour refermer le panneau à cristaux liquides, poussez le moniteur vers le haut dans sa
position la plus haute.
À suivre....
11
Page 88

2 Mettez l’appareil sous tension.
Moniteur Télécommande
3 Choisissez la source de lecture.
MODE
Chaque fois que vous appuyez sur la touche, la source de lecture change comme suit:
AV 1 AV 2DISC
FRANÇAIS
4 Utilisez la source de lecture que vous avez choisie.
Pour utiliser le lecteur de DVD intégré, référez-vous à “Opérations des disques” à la page
18.
Pour commander l’appareil extérieur, référez-vous au mode d’emploi fourni avec
l’appareil connecté.
5 Ajustez le volume sur l’autoradio.
• Lors de l’utilisation du casque d’écoute, ajustez son propre niveau de volume.
Pour mettre l’appareil hors tension
Moniteur Télécommande
Pour mettre en service le capteur de porte
• OFF: Éteint le plafonnier.
• DOOR: Met en service le capteur de porte de façon que le plafonnier s’allume quand une
porte est ouverte.
• ON: Allume le plafonnier.
12
• Lors de l’utilisation d’un casque d’écoute, mettez
l’appareil hors tension après avoir mis le casque hors
tension.
Page 89

Ajustements
Utilisation du menu du moniteur
Vous pouvez réaliser vos propres ajustements pour l’affichage ou le son en utilisant le menu.
• Pour les éléments ajustables, référez-vous à la page suivante.
La télécommande—RM-RK230 a deux touches MENU. Dans
cette section, nous utilisons la touche MENU de la section
MONITOR CONTROL.
Procédure de base
1
Appelez le menu.
FRANÇAIS
BRIGHT
CONTRAST
TINT
COLOR
IR ON
DIMMER
DVD SURROUND OFF
NTSC / PAL PAL
WHITE LED ON
Réglage de menu actuel
Le menu disparaît si une autre opération est réalisée ou si aucune opération n’est réalisée
pendant environ 5 secondes.
2 Choisissez le réglage que vous souhaitez ajuster.
MENU
3 Ajustez le niveau du réglage choisi (ou choisissez le réglage approprié).
Cette touche n’est pas utilisée pour changer le réglage
“DVD SURROUND”.
4 Quittez le menu.
Appuyez répétitivement sur la touche jusqu’à ce que le menu disparaisse.
MENU
13
Page 90

Réglages ajustables sur le menu du moniteur
BRIGHT:
CONTRAST:
TINT:
COLOR:
FRANÇAIS
IR*:
DIMMER:
DVD SURROUND:
NTSC/PAL:
WHITE LED:
Ajustez ce réglage si l’image est trop lumineuse ou trop sombre.
• Plage d’ajustement: –10 à +11
• Niveau initial: 0 (centre)
Contrôle le degré de différence entre les parties les plus lumineuses et les
plus sombres de l’image.
• Plage d’ajustement: –10 à +11
• Niveau initial: 0 (centre)
Ajustez ce réglage si la couleur de la peau humaine n’est pas naturelle.
• Plage d’ajustement: –10 à +11
• Niveau initial: 0 (centre)
Permet d’ajuster la couleur de l’image—plus clair ou plus sombre.
• Plage d’ajustement: –10 à +11
• Niveau initial: 0 (centre)
Réglez sur “ON” quand vous écoutez le son de lecture en utilisant le
casque d’écoute sans fil.
• Réglages sélectionnables: ON, OFF
• Réglage initial: ON
Ajuste la luminosité de l’écran et de la DEL blanche quand vous allumez
les feux de la voiture.
• Plage d’ajustement: –5 à +5
• Niveau initial: 0 (centre)
Cette fonction vous permet d’obtenir un effet Surround de votre système
stéréo. Quand vous connectez un autoradio incompatible avec les sources
multicanaux, vous pouvez d’un son Surround vertical avec votre système
stéréo à 2 canaux.
Si vous mettez le moniteur hors tension, le réglage est réinitialisé.
• Réglages sélectionnables: OFF, ACTION, DRAMA, THEATER
– ACTION: Convient pour les films d’action et les émissions de
sport.
– DRAMA: Créée un son naturel et chaud et vous permet de
regarder un film dans une ambiance relaxante.
– THEATER: Vous offre l’un effet sonore d’un grand cinéma.
• Réglage initial: OFF
Choisissez le standard de couleur correspondant aux signaux d’entrée.
• Réglages sélectionnables: PAL, NTSC
• Réglage initial: PAL
Mettez l’appareil hors tension pour mettre en service le nouveau réglage
si vous avez changé le réglage.
Allume ou éteint la diode (DEL) blanche quand vous mettez le moniteur
sous tension.
• Réglages sélectionnables: ON, OFF
• Réglage initial: ON
*
Mettez le casque d’écoute hors service avant de changer le réglage “IR”.
14
Page 91

Changement du format d’image
Vous pouvez choisir le format d’image pour les signaux vidéo de lecture.
Procédure de base
Chaque fois que vous appuyez sur cette touche, le format d’image change.
ASPECT
Formats d’image sélectionnables
Lors de l’entrée d’un signal vidéo 16:9:
FRANÇAIS
FULL:
NORMAL:
JUST:
ZOOM:
Les images apparaissent entièrement sur l’écran.
• Dans certains cas, des barres noires peuvent apparaître en
haut et en bas de l’écran.
Les images sont compressées horizontalement.
• Des barres noires apparaissent à gauche et à droite de
l’écran.
• Dans certains cas, des barres noires peuvent aussi
apparaître en haut et en bas de l’écran.
La partie centrale de l’image est compressée horizontalement
et les côtés gauche et droit de l’image sont agrandis
horizontalement.
• Dans certains cas, des barres noires peuvent apparaître en
haut et en bas de l’écran.
Les images sont agrandies sur l’écran de façon qu’il n’y
ait pasde barre noire. (L’image entière n’apparaît pas sur
l’écran.)
À suivre....
15
Page 92

Lors de l’entrée d’un signal vidéo 4:3:
FRANÇAIS
FULL:
NORMAL:
JUST:
ZOOM:
Les images sont agrandies horizontalement et apparaissent
entièrement sur l’écran.
Les images apparaissent au centre de l’écran.
• Des barres noires apparaissent à gauche et à droite de
l’écran.
Les images sont agrandies horizontalement. Le rapport
d’agrandissement augmente pour les deux côtés de l’écran.
Les images sont agrandies sur l’écran de façon qu’il n’y
ait pas de barre noire. (L’image entière n’apparaît pas sur
l’écran.)
16
Page 93

Disques reproductibles
Disques que vous pouvez reproduire sur
votre appareil
Vous pouvez reproduire les disques suivants—
12 cm et 8 cm—sur le lecteur de DVD intégré.
• DVD Vidéo: Enregistrés au standard de
couleur PAL avec un code de région “2” (voir
ci-dessous).
– Les DVD-R/DVD-RW enregistrés au
format DVD Vidéo peuvent aussi être
reproduits (voir page 33).
• CD Vidéo (VCD)/CD audio
• MP3/WMA/JPEG: Enregistrés sur un
CD-R/CD-RW ou un DVD-R/DVD-RW/
DVD-ROM.
– CD-R/CD-RW: Compatibles avec ISO 9660
Level 1, ISO 9660 Level 2, Romeo et Joliet.
– DVD-R/DVD-RW/DVD-ROM: Format
compatible avec UDF-Bridge*
Avec certains disques, les opérations décrites dans
ce manuel peuvent être légèrement différentes.
1
.
Disque ne pouvant pas être reproduits
DVD-Audio, DVD-ROM (données),
DVD-RAM, DVD-R/DVD-RW enregistrés
au format DVD-VR, CD-ROM, CD-I (CD-I
Ready), Photo CD, etc.
• Reproduire ces types de disques produit du
bruit qui risque d’endommager les enceintes.
Remarque sur le code de région:
Les lecteurs de DVD et les disques vidéo
DVD ont leur propre numéro de code
de région. Cet appareil peut uniquement
reproduire les disques DVD dont les
numéros de code de région comprennent “2”.
Exemple:
Si vous insérez un disque DVD Vidéo d’un
code de région incorrect
“ERREUR DE CODE REGIONAL”
apparaît sur le moniteur. Le disque est éjecté
automatiquement.
Précautions pour la lecture de disques à
double face
• La face non DVD d’un disque à “DualDisc”
n’est pas compatible avec le standard
“Compact Disc Digital Audio”. Par
conséquent, l’utilisation de la face non DVD
d’un disque à double face sur cet appareil
n’est pas recommandée.
Formats audio numériques
Cet appareil peut reproduire les formats audio
numériques suivants.
Linear PCM: Format audio numérique non
compressé, le même format qui est utilisé pour
les CD et la plupart des originaux de studio.
Dolby Digital *
compressé, mis au point par Dolby Laboratories,
qui permet un codage sur plusieurs canaux afin
de créer un son Surround réaliste.
3
DTS *
(Digital Theater Systems):
audio compressé, mis au point par Digital Theater
Systems, Inc., qui permet aussi un codage
multicanaux comme le Dolby Digital. Comme le
rapport de compression est plus faible que pour le
Dolby Digital, il offre une plage dynamique plus
large et une meilleure séparation.
MPEG Audio:
compressé qui permet aussi le codage multicanaux
afin de créer un son Surround réaliste. Cependant,
cet appareil les signaux multicanaux en deux
canaux (décodés PCM) et les reproduit.
*1 Un système de fichier hybride utilisé pour
offrir une compatibilité avec ISO 9660 et
permettre l’accès à n’importe quel type de
fichiers sur le disque (UDF signifie Format
de disque universel).
2
*
Fabriqué sous licence de Dolby
Laboratories. Le terme “Dolby” et le sigle
double D sont des marques commerciales de
Dolby Laboratories.
3
*
“DTS” et “DTS 2.0 + Digital Out”sont des
marques de commerce de Digital Theater
Systems, Inc.
Le “DVD logo” est une marque de commerce
de DVD Format/Logo Licensing Corporation,
enregistrée aux États-Unis, au Japon et dans
d’autres pays.
2
: Format audio numérique
Format
Un autre format audio numérique
FRANÇAIS
17
Page 94

Opérations des disques
Lecture d’un disque
Le type de disque est détecté automatiquement
et la lecture démarre automatiquement (pour les
DVD: le démarrage automatique de la lecture
dépend de son programme interne).
Si le disque actuel est un CD audio, CD Text,
disque MP3/WMA, JPEG ou VCD sans PBC,
toutes les plages sont reproduites répétitivement
jusqu’à ce que vous changiez la source ou
éjectiez le disque.
• Si une liste de titres ou un menu de disque
apparaît pendant la lecture d’un DVD ou d’un
VCD avec PBC, référez-vous à “Utilisation
FRANÇAIS
du menu de disque” à la page 22.
Avant de réaliser n’importe quelle
opération, assurez-vous de ce qui suit....
DVD Vidéo CD Vidéo avec PBC
CD Vidéo
avec/sans PBC
CD Audio/
CD Text
Si “ ” apparaît sur le moniteur quand vous
appuyez sur une touche, c’est que l’autoradio
ne peut pas accepter la commande effectuée.
• Dans certains cas, la commande peut être
refusée sans que “
” apparaisse.
Démarrage de la lecture
1 Ouvrez le panneau à cristaux
liquides.
• Vous pouvez reproduire un disque même
si le moniteur est fermé.
2 Mettez l’appareil sous tension.
Moniteur Télécommande
3 Insérez un disque dans la fente
d’insertion.
Face de lecture (brillante)
dirigée vers le bas
Disque MP3/WMA Disque JPEG
Tous les disques
de cette liste
Avant de réaliser n’importe quelle opération,
assurez-vous de ce qui suit....
• Pour la lecture de DVD, vous pouvez changer
les réglages du menu de réglage comme vous
le souhaitez. (Voir pages 28 à 30.)
• Pour la lecture de DVD/CD, il est plus
pratique d’utiliser la télécommande car elle
vous permet d’accéder à plus de fonctions.
18
• Quand un disque est inséré dans la
fente d’insertion, l’appareil se met sous
tension, puis “DISC” est choisi comme
source de lecture automatiquement.
Page 95

Opérations de base
Opérations Opération suivante
Pour arrêter
temporairement la lecture
Relecture des scènes
précédentes—Relecture par
une simple pression
La lecture est arrêtée momentanément (pause).
• Pour les disques JPEG: appuyer sur ENTER permet aussi
de faire une pause de l’image sur le moniteur.
Une image fixe apparaît.
A Lecture image par image
B Lecture au ralenti
FRANÇAIS
• Aucun son ne sort pendant la lecture au ralenti.
• Lors de la lecture d’un VCD, la lecture au ralenti vers l’arrière
n’est pas disponible.
Pour reprendre la lecture normale:
La position de lecture recule d’environ 10 secondes par
rapport à sa position actuelle.
• Cette fonction peut être utilisée uniquement à l’intérieur du même
titre.
• Cette fonction ne peut pas être utilisée avec certains DVD.
Pour arrêter la lecture
•
Pendant la lecture, les icônes du guide sur l’écran apparaissent un instant sur le moniteur (voir page 35).
Lorsque vous démarrez à nouveau la lecture,
elle reprend à partir du point où elle a été
interrompue (Reprise de la lecture).
Lors que vous démarrez à nouveau la lecture, elle
commence à partir du début de la dernière plage
reproduire.
Pour éjecter le disque
Vous pouvez éjecter le disque même quand le moniteur est hors tension.
À suivre....
19
Page 96

Pour aller aux plages/chapitres
suivants ou précédents
Pour localiser un titre/chapitre/plage
directement
• Pour les DVD: Pendant la lecture ou une
pause
Pour aller aux
chapitres/plages
suivants.
Pour retourner au début du chapitre/plage actuel,
puis aux chapitres/plages précédents.
Pour faire avancer ou reculer
rapidement le chapitre/
FRANÇAIS
plage
Avance rapide.
Retour rapide.
* La vitesse de recherche change de x2 ] x10
pour tous les disques (DVD, VCD, CD), mais
l’information apparaissant sur le moniteur est
seulement pour les DVD/VCD.
Pour faire une recherche
vers l’avant ou vers
l’arrière d’un chapitre/plage
• Pour les DVD: Pendant la lecture ou une
pause—choisissez un
chapitre.
À l’arrêt—choisissez un
titre.
• Pour les VCD: Quand la fonction PBC
(voir page 22) n’est pas en
service.
• Pour les fichiers MP3/WMA/JPEG:
Choisissez une plage
à l’intérieur du même
dossier.
Choisissez le numéro correspondant à l’élément
souhaité (voir page 9).
Pour localiser un titre/dossier
Au titre/dossier suivant
Au titre/dossier précédent
Pour localiser un titre/
dossier particulier
L’information affichée est uniquement pour les
DVD/VCD:
• Pour rétablir la vitesse normale
20
Avant 10 secondes,
appuyez sur les touches
numériques (voir page
9).
• Pour les disques MP3/WMA/JPEG: Pour
choisir directement des dossiers en utilisant
les touches numériques, il faut que les noms
affectés aux dossiers débutent par un nombre
de deux chiffres—01, 02, 03, etc.
Page 97

Fonctions spéciales pour les DVD/VCD/JPEG
Sélection de la langue des
dialogues
Pour les DVD:
Vous pouvez choisir la langue à écouter
si le disque possède plusieurs langues des
dialogues.
1/3
ENGLISH
Ex.: Quand le disque possède 3 options
Pour les VCD:
Vous pouvez choisir le canal audio à
reproduire. (C’est pratique lors de la
lecture d’un VCD Karaoké.)
1/3
ENGLISH
Sélection des sous-titres
Vous pouvez choisir la langue des soustitres apparaissant sur le moniteur.
• Vous pouvez régler la langue initiale des
sous-titres en utilisant le menu de réglage
(voir page 29).
1/3
ENGLISH
1/3
ENGLISH
Ex.: Quand le disque possède 3 options
Sélection d’un angle de vue
Vous pouvez voir la même scène avec des
angles différents si le disque possède des
vues multi angles.
FRANÇAIS
ST
ST
Pour écouter la lecture stéréo (gauche/
ST:
droite) normale.
Pour écouter le canal audio (L) gauche.
L:
Pour écouter le canal audio (R) droit.
R:
• Avec certains DVD et VCD, il est interdit de
changer la langue des sous-titres, la langue
des dialogues (ou le canal audio) sans utiliser
le menu de disque.
1/3
1
1/3
1
1/3
1
1/3
3
Ex.: Quand le disque possède 3 angles de vue
1/3
2
21
Page 98

Utilisation du menu de disque
Il est possible de commander la lecture à partir
d’un menu lors de lecture d’un DVD possédant
cette fonction ou d’un VCD avec PBC
(Playback Control).
Lors de la lecture d’un DVD
1
Une liste de titre ou un menu de disque
apparaît sur le moniteur.
FRANÇAIS
2 Choisissez l’élément souhaité sur le
menu.
La lecture de l’élément souhaité démarre.
• Avec certains disque, vous pouvez aussi
choisir les éléments avec les touches
numériques correspondantes.
Lors de la lecture d’un VCD
• Quand une liste d’éléments est affichée
sur le moniteur.
Annulation de la lecture PBC
1
2 Choisissez une plage pour démarrer la
lecture normale en utilisant les touches
numériques (voir page 9).
Pour remettre en service la fonction PBC
Zoom
1
ZOOM 1 ZOOM 2 ZOOM 3 ZOOM 4
ZOOM OFF
• Pour les disques JPEG (uniquement
pendant une pause):
ZOOM 1 ZOOM 2
ZOOM OFF
ZOOM 5ZOOM 6
• Pour choisir un numéro supérieur à 9, référezvous à “Comment choisir un numéro” à la
page 9.
Pour retourner aux menus précédents
•
Avec certains disques vous pouvez aussi vous
déplacer sur le menu en appuyant sur 4 / ¢.
22
2 Déplacez la partie agrandie de
l’image.
• Pour les fichiers JPEG:
Vous ne pouvez pas déplacer la position
du zoom quand toute l’image est encore
affichée sur le moniteur.
Pour annuler le zoom, choisissez
“ZOOM OFF” à l’étape 1.
Page 99

Commande des disques en utilisant l’affichage sur l’écran
À propos de la barre sur l’écran
Vous pouvez vérifier les informations du
disque et utiliser certaines fonctions à l’aide
de la barre sur l’écran.
• Pour les CD audio, CD Text et disques
MP3/WMA/JPEG, vous pouvez aussi
utiliser l’écran de commande et l’écran de
liste (voir pages 26 et 27).
Barres sur l’écran
DVD
DVD -V
TIME TITLE CHAP
2ch
VCD
VCD
TIME
PBC
TRACK REPEAT
MP3/WMA
FILE
REPEAT
RANDOMINTRO
JPEG
FILE
REPEAT
CD Text/CD audio
*
REPEAT
5. 1ch
RANDOMINTRO
CD
* Uniquement pour les CD audio DTS
T02-C03 TOTAL 1:25:58
OFF
TRACK 01 TIME 00:36
RANDOMINTRO
REPEAT TRACK
REPEAT FOLDER
REPEAT TRACK
TIME 00:00:36
TIME 00:36
1 Type de disque
2 • Type de format du signal audio (pour les
DVD et les CD audio DTS)
• PBC (uniquement pour les VCD)
3 Informations sur la lecture
Titre/chapitre actuel
T02-C03
TRACK 01
TOTAL
Plage actuelle
Durée de lecture écoulée du
disque
Durée restante du disque (pour
T. REM
les VCD)/Durée restante du titre
(pour les DVD)
TIME
Durée de lecture écoulée du
chapitre ou de la plage actuelle
Durée de lecture restante du
REM
chapitre ou de la plage actuelle
4 Conditions de lecture
Lecture
Recherche vers l’avant/vers
l’arrière
Lecture au ralenti vers l’avant/
vers l’arrière
Pause
Arrêt
5 Icônes de fonctionnement
Indications de la durée
TIME
Recherche temporelle—Entrée
la durée de lecture écoulée du
titre actuel ou du disque.
TITLE
Recherche de titre
CHAP
Recherche de chapitre
TRACK
Recherche de plage
Changement de la langue des
dialogues ou le canal audio.
Changement de la langue des
sous-titres.
Changement de l’angle de vue.
Lecture répétée (pour les DVD)
OFF
Lecture répétée (pour les autres
REPEAT
disques)
INTRO
Lecture des introductions
Lecture aléatoire
RANDOM
6 Mode de lecture actuel
À suivre....
FRANÇAIS
23
Page 100

Opérations de base de la
barre sur l’écran
Pour faire disparaître la barre sur l’écran
1 Affichez la barre sur écran.
• Pour les DVD/VCD:
(deux fois)
• Pour les autres disques:
FRANÇAIS
DVD -V
TIME TITLE CHAP
Quand un disque JPEG est en place, passez
à l’étape 3.
2ch
T02-C03 TOTAL 1:25:58
OFF
2 Choisissez un élément.
3 Choisissez un élément.
• Si le menu déroulant apparaît....
1
DVD -V
TIME TITLE CHAP
ou
2ch
T02-C03 TOTAL 1:25:58
OFF
_ _
• La barre sur l’écran pour les CD ou les
disques MP3/WMA/JPEG disparaît
automatiquement quelques secondes après la
dernière opération.
• Options pouvant être choisie pour la
lecture répétée/des introductions/aléatoire:
OFF
Vous pouvez répéter le titre ou le
chapitre actuel.
DVD (pendant la lecture ou une
pause):
OFF CHAP TITLE
REPEAT
Vous pouvez répéter la plage
actuelle (sauf pour les disques
JPEG) ou les plages du dossier
actuel (uniquement pour les
disques MP3/WMA/JPEG).
VCD (quand PBC n’est pas utilisé):
REPEAT
MP3/WMA:
REPEAT TRACK
REPEAT FOLDER
JPEG:
REPEAT FOLDER
24
CD Text/CD audio:
REPEAT TRACK
2
 Loading...