

Page 1
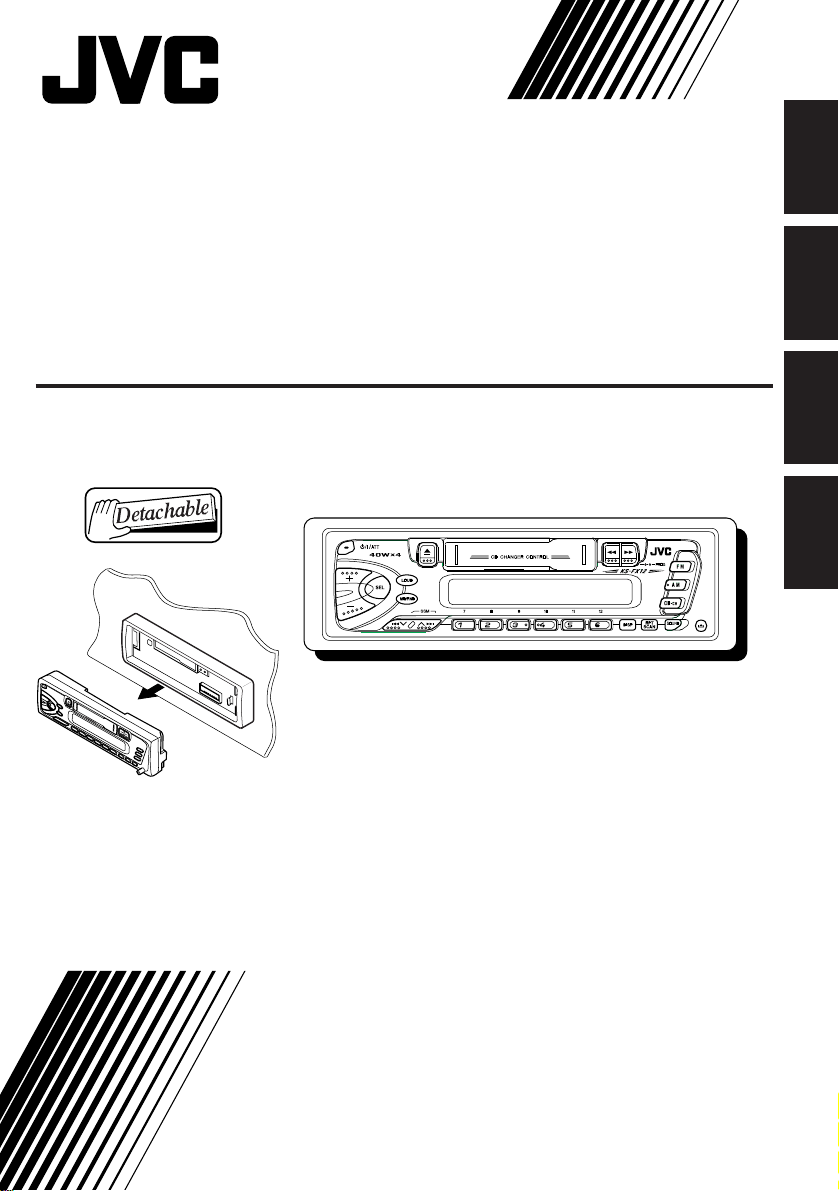
CASSETTE RECEIVER
CASSETTEN-RECEIVER
RADIOCASSETTE
RADIO/CASSETTEPLER
ENGLISH
DEUTSCH
KS-FX12
For installation and connections, refer to the separate manual.
Für den Einbau und die Anschlüsse siehe das eigenständige Handbuch.
Pour l’installation et les raccordements, se référer au manuel séparé.
Bijzonderheden over de installatie en aansluiting van het apparaat vindt u in de desbetreffende
handleiding.
INSTRUCTIONS
BEDIENUNGSANLEITUNG
MANUEL D’INSTRUCTIONS
GEBRUIKSAANWIJZING
FRANÇAIS
NEDERLANDS
FSUN3098-311
[E]
Page 2
Thank you for purchasing a JVC product. Please read all instructions carefully before operation, to
ensure your complete understanding and to obtain the best possible performance from the unit.
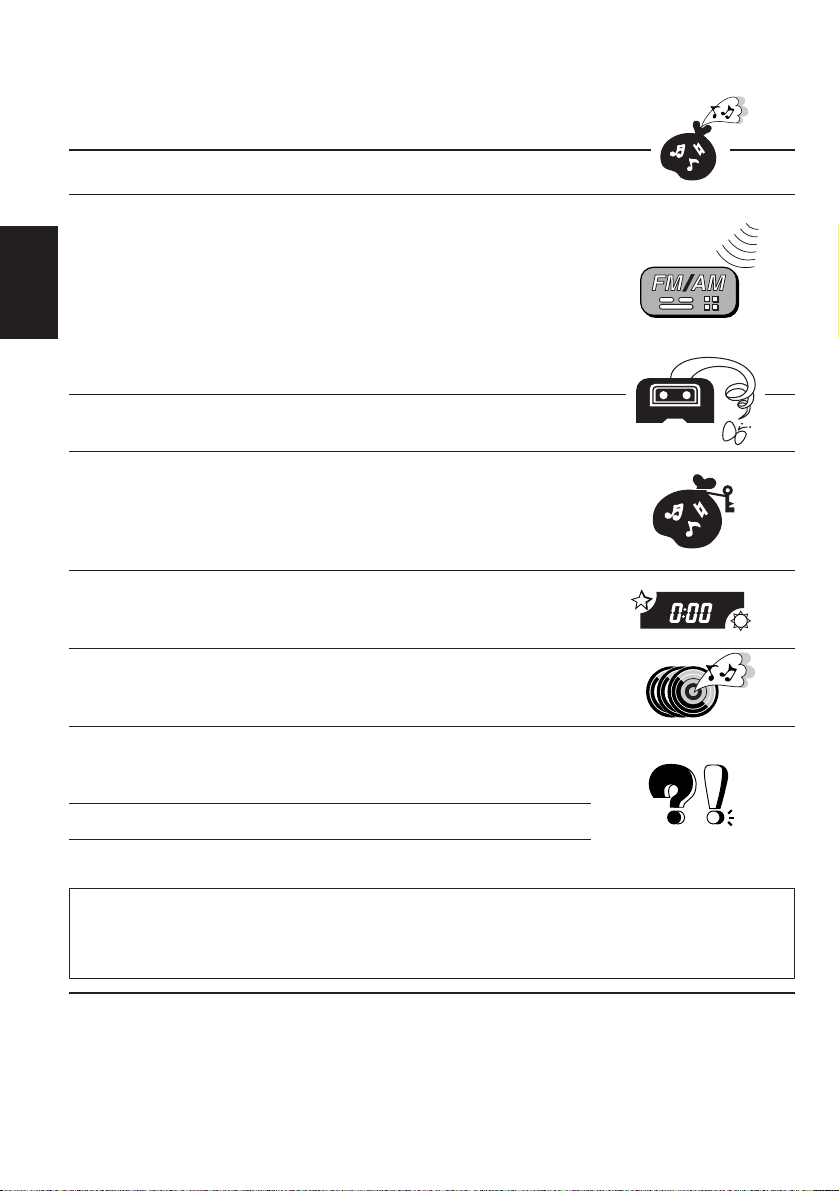
CONTENTS
BASIC OPERATIONS.................................................... 3
ENGLISH
RADIO OPERATIONS................................................... 4
Listening to the radio .....................................................................4
Storing stations in memory............................................................5
FM station automatic preset: SSM............................................... 5
Manual preset .............................................................................. 6
Tuning into a preset station ...........................................................7
Other convenient tuner functions .................................................8
Scanning broadcast stations ....................................................... 8
Selecting FM reception sound .....................................................8
TAPE OPERATIONS ..................................................... 9
Listening to a tape ..........................................................................9
SOUND ADJUSTMENTS ............................................. 10
Turning on/off the loudness function .......................................... 10
Selecting preset sound modes ......................................................10
Adjusting the sound...................................................................... 11
Storing your own sound adjustments .........................................12
OTHER MAIN FUNCTIONS ......................................... 13
Setting the clock ............................................................................13
Detaching the control panel .........................................................14
CD CHANGER OPERATIONS ...................................... 15
Playing CDs ...................................................................................15
Selecting CD playback modes ..................................................... 17
MAINTENANCE ........................................................ 18
To extend the lifetime of the unit.................................................18
How to Reset your unit.................................................................18
TROUBLESHOOTING .................................................19
SPECIFICATIONS ....................................................... 20
Note:
For security reasons, a numbered ID card is provided with this unit, and the same ID number is
imprinted on the unit’s chassis. Keep the card in a safe place, as it will help the authorities to
identify your unit if stolen.
BEFORE USE
For safety....
*
• Do not raise the volume level too much, as this
will block outside sounds, making driving
dangerous.
• Stop the car before performing any complicated
operations.
2
Temperature inside the car....
*
If you have parked the car for a long time in hot
or cold weather, wait until the temperature in the
car becomes normal before operating the unit.
Page 3
BASIC OPERATIONS
2
1
1
2
3
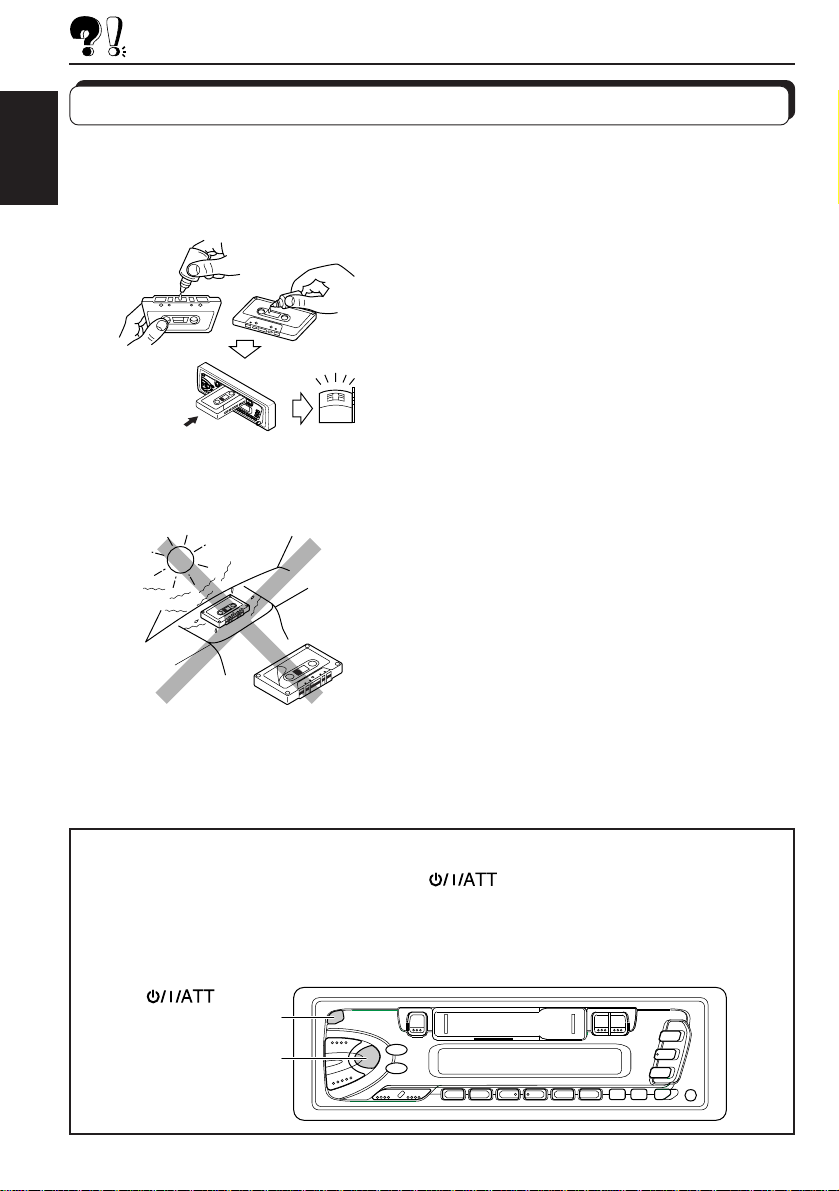
Note:
When you use this unit for the
first time, set the built-in
clock correctly, see page 13.
ENGLISH
3
CD-
/I/ATT
Notes on One-Touch Operation:
• When you select tuner as a source in step 2 below, the power automatically
comes on. You do not have to press this button to turn on the power.
• If the cassette is already in the cassette compartment, tape play starts
automatically.
F M
A M
CH
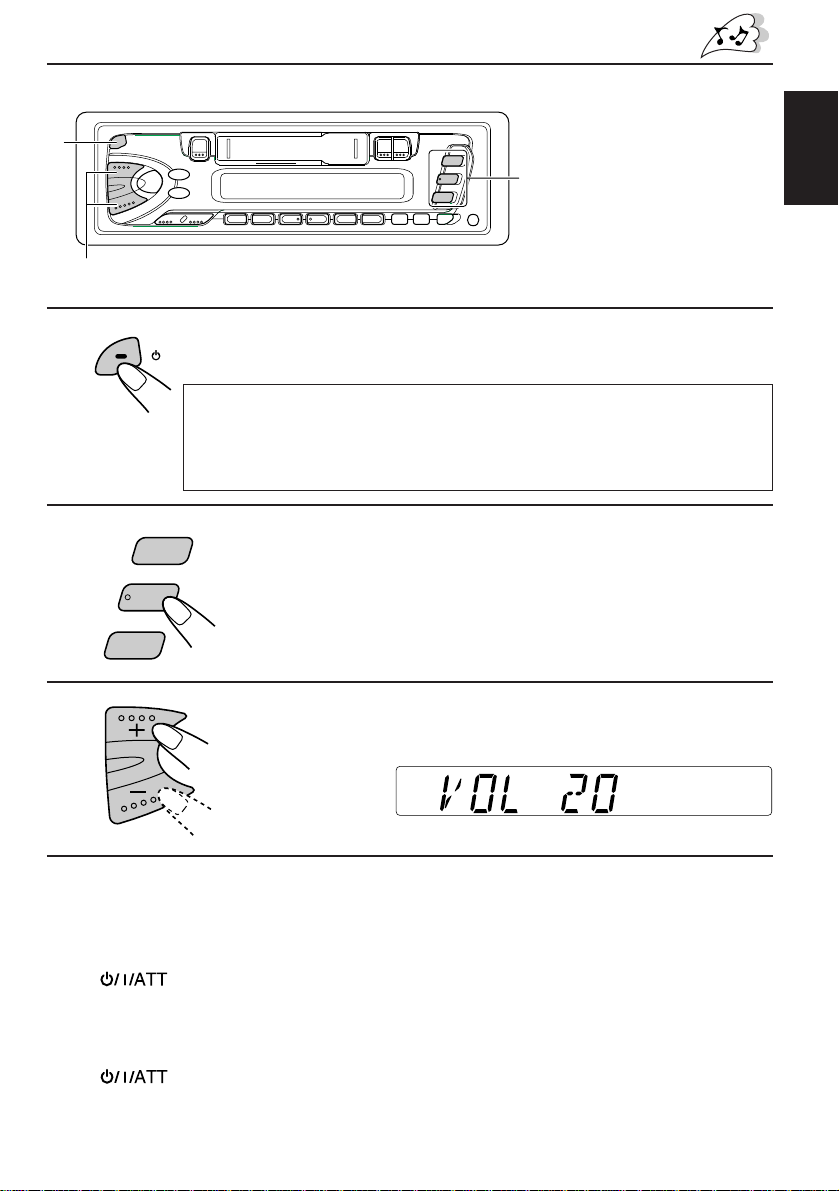
Turn on the power.
Play the source.
To operate the tuner, see pages 4 – 8.
To operate the tape deck, see page 9.
To operate the CD changer, see pages 15 – 17.
Adjust the volume.
Volume level appears
4
Adjust the sound as you want (see pages 10 – 12).
To drop the volume in a moment
Press briefly while listening to any source. “ATT” starts flashing on the display, and
the volume level will drop in a moment.
To resume the previous volume level, press the button briefly again.
To turn off the power
Press for more than 1 second.
3
Page 4
RADIO OPERATIONS
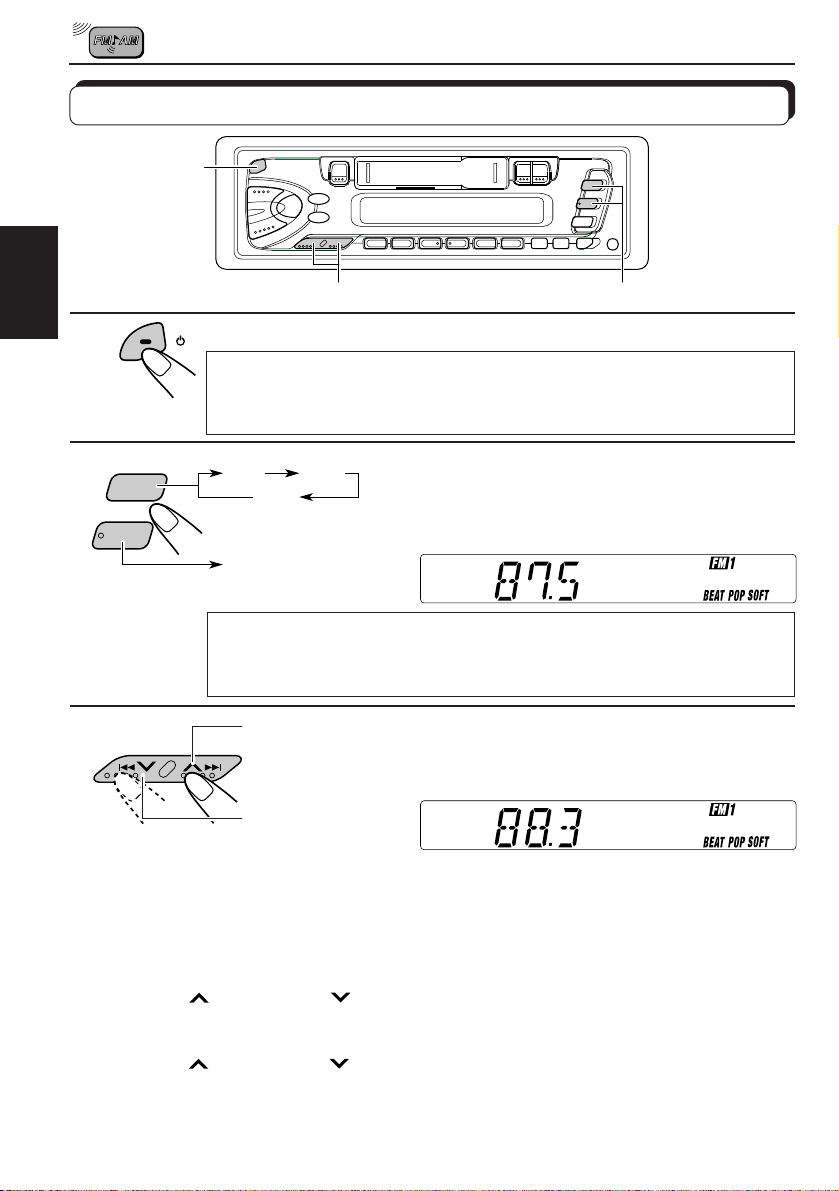
Listening to the radio
ENGLISH
1
2
A M
1
3
2
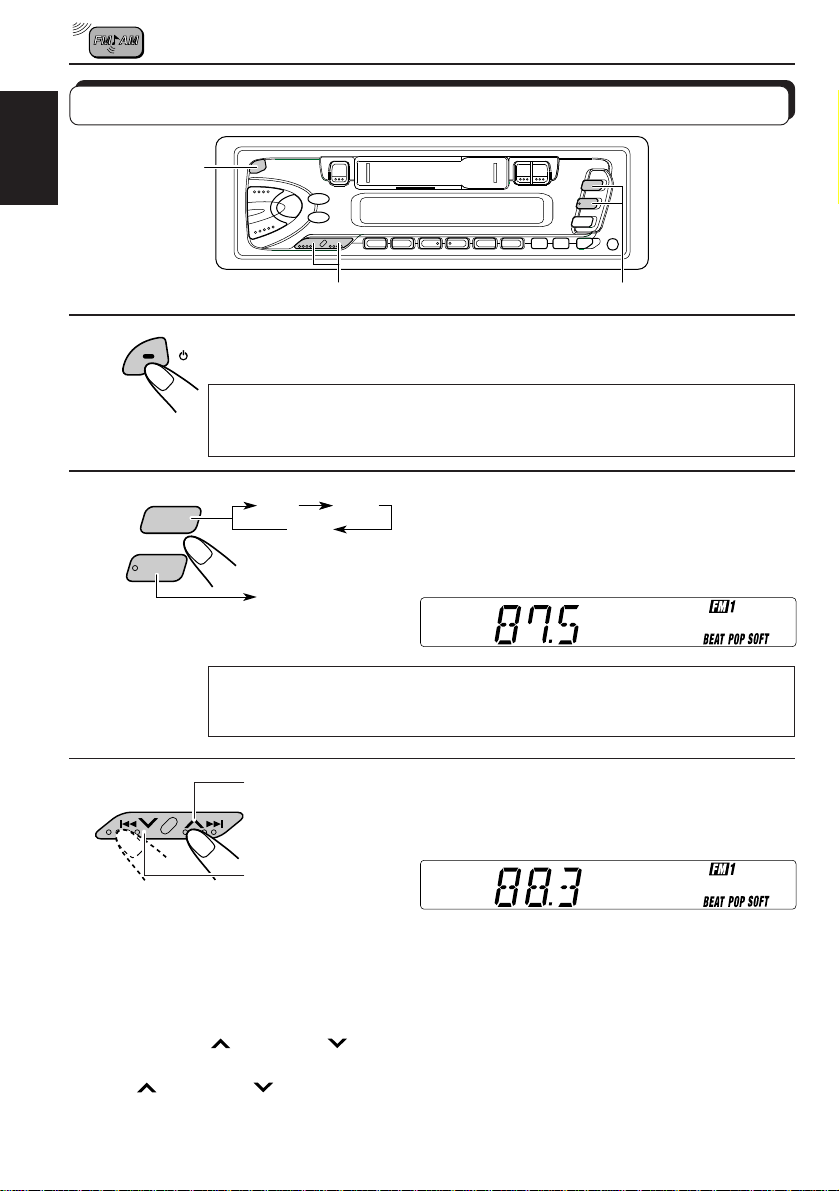
Turn on the power.
/I/ATT
Note on One-Touch Operation:
When you select a band in step 2 below , the power automatically comes on. You
do not have to press this button to turn on the power.
Select the band (FM1, FM2,
FM3 or AM).
Y ou can select an y one of FM1, FM2, and
FM3 to listen to an FM station.
F M
FM1 FM2
FM3
AM
Note:
When a cassette is in the cassette compartment, you cannot select the tuner . Be sur e
to eject the cassette from the cassette compartment to listen to the radio.
3
To stop searching before a station is received, press the same button you have pressed
for searching.
To search stations
of higher
frequencies.
To search stations
of lower
frequencies.
Start searching a station.
When a station is received, searching
stops.
To tune in a particular frequency manually:
1 Press FM or AM to select the band.
2 Press and hold
Now you can manually change the frequency while “M” is flashing.
3 Press
• If you hold down the button, the frequency keeps changing (in 50 kHz intervals f or FM and
9 kHz intervals for AM — MW/LW) until you release the button.
4
¢ or 4 repeatedly until the frequency you want is reached.
¢ or 4 until “M” starts flashing on the display.
Page 5
Storing stations in memory
You can use one of the following two methods to store broadcasting stations in memory.
• Automatic preset of FM stations: SSM (Strong-station Sequential Memory)
• Manual preset of both FM and AM stations.
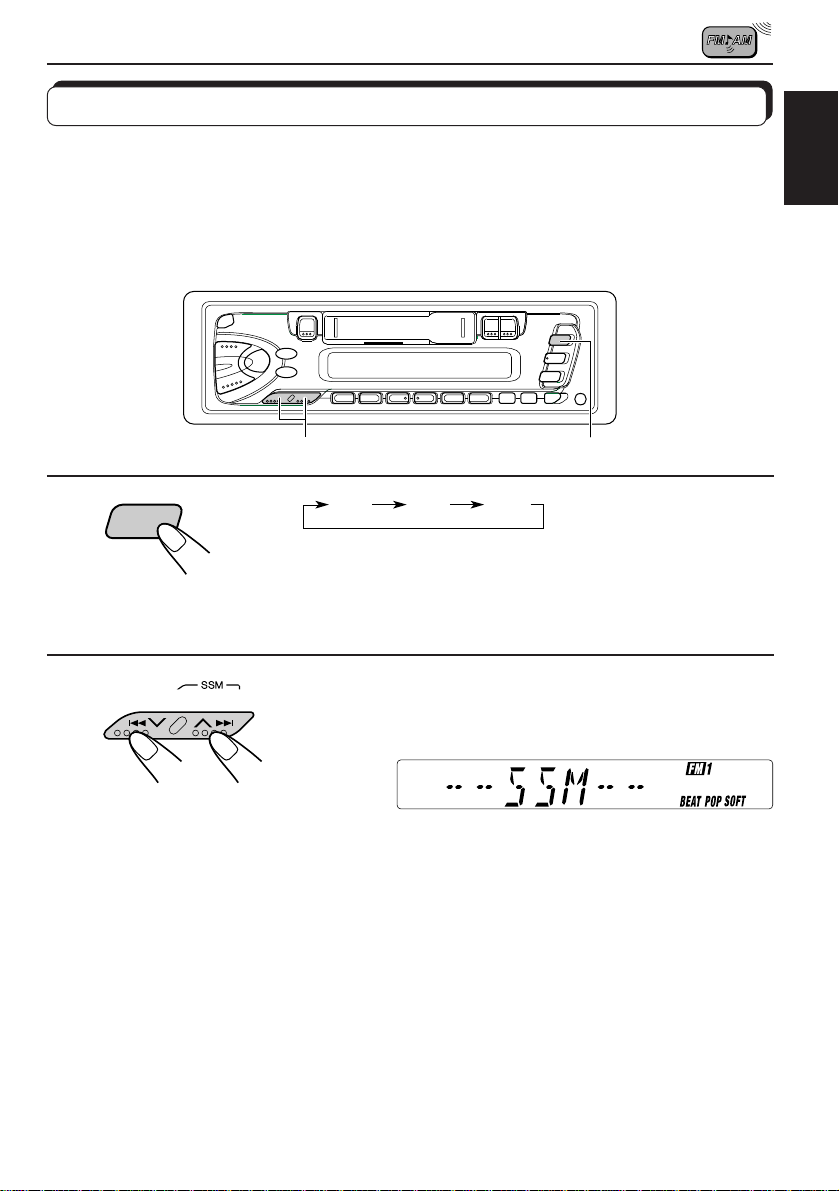
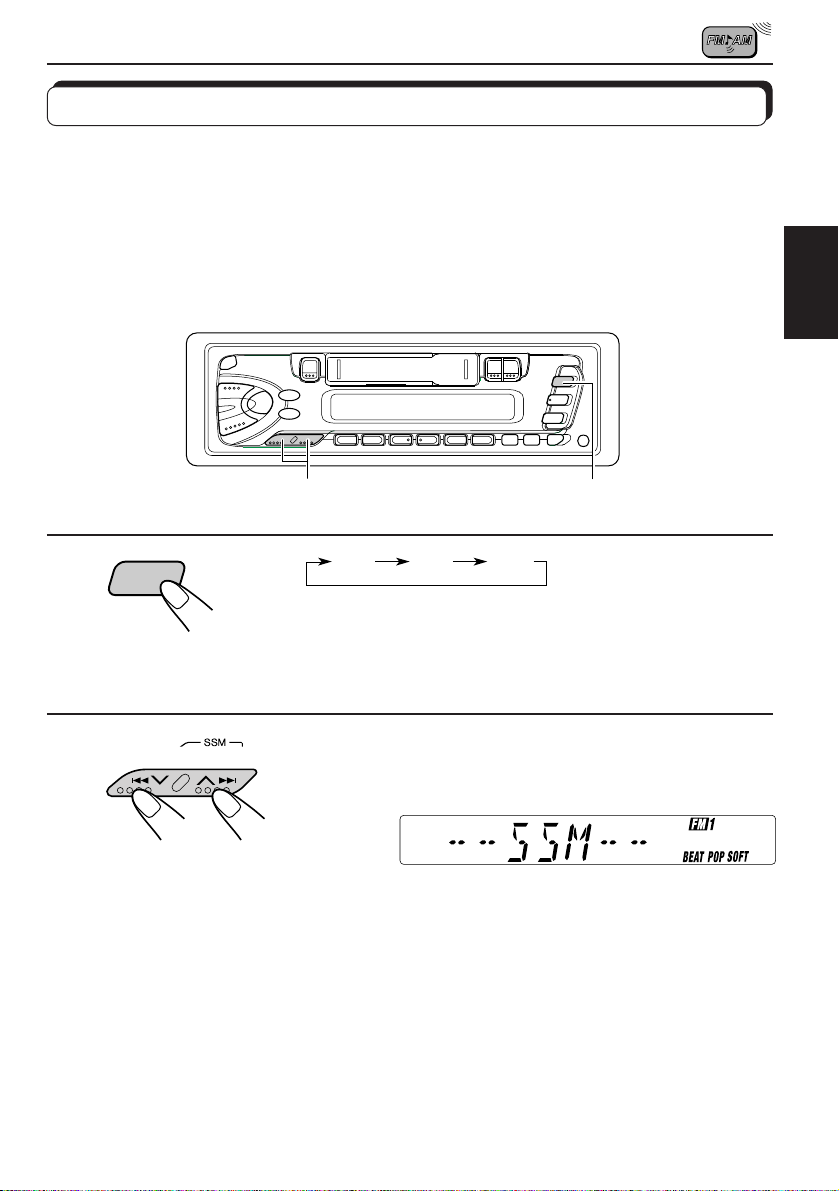
FM station automatic preset: SSM
You can preset 6 local FM stations in each FM band (FM1, FM2 and FM3).
ENGLISH
1
F M
2
FM1 FM2 FM3
1
Select the FM band number (FM1, FM2 or
FM3) you want to store FM stations into.
2
Press and hold the button for more than 2
seconds.
“SSM” appears, then disappears when automatic
preset is over.
Local FM stations with the strongest signals are searched and stored automatically in the
band number you have selected (FM1, FM2 or FM3). These stations are preset in the number
buttons — No. 1 (lowest frequency) to No. 6 (highest frequency).
When automatic preset is over, the station stored in number button 1 will be automatically
tuned in.
5
Page 6
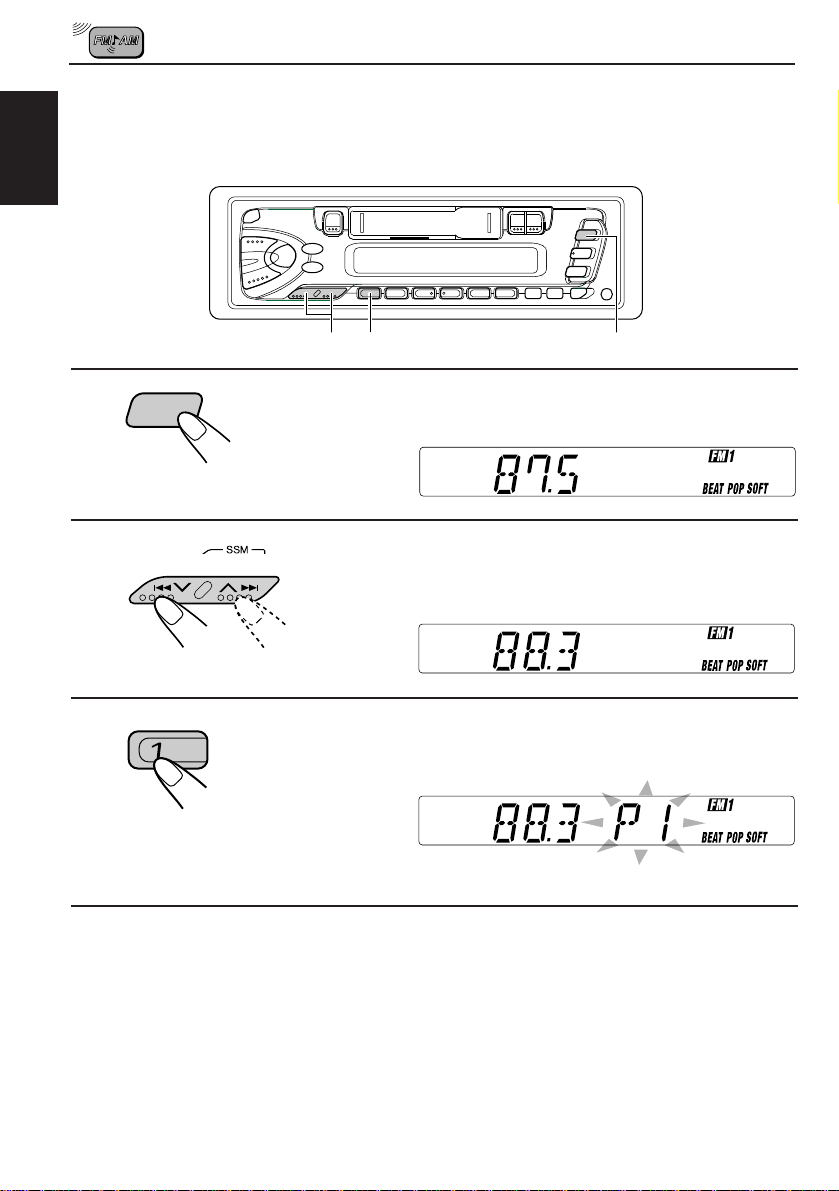
Manual preset
You can preset up to 6 stations in each band (FM1, FM2, FM3 and AM) manually.
Example: Storing an FM station of 88.3 MHz into the preset number 1 of the FM1 band.
ENGLISH
1
2
3
F M
23
1
Select the FM1 band.
Tune into a station of 88.3 MHz.
See page 4 to tune into a station.
Press and hold the button for more than 2
seconds.
Preset number “P1” flashes for a while.
4
Repeat the above procedure to store other stations into other
preset numbers.
Notes:
• A previously preset station is erased when a new station is stored in the same preset number.
• Preset stations are er ased when the power suppl y to the memory cir cuit is inter rupted (for example,
during battery replacement). If this occurs, preset the stations again.
6
Page 7
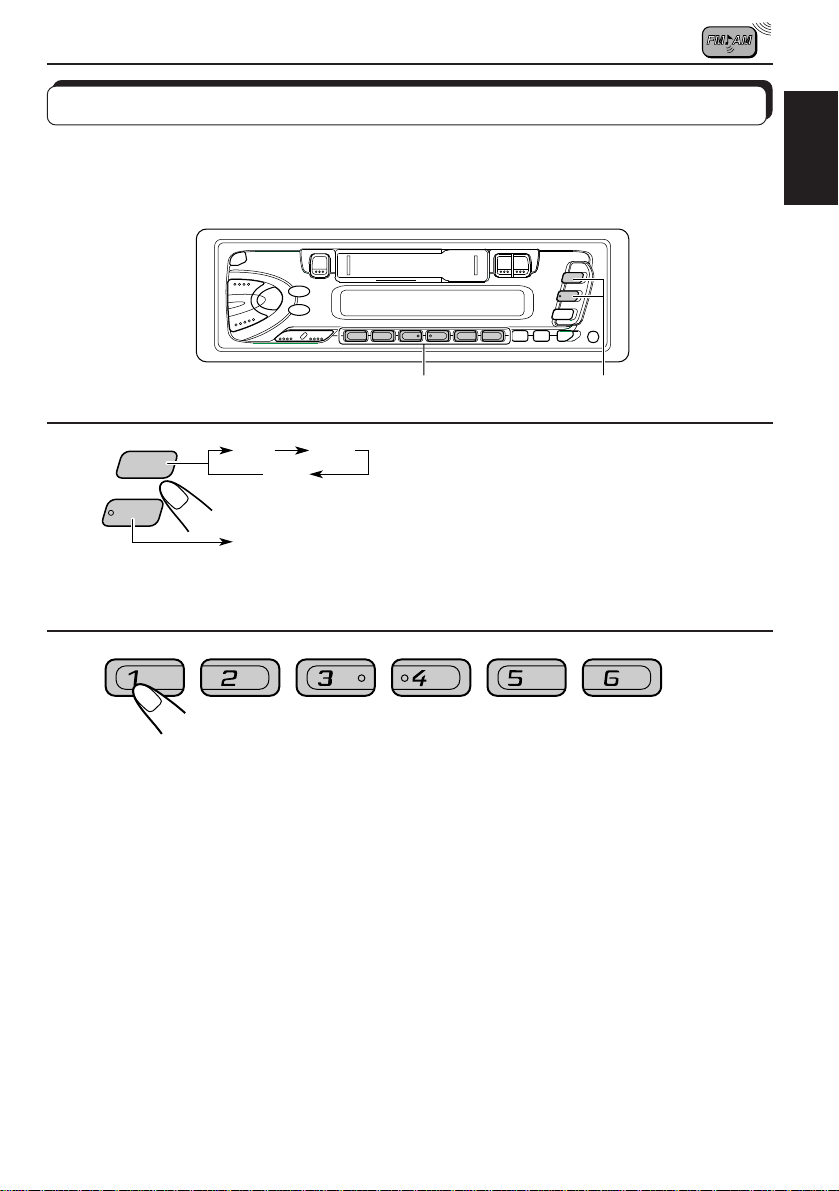
Tuning into a preset station
You can easily tune into a preset station.
Remember that you must store stations first. If you ha ve not stored them yet, see page 5 or 6.
ENGLISH
1
2
A M
F M
FM1 FM2
FM3
AM
Select the band (FM1, FM2, FM3 or AM) you
want.
Select the number (1 – 6) for the preset station
you want.
2
1
7
Page 8
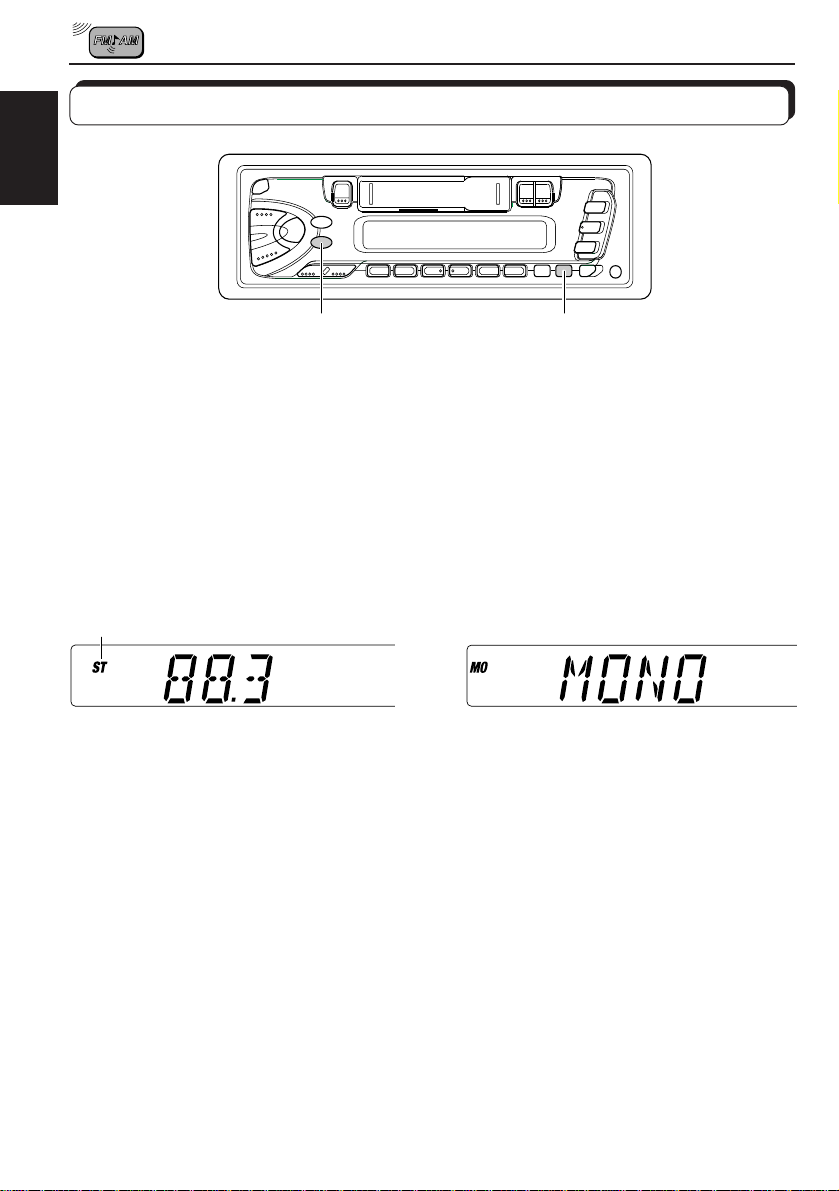
Other convenient tuner functions
ENGLISH
MO/RND RPT/SCAN
Scanning broadcast stations
When you press RPT/SCAN while listening to the radio , station scanning starts. Each time a
broadcast is tuned in, scanning stops for about 5 seconds (tuned frequency number flashes
on the display), and you can check what program is now being broadcast.
If you want to listen to that program, press the same button again to stop scanning.
Selecting FM reception sound
When an FM stereo broadcast is hard to receive:
Press MO/RND while listening to an FM stereo broadcast. The sound you hear becomes
monaural but reception will be improved.
Lights when receiving an FM broadcast in stereo
\
To restore the stereo effect, press the same button again.
8
Page 9
Listening to a tape
TAPE OPERATIONS
1
2
3
1
/I/ATT
PROG
2
3
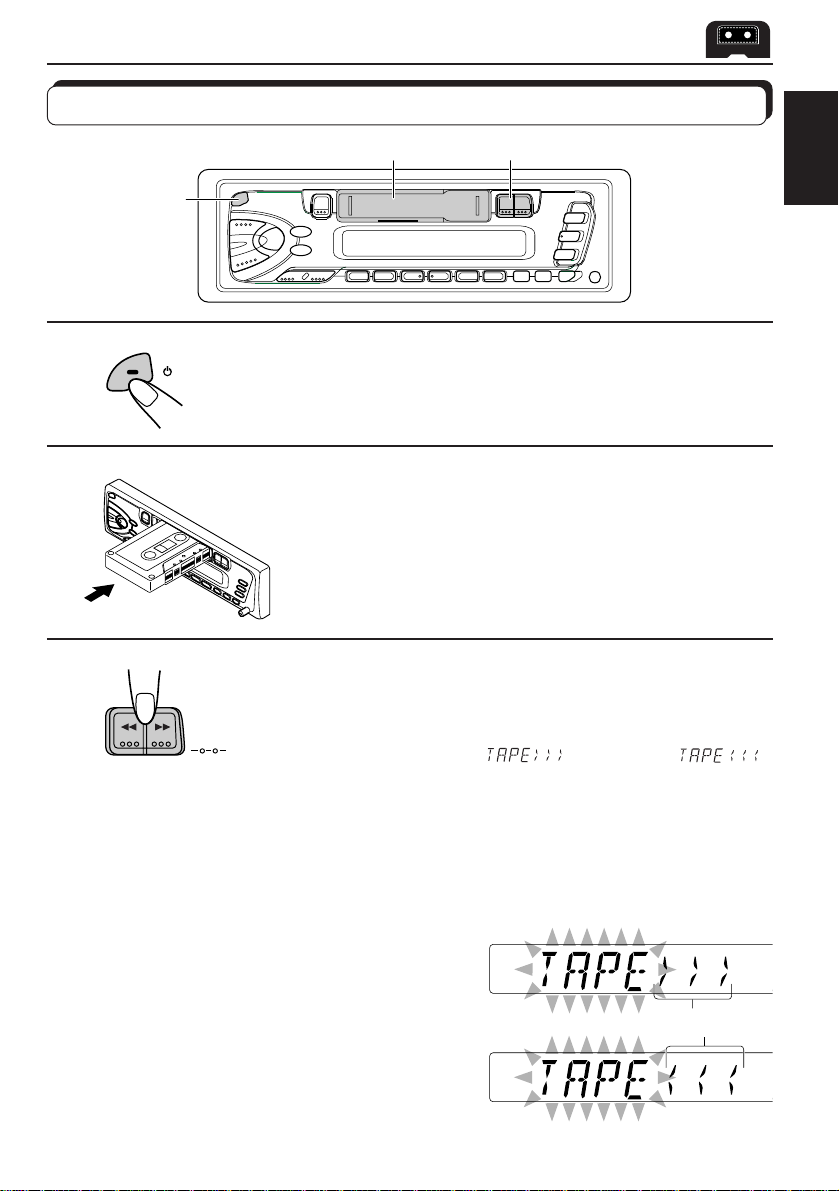
Turn on the power.
Insert a cassette.
When one side of the tape reaches its end during play, the
other side of the tape automatically starts playing. (Auto
Reverse)
Select the tape direction.
• Press the both buttons at the same time.
Each time you press the button, the tape direction changes
alternatively – forward (
) and reverse ( ).
ENGLISH
To stop play and eject the cassette
Press 0.
Tape play stops and the cassette ejects from the cassette compartment.
You can hear the last received station.
• You can also eject the cassette with the unit turnd off.
To fast-wind a tape
Press either ¡ or 1.
The tape will be wound in the direction of the arrows
(¡ or 1).
T o restart playback, press ¡ or 1 lightly .
Tape direction
9
Page 10
SOUND ADJUSTMENTS
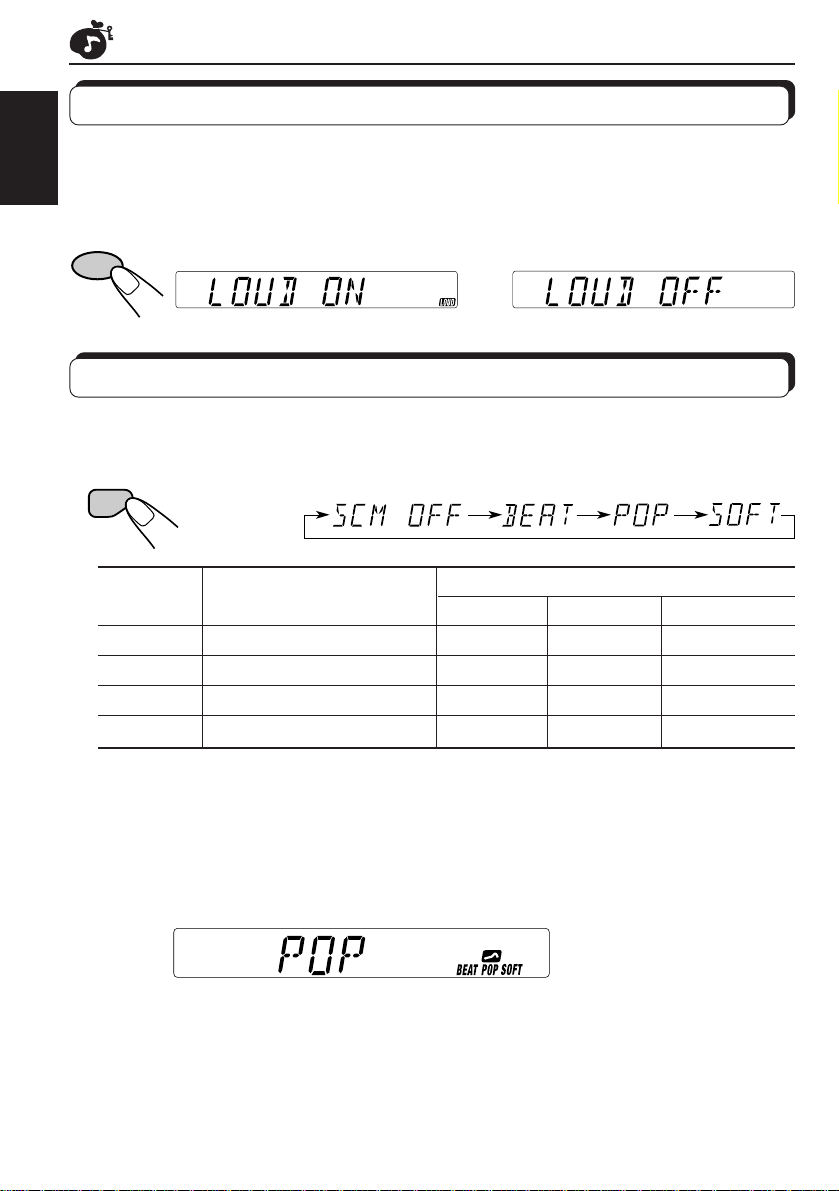
Turning on/off the loudness function
The human ear is less sensitive to low and high frequencies at low volumes.
The loudness function can boost these frequencies to produce a well-balanced sound at low
ENGLISH
volume levels.
Each time you press LOUD, the loudness function turns on/off alter natively.
LOUD
|\
Selecting preset sound modes
You can select a preset sound adjustment suitable to the music genre.
Each time you press SOUND, the sound mode changes as follows.
SOUND
Indication For: Preset values
Bass Treble Loudness
SCM OFF (Flat sound) 00 00 On
BEAT Rock or disco music +2 00 On
POP Light music +4 +1 Off
SOFT Quiet background music +1 –3 Off
Notes:
• You can adjust the preset sound mode to your preference, and store it in memory.
If you want to adjust and store your original sound mode, see “Storing your own sound adjustments”
on page 12.
• T o adjust only the bass and treble r einfor cement levels to your pr eference, see “Adjusting the sound”
on page 11.
• When one of the sound modes is selected, it is shown on the display as follows:
For example, when “POP” is selected.
10
Page 11

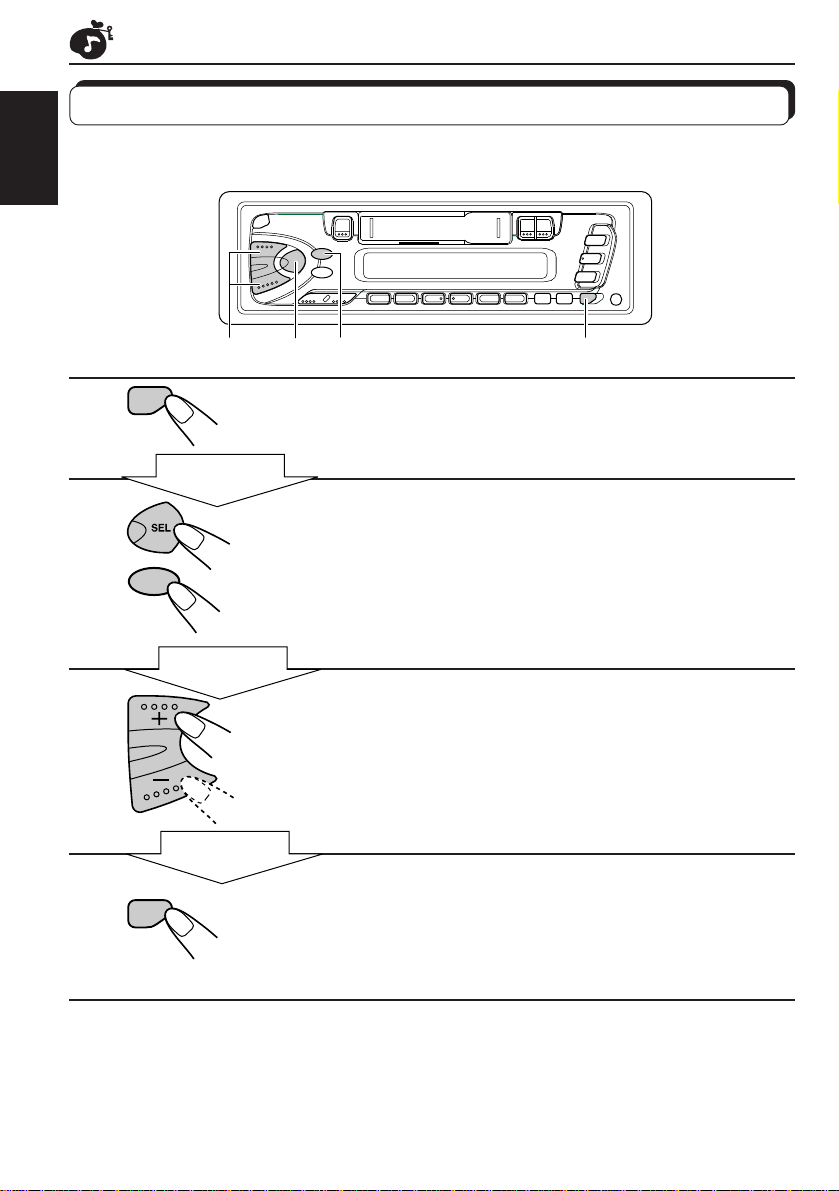
Adjusting the sound
You can adjust the treble/bass sound and the speaker balance.
ENGLISH
2
1
1
Select the item you want to adjust.
Indication To do: Range
BAS Adjust the bass –6 (min.) — +6 (max.)
(bass)
TRE Adjust the treble –6 (min.) — +6 (max.)
(treble)
FAD Adjust the front and rear speaker R6 (rear only) — F6 (front only)
(Fader)* balance
BAL Adjust the left and right speaker L6 (left only) — R6 (right only)
(Balance) balance
VOL Adjust the volume 00 (min.) — 50 (max.)
(Volume)
Note:
* If you are using a two-speaker system, set the fader level to “00”.
2
Adjust the level.
Note:
Normally the + and – buttons work as the volume contr ol buttons.
So you do not have to select “VOL” to adjust the volume level.
11
Page 12
Storing your own sound adjustments
You can adjust the sound modes (BEAT, POP, SOFT: see page 10) to your preference and
store your own adjustments in memory.
ENGLISH
1
2
3
4
SOUND
LOUD
SOUND
3
Within
5 seconds
Within
5 seconds
Within
5 seconds
2 2 1,4
Call up the sound mode you want to adjust.
See page 10 for details.
To adjust the bass or treble sound level
Select “BAS” or “TRE.”
To turn on or off the loudness function
Each time you press LOUD, the loudness function turns on
and off alternatively. (= go to step 4)
Adjust the bass or treble level.
See page 11 for details.
Press and hold SOUND until the sound mode
you have selected in step 1 flashes on the
display.
Your setting is stored in memory.
5
Repeat the same procedure to store other settings.
To reset to the factory settings
Repeat the same procedure and reassign the preset values listed in the table on page 10.
12
Page 13
OTHER MAIN FUNCTIONS
Clock
Disc
number
Elapsed
playing time
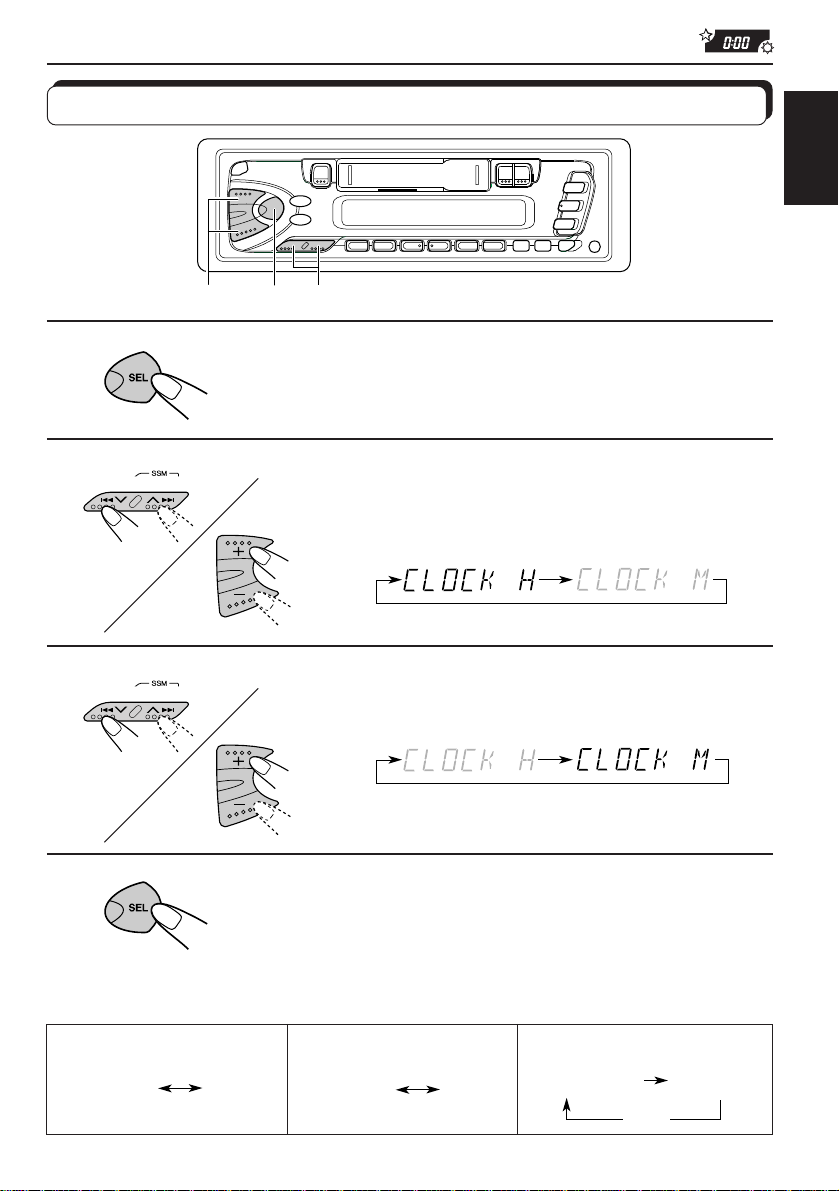
Setting the clock
ENGLISH
1
2
3
1.
1.
2,3
2.
2.
1,4 42,3
Press and hold the button for more than 2
seconds.
“CLOCK H” or “CLOCK M” appears on the display.
Set the hour.
1. Select “CLOCK H” if not shown on the
display.
2. Adjust the hour.
Set the minute.
1. Select “CLOCK M.”
2. Adjust the minute.
4
Start the clock.
To check the current clock time (changing the display mode)
Press DISP repeatedly . Each time you press the button, the displa y mode changes as follows .
During tuner operation:
Frequency
Clock
During tape operation:
Play mode
Clock
During CD changer operation:
13
Page 14
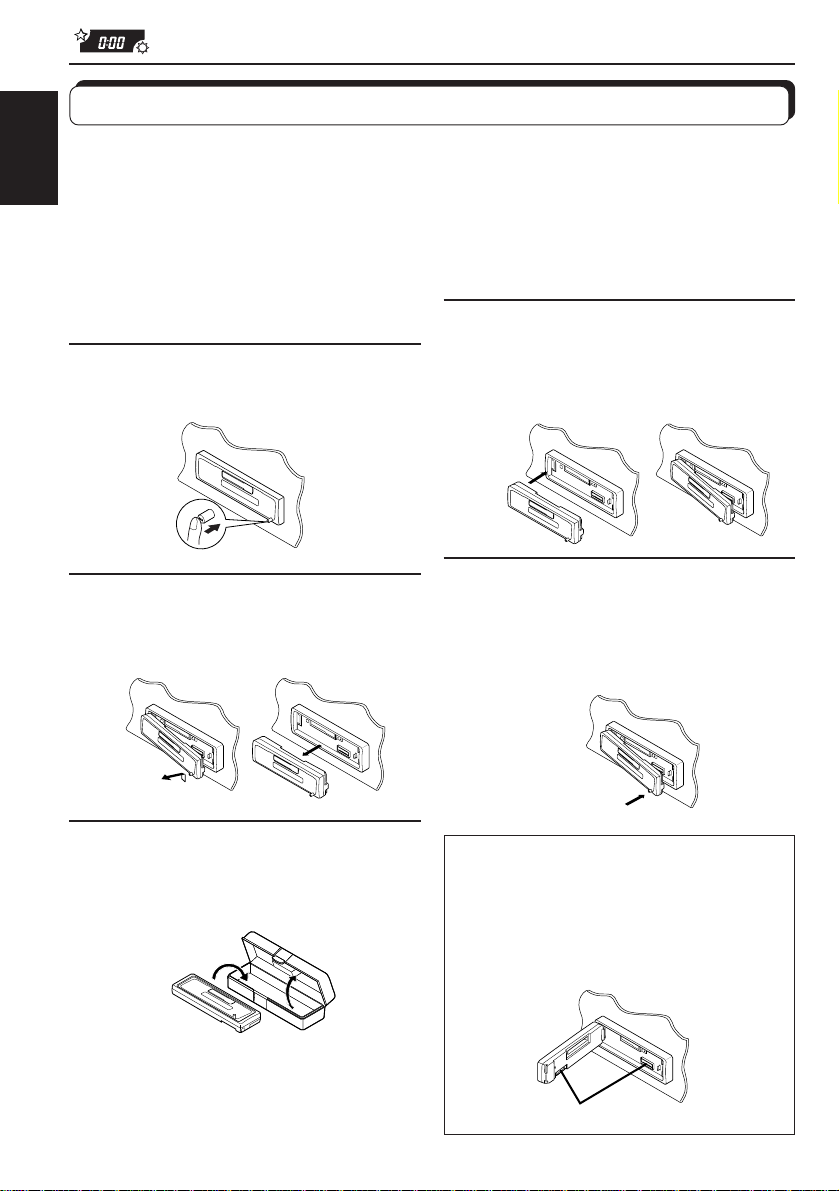
Detaching the control panel
You can detach the control panel when leaving the car.
When detaching or attaching the control panel, be careful not to damage the connectors on
ENGLISH
the back of the control panel and on the panel holder.
How to detach the control
panel
Before detaching the control panel, be sure
to turn off the power.
1
Unlock the control panel.
2
Lift and pull the control panel
out of the unit.
How to attach the control
panel
1
Insert the left side of the
control panel into the groove
on the panel holder.
2
Press the right side of the
control panel to fix it to the
panel holder.
14
3
Put the detached control
panel into the provided case.
Note on cleaning the connectors:
If you frequently detach the contr ol panel, the
connectors will deteriorate.
T o minimize this possibility , periodically wipe
the connectors with a cotton swab or cloth
moistened with alcohol, being careful not to
damage the connectors.
Connectors
Page 15
CD CHANGER OPERATIONS
We recommend that you use one of the CH-X series with your unit.
If you have another CD automatic changer, consult your JVC IN-CAR ENTERTAINMENT
dealer for connections.
• For example, if your CD automatic changer is one of the KD-MK series, you need a cord (KSU15K) for connecting it to this unit.
Before operating your CD automatic changer:
• Refer also to the Instructions supplied with your CD changer.
• If no discs are in the magazine of the CD changer or the discs are inserted upside
down, “NO CD” or “NO DISC” will appear on the display. If this happens, remove the
magazine and set the discs correctly.
• If “RESET 1 - RESET 8” appears on the displa y , something is wrong with the connection
between this unit and the CD changer. If this happens, check the connection, connect
the connecting cord(s) firmly if necessary, then press the reset button of the CD changer .
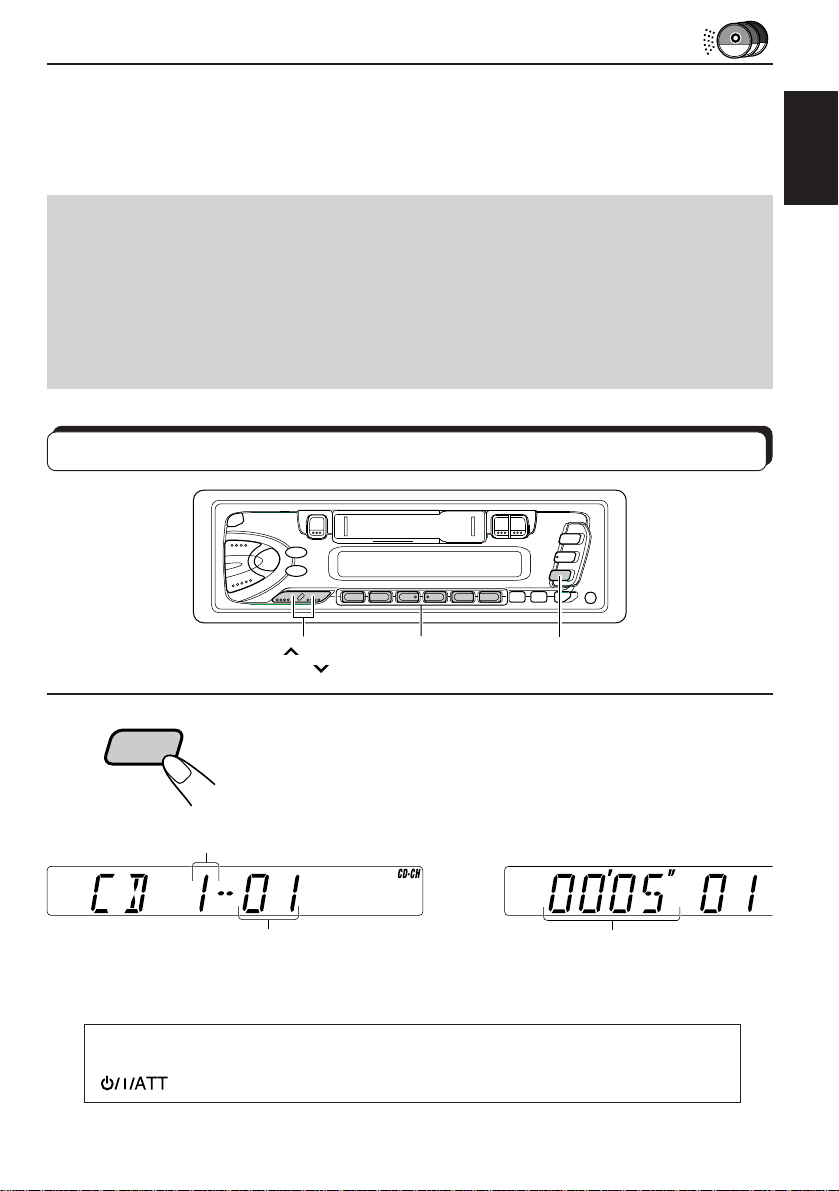
Playing CDs
ENGLISH
¢
4
Number buttons
1
1
CD-
CH
Disc number
Select the CD automatic changer.
Playback starts from the first track of the first disc.
All tracks of all discs are played back.
\
Track number
Note on One-T ouch Operation:
When you press CD-CH, the power automatically comes on. You do not have to press
to turn on the power.
Elapsed playing time
(The clock time is shown if you have
pressed DISP to see the clock time.
See page 13.)
15
Page 16
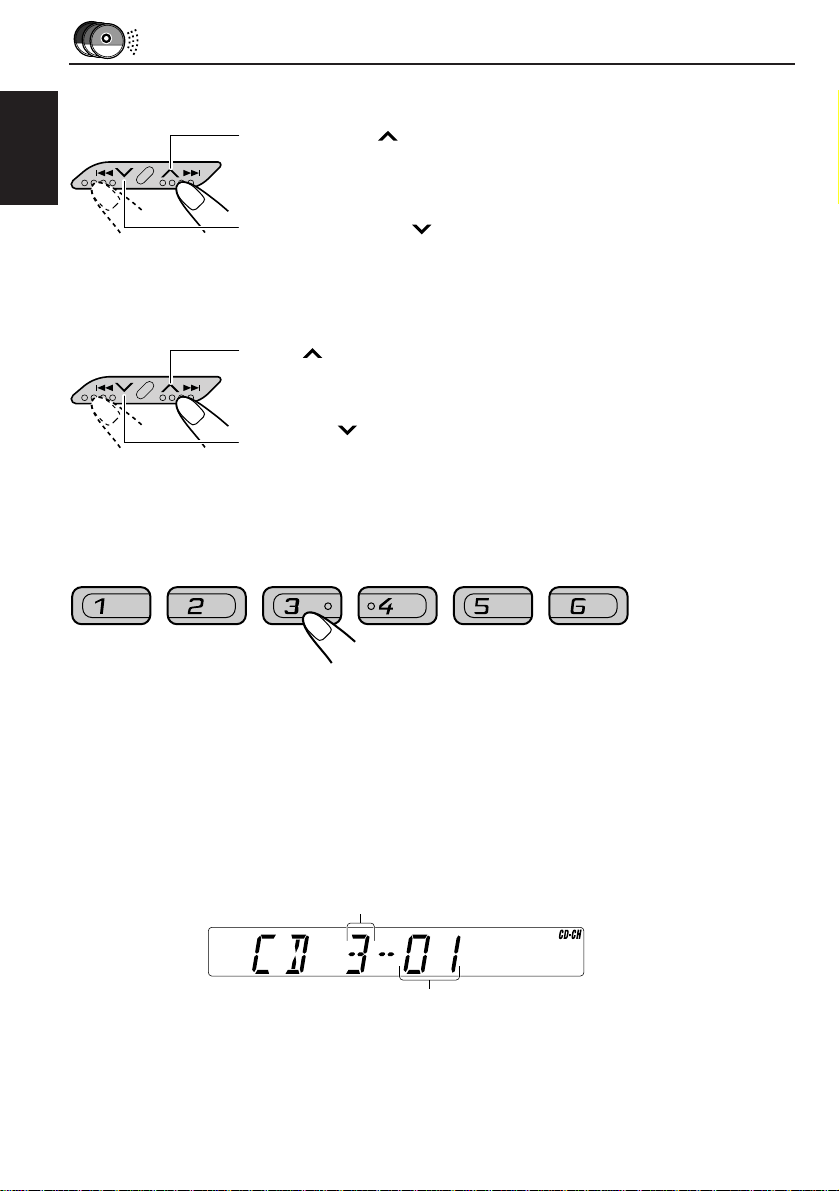
To fast forward or reverse the track
Press and hold ¢, while playing a CD, to fast forward the track.
ENGLISH
Press and hold 4
, while playing a CD, to reverse the track.
To go to the next track or the previous track
Press ¢ briefly, while pla ying a CD, to go ahead to the beginning
of the next track. Each time you press the button consecutively, the
beginning of the next tracks is located and played back.
Press 4
briefly, while playing a CD, to go back to the beginning
of the current track. Each time you press the b utton consecutiv ely, the
beginning of the previous tracks is located and played back.
To go to a particular disc directly
7 8 9 10 11 12
Press the number button corresponding to the disc number to start its
playback.
• To select a disc number from 1 – 6:
Press 1 (7) – 6 (12) briefly.
• To select a disc number from 7 – 12:
Press and hold 1 (7) – 6 (12) for more than 1 second.
16
Ex. When disc number 3 is selected
Disc number
Track number
Page 17
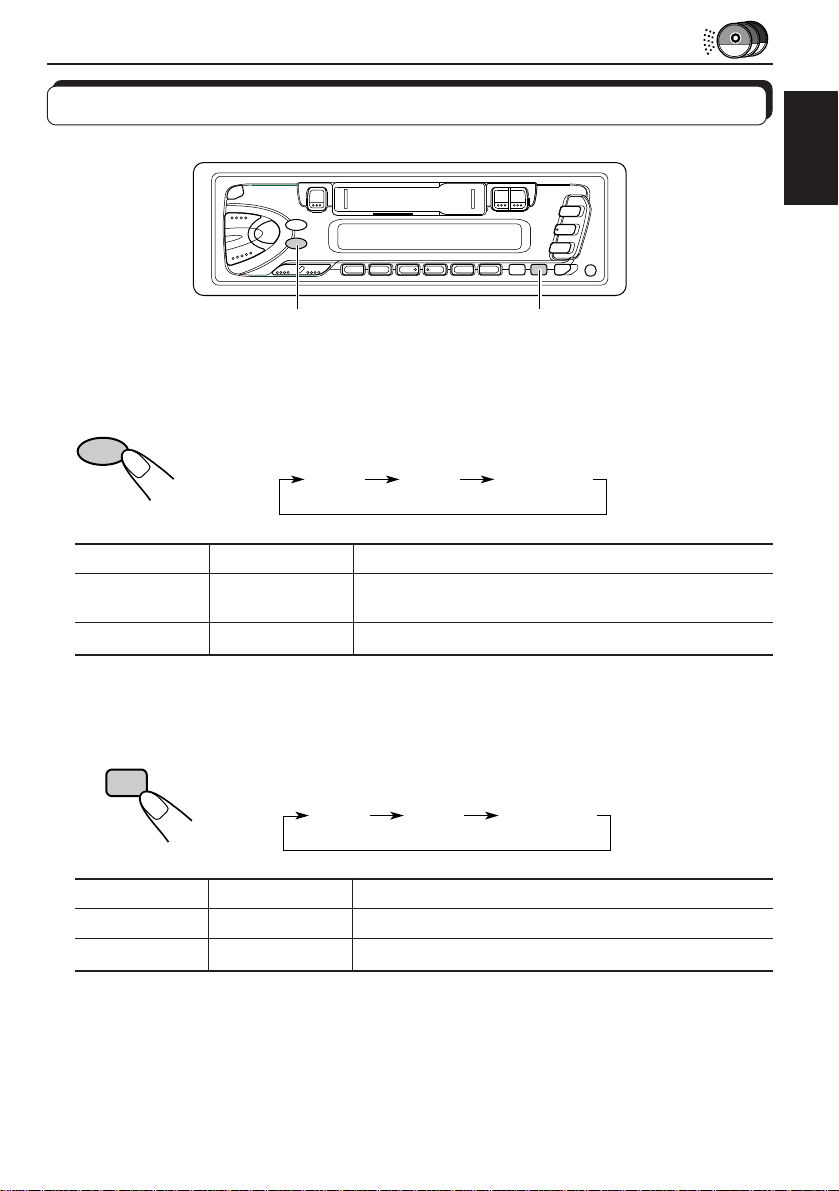
Selecting CD playback modes
ENGLISH
MO/RND
RPT/SCAN
To play back tracks at random (Random Play)
Each time you press MO/RND (Mono/Random) while playing a CD, CD
MO/RND
random play mode changes as follows:
RND1 RND2 Canceled
(Random1) (Random2)
Mode RND Indicator Plays at random
RND1 Lights All tracks of the current disc, then the tracks of the
next disc, and so on.
RND2 Flashes All tracks of all discs inserted in the magazine.
To play back tracks repeatedly (Repeat Play)
Each time you press RPT/SCAN (Repeat/Scan) while playing a CD, CD
RPT
SCAN
Mode RPT Indicator Plays repeatedly
RPT1 Lights The current track (or specified track).
RPT2 Flashes All tracks of the current disc (or specified disc).
repeat play mode changes as follows:
RPT1 RPT2 Canceled
(Repeat1) (Repeat2)
17
Page 18
MAINTENANCE
To extend the lifetime of the unit
This unit requires very little attention, but you will be able to extend the life of the unit if you
follow the instructions below.
ENGLISH
To clean the heads
• Clean the heads after every 10 hours of use
using a wet-type head cleaning tape (available
at an audio store).
When the head becomes dirty, y ou may realize
the following symptoms:
– Sound quality is reduced.
– Sound level decreases.
– Sound drops out.
• Do not play dirty or dusty tapes.
• Do not touch the highly-polished head with any
metallic or magnetic tools.
To keep the tape clean
• Always store the tapes to their storage cases
after use.
• Do not store tapes in the following places:
– Subject to direct sunlight
– With high humidity
– At extremely hot temperatures
CAUTIONS:
• Do not play the tapes with peeling labels; otherwise, they can damage the unit.
• Tighten tapes to remove slack since loose tape may become entangled with the mechanism.
• Do not leave a cassette in the cassette compartment after use, as the tape may become slack.
How to reset your unit
Press and hold both the SEL (Select) and (Standby/On/ATT) buttons at
the same time for several seconds.
This will reset the built-in microcomputer.
NOTE: Your preset adjustments — such as preset channels or sound adjustments
— will also be erased.
(Standby/On/ATT)
SEL (Select)
18
Page 19
TROUBLESHOOTING
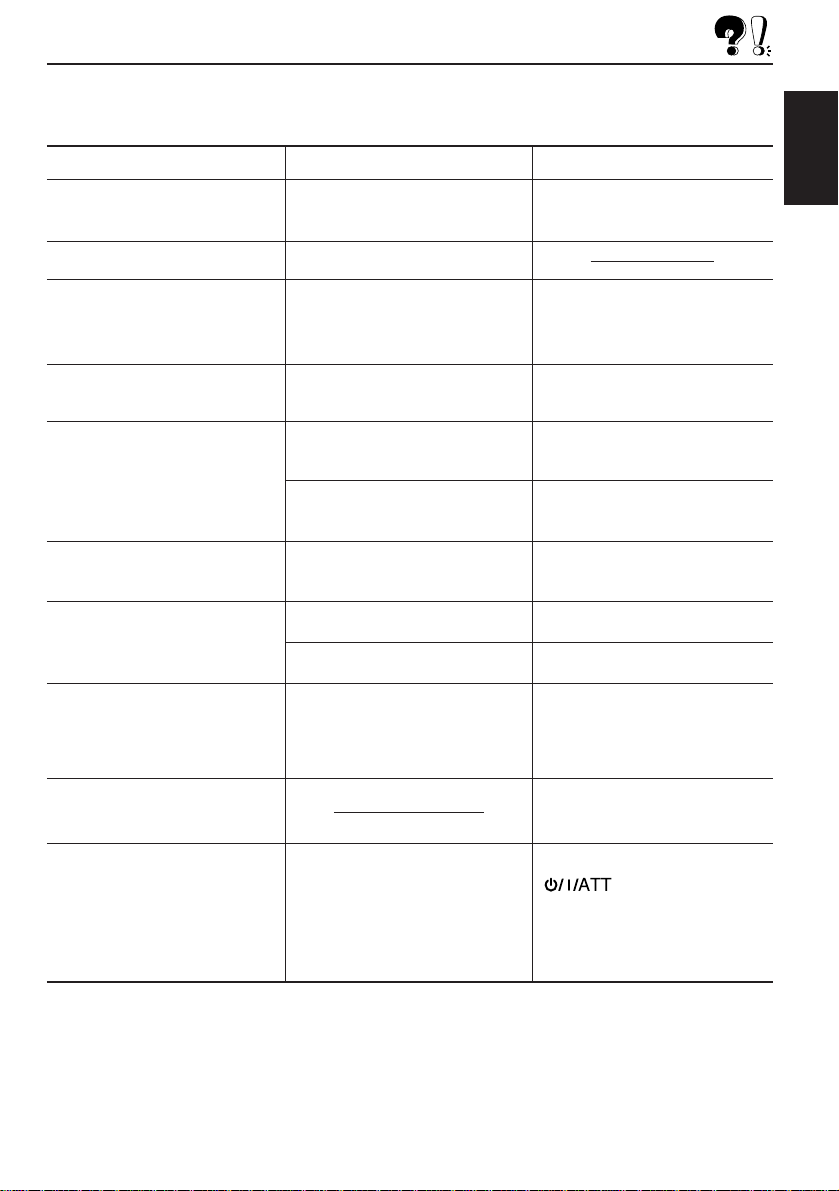
What appears to be trouble is not always serious. Check the following points before calling a
service center.
Symptoms
• A cassette tape cannot be
inserted.
• Cassette tapes become hot.
• Tape sound is at very low
level and sound quality is
degraded.
• Sound is sometimes
interrupted.
• Sound cannot be heard from
the speakers.
• Static noise while listening
to the radio.
• “NO CD” or “NO DISC”
appears on the display.
• “RESET 8” appears on the
display.
Causes
You have tried to insert a
cassette in the wrong way.
This is not a malfunction.
The tape head is dirty.
Connections are not good.
The volume control is turned
to the minimum level.
Connections are incorrect.
The antenna is not connected
firmly.
No CD is in the magazine.
CDs are inserted incorrectly.
This unit is not connected to a
CD changer correctly.
Remedies
Insert the cassette with the
exposed tape facing right.
Clean it with a head cleaning
tape.
Check the cords and
connections.
Adjust it to the optimum level.
Check the cords and
connections.
Connect the antenna firmly.
Insert CDs into the magazine.
Insert them correctly.
Connect this unit and the CD
changer correctly and press
the reset button of the CD
changer.
ENGLISH
• “RESET 1-RESET 7”
appears on the display.
• The unit does not work at
all.
The built-in microcomputer
may function incorrectly due
to noise, etc.
Press the reset button of the
CD changer.
While holding SEL, press
for more than 2
seconds to reset the unit. (The
clock setting and preset
stations stored in memory are
erased.) (See page 18).
19
Page 20

SPECIFICATIONS
AUDIO AMPLIFIER SECTION
Maximum Power Output:
Front: 40 watts per channel
Rear: 40 watts per channel
Continuous Power Output (RMS):
ENGLISH
Front: 16 watts per channel into 4 Ω, 40
to 20,000 Hz at no more than 0.8%
total harmonic distortion.
Rear: 16 watts per channel into 4 Ω, 40
to 20,000 Hz at no more than 0.8%
total harmonic distortion.
Load Impedance: 4 Ω (4 to 8 Ω allowance)
Tone Control Range
Bass: ±10 dB at 100 Hz
Treble:±10 dB at 10 kHz
Frequency Response: 40 to 20,000 Hz
Signal-to-Noise Ratio: 70 dB
Line-Out Level/Impedance: 2.0 V/20 kΩ load
(250 nWb/m)
TUNER SECTION
Frequency Range
FM: 87.5 to 108.0 MHz
AM: (MW) 522 to 1,620 kHz
(L W) 144 to 279 kHz
[FM T uner]
Usable Sensitivity: 11.3 dBf (1.0 µV/75 Ω)
50 dB Quieting Sensitivity:
16.3 dBf (1.8 µV/75 Ω)
Alternate Channel Selectivity (400 kHz):
65 dB
Frequency Response: 40 to 15,000 Hz
Stereo Separation: 30 dB
Capture Ratio: 2.0 dB
CASSETTE DECK SECTION
Wow & Flutter: 0.15% (WRMS)
Fast-Wind Time: 190 sec. (C-60)
Frequency Response:
50 to 14,000 Hz (±3 dB)
Signal-to-Noise Ratio: 52 dB
Stereo Separation: 40 dB
GENERAL
Power Requirement
Operating Voltage: DC 14.4 volts (11 to 16
volts allowance)
Grounding System: Negative ground
Allowable Working Temperature:
0°C to +40°C
Dimensions (W x H x D)
Installation Size: 182 x 52 x 150 mm
Panel Size: 188 x 58 x 14 mm
Mass: 1.3 kg (excluding accessories)
Design and specifications subject to change
without notice.
[MW T uner]
Sensitivity: 20 µV
Selectivity: 35 dB
[L W Tuner]
Sensitivity: 50 µV
20
Page 21
Wir danken Ihnen für den Kauf eines JVC Produkts. Bitte lesen Sie die Anleitung vollständig durch,
bevor Sie das Gerät in Betrieb nehmen, um sicherzustellen, daß Sie alles vollständig verstehen und die
bestmögliche Leistung des Geräts erhalten.
INHALTSVERZEICHNIS
GRUNDBEDIENUNGEN ............................................... 3
RADIOBETRIEB............................................................ 4
Radiohören ......................................................................................4
Speichern der Sender .....................................................................5
Automatisches Vorabstimmen des UKW-Senders: SSM ............. 5
Manuelles Vorabstimmen ............................................................ 6
Feinabstimmen auf einen vorabgestimmten Sender ...................7
DEUTSCH
Andere praktische Tuner-Funktionen ..........................................8
Suchdurchlaufen der Rundfunksender ........................................ 8
Wählen des UKW-Empfangstons ................................................ 8
KASSETTENBETRIEB ..................................................... 9
Hören einer Kassette ......................................................................9
TONEINSTELLUNGEN ................................................ 10
Die Lautstärkefunktion ein/ausschalten.....................................10
Wählen der voreingestellten Tonbetriebsarten .......................... 10
Einstellen des Tons ........................................................................ 11
Speichern Ihrer eigenen Toneinstellungen .................................12
ANDERE WICHTIGE FUNKTIONEN ............................. 13
Stellen der Uhr..............................................................................13
Abnehmen der Bedientafel ..........................................................14
CD-WECHSLERBETRIEB .............................................. 15
Abspielen der CDs ........................................................................ 15
Wählen der CD-Abspielbetriebsarten ........................................17
WARTUNG ............................................................... 18
Zum Verlängern der Lebensdauer des Geräts ...........................18
Zurücksetzen des Geräts.............................................................. 18
FEHLERSUCHE ........................................................... 19
TECHNISCHE DATEN.................................................. 20
Hinweis:
Zu diesem Gerät wird eine Identifikationskarte mitgeliefert, auf der die Gerätechassis-Nummer
vermerkt ist. Heben Sie diese Karte getrennt vom Gerät auf. Im Falle eines Diebstahls kann sie die
Geräteidentifizierung erleichtern.
VOR DEM GEBRAUCH
Für die Sicherheit...
*
• Die Lautstärke nicht zu laut stellen, da dadurch
Außengeräusche überdeckt und das Autofahren
gefährlich wird.
• Das Auto vor dem Durchführen von
komplizierten Bedienungen anhalten.
2
Temperatur im Auto...
*
Wenn Sie das Auto für lange Zeit in heißem oder
kaltem Wetter parken, bitte warten, bis die
Temperatur im Auto sich normalisiert hat, bevor
Sie das Gerät einschalten.
Page 22

GRUNDBEDIENUNGEN
2
1
1
2
Hinweis:
W enn Sie das Gerät erstmals
verwenden, stellen Sie bitte
die eingebaute Uhr korrekt
ein, siehe Seite 13.
3
DEUTSCH
CD-
/I/ATT
Hinweis zum Ein-T astendruc k-Betrieb:
• W enn Sie die Progr ammquelle T uner in Schritt 2 unten wählen, wir d das Gerät
automatisch eingeschaltet. Sie brauchen dafür nicht
• Ist bereits eine Kassette im Gerät eingelegt, wird automatisch die
Kassettenwiedergabe ausgelöst.
F M
A M
CH
Das Gerät einschalten.
Die Programmquelle abspielen.
Für die Bedienung des Tuners siehe Seiten 4 – 8.
Für die Bedienung des Kassettendecks siehe Seite 9.
Für die Bedienung des CD-Wechslers siehe Seiten 15 – 17.
zu drücken.
3
Die Lautstärke einstellen.
Der Lautstärkepegel wird angezeigt
4
Den Klang wie gewünscht einstellen (siehe Seite 10 – 12).
Für ein sofortiges Absenken der Lautstärke
Kurz beim Hören einer beliebigen Programmquelle drücken. “ATT” blinkt auf der
Anzeige und die Lautstärke fällt sofort ab.
Zur Wiederherstellung der vorherigen Lautstärke die Taste nochmals kurz drücken.
Zum Ausschalten des Geräts
länger als 1 Sekunde drücken.
3
Page 23
RADIOBETRIEB
Radiohören
1
3
DEUTSCH
1
2
F M
A M
3
Zum Anhalten der Suche bevor ein Sender empfangen wird, die gleiche Taste, die Sie für
die Suche gedrückt haben, nochmals drücken.
/I/ATT
Hinweis zum Ein-Tastendruck-Modus:
Wenn Sie beim nachfolgenden Schritt 2 den Empfangsbereich wählen, sc haltet
sich das Gerät automatisch ein. Sie brauchen dementsprechend diese Taste
nicht zur Einschaltung verwenden.
FM1 FM2
FM3
AM
Hinweis:
Falls eine Kassette im Kassettenfach eingelegt ist, kann nicht auf die
Programmquelle Tuner umgeschaltet werden. Wenn Radioempfang gewünscht
wird, darf keine Kassette eingelegt sein!
Zum Suchen
von Sendern mit
höherer Frequenz.
Zum Suchen
von Sendern mit
niedrigerer
Frequenz.
Das Gerät einschalten.
Wählen Sie den Empfangsbereich (FM1,
FM2, FM3 oder AM).
Sie können zwischen FM1, FM2 und FM3 wählen,
wenn Sie einen UKW-Sender hören möchten.
Beginnen Sie mit der Suche nach
einem Sender.
Wenn ein Sender empfangen wird, Suchstopps .
2
Zum Feinabstimmen einer bestimmten Frequenz von Hand:
1 Drücken Sie FM (UKW) order AM (MW/LW), um das Frequenzband zu wählen.
2 Drücken Sie
Display zu blinken beginnt. Sie können die Frequenz jetzt manuell ändern, solange “M”
blinkt.
3 Drücken Sie
angezeigt wird.
• Wenn Sie die Taste gedrückt halten, ändert sich die Frequenz (in Intervallen von 50 kHz
bei UKW und in Intervallen von 9 kHz bei MW/LW), bis Sie die Taste loslassen.
4
¢ oder 4 , und halten Sie die jeweilige Taste gedrückt, bis “M” im
¢ oder 4 mehrfach hintereinander, bis die gewünschte Frequenz
Page 24
Speichern der Sender
Sie können die Rundfunksender auf zwei Arten abspeichern.
• Automatisches Vorabstimmen der UKW-Sender: SSM (Strong-station Sequential Memory
= Reihenspeicher für starke Sender)
• Manuelles Vorabstimmen für UKW- und MW-Sender
Automatisches Vorabstimmen des UKW-Senders: SSM
Sie können 6 lokale UKW-Sender pro UKW-Empfangsbereich (FM1, FM2 und FM3)
vorabstimmen.
DEUTSCH
1
F M
2
FM1 FM2 FM3
1
Die gewünschte Empfangsbereichzahl (FM1,
FM2 und FM3), in der UKW-Sender
gespeichert werden sollen, wählen.
2
Die beiden Tasten länger als 2 Sekunden
drücken und halten.
“SSM” erscheint und verscwindet bei Abschluß der
automatischen Vor abstimmung wieder.
Die lokalen UKW-Sender mit den stärksten Signalen werden gesucht und automatisch in der
Empfangsbereichszahl (FM1, FM2 und FM3), die Sie gewählt haben, gespeichert. Diese
Sender sind auf den Nummerntasten vorabgestimmt – Nr. 1 (niedr igste Frequenz) bis Nr. 6
(höchste Frequenz).
Wenn die automatische Vorabstimmung abgeschlossen ist, wird der Sender der Taste 1
automatisch eingeschaltet.
5
Page 25

Manuelles Vorabstimmen
Sie können bis zu 6 Sender pro Empfangsbereich (FM1, FM2, FM3 und AM) von Hand
vorabstimmen.
BEISPIEL: Speichern des UKW-Senders 88.3 MHz auf der Tastenzahl 1 des FM1-Empfangsbereichs.
DEUTSCH
1
F M
23
Den FM1-Empfangsbereich wählen.
1
2
Auf den Sender 88.3 MHz abstimmen.
Siehe Seite 4 zum Abstimmen auf einen Sender.
3
Die Taste länger als 2 Sekunden drücken und
halten.
Die Zahl “P1” blinkt für einige Momente.
4
Das obige Verfahren zum Speichern der anderen Sender auf
andere vorabgestimmte Zahlen wiederholen.
Hinweise:
• Ein vorheriger vorabgestimmter Sender wird gelöscht, wenn ein neuer Sender auf der gleichen
vorabgestimmten Zahl abgespeichert wird.
• Vorabgestimmte Sender werden gelöscht, wenn die Stromversorgung des Speicherstromkreises
unterbrochen wird (z.B. beim Wechseln der Batterie). In diesem Fall die Sender nochmals
vorabstimmen.
6
Page 26

Feinabstimmen auf einen vorabgestimmten Sender
Sie können einfach auf einen vorabgestimmten Sender feinabstimmen.
Bedenken Sie, daß Sie zuerst Sender speichern müssen. Wenn Sie das noch nicht getan
haben, lesen Sie Seiten 5 oder 6.
DEUTSCH
1
2
A M
F M
FM1 FM2
FM3
AM
Den gewünschten Empfangsbereich (FM1,
FM2, FM3 oder AM) auswählen.
Die gewünschte Zahl (1 – 6) für den
vorabgestimmten Sender wählen.
2
1
7
Page 27

Andere praktische Tuner-Funktionen
DEUTSCH
MO/RND RPT/SCAN
Suchdurchlaufen der Rundfunksender
Wenn Sie RPT/SCAN (Wiederholung/Suchdurchlauf) während des Radiohörens drücken,
beginnt ein Suchdurchlauf der Rundfunksender. Immer w enn ein Sender abgestimmt ist, hält
der Suchdurchlauf für ungefähr 5 Sekunden (abgestimmte Frequenzzahl blinkt auf der Anz eige)
und Sie können überprüfen, welche Sendung gerade ausgestrahlt wird.
Möchten Sie sich diese Sendung anhören, drücken Sie die gleiche Taste nochmals und der
Suchdurchlauf wird beendet.
Wählen des UKW-Empfangstons
Wenn eine UKW-Stereosendung schwer zu empfangen ist:
MO/RND (Mono/Zufallswiedergabe) beim Hören einer UKW-Stereo-Sendung drücken. Der
Ton, den Sie nun hören, wird monaural, der Empfang jedoch besser.
Leuchtet auf, wenn eine UKW-Sendung in Stereo empfangen wird.
\
Zum Wiederherstellen des Stereo-Effekts die gleiche Taste nochmals drücken.
8
Page 28

KASSETTENBETRIEB
Hören einer Kassette
1
2
3
1
/I/ATT
PROG
2
3
Einschalten.
Eine Kassette einlegen.
Wird eine Kassettenseite bis zum Bandende abgespielt,
wechselt die Wiedergabe automatisch auf die andere
Kassettenabspielrichtung (Autoreverse).
Die Kassettenabspielrichtung wählen.
• Beide Tasten gleichzeitig drücken.
Hierbei wird jeweils auf die entgegengesetzte Abspielrichtung
gewechselt — vorwärts (
(
).
) oder rückwärts
DEUTSCH
Abspielstopp und Kassettenauswurf
0 drücken.
Das Band wird angehalten und die Kassette wird automatisch aus dem Kassettenfach
ausgeschoben. Es wird der zuletzt eingestellte Sender empfangen.
• Sie können die Kassette auch durch Ausschalten des Geräts auswerfen.
Schnelles Vorwärts- und Rückwärtsspulen
¡ oder 1 drücken.
Das Band wird in Pfeilrichtung (¡ oder 1)
umgespult.
Um erneut auf Wiedergabe zu schalten, die Taste
¡ oder 1 leicht antippen.
Kassettenabspielrichtung
9
Page 29

TONEINSTELLUNGEN
Die Lautstärkefunktion ein/ausschalten
Das menschliche Gehör ist weniger empfindlich für niedrige und hohe Frequenzen bei geringer
Lautstärke.
Die Lautstärkenfunktion kann diese Frequenzen verstärken, um einen gut ausgeglichenen
Ton bei geringer Lautstärke zu schaffen.
Jedes Mal, wenn Sie LOUD (laut) drücken, wird die Lautstärkenfunktion jeweils ein- oder
ausgeschaltet.
LOUD
DEUTSCH
Wählen der voreingestellten Tonbetriebsarten
Sie können eine voreingestellte Toneinstellung, die zum jeweiligen Musikgenre paßt, wählen.
Jedes Mal, wenn Sie SOUND (Ton) drücken, wechselt die Tonbetriebsart wie folgt.
SOUND
|\
Anzeige Für: Voreingestellte Werte
Baß Treble Lautstärke
SCM OFF (flacher Ton) 00 00 Ein
BEAT Rock- oder Disko-Musik +2 00 Ein
POP leichte Musik +4 +1 Aus
SOFT ruhige Hintergrundsmusik +1 –3 Aus
Hinweise:
• Sie können die voreingestellten Tonbetriebsarten nach Ihrem Wunsch einstellen und abspeichern.
Möchten Sie Ihre ursprüngliche Tonbetriebsart einstellen und speichern, Seite 12 “Speichern Ihrer
eigenen Toneinstellungen” lesen.
• Um ausschließlich die Baß-oder Treble-Verstärkungsgrade nach Ihrem Wunsch einzustellen, Seite
11 “Einstellen des Tons” lesen.
• Wenn eine der Tonbetriebsarten gewählt, wird sie auf der Anzeige folgendermaßen angezeigt:
Wenn z.B. “POP” gewählt wurde.
10
Page 30

Einstellen des Tons
Sie können den Treble/Baß-Ton und den Lautsprecherausgleich einstellen.
2
1
1
Die einzustellende Position wählen.
Anzeige Zu tun: Bereich
BAS Einstellen des Baß –6 (min.) — +6 (max.)
(Baß)
TRE Einstellen des Treble –6 (min.) — +6 (max.)
(Treble)
FAD Einstellen des vorderen und hinteren R6 (nur hinten) — F6 (nur vorne)
(Ausblender)* Lautsprecherausgleichs
BAL Einstellen des linken und rechten L6 (nur links) — R6 (nur rechts)
(Ausgleich) Lautsprecherausgleichs
VOL Einstellen der Lautstärke 00 (min.) — 50 (max.)
(Lautstärke)
Hinweis:
* Wenn Sie eine Anlage mit zwei Lautsprechern verw enden, setzen Sie den Ausblender auf “00”.
2
Lautstärke einstellen.
DEUTSCH
Hinweis:
Normalerweise dienen die + und – Taste als LautstärkeRegelungstasten. Sie müssen daher nicht “VOL” wählen, um die
Lautstärke einzustellen.
11
Page 31

Speichern Ihrer eigenen Toneinstellungen
Sie können die Tonbetriebsarten (BEA T, POP, SOFT: siehe Seite 10) nach Wunsch einstellen
und ihre eigenen Einstellungen speichern.
DEUTSCH
3
2 2 1,4
1
2
3
4
SOUND
Innerhalb
5 sekunden
LOUD
Innerhalb
5 sekunden
Innerhalb
5 sekunden
SOUND
Rufen Sie die Tonbetriebsart, die Sie
einstellen möchten, auf.
Siehe Seite 10 für Einzelheiten.
Zum Einstellen der Baß- und Treble-Tonniveau
“BAS” oder “TRE” wählen.
Zum Ein- oder Ausschalten der Lautstärkenfunktion
Jedes Mal, wenn Sie LOUD (laut) drücken, wird die Lautstärkenfunktion
=
jeweils ein- oder ausgeschaltet. (
Gehe zu Schritt 4)
Das Baß- oder Treble-Niveau einstellen.
Siehe Seite 11 für Einzelheiten.
SOUND (Ton) drücken und halten, bis die
Tonbetriebart, die Sie in Schritt 1 gewählt
haben, auf der Anzeige blinkt.
Ihre Einstellung ist gespeichert.
5
Das gleiche V erf ahren zum Speichern der anderen Einstellungen
wiederholen.
Zum Zurückstellen auf die Werkseinstellung
Das gleiche Verfahren wiederholen und die voreingestellten Werte, die in der Tabelle auf
Seite 10 aufgeführt werden, wieder zuordnen.
12
Page 32

ANDERE WICHTIGE FUNKTIONEN
Stellen der Uhr
1
2
3
4
1.
1.
2,3
2.
2.
1,4 42,3
DEUTSCH
Die Taste länger als 2 Sekunden drück en und
halten.
“CLOCK H” (Uhr, Stunde) oder “CLOCK M” (Uhr, Minute)
erscheint auf der Anzeige.
Die Stunde einstellen.
1. “CLOCK H” (Uhr, Stunde) wählen, sofern
noch nicht auf der Anzeige.
2. Die Stundenzahl einstellen.
Die Minuten einstellen.
1. “CLOCK M” (Uhr, Minute) wählen.
2. Die Minuten einstellen.
Die Uhr einschalten.
Zum Überprüfen der derzeitigen Uhrzeit (Wechseln der Anzeigenbetriebsart)
DISP (Anzeige) wiederholt drücken. Jedes Mal, wenn Sie die Taste drücken, wechselt die
Anzeigenbetriebsart wie folgt.
Uhr
Während des CDwechslerbetriebs:
Vergangene
Abspielzeit
Uhr
CD-Nummer
Während des Tuner-Betriebs:
Frequenz
Uhr
Während des
Kassettenbetriebs:
Abspielbetriebsart
13
Page 33

Abnehmen der Bedientafel
Sie können die Bedientafel beim Verlassen des Autos abnehmen.
Beim Abnehmen oder Anbringen der Bedientafel vorsichtig sein, damit die Stecker auf der
Rückseite der Bedientafel und der Tafelhalters nicht beschädigt werden.
Zum Abnehmen der
Bedientafel
Vor dem Abnehmen der Bedientafel
sicherstellen, daß der Strom ausgeschaltet ist.
DEUTSCH
1
Die Bedientafel entriegeln.
2
Die Bedientafel anheben
und aus dem Gerät
herauszichen.
Zum Anbringen der
Bedientafel
1
Die linke Seite der Bedientafel
in die Kerbe in des T afelhalters
einsetzen.
2
Die rechte Seite der
Bedientafel eindrücken, um
sie im Tafelhalter zu fixieren.
14
3
Die abgenommene
Bedientafel in die dafür
vorgesehene Hülle
stecken.
Hinweis zur Reinigung der Stecker:
Wenn Sie die Bedientafel häufig abnehmen,
verschlechtern sich die Stecker.
Ein periodisches Abwischen der Stecker mit
einem Wattestäbchen oder Tuch, die mit
Alkohol befeuchtet wurden, senkt diese
Möglichkeit. Seien Sie vorsichtig, damit Sie
die Stecker nicht beschädigen.
Stecker
Page 34

CD-WECHSLERBETRIEB
Wir empfehlen Ihnen, einen Wechsler der Serie CH-X zusammen mit diesem Gerät zu
verwenden.
Wenn Sie einen anderen automatischen CD-Wechsler besitz en, fragen Sie JVC-Fachhändler
für Autostereoanlagen, wie die Anschlüsse durchgeführt werden müssen.
• Handelt es sich bei Ihrem automatischen CD-Wechsler um einen der Reihe KD-MK, brauchen Sie
ein Kabel (KS-U15K) zum Anschließen an dieses Gerät.
Vor dem Betreiben Ihres automatischen CD-Wechslers:
• Siehe auch die Anleitung, die Ihrem CD-Wechsler beiliegt.
• Sind keine CDs im Magazin des CD-Wechslers oder sind die CDs mit der Oberseite
nach unten eingelegt, erscheint “NO CD” (k eine CD) oder “NO DISC” (keine DISC) auf
der Anzeige. In diesem Fall das Magazin herausnehmen und die CDs richtig einlegen.
• Erscheint “RESET 1 - RESET 8” (zurücksetzen 1 – 8) auf der Anzeige, stimmt etwas
nicht mit der Verbindung zwischen dem Gerät und dem CD-Wechsler. In diesem Fall
die Verbindung über prüfen und das (die) Kabel ggf. fest anschließen und dann die
Rücksetztaste des CD-Wechslers drücken.
Abspielen der CDs
DEUTSCH
¢
4
1
CD-
CH
CD-Nummer
Titelnummer
Hinweis zum Ein-T astendruc k-Betrieb:
Wenn Sie
Sie brauchen dafür nicht
CD-CH
(CD-Wechsler) drücken, wird der Strom automatisch eingeschaltet.
Den automatischen CD-Wechsler wählen.
Das Abspielen beginnt mit dem ersten Titel auf der ersten CD .
Alle Titel aller CDs werden abgespielt.
Nummerntasten
zu drücken.
1
\
Vergangene Spielzeit
(Die Uhrzeit wird angezeigt, wenn Sie DISP
(Anzeige) zum Einsehen der Uhrzeit gedrückt
haben. Siehe Seite 13.)
15
Page 35

Zum schnellen Vor- oder Rücklauf des Titels
¢ für einen schnellen Vor lauf des Titels drücken und halten,
während eine CD abgespielt wird.
4
für einen Rücklauf des Titels drücken und halten, während
eine CD abgespielt wird.
Weitergehen zum nächsten oder vorhergehenden Titel
DEUTSCH
¢ kurz bei laufender CD drücken, um zum nächsten Titelanf ang
zu kommen. Jedes Mal, wenn Sie diese Taste drücken, wird der Anfang
des jeweils nächsten Titels gesucht und abgespielt.
4
kurz bei laufender CD drücken, um zum derz eitigen Titelanf ang
zu kommen. Jedes Mal, wenn Sie diese Taste drücken, wird der Anfang
des jeweils vorhergehenden Titels gesucht und abgespielt.
Zum direkten Anfahren einer bestimmten CD
7 8 9 10 11 12
16
Die Nummerntaste der jeweiligen CD-Nummer drücken, um ihr Abspielen
zu beginnen.
• Eine CD-Nummer von 1 – 6 wählen:
Kurz 1 (7) – 6 (12) drücken.
• Zum Wählen einer CD-Nummer von 7 – 12:
1(7) – 6 (12) länger als 1 Sekunde drücken und halten
Beispiel: Wird die CD-Nummer 3 gewählt
CD-Nummer
Titelnummer
Page 36

Wählen der CD-Abspielbetriebsarten
MO/RND
RPT/SCAN
Zum zufälligen Abspielen der Titel (Zufallswiedergabe)
Jedes Mal, wenn Sie MO/RND (Mono/Zufall) bei laufender CD drücken,
MO/RND
wechselt die Abspielbetriebsart nach dem Zufallsprinzip wie folgt:
RND1 RND2 Ausgeschaltet
(Zufall1) (Zufall2)
Betriebsart Zufallsanzeige Zufallswiedergabe
RND1 Leuchtet auf Alle Titel der aktuellen CD , dann dieTitel der nächsten
CD usw.
RND2 Blinkt Alle Titel aller CDs im Magazin.
Zum wiederholten Abspielen von Titeln (Wiederholung)
Jedes Mal, wenn Sie RPT/SCAN (Wiederholung/Suchdurchlauf) bei
RPT
SCAN
Betriebsart
RPT1 Leuchtet auf Der aktuelle Titel (oder angegebene Titel).
RPT2 Blinkt Alle Titel der aktuellen CD (oder angegebenen CD).
laufender CD drücken, wechselt die Abspielbetriebsar t zur Wiederholung
der CD wie folgt:
RPT1 RPT2 Ausgeschaltet
(
Wiederholung1)(Wiederholung2
Wiederholungsanzeige
)
Wiederholtes Abspielen
DEUTSCH
17
Page 37

WARTUNG
Zum Verlängern der Lebensdauer des Geräts
Dieses Gerät bedarf nur wenig Aufmerksamkeit. Sie können jedoch die Lebensdauer des
Geräts verlängern, wenn Sie die nachfolgenden Anweisungen befolgen.
Zum Reinigen der Tonköpfe
• Die T onköpf e alle 10 Betriebsstunden mit einer
Tonkopf-Reinigungskassette (im Laden
erhältlich) reinigen.
Wenn die T onköpf e verschmutzen, merken Sie
das an folgenden Symptomen:
DEUTSCH
Zum Sauberhalten der Kassetten
– Tonqualität sinkt.
– Tonniveaus sinken.
– Ton fällt weg.
• Keine schmutzigen oder verstaubten
Kassetten abspielen.
• Die hochpolierten Tonköpfe nicht mit
metallischen oder magnetischen Werkzeugen
berühren.
• Die Kassetten immer in ihren Hüllen
aufbewahren.
• Die Kassetten nicht an folgenden Orten
aufbewahren:
– im direkten Sonnenlicht
– bei hoher Luftfeuchtigkeit
– bei extrem hohen Temperaturen
VORSICHT:
• Kassetten mit abblätternden Etiketten nicht abspielen, da sie das Gerät beschädigen können.
• Die Kassetten spannen, um Spiel zu entfernen, da lose Tonbänder sich im Mechanismus verheddern
können.
• Kassetten nicht nach dem Gebrauch im Kassettenfach lassen, da die Kassette dadur ch an Spannung
verlieren kann.
Zurücksetzen des Geräts
Die Tasten SEL (Select) und (Bereitschaft/Ein/ATT) mehrere Sekunden lang
gleichzeitig gedrückt halten.
Dadurch wird der eingebaute Mikro-Computer zurückgesetzt.
HINWEISE: Ihre Voreinstellungen — wie Vorwahlkanäle oder Klangeinstellungen —
werden ebenfalls gelöscht.
(Bereitschaft/Ein/ATT)
SEL (Select)
18
Page 38

FEHLERSUCHE
Was wie ein Problem aussieht, m uß nicht immer eines sein. Die f olgenden Punkte v or einem
Anruf bei einer Kundendienststelle überprüfen.
Symptome
• Kassette kann nicht
eingelegt werden.
• Kassetten werden heiß.
• Die T onwiedergabe der
Kassette ist sehr niedrig und
die Tonqualität hat sich
verschlechtert.
• Die T onwiedergabe ist
manchmal unterbrochen.
• Die Lautsprecher geben
keinen Ton wieder.
• Störgeräusche beim
Radiohören.
• “NO CD” (keine CD) oder
“NO DISC” (keine DISC)
erscheint auf der Anzeige.
• “RESET 8” (zurücksetzen 8)
erscheint auf der Anzeige.
Ursachen
Sie haben die Kassette falsch
herum eingelegt.
Das ist keine Fehlfunktion.
Der Tonkopf ist verschmutzt.
Anschlüsse sind nicht gut.
Die Lautstärkenregelung ist
ganz zurückgestellt.
Anschlüsse sind falsch.
Die Antenne ist nicht fest
angeschlossen.
Es ist keine CD im Magazine.
CDs sind falsch eingelegt.
Das Gerät ist nicht richtig am
CD-Wechsler angeschlossen.
Abhilfen
Die Kassette mit dem freiliegenden
Tonband nach rechts einlegen.
Das Gerät mit einer TonkopfReinigungskassette reinigen.
Die Kabel und Anschlüsse
überprüfen.
Auf optimales Niveau
einstellen.
Die Kabel und Anschlüsse
überprüfen.
Die Antenne fest anschließen.
CDs ins Magazine legen.
Sie richtig herum einlegen.
Sie richtig herum einlegen. Das
Gerät und den CD-Wechsler
richtig miteinander verbinden
und die Rücksetztaste des CDWechslers drücken.
DEUTSCH
• “RESET 1 - RESET 7”
(zurücksetzen 1 – 7) erscheint
auf der Anzeige.
• Das Gerät funktioniert
überhaupt nicht.
Der eingebaute MikroComputer funktioniert
aufgrund von Lärm usw. nicht
richtig.
Die Rücksetztaste des CDWechslers drücken.
und SEL (wählen)
gleichzeitig länger als 2
Sekunden zum Zurücksetzen
des Geräts drücken. (Die
Uhreinstellung und die
vorabgestimmten Sender, die
abgespeichert waren, werden
gelöscht.) (siehe Seite 18).
19
Page 39

TECHNISCHE DATEN
AUDIO-VERSTÄRKERTEIL
Max. Leistungsabgabe:
Vorne: 40 W pro Kanal
Hinten: 40 W pro Kanal
Kontinuierliche Leistungsabgabe (RMS):
Vorne: 16 W pro Kanal in 4Ω, 40 bis
20.000 Hz bei nicht mehr als 0,8%
Gesamtklirrfaktor .
Hinten: 16 W pro Kanal in 4Ω, 40 bis
20.000 Hz bei nicht mehr als 0,8%
DEUTSCH
Last-Impedanz: 4 Ω (4 bis 8 Ω Toleranz)
Tonregelbereich:
Bass: ±10 dB bei 100 Hz
Treble: ±10 dB bei 10 kHz
Frequenzgang: 40 bis 20.000 Hz
Signal/Störabstand: 70 dB
Line-Out-Niveau/Impedanz: 2,0 V pro 20 kΩ
Last (250 nWb/m)
Gesamtklirrfaktor .
TUNER-TEIL
Frequenzbereich:
UKW: 87,5 bis 108,0 MHz
MW/LW: (MW) 522 bis 1.620 kHz
(L W) 144 bis 279 kHz
[UKM-Tuner]
Brauchbare Empfindlichkeit:
11,3 dBf (1,0 µV/75 Ω)
50 dB Empfindlichkeitsschwelle:
16,3 dBf (1,8 µV/75 Ω)
Zweitkanalabstimmschärfe (400 kHz):
65 dB
Frequenzgang: 40 bis 15.000 Hz
Stereotrennabstand: 30 dB
Empfangsverhältnis: 2,0 dB
KASSETTENDECKTEIL
Tonhöhenschwankung: 0,15% (WRMS)
Schnellspulzeit: 190 s (C-60)
Frequenzgang:
50 bis 14.000 Hz
Signal/Störabstand: 52 dB
Stereotrennabstand: 40 dB
ALLGEMEIN
Leistungsanforderungen:
Betriebsspannung: DC 14,4 V (11 bis 16 V
zulässig)
Erdungssystem: negative Masse
zugelassene Arbeitstemperatur:
0 °C bis +40 °C
Abmessungen (b x h x t)
Einbaugröße: 182 x 52 x 150 mm
Bedientafelgröße: 188 x 58 x 14 mm
Gewicht: 1,3 kg (ausschließlich Zubehör)
Änderungen der Konstruktion und technische
Daten ohne Vorankündigung möglich.
[MW-Tuner]
Empfindlichkeit: 20 µV
Trennschärfe: 35 dB
[LW-Tuner]
Empfindlichkeit: 50 µV
20
Page 40

Merci pour avoir acheté un produit JVC. V euillez lire attentivement toutes les instructions avant d'utiliser
l'appareil afin de bien comprendre son fonctionnement et d'obtenir les meilleures performances possibles.
TABLE DES MATIERES
OPERATIONS DE BASE ................................................ 3
FONCTIONNEMENT DE LA RADIO ................................ 4
Ecoute de la radio ........................................................................... 4
Mémorisation des stations .............................................................5
Présélection automatique des stations FM: SSM ........................ 5
Présélection manuelle ................................................................. 6
Accord d'une station présélectionnée ...........................................7
Autres fonctions pratiques du tuner .............................................8
Balayage des stations diffusées .................................................. 8
Sélection du son de réception FM ............................................... 8
FONCTIONNEMENT DU LECTEUR DE CASSETTES............ 9
Ecoute d'une cassette...................................................................... 9
FRANÇAIS
AJUSTEMENT DU SON .............................................. 10
Mise en/hors service de la fonction loudness.............................. 10
Sélection des modes sonores préréglés........................................ 10
Ajustement du son ........................................................................ 11
Mémorisation de votre propre ajustement sonore..................... 12
AUTRES FONCTIONS PRINCIPALES ............................ 13
Réglage de l'horloge .....................................................................13
Détachement du panneau de commande ....................................14
FONCTIONNEMENT DU CHANGEUR DE CD ................ 15
Lecture de CD ............................................................................... 15
Sélection des modes de lecture de CD.........................................17
ENTRETIEN ............................................................... 18
Pour prolonger la durée de vie de l’appareil.............................. 18
Comment réinitialiser votre appareil .........................................18
DEPANNAGE ............................................................ 19
SPECIFICATIONS ....................................................... 20
Remarque:
P our des raisons de sécurité, une carte d'identification numér otée est fournie avec cet appareil, et
le même numéro d'identification est imprimé sur le châssis de l'appareil. Conserver cette carte
dans un endroit sûr, elle pourra aider les autorités pour identifier votre appareil en cas de vol.
AVANT D'UTILISER L'APPAREIL
Par sécurité....
*
• N'augmentez pas trop le volume car cela
bloquerait les sons de l'extérieur rendant la
conduite dangereuse.
• Arrêtez la voiture avant de réaliser toute
opération compliquée.
2
Température à l'intérieur de la voiture....
*
Si votre voitur e est restée garée pendant longtemps
dans un climat chaud ou froid, attendez que la
température à l'intérieur de la voitur e redevienne
normale avant d'utiliser l'appareil.
Page 41

OPERATIONS DE BASE
2
1
Remarque:
Si vous utilisez cette appareil
pour la première fois, réglez
l'horloge intégrée en vous
3
reportant à la page 13.
1
2
CD-
/I/ATT
Remarques sur le fonctionnement monotouche:
• Quand vous choisissez le tuner comme sour ce à l’étape 2 ci-dessous, l'appareil
se met automatiquement sous tension. Vous n'avez donc pas besoin d'appuyer
d'abord sur cette touche pour mettre l'appareil sous tension.
• Si une cassette se trouve déjà dans le compartiment, la reproduction de la
cassette commence automatiquement.
F M
A M
CH
Mettez l'appareil sous tension.
Reproduire la source.
Pour utiliser le tuner, voir les pages 4 – 8.
Pour utiliser le lecteur de cassettes, v oir la page 9
Pour utiliser le changeur CD, voir les pages 15 – 17.
.
3
Ajustez le volume.
Le niveau de volume apparaît
4
Ajustez le son comme vous le souhaitez (voir les pages 10 – 12).
Pour baisser le son instantanément
Appuyez brièvement sur pendant l'écoute de n'impor te quelle source. “ATT”
commence à clignoter sur l'affichage, et le niveau de volume est baissé instantanément.
Pour revenir au niveau de volume précédent, appuyez de nouveau brièvement sur la touche.
Pour mettre l'appareil hors tension
Appuyez sur pendant plus d'une seconde.
FRANÇAIS
3
Page 42

FONCTIONNEMENT DE LA RADIO
Ecoute de la radio
1
1
FRANÇAIS
2
F M
A M
3
3
/I/ATT
Remarque sur le fonctionnement monotouche:
Quand vous choisissez une bande à l’étape 2 ci-dessous, l'appareil se met
automatiquement sous tension. V ous n'avez donc pas besoin d'appuyer d'abor d
sur cette touche pour mettre l'appareil sous tension.
FM1 FM2
FM3
AM
Remarque:
Quand une cassette se trouve dans le compartiment à cassette, vous ne pouvez pas c hoisir le
tuner. Assurez-vous d’éjecter la cassette du compartiment pour écouter la radio.
Pour rechercher
des stations de
fréquences
supérieures
Pour rechercher
des stations de
fréquences
inférieures
Mettez l’appareil sous tension.
Choisissez la bande ( FM1, FM2, FM3
ou AM).
Vous pouvez choisir n'importe quelle bande FM1,
FM2 ou FM3 pour écouter une station FM.
Commencez la recherche d'une station.
Quand une station est accordée, la recherche
s'arrête.
2
Pour arrêter la recherche avant qu'une station ne soit accordée, appuyez sur la même
touche que vous avez utilisée pour la recherche.
Pour accorder une fréquence particulière sans manuellement:
1 Appuyez sur FM ou AM pour choisir la bande.
2 Maintenez pressé
Vous pouvez alors changer la fréquence manuellement pendant que “M” clignote.
3 Appuyez répétitivement sur ¢ ou 4 jusqu'à ce que la fréquence souhaitée soit
atteinte.
• Si vous maintenez la touche pressée, la fréquence continue de changer (par intervalle de
50 kHz pour la bande FM et par intervalle de 9 kHz pour la bande AM—PO/GO) jusqu'à
ce que vous la relâchiez.
4
¢ ou 4 jusqu'à ce que “M” clignote sur l'affichage.
Page 43

Mémorisation des stations
Vous pouv ez utiliser l'une des deux méthodes suiv antes pour mémoriser les stations reçues.
• Présélection automatique des stations FM: SSM (Strong-station Sequential Memory)
• Présélection manuelle des stations FM et AM
Présélection automatique des stations FM: SSM
Vous pouv ez présélectionner 6 stations locales dans chaque bande FM (FM1, FM2, et FM3).
2
1
FRANÇAIS
1
F M
FM1 FM2 FM3
Choisissez le numéro de bande FM (FM1,
FM2 ou FM3) où vous souhaitez mémoriser
les stations.
2
Maintenez pressées les deux touches
pendant plus de 2 secondes.
“SSM” apparaît, puis disparaît quand la présélection
automatique est terminée.
Les stations locales FM avec les signaux les plus forts sont recherchées et mémorisées
automatiquement dans le numéro de bande que vous avez choisi (FM1, FM2 ou FM3). Ces
stations sont mémorisées sur les touches de présélection de station — No. 1 (fréquence la
plus basse) à No. 6 (fréquence la plus haute).
Quand la présélection est terminée, la station mémorisée automatiquement sur la touche de
présélection de station 1 est accordée automatiquement.
5
Page 44

Présélection manuelle
Vous pouvez présélectionner manuellement un maximum de 6 stations pour chaque bande
(FM1, FM2, FM3 et AM).
EXEMPLE: Mémorisation de la station FM située à 88,3 MHz sur le numéro de présélection
1 de la bande FM1.
1
FRANÇAIS
F M
23
Choisissez la bande FM1.
1
2
Accordez une station à 88,3 MHz.
Reportez-vous à la page 4 pour accorder une station.
3
Maintenez pressée la touche pendant plus de
2 secondes.
Le numéro de présélection “P1” clignote quelques instants.
4
Répétez la procédure ci-dessus pour mémoriser d’autres stations
sur d’autres numéros de présélection.
Remarques:
• La station précédemment présélectionnée est effacée quand une nouvelle station est mémorisée sur
le même numéro de présélection.
• Les stations présélectionnées sont effacées si l'alimentation du circuit mémoire est interrompue (par
exemple, pendant le changement de la batterie). Si cela se pr oduit, présélectionnez de nouveau les stations.
6
Page 45

Accord d'une station présélectionnée
Vous pouvez accorder facilement une station présélectionnée.
Rappelez-vous que vous devez d'abord mémoriser les stations. Si vous ne les avez pas
encore mémorisées, reportez-vous aux page 5 ou 6.
1
2
A M
F M
FM1 FM2
FM3
AM
Choisissez la bande (FM1, FM2, FM3 ou AM)
souhaitée.
Choisissez le numéro (1 – 6) de la station
présélectionnée souhaitée.
2
1
FRANÇAIS
7
Page 46

Autres fonctions pratiques du tuner
MO/RND RPT/SCAN
Balayage des stations diffusées
Si vous appuyez sur RPT/SCAN lors de l'écoute de la radio, le balayage des stations
commence. Chaque fois qu'une émission est accordée , le bala yage s'arrête pendant en viron
5 secondes (la fréquence accordée clignote sur l'affichage), et vous pouvez vérifier quel
FRANÇAIS
programme est en train d'être diffusé.
Si vous souhaitez écouter ce programme, appuyez de nouveau sur la même touche pour
arrêter le balayage.
Sélection du son de réception FM
Quand une émission FM stéréo est difficile à recevoir:
Appuyez sur MO/RND lors de l'écoute d'une émission FM stéréo. Le son que vous entendez
devient monophonique mais la réception est améliorée.
S'allume lors de la réception d'une émission FM stéréo
\
Pour rétablir l'effet stéréo, appuyez de nouveau sur la même touche.
8
Page 47

FONCTIONNEMENT DU LECTEUR DE CASSETTES
Ecoute d'une cassette
1
2
3
1
/I/ATT
PROG
2
3
Mettez l’appareil sous tension.
Insérez une cassette.
Quand une face de la cassette atteint sa fin pendant la lecture,
l'autre face de la cassette commence à être reproduite
automatiquement. (Autoreverse)
Choisissez la direction de défilement de la bande.
• Appuyez sur les deux touches en même temps.
Chaque fois que vous appuyez sur cette touche , la direction
de défilement de la bande change alternativement—vers
l'avant (
) et inversée ( ).
FRANÇAIS
Pour arrêter la lecture et éjecter la cassette
Appuyez sur 0.
La lecture de la cassette s'arrête et la cassette est éjectée du compartiment à cassette.
Vous pouvez entendre la dernière station reçue.
• Vous pouvez aussi éjecter la cassette quand l’appareil est hors tension.
Pour bobiner rapidement la bande
Appuyez sur ¡ ou 1.
La bande est bobinée dans la direction des flèches
(¡ ou 1).
Pour reprendre la lecture, appuyez légèrement sur
¡ ou 1.
Sens de défilement de la bande
9
Page 48

AJUSTEMENT DU SON
Mise en/hors service de la fonction loudness
L'oreille humaine est moins sensible aux basses et hautes fréquences à faible volume.
La fonction loudness peut accentuer ces fréquences pour produire un son bien équilibré à
faible volume.
Chaque fois que vous appuyez sur LOUD, la fonction loudness se met alternativement en/
hors service.
LOUD
|\
Sélection des modes sonores préréglés
Vous pouvez choisir un ajustement sonore préréglé adapté au type de musique.
FRANÇAIS
Chaque fois que vous appuyez sur SOUND, le mode sonore change comme suit.
SOUND
Indication Pour: Valeurs préréglées
Graves Aigus Loudness
SCM OFF (Son plat) 00 00 En service
BEAT Musique rock ou disco +2 00 En service
POP Musique légère +4 +1 Hors service
SOFT Musique de fond +1 –3 Hors service
Remarques:
• Vous pouvez ajuster le mode sonore préréglé comme vous le souhaitez et le mémoriser.
Si vous souhaitez ajuster et mémoriser votre pr opre mode sonor e, r eportez-vous à “Mémorisation de
votre propre ajustement sonore” à la page 12.
• Pour ajuster seulement les gr aves et les aigus comme vous le souhaitez, reportez-vous à “Ajustement
du son” à la page 11.
• Quand l’un des modes sonores est choisi, il est montré sur l’affichage de la façon suivante:
Par exemple, quand “POP” est choisi.
10
Page 49

Ajustement du son
Vous pouvez ajuster les sons aigus/graves et la balance des enceintes.
2
1
1
Choisissez l'élément que vous souhaitez
ajuster.
Indication Pour: Plage
BAS Ajuster les graves –6 (min.) — +6 (max.)
(graves)
TRE Ajuster les aigus –6 (min.) — +6 (max.)
(aigus)
FAD Ajuster l'équilibre entre les enceintes R6 — F6
(Fader)* avant et arrière.
BAL Ajuster l'équilibre entre les enceintes L6 — R6
(Balance) gauche et droite
VOL Ajuster le volume 00 (min.) — 50 (max.)
(Volume)
Remarque:
*
Si vous utilisez un système à deux enceintes, réglez le niveau de fader sur “00”.
(arrière seulement) (avant seulement)
(gauche seulement) (droite seulement)
2
Ajustez le niveau.
FRANÇAIS
Remarque:
Normalement les touches + et – fonctionnent comme touches de
commande du volume. Alors, vous n'avez pas besoin de choisir
“VOL” pour ajuster le niveau de volume.
11
Page 50

Mémorisation de votre propre ajustement sonore
Vous pouvez ajuster les modes sonores (BEAT, POP, SOFT: reportez-vous à la page 10)
comme vous le souhaitez et mémoriser votre propre ajustement.
1
FRANÇAIS
SOUND
2
3
4
SOUND
En moins de
5 secondes
LOUD
En moins de
5 secondes
En moins de
5 secondes
3
2 2 1,4
Appelez le mode sonore que vous souhaitez
ajuster.
Reportez-vous à la page 10 pour les détails.
Pour ajuster le niv eau sonore des grav es ou des
aigus.
Choisissez “BAS” ou “TRE.”
Pour mettre la fonction loudness en ou hors service
Chaque fois que vous appuyez sur LOUD, la fonction loudness se
met alternativement en et hors service (= allez à l'étape 4)
Ajustez le niveau des graves ou des aigus.
Reportez-vous à la page 11 pour les détails.
Maintenez SOUND pressée jusqu'à ce que le
mode sonore choisi à l'étape 1 clignote sur
l'affichage.
Votre réglage est mémorisé.
5
Répétez la même procédure pour mémoriser d'autres réglages.
Pour réinitialiser aux réglages de l'usine
Répétez la même procédure et réattribuez les valeurs préréglées du tableau de la page 10.
12
Page 51

AUTRES FONCTIONS PRINCIPALES
Réglage de l'horloge
1
2
3
4
1.
1.
2,3
2.
2.
1,4 42,3
Maintenez pressée la touche pendant plus de
2 secondes.
“CLOCK H” ou “CLOCK M” apparaît sur l'affichage.
FRANÇAIS
Réglez l'heure.
1. Choisissez “CLOCK H” s'il n'apparaît pas
sur l'afficage.
2. Ajustez l'heure.
Réglez les minutes.
1. Choisissez “CLOCK M.”
2. Ajustez les minutes.
Démarrez l'horloge.
Pour vérifier l'heure actuelle de l'horloge (modification du
mode d'affichage)
Appuyez sur DISP répétitivement. Chaque fois que vous appuyez sur la touche, le mode
d'affichage change comme suit.
Pendant l'utilisation du tuner: Pendant l'utilisation du
Fréquence
Horloge
lecteur de cassette:
Mode de lecture
Horloge
Pendant l'utilisation du
changeur de CD:
Durée de
lecture écoulée
Horloge
Numéro
de disque
13
Page 52

Détachement du panneau de commande
Vous pouvez détacher le panneau de commande quand vous quittez la voiture.
Lors du détachement ou de la remise en place du panneau de commande, faites attention de
ne pas endommager les connecteurs situés à l'arrière du panneau et sur le porte-panneau.
Comment détacher le
panneau de commande
Avant de détacher le panneau de commande ,
assurez-vous de mettre l'appareil hors tension.
1
Déverrouillez le panneau de
commande.
FRANÇAIS
2
Levez et tirez le panneau de
commande de l'appareil.
Comment attacher le panneau
de commande
1
Insérez le côté gauche du
panneau de commande
dans la rainure située du
côté droit du porte- panneau.
2
Appuyez sur le côté droit du
panneau de commande pour
le fixer au porte-panneau.
14
3
Mettez le panneau de
commande détaché dans la
boîte fournie.
Remarque sur le nettoyage des
connecteurs:
Si vous détachez fréquemment le panneau de
commande, les connecteurs se détérioreront.
Pour réduire cette détérioration, essuyez
périodiquement les connecteurs avec un coton-tige
ou un tissus imprégné d'alcool, en faisant attention
de ne pas endommager les connecteurs.
Connecteurs
Page 53

FONCTIONNEMENT DU CHANGEUR DE CD
Nous vous recommandons d’utiliser un changeur de CD de la série CH-X avec v otre appareil.
Si vous possédez un autre changeur automatique de CD , consultez votre re vendeur autoradio
JVC pour les connexions.
• Par e xemple , si votre changeur automatique de CD appartient à la série KD-MK, vous avez besoin
d’un câble (KS-U15K) pour le connecter à l'appareil.
Avant d'utiliser votre changeur automatique de CD:
• Référez-vous aussi aux instructions fournies avec votre changeur de CD.
• Si aucun disque ne se trouve dans le magasin du changeur de CD ou si les disques
ont été insérés à l'envers, “NO CD” ou “NO DISC” apparaît sur l'affichage. Si cela se
produit, retirez le magasin et placez les disques correctement.
• Si “RESET 1 - RESET 8” apparaît sur l'affichage, c'est qu'il y a un problème avec la
connexion entre cet appareil et le changeur de CD. Si cela se produit, vérifiez la
connexion, connectez le(s) cordon(s) de connexion fermement si nécessaire, puis
appuyez sur la touche de réinitialisation du changeur de CD.
Lecture de CD
1
CD-
CH
Numéro de disque
¢
4
Choisissez le changeur automatique de CD.
La lecture commence à partir de la première plage du premier
disque.
Toutes les plages de tous les disques sont reproduites.
Numéro de plage
Touches numérigues
\
FRANÇAIS
1
Durée de lecture écoulée
(L'horloge est affichée si vous avez
appuyez sur DISP pour voir l'heure.
Voir la page 13.)
Remarque sur le fonctionnement monotouche:
Si vous appuyez sur CD-CH, l'appareil se met automatiquement sous tension. Vous n'avez
pas besoin d'appuyez sur
pour le mettre sous tension.
15
Page 54

Pour avancer rapidement ou inverser une plage
Maintenez ¢ pressé, pendant la reproduction d'un CD, pour
avancer rapidement la plage.
Maintenez 4
pressé, pendant la reproduction d'un CD, pour
inverser la plage.
Pour aller à la plage suivante ou à la plage précédente
Appuyez brièvement sur ¢ ors de la reproduction d'un CD, pour
avancer jusqu'au début de la plage suivante. Chaque fois que vous
appuyez répétitivement sur la touche, le début de la plage suiv ante est
localisé et celle-ci est reproduite.
FRANÇAIS
Appuyez brièvement sur 4
revenir au début de la plage actuelle. Chaque fois que vous appuyez
répétitivement sur la touche, le début de la plage précédente est localisé
lors de la reproduction d'un CD, pour
et celle-ci est reproduite.
Pour aller directement à une disque particulièr
7 8 9 10 11 12
Appuyez sur la touche numérique correspondante au numéro de disque
souhaité pour commencer sa reproduction.
• Pour choisir un numéro de disque de 1 – 6:
Appuyez brièvement sur 1 (7) – 6 (12).
• Pour choisir un numéro de disque 7 – 12:
Maintenez pressé 1 (7) – 6 (12) pendant plus d'une seconde.
16
Ex. Quand le disque numéro 3 est choisi.
Numéro de disque
Numéro de plage
Page 55

Sélection des modes de lecture de CD
MO/RND RPT/SCAN
Pour reproduire les plage aléatoirement (Lecture aléatoire)
Chaque fois que vous appuyez sur MO/RND (Mono/Aléatoire) pendant la
MO/RND
Mode Indicateur RND Reproduit aléatoirement
RND1 Allumé Toutes les plages du disque actuelle, puis celles du
RND2 Clignote Toutes les plages de tous les disques insérés dans le
reproduction d'un CD, le mode de lecture aléatoire change comme suit:
RND1 RND2 Annulé
(Mode de lecture
aléatoire 1)
(Mode de lecture
aléatoire 2)
disque suivant, etc.
magasin.
FRANÇAIS
Pour reproduire les plages répétitivement (Lecture répétée)
RPT
SCAN
Mode Indicateur RPT Reproduit répétitivement
RPT1 Allumé La plage actuelle (ou une plage spécifiée).
RPT2 Clignote Toutes les plages du disque actuel (ou d'un disque
Chaque fois que vous appuyez sur RPT/SCAN (Répétition/Scan) pendant
la reproduction d'un CD , le mode de lecture répétée de CD change comme
suit:
RPT1 RPT2 Annulé
(Mode de
répétition1)
(Mode de
répétition 2)
spécifié).
17
Page 56

ENTRETIEN
Pour prolonger la durée de vie de l’appareil
Cet appareil ne demande que très peu d'attention, mais vous pourrez prolonger sa durée de
vie si vous suivez les instructions ci-dessous.
Pour nettoyer les têtes
• Nettoyer les têtes toutes les 10 heures
d'utilisation en utilisant un cassette de
nettoyage de tête de type humide (disponible
dans un magasin audio).
Quand la tête devient sale, les symptômes
suivants apparaissent:
– La qualité du son est réduite.
– Le niveau sonore diminue.
– Le son saute.
• Ne reproduisez pas des cassettes sales ou
poussiéreuses.
FRANÇAIS
Pour garder les cassettes propres
• Ne touchez pas la tête polie avec un outil en
métal ou magnétique.
• Conservez toujours les cassettes dans leur
boîtier après utilisation.
• Ne conservez pas les cassettes dans les
endroits suivants:
– Dans un endroit exposé à la lumière directe
du soleil
– Dans un endroit très humide
– Dans un endroit extrêmement chaud
ATTENTION:
• Ne reproduisez pas des cassettes avec une étiquette qui se détache; cela pourrait endommager
l'appareil.
• Tendez les bandes pour éliminer leur mou car les bandes avec du mou peuvent se prendre dans le
mécanisme.
• Ne laissez pas une cassette à l'intérieur du compartiment à cassette après son utilisation car la
bande peut se détendre.
Comment réinitialiser votre appareil
Maintenez pressée les touches SEL (sélection) et (Attente/Mise sous tension/
ATT) en même temps pendant quelques secondes.
Cela réinitialisera le microprocesseur intégré.
REMARQUE: Les ajustements que vous avez préréglés — tels que les canaux préréglés
(Attente/Mise sous tension/ATT)
18
ou les ajustements sonores — seront aussi effacés.
SEL (sélection)
Page 57

DEPANNAGE
Ce qui apparaît comme une problème n'est pas toujours très sérieux. Vérifier les points suivants
avant d'appeler un centre de réparation.
Symptômes
• La cassette ne peut pas être
insérée.
• La cassette devient chaude.
• Le son de la cassette est de
très faible niveau et la
qualité sonore est dégradée.
• Le son est interrompu par
moment.
• Le son ne peut pas être
entendu des enceintes.
• Il y a du bruit statique lors
de l'écoute de la radio.
• “NO CD” ou “NO DISC”
apparaît sur l'affichage.
• “RESET 8” apparaît sur
l'affichage.
Causes
Vous avez essayé d'insérer la
cassette dans le mauvais sens.
Ce n'est pas une défaillance.
La tête de lecture est sale.
Les connexions ne sont pas
bonnes.
La commande du volume est
tournée sur le niveau minimum.
Les connexions sont
incorrectes.
L'antenne n'est pas connectée
fermement.
Il n'y a pas de CD dans le
magasin.
Les CD ne sont pas insérés
correctement.
Cet appareil n'est pas
connecté correctement à un
changeur de CD.
Remèdes
Insérez la cassette avec la
bande dirigée vers la droite.
Nettoyez-la avec une cassette
de nettoyage de tête.
Vérifiez les cordons et les
connexions.
Ajustez-le sur le niveau
optimum.
Vérifiez les cordons et les
connexions.
Connectez l'antenne
fermement.
Insérez des CD dans le
magasin.
Insérez-les correctement.
Connectez cet appareil et le
changeur CD correctement et
appuyez sur la touche de
réinitialisation du changeur CD.
FRANÇAIS
• “RESET 1-RESET 7”
apparaît sur l'affichage.
• L'appareil ne fonctionne pas
du tout.
Le micro-ordinateur intégré
peut fonctionner
incorrectement à cause de
bruit, etc.
Appuyez sur la touche de
réinitialisation du changeur CD.
En maintenant SEL pressé,
appuyez sur
pendant plus de 2 secondes
pour réinitialiser l'appareil. (Le
réglage de l'horloge et les
stations présélectionnées en
mémoire sont effacées.) (voir
page 18.)
19
Page 58

SPECIFICATIONS
SECTION AMPLIFICATEUR
AUDIO
Puissance de sortie maximum:
Avant: 40 watts par canal
Arrière: 40 watts par canal
Puissance de sortie en mode continu
(efficace):
Av ant: 16 watts par canal pour 4 Ω, 40
à 20.000 Hz à moins de 0,8%
de distorsion harmonique totale.
Arrière: 16 watts par canal pour 4 Ω, 40
à 20.000 Hz à moins de 0,8%
de distorsion harmonique totale.
Impédance de charge: 4 Ω (4 à 8 Ω tolérés)
Plage de commande de la tonalité
Graves: ±10 dB à 100 Hz
FRANÇAIS
Aigus: ±10 dB à 10 kHz
Réponse en fréquence: 40 à 20.000 Hz
Rapport signal sur bruit: 70 dB
Nivea de sortie de ligne/Impédance: 2,0 V/
20 kΩ en charge (250 nWb/m)
SECTION TUNER
Plage de fréquence
FM: 87,5 à 108,0 MHz
AM: (PO) 522 à 1.620 kHz
(GO) 144 à 279 kHz
SECTION LECTEUR DE
CASSETTE
Pleurage et scintillement: 0,15% (WRMS)
Durée de rebobinage: 190 sec. (C-60)
Réponse en fréquence:
50 à 14.000 Hz (±3 dB)
Rapport signal sur bruit: 52 dB
Séparation stéréo: 40 dB
GENERAL
Alimentation
T ension de fonctionnement: CC 14,4 v olts (11
à 16 volts tolérés)
Système de mise à la masse: Masse négativ e
T empérature de f onctionnnement admissible:
0°C à +40°C
Dimensions (L x H x P)
Taille d'installation: 182 x 52 x 150 mm
Taille du panneau: 188 x 58 x 14 mm
Masse: 1,3 kg (sans les accessoires)
La conception et les spécifications sont sujettes à
changement sans notification.
[Tuner FM]
Sensibilité utilisable: 11,3 dBf (1,0 µV/75 Ω)
Sensibilité utile à 50 dB: 16,3 dBf (1,8 µV/75 Ω)
Sélectivité de canal alterné (400 kHz): 65 dB
Réponse en fréquence: 40 à 15,000 Hz
Séparation stéréo: 30 dB
Rapport de synchronisation: 2,0 dB
[Tuner PO]
Sensibilité: 20 µV
Sélectivité: 35 dB
[Tuner GO]
Sensibilité: 50 µV
20
Page 59

Hartelijk dank voor de aanschaf van dit JVC-product! Wij verzoeken u de gebruiksaanwijzing goed
door te lezen voordat u het apparaat gaat gebruiken. Zo krijgt u een volledig inzicht in de functies van
het apparaat en kunt u de mogelijkheden van het apparaat optimaal benutten.
INHOUDSOPGAVE
BASISBEDIENING........................................................ 3
GEBRUIK VAN DE RADIO ............................................ 4
Naar de radio luisteren...................................................................4
Radiostations in het geheugen opslaan ......................................... 5
Automatisch instellen van FM-stations: SSM .............................. 5
Handmatig instellen van stations ................................................. 6
Afstemmen op een ingesteld station ..............................................7
Andere handige radiofuncties .......................................................8
Radiostations scannen ................................................................ 8
Geluid selecteren bij ontvangst van FM-station........................... 8
GEBRUIK VAN HET CASSETTEDECK .............................. 9
Naar een band luisteren .................................................................9
GELUID REGELEN ......................................................10
LOUD in-/uitschakelen ................................................................10
Vooraf ingestelde geluidsweergave selecteren............................10
Geluid aanpassen .......................................................................... 11
Uw eigen geluidsinstelling opslaan..............................................12
NEDERLANDS
ANDERE HOOFDFUNCTIES ........................................ 13
Klok instellen ................................................................................13
Bedieningspaneel verwijderen..................................................... 14
GEBRUIK VAN DE CD-WISSELAAR .............................. 15
CD’s afspelen.................................................................................15
Afspeelmodus selecteren ..............................................................17
ONDERHOUD ........................................................... 18
Levensduur van het apparaat verlengen ....................................18
Het apparaat terugstellen ............................................................18
PROBLEMEN OPLOSSEN ........................................... 19
SPECIFICATIES ........................................................... 20
Opmerking:
Voor de veiligheid is een genummerde identificatiekaart bij het toestel geleverd. Het
identificatienummer is tevens op de behuizing van het toestel gedrukt. Bewaar de kaart op een
veilige plaats. Deze kaart is belangrijk voor identificatie indien het toestel is gestolen.
ALVORENS HET APPARAAT TE GEBRUIKEN
Denk aan de veiligheid...
*
• Zet het volume onder het rijden niet te luid. Dit
is gevaarlijk, omdat u de geluiden buiten de auto
niet meer hoort.
• Zet de auto stil voordat u ingewikkelde
handelingen met het apparaat gaat verrichten.
2
Temperatuur binnen de auto...
*
Als de auto gedurende lange tijd in de kou of in de
warmte heeft gestaan, mag u het apparaat pas
gebruiken nadat de temperatuur in de auto weer
normale waarden heeft bereikt.
Page 60

BASISBEDIENING
2
1
Opmerking:
W anneer u het apparaat voor
de eerste keer gebruikt, moet
u de ingebouwde klok op de
juiste wijze instellen (zie
3
bladzijde 13).
1
Schakel de stroom in.
Start de weergave van de geluidsbron.
Voor gebruik van de radio, zie bladzijde 4 – 8.
Voor gebruik van het cassettedeck, zie bladzijde 9.
V oor gebruik v an de CD-wisselaar, zie bladzijde 15 – 17.
2
CD-
/I/ATT
“One-T ouch” bediening:
• Bij het selecteren van tuner in stap 2 hier onder wordt het appar aat automatisch
ingeschakeld. U hoeft niet op deze toets te drukken om het apparaat in te
schakelen.
• De cassetteweergave start automatisch indien er reeds een cassette in het
apparaat is geplaatst.
F M
A M
CH
3
Regel het volume.
Het door u ingestelde geluidsniveau verschijnt.
4
Stel het geluid in zoals u zelf wilt (zie bladzijde 10 – 12).
NEDERLANDS
Volume in een oogwenk zachter zetten
Druk tijdens het luisteren naar een willekeurige geluidsbron kort op . Op het
afleesvenster begint de tekst “ATT” te knipperen en het volume zal in een oogwenk dalen.
Om het eerdere volume te herstellen, drukt u nogmaals kort op dezelfde toets.
Stroom uitschakelen
Druk langer dan 1 seconde op .
3
Page 61

GEBRUIK VAN DE RADIO
Naar de radio luisteren
1
3
Schakel de spanning in.
Selecteer de golfband (FM1, FM2, FM3
of AM)
U kunt éé van de drie FM-golfbandn (FM1, FM2 en
FM3) selecteren om naar een FM-zender te luisteren.
Zoek een station.
Wanneer een station wordt ontvangen, stopt het
zoeken.
F M
/I/ATT
“One-T ouch” bediening:
Bij het selecteren van een golfband in stap 2 hieronder wordt het apparaat
automatisch ingeschakeld. U hoeft niet op deze toets te drukken om het appar aat
in te schakelen.
FM1 FM2
FM3
AM
Opmerking:
U kunt tuner niet kiezen indien er een cassette in het toestel is geplaatst. V erwijder
de cassette uit de cassettehouder wanneer u een radiozender wilt beluisteren.
Stations met een
lagere frequentie
zoeken.
Stations met een
hogere frequentie
zoeken.
1
2
A M
NEDERLANDS
3
Als u met zoeken wilt stoppen voordat u een station ontvangen hebt, drukt u op de toets
die u hebt ingedrukt om naar een station te gaan zoeken.
2
Handmatig een frequentie opzoeken:
1 Druk op FM of AM om de gewenste omroepband te selecteren.
2 Druk op ¢ of 4 en houd deze toets ingedrukt totdat de letter “M” op het
afleesvenster begint te knipperen.
U kunt de frequentie handmatig wijzigen, terwijl de letter “M” knippert.
3 Druk meerdere malen op 4
• Als u de toets ingedrukt houdt, blijft de frequentie veranderen (bij FM steeds met 50 kHz
en bij AM steeds met 9 kHz – MW/LW) totdat u de knop loslaat.
4
of ¢ totdat de gewenste frequentie is bereikt.
Page 62

Radiostations in het geheugen opslaan
U kunt een van de volgende twee methoden gebruiken om de radiostations in het geheugen
op te slaan.
• Automatisch instellen van FM-stations: SSM (Strong-station Sequential Memory)
• Handmatig instellen van FM en AM-stations
Automatisch instellen van FM-stations: SSM
U kunt 6 lokale FM-stations instellen op elke FM-band (FM1, FM2 en FM3).
1
F M
2
FM1 FM2 FM3
1
Selecteer het nummer van de FM-band (FM1,
FM2 of FM3) waarop u FM-stations wilt
opslaan.
2
Druk op de toets en houd hem langer dan 2
seconden ingedrukt.
De tekst “SSM” verschijnt op het afleesvenster en
verdwijnt wanneer het automatisch instellen van
radiostations is beëindigd.
Lokale FM-stations met de sterkste signalen worden automatisch gezocht en opgeslagen op
het bandummer dat u hebt geselecteerd (FM1, FM2 of FM3). Deze stations worden
toegewezen aan de nummertoetsen 1 (laagste frequentie) tot 6 (hoogste frequentie).
Wanneer het automatisch instellen klaar is, zal automatisch worden afgestemd op het station
dat is opgeslagen onder toets 1.
NEDERLANDS
5
Page 63

Handmatig instellen van stations
U kunt handmatig maximaal 6 stations opslaan op elke band (FM1, FM2, FM3 en AM).
VOORBEELD: Een FM-station op 88.3 MHz opslaan onder nummer 1 van FM1.
1
2
NEDERLANDS
F M
3
4
Herhaal bovenstaande procedure om andere stations onder
andere nummers op te slaan.
23
1
Selecteer FM1.
Stem af op een station op 88.3 MHz op.
Zie bladzijde 4 voor het afstemmen op een station.
Druk op de toets en houd hem langer dan 2
seconden ingedrukt.
Nummer “P1” knippert even.
Opmerkingen:
• Een eerder ingesteld station wordt ge wist wanneer een nieuw station wordt opgesla gen onder hetzelfde
nummer .
• Ingestelde stations worden gewist wanneer de stroomtoevoer naar het geheugen wordt onderbroken
(bijvoorbeeld bij het vervangen van batterijen). Als dit gebeurt, moeten de stations opnieuw worden
ingesteld.
6
Page 64

Afstemmen op een ingesteld station
U kunt in een handomdraai afstemmen op een ingesteld station.
Denk eraan dat u de stations eerst moet opslaan! Zie bladzijde 5 of 6, als u dat nog niet hebt
gedaan.
1
2
A M
F M
FM1 FM2
FM3
AM
Selecteer de gewenste band (FM1, FM2, FM3
of AM).
Selecteer het nummer (1 – 6) van het door u
gewenste station.
2
1
NEDERLANDS
7
Page 65

Andere handige radiofuncties
MO/RND RPT/SCAN
Radiostations scannen
Wanneer u tijdens het luisteren naar de radio op RPT/SCAN drukt, begint het scannen. Elke
keer dat er wordt afgestemd op een bepaald station, stopt het scannen gedurende 5 seconden
(de frequentie waarop is afgestemd knippert op het afleesvenster). U kunt dan vaststellen
welk programma op dat moment wordt uitgezonden.
Als u naar het betreffende programma wilt luisteren, drukt u nogmaals op dezelfde toets om
het scannen te beëindigen.
Geluid selecteren bij ontvangst van FM-station
NEDERLANDS
Wanneer een stereo-uitzending op FM slecht te ontvangen is, doet u het volgende:
Druk op MO/RND terwijl u naar een stereo-uitzending op FM luistert. U hoort dan een
monogeluid maar de ontvangst zal beter zijn.
Er brandt een lampje wanneer een FM-uitzending in stereo wordt ontvangen.
\
Om het stereo-effect te herstellen, drukt u op opnieuw op dezelfde toets.
8
Page 66

GEBRUIK VAN HET CASSETTEDECK
Naar een band luisteren
1
2
3
1
/I/ATT
PROG
2
3
Schakel de spanning in.
Plaats een cassette.
Wanneer het eind van een cassettekant bij weergave wordt
bereikt, zal automatisch naar het begin van de andere kant
voor weergave worden overgeschakeld. (Auto-Reverse)
Kies de bandtransportrichting.
• Druk tegelijk op beide toetsen.
Door iedere druk op beide toetsen wordt afwisselend de
voorwaartse (
bandtransportrichting ingesteld.
) en tegengestelde ( )
NEDERLANDS
Stoppen en uitwerpen van de cassette
Druk op 0.
De cassetteweergave stopt en de cassette wordt uitgeworpen.
U hoort vervolgens de uitzending van de laatst ontvangen zender, of de weergave van de
CD-wisselaar.
• De cassette kan tevens worden uitgeworpen wanneer het toestel is uitgeschakeld.
Snel doorspoelen van een cassette
Druk op ¡ of 1.
De band wordt in de richting van de pijlen gespoeld
(¡ of 1).
Druk licht op ¡ of 1 om de weergave weer voort
te zetten.
Bandtransportrichting
9
Page 67

GELUID REGELEN
LOUD in-/uitschakelen
Het menselijke oor is bij lage volumes minder gevoelig voor lage en hoge frequenties.
Met LOUD worden deze frequenties versterkt, waardoor er ook bij lage geluidsniveaus een
evenwichtig geluid kan worden geproduceerd.
Elke keer dat u op LOUD drukt, wordt deze functie afwisselend in- en uitgeschakeld.
LOUD
|\
Vooraf ingestelde geluidsweergave selecteren
U kunt een vooraf ingestelde geluidsweergave selecteren die past bij het betreffende
muziekgenre.
Elke keer dat u op SOUND drukt, verandert de geluidsweergave als volgt.
SOUND
NEDERLANDS
Indicatie Voor: Vooraf ingestelde waarden
Bas Treble Loud
SCM OFF (Vlak geluid) 00 00 Aan
BEAT Rock- of discoritme +2 00 Aan
POP Lichte muziek +4 +1 Uit
SOFT Rustige achtergrondmuziek +1 –3 Uit
Opmerkingen:
• U kunt de vooraf ingestelde geluidsweergave wijzigen en in het geheugen opslaan.
Meer bijzonderheden over het aanpassen en opslaan van uw eigen geluidsinstelling vindt u in het
gedeelte “Uw eigen geluidsinstelling opslaan” op bladzijde 12.
• Meer bijzonderheden over het aanpassen van het niveau van bas en treble vindt u in het gedeelte
“Geluid aanpassen” op bladzijde 11.
• W anneer een bepaalde geluidsweergave is g eselecteerd, wor dt dit als volgt op de display weerge geven:
Op de display is de tekst “POP” te zien, wanneer u
deze geluidsweergave hebt geselecteerd.
10
Page 68

Geluid aanpassen
U kunt het geluid van bas en treble en het evenwicht van de speakers aanpassen.
2
1
1
Selecteer de functie die u wilt aanpassen.
Indicatie Doel: Bereik
BAS Bastonen aanpassen –6 (min.) tot +6 (max.)
(bas)
TRE Treble aanpassen –6 (min.) tot +6 (max.)
(treble)
FAD Evenwicht tussen voor- en R6 (alleen achterin) tot
(faden)* achterspeakers aanpassen F6 (alleen voorin)
BAL Evenwicht tussen linker- en L6 (alleen links) tot
(balans) rechterspeaker aanpassen R6 (alleen rechts)
VOL Het volume aanpassen 00 (min.) tot 50 (max.)
(volume)
Opmerking:
* Als u een systeem met twee speakers gebruikt moet u FAD op “00” zetten.
2
Pas het niveau aan.
NEDERLANDS
Opmerking:
Normaal gesproken werken de toetsen + en – als volumer e gelaars.
U hoeft “VOL” dus niet te selecteren als u het geluidsniveau wilt
aanpassen.
11
Page 69

Uw eigen geluidsinstelling opslaan
De geluidsweergave (BEAT, POP, SOFT, zie bladzijde 10) kan worden aangepast en in het
geheugen worden opgeslagen.
1
SOUND
2
NEDERLANDS
LOUD
3
4
SOUND
3
Binnen
5 seconden
Binnen
5 seconden
Binnen
5 seconden
2 2 1,4
Roep de geluidsweergave op die u wilt aanpassen.
Meer bijzonderheden over de geluidsweergave vindt u op
bladzijde 10.
Kies “BAS” of “TRE” als u het geluidsniveau
van de bas of treble wilt aanpassen.
Of schakel LOUD in of uit.
Elke keer dat u op LOUD drukt, wordt deze functie in- of
uitgeschakeld. (= Ga daarna door met stap 4.)
Pas het niveau van bas of treble aan.
Meer bijzonderheden over bas en treb le vindt u op bladzijde
11.
Druk op SOUND en houd deze toets ingedrukt
totdat de geluidsweergave die u bij stap 1 hebt
geselecteerd op het afleesvenster begint te
knipperen.
Uw instelling wordt in het geheugen opgeslagen.
5
Herhaal deze procedure om de andere instellingen op te slaan.
Opnieuw instellen van de fabrieksinstellingen
Herhaal bovenstaande procedure en stel de waarden in die zijn weergegeven in de tabel op bladzijde 10.
12
Page 70

ANDERE HOOFDFUNCTIES
Klok instellen
1
2
3
4
1.
1.
2,3
2.
2.
1,4 42,3
Druk op de toets en houd hem langer dan 2
seconden ingedrukt.
Op het afleesvenster verschijnt “CLOCK H” of “CLOCK M”.
Stel het juiste uur in.
1. Selecteer “CLOCK H” indien deze tekst niet
op het afleesvenster staat.
NEDERLANDS
2. Wijzig het weergegeven uur.
Stel de minuten in.
1. Selecteer “CLOCK M”.
2. Wijzig de weergegeven minuten.
Start de klok.
Huidige tijd van de klok controleren (andere modus op afleesvenster tonen)
Druk meerdere malen op DISP.Elke keer dat u op de toets drukt, verandert het afleesvenster
als volgt.
Bij gebruik van de radio:
Frequentie
Klok
Bij gebruik van het cassettedeck:
Afspeelmodus
Klok
Bij gebruik van de CD-Wisselaar:
Klok
Nummer van
de CD
Verstreken
speeltijd
13
Page 71

Bedieningspaneel verwijderen
U kunt het bedieningspaneel verwijderen, wanneer u uit de auto stapt.
U moet het bedieningspaneel voorzichtig verwijderen en weer op zijn plaats bevestigen,
zodat de connectors op de achterkant van het bedieningspaneel en de houder van het
bedieningspaneel niet worden beschadigd.
Hoe moet u het bedieningspaneel
verwijderen?
Voordat u het bedieningspaneel verwijdert,
moet u er zeker van zijn dat de stroom is
uitgeschakeld.
1
Ontgrendel het bedieningspaneel.
Hoe moet u het bedieningspaneel
weer op zijn plaats bevestigen?
1
Stop de linkerkant van het
bedieningspaneel in de
uitsparing op de houder.
NEDERLANDS
2
Duw het bedieningspaneel
omhoog en trek het naar u
toe om het uit het apparaat
te halen.
3
Stop het losgemaakte
bedieningspaneel in het
daarvoor bestemde doosje.
14
2
Druk op de rechterkant van
het bedieningspaneel totdat
dit in de houder vastzit.
Opmerking over het reinigen van de
connectors:
Als u het bedieningspaneel vaak verwijdert,
zullen de connectors op een gegeven moment
minder goed gaan functioneren.
Om deze mogelijkheid tot het minimum te
beperken, moet u de connectors van tijd tot
tijd met een met alcohol bevochtigde katoenen
doek schoonmaken. Zorg ervoor dat u de
connectors daarbij niet beschadigt.
Connectors
Page 72

GEBRUIK VAN DE CD-WISSELAAR
We adviseren u om bij deze eenheid gebruik te maken van een CD-wisselaar uit de serie
CH-X.
Als u een andere automatische CD-wisselaar in uw bezit hebt, raden we u aan contact op te
nemen met uw JVC-dealer in auto-accessoires voor meer informatie ov er de juiste
aansluitingen.
• V oorbeeld: Als u een CD-wisselaar uit de KD-MK serie hebt, hebt u een kabel (KS-U15K) nodig om
deze met het apparaat te verbinden.
Alvorens uw automatische CD-wisselaar te gebruiken:
• Lees de instructies door die bij uw CD-wisselaar zijn geleverd.
• Als er geen CD’s in de houder van de CD-wisselaar aanw ezig zijn of wanneer de CD’ s
ondersteboven in de houder zitten, verschijnt op het afleesvenster de tekst “NO CD”
of “NO DISC”. Als dit gebeurt, moet u de houder verwijderen en de CD’s op de juiste
wijze in de houder plaatsen.
• Als op het afleesvenster de tekst “RESET 1 - RESET 8” verschijnt, is er iets fout met
de verbinding tussen dit apparaat en de CD-wisselaar. Als dit gebeurt, moet u de
verbinding controleren, de verbindingskabel(s) indien nodig stevig vastmaken en dan
op de resetknop van de CD-wisselaar drukken.
CD’s afspelen
NEDERLANDS
Nummertoetsen
4
¢
1
CD-
CH
Nummer van de CD
Selecteer de automatische CD-wisselaar.
Het afspelen begint bij het eerste muziekstuk van de eerste CD.
Alle muziekstukken van alle CD’s worden afgespeeld.
\
Nummer van het
muziekstuk
Opmerking bij het bedienen van de CD-wisselaar d.m.v. één toets:
W anneer u op
CD-CH
te drukken om de stroom in te schakelen.
drukt, wordt automatisch de str oom ingeschakeld . U hoeft niet op
Verstreken speeltijd
(De tijd op de klok wordt weergegeven
wanneer u op DISP drukt. Zie bladzijde 13.)
1
15
Page 73
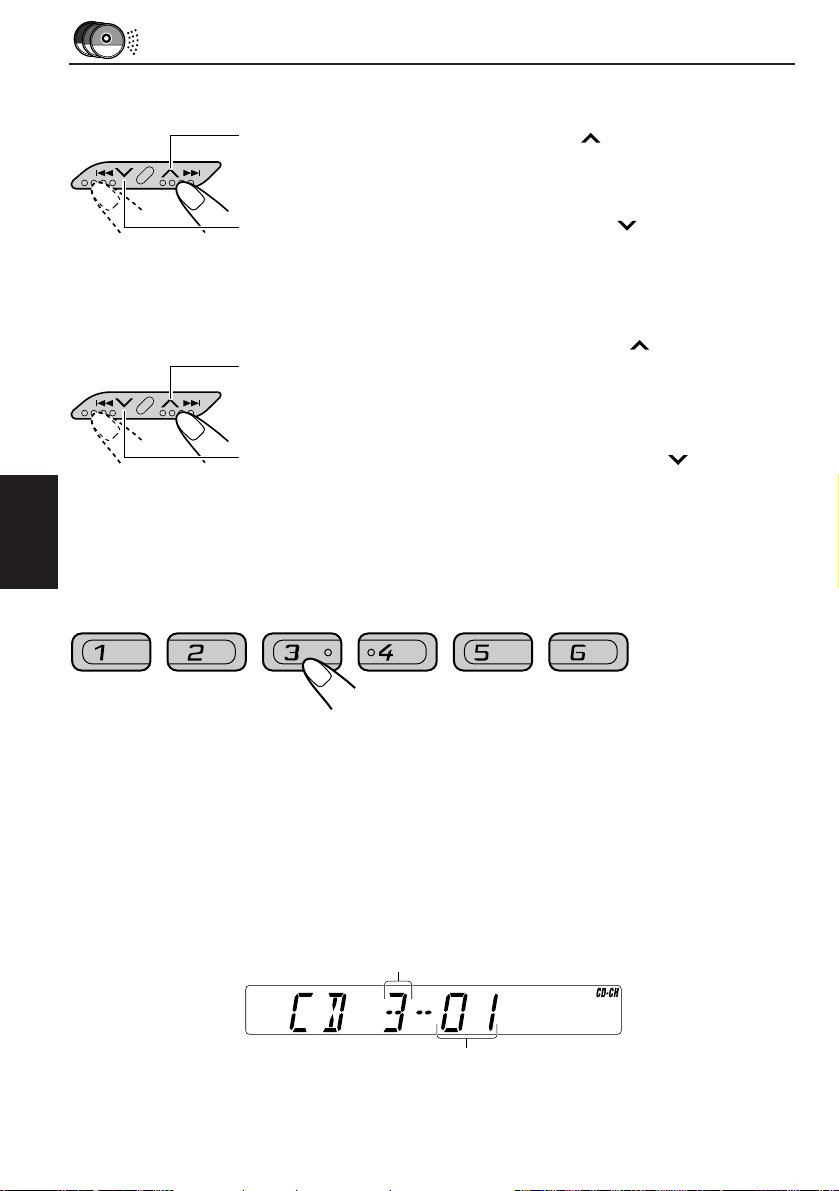
Versneld vooruit afspelen en achteruit afspelen van het
muziekstuk
Druk tijdens het afspelen van een CD op ¢ en houd deze toets
ingedrukt om het muziekstuk versneld vooruit af te spelen.
Druk tijdens het afspelen van een CD op 4
ingedrukt om het muziekstuk achteruit af te spelen.
Naar het volgende of vorige muziekstuk springen
Druk tijdens het afspelen van een CD kort op ¢ om naar het
begin van het volgende muziekstuk te gaan. Telkens wanneer u
meerdere malen op deze toets drukt, wordt het begin van het
eerstvolgende muziekstuk gezocht en afgespeeld.
Druk tijdens het afspelen van een CD kort op 4 om naar het
begin van het huidige muziekstuk te gaan. Telkens wanneer u
meerdere malen op deze toets drukt, wordt het begin van het vorige
muziekstuk gezocht en afgespeeld.
Direct naar een bepaalde CD gaan
NEDERLANDS
7 8 9 10 11 12
Druk op de nummertoets die correspondeert met het nummer van de CD
om het afspelen te laten beginnen.
• Nummer 1 – 6 selecteren:
Druk kort op 1 (7) – 6 (12).
• Nummer 7 – 12 selecteren:
Druk kort op 1 (7) – 6 (12) en houd deze toets langer dan 1 seconde
ingedrukt.
en houd deze toets
16
Voorbeeld: Wanneer CD nummer 3 wordt geselecteerd
Nummer van de CD
Nummer van het
muziekstuk
Page 74

Afspeelmodus selecteren
MO/RND
RPT/SCAN
Muziekstukken in willekeurige volgorde afspelen (Random Play)
Elke keer dat u tijdens het afspelen van een CD op MO/RND (Mono/
Random) drukt, verandert de modus Random Play als volgt:
MO/RND
RND1 RND2 Uit, geen aanduiding
(Random1) (Random2)
Modus RND-indicator Afspelen in willekeurige volgorde
RND1 Constant aan Alle muziekstukken van de huidige CD, daarna de
muziekstukken van de volgende CD enzovoorts.
RND2 Knippert Alle muziekstukken van alle CD’s in de CD-houder.
Muziekstukken meerdere keren afspelen (Repeat Play)
Elke keer dat u tijdens het afspelen van een CD op RPT/SCAN (Repeat/
RPT
SCAN
Modus RPT-indicator Meerdere keren afspelen
RPT1 Constant aan Het huidige muziekstuk (of opgegeven muziekstuk).
RPT2 Knipper t Knippert Alle muziekstukken van de huidige CD (of
Scan) drukt, verandert de modus Repeat Play als volgt:
RPT1 RPT2 Uit, geen aanduiding
(Repeat1) (Repeat2)
opgegeven CD).
NEDERLANDS
17
Page 75

ONDERHOUD
Levensduur van het apparaat verlengen
Dit apparaat vergt weinig zorg, maar u zult de le vensduur van het appar aat kunnen verlengen
als u onderstaande instructies opvolgt.
Koppen reinigen
• Reinig de koppen na elke 10 bedrijfsuren met
een reinigingsband. Gebruik een type band
met vloeistof (verkrijgbaar bij uw
detailhandelaar).
Wanneer de kop vuil wordt, zijn de volgende
symptomen merkbaar:
– De geluidskwaliteit wordt minder.
– Het geluidsniveau neemt af.
– Het geluid valt weg.
• Gebruik geen vuile of stoffige banden.
• Zorg dat het glanzende gedeelte van de kop
niet in aanraking komt met metalen of
magnetisch gereedschap.
De band schoonhouden
• Bewaar de banden na gebruik altijd in het
opbergdoosje.
NEDERLANDS
• Zorg dat u de banden niet neerlegt op:
– Plaatsen waar zij blootstaan aan direct
zonlicht.
– Zeer vochtige plaatsen.
– Plaatsen met uitzonderlijk hoge temperaturen.
LET OP!
• Gebruik geen cassettes met loszittende stickers. W anneer de band wordt afg espeeld, kan het apparaat
hierdoor worden beschadigd.
• Zorg dat de band strak zit en geen lussen vertoont. Deze kunnen in het mec hanisme verstrikt raken.
• Laat na gebruik geen cassettes in de cassettehouder achter. De band kan hierdoor rekken.
Het apparaat terugstellen
Houd de SEL (selectie) en de (standby/aan/ATT) toetsen beide gelijktijdig een
paar seconden ingedrukt.
De ingebouwde microcomputer wordt hierdoor teruggesteld.
OPMERKINGEN: De geheugeninstellingen — zoals de voorkeurzenders en de
(standby/aan/ATT)
SEL (selectie)
18
geluidsinstellingen — zullen eveneens gewist worden.
Page 76

PROBLEMEN OPLOSSEN
Een probleem hoeft niet altijd ernstig te zijn. Voordat u hulp inroept van een dienstverlenende
instantie, moet u eerst de volgende punten controleren.
Symptomen
• Er kan geen band in het
apparaat worden gestopt.
• De banden worden heet.
• Het geluidsniveau van de
band is erg laag en de
geluidskwaliteit is aangetast.
• Het geluid wordt soms
onderbroken.
• Er komt geen geluid uit de
speakers.
• U hoort ruis terwijl u naar de
radio luistert.
• Op het afleesvenster
verschijnt de tekst “NO CD”
of “NO DISC”.
• Op het afleesvenster
verschijnt de tekst “RESET
8”.
Oorzaken
U probeert de cassette op de
verkeerde manier in de
cassettehouder te stoppen.
Dit is geen storing.
De kop van de band is vuil.
Verkeerde verbindingen.
De geluidsknop is op de laagste
stand gezet.
Verkeerde verbindingen.
De antenne zit niet goed vast.
Er zit geen CD in de CD-houder.
De CD’s zijn op de verkeerde
manier in de CD-houder geplaatst.
Het apparaat is niet op de juiste
manier met de CD-wisselaar
verbonden.
Oplossingen
Stop de cassette in het apparaat
en zorg dat de onderkant, waar
de band zichtbaar is, rechts zit.
Reinig de kop met een
speciale reinigingsband.
Controleer de bedrading en de
verbindingen.
Pas het geluid aan totdat het
optimale niveau is bereikt.
Controleer de bedrading en de
verbindingen.
Zorg dat de antenne stevig
vast zit.
Stop de CD’s in de CD-houder .
Stop ze op de juiste manier in
de CD-houder.
V erbind het apparaat en de CD-
wisselaar op de juiste manier
met elkaar en druk op de
resetknop van de CD-wisselaar.
NEDERLANDS
• Op het afleesvenster
verschijnt de tekst “RESET 1
- RESET 7”.
• Het apparaat functioneert
helemaal niet.
Soms functioneert de
ingebouwde microcomputer
niet goed ten gevolge van
lawaai, enzovoorts.
Druk op de resetknop van de
CD-wisselaar.
Druk tegelijkertijd gedurende meer
dan 2 seconden op
SEL om het apparaat terug te
stellen. (De instellingen v an de klok
en de stations die in het geheugen
zijn opgeslagen worden gewist.)
(zie bladzijde 18).
en
19
Page 77

SPECIFICATIES
GELUIDSVERSTERKER
Maximum uitgangsvermogen:
Voorin: 40 watt per kanaal
Achterin: 40 watt per kanaal
Ononderbroken uitgangsvermogen (RMS):
V oorin: 16 watt per kanaal in 4 Ω, 40 tot
20.000 Hz met niet meer dan
0,8% totale harmonische
vervorming van het geluid.
Achterin:16 watt per kanaal in 4 Ω, 40 tot
20.000 Hz met niet meer dan
0,8% totale harmonische
vervorming van het geluid.
Belastingsimpedantie: speling 4 Ω (4 tot 8 Ω)
Regelbereik tonen:
Bas: ±10 dB bij 100 Hz
Treble: ±10 dB bij 10 kHz
Weergavekarakteristiek: 40 tot 20.000 Hz
Signaal/ruisverhouding: 70 dB
Uitgangsniveau/Impedantie: 2,0 V/20 kΩ last
(250 nWb/m)
NEDERLANDS
RADIO
Frequentiebereik:
FM: 87,5 tot 108,0 MHz
AM: (MW) 522 tot 1.620 kHz
(L W) 144 tot 279 kHz
CASSETTEDECK
Zweving: 0,15% (WRMS)
Versneld doorspoelen: 190 sec. (C-60)
Weergavekarakteristiek:
50 tot 14.000 Hz
Signaal-/ruisverhouding : 52 dB
Stereoseparatie : 40 dB
ALGEMEEN
Voeding:
Werkspanning: gelijkstroom 14,4 volt
(speling 11 tot 16 volt)
Aardingssysteem negatieve aarding
Bedrijfstemperatuur: 0 °C tot +40 °C
Afmetingen (breedte x hoogte x diepte)
Afmetingen apparaat (ten behoeve van
installatie): 182 x 52 x 150 mm
Afmetingen paneel: 188 x 58 x 14 mm
Gewicht: 1,3 kg (excl. accessoires)
Ontwerp en specificaties kunnen zonder
kennisgeving worden gewijzigd.
[FM-zenders]
Gevoeligheid bij normaal bedrijf:
11,3 dBf (1,0 µV/75 Ω)
Gevoeligheid bij 50 dB geluidsdemping:
16,3 dBf (1,8 µV/75 Ω)
Selectiviteit alternatief kanaal (400 kHz):
65 dB
Weergavekarakteristiek: 40 tot 15.000 Hz
Stereo-scheiding: 30 dB
Vangbereik: 2,0 dB
[MW-zenders]
Gevoeligheid: 20 µV
Selectiviteit: 35 dB
[LW-zenders]
Gevoeligheid: 50 µV
20
Page 78

Having TROUBLE with operation?
Please reset your unit
Refer to page of How to reset your unit
Haben Sie PROBLEME mit dem Betrieb?
Bitte setzen Sie Ihr Gerät zurück
Siehe Seite Zurücksetzen des Geräts
Vous avez des PROBLÉMES de fonctionnement?
Réinitialisez votre appareil
Référez-vous à la page intitulée Comment réinitialiser votre appareil
Hebt u PROBLEMEN met de bediening?
Stel het apparaat terug
Zie de pagina met de paragraaf Het apparaat terugstellen
EN, GE, FR, NL
VICTOR COMPANY OF JAPAN, LIMITED
1199HISFLEJES
JVC
 Loading...