

Page 1
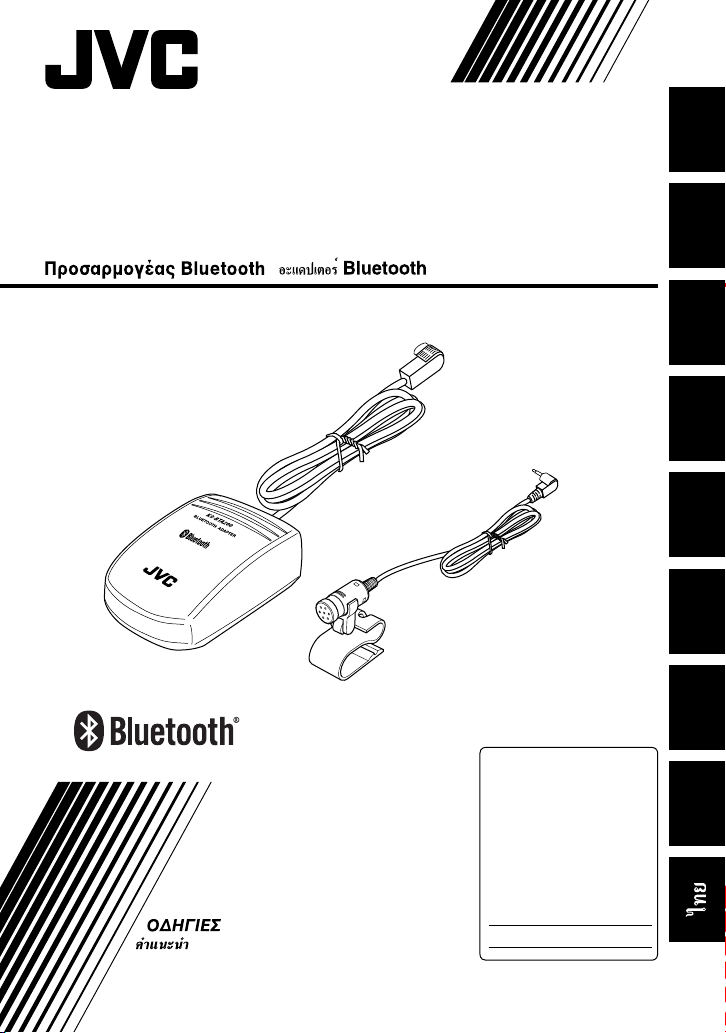
Bluetooth adapter
Bluetooth-Adapter / Adaptateur Bluetooth
Bluetooth adapter / Adaptador Bluetooth
Adattatore Bluetooth / Adaptador Bluetooth
/
KS-BTA200
ENGLISHDEUTSCH
FRANÇAIS
NEDERLANDS
ESPAÑOL
ITALIANO
INSTRUCTIONS
BEDIENUNGSANLEITUNG
MANUEL D’INSTRUCTIONS
GEBRUIKSAANWIJZING
MANUAL DE INSTRUCCIONES
ISTRUZIONI
INSTRUÇÕES
For customer Use:
Enter below the Model
No. and Serial No. which
are located on the top or
bottom of the cabinet.
Retain this information
for future reference.
Model No.
Serial No.
LVT1640-001A
PORTUGUÊS
ΕΛΛΗΝΙΚΑ
[K]
Page 2

Declaration of Conformity with regard to the R&TTE Directive 1999/5/EC
0536
English: Español:
Hereby, JVC, declares that this
KS-BTA200 is in compliance with the
essential requirements and other
relevant provisions of Directive
1999/5/EC.
Deutsch: Ελληνική:
Hiermit erklärt JVC, dass sich das Gerät
KS-BTA200 in Übereinstimmung mit
den grundlegenden Anforderungen
und den übrigen einschlägigen
Bestimmungen der Richtlinie 1999/5/
EG befindet. (BMWi)
Hiermit erklärt JVC die
Übereinstimmung des Gerätes
KS-BTA200 mit den grundlegenden
Anforderungen und den anderen
relevanten Festlegungen der Richtlinie
1999/5/EG befindet. (Wien)
Français: Malti:
Par la présente JVC déclare que
l’appareil KS-BTA200 est conforme aux
exigences essentielles et aux autres
dispositions pertinentes de la directive
1999/5/CE.
Nederlands: Português:
Hierbij verklaart JVC dat het toestel
KS-BTA200 in overeenstemming is
met de essentiële eisen en de andere
relevante bepalingen van richtlijn
1999/5/EG.
Dansk: Suomi:
Undertegnede JVC erklærer herved, at
følgende udstyr KS-BTA200 overholder
de væsentlige krav og øvrige relevante
krav i direktiv 1999/5/EF.
Por medio de la presente JVC declara
que el KS-BTA200 cumple con los
requisitos esenciales y cualesquiera
otras disposiciones aplicables o
exigibles de la Directiva 1999/5/CE.
ΜΕ ΤΗΝ ΠΑΡΟΥΣΑ JVC ∆ΗΛΩΝΕΙ ΟΤΙ
KS-BTA200 ΣΥΜΜΟΡΦΩΝΕΤΑΙ ΠΡΟΣ
ΤΙΣ ΟΥΣΙΩ∆ΕΙΣ ΑΠΑΙΤΗΣΕΙΣ ΚΑΙ ΤΙΣ
ΛΟΙΠΕΣ ΣΧΕΤΙΚΕΣ ∆ΙΑΤΑΞΕΙΣ ΤΗΣ
Ο∆ΗΓΙΑΣ 1999/5/ΕΚ.
Italiano:
Con la presente JVC dichiara che
questo KS-BTA200 è conforme
ai requisiti essenziali ed alle altre
disposizioni pertinenti stabilite dalla
direttiva 1999/5/CE.
Hawnhekk, JVC, jiddikjara li dan
KS-BTA200 jikkonforma mal-ħtiġijiet
essenzjali u ma provvedimenti oħrajn
relevanti li hemm fid-Dirrettiva 1999/5/
EC.
JVC declara que este KS-BTA200 está
conforme com os requisitos essenciais
e outras disposições da Directiva
1999/5/CE.
JVC vakuuttaa täten että KS-BTA200
tyyppinen laite on direktiivin 1999/5/
EY oleellisten vaatimusten ja sitä
koskevien direktiivin muiden ehtojen
mukainen.
G-1
Page 3

Svenska: Lietuviu:
Härmed intygar JVC att denna
KS-BTA200 står I överensstämmelse
med de väsentliga egenskapskrav och
övriga relevanta bestämmelser som
framgår av direktiv 1999/5/EG.
Íslenska: Magyar:
Hér með lýsir JVC yfir því að KS-BTA200
er í samræmi við grunnkröfur og aðrar
kröfur, sem gerðar eru í tilskipun
1999/5/EC.
Norsk: Polski:
JVC erklærer herved at utstyret
KS-BTA200 er i samsvar med de
grunnleggende krav og øvrige
relevante krav i direktiv 1999/5/EF.
Cesky: Slovensko:
JVC tímto prohlašuje, že tento
KS-BTA200 je ve shodě se základními
požadavky a dalšími príslušnými
ustanoveními směrnice 1999/5/ES.
Eesti: Slovensky:
Käesolevaga kinnitab JVC seadme KSBTA200 vastavust direktiivi 1999/5/EÜ
põhinõuetele ja nimetatud direktiivist
tulenevatele teistele asjakohastele
sätetele.
Latviski:
Ar šo JVC deklarē, ka KS-BTA200 atbilst
Direktīvas 1999/5/EK būtiskājam
prasībām un citiem ar to saistītajiem
noteikumiem.
Šiuo JVC deklaruoja, kad šis KS-BTA200
atitinka esminius reikalavimus ir kitas
1999/5/EB Direktyvos nuostatas.
Alulírott, JVC nyilatkozom, hogy a KSBTA200 megfelel a vonatkozó alapvetõ
követelményeknek és az 1999/5/EC
irányelv egyéb elõírásainak.
Niniejszym JVC oświadcza, że
KS-BTA200 jest zgodny z zasadniczymi
wymogami oraz pozostałymi
stosownymi postanowieniami
Dyrektywy 1999/5/EC.
JVC izjavlja, da je ta KS-BTA200 v
skladu z bistvenimi zahtevami in
ostalimi relevantnimi določili direktive
1999/5/ES.
JVC týmto vyhlasuje, že KS-BTA200
spĺňa základné požiadavky a všetky
príslušné ustanovenia Smernice
1999/5/ES.
G-2
Page 4
Please read all instructions carefully before operation, to ensure your complete understanding and to obtain the
INFORMATION (For U.S.A.)
ENGLISH
This equipment has been tested and found to comply with the limits for a Class B digital device, pursuant to Part
15 of the FCC Rules. These limits are designed to provide reasonable protection against harmful interference
in a residential installation. This equipment generates, uses and can radiate radio frequency energy and, if not
installed and used in accordance with the instructions, may cause harmful interference to radio communications.
However, there is no guarantee that interference will not occur in a particular installation. If this equipment does
cause harmful interference to radio or television reception, which can be determined by turning the equipment off
and on, the user is encouraged to try to correct the interference by one or more of the following measures:
– Reorient or relocate the receiving antenna.
– Increase the separation between the equipment and receiver.
– Connect the equipment into an outlet on a circuit different from that to which the receiver is connected.
– Consult the dealer or an experienced radio/TV technician for help.
Thank you for purchasing a JVC product.
best possible performance from the unit.
Caution:
Changes or modifications not approved by JVC could void the user’s authority to operate the equipment.
Information for Users on Disposal of Old Equipment
This symbol indicates that the product with this symbol should not be disposed
as general household waste at its end-of-life. If you wish to dispose of this
product, please do so in accordance with applicable national legislation or
other rules in your country and municipality. By disposing of this product
correctly, you will help to conserve natural resources and will help prevent
potential negative effects on the environment and human health.
This symbol is only valid in the
European Union.
Dear Customer,
This apparatus is in conformance with the valid European directives and standards regarding electromagnetic
compatibility and electrical safety.
European representative of Victor Company of Japan, Limited is:
JVC Technology Centre Europe GmbH
Postfach 10 05 52
61145 Friedberg
Germany
2
Page 5

Introduction
Warnings
• USE WITH DC 12 V NEGATIVE GROUND VEHICLES.
If your vehicle is not of 12 V Negative Ground type, a
voltage inverter is required, which can be purchased
at a JVC car audio (IN-CAR ENTERTAINMENT) dealer.
• This adapter has been designed exclusively for use
with JVC’s car receivers. Do not use this adapter with
any other car receiver.
Precautions
• This adapter is designed for use with Bluetooth
devices (cellular phone and audio players).
• Do not raise the volume level too much, as this will
block outside sounds, making driving dangerous.
• Do not perform complicated operations while
driving; otherwise, it may result in an accident.
• While driving, do not perform any complicated
operation such as dialling the numbers, using phone
book, etc. When you perform these operations, stop
your car in a safe place.
• Some Bluetooth devices may not be connected to
this unit depending on the Bluetooth version of the
device.
• This unit may not work for some Bluetooth devices.
• Connecting condition may vary depending on
circumstances around you.
Introduction
3
Page 6

Introduction
About Bluetooth
ENGLISH
Bluetooth is a short-range wireless radio
communication technology for the mobile device such
as cellular phones, portable PCs, and other devices. The
bluetooth devices can be connected without cables and
communicate each other.
• The Bluetooth word mark and logos are owned by
the Bluetooth SIG, Inc. and any use of such marks
by Victor Company of Japan, Limited (JVC) is under
licence. Other trademarks and trade names are those
of their respective owners.
• The serial number is printed on the label placed on
the bottom of the adapter unit.
To send or receive voice and data between this adapter
and your Bluetooth device must be within 10 m in
distance.
However, the transmission distance may be shorter
depending on the circumstances around you.
Bluetooth profile
This adapter supports the following Bluetooth profiles;
HSP (Headset Profile)
HFP (Hands-Free Profile)
A2DP (Advanced Audio Distribution Profile)
AVRCP (Audio/Video Remote Control Profile)
SPP (Serial Port Profile)
OPP (Object Push Profile)
General information
• This adapter supports only JVC’s Bluetooth-Ready car
receivers.
• Refer to the list (included in the box) to see the
countries where you may use the Bluetooth®
function.
Features
By using this adapter, you can operate Bluetooth
devices with your receiver as follows:
• Making/receiving a call
• Calling from phonebook
• Calling by voice command
• Calling from call histories
– Redial
– Missed Call
– Received Call
• Calling by preset numbers
• Receiving the SMS (Short Message Service)/Text
Message
• Playback a Bluetooth audio player
Available functions differ depending on the type
of your receiver and Bluetooth devices.
Pairing and PIN Code
When you connect a Bluetooth device to your car
receiver through this adapter for the first time, make
pairing between the adapter and the device. Pairing
allows Bluetooth devices to communicate each other.
To make pairing, you may need to enter the PIN
(Personal Identification Number) code of your Bluetooth
device you want to connect.
4
Page 7

Contents
Introduction
Introduction ................................ 3
Warnings ...........................................................3
Precautions ........................................................3
About Bluetooth ................................................ 4
General information ..........................................4
Getting Started ............................ 6
Installation ........................................................6
Connecting to the receiver .................................8
Check the type of your receiver ..........................9
Menu structures ............................................. 10
Connection
Bluetooth Connection ................12
Selecting a Source .......................................... 12
Registering a Bluetooth device — Pairing ..... 12
Connecting/Disconnecting the device ............ 17
Bluetooth Phone
Bluetooth Phone Operations .......19
Selecting a Source .......................................... 19
Receiving a call ............................................... 19
Calling a number in the phone book ............... 20
Advanced Operations ..................21
Calling by voice command .............................. 21
Calling a number from the call history ............ 22
Calling the last call number directly
— Redial .................................................. 23
Answering a waiting call ................................ 23
Using preset numbers ..................................... 24
Calling by entering a phone number .............. 25
Receiving an SMS (Short Message Service)/
Text Message ............................................. 27
Reading an SMS/Text Message ....................... 27
Bluetooth Audio
Bluetooth Audio Operations ........29
Selecting a source ........................................... 29
Playback operations .....................................29
Settings
Other Settings ...........................30
Basic procedure .............................................. 30
Setting items ..............................................31
Others
Troubleshooting .........................32
Specifications ............................33
Introduction
5
Page 8
Getting Started
Installation
ENGLISH
Warning
Avoid installing the adapter unit and the microphone
unit in the following places.
– Where they would hinder your safety driving.
– Where they would be exposed to direct sunlight
or heat directly from the heater or placed in an
extremely hot place.
– Where they would be subject to rain, water splashes
or excessive humidity.
– Where they would be subject to dust.
– Where they would be positioned on an unstable
place.
– Where they could damage the car’s fittings.
– Where radio wave interferes (EX.: trunk, etc.).
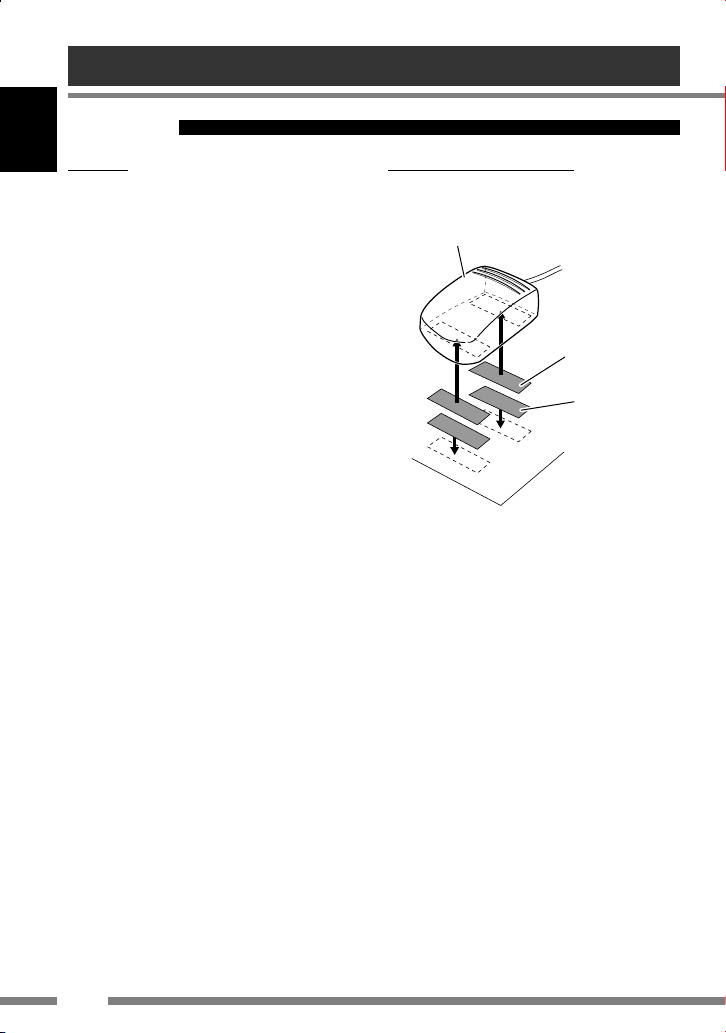
Mounting the adapter unit
Wipe clean the selected surface sufficiently, and affix
the Velcro tape.
Interface adapter unit
Velcro tape (hard)
(supplied)
Velcro tape (soft)
(supplied)
• If the Velcro tape (hard) adheres to the car mat
directly, you may install this unit without using the
Velcro tape (soft).
• The serial number is printed on the label placed on
the bottom of the unit. Do not cover up the label
with the velcro tape.
6
Page 9
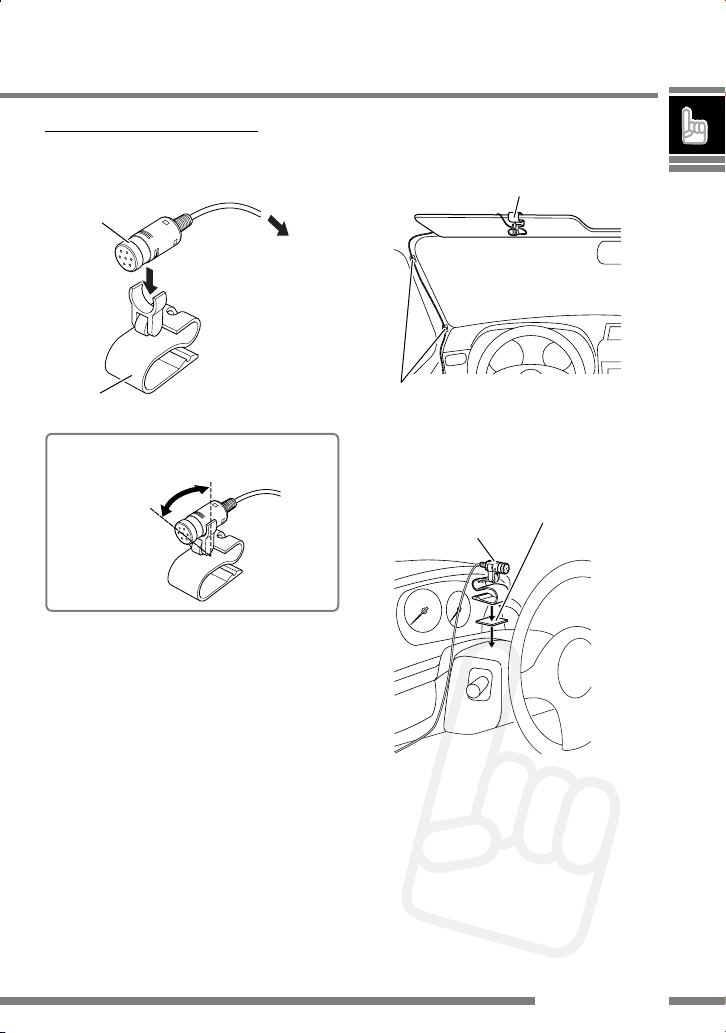
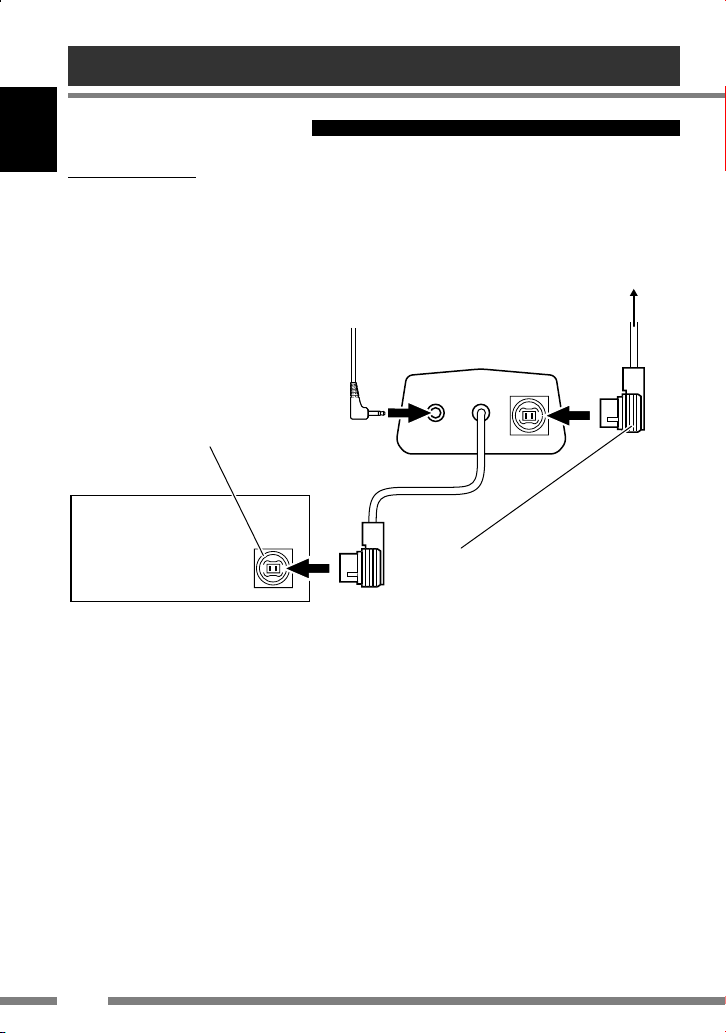
Installing the microphone unit
1 Attach the microphone to the
microphone clip.
Microphone
(supplied)
To Interface
adapter unit
2 Install the microphone unit.
To install on the sun visor
Microphone unit (supplied)
Microphone clip
(supplied)
To adjust the microphone angle
Secure the microphone cord using cord
clamps (not supplied) if necessary.
To install on the steering column
Install the microphone unit on the top side of the
steering column.
microphone unit (supplied)
Double-sided adhesive
tape (supplied)
Introduction
7
Page 10
Getting Started
Connecting to the receiver
ENGLISH
Typical connection
Turn off the power to the receiver and turn off the vehicle’s ignition switch before connecting or disconnecting the
unit.
To other external component
(see below)
From microphone unit
Interface adapter unit
CD Changer jack
Receiver
• You can connect the following external components to this adapter;
- CD Changer
- SIRIUS Satellite radio
- XM Satellite radio
- DAB tuner
- Interface adapter for iPod
- D.player interface adapter
- Line Input Adapter
- Aux Input Adapter
• See also the installation manual supplied with your receiver.
8
Signal cord
(supplied for or attached to the external component)
Page 11
Checking the type of your receiver
Operating procedures through a receiver are different
depending on the type of the receiver.
Check the type of your receiver by the chart below.
Example: type of the receiver
Type A
• If your answer is “Yes,” follow
• If your answer is “No,” follow
Is your receiver KD-NX5000?
Is your receiver equipped with the
built-in monitor?
Is your receiver equipped with
the 3 Dimensional Liquid Crystal
Display?
Type D
.
.
Type A
Type B
Type B
Type C
Type C
Type D
• Menu operations are different depending on the type
of your receiver.
For details, see also the instructions supplied with
your receiver.
Introduction
9
Page 12

Getting Started
Menu structures
ENGLISH
Indication language
In this manual, English indications are used for purpose of explanation. You can change the
indication language to other than English for some receivers. Refer to the instruction manual
supplied with your receiver.
Bluetooth Phone
Dial / Dial Menu / DIAL *1Select the method to make a call.
Redial / REDIAL *
Received Calls / RECEIVE *2Select a phone number from the list of the received
Phonebook / PH BOOK *
Missed Calls / MISSED *
Phone number / NUMBER
Voice / Voice Dialing /
VOICE *
Message *
1, 2, 4
You can read a message from the following message histories.
Unread
Read
Unsent
Sent
Open / OPEN *
5
Make the unit ready to establish a new Bluetooth connection. Select this when
establishing a Bluetooth connection with a device for the first time, from the
device. ☞ page 12.
Search / SEARCH *
5
Make the unit ready to establish a new Bluetooth connection. Select this when
establishing a Bluetooth connection with a device for the first time, from the unit.
The unit searches for available new devices. ☞ page 14.
Special Device / SPECIAL *5Shows the list of Bluetooth devices which require some special procedure to establish
Bluetooth connection. Select a device you want to connect. ☞ page 15.
Connection / Connect /
CONNECT *
Disconnection / Disconnect
/ DISCNNCT *
6
1
Delete Pair / DELETE *
After selecting a device from among the registered devices, establish the connection
with it. ☞ page 17.
Disconnect the current device before connecting another device. ☞ page 18.
6
Delete the registered devices. ☞ page 16.
2
Select a phone number from the list of the phone
numbers you have dialed. ☞ page 22.
calls. ☞ page 22.
2
Select a name, then phone number from the phone
book of the connected cellular phone. ☞ page 20.
2
Select a phone number from the list of the missed calls.
☞ page 22.
Enter the phone number. ☞ page 25.
3
You can call by voice command. ☞ page 21.
Messages you have not read. ☞ page 27.
Messages you have read. ☞ page 27.
Messages you have not sent. ☞ page 27.
Messages you have sent. ☞ page 27.
10
Page 13
Setup / Settings /
SETTING
Change the settings. ☞ page 30.
Auto Connect / AUTO CNT You can set to connect a Bluetooth device
automatically when the receiver is turned on.
Auto Answer /
AUTO ANS*
7
Message Info *
2, 4, 7
You can set the receiver to receive or reject the
incoming calls automatically.
You can set the receiver inform when you receive an
SMS/Text Message.
Microphone Level /
Mic Setting / MIC SET *
Version / VERSION *
Adjust a microphone volume.
7
8
Display the software and hardware versions.
Bluetooth Audio
Open / OPEN *
Search / SEARCH *
Special Device / SPECIAL *5Shows the list of Bluetooth devices which requires some special procedure to
Connection / Connect /
CONNECT *
Disconnection / Disconnect
/ DISCNNCT *
Delete Pair / DELETE *
Setup / Settings /
SETTINGS
5
Make the unit ready to establish a new Bluetooth connection. Select this when
establishing a Bluetooth connection with a device for the first time, from the
device. ☞ page 12.
5
Make the unit ready to establish a new Bluetooth connection. Select this when
establishing a Bluetooth connection with a device for the first time, from the unit.
The unit searches for available new devices. ☞ page 14.
establish Bluetooth connection. Select a device you want to connect. ☞ page 15.
6
1
After selecting a device from among the registered devices, establish the connection
with it. ☞ page 17.
Disconnect the current device before connecting another device. ☞ page 18.
6
Delete the registered devices. ☞ page 16.
Change the settings. ☞ page 30.
Version / VERSION *
8
Display the software and hardware versions.
1
Selectable only when the device is connected.
*
2
Selectable only when your cellular phone is equipped with the function.
*
3
Selectable only when your cellular phone is equipped with the voice recognition system.
*
4
Excluding type D.
*
5
Selectable only when “New Device“ is selected.
*
6
*
Selectable only when the registered device is selected.
7
Not selectable for “New Device“.
*
8
If you wish to receive more information about Bluetooth, visit our JVC web site.
*
Introduction
11
Page 14

Bluetooth Connection
• For details of the menu operations, refer to the instruction manual supplied with your receiver.
• Indications on the display (monitor) and button names vary among the receivers.
ENGLISH
ex. SOURCE: SRC 7: 7 / BACK MENU: AV MENU, AV Menu
Bluetooth Phone: Bluetooth PHONE, BT-PHONE
New Device: New device, NEW DEVICE
Preparation: Turn on the Bluetooth function of the Bluetooth device.
Selecting a source
Before you connect a Bluetooth device, change the
source to the Bluetooth device.
for Type A
Press and hold MENU to call up the
Bluetooth menu or press SRC repeatedly to
select “Bluetooth Audio.”
for Type B/Type C/Type D
You can select “Bluetooth Phone” and
“Bluetooth Audio” as the source.
Press SOURCE repeatedly to select
“Bluetooth Phone” or “Bluetooth
Audio.”
Registering a Bluetooth device — Pairing
When you connect a Bluetooth device for the first time,
register and make pairing between the unit and the
device.
• Pairing may not be possible with some Bluetooth
devices.
To connect from the other Bluetooth
device
Use “Open” to establish connection with a Bluetooth
device from the device.
for Type A
1 Display “Bluetooth Phone” screen
or select “Bluetooth Audio” as the
source.
2 Press 5/∞ to select “New Device.”
3 Display the menu, then select “Mode”
] “Open.”
4 Press 4/¢ /5/∞ to enter the PIN
(Personal Identification Number) Code,
then select “Connect.”
4/¢/5/∞:
Select a number.
ENT:
Enter the number.
• Refer to the instruction manual supplied with
your receiver.
• You can enter any number you like (1-digit to
16-digit numbers).
• Some devices have their own PIN code. Enter
the specified PIN code to the unit.
5 Use the Bluetooth device to search for
the unit.
• Enter the same PIN code (as entered in the
above step) on the device to be connected.
“Connected (and the device name)” appears
on the display.
12
Page 15

for Type B
1 While “Bluetooth Phone” or
“Bluetooth Audio” is selected as
the source, select “New Device.”
2 Display the menu, then select
“Bluetooth” ] “Open.”
3 Enter the PIN (Personal Identification
Number) Code.
Refer to the instruction manual supplied with your
receiver.
• You can enter any number you like (1-digit to
16-digit numbers).
• Some devices have their own PIN code. Enter
the specified PIN code to the unit.
4 Use the Bluetooth device to search for
the unit.
• Enter the same PIN code (as entered in the
above step) on the device to be connected.
“Connected (and the device name)” appears
on the display.
for Type C
1 While “Bluetooth Phone” or
“Bluetooth Audio” is selected as
the source, select “New Device.”
2 Press MODE, then select “Open.”
3 Use the following buttons to enter the
PIN (Personal Identification Number)
Code.
4/¢: Move the entry position.
5/∞: Select a number.
5:
1: Enter the number.
• You can enter any number you like (1-digit to
16-digit numbers).
• Some devices have their own PIN code. Enter
the specified PIN code to the unit.
Delete all entries.
4 Use the Bluetooth device to search for
the unit.
• Enter the same PIN code (as entered in the
above step) on the device to be connected.
“Connected (and the device name)” appears
on the display.
for Type D
1 While “Bluetooth Phone” or
“Bluetooth Audio” is selected as
the source, press 4/¢ to select
“NEW.”
2 Press ∞, then select “OPEN.”
3 Use the following buttons to enter the
PIN (Personal Identification Number)
Code.
4/¢: Move the entry position.
VOLUME +/– (Control dial):
Select a number.
∞: Enter the number.
• You can enter any number you like (1-digit to
16-digit numbers).
• Some devices have their own PIN code. Enter
the specified PIN code to the unit.
4 Use the Bluetooth device to search for
the unit.
• Enter the same PIN code (as entered in the
above step) on the device to be connected.
“CONNECT (and the device name)” appears
on the display.
13Connection
Page 16

Bluetooth Connection
Registering a Bluetooth device — Pairing
ENGLISH
To connect an available device from
the unit
Use “Search” to establish connection with a
Bluetooth device from the unit.
for Type A
1 Display “Bluetooth Phone” screen
or select “Bluetooth Audio” as the
source.
2 Press 5/∞ to select “New Device.”
3 Display the menu, then select “Mode”
] “Search.”
The unit searches for the devices and displays the
list of the available devices.
4 Select a device name you want to
connect.
5 Press 4/¢ /5/∞ to enter the PIN
(Personal Identification Number) Code
of the device to be connected, then
select “Connect.”
4/¢/5/∞:
ENT:
• Refer to the instruction manual supplied with
your receiver.
“Connected (and the device name)” appears
on the display.
Select a number.
Enter the number.
(continued)
for Type B
1 While “Bluetooth Phone” or
“Bluetooth Audio” is selected as
the source, select “New Device.”
2 Display the menu, then select
“Bluetooth” ] “Search.”
The unit searches for the devices and displays the
list of the available devices.
3 Select a device name you want to
connect.
4 Enter the PIN (Personal Identification
Number) Code of the device to be
connected.
• Refer to the instruction manual supplied with
your receiver.
“Connected (and the device name)” appears
on the display.
for Type C
1 While “Bluetooth Phone” or
“Bluetooth Audio” is selected as
the source, select “New Device.”
2 Press MODE, then select “Search.”
The unit searches for the devices and displays the
list of the available devices.
3 Select a device name you want to
connect.
14
Page 17
4 Use the following buttons to enter the
PIN (Personal Identification Number)
Code of the device to be connected.
4/¢:
5/∞: Select a number.
5: Delete all entries.
1: Enter the number.
“Connected (and the device name)” appears
on the display.
Move the entry position.
for Type D
1 While “Bluetooth Phone” or
“Bluetooth Audio” is selected as
the source, press 4/¢ to select
“NEW.”
2 Press ∞, then select “SEARCH.”
The unit searches for the devices and displays the
list of the available devices.
3 Select a device name you want to
connect.
4 Use the following buttons to enter the
PIN (Personal Identification Number)
Code of the device to be connected.
4/¢: Move the entry position.
VOLUME +/– (Control dial):
Select a number.
∞: Enter the number.
“CONNECT (and the device name)” appears
on the display.
To connect a special device
Some Bluetooth devices require some special
procedures to establish Bluetooth connection for the
first time. You need to select the device name for those
Bluetooth devices before you register it.
for Type A
1 Display “Bluetooth Phone” screen
or select “Bluetooth Audio” as the
source.
2 Press 5/∞ to select “New device.”
3 Display the menu, then select “Mode”
] “Special Device.”
The list of special devices appears on the display.
4 Select a device name you want to
connect.
5 Connect the selected device using
“Open (page 12)”or “Search (page
14).”
for Type B
1 While “Bluetooth Phone” or
“Bluetooth Audio” is selected as
the source, select “New device.”
2 Display the menu, then select
“Bluetooth” ] “Special
Device.”
The list of special devices appears on the display.
3 Select a device name you want to
connect.
4 Connect the selected device using
“Open (page 13)”or “Search (page
14).”
Connection
15
Page 18

Bluetooth Connection
Registering a Bluetooth device — Pairing
ENGLISH
for Type C
1 While “Bluetooth Phone” or
“Bluetooth Audio” is selected as
the source, select “New device.”
2 Press MODE, then select “Special
Device.”
The list of special devices appears on the display.
3 Select a device name you want to
connect.
4 Connect the selected device using
“Open (page 13)”or “Search (page
14).”
for Type D
1 While “Bluetooth Phone” or
“Bluetooth Audio” is selected as
the source, press 4/¢ to select
“NEW.”
2 Press ∞, then select “SPECIAL.”
3 Select a device name you want to
connect.
4 Connect the selected device using
“OPEN (page 13)”or “SEARCH (page
14).”
(continued)
To delete the registered device
You can register up to five Bluetooth devices.
If you want to connect a 6th device, delete one of the
registered devices.
for Type A
1 Display “Bluetooth Phone” screen
or select “Bluetooth Audio” as the
source.
2 Press 5/∞ to select a registered device
you want to delete.
3 Display the menu, then select “Mode”
] “Delete Pair.”
4 Select “Yes” to delete the device.
• If you select “No,” the procedure is canceled.
for Type B
1 While “Bluetooth Phone” or
“Bluetooth Audio” is selected as
the source, select a registered device
you want to delete.
2 Display the menu, then select
“Bluetooth” ] “Delete Pair.”
3 Select “Yes” to delete the device.
• If you select “No,” the procedure is canceled.
16
Page 19
for Type C
1 While “Bluetooth Phone” or
“Bluetooth Audio” is selected as
the source, select a registered device
you want to delete.
2 Press MODE, then select “Delete
Pair.”
3 Select “Yes” to delete the device.
• If you select “No,” the procedure is canceled.
for Type D
1 While “Bluetooth Phone” or
“Bluetooth Audio” is selected as
the source, press 4/¢ to select a
registered device you want to delete.
Connecting/Disconnecting the device
To connect a device manually
Only one device can be connected at a time for each
source (“Bluetooth Phone” and “Bluetooth Audio”).
for Type A
1 Display “Bluetooth Phone” screen
or select “Bluetooth Audio” as the
source.
2 Press 5/∞ to select a registered
device.
3 Select “Mode” ] “Connection” to
connect a selected device.
2 Press ∞, then select “DELETE.”
3 Select “YES” to delete the device.
• If you select “NO,” the procedure is canceled.
for Type B
1 While “Bluetooth Phone” or
“Bluetooth Audio” is selected as
the source, select a registered device.
2 Display the menu, then select
“Bluetooth” ] “Connect” to
connect a selected device.
for Type C
1 While “Bluetooth Phone” or
“Bluetooth Audio” is selected
as the source, use 5/∞ to select a
registered device.
2 Press MODE, then select “Connect”
to connect a selected device.
Connection
17
Page 20
Bluetooth Connection
Connecting/Disconnecting the device
ENGLISH
for Type D
1 While “Bluetooth Phone” or
“Bluetooth Audio” is selected as
the source, press 4/¢ to select a
registered device.
2 Press ∞, then select “CONNECT” to
connect a selected device.
Note
You can connect the Bluetooth cellular phone automatically
when the receiver is turned on.
See “Auto Connect” on page 31.
(continued)
To disconnect a device
You can disconnect a Bluetooth device.
for Type A
1 Display “Bluetooth Phone” screen
or select “Bluetooth Audio” as the
source.
2 Select “Mode” ]
“Disconnection” to disconnect a
device.
for Type B
1 Select “Bluetooth Phone” or
“Bluetooth Audio” as the source.
2 Display the menu, then select
“Bluetooth” ] “Disconnect” to
disconnect a device.
for Type C
1 Select “Bluetooth Phone” or
“Bluetooth Audio” as the source.
2 Press MODE, then select
“Disconnect” to disconnect a device.
18
for Type D
1 Select “Bluetooth Phone” or
“Bluetooth Audio” as the source.
2 Press ∞, then select “DISCNNCT” to
disconnect a device.
Page 21
Bluetooth Phone Operations
• Before you use a Bluetooth device with your receiver, connect a Bluetooth device. See “Bluetooth
Connection” on page 12.
• When the sound is stopped or interrupted during the use of a Bluetooth device, try the following
remedies.
• Turn Off, then turn On the power to the receiver.
• (When sound is not yet restored,) Connect the device again. See “Connecting/Disconnecting the
device“ on page 17.
• For details of the menu operations, refer to the instruction manual supplied with your receiver.
• Indications on the display (monitor) and button names vary among the receivers.
ex. SOURCE: SRC 7: 7 / BACK MENU: AV MENU, AV Menu
Bluetooth Phone: Bluetooth PHONE, BT-PHONE
New Device: New device, NEW DEVICE
Selecting a source
Before you operate the Bluetooth phone function,
change the source to “Bluetooth Phone.”
for Type A
Press and hold MENU to call up the
Bluetooth menu or press PHONE on the
remote controller.
for Type B/Type C/Type D
Press SOURCE repeatedly to select
“Bluetooth Phone.”
Receiving a call
If you receive a call, “Receiving Call (and name,
phone number if acquired)” appears on the display.
Press one of the following buttons.
The source changes to Bluetooth Phone and you can
receive the incoming call.
Type A
Any key (except /ATT, +/–, MAP, SRC and
0.)
Type B/Type C/Type D
Any key (except /ATT and VOL +/–.)
for the Touch Panel model
You can also press the message “Receiving
Call” displayed on the touch panel to receive
a call.
• When another call comes in while talking, see
“Answering a waiting call” on page 23.
To end the call or reject an incoming call, press and
hold one of the above buttons.
Note
You can set the receiver to receive or reject the incoming call
automatically. See “Auto Answer” on page 31.
Connection/Bluetooth Phone
19
Page 22

Bluetooth Phone Operations
Calling a number in the phone book
ENGLISH
You can call a number from the phone book in the connected cellular phone.
Before you use this function, transfer the phone book memory of the cellular phone to this unit (Refer to the
instruction manual supplied with your cellular phone).
• With some cellular phones, the phone book memory is transferred automatically.
for Type A
1 Display the dial menu.
2 Select “Phonebook.”
3 Select a name from the list.
The list of phone numbers appears.
4 Select a phone number you want and
press ENT.
for Type B
1 Display the dial menu.
2 Select “Phonebook.”
3 Select a name from the list.
The list of phone numbers appears.
4 Select a phone number you want.
for Type C
1 Display the dial menu.
2 Select “Phonebook.”
3 Select a name from the list.
The list of phone numbers appears.
4 Select a phone number you want and
press the number button 1.
for Type D
1 Display the dial menu.
2 Select “PH BOOK.”
3 Select a name from the list.
The list of phone numbers appears.
4 Select a phone number you want and
press ∞.
20
Page 23

Advanced Operations
Calling by voice command
If your cellular phone is equipped with the voice recognition system, you can make a call by your voice.
for Type A
for Type C
1 Display “Bluetooth Phone” screen.
2 Press and hold MENU.
“Say” appears on the display.
• You can also select voice dialing function from
the dial menu. To use the function, select
“Voice” from the dial menu.
• If your cellular phone does not support the
voice recognition system, “Error” appears.
3 Speak the name you want to call.
• Pronounce slowly and clearly.
for Type B
1 Press and hold MENU.
“Say Name” appears on the display.
• You can also select voice dialing function from
the dial menu. To use the function, select
“Voice Dialing” from the dial menu.
• If your cellular phone does not support the
voice recognition system, “Error” appears.
2 Speak the name you want to call.
• Pronounce slowly and clearly.
1 Press and hold MODE.
“Say” appears on the display.
• You can also select voice dialing function from
the dial menu. To use the function, select
“Voice” from the dial menu.
• If your cellular phone does not support the
voice recognition system, “Error” appears.
2 Speak the name you want to call.
• Pronounce slowly and clearly.
for Type D
1 Press and hold MODE.
“SAY” appears on the display.
• You can also select voice dialing function from
the dial menu. To use the function, select
“VOICE” from the dial menu.
• If your cellular phone does not support the
voice recognition system, “ERROR” appears.
2 Speak the name you want to call.
• Pronounce slowly and clearly.
Bluetooth Phone
21
Page 24

Advanced Operations
Calling a number from the call history
ENGLISH
This unit has three kinds of call histories — redial, received calls and missed calls. You can call a number using
these call histories.
for Type A
for Type B
1 Display the dial menu.
2 Select a call history.
You can select from the following call histories;
Redial:
Calls recently made.
Received Calls:
Calls recently received.
Missed Calls:
Calls recently missed.
3 Select a name (if acquired) or phone
number, then press ENT.
1 Display the dial menu.
2 Select a call history.
You can select from the following call histories;
Redial:
Calls recently made.
Received Calls:
Calls recently received.
Missed Calls:
Calls recently missed.
3 Select a name (if acquired) or phone
number.
22
Page 25
for Type C
1 Display the dial menu.
2 Select a call history.
You can select from the following call histories;
Redial:
Calls recently made.
Received Calls:
Calls recently received.
Missed Calls:
Calls recently missed.
3 Select a name (if acquired) or phone
number, then press number button 1.
Calling the last call number directly — Redial
This function is available only when the remote
controller supplied with your receiver has the PHONE
button.
On the remote controller only
1 Press and hold PHONE.
The last called phone number is displayed.
2 Press PHONE.
for Type D
1 Display the dial menu.
2 Select a call history.
You can select from the following call histories;
REDIAL:
Calls recently made.
RECEIVED:
Calls recently received.
MISSED:
Calls recently missed.
3 Select a name (if acquired) or phone
number, then press ∞.
Answering a waiting call
If your cellular phone is equipped with the call waiting
function, you can put the current call on hold and
answer the waiting call.
Press one of the following buttons.
To restore the on-hold call, press one of the following
buttons again.
• When you end one call, you can connect to the other.
Type A
Any key (except /ATT, +/–, MAP, SRC and
0.)
Type B/Type C/Type D
Any key (except /ATT and VOL +/–.)
for the Touch Panel model
You can also press the message “Receiving
Call” displayed on the touch panel.
Bluetooth Phone
23
Page 26

Advanced Operations
Using preset numbers
ENGLISH
You can preset up to six phone numbers.
To store a preset number
for Type A
1 Select a phone number you want
to preset from the number list
(Phonebook, Redial, Received Calls or
Missed Calls.)
2 Press and hold ENT to display the
preset list.
3 Select a preset number you want to
store into, then press ENT.
for Type C/Type D
1 Select a phone number you want
to preset from the number list
(Phonebook, Redial, Received Calls or
Missed Calls.)
2 Press and hold a number button on the
receiver you want to store the phone
number into.
To call a preset phone number
for Type A/Type B
for Type B
1 Select a phone number you want
to preset from the number list
(Phonebook, Redial, Received Calls or
Missed Calls.)
2 Press and hold ENT to display the
preset list.
for the Touch Panel model
Press and hold a phone number on the touch
panel.
3 Select a preset number you want to
store into.
24
1 Press and hold 5/∞ to display the
preset list.
for the Touch Panel model
Display the preset list.
2 Select a preset number you want to call.
for Type C/Type D
Press a number button on the receiver you
want to call.
Page 27
Calling by entering a phone number
You can make a call by entering a phone number on the receiver.
for Type A
for Type B
1 Display the dial menu.
2 Select “Phone Number.”
3 Press 4/¢ /5/∞ to enter a
phone number, then select “Dial.”
4/¢/5/∞:
Select a number.
ENT: Enter a number.
Note
You can store the entered phone number into the preset
list. Select “Store” in the step 3 to display the preset list.
Select a preset number you want to store into, then press
ENT.
1 Display the dial menu.
2 Select “Phone Number.”
3 Enter a phone number.
Refer to the instruction manual supplied with your
receiver.
Note
You can store the entered phone number into the preset
list. Press and hold ENT or press “PRESET” on the
touch panel to display the preset list.
Select a preset number you want to store into.
Bluetooth Phone
25
Page 28
Advanced Operations
for Type C
1 Display the dial menu.
ENGLISH
2 Select “PHONE NUMBER.”
3 Press 4/¢ /5/∞ to enter a
phone number, then press the number
button 1.
4/¢:
5/∞: Select a number.
5: Delete all entries.
Note
You can store the entered phone number into the preset
list. Press and hold a number buttons you want to store
into.
Move the entry position.
for Type D
1 Display the dial menu.
2 Select “NUMBER.”
3 Press 4/¢, VOLUME +/– to
enter a phone number, then press
4/¢:
VOLUME +/– (Control dial):
Note
You can store the entered phone number into the preset
list. Press and hold a number buttons you want to store
into.
Move the entry position.
Select a number.
∞.
26
Page 29
Receiving an SMS (Short Message Service)/ Text Message
If your cellular phone can use SMS (Short Message
Service)/Text Message, you can read the messages on
the display (monitor) of the receiver.
Reading an SMS/ Text Message
for Type A
1 Display “Bluetooth Phone” screen.
2 Select “Mode” ] “Message.”
When you receive a message, “Receiving
Message/Receiving MSG/RCV MSG”
appears on the display (monitor).
for Type A/Type B
Press ENT or “YES” on the touch panel to
read the message.
for Type C
Press 1 to read the message.
For Type D
“RCV MSG” appears on the display to tell you the
arrival of the message.
• You cannot read the received message on the
display.
To read the message later (only for
type A/B/C)
Press 7 or 3 (for Type C) when you receive an SMS/Text
Message. Received message is stored in Unread in
message histories.
Note
You can set to ignore the arrival of the message when you
receive an SMS/Text Message.
Refer to “Message Info” on page 31.
3 Select a message history.
You can select one of the following message
histories;
Unread:
Messages not read yet.
Read:
Messages already read.
Unsent:
Messages not sent yet.
Sent:
Messages already sent.
4 Select a message you want to read.
Bluetooth Phone
27
Page 30

Advanced Operations
for Type B
ENGLISH
1 Select “Bluetooth” ] “Message
Menu.”
2 Select a message history.
You can select one of the following message
histories;
Unread:
Messages not read yet.
Read:
Messages already read.
Unsent:
Messages not sent yet.
Sent:
Messages already sent.
3 Select a message you want to read.
for Type C
1 Press MODE, then select “Message
Menu.”
2 Select a message history.
You can select one of the following message
histories;
Unread:
Messages not read yet.
Read:
Messages already read.
Unsent:
Messages not sent yet.
Sent:
Messages already sent.
3 Select a message you want to read.
for Type D
Not Available for this type.
28
Page 31

Bluetooth Audio Operations
• Before you use a Bluetooth device on your receiver, connect a Bluetooth device. See “Bluetooth
Connection” on page 12.
• When sound is stopped or interrupted during the use of a Bluetooth device, try the following
remedies.
• Turn Off, then turn On the power to the receiver.
• (When sound is not yet restored,) Connect the device again. See “Connecting/Disconnecting the
device“ on page 17.
• For details of the menu operations, refer to the instruction manual supplied with your receiver.
• Indications on the display (monitor) and button names vary among the receivers.
ex. SOURCE: SRC 7: 7 / BACK
Bluetooth Audio: Bluetooth AUDIO, BT-AUDIO
Selecting a source
Before you operate the Bluetooth audio device, change
the source to “Bluetooth Audio.”
for Type A
You can select “Bluetooth Audio” as the source.
Press SRC repeatedly to select
“Bluetooth Audio.”
for Type B/Type C/Type D
You can select “Bluetooth Audio” as the source.
Press SOURCE repeatedly to select
“Bluetooth Audio.”
Playback operations
for Type A/Type B
3: Start playback
6: Start playback/Pause
¢: Forward skip
4: Reverse skip
7: Stop
for Type C
1: Start playback
3: Stop
¢: Forward skip
4: Reverse skip
for Type D
5: Start playback
¢: Forward skip
4: Reverse skip
Bluetooth Phone/Bluetooth Audio
29
Page 32

Other Settings
Basic procedure
for Type A
ENGLISH
1 Display “Bluetooth Phone” screen
or select “Bluetooth Audio” as the
source.
2 Select “Mode” ] “Setup” from the
menu.
3 Select an item.
See “Setting items” on the next page.
4 Press the following buttons to change
the settings.
5/∞: Change the setting.
ENT: Confirm the setting.
for Type B
1 Display the menu, then select
“Bluetooth” ] “Settings”.
2 Select an item.
See “Setting items” on the next page.
3 Change the settings.
Refer to the instruction manual supplied with your
receiver.
for Type C
1 Press MODE, then select “Settings.”
2 Select an item.
See “Setting items” on the next page.
3 Press the following buttons to change
the settings.
5/∞: Change the setting.
1: Confirm the setting.
for Type D
1 While “Bluetooth Phone” or
“Bluetooth Audio” is selected as
the source, press ∞/4/¢ to select
“SETTINGS.”
2 Select an item.
See “Setting items” on the next page.
3 Press the following buttons to change
the settings.
VOLUME +/– (Control dial):
Change the setting.
∞: Confirm the setting.
30
Page 33

Setting items
You can change the following items in Setting menu (_: initial):
Auto Connect
You can set to connect a Bluetooth device automatically
when the receiver is turned on.
Off: Does not connect any device automatically.
Last: Connects with the last connected device.
Order: Connects with the available registered
device found at first.
Auto Answer
You can set the receiver to receive or reject incoming
calls automatically.
Off: The receiver does not answer calls
automatically.
Answer the calls manually.
On: The receiver receives incoming calls
automatically.
Reject: The unit rejects all incoming calls.
Message Info
You can set the receiver to inform the arrival of the
message when you receive an SMS (Short Message
Service)/Text Message.
Auto: The receiver rings and informs you of the
arrival of the message.
Manual: The receiver does not inform you of the
arrival of the message.
Microphone Level / Mic Setting
Adjust a microphone volume.
Level: 1, 2 , 3
Version
Display the software and hardware versions.
Settings
31
Page 34

Troubleshooting
What appears to be trouble is not always serious. Check the following points before calling a service center.
Symptoms Remedies
ENGLISH
Bluetooth device does not detect the unit. • This unit can be connected with one Bluetooth cellular
The unit does not detect the Bluetooth device. • Check the Bluetooth setting of the device.
“Device Unfound/UNFOUND” appears on the display. • Check the Bluetooth setting of the device, then search
The unit does not make pairing with the Bluetooth
device.
“Connection Error/ERR CNT” appears on the display. • Select “Connect” to connect the device again.
Echo or noise occurs. • Adjust the position of the microphone unit.
“Error/ERROR” appears on the display. • Try the function again.
“Loading/LOADING” appears on the display. • Try the function again.
“Please Wait/WAIT” appears on the display. • Wait until the message goes off.
“Reset 08/RESET 8” appears on the display. • Check the connection between the adapter and the
Phone sound quality is poor. • Reduce the distance between the unit and the
phone and one Bluetooth audio device at a time.
While connecting a device, this unit cannot be detected
from another device. Disconnect currently connected
device and search again.
• Search from the Bluetooth device. After detecting the
unit, select “Open” on the unit to connect the device.
again.
• Enter the same PIN Code to the unit and target device.
• Select the device name from “Special Device,” then
connect again.
• (If the message appears again)
The connected device is not equipped with the
function.
• (If the message does not go off)
Turn Off, then turn On the power to the receiver.
unit.
• Turn Off, then turn On the power to the receiver.
Bluetooth cellular phone.
• Move the car to a place where you can get a better
signal reception.
32
Page 35

Symptoms Remedies
Sound is interrupted or skipped during playback of a
Bluetooth audio device.
The connected audio device cannot be controlled. • Check whether the connected audio device supports
Bluetooth information:
If you wish to receive more information about Bluetooth, visit our JVC web site.
• Place the Bluetooth audio device nearer to the adapter.
• Disconnect the connected Bluetooth cellular phone.
• Turn Off, then turn On the power to the receiver.
• (When sound is not yet restored,)
connect the device again.
AVRCP.
Specifications
GENERAL
Power Requirement:
Operating Voltage:
DC 14.4 V (11 V to 16 V allowance)
Grounding System: Negative ground
Current consumption: 70 mA
Allowable Operating Temperature:
0°C to +40°C (32°F to 104°F)
Dimensions (W × H × D):
70 mm × 34.5 mm × 90 mm
13
(2-
/16” × 1-3/8” × 3-9/16”)
Mass (approx.):
150 g (0.32 lbs)
(excluding accessories)
BLUETOOTH SECTION
Bluetooth Version:
Bluetooth 1.2 certified
Output Power:
+4 dBm Max. (Power class 2)
Service Area:
Within 10 m (10.9 yd.)
Profile:
HSP (Headset Profile)
HFP (Hands-Free Profile)
A2DP (Advanced Audio Distribution Profile)
AVRCP (Audio/Video Remote Control Profile)
SPP (Serial Port Profile)
OPP (Object Push Profile)
Design and specifications are subject to change without
notice.
33Others
Page 36

Bitte lesen Sie die Anleitung vollständig durch, bevor Sie das Gerät in Betrieb nehmen, um sicherzustellen, daß Sie
alles vollständig verstehen und die bestmögliche Leistung des Geräts erhalten.
Wir danken lhnen für den Kauf eines JVC Produkts.
Benutzerinformationen zur Entsorgung alter Geräte
Dieses Symbol zeigt an, dass das damit gekennzeichnete Produkt nicht als
normaler Haushaltsabfall entsorgt werden soll. Wenn Sie dieses Produkt
entsorgen möchten, halten Sie sich dabei bitte an die entsprechenden
Landesgesetze und andere Regelungen in Ihrem Land bzw. Ihrer Gemeinde. Die
DEUTSCH
Dieses Symbol ist nur in der
Europäischen Union gültig.
Sehr geehrter Kunde, sehr geehrte Kundin,
Dieses Gerät stimmt mit den gültigen europäischen Richtlinien und Normen bezüglich elektromagnetischer
Verträglichkeit und elektrischer Sicherheit überein.
Die europäische Vertretung für die Victor Company of Japan, Limited ist:
JVC Technology Centre Europe GmbH
Postfach 10 05 52
61145 Friedberg
Deutschland
korrekte Entsorgung dieses Produkts dient dem Umweltschutz und verhindert
mögliche Schäden für die Umwelt und die menschliche Gesundheit.
2
Page 37

Einleitung
Warnungen
• NUR FÜR VERWENDUNG MIT FAHRZEUGEN MIT
12 V UND NEGATIVER MASSE.
Wenn Ihr Fahrzeug mit einer anderen elektrischen
Spannung als 12 V und negative Masse arbeitet, ist
ein Spannungsinverter erforderlich, der bei einem
Fachhändler für JVC car audio erhältlich ist.
• Dieser Adapter wurde ausschließlich zur Verwendung
mit Auto-Receivern von JVC entworfen. Verwenden
Sie diesen Adapter nicht mit einem anderen AutoReceiver.
Vorsichtsmaßregeln
• Dieser Adapter ist zur Verwendung mit BluetoothGeräten entworfen (Handy und Audio-Player).
• Stellen Sie die Lautstärke nicht zu hoch ein, da
dadurch Außengeräusche blockiert werden und das
Fahren gefährlich werden kann.
• Führen Sie keine komplizierten Bedienungen beim
Fahren aus; andernfalls besteht die Gefahr, dass
Unfälle verursacht werden.
• Nehmen Sie beim Fahren keine komplizierten
Bedienungen vor, wie Wählen von Nummern,
Verwenden des Telefonbuchs usw. Wenn Sie solche
Bedienungen vornehmen möchten, stoppen Sie das
Fahrzeug an einer sicheren Stelle.
• Manche Bluetooth-Geräte lassen sich möglicherweise
je nach Bluetooth-Version des Geräts nicht an dieses
Gerät anschließen.
• Diese Einheit arbeitet u.U. bei bestimmten
Bluetooth-Geräten nicht.
• Der Verbindungszustand kann sich je nach
Umständen ändern.
Einleitung
3
Page 38

Einleitung
Über Bluetooth
Bluetooth ist eine drahtlose Funkkommunikations
technologie mit kurzer Reichweite für Mobilgeräte
wie Handys, tragbare PCs und ähnliche Geräte. Die
DEUTSCH
Bluetooth-Geräte können ohne Kabel miteinander
verbunden werden und kommunizieren.
• Die Wortmarke Bluetooth und die Logos sind
Eigentum der Bluetooth SIG, Inc., und jegliche
Verwendung solcher Marken durch die Victor
Company of Japan, Limited (JVC) geschieht unter
Lizenz. Andere Warenzeichen und Handelsnamen
sind Eigentum ihrer jeweiligen Besitzer und werden
von uns anerkannt.
• Die Seriennummer ist auf dem Schild auf der
Unterseite der Adaptereinheit aufgedruckt.
Zum Senden oder Empfangen von Sprache oder Daten
zwischen diesem Adapter und Ihrem Bluetooth-Gerät
darf der Abstand nicht größer als 10 m sein.
Der Übertragungsabstand kann aber je nach Umständen
auch geringer sein.
Bluetooth-Profil
Dieser Adapter unterstützt die folgenden Bluetooth-Profile;
HSP (Kopfhörer-Profil)
HSP (Freisprech-Profil)
A2DP (Advanced Audio Distribution Profile)
AVRCP (Audio/Video Remote Control Profile)
SPP (Serial Port Profile)
OPP (Object Push Profile)
Pairing und PIN-Code
Wenn Sie ein Bluetooth-Gerät zum ersten Mal an
Ihren Auto-Receiver über diesen Adapter anschließen,
nehmen Sie Registrierung und Pairing zwischen
dem Adapter und dem Gerät vor. Pairing erlaubt es
Bluetooth-Geräten, miteinander zu kommunizieren.
Um Pairing vorzunehmen, müssen Sie u.U. den
PIN-(Personal Identification Number) Code des
anzuschließen gewünschten Bluetooth-Geräts
eingeben.
Allgemeine Information
• Dieser Adapter unterstützt nur Bluetooth-konforme
Auto-Receiver von JVC.
• Siehe Liste (im Karton) zur Bestätigung der Länder,
in denen die Bluetooth®-Funktion verwendet werden
kann.
Merkmale
Durch Verwendung dieses Adapters können Sie
den Bluetooth-Geräte mit Ihrem Receiver wie folgt
verwenden:
• Einen Ruf tätigen/empfangen
• Anrufen vom Telefonbuch
• Anrufen mit Sprachbefehl
• Anrufen vom Rufhistorien
– Neuwahl
– Verpasste Anrufe
– Empfangene Anrufe
• Anrufen mit Kurzwahlnummern
• Empfangen von SMS (Short Message Service)/TextMeldungen
• Wiedergabe mit einem Bluetooth-Audioplayer
Verfügbare Funktionen können sich je nach
Typ Ihres Receivers und des Bluetooth-Geräts
unterscheiden.
4
Page 39

Inhalt
Einleitung
Einleitung .................................... 3
Warnungen .......................................................3
Vorsichtsmaßregeln ..........................................3
Über Bluetooth .................................................. 4
Allgemeine Information ....................................4
Erste Schritte ............................... 6
Einbau ...............................................................6
Anschließen an den Receiver ............................. 8
Prüfen Sie den Typ Ihres Receivers .....................9
Menü-Strukturen ............................................ 10
Anschluss
Bluetooth-Verbindung ...............12
Wählen einer Quelle ....................................... 12
Registrieren eines Bluetooth-Geräts
— Pairing ................................................. 12
Anschließen/Abtrennen des Geräts ................ 17
Bluetooth-Telefon
Bluetooth-Telefon-
Bedienungen .........................19
Wählen einer Quelle ....................................... 19
Einen Ruf empfangen ..................................... 19
Anrufen einer Nummer im Telefonbuch .......... 20
Erweiterte Funktionen ...............21
Anrufen mit Sprachbefehl .............................. 21
Anrufen einer Nummer aus der
Ruf-Historie ............................................... 22
Direktes Rufen der zuletzt gerufenen Nummer
— Redial .................................................. 23
Entgegennehmen eines wartenden Rufs ........ 23
Verwendung von Kurzwahlnummern ............. 24
Anruf durch Eingabe einer Telefonnummer .... 25
Empfangen von SMS (Short Message Service)/
Text-Meldungen ........................................ 27
Lesen einer SMS/Text-Meldung ...................... 27
Bluetooth-Audio
Bluetooth-Audiobedienungen ....29
Wählen einer Quelle ....................................... 29
Wiedergabebetrieb ......................................29
Einstellungen
Andere Einstellungen .................30
Grundlegendes Verfahren ............................... 30
Einstellpunkte ................................................ 31
Andere
Störungssuche ...........................32
Technische Daten .......................33
Einleitung
5
Page 40

Erste Schritte
Einbau
Warnung
Vermeiden Sie den Einbau des Adapters und Mikrofons
an den folgenden Stellen.
– Wo die Teile sicheres Fahren verhindern.
– Wo die Teile direktem Sonnenlicht oder direktem
DEUTSCH
Warmluftstrom von der Heizung ausgesetzt ist, oder
an sehr heißen Stellen.
– Wo die Teile Regen, Wasserspritzern oder sehr
starker Luftfeuchtigkeit ausgesetzt ist.
– Wo die Teile Staub ausgesetzt ist.
– An einer instabilen Stelle.
– Wo die Teile Anbauteile des Fahrzeugs beschädigen
können.
– Wo elektromagnetische Störungen vorliegen (z.B.:
Kofferraum usw.).
Montage des Geräts
Wischen Sie die gewählte Oberfläche gut sauber und
bringen Sie das Klettband an.
Schnittstellenadapter-Einheit
Klettband (
hart)
(mitgeliefert)
Klettband (weich)
(mitgeliefert)
• Wenn das Klettband (hart) direkt an der Automatte
anhaftet, können Sie diese Einheit einbauen, ohne
das Klettband (weich) zu verwenden.
• Die Seriennummer ist auf dem Schild auf der
Unterseite der Einheit aufgedruckt. Das Schild darf
nicht durch Klettband verdeckt werden.
6
Page 41

Einbau der Mikrofoneinheit
1 Bringen Sie das Mikrofon am
Mikrofonclip an.
Microfon
(mitgeliefert)
Zur SchnittstellenadapterEinheit
2 Installieren Sie die Mikrofoneinheit.
Zum Anbringen auf der Sonnenblende
Mikrofoneinheit (mitgeliefert)
Mikrofonclip
(mitgeliefert)
Zum Einstellen des Mikrofonwinkels
Sichern Sie das Mikrofonkabel mit Kabelklemmen
(nicht mitgeliefert), wenn erforderlich.
Zum Anbringen an der Lenksäule
Bringen Sie die Mikrofoneinheit an der Oberseite
der Lenksäule an.
Mikrofoneinheit
(mitgeliefert)
Doppelseitiges
Klebeband
(mitgeliefert)
Einleitung
7
Page 42

Erste Schritte
Anschließen an den Receiver
Typischer Anschluss
Immer den Receiver und die Zündung des Fahrzeugs mit dem Zündschlüssel ausschalten, bevor die Einheit
angeschlossen oder abgetrennt wird.
DEUTSCH
Von Mikrofon-Einheit
Schnittstellenadapter-Einheit
CD-Wechsler-Buchse
Receiver
• Sie können die folgenden externen Komponenten an diesen Adapter anschließen;
- CD-Wechsler
- SIRIUS-Satelliten-Radio
- XM-Satelliten-Radio
- DAB-Tuner
- Schnittstellenadapter für iPod
- D.player schnittstellenadapter
- Line-Eingangsadapter
- Aux-Eingangsadapter
• Siehe auch die Ihrem Receiver mitgelieferte Bedienungsanleitung.
Signalkabel
(mitgeliefert für oder angebracht an die externe
Komponente)
Zu anderen externen
Komponenten (siehe unten)
8
Page 43

Prüfen des Typs des Receivers
Bedienungsverfahren über einen Receiver können sich
je nach Typ des Receivers unterscheiden.
Prüfen Sie den Typ Ihres Receivers anhand der Tabelle
unten.
Beispiel: Typ des Receivers
Typ A
• Wenn Ihre Antwort „Ja“ ist, folgen Sie
• Wenn Ihre Antwort „Nein“ ist, folgen Sie
Ist Ihr Receiver KD-NX5000?
Ist Ihr Receiver mit dem
eingebauten Monitor
ausgestattet?
Ist Ihr Receiver mit
dem 3-dimensionalen
Flüssigkristalldisplay
ausgestattet?
.
Typ A
Typ B
Typ C
Typ D
• Menü-Bedienungen können sich je nach Typ Ihres
Receivers unterscheiden.
Einzelheiten siehe mit Ihrem Receiver mitgelieferte
Bedienungsanleitung.
.
Typ B
Typ C
Typ D
Einleitung
9
Page 44
Erste Schritte
Menü-Strukturen
Anzeigesprache
In dieser Anleitung werden englischsprachige Anzeigen zur Erklärung verwendet. Sie können bei
einigen Receivern die Anzeigesprache auf eine andere Sprache als Englisch umstellen. Siehe mit
Ihrem Receiver mitgelieferte Bedienungsanleitung.
DEUTSCH
Bluetooth-Telefon
Dial / Dial Menu / DIAL *1Wählen Sie die Methode zum Vornehmen eines Rufs.
Redial / REDIAL *
Received Calls / RECEIVE
Phonebook / PH BOOK *
Missed Calls / MISSED *
Phone number / NUMBER
Voice / Voice Dialing /
VOICE *
Message *
1, 2, 4
Sie können eine Meldung aus den folgenden Meldungshistorien wählen.
Unread
Read
Unsent
Sent
Open / OPEN *
5
Bereiten Sie die Einheit zum Herstellen einer neuen Bluetooth-Verbindung vor.
Wählen Sie dies, wenn eine Bluetooth-Verbindung mit einem Gerät zum ersten Mal
hergestellt wird, vom Gerät. ☞ Seite 12.
Search / SEARCH *
5
Bereiten Sie die Einheit zum Herstellen einer neuen Bluetooth-Verbindung vor.
Wählen Sie dies, wenn eine Bluetooth-Verbindung mit einem Gerät zum ersten Mal
hergestellt wird, von der Einheit. Die Einheit such nach verfügbaren neuen
Geräten. ☞ Seite 14.
Special Device / SPECIAL
*5Zeigt die Liste der Bluetooth-Geräte, die ein besonderes Verfahren zum Herstellen
einer Bluetooth-Verbindung erfordern. Wählen Sie ein zum Anschluss gewünschtes
Gerät. ☞ Seite 15.
Connection / Connect /
CONNECT *
6
Disconnection /
Disconnect / DISCNNCT
Delete Pair / DELETE *
Nach dem Wählen eines Geräts unter den registrierten Geräten stellen Sie die
Verbindung her. ☞ Seite 17.
Trennen Sie das aktuelle Gerät vor dem Anschließen eines anderen Geräts ab.
1
☞ Seite 18.
*
6
Löschen Sie die registrierten Geräte. ☞ Seite 16.
2
Wählen Sie eine Telefonnummer aus der Liste der
gewählten Telefonnummern. ☞ Seite 22.
*2Wählen Sie eine Telefonnummer aus der Liste der
empfangenen Rufe. ☞ Seite 22.
2
Wählen Sie einen Namen, dann eine Telefonnummer
aus dem Telefonbuch des angeschlossenen Handys.
☞ Seite 20.
2
Wählen Sie eine Telefonnummer aus der Liste der
verpassten Rufe. ☞ Seite 22.
Geben Sie die Telefonnummer ein. ☞ Seite 25.
3
Sie können mit Sprachbefehl anrufen. ☞ Seite 21.
Meldungen, die Sie nicht gelesen haben. ☞ Seite 27.
Meldungen, die Sie gelesen haben. ☞ Seite 27.
Meldungen, die Sie nicht gesendet haben. ☞ Seite 27.
Meldungen, die Sie gesendet haben. ☞ Seite 27.
10
Page 45

Setup / Settings /
SETTING
Bluetooth-Audio
Open / OPEN *
Search / SEARCH *
Special Device /
SPECIAL
Connection / Connect /
CONNECT *
Disconnection /
Disconnect / DISCNNCT
Delete Pair / DELETE *
Setup / Settings /
SETTINGS
5
5
5
*
6
Ändern Sie die Einstellungen. ☞ Seite 30.
Auto Connect / AUTO CNT Sie können das Bluetooth-Handy auf automatische
Verbindung einstellen, wenn der Receiver
eingeschaltet wird.
Auto Answer /
AUTO ANS *
7
Message Info *
2, 4, 7
Sie können den Receiver auf automatische Annahme
oder Abweisen ankommender Rufe einstellen.
Sie können den Receiver darauf einstellen, zu
informieren, wenn Sie eine SMS/Text-Meldung
empfangen.
Microphone Level /
Mic Setting / MIC SET *
Version / VERSION *
Stellen Sie eine Mikrofonlautstärke ein.
7
8
Lassen Sie die Version von Software und Hardware
anzeigen.
Bereiten Sie die Einheit zum Herstellen einer neuen Bluetooth-Verbindung vor.
Wählen Sie dies, wenn eine Bluetooth-Verbindung mit einem Gerät zum ersten Mal
hergestellt wird, vom Gerät. ☞ Seite 12.
Bereiten Sie die Einheit zum Herstellen einer neuen Bluetooth-Verbindung vor.
Wählen Sie dies, wenn eine Bluetooth-Verbindung mit einem Gerät zum ersten Mal
hergestellt wird, von der Einheit. Die Einheit such nach verfügbaren neuen Geräten.
☞ Seite 14.
Zeigt die Liste der Bluetooth-Geräte, die ein besonderes Verfahren zum Herstellen
einer Bluetooth-Verbindung erfordern. Wählen Sie ein zum Anschluss gewünschtes
Gerät. ☞ Seite 15.
Nach dem Wählen eines Geräts unter den registrierten Geräten stellen Sie die
Verbindung her. ☞ Seite 17.
Trennen Sie das aktuelle Gerät vor dem Anschließen eines anderen Geräts ab.
1
☞ Seite 18.
*
6
Löschen Sie die registrierten Geräte. ☞ Seite 16.
Ändern Sie die Einstellungen. ☞ Seite 30.
Version / VERSION *
8
Lassen Sie die Version von Software und Hardware anzeigen.
1
Nur wählbar, wenn das Gerät angeschlossen ist.
*
2
*
Nur wählbar, wenn das Handy mit dieser Funktion ausgestattet ist.
3
Nur wählbar, wenn das Handy mit dieser Spracherkennungssystem ausgestattet ist.
*
4
Ausgenommen Typ D.
*
5
Nur wählbar, wenn „New Device“ gewählt ist.
*
6
Nur wählbar, wenn das registrierte Gerät gewählt ist.
*
7
Nicht wählbar für „New Device“.
*
8
Wenn Sie weitere Information über Bluetooth wünschen, besuchen Sie uns auf der JVC-Website.
*
Einleitung
11
Page 46

Bluetooth-Verbindung
• Einzelheiten über Menü-Bedienung siehe mit Ihrem Receiver mitgelieferte
Bedienungsanleitungen.
• Anzeigen im Display (Monitor) und Tastenbezeichnungen unterscheiden sich unter den Receivern.
Beispiel: SOURCE: SRC 7: 7 / BACK MENU: AV MENU, AV Menu
Bluetooth Phone: Bluetooth PHONE, BT-PHONE
New Device: New device, NEW DEVICE
Vorbereitung: Schalten Sie die Bluetooth-Funktion am Bluetooth-Gerät ein.
DEUTSCH
Wählen einer Quelle
Bevor Sie ein Bluetooth-Gerät anschließen, schalten Sie
die Quelle auf Bluetooth-Gerät um.
für Typ A
Halten Sie die Taste MENU gedrückt,
um das Bluetooth-Menü aufzurufen, oder
drücken Sie die Taste SRC wiederholt, um
„Bluetooth Audio“ zu wählen.
für Typ B/Typ C/Typ D
Sie können „Bluetooth Phone“ und
„Bluetooth Audio“ als Quelle wählen.
Drücken Sie SOURCE wiederholt, um
„Bluetooth Phone“ oder „Bluetooth
Audio“ zu wählen.
Registrieren eines BluetoothGeräts — Pairing
Wenn Sie ein Bluetooth-Gerät zum ersten mal
anschließen, nehmen Sie Registrierung und Pairing
zwischen der Einheit und dem Gerät vor.
•
Pairing ist u.U. mit manchen Bluetooth-Geräten nicht
möglich.
Zum Anschließen vom anderen
Bluetooth-Gerät
Verwenden Sie „Open“ zur Herstellung der
Verbindung mit einem Bluetooth-Gerät vom Gerät.
für Typ A
1 Rufen Sie den „Bluetooth Phone“-
Bildschirm auf oder wählen Sie
„Bluetooth Audio“ als Quelle.
2 Drücken Sie 5/∞ zur Wahl von „New
Device“.
3 Rufen Sie das Menü auf, und wählen Sie
„Mode“ ] „Open“.
4 Drücken Sie 4/¢ /5/∞
zur Eingabe des PIN- (Personal
Identification Number) Codes, und
wählen Sie dann „Connect“.
4/¢/5/∞:
Wählen Sie eine Zahl.
ENT:
Geben Sie die Nummer ein.
• Siehe mit Ihrem Receiver mitgelieferte
Bedienungsanleitung.
• Sie können eine beliebige Zahl wählen (1 bis 16
Stellen).
• Manche Geräte haben ihren eigenen PIN-Code.
Geben Sie den festgelegten PIN-Code in die
Einheit ein.
5 Verwenden Sie das Bluetooth-Gerät
zum Suchen der Einheit.
• Geben Sie den gleichen PIN-Code (wie
im obigen Schritt eingegeben) am
anzuschließenden Gerät ein.
„Connected (und der Geräte-Name)“
erscheint im Display.
12
Page 47

für Typ B
1
Während „Bluetooth Phone“ oder
„Bluetooth Audio“ als Quelle
gewählt ist, wählen Sie „New Device“.
2 Rufen Sie das Menü auf, und wählen Sie
„Bluetooth“ ] „Open“.
3 Geben Sie den PIN- (Personal
Identification Number) Code ein.
Siehe mit Ihrem Receiver mitgelieferte
Bedienungsanleitung.
• Sie können eine beliebige Zahl wählen (1 bis 16
Stellen).
•
Manche Geräte haben ihren eigenen PIN-Code. Geben
Sie den festgelegten PIN-Code in die Einheit ein.
4 Verwenden Sie das Bluetooth-Gerät
zum Suchen der Einheit.
•
Geben Sie den gleichen PIN-Code (wie im obigen
Schritt eingegeben) am anzuschließenden Gerät ein.
„Connected (und der Geräte-Name)“
erscheint im Display.
für Typ C
1
Während „Bluetooth Phone“ oder
„Bluetooth Audio“ als Quelle
gewählt ist, wählen Sie „New Device“.
2 Wählen Sie MODE, wählen Sie dann
„Open“.
3 Verwenden Sie die folgenden Tasten zur
Wahl des PIN- (Personal Identification
Number) Codes.
4/¢: Bewegen Sie die Eingabe-Position.
5/∞: Wählen Sie eine Zahl.
5:
1: Geben Sie die Nummer ein.
• Sie können eine beliebige Zahl wählen (1 bis 16
Stellen).
•
Manche Geräte haben ihren eigenen PIN-Code. Geben
Sie den festgelegten PIN-Code in die Einheit ein.
Löschen Sie alle Einträge.
4 Verwenden Sie das Bluetooth-Gerät
zum Suchen der Einheit.
•
Geben Sie den gleichen PIN-Code (wie im obigen
Schritt eingegeben) am anzuschließenden Gerät ein.
„Connected (und der Geräte-Name)“
erscheint im Display.
für Typ D
1 Während „Bluetooth Phone“ oder
„Bluetooth Audio“ als Quelle
gewählt ist, drücken Sie 4/¢ zur
Wahl von „NEW“.
2 Drücken Sie ∞, und wählen Sie dann
„OPEN“.
3 Verwenden Sie die folgenden Tasten zur
Wahl des PIN- (Personal Identification
Number) Codes.
4/¢: Bewegen Sie die Eingabe-Position.
VOLUME +/– (Steuerregler):
∞: Geben Sie die Nummer ein.
• Sie können eine beliebige Zahl wählen (1 bis 16
Stellen).
•
Manche Geräte haben ihren eigenen PIN-Code. Geben
Sie den festgelegten PIN-Code in die Einheit ein.
Wählen Sie eine Nummer.
4 Verwenden Sie das Bluetooth-Gerät
zum Suchen der Einheit.
•
Geben Sie den gleichen PIN-Code (wie im obigen
Schritt eingegeben) am anzuschließenden Gerät ein.
„CONNECT (und der Geräte-Name)“ erscheint
im Display.
13Anschluss
Page 48

Bluetooth-Verbindung
Registrieren eines Bluetooth-Geräts — Pairing
Zum Anschluss eines verfügbaren
Geräts von der Einheit
Verwenden Sie „Search“ zur Herstellung der
Verbindung mit einem Bluetooth-Gerät von der Einheit.
DEUTSCH
für Typ A
für Typ B
1 Während „Bluetooth Phone“
oder „Bluetooth Audio“ als
Quelle gewählt ist, wählen Sie „New
Device“.
2 Rufen Sie das Menü auf, und wählen Sie
1 Rufen Sie den „Bluetooth Phone“-
Bildschirm auf oder wählen Sie
„Bluetooth Audio“ als Quelle.
2 Drücken Sie 5/∞ zur Wahl von „New
Device“.
3 Rufen Sie das Menü auf, und wählen Sie
„Mode“ ] „Search“.
Die Einheit sucht nach den Geräten und zeigt die
Liste verfügbarer Geräte.
„Bluetooth“ ] „Search“.
Die Einheit sucht nach den Geräten und zeigt die
Liste verfügbarer Geräte.
3 Wählen Sie einen zum Anschluss
gewünschten Gerätenamen.
4 Geben Sie den gleichen PIN-(Personal
Identification Number) Code des
anzuschließenden Geräts ein.
• Siehe mit Ihrem Receiver mitgelieferte
4 Wählen Sie einen zum Anschluss
gewünschten Gerätenamen.
5 Drücken Sie 4/¢ /5/∞ um den
PIN-(Personal Identification Number)
Code des anzuschließen gewünschten
Geräts einzugeben, und wählen Sie
dann „Connect“.
4/¢/5/∞:
ENT:
• Siehe mit Ihrem Receiver mitgelieferte
Bedienungsanleitung.
„Connected (und der Geräte-Name)“
erscheint im Display.
Wählen Sie eine Nummer.
Geben Sie die Nummer ein.
„Connected (und der Geräte-Name)“
erscheint im Display.
für Typ C
1 Während „Bluetooth Phone“
oder „Bluetooth Audio“ als
Quelle gewählt ist, wählen Sie „New
Device“.
2 Wählen Sie MODE, wählen Sie dann
„Search“.
Die Einheit sucht nach den Geräten und zeigt die
Liste verfügbarer Geräte.
3 Wählen Sie einen zum Anschluss
gewünschten Gerätenamen.
(Fortsetzung)
Bedienungsanleitung.
14
Page 49

4 Verwenden Sie die folgenden Tasten,
um den PIN-(Personal Identification
Number) Code des anzuschließenden
Geräts einzugeben.
4/¢:
5/∞: Wählen Sie eine Zahl.
5: Löschen Sie alle Einträge.
1: Geben Sie die Nummer ein.
„Connected (und der Geräte-Name)“
erscheint im Display.
für Typ D
Verschieben Sie die Eingabeposition.
Zum Anschließen eines Spezialgeräts
Manche Bluetooth-Geräte erfordern spezielle Verfahren,
um beim ersten Mal die Bluetooth-Verbindung
herzustellen. Sie müssen den Gerätenamen für diese
Bluetooth-Geräte vor der Registrierung wählen.
für Typ A
1 Rufen Sie den „Bluetooth Phone“-
Bildschirm auf oder wählen Sie
„Bluetooth Audio“ als Quelle.
2 Drücken Sie 5/∞ zur Wahl von „New
device“.
1 Während „Bluetooth Phone“ oder
„Bluetooth Audio“ als Quelle
gewählt ist, drücken Sie 4/¢ zur
Wahl von „NEW“.
2 Drücken Sie ∞, und wählen Sie dann
„SEARCH“.
Die Einheit sucht nach den Geräten und zeigt die
Liste verfügbarer Geräte.
3 Wählen Sie einen zum Anschluss
gewünschten Gerätenamen.
4 Verwenden Sie die folgenden Tasten,
um den PIN- (Personal Identification
Number) Code des anzuschließenden
Geräts einzugeben.
4/¢: Bewegen Sie die Eingabe-Position.
VOLUME +/– (Regelscheibe):
Wählen Sie eine Zahl.
∞: Geben Sie die Nummer ein.
„CONNECT (und der Geräte-Name)“ erscheint
im Display.
3 Rufen Sie das Menü auf, und wählen Sie
„Mode“ ] „Special Device“.
Die Spezialgeräte-Liste erscheint im Display.
4 Wählen Sie einen zum Anschluss
gewünschten Gerätenamen.
5 Schließen Sie das gewählte Gerät mit
„Open (Seite 12)“ oder „Search
(Seite 14)“ an.
für Typ B
1 Während „Bluetooth Phone“
oder „Bluetooth Audio“ als
Quelle gewählt ist, wählen Sie „New
device“.
2 Rufen Sie das Menü auf, und wählen
Sie „Bluetooth“ ] „Special
Device“.
Die Spezialgeräte-Liste erscheint im Display.
3 Wählen Sie einen zum Anschluss
gewünschten Gerätenamen.
4 Schließen Sie das gewählte Gerät mit
„Open (Seite 13)“ oder „Search
(Seite 14)“ an.
Anschluss
15
Page 50

Bluetooth-Verbindung
Registrieren eines Bluetooth-Geräts — Pairing
für Typ C
1 Während „Bluetooth Phone“
oder „Bluetooth Audio“ als
Quelle gewählt ist, wählen Sie „New
DEUTSCH
device“.
2 Drücken Sie MODE, und wählen Sie
dann „Special Device“.
Die Spezialgeräte-Liste erscheint im Display.
3 Wählen Sie einen zum Anschluss
gewünschten Gerätenamen.
4 Schließen Sie das gewählte Gerät mit
„Open (Seite 13)“ oder „Search
(Seite 14)“ an.
für Typ D
1 Während „Bluetooth Phone“ oder
„Bluetooth Audio“ als Quelle
gewählt ist, drücken Sie 4/¢ zur
Wahl von „NEW“.
2 Drücken Sie ∞, und wählen Sie dann
„SPECIAL“.
3 Wählen Sie einen zum Anschluss
gewünschten Gerätenamen.
Zum Löschen des registrierten Geräts
Sie können bis zu fünf Bluetooth-Geräte registrieren.
Wenn Sie ein 6. Gerät anschließen möchten, löschen Sie
eines der registrierten Geräte.
für Typ A
1 Rufen Sie den „Bluetooth Phone“-
Bildschirm auf oder wählen Sie
„Bluetooth Audio“ als Quelle.
2 Drücken Sie 5/∞ zum Wählen eines
registrierten Geräts, das Sie löschen
möchten.
3 Rufen Sie das Menü auf, und wählen Sie
„Mode“ ] „Delete Pair“.
4 Wählen Sie „Yes“ zum Löschen des
Geräts.
• Wenn Sie „No“ wählen, wird der Vorgang
für Typ B
1 Während „Bluetooth Phone“ oder
„Bluetooth Audio“ als Quelle
gewählt ist, wählen Sie ein zu löschen
gewünschtes registriertes Gerät.
2 Rufen Sie das Menü auf, und wählen Sie
4 Schließen Sie das gewählte Gerät mit
„OPEN (Seite 13)“ oder „SEARCH
(Seite 14)“ an.
„Bluetooth“ ] „Delete Pair“.
3 Wählen Sie „Yes“ zum Löschen des
Geräts.
• Wenn Sie „No“ wählen, wird der Vorgang
(Fortsetzung)
aufgehoben.
aufgehoben.
16
Page 51

für Typ C
1 Während „Bluetooth Phone“ oder
„Bluetooth Audio“ als Quelle
gewählt ist, wählen Sie ein zu löschen
gewünschtes registriertes Gerät.
2 Wählen Sie MODE, wählen Sie dann
„Delete Pair“.
3 Wählen Sie „Yes“ zum Löschen des
Geräts.
• Wenn Sie „No“ wählen, wird der Vorgang
aufgehoben.
für Typ D
1 Während „Bluetooth Phone“ oder
„Bluetooth Audio“ als Quelle
gewählt ist, drücken Sie 4/¢ zum
Wählen eines zu löschen gewünschten
registrierten Geräts.
2 Drücken Sie ∞, und wählen Sie dann
„DELETE“.
3 Wählen Sie „YES“ zum Löschen des
Geräts.
• Wenn Sie „NO“ wählen, wird der Vorgang
aufgehoben.
Anschließen/Abtrennen des
Geräts
Zum manuellen Anschließen eines
Geräts
Nur ein Gerät zur Zeit kann an jede Quelle
angeschlossen werden („Bluetooth Phone“ und
„Bluetooth Audio“).
für Typ A
1 Rufen Sie den „Bluetooth Phone“-
Bildschirm auf oder wählen Sie
„Bluetooth Audio“ als Quelle.
2 Drücken Sie 5/∞ zur Wahl eines
registrierten Geräts.
3 Wählen Sie „Mode“ ]
„Connection“ zum Anschließen
eines gewählten Geräts.
für Typ B
1 Während „Bluetooth Phone“ oder
„Bluetooth Audio“ als Quelle
gewählt ist, wählen Sie ein registriertes
Gerät.
2 Rufen Sie das Menü auf, und wählen Sie
„Bluetooth“ ] „Connect“ zum
Anschließen eines gewählten Geräts.
für Typ C
1 Während „Bluetooth Phone“ oder
„Bluetooth Audio“ als Quelle
gewählt ist, wählen Sie ein registriertes
Gerät mit 5/∞.
2 Drücken Sie MODE, und wählen Sie
dann „Connect“ zum Anschließen
eines gewählten Geräts.
Anschluss
17
Page 52

Bluetooth-Verbindung
Anschließen/Abtrennen des Geräts
für Typ D
1 Während „Bluetooth Phone“ oder
„Bluetooth Audio“ als Quelle
gewählt ist, drücken Sie 4/¢, um
DEUTSCH
ein registriertes Gerät zu wählen.
2 Drücken Sie ∞, und wählen Sie dann
„CONNECT“ zum Anschließen eines
gewählten Geräts.
Hinweis
Sie können das Bluetooth-Handy automatisch verbinden, wenn
der Receiver eingeschaltet wird.
Siehe „Auto Connect“ auf Seite 31.
(Fortsetzung)
Zum Abtrennen eines Geräts
Sie können ein Bluetooth-Gerät abtrennen.
für Typ A
1 Rufen Sie den „Bluetooth Phone“-
Bildschirm auf oder wählen Sie
„Bluetooth Audio“ als Quelle.
2 Wählen Sie „Mode“ ]
„Disconnection“ zum Abtrennen
eines Geräts.
für Typ B
1 Wählen Sie „Bluetooth Phone“
oder „Bluetooth Audio“ als Quelle.
2 Rufen Sie das Menü auf, und wählen
Sie „Bluetooth“ ] „Disconnect“
zum Abtrennen eines Geräts.
für Typ C
1 Wählen Sie „Bluetooth Phone“
oder „Bluetooth Audio“ als Quelle.
2 Drücken Sie MODE, und wählen Sie
dann „Disconnect“ zum Abtrennen
eines Geräts.
18
für Typ D
1 Wählen Sie „Bluetooth Phone“
oder „Bluetooth Audio“ als Quelle.
2 Drücken Sie ∞, und wählen Sie dann
„DISCNNCT“ zum Abtrennen eines
Geräts.
Page 53

Bluetooth-Telefon-Bedienungen
• Bevor Sie ein Bluetooth-Berät mit Ihrem Receiver verwenden, schließen Sie ein Bluetooth-Gerät
an. Siehe „Bluetooth-Anschluss“ auf Seite 12.
• Wenn der Ton während der Verwendung eines Bluetooth-Geräts gestoppt unterbrochen wird,
probieren Sie eine der folgenden Abhilfen.
• Schalten Sie die Stromversorgung des Receivers aus und dann wieder ein.
• (Wenn der Ton noch nicht wiederhergestellt ist,) Schließen Sie das Gerät erneut an. Siehe
„Anschließen/Abtrennen des Geräts“ auf Seite 17.
• Einzelheiten über Menü-Bedienung siehe mit Ihrem Receiver mitgelieferte
Bedienungsanleitungen.
• Anzeigen im Display (Monitor) und Tastenbezeichnungen unterscheiden sich unter den Receivern.
Beispiel: SOURCE: SRC 7: 7 / BACK MENU: AV MENU, AV Menu
Bluetooth Phone: Bluetooth PHONE, BT-PHONE
New Device: New device, NEW DEVICE
Wählen einer Quelle
Bevor Sie die Bluetooth-Telefon-Funktion verwenden,
schalten Sie die Quelle auf „Bluetooth Phone“
um.
für Typ A
Halten Sie die Taste MENU gedrückt,
um das Bluetooth-Menü aufzurufen, oder
drücken Sie die Taste PHONE an der
Fernbedienung.
für Typ B/Typ C/Typ D
Drücken Sie SOURCE wiederholt, um
„Bluetooth Phone“ zu wählen.
Einen Ruf empfangen
Wenn Sie einen Ruf empfangen, erscheint „Receiving Call
(und Name, Telefonnummer falls übernommen)“ im Display.
Drücken Sie eine der folgenden Tasten.
Die Quelle wechselt auf Bluetooth-Telefon um, und Sie
können den ankommenden Ruf empfangen.
Typ A
Beliebige Taste (ausgenommen /ATT, +/–,
MAP, SRC und 0.)
Typ B/Typ C/Typ D
Beliebige Taste (ausgenommen /ATT und VOL +/–.)
für das Sensorschirm-Modell
Sie können auch die Meldung „Receiving
Call“ im Sensordisplay drücken, um einen Ruf
entgegenzunehmen.
• Wenn ein anderer Ruf während des Gesprächs
ankommt, siehe „Entgegennehmen eines
wartenden Rufs“ auf Seite 23.
Zum Beenden des Rufs oder Abweisen eine
ankommenden Rufs halten, Sie eine der obigen
Tasten gedrückt.
Hinweis
Sie können den Receiver auf automatische Annahme oder
Abweisen des Rufs einstellen. Siehe „Auto Answer“ auf Seite 31.
Verbindung/Bluetooth-Telefon
19
Page 54

Bluetooth-Telefon-Bedienungen
Anrufen einer Nummer im Telefonbuch
Sie können eine Nummer aus dem Telefonbuch des angeschlossenen Handys anrufen.
Bevor Sie diese Funktion verwenden, übertragen Sie den Telefonbuchspeicher des Handys zu dieser Einheit (siehe
Bedienungsanleitung des Handys).
• Bei manchen Handys wird das Telefonbuch automatisch übertragen.
für Typ A
DEUTSCH
1 Rufen Sie das Anwählen-Menü auf.
2 Wählen Sie „Phonebook“.
3 Wählen Sie einen Namen aus der Liste.
Die Liste der Telefonnummern erscheint.
4 Wählen Sie eine gewünschte
Telefonnummer und drücken Sie ENT.
für Typ B
1 Rufen Sie das Anwählen-Menü auf.
2 Wählen Sie „Phonebook“.
3 Wählen Sie einen Namen aus der Liste.
Die Liste der Telefonnummern erscheint.
4 Wählen Sie eine gewünschte
Telefonnummer.
für Typ C
1 Rufen Sie das Anwählen-Menü auf.
2 Wählen Sie „Phonebook“.
3 Wählen Sie einen Namen aus der Liste.
Die Liste der Telefonnummern erscheint.
4 Wählen Sie eine gewünschte
Telefonnummer und drücken Sie die
Zifferntaste 1.
für Typ D
1 Rufen Sie das Anwählen-Menü auf.
2 Wählen Sie „PH BOOK“.
3 Wählen Sie einen Namen aus der Liste.
Die Liste der Telefonnummern erscheint.
4 Wählen Sie eine gewünschte
Telefonnummer und drücken Sie ∞.
20
Page 55

Erweiterte Funktionen
Anrufen mit Sprachbefehl
Wenn Ihr Handy ein Spracherkennungssystem hat, können Sie mit Sprachbefehl anrufen.
für Typ A
für Typ C
1 Rufen Sie den Bildschirm „Bluetooth
Phone“ auf.
2 Halten Sie MENU gedrückt.
„Say“ erscheint im Display.
• Sie können auch die Sprach-AnwahlFunktion aus dem Anwählen-Menü wählen.
Zur Verwendung der Funktion wählen Sie
„Voice“ aus dem Anwählen-Menü.
• Wenn Ihr Handy das Spracherkennungssystem
nicht unterstützt, erscheint die Meldung
„Error“.
3 Sprechen Sie den Namen der Stelle, die
angerufen werden soll.
• Sprechen Sie langsam und deutlich.
für Typ B
1 Halten Sie MENU gedrückt.
„Say Name“ erscheint im Display.
• Sie können auch die Sprach-AnwahlFunktion aus dem Anwählen-Menü wählen.
Zur Verwendung der Funktion wählen Sie
„Voice Dialling“ aus dem AnwählenMenü.
• Wenn Ihr Handy das Spracherkennungssystem
nicht unterstützt, erscheint die Meldung
„Error“.
2 Sprechen Sie den Namen der Stelle, die
angerufen werden soll.
• Sprechen Sie langsam und deutlich.
1 Halten Sie MODE gedrückt.
„Say“ erscheint im Display.
• Sie können auch die Sprach-AnwahlFunktion aus dem Anwählen-Menü wählen.
Zur Verwendung der Funktion wählen Sie
„Voice“ aus dem Anwählen-Menü.
• Wenn Ihr Handy das Spracherkennungssystem
nicht unterstützt, erscheint die Meldung
„Error“.
2 Sprechen Sie den Namen der Stelle, die
angerufen werden soll.
• Sprechen Sie langsam und deutlich.
für Typ D
1 Halten Sie MODE gedrückt.
„SAY“ erscheint im Display.
• Sie können auch die Sprach-AnwahlFunktion aus dem Anwählen-Menü wählen.
Zur Verwendung der Funktion wählen Sie
„VOICE“ aus dem Anwählen-Menü.
• Wenn Ihr Handy das Spracherkennungssystem
nicht unterstützt, erscheint die Meldung
„ERROR“.
2 Sprechen Sie den Namen der Stelle, die
angerufen werden soll.
• Sprechen Sie langsam und deutlich.
Bluetooth-Telefon
21
Page 56

Erweiterte Funktionen
Anrufen einer Nummer aus der Ruf-Historie
Dieses Gerät hat drei Arten von Ruf Historien — Neuwahl, empfangene Rufe und verpasste Rufe. Sie können eine
Nummer aus diesen Ruf-Historien anrufen.
für Typ A
1 Rufen Sie das Anwählen-Menü auf.
DEUTSCH
2 Wählen Sie eine Ruf-Historie.
Sie können unter den folgenden Ruf-Historien
wählen;
Redial:
Kürzlich getätigte Rufe.
Received Calls:
Kürzlich empfangene Rufe.
Missed Calls:
Kürzlich verpasste Rufe.
3 Wählen Sie einen Namen
(falls übernommen) oder eine
Telefonnummer und drücken Sie ENT.
für Typ B
1 Rufen Sie das Anwählen-Menü auf.
2 Wählen Sie eine Ruf-Historie.
Sie können unter den folgenden Ruf-Historien
wählen;
Redial:
Kürzlich getätigte Rufe.
Received Calls:
Kürzlich empfangene Rufe.
Missed Calls:
Kürzlich verpasste Rufe.
3 Wählen Sie einen Namen (falls
übernommen) oder Telefonnummer.
22
Page 57

für Typ C
1 Rufen Sie das Anwählen-Menü auf.
2 Wählen Sie eine Ruf-Historie.
Sie können unter den folgenden Ruf-Historien
wählen;
Redial:
Kürzlich getätigte Rufe.
Received Calls:
Kürzlich empfangene Rufe.
Missed Calls:
Kürzlich verpasste Rufe.
3 Wählen Sie einen Namen
(falls übernommen) oder eine
Telefonnummer und drücken Sie die
Zifferntaste 1.
für Typ D
1 Rufen Sie das Anwählen-Menü auf.
2 Wählen Sie eine Ruf-Historie.
Sie können unter den folgenden Ruf-Historien
wählen;
REDIAL:
Kürzlich getätigte Rufe.
RECEIVED:
Kürzlich empfangene Rufe.
MISSED:
Kürzlich verpasste Rufe.
3 Wählen Sie einen Namen
(falls übernommen) oder eine
Telefonnummer und drücken Sie ∞.
Direktes Rufen der zuletzt
gerufenen Nummer
— Redial
Diese Funktion steht zur Verfügung, wenn die mit
Ihrem Receiver mitgelieferte Fernbedienung eine
PHONE-Taste hat.
Nur an der Fernbedienung
1 Halten Sie PHONE gedrückt.
Die zuletzt gerufene Telefonnummer wird
angezeigt.
2 Drücken Sie die Taste PHONE.
Entgegennehmen eines
wartenden Rufs
Wenn Ihr Handy mit der Anklopfen-Funktion
ausgestattet ist, können Sie den aktuellen Ruf in
die Warteschleife setzen und den wartenden Ruf
entgegennehmen.
Drücken Sie eine der folgenden Tasten.
Zum Wiederherstellen des auf Warteschleife
gesetzten Rufs drücken Sie eine der folgenden Tasten
erneut.
• Wenn Sie einen Ruf beenden, können Sie die
Verbindung zum nächsten herstellen.
Typ A
Beliebige Taste (ausgenommen /ATT, +/–,
MAP, SRC und 0.)
Typ B/Typ C/Typ D
Beliebige Taste (ausgenommen /ATT und
VOL +/–.)
für das Sensorschirm-Modell
Sie können auch die Meldung „Receiving
Call“ im Sensordisplay drücken.
Bluetooth-Telefon
23
Page 58

Erweiterte Funktionen
Verwendung von Kurzwahlnummern
Sie können bis zu 6 Telefonnummern voreingeben.
Zum Speichern einer Kurzwahlnummer
für Typ A
1 Wählen Sie eine zur Kurzwahl
DEUTSCH
gewünschte Telefonnummer aus der
Nummernliste (Phonebook, Redial,
Received Calls oder Missed Calls).
2 Halten Sie ENT gedrückt, um die
Kurzwahlnummerliste zu sehen.
3 Wählen Sie die Festwahlnummer,
unter der gespeichert werden soll, und
drücken Sie ENT.
für Typ B
1 Wählen Sie eine zur Kurzwahl
gewünschte Telefonnummer aus der
Nummernliste (Phonebook, Redial,
Received Calls oder Missed Calls).
2 Halten Sie ENT gedrückt, um die
Kurzwahlnummerliste zu sehen.
für das Sensorschirm-Modell
Halten Sie eine Telefonnummer am Sensorschirm
gedrückt.
für Typ C/Typ D
1 Wählen Sie eine zur Kurzwahl
gewünschte Telefonnummer aus der
Nummernliste (Phonebook, Redial,
Received Calls oder Missed Calls).
2 Eine Zifferntaste am Receiver gedrückt
halten, unter der die Telefonnumer
abgespeichert werden soll.
Zum Rufen einer Kurzwahl-
Telefonnummer
für Typ A/Typ B
1 Halten Sie 5/∞ gedrückt, um die
Kurzwahlnummerliste zu sehen.
für das Sensorschirm-Modell
Zeigen Sie die Kurzwahlnummerliste an.
2 Wählen Sie die Kurzwahlnummer, die
angerufen werden soll.
für Typ C/Typ D
Drücken Sie eine Zifferntaste der
anzurufenden Nummer am Receiver.
3 Wählen Sie die Festsendernummer,
unter der gespeichert werden soll.
24
Page 59

Anruf durch Eingabe einer Telefonnummer
Sie können einen Anruf tätigen, indem Sie eine Telefonnummer am Receiver eingeben.
für Typ A
für Typ B
1 Rufen Sie das Anwählen-Menü auf.
2 Wählen Sie „Phone Number“.
3 Drücken Sie 4/¢ /5/∞ zur
Eingabe einer Telefonnummer, und
wählen Sie dann „Dial“.
4/¢/5/∞:
Wählen Sie eine Zahl.
ENT: Geben Sie eine Zahl ein.
Hinweis
Sie können die eingegebene Telefonnummer in der
Kurzwahlliste speichern. Wählen Sie „Store“ in Schritt 3
zur Anzeige der Kurzwahlliste.
Wählen Sie die Festwahlnummer, unter der gespeichert
werden soll, und drücken Sie ENT.
1 Rufen Sie das Anwählen-Menü auf.
2 Wählen Sie „Phone Number“.
3 Geben Sie eine Telefonnummer ein.
Siehe mit Ihrem Receiver mitgelieferte
Bedienungsanleitung.
Hinweis
Sie können die eingegebene Telefonnummer in der
Kurzwahlliste speichern. Halten Sie ENT gedrückt oder
drücken Sie „PRESET“ am Sensorschirm, um die
Kurzwahlliste zu sehen.
Wählen Sie die Festsendernummer, unter der gespeichert
werden soll.
Bluetooth-Telefon
25
Page 60

Erweiterte Funktionen
für Typ C
1 Rufen Sie das Anwählen-Menü auf.
2 Wählen Sie „PHONE NUMBER“.
3 Drücken Sie 4/¢ /5/∞ zur
Eingabe einer Telefonnummer, und
DEUTSCH
drücken Sie dann die Zifferntaste 1.
4/¢:
5/∞: Wählen Sie eine Zahl.
5: Löschen Sie alle Einträge.
Hinweis
Sie können die eingegebene Telefonnummer in der
Kurzwahlliste speichern. Halten Sie die Zifferntaste
gedrückt, unter der gespeichert werden soll.
Verschieben Sie die Eingabeposition.
für Typ D
1 Rufen Sie das Anwählen-Menü auf.
2 Wählen Sie „NUMBER“.
3 Drücken Sie 4/¢,
VOLUME +/– zur Eingabe einer
Telefonnummer, und drücken Sie
∞.
dann
4/¢:
VOLUME +/– (Regelscheibe):
Hinweis
Sie können die eingegebene Telefonnummer in der
Kurzwahlliste speichern. Halten Sie die Zifferntaste
gedrückt, unter der gespeichert werden soll.
Verschieben Sie die Eingabeposition.
Wählen Sie eine Zahl.
26
Page 61
Empfangen von SMS
(Short Message Service)/
Text-Meldungen
Wenn Ihr Handy SMS (Short Message Service)/
Text-Meldungen verwenden kann, können Sie die
Meldungen auf dem Display (Monitor) des Receivers
lesen.
Wenn Sie eine Meldung empfangen, erscheint
„Receiving Message/Receiving MSG/
RCV MSG“ im Display (Monitor).
für Typ A/Typ B
Drücken Sie ENT oder „YES“ im
Sensorschirm, um die Meldung zu lesen.
für Typ C
Drücken Sie 1 zum Lesen der Meldung.
Für Typ D
„RCV MSG“ erscheint im Display, um auf die
Ankunft der Meldung hinzuweisen.
• Sie können nicht die empfangene Meldung im
Display lesen.
Lesen einer SMS/
Text-Meldung
für Typ A
1 Rufen Sie den Bildschirm „Bluetooth
Phone“ auf.
2 Wählen Sie „Mode“ ] „Message“.
3 Wählen Sie eine Meldungshistorie.
Sie können einen der folgenden MeldungshistorieBildschirme wählen;
Unread:
Meldungen, die Sie noch nicht gelesen
haben.
Read:
Meldungen, die Sie bereits gelesen haben.
Unsent:
Meldungen, die Sie noch nicht gesendet
haben.
Sent:
Meldungen, die Sie bereits gesendet haben.
4 Wählen Sie eine zu Lesen gewünschte
Meldung.
Zum späteren Lesen der Meldung (nur
für Typ A/B/C)
Drücken Sie 7 oder 3 (für Typ C) wenn Sie eine SMS/
Text-Meldung empfangen. Die erhaltene Meldung wird
in Unread in den Meldungshistorien gespeichert.
Hinweis
Sie können darauf einstellen, die Meldung nicht
anzuzeigen, wenn Sie eine SMS/Text-Meldung empfangen.
Siehe auch „Message Info“ auf Seite 31.
Bluetooth-Telefon
27
Page 62

Erweiterte Funktionen
für Typ B
1 Wählen Sie „Bluetooth“ ]
„Message Menu“.
2 Wählen Sie eine Meldungshistorie.
Sie können einen der folgenden Meldungshistorie-
DEUTSCH
Bildschirme wählen;
Unread:
Meldungen, die Sie noch nicht gelesen
haben.
Read:
Meldungen, die Sie bereits gelesen haben.
Unsent:
Meldungen, die Sie nicht gesendet haben.
Sent:
Meldungen, die Sie bereits gesendet haben.
3 Wählen Sie eine zu Lesen gewünschte
Meldung.
für Typ C
1 Wählen Sie MODE, wählen Sie dann
„Message Menu“.
2 Wählen Sie eine Meldungshistorie.
Sie können einen der folgenden MeldungshistorieBildschirme wählen;
Unread:
Meldungen, die Sie noch nicht gelesen
haben.
Read:
Meldungen, die Sie bereits gelesen haben.
Unsent:
Meldungen, die Sie nicht gesendet haben.
Sent:
Meldungen, die Sie bereits gesendet haben.
3 Wählen Sie eine zu Lesen gewünschte
Meldung.
für Typ D
Nicht für diesen Typ verfügbar.
28
Page 63

Bluetooth-Audiobedienungen
• Bevor Sie ein Bluetooth-Berät an Ihrem Receiver verwenden, schließen Sie ein Bluetooth-Gerät
an. Siehe „Bluetooth-Anschluss“ auf Seite 12.
• Wenn der Ton während der Verwendung eines Bluetooth-Geräts gestoppt unterbrochen wird,
probieren Sie eine der folgenden Abhilfen.
• Schalten Sie die Stromversorgung des Receivers aus und dann wieder ein.
• (Wenn der Ton noch nicht wiederhergestellt ist,) Schließen Sie das Gerät erneut an. Siehe
„Anschließen/Abtrennen des Geräts“ auf Seite 17.
• Einzelheiten über Menü-Bedienung siehe mit Ihrem Receiver mitgelieferte
Bedienungsanleitungen.
• Anzeigen im Display (Monitor) und Tastenbezeichnungen unterscheiden sich unter den Receivern.
Beispiel: SOURCE: SRC 7: 7 / BACK
Bluetooth Audio: Bluetooth AUDIO, BT-AUDIO
Wählen einer Quelle
Bevor Sie die Bluetooth-Audiogerät-Funktion
verwenden, schalten Sie die Quelle auf „Bluetooth
Audio“ um.
für Typ A
Wenn Sie „Bluetooth Audio“ als Quelle wählen.
Drücken Sie SRC wiederholt, um
„Bluetooth Audio“ zu wählen.
für Typ B/Typ C/Typ D
Wenn Sie „Bluetooth Audio“ als Quelle wählen.
Drücken Sie SOURCE wiederholt, um
„Bluetooth Audio“ zu wählen.
Wiedergabebetrieb
für Typ A/für Typ B
3: Starten Sie die Wiedergabe
6: Starten der Wiedergabe/Pause
¢: Vorwärts überspringen
4: Rückwärts überspringen
7: Stopp
für Typ C
1: Starten Sie die Wiedergabe
3: Stopp
¢: Vorwärts überspringen
4: Rückwärts überspringen
für Typ D
5: Starten Sie die Wiedergabe
¢: Vorwärts überspringen
4: Rückwärts überspringen
Bluetooth-Telefon/Bluetooth-Audio
29
Page 64

Andere Einstellungen
Grundlegendes Verfahren
für Typ A
1 Rufen Sie den „Bluetooth Phone“-
Bildschirm auf oder wählen Sie
„Bluetooth Audio“ als Quelle.
DEUTSCH
2 Wählen Sie „Mode“ ] „Setup“ aus
dem Menü.
3 Wählen Sie einen Parameter.
Siehe „Einstellpunkte“ auf der nächsten Seite.
4 Drücken Sie die folgenden Tasten zum
Ändern der Einstellungen.
5/∞: Ändern Sie die Einstellung.
ENT: Bestätigen Sie die Einstellung.
für Typ B
1 Rufen Sie das Menü auf, und wählen Sie
„Bluetooth“ ] „Settings“.
2 Wählen Sie einen Parameter.
Siehe „Einstellpunkte“ auf der nächsten Seite.
3 Ändern Sie die Einstellungen.
Siehe mit Ihrem Receiver mitgelieferte
Bedienungsanleitung.
für Typ C
1 Wählen Sie MODE, wählen Sie dann
„Settings“.
2 Wählen Sie einen Parameter.
Siehe „Einstellpunkte“ auf der nächsten Seite.
3 Drücken Sie die folgenden Tasten zum
Ändern der Einstellungen.
5/∞: Ändern Sie die Einstellung.
1: Bestätigen Sie die Einstellung.
für Typ D
1 Während „Bluetooth Phone“ oder
„Bluetooth Audio“ als Quelle
gewählt ist, drücken Sie ∞/4/¢
zum Wählen von „SETTINGS“.
2 Wählen Sie einen Parameter.
Siehe „Einstellpunkte“ auf der nächsten Seite.
3 Drücken Sie die folgenden Tasten zum
Ändern der Einstellungen.
VOLUME +/– (Regelscheibe):
Ändern Sie die Einstellung.
∞: Bestätigen Sie die Einstellung.
30
Page 65

Einstellpunkte
Sie können die folgenden Punkte im Setting-Menü ändern (_: Anfänglich):
Auto Connect
Sie können das Bluetooth-Handy auf automatische
Verbindung einstellen, wenn der Receiver eingeschaltet
wird.
Off: Stellt keine Geräteverbindung automatisch
her.
Last: Verbindet mit dem letzten
angeschlossenen Gerät.
Order: Verbindet mit dem zuerst gefundenen
verfügbaren registrierten Gerät.
Auto Answer
Sie können den Receiver auf automatische Annahme
oder Abweisen ankommender Rufe einstellen.
Off: Der Receiver nimmt Rufe nicht automatisch
entgegen.
Nehmen Sie die Rufe manuell entgegen.
On: Der Receiver empfängt ankommende Rufe
automatisch.
Reject: Die Einheit weist alle ankommenden Rufe
ab.
Message Info
Sie können den Receiver darauf einstellen, über
die Ankunft der Meldung zu informieren, wenn Sie
eine SMS (Short Message Service)/Text-Meldung
empfangen.
Auto: Der Receiver klingelt und informiert Sie
über die Ankunft der Meldung.
Manual: Der Receiver informiert Sie nicht über die
Ankunft einer Meldung.
Microphone Level / Mic Setting
Stellen Sie eine Mikrofonlautstärke ein.
Level: 1, 2 , 3
Version
Lassen Sie die Versionen von Software und Hardware
anzeigen.
Einstellungen
31
Page 66

Störungssuche
Was wie eine Betriebsstörung erscheint, muss nicht immer ein ernstes Problem darstellen. Gehen Sie die folgenden
Prüfpunkte durch, bevor Sie sich an den Kundendienst wenden.
Symptome Abhilfe
Das Bluetooth-Gerät erkennt nicht die Einheit. •
DEUTSCH
Die Einheit erkennt nicht das Bluetooth-Gerät. • Prüfen Sie die Bluetooth-Einstellung des Geräts.
„Device Unfound/UNFOUND“ erscheint im Display. • Prüfen Sie die Bluetooth-Einstellung des Geräts, und
Die Einheit kann nicht das Pairing mit dem
Bluetooth-Gerät ausführen.
„Connection Error/ERR CNT“ erscheint im Display. •
Echo oder Rauschen tritt auf. • Justieren Sie die Mikrofoneinheit-Position.
„Error/ERROR” erscheint im Display. • Probieren Sie die Funktion erneut.
„Loading/LOADING“ erscheint im Display. • Probieren Sie die Funktion erneut.
„Please Wait/WAIT“ erscheint im Display. • Warten Sie, bis die Meldung erlischt.
„Reset 08/RESET 8“ erscheint im Display. •
Die Telefon-Tonqualität ist schlecht. • Verringern Sie den Abstand zwischen der Einheit und
Diese Einheit kann mit einem Bluetooth-Handy und
einem Bluetooth-Audiogerät zur Zeit verbunden werden.
Beim Anschließen eines Geräts kann diese Einheit nicht
von einem anderen Gerät erkannt werden. Trennen Sie das
momentan angeschlossene Gerät ab und suchen Sie erneut.
• Suchen Sie vom Bluetooth-Gerät. Nachdem die Einheit
erkannt wird, wählen Sie „Open“ an der Einheit zum
Anschließen des Geräts.
suchen Sie erneut.
• Geben Sie den gleichen PIN-Code für sowohl die Einheit
als auch das Ziel-Gerät ein.
• Wählen Sie den Gerätenamen unter „Special Device“,
und verbinden Sie erneut.
Wählen Sie „Connect“ zum erneuten Anschließen des Geräts.
• (Wenn die Meldung erneut erscheint)
Das angeschlossene Gerät ist nicht mit der Funktion
ausgestattet.
• (Wenn die Meldung nicht erlischt)
Schalten Sie die Stromversorgung des Receivers aus
und dann wieder ein.
Prüfen Sie die Verbindung zwischen dem Adapter und
diesem Gerät.
• Schalten Sie die Stromversorgung des Receivers aus
und dann wieder ein.
dem Bluetooth-Handy.
• Bewegen Sie das Fahrzeug zu einem Ort, wo ein
besseres Telefonsignal empfangen wird.
32
Page 67

Symptome Abhilfe
Der Ton wird unterbrochen oder weist bei
Wiedergabe von einem Bluetooth-Audiogerät
Aussetzer auf.
Das angeschlossene Audiogerät kann nicht gesteuert
werden.
Bluetooth-Information:
Wenn Sie weitere Information über Bluetooth wünschen, besuchen Sie uns auf der JVC-Website.
• Stellen Sie das Bluetooth-Audiogerät näher am
Adapter auf.
• Trennen sie das angeschlossene Bluetooth-Handy ab.
• Schalten Sie die Stromversorgung des Receivers aus
und dann wieder ein.
• (Wenn der Ton noch nicht wiederhergestellt ist,)
schließen Sie das Gerät erneut an.
• Prüfen Sie, ob das angeschlossene Audiogerät AVRCP
unterstützt.
Technische Daten
ALLGEMEINES
Betriebsstromanforderungen:
Betriebsspannung:
DC 14,4 V (11 V bis 16 V Toleranz)
Erdungssystem: Negative Masse
Aktuelle Leistungsaufnahme: 70 mA
Zulässige Betriebstemperatur:
0 °C bis +40 °C
Abmessungen (B × H × T):
70 mm × 34,5 mm × 90 mm
Gewicht (ca.):
150 g (ohne Zubehör)
BLUETOOTH-SEKTION
Bluetooth-Version:
Bluetooth 1,2 zertifiziert
Ausgangsleistung:
+4 dBm Max. (Leistungsklasse 2)
Dienstbereich:
innerhalb von 10 m
Profil:
HSP (Kopfhörer-Profil)
HSP (Freisprech-Profil)
A2DP (Advanced Audio Distribution Profile)
AVRCP (Audio/Video Remote Control Profile)
SPP (Serial Port Profile)
OPP (Object Push Profile)
Änderungen bei Design und technischen Daten bleiben
vorbehalten.
33Andere
Page 68

Veuillez lire attentivement toutes les instructions avant d’utiliser l’appareil afin de bien comprendre son
fonctionnement et d’obtenir les meilleures performances possibles.
Merci pour avoir acheté un produit JVC.
Précautions:
Tout changement ou modification non approuvé par JVC peut annuler l’autorité de l’utilisateur d’utiliser l’appareil.
Informations relatives à l’élimination des appareils usagés, à l’intention des
utilisateurs
Lorsque ce symbole figure sur le produit, cela signifie qu’il ne doit pas être
éliminé en tant que déchet ménager à la fin de son cycle de vie. Si vous
souhaitez éliminer ce produit, faites-le conformément à la législation nationale
ou autres règles en vigueur dans votre pays et votre municipalité. En éliminant
FRANÇAIS
Ce symbole n’est reconnu que
dans l’Union européenne.
Cher(e) client(e),
Cet appareil est conforme aux directives et normes européennes en vigueur concernant la compatibilité
électromagnétique et à la sécurité électrique.
Représentant européen de la société Victor Company of Japan, Limited:
JVC Technology Centre Europe GmbH
Postfach 10 05 52
61145 Friedberg
Allemagne
correctement ce produit, vous contribuez à la conservation des ressources
naturelles et à la prévention des éventuels effets négatifs sur l’environnement
et la santé humaine.
2
Page 69

Introduction
Avertissements
• UTILISEZ AVEC DES VÉHICULES 12 V CC À MASSE
NÉGATIVE.
Si votre véhicule n’utilise pas un système 12 V
de mise à masse négative, vous devez utiliser un
inverseur de tension qui peut être acheté chez votre
revendeur d’autoradio JVC.
• Cet adaptateur a été conçu spécialement pour être
utilisé avec un autoradio JVC. N’utilisez pas cet
adaptateur avec un autre autoradio.
Précautions
• Cet adaptateur est conçu pour être utilisé avec les
appareil Bluetooth (téléphone cellulaire/lecteurs
audio).
• N’augmentez pas trop le volume car cela bloquerait
les sons de l’extérieur rendant la conduite
dangereuse.
• Ne réalisez pas des opérations compliquées pendant
que vous conduisez, cela pourrait entraîner un
accident.
• Pendant que vous conduisez, ne réalisez pas
d’opérations compliquées telles que la composition
d’un numéro, l’utilisation du répertoire
téléphonique, etc. Pour réaliser ces opération, arrêtez
votre voiture dans un endroit sûr.
• Il se peut que certains appareils Bluetooth ne
puissent pas être connectés à cet appareil en fonction
de la version Bluetooth de l’appareil.
• Cet appareil peut ne pas fonctionner avec certains
appareils Bluetooth.
• Les conditions de connexion peuvent varier en
fonction des circonstances autour de vous.
Introduction
3
Page 70

Introduction
À propos de Bluetooth
Bluetooth est une technologie de communication radio
à courte distance pour les appareils portables tels que
les téléphones portables, les ordinateurs portables, etc.
Les appareils Bluetooth peuvent être connectés sans
câble et communiquer les uns avec les autres.
• La marque du mot et les logos Bluetooth sont la
propriété de Bluetooth SIG, Inc. et toute utilisation
de ces marques par Victor Company of Japan, Limited
FRANÇAIS
(JVC) est faite sous licence. Les autres marques
et noms de commerce sont la propriété de leur
propriétaire respectif.
• Le numéro de série est imprimé sur l’étiquette placée
sous l’adaptateur.
Pour envoyer et recevoir un son ou des données entre
cet adaptateur et votre périphérique Bluetooth, ils
doivent se trouver à moins de 10 m de distance l’un de
l’autre.
Cependant, la distance de transmission peut être plus
courte en fonction des circonstances.
Profile Bluetooth
Cet adaptateur prend en charge les profiles Bluetooth
suivants:
HSP (Profile de casque d’écoute)
HFP (Profile mains libres)
A2DP (Profile de distribution audio avancé)
AVRCP (Profile de télécommande audio/vidéo)
SPP (Profile de port série)
OPP (Profile de poussée d’objet)
Informations générales
• Cet adaptateur prend uniquement en charge les
autoradios JVC prêts pour Bluetooth.
• Référez-vous à la liste (comprise dans la boîte) pour
voir les pays où vous pouvez utiliser la fonction
Bluetooth®.
Caractéristiques
En utilisant cet adaptateur, vous pouvez commander
des appareils Bluetooth avec votre autoradio de la façon
suivante:
• Pour faire/recevoir un appel
• Appel à partir du répertoire téléphonique
• Appel par commande vocale
• Appel à partir des historiques
– Recomposition
– Appel manqué
– Appel reçu
• Appel par numéros préréglés
• Réception d’un SMS (Service de messages courts)/
Message textuel
• Lecture d’un lecteur audio Bluetooth
Les fonctions disponibles diffèrent en fonction
du type de votre autoradio et des appareils
Bluetooth.
Pairage et code PIN
Quand vous connectez un périphérique Bluetooth
à votre autoradio à travers cet adaptateur pour la
première fois, réaliser le pairage entre l’adaptateur et
le périphérique. Le pairage permet aux périphériques
Bluetooth de communiquer entre eux.
Pour réaliser le pairage, vous pouvez avoir besoin
d’entrer le code PIN (numéro d’identification personnel)
du périphérique Bluetooth que vous souhaitez connecter.
4
Page 71

Sommaire
Introduction
Introduction ................................ 3
Avertissements .................................................. 3
Précautions ........................................................ 3
À propos de Bluetooth ....................................... 4
Informations générales .....................................4
Pour commencer .......................... 6
Installation ........................................................6
Connexion à l’autoradio ..................................... 8
Vérification du type de votre autoradio .............9
Structures de menu ........................................ 10
Connexion
Connexion Bluetooth ..................12
Sélection d’une source. ................................... 12
Enregistrement d’un appareil Bluetooth
— Pairage ................................................ 12
Connexion/déconnexion de l’appareil ............. 17
Téléphone Bluetooth
Opérations du téléphone
Bluetooth ..............................19
Sélection d’une source. ................................... 19
Réception d’un appel ...................................... 19
Appel d’un numéro du répertoire
téléphonique ............................................. 20
Opérations avancées .................. 21
Appel par commande vocale .......................... 21
Appel d’un numéro à partir de l’historique des
appels ....................................................... 22
Appel du dernier numéro composé directement
— Recomposition .................................... 23
Pour répondre à un appel en attente .............. 23
Utilisation des numéros préréglés .................. 24
Appel par entrée d’un numéro de
téléphone .................................................. 25
Réception d’un SMS (Service de messages courts)/
message textuel ........................................ 27
Lecture d’un SMS/Message textuel ................. 27
Audio Bluetooth
Opérations audio Bluetooth ........ 29
Sélection d’une source. ................................... 29
Opérations de lecture ................................... 29
Réglages
Autres réglages ..........................30
Procédure de base .......................................... 30
Réglages possibles ...................................... 31
Autres
Dépannage ................................32
Spécification .............................. 33
Introduction
5
Page 72

Pour commencer
Installation
Avertissement
Évitez d’installer l’adaptateur et le microphone dans les
endroits suivants.
– Où ils peuvent gêner une conduite en toute sécurité.
– Où ils peuvent être exposés aux rayons directs du
soleil ou à la chaleur directe du chauffage, ou s’ils
sont placés dans un endroit très chaud.
– Où ils peuvent être soumis à la pluie, à des
éclaboussures ou à une humidité excessive.
– Où ils peuvent être soumis à la poussière.
FRANÇAIS
– Où ils peuvent être positionnés dans un
emplacement instable.
– Où ils peuvent endommager les garnitures de la
voiture.
– Où il y a des interférences avec les ondes radio
(EX.: coffre, etc.).
Montage de l’appareil
Nettoyez bien la surface choisie et fixez-y la bande
Velcro.
Adaptateur d’interface
Bande Velcro (dure)
(fournie)
Bande Velcro (souple)
(fournie)
• Si la bande Velcro (dure) adhère directement au tapis
de sol, vous pouvez installer cet appareil sans utiliser
la bande Velcro (souple).
• Le numéro de série est imprimé sur l’étiquette placée
sous l’appareil. Ne recouvrez pas l’étiquette avec la
bande Velcro.
6
Page 73

Installation du microphone
1 Fixez le microphone sur l’attache du
microphone.
Microphone
(fournie)
À l’adaptateur
d’interface
2 Installez le microphone.
Pour installer le pare-soleil
Microphone (fourni)
Attache du microphone
(fournie)
Pour ajuster l’angle du microphone
Fixez si nécessaire le cordon du microphone en
utilisant des serre-fils (non fournis).
Installation sur la colonne de direction
Installer le microphone sur le côté supérieur de la
colonne de direction.
Microphone (fourni)
Bande adhésive à
double face (fournie)
Introduction
7
Page 74

Pour commencer
Connexion à l’autoradio
Connexion typique
Mettez l’autoradio hors tension et coupez le contact du véhicule avant de connecter ou de déconnecter l’appareil.
À un autre appareil extérieur
(voir ci-dessous)
À partir du microphone
FRANÇAIS
Prise du changeur de CD
Adaptateur d’interface
Autoradio
• Vous pouvez connecter les appareils extérieurs suivants à cet adaptateur;
- Changeur de CD
- Radio satellite SIRIUS
- Radio satellite XM
- Tuner DAB
- Adaptateur d’interface pour iPod
- Adaptateur d’interface pour lecteur D.
- Adaptateur d’entrée de ligne
- Adaptateur d’entrée auxiliaire
• Référez-vous aussi au manuel d’installation fourni avec votre autoradio.
8
Cordon de signal
(fourni avec ou attaché à l’appareil extérieur)
Page 75

Vérification du type de votre autoradio
Les procédures d’utilisation à travers un autoradio
diffèrent en fonction du type d’autoradio.
Vérifiez le type de votre autoradio en vous référant au
tableau ci-dessous.
Type A
Exemple: type d’autoradio
• Si vous répondez “Oui”, suivez
• Si vous répondez “Non”, suivez
Votre autoradio est-il un
KD-NX5000?
Votre autoradio est-il muni d’un
moniteur intégré?
Votre autoradio est-il muni d’un
affichage à cristaux liquides tridimensionnel?
.
.
Type A
Type B
Type C
Type D
• L’utilisation des menus diffère en fonction du type de
votre autoradio.
Pour plus de détails, référez-vous aux instructions
fournies avec votre autoradio.
Type B
Type C
Type D
Introduction
9
Page 76

Pour commencer
Structures de menu
Langue des indications
Dans ce manuel, les indications en anglais sont utilisées à titre d’exemple. Vous pouvez changer
la langue d’affichage sur une autre langue de l’anglais avec certains autoradios. Référez-vous au
manuel d’instructions fourni avec votre autoradio.
Téléphone Bluetooth
Dial / Dial Menu / DIAL
FRANÇAIS
Message *
Open / OPEN *
Search / SEARCH *
Special Device / SPECIAL
Connection / Connect /
CONNECT *
Disconnection /
Disconnect / DISCNNCT
Delete Pair / DELETE *
1, 2, 4
6
*1Choisissez la méthode pour faire un appel.
Redial / REDIAL *
2
Received Calls / RECEIVE
Phonebook / PH BOOK *
Missed Calls / MISSED *
Phone number / NUMBER
Voice / Voice Dialing /
3
VOICE *
Vous pouvez lire un message à partir de l’historique des messages suivant.
Unread
Read
Unsent
Sent
5
Rendez l’appareil prêt pour établir une nouvelle connexion Bluetooth. Choisissez ce
réglage lors de l’établissement d’une connexion Bluetooth avec un appareil pour la
première fois, à partir du périphérique. ☞ page 12.
5
Rendez l’appareil prêt pour établir une nouvelle connexion Bluetooth. Choisissez ce
réglage lors de l’établissement d’une connexion Bluetooth avec un appareil pour la
première fois, à partir de l’appareil extérieur. L’appareil recherche les nouveaux
appareils disponibles. ☞ page 14.
*5Montre la liste des appareils Bluetooth qui demandent certaines procédures
spéciales pour que la connexion Bluetooth soit établie. Choisissez un appareil que
vous souhaitez connecter. ☞ page 15.
Après avoir choisi un appareil à partir de la liste des appareils enregistrés, établissez
la connexion avec lui. ☞ page 17.
Déconnectez l’appareil actuel avant d’en connecter un autre. ☞ page 18.
1
*
6
Supprimez les appareils enregistrés. ☞ page 16.
Choisissez un numéro de téléphone à partir de liste
des numéros de téléphone que vous avez composés.
☞ page 22.
*2Choisissez un numéro de téléphone à partir de liste
des appels reçus. ☞ page 22.
2
Choisissez un nom, puis un numéro de téléphone
à partir du répertoire téléphonique du téléphone
cellulaire connecté. ☞ page 20.
2
Choisissez un numéro de téléphone à partir de liste
des appels manqués. ☞ page 22.
Entrez le numéro de téléphone. ☞ page 25.
Vous pouvez faire un appel par commande vocale.
☞ page 21.
Les messages que vous n’avez pas lus. ☞ page 27.
Les messages que vous avez lus. ☞ page 27.
Les messages que vous n’avez pas envoyés. ☞ page 27.
Les messages que vous avez envoyés. ☞ page 27.
10
Page 77

Setup / Settings /
SETTING
Audio Bluetooth
Open / OPEN *
Search / SEARCH *
Special Device / SPECIAL
Connection / Connect /
CONNECT *
Disconnection /
Disconnect / DISCNNCT
Delete Pair / DELETE *
Setup / Settings /
SETTINGS
5
5
6
Changez les réglages. ☞ page 30.
Auto Connect / AUTO CNT Vous choisir de vous connecter automatiquement à
un appareil Bluetooth quand l’autoradio est mis sous
tension.
Auto Answer /
AUTO ANS *
7
Message Info *
2, 4, 7
Vous pouvez régler l’autoradio pour recevoir ou refuser
des appels automatiquement.
Vous pouvez régler l’autoradio pour vous informer lors
de la réception d’un SMS/Message textuel.
Microphone Level /
Mic Setting / MIC SET *
Version / VERSION *
Ajuste le volume d’un microphone.
7
8
Affichez la version du logiciel et du matériel.
Rendez l’appareil prêt pour établir une nouvelle connexion Bluetooth. Choisissez ce
réglage lors de l’établissement d’une connexion Bluetooth avec un appareil pour la
première fois, à partir du périphérique. ☞ page 12.
Rendez l’appareil prêt pour établir une nouvelle connexion Bluetooth. Choisissez ce
réglage lors de l’établissement d’une connexion Bluetooth avec un appareil pour la
première fois, à partir de l’appareil extérieur. L’appareil recherche les nouveaux
appareils disponibles. ☞ page 14.
*5Montre la liste des appareils Bluetooth qui demandent certaines procédures
spéciales pour que la connexion Bluetooth soit établie. Choisissez un appareil que
vous souhaitez connecter. ☞ page 15.
Après avoir choisi un appareil à partir de la liste des appareils enregistrés, établissez
la connexion avec lui. ☞ page 17.
Déconnectez l’appareil actuel avant d’en connecter un autre. ☞ page 18.
1
*
6
Supprimez les appareils enregistrés. ☞ page 16.
Changez les réglages. ☞ page 30.
Version / VERSION *
8
Affichez la version du logiciel et du matériel.
1
Peut être choisi uniquement quand l’appareil est connecté.
*
2
Peut être choisi uniquement quand votre téléphone portable est muni de cette fonction.
*
3
Peut être choisi uniquement quand votre téléphone portable est muni d’un système de reconnaissance vocale.
*
4
Saut le type D.
*
5
Peut être choisi uniquement quand “New Device“ est choisi.
*
6
Peut être choisi uniquement quand l’appareil enregistré est choisi.
*
7
Ne peut pas être choisi pour “New Device“.
*
8
Si vous souhaitez recevoir plus d’informations sur le système Bluetooth, consultez le site web de JVC.
*
Introduction
11
Page 78

Connexion Bluetooth
• Pour des détails sur l’utilisation du menu, référez-vous au manuel d’instruction fourni avec votre
autoradio.
• Les indications sur l’affichage (moniteur) et les noms des touches varient d’un autoradio à l’autre.
ex.
SOURCE: SRC 7: 7 / BACK MENU: AV MENU, AV Menu
Bluetooth Phone: Bluetooth PHONE, BT-PHONE,
New Device: New device, NEW DEVICE
Préparation: Mettez en service la fonction Bluetooth sur l’appareil Bluetooth.
Sélection d’une source
Avant de connecter un périphérique Bluetooth, changez
la source sur le périphérique Bluetooth.
FRANÇAIS
pour le Type A
Maintenez pressée la touche MENU pour
afficher le menu Bluetooth ou appuyez
répétitivement sur SRC pour choisir
“Bluetooth Audio”.
pour le Type B/Type C/Type D
Vous pouvez choisir “Bluetooth Phone” et
“Bluetooth Audio” comme source.
Appuyez répétitivement sur SOURCE
pour choisir “Bluetooth Phone” ou
“Bluetooth Audio”.
Enregistrement d’un appareil
Bluetooth — Pairage
Quand vous connecter un appareil Bluetooth pour la
première fois, enregistrez-le et faites les pairage entre
l’appareil Bluetooth et l’autoradio.
• Le pairage n’est pas possible certains périphérique
Bluetooth.
Pour connecter un autre appareil
Bluetooth
Utilisez “Open” pour établir la connexion avec un
appareil Bluetooth à partir de l’autoradio.
pour le Type A
1 Affichez l’écran “Bluetooth Phone”
ou choisissez “Bluetooth Audio”
comme source.
2 Appuyez sur 5/∞ pour choisir “New
Device”.
3 Affichez le menu, puis choisissez
“Mode” ] “Open”.
4 Appuyez sur 4/¢ /5/∞
pour entrer le code PIN (numéro
d’identification personnel), puis
choisissez “Connect”.
4/¢/5/∞:
Choisissez un numéro.
ENT:
Entrez le numéro.
• Référez-vous au manuel d’instruction fourni
avec votre autoradio.
• Vous pouvez entrer n’importe quel nombre
(entre 1 et 16 chiffres).
• Certains périphériques ont leur propre code PIN.
Entrez le code PIN spécifié sur l’appareil.
5 Utilisez l’appareil Bluetooth pour
rechercher l’autoradio.
• Entrez le même code PIN (que vous avez
entré à l’étape ci-dessus) sur le périphérique à
connecter.
“Connected (et le nom de l’appareil)”
apparaît sur l’affichage.
12
Page 79

pour le Type B
1
Pendant que “Bluetooth Phone” ou
“Bluetooth Audio” est choisi comme
source, choisissez “New Device”.
2 Affichez le menu, puis choisissez
“Bluetooth” ] “Open”.
3 Entrez le code PIN (numéro
d’identification personnel).
Référez-vous au manuel d’instruction fourni avec
votre autoradio.
• Vous pouvez entrer n’importe quel nombre
(entre 1 et 16 chiffres).
• Certains périphériques ont leur propre code PIN.
Entrez le code PIN spécifié sur l’appareil.
4 Utilisez l’appareil Bluetooth pour
rechercher l’autoradio.
•
Entrez le même code PIN (que vous avez entré à
l’étape ci-dessus) sur le périphérique à connecter.
“Connected (et le nom de l’appareil)”
apparaît sur l’affichage.
pour le Type C
1
Pendant que “Bluetooth Phone” ou
“Bluetooth Audio” est choisi comme
source, choisissez “New Device”.
2 Appuyez sur MODE, puis choisissez
“Open”.
3 Utilisez les touches suivantes
pour entrer le code PIN (numéro
d’identification personnel).
4/¢: Déplacez la position d’entrée.
5/∞: Choisissez un numéro.
5:
1: Entrer le numéro.
• Vous pouvez entrer n’importe quel nombre
(entre 1 et 16 chiffres).
• Certains périphériques ont leur propre code PIN.
Entrez le code PIN spécifié sur l’appareil.
Supprimez toutes les entrées.
4 Utilisez l’appareil Bluetooth pour
rechercher l’autoradio.
• Entrez le même code PIN (que vous avez
entré à l’étape ci-dessus) sur le périphérique à
connecter.
“Connected (et le nom de l’appareil)”
apparaît sur l’affichage.
pour le Type D
1 Pendant que “Bluetooth Phone”
ou “Bluetooth Audio” est choisi
comme source, appuyez sur 4/¢
pour choisir “NEW”.
2 Appuyez sur ∞, puis choisissez
“OPEN”.
3 Utilisez les touches suivantes
pour entrer le code PIN (numéro
d’identification personnel).
4/¢: Déplacez la position d’entrée.
VOLUME +/– (molette de commande):
Choisissez un numéro.
∞: Entrer le numéro.
• Vous pouvez entrer n’importe quel nombre
(entre 1 et 16 chiffres).
• Certains périphériques ont leur propre code PIN.
Entrez le code PIN spécifié sur l’appareil.
4 Utilisez l’appareil Bluetooth pour
rechercher l’autoradio.
• Entrez le même code PIN (que vous avez
entré à l’étape ci-dessus) sur le périphérique à
connecter.
“CONNECT (et le nom de l’appareil)” apparaît
sur l’affichage.
13Connexion
Page 80

Connexion Bluetooth
Enregistrement d’un appareil Bluetooth — Pairage
Pour connecter un périphérique
disponible à l’appareil
Utilisez “Search” pour établir la connexion avec un
appareil Bluetooth à partir de l’autoradio.
pour le Type A
pour le Type B
1 Pendant que “Bluetooth Phone”
ou “Bluetooth Audio” est choisi
comme source, choisissez “New
Device”.
2 Affichez le menu, puis choisissez
1 Affichez l’écran “Bluetooth Phone”
ou choisissez “Bluetooth Audio”
FRANÇAIS
comme source.
2 Appuyez sur 5/∞ pour choisir “New
Device”.
3 Affichez le menu, puis choisissez
“Mode” ] “Search”.
L’autoradio recherche les appareils et affiche la
liste des appareils disponibles.
4 Choisissez le nom de l’appareil que vous
souhaitez connecter.
5 Appuyez sur 4/¢ /5/∞
pour entrer le code PIN (numéro
d’identification personnel) du
périphérique à connecter, puis
choisissez “Connect”.
4/¢/5/∞:
ENT:
• Référez-vous au manuel d’instruction fourni
avec votre autoradio.
“Connected (et le nom de l’appareil)”
apparaît sur l’affichage.
Choisissez un numéro.
Entrez le numéro.
“Bluetooth” ] “Search”.
L’autoradio recherche les appareils et affiche la
liste des appareils disponibles.
3 Choisissez le nom de l’appareil que vous
souhaitez connecter.
4 Entrez le code PIN (numéro
d’identification personnel) du
périphérique à connecter.
• Référez-vous au manuel d’instruction fourni
avec votre autoradio.
“Connected (et le nom de l’appareil)”
apparaît sur l’affichage.
pour le Type C
1 Pendant que “Bluetooth Phone”
ou “Bluetooth Audio” est choisi
comme source, choisissez “New
Device”.
2 Appuyez sur MODE, puis choisissez
“Search”.
L’autoradio recherche les appareils et affiche la
liste des appareils disponibles.
3 Choisissez le nom de l’appareil que vous
souhaitez connecter.
(suite)
14
Page 81

4 Utilisez les touches suivantes
pour entrer le code PIN (numéro
d’identification personnel) du
périphérique à connecter.
4/¢:
5/∞: Choisissez un numéro
5: Supprimez toutes les entrées.
1: Entrer le numéro.
“Connected (et le nom de l’appareil)”
apparaît sur l’affichage.
Passez sur la position d’entrée.
Pour connecter un appareil spécial
Certains périphériques Bluetooth nécessitent une
procédure spéciale pour établir la connexion Bluetooth
pour la première fois Pour ces périphériques Bluetooth,
vous devez choisir le nom du périphérique avant de
.
l’enregistrer.
pour le Type A
1 Affichez l’écran “Bluetooth Phone”
ou choisissez “Bluetooth Audio”
comme source.
pour le Type D
1 Pendant que “Bluetooth Phone”
ou “Bluetooth Audio” est choisi
comme source, appuyez sur 4/¢
pour choisir “NEW”.
2 Appuyez sur ∞, puis choisissez
“SEARCH”.
L’autoradio recherche les appareils et affiche la
liste des appareils disponibles.
3 Choisissez le nom de l’appareil que vous
souhaitez connecter.
4 Utilisez les touches suivantes
pour entrer le code PIN (numéro
d’identification personnel) du
périphérique à connecter.
4/¢: Déplacez la position d’entrée.
VOLUME +/– (molette de commande):
Choisissez un numéro.
∞: Entrer le numéro.
“CONNECT (et le nom de l’appareil)” apparaît
sur l’affichage.
2 Appuyez sur 5/∞ pour choisir “New
device”.
3 Affichez le menu, puis choisissez
“Mode” ] “Special Device”.
La liste des appareils spéciaux apparaît sur l’affichage.
4 Choisissez le nom de l’appareil que vous
souhaitez connecter.
5 Connectez l’appareil choisi en utilisant
“Open (page 12)” ou “Search (page
14)”.
pour le Type B
1 Pendant que “Bluetooth Phone”
ou “Bluetooth Audio” est choisi
comme source, choisissez “New
device”.
2 Affichez le menu, puis choisissez
“Bluetooth” ] “Special
Device”.
La liste des appareils spéciaux apparaît sur l’affichage.
3 Choisissez le nom de l’appareil que vous
souhaitez connecter.
4 Connectez l’appareil choisi en utilisant
“Open (page 13)” ou “Search (page
14)”.
Connexion
15
Page 82

Connexion Bluetooth
Enregistrement d’un appareil Bluetooth — Pairage
pour le Type C
1 Pendant que “Bluetooth Phone”
ou “Bluetooth Audio” est choisi
comme source, choisissez “New
device”.
Pour supprimer l’appareil enregistré
Vous pouvez enregistrer un maximum de cinq appareils
Bluetooth.
Si vous souhaitez connecter un 6e appareil, supprimez
un des appareils enregistrés.
pour le Type A
2 Appuyez sur MODE, puis choisissez
“Special Device”.
La liste des appareils spéciaux apparaît sur
FRANÇAIS
l’affichage.
3 Choisissez le nom de l’appareil que vous
souhaitez connecter.
4 Connectez l’appareil choisi en utilisant
“Open (page 13)” ou “Search (page
14)”.
pour le Type D
1 Pendant que “Bluetooth Phone”
ou “Bluetooth Audio” est choisi
comme source, appuyez sur 4/¢
pour choisir “NEW”.
2 Appuyez sur ∞, puis choisissez
“SPECIAL”.
3 Choisissez le nom de l’appareil que vous
souhaitez connecter.
1 Affichez l’écran “Bluetooth Phone”
ou choisissez “Bluetooth Audio”
comme source.
2 Appuyez sur 5/∞ pour choisir l’appareil
enregistré que vous souhaitez
supprimer.
3 Affichez le menu, puis choisissez
“Mode” ] “Delete Pair”.
4 Choisissez “Yes” pour supprimer
l’appareil.
• Si vous choisissez “No”, la procédure est
annulé.
pour le Type B
1 Pendant que “Bluetooth Phone”
ou “Bluetooth Audio” est choisi
comme source, choisissez l’appareil que
vous souhaitez supprimer.
2 Affichez le menu, puis choisissez
4 Connectez l’appareil choisi en utilisant
“OPEN (page 13)” ou “SEARCH
(page 14)”.
“Bluetooth” ] “Delete Pair”.
3 Choisissez “Yes” pour supprimer
l’appareil.
• Si vous choisissez “No”, la procédure est
annulé.
(suite)
16
Page 83

pour le Type C
1 Pendant que “Bluetooth Phone”
ou “Bluetooth Audio” est choisi
comme source, choisissez l’appareil que
vous souhaitez supprimer.
2 Appuyez sur MODE, puis choisissez
“Delete Pair”.
3 Choisissez “Yes” pour supprimer
l’appareil.
• Si vous choisissez “No”, la procédure est
annulé.
pour le Type D
1 Pendant que “Bluetooth Phone”
ou “Bluetooth Audio” est choisi
comme source, appuyez sur 4/¢
pour choisir l’appareil enregistré que
vous souhaitez supprimer.
2 Appuyez sur ∞, puis choisissez
“DELETE”.
3 Choisissez “YES” pour supprimer
l’appareil.
• Si vous choisissez “NO”, la procédure est
annulé.
Connexion/déconnexion de
l’appareil
Pour connecter un appareil
manuellement
Un seul appareil peut être connecté en même
temps pour chaque source (“Bluetooth Phone” et
“Bluetooth Audio”).
pour le Type A
1 Affichez l’écran “Bluetooth Phone”
ou choisissez “Bluetooth Audio”
comme source.
2 Appuyez sur 5/∞ pour choisir un
appareil enregistré.
3 Choisissez “Mode” ]
“Connection” pour connecter un
appareil choisi.
pour le Type B
1 Pendant que “Bluetooth Phone”
ou “Bluetooth Audio” est choisi
comme source, choisissez un appareil
enregistré.
2 Affichez le menu, puis choisissez
“Bluetooth” ] “Connect” pour
connecter l’appareil choisi.
pour le Type C
1 Pendant que “Bluetooth Phone”
ou “Bluetooth Audio” est choisi
comme source, utilisez 5/∞ pour
choisir un appareil enregistré.
2 Appuyez sur MODE, puis choisissez
“Connect” pour connecter l’appareil
choisi.
Connexion
17
Page 84

Connexion Bluetooth
Connexion/déconnexion de l’appareil
pour le Type D
1 Pendant que “Bluetooth Phone”
ou “Bluetooth Audio” est choisi
comme source, appuyer sur 4/¢
pour choisir un appareil enregistré.
2 Appuyez sur ∞, puis choisissez
“CONNECT” pour connecter
l’appareil choisi.
FRANÇAIS
Remarque
Vous pouvez connecter le téléphone portable Bluetooth
automatiquement quand l’autoradio est sous tension.
Référez-vous à “Auto Connect” à la page 31.
(suite)
Pour déconnecter un appareil
Vous pouvez déconnecter un appareil Bluetooth.
pour le Type A
1 Affichez l’écran “Bluetooth Phone”
ou choisissez “Bluetooth Audio”
comme source.
2 Choisissez “Mode” ]
“Disconnection” pour déconnecter
un appareil.
pour le Type B
1 Choisissez “Bluetooth Phone” ou
“Bluetooth Audio” comme source.
2 Affichez le menu, puis choisissez
“Bluetooth” ] “Disconnect”
pour déconnecter un appareil.
pour le Type C
1 Choisissez “Bluetooth Phone” ou
“Bluetooth Audio” comme source.
2 Appuyez sur MODE, puis choisissez
“Disconnect” pour déconnecter un
appareil.
18
pour le Type D
1 Choisissez “Bluetooth Phone” ou
“Bluetooth Audio” comme source.
2 Appuyez sur ∞, puis choisissez
“DISCNNCT” pour déconnecter un
appareil.
Page 85

Opérations du téléphone Bluetooth
• Avant d’utiliser un appareil Bluetooth avec votre autoradio, connectez un appareil Bluetooth.
Référez-vous à “Connexion Bluetooth” à la page 12.
• Si le son est coupé ou interrompu pendant l’utilisation d’un appareil Bluetooth, essayez les
remèdes suivants.
• Mettez l’autoradio hors tension puis de nouveau sous tension.
• (Si le son n’est toujours pas rétabli,) Connectez de nouveau le périphérique. Référez-vous à
“Connexion/déconnexion de l’appareil” à la page 17.
• Pour des détails sur l’utilisation du menu, référez-vous au manuel d’instruction fourni avec votre
autoradio.
• Les indications sur l’affichage (moniteur) et les noms des touches varient d’un autoradio à l’autre.
SOURCE: SRC 7: 7 / BACK MENU: AV MENU, AV Menu
ex.
Bluetooth Phone: Bluetooth PHONE, BT-PHONE
New Device: New device, NEW DEVICE
Sélection d’une source
Avant d’utiliser la fonction de téléphone Bluetooth,
changez la source sur “Bluetooth Phone”.
pour le Type A
Maintenez pressée MENU pour appeler le
menu Bluetooth ou appuyez sur PHONE
sur la télécommande.
pour le Type B/Type C/Type D
Appuyez répétitivement sur SOURCE pour
choisir “Bluetooth Phone”.
Réception d’un appel
Si vous recevez un appel, “Receiving Call (et le
nom et le numéro de téléphone, s’ils sont obtenus)”
apparaissent sur l’affichage.
Appuyez sur une des touches suivantes.
La source change sur
recevoir l’appel entrant.
Type A
N’importe quelle touche (sauf /ATT, +/–,
MAP, SRC et 0.)
Type B/Type C/Type D
N’importe quelle touche (sauf /ATT et VOL +/–.)
pour les modèles avec panneau tactile
Vous pouvez aussi toucher le message
“Receiving Call” affiché sur le panneau
tactile pour recevoir un appel.
• Si un autre appel arrive pendant que vous êtes
en communication, référez-vous à “Pour répondre
à un appel en attente” à la page 23.
Pour terminer l’appel ou refuser un appel entrant,
maintenez pressée une des touches ci-dessus.
Remarque
Vous pouvez régler l’autoradio pour recevoir ou refuser un appel
automatiquement. Référez-vous à “Auto Answer” à la page 31.
Téléphone Bluetooth
Connexion/Téléphone Bluetooth
et vous pouvez
19
Page 86

Opérations du téléphone Bluetooth
Appel d’un numéro du répertoire téléphonique
Vous pouvez appeler un numéro à partir du répertoire téléphonique du téléphone portable connecté.
Avant d’utiliser cette fonction, transférer la mémoire du répertoire téléphonique du téléphone portable dans cet
appareil (référez-vous au manuel d’instruction fourni avec votre téléphone portable).
• Avec certains téléphones portables, la mémoire du répertoire téléphone est transféré automatiquement.
pour le Type A
1 Affichez le menu de composition de
numéro.
2 Choisissez “Phonebook”.
FRANÇAIS
3 Choisissez une nom sur la liste.
La liste des numéros de téléphone apparaît.
4 Choisissez le numéro de téléphone
souhaité et appuyez sur ENT.
pour le Type B
1 Affichez le menu de composition de
numéro.
2 Choisissez “Phonebook”.
3 Choisissez une nom sur la liste.
La liste des numéros de téléphone apparaît.
4 Choisissez le numéro de téléphone
souhaité.
pour le Type C
1 Affichez le menu de composition de
numéro.
2 Choisissez “Phonebook”.
3 Choisissez une nom sur la liste.
La liste des numéros de téléphone apparaît.
4 Choisissez le numéro de téléphone
souhaité et appuyez sur la touche
numérique 1.
pour le Type D
1 Affichez le menu de composition de
numéro.
2 Choisissez “PH BOOK”.
3 Choisissez une nom sur la liste.
La liste des numéros de téléphone apparaît.
4 Choisissez le numéro de téléphone
souhaité et appuyez sur ∞.
20
Page 87

Opérations avancées
Appel par commande vocale
Si votre téléphone portable est muni d’un système de reconnaissance vocale, vous pouvez faire des appel par
commande vocale.
pour le Type A
pour le Type C
1 Affichez l’écran “Bluetooth
Phone”.
2 Maintenez pressée MENU.
“Say” apparaît sur l’affichage.
• Vous pouvez aussi choisir la fonction de
composition de numéro par commande vocale
à partir du menu de composition de numéro.
Pour utiliser la fonction, choisissez “Voice” à
partir du menu de composition de numéro.
• Si votre téléphone portable ne prend pas en
charge le système de reconnaissance vocale,
“Error” apparaît.
3 Dites le nom que vous souhaitez
appeler.
• Prononcez doucement et clairement.
pour le Type B
1 Maintenez pressée MENU.
“Say Name” apparaît sur l’affichage.
• Vous pouvez aussi choisir la fonction de
composition de numéro par commande vocale
à partir du menu de composition de numéro.
Pour utiliser la fonction, choisissez “Voice
Dialing” à partir du menu de composition
de numéro.
• Si votre téléphone portable ne prend pas en
charge le système de reconnaissance vocale,
“Error” apparaît.
2 Dites le nom que vous souhaitez
appeler.
• Prononcez doucement et clairement.
1 Maintenez la touche MODE pressée.
“Say” apparaît sur l’affichage.
• Vous pouvez aussi choisir la fonction de
composition de numéro par commande vocale
à partir du menu de composition de numéro.
Pour utiliser la fonction, choisissez “Voice” à
partir du menu de composition de numéro.
• Si votre téléphone portable ne prend pas en
charge le système de reconnaissance vocale,
“Error” apparaît.
2 Dites le nom que vous souhaitez
appeler.
• Prononcez doucement et clairement.
pour le Type D
1 Maintenez la touche MODE pressée.
“SAY” apparaît sur l’affichage.
• Vous pouvez aussi choisir la fonction de
composition de numéro par commande vocale
à partir du menu de composition de numéro.
Pour utiliser la fonction, choisissez “VOICE”
à partir du menu de composition de numéro.
• Si votre téléphone portable ne prend pas en
charge le système de reconnaissance vocale,
“ERROR” apparaît.
2 Dites le nom que vous souhaitez
appeler.
• Prononcez doucement et clairement.
Téléphone Bluetooth
21
Page 88

Opérations avancées
Appel d’un numéro à partir de l’historique des appels
Cet appareil possède trois types d’historique d’appels — les numéros composés, les appels reçus et les appels
manqués. Vous pouvez appeler un numéro en utilisant ces historiques d’appels.
pour le Type A
pour le Type B
1 Affichez le menu de composition de
numéro.
2 Choisissez un historique d’appels.
Vous pouvez choisir un des historiques d’appels
suivants;
FRANÇAIS
Redial:
Appels faits récemment.
Received Calls:
Appels reçus récemment.
Missed Calls:
Appels manqués récemment.
3 Choisissez un nom (s’il a été obtenu) ou
un numéro de téléphone, puis appuyez
sur ENT.
1 Affichez le menu de composition de
numéro.
2 Choisissez un historique d’appels.
Vous pouvez choisir un des historiques d’appels
suivants;
Redial:
Appels faits récemment.
Received Calls:
Appels reçus récemment.
Missed Calls:
Appels manqués récemment.
3 Choisissez un nom (s’il a été obtenu) ou
un numéro de téléphone.
22
Page 89

pour le Type C
1 Affichez le menu de composition de
numéro.
2 Choisissez un historique d’appels.
Vous pouvez choisir un des historiques d’appels
suivants;
Redial:
Appels faits récemment.
Received Calls:
Appels reçus récemment.
Missed Calls:
Appels manqués récemment.
3 Choisissez un nom (s’il a été obtenu) ou
un numéro de téléphone, puis appuyez
sur la touche numérique 1.
pour le Type D
1 Affichez le menu de composition de
numéro.
2 Choisissez un historique d’appels.
Vous pouvez choisir un des historiques d’appels
suivants;
REDIAL:
Appels faits récemment.
RECEIVED:
Appels reçus récemment.
MISSED:
Appels rmanqués récemment.
3 Choisissez un nom (s’il a été obtenu) ou
un numéro de téléphone, puis appuyez
sur ∞.
Appel du dernier numéro
composé directement —
Recomposition
Cette fonction est disponible quand la télécommande
fournie avec votre autoradio possède une touche
PHONE.
Sur la télécommande uniquement
1 Maintenez pressée la touche PHONE.
Le dernier numéro de téléphone appelé est
affiché.
2 Appuyez sur PHONE.
Pour répondre à un appel en
attente
Si vous téléphone portable est muni d’une fonction de
mise en attente des appels, vous pouvez mettre l’appel
actuel en garde et répondre à l’appel en attente.
Appuyez sur une des touches suivantes.
Pour reprendre l’appel en garde, appuyez de nouveau
sur une des touches suivantes.
• Quand vous terminez un appel, vous pouvez prendre
l’autre.
Type A
N’importe quelle touche (sauf /ATT, +/–,
MAP, SRC et 0.)
Type B/Type C/Type D
N’importe quelle touche (sauf /ATT et
VOL +/–.)
pour les modèles avec panneau tactile
Vous pouvez aussi toucher le message
“Receiving Call” affiché sur le panneau
tactile.
Téléphone Bluetooth
23
Page 90

Opérations avancées
Utilisation des numéros préréglés
Vous pouvez prérégler un maximum de six numéros de
téléphone.
Pour mémoriser un numéro préréglé
pour le Type A
1 Choisissez le numéro de téléphone que
vous souhaitez prérégler à partir de la
liste des numéros (Phonebook, Redial,
Received Calls ou Missed Calls).
FRANÇAIS
2 Maintenez pressée la touche ENT pour
afficher la liste de préréglages.
3 Choisissez un numéro de préréglage
sur lequel vous souhaitez mémoriser le
programme, puis appuyez sur ENT.
pour le Type B
1 Choisissez le numéro de téléphone que
vous souhaitez prérégler à partir de la
liste des numéros (Phonebook, Redial,
Received Calls ou Missed Calls).
2 Maintenez pressée la touche ENT pour
afficher la liste de préréglages.
pour les modèles avec panneau tactile
Maintenez pressé un numéro de téléphone sur le
panneau tactile.
3 Choisissez un numéro de préréglage
sur lequel vous souhaitez mémoriser le
programme.
pour le Type C/Type D
1 Choisissez le numéro de téléphone que
vous souhaitez prérégler à partir de la
liste des numéros (Phonebook, Redial,
Received Calls ou Missed Calls).
2 Maintenez pressée la touche numérique
sur l’autoradio où vous souhaitez
mémoriser le numéro de téléphone.
Pour appeler un numéro de téléphone
préréglé
pour le Type A/Type B
1 Maintenez pressée 5/∞ pour afficher la
liste des préréglages.
pour les modèles avec panneau tactile
Affichez la liste des préréglages.
2 Choisissez le numéro de préréglage que
vous souhaitez appeler.
pour le Type C/Type D
Appuyez sur la touche numérique sur
l’autoradio que vous souhaitez appeler.
24
Page 91

Appel par entrée d’un numéro de téléphone
Vous pouvez faire un appel en entrant un numéro de téléphone sur l’autoradio.
pour le Type A
pour le Type B
1 Affichez le menu de composition de
numéro.
2 Choisissez “Phone Number”.
3 Appuyez sur 4/¢ /5/∞ pour
entrer un numéro de téléphone, puis
choisissez “Dial”.
4/¢/5/∞:
Choisissez un numéro.
ENT: Entrez un numéro.
Remarque
Vous pouvez mémoriser le numéro de téléphone entré dans
la liste des préréglages. Choisissez “Store” à l’étape 3
pour afficher la liste des préréglages.
Choisissez un numéro de préréglage sur lequel vous
souhaitez mémoriser le programme, puis appuyez sur
ENT.
1 Affichez le menu de composition de
numéro.
2 Choisissez “Phone Number”.
3 Entrez un numéro de téléphone.
Référez-vous au manuel d’instruction fourni avec
votre autoradio.
Remarque
Vous pouvez mémoriser le numéro de téléphone entré
dans la liste des préréglages. Maintenez pressée ENT
ou appuyez sur “PRESET” sur le panneau tactile pour
afficher la liste des préréglages.
Choisissez un numéro de préréglage sur lequel vous
souhaitez mémoriser le programme.
Téléphone Bluetooth
25
Page 92

Opérations avancées
pour le Type C
1 Affichez le menu de composition de
numéro.
2 Choisissez “PHONE NUMBER”.
3 Appuyez sur 4/¢ /5/∞ pour
entrer un numéro de téléphone, puis
appuyez sur la touche numérique 1.
4/¢:
5/∞: Choisissez un numéro
5: Supprimez toutes les entrées.
FRANÇAIS
Remarque
Vous pouvez mémoriser le numéro de téléphone entré
dans la liste des préréglages. Maintenez pressée la
touche numérique sur laquelle vous souhaitez stocker le
préréglage.
Passez sur la position d’entrée.
pour le Type D
1 Affichez le menu de composition de
numéro.
2 Choisissez “NUMBER”.
3 Appuyez sur 4/¢, VOLUME
+/– pour entrer un numéro de
téléphone, puis appuyez sur
4/¢:
VOLUME +/– (molette de commande):
Remarque
Vous pouvez mémoriser le numéro de téléphone entré
dans la liste des préréglages. Maintenez pressée la
touche numérique sur laquelle vous souhaitez stocker le
préréglage.
Passez sur la position d’entrée.
Choisissez un numéro.
∞.
26
Page 93

Réception d’un SMS
(Service de messages courts)/
message textuel
Si vous utilisez un téléphone portable pouvant utiliser
les SMS (Services de messages courts)/Messages
textuels, vous pouvez lire les messages sur l’affichage
(moniteur) de l’autoradio.
Quand vous recevez un message, “Receiving
Message/Receiving MSG/RCV MSG”
apparaît sur l’affichage (moniteur).
pour le Type A/Type B
Appuyez sur ENT ou “YES” sur le panneau
tactile pour lire le message.
pour le Type C
Appuyez sur 1 pour lire le message.
Pour le Type D
“RCV MSG” apparaît sur l’affichage pour vous
informer de l’arrivée d’un message.
• Vous ne pouvez pas lire le message reçu sur l’affichage.
Pour lire le message plus tard
(uniquement poru le type A/B/C)
Appuyez sur 7 ou 3 (pour le Type C) quand vous
recevez un SMS/Message textuel. Le message reçu est
mémorisé dans l’historique des messages Unread.
Lecture d’un SMS/
Message textuel
Pour le Type A
1 Affichez l’écran “Bluetooth
Phone”.
2 Choisissez “Mode” ] “Message”.
3 Choisissez un historique de messages.
Vous pouvez choisir un des historiques de
messages suivants;
Unread:
Messages non lus.
Read:
Messages déjà lus.
Unsent:
Messages non envoyés.
Sent:
Messages déjà envoyés.
4 Choisissez le message que vous
souhaitez lire.
Remarque
Vous pouvez faire le réglage pour ignorer les messages
quand vous recevez un SMS/Message textuel.
Référez-vous à “Message Info” à la page 31.
Téléphone Bluetooth
27
Page 94

Opérations avancées
pour le Type B
1 Choisissez “Bluetooth” ]
“Message Menu”.
2 Choisissez un historique de messages.
Vous pouvez choisir un des historiques de
messages suivants;
Unread:
Messages non lus.
Read:
FRANÇAIS
Messages déjà lus.
Unsent:
Messages non envoyés.
Sent:
Messages déjà envoyés.
3 Choisissez le message que vous
souhaitez lire.
pour le Type C
1 Appuyez sur MODE, puis choisissez
“Message Menu”.
2 Choisissez un historique de messages.
Vous pouvez choisir un des historiques de
messages suivants;
Unread:
Messages non lus.
Read:
Messages déjà lus.
Unsent:
Messages non envoyés.
Sent:
Messages déjà envoyés.
3 Choisissez le message que vous
souhaitez lire.
pour le Type D
Non disponible pour ce type.
28
Page 95

Opérations audio Bluetooth
• Avant d’utiliser un appareil Bluetooth sur votre autoradio, connectez un appareil Bluetooth.
Référez-vous à “Connexion Bluetooth” à la page 12.
• Si le son est coupé ou interrompu pendant l’utilisation d’un appareil Bluetooth, essayez les
remèdes suivants.
• Mettez l’autoradio hors tension puis de nouveau sous tension.
• (Si le son n’est toujours pas rétabli,) Connectez de nouveau le périphérique. Référez-vous à
“Connexion/déconnexion de l’appareil” à la page 17.
• Pour des détails sur l’utilisation du menu, référez-vous au manuel d’instruction fourni avec votre
autoradio.
• Les indications sur l’affichage (moniteur) et les noms des touches varient d’un autoradio à l’autre.
ex. SOURCE: SRC 7: 7 / BACK
Bluetooth Audio: Bluetooth AUDIO, BT-AUDIO
Sélection d’une source
Avant d’utiliser la fonction de périphérique audio
Bluetooth, changez la source sur “Bluetooth
Audio”.
pour le Type A
Vous pouvez choisir “Bluetooth Audio” comme
source.
Appuyez répétitivement sur SRC pour
choisir “Bluetooth Audio”.
pour le Type B/Type C/Type D
Vous pouvez choisir “Bluetooth Audio” comme
source.
Appuyez répétitivement sur SOURCE pour
choisir “Bluetooth Audio”.
Opérations de lecture
pour le Type A/Type B
3: Démarrez la lecture
6: Démarrage de la lecture/pause
¢: Saut vers l’avant
4: Saut vers l’arrière
7: Arrêt
pour le Type C
1: Démarrage de la lecture
3: Arrêt
¢: Saut vers l’avant
4: Saut vers l’arrière
pour le Type D
5: Démarrage de la lecture
¢: Saut vers l’avant
4: Saut vers l’arrière
Téléphone Bluetooth/Audio Bluetooth
29
Page 96

Autres réglages
Procédure de base
pour le Type A
1 Affichez l’écran “Bluetooth Phone”
ou choisissez “Bluetooth Audio”
comme source.
2 Choisissez “Mode” ] “Setup” à
partir du menu.
3 Choisissez un élément.
Référez-vous à “Réglages possibles” à la page
FRANÇAIS
suivante.
4 Appuyez sur une des touches suivantes
pour changer les réglages.
5/∞: Changez le réglage.
ENT: Validez le réglage.
pour le Type B
1 Affichez le menu, puis choisissez
“Bluetooth” ] “Settings”.
2 Choisissez un élément.
Référez-vous à “Réglages possibles” à la page
suivante.
3 Changez les réglages.
Référez-vous au manuel d’instruction fourni avec
votre autoradio.
pour le Type C
1 Appuyez sur MODE, puis choisissez
“Settings”.
2 Choisissez un élément.
Référez-vous à “Réglages possibles” à la page
suivante.
3 Appuyez sur une des touches suivantes
pour changer les réglages.
5/∞: Changez le réglage.
1: Validez le réglage.
pour le Type D
1 Pendant que “Bluetooth Phone”
ou “Bluetooth Audio” est
choisi comme source, appuyez
sur ∞/4/¢ pour choisir
“SETTINGS”.
2 Choisissez un élément.
Référez-vous à “Réglages possibles” à la page
suivante.
3 Appuyez sur une des touches suivantes
pour changer les réglages.
VOLUME +/– (molette de commande):
Changez le réglage.
∞: Validez le réglage.
30
Page 97

Réglages possibles
Vous pouvez changer les options suivantes dans le menu de réglage (_: Réglage initial):
Auto Connect
Vous choisir de vous connecter automatiquement à
un appareil Bluetooth quand l’autoradio est mis sous
tension.
Off: Aucun périphérique n’est connecté
automatiquement.
Last: Permet de reconnecter le dernier appareil
connecté.
Order: Permet de connecter le périphérique
enregistré disponible trouvé en premier.
Auto Answer
Vous pouvez régler l’autoradio pour recevoir ou refuser
des appels automatiquement.
Off: L’autoradio ne répond pas automatiquement
aux appels entrants.
Répondez aux appels manuellement.
On: L’autoradio reçoit automatiquement les
appels entrants.
Reject: L’appareil refuse tous les appels entrants.
Message Info
Vous pouvez régler l’autoradio pour vous informer de
l’arriver d’un message quand vous recevez un SMS
(Service de messages courts)/Message textuel.
Auto: L’autoradio sonne et vous informe de
l’arrivée d’un message.
Manual: L’autoradio ne vous informe pas de
l’arrivée d’un message.
Microphone Level / Mic Setting
Ajuste le volume d’un microphone.
Level: 1, 2 , 3
Version
Affichez la version du logiciel et du matériel.
Réglages
31
Page 98

Dépannage
Ce qui apparaît être un problème n’est pas toujours sérieux. Vérifiez les points suivants avant d’appeler un centre de
service.
Symptôme Remèdes
L’appareil Bluetooth ne détecte pas l’autoradio. • Cet autoradio peut être connecté à un téléphone
L’appareil ne détecte pas l’appareil Bluetooth. • Vérifiez le réglage Bluetooth du périphérique.
FRANÇAIS
“Device Unfound/UNFOUND” apparaît sur l’affichage. • Vérifiez le réglage Bluetooth du périphérique, puis
L’appareil ne réalise pas le pairage avec le
périphérique Bluetooth.
“Connection Error/ERR CNT” apparaît sur l’affichage. • Choisissez “Connect” pour connecter de nouveau le
Il y a un écho ou du bruit. • Ajustez la position du microphone.
“Error/ERROR” apparaît sur l’affichage. • Essayez de nouveau la fonction.
“Loading/LOADING” apparaît sur l’affichage. • Essayez de nouveau la fonction.
“Please Wait/WAIT” apparaît sur l’affichage. • Attendez que le message disparaisse.
“Reset 08/RESET 8” apparaît sur l’affichage. • Vérifiez la connexion entre l’adaptateur et cet appareil.
Le son du téléphone est de mauvaise qualité. • Réduisez la distance entre cet appareil et le téléphone
portable Bluetooth et à un appareil audio Bluetooth en
même temps.
Pendant la connexion à un appareil, cet autoradio ne
peut pas être détecté par un autre appareil. Déconnectez
l’appareil actuellement connecté et refaites une recherche.
• Faites une recherche à partir du périphérique
Bluetooth. Après que l’appareil a été détecté, choisissez
“OPEN” sur cet appareil pour connecter le périphérique.
faites de nouveau la recherche.
• Entrez le même code PIN pour cet appareil et le
périphérique cible.
• Choisissez le nom de l’appareil à partir de “Special
Device”, puis connectez de nouveau.
périphérique.
• (Si le message apparaît de nouveau)
Le périphérique connecté n’est pas muni de cette fonction.
• (Si le message ne disparaît pas)
Mettez l’autoradio hors tension puis de nouveau sous
tension.
• Mettez l’autoradio hors tension puis de nouveau sous
tension.
portable Bluetooth.
• Déplacez la voiture dans un endroit où vous pouvez
obtenir un meilleur signal de réception.
32
Page 99

Symptôme Remèdes
Le son est interrompu ou saute pendant la lecture
d’un appareil audio Bluetooth.
L’appareil audio connecté ne peut pas être
commandé.
Informations sur le système Bluetooth:
Si vous souhaitez recevoir plus d’informations sur le système Bluetooth, consultez le site web de JVC.
• Placez l’appareil audio Bluetooth plus près de cet
adaptateur.
• Déconnectez le téléphone portable Bluetooth
connecté.
• Mettez l’autoradio hors tension puis de nouveau sous
tension.
• (Si le son n’est toujours pas rétabli,)
connectez de nouveau l’appareil.
• Vérifiez si l’appareil audio connecté prend en charge
AVRCP.
Spécifications
GÉNÉRALES
Alimentation:
Tension de fonctionnement:
CC 14,4 V (11 V à 16 V admissibles)
Système de mise à la masse: Masse négative
Consommation: 70 mA
Températures de fonctionnement admissibles:
0°C à +40°C
Dimensions (L × H × P):
70 mm × 34,5 mm × 90 mm
Masse (approx.):
150 g (sans les accessoires)
SECTION BLUETOOTH
Version Bluetooth:
Bluetooth 1,2 certifié
Puissance de sortie:
+4 dBm Max. (Classe d’alimentation 2)
Zone de fonctionnement:
moins de 10 m
Profile:
HSP (Profile de casque d’écoute)
HFP (Profile mains libres)
A2DP (Profile de distribution audio avancé)
AVRCP (Profile de télécommande audio/vidéo)
SPP (Profile de port série)
OPP (Profile de poussée d’objet)
La conception et les spécifications sont sujettes à changement
sans notification.
33Autres
Page 100

Wij verzoeken u de gebruiksaanwijzing goed door te lezen voordat u het apparaat gaat gebruiken. Zo krijgt u een
volledig inzicht in de functies van het apparaat en kunt u de mogelijkheden optimaal benutten.
Hartelijk dank voor de aanschaf van dit JVC-product!
Informatie voor gebruikers over het weggooien van oude apparatuur
Deze markering geeft aan dat het product met dit symbool bij het einde van de
gebruiksduur niet bij het huishoudelijk afval mag worden gegooid. Wanneer
u dit product wilt verwijderen, houdt u dan aan de geldende nationale
wetgeving of andere regels in uw land en uw gemeente. Door dit product naar
het inzamelingspunt te brengen, werkt u mee aan het behoud van natuurlijke
hulpbronnen en met het voorkomen van potentiële negatieve effecten op het
Dit symbool is alleen geldig in de
Europese Unie.
Geachte klant,
Dit apparaat voldoet aan de geldende Europese normen en richtlijnen inzake elektromagnetische compatibiliteit en
elektrische veiligheid.
De Europese vertegenwoordiger van Victor Company of Japan, Limited is:
NEDERLANDS
JVC Technology Centre Europe GmbH
Postfach 10 05 52
61145 Friedberg
Duitsland
milieu en de volksgezondheid.
2
 Loading...