

JVC
VIDEO CASSETTE RECORDER
HR-J620U
v - • | • v
TRUCTIONS
For Customer Use:
Enter below the Serial No. which is
located on the rear of cabinet. Retain
this information forfuture reference.
Model No. HR-J620U
Serial No.
PU30425-1547-1

Safety Precautions
CAUTION: TO REDUCE THE RISK OF ELECTRIC SHOCK.
I Note to CATV system installer:
attention to Article 820-40 of the NEC that provides guidelines
for proper grounding and, in particular, specifies that the cable
ground shall be connected to the grounding system of the
i This reminder is provided to call the CATV system installer's
building, as close to the point of cable entry as practical.
DO NOT REMOVE COVER (OR BACK).
NO USER-SERVICEABLE PARTS INSIDE.
REFER SERVICING TO QUALIFIED SERVICE PERSONNEL.
The lightning flash with arrowhead symbol, within an
equilateral triangle, is intended to alert the user to the
presence of uninsulated "dangerous voltage" within the
product's enclosure that may be of sufficient magnitude to
constitute a risk of electric shock to persons.
The exclamation point within an equilateral triangle is
intended to alert the user to the presence of important
operating and maintenance (servicing) instructions in the
literature accompanying the appliance.
NOTE:
• When you are not using the video recorder for a long period of
time, it is recommended that you disconnect the power cord
from the AC outlet.
• Changes or modifications not approved by JVC could void
user's authority to operate the equipment.
• The rating plate and the safety caution are on the rear of the
unit.
• Please read the "Precautions" section of this instruction manual
and the "Video Products Safety Guide" enclosed with this
manual before installing or operating the VCR.
• This instruction manual, and the other reference materials
enclosed with it, contain important information on VCR
operation and proper usage. Please keep them near your VCR
in a place where you can easily access them for reference.
• It should be noted that it may be unlawful to re-record pre-
recorded tapes, records, or discs without the consent of the
owner of copyright in the sound or video recording, broadcast
or cable program and in any literary, dramatic, musical, or
artistic work embodied therein.
WARNING:
TO PREVENT FIRE OR SHOCK
HAZARD, DO NOT EXPOSE THIS
UNIT TO RAIN OR MOISTURE.
CAUTION:
This video cassette recorder should be used with AC 120V,_,
60 Hz only.
To prevent electric shocks and fire hazards, do NOT use any
other power source.
CAUTION:
TO PREVENT ELECTRIC SHOCK, MATCH WIDE BLADE
OF PLUG TO WIDE SLOT, FULLY INSERT.
ATTENTION:
POUR _VITER LES CHOCS I_LECTRIQUES, INTRODUIRE
LA LAME LA PLUS LARGE DE LA FICHE DANS LA
BORNE CORRESPONDANTE DE LA PRISE ET POUSSER
JUSQU'AU FOND.
Htmt,.
• Cassettes marked "VHS" (or "S-VHS") can be used with this video
cassette recorder.
• HQ VHS is compatible with existing VHS equipment.
How To Use This Instruction Manual
This instruction manual begins with an introductory
section, "Getting To Know Your VCR", followed by
necessary set-up procedures in "Setting Up Your VCR".
The next four sections --"Playback", "Recording",
"Timer-Recording" and "Special Features" -- take you
step-by-step through these operations of your VCR.
"Editing" introduces you to your VCR's editing features.
"If You Have Any Questions" is the section you should
refer to if you experience any problems in VCR operation
or if you need additional information regarding a feature
or terminology. At the end of the book you will find
"Warranty" information and the locations you can contact
"For Servicing".
Throughout the book, if you ever need to refer to
another page for instructions or information, you will be
told so by a E7 mark pointing to the page number.
Unless otherwise specified, operation buttons
mentioned in the instructions refer to those located on the
remote control, not those duplicated on the VCR.
Remember, you must use your VCR correctly to fully
enjoy it. Please use this manual effectively. It's the surest
and quickest way to unlock the full potential Of your new
JVC VCR.
2
Table Of Contents
Some of your VCR's features
Instant Re-View _ p.16
Quick accesss to your recordings! At the touch of a button, tbxs
function automatically turns on the VCR, rewinds the tape, searches
for the beginning of your recorded program, and starts playback.
Timer-Recording _ p.22
Ten minute memory backup if there is a power fadure.
Auto Daylight Saving Time _" p.12
Getting To Know Your VCR
Front Panel ...................................................... 4
Display Panel ................................................... ,5
Back Panel ...................................................... 6
Wireless Remote Control ................................... 7
On-S6reen Menus and Displays ........................... 8
Setting Up Your VCR
Making the right connections ............................ 10
Setting your VCR's clock ................................. 12
Setting your VCR's tuner ................................. 13
I_ Playback ...........................................15
• Recording .........................................19
Timer-Recording ............................22
Special Features ............................25
I_Q Editing ...........................................26
9 If You Have Any Questions
Before requesting service ................................. 28
Notes regarding .............................................. 30
Automatic adjustment of the VCR's clock for Daylight Saving
Time.
TV and Cable Box Multi-Brand Remote
Control _;_p.25
Compatible with most major brands of televisions and Cable
Boxes for basic control functions. Puts an end to two-handed
remote control.
Precautions ...........................................31
About head cleaning ..........................31
Specifications .......................................31
Operaciones oasmasen._ __
espafiol .............................:,_................32
For Servicing ........................................34
Warranty .................................................35
3
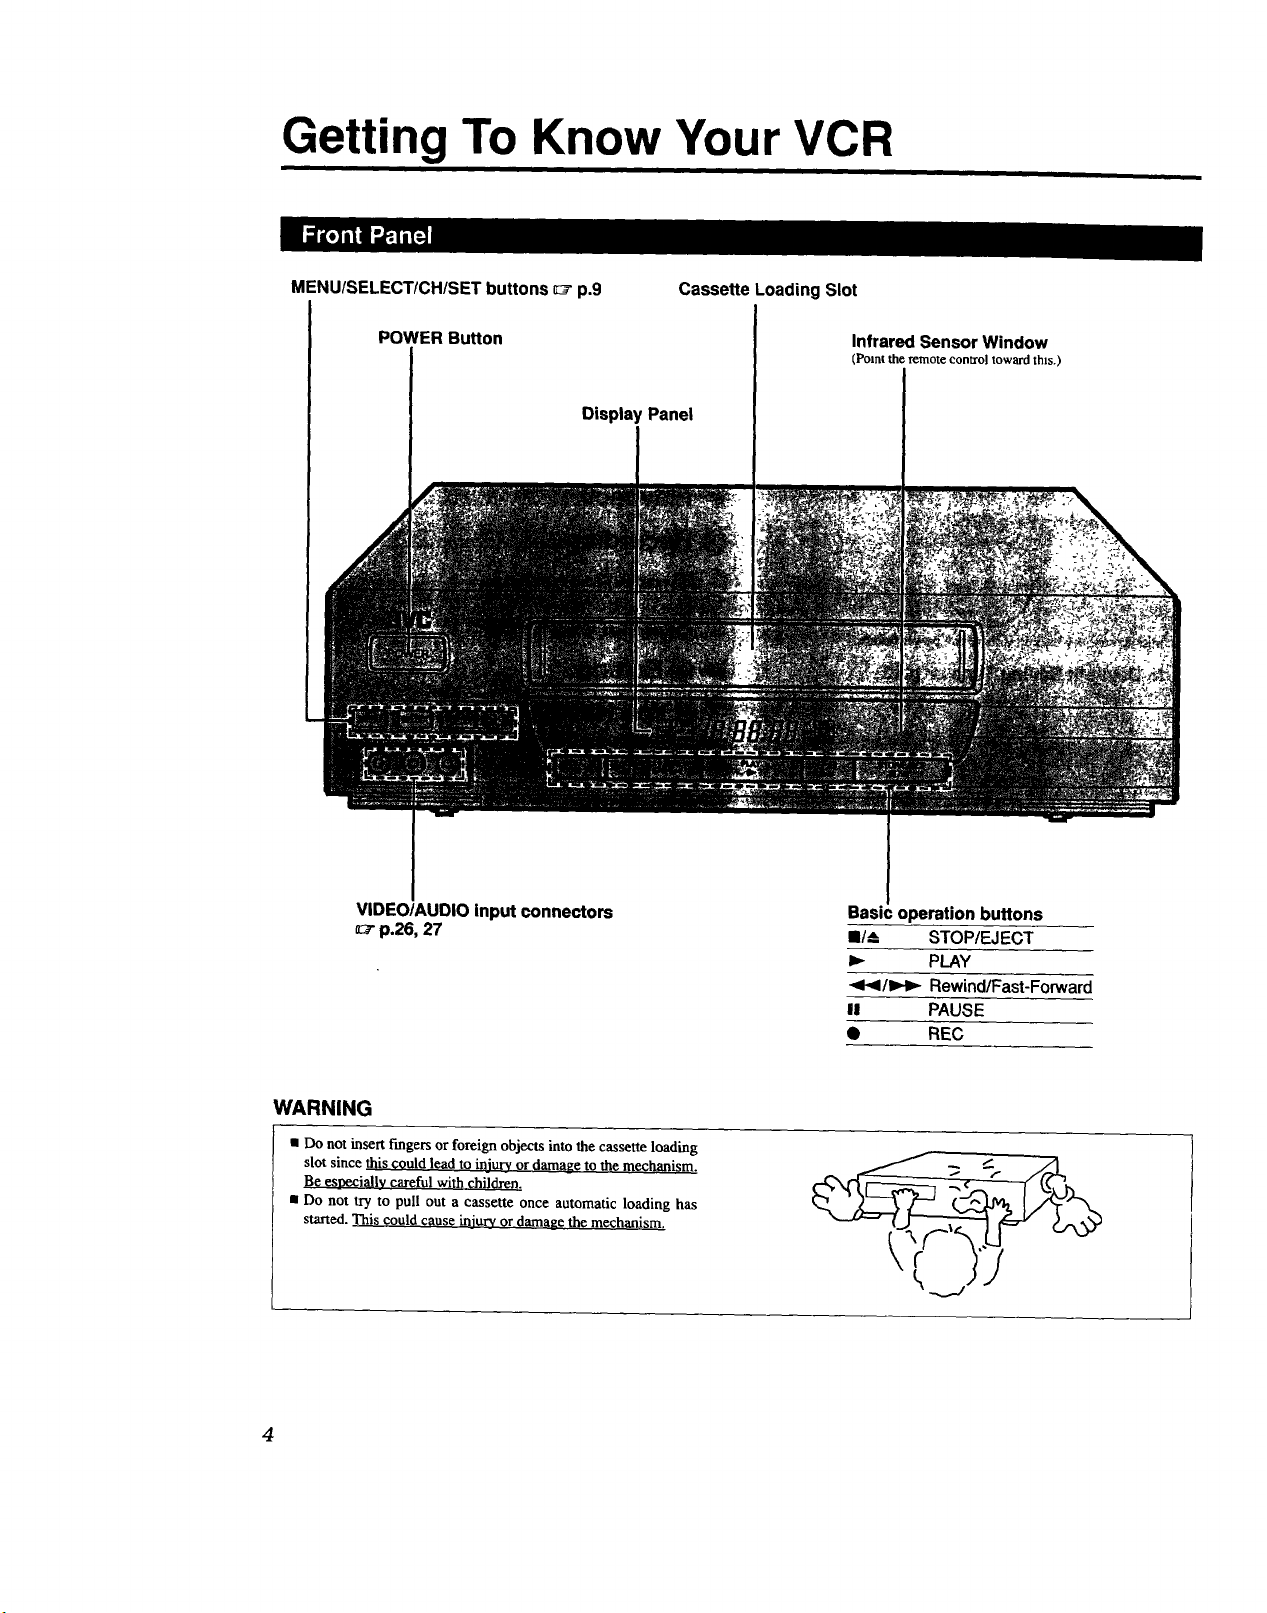
Getting To Know Your VCR
MENU/SELECT/CH/SET buttons _ p.9 Cassette Loading Slot
POWER Button Infrared Sensor Window
Display Panel
VIDEO/AUDIO input connectors
_" p.26, 27
(Pointtheremoteconn'oltowardth_s.)
Basic operation buttons
II/_ STOP/EJECT
I_ PLAY
<1<1/1_1_ Rewind/Fast-Forward
II PAUSE
• REC
WARNING
• Do not insert fingers or foreign objects into the cassette loading
slot since this could lead to injury or damage tothe mechanism.
Be esnecially careful with children.
• Do not try to pull out a cassette once automatic loading has
started.This could cause injury ordamage the mechanism.
4
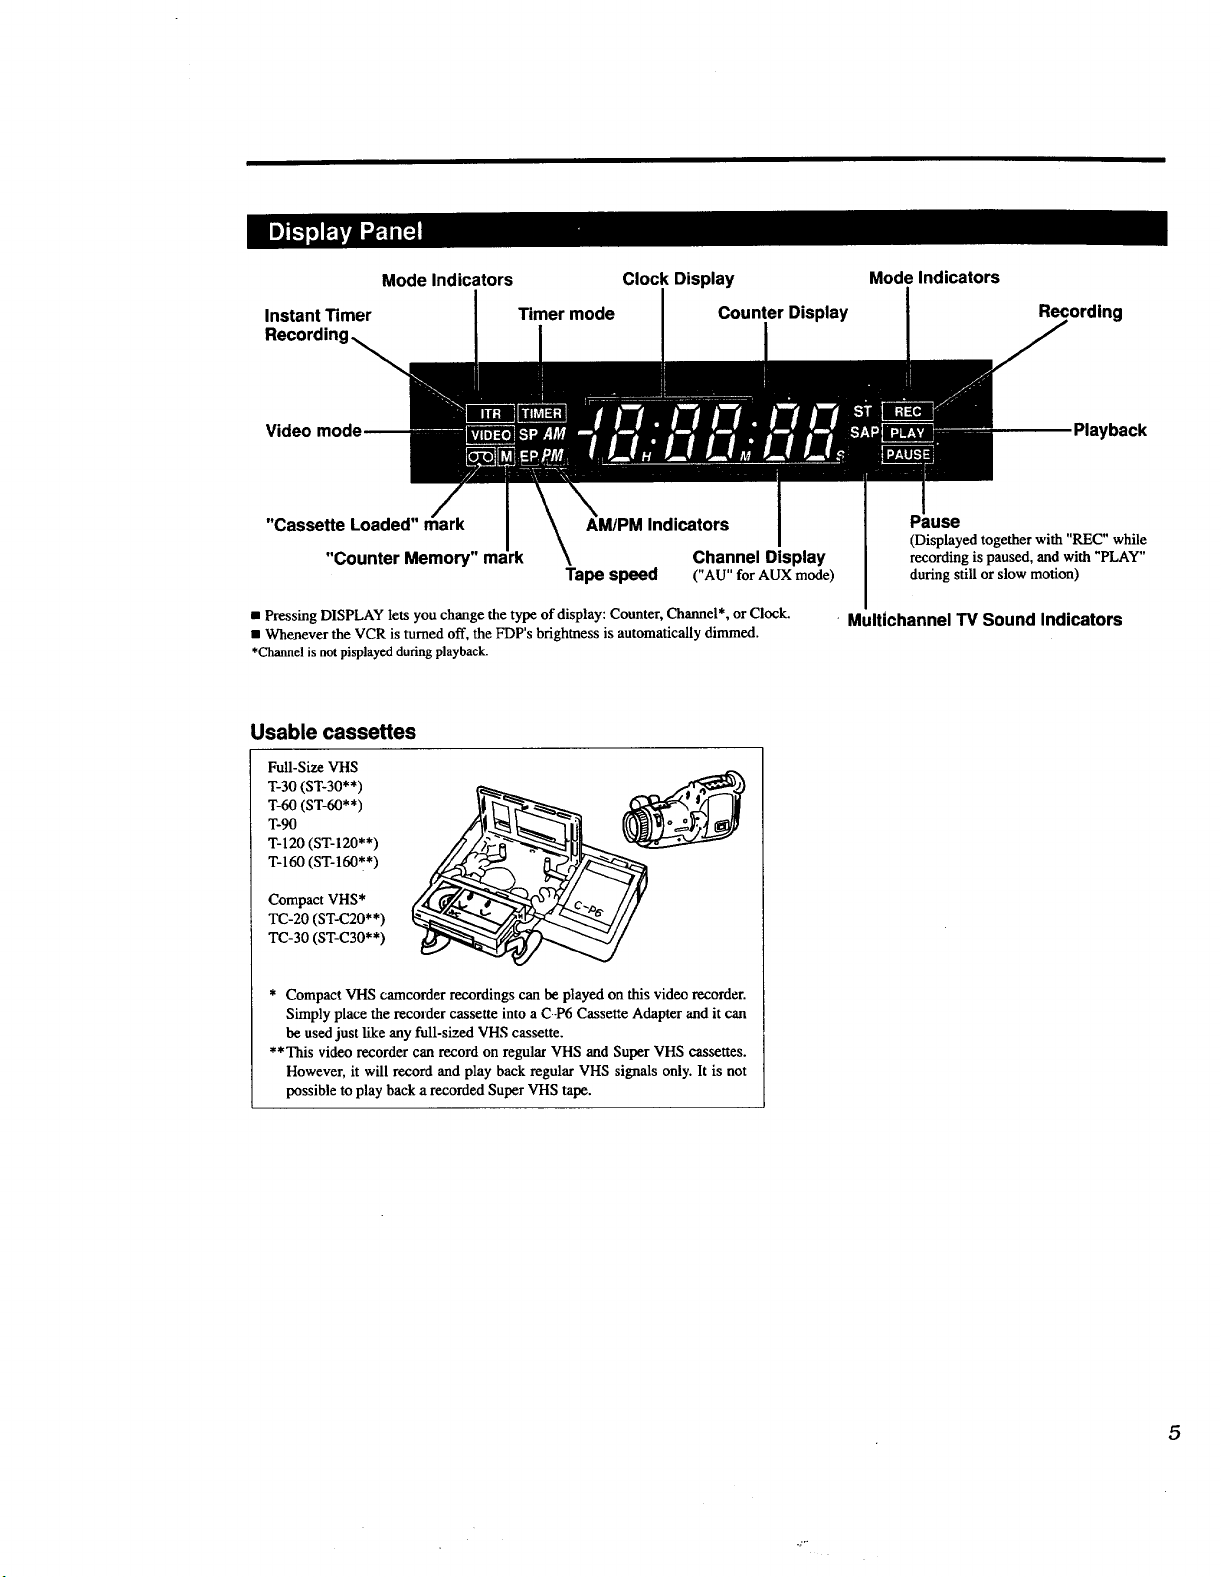
Mode Indicators Clock Display Mode Indicators
Instant Timer Timer mode Counter Display Recording
Video
"Cassette Loaded"
"Counter Memory" ms
AM/PM Indicators
Channel Display
Tape speed ("AU"forAUXmode)
• Pressing DISPLAY lets you change the type of display: Counter, Channel*, or Clock.
• Whenever the VCR is turned off, the FDP's brightness is automatically dimmed.
*Channel is not pisplayed during playback.
Usable cassettes
Full-Size VHS
T-60 (ST-60**)
T-90
T-30 (ST-30**)
T-120 (ST-120**)
T-160 (ST-160**)
Compact VHS*
TC-20 (ST-C20**)
TC-30 (ST-C30**)
* Compact VHS camcorder recordings can be played on this video recorder.
Simply place the recorder cassette into a C-P6 Cassette Adapter and it can
be used just like any full-si-_ VHS cassette.
**This video recorder can record on regular VHS and Super VHS cassettes.
However, it will record and play back regular VHS signals only. It is not
possible to play back a recorded Super VHS tape.
Playback
Pause
(Displayed together with "REC" while
recording is paused, and with "PLAY"
during still or slow motion)
- Multichannel TV Sound Indicators
5
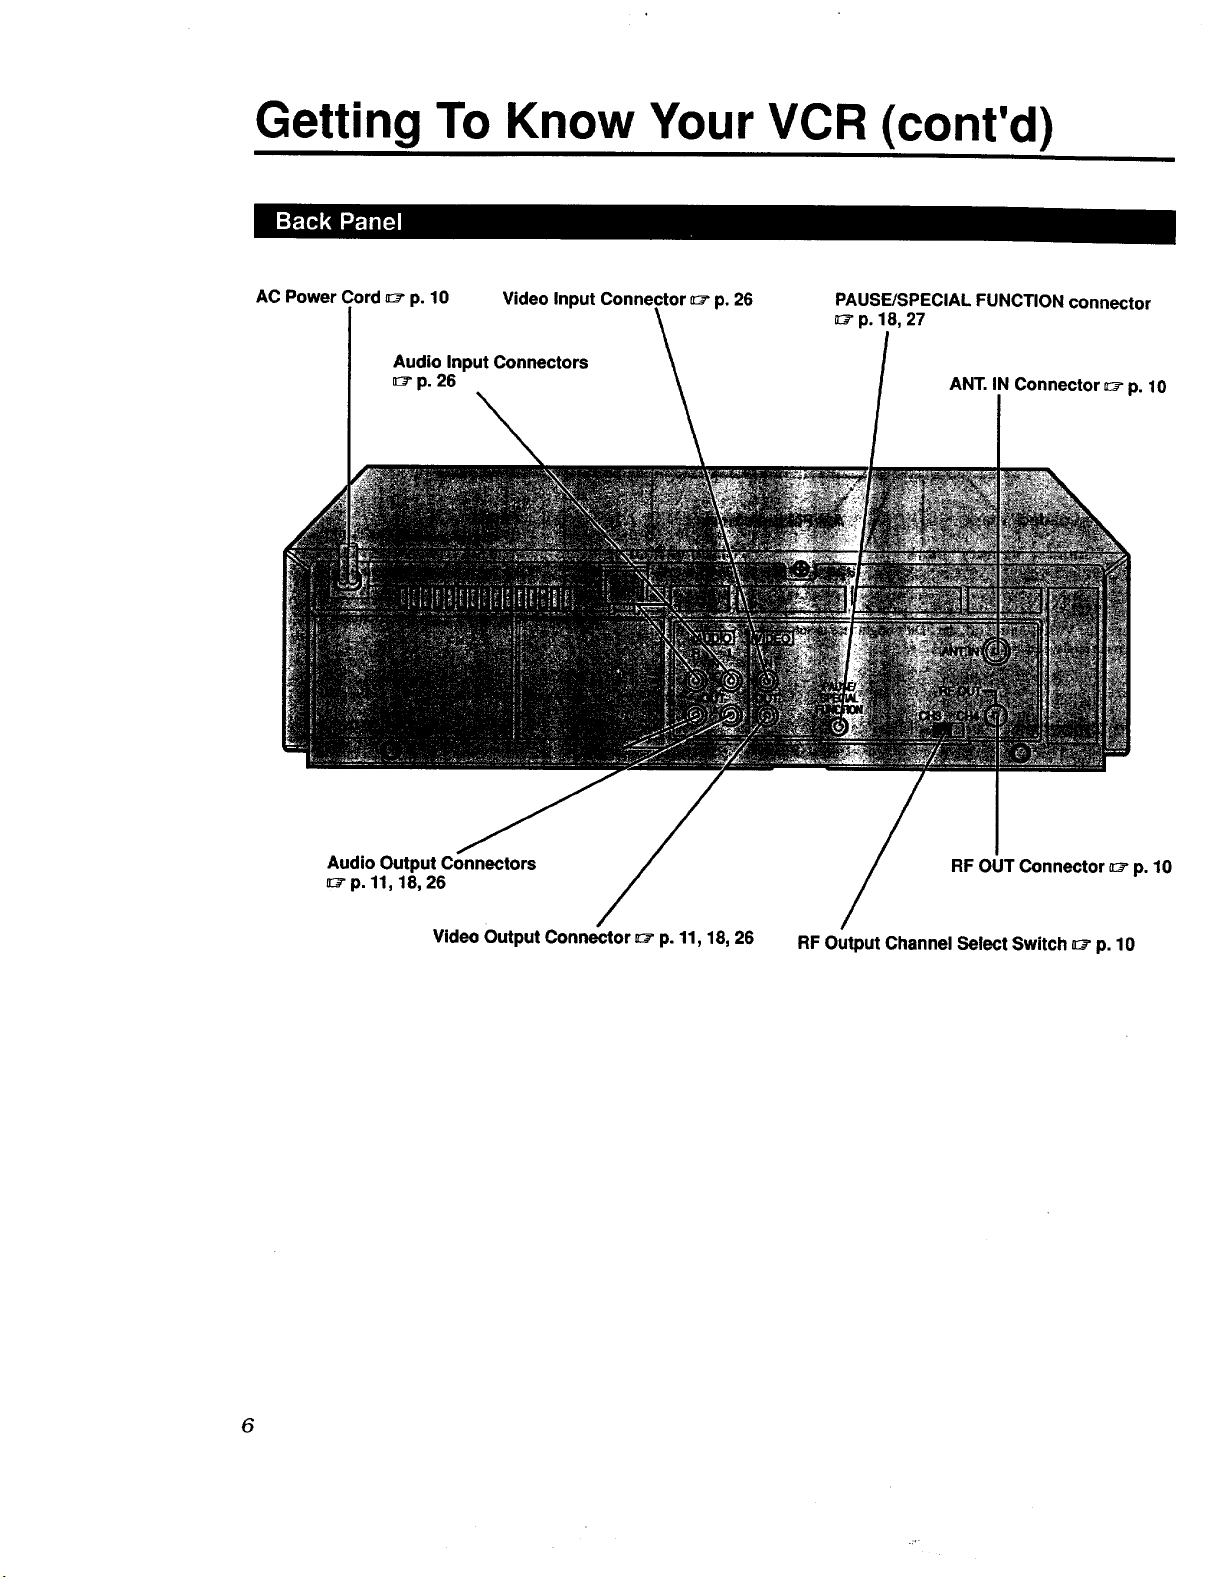
Getting To Know Your VCR (cont'd)
AC Power Cord 0_- p. 10 Video Input Connector _" p. 26
Audio Input Connectors
0_ p. 26
Audio Output Connectors
z_-p. 11, 18, 26
PAUSE/SPECIAL FUNCTION connector
0_-p. 18, 27
ANT. IN Connector _-p. 10
RF OUT Connector 0_-p. 10
Video Output Connector _" p. 11, 18, 26
6
RF Output Channel Select Switch 0_-p. 10

Instant Re-View
Display _ p. 5, 17
TV/VIDEO Mode Switching
Multi-Purpose Digit Keys
Tape Speed
ENTER/OSD _ p. 8, 19
C.MEMORY/ADD
p. 14, 17
TV Volume _ p. 25
SHUTTLE PLUS _" p. 15, 16
SKIP
p. 14, 17, 24
SKIP SEARCH _" p. 16
Timer _ p. 23
On-Screen Menu _ p. 9
TV/CABLE/VCR control select
switch _- p. 25
• Set to the appropriate position
depending on the unit you
wish to operate.
Basic Functions
_:_ p. 15, 19
A/B CODE select switch
_p. 26
Installing Batteries
[] Slide the battery compartment cover in the direction of the arrow.
[] Insert 2 "AAA"-size batteries (provided) in the correct directions.
[] Replacethecover.
How To Use
This remote control can operate most of your VCR's functions.
Set the TV/CABLF_./VCRswitch to the VCR position.
[] Point the remote control toward the VCR's sensor window.
[] Press the appropriate operation button.
• The maximum operating distance of the remote control is
about 8 m (*26ft).
This remote control can also operate TVs and Cable Boxes of various
brands. For instmctaons, _ p. 25.
7
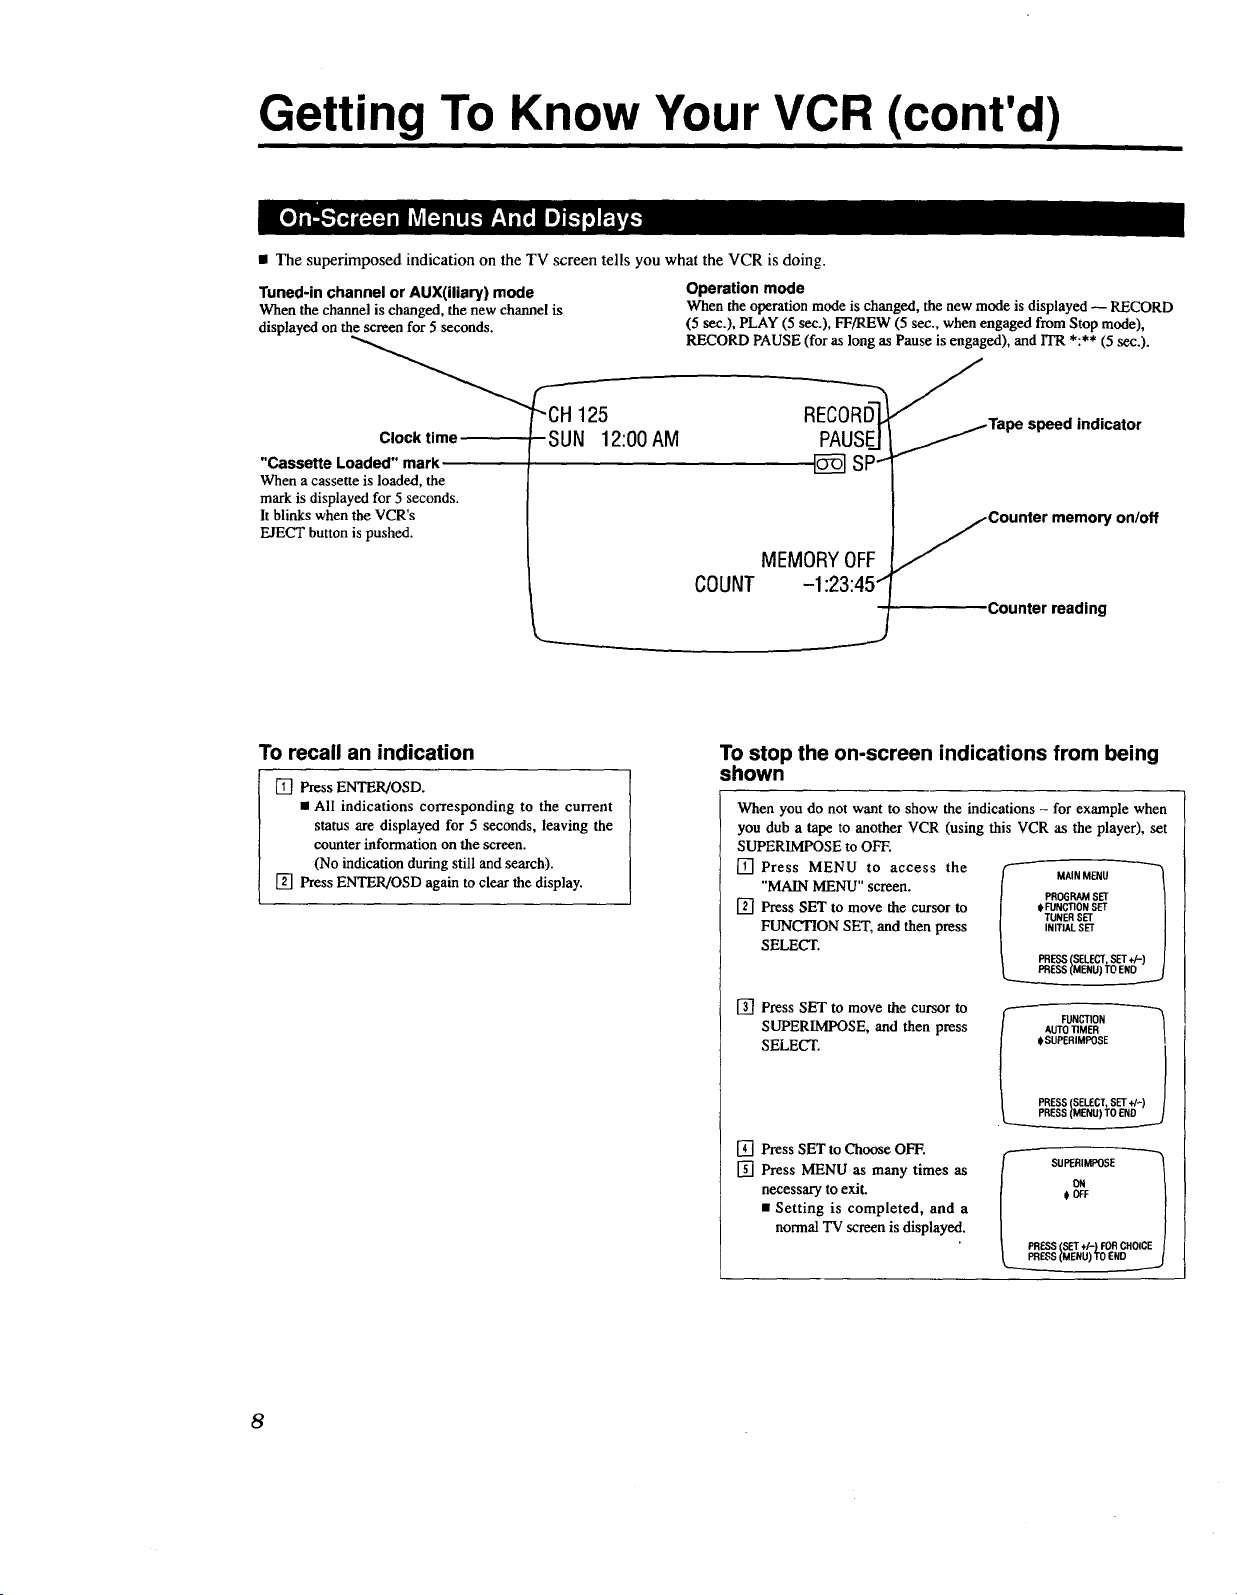
Getting To Know Your VCR (cont'd)
• The superimposed indication on the TV screen tells you what the VCR is doing.
Tuned-in channel or AUX(iliary) mode
When the channel is changed, the new channel is
displayed on the screen for 5 seconds.
Operation mode
When the operation mode is changed, the new mode is displayed -- RECORD
(5 sec.), PLAY (5 sec.), FF/REW (5 sec., when engaged from Stop mode),
RECORD PAUSE (for as long as Pause is engaged), and ITR *:** (5 sec.).
Clock time
"Cassette Loaded" mark
When a cassette is loaded, the
mark is displayed for 5 seconds.
It blinks when the VCR's
EJECT button is pushed.
To recall an indication
[] Press ENTER/OSD.
• All indications corresponding to the current
status are displayed for 5 seconds, leaving the
counter information on the screen.
(No indication during still and search).
[] Press ENTER/OSD again to clear the display.
SUN 12:00 AM
REp_0UR@ _Tape speed indicator
sP--
MEMORYOFF
COUNT -1:23:451
To stop the on-screen indications from being
shown
When you do not want to show the indications - for example when
you dub a tape to another VCR (using this VCR as the player), set
SUPERIMPOSE to OFF.
[] Press MENU to access the (- MAINMENU "_
"MAIN MENU" SCl'een. _/ PROGRAM SET _/
[] Press SET to move the cursor to / oFUNCTIONSET |
FUNCTION SET, and then press [ I,ITIAt.SET /
SELECT. |t PRESS(SELECT,SET+/-) /|
[] Press SET to move the cursor to
SUPERIMPOSE, and then press
SELECT.
Counter memory on/off
Counter reading
/ TUNER SET |
L____s (ME.u)_E.O____.j
_" FUNCTION
/ AUTOTIMER
#SUPERIMPOSE
] PRESS(SELECT,SET+/-)
[] Press SET to Choose OFF.
[] Press MENU as many times as
necessary to exit.
• Setting is completed, and a
normal TV screen is displayed.
I SUPEI_MPO$E
€ OFF
8

m You can set the clock, tuner, timer, and other functions using the on-screen menu. For this, the MENU, SET+/- and SELECT
buttons on the VCR or remote control are used.
.............. Press MENU button.
TVscreen )
[_ .............. Press SET button.
.............. Press SELECT button.
* Press MENU to return to the TV screen.
_LINW_
oPR_ P,A_
(If the clock has
not been set)
k___pRESS SELECTS_T.-1
CSEE3
_,E_ i!_tlu) TOM_IN_mJ
n_'p. 20
nlt_0n
,_
_'p 13
_T_ ;_ t_stm
Xll_ 11:$3 N,I
O.S.T O_
n::_"p. 12
_p 22
k
_'p8
9
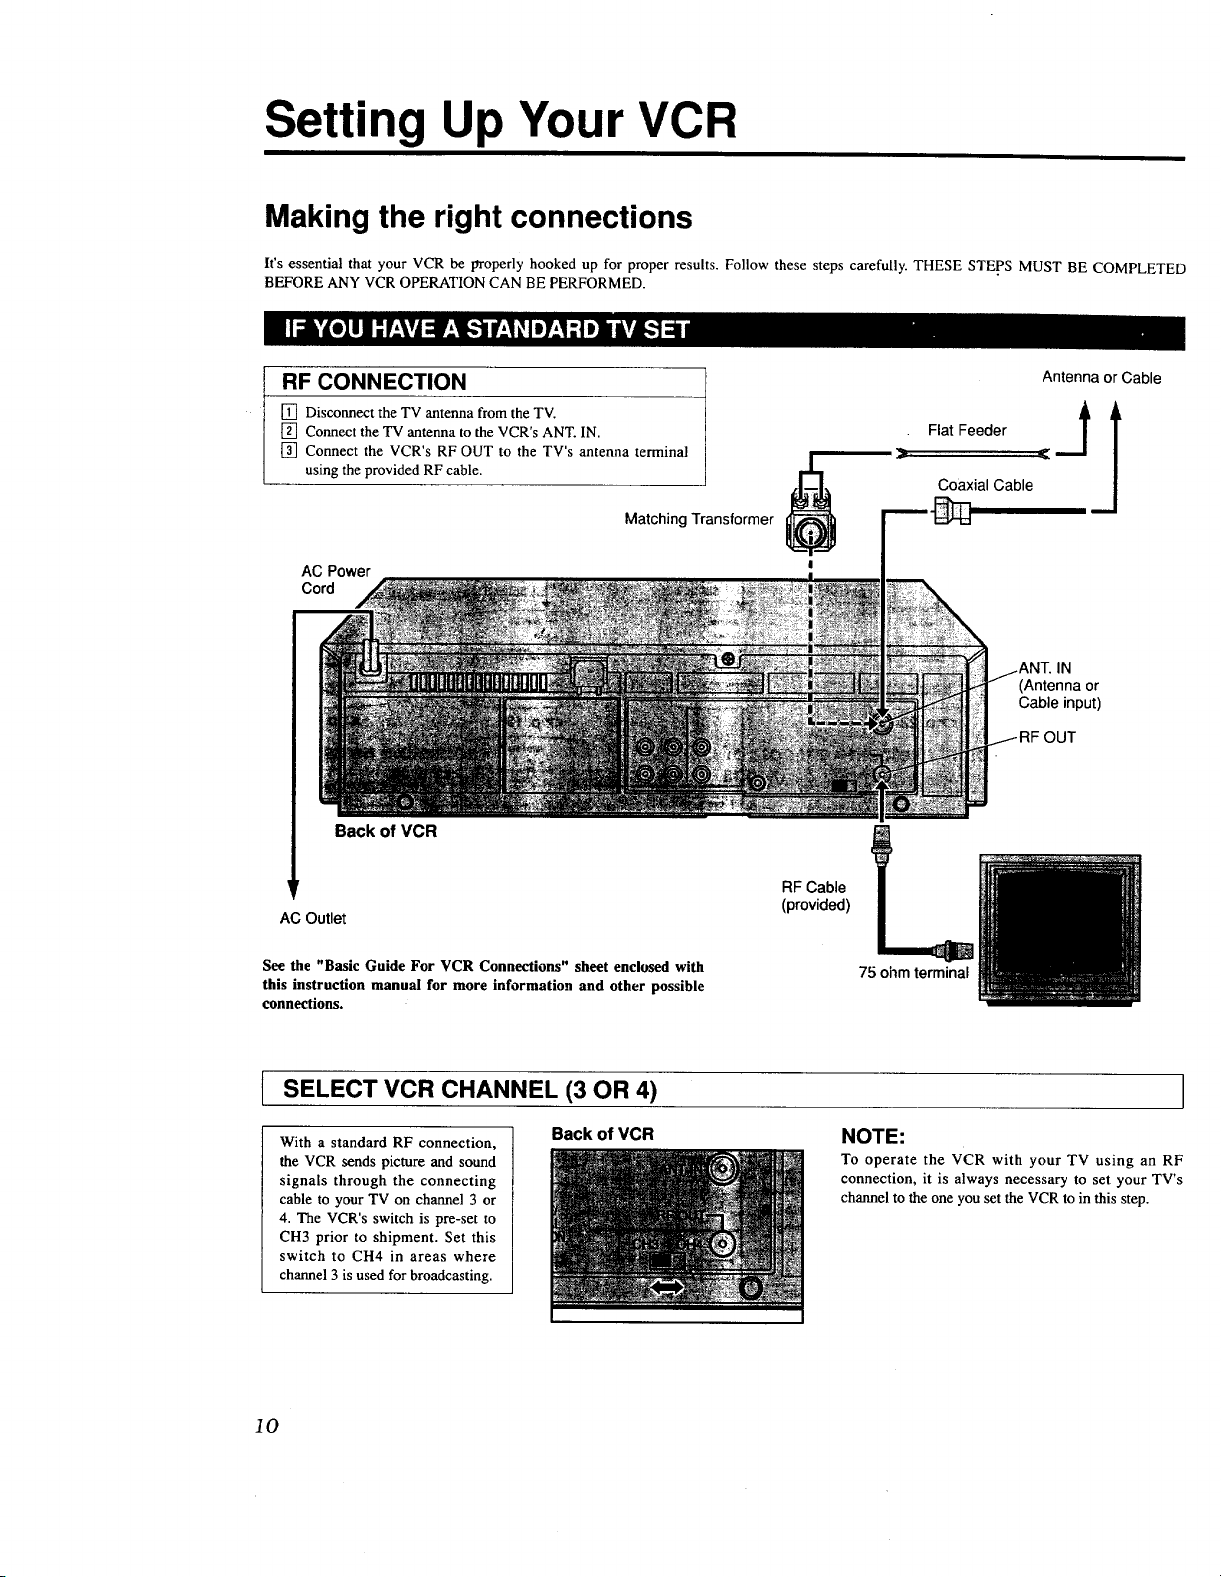
Setting Up Your VCR
Making the right connections
It's essential that your VCR be properly hooked up for proper results. Follow these steps carefully. THESE STEPS MUST BE COMPLETED
BEFORE ANY VCR OPERATION CAN BE PERFORMED.
RF CONNECTION
[] Disconnect theTV antennafrom theTV.
[] Connect the TV antenna to the VCR's ANT. IN.
[] Connect the VCR's RF OUT to the TV's antenna terminal
using the provided RF cable.
Matching Transformer
AC Power
Cord
Back of VCR
AC Outlet
!
RF Cable
(provided)
Antenna or Cable
. Flat Feeder jt --
Coaxial Cable
IN
(Antenna or
Cable input)
OUT
3
See the "Basic Guide For VCR Connections" sheet enclosed with
this instruction manual for more information and other possible
connections.
[ SELECT VCR CHANNEL (3 OR 4)
With a standard RF connection,
the VCR sends picture and sound
signals through the connecting
cable to your TV on channel 3 or
4. The VCR's switch is pre-set to
CH3 prior to shipment. Set this
switch to CH4 in areas where
channel 3 is used for broadcasting.
10
Back of VCR
75 ohm terminal
NOTE:
To operate the VCR with your TV using an RF
connection, it is always necessary to set your TV's
channel to the one you set the VCR to in this step.
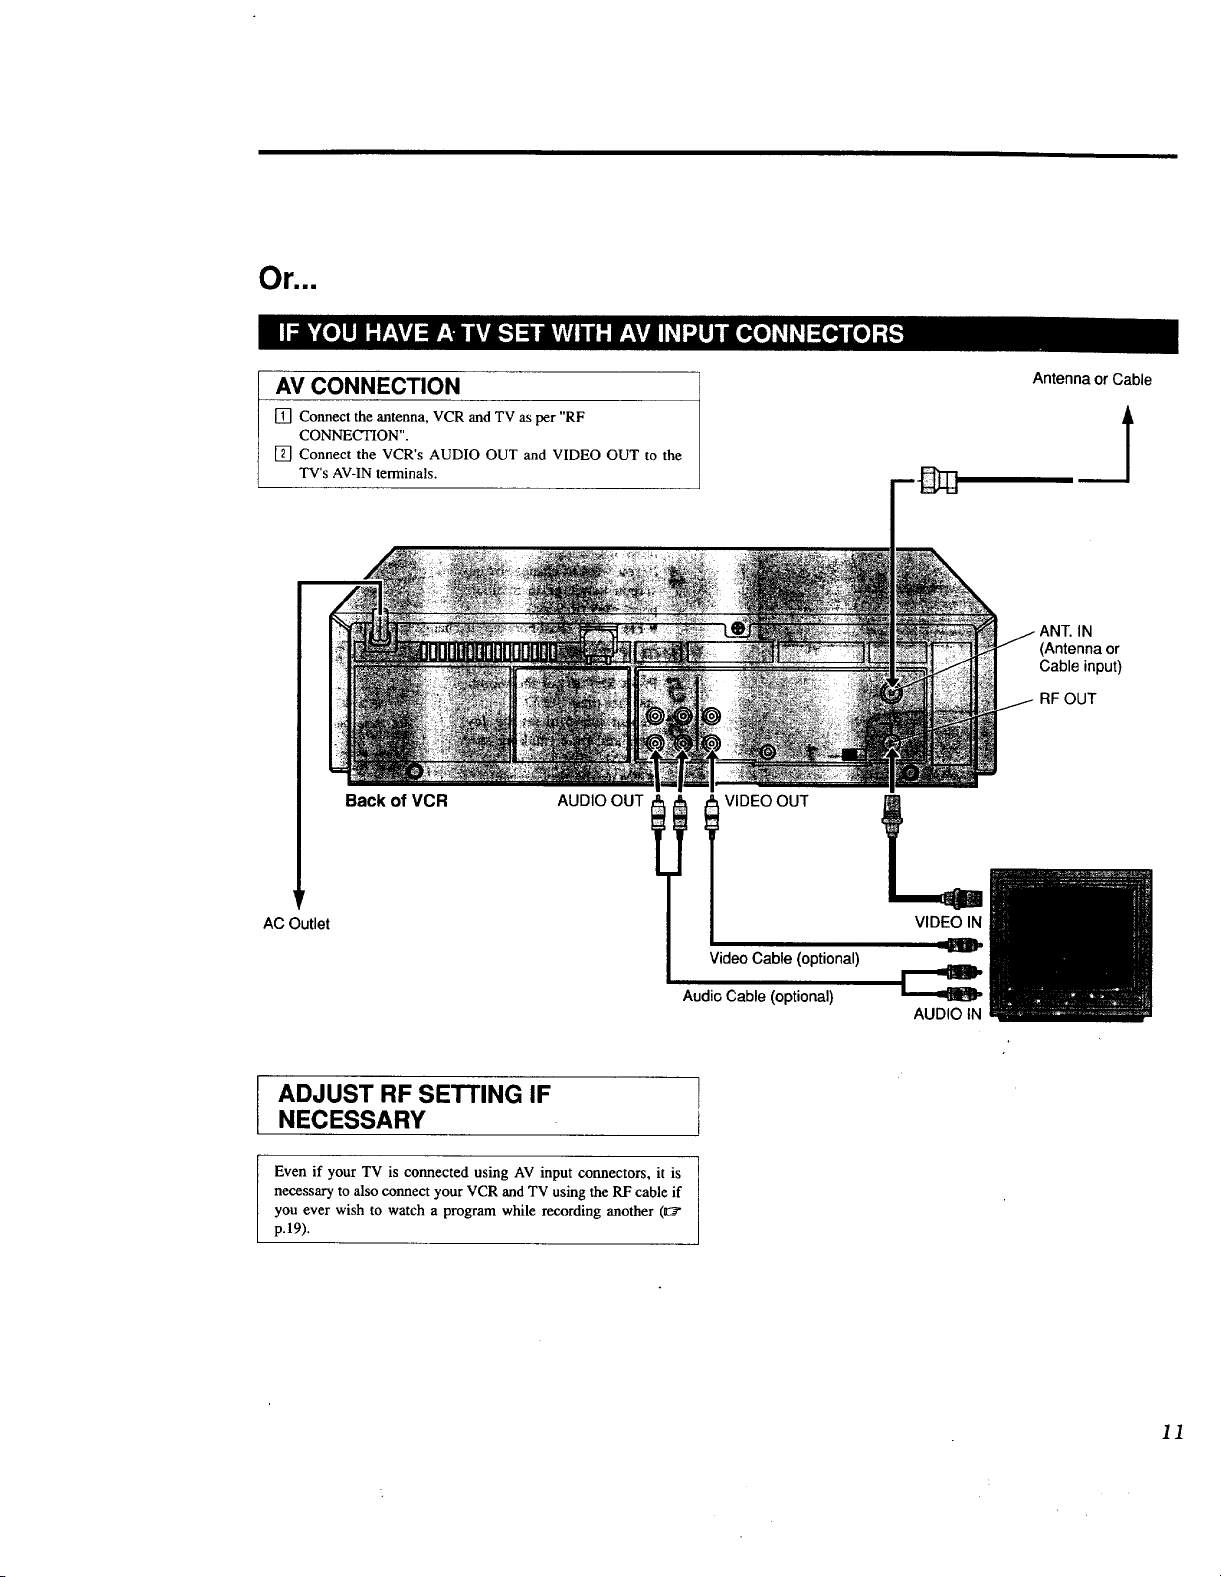
Orlmu
AV CONNECTION
[] Connect the antenna, VCR and TV as per "RF
CONNECTION".
[] Connect the VCR's AUDIO OUT and VIDEO OUT to the
TV's AV-IN terminals.
Back of VCR
AUDIO OUT l
AC Outlet
Antenna or Cable
J
(Antenna or
Cable input)
RF OUT
I T VIDEO OUT
VIDEO IN
I DJUST RF SETTING IF
NECESSARY
Even if your TV is connected using AV input connectors, it is
necessary to also connect your VCR and TV using the RF cable if
you ever wish to watch a program while recording another (_:_"
p.19).
Video Cable (optional)
Audio Cable (optional)
AUDIO IN
11

Setting Up Your VCR
(cont'd) IPo.,.ST.UCC,O.ESE.
ESPAI;iOL VEA p.32- 33. !
Setting your VCR's clock
Since your VCR bases all of its timer recording start and stop "decisions" on the time kept by its built-in clock, accurate setting of this
clock is crucial for proper ttmer-recording results.
Press POWER
• If watching on channel 3 or 4, press TV/'VIDEO to select
POWER ON;
SELECT CHANNEL
3 OR 4 (OR AV MODE)
1
i
the VIDEO mode. The VCR's VIDEO indicator will light.
[ AGCESS-THEON-SCREEN MENU":
I _ Press MENU.
' _" • The Mare Menu screen will S INITIALSET
appear. / DATE 1/1/95SUN |
Press SET to move the cursor / DST OFF |[ ENGLISH PRESS tEFj /
to "INITIAL SET", and then | SPANISHPRESSIREW) /
press SELECT. t PRESS (SELECT SET,l-) /
If you want to change the on-
screen language to Spanish,
press _ (Rewind).
• Press _ (Fast Forward) to change back to English.
_' Press SET to set the month,
and then press SELECT. F INmALSET _
6 Repeat step 5 to set the day, I D_!_,zr23_,,mu I
year and time (making sure ] .D:._-,_,':,_-_E.._ ]
I that AM or PM is correct). I _XN?S"H_E_S_[;_Wl I
• The day of the week will I PRESS(SELECT.SET+l-) I
automatically appear.
/
| TiME 1200AM |
/ /
4
You can also use the POWER, MENU. HEW. FF. SET
and SELECT buttons on the VCR.
12
2,8
7
If you want to take advantage of Auto D.S.T_ (Daylight
Saving Time) (see below), press SET to choose ON.
TO MAKE CORRECTIONS
Press SELECT so that the item you want to change blinks. Reset
that item. Continue to step 8_
• _ _i _-_._ " '_
Press MENU.
Auto Daylight Saving Time
Your VCR is incorporated with the D.S.T. function which
automatically adjusts the clock at the start/end of Daylight Saving
Time, making manual re-setting unnecessary.
When D.S.T. is set to ON:
• On the first Sunday of April, 1 minute after l:59AM the
VCR's clock is adjusted to 3:00AM.
• On the last Sunday of October, 1 minute after l'59AM the
VCR's clock is adjusted to I:OOAM.
' • If you live in an area without Daylight Saving Time, keep
I D.S.T. OFF when setting the clock.

POR INSTRUCCIONES EN
ESPANOL VEA p.32 - 33.
Setting your VCR's tuner
The Auto Set feature introduced here automatically assigns receivable channels tn your area to the CHANNEL UPfDOWN buttons
and skips the others so you won't have to go through any "blank" channels to get to the one you want.
TURN ON THE VCR.._,_:_:_+_:_:',_-_ ....
Press POWER
POWER ON;
SELECT CHANNEL
.3 OR 4 (OR AV MODE)
W/VIDEO
• If watching on channel 3 or 4, press TVc_'IDEO to select
the VIDEO mode. The VCR's VIDEO indicator will light.
ACCESS THE ON-SCREENMENU _!i,-_
Press MENU.
• The Mare Menu screen will
appear.
Press SET to move the cursor
to "TUNER SET", and then
press SELECT
Press SET to move the cursor
to "BAND", and then press
SELECT.
TUNER SET
$ BAND
AFC
AUTO CHANNEL SET
MANUAL CHANNEL SET
PRESS (SELECT, SET +/-)
PRESS (MENU] TO END
SELECTTHE BAND" .... ,_ -::',,
Press SET to choose "TV" or
"CATV".
• The BAND select feature
has 2 settings (TV and
CATV). Set to TV if your
antenna provides only UHF
and VHF channels. Set to
CATV if your antenna
system is a cable TV line
Press MENU.
BAND
sTV
CAW
PRESS (SET+I-) FORCHOICE
PRESS (MENU] TO END
You can also use the POWER, MENU, SET
and SELECT buttons on the VCR
5
START. _I,UTO_SET .:.__o_,_ __
Press SET to move the cursor to "AUTO CHANNEL SET",
and then press SELECT
• Auto set is in progress and "SCANNING..." is displayed.
• When available channels are scanned, "ADD" will be
displayed on the screen.
• When unavailable channels are skipped, "SKIP" will be
dtsplayed.
• After completton of auto set, the lov,est tuned-in channel
number and "SCAN COMPLETED" are displayed.
• If "SCAN COMPLETED -- NO SIGNAL --" is
displayed, check the band setting and connectmns, and
start agam. 1:_p.10, 11.
BAND TUNER SET
AFC
OAUTO CHANNEL SET
MANUAL CHANNEL SET
PRESS (SELECT, SET +/-I
SS (MENU) TO END
AUTOCHANNEL SET
" CH 5 _/O[_
SCANNING
RETURN!To THE "r_:_N !::--- ::--_'_'"_"
Press MENU as many times as necessary to exit.
13

Setting Up Your VCR (cont'd)
To add a "skipped" channel to your
VCR's tuner
SKIP
keys
MENU
A[
;ET +/-
Press MENU.
[]
• The Main Menu screen will appear.
[]
Press SET to move the cursor to "TUNER SET", and then
press SELECT.
[] Press SET to move the cursor to
"AFC", and then press SELECT.
[] Press SET tochoose "SPCL".
[] Press MENU.
[] Press SET to move the cursor to
"MANUAL CHANNEL SET",
and then press SELECT.
[] Input the channel number using the Digit keys.
[] Press ADD to store the channel.
[] Specify another channel number or press MENU as many
times as necessary to exit.
To delete an unwanted channel from
your VCR's tuner
[]
Press MENU.
• The Main Menu screen will appear.
[]
Press SET to move the cursor to "TUNER SET", and then
press SELECT.
[]
Press SET to move the cursor to
"MANUAL CHANNEL SET",
and then press SELECT.
[]
Input the channel number using
the Digit keys or the CH +/-
buttons.
[]
Press CH. SKIP to delete the
channel.
[]
Specify another channel number or press MENU as many
times as necessary to exit.
MANUAL CHANNEL SET -_
MANUAL CHANNEL SET "_
SELECT CH NO. AND |
14

POR INSTRUCCIONES EN
Playback
The easiest, most basic operation possible with your VCR is tape playback. Previously-recorded signals on a video tape are read by
your VCR and displayed on your TV just like a TV program.
Insert a cassette with its window side up, and label side
POWER ON;
SELECT CHANNEL
3 OR 4 (OR AV MODE)
facing you. Press gradually on the middle of the cassette
until the VCR pulls the cassette in.
• The VCR power will come on automatically.
• The counter will be reset to "OH00M00S" automatically.
• If the safety tab on the cassette is absent, playback will
Press I_ (PLAY).
Press • (STOP).
ESPANOL VEA p.32 - 33.
start automatically.
REW
PLAY
6
Press -<1<1to rewind the tape.
Press _ to fast-forward the tape.
• Press • to stop the tape.
_
Press the VCR's n/_ (STOP/EJECT) button.
To view a still picture
During Playback...
[] PressPAUSE toview astill picture.
• If there is vertical picture jitter, press CH - or + (on the
VCR or remote control) to make the picture more stable.
[] To advance the picture frame by frame, press PAUSE again.
• For frame-by-frame playback in the forward or reverse
direction, press SHUTTLE PLUS I<< or I)-1)4in the
corresponding direction while in the still picture mode.
[] Press PLAY to resume normal playback.
To view a slow/fast-motion picture
During Playback...
[] Press the SHUTTLE PLUS 14-(I or I_IH button. Tape speed
will change in the corresponding direction.
• To increase the speed, press the button for the same direction.
• To decrease speed, press the button for the opposite direction.
• For forward slow motion playback, press PAUSE for more
than 2 seconds while in the still picture mode.
[] Press PLAY to resume normal playback,
Or...
During Playback...
[] Press FF for forward fast-motion, or REW for reverse fast-
motion.
[] Press PLAY to resume normal playback.
• For short searches, keep FF or REW pressed for more than
2 seconds. When released, normal playback will continue.
15

Playback (cont'd)
CH +/- PLAY STOP
PLAY indicator
SKIP
SEARCH
To adjust tracking manually
This overrides your VCR's automatic tracking
During Playback...
[] Press the VCR's CH(annel) +/- buttons simultaneously to
cancel auto tracking
• The remote control's CH +/- cannot be used for this
purpose.
[] Press CH + or- to adjust tracking.
• Press the VCR's CH +/- simultaneously to return to
automatic tracking
During Slow...
[] Simply press CH + or - to adjust tracking.
Index Search
Index codes are electronic "bookmarks" which are automatically
placed on the tape whenever recording is started. Index Search
automatically seek_ out these index codes so you can easily find
the beginning of a recording (up to 9 index codes away in either
direction).
During Stop ....
[] Press SHUTTLE PLUS t<<l or I_l*q "INDEX -1" or
"INDEX 1" wall be displayed and search will begin in the
corresponding direction.
[] If you wish to access index codes 2 through 9, press
SHUTTLE PLUS 1<14 or I_IH repeatedly until the correct
index number is thsplayed.
• When the specified index code is found, playback will start
E
automatically.
SHUTTLE
PLUS
Instant Re-View
Programs that have been timer-recorded overnight are easy to
access.
[] Press REVIEW.
• The VCR automatically turns on, rewinds to the beginning
of the last recording, and starts playback.
• If you timer-recorded 2 programs, press REVIEW twice.
For 3 programs, press REVIEW three times, and so on.
This is possible up to nine times.
• Re-View does not function when the VCR's Timer mode is
engaged. Disengage Timer to use Re-View.
Skip Search
To skap over unwanted sections of a recording.
During Playback...
[] Press SKIP SEARCH from 1 to 4 times.
This fast-motions through 30-sec. to 2-min. of tape.
• Playback resumes automatically.
• Press PLAY to cancel a Skip Search midway.
Repeat Playback
To play the whole tape repeatedly.
During Playback...
[] Press PLAY for more than 5 seconds, and release.
• The "PLAY" indicator on the VCR panel will blink slowly.
• The tape will be played 20 times automatically, and then
stop.
• To stop repeated playback at any time, press STOP.
16

POWER
I,
REW PLAY
_IER
Counter Reset
To reset the tape counter to zero
[] Press C. RESET.
• Pressing DISPLAY repeatedly changes the VCR's
displayed indication. (Counter readmg _ Channel*
Clock nine).
*Channel is not displayed during playback.
Counter Memory
To returnto tape position zero
During Playback...
[] PressC. RESET at a point you wish to locate later.
• The counter will read "0H 00M 00S".
[] Press C. MEMORY.
• Counter Memory mark is displayed.
[] When you wish to return to that point, press STOP and
then press REW.
• The tape will rewind and stop at about "OH00M 00S"
automatically.
[]To cancel the Counter Memory mode, press
C. MEMORY.
Next-Function Memory
You can "tell" the VCR what to do immediately after rewinding.
During Stop:
For automaticstart of playback after the tape isrewound...
[] Press REW.
[] Press PLAY within 2 seconds.
Fgr automatic power off after the tape is rewound...
[] Press REW.
[] Press POWER within 2 seconds.
For automatic timer standby after the tape is rewound...
[] Press REW.
[] Press TIMER within 2 seconds.
• If you want the "next function" to automatically start when
the counter reads "OH00M00S" (instead of at the beginning
of the tape), press C. MEMORY so that the counter
memory "M" mark appears on the VCR display panel
before pressing Rewind or Fast-Forward.
17

Playback (cont'd)
SELECT
MENU
SET
To select the soundtrack
Your VCR is capable of recording two soundtracks (Ht-Fi and
NORMAL) s_multaneously, and playing back the selected
soundtrack or two together.
During Playback or Stop:
[] Press MENU, SET, and
SELECT as many times as
necessary to access the AUDIO
MONITOR screen. (_ p. 9).
[] Press SET to choose "HI-FI",
"NORM". or "MIX".
• HI-FI to hsten to the Hi-Fi
soundtrack
• NORM to listen to the normal soundtrack
• MIX to hsten to both soundtracks combined. Select this
setting when playing back ethted tapes with insert edits or
dubbed autho made on an appropriately equipped VCR
• Normal autho will be outputted regardless of the playback
autho momtor selecuon if H_-Ft audto Lsnot present on the
tape.
[]
Press MENU as man3, tnnes as necessary to exit.
I AUDIO MONITOR _j
PRESS (SET +I-)FOR CHOICE/
PRESS (MENU) TO END _._
Example
AV COMPU LINK
Television
18
AUDIO OUT
VIDEO OUT
AUDIO
VIDEO IN
AV COMPU LINK
(VCR ONLY)
Your VCR
PAUSE/SPECIAL
FUNCTION
AV COMPU LINK
Cable (optional)
AV COMPU LINK Playback
Your VCR is compatible with JVC's AV COMPU LINK
components which include amplifiers (or receivers) and televisions.
PREPARATION
[] Connect )'our VCR to an AV COMPU LINK amplifier and/or
an AV COMPU LINK television as illustrated.
[] Press MENU, SET, and
SELECT as many times as
necessary to access the
SPECIAL FUNCTION screen.
(_z;_p. 9)
[] Press SET to chose "AV
COMPU-LINK".
[] Press MENU as man), times as
necessary, to exit.
OPERATION
AV COMPU LINK wdeo playback is as easy as this:
• Simply load a cassette in your VCR and press PLAY. (If the
cassette's safety tab has been removed, it _s not necessary to
press play). The TV (and amplifier) turn on automatically and
the TV's mode is automaucally set to VIDEO; you're ready to
watch!
• Connection vanes according to the type of TV. Please read
your TV's instruction manual when making TV connection.
" SPECIAL FUNf.TION "_
( PAUSE |
l,AV COMPU-LINK J
| PRESS (SET +/-)FOR CHOICE|

POR INSTRUCCIONES EN
Recording
TV stgnals being received by the VCR's built-in tuner can be recorded onto a video tape. This is realtime video recording.
Insert a cassette with the safety tab present. °
POWER ON;
SELECT CHANNEL
3 OR 4 (OR AV MODE)
i
l ,l_l _" l"_'_''_ - "_ '_ "
1
:. RESET
• The VCR Power will comeon automatically.
• If watching on channel 3 or 4 be sure that the VIDEO
_CNOOSI_ A PROGRAi_ ...........
Press CH(annel) +/- (or the digit keys followed by ENTER)
to select the channel you wtsh to record.
• Even if you don't press ENTER, the channel will
SET THE TAPE SPEED _;¢:,
:!TO'START,RECORDING ''_ ":"_,'=_._:"-'
i-,TO PAUSERECORDING ..... ::_)_-_-:
5 ]_'essII (PAUSE).
ESPAI_IOL VEA p.32 - 33.
indicator is ht. If the indicator is not lit, press TV/VIDEO
so that it lights.
automat_call3, change m about 2 seconds.
Press SP/EP.
Press • (REC) and I_ (PLAY) simultaneously.
Press I_ (PLAY) to resume recording.
OSD
it keys
Press • (STOP).
To watch a program while recording
another
During Recording...
[] Press TV/VIDEO. The VCR's VIDEO indtcator and the TV
broadcast being recorded will disappear.
[] Use the channel controls on the TV to select the other
channel you wish to view.
• The program selected with the TV channel controls will
appear on the TV screen while the one selected with the
VCR channel controls will be recorded on the tape.
To display the elapsed recording time
Before starting recording...
[] Press C. RESET.
• The counter wall be reset to "OH00M 00S", and will show
the exact elapsed time as the tape runs.
[] After starting recordmg, press OSD at any time to check the
elapsed time on the TV screen.
[] Press OSD again to clear _t from the screen.
19

O Recording (cont'd)
Instant Timer Recording
To set the VCR to shut-off automattcally after recording.
During Recording...
[] Press the VCR's REC button. The "ITR" indication bhnks and
"0:30" appears mdicatmg the recording will continue for 30
minutes and then power will sw_tch off.
,,I,-
I'W6"_Isp
U "-t U
I
REC
[] Press REC agaLn to extend the record time by 30-minute
increments (up to 9 hours).
• This function is available only using the REC button on the
VCR.
• After the off-ttme is set, the display returns to the
prevtously dtsplayed mode (counter, channel or clock).
• You can check the time remaining before the VCR shuts off
by pressing REC once; the remaining time is displayed for
5 seconds. (Pressing REC more than once wall extend the
record time.)
Accidental erasure prevention
• To prevent accidental recording on a recorded cassette, remove
its safety tab.
To record on ntlater, cover the hole with adhesive tape.
20

__i t°r
SAP indicator
Stereo and SAP (Second Audio
Program)
Your VCR is equipped with an MTS decoder for receptton of
Multtchannel TV Sound broadcasts.
• When a stereo program is being recetved, the ST indicator
hghts.
• When an SAP program (such as a bihngual broadcast) is being
received, the SAP inthcator lights.
• When a stereo program is accompanied by SAP audio, both
indtcators light
To record stereo programs
Stereo programs areautomattcally recorded in stereo on the Ht-Fi
audio track. No spectal operation ns required. Simply follow the
basic recording procedure.
• To listen to the stereo soundtrack while recording, set the on-
screen AUDIO MONITOR to "HI-FI". _ p.18.
To record SAP programs
[] Press MENU, SET, and
SELECT as many ttmes as
necessary to access the 2ND
AUDIO screen. (_ p. 9).
[] Press SET to choose "ON".
[] Press MENU as many times as
necessary to exit.
Then follow the basic recording
procedure.
• If an SAP program is received, the SAP audio wall be recorded
on both the Hi-Fi and the normal audio tracks. The main audio
program will not be recorded.
• If a regular program (non-SAP) is received, the main audio
will be recorded on both the Hi-Fi and the normal audio tracks.
?ND AUDIO "_
PRESS tSET +I-)FOR CHOICE )
21

Timer-Recording POR INSTRUCCIONES EN
With the On-Screen Timer Programming function introduced here you can directly program the VCR's timer to record up to 8 TV
shows, up to a year ahead. It's especially convenient when you want to timer-record program,, whale you're away from home for long
periods of time (over a week). TIMER PROGRAMMING IS NOT POSSIBLE UNLESS THE CLOCK HAS BEEN SET.
Insert a cassette with the safety tab present.
POWER ON;
SELECT CHANNEL
3 OR 4 (OR AV MODE)
• The VCR power wtll come on automatically. If watching
• If the clock has not been set, set the clock before startmg
ESPANOL VEA p.32 - 33.
on channel 3 or 4 be sure that the VIDEO mdicator ts ]it. If
the indicator is not lit, press TV/VIDEO so that it lights.
step 2. z:_" p 12
ACCESS THE ON-SCREEN MENU
Press MENU and then press SELECT.
• The Program Set screen wtll appear.
SELECT APROGRAM NUMBER "
I
Press SET to move to a vacant
program number, and then /'- PROGRAM1 "-_
press SELECT. DATE --/--
- STOP -- - AM |
-/
1
vacant, and the cursor is at CHANNEL -- SP
• lnmallv all programs are __ STAnT .... AM /
program 1. So simply press PRESS(SELECT.SET÷/-) /
SELECT
WEEKLY
4
t" "-- =
Press SET to set the month,
and then press SELECT.
Press SET to set the day.
• The day of the week wdl
automatically appear.
• To record the program daffy
(Mon-Fri) press DAILY
(Digit key 8). To record the
program weekly press WEEKLY (Digit key 9). "DAILY"
or "WEEKLY" will appear on the screen.
Press SELECT.
(Continued on next page.)
PROGRAM 1
| DATE 12/28 THU
l START .... AM
| STOP .... AM
CHANNEL -- SP
PRESS (SELECT, SET +/-)
l You can also use the MENU, SETand SELECT buttons on the VCR J
22

"ERROR"WARNING
If the start time you mput has already passed (t.e is prior to the
present date and time), the VCR will flash "ERROR" on the
Program Set screen
--ERROR--
DATE -/ I "3/22WED
START 12 30 AM
STOP .... AM
CHANNEL --SP
P_OSP_M 1
PRESS SELECT, SET÷/-I
PRESS MENU) TOEND
Check if you've input the correct time and date. Remember: late
night shows beginning at midnight or later must have the next
day's date.
INPUT THE START TIME
Press SET to set the hour
7
(makmg sure that AM or
PM is correct), and then
press SELECT
Press SET to set the
8
minutes, and then press
SELECT.
PROGRAM 1 _-_
DATE 12/28 THU |
START 12 00 PM |
STOP -- -AM /
CHANNEL -- SP |
PRESS (SELECT, SET +F) .I
.._._PRESS (MENU) TO ENO____._
/
1NPUT THE STOP ,-TIME;:.;:'- .__';;__'_'-;'_*-_°"'
Set the stop ume m the same
way as you set the start time S PROGRAM1
START 12 O0PM /
STOP 1 O0 PM |
CHANNEL -- SP
m steps 7 - 8. ! DATE 12/28"RqU /|
PRESS (SELECT SET +/-)
PRESS (MENU) _
!
,_'_N,!_IT _E CHANNEL_UM__
10Pre,sthe igit eys,oenter
the channel number, and PROGRAM1
then press SELECT. DATE "_2,'28TRU
START 12 00 PM
STOP 1 00 PM
CRANNEL 25 SP
PRESS (SELECT. SET +/-}
PRESS (MENU) TO END
)
9,11
TO DISENGAGE THE TIMER
For safety, when AUTO TIMER is "OFF", your VCR disables all
other functions while in the Umer mode.
• To use your VCR, first disengage the timer mode by pressing
TIMER again. Now all functtons wdl be operable
• To re-engage the timer, press TIMER.
Press SET to choose SP or
11
EP, and then press SELECT.
• To input another program,
repeat steps 3 - 11.(You
can set up to a maximum
of 8 programs.)
S PROGRAM 1 "_
| DATE 12J28 THU 1
l START 12 00 PM /
/ STOP 1 00 PM |
/ CHANNEL 25EP /
1 PRESS (SELECT, SET +/-) ]
•L____._s.(MENUlTOE.___J
12 Press NU.
• Select the desired Auto Timer setting. See page 24 for
details.
13Press MENU again,
4 Press TIMER.
• The VCR wdl enterthe timer mode and power will go
off.
For AUTO TIMER and other timer programming features, _ p.24.
For other error indications, _ p.29.
NOTES:
• If there is a power fatlure, the VCR will remember your umer-record
selections for 10 minutes.
• When timer-recording cable channels received through a Converter
Box, be sure to keep the Converter Box set to ON.
23

Q Timer-Recording (cont'd)
MENU
Auto Timer
What this feature does: Usually, the turner mode ns not
engaged unless the TIMER button =s pressed But with AUTO
TIMER set to ON, the tzmer mode is automatically _ when
the VCR's power is turned off, and is _ whenever VCR
power IS turned on again.
[] After step 12 (_ p 23), press
SET to choose "ON", and press
MENU.
SELECT SET
Or...
[] Press MENU, SET, and
SELECT as many times as
necessary to access the AUTO TINIER screen. (_ p 9)
[] Press SET to choose "ON".
[] Press MENU as many tmles as necessary to extt.
To check and cancel programs
Make sure the timer mode is disengaged first. Then...
[] Press MENU and then press SELECT (to access the Program
Set screen).
[] Press SET to check through the programs in succession
To cancel the program...
[] Press CANCEL.
• Repeat steps 2 and 3 as necessary..
[] Press MENU as many times as necessary, to exit.
t PRESS (SET +I-)FOR CHOICE1
OFF
24
MENU
ET

Special Features
The provided remote control is capable of controlhng 10 different TV brands including JVC and 13 different Cable Box brands.
Follow the instructions below to set the appropriate code for your TV or Cable Box.
TV Multi-Brand Remote Control
If your TV tsa JVC, you don't have to set the TV code.
PREPARATION
[] Turn the TV's power OFF using the TV's remote control.
[] Set the remote control's TV/CABLENCR swttch to "TV".
[_] While holding dov,'ll the POWER button, enter your TV's
brand code with the Dnglt keys then press STOP.
• Brand setting is completed Once you set the brand, you do
not have to reset it until the remote's batteries are replaced.
ENTER
VOL.
VCR switch
• If you set the wrong code, re-enter the right code.
[] Press POWER to turn the TV power on and check to see if
the remote control works with the TV.
OPERATION
[] Set the remote control's TV/CABLENCR switch to "TV".
[] Operate the TV.
• POWER, TV/VIDEO, CH +[-, VOL. +/- buttons and Digit
keys are available.
[] To operate VCR, set the TV/CABLE/VCR switch to "VCR".
TV Brand Name And Code
TV BRAND NAME BRAND CODE
JVC
MAGNAVOX
MITSUBISHI
PANASONIC
RCA
SHARP
SONY
TOSHIBA
ZENITH
HITACHI
Cable Box Brand Name And Code
CABLE BOX BRAND NAME BRAND CODE
GI
JERROLD
SCIENTIFIC ATLANTA
ZENITH
PIONEER
HAMLIN
REGAL
OAK
SIGMA
TOCOM
RCA
PANASONIC
SPRUCER
01,02,03,04,05,06,07,08
01,02,03,04,05,06,07,08
09,10
11,12
13,14
15,16,17,18
15,16,17,18
19,20,21
19,20,21
22,23
24,25,26
24,25,26
24,25,26
01
02
03
O4
05
O6
07
O8
09
10
Cable Box Multi-Brand Remote Control
Some Cable Box brands have more than one code. When your
Cable Box does not function with a specified code, try other codes.
PREPARATION
[] Turn the Cable Box power OFF using the Cable Box's remote
control.
[] Set the remote control's TV/CABLE/VCR switch to
"CABLE".
[] While holding down the POWER button, enter your Cable
Box's brand code with the Digit keys then press STOP.
• Brand setting is completed. Once you set the brand, you do
not have to reset it until the remote's batteries are replaced.
• If you set the wrong code, re-enter the right code.
[] Press POWER to torn the Cable Box's power on and check to
see if the remote control works with the Cable Box.
OPERATION
[] Set the remote control's TV/CABLE/VCR switch to "CABLE".
[] Operate the Cable Box
• POWER, CH +/-, ENTER buttons and Digit keys are
available.
[] To operate VCR, set the TV/CABLE/VCR switch to "VCR".
25

O Editing
Player
AUDIO OUT
AUDIO IN
Recorder
Your VCR
VIDEO OUT
VIDEO IN
Another VCR
To edit to or from another VCR
I Your VCR be used as either the deck the
player when editing tapes.
PREPARATION
[] Connect the player's VIDEO OUT and AUDIO OUT
OPERATION
[] Press MENU, SET, and
[] Press SET to choose "FRONT"
[] Press MENU as many times as necessary to exit.
[] Set the recorder's input mode to AUX.
t [] Put the player in the Play mode.
I [] Put the recorder in the Record mode.
can
connectors to the recorder's VIDEO IN and AUDIO IN
connectors.
• When using your VCR as a recorder and connecting it to a
monaural deck, connect that deck's AUDIO OUT connector
to your VCR's AUDIO IN L connector.
SELECT as many times as f AUXINPUT
necessary to access the AUX | , FRONT
INPUT screen. (Ezrp.9) / REAR "J
or"REAR", t PRESS(SET+/-)FORCH01CE|
• Select FRONT to connect to
the front panel connectors.
• Select REAR to connect to the rear panel connectors.
• With this VCR model, press the digit key "0". "AU" .will
appear instead of a channel number.
recording or SOUrCe
f 1
VIDEO
IN
Recorder
AUDIO
IN
AUDIO OUT VIDEO
Player
Your VCR
To control two JVC VCRs
The remote control is capable of controlling two JVC VCRs
independently using the A/B CODE switch (_:rp.7): You can set
this VCR so that it responds to the remote control only when the
switch is in the "B" position and set another JVC VCR so that it
responds only when the switch is in the "A" position. This way
you can control two,.lVC VCRs independently with a single
remote control.
The A/B CODE switch is preset to the "A" position because your
VCR is initially set to respond to A code signals. You can easily
modify your VCR to respond to B code signals.
I1-] Unplug the VCR's power cord from the AC outlet.
[] Set the A/B CODE switch on the remote control unit to "B".
[] Plug the VCR's power cord back into the AC outlet. Do not
use other remote controls at this stage.
[] Tum the VCR power on using the remote control's POWER
button. The VCR will now respond only to B code signals.
Another VCR
26

VIDEO
IN
To edit from a camcorder
Recorder Your VCR
/
PAUSE/SPECIAL
I o the rear panel
FUNCTION connector
Edding Cable (Optional)
i...-(JVC.camc.°-rder-°-nJz)"....
AUDIO OUT
Player VIDEO OUT EDIT
Tape-to-tape editing is also possible using a camcorder (equipped
wnth playback facdlty) as the player and your VCR as the
recorder.
PREPARATION
[] Connect the camcorder's VIDEO OUT and AUDIO OUT
connectors to the VCR's front panel VIDEO IN and AUDIO
IN connectors.
• Use the L connector for
monaural connection.
• When a Master Edit Control-
eqmpped JVC camcorder is
used, the camcorder _s
capable of controlling your
VCR.
Press MENU, SET, and
SELECT as many times
$SPECIALpAusEFUNETION 1
AV COMPU-LINK
PRESS (SET *!-)FOR CHOICE
PRESS (MENU) TO END
as necessary to access the SPECIAL FUNCTION
screen. (_:7"p.9)
(_) Press SET to choose "PAUSE".
@ Press MENU as many ttmes as rtecessary to exit.
• Refer to camcorder's instruction manual for set-up
procedure.
OPERATION
[] Press MENU, SET and
SELECT as many times as
necessary to access the "AUX
INPUT" screen./_ p. 9)
Press SET to choose "FRONT",
[]
[]
Press MENU as many times as
necessary to exit.
[]
Set the VCR's input mode to
AUX by pressing digit key "0".
"AU" will appear instead of a channel number.
[]
Put the camcorder in the Play mode.
Put the VCR in the Record mode.
[]
• Refer to the camcorder/recorder's instruction manual for
operation instructions.
AUX INPUT "_
PRESS (SET +I-)FOR CHOICE/
(MENU) TO END _
27

If You Have Any Questions
Before requesting service...
Power or Tape Transport Problems?
Symptoms
No power is applied to the VCR.
Remote control does not function.
Clock is functioning properly, but the VCR
cannot be powered.
Cassette will not load. Gets stuck and is
ejected a few seconds later.
Tape stops during rewind or fast-forward.
Tape will not rewind or fast-forward.
Playback Problems?
Symptoms
Playback picture does not appear while the
tape is running.
Noise appears during visual search. • This is normal.
Noise appears during normal playback. • Is the automatic tracking mode engaged?
• ls the power cord disconnected?
-- Connect it.
• Are the batteries discharged?
-- Replace with new ones.
• Is the A/B code switch set to the appropriate position?
• Is the TV/CABLENCR switch set to the appropriate position?
-- Check once again.
• Is "TIMER" displayed on the display panel?
-- Press the TIMER button to extinguish the display.
• Are you inserting the cassette correctly? Incorrect insertion causes the built-in safety
mechanism to automatically eject the cassette.
-- Wait a few seconds and re-insert correctly.
-- Be sure to push the middle of the cassette's label side and be sure the window side is up.
• Is the C. MEMORY button pressed?
-- Press again to make "M" disappear from the counter display.
• Is the tape already fully rewound or fast-forwarded?
-- Check the cassette.
• If you are using RF OUT connection, is the TV receiver's channel selector set to the correct
video channel?
-- Set it to the RF converter channel (3 or 4). (_ p.10)
• If you are using AV connection, is the TV receiver set to the AV mode?
-- Set it to the AV mode.
--Try manual tracking. (_:_tp.16)
Check points
Check points
Noise appears during slow playback. • Try manual tracking. (_ p.16)
Playback picture is blurred or interrupted • Video heads may be dirty.
while TV broadcasts are clear. -- Head cleaning is necessary. Consult your JVC dealer (_" p.31).
Breaks are noticeable in Hi-Fi audio sound. • Is the automatic tracking mode engaged?
Hi-Fi soundtrack cannot be heard. • Is "AUDIO MONITOR" on the FUNCTION menu set to "NORM"?
• This is normal in the LP mode.
--Try manual tracking. (_:zrp.16).
-- Set it to "HI-FI" (_ p.18).
• Is Hi-Fi audio present on the tape?
Recording Problems?
Symptoms
Recording cannot be started.
TV broadcasts cannot be recorded.
Tape-to-tape editing is not possible.
Camera recording is not possible.
• Is a cassette loaded?
• Is the safety tab on the cassette removed?
-- Cover with adhesive tape (az_ p.20)
• Has "AUX" been selected by mistake?
-- Set to the desired channel.
• Is the camcorder or VCR correctly connected?
• Are all necessary power switches turned ON?
• Has "AUX" been selected?
-- Set to "AUX".
• Have the correct inputs been selected?
-- Make sure the correct inputs (FRONT or REAR) have been selected on the AUX INPUT
screen. (_ p.27)
• Is the camcorder correctly connected?
• Has "AUX" been selected?
-- Set to "AUX".
Check points
28

Timer-Recording Problems?
Symptoms
Timer recording is not possible.
Timer programming screen does not function
properly.
"TIMER" and "f_---I"on the display panel
continue blinking.
The cassette is automatically ejected.
"TIMER" and "[_" continue blinking.
"TIMER" blinks for t0 seconds and the timer
mode is cancelled.
The cassette is ejected, power is shut off and
"TIMER" and "_---]" are blinking.
• Have you set the clock correctly and programmed the timercorrectly?
-- Check once again.
• Have you set the VCR's tuner?
-- Check once again.
• Is the TIMER indicator displayed on the display panel?
-- If not, press the TIMER button to display the TIMER indicator.
• Is the ITR indicator displayed on the display panel?
-- Timer programming is not possible while an ITR is in progress.
• There is no cassette in the VCR.
-- Insert a cassette with the safety tab intact.
• The inserted cassette has its safety tab removed.
-- Insert a cassette with its safety tab intact. Or cover the safety tab hole of the cassette with
adhesive tape and re-insert it. _ p.20.
• There are no preset programs in memory, or they have all been incorrectly preset.
-- Check the programmed data and re-program it as necessary. Press TIMER again.
• This means that the end of the tape was reached while timer-recording was in progress.
Therefore, the preset program may not be recorded in its entirety.
Check points
Other Problems?
Symptoms Check points
Some channels are skipped over when
scanning channels. • Those channels are preset to be skipped over. If you need them, restore them. (_" p. 14)
Channel cannot be switched. • Is recording in progress?
Snowy picture on screen when viewing TV • Is the VIDEO indicator lit?
programs while recording another program. -- Press the TV/VIDEO button.
Remote control does not work with my TV. • Although the provided remote control unit is compatible with JVC televisions as well as
"12:00 AM" is blinking. • This means the clock must be set. It's displayed when time-keeping is terminated due to a
-- Press the PAUSE button, change the channel, and press the PLAY button.
many TV models manufactured by others, it is possible that the provided remote control will
not work with your TV, or in some instances, will have limited function capability. (_7"p.25)
• Is the remote control's TV/CABLENCR switch set to "TV"?
-- If not, set it to "TV".
power failure or because the VCR's power plug was pulled from the AC outlet.
To set the clock. _" p. 12. If power was interrupted, it's also likely that all preset timer
programming data has been erased. Please check and re-program as necessary.
ATTENTION:
This recorder contains microcomputers. External electronic noise or interference could cause malfunctioning. In such cases, switch the power off
and unplug the power cord. Then plug it in again and switch power on. Take out the cassette. After checking the cassette, operate the unit as usual.
29

If You Have Any Questions (cont'd)
Notes regarding...
Tuner Set
• Since receivable channels differ by locale, it will be necessary to
reset your VCR's channels when you move to another location. Auto
Channel Set is the easiest way to do this. 0_ p. 13
Playback
• If the end of the tape is reached during play or search, it is
automatically rewound to the beginning and stops.
• The VCR automatically stops when still continues for more than 5
minutes.
• If the still picture is unstable, use the VCR's CH -/+ buttons to
correct the picture.
• During search playback, some noise bars will appear.
• If noise bars appear during playback or slow motion, correct using
manual tracking, z:r p. 16.
• There is no audio during search, slow, still, or frame-by-frame
playback.
• When playing back LP recordings in the search, still, or frame by
frame playback mode, the picture will be distorted, and there may be
a loss of colour.
• When a tape is first inserted, the recorder enters the automatic
tracking mode automatically.
• During muhi-speed search, some noise bars will appear.
• If adjacent index codes are too close to each other, Index Search may
not function properly.
• You do not have to set to NORM when playing back tapes with
normal sound track only.
• When MIX is selected, both "Hi-Fi" and "NORM" appear on the TV
screen when the OSD button is pressed.
Recording
• To start recording with the VCR's Record button, press it once on its
own. Pressing Record more than once activates Instant Timer
Recording. a:2ep.20.
• After pause, when recording is resumed, a few frames recorded
before the pause may be overlapped by the new recording. This is
meant to reduce picture distortion and is not a malfunction.
• The VCR automatically stops when record-pause continues for more
than 5 minutes.
• If the end of the tape is reached while recording, it is automatically
rewound to the beginning and stops.
• If the Record button does not work, check to see if the cassette's
safety tab has been removed.
• The channel cannot be changed while recording is in progress. To
change the channel, press Pause, then change the channel.
Timer-Recording
• When timer-recording is successfully completed, the VCR power is
automatically switched off.
• If the end of tape is reached while timer-recording, the cassette is
automatically ejected.
• Since the timer starts and stops recording based on the time being
kept by the VCR's built-in clock, the clock's time must be accurate
for correct timer-recording results.
• When you program the timer while viewing a program or a tape, the
TV screen will show the on-screen menu but the audio will continue
to be heard.
• You can also program the timer while the VCR is recording; the on-
screen menu will not be recorded on tape.
Remote TV Operation
• Whenever you replace batteries in the remote control, it is necessary
to reset the TV code if your television is not a JVC TV.
• With some televisions, the TV/VIDEO button functions only to
switch the TV to the VIDEO(AV) mode.
• Although the provided remote control unit is compatible with JVC
televisions as well as many TV models manufactured by others, it is
possible that the provided remote control will not work with your
TV.
Remote Cable Box Operation
• Whenever you replace batteries in the remote control, it is necessary
to reset the Cable Box code.
• Although the provided remote control unit is compatible with many
different Cable Box brands, it is possible that the provided remote
control will not work with your Cable Box.
3O

Precautions
Specifications
Please follow these safety precautions. Not doing so may
result in damage to the VCR, remote control, or video
cassette.
• Avoid extreme heat and direct sunlight.
• Avoid extreme cold.
• Avoid extreme humidity.
• Avoid dust.
• Avoid places subject to vibrations.
• Avoid strong magnetic fields.
• Do not block the VCR's ventilation openings.
• Do not place anything heavy on the VCR or remote
control.
• Do not place anything which might spill on top of the VCR
or remote control.
• Do not place the VCR on cushions, pillows, or thick
carpeting.
• Use the VCR in a stable, horizontal position only.
Beware of moisture condensation
Moisture in the air will condense on the VCR when you move it from a
cold place to a warm place, or under extremely humid conditions --
just as water droplets form on the surface of a glass filled with cold
liquid. Moisture condensation on the head drum will cause damage to
_. In conditions where condensation may occur, keep the VCR's
power turned on for a few hours to let the moisture dry.
When transporting
• Be sure to remove cassette from VCR before packing.
• Avoid violent shocks to the VCR during packing and transport.
Place cassettes in cassette cases and store vertically.
GENERAL
Power requirement
Power consumption
Temperature
Operating
Storage
Operating position
Dimensions (WxHxD)
Weight
Format
Maximum recording
time (SP)
(EP)
VIDEO/AUDIO
Signal system
Recording/Playback
system
Signal-to-noise ratio
Horizontal resolution
Frequency range
Input/Output
TUNER
Tuning system
Channel coverage
(VHF)
(UHF)
(CATV)
RF output
AC 120 V_, 60 Hz
21W
5°C to 40°C (41°F to I04°F)
-20°C to 60°C (-4°F to 140°F)
Horizontal only
360 x 94 x 298 mm
(14-3/16" x 3-3/4" x 11-3/4")
3.8 kg (8.4 lbs)
VHS NTSC standard
: 160min. with T-160 video cassette
: 480 min. with T-160 video cassette
NTSC-type color signal and EIA
monochrome signal, 525 lines/60 fields
DA-4 (Double Azimuth) head helical scan
system
45 dB
240 lines
70 Hz to 10,000 Hz (Normal audio)
20 Hz to 20,000 Hz (Hi-Fi audio)
RCA connectors (IN x 2, OUT x I)
Frequency synthesized tuner
Channels 2-13
Channels 14---69
113 Channels
Channel 3 or 4
(switchable; preset to Channel 3 when
shipped) 75 ohms, unbalanced
About head cleaning
• If the picture playback becomes blurred, it does not mean that the
recorded program has been erased.
• Dirt accumulated on the video heads after long periods of use can
cause a blurred or noisy picture. In this case, head cleaning requiring
highly technical care is necessary.
• For head cleaning, consult the nearest JVC dealer.
TIMER
Clock reference : Quartz
Program capacity : 1-year programmable timer/
Memory backup time : Approx. 10 rain.
ACCESSORIES
Provided accessories
Specifications shown are for SP mode unless otherwise specified.
E. & O.E. Design and specifications subject to change without notice.
8-programs
:. RF cable (F-type),
Infrared remote control unit,
"AAA" battery x 2
31

Operaciones basicas en espafiol
Para las conexiones VCR-TV yea la hoja de la "Gufa b_isica para las conexiones del VCR" adjunta a este manual de instrucciones.
Ajuste del reloj de su VCR y de la lengua para
ENCIENDA;
SELECCIONE EL CANAL
30 4 (O MODO AV)
STOP/EJECT
;H/SET +/-
indicacibn en pantalla
1. Presione POWER para encender el VCR.
2. Presione TV/VIDEO para que aparezca "TV" del display del VCR.
3. Presione MENU.
4. Presione SET +/- para seleccionar "AJUSTE INICIAL", y luego
presione SELECT.
5. Presione REW para seleccionar "ESPAlqOL" para indicaci6n en
pantalla.
6. Presione SET +/- para fijar el mes y luego presione SELECT.
7. Repita el paso 6 para ajustar el dia, el afio y la hora.
FECHA 9/3/94 DO
HORA 11:53 AM
CAMBI0 HORARIO ACTIVO
INGLES : PRESIQNE FF)
ESPANOL: PRESIONE REW
I AJUSTE INICIAL
PRESIONE (SELECT, SET +/-)
PREStONE (MENU) PKERMINAR
8. Presione MENU para comenzar de funcionamiento del reloj.
Asignacibn de canales al sintonizador de su VCR
1. Presione POWER para encender el VCR.
2. Presione TV/VIDEO para que aparezca "TV" del display del VCR.
3. Presione MENU.
4. Presione SET +/- para seleccionar "AJUSTE DE SINTONIZADOR",
y luego presione SELECT.
AJUSTE DE SINTONKZADOR
0 BANOA
CAF
AJUSTEAUTODECANAL
AJUSE MANUALDECANAL
PRESIONE (SELECT, SET +/-)
PRESIONE (MENU) PKERMINAR
5. Presione SET +/- para seleccionar "BANDA", y luego presione
SELECT.
6. Presione SET +/- para seleccionar "TV" o "CABLE".
• Ajtistelo en TV si su antena recibe s61o canales de UHF y VHE
Aj6stelo en CABLE si su sistema de antena es una lfnea de TV
por cable.
7. Presione MENU.
8. Presione SET+/- para seleccionar "AJUSTE AUTO DE CANAL",
y luego presione SELECT.
• Se inicia la sintonizaci6n autom_itica de canales y despu6s de
completada la misma aparecer_ en la pantalla el mensaje "FIN DE
EXPLORACION".
AJUSTE DE SINTONIZADOR
BANDA
#AJ_LISTE AUTO DE CANAL
AJUSTE MANUAL DECANAL
PRESIONE (SELECT, SET +/-)
ESIONE (MENU) P/TERMINAR
9. Presione MENU tantas veces como sea necesario.
° sLE
I BANDA _'_
PRESIONE (SET +/-)P/ELEGIR J
PRESIONE (MENU) PgrERMINARJ
AJUSTEAUTOMATICO
OECANAL
CANAL_AGREGADO
EXPLORANDO...
PRESIONE (MENU) PKERMINAR
32

I_i_ !_ _i_' _;_:_l"rt_ i _i_z_¸i_S _¸¸__ _
Preparacibn
• Encienda el televisor.
• Seleccione el canal 3 o 4 (o modo AV).
1. Inserte an cassette.
• El VCR se encender_, autom_ticamente y el contador se
reposicionar_ a 0:00:00.
• Si el cassette no tuviera leng0eta de seguridad, comenzar:t
autom:iticamente la reproducciOn.
2. Presione PLAY para iniciar la reproducci6n.
3. Presione STOP para detener la reproducc_6n.
• Para rebobinar la cinta, presione REW.
• Para avanzar r_pidamente la cinta, presione FE
• Para detener el rebobinado o bobinado r_pido, presione STOE
4. Presione STOP/EJECT en el VCR para expulsar el cassette.
Preparacibn
• Encienda el televisor.
• Seleccione el canal 3 o 4 (o modo AV).
1. Inserte un cassette con lengtieta de seguridad.
• E1 VCR se encender_f autom_iticamente y el contador se
reposicionani a 0:00:00.
2. Presione CH +/- (o las teclas num6ricas y luego ENTER) para
seleccionar el canal que desea grabar.
3. Presione SP/EP para cambiar la velocidad de cinta.
4. Presione simult=ineamente REC y PLAY para comenzar la
grabaci6n.
• Para efectuar una pausa de grabaci6n, presione PAUSE.
• Para continuar con la grabaci6n, pesione PLAY.
5. Presione STOP para detener la grabaci6n.
Para mirar un programa mientras graba otro
Durante la grabaci6n...
1.Presione TV/VIDEO para que aparezca "VIDEO" del display del
VCR.
• La teledifusi6n que se es_ grabando desaparecer_n.
2. Utilice los controles de canales del televisor para elegir otto canal
que desee ver.
• El programa seleccionado con los controles de canales de TV
aparecer_i en la pantalla del televisor mientras el programa
seleccionado con los controles de canales del VCR se grabar_ en
la cinta.
Preparacion
• Encienda el televisor.
• Seleccione el canal 3 o 4 (o modo AV).
1. lnserte un cassette con lengtieta de seguridad.
• El VCR se encender=i autom,'iticamente y el contador se
reposicionar_i a 0:00:00.
2. Presione MENU, y luego presione SELECT.
• Aparece_ el metal "PROGRAMA".
FECHA --1-- |
ENCENDIDO --:- AM |
APAGAO0 --:-- AM |
CANAL -- SP /
I PROGRAMA 1
PRESIONE SELECT, SET +/-)
PRESIONE MENU) P/TERMINARJ
l
3. Presione SET +/- para seleccionar un ntimero de programa vacante,
y luego presione SELECT.
• lnicialmente todos los programas est_in vacantes y el cursor es_
en el programa 1. Por lo tanto, presione simplemente SELECT.
4. Presione SET +/- para fijar el mes y luego presione SELECT.
5. Presione SET +[- para fijarel dfa del mes.
• Para grabar un programa diario (lunes - viernes), presione
DAILY (tecla 8). Para grabar un programa semanal, presione
WEEKLY (tecla 9).
6. Presione SELECT.
7. Repita el paso 4 para fijar la hora de inicio, la hora de finalizaci6n, el
ntimero de canal y la velocidad de cinta.
FECHA 9/6 MI
ENCENDIDO 12:00 PM
APAGADO 1:00 PM
CANAL 125 EP
PROGRAMA 1 1
PRESIONE SELECT, SET +/-)
PRESIONE MENU) P/TERM NAR
8. Presione MENU tantas veces como sea necesario.
9. Presione TIMER.
• El VCR se establecer=i en el modo de grabaci6n programada y se
apagar_i.
1
33

For Servicing
HOW TO LOCATE YOUR JVC SERVICE CENTER
Dear customer:
In order to receive the most satisfaction from your purchase, read the instruction booklet before operating the unit, In the event
that repair isnecessary, or for the address nearest your location, please refer to the factory service center list below or within
i the Continental United States, call 1-800-252-5722 for your authorized servicer. Remember to retain your Billof Sale for
Warranty Service.
107 Little Fails Road
Fairfield, NJ 07004-2105
(201) 808-9279
5665 Corporate Avenue
Cypress, CA 90630-0024
(714) 229-8011
230 Eliot Street
Ashland, MA 01721-2377
(508) 881-5923
TOLL FREE: 1-800-252-5722
JVC SERVICE & ENGINEERING
COMPANY OF AMERICA
DIVISION OF US JVC CORP.
FACTORY SERVICE CENTER LOCATIONS
1500 Lakes Parkway 705 Enterprise Street
Lawrenceville, GA 30243-5357 Aurora, IL 60504-8149
(404) 339-2522 (708) 851-7855
10700 Hammerly, Suite 110
Houston, TX 77043
(713) 935-9331
14505 Commerce Way
Miami Lakes, FL 33016-1512
(305) 362-6252
2969 Mapunapuna Place
Honolulu, HI 96819-2040
(808) 833-5828
890 Dubuque Avenue
South San Francisco, CA 94080-1804
(415) 871-2666
--JVC
Sophisticated electronic products may require occasional service. Just as quality is a keyword in the engineering and
production of the wide array of JVC products, service is the key to maintaining the high level performance for which JVC is
world famous. The JVC service and engineering organization stands behind our products.
JVC SERVICE & ENGINEERING COMPANY OF AMERICA
ff you ship the product...
Pack your JVC unit in the original carton or one of equivalent
size and strength. Enclose, with the unit, a letter stating the
problem or symptom that exists and also a copy of the receipt or
bill of sale you received when you purchased your JVC unit
Print your home return address on the outside and the inside of
the carton. Send to the appropriate JVC Factory Service Center
as listed above.
NATIONAL HEADQUARTERS
DIVISION OF US JVC CORP.
107 Uttle Falls Road
Fairfield, NJ 07004-2105
Don't service it yourself,
CAUTION
To prevent electrical shock, do not open the cabinet.
No user serviceable parts inside.
Refer servicing to qualified service personnel
_r ACCESSORIES
purchase accessories foryour JVC product, you may contact your local JVC Dealer,
from the 48 Continental United States call toll free: 1-800-882-2345.
34

Warranty
JVC COMPANY OF AMERICA warrants this product and all parts thereof, except as set forth below ONLY TO THE
ORIGINAL PURCHASER AT RETAIL to be FREE FROM DEFECTIVE MATERIALS AND WORKMANSHIP from the date of
original retail purchase for the period as shown below. ("The Warranty Period")
THIS LIMITED WARRANTY IS VALID ONLY IN THE FIFTY (50) UNITED STATES, THE DISTRICT OF COLUMBIA AND IN
COMMONWEALTH OF PUERTO RICO.
WHAT WE WILL DO:
If this product is found to be defective, JVC will repair or replace defective parts at no charge to the original owner. Such
repair and replacement services shall be rendered by JVC during normal business hours at JVC authorized service centers.
Parts used for replacement are warranted only for the remainder of the Warranty Period. All products and parts thereof may
be brought to a JVC authorized service center on a carry-in basis except for Television sets having a screen size 25 inches
and above which are covered on an in-home basis.
WHAT YOU MUST DO FOR WARRANTY SERVICE:
Return your product to a JVC authorized service center with a copy of your bill of sale. For your nearest JVC authorized
service center, please call toll free: (800) 252-5722.
If service is not available locally, box the product carefully, preferably in the original carton, and ship, insured, with a copy of
your bill of sale plus a letter of explanation of the problem to the nearest JVC Factory Service Center, the name and location
of which will be given to you by the toll-free number.
If you have any questions concerning your JVC Product, please contact our Customer Relations Department.
WHAT IS NOT COVERED:
This limited warranty provided by JVC does not cover:
1. Products which have been subject to abuse, accident, alteration, modification, tampering, negligence, misuse, faulty
installation, lack of reasonable care, or if repaired or serviced by anyone other than a service facility authorized by JVC to
render such service, or if affixed to any attachment not provided with the products, or if the model or serial number has
been altered, tampered with, defaced or removed;
2. Initial installation and installation and removal for repair;
3. Operational adjustments covered in the Owner's Manual, normal maintenance, video and audio head cleaning;
4. Damage that occurs in shipment, due to act of GOd, and cosmetic damage;
5. Signal reception problems and failures due to line power surge;
6. Video Pick-up Tubes/CCD Image Sensor, Cartridge, Stylus (Needle) are covered for 90 days from the date of purchase;
7. Accessories;
8. Batteries (except that Rechargeable Batteries are covered for 90 days from the date of purchase);from the date of
purchase);
There are no other express warranties except as listed above.
THE DURATION OF ANY IMPLIED WARRANTIES INCLUDING THE IMPLIED WARRANTY OF MERCHANTABILITY, IS
LIMITED TO THE DURATION OF THE EXPRESS WARRANTY HEREIN.
JVC SHALL NOT BE LIABLE FOR THE LOSS OF USE OF THE PRODUCT, INCONVENIENCE, LOSS OR ANY OTHER
DAMAGES, WHETHER DIRECT, INCIDENTAL OR CONSEQUENTIAL (INCLUDING, WITHOUT LIMITATION, DAMAGE
TO TAPES, RECORDS OR DISCS) RESULTING FROM THE USE OF THIS PRODUCT, OR ARISING OUT OF ANY
BREACH OF THIS WARRANTY. ALL EXPRESS AND IMPLIED WARRANTIES, INCLUDING THE WARRANTIES OF
MERCHANTABILITY AND FITNESS FOR PARTICULAR PURPOSE, ARE LIMITED TO THE WARRANTY PERIOD SET
FORTH ABOVE.
Some states do not atiow the exclusion of incidental or consequential damages or limitations on how long an implied
warranty lasts, so these limitations or exclusions may not apply to you. This warranty gives you specific legal rights and you
may also have other rights which vary from state to state.
LIMITED WARRANTY CONSUMERVIDEO1-90
PARTS 1YR 90DAYS
JVC COMPANY OF AMERICA 41 Slater Drive
DIVISION OF US JVC CORP. EImwood Park, New Jersey 07407
LABOR
REFURBISHED PRODUCTS CARRY A SEPARATE WARRANTY, THIS WARRANTY DOES NOT APPLY. FOR DETAILS OF
REFURBISHED PRODUCT WARRANTY, PLEASE REFER TO THE REFURBISHED PRODUCT WARRANTY INFORMATION
PACKAGED WITH EACH REFURBISHED PRODUCT.
For customer use:
Enter below the Model No. and Serial No. which is located either on the rear. bottom or side of the cabinet. Retain this information for future
reference.
Model No.: Serial No:
Purchase date: Name of dealer:
35

JVC
JVC COMPANY OF AMERICA
DIVISION OF USJVC CORR
41 Slater Ddve, Elmwood Park, N.J.07407
Ii
(
(
!
(
(
U.S.PATENTS
4034576 4092684 4829419
4064537 4120583 4896260
4068257 4121284 4942425
4079412 4178606 4954951
4091426
Canada Patented (BrevetS), 1979, 1980
[] O Printed in Malaysia
COPYRIGHT © 1995 VICTOR COMPANY OF JAPAN, LTD.
1194"I-[V_ UN:_ MX
 Loading...