

Page 1

VIDEO CASSETTE RECORDER
HR-J4009UM
INSTRUCTIONS
LPT0701-001A
COPYRIGHT © 2002 VICTOR COMPANY OF JAPAN, LTD.
Dear Customer,
Thank you for purchasing the JVC VHS video cassette recorder.
Before use, please read the safety information and precautions to
ensure safe use of your new VCR.
CAUTIONS
WARNING: DANGEROUS VOLTAGE INSIDE
WARNING: TO PREVENT FIRE OR SHOCK HAZARD, DO
NOT EXPOSE THIS UNIT TO RAIN OR
MOISTURE.
The POWER /l button does not completely shut off mains
power from the unit, but switches operating current on and off.
“ ” shows electrical power standby and “ l ” shows ON.
This unit is produced to comply with Standard IEC 60065.
POWER SYSTEM:
This set operates on voltage of AC 110 – 220V~, 50/60 Hz with
automatic switching.
Printed in Thailand
UM
CAUTION
■ When you are not using the VCR for a long period of time, it is
recommended that you disconnect the power cord from the
AC outlet.
■ Dangerous voltage inside. Refer internal servicing to qualified
service personnel. To prevent electric shock or fire hazard,
remove the power cord from the AC outlet prior to
connecting or disconnecting any signal lead or aerial.
■ Changes or modifications not approved by JVC could void
user’s authority to operate the equipment.
• Cassettes marked “VHS” (or “S-VHS”) can be used with this video
cassette recorder. However, S-VHS recording is not possible with
this model.
• This model is equipped with SQPB (S-VHS QUASI PLAYBACK)
that makes it possible to play back S-VHS recordings with
regular VHS resolution.
• HQ VHS is compatible with existing VHS equipment.
4F11501A
K
02/01
Use the conversion plug (provided) depending on the type of
your AC WALL outlet.
The rating plate and safety caution are on the rear of the unit.
IMPORTANT:
It may be unlawful to record or play back copyrighted material
without the consent of the copyright owner.
Page 2

When the equipment is installed in a cabinet or a shelf, make sure
that it has sufficient space on all sides to allow for ventilation
(10 cm or more on both sides, on top and at the rear).
When discarding batteries, environmental problems must be
considered and the local rules or laws governing the disposal of
these batteries must be followed strictly.
Failure to heed the following precautions may result in damage
to the VCR, Remote or video cassette.
1. DO NOT place the VCR ...
... in an environment prone to extreme temperatures or humidity.
... in direct sunlight.
... in a dusty environment.
... in an environment where strong magnetic fields are generated.
... on a surface that is unstable or subject to vibration.
2. DO NOT block the VCR’s ventilation openings or holes.
(If the ventilation openings or holes are blocked by a newspaper
or cloth, etc., the heat may not be able to get out.)
3. DO NOT place heavy objects on the VCR or Remote.
4. DO NOT place anything which might spill on top of the VCR or
Remote.
(If water or liquid is allowed to enter this equipment, fire or electric
shock may be caused.)
5. DO NOT expose the apparatus to dripping or splashing.
6. DO NOT use this equipment in a bathroom or places with water.
Also DO NOT place any containers filled with water or liquids
(such as cosmetics or medicines, flower vases, potted plants, cups,
etc.) on top of this unit.
7. DO NOT place any naked flame sources, such as lighted candles,
on the apparatus.
8. AVOID violent shocks to the VCR during transport.
MOISTURE CONDENSATION
Moisture in the air will condense on the VCR when you move it
from a cold place to a warm place, or under extremely humid
conditions—just as water droplets form on the surface of a glass
filled with cold liquid. Moisture condensation on the head drum will
cause damage to the tape. In conditions where condensation may
occur, keep the VCR’s power turned on for a few hours to let the
moisture dry.
How to use the Remote
Before use, insert two AAA size batteries into the Remote with the
polarity ( and ) matched correctly as indicated on the battery
compartment or on the lid.
● Point the Remote toward the remote sensor on the target
component.
●
The maximum operating distance of the remote control is about 5 m.
NOTE:
If the Remote does not work properly, remove its batteries, wait for
a few seconds, replace the batteries and then try again.
Video heads cleaning
The heads get dirty in the following cases:
● in an environment prone to extreme temperature or humidity.
● in a dusty environment
● flaw, dirt or mold on video tapes
● continuous usage for a long time
Use a dry cleaning cassette — TCL-2 — when:
● Rough, poor picture appears while a tape is played back.
● The picture is unclear or no picture appears.
Page 3
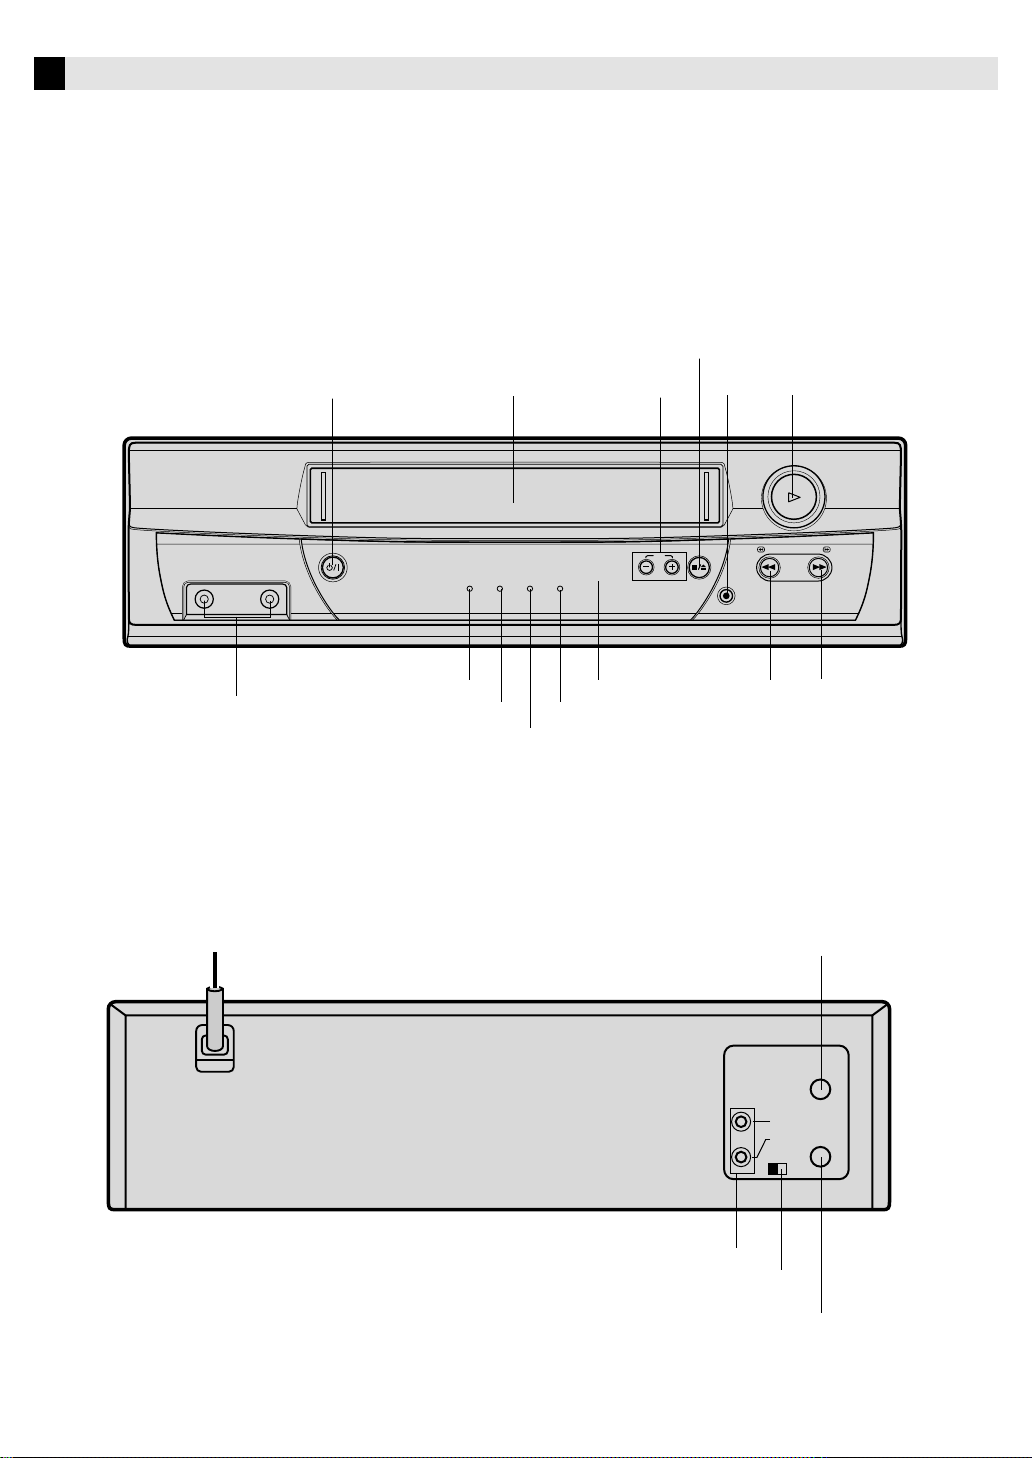
Buttons, Connectors and Indicators
Front Panel
STOP/EJECT
VIDEO/AUDIO input
Rear Panel
AC power cord
VIDEO
connectors
AUDIO
POWER
POWER
Cassette loading slot
TV/VCR TIMER REC POWER
TV/VCR indicator
TIMER indicator
POWER indicator
REC indicator
CH–/+
CH
Remote sensor
REC
STOP/EJECT
REW
REC
REW
UHF/VHF IN (ANT)
PLAY
PLAY
FF
FF
OUT
AUDIO/VIDEO OUT
3/4 CHANNEL
SELECTTOR SWITCH
UHF/VHF
IN(ANT)
VIDEO
OUT(TV)
AUDIO
CH
34
UHF/VHF OUT (TV)
Page 4
– Buttons, Connectors and Indicators –
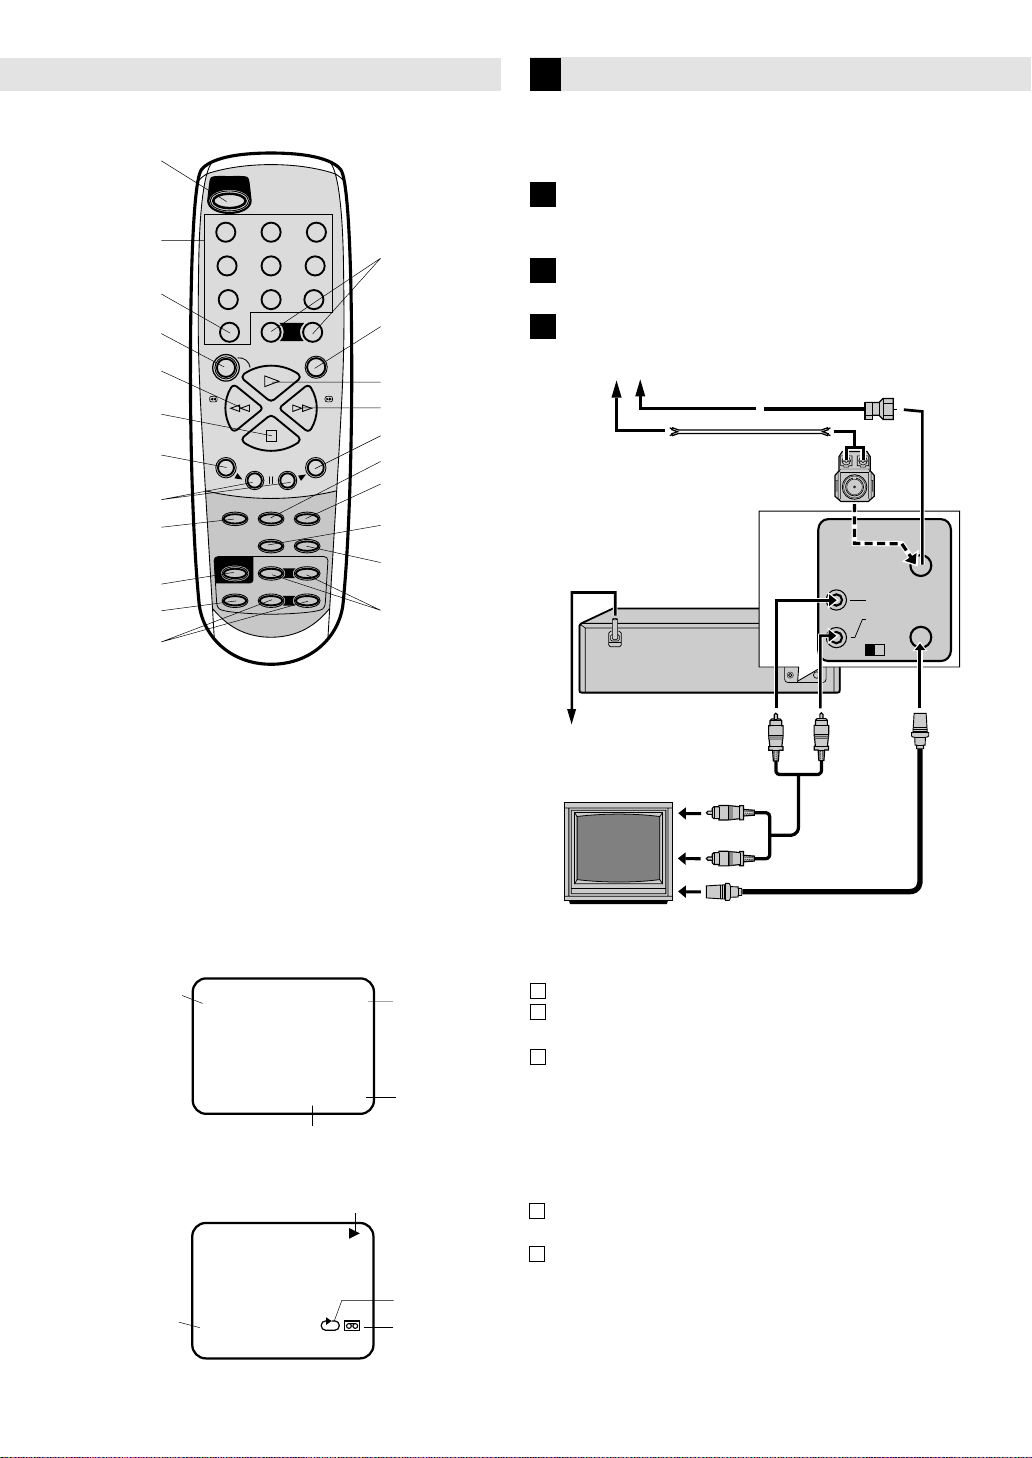
Remote
POWER
POWER
123
Number keys
AUX
REC
REW
STOP
MENU
SET–/+
TV/VCR
TV POWER
INPUT
TV VOL–/+
This Remote transmit A code
signals only; it is not applicable
to B code signals.
456
7089
–
REC
PLAY
REW FF
MENU
STOP
–
SET
TV/VCR TIMER
SP/EP DISPLAY
–
TV POWER
–
INPUT
TV CH
TV VOL
Connections and VCR channel
Setting
Check contents
1
Make sure the package contains all of the accessories listed
CH–/+
+
CH(AUX)
PAUSE
PA US E
PLAY
FF
ENTER
+
CANCEL
C.RESET
ENTER
TIMER
CANCEL
C.RESET
SP/EP
+
+
DISPLAY
TV CH–/+
in “Specifications”.
Situate VCR
2
Place the VCR on a stable, horizontal surface.
Connect VCR to TV
3
Antenna or cable
Coaxial cable
Flat feeder
Matching transformer
(not supplied)
AC power cord
Back of VCR
AC outlet
OUT
UHF/VHF
OUT
IN(ANT)
VIDEO
L
AUDIO
R
34
OUT(TV)
VIDEO
AUDIO
CH
UHF/VHF
IN(ANT)
OUT(TV)
On-screen display
If you press DISPLAY on the Remote, you can see the current VCR
status on the TV screen. Press DISPLAY again to exit on-screen
display.
The indications are not recorded even if the VCR is in the recording
mode.
WHILE WATCHING TV
DAY AND CLOCK TIME
WHILE OPERATING A TAPE
AUTO TRACKING
AUTO TR.
CH 1258 : 30 AM THU
00 : 00 : 00 SP
CHANNEL
TAPE
SPEED
REAL TIME COUNTER
OPERATING MODE
CH 1258 : 30 AM THU
AUTO REPEAT
00 : 00 : 00 SP
TAPE IN
To audio/video input connectors
Audio/video cable
(not supplied)
TV
To 75 Ω terminal
RF cable
(supplied)
RF Connection
1
Disconnect the TV antenna from the TV.
2
Connect the TV antenna cable to the UHF/VHF IN
terminal on the rear of the VCR.
3
Connect the supplied RF cable between the UHF/VHF
OUT terminal on the rear of the VCR and the TV’s
antenna input terminal.
AV Connection
(improves picture quality during tape playback.)
If your TV is equipped with audio/video input connectors
1
Connect the antenna, VCR and TV as shown in the
illustration.
2
Connect an audio/video cable between the AUDIO/
VIDEO OUT connectors on the rear of the VCR and the
audio/video input connectors on the TV.
• Even if you are using audio/video cables to connect your
VCR to your TV, you must also connect it using the RF
cable. This will ensure that you can record one show while
watching another.
Page 5
– Connections and VCR channel Setting –
4
Set VCR channel
To view playback of a recorded tape, or to watch a program
selected by the VCR's channel selector, the TV must be set to
channel 3 or 4 (video channel) when a TV is connected with
the 75 ohm coaxial cable only.
1
Set the 3/4 Channel selector switch (Rear of the VCR) to
CH 3 or 4.
2
Turn ON the TV and set to CH 3 or 4 to correspond with
the channel selected in 1.
3
Press POWER to turn on the VCR.
The POWER indicator will light.
Press TV/VCR to select the VCR
4
position.
CAN 125
The TV/VCR indicator will light.
5
Select any channel to receive a
TV station in your area.
The channel number will appear
on the screen for about 4 seconds.
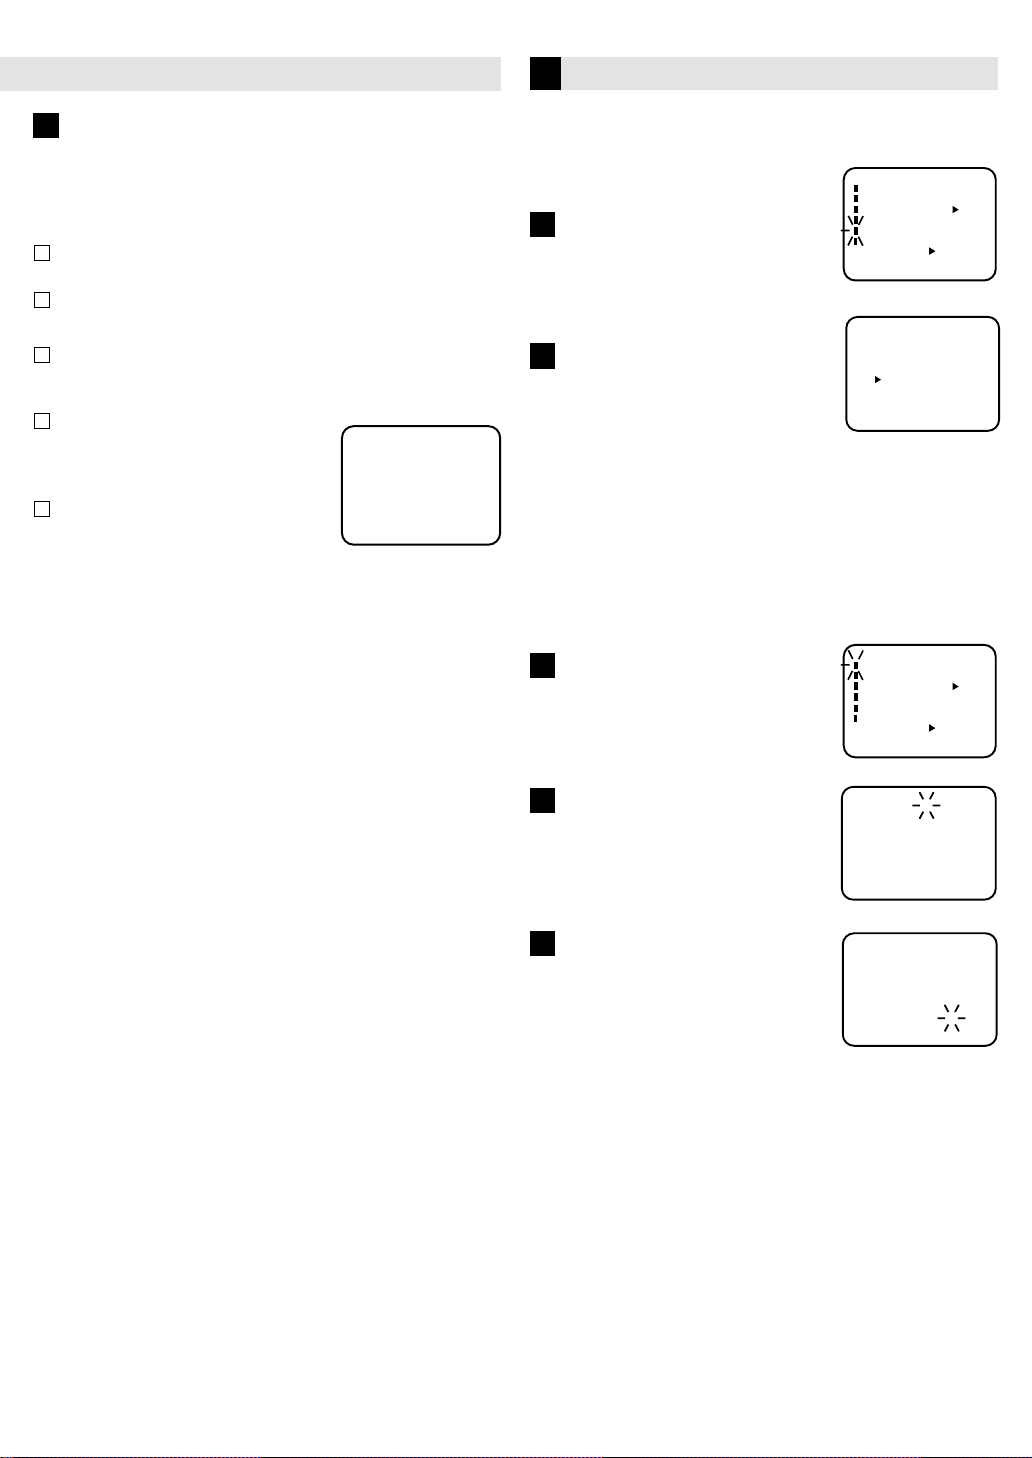
Initial Settings
Language Setting
The default setting is “ESPAÑOL”.
Access Menu screen, then
1
Language screen
Press MENU on the Remote. Press
SET –/+ to select “LANGUAGE”, then
press ENTER.
2
Select language
This VCR offers you the language
choice to view menus and some
messages — in English, Spanish or
French. Press SET –/+ to select your desired language, then
press ENTER.
Press MENU twice to return to normal screen.
Clock Setting
Preparations
You must set the date and time for timer recording.
Access Menu screen, then Clock
1
Set screen
Press MENU on the Remote. Press
SET –/+ to select “CLOCK SET”, then
press ENTER.
MENU
CLOCK SET
TIMER REC SET
AUTO REPEAT
CH SET UP
LANGUAGE/IDIOMA/LANGUE
NO NOISE BACKGROUND
〈+/—/ENTER/MENU〉
LANGUAGE/IDIOMA/LANGUE
〈
+
/–/ENTER/MENU
MENU
CLOCK SET
TIMER REC SET
AUTO REPEAT
CH SET UP
LANGUAGE/IDIOMA/LANGUE
NO NOISE BACKGROUND
〈+/—/ENTER/MENU〉
ON OFF
ON OFF
ENGLISH
ESPAÑOL
FRANCAIS
〉
ON OFF
ON OFF
Set month, day, year and time
2
Press SET –/+ until the desired month
appears, then press ENTER. Set the
day, year and time in the same way.
Start clock
3
Press MENU twice and normal screen
appears.
MONTH
3
DAY
YEAR
2000
TIME
+
〈
—
/ENTER/CANCEL/MENU
/
3
MONTH
DAY
2002
YEAR
TIME
+
〈
—
/ENTER/CANCEL/MENU
/
112(WED)
: 00 AM
268(TUE)
: 30 AM
To make corrections any time during the process
Press CANCEL repeatedly until the item you want to change
blinks, then press SET –/+.
NOTE:
After a power failure or disconnection of the power over 18
hours, the timer settings will be lost. In this case, reset the
present time.
〉
〉
Page 6

– Initial Settings –
Tuner Setting
This VCR is equipped with a channel memory feature which
allows channels to skip up or down to the next channel set
into memory, skipping over unwanted channels. Before
selecting channels, they must be programmed into the VCR’s
memory. In addition to normal VHF and UHF channels, this
VCR can receive up to 113 Cable TV channels. To use this
VCR with an antenna, set the TV/CATV menu option to the
TV mode. When shipped from the factory, this menu option
is in the CATV mode.
– TV/CATV Selection
Access Menu screen, then CH
1
Set Up screen
Press MENU on the Remote. Press
SET –/+ to select “CH SET UP”, then
press ENTER.
Perform TV/CATV Selection
2
Press SET –/+ to select “TV/CATV”,
then press ENTER to select the TV
or CATV mode. The arrow indicates
the selected mode.
TV - VHF/UHF channels
CATV - CABLE TV channels
Press MENU twice to return to normal screen.
MENU
CLOCK SET
TIMER REC SET
AUTO REPEAT
CH SET UP
LANGUAGE/IDIOMA/LANGUE
NO NOISE BACKGROUND
〈+/—/ENTER/MENU〉
CH SET UP
TV CATV
AUTO CH MEMORY
ADD/DELETE
〈
+
/–/ENTER/MENU
ON OFF
ON OFF
〉
Setting channels automatically
– Auto Channel
The VCR can receive a maximum of
181 channels by presetting the
channels into memory.
Access Menu screen, then CH
1
Set Up screen
Press MENU on the Remote. Press
SET –/+ to select “CH SET UP”, then
press ENTER.
2
Perform Auto
Press SET –/+ to select “AUTO CH
MEMORY”, then press ENTER.
Complete Auto Channel
3
The auto tuning will start. The
channel display will count up and
when finished, the screen returns to
normal.
Memory
Channel
Memory
Memory
MENU
CLOCK SET
TIMER REC SET
AUTO REPEAT
CH SET UP
LANGUAGE/IDIOMA/LANGUE
NO NOISE BACKGROUND
〈+/—/ENTER/MENU〉
CH SET UP
TV CATV
AUTO CH MEMORY
ADD/DELETE
〈
+
/–/ENTER/MENU
ON OFF
ON OFF
〉
CH 001
Setting channels manually
– Manual Channel Set
You can add the channels you want or delete the channels
you do not want manually.
Access Menu screen, then CH
1
Set Up screen
Press MENU on the Remote. Press
SET –/+ to select “CH SET UP”, then
press ENTER.
Access ADD/DELETE Mode
2
Press SET –/+ to select “ADD/
DELETE”, then press ENTER.
Add or Delete desired channels
3
Press SET –/+ on the Remote to
1
select a channel number you
want to add or delete.
2
To add channels
Press ENTER until “ADD” appears on the screen to set to
add the unmemorized channel.
To delete channels
Press ENTER until “DELETE” appears on the screen to set
to delete the channel from memory.
Repeat to to add or delete other channel.
Press MENU three times to return to normal screen.
3
1 2
NOTE: You can’t select “CH SET UP” if you set the channel
to “L”.
MENU
CLOCK SET
TIMER REC SET
AUTO REPEAT
CH SET UP
LANGUAGE/IDIOMA/LANGUE
NO NOISE BACKGROUND
〈+/—/ENTER/MENU〉
CH SET UP
TV CATV
AUTO CH MEMORY
ADD/DELETE
〈
+
/–/ENTER/MENU
ADD
+
〈
/–/ENTER/MENU
ON OFF
ON OFF
〉
CH 012
〉
Page 7

Playback
Slow-motion
Basic Playback
Load a cassette
1
PLAY
VIDEO
Make sure the window side is up, the rear
label side is facing you and the arrow on
the front of the cassette is pointing
towards the VCR.
• Do not apply too much pressure when
inserting.
• The VCR turns on, and the counter on
the on-screen display is reset, automatically.
• If the cassette’s record safety tab has been removed, playback
begins automatically.
Start playback
2
Press PLAY ( ).
TV/VCR TIMER REC POWER
POWER
AUDIO
CH
During playback
Stop playback
Press STOP (
Remote.
) on the
OR Press STOP/EJECT (■/
)
on the VCR.
STOP/EJECT
REW
FF
REC
Press PLAY (
Remote.
) on the
OR Press Play ( ) on the
VCR.
• Playback will proceed at
1/10 th of the normal speed.
• Press PLAY ( ) to resume
normal playback.
NOTE:
During slow motion picture, some noise might appear on
the TV screen. Use the SET–/+ on the Remote to eliminate
the noise.
Speed search
Press REW (
) or FF
( ) on the Remote.
• Press PLAY (
) to resume
OR Press REW (
FF ( ) on the VCR.
) or
normal playback.
Variable speed search
Press REW (
(
) repeatedly on the
Remote.
• Press PLAY (
) or FF
) to resume
OR Press REW ( ) or FF
( ) repeatedly on
the VCR.
normal playback.
• Each time you press REW
(
) or FF ( ) the
playback speed changes.
TAPE SPEED PICTURE SEARCH SPEED
SP
EP
PRESS ONCE
3X
9X
PRESS TWICE
5X
15X
Pause playback and view still picture
Press PAUS E.
• Press PLAY (
) to resume
normal playback.
Pause and Frame-by-Frame playback
Press PAUS E to pause, then
press PAUSE repeatedly.
Press PLAY ( ) to resume
normal playback.
When the tape is not running
Rewind/fast-forward
Press REW (
) on the Remote.
(
) or FF
OR Press REW (
Eject the tape
Press STOP/EJECT (■/
) on
the VCR.
• You can also eject the
cassette when the VCR is
turned off.
Turn off the VCR
Press POWER on the
OR Press POWER (
Remote.
(
the VCR.
) or FF
) on the VCR.
/l) on
Page 8

– Playback –
Playback Features
Adjusting tracking condition
– Tracking Adjustment
Automatic tracking adjustment
Whenever you insert a tape and start playback, automatic
tracking starts working and continuously analyzes the signal
to enable optimum picture quality during playback.
Manual tracking adjustment
If automatic tracking cannot eliminate noises well during
playback, press SET –/+ on the Remote to eliminate the
noises. Press it briefly for a fine adjustment, or press and
hold for a coarse adjustment.
• Press SP/EP on the Remote to reactivate automatic
tracking.
Playing back tape repeatedly
– Auto Repeat Play
Access Menu screen
1
Press MENU on the Remote.
Press SET –/+ to select “AUTO
REPEAT”.
MENU
CLOCK SET
TIMER REC SET
AUTO REPEAT
CH SET UP
LANGUAGE/IDIOMA/LANGUE
NO NOISE BACKGROUND
〈+/—/ENTER/MENU〉
ON OFF
ON OFF
Recording
It may be unlawful to record or play back copyrighted
material without the consent of the copyright owner.
Accidental erasure prevention
To prevent accidental recording on a recorded cassette,
remove its record safety tab. To record on
it later, cover the hole with adhesive
tape.
Basic Recording
Load a cassette
1
Make sure the record safety tab is
intact. If not, cover the hole with
adhesive tape before inserting the
cassette.
• The VCR turns on, and the counter
is reset, automatically.
2
Select recording channel
Press CH–/+ or the Number keys on
the Remote [CH–/+ on the VCR].
• If you connect the TV and the VCR
only using the RF connection, press
TV/VCR on the Remote so that the
TV/VCR indicator lights to view the program to be
recorded.
Set tape speed
3
Press SP/EP.
Record safety tab
CH 001
Select ON/OFF
2
Press ENTER to select “ON” or
“OFF”.
Press MENU to return to normal
screen.
Start Auto Repeat Play
3
Press PLAY. The tape will play
over and over until the repeat
mode is canceled.
MENU
CLOCK SET
TIMER REC SET
AUTO REPEAT
CH SET UP
LANGUAGE/IDIOMA/LANGUE
NO NOISE BACKGROUND
〈+/—/ENTER/MENU〉
ON OFF
ON OFF
4
Start recording
On the VCR, press REC. Or on the
Remote, while holding REC, press
PLAY (
).
The REC indicator will light.
During recording
Pause recording
Press PA US E.
• Press PAU SE to resume recording.
• You can select channel in the
recording pause mode.
Stop recording
Press STOP (
) on the
OR Press STOP/EJECT
Remote.
00 : 00 : 00 SP
CH 110
(■/ ) on the VCR.
Page 9

– Recording –
Recording Features
Specifying recording length
- One Touch Timer Recording (OTR)
The One-touch Timer Recording feature provides a
simple and convenient way to make a timed
recording.
EXAMPLE: One-touch Timer Recording for 30 minutes.
When a TV is connected with an audio/video cable, turn the
TV on and select the video input mode on the TV.
Load a cassette tape with the
1
erase prevention tab intact.
Press SP/EP to select the desired
2
tape speed SP or EP.
The counter and SP or EP will
appear on the screen for about 4
seconds.
00 : 00 : 00 SP
Press the Number keys or CH –/+
3
to select the channel to be
recorded.
The channel number will appear
on the screen and display for
about 4 seconds.
Press REC on the VCR or while
4
holding REC, press PLAY (
the Remote to begin recording.
Press REC on the VCR again to
stop recording after 30 minutes.
Each additional press of REC will
increase recording time as shown
in the chart below, up to a
maximum of 5 hours. The OTR
and recording time will appear on
screen for about 4 seconds.
NOTES: • Press REC to increase
the time needed for
recording (See the
chart ).
• To cancel OTR, press
STOP (
) or turn off
the power.
Watching one program while recording another
During recording…
• If you connect the TV and the VCR only using the RF
connection to view pictures from the VCR, press TV/VCR
on the Remote so that TV/VCR indicator goes off. (The TV
broadcast being recorded disappears.)
• If you are using the AV connection to view pictures from
the VCR, change the TV’s input mode from AV to TV.
Then, select the channel you want to watch, on the TV.
) on
Press
once
twice
3 times
4 times
5 times
6 times
7 times
8 times
9 times
CH 125
OTR 0 : 30
CH 125
Recording time
NORMAL REC
0:30
1:00
1:30
2:00
3:00
4:00
5:00
NORMAL REC
Timer Recording
Timer recording can be programmed on-screen with
the remote control. The built-in timer allows automatic
unattended recording of up to 8 programs within 1
month.
NOTES:
• After timer recording is completed, the VCR turns off
automatically.
• You can program the timer recording while a regular
recording is in progress; the menu screens will not be
recorded.
• The timer recording will start at 20 seconds before the
time you predetermined.
EXAMPLE: Program a timer recording for the 26th day,
channel 125 (CATV), 11:00 - 11:30 PM on timer program
number 1 (Tape speed: EP).
When a TV is connected with an audio/video cable, turn the
TV and this VCR on and select the video input mode on the
TV.
Press MENU on the Remote.
1
Check the “TIMER REC SET”
option is selected, then press
ENTER.
Press SET –/+ to select one
2
of the program lines, then
press ENTER.
Press SET –/+ to select the
3
date, then press ENTER.
Set the start time, end time,
4
channel and tape speed as in
step 3.
NOTE: To record from external
source, press SET –/+
and set the channel to
"L". "L" will appear
next to CH 125 (or 69).
To enter other programs,
5
repeat step 2 through 4. Or,
press MENU twice to return
to the normal screen.
Press TIMER on the Remote.
6
The power will go off, the
TIMER indicator will light and
the VCR stands by for
recording.
To use the VCR while it is in timer recording standby mode
Press TIMER. After you use the VCR, press TIMER again
to put the VCR into timer recording standby mode.
MENU
CLOCK SET
TIMER REC SET
AUTO REPEAT
CH SET UP
LANGUAGE/IDIOMA/LANGUE
NO NOISE BACKGROUND
〈+/—/ENTER/MENU〉
DATE START END CH
––––– –: –– –: –– –– –
––––– –: –– –: –– –– –
––––– –: –– –: –– –– –
––––– –: –– –: –– –– –
––––– –: –– –: –– –– –
––––– –: –– –: –– –– –
––––– –: –– –: –– –– –
––––– –: –– –: –– –– –
〈
+
/–/ENTER/CANCEL/MENU
DATE
26(SU)
------ -
------ -
------ -
------ -
------ -
------ -
------ -
+
/–/ENTER/CANCEL/MENU
〈
ON OFF
ON OFF
START END
-:-- -:--
-:--
-:--
-:--
-:--
-:--
-:-- ---
-:--
-:--
-:-- -:-- ---
-:-- -:-- ---
-:--
-:-- ---
〉
CH
---
---
---
---
〉
-
Page 10

– Timer Recordings –
TO CORRECT THE SETTINGS
When setting the Timer Recording, press ENTER until the
desired setting blinks, then re-enter the setting using SET –/+.
When finished, press ENTER.
NOTES: • The VCR cannot be used while the TIMER
indicator is lit.
• After a power failure or disconnection of the
power plug over 18 hours, all programmed
recording settings must be reset upon
resumption of power. In this case, reset the clock
and reprogram any timer recordings.
• Press CANCEL to move cursor backward for
correction.
TO SET DAILY/WEEKLY TIMER
When setting the date in step 3 in the Setting the Timer
Recording section on the previous page, press SET –
repeatedly.
The setting changes as follows:
Example
The current day (Friday) SU-SA (Sunday to Saturday)
One month later
minus one day
MO-SA (Monday to Saturday)
MO-FR (Monday to Friday)
IF THE PROGRAM OVERLAPS ANOTHER
NOTE: Do not overlap programs as portions of the
conflicting programs will be lost. The first
recording time has priority over the next recording
time as shown in the diagram.
Program 1
Program 2
Program 3
Recording
Control Settings
8 : 00
NOTES: • The everyday/every week recording can be made
continuously until the recording is canceled or
the tape reaches the end.
• During timer recording, the automatic rewinding
mechanism does not function.
Prog.1
9 : 00
Deleted Parts
Non Recorded Portion Parts
Prog.2 Prog.3
10 : 00
11 : 00
WKL-WE WKL-TH (Weekly Thursday)
(Weekly Wednesday)
TO CONFIRM THE SETTINGS
Press SET –/+ to select the
“TIMER REC SET” option in the
MENU. Then press ENTER to
display the timer program list.
Press MENU twice to return to
the normal screen.
TO CANCEL A PROGRAM
Press the SET –/+ to select the
“TIMER REC SET” option in the
MENU. Then press SET –/+ to
select the unnecessary program,
and press CANCEL to cancel the
program.
DATE START END CH
26 (WE)11:00PM 11:30PM
––––– –: –– –:–– –– –
––––– –: –– –:–– –– –
––––– –: –– –:–– –– –
––––– –: –– –:–– –– –
––––– –: –– –:–– –– –
––––– –: –– –:–– –– –
––––– –: –– –:–– –– –
〈
+
/–/ENTER/CANCEL/MENU
DATE START END CH
––––– –:–– –:–– –– –
––––– –:–– –:–– –– –
––––– –:–– –:–– –– –
––––– –:–– –:–– –– –
––––– –:–– –:–– –– –
––––– –:–– –:–– –– –
––––– –:–– –:–– –– –
––––– –:–– –:–– –– –
〈
+
/–/ENTER/CANCEL/MENU
125 EP
〉
〉
Page 11

Other Functions
BLUE BACK — ON/OFF
When this function is set to “ON”, the TV screen becomes all
blue in the following cases:
When receiving a channel not in use.
When stopping playback.
1
Press MENU on the remote. Press SET –/+ to select
“NO NOISE BACKGROUND”.
2
Press ENTER to select “ON”.
Press MENU to return to normal screen.
3
Editing
You can use your VCR as the playback or recording VCR.
You can use a camcorder as the playback VCR and your VCR
as the recording VCR. Refer also to the other components’
instruction manuals for connection and its operations.
1
Make connections
Example: When using this VCR as the playback VCR
This VCR (for playback)
JVC TV Remote Control
This Remote can control some functions (TV POWER,
INPUT, TV CH –/+ and TV VOL –/+) of a remote
controllable JVC TV without setting.
NOTE:
• It’s not possible to operate a unit not equipped with a
remote sensor.
• This Remote can control a JVC TV only.
To AUDIO/VIDEO OUT
Audio/video cable
(not supplied)
To audio/video input
Another VCR (for recording)
• When using this VCR as the recording VCR, connect this
VCR’s audio/video input connectors to the audio/video
output connectors on the other VCR. If the playback VCR
is monaural, connect the audio output connector on the
playback VCR to the left audio input connector on this
VCR.
Load cassettes
2
Insert the playback cassette into the playback VCR and the
cassette to be recorded on into the recording VCR.
3
Select input mode on recording VCR
Select the correct external input on the recording VCR.
On this VCR (when using this VCR as the recording VCR);
Select “L” — when connecting the other VCR to the audio/video
input connectors on the front panel.
Press O (AUX) or CH–/+ on the Remote [CH–/+ on the VCR].
4
Start playback
Press PLAY ( ) on the playback VCR.
5
Start recording
Press REC on the recording VCR.
Page 12

Before Requesting Service
Make sure by first checking the following points.
SYMPTOM CAUSE POSSIBLE SOLUTION
POWER
No power.
Although the power is on, it
does not operate.
TV BROADCAST RECEPTION
A TV program that is selected by
the VCR does not appear on the
screen.
RECORDING
TV recording does not work.
Timer recording does not work.
PLAYBACK
No picture on screen when
playing back a recorded tape.
Noise bars on screen.
REMOTE CONTROL
Remote control does not work.
TV programs cannot be seen
using the TV selector.
The AC power cord is not connected.
Cassette is not inserted. Insert a video cassette.
Antenna connection is not correct.
Antenna cable is disconnected.
The video channel is not in the correct
position.
The TV is not set to the video channel
3 or 4.
The TV/VCR selector is set at TV mode
(The TV/VCR indicator is not lit).
INPUT is set to the LINE mode.
The erase prevention tab of the video
cassette is broken off.
INPUT is set to the LINE mode.
The time is not set correctly.
The recording start/end time is not set
correctly.
The TIMER button has not been
pressed (The TIMER indicator is not lit).
The TV is not set to the video channel 3
or 4.
Tracking adjustment beyond range of
automatic tracking circuit.
Video heads are dirty.
The tape is worn or damaged.
It is not aimed at the remote sensor.
Distance too far or too much light in
the room.
There is an obstacle in the path of the
beam.
The batteries are weak.
The +, – polarity of the batteries are
not inserted correctly.
The TV/VCR function is in the VCR
mode.
Connect the AC power cord to the AC
outlet.
Connect it correctly.
Reconnect the antenna cable.
Set it to CH 3 or 4.
Set the TV channel selector to the 3 or 4
position.
Press the TV/VCR selector button (The TV/
VCR indicator will light).
Press the Number key or CH –/+ button to
select your desired TV program.
Place a piece of vinyl tape over the gap.
Press the Number key or CH –/+ button to
select your desired TV program.
Reset the present time.
Set the start/end time.
Press the TIMER button (The TIMER
indicator is lit).
Set to the video channel 3 or 4 or
adjust the fine tuning button on your
TV set.
Adjust tracking manually using the SET – or
+ buttons on the remote control.
Have the video heads cleaned.
Try another tape.
Aim it at the remote sensor.
Operate within 15 feet (5 meters) reduce
the light in the room.
Clear the path of the beam.
Replace the batteries.
Insert correctly.
Set to TV, or turn off the VCR power
button.
Page 13

Specifications
GENERAL
Power requirement
Power consumption
Power on
Power off
Temperature
Operating
Storage
Operating position
Dimensions (W x H x D)
Weight
Format
Maximum recording time
SP
EP
VIDEO/AUDIO
Signal system
Recording/Playback
system
Signal-to-noise ratio
Horizontal resolution
Frequency range
Normal audio
Input/Output
TUNER
Tuning system
Channel coverage
VHF
UHF
CATV
RF output
: AC 110 V-220 V~, 50Hz/60 Hz
:9 W
: 2.0 W
:5°C to 40°C (41°F to 104°F)
: –20°C to 60°C
: Horizontal only
: 360 mm x 95 mm x 224 mm
: 3.2 kg
: VHS NTSC standard
: 210 min. with ST-210 video cassette
: 630 min. with ST-210 video cassette
: NTSC-type color signal and EIA monochrome signal, 525 lines/60 fields
: DA-4 (Double Azimuth) head helical scan system
: 42 dB
: 230 lines
: 100 Hz to 10,000 Hz
:
: Frequency-synthesized tuner
: Channels 2–13
: Channels 14–69
: 113 Channels
: Channel 3 or 4 (switchable; preset to Channel 3 when shipped) 75 ohms,
RCA connectors (IN x 1, OUT x 1)
unbalanced
(–4°F to140°F)
TIMER
Clock reference
Program capacity
Memory backup for timer
ACCESSORIES
Provided accessories
Specifications shown are for SP mode unless specified otherwise.
E. & O.E. Design and specifications subject to change without notice.
: Quartz
: 1-month programmable timer/8 programs
: Approx. 18 hours
: RF cable (F-type), Infrared remote control unit, “AAA” battery x 2, Conversion plug
Page 14

Page 15

Page 16

 Loading...