

Page 1
JVC HM100U
BASIC OPERATIONS
by EMMANUEL ALEXANDRE Jr./CUNY-TV
!!
!!Feb. 29, 2012 Ver.6
!"#$%&'%
Page 2

Intro
This is a basic summary based on both the menu
settings and the actual buttons on the camera. I’ve
omitted certain information that I found either self-
explanatory or irrelevant to students. I’ve also kept
away from advance video and audio settings. Please
refer to the manufacturer’s PDF manual for a more in-
depth look.
1.
Link:
http://inside.massart.edu/Documents/inside.massart.edu/
academic_resources/GY-HM100U.pdf
!"#$%&'%
Page 3
NOTE
Open/Close
Lens Cap
OPERATING THE JVC HM100U
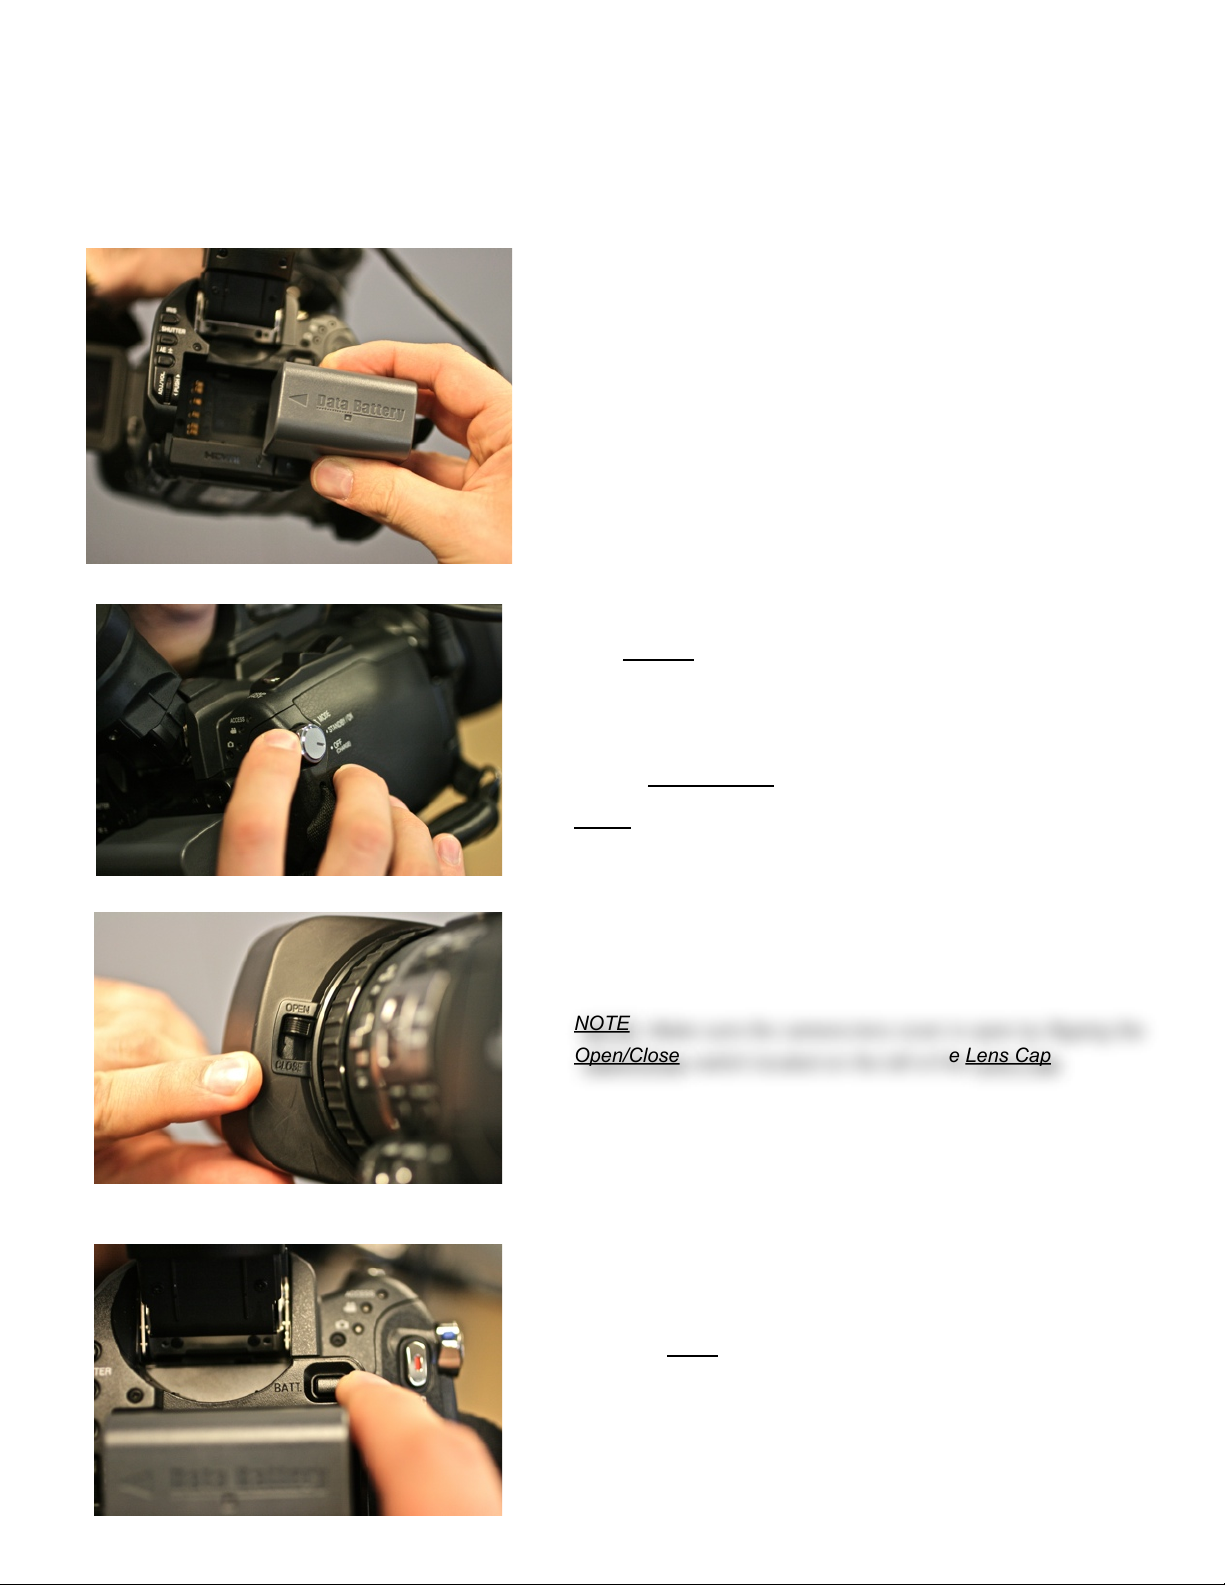
Turning on the camera
First, hold the battery firmly in your hand making
sure that the arrow is pointing left. Then slide the
battery onto the holster in the camera making sure
the metal parts engage, you should then hear a
clicking sound.
2.
The On/Off switch is located on the right side of the
camera. Turn the camera on by pressing the blue
button on the wheel then turn it counter clock wise
to the Standby/On position. Turn once more to the
Mode position to switch to still camera mode.
: Make sure the camera lens cover is open by flipping the
switch located on the left of the
.
To change the battery, simply press the button
marked BATT. located right on top of the holster
then slide it towards the right and pull out.
!"#$%&'%
Page 4
NOTE
NOTE
NOTE
3.
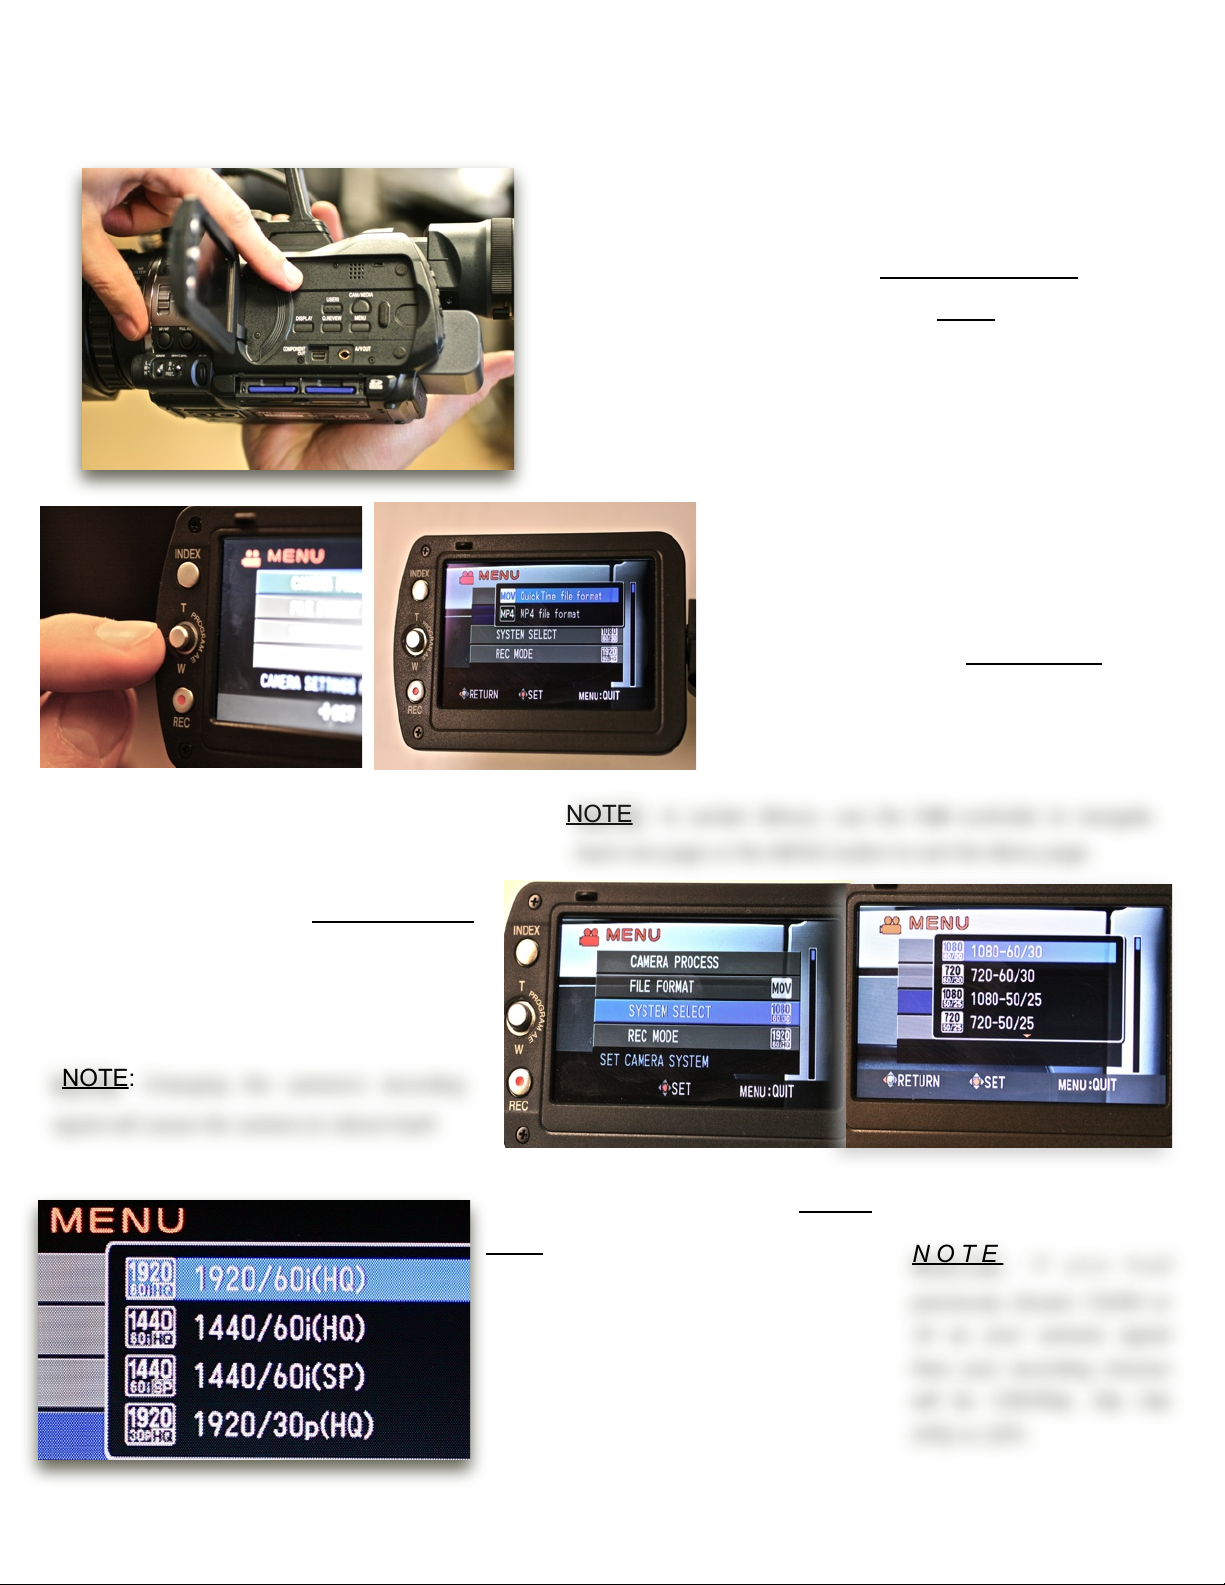
Selecting the Camera/Recording modes
Open the LCD screen, which is located on the left side
of the camera. Inside the LCD compartment you’ll
find a series of buttons. Press the Menu button.
The camera menu selections will then appear on the
LCD screen.
Use the controller on the left edge of
the LCD screen, labelled (T,W) to scroll
up, down and across the menu
Scroll down to the System Select
menu to choose the camera’s
recording signal. Select 1080-60/30
from the list.
: Changing the camera’s recording
signal will cause the camera to reboot itself.
selections. Select File Format by
pressing down on the center of
controller. Choose Quicktime file format.
: In certain Menus, use the T, W controller to navigate
back one page or the MENU button to exit the Menu page.
Now scroll down to select Record
Mode. The following selection will
determine the recording settings of
your camera, from 1920/60i or 30p
(HQ) ‘High Quality’ to 1440/60i(HQ)
or (SP) ‘Standard Quality’.
Select 1920/60i(HQ) from the list.
or 1920/30p(HQ) if you’re
shooting for the web.
: If you had
previously chosen 720/60 or
24 as your camera signal
then your recording choices
will be 1280/60p, 30p 24p
(HQ) or (SP).
!"#$%&'%
Page 5
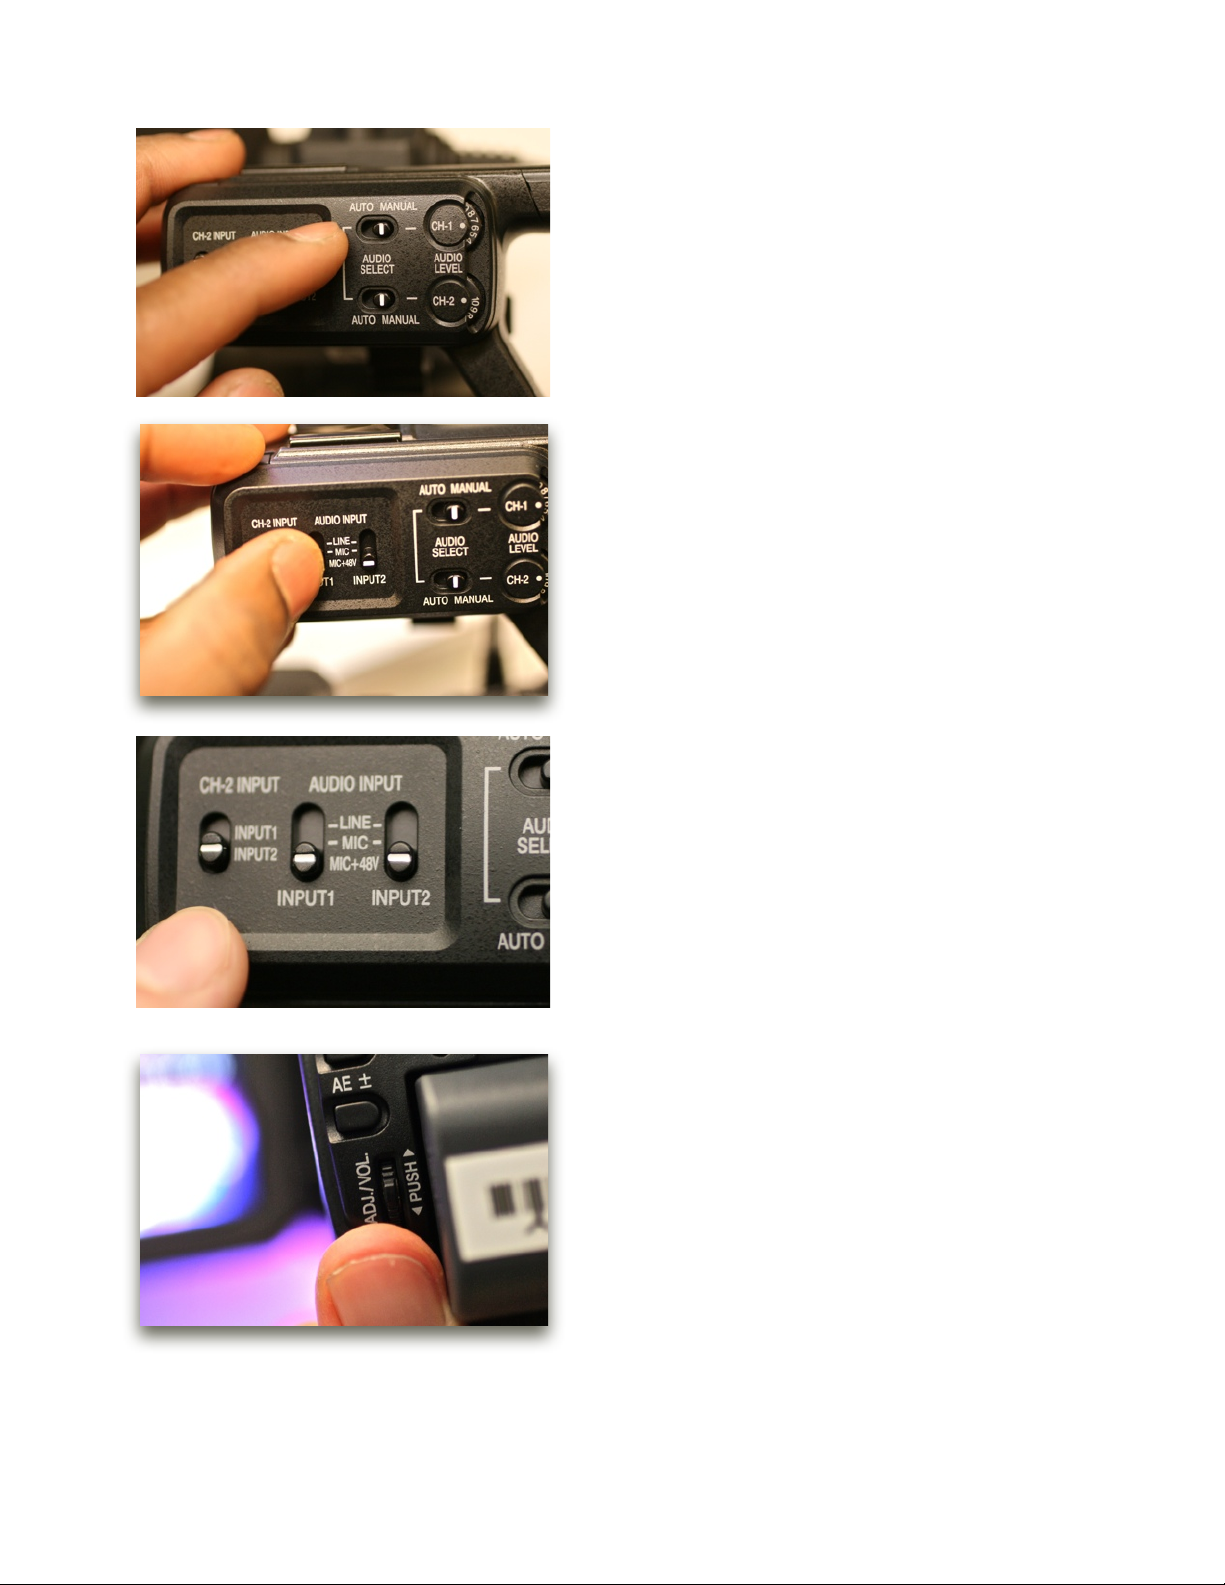
Audio Select
Manual
Audio Level
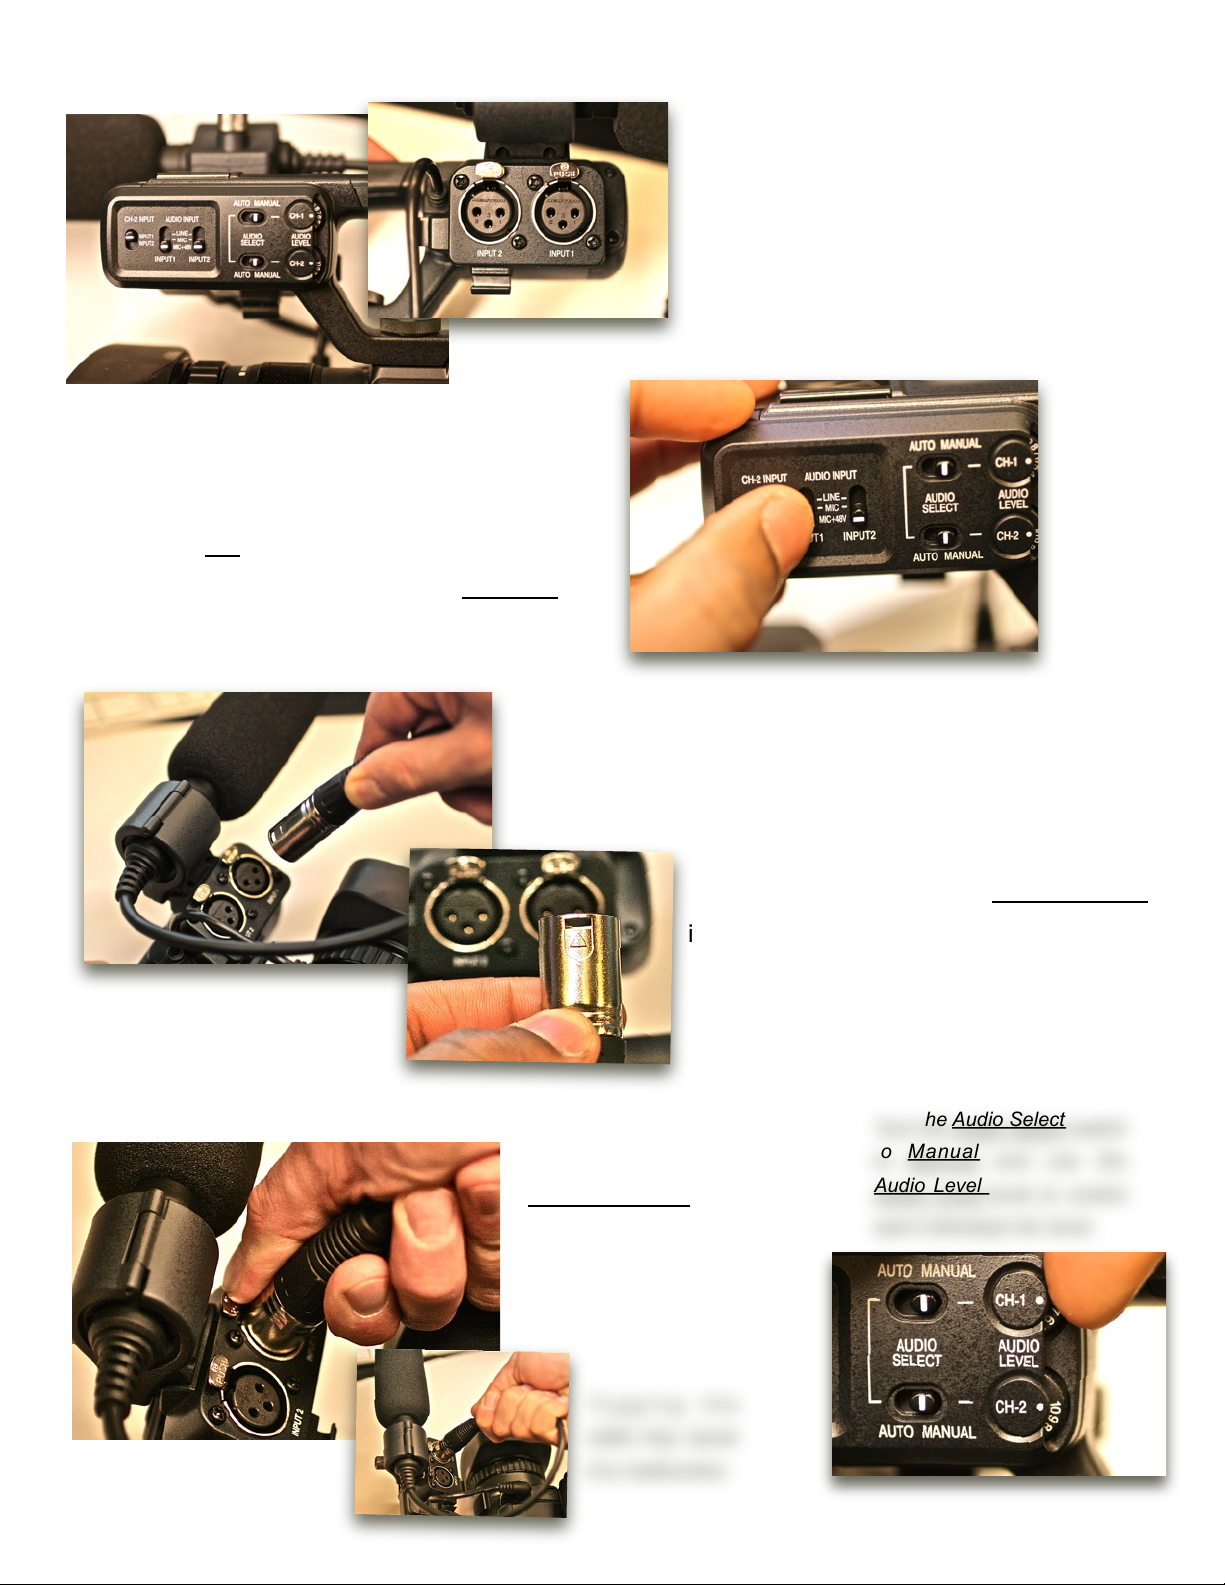
Connecting the microphone
To connect an external microphone to the
camera, first select the audio input and choose
the type of input using the controls. Move the
switch to Mic for microphones that use their
own power supply, or switch to Mic+48V for
microphones that draw power from the camera.
4.
The camera’s audio controls are located
on the left side, at the tip of the handle.
The XLR inputs are on the opposite
side, under the microphone holder.
Then plug the XLR cable to one of
the inputs selected, either 1 or 2 on
the opposite side of the controls.
Make sure the arrow on the XLR Connector
is pointing towards the PUSH button on the
camera, then push the connector forward
until a clicking sound is heard.
Turn the
To disconnect, press the
to
PUSH Button on the
each individual mic level.
camera then pull out
while holding the end of
switch
and use the
knob to control
the connector cable.
Tugging the
cable may cause
it to malfunction
!"#$%&'%
Page 6
Setting the audio
5.
1.Make sure the audio switch is set to
MANUAL
2.Make sure that your AUDIO INPUT
1 and INPUT 2 are set to Mic+48khz
for on board microphone or your WIRED
mics.
3.Make sure that your CH-2 INPUT is
set to INPUT 2
4.Make sure that your headphone
levels are turned up by adjusting the
ADJ./VOL. knob on the back of the
camera
!"#$%&'%
Page 7

Recording
NOTE
Preview Mode,
The SDHC card slots are located at the
bottom of the camera, under the LCD
screen. This camera model allows for a
minimum Class 6 card and up to Class
10 card. A standard 32 gig SDHC card
will record up 1 hour and 50 minutes.
6.
Insert the card into the slot, with the
metallic censors going in first and the
label facing up. Slightly push the card
once with the tip of your finger until
you hear a click. Push the card once
Turn on your camera and begin recording
by pressing the REC button located behind
the On/Off knob. Press once and a REC
sign will appear on the LCD screen, and
you will see the counter begin to roll
above it. Press it once more, and the
counter will stop and a green ‘Pause’
signal will appear on the screen.
more to disengage it from the slot and
pull it out with the tip of your fingers.
: Ejecting the SDHC cards while recording or while in
(CAM/MEDIA) will result in file corruption.
!"#$%&'%!"#$%&'%
Page 8

Zooming and Focus
Auto
Manual
7.
There are three ways to zoom on the camera. First by
using the rocker located on the right side above the hand
strap. Push the T(Telephoto) to zoom-in and W(Wide) to
zoom-out.
Second, flip the LCD open, then you will see the same
corresponding (T,W) controls on the left of the LCD panel.
You can also use the REC button on that panel to record.
Third, there is a Focus and Zoom switch located on the left
side of camera, on the lens barrel. Select Zoom to use the
camera’s manual zoom ring or select Focus to turn that
same ring into a manual focus.
NOTE: The
button (AF/MF) is located right under that switch.
or
Adjusting the White Balancing
The white balancing selection switch is located on the
left side of the camera, right under the Auto/Manual
Focus and Full Auto buttons.
To set custom white balance, first point at a white
surface. Make sure that there is nothing else in the
focus selection
frame. Next, select A or B as your custom preset.
Then press the AWB button located on the front of the
camera until the OK sign flashes on the LCD screen.
!"#$%&'%
Page 9

Adjusting the Iris
Automatic Iris
Shutter speed
Automatic Shutter
To m a n ua lly adjust the Ir i s , first press the Iris button which
is located on the back of the camera, right above the
battery compartment.
Once pressed, a numerical value will be highlighted on the
upper left side of the LCD screen.
Use the Adj/Vol dial located below the Shutter button to
8.
either open or close the Iris. As the numbers increase your
image becomes darker, and as they decrease, more light
gets into the camera.
NOTE: Press the Iris button again to engage the
, and the numerical value should disappear
Selecting the shutter speed
The Shutter is located right below the Iris. Press the
Shutter button to manually adjust it.
Once pressed, a numerical value will be highlighted on
the LCD screen, right below the iris selection number.
NOTE: The standard
be at 1/60. Press the shutter button again
to engage the
numerical value should disappear
should
, and the
The shutter increments are expressed in fractions, i.e
(1/30, 1/60, 1/80, 1/100). With the slower shutter
speeds, (1/30 or 1/15) your image will be brighter,
however it will create motion artifacts to your footage,
while with a faster shutter, (1/100 or 1/250) your image
will be darker and have “stuttering” or “choppy” artifacts.
!"#$%&'%
Page 10

User shortcuts
NOTE
There are three user shortcuts that can be
assigned for several functions in the camera.
User 1 and User 2 are located on the left side of
the camera, right above the Focus/Zoom switch.
User 3 is located inside the LCD compartment,
right next to the CAM/MEDIA button.
9.
To assign a user function. First press the
Menu button then select Camera Settings
from the menu window. A list of choices
will be displayed, then press the T, W
controller to make a selection.
: The Cameras are preset with User 1 for Focus
Assist, User 2 for Color bars and User 3 for Zebra.
!"#$%&'%
Page 11

Reviewing the clips
NOTE
CAM/MEDIA
NOTE
Timecode
Menu button
TC
Preset
Reset
Push the CAM/MEDIA button, which is located
in the LCD compartment. A new Menu screen
will come up, displaying thumbnails of clips
shot. You can navigate through the menu by
using the (T,W) controller on the LCD panel.
Press the center of the controller to select and
view a clip.
Once the clip begins to play, push the (T,W)
controller left or right to either rewind fast-
10.
forward through the clip and push the center
to pause. Push up to go back to the beginning
of the clip and down to jump to the end, then
push down to exit back to the Viewing Menu.
Press the CAM/MEDIA button once more to exit
the reviewing mode.
: You can Delete or Copy clips by pressing
the Menu button while in the
: You can reset the camera’s
pressing the
, then select
, then selecting
.
mode.
by
!"#$%&'%
Page 12

Formatting SDHC cards
NOTE: In certain Menus, use the T,W controller to navigate back one
page or the MENU button to exit the Menu page.
11.
There are three ways to Format the SDHC cards.
First, in Camera mode, press the Menu button,
then choose Media Settings. Once selected, you
will see the Format setting. Press it, then you will
have the choice of formatting Slot A or B. After
choosing which slot to format, you will be
prompted to decide which formatting method to
employ.
Choose FILE to wipe the card of all media, then
press OK.
Second, while in CAM/MEDIA mode press the
Menu button then select Delete. There will be
choices to delete Current file, to File Select or
Delete All.
Third, while in CAM/MEDIA mode press the Menu
button then proceed to Media Settings then follow
Step one.
!"#$%&'%
Page 13

Exporting Files
NOTE
EJECT
Untitled
Disks
12.
There are three ways of exporting your media
onto your computer. First, by inserting your
SDHC card into your MacBook Pro’s SD card slot,
second connecting the camera directly onto a
computer using a USB cable or through an
external SDHC Card Reader.
To connect the camera directly to the computer
Attach the USB cable to the USB port located on
the back of the camera under the battery slot
and next to the HDMI port. Once connected, the
camera will automatically prompt you to enter
PLAYBACK ON PC mode.
Press the center of the T,W controller to engage
the PC link. You will then see two Untitled Disks
mounted on your Finder. Follow the path to drag
and drop your video files to your external hard
drive.
: Before disconnecting the USB
cable please
just as you would a hard drive,
then unplug the USB cable from the
camera. Failure to properly eject the
disks will result in file corruption.
the
!"#$%&'%
Page 14

Importing into Final Cut Pro
13.
Once your project folders have been
created and linked through the System
Settings menu in FCP, you will need to
choose the proper Video Format before
importing your files.
First, select Easy Setup under the drop-
do w n me n u ba r in F C P. T h e
JVCHM100U uses the XDCAM HD format
Then, you will need to choose the
corresponding HD signal/resolution that your
footage was shot in. Please select: XDCAM
EX 1080/60i VBR or 1080p/30 VBR from the
drop down menu.
NOTE: The JVC shoots HD footage in High
Quality(HQ) at Variable Bit Rates(VBR) up to
35Mb/s and in Standard Quality(SP) at a
Constant Bit Rate of 25Mb/s. Please consult
with your Instructors or Broadcast Staff.
Now you are ready to import your
files into Final Cut Pro.
!"#$%&'%
Page 15

Final Cut Pro - Video Export Process
14.
Exporting Video for the Web and Broadcast
Classes.
Introduction
There are various formats that are used to encode video when exporting out of Final Cut Pro
Here we’ll go over settings in exporting to the Web or for Broadcast Classes
Step 1
Preparing your Video for the WEB.
When you’re finished editing and ready to export
out of Final Cut Pro for the WEB (Youtube,Vimeo),
Go to FILE_EXPORT_USING QUICKTIME
CONVERSIONS.
Step 2
Select OPTIONS next to Format_QuickTime Movie,
from there you’ll select Video_SETTINGS, SIZE and
SOUND SETTINGS.
Step 2b
Video SETTINGS: select H.264, in the MOTION
section you’ll keep the Frame Rate as Current and
Key Frames at Automatic. In the DATA RATE section
you’ll select Restrict to and Type in 10000 if you’ll
be uploading video with a resolution of 1920x1080.
But if you’re uploading video with a resolution of
1280x720 then type in 5000.
Step 1
Step 2
Step 3
For FILTER you can skip these settings and move on
to SIZE, here you’ll select the size that corresponds
to your sequence settings which will be
1920x1080HD. Please be aware the size settings
are subject to changes depending on what is
requested by The Professor or Content Site you’re
uploading to.
Step 2b
Step 3
()#$%&'%
Page 16

Final Cut Pro - Video Export Process
15.
Exporting Video for a News Broadcast
FCP 7.0
Step 4
In SOUND SETTINGS select AAC. Keep the sound channels at
Stereo and change the RATE to 44.100khz., all the other
settings remain the same.
After all your settings are selected,Export and Save your file
in your EXPORTS folder in your main project folder.
Instructions on File and Folder management will be provided
by your Professor. Now you’re ready to upload to Youtube.
For detailed instructions for uploading to Youtube http://
www.google.com/support/youtube/bin/answer.py?
hl=en&answer=57924
Step 5 If you’re uploading to VIMEO
You’ll go through the same settings for Vimeo with a few
minor changes. Your settings in Vimeo only allows a certain
amount of uploads and a size limit of 500mb if you aren't
subscribed to Vimeo Pro. In this instance you’ll
restrict your DATA RATE settings to 5000 and use a lower
resolution depending on what the video is being displayed
for. For example 1280x720HD or 640x480 VGA
Step 4
Step 5: cont.
For more Information on uploading to Vimeo
please go http://vimeo.com/help/faq#upload
Please make note of the “What are the
recommended settings for uploading a video”
Section. It has useful and detailed information on
compressing video for Vimeo.
Step 4b
()#$%&'%
Page 17

Final Cut Pro - Video Export Process
16.
Exporting Video for Broadcast Classes
Ver.1 Setty McIntosh
These are the settings for exporting your final project For Broadcast Class
Step 1
When you’re finished editing and ready to export
out of Final Cut Pro for your BROADCAST CLASS Go
to FILE_EXPORT_QuickTime_Movie
Step 2
Select CURRENT SETTNGS, and leave all the other options the
same, keep in mind these current settings are the settings of your
Final Cut Project and are also the settings of your JVC HM100U
(XDCAM EX 1080i60 VBR). Nothing needs to change. This will be
your Master Clip from which all other encoded video will come from.
Step 1
Step 2
Step 3
If you need to export your video to other settings,
refer to the web settings in the previous pages or
use whatever format is requested. You can do the
exporting out of QuickTime Player7.
Open the file with QuickTime Player 7 and choose
export. From there you can select whatever settings
you choose. The setup is the similar to exporting
from Final Cut Pro (Step 3b)
Step 3
Step 3b
()#$%&'%
 Loading...