

Page 1
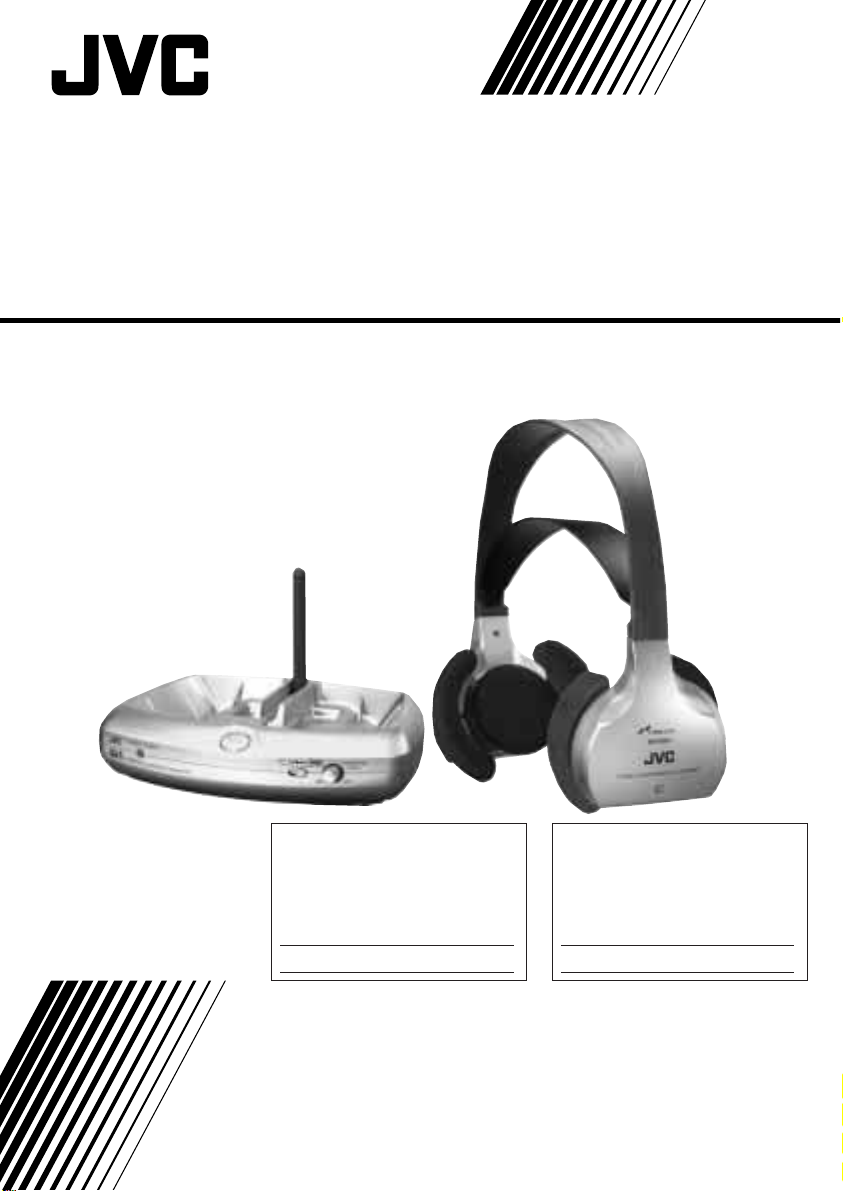
CORDLESS STEREO HEADPHONES
CASQUE STEREO SANS FIL
AURICULARES ESTÉREO INALÁMBRICOS
HA-W1000RF-J/C
INSTRUCTIONS
MANUEL D’INSTRUCTIONS
MANUAL DE INSTRUCCIONES
LNT0017-001A
À l'usage du client :
Inscrivez ci-dessous le n° de modèle et le n°
de série qui se trouvent sur le fond du coffret.
Conservez ces informations pour pouvoir vous
y reporter ultérieurement.
N° de modèle
N° de série
For Customer Use :
Enter below the Model No. and Serial No.
which are located on the bottom of cabinet.
Retain this information for future reference.
Model No.
Serial No.
Page 2

Hearing Comfort and Well-Being
●
Do not play your headphones at a high volume. Hearing experts advice
against continuous extended play.
●
If you experience a ringing in your ears, reduce volume or discontinue use.
Traffic safety
●
Do not use while operating a motorized vehicle. It may create a traffic
hazard and is illegal in many area.
●
You should use extreme caution or temporarily discontinue use in potentially
hazardous situations.
●
Even though your headphones are of the open-air type designed to let you
hear outside sounds, don’t turn up the volume so high that you can’t hear
what’s around you.
FCC INFORMATION
This device complies with Part 15 of the FCC Rules. Operation is subject to
the following two conditions:
(1) This device may not cause harmful interference
(2) This device must accept any interference received, including interference
that may cause undesired operation.
CAUTION: Changes or modifications not approved by JVC could void user’s
authority to operate the equipment.
Contact
Address: JVC AMERICAS CORP.
JVC COMPANY OF AMERICA
1700 Valley Road, Wayne, N.J. 07470
Telephone: 1 (973) 317-5000
Note:
This equipment has been tested and found to comply with the limits for a Class B digital device, pursuant to
Part 15 of the FCC rules. These limits are designed to provide reasonable protection against harmful
interference in a residential installation. This equipment generates, uses and can radiate radio frequency
energy and, if not installed and used in accordance with the instructions, it may cause harmful interference to
radio communications. However, there is no guarantee that interference will not occur in a particular
installation. If this equipment does cause harmful interference to radio or television reception, which can be
determined by turning the equipment off and on, the user is encouraged to try to correct the interference by
one or more of the following measures:
●
Reorient or relocate the receiving antenna.
●
Increase the separation between the equipment and receiver
●
Connect the equipment into an outlet on a circuit different from that to which the receiver is connected.
●
Consult the dealer or an experienced radio/TV technician for help.
Page 3
32
This device complies with RSS-210 of the IC Rules. Operation is subject to
the following two conditions:
(1) This device may not cause harmful interference
(2) This device must accept any interference received, including interference
that may cause undesired operation of the device.
CAUTION: Changes or modifications not approved by JVC could void user’s
authority to operate the equipment.
Contact
Address: JVC CANADA INC.
21 Finchdene Square, Toronto, ON M1X 1A7
Telephone: (416) 293-1311 e-mail: info@jvc.ca
Note:
This equipment has been tested and found to comply with the limits for a Class B digital device, pursuant to
Industry Canada’s RSS-210. These limits are designed to provide reasonable protection against harmful
interference in a residential installation. This equipment generates, uses and can radiate radio frequency
energy and, if not installed and used in accordance with the instructions, it may cause harmful interference to
radio communications. However, there is no guarantee that interference will not occur in a particular
installation. If this equipment does cause harmful interference to radio or television reception, which can be
determined by turning the equipment off and on, the user is encouraged to try to correct the interference by
one or more of the following measures:
●
Reorient or relocate the receiving antenna.
●
Increase the separation between the equipment and receiver
●
Connect the equipment into an outlet on a circuit different from that to which the receiver is connected.
●
Consult the dealer or an experienced radio/TV technician for help.
IC INFORMATION
Cet appareil est conforme à la RSS-210 du réglement de la IC. Le
fonctionnement est sujet aux deux conditions suivantes:
(1) Cet appareil ne peut causer d’interférences nuisi-bles
(3) Cet appareil reçoit toute interférence même les interférences qui peuvent
occasioner un mauvais fonctionnement.
ATTENTION: Les changements ou les modifications non approuvés par JVC
risquent de retirer à l'utilisateur le droit d'utiliser l'appareil.
Contact
Adresse: JVC CANADA INC.
21 Finchdene Square, Toronto, ON M1X 1A7
Téléphone: (416) 293-1311 e-mail: info@jvc.ca
Remarque :
L'appareil a été testé et jugé conforme aux limites des appareils numériques de classe B, aux
termes de la réglementation RSS-210 de l'industrie du Canada. Ces limites ont pour but d'assurer
une protection raisonnable contre les interférences parasites lorsque l'appareil est utilisé dans une
installation résidentielle. Cet appareil engendre, utilise et peut émettre une énergie radioélectrique
et, s'il n'est pas installé et utilisé en stricte conformité avec ces instructions, il peut provoquer des
interférences parasites dans les liaisons radiophoniques. Ceci ne garantit pas pour autant qu'une
installation particulière n'émettra aucune interférence. Si l'appareil engendre des interférences
parasites avec la réception radio ou télévision, ce qui pourra être déterminé en éteignant puis en
rallumant l'appareil, il est conseillé à l'utilisateur d'essayer de corriger les interférences en prenant
l'une des mesures ci-dessous:
●
Modifier l'orientation ou changer l'emplacement de l'antenne de réception.
●
Eloigner davantage l'appareil du récepteur.
●
Brancher l'appareil dans une prise d'un circuit différent de celui auquel le récepteur est raccordé.
●
Demander l'aide de son agent ou d'un technicien radio/télévision qualifié.
INFORMATION SUR IC
Page 4
IMPORTANT
RISK OF ELECTRIC SHOCK
DO NOT OPEN
CAUTION
CAUTION: TO REDUCE THE RISK OF ELECTRIC SHOCK,
DO NOT REMOVE COVER (OR BACK).
NO USER-SERVICEABLE PARTS INSIDE.
REFER SERVICING TO QUALIFIED SERVICE PERSONNEL.
This lightning flash with arrowhead symbol, within an
equilateral triangle, is intended to alert the user to the
presence of uninsulated “dangerous voltage” within the
product’s enclosure that may be of sufficient magnitude
to constitute a risk of electric shock to persons.
The exclamation point within an equilateral triangle is
intended to alert the user to the presence of important
operating and maintenance (servicing) instructions in the
literature accompanying the appliance.
CAUTION:
TO PREVENT ELECTRIC SHOCK DO NOT USE THIS PLUG WITH AN
EXTENSION CORD, RECEPTACLE OR OTHER OUTLET UNLESS THE
BLADES CAN BE FULLY INSERTED TO PREVENT BLADE EXPOSURE.
ATTENTION:
POUR PREVENIR LES CHOCS ELECTRIQES NE PAS UTILISER CETTER
FICHE AVEC UN PROLONGATEUR, UNE PRISE DE COURANT OU UNE
AUTRE SORTIE DE COURANT, SAUF SI LES LAMES PEUVENT ETRE
INSEREES AFOND SANS EN LAISSER AUCUNE PARTIE ADECOUVERT.
(1) This device may not cause interference.
(2) This device must accept any interference, including interference that may
cause undesired operation of the device.
(1) Ce produit ne cause pas d’interférence.
(2) Ce produit doit accepte toute interférence, incluant interférence qui peut
causé opération non désiré.
Page 5

54
ENGLISH
Thank you for purchasing this JVC product.
Before you begin operating this unit, please read the instructions carefully to be
sure you get the best possible performance.
If you have any questions, consult your JVC dealer.
ENGLISH INSTRUCTIONS ................................................. Pages 6 – 21
FRANÇAIS
Nous vous félicitons d’avoir acquis ce produit JVC.
Avant de vous en servir, lisez attentivement le mode d’emploi pour en obtenir les
meilleures performances.
Si vous avex d’autres questions, interrogez votre revendeur JVC.
INSTRUCTIONS EN FRANÇAIS ........................................ Pages 22 – 37
ESPAÑOL
Gracias por adquirir este producto JVC.
Antes de utilizar la unidad, lea cuidadosamente estas instrucciones para obtener
el máximo rendimiento.
Si tiene cualquier duda, póngase en contacto con su distribuidor de productos JVC.
INSTRUCCIONES EN ESPAÑOL ........................................ Páginas 38 – 53
Page 6

“SOME DO’S AND DON’TS ON THE SAFE USE OF EQUIPMENT”
This equipment has been designed and manufactured to meet international safety standards
but, like any electrical apparatus, care must be taken if you are to obtain the best results and
safety is to be assured.
••••••••••••••••••••••••••••••••••••••••
Do read the operating instructions before you attempt to use the equipment.
Do ensure that all electrical connections (including the plug, extension cord and inter-
connections between pieces of equipment) are properly made and in accordance with the
manufacturer’s instructions. Switch off and withdraw the plug when making or changing
connections.
Do consult your dealer if you are ever in doubt about the installation or operation or safety of
your equipment.
Do be careful with glass panels or doors on equipment.
••••••••••••••••••••••••••••••••••••••••
DON’T continue to operate the equipment if you are in any doubt about it working normally, or
if it is damaged in any way—switch off—withdraw the plug and consult your dealer.
DON’T remove any fixed cover as this may expose dangerous voltages.
DON’T leave equipment switched on when it is unattended unless it is specifically stated that
it is designed for unattended operation or has a standby mode.
Switch off using the switch on the equipment and make sure that your family know
how to do this.
Special arrangements may need to be made for infirm or handicapped people.
DON’T use equipment such as personal stereos or radios so that you are distracted from the
requirements of road safety. It is illegal to watch television when driving.
DON’T listen to headphones at high volume as such use can permanently damage your
hearing.
DON’T obstruct the ventilation of the equipment, for example with curtains or on soft
furnishings.
Overheating will cause damage and shorten the life of the equipment.
DON’T use makeshift stands and NEVER fix legs with wood screws. To ensure complete
safety always fit the manufacturer’s approved stand or legs with the fixing screws
supplied according to the instructions.
DON’T allow electrical equipment to be exposed to rain or moisture.
ABOVE ALL
NEVER let anyone especially children push anything into holes, slots or any other
opening in the case. This could result in a fatal electrical shock.
NEVER guess or make changes with electrical equipment of any kind. It is better to
be safe than sorry!
CAUTION:
CHARGE ONLY WITH PROVIDED Ni-MH TYPE BATTERY.
OTHER TYPES OF BATTERY MAY BURST CAUSING
PERSONAL INJURY AND DAMAGE.
Page 7
76
ENGLISH
IMPORTANT
1. Installation
●
Select a place which is level, dry
and neither too hot nor too cold
(between 0˚C and 35˚C /32˚F and
95˚F).
●
Keep away from direct sunlight.
●
Do not put it too close to a heater.
2. Power cord
●
Do not handle the power cord with
wet hands!
●
Do not bend the power cord
sharply.
3. Malfunctions, etc.
●
There are no serviceable parts
inside. If anything goes wrong,
unplug the power cord and consult
your dealer.
●
Do not insert any metallic object.
●
Do not allow water to get inside.
FEATURES
●
Frequency modulation system which
allows headphones to be used even
in areas where the transmitter cannot
be seen
●
Reception range (up to 328 ft./100 m:
using JVC measurement system)
●
Equipped with circuitry for
deep bass sound and threedimensional sound field regardless of
the sound source.
●
Paging/Call Function for direct verbal
access to user
●
Rechargeable system with built-in
Ni-MH battery that requires no charge
cable (on-stand charging)
●
Large 40 mm dia. drivers for highquality sound (open type)
●
Soft Comfort-fit Headband that
adjusts easily when put-on and
switches on automatically
●
Automatic Power On/Off transmitter
●
Auto-level control circuit that automatically adjusts signals to the
appropriate modulation level
●
Single volume control adjusts the
volume level of the left and right
channels simultaneously
●
Adaptable to any audio/visual equipment
WARNING:
To reduce the risk of electrical shocks, fire, etc.:
1. Do not remove screws, cover or cabinet.
2. Do not expose this appliance to rain or moisture.
Page 8
1
4
6
5
2
3
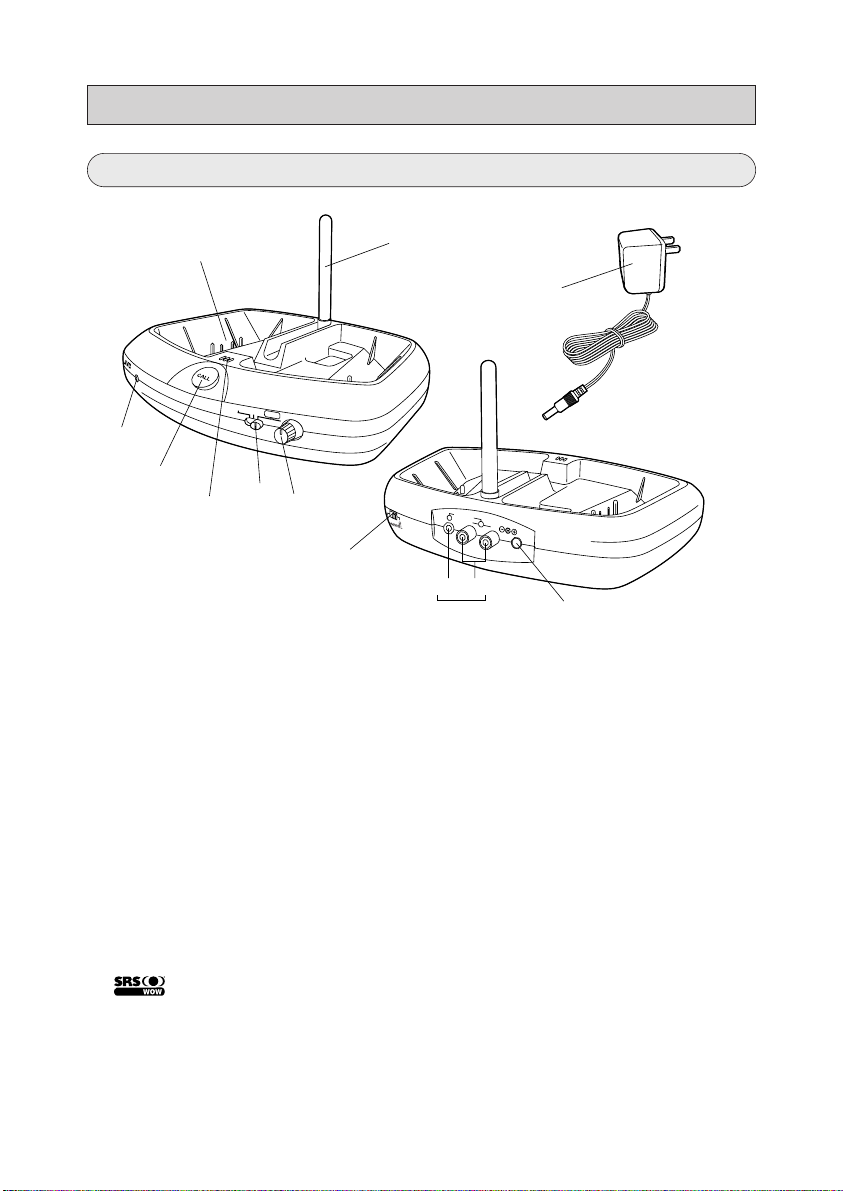
NAMES OF PARTS AND THEIR FUNCTIONS
M
I
N
PO
W
E
R / C
H
A
R
G
E
W
O
W
O
F
F
S
U
R
R
O
U
N
D
L
E
V
E
L
M
A
X
T
r
u
B
a
s
s
B
L
A
U
D
I
O
I
N
D
C
-
I
N
7
.
5
V
R
A
1
8
9
0
2
3
6
7
4
5
[B][A]
-
Transmitter
1 POWER/CHARGE (Indicator)
When an audio signal is input: The
power automatically turns on and the
indicator lights in green.
When charging: Lights in red
2 CALL (Call button)
While the CALL button is pressed,
sound from the microphone is
transmitted to the receiver. When
the CALL button is released, the
regular audio signal is transmitted.
3 Microphone
The sound input into the microphone
is transmitted to the headphones.
4 Surround Switch
Turn on the switch to activate
functions
5 SURROUND LEVEL
When the switch is set to WOW, the
surround effect will increase by
turning the knob to the right.
6 Charging output terminal
7 Antenna
For use, stand it vertically.
8 CHANNEL
Changes the transmission frequency.
9 AUDIO IN (Audio input terminals)
[A] RCA pin jack (L/R)
[B] 3.5mm dia. stereo minijack
0 DC IN (DC 7.5V jack)
- AC adaptor (J47310-001)
Connects to a household AC outlet
(AC 120V, 60Hz).
Note:
The provided AC adaptor is exclusively
for use with this unit.
Do not connect to any other equipment.
Page 9

98
ENGLISH
NAMES OF PARTS AND THEIR FUNCTIONS
Receiver (Cordless Headphones)
1 Soft Comfort-Fit Headband and
Power Switch
When you widen the headband to
put it on your head, this switches on
the power. When you take the
headband off, it contracts back to its
original length and this switches off
the power.
2 Power Indicator
The indicator lights in red when the
power is turned on.
3 VOL. (Volume control)
Adjusts the volume level of the left
and right channels simultaneously.
4 Charging input terminal
5 Ear Pad
6 Bar Cushion
1
4
6
5
2
3
• For replacement ear pads and bar cushions, please consult with
the dealer where you purchased the headphones.
Page 10

Provided
exclusive
AC adaptor
(J47310-001)
To AC outlet
(AC 120 V, 60 Hz)
Note:
Be sure to use the provided exclusive AC adaptor (J47310-001) for connection.
Use of any other AC adaptor may cause a malfunction.
To DC 7.5 V jack
Plug polarities
B
L
A
U
D
I
O
I
N
D
C
-
I
N
7
.
5
V
R
A
The usable area between the transmitter and
the headphones is within a radius of max 328 ft.
(100 m) (based on measurements taken when
placed in direct view in a straight line and no
interference situation).
Max: 328 ft. (100 m)
(Under controlled ambient conditions)
M
I
N
P
O
W
E
R
/
C
H
A
R
G
E
W
O
W
O
F
F
S
U
R
R
O
U
N
D
L
E
V
E
L
M
A
X
T
r
u
B
a
s
s
V
O
L
When connecting to a standard stereo phone jack
(0.24"/6.3 mm dia.)
— Use the provided plug adaptor
(Converts a stereo miniplug to a standard stereo
phone plug)
When connecting to a monaural minijack
— Use an optional plug adaptor
(Converts a stereo miniplug to a monaural miniplug)
To HEADPHONES jack
TV, audio amplifier,
VCR, tape deck,
video disc player,
etc.
When
connecting to a
stereo minijack
L-channel
(white plug)
To the audio
input terminal [A]
Provided
connection cord
R-channel (red plug)
B
L
A
U
D
I
O
I
N
D
C
I
N
7
.
5
V
R
A
CONNECTION
L-channel
(white plug)
R-channel
(red plug)
To LINE OUT or REC
OUT terminals
TV, audio amplifier,
VCR, tape deck,
video disc player,
etc.
Provided
connection cord
To the audio input
terminal [B]
B
L
A
U
D
I
O
I
N
D
C
I
N
7
.
5
V
R
A
■ How to connect to AV equipment
Connection to HEADPHONES jack
Connection to LINE OUT or REC OUT terminals
Page 11

1110
ENGLISH
Provided
exclusive
AC adaptor
(J47310-001)
To AC outlet
(AC 120 V, 60 Hz)
Note:
Be sure to use the provided exclusive AC adaptor (J47310-001) for connection.
Use of any other AC adaptor may cause a malfunction.
To DC 7.5 V jack
Plug polarities
B
L
A
U
D
I
O
I
N
D
C
I
N
7
.
5
V
R
A
CONNECTION
RANGE OF USE
Connection to power supply
Note:
This product uses high frequency range of 900MHz. For this reason, the usable
area may differ depending on the surroundings. The range narrows or cause
interference with reception in the following cases:
●
In places such as inside an apartment with reinforced concrete walls, or when the
transmitter and headphones are separated by obstacles such as steel-reinforced doors.
●
When items such as metal furniture are situated nearby.
●
The usage location faces a street.
●
There is noise or interference in the vicinity. (e.g. truck wireless systems and wireless
communications systems installed along roads)
●
There is equipment that gives off electromagnetic waves in the vicinity.
●
There is a cordless phone or other wireless communications device in the vicinity.
The usable area between the transmitter and
the headphones is within a radius of max 328 ft.
(100 m) (based on measurements taken when
placed in direct view in a straight line and no
interference situation).
Max: 328 ft. (100 m)
(Under controlled ambient conditions)
M
I
N
P
O
W
E
R
/
C
H
A
R
G
E
W
O
W
O
F
F
S
U
R
R
O
U
N
D
L
E
V
E
L
M
A
X
T
r
u
B
a
s
s
V
O
L
Page 12

3
2
4
L
Remove three
screws using a +
screw driver
Remove the
housing cover
by sliding it
down
Battery appears
Warning: Do not touch anything other than
the battery and connector. Doing so may
be hazardous causing electrical shock.
Remove the
battery by
pulling the
connector
behind the
battery
1
POWER REQUIREMENTS OF HEADPHONES
Charging rechargeable Ni-MH battery
The Ni-MH battery is
installed in the
headphones.
2
Charging input
terminal
Charging output
terminal
3
V
O
A
U
D
I
O
I
N
B
L
D
C
A
I
N
7
.
5
R
V
L
To AC outlet
4
To DC IN 7.5V jack
1
Connect the AC adaptor to the transmitter and plug the AC adaptor into an AC
outlet.
2
Set the ON/OFF (power) switch on the headphones to OFF. The battery cannot be
charged when the switch is set to ON.
3
Set the headphones on the transmitter so that the Charging Input Terminal connects
to the Charging Output Terminal. Use both hands to set firmly.
4
The charger starts charging the battery automatically and the transmitter's indicator
lights in red. The indicator may not light in red if the headphones are not set properly.
In this case, adjust the position of the headphones until the indicator lights in red. If
the indicator blinks or goes out even if you firmly set the headphones in place using
both hands, it may be that the battery is already charged to full capacity.
The battery can be fully charged in approx. 24 hours.
During recharge the indicator lights in red, which will start to blink rapidly near
completion. Blinking will gradually slow down or turn off at completion.
Note that depending on the condition of r echargeable battery or others, the
Charging time
indicator may not blink even after r echarging for 24 hours.
Battery running time
After charging is complete, you can use them continuously for approx. 35 hours.
Tips for better use
●
Be sure to charge the batteries within the temperature range of 50 F ~ 95 F
(10 C ~ 35 C).
●
Charging batteries that are not completely exhausted will cause efficiency to decline.
Be sure to charge them after they have been completely exhausted.
1
Page 13

1312
ENGLISH
CAUTIONS ABOUT THE
RECHARGEABLE BATTERY
ATTENTION:
The product that you have purchased contains a rechargeable battery. The
battery is recyclable. At the end of its useful life, under various state and local
laws, it may be illegal to dispose of this battery into the municipal waste
stream. Check with your local solid waste officials for details in your area for
recycling options or proper disposal.
If the usable time of fully charged battery decreases by about half, or noise
begins to persist, replace the battery with a new one. When purchasing
rechargeable Ni-MH battery, consult the dealer where you bought the product.
How to Remove the Battery:
Note: Take extra caution in changing the battery. If you are unsure or feel
insecure replacing the battery, consult our local dealer or JVC service counter
for replacement. If you attempt to disassemble this unit for other purposes, it
may damage the unit.
Exclusive Rechargeable Ni-MH Battery: J47374 (2.4 V, 1800 mAh)
3
2
4
L
Remove three
screws using a +
screw driver
Remove the
housing cover
by sliding it
down
Battery appears
Warning: Do not touch anything other than
the battery and connector. Doing so may
be hazardous causing electrical shock.
Remove the
battery by
pulling the
connector
behind the
battery
1
Page 14

M
IN
P
O
W
E
R
/
C
H
A
R
G
E
W
O
W
O
F
F
S
U
R
R
O
U
N
D
L
E
V
E
L
M
A
X
T
r
u
B
a
s
s
V
O
L
If the batteries are used incorrectly, they may leak, heat or explode, and may cause
fire, injury or soiling. Make note of the following:
1. Be sure to use the provided exclusive battery. Do not use any other
rechargeable or dry cell battery.
2. Do not throw the battery in a fire or heat it.
3. Do not deform, take apart, modify or directly solder the battery.
4. Do not remove or damage the covering tube.
5. If any liquid from the battery gets into your eyes, it may cause blindness.
If battery liquid does get into your eyes, do not rub them, but instead
immediately wash them thoroughly with clean water, then consult a doctor at
once. Also, should any liquid from the rechargeable battery get onto your skin or
clothes, it may burn your skin. In this case, wash with clean water immediately.
6. Do not immerse or wet the battery in water.
7. Do not use or leave the battery in an area where the temperature becomes
significantly higher, such as in direct sunlight, inside a car on hot day or near
heat-generating equipment.
8. Do not subject the battery to strong shocks or throw it.
CAUTIONS ABOUT CHARGING
1. Be sure to use only this unit for charging.
2. You can charge the rechargeable battery approximately 500 times.
3. Charging times differ depending on the temperature range or the remaining
charge in the battery.
4. Excessive charging doesn’t result in malfunction.
5. Battery life will decrease in cold places.
6. Due to characteristics of the batteries, they expend their charge a little even
when the power is turned off.
7. Be sure to use the provided AC adaptor (model J47310-001)
OTHER CAUTIONS
1. Caution! To avoid risk of fire or injury, do not attempt to charge non-rechargeable
batteries.
2. Replace only with the same type recommended by the manufacturer.
3. Please dispose of old, defective batteries in an environmentally friendly manner
in accordance with the relevant legislation.
4. No naked flame sources, such as lighted candles, should be placed on the
apparatus.
5. The unit shall not be exposed to dripping or splashing and that no objects filled
with liquids, such as vases, shall be placed on or by the unit.
6. For indoors use only. Do not expose to rain.
7. Don’t open, no user serviceable parts inside.
Page 15

HOW TO USE
M
I
N
P
O
W
E
R
/
C
H
A
R
G
E
W
O
W
O
F
F
S
U
R
R
O
U
N
D
L
E
V
E
L
M
A
X
T
r
u
B
a
s
s
V
O
L
1. Connect the transmitter and AV equipment. (Refer to page 10)
2. Connect the AC adaptor to the transmitter, then plug the AC adaptor into an
AC outlet. (Refer to page 11)
3. Turn on the power on the transmitter and the connected AV equipment.
Transmitter power
When an audio signal is input, the transmitter’s power is turned on automatically, and the
indicator lights in green. Also, when no audio signal is input for about a minute, the indicator goes out automatically and the power turns off. (Automatic Power On/Off function)
The Automatic Power On/Off function is activated from audio on the left channel. The function may not activate properly in situations when the audio signal is detected only from the
right channel.
In some situations, the power may not be turned on automatically by the input sound
(e.g. a song with a quiet opening or gradual fade-in). This is not a malfunction.
4. To avoid excessive volume, first set the headphones’ volume to a low level
and fit them to the head to automatically turn on the power. Turn the receiv-
er power on after confirming transmitter’s power on.
5. When the power goes on, tuning begins automatically. Tuning may take
few seconds and sound is not heard during this procedure. This is not
a malfunction.
ENGLISH
If Auto Tuning does not activate on the first attempt, remove the headphone, turn the power off,
and place it back on your head to reattempt the auto-tuning reception process.
V
O
L
Before using the headphones for the first time, charge the rechargeable battery.
15
Page 16

HOW TO USE
Within approx. 23 ft (7 m)
MAX. MIN.
VOL.
M
I
N
P
O
W
E
R
/
C
H
A
R
G
E
W
O
W
O
F
F
S
U
R
R
O
U
N
D
L
E
V
E
L
M
A
X
T
r
u
B
a
s
s
21
CHANNEL
21
CHANNEL
6. Adjust the volume control of the connected AV equipment and the headphones, and set them to the desired listening level.
At the same time, adjust the ear pad angle to make it fit comfortably.
In case of interference or too much noise
(e.g. when used near a cordless phone or any
other transmission device), set the transmitter’s
CHANNEL to a different position. To re-tune
the headphone, remove once and wear again.
To set optimum signal
reception, adjustments
should be done within
a range of approx.
23ft. (7 m) between the
transmitter and the
headphones.
Tips for better use
For improved sound quality, set the volume level of the connected equipment as high as
possible without causing distortion, while setting volume level of the headphones to a
slightly lower level. In surround mode, have the mode turned on while making the adjustments as surround mode tend to distort more than normal mode.
After use
The power turns off by removing the headphone from head. When sound signal is not
received for two minutes, the transmitter is set to turn off automatically. Recharge the
headphone after use.
The headphone is designed to automatically turn off when removed from your head, however auto
power-off may not activate in certain situations. In such cases, confirm that the power indicator light is
off by manually shortening the headband to its minimal length.
Notes:
1. When using the headphones, don’t raise the volume excessively. Continuous listening
for a long time at high volumes may damage your hearing.
2. For safety reasons, do not use the headphones while riding a bicycle or driving a
motorcycle, car, etc.
3. If the headphone is not used for a prolonged time, unplug the AC adaptor from an AC
outlet.
16
Page 17

1716
ENGLISH
HOW TO USE THE FUNCTION
MIN
P
O
W
E
R
/
C
H
A
R
G
E
W
O
W
O
F
F
SUR
ROU
ND
LEVEL
M
AX
T
r
u
B
a
s
s
OFF
OFF : Normal mode
TruBass : Setting that emphasizes the deep bass
WOW : Setting for sound field with
3-dimensional feel
SURROUND LEVEL:
This is only valid for SRS WOW mode.
It adjusts the level of broadness
of the sound.
MIN MAX
SURROUND
LEVEL
TruBass
WOW
This function has a SRS WOW circuit that lets you enjoy deep bass and a
three-dimensional sound field regardless of the sound source.
In order to reproduce a powerful surround sound, this unit’s surround circuit emphasizes
the bass and middle frequencies. Therefore, for some sound sources (the music or video
software), the sound is distorted when the surround mode is switched on. If this happens,
adjust the volume control of the connected AV equipment and the headphones to a
distortion-free level.
The HA-W1000RF uses surround technology developed by SRS Labs, Inc.
of the United States.
●
TruBass mode: Technology that electrically applies the deep bass reproduction
technique of pipe organs to reproduce bass without an equalizer
●
WOW mode: Asingle circuit that combines three of the following technologies:
SRS for a natural 3-dimensional field for stereo signals, Focus technology to
move the sound image vertically and clarifies the contours of voices and musical
instruments, and TruBass technology explained above.
is a trademark of SRS Labs,
Inc.
WOW technology is incorporated
under license from SRS Labs, Inc.
Note: Surround sound cannot be
reproduced when the source signal is
monaural.
FOCUS
Hypothetical speaker
L
Hypothetical speaker
R
FOCUS
SRS
SRS
TruBass
SRS WOW image diagram
Page 18

Symptoms Cause Remedy
Check the connection of the
transmitter.
Turn the power on the connected AV
equipment ON and start playing.
Connect them with an optional plug
adaptor. (Converts monaural audio
output to stereo audio output.)
Wear the headphones again to
switch the power back on, then tune
again.
Use them within the range the
frequency modulation signal can
reach. (Refer to page 11)
Replace it with a new battery. Refer
to page 13 or consult your dealer for
replacement.
Is the transmitter’s power OFF?
Is the headphones’ power OFF?
Is the battery in the headphones
exhausted?
Is the volume of the headphones set
to the minimum level?
Is the volume of the connected AV
equipment set to the minimum level?
Is the transmitter connected to
equipment with monaural audio
output?
Is the battery in the headphones
exhausted?
Is the volume of the connected AV
equipment set too high?
Is the battery in the headphones
exhausted?
Are the frequency modulation signals
being received correctly?
Is the volume of the connected AV
equipment set too low?
Are the headphones too far away
from the transmitter?
Has the rechargeable battery
expired?
No sound.
Widen the headphones to wear it and
the power will turn on automatically
(the indicator lights).
Fully charge the headphones.
Adjust the volume of the head-
phones to the appropriate level.
Raise the volume level of the
connected AV equipment as high as
possible without causing distortion.
Adjust the volume level of the
connected AV equipment as high as
possible without causing distortion.
Adjust the volume level of the
connected AV equipment as high as
possible without causing distortion.
Is there a possibility of interference? Switch the transmitter channel, wear
the headphones again to switch the
power back on, then tune again.
Fully charge the headphones.
Fully charge the headphones.
No sound from
the R-channel.
Distorted sound.
Noisy sound.
Battery charging
is impossible.
HOW TO USE THE PAGING/CALL FUNCTION
1 2
3 4
The transmitter has a built-in microphone for transmitting your voice, etc. to the
headphones.
1. To send a message to the person wearing
2. The microphone is next to the CALL button. Speak into it from at least 4 inches
3. Pressing the CALL button while wearing the headphones may cause feedback
the headphones, press the CALL button on
the transmitter and speak into it. Your voice
is transmitted to the headphones as long as
the CALL button is pressed (the line input
sound is interrupted while the CALL button
is pressed).
(10cm) away. Speaking too close to the microphone or speaking too loudly may
cause the sound transmitted to the headphones to the distorted.
(a howling sound) to occur. Turn the volume down on the headphone before
pressing the CALL button.
Microphone
CALL
P
O
W
E
R
/
C
H
A
R
G
E
O
F
F
T
r
u
B
a
s
s
W
O
W
S
U
R
R
O
U
N
D
L
E
V
E
L
M
I
N
M
A
X
Page 19

1918
ENGLISH
TROUBLESHOOTING
What appears to be a malfunction may not always be serious. First make
sure...
Symptoms Cause Remedy
Check the connection of the
transmitter.
Turn the power on the connected AV
equipment ON and start playing.
Connect them with an optional plug
adaptor. (Converts monaural audio
output to stereo audio output.)
Wear the headphones again to
switch the power back on, then tune
again.
Use them within the range the
frequency modulation signal can
reach. (Refer to page 11)
Replace it with a new battery. Refer
to page 13 or consult your dealer for
replacement.
Is the transmitter’s power OFF?
Is the headphones’ power OFF?
Is the battery in the headphones
exhausted?
Is the volume of the headphones set
to the minimum level?
Is the volume of the connected AV
equipment set to the minimum level?
Is the transmitter connected to
equipment with monaural audio
output?
Is the battery in the headphones
exhausted?
Is the volume of the connected AV
equipment set too high?
Is the battery in the headphones
exhausted?
Are the frequency modulation signals
being received correctly?
Is the volume of the connected AV
equipment set too low?
Are the headphones too far away
from the transmitter?
Has the rechargeable battery
expired?
No sound.
Widen the headphones to wear it and
the power will turn on automatically
(the indicator lights).
Fully charge the headphones.
Adjust the volume of the headphones to the appropriate level.
Raise the volume level of the
connected AV equipment as high as
possible without causing distortion.
Adjust the volume level of the
connected AV equipment as high as
possible without causing distortion.
Adjust the volume level of the
connected AV equipment as high as
possible without causing distortion.
Is there a possibility of interference? Switch the transmitter channel, wear
the headphones again to switch the
power back on, then tune again.
Fully charge the headphones.
Fully charge the headphones.
No sound from
the R-channel.
Distorted sound.
Noisy sound.
Battery charging
is impossible.
Page 20

SPECIFICATIONS
General Specifications
Modulation system : Stereo frequency modulation system
Carrier frequency : 906 – 908 MHz
Usable area
(distance to reach) : Max. 328 ft./100 m
(using JVC measurement systems, under controlled
ambient conditions)
Frequency response : 30 – 16,000 Hz
Distortion : Less than 4% (at 1 kHz)
Transmitter (J22176-001)
Power requirements : DC 7.5 V (with the exclusive AC adaptor)
Audio input termina sl : 0.13”/3.5 mm dia. stereo minijack, RCA pin jack x 2
Input impedance : 27kΩ
Reference input level : 300 mV
Dimensions : 7.75” (W) x 5.39” (H) 4.76” (D)/197 x 137 x 121 mm
(including antenna)
Mass : 11.2 oz/320 g (without connection cord and AC adaptor)
Headphones (HA-W1000RF)
Power requirements : Rechargeable Ni-MH battery (2.4 V)
Battery running time : 35 hours (when charged for 24 hours)
Mass : 9.52 oz/270 g (with installed rechargeable battery)
Provided Accessories
Instructions x 1
AC adaptor x 1
Connection cord x 1 (0.13”/3.5 mm dia. stereo miniplug —
RCA pin plug x 2: 5.9 ft./1.8 m)
Plug adaptor x 1 (converts 0.13”/3.5 mm dia. stereo miniplug to a 0.24”/6.3 mm
dia. standard stereo phone plug)
* Design and specifications subject to change without notice.
Page 21

2120
ENGLISH
Page 22

HA-W1000RF
-
J/C CORDLESS STEREO HEADPHONES
© 2003 VICTOR COMPANY OF JAPAN, LIMITED
Printed in China
LNT0017-001A
Page 23

CORDLESS FM STEREO HEADPHONES
KABELFREIER FM STEREO-KOPFHÖRER
DRAADLOZE FM STEREO HOOFDTELEFOON
CASQUE STEREO FM SANS FIL
CUFFIA STEREO FM CORDLESS
TRÅDLÖSA FM-STEREOHÖRLURAR MED
UPPLADDNINGSBART BATTERI
LADATTAVAT LANGATTOMAT FM STEREOKUULOKKEET
HA-W1000RF-G
INSTRUCTIONS
BEDIENUNGSANLEITUNG
GEBRUIKSAANWIJZING
MANUEL D’INSTRUCTIONS
ISTRUZIONI
BRUKSANVISNING
KÄYTTÖOHJEET
LNT0018-001A
Page 24

863MHz — 865 MHZ
THIS DEVICE IS INTENDED FOR USE IN THESE COUNTRIES:
DIESES GERÄT IST FÜR DEN GEBRAUCH IN DEN FOLGENDEN LÄNDERN VORGESEHEN:
DIT APPARAAT IS BEDOELD VOOR GEBRUIK IN DEZE LANDEN:
DISPOSITIF PREVU POUR ETRE UTILISE DANS LES PAYS SUIVANTS:
QUESTO DISPOSITIVO È DESTINATO PER L’USO IN QUESTI PAESI:
DENNA APPARAT ÄR AVSEDD FÖR BRUK I DESSA LÄNDER:
TÄMÄ LAITE ON TARKOITETTU KÄYTETTÄVÄKSI NÄISSÄ MAISSA:
CORDLESS FM STEREO HEADPHONES
English Hereby, JVC, declares that this HA-W1000RF is in compliance with the
essential requirements and other relevant provisions of Directive 1999/5/EC.
Finnish JVC vakuuttaa täten että HA-W1000RF tyyppinen laite on direktiivin 1999/5/EY
oleellisten vaatimusten ja sitä koskevien direktiivin muiden ehtojen mukainen.
Dutch Hierbij verklaart JVC dat het toestel HA-W1000RF in overeenstemming is met
de essentiële eisen en de andere relevante bepalingen van richtlijn 1999/5/EG
Bij deze verklaart JVC dat deze HA-W1000RF voldoet aan de essentiële
eisen en aan de overige relevante bepalingen van Richtlijn 1999/5/EC.
French Par la présente JVC déclare que l’appareil HA-W1000RF est conforme aux
exigences essentielles et aux autres dispositions pertinentes de la directive
1999/5/CE
Par la présente, JVC déclare que ce HA-W1000RF est conforme aux
exigences essentielles et aux autres dispositions de la directive 1999/5/CE qui
lui sont applicables.
Swedish Härmed intygar JVC att denna HA-W1000RF står i överensstämmelse med de
väsentliga egenskapskrav och övriga relevanta bestämmelser som framgår av
direktiv 1999/5/EG.
Danish Undertegnede JVC erklærer herved, at følgende udstyr HA-W1000RF
overholder de væsentlige krav og øvrige relevante krav i direktiv 1999/5/EF
German Hiermit erklärt JVC, dass sich dieser/diese/dieses HA-W1000RF in
Übereinstimmung mit den grundlegenden Anforderungen und den anderen
relevanten Vorschriften der Richtlinie 1999/5/EG befindet”. (BMWi)
Hiermit erklärt JVC die Übereinstimmung des Gerätes HA-W1000RF mit den
grundlegenden Anforderungen und den anderen relevanten Festlegungen der
Richtlinie 1999/5/EG. (Wien)
Greek ΜΕ ΤΗΝ ΠΑΡΟΤΣΑ JVC ∆ΗΛΩΝΕΙ ΟΤΙ HA-W1000RF ΣΤΜΜΟΡΦΩΝΕΤΑΙ
ΠΡΟΣ ΤΙΣ ΟΤΣΙΩ∆ΕΙΣ Α ΠΑΙΤΗΣΕΙΣ ΚΑΙ ΤΙΣ ΛΟΙΠΕΣ ΣΧΕΤΙΚΕΣ ∆ΙΑΤΑΞΕΙ
Σ ΤΗΣ Ο∆ΗΓ ΙΑΣ 1999/5/EK
Italian Con la presente JVC dichiara che questo HA-W1000RF e conforme ai
requisiti essenziali ed alle altre disposizioni pertinenti stabilite dalla direttiva
1999/5/CE.
Spanish Por medio de la presente JVC declara que el HA-W1000RF cumple con los
Portuguese JVC declara que este HA-W1000RF está conforme com os requisitos
requisitos esenciales y cualesquiera otras disposiciones aplicables o exigibles
de la Directive 1999/5/CE
essenciais e outras disposiçôes da Directiva 1999/5/CE.
Page 25

SPECIFICATIONS
General Specifications
Modulation system : Stereo frequency modulation system
Carrier frequency : 863 – 865 MHz
Usable area
(distance to reach) : Max. 100 m
(using JVC measurement systems, under controlled
ambient conditions)
Frequency response : 30 – 16,000 Hz
Distortion : Less than 4% (at 1 kHz)
Transmitter (J22176-002)
Power requirements : DC 7.5 V (with the exclusive AC adaptor)
Audio input termina sl : 3.5 mm dia. stereo minijack, RCA pin jack x 2
Input impedance : 27kΩ
Reference input level : 300 mV
Dimensions : 197 (W) x 137 (D) x 121 (H) mm
(including antenna)
Mass : 320 g (without connection cord and AC adaptor)
Headphones (HA-W1000RF)
Power requirements : Rechargeable Ni-MH battery (2.4 V)
Battery running time : 35 hours (when charged for 24 hours)
Mass : 270 g (with installed rechargeable battery)
Provided Accessories
Instructions x 1
AC adaptor x 1
Connection cord x 1 (3.5 mm dia. stereo miniplug — RCApin plug x 2: 1.8 m)
Plug adaptor x 1 (converts 3.5 mm dia. stereo miniplug to a 6.3 mm dia.
standard stereo phone plug)
* Design and specifications subject to change without notice.
Page 26

ENGLISH
This product's performance would be degraded under a strong electro-static environment. And the function would be self-recoverable after the above case.
This product's performance would be degraded since the disturbance from the
mains cord. And the function would be self-recoverable after the above case.
DEUTSCH
Die Leistung dieses Produkts würde sich in einer stark elektrostatisch geladenen
Umgebung verschlechtern.
Und die Funktion würde sich nach dem obigen Fall selbst wiederherstellen.
Die Leistung dieses Produkts würde sich aufgrund einer Störung durch das
Netzkabel verschlechtern.
Und die Funktion würde sich nach dem obigen Fall selbst wiederherstellen.
NEDERLANDS
De prestatie van dit product neemt af in een omgeving met een sterk elektrostatisch veld.
De normale werking wordt echter automatisch hersteld wanneer de storingsbron
wordt weggenomen.
De prestatie van dit product neemt af als het netsnoer storingen oppikt.
De normale werking wordt echter automatisch hersteld wanneer de storingsbron
wordt weggenomen.
FRANÇAIS
Les performances de ce produit se détérioreront dans un environnement fortement
électro-statique.
Par ailleurs, le fonctionnement se restaurera de lui-même dans le cas ci-dessus.
Les performances de ce produit se détérioreront en cas de perturbations du cordon
d'alimentation.
Par ailleurs, le fonctionnement se restaurera de lui-même dans le cas ci-dessus.
ITALIANO
La prestazione di questo prodotto potrebbe deteriorarsi in presenza di un forte
ambiente elettrostatico.
La funzione dovrebbe ripristinarsi automaticamente dopo il caso descritto sopra.
La prestazione di questo prodotto potrebbe deteriorarsi a causa di disturbi provenienti dal cavo di alimentazione.
La funzione dovrebbe ripristinarsi automaticamente dopo il caso descritto sopra.
SVENSKA
Denna produkts prestanda kan försämras i en starkt elektrostatisk miljö.
Funktionen kan dock återställas automatiskt i ovanstående fall.
Denna produkts prestanda kan försämras på grund av störningar från nätkabeln.
Funktionen kan dock återställas automatiskt i ovanstående fall.
SUOMI
Tämän tuotteen suorituskyky heikkenee huomattavasti ympäristössä, jossa on
voimakasta sähköistä staattisuutta.
Toiminto palautuu ennalleen itsestään yllä olevan tilanteen korjauduttua.
Tämän tuotteen suorituskyky heikkenee verkkojohdossa olevien häiriöiden johdosta.
Toiminto palautuu ennalleen itsestään yllä olevan tilanteen korjauduttua.
ENGLISHDEUTSCH
NEDERLANDS
FRANÇAISSVENSKA ITALIANOSUOMI
115
 Loading...