

Page 1
LYT2019-001A-M
INSTRUCTIONS
MANUAL DE INSTRUCCIONES
MEMORY CAMERA
VIDEOCÁMARA CON MEMORIA
GZ-MS130U
Please read the instruction manual prior to
connecting or operating this product.
Por favor, lea el manual de instrucciones
antes de conectar u operar este producto.
For more details on the
operations, refer to the
GUIDEBOOK in the supplied
CD-ROM.
Para obtener más
información sobre las
operaciones, consulte la
GUÍA incluida en el CD-ROM
suministrado.
Dear Customer
Thank you for purchasing
this memory camera. Before
use, please read the safety
information and precautions
contained in pages 2 and 3 to
ensure safe use of this product.
For Future Reference:
Enter the Model No. (located
on the bottom of the memory
camera) and Serial No. (located
on the battery pack mount of the
camcorder) below.
Model No.
Serial No.
Apreciado cliente
Muchas gracias por haber
adquirido esta videocamara con
memoria. Antes de usarla, lea la
informacion de seguridad y las
precauciones contenidas en las
paginas 2 y 3 para garantizar un
uso seguro de este producto.
Para futuras consultas:
Escriba a continuación el número de
modelo (ubicado en la parte inferior
de la videocámara) y el número de
serie (ubicado en el compartimiento
de la batería de la videocámara).
Número de modelo
Número de serie
SPEN
ENGLISH
ESPANOL
Page 2
Safety Precautions
CAUTION
RISK OF ELECTRIC SHOCK
DO NOT OPEN
CAUTION: TO REDUCE THE RISK OF ELECTRIC SHOCK,
DO NOT REMOVE COVER (OR BACK).
NO USER-SERVICEABLE PARTS INSIDE.
REFER SERVICING TO QUALIFIED SERVICE PERSONNEL.
The lightning flash with arrowhead symbol, within an
equilateral triangle, is intended to alert the user to the
presence of uninsulated "dangerous voltage" within the
product's enclosure that may be of sufficient magnitude
to constitute a risk of electric shock to persons.
The exclamation point within an equilateral triangle is
intended to alert the user to the presence of important
operating and maintenance (servicing) instructions in
the literature accompanying the appliance.
WARNING: TO PREVENT FIRE OR
SHOCK HAZARD, DO NOT EXPOSE THIS
UNIT TO RAIN OR MOISTURE.
NOTES:
The rating plate and safety caution are on the
•
bottom and/or the back of the main unit.
The serial number plate is on the battery pack
•
mount.
The rating information and safety caution of the
•
AC adapter are on its upper and lower sides.
For USA-California Only
This product contains a CR Coin Cell Lithium
Battery which contains Perchlorate Material
– special handling may apply.
See www.dtsc.ca.gov/hazardouswaste/perchlorate
Caution on Replaceable lithium battery
The battery used in this device may present a fire
or chemical burn hazard if mistreated.
Do not recharge, disassemble, heat above 100°C
or incinerate.
Replace battery with Panasonic (Matsushita
Electric), Sanyo, Sony or Maxell CR2025.
Danger of explosion or Risk of fire if the battery is
incorrectly replaced.
Dispose of used battery promptly.
•
Keep away from children.
•
Do not disassemble and do not dispose of in fire.
•
When the equipment is installed in a cabinet or on
a shelf, make sure that it has sufficient space on
all sides to allow for ventilation (10 cm (3-15/16
or more on both sides, on top and at the rear).
Do not block the ventilation holes.
(If the ventilation holes are blocked by a
newspaper, or cloth etc. the heat may not be able
to get out.)
No naked flame sources, such as lighted candles,
should be placed on the apparatus.
When discarding batteries, environmental
problems must be considered and the local rules
or laws governing the disposal of these batteries
must be followed strictly.
The apparatus shall not be exposed to dripping
or splashing.
Do not use this equipment in a bathroom or
places with water.
Also do not place any containers filled with water
or liquids (such as cosmetics or medicines, flower
vases, potted plants, cups etc.) on top of this unit.
(If water or liquid is allowed to enter this
equipment, fire or electric shock may be caused.)
Do not point the lens directly into the sun. This
can cause eye injuries, as well as lead to the
malfunctioning of internal circuitry. There is also a
risk of fire or electric shock.
CAUTION!
The following notes concern possible physical
damage to the camcorder and to the user.
Carrying or holding the camcorder by the LCD
monitor can result in dropping the unit, or in a
malfunction.
Do not use a tripod on unsteady or unlevel surfaces.
It could tip over, causing serious damage to the
camcorder.
CAUTION!
Connecting cables (Audio/Video, S-Video, etc.)
the camcorder and leaving it on top of the TV is
not recommended, as tripping on the cables will
cause the camcorder to fall, resulting in damage.
CAUTION:
The mains plug shall remain readily operable.
WARNING:
Batteries, including lithium batteries installed in
the camcorder and the remote control, should
not be exposed to excessive heat such as direct
sunshine, fire or the like.
")
to
EN2
Page 3
IMPORTANT SAFETY INSTRUCTIONS
1. Read these instructions.
2. Keep these instructions.
3. Heed all warnings.
4. Follow all instructions.
5. Do not use this apparatus near water.
6. Clean only with dry cloth.
7. Do not block any ventilation openings. Install
in accordance with the manufacturer’s
instructions.
8. Do not install near any heat sources such
as radiators, heat registers, stoves, or other
apparatus (including amplifiers) that produce
heat.
9. Only use attachments/accessories specified by
the manufacturer.
10. Use only with the cart,
stand, tripod, bracket,
or table specified by
the manufacturer,
or sold with the
apparatus. When a cart
is used, use caution
when moving the
cart/apparatus combination to avoid injury from
tip-over.
11. Unplug this apparatus during lightning storms
or when unused for long periods of time.
12. Refer all servicing to qualified service
personnel. Servicing is required when the
apparatus has been damaged in any way, such
as power-supply cord or plug is damaged,
liquid has been spilled or objects have fallen
into the apparatus, the apparatus has been
exposed to rain or moisture, does not operate
normally, or has been dropped.
Remember that this camcorder is intended for
private consumer use only.
Any commercial use without proper permission
is prohibited. (Even if you record an event such
as a show, performance or exhibition for personal
enjoyment, it is strongly recommended that you
obtain permission beforehand.)
Trademarks
Manufactured under license from Dolby
•
Laboratories. Dolby and double-D symbol are
trademarks of Dolby Laboratories.
Windows® is either a registered trademark or
•
trademark of Microsoft Corporation in the United
States and/or other countries.
Macintosh is a registered trademark of Apple
•
Inc.
YouTube and the YouTube logo are trademarks
•
and/or registered trademarks of YouTube LLC.
iTunes is a trademark of Apple Inc., registered
•
in the U. S. and other countries.
Other product and company names included
•
in this instruction manual are trademarks
and/or registered trademarks of their respective
holders.
If this symbol is shown, it is only
valid in the European Union.
EN3
Page 4
Easy Start Guide
Charge the battery before recording
Turn off the camcorder and attach the battery pack.
Access lamp
Blinks: Accessing files
Do not remove the
AC adapter, the
battery pack or the
SD card when
the lamp is blinking
Battery Pack
The battery pack
is not charged
at the time of
purchase.
CAUTION
Be sure to use JVC battery packs. If you use any other battery packs besides
JVC battery packs, safety and performance can not be guaranteed.
.
Power/charge lamp
Blinks: Charging
goes out: Charging finished
Open the cover
AC Adapter
To AC Outlet
(110V to 240V)
Grip Adjustment
Adjust the strap and fasten.
• Do not pull the strap when you open the
fasten. Please use the tab to open it.
• Fasten the strap when you grip the
camcorder.
• When carrying the camcorder, please be
careful not to drop it.
Grip strap
C
D
Ta b
Fasten
EN4
Page 5
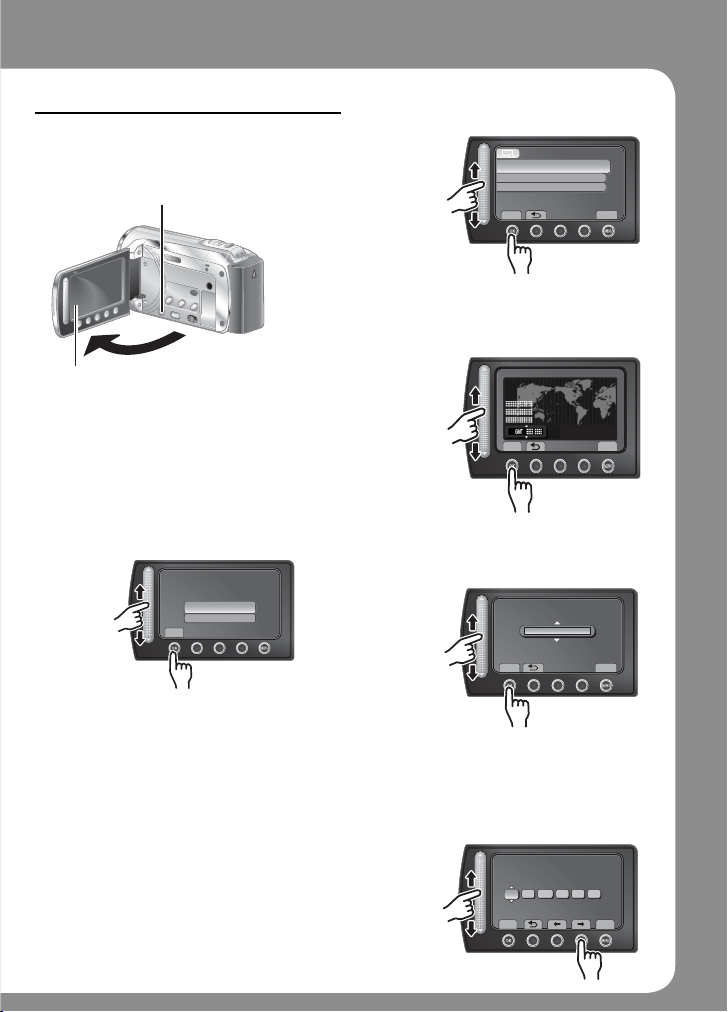
Date/Time Setting
Open the LCD monitor to
turn on the camcorder
Q
Power Button
Select [CLOCK SETTING]
S
CLOCK ADJUST
CLOCK SETTING
AREA SETTING
SET FOR DAYLIGHT SAVING TIME
SET THE CITY, DATE AND TIME
SET
Select the city closest to
the area where you use
T
the camcorder
QUIT
LCD monitor
Select [YES] within
10 seconds
R
Slide your finger up and down on
the sensor. Then touch OK.
SET DATE/TIME!
YES
NO
SET
When the message disappears, press the
•
power button for at least 2 seconds to turn
off the power, and then press it again for at
least 2 seconds.
Touch the sensors with your finger. The
•
sensors do not function if you touch them
with your finger nail or with gloves on.
AREA SETTING
SET
Select [ON] if daylight
U
saving time is effective.
SET FOR DAYLIGHT SAVING TIME
DAYLIGHT SAVING TIME (DST)
SET DAYLIGHT SAVING TIME
SET
R
Set the date and time
V
Touch sensor: Sets the date and time
}: Moves the cursor to the right
OK: Clock starts
CLOCK SETTING
DATE TIME
NOV 1 2009 4 55 PM
SAVE
NOV.1.2009 04:55PM
OFF
NOV.1.2009 04.55PM
GMT+ 9:00
QUIT
QUIT
QUIT
EN5
Page 6
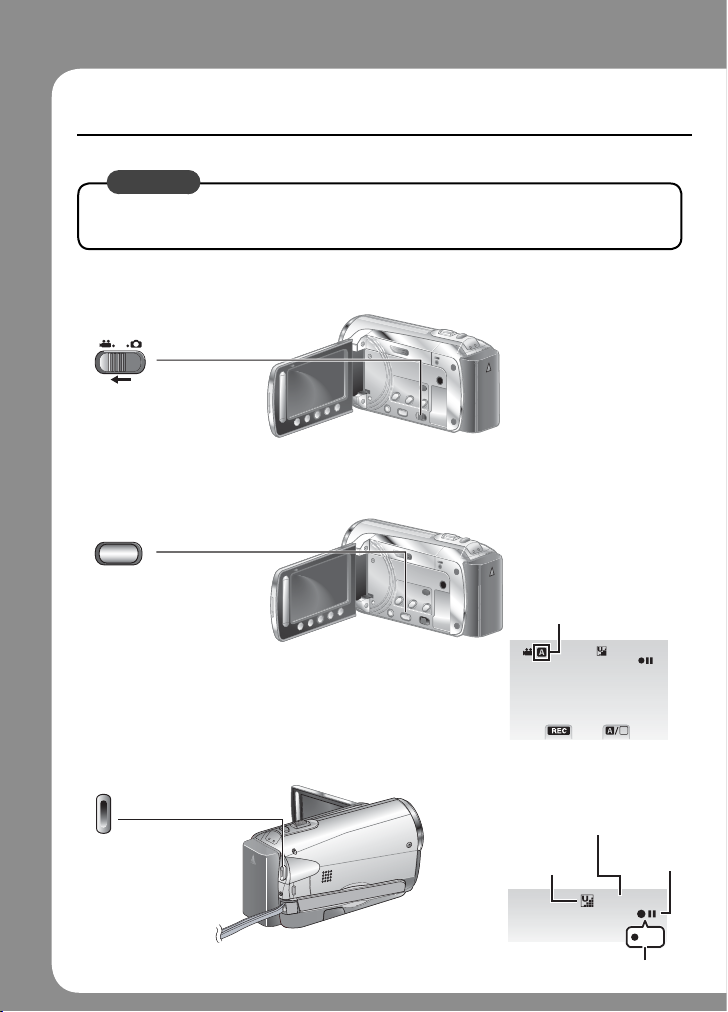
Video recording
CAUTION
Before recording an important scene, it is recommended to conduct a trial
recording.
Slide the mode switch to select ! (video) mode
Q
S elect recording mode
R
PLAY/REC
EN6
The mode changes
when you press the
button.
Start recording
S
Press the START/
STOP button to start
recording, and press
it again to stop.
The auto recording
indicator appears.
[]
4 h 59 m
0 : 04 : 01
M
Remaining space on built-in
memory or SD card
Video
Quality
C
D
0 : 04 : 01
Recordstandby
[ ]
4 h 59 m
REC
Recording
Page 7
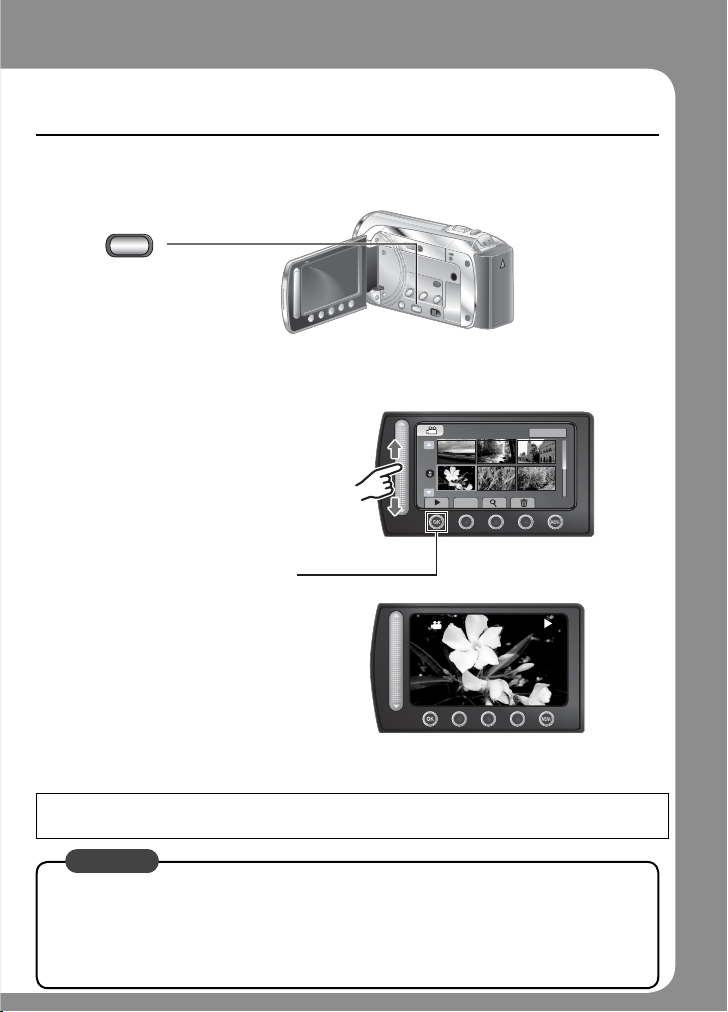
Playing back
Select playback mode
Q
PLAY/REC
The mode changes when
you press the button.
Select the desired fi le
R
Index screen
VIDEO PLAYBACK
1/2
LASER TOUCH OPERATION
Select F(Touch OK)
S
To perform operations such as forward search or reverse search ( pg. 22)
L
To view files on TV ( pg. 25)
L
It is recommended to copy your important recorded data to a DVD or other recording media
for storage. JVC will not be responsible for any lost data.
CAUTION
Don’t forget to make copies after recording!
To copy files onto DVD discs ( pg. 27)
•
To dub files using a VCR/DVD recorder ( pg. 34)
•
To play back a created DVD disc ( pg. 28)
•
To edit files on your computer ( pg. 29)
•
Playback screen
LASER TOUCH OPERATION
DIGEST
NOV.01.2009 04:55PM
EN7
Page 8

Contents
GETTING STARTED
Index ...................................................... 10
Accessories .......................................... 12
Attaching the core filter ................................12
Preparing the Remote Control .....................12
Indications on LCD Monitor ................. 13
Necessary Settings before Use ........... 15
Charging the Battery Pack ........................... 15
Other Settings ....................................... 16
Date/Time Setting ........................................16
Language Setting ........................................17
Tripod Mounting ........................................... 17
Using an SD Card ........................................ 18
RECORDING/PLAYBACK
Recording Files ..................................... 19
Video Recording .......................................... 19
Still Image Recording ..................................20
Zooming ....................................................... 21
LED Light .....................................................21
Checking the Remaining Battery Power ......21
Checking the Remaining Space on the
recording medium ......................................21
Playing Back Files ................................ 22
Video Playback ............................................22
Still Image Playback ....................................23
Manual Recording ............................... 24
Change to Manual Recording Mode ............24
Backlight Compensation ..............................24
Manual Setting Menu ................................... 24
USING WITH TV
Viewing Files on TV .............................. 25
Connection with TV......................................25
Playback Operation .....................................25
EDITING
Managing Files ...................................... 26
Capture a Still Image from a Video .............. 26
Deleting Files ...............................................26
COPYING
Copying Files ........................................ 27
Using a DVD Burner ....................................27
Creating a DVD using a PC .........................29
Dubbing Files to a VCR/DVD Recorder .......34
Using with a Portable Media Player .... 35
Turning on the Export Mode ........................35
Changing the Export Setting .......................35
Transfering the Files to PC ..........................35
Uploading Files to Websites ................ 36
Turning on the Upload Mode .......................36
Uploading Files ............................................36
FURTHER INFORMATION
Changing the Menu Settings ............... 37
Troubleshooting .................................... 37
Warning Indications ............................. 39
Specifications ....................................... 40
Cautions ................................................ 42
Terms ..................................................... 44
EN8
Page 9
How to use the Touch
Sensor
After the menu is displayed on the LCD monitor:
VIDEO
MANUAL SETTING
LIGHT
REGISTER EVENT
VIDEO QUALITY
USE DETAIL SETTINGS BAS ED
SET
Q Slide your finger up and down on the sensor.
R Select [SET]. (Touch OK.)
A
B
A
To select an on-screen button appearing on
the left side, touch the portion of the sensor
next to the on-screen button.
B
To select an on-screen button appearing at
the bottom of the screen, touch the buttons
underneath them.
Read these INSTRUCTIONS
to enjoy your CAMCORDER.
For more details on the
operations, refer to the
GUIDEBOOK in the supplied
CD-ROM.
In order to view the
GUIDEBOOK, Adobe
®
Reader® must be installed.
Adobe
®
Reader® can be loaded from Adobe’s
Adobe
web site:
http://www.adobe.com/
NOTE
Select your desired language with a single
click.
The model name is indicated on the bottom of your
camcorder.
®
Acrobat® ReaderTM or
QUIT
Read This First!
Make a backup of important recorded data
It is recommended to copy your important
recorded data to a DVD or other recording media
for storage. JVC will not be responsible for any
lost data.
Make a trial recording
Before the actual recording of important data,
make a trial recording and play back the recorded
data to check that the video and sound have been
recorded correctly. We recommend you to use the
same recording media when performing both the
trial recording and the actual recording.
Reset the camcorder if it does not operate
correctly
Close the LCD monitor and remove the power
supply (battery pack or AC adapter) from the
camcorder, then reattach it.
Precautions on handling batteries
Be sure to use the JVC BN-VF808U/VF815U/
•
VF823U battery packs. This product includes
patented and other proprietary technology and
is made to be used with the JVC battery and
not with other batteries. JVC cannot guarantee
safety or performance of this product when it is
operated by other batteries.
If the camcorder is subjected to electrostatic
•
discharge, turn off the power before using it
again.
If a malfunction occurs, stop using the
camcorder immediately and contact www.jvc.
com or by phone at 1-800-252-5722
Recorded data may be erased while the
camcorder is being repaired or inspected. Back up
all data before requesting repairs or inspections.
Because camcorder may be used for
demonstration in a shop, the demonstration
mode is set to on by default
To deactivate the demonstration mode, set [DEMO
MODE] to [OFF].
When Using an SD Card
Operations are confirmed on the following SD
•
cards. Class 4 or higher compatible SD or SDHC
card Panasonic, TOSHIBA, SanDisk, ATP SD
card (256 MB to 2 GB) or SDHC card (4 GB to
32 GB)
If other media are used, they may fail to record
•
data correctly, or they may lose data that had
already been recorded.
MultiMediaCards are not supported.
•
STARTED
GETTING
RECORDING/
PLAYBACK
USING WITH
TV EDITING COPYING
INFORMATION
FURTHER
EN9
Page 10

GETTING STARTED
Index
C
D
EN10
NOTE
The LCD monitor can rotate 270°.
•
Be careful not to cover 4, 5, 7 and 8
•
during shooting.
Page 11

Camcorder
! Touch Sensor
# OK Button
$ MENU Button
% Power (1) Button
& SD Card Slot ( pg. 18)
( EXPORT Button
) AV Connector
* UPLOAD Button ( pg. 36)
+ PLAY/REC Button ( pg. 19, 20, 22, 23)
, Mode Switch [!, #]
- DIRECT DVD Button ( pg. 28)
INFO Button ( pg. 21)
. START/STOP Button ( pg. 19)
/ SNAPSHOT Button ( pg. 20)
0Zoom Lever [W 7, T] ( pg. 21)
Speaker Volume Control
1 Speaker
2 DC Connector
3 USB Connector ( pg. 27, 30)
4 Camera Sensor
5 LED Light ( pg. 21)
6 Lens Cover
7 Lens
8Stereo Microphone
9Stud Hole
: Tripod Mounting Socket ( pg. 17)
; Battery Release Button [BATT.] ( pg. 15)
Remote Control
Q Infrared Beam Transmitting Window
R ZOOM (T/W) Buttons (Zoom in/out)
S Up Button
T Skip Backward Button
U Left Button
V Back Button
W PLAYLIST Button
X START/STOP Button
Y S. SHOT (SNAPSHOT) Button
Z INFO Button
a Skip Forward Button
b PLAY/PAUSE Button
c Right Button
d Next Button
e Down Button
f INDEX Button*
g DISP Button
* Each time you press INDEX, the screen
switches as shown below:
!mode:
Index Screen « Group Index Screen
#mode:
Index Screen «Date Index Screen
STARTED
GETTING
EN11
Page 12
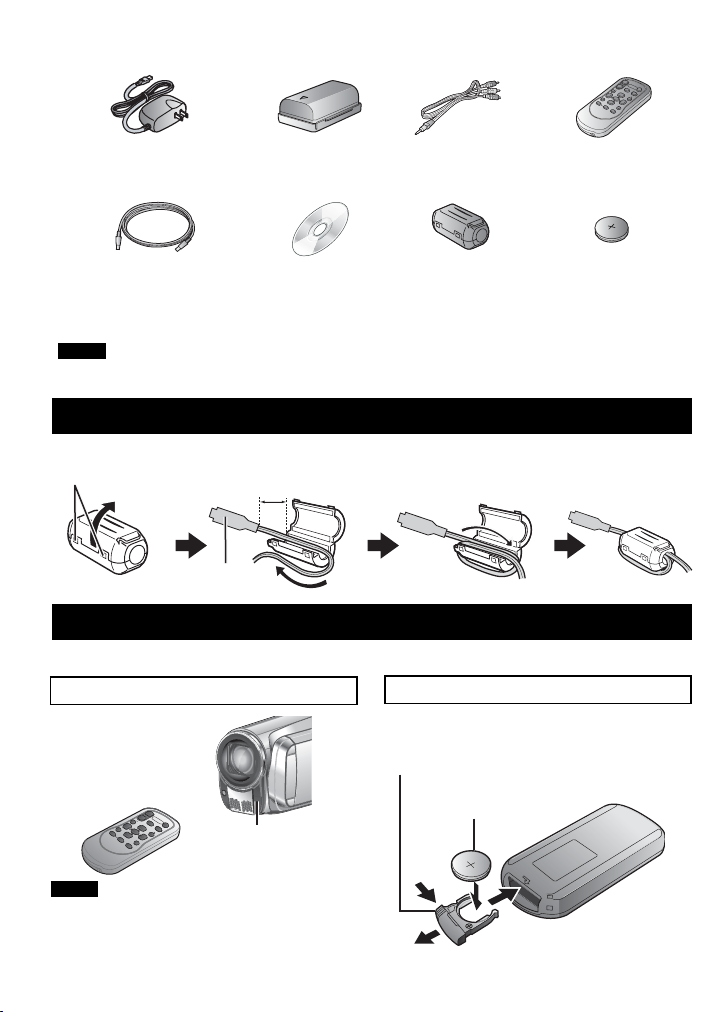
Accessories
AC Adapter
AP-V20U
Battery Pack
BN-VF808U
Audio/Video
Cable
Remote Control
RM-V751U
USB Cable CD-ROM
NOTE
Make sure to use the provided cables for connections. Do not use any other cables.
Core Filter (x2) Lithium Battery
Attaching the Core Filter
The core filter reduces interference caused when connecting to other devices.
Release the stopper.
To be connected
to the camcorder
3 cm (1-3/16")
USB Cable: Wind once
AC Adapter: Wind twice
Preparing the Remote Control
A battery is included inside the remote control at the time of purchase.
Remove the insulation sheet before use.
Beam Effective Area
Remote Sensor
Effective distance:
NOTE
The transmitted beam may not be effective
or may cause incorrect operation when the
remote sensor is directly exposed to sunlight
or powerful lighting.
5 m (16 ft)
To Reinsert the Battery
Pull out the battery holder by pressing the
lock tab.
Lock Tab
Lithium Battery
(CR2025)
EN12
CR2025
Pre-installed in the
remote control unit.
Page 13
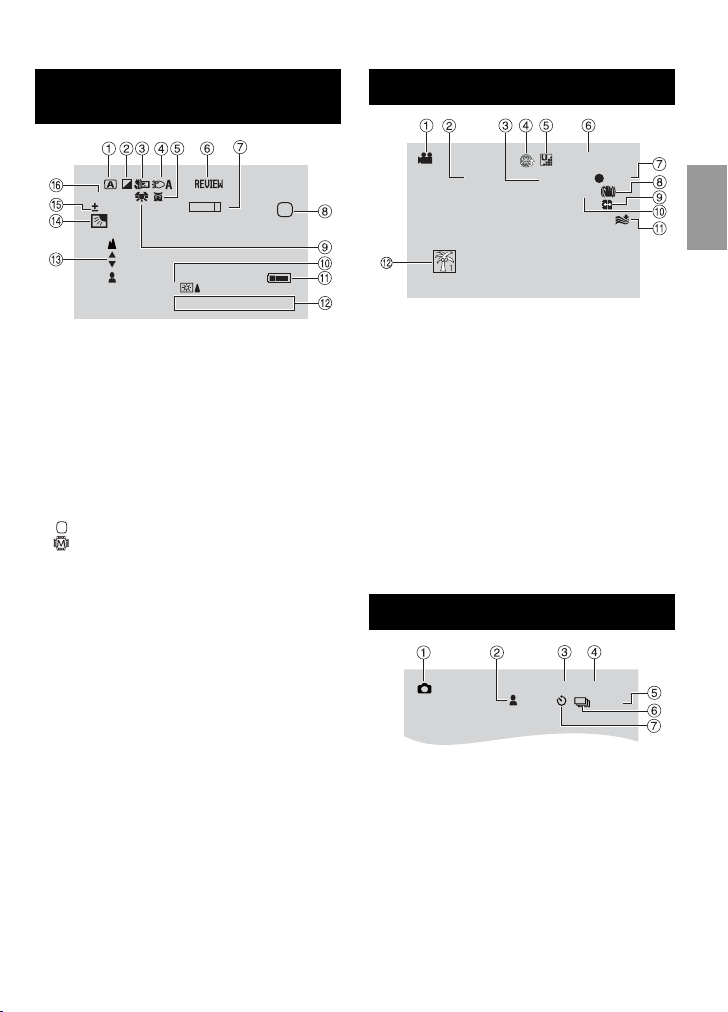
Indications on LCD Monitor
During both Video and Still Image
Recording
1/4000
0
WT
LCD
JAN. 1. 2009 4:55 PM
SD
! Selected Operation Mode Indicator
( pg. 24)
4
: Auto Mode
3
: Manual Mode
# Effect Mode Indicator
$ Tele Macro Mode Indicator
% LED Light Indicator ( pg. 21)
& Scene Select Mode Indicator
(Quick Review Indicator ( pg.19, 20)
) Zoom Indicator ( pg. 21)
* Recording Medium Indicator
SD
: SD Card
: Built-in memory
+ White Balance Indicator
, Monitor Backlight Indicator
- Battery Indicator
. Date/Time ( pg. 16)
/ Manual Focus Adjustment Indicator
0 Backlight Compensation Indicator
( pg. 24)
1 Brightness Control Indicator
. : Photometry Area Control Indicator
2 Shutter Speed
During Video Recording Only
LIB.
[4h59m]
0:04:01
PHOTO
REC
! Mode Indicator
# EXPORT Mode Indicator ( pg. 35)
$ Counter
% Upload Mode Indicator ( pg. 36)
& Video Quality:
(ULTRA FINE), C (FINE),
B
(NORMAL), E (ECONOMY)
D
( Remaining Time
)
REC: (Appears during recording.)
M
: (Appears during record-standby mode.)
MQ
* Digital Image Stabilizer (DIS) Indicator
(Appears when [DIS] is set to [OFF].)
+
Auto switch record media
, Shooting Indicator ( pg. 19)
- Wind Cut Indicator
. Event Indicator
During Still Image Recording Only
[9999]
FINE
10
PHOTO
STARTED
GETTING
! Mode Indicator
# Focus Indicator ( pg. 20)
$ Image Quality: FINE (fine) or STD
(standard)
% Remaining Number of Shots
& Shooting Indicator ( pg. 20)
( Shutter Mode Indicator
) Self-Timer Indicator
EN13
Page 14
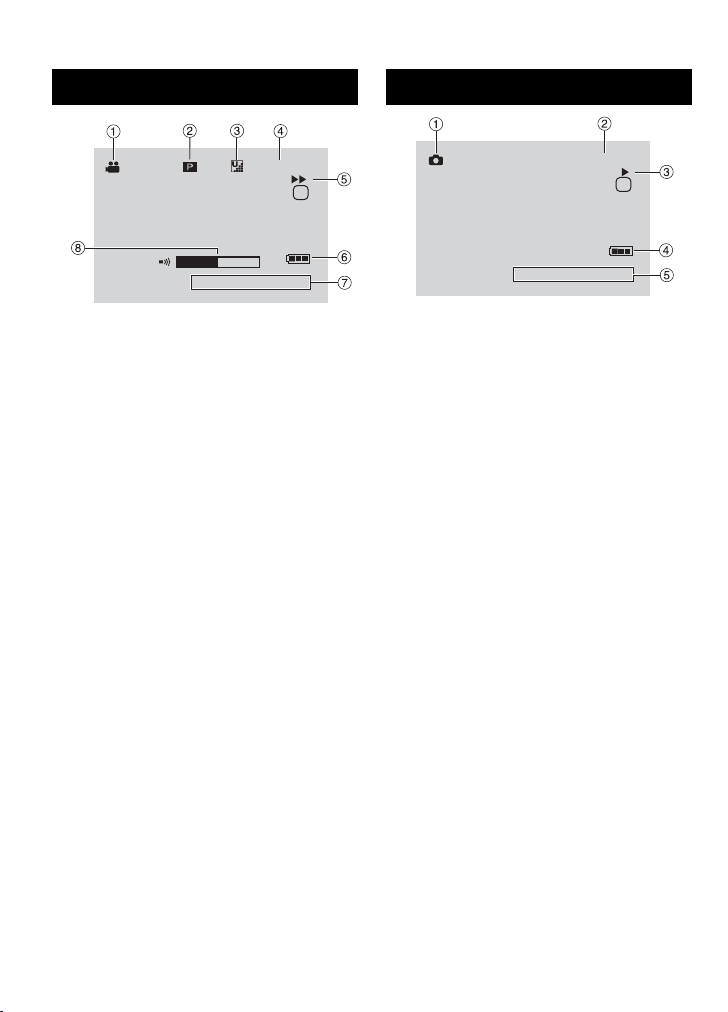
Indications on LCD Monitor (Continued)
During Video Playback
1: 55 : 01
+4
SD
JAN. 1. 2009 4:55 PM
! Mode Indicator
# Playlist Playback Indicator (Appears when
playing back a playlist.)
$ Video Quality:
(ULTRA FINE), C (FINE),
B
(NORMAL), E (ECONOMY)
D
% Counter
& Playback Mode
:Playback
F
:Pause
Q
:Forward Search
K
:Reverse Search
J
:Forward Slow-Motion
G
:Reverse Slow-Motion
E
(The number on the left shows speed.)
( Battery Indicator
) Date/Time ( pg. 16)
* Volume Level Indicator
8
During Still Image Playback
101- 0098
SD
JAN. 1. 2009 4:55 PM
! Mode Indicator
# older/File Number
$ Slide Show Playback Indicator
% Battery Indicator
& Date/Time ( pg. 16)
EN14
Page 15

Necessary Settings before Use
To check the remaining battery power
Charging the Battery Pack
1
Close the LCD monitor to turn off the
camcorder.
2
Attach the battery pack, then
connect the AC adapter.
• With the “vv” (arrow) on the battery pack
pointing at the correct direction, slide the
battery pack until it locks in place.
DC Jack
L
See page 21.
Required charging/recording time
L
(approx.)
*When the LED light is off and the monitor
backlight is set to [STANDARD] mode.
Battery pack Charging time
BN-VF808U
(Provided)
BN-VF815U 2 hr. 40 min. 5 hr. 25 min.*
BN-VF823U 3 hr. 40 min. 8 hr. 10 min.*
To detach the battery pack
L
Recording time
1 hr. 50 min. 2 hr. 45 min.*
STARTED
GETTING
v v Arrow
The power/charge lamp blinks to indicate
•
charging has started.
When the lamp goes out, charging is
•
finished.
DC
AC Adapter
To AC Outlet
(110V to 240V)
NOTE
You can also use the camcorder with just
•
the AC adapter.
The actual recording time may shorten
•
depending on the recording environment,
such as when recording scenes with fast
moving subject.
Please do not pull or bend the AC adapter
•
plug and cable. This may damage the AC
adapter.
EN15
Page 16

>
>
Other Settings
Date/Time Setting
1
2
3
4
5
6
Selected area is highlighted
Principal city of
the selected area
Time difference to
GMT
7
EN16
Open the LCD monitor to turn on the
camcorder.
Touch MENU.
Select [DISPLAY SETTINGS].
VIDEO
WIND CUT
AUTO SWITCH REC MEDIA
DISPLAY SETTINGS
BASIC SETTINGS
CONFIGURE ON-SCREEN DISPLAY
SET
>
QUIT
Select [CLOCK ADJUST].
DISPLAY SETTINGS
LANGUAGE
CLOCK ADJUST
DATE DISPLAY STYLE
MONITOR BRIGHT
SET DATE AND TIME
SET
QUIT
Select [CLOCK SETTING].
CLOCK ADJUST
CLOCK SETTING
AREA SETTING
SET FOR DAYLIGHT SAVING TIME
SET THE CITY, DATE AND TIME
SET
QUIT
Select the city closest to the area
where you use the camcorder.
AREA SETTING
NOV.1.2009 04:55PM
SET
QUIT
Select [ON] if daylight saving time is
effective.
[ON]: Clock is advanced one hour from
the normal time which you set.
[OFF]: Deactivates the function.
SET FOR DAYLIGHT SAVING TIME
DAYLIGHT SAVING TIME (DST)
OFF
NOV.1.2009 04.55PM
SET DAYLIGHT SAVING TIME
SET
8
Set the date and time.
Select the item by using the touch sensor
and select [}] to set.
CLOCK SETTING
DATE TIME
9
Select [SAVE].
NOV 1 2009 4 55 PM
SAVE
GMT+ 9:00
To reset the setting, select [QUIT]
Setting the clock to local time
when traveling
After performing steps 1-4
5
Select [AREA SETTING].
CLOCK ADJUST
CLOCK SETTING
AREA SETTING
SET FOR DAYLIGHT SAVING TIME
SET WHEN IN ANOTHER COUNTRY
SET
6
Select the city closest to the area
you are traveling.
AREA SETTING
NOV.1.2009 04:55PM
SET
To return to the previous screen
L
Select
To quit the screen
L
Select [QUIT].
@
.
QUIT
QUIT
QUIT
QUIT
Page 17

Language Setting
>
>
The language on the display can be changed.
1
Open the LCD monitor to turn on the
camcorder.
2
Touch MENU.
3
Select [DISPLAY SETTINGS].
VIDEO
WIND CUT
AUTO SWITCH REC MEDIA
DISPLAY SETTINGS
BASIC SETTINGS
CONFIGURE ON-SCREEN DISPLAY
SET
4
Select [LANGUAGE].
DISPLAY SETTINGS
LANGUAGE
CLOCK ADJUST
DATE DISPLAY STYLE
MONITOR BRIGHT
ON-SCREEN DISPLAY LANGUAGE
SET
5
Select the desired language.
To return to the previous screen
L
Select
To quit the screen
L
Select [QUIT]
@
.
>
QUIT
QUIT
Tripod Mounting
Align the camcorder stud hole with the tripod
stud, and the mounting socket with the screw,
and then rotate the camcorder clockwise to
mount it to the tripod.
Bottom of the
Camcorder
NOTE
Do not use a tripod on unsteady or unlevel
surfaces. It could tip over, causing serious
damage to the camcorder.
STARTED
GETTING
EN17
Page 18

E
L
A ON
M
A
GE
F
ATBUILT-IN MEM
.
F
A
T SD CARD
Other Settings (Continued)
NOTE
Using an SD Card
If you want to record to an SD card, the
following operations need to be performed.
Operations are confirmed on the following
•
SD cards: Class 4 or higher compatible
SD or SDHC card Panasonic, TOSHIBA,
SanDisk, ATP SD card (256 MB to 2 GB) or
SDHC card (4 GB to 32 GB).
If other media are used, they may fail to
•
record data correctly, or they may lose data
that had already been recorded.
MultiMediaCards are not supported.
•
Cards used to record video on this
•
camcorder cannot be played back on other
devices.
Some card readers (including internal card
•
readers in PCs) may not be able to support
SDHC format. If you use an SDHC card for
recording and encounter any reading error,
the card reader you are using might be a
non-SDHC supported device. Please use
the camcorder or other SDHC compatible
devices to access the card.
Insert and remove the SD card only while
•
the power is turned off. Otherwise, data on
the card may be corrupted.
Do not touch the terminal on the reverse
•
side of the label.
R Change the recording medium
The camcorder is programmed to record on
the BUILT-IN MEMORY flash when it is
shipped from the factory. You can change the
recording medium to SD card.
Set [REC MEDIA FOR VIDEO] to [SD
CARD) and [REC MEDIA FOR IMAGE]
to [SD].
MEDIA SETTINGS
REC MEDIA FORVIDEO
REC MEDIA FOR I
BUILT-IN MEMORY
ORM
SD CARD
ORM
RASE AL
SET
QUIT
Q Insert an SD card
Preparation:
Press Power (1) button to turn off the
camcorder.
1
Open the SD card cover.
2
Firmly insert the card with its clipped
edge first.
3
Close the SD card cover.
To remove an SD card
L
Push the SD card once.
After the card comes out a little, pull it out.
EN18
Clipped Edge
S Format an SD card when using it for
the first time
Select [FORMAT SD CARD] to format
the card.
MEDIA SETTINGS
REC MEDIA FOR VIDEO
REC MEDIA FOR IMAGE
FORMAT BUILT-IN MEM.
FORMAT SD CARD
ERASE ALL DATA ON
SET
QUIT
It is recommended to copy your important
recorded data to a DVD or other recording
media for storage. JVC will not be
responsible for any lost data.
Page 19

RECORDING/PLAYBACK
Recording Files
Video Recording
Slide the mode switch to select
! (video) mode.
SNAPSHOT
L To stop recording
Press the START/STOP again.
L To view the last recorded scene
Select
A while recording is paused.
Selecting
scene.
$ during playback deletes that
LTo record a still image during video
recording
Press SNAPSHOT.
Press the PLAY/REC button to
select recording mode.
PLAY/REC
[4 h 59 m]
0:00:00
Press the START/STOP button to
start recording.
[4 h 59 m]
0:00:01 REC
Approximate remaining time
You can also start/stop recording by
selecting [REC] on the LCD monitor.
(On-screen recording control).
for recording appears.
L To change the picture quality
Change the settings in [VIDEO QUALITY].
L To change the aspect ratio of the image
(16:9/4:3)
Change the settings in [SELECT ASPECT
RATIO].
RECORDING/
PLAYBACK
NOTE
The video recording mode is automatically selected when you turn off the camcorder and then on
•
again.
If the camcorder is not operated for 5 minutes while the power is on, it turns itself off automatically to
•
conserve power.
After recording video for 12 consecutive hours, recording stops automatically.
•
A new file will be created for every 4 GB of continuous shooting.
•
This camcorder records video in MPEG2 format compliant with SD-VIDEO format. This camcorder is
•
not compatible with other digital video formats.
EN19
Page 20

Recording Files (Continued)
Still Image Recording
Slide the mode switch to select
# (still image) mode.
L To view the last recorded image
Select
A after shooting.
Selecting $ during playback deletes
that image.
L To change the picture quality
Change the settings in [IMAGE
QUALITY].
L To record still images continuously
Set to [CONTINUOUS SHOOTING] in
[SHUTTER MODE].
Press the PLAY/REC button to
select recording mode.
PLAY/REC
FINE [9999]
Press and hold the SNAPSHOT
button halfway.
FINE
The ? indicator becomes green when
the captured image is focused.
Press the SNAPSHOT button fully
to take the photo/picture.
FINE [9999]
PHOTO
NOTE
DIS (Digital Image Stabilizer) does not function during still image recording.
•
If the camcorder is not operated for 5 minutes while the power is on, it turns itself off automatically to
•
conserve power.
EN20
Page 21

Zooming
Preparation:
Slide the mode switch to select ! or #
•
mode.
Press the PLAY/REC button to select
•
recording mode.
Zoom out Zoom in
W: Wide angle T: Telephoto
You can also zoom out/zoom in by selecting
[W] or [T] on the LCD monitor. (On-screen
zoom control).
Zoom Ratio (Factory-preset)
! mode # mode
[80X/DIGITAL] [35X/OPTICAL]
L To change the maximum zoom ratio (for
! mode only)
Change the settings in [ZOOM].
NOTE
Macro shooting is possible as close as
approx. 5 cm (2”) to the subject when the
zoom lever is set all the way to W.
LED Light
Preparation:
Slide the mode switch to select ! or #
•
mode.
Press the PLAY/REC button to select
•
recording mode.
1
Touch MENU.
2
Select [LIGHT].
3
Select the desired setting.
The LED light remains on regardless
ON
of the surrounding conditions.
The LED light turns on automatically
AUTO
when shooting in insufficient light
conditions.
Deactivates this function
OFF
Checking the Remaining Battery Power
Preparation:
Attach the battery pack.
•
Press the PLAY/REC button to select
•
recording mode.
For ! mode:
Press the INFO button three times or INFO
and then select ;.
For # mode:
Press INFO.
DIRECT
DVD
INFO
BATTERY CONDITION
100%
50%
0%
MAX TIME
min
QUIT
L To return to the normal screen
Select [QUIT] or press INFO.
NOTE
The recordable time display should only be used
as a guide. It is displayed in 10 minute units.
Checking the Remaining Space on
the recording medium
Preparation:
Slide the mode switch to select ! mode.
•
Press the PLAY/REC button to select
•
recording mode.
Press the INFO button once (BUILT-IN
MEMORY) or twice (SD CARD).
DIRECT
DVD
INFO
MAX RECORDING TIME
0h05m
0h07m
0h09m
0h26m
SET
BUILT-IN MEM
QUIT
The maximum recording time is displayed for
each video quality mode.
L To change the picture quality
1) Select the video quality.
2) Select [SET].
L To Change the Recording Media
1) Press INFO to select Built-in Memory
or SD.
2) SELECT [SET].
L To quit the screen
Select [QUIT].
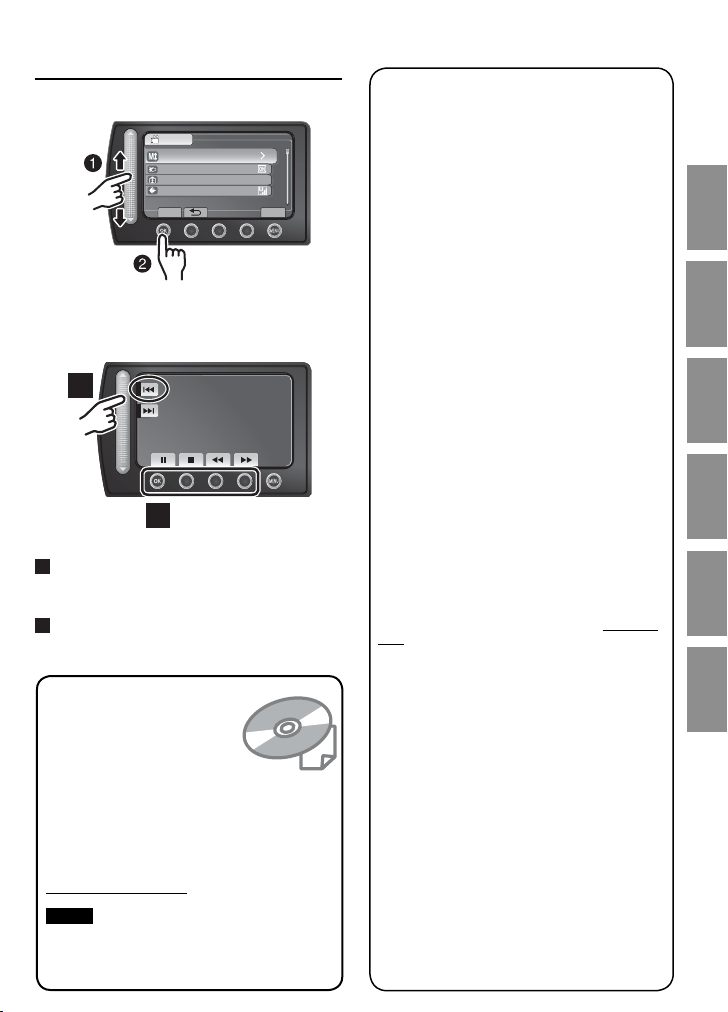
PLAYBACK
EN21
RECORDING/
Page 22

Playing Back Files
Video Playback
Slide the mode switch to select
! (video) mode.
L To move to the previous or next page
Touch [
v] or [V] for over a second.
L To play back a few seconds from each
select scene of the recorded videos
Touch [
DIGEST].
L Operations during Video Playback
On-screen buttons
Press PLAY/REC to select the
playback mode.
PLAY/REC
The index screen appears.
VIDEO PLAYBACK
DIGEST
1/2
NOV.1.2009 04:55PM
Select the desired file.
L To delete a video
Select *when playback is stopped.
L To change the number of thumbnails
(6 thumbnails / 20 thumbnails)
Move the zoom lever to [T] or [W].
L Speaker volume
: Return to the first scene of the file
N
: Go to the first scene of the next file
O
: Return to the index screen
L
: Reverse search (during playback)
J
: Frame-by-frame playback in reverse
E
direction (during pause)*
: Playback
F
: Pause
Q
: Forward search (during playback)
K
: Frame-by-frame playback in forward
G
direction (during pause)*
* Slow playback starts when you keep
touching the sensor button under
for a while.
EN22
—:Turn down the volume
+ :Turn up the volume
E / G
Page 23

Still Image Playback
Slide the mode switch to
select # (still image) mode.
L To move to the previous or next page
Touch [
v] or [V] for over a second.
L To delete a still image
Select $.
L To change the number of thumbnails
(6 thumbnails/20 thumbnails)
Move the zoom lever to [T] or [W].
Press PLAY/REC to select the
playback mode.
IMAGE PLAYBACK
PLAY/REC
NOV.01.2009 04:55PM
The index screen appears.
Select the desired file.
1/2
RECORDING/
PLAYBACK
L Operations during Still Image Playback On-screen buttons
: Change playback order of slide show in reverse direction
P
: Change playback order of slide show in forward direction
F
: Return to the index screen
L
: Display the previous file
N
: Start the slide show
F
: End the slide show
Q
: Display the next file
O
EN23
Page 24

Manual Recording
Manual recording mode enables you to set
the focus and screen brightness etc. manually.
Change to Manual Recording Mode
Preparation:
Slide the mode switch to select ! or #
•
mode.
Press the PLAY/REC button to select
•
recording mode.
Select [A/M] twice.
[4 h 59 m]
/
L To return to the auto recording mode
Select [A/M] so that the
appears.
Backlight Compensation
Backlight compensation brightens the subject
by increasing the exposure.
In the manual recording mode;
Select -.
4 indicator
RECREC
/
L To cancel backlight compensation
Select - again.
NOTE
If the LCD monitor is turned upside down, is not displayed. Change the setting when the
LCD monitor is in the normal position.
Manual Setting Menu
In the manual recording mode:
1
Touch MENU.
2
Select [MANUAL SETTING].
VIDEO
MANUAL SETTING
LIGHT
REGISTER EVENT
VIDEO QUALITY
USE DETAIL SETTINGS BASED
SET
3
Select the desired menu.
VIDEO
SCENE SELECT
FOCUS
ADJUST BRIGHTNESS
SHUTTER SPEED
THE BRIGHTNESS OF THE
SET
4
Select the desired setting.
VIDEO
AUTO
MANUAL
SET
Depending on the kind of settings you
select, you can set the value by using the
touch sensor.
L To return to the previous screen
Select
@.
L To quit the screen
Select [QUIT].
QUIT
QUIT
QUIT
EN24
Page 25

Viewing Files on TV
This camcorder is designed to be used
with NTSC-type color television signals. It
cannot be used with a television of a different
standard.
Connection with TV
L To connect using the AV connector.
Preparation:
Turn off all units.
DC
Connector
AV Cable
To AC
Outlet
AC Adapter
AV
Connector
AV Input Connector
Playback Operation
After the connection with TV is completed
1 Turn on the camcorder and the TV.
2 Set the TV to its VIDEO mode.
3 (Only when connecting the camcorder to
the VCR/DVD recorder)
Turn on the VCR/DVD recorder, and
set the VCR/DVD recorder to its AUX
input mode.
4 Start playback on the camcorder.
( p. 22, 23)
USING WITH
TV
EN25
Page 26

EDITING/PRINTING
Managing Files
CAUTION
Do not remove the recording medium or
perform any other operation (such as turning
off the power) while accessing files. Also,
be sure to use the provided AC adapter, as
the data on the recording medium may be
corrupted if the battery becomes exhausted
during operation. If the data on the recording
medium becomes corrupted, format the
recording medium to use the medium again.
Capture a Still Image from a Video
You can capture the desired scene from a
recorded video, and store it as a still image.
Preparation:
• Slide the mode switch to select
! mode.
• Press the PLAY/REC button to select
playback mode.
Press SNAPSHOT when playback is
paused.
SNAPSHOT
NOTE
• Captured still images are stored at a
resolution of 640 x 360 (if the video was
recorded in 16:9) or 640 x 480 (if the video
was recorded in 4:3). The image can be
elongated in the horizontal or vertical
directions depending on the quality of the
source video file.
• The continuous shooting function cannot be
used to capture images.
• You cannot capture video during playback.
Deleting Files
Protected files cannot be deleted. To delete
•
them, release the protection first.
Once files are deleted, they cannot be
•
restored. Check files before deleting.
Preparation:
Slide the mode switch to select ! or #
•
mode.
Press the PLAY/REC button to select
•
playback mode.
Touch MENU.
1
Select [DELETE]
2
VIDEO
DELETE
UPLOAD SETTINGS
SEARCH
PLAYBACK PLAYLIST
Select [CURRENT].
3
Select [YES].
4
DELETE RECORDED VIDEO
SET
VIDEO
CURRENT
FILE SELECT
DELETE ALL
DELETE ONE SCENE AT A TIME
SET
(REMAINING SCENES:0009)
SET
DELETE
DELETE?
YES
NO
QUIT
QUIT
QUIT
You can select the previous or next file by
selecting
{
or }.
L To quit the screen
Select [QUIT].
EN26
Page 27

COPYING
Copying Files
It is recommended to copy your important
recorded data to a DVD or other recording
media for storage. JVC will not be
responsible for any lost data.
Types of Copying and Connectable Device
DVD Burner
(CU-VD3/CU-VD50)
You can copy video files
recorded on this camcorder
onto DVD discs.
PC
You can copy video/
still image files on this
camcorder onto your PC.
VCR/DVD Recorder
You can dub video files
recorded on this camcorder
onto DVD discs.
NOTE
It is recommended to use the JVC DVD
burner (CU-VD50/CU-VD3). When using
CU-VD20 or CU-VD40, the recording time
may take approx. 2 times longer than the time
that is described in the instruction manual of
DVD burner.
Using a DVD Burner
Supported discs: 12cm DVD-R, DVD-RW
Regarding DVD-R discs, only unused DVD-R
•
discs can be used. Regarding DVD-RW
discs, used DVD-RW discs can also be
used, but they need to be formatted before
recording. Formatting a disc deletes all
content recorded on the disc up until that
time.
Dual-layer discs cannot be used.
•
Regarding finalization after copying
The disc is automatically finalized so that
it can be played on other devices. After
finalizing, the disc is a play-only disc, so no
more files can be added.
Connection with a DVD Burner
Preparation:
Turn on the camcorder first, then turn on the
DVD burner.
DC
Connector
C
D
To AC
Outlet
AC Adapter
DVD Burner
USB Connector
NOTE
Refer also to the optional DVD burner’s
•
instruction manual.
Use the USB cable that came with the DVD
*
burner.
USB
Connector
USB
Cable*
COPYING
EN27
Page 28

Copying Files (Continued)
Backup All Files
Preparation:
Connect the camcorder to the DVD burner.
•
Slide the mode switch to select ! mode.
•
1
Select [CREATE FROM ALL].
CREATE DVD
CREATE FROM ALL
SELECT AND CREATE
CREATE DUPLICATE
PLAYBACK
COPY RECORDED VIDEOS
SET
2
Select the desired menu.
CREATE FROM ALL
ALL SCENES
UNSAVED SCENES
COPY ALL VIDEOS TO DVD
[ALL SCENES]:
•
All files in the recording medium are
copied.
[UNSAVED SCENES]:
•
Files that have never been copied to a
DVD disc are automatically selected and
copied.
3
Select the desired disc number.
If you select [ALL], all discs in the list are
•
created.
To preview scenes, select [CHECK].
•
mark shows that the disc is created
•
already.
4
Select [YES] or [NO].
[YES]: Displays the thumbnails by group.
•
SET
DVD CREATION LIST
ALL(TOTAL:3)
DVD1
DVD2
DVD3
SET
• [NO]: Displays the thumbnails by date.
5
Select [EXECUTE].
The files are copied on the disc. When
•
[COMPLETED] appears, touch OK.
When [INSERT NEXT DISC PRESS
•
[STOP] TO EXIT CREATE] appears,
change the disc. Remaining files are
copied on the second disc.
EN28
To cancel copying, select [STOP].
•
CHECK
Copying Video Files that Have Never
Been Copied
Files that have never been copied to the DVD
discs are automatically selected and copied.
1
Open the LCD monitor to turn on the
camcorder.
2
Press the DIRECT DVD.
DIRECT
DVD
INFO
3
Select [EXECUTE].
UNSAVED SCENES
READY TO CREATE
DVD-R
EXECUTE
RETURN
SET
The DVD disc begins to be created.
•
When [COMPLETED] appears, touch
OK.
When [INSERT NEXT DISC PRESS
•
[STOP] TO EXIT CREATE] appears,
change the disc. Remaining files are
copied on the second disc.
To cancel the DVD creation, select
QUIT
•
[STOP].
QUIT
L To quit the screen
1) Select [QUIT].
2) When [QUIT?] appears, select [YES].
L To play back the created disc using the
camcorder
1) Connect the camcorder to the DVD
burner.
2) Turn on the comcorder first, then turn on
the DVD burner.
3) Select [PLAYBACK].
4) Select the desired folder.
5) Select the creation date of the disc.
6) Select the desired file. To return to the
previous screen, select @.
Page 29

Creating a DVD using a PC
Please read the “JVC SOFTWARE LICENCE
AGREEMENT” in the CD-ROM instruction
before you install software.
You can copy the data from the camcorder
and create a DVD using a PC.
QInstalling the software to the PC
System Requirements
Windows Vista
Windows Vista
OS:
Home Basic (SP1)
Home Premium (SP1)
(32-bit, pre-installed)
Either one of the following:
CPU:
Intel® Pentium® 4, 1.6 GHz or higher
•
Intel® Pentium® M, 1.4 GHz or higher
•
Intel® CoreTM Duo, 1.5 GHz or higher
•
At least 1 GB
RAM:
Windows XP
Windows
OS:
Home Edition (SP2/SP3)
Professional (SP2/SP3)
(pre-installed)
Either one of the following:
CPU:
• Intel
• Intel
• Intel
At least 512 MB
RAM:
®
®
XP
®
Pentium® 4, 1.6 GHz or higher
®
Pentium® M, 1.4 GHz or higher
®
CoreTM Duo, 1.5 GHz or higher
Preparation:
Load the provided CD-ROM into the PC.
In Windows Vista, the auto play dialog box
appears.
1
Click [Easy Installation].
Follow the on-screen instructions.
2
Click [Next].
3
Click [Finish].
COPYING
L To check the PC specification
Right-click on [Computer] (or [My
Computer]) in the [Start] menu and select
[Properties].
NOTE
Make sure your PC has a recordable DVD
•
drive.
If your system does not meet the
•
requirements, it is recommended to copy
files using the DVD burner. ( p. 27)
Macintosh users may use the software
•
included with their Macintosh (iMovie ‘08,
iPhoto) to copy files to their computer.
Everio MediaBrowser icon is created on
the desktop.
L To see the Instruction Guide for Everio
MediaBrowser
1) Double-click the icon of Everio
MediaBrowser.
2) Click [Help], and click [MediaBrowser
Help].
Click
Click
EN29
Page 30

Copying Files (Continued)
RMaking Backup on the PC
Preparation:
Install the software to the PC.
•
Make sure that enough free space is left in
•
the PC’s HDD.
Close the LCD monitor to turn off the
•
camcorder.
DC
AC Adapter
Connector
To AC
Outlet
DC
USB
Connector
USB Cable
USB Connector
1
Open the LCD monitor to turn on the
camcorder.
2
Select [BACK UP].
USB MENU
CREATE DVD
UPLOAD
LIB.
EXPORT TO LIBRARY
BACK UP
SAVE RECORDED VIDEO/STILL
SET
Everio MediaBrowser starts on the PC.
3
Click [All volume in camcorder] and
click [Next].
4
Click [Start].
Backup starts.
L To disconnect the camcorder from the
PC
1) Right-click the icon (Safely Remove
Hardware) on the task bar and select
[Safely remove USB Mass Storage
Device].
2) Follow the on-screen instructions and
make sure that the device can be safely
removed.
3) Disconnect the USB cable and close
the LCD monitor.
NOTE
It takes time to backup many videos.
QUIT
EN30
Page 31

SMaking User Lists to Arrange the
Files
You can make a user list of a certain subject
(such as Travel, Athletic meet) and put the
files related to the subject into the user list.
Preparation:
Make backup on the PC.
1
Double-click icon and open the
calendar.
2
Select [Movies only].
3
Click [+].
5
Double-click the recording date.
The files recorded on the day are
displayed.
6
Drag the file and drop into the user
list.
To add other files into the user list, repeat
steps 5 and 6
COPYING
4
Input the name of the new user list
and click [OK].
EN31
Page 32

Copying Files (Continued)
TCopying Files to a DVD
Preparation:
Use a recordable DVD disc (It is
recommended to use a DVD-R disc.)
1
Select the user list and click [Create
Disc].
2
Click [Select files individually] and
click [Next].
To add all the files onto DVD discs, click
[Select all files displayed], then go to
step 4.
3
Drag the file, and drop into the part
at the bottom and click [Next].
4
Input the disc name, select the top
menu style and click [Next].
5
Click [Start].
NOTE
For detail on operating Everio
•
MediaBrowser, click [Help] and refer to
[MediaBrowser Help].
Adobe® Reader® must be installed to read
•
[MediaBrowser Help]. Adobe
be loaded from Adobe’s web site:
http://www.adobe.com
For assistance in operating the provided
•
software, refer to the support information.
(
p. 33)
®
Reader® can
EN32
Page 33

[
]
Folder Structure and Extensions
Recording medium
[DCIM]
[XXXJVCSO]
X = number
Contains the still image folders.
[SD_VIDEO]
[MGR_INFO]
[PRGXXX]
[PRGXXX.PGI]
[MOVXXX.MOD]
[MOVXXX.MOI]
[PRGXXX]
[EXTMOV]
[MOV_XXX.MOD]
PRIVATE
* Information such as the date and time of recording, recorded with the video file.
Customer Support Information
Use of this software is authorized according to the terms of the software licence.
Contains the video file folders.
Management information* for the media as a
whole
Management information*
Video file
Management information* for the video files
Video file which management information is
corrupted.
Contains management information files of event
and/or DVD creation information for the files taken
with the camcorder.
JVC
When contacting the nearest JVC office or agency in your country (refer to the JVC Worldwide
Service Network at http://www.jvc-victor.co.jp/english/worldmap/index-e.html) about this
software, please have the following information ready.
Product Name, Model, Problem, Error Message.
•
PC, (Manufacturer, Model (Desktop/Laptop), CPU, OS, Memory (MB), Available Hard Disk
•
Space (GB)).
Please note that it may take some time to respond to your questions, depending on their subject matter.
JVC cannot answer questions regarding basic operation of your PC, or questions regarding specifications or
performance of the OS, other applications or drivers.
Pixela
Region Language Phone #
USA and Canada English +1-800-458-4029 (toll-free)
Europe (UK, Germany,
France and Spain
Other Countries in Europe
Asia (Philippines) English +63-2-438-0090
China Chinese +86-21-5385-3786
Homepage: http://www.pixela.co.jp/oem/jvc/mediabrowser/e/
Please check our website for latest information and downloading.
English/Germany/France/Spanish +1-800-1532-4865 (toll-free)
English/Germany/France/Spanish/
Italian/Dutch
+44-1489-564-764
COPYING
EN33
Page 34

Copying Files (Continued)
Dubbing Files to a VCR/DVD Recorder
Preparation:
Create a playlist.
•
Turn off all units.
•
L To connect using the AV connectors
(analog dubbing)
To AC
Outlet
AV Connector
AC
Adapter
AV Cable
Connector
AC
Adapter
DC
1
Open the LCD monitor to turn on the
camcorder.
2
Set the VCR/DVD recorder to its AUX
input mode.
Check that the images from the camcorder
are input correctly to the VCR/DVD
recorder.
3
Play back playlists on the camcorder.
1) Touch MENU.
2) Select [DUBBING PLAYBACK].
3) Select the desired playlist.
4) Select [YES]. (A black screen is
displayed for 5 seconds at the first and
the last scene.)
4
At the point you want to start
dubbing, start recording on the VCR/
DVD recorder.
Refer to the VCR/DVD recorder’s
instruction manual.
EN34
VCR/DVD
Recorder
AV Connector
(Input)
To AC
Outlet
L To stop dubbing
Stop recording on the VCR/DVD recorder.
L To hide the date or icons on the screen
Change the settings in [DISPLAY ON TV].
Page 35

Using with a Portable Media Player
3
Turning on the Export Mode
You can easily transfer videos recorded
in export mode to iTunes
®
. All the files with
the export setting turned on are transferred
to PC. For details on transferring, refer to
the operation guide of MediaBrowser in the
CD-ROM.
Preparation:
Slide the mode switch to select ! mode.
•
Press the PLAY/REC button to select
•
recording mode.
Press EXPORT twice.
EXPORT
ON
L To turn off the export mode
Press EXPORT twice.
Changing the Export Setting
Select [DONE].
L To cancel the export setting
Select the file and press [LIB.] again.
L To quit the screen
1) Select [DONE].
2) Select [YES].
Transferring the Files to PC
Preparation:
Install iTunes
http://www.apple.com/itunes/
1
Connect the camcorder to the PC
with the USB cable.
2
Select [EXPORT TO LIBRARY].
®
on a PC.
USB MENU
CREATE DVD
UPLOAD
LIB.
EXPORT TO LIBRARY
BACK UP
EASY VIDEO REGISTRATION
SET
QUIT
You can set the recorded videos to the export
setting.
Preparation:
Slide the mode switch to select ! mode.
•
Press the PLAY/REC button to select
•
playback mode.
1
Press EXPORT.
EXPORT
2
Select the fi le and select [LIB.].
EXPORT SETTINGS
LIB. LIB.
SD
LIB.
To check the content of the file, select
•
[CHECK].
1/3
DONECHECK
All the files with the export setting turned
on are transferred to PC.
LCannot export the file to iTunes
Refer to “Q&A”, “Latest Information”,
•
“Download Information”, etc. in [Click for
Latest Product Info] in the help of the
provided Everio MediaBrowser software.
COPYING
®
EN35
Page 36

Uploading Files to Websites
Turning on the Upload Mode
You can upload the file to video sharing
websites (You Tube
TM
) quickly after recording.
For more information on YouTube™, visit
YouTube™ website: http://www.youtube.com/
Preparation:
Slide the mode switch to select ! mode.
•
Press the PLAY/REC button to select
•
recording mode
Press UPLOAD twice.
UPLOAD
ON
If you record a file with the upload mode
set on, the recording stops automatically
10 minutes after the recording is started.
The remaining time is displayed on the
LCD monitor.
NOTE
The upload mode turns off each time
recording is finished.
Uploading Files
For detalis on uploading files, refer to the
operation guide of MediaBrowser in the CDROM.
1
Connect the camcorder to the PC
with the USB cable.
2
Select [UPLOAD].
USB MENU
PLAYBACK ON PC
CREATE DVD
UPLOAD
EXPORT TO LIBRARY
EASY UPLOAD TO VIDEO
SET
QUIT
L Cannot upload the file to YouTube™
• You need your YouTube™ account to
upload files to YouTube™. Create your
account.
• Refer to “Q&A”, “Latest Information”,
“Download Information”, etc. in [Click for
Latest Product Info] in the help of the
provided Everio MediaBrowser software.
EN36
Page 37

MENU SETTINGS
T
Y
ZOOM
DIS
IMAG
O
O
Changing the Menu Settings
1
Touch MENU.
2
Select the desired menu.
VIDEO
REGISTER EVENT
VIDEO QUALITY
ZOOM
DIS
IMAGE BLURRED NEED TO
SET
ON
QUIT
Troubleshooting
Before requesting service, consult the
following chart. If the solutions indicated in the
chart do not solve the problem, consult your
nearest JVC dealer or JVC service center for
instructions.
Refer also to the FAQ of new products on
JVC’s website.
Power
Trouble Action
Connect the AC adapter securely.
No power is supplied.
•
Recharge the battery pack.
•
3
Select the desired setting.
VIDEO
REGISTER EVEN
OFF
VIDEO QUALIT
ON
ON
E BLURRED NEED T
SET
N
QUIT
L To return to the previous screen
Select
@.
L To quit the screen
Select [QUIT].
The following phenomena are not
malfunctions.
The camcorder heats up when it is used for
•
a long time.
The battery heats up during charging.
•
When playing back a video file, the
•
image stops momentarily or the sound is
interrupted at junctions between scenes.
LCD monitor momentarily become red or
•
black when sunlight is recorded.
Black spots, or red, green, or blue spots
•
appear on the LCD monitor. (The LCD
monitor contains 99.99% effective pixels, but
0.01% of fewer pixels may be ineffective.)
INFORMATION
FURTHER
Display
The remaining battery
display is not correct.
The LCD monitor is
difficult to see.
Fully charge the battery pack, run it down, and then recharge it
•
again.
If the camcorder is used for long periods of time in high or low
•
temperatures, or if the battery pack is repeatedly charged, the
amount of remaining battery may not be displayed correctly.
The LCD monitor may be difficult to see if used in bright areas
•
such as under direct sunlight.
EN37
Page 38

Troubleshooting (Continued)
Trouble Action
Recording cannot be
Recording
performed.
Recording stops by
itself.
Sound or video are
interrupted.
Playback
Cannot find a recorded
video/image.
The lamp does not
flash during battery
Other Problems
pack charging.
Cannot upload the file
to YouTube
Cannot export the file
to iTunes
™
®
SD Card or Built-In Memory is full. Delete unnecessary files or
•
replace the SD Card.
Insert a commercially available SD card, and set each of the [REC
•
MEDIA FOR VIDEO] to [SD Card] and [REC MEDIA FOR IMAGE]
to [SD].
Recording stops automatically after 12 hours of continuous
•
recording.
Sometimes playback is interrupted at the connecting section
•
between two scenes. This is not a malfunction.
Select [PLAYBACK MPG FILE] then search the video on the index
•
screen.
(Video files that have damaged management information can be played back.)
Cancel group display and date search functions.
•
Change the setting in [REC MEDIA FOR VIDEO] or [REC MEDIA
•
FOR IMAGE]. (Files on other media are not displayed.)
Slide the mode switch to select the desired mode (! or #).
•
Check the remaining battery pack charge.
•
(When the battery pack is fully charged, the lamp does not flash.)
When recharging in either a hot or cold environment, ensure that
•
battery is being charged within the permitted temperature range.
(If the battery pack is being recharged outside the permitted temperature
range, recharging may stop to protect the battery pack.)
You need your YouTube™ account to upload files to YouTube™.
•
Create your account.
Refer to “Q&A”, “Latest Information”, “Download Information”, etc.
•
in [Click for Latest Product Info] in the help of the provided Everio
MediaBrowser software.
Refer to “Q&A”, “Latest Information”, “Download Information”, etc.
•
in [Click for Latest Product Info] in the help of the provided Everio
MediaBrowser software.
L To reset the camcorder when it does not operate normally
!
Close the LCD monitor and remove the power supply (battery pack or AC adapter) from the
camcorder, then reattach it.
# Execute [FACTORY PRESET].
EN38
Page 39

Warning Indications
Indication Action
Set the clock. If the message still appears after setting the
•
SET DATE/TIME!
clock, the battery for the clock has been depleted. Consult
your nearest JVC dealer.
COMMUNICATING ERROR
NOT FORMATTED
FORMAT ERROR!
DATA DELETION ERROR
BUILT-IN MEMORY ERROR!
MEMORY CARD ERROR!
CANNOT TAKE MORE STILL
IMAGES AT THE MOMENT
RECORDING FAILURE
USE AC ADAPTER
Be sure to use JVC battery packs.
•
Select [OK] and select [YES] to perform formatting.
•
Check the operating procedure, and perform once again.
•
Turn off the camcorder, and turn it on again.
•
Turn off the camcorder, and turn it on again.
•
If the problem persists, backup all data, and then perform
•
formatting (All data is deleted).
Turn off the camcorder, and turn it on again.
•
Remove and re-insert the SD card (MultiMediaCard cannot be
•
used).
Remove any dirt from the SD card terminals.
•
Insert the SD card before switching the power on.
•
If the problem persists, backup all data, and then perform
•
formatting (All data is deleted).
Stop video recording, and then record a still image. (If an SD
•
card is removed or inserted during video recording, a still
image cannot be recorded.)
Turn off the camcorder, and turn it on again.
•
Use the AC Adapter as power supply.
•
INFORMATION
FURTHER
EN39
Page 40

Specifications
Camcorder
L For general
Power supply
DC 11 V (Using AC adapter)
DC 7.2 V (Using battery pack)
Power consumption
Approx. 1.8 W*
* When the LED light is off and the monitor
backlight is set to [STANDARD] mode.
Dimensions (W x H x D)
54.5 mm x 65 mm x 112.5 mm
(2-1/8”x2-9/16”x4-7/16”)
Weight
Approx. 245 g (0.54 lbs)
(incl. grip belt)
Approx. 290 g (0.64 lbs)
(incl. battery and grip belt)
Operating temperature
0°C to 40°C (32°F to 104°F)
Operating humidity
35% to 80%
Storage temperature
–20°C to 50°C (–4°F to 122°F)
Pickup
1/6" (800,000 pixels) CCD
Lens
F 1.8 to 4.0, f = 2.2 mm to 77.0 mm,
35:1 power zoom lens
Filter diameter
ø30.5 mm
LCD monitor
2.7" diagonally measured, LCD panel/TFT
active matrix system
LED Light
Within 1.5 m (4.9 ft)
(recommended shooting distance)
L For video/Audio
Format
SD-VIDEO
Recording/Playback format
Video: MPEG-2
Audio: Dolby Digital (2 ch)
Signal format
NTSC standard
Recording mode (video)
ULTRA FINE: 720 x 480 pixels, 8.5 Mbps (VBR)
FINE: 720 x 480 pixels, 5.5 Mbps (VBR)
NORMAL: 720 x 480 pixels, 4.2 Mbps (VBR)
ECONOMY: 352 x 240 pixels, 1.5 Mbps (VBR)
Recording mode (audio)
ULTRA FINE: 48 kHz, 384 kbps
FINE: 48 kHz, 384 kbps
NORMAL: 48 kHz, 256 kbps
ECONOMY: 48 kHz, 128 kbps
L For still image
Format
JPEG
Image size
832 x 624
Picture quality
FINE/STANDARD
L For connectors
AV output
Video output: 1.0 V (p-p), 75 Ω
Audio output: 300 mV (rms), 1 kΩ
USB
Mini USB type A and B, USB 2.0 compliant
AC Adapter
Power requirement
AC 110 V to 240 Vd, 50 Hz/60 Hz
Output
DC 11 V
§
, 1 A
EN40
Page 41

Remote Control
Power supply
DC 3 V
Battery life
Approx. 1 year
(depending on the frequency of use)
Operating distance
Within 5 m (16.4 ft)
Dimensions (W x H x D)
42 mm x 14.5 mm x 91 mm
(1-11/16” x 5/8” x 3-5/8”)
Weight
Approx. 30 g (0.07 lbs)
(incl. battery)
Design and specifications subject to change
without notice.
Operating temperature
0°C to 40°C (32 F° to 104° F)
Approximate recording time (for video) h: hour/m: minute
Recording
medium
Quality
ULTRA FINE 3 min. 6 min. 14 min. 29 min. 1 hr. 1 hr. 50 min. 3 hr. 45 min. 7 hr. 30 min.
FINE 5 min. 10 min. 21 min. 43 min. 1 hr. 20 min. 2 hr. 50 min. 5 hr. 40 min. 11 hr. 20 min.
NORMAL 6 min. 13 min. 29 min. 1 hr. 1 hr. 50 min. 3 hr. 45 min. 7 hr. 30 min. 15 hr. 00 min.
ECONOMY 18 min. 36 min. 1 hr. 20 min. 2 hr. 30 min. 5 hr. 9 hr. 55 min. 20 hr. 00 min. 40 hr. 00 min.
256 MB 512 MB 1 GB 2 GB 4 GB 8 GB 16 GB 32 GB
SD or SDHC Card
Recording medium
Quality
ULTRA FINE 3 hr. 45 min.
FINE 5 hr. 40 min.
NORMAL 7 hr. 30 min.
ECONOMY 20 hr. 00 min.
Built-In Memory
16 GB
Approximate number of storable images (for still image)
The Built-In Memory can record up to 9999 still images in either mode.
Mode
!
#
!
Recording medium
Image size/Quality
640 x 480 / FINE 1450 2920 5930 9999 9999 9999 9999 9999
4:3
640 x 480 / STANDARD 2080 4180 8480 9999 9999 9999 9999 9999
832 x 624 / FINE 970 1950 3950 7590 9999 9999 9999 9999
4:3
832 x 624 / STANDARD 1450 2920 5930 9999 9999 9999 9999 9999
640 x 360 / FINE 1820 3660 7420 9999 9999 9999 9999 9999
16:9
640 x 360 / STANDARD 2420 4880 9890 9999 9999 9999 9999 9999
256 MB 512 MB 1 GB 2 GB 4 GB 8 GB 16 GB 32 GB
SD or SDHC Card
The recordable time and the number of still images are approximate and may differ depending on the
recording environment, the condition of the SD card, or the remaining battery power.
INFORMATION
EN41
FURTHER
Page 42

Cautions
AC Adapter
When using the AC adapter in areas other
than the USA
The provided AC adapter features automatic
voltage selection in the AC range from 110 V to
240 V.
USING HOUSEHOLD AC PLUG ADAPTER
In case of connecting the unit’s power cord to
an AC wall outlet other than American National
Standard C73 series type use an AC plug
adapter, called a “Siemens Plug”, as shown.
For this AC plug adapter, consult your nearest
JVC dealer.
Plug Adapter
Battery Packs
The supplied battery
pack is a lithium-ion
battery. Before using
the supplied battery
pack or an optional
battery pack, be sure
to read the following
cautions:
To avoid hazards
•
... do not burn.
... do not short-circuit the terminals. Keep it away
from metallic objects when not in use. When
transporting, make sure the provided battery
cap is attached to the battery. If the battery
cap is misplaced, carry the battery in a plastic
bag.
... do not modify or disassemble.
... do not expose the battery to temperatures
exceeding 60°C, as this may cause the battery
to overheat, explode or catch fire.
... use only specified chargers.
To prevent damage and prolong service life
•
... do not subject to unnecessary shock.
... charge within the temperature range of 10°C
to 35°C (50°F to 95°F). This is a chemical
reaction type battery — cooler temperatures
impede chemical reaction, while warmer
temperatures can prevent complete charging.
... store in a cool, dry place. Extended exposure
to high temperatures will increase natural
discharge and shorten service life.
... fully charge and then fully discharge the
battery every 6 months when storing the
battery pack over a long period time.
... remove from charger or powered unit when
not in use, as some machines use current
even when switched off.
EN42
Terminals
ATTENTION:
The battery you
have purchased is
recyclable. Please call
1-800-8-BATTERY for
information on how to
recycle this battery.
Recording Medium
Be sure to follow the guidelines below
•
to prevent corruption or damage to your
recorded data.
Do not bend or drop the recording medium, or
•
subject it to strong pressure, jolts or vibrations.
Do not splash the recording medium with water.
•
Do not use, replace, or store the recording
•
medium in locations that are exposed to strong
static electricity or electrical noise.
Do not turn off the camcorder power or remove
•
the battery or AC adapter during shooting,
playback, or when otherwise accessing the
recording medium.
Do not bring the recording medium near objects
•
that have a strong magnetic field or that emit
strong electromagnetic waves.
Do not store the recording medium in locations
•
with high temperature or high humidity.
Do not touch the metal parts.
•
LCD Monitor
To prevent damage to the LCD monitor, DO
•
NOT
... push it strongly or apply any shocks.
... place the camcorder with LCD monitor on the
bottom.
To prolong service life
•
... avoid rubbing it with coarse cloth.
Page 43

Main Unit
For safety, DO NOT
•
... open the camcorder’s chassis.
... disassemble or modify the unit.
... allow inflammables, water or metallic objects
to enter the unit.
... remove the battery pack or disconnect the
power supply while the power is on.
... leave the battery pack attached when the
camcorder is not in use.
... place naked flame sources, such as lighted
candles, on the apparatus.
... expose the apparatus to dripping or splashing.
... leave dust or metal objects adhered to the
power plug or an AC wall outlet.
... insert any objects in the camcorder.
Avoid using the unit
•
... in places subject to excessive humidity or dust.
... in places subject to soot or steam such as
near a cooking stove.
... near appliances generating strong magnetic
or electric fields (speakers, broadcasting
antennas, etc.).
... in places subject to extremely high (over 40°C)
or extremely low (under 0°C) temperatures.
DO NOT leave the unit
•
... in places of over 50°C.
... in places where humidity is extremely low
(below 35%) or extremely high (above 80%).
... in direct sunlight.
... in a closed car in summer.
... near a heater.
... in high places such as on a TV. Leaving the
unit in high places while a cable is connected
may result in a malfunction if the cable is
caught and the unit falls onto the floor.
To protect the unit, DO NOT
•
... allow it to become wet.
... drop the unit or strike it against hard objects.
... subject it to shock or excessive vibration
during transportation.
... keep the lens directed at extremely bright
objects for long periods.
... expose the lens to direct sunlight.
... swing it excessively when using the hand
strap.
... swing the soft camcorder case excessively
when the camcorder is inside it.
To prevent the unit from dropping,
•
Fasten the grip belt securely.
•
When using the camcorder with a tripod, attach
•
the camcorder to the tripod securely.
If the camcorder drops, you may be injured
and the camcorder may be damaged.
When a child uses the unit, there must be
parental guidance.
Declaration of Conformity
Model Number: GZ-MS130U
Trade Name: JVC
Responsible party: JVC AMERICAS CORP.
Address: 1700 Valley Road Wayne, N. J. 07470
Telephone Number: 973-317-5000
This device complies with Part 15 of FCC
Rules. Operation is subject to the following
two conditions: (1) This device may not cause
harmful interference, and (2) this device must
accept any interference received, including
interference that may cause undesired
operation.
Changes or modifications not approved
by JVC could void the user’s authority to
operate the equipment. This equipment has
been tested and found to comply with the
limits for a Class B digital device, pursuant
to Part 15 of the FCC Rules. These limits are
designed to provide reasonable protection
against harmful interference in a residential
installation. This equipment generates, uses,
and can radiate radio frequency energy and, if
not installed and used in accordance with the
instructions, may cause harmful interference
to radio communications. However, there is
no guarantee that interference will not occur
in a particular installation. If this equipment
does cause harmful interference to radio or
television reception, which can be determined
by turning the equipment off and on, the
user is encouraged to try to correct the
interference by one or more of the following
measures: Reorient or relocate the receiving
antenna. Increase the separation between the
equipment and receiver.
Connect the equipment into an outlet on a
circuit different from that to which the receiver
is connected.
Consult the dealer or an experienced radio/TV
technician for help.
This Class B digital apparatus complies with
Canadian ICES-003.
Cet appareil numérique de la classe B est
conforme à la norme NMB-003 du Canada.
INFORMATION
FURTHER
EN43
Page 44

Terms
A AC Adapter ................................................. 15, 42
AV Connection ............................................ 25, 34
B Backlight Compensation ................................... 24
Battery Pack ................................................ 15, 42
Built-In Memory ............................................ 18, 39
C CD-ROM ..................................................... 12, 29
Clock Adjust ......................................................16
D Date/Time Setting ............................................... 5
Daylight Saving Time ........................................16
Deleting Files .................................................... 26
Digest Playback ................................................. 22
Dubbing playback .............................................34
DVD Backup ...................................................... 28
DVD Burner ....................................................... 27
E Export to Library Mode ...................................... 35
F Finalize .............................................................. 27
I iTunes ............................................................... 35
L Language Setting .............................................. 17
LCD Monitor ................................................ 13, 42
LED Light .......................................................... 21
M Manual Recording ..............................................24
Menu Settings .................................................... 37
N Number of Images ............................................. 41
O On-screen Recording Control ........................... 19
On-screen Zoom Control .................................. 21
P Portable Media Player ....................................... 35
Q Quick Review .............................................. 19, 20
R Recordable Time ...............................................41
Recording Medium ............................................. 42
Remaining Battery Power .................................. 21
Remaining Recording Time ...............................21
Remote Control ............................................ 10, 11
S SD Card ............................................................. 18
Speaker Volume ................................................. 22
U Uploding Files ................................................... 36
USB Cable ...................................................27, 30
V Viewing Files on TV .......................................... 25
Y YouTube ...........................................................36
Z Zoom ................................................................. 21
 Loading...