

Page 1

Verifying the Accessories
INFO
SNAP
SHOT
START
/STOP
INDEX
AC Adapter
AP-V30M
Battery Pack
BN-VG114E
Power Cord
Remote Control
RM-V760U
USB Cable
(Type A - Mini Type B)
HDMI Mini Cable
AV Cable
(exclusive)
CD-ROM Stylus pen
Basic User Guide
(this manual)
LYT2458-001A-M
EN
Basic User Guide
CAMCORDER
GZ-GX1BEK
Detailed User Guide
.
For more details on operating this product, please refer to the
“Detailed User Guide” at the following website.
o
http://manual3.jvckenwood.com/index.html/
Dear Customers
Thank you for purchasing this JVC product.
Before use, please read the Safety Precautions
and Cautions on p. 2 and p. 10 to ensure
safe use of this product.
Page 2

Safety Precautions
When the equipment is installed in a cabinet or on
a shelf, make sure that it has sufficient space on
all sides to allow for ventilation (10 cm or more on
both sides, on top and at the rear).
Do not block the ventilation holes.
(If the ventilation holes are blocked by a newspaper,
or cloth etc. the heat may not be able to get out.)
No naked flame sources, such as lighted candles,
should be placed on the apparatus.
When discarding batteries, environmental
problems must be considered and the local rules
or laws governing the disposal of these batteries
must be followed strictly.
The apparatus shall not be exposed to dripping
or splashing.
Do not use this equipment in a bathroom or
places with water.
Also do not place any containers filled with water
or liquids (such as cosmetics or medicines, flower
vases, potted plants, cups etc.) on top of this unit.
(If water or liquid is allowed to enter this
equipment, fire or electric shock may be caused.)
Do not point the lens directly into the sun. This
can cause eye injuries, as well as lead to the
malfunctioning of internal circuitry. There is also a
risk of fire or electric shock.
CAUTION!
The following notes concern possible physical
damage to this unit and to the user.
Carrying or holding this unit by the LCD monitor
can result in dropping the unit, or in a malfunction.
Do not use a tripod on unsteady or unlevel
surfaces. It could tip over, causing serious damage
to the unit.
CAUTION!
Connecting cables (Audio/Video, etc.)
to this unit and leaving it on top of the TV is not
recommended, as tripping on the cables will cause
this unit to fall, resulting in damage.
CAUTION:
To avoid electric shock
or damage to the unit,
first firmly insert the small
end of the power cord
into the AC Adapter
until it is no longer wobbly,
and then plug the larger
end of the power cord into an AC outlet.
IMPORTANT (for owners in the U.K.)
Connection to the mains supply in the United
Kingdom.
DO NOT cut off the mains plug from this equipment.
If the plug fitted is not suitable for the power points
in your home or the cable is too short to reach
a power point, then obtain an appropriate safety
approved extension lead or consult your dealer.
BE SURE to replace the fuse only with an
identical approved type, as originally fitted,
and to replace the fuse cover.
If nonetheless the mains plug is cut off be sure
to remove the fuse and dispose of the plug
immediately, to avoid possible shock hazard by
inadvertent connection to the mains supply.
If this product is not supplied fitted with a mains
plug then follow the instructions given below:
DO NOT make any connection to the Larger
Terminal coded E or Green.
The wires in the mains lead are coloured in
accordance with the following code:
Blue to N
(Neutral) or Black
Brown to L (Live)
or Red
If these colours do not correspond with the terminal
identifications of your plug, connect as follows:
Blue wire to terminal coded N (Neutral) or coloured
black.
Brown wire to terminal coded L (Live) or coloured Red.
If in doubt — consult a competent electrician.
WARNING: TO PREVENT FIRE OR SHOCK
HAZARD, DO NOT EXPOSE THIS UNIT TO RAIN
OR MOISTURE.
CAUTIONS:
•
To prevent shock, do not open the cabinet. No
user serviceable parts inside. Refer servicing to
qualified personnel.
When you are not using the AC adapter for a
long period of time, it is recommended that you
disconnect the power cord from AC outlet.
•
NOTES:
•
The rating plate and safety caution are on the
bottom and/or the back of the main unit.
The serial number plate is on the battery pack mount.
The rating information and safety caution of the
AC adapter are on its upper and lower sides.
•
•
WARNING:
The battery pack and the camcorder with battery
installed, and the remote control with battery
installed should not be exposed to excessive heat
such as direct sunlight, fire or the Iike.
CAUTION:
The mains plug shall remain readily operable.
•
Remove the mains plug immediately if the
camcorder functions abnormally.
Caution on Replaceable lithium battery
The battery used in this device may present a fire
or chemical burn hazard if mistreated.
Do not recharge, disassemble, heat above 100°C
or incinerate.
Replace battery with Panasonic, Sanyo, Sony or
Maxell CR2025.
Danger of explosion or Risk of fire if the battery is
incorrectly replaced.
•
Dispose of used battery promptly.
•
Keep away from children.
•
Do not disassemble and do not dispose of in fire.
CAUTIONS:
•
Be sure to use the supplied AC adapter.
Do not use the supplied AC adapter with other
devices.
•
.
2
Page 3

SOME DO’S AND DON’TS ON THE SAFE
USE OF EQUIPMENT
This equipment has been designed and manufactured
to meet international safety standards but, like any
electrical equipment, care must be taken if you are to
obtain the best results and safety is to be assured.
DO read the operating instructions before you attempt
to use the equipment.
DO ensure that all electrical connections (including the
mains plug, extension leads and interconnections between
pieces of equipment) are properly made and in accordance
with the manufacturer’s instructions. Switch off and withdraw
the mains plug when making or changing connections.
DO consult your dealer if you are ever in doubt about
the installation, operation or safety of your equipment.
DO be careful with glass panels or doors on equipment.
DON’T continue to operate the equipment if you are in
any doubt about it working normally, or if it is damaged
in any way — switch off, withdraw the mains plug and
consult your dealer.
DON’T remove any fixed cover as this may expose
dangerous voltages.
DON’T leave equipment switched on when it is
unattended unless it is specifically stated that it is
designed for unattended operation or has a standby
mode. Switch off using the switch on the equipment
and make sure that your family knows how to do this.
Special arrangements may need to be made for infirm
or handicapped people.
DON’T use equipment such as personal stereos
or radios so that you are distracted from the
requirements of road safety. It is illegal to watch
television whilst driving.
DON’T listen to headphones at high volume, as such
use can permanently damage your hearing.
DON’T obstruct the ventilation of the equipment, for
example with curtains or soft furnishings. Overheating
will cause damage and shorten the life of the equipment.
DON’T use makeshift stands and NEVER fix legs with
wood screws — to ensure complete safety always fit
the manufacturer’s approved stand or legs with the
fixings provided according to the instructions.
DON’T allow electrical equipment to be exposed to
rain or moisture.
ABOVE ALL
•
NEVER let anyone especially children push
anything into holes, slots or any other opening in the
case — this could result in a fatal electrical shock;
•
NEVER guess or take chances with electrical equipment
of any kind — it is better to be safe than sorry!
Information for Users on Disposal of Old
Equipment and Batteries
Products
Battery
Notice:
The sign Pb below the symbol
for batteries indicates that this
battery contains lead.
[European Union]
These symbols indicate that the electrical and
electronic equipment and the battery with this symbol
should not be disposed of as general household
waste at its end-of-life. Instead, the products should
be handed over to the applicable collection points for
the recycling of electrical and electronic equipment as
well as batteries for proper treatment, recovery and
recycling in accordance with your national legislation
and the Directive 2002/96/EC and 2006/66/EC.
By disposing of these products correctly, you will help
to conserve natural resources and will help to prevent
potential negative effects on the environment and
human health which could otherwise be caused by
inappropriate waste handling of these products.
For more information about collection points and
recycling of these products, please contact your
local municipal office, your household waste disposal
service or the shop where you purchased the product.
Penalties may be applicable for incorrect disposal of
this waste, in accordance with national legislation.
[Business users]
If you wish to dispose of this product, please visit
our web page http://www.jvc.eu to obtain
information about the take-back of the product.
[Other Countries outside the European Union]
These symbols are only valid in the European Union.
If you wish to dispose of these items, please do so
in accordance with applicable national legislation or
other rules in your country for the treatment of old
electrical and electronic equipment and batteries.
Wireless LAN
This device may not be used for setting up outdoor
radio links in France and in some areas the RF
output power may be limited to 10 mW EIRP in the
frequency range of 2454 - 2483.5 MHz For detailed
information the end-user should contact the national
spectrum authority in France.
In Italy the end-user should apply for a license at
the national spectrum authorities in order to obtain
authorization to use the device for setting up
outdoor radio links and/or for supplying public access
to telecommunications and/or network services.
This device is a 2.4 GHz wideband transmission
system (transceiver), intended for use in all EU
member states and EFTA countries, except in
France and Italy where restrictive use applies.
(for GZ-GX1)
Make a backup of important recorded data
JVC will not be responsible for any lost data.
It is recommended to copy your important recorded
data to a disc or other recording media for storage
once every 3 months.
Hereby, JVC declares that this unit GZ-GX1 is in
compliance with the essential requirements and
other relevant provision of Directive 1999/5/EC.
For
GZ-GX1
;
A copy of the Declaration of Conformity with regard
to the R&TTE Directive 1999/5/EC can be
downloaded from the following Web sites.
http://www3.jvckenwood.com/ecdoc/
•
•
-
-
-
-
•
Be sure to keep it out of reach of young children.
It may be swallowed accidentally.
Do not place the stylus pen within the reach of
young children.
Doing so may cause blindness or other
damages to the eye.
Do not poke your eye with the stylus pen.
Scratches and damages caused by using stylus
pens besides the supplied one cannot be
guaranteed.
Be sure to use the supplied stylus pen.
Stylus Pen
.
3
Page 4

Contents
2
4
5
1
3
6
ced ab
9
8
0
7
Safety Precautions ................................. 2
Names of Parts and Functions ............... 4
Getting Started
Grip Adjustment ..................................... 5
Charging the Battery Pack ..................... 5
Inserting an SD Card .............................. 6
Clock Setting .......................................... 7
Video Quality .......................................... 7
Recording
Video Recording .................................... 8
Playback
Playing Back/Deleting Files on this Unit
Further Information
Troubleshooting/Cautions .................... 10
Recordable Time/Specifications .......... 12
For more information, please refer to the Detailed User Guide.
http://manual3.jvckenwood.com/index.html/
Names of Parts and Functions
H
USB Connector
I
HDMI Mini Connector
J
AV Connector/Headphones Connector
K
Microphone Connector
L
PLAY/REC (Playback/Recording)
Button
.
A
Flash
B
Lens/Lens Cover
C
Light
D
Zoom/Volume Lever (p. 8, 9)
E
a (Image Stabilizer) Button
F
SNAPSHOT (Still Image Recording)
Button
G
START/STOP (Video Recording)
Button (p. 8)
Switches between recording and
playback modes.
M
SILENT Button
By pressing and holding this button, the
operating sound is turned off and this
unit is set to the SILENT MODE, which
reduces the brightness of the screen.
N
M (Power) Button
Press and hold to turn the power on/off
while the LCD monitor is opened.
O
A/B (Video/Still Image) Button
Switches between video and still image
modes.
.... 9
4
Page 5
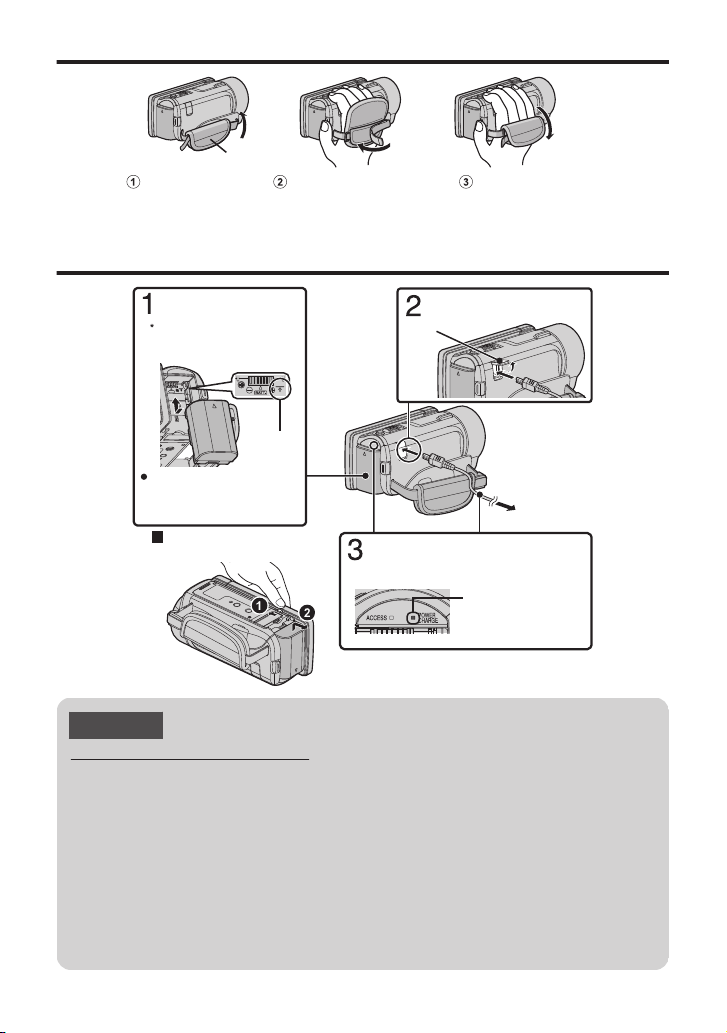
Grip Adjustment
Pad
Attach the pad
Adjust the length of the belt
Pull back the pad
(Base)
To detach the battery pack
Charging finished:
Goes out
Charging in progress:
Blinks
Charging Lamp
Plug in the power.
(110 V to 240 V)
AC Adapter
To AC Outlet
Cover
Connect the DC
connector.
Align the top of the battery
with the mark on this unit,
and slide in until the battery
clicks into place.
The battery pack is not
charged at the time of
purchase.
Attach the battery pack.
Mark
.
Charging the Battery Pack
.
CAUTION
Be sure to use JVC battery packs.
If you use any other battery packs besides JVC battery packs, safety and
0
performance cannot be guaranteed.
Charging time: Approx. 2 h 30 m (using supplied battery pack)
0
The charging time is when the unit is used at 25°C. If the battery pack is charged
0
outside the room temperature range of 10°C to 35°C, charging may take a longer
time or it may not start. The recordable and playable time may also be shortened
under some usage conditions such as at low temperature.
You can record or play back videos while the AC adapter is connected. (Battery
0
charging cannot be performed during recording or playback.)
Remove the battery when the unit is to be used for a long time. Performance
of the battery may drop if it is left attached to the unit.
5
Page 6

Inserting an SD Card
※
Turn off the power of this unit before
inserting or removing a card.
(Base)
Insert an SD card.
Open the cover.Close the LCD monitor.
Terminal
Insert a commercially available SD card before recording.
.
To remove the card
o
Push the card inward once, then pull it out straight.
NOTE
Operations are confirmed on the following SD cards.
Manufacturer Panasonic, TOSHIBA, SanDisk
Video
A
Still Image
Using SD cards (including SDHC/SDXC cards) other than those specified
0
above may result in recording failure or data loss.
This unit is not guaranteed to operate with all SD cards, even when using the ones
0
specified above. Some SD cards may not work due to specification changes, etc.
To protect the data, do not touch the terminals of the SD card.
0
When using an SDXC card, check its compatibility with the OS of your computer
0
by referring to the Detailed User Guide.
Class 4 or higher compatible SD card (2 GB)/
Class 4 or higher compatible SDHC card (4 GB to 32 GB)/
Class 4 or higher compatible SDXC card (48 GB to 64 GB)
(When recording with video quality “UXP”, Class 6 or higher is
recommended.)
When recording in progressive format (50p), Class 6 or higher is required.
SD card (256 MB to 2 GB) / SDHC card (4 GB to 32 GB) / SDXC card
B
(48 GB to 64 GB)
6
Page 7

Clock Setting
NO
YES
SET DATE/TIME!
201211000
TIMEDATE
CLOCK SETTING
1
SET
GMT
SAVE
CLOCK/AREA SETTING
Open the LCD monitor.
1
.
The unit turns on. When the LCD
0
monitor is closed, the unit turns off.
Tap “YES” when “SET DATE/TIME!”
2
is displayed.
.
Set the date and time.
3
.
When the year, month, day, hour, or minute
0
item is tapped, “∧” and “∨” will be displayed.
Tap “∧” or “∨” to adjust the value.
Repeat this step to input the year, month, day,
0
hour, and minute.
After setting the date and time, tap “SET”.
4
Select the region where you live and
5
tap “SAVE”.
The city name and time difference are
0
displayed.
Tap “<” or “>” to select the city name.
0
.
Video Quality
By default, it is set to XP.
To change the setting
o
Tap “MENU”.
A
Tap “MENU”.
B
Tap “VIDEO QUALITY”.
C
Tap the desired video quality.
D
High Definition UXP Higher video quality
XP
SP
EP
*1 For the approximate video recording time, refer to p. 12.
*2 Please refer to the “Detailed User Guide” when recording in progressive format (50p).
More recording time
.
7
Page 8
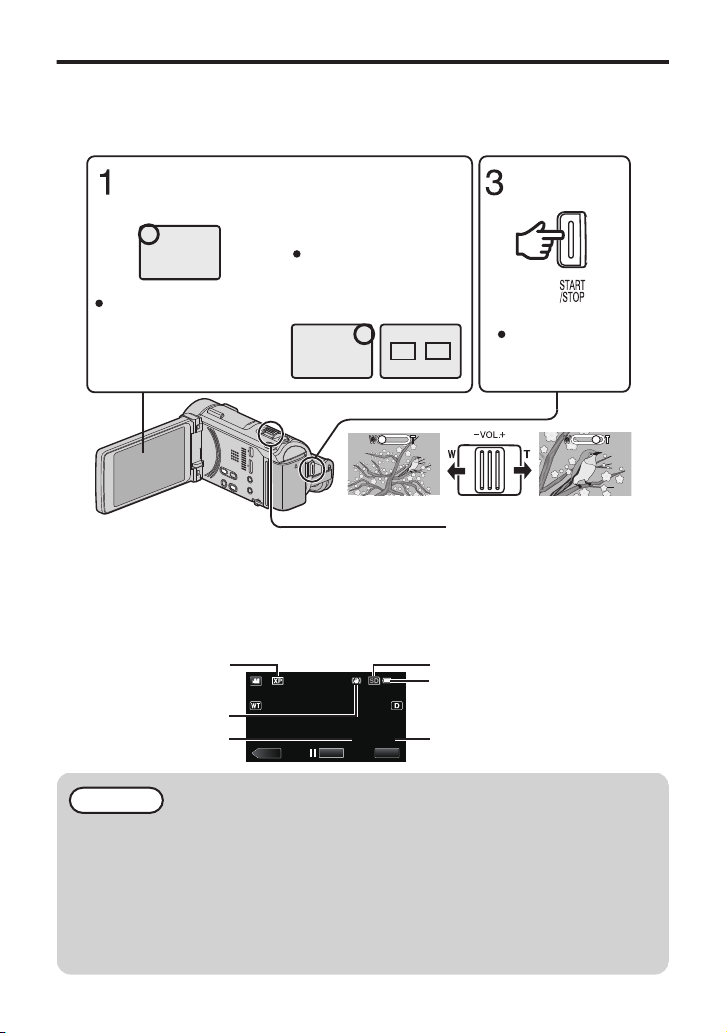
Video Recording
(Telephoto)
(Wide angle)
Zooming
Press again to
stop.
Start recording.
H
P
A
C
A
2
Check if the recording
mode is A video.
Check if the
recording mode is C
Intelligent Auto.
If the mode is H Manual,
tap H on the touch
screen, then tap P to
switch.
If the mode is B still image,
tap B on the touch screen,
then tap A to switch.
MENU
≪PLAY
REC
0:00:00 [0:54]
Image Stabilizer
Scene Counter
Battery Indicator
Remaining Recording Time
Video Quality
Recording Media
You can record without worrying about the setting details by using the Intelligent Auto mode. Settings
such as exposure and focus will be adjusted automatically to suit the shooting conditions.
In case of specific shooting scenes such as person etc., its icon is displayed on the screen.
0
Before recording an important scene, it is recommended to conduct a trial recording.
.
0
The mode can also be switched between video and still image by pressing the A/B
button on this unit.
You can also tap 6 on the touch screen to record. To stop recording, tap
0
In addition, you can also tap D to zoom.
Indications during video recording
o
.
NOTE
The estimated recording time of the supplied battery pack is approximately 40 minutes.
0
Do not remove the battery pack, AC adapter, or SD card when the access lamp
0
is lighted. The recorded data may become unreadable.
This unit turns itself off automatically to conserve power when it is not operated
0
for 5 minutes. (only when using the battery pack)
The angle of view may change when the image stabilizer is turned on or off.
0
Videos recorded in 50p mode (select “50p” in “SYSTEM SELECT”) can be
0
played back only by the AVCHD Progressive compatible devices.
7
.
8
Page 9
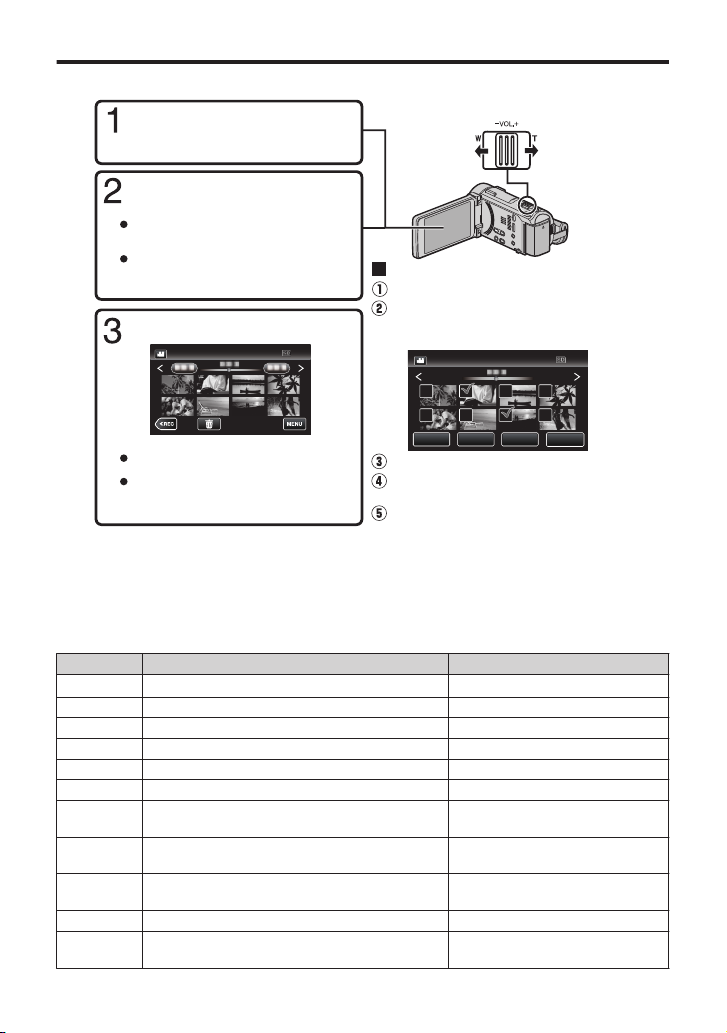
Playing Back/Deleting Files on this Unit
The mode can also be switched by
pressing the PLAY/REC button on
this unit.
SETREL ALLSEL ALL
DELETE
QUIT
Tap on the files to delete.
Ta p A.
To delete unwanted files
Turn up the
volume
Turn down
the volume
Volume adjustment during playback
Ta p u to return to the video
index screen.
Tap on the file to play back.
Tap “SET”.
A delete mark appears on the selected file.
To remove the delete mark, tap again.
Ta p E to return to the recording
mode.
Ta p F on the touch screen
to select the playback mode.
Ta p e to pause playback.
Tap “OK”.
Tap “EXECUTE” when the
confirmation message appears.
Ta p A or B to select the video
or still image mode.
Select and play back the recorded videos or still images from an index screen (thumbnail display).
.
When playing back videos recorded in 50p mode (select “50p” in “SYSTEM SELECT”),
0
please refer to the “Detailed User Guide”.
To capture a still image during playback
o
Pause the playback and press the SNAPSHOT button.
Usable operation buttons during playback
o
d / e
g
h
i
j
Playback/pause Start/pause slideshow
Stop (returns to index screen) Stop (returns to index screen)
u
Advances to the next video Advances to the next still image
Returns to the beginning of the scene
Forward search Reverse search Forward slow-motion / Press and hold to
k
start slow playback
Reverse slow-motion / Press and hold to
l
start reverse slow playback
During video playback During still image playback
R
S
T
Returns to the previous still image
-
-
- Rotates 90 degrees
counterclockwise
- Rotates 90 degrees clockwise
-
Continuous playback of images
taken by continuous shooting
9
Page 10
Troubleshooting/Cautions
Battery Pack
The supplied battery pack is a
lithium-ion battery. Before using
the supplied battery pack or an
optional battery pack, be sure
to read the following cautions:
•
To avoid hazards
...
do not burn.
...
do not short-circuit the terminals. Keep it away
from metallic objects when not in use. When
transporting, carry the battery in a plastic bag.
...
do not modify or disassemble.
...
do not expose the battery to temperatures
exceeding 60°C, as this may cause the
battery to overheat, explode or catch fire.
...
use only specified chargers.
•
To prevent damage and prolong service life
...
do not subject to unnecessary shock.
...
charge within the temperature range of 10°C
to 35°C. Cooler temperatures
require longer charging time, or in some cases
stop charging at all.
Warmer temperatures prevent complete
charging, or in some cases stop charging at all.
...
store in a cool, dry place. Extended exposure
to high temperatures will increase natural
discharge and shorten service life.
...
keep a 30% battery level (
X) if the battery pack
is not to be used for a long period of time.
In addition, fully charge and then fully discharge
the battery pack every 6 months, then continue
to store it at a 30% battery level (
X).
...
remove from charger or powered unit when not
in use, as some machines use current even
when switched off.
...
do not drop or subject to strong impact.
Recording Medium
•
Be sure to follow the guidelines below
to prevent corruption or damage to your
recorded data.
•
Do not bend or drop the recording medium,
or subject it to strong pressure, jolts or
vibrations.
•
Do not splash the recording medium with water.
•
Do not use, replace, or store the recording
medium in locations that are exposed to
strong static electricity or electrical noise.
•
Do not turn off the camcorder power or
remove the battery or AC adapter during
shooting, playback, or when otherwise
accessing the recording medium.
•
Do not bring the recording medium near
objects that have a strong magnetic field or
that emit strong electromagnetic waves.
•
Do not store the recording medium in
locations with high temperature or high humidity.
•
Do not touch the metal parts.
•
When formatting or erasing data using
the camcorder, only the file administration
information is changed. The data is not
completely erased from the recording medium.
If you want to completely erase all of the data,
we recommend either using commercially
available software that is specially designed for
that purpose, or by physically destroying the
camcorder with a hammer etc.
LCD Monitor
•
To prevent damage to the LCD monitor,
DO NOT
... push it strongly or apply any shocks.
... place the camcorder with LCD monitor on the
bottom.
•
To prolong service life
... avoid rubbing it with coarse cloth.
Troubleshooting
If the above do not solve the problem, consult
your nearest JVC dealer or JVC service center.
Remove the AC adapter and battery pack from
this unit, reattach them, open the LCD monitor
and this unit powers on automatically.
Turn off the power. (Close the LCD monitor.)
In such a case, reset the unit.
This unit is a microcomputer-controlled device.
Electrostatic discharge, external noise and
interference (from a TV, a radio, etc.) might
prevent it from functioning properly.
If you have difficulties operating the unit, refer
to the detailed descriptions in the “Detailed
User Guide”.
Refer to the “Troubleshooting” section in the
“Detailed User Guide”.
If you encounter problems with this unit, check the
following before requesting service.
http://manual3.jvckenwood.com/index.html/
1.
A
B
2.
3.
•
While the LCD monitor screen has more than
99.99% effective pixels, 0.01% of the pixels
may be bright spots (red, blue, green) or dark
spots. This is not a malfunction. The spots will
not be recorded.
Terminals
.
10
Page 11

Main Unit
•
To prevent the unit from dropping,
•
Fasten the grip belt securely.
•
When using the camcorder with a tripod,
attach the camcorder to the tripod securely.
If the camcorder drops, you may be injured
and the camcorder may be damaged.
When a child uses the unit, there must be
parental guidance.
•
For safety, DO NOT
... open the camcorder’s chassis.
... disassemble or modify the unit.
...
...
...
...
...
...
...
allow inflammables, water or metallic objects
to enter the unit.
remove the battery pack or disconnect the
power supply while the power is on.
leave the battery pack attached when the
camcorder is not in use.
place naked flame sources, such as lighted
candles, on the apparatus.
expose the apparatus to dripping or splashing.
leave dust or metal objects adhered to the
power plug or an AC wall outlet.
insert any objects in the camcorder.
•
Avoid using the unit
... in places subject to excessive humidity or dust.
... in places subject to soot or steam such as near
a cooking stove.
... in places subject to excessive shock or vibration.
... near a television set.
... near appliances generating strong magnetic
or electric fields (speakers, broadcasting
antennas, etc.).
... in places subject to extremely high (over 40°C)
or extremely low (under 0°C) temperatures.
•
DO NOT leave the unit
... in places of over 50°C .
... in places where humidity is extremely low
(below 35 %) or extremely high (above 80 %).
... in direct sunlight.
... in a closed car in summer.
... near a heater.
... in high places such as on a TV. Leaving the unit
in high places while a cable is connected may
result in a malfunction if the cable is caught and
the unit falls onto the floor.
•
To protect the unit, DO NOT
... allow it to become wet.
... drop the unit or strike it against hard objects.
... subject it to shock or excessive vibration during
transportation.
... keep the lens directed at extremely bright
objects for long periods.
... expose the lens to direct sunlight.
... swing it excessively when using the hand strap.
... swing the soft camera case excessively when
the camera is inside it.
... store the camcorder in a dusty or sandy area.
Dear Customer, [European Union]
This apparatus is in conformance with the valid
European directives and standards regarding
electromagnetic compatibility and electrical
safety.
European representative of JVC KENWOOD
Corporation is:
JVC Technical Services Europe GmbH
Postfach 10 05 04
61145 Friedberg
Germany
Remember that this unit is intended for
private consumer use only.
Any commercial use without proper permission
is prohibited. (Even if you record an event such
as a show, performance or exhibition for personal
enjoyment, it is strongly recommended that you
obtain permission beforehand.)
Trademarks
•
AVCHD Progressive/AVCHD and AVCHD
Progressive/AVCHD logo are trademarks
of Panasonic Corporation and Sony Corporation.
•
x.v.Colour™ is a trademark of
Sony Corporation.
•
HDMI
is a trademark of HDMI
Licensing, LLC.
•
Manufactured under license from Dolby
Laboratories. Dolby and the double-D symbol
are trademarks of Dolby Laboratories.
•
Windows® is either registered trademark or
trademark of Microsoft Corporation in the
United States and/or other countries.
•
Macintosh is a registered trademark of Apple Inc.
•
iMovie, iPhone and iPhoto are trademarks of
Apple Inc., registered in the U.S. and other
countries.
•
YouTube™, the YouTube logo and Android™
are trademarks and/or registered trademarks
of Google Inc.
•
Intel, Intel Core, and Pentium are trademarks or
registered trademarks of Intel Corporation or its
subsidiaries in the United States and other countries.
•
Wi-Fi, Wi-Fi logo, Wi-Fi CERTIFIED, Wi-Fi
CERTIFIED logo, WPA, and WPA2 are trademarks
or registered trademarks of Wi-Fi Alliance.
•
QR Code is registered trademark of DENSO WAVE
INCORPORATED.
•
Other product and company names included in
this instruction manual are trademarks and/or
registered trademarks of their respective holders.
•
Marks such as ™ and ® have been omitted in this
manual.
When the temperature of this unit rises during
recording, 7 will turn yellow to alert.
The power may turn off to protect the circuit if
the temperature of this unit rises too much.
While this unit may be used with the LCD
monitor reversed and closed, the temperature
rises more easily. Leave the LCD monitor open
when using this unit in places exposed to direct
sunlight or high temperatures.
.
11
Page 12

Recordable Time/Specifications
Approximate Video Recording Time
Quality
50p 15 m 35 m 1 h 10 m 2 h 30 m 3 h 50 m 5 h
UXP 20 m 40 m 1 h 20 m 2 h 50 m 4 h 10 m 5 h 40 m
XP 30 m 1 h 2 h 4 h 6 h 8 h 10 m
SP 40 m 1 h 20 m 2 h 50 m 5 h 50 m 8 h 30 m 11 h 30 m
EP 1 h 40 m 3 h 30 m 7 h 10 m 14 h 40 m 21 h 30 m 28 h 50 m
The approximate recording time is only a guide. The actual recording time may shorten
0
depending on the shooting environment.
Camera
Power supply Using AC adapter: DC 5.2 V, Using battery pack: DC 3.6 V
Power consumption 3.7 W (when “LIGHT” is set to “OFF” and “MONITOR
Dimensions 57 mm x 63 mm x 129 mm
Mass Approx. 360 g (camera only),
AC Adapter (AP-V30M)
Power supply AC 110 V to 240 V, 50 Hz/60 Hz
Output DC 5.2 V, 1.8 A
Dimensions 50 mm x 29 mm x 100 mm
Mass Approx. 112 g
4 GB 8 GB 16 GB 32 GB 48 GB 64 GB
BRIGHTNESS” is set to “3” (standard))
Rated Current Consumption: 1.8 A
(W x H x D: excluding grip belt)
Approx. 400 g (including supplied battery pack)
(W x H x D: excluding cord and AC plug)
SDHC/SDXC Card
The specifications and appearance of this product are subject to changes for
further improvement without prior notice.
*LYT2458-001A-M*
©2012 JVC KENWOOD Corporation
12
0112HOH-SW-VM
EK
 Loading...