

Page 1

LYT2488-001A-M
EN
Live Streaming Camera
GV-LS2
U
ENGLISH
FRANÇAIS
ESPAÑOL
PORTUGUÊS
Basic User Guide
For Future Reference:
Enter the Model No. (located on the bottom
of the camera) and Serial No. (located on the
battery pack mount of the camera) below.
Model No.
Serial No.
Dear Customers
Thank you for purchasing this JVC product.
Before use, please read the Safety Precautions and Cautions on p.2 and p.4 to ensure
use of this product.
Detailed User Guide
This product is provided with "Basic User Guide" (this manual) and "Detailed User
Guide". For more details on operating this product, please refer to the "Detailed User
Guide" at the following website.
http://manual3.jvckenwood.com/
■
Contents
Safety Precautions ..............................2
Cautions ...............................................4
Verifying the Accessories ...................6
Component Names and Functions ....7
Preparation before Use .......................9
Attaching/Removing Devices ...........11
Using the Camera ..............................12
Specifi cations ....................................14
Page 2

Safety Precautions
The lightning fl ash with arrowhead symbol, within
an equilateral triangle, is intended to alert the user
to the presence of uninsulated "dangerous voltage"
within the product's enclosure that may be of
suffi cient magnitude to constitute a risk of electric
shock to persons.
The exclamation point within an equilateral triangle
is intended to alert the user to the presence of
important operating and maintenance (servicing)
instructions in the literature accompanying the
appliance.
WARNING: TO PREVENT FIRE OR SHOCK
HAZARD, DO NOT EXPOSE THIS UNIT TO
RAIN OR MOISTURE.
NOTES:
• The rating plate and safety caution are on the
bottom and/or the back of the main unit.
• The serial number plate is on the battery pack
mount.
• The rating information and safety caution of the AC
adapter are on its upper and lower sides.
For USA-California Only
This product contains a CR Coin Cell Lithium
Battery which contains Perchlorate Material
– special handling may apply.
See www.dtsc.ca.gov/hazardouswaste/perchlorate
WARNING:
The battery pack and the camcorder with battery
installed should not be exposed to excessive heat
such as direct sunlight, fi re or the like.
Make a backup of important recorded data
JVC will not be responsible for any lost data.
It is recommended to copy your important recorded
data to a disc or other recording media for storage
once every 3 months.
When the equipment is installed in a cabinet or on
a shelf, make sure that it has suffi cient space on all
sides to allow for ventilation (10 cm (3-15/16") or
more on both sides, on top and at the rear).
Do not block the ventilation holes.
(If the ventilation holes are blocked by a newspaper,
or cloth etc. the heat may not be able to get out.)
No naked fl ame sources, such as lighted candles,
should be placed on the apparatus.
When discarding batteries, environmental problems
must be considered and the local rules or laws
governing the disposal of these batteries must be
followed strictly.
The apparatus shall not be exposed to dripping or
splashing.
Do not use this equipment in a bathroom or places
with water.
Also do not place any containers fi lled with water
or liquids (such as cosmetics or medicines, fl ower
vases, potted plants, cups etc.) on top of this unit. (If
water or liquid is allowed to enter this equipment, fi re
or electric shock may be caused.)
Do not point the lens directly into the sun. This
can cause eye injuries, as well as lead to the
malfunctioning of internal circuitry. There is also a risk
of fi re or electric shock.
CAUTION!
The following notes concern possible physical
damage to this unit and to the user.
Do not use a tripod on unsteady or unlevel surfaces.
It could tip over, causing serious damage to the unit.
CAUTION!
Connecting cables (Audio/Video, etc.) to this unit
and leaving it on top of the TV is not recommended,
as tripping on the cables will cause this unit to fall,
resulting in damage.
CAUTION:
The mains plug shall remain readily operable.
• Remove the mains plug immediately if the
camcorder functions abnormally.
CAUTION:
• Dispose of used batteries according to the
instructions.
• Risk of explosion if battery is replaced by an
incorrect type.
WARNING
For PLUGGABLE EQUIPMENT, the socket outlet
shall be installed near the equipment and shall be
easily accessible.
For more details, refer to the Detailed User Guide at http://manual3.jvckenwood.com/
2
Page 3

CAUTION:
To maintain compliance with FCC' s RF exposure
guidelines, use only the supplied antenna.
Unauthorized antenna, modifi cation, or attachments
could damage the transmitter and may violate FCC
regulations.
This device complies with Part 15 of the FCC Rules.
Operation is subject to the following two conditions:
(1) This device may not cause harmful interference.
(2) This device must accept any interference
received, including interference that may Cause
undesired operation.
IMPORTANT SAFETY INSTRUCTIONS
1. Read these instructions.
2. Keep these instructions.
3. Heed all warnings.
4. Follow all instructions.
5. Do not use this apparatus near water.
6. Clean only with dry cloth.
7. Do not block any ventilation openings. Install in
accordance with the manufacturer' s instructions.
8. Do not install near any heat sources such as
radiators, heat registers, stoves, or other apparatus
(including amplifi ers) that produce heat.
9. Protect the power cord from being walked on
or pinched particularly at plugs, convenience
receptacles, and the point where they exit from the
apparatus.
10. Only use attachments/accessories specifi ed by the
manufacturer.
11. Use only with the cart,
stand, tripod, bracket,
or table specifi ed by the
manufacturer, or sold with
the apparatus.
When a cart is used, use
caution when moving the
cart/apparatus combination
to avoid injury from tip-over.
12. Unplug this apparatus during lightning storms or
when unused for long periods of time.
13. Refer all servicing to qualifi ed service personnel.
Servicing is required when the apparatus has been
damaged in any way, such as power-supply cord or
plug is damaged, liquid has been spilled or objects
have fallen into the apparatus, the apparatus has
been exposed to rain or moisture, does not operate
normally, or has been dropped.
Remember that this unit is intended for
private consumer use only.
Any commercial use without proper permission is
prohibited. (Even if you record an event such as
a show, performance or exhibition for personal
enjoyment, it is strongly recommended that you
obtain permission beforehand.)
Trademarks
• AVCHD and AVCHD logo are trademarks of
Panasonic Corporation and Sony Corporation.
• Manufactured under license from Dolby
Laboratories. Dolby and the double-D symbol are
trademarks of Dolby Laboratories.
• Android™ is a trademark of Google Inc.
• Windows® is either registered trademark or
trademark of Microsoft Corporation in the United
States and/or other countries.
• iPod, iPhone, iMovie and iPhoto are trademarks
of Apple Inc., registered in the U.S. and other
countries.
• Intel, Intel Core, and Pentium are trademarks
or registered trademarks of Intel Corporation or
its subsidiaries in the United States and other
countries.
• Wi-Fi, Wi-Fi logo, Wi-Fi CERTIFIED, Wi-Fi
CERTIFIED logo, WPA, and WPA2 are trademarks
or registered trademarks of Wi-Fi Alliance.
• Other product and company names included in this
instruction manual are trademarks and/or registered
trademarks of their respective holders. Marks such
®
as ™ and
have been omitted in this manual.
When using the AC adapter in areas other
than the USA
The provided AC adapter features automatic voltage
selection in the AC range from 110 V to 240 V.
USING HOUSEHOLD AC PLUG ADAPTER
In case of connecting the unit's power cord to an AC
wall outlet other than American National Standard
C73 series type use an AC plug adapter, called a
"Siemens Plug", as shown.
For this AC plug adapter, consult your nearest JVC
dealer.
Plug Adapter
• Remove the AC adapter from the AC wall outlet
when not in use.
• Do not leave dust or metal objects adhered to the
If this symbol is shown, it is only valid in
the European Union.
For more details, refer to the Detailed User Guide at http://manual3.jvckenwood.com/
AC wall outlet or AC adapter (power/DC plug).
• Be sure to use the supplied AC adapter.
• Do not use the supplied AC adapter with other
devices.
3
Page 4

Cautions
Recording Medium
• Be sure to follow the guidelines below
to prevent corruption or damage to your
recorded data.
• Do not bend or drop the recording medium, or
subject it to strong pressure, jolts or vibrations.
• Do not splash the recording medium with water.
• Do not use, replace, or store the recording
medium in locations that are exposed to strong
static electricity or electrical noise.
• Do not turn off the camcorder power or remove
the battery or AC adapter during shooting,
playback, or when otherwise accessing the
recording medium.
• Do not bring the recording medium near objects
that have a strong magnetic field or that emit
strong electromagnetic waves.
• Do not store the recording medium in locations
with high temperature or high humidity.
• Do not touch the metal parts.
• When formatting or erasing data using the
camcorder, only the fi le administration information
is changed. The data is not completely erased from
the recording medium.If you want to completely
erase all of the data, we recommend either using
commercially available software that is specially
designed for that purpose, or by physically
destroying the camcorder with a hammer etc.
For more details, refer to the Detailed User Guide at http://manual3.jvckenwood.com/
4
Main Unit
• For safety, DO NOT
... open the camcorder's chassis.
... disassemble or modify the unit.
... allow infl ammables, water or metallic objects to
enter the unit.
... remove the battery pack or disconnect the
power supply while the power is on.
... leave the battery pack attached when the
camcorder is not in use.
... place naked fl ame sources, such as lighted
candles, on the apparatus.
... expose the apparatus to dripping or splashing.
... leave dust or metal objects adhered to the
power plug or an AC wall outlet.
... insert any objects in the camcorder.
• Avoid using the unit
... in places subject to excessive humidity or dust.
... in places subject to soot or steam such as near
a cooking stove.
... near appliances generating strong magnetic
or electric fi elds (speakers, broadcasting
antennas, etc.).
... in places subject to extremely high (over 40°C
or 104°F) or extremely low (under 0°C or 32°F)
temperatures.
• DO NOT leave the unit
... in places of over 50°C (122°F).
... in places where humidity is extremely low
(below 35%) or extremely high (above 80%).
... in direct sunlight.
... in a closed car in summer.
... near a heater.
... in high places such as on a TV. Leaving the unit
in high places while a cable is connected may
result in a malfunction if the cable is caught and
the unit falls onto the fl oor.
• To protect the unit, DO NOT
... allow it to become wet.
... drop the unit or strike it against hard objects.
... subject it to shock or excessive vibration during
transportation.
... keep the lens directed at extremely bright
objects for long periods.
... expose the lens to direct sunlight.
... swing it excessively when using the hand strap.
... swing the soft camcorder case excessively
when the camcorder is inside it.
... store the camcorder in a dusty or sandy area.
• To prevent the unit from dropping,
• When using the camcorder with a tripod, attach
the camcorder to the tripod securely.
If the camcorder drops, you may be injured and the
camcorder may be damaged.
When a child uses the unit, there must be parental
guidance.
Page 5

Battery Pack (optional)
The supplied battery pack is a
lithium-ion battery. Before using
the supplied battery pack or an
optional battery pack, be sure to
read the following cautions:
• To avoid hazards
...
burn.
do not
...
short-circuit the terminals. Keep it
do not
away from metallic objects when not in use.
When transporting, carry the battery in a
plastic bag.
...
modify or disassemble.
do not
...
expose the battery to temperatures
do not
exceeding 60°C (140°F), as this may cause
the battery to overheat, explode or catch fi re.
... use only specifi ed chargers.
• To prevent damage and prolong
service life
... do not subject to unnecessary shock.
... charge within the temperature range of 10°C
to 35°C (50°F to 95°F). Cooler temperatures
require longer charging time, or in some
cases stop charging at all.
Warmer temperatures prevent complete
charging, or in some cases stop charging at
all.
... store in a cool, dry place. Extended exposure
to high temperatures will increase natural
discharge and shorten service life.
... keep a 30% battery level ( ) if the battery
pack is not to be used for a long period of
time.
In addition, fully charge and then fully
discharge the battery pack every 6 months,
then continue to store it at a 30% battery
level ( ).
... remove from charger or powered unit when
not in use, as some machines use current
even when switched off.
... do not drop or subject to strong impact.
ATTENTION:
The product you have purchased
is powered by a rechargeable
battery that is recyclable.
Please call 1-800-8-BATTERY
for information on how to recycle
this battery.
(USA and Canada only)
Terminals
Declaration of Conformity
Model Number : GV-LS2
Trade Name : JVC
Responsible party : JVC AMERICAS CORP.
Address : 1700 Valley Road Wayne, N. J. 07470
Telephone Number : 973-317-5000
This device complies with Part 15 of FCC
Rules. Operation is subject to the following
two conditions: (1) This device may not cause
harmful interference, and (2) this device must
accept any interference received, including
interference that may cause undesired operation.
Changes or modifi cations not approved by JVC
could void the user's authority to operate the
equipment. This equipment has been tested and
found to comply with the limits for a Class B digital
device, pursuant to Part 15 of the FCC Rules.
These limits are designed to provide reasonable
protection against harmful interference in a
residential installation. This equipment generates,
uses, and can radiate radio frequency energy
and, if not installed and used in accordance with
the instructions, may cause harmful interference
to radio communications. However, there is no
guarantee that interference will not occur in a
particular installation. If this equipment does cause
harmful interference to radio or television reception,
which can be determined by turning the equipment
off and on, the user is encouraged to try to correct
the interference by one or more of the following
measures: Reorient or relocate the receiving
antenna. Increase the separation between the
equipment and receiver.
Connect the equipment into an outlet on a
circuit different from that to which the receiver is
connected.
Consult the dealer or an experienced radio/TV
technician for help.
This Class B digital apparatus complies with
Canadian ICES-003.
Cet appareil numérique de la classe B est
conforme à la norme NMB-003 du Canada.
For more details, refer to the Detailed User Guide at http://manual3.jvckenwood.com/
5
Page 6

Verifying the Accessories
AC Adapter *
UIA324-12
LAN Cable
Basic User Guide
(This manual)
*1 Use the supplied conversion cable and AC cord when connecting the AC adapter.
*2 Attach this cover to rear of the camera when carrying the unit, etc.
● Purchase an SD card separately.
Operation confirmed with the following SD cards.
Manufacturer
Video
1
Panasonic
TOSHIBA
SanDisk
Class 4 or higher compatible SD card (2 GB)
Class 4 or higher compatible SDHC card (4 GB to 32 GB)
Class 4 or higher compatible SDXC card (48 GB to 64 GB)
(When recording with video quality "UXP", Class 6 or higher
is recommended.)
AC cord
Software CD-ROM
Conversion Cable
Rear Cover*
2
• Using SD cards (including SDHC/SDXC cards) other than those specified above
may result in recording failure or data loss.
• Not all SD card operations are guaranteed. Some operations may not be
performed due to specification changes, etc.
• Do not touch the terminals of the SD card. Doing so may cause data loss.
●When using the AC adapter overseas, use a commercially available
conversion plug appropriate for the country or region.
For more details, refer to the Detailed User Guide at http://manual3.jvckenwood.com/
6
Page 7

Component Names and Functions
●Camera
1
<Front>
2
3
4
6
7
5
<Back>
RESET
DIRECT WLAN
ETHERENT
80
9
LAN(OFF)
PLUG IN POWER
-
MIC
DC
=
AV
~
<Top> <Bottom>
!
@
%
#
$
1
Internal mic:
sounds coming through this mic when
no external mic is connected.
2
Lens:
3
LED light:
places.
4
Information lamp:
indicate the recording status, etc.
5
Camera sensor:
balance automatically.
6
[RESET] button:
settings. Press and hold this button
with the tip of a paper clip or the like
when the AC adapter is connected.
7
LAN terminal:
computer or router via a LAN cable.
8
Network mode switch:
network mode.
9
Battery terminal:
separately purchased battery pack.
(BN-VG139U)
For more details, refer to the "Detailed
Transmits/Records
Do not touch it directly.
Works as a light in dark
Can be lit up to
Adjusts the white
Resets the network
Connects to a
Switches the
Connect a
User Guide."
0
SD card slot:
For compatible cards,
see p.6.
-
[MIC] terminal:
Connect an external
mic.
=
[DC] connector:
Connect the
supplied AC adapter.
~
[AV] connector:
Connect a separately
purchased AV cord.
!
Hot shoe:
Mount camera accessories
or the like.
@
Shooting button:
Starts transmitting/
recording. To stop, press this button
again.
#
WPS button:
Press and hold to
connect wirelessly (Wi-Fi) in WPS
mode for the fi rst time.
$
Power button:
Press and hold to
power on. To power off, press and
hold this button again.
%
Tripod mounting hole:
Mount a
separately purchased tripod.
For more details, refer to the Detailed User Guide at http://manual3.jvckenwood.com/
7
Page 8

●Pantilter
<Front>
3
4
12
50
<Back>
PLUG IN
MICPOWER
AV DCEXTEND
9
<Bottom>
-
1
Power button:
Press and hold to
power on. To power off, press and
hold this button again.
2
Power lamp:
Lights up when powered
on.
3
Tilt lock switch ([TILT LOCK]):
the pantilter before moving.
4
Camera fi xing screw:
Secures the
camera to the pantilter.
5
Fixing hole for drop prevention:
Secure the entire unit with a binder or
the like.
Lock
678
6
[MIC] terminal:
Connect an external
mic.
7
[AV] connector:
Connect a separately
purchased AV cord.
8
[EXTEND] terminal:
Not used. (for
future use.)
9
Pan lock switch ([PAN LOCK]):
the pantilter before moving.
0
[DC] connector:
Connect the
supplied AC adapter.
-
Tripod mounting hole:
Mount a
separately purchased tripod.
Lock
For more details, refer to the Detailed User Guide at http://manual3.jvckenwood.com/
8
Page 9

Preparation before Use
Connecting the Camera to
Your Computer
To set up the camera, fi rst connect it to
your computer.
Required operating environment
Browser: Internet Explorer 9 or later
1 Attach the supplied LAN cable to
the camera.
MIC
DIRECT WLAN
LAN(OFF)
ETHERENT
PLUG IN POWER
DC
AV
MIC
DIRECT WLAN
PLUG IN POWER
DC
LAN(OFF)
AV
RESET
RESET
ETHERENT
2 Connect the camera to your
computer via the supplied LAN
cable.
3 Set the network mode switch to
[LAN•OFF].
DIRECT WLAN LAN(OFF)
• If the network mode switch is set to
[DIRECT] or [WLAN], the LAN terminal
cannot be used.
• While the power is on, switching the
network mode switch does not change
the setting.
• Do not use cables (AV cable,
microphone, etc.) with L-shaped
connecters.
• For other ways of connecting, see
"Detailed User Guide".
Connecting the AC Adapter
Connect the supplied AC adapter to the
DC connector of the camera.
MIC
DIRECT WLAN
PLUG IN POWER
DC
LAN(OFF)
AV
RESET
ETHERENT
AC adapter Conversion cable
Configuring the Camera Settings
Appropriate for Your Needs
Specify the video format, zoom, etc.
appropriate for your needs. Confi gure the
settings on a browser.
Logging in as an administrator
1 If the power is not turned on, press
and hold the [POWER] button to
power on.
The [POWER] button starts blinking.
Wait until it stops blinking and stays lit.
2 Set the Network Setting of the
computer as follows.
IP Address
192.168.1.254 (except 192.168.1.100)
(example) 192.168.1.23
Subnet mask
Make a note of the current network
settings before operation for resetting
the network setting.
3 Start Internet Explorer, and enter
"http://192.168.1.100:8000" in the
address bar.
: 192.168.1.2 to
: 255.255.255.0
For more details, refer to the Detailed User Guide at http://manual3.jvckenwood.com/
9
Page 10

4 Enter the user name and password
of the administrator.
Initial setting: USERNAME "root",
PASSWORD "password".
If login is successful, the setup screen
appears.
Changing the settings
Select "NETWORK", "CAMERA/PAN
TILTER", or "MANAGE" in the left window
of the screen to change the settings.
Click "+" on the left of each item to show
the sub categories.
●"NETWORK"
• "WIRED NETWORK"
For establishing a wired connection.
• "WIRELESS NETWORK"
For connecting wirelessly.
• "MONITORING SETTINGS"
For connecting via a network.
• "STREAM SETTINGS"
Format for transmitting/recording.
●"CAMERA/PAN TILTER"
• "CAMERA SETTINGS"
Camera settings such as zoom.
• "PAN TILTER SETTINGS"
Pantilter settings such as angle.
●"MANAGE"
• "COMMON SETTINGS"
Change the password of the
administrator, set the clock, etc.
• "MEDIA MANAGEMENT"
Format the SD card.
• "TURN OFF CAMERA"
Turn off the power of the camera.
* The power cannot be turned on via
the browser.
Connecting the AC Adapter to
the pantilter
For more details about attaching the
pantilter, refer to page 11.
Connect the supplied AC adapter to the
DC connector of the pantilter.
• Unlock the pantilter before
RESET
DIRECT WLAN
ETHERENT
PLUG IN
MIC
AV DCEXTEND
POWER
(page 8)
MIC
PLUG IN POWER
DC
LAN(OFF)
AV
connecting the AC adapter.
• Remove all tape from the pantilter.
AC adapter Conversion cable
• After connecting the AC adapter, the
power turns on and the pantilter moves
automatically for position adjustment.
The pantilter moves everytime the unit
is turned on.
• The power lamp blinks when the
position adjustment fails. Turn off
the unit and turn it on again for
readjustment.
• When the pantilter is not used, connect
the AC adapter to the camera itself.
For details, refer to the "Detailed User
Guide".
For more details, refer to the Detailed User Guide at http://manual3.jvckenwood.com/
10
Page 11

Attaching/Removing Devices
Attaching the Pantilter
The supplied pantilter allows you to pan (move horizontally) and tilt (move vertically)
the camera using your computer or smartphone.
1 Push the camera straight down.
Direction (Front)
• Remove all cables before attaching the pantilter.
• Check the position of the hole on the bottom side when attaching the pantilter.
• Attach the pantilter firmly so as not to leave a gap.
• Hold the pantilter (not the camera) when carrying the unit.
• When using the pantilter, connect the AC adapter, AV cord, and external mic to the
pantilter.
• The pantilter does not work properly when placed on a slant, upside down or on its
side.
Inserting/Removing an SD card
Insert a commercially available SD card before recording.
●Inserting
2 Screw and fix the camera.
PLU
MIC
G
IN
P
O
WE
R
AV
E
X
TE
N
D
D
C
●Removing
Insert the card straight with the terminal
facing to the right.
Push the card in once, and pull it out
straight.
• Turn off the power before inserting/removing the SD card.
• Make sure that the write protect switch of the SD card is not set to LOCK (writing
protected).
• Some cards need to be formatted with this unit. For details, refer to the "Detailed
User Guide".
For more details, refer to the Detailed User Guide at http://manual3.jvckenwood.com/
11
Page 12

Using the Camera
Viewing on a Browser
Access "http://192.168.1.100:80" by
Internet Explorer.
If you log in using the user name and
password of the administrator or those
set in "MONITORING SETTINGS" (p.10),
you can watch a video on a browser.
• To watch a video via a network, the
"MONITORING SETTINGS" (p.10) are
required. Entering the user name and
password of our DDNS service allows
you quick access.
To acquire a DDNS service account,
visit our website
https://dd3.jvckenwood.com/user/
<Example of browser>
4
1
2
3
1
Switch the display. (Monitor:
Tab:
Camera image and control panel,
File: Images on the SD card, Status:
Message history)
2
Control panel:
pantilter.
3
Message Bar:
message, etc.
4
Logout:
5
Status:
such as the remaining battery power.
6
Stream settings:
settings.
Controls the camera/
Displays an error
Click this to log out.
Indicates the current status
Displays the stream
5
6
Installing the Supplied Software
"JVC CAM Control" allows you to control
multiple cameras, change the angle, etc.
1 Insert the supplied software CD-
ROM into the CD/DVD drive of your
computer.
2 Follow the on-screen instructions
to finish the installation.
For more details, refer to the Detailed User Guide at http://manual3.jvckenwood.com/
12
Page 13

Streaming Images
Installing the supplied "Camera Driver"
allows you to use this unit as a web
camera. Use the distribution software
such as "Ustream Producer" (http://www.
ustream.tv/producer) or website for the
web camera to stream the images.
“Camera Driver” will be installed along
with “JVC CAM Control.”
Installing the Application for a
Mobile Terminal
You can pinch, drag, etc. on the touch
panel of a smartphone/tablet computer to
operate the camera intuitively. In addition,
the camera can be panned/tilted by
moving the tablet computer.
1 Download the software appropriate
for your environment.
• Smartphone (Android OS 2.3 or
later)
Download "JVC CAM Control Single"
from Google Play Store.
• Android tablet (Android OS 2.3 or
later, Screen size: 7 inches or more,
Resolution: 1024 x 600 or more)
Download "JVC CAM Control Multi"
from Google Play Store.
• iPhone/iPod touch/iPad (iOS 5.1.1 or
later)
Download "JVC CAM Control" from
App Store.
2 Follow the on-screen instructions
to finish the installation.
For more details, refer to the Detailed User Guide at http://manual3.jvckenwood.com/
13
Page 14

Specifications
Camera
Power supply
Power consumption
Dimensions (mm)
Mass
Operating
environment
Image element
Image range
Lens
Zoom
Video recording method
Media
Network standard
Battery for the clock
Stream output format
Format 1
Format 2
Format 3
Power supply
Power consumption
Allowable operating
temperature
Dimensions (mm)
Mass
Dimensions (mm)
Mass
Movable area
Video
Audio
System
Video
Audio
System
Video
Audio
AC adapter (UIA324-12)
Pantilter (GV-LS2WUP)
*1 Estimated under the conditions of DIS being set to "OFF" for the wide(W) end and
to "MEDIUM" for the tele (T) end.
● Specifications and appearance are subject to change without notice due to
product improvements.
For more details, refer to the Detailed User Guide at http://manual3.jvckenwood.com/
14
Using the AC adapter: DC 12 V, Using a battery pack: DC 3.6 V
5.6 W (when using the pantilter)
73 x 48 x 89 (2 7/8'' x 1 15/16'' x 3 9/16'') (W × H × D)
Approx. 229 g (0.51 lbs) (excluding the battery)
Allowable operating temperature: 0℃ to 40℃ (32℉ to 104℉), Allowable
storage temperature: – 20℃ to 50℃ (− 4℉ to 122℉), Allowable relative
humidity: 35 % to 80 %
1/2.3: 12.40 mil. pixels (BSI CMOS)
5.40 mil. to 2.07 mil. pixels (Image stabilization: OFF, Dynamic zoom: ON)
F1.2 to F2.8 f = 3.76 mm (3/16'') to 37.6 mm (1 1/2'')
Equivalent to 35 mm (1 7/16'') camera: 29.5 mm (1 3/16'') to 476 mm (18
3/4'') (Dynamic zoom: ON)
Equivalent to 35 mm (1 7/16'') camera: 29.5 mm (1 3/16'') to 407 mm (16
1/16'') (Dynamic zoom: OFF)*
Optical zoom: up to 10x, Dynamic zoom: up to 16x (Image stabilization:
OFF), Digital zoom: up to 200x
AVCHD standard certifi ed, video: AVC/H.264, Audio: Dolby Digital (2ch)
SD/SDHC/SDXC cards (not supplied)
Wired: 10BASE-T/100BASE-TX, Wireless: IEEE 802.11b/g/n 2.4 GHz band only
Secondary battery
Stream 1 Stream 2
JPEG (640x360)
LPCM 16 kHz 16 bit 1 ch
MPEG-2 TS
H.264 Main Profi le (720x480) JPEG (640x360)
AAC 48 kHz 16 bit 2 ch LPCM 16 kHz 16 bit 1 ch
MPEG-2 TS
H.264 High Profi le (1920x1080) JPEG (640x360)
AAC 48 kHz 16 bit 2 ch LPCM 16 kHz 16 bit 1 ch
AC 100 V to 240 V, 50 Hz/60 Hz
DC 12 V, 2 A
0℃ to 40℃ (32℉ to 104℉)(10℃ to 35℃ (50℉ to 95℉) at battery charge)
44 x 29 x 96 (1 3/4'' x 1 3/16'' x 3 13/16'') (W × H × D, excluding AC cord and AC plug)
Approx. 175
128 x 113 x 108 (5 1/16'' x 4 1/2'' x 4 5/16'') (W × H × D)
Approx. 609 g (1.4 lbs)
Pan: ±150° (Wi-Fi) / ±100° (LAN), Tilt: – 30° to + 40°
g
(0.39 lbs)
1
None
—
—
Page 15

MEMO
For more details, refer to the Detailed User Guide at http://manual3.jvckenwood.com/
15
Page 16

©2012 JVC KENWOOD Corporation
C2N
0712HO-MW-VM
Page 17

LYT2488-001A-M
FR
Caméra live streaming
GV-LS2
U
ENGLISH
FRANÇAIS
ESPAÑOL
PORTUGUÊS
Mode d’emploi de base
Pour une référence ultérieure:
Entrer le numéro de modèle (situé au dessous
de la caméra) et le numéro de série (situé sur
le logement de la batterie de la caméra)
ci-dessous.
No de modèle
No de série
Cher clients
Merci pour avoir acheté ce produit JVC.
Avant son utilisation, prière de lire les précautions de sécurité et les précautions des
pages 2 et 4 pour assurer une utilisation sûre de ce produit.
Mode d’emploi détaillé
Ce produit est fourni avec un “Mode d’emploi de base” (ce document) et un “Mode
d’emploi détaillé”. Pour en savoir plus sur l’utilisation de ce produit, veuillez vous
reporter au “Mode d’emploi détaillé” disponible sur le site Web suivant.
■
http://manual3.jvckenwood.com/
Table des matières
Précautions de sécurité .........................2
Précautions............................................4
Vérifi cation des accessoires ..................6
Noms des composants et fonctions.......7
Préparation avant l’utilisation.................9
Fixation/retrait des périphériques ........11
Utilisation du caméscope.....................12
Caractéristiques techniques ................14
Page 18

Précautions de sécurité
Si l’équipement est installé dans un coffret ou sur une
étagère, s’assurer qu’il y a un espace suffi sant sur
tous les côtés pour permettre la ventilation (10 cm
(3-15/16") ou plus sur les deux côtés, au dessus et à
l’arrière).
Ne pas recouvrir les orifi ces de ventilation.
(Si les orifi ces de ventilation sont bouchés par un
journal, un tissu, etc., la chaleur peut ne pas s’éliminer.)
Le symbole en forme d’éclair avec des tête de fl èche
dans un triangle équilatéral a pour but d’attirer
l’attention de l’utilisateur sur la présence d’une “tension
dangereuse” non isolée à l’intérieur du boîtier de
l’appareil, qui peut être d’une amplitude suffi sante pour
constituer un risque de choc électrique aux personnes.
Le point d’exclamation à l’intérieur d’un triangle
équilatéral est destiné à alerter l’utilisateur sur la
présence d’opérations d’entretien importantes au
sujet desquelles des renseignements se trouvent
dans le manuel d’instructions.
AVERTISSEMENT: POUR ÉVITER
LES RISQUES D’INCENDIE OU
D’ÉLECTROCUTION, N’EXPOSEZ PAS
L’APPAREIL À LA PLUIE NI À L’HUMIDITÉ.
REMARQUES:
• La plaque d’identification et l’avertissement de
sécurité se trouvent sous l’appareil et/ou au dos.
• La plaque de numéro de série se trouve sur le
logement de la batterie.
• Les informations d’identifi cation et l’avertissement
de sécurité de l’adaptateur secteur sont situés sur
ses côtés supérieur et inférieur.
Pour Californie des États-Unis seulement
Cet appareil contient une pile-bouton CR au lithium
qui contient du perchlorate
– une manipulation spéciale peut être requise.
Voir www.dtsc.ca.gov/hazardouswaste/perchlorate
AVERTISSEMENT:
La batterie et le caméscope avec la batterie
installée ne doivent pas être exposés à une
chaleur excessive.
Effectuer une sauvegarde des données
enregistrées importantes
JVC décline toute responsabilité pour toute perte de
données.
Il est recommandé de les copier sur un disque ou un
autre support d’enregistrement pour stockage une
fois tous les 3 mois.
Aucune source à fl amme nue, telle que des bougies
allumées, ne doit être placée sur l’appareil.
Pour jeter des piles, prenez en compte les problèmes
liés à l’environnement et respectez strictement les
réglementations ou lois locales régissant la mise au
rebut de ces piles.
L’appareil ne doit pas être exposé à l’égouttage ni
aux éclaboussements.
N’utilisez pas cet appareil dans une salle de bain, ni
dans des endroits avec de l’eau.
De plus, ne placez pas de récipient rempli d’eau
ou de liquides (tels des produits cosmétiques, des
médicaments, des vases de fl eurs, des plantes en
pot, des tasses, etc.) sur le dessus de cet appareil.
(Si de l’eau ou un liquide entre dans ce matériel, un
incendie ou un choc électrique risque de se produire.)
Ne dirigez pas l’objectif directement vers le soleil.
Vous pourriez vous abîmer la vue et l’appareil pourrait
être endommagé. Il y a aussi risque d’incendie ou
d’électrocution.
PRÉCAUTION!
Les remarques suivantes sont destinées à protéger
l’utilisateur et l’appareil. Contre des dommages
éventuels.
N’utilisez pas de trépied photographique sur des
surfaces irrégulières et inclinées.
Il pourrait tomber et l’appareil pourrait être
sérieusement endommagé.
PRÉCAUTION!
Avec des câbles (Audio/Vidéo, etc.) raccordés, il
est recommandé de ne pas laisser l’appareil sur le
dessus du téléviseur, car tirer sur les câbles pourrait
faire tomber l’appareil, causant des dommages.
ATTENTION:
La prise secteur doit être opérationnelle.
• Retirez la fi che secteur immédiatement si le
caméscope fonctionne de façon anormale.
ATTENTION:
• Mettez au rebut les piles en respectant les
instructions.
• Risque d’explosion si la batterie est remplacée par
un type incorrect.
AVERTISSEMENT
Pour L’ÉQUIPEMENT QUI DOIT ÊTRE BRANCHÉ
SUR LE SECTEUR, la prise doit être installée près
de l’équipement et facilement accessible.
2
Pour en savoir plus reportez-vous au Mode d’emploi détaillé à
http://manual3.jvckenwood.com/
Page 19

ATTENTION :
Pour conserver la compatibilité avec les directives
d’exposition RF FCC, utilisez uniquement l’antenne fournie.
L’utilisation d’une antenne non autorisée, la
modifi cation de l’antenne fournie ou l’utilisation
d’accessoires peut endommager l’émetteur et
contrevenir aux règlements FCC.
Cet appareil est conforme à la partie 15 des règles de
la FCC (Federal Communications Commission).
Le fonctionnement est sujet aux deux conditions
suivantes:
(1) Cet appareil ne peut pas causer d’interférences
nuisibles, et.
(2) Cet appareil doit accepter toute interférence
reçue, y compris des interférences qui peuvent
causer un mauvais fonctionnement.
INSTRUCTIONS IMPORTANTES DE SÉCURITÉ
1. Lisez ces instructions.
2. Conservez ces instructions.
3. Tenez compte de tous les avertissements.
4. Suivez toutes les instructions.
5. N’utilisez pas cet appareil près de l’eau.
6. Nettoyez uniquement avec un chiffon sec.
7.
Ne bloquez pas les fentes de ventilation. Installez cet
appareil conformément aux instructions du fabricant.
8. N’installez pas l’appareil près d’une source de
chaleur telle qu’un radiateur, un poêle ou tout autre
appareil (y compris les amplifi cateurs) qui produit de
la chaleur.
9. Empêchez le cordon d’alimentation d’être piétiné ou
pincé, en particulier au niveau des fi ches, des prises
de courant et des sorties des appareils.
10. Utilisez uniquement les accessoires spécifi és par le
fabricant.
11. Utilisez uniquement un
chariot, un support, un
trépied, une applique ou une
table spécifi é par le fabricant
ou vendu avec l’appareil.
Si l’appareil est installé sur
une table roulante, celle-ci
doit être déplacée avec soin
afi n d’éviter des blessures
ou de faire tomber l’appareil.
12.
Débranchez cet appareil pendant un orage ou s’il ne
doit pas être utilisé pendant une période prolongée.
13. Toute réparation doit être confi ée à un personnel
d’entretien qualifi é.
L’appareil doit être réparée s’il a été endommagé
de tel façon que le cordon ou la fi che d’alimentation
est endommagée, si un liquide a coulé ou un objet
est tombé à l’intérieur, si l’appareil a été exposé
à la pluie ou à l’humidité, s’il ne fonctionne pas
normalement ou est tombé.
Si ce symbole est montré, il n’est
reconnu que dans l’Union européenne.
Noter que cet appareil est destiné à un usage
privé uniquement.
Toute utilisation commerciale sans autorisation est
interdite. (Même si vous enregistrez un spectacle
ou une exposition pour votre plaisir personnel, il est
vivement recommandé de demander au préalable
l’autorisation de fi lmer.)
Marques commerciales
• Les logos AVCHD et AVCHD sont des marques
de commerce de Panasonic Corporation et Sony
Corporation.
• Fabriqué sous licence concédée par Dolby
Laboratories. Le terme “Dolby” et le sigle double D sont
des marques commerciales de Dolby Laboratories.
• Android™ est une marque de commerce de Google Inc.
• Windows® est une marque déposée ou une marque
de commerce de Microsoft Corporation aux ÉtatsUnis et/ou dans d’autres pays.
• iPod, iPhone, iMovie et iPhoto sont des marques
de commerce d’Apple Inc., enregistrée aux ÉtatsUnis et dans les autres pays.
• intel, Intel Core et Pentium sont des marques de
commerce ou des marques déposées de Intel
Corporation ou de ses filiales aux États-Unis et
dans les autres pays.
• Wi-Fi, le logo Wi-Fi, Wi-Fi CERTIFIED, le logo
Wi-Fi CERTIFIED, WPA et WPA2 sont des
marques de commerce et des marques déposées
de Wi-Fi Alliance.
• Les autres noms de produit et d’entreprise cités
dans ce mode d’emploi sont des marques de
commerce et/ou des marques déposées de leurs
détenteurs respectifs. Les marques telles que ™ et
sont omises dans ce mode d’emploi.
®
Lors de l’utilisation de l’adaptateur secteur
dans d’autres régions que les États-Unis
L’adaptateur secteur fourni comporte une fonction de
sélection automatique de la tension dans une plage
de 110 V à 240 V.
UTILISATION DE L’ADAPTATEUR DE FICHE
SECTEUR
Lors du branchement du cordon d’alimentation de
l’appareil à une prise de secteur différente du standard
national américain C73, utilisez un adaptateur de fi che
nommé “Siemens Plug”, comme indiqué ci-dessous.
Pour cet adaptateur de prise secteur, consulter votre
revendeur JVC le plus proche.
Adaptateur de fi che
• Retirez l’adaptateur secteur de la prise murale
quand vous ne l’utilisez pas.
• Ne laissez pas des objets poussiéreux ou
métalliques en contact avec la prise secteur murale
ou l’adaptateur secteur (fi che d’alimentation/CC).
• Assurez-vous d’utiliser l’adaptateur secteur fourni.
• N’utilisez pas l’adaptateur secteur fourni avec un
autre appareil.
Pour en savoir plus reportez-vous au Mode d’emploi détaillé à
http://manual3.jvckenwood.com/
3
Page 20

Précautions
Support d’enregistrement
• Veillez à suivre les directives ci-dessous
pour éviter d’altérer ou d’endommager
les données enregistrées.
• Ne déformez pas ni ne laissez tomber le support
d’enregistrement, ou le soumettre à une forte
pression, des secousses ou des vibrations.
• N’éclaboussez pas le support d’enregistrement
avec de l’eau.
• N’utilisez pas, ne remplacez pas, ni ne rangez
le support d’enregistrement dans des endroits
fortement exposés à de l’électricité statique ou à
des parasites électriques.
• Ne mettez pas le caméscope hors tension ni
ne retirez la batterie ou l’adaptateur secteur
pendant la prise de vue, la lecture ou l’accès au
support d’enregistrement.
• Ne placez pas le support d’enregistrement à
proximité d’objets possédant un fort champ
magnétique ou émettant de fortes ondes
électromagnétiques.
• Ne rangez pas le support d’enregistrement dans
des endroits exposés à une température élevée
ou à une forte humidité.
• Ne touchez pas les pièces métalliques.
• Lors du formatage ou de l’effacement des données
à l’aide des fonctions du caméscope, seules les
informations de gestion des fi chiers sont modifi ées.
Les données ne sont pas complètement effacées
du support d’enregistrement.Si vous souhaitez
effacer complètement toutes les données, nous
vous recommandons soit d’utiliser un logiciel
disponible dans le commerce spécialement
conçu à cette fi n, soit de détruire physiquement le
caméscope à l’aide d’un marteau, etc.
4
Pour en savoir plus reportez-vous au Mode d’emploi détaillé à
http://manual3.jvckenwood.com/
Appareil
• Pour votre sécurité, NE PAS
... ouvrir le boîtier du caméscope.
... démonter ou modifi er l’appareil.
laisser pénétrer des substances infl ammables,
...
de l’eau ou des objets métalliques dans l’appareil.
... retirer la batterie ou débrancher l’appareil
pendant que celui-ci est sous tension.
... laisser la batterie à l’intérieur du caméscope
lorsque celui-ci n’est pas utilisé.
... placer des sources de fl ammes nues, telles
que des bougies allumées, sur l’appareil.
exposer l’appareil à l’égouttage ou aux éclaboussements.
...
... laisser s’accumuler de la poussière ou
placer des objets métalliques sur la prise
d’alimentation ou une prise de courant murale.
... insérer des objets dans le caméscope.
• Éviter d’utiliser l’appareil
... dans des endroits trop humides ou poussiéreux.
... dans des lieux exposés à de la suie ou à de la
vapeur (par exemple, près d’une cuisinière).
... près d’appareils générant des champs
magnétiques ou électriques intenses (hautparleurs, antennes de diffusion, etc.).
dans des lieux exposés à des températures
...
extrêmement élevées (au-delà de 40°C ou 104°F)
ou extrêmement basses (en deçà de 0°C ou 32°F).
• NE laissez PAS l’appareil
... dans des lieux exposés à des températures
supérieures à 50°C (122°F).
dans des lieux exposés à des taux d’humidité
...
extrêmes (en deçà de 35% ou au-delà de 80%).
... en plein soleil.
... dans une voiture hermétiquement fermée en
période estivale.
... près d’un radiateur.
... en hauteur, sur un téléviseur par exemple. Si
l’appareil est placé en hauteur alors que le
câble est raccordé, celui-ci peut être coincé et
l’appareil peut tomber et ne plus fonctionner.
• Pour protéger l’appareil, NE PAS
... le mouiller.
le faire tomber ou le cogner contre des objets durs.
...
... le soumettre à trop de chocs ou vibrations
durant le transport.
... maintenir l’objectif orienté vers des objets
extrêmement lumineux pendant trop longtemps.
... exposer l’objectif à la lumière directe du soleil.
... le balancer inutilement par la dragonne.
... trop balancer l’étui souple lorsque le
caméscope est à l’intérieur.
... ranger le caméscope dans un endroit
poussiéreux ou avec du sable.
• Pour éviter une chute de l’appareil,
•
Lors de l’utilisation du caméscope avec un trépied,
fi xer fermement le caméscope sur le trépied.
Si le caméscope se détache et tombe, il peut causer
des blessures ou être endommagé.
Si un enfant utilise l’appareil, un adulte doit être présent.
Page 21

Batteries (optionnel)
La batterie fournie est une
batterie au lithiumion. Avant
d’utiliser la batterie fournie ou une
batterie en option, bien lire les
consignes suivantes:
• Pour éviter tout accident
...
brûler.
ne pas
...
court-circuiter les terminaux. Garder à
ne pas
bonne distance d’objets métalliques lorsqu’il
n’est pas utilisé. Lors du transport, mettez la
batterie dans un sac en plastique.
...
modifi er ni démonter.
ne pas
...
exposer la batterie à des
ne pas
températures supérieures à 60°C (140°F) car
celle-ci risquerait de surchauffer, d’exploser
ou de prendre feu.
... utiliser uniquement les chargeurs spécifi és.
• Pour éviter tout endommagement et
prolonger la durée de vie utile
... ne pas soumettre à un choc inutile.
... recharger à l’intérieur d’une plage de
température de 10°C à 35°C (50°F to 95°F).
Des températures basses peuvent prolonger
la durée de charge, ou même dans certains
cas arrêter la recharge.
Des températures élevées peuvent empêcher
une charge complète, ou même dans
certains cas arrêter la recharge.
... entreposer dans un endroit frais et sec. Toute
exposition prolongée à de températures
élevées accélérera la décharge naturelle et
diminuera la durée de vie utile.
... garde le niveau de la batterie à 30% ( )
si la batterie n’est pas utilisée pendant
longtemps. De plus, chargez complètement et
ensuite déchargez la batterie complètement
tous les 6 mois, puis continuez à la stocker à
un niveau de 30% de charge ( ).
... retirer l’appareil du chargeur ou le débrancher
lorsque vous ne vous en servez pas; certains
appareils, même éteints, continuent de
consommer du courant.
... ne pas laisser tomber ou soumis à des chocs
violents.
ATTENTION:
La batterie que vous vous êtes
procurée est recyclable.
Pour des renseignements
sur le recyclage de cette
batterie, veuillez composer le
1-800-8-BATTERY.
(États-Unis et Canada seulement)
Bornes
Déclaration de conformité
Numéro de modèle : GV-LS2
Nom de marque : JVC
Personne responsable: JVC AMERICAS CORP.
Adresse : 1700 Valley Road Wayne, N. J. 07470
Numéro de téléphone : 973-317-5000
Cet appareil est conforme à la partie 15 des règles
de la FCC. Le fonctionnement est sujet aux deux
conditions suivantes: (1) Cet appareil ne peut
pas causer d’interférences nuisibles, et (2) cet
appareil doit accepter toute interférence reçue, y
compris les interférences qui peuvent causer un
fonctionnement indésirable.
Tout changement ou modifi cation non approuvé
par JVC peut annuler l’autorité de l’utilisateur
d’utiliser l’appareil. Cet équipement a été testé
et a été trouvé conforme avec les limites des
appareils numériques de classe B, conformément
à l’article 15 du règlement FCC. Ces limites sont
conçues pour offrir une protection raisonnable
contre les interférences nuisibles d’une installation
résidentielle. Cet équipement génère, utilise et
peut émettre de l’énergie radio fréquence et, s’il
n’est pas installé conformément aux instructions,
il peut causer des interférences nuisibles aux
communications radio. Cependant, il n’y a
aucune garantie que de telles interférences ne se
produiront pas dans une installation particulière.
Si cet appareil provoque des interférences avec
la réception radio ou de télévision, ce qui peut
être vérifi é en alimentant l’appareil et en coupant
son alimentation, nous conseillons à l’utilisateur
d’essayer d’éliminer ces interférences par l’un ou
plusieurs des moyens suivants: Réorientez ou
changez l’emplacement de l’antenne de réception.
Augmentez l’espace entre l’équipement et
l’ampli-tuner.
Connectez l’équipement sur une prise secteur
appartement à un circuit électrique différent de
celui auquel l’ampli-tuner est connecté.
Consultez votre revendeur ou un technicien radio/
télévision expérimenté pour en savoir plus.
Cet appareil numérique de la classe B est
conforme à la norme NMB-003 du Canada.
Pour en savoir plus reportez-vous au Mode d’emploi détaillé à
http://manual3.jvckenwood.com/
5
Page 22

Vérification des accessoires
Adaptateur secteur *
UIA324-12
Câble LAN
Mode d’emploi de base
(Ce document)
*1 Utilisez le câble de conversion fourni et le cordon secteur pour raccorder l’adaptateur
secteur.
*2 Attachez ce couvercle à l’arrière de cette caméra quand vous la transportez, etc.
● Achetez une carte SD séparément.
Cette opération a été vérifiée avec les cartes SD suivantes.
Fabricant
Vidéo
• Utiliser d’autres cartes SD (y compris les cartes SDHC/SDXC) que les cartes
spécifiées ci-dessus peut entrainer des erreurs d’enregistrement ou des pertes de
données.
• Toutes les opérations sur les cartes SD ne sont pas garanties. Certaines
opérations peuvent ne pas fonctionner à cause de changements de spécifications,
etc.
• Ne touchez pas les bornes de la carte SD. Cela pourrait causer une perte de
données.
1
Panasonic
TOSHIBA
SanDisk
Classe 4 ou cartes SD compatible supérieure (2 Go)
Classe 4 ou Carte SDHC compatible supérieure (4 Go à 32 Go)
Classe 4 ou Carte SDXC compatible supérieure (48 Go à 64 Go)
(Lors de l’enregistrement avec la qualité vidéo “UXP”, la classe
6 ou supérieure est recommandée.)
Cordon secteur
CD-ROM du logiciel
Câble de conversion
Couvercle arrière*
2
●Lors de l’utilisation de l’adaptateur secteur à l’étranger, utilisez un adaptateur
de fiche en vente dans le commerce approprié au pays ou à la région visitée.
6
Pour en savoir plus reportez-vous au Mode d’emploi détaillé à
http://manual3.jvckenwood.com/
Page 23

Noms des composants et fonctions
●Caméra
<Avant>
1
3
4
5
2
<Dessus> <Dessous>
!
@
#
$
1
Microphone intégré:
Transmet/
enregistre les sons entrant à travers
ce microphone quand aucun
microphone extérieur n’est connecté.
2
Objectif:
3
Éclairage LED:
Ne le touchez pas directement.
Fonctionne comme
éclairage dans les endroits sombres.
4
Témoin d’information:
Il peut s’allumer
pour indiquer l’état d’enregistrement, etc.
5
Capteur de caméra:
Ajuste
automatiquement la balance des blancs.
6
Bouton [RESET]:
Réinitialise les
réglages réseau. Maintenez cette
touche enfoncée avec la pointe d’une
trombone ou d’un objet similaire quand
l’adaptateur secteur est connecté.
7
Prise LAN:
Connectez-la à un ordinateur
ou un routeur à l’aide d’un câble LAN.
8
Commutateur de mode réseau:
Commute le mode réseau.
9
Prise de batterie:
Pour connecter une
batterie vendue séparément. (BN-VG139U)
Pour en savoir plus, référez-vous
“Mode d’emploi détaillé”.
Pour en savoir plus reportez-vous au Mode d’emploi détaillé à
http://manual3.jvckenwood.com/
<Arrière>
9
ETHERENT
RESET
DIRECT WLAN
LAN(OFF)
6
7
80
PLUG IN POWER
-
MIC
DC
=
AV
~
%
0
Fente de carte SD:
Pour les cartes
compatibles, voir p.6.
-
Prise [MIC]:
Connectez y un
microphone extérieur.
=
Connecteur [DC]:
Connectez y
l’adaptateur secteur fourni.
~
Connecteur [AV]:
Connectez y un
cordon AV vendu séparément.
!
Pour monter un accessoire
Griffe:
de la caméra ou quelque chose
d’équivalent.
@
Touche de prise de vue:
Démarre la
transmission/enregistrement. Pour arrêter,
appuyez de nouveau sur la touche.
#
Touche WPS:
Maintenez enfoncée
cette touche pour effectuer une
connexion sans fi l (Wi-Fi) en mode
WPS pour la première fois.
$
Touche d’alimentation:
Maintenez-la
enfoncée pour mettre l’appareil sous
tension. Pour couper l’alimentation,
maintenez de nouveau la touche enfoncée.
%
Douille de montage du trépied:
Pour
monter un trépied vendu séparément.
7
Page 24

●Support panoramique
<Avant>
3
4
12
50
<Arrière>
PLUG IN
MICPOWER
AV DCEXTEND
9
<Dessous>
-
1
Touche d’alimentation:
Maintenez-la
enfoncée pour mettre l’appareil sous
tension. Pour couper l’alimentation,
maintenez de nouveau la touche
enfoncée.
2
Témoin d’alimentation:
Le témoin
est allumé quand l’appareil est sous
tension.
3
Commutateur de verrouillage
([TILT LOCK]):
Verrouille le support
panoramique avant de le déplacer.
4
Vis de fi xation de caméra:
Fixe la
caméra sur le support panoramique.
5
Trou de fi xation pour éviter les
Attachez l’appareil avec un
chutes:
câble ou quelque chose de similaire.
678
6
Prise [MIC]:
Connectez y un
microphone extérieur.
7
Connceteur [AV]:
Connectez y un
cordon AV vendu séparément.
8
Prise [EXTEND]:
Non utilisé. (pour
une utilisation future)
9
Commutateur de verrouillage
panoramique ([PAN LOCK]):
Verrouille le support panoramique
avant de le déplacer.
0
Connecteur [DC]:
Connectez y
l’adaptateur secteur fourni.
-
Douille de montage du trépied:
monter un trépied vendu séparément.
Pour
8
Pour en savoir plus reportez-vous au Mode d’emploi détaillé à
http://manual3.jvckenwood.com/
Page 25

Préparation avant l’utilisation
Connexion du caméscope à
votre ordinateur
Pour régler le caméscope, connectez-le
d’abord à votre ordinateur.
Environnement de fonctionnement
nécessaire
Navigateur: Internet Explorer 9 ou ultérieur
1 Fixez le câble LAN au caméscope.
MIC
RESET
ETHERENT
2 Connectez le caméscope à
l’ordinateur avec le câble LAN
fourni.
3 Réglez le commutateur de mode
réseau [LAN•OFF].
DIRECT WLAN LAN(OFF)
• Si le commutateur de mode réseau est
réglé sur [DIRECT] ou [WLAN], la prise
LAN ne peut pas être utilisée.
• Pendant que l’appareil est sous tension,
changer le commutateur de mode
réseau ne change pas le réglage.
• N’utilisez pas de câbles (câble AV,
microphone, etc.) avec un connecteur
en L.
• Pour les autres méthodes de connexion,
reportez-vous au “Mode d’emploi
détaillé”.
Pour en savoir plus reportez-vous au Mode d’emploi détaillé à
PLUG IN POWER
LAN(OFF)
ETHERENT
DC
AV
MIC
DIRECT WLAN
PLUG IN POWER
DC
LAN(OFF)
AV
RESET
DIRECT WLAN
http://manual3.jvckenwood.com/
Connexion de l’adaptateur secteur
Connectez l’adaptateur secteur fourni au
connecteur CC de la caméra.
MIC
DIRECT WLAN
PLUG IN POWER
DC
LAN(OFF)
AV
Adaptateur
RESET
ETHERENT
Câble de conversion
secteur
Configuration des réglages du
caméscope en fonction de vos
besoins
Spécifi ez le format vidéo, le zoomm, etc.
en fonction de vos besoins. Confi gurez
les réglages sur un navigateur.
Connexion en tant qu’administrateur
1
Si l’appareil n’est pas sous tension,
maintenez enfoncée la touche
[POWER] pour le mettre sous tension.
La touche [POWER] commence à
clignoter. Attendez qu’elle s’arrête de
clignoter et reste allumée.
2 Faites les réglages réseau de
l’ordinateur de la façon suivante.
Adresse IP:
192.168.1.254 (sauf 192.168.1.100)
(exemple) 192.168.1.23
Masque de sous-réseau:
Notez les réglages actuels du reseau
avant de commencer afin de pouvoir
refaire les réglages plus tard.
3 Demarrez Internet Explorer, et
entrez “http://192.168.1.100:8000”
dans la barre d’adresse.
192.168.1.2 à
255.255.255.0
9
Page 26

4 Entrez le nom d’utilisateur et le mot
de passe de l’administrateur.
Réglage initial: NOM UTILISATEUR
“root”, MODE DE PASSE “password”.
Si la connexion réussi, l’écran de
configuration apparaît.
Modifi cation des réglages
Sélectionnez “RESEAU”, “CAMESCOPE/
PANO-INCL.” ou “GESTION” dans la fenêtre de
gauche de l’écran pour changer les réglages.
Cliquez sur “+” sur la gauche de chaque
élément pour affi cher les sous-catégories.
●“RESEAU”
• “RESEAU CABLE”
Pour établir une connexion par câble.
• “RESEAU SANS FIL”
Pour établir une connexion sans fil.
• “PARAMETRES CONTROLE”
Pour une connexion via un réseau.
• “PARAMETRES FLUX”
Format pour transmission/enregistrement.
●“CAMESCOPE/PANO-INCL.”
• “PARAMETRES CAMESCOPE”
Réglages du caméscope comme par
exemple le zoom.
• “PARAMETRES PANO-INCL.”
Réglages du support panoramique
comme par exemple l’angle.
●“GESTION”
• “PARAMETRES COMMUNS”
Pour changer le mot de passer
administrateur, régler l’horloge, etc.
• “GESTION SUPPORT”
Pour formater la carte SD.
• “ETEINDRE CAMESCOPE”
Pour mettre le caméscope hors tension.
* L’alimentation ne peut pas être
coupée avec le navigateur.
Connexion de l’adaptateur
secteur au support panoramique
Pour en savoir plus sur la fi xation du
support panoramique, reportez-vous à la
page 11.
Connectez l’adaptateur secteur fourni au
connecteur CC du support panoramique.
• Déverrouillez d’abord le support
panoramique avance de connecter
l’adaptateur secteur.
• Retirez tout le ruban adhésif du
support panoramique.
Adaptateur
secteur
• Après avoir connecté l’adaptateur
secteur, l’appareil se met sous tension
et le support panoramique se déplace
automatiquement pour l’ajustement de
la position. Le support panoramique se
séplace chaque fois que l’appareil est
mis sous tension.
• Le témoin d’alimentation clignote quand
la position d’ajustement ne peut pas
être atteinte. Mettez l’appareil hors
tension puis remettez-le sous tension.
• Quand vous n’utilisez pas le support
panoramique, connectez l’adaptateur
secteur directement au caméscope.
(page 8)
MIC
PLUG IN POWER
RESET
DC
DIRECT WLAN
LAN(OFF)
AV
ETHERENT
PLUG IN
MIC
AV DCEXTEND
POWER
Câble de conversion
Pour en savoir plus, référez-vous “Mode
d’emploi détaillé”.
10
Pour en savoir plus reportez-vous au Mode d’emploi détaillé à
http://manual3.jvckenwood.com/
Page 27

Fixation/retrait de périphériques
Fixation du support panoramique
Le support panoramique fourni vous permet de faire un panoramique horizontal ou un
panoramique vertical avec la caméra en utilisant votre ordinateur ou un smartphone.
1 Poussez la caméra vers le bas.
2 Vissez et fixez la caméra.
Direction (Avant)
P
MIC
L
U
G
IN
P
O
WE
R
AV
E
X
TE
N
D
DC
• Retirez tous les câbles avant de fixer le support panoramique.
• Vérifiez la position du trou sur la face inférieure lors de la fixation du support
panoramique.
• Fixez le support panoramique solidement de façon qu’il ne reste aucun espace.
• Tenez le support panoramique (non la caméra) lors du transport de l’appareil.
• Lors de l’utilisation du support panoramique, connectez l’adaptateur secteur, le
cordon AV et le microphone extérieur au support panoramique.
• Le support panoramique ne fonctionne pas correctement quand il est placé en pente,
à l’envers ou sur le côté.
Insertion/retrait d’une carte SD
Insérez une carte SD en vente dans le commerce avant de commencer l’enregistrement.
●Insertion
Insérez la carte bien droite avec les
bornes dirigées vers la droite.
• Mettez l’appareil hors tension avant d’insérer/retirer la carte SD.
• Assurez-vous que le commutateur de protection en écriture de la carte SD n’est pas
positionné sur LOCK (protection en écriture).
• Certaines cartes doivent etre formatées avec cet appareil. Pour en savoir plus,
référez-vous “Mode d’emploi détaillé”.
Pour en savoir plus reportez-vous au Mode d’emploi détaillé à
http://manual3.jvckenwood.com/
●Retrait
Poussez une fois la carte et tirez-la bien
droit.
11
Page 28

Utilisation du caméscope
Affichage dans un navigateur
Accédez à “http://192.168.1.100:80” avec
Internet Explorer.
Si vous vous connectez en utilisant le
nom d’utilisateur et le mot de passe de
l’administrateur ou ceux réglés dans
“PARAMETRES CONTROLE” (p.10), vous
pouvez voir l’image vidéo sur un navigateur.
• Pour voir une image vidéo à travers
un réseau il est nécessaire de régler
“PARAMETRES CONTROLE” (p.10).
Entrer le nom d’utilisateur et le mot de
passe de notre service DDNS vous
donne un accès rapide.
Pour obtenir un compte de service
DDNS, consultez notre site Web
https://dd3.jvckenwood.com/user/
<Exemple de navigateur>
1
2
3
12
1
2
3
4
5
6
Onglet:
image du caméscope et panneau de
commande, Fichier: images sur la carte
SD, État: historique des messages)
Panneau de commande:
le caméscope/support panoramique.
Barre des messages:
message d’erreur, etc.
Déconnexion:
déconnecter.
État:
charge restante de la batterie.
Réglages du fl ux d’images:
les réglages du fl ux d’images.
Commute l’affi chage. (Moniteur:
Cliquez ici pour vous
Indisque l’état actuel tel que la
Pour en savoir plus reportez-vous au Mode d’emploi détaillé à
4
Commande
Affi che un
Affi che
http://manual3.jvckenwood.com/
Installation du logiciel fourni
“JVC CAM Control” vous permet de
commander plusieurs caméscopes, de
changer l’angle, etc.
1 Insérez le CD-ROM du logiciel
fourni dans le lecteur CD/DVD de
votre ordinateur.
2 Suivez les instructions sur l’écran
pour terminer l’installation.
5
6
Page 29

Diffusion en flux d’images
En installant le pilote “Camera Driver”
fourni, vous pouvez utiliser cet appareil
comme une webcaméra. Utilisez un logiciel
disponible tel que “Ustream Producer”
(http://www.ustream.tv/producer)
ou un site web pour webcaméra pour
diffuser le fl ux d’images.
“Camera Driver” est installé en même
temps que “JVC CAM Control”
.
Installation de l’application
pour un terminal mobile
Vous pouvez pincer, faire glisser, etc.
avec le panneau tactile d’un smartphone/
tablette pour commander la caméra
de façon intuitive. De plus, la caméra
peut être déplacée horizontalement/
verticalement en fonction du mouvement
de la tablette.
1 Téléchargez le logiciel approprié à
votre environnement.
• Smartphone (Android OS 2.3 ou
supérieur)
Téléchargez “JVC CAM Control
Single” à partir du Google Play Store.
• Tablette Android (Android OS 2.3 ou
ultérieur, Taille de l’écran: 7 pouces
ou plus, Résolution: 1024 x 600 ou
plus)
Téléchargez “JVC CAM Control Multi”
à partir du Google Play Store.
• iPhone/iPod touch/iPad (iOS 5.1.1 ou
supérieur)
Téléchargez “JVC CAM Control” à
partir de l’App Store.
2 Suivez les instructions sur l’écran
pour terminer l’installation.
Pour en savoir plus reportez-vous au Mode d’emploi détaillé à
http://manual3.jvckenwood.com/
13
Page 30

Caractéristiques techniques
Caméscope
Alimentation
Consommation électrique
Dimensions (mm)
Masse
Environnement de
fonctionnement
Élément d’image
Plage d’image
Objectif
Zoom
Méthode d’enregistrement vidéo
Support
Norme de réseau
Pile pour l’horloge
Format de sortei du flux d’images
Format 1
Format 2
Format 3
Adaptateur secteur (UIA324-12)
Alimentation
Consommation électrique
Température de
fonctionnement admissible
Dimensions (mm)
Masse
Support panoramique (GV-LS2WUP)
Dimensions (mm)
Masse
Zone mobile
Vidéo
Audio
Système
Vidéo
Audio
Système
Vidéo
Audio
*1 Estimation faite quand DIS est réglé sur “OFF” pour l’extrémité grand angle (W) et
sur “MEDIUM” pour l’extrémité téléobjectif (T).
● Les spécifications et l’apparence sont sujettes à des modifications sans
préavis afin d’améliorer le produit.
14
Pour en savoir plus reportez-vous au Mode d’emploi détaillé à
Utilisation de l’adaptateur secteur: CC 12 V, en utilisant la batterie: CC 3,6 V
5,6 W (lors de l’utilisation du support panoramique)
73 x 48 x 89 (2 7/8" x 1 15/16" x 3 9/16") (L × H × P)
Environ 229 g (0.51 lbs) (sans la batterie)
Températures de fonctionnement admissibles: 0 à 40°C (32°F à
104°F), Températures de stockage admissibles: – 20 à 50°C (– 4°F à
122°F), Humidité relative admissible: 35 à 80%
1/2.3: 12,40 mil. pixels (BSI CMOS)
5,40 mil. à 2,07 mil. pixels (Stabilisation d’image: OFF, Zoom dynamique: ON)
F1.2 à F2.8 f = 3,76 mm (3/16") à 37,6 mm (1 1/2")
Équivalent pour un appareil photo 35 mm (1 7/16"): 29,5 mm (1 3/16")
à 476 mm (18 3/4") (Zoom dynamique: ON)
Équivalent pour un appareil photo 35 mm (1 7/16”): 29,5 mm (1 3/16”)
à 407 mm (16 1/16”) (Zoom dynamique: OFF)*
Zoom optique: 10x maximum, Zoom dynamique: 16x
(Stabilisation d’image: OFF), Zoom numérique: 200x maximum
AVCHD standard certifi é, vidéo: AVC/H.264, Audio: Dolby Digital (2ch)
Cartes SD/SDHC/SDXC (non fournies
Câblé: 10BASE-T/100BASE-TX, Sans fi l: bande IEEE 802.11b/g/n 2,4 GHz uniquement
Pile secondaire
Flux d’images 1 Flux d’images 2
JPEG (640x360)
LPCM 16 kHz 16 bits 1 canal
MPEG-2 TS
Profi le principal H.264 (720x480) JPEG (640x360)
AAC 48 kHz 16 bits 2 canaux LPCM 16 kHz 16 bits 1 canal
MPEG-2 TS
High Profi le H.264 (1920x1080) JPEG (640x360)
AAC 48 kHz 16 bits 2 canaux LPCM 16 kHz 16 bits 1 canal
CA 100 V à 240 V, 50 Hz/60 Hz
CC 12 V, 2 A
0°C à 40°C (32°F à 104°F) (10°C à 35°C (50°F à 95°F) pendant la charge de la batterie)
44 x 29 x 96 (1 3/4" x 1 3/16" x 3 13/16") (L × H × P, sauf le cordon secteur et la fi che secteur)
Environ 175 g (0.39 lbs)
128 x 113 x 108 (5 1/16" x 4 1/2" x 4 5/16") (L × H × P)
Environ 609 g (1.4 lbs)
Mouvement horizontal: ±150° (Wi-Fi) / ±100° (LAN), Mouvement vertical: – 30° à
)
Aucun
1
maximum
—
—
http://manual3.jvckenwood.com/
40°
+
Page 31

MÉMO
Pour en savoir plus reportez-vous au Mode d’emploi détaillé à
http://manual3.jvckenwood.com/
15
Page 32

©2012 JVC KENWOOD Corporation
C2N
0712HO-MW-VM
Page 33

LYT2488-001A-M
SP
Cámara para transmisión en directo
GV-LS2
U
ENGLISH
FRANÇAIS
ESPAÑOL
PORTUGUÊS
Guía básica del usuario
Para futuras consultas:
Escriba a continuación, el número de modelo
(ubicado en la parte inferior de la cámara) y el
número de serie (ubicado en el compartimento
de la batería de la cámara).
Número de modelo
Número de serie
Apreciados clientes
Gracias por haber adquirido este producto JVC.
Antes de su uso, lea las precauciones de seguridad y las advertencias incluidas en las
páginas 2 y 4 para garantizar un uso seguro de este producto.
Guía detallada del usuario
Este producto viene con una "Guía básica del usuario" (este manual) y una "Guía
detallada del usuario". Si desea más información sobre cómo operar este producto,
consulte la "Guía detallada del usuario" en el siguiente sitio web.
■
http://manual3.jvckenwood.com/
Contenido
Precauciones de seguridad ...................2
Precauciones .........................................4
Comprobación de accesorios ................6
Nombres y funciones de los
componentes .........................................7
Preparativos previos al uso ...................9
Conexión/desconexión de dispositivos
Uso de la cámara ................................12
Especifi caciones ..................................14
...11
Page 34
Precauciones de seguridad
Cuando instale el equipo en un armario o sobre
un estante, asegúrese de dejar un espacio libre
sufi ciente alrededor para disponer de una ventilación
sufi ciente (10 cm [3-15/16"] o más a ambos lados, en
la parte superior y en la trasera).
No bloquee los orifi cios de ventilación.
(Si se bloquean con un periódico, paño, etc., el calor
quedará atrapado.)
No coloque sobre el aparato ninguna fuente de llama
El símbolo de rayo con punta de fl echa, dentro de
un triángulo equilátero, alerta al usuario sobre la
presencia de "tensión peligrosa" no aislada en la
carcasa del producto, cuya magnitud constituye un
riesgo de electrocución.
El signo de exclamación dentro de un triángulo
equilátero alerta al usuario sobre importantes
instrucciones de operación o mantenimiento
(servicio) en la documentación que acompaña al
aparato.
ADVERTENCIA: PARA EVITAR RIESGO DE
INCENDIO O DE DESCARGA ELÉCTRICA,
NO EXPONGA LA UNIDAD A LA LLUVIA NI A
LA HUMEDAD.
NOTAS:
• La placa de valores nominales y las precauciones
de seguridad se encuentran en la parte inferior y/o
en la parte posterior de la unidad principal.
• La placa con el número de serie se encuentra en el
compartimento de la batería.
• La información sobre valores nominales y las
precauciones de seguridad del adaptador de CA se
encuentran en sus caras superior e inferior.
Sólo para EE.UU.-California
Este producto contiene una batería de litio CR de tipo
botón que contiene perclorato (puede requerirse una
manipulación especial).
Visite www.dtsc.ca.gov/hazardouswaste/perchlorate
ADVERTENCIA:
No deje ni la batería ni la cámara con la batería
instalada expuestas al calor excesivo
directa del sol, el fuego u otra condición similar.
Haga copias de seguridad de los datos
importantes que haya grabado
JVC no asumirá ninguna responsabilidad por la
pérdida de datos.
Se recomienda copiar todos los datos importantes
que haya grabado a un disco u otro medio de
grabación cada 3 meses.
como la luz
sin protección, como velas encendidas.
Cuando descarte las baterías, deberá tener en
cuenta los problemas medioambientales y observar
estrictamente las normas o leyes locales vigentes
relacionadas con su eliminación.
No exponga la unidad a goteos ni salpicaduras.
No utilice este equipo en el baño ni en lugares con agua.
Tampoco coloque sobre la unidad ningún recipiente
con agua u otros tipos de líquido (cosméticos,
medicamentos, fl oreros, macetas, tazas, etc.). (Si el
agua u otro líquido llegara a penetrar en la unidad,
podría ocasionar un incendio o descarga eléctrica.)
No apunte el objetivo directamente hacia el sol. Esto
puede ocasionar lesiones en los ojos y fallas en
los circuitos internos. También existe el riesgo de
incendio o descarga eléctrica.
¡PRECAUCIÓN!
Las siguientes notas se relacionan con posibles
daños a la unidad o lesiones al usuario.
No utilice un trípode en superfi cies inestables o
desniveladas.
La unidad podría caerse y sufrir daños irreversibles.
¡PRECAUCIÓN!
No se recomienda dejar la unidad sobre el televisor
con los cables conectados (audio/video, etc.); alguien
podría tropezar con los cables y la unidad podría
caerse y dañarse.
PRECAUCIONES:
El enchufe de alimentación debe estar siempre
accesible.
• Desconéctelo inmediatamente si la cámara
funciona incorrectamente.
PRECAUCIONES:
• Descarte las baterías usadas de acuerdo con las
instrucciones.
• Si reemplaza la batería por una del tipo incorrecto
existe el riesgo de explosión.
ADVERTENCIA
En el caso de EQUIPOS DE CONEXIÓN CON
ENCHUFE, la toma de corriente debe estar cerca del
equipo y en un lugar fácilmente accesible.
2
Si desea más información, consulte la Guía detallada del usuario en
http://manual3.jvckenwood.com/
Page 35

PRECAUCIONES:
Para mantener el cumplimiento de las directivas
sobre exposición a radiofrecuencias de la FCC utilice
solamente la antena suministrada.
Si utiliza una antena, accesorios o modifi caciones no
autorizados puede dañar el transmisor e infringir las
reglamentaciones de la FCC.
Este dispositivo cumple con la Sección 15 de las
normas de la FCC.
Su funcionamiento está sujeto a las dos siguientes
condiciones:
(1)
Este dispositivo no debe causar interferencia perjudicial.
(2) Este dispositivo debe aceptar cualquier
interferencia recibida, incluyendo la interferencia que
pueda causar un funcionamiento no deseado.
INSTRUCCIONES DE SEGURIDAD IMPORTANTES
1. Lea estas instrucciones.
2. Guarde las instrucciones.
3. Preste atención a todas las advertencias.
4. Siga todas las instrucciones.
5. No utilice la unidad cerca del agua.
6. Limpie solo con un paño seco.
No bloquee las ranuras de ventilación. Instale la
7.
unidad de acuerdo con las instrucciones del fabricante.
8.
No la instale cerca de fuentes de calor, como radiadores,
rejillas de calefacción, estufas u otros tipos de aparatos
(incluidos amplifi cadores) que generen calor.
9.
Proteja el cable de alimentación, para evitar que sea
pisado o aplastado, especialmente sus enchufes, las
tomas de corriente y en el punto de salida de la unidad.
10. Utilice únicamente los dispositivos o accesorios
especifi cados por el fabricante.
11. Utilice solamente con la
carretilla, trípode, soporte
o mesa especifi cado por el
fabricante o vendido con el
aparato.
Cuando utilice una carretilla,
tenga cuidado cuando los
mueva para evitar lesiones
en caso de vuelco.
Desenchufe este aparato en caso de tormentas eléctricas
12.
o cuando no lo utilice por períodos prolongados.
13. Encargue el servicio de mantenimiento y reparación
únicamente a personal de servicio califi cado.
Se requiere servicio de mantenimiento cuando el
aparato ha sido dañado de alguna manera, por ejemplo,
si el cable de alimentación o el enchufe está dañado,
se ha derramado líquido o ha entrado algún objeto
dentro del aparato, si ha quedado expuesto a la lluvia o
humedad, no funciona normalmente o se ha caído.
La operación de este equipo está sujeta a las
siguientes dos condiciones: (1) es posible que
este equipo o dispositivo no cause interferencia
perjudicial y (2) este equipo o dispositivo debe
aceptar cualquier interferencia, incluyendo la que
pueda causar su operación no deseada.
Si aparece este símbolo, indica que
solamente es válido para la Unión
Europea.
Recuerde que esta unidad debe utilizarse solo
para fi nes privados.
Está prohibido cualquier uso comercial sin la autorización
correspondiente. (Aunque grabe acontecimientos tales
como espectáculos o exhibiciones solo para su disfrute
personal, se recomienda especialmente que se obtenga
una autorización previa.)
Marcas comerciales
• AVCHD y el logotipo AVCHD son marcas comerciales
de Panasonic Corporation y Sony Corporation.
• Fabricado bajo licencia de Dolby Laboratories.
Dolby y el símbolo de la doble D son marcas
comerciales de Dolby Laboratories.
• Android™ es una marca comercial de Google Inc.
• Windows
• iPod, iPhone, iMovie y iPhoto son marcas
• Intel, Intel Core y Pentium son marcas comerciales
• Wi-Fi, el logotipo Wi-Fi, Wi-Fi CERTIFIED, el logotipo
• Otros nombres de productos y empresas incluidos
®
es una marca comercial o marca
registrada de Microsoft Corporation en los EE.UU.
y/o en otros países.
comerciales de Apple Inc., registradas en los
EE.UU. y en otros países.
o marcas registradas de Intel Corporation o sus
subsidiarias en los EE.UU. y en otros países.
Wi-Fi CERTIFIED, WPA, y WPA2 son marcas
comerciales o marcas registradas de Wi-Fi Alliance.
en este manual de instrucciones son marcas
comerciales y/o marcas registradas de sus
respectivos propietarios. En este manual se han
omitido las indicaciones, como ™ y
®
.
Uso del adaptador de CA, excepto en los EE.UU.
El adaptador de CA suministrado selecciona
automáticamente la tensión en el rango de 110 V a
240 V CA.
USO DE UN ADAPTADOR PARA ENCHUFES
DE CA DEL HOGAR
En caso de conectar el cable de alimentación de la
unidad a una toma de corriente de CA que no sea
de la serie American National Standard C73, utilice
un adaptador para enchufes de CA denominado
"Siemens Plug", como se muestra abajo.
Si desea más información acerca de este adaptador
para enchufes de CA, consulte al distribuidor de JVC
más cercano.
• Extraiga el adaptador de CA de la toma de
corriente cuando no lo utilice.
• No deje polvo ni objetos metálicos adheridos a la
toma de corriente ni al adaptador de CA (enchufe
de alimentación/CC).
• Asegúrese de utilizar el adaptador de CA
suministrado.
• No utilice el adaptador de CA suministrado con
otros dispositivos.
Adaptador para enchufes
Si desea más información, consulte la Guía detallada del usuario en
http://manual3.jvckenwood.com/
3
Page 36

Precauciones
Medio de grabación
• Asegúrese de observar las siguientes
directrices para evitar los daños o la
pérdida de los datos grabados.
• No doble ni deje caer el medio de grabación, ni
lo someta a presión, sacudidas ni vibraciones
fuertes.
• No salpique con agua el medio de grabación.
• No utilice, reemplace ni guarde el medio de
grabación en lugares donde esté expuesto a
electricidad estática o ruido eléctrico fuertes.
• No apague la cámara ni extraiga la batería
o el adaptador de CA durante la grabación,
reproducción o mientras se está accediendo al
medio de grabación.
• No acerque el medio de grabación a objetos
que posean un potente campo magnético ni que
emitan potentes ondas electromagnéticas.
• No guarde el medio de grabación en lugares
con alta temperatura o alta humedad.
• No toque las partes metálicas.
• Cuando formatea o borra los datos con la cámara,
solo se modifi ca la información de administración
de archivos. Los datos no se borran por completo
del medio de grabación. Si desea borrar
completamente todos los datos, le recomendamos
utilizar un software disponible en el mercado
diseñado especialmente para este fi n o destrozar
físicamente la cámara con un martillo, etc.
4
Si desea más información, consulte la Guía detallada del usuario en
http://manual3.jvckenwood.com/
Unidad principal
• Por seguridad, NO
... abra la carcasa de la cámara.
... desarme ni modifi que la unidad.
... permita que ingresen en la unidad productos
infl amables, agua ni objetos metálicos.
... extraiga la batería ni desconecte la fuente de
alimentación con la unidad encendida.
... deje la batería instalada cuando no utiliza la
cámara.
... coloque una fuente de llama sin protección
sobre el aparato, como velas encendidas.
... exponga la unidad a goteos o salpicaduras.
... deje polvo ni objetos metálicos adheridos al
enchufe de alimentación o el toma de corriente
de CA.
... inserte ningún objeto en la cámara.
• Evite utilizar la unidad
...
en lugares excesivamente húmedos o polvorientos.
... en lugares donde exista hollín o vapor, como
cerca de una cocina.
... cerca de dispositivos que generen campos
magnéticos o eléctricos potentes (altavoces,
antenas de transmisión, etc.).
... en lugares sometidos a temperatura
extremadamente alta (más de 40°C o 104°F) o
extremadamente baja (menos de 0°C o 32°F).
• NO DEJE la unidad
... en lugares con más de 50°C (122°F).
... en lugares donde la humedad sea
extremadamente baja (menos de 35%) o
extremadamente alta (más de 80%).
... bajo la luz directa del sol.
... en un automóvil cerrado en verano.
... cerca de un calefactor.
... en lugares altos, como sobre un televisor. Si
deja la unidad en lugares altos con el cable
conectado, corre el riesgo de engancharse y
causar la caída de la cámara.
• Para proteger la unidad, NO
... permita que se moje.
... la deje caer ni la golpee contra objetos duros.
... la someta a golpes ni vibraciones excesivas
durante el transporte.
deje el objetivo apuntado hacia objetos
...
extremadamente brillantes por períodos prolongados.
... exponga el objetivo a la luz directa del sol.
... la balancee excesivamente cuando utilice la
correa de mano.
... balancee la funda blanda de la cámara con ella
dentro.
guarde la cámara en un lugar con polvo o arena.
...
• Para evitar que la unidad se caiga,
• Cuando monte la cámara sobre un trípode,
fíjela fi rmemente al trípode.
Si la cámara se cae, usted podría lesionarse o la
cámara podría dañarse.
Cuando un niño utilice la unidad, debe hacerlo con
la supervisión de los padres.
Page 37

Baterías (opcional)
La batería suministrada es una
batería de iones de litio. Antes
de utilizar la batería suministrada
o una batería opcional, lea las
precauciones siguientes:
• Para evitar riesgos
... no queme la batería.
... no acorte el circuito de las terminales.
Mantener alejado de objetos metálicos
cuando no se utilice. Cuando transporte
la unidad, coloque la batería en una bolsa
plástica.
... no modifi que ni desmonte la batería.
... no exponga la batería a temperaturas
superiores a 60°C (140°F), puesto que la
batería podría calentarse en exceso, explotar
o incendiarse.
... utilice solamente los cargadores
especifi cados.
• Para evitar daños y prolongar la vida
útil
... no la someta a sacudidas innecesarias
.... cárguela dentro del margen de temperatura
de 10°C a 35°C (50°F a 95°F). A
temperaturas más bajas se requiere más
tiempo de carga, y en algunos casos
puede que incluso se detenga la carga.
A temperaturas más altas puede resultar
imposible terminar la carga, y en algunos
casos puede que incluso se detenga.
... guárdela en lugar fresco y seco. La
exposición prolongada a temperaturas
elevadas aumentará la descarga natural y
reducirá el periodo de vida útil.
... mantenga un 30% del nivel de batería ( )
si las baterías no serán utilizadas por largo
tiempo.
Asimismo, cárguelas por completo y luego
descárguelas por completo cada 6 meses;
luego continúe guardándolas con un nivel de
batería de 30% ( ).
... cuando no se utilice, se debe retirar del
cargador o dispositivo eléctrico, ya que
algunas máquinas utilizan corriente incluso
estando apagadas.
... no deje caer ni exponga a fuertes impactos.
ATENCIÓN:
La batería que ha adquirido es
reciclable. Por favor comunicarse
al 1-800-8-BATTERY para
información sobre como reciclar
dicha batería.
(Sólo para EE.UU. y Canadá)
Terminales
Declaración de conformidad
Número de modelo: GV-LS2
Nombre comercial: JVC
Parte responsable: JVC AMERICAS CORP.
Dirección: 1700 Valley Road Wayne, N. J. 07470
Número de teléfono: 973-317-5000
Este dispositivo cumple con la Sección 15 de las
normas de la FCC. Su funcionamiento está sujeto a
las dos siguientes condiciones: (1) Este dispositivo
no debe causar interferencia perjudicial y (2) este
dispositivo debe aceptar cualquier interferencia
recibida, incluyendo la interferencia que pueda
ocasionar un funcionamiento no deseado.
Los cambios o modifi caciones no aprobados por
JVC pueden anular la autorización del usuario
para operar la unidad. Este equipo ha sido
probado y se ha comprobado que cumple con
los límites para los dispositivos digitales clase B,
de acuerdo con la Sección 15 de las normas de
la FCC. Estos límites se han establecido para
proporcionar una protección razonable contra
interferencias perjudiciales en una instalación
residencial. Este equipo genera, utiliza y puede
irradiar energía de radiofrecuencia, y, si no se
instala y utiliza de acuerdo con las instrucciones,
puede causar interferencias perjudiciales en las
comunicaciones por radio. No obstante, no se
garantiza que no puedan producirse interferencias
en una instalación concreta. Si este equipo causa
interferencias perjudiciales en la recepción de radio
o televisión, lo cual puede determinarse apagando
y encendiendo el equipo, se aconseja al usuario
tratar de corregir las interferencias tomando una
o varias de las siguientes medidas: Reorientar o
cambiar de lugar la antena receptora. Aumentar la
separación entre el equipo y el receptor.
Conectar el equipo a una toma de un circuito
distinto de aquél al que esté conectado el receptor.
Consulte con el distribuidor o un técnico de radio/TV
con experiencia.
Si desea más información, consulte la Guía detallada del usuario en
http://manual3.jvckenwood.com/
5
Page 38

Comprobación de accesorios
Adaptador de CA *
UIA324-12
Cable LAN
Guía básica del usuario
(Este manual)
*1 Utilice el cable de conversión suministrado y el cable de CA cuando conecte el
adaptador de CA.
*2 Cuando transporte la unidad, etc. instale esta cubierta en la parte posterior de la
cámara.
● Compre una tarjeta SD por separado.
Se ha comprobado el funcionamiento con las siguientes tarjetas SD.
Fabricante
Video
1
Panasonic
TOSHIBA
SanDisk
Tarjeta SD compatible de clase 4 o superior (2 GB)
Tarjeta SDHC compatible de clase 4 o superior (4 GB a 32 GB)
Tarjeta SDXC compatible de clase 4 o superior (48 GB a 64 GB)
(Para grabaciones con calidad de video "UXP", se
recomienda utilizar una tarjeta clase 6 o superior.)
Cable de CA
CD-ROM del software
Cable de conversión
Cubierta posterior*
2
• Si utiliza otras tarjetas SD (incluidas las tarjetas SDHC/SDXC) que no sean las
especificadas anteriormente, pueden producirse fallas de grabación o pérdida de datos.
• No se garantizan todas las operaciones de las tarjetas SD. Algunas operaciones
pueden no realizarse debido a cambios en las especificaciones, etc.
• No toque los terminales de la tarjeta SD. De lo contrario, podrían ocurrir pérdidas
de datos.
●Cuando utilice el adaptador de CA fuera de su país, emplee un enchufe de
conversión disponible en el mercado adecuado para el país o región.
6
Si desea más información, consulte la Guía detallada del usuario en
http://manual3.jvckenwood.com/
Page 39

Nombres y funciones de los componentes
●Cámara
<Parte delantera>
1
3
4
5
2
<Parte superior> <Parte inferior>
!
@
#
$
1
Micrófono integrado:
Transmite/
graba los sonidos captados por el
micrófono cuando no se conecta un
micrófono externo.
2
Objetivo:
3
Luz LED:
No debe tocarlo directamente.
Funciona como una luz en
lugares oscuros.
4
Luz indicadora:
Se ilumina para
indicar el estado de la grabación, etc.
5
Sensor de la cámara:
Ajusta el
balance de blancos automáticamente.
6
Botón [RESET]:
Restablece la
confi guración de red. Pulse y mantenga
pulsado este botón con la punta de un
clip para papel o elemento similar con
el adaptador de CA conectado.
7
Terminal LAN:
Para conectar la
cámara a una computadora o
enrutador mediante un cable LAN.
8
Interruptor del modo de red:
Cambia el modo de red.
9
Terminal de la batería:
Para conectar
una batería adquirida por separado.
(BN-VG139U)
Si desea más información, consulte la
"Guía detallada del usuario".
Si desea más información, consulte la Guía detallada del usuario en
http://manual3.jvckenwood.com/
<Parte posterior>
9
ETHERENT
RESET
DIRECT WLAN
LAN(OFF)
6
7
80
PLUG IN POWER
-
MIC
DC
=
AV
~
%
0
Ranura para tarjeta SD:
Si desea
conocer cuáles tarjetas son
compatibles, consulte la pág. 6.
-
Terminal [MIC]:
Para conectar un
micrófono externo.
=
Conector [DC]:
Para conectar el
adaptador de CA suministrado.
~
Conector [AV]:
Para conectar un
cable de AV adquirido por separado.
!
Zapata caliente:
Para conectar
accesorios de la cámara o similares.
@
Botón de grabación:
Inicia la
transmisión/grabación. Para detener,
pulse nuevamente este botón.
#
Botón WPS:
Pulse y mantenga
pulsado para conectar por primera
vez la cámara de forma inalámbrica
(Wi-Fi) en modo WPS.
$
Botón de encendido:
Pulse y
mantenga pulsado para encender
la cámara. Para apagarla, vuelva a
mantener pulsado este botón.
%
Orifi cio para montaje del trípode:
Para montar un trípode adquirido por
separado.
7
Page 40

●Soporte basculante ("Pantilter")
<Parte delantera>
<Parte posterior>
3
4
12
50
9
PLUG IN
MICPOWER
AV DCEXTEND
<Parte inferior>
-
1
Botón de encendido:
Pulse y
mantenga pulsado para encender
la cámara. Para apagarla, vuelva a
mantener pulsado este botón.
2
Luz de encendido:
Se enciende
cuando se enciende la cámara.
3
Interruptor de bloqueo de
inclinación ([TILT LOCK]):
Bloquea
el soporte basculante antes de iniciar
su movimiento.
4
Tornillo de fi jación de la cámara:
Fija la cámara al soporte basculante.
5
Orifi cio de fi jación para
prevención de caídas:
Asegure
todo el conjunto de la unidad con un
sujetador o similar.
678
6
Terminal [MIC]:
Para conectar un
micrófono externo.
7
Conector [AV]:
Para conectar un
cable de AV adquirido por separado.
8
Terminal [EXTEND]:
No se utiliza.
(para uso en el futuro)
9
Interruptor de bloqueo de
panoramización ([PAN LOCK]):
Para bloquear el soporte basculante
antes de iniciar su movimiento.
0
Conector [DC]:
Para conectar el
adaptador de CA suministrado.
-
Orifi cio para montaje del trípode:
Para montar un trípode adquirido por
separado.
8
Si desea más información, consulte la Guía detallada del usuario en
http://manual3.jvckenwood.com/
Page 41

Preparativos previos al uso
Conexión de la cámara a una
computadora
Para confi gurar la cámara, primero
conéctela a la computadora.
Entorno de funcionamiento requerido
Navegador: Internet Explorer 9 o superior
1 Conecte el cable LAN a la cámara.
MIC
DIRECT WLAN
LAN(OFF)
ETHERENT
PLUG IN POWER
DC
AV
MIC
DIRECT WLAN
PLUG IN POWER
DC
LAN(OFF)
AV
RESET
RESET
ETHERENT
2
Conecte la cámara a la computadora
con el cable LAN suministrado.
3 Ajuste el interruptor del modo de
red a [LAN•OFF.
DIRECT WLAN LAN(OFF)
• El terminal LAN no se podrá utilizar si el
interruptor del modo de red se ajusta a
[DIRECT] o [WLAN].
• El ajuste no cambiará si el interruptor
de moto de red se cambia mientras la
alimentación está conectada.
• No utilice cables (cable de AV, micrófono,
etc.) con conectores en forma de L.
• Para obtener información sobre otras
formas de conexión, consulte la "Guía
detallada del usuario".
Conexión del adaptador de CA
Conecte el adaptador de CA suministrado
al conector CC de la cámara.
MIC
DIRECT WLAN
PLUG IN POWER
DC
LAN(OFF)
AV
RESET
ETHERENT
Adaptador de CA Cable de conversión
Configuración de los ajustes
de la cámara adecuados a sus
necesidades
Especifi que el formato de video, el zoom,
etc. adecuados a sus necesidades.
Confi gure los ajustes en el navegador.
Inicio de sesión como administrador
1 Si no se ha conectado la
alimentación, mantenga pulsado el
botón [POWER] para conectarla.
El botón [POWER] comienza a
parpadear. Espere hasta que deje de
parpadear y permanezca iluminado.
2 Configure los ajustes de red en la
computadora de la siguiente forma.
Dirección IP
: 192.168.1.2
192.168.1.254 (excepto 192.168.1.100)
(ejemplo) 192.168.1.23
Máscara de subred
Antes de la operación, tome nota
de los ajustes de red actuales para
restablecer los ajustes de red.
3 Inicie Internet Explorer y en la
barra de direcciones ingrese
"http://192.168.1.100:8000".
a
: 255.255.255.0
Si desea más información, consulte la Guía detallada del usuario en
http://manual3.jvckenwood.com/
9
Page 42

4 Ingrese el nombre de usuario y la
contraseña del administrador.
Configuración inicial: NOMBRE DE USUARIO
“root”, CONTRASEÑA “password”.
Si se inició la sesión correctamente,
aparecerá la pantalla de configuración.
Cambio de los ajustes
Seleccione "RED", "CÁMARA/PAN TILTER",
o "DIRIGIR" en la ventana izquierda de la
pantalla para cambiar los ajustes. Haga clic
en "+", a la izquierda de cada elemento,
para visualizar las subcategorías.
●"RED"
• "RED CABLEADA"
Para establecer una conexión a
través de cable.
• "RED INALÁMBRICA"
Para establecer una conexión inalámbrica.
• "AJUSTES DE MONITOR"
Para conectarse a través de una red.
• "AJUSTES FLUJO DATOS"
Formato para transmisión/grabación.
●"CÁMARA/PAN TILTER"
• "AJUSTES DE CÁMARA"
Ajustes de la cámara, como el zoom.
• "AJUSTES PAN TILTER"
Ajustes del soporte basculante, como
el ángulo.
●"DIRIGIR"
• "AJUSTES COMUNES"
Cambiar la contraseña del
administrador, ajustar el reloj, etc.
• "GESTIÓN DE MEDIOS"
Formatear la tarjeta SD.
• "APAGAR CÁMARA"
Apaga la cámara.
*
No se puede encender la
alimentación a través del navegador.
Si desea más información, consulte la
"Guía detallada del usuario".
10
Si desea más información, consulte la Guía detallada del usuario en
http://manual3.jvckenwood.com/
Conexión del adaptador de CA
al soporte basculante
Para obtener más información sobre la
fi jación del soporte basculante, consulte
la página 11.
Conecte el adaptador de CA suministrado
al conector CC del soporte basculante.
• Desbloquee el soporte basculante
antes de conectar el adaptador de
(página 8)
CA.
• Retire todas las cintas del soporte
basculante.
Adaptador de CA Cable de conversión
• Después de conectar el adaptador de CA,
se conecta la alimentación y el soporte
basculante inicia el ajuste de posición
desplazándose automáticamente. El
soporte basculante se desplaza cada vez
que se enciende la unidad.
• La luz de encendido parpadea cuando
falla el ajuste de posición. Apague la
unidad y vuelva a encenderla para
volver a ajustar.
• Cuando no utilice el soporte basculante,
conecte el adaptador de CA a la cámara.
MIC
PLUG IN POWER
RESET
DC
DIRECT WLAN
LAN(OFF)
AV
ETHERENT
PLUG IN
MIC
AV DCEXTEND
POWER
Page 43

Conexión/desconexión de dispositivos
Fijación del soporte basculante
El soporte basculante suministrado permite panoramizar (mover horizontalmente) e
inclinar (mover verticalmente) la cámara mediante una computadora o teléfono inteligente.
1 Presione la cámara en línea recta
hacia abajo.
2 Atornille y fije la cámara.
Dirección (Frente)
PLU
MIC
G
IN
P
O
WE
R
AV
E
X
TE
N
D
D
C
• Retire todos los cables antes de fijar el soporte basculante.
• Cuando instale el soporte basculante, compruebe la posición del orificio en el lado inferior.
• Fije firmemente el soporte basculante de forma que no quede ninguna separación.
• Cuando transporte la unidad, sostenga el soporte basculante (no la cámara).
• Cuando utilice el soporte basculante, conecte el adaptador de CA, el cable de CA y
el micrófono externo al soporte basculante.
• El soporte basculante no funciona correctamente sobre superficies inclinadas, o
cuando lo coloca invertido o sobre su costado.
Inserción/Extracción de una tarjeta SD
Antes de grabar, inserte una tarjeta SD disponible en el mercado.
●Inserción
Inserte la tarjeta en línea recta con el
terminal dirigido hacia la derecha.
• Apague la alimentación antes de insertar o extraer la tarjeta SD.
• Asegúrese de que el interruptor de protección contra escritura de la tarjeta SD no
esté en la posición LOCK (protección contra escritura).
• Algunas tarjetas deben formatearse con esta unidad. Si desea más información,
consulte la "Guía detallada del usuario".
Si desea más información, consulte la Guía detallada del usuario en
http://manual3.jvckenwood.com/
●Extracción
Presione la tarjeta hacia dentro una vez y
extráigala en línea recta.
11
Page 44

Uso de la cámara
Visualización en un navegador
Acceda a "http://192.168.1.100:80" con
Internet Explorer.
Es posible ver un video en un navegador
después de iniciar sesión con el nombre de
usuario y la contraseña del administrador,
o con los que se establecieron en
"AJUSTES DE MONITOR" (pág. 10).
• Para ver un video a través de una red,
serán necesarios los "AJUSTES DE
MONITOR" (pág. 10). Para un acceso
más rápido, ingrese el nombre de usuario
y la contraseña de nuestro servicio DDNS.
Para obtener una cuenta del servicio
DDNS, visite nuestro sitio web
https://dd3.jvckenwood.com/user/
<Ejemplo de navegador>
4
1
2
3
1
Pestaña:
imagen de la cámara y panel de
control, Archivo: imágenes en la tarjeta
SD, Estado: historial de mensajes)
2
Panel de control:
y el soporte basculante.
3
Barra de mensajes:
mensajes de error, etc.
4
Cierre de sesión:
cerrar sesión.
5
Estado:
la carga remanente en la batería.
6
Ajustes del fl ujo de datos:
los ajustes del fl ujo de datos.
Cambia de pantalla. (Monitor:
Controla la cámara
Muestra los
Haga clic aquí para
Indica el estado actual, como
5
6
Muestra
Instalación del software suministrado
"JVC CAM Control" le permite controlar
múltiples cámaras, cambiar el ángulo,
etc.
1 Inserte el CD-ROM de software
suministrado en el lector de CD
DVD de su computadora.
2 Siga las instrucciones en pantalla
para completar la instalación.
/
12
Si desea más información, consulte la Guía detallada del usuario en
http://manual3.jvckenwood.com/
Page 45

Flujo de imágenes
Si instala el controlador "Camera Driver"
suministrado podrá utilizar la unidad
como cámara web. Utilice un software de
distribución, como "Ustream Producer"
(http://www.ustream.tv/producer) o un
sitio web para transmitir las imágenes
desde la cámara web.
El controlador “Camera Driver” se
instalará junto con “JVC CAM Control”.
Instalación de la aplicación
para un terminal móvil
Puede pellizcar, arrastrar, etc. sobre el
panel táctil de un teléfono inteligente
o tableta para controlar la cámara de
manera intuitiva. Además, la cámara
puede panoramizarse o inclinarse
moviendo la tableta.
1 Descargue el software
correspondiente a su entorno.
• Teléfono inteligente (Android OS 2.3
o posterior)
Descargue "JVC CAM Control Single"
de Google Play Store.
• Tableta Android (Android OS 2.3 o
posterior, tamaño de la pantalla:
7 pulgadas o más, resolución:
1024 x 600 o más)
Descargue "JVC CAM Control Multi" de
Google Play Store.
• iPhone/iPod touch/iPad (iOS 5.1.1 o
posterior)
Descargue "
App Store.
2 Siga las instrucciones en pantalla
para completar la instalación.
JVC CAM Control
" de
Si desea más información, consulte la Guía detallada del usuario en
http://manual3.jvckenwood.com/
13
Page 46

Especificaciones
Cámara
Fuente de alimentación
Consumo de energía
Dimensiones (mm)
Peso
Entorno de
funcionamiento
Elemento de imagen
Rango de imagen
Objetivo
Zoom
Método de
grabación de video
Medios
Estándar de red
Pila para el reloj
Formato de salida del flujo de datos
Formato 1
Formato 2
Formato 3
Fuente de alimentación
Consumo de energía
Temperatura de
funcionamiento permisible
Dimensiones (mm)
Peso
Dimensiones (mm)
Peso
Área de movimiento
Vídeo
Audio
Sistema
Vídeo
Audio
Sistema
Vídeo
Audio
Adaptador de CA (UIA324-12)
Soporte basculante ("Pantilter") (GV-LS2WUP)
*1 Estimación realizada con DIS ajustado a "OFF" para el extremo de gran angular (W)
y a "MEDIUM" para el extremo de telefoto (T).
● Debido a mejoras en el producto, las especificaciones y la apariencia están
sujetos a cambios sin previo aviso.
14
Si desea más información, consulte la Guía detallada del usuario en
Con el adaptador de CA: 12 V CC, con la batería: 3,6 V CC
5,6 W (cuando se utiliza el soporte basculante)
73 x 48 x 89 (2 7/8" x 1 15/16" x 3 9/16") (An × Al × Pr)
Aprox. 229 g (0.51 lbs) (sin batería)
Temperatura de funcionamiento permisible: 0 a 40℃ (32℉ a 104℉), temperatura de
almacenamiento permisible: – 20 a 50℃ (– 4℉ a 122℉), humedad relativa permisible: 35 a 80%
1/2.3: 12,40 millones de píxeles (BSI CMOS)
5,40 millones a 2,07 millones de píxeles (estabilización de imagen: OFF, zoom dinámico: ON)
F1.2 a F2.8 f = 3,76 mm (3/16") a 37,6 mm (1 1/2")
Equivalente a una cámara de 35 mm (1 7/16"): 29,5 mm (1 3/16") a 476 mm
(18 3/4") (Zoom dinámico: ON)
Equivalente a una cámara de 35 mm (1 7/16"): 29,5 mm (1 3/16") a 407 mm
(16 1/16") (Zoom dinámico: OFF)*
Zoom óptico: hasta 10x, zoom dinámico: hasta 16x (Estabilizador de
imagen: OFF), zoom digital: hasta 200x
AVCHD estándar certifi cado, video: AVC/H.264, audio: Dolby Digital
(2 canales)
Tarjetas SD/SDHC/SDXC (no suministradas
Con cable: 10BASE-T/100BASE-TX, inalámbrica: IEEE 802.11b/g/n banda de 2,4 GHz solamente
Pila secundaria
Flujo de datos 1 Flujo de datos 2
JPEG (640x360)
LPCM 16 kHz 16 bits 1 canal
MPEG-2 TS —
H.264 Perfi l principal (720x480) JPEG (640x360)
AAC 48 kHz 16 bits 2 canales LPCM 16 kHz 16 bits 1 canal
MPEG-2 TS —
H.264 High Profi le (1920x1080) JPEG (640x360)
AAC 48 kHz 16 bits 2 canales LPCM 16 kHz 16 bits 1 canal
100 V a 240 V CA, 50 Hz/60 Hz
12 V CC, 2 A
0℃ a 40℃ (32℉ a 104℉) (10℃ a 35℃ (50℉ a 95℉) durante la carga de
la batería)
44 x 29 x 96 (1 3/4" x 1 3/16" x 3 13/16") (An × Al × Pr, excluyendo el cable y el enchufe de CA)
Aprox. 175 g (0.39 lbs)
128 x 113 x 108 (5 1/16" x 4 1/2" x 4 5/16") (An × Al × Pr)
Aprox. 609 g (1.4 lbs)
Panoramización: ±150° (Wi-Fi) / ±100° (LAN), Inclinación: – 30° a +40°
1
)
Ninguno
http://manual3.jvckenwood.com/
Page 47

NOTAS
Si desea más información, consulte la Guía detallada del usuario en
http://manual3.jvckenwood.com/
15
Page 48

©2012 JVC KENWOOD Corporation
C2N
0712HO-MW-VM
Page 49

LYT2488-001A-M
PT
Câmera de Transmissão ao Vivo
GV-LS2
U
ENGLISH
FRANÇAIS
ESPAÑOL
PORTUGUÊS
Guia Básico do Usuário
Para futuras consultas:
Introduza o número do modelo (localizado
na parte inferior da câmera) e o número de
série (localizado na montagem da bateria da
câmera) nos espaços a seguir.
Nº do modelo
Nº de série
Prezados Usuários
Obrigado por comprar este produto JVC.
Antes de usar o produto, leia as Precauções de segurança nas páginas 2 e 4 para
garantir o uso correto do produto.
Guia Detalhado do Usuário
Este produto é fornecido com o "Guia Básico do Usuário" (este manual) e o "Guia
Detalhado do Usuário". Para maiores detalhes sobre a operação deste produto,
consulte o "Guia Detalhado do Usuário" no seguinte website.
■
http://manual3.jvckenwood.com/
Sumário
Precauções de segurança .....................2
Precauções............................................4
Confi rmação dos acessórios .................6
Nomes e funções dos componentes .....7
Preparação antes do uso ......................9
Colocação/remoção dos dispositivos
Uso da câmera ....................................12
Especifi cações.....................................14
...11
Page 50

Precauções de segurança
Quando o produto produto é instalado em uma caixa
ou em uma prateleira, certifi que-se de que haja
sufi ciente espaço (10 cm ou mais em ambos os lados
e nas partes superior e posterior, para permitir uma
ventilação adequada).
Não bloqueie as aberturas de ar.
(Se as aberturas de ventilação forem bloqueadas por
um jornal, tecido, etc., o calor poderá acumular-se no
O símbolo do raio com uma seta na ponta dentro
de um triângulo equilátero destina-se a a alertar o
usuário sobre a presença de "voltagem perigosa"
não isolada dentro do invólucro do produto, que
pode ser de magnitude sufi ciente para apresentar
um risco de choque elétrico às pessoas.
O ponto de exclamação dentro de um triângulo
equilátero destina-se a alertar o usuário sobre a
presença de instruções importantes de operação
e de manutenção (reparo) na literatura que
acompanha o produto.
ADVERTÊNCIA: PARA PREVENIR O RISCO
DE INCÊNDIO OU CHOQUE ELÉTRICO, NÃO
EXPONHA ESTE PRODUTO À CHUVA OU À
UMIDADE.
NOTAS:
• A placa de classificação e a precaução de
segurança se encontram na parte inferior e/ou na
parte posterior da unidade principal.
• A placa do número de série se encontra na
montagem da bateria.
• A informação de classificação e a precaução de
segurança do adaptador de CA se encontram nas
suas partes superior e inferior.
ADVERTÊNCIA:
A bateria e a câmera com a bateria
instalada não devem ser expostas ao calor excessivo
como a luz direta do sol, fogo ou algo similar.
Faça um backup de dados gravados importantes
A JVC não será responsável por nenhuma perda de
dados.
É recomendável copiar dados gravados importantes
em um disco ou outro meio de gravação para
armazenamento uma vez cada 3 meses.
2
Para maiores detalhes, consulte o Guia Detalhado do Usuário em
http://manual3.jvckenwood.com/
interior do produto.)
Não coloque fontes com chamas abertas como, por
exemplo, velas acesas, perto do produto.
Para eliminar as pilhas, leve em consideração
os problemas ambientais e siga estritamente os
regulamentos e leis locais que regulam a eliminação
de pilhas.
O produto não deve ser exposto a gotejamentos ou
salpicos de líquidos.
Não use este produto em um banheiro ou lugares
com água.
Não coloque também nenhum recipiente enchido com
água ou líquidos (como cosméticos ou remédios, vasos
de fl ores, plantas envasadas, copos, etc.) em cima do
produto. (A infi ltração de água ou líquido no produto
pode provocar um incêndio ou choque elétrico.)
Não aponte a lente diretamente para o sol. Isso pode
provocar lesões oculares, bem como pode provocar
um mau funcionamento dos circuitos internos.
Também existe o risco de incêndio e choque elétrico.
PRECAUÇÃO!
As seguintes notas indicam possíveis danos físicos a
este produto e ao usuário.
Não use um tripé em superfícies instáveis ou
desniveladas.
O produto poderia tombar e sofrer sérios danos.
PRECAUÇÃO!
Não é recomendável conectar cabos (áudio/vídeo,
etc.) a este produto e deixar o produto em cima de
um televisor, pois alguém pode tropeçar nos cabos e
derrubar o produto, o que resultaria em danos.
PRECAUÇÃO:
O plugue do cabo de alimentação deverá estar
prontamente operável.
• Desconecte o plugue do cabo de alimentação
imediatamente no caso de alguma anormalidade
da câmera.
PRECAUÇÃO:
• Elimine baterias usadas de acordo com as
instruções.
• Existe o risco de explosão se a bateria for
substituída por um tipo incorreto.
ADVERTÊNCIA
Para EQUIPAMENTO PLUGÁVEL, a tomada deve
estar perto do equipamento e ser de fácil acesso.
Page 51

PRECAUÇÃO:
Para conservar a conformidade com as diretrizes de
exposição RF da FCC, use somente a antena fornecida.
Uma antena não autorizada, modifi cação ou
acessórios podem danifi car o transmissor e podem
violar os regulamentos da FCC.
Este dispositivo está em conformidade com a Parte
15 dos Regulamentos da FCC.
A operação está sujeita às seguintes duas condições:
Este dispositivo não pode causar interferência prejudicial.
(1)
(2) Este dispositivo deve aceitar qualquer
interferência recebida, incluindo interferências que
possam causar um funcionamento indesejável.
INSTRUÇÕES IMPORTANTES DE SEGURANÇA
1. Leia estas instruções.
2. Guarde estas instruções.
3. Observe todas as advertências.
4. Siga todas as instruções.
5. Não use este produto perto de água.
6. Limpe somente com um pano seco.
7. Não bloqueie nenhuma abertura de ventilação.
Instale de acordo com as instruções do fabricante.
Não instale perto de fontes de calor como radiadores,
8.
aquecedores, fogões, ou outros aparelhos (inclusive
amplifi cadores) que produzem calor.
9. Proteja o cabo de alimentação para evitar que seja
pisado ou comprimido, especialmente em plugues,
tomadas e no ponto onde o mesmo sai do produto.
10. Use somente os apetrechos/acessórios
especifi cados pelo fabricante.
Use somente o carrinho,
11.
suporte, tripé, suporte ou mesa
especifi cados pelo fabricante,
ou vendidos com o produto.
Quando usar um carrinho,
tome cuidado ao mover a
combinação de carrinho/
produto para evitar ferimentos
causados pelo tombamento
da combinação.
12. Desconecte este produto durante tempestades com
trovoadas ou quando não for usá-lo durante um
longo período de tempo.
13. Encarregue qualquer reparo a pessoal de serviço
qualifi cado.
O reparo será necessário se o produto sofrer algum dano
como, por exemplo, uma avaria do cabo de alimentação
ou do seu plugue, derrame de líquido ou infi ltração
de objetos no produto, exposição do produto à chuva
ou umidade, ou se o produto não estiver funcionando
corretamente devido a uma queda ou outro motivo.
Repare que este produto é destinado apenas
ao uso privado do usuário.
É proibido qualquer uso comercial sem a autorização
apropriada. (Mesmo que você for gravar um evento
como um show, atuação ou exposição para o seu
desfrute pessoal, recomendamos fortemente que
você obtenha uma permissão antecipadamente.)
Marcas comerciais
• AVCHD e o logotipo AVCHD são marcas registradas
da Panasonic Corporation e Sony Corporation.
• Fabricado sob licença da Dolby Laboratories. Dolby
e o símbolo D duplo são marcas registradas da
Dolby Laboratories.
• Android™ é uma marca registrada da Google Inc.
• Windows
• iPod, iPhone, iMovie e iPhoto são marcas
• Intel, Intel Core e Pentium são marcas comerciais
• Wi-Fi, Wi-Fi logo, Wi-Fi CERTIFIED, o logotipo
• Os nomes de outros produtos e empresas incluídos
®
é uma marca registrada ou marca
comercial da Microsoft Corporation nos Estados
Unidos e/ou em outros países.
comerciais da Apple Inc., registradas nos Estados
Unidos e em outros países.
ou marcas registradas da Intel Corporation ou suas
subsidiárias nos Estados Unidos e em outros países.
Wi-Fi CERTIFIED, WPA e WPA2 são marcas
comerciais ou marcas registradas da Wi-Fi Alliance.
neste manual de instruções são as marcas
comerciais e/ou marcas registradas dos seus
respectivos proprietários. As marcas como ™ e
foram omitidas neste manual.
Quando usar o adaptador de CA em áreas
fora dos Estados Unidos
O adaptador de CA fornecido oferece uma seleção
de voltagem automática no intervalo de CA 110 V a
240 V.
USO DO ADAPTADOR DE TOMADA
ELÉTRICA DOMÉSTICA
No caso de conectar o cabo de alimentação do
produto a uma tomada elétrica que não seja do tipo
ANSI-C73, use um adaptador de plugue denominado
"Plugue Siemens" como mostrado.
Para este adaptador de plugue, consulte o seu
revendedor JVC mais próximo.
Adaptador de plugue
®
• Retire o adaptador de CA da tomada elétrica
quando não estiver usando o produto.
• Não deixe poeira ou objetos metálicos aderidos na
tomada elétrica ou no adaptador de CA (plugue do
cabo/de CC).
• Certifi que-se de usar somente o adaptador de CA
Se este símbolo for mostrado, só é
válido na União Europeia.
fornecido.
• Não use o adaptador de CA fornecido com outros
dispositivos.
Para maiores detalhes, consulte o Guia Detalhado do Usuário em
http://manual3.jvckenwood.com/
3
Page 52

Precauções
Meio de gravação
• Certifique-se de seguir as orientações
a seguir para prevenir a corrupção ou
danifi cação dos seus dados gravados.
• Não dobre nem derrube o meio de gravação,
nem o sujeite a pressões, sacudidas ou
vibrações fortes.
• Não espirre água no meio de gravação.
• Não use, substitua nem guarde o meio de
gravação em lugares expostos a eletricidade
estática e ruído elétrico fortes.
• Não desligue a câmera nem retire a bateria
ou adaptador de CA durante uma gravação,
reprodução ou acesso ao meio de gravação.
• Não aproxime o meio de gravação de objetos
com um campo magnético forte ou que emitem
ondas eletromagnéticas fortes.
• Não guarde o meio de gravação em lugares
com alta temperatura ou alta umidade.
• Não toque nas partes metálicas.
• Ao formatar ou apagar dados usando a câmera,
somente a informação de administração
de arquivos será mudada. Os dados não
são apagados completamente do meio de
gravação. Se você quiser apagar todos os dados
completamente, recomendamos o uso de um
software disponível comercialmente, que seja
designado especifi camente para tal fi nalidade, ou
a destruição física da câmera com um martelo,
etc.
4
Para maiores detalhes, consulte o Guia Detalhado do Usuário em
http://manual3.jvckenwood.com/
Unidade principal
• Para sua segurança, NÃO
... abra o corpo da câmera.
... desmonte nem modifi que a unidade.
... permita a infi ltração de substâncias infl amáveis,
água ou objetos metálicos na unidade.
... retire a bateria nem desconecte o fornecimento
de energia enquanto a câmera estiver ligada.
... deixe a bateria instalada quando a câmera não
estiver em uso.
... coloque fontes de chamas abertas como, por
exemplo, velas acesas, no produto.
... exponha o produto a gotejamentos ou salpicos
de líquidos.
... deixe poeira ou objetos metálicos aderidos
no plugue do cabo de alimentação ou numa
tomada elétrica de parede.
... insira nenhum objeto na câmera.
• Evite usar o produto
...
em lugares sujeitos a umidade ou poeira excessiva.
... em lugares sujeitos a fuligem ou vapor como,
por exemplo, perto de um fogão de cozinha.
... perto de aparelhos que geram campos
magnéticos ou elétricos fortes (alto-falantes,
antenas de radiodifusão, etc.).
... em lugares sujeitos a temperaturas
extremamente altas (acima de 40°C) ou
extremamente baixas (abaixo de 0°C).
• NÃO deixe o produto
... em lugares acima de 50°C.
em lugares onde a umidade seja extremamente baixa
...
(abaixo de 35%) ou extremamente alta (acima de 80%).
... sob a luz direta do sol.
... em um carro fechado no verão.
... perto de um aquecedor.
em lugares altos como em cima de um televisor.
...
Deixar o produto em lugares altos com o cabo
conectado pode resultar num mau funcionamento
se o cabo for agarrado e o produto cair no chão.
• Para proteger o produto, NÃO
... permita que o mesmo fi que molhado.
derrube o produto nem o bata contra objetos duros.
...
... o sujeite a choques ou vibrações excessivas
durante o transporte.
mantenha a lente direcionada para objetos extremamente
...
brilhantes durante longos períodos de tempo.
... exponha a lente à luz direta do sol.
o oscile excessivamente ao usar a correia de mão.
...
... oscile o estojo mole excessivamente quando a
câmera estiver nele.
guarde a câmera em uma área poeirenta ou arenosa.
...
• Para prevenir a queda do produto,
• Aperte a correia de punho fi rmemente.
• Quando usar a câmera com um tripé, monte a
câmera fi rmemente no tripé.
Se a câmera cair, você poderá sofrer ferimentos e a
câmera poderá sofrer danos.
Se uma criança usar o produto, deve fazê-lo sob a
orientação de um adulto.
Page 53

Bateria (opcional)
A bateria fornecida é de íons
lítio. Antes de utilizar a bateria
fornecida ou uma bateria opcional
certifi que-se de ler as precauções
a seguir:
• Para evitar acidentes
...
queime.
não
...
faça curto-circuito nos terminais.
não
Mantenha o aparelho afastado de objetos
metálicos quando. não está em utilização.
Durante o transporte, leve a bateria num
saco de plástico.
...
modifi que nem desmonte.
não
...
exponha a bateria a temperaturas
não
superiores a 60ºC (140ºF), pois pode
superaquecer, explodir ou provocar um
incêndio.
... utilize apenas carregadores específi cos.
• Para evitar danos e prolongar a vida
útil
... não a submeta a pancadas desnecessárias.
... carregue-a dentro dos níveis de temperatura
de 10°C a 35°C (50°F a 95°F). As
temperaturas mais frias impedem a reação
química.
E as temperaturas mais quentes podem
impedir que a carga seja concluída.
... guarde-a num local frio e seco. A exposição
prolongada a altas temperaturas aumenta
a descarga natural e diminui a vida útil da
bateria.
... Mantenha um nível de bateria de 30% ( )
se não pretender utilizar a bateria durante
um longo período de tempo.
Adicionalmente, carregue totalmente e
posteriormente descarregue totalmente a
bateria de 6 em 6 meses, continuando depois
a guardá-la com um nível de bateria de 30%
( ).
... quando não estiver utilizando-a, retire-a do
carregador ou da tomada, já que alguns
equipamentos mantêm a corrente mesmo
depois de desligados.
... Não deixe cair o aparelho nem o sujeite a
impactos fortes.
Terminais
Declaração de Conformidade
Número do modelo: GV-LS2
Nome comercial: JVC
Responsável: JVC AMERICAS CORP.
Endereço: 1700 Valley Road Wayne, N. J. 07470
Número de telefone: 973-317-5000
Este dispositivo está em conformidade com
a Parte 15 dos Regulamentos da FCC. A
operação está sujeita às seguintes duas
condições: (1) Este dispositivo não pode causar
interferência prejudicial, e (2) este dispositivo
deve aceitar qualquer interferência recebida,
incluindo interferências que possam causar um
funcionamento indesejável.
Alterações ou modifi cações não aprovadas pela
JVC podem anular a autoridade do usuário para
operar este equipamento. Este equipamento foi
testado e foi verifi cado que cumpre com os limites
para um dispositivo digital de Classe B, de acordo
com a Parte 15 dos Regulamentos da FCC. Esses
limites são concebidos para proporcionar uma
proteção razoável contra interferências prejudiciais
em uma instalação residencial. Este equipamento
gera, emprega e pode radiar energia de frequência
de rádio e, se não for instalado e usado de acordo
com as instruções, pode causar interferência
prejudicial às comunicações de rádio. No entanto,
não há garantia de que não ocorra nenhuma
interferência em uma instalação particular. Se
este equipamento causar uma interferência
prejudicial à recepção de rádio ou televisão, que
pode ser determinada pela operação de desligar
e ligar o equipamento, o usuário deve tentar
corrigir a interferência tomando uma ou mais das
seguintes medidas: Reoriente ou reposicione a
antena de recepção. Aumente a separação entre o
equipamento e o receptor.
Conecte o equipamento a outra tomada elétrica em
um circuito diferente do usado para a conexão do
receptor.
Consulte o seu revendedor ou um técnico de rádio/
TV experiente para ajuda.
Para maiores detalhes, consulte o Guia Detalhado do Usuário em
http://manual3.jvckenwood.com/
5
Page 54

Confirmação dos acessórios
Adaptador de CA*
UIA324-12
Cabo LAN
Guia Básico do Usuário
(Este manual)
*1
Use o cabo de conversão fornecido e o cabo de CA quando conectar o adaptador de CA.
*2 Instale esta tampa na parte posterior da câmera quando carregar o produto, etc.
● Compre um cartão SD separadamente.
O funcionamento foi confirmado com os seguintes cartões SD.
Fabricante
Vídeo
1
Panasonic
TOSHIBA
SanDisk
Cartão SD compatível com Classe 4 ou superior (2 GB)
Cartão SDHC compatível com Classe 4 ou superior (4 GB a
32 GB)
Cartão SDXC compatível com Classe 4 ou superior (48 GB
a 64 GB)
(Quando gravar com qualidade de vídeo "UXP", é
recomendável usar um cartão de Classe 6 ou superior.)
Cabo de CA
CD-ROM do software
Cabo de conversão
Tampa traseira*
2
• Usar cartões SD (inclusive cartões SDHC/SDXC) diferentes dos especificados
acima pode resultar na falha de gravação ou perdas de dados.
• Nem todas operações com cartão SD são garantidas. Algumas operações podem
não ser realizadas em virtude de mudanças nas especificações, etc.
• Não toque nos terminais do cartão SD. Fazer isso pode provocar a perda dos dados.
●Quando usar o adaptador de CA no exterior, use um plugue de conversão
disponível comercialmente apropriado para o país ou região de destino.
6
Para maiores detalhes, consulte o Guia Detalhado do Usuário em
http://manual3.jvckenwood.com/
Page 55
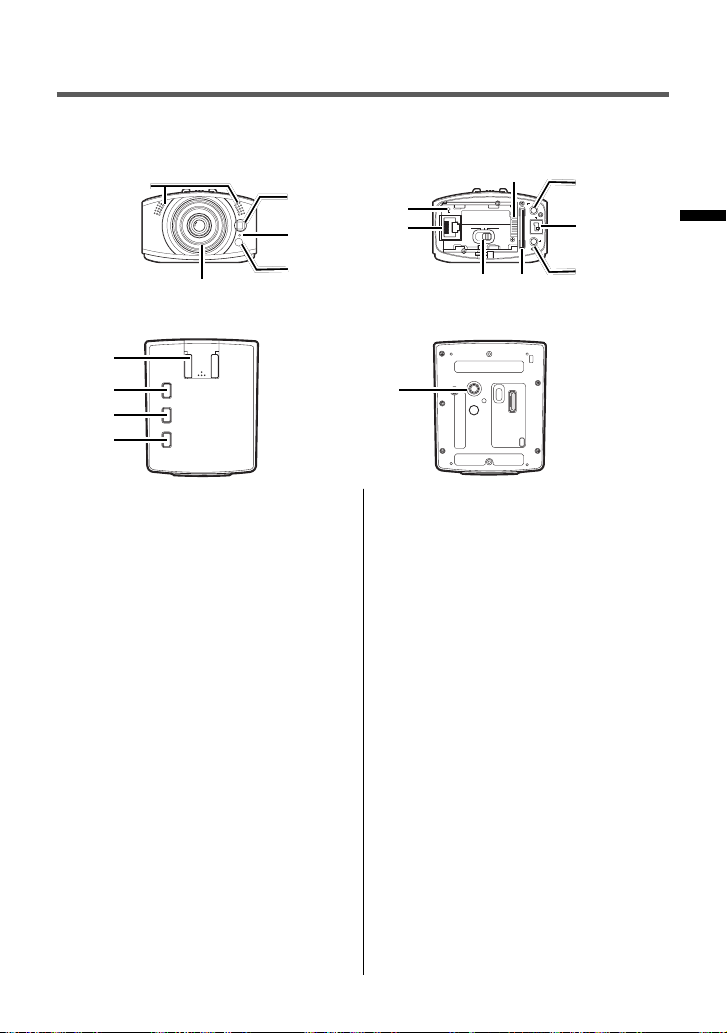
Nomes e funções dos componentes
●Câmera
<Frente> <Traseira>
1
3
4
5
2
<Parte superior> <Parte inferior>
!
@
#
$
1
Microfone interno:
Transmite/grava
os sons captados quando não há um
microfone externo conectado.
2
3
Não a toque diretamente.
Lente:
Luz LED:
Funciona como uma luz em
lugares escuros.
4
Luz de informação:
Pode acender-se
para indicar o estado de gravação, etc.
5
Sensor da câmera:
Ajusta o balanço
do branco automaticamente.
6
Botão [RESET]:
Reinicializa as defi nições da
rede. Mantenha este botão pressionado com
a ponta de um clipe de papel ou algo similar
quando o adaptador de CA estiver conectado.
7
Terminal LAN:
Serve para conectar um
computador ou roteador através de um cabo LAN.
8
Interruptor do modo de rede:
Comuta o modo de rede.
9
Terminal de bateria:
Conecte uma
bateria comprada separadamente.
(BN-VG139U)
Para maiores detalhes, consulte o
"Guia Detalhado do Usuário".
Para maiores detalhes, consulte o Guia Detalhado do Usuário em
http://manual3.jvckenwood.com/
9
ETHERENT
RESET
DIRECT WLAN
LAN(OFF)
6
7
80
PLUG IN POWER
-
MIC
DC
=
AV
~
%
0
Abertura para cartão SD:
Para os
cartões compatíveis, consulte a página 6.
-
Terminal [MIC]:
Conecte um
microfone externo.
=
Conector [DC]:
Conecte o adaptador
de CA fornecido.
~
Conector [AV]:
Conecte um cabo AV
comprado separadamente.
!
Sapata quente:
Monte os acessórios
da câmera aqui.
@
Botão de gravação:
Inicia a
transmissão/gravação. Para parar,
pressione o botão de novo.
#
Botão WPS:
Mantenha este botão
pressionado para estabelecer a
conexão sem fi os (Wi-Fi) no modo
WPS pela primeira vez.
$
Botão de alimentação:
Mantenha
este botão pressionado para ligar a
câmera. Para desligar, mantenha o
botão pressionado de novo.
%
Rosca de montagem de tripé:
Monte
um tripé comprado separadamente.
7
Page 56

●Panoramizador e inclinador
<Frente>
<Traseira>
3
4
12
50
9
PLUG IN
MICPOWER
AV DCEXTEND
<Parte inferior>
-
1
Botão de alimentação:
Mantenha
este botão pressionado para ligar a
câmera. Para desligar, mantenha o
botão pressionado de novo.
2
Luz de alimentação:
Acende-se
quando a câmera é ligada.
3
Interruptor de bloqueio de
inclinação ([TILT LOCK]):
Bloqueie
o panoramizador e inclinador antes de
mover.
4
Parafuso de fi xação da câmera:
Fixa a câmera no panoramizador e
inclinador.
5
Orifício de fi xação para prevenção
de queda:
Fixe a unidade completa
com uma correia ou algo similar.
678
6
Terminal [MIC]:
Conecte um
microfone externo.
7
Conector [AV]:
Conecte um cabo AV
comprado separadamente.
8
Terminal [EXTEND]:
Não usado.
(para uso futuro)
9
Interruptor de bloqueio de
panoramização ([PAN LOCK]):
Bloqueie o panoramizador e inclinador
antes de mover.
0
Conector [DC]:
Conecte o adaptador
de CA fornecido.
-
Rosca de montagem de tripé:
Monte
um tripé comprado separadamente.
8
Para maiores detalhes, consulte o Guia Detalhado do Usuário em
http://manual3.jvckenwood.com/
Page 57

Preparação antes do uso
Conexão da câmera ao seu
computador
Para confi gurar a câmera, primeiro
conecte-a ao seu computador.
Ambiente operacional necessário
Navegador: Internet Explorer 9 ou posterior
1 Instale o cabo LAN na câmera.
MIC
RESET
ETHERENT
2 Conecte a câmera ao computador
com o cabo LAN fornecido.
3 Ajuste o interruptor do modo de
rede para [LAN•OFF].
DIRECT WLAN LAN(OFF)
• Se o interruptor do modo de rede for
ajustado para [DIRECT] ou [WLAN], o
terminal LAN não poderá ser usado.
• Enquanto a alimentação estiver ligada,
mudar o interruptor do modo de rede
não mudará a definição.
• Não use cabos (cabo AV, microfone,
etc.) com conectores em forma de "L".
• Para outras formas de conectar,
consulte o Guia Detalhado do Usuário.
Para maiores detalhes, consulte o Guia Detalhado do Usuário em
PLUG IN POWER
LAN(OFF)
ETHERENT
DC
AV
MIC
DIRECT WLAN
PLUG IN POWER
DC
LAN(OFF)
AV
RESET
DIRECT WLAN
http://manual3.jvckenwood.com/
Conexão do adaptador de CA
Conecte o adaptador de CA fornecido ao
conector DC da câmera.
MIC
DIRECT WLAN
PLUG IN POWER
DC
LAN(OFF)
AV
RESET
ETHERENT
Adaptador de CA Cabo de conversão
Configuração das definições
da câmera adequadas às suas
necessidades
Especifi que o formato de vídeo, zoom,
etc. adequados às suas necessidades.
Confi gure as defi nições em um navegador.
Início de sessão como um administrador
1 Se a alimentação não estiver
ligada, mantenha o botão [POWER]
pressionado para ligá-la.
O botão [POWER] começará a piscar.
Espere até que o botão pare de piscar
e permaneça aceso.
2 Ajuste a definição de rede do
computador como segue.
Endereço IP
192.168.1.254 (exceto 192.168.1.100)
(exemplo) 192.168.1.23
Máscara de sub-rede
Anote as definições de rede atuais
antes da operação para reinicializar
as definições da rede.
3 Inicie o Internet Explorer
e, em seguida, introduza
"
http://192.168.1.100:8000" na barra
de endereço.
: 192.168.1.2 a
: 255.255.255.0
9
Page 58

4 Introduza o nome do usuário e a
senha do administrador.
Definição inicial: NOME DO USUÁRIO
"root", SENHA "password".
Se o início de sessão for bem sucedido,
a tela de configuração aparecerá.
Alteração das defi nições
Selecione "REDE", "CÂMARA/PAN
INCL." ou "GERIR" na janela esquerda
da tela para alterar as defi nições. Clique
em "+" na esquerda de cada item para
mostrar as subcategorias.
●"REDE"
• "REDE COM FIOS"
Para estabelecer uma conexão com fios.
• "REDE SEM FIOS"
Para estabelecer uma conexão sem fios.
• "DEFIN. DE MONITORIZ."
Para conectar através de uma rede.
• "DEFINIÇÕES DE FLUXO"
Formato para transmissão/gravação.
●"CÂMARA/PAN INCL."
• "DEFINIÇÕES DE CÂMARA"
As definições da câmera como zoom.
• "DEFINIÇÕES PAN INCL."
As definições do panoramizador e
inclinador como ângulo.
●"GERIR"
• "DEFINIÇÕES COMUNS"
Altere a senha do administrador,
ajuste do relógio, etc.
• "GESTÃO DE MULTIMÉDIA"
Formate um cartão SD.
• "DESLIGAR CÂMARA"
Desligue a câmera.
* A alimentação não pode ser ligada
através do navegador.
Conexão do adaptador de
CA ao o panoramizador e
inclinador
Para maiores detalhes sobre a instalação
do panoramizador e inclinador, consulte
a página 11.
Conecte o adaptador de CA fornecido
ao conector DC do panoramizador e
inclinador.
• Desbloqueie o panoramizador e
inclinador antes de conectar o
adaptador de CA.
• Retire toda a fita do panoramizador e
inclinador.
Adaptador de CA Cabo de conversão
• Depois de conectar o adaptador de CA, a
alimentação é ligada e o panoramizador
e inclinador se move automaticamente
para o ajuste de posição.
O panoramizador e inclinador se move
toda vez que a unidade é ligada.
• A luz de alimentação pisca quando o
ajuste de posição falha. Desligue a
unidade e ligue-a de novo para o reajuste.
• Quando não for usar o panoramizador e
inclinador, conecte o adaptador de CA
à própria câmera.
(página 8)
RESET
DIRECT WLAN
ETHERENT
PLUG IN
MIC
POWER
MIC
PLUG IN POWER
DC
LAN(OFF)
AV
AV DCEXTEND
Para maiores detalhes, consulte o "Guia
Detalhado do Usuário".
10
Para maiores detalhes, consulte o Guia Detalhado do Usuário em
http://manual3.jvckenwood.com/
Page 59

Colocação/remoção dos dispositivos
Instalação do panoramizador e inclinador
O panoramizador e inclinador fornecido permite-lhe panoramizar (mover horizontalmente)
e inclinar (mover verticalmente) a câmera usando o seu computador ou smartphone.
1 Empurre a câmera para baixo em
linha reta.
Direção (Frente)
• Retire todos os cabos antes de instalar o panoramizador e inclinador.
• Verifique a posição do orifício na parte inferior quando instalar o panoramizador e inclinador.
• Instale o panoramizador e inclinador firmemente, não deixando nenhuma folga.
• Segure o panoramizador e inclinador (não a câmera) ao carregar a unidade.
• Quando usar o panoramizador e inclinador, conecte o adaptador de CA, cabo AV e
microfone externo ao panoramizador e inclinador.
• O panoramizador e inclinador não funcionará corretamente se for colocado
obliquamente, de cabeça para baixo ou de lado.
Colocação/remoção de um cartão SD
Coloque um cartão SD disponível comercialmente antes de gravar.
●Colocação
2 Aparafuse e fixe a câmera.
P
MIC
L
U
G
IN
P
O
WE
R
AV
E
X
TE
N
D
D
C
●Remoção
Insira o cartão em linha reta, com o
terminal virado para a direita.
Empurre o cartão uma vez e, em
seguida, puxe-o em linha reta.
• Desligue a alimentação antes de colocar/retirar um cartão SD.
• Certifique-se de que o interruptor de proteção de gravação do cartão SD não esteja
na posição LOCK (protegido contra gravação).
• Alguns cartões precisam ser formatados com este produto. Para maiores detalhes,
consulte o "Guia Detalhado do Usuário".
Para maiores detalhes, consulte o Guia Detalhado do Usuário em
http://manual3.jvckenwood.com/
11
Page 60

Uso da câmera
Exibição em um navegador
Acesse "http://192.168.1.100:80" com
Internet Explorer.
Se você iniciar uma sessão usando o
nome do usuário e senha do administrador
ou os dados defi nidos em "DEFIN. DE
MONITORIZ." (página 10), você poderá
ver a imagem em um navegador.
• Para ver a imagem através de uma
rede, é necessário configurar "DEFIN.
DE MONITORIZ." (página 10).
Introduzir o nome do usuário e a senha
de nosso serviço DDNS
proporciona-lhe um acesso rápido.
Para adquirir uma conta de serviço
DDNS, visite o nosso website
https://dd3.jvckenwood.com/user/
<Exemplo de navegador>
4
1
2
3
1
2
3
4
5
6
12
Mude a exibição. (Monitor:
Guia:
Imagem da câmera e painel de
controle, Arquivo: Imagens no cartão
SD, estado: Histórico de mensagens)
Painel de controle:
câmera/panoramizador e inclinador.
Barra de mensagem:
mensagem de erro, etc.
Terminar sessão:
terminar uma sessão.
Indica o estado atual como a
Estado:
energia restante da bateria.
Defi nições de fl uxo:
defi nições de fl uxo.
Para maiores detalhes, consulte o Guia Detalhado do Usuário em
Controla a
Exibe uma
Clique aqui para
Exibe as
http://manual3.jvckenwood.com/
Instalação do software fornecido
"JVC CAM Control" permite-lhe controlar
várias câmeras, alterar o ângulo, etc.
1 Insira o CD-ROM do software
fornecido na unidade de CD/DVD
do seu computador.
2 Siga as instruções na tela para
concluir a instalação.
5
6
Page 61

Transmissão de imagens em
fluxo (Streaming)
Instalar o "Camera Driver" fornecido
lhe permitirá usar este produto como
uma câmera Web. Use um software de
distribuição como "Ustream Producer"
(http://www.ustream.tv/producer) ou
um site na Web para câmera Web para
transmitir as imagens em fl uxo.
O "Camera Driver" será instalado junto
com "JVC CAM Control".
Instalação do aplicativo para
um terminal móvel
Você pode tocar, arrastar, etc. o painel
tátil de um smartphone/tablet para operar
a câmera intuitivamente. Além disso, a
câmera pode ser panoramizada/inclinada
pelo movimento do tablet.
1 Baixe o software apropriado para o
seu ambiente de uso.
• Smartphone (Android OS 2.3 ou
posterior)
Baixe "JVC CAM Control Single" de
Google Play Store.
• Tablet Android (Android OS 2.3 ou
posterior, Tamanho da tela:
7 polegadas ou mais, Resolução:
1024 x 600 ou mais)
Baixe "JVC CAM Control Multi" de
Google Play Store.
• iPhone/iPod touch/iPad (iOS 5.1.1 ou
posterior)
Baixe "JVC CAM Control" de App
Store.
2 Siga as instruções na tela para
concluir a instalação.
Para maiores detalhes, consulte o Guia Detalhado do Usuário em
http://manual3.jvckenwood.com/
13
Page 62

Especificações
Câmera
Fornecimento de energia
Consumo de corrente
Dimensões (mm)
Peso
Ambiente de
funcionamento
Elemento de imagem
Gama de imagem
Lente
Zoom
Método de gravação de vídeo
Mídia
Padrão de rede
Pilha para o relógio
Formato de saída de fluxo
Formato 1
Formato 2
Formato 3
Fornecimento de energia
Consumo de corrente
Temperatura de
funcionamento permissível
Dimensões (mm)
Peso
Dimensões (mm)
Peso
Área movível
Vídeo
Áudio
Sistema
Vídeo
Áudio
Sistema
Vídeo
Áudio
Adaptador de CA (UIA324-12)
Panoramizador e Inclinador (GV-LS2WUP)
*1 Estimado nas condições de DIS defi nido para "OFF" para a extremidade de
grande-angular (W), e "MÉDIO" para a extremidade de telefoto (T).
● As especificações e a aparência estão sujeitas a mudanças sem aviso
prévio devido a melhorias do produto.
14
Para maiores detalhes, consulte o Guia Detalhado do Usuário em
Uso do adaptador de CA: CC 12 V, Uso de uma bateria: CC 3,6 V
5,6 W (quando usar o panoramizador e inclinador)
73 x 48 x 89 (2 7/8" x 1 15/16" x 3 9/16") (L × A × P)
Aprox. 229 g (0.51 lbs) (excluindo a bateria)
Temperatura de funcionamento permissível: 0 a 40℃ (32℉ a 104℉), Temperatura de
armazenamento permissível: – 20 a 50℃ (– 4℉ a 122℉), Umidade relativa permissível: 35 a 80%
1/2.3: 12,40 milhões de pixels (BSI CMOS)
5,40 milhões a 2,07 milhões de pixels (Estabilizador de imagem: Desativado, Zoom dinâmico: Ativado)
F1.2 a F2.8 f = 3,76 mm (3/16") a 37,6 mm (1 1/2")
Equivalente a câmera de 35 mm (1 7/16"): 29,5 mm (1 3/16") a 476 mm (18 3/4") (Zoom dinâmico: Ativado)
Equivalente a câmera de 35 mm (1 7/16"): 29,5 mm (1 3/16") a 407 mm (16 1/16") (Zoom dinâmico: Desativado)*
Zoom ótico: até 10x, Zoom dinâmico: até 16x
Desativado), Zoom digital: até 200x
Padrão AVCHD certifi cado, vídeo: AVC/H.264, Áudio: Dolby Digital (2 canais)
Cartões SD/SDHC/SDXC (não fornecidos
Com fi os: 10BASE-T/100BASE-TX, Sem fi os: somente banda de IEEE 802.11b/g/n 2,4 GHz
Pilha secundária
Fluxo 1 Fluxo 2
JPEG (640x360)
LPCM 16 kHz 16 bits 1 canal
MPEG-2 TS
Perfi l principal H.264 (720x480) JPEG (640x360)
AAC 48 kHz 16 bits 2 canais LPCM 16 kHz 16 bits 1 canal
MPEG-2 TS
H.264 High profi le (1920x1080) JPEG (640x360)
AAC 48 kHz 16 bits 2 canais LPCM 16 kHz 16 bits 1 canal
CA 100 V a 240 V, 50 Hz/60 Hz
CC 12 V, 2 A
0℃ a 40℃ (32℉ a 104℉) (10℃ a 35℃ (50℉ a 95℉) na carga da
bateria)
44 x 29 x 96 (1 3/4" x 1 3/16" x 3 13/16") (L × A × P, excluindo o cabo de CA e plugue de CA)
Aprox. 175 g (0.39 lbs)
128 x 113 x 108 (5 1/16" x 4 1/2" x 4 5/16") (L × A × P)
Aprox. 609 g (1.4 lbs)
Panoramização: ±150° (Wi-Fi) / ±100° (LAN), Inclinação: – 30° a +40°
(Estabilizador de imagem:
)
Nenhum
—
—
http://manual3.jvckenwood.com/
1
Page 63

NOTAS
Para maiores detalhes, consulte o Guia Detalhado do Usuário em
http://manual3.jvckenwood.com/
15
Page 64

©2012 JVC KENWOOD Corporation
C2N
0712HO-MW-VM
 Loading...