

Page 1

LYT2644-002A
0513YHM-YH-OT
C2N
Live Streaming Camera
GV-LS2 / GV-LS1
Connection Guide
This PDF will give you the steps in order to connect the Live Streaming
Camera to your network and digital devices.
Other information can be found in the Reference Manual.
Connecting wirelessly to the camera (Wi-Fi direct) ⇒ Go to page 2
Connecting wirelessly via a Wi-Fi LAN router ⇒ Go to page 7
Connecting to the camera from outside the house ⇒ Go to page 16
Distribution on Ustream ⇒ Go to page 24
1
Page 2
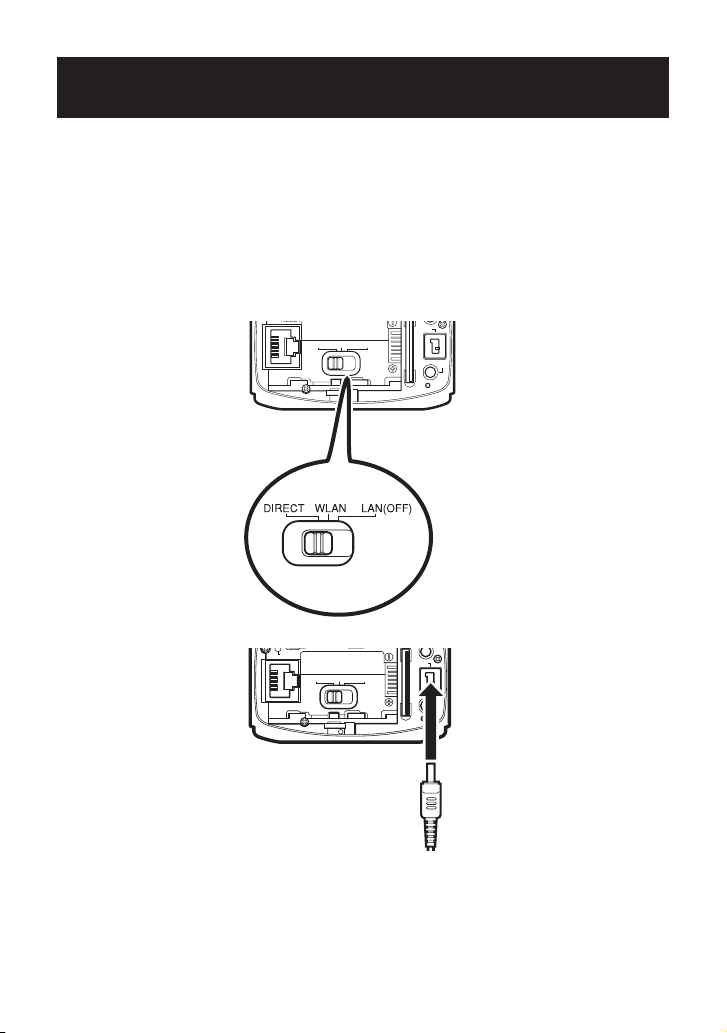
Connecting wirelessly to the camera (Wi-Fi direct)
DIRECT WLAN
RESET
LAN(OFF)
ETHERNET
DC
AV
MIC
PLUG IN POWER
DIRECT WLAN
RESET
LAN(OFF)
ETHERNET
DC
AV
MIC
PLUG IN POWER
DIRECT WLAN
RESET
LAN(OFF)
ETHERNET
DC
AV
MIC
PLUG IN POWER
Android and iOS devices (e.g. iPhone, iPad) can be connected to the
camera directly without a Wi-Fi router.
* Before connecting to the camera, install the JVC CAM Control app.
(When connected to the camera, your devices will not be able to access
the Internet.)
1. Switch the network mode to 'DIRECT'.
2. Connect the AC adapter.
Once you start the camera, the WPS button will blink slowly.
2
Page 3
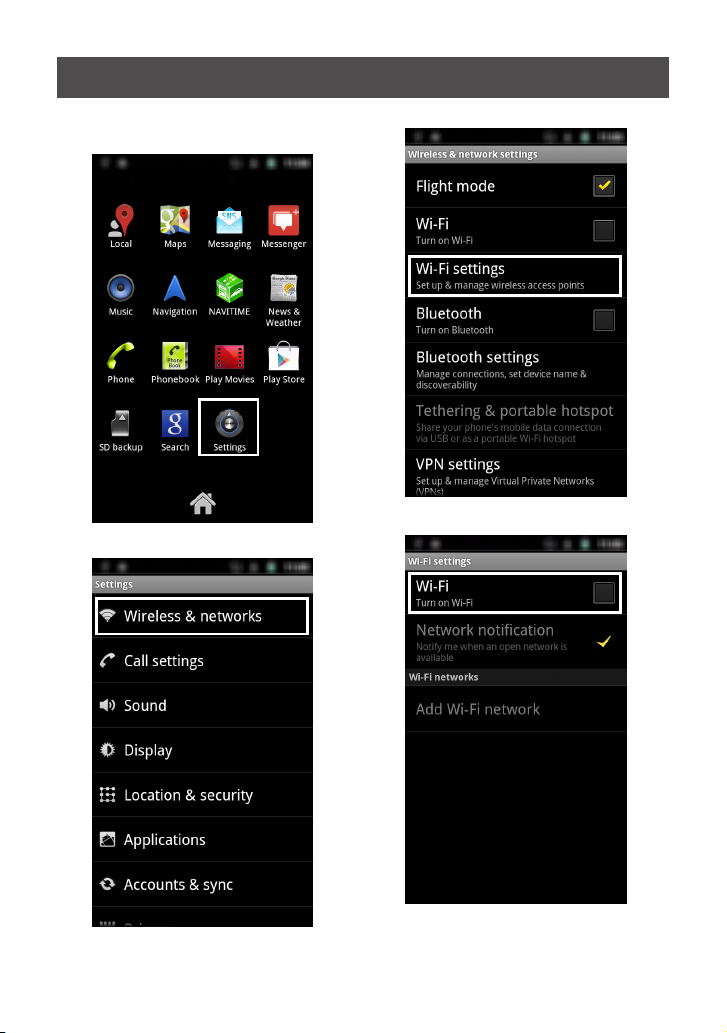
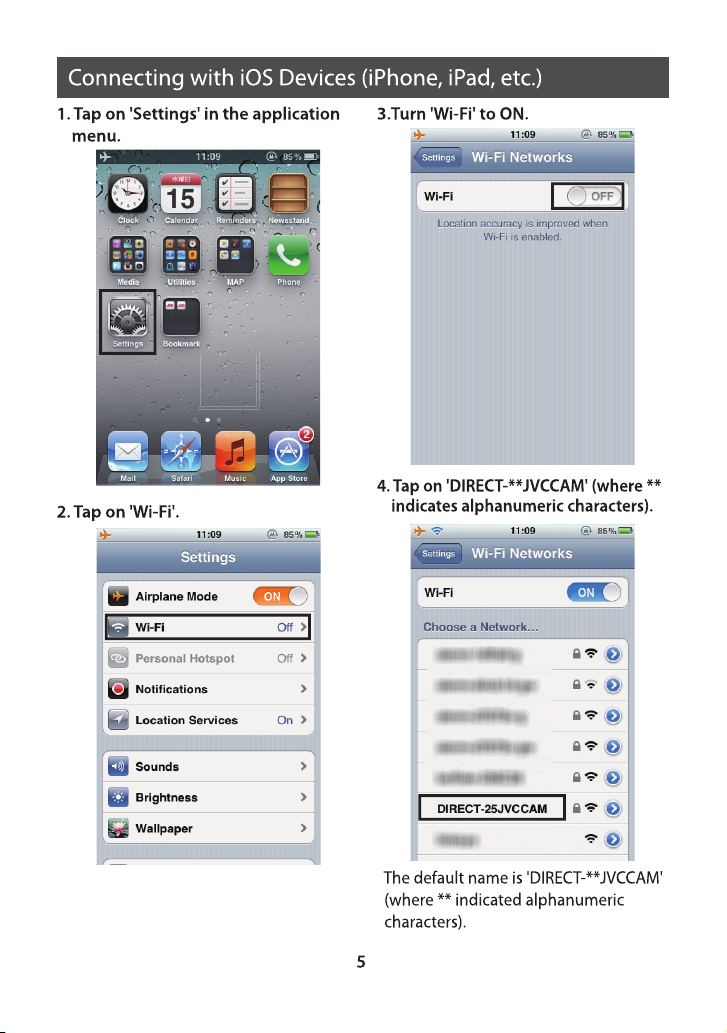
Connecting with Android devices
1. Tap on 'Settings' on the application
menu screen.
2. Tap on 'Wireless & networks
'.
3. Tap on 'Wi-Fi settings'.
4. Tap on 'Wi-Fi'.
3
Page 4
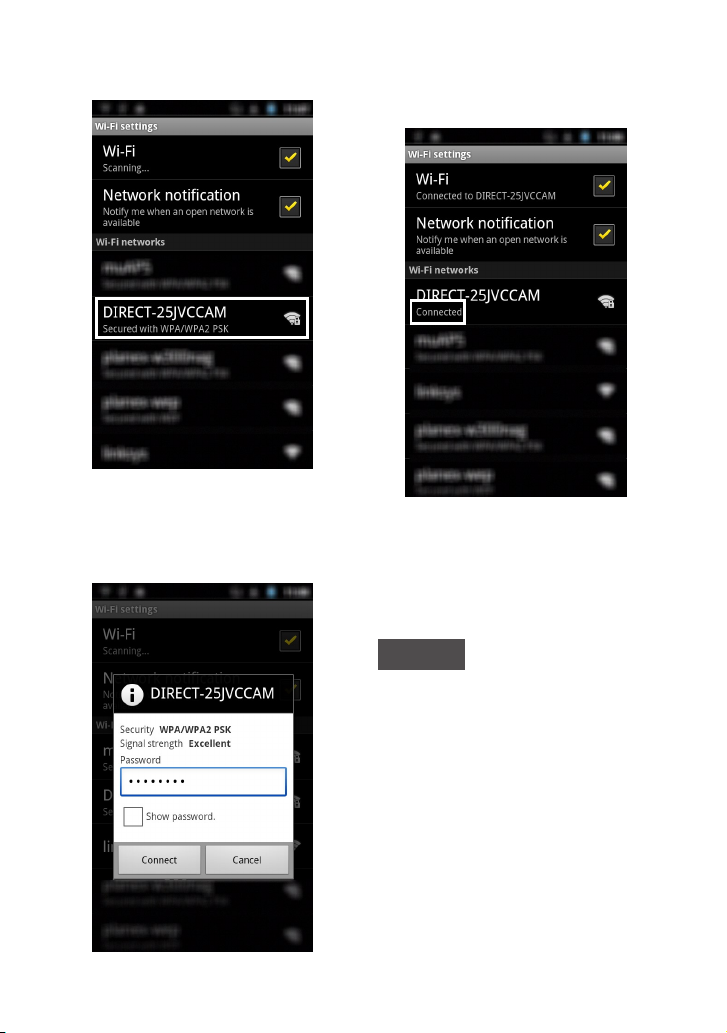
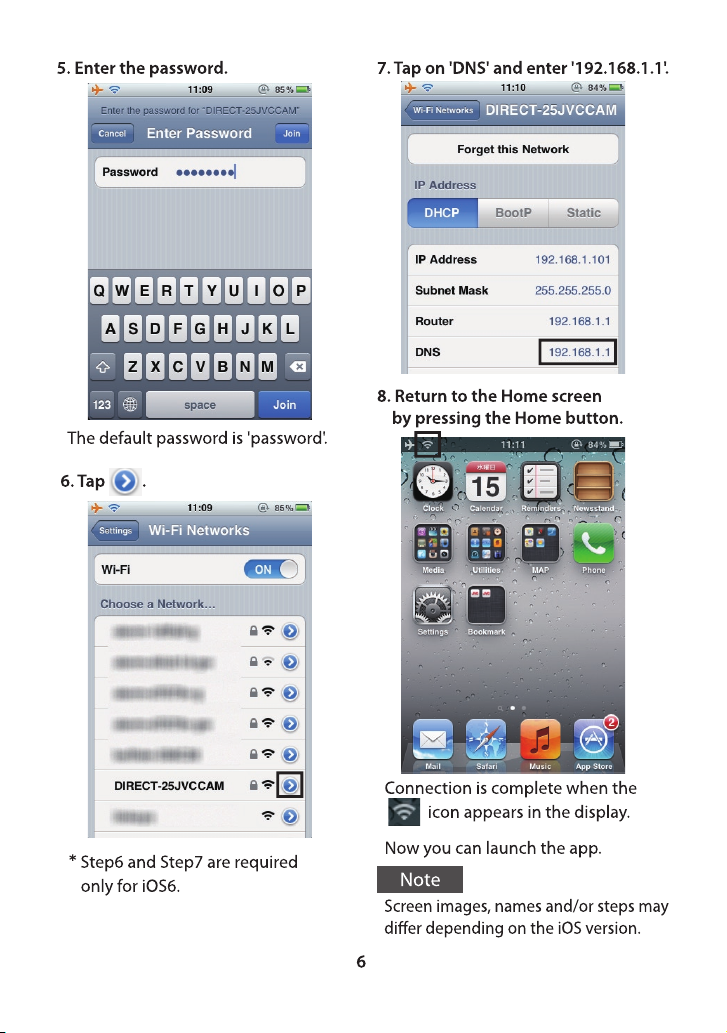
5. Tap on 'DIRECT-**JVCCAM' (where **
indicates alphanumeric characters).
The default name is 'DIRECT-**JVCCAM'
(where ** indicates alphanumeric
characters).
6. Enter your password.
The default password is 'password'.
7. Wait until connection is complete.
Connection is complete when
'Connected' appears on the display.
Now you can launch the app.
Note
Screen images, names and/or steps may
dier depending on the device.
4
Page 5
Page 6
Page 7

Connecting Wirelessly via a Wi-Fi LAN Router
Please check the packaging or user manual to conrm that your
Wi-Fi router supports Wi-Fi Protected Setup (WPS).
If WPS is supported ⇒ Go to page 8
If WPS is not supported ⇒ Go to page 9
If connection fails ⇒ Go to Page 15
7
Page 8
DIRECT WLAN
RESET
LAN(OFF)
ETHERNET
DC
AV
MIC
PLUG IN POWER
DIRECT WLAN
RESET
LAN(OFF)
ETHERNET
DC
AV
MIC
PLUG IN POWER
DIRECT WLAN
RESET
LAN(OFF)
ETHERNET
DC
AV
MIC
PLUG IN POWER
If WPS is Supported
1. Switch the network mode to 'WLAN'.
2. Connect the AC adapter.
3. Activate WPS on the wireless LAN router.
Refer to your wireless LAN router’s user manual for how to activate WPS.
4. Hold down the WPS button.
Once the WPS button stops blinking, connection is complete.
Note
WPS button does not work during start up.
(The Record button will blink red during start up.
Wait for the Record button to stop blinking, then hold down the WPS button.)
8
Page 9
DIRECT WLAN
RESET
LAN(OFF)
ETHERNET
DC
AV
MIC
PLUG IN POWER
DIRECT WLAN
RESET
LAN(OFF)
ETHERNET
DC
AV
MIC
PLUG IN POWER
DIRECT WLAN
RESET
LAN(OFF)
ETHERNET
DC
AV
MIC
PLUG IN POWER
DIRECT WLAN
RESET
LAN(OFF)
ETHERNET
DC
AV
MIC
PLUG IN POWER
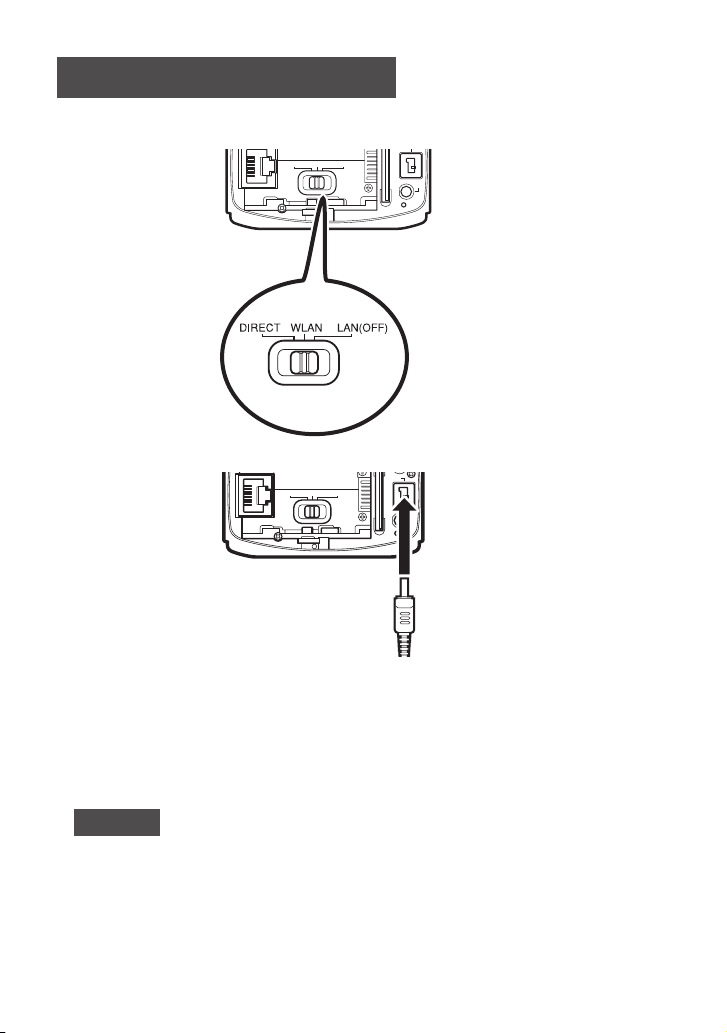
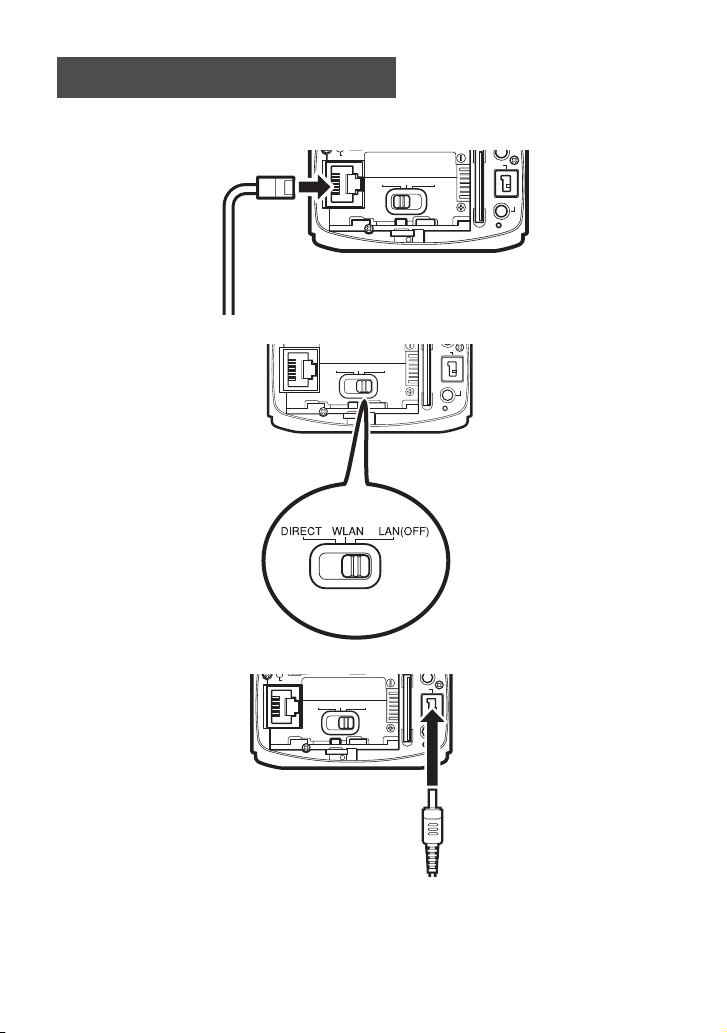
If WPS is Not Supported
1. Use the supplied LAN cable to connect your camera to the computer:
(1) Connect the LAN cable to the camera.
(2) Switch the network mode to 'LAN(OFF)'.
(3) Connect the AC adapter.
• A LAN cable cannot be used when the network mode is switched to 'DIRECT' or 'WLAN'.
• Settings will not be changed unless you turn the power OFF before switching the
network mode.
9
Page 10
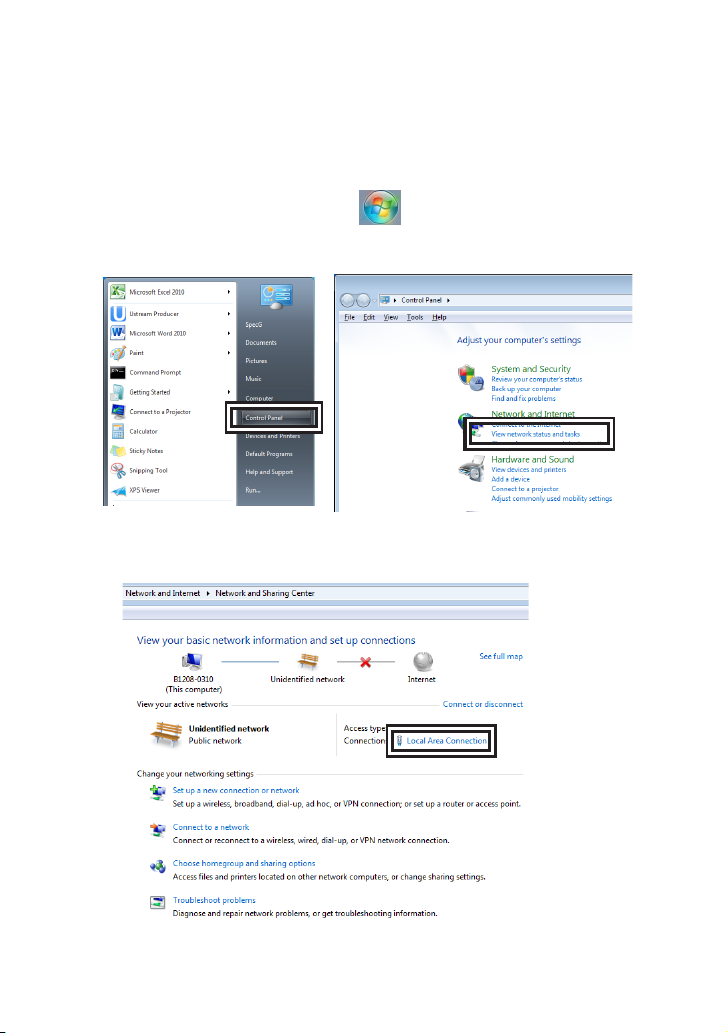
2. Change the network settings on your computer:
Under Windows 7:
* For changing settings on OS versions other than Windows 7,
please refer to your computer’s user manual.
(1) Click on the Windows Start Menu.
(2) Click on [Control Panel] ⇒ Click on [View Network Status and Tasks]
(3) Click on [Local Area Connection]
* Button names may dier depending on your computer
10
Page 11

(4) Click on [Properties].
(5) Double click [Internet Protocol Version 4]
(6) Change the IP address and subnet mask as shown below:
IP address: 192.168.1.101, Subnet mask: 255.255.255.0
Important
Once you nish setting up the device, write down the current computer
settings before making any changes so you can revert to your original settings
if necessary.
11
Page 12

3. Register a Wi-Fi router from your camera’s Settings screen:
(1) Open Internet Explorer and enter the following URL:
http://192.168.1.100:8000/
(2) Enter the administrator username and password.
The default username is 'root' , and the default password is 'password'.
(3) Select [Wireless Network] in [Network].
(4) Click on [Search].
12
Page 13

(5) Select the Access Point you will connect to.
(6) Enter your password.
Please refer to your Wi-Fi router’s user manual for information on Access Point
name and password. (Some routers may have stickers on them with the default
settings.)
13
Page 14

(7) Click on [Save].
DIRECT WLAN
RESET
LAN(OFF)
ETHERNET
DC
AV
MIC
PLUG IN POWER
DIRECT WLAN
RESET
LAN(OFF)
ETHERNET
DC
AV
MIC
PLUG IN POWER
4. Reboot the camera:
(1) Turn o the camera and remove the LAN cable.
(2) Switch the network mode to 'WLAN'.
(3) Turn the camera on.
When the WPS button light stops blinking and remains lit,
connection is complete.
14
Page 15

If Connection Fails
If connection fails, check the following:
● If you are unable to locate the router
⇒ Check your router name (SSID).
Refer to the user manual or, in some cases, default settings may be
printed on a sticker on the router itself.
⇒ Make sure the router is not set to Stealth Mode.
(This Mode hides the SSID)
● If you are unable to connect to WPS:
⇒ Follow the steps described in your router’s user manual to connect with
WPS. (Some devices have specic steps that need to be followed to
activate WPS.)
● If you are unable to connect even after entering the password:
⇒ Check that the password for the router is correct.
⇒ Make sure that the Network Mode is switched to WLAN.
(Always turn the camera power OFF before switching the Mode. The
Mode will not be switched if you move it while the camera is still ON.)
15
Page 16

Connecting to the Camera from Outside Your Home
Using a smartphone or other device, you can control your camera and
stream images even outside.
(Your camera must be connected to a Wi-Fi router that is connected to
the Internet to use this feature.
For how to connect the camera to a wireless LAN router, see Connecting
Wirelessly to Wi-Fi LAN Router on page 7.)
Required Settings
Obtain a DDNS account.
1
Obtaining a DDNS account gives you a URL to access the camera
⇒ See page 17.
Set up the DDNS account on your camera
2
⇒ Go to page 20.
Change the camera’s IP address setting to 'AUTO'.
3
(This applies only when connecting with LAN cable)
⇒ Go to page 22.
Register the URL in JVC CAM Control
4
⇒ Go to page 23.
16
Page 17

Obtaining a DDNS Account
1
(1) Open Internet Explorer and enter the following URL:
https://dd3.jvckenwood.com/user/
(2) Click on [Member Registration].
(3) Read the User Agreement and click [Yes].
17
Page 18

(4) Enter your email address (username), product serial number,
and password, and click [Conrm].
For the product serial number, check the sticker attached to where the
camera’s battery is located.
(5) Click on [OK].
18
Page 19

(6) After reading the email sent to your registered email address,
click on the URL to conrm registration.
Note
You must access your account within 3 days of registration.
Your account will be invalidated after 3 days without access.
(7) Make a copy of the URL (WAN) for accessing your account.
19
Page 20

Setting Up You Camera's DDNS Account
2
(1) Using Internet Explorer, go into your camera’s Settings.
URL to access Settings: http://(camera’s IP address):8000
Ex. Enter http://192.168.1.100:8000 into the address bar.
Note
The camera’s IP address varies depending on your network environment.
Use the following method if you do not know your camera’s IP address:
(i) Open JVC CAM Control on your computer.
(ii) Check the camera’s IP address displayed on the right.
• JVC CAM Control must be installed on your computer in advance.
The computer and camera should be connected to the same Wi-Fi router.
• If you cannot nd your camera’s IP address (if it is not displayed) even
when using JVC CAM Control, refer to the Settings screen on your router.
20
Page 21

(2) Click on [Monitoring Settings].
(3) Turn DDNS to ON. After entering your username and
password, click [Save].
(4) After setting is complete, reboot the camera.
Note
If your DDNS is not accessed for one year after the completion of this
registration, your account will be invalidated.
21
Page 22

Changing the Camera’s IP Address Setting to Automatic
3
(only necessary when connected to a wired LAN)
This step is not necessary when the camera is wirelessly connected
to a Wi-Fi LAN router because the IP address is set to Automatic by
default.
(1) Open Settings in your camera via Internet Explorer.
URL for Settings: http://(camera’s IP address):8000.
Ex. Enter http://192.168.1.100:8000 into the address bar.
(2) Change the NETWORK SETTINGS on WIRED NETWORK to [AUTO],
then click [SAVE].
22
Page 23

Registering URL in JVC CAM Control
4
The following is an example using JVC CAM Control for Android,
but the same applies for iOS (iPad) and Windows.
(1) Open JVC CAM Control.
(2) Tap on Camera Registration.
(3) Tap on Add Camera.
(4) Enter a camera name (any name) and URL, and tap [OK].
23
Page 24

Distribution on Ustream
Once JVC CAM Control is installed onto a computer running Windows,
JVC CAM Driver is installed at the same time.
Images from the camera can be streamed via Ustream using JVC CAM
Driver and Ustream Producer (http://ustream.tv/producer/) together.
Preparation
• Install JVC CAM Driver (for Windows) and Ustream Producer onto
your computer.
• Connect your camera to the Wi-Fi LAN router.
Make sure your camera and computer are connected to the same
router.
• For how to connect your camera to the router,
see 'Connecting Wirelessly to Wi-Fi LAN Router' on page 7.
• To connect 2 or more cameras via ethernet, you should change the IP
addresses of each cameras to the value that does not overlap.
Or you may use 'AUTO' setting(DHCP). In that case, cameras obtain IP
addresses from your router automatically.
See 'Change the camera’s IP address setting to 'AUTO'' on page 22.
Required Settings
Changing the Streaming setting
1
⇒
Registering your camera in JVC CAM driver
2
⇒
Adding your camera to Ustream Producer
3
⇒
Go to page 25
Go to page 27.
Go to page 29.
.
24
Page 25

Changing the Streaming setting
1
(1) Start [JVC CAM Control] on your computer.
(2) Click on the camera that is displayed on the right.
(3) Enter your username and password, then click [OK].
At the time of purchase, the default username is 'root'
and password is 'password'.
25
Page 26

(4) Click on [STREAM SETTING].
(5) Select [MPEG-2 TS(SD) + MotionJPEG], then click [OK].
Note
• When streaming HD video, select MPEG-2 TS(HD) + Motion JPEG.
(You will need to have Ustream Producer Pro or Ustream Producer Studio,
which are paid services).
• Photos cannot be taken while the Stream setting MPEG-2 TS ~ .
(6) Close JVC CAM Control.
26
Page 27

Registering Your Camera to JVC CAM Driver
2
(1) Start [JVC CAM driver setup] on your computer.
(2) Click the number on the left,
and then click on the camera displayed on the right.
・ If you select the number 1 on the left.
your camera will be registered as 'JVC CAM Video 1'.
・ To register 2 or more cameras, select a number from 2 to 4,
and then click the camera.
(3) Enter your username and password (for JVC CAM Driver),
then click [OK].
・ At the time of purchase, the default username is 'camuser'
and password is 'password'.
(Please note that the username diers from JVC CAM Control.)
27
Page 28

(4) Select [MPEG-2 TS (SD)], then click [OK].
• When streaming HD video, select MPEG-2 TS(HD). (You will need to have
Ustream Producer Pro or Ustream Producer Studio, which are paid services).
(5) Close JVC CAM driver setup.
Your camera is now registered as JVC CAM Video 1.
28
Page 29

Adding Your Camera to Ustream Producer
3
(1) Start [Ustream Producer] on your computer.
(2) Enter your username and password, then click [Login].
• If you do not have a Ustream account, register an account from the
[Sign up!] button.
• If you will not be streaming immediately and would like to only set up the
camera, then proceed by clicking on [Later].
(3) Click .
29
Page 30

(4) Select [Add JVC CAM Video 1 Shot].
(5) Click again
and select [Add JVC CAM Audio 1 Shot].
• You can skip this step if you are not streaming the camera’s audio.
30
Page 31

(6) Select the camera that has been added.
(7) Click and select [JVC CAM Audio 1].
• You can skip this step if you are not streaming the camera’s audio.
31
Page 32

(8) Click on [Start Streaming] to begin streaming.
Note
• These steps are applicable as of February 2013. Operation methods
may dier depending on the version of Ustream Producer.
32
 Loading...