

Page 1

BEFORE OPERATION
AVANT DE COMMENCER
ANTES DE LA OPERACION
GV-DV1000
ENGLISH
FRANÇAIS
DV Capture Board
PhotoSuite SE
ENGLISH
Video Navigator
CASTELLANO
VideoWorks
LYT0272-001A
Page 2

2 EN
JVC SOFTWARE LICENSE AGREEMENT
IMPORTANT
TO CUSTOMERS:
MAKE SURE TO READ THIS CAREFULLY BEFORE OPENING THE SEALED SOFTWARE
PACKETS
Thank you for purchasing our product. In order to start using the software program enclosed, you are required to accept the terms and conditions of the agreement as provided
below.
Software License Agreement
This is a legal agreement between you (either an individual or an entity) and Victor Company
of Japan, Limited (JVC). By opening the sealed software packages and/or by using the Program, you are agreeing to be bound by the terms of this Agreement. Should you not agree to
the terms hereof, return the unopened software packets and the accompanying items to the
place where you obtained them.
1. GRANT OF LICENSE
This License Agreement (Agreement) permits you to use the software program (Program)
enclosed in this package and/or the accompanying written material (e. g. printed manuals).
Although you are also granted license to load the Program into temporary memory (i. e. RAM)
or install the Program once into permanent memory (e. g. hard disk, CD-R, or other storage
device) of one (1) computer system, you are strictly prohibited to install the Program on a
network server for the sole purpose of internal distribution.
2. COPYRIGHT
Not with standning the provision of Article 1 hereof, any copyright in the Program is owned
exclusively by JVC and is protected by the Japanese copyright law, copyright laws of other
countries, as applicable, and relevant provisions under international treaties including the
Berne Convention for the Protection of Literary and Artistic Works, as amended, and the
Universal Copyright Convention, as amended. Therefore, you must treat the Program like any
other copyrighted material except that you may either (a) make one (1) copy of the Program
solely for your personal backup or archival purposes, or (b) transfer the Program to a single
hard disk, provided that you keep the original solely for your personal backup or archival
purposes.
3. RESTRICTION ON THE PROGRAM
You may not reverse engineer, decompile, disassemble, revise or modify the Program, except
to the extent that such restriction is expressly prohibited by applicable law. JVC and its distributors and dealers shall not be liable for any claims or defects etc. arising out of or in
connection with such prohibited activities as indicated in this Agreement.
4. OTHER RESTRICTIONS
You may not rent, lease or transfer the Program to any third party nor let such a party use the
Program.
Page 3

EN 3
5. LIMITED WARRANTY
JVC warrants that any media in which the Program is embodied (e.g. floppy discs, CD-ROM,
etc.) are free from any defects in materials and workmanship for a period of thirty (30) days
from the date of your purchase and that any hardware accompanying the Program is also free
from defects to the extent provided in the attached Warranty Form. JVC’s entire liability and
your exclusive remedy in conneciotn with the Program shall be, at JVC’s option, either (a)
return of the price paid, or (b) replacement of defective Program media.
6. DISCLAIMER OF WARRANTIES
EXCEPT FOR THE EXPRESS WARRANTIES STATED HEREIN AND TO THE EXTENT PERMITTED BY APPLICABLE LAW, JVC AND ITS SUPPLIERS DISCLAIM ANY OTHER WARRANTIES, EITHER EXPRESS OR IMPLIED, INCLUDING BUT NOT LIMITED TO IMPLIED
WARRANTIES OF MERCHANTABILITY AND FITNESS FOR A PARTICULAR PURPOSE IN
REGARD TO THE PROGRAM AND THE ACCOMPANYING PRINTED MATERIALS.
7. LIMITED LIABILITY
TO THE EXTENT PERMITTED BY APPLICABLE LAW, IN NO EVENT SHALL JVC AND ITS
SUPPLIERS BE LIABLE FOR ANY INDIRECT, SPECIAL, INCIDENTAL OR CONSEQUENTIAL DAMAGES WHATSOEVER, REGARDLESS OF THE FORM OF ACTION WHETHER IN
CONTRACT, TORT, STRICT PRODUCT LIABILITY OR OTHERWISE (INCLUDING BUT NOT
LIMITED TO DAMAGES FOR LOSS OF PROFITS, BUSINESS INTERRUPTION, LOSS OF
BUSINESS INFORMATION OR ANY OTHER PECUNIARY LOSS) ARISING OUT OF OR IN
CONNECTION WITH THE USE OF OR INABILITY TO USE THE PROGRAM, EVEN IF JVC
HAS BEEN ADVISED OF THE POSSIBILITY OF SUCH DAMAGES.
Victor Company of Japan, Limited
Page 4

4 EN
CONTENTS
JVC SOFTWARE LICENSE AGREEMENT 2
TECHNICAL SUPPORT FOR REGISTERED USER 5
User Registration Method
NOTICE FOR USERS 7
INSTALLING DV CAPTURE BOARD 8
INSTALLING DV CAPTURE DRIVERS 10
For WINDOWS® 98
For WINDOWS® 95 VERSION 4.00.950B or later
For WINDOWS® 95 VERSION 4.00.950 or 4.00.950A
CONNECTING AND TROUBLESHOOTING 16
Connecting DV Device
Troubleshooting for DV Capture Board
For WINDOWS® 98 (p. 10~11)
For WINDOWS® 95 (p. 12~15)
INSTALLING VIDEO NAVIGATOR 18
Preparation
Installing Video Navigator
STARTING UP VIDEO NAVIGATOR 19
Preparation
FINISHING VIDEO NAVIGATOR 19
INSTALLING PHOTOSUITE SE 20
......................................................................... 18
......................................................................... 19
......................................................... 5
............................................................... 10
........................ 12
.................. 14
............................................................ 16
....................................... 17
............................................... 17
............................................... 17
...................................................... 18
Installing PHOTOSUITE SE
INSTALLING VIDEOWORKS 21
Installing VIDEOWORKS
INSTALLING ACROBAT READER 22
Installing ACROBAT READER
STARTING UP AND FINISHING 23
Starting up VIDEOWORKS
Finishing VIDEOWORKS
IMPORTING IMAGES INTO VIDEOWORKS 24
Preparation
......................................................................... 24
....................................................... 20
......................................................... 21
................................................... 22
...................................................... 23
......................................................... 23
Page 5

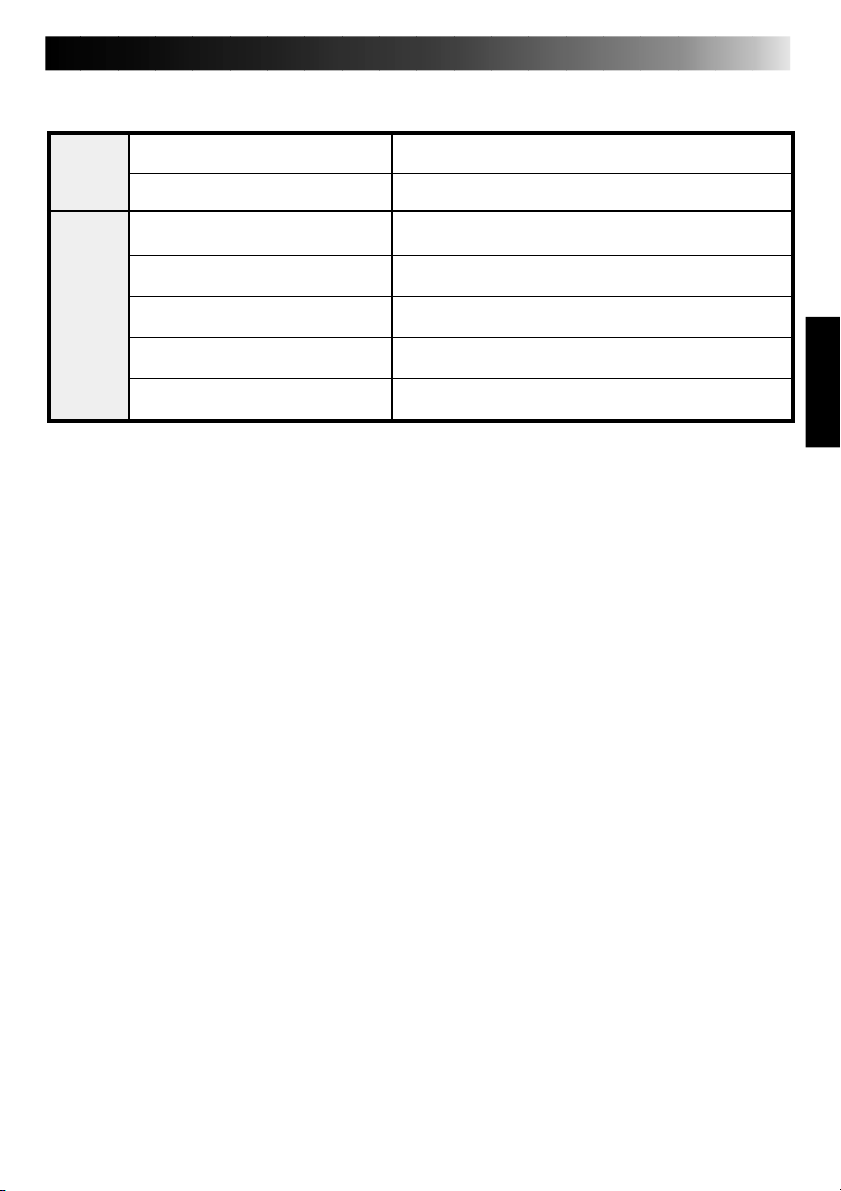
TECHNICAL SUPPORT FOR REGISTERED USER
TECHNICAL SUPPORT FOR REGISTERED USER
To enable the technical support of each company, perform the user registration according the
below table.
EN 5
User Registration Method
Product Name Support company Registration Method Remarks
Video Navigator
Adaptec
DV Capture Board
Adaptec Driver
(program)
VideoWorks
MGI PhotoSuite SE
• Repairs for the Adaptec DV capture board:
Please consult the MGI support center for
repairs of the Adaptec DV capture board.
Subject to the conditions stated hereby,
MGI Software Corp. guarantees for this
equipment only against defects in workmanship for the period of 5 years from the
date of purchase. No charge will be made
during this period for labor or for replacement parts for the Adaptec DV capture
board. You have to represent the receipt
proving the purchase of this product
including the dealer’s name and address
with your claim.
This guarantee excludes:
1)Alternations or adjustments made to the
equipment.
JVC
MGI
MGI
NewSoft
MGI
Not required.
Mail the MGI
software user
registration post
card.
Mail the MGI
software user
registration post
card.
Not required.
Mail the MGI
software user
registration post
card.
2)All damages caused through the accident,
misuse, wear and tear and neglect.
3)Error on use by connecting this product
with other devices.
4)Damages caused by fire, moisture, natural
disasters or incorrect voltage.
Technical Support
Please inform the technical support of each
corporation in the next page of your question
for each product. Please acknowledge
beforehand that it may require longer time
for some questions.
See JVC Software
License Agreement.
(p. 2)
See Adaptec
Software License
Agreement. (attached
sheet)
For repair of the
board see Repair of
Adaptec DV Capture
Board in below.
See MGI Software
Corp, Software
License Agreement.
(attached sheet)
See MGI Software
Corp, Software
License Agreement.
(attached sheet)
See MGI Software
Corp, Software
License Agreement.
(attached sheet)
Page 6

6 EN
TECHNICAL SUPPORT FOR REGISTERED USER (cont.)
JVC Support for:
Phone: 1-800-252-5722 (only in U.S.A)
Adaptec and MGI Support for:
North America (Canada)
Address: MGI Software Corp.
Phone: 1-905-764-7291
e-mail: support@mgisoft.com
Europe (Holland)
Phone: +31-20-430-3026
Fax: +31-20-430-3024
Asia/Pacific (Australia)
Address: Support Group Services
ATTN: MGI Technical Support Australia
Phone: 61-3-9929-9735
Fax: 61-3-9399-9523
e-mail: techsup@supportgroup.com.au
40 West Wilmot Street
Richmond Hill, Ontario
L48 1H8
Canada
Ground Floor
14 Spink Street
Gardenvale Vic 3186
NewSoft Support for:
North America(U.S.A)
Technical Support Hotline:
Please e-mail: tech@newsoftinc.com or
call (510) 445-8616
www.newsoftinc.com
Europe
UK
The Software Centre
East Way
East Mill Industrial Estate
Ivybridge
Devon, PL21 9PE
United Kingdom
Tel: (44) 1752-201148
Fax: (44) 1752-894833
France
Info Trade Centre
d’activités de l’Ourcq 45
rue Delizy 93692
Pantin
France
Tel: (33) 1-4810-7550
Fax: (33) 1-4810-7555
Asia/Pacific (Taiwan, R.O.C.)
9F, NO68
Sec. 3, Nankig E. Rd.
Taipei
Taiwan, R.O.C.
Tel: (886) 2-2517-0750
Fax: (886) 2-2517-0760
support@newsoft.com.tw
www.newsoft.com.tw
JVC cannot answer questions regarding basic operation of your PC, or questions
regarding specifications or performance of the products for Adaptec, MGI and Newsoft.
Page 7
NOTICE FOR USERS
When contacting the technical support centers (p. 6) about this software, please fill out the
following and have the appropriate information ready.
EN 7
Product
PC
Please note that it may take some time to respond to your questions, depending on their
subject matter.
Name of Software
Version of Software
Model
CPU
OS
Memory MB
Available Hard Disk Space MB
Page 8
8 EN
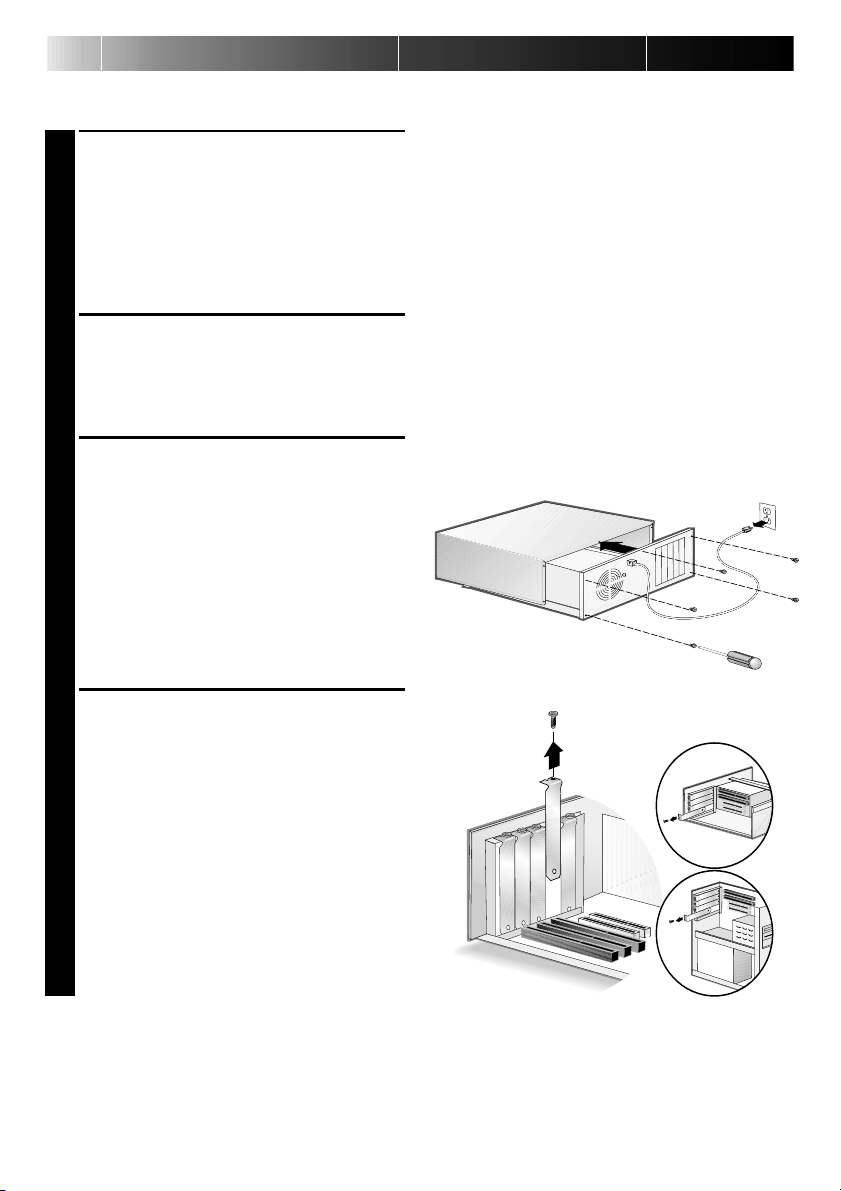
To install the DV Capture Board (AHA-8920 IEEE Host Adapter) in your computer so you can
connect IEEE 1394 devices to your system, follow these steps:
Discharge any static electricity build-up
1
before handing the DV Capture Board
by touching a grounded metal object
(like the exposed metal parts on the back
of your computer).
Turn OFF the power of the computer and
2
disconnect the power cord.
Remove the cover from the computer.
3
(Refer to your computer’s manual.)
INSTALLING DV CAPTURE BOARD
Locate an unused PCI expansion slot
4
(typically white or ivory) and remove the
expansion slot cover. Save the slot cover
screw for use In Step 6.
Page 9

Remove the DV Capture Board from its
5
antistatic packaging. Always handle the
card by its edges.
Carefully insert the DV Capture Board
6
into the PCI expansion slot until it is
firmly seated, then replace the slot cover
screw.
EN 9
IEEE 1394 DV Capture Board
Replace your computer cover. The
7
driver program (IEEE 1394 software) for
the DV Capture Board must be installed
on your computer before you can use
the JVC Video Navigator.
Caution
•Computers may have vertical or horizontal PCI expansion slots. Refer to your computer
manual to locate the PCI expansion slots.
•Do not place the DV Capture Board in an area where there is static electricity, such as on a
carpet. Static electricity could damage the parts on the board.
• Do not touch the metal terminals with your bare hand.
• Do not give the board a strong shock because precise electronic parts are mounted on the
board.
• Refer to the computer’s instruction book before removing the board from your computer.
The board or your computer may be damaged if the board is removed incorrectly.
• Do not spill water on the board.
Page 10

10 EN
Caution
• In case the DV Capture Board has been installed with Windows® 95, these steps are not
required.
INSTALLING DV CAPTURE DRIVERS
FOR WINDOWS® 98
Before you use the DVC Capture Board, you must install the DV Capture Board drivers. If you
have not done so already, install the DV Capture Board (see p. 8). Follow these steps to install
the drivers. If you make a mistake during the install procedure, click the Back button and
correct the mistake.
Turn on your computer. Put the included
1
JVC CD-ROM in your CD-ROM drive.
The New Hardware Found Window is
displayed.
If the New Hardware Found Window is
not displayed click the Start button on
the Task Bar and select Shut Down. In
the Shut Down Windows window select
Restart the computer and click OK.
The Add New Hardware Wizard is
2
displayed.
Click the Next button.
Make sure Search for the best driver for
3
your device. (Recommended). is
selected. Then click the Next button.
Page 11

Make sure only the CD-ROM drive is
4
selected. Then click the Next button.
Make sure The updated driver
5
(Recommended) Adaptec AHA- 8920
Host Adapter is selected. Then click the
Next button.
Click the Next button.
6
EN 11
Click the Finish button.
7
Restart your computer.
8
Page 12

12 EN
Before installing, confirm your Windows® 95 version. Double-click the system icon in the
Control Panel and select General tab.
FOR WINDOWS® 95 VERSION 4.00.950B OR LATER
Before you use the DVC Capture Board, you must install the DV Capture Board drivers. If you
have not done so already, install the DV Capture Board (See p. 8). Follow these steps to install
the drivers:
Turn on your computer. Put the included
1
JVC CD-ROM in your CD-ROM drive.
The New Hardware Found Window is
displayed.
The Next Hardware Found window is
displayed.
The Update Device Driver Wizard is
2
displayed. Click the Next button.
INSTALLING DV CAPTURE DRIVERS (cont.)
Click the Finish button.
3
Page 13

The Insert Disk window is displayed.
4
Click the OK button.
If you know the drive letter for your CD-
5
ROM drive enter it in the box below
Copy files from: and go to step 7. If you
do not know the drive letter for your
CD-ROM drive continue with the next
step.
In the Open window click the arrow
6
below Drives: and select your CD-ROM
drive. Click wn1394.inf in the file list.
Then click the OK button.
EN 13
In the Copying Files... window click the
7
OK button.
Restart your computer.
8
Page 14

14 EN
INSTALLING DV CAPTURE DRIVERS (cont.)
FOR WINDOWS® 95 VERSION 4.00.950 OR 4.00.950A
Before you use the DVC Capture Board, you must install the DV Capture Board drivers. If you
have not done so already, install the DV Capture Board (See p. 8). Follow these steps to install
the drivers:
Turn on your computer. Put the included
1
JVC CD-ROM in your CD-ROM drive.
The New Hardware Found Window is
displayed.
The New Hardware Found Window is
displayed.
In the New Hardware Found Window
2
select Driver from disk Provided by
hardware manufacturer. Then click the
OK button.
If you know the drive letter for your CD-
3
ROM drive enter it in the box below
Copy manufacturer’s files from: and go
to step 5. If you do not know the driver
letter for your CD-ROM drive continue
with the next step.
Page 15

In the Open window click the arrow
4
below Drives: and select your CD-ROM
drive. Click wn1394.inf in the file list.
Then click the OK button.
In the Install From Disk window click
5
the OK botton.
After the installation is complete we
6
recommend you restart your computer.
EN 15
Page 16

16 EN
CONNECTING AND TROUBLESHOOTING
CONNECTING DV DEVICE
Plug the included DV cable’s larger
1
connector into the socket on the DV
Capture Board.
• Confirm that the connector is securely
plugged in.
Plug the DV cable’s smaller connector
2
into the camcorder’s DV OUT/IN socket.
• Confirm that the connector is securely
plugged in.
• Refer to your camcorders’s instruction
book to locate the camcorder’s DV
OUT/IN socket.
DV IN/OUT
Page 17

EN 17
TROUBLESHOOTING FOR DV CAPTURE BOARD
If you are experiencing problems when using DV Capture Board, check the following items:
• The DV Capture Drivers are not installed.
• The PCI expansion slot must be a 5V bus master PCI expansion slot. Refer to your computer’s
manual and seat the DV Capture Board in the PCI expansion slot firmly.
FOR WINDOWS® 98 (P. 10~11)
• If the drivers did not install properly then use the following procedure:
1.
Double-click the System icon in the Control Panel.
2.
Select Device Manager tab.
3.
Click the + to the left of the 1394 Bus Controller icon.
4.
Click the Adaptec AHA-8920 Host Adapter icon to select it.
Then click the Remove button.
5.
Click OK button.
6.
Restart your computer.
7.
Install the DV Capture Driver again. (See p.10-11)
MEMO
• About Windows® 98 basic operation, refer to the instruction book of Windows® 98 or your
computer.
FOR WINDOWS® 95 (P. 12~15)
• If the drivers did not install properly then use the following procedure:
1.
Double-click the System icon in the Control Panel.
2.
Select Device Manager tab.
3.
Click the + to the left of the 1394 Bus Controller icon.
4.
Double-click the Adaptec AHA-8920 Host Adapter icon, or the PCI FireWire (IEEE 1394)
icon.
5.
Click Driver tab in the properties window.
6.
Click Change Driver button.
7.
Follow the prompts on the display.
Page 18

18 EN
About Windows® 95 basic operation, refer to the instructions of Windows® 95 or your computer.
PREPARATION
Start Windows.
INSTALLING VIDEO NAVIGATOR
DirectX
1
Close all open windows and toolbars. Close any icons shown on the task bar.
2
Confirm that programs are not displayed on the task bar.
3
INSTALLING VIDEO NAVIGATOR
Insert the included CD-ROM into the
1
CD-ROM drive.
Click Start menu and select Run.
2
Click Browse button in the Run window.
3
In Browse window, select the Setup.exe
icon in VideoNavigtor folder in the CDROM drive and then OK button.
Confirm \VideoNavigator\Setup.exe is
4
shown in the Run window.
Then click the OK button.
• The install program for Video Navigator will start. Follow the prompts on
the display.
Page 19

STARTING UP VIDEO NAVIGATOR
PREPARATION
Insert your video cassette to your DV
1
device.
Connect the DV cable to your computer
2
and your digital camcorder. (See the
separate booklet of DV Video Navigator,
p. 8)
Set your digital camcorder to Play mode.
3
EN 19
Turn on your computer and start up
4
Windows
Click Start on the task bar.
®
95.
5
Select Program and VideoNavigator 1.0
6
and click VideoNavigator 1.0.
Then Video Navigator will start up.
MEMO
• Close all open windows and toolbars. Close any icons shown on the task bar.
• Turn off the function that starts up software automatically by time control. For example,
screen saver, E-mail, communication software, viruses checker, scheduler and etc.
• Disable sharing for all shared resources, for example shared folders or shared printers.
Caution
• Do not remove the DV device and turn off the power of DV device while Video Navigator
is running.
FINISHING VIDEO NAVIGATOR
At Index window, click File menu and
1
Exit.
Or click the closing button.
Video Navigator will finish.
Turn off the power of DV device.
2
Page 20

20 EN
Using MGI PhotoSuite Starter Edition (SE), you can transform or enhance the pictures you take
by altering colors, making collages, and more. Put your photos into posters, calendars and
greeting cards. You’ll see your photos in a whole new light. Put your photos into a picture
frame or a screen saver, or into a school science report, or wherever you’d like them to be.
Surprise yourself, impress your friends, and create your own exciting new photo collection!
INSTALLING PHOTOSUITE SE
Insert the included CD-ROM into the
1
CD-ROM drive.
Click Start menu and select Run.
INSTALLING PHOTOSUITE SE
2
Click Browse button in the Run window.
3
In Browse window, select the CD-ROM
4
icon in Look in: Column. In the list
column, double-click PhotoSuite folder
and Setup icon.
Confirm \PhotoSuite\Setup.exe is shown
5
in the Run window. Then click the OK
button.
• The install program for PhotoSuite will
start. Follow the prompts on the
display.
Page 21

INSTALLING VIDEOWORKS
Presto! VideoWorks enables you to manage and edit in detail on your computer screen video
sequences as well as sounds (AVI files), or video/audio fragments captured from video devices
such as a VCR, a laser disc player, a Camcorder, etc. You can combine several video sequences with significant order, create smooth transition effects, add various video effects, and
render moving titles to compose a creation of art.
EN 21
INSTALLING VIDEOWORKS
Insert the included CD-ROM into the
1
CD-ROM drive.
Click Start menu and select Run.
2
Click Browse button in the Run window.
3
In Browse window, select the CD-ROM
4
icon in Look in: Column. In the list
column, double-click VideoWorks folder
and Setup icon.
Confirm\VideoWorks\Setup.exe is
5
shown in the Run window.
Then click the OK button.
• The install program for VideoWorks
will start. Follow the prompts on the
display.
Caution
• VideoWorks requires that the Windows Multimedia components are installed. Use the
Add/Remove Programs icon in the Control Panel to install the Multimedia components.
Check that Multimedia is selected in the Windows Setup tab.
• The installation of the Microsoft ActiveMovie or DirectX components may cause your
computer to lockup. This occurs after the installation is complete when you are prompted
to restart your computer. If your computer locks up after you choose to restart, press the
CTRL+ALT+DEL keys to open the Close Program window. Select Microsoft ActiveMovie or
DirectX Setup and click the End Task button.
Page 22

22 EN
INSTALLING ACROBAT READER
The VideoWorks Manual File is supplied as acrobat data file. In case it cannot be opened, you
should install Adobe Acrobat Reader.
Insert the included CD-ROM into the
1
CD-ROM drive.
Click Start menu and select Run.
INSTALLING ACROBAT READER
2
Click Browse button in the Run window.
3
In Browse window, select the CD-ROM
4
icon in Look in: Column. In the list
column, double-click AcrobatReader
folder and Setup icon.
Confirm \AcrobatReader\Setup.exe is
5
shown in the Run window.
Then click the OK button.
• The install program for Acrobat Reader
will start. Follow the prompts on the
display.
Page 23

STARTING UP AND FINISHING
EN 23
STARTING UP VIDEOWORKS
Click Start on the task bar.
1
Select Program and Presto! VideoWorks
2
and click Presto! VideoWorks.
Then VideoWorks will start up.
MEMO
• Close all open windows and toolbars. Close any icons shown on the task bar.
• Turn off the function that starts up software automatically by time control. For example for
screen saver, E-mail, communication software, viruses checker, scheduler and etc.
• Disable sharing for all shared resources, for example shared folders or shared printers
FINISHING VIDEOWORKS
Click File menu and Exit.
1
• Or click the Exit button.
• For saving or other operation, refer to
Presto! VideoWorks ManualFile
produced as PDF file.
• VideoWorks will finish.
Page 24

24 EN
VideoWorks makes an action file from images captured by Video Navigator. The action movie
can be adjusted to smooth action by morph function.You can view the action file as like a
movie because the snapshots related with time are connected continuously and displayed with
frame-playback.
IMPORTING IMAGES INTO VIDEOWORKS
PREPARATION
• You should save image files as JPEG or Bitmap format when saving them with Video Navigator.
• Start up VideoWorks. (See p. 23)
Caution
• For images importing to VideoWorks, you should save them with the default file name
(jvn01.jpg). They are saved with the filnames having serial numbers from jvn01.jpg.
To import them easily, you had better make a new folder or specify an existing folder when
saving them with Video Navigator.
• The file names must contain serial number from 01.
In the main window of VideoWorks,
1
click File menu and Import.
In Open window, select Image File in
2
Files of type column. And click Option
button.
Check Stream button and Fit in with
3
video dimensions button in Import
Options Window.
• If necessary, check Morph button.
• See p. 25 MEMO.
Click OK button.
4
Page 25

Click one of the image files in Open
5
window.
Click Open button.
6
• The image files in same folder are
imported and action movie is made
with them.
• Media Viewer window is displayed.
• Processing time for importing depends
on the settings of Import Options
window. (See step 3.)
Click the play button on the Media
7
Viewer window.
EN 25
MEMO
• Video Album
You can make video-album with images not continuing as travel snapshots. The images are
switched at constant duration automatically as slide-show.
Example: Displaying 10 images and 5 seconds each image.
In Import Options window, input 1 (frame / sec) into Frame rate column and 50 (seconds)
into Sec: column. (See step 3.)
The memory size becomes minimum by inputing 1 into Frame rate column.
Video duration is whole displaying duration. 10 (images) × 5 (seconds) = 50 (seconds)
• Animation for Internet
In many cases, animation on Internet web is set to 160 × 120 for video dimensions and 15
for frame rate. By using Video Navigator, you can capture and save the suitable images by
setting preferences for Capture (interval: 2 frames) and preferences for Save Image (160 ×
120).
In detail, refer to INSTRUCTIONS book in same pack.
For 99 images, you had better set Video duration in Import Options window to 6 seconds
9 frames. (15 images is equal to 1 second.) If it is set to longer duration, the animation
movie becomes slower.
Page 26

COPYRIGHT© 1998 VICTOR COMPANY OF JAPAN, LTD.
Printed in Japan
0998MNV*SN*SN
VICTOR COMPANY OF JAPAN, LIMITED
U
BEFORE OPERATION
 Loading...