

Page 1
DIGITAL VIDEO CAMERA
Dear Customer,
Thank you for purchasing this digital
video camera. Before use, please
read the safety information and
precautions contained in the pages
2 – 5 to ensure safe use of this
product.
ENGLISH
GR-D375U
Please visit our Homepage on the World Wide Web for
Digital Video Camera:
http://www.jvc.co.jp/english/cyber/
For Accessories
http://www.jvc.co.jp/english/accessory/
:
GETTING STARTED
VIDEO RECORDING &
PLAYBACK
DIGITAL STILL CAMERA
(D.S.C.) RECORDING &
PLAYBACK
ADVANCED FEATURES
REFERENCES
TERMS
For Customer Use:
Enter below the Model No. and
Serial No. which is located on the
bottom of the camcorder. Retain this
information for future reference.
Model No.
Serial No.
8
19
26
31
46
55
INSTRUCTIONS
To deactivate the demonstration,
set “DEMO MODE” to “OFF”.
(
pg. 31, 34)
LYT1531-001A
EN
Page 2
2
EN
Read This First!
●
Before recording important video, be sure to
make a trial recording.
Play back your trial recording to make sure the
video and audio have been recorded properly.
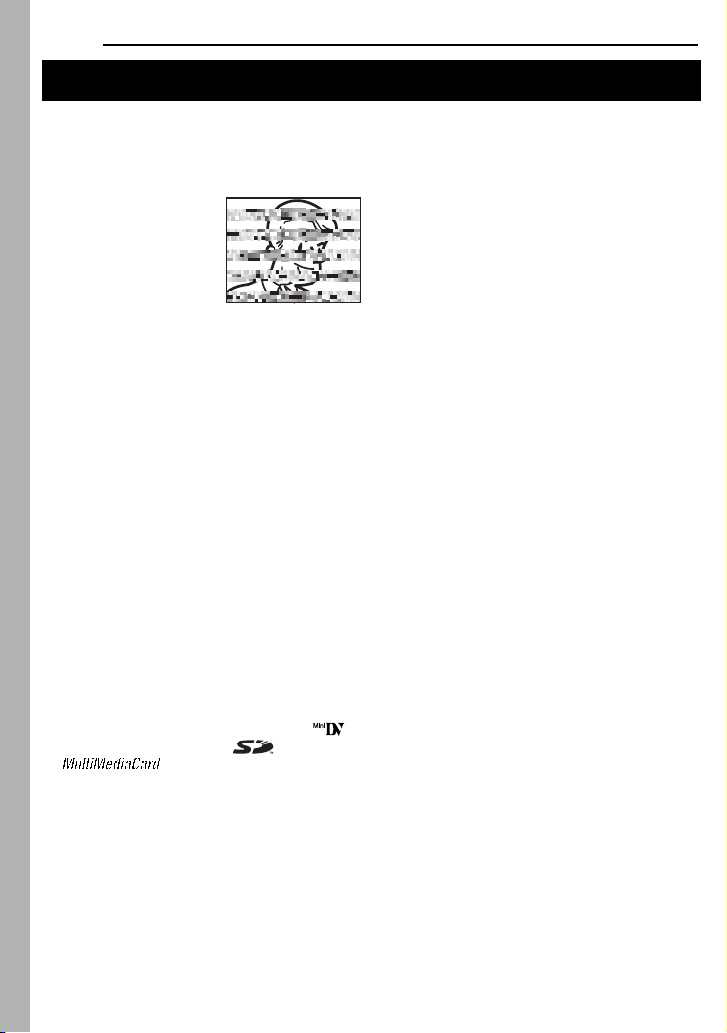
●
We recommend cleaning your video heads before
use.
If you haven’t used your
camcorder for awhile, the
heads may be dirty. We
recommend periodically
cleaning the video heads
with a cleaning cassette
(optional).
●
Be sure to store your
cassette tapes and camcorder in the proper
environment.
Video heads can become dirty more easily if your
cassette tapes and camcorder are stored in a
dusty area. Cassette tapes should be removed
from the camcorder and stored in cassette cases.
Store the camcorder in a bag or other container.
●
Use SP (Standard) mode for important video
recordings.
LP (Long Play) mode lets you record 50% more
video than SP (Standard) mode, but you may
experience mosaic-like noise during playback
depending on the tape characteristics and the
usage environment.
So, for important recordings, we recommend
using SP mode.
●
For safety and reliability.
It is recommended only genuine JVC batteries
and accessories are used in this camcorder.
●
This product includes patented and other
proprietary technology and will operate only with
JVC Data Battery. Use the JVC BN-VF707U/
VF714U/VF733U battery packs. Using generic
non-JVC batteries can cause damage to the
internal charging circuitry.
●
This camcorder is designed exclusively for the
digital video cassette, SD Memory Card and
MultiMediaCard. Only cassettes marked “ ”
and memory cards marked “ ” or
“ ” can be used with this unit.
●
Remember that this camcorder is intended for
private consumer use only.
Any commercial use without proper permission is
prohibited. (Even if you record an event such as a
show, performance or exhibition for personal
enjoyment, it is strongly recommended that you
obtain permission beforehand.)
●
DO NOT leave the unit
- in place of over 50°C (122°F)
- in place where humidity is extremely low (below
35%) or extremely high (80%).
- in direct sunlight.
- in a closed car in summer.
- near a heater.
●
The LCD monitor is made with high-precision
technology. However, black spots or bright spots
of light (red, green or blue) may appear constantly
on the LCD monitor. These spots are not
recorded on the tape. This is not due to any
defect of the unit. (Effective dots: more than
99.99%)
●
Do not leave the battery pack attached when the
camcorder is not in use and check the unit
regularly whether it is working or not.
Page 3

SAFETY PRECAUTIONS
CAUTION
RISK OF ELECTRIC SHOCK
DO NOT OPEN
CAUTION: TO REDUCE THE RISK OF ELECTRIC SHOCK,
DO NOT REMOVE COVER (OR BACK).
NO USER-SERVICEABLE PARTS INSIDE.
REFER SERVICING TO QUALIFIED SERVICE PERSONNEL.
The lightning flash with arrowhead symbol, within an
equilateral triangle, is intended to alert the user to the
presence of uninsulated "dangerous voltage" within the
product's enclosure that may be of sufficient magnitude
to constitute a risk of electric shock to persons.
The exclamation point within an equilateral triangle is
intended to alert the user to the presence of important
operating and maintenance (servicing) instructions in
the literature accompanying the appliance.
WARNING: TO PREVENT FIRE OR SHOCK
HAZARD, DO NOT EXPOSE THIS UNIT TO
RAIN OR MOISTURE.
CAUTIONS:
●
This camcorder is designed to be used with
NTSC-type color television signals. It cannot be
used for playback with a television of a different
standard. However, live recording and LCD
monitor/viewfinder playback are possible
anywhere.
●
This product includes patented and other
proprietary technology and will operate only
with JVC Data Battery. Use the JVC
BN-VF707U/VF714U/VF733U battery packs
and, to recharge them or to supply power to the
camcorder from an AC outlet, use the provided
multi-voltage AC Adapter. (An appropriate
conversion adapter may be necessary to
accommodate different designs of AC outlets in
different countries.)
Caution on Replaceable lithium battery
The battery used in this device may present a fire
or chemical burn hazard if mistreated.
Do not recharge, disassemble, heat above 100°C
(212°F) or incinerate.
Replace battery with Panasonic (Matsushita
Electric), Sanyo, Sony or Maxell CR2025.
Danger of explosion or Risk of fire if the battery is
incorrectly replaced.
●
Dispose of used battery promptly.
●
Keep away from children.
●
Do not disassemble and do not dispose of in
fire.
NOTES:
●
The rating plate (serial number plate) and
safety caution are on the bottom and/or the
back of the main unit.
●
The rating information and safety caution of the
AC Adapter are on its upper and lower sides.
EN
3
Page 4

4
EN
When the equipment is installed in a cabinet or on
a shelf, make sure that it has sufficient space on
all sides to allow for ventilation (10 cm (3-15/16")
or more on both sides, on top and at the rear).
Do not block the ventilation holes.
(If the ventilation holes are blocked by a
newspaper, or cloth etc. the heat may not be able
to get out.)
No naked flame sources, such as lighted candles,
should be placed on the apparatus.
When discarding batteries, environmental
problems must be considered and the local rules
or laws governing the disposal of these batteries
must be followed strictly.
The apparatus shall not be exposed to dripping or
splashing.
Do not use this equipment in a bathroom or
places with water.
Also do not place any containers filled with water
or liquids (such as cosmetics or medicines, flower
vases, potted plants, cups etc.) on top of this unit.
(If water or liquid is allowed to enter this
equipment, fire or electric shock may be caused.)
Do not point the lens or the viewfinder directly into
the sun. This can cause eye injuries, as well as
lead to the malfunctioning of internal circuitry.
There is also a risk of fire or electric shock.
CAUTION!
The following notes concern possible physical
damage to the camcorder and to the user.
When carrying, be sure to always securely attach
and use the provided strap. Carrying or holding
the camcorder by the viewfinder and/or the LCD
monitor can result in dropping the unit, or in a
malfunction.
Take care not to get your finger caught in the
cassette holder cover. Do not let children operate
the camcorder, as they are particularly
susceptible to this type of injury.
Do not use a tripod on unsteady or unlevel
surfaces. It could tip over, causing serious
damage to the camcorder.
CAUTION!
Connecting cables (Audio/Video, S-Video, etc.) to
the camcorder and leaving it on top of the TV is
not recommended, as tripping on the cables will
cause the camcorder to fall, resulting in damage.
IMPORTANT SAFETY INSTRUCTIONS
1. Read these instructions.
2. Keep these instructions.
3. Heed all warnings.
4. Follow all instructions.
5. Do not use this apparatus near water.
6. Clean only with dry cloth.
7. Do not block any ventilation openings. Install in
accordance with the manufacturer’s instructions.
8. Do not install near any heat sources such as
radiators, heat registers, stoves, or other
apparatus (including amplifiers) that produce
heat.
9. Only use attachments/accessories specified by
the manufacturer.
10. Use only with the
cart, stand, tripod,
bracket, or table
specified by the
manufacturer, or
sold with the
apparatus. When a
cart is used, use
caution when
moving the cart/
apparatus combination to avoid injury from tipover.
11. Unplug this apparatus during lightning storms or
when unused for long periods of time.
12. Refer all servicing to qualified service
personnel. Servicing is required when the
apparatus has been damaged in any way, such
as power-supply cord or plug is damaged, liquid
has been spilled or objects have fallen into the
apparatus, the apparatus has been exposed to
rain or moisture, does not operate normally, or
has been dropped.
Page 5

Before Using This Camcorder
Make sure you only use cassettes with the Mini
DV mark .
Make sure you only use memory cards with the
mark or .
This camcorder is designed exclusively for the
digital video cassette, SD Memory Card and
MultiMediaCard. Only cassettes marked “ ”
and memory cards marked “ ” or
“ ” can be used with this unit.
Remember that this camcorder is not
compatible with other digital video formats.
Remember that this camcorder is intended for
private consumer use only.
Any commercial use without proper permission is
prohibited. (Even if you record an event such as a
show, performance or exhibition for personal
enjoyment, it is strongly recommended that you
obtain permission beforehand.)
Before recording important video, be sure to
make a trial recording.
Play back your trial recording to make sure the
video and audio have been recorded properly.
We recommend cleaning your video heads
before use.
If you haven’t used your camcorder for a while, the
heads may be dirty. We recommend periodically
cleaning the video heads with a cleaning cassette
(optional).
Be sure to store your cassette tapes and
camcorder in the proper environment.
Video heads can become dirty more easily if your
cassette tapes and camcorder are stored in a dusty
area. Cassette tapes should be removed from the
camcorder and stored in cassette cases. Store the
camcorder in a bag or other container.
Use SP (Standard) mode for important video
recordings.
LP (Long Play) mode lets you record 50% more
video than SP (Standard) mode, but you may
experience mosaic-like noise during playback
depending on the tape characteristics and the
usage environment.
So, for important recordings, we recommend using
SP mode.
It is recommended that you use JVC brand
cassette tapes.
Your camcorder is compatible with all brands of
commercially available cassette tapes complying
with the MiniDV standard, but JVC brand cassette
tapes are designed and optimized to maximize the
performance of your camcorder.
Also read “CAUTIONS” on pages 51 – 53.
●
Microsoft® and Windows® are either registered
trademarks or trademarks of Microsoft
Corporation in the United States and/or other
countries.
●
Macintosh is a registered trademark of Apple
Computer, Inc.
●
QuickTime is a registered trademark of Apple
Computer, Inc.
EN
5
Page 6
6
EN
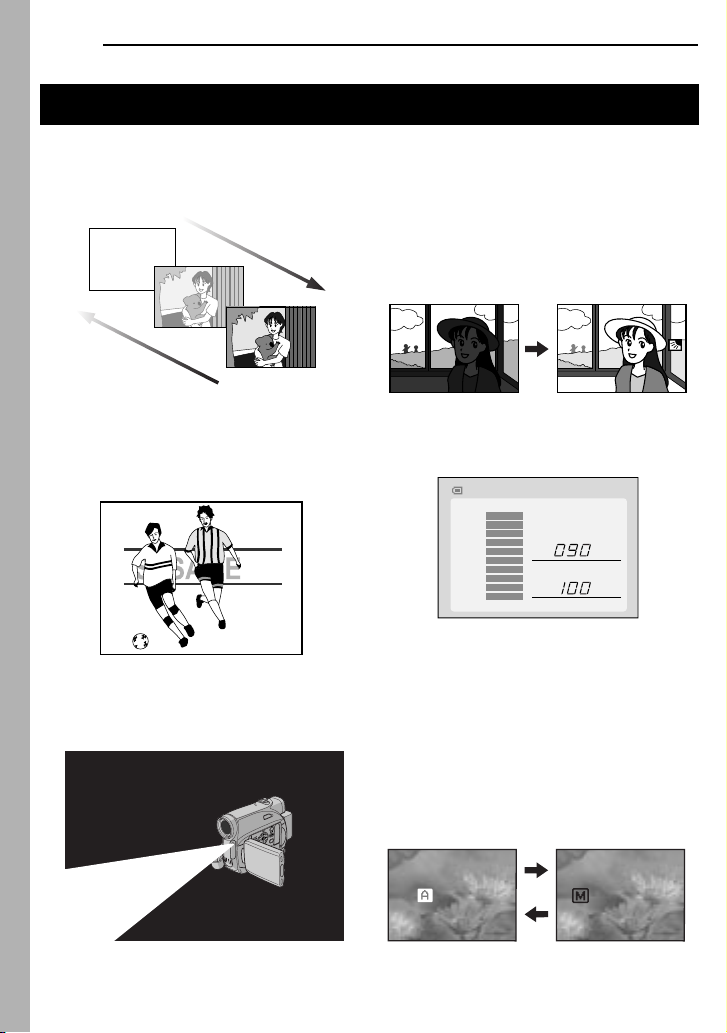
Major Features of this Camcorder
Wipe/Fader Effects
You can use the Wipe/Fader Effects to make
pro-style scene transitions. ( pg. 40)
Fade in
Fade out
Program AE, Effects and Shutter Effects
For example, “SPORTS” mode allows fastmoving images to be captured one frame at a
time, for vivid, stable slow-motion. ( pg. 41)
LED Light
You can brighten the subject in the dark place
with the LED Light. ( pg. 36)
Backlight Compensation
Simply pressing the
brightens the image darkened by backlight.
( pg. 39)
●
You can also select a spot metering area so
that more precise exposure compensation
is available. ( pg. 39, Spot Exposure
Control)
BACKLIGHT
button
Data Battery
You can check the battery status by simply
pressing the
DATA
button. ( pg. 14)
BATTERY CONDITION
100%
50%
0%
MAX TIME
LCD
FINDER
min
min
Live Slow
You can record and play back precious or
hard-to-see moments at a slow speed. The
sound is recorded and played back in real
time. ( pg. 36)
Auto Button
You can change the recording mode between
manual setting to the standard mode setting
of the camcorder by pressing the
button.
AUTO
AUTO
MANUAL
Page 7

GETTING STARTED 8
Index................................................................. 8
Provided Accessories ..................................... 12
Power ............................................................. 13
Operation Mode.............................................. 15
Language Settings.......................................... 16
Date/Time Settings ......................................... 16
Grip Adjustment.............................................. 17
Viewfinder Adjustment.................................... 17
Brightness Adjustment Of The Display........... 17
Tripod Mounting.............................................. 17
Loading/Unloading A Cassette ....................... 18
Loading/Unloading A Memory Card ............... 18
VIDEO RECORDING & PLAYBACK 19
VIDEO RECORDING ...........................................19
Basic Recording ............................................. 19
Tape Remaining Time ................................19
LCD Monitor And Viewfinder ......................19
Zooming...................................................... 20
Journalistic Shooting ..................................20
Time Code.................................................. 20
Quick Review.............................................. 21
Recording From The Middle Of A Tape...... 21
VIDEO PLAYBACK .............................................21
Normal Playback ............................................ 21
Still Playback ..............................................21
Shuttle Search............................................ 22
Blank Search ..............................................22
Connections To A TV Or VCR........................ 23
Playback Using The Remote Control ............. 24
DIGITAL STILL CAMERA (D.S.C.) RECORDING
& PLAYBACK 26
D.S.C. RECORDING............................................ 26
Basic Shooting (D.S.C. Snapshot) ................. 26
D.S.C. PLAYBACK.............................................. 27
Normal Playback Of Images........................... 27
Auto Playback Of Images ............................... 27
Index Playback Of Files.................................. 27
Removing On-Screen Display ........................27
ADDITIONAL FEATURES FOR D.S.C. ....................28
Resetting The File Name................................ 28
Protecting Files............................................... 28
Deleting Files.................................................. 29
Setting Print Information (DPOF Setting) ....... 29
Initializing A Memory Card.............................. 30
CONTENTS
EN
ADVANCED FEATURES 31
MENUS FOR DETAILED ADJUSTMENT..................31
Changing The Menu Settings ......................... 31
Recording Menus............................................ 32
Playback Menus .............................................35
FEATURES FOR RECORDING...............................36
LED Light........................................................ 36
Live Slow ........................................................36
Wide Mode...................................................... 36
Night-Alive ......................................................37
Snapshot (Record Still Image On Tape)......... 37
Manual Focus ................................................. 37
Exposure Control............................................ 38
Iris Lock ..........................................................38
Backlight Compensation................................. 39
Spot Exposure Control.................................... 39
White Balance Adjustment.............................. 39
Manual White Balance Adjustment................. 40
Wipe Or Fader Effects .................................... 40
Program AE, Effects And Shutter Effects ....... 41
EDITING............................................................ 42
Dubbing To A VCR ......................................... 42
Dubbing To Or From A Video Unit Equipped With
A DV Connector (Digital Dubbing).............. 43
Connection To A Personal Computer............. 44
Audio Dubbing ................................................ 45
Insert Editing................................................... 45
REFERENCES 46
TROUBLESHOOTING .......................................... 46
USER MAINTENANCE......................................... 50
CAUTIONS ........................................................51
SPECIFICATIONS................................................ 54
TERMS 55
7
Page 8
8
Index
GETTING STARTED
EN
16:9
Page 9

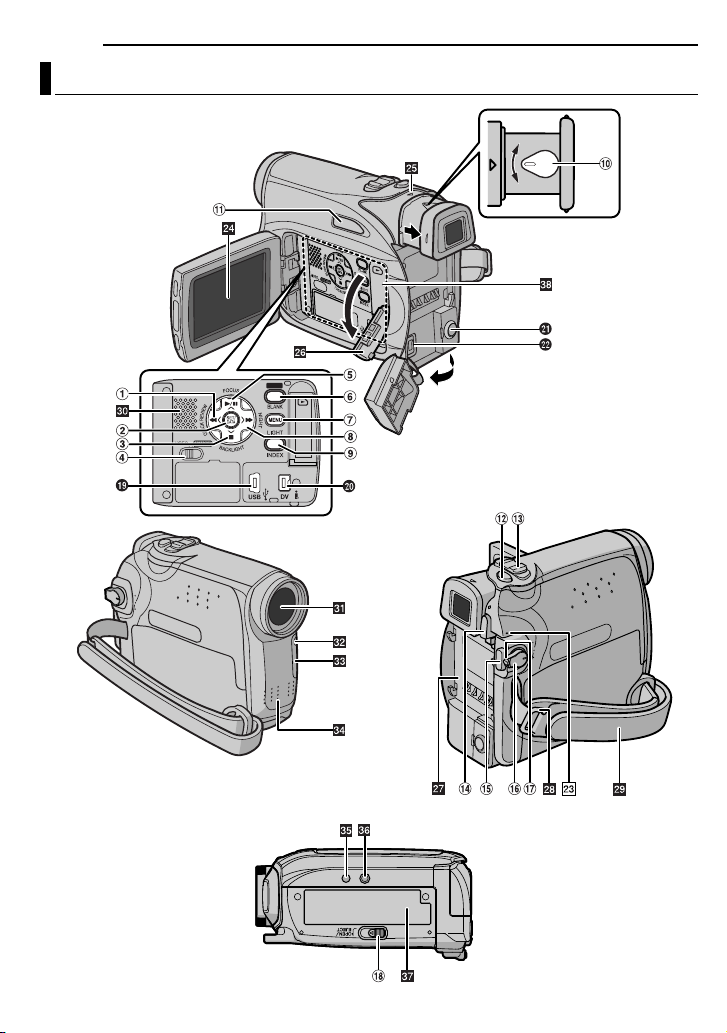
Controls
1
Rewind Button [1] ( pg. 21)
Left Button [
Quick Review Button [QUICK REVIEW]
(
pg. 21)
2
Set Button [SET] ( pg. 16)
Data Battery Button [DATA] (
3
Stop Button [7] ( pg. 21)
Down Button [
Backlight Compensation
Button [BACKLIGHT]
4
VIDEO/MEMORY Switch ( pg. 15)
5
Play/Pause Button [6] ( pg. 21)
Up Button [
Manual Focus Button [FOCUS] ( pg. 37)
6Wide (16:9) Button [16.9] ( pg. 36)
Blank Search [BLANK] ( pg. 22)
7Menu Button [MENU] ( pg. 31)
8Fast-Forward Button [¡] ( pg. 21)
Right Button [2]
Night Button [NIGHT] ( pg. 37)
9Index Button [INDEX] ( pg. 27)
LED Light Button [LIGHT]
!Diopter Adjustment Control ( pg. 17)
"Auto Button [AUTO] ( pg. 15)
#Snapshot Button [SNAPSHOT]
( pg. 26, 37)
Live Slow Button ( pg. 31, 36)
$Power Zoom Lever [T/W] ( pg. 20)
Speaker Volume Control [VOL. +, –]
( pg. 21)
%Battery Release Button [PUSH BATT.]
( pg. 13)
&Recording Start/Stop Button ( pg. 19)
(Power Switch [REC, PLAY, OFF] ( pg. 15)
)Lock Button ( pg. 15)
~Cassette Open/Eject Switch [OPEN/EJECT]
( pg. 18)
1
]
pg. 14)
4
]
3
]
Connectors
The connectors are located beneath the covers.
+USB (Universal Serial Bus) Connector
( pg. 44)
,Digital Video Connector [DV IN/OUT] (i.LINK*)
( pg. 43, 44)
* i.LINK refers to the IEEE1394-1995 industry
specification and extensions thereof. The
logo is used for products compliant with the
i.LINK standard.
-Audio/Video Output Connector [AV]
( pg. 23, 42)
.DC Input Connector [DC] ( pg. 13)
GETTING STARTED
Indicators
ç
POWER/CHARGE Lamp ( pg. 13, 19)
Other Parts
é
LCD Monitor ( pg. 19, 20)
è
Viewfinder ( pg. 17)
ê
Card Cover [ ] ( pg. 18)
ë
Battery Pack Mount ( pg. 13)
í
Shoulder Strap Eyelet ( pg. 12)
ì
Grip Strap ( pg. 17)
î
Speaker ( pg. 21)
ï
Lens
ñ
LED Light
ó
Camera Sensor
(Be careful not to cover this area, a sensor
necessary for shooting is built-in here.)
ò
Stereo Microphone
ô
Stud Hole ( pg. 17)
ö
Tripod Mounting Socket ( pg. 17)
õ
Cassette Holder Cover ( pg. 18)
ú
Memory Card Slot
EN
9
GETTING STARTED
Page 10
10 EN
GETTING STARTED
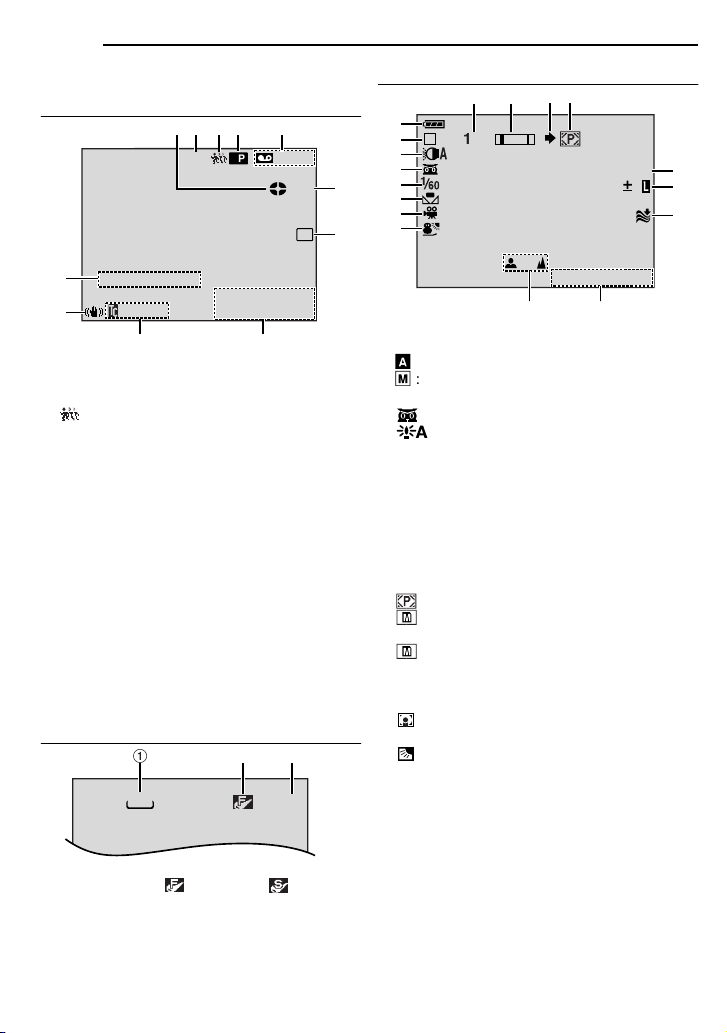
LCD Monitor/Viewfinder Indications
During Video Recording Only
2
4
35
1
LP
16:9
15:55
9 8
D
"
!
SOUND12BIT
1Tape Running Indicator ( pg. 19)
(Rotates while tape is running.)
2Selected Wide Mode Indicator ( pg. 36)
3 : Live Slow Indicator ( pg. 36)
4Recording Speed Mode (SP/LP) ( pg. 32)
(only LP indicator is displayed)
5Tape Remaining Time ( pg. 19)
6REC: (Appears during recording.) ( pg. 19)
PAUSE: (Appears during Record-Standby
mode.) ( pg. 19)
SLOW
: (Appears when using Live Slow.)
( pg. 36)
7Selected Wipe/Fader Effect Indicator
( pg. 40)
8Date/Time ( pg. 34)
9Time Code ( pg. 34)
!Digital Image Stabilizer (“DIS”) ( pg. 32)
"SOUND 12BIT/16BIT: Sound Mode Indicator
( pg. 32) (Appears for approx. 5 seconds
after turning on the camcorder.)
During D.S.C. Recording Only
640
1Image Size: 640 (640 x 480) ( pg. 26)
2Picture Quality: (FINE) and
(STANDARD) (in order of quality) ( pg. 34)
3Remaining Number Of Shots ( pg. 26)
(Displays the approximate remaining number
of shots that can be stored during D.S.C.
recording.)
– – –min
PAUSE
:611.3
1
C0
2A0
E
.
23
6
W
H
7
M
6
51
During Both Video And D.S.C. Recording
!
9
1
M
2
3
4
5
6
7
8
10
x
1Battery Remaining Power Indicator
2Operation Mode ( pg. 15)
A
: Auto Mode
M
: Manual Mode
3LED Light Indicator ( pg. 36)
4 : Night-Alive Indicator ( pg. 37)
: Gain Up Mode ( pg. 33)
5Shutter Speed
6White Balance Indicator ( pg. 39)
7Selected Effect Indicator
8Selected Program AE Indicator ( pg. 41)
9Approximate Zoom Ratio ( pg. 20)
!Zoom Indicator ( pg. 20)
"Shooting Icon ( pg. 26)
(Appears and blinks during shooting.)
#Card Icon ( pg. 26)
: Appears during shooting.
: Blinks in white when a memory card is
not loaded.
: Blinks in yellow while the camcorder is
reading the data in the memory card.
$
PHOTO
: (Appears when taking Snapshot.)
( pg. 26, 37)
% : Spot Exposure Control Indicator
( pg. 39)
: Backlight Compensation Indicator
( pg. 39)
±: Exposure Adjustment Indicator ( pg. 38)
Iris Lock Indicator ( pg. 38)
&Wind Cut Indicator ( pg. 33)
(Date ( pg. 16)
)Manual Focus Adjustment Indicator
( pg. 37)
#"
C06.2 0
E
.
D
PHOTO
3
6
()
$
%
&
Page 11

During Video Playback
21
3
4
5
2 0
1L2
M
I
X
BIT
GETTING STARTED
EN 11
During D.S.C. Playback
1
LP
100-0013
BLANK SEARCH
PUSH "STOP" BUTTON
D E C
TO CANCEL
O
L
M
E
U
V
:/2
1
:
2
5
8
1Battery Remaining Power Indicator
2Sound Mode Indicator ( pg. 35)
3Blank Search Indicator ( pg. 22)
4Tape Speed (SP/LP) ( pg. 35)
(only LP indicator is displayed)
53: Playback
¡: Fast-Forward/Shuttle Search
1: Rewind/Shuttle Search
8: Pause
8 3: Forward Frame-By-Frame Playback/
Slow-Motion
2 8: Reverse Frame-By-Frame Playback/
Slow-Motion
: Audio Dubbing
8 : Audio Dubbing Pause
6Date/Time ( pg. 35)
7VOLUME: Volume Level Indicator ( pg. 21)
BRIGHT: Brightness Control Indicator (LCD
monitor/Viewfinder) ( pg. 17)
8Time Code ( pg. 35)
7
1.11.320A
:
6
6
M
6
0
BRIGHT
– 5
3 2
1Folder/File Number ( pg. 27)
2Operation Mode Indicator ( pg. 27)
3Brightness Control Indicator (LCD monitor/
Viewfinder) ( pg. 17)
GETTING STARTED
Page 12
12 EN
GETTING STARTED
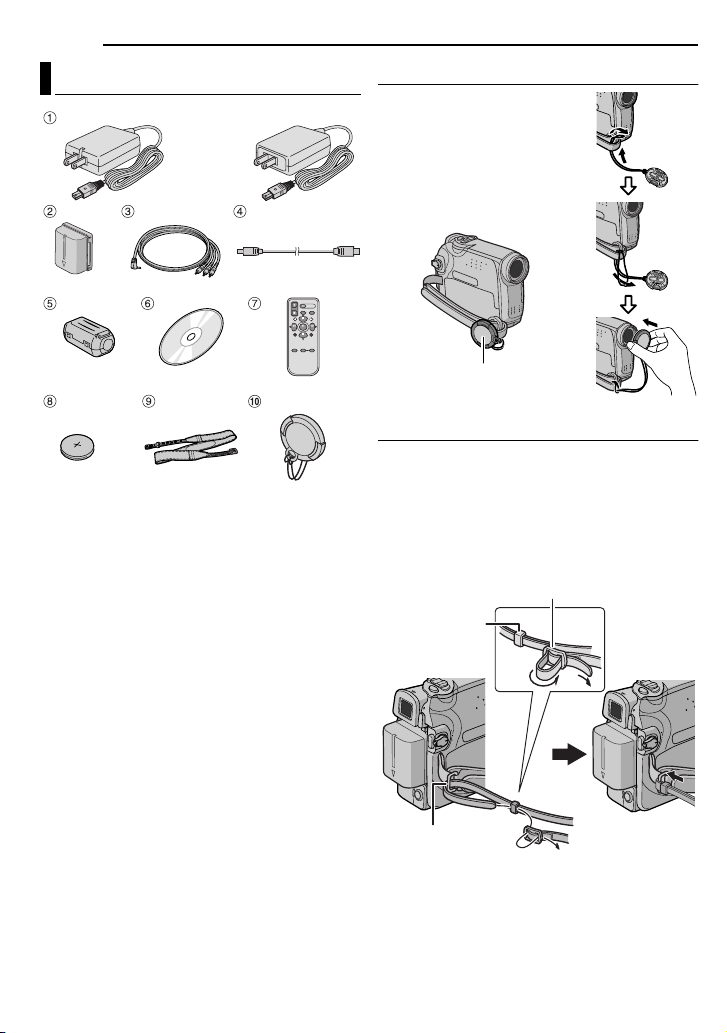
Provided Accessories
OR
1 AC Adapter AP-V14U or AP-V18U
2 Battery Pack BN-VF707U
3 Audio/Video Cable (ø3.5 mini-plug to RCA
plug)
4 USB Cable
5 Core Filter (for USB cable, pg. 13 for
attachment)
6 CD-ROM
7 Remote Control Unit RM-V720U
8 Lithium Battery CR2025* (for remote control
unit)
9 Shoulder Strap (see the right column for
attachment)
! Lens Cap (see the right column for
attachment)
* A lithium battery is pre-installed in the Remote
Control Unit at time of shipment (with insulation
sheet). To use the Remote Control Unit, remove
the insulation sheet.
NOTES:
● In order to maintain optimum performance of the
camcorder, provided cables may be equipped with
one or more core filter. If a cable has only one core
filter, the end that is closest to the filter should be
connected to the camcorder.
● Make sure to use the provided cables for
connections. Do not use any other cables.
How To Attach The Lens Cap
To protect the lens, attach
the provided lens cap to the
camcorder as shown in the
illustration.
NOTE:
To confirm the lens cap is on
correctly make sure the cap is
flush to the camcorder.
Place here during
shooting.
How To Attach The Shoulder Strap
Follow the illustration.
1 Thread the strap through the eyelet.
2 Fold it back and thread it through the strap
guide and the buckle.
● To adjust the length of the strap, loosen and then
tighten the strap in the buckle.
3 Slide the strap guide fully towards the eyelet.
Buckle
Strap guide
1
Eyelet
2
2
3
Page 13

How To Attach The Core Filter
Attach the core filters to the cables. The core
filter reduces interference.
1 Release the stoppers on both ends of the
core filter.
Stopper
2 Run the cable through the core filter, leaving
approx. 3 cm (1-3/16") of cable between the
cable plug and the core filter.
Wind the cable once around the outside of the
core filter as shown in the illustration.
3 cm (1-3/16")
Core filter
GETTING STARTED
EN 13
Power
This camcorder’s 2-way power supply system
lets you choose the most appropriate source of
power. Do not use provided power supply units
with other equipment.
Charging The Battery Pack
Battery pack mount
PUSH
Battery
pack
Arrow
To DC connector
1
2
BATT.
POWER/
CHARGE
lamp
GETTING STARTED
Wind once
3 Close the core filter until it clicks shut.
NOTES:
● Take care not to damage the cable.
● When connecting a cable, attach the end with the
core filter to the camcorder.
Power switch
AC Adapter
To AC outlet
1 Set the Power Switch to “OFF”.
2 With the arrow on the battery pack pointing
downward, push the battery pack slightly against
the battery pack mount 1.
3 Slide down the battery pack until it locks in
place 2.
4 Connect the AC Adapter to the camcorder.
5 Plug the AC Adapter into an AC outlet. The
POWER/CHARGE lamp on the camcorder
blinks to indicate charging has started.
6 When the POWER/CHARGE lamp goes out,
charging is finished. Unplug the AC Adapter
from the AC outlet. Disconnect the AC Adapter
from the camcorder.
CONTINUED ON NEXT PAGE
Page 14

14 EN
A
GETTING STARTED
To detach the battery pack
Slide the battery pack upward while pressing
PUSH BATT. to detach it.
Battery pack Charging time
BN-VF707U* Approx. 1 hr. 30 min.
BN-VF714U Approx. 2 hrs. 40 min.
BN-VF733U Approx. 5 hrs. 40 min.
* Provided
NOTES:
● This product includes patented and other
proprietary technology and will operate only
with JVC Data Battery. Use the JVC BNVF707U/VF714U/VF733U battery packs. Using
generic non-JVC batteries can cause damage
to the internal charging circuitry.
● If the protective cap is attached to the battery
pack, remove it first.
● During charging, the camcorder cannot be
operated.
● Charging is not possible if the wrong type of
battery is used.
● When charging the battery pack for the first time
or after a long storage period, the POWER/
CHARGE lamp may not light. In this case, remove
the battery pack from the camcorder, then try
charging again.
● If a fully charged battery pack is attached to the
unit, the POWER/CHARGE lamp does not blink to
indicate that charging is not performed.
● If the battery operation time remains extremely
short even after having been fully charged, the
battery is worn out and needs to be replaced.
Please purchase a new one.
● Since the AC Adapter processes electricity
internally, it becomes warm during use. Be sure to
use it only in well-ventilated areas.
● Using the optional AA-VF7 Battery Charger, you
can charge the BN-VF707U/VF714U/VF733U
battery pack without the camcorder.
● After 5 minutes has elapsed in Record-Standby
mode with the cassette inserted and no operation
is performed (“PAUSE” indicator may not appear),
the camcorder will automatically turn off its power
supplied from the AC adapter. In this case, the
battery charge starts if the battery is attached to
the camcorder.
Using The Battery Pack
Perform steps 2 – 3 in “Charging The Battery
Pack”.
Maximum continuous recording time
Battery pack
BN-VF707U* 1 hr. 30 min. 1 hr. 40 min.
BN-VF714U 3 hrs. 3 hrs.25 min.
BN-VF733U 7 hrs. 8 hrs.
* Provided
LCD monitor
on
Viewfinder on
NOTES:
● Recording time is reduced significantly under the
following conditions:
• Zoom or Record-Standby mode is engaged
repeatedly.
• The LCD monitor is used repeatedly.
• The playback mode is engaged repeatedly.
• The LED Light is used.
● Before extended use, it is recommended that you
prepare enough battery packs to cover 3 times the
planned shooting time.
TTENTION:
Before detaching the power source, make sure that
the camcorder’s power is turned off. Failure to do so
can result in a camcorder malfunction.
Data Battery System
You can check the remaining battery power and
the recordable time.
1) Make sure the battery is attached and the
Power Switch is set to “OFF”.
2) Open the LCD monitor fully.
3) Press DATA, and the battery status screen
appears.
● It is displayed for approx. 3 seconds if the
button is pressed and released quickly, and for
approx. 15 seconds if the button is pressed
and hold for several seconds.
● If “COMMUNICATION ERROR” appears
instead of the battery status even though you
tried to press DATA several times, there may
be a problem with your battery. In such a case,
consult your nearest JVC dealer.
Page 15
Using AC Power
Perform step 4 in “Charging The Battery Pack”.
NOTE:
The provided AC Adapter features automatic
voltage selection in the AC range from 110 V to
240 V.
About Batteries
DANGER! Do not attempt to take the batteries
apart, or expose them to flame or excessive
heat, as it may cause a fire or explosion.
WARNING! Do not allow the battery or its
terminals to come in contact with metals, as this
can result in a short circuit and possibly start a
fire.
To resume the original function of the
accurate battery power indication
If the battery power indication differs from the
actual operating time, fully charge the battery, and
then run it down. However this function may not
turn back if the battery was used for a long period
of time under extremely high/low temperature
condition or charged too many times.
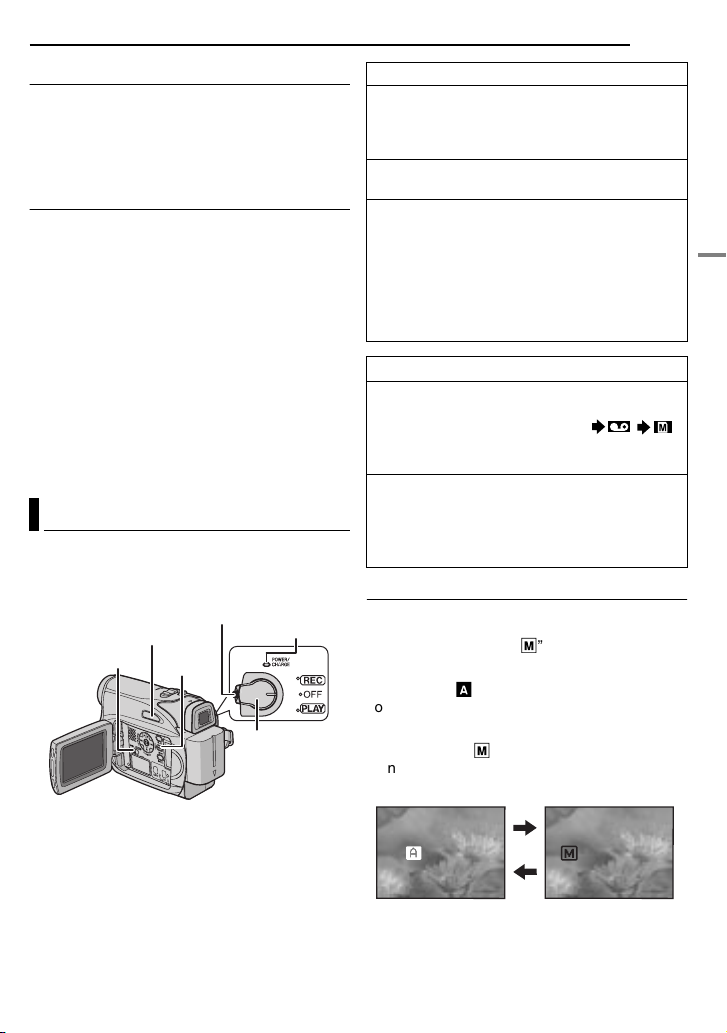
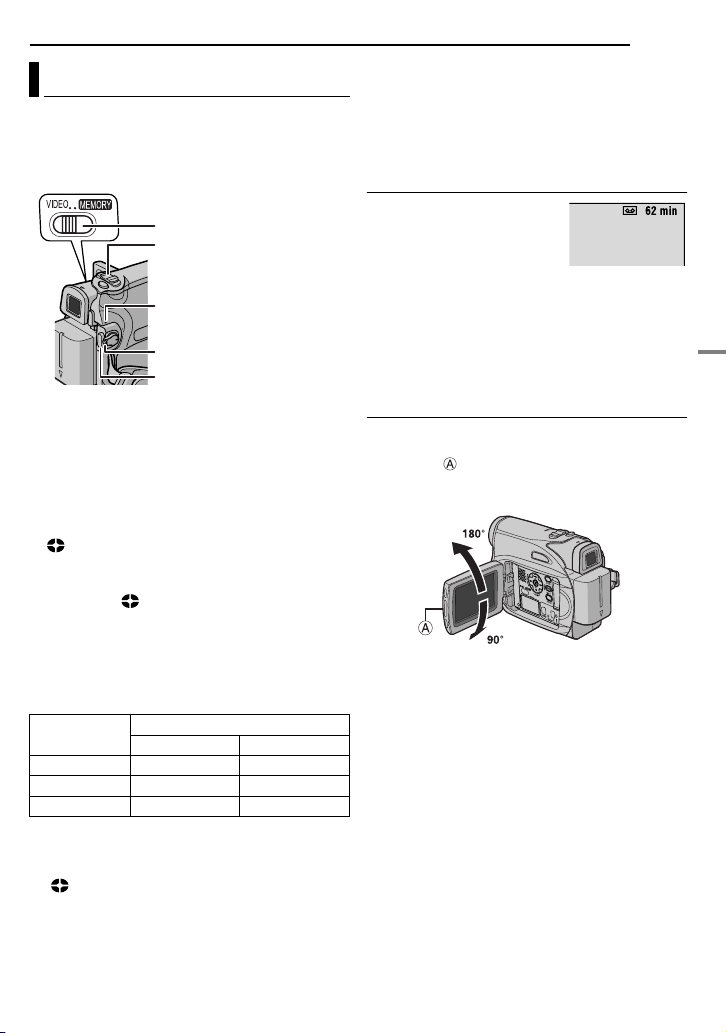
Operation Mode
To turn on the camcorder, set the Power Switch
to any operation mode except “OFF” while
pressing down the Lock Button located on the
switch.
VIDEO/
MEMORY
Choose the appropriate operation mode
according to your preference using the Power
Switch and VIDEO/MEMORY Switch.
Lock Button
AUTO
MENU
POWER/
CHARGE lamp
Power Switch
GETTING STARTED
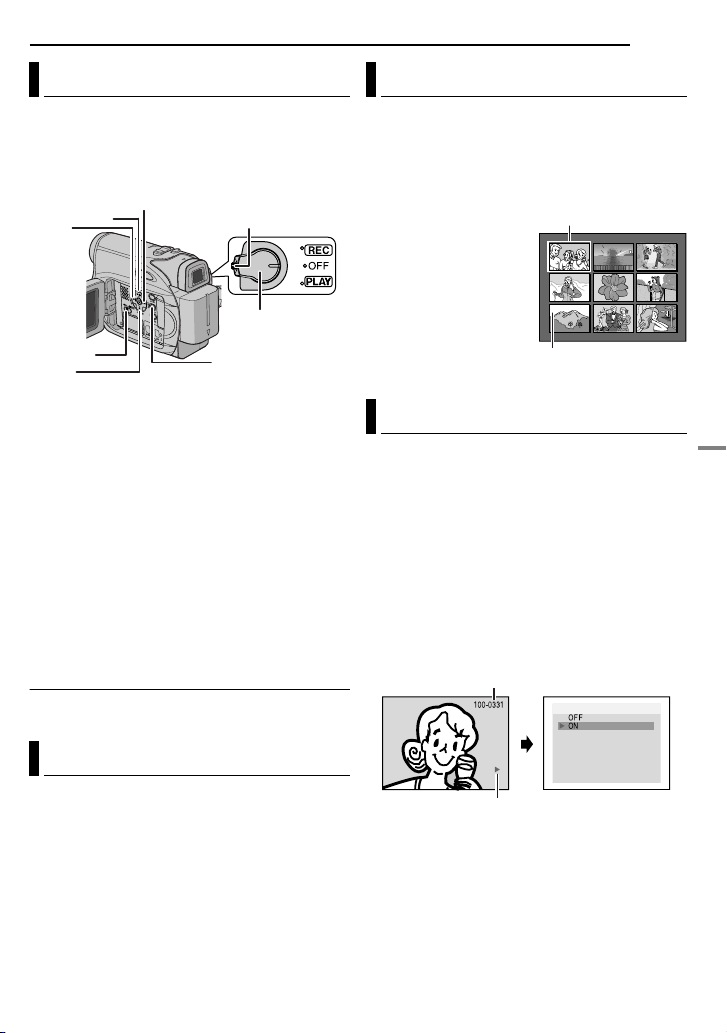
Power Switch Position
REC:
● Allows you to perform recording on the tape.
● Allows you to set various recording functions
using the menus. ( pg. 32)
OFF:
Allows you to switch off the camcorder.
PLAY:
● Allows you to play back a recording on the
tape.
● Allows you to display a still image stored in
the memory card or to transfer a still image
stored in the memory card to a PC.
● Allows you to set various playback functions
using the Menus. ( pg. 31)
VIDEO/MEMORY Switch Position
VIDEO:
Allows you to record on a tape or play back a
tape. If “REC SELECT” is set to “ / ”
( pg. 34), still images are recorded both on
the tape and the memory card.
MEMORY:
● Allows you to record in a memory card or
access data stored in a memory card.
● When the Power Switch is set to “REC”, the
currently selected image size appears.
EN 15
Auto/Manual Mode
Press AUTO button repeatedly to switch to auto/
manual recording mode. When manual mode is
selected, the indicator “M” appears on the LCD
monitor.
Auto Mode :
You can record using no special effects or
manual adjustments.
Manual Mode :
Manual recording is possible by setting various
functions
.
AUTO
A
M
MANUAL
GETTING STARTED
Page 16
16 EN
GETTING STARTED
Power-Linked Operation
When the Power Switch is set to “REC”, you can
also turn on/off the camcorder by opening/
closing the LCD monitor or pulling out/pushing in
the viewfinder.
INFORMATION:
The following explanations in this manual
supposes the use of LCD monitor in your
operation. If you want to use the viewfinder,
close the LCD monitor and pull out the
viewfinder fully.
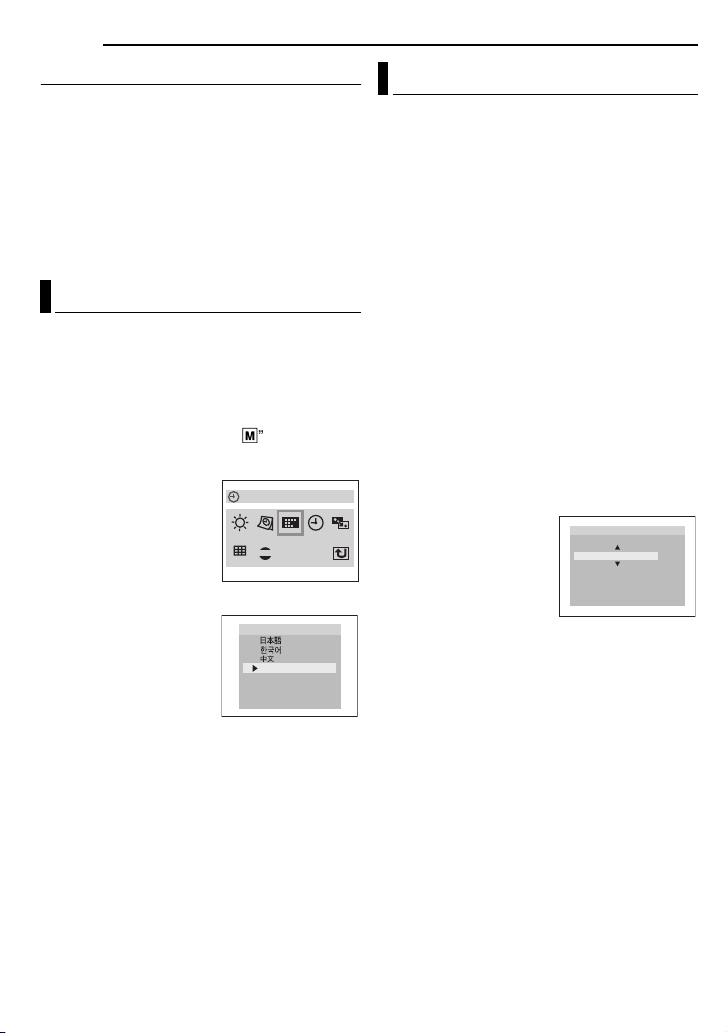
Language Settings
The language on the display can be changed.
( pg. 31, 34)
1 Set the Power Switch to “REC” while pressing
down the Lock Button located on the switch.
2 Open the LCD monitor fully. ( pg. 19)
3 Set the recording mode to “
4 Press MENU. The Menu Screen appears.
5 Press 3, 4, 2 or 1 to
select “DISPLAY”, and
press SET. The DISPLAY
Menu appears.
6 Press 3, 4, 2 or 1 to
select “LANGUAGE”, and
press SET.
7 Press 3 or 4 to select
the desired language, and
press SET or 2.
● Press 1 whenever you
want to return to the
previous menu screen.
8 Press MENU. The
Menu Screen closes.
M
”.( pg. 15)
DEMO
0001
ENGLISH
FRANÇAIS
ESPAÑOL
PORTUGUÊS
LANGUAGE
LANGUAGE
Date/Time Settings
The date/time is recorded onto the tape at all
times, but its display can be turned on or off
during playback. ( pg. 34, 35)
1 Perform steps 1 – 5 in “Language Settings”
on the left column.
2 Press 3, 4, 2 or 1 to select “CLOCK ADJ.”,
and press SET. The date display format is
highlighted.
3 Press 3 or 4 to select the desired date
display format, then press SET or 2. Select from
“MONTH.DATE.YEAR”, “DATE.MONTH.YEAR”
or “YEAR.MONTH.DATE”.
4 Press 3 or 4 to select the time display
format, then press SET or 2. Select from “24h”
or “12h”.
5 Set the year, month, date, hour and minute.
Press 3 or 4 to select the value, then press SET
or 2. Repeat this step until you have input all the
settings.
NOTE:
Press 1 to return to the previous setting.
6 Press MENU.The Menu
screen closes.
O
M NTH
CLOCK ADJ
DATE YEAR..
DEC70
62006
..
0:05
.
12h
AM
Page 17
GETTING STARTED
EN 17
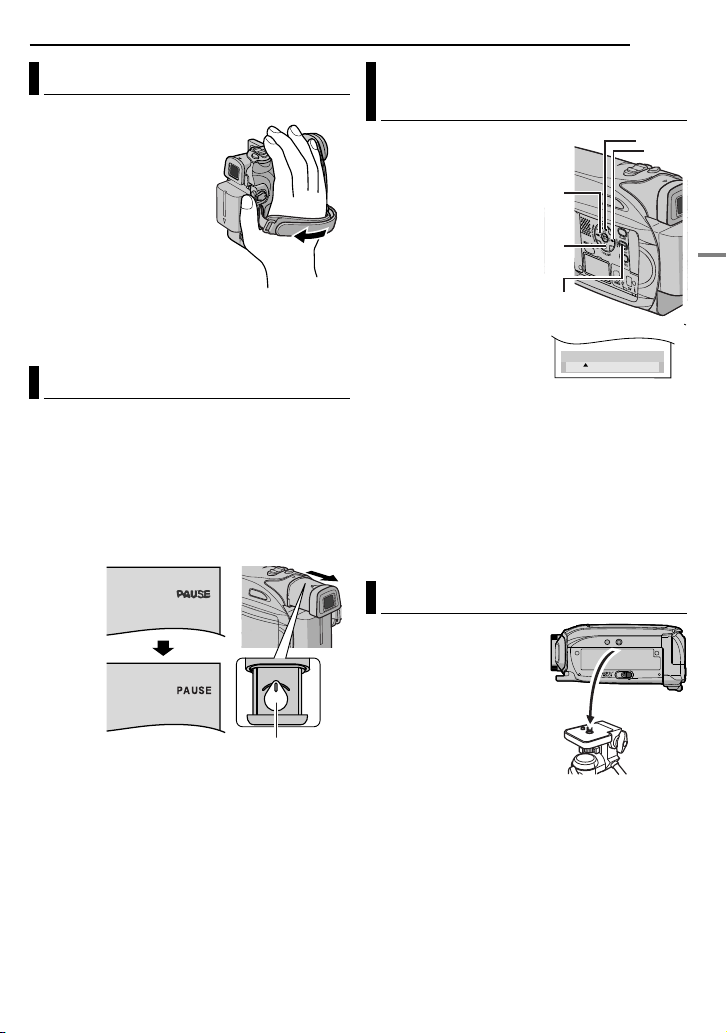
Grip Adjustment
1 Adjust the velcro strip.
● Before making the
adjustment, remove any
security tags that may
be attached to the
velcro.
2 Pass your right hand
through the loop and
grasp the grip.
3 Adjust your thumb and
fingers through the grip to
easily operate the Recording Start/Stop Button,
Power Switch and Power Zoom Lever. Be sure
to fasten the velcro strip to your preference.
Viewfinder Adjustment
1 Set the Power Switch to “REC” while pressing
down the Lock Button located on the switch.
2 Make sure the LCD monitor is closed and
locked. Pull out the viewfinder fully and adjust it
manually for best viewability.
3 Turn the Diopter Adjustment Control until the
indications in the viewfinder are clearly focused.
Example:
Diopter Adjustment Control
CAUTION:
When retracting the viewfinder, take care not to
pinch your fingers.
Brightness Adjustment Of The Display
33
BRIGHT
BRIGHT
– 5
33
22
22
– 5
1 Set the Power Switch
to “REC” or “PLAY” while
pressing down the Lock
Button located on the
switch.
2 Open the LCD monitor
fully. ( pg. 19)
● To adjust the brightness of
the viewfinder, pull out the
viewfinder fully and set
“PRIORITY” to “FINDER”
( pg. 31, 33).
3 Press MENU. The
Menu Screen appears. If
you are in Playback mode,
please proceed to Step 5.
11
11
44
44
MENU
4 Press 3, 4, 2 or 1 to select “DISPLAY”, and
press SET. The DISPLAY Menu appears.
5 Press 3, 4, 2 or 1 to select “BRIGHT”, and
press SET. The Menu Screen closes and the
brightness control menu appears.
6 Press 3 or 4 until the appropriate brightness
is reached and press SET or 2.
7 Press MENU. The menu screen closes.
Tripod Mounting
To attach the camcorder
to a tripod, align the
direction stud and screw
to the mounting socket
and stud hole on the
camcorder. Then tighten
the screw clockwise.
● Some tripods are not
equipped with studs.
GETTING STARTED
Page 18
18 EN
A
GETTING STARTED
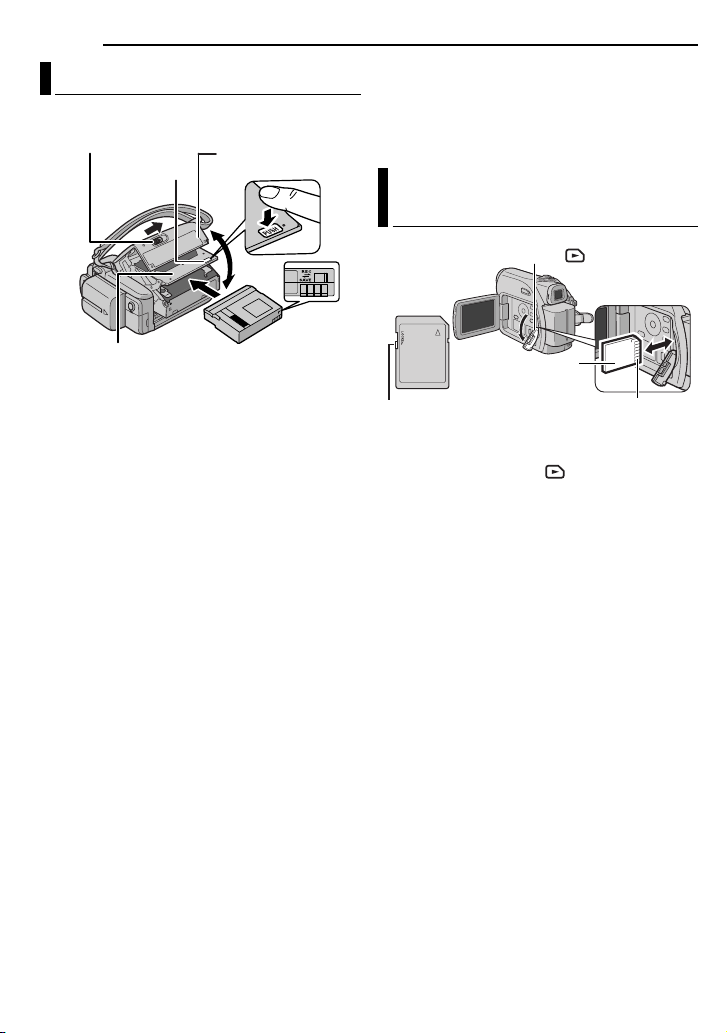
Loading/Unloading A Cassette
The camcorder needs to be powered up to load
or eject a cassette.
OPEN/EJECT
PUSH
Cassette holder
cover
● If the tape does not load properly, open the
cassette holder cover fully and remove the
cassette. A few minutes later, insert it again.
● When the camcorder is suddenly moved from a
cold place to a warm environment, wait a short
time before opening the cassette holder cover.
Loading/Unloading A Memory Card
Card Cover ( )
Cassette holder
Make sure the window side
is facing out.
Erase
protection tab
1 Slide and hold OPEN/EJECT in the direction
of the arrow, then pull the cassette holder cover
open until it locks. The cassette holder opens
automatically.
● Do not touch internal components.
2 Insert or remove a tape and press “PUSH” to
close the cassette holder.
● Be sure to press only the section labeled “PUSH”
to close the cassette holder; touching other parts
may cause your finger to get caught in the
cassette holder, resulting in injury or product
damage.
● Once the cassette holder is closed, it recedes
automatically. Wait until it recedes completely
before closing the cassette holder cover.
● When the battery pack’s charge is low, you may
not be able to close the cassette holder cover. Do
not apply force. Replace the battery pack with a
fully charged one or use AC power before
continuing.
3 Close the cassette holder cover firmly until it
locks into place.
To protect valuable recordings
Slide the erase protection tab on the back of the
tape in the direction of “SAVE”. This prevents the
tape from being recorded over. To record on this
tape, slide the tab back to “REC” before loading
it.
NOTES:
● If you wait a few seconds and the cassette holder
does not open, close the cassette holder cover
and try again. If the cassette holder still does not
open, turn the camcorder off then on again.
Memory card
(optional)
Write/erase protection tab
Clipped edge
1 Make sure the camcorder’s power is off.
2 Open the card cover ( ).
3 To load a memory card, firmly insert it with
its clipped edge first.
To unload a memory card, push it once. After
the memory card comes out of the camcorder,
pull it out.
● Do not touch the terminal on the reverse side of
the label.
4 Close the card cover.
To protect valuable files (available only for
SD Memory Card)
Slide the write/erase protection tab on the side
of the memory card in the direction of “LOCK”.
This prevents the memory card from being
recorded over. To record on this memory card,
slide the tab back to the position opposite to
“LOCK” before loading it.
NOTES:
● Some brands of memory cards are not compatible
with this camcorder. Before purchasing a memory
card, consult its manufacturer or dealer.
● Before using a new memory card, it is necessary
to format the card. ( pg. 30)
TTENTION:
Do not insert or remove the memory card while the
camcorder is turned on, as this may cause the
memory card to be corrupted or cause the
camcorder to become unable to recognize whether
or not the card is installed.
Page 19
Basic Recording
NOTE:
Before continuing, perform the procedures listed
below:
● Power ( pg. 13)
● Loading A Cassette ( pg. 18)
VIDEO/MEMORY
Zoom Lever
POWER/CHARGE Lamp
Lock Button
Recording Start/Stop Button
1 Remove the lens cap. ( pg. 12)
2 Open the LCD monitor fully.
3 Set the VIDEO/MEMORY Switch to “VIDEO”.
4 Set the Power Switch to “REC” while pressing
down the Lock Button located on the switch.
The POWER/CHARGE lamp lights and the
●
camcorder enters the Record-Standby mode.
“ PAUSE” is displayed.
● To record in LP (Long Play) mode, pg. 32.
5 To start recording, press the Recording Start/
Stop Button. “ REC” appears on the display
while recording is in progress.
6 To stop recording, press the Recording Start/
Stop Button again. The camcorder re-enters the
Record-Standby mode.
Approximate recording time
Tape
30 min. 30 min. 45 min.
60 min. 60 min. 90 min.
80 min. 80 min. 120 min.
NOTES:
● If the Record-Standby mode continues for
5 minutes and no operation is performed
“ PAUSE” indicator may not appear), the
(
camcorder’s power shuts off automatically. To turn
the camcorder on again, push back and pull out
the viewfinder again or close and re-open the LCD
monitor.
Recording mode
SP LP
VIDEO RECORDING
● When a blank portion is left between recorded
scenes on the tape, the time code is interrupted
and errors may occur when editing the tape. To
avoid this, refer to “Recording From The Middle Of
pg. 21).
A Tape” (
● To turn the melody sounds off, pg. 33.
EN
19
Tape Remaining Time
Approximate tape remaining
time appears on the display.
“– – – min” means the
camcorder is calculating the
remaining time. When the
remaining time reaches 2 minutes, the indication
starts blinking.
●
The time required to calculate and display the
remaining tape length, and the accuracy of the
calculation, may vary according to the type of tape
used.
LCD Monitor And Viewfinder
While using the LCD monitor:
Make sure the viewfinder is pushed back in. Pull
on the end of the LCD monitor and open the
LCD monitor fully. It can rotate 270° (90°
downward, 180° upward).
While using the viewfinder:
Make sure the LCD monitor is closed and
locked. Pull out the viewfinder fully.
NOTES:
● The image will not appear simultaneously on the
LCD monitor and the viewfinder. When the
viewfinder is pulled out while the LCD monitor is
opened, you can select which one to use. Set
“PRIORITY” to the desired mode in SYSTEM
pg. 33)
Menu. (
● Colored bright spots may appear all over the LCD
monitor or the viewfinder. However, this is not a
malfunction. (
pg. 47)
VIDEO RECORDING & PLAYBACK
Page 20
20 EN
VIDEO RECORDING
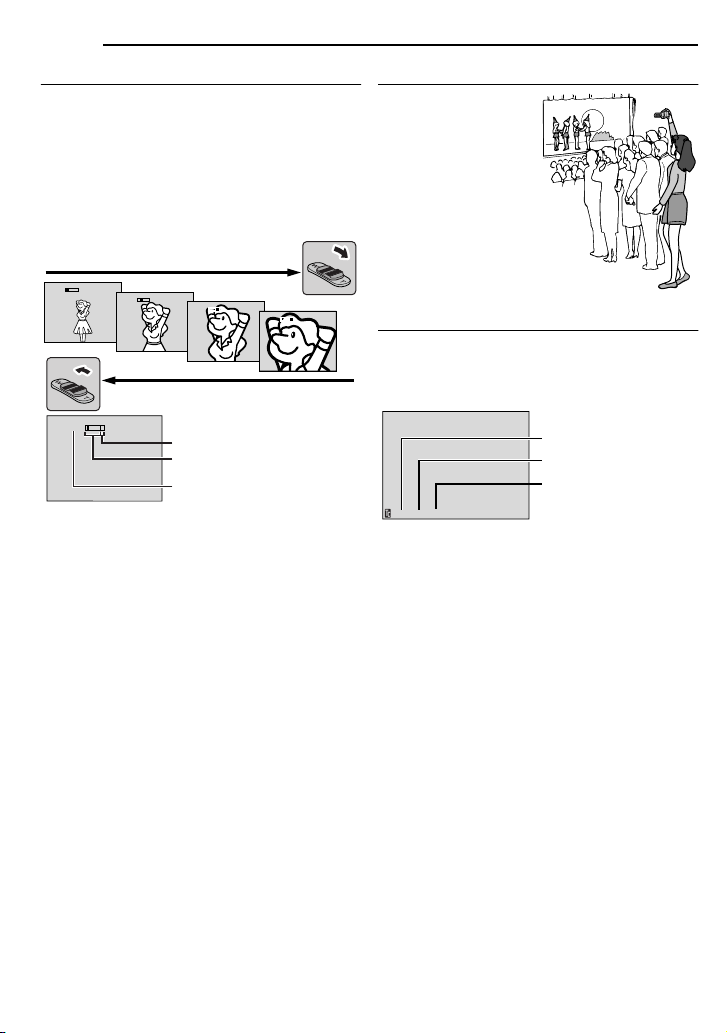
Zooming
Produces the zoom in/out effect, or an
instantaneous change in image magnification.
Zoom In
Slide the Power Zoom Lever towards “T”.
Zoom Out
Slide the Power Zoom Lever towards “W”.
●
The further you slide the Power Zoom Lever, the
quicker the zoom action.
Zoom in (T: Telephoto)
1
x
10
NOTES:
● Focusing may become unstable during Zooming.
In this case, set the zoom while in RecordStandby, lock the focus by using the manual focus
pg. 37), then zoom in or out in Record mode.
(
● Zooming is possible to a maximum of 800X, or it
can be switched to 32X magnification using the
optical zoom. (
● Zoom magnification of over 32X is done through
Digital image processing, and is therefore called
Digital Zoom.
● During Digital zoom, the quality of image may
suffer.
● Digital zoom cannot be used when the VIDEO/
MEMORY Switch is set to “MEMORY”.
●
Macro shooting (as close as approx. 5 cm (2") to
the subject) is possible when the Power Zoom
Lever is set all the way to “W”. Also see “TELE
MACRO” in FUNCTION Menu on page 32.
● When shooting a subject close to the lens, zoom
out first. If zoomed-in in the auto focus mode, the
camcorder may automatically zoom out
depending on the distance between the
camcorder and the subject. This will not occur
when “TELE MACRO” is set to “ON”. (
10
x
20
x
40
x
Zoom out (W: Wide angle)
x
Digital zoom zone
32X (optical) zoom zone
Approximate zoom ratio
pg. 33)
pg. 32)
Journalistic Shooting
In some situations,
different shooting
angles may provide
more dramatic results.
Hold the camcorder in
the desired position
and tilt the LCD
monitor in the most
convenient direction. It
can rotate 270° (90°
downward, 180°
upward).
Time Code
During recording, a time code is recorded on the
tape. This code is to confirm the location of the
recorded scene on the tape during playback.
Display
Minutes
Seconds
Frames*
12:34:24
* Frames are not displayed during recording.
If recording starts from a blank portion, the time
code begins counting from “00:00:00”
(minute:second:frame). If recording starts from
the end of a previously recorded scene, the time
code continues from the last time code number.
If during recording a blank portion is left partway
through the tape, the time code is interrupted.
When recording is resumed, the time code
starts counting up again from “00:00:00”. This
means the camcorder may record the same time
codes as those existing in a previously recorded
scene. To prevent this, perform Recording From
The Middle Of A Tape ( pg. 21) in the following
cases;
●
When shooting again after playing back a
recorded tape.
● When power shuts off during shooting.
● When a tape is removed and re-inserted during
shooting.
● When shooting using a partially recorded tape.
● When shooting on a blank portion located partway
through the tape.
● When shooting again after shooting a scene then
opening/closing the cassette holder cover.
(30 frames = 1 second)
Page 21

NOTES:
S
● The time code cannot be reset.
● During fast-forwarding and rewinding, the time
code indication does not move smoothly.
● The time code is displayed only when “TIME
CODE” is set to “ON”. (
pg. 34)
Quick Review
Enables to check the end of the last recording.
1) Press QUICK REVIEW during the RecordingStandby mode.
2) Tape is rewound for about several seconds
and played back automatically, then pauses in
the Recording-Standby mode for the next shot.
●
Distortion may occur at start of playback. This is
normal.
Recording From The Middle Of A Tape
1) Play back a tape or use Blank Search
( pg. 22) to find the spot at which you want to
start recording, then engage the Still Playback
mode. (See the right column.)
2) Set the Power Switch to “REC” while pressing
down the Lock Button located on the switch,
then start recording.
VIDEO PLAYBACK
EN 21
Normal Playback
¡¡
¡¡
66
66
11
11
peaker
VIDEO/
MEMORY
7
1 Load a cassette. ( pg. 18)
2 Set the VIDEO/MEMORY Switch to “VIDEO”.
3 Set the Power Switch to “PLAY” while
pressing down the Lock Button located on the
switch.
4 To start playback, press 6.
5 To stop playback, press 7.
During Stop mode, press 1 to rewind, or ¡ to
●
fast-forward the tape.
To control the speaker volume
Slide the Power Zoom Lever (VOL. +/–) towards
“+” to turn up the volume, or towards “–” to turn
down the volume.
NOTES:
● The playback picture can be viewed in the LCD
monitor, viewfinder or on a connected TV.
pg. 23)
(
● If Stop mode continues for 5 minutes when power
is supplied from a battery, the camcorder shuts off
automatically. To turn on again, set the Power
Switch to “OFF”, then to “PLAY”.
● When a cable is connected to the AV connector,
the sound is not heard from the speaker.
Still Playback
Pauses during video playback.
1) Press 6 during playback.
2) To resume normal playback, press 6 again.
●
If still playback continues for more than about
3 minutes, the camcorder’s Stop mode is
automatically engaged.
VOL. +/–
Lock Button
MENU
VIDEO RECORDING & PLAYBACK
Page 22

22 EN
A
VIDEO PLAYBACK
Shuttle Search
Allows high-speed search in either direction
during video playback.
1) During playback, press ¡ for forward
search, or 1 for reverse search.
2) To resume normal playback, press 6.
●
During playback, press and hold ¡ or 1. The
search continues as long as you hold the button.
Once you release the button, normal playback
resumes.
● A slight mosaic effect appears on the display
during Shuttle Search. This is not a malfunction.
TTENTION:
During Shuttle Search, parts
of the picture may not be
clearly visible, particularly on
the left side of the screen.
Blank Search
Helps you find where you should start recording
in the middle of a tape to avoid time code
interruption. ( pg. 20)
1 Load a cassette. ( pg. 18)
2 Set the VIDEO/MEMORY Switch to “VIDEO”.
3 Set the Power Switch to “PLAY” while
pressing down the Lock Button located on the
switch.
4 Press BLANK.
●
The “BLANK SEARCH” indication appears and
the camcorder automatically starts reverse or
forward search, then stops at the spot which is
about 3 seconds of tape before the beginning of
the detected blank portion.
● To cancel Blank Search, press 7 or BLANK.
NOTES:
● Before starting Blank Search, if the current
position is at a blank portion, the camcorder
searches in the reverse direction. If the current
position is at a recorded portion, the camcorder
searches in the forward direction.
● If the beginning or end of the tape is reached
during Blank Search, the camcorder stops
automatically.
● A blank portion which is shorter than 5 seconds of
tape may not be detected.
● The detected blank portion may be located
between recorded scenes. Before you start
recording, make sure there is no recorded scene
after the blank portion.
Page 23
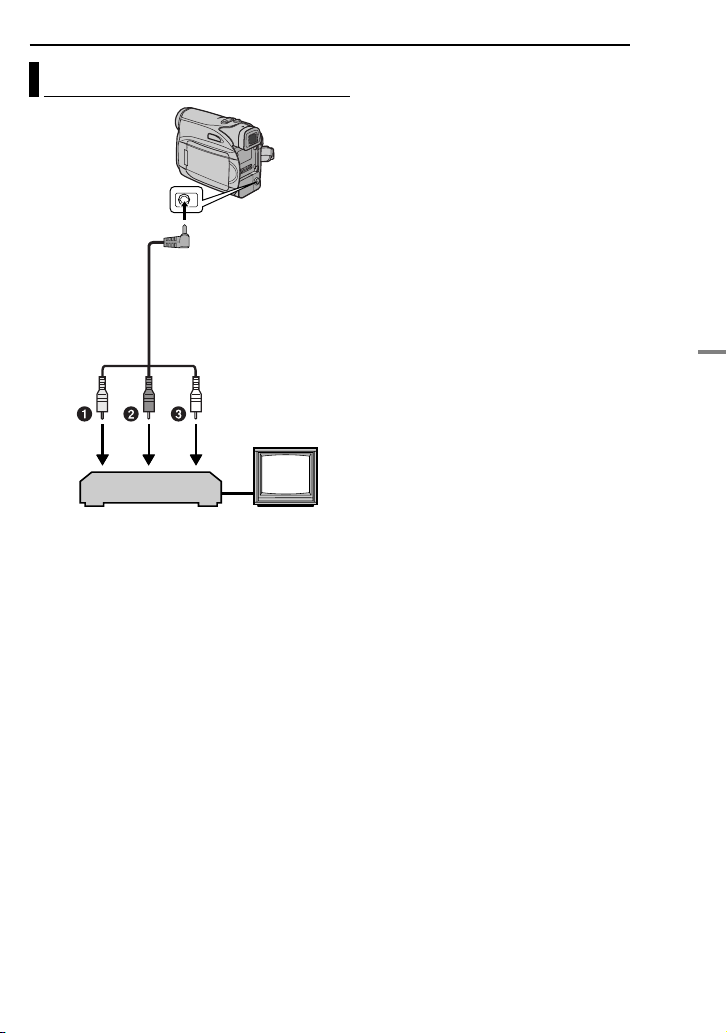
Connections To A TV Or VCR
To AV
connector
Audio/Video cable
(provided)
TV
VCR
1Yellow to VIDEO IN (Connect when your TV/
VCR has only A/V input connectors.)
2Red to AUDIO R IN*
3White to AUDIO L IN*
* Not required for watching still images only.
VIDEO PLAYBACK
EN 23
1 Make sure all units are turned off.
2 Connect the camcorder to a TV or VCR as
shown in the illustration.
If using a VCR, go to step 3.
If not, go to step 4.
3 Connect the VCR output to the TV input,
referring to your VCR’s instruction manual.
4 Turn on the camcorder, the VCR and the TV.
5 Set the VCR to its AUX input mode, and set
the TV to its VIDEO mode.
6 Start playback on the camcorder. ( pg. 21)
To choose whether or not the following
displays appear on the connected TV
●
Date/Time
Set “DATE/TIME” to “ON” or “OFF”.
pg. 31, 35)
(
Or, press DISPLAY on the remote control to turn
on/off the date indication.
● Time Code
Set “TIME CODE” to “ON” or “OFF”.
pg. 31, 35)
(
● Indications other than date/time and time code
Set “ON SCREEN” to “OFF”, “LCD” or “LCD/TV”.
pg. 31, 35)
(
NOTES:
● It is recommended to use the AC Adapter as
the power supply instead of the battery pack.
(
pg. 15)
● To monitor the picture and sound from the
camcorder without inserting a tape or memory
card, set the camcorder’s Power Switch to “REC”,
then set your TV to the appropriate input mode.
● Make sure you adjust the TV sound volume to its
minimum level to avoid a sudden burst of sound
when the camcorder is turned on.
VIDEO RECORDING & PLAYBACK
Page 24
24 EN
VIDEO PLAYBACK
Playback Using The Remote Control
The Full-Function Remote Control Unit can
operate this camcorder from a distance as well
as the basic operations (Playback, Stop, Pause,
Fast-Forward and Rewind) of your VCR. It also
makes additional playback functions possible.
( pg. 25)
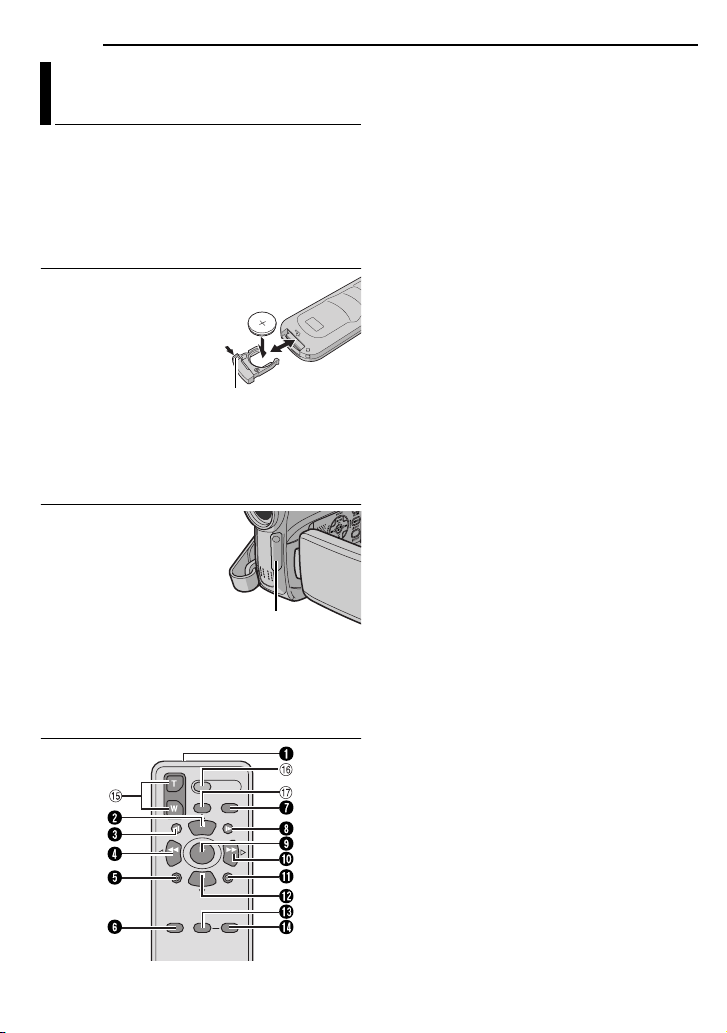
Installing The Battery
The remote control uses
one lithium battery
(CR2025).
1 Pull out the battery
holder by pushing the lock
tab.
2 Insert the battery in the
holder, and be sure to
have the “+” mark visible.
3 Slide the holder back in until you hear a click.
Beam Effective Area (indoor use)
When using the remote
control, be sure to point it
at the remote sensor. The
transmitted beam’s
approximate effective
distance for indoor use is
5 m (16 ft).
NOTE:
The transmitted beam may not be effective or may
cause incorrect operation when the remote sensor
is directly exposed to sunlight or powerful lighting.
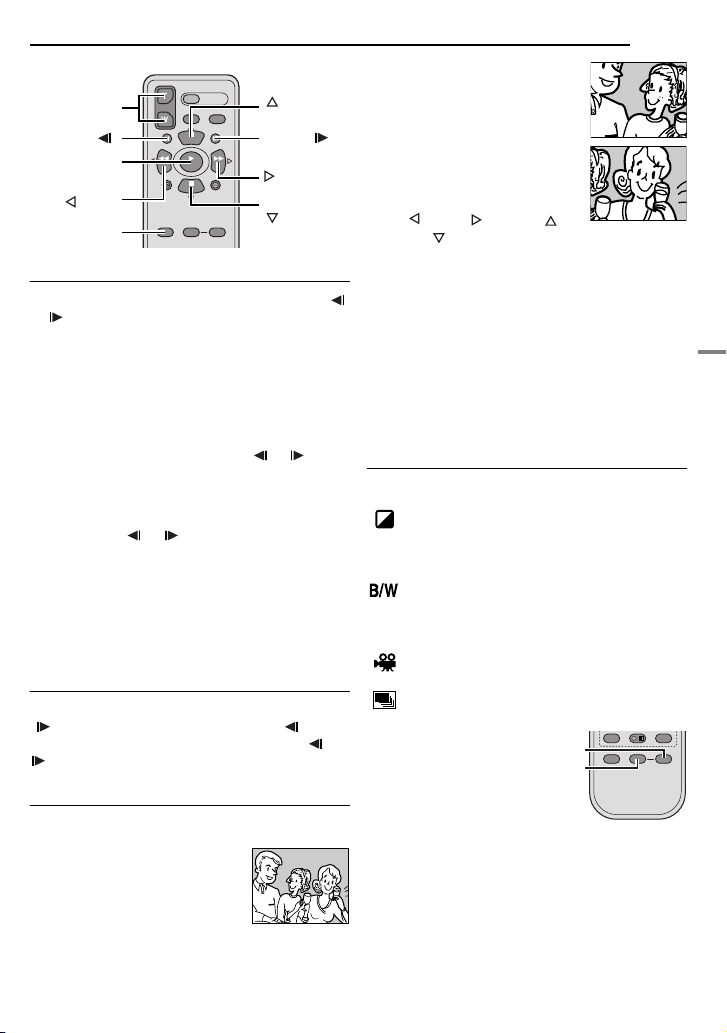
Buttons And Functions
2
1
Lock tab
Remote sensor
3
1
The following buttons are available only when
the camcorder’s Power Switch is set to “PLAY”.
2PAUSE Button
●
Pauses the tape ( pg. 25)
Up Button ( pg. 25)
3SLOW Rewind Button ( pg. 25)
4REW Button
●
Rewind/Reverse Shuttle Search on a tape
pg. 22)
(
● Displays previous file in a memory card
pg. 27)
(
Left Button ( pg. 25)
5INSERT Button ( pg. 45)
6SHIFT Button ( pg. 25)
7DISPLAY Button ( pg. 23, 42)
8SLOW Forward Button ( pg. 25)
9PLAY Button
●
Starts Playback of a tape ( pg. 21)
● Starts Auto Playback of images in a memory
pg. 27)
card (
!FF Button
●
Forward/Forward Shuttle Search on a tape
pg. 22)
(
● Displays next file in a memory card ( pg. 27)
Right Button ( pg. 25)
"A. DUB Button ( pg. 45)
#STOP Button
●
Stops the tape ( pg. 21)
● Stops Auto Playback ( pg. 27)
Down Button ( pg. 25)
$EFFECT Button ( pg. 25)
%EFFECT ON/OFF Button ( pg. 25)
The following buttons are available when the
camcorder’s Power Switch is set to “REC”.
&Zoom (T/W) Buttons
Zoom in/out ( pg. 20, 25)
(Also available with the Power Switch set to
“PLAY”)
(START/STOP Button
Functions the same as the Recording Start/
Stop Button on the camcorder.
)S.SHOT Button
Functions the same as SNAPSHOT on the
camcorder.
(Also available with the Power Switch set to
“PLAY”)
1Infrared beam transmitting window
Transmits the beam signal.
●
Page 25
.
PAUSE or
Zoom (T/W)
SLOW ( )
PLAY
(Left)
SHIFT
(Up)
SLOW ( )
(Right)
STOP or
(Down)
Slow-Motion Playback
During normal video playback, press SLOW (
or ) more than approx. 2 seconds.
After approx. 10 minutes, normal playback
●
resumes.
● To pause Slow-Motion playback, press PAUSE
(PAUSE).
● To stop Slow-Motion playback, press PLAY (3).
NOTES:
● You can also engage Slow-Motion Playback from
Still Playback by pressing SLOW ( or ) more
than approx. 2 seconds.
● During Slow-Motion Playback, due to digital
image processing, the picture may take on a
mosaic effect.
● After SLOW ( or ) is pressed and held, the
still image may be displayed for a few seconds,
followed by a blue screen for a few seconds. This
is not a malfunction.
● During Slow-Motion Playback, there will be
disturbances in video and the picture may seem
unstable, especially with steady images. This is
not a malfunction.
Frame-By-Frame Playback
During normal or still playback, press SLOW
( ) repeatedly for forward or SLOW ()
repeatedly for reverse. Each time SLOW ( or
) is pressed, the frame is played back.
Playback Zoom
Magnifies the recorded image up to 25X at any
time during video playback and D.S.C. playback.
1) Press PLAY (3) to start video
playback. Or perform normal
playback of images.
VIDEO PLAYBACK
EN 25
2) At the point you want to zoom
in, press the Zoom Button (T).
●
To zoom out, press the Zoom
Button (W).
3) You can move the image on
the screen around to find a
particular portion of the picture.
While holding down SHIFT,
press (Left), (Right),
(Up) and (Down).
●
To end zoom, press and hold W until
magnification returns to normal. Or, press STOP
7) and then press PLAY (3) during video
(
playback.
● To end zoom during D.S.C. playback, press PLAY
3).
(
NOTES:
● Zoom can also be used during slow-motion and still
playback.
● Due to digital image processing, the quality of the
image may suffer.
Playback Special Effects
Allows you to add creative effects to the video
playback image.
SEPIA: Recorded scenes have a brownish
tint like old photos. Combine this with the
Cinema mode ( pg. 36, “WIDE MODE”) for a
classic look.
MONOTONE: Like classic black and white
films, your footage is shot in B/W. Used together
with the Cinema mode ( pg. 36, “WIDE
MODE”), it enhances the “classic film” effect.
CLASSIC: Gives recorded scenes a
strobe effect.
STROBE: Your recording looks like a
series of consecutive snapshots.
1) To start
playback,
press PLAY
(3).
2) Press
EFFECT. The
PLAYBACK EFFECT Select Menu appears.
3) Press EFFECT repeatedly to move the
highlight bar to the desired effect.
●
The selected function is activated and after
2 seconds the menu disappears.
● To deactivate the selected effect, press EFFECT
ON/OFF. To reactivate the selected effect press
EFFECT ON/OFF again.
● To change the selected effect, repeat from step 2
above.
EFFECT ON/OFF
EFFECT
VIDEO RECORDING & PLAYBACK
Page 26
26 EN
D.S.C. RECORDING
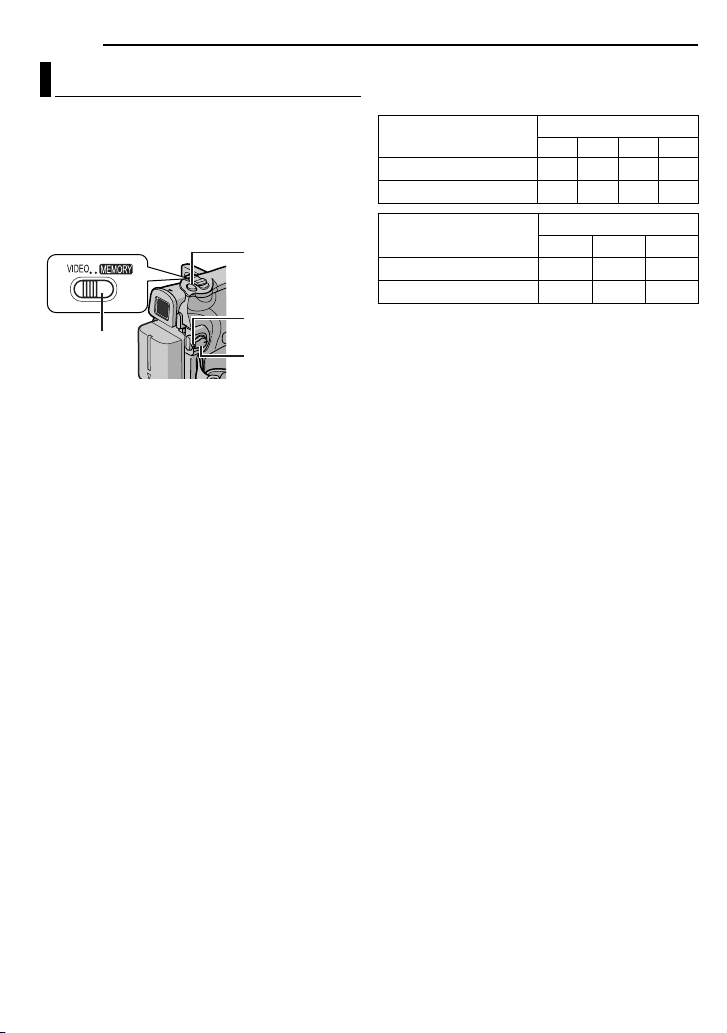
Basic Shooting (D.S.C. Snapshot)
You can use your camcorder as a Digital Still
Camera for taking snapshots. Still images are
stored in the memory card.
NOTE:
Before continuing, perform the procedures listed
below:
● Power ( pg. 13)
● Loading a Memory Card ( pg. 18)
VIDEO/
MEMORY
1 Remove the lens cap.
2 Open the LCD monitor fully. ( pg. 19)
3 Set the VIDEO/MEMORY Switch to
“MEMORY”.
4 Set the Power Switch to “REC” while pressing
down the Lock Button located on the switch.
●
To change the Picture Quality, pg. 31, 34.
5 Press SNAPSHOT. The
appears while the snapshot is being taken.
To delete unwanted still images, refer to “Deleting
●
( pg. 29)
Files”.
● When you do not want to hear the shutter sound,
set “MELODY” to “OFF”. (
NOTE:
If shooting is not performed for approx. 5 minutes
when the Power Switch is set to
is supplied from the battery pack, the camcorder
shuts off automatically to save power. To perform
shooting again, push back and pull out the
viewfinder again or close and re-open the LCD
monitor.
SNAPSHOT
Lock Button
Power Switch
“PHOTO
” indication
pg. 31, 33)
“REC” and power
Approximate Number of Storable Images
●
The number increases or decreases depending
on the Picture Quality/Image Size, etc.
Image Size/Picture
Quality
640 x 480/FINE 47 95 205 425
640 x 480/STANDARD 160 295 625 1285
Image Size/Picture
Quality
640 x 480/FINE 55 105 215
640 x 480/STANDARD 190 320 645
* Optional
SD Memory Card*
8 MB 16 MB 32 MB 64 MB
MultiMediaCard*
8 MB 16 MB 32 MB
Page 27
D.S.C. PLAYBACK
EN 27
Normal Playback Of Images
Images shot with the camcorder are
automatically numbered, then stored in
numerical order in the memory card. You can
view the stored images, one at a time, much like
flipping through a photo album.
22
22
6
11
11
VIDEO/
MEMORY
7
1 Load a memory card. ( pg. 18)
2 Set the VIDEO/MEMORY Switch to
“MEMORY”.
3 Set the Power Switch to “PLAY” while
pressing down the Lock Button located on the
switch.
●
A stored image is displayed.
4 Press 1 to display the previous file. Press 2
to display the next file.
NOTE:
Images shot and stored on the card with another
device with resolutions other than “640 x 480” will
be displayed as thumbnails only. These thumbnail
images cannot be transferred to a PC.
Playback Zoom
Available only with the remote control.
( pg. 25)
Lock Button
Power Switch
MENU
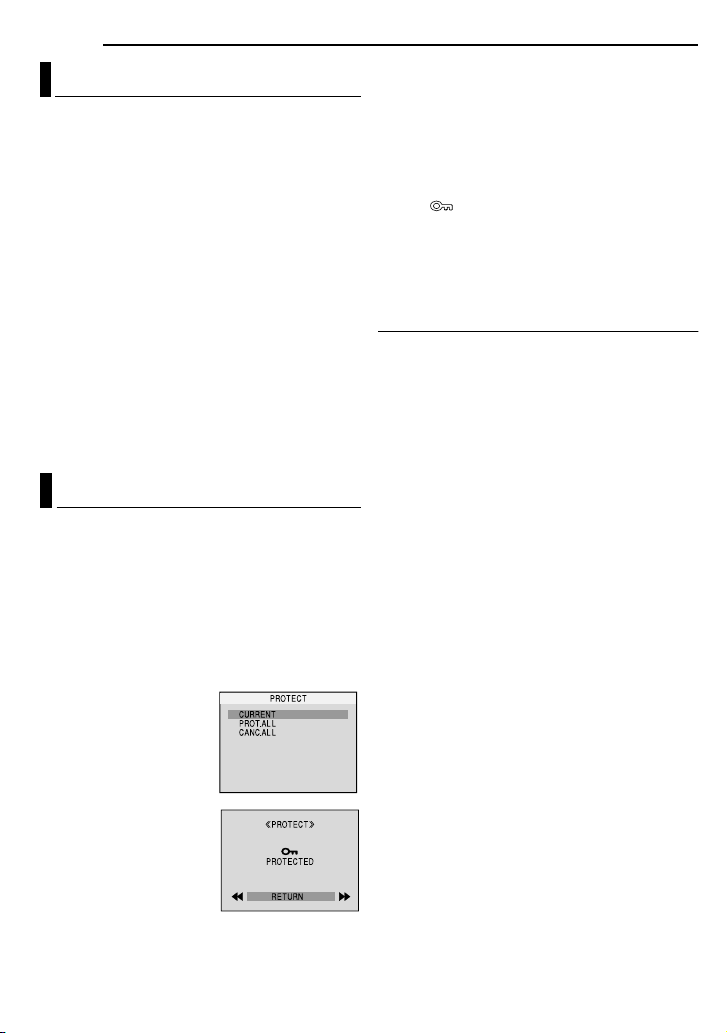
Index Playback Of Files
You can view several different files stored in the
memory card at a time. This browsing capability
makes it easy to locate a particular file you want.
1 Perform steps 1 – 3 in “Normal Playback Of
Images”.
2 Press INDEX. The
Index Screen appears.
3 Press 4, 3, 1 or 2 to
move the frame to the
desired file.
4 Press SET. The
selected file is displayed.
Selected file
2
1
4
5
8 9
7
Index number
3
6
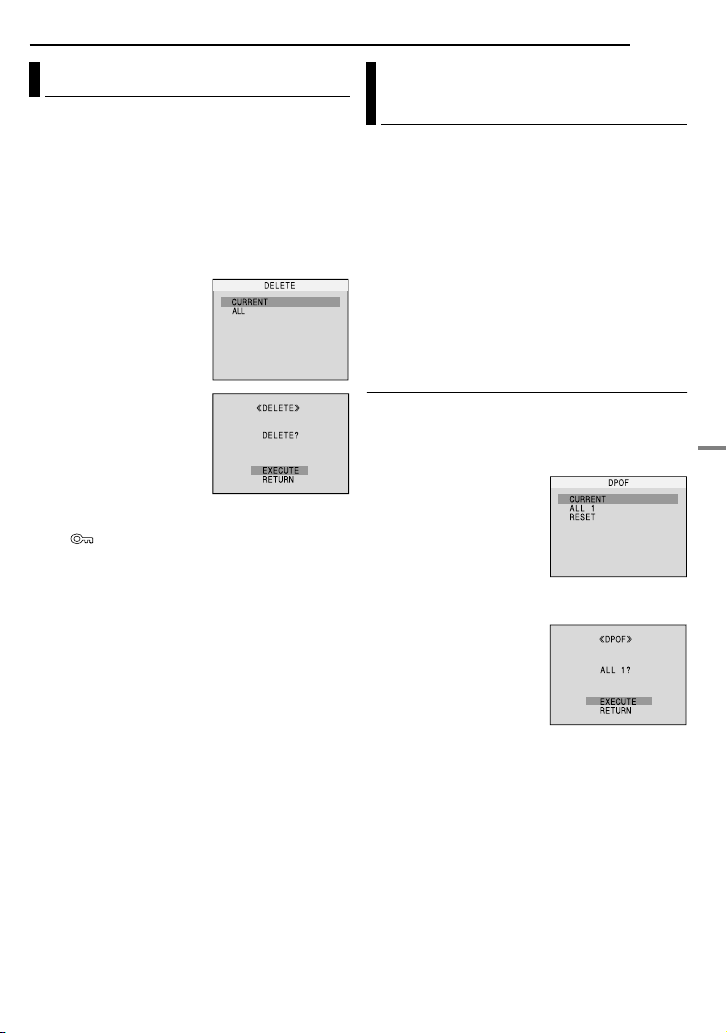
Removing On-Screen Display
1 Perform steps 1 – 3 in “Normal Playback Of
Images”.
2 Press MENU. The Menu Screen appears.
3 Press 4, 3, 1 or 2 to select “ON SCREEN”,
and press SET. The ON SCREEN Menu
appears.
4 Press 4 or 3 to select “OFF”, and press SET
or
2, then press MENU. The operation mode
indicator, folder/file number and battery
remaining power indicator disappear.
●
To display the indicators again, select “ON”.
Folder/file number
ON SCREEN
Auto Playback Of Images
You can run through all the images stored in
memory card automatically.
1 Perform steps 1 – 3 in “Normal Playback Of
Images”.
2 Press 6 to start Auto Playback.
If you press 1 during Auto Playback, files are
●
displayed in descending order.
● If you press 2 during Auto Playback, files are
displayed in ascending order.
3 To end Auto Playback, press 7.
Operation mode indicator
DIGITAL STILL CAMERA (D.S.C.) RECORDING & PLAYBACK
Page 28
28 EN
ADDITIONAL FEATURES FOR D.S.C.
Resetting The File Name
By resetting the file name, a new folder will be
made. The new files you are going to make will
be stored in the new folder. It is convenient to
separate the new files from previously made
files.
1 Perform steps 1 – 3 in “Normal Playback Of
Images”. ( pg. 27)
2 Press MENU. The Menu Screen appears.
3 Press 4, 3, 1 or 2 to select “NO. RESET”,
and press SET. The NO. RESET screen
appears.
4 Press 4 or 3 to select “EXECUTE”, and
press SET. The new folder (such as
“101JVCGR”) will be made and the file name of
the next shot starts from DVC00001.
NOTE:
If the file name reaches DVC09999, a new folder
(such as “101JVCGR”) will be made and the file
name will start again from DVC00001.
Protecting Files
The Protect mode helps prevent the accidental
erasure of files.
1 Perform steps 1 – 3 in “Normal Playback Of
Images”. ( pg. 27)
2 Press MENU. The Menu Screen appears.
3 Press 4, 3, 1 or 2 to select “PROTECT”, and
press SET. The PROTECT Menu appears.
To protect the currently displayed file
4 Press 4 or 3 to select
“CURRENT”, and press
SET or
2. The PROTECT
screen appears.
5 Press 1 or 2 to select
the desired file.
6 Press 4 or 3 to select
“EXECUTE”, and press
SET.
●
To cancel protection,
select “RETURN”.
● Repeat steps 5 and 6 for
all files you want to
protect.
To protect all files stored in the memory card
4 Press 4 or 3 to select “PROT.ALL”, and press
SET or
2. The PROTECT screen appears.
5 Press 4 or 3 to select “EXECUTE”, and
press SET.
●
To cancel protection, select “RETURN”.
NOTES:
● If the “ ” mark appears, the currently displayed
file is protected.
● When the memory card is initialized or corrupted,
even protected files are deleted. If you do not want
to lose important files, transfer them to a PC and
save them.
To Remove Protection
Before doing the following, perform steps 1 – 3
in “Protecting Files”.
To remove protection from the currently
displayed file
4 Press 4 or 3 to select “CURRENT”, and
press SET or
2. The PROTECT screen appears.
5 Press 1 or 2 to select the desired file.
6 Press 4 or 3 to select “EXECUTE”, and
press SET.
●
To cancel selection, select “RETURN”.
● Repeat steps 5 and 6 for all files you want to
remove protection.
To remove protection from all files stored in
the memory card
4 Press 4 or 3 to select “CANC.ALL”, and
press SET or
2. The PROTECT screen appears.
5 Press 4 or 3 to select “EXECUTE”, and
press SET.
●
To cancel selection, select “RETURN”.
Page 29
ADDITIONAL FEATURES FOR D.S.C.
EN 29
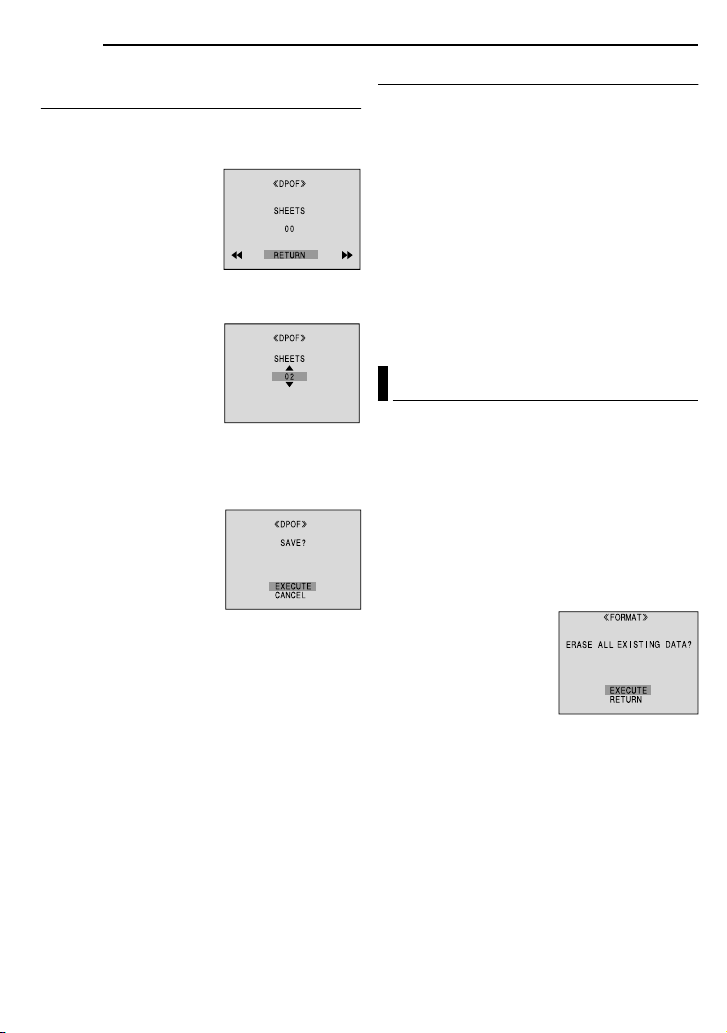
Deleting Files
Previously stored files can be deleted either one
at a time or all at once.
1 Perform steps 1 – 3 in “Normal Playback Of
Images”
( pg. 27).
2 Press MENU. The Menu Screen appears.
3 Press 4, 3, 1 or 2 to select “DELETE”, and
press SET. The Menu appears.
To delete the currently displayed file
4 Press 4 or 3 to select
“CURRENT”, and press
SET or
2. The DELETE
screen appears.
5 Press 1 or 2 to select
the desired file.
6 Press 4 or 3 to select
“EXECUTE”, and press
SET.
●
To cancel deletion, select
“RETURN”.
● Repeat steps 5 and 6 for
all files you want to delete.
NOTE:
If the “ ” mark appears, the selected file is
protected and cannot be deleted.
To delete all files stored in the memory card
4 Press 4 or 3 to select “ALL”, and press SET
or
2. The DELETE screen appears.
5 Press 4 or 3 to select “EXECUTE”, and
press SET.
To cancel deletion, select “RETURN”.
●
NOTES:
● Protected files ( pg. 28) cannot be deleted. To
delete them, remove protection first.
● Once files are deleted, they cannot be restored.
Check files before deleting.
CAUTION:
Do not remove the memory card or perform any
other operation (such as turning off the camcorder)
during deletion. Also, be sure to use the provided
AC Adapter, as the memory card may be corrupted
if the battery becomes exhausted during deletion. If
the memory card becomes corrupted, initialize it.
pg. 30)
(
Setting Print Information (DPOF Setting)
This camcorder is compatible with the DPOF
(Digital Print Order Format) standard in order to
support future systems such as automatic
printing. You can select one of the 2 print
information settings for images stored in the
memory card: “To Print All Still Images (One
Print For Each)” or “To Print By Selecting Still
Images And Number Of Prints”.
NOTE:
If you load a memory card already set as shown
below in a printer compatible with DPOF, it will
make prints of the selected still images
automatically.
To Print All Still Images (One Print For Each)
1 Perform steps 1 – 3 in “Normal Playback Of
Images”. ( pg. 27)
2 Press MENU. The Menu Screen appears.
3 Press 4, 3, 1 or 2 to
select “DPOF”, and press
SET. The DPOF Menu
appears.
4 Press 4 or 3 to select
“ALL 1”, and press SET or
2. The DPOF screen
appears.
5 Press 4 or 3 to select
“EXECUTE”, and press
SET. The normal playback
screen appears.
●
To cancel selection, select
“RETURN”.
DIGITAL STILL CAMERA (D.S.C.) RECORDING & PLAYBACK
Page 30
30 EN
ADDITIONAL FEATURES FOR D.S.C.
To Print By Selecting Still Images And Number Of Prints
1 Perform steps 1 – 3 in “To Print All Still
Images (One Print For Each)”. ( pg. 29)
2 Press 4 or 3 to select
“CURRENT”, and press
SET or
2. The DPOF
screen appears.
3 Press 1 or 2 to select
the desired file.
4 Press 4 or 3 to select the number indication
(00), and press SET.
5 Select the number of
prints by pressing
increase the number, or
to decrease the number,
and press SET.
●
Repeat steps 3 through 5
for the desired number of
prints.
● The number of prints can be set up to 15.
● To correct the number of prints, select the image
again and change the number.
3 to
4
6 Press 4 or 3 to select
“RETURN”, and press
SET. The “SAVE?”
appears.
●
If you did not change any
settings in step 3 through
5, the DPOF Menu
reappears.
7 Press 4 or 3 to select “EXECUTE” to save
the setting you have just made, and press SET.
To cancel selection, select “CANCEL”.
●
To Reset The Number Of Prints
1 Perform steps 1 – 3 in “To Print All Still
Images (One Print For Each)”. ( pg. 29)
2 Press 4 or 3 to select “RESET”, and press
SET. The DPOF screen appears.
3 Press 4 or 3 to select “EXECUTE”, and
press SET. The normal playback screen
appears.
●
To cancel selection, select “RETURN”.
● The number of prints is reset to 0 for all still
images.
CAUTION:
While performing the above, never disconnect
power, as this may cause the memory card to be
corrupted.
Initializing A Memory Card
You can initialize a memory card any time.
After initializing, all files and data stored in the
memory card, including those which have been
protected, are cleared.
1 Set the VIDEO/MEMORY Switch to
“MEMORY”.
2 Set the Power Switch to “PLAY” while
pressing down the Lock Button located on the
switch.
3 Press MENU. The Menu Screen appears.
4 Press 4, 3, 1 or 2 to
select “FORMAT”, and
press SET. The FORMAT
screen appears.
5 Press 4 or 3 to select
“EXECUTE”, and press
SET. The memory card is
initialized.
●
When initialization is finished, “NO IMAGES
STORED” appears.
● To cancel initialization, select “RETURN”.
CAUTION:
Do not perform any other operation (such as
turning off the camcorder) during initialization.
Also, be sure to use the provided AC Adapter, as
the memory card may be corrupted if the battery
becomes exhausted during initialization. If the
memory card becomes corrupted, initialize it.
Page 31

Changing The Menu Settings
SP
LP
REC MODE
Selected menu icon
SP
LP
“3” indicator
This camcorder is equipped with an easy-to-use,
on-screen menu system that simplifies many of
the more detailed camcorder settings.
( pg. 31 – 35)
11
11
VIDEO/
MEMORY
44
44
MENU
1 For Video and D.S.C. Recording Menus:
●
Set the VIDEO/MEMORY Switch to “VIDEO” or
“MEMORY”.
● Set the Power Switch to “REC” while pressing
down the Lock Button located on the switch.
● Set the recording mode to “
For Video Playback Menu:
Set the VIDEO/MEMORY Switch to “VIDEO”.
●
● Set the Power Switch to “PLAY” while pressing
down the Lock Button located on the switch.
● For D.S.C. Playback Menu, refer to “D.S.C.
PLAYBACK” (
2 Open the LCD monitor fully. ( pg. 19)
3 Press MENU. The Menu Screen appears.
4 Press 4, 3, 1 or 2 to select the desired
function, and press SET. The selected function
menu appears.
Screen for Video and
D.S.C. Recording Menu
FUNCTION
5 Setting procedure hereafter depends on the
selected function.
NOTES:
● You cannot enter Menu Screen during recording.
● Certain functions cannot be set in the Video or
D.S.C. Recording Menus. These icons will be
displayed in grey/white.
pg. 27).
33
33
Lock Button
22
22
Power Switch
M
”. ( pg. 15)
Screen for Video
Playback Menu
REC MODE
SP
LP
MENUS FOR DETAILED ADJUSTMENT
EN 31
Video Recording and D.S.C. Recording Menus
FUNCTION ( pg. 32)
SETTING ( pg. 32)
SYSTEM ( pg. 33)
DISPLAY ( pg. 34)
DSC ( pg. 34)
4, 3, 1 or 2 to
1) Press
select the desired
selection and press SET.
●
Example: WIPE/FADER
Menu
2) Press 3 or 4 to select the desired parameter
and press SET or 2. Selection is complete.
●
The “3” indicator shows the setting that is
currently saved inside the camcorder’s memory.
● Press 1 whenever you want to cancel or return to
the previous Menu Screen.
3) Press MENU. The Menu Screen closes.
NOTE:
Repeat the procedure if you wish to set other
function menus.
Selected menu icon
WIPE/FADER
EF
WB
Video Playback Menu
SP
LP
REC MODE ( pg. 35)
SOUND MODE ( pg. 35)
NARRATION ( pg. 35)
BRIGHT ( pg. 35)
DATE/TIME ( pg. 35)
ON SCREEN ( pg. 35)
TIME CODE ( pg. 35)
Example: REC MODE
Menu
1) Press 3 or 4 to
select the desired
parameter and press
SET or 2. Selection is
complete.
●
Repeat the procedure if
you wish to set other
function menus.
● The “3” indicator shows
the setting that is
currently saved inside
the camcorder’s
memory.
● Press 1 whenever you
want to cancel or return
to the previous Menu Screen.
2) Press MENU. The Menu Screen closes.
ADVANCED FEATURES
Page 32

32 EN
MENUS FOR DETAILED ADJUSTMENT
Recording Menus
FUNCTION
The following menu settings can be changed
only when the Power Switch is set to “REC”.
[ ] = Factory-preset
WIPE/FADER
( pg. 40), “Wipe or Fader Effects”
EFFECT
( pg. 41), “Program AE, Effects and Shutter
Effects”
PROGRAM AE
( pg. 41), “Program AE, Effects and Shutter
Effects”
SHUTTER
( pg. 41), “Program AE, Effects and Shutter
Effects”
EXPOSURE
( pg. 38), “Exposure Control”
W. BALANCE
( pg. 39), “White Balance Adjustment”
TELE MACRO
[OFF]: Disables the function.
ON: When the distance to the subject is less
than 1 m (3.3 ft), set “TELE MACRO” to “ON”.
You can shoot a subject as large as possible at a
distance of approx. 40 cm (1.4 ft).
Depending on the zoom position, the lens may go
out of focus.
SETTING
The following settings are effective when the
Power Switch is set to “REC”.
[ ] = Factory-preset
REC MODE
[SP]*: To record in the SP (Standard Play) mode
LP: Long Play—more economical, providing 1.5
times the recording time.
* SP indicator does not appear on the screen.
NOTES:
● Audio Dubbing ( pg. 45) and Insert Editing
pg. 45) are possible on tapes recorded in the
(
SP mode.
● If the recording mode is switched, the playback
picture will be blurred at the switching point.
● It is recommended that tapes recorded in the LP
mode on this camcorder be played back on this
camcorder.
● During playback of a tape recorded on another
camcorder, blocks of noise may appear or there
may be momentary pauses in the sound.
SOUND MODE
[12BIT]: Enables video recording of stereo
sound on four separate channels, and is
recommended for use when performing Audio
Dubbing. (Equivalent to the 32 kHz mode of
previous models)
16BIT: Enables video recording of stereo sound
on two separate channels. (Equivalent to the
48 kHz mode of previous models)
DIS*
OFF: Disables the function.
[ON ]: To compensate for unstable images
caused by camera-shake, particularly at high
magnification.
NOTES:
● Accurate stabilization may not be possible if hand
shake is excessive, or depending on the shooting
condition.
● The “” indicator blinks or goes out if the
Stabilizer cannot be used.
● Switch off this mode when recording with the
camcorder on a tripod.
* Available only when the VIDEO/MEMORY Switch
is set to “VIDEO”.
Page 33

SNAP/SLOW*
[SNAP]: Snapshot mode
SLOW : Live Slow mode
For details on the procedure, refer to “Live Slow”
( pg. 36) and “Snapshot (Record Still Image
On Tape)” ( pg. 37).
* Available only when the VIDEO/MEMORY Switch
is set to “VIDEO”.
ZOOM*
[32X]: When set to “32X” while using digital
zoom, the zoom magnification will reset to 32X
since digital zoom will be disengaged.
64X*: Allows you to use the Digital Zoom. By
digitally processing and magnifying images,
zooming is possible from 32X (the optical zoom
limit), to a maximum of 64X digital magnification.
800X*: Allows you to use the Digital Zoom. By
digitally processing and magnifying images,
zooming is possible from 32X (the optical zoom
limit), to a maximum of 800X digital
magnification.
* Available only when the VIDEO/MEMORY Switch
is set to “VIDEO”.
GAIN UP
OFF: Allows you to shoot dark scenes with no
picture brightness adjustment.
[AGC]: The overall appearance may be grainy,
but the image is bright.
AUTO : The shutter speed is automatically
adjusted. Shooting a subject in low or poor
lighting at slow shutter speed provides a brighter
image than in the AGC mode, but the subject’s
movements are not smooth or natural. The
overall appearance may be grainy. While the
shutter speed is being automatically adjusted,
“” is displayed.
WIND CUT
[OFF]: Disengages the function.
ON : Helps cut down on noise created by
wind. The “” indicator appears. The quality of
the sound will change. This is normal.
MENUS FOR DETAILED ADJUSTMENT
EN 33
SYSTEM
The “ SYSTEM” functions which are set when
the Power Switch is set to “REC” are also
applied when the Power Switch is set to “PLAY”.
[ ] = Factory-preset
MELODY
OFF: Even though not heard while shooting,
shutter sound is recorded on the tape.
[ON]: A melody sounds when any operation is
performed. It also activates the shutter sound
effect. ( pg. 26, 37)
CAM RESET
[RETURN]: Does not reset all settings to the
factory-preset.
EXECUTE: Resets all settings to the factorypreset.
PRIORITY
[LCD]: The image is displayed on the LCD
monitor when the viewfinder is pulled out while
the LCD monitor is opened.
FINDER: The image is displayed in the
viewfinder when the viewfinder is pulled out
while the LCD monitor is opened.
REMOTE
OFF: Disables the remote control operations.
[ON]: Enables the remote control operations.
ADVANCED FEATURES
Page 34

34 EN
MENUS FOR DETAILED ADJUSTMENT
DISPLAY
● The following menu settings can be changed only
when the Power Switch is set to “REC”.
● The DISPLAY settings except “BRIGHT” and
“LANGUAGE” are effective only for shooting.
[ ] = Factory-preset
BRIGHT
pg. 17, “Brightness Adjustment Of The
Display”
CLOCK ADJ.
pg. 16, “Date/Time Settings”
LANGUAGE
/ / / [ENGLISH] / FRANÇAIS /
ESPAÑOL / PORTUGUÊS
The language setting can be changed.
( pg. 16)
DATE/TIME
[OFF]: The date/time does not appear.
ON: The date/time is always displayed.
●
The date indication can also be turned on/off by
pressing the DISPLAY Button on the remote
pg. 23, 42)
control. (
ON SCREEN
LCD: Keeps the camcorder’s display (except the
date, time and time code) from appearing on the
connected TV screen.
[LCD/TV]: Makes the camcorder’s display
appear on screen when the camcorder is
connected to a TV.
TIME CODE
[OFF]: Time code is not displayed.
ON: Time code is displayed on the camcorder
and on the connected TV. Frame numbers are
not displayed during recording.
( pg. 20)
DEMO MODE
OFF: Automatic demonstration will not take
place.
[ON]: Demonstrates certain functions such as
Wipe/Fader and Effects, etc., and can be used
to confirm how these functions operate.
Demonstration starts in the following cases:
●
When the Menu Screen is closed after “DEMO
MODE” is turned “ON”.
● With “DEMO MODE” set to “ON”, if there is no
operation for about 3 minutes after the Power
Switch is set to “REC”.
● Performing any operation during the
demonstration stops the demonstration
temporarily. If no operation is performed for more
than 3 minutes after that, the demonstration will
resume.
NOTES:
● If a cassette is in the camcorder, the
demonstration cannot be turned on.
● “DEMO MODE” remains “ON” even if the
camcorder power is turned off.
DSC
[ ] = Factory-preset
QUALITY
[FINE] / STANDARD
The Picture Quality mode can be selected to
best match your needs. Two Picture Quality
modes are available: FINE ( ) and
STANDARD ( ) (in order of quality).
NOTE:
The number of storable images depends on the
selected picture quality as well as the composition
of the subjects in the images and the type of
memory card being used. (
REC SELECT
[ (TAPE)]: When Snapshot recording is
performed with the VIDEO/MEMORY Switch set
to “VIDEO”, still images are recorded only onto
the tape.
/ (TAPE/CARD): When Snapshot
recording is performed with the VIDEO/
MEMORY Switch set to “VIDEO”, still images
are recorded not only onto the tape but also in
the memory card (640 x 480 pixels).
pg. 26)
Page 35

Playback Menus
[ ] = Factory-preset
SOUND MODE and NARRATION
During tape playback, the camcorder detects the
sound mode in which the recording was made,
and plays the sound back. Select the type of
sound to accompany your playback picture.
According to the menu access explanation on
page 31, select “SOUND MODE” or
“NARRATION” from the Menu Screen and set it
to the desired parameter.
The setting below are effective only for video
playback except “BRIGHT” and “REC MODE”.
The parameters (except “OFF” in ON SCREEN,
SOUND MODE and NARRATION settings) are
the same as in the description on page 32, 34.
REC MODE [SP]* / LP
Allows you to set the video recording mode (SP
or LP) depending on your preference. It is
recommended you use “REC MODE” in VIDEO
Menu when using this camcorder as a recorder
during dubbing. ( pg. 42, 43)
*SP indicator does not appear on the screen.
SOUND MODE
[STEREO ]: Sound is output on both “L” and
“R” channels in stereo.
SOUND L : Sound from the “L” channel is
output.
SOUND R : Sound from the “R” channel is
output.
NARRATION
[OFF]: Original sound is output on both “L” and
“R” channels in stereo.
ON: Dubbed sound is output on both “L” and “R”
channels in stereo. ( pg. 45)
MIX: Original and dubbed sounds are combined
and output in stereo on both “L” and “R”
channels.
MENUS FOR DETAILED ADJUSTMENT
BRIGHT
pg. 17, “Brightness Adjustment Of The
Display”
DATE/TIME
[OFF]: The DATE/TIME does not appear.
ON: The DATE/TIME is always displayed.
ON SCREEN OFF / [LCD] / LCD/TV
When set to “OFF”, the camcorder’s display
disappears.
TIME CODE [OFF] / ON
pg. 20, “Time Code”
EN 35
ADVANCED FEATURES
Page 36

36 EN
FEATURES FOR RECORDING
LED Light
LED Light can be used to
brighten the subject in the dark
place during video recording or
D.S.C. shooting.
1 Press LIGHT repeatedly to
change the setting.
OFF: Turns off the light.
ON: The light is on always. ( appears.)
AUTO: The light turns on automatically when
dark. ( appears.)
LED Light
2 Press the Recording Start/Stop Button to
start video recording or SNAPSHOT to shoot a
still image.
NOTES:
●
Be careful not to point the LED Light directly to eyes.
● If the light does not reach the subject when the
LED Light setting is “ON”, the Night-Alive function
will be activated, and makes it possible to shoot
the subject brighter.
● There is a difference in the brightness of the
images shot between the center area which is
illuminated by the LED Light and the surrounding
areas (which will be darker).
● Since subjects are shot at a reduced shutter
speed when the LED Light setting is “ON”, they
will appear slightly blurred.
Live Slow
This feature is useful for recording or playing
back precious or hard-to-see moments at a slow
speed. Sound is recorded and played back in
real time.
1 Set the VIDEO/MEMORY Switch to “VIDEO”.
2 Set the recording mode to “
3 Set “SNAP/SLOW” to “SLOW”.
( pg. 31, 33) The Live Slow indicator “”
appears.
4 Press SNAPSHOT (SLOW) during recording
or playback.
● The moving pictures are divided into four
frames. They are recorded or played back for
1.5 seconds, and then normal recording or
playback resumes.
● This feature is effective when the recording
mode selection is set to both “A” or “
NOTE:
Available only when the VIDEO/MEMORY Switch is
set to “VIDEO”.
M
”. ( pg. 15)
M
”.
Wide Mode
This camcorder allows you to choose the type of
image output format for video recording.
1 Set the Power Switch to “REC”.
2 Press 16:9 button repeatedly to choose your
selection.
4 : 3
[4:3]: Records with no change in the screen
ratio. For playback on a TV with a normal screen
ratio. When using this mode on a TV with a
normal screen ratio, refer to your TV’s instruction
manual.
16:9: For playback on TVs with an aspect ratio of
16:9. Naturally expands the image to fit the
screen without distortion. The “16:9” indicator
appears. When using this mode, refer to your
wide-screen TV’s instruction manual. During
playback/recording on 4:3 TVs/LCD monitor/
viewfinder, the image is elongated vertically.
[ ] = Factory-preset
NOTE:
Available only when the VIDEO/MEMORY Switch is
set to “VIDEO”.
16 : 9
Page 37

Night-Alive
Makes dark subjects or areas even brighter than
they would be under good natural lighting.
Although the recorded image is not grainy, it may
look as if it is strobing due to the slow shutter
speed.
1 Set the Power Switch to “REC”.
2 Set the recording mode to “
M
”. ( pg. 15)
3 Press NIGHT so that the Night-Alive indicator
“” appears.
●
The shutter speed is automatically adjusted to
provide up to 30 times sensitivity.
● “” appears beside “” while the shutter speed
is being automatically adjusted.
To deactivate Night-Alive
Press NIGHT again so that the Night-Alive
indicator disappears.
NOTES:
● During Night-Alive, “GAIN UP” or “DIS” in
SETTING Menu
activated.
● Night-Alive cannot be activated simultaneously
with “SNOW” or “SPORTS” of “PROGRAM AE”, or
all modes of “SHUTTER”. (
● During Night-Alive, it may be difficult to bring the
camcorder into focus. To prevent this, use of a
tripod is recommended.
( pg. 32, 33) cannot be
pg. 41).
Snapshot (Record Still Image On Tape)
This feature lets you record still images that look
like photographs onto a tape.
1 Set the VIDEO/MEMORY Switch to “VIDEO”.
2 Set the Power Switch to “REC”.
3 Set the recording mode to “
4 Set “SNAP/SLOW” to “SNAP”. ( pg. 31, 33)
5 Press SNAPSHOT.
There is the sound effect of a shutter closing.
●
● The
“PHOTO
will be recorded for approx. 5 seconds, then the
camcorder re-enters the Record-Standby mode.
● You can perform Snapshot also during recording.
A still image will be recorded for approx.
5 seconds, then the normal recording resumes.
● Snapshot is effective when the recording mode
selection is set to both
Snapshot mode cannot be used when the 16:9
●
Wide mode (16:9 indicator) is selected.
” indication appears and a still image
M
“A” or “M”.
”. ( pg. 15)
FEATURES FOR RECORDING
EN 37
Motor Drive Mode
Keeping SNAPSHOT pressed in step 5 provides
an effect similar to serial photography. (Interval
between still images: approx. 1 second)
●
The Motor Drive mode is disabled when “REC
SELECT” is set to “ / ”. (
pg. 34)
Manual Focus
The camcorder’s Full Range AF system offers
continuous shooting ability from close-up (as
close as approx. 5 cm (2") to the subject) to
infinity.
However, correct focus may not be obtained
depending on the shooting condition. In this
case, use the manual focus mode.
1 Set the Power Switch
to “REC”.
2 Set the recording mode
to “
M
”. ( pg. 15)
3 Press FOCUS. The
manual focus indicator
appears.
4 Press 1 or 2 to focus
on a subject.
When the focus level cannot be adjusted any
●
further or closer, “” or “” will blink.
5 Press SET. Focus adjustment is complete.
To reset to Auto Focus
Press FOCUS twice.
Manual focus is recommended in situations
listed below.
When two subjects overlap in the same scene.
●
● When illumination is low.*
● When the subject has no contrast (difference in
brightness and darkness), such as a flat, onecolor wall, or a clear, blue sky.*
● When a dark object is barely visible in the LCD
monitor or the viewfinder.*
● When the scene contains minute patterns or
identical patterns that are regularly repeated.
● When the scene is affected by sunbeams or light
reflecting off the surface of a body of water.
● When shooting a scene with a high-contrast
background.
* The following low-contrast warnings appear
blinking: , , and .
Manual focus
indicator
ADVANCED FEATURES
Page 38

38 EN
FEATURES FOR RECORDING
Exposure Control
Manual exposure control is recommended in the
following situations:
●
When shooting using reverse lighting or when the
background is too bright.
● When shooting on a reflective natural background
such as at the beach or when skiing.
● When the background is overly dark or the subject
is bright.
1 Set the Power Switch to “REC”.
2 Set the recording mode to “
3 Set “EXPOSURE” to “MANUAL” in
FUNCTION Menu. ( pg. 31)
●
The exposure control menu appears.
4 To brighten the image, press 3. To darken the
image, press 4. (maximum ±6)
●
+3 exposure has the same effect as the backlight
compensation. (
● –3 exposure has the same effect as when
“PROGRAM AE” is set to “SPOTLIGHT”.
pg. 41)
(
Operation Mode Video Memory
Exposure Level ±0
pg. 39)
5 Press SET or 2. Exposure adjustment is
complete.
To return to automatic exposure control
Select “AUTO” in step 3.
NOTES:
● You cannot use the manual exposure control at
the same time when “PROGRAM AE” is set to
“SPOTLIGHT” or “SNOW” (
backlight compensation.
● If the adjustment does not cause any visible
change in brightness, set “GAIN UP” to “AUTO”.
(
pg. 31, 33)
M
”. ( pg. 15)
±0EV
±0.3EV
±1
±0.7EV
±2
±1.0EV
±3
±1.3EV
±4
±1.7EV
±5
±2.0EV
±6
pg. 41), or with the
Iris Lock
Like the pupil of the human eye, the iris
contracts in well-lit environments to keep too
much light from entering, and dilates in dim
environments to allow in more light.
Use this function in the following situations:
●
When shooting a moving subject.
● When the distance to the subject changes (so its
size in the LCD monitor or the viewfinder
changes), such as when the subject is backing
away.
● When shooting on a reflective natural background
such as at the beach or when skiing.
● When shooting objects under a spotlight.
● When zooming.
1 Set the Power Switch to “REC”.
2 Set the recording mode to “
3 Set “EXPOSURE” to “MANUAL” in
FUNCTION Menu. ( pg. 31)
●
The exposure control menu appears.
4 Adjust zoom so that the subject fills the LCD
monitor or the viewfinder, then press and hold
SET or 2 for over 2 seconds. The “” indication
appears.
5 Press SET or 2. The iris is locked.
6 Press MENU. The Menu Screen closes. The
“” indicator appears.
To return to automatic iris control
Select “AUTO” in step 3.
●
The exposure control indicator and “”
disappear.
To lock the exposure control and the iris
After step 3, adjust the exposure by pressing 3
or 4. Then lock the iris in steps 4 – 6. For
automatic locking, select “AUTO” in step 3. The
exposure control and the iris become automatic.
M
”. ( pg. 15)
Page 39

Backlight Compensation
Backlight compensation brightens the subject
quickly.
With simple operation, backlight compensation
feature brightens the dark subject portion by
increasing the exposure.
1 Set the Power Switch to “REC”.
2 Press BACKLIGHT so that the Backlight
Compensation indicator “” appears.
To cancel Backlight Compensation
Press BACKLIGHT twice so that the “”
indicator disappears.
NOTE:
Using Backlight Compensation may cause the light
around the subject to become too bright and the
subject to become white.
Spot Exposure Control
Selection of a spot metering area enables more
precise exposure compensation. You can select
one of the three metering areas on the LCD
monitor/viewfinder.
1 Set the Power Switch to “REC”.
2 Set the recording mode to “
3 Press BACKLIGHT twice so that the Spot
Exposure Control indicator “” appears.
● A spot metering area frame appears at the
center of the LCD monitor/viewfinder.
4 Press 2 or 1 to select the desired spot
metering area frame.
5 Press SET.
● Spot Exposure Control is engaged.
● Exposure is adjusted to make the brightness of
the selected area most appropriate.
To lock the iris
After step 4, press and hold SET over 2
seconds. The “” indication appears and the iris
is locked.
To cancel Spot Exposure Control
Press BACKLIGHT once so that the “”
indicator disappears.
M
”. ( pg. 15)
FEATURES FOR RECORDING
EN 39
NOTES:
● You cannot use the Spot Exposure Control at the
same time with following functions.
• “16:9” in “WIDE MODE” (
• “STROBE” in EFFECT (
• Digital Zoom (
● Depending on the shooting location and condition,
optimum result may not be attained.
pg. 20)
pg. 36)
pg. 41)
White Balance Adjustment
The white balance refers to the correctness of
color reproduction under various lighting. If the
white balance is correct, all other colors will be
accurately reproduced.
The white balance is usually adjusted
automatically. However, more advanced
camcorder operators control this function
manually to achieve a more professional color/
tint reproduction.
To change the setting
Set “W. BALANCE” to the desired mode.
( pg. 31)
●
The selected mode indicator except “AUTO”
appears.
[AUTO]: White balance is adjusted
automatically.
MWB: Adjust the white balance manually
when shooting under various types of lighting.
( “Manual White Balance Adjustment”, pg. 40)
FINE: Outdoors on a sunny day.
CLOUD: Outdoors on a cloudy day.
[ ] = Factory-preset
To return to automatic white balance
Set “W. BALANCE” to “AUTO”. ( pg. 31)
ADVANCED FEATURES
Page 40

40 EN
FEATURES FOR RECORDING
Manual White Balance Adjustment
Adjust the white balance
manually when shooting
under various types of
lighting.
1 Set the Power Switch
to “REC”.
2 Set the recording mode to “
3 Hold a sheet of plain white paper in front of
the subject. Adjust zoom or position yourself so
that the white paper fills the screen.
4 Select “MWB” in “ W. BALANCE” menu
( pg. 31), then press and hold SET or 2 until
begins blinking.
●
When the setting is completed, stops blinking.
5 Press SET or 2 to engage the setting.
6 Press MENU. The Menu Screen closes and
the Manual White Balance indicator is
displayed.
NOTES:
● In step 3, it may be difficult to focus on the white
paper. In such a case, adjust focus manually.
pg. 37)
(
● A subject can be shot under various types of
lighting conditions indoors (natural, fluorescent,
candlelight, etc.). Because the color temperature
is different depending on the light source, the
subject tint will differ depending on the white
balance settings. Use this function for a more
natural result.
● Once you adjust white balance manually, the
setting is retained even if the power is turned off or
the battery removed.
White paper
M
”. ( pg. 15)
Wipe Or Fader Effects
These effects let you make pro-style scene
transitions. Use them to spice up the transition
from one scene to the next.
Wipe or Fader works when video recording is
started or stopped.
1 Set the VIDEO/MEMORY Switch to “VIDEO”.
2 Set the Power Switch to “REC”.
3 Set the recording mode to “
4 Set “” in FUNCTION Menu. ( pg. 31)
●
The WIPE/FADER menu disappears and the
effect is reserved.
● The selected effect indicator appears.
5 Press the Recording Start/Stop Button to
activate the Fade-in/out or Wipe-in/out.
To deactivate the selected effect
Select “OFF” in step 4. The effect indicator
disappears.
NOTE:
You can extend the length of a Wipe or Fader by
pressing and holding the Recording Start/Stop
Button.
WIPE/FADER
OFF: Disables the function. (Factory-preset)
WHITE : Fade in or out with a white screen.
BLACK : Fade in or out with a black screen.
SLIDE : Wipe in from right to left, or wipe out
from left to right.
SCROLL : The scene wipes in from the
bottom to the top of a black screen, or wipes out
from top to bottom, leaving a black screen.
M
”. ( pg. 15)
Page 41

Program AE, Effects And Shutter Effects
1 Set the Power Switch to “REC”.
2 Set the recording mode to “
3 Set “EFFECT”, “PROGRAM AE” or
“SHUTTER” in FUNCTION Menu. ( pg. 31)
●
The EFFECT, PROGRAM AE or SHUTTER menu
disappears and the selected effect is activated.
● The selected effect indicator appears.
To deactivate the selected effect
Select “OFF” in step 3. The effect indicator
disappears.
NOTES:
● Program AE, Effects and Shutter Effects can be
changed during Record-Standby.
● Some modes of Program AE and Shutter Effects
cannot be used during Night-Alive.
● When a subject is too bright or reflective, a
vertical streak may appear (smear
phenomenon). Smear phenomenon tends to
occur when “SPORTS” or any mode of
“SHUTTER 1/500 – 1/4000” is selected.
EFFECT
OFF: Disables the function. (Factory-preset)
SEPIA : Recorded scenes have a brownish
tint like old photos.
MONOTONE : Like classic black and white
films, your footage is shot in B/W.
CLASSIC* : Gives recorded scenes a strobe
effect.
STROBE* : Your recording looks like a series
of consecutive snapshots.
* Not available for still image recording.
M
”. ( pg. 15)
FEATURES FOR RECORDING
EN 41
PROGRAM AE
OFF: Disables the function. (Factory-preset)
SPORTS
(Variable Shutter Speed: 1/250 – 1/4000):
This setting allows fast-moving images to be
captured one frame at a time, for vivid, stable
slow-motion playback. The faster the shutter
speed, the darker the picture becomes. Use the
shutter function under good lighting conditions.
SNOW : Compensates for subjects that may
otherwise appear too dark when shooting in
extremely bright surroundings such as in the
snow.
SPOTLIGHT : Compensates for subjects that
may otherwise appear too bright when shooting
under extremely strong direct lighting such as
spotlights.
TWILIGHT : Makes evening scenes look
more natural. White Balance ( pg. 39) is
automatically set to “”, but can be changed to
your desired setting. When Twilight is chosen,
the camcorder automatically adjusts the focus
from approx. 10 m (32 ft) to infinity. From less
than 10 m, adjust the focus manually.
SHUTTER
OFF: Disables the function. (Factory-preset)
SHUTTER 1/60: The shutter speed is fixed
at 1/60th of a second. Black bands that usually
appear when shooting a TV screen become
narrower.
SHUTTER 1/100: The shutter speed is
fixed at 1/100th of a second. The flickering that
occurs when shooting under a fluorescent light
or mercury-vapour lamp is reduced.
SHUTTER 1/500/SHUTTER 1/4000: These
settings allow fast-moving images to be
captured one frame at a time, for vivid, stable
slow-motion playback by fixing shutter speed
variables. Use these settings when an automatic
adjustment does not work well, using SPORTS
mode. The faster the shutter speed, the darker
the picture becomes. Use the shutter function
under good lighting conditions.
ADVANCED FEATURES
Page 42

42 EN
EDITING
Dubbing To A VCR
To AV
connector
Audio/Video cable
(provided)
VCR
1Yellow to VIDEO IN
2Red to AUDIO R IN
3White to AUDIO L IN
TV
To use this camcorder as a player
1 Following the illustrations, connect the
camcorder and the VCR’s input connectors.
2 Start playback on the camcorder. ( pg. 21)
3 At the point you want to start dubbing, start
recording on the VCR. (Refer to the VCR’s
instruction manual.)
4 To stop dubbing, stop recording on the VCR,
then stop playback on the camcorder.
NOTES:
● It is recommended to use the AC Adapter as
the power supply instead of the battery pack.
(
pg. 15)
● To choose whether or not the following displays
appear on the connected TV
• Date/time
Set “DATE/TIME” to “ON” or “OFF”.
pg. 31, 35) Or, press DISPLAY on the
(
remote control to turn on/off the date indication.
• Time code
Set “TIME CODE” to “OFF” or “ON”.
pg. 31, 35)
(
• Indications other than date/time and time code
Set “ON SCREEN” to “OFF”, “LCD” or “LCD/
TV”. ( pg. 31, 35)
Page 43

Dubbing To Or From A Video Unit Equipped With A DV Connector (Digital Dubbing)
It is also possible to copy recorded scenes from
the camcorder onto another video unit equipped
with a DV connector. Since a digital signal is
sent, there is little, if any, image or sound
deterioration.
To DV IN/OUT
Core filter
Video unit equipped with DV connector
To use this camcorder as a player
1 Make sure all units are turned off.
2 Connect this camcorder to a video unit
equipped with a DV input connector using a DV
cable as shown in the illustration.
3 Start playback on the camcorder. ( pg. 21)
4 At the point you want to start dubbing, start
recording on the video unit. (Refer to the video
unit’s instruction manual.)
5 To stop dubbing, stop recording on the video
unit, then stop playback on this camcorder.
DV cable (optional)
To DV IN/OUT
EDITING
NOTES:
● It is recommended to use the AC Adapter as
the power supply instead of the battery pack.
(
pg. 15)
● If a blank portion or disturbed image is played
back on the player during dubbing, the dubbing
may stop so that an unusual image is not dubbed.
● Even though the DV cable is connected correctly,
sometimes the image may not appear in step 4. If
this occurs, turn off the power and make
connections again.
● If “Playback Zoom” ( pg. 25) or “Playback
Special Effects” (
SNAPSHOT is pressed during playback, only the
original playback image recorded on the tape is
output from the DV IN/OUT connector.
● When using a DV cable, be sure to use the
optional JVC VC-VDV204U or VC-VDV206U DV
cable.
To use this camcorder as a recorder
pg. 25) is attempted or
EN 43
1 Make sure all units are turned off.
2 Connect this camcorder to a video unit
equipped with a DV output connector using a DV
cable as shown in the illustration.
3 Set the camcorder’s Power Switch to “PLAY”.
4 Set “REC MODE” to “SP” or “LP”. ( pg. 35)
5 Start playback on the player.
6 Press the Recording Start/Stop Button to
engage the Record-Pause mode.
• The “” indication appears on the
DV IN
screen.
7 At the point you want to start dubbing, press
the Recording Start/Stop Button to start
dubbing. The indication rotates.
8 Press the Recording Start/Stop Button again
to stop dubbing. The indication stops
rotating.
9 Press 7 to return to the normal playback
mode.
NOTE:
Digital Dubbing is performed in the sound mode
recorded on the original tape, regardless of the
current “SOUND MODE” setting. (
pg. 32)
ADVANCED FEATURES
Page 44

44 EN
EDITING
Connection To A Personal Computer
[A] Using USB cable
To USB
Core filter
USB cable
(provided)
To USB
connector
PC
When connecting the camcorder to a PC
using a DV cable, make sure to follow the
procedure below. Connecting the cable
incorrectly may cause malfunctions to the
camcorder and/or the PC.
●
Connect the DV cable first to the PC, and then
to the camcorder.
● Connect the DV cable (plugs) correctly
according to the shape of the DV connector.
[B] Using DV cable
OR
To DV IN/OUT
Core filter
DV cable
(optional)
Core filter
To DV connector
PC with DV connector
[A] Using USB cable
It is possible to transfer still images stored on a
memory card to a PC.
[B] Using DV cable
It is also possible to transfer still/moving images
to a PC with a DV connector by using the
provided software, software equipped with the
PC or commercially available software.
If you are using a Windows
®
Windows
Messenger to conduct video
conferences over the Internet, using a
camcorder. For details, refer to the help for the
®
Windows
Messenger.
NOTES:
● Refer to “SOFTWARE INSTALLATION AND PC
CONNECTION GUIDE” for the bundled software
and drivers.
● It is recommended to use the AC Adapter as
the power supply instead of the battery pack.
(
pg. 15)
● Never connect the USB cable and the DV
cable simultaneously to the camcorder.
Connect only the cable you wish to use to the
camcorder.
● When using a DV cable, be sure to use the
optional JVC VC-VDV206U or VC-VDV204U DV
cable depending on the type of DV connector
(4 or 6 pins) on the PC.
● If the PC connected to the camcorder via the USB
cable is not powered, the camcorder does not
enter the USB mode.
● The date/time information cannot be captured into
the PC.
● Refer to the instruction manuals of the PC and
Software.
● The still images can also be transferred to a PC
with a DV connector-equipped capture board.
● The system may not work properly depending on
the PC or capture board you are using.
“USB” and/or “ ” appears on the LCD
monitor while the PC is accessing data in the
camcorder or the camcorder is transferring a
file to the PC.
NEVER disconnect the USB cable while
“ ” is displayed on the LCD
monitor since this can result in product
damage.
®
XP, you can use
Page 45

EDITING
EN 45
Audio Dubbing
The audio track can be customized only when
recorded in the 12-BIT and SP modes.
( pg. 32)
●
Use the provided remote control.
Speaker
START/
STOP
PAUSE
REW
INSERT
1 Play back the tape to locate the point where
editing will start, then press PAUSE (8).
2 While holding A. DUB ( ) on the remote
control, press PAUSE (8). The “8 ” indicator
appears.
3 Press PLAY (3), then begin “narrating”.
Speak into the microphone.
●
To pause dubbing, press PAUSE (8).
4 To end Audio Dubbing, press PAUSE (8),
then STOP (7).
To hear the dubbed sound during playback
Set “NARRATION” to “ON” or “MIX”.
( pg. 31, 35)
NOTES:
● Sound is not heard from the speaker during Audio
Dubbing.
● When editing onto a tape that was recorded at
12-BIT, the old and new soundtracks are recorded
separately.
● If you dub onto a blank space on the tape, the
sound may be disrupted. Make sure you only edit
recorded areas.
● If feedback or howling occurs during TV playback,
move the camcorder’s microphone away from the
TV, or turn down the TV’s volume.
● If you change from 12-BIT to 16-BIT in mid-
recording and then use the tape for Audio
Dubbing, it is not effective from the point where
16-BIT recording began.
● During Audio Dubbing, when the tape moves to
scenes recorded in the LP mode, scenes
recorded in 16-BIT audio or a blank portion, Audio
Dubbing stops.
Stereo Microphone
PLAY
STOP
A.DUB
Insert Editing
You can record a new scene into a previously
recorded tape, replacing a section of the original
recording with minimal picture distortion at the in
and out points. The original audio remains
unchanged.
●
Use the provided remote control.
NOTES:
● Before performing the following steps, make sure
that “TIME CODE” for DISPLAY in both Recording
and Playback Menus is set to “ON”.
pg. 31, 34, 35)
(
● Insert Editing is not possible on a tape recorded in
the LP mode or on a blank portion of a tape.
1 Play back the tape, locate the Edit-Out point
and press PAUSE (8). Confirm the time code at
this point. ( pg. 20)
2 Press REW (1) until the Edit-In point is
located, then press PAUSE (8).
3 Press and hold INSERT ( ) on the remote
control, then press PAUSE (8). The “8 ”
indicator and the Time Code (min.:sec.) appear
and the camcorder enters Insert-Pause mode.
4 Press START/STOP to begin editing.
●
Confirm the insert at the time code you checked in
step 1.
● To pause editing, press START/STOP. Press it
again to resume editing.
5 To end Insert Editing, press START/STOP,
then STOP (7) on the remote control.
NOTES:
● Program AE, Effects and Shutter Effects
pg. 41) can be used to spice up the scenes
(
being edited during Insert Editing.
● During Insert Editing, the date and time
information changes.
● If you perform Insert Editing onto a blank space
on the tape, the audio and video may be
disrupted. Make sure you only edit recorded
areas.
● During Insert Editing, when the tape moves to
scenes recorded in the LP mode or a blank
portion, Insert Editing stops. (
pg. 49)
ADVANCED FEATURES
Page 46

46 EN
TROUBLESHOOTING
If, after following the steps in the chart below, the
problem still exists, please consult your nearest
JVC dealer.
The camcorder is a microcomputer-controlled
device. External noise and interference (from a
TV, a radio, etc.) might prevent it from
functioning properly. In such cases, first
disconnect its power supply unit (battery pack,
AC Adapter, etc.) and wait a few minutes; and
then re-connect it and proceed as usual from
the beginning.
Power
No power is supplied.
● The power is not connected properly.
➜Connect the AC Adapter securely. ( pg. 14)
● The battery pack is not attached firmly.
➜Detach the battery pack once again and re-attach
it firmly. ( pg. 14)
● The battery is dead.
➜Replace the dead battery with a fully charged
one. ( pg. 14)
Video and D.S.C. Recording
Recording cannot be performed.
● The tape’s erase protection tab is set to “SAVE”.
➜Set the tape’s erase protection tab to “REC”.
( pg. 18)
● “TAPE END” appears.
➜Replace with new cassette. ( pg. 18)
● The cassette holder cover is open.
➜Close the cassette holder cover.
When shooting a subject illuminated by
bright light, vertical lines appear.
● This is not a malfunction.
When the screen is under direct sunlight
during shooting, the screen becomes red or
black for an instant.
● This is not a malfunction.
During recording, the date/ time does not
appear.
● “DATE/TIME” is set to “OFF”.
➜Set “DATE/TIME” to “ON”. ( pg. 31, 34)
The LCD monitor or viewfinder indications
blink.
● Effects and “DIS” functions that cannot be used
together are selected at the same time.
➜Re-read the sections covering Effects and “DIS”.
( pg. 31, 32, 41)
Digital Zoom does not work.
● 32X optical zoom is selected.
➜Set “ZOOM” to “64X” or “800X”. ( pg. 33)
● The VIDEO/MEMORY Switch is set to
“MEMORY”.
➜Set the VIDEO/MEMORY Switch to “VIDEO”.
Video and D.S.C. Playback
The tape is moving, but there is no picture.
● Your TV has AV input terminals, but is not set to
its VIDEO mode.
➜Set the TV to the mode or channel appropriate for
video playback. ( pg. 23)
● The cassette holder cover is open.
➜Close the cassette holder cover. ( pg. 18)
Blocks of noise appear during playback, or
there is no playback picture and the screen
becomes blue.
➜Clean the video heads with an optional cleaning
cassette. ( pg. 52)
Advanced features
The focus does not adjust automatically.
● Focus is set to the Manual mode.
➜Set Focus to the Auto mode. ( pg. 37)
● The lens is dirty or covered with condensation.
➜Clean the lens and check the focus again.
( pg. 50)
Snapshot mode cannot be used.
● The Wide (16:9) mode (16:9 indicator) is
selected.
➜Disengage the 16:9 (16:9 indicator) Wide mode.
( pg. 36)
Page 47

The color of Snapshot looks strange.
● The light source or the subject does not include
white. Or there are various different light sources
behind the subject.
➜Find a white subject and compose your shot so
that it also appears in the frame. ( pg. 37, 40)
The image taken using Snapshot is too
dark.
● Shooting was performed under backlit conditions.
➜Press BACKLIGHT. ( pg. 39)
The image taken using Snapshot is too
bright.
● The subject is too bright.
➜Set “” to “SPOTLIGHT”. ( pg. 41)
White Balance cannot be activated.
● The Sepia (SEPIA) or Monotone (MONOTONE)
mode is activated.
➜Disengage the Sepia (SEPIA) or Monotone
(MONOTONE) mode before setting White
Balance. ( pg. 41)
The image looks like the shutter speed is
too slow.
● When shooting in the dark, the unit becomes
highly sensitive to light when “GAIN UP” is set to
“AUTO”.
➜If you want the lighting to look more natural, set
“GAIN UP” to “AGC” or “OFF”. ( pg. 31, 33)
Other problems
The POWER/CHARGE lamp on the
camcorder does not light during charging.
● Charging is difficult in places subject to extremely
high/low temperatures.
➜To protect the battery, it is recommended to
charge it in places with a temperature of 10°C to
35°C (50°F to 95°F). ( pg. 51)
● The battery pack is not attached firmly.
➜Detach the battery pack once again and re-attach
it firmly. ( pg. 13, 14)
“SET DATE/TIME!” appears.
● The date/time is not set.
➜Set the date/time. ( pg. 16)
● The built-in clock battery has run out and the
previously set date/time has been erased.
➜Consult your nearest JVC dealer for replacement.
TROUBLESHOOTING
EN 47
Files stored in the memory card cannot be
deleted.
● Files stored in the memory card are protected.
➜Remove protection from the files stored in the
memory card and delete them. ( pg. 28)
When the image is printed from the printer,
a black bar appears at the bottom of the
screen.
● This is not a malfunction.
By recording with “DIS” de-activated ( pg. 31, 32)
➜
this can be avoided.
When the camcorder is connected via the
DV connector, the camcorder does not
operate.
● The DV cable was plugged/unplugged with power
turned on.
➜Turn the camcorder’s power off and on again,
then operate it.
Images on the LCD monitor appear dark or
whitish.
● In places subject to low temperature, images
become dark due to the characteristics of the
LCD monitor. This is not a malfunction.
➜Adjust the brightness and angle of the LCD
monitor. ( pg. 17, 19)
● When the LCD monitor’s fluorescent light reaches
the end of its service life, images on the LCD
monitor become dark.
➜Consult your nearest JVC dealer.
Colored bright spots appear all over the
LCD monitor or the viewfinder.
● The LCD monitor and the viewfinder are made
with high-precision technology. However, black
spots or bright spots of light (red, green or blue)
may appear constantly on the LCD monitor or the
viewfinder. These spots are not recorded on the
tape. This is not due to any defect of the unit.
(Effective dots: more than 99.99%)
The cassette will not load properly.
● The battery’s charge is low.
➜Install a fully charged battery. ( pg. 13)
REFERENCES
Page 48

48 EN
TROUBLESHOOTING
The memory card cannot be removed from
the camcorder.
➜Push in the memory card a few more times.
( pg. 18)
Picture does not appear on the LCD monitor.
● The viewfinder is pulled out and “PRIORITY” is
set to “FINDER”.
➜Push the viewfinder back in or set “PRIORITY” to
“LCD”. ( pg. 19, 31, 33)
● The LCD monitor’s brightness setting is too dark.
➜Adjust the brightness of the LCD monitor.
( pg. 17)
➜If the monitor is tilted upward 180 degrees, open
the monitor fully. ( pg. 19)
An error indication (01 – 04 or 06) appears.
● A malfunction of some kind has occured. In this
case the camcorder’s functions become
unusable.
➜ pg. 49.
The remote control does not work.
● “REMOTE” is set to “OFF”.
➜Set “REMOTE” to “ON”. ( pg. 31, 33)
● The remote control does not point at the remote
sensor.
➜Point at the remote sensor. ( pg. 24)
● The remote control batteries are exhausted.
➜Replace the batteries with fresh ones. ( pg. 24)
Warning Indications
Displays the battery remaining power.
Remaining power level
As the battery power comes close to nil, the
battery remaining power indicator blinks.
When the battery power is exhausted, power
turns off automatically.
● Appears if a tape is loaded.
● Blinks when no tape is loaded.
CHECK TAPE’S ERASE PROTECTION TAB
Appears when the erase protection tab is set to
“SAVE” while the Power Switch is set to “REC”
and the VIDEO/MEMORY Switch is set to
“VIDEO”. (
pg. 15)
ExhaustedHigh
USE CLEANING CASSETTE
Appears if dirt is detected on the heads during
recording. Use an optional cleaning cassette.
(
pg. 52)
CONDENSATION, OPERATION
PAUSED PLEASE WAIT
Appears if condensation occurs. When this
indication is displayed, wait more than 1 hour
until condensation disappears.
TAPE!
Appears if a tape is not loaded when the
Recording Start/Stop Button or SNAPSHOT
Button is pressed while the Power Switch is set
to “REC” and the VIDEO/MEMORY Switch is set
to “VIDEO”.
TAPE END
Appears when the tape ends during recording or
playback.
SET DATE/TIME!
● Appears when the date/time is not set.
(
pg. 16)
● The built-in clock battery has run out and the
previously set date/time has been erased.
Consult your nearest JVC dealer for
replacement.
LENS CAP
Appears for 5 seconds after power is turned on if
the lens cap is attached or when it is dark.
A. DUB ERROR!
Appears if Audio Dubbing is attempted on a
blank portion of a tape. (
pg. 45)
A. DUB ERROR!
<CANNOT DUB ON A LP RECORDED TAPE>
<CANNOT DUB ON A 16BIT RECORDING>
<CHECK TAPE’S ERASE PROTECTION
TAB>
● Appears if Audio Dubbing is attempted on a
tape recorded in the LP mode. (
● Appears if Audio Dubbing is attempted on a
tape recorded in 16-BIT audio. (
● Appears if A. DUB ( ) on the remote control
pg. 45)
pg. 45)
is pressed when the erase protection tab is set
to “SAVE”. (
pg. 45)
Page 49

INSERT ERROR!
<CANNOT EDIT ON A LP RECORDED
TAPE>
<CHECK TAPE’S ERASE PROTECTION
TAB>
<CANNOT EDIT ON A BLANK PORTION>
● Appears if Insert Editing is attempted on a
tape recorded in the LP mode. (
● Appears if INSERT ( ) on the remote control
pg. 45)
is pressed when the erase protection tab is set
to “SAVE”. (
● Appears if Insert Editing is attempted on a
blank portion of a tape. (
pg. 45)
pg. 45)
MEMORY IS FULL
Appears when the memory card’s memory is full
and shooting is not possible.
HDV
Appears when pictures recorded in the HDV
format are detected. The pictures in the HDV
format cannot be played back with this
camcorder.
?
Appears when playing back a file that is not
compatible with DCF or a file with a size that is
not compatible with this camcorder.
COPY PROTECTED
Appears if dubbing of copyguarded signals is
attempted while this camcorder is being used as
a recorder.
MEMORY CARD!
Appears if there is no memory card loaded when
the SNAPSHOT Button is pressed while the
Power Switch is set to “REC” and the VIDEO/
MEMORY Switch is set to “MEMORY”.
PLEASE FORMAT
Appears when there is a problem with a memory
card and its memory is corrupt, or it has not
been initialized. Initialize the memory card.
(
pg. 30)
TROUBLESHOOTING
EN 49
NO IMAGES STORED
Appears if there are no image files stored in the
memory card when you attempt memory card
playback.
CARD ERROR!
Appears when the camcorder does not
recognize the loaded memory card. Remove the
memory card once and insert it again. Repeat
these procedures until no indication appears. If
the indication still appears, the memory card is
corrupted.
CHECK CARD’S WRITE PROTECTION
SWITCH
Appears when you attempt to shoot digital still
images when the write protection tab on the SD
Memory Card is set to the “LOCK” position.
UNIT IN SAFEGUARD MODE
REMOVE AND REATTACH BATTERY OR DC
PLUG
The error indications (01, 02 or 06) show what
type of malfunction has occured. When an error
indication appears, the camcorder turns off
automatically. Remove the power supply
(battery, etc.) and wait a few minutes for the
indication to clear. When it does, you can
resume using the camcorder. If the indication
remains, consult your nearest JVC dealer.
UNIT IN SAFEGUARD MODE
EJECT AND REINSERT TAPE
The error indications (03 or 04) show what type
of malfunction has occured. When an error
indication appears, the camcorder turns off
automatically. Eject the cassette once and reinsert it, then check if the indication clears.
When it does, you can resume using the
camcorder. If the indication remains, consult
your nearest JVC dealer.
REFERENCES
Page 50

50 EN
USER MAINTENANCE
Cleaning The Camcorder
Before cleaning, turn off the camcorder and
remove the battery pack and AC Adapter.
To clean the exterior
Wipe gently with a soft cloth. Put the cloth in
diluted mild soap and wring it well to wipe off
heavy dirt. Then wipe again with a dry cloth.
To clean the LCD monitor
Wipe gently with a soft cloth. Be careful not to
damage the monitor. Close the LCD monitor.
To clean the lens
Blow it with a blower brush, then wipe gently
with lens cleaning paper.
To clean the viewfinder lens
Remove dust from the viewfinder using a blower
brush.
NOTES:
● Avoid using strong cleaning agents such as
benzine or alcohol.
● Cleaning should be done only after the battery
pack has been removed or other power units have
been disconnected.
● Mold may form if the lens is left dirty.
● When using a cleaner or chemically treated cloth
refer to the cautions of each product.
● To clean the viewfinder, please consult your
nearest JVC dealer.
Page 51

AC Adapter
When using the AC Adapter in areas other than
the USA
The provided AC Adapter features automatic
voltage selection in the AC range from 110 V to
240 V.
USING HOUSEHOLD AC PLUG ADAPTER
In case of connecting the unit’s power cord to an
AC wall outlet other than American National
Standard C73 series type use an AC plug adapter,
called a “Siemens Plug”, as shown.
For this AC plug adapter, consult your nearest JVC
dealer.
Plug adapter
Battery Packs
The supplied battery
pack is a lithium-ion
battery. Before using the
supplied battery pack or
an optional battery pack,
be sure to read the
following cautions:
● To avoid hazards
...do not burn.
...do not short-circuit the terminals. When
transporting, make sure the provided battery cap
is attached to the battery. If the battery cap is
misplaced, carry the battery in a plastic bag.
...do not modify or disassemble.
...do not expose the battery to temperatures
exceeding 60°C (140°F), as this may cause the
battery to overheat, explode or catch fire.
...use only specified chargers.
To prevent damage and prolong service
●
life
...do not subject to unnecessary shock.
...charge in an environment where temperatures
are within the tolerances shown in the chart
below. This is a chemical reaction type battery —
cooler temperatures impede chemical reaction,
while warmer temperatures can prevent
complete charging.
...store in a cool, dry place. Extended exposure to
high temperatures will increase natural discharge
and shorten service life.
...fully charge and then fully discharge the battery
every 6 months when storing the battery pack
over a long period time.
Terminals
CAUTIONS
... remove from charger or powered unit when not in
use, as some machines use current even when
switched off.
EN 51
The Benefits Of Lithium-Ion Batteries
Lithium-ion battery packs are small but have a
large power capacity. However, when one is
exposed to cold temperatures (below 10°C/
50°F), its usage time becomes shorter and it
may cease to function. If this happens, place
the battery pack in your pocket or other warm,
protected place for a short time, then reattach it to the camcorder.
NOTES:
● It is normal for the battery pack to be warm after
charging, or after use.
Temperature Range Specifications
Charging: 10°C to 35°C (50°F to 95°F)
Operation: 0°C to 40°C (32°F to 104°F)
Storage: –20°C to 50°C (–4°F to 122°F)
● The lower the temperature, the longer recharging
takes.
● Charging times are for a fully discharged battery
pack.
Cassettes
To properly use and store your cassettes, be
sure to read the following cautions:
● During use
...make sure the cassette bears the Mini DV mark.
...be aware that recording onto prerecorded tapes
automatically erases the previously recorded
video and audio signals.
...make sure the cassette is positioned properly
when inserting.
...do not load and unload the cassette repeatedly
without allowing the tape to run at all. This
slackens the tape and can result in damage.
...do not open the front tape cover. This exposes
the tape to fingerprints and dust.
Store cassettes
●
...away from heaters or other heat sources.
...out of direct sunlight.
...where they won’t be subject to unnecessary
shock or vibration.
...where they won’t be exposed to strong magnetic
fields (such as those generated by motors,
transformers or magnets).
...vertically, in their original cases.
REFERENCES
Page 52

52 EN
CAUTIONS
Memory Cards
To properly use and store your memory cards,
be sure to read the following cautions:
● During use
...make sure the memory card bears the SD or
MultiMediaCard mark.
...make sure the memory card is positioned
properly when inserting.
While the memory card is being accessed
●
(during recording, playback, deletion,
initialization, etc.)
...never unload the memory card and never turn off
the camcorder.
Store memory cards
●
...away from heaters or other heat sources.
...out of direct sunlight.
...where they won’t be subject to unnecessary
shock or vibration.
...where they won’t be exposed to strong magnetic
fields (such as those generated by motors,
transformers or magnets).
LCD Monitor
● To prevent damage to the LCD monitor, DO
NOT
...push it strongly or apply any shocks.
...place the camcorder with the LCD monitor on the
bottom.
To prolong service life
●
...avoid rubbing it with coarse cloth.
Be aware of the following phenomena for
●
LCD monitor use. These are not
malfunctions
...While using the camcorder, the surface around
the LCD monitor and/or the back of the LCD
monitor may heat up.
...If you leave power on for a long time, the surface
around the LCD monitor becomes hot.
Main Unit
● For safety, DO NOT
...open the camcorder’s chassis.
...disassemble or modify the unit.
...short-circuit the terminals of the battery pack.
Keep it away from metallic objects when not in
use.
...allow inflammables, water or metallic objects to
enter the unit.
...remove the battery pack or disconnect the power
supply while the power is on.
...leave the battery pack attached when the
camcorder is not in use.
Avoid using the unit
●
...in places subject to excessive humidity or dust.
...in places subject to soot or steam such as near a
cooking stove.
...in places subject to excessive shock or vibration.
...near a television set.
...near appliances generating strong magnetic or
electric fields (speakers, broadcasting antennas,
etc.).
...in places subject to extremely high (over 40°C or
104°F) or extremely low (under 0°C or 32°F)
temperatures.
DO NOT leave the unit
●
...in places of over 50°C (122°F).
...in places where humidity is extremely low (below
35%) or extremely high (above 80%).
...in direct sunlight.
...in a closed car in summer.
...near a heater.
To protect the unit, DO NOT
●
...allow it to become wet.
...drop the unit or strike it against hard objects.
...subject it to shock or excessive vibration during
transportation.
...keep the lens directed at extremely bright objects
for long periods.
...expose the lens and viewfinder’s lens to direct
sunlight.
...carry it by holding the LCD monitor or the
viewfinder.
... swing it excessively when using the hand strap or
the grip.
... swing the soft camera case excessively when the
camcorder is inside it.
Dirty heads can cause the following
●
problems:
...No picture during playback.
...Blocks of noise appear during playback.
...During recording or playback, the Head Clog
Warning indicator “” appears.
...Recording cannot be performed properly.
In such cases, use an optional cleaning
cassette. Insert it and play back. If the cassette
is used more than once consecutively, damage
to the video heads may result. After the
camcorder plays back for about 20 seconds, it
stops automatically. Also refer to the cleaning
cassette’s instructions.
If, after using the cleaning cassette, the
problems still exist, consult your nearest JVC
dealer.
Mechanical moving parts used to move the
video heads and video tape tend to become
dirty and worn out over time. In order to maintain
a clear picture at all times, periodic check-ups
are recommended after using the unit for about
1,000 hours. For periodic check-ups please
consult your nearest JVC dealer.
Page 53

How To Handle A CD-ROM
● Take care not to soil or scratch the mirror surface
(opposite to the printed surface). Do not write
anything or put a sticker on either the front or back
surface. If the CD-ROM gets dirty, gently wipe it
with a soft cloth outward from the center hole.
● Do not use conventional disc cleaners or cleaning
spray.
● Do not bend the CD-ROM or touch its mirror
surface.
● Do not store your CD-ROM in a dusty, hot or
humid environment. Keep it away from direct
sunlight.
About moisture condensation
● You have observed that pouring a cold liquid
into a glass will cause drops of water to form on
the glass’ outer surface. This same
phenomenon occurs on the head drum of a
camcorder when it is moved from a cool place
to a warm place, after heating a cold room,
under extremely humid conditions or in a place
directly subjected to the cool air from an air
conditioner.
● Moisture on the head drum can cause severe
damage to the video tape, and can lead to
internal damage to the camcorder itself.
Serious malfunctioning
If malfunctioning occurs, stop using the unit
immediately and consult your local JVC
dealer.
The camcorder is a microcomputer-controlled
device. External noise and interference (from
a TV, a radio, etc.) might prevent it from
functioning properly. In such cases, first
disconnect its power supply unit (battery pack,
AC Adapter, etc.) and wait a few minutes and
then re-connect it and proceed as usual from
the beginning.
CAUTIONS
EN 53
Declaration of Conformity
Model Number : GR-D375U
Trade Name : JVC
Responsible party : JVC AMERICAS
CORP.
Address : 1700 Valley Road
Wayne, N. J. 07470
Telephone Number : 973-317–5000
This device complies with Part 15 of FCC
Rules. Operation is subject to the following
two conditions: (1) This device may not cause
harmful interference, and (2) this device must
accept any interference received, including
interference that may cause undesired
operation.
Changes or modifications not approved by
JVC could void the user’s authority to operate
the equipment. This equipment has been
tested and found to comply with the limits for a
Class B digital device, pursuant to Part 15 of
the FCC Rules. These limits are designed to
provide reasonable protection against harmful
interference in a residential installation. This
equipment generates, uses, and can radiate
radio frequency energy and, if not installed
and used in accordance with the instructions,
may cause harmful interference to radio
communications. However, there is no
guarantee that interference will not occur in a
particular installation. If this equipment does
cause harmful interference to radio or
television reception, which can be determined
by turning the equipment off and on, the user
is encouraged to try to correct the interference
by one or more of the following measures:
Reorient or relocate the receiving antenna.
Increase the separation between the
equipment and receiver.
Connect the equipment into an outlet on a
circuit different from that to which the
receiver is connected.
Consult the dealer or an experienced radio/
TV technician for help.
REFERENCES
This Class B digital apparatus complies with
Canadian ICES-003.
Cet appareil numérique de la classe B est
conforme à la norme NMB-003 du Canada.
Page 54

54 EN
SPECIFICATIONS
Camcorder
For General
Power supply
DC 11 V (Using AC Adapter)
DC 7.2 V (Using battery pack)
Power consumption
Approx. 2.8 W (3.0 W*) (LCD monitor off, viewfinder
on)
Approx. 3.2 W (3.4 W*) (LCD monitor on, viewfinder
off)
Approx. 6.5 W (Maximum; when charging the
battery pack)
* Using LED Light
Dimensions (W x H x D)
59 mm x 94 mm x 114 mm
(with the LCD monitor closed and the
4-1/2")
viewfinder pushed back in)
Weight
Approx. 400 g (0.88 lbs) (without battery, cassette
and lens cap)
Approx. 480 g (1.06 lbs) (incl. battery, cassette and
lens cap)
Operating temperature
0°C to 40°C (32°F to 104°F)
Operating humidity
35% to 80%
Storage temperature
–20°C to 50°C (–4°F to 122°F)
Pickup
1/6" CCD
Lens
F 2.0, f = 2.3 mm to 73.6 mm, 32:1 power zoom lens
Filter diameter
ø27 mm
LCD monitor
2.5" diagonally measured, LCD panel/TFT active
matrix system
Viewfinder
Electronic viewfinder with 0.33" color LCD
Speaker
Monaural
LED Light
Effective distance: 1.5 m (5 ft)
For Digital Video Camera
Format
DV format (SD mode)
Signal format
NTSC standard
Recording/Playback format
Video: Digital component recording
Audio: PCM digital recording, 32 kHz 4-channel
(12-BIT), 48 kHz 2-channel (16-BIT)
Cassette
Mini DV cassette
Tape speed
SP: 18.8 mm/s, LP: 12.5 mm/s
(2-5/16" x 3-11/16" x
Maximum recording time (using 80 min.
cassette)
SP: 80 min., LP: 120 min.
For Digital Still Camera
Storage media
SD Memory Card/MultiMediaCard
Compression system
JPEG (compatible)
File size
Still image:
1 mode (640 x 480 pixels)
Picture quality
2 modes (FINE/STANDARD)
Approximate number of storable images
pg. 26
For Connectors
AV
Video output: 1.0 V (p-p), 75 Ω, analog
Audio output: 300 mV (rms), 1 kΩ, analog, stereo
DV
Input/output: 4-pin, IEEE1394 compliant
USB
Mini USB-B type, USB 1.1 compliant
AC Adapter
Power requirement
AC 110 V to 240 V~, 50 Hz/60 Hz
Output
DC 11 V =, 1 A
Specifications shown are for SP mode unless
otherwise indicated. E & O.E. Design and
specifications subject to change without notice.
Page 55

A
AC Adapter .................................................... 15
Audio Dubbing ............................................... 45
Auto/Manual Mode ........................................ 15
B
Backlight Compensation ................................ 39
Battery Pack ......................................13, 14, 51
Blank Search .................................................22
C
Changing The Menu Settings ................ 31 – 35
Charging The Battery Pack ........................... 13
Connection To A Personal Computer ............ 44
Connections To A TV Or VCR ....................... 23
D
Data Battery ................................................... 14
Date/Time Settings ........................................ 16
Deleting Files ................................................. 29
Demonstration Mode .....................................34
Digital Image Stabilization (DIS) .................... 32
DPOF Setting
(Digital Print Order Format) .................... 29
Dubbing .................................................. 42, 43
E
Exposure Control ........................................... 38
I
Initializing A Memory Card ............................. 30
Insert Editing .................................................. 45
Iris Lock .........................................................38
L
LCD Monitor and Viewfinder .................... 19, 20
LED Light ....................................................... 36
Live Slow .......................................................36
Loading A Cassette .......................................18
Loading A Memory Card ................................ 18
M
Manual Focus ................................................ 37
Memory Card ........................................... 18, 52
Motor Drive Mode .......................................... 37
TERMS
EN 55
N
Night-Alive ..................................................... 37
P
Picture Quality ...............................................34
Playback Sound ............................................. 35
Playback Special Effects ...............................25
Power-Linked Operation ................................ 16
Program AE, Effects and Shutter Effects ....... 41
Q
Quick Review ................................................. 21
R
Recording Capacity
Memory Card .......................................... 26
Tape ........................................................ 19
Recording Media Selection ............................ 34
Remote Control .............................................. 24
Resetting The File Name ............................... 28
S
Slow-Motion Playback ...................................25
Snapshot Mode ........................................ 33, 37
Sound Mode ............................................32, 35
Speaker Volume ............................................ 21
Specifications ................................................. 54
Spot Exposure Control ................................... 39
T
Tape Speed (REC MODE) ......................32, 35
Tele Macro ..................................................... 32
Time Code ......................................... 20, 34, 35
Tripod Mounting ............................................. 17
Troubleshooting ........................................46-49
W
Warning Indications ................................. 48, 49
White Balance ................................................ 39
Wide Mode ..................................................... 36
Wipe Or Fader Effects ................................... 40
Z
Zooming ............................................. 20, 24, 33
TERMS
Page 56

EN
GR-D375U
© 2006 Victor Company of Japan, Limited
Printed in Malaysia
UC
0206ASR-NF-VM
Page 57

CAMÉSCOPE NUMÉRIQUE
Cher client,
Nous vous remercions pour l’achat de ce
caméscope numérique. Avant utilisation,
veuillez lire les informations pour votre
sécurité et les précautions de sécurité
indiquées dans les pages 2 – 5 pour
assurer une utilisation sûre de cet appareil.
FRANÇAIS
GR-D375U
Consultez la page d’accueil de notre site Web pour le
caméscope numérique:
http://www.jvc.co.jp/english/cyber/
Pour les accessoires
http://www.jvc.co.jp/english/accessory/
:
MISE EN ROUTE
ENREGISTREMENT ET
LECTURE VIDÉO
ENREGISTREMENT ET
LECTURE D’APPAREIL PHOTO
NUMÉRIQUE (D.S.C.)
FONCTIONS ÉLABORÉES
RÉFÉRENCES
LEXIQUE
19
26
31
46
55
8
MANUEL D’UTILISATION
Pour désactiver la démonstration,
régler “MODE DÉMO” sur
“ARRÊT”. (
p. 31, 34)
LYT1531-001A
FR
Page 58

2
FR
À lire avant de commencer!
●
Avant d’enregistrer une vidéo importante,
effectuer un enregistrement test.
Visualiser votre enregistrement test pour vous
assurez que les images et le son ont été
enregistrés correctement.
●
Nous recommandons de nettoyer les têtes vidéo
avant chaque utilisation.
Si vous n’avez pas utilisé
votre caméscope
pendant un certain
temps, les têtes peuvent
être encrassées. Nous
recommandons de
nettoyer les têtes vidéo
périodiquement en
utilisant une cassette de nettoyage (optionnelle).
●
Conserver les cassettes vidéo et le caméscope
dans un environnement propre.
Les têtes vidéo s’encrasseront rapidement si
vous laissez les cassettes vidéo et le caméscope
dans un endroit poussiéreux. Les cassettes vidéo
doivent être retirées du caméscope et rangées
dans leur boîtier. Ranger le caméscope dans une
housse ou tout autre sacoche appropriée.
●
Utiliser le mode SP (Lecture standard) pour les
enregistrements vidéo importants.
Le mode LP (Longue durée) vous permet
d’enregistrer 50% de vidéo en plus par rapport au
mode SP (Lecture standard), mais le son risque
d’être saccadé pendant la lecture selon les
caractéristiques de la cassette et l’environnement
d’utilisation.
Ainsi, nous recommandons d’utiliser le mode SP
pour les enregistrements importants.
●
Pour des raisons de sécurité et de fiabilité,
Il est recommandé de n'utiliser que des batteries
et des accessoires JVC authentiques dans ce
caméscope.
●
Ce produit inclut des technologies brevetées et
exclusives et fonctionne uniquement avec des
infos batterie de marque JVC. Utiliser les
batteries JVC BN-VF707U/VF714U/VF733U.
L’utilisation de batteries autres que JVC pourrait
endommager le circuit de recharge interne.
●
Ce caméscope est conçu exclusivement pour les
cassettes vidéo numériques, les cartes mémoires
SD et les cartes MultiMediaCard. Seules les
cassettes marquées “ ” et les cartes
mémoires marquées “ ” ou
“ ” peuvent être utilisées avec cet
appareil.
●
Souvenez-vous que ce caméscope est destiné à
l’usage privé seulement.
Toute utilisation commerciale sans autorisation
est interdite. (Même si vous enregistrez un
spectacle ou une exposition pour votre plaisir
personnel, il est vivement recommandé de
demander l’autorisation de filmer.)
●
NE PAS laisser l’appareil
- Dans des endroits à plus de 50°C.
- Dans des lieux exposés à des taux d’humidité
extrêmes (en deçà de 35% ou au-delà de
80%).
- En plein soleil.
- Dans une voiture hermétiquement fermée en
période estivale.
- Près d’un radiateur.
●
L’écran LCD est fabriqué selon une technologie
haute précision. Des points noirs ou des points
brillants de lumière (rouge, vert ou bleu) peuvent
toutefois apparaître et rester à l’écran LCD. Ces
points ne sont pas enregistrés sur la bande. Il ne
s’agit en aucun cas d’un défaut de l’appareil.
(Points efficaces: supérieurs à 99,99%)
●
Ne pas laisser la batterie en place lorsque le
caméscope n'est pas utilisé et vérifier
régulièrement l'appareil, qu'il soit utilisé ou non.
Page 59

PRÉCAUTIONS DE SÉCURITÉ
AVERTISSEMENT: POUR ÉVITER LES
RISQUES D’INCENDIE OU
D’ÉLECTROCUTION, NE PAS EXPOSER
L’APPAREIL À LA PLUIE NI À L’HUMIDITÉ.
PRÉCAUTIONS:
●
Ce caméscope est conçu pour être utilisé avec
les signaux de télévision couleur de type
NTSC. Il ne peut pas être utilisé pour la lecture
sur un téléviseur de standard différent.
Cependant, l’enregistrement en direct et la
lecture sur l’écran LCD/dans le viseur sont
possibles n’importe où.
●
Ce produit inclut des technologies brevetées et
exclusives et fonctionne uniquement avec des
infos batterie de marque JVC. Utiliser les
batteries BN-VF707U/VF714U/VF733U et,
pour les recharger ou fournir l’alimentation au
caméscope à partir d’une prise secteur, utiliser
l’adaptateur secteur multi-tensions fourni. (Un
adaptateur de conversion adéquat risque d’être
nécessaire pour le branchement sur les prises
secteur de formes différentes selon les pays.)
Avertissement sur la pile au lithium
remplacable
La pile utilisée dans cet appareil peut présenter
des risques d’incendie ou de brûlure chimique si
elle est mal traitée.
Ne pas recharger, démonter, chauffer à plus de
100°C (212°F) ni mettre au feu.
Changer la pile avec une CR2025 Panasonic
(Matsushita Electric), Sanyo, Sony ou Maxell.
Danger d’explosion ou risque d’incendie si la pile
n’est pas changée correctement.
●
Jeter immédiatement les piles usées.
●
Placer hors de la portée des enfants.
●
Ne pas démonter ni jeter au feu.
REMARQUES:
●
La plaque d’identification (numéro de série) et
l’étiquette d’avertissement de sécurité se
trouvent sous l’appareil et/ou au dos.
●
L’information d’identification et l’avertissement
de sécurité de l’adaptateur secteur sont situés
sur ses côtés supérieur et inférieur.
FR
3
Page 60

4
A
A
FR
Si le matériel est installé dans un coffret ou sur
une étagère, s’assurer qu’il y a un espace
suffisant sur tous les côtés pour permettre la
ventilation (10 cm ou plus sur les deux côtés, au
dessus et à l’arrière).
Ne pas boucher les orifices de ventilation.
(Si les orifices de ventilation sont bouchés par un
journal, un tissu, etc., la chaleur peut ne pas
s’éliminer.)
Aucune source à flamme nue, telle que des
bougies allumées, ne doit être placée sur
l’appareil.
En jetant des batteries aux ordures, les
problèmes d’environnement doivent être pris en
considération et les réglementations locales ou la
législation concernant le rebut de ces batteries
doivent être strictement respectées.
L’appareil ne doit pas être exposé à l’égouttage ni
aux éclaboussements.
Ne pas utiliser cet appareil dans une salle de
bain, ni dans des endroits avec de l’eau.
Aussi, ne pas placer de récipient rempli d’eau ou
de liquides (tels des produits cosmétiques, des
médicaments, des vases de fleurs, des plantes
en pot, des tasses, etc.) sur le dessus de cet
appareil.
(Si de l’eau ou un liquide entre dans ce matériel,
un incendie ou un choc électrique risque de se
produire.)
Ne dirigez pas l’objectif ou le viseur directment
vers le soleil. Vous pourriez vous abîmer la vue et
l’appareil pourrait être endommagé. Il y a aussi
risque d’incendie ou d’électrocution.
TTENTION!
Les remarques suivantes sont destinées à
protéger l’utilisateur et l’appareil contre des
dommages éventuels.
Quand vous portez l’appareil, veillez à toujours
attacher et utiliser correctement la courroie
fournie. Ne pas transporter ou saisir le
caméscope par le viseur et/ou l’écran LCD, car il
pourrait tomber ou s’endommager.
Veillez à ne pas vous laisser prendre les doigts
dans le volet de logement de cassette, et ne
laissez pas les enfants utiliser l’appareil, car ils
peuvent facilement se blesser de cette façon.
Ne pas utiliser de pied photographique sur des
surfaces irrégulières et inclinées. Il pourrait
tomber et l’appareil pourrait être sérieusement
endommagé.
TTENTION!
Avec des câbles (Audio/Vidéo, S-Vidéo, etc.)
raccordés, il est recommandé de ne pas laisser le
caméscope sur le dessus du téléviseur, car tirer
sur les câbles pourrait faire tomber le caméscope,
causant des dommages.
CONSIGNES DE SÉCURITÉ IMPORTANTES
1. Lire ces instructions.
2. Conserver ces instructions.
3. Tenir compte de tous les avertissements.
4. Respecter toutes les instructions.
5. Ne pas utiliser cet appareil à proximité de l’eau.
6. Ne nettoyer qu’avec un chiffon sec.
7. Ne pas boucher les ouvertures de ventilation.
Installer selon les instructions du fabricant.
8. Ne pas installer à proximité de sources de
chaleur telles que des radiateurs, des
accumulateurs de chaleur, des poêles, ou
d’autres appareils (comprenant les
amplificateurs) qui produisent de la chaleur.
9. N’utiliser que des accessoires spécifiés par le
fabricant.
10. N’utiliser qu’avec le chariot, le stand, le trépied,
le support ou la table spécifié par le fabricant,
ou vendu avec l’appareil. Lorsqu’un chariot est
utilisé, faire attention pour déplacer la
combinaison chariot/appareil pour éviter des
blessures causées par un basculement.
11. Débrancher cet appareil pendant un orage ou
quand il n’est pas utilisé pendant une longue
durée.
12. Confier toutes les réparations à du personnel de
service qualifié. Un dépannage est nécessaire
lorsque l’appareil a été endommagé d’une façon
ou d’une autre, tel que lorsque le cordon
d’alimentation ou la fiche est endommagé, si du
liquide a été renversé ou si des objets sont
tombés à l’intérieur de l’appareil, si l’appareil a
été exposé à la pluie ou à l’humidité, ne
fonctionne pas normalement ou a fait une chute.
Page 61

Avant d’utiliser ce caméscope
Veillez à utiliser des cassettes portant la
mention .
Assurez-vous que vous n’utilisez que des cartes
mémoires avec la marque ou
Ce caméscope est conçu exclusivement pour les
cassettes vidéo numériques, les cartes mémoires
SD et les cartes MultiMediaCard. Seules les
cassettes marquées “ ” et les cartes mémoires
marquées “ ” ou “ ” peuvent
être utilisées avec cet appareil.
Souvenez-vous que ce caméscope n’est pas
compatible avec les autres formats vidéo
numériques.
Souvenez-vous que ce caméscope est destiné à
l’usage privé seulement.
Toute utilisation commerciale sans autorisation est
interdite. (Même si vous enregistrez un spectacle
ou une exposition pour votre plaisir personnel, il est
vivement recommandé de demander l’autorisation
de filmer.)
Avant d’enregistrer une vidéo importante,
effectuer un enregistrement test.
Visualiser votre enregistrement test pour vous
assurez que les images et le son ont été enregistrés
correctement.
Nous recommandons de nettoyer les têtes vidéo
avant chaque utilisation.
Si vous n’avez pas utilisé votre caméscope pendant
un certain temps, les têtes peuvent être
encrassées. Nous recommandons de nettoyer les
têtes vidéo périodiquement en utilisant une cassette
de nettoyage (optionnelle).
Conserver les cassettes vidéo et le caméscope
dans un environnement propre.
Les têtes vidéo s’encrasseront rapidement si vous
laissez les cassettes vidéo et le caméscope dans
un endroit poussiéreux. Les cassettes vidéo doivent
être retirées du caméscope et rangées dans leur
boîtier. Ranger le caméscope dans une housse ou
tout autre sacoche appropriée.
Utiliser le mode SP (Lecture standard) pour les
enregistrements vidéo importants.
Le mode LP (Long Play) vous permet d’enregistrer
50% de vidéo en plus par rapport au mode SP
(Lecture standard), mais le son risque d’être
saccadé pendant la lecture selon les
caractéristiques de la cassette et l’environnement
d’utilisation.
Ainsi, nous recommandons d’utiliser le mode SP
pour les enregistrements importants.
.
FR
Il est recommandé d’utiliser des cassettes vidéo
de la marque JVC.
Votre caméscope est compatible avec toutes les
marques de cassettes vidéo disponibles dans le
commerce conformes à la norme MiniDV. Toutefois,
les cassettes vidéo JVC sont conçues et optimisées
pour maximiser les performances de votre
caméscope.
Lire également “CONSIGNES DE SÉCURITÉ” dans
les pages 51 – 53.
●
Microsoft® et Windows® sont des marques
déposées ou des marques de fabrique de
Microsoft Corporation aux États-Unis et/ou dans
d’autres pays.
●
Macintosh est une marque déposée d’Apple
Computer, Inc.
●
QuickTime est une marque déposée d’Apple
Computer, Inc.
5
Page 62

6
FR
Fonctions principales de ce caméscope
Effets de volet/fondu
YVous pouvez utiliser les effets de volet/
fondu pour faire des transitions de scènes de
type professionnel. ( p. 40)
Fondu en
entrée
Fondu en
sortie
Programme AE, effets et effets de
l'obturateur
Par exemple, le mode “SPORTS” permet de
filmer des scènes rapides une image à la fois,
puis de donner une lecture au ralenti stable
aux couleurs vivaces. ( p. 41)
Lumière à LED
Vous pouvez éclaircir le sujet dans un endroit
sombre avec la lumière à LED. ( p. 36)
Compensation du contre-jour
Simplement appuyer sur la touche
BACKLIGHT
éclaircit l’image assombrie par
le contre-jour. ( p. 39)
●
Vous pouvez aussi sélectionner une zone
de mesure isolée pour qu’une
compensation d’exposition plus précise soit
disponible. ( p. 39, Sélection de la zone
de mesure d’exposition)
Infos batterie
Vous pouvez vérifier l’état de la batterie en
appuyant sur la touche
ÉTAT DE LA BATTERIE
100%
50%
0%
DATA
. ( p. 14)
TEMPS MAXI
LCD
VISEUR
mn
mn
Ralenti en direct
Vous pouvez enregistrer et revoir au ralenti
des moments précieux ou difficiles à voir. Le
son est enregistré et rejoué en temps réel.
( p. 36)
Bouton Auto
Vous pouvez changer de mode
d'enregistrement, alternant entre les modes
réglage manuel et réglage standard du
caméscope, en appuyant sur le bouton
AUTO
.
AUTO
MANUAL
Page 63

MISE EN ROUTE 8
Index................................................................. 8
Accessoires fournis ........................................ 12
Alimentation.................................................... 13
Mode de fonctionnement ................................ 15
Réglages de langue........................................ 16
Réglages de la date et de l’heure................... 16
Ajustement de la poignée ............................... 17
Ajustement de la netteté du viseur .................17
Ajustement de la luminosité de l’affichage ..... 17
Montage sur un trépied................................... 17
Insertion/Éjection d’une cassette.................... 18
Insertion/Éjection d’une carte mémoire ..........18
ENREGISTREMENT ET LECTURE VIDÉO 19
ENREGISTREMENT VIDÉO ..................................19
Enregistrement de base ................................. 19
Durée de bande restante............................ 19
Écran LCD et viseur ...................................19
Zoom ..........................................................20
Prise de vues journalistique........................ 20
Time Code.................................................. 20
Relecture rapide .........................................21
Enregistrement sur une cassette en cours. 21
LECTURE VIDÉO................................................. 21
Lecture normale.............................................. 21
Pause sur image......................................... 21
Recherche accélérée.................................. 22
Recherche de section vierge...................... 22
Raccordement à un téléviseur ou à un
magnétoscope............................................ 23
Lecture à l’aide de la télécommande.............. 24
ENREGISTREMENT ET LECTURE D’APPAREIL
PHOTO NUMÉRIQUE (D.S.C.) 26
ENREGISTREMENT D.S.C.................................... 26
Prise de vues simple (Photo D.S.C.) .............. 26
LECTURE D.S.C. .................................................27
Lecture normale des images ..........................27
Lecture automatique des images ................... 27
Lecture indexée des fichiers........................... 27
Suppression de l’affichage sur écran ............. 27
FONCTIONS SUPPLÉMENTAIRES POUR D.S.C. .....28
Redéfinition du nom de fichier ........................ 28
Protection des fichiers ....................................28
Suppression des fichiers ................................ 29
Réglage des informations d’impression (Réglage
DPOF) ........................................................29
Initialisation d’une carte mémoire ................... 30
TABLE DES MATIÈRES
FR
FONCTIONS ÉLABORÉES 31
UTILISATION DES MENUS POUR UN AJUSTEMENT
DÉTAILLÉ...........................................................31
Modification des réglages des menus ............31
Menus d’enregistrement ................................. 32
Menus de lecture ............................................ 35
FONCTIONS POUR ENREGISTREMENT.................36
Lumière à LED................................................ 36
Ralenti en direct.............................................. 36
Mode Large..................................................... 36
Prise de vues en faible lumière....................... 36
Photo (Enregistrer une image fixe sur la bande)
.................................................................... 37
Mise au point manuelle................................... 37
Commande d’exposition ................................. 38
Verrouillage de l’iris ........................................38
Compensation de contre-jour .........................39
Sélection de la zone de mesure d’exposition .39
Réglage de la balance des blancs.................. 39
Réglage de la balance des blancs manuelle .. 40
Effets de volet ou de fondu............................. 40
Programme AE, effets et effets de l'obturateur
.................................................................... 41
MONTAGE ........................................................42
Copie vers un magnétoscope......................... 42
Copie vers ou depuis un appareil vidéo équipé
d’un connecteur DV (Copie numérique) .....43
Raccordement à un ordinateur personnel ......44
RÉFÉRENCES 46
DÉPANNAGE .....................................................46
Nettoyage du caméscope....................................50
CONSIGNES DE SÉCURITÉ................................... 51
CARACTÉRISTIQUES TECHNIQUES.......................54
LEXIQUE 55
7
Page 64

8
Index
MISE EN ROUTE
FR
16:9
Page 65

Commandes
1
Touche de rembobinage [1] ( p. 21)
Touche vers la gauche [
Touche Relecture rapide [QUICK REVIEW]
(
pg. 21)
2
Touche de réglage [SET] ( p. 16)
Touche d'infos de batterie [DATA] (
3
Touche Arrêt [7] ( p. 21)
Touche de descente [
Touche de compensation de contre-jour
[BACKLIGHT]
4
Commutateur VIDEO/MEMORY ( p. 15)
5
Touche Lecture/Pause [6] ( p. 21)
Touche de montée [
Touche de mise au point manuelle [FOCUS]
(
p. 37)
6
Touche d'écran large (16:9) [16.9] ( p. 36)
Touche de recherche de section vierge
[BLANK] ( p. 22)
7Touche Menu [MENU] ( p. 31)
8Touche d’avance rapide [¡] ( p. 21)
Touche vers la droite [2]
Touche Nuit [NIGHT] ( p. 36)
9Touche Index [INDEX] ( p. 27)
Touche de lumière à LED [LIGHT]
!Commande d’ajustement dioptrique ( p. 17)
"Touche Auto [AUTO] ( p. 15)
#Touche d’activation du mode Photo
[SNAPSHOT] ( p. 26, 37)
Touche Ralenti en direct ( p. 31, 33)
$Commande de zoom [T/W] ( p. 20)
Commande de volume du haut-parleur
[VOL. +, –] ( p. 21)
%Touche de libération de la batterie [PUSH
BATT.] ( p. 13)
&Touche de marche/arrêt d’enregistrement
( p. 19)
(Interrupteur d’alimentation [ENR, PLAY, OFF]
( p. 15)
)Touche de verrouillage ( p. 15)
~Interrupteur d’ouverture/éjection de la
cassette [OPEN/EJECT] ( p. 18)
1
]
p. 14)
4
]
3
]
Connecteurs
Les connecteurs sont situés sous les caches.
+Connecteur USB (Universal Serial Bus)
( p. 44)
,Connecteur vidéo numérique [DV IN/OUT]
(i.LINK*) ( p. 43, 44)
* i.LINK fait référence aux spécifications et
extensions de la norme IEEE1394-1995. Le logo
est applicable aux produits conformes à la
norme i.LINK.
-Connecteur de sortie audio/vidéo [AV]
( p. 23, 42)
.Connecteur d’entrée CC [DC] ( p. 13)
MISE EN ROUTE
Indicateurs
ç
Témoin POWER/CHARGE ( p. 13, 19)
Éléments divers
é
Écran LCD ( p. 19, 20)
è
Viseur ( p. 17)
ê
Volet de carte [ ] ( p. 18)
ë
Monture de la batterie ( p. 13)
í
Œillet de courroie en bandoulière ( p. 12)
ì
Poignée ceinturée ( p. 21)
î
Haut-parleur ( p. 17)
ï
Objectif
ñ
Lumière à LED
ó
Capteur de la caméra
(Veiller à ne pas obstruer cette zone ; un
capteur intégré indispensable à la prise de
vues est situé à cet endroit.)
ò
Microphone stéréo
ô
Orifice de borne ( p. 17)
ö
Vis de montage de trépied ( p. 17)
õ
Volet de logement de cassette ( p. 18)
ú
Fente de carte mémoire
FR
9
MISE EN ROUTE
Page 66

10 FR
MISE EN ROUTE
Indications de l’écran LCD/du viseur
Durant l’enregistrement vidéo uniquement
2
4
35
1
LP
16:9
15:55
9 8
D
"
!
SOUND12BIT
1Indicateur du défilement de la bande ( p. 19)
(Tourne au fur et à mesure que la bande
défile.)
2Indicateur du mode large sélectionné
( p. 36)
3 : Indicateur de ralenti en direct ( p. 36)
4Mode Vitesse d’enregistrement (SP/LP)
( p. 32)
(Seul l'indicateur LP s'affiche.)
5Durée de bande restante ( p. 19)
6ENR: (Apparaît pendant l’enregistrement.)
( p. 19)
PAUSE: (Apparaît lorsque le mode d’attente
d’enregistrement est activé.) ( p. 19)
SLOW
: (Apparaît lors de l’utilisation du ralenti
en direct.) ( p. 36)
7Indicateur de l’effet de fondu/volet sélectionné
( p. 40)
8Date/Heure ( p. 34)
9Time Code ( p. 34, 32)
!Stabilisateur d’image numérique (“DIS”)
( p. 32)
"SOUND 12BIT/16BIT: Indicateur du mode
Son ( p. 32) (Apparaît pendant environ 5
secondes après la mise en marche du
caméscope.)
Durant l’enregistrement D.S.C. uniquement
640
1Dimensions de l’image: 640 (640 x 480)
( p. 26)
2Qualité de l’image: (FINE) et
(STANDARD) (par ordre de qualité) ( p. 34)
3Nombre de prises restantes ( p. 26)
– – –mn
PAUSE
:611.3
1
C0
2A0
E
.
23
6
W
H
7
M
6
51
(Affiche le nombre approximatif de prises
restantes pouvant être stockées durant
l’enregistrement D.S.C.)
Durant les enregistrements vidéo et D.S.C.
9
1
M
2
3
4
5
6
7
8
10
x
1Indicateur d’énergie restante dans la batterie
2Mode de fonctionnement ( p. 15)
A
: Mode Auto
M
: Mode manuel
3Témoin de lumière à LED ( p. 36)
4 : Indicateur de prise de vues en faible
lumière ( p. 36)
: Mode Gain relevé ( p. 33)
5Vitesse de l'obturateur
6Indicateur de la balance des blancs ( p. 39)
7Indicateur d’effet sélectionné
8Indicateur du mode Programme AE ( p. 41)
9Rapport de zoom approximatif ( p. 20)
!Indicateur du zoom ( p. 20)
"Icône de prise de vues ( p. 26)
(Apparaît et clignote durant la prise de vues.)
#Icône de carte ( p. 26)
: Apparaît durant la prise de vues.
: Clignote en blanc lorsqu’une carte
mémoire n’a pas été chargée.
: Clignote en jaune pendant que le
caméscope lit les données sur la carte
mémoire.
$
PHOTO
: (Apparaît pendant la prise d’un cliché)
( p. 26, 37)
% : Indicateur de mode sélection manuel de
la zone d’exposition ( p. 39)
: Indicateur de compensation de contrejour
( p. 39)
±: Indicateur de l’ajustement de l’exposition
( p. 38)
Indicateur du verrouillage de l’iris ( p. 38)
&Indicateur de la coupure des bruits du vent
( p. 33)
(Date ( p. 16)
)Indicateur du réglage manuel de la mise au
point ( p. 37)
#"
!
$
PHOTO
%
C06.2 0
E
D
3
&
6
.
()
Page 67

Durant la lecture vidéo
21
2 0
1L2
M
I
X
BIT
BLANK SEARCH
PUSH "STOP" BUTTON
TO CANCEL
V
O
L
M
U
:/2
1
:
2
5
1Indicateur d’énergie restante dans la batterie
2Indicateur du mode Son ( p. 35)
3Indicateur de la recherche d’une section
4Vitesse de la bande (SP/LP) ( p. 35)
53: Lecture
6Date/Heure ( p. 34, 35)
7VOLUME: Indicateur du niveau du volume
8Time Code ( p. 35)
8
vierge ( p. 22)
(Seul l'indicateur LP s'affiche.)
¡
: Avance rapide/Recherche accélérée
1: Rembobinage/Recherche accélérée
8: Pause
8 3: Lecture image par image en sens avant/
Ralenti en sens avant
2 8: Lecture image par image en sens
inverse/Ralenti en sens inverse
( p. 21)
BRIGHT: Indicateur de la commande de
luminosité (Écran LCD/Viseur) ( p. 17)
3
D E C
E
7
4
LP
1.11.320A
:
6
6
5
M
6
0
MISE EN ROUTE
FR 11
Durant la lecture D.S.C.
1
100-0013
BRIGHT
– 5
3 2
1Numéro du dossier et du fichier ( p. 27)
2Indicateur du mode de fonctionnement
( p. 27)
3Indicateur de la commande de luminosité
(Écran LCD/Viseur) ( p. 17).
MISE EN ROUTE
Page 68

12 FR
MISE EN ROUTE
Accessoires fournis
OU
Comment attacher le couvre-objectif
Pour protéger l’objectif,
attacher le couvre-objectif
au caméscope comme
montré dans l’illustration.
REMARQUE:
Pour confirmer que le couvreobjectif est installé
correctement, s’assurer qu’il
est en ligne avec le
caméscope.
1 Adaptateur secteur AP-V14U ou AP-V18U
2 Batterie BN-VF707U
3 Câble audio/vidéo (minifiche ø3.5 mm-fiche
RCA)
4 Câble USB
5 Filtre en ligne (pour câble USB, voir la
colonne de droite pour le montage)
6 CD-ROM
7 Télécommande RM-V720U
8 Batterie au lithium CR2025* (pour
télécommande)
9 Courroie en bandoulière (voir la colonne de
droite pour le montage)
! Couvre-objectif (voir la colonne de droite
pour le montage)
REMARQUES:
● Pour maintenir les performances optimales du
caméscope, des câbles fournis peuvent être
équipés avec un ou plusieurs filtres en ligne. Si un
câble a uniquement un filtre en ligne, l’extrémité du
câble la plus proche du filtre doit être raccordée au
caméscope.
● Pour les raccordements, veiller à utiliser les câbles
fournis. Ne pas utiliser d’autres câbles.
Placer ici pendant la prise
de vues.
Comment attacher la bandoulière
Suivre l’illustration.
1 Passer la courroie à travers l’œillet.
2 La plier en arrière et la passer à travers le
guide de courroie et la boucle.
● Pour ajuster la longueur de la courroie, la
desserrer puis la resserrer dans la boucle.
3 Faire glisser le guide de courroie
complètement vers l’œillet.
Boucle
Guide de
courroie
1
Œillet
2
2
3
Page 69

Comment attacher le filtre en ligne
.
Attacher les filtres en ligne aux câbles. Le filtre
en ligne réduit les interférences.
1 Relâcher les pièces d’arrêt aux deux
extrémités du filtre en ligne.
MISE EN ROUTE
FR 13
Alimentation
Les deux possibilités d’alimentation de ce
caméscope vous laissent le choix de la source
d’alimentation la plus appropriée à vos besoins.
Ne pas utiliser les sources d’alimentation
fournies avec d’autres appareils.
Recharge de la batterie
Pièce d’arrêt
2 Faire passer le câble par le filtre en ligne,
laissant environ 3 cm de câble entre la fiche du
câble et le filtre en ligne.
Enrouler le câble une fois autour de l’extérieur
du filtre en ligne comme montré dans
l’illustration.
3 cm
Filtre en ligne
Enrouler le câble une fois
3 Fermer le filtre en ligne jusqu’à son
enclenchement.
REMARQUES:
● Faire attention de ne pas endommager le câble.
● En raccordant des câbles, brancher l’extrémité
avec le filtre en ligne au caméscope.
Monture de la batterie
PUSH
Batterie
BATT.
1
Flèche
Vers le connecteur CC
Vers une prise
secteur
2
Interrupteur
d’alimentation
Adaptateur
secteur
Témoin
POWER/
CHARGE
1 Régler l’interrupteur d’alimentation sur “OFF”.
2 Avec la flèche sur la batterie pointant vers le
bas, pousser légèrement la batterie contre la
monture de la batterie 1.
3 Faire glisser la batterie vers le bas jusqu’à
son verrouillage en place 2.
4 Brancher l’adaptateur secteur au
caméscope.
5 Brancher l’adaptateur secteur à une prise
secteur. Le témoin POWER/CHARGE sur le
caméscope clignote pour indiquer que la
recharge a commencé.
6 Lorsque le témoin POWER/CHARGE
s’éteint, la recharge est terminée. Débrancher
l’adaptateur secteur de la prise secteur.
Débrancher l’adaptateur secteur du caméscope.
MISE EN ROUTE
SUITE À LA PAGE SUIVANTE
Page 70

14 FR
A
MISE EN ROUTE
Pour retirer la batterie
Faire glisser la batterie vers le haut tout en
appuyant sur PUSH BATT. pour la détacher.
Batterie Durée de recharge
BN-VF707U* Environ 1 h 30 mn
BN-VF714U Environ 2 h 40 mn
BN-VF733U Environ 5 h 40 mn
* Fournie
REMARQUES:
● Ce produit inclut des technologies brevetées
et exclusives et fonctionne uniquement avec
des infos batterie de marque JVC. Utiliser les
batteries BN-VF707U/VF714U/VF733U JVC.
L’utilisation de batteries autres que JVC
pourrait endommager le circuit de recharge
interne.
● Si le couvercle protecteur est attaché à la batterie,
commencer par le retirer.
● Pendant la recharge, le caméscope ne peut pas
être utilisé.
● La recharge n’est pas possible si le mauvais type
de batterie est utilisée.
● En chargeant la batterie pour la première fois ou
après une longue période de stockage, le témoin
POWER/CHARGE peut ne pas s’allumer. Dans
ce cas, retirer la batterie du caméscope, puis
essayer de nouveau de la recharger.
● Si une batterie entièrement chargée est fixée à
l’appareil, l’indicateur POWER/CHARGE ne
clignote pas pour indiquer qu’aucun chargement
n’a lieu.
● Si la durée d’utilisation de la batterie devient très
courte même après avoir été complètement
rechargée, la batterie est usée et a besoin d’être
remplacée. Veuiller en acheter une nouvelle.
● Compte tenu de l’électricité qu’il génère
intérieurement, l’adaptateur secteur chauffe en
cours d’usage. Ne vous en servir que dans des
endroits bien ventilés.
● En utilisant le chargeur de batterie AA-VF7 en
option, vous pouvez recharger la batterie BNVF707U/VF714U/VF733U sans le caméscope.
● Après que 5 minutes se soient écoulées en mode
d’attente d’enregistrement avec une cassette
insérée et sans qu'aucune opération ne soit
effectuée (pendant ce temps, l'indicateur (“PAUSE”
peut ne pas apparaître), le caméscope coupe
automatiquement l’alimentation fournie par
l'adaptateur secteur. Dans ce cas, la batterie
commence à se recharger si elle est attachée au
caméscope.
Utilisation de la batterie
Reprendre les étapes 2 – 3 de la section
“Recharge de la batterie”.
Durée maximum d’enregistrement continu
Batterie
BN-VF707U* 1 h 30 mn 1 h 40 mn
BN-VF714U 3 h 3 h 25 mn
BN-VF733U 7 h 8 h
* Fournie
REMARQUES:
● La durée d’enregistrement est réduite de façon
significative sous les conditions suivantes:
• Le zoom ou le mode d’attente d’enregistrement
est engagé de façon répétée.
• L’écran LCD est utilisé de façon répétée.
• Le mode de lecture est engagé de façon
répétée.
• La lumière à LED est utilisée.
● Avant un usage prolongé, il est recommandé de
préparer suffisamment de batteries pour couvrir 3
fois la durée de prise de vues prévue.
TTENTION:
Avant de détacher la source d’alimentation,
s’assurer que l’alimentation du caméscope est
coupée. Ne pas respecter cela peut conduire à un
mauvais fonctionnement du caméscope.
Écran LCD en
marche
Viseur en
marche
Système d’infos de batterie
Vous pouvez vérifier l’énergie restante et la
durée d’enregistrement disponible.
1) S’assurer que la batterie est attachée et que
l’interrupteur d’alimentation est réglé sur “OFF”.
2) Ouvrir complètement l’écran LCD.
3) Appuyer sur DATA pour faire apparaître
l’écran d’état de la batterie.
● Elles s’affichent pendant environ 3 secondes
si la touche est enfoncée et relâchée
rapidement, et pendant environ 15 secondes si
la touche reste enfoncée pendant plusieurs
secondes.
● Si “ERREUR DE COMMUNICATION” apparaît
au lieu de l’état de la batterie même si vous
avez appuyé sur DATA plusieurs fois, il doit y
avoir un problème au niveau de la batterie.
Dans un tel cas, consulter le revendeur JVC le
plus proche.
Page 71

Utilisation de l’alimentation secteur
Reprendre l’étape 4 de la section “Recharge de
la batterie”.
REMARQUE:
L’adaptateur secteur fourni dispose d’une sélection
automatique de la tension dans la gamme 110 V à
240 V CA.
À propos des batteries
DANGER! Ne pas démonter les batteries ni les
exposer au feu ou à une chaleur excessive, ce
qui pourrait causer un incendie ou une
explosion.
AVERTISSEMENT ! Ne pas laisser la batterie
ou ses bornes entrer en contact avec des objets
métalliques, ce qui pourrait produire un courtcircuit et éventuellement déclencher un
incendie.
Pour reprendre la fonction originale de
l’indication exacte d’énergie de la batterie
Si l’indication d’énergie de la batterie diffère du
temps de fonctionnement réel, recharger
complètement la batterie, puis la faire fonctionner
jusqu’à ce qu’elle soit déchargée. Cependant,
cette fonction peut ne pas marcher si la batterie a
été longtemps utilisée dans des conditions de
température haute/faible extrêmes ou chargée
trop de fois.
Mode de fonctionnement
Pour mettre le caméscope en marche, régler
l’interrupteur d’alimentation sur tout mode de
fonctionnement sauf “OFF” tout en appuyant sur
la touche de verrouillage située sur
l’interrupteur.
VIDEO/
MEMORY
Touche de
verrouillage
AUTO
MENU
Témoin POWER/
CHARGE
Interrupteur
d’alimentation
MISE EN ROUTE
Position de l’interrupteur d’alimentation
REC:
● Vous permet d'enregistrer sur la bande.
● Vous permet de régler diverses fonctions
d’enregistrement en utilisant les Menus.
( p. 32)
OFF:
Vous permet de couper l’alimentation du
caméscope.
PLAY:
● Vous permet de lire un enregistrement sur la
bande.
● Vous permet d’afficher une image fixe
enregistrée sur la carte mémoire ou de
transférer une image fixe enregistrée sur la
carte mémoire vers un ordinateur.
● Vous permet de régler diverses fonctions de
lecture en utilisant les Menus. ( p. 31)
Position du commutateur VIDEO/MEMORY
VIDEO:
Vous permet d’enregistrer sur une bande ou de
lire une bande. Si “ENREG SUR” est réglé sur
“/” ( p. 34), des images fixes sont
enregistrées sur la bande et sur la carte mémoire.
MEMORY:
● Vous permet d’enregistrer sur une carte
mémoire ou d’accéder à des données
stockées sur une carte mémoire.
● Lorsque l’interrupteur d’alimentation est réglé
sur “REC”, la taille d’image sélectionnée
actuellement apparaît.
FR 15
Mode Auto/Manuel
Appuyer sur le bouton AUTO plusieurs fois de
suite pour alterner entre le mode
d'enregistrement auto et le mode
d'enregistrement manuel. Lorsque le mode
manuel est choisi, l'indicateur “M” apparaît à
l'écran LCD.
Mode Auto :
Vous pouvez enregistrer sans effets spéciaux ni
ajustements manuels.
Mode Manuel :
L'enregistrement manuel est possible en
réglant diverses fonctions.
A
M
MISE EN ROUTE
Choisir le mode de fonctionnement approprié en
utilisant l’interrupteur d’alimentation et le
commutateur VIDEO/MEMORY.
AUTO
MANUAL
Page 72

16 FR
MISE EN ROUTE
Fonctionnement lié à l’alimentation
Lorsque l’interrupteur d’alimentation est réglé
sur “REC”, vous pouvez aussi allumer/éteindre
le caméscope en ouvrant/fermant l’écran LCD
ou en tirant/poussant le viseur.
INFORMATION:
Les explications suivantes du présent manuel
prennent pour hypothèse l’emploi de l’écran
LCD lors des opérations. Si vous souhaitez
utiliser le viseur, fermer l’écran LCD et tirer
complètement sur le viseur.
Réglages de langue
La langue d’affichage peut être changée.
( p. 31, 34)
1 Régler l’interrupteur d’alimentation sur “REC”
tout en appuyant sur la touche de verrouillage
située sur l’interrupteur.
2 Ouvrir complètement l’écran LCD. ( p. 19)
3 Régler le mode d'enregistrement à
“M”.( p. 15)
4 Appuyer sur MENU. L’écran de menu
apparaît.
5 Appuyer sur 3, 4, 2 ou
1 pour choisir “DISPLAY”
(AFFICHAGE), puis
appuyer sur SET. Le menu
DISPLAY (AFFICHAGE)
apparaît.
6 Appuyer sur 3, 4, 2 ou 1 afin de sélectionner
“LANGUAGE”, et appuyer ensuite sur SET.
7 Appuyer sur 3 ou sur 4
to afin de sélectionner la
langue souhaitée, et
appuyer ensuite sur SET
ou 2.
● Appuyer sur 1 en tout
temps pour annuler ou
revenir au menu précédent.
8 Appuyer sur MENU. L’écran de menu se
ferme.
J?LES?EC
LANGUAGE
ENGLISH
FRANÇAIS
ESPAÑOL
PORTUGUÊS
Réglages de la date et de l’heure
La date et l’heure seront toujours enregistrées
automatiquement sur la bande. Vous pouvez
choisir de les afficher ou non pendant la lecture.
( p. 34, 35)
1 Procéder aux étapes 1 à 5 de la section
“Réglages de langue” (dans la colonne de
gauche.)
2 Appuyer sur 3, 4, 2 ou sur 1 afin de
sélectionner “RÉGL. HORL”, et appuyer ensuite
sur SET. Le format de la date affichée est en
surbrillance.
3 Appuyer sur 3 ou 4 pour choisir le format
d'affichage de la date désiré, puis appuyer sur
SET ou 2. Choisir entre “MONTH.DATE.YEAR”,
“DATE.MONTH.YEAR” ou “YEAR.MONTH.DATE”.
4 Appuyer sur 3 ou 4 pour choisir le format
d'affichage de l'heure désiré, puis appuyer sur
SET ou 2. Choisir entre “24h” ou “12h”.
5 Régler l'année, le mois, la date, l'heure et les
minutes. Appuyer sur 3 ou 4 pour régler la
valeur, puis appuyer sur SET ou 2. Répéter
cette étape jusqu'à ce que toutes les données
soient réglées.
REMARQUE:
Appuyer sur 1 pour revenir au réglage précédent.
6 Appuyer sur MENU.
L’écran de menu se ferme.
O
MNTH
REGL. HORL
DATE YEAR..
DEC70
62006
..
0:05
12h
AM
Page 73

MISE EN ROUTE
FR 17
Ajustement de la poignée
1 Ajuster la bande Velcro.
● Avant de faire
l'ajustement, retirer les
étiquettes de sécurité
pouvant être fixées à la
bande Velcro.
2 Passer la main droite
dans la boucle et tenir la
poignée.
3 Ajuster la position de
votre pouce et de vos doigts
dans la poignée pour commander facilement la
touche de marche/arrêt d’enregistrement,
l’interrupteur d’alimentation et la commande de
zoom. S’assurer de refixer la bande Velcro.
Ajustement de la netteté du viseur
1 Régler l’interrupteur d’alimentation sur “REC”
tout en appuyant sur la touche de verrouillage
située sur l’interrupteur.
2 S’assurer que l’écran LCD est fermé et
verrouillé. Tirer complètement sur le viseur et
l’ajuster manuellement pour la meilleure vue.
3 Tourner la commande d’ajustement
dioptrique jusqu’à ce que les indications dans le
viseur soient nettement au point.
Exemple:
Ajustement de la luminosité de
l’affichage
33
BRIGHT
– 5
33
22
22
1 Régler l’interrupteur
d’alimentation sur “REC”
ou “PLAY” tout en
appuyant sur la touche de
verrouillage située sur
l’interrupteur.
2 Ouvrir complètement
l’écran LCD. ( p. 19)
● Pour ajuster la luminosité
du viseur, tirer
complètement le viseur et
régler “PRIORITÈ” sur
“VISEUR” ( p. 31, 31).
11
11
44
44
MENU
3 Appuyer sur MENU.
L’écran de menu apparaît.
Si vous êtes en mode Lecture, passez à l'étape 5.
4 Appuyer sur 3, 4, 2 ou 1 pour choisir
“AFFICHAGE”, puis appuyer sur SET. Le menu
AFFICHAGE apparaît.
5 Appuyer sur 3, 4, 2 ou 1 pour choisir
“LUMINOSITÉ”, puis appuyer sur SET. L'écran
de menu se fermera et le menu du contrôle de la
luminosité apparaîtra.
6 Appuyer sur 3 or 4 jusqu'à ce que la
luminosité soit correcte, puis appuyez sur SET
ou 2.
7 Appuyer sur MENU. L’écran de menu se
ferme.
MISE EN ROUTE
Commande d’ajustement dioptrique
PRÉCAUTION:
Lors du retrait du viseur, veiller à ne pas pincer vos
doigts.
Montage sur un trépied
Pour fixer le caméscope
sur un trépied, aligner le
taquet et la vis de
direction avec la prise de
montage et l’orifice de
taquet sur le caméscope.
Puis serrer la vis dans le
sens des aiguilles d’une
montre.
● Certains trépieds ne
sont pas équipés de taquet.
Page 74

18 FR
A
MISE EN ROUTE
Insertion/Éjection d’une cassette
Le caméscope a besoin d’être alimenté pour
charger ou éjecter une cassette.
OPEN/EJECT
PUSH
Logement de cassette
Diriger la fenêtre vers
l’extérieur.
1 Faire coulisser et maintenir OPEN/EJECT
dans le sens de la flèche, puis tirer le volet pour
s’ouvrir jusqu’à son blocage. Le logement
s’ouvre automatiquement.
● Ne pas toucher les pièces internes.
2 Insérer ou enlever la cassette et appuyer sur
“PUSH” pour fermer le logement.
● Bien s’assurer de n’appuyer que sur la partie
marquée “PUSH” pour fermer le logement de
cassette ; toucher d’autres pièces pourrait prendre
votre doigt dans le logement, risquant de vous
blesser ou de produire des dommages.
● Quand on ferme le logement de la cassette, il
s’abaisse automatiquement. Attendre qu’il soit
complètement abaissé avant de fermer le volet.
● Quand la tension de la batterie est faible, il peut
être impossible de fermer le volet. Ne pas le forcer.
Remplacer la batterie avec une batterie
complètement chargée ou utiliser l’alimentation
secteur avant de continuer.
3 Fermer fermement le volet de logement de
cassette jusqu’à son verrouillage en place.
Pour protéger des enregistrements
importants
Pousser le commutateur de protection contre
l’effacement au dos de la bande dans le sens de
“SAVE”. Vous ne risquerez pas de réenregistrer la
bande. Pour enregistrer sur cette bande, ramener
le commutateur sur “REC” avant de l’insérer.
REMARQUES:
● Si l’on attend quelques secondes et que le logement
ne s’ouvre pas, refermer le volet et essayer une
nouvelle fois. Si le logement de cassette ne s’ouvre
toujours pas, mettre le caméscope hors tension puis
de nouveau sous tension.
● Si la bande n’est pas chargée correctement,
ouvrir complètement le volet de logement de
cassette et retirer la cassette. Quelques minutes
plus tard, l’introduire de nouveau.
Volet de logement
de cassette
Commutateur
de protection
contre
l’effacement
● Lorsque le caméscope est transporté d’un lieu
froid dans un lieu chaud, attendre quelques
instants avant d’ouvrir le volet afin d’éviter une
éventuelle condensation.
Insertion/Éjection d’une carte mémoire
Commutateur de protection
contre l’écriture/l’effacement
1 S’assurer que l’alimentation du caméscope
est coupée.
2 Ouvrir le volet de carte ( ).
3 Pour insérer une carte mémoire, insérer
complètement avec le bord biseauté en premier.
Pour retirer une carte mémoire, la pousser
une fois. La carte mémoire sort du caméscope
automatiquement ; retirez-la.
● Ne pas toucher la prise sur le côté opposé de
l’étiquette.
4 Fermer le volet de carte.
Pour protéger des fichiers importants
(disponible uniquement sur les cartes
mémoire SD)
Pousser le commutateur de protection contre
l’écriture et l’effacement au dos de la carte
mémoire dans le sens de “LOCK”. Vous ne
risquerez pas de réenregistrer la carte mémoire.
Pour enregistrer sur cette carte mémoire,
ramener le commutateur sur la position à
l’opposé de “LOCK” avant de l’insérer.
REMARQUES:
● Certaines marques de cartes mémoire ne sont
pas compatibles avec ce caméscope. Avant
d’acheter une carte mémoire, consulter le
fabricant ou le revendeur.
● Avant d’utiliser une nouvelle carte mémoire, il est
nécessaire de formater la carte. ( p. 30)
TTENTION:
Ne pas introduire ou retirer la carte mémoire alors
que le caméscope est mise en marche, ce qui
pourrait corrompre la carte mémoire ou le
caméscope pourrait ne plus être capable de
reconnaître si la carte est installée ou non.
Volet de carte ( )
Carte mémoire
(en option)
Bord biseauté
Page 75

Enregistrement de base
REMARQUE:
Avant de continuer, effectuer les procédures
indiquées ci-dessous :
● Alimentation ( p. 13)
● Insertion d’une cassette ( p. 18)
VIDEO/MEMORY
Commande de zoom
Témoin POWER/CHARGE
Touche de verrouillage
Touche de marche/arrêt
d’enregistrement
1 Retirer le couvre-objectif. ( p. 12)
2 Ouvrir complètement l’écran LCD.
3 Régler le commutateur VIDEO/MEMORY sur
“VIDEO”.
4 Régler l’interrupteur d’alimentation sur “REC”
tout en appuyant sur la touche de verrouillage
située sur l’interrupteur.
●
Le témoin POWER/CHARGE s’allume et le
caméscope passe en mode d’attente
d’enregistrement. “ PAUSE” est affiché.
● Pour enregistrer en mode LP (Longue durée),
p. 32.
5 Pour démarrer l’enregistrement, appuyer sur
la touche de marche/arrêt d’enregistrement.
“ ENR” apparaît dans l’affichage alors que
l’enregistrement est en cours.
6 Pour arrêter l’enregistrement, appuyer à
nouveau sur la touche de marche/arrêt
d’enregistrement. Le caméscope repasse en
mode d’attente d’enregistrement.
Durée d’enregistrement approximative
Bande
30 mn 30 mn 45 mn
60 mn 60 mn 90 mn
80 mn 80 mn 120 mn
REMARQUES:
● Après que 5 minutes se soient écoulées en mode
d’attente d’enregistrement sans qu'aucune
opération ne soit effectuée (
l'indicateur
“ PAUSE” peut ne pas apparaître),
Mode d’enregistrement
SP LP
pendant ce temps,
ENREGISTREMENT VIDÉO
le caméscope coupe automatiquement
l'alimentation. Pour allumer le caméscope de
nouveau, pousser et tirer une autre fois le viseur
ou fermer et rouvrir l'écran LCD.
● Lorsqu’une section vierge est laissée entre des
séquences enregistrées sur la bande, le time
code est interrompu et des erreurs peuvent se
produire en faisant du montage avec la bande.
Pour éviter ceci, se référer à “Enregistrement sur
une cassette en cours” (
● Pour désactiver le mélodie sonore, p. 33.
p. 21).
FR
19
Durée de bande restante
La durée approximative de
bande restante apparaît
dans l’affichage. “– – – mn”
signifie que le caméscope
calcule le temps restant.
Lorsque la durée restante atteint 2 minutes,
l’indicateur commence à clignoter.
●
Le temps nécessaire pour calculer et afficher la
durée de bande restante et la précision du calcul
peuvent varier selon de type de bande utilisé.
Écran LCD et viseur
Durant l’utilisation de l’écran LCD:
S’assurer que le viseur est rentré. Soulever
l’extrémité de l’écran LCD pour ouvrir celui-ci
complètement. Il peut tourner de 270° (90° vers
le bas, 180° vers le haut).
Durant l’utilisation du viseur:
S’assurer que l’écran LCD est fermé et
verrouillé. Tirer complètement sur le viseur.
REMARQUES:
● L’image n’apparaîtra pas simultanément sur
l’écran LCD et dans le viseur. Lorsque le viseur
est tiré alors que l’écran LCD est ouvert, vous
pouvez sélectionner lequel utiliser. Régler
“PRIORITÉ” sur le mode souhaité dans le menu
SYSTÈME. (
● Des points lumineux colorés peuvent envahir
l’écran LCD ou le viseur. Cependant, il ne s’agit
pas d’un mauvais fonctionnement. (
p. 33)
p. 47)
ENREGISTREMENT ET LECTURE VIDÉO
Page 76

20 FR
ENREGISTREMENT VIDÉO
Zoom
Produit un effet zoom, ou un changement
immédiat dans le grossissement de l’image.
Zoom avant
Glisser la commande de zoom vers “T”.
Zoom arrière
Glisser la commande de zoom vers “W”.
●
Plus vous glissez la commande de zoom, plus le
zoom répond rapidement.
Zoom avant (T: en téléobjectif)
1
x
10
REMARQUES:
● La mise au point peut devenir instable pendant
l’opération de zoom. Dans ce cas, régler le zoom
en mode d’attente d’enregistrement, mémoriser la
mise au point en utilisant la mise au point
manuelle (
ou arrières en mode d’enregistrement.
● Le zoom est possible jusqu’à un maximum de
800X, ou il peut être commuté sur un
grossissement 32X en utilisant le zoom optique.
p. 33)
(
● L’agrandissement zoom au delà de 32X est
effectué par traitement d’image numérique, et il
est par conséquent appelé zoom numérique.
● Pendant le zoom numérique, la qualité d’image
peut être dégradée.
● Le zoom numérique ne peut pas être utilisé
lorsque le commutateur VIDEO/MEMORY est
réglé sur “MEMORY”.
●
La prise de vues macro (jusqu’à 5 cm du sujet) est
possible lorsque la commande de zoom est réglée
à fond sur “W”. Voir également “MACRO” dans le
menu MANUEL à la page 32.
● Pour filmer un sujet près de l’objectif, faire d’abord
un zoom arrière. En cas de zoom avant en mode
Mise au point automatique, le caméscope peut
faire automatiquement un zoom arrière selon la
distance entre le caméscope et le sujet. Ceci ne
se produit pas lorsque “MACRO” est réglé sur
“MARCHE”. (
10
x
Zoom arrière (W: en grand angle)
x
20
x
Zone de zoom numérique
Zone de zoom 32X
(optique)
Rapport de zoom
approximatif
p. 37), puis faire des zooms avant
p. 32)
40
x
Prise de vues journalistique
Dans certaines
situations, des angles
de prise de vues
différents peuvent
offrir des résultats plus
spectaculaires. Tenir le
caméscope dans la
position désirée et
incliner l’écran LCD
dans le sens le plus
commode. Il peut
tourner de 270° (90°
vers le bas, 180° vers
le haut).
Time Code
Pendant l’enregistrement, un time code est
enregistré sur la bande. Ce code est utilisé pour
confirmer la place de la séquence enregistrée
sur la bande pendant la lecture.
Affichage
Minutes
Secondes
Images*
(30 images =
12:34:24
* Les numéros d’image ne sont pas affichés
pendant l’enregistrement.
Si l’enregistrement commence à partir d’une
section vierge, le time code commence à
compter à partir de “00:00:00”
(minutes:secondes:image). Si l’enregistrement
commence à partir de la fin d’une séquence
enregistrée précédemment, le time code
continue à partir de la valeur du dernier time
code. Si pendant l’enregistrement, une partie
vierge est laissée sur la bande, le time code est
interrompu. Quand l’enregistrement est repris, le
time code recommence à compter à partir de
“00:00:00”. Ce qui signifie que le caméscope
peut enregistrer les mêmes time codes que
ceux existant dans une séquence enregistrée
précédemment. Pour empêcher ceci, exécuter
Enregistrement sur une cassette en cours
( p. 21) dans les cas suivants;
●
Après lecture de la bande enregistrée, quand
vous refaites une prise de vues.
● Si l’alimentation est coupée pendant la prise de
vues.
● Si la cassette est retirée puis remise pendant la
prise de vues.
1 seconde)
Page 77

● Si on filme en utilisant une bande partiellement
enregistrée.
● Si on filme sur une partie vierge située au milieu
de la bande.
● Si on filme de nouveau après avoir déjà fait une
prise de vues et ouvert/fermé le volet de logement
de cassette.
REMARQUES:
● Le time code ne peut pas être remis à zéro.
● Pendant l’avance rapide ou le rembobinage,
l’indication de time code n’évolue pas de façon
régulière.
● Le time code n’est affiché que lorsque “TIME
CODE” est réglé sur “MARCHE”. (
p. 34)
Relecture rapide
Vous permet de vérifier la fin du dernier
enregistrement.
1) Appuyer sur QUICK REVIEW lorsque le
mode d’attente d’enregistrement est activé.
2) La bande est rembobinée pendant plusieurs
secondes et relue automatiquement, puis se
met en pause en mode d’attente
d’enregistrement pour la prochaine prise de
vues.
●
Il peut y avoir une certaine distorsion d’image au
début de la lecture. C’est normal.
Enregistrement sur une cassette en cours
1) Lire une cassette ou utiliser la fonction de
recherche de section vierge ( p. 22) pour
trouver le point à partir duquel vous voulez
commencer l’enregistrement, puis passer en
mode de pause sur image. (Voir la colonne de
droite.)
2) Régler l’interrupteur d’alimentation sur “REC”
tout en appuyant sur la touche de verrouillage
située sur l’interrupteur, puis commencer
l’enregistrement.
LECTURE VIDÉO
FR 21
Lecture normale
¡¡
¡¡
66
66
11
11
Hautparleur
VIDEO/
MEMORY
7
1 Insérer une cassette. ( p. 18)
2 Régler le commutateur VIDEO/MEMORY sur
“VIDEO”.
3 Régler l’interrupteur d’alimentation sur
“PLAY” tout en appuyant sur la touche de
verrouillage située sur l’interrupteur.
4 Pour commencer la lecture, appuyer sur 6.
5 Pour arrêter la lecture, appuyer sur 7.
En mode d’arrêt, appuyer sur 1 pour le
●
rembobinage ou sur
Pour commander le volume du haut-parleur
Glisser la commande de zoom (VOL. +/–) vers
“+” pour augmenter le volume ou vers “–” pour
le diminuer.
REMARQUES:
● L’image de lecture peut être visionnée sur l’écran
LCD, dans le viseur ou sur un téléviseur raccordé.
p. 23)
(
● Si le mode d’arrêt dure pendant 5 minutes lorsque
l’énergie est fournie par une batterie,
l’alimentation du caméscope est coupée
automatiquement. Pour remettre l’alimentation,
régler l’interrupteur d’alimentation sur “OFF”, puis
sur “PLAY”.
● Lorsqu’un câble est raccordé au connecteur AV, le
son n’est pas entendu du haut-parleur.
Pause sur image
Permet d’effectuer une pause pendant la lecture
vidéo.
1) Durant la lecture, appuyer sur 6.
2) Pour reprendre la lecture normale, appuyer
de nouveau sur 6.
●
Si la pause sur image dure pendant plus de
3 minutes, le mode d’arrêt du caméscope est
engagé automatiquement.
VOL. +/–
Touche de verrouillage
MENU
¡ pour l’avance rapide.
ENREGISTREMENT ET LECTURE VIDÉO
Page 78

22 FR
A
LECTURE VIDÉO
Recherche accélérée
Permet une recherche à grande vitesse dans un
sens ou l’autre durant la lecture vidéo.
1) Pendant la lecture, appuyer sur ¡ pour le
sens avant ou sur 1 pour le sens inverse.
2) Pour reprendre la lecture normale, appuyer
sur 6.
●
Pendant la lecture, appuyer en continu ¡ ou
1. La recherche continue tant que vous
maintenez la touche. Une fois la touche relâchée,
la lecture normale reprend.
● Un léger effet de mosaïque apparaît dans
l’affichage pendant la recherche accélérée. Ce
n’est pas un mauvais fonctionnement.
TTENTION:
Lors d’une recherche
accélérée, il est possible
qu’une partie de l’image ne
soit pas clairement visible,
particulièrement du côté
gauche de l’écran.
Recherche de section vierge
Aide à repérer l’endroit où démarrer
l’enregistrement sur une cassette en cours pour
éviter une interruption du time code. ( p. 20)
1 Insérer une cassette. ( p. 18)
2 Régler le commutateur VIDEO/MEMORY sur
“VIDEO”.
3 Régler l’interrupteur d’alimentation sur
“PLAY” tout en appuyant sur la touche de
verrouillage située sur l’interrupteur.
4 Appuyer sur BLANK.
●
L’indication “RECHERCHE BLANCS” apparaît et
le caméscope démarre automatiquement la
recherche en sens avant ou en sens inverse, puis
s’arrête à l’endroit qui est à environ 3 secondes
de bande avant le commencement de la section
vierge détectée.
● Pour interrompre la recherche de section vierge,
appuyer sur 7 ou
BLANK.
REMARQUES:
● Avant de lancer une recherche de section vierge
et si la position actuelle se situe sur une section
vierge, le caméscope effectue la recherche en
sens inverse. Si la position actuelle se situe sur
une partie enregistrée, le caméscope effectue la
recherche en sens avant.
● Si le début ou la fin de la bande est atteint durant
la recherche de section vierge, le caméscope
s’arrête automatiquement.
● Une partie vierge plus courte que 5 secondes ne
peut pas être détectée.
● La partie vierge détectée peut se situer entre des
séquences enregistrées. Avant de démarrer
l’enregistrement, s’assurer qu’il n’y a aucune
séquence enregistrée après la partie vierge.
Page 79

Raccordement à un téléviseur ou à un magnétoscope
Vers le
connecteur AV
Câble audio/vidéo
(fourni)
Téléviseur
Magnétoscope
1Jaune vers VIDEO IN (À raccorder si votre
téléviseur ou magnétoscope ne possède que
des connecteurs d’entrée A/V.)
2Rouge vers AUDIO R IN*
3Blanc vers AUDIO L IN*
* Non requis pour la visualisation d’images fixes
uniquement.
LECTURE VIDÉO
FR 23
1 S’assurer que l’alimentation de tous les
appareils est coupée.
2 Raccorder le caméscope à un téléviseur ou à
un magnétoscope comme montré dans
l’illustration.
En utilisant un magnétoscope, aller à l’étape 3.
Sinon, passer à l’étape 4.
3 Raccorder la sortie du magnétoscope à
l’entrée du téléviseur, en se référant au mode
d’emploi du magnétoscope.
4 Mettre le caméscope, le magnétoscope et le
téléviseur sous tension.
5 Régler le magnétoscope dans son mode
d’entrée AUX, et régler le téléviseur sur le mode
VIDÉO.
6 Démarrer la lecture sur le caméscope.
( p. 21)
Pour choisir l’affichage ou non des fonctions
suivantes sur le téléviseur raccordé
●
Date/Heure
Régler “DATE/HEURE” sur “MARCHE” ou
“ARRÊT”. (
● Time Code
Régler “TIME CODE” sur “MARCHE” ou
“ARRÊT”. (
● Indications autres que la date/heure et le time
code
Régler “ÉCRAN” sur “ARRÊT”, “LCD” ou “LCD/
TV”. (
REMARQUES:
● Il est recommandé d’utiliser l’adaptateur
secteur comme source d’alimentation au lieu
de la batterie. (
● Pour contrôler l’image et le son du caméscope
sans introduire de cassette ni de carte mémoire,
régler l’interrupteur d’alimentation du caméscope
sur “REC”, puis régler votre téléviseur sur le mode
d’entrée approprié.
● S’assurer de régler le volume du son du téléviseur
sur son niveau minimum pour éviter une pointe
soudaine de son quand le caméscope est mis en
marche.
p. 31, 35)
p. 31, 35)
p. 31, 35)
p. 15)
ENREGISTREMENT ET LECTURE VIDÉO
Page 80

24 FR
LECTURE VIDÉO
Lecture à l’aide de la télécommande
La télécommande toute fonction sert à faire
fonctionner le caméscope à distance et à
exécuter les opérations de base (lecture, arrêt,
pause, avance rapide et rembobinage) du
magnétoscope. Elle active également les
fonctions de lecture complémentaires. ( p. 25)
Mise en place de la batterie
La télécommande marche
à l’aide d’une batterie au
lithium (CR2025).
1 Sortir le logement de
batterie en poussant sur le
bouton de verrouillage.
2 Insérer la batterie dans
son logement et s’assurer
que la marque “+” est visible.
3 Remettre le logement en place en le faisant
glisser jusqu’à entendre un clic.
Portée de la télécommande (usage en intérieur)
Lors de l’usage de la
télécommande, bien la
diriger vers le capteur de
la télécommande. La
distance réelle
approximative du rayon
transmis en usage
interne est de 5 m
REMARQUE:
Le rayon transmis peut manquer d’efficacité ou
entraîner des dysfonctionnements si le capteur de
la télécommande est directement exposé à la
lumière du soleil ou à des éclairages puissants.
Touches et fonctions
2
1
Bouton de
verrouillage
Capteur de la
télécommande
3
1
1Fenêtre de transmission du rayon infrarouge
●
Transmet le signal du rayon.
Les touches suivantes sont disponibles
uniquement lorsque l’interrupteur d’alimentation
du caméscope est réglé sur “PLAY”.
2Touche PAUSE
●
Interrompt momentanément la bande
p. 25)
(
Touche de déplacement vers le haut
( p. 25)
3Touche de rembobinage SLOW ( p. 25)
4Touche REW
●
Rembobinage/Recherche accélérée inverse
sur une bande (
● Affiche le fichier précédent sur une carte
mémoire (
Touche de déplacement vers la gauche
( p. 25)
5Touche INSERT ( pg. 45)
6Touche SHIFT ( p. 25)
7Touche DISPLAY ( p. 23, 42)
8Touche d’avance SLOW ( p. 25)
9Touche PLAY
●
Démarre la lecture d’une bande ( p. 21)
● Démarre la lecture automatique des images
sur une carte mémoire (
!Touche FF
●
Avance rapide/Recherche accélérée sur une
bande (
● Affiche le fichier suivant sur une carte mémoire
pg. 27)
(
Touche de déplacement vers la droite
( p. 25)
"Touche A. DUB ( pg. 45)
#Touche STOP
●
Arrête la bande ( p. 21)
● Arrête la lecture automatique ( pg. 27)
Touche de déplacement vers le bas ( p. 25)
$Touche EFFECT ( p. 25)
%Touche EFFECT ON/OFF ( p. 25)
Les touches suivantes sont disponibles lorsque
l’interrupteur d’alimentation du caméscope est
réglé sur “REC”
&Touches de zoom (T/W)
Zoom avant/arrière ( p. 20, 25)
(également disponible avec l’interrupteur
d’alimentation réglé sur “PLAY”)
(Touche START/STOP
Fonctionne comme la touche de marche/arrêt
d’enregistrement du caméscope.
)Touche S.SHOT
Fonctionne comme la touche SNAPSHOT du
caméscope.
(également disponible avec l’interrupteur
d’alimentation réglé sur “PLAY”)
p. 22)
pg. 27)
pg. 27)
p. 22)
Page 81

.
PAUSE ou
Zoom (T/W)
SLOW ( )
PLAY
(Gauche)
SHIFT
(Haut)
SLOW ( )
(Droite)
STOP ou
(Bas)
Lecture au ralenti
Lors de la lecture vidéo normale, appuyer sur
SLOW ( ou ) pendant plus de 2 secondes
environ.
●
Après 10 minutes environ, la lecture normale
reprend.
● Pour interrompre momentanément la lecture au
ralenti, appuyer sur PAUSE (PAUSE).
● Pour arrêter la lecture au ralenti, appuyer sur
PLAY (
3).
REMARQUES:
● Il est également possible de déclencher la lecture
au ralenti à partir de la pause sur image en
appuyant sur SLOW ( ou ) pendant plus de
2 seconds environ.
● Pendant la lecture au ralenti, l’image peut dévoiler
un effet de mosaïque en raison du traitement
numérique qu’elle subit.
● Après que SLOW ( ou ) est actionné et
maintenu, l’image fixe peut s’afficher juste
quelques secondes, pour faire place ensuite à un
écran bleu. Ce n’est pas un mauvais
fonctionnement.
● Pendant la lecture au ralenti, la vidéo va
rencontrerquelques perturbations, et l’image peut
paraître instable, notamment avec les plans fixes.
Ce n’est pas un mauvais fonctionnement.
Lecture image par image
Lors de la lecture normale ou d’une pause sur
image, appuyer sur SLOW ( ) de façon
répétée pour aller dans le sens avant ou sur
SLOW ( ) de façon répétée pour aller dans le
sens inverse. Chaque fois que SLOW ( ou
) est actionné, une lecture image par image
est effectuée.
Lecture avec zoom
Agrandit l’image enregistrée jusqu’à 25X à tout
moment pendant la lecture vidéo et la lecture
D.S .C.
1) Appuyer sur PLAY (3) pour
démarrer la lecture vidéo. Ou
exécuter la lecture normale des
images.
LECTURE VIDÉO
FR 25
2) À l’endroit exact où vous
voulez agrandir l’image, appuyer
sur la touche de zoom (T).
Pour revenir vers un plan général
●
en zoom arrière, appuyer sur la
touche de zoom (W).
3) Vous pouvez déplacer l’image
sur l’écran à la recherche d’une
portion particulière de l’image.
Tout en maintenant SHIFT,
enfoncée, appuyer sur
(Gauche), (Droite), (Haut) et (Bas).
Pour arrêter le zoom, appuyer en continu sur W
●
jusqu’à ce que l’image redevienne normale.
Sinon, appuyer sur STOP (
durant la lecture vidéo.
● Pour remettre l’image à sa taille normale durant
l'affichage d'une photo en mode zoom, appuyer
sur PLAY (
REMARQUES:
● Le zoom peut également être utilisé pendant la
lecture au ralenti et la pause sur image.
● À cause du traitement numérique, la qualité de
l’image peut souffrir.
3).
7), puis sur PLAY (3)
Effets spéciaux en lecture
Permet d’ajouter des effets créatifs à l’image en
cours de lecture vidéo.
SÉPIA: La teinte des scènes enregistrées
est légèrement brunie, comme les vieilles
photographies. Associer cet effet au mode
Cinéma ( p. 36, “Mode Large”) pour donner
une tonalité ancienne au film.
NOIR&BLANC: Comme dans les vieux
films, le film est tourné en noir et blanc. Utilisé
en mode Cinéma ( p. 36, “Mode Large”), il
rehausse l’effet “Cinéma classique”.
FILM ANC.: Donne aux scènes
enregistrées un effet stroboscopique.
STROBOSCOP.: L’enregistrement
ressemble à une série de clichés consécutifs.
1) Pour
démarrer la
lecture,
appuyer sur
PLAY (3).
2) Appuyer
sur EFFECT. Le menu de sélection EFFET
LECTURE apparaît.
3) Appuyer sur EFFECT de façon répétée pour
déplacer la barre lumineuse vers l’effet souhaité.
●
La fonction choisie est activée et au bout de 2
secondes, le menu disparaît.
● Pour désactiver l’effet sélectionné, appuyer sur
EFFECT ON/OFF. Pour réactiver l’effet
sélectionné, appuyer de nouveau sur EFFECT
ON/OFF.
● Pour modifier l’effet sélectionné, reprendre depuis
l’étape 2 ci-dessus.
EFFECT ON/OFF
EFFECT
ENREGISTREMENT ET LECTURE VIDÉO
Page 82

26 FR
ENREGISTREMENT D.S.C.
Prise de vues simple (Photo D.S.C.)
Vous pouvez utiliser votre caméscope comme
un appareil photo numérique pour prendre des
photos. Les images fixes sont stockées dans la
carte mémoire.
REMARQUE :
Avant de continuer, effectuer les procédures
indiquées ci-dessous :
● Alimentation ( p. 13)
● Insertion d’une carte mémoire ( p. 18)
VIDEO/
MEMORY
1 Retirer le couvre-objectif.
2 Ouvrir complètement l’écran LCD. ( p. 19)
3 Régler le commutateur VIDEO/MEMORY sur
“MEMORY”.
4 Régler l’interrupteur d’alimentation sur “REC”
tout en appuyant sur la touche de verrouillage
située sur l’interrupteur.
●
Pour changer la qualité de l’image., p. 31, 34.
5 Appuyer sur SNAPSHOT. L’indication
“PHOTO
” apparaît tandis que le photo est prise.
●
Pour supprimer les images fixes que vous ne
souhaitez pas garder, se reporter à la section
“Suppression des fichiers”.
● Pour ne pas entendre le bruit de l’obturateur,
désactiver le signal sonore régler “MELODY” sur
“ARRÉT”. (
REMARQUE :
Si la prise de vues n’est pas exécutée dans les 5
minutes environ qui suivent le réglage sur “REC” de
l’interrupteur d’alimentation tandis que l’énergie est
fournie par la batterie, l’alimentation du caméscope
est coupée automatiquement pour des raisons
d’économie. Pour réactiver la prise de vues, rentrer
et tirer de nouveau sur le viseur ou fermer et ouvrir
de nouveau l’écran LCD.
p. 31, 33)
SNAPSHOT
Touche de
verrouillage
Interrupteur
d’alimentation
( p. 29)
Nombre approximatif d’images pouvant être
stockées
●
Le nombre augmente ou diminue selon la qualité,
la grandeur de l’image, etc.
Dimension/Qualité de
l’image
640 x 480/FIN 47 95 205 425
640 x 480/STANDARD 160 295 625 1285
Dimension/Qualité de
l’image
640 x 480/FIN 55 105 215
640 x 480/STANDARD 190 320 645
* En option
Carte mémoire SD*
8 MB 16 MB 32 MB 64 MB
MultiMediaCard*
8 MB 16 MB 32 MB
Page 83

Lecture normale des images
Les images prises à l’aide du caméscope sont
automatiquement numérotées, puis stockées
par ordre numérique dans la carte mémoire.
Vous pouvez visionner les images stockées, une
à la fois, comme en feuilletant un album photos.
22
22
11
11
VIDEO/
MEMORY
7
6
Touche de verrouillage
Interrupteur
d’alimentation
MENU
1 Insérer une carte mémoire. ( p. 18)
2 Régler le commutateur VIDEO/MEMORY sur
“MEMORY”.
3 Régler l’interrupteur d’alimentation sur
“PLAY” tout en appuyant sur la touche de
verrouillage située sur l’interrupteur.
●
Une image stockée s’affiche.
4 Appuyer sur 1 pour afficher le fichier
précédent. Appuyer sur
suivant.
REMARQUE :
Les images prises et stockées sur la carte d’un
autre périphérique avec des résolutions autres que
“640 x 480” seront affichées sous format miniature
uniquement. Elles ne peuvent pas être ainsi
transférées sur ordinateur.
Lecture avec zoom
Disponible uniquement avec la télécommande.
( p. 25)
2 pour afficher le fichier
Lecture automatique des images
Vous pouvez passer en revue la totalité des
images stockées dans la carte mémoire d’une
façon automatique.
1 Reprendre les étapes 1 – 3 de la section
“Lecture normale des images”.
2 Appuyer sur 6 pour démarrer la lecture
automatique.
●
Si vous appuyez sur 1 pendant la lecture
automatique, les fichiers sont affichés selon un
ordre décroissant.
LECTURE D.S.C.
● Si vous appuyez sur 2 pendant la lecture
automatique, les fichiers sont affichés selon un
ordre croissant.
FR 27
3 Pour arrêter la lecture automatique, appuyer
sur 7
.
Lecture indexée des fichiers
Vous pouvez visualiser simultanément plusieurs
fichiers différents stockés dans la carte
mémoire. Cette fonctionnalité de navigation
facilite la recherche d’un fichier particulier.
1 Reprendre les étapes 1 – 3 de la section
“Lecture normale des images”.
2 Appuyer sur INDEX.
L’écran d’index apparaît.
3 Appuyer sur 4, 3, 1
ou sur 2 pour déplacer la
marge vers le fichier
désigné.
4 Appuyer sur SET. Le
fichier sélectionné est
affiché.
Fichier sélectionné
3
2
1
4
5
6
8 9
7
Numéro index
Suppression de l’affichage sur
écran
1 Reprendre les étapes 1 – 3 de la section
“Lecture normale des images”.
2 Appuyer sur MENU. L’écran de menu
apparaît.
3 Appuyer sur 4, 3, 1 ou 2 afin de sélectionner
“ÉCRAN”, et appuyer ensuite sur SET. Le menu
ÉCRAN apparaît.
4 Appuyer sur 4 ou 3 pour choisir “ARRÉT”,
puis appuyer sur SET ou
operation mode indicator, folder/file number and
battery remaining power indicator disappear.
Pour faire réapparaître les indicateurs,
●
sélectionner “MARCHE”.
Numéro du dossier et du fichier
Indicateur du mode de
fonctionnement
2, puis sur MENU. The
ENREGISTREMENT ET LECTURE D’APPAREIL PHOTO NUMÉRIQUE (D.S.C.)
Page 84

28 FR
PROTECTION
PROT G
FONCTIONS SUPPLÉMENTAIRES POUR D.S.C.
Redéfinition du nom de fichier
En redéfinissant le nom de fichier, un nouveau
dossier est créé. Les nouveaux fichiers que
vous allez créer seront stockés dans le nouveau
dossier. Il est plus pratique de séparer les
nouveaux fichiers des fichiers créés
précédemment.
1 Reprendre les étapes 1 – 3 de la section
“Lecture normale des images”.
2 Appuyer sur MENU. L’écran de menu
apparaît.
3 Appuyer sur 4, 3, 1 ou sur 2 afin de
sélectionner “RENOMMER FICH”, et appuyer
ensuite sur SET. L’écran RENOMMER FICH
apparaît.
4 Appuyer sur 4 ou sur 3 afin de sélectionner
“EXÊCUTER”, et appuyer ensuite sur SET. Le
nouveau dossier (p.ex. “101JVCGR”) sera
créé,et le nom du fichier du cliché suivant
démarre à partir de DVC00001.
REMARQUE :
Si le nom de fichier atteint DVC09999, un nouveau
dossier (p.ex. “101JVCGR”) sera créé, et le nom du
fichier redémarre à partir de DVC00001.
Protection des fichiers
Le mode de protection, lorsqu’il est activé,
empêche tout effacement accidentel des
fichiers.
1 Reprendre les étapes 1 – 3 de la section
“Lecture normale des images”. ( p. 27)
2 Appuyer sur MENU. L’écran de menu
apparaît.
3 Appuyer sur 4, 3, 1 ou sur 2 afin de
sélectionner “PROTECTION”, et appuyer
ensuite sur SET. L’écran PROTECTION
apparaît.
Pour protéger le fichier actuellement affiché
4 Appuyer sur 4 ou 3
afin de sélectionner
“ACTUEL”, et appuyer
ensuite sur SET ou
L’écran PROTECTION
apparaît.
5 Appuyer sur 1 ou 2
pour sélectionner le fichier désiré.
2.
6 Appuyer sur 4 ou sur 3
afin de sélectionner
“EXÊCUTER”, et appuyer
ensuite sur SET.
●
Pour annuler la protection,
sélectionner “RETOUR”.
● Répéter les étapes 5 et 6
pour tous les fichiers à protéger.
Pour protéger tous les fichiers stockés dans
la carte mémoire
4 Appuyer sur 4 ou sur 3 afin de sélectionner
“PROT.TOUS”, et appuyer ensuite sur SET ou
L’écran PROTECTION apparaît.
5 Appuyer sur 4 ou sur 3 afin de sélectionner
“EXÊCUTER”, et appuyer ensuite sur SET.
●
Pour annuler la protection, sélectionner
“RETOUR”.
REMARQUE :
● Le symbole “” qui apparaît signifie que le
fichier affiché est protégé.
● Si la carte mémoire est initialisée ou altérée,
même les fichiers protégés sont supprimés. Pour
éviter de perdre des fichiers importants, les
transférer sur ordinateur et les enregistrer.
Pour retirer la protection
Avant de procéder, exécuter les étapes 1 – 3 de
la section “Protection des fichiers”.
Pour retirer la protection du fichier
actuellement affiché
4 Appuyer sur 4 ou sur 3 afin de sélectionner
“ACTUEL”, et appuyer ensuite sur SET ou
L’écran PROTECTION apparaît.
2.
5 Appuyer sur 1 ou 2 pour sélectionner le
fichier désiré.
6 Appuyer sur 4 ou sur 3 afin de sélectionner
“EXÊCUTER”, et appuyer ensuite sur SET.
●
Pour annuler la sélection, sélectionner
“RETOUR”.
● Répéter les étapes 5 et 6 pour tous les fichiers à
protéger.
Pour protéger tous les fichiers stockés dans
la carte mémoire
4 Appuyer sur 4 ou sur 3 afin de sélectionner
“ANNUL.TOUS”, et appuyer ensuite sur SET ou
2. L’écran PROTECTION apparaît.
5 Appuyer sur 4 ou sur 3 afin de sélectionner
“EXÊCUTER”, et appuyer ensuite sur SET.
●
Pour annuler la protection, sélectionner
“RETOUR”.
2.
Page 85

FONCTIONS SUPPLÉMENTAIRES POUR D.S.C.
Suppression des fichiers
Les fichiers antérieurement stockés peuvent
être supprimés individuellement ou tous à la
fois.
1 Reprendre les étapes 1 – 3 de la section
“Lecture normale des images”
2 Appuyer sur MENU. L’écran de menu
apparaît.
3 Appuyer sur 4, 3, 1 ou sur 2 afin de
sélectionner “SUPPRIMER”, et appuyer ensuite
sur SET. Le menu secondaire apparaît.
Pour supprimer le fichier actuellement
affiché
4 Appuyer sur 4 ou sur 3
afin de sélectionner
“ACTUEL”, et appuyer
ensuite sur SET ou
L’écran SUPPRIMER
apparaît.
2.
5 Appuyer sur 1 ou 2
pour sélectionner le fichier désiré.
6 Appuyer sur 4 ou sur 3
afin de sélectionner
“EXÊCUTER”, et appuyer
ensuite sur SET.
●
Pour annuler la
suppression, sélectionner
“RETOUR”.
● Répéter les étapes 5 et 6 pour tous les fichiers à
supprimer.
REMARQUE :
Le symbole “” qui apparaît signifie que le fichier
sélectionné est protégé et qu’il n’est pas possible
de le supprimer.
Pour supprimer tous les fichiers stockés
dans la carte mémoire
4 Appuyer sur 4 ou sur 3 afin de sélectionner
“TOUR”, et appuyer ensuite sur SET ou
L’écran SUPPRIMER apparaît.
5 Appuyer sur 4 ou sur 3 afin de sélectionner
“EXÊCUTER”, et appuyer ensuite sur SET.
●
Pour annuler la suppression, sélectionner
“RETOUR”.
REMARQUE :
● Il n’est pas possible de supprimer les fichiers
protégés (
retirer la protection.
● Une fois les fichiers supprimés, ils ne peuvent pas
être restaurés. Bien vérifier tous les fichiers avant
de les supprimer.
p. 28). Pour ce faire, il faut d’abord
( p. 27).
SUPPRIMER
ACTUEL
TOUS
2.
FR 29
PRÉCAUTION :
Ne pas ôter la carte mémoire ou exécuter d’autres
opérations (ex. éteindre le caméscope) pendant la
suppression. De même, veiller à utiliser l’adaptateur
secteur fourni pour éviter toute altération éventuelle
de la carte mémoire pouvant survenir suite à
l’épuisement de la batterie pendant la suppression.
En cas d’altération de la carte mémoire, procéder à
son initialisation. (
p. 30)
Réglage des informations d’impression (Réglage DPOF)
Ce caméscope est compatible avec la norme
DPOF (Digital Print Order Format) dans un but
de prise en charge des futurs systèmes tels que
l’impression automatique. Deux réglages des
informations d’impression sont possibles pour
les images stockées dans la carte mémoire:
“Pour imprimer toutes les images fixes (Un
tirage pour chaque)” ou “Pour imprimer en
sélectionnant les images fixes et le nombre de
tirages”.
REMARQUE :
Si vous chargez une carte mémoire déjà réglée
d’après les paramètres dans l’illustration ci-dessous
dans une imprimante compatible DPOF, elle
procédera automatiquement à des tirages des
images fixes sélectionnées.
Pour imprimer toutes les images fixes (Un
tirage pour chaque)
1 Reprendre les étapes 1 – 3 de la section
“Lecture normale des images”. ( p. 27)
2 Appuyer sur MENU. L’écran de menu
apparaît.
3 Appuyer sur 4, 3, 1 ou
2 afin de sélectionner
sur
“DPOF”, et appuyer
ensuite sur SET. L’écran
DPOF apparaît.
4 Appuyer sur 4 ou sur 3
afin de sélectionner “1
TIRAGE DE CHAQUE ?”, et appuyer ensuite sur
2. L’écran DPOF apparaît.
SET ou
5 Appuyer sur 4 ou sur 3
afin de sélectionner
“EXÊCUTER”, et appuyer
ensuite sur SET. L’écran
de lecture normale
apparaît.
●
Pour annuler la sélection,
sélectionner “RETOUR”.
ENREGISTREMENT ET LECTURE D’APPAREIL PHOTO NUMÉRIQUE (D.S.C.)
Page 86

30 EN
FONCTIONS SUPPLÉMENTAIRES POUR D.S.C.
Pour imprimer en sélectionnant les images
fixes et le nombre de tirages
1 Reprendre les étapes 1 – 3 de la section
“Pour imprimer toutes les images fixes (Un
tirage pour chaque)”.
2 Appuyer sur 4 ou sur 3
afin de sélectionner
“ACTUEL”, et appuyer
ensuite sur SET ou
L’écran DPOF apparaît.
2.
3 Appuyer sur 1 ou 2
pour sélectionner le fichier désiré.
4 Appuyer sur 4 ou sur 3 afin de sélectionner
l’indication numérique (00), et appuyer sur SET.
5 Sélectionner le nombre
de tirages en appuyant sur
3 pour augmenter la
quantité, ou sur
diminuer, et appuyer
ensuite sur SET.
●
Répéter les étapes 3 à 5
pour le nombre souhaité de tirages.
● Le nombre de tirages peut être défini jusqu’à 15.
● Pour corriger le nombre de tirages, sélectionner
de nouveau l’image et modifier le nombre.
4 pour la
6 Appuyer sur 4 ou sur 3
afin de sélectionner
“RETOUR”, et appuyer
ensuite sur SET. L’écran
“ENREGISTRER?”
apparaît.
●
Si vous n’aviez pas modifié
les réglages de l’étape 3 à l’étape 5, le menu
DPOF Menu réapparaît.
7 Appuyer sur 4 ou sur 3 afin de sélectionner
“EXÊCUTER” pour enregistrer le réglage que
vous venez de faire, et appuyer ensuite sur SET.
●
v Pour annuler la sélection, sélectionner
“ANNULER”.
Pour remettre le nombre de tirages à zéro
1 Reprendre les étapes 1 – 3 de la section
“Pour imprimer toutes les images fixes (Un
tirage pour chaque)”.
2 Appuyer sur 4 ou sur 3 afin de sélectionner
“REM.À ZÉRO”, et appuyer ensuite sur SET.
L’écran DPOF apparaît.
3 Appuyer sur 4 ou sur 3 afin de sélectionner
“EXÊCUTER”, et appuyer ensuite sur SET.
L’écran de lecture normale apparaît.
●
Pour annuler la sélection, sélectionner
“RETOUR”.
● Le nombre de tirages est remis à 0 pour toutes les
images fixes.
PRÉCAUTION :
Lors de l’exécution des opérations ci-dessus, ne
jamais débrancher l’alimentation ; cela risquerait
d’altérer la carte mémoire.
Initialisation d’une carte mémoire
Vous pouvez initialiser une carte mémoire à tout
moment.
Après initialisation, tous les fichiers et données
stockés dans la carte mémoire, y compris ceux
qui ont été protégés, sont effacés.
1 Régler le commutateur VIDEO/MEMORY sur
“MEMORY”.
2 Régler l’interrupteur d’alimentation sur
“PLAY” tout en appuyant sur la touche de
verrouillage située sur l’interrupteur.
3 Appuyer sur MENU. L’écran de menu
apparaît.
4 Appuyer sur 4, 3, 1
ou sur 2 afin de
sélectionner
“FORMATER”, et appuyer
ensuite sur SET. L’écran
FORMATER apparaît.
5 Appuyer sur 4 ou sur
3 afin de sélectionner “EXÊCUTER”, et appuyer
ensuite sur SET. La carte mémoire est
initialisée.
●
Lorsque l’initialisation est terminée, les messages
“PAS D’IMAGES STOCKÉES” apparaissent.
● Pour annuler l’initialisation, sélectionner
“RETOUR”.
PRÉCAUTION :
Ne pas exécuter d’autres opérations (ex. éteindre le
caméscope) pendant l’initialisation. De même,
veiller à utiliser l’adaptateur secteur fourni pour
éviter toute altération éventuelle de la carte
mémoire pouvant survenir suite à l’épuisement de
la batterie pendant l’initialisation. En cas d’altération
de la carte mémoire, procéder à son initialisation.
Page 87

UTILISATION DES MENUS POUR UN AJUSTEMENT DÉTAILLÉ
Modification des réglages des menus
Ce caméscope dispose d’un système de menus
sur écran facile à utiliser qui simplifie beaucoup
de nombreux réglages de détail. ( p. 31 – 35)
11
11
VIDEO/
MEMORY
44
44
MENU
1 Pour les menus d’enregistrement vidéo et
D.S.C.:
Régler le commutateur VIDEO/MEMORY sur
●
“VIDEO” ou “MEMORY”.
● Régler l’interrupteur d’alimentation sur “REC” tout
en appuyant sur la touche de verrouillage située
sur l’interrupteur.
● Régler le mode d'enregistrement à “
Pour les menus de lecture vidéo:
●
Régler le commutateur VIDEO/MEMORY sur
“VIDEO”.
● Régler l’interrupteur d’alimentation sur “PLAY”
tout en appuyant sur la touche de verrouillage
située sur l’interrupteur.
● Pour les menus de lecture D.S.C., vous reporter à
la section “LECTURE D.S.C.” (
2 Ouvrir complètement l’écran LCD. ( p. 19)
3 Appuyer sur MENU. L’écran de menu
apparaît.
4 Appuyer sur 4, 3, 1 ou sur 2 afin de
sélectionner la fonction désirée, et appuyer
ensuite sur SET. Le menu de la fonction
sélectionnée apparaît.
Écran pour le menu
d’enregistrement
vidéo et D.S.C.
FONCTION
5 La procédure de réglage expliquée ci-après
dépend de la fonction sélectionnée.
REMARQUES:
● Vous ne pouvez pas ouvrir l'écran Menu pendant
l'enregistrement.
● Il est impossible de régler certaines fonctions
dans les menus d’enregistrement vidéo et de
capture d’image. Les icônes de ces fonctions sont
affichées en gris/blanc.
Touche de
33
33
verrouillage
22
22
Interrupteur
d’alimentation
M
”. ( p. 15)
p. 27).
Écran pour le menu
de lecture vidéo
MODE ENREG
SP
LP
FR 31
Menus d'enregistrement vidéo et de capture d’image
FONCTION (
REGLAGE ( p. 32)
SYSTÊME ( p. 33)
AFFICHAGE ( p. 34)
APP. PHOTO NUM.
( p. 34)
1) Appuyer sur
4, 3, 1
ou 2 pour choisir la
sélection désirée, puis
appuyer sur SET.
●
Exemple: Menu VOLET/FONDU
2) Appuyer sur 3 ou 4 pour choisir le paramètre
désiré, puis appuyer sur SET ou 2. La sélection
est terminée.
●
L'indicateur “3” montre le réglage qui est
actuellement sauvegardé dans la mémoire du
caméscope.
● Appuyer sur 1 en tout temps pour annuler ou
revenir au menu précédent.
3) Appuyer sur MENU. L’écran de menu se
ferme.
REMARQUE:
Répéter la même procédure pour régler d’autres
fonctions.
p. 32)
L’icône du menu
sélectionné
VOLET/FONDU
EF
WB
Menus de lecture d'une vidéo
SP
LP
MODE ENREG ( p. 35)
MODE SON ( p. 35)
COMMENT ( p. 35)
LUMINOSITÉ ( p. 35)
DATE/HEURE ( p. 35)
ÉCRAN ( p. 35)
TIME CODE (
Exemple: Menu MODE
ENREG
1) Appuyer sur 3 ou 4
pour choisir le paramètre
désiré, puis appuyer sur
SET ou 2. La sélection
est terminée.
●
Répéter la même
procédure pour régler
d’autres fonctions.
● L'indicateur “
réglage qui est
actuellement sauvegardé
dans la mémoire du
caméscope.
● Appuyer sur 1 en tout
temps pour annuler ou
revenir au menu précédent.
‰
” montre le
2) Appuyer sur MENU. L’écran de menu se
ferme.
L’icône du menu
sélectionné
p. 35)
“‰” indicateur
SP
LP
MODE ENREG
MODE ENREG
SP
LP
FONCTIONS ÉLABORÉES
Page 88

32 FR
UTILISATION DES MENUS POUR UN AJUSTEMENT DÉTAILLÉ
Menus d’enregistrement
FONCTION
Les réglages du menu ne peuvent être changés
que lorsque l'interrupteur se trouve à “REC”.
[ ] = Préréglage en usine
VOLET/FONDU
( p. 40), “Effets de volet ou de fondu”
EFFET
( p. 41), “Programme AE, effets et effets de
l'obturateur”
EFFETS PRG.
( p. 41), “Programme AE, effets et effets de
l'obturateur”
OBTUR.
( p. 41), “Programme AE, effets et effets de
l'obturateur”
EXPOSITION
( p. 38), “Commande d’exposition”
BAL. BLANCS
( p. 39), “Réglage de la balance des blancs”
MACRO
[ARRÊT]: Désactive la fonction.
MARCHE: Lorsque la distance jusqu’au sujet
est inférieure à 1 m, régler “MACRO” sur
“MARCHE”. Vous pouvez filmer un sujet aussi
grand que possible à une distance d’environ
40 cm.
Selon la position du zoom, l’objectif peut ne pas
faire la mise au point.
REGLAGE
Les réglages suivants peuvent être changés
lorsque l’interrupteur se trouve à “REC”.
[ ] = Préréglage en usine
MODE ENREG
[SP]*: Pour enregistrer en mode SP (Lecture
standard)
LP: Lecture longue durée — plus économique,
offrant 1,5 fois la durée d’enregistrement
normale.
* L'indicateur SP n'apparaît pas à l'écran.
REMARQUES:
● Le doublage audio ( p. 45) et l’insertion vidéo
p. 45) sont possibles sur des bandes
(
enregistrées en mode SP.
● Si le mode d’enregistrement est commuté, l’image
en cours de lecture devient floue au point de
commutation.
● Il est recommandé de lire sur ce caméscope les
bandes enregistrées en mode LP sur ce même
caméscope.
● Pendant la lecture d’une bande enregistrée sur un
autre caméscope, des parasites peuvent
apparaître ou il peut y avoir des pauses
momentanées dans le son.
MODE SON
[12BITS]: Permet l'enregistrement du son
stéréo sur quatre voies différentes en mode
vidéo. (Équivaut au mode 32 kHz des modèles
précédents)
16BITS: Permet l’enregistrement du son en
stéréo sur deux canaux. (Équivaut au mode
48 kHz des modèles précédents)
STAB IMAGE*
ARRÊT: Désactive la fonction.
[MARCHE ]: Pour neutraliser l’instabilité
des images due au tremblement de la caméra,
notamment via un important grossissement.
REMARQUES:
● Une stabilisation précise peut ne pas être
possible si la main tremble trop ou en fonction des
conditions de prise de vue.
● L’indicateur “” clignote ou s’éteint si le
stabilisateur ne peut être utilisé.
● Désactiver ce mode au moment d’enregistrer
avec le caméscope sur un trépied.
* Accessible uniquement lorsque le sélecteur
VIDEO/MEMORY est réglé à “VIDEO”.
Page 89

UTILISATION DES MENUS POUR UN AJUSTEMENT DÉTAILLÉ
PHOTO LENT*
[PHOTO]: Mode Photo
LENT : Mode Ralenti en direct
Pour plus de détails sur la procédure, vous
reporter à la section “Ralenti en direct” ( p. 36)
et “Photo (Enregistrer une image fixe sur la
bande)” ( p. 37).
* Accessible uniquement lorsque le sélecteur
VIDEO/MEMORY est réglé à “VIDEO”.
ZOOM*
[32X]: Lorsqu’il est réglé sur “32X” et que le
zoom numérique est utilisé, le grossissement du
zoom est réinitialisé sur 32X puisque le zoom
numérique est débrayé.
64X*: Permet d’utiliser le zoom numérique. Par
un traitement numérique et un grossissement
des images, le zoom peut aller de 32X (la limite
du zoom optique) à un grossissement
numérique maximum de 64X.
800X*: Permet d’utiliser le zoom numérique. Par
un traitement numérique et un grossissement
des images, le zoom peut aller de 32X (la limite
du zoom optique) à un grossissement
numérique maximum de 800X.
* Accessible uniquement lorsque le sélecteur
VIDEO/MEMORY est réglé à “VIDEO”.
GAIN
ARRÊT: Permet de filmer des scènes sombres
sans réglage de luminosité de l’image.
[CAG]: L’aspect général peut paraître granuleux,
mais l’image reste lumineuse.
AUTO : La vitesse de l’obturateur se règle
automatiquement. La prise d’un sujet dans un
lieu pas ou mal éclairé à une vitesse lente
d’obturation fournit une image plus lumineuse
qu’en mode CAG; les mouvements du sujet sont
toutefois légèrement saccadés et peuvent
paraître peu naturels. L’aspect général peut
sembler granuleux. Tandis que la vitesse de
l’obturateur se règle automatiquement, “”
s’affiche.
SUPPR VENT
[ARRÊT]: Désactive la fonction.
MARCHE : Contribue à couper le bruit créé
par le vent. L’indication “” apparaît. La qualité
du son change. C’est normal.
FR 33
SYSTÊME
Les fonctions “ SYSTÊME” qui sont réglées
lorsque l’interrupteur d’alimentation est réglé sur
“REC” sont également appliquées lorsque
l’interrupteur d’alimentation est réglé sur “PLAY”.
[ ] = Préréglage en usine
MÉLODIE
ARRÊT: Bien qu’il n’est pas entendu pendant la
prise de vues, le bruit de l’obturateur est
enregistré sur la bande.
[MARCHE]: Une mélodie est diffusée
lorsqu’une opération est effectuée. Active
également l’effet sonore de l’obturateur.
( p. 27, 37)
RÉTABLIR
[RETOUR]: Ne rétablit pas tous les réglages fait
en usine.
EXÉCUTER: Rétablit tous les réglages fait en
usine.
PRIORITÉ
[LCD]: L’image est affichée sur l’écran LCD
lorsque le viseur est tiré alors que l’écran LCD
est ouvert.
VISEUR: L’image est affichée dans le viseur
lorsque le viseur est tiré alors que l’écran LCD
est ouvert.
TÉLÉCOMAND
[LCD]: Permet de désactiver le fonctionnement
de la télécommande.
VISEUR: Permet d’activer le fonctionnement de
la télécommande.
FONCTIONS ÉLABORÉES
Page 90

34 FR
UTILISATION DES MENUS POUR UN AJUSTEMENT DÉTAILLÉ
AFFICHAGE
● Les réglages du menu ne peuvent être changés
que lorsque l'interrupteur se trouve à “REC”.
● Les réglages de AFFICHAGE sauf
“LUMINOSITÉ” et “LANGUAGE” prennent effet
uniquement pour la prise de vues.
[ ] = Préréglage en usine
LUMINOSITÉ
p. 17, “Ajustement de la luminosité de
l’affichage”
RÉGL. HORL
p. 16, “Réglages de la date et de l’heure”
LANGUAGE
/ / / [ENGLISH] / FRANÇAIS /
ESPAÑOL / PORTUGUÊS
Le réglage de la langue peut être changée.
( p. 16)
DATE/HEURE
[ARRÊT]: La date/l’heure n’apparaissent pas.
MARCHE: La date et/ou l’heure sont toujours
affichées.
ÉCRAN
LCD: Empêche l’affichage du caméscope (sauf
la date, l’heure et le time code) d’apparaître sur
l’écran du téléviseur raccordé.
[LCD/TV]: Fait apparaître l’affichage du
caméscope sur l’écran quand le caméscope est
raccordé à un téléviseur.
TIME CODE
[ARRÊT]: Le time code n’est pas affiché.
MARCHE: Le time code est affiché sur le
caméscope et sur le téléviseur raccordé. Les
numéros d’image ne sont pas affichés pendant
l’enregistrement.
( p. 20)
MODE DÉMO
ARRÊT: Aucune démonstration automatique n’a
lieu.
[MARCHE]: Fait la démonstration de certaines
fonctions telles que Volet/Fondu et Effets, etc. et
peut être utilisé pour confirmer comment ces
fonctions agissent. Une démonstration démarre
dans les cas suivants:
●
Lorsque l’écran de menu est fermé, et que
“MODE DÉMO” est réglé sur “MARCHE”.
● Lorsque “MODE DÉMO” est réglé sur “MARCHE”,
et qu’aucune opération n’a été exécutée environ 3
minutes après que l’interrupteur d’alimentation a
été réglé sur “REC”.
● Effectuer n’importe quelle opération pendant la
démonstration l’arrête momentanément. Si
aucune opération n’a toujours pas été effectuée
plus de 3 minutes après, la démonstration
reprend.
REMARQUES:
● Si une cassette se trouve dans le caméscope, la
démonstration ne peut démarrer.
● “MODE DÉMO” reste sur “MARCHE”, même si
l’alimentation du caméscope est coupée.
APP. PHOTO NUM.
[ ] = Préréglage en usine
QUALITÉ
[FIN] / STANDARD
Le mode Qualité de l’image peut être
sélectionné pour correspondre au mieux à vos
besoins. Deux modes Qualité de l'image sont
disponibles : FIN ( ) et STANDARD ( )
(par ordre de qualité).
REMARQUE:
Le nombre d’images pouvant être stockées dépend
de la qualité d’image sélectionnée ainsi que de la
composition des sujets dans les images et du type
de carte mémoire utilisée. (
ENREG SUR
[ (BANDE)]: Lorsque l’enregistrement de
photo est effectué avec le commutateur VIDEO/
MEMORY réglé sur “VIDEO”, les images fixes
sont enregistrées sur la bande uniquement.
/ (BANDE/CARTE): Lorsque
l’enregistrement de photo est effectué avec le
commutateur VIDEO/MEMORY réglé sur
“VIDEO”, les images fixes sont enregistrées non
seulement sur la bande, mais aussi sur la carte
mémoire (640 x 480 pixels).
p. 26)
Page 91

UTILISATION DES MENUS POUR UN AJUSTEMENT DÉTAILLÉ
Menus de lecture
[ ] = Préréglage en usine
MODE SON et COMMENT
Pendant la lecture de la bande, le caméscope
détecte le mode dans lequel le son a été
enregistré, et reproduit ce dernier dans le même
mode. Sélectionner le type de son qui doit
accompagner l’image qui apparaît. Selon
l’explication d’accès au menu de la page 31,
sélectionner “MODE SON” ou “COMMENT” sur
l’écran de menu, puis le régler sur le paramètre
souhaité.
Les réglages ci-dessous ne prennent effet
uniquement pour la lecture vidéo, sauf
“LUMINOSITÉ” et “MODE ENREG”.
Les paramètres (sauf “ARRÊT” dans les
réglages ÉCRAN, MODE SON et COMMENT)
sont les mêmes que ceux décrits à la page 32,
34.
MODE ENREG [SP]* / LP
Permet de régler le mode d’enregistrement
vidéo (SP ou LP) selon votre préférence. Il est
recommandé d’utiliser “MODE ENREG” dans le
menu Playback si ce caméscope sert
d’enregistreur durant la copie. ( p. 45, 45)
* L'indicateur SP n'apparaît pas à l'écran.
MODE SON
[STEREO ]: Le son sort sur les deux canaux
“L” et “R” en stéréo.
GAUCHE : Le son du canal “L” sort.
DROIT : Le son du canal “R” sort.
COMMENT
[ARRÊT]: Le son initial sort sur les deux canaux
“L” et “R” en stéréo.
MARCHE: Le son copié sort sur les deux
canaux “L” et “R” en stéréo. ( p. 45)
MIXE: Les sons initiaux et copiés sont combinés
et sortent sur les deux canaux “L” et “R” en
stéréo.
FR 35
LUMINOSITÉ
p. 17, “Ajustement de la luminosité de
l’affichage”
DATE/HEURE
[ARRÊT]: La date/l’heure n’apparaissent pas.
MARCHE:
affichées.
ÉCRAN ARRÊT / [LCD] / LCD/TV
Réglé sur “ARRÊT”, l’affichage du caméscope
disapparaît.
TIME CODE [ARRÊT] / MARCHE
p. 20, “Time Code”
a date et/ou l’heure sont toujours
FONCTIONS ÉLABORÉES
Page 92

36 FR
FONCTIONS POUR ENREGISTREMENT
Lumière à LED
La lumière à LED peut être
utilisée pour éclaircir le sujet dans
un endroit sombre durant
l’enregistrement vidéo ou la prise
de vues D.S.C.
1 Appuyer sur LIGHT plusieurs
fois pour changer le réglage.
ARRÊT: Éteint la lumière.
MARCHE: La lumière est toujours
allumée. ( apparaît.)
AUTO: La lumière s’allume automatiquement
en cas de condition sombre. ( apparaît.)
Lumière à
LED
2 Appuyer sur la touche de marche/arrêt
d’enregistrement pour démarrer
l’enregistrement vidéo ou sur SNAPSHOT pour
prendre une photo.
REMARQUES:
● Veiller à ne pas pointer directement la lumière à
LED vers des yeux.
● Si la lumière n’atteint pas le sujet lorsque le réglage
de la lumière à LED est “MARCHE”, la fonction de
prise de vues en faible lumière est activée et rend
possible l’enregistrement du sujet plus clair.
● Il existe une différence de luminosité des images
enregistrées entre la zone centrale qui est
illuminée par la lumière à LED et les zones
environnantes (qui sont plus sombres).
● Puisque les sujets sont enregistrés à une vitesse
d’obturateur réduite lorsque le réglage de la
lumière à LED est “MARCHE”, ils apparaissent
légèrement flous.
Ralenti en direct
Cette fonction est utile pour enregistrer et revoir
au ralenti des moments précieux ou difficiles à
voir. Le son est enregistré et rejoué en temps réel.
1 Régler le commutateur VIDEO/MEMORY sur
“VIDEO”.
2 Régler le mode d'enregistrement à
M
”.( p. 15)
“
3 Régler “PHOTO LENT” sur “LENT”.
( p. 31, 33) L’indicateur de ralenti en direct
“” apparaît.
4 Appuyer sur SNAPSHOT (SLOW) pendant
l’enregistrement ou la lecture.
● Les images en mouvement sont divisées en
quatre images. Elles sont enregistrées ou lues
pendant 1.5 secondes, puis l’enregistrement
normal ou la lecture reprend.
● Cette fonction est accessible lorsque le sélecteur
de mode d’enregistrement se troure á “A” ou
M
”.
“
REMARQUE:
Accessible uniquement lorsque le sélecteur VIDEO/
MEMORY est réglé à “VIDEO”.
Mode Large
Ce caméscope vous permet de choisir le type
de format de sortie de l'image pour
l'enregistrement.
1 Régler l'interrupteur à “REC”.
2 Appuyer sur le bouton 16:9 plusieurs fois
pour obtenir la sélection désirée.
4 : 3
[4:3]: Enregistre sans aucune modification des
proportions Hauteur/Largeur de l’écran. Pour
toute lecture sur un téléviseur avec un rapport
d’écran normal. Au moment d’utiliser ce mode, se
reporter au mode d’emploi du téléviseur à rapport
d'écran normal.
16:9: Pour toute lecture sur des téléviseurs dont
le rapport Hauteur/Largeur est 16:9. L’image est
naturellement élargie pour remplir l’écran sans
aucune distorsion. L'indicateur “16:9” apparaît.
Au moment d’utiliser ce mode, se reporter au
mode d’emploi du téléviseur à écran large.
Pendant la lecture/l’enregistrement sur des
téléviseurs 4:3/écran LCD/viseur, l’image est
allongée à la verticale.
[ ] = Préréglage en usine
REMARQUE:
Accessible uniquement lorsque le sélecteur VIDEO/
MEMORY est réglé à “VIDEO”.
16 : 9
Prise de vues en faible lumière
Éclaire les sujets ou endroits sombres
davantage que s’ils étaient dans des conditions
d’éclairage naturel. Bien que l’image enregistrée
ne soit pas granuleuse, elle peut paraître
légèrement stroboscopique en raison de la
lenteur de la vitesse d’obturation.
1 Régler l’interrupteur d’alimentation sur “REC”.
2 Régler le mode d'enregistrement à
M
”.( p. 15)
“
3 Appuyer sur NIGHT pour que l’indicateur de
prise de vues en faible lumière “” apparaisse.
●
La vitesse de l’obturateur se règle
automatiquement pour offrir jusqu’à 30 fois la
sensibilité normale.
● “” apparaît à côté de “” tandis que la vitesse
de l’obturateur se règle automatiquement.
Page 93

Pour désactiver la prise de vues en faible
lumière
Appuyer de nouveau sur NIGHT pour que
l’indicateur de prise de vues en faible lumière
disparaisse.
REMARQUES:
● Pendant la prise de vue en faible lumière, les
réglages “GAIN” ou “STAB IMAGE” du menu
REGLAGE
activés.
● La prise de vue en faible lumière ne peut pas être
activée en même temps que les fonctions
“NEIGE” ou “SPORTS” de “EFFETS PRG.”, ou de
tous les modes “OBTUR.”. (
● Pendant la prise de vues en faible lumière, la mise
au point du caméscope peut se révéler difficile.
Pour remédier à ce problème, utiliser un trépied.
( p. 32, 33) ne peuvent pas être
p. 41).
Photo (Enregistrer une image fixe sur la bande)
Cette fonction permet d’enregistrer des images
fixes qui ressemblent à des photos sur bande.
1 Régler le commutateur VIDEO/MEMORY sur
“VIDEO”.
2 Régler l’interrupteur d’alimentation sur “REC”.
3 Régler le mode d'enregistrement à “
( p. 15)
4 Régler la fonction “PHOTO LENT” sur
“PHOTO”. ( p. 31, 33)
5 Appuyer sur SNAPSHOT.
On entend l’effet sonore d’un obturateur qui se
●
ferme.
● L’indication “PHOTO” apparaît et une image fixe
est enregistrée pendant 5 secondes environ ; le
caméscope revient ensuite en mode d’attente
d’enregistrement.
● Vous pouvez réaliser une prise de clichés
également pendant l’enregistrement. Une image
fixe est enregistrée pendant 5 secondes environ,
puis l’enregistrement normal reprend.
● La fonction Photo est accessible lorsque le
sélecteur de mode d’enregistrement se trouve à
“A” ou à “M”.
Il n’est pas possible d’utiliser le mode Photo
●
lorsque le mode Large 16:9 (indicateur 16:9) est
activ.
Mode Prise de vues en rafale
Maintenir la touche SNAPSHOT enfoncée à
l’étape 5 revient à exécuter une action
comparable à la photographie en rafale.
(Intervalle entre les images fixes : 1 seconde
environ)
M
”.
FONCTIONS POUR ENREGISTREMENT
●
Le mode Prise de vues en rafale est désactivé
lorsque “ENREG SUR” est réglé sur “ /
p. 34)
”. (
FR 37
Mise au point manuelle
Le système de mise au point automatique toute
distance du caméscope permet de filmer en
continu du gros plan (à 5 cm environ du sujet) à
l’infini.
Cependant, une mise au point correcte peut ne
pas être obtenue en fonction des conditions de
prise de vues. Dans ce cas, utiliser le mode de
mise au point manuelle.
1 Régler l’interrupteur
d’alimentation sur “REC”.
2 Régler le mode
d'enregistrement à “
( p. 15)
3 Appuyer sur FOCUS.
L’indicateur de mise au
point manuelle apparaît.
4 Appuyer sur 1 ou sur 2
pour faire la mise au point sur un sujet.
●
Si le réglage de la mise au point ne peut pas se
faire à une distance plus éloignée ou plus
rapprochée, “” ou “” clignote.
5 Appuyer sur SET. L’ajustement de la mise au
point est terminé.
Pour rétablir la mise au point automatique
Appuyer deux fois sur FOCUS.
La mise au point manuelle est recommandée
dans les situations répertoriées ci-dessous.
●
Si deux sujets à des distances différentes se
recoupent dans la même scène.
● Lorsque l’éclairage est faible.*
● Lorsque le sujet n’a pas de contraste (différence
entre luminosité et ombre), comme un mur
unicolore et plat ou un ciel bleu sans nuages.*
● Quand un objet sombre se voit à peine sur l’écran
LCD ou dans le viseur.*
● Quand la scène contient des objets minuscules
ou identiques qui sont répétés avec régularité.
●
Quand la scène est modifiée par des rayons de soleil
ou de lumière réfléchis à la surface de l’eau.
●
Quand une scène est prise sur un fond à contraste
élevé.
*
Les avertissements de faible contraste suivants
clignotent: , , et .
M
”.
Indicateur de mise
au point manuelle
FONCTIONS ÉLABORÉES
Page 94

38 FR
FONCTIONS POUR ENREGISTREMENT
Commande d’exposition
La commande d’exposition manuelle est
conseillée dans les situations suivantes :
●
Lors d’une prise de vues en contre-jour ou sur un
arrière-plan trop lumineux.
● Lors d’une prise de vues sur un fond réfléchissant
naturellement la lumière, comme à la plage ou sur
les pistes de ski.
● Quand le fond est sombre excessivement ou que
le sujet est clair.
1 Régler l’interrupteur d’alimentation sur “REC”.
2 Régler le mode d'enregistrement à
“
M
”.( p. 15)
3 Régler “EXPOSITION” à “MANNUELLE”
dans le menu FONCTION. ( p. 31)
●
L’indicateur de la commande d’exposition
apparaît.
4 Pour rendre l’image plus lumineuse, appuyer
sur 3. Pour rendre l’image plus sombre, appuyer
4. (±6 maximum)
●
L’exposition +3 fait le même effet que la
compensation de contre-jour. (
● L’exposition –3 fait le même effet que lorsque
“EFFETS PRG.” est réglé sur “PROJECTEUR”.
p. 41)
(
Mode de
fonctionnement
Niveau
d’exposition
5 Appuyer sur SET ou 2. L’ajustement de
l’exposition est terminé.
Pour rétablir la commande d’exposition
automatique
Sélectionner “AUTO” à l’étape 3.
REMARQUES:
● Il n’est pas possible d’utiliser la commande
d’exposition manuelle lorsque “EFFETS PRG.” est
réglé sur “PROJECTEUR” ou “NEIGE” (
ou avec la compensation de contre-jour.
● Si l’ajustement ne cause pas de changement
visible de la luminosité, régler “GAIN” sur “AUTO”.
p. 31, 33)
(
p. 39)
Vidéo Mémoire
± 0
± 1
± 2
± 3
± 4
± 5
± 6
(Memory)
± 0EV
± 0,3EV
± 0,7EV
± 1,0EV
± 1,3EV
± 1,7EV
± 2,0EV
p. 41),
Verrouillage de l’iris
Comme la pupille de l’œil humain, l’iris se
contracte dans un milieu bien éclairé pour éviter
de faire pénétrer trop de lumière, et se dilate
quand l’éclairage est faible pour laisser passer
plus de lumière.
Utiliser cette fonction dans les situations
suivantes :
●
Lors d’une prise de vues d’un sujet en
mouvement.
● Lorsque la distance entre le sujet et le caméscope
change (la taille du sujet sur l’écran LCD ou dans
le viseur change également), comme quand le
sujet s’éloigne.
● Lors d’une prise de vues sur un fond réfléchissant
naturellement la lumière, comme à la plage ou sur
les pistes de ski.
● Lors d’une prise de vues d’un sujet éclairé par un
projecteur.
● Lorsque le zoom est utilisé.
1 Régler l’interrupteur d’alimentation sur “REC”.
2 Régler le mode d'enregistrement à “
( p. 15)
3 Régler “EXPOSITION” à “MANNUELLE”
dans le menu FONCTION. ( p. 31)
●
Le menu de la commande d'exposition apparaît.
4 Ajuster le zoom de façon que le sujet
remplisse l’écran LCD ou le viseur, puis
maintenir SET ou 2 enfoncé pendant plus de 2
secondes. L'indicateur “” apparaît.
5 Appuyer sur SET ou 2. L'iris est verrouillé.
6 Appuyer sur MENU. L’écran de menu se
ferme. L'indicateur “” apparaît.
Pour rétablir la commande de l’iris
automatique
Sélectionner “AUTO” à l’étape 3.
●
L’indicateur de commande d’exposition et “”
disparaissent.
Pour verrouiller la commande d’exposition et
l’iris
Après l’étape 3, ajuster l’exposition en appuyant
sur 3 ou sur 4. Ensuite, verrouiller l’iris à
l’étapes 4 – 6. Pour un verrouillage
automatique, sélectionner “AUTO” à l’étape 3.
La commande d’exposition et l’iris deviennent
automatiques.
M
”.
Page 95

Compensation de contre-jour
La compensation de contre-jour éclaircit le sujet
rapidement.
D’une opération simple, la fonction de
compensation de contre-jour éclaircit la portion
sombre d’un sujet en augmentant l’exposition.
1 Régler l’interrupteur d’alimentation sur
“REC”.
2 Appuyer sur BACKLIGHT pour que
l’indicateur de compensation de contre-jour “”
apparaisse.
Pour annuler la compensation de contre-jour
Appuyer deux fois sur BACKLIGHT pour que
l’indicateur “” disparaisse.
REMARQUE:
L’usage de la compensation de contre-jour peut
entraîner une trop grande luminosité autour du sujet
qui devient blanc.
Sélection de la zone de mesure d’exposition
La sélection d’une zone de mesure permet une
compensation de l’exposition plus précise. Vous
pouvez sélectionner l’une des trois zones de
mesure sur l’écran LCD/le viseur.
1 Régler l’interrupteur d’alimentation sur “REC”.
2 Régler le mode d'enregistrement à
“
M
”.( p. 15)
3 Appuyer sur BACKLIGHT deux fois pour que
l’indicateur de mode sélection manuel de la
zone d’exposition “” apparaisse.
● Un cadre de zone de mesure apparaît au
centre de l’écran LCD/le viseur.
4 Appuyer sur 2 ou 1 pour sélectionner le
cadre de zone de mesure.
5 Appuyer sur SET.
● La sélection de la zone de mesure d’exposition
est activée.
● L’exposition est ajustée pour que la luminosité
de la zone sélectionnée soit plus appropriée.
Pour verrouiller l’iris
Après l’étape 4, appuyer sur SET et la maintenir
enfoncé pendant plus de 2 secondes pour
verrouiller l’iris. “” apparaît et l’iris est
verrouillé.
FONCTIONS POUR ENREGISTREMENT
Pour annuler le mode sélection manuel de la
zone d’exposition
Appuyer sur BACKLIGHT une fois pour que
l’indicateur “” disparaisse.
REMARQUES:
● Il n’est pas possible d’utiliser la sélection de la
zone de mesure d’exposition de zone en même
temps que les fonctions suivantes.
• “16:9” dans “MODE LARGE” (
• “STROBOSCOP” dans EFFET (
• Zoom numérique (
● Suivant le lieu et les conditions de prise de vue, il
se peut que l’on ne puisse pas atteindre un
résultat optimal.
p. 20)
p. 36)
FR 39
p. 41)
Réglage de la balance des blancs
La balance des blancs renvoie à l’exactitude de
la reproduction des couleurs sous des
éclairages différents. Si la balance des blancs
est correcte, toutes les autres couleurs sont
parfaitement reproduites.
En principe, la balance des blancs est réglée
automatiquement. Toutefois, des utilisateurs de
caméscope expérimentés commandent cette
fonction manuellement pour obtenir une
reproduction de couleur/teinte plus
professionnelle.
Pour changer le réglage
Régler la fonction “BAL. BLANCS” sur le mode
souhaité. ( p. 31)
●
L’indicateur du mode sélectionné, à l’exception de
“AUTO” apparaît.
[AUTO]: La balance des blancs se règle
automatiquement.
BAL.MAN: Réglage manuel de la balance
des blancs lors d’une prise de vues sous des
types d’éclairage différents. ( “Réglage de la
balance des blancs manuelle”, p.40)
BEAU TPS: À l’extérieur un jour de beau
temps.
NUAGEUX: À l’extérieur un jour couvert.
[ ] = Préréglage en usine
Pour rétablir la balance des blancs
automatique
Régler “BAL. BLANCS” sur “AUTO”. ( p. 31)
FONCTIONS ÉLABORÉES
Page 96

40 FR
FONCTIONS POUR ENREGISTREMENT
Réglage de la balance des blancs manuelle
Régler manuel de la
balance des blancs lors
d’une prise de vues sous
des types d’éclairage
différents.
1 Régler l’interrupteur
d’alimentation sur
“REC”.
2 Régler le mode d'enregistrement à
“
M
”.( p. 15)
3 Tenir une feuille de papier blanc devant le
sujet. Ajuster le zoom ou vous déplacer pour
que la feuille de papier blanc remplisse l’écran.
4 Sélectionner “BAL.MAN” dans le menu “
BAL. BLANCS” ( p. 31), puis appuyer en
continu sur SET ou 2 jusqu’au moment où
commence à clignoter.
●
Lorsque le réglage est terminé, s’arrête de
clignoter.
5 Appuyer sur SET ou 2 pour activer le
réglage.
6 Appuyer sur MENU. L’écran de menu se
ferme, et l’indicateur de balance des blancs
manuelle est affiché.
REMARQUES:
● À l’étape 3, la mise au point sur la feuille de
papier blanc peut se révéler difficile. En pareil cas,
ajuster manuellement la mise au point. (
● Un sujet peut être filmé sous différents types
d’éclairage en intérieur (éclairage naturel, lumière
fluorescente, éclairage à la bougie, etc.). La
température de couleur étant différente selon le
type de lumière, la teinte du sujet varie en fonction
des réglages de la balance des blancs. Utiliser
cette fonction pour obtenir une image plus
naturelle.
● Le réglage de la balance des blancs effectué
manuellement reste mémorisé même après la
mise hors tension de l’appareil ou le retrait de la
batterie.
Papier blanc
p. 37)
Effets de volet ou de fondu
Ces effets permettent de faire des transitions de
scènes de type professionnel. Les utiliser pour
relever les transitions d’une scène à la suivante.
Le volet ou le fondu fonctionne quand
l’enregistrement vidéo démarre ou s’arrête.
1 Régler le commutateur VIDEO/MEMORY sur
“VIDEO”.
2 Régler l’interrupteur d’alimentation sur “REC”.
3 Régler le mode d'enregistrement à
“
M
”.( p. 15)
4 Régler la FONCTION “” sur le mode
souhaité. ( p. 31)
●
Le menu VOLET/FONDU disparaît et l’effet est
réservé.
● L’indicateur de l’effet sélectionné apparaît.
5 Appuyer sur la touche de marche/arrêt
d’enregistrement pour activer les effets d’entrée/
sortie en fondu ou d’ouverture/fermeture de
volet.
Pour désactiver l’effet sélectionné
Sélectionner “ARRÊT” à l’étape 4. L’indicateur
de l’effet disparaît.
REMARQUE:
Vous pouvez prolonger les effets de volet ou de
fondu en appuyant sur la touche de marche/arrêt
d’enregistrement et en la maintenant enfoncée.
VOLET/FONDU
ARRÊT: Désactive la fonction. (Préréglage en
usine)
FONDU BLAN : Entrée ou sortie en fondu
sur un écran blanc.
FONDU NOIR : Entrée ou sortie en fondu
sur un écran noir.
VOLET HORI : Ouverture ou fermeture du
volet de droite à gauche ou de gauche à droite,
respectivement.
VOLET VERT : La scène s’ouvre du bas
vers le haut sur un écran noir, ou se ferme du
haut vers le bas, laissant place à un écran noir.
Page 97

Programme AE, effets et effets de l'obturateur
1 Régler l’interrupteur d’alimentation sur “REC”.
2 Régler le mode d'enregistrement à
“
M
”.( p. 15)
3 Régler “EFFET”, “EFFETS PRG.” ou
“OBTUR.” dans le menu FONCTION. ( p. 31)
●
Le menu EFFET, EFFETS PRG. ou OBTUR.
disparaît et l'effet choisi est activé.
● L’indicateur de l’effet sélectionné apparaît.
Pour désactiver l’effet sélectionné
Sélectionner “ARRÊT” à l’étape 3. L’indicateur
de l’effet disparaît.
REMARQUES:
● Programme AE, effets et effets de l'obturateur
peuvent être changés en mode d'attente de
l'enregistrement.
● Certains modes de Programme AE et effets de
l'obturateur ne peuvent pas être utilisés lors de la
prise de vue en faible lumière.
● Une ligne verticale peut apparaître si le sujet
est trop lumineux ou réfléchit trop la lumière
(phénomène de maculage). Ce phénomène de
maculage a tendance à se produire lorsque le
modo “SPORTS” ou tout mode de
“OBTUR. 1/500 – 1/4000” est sélectionné.
EFFET
ARRÊT: Désactive la fonction. (Préréglage en
usine)
SÉPIA : La teinte des scènes enregistrées
est légèrement brunie, comme les vieilles
photographies.
NOIR & BLANC : Comme dans les vieux
films, le film est tourné en noir et blanc.
FILM ANC.* : Donne aux scènes
enregistrées un effet stroboscopique.
STROBOSCOP* : L’enregistrement
ressemble à une série de clichés consécutifs.
* Indisponible pour l’enregistrement d’images fixes
FONCTIONS POUR ENREGISTREMENT
FR 41
EFFETS PRG.
ARRÊT: Désactive la fonction. (Préréglage en
usine)
SPORTS
(Vitesse de l’obturateur variable: 1/250 –
1/4000):
Ce réglage permet de filmer des scènes rapides
une image à la fois, puis de donner une lecture
au ralenti stable aux couleurs vivaces. Plus la
vitesse de l’obturateur est rapide, plus l’image
s’assombrit. Utiliser la fonction de l’obturateur
dans des endroits très bien éclairés.
NEIGE : Compense les sujets qui pourraient
apparaître autrement trop sombres lors d’une
prise dans des milieux extrêmement lumineux
tels que dans la neige.
PROJECTEUR : Compense les sujets qui
pourraient apparaître autrement trop clairs lors
d’une prise sous un éclairage direct très
intenses comme des projecteurs.
CRÉPUSCULE : Rend les couchers de
soleil plus naturels. La balance des blancs
( p. 39) quoique modifiable selon le choix de
l’utilisateur, est automatiquement réglée sur
“”. Lorsque le mode Crépuscule est choisi, la
mise au point du caméscope se réajuste
automatiquement sur environ 10 m à l’infini.
Pour une distance inférieure à 10 m, procéder à
la mise au point manuellement.
OBTUR.
ARRÊT: Désactive la fonction. (Préréglage en
usine)
OBTUR. 1/60: La vitesse d’obturation est
fixée à 1/60 de seconde. Les bandes noires qui
apparaissent habituellement lors d’une prise sur
un écran TV rétrécissent.
OBTUR. 1/100: La vitesse d’obturation est
fixée à 1/100 de seconde. Le scintillement qui se
produit lors d’une prise sous un éclairage
fluorescent ou une lampe à vapeur de mercure
diminue.
OBTUR. 1/500/OBTUR. 1/4000: Ces réglages
permettent de filmer des scènes rapides une
image à la fois, puis de donner une lecture au
ralenti stable aux couleurs vivaces en réglant
des variables de vitesse d’obturation. Utiliser
ces réglages lorsqu’un ajustement automatique
ne fonctionne pas correctement sous le mode
SPORTS. Plus la vitesse de l’obturateur est
rapide, plus l’image s’assombrit. Utiliser la
fonction de l’obturateur dans des endroits très
bien éclairés.
FONCTIONS ÉLABORÉES
Page 98

42 FR
MONTAGE
Copie vers un magnétoscope
Vers le
connecte
ur AV
Câble audio/vidéo
(fournie)
Magnétoscope
1Jaune vers VIDEO IN
2Rouge vers AUDIO R IN
3Blanc vers AUDIO L IN
Téléviseur
Pour utiliser ce caméscope comme lecteur
1 Conformément aux illustrations, raccorder les
connecteurs d’entrée du caméscope et du
magnétoscope.
2 Démarrer la lecture sur le caméscope.
( p. 21)
3 À l’endroit exact où vous voulez que la copie
démarre, démarrer l’enregistrement sur le
magnétoscope. (Reportez-vous au manuel
d’instructions du magnétoscope.)
4 Pour arrêter la copie, arrêter l’enregistrement
sur le magnétoscope puis arrêter la lecture sur
le caméscope.
REMARQUES:
● IIl est recommandé d’utiliser l’adaptateur
secteur comme source d’alimentation au lieu
de la batterie. (
● Pour choisir l’affichage ou non des fonctions
suivantes sur le téléviseur raccordé
• Date/Heure
Régler “DATE/HEURE” sur “MARCHE” ou
“ARRÊT”. (
DISPLAY sur la télécommande pour activer/
désactiver l’affichage de la date.
• Time code
Régler “TIME CODE” sur “ARRÊT” ou
“MARCHE”. (
• Indications autres que la date/heure et le time
code
Régler “ÉCRAN” sur “ARRÊT”, “LCD” ou “LCD/
TV”. (
p. 15)
p. 31, 35) Ou appuyer sur
p. 31, 35)
p. 31, 35)
Page 99

Copie vers ou depuis un appareil vidéo équipé d’un connecteur DV (Copie numérique)
Il est également possible de copier des scènes
enregistrées à l’aide du caméscope sur un autre
appareil vidéo équipé d’un connecteur DV.
Comme un signal numérique est envoyé, il y a
peu, voire pas de dégradation de l’image ou du
son.
Vers DV IN/OUT
Filtre en ligne
Appareil vidéo équipé d’un connecteur DV
Pour utiliser ce caméscope comme lecteur
1 S’assurer que l’alimentation de tous les
appareils est coupée.
2 Raccorder le caméscope à un appareil vidéo
équipé d’un connecteur d’entrée DV à l’aide d’un
câble DV conformément à l’illustration.
3 Démarrer la lecture sur le caméscope.
( p. 21)
4 À l’endroit exact où vous voulez que la copie
démarre, démarrer l’enregistrement sur
l’appareil vidéo. (Reportez-vous au manuel
d’instructions de l’appareil.)
Câble DV (en option)
Vers DV IN/OUT
MONTAGE
FR 43
5 Pour arrêter la copie, arrêter l’enregistrement
sur l’appareil vidéo puis arrêter la lecture sur ce
caméscope.
REMARQUES:
● Il est recommandé d’utiliser l’adaptateur
secteur comme source d’alimentation au lieu
de la batterie. (
● Dans l’hypothèse d’une section vierge ou d’une
image distordue lue sur le lecteur pendant la
copie, celle-ci peut s’arrêter pour contourner l’une
image anormale.
● Même si le câble DV est correctement branché,
l’image peut parfois ne pas apparaître à l’étape 4.
Dans pareil cas, couper l’alimentation, et
recommencer le raccordement.
● Si “Lecture avec zoom” ( p. 25) ou “Effets
spéciaux en lecture” (
SNAPSHOT est actionné pendant la lecture,
seule l’image en lecture initiale enregistrée sur
bande est sortie du connecteur DV IN/OUT.
● Si un câble DV est branché, bien utiliser le
câble DV JVC VC-VDV204U ou VC-VDV206U
DV en option.
Pour utiliser ce caméscope comme
enregistreur
p. 15)
p. 25) est exécuté ou si
1 S’assurer que l’alimentation de tous les
appareils est coupée.
2 Raccorder le caméscope à un appareil vidéo
équipé d’un connecteur de sortie DV à l’aide
d’un câble DV conformément à l’illustration.
3 Régler l’interrupteur d’alimentation du
caméscope sur “PLAY”.
4 Régler “MODE ENREG” sur “SP” ou “LP”.
( p. 35)
5 Démarrer la lecture sur le lecteur.
6 Appuyer sur la touche de marche/arrêt
d’enregistrement pour passer en mode de
pause d’enregistrement.
●
L’indication “” apparaît sur l’écran.
DV IN
7 À l’endroit exact où vous voulez commencer
la copie, appuyer sur la touche de marche/arrêt
d’enregistrement pour commencer la copie.
L’indication pivote.
8 Appuyer à nouveau sur la touche de marche/
arrêt d’enregistrement pour arrêter la copie.
L’indication cesse de pivoter.
9 Appuyer sur 7 pour retourner au mode de
lecture normale.
REMARQUE:
La copie numérique est exécutée en mode son
enregistré sur la bande initiale, quel que soit le
“MODE SON” en cours. (
p. 32)
FONCTIONS ÉLABORÉES
Page 100

44 FR
MONTAGE
Raccordement à un ordinateur personnel
[A] Utilisation du câble USB
Il est possible de transférer des images fixes
d’une carte mémoire à un PC.
[A] Utilisation du
câble USB
[B] Utilisation du
câble DV
OU
Vers USB
Filtre en
ligne
Câble USB
(fourni)
Vers le
connecteur
USB
Ordinateur
Lors du raccordement du caméscope à un
ordinateur à l’aide d’un câble DV, s’assurer de
suivre la procédure ci-dessous. Un
raccordement incorrect du câble peut
provoquer un dysfonctionnement du
caméscope et/ou de l’ordinateur.
●
Raccorder en premier le câble DV à l’ordinateur,
puis au caméscope.
● Raccorder le câble DV (à broches) correctement
selon la forme du connecteur DV.
Vers DV IN/OUT
Filtre en
ligne
Câble DV
(en option)
Filtre en
ligne
Vers le
connecteur DV
Ordinateur équipé d’un
connecteur DV
[B] Utilisation du câble DV
IIl est également possible de transférer des
images fixes/en mouvement vers un ordinateur
équipé d’un connecteur DV via le logiciel fourni,
le logiciel installé sur l’ordinateur ou disponible
dans le commerce. Si vous avez Windows
vous pouvez utiliser Windows
®
Messenger pour
mener des vidéo conférences sur Internet à
l’aide d’un caméscope. Pour plus de détails,
reportez-vous à l’aide de Windows
REMARQUES:
● Se reporter à “GUIDE D’INSTALLATION DU
LOGICIEL ET RACCORDEMENT
D’ORDINATEUR” pour les logiciels et pilotes
fournis.
● Il est recommandé d’utiliser l’adaptateur
secteur comme source d’alimentation au lieu
de la batterie. (
p. 15)
● Ne jamais brancher le câble USB et le câble
DV simultanément sur le caméscope.
Raccorder uniquement le câble que vous
souhaitez utiliser au caméscope.
● Lorsqu’un câble DV est sélectionné, s’assurer
d’utiliser le câble DV JVC VC-VDV206U ou
JVC VC-VDV204U en option selon le type de
connecteur DV (4 ou 6 broches) sur
l’ordinateur.
● Si l’ordinateur relié au caméscope via le câble
USB n’est pas sous tension, le mode USB du
caméscope n’est pas activé.
● Les informations sur la date et l’heure ne peuvent
pas être saisies sur l’ordinateur.
● Se reporter au mode d’emploi de l’ordinateur et
au manuel d’instructions du logiciel.
● Les images fixes sont aussi transférables vers un
ordinateur via le panneau de capture équipé d’un
connecteur DV.
● Le système peut ne pas fonctionner correctement
suivant l’ordinateur ou le panneau de capture que
vous utilisez. .
“USB” et/ou “ ” apparaissent sur
l’écran LCD tandis que l’ordinateur accède
aux données du caméscope ou que le
caméscope transfère un fichier vers
l’ordinateur.
NE JAMAIS débrancher le câble USB tant
que “ ” est affiché sur l’écran LCD ;
vous risquez d’endommager gravement le
produit.
®
Messenger.
®
XP,
 Loading...