

Page 1
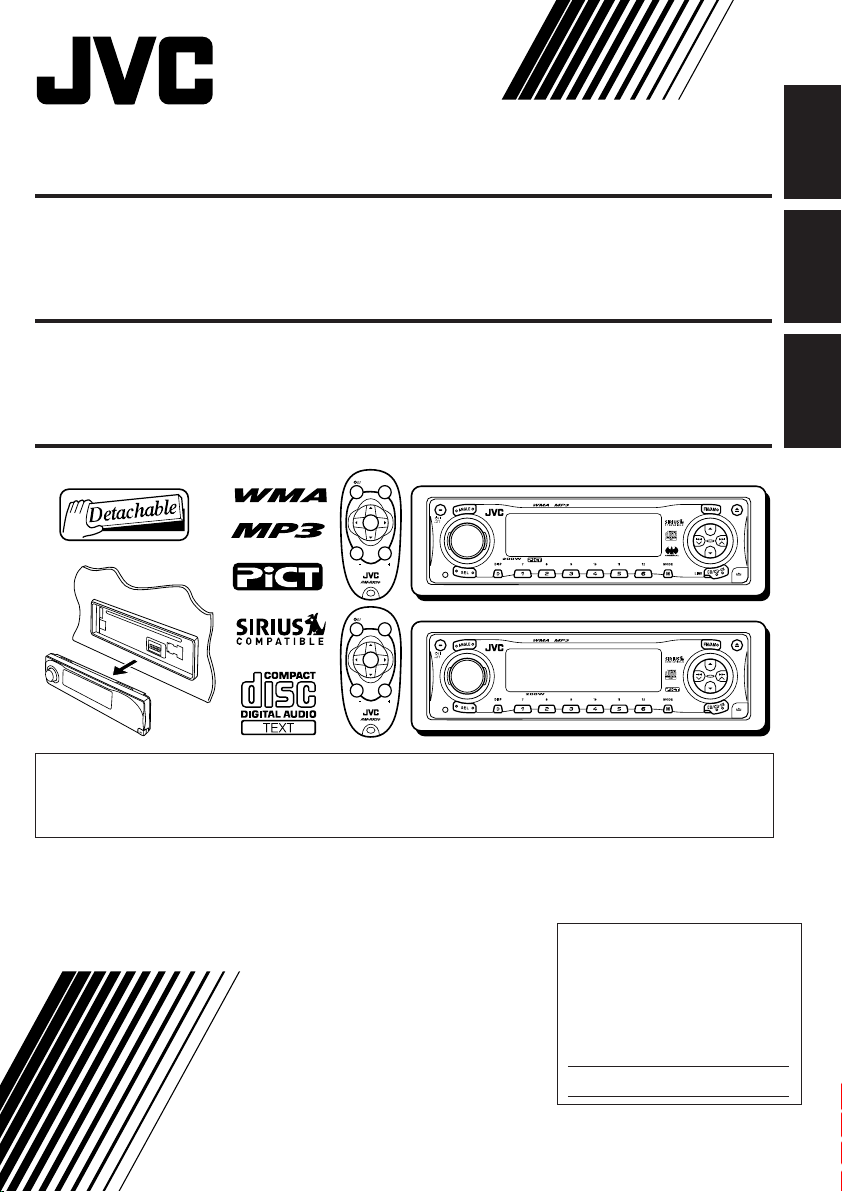
CD RECEIVER KD-AR3000/KD-LH300
ENGLISH
RECEPTOR CON CD KD-AR3000/KD-LH300
RECEPTEUR CD KD-AR3000/KD-LH300
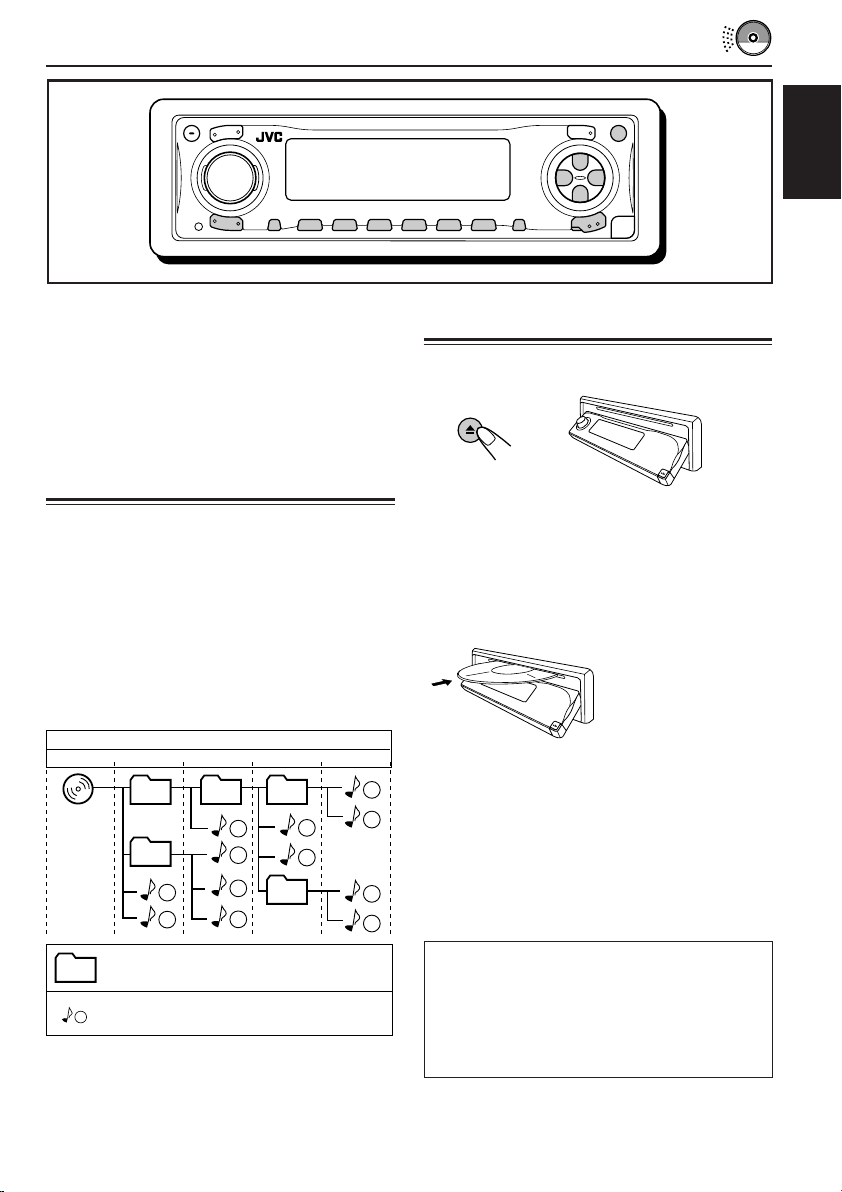
KD-AR3000
SOUND
ATT
U
SOURCE
F
R
D
VOL
VOL
KD-LH300
SOUND
ATT
U
SOURCE
F
R
D
VOL
VOL
• This unit is equipped with the display demonstration. To cancel it, see page 8.
• Esta unidad está equipada con demostración en la pantalla. Para cancelarla, consulte la página 8.
• Cet appareil est équipé d’une fonction de démonstration des affichages. Pour l’annuler, référezvous à la page 8.
For installation and connections, refer to the separate manual.
Para la instalación y las conexiones, refiérase al manual separado.
Pour l’installation et les raccordements, se référer au manuel séparé.
For customer Use:
Enter below the Model No. and
Serial No. which are located on
INSTRUCTIONS
MANUAL DE INSTRUCCIONES
MANUEL D’INSTRUCTIONS
the top or bottom of the
cabinet. Retain this information
for future reference.
Model No.
Serial No.
KD-AR3000
KD-LH300
GET0201-001A
ESPAÑOL
FRANÇAIS
[J]
Page 2
INFORMATION (For U.S.A.)
This equipment has been tested and found to comply with the limits for a Class B digital device,
pursuant to Part 15 of the FCC Rules. These limits are designed to provide reasonable protection
against harmful interference in a residential installation. This equipment generates, uses, and can
radiate radio frequency energy and, if not installed and used in accordance with the instructions,
ENGLISH
may cause harmful interference to radio communications. However, there is no guarantee that
interference will not occur in a particular installation. If this equipment does cause harmful
interference to radio or television reception, which can be determined by turning the equipment off
and on, the user is encouraged to try to correct the interference by one or more of the following
measures:
– Reorient or relocate the receiving antenna.
– Increase the separation between the equipment and receiver.
– Connect the equipment into an outlet on a circuit different from that to which the receiver is connected.
– Consult the dealer or an experienced radio/TV technician for help.
IMPORTANT FOR LASER PRODUCTS
1. CLASS 1 LASER PRODUCT
2. CAUTION: Do not open the top cover. There are no user serviceable parts inside the unit; leave all
servicing to qualified service personnel.
3. CAUTION: Visible and invisible laser radiation when open and interlock failed or defeated. Avoid
direct exposure to beam.
Caution:
If the temperature inside the car is below 0˚ C (32˚ F), the movement of animation and text scroll will be
halted on the display to prevent the display from being blurred. (LOW TEMP.) indicator appears on
the display.
When the temperature increases, the operating temperature is resumed, and these functions will start
working again.
CAUTION on Volume Setting:
Discs produce very little noise compared with other sources. If the volume level is adjusted for the tuner, for
example, the speakers may be damaged by the sudden increase in the output level. Therefore, lower the
volume before playing a disc and adjust it as required during playback.
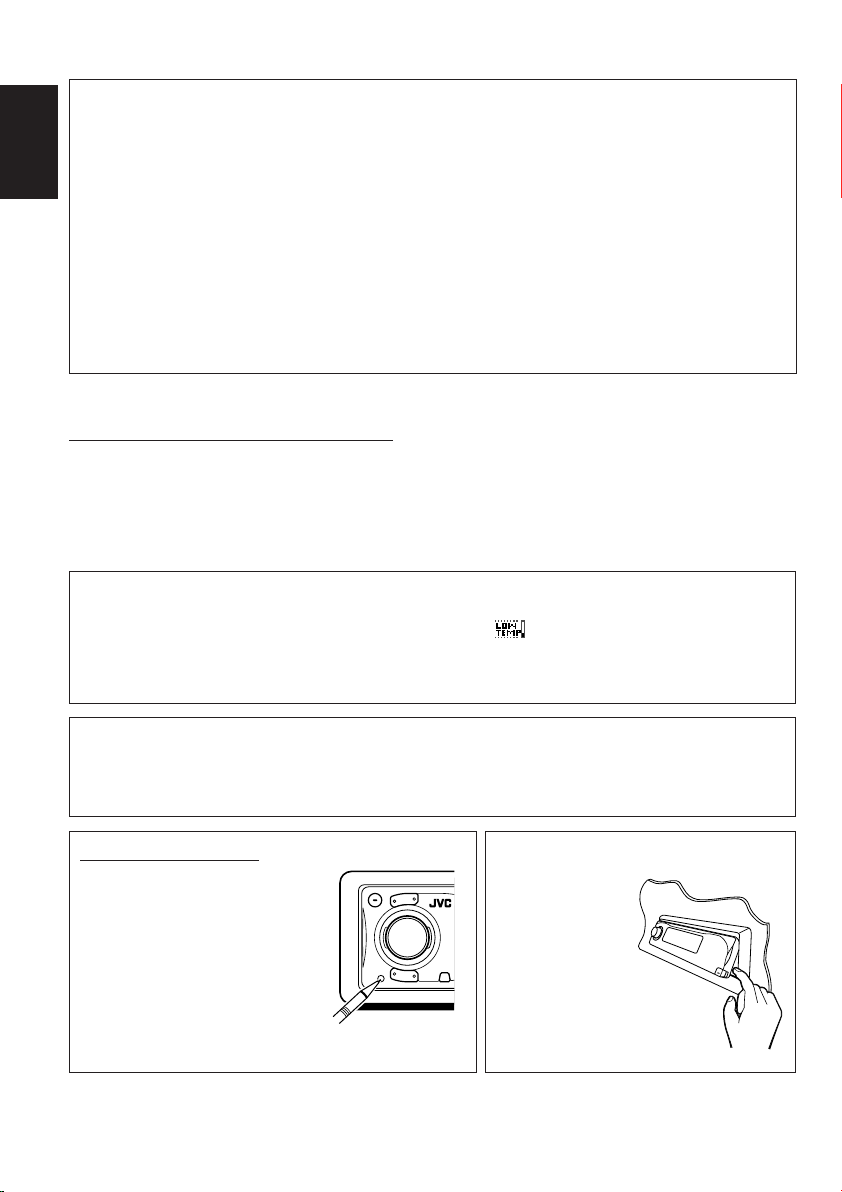
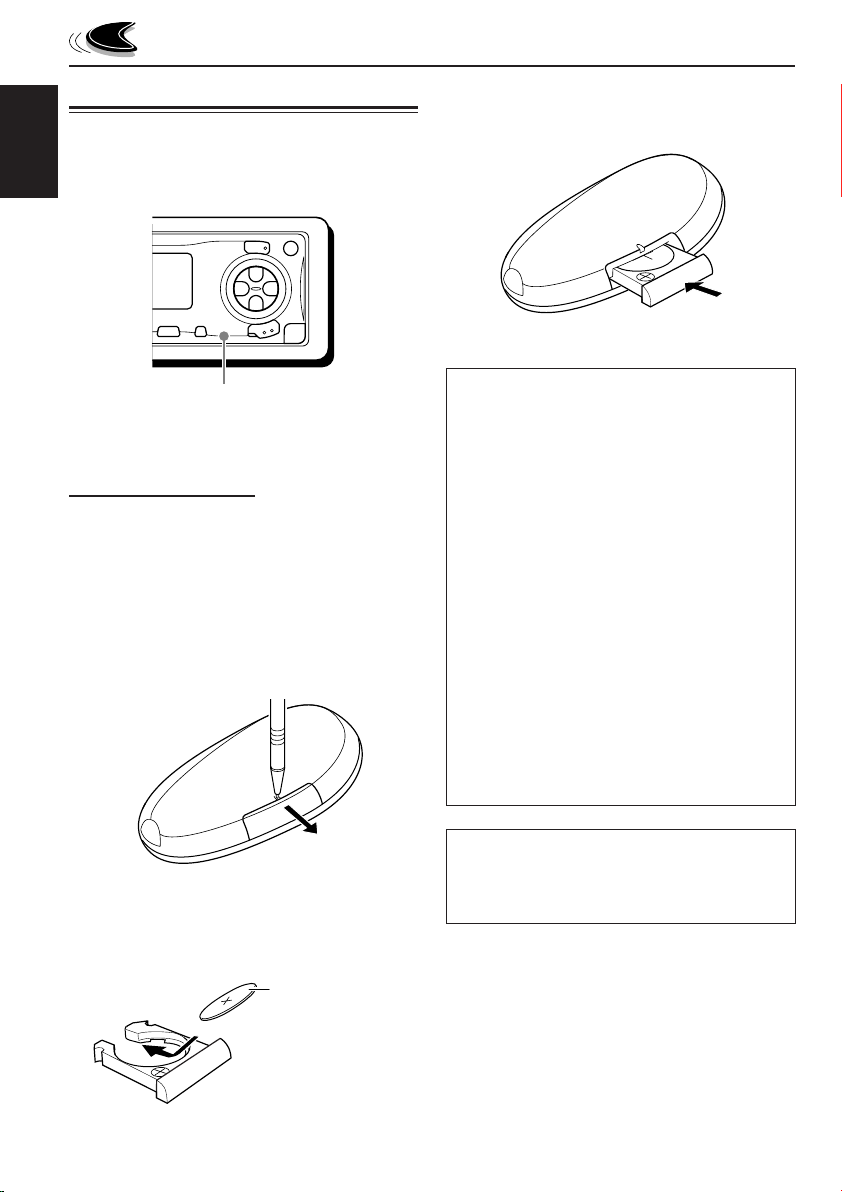
How to reset your unit
Press the reset button on the
control panel using a ball-point
pen or a similar tool.
This will reset the built-in
microcomputer.
Note:
Your preset adjustments—such as
preset channels or sound adjustments—will also be erased.
CAUTION:
NEVER insert
your finger in
between the
control panel and
the unit, as it
may get caught
or hurt.
(See page 44.)
2
Page 3

Thank you for purchasing a JVC product. Please read all instructions carefully before operation,
to ensure your complete understanding and to obtain the best possible performance from the unit.
CONTENTS
How to reset your unit ............................... 2
LOCATION OF THE BUTTONS ............ 4
Control panel ............................................. 4
Remote controller ...................................... 5
Preparing the remote controller ................ 6
BASIC OPERATIONS ....................... 7
Turning on the power ................................ 7
Canceling the display demonstration ........ 8
Setting the clock ........................................ 9
RADIO OPERATIONS ...................... 10
Listening to the radio ................................. 10
Storing stations in memory ....................... 12
Tuning in to a preset station ...................... 13
Changing the display pattern .................... 14
DISC OPERATIONS ........................ 15
About MP3 and WMA discs ...................... 15
Playing a disc ............................................ 15
Locating a track or a particular portion
on a disc ................................................. 18
Selecting a folder and a track using the
name lists ............................................... 20
Selecting the playback modes .................. 21
Prohibiting disc ejection ............................ 22
Changing the display pattern .................... 23
SOUND ADJUSTMENTS ................... 24
Adjusting the sound .................................. 24
Selecting preset sound modes
(iEQ: intelligent equalizer) ...................... 25
Storing your own sound modes ................ 27
Selecting the display theme ...................... 28
ENGLISH
GRAPHIC DISPLAYS ....................... 29
Downloading images and animations ....... 30
Deleting unwanted files ............................. 32
Activating the downloaded images and
animations .............................................. 34
OTHER MAIN FUNCTIONS ................ 36
Changing the general settings (PSM) ....... 36
Selecting the dimmer mode ...................... 40
Changing the display color ........................ 41
Assigning names to the sources ................ 43
Changing the control panel angle .............. 44
Detaching the control panel ...................... 45
CD CHANGER OPERATIONS .............. 46
Playing discs ............................................. 46
Selecting a disc/folder/track using the
name lists ............................................... 49
Selecting the playback modes .................. 50
EXTERNAL COMPONENT OPERATIONS ... 52
Playing an external component ................. 52
TROUBLESHOOTING ...................... 53
MAINTENANCE ............................. 56
Handling discs ........................................... 56
SPECIFICATIONS........................... 57
BEFORE USE
*For safety....
• Do not raise the volume level too much, as this will
block outside sounds, making driving dangerous.
• Stop the car before performing any complicated
operations.
*Temperature inside the car....
If you have parked the car for a long time in hot
or cold weather, wait until the temperature in the
car becomes normal before operating the unit.
3
Page 4
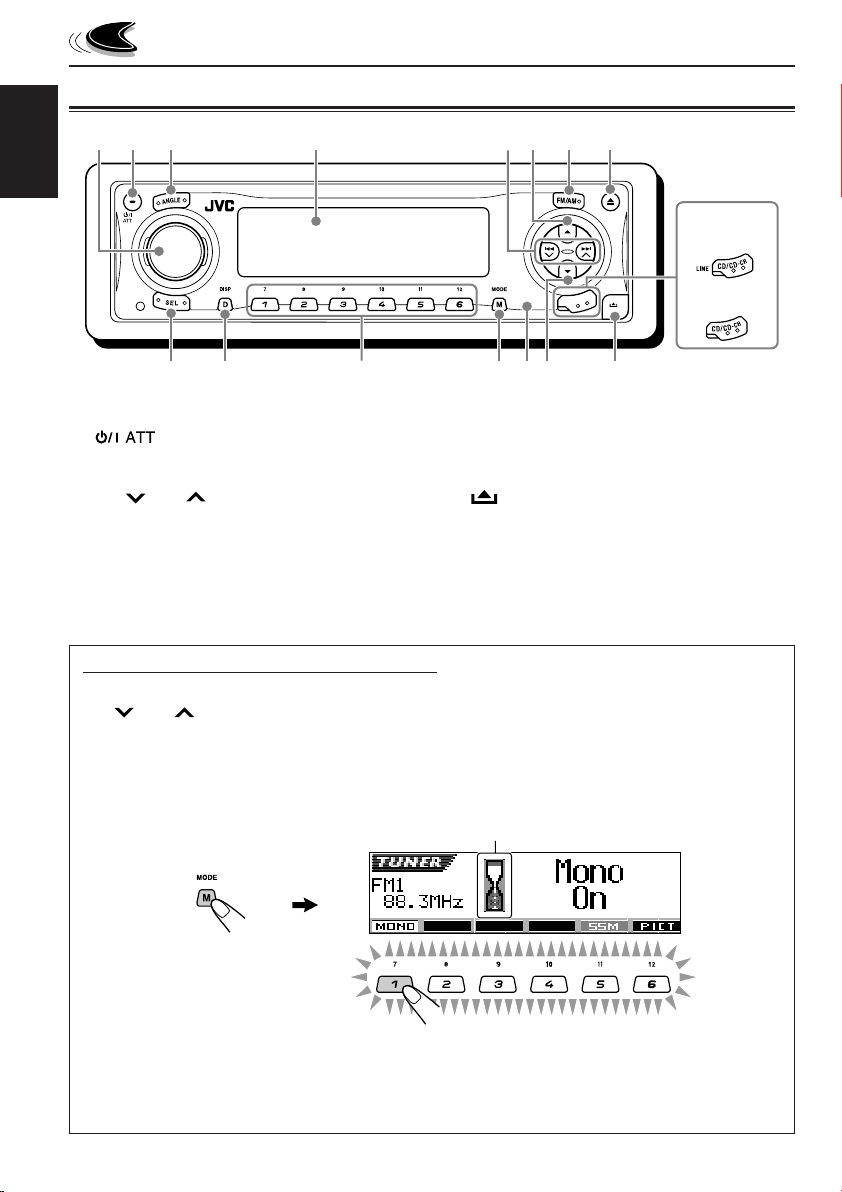
LOCATION OF THE BUTTONS
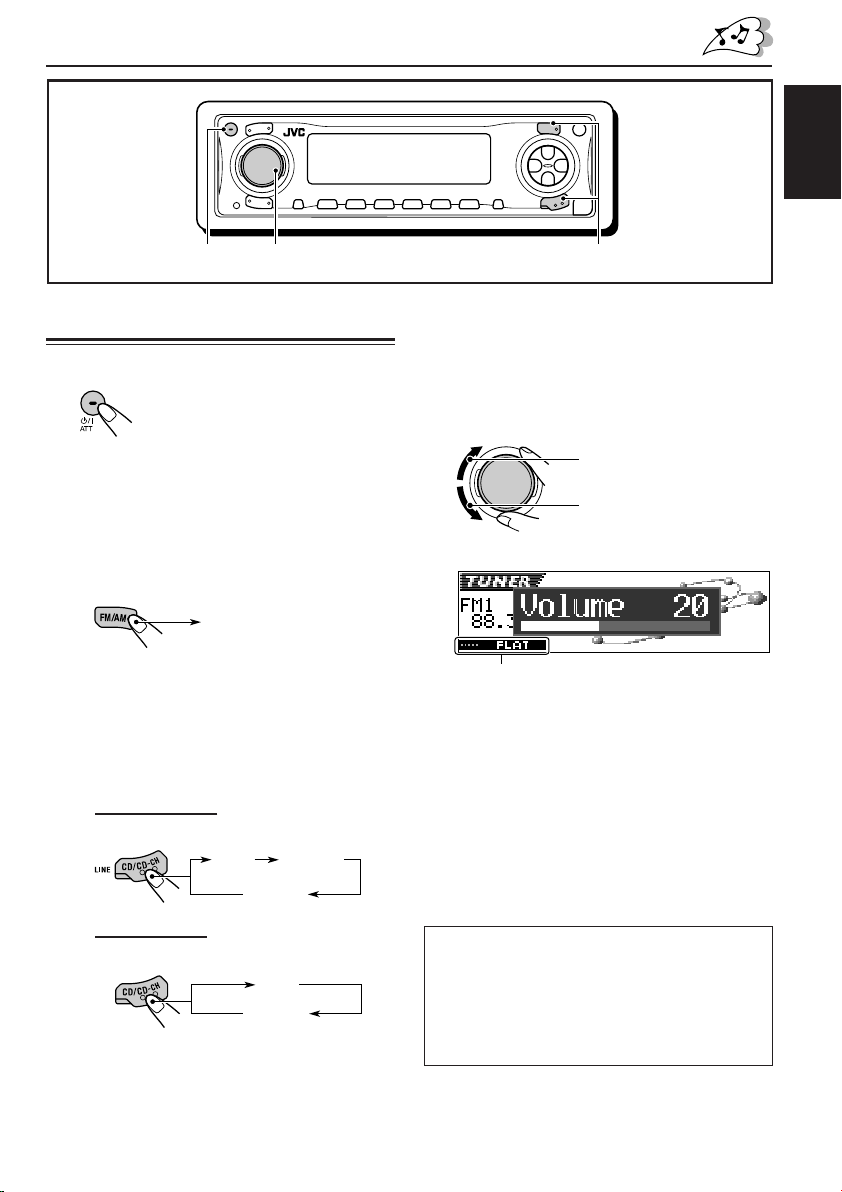
Control panel
12 3 4 56 7 8
ENGLISH
9p q we tr
y
KD-AR3000
KD-LH300
1 Control dial
2 (standby/on attenuator) button
3 ANGLE button
4 Display window
5 4 /¢ buttons
6 5 (up) button
7 FM/AM button
8 0 (eject) button
9 SEL (select) button
p D DISP (display) button
q Number buttons
w M MODE button
e Remote sensor
r ∞ (down) button
t (control panel release) button
y For KD-AR3000:
CD/CD-CH (CD changer) LINE button
For KD-LH300:
CD/CD-CH (CD changer) button
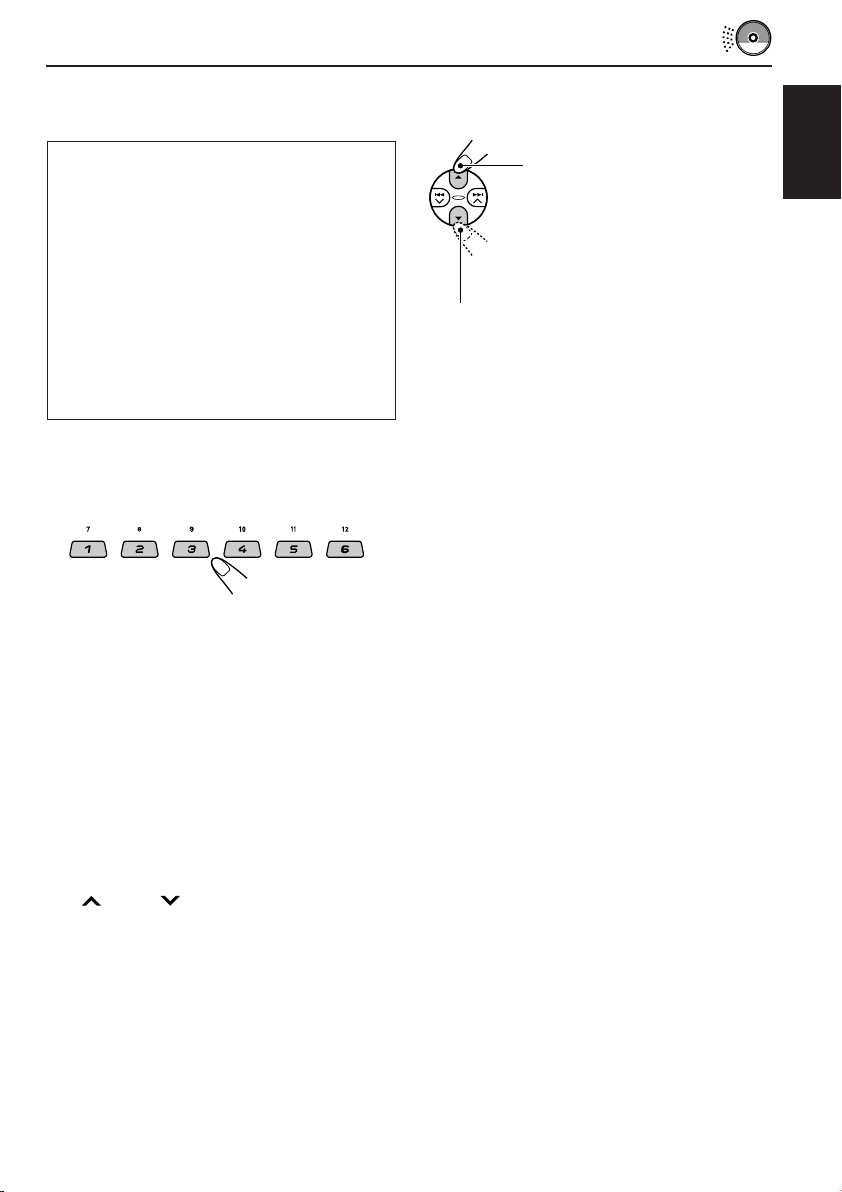
Illumination Navigation for easy operations
If you use M MODE or SEL (select), the display and some controls (such as the number buttons,
4 /¢ , 5/∞, and control dial) enter the corresponding control mode, then the controls
start flashing to lead you to the next operational steps. (Illumination Navigation)
• The display shows how these buttons function during this period.
Ex.: When you press number button 1 after pressing M MODE, to operate the FM tuner.
Time countdown indicator
To use these controls for original functions again, wait until the controls stop flashing without
using these controls.
• Pressing M MODE again also restores original functions. However, pressing SEL (select) makes
the unit enters a different mode.
4
Page 5
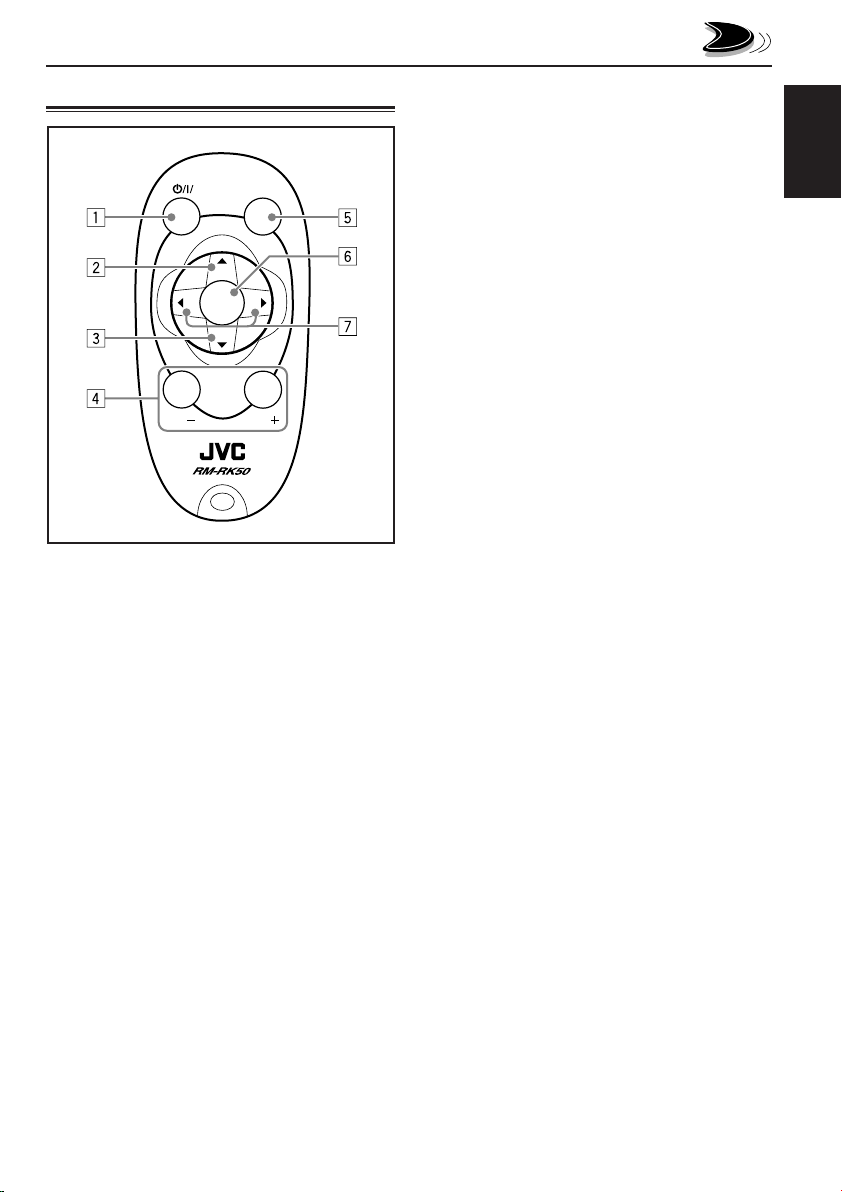
Remote controller
ATT
U
SOURCE
R
D
VOL
SOUND
F
VOL
3 • Selects the preset stations while listening to
the radio.
Each time you press the button, the preset
station number increases, and the selected
station is tuned in.
• Skips to the first track of the previous folder
while listening to an MP3 or a WMA disc.
Each time you press the button, you can
move to the previous folder and start
playing the first track.
• While playing an MP3 disc on an MP3compatible CD changer;
– Skips to the previous disc if pressed
briefly.
– Skips to the previous folder if pressed and
held.
Note:
While playing a CD on a CD changer,
this always skips to the previous disc.
4 Functions the same as the control dial on the
main unit.
Note:
These buttons do not function for the
preferred setting mode (PSM) adjustment.
ENGLISH
1 • Turns on the unit if pressed when the unit is
turned off.
• Turns off the unit if pressed and held for a
few seconds.
• Drops the volume level in a moment if
pressed briefly.
Press again to resume the volume.
2 • Selects the band while listening to the radio.
Each time you press the button, the band
changes.
• Skips to the first track of the next folder
while listening to an MP3 or a WMA disc.
Each time you press the button, you can
move to the next folder and start playing the
first track.
• While playing an MP3 disc on an MP3compatible CD changer;
– Skips to the next disc if pressed briefly.
– Skips to the next folder if pressed and
held.
Note:
While playing a CD on a CD changer,
this always skips to the next disc.
5 Selects the sound mode (iEQ: intelligent
equalizer).
Each time you press the button, the sound
mode (iEQ) changes.
6 Selects the source.
Each time you press the button, the source
changes.
7 • Searches for stations while listening to the
radio.
• Fast-forwards or reverses the track/file if
pressed and held while listening to a disc.
• Skips to the beginning of the next track/file
or goes back to the beginning of the current
(or previous) tracks/files if pressed briefly
while listening to a disc.
5
Page 6
Preparing the remote controller
Before using the remote controller:
• Aim the remote controller directly at the remote
sensor on the main unit. Make sure there is no
ENGLISH
obstacle in between.
3. Return the battery holder.
Insert again the battery holder by pushing it
until you hear a clicking sound.
(back side)
Remote sensor
• Do not expose the remote sensor to strong
light (direct sunlight or artificial lighting).
Installing the battery
When the controllable range or effectiveness of
the remote controller decreases, replace the
battery.
1. Remove the battery holder.
1) Push out the battery holder in the direction
indicated by the arrow using a ball-point
pen or a similar tool.
2) Remove the battery holder.
(back side)
2. Place the battery.
Slide the battery into the holder with the +
side facing upwards so that the battery is
fixed in the holder.
Lithium coin
battery (product
number: CR2025)
WARNING:
• Store the battery in a place where children
cannot reach.
If a child accidentally swallows the battery,
consult a doctor immediately.
• Do not recharge, short, disassemble, or heat the
battery or dispose of it in a fire.
Doing any of these things may cause the battery
to give off heat, crack, or start a fire.
• Do not leave the battery with other metallic
materials.
Doing this may cause the battery to give off
heat, crack, or start a fire.
• When throwing away or saving the battery,
wrap it in tape and insulate; otherwise, the
battery may start to give off heat, crack, or start
a fire.
• Do not poke the battery with tweezers or similar
tools.
Doing this may cause the battery to give off
heat, crack, or start a fire.
CAUTION:
DO NOT leave the remote controller in a place
(such as dashboards) exposed to direct sunlight for
a long time. Otherwise, it may be damaged.
6
Page 7
BASIC OPERATIONS
ENGLISH
1
Turning on the power
1
Turn on the power.
Note on One-Touch Operation:
When you select a source in step 2 below, the
power automatically comes on. You do not have
to press this button to turn on the power.
2
Select the source.
• To operate the tuner, press FM/AM.
TUNER
Then, press FM/AM repeatedly to select
the band (FM1, FM2, FM3, or AM).
• To operate the CD player (CD),
CD changer (CD-CH), or external
component (LINE-IN or SIRIUS)
For KD-AR3000:
• Press CD/CD-CH LINE repeatedly.
1
CD*
For KD-LH300:
• Press CD/CD-CH repeatedly.
(or LINE-IN/SIRIUS*3)
*1Without loading the CD, you cannot select
“CD” as the source.
CD-CH*
(or SIRIUS*3)
LINE-IN
1
CD*
CD-CH*
2
23
*2Without connecting the CD changer, you
cannot select “CD-CH” as the source.
*3To select the external component as the source,
set “Ext Input” correctly (see page 39).
3
Adjust the volume.
To increase the volume
To decrease the volume
Volume level appears.
Current sound mode (iEQ)
(see page 25)
4
Adjust the sound as you want.
(See pages 24 – 27.)
Note:
While playing a source, you can select the display
2
theme of your preference. For details, see “Selecting
the display theme” on page 28.
NOTICE:
The illustrations of the display used in this manual
are mainly of the initial setting when shipped from
the factory. If you have changed the display
themes or some PSM items, the actual displays
you see will be different.
7
Page 8
To drop the volume in a moment
Press briefly while listening to any
source. “AT T ” starts flashing on the display, and
the volume level will drop in a moment.
To resume the previous volume level, press the
ENGLISH
button briefly again.
• If you turn the control dial, you can also restore
the sound.
To turn off the power
Press and hold for more than one
second.
• If you turn off the power while listening to a
disc, disc play will start from where playback
has been stopped previously, next time you
turn on the power.
Canceling the display
demonstration
When shipped from the factory, display
demonstration has been activated, and starts
automatically when no operations are done for
about 20 seconds.
• It is recommended to cancel the display
demonstration before you use the unit for the
first time.
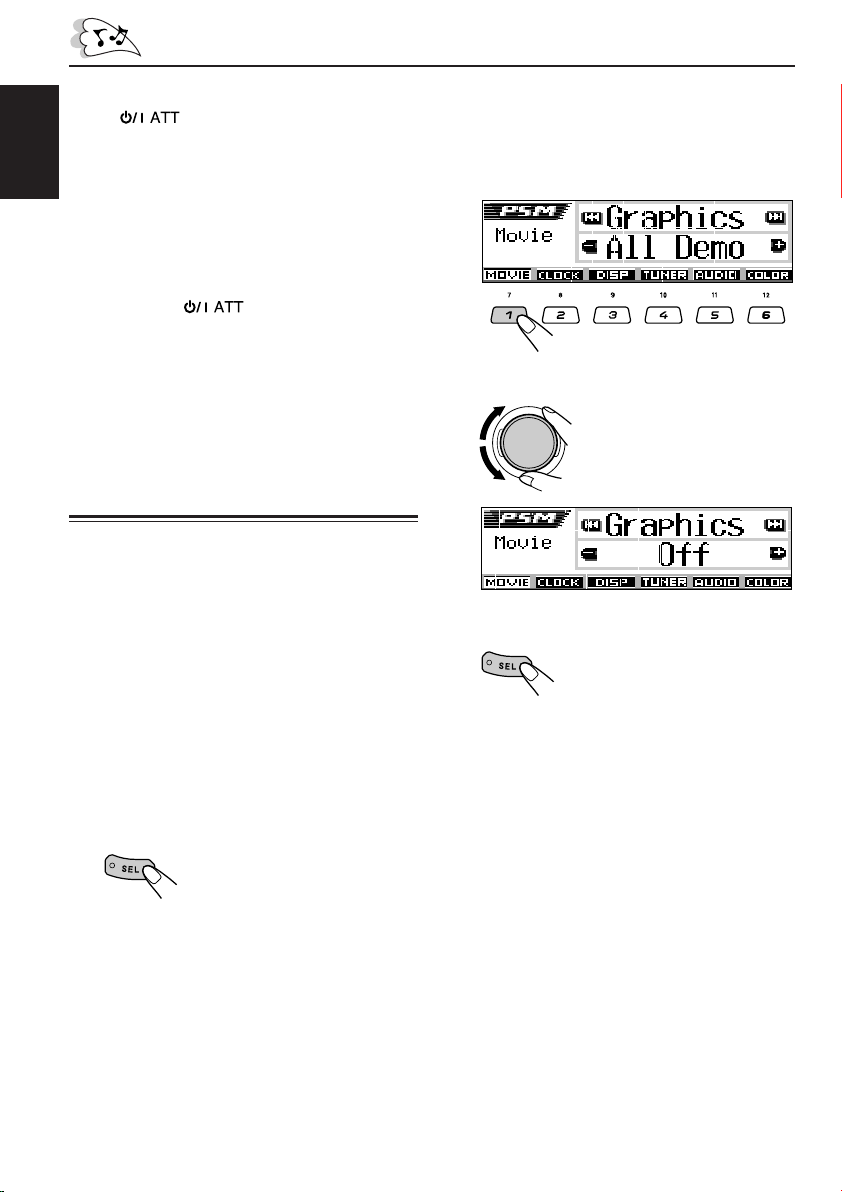
2
Press number button 1 to select
“MOVIE”—Movie category of the
PSM settings.
The “Graphics” setting screen appears on
the display.
3
Select “Off.”
4
Finish the setting.
To cancel the display demonstration, follow
the procedure below:
1
Press and hold SEL (select) for more
than 2 seconds so that one of the
PSM items appears on the display.
(PSM: see pages 36 and 37.)
The next-step-operation buttons
start flashing.
8
To activate the display demonstration, repeat
the same procedure and select “All Demo” or “Int
Demo” in step 3.
• For more details, see “To show the graphics on
the display—Graphics” on page 38.
Page 9
Setting the clock
You can also set the clock system to either
24 hours or 12 hours.
1
Press and hold SEL (select) for more
than 2 seconds so that one of the
PSM items appears on the display.
(PSM: see pages 36 and 37.)
The next-step-operation buttons
start flashing.
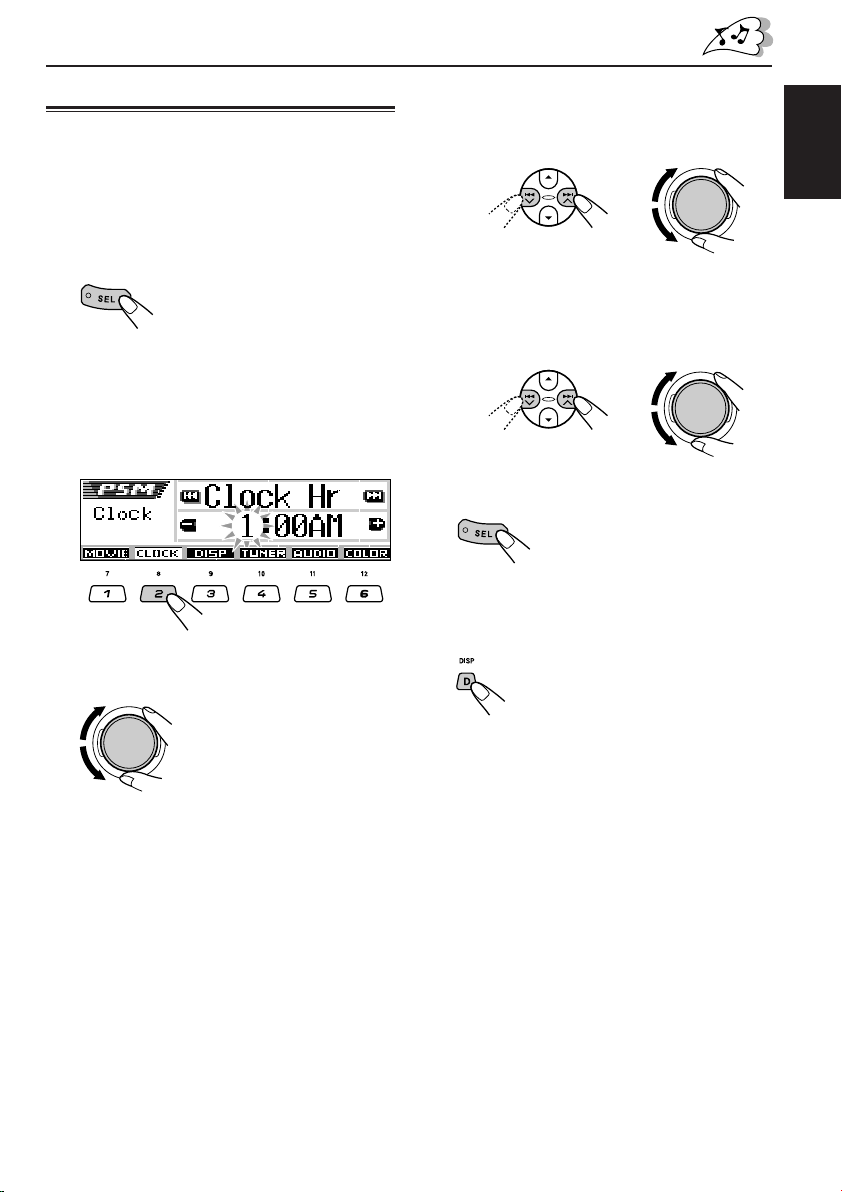
2
Press number button 2 to select
“CLOCK”—Clock category of the
PSM settings.
The “Clock Hr” (hour) setting screen
appears on the display.
4
Set the minute.
1 Select “Clock Min” (minute).
2 Adjust the minute.
12
5
Set the clock system.
1 Select “24H/12H.”
2 Select “24Hours” or “12Hours.”
12
6
Finish the setting.
To check the clock time when the unit is
turned off, press D DISP.
ENGLISH
3
Adjust the hour.
The power turns on and the clock time is shown
for about 5 seconds, then the power turns off.
9
Page 10
ENGLISH
RADIO OPERATIONS
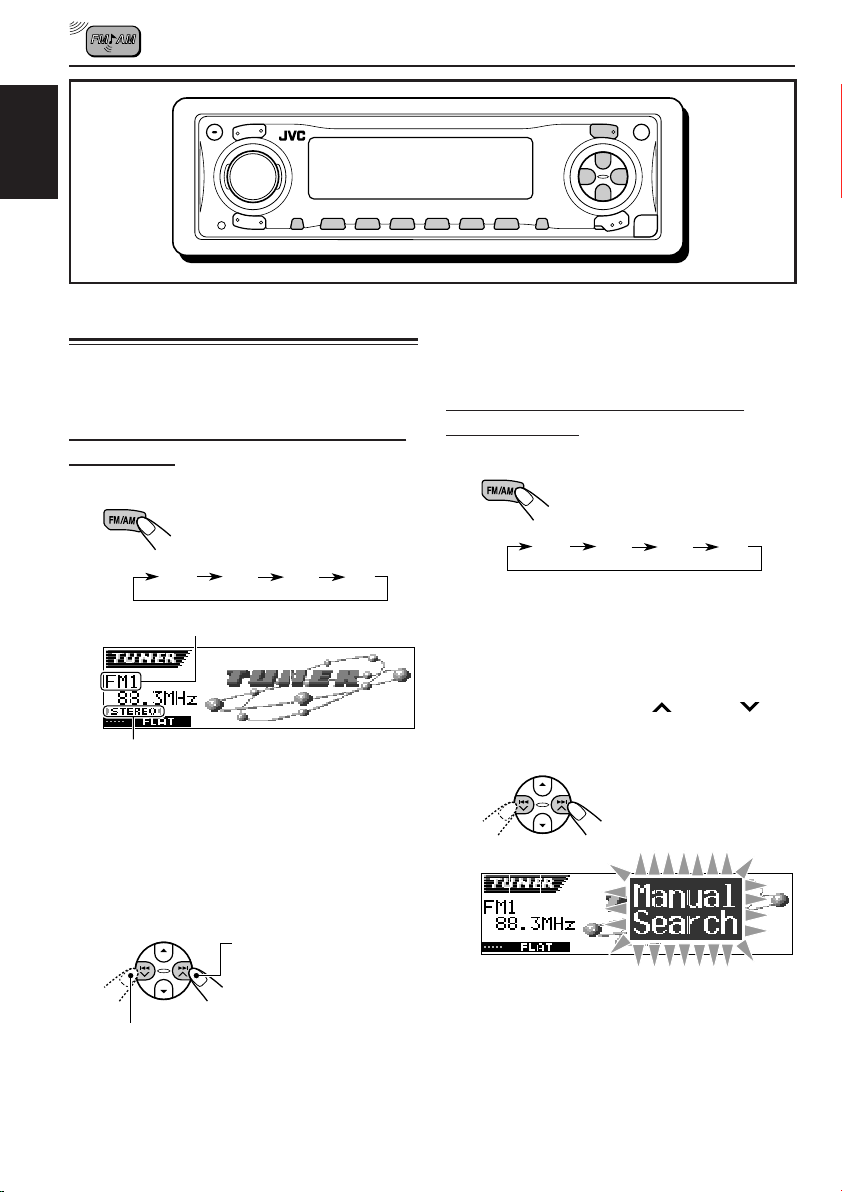
Listening to the radio
You can use either automatic searching or manual
searching to tune in to a particular station.
Searching for a station automatically:
Auto search
1
Select the band (FM1 – 3, AM).
Each time you press the button,
the band changes as follows:
FM1 FM2 FM3 AM
Selected band appears.
Lights up when receiving an FM stereo
broadcast with sufficient signal strength.
Note:
This receiver has three FM bands (FM1, FM2,
FM3). You can use any one of them to listen to
an FM broadcast.
To stop searching before a station is
received, press the same button you have
pressed for searching.
Searching for a station manually:
Manual search
1
Select the band (FM1 – 3, AM).
Each time you press the button,
the band changes as follows:
FM1 FM2 FM3 AM
Note:
This receiver has three FM bands (FM1, FM2,
FM3). You can use any one of them to listen to
an FM broadcast.
2
Press and hold ¢ or 4
until “Manual Search” starts flashing
on the display.
10
2
Start searching for a station.
To search for stations of
higher frequencies
To search for stations of lower frequencies
When a station is received, searching stops.
Page 11

3
Tune in to a station you want while
“Manual Search” is flashing.
To tune in to stations of
higher frequencies
To tune in to stations of lower frequencies
• If you release your finger from the button,
the manual mode automatically turns off
after about 5 seconds.
• If you hold down the button, the frequency
keeps changing (in 200 kHz intervals for
FM and 10 kHz for AM) until you release
the button.
If the sound quality decreases and the
stereo effect is lost while listening to an
FM station
In some areas, adjacent stations may
interfere with each other. If this interference
occurs, this unit can automatically reduce this
interference noise (the initial setting when
shipped from the factory). However, in this
case, the sound quality will be degraded and
the stereo effect will also be lost.
If you do not want to degrade the sound
quality and to lose the stereo effect, rather
than to eliminate the interference noise, see
“To change the FM tuner selectivity—IF Filter”
on page 39.
When an FM stereo broadcast is hard to
receive:
Set the FM reception mode to “Mono On.”
1 Press M MODE while listening to an FM
stereo broadcast.
“Mode” appears on the display.
The next-step-operation buttons
start flashing.
2 Press number button 1 to select “Mono On”
while “Mode” is still on the display.
Each time you press the button, “Mono On” or
“Mono Off” appears alternately.
After about
5 seconds
The display returns to the source indication
screen.
MONO indicator appears.
The sound you hear becomes monaural but the
reception will be improved.
ENGLISH
11
Page 12
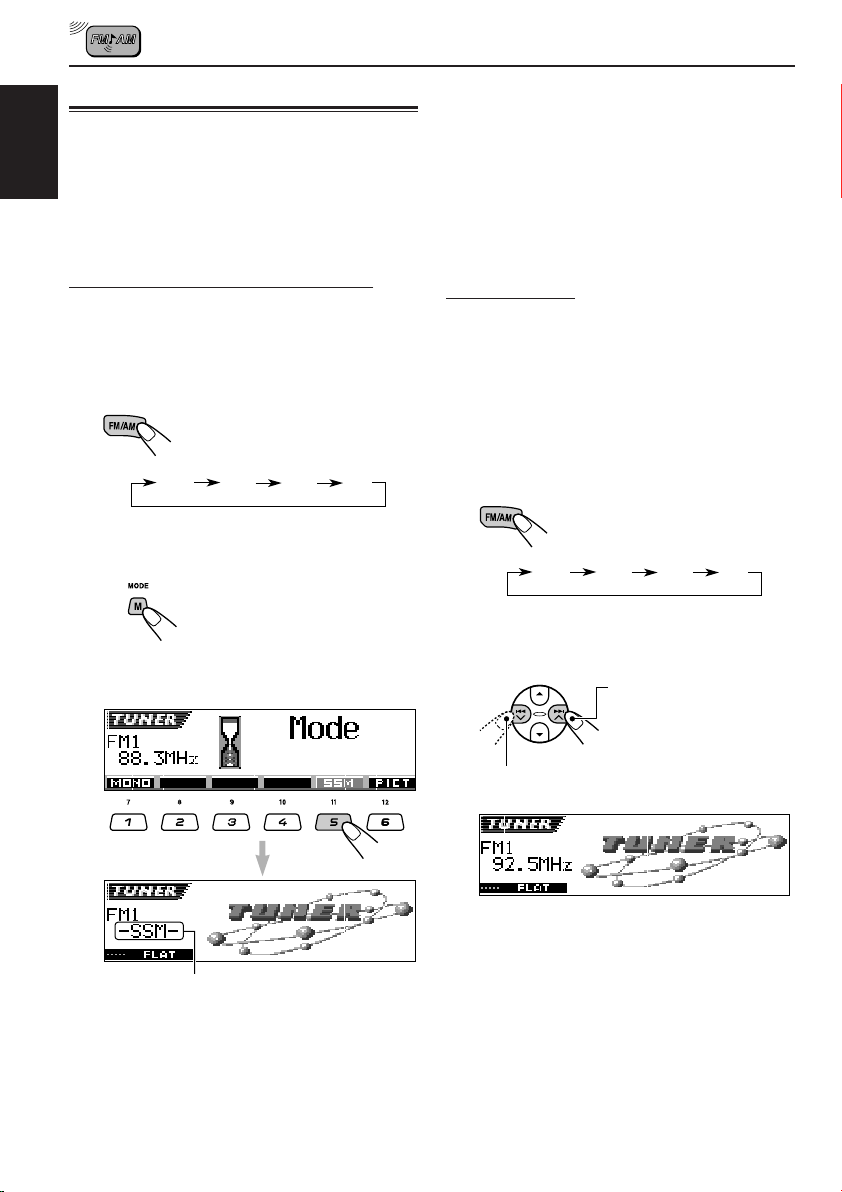
Storing stations in memory
You can use one of the following two methods to
store broadcasting stations in memory.
• Automatic preset of FM stations: SSM (Strong-
ENGLISH
station Sequential Memory)
• Manual preset of both FM and AM stations
Local FM stations with the strongest signals are
searched and stored automatically in the band
number you have selected (FM1, FM2, or FM3).
These stations are preset in the number buttons
—No.1 (lowest frequency) to No.6 (highest
frequency).
When automatic preset is over, the station stored
in number button 1 will be automatically tuned in.
FM station automatic preset: SSM
You can preset 6 local FM stations in each FM
band (FM1, FM2, and FM3).
1
Select the FM band (FM1 – 3) you
want to store FM stations into.
Each time you press the button,
the band changes as follows:
FM1 FM2 FM3 AM
2
Start automatic preset.
1 Press M MODE.
“Mode” appears on the display.
The next-step-operation buttons
start flashing.
2 Press and hold number button 5 while
“Mode” is still on the display.
Manual preset
You can preset up to 6 stations in each band
(FM1, FM2, FM3, and AM) manually.
Ex.: Storing FM station of 92.5 MHz into the
preset number 1 of the FM1 band.
1
Select the band (FM1 – 3, AM) you
want to store stations into (in this
example, FM1).
Each time you press the button,
the band changes as follows:
FM1 FM2 FM3 AM
2
Tune in to a station (in this example,
of 92.5 MHz).
To tune in to stations of
higher frequencies
To tune in to stations of lower frequencies
12
“–SSM–” appears, then disappears
when automatic preset is over.
Page 13
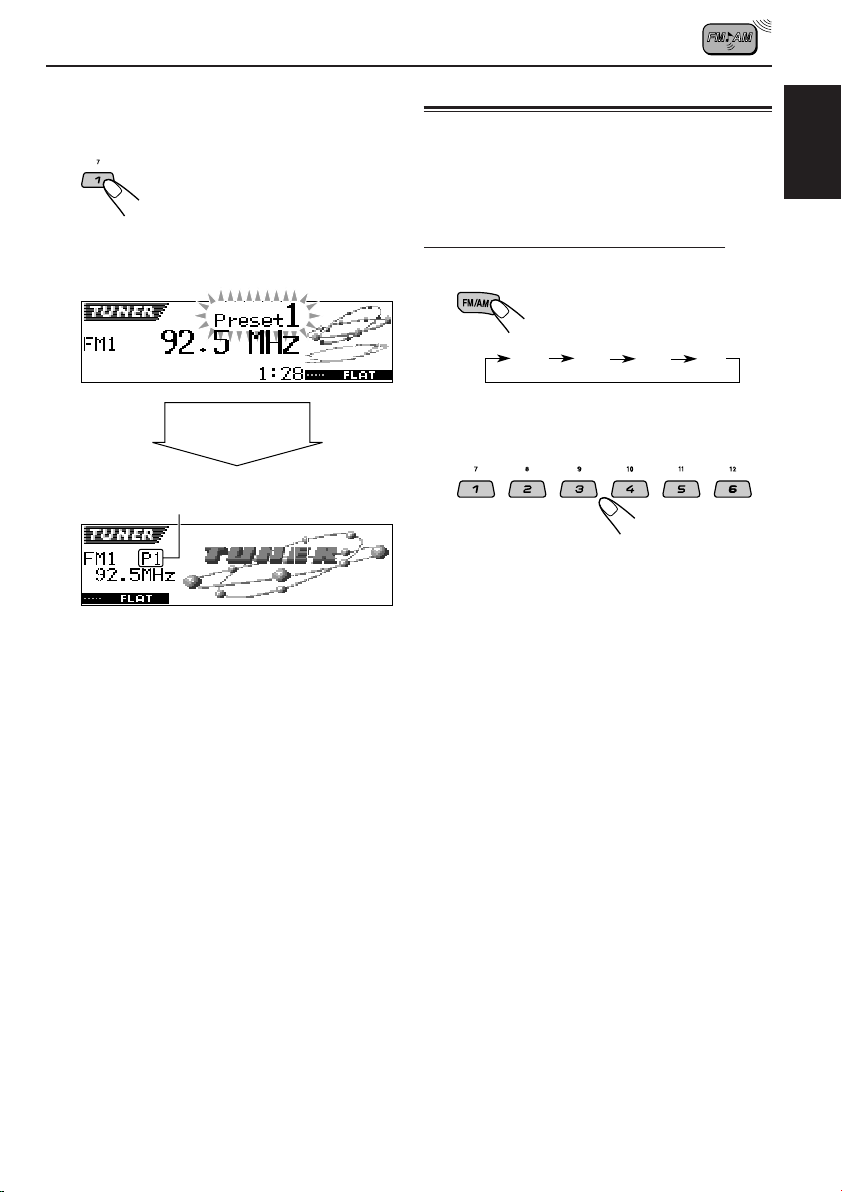
3
Press and hold the number button
(in this example, 1) for more than
2 seconds.
Tuning in to a preset station
You can easily tune in to a preset station.
Remember that you must store stations first. If
you have not stored them yet, see “Storing
stations in memory” on pages 12 and 13.
ENGLISH
The display pattern automatically changes
to the small animation display (see page
14).
After about
5 seconds
Preset number appears.
4
Repeat the above procedure to store
other stations into other preset
numbers.
Notes:
• A previously preset station is erased when a new
station is stored in the same preset number.
• Preset stations are erased when the power supply to
the memory circuit is interrupted (for example,
during battery replacement). If this occurs, preset
the stations again.
Selecting a preset station directly
1
Select the band (FM1 – 3, AM).
Each time you press the button,
the band changes as follows:
FM1 FM2 FM3 AM
2
Select the number (1 – 6) for the
preset station you want.
Note:
You can also use the 5 (up) or ∞ (down) button on
the unit to select the next or previous preset stations.
Each time you press the 5 (up) or ∞ (down) button,
the next or previous preset station is tuned in.
CONTINUED ON THE NEXT PAGE
13
Page 14
Selecting a preset station using the
preset station list
If you forget what stations are stored in which
preset numbers, you can check the preset station
ENGLISH
list, then select your desired station.
1
Select the band (FM1 – 3, AM).
Each time you press the button,
the band changes as follows:
FM1 FM2 FM3 AM
2
Press and hold 5 (up) or ∞ (down)
until the preset station list for the
current band (FM1, FM2, FM3, or AM)
appears on the display.
The current station will be
highlighted on the display.
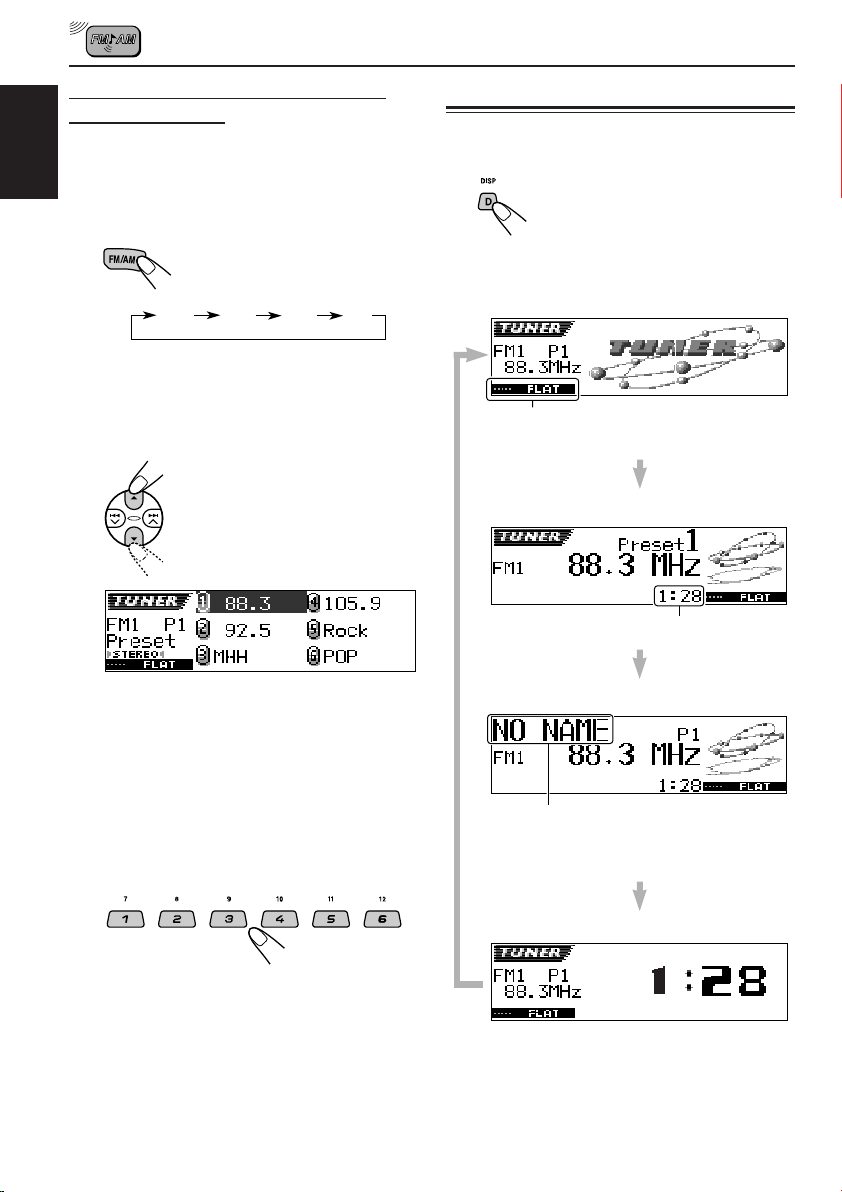
Changing the display pattern
By pressing D DISP, you can change the
information shown on the display.
Each time you press the button,
the display patterns change as
follows:
Ex.: When selecting preset station 1 of FM1 band
Large animation display
Current sound mode (iEQ)
(see page 25)
Small animation display 1
Clock time
Notes:
• You can show the other FM band preset station lists
(FM1, FM2, or FM3) by pressing 5 (up) or ∞ (down).
• If a name has been assigned to a station (see page
43), it will be shown instead of the station
frequency.
3
Select the number (1 – 6) for the
preset station you want.
14
Small animation display 2
If a name has been assigned to a
station it will be shown instead of
“NO NAME.”
Clock time display
Page 15
DISC OPERATIONS
ENGLISH
This unit has been designed to reproduce CDs,
CD-Rs (Recordable), CD-RWs (Rewritable), and
CD Texts.
• This unit is also compatible with MP3 and
WMA discs. For details about these discs,
refer to “A Guide to MP3/WMA” (separate
volume).
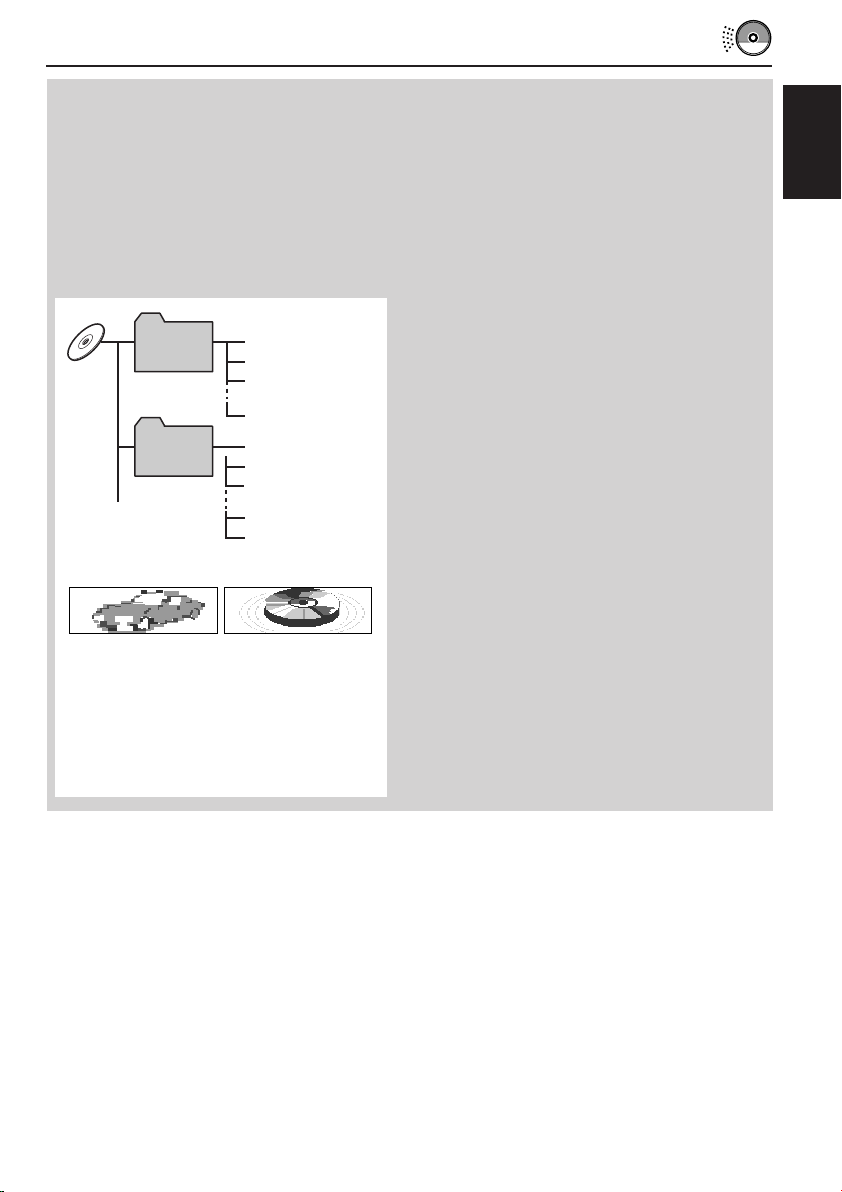
About MP3 and WMA discs
MP3 and WMA (Windows Media® Audio) “tracks”
(word “file” is not used to indicate MP3 or WMA
files, “track” is used in this manual) are recorded
in “folders.”
During recording, the tracks and folders can be
arranged in a way similar to arranging files and
folders of computer data.
“Root” is similar to the root of a tree. Every track
and folder can be linked to and be accessed from
the root.
01
05
Hierarchy
1
2
02 03
3
10
11
04
12
6
4
5
7
8
9
Level 1 Level 2 Level 3 Level 4 Level 5
ROOT
Playing a disc
1
Open the control panel.
Note on One-Touch Operation:
When a disc is already in the loading slot,
pressing CD/CD-CH LINE (for KD-AR3000) or
CD/CD-CH (for KD-LH300) turns on the unit
and starts playback automatically.
2
Insert a disc into the loading slot.
The unit draws the disc,
the control panel goes
back to the previous
position (see page
44), and playback
starts automatically.
All tracks will be played repeatedly until you
stop playback.
Note:
For details on playable discs and other related
information, see page 56.
01
: Folders and their playback order
: MP3/WMA tracks and their playback
1
order
• Microsoft and Windows Media are either registered
trademarks or trademarks of Microsoft Corporation
in the United States and/or other countries.
About mistracking:
Mistracking may result from driving on extremely
rough roads. This does not damage the unit and
the disc, but will be annoying.
We recommend that you stop disc play while
driving on such rough roads.
15
Page 16
Display indications when inserting an audio
CD or a CD Text:
ENGLISH
Display indications when inserting an MP3
or a WMA discs:
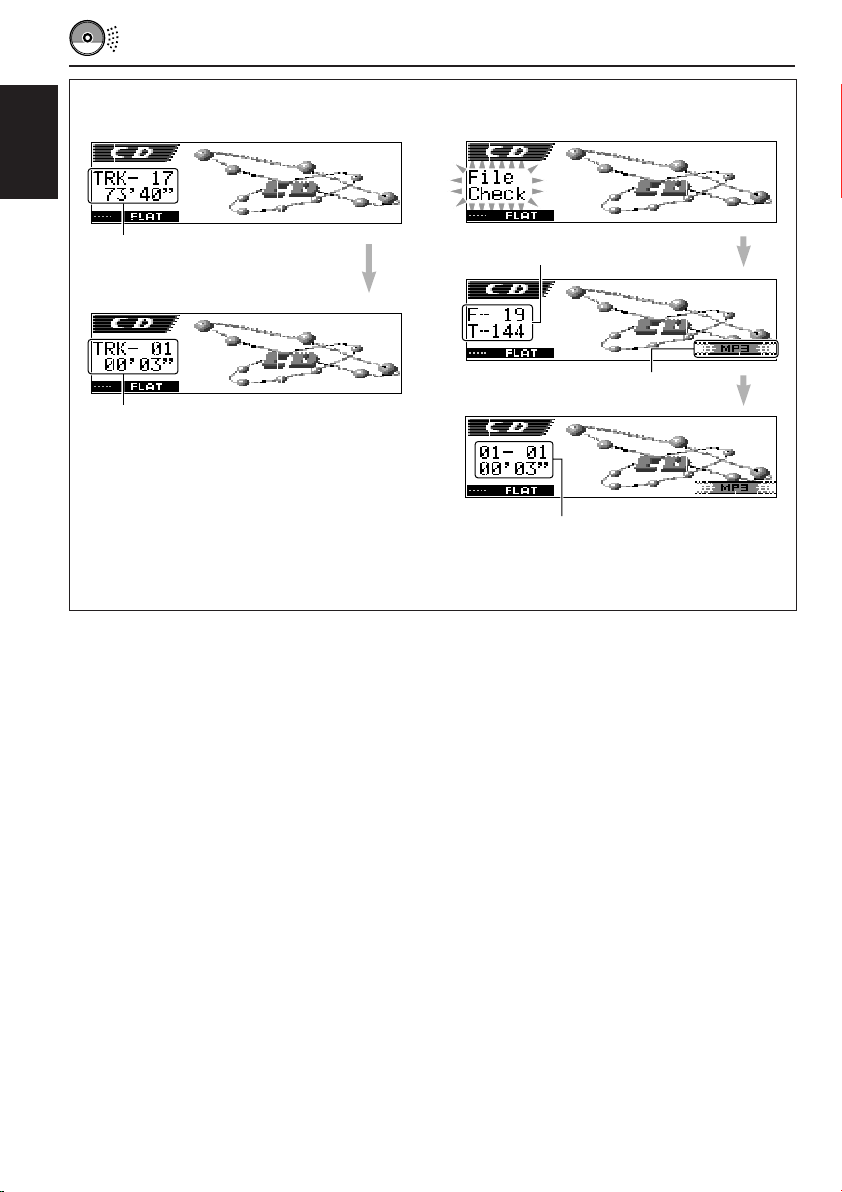
Total track number and total
playing time of the inserted CD
Current track and elapsed playing time
Notes:
• MP3 or WMA discs require a longer readout time.
(It differs due to the complexity of the folder/track
configuration.)
• The unit cannot read or play an MP3 track
without the extension code <.mp3>, and a WMA
track without the extension code <.wma>.
To stop play and eject the disc
Press 0.
Disc play stops and the control panel moves
down. The disc automatically ejects from the
loading slot. The source changes to the
previously selected source.
• If you change the source or turn the power off,
disc play also stops (without ejecting the disc).
Next time you select “CD” as the source or turn
the power on, disc play starts from where
playback has been stopped previously.
Total folder and track numbers
MP3 indicator*
Current folder/track and elapsed playing time
* WMA or MP3 indicator lights up depending on the
first detected track.
Notes:
• If the ejected disc is not removed for about
15 seconds, the disc is automatically inserted again
into the loading slot to protect it from dust.
(Disc play will not start this time.)
• You can eject the disc even when the unit is turned
off.
To return the control panel to its previous
position, press 0 again.
• If you keep the loading slot fully open for about
1 minute, (beeps sound when the “Beep”
setting is turned “On”—see page 39) the
control panel automatically returns to its
previous position.
Be careful not to get the disc or your finger
caught in between the control panel and the
unit.
16
Page 17
What is ImageLink?
When an MP3 or a WMA folder includes an
image <jml> file edited by Image Converter
(supplied in the CD-ROM), you can show the
image on the display while the tracks in the
folder are played back.
• While reading an image <jml> file, no
sounds come out (“Image Link” is shown on
the display during this period).
Album 1
(Folder 1)
Album 2
(Folder 2)
Display window
Music001.mp3
Music002.mp3
Music003.mp3
Photo1.jml
Music004.wma
Music005.mp3
Music006.wma
Photo2.jml
Photo3.jml
Display window
To activate ImageLink, follow the procedure
below:
• See also “Changing the general settings
(PSM)” on page 36.
ENGLISH
1 Press and hold SEL (select) for more than
2 seconds so that one of the PSM items
appears on the display.
2 Press number button 1 to select “MOVIE”—
Movie category of the PSM settings.
The “Graphics” setting screen appears on
the display.
3 Turn the control dial to select “ImageLink.”
4 Press SEL (select) to finish the setting.
ImageLink starts functioning when the next
folder starts playing.
Note:
ImageLink will not work in the following cases:
• If no <jml> file is included in an MP3/WMA
folder.
• If Intro Scan is activated.
• If the source is changed to any other than “CD,” or
• If you turn off then on the unit while “Image Link”
is shown on the display.
Photo1.jml
If there are more than one <jml> file in a
folder, a <jml> file with younger playback
order number will be shown on the display
(in the above example, “Photo2.jml” will be
used for Album 2).
Photo2.jml
17
Page 18
Locating a track or a
particular portion on a disc
To fast-forward or reverse the track
ENGLISH
Press and hold 4 , while playing a disc, to
reverse the track.
Note:
During this operation on an MP3 or WMA disc, you
can only hear intermittent sounds. (The elapsed
playing time also changes intermittently on the
display.)
To go to the next or previous tracks
Press and hold ¢ ,
while playing a disc, to
fast-forward the track.
Press ¢ briefly, while
playing a disc, to go ahead to
the beginning of the next
track.
Each time you press the
button consecutively, the
beginning of the next tracks is
located and played back.
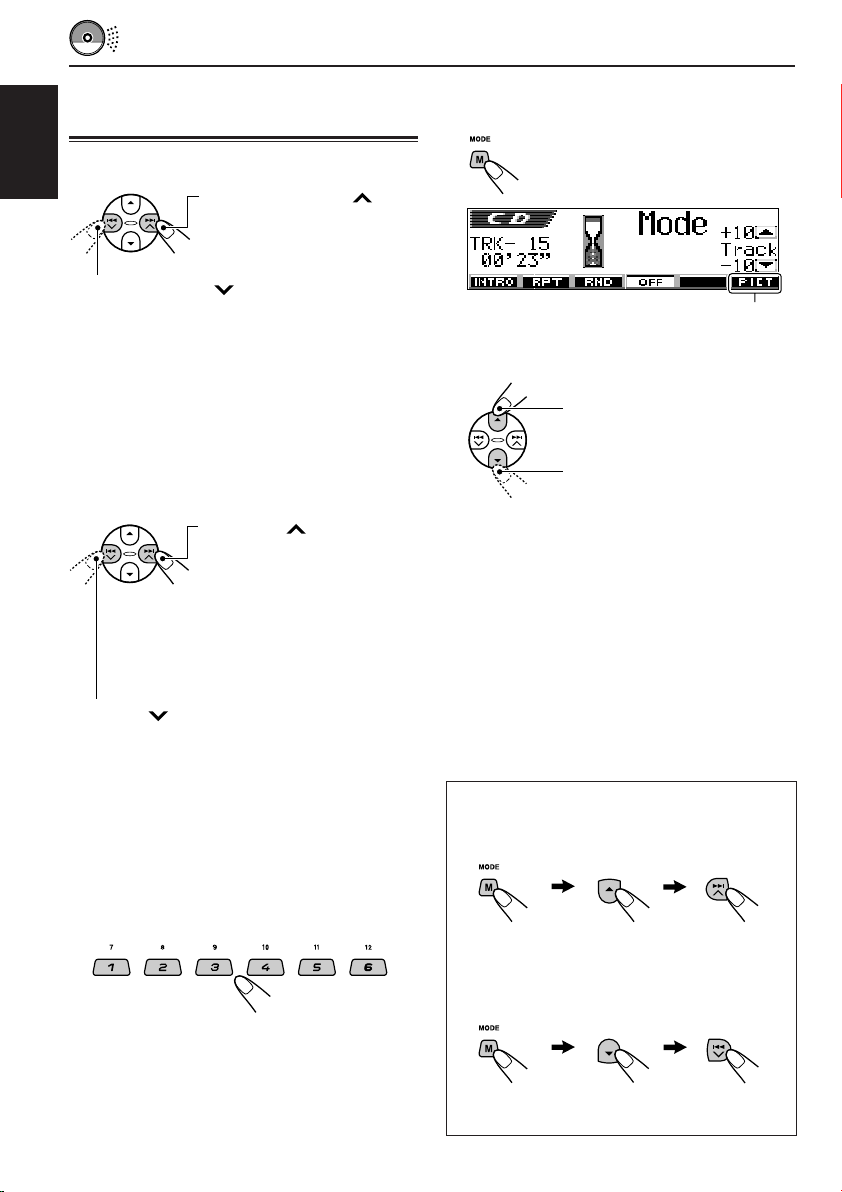
To go to a track quickly
1 Press M MODE while playing a disc.
“Mode” appears on the display.
The next-step-operation buttons
start flashing.
See page 30 for this function.
2 Press 5 (up) or ∞ (down) while “Mode” is still
on the display.
To skip 10 tracks* forwards
to the last track
To skip 10 tracks* backwards
to the first track
* First time you press 5 (up) or ∞ (down)
button, the track skips to the nearest higher
or lower track with a track number of multiple
ten (ex. 10th, 20th, 30th).
Then each time you press the button, you can
skip 10 tracks (see “How to go to the desired
track quickly” below).
• After the last track, the first track will be
selected, and vice versa.
Press 4 briefly, while playing a disc, to go
back to the beginning of the current track.
Each time you press the button consecutively,
the beginning of the previous tracks is located
and played back.
To go to a particular track directly
(Only for CD and CD Text discs)
Press the number button corresponding to the
track number to start its playback.
• To select a track number from 01 – 06:
Press 1 (7) – 6 (12) briefly.
• To select a track number from 07 – 12:
Press and hold 1 (7) – 6 (12) for more than one
second.
18
Note:
If the current playing disc is an MP3 or a WMA disc,
tracks are skipped within the same folder.
How to go to the desired track quickly
• Ex. 1: To select track number 32 while
playing track number 6
(Three times) (Twice)
Track 6 \ 10 \ 20 \ 30 \ 31 \ 32
• Ex. 2 :To select track number 8 while
playing track number 36
(Three times) (Twice)
Track 36 \ 30 \ 20 \ 10 \ 9 \ 8
Page 19
To go to a particular folder directly
(Only possible for MP3 or WMA disc)
To skip to the next or previous folder
(Only possible for MP3 or WMA disc)
IMPORTANT:
To directly select the folders using the number
button(s), it is required that folders are
assigned 2 digit numbers at the beginning of
their folder names. (This can only be done
during the recording of CD-Rs or CD-RWs.)
Ex.: If folder name is “01 ABC”
= Press 1 to go to Folder 01 ABC.
If folder name is “1 ABC,” pressing 1
does not work.
If folder name is “12 ABC”
= Press and hold 6 (12) to go to Folder
12 ABC.
Press the number button corresponding to the
folder number to start playing the first track in the
selected folder.
• To select a folder number from 01 – 06:
Press 1 (7) – 6 (12) briefly.
• To select a folder number from 07 – 12:
Press and hold 1 (7) – 6 (12) for more than one
second.
Notes:
• If “No Music” appears on the display after you
have selected a folder, it means that the folder does
not contain any MP3 or WMA tracks.
• You cannot directly select a folder with a number
greater than 12.
Press 5 (up) while playing a disc
to skip to the next folder.
Each time you press the button
consecutively, the next folder is
located and the first track in the
folder starts playing.
Press ∞ (down) while playing a disc to skip back
to the previous folder.
Each time you press the button consecutively,
the previous folder is located and the first track in
the folder starts playing.
Note:
If the folder does not contain any MP3 or WMA
tracks, it is skipped.
ENGLISH
To select a particular track in a folder, press
¢ or 4 after selecting the folder.
19
Page 20
Selecting a folder and a track
using the name lists
The following operations are only possible
ENGLISH
when playing an MP3 or a WMA disc.
You can show the folder name and track name
lists on the display while playing a disc. Then,
select a folder or a track you want to start
playback with.
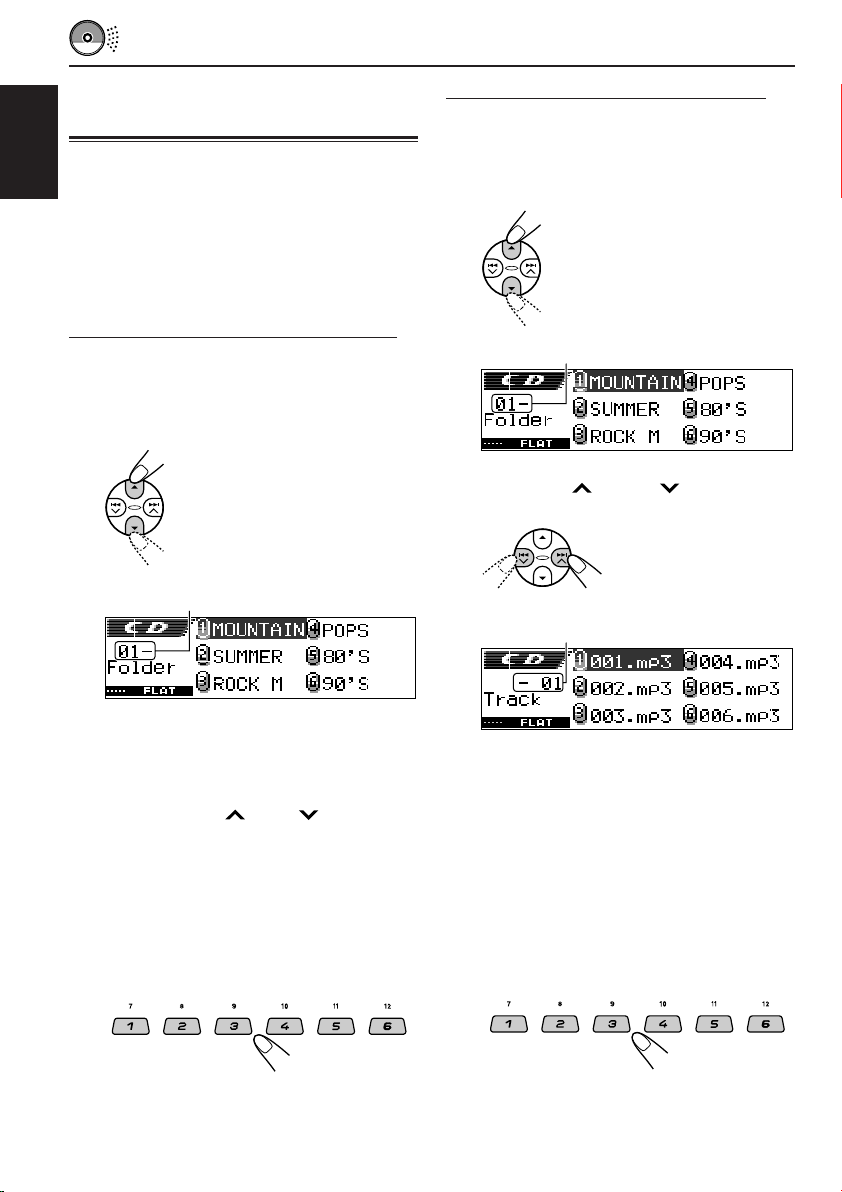
Selecting a folder and start playback
1
Press and hold 5 (up) or ∞ (down)
so that the folder name list of the
inserted disc appears on the
display.
The current playing folder will be
highlighted on the display.
Current folder number
Selecting a track and start playback
1
Press and hold 5 (up) or ∞ (down)
so that the folder name list of the
inserted disc appears on the
display.
The current playing folder will be
highlighted on the display.
Current folder number
2
Press ¢ or 4 to show the
track name list of the current folder.
The current playing track
will be highlighted on the
display.
Current track number
20
Notes:
• The display can shows only six names at a
time. You can show the other names on the
next lists by pressing 5 (up) or ∞ (down).
• If you press ¢ or 4 , the track name
list of the current playing folder appears.
Each time you press the button, the folder name
list and track name list appear alternately.
• Only folders with MP3 or WMA tracks will be
listed.
2
Select the number (1 – 6) for the folder
you want to play.
Each time you press the button, the folder
name list and track name list appear
alternately.
Note:
The display can shows only six names at a time.
You can show the other names on the next lists
by pressing 5 (up) or ∞ (down).
3
Select the number (1 – 6) for the
track you want to play.
Page 21
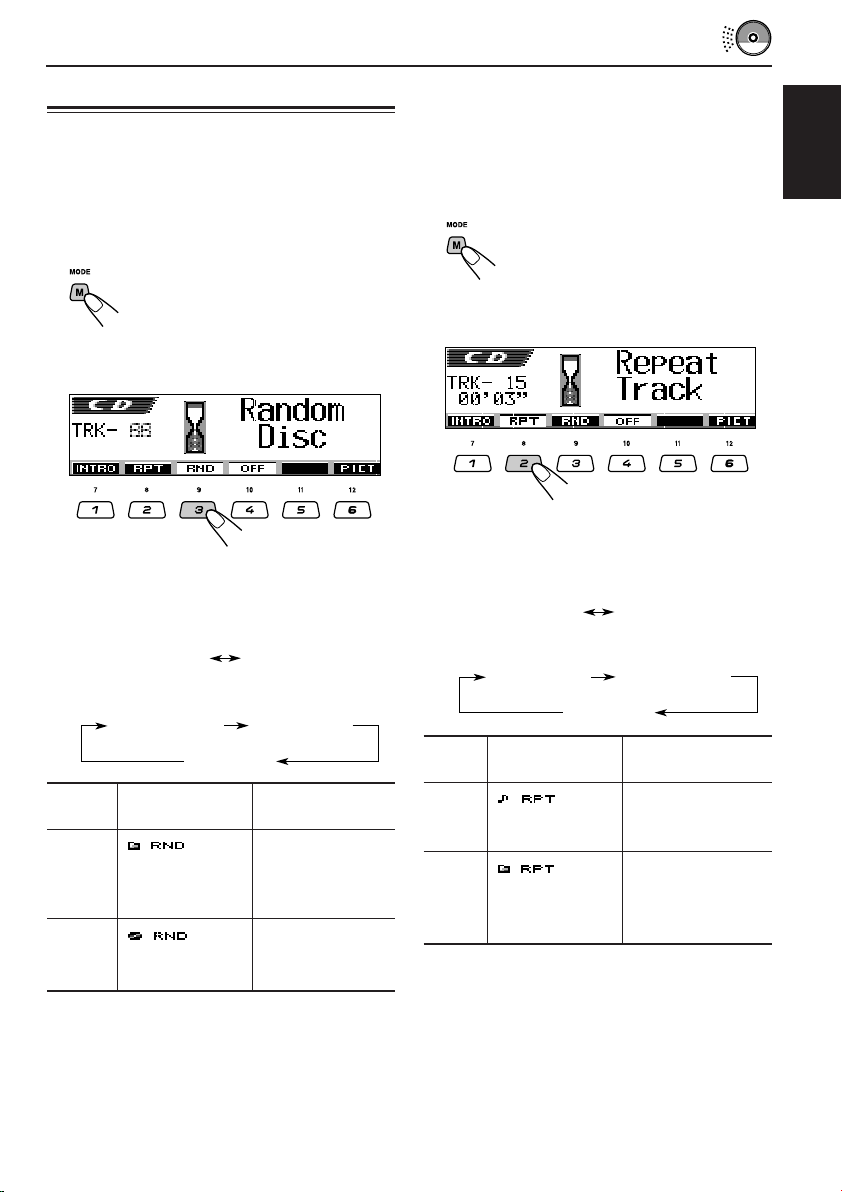
Selecting the playback modes
To play back tracks at random
(Random Play)
You can play back all tracks on the disc (or a
folder for MP3 and WMA discs) at random.
1 Press M MODE while playing a disc.
“Mode” appears on the display.
The next-step-operation buttons
start flashing.
2 Press number button 3 repeatedly while
“Mode” is still on the display.
Each time you press the button, random play
mode changes as follows:
For audio CD and CD Text discs:
Random OffRandom Disc
For MP3 and WMA discs:
Random DiscRandom Folder
Random Off
Mode
Random All tracks of the
Folder* (folder random) current folder, then
Random (disc All tracks on the
Disc random) indicator disc.
* “Random Folder” can be used for MP3 and WMA
discs only.
To cancel random play, select “Random Off” by
pressing number button 3 repeatedly or press
number button 4 in step 2.
Active
indicator
indicator lights tracks of the next
up. folder and so on.
lights up.
Plays at random
To play back tracks repeatedly
(Repeat Play)
You can play back the current track (or a folder
for MP3 and WMA discs) repeatedly.
1 Press M MODE while playing a disc.
“Mode” appears on the display.
The next-step-operation buttons
start flashing.
2 Press number button 2 repeatedly while
“Mode” is still on the display.
Each time you press the button, repeat play
mode changes as follows:
For audio CD and CD Text discs:
Repeat OffRepeat Track
For MP3 and WMA discs:
Repeat FolderRepeat Track
Repeat Off
Mode
Repeat (track The current (or
Track repeat) indicator specified) track.
Repeat (folder All tracks of the
Folder* repeat) indicator current (or
* “Repeat Folder” can be used for MP3 and WMA
discs only.
To cancel repeat play, select “Repeat Off” by
pressing number button 2 repeatedly or press
number button 4 in step 2.
Active
indicator
lights up.
lights up. specified) folder of
Plays repeatedly
the disc.
ENGLISH
21
Page 22

To play back only intros
(Intro Scan)
You can play back the first 15 seconds of each
track sequentially.
ENGLISH
1 Press M MODE while playing a disc.
“Mode” appears on the display.
The next-step-operation buttons
start flashing.
2 Press number button 1 repeatedly while
“Mode” is still on the display.
Prohibiting disc ejection
You can prohibit disc ejection and can lock a disc
in the loading slot.
While pressing SEL (select), press and
hold 0 (eject) for more than 2 seconds.
“No Eject” flashes on the display for about
5 seconds, and the disc is locked and cannot be
ejected.
Each time you press the button, intro scan
mode changes as follows:
For audio CD and CD Text discs:
Intro OffIntro Track
For MP3 and WMA discs:
Intro FolderIntro Track
Intro Off
Mode
Intro (track All tracks on the
Track intro) indicator disc.
Intro The first track of every
Folder* (folder intro) folder of the disc.
* “Intro Folder” can be used for MP3 and WMA
discs only.
To cancel intro scan, select “Intro Off” by
pressing number button 1 repeatedly or press
number button 4 in step 2.
Active Plays the beginnings
indicator (15 seconds) of
lights up.
indicator
lights up.
To cancel the prohibition and unlock the
disc
While pressing SEL (select), press and hold
0 (eject) again for more than 2 seconds.
“Eject OK” flashes on the display for about
5 seconds, and the disc is unlocked.
22
Page 23
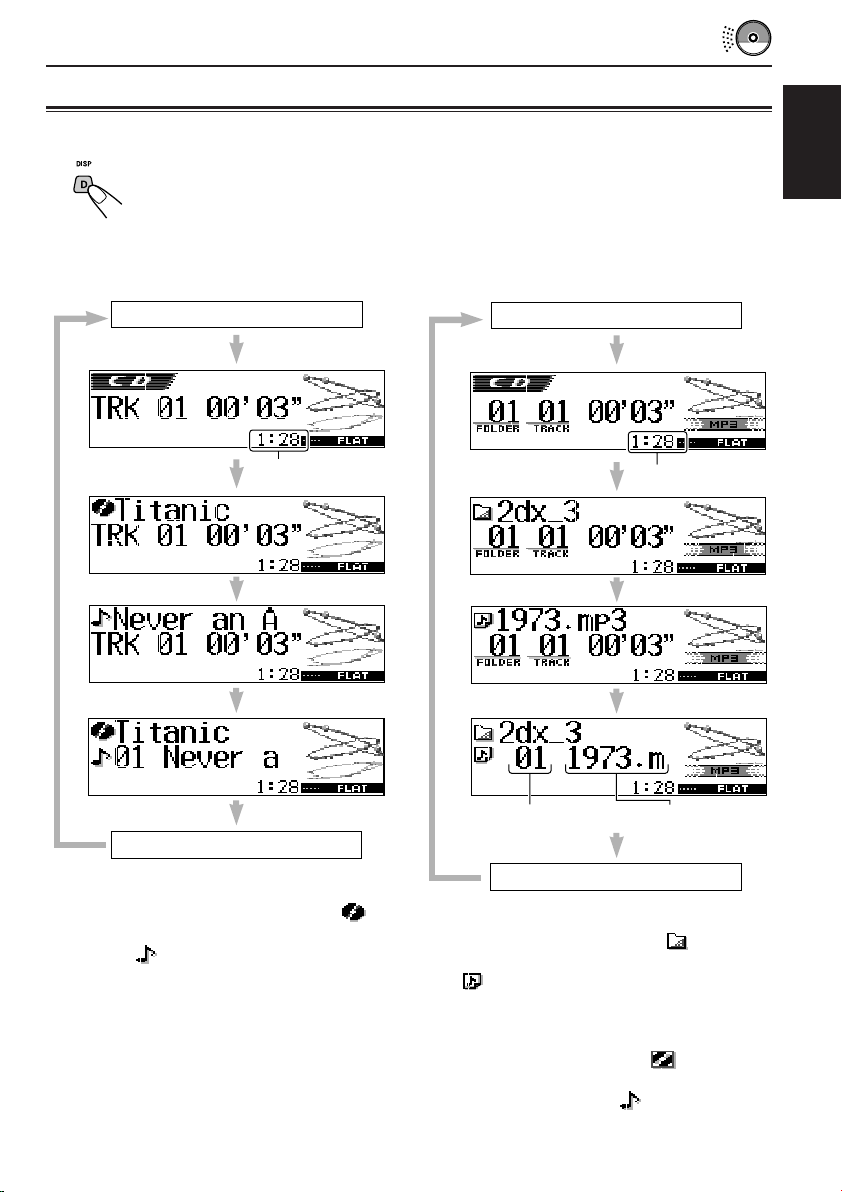
Changing the display pattern
By pressing D DISP, you can change the information shown on the display.
If the information cannot be shown at a time, it will scroll on the display. See also “To
select the scroll mode—Scroll” on page 38.
Some characters or symbols will not be shown (will be blanked or substituted) on the
display.
Each time you press the button, the display patterns change as follows:
While playing an audio CD or a CD Text disc:
Original display
While playing an MP3 or a WMA disc when
“Tag ” is set to “Off”:
ENGLISH
Original display
Clock time
Clock
Notes:
• When the disc title/performer is shown, the
(disc) indicator lights up. When the track title is
shown, the (track) indicator lights up.
• If no name is assigned to the audio CD, “NO
NAME” will appear. To assign a name to an audio
CD, see page 43.
• If no disc title/performer or no track title is
recorded for the CD Text, “NO NAME” will appear.
Clock time
Current track
number
Track name
Clock
Notes:
• When the folder name is shown, the (folder)
indicator lights up. When the track name is shown,
the (track) indicator lights up.
• If “Tag” is set to “On” (see page 38), ID3 tag
information will appear on the display if the disc
has an ID3 tag.
The album name/performer with (disc)
indicator appear on the display instead of the folder
name; while track title with (track) indicator
appear instead of the track name.
23
Page 24
SOUND ADJUSTMENTS
Adjusting the sound
You can set the speaker output balance, subwoofer
output level, and input level of each source.
ENGLISH
• There is a time limit in doing the following
procedure. If the setting is canceled before you
finish, start from step 1 again.
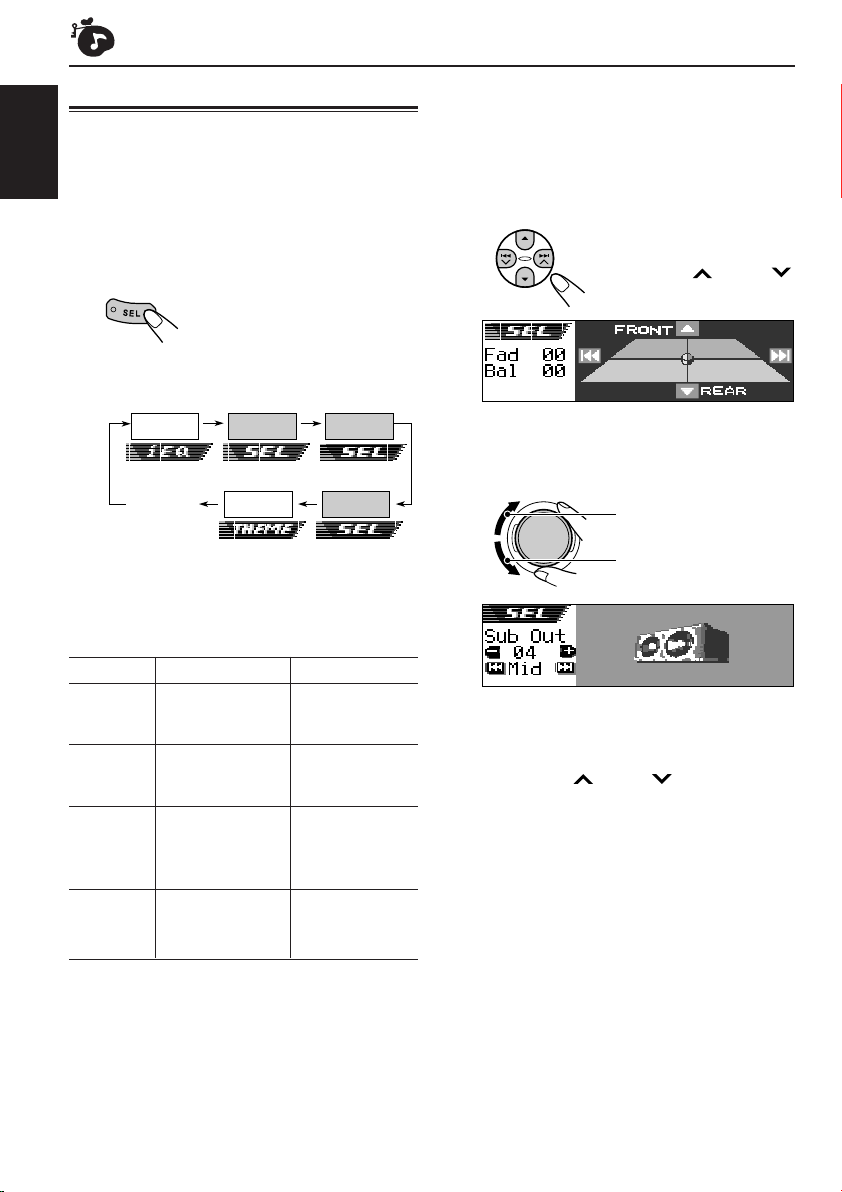
1
Select the item you want to adjust.
The next-step-operation
buttons start flashing.
Each time you press the
button, the adjustable items
change as follows:
iEQ
Canceled
• For iEQ (sound mode) settings,
see pages 25 – 27.
• For THEME (display theme) settings,
see page 28.
Indication To do: Range
Fad Adjust the front R06 (Rear only)
and rear speaker |
balance. F06 (Front only)
Bal Adjust the left L06 (Left only)
and right speaker |
balance. R06 (Right only)
Sub Out Adjust the 00 (min.)
subwoofer output |
level and cutoff 12 (max.)
frequency level. Low/Mid/High
Vol Adj Adjust and store –12 (min.)
the input level |
of each source. +12 (max.)
Fad/Bal
Theme
Sub Out
Vol Adj
2
Make adjustments.
• To adjust fader and balance—Fad, Bal:
You can make these two adjustments at
the same time.
• If you are using a two-speaker system,
set the fader level to “00.”
• Press 5 (up) or ∞ (down)
to adjust the fader.
• Press ¢ or 4
to adjust the balance.
• To adjust subwoofer output—Sub Out:
This takes effect only when a subwoofer is
connected.
To increase the level
To decrease the level
You can also set an appropriate cutoff
frequency level according to the subwoofer
connected.
• Press ¢ or 4 to select “Low,”
“Mid,” or “High.”
Low: Frequencies higher than 50 Hz are
cut off to the subwoofer.
Mid: Frequencies higher than 80 Hz are
cut off to the subwoofer.
High: Frequencies higher than 115 Hz are
cut off to the subwoofer.
24
Page 25
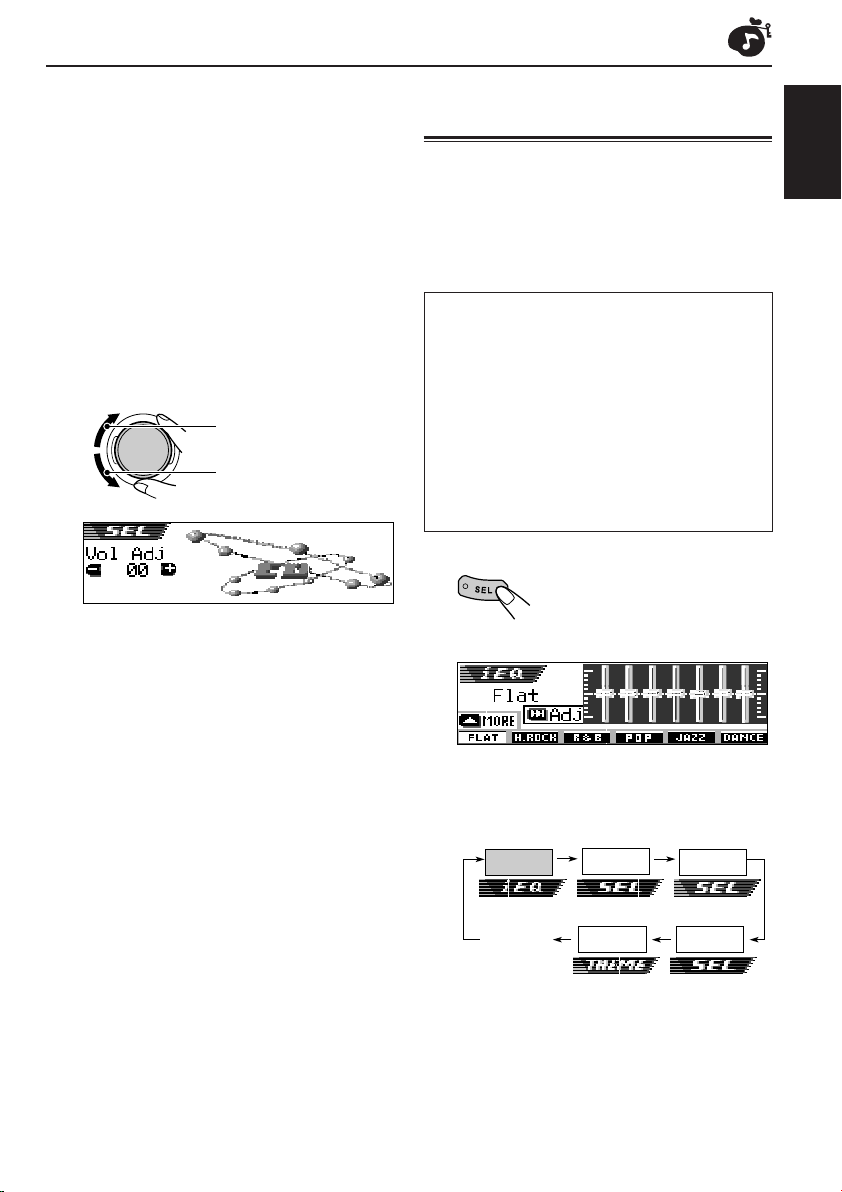
• To adjust the input level of each source
—Vol Adj:
Volume adjustment level can be
separately stored for each source—CD,
AM, Line in, CD changer, and SIRIUS.
Before making an adjustment, select an
appropriate source for which you want to
make an adjustment.
Once you have adjusted it, it is memorized,
and you will not need to adjust the volume
level each time you change the source.
Adjust the input level to match it to the FM
sound level.
• You cannot make an adjustment if the
source is FM. “FIX” will appear.
To increase the level
To decrease the level
Selecting preset sound modes
(iEQ: intelligent equalizer)
You can select a preset sound mode (iEQ:
intelligent equalizer) suitable to the music genre.
• There is a time limit in doing the following
procedure. If the setting is canceled before you
finish, start from step 1 again.
Available sound modes:
FLAT (No sound mode is applied)
H.ROCK (Hard Rock)
R & B (Rhythm and Blues)
POP (Popular music)
JAZZ (Jazz music)
DANCE (Dance music)
Country (Country music)
REGGAE (Reggae)
CLASSIC (Classical music)
USER 1, USER 2, USER 3
1
Press SEL (select) once.
The last selected sound mode
is called up.
The next-step-operation
buttons start flashing.
ENGLISH
Ex.: If you have selected “Flat” previously
Each time you press the button, the
adjustable items change as follows:
iEQ
Canceled
• For SEL (basic sound) settings,
see pages 24 – 25.
• For THEME (display theme) settings,
see page 28.
CONTINUED ON THE NEXT PAGE
Fad/Bal
Theme
Sub Out
Vol Adj
25
Page 26
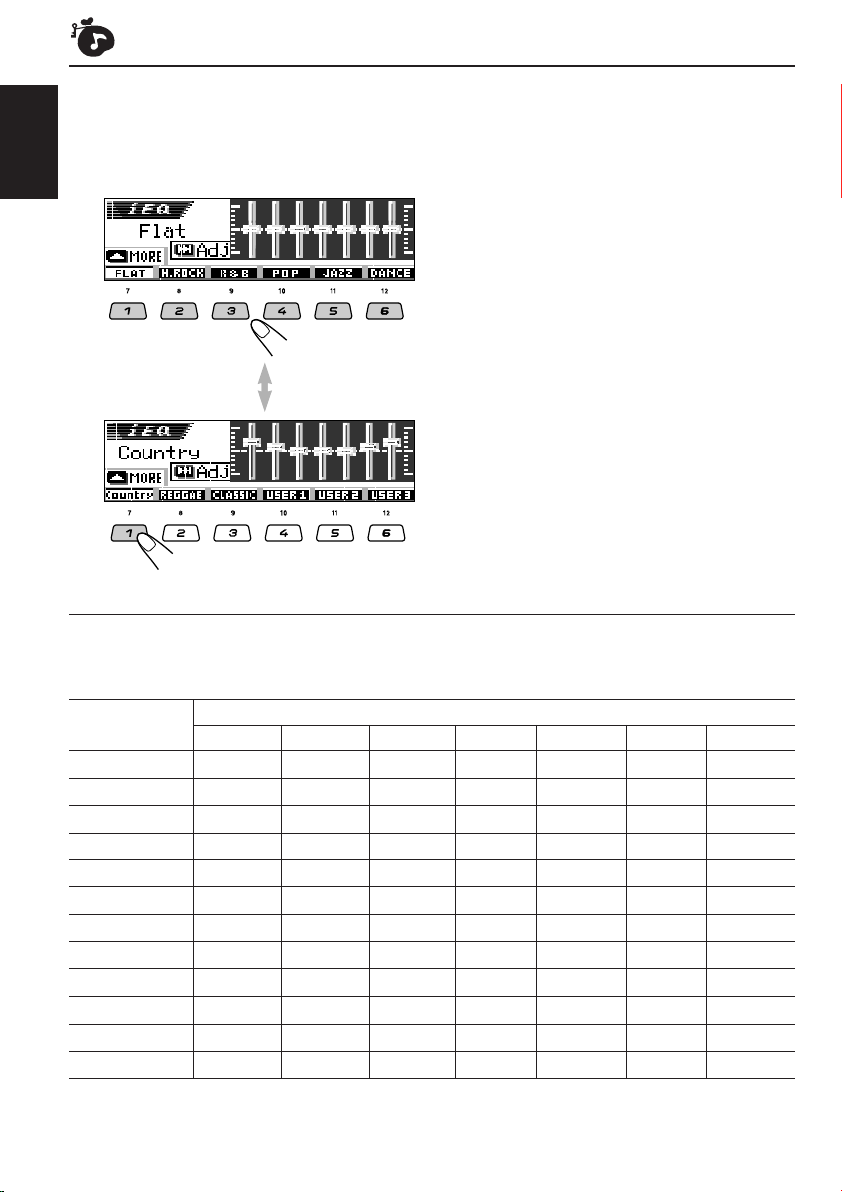
2
Press the number button to select
the sound mode you want.
• This unit has two sound mode selection
ENGLISH
screens. To move to the other screen,
press 5 (up) or ∞ (down).
Press 5 (up) or
∞ (down).
To cancel the sound mode, select “FLAT” in
step 2.
Notes:
• You can adjust the preset sound modes temporarily.
However, your temporary adjustments will be reset
when you select another sound mode.
• For details about the preset settings of each sound
mode, see table below.
To exit from the sound mode selection
screen, press SEL (select) repeatedly or wait for
about 5 seconds.
Sound modes (preset frequency level settings)
The list below shows the preset frequency level settings for each sound mode.
Sound Preset equalizing values
Mode 60 Hz 150 Hz 400 Hz 1 kHz 2.4 kHz 6 kHz 12 kHz
Flat 00 00 00 00 00 00 00
Hard Rock +03 +03 +01 00 00 +02 +01
R & B +03 +02 +02 00 +01 +01 +03
Pop 00 +02 00 00 +01 +01 +02
Jazz +03 +02 +01 +01 +01 +03 +02
Dance Music +04 +02 00 –02 –01 +01 +01
Country +02 +01 00 00 00 +01 +02
Reggae +03 00 00 +01 +02 +02 +03
Classic +02 +03 +01 00 00 +02 00
User 1 00 00 00 00 00 00 00
User 2 00 00 00 00 00 00 00
User 3 00 00 00 00 00 00 00
26
Page 27
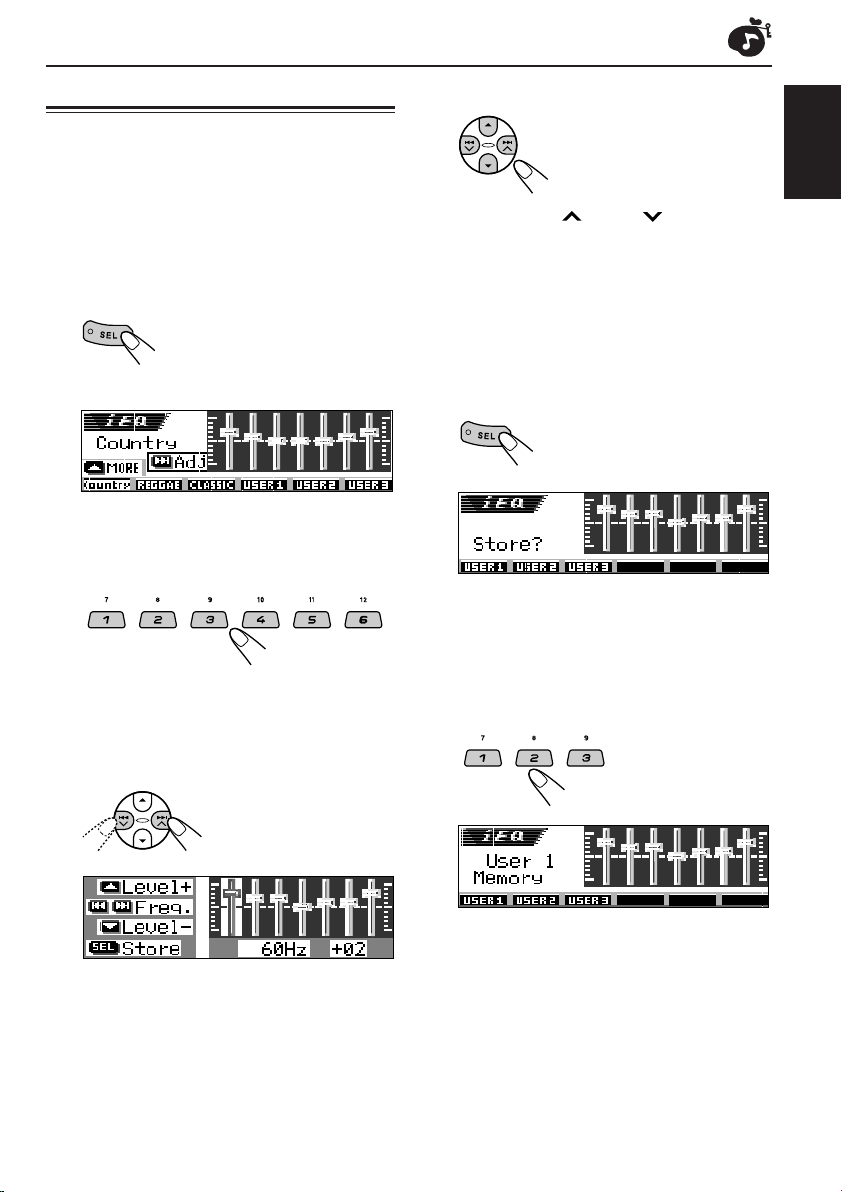
Storing your own sound modes
You can adjust the sound modes to your
preference and store your own adjustments in
memory (USER 1, USER 2, and USER 3).
4
Make adjustments as you like.
ENGLISH
• There is a time limit in doing the following
procedure. If the setting is canceled before you
finish, start from step 1 again.
1
Press SEL (select) once.
The last selected sound mode
is called up.
The next-step-operation
buttons start flashing.
Ex.: If you have selected “Country” previously
2
Select the sound mode you want to
adjust.
• This unit has two sound mode selection
screens. To move to the other screen,
press 5 (up) or ∞ (down).
3
Enter the sound adjustment mode.
The following sound
mode adjustment screen
appears on the display.
1) Press ¢ or 4 to select the
frequency band—60Hz, 150Hz, 400Hz,
1kHz, 2.4kHz, 6kHz, 12kHz.
2) Press 5 (up) or ∞ (down) to adjust the
level of the selected band within the
range of –05 to +05.
3) Repeat steps 1) and 2) to adjust the
other frequency bands.
5
Store the adjustment you made.
The confirmation message
appears—whether you want to
store the adjustment.
If you want to cancel the adjustments,
press D DISP.
6
Select one of the user sound modes
(USER 1, USER 2, or USER 3) you
want to store into.
Ex.: When you select “User 1”
27
Page 28
Selecting the display theme
You can select the theme of the display during
playback.
ENGLISH
• There is a time limit in doing the following
procedure. If the setting is canceled before you
finish, start from step 1 again.
1
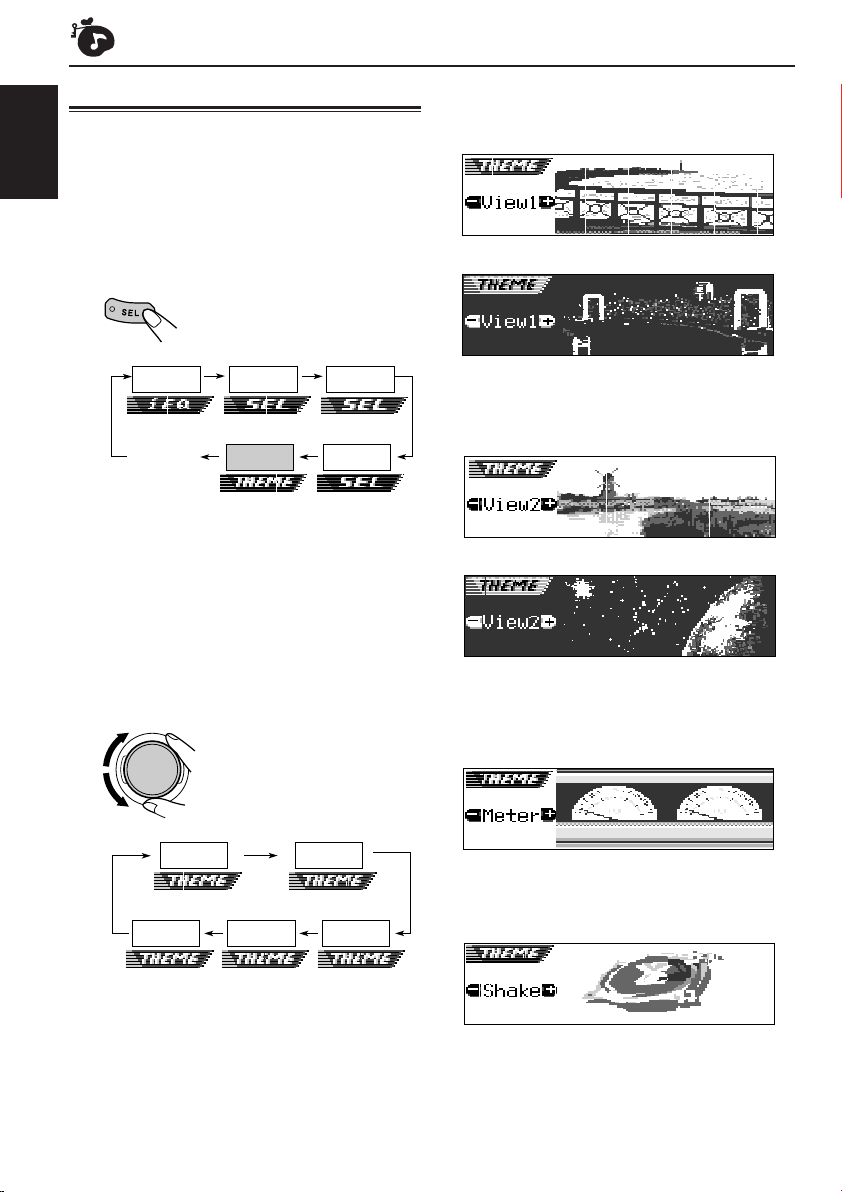
Select “THEME.”
Each time you press the
button, the adjustable items
change as follows:
View 1:
A scenery display appears.
• Positive pattern display:
• Negative pattern display:
iEQ
Canceled
The last selected theme appears on the
display.
The next-step-operation button starts
flashing.
• For SEL (basic sound) settings,
see pages 24 – 25.
• For iEQ (sound mode) settings,
see pages 25 – 27.
2
Select the display theme you want.
Fad/Bal
Theme
As you turn the control dial,
the themes change as
follows:
View2View1
Sub Out
Vol Adj
MeterShakeOff
View 2:
A scenery display appears.
• Positive pattern display:
• Negative pattern display:
Meter:
The left and right audio level meters appear.
• If the small animation display is selected, only
one audio level meter can be shown.
Shake:
The speaker on the display vibrates as input
audio level changes.
Note:
View 1 and 2 have positive pattern display and
negative pattern display (see right column). Either
positive or negative pattern display is automatically
selected depending on the “LCD Type” setting (see
page 38).
28
Off:
Cancels the display theme.
Page 29
GRAPHIC DISPLAYS
With the supplied Image Converter CD-ROM, you
can edit your own favorite pictures and use them
as the opening screen, ending screen, and
graphic screen while playing a source.
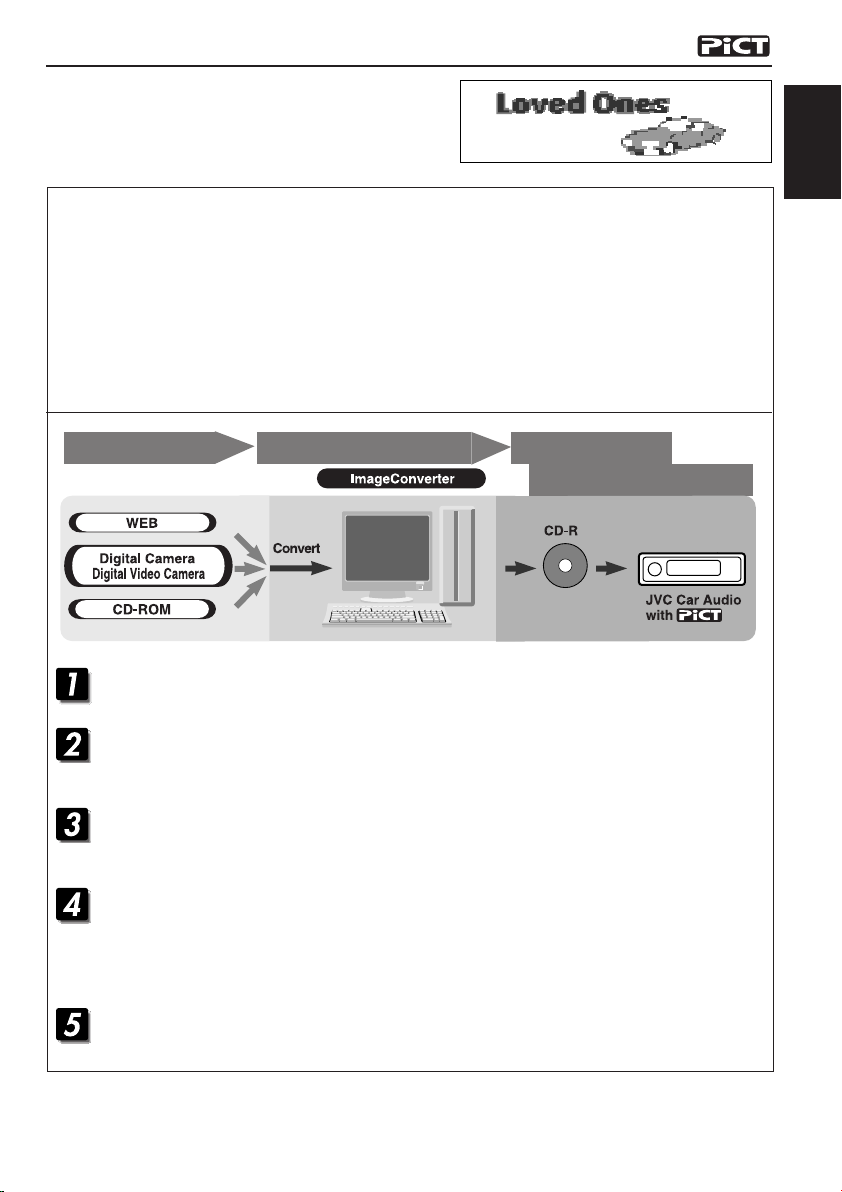
What is Image Converter?
Image Converter is a JVC’s original software to produce customize images to be shown on your
JVC Car Audio.
Here is a basic procedure to make a CD-R including still images (pictures) and animations
(movies) using Image Converter
In this manual, we only explain how to export the files (still images and animations) into the built-in
memory of this unit—step 5 below.
• For the other processes (from steps 1 to 4 below), refer to Image Converter’s Operation Guide
(PDF files included in the “Manual” folder of the supplied CD-ROM).
ENGLISH
Import of images Writing onto a CD-R
Image retouching and editing
Play back on your car audio
KD-AR3000
KD-LH300
Install / Start the program
Install Image Converter on your PC.
Import the images
Import the source images from the Image Converter CD-ROM or from other equipment like
a digital camera or a digital video camera.
Retouch and edit the images
Retouch the images like trimming or adjusting color, editing the animation effect, and adding
the texts.
Write your images onto a CD-R
Write the animations or the still images you made with Image Converter using your CD-R
writing software.
You have to write the images you made onto a CD-R to enjoy the images on your Car Audio.
• To write data onto a CD-R, refer also to the instruction of your CD-R writing software.
Enjoy the animations or the still images you made on your Car Audio
Export the images to your JVC Car Audio from the CD-R you made.
29
Page 30
Downloading images and
animations
Before starting the following procedure, prepare
ENGLISH
a CD-ROM including still images (pictures) and
animations (movies).
• The supplied Image Converter CD-ROM
includes sample images and animations, so
you can use this disc as your first trial.
IMPORTANT:
• Still images (pictures) should have <jml>, and
animations (movies) should have <jma> as
their extension code in their file names.
• Downloading a file can be done only while
selecting “CD” as the source; on the other
hand, deleting a file can be done while
selecting any source.
• Before you download or erase the files,
observe the following:
– Do not download a file while driving.
– Do not turn off the ignition key of the car
while downloading or erasing a file*.
– Do not detach the control panel while
downloading or erasing a file*.
* If you do it, the file download and erasure
will not be done correctly. In this case,
perform the same procedure again.
• If you have already downloaded an
animation for “Opening,” “Ending,” or
“Movie,” downloading a new animation
deletes the previously stored animation.
• It takes a long time for the unit to download
an animation.
– About 6 to 7 seconds for a still image
(one frame).
– About 3 to 4 minutes for an animation of
30 frames.
– About 10 minutes for an animation of 90
frames.
2
Insert a CD-ROM with the files
(images and animations) into the
loading slot.
The unit draws the
disc, the control panel
goes back to the
previous position (see
page 44).
• If the disc includes playable audio files
such as MP3 tracks, playback starts
automatically.
3
Press M MODE after the disc is
detected.
“Mode” appears on the display.
The next-step-operation buttons
start flashing.
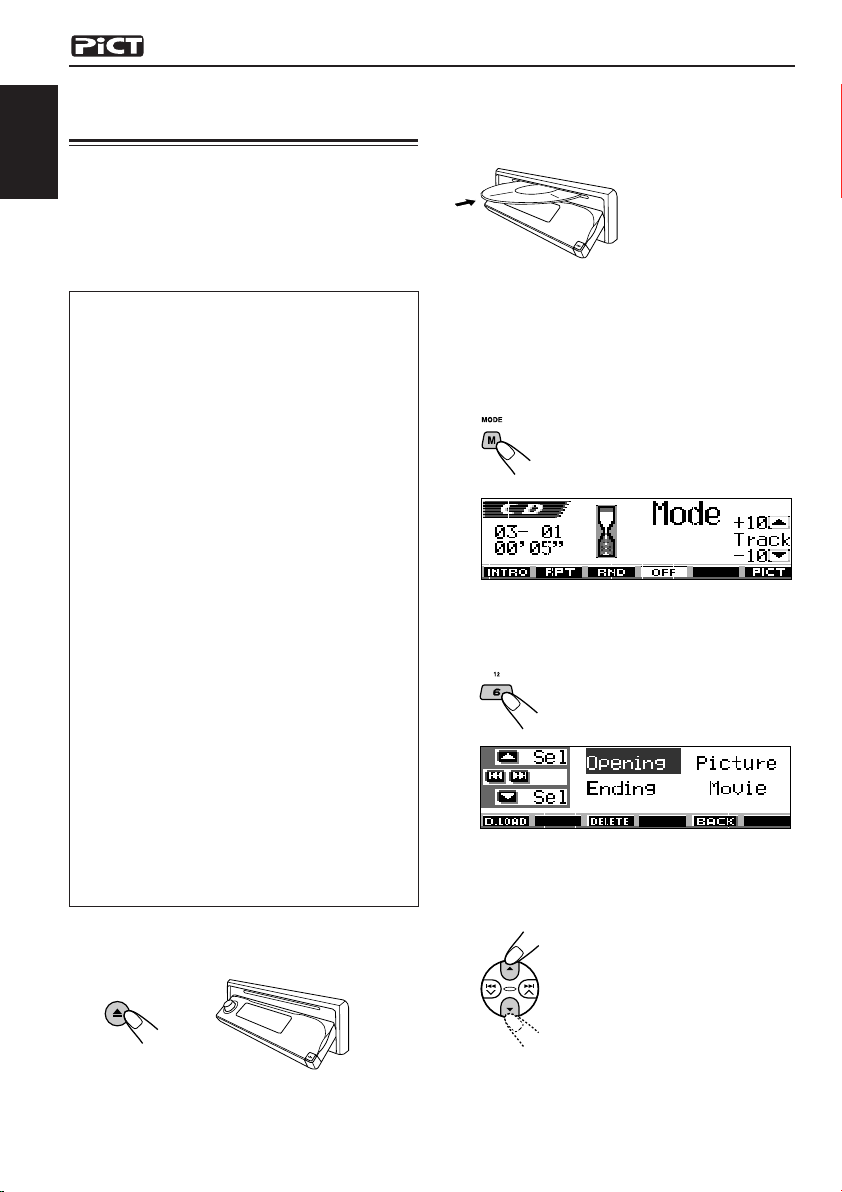
4
Press number button 6 to show the
download selection screen.
5
Select (highlight) one of the listed
items for which you want to
download a file.
30
1
Open the control panel.
Page 31

• Opening : Opening screen
To download an animation to be shown
after the unit is turned on. (You can store
only one animation consisting of a
maximum of 30 frames.)
• Ending : Ending screen
To download an animation to be shown
before the unit is turned off. (You can store
only one animation consisting of a
maximum of 30 frames.)
• Picture : Graphic screen*
To download a still image to be shown if no
operation is done for about 20 seconds. (You
can store 90 frames of still images—one
frame each.)
• Movie : Graphic screen*
To download an animation to be shown if
no operation is done for about 20 seconds.
(You can store only one animation consisting
of a maximum of 90 frames.)
* Graphic screen will appear only if the
“Graphics” setting is set to one of the
following—“UserMovie,” “UserSlide,” or
“UserPict.” (see page 38).
If you want to cancel the procedure,
press number button 5, the download
selection screen goes off.
6
Show the name list of the folder
included in the inserted CD-R.
“File Check....” appears for a
while, then the folder list
appears.
Notes:
• On this list, the folders including the target
files—<jml> files for “Picture” and <jma>
files for the others—are shown.
• The display can show only six names at a time.
You can show the other names on the next lists
by pressing 5 (up) or ∞ (down).
• If a disc inserted does not include any <jml>
and <jma> files, beeps sound and you cannot
go to the next step.
If you want to cancel the procedure, press
D DISP.
7
Select (highlight) a folder in which a
file you want is included.
8
Show the name list of the files
included in the selected folder.
Each time you press the
button, the lists on the
display changes as
follows:
Folder name
list
Ex.: When you have selected “Picture” in
step
5
File name
list
ENGLISH
The currently selected folder will be
highlighted on the display.
Note:
The display can show only six names at a time.
You can show the other names on the next lists
by pressing 5 (up) or ∞ (down).
CONTINUED ON THE NEXT PAGE
31
Page 32

9
Select (highlight) a file you want to
download.
ENGLISH
The file name appears, and the unit will
ask you “Download OK?”
Deleting unwanted files
• When “BACK” is shown on the display above
number button 5, you can go back to the
previous screen by pressing number button 5.
To delete all the stored files at a time
1 Press M MODE while playing any source.
“Mode” appears on the display.
The next-step-operation buttons
start flashing.
10
If it is OK, press number button 1 to
start downloading.
Downloading starts, and
“Downloading...” appears on the
display.
If it is over, the file name list
appears again.
If it is not OK, press number button 5, the
file selection screen appears again. Repeat
from step 8 again.
11
Repeat steps 8 to 10 if you are
downloading files for “Picture” and
want to store more files.
12
Finish the download procedure.
To download a file for another item listed on the
download selection screen, repeat from step
again.
Notes:
• If you try to store the 91st image for picture screen,
“Picture Full” appears and you cannot start
downloading. In this case, delete unwanted files
before downloading.
• If the total frame number of the downloaded
animations exceeds the following number, the
exceeding frames are ignored.
– For opening and ending screens: 30 frames
– For movie screen: 90 frames
3
2 Press number button 6 to show the download
selection screen.
3 Press 5 (up) or ∞ (down) to select (highlight)
all the listed items.
4 Press number button 4.
The unit asks you “All File Delete
OK?”
5 Press number button 4 again.
“Now Deleting...” appears while
erasing the files. When erasure is
over, the download selection
screen appears again.
6 Press number button 5 to resume the source
indication screen.
32
Page 33

To delete the files stored for “Opening,”
“Ending,” “Picture (all stored images at a
time),” and “Movie”
1 Press M MODE while playing any source.
“Mode” appears on the display.
The next-step-operation buttons
start flashing.
2 Press number button 6 to show the download
selection screen.
3 Press 5 (up) or ∞ (down) to select (highlight)
one of the listed items.
Appears when “Picture” is
selected (highlighted)
4 To delete the file stored in “Opening,”
“Ending,” and “Movie,” press number button
3.
The file name of the previously
stored animation appears, and the
unit asks you “Delete OK?”
To delete all the files stored in “Picture” at
a time, press number button 4.
The unit asks you “All Picture
Delete OK?”
5 To delete the file stored in “Opening,”
“Ending,” and “Movie,” press number button
3 again.
6 Press number button 5 to resume the source
indication screen.
ENGLISH
To delete the stored files for “Picture”
(one by one)
1 Press M MODE while playing any source.
“Mode” appears on the display.
The next-step-operation buttons
start flashing.
2 Press number button 6 to show the download
selection screen.
3 Press 5 (up) or ∞ (down) to select (highlight)
“Picture.”
4 Press number button 3.
The unit shows the name list of the
stored files.
Note:
The display can show only six names at a time. You
can show the other names by pressing 5 (up) or
∞ (down) repeatedly.
5 Press the number buttons for the file you want
to delete.
To delete all the files stored in “Picture” at
a time, press number button 4 again.
“Now Deleting...” appears while
erasing all the stored files. When
erasure is over, the download
selection screen appears again.
Selected file name appears, and the unit asks
you “Delete OK?”
CONTINUED ON THE NEXT PAGE
33
Page 34

6 Press number button 3 to start erasure.
“Now Deleting...” appears while
erasing the selected file. When
erasure is over, the name list of the
ENGLISH
7 To delete more files, repeat from steps 5 and 6.
8 Press D DISP to resume the source indication
screen.
stored file appears again.
3
Select “Opening” (opening screen
setting) or “Ending” (ending screen
setting).
Activating the downloaded
images and animations
Activating the animations stored for
opening and ending screens
After the unit turns on or before the unit turns off,
you can see preset animations on the display.
These are called opening screen and ending
screen. You can use your own edited animations
for these opening and ending screens.
• Before performing the following procedure,
make sure that “KeyIn CFM” is set to “On”;
otherwise, the animations may not be shown.
(See page 38.)
• If no animation is stored in “Opening” and
“Ending,” “Opening” and “Ending” cannot be
selected as a PSM item.
1
Press and hold SEL (select) for more
than 2 seconds so that one of the
PSM items appears on the display.
(PSM: see pages 36 and 37.)
2
Press number button 1 to select
“MOVIE”—Movie category of the
PSM settings.
The “Graphics” setting screen appears on
the display.
Ex.: When you select “Opening”
4
Select “User.”
• Default: Factory-preset animation is used.
• User: Your own edited animation is
5
Finish the setting.
used.
Activating the graphic screen using
either picture or movie
Using this setting, you can change the graphic
displays. These graphic screen appears if no
operation is done for about 20 seconds.
• If no image is stored in “Picture,” or no
animation in “Movie,” “UserPict.,” “UserMovie,”
and “UserSlide” cannot be selected as a PSM
item.
1
Press and hold SEL (select) for more
than 2 seconds so that one of the
PSM items appears on the display.
(PSM: see pages 36 and 37.)
34
Page 35

2
Press number button 1 to select
“MOVIE”—Movie category of the
PSM settings.
The “Graphics” setting screen appears on
the display.
3
Select “UserMovie,” “UserSlide,” or
“UserPict.”
Ex.: When you select
“UserPict.”
Selecting a still image for graphic
display—User Picture
You cannot select “UserPict.” as a PSM item in
the following cases:
• If no image is stored in “Picture,” or
• “UserPict.” is not selected for the “Graphics”
setting (see the left column).
1
Press and hold SEL (select) for more
than 2 seconds so that one of the
PSM items appears on the display.
(PSM: see pages 36 and 37.)
2
Press number button 1 to select
“MOVIE”—Movie category of the
PSM settings.
The “Graphics” setting screen appears on
the display.
ENGLISH
• UserMovie: Your edited animation stored
• UserSlide: Your edited still images stored
• UserPict.: One of your edited still image
4
Finish the setting.
To cancel all graphic displays, select “Off” in
step 3.
Note:
For the “Graphics” setting, you can also select “All
Demo,” “Int Demo,” and “ImageLink.”
– See pages 8 and 38 for “All Demo” and “Int Demo.”
– See pages 17 and 38 for “ImageLink.”
in “Movie” is activated as your
graphic screen.
in “Picture” are activated and
shown in sequence as your
graphic screen.
stored in “Picture” is activated
as your graphic screen.
Select one of the stored
images (see the next
column).
3
Select “UserPict.”
4
Select a file you want.
5
Finish the setting.
File name of the current
selected image also
appears.
35
Page 36

OTHER MAIN FUNCTIONS
Changing the general settings
(PSM)
You can change the items listed on the table
ENGLISH
below and on page 37 by using the PSM
(Preferred Setting Mode) control.
• The PSM items are grouped into six
categories—MOVIE, CLOCK, DISP (display),
TUNER, AUDIO, and COLOR.
Basic Procedure
1
Press and hold SEL (select) for more
than 2 seconds so that one of the
PSM items appears on the display.
(See below and page 37.)
The next-step-operation
buttons start flashing.
2
Press number button to select one
of the PSM categories.
The first-listed item in the selected category
appears.
3
Select the PSM item you want to
adjust.
• By pressing ¢ or 4 repeatedly,
you can also move to another category.
4
Adjust the PSM item selected.
5
Repeat steps 2 to 4 to adjust the
other PSM items if necessary.
6
Finish the setting.
Preferred Setting Mode (PSM) items
The PSM items are grouped into six categories—MOVIE, CLOCK, DISP (display), TUNER, AUDIO,
and COLOR.
Indications Selectable values/items
Graphics Movie demonstration
KeyIn CFM Key-in confirmation
Opening*
MOVIE
Ending*
UserPict.*2User Picture
*1Displayed only after a downloadable file is stored in memory.
*2Displayed only after a downloadable file is stored in memory and while selecting “UserPict.” for “Graphics.”
36
1
Opening animation
1
Ending animation
See page 38 for details
On
Default
Default User
Off
User
Factory-preset See
settings page
All Demo 8, 17, 38
On 38
Default
Default
First stored 35From the stored files
34
34
Page 37

Indications Selectable values/items
Clock Hr Hour adjustment
Clock Min Minute adjustment
CLOCK
24H/12H 24 hours or 12 hours
1 – 12 (0 – 23)
00 – 59
12Hours 24Hours
Factory-preset See
settings page
1 (1:00AM) 9
00 (1:00AM) 9
12Hours 9
ENGLISH
Scroll Scroll mode
Dimmer Dimmer mode
From– To*
3
Dimmer time setting
Contrast Contrast
DISP (display)
LCD Type Display type
Font Type Font type
Tag Tag display
IF Filter Intermediate
TUNER
frequency filter
Beep Key-touch tone
Ext Input*4External component
AUDIO
Amp.Gain Amplifier gain control
All SRC Selected source
Once
Off
Auto Off
Time Set
Any time – Any time
1 – 10
Auto
Positive
Negative
1
Off
Wide Auto
Off
Changer
Line In*
SIRIUS
HighPower
Off*
LowPower
6
See page 41 for details
Auto
On
2
On
On
Once 38
6PM – 7AM
5
Changer
HighPower 39
Every 41
Auto 40
40
5
38
Auto 38
138
On
38
Auto 39
On
39
39
User User color selection
R Red
G Green
COLOR
B Blue
SlotLight Slot light
Day Night
00 – 11
00 – 11
00 – 11
On
*3Displayed only when “Dimmer” is set to “Time Set.”
*4Not displayed when the current source is the external component.
*5Only for KD-LH300
*6Only for KD-AR3000
Off
Day
Day: 07/Night: 05
Day: 07/Night: 05
Day: 07/Night: 05
On
42
42
42
42
39
37
Page 38

To show the graphics on the display
—Graphics
You can change the graphics shown on the
display. These graphics appear if no operation is
ENGLISH
done for about 20 seconds (except for
“ImageLink”).
• All Demo: Display demonstration (animation)
• Int Demo: Display demonstration (animation)
• UserMovie: Your edited animation appears
• UserSlide: Your edited still images appears
• UserPict.: One of your edited still image
• ImageLink: To show a still image while
• Off: Cancels all graphic display above.
Note:
You can select “UserMovie,” “UserSlide,” and
“UserPict.” only after downloading the appropriate
files in memory. (See page 30.)
appears (see page 8).
and playback source indication
appears alternately (see page 8).
(see pages 34 and 35).
in sequence (see pages 34 and
35).
appears (see pages 34 and 35).
playing back an MP3/WMA tracks
(see page 17).
To turn the source animation on the
display on or off—KeyIn CFM
When changing the source, the display shows
the source animation. You can turn on or off the
source animation on the display.
• On: Turns on the source animation.
• Off: Cancels the source animation.
To select the scroll mode—Scroll
You can select the scroll mode for the disc
information (when the entire text cannot be
shown at once).
• Once: Scrolls only once.
• Auto: Repeats the scroll (in 5-second
• Off: Cancels scroll mode.
intervals).
To adjust the display contrast level
—Contrast
Adjust the display contrast (1 – 10) to make the
display indications clear and legible.
To select the display illumination pattern
—LCD Type
You can select the display illumination patterns
according to your preference.
• Auto: Positive pattern will be selected
during the day time (depending on
the “Dimmer” setting); on the other
hand, negative pattern will be used
during the night time (depending on
the “Dimmer” setting).
• Positive: Positive (normal) pattern of the
display.
• Negative: Negative pattern of the display.
To select the font on the display
—Font Type
You can change the font types used on the
display. Select either “1” or “2” according to your
preference.
To turn the tag display on or off—Tag
An MP3/WMA track can contain track information
called “ID3 Tag” where its album name,
performer, track title, etc. are recorded.
There are two versions–ID3v1 (ID3 Tag version 1)
and ID3v2 (ID3 Tag version 2). If both ID3v1 and
ID3v2 are recorded on a disc, ID3v2 information
will be shown.
• On: Turns on the ID3 tag display while
playing MP3/WMA tracks.
• If an MP3/WMA track does not
have ID3 tags, folder name and
track name appear.
• Off: Turns off the ID3 tag display while
playing MP3/WMA tracks. (Only
the folder name and track name
can be shown.)
Note:
Even if the scroll mode is set to “Off,” you can scroll
the display by pressing D DISP for more than one
second.
38
Page 39

To change the FM tuner selectivity
—IF Filter
In some areas, adjacent stations may interfere
with each other. If this interference occurs, noise
may be heard.
• Auto: When this type of interference
occurs, this unit automatically
increases the tuner selectivity so
that interference noise will be
reduced. (But the stereo effect will
also be lost.)
• Wide: Subject to the interference from
adjacent stations, but sound quality
will not be degraded and the stereo
effect will not be lost.
To turn the key-touch tone on or off—Beep
You can deactivate the key-touch tone if you do
not want it to beep each time you press a button.
• On: Activates the key-touch tone.
• Off: Deactivates the key-touch tone.
To select the amplifier gain control
—Amp.Gain
You can change the maximum volume level of
this unit. When the maximum power of the
speakers is less than 50 W, select “LowPower” to
prevent them from being damaged.
• LowPower: You can adjust the volume level
from “Volume 00” to “Volume 30.”
Note:
If you change the setting from
“HighPower” to “LowPower” while
listening at a volume level more than
30, the unit automatically changes the
volume level to “Volume 30.”
• HighPower: You can adjust the volume level
from “Volume 00” to “Volume 50.”
• Off: Only for KD-AR3000: Deactivates
the built-in amplifier. (Sounds
come out only from external
amplifiers connected to Line Out
plugs).
ENGLISH
To select the external component to use
—Ext Input
You can connect the external component to the
CD changer jack on the rear using the adapter
specially designed for the component.
• Changer: To use the CD changer.
• Line In: To use the external component
other than CD changer (only for
KD-LH300).
• SIRIUS: To use the JVC SIRIUS Radio.
Notes:
• Only for KD-LH300: For connecting the Line Input
Adapter KS-U57 and the external component, refer
to the Installation/Connection Manual (separate
volume).
• For connecting the JVC SIRIUS Radio, refer to the
SIRIUS Radio Setup Manual (separate volume).
To turn the slot light on or off—SlotLight
You can turn off the slot light if you do not want
the illumination each time you insert/eject the
disc or when you change the control panel angle.
• On: Activates the illumination.
• Off: Deactivates the illumination.
39
Page 40

Selecting the dimmer mode
You can dim the display at night automatically or
as you set the timer.
ENGLISH
Note:
Auto Dimmer equipped with this unit may not work
correctly on some vehicles, particularly on those
having a control dial for dimming.
In this case, select any other than “Auto.”
1
Press and hold SEL (select) for more
than 2 seconds so that one of the
PSM items appears on the display.
(See pages 36 and 37.)
The next-step-operation
buttons start flashing.
2
Press number button 3 to select
“DISP”—Display category of the
PSM settings.
4
Set the dimmer mode as you like.
• Auto: Activates Auto Dimmer.
When you turn on the car
head lights, the display
automatically dims.
• Off: Cancels Auto Dimmer.
• On: Always dims the display.
• Time Set: Used to set the timer for the
dimmer mode.
Note:
Selecting “Auto” or “Time Set” may change the
display pattern to the “Negative” or “Positive”
pattern if “LCD Type” is set to “Auto.”
• If you select “Time Set,” go to the following
steps to set the timer.
• If you select any other than “Time Set,” go
to step 7 to finish the setting.
5
Select “From– To” to set the timer for
the dimmer mode.
40
3
Press ¢ or 4 to select
“Dimmer.”
6
Set the timer.
1 Turn the control dial to select the start
time.
2 Press ¢ once.
3 Turn the control dial to select the end
time.
7
Finish the setting.
Page 41

Changing the display color
You can set the display color using the PSM
control. You can select your favorite color for
each source (or for all sources).
You can also create your own colors, and set
them as the display color.
Setting the desired color for each source
Once you have set the color for each source (or
for all sources), the display illuminates in the
selected color when the source is selected.
1
Press and hold SEL (select) for more
than 2 seconds so that one of the
PSM items appears on the display.
(See pages 36 and 37.)
The next-step-operation
buttons start flashing.
2
Press number button 6 to select
“COLOR”—Color category of the
PSM settings.
3
Select the source that you want to
set the display color for.
For KD-AR3000:
All SRC* CD
AM
For KD-LH300:
All SRC* CD
AM
* When you select “All SRC,” you can use the
same color for all the sources.
4
Select the display color.
Every*1 O Aqua O Sky O Sea O
Leaves O Grass O Apple O Rose O
Amber O Honey O Violet O Grape O
Pale O User
beginning)
*1 When you select “Every,” the color changes
every 2 seconds (changing to every color
listed above except “User”).
*2 When you select “User,” the user-edited
colors—“Day” and “Night” will be applied.
(See page 42.)
5
Repeat steps 3 and 4 to select the
color for each source (except when
selecting “All SRC” in step
Changer (SIRIUS)
FM
(or Line In, SIRIUS)
As you turn the control dial,
the colors change as follows:
2
*
O (back to the
Line In
Changer
FM
ENGLISH
3
).
6
Finish the setting.
CONTINUED ON THE NEXT PAGE
41
Page 42

Creating your own color—User
You can create your own colors—“Day” and
“Night,” and select them as the display color for
any desired source.
ENGLISH
• Day: Can be used as your user color during
• Night: Can be used as your user color during
* Depends on the “Dimmer” setting.
1
2
the day time*.
the night time*.
Press and hold SEL (select) for more
than 2 seconds so that one of the
PSM items appears on the display.
(See pages 36 and 37.)
The next-step-operation
buttons start flashing.
Press number button 6 to select
“COLOR”—Color category of the
PSM settings.
4
Select the user color adjustment
screen.
One of the user color
adjustment screens
appears.
“User Day” or “User
Night” is shown on the
left side of the display.
5
Select “Day” or “Night” which you
want to make an adjustment for.
6
Adjust the selected user color.
1) Press ¢
one of three primary colors—“R”
(red), “G” (green), and “B” (blue).
or 4 to select
42
3
Select “User” as a color.
The user color will be applied
to the currently selected
source (the one shown on the
upper portion of the display.
In this example “All SRC”).
To select which source to apply your user
color to, select the target source first by
pressing 5 (up) or ∞ (down), before
selecting “User” in this step.
2) Press 5 (up) or ∞ (down) to
adjust the selected primary color.
You can adjust within the range of 00 to
11.
3) Repeat steps 1) and 2) to adjust
the other primary colors.
7
Repeat steps 5 and 6 to adjust the
other user colors—“Day” or “Night.”
8
Finish the setting.
Page 43

Assigning names to the sources
You can assign names to station frequencies,
CDs (both in this unit and in the CD changer),
and the external component (Line Input).
After assigning a name, it will appears on the
display when you select the source.
Sources
Station frequencies Up to 10 characters (up to
CDs* Up to 32 characters (up to
External component Up to 8 characters
(Line Input)
* You cannot assign a name to a CD Text or an MP3/
WMA disc.
1
Select a source you want to assign a
name to.
(For KD-AR3000)
When you select a source, the power
automatically comes on.
Maximum number of
characters
30 station frequencies
including both FM and
AM)
40 discs)
(For KD-LH300)
3
Select the character set you want
while the first character position is
flashing.
Each time you press the
button, the character set
changes as follows:
(a – z: small)(A – Z: capital)
(0 – 9: numbers, and
symbols)
4
Select a character.
• About the available
characters, see page 55.
5
Move the cursor to the next
(or previous) character position.
6
Repeat steps 3 to 5 until you finish
entering the name.
7
Finish the procedure while the last
selected character is flashing.
ENGLISH
2
While pressing D DISP, press and
hold SEL (select) for more than
2 seconds.
The next-step-operation buttons start
flashing.
Ex.: When you select CD as the source
To erase the input characters
To erase all the characters at a time, press and
hold D DISP for more than 1 second as
described in the procedure above.
Notes:
• When you try to assign a name to a 41st disc or to a
31st station frequency, “Name Full” appears and
you cannot enter the text entry mode. In this case,
delete unwanted names before assignment.
• When the CD changer is connected, you can assign
names to CDs in the CD changer. These names can
also be shown on the display if you insert the CDs
in this unit.
43
Page 44

Changing the control panel
angle
You can change the angle of the control panel to
ENGLISH
four positions.
Press ANGLE repeatedly to adjust the
angle of the control panel to the position
you want.
The control panel angles changes as follows:
CAUTION:
NEVER insert your
finger in between the
control panel and the
unit, as it may get
caught or hurt.
A
B
DC
Note:
If you turn the power off, the control panel automatically returns to the closed position. Next time you turn on the
power, the control panel moves to its previous position.
44
Page 45

Detaching the control panel
You can detach the control panel when leaving
the car.
When detaching or attaching the control panel,
be careful not to damage the connectors on the
back of the control panel and on the panel
holder.
Detaching the control panel
Before detaching the control panel, be sure to
turn off the power.
1
Unlock the control panel.
2
Lift and pull the control panel out of
the unit.
Attaching the control panel
1
Insert the left side of the control
panel into the groove on the panel
holder.
2
Press the right side of the control
panel to fix it to the panel holder.
Note on cleaning the connectors:
If you frequently detach the control panel, the
connectors will deteriorate.
To minimize this possibility, periodically wipe the
connectors with a cotton swab or cloth moistened
with alcohol, being careful not to damage the
connectors.
ENGLISH
3
Put the detached control panel into
the provided case.
Connectors
45
Page 46

ENGLISH
CD CHANGER OPERATIONS
We recommend that you use the JVC MP3compatible CD changer with your unit.
By using this CD changer, you can play back
your original CD-Rs (Recordable) and CD-RWs
(Rewritable) recorded either in audio CD format
or in MP3 format.
• You can also connect other CH-X series
CD changers (except CH-X99 and CH-X100).
However, they are not compatible with MP3
discs, so you cannot play back MP3 discs.
• You cannot use the KD-MK series CD
changers with this unit.
Before operating your CD changer:
• Refer also to the Instructions supplied with
your CD changer.
• If no discs are in the magazine of the CD
changer or the discs are inserted upside
down, “No Disc” will flash on the display. If
this happens, remove the magazine and set
the discs correctly.
• If no magazine is loaded in the CD changer,
“No Magazine” flashes on the display. If this
happens, insert the magazine in the CD
changer.
• If “Reset 01” – “Reset 08” flashes on the
display, something is wrong with the
connection between this unit and the CD
changer. If this happens, check the
connection and make sure the cords are
connected firmly. Then, press the reset
button of the CD changer.
Playing discs
Select the CD changer (CD-CH).
(For KD-AR3000) (For KD-LH300)
Each time you press the button, the source
changes as described on page 7.
• When the current disc is an MP3 disc:
Playback starts from the first folder of the
current disc once file check is completed.
Selected disc number
46
Current folder/track and
elapsed playing time
MP3 indicator
Page 47

• When the current disc is a CD:
Playback starts from the first track of the
current disc.
Selected disc number
To go to a particular disc directly
Press the number button corresponding to the
disc number to start its playback (while the CD
changer is playing).
ENGLISH
• To select a disc number from 01 – 06:
Press 1 (7) – 6 (12) briefly.
• To select a disc number from 07 – 12:
Press and hold 1 (7) – 6 (12) for more than
one second.
Current track and elapsed playing time
Notes:
• When you press CD/CD-CH LINE (for KD-AR3000)
or CD/CD-CH (for KD-LH300), the power
automatically comes on. You do not have to press
to turn on the power.
• If you change the source, CD changer play also
stops. Next time you select “CD-CH” as the source,
disc play starts from where playback has been
stopped previously.
To change the display pattern
By pressing D DISP, you can change the
information shown on the display.
Each time you press the button,
the display patterns change.
• For details, see page 23.
To fast-forward or reverse the track
Press and hold ¢ ,
during play, to fast-forward
the track.
Press and hold 4 , during play, to reverse
the track.
Note:
During this operation on an MP3 disc, you can only
hear intermittent sounds. (The elapsed playing time
also changes intermittently on the display.)
To go to the next or previous tracks
Press ¢ briefly during
play, to skip ahead to the
beginning of the next track.
Each time you press the
button consecutively, the
beginning of the next tracks
is located and played back.
Press 4 briefly during play, to skip back to
the beginning of the current track.
Each time you press the button consecutively,
the beginning of the previous tracks is located
and played back.
47
Page 48

This operation is only possible when
using JVC MP3-compatible CD changer
(CH-X1500).
To go to a track quickly
ENGLISH
1 Press M MODE while playing a disc.
“Mode” appears on the display.
The next-step-operation buttons
start flashing.
See page 30 for this function.
Ex.: When the current disc is an MP3 disc
2 Press 5 (up) or ∞ (down) while “Mode” is still
on the display.
How to go to the desired track quickly
• Ex. 1: To select track number 32 while
playing track number 6
(Three times) (Twice)
Track 6 \ 10 \ 20 \ 30 \ 31 \ 32
• Ex. 2 :To select track number 8 while
playing track number 36
(Three times) (Twice)
Track 36 \ 30 \ 20 \ 10 \ 9 \ 8
To skip 10 tracks* forwards to
the last track
To skip 10 tracks* backwards to
the first track
* First time you press 5 (up) or ∞ (down)
button, the track skips to the nearest higher
or lower track with a track number of multiple
ten (ex. 10th, 20th, 30th).
Then each time you press the button, you can
skip 10 tracks (see “How to go to the desired
track quickly” on the right column).
• After the last track, the first track will be
selected, and vice versa.
Note:
If the current playing disc is an MP3 disc, tracks are
skipped within the same folder.
To skip to the next or previous folder
(Only for MP3 discs)
Press 5 (up) while playing an
MP3 disc, to go to the next folder.
Each time you press the button
consecutively, the next folder is
located, and the first track in the
folder starts playback.
Press ∞ (down) while playing an MP3 disc, to go
to the previous folder.
Each time you press the button consecutively,
the previous folder is located, and the first track
in the folder starts playback.
48
Page 49

Selecting a disc/folder/track
using the name lists
If you forget what discs are loaded in the CD
changer, you can show the disc name list and
select a disc in the list shown on the display.
• The display can show only six names at a time.
1
While playing a disc, press and hold
5 (up) or ∞ (down) until a disc name
list appears on the display.
Selected disc number
Note:
If a disc has a disc title (CD Text) or an assigned
disc name, it will be shown on the display.
However, if the disc has not been played before,
its disc number will appear.
2
Press 5 (up) or ∞ (down) to show
the other disc name list, if
necessary.
While playing an MP3 disc, you can also show
the folder name list(s) and track name list(s) on
the display, then select a folder or track.
1 While playing an MP3 disc, press and hold
5 (up) or ∞ (down) until a disc name list
appears on the display.
2 Press ¢ or 4 to show a folder
name list of the current disc or track name list
of the current folder.
Each time you press the button, the lists on
the display change as follows:
Disc name list Folder name list
Track name list
Current folder number
Ex.: When folder name list is selected
Current track number
Ex.: When track name list is selected
Note:
The display can shows only six items at a time. You
can show the other names on the next lists by
pressing 5 (up) or ∞ (down).
ENGLISH
3
Select the number (1 – 6) for the disc
you want to play.
3 Press the number button for the disc, folder,
or track you want to play.
49
Page 50

Selecting the playback modes
To play back tracks at random
(Random Play)
ENGLISH
1 Press M MODE during play.
“Mode” appears on the display.
The next-step-operation buttons
start flashing.
2 Press number button 3 repeatedly while
“Mode” is still on the display.
Ex.: When you select “Random Disc” while
playing an MP3 disc
Each time you press the button, random play
mode changes as follows:
Note:
MP3 indicator also lights up if the current playing
disc is an MP3 disc.
To cancel random play, select “Random Off” by
pressing number button 3 repeatedly or press
number button 4 in step 2.
To play back tracks repeatedly
(Repeat Play)
1 Press M MODE during play.
“Mode” appears on the display.
The next-step-operation buttons
start flashing.
2 Press number button 2 repeatedly while
“Mode” is still on the display.
For MP3 discs:
Random DiscRandom Folder
Random Off
For CDs:
Random All
Random AllRandom Disc
Random Off
Mode
Random All tracks of the
Folder* (folder random) current folder, then
Random All tracks of the
Disc (disc random) current (or
Random All tracks of all
All (all random) discs inserted in
* “Random Folder” is only applicable for MP3 disc.
50
Active
indicator
indicator tracks of the next
lights up. folder and so on.
indicator specified) disc.
lights up.
indicator the magazine.
lights up.
Plays at random
Ex.: When you select “Repeat Track” while
playing an MP3 disc
Each time you press the button, repeat play
mode changes as follows:
For MP3 discs:
Repeat FolderRepeat Track
Repeat Off
For CDs:
Repeat Disc
Repeat DiscRepeat Track
Repeat Off
Page 51

Mode
Repeat (track The current (or
Track repeat) indicator specified) track.
Repeat (folder All tracks of the
Folder* repeat) indicator current (or
Repeat (disc All tracks of the
Disc repeat) indicator current (or
* “Repeat Folder” is only applicable for MP3 disc.
Note:
MP3 indicator also lights up if the current playing
disc is an MP3 disc.
To cancel repeat play, select “Repeat Off” by
pressing number button 2 repeatedly or press
number button 4 in step 2.
Active
indicator
lights up.
lights up. specified) folder of
lights up. specified) disc.
Plays repeatedly
the current disc.
To play back only intros (Intro Scan)
1 Press M MODE during play.
“Mode” appears on the display.
The next-step-operation buttons
start flashing.
2 Press number button 1 repeatedly while
“Mode” is still on the display.
Each time you press the button, intro scan
mode changes as follows:
For MP3 discs:
Intro FolderIntro Track
Intro Off
For CDs:
Intro Disc
Intro DiscIntro Track
Intro Off
Mode
Intro All tracks of the
Track (track intro) current disc.
Intro The first track of every
Folder* (folder intro) folder of the current
Intro (disc The first tracks of
Disc intro) indicator the inserted discs.
* “Intro Folder” is only applicable for MP3 disc.
Note:
MP3 indicator also lights up if the current playing
disc is an MP3 disc.
To cancel intro scan, select “Intro Off” by
pressing number button 1 repeatedly or press
number button 4 in step 2.
Active Plays the beginnings
indicator (15 seconds) of
indicator
lights up.
indicator disc.
lights up.
lights up.
ENGLISH
Ex.: When you select “Intro Track” while
playing an MP3 disc
51
Page 52

ENGLISH
EXTERNAL COMPONENT OPERATIONS
Playing an external component
For KD-AR3000:
You can connect an external components to the
LINE IN plugs on the rear.
• You can also connect the SIRIUS tuner to the
CD changer jack on the rear and select it as
the external component.
For KD-LH300:
You can connect the external component to the
CD changer jack on the rear using the adapter
specially designed for the external component.
• Before operating the external component,
select the “Ext Input” setting correctly (see
page 39).
• To use the JVC SIRIUS Radio, refer to the
SIRIUS Radio Setup Manual (separate
volume).
1
Select the external component
(LINE-IN/SIRIUS).
(For KD-AR3000) (For KD-LH300)
Each time you press the button, the source
changes as described on page 7.
Note on One-Touch Operation:
When you press CD/CD-CH LINE (for
KD-AR3000) or CD/CD-CH (for KD-LH300),
the power automatically comes on. You do not
have to press to turn on the power.
2
Turn on the connected component
and start playing the source.
3
Adjust the volume.
4
Adjust the sound as you want.
(See pages 24 – 27.)
52
Page 53

TROUBLESHOOTING
What appears to be trouble is not always serious. Check the following points before calling a service
center.
Symptoms
• Sound cannot be heard
from the speakers.
• This unit does not work
at all.
General
•“Panel Connect Error”
appears on the display.
• SSM (Strong-station
Sequential Memory)
automatic preset does
not work.
FM/AM
• Static noise while
listening to the radio.
• Disc cannot be played
back.
• CD-R/CD-RW cannot be
played back.
• Tracks on the CD-R/
CD-RW cannot be
skipped.
Causes
The volume level is set to the
minimum level.
Connections are incorrect.
The built-in microcomputer may
have functioned incorrectly due
to noise, etc.
The control panel is not attach
correctly and firmly.
Signals are too weak.
The antenna is not connected
firmly.
Disc is inserted upside down.
CD-R/CD-RW is not finalized.
Remedies
Adjust it to the optimum level.
Check the cords and connections.
Press the reset button on the
control panel. (The clock setting
and preset stations stored in
memory are erased.)
(See page 2.)
Remove the control panel, wipe
the connectors, then attach it
again. (See page 45.)
Store stations manually.
Connect the antenna firmly.
Insert the disc correctly.
• Insert a finalized CD-R/CD-RW.
• Finalize the CD-R/CD-RW
with the component which
you used for recording.
ENGLISH
• Disc cannot be ejected.
• Disc cannot be
recognized (“No Disc,”
“Loading Error,” or “Eject
Error” flashes on the
display.)
Disc Playback
• Disc sound is sometimes
interrupted.
•“No Disc” flashes on the
display.
Disc is locked.
The CD player may function
incorrectly.
You are driving on rough roads.
Disc is scratched.
Connections are incorrect.
No disc in the loading slot.
Disc is inserted incorrectly.
Unlock the disc. (See page 22.)
While pressing
(standby/on attenuator), press
and hold 0 (eject) for more than
2 seconds to eject the disc.
Stop playback while driving on
rough roads.
Change the disc.
Check the cords and connections.
Insert a disc into the loading slot.
Insert the disc correctly.
53
Page 54

Symptoms
Causes
Remedies
• Disc cannot be played
ENGLISH
•“Not Support” appears and
• Noise is generated.
• A longer readout time is
MP3/WMA Playback
• Tracks cannot be played
• Elapsed playing time is not
back.
tracks skip.
required (“File Check”
keeps flashing on the
display).
back as you have intended
them to play.
correct.
No MP3/WMA tracks are
recorded on the disc.
MP3/WMA tracks do not have
the extension code <.mp3> or
<.wma> in their track names.
MP3/WMA tracks are not
recorded in the format
compliant with ISO 9660 Level
1, Level 2, Romeo, or Joliet.
Tracks are not encoded in an
appropriate format.
WMA tracks are copyprotected.
The track played back is not
an MP3/WMA track (although
it has the extension code
<.mp3> or <.wma>).
Readout time varies due to
the complexity of the folder/
track configuration.
Playback order is determined
when the tracks are recorded.
This sometimes occurs during
play. This is caused by how
the tracks are recorded on the
disc.
Change the disc.
Add the extension code
<.mp3> or <.wma> to their track
names.
Change the disc.
(Record MP3/WMA tracks using
a compliant application.)
Insert a disc that contains tracks
encoded in an appropriate
format.
This is normal. Copy-protected
tracks cannot be played back.
Skip to another track or change
the disc. (Do not add the
extension code <.mp3> or
<.wma> to non-MP3/WMA
tracks.)
Do not use too many hierarchies
and folders.
54
•“No Files” flashes on the
display.
•“No Music” appears on the
display.
• Correct characters are not
displayed (e.g. album
name).
The current disc does not
contain any MP3/WMA track.
The current folder does not
contain any MP3/WMA track.
Only <jml> and/or <jma> files
are recorded on the disc.
This unit can only display
alphabets (capital: A–Z, small:
a – z), numbers, and a limited
number of symbols.
Insert a disc that contains MP3/
WMA tracks.
Select another folder that
contains MP3/WMA tracks.
Insert a disc that contains MP3/
WMA tracks.
Page 55

Symptoms
Causes
Remedies
• Download does not seem to
finish.
• Animation does not move.
•“Movie” category settings in
the PSM do not take effect.
•“No Disc” flashes on the
display.
•“No Magazine” flashes on
the display.
•“Reset 08” flashes on the
display.
•“Reset 01” – “Reset 07”
flashes on the display.
• The CD changer does not
work at all.
You are trying to download an
animation of many frames.
Temperature in the car
compartment is very low—
(LOW TEMP.) indicator
appears.
No disc is in the magazine.
Discs are inserted upside
down.
No magazine is loaded in the
CD changer.
This unit is not connected to the
CD changer correctly.
The built-in microcomputer may
function incorrectly due to
noise, etc.
This is normal (see page 30).
Wait until the operating
temperature resumes—until
(LOW TEMP.) indicator
goes off.
Insert discs into the
magazine.
Insert discs correctly.
Insert the magazine.
Connect this unit and the
CD changer correctly and
press the reset button of the
CD changer.
Press the reset button of the
CD changer.
Press the reset button on the
control panel. (The clock
setting and preset stations
stored in memory are
erased.) (See page 2.)
ENGLISH
Graphics
CD Changer
Available characters
You can use the following characters to assign names to stations, CDs, and external component
(Line Input). (See page 43.)
• These characters can be also used to show other information such as disc title/performer on the
display.
Capital letters
space
Small letters Numbers and symbols
space
space
55
Page 56

MAINTENANCE
Handling discs
This unit has been designed to reproduce CDs,
CD-Rs (Recordable), CD-RWs (Rewritable), and
CD Texts.
ENGLISH
• This unit is also compatible with MP3 and
WMA discs.
How to handle discs
When removing a disc
from its case, press down
the center holder of the case
and lift the disc out, holding
it by the edges.
• Always hold the disc by the edges. Do not
touch its recording surface.
When storing a disc into its case, gently insert
the disc around the center holder (with the
printed surface facing up).
• Make sure to store discs into the cases after
use.
To keep discs clean
A dirty disc may not be played
correctly. If a disc does become
dirty, wipe it with a soft cloth in a
straight line from center to edge.
To play new discs
New discs may have some rough
spots around the inner and outer
edges. If such a disc is used, this
unit may reject the disc.
To remove these rough spots, rub
the edges with a pencil or ball-point pen, etc.
Moisture condensation
Moisture may condense on the lens inside the
CD player in the following cases:
• After starting the heater in the car.
• If it becomes very humid inside the car.
Should this occur, the CD player may
malfunction. In this case, eject the disc and leave
the unit turned on for a few hours until the
moisture evaporates.
Center holder
When playing a CD-R or CD-RW
Before playing back CD-Rs or CD-RWs, read
their instructions or cautions carefully.
• Use only “finalized” CD-Rs or CD-RWs.
• Some CD-Rs or CD-RWs may not be played
back on this unit because of their disc
characteristics, and for the following reasons:
– Discs are dirty or scratched.
– Moisture condensation on the lens inside the
unit.
– The pickup lens inside the unit is dirty.
• CD-RWs may require a longer readout time
since the reflectance of CD-RWs is lower than
that of regular CDs.
• CD-Rs or CD-RWs are susceptible to high
temperatures or high humidity, so do not leave
them inside your car.
• Do not use following CD-Rs or CD-RWs:
– Discs with stickers, labels, or protective seal
stuck to the surface.
– Discs on which labels can be directly printed
by an ink jet printer.
Using these discs under high temperatures or
high humidity may cause malfunctions or
damage to discs. For example,
– Stickers or labels may shrink and warp a
disc.
– Stickers or labels may be peeled off so discs
cannot be ejected.
– Print on discs may get sticky.
Read instructions or cautions about labels and
printable discs carefully.
CAUTIONS:
• Do not insert 8 cm (3-3/16") discs (single CDs)
into the loading slot. (Such discs cannot be
ejected.)
• Do not insert any disc of unusual shape—like a
heart or flower; otherwise, it will cause a
malfunction.
• Do not expose discs to direct sunlight or any
heat source or place them in a place subject to
high temperature and humidity. Do not leave
them in a car.
• Do not use any solvent (for example,
conventional record cleaner, spray, thinner,
benzine, etc.) to clean discs.
56
Warped
disc
Sticker
Sticker
residue
Disc
Stick-on
label
Page 57

SPECIFICATIONS
AUDIO AMPLIFIER SECTION
Maximum Power Output:
Front: 50 W per channel
Rear: 50 W per channel
Continuous Power Output (RMS):
Front: 19 W per channel into 4 Ω, 40 Hz
to 20 000 Hz at no more than
0.8% total harmonic distortion.
Rear: 19 W per channel into 4 Ω, 40 Hz
to 20 000 Hz at no more than
0.8% total harmonic distortion.
Load Impedance: 4 Ω (4 Ω to 8 Ω allowance)
Equalizer Control Range:
Frequencies: 60 Hz, 150 Hz, 400 Hz,
1 kHz, 2.4 kHz, 6 kHz, 12 kHz
Level: ±10 dB
Frequency Response: 40 Hz to 20 000 Hz
Signal-to-Noise Ratio: 70 dB
Line-In Level/Impedance:
KD-AR3000: 1.5 V/20 kΩ load
Line-Out Level/Impedance:
KD-AR3000: 5.0 V/20 kΩ load (full scale)
KD-LH300: 4.0 V/20 kΩ load (full scale)
Output Impedance: 1 kΩ
Subwoofer-Out Level/Impedance:
2.0 V/20 kΩ load (full scale)
TUNER SECTION
Frequency Range:
FM: 87.5 MHz to 107.9 MHz
AM: 530 kHz to 1 710 kHz
CD PLAYER SECTION
Type: Compact disc player
Signal Detection System: Non-contact optical
pickup (semiconductor laser)
Number of channels: 2 channels (stereo)
Frequency Response: 5 Hz to 20 000 Hz
Dynamic Range: 96 dB
Signal-to-Noise Ratio: 98 dB
Wow and Flutter: Less than measurable limit
MP3 decoding format:
MPEG 1/2 Audio Layer 3
Max. Bit Rate: 320 Kbps
WMA (Windows Media® Audio) decoding format:
Max. Bit Rate: 192 Kbps
GENERAL
Power Requirement:
Operating Voltage:
DC 14.4 V (11 V to 16 V allowance)
Grounding System: Negative ground
Allowable Operating Temperature:
0°C to +40°C (32°F to 104°F)
Dimensions (W × H × D):
Installation Size (approx.):
182 mm × 52 mm × 159 mm
(7-3/16" × 2-1/16" × 6-5/16")
Panel Size (approx.):
188 mm × 58 mm × 12 mm
(7-7/16" × 2-5/16" × 1/2")
Mass (approx.):
1.6 kg (3.5 lbs) (excluding accessories)
ENGLISH
[FM Tuner]
Usable Sensitivity: 11.3 dBf (1.0 µV/75 Ω)
50 dB Quieting Sensitivity: 16.3 dBf (1.8 µV/75 Ω)
Alternate Channel Selectivity (400 kHz): 65 dB
Frequency Response: 40 Hz to 15 000 Hz
Stereo Separation: 35 dB
Capture Ratio: 1.5 dB
[AM Tuner]
Sensitivity: 20 µV
Selectivity: 35 dB
Design and specifications are subject to change
without notice.
If a kit is necessary for your car, consult your
telephone folder for the nearest car audio
speciality shop.
57
Page 58

IMPORTANTE (EE.UU.)
Este equipo se ha sometido a todo tipo de pruebas y cumple con las normas establecidas para
dispositivos de Clase B, de conformidad con la Parte 15 de las reglas de la FCC (Comisión Federal
de Comunicaciones). Estas reglas están diseñadas para asegurar una protección razonable contra
este tipo de interferencias en las instalaciones residenciales. Este equipo genera y utiliza energía
de radiofrecuencia. Si no se instala y utiliza debidamente,es decir, conforme a las instrucciones,
podrían producirse interferencias en radiocomunicaciones. Sin embargo, no se garantiza que estas
interferencias no se produzcan en una instalación determinada. Si este equipo ocasiona
interferencias en la recepción de radio o televisión, lo cual puede comprobarse mediante la
conexión o desconexión del equipo, el problema podrá corregirse mediante una o una combinación
de las siguientes medidas:
ESPAÑOL
– Reoriente la antena receptora o cámbiela de lugar.
– Aumente la separación entre el equipo y el aparato receptor.
– Enchufe el equipo a una toma de corriente situada en un circuito distinto del aparato receptor.
– Consulte a su distribuidor o a un técnico experto en radio/televisión.
IMPORTANTE PARA PRODUCTOS LÁSER
1. PRODUCTO LÁSER CLASE 1
2. PRECAUCIÓN: No abra la tapa superior. En el interior de la unidad no hay piezas que pueda
reparar el usuario; encargue el servicio a personal técnico cualificado.
3. PRECAUCIÓN: Radiación láser visible e invisible en caso de apertura o con interbloqueo averiado
o defectuoso. Evite la exposición directa a los haces.
Precaución:
Si la temperatura del interior del vehículo es de menos de 0˚ C (32˚ F), el movimiento de la animación y el
desplazamiento del texto quedarán detenidos en la pantalla para evitar perturbaciones en la misma. El
indicador (LOW TEMP.) aparece en la pantalla.
Estas funciones se vuelven a activar cuando la temperatura aumenta hasta llegar a la temperatura de
funcionamiento.
PRECAUCIÓN sobre el ajuste del volumen:
Los discos producen muy poco ruido al compararse con otras fuentes. Si ajusta el nivel de volumen para el
sintonizador, por ejemplo, los altavoces podrían dañarse debido a un repentino aumento del nivel de salida.
Por lo tanto, antes de reproducir un disco, disminuya el volumen y ajústelo al nivel deseado durante la
reproducción.
Cómo reposicionar su unidad
Pulse el botón de reposición en el
panel de control utilizando un
bolígrafo o una herramienta similar.
Esto hará que se reposicione el
microcomputador
incorporado.
Nota:
También se borrarán los ajustes preestablecidos por usted—
como por ejemplo los canales preajustados o los ajustes de
sonido.
PRECAUCIÓN:
NUNCA
introduzca su
dedo entre el
panel de control y
la unidad, pues
podría lastimarse al
quedar aprisionado.
(Consulte la página 44).
2
Page 59

Muchas gracias por la compra de un producto JVC. Como primer paso, por favor lea
detenidamente este manual para comprender a fondo todas las instrucciones y obtener un
máximo disfrute de esta unidad.
CONTENIDO
Cómo reposicionar su unidad ................... 2
UBICACIÓN DE LOS BOTONES ........... 4
Panel de control ........................................ 4
Control remoto .......................................... 5
Preparación del control remoto ................. 6
OPERACIONES BASICAS .................. 7
Conexión de la alimentación ..................... 7
Cancelación de la demostración en
pantalla ................................................... 8
Ajuste del reloj .......................................... 9
OPERACIONES DE LA RADIO............. 10
Para escuchar la radio .............................. 10
Cómo almacenar emisoras en la
memoria ................................................. 12
Cómo sintonizar una emisora
preajustada............................................. 13
Cambio del patrón en pantalla .................. 14
OPERACIONES DE LOS DISCOS ......... 15
Acerca de los discos MP3 y WMA ............ 15
Reproducción del disco............................. 15
Cómo encontrar una pista o un punto
determinado de un disco ........................ 18
Selección de una carpeta y de una pista
utilizando las listas de nombres ............. 20
Selección de los modos de
reproducción........................................... 21
Prohibición de la expulsión del disco ........ 22
Cambio del patrón en pantalla .................. 23
AJUSTES DEL SONIDO .................... 24
Ajuste del sonido....................................... 24
Selección de los modos de sonido
preajustados
(iEQ: ecualizador inteligente) ................. 25
Cómo almacenar sus propios modos de
sonido ..................................................... 27
Selección del tema para la pantalla .......... 28
VISUALIZACIONES GRÁFICAS ........... 29
Cómo descargar imágenes y
animaciones ........................................... 30
Cómo borrar archivos innecesarios .......... 32
Activación de imágenes y animaciones
descargadas ........................................... 34
OTRAS FUNCIONES PRINCIPALES ...... 36
Cambio de los ajustes generales (PSM) ....
Selección del modo atenuador de luz ....... 40
Cambio del color de la pantalla................. 41
Asignación de nombres a las fuentes ....... 43
Cambio del ángulo del panel de control.... 44
Desmontaje del panel de control .............. 45
36
OPERACIÓN DEL CAMBIADOR DE
CD .......................................... 46
Reproducción de los discos ...................... 46
Selección de un disco/una carpeta/una
pista utilizando las listas de nombres ..... 49
Selección de los modos de
reproducción........................................... 50
OPERACIONES DE LOS COMPONENTES
EXTERIORES .............................. 52
Reproducción de un componente
exterior ................................................... 52
LOCALIZACIÓN DE AVERIAS ............. 53
MANTENIMIENTO .......................... 56
Manipulación de los discos ....................... 56
ESPECIFICACIONES ....................... 57
ESPAÑOL
ANTES DE USAR
*Para fines de seguridad....
• No aumente demasiado el nivel de volumen pues es
muy peligroso conducir si no se escuchan los
sonidos exteriores.
• Detenga el automóvil antes de efectuar cualquier
operación complicada.
*Temperatura dentro del automóvil....
Si ha dejado el automóvil estacionado durante largo
tiempo en un sitio cálido o frío, no opere la unidad
hasta que se normalice la temperatura del habitáculo.
3
Page 60

UBICACIÓN DE LOS BOTONES
Panel de control
12 3 4 56 7 8
y
KD-AR3000
ESPAÑOL
KD-LH300
9p q we tr
1 Dial de control
2 Botón (en espera/encendido
atenuador)
3 Botón ANGLE
4 Ventanilla de visualización
5 Botones 4 /¢
6 Botón 5 (arriba)
7 Botón FM/AM
8 Botón 0 (expulsión)
9 Botón SEL (selección)
p Botón D DISP (visualización)
q Botones numéricos
w Botón M MODE
e Sensor remoto
r Botón ∞ (abajo)
t Botón (soltar panel de control)
y Para KD-AR3000:
Botón CD/CD-CH (cambiador de CD) LINE
Para KD-LH300:
Botón CD/CD-CH (cambiador de CD)
Navegación con iluminación para facilidad de operación
Si utiliza M MODE o SEL (selección), la pantalla y algunos controles (tales como los botones
numéricos, 4 /¢ , 5/∞ y el dial de control) acceden al modo de control correspondiente,
y luego los controles comienzan a parpadear para conducirle a los siguientes pasos operacionales.
(Navegación con iluminación)
• En la pantalla se indica cómo funcionan estos botones durante este período.
Ej.: Cuando se pulsa el botón numérico 1 después de pulsar M MODE para accionar el
sintonizador de FM.
Indicador de cuenta atrás
Para volver a utilizar estos botones para las funciones originales, espere hasta que los
controles dejen de parpadear sin utilizar tales controles.
• Pulsando M MODE otra vez también se restablecen las funciones originales. Sin embargo, si
pulsa SEL (selección), la unidad accede a un modo diferente.
4
Page 61

Control remoto
SOUND
ATT
U
SOURCE
R
VOL
1 • La unidad se enciende si es pulsado
estando la unidad apagada.
• La unidad se apaga si lo pulsa y mantiene
pulsado durante algunos segundos.
• El nivel de volumen disminuye
instantáneamente si pulsa de manera
breve.
Vuelva a pulsar para volver al volumen
anterior.
2 • Selecciona la banda mientras está
escuchando la radio.
Cada vez que pulsa el botón, la banda
cambia.
• Salta a la primera pista de la carpeta
siguiente mientras se está escuchado un
disco MP3 o WMA.
Cada vez que pulsa el botón, podrá
desplazarse a la carpeta siguiente e iniciar
la reproducción de la primera pista.
• Mientras se reproduce un disco MP3 en un
cambiador de CD compatible con MP3;
– Se salta al siguiente disco pulsándolo
brevemente.
– Se salta a la siguiente carpeta pulsándolo
y manteniéndolo pulsado.
Nota:
Mientras se está reproduciendo un CD en
el cambiador de CD, esto hará que se
salte siempre al siguiente disco.
F
D
VOL
3 • Selecciona la emisora preajustada mientras
está escuchando la radio.
Cada vez que pulsa el botón, el número de
la emisora preajustada aumenta, y se
sintoniza la emisora seleccionada.
• Salta a la primera pista de la carpeta
anterior mientras se está escuchado un
disco MP3 o WMA.
Cada vez que pulsa el botón, podrá
desplazarse a la carpeta anterior e iniciar la
reproducción de la primera pista.
• Mientras se reproduce un disco MP3 en un
cambiador de CD compatible con MP3;
– Se salta al disco anterior pulsándolo
brevemente.
– Se salta a la carpeta anterior pulsándolo
y manteniéndolo pulsado.
Nota:
Mientras se está reproduciendo un CD en
el cambiador de CD, esto hará que se
salte siempre al anterior disco.
4 Funciona igual que el dial de control de la
unidad principal.
Nota:
Estos botones no funcionan para controlar
el modo de ajustes preferidos (PSM).
5 Selecciona el modo de sonido (iEQ:
ecualizador inteligente).
Cada vez que pulsa el botón, el modo de
sonido (iEQ) cambia.
6 Seleccione la fuente.
Cada vez que pulsa el botón, la fuente
cambia.
7 • Busca estaciones mientras escucha la
radio.
• Avanza o retrocede hasta la pista/el archivo
si lo mantiene presionado mientras escucha
el disco.
• Salta al principio de la pista/el archivo
siguiente o retrocede al principio de las
pistas/los archivos actual (o de la anterior)
si lo presiona brevemente mientras escucha
el disco.
ESPAÑOL
5
Page 62

Preparación del control
remoto
Antes de emplear el control remoto:
• Apunte el control remoto directamente hacia el
sensor remoto de la unidad principal.
Asegúrese de que no haya obstáculos en el
camino.
ESPAÑOL
Sensor remoto
• No exponga el sensor remoto a la luz intensa
(luz solar directa o iluminación artificial).
Instalación de la pila
Cuando los límites de alcance o la efectividad
del control remoto se reduce, reemplace la pila.
1. Retire la portapila.
1) Extráigalo en la dirección indicada por la
flecha utilizando un bolígrafo u otra
herramienta similar.
2) Retire la portapila.
3. Vuelva a colocar a la portapila.
Inserte nuevamente a la portapila
empujándolo hasta escuchar un chasquido.
(lado posterior)
ADVERTENCIA:
• Guarde la pila fuera del alcance de los niños.
Si llega a ser ingerida, acuda inmediatamente
al médico.
• No recargue, cortocircuite, desarme ni caliente
la pila, ni las arroje al fuego.
Cualquiera de estas acciones podrá hacer que
la pila desprenda calor, se agriete o provoque
un incendio.
• No mezcle pila con otros objetos de metal.
Si lo hace, la pila podrían desprender calor,
agrietarse o provocar un incendio.
• Cuando descarte o almacene la pila,
envuélvalas con una cinta y aíslelas.
Si no lo hace, podrían desprender calor,
agrietarse o provocar un incendio.
• No saque la pila con una aguja de metal.
Si lo hace, la pila podría desprender calor,
agrietarse o provocar un incendio.
(lado
posterior)
2. Coloque la pila.
Introduzca la pila en el portapila con el lado +
dirigido hacia arriba, de manera que quede
asegurada dentro del mismo.
Pila de litio
(Número del
producto: CR2025)
6
PRECAUCIÓN:
NO deje el control remoto en un lugar expuesto a
la luz directa del sol (como los cubretableros)
durante un tiempo prolongado. De lo contrario, se
podría dañar.
Page 63

OPERACIONES BASICAS
1
Conexión de la alimentación
1
Encienda la unidad.
Nota sobre la operación con pulsación única:
La unidad se enciende automáticamente cuando
usted selecciona la fuente en el paso 2 de abajo.
No necesitará presionar este botón para
encender la unidad.
2
Reproduzca la fuente.
•
Para operar el sintonizador, pulse FM/AM.
TUNER
Luego, pulse FM/AM repetidamente para
seleccionar la banda (FM1, FM2, FM3 o
AM).
• Para operar el reproductor de CD (CD),
el cambiador de CD (CD-CH), o un
componente externo (LINE-IN o SIRIUS).
23
*2No se podrá seleccionar “CD-CH” como
fuente si no está conectado el cambiador de
CD.
*3Para seleccionar el componente externo como
fuente, ajuste correctamente “Ext Input”
(consulte la página 39).
3
Ajuste el volumen.
Para aumentar el volumen
Para reducir el volumen
Aparece el nivel de volumen.
Modo de sonido actual (iEQ)
(consulte la página 25)
4
Ajuste el sonido según se desee.
(Consulte las páginas 24 a 27).
ESPAÑOL
Para KD-AR3000:
• Pulse CD/CD-CH LINE repetidamente.
1
CD*
(o SIRIUS*3)
LINE-IN
Para KD-LH300:
• Pulse CD/CD-CH repetidamente:
CD*
CD-CH*
(o LINE-IN/SIRIUS*3)
*1No se podrá seleccionar “CD” como fuente si
no está cargado el CD.
CD-CH*
1
2
2
Nota:
Mientras se está reproduciendo una fuente, se podrá
efectuar la selección del tema deseado para la
pantalla. Para más detalles, consulte “Selección del
tema para la pantalla” en la página 28.
AVISO:
Las ilustraciones de la pantalla utilizadas en este
manual son principalmente para el ajuste inicial
realizado en el momento de expedirse de fábrica.
Si se han modificado los patrones de visualización
o algunas opciones PSM, entonces las
visualizaciones en pantalla serán diferentes.
7
Page 64

Para disminuir el volumen en un instante
Pulse por un tiempo breve mientras
está escuchando cualquier fuente. “AT T ”
comienza a parpadear en la pantalla, y el nivel
de volumen disminuirá en un instante.
Para regresar al nivel de volumen anterior,
vuelva a presionar brevemente el botón.
• Si gira el dial de control, también se podrá
restablecer el sonido.
Para apagar la unidad
ESPAÑOL
Pulse y mantenga pulsado durante
más de 1 segundo.
• Si desconecta la alimentación mientras
está escuchando un disco, cuando vuelva a
conectar la alimentación la próxima vez el
disco se empezará a reproducir desde el punto
en que fue detenido previamente.
Cancelación de la
demostración en pantalla
La unidad se expide de fábrica con la
demostración en pantalla activada para que se
inicie automáticamente tras un período de
inactividad de 20 segundos.
• Se recomienda cancelar la demostración en
pantalla antes de utilizar la unidad por primera
vez.
Para cancelar la demostración en pantalla,
siga el procedimiento de abajo:
1
Pulse y mantenga pulsado SEL
(selección) durante más de 2
segundos para que aparezca uno de
los ítems de PSM en la pantalla.
(PSM: consulte las páginas 36 y 37).
Los botones del siguiente paso
de la operación comienzan a
parpadear.
2
Pulse el botón numérico 1 para
seleccionar “MOVIE”—Categoría de
película de los ajustes de PSM.
La pantalla de ajuste “Graphics” aparece en
la pantalla.
3
Seleccione “Off”.
4
Finalice el ajuste.
Para activar la demostración en pantalla,
repita el mismo procedimiento y seleccione
“All Demo” o “Int Demo” en el paso 3.
• Para mayor información, consulte “Para
mostrar los gráficos en la pantalla
—Graphics” en la página 38.
8
Page 65

Ajuste del reloj
Permite ajustar el sistema de reloj a 24 horas o
bien a 12 horas.
1
Pulse y mantenga pulsado SEL
(selección) durante más de 2
segundos para que aparezca uno de
los ítems de PSM en la pantalla.
(PSM: consulte las páginas 36 y 37).
Los botones del siguiente paso
de la operación comienzan a
parpadear.
2
Pulse el botón numérico 2 para
seleccionar “CLOCK”—Categoría de
reloj de los ajustes de PSM.
La pantalla de ajuste “Clock Hr” (hora)
aparece en la pantalla.
4
Ajuste los minutos.
1 Seleccione “Clock Min” (minutos).
2 Ajuste los minutos.
12
5
Ajuste el sistema de reloj.
1 Seleccione “24H/12H”.
2 Seleccione “24Hours” o “12Hours”.
12
6
Finalice el ajuste.
Para verificar la hora actual del reloj con la
unidad desactivada, pulse D DISP.
ESPAÑOL
3
Ajuste la hora.
La unidad se enciende y la hora del reloj
aparece durante 5 segundos; luego, la unidad se
apaga.
9
Page 66

OPERACIONES DE LA RADIO
ESPAÑOL
Para escuchar la radio
Podrá sintonizar una determinada emisora
mediante búsqueda automática o búsqueda
manual.
Para buscar una emisora
automáticamente: Búsqueda automática
1
Seleccione la banda (FM1 – 3, AM).
Cada vez que pulsa el botón, la
banda cambia de la siguiente
manera:
FM1 FM2 FM3 AM
Aparece la banda seleccionada.
Se enciende cuando se recibe una
radiodifusión en FM estéreo de
intensidad suficiente.
Nota:
Este receptor tiene tres bandas FM (FM1, FM2,
FM3). Podrá usar cualquiera de ellas para
escuchar un radiodifusión en FM.
Para cancelar la búsqueda antes de recibir
una emisora, pulse el mismo botón que el
pulsado para la búsqueda.
Para buscar una emisora
manualmente: Búsqueda manual
1
Seleccione la banda (FM1 – 3, AM).
Cada vez que pulsa el botón, la
banda cambia de la siguiente
manera:
FM1 FM2 FM3 AM
Nota:
Este receptor tiene tres bandas FM (FM1, FM2,
FM3). Podrá usar cualquiera de ellas para
escuchar un radiodifusión en FM.
2
Pulse y mantenga pulsado ¢ o
hasta que “Manual Search”
4
comience a parpadear en la pantalla.
10
2
Comience la búsqueda de la emisora.
Para buscar emisoras de
frecuencias más altas
Para buscar emisoras de frecuencias más
bajas
La búsqueda se interrumpe cada vez que
se recibe una emisora.
Page 67

3
Sintonice la emisora deseada
mientras “Manual Search” está
parpadeando
Para sintonizar emisoras
de frecuencias más
altas
Para sintonizar emisoras de frecuencias
más bajas
• Si aparta su dedo del botón, el modo
manual se desactivará automáticamente
después de 5 segundos.
• Si mantiene el botón pulsado, la
frecuencia cambiará continuamente
(a intervalos de 200 kHz para FM y a
intervalos de 10 kHz para AM) hasta
soltarlo.
Si la calidad del sonido disminuye y el
efecto estereofónico se pierde mientras
está escuchando una emisora FM
En algunas áreas, las emisoras adyacentes
podrían interferir entre sí. Si se produce este
tipo de interferencias, esta unidad puede
atenuar los ruidos parásitos (ajuste inicial de
fábrica). Sin embargo, en este caso, la
calidad del sonido se degrada y también se
pierde el efecto estereofónico.
Si prefiere que la calidad del sonido no se
degrade y que el efecto estereofónico se
mantenga en lugar de eliminar los ruidos
parásitos, consulte “Para cambiar la
selectividad del sintonizador de FM
—IF Filter” en la página 39.
Cuando una radiodifusión en FM estéreo
sea difícil de recibir:
Ajuste el modo de recepción FM a “Mono On”.
1 Pulse M MODE mientras se está escuchando
una radiodifusión en FM estéreo.
Aparece “Mode” en la pantalla.
Los botones del siguiente paso de
la operación comienzan a
parpadear.
ESPAÑOL
2 Pulse el botón numérico 1 para seleccionar
“Mono On” mientras “Mode” permanece
visualizado en la pantalla.
Cada vez que pulsa el botón, “Mono On” y
“Mono Off” aparecen alternativamente.
Después de unos
5 segundos
La pantalla vuelve a la pantalla de indicación
de fuente.
Aparece el indicador MONO.
El sonido se escuchará en monofónico pero se
conseguirá mejorar la recepción.
11
Page 68

Cómo almacenar emisoras en
la memoria
Las emisoras podrán almacenarse en la
memoria mediante uno de los dos métodos
siguientes.
•
Preajuste automático de emisoras FM: SSM
(Memoria secuencia de las emisoras fuertes)
•
Preajuste manual de ambas emisoras FM y AM
ESPAÑOL
Preajuste automático de emisoras FM:
SSM
Pueden preajustarse 6 emisoras FM locales en
cada banda FM (FM1, FM2 y FM3).
Las emisoras FM locales con las señales más
intensas serán exploradas y almacenadas
automáticamente en el número de banda
seleccionado (FM1, FM2 o FM3).
Estas emisoras quedan preajustadas en los
botones—No.1 (frecuencia más baja) a No.6
(frecuencia más alta).
Cuando finalice el preajuste automático, se
sintonizará automáticamente la emisora
almacenada en el botón número 1.
Preajuste manual
Podrá preajustar manualmente hasta 6 emisoras
en cada banda (FM1, FM2, FM3 y AM).
1
Seleccione la FM banda (FM1 – 3) en
que desea almacenar las emisoras
FM.
Cada vez que pulsa el botón, la
banda cambia de la siguiente
manera:
FM1 FM2 FM3 AM
2
Inicie el preajuste automático.
1 Pulse M MODE.
Aparece “Mode” en la pantalla.
Los botones del siguiente paso
de la operación comienzan a
parpadear.
2 Pulse y mantenga pulsado el botón
numérico 5, mientras “Mode” permanece
visualizado en la pantalla.
Ej.: Almacenamiento de una emisora FM de
92,5 MHz en el número de preajuste 1 de la
banda FM1.
1
Seleccione la banda (FM1 – 3, AM)
en que desea almacenar las
emisoras (en este ejemplo, FM1).
Cada vez que pulsa el botón, la
banda cambia de la siguiente
manera:
FM1 FM2 FM3 AM
2
Sintonice la emisora (en este
ejemplo de 92,5 MHz).
Para sintonizar emisoras
de frecuencias más
altas
Para sintonizar emisoras de frecuencias
más bajas
12
Aparece y se mantiene visualizado “–SSM–”
hasta finalizar el preajuste automático.
Page 69

3
Pulse y mantenga pulsado el botón
numérico (en este ejemplo, 1),
durante más de 2 segundos.
El patrón de visualización cambia
automáticamente a pantalla de animación
pequeña (consulte la página 14).
Después de unos
5 segundos
Cómo sintonizar una emisora
preajustada
Las emisoras preajustadas pueden sintonizarse
fácilmente.
Tenga presente que primero deberá almacenar
las emisoras. Si todavía no lo ha hecho, consulte
“Cómo almacenar emisoras en la memoria” en
las páginas 12 y 13.
Selección directa de una emisora
preajustada
1
Seleccione la banda (FM1 – 3, AM).
Cada vez que pulsa el botón, la
banda cambia de la siguiente
manera:
FM1 FM2 FM3 AM
ESPAÑOL
Aparece el número de preajuste.
4
Repita el procedimiento de arriba
para almacenar otras emisoras en
los otros números de preajuste.
Notas:
• La emisora preajustada previamente se borra
cuando se almacena una emisora nueva en el
mismo número de preajuste.
• Si se deja de suministrar energía al circuito de la
memoria (por ejemplo, durante el reemplazo de la
batería) se borrarán todas las emisoras
preajustadas. Si así sucede, vuelva a preajustar las
emisoras.
2
Seleccione el número (1 – 6) en que
desea preajustar la emisora.
Nota:
También pueden usar los botones 5 (arriba) o ∞
(abajo) en la unidad para seleccionar las emisoras
preajustadas siguientes o anteriores.
Cada vez que pulsar los botones 5 (arriba) o
∞ (abajo), se sintonizará las emisoras preajustadas
siguientes o anteriores.
CONTINUA EN LA PÁGINA SIGUIENTE
13
Page 70

Selección de una emisora preajustada
utilizando la lista de emisoras
preajustadas
Si olvida cuáles son las emisoras memorizadas
en cada uno de los números preajustados, podrá
verificar la lista de emisoras preajustadas, y
seleccionar la emisora deseada de la lista.
1
Seleccione la banda (FM1 – 3, AM).
ESPAÑOL
2
Pulse y mantenga pulsado 5 (arriba)
o ∞ (abajo) hasta que la lista de
emisoras preajustadas para la
banda actual (FM1, FM2, FM3 o AM)
aparezca en la pantalla.
Cada vez que pulsa el botón, la
banda cambia de la siguiente
manera:
FM1 FM2 FM3 AM
La emisora recibida
actualmente aparecerá
resaltada en la pantalla.
Cambio del patrón en pantalla
Si pulsa D DISP, podrá cambiar la información
mostrada en la pantalla.
Cada vez que pulsa el botón, los
patrones en pantalla cambian de
la siguiente manera:
Ej.: Cuando se selecciona la emisora preajustada
1 de la banda FM1
Pantalla de animación grande
Modo de sonido actual (iEQ)
(consulte la página 25)
Pantalla 1 de animación pequeña
Hora del reloj
Notas:
• Es posible mostrar las otras listas de emisoras
preajustadas de la banda FM (FM1, FM2 o FM3)
pulsando 5 (arriba) o ∞ (abajo).
• Si se ha asignado un nombre a la emisora (consulte
la página 43), se visualizará el nombre, en lugar de
la frecuencia de la emisora.
3
Seleccione el número (1 – 6) en que
desea preajustar la emisora.
14
Pantalla 2 de animación pequeña
Si se ha asignado un nombre a la
emisora, se visualizará el nombre,
en lugar de “NO NAME”.
Pantalla de la hora del reloj
Page 71

OPERACIONES DE LOS DISCOS
Esta unidad ha sido diseñada para reproducir
CDs, CD-Rs (Grabables), CD-RWs
(Reescribibles), y CD Texts.
• Esta unidad también es compatible con
discos MP3 y WMA. Para mayor información
sobre estos discos, refiérase a “Una guía
sobre MP3/WMA” (volumen separado).
Acerca de los discos MP3 y
WMA
Las “pistas” MP3 y WMA (Windows Media
Audio) (en este manual, en lugar de la palabra
“archivo”, se utiliza la palabra “pista” para indicar
archivos MP3 o WMA) se encuentran grabadas
en “carpetas”.
Durante la grabación, las pistas y las carpetas se
pueden disponer de manera similar a los
archivos y las carpetas de los datos de
ordenador.
La “raíz” es similar a la raíz de un árbol. Cada
una de las pistas y las carpetas pueden
enlazarse con la raíz y accederse desde ella.
01
05
Jerarquía
1
2
02 03
3
10
11
04
12
Nivel 1 Nivel 2 Nivel 3 Nivel 4 Nivel 5
ROOT
®
6
4
5
7
8
9
Reproducción del disco
1
Abra el panel de control.
Nota sobre la operación con pulsación única:
Si pulsa CD/CD-CH LINE (para KD-AR3000) o
CD/CD-CH (para KD-LH300) habiendo un CD
en la ranura de carga, la unidad se enciende y la
reproducción se inicia automáticamente.
2
Inserte un disco en la ranura de carga.
El disco se introduce
en la unidad, el panel
de control vuelve a la
posición anterior
(consulte la página
44), y la reproducción
se inicia
automáticamente.
Todas las pistas se reproducirán
repetidamente hasta que usted pare la
reproducción.
Nota:
Para los detalles sobre los discos que se pueden
reproducir y otra información relacionada, consulte
la página 56.
ESPAÑOL
: Carpetas y su orden de reproducción
01
: Pistas MP3/WMA y su orden de
1
reproducción
• Microsoft y Windows Media son marcas registradas
o bien marcas comerciales de Microsoft
Corporation en los Estados Unidos y/u otros países.
Acerca del mal seguimiento:
El mal seguimiento es un defecto que podría
suceder cuando conduce por caminos muy
accidentados. Esto no produce daños a la unidad
ni al disco, pero resultará muy molesto.
Se recomienda detener la reproducción del disco
cuando conduzca por caminos accidentados.
15
Page 72

Indicaciones en la pantalla cuando se
inserta un CD de audio o un CD Text:
Indicaciones en pantalla al insertar discos
MP3 o WMA:
Número total de pistas y tiempo
de reproducción total del disco
insertado
ESPAÑOL
Pista actual y tiempo de reproducción
transcurrido
Notas:
• Los discos MP3 o WMA requieren mayor tiempo
de lectura. (Varía según la complejidad de la
configuración de carpeta/pista).
• La unidad no puede leer ni reproducir una pista
MP3 sin el código de extensión <.mp3>, ni una
pista WMA sin el código de extensión <.wma>.
Para parar la reproducción y expulsar el
disco
Pulse 0.
La reproducción del disco se para y el panel de
control bascula hacia abajo. El disco sale
automáticamente de la ranura de carga. La
fuente cambia a la seleccionada previamente.
• Si cambia de fuente o desconecta la
alimentación, la reproducción del disco
también cesa (sin que el disco sea expulsado).
La próxima vez que selecciona “CD” como
fuente o al conectar la alimentación, la
reproducción del disco se inicia desde el punto
en que se detuvo previamente.
Número total de carpetas y pistas
Indicador MP3*
Carpeta/pista actual y tiempo de
reproducción transcurrido
* Se enciende el indicador WMA o MP3, dependiendo
de la pista detectada en primer término.
Notas:
• Si no saca el disco expulsado en unos 15 segundos,
será reinsertado automáticamente en la ranura de
carga para protegerlo del polvo.
(En este caso no se reproduce el disco).
• Podrá expulsar el disco incluso cuando la unidad
esté apagada.
Para que el panel de control vuelva a su
posición anterior, pulse 0 otra vez.
• Si la ranura de carga permanece
completamente abierta durante
aproximadamente 1 minuto (el pitido suena al
poner el ajuste “Beep” en “On”—consulte la
página 39), el panel de control volverá
automáticamente a su posición anterior.
Tenga la precaución de evitar que el disco o el
dedo quede aprisionado entre el panel de
control y la unidad.
16
Page 73

¿Qué es ImageLink?
j
Cuando una carpeta MP3 o WMA incluye un
archivo <jml> de imagen editado por Image
Converter (suministrado en el CD-ROM), se
podrá mostrar la imagen en la pantalla
mientras se reproducen las pistas de la
carpeta.
• Mientras se está leyendo una imagen de
archivo <jml>, no se generará sonido
(“Image Link” se visualiza en la pantalla
durante este lapso).
Álbum 1
(Carpeta
Álbum 2
(Carpeta
Ventanilla de
visualización
Photo1.
Music001.mp3
1)
Music002.mp3
Music003.mp3
Photo1.jml
Music004.wma
2)
Music005.mp3
Music006.wma
Photo2.jml
Photo3.jml
Ventanilla de
visualización
ml
Photo2.jml
Para activar ImageLink, siga el
procedimiento de abajo:
• Consulte también “Cambio de los ajustes
generales (PSM)” en la página 36.
1 Pulse y mantenga pulsado SEL (selección)
durante más de 2 segundos para que
aparezca uno de los items de PSM en la
pantalla.
2 Pulse el botón numérico 1 para seleccionar
“MOVIE”—Categoría de película de los
ajustes de PSM.
La pantalla de ajuste “Graphics” aparece
en la pantalla.
3 Gire el dial de control para seleccionar
“ImageLink”.
4 Pulse SEL (selección) para finalizar el
ajuste.
ImageLink empezará a funcionar cuando
se empiece a reproducir la siguiente
carpeta.
Nota:
ImageLink no funcionará en los casos siguientes:
• Si no hay archivo <jml> incluido en una
carpeta MP3/WMA.
• Si está activada la Búsqueda de introducción,
•
Si se cambia a otra fuente desde “CD”, o
• Si apaga la unidad y la vuelve a encender
mientras “Image Link” se encuentra
visualizado en la pantalla.
ESPAÑOL
Si hay más de un archivo <jml> en una
carpeta, el archivo <jml> con el número de
orden de reproducción más reciente será
visualizado en la pantalla (en el ejemplo de
arriba, “Photo2.jml” será usado para el
Álbum 2).
17
Page 74

Cómo encontrar una pista o un
punto determinado de un disco
Para efectuar la búsqueda progresiva o
regresiva de la pista
Pulse y mantenga pulsado
¢ , mientras se está
reproduciendo el disco para
avanzar rápidamente la pista.
ESPAÑOL
Pulse y mantenga pulsado 4 , mientras se
está reproduciendo el disco para hacer
retroceder la pista.
Nota:
Durante esta operación en un disco MP3 o WMA,
podrá escuchar sólo sonidos intermitentes. (El tiempo
de reproducción transcurrido también cambia
intermitentemente en la pantalla).
Para desplazarse rápidamente a una pista
1 Pulse M MODE mientras se está
reproduciendo un disco.
Aparece “Mode” en la pantalla.
Los botones del siguiente paso de la
operación comienzan a parpadear.
Para esta función, consulte la página 30.
2 Pulse 5 (arriba) o ∞ (abajo) mientras “Mode”
permanece visualizado en la pantalla.
Para saltar 10 pistas* hacia
adelante hasta la última pista
Para seleccionar las pistas siguientes o
anteriores
Pulse ¢ por un tiempo
breve mientras se está
reproduciendo un disco para
saltar al comienzo de la pista
siguiente.
Cada vez que pulse el botón
consecutivamente, se
localiza el comienzo de las
pistas siguientes y se efectúa
la reproducción.
Pulse 4 por un tiempo breve mientras se
está reproduciendo un disco para volver al
comienzo de la pista actual.
Cada vez que pulse el botón consecutivamente,
se localiza el comienzo de las pistas anteriores y
se efectúa la reproducción.
Para seleccionar directamente una
determinada pista
(Sólo discos CD y CD Text)
Pulse el botón de número correspondiente al
número de pista que desea reproducir.
• Para seleccionar un número de pista entre
01 – 06:
Pulse 1 (7) – 6 (12) por un tiempo breve.
• Para seleccionar un número de pista entre
07 – 12:
Pulse y mantenga pulsado 1 (7) – 6 (12)
durante más de 1 segundo.
18
Para saltar 10 pistas* hacia
atrás hasta la primera pista
* La primera vez que pulsa el botón 5 (arriba)
o ∞ (abajo), se salta a la pista superior o
inferior más próxima cuyo número de pista
sea múltiplo de diez (ej. 10˚, 20˚, 30˚).
Posteriormente, cada vez que pulsa el botón,
podrá saltar 10 pistas (consulte “Cómo ir
rápidamente a la pista deseada” de abajo).
• Después de la última pista, se seleccionará
la primera pista, y viceversa.
Nota:
Si el disco que se está reproduciendo es un disco MP3
o WMA, se saltarán las pistas de la misma carpeta.
Cómo ir rápidamente a la pista deseada
• Ej. 1: Para seleccionar la pista número 32
mientras se está reproduciendo la
pista número 6
(Tres veces) (Dos veces)
Pista 6 \ 10 \ 20 \ 30 \ 31 \ 32
• Ej. 2 : Para seleccionar la pista número 8
mientras se está reproduciendo la
pista número 36
(Tres veces)
Pista 36 \ 30 \ 20 \ 10 \ 9 \ 8
(Dos veces)
Page 75

Para ir directamente a una carpeta
específica
(Posible solamente para el disco MP3 o
WMA)
Para saltar a la carpeta siguiente o
anterior
(Posible solamente para el disco MP3 o
WMA)
IMPORTANTE:
Para seleccionar directamente las carpetas
utilizando el(los) botón(es) numérico(s), será
preciso asignar a las carpetas un número de
2 dígitos al comienzo de los nombres de
carpetas. (Esto se podrá efectuar solamente
durante la grabación de los discos CD-R o
CD-RW.)
Ej.: Si el nombre de la carpeta es “01 ABC”
= Pulse 1 para ir a la carpeta 01 ABC.
Si el nombre de la carpeta es
“1 ABC”, la pulsación de 1 no tiene
efecto alguno.
Si el nombre de la carpeta es “12 ABC”
= Pulse y mantenga pulsado 6 (12)
para ir a la carpeta 12 ABC.
Pulse el botón numérico correspondiente al
número de carpeta para iniciar la reproducción
de la primera pista de la carpeta seleccionada.
• Para seleccionar un número de carpeta entre
01 – 06:
Pulse 1 (7) – 6 (12) por un tiempo breve.
• Para seleccionar un número de carpeta entre
07 – 12:
Pulse y mantenga pulsado 1 (7) – 6 (12)
durante más de 1 segundo.
Pulse 5 (arriba) mientras se
reproduce un disco, para saltar a
la carpeta siguiente.
Cada vez que pulsa el botón
consecutivamente, se localizará
la carpeta siguiente y se iniciará
la reproducción de la primera
pista de la carpeta.
Pulse ∞ (abajo) mientras se reproduce un disco,
para ir a la carpeta anterior.
Cada vez que pulsa el botón consecutivamente,
se localizará la carpeta anterior y se iniciará la
reproducción de la primera pista de la carpeta.
Nota:
Si la carpeta no contiene pistas MP3 ni WMA, la
misma será omitida.
ESPAÑOL
Notas:
• Si en la pantalla aparece “No Music” después de
seleccionar una carpeta, significa que la carpeta no
contiene pistas MP3 o WMA.
• No podrá seleccionar directamente una carpeta con
un número mayor que 12.
Para seleccionar una pista específico en una
carpeta, pulse ¢ o 4 después de
seleccionar la carpeta.
19
Page 76

Selección de una carpeta y
una pista utilizando las listas
de nombres
Las siguientes operaciones son posibles
únicamente cuando se reproduce un disco
MP3 o WMA.
Podrá mostrar en la pantalla las listas de
nombres de carpetas y nombres de pistas
mientras se está reproduciendo un disco. Luego,
ESPAÑOL
seleccione la carpeta o la pista deseado para
iniciar su reproducción.
Selección de una carpeta e inicio de
la reproducción
1
Pulse y mantenga pulsado 5 (arriba)
o ∞ (abajo) de manera que en la
pantalla aparezca la lista de nombres
de carpetas del disco insertado.
La carpeta que se está
reproduciendo actualmente
aparecerá resaltada en la
pantalla.
Número de carpeta actual
Selección de una pista e inicio de la
reproducción
1
Pulse y mantenga pulsado 5 (arriba)
o ∞ (abajo) de manera que en la
pantalla aparezca la lista de nombres
de carpetas del disco insertado.
La carpeta que se está
reproduciendo actualmente
aparecerá resaltada en la
pantalla.
Número de carpeta actual
2
Pulse ¢ o 4 para mostrar
la lista de nombres de pistas de la
carpeta actual.
La pista que se está
reproduciendo
actualmente aparecerá
resaltada en la pantalla.
Número de pista actual
20
Notas:
• La pantalla puede mostrar sólo seis nombres
a la vez. Para mostrar los otros nombres de
las listas siguientes, pulse 5 (arriba) o ∞
(abajo).
• Si se pulsa ¢ o 4 , aparecerá la
lista de nombres de pistas de la carpeta que
se está reproduciendo en ese momento.
Cada vez que pulsa el botón, aparecen
alternativamente la lista de nombres de
carpetas y la lista de nombres de pistas.
• En la lista aparecerán solamente las carpetas
que contienen pistas MP3 o WMA.
2
Seleccione el número (1 – 6) de la
carpeta que se desea reproducir.
Cada vez que pulsa el botón, la lista de
nombres de carpetas y la lista de nombres
de pistas cambian alternativamente.
Nota:
La pantalla puede mostrar sólo seis nombres a
la vez. Para mostrar los otros nombres de las
listas siguientes, pulse 5 (arriba) o ∞ (abajo).
3
Seleccione el número (1 – 6) de la
pista que se desea reproducir.
Page 77

Selección de los modos de
reproducción
Para reproducir las pistas de forma
aleatoria (Reproducción aleatoria)
Podrá reproducir de forma aleatoria todas las
pistas del disco (o una carpeta de los discos
MP3 y WMA).
1 Pulse M MODE mientras se está
reproduciendo un disco.
Aparece “Mode” en la pantalla.
Los botones del siguiente paso de la
operación comienzan a parpadear.
2 Pulse repetidamente el botón numérico 3
mientras “Mode” parmanece visualizado en la
pantalla.
Cada vez que pulsa el botón, el modo de
reproducción aleatoria cambia de la siguiente
manera :
Para los discos CD de audio y CD Text:
Random OffRandom Disc
Para discos MP3 y WMA:
Random DiscRandom Folder
Random Off
Modo
Random
Folder* (aleatoria de la carpeta
Random
Disc (aleatoria del disco.
* “Random Folder” se puede utilizar solamente para
discos MP3 y WMA.
Para cancelar la reproducción aleatoria, seleccione
“Random Off” pulsando repetidamente el botón
numérico 3 o pulse el botón numérico 4 en el paso 2.
Indicador Reproducción
activo aleatoria
El indicador Todas las pistas
de carpeta) se actual, luego todas
enciende. las pistas de la
carpeta siguiente,
y así sucesivamente.
El indicador Todas las pistas
de disco) se
enciende.
Para reproducir las pistas repetidamente
(Reproducción repetida)
Puede reproducir repetidamente la pista actual
(o una carpeta de los discos MP3 y WMA).
1 Pulse M MODE mientras se está
reproduciendo un disco.
Aparece “Mode” en la pantalla.
Los botones del siguiente paso de la
operación comienzan a parpadear.
2 Pulse repetidamente el botón numérico 2
mientras “Mode” parmanece visualizado en la
pantalla.
Cada vez que pulsa el botón, el modo de
reproducción repetida cambia de la siguiente
manera :
Para los discos CD de audio y CD Text:
Repeat OffRepeat Track
Para discos MP3 y WMA:
Repeat FolderRepeat Track
Repeat Off
Modo
Repeat
Tr ac k (repetición (o especificada).
Repeat
Folder* de la carpeta actual
* “Repeat Folder” se puede utilizar solamente para
discos MP3 y WMA.
Para cancelar la reproducción repetida,
seleccione “Repeat Off” pulsando repetidamente
el botón numérico 2 o pulse el botón numérico 4
en el paso 2.
Indicador Reproducción
activo repetida
El indicador La pista actual
de pista) se
enciende.
El indicador Todas las pistas
(repetición de (o especificada)
carpeta) se enciende. del disco.
ESPAÑOL
21
Page 78

Para reproducir sólo las introducciones
musicales (Búsqueda de introducción)
Podrá reproducir secuencialmente los primeros
15 segundos de cada pista.
1 Pulse M MODE mientras se está
reproduciendo un disco.
Aparece “Mode” en la pantalla.
Los botones del siguiente paso de la
operación comienzan a parpadear.
2 Pulse repetidamente el botón numérico 1
ESPAÑOL
mientras “Mode” parmanece visualizado en la
pantalla.
Cada vez que pulsa el botón, el modo de
búsqueda de introducción cambia de la
manera siguiente:
Para los discos CD de audio y CD Text:
Intro OffIntro Track
Para discos MP3 y WMA:
Intro FolderIntro Track
Intro Off
Prohibición de la expulsión
del disco
Es posible inhibir la expulsión del disco y
bloquearlo dentro de la ranura de carga.
Mientras pulsa SEL (selección), pulse y
mantenga pulsado 0 (expulsión)
durante más de 2 segundos.
“No Eject” parpadea en la pantalla durante
aproximadamente 5 segundos, y el disco queda
bloqueado para que no pueda expulsarse.
Para cancelar la prohibición y
desbloquear el disco
Mientras pulsa SEL (selección), pulse y
mantenga pulsado 0 (expulsión) de nuevo
durante más de 2 segundos.
“Eject OK” parpadea en la pantalla durante
aproximadamente 5 segundos, y el disco queda
desbloqueado.
Modo
Intro El indicador Todas las pistas del
Track disco.
Intro El indicador La primera pista
Folder* de cada carpeta del
* “Intro Folder” se puede utilizar solamente para
discos MP3 y WMA.
Para cancelar la búsqueda de introducción,
seleccione “Intro Off” pulsando repetidamente el
botón numérico 1 o pulse el botón numérico 4 en
el paso 2.
Indicador
activo
(introducción
de pista)
se enciende.
(introducción disco.
de carpeta) se
enciende.
Reproducción del
comienzo
(15 segundos) de
22
Page 79

Cambio del patrón en pantalla
Si pulsa D DISP, podrá cambiar la información mostrada en la pantalla.
Mientras se reproduce un disco CD de audio
o un CD Text:
Si no se puede mostrar toda la información simultáneamente, será desplazada en la
pantalla. Consulte también “Para seleccionar el modo de desplazamiento—Scroll” en la
página 38.
Algunos caracteres o símbolos no serán mostrados (aparecerán en blanco o sustituidos
por otros) en la pantalla.
Cada vez que pulsa el botón, los patrones en pantalla cambian de la siguiente manera:
Mientras se reproduce un disco MP3 o WMA
con “Tag ” (Etiqueta) ajustada a “Off”:
Pantalla original
Hora del reloj
Pantalla original
Hora del reloj
ESPAÑOL
Reloj
Notas:
• Cuando se muestra el título/ejecutante del disco, el
indicador (disco) se enciende. Cuando se
muestra el título de la pista, el indicador
(pista) se enciende.
• Si no se ha asignado un nombre al CD
convencional, aparecerá “NO NAME”. Para
asignar un nombre a un CD de audio, consulte la
página 43.
• Si no se ha grabado el título/ejecutante del disco o
el título de la pista del CD Text, aparecerá “NO
NAME”.
Número de pista
actual
Nombre del
pista
Reloj
Notas:
• Cuando se muestra el nombre de la carpeta, el
indicador (carpeta) se enciende. Cuando se
muestra el nombre del pista, el indicador
(pista) se enciende.
• Si “Tag” se encuentra ajustada a “On” (consulte la
página 38), aparecerá la información de la etiqueta
ID3 en la pantalla si el disco tiene una etiqueta ID3.
El nombre del álbum/ejecutante y el indicador
(disco) aparecerán en la pantalla en lugar del
nombre de la carpeta, mientras que el título de la
pista y el indicador (pista) aparecerán en lugar
del nombre del pista.
23
Page 80

AJUSTES DEL SONIDO
Ajuste del sonido
Podrá ajustar el balance de salida de los
altavoces, el nivel de salida del subwoofer y el
nivel de entrada de cada altavoz.
• Hay un límite de tiempo para realizar el
siguiente procedimiento. Si el ajuste se
cancela antes de haber terminado, comience
otra vez desde el paso 1.
1
Seleccione el ítem que desea ajustar.
ESPAÑOL
Cancelado
• Para los ajustes iEQ (modo de sonido),
consulte las páginas 25 – 27.
• Para los ajustes THEME (tema de la
pantalla), consulte la página 28.
Los botones del siguiente paso
de la operación comienzan a
parpadear.
Cada vez que pulsa el botón,
las opciones ajustables
cambian de la siguiente
manera:
iEQ
Fad/Bal
Theme
Sub Out
Vol Adj
2
Efectúe los ajustes.
• Para ajustar el desvanecedor y el
balance—Fad, Bal:
Efectúe simultáneamente estos dos
ajustes.
• Si está utilizando un sistema de dos
altavoces, ajuste el nivel del
desvanecedor a “00”.
• Pulse 5 (arriba) o ∞
(abajo) para ajustar el
desvanecedor.
• Pulse ¢ o 4
para ajustar el balance.
• Para ajustar la salida del subwoofer
—Sub Out:
Esto sólo tendrá efecto cuando hay un
subwoofer conectado.
Para aumentar el nivel
Para disminuir el nivel
Indicación Para: Gama
Fad Ajustar el R06 (Trasero
balance de los solamente)
altavoces |
delantero y F06 (Delantero
trasero. solamente)
Bal Ajustar el L06 (Izquierdo
balance de los solamente)
altavoces |
izquierdo y R06 (Derecho
derecho. solamente)
Sub Out Ajustar el nivel
de salida del 00 (mín.)
subwoofer y el |
nivel de la 12 (máx.)
frecuencia Low/Mid/High
de corte.
Vol Adj Ajustar y
almacenar el –12 (mín.)
nivel de |
entrada de +12 (máx.)
cada fuente.
24
También podrá ajustar un nivel de
frecuencia de corte apropiado de acuerdo
con el subwoofer conectado.
• Pulse ¢ o 4 para seleccionar
“Low”, “Mid” o “High”.
Low: Las frecuencias superiores a
50 Hz no se suministran al
subwoofer.
Mid: Las frecuencias superiores a
80 Hz no se suministran al
subwoofer.
High: Las frecuencias superiores a
115 Hz no se suministran al
subwoofer.
Page 81

• Para ajustar el nivel de entrada de cada
fuente—Vol Adj:
El nivel de ajuste de volumen puede
almacenarse separadamente para cada
fuente—CD, AM, Line in, cambiador de
CD, y SIRIUS. Antes de realizar un ajuste,
seleccione la fuente apropiada, cuyo
ajuste se desea realizar.
Una vez realizado el ajuste, el mismo será
memorizado, y por lo tanto no necesitará
ajustar el nivel de volumen cada vez que
cambie de fuente.
Ajuste de manera que el nivel de entrada
corresponda con el nivel de sonido FM.
• No se podrá realizar el ajuste si la
fuente es FM. Aparecerá “FIX”.
Para aumentar el nivel
Para disminuir el nivel
Selección de los modos de
sonido preajustados
(iEQ: ecualizador inteligente)
Permite seleccionar un modo de sonido
preajustado (iEQ: ecualizador inteligente)
adecuado al género musical.
• Hay un límite de tiempo para realizar el
siguiente procedimiento. Si el ajuste se
cancela antes de haber terminado, comience
otra vez desde el paso 1.
Modos de sonido disponibles:
FLAT (No se aplica ningún modo de sonido)
H.ROCK (Hard Rock)
R & B (Rhythm y Blues)
POP (Música popular)
JAZZ (Música Jazz)
DANCE (Música para bailar)
Country (Música country)
REGGAE (Reggae)
CLASSIC (Música clásica)
USER 1, USER 2, USER 3
1
Pulse SEL (selección) una vez.
El último modo de sonido
seleccionado será llamado.
Los botones del siguiente paso
de la operación comienzan a
parpadear.
ESPAÑOL
Ej.: Si se ha seleccionado “Flat” previamente
Cada vez que pulsa el botón, las opciones
ajustables cambian de la siguiente manera:
iEQ
Cancelado
• Para los ajustes SEL (sonido básico),
consulte las páginas 24 – 25.
• Para los ajustes THEME (tema de la
pantalla), consulte la página 28.
CONTINUA EN LA PÁGINA SIGUIENTE
Fad/Bal
Theme
Sub Out
Vol Adj
25
Page 82

2
Pulse el botón numérico para
seleccionar el modo de sonido
deseado.
• Esta unidad dispone de dos pantallas de
selección del modo de sonido. Para ir a la
otra pantalla, pulse 5 (arriba) o ∞ (abajo).
Para cancelar el modo de sonido, seleccione
“FLAT” en el paso 2.
Notas:
• Puede ajustar temporalmente los modos de sonido
preajustados. Sin embargo, los ajustes temporales
se reposicionan cuando se seleccione otro modo de
sonido.
• Para los detalles sobre los preajustes de cada modo
de sonido, consulte la tabla de abajo.
ESPAÑOL
Pulse 5 (arriba)
o ∞ (abajo).
Para salir de la pantalla de selección del
modo de sonido, pulse SEL (selección)
repetidamente o espere durante
aproximadamente 5 segundos.
Modos de sonido (ajustes de los niveles de frecuencia preajustados)
En la lista de abajo se muestran los ajustes de niveles de frecuencia preajustados para cada modo de
sonido.
Modo de Valores de ecualización preajustados
sonido 60 Hz 150 Hz 400 Hz 1 kHz 2.4 kHz 6 kHz 12 kHz
Flat 00 00 00 00 00 00 00
Hard Rock +03 +03 +01 00 00 +02 +01
R & B +03 +02 +02 00 +01 +01 +03
Pop 00 +02 00 00 +01 +01 +02
Jazz +03 +02 +01 +01 +01 +03 +02
Dance Music +04 +02 00 –02 –01 +01 +01
Country +02 +01 00 00 00 +01 +02
Reggae +03 00 00 +01 +02 +02 +03
Classic +02 +03 +01 00 00 +02 00
User 1 00 00 00 00 00 00 00
User 2 00 00 00 00 00 00 00
User 3 00 00 00 00 00 00 00
26
Page 83

Cómo almacenar sus propios
modos de sonido
Usted podrá ajustar los modos de sonido a su
gusto y almacenar sus propios ajustes en la
memoria (USER 1, USER 2 y USER 3).
• Hay un límite de tiempo para realizar el
siguiente procedimiento. Si el ajuste se
cancela antes de haber terminado, comience
otra vez desde el paso 1.
1
Pulse SEL (selección) una vez.
El último modo de sonido
seleccionado será llamado.
Los botones del siguiente paso
de la operación comienzan a
parpadear.
Ej.: Si se ha seleccionado “Country”
previamente
2
Seleccione el modo de sonido que
desea ajustar.
4
Realice los ajustes que desea.
Pulse ¢ o 4 para
1)
seleccionar la banda de frecuencia
—60Hz, 150Hz, 400Hz, 1kHz, 2.4kHz,
6kHz, 12kHz.
2) Pulse 5 (arriba) o ∞ (abajo) para
ajustar el nivel de la banda
seleccionada, dentro del margen de
–05 a +05.
3) Repita los pasos 1) y 2) para ajustar
las otras bandas de frecuencias.
5
Guarde los ajustes realizados por
usted.
Aparece el mensaje de
confirmación—para verificar
que desea almacenar el ajuste.
Si desea cancelar los ajustes, pulse
D DISP.
ESPAÑOL
• Esta unidad dispone de dos pantallas de
selección del modo de sonido. Para
desplazarse a la otra pantalla, pulse 5
(arriba) o ∞ (abajo).
3
Acceda al modo de ajuste de sonido.
Se visualiza la siguiente
pantalla de ajuste del
modo de sonido.
6
Seleccione uno de los modos de
sonido de usuario (USER 1, USER 2
o USER 3) en que desea almacenar.
Ej.: Cuando se ha seleccionado “User 1”
27
Page 84

Selección del tema para la
pantalla
Podrá seleccionar el tema para la pantalla
durante la reproducción.
• Hay un límite de tiempo para realizar el
siguiente procedimiento. Si el ajuste se cancela
antes de haber terminado, comience otra vez
desde el paso 1.
ESPAÑOL
1
Seleccione “THEME”.
Cada vez que pulsa el botón,
las opciones ajustables
cambian de la siguiente
manera:
iEQ
Fad/Bal
Sub Out
View (vista) 1:
Se visualiza un paisaje.
• Visualización de patrón positivo:
• Visualización de patrón negativo:
View (vista) 2:
Se visualiza un paisaje.
• Visualización de patrón positivo:
Cancelado
En la pantalla aparece el tema seleccionado
en último término.
Los botones del siguiente paso de la
operación comienzan a parpadear.
• Para los ajustes SEL (sonido básico),
consulte las páginas 24 – 25.
• Para los ajustes iEQ (modo de sonido),
consulte las páginas 25 – 27.
2
Seleccione el tema para pantalla que
Theme
Vol Adj
desea.
Conforme gira el dial de
control, los temas cambian
de la siguiente manera:
View2View1
MeterShakeOff
Nota:
Las vistas 1 y 2 disponen de visualización de patrón
positivo y de visualización de patrón negativo (consulte la
columna derecha). Se seleccionará visualización de
patrón positivo o bien de patrón negativo, dependiendo
del ajuste “LCD Type” (consulte la página 38).
28
• Visualización de patrón negativo:
Meter:
Aparecen los medidores de nivel de audio
izquierdo y derecho.
• Si se ha seleccionado la pantalla de animación
pequeña, sólo se mostrará un medidor de nivel
de audio.
Shake:
El altavoz en la pantalla vibra conforme cambia el
nivel de audio.
Off:
Se cancela el tema de la pantalla.
Page 85

VISUALIZACIONES GRÁFICAS
Utilizando el Image Converter incluido en el
CD-ROM suministrado, podrá editar sus
imágenes favoritas y utilizarlas como sus propias
pantalla de apertura, pantalla de fin, y pantalla
gráfica mientras se reproduce una fuente.
¿Qué es Image Converter?
Image Converter es un software original de JVC que permite producir imágenes personalizadas
para visualizarlas en su Car Audio de JVC.
A continuación se describe el procedimiento básico para crear con Image Converter un
CD-R que incluya imágenes fijas (imágenes) y animaciones (películas)
En este manual se explica solamente cómo exportar los archivos (imágenes fijas y animaciones) a
la memoria incorporada a esta unidad—paso 5 de abajo.
• Para los otros procesos (desde los pasos 1 a 4 de abajo), consulte la Guía de operación del
Image Converter (Convertidor de imágenes) (archivos PDF incluidos en la carpeta “Manual” del
CD-ROM suministrado).
ESPAÑOL
Importación de imágenes
Retoque y edición de imágenes
Convertidor de imágenes
Escritura en un CD-R
Reproducción en su car audio
KD-AR3000
Convertir
KD-LH300
Instale / Inicie el programa
Instale Image Converter en su PC.
Importe las imágenes
Importe las imágenes fuentes desde el CD-ROM de Image Converter o desde otro equipo
tal como una cámara digital o una videocámara digital.
Retoque y edite las imágenes
Efectúe el retoque de las imágenes, como recorte o ajuste de color, edición del efecto de
animación, y adición de textos.
Escriba sus imágenes en un CD-R
Escriba las animaciones o las imágenes fijas creadas con Image Converter utilizando su
software de escritura CD-R.
Para poder ver las imágenes en su Car Audio, las imágenes creadas deben ser escritas en
un CD-R.
• Para escribir datos en un CD-R, refiérase también a las instrucciones de su software de
escritura CD-R.
Vea en su Car Audio las animaciones o las imágenes fijas creadas.
Exporte las imágenes a su Car Audio JVC desde el CD-R que ha creado.
29
Page 86

Cómo descargar imágenes y
animaciones
Antes de iniciar el siguiente procedimiento,
prepare un CD-ROM que incluya imágenes fijas
(imágenes) y animaciones (películas).
• El CD-ROM Image Converter suministrado
incluye imágenes y animaciones de muestra,
de manera que primero podrá utilizar este
disco como prueba.
ESPAÑOL
IMPORTANTE:
• Las imágenes fijas (imágenes) deberán
contar con <jml> y las animaciones
(películas) con <jma> como código de
extensión en sus nombres de archivo.
• La descarga de un archivo solamente se
puede realizar mientras se encuentra
seleccionado “CD” como fuente; por otra
parte, el borrado de un archivo se puede
realizar mientras se está seleccionando
cualquier fuente.
• Antes de descargar o borrar los archivos,
observe lo siguiente:
– No descargue un archivo mientras está
conduciendo.
– No desconecte la llave de encendido del
automóvil mientras está descargando o
borrando un archivo*.
– No desmonte el panel de control mientras
está descargando o borrando un archivo*.
* Si lo hiciese, la descarga del archivo o el
borrado no se realizará correctamente.
En este caso, vuelva a efectuar el mismo
procedimiento.
• Si ya se ha descargado una animación para
“Opening” , “Ending” o “Movie”, la descarga
de una nueva animación hará que se borre
la animación almacenada previamente.
• La unidad tarda bastante tiempo en
descargar una animación.
– Aproximadamente 6 a 7 segundos para
una imagen fija (un fotograma).
– Aproximadamente 3 a 4 minutos para una
animación de 30 fotogramas.
– Aproximadamente 10 minutos para una
animación de 90 fotogramas.
2
Inserte un CD-ROM con los archivos
(imágenes y animaciones) en la
ranura de carga.
El disco se introduce
en la unidad, el panel
de control vuelve a la
posición anterior
(consulte la página
44).
• Si el disco incluye archivos de audio
reproducibles tales como pistas MP3, la
reproducción se inicia automáticamente.
3
Pulse M MODE después que el disco
sea detectado.
Aparece “Mode” en la pantalla.
Los botones del siguiente paso
de la operación comienzan a
parpadear.
4
Pulse el botón numérico 6 para que
se visualice la pantalla de selección
de descarga.
5
De las opciones listadas abajo,
seleccione (resalte) la que se desea
usar para descargar un archivo.
30
1
Abra el panel de control.
Page 87

• Opening : Pantalla de apertura
Descarga una animación para que se
visualice después de encender la unidad.
(Solamente se puede almacenar una
animación compuesta de 30 fotogramas
como máximo).
• Ending : Pantalla de fin
Descarga una animación para que se
visualice después de apagar la unidad.
(Solamente se puede almacenar una
animación consistente en 30 fotogramas
como máximo).
• Picture : Pantalla gráfica*
Para descargar la imagen fija que se
desea visualizar tras un período de
inactividad de unos 20 segundos. (Podrá
almacenar 90 cuadros de imágenes
fijas—una para cada fotograma).
• Movie : Pantalla gráfica*
Para descargar la animación que se
desea visualizar tras un período de
inactividad de unos 20 segundos.
(Solamente se puede almacenar una
animación compuesta de 90 fotogramas
como máximo).
* La pantalla de gráficos aparecerá solamente
cuando “Graphics” se encuentra ajustado a
uno de los siguientes ajustes—“UserMovie”,
“UserSlide” o “UserPict.” (consulte la
página 38).
Si desea cancelar el procedimiento, pulse
el botón numérico 5 para que se apague la
pantalla de selección de descarga.
Notas:
• En esta lista, se muestran las carpetas,
incluyendo los archivos objetivo—archivos
<jml> para “Picture” y archivos <jma> para
los demás.
• La pantalla puede mostrar solamente seis
nombres a la vez. Para mostrar los otros
nombres de las listas siguientes, pulse
5 (arriba) o ∞ (abajo).
• Si el disco insertado no incluye ningún
archivo <jml> o <jma>, se escucharán
pitidos y no se podrá ir al paso siguiente.
Si desea cancelar el procedimiento, pulse D
DISP.
7
Seleccione (resalte) la carpeta en la
cual se encuentra incluido el archivo
deseado.
8
Muestre la lista de nombres de
archivos incluidos en la carpeta
seleccionada.
Cada vez que pulsa el
botón, las listas de la
pantalla cambian de la
siguiente manera:
Lista de
nombres
de carpetas
Lista de
nombres
de archivos
ESPAÑOL
6
Muestre la lista de nombres de
carpetas incluida en el CD-R
insertado.
Aparece “File Check....” durante
unos momentos, y luego
aparece la lista de carpetas.
La carpeta actualmente seleccionada
aparecerá resaltada en la pantalla.
Ej.: Cuando haya seleccionado “Picture”
en el paso 5.
Nota:
La pantalla puede mostrar solamente seis
nombres a la vez. Para mostrar los otros
nombres de las listas siguientes, pulse
5 (arriba) o ∞ (abajo).
CONTINUA EN LA PÁGINA SIGUIENTE
31
Page 88

ESPAÑOL
9
Seleccione (resalte) el archivo que
se desea descargar.
Aparece el nombre del archivo, y la
unidad le pregunta “Download OK?”.
10
Si es OK, pulse el botón numérico 1
para iniciar la descarga.
La descarga se inicia, y aparece
“Downloading...” en la pantalla.
Si ha finalizado, aparecerá de
nuevo la lista de los nombres de
archivos.
Si no es OK, pulse el botón numérico 5, y
aparecerá otra vez la pantalla de selección
de archivo. Repita de nuevo desde el paso 8.
11
Repita los pasos 8 a 10 si está
descargando archivos para “Picture”
y desea almacenar más archivos.
Cómo borrar archivos
innecesarios
• Si aparece “BACK” en la pantalla encima del
botón numérico 5, podrá volver a la pantalla
anterior pulsando el botón numérico 5.
Para borrar simultáneamente todos los
archivos
1 Pulse M MODE mientras se está
reproduciendo alguna fuente.
Aparece “Mode” en la pantalla.
Los botones del siguiente paso de
la operación comienzan a
parpadear.
2 Pulse el botón numérico 6 para mostrar la
pantalla de selección de descarga.
3 Pulse 5 (arriba) o ∞ (abajo) para seleccionar
(resaltar) todas las opciones listadas.
12
Finalice el procedimiento de
descarga.
Para descargar un archivo para otra opción
listada en la pantalla de selección de descarga,
repita de nuevo desde el paso 3.
Notas:
• Cuando intente almacenar la imagen 91 para la
pantalla de imagen, “Picture Full” aparece y no se
podrá iniciar la descarga. En este caso, borre los
archivos innecesarios antes de iniciar la descarga.
• Si el número total de fotogramas de una animación
descargada excede las cantidades indicadas
seguidamente, se ignorarán los fotogramas que
excedan tales cantidades.
– Para las pantallas de apertura y de fin: 30
– Para pantalla de película: 90
32
4 Pulse el botón numérico 4.
La unidad le pregunta “All File
Delete OK?”
5 Pulse de nuevo el botón numérico 4.
Aparece “Now Deleting...” mientras
se están borrando los archivos.
Cuando se termina de borrar,
volverá a aparecer la pantalla de
selección de descarga.
6 Pulse el botón numérico 5 para restablecer la
pantalla de indicación de fuente.
Page 89

Para borrar los archivos almacenados
para “Opening”, “Ending”, “Picture
(todas las imágenes almacenadas
simultáneamente)” y “Movie”
1 Pulse M MODE mientras se está
reproduciendo alguna fuente.
Aparece “Mode” en la pantalla.
Los botones del siguiente paso de
la operación comienzan a
parpadear.
2 Pulse el botón numérico 6 para mostrar la
pantalla de selección de descarga.
3 Pulse 5 (arriba) o ∞ (abajo) para seleccionar
(resaltar) entre las opciones listadas.
Aparece cuando se ha
seleccionado (resaltado) “Picture”
4 Para borrar el archivo almacenado en
“Opening”, “Ending” y “Movie”, pulse el
botón numérico 3.
Aparece el nombre de archivo de la
animación almacenada
previamente, y la unidad le
pregunta “Delete OK?”
Para borrar simultáneamente todos los
archivos almacenados en “Picture”, pulse
el botón numérico 4.
La unidad le pregunta “All
Picture Delete OK?”
6 Pulse el botón numérico 5 para restablecer la
pantalla de indicación de fuente.
Cómo borrar los archivos almacenados
para “Picture” (uno por uno)
1 Pulse M MODE mientras se está
reproduciendo alguna fuente.
Aparece “Mode” en la pantalla.
Los botones del siguiente paso de
la operación comienzan a
parpadear.
2 Pulse el botón numérico 6 para mostrar la
pantalla de selección de descarga.
3 Pulse 5 (arriba) o ∞ (abajo) para seleccionar
(resaltar) “Picture”.
4 Pulse el botón numérico 3.
La unidad muestra la lista de
nombres de archivos almacenados.
Nota:
La pantalla puede mostrar solamente seis nombres
a la vez. Para mostrar los otros nombres de las
listas, pulse repetidamente 5 (arriba) o ∞ (abajo).
ESPAÑOL
5 Para borrar el archivo almacenado en
“Opening”, “Ending” y “Movie”, pulse de
nuevo el botón numérico 3.
Para borrar simultáneamente todos los
archivos almacenados en “Picture”, pulse
de nuevo el botón numérico 4.
Aparece “Now Deleting...” mientras
se borran todos los archivos
almacenados. Cuando se termina
de borrar, volverá a aparecer la
pantalla de selección de descarga.
5 Pulse los botones numéricos
correspondientes al archivo que desea borrar.
Aparece el nombre del archivo seleccionado,
y la unidad le pregunta “Delete OK?”
CONTINUA EN LA PÁGINA SIGUIENTE
33
Page 90

6
Pulse el botón numérico 3 para iniciar el borrado.
Aparece “Now Deleting...” mientras
se está borrando el archivo
seleccionado. Cuando se termina de
borrar, volverá a aparecer la lista de
nombres del archivo almacenado.
7
Para borrar más archivos, repita los pasos 5 y 6.
8 Pulse D DISP para restablecer la pantalla de
indicación de fuente.
ESPAÑOL
3
Seleccione “Opening” (ajuste de la
pantalla de apertura) o “Ending”
(ajuste de la pantalla de fin).
Activación de imágenes y
animaciones descargadas
Activación de las animaciones
almacenadas para las pantallas de
apertura y de cierre
Antes que se encienda o se apague la unidad, podrá
ver animaciones preestablecidas en la pantalla. Las
mismas reciben el nombre de pantalla de apertura y
pantalla de fin. Si lo desea, podrá utilizar sus propias
animaciones editadas para las pantallas de apertura
y de fin.
•
Antes de realizar el siguiente procedimiento,
asegúrese de que “KeyIn CFM” se encuentre
ajustado a “On”; de lo contrario, no se podrán
visualizar las animaciones. (Consulte la página 38).
•
Si no hay ninguna animación almacenada en
“Opening” y “Ending”, no se podrá seleccionar
“Opening” ni “Ending” como opción de PSM.
1
Pulse y mantenga pulsado SEL
(selección) durante más de 2
segundos para que aparezca uno de
los ítems de PSM en la pantalla.
(PSM: consulte las páginas 36 y 37).
2
Pulse el botón numérico 1 para
seleccionar “MOVIE”—Categoría de
película de los ajustes de PSM.
La pantalla de ajuste “Graphics” aparece en
la pantalla.
Ej.: Cuando se selecciona “Opening”
4
Seleccione “User”.
• Default: Se utiliza una animación
• User: Se utiliza su propia animación
5
Finalice el ajuste.
preajustada en fábrica.
editada.
Activación de la pantalla gráfica
utilizando ya sea imagen o película
Utilizando este ajuste, podrá cambiar las
visualizaciones gráficas. Estas pantallas gráficas
aparecen si no se realiza ninguna operación
durante aproximadamente 20 segundos.
• Si no hay ninguna imagen almacenada en
“Picture” ni ninguna animación en “Movie”, no
se podrá seleccionar “UserPict.”, “UserMovie” y
“UserSlide” como opción de PSM.
1
Pulse y mantenga pulsado SEL
(selección) durante más de 2
segundos para que aparezca uno de
los ítems de PSM en la pantalla.
(PSM: consulte las páginas 36 y 37).
34
Page 91

2
Pulse el botón numérico 1 para
seleccionar “MOVIE”—Categoría de
película de los ajustes de PSM.
La pantalla de ajuste “Graphics” aparece en
la pantalla.
3
Seleccione “UserMovie”, “UserSlide”
o “UserPict.”.
Ej.: Cuando se selecciona
“UserPict.”.
• UserMovie: La animación editada por
• UserSlide: Las imágenes fijas editadas
• UserPict.: Una de las imágenes
4
Finalice el ajuste.
usted y almacenada en
“Movie” se activa como su
pantalla gráfica.
por usted y almacenadas en
“Picture” se activan y se
muestran secuencialmente,
como su pantalla gráfica.
editadas por usted y
almacenada en “Picture” se
activa como su pantalla
gráfica.
Seleccione una de las
imágenes almacenadas
(consulte la columna
siguiente).
Selección de una imagen fija para
visualización gráfica—User Picture
En los siguientes casos, no podrá seleccionar
“UserPict.” como una opción de PSM:
• Si no hay ninguna imagen almacenada en
“Picture”, o
• No se ha seleccionado “UserPict.” para el ajuste
“Graphics” (consulte la columna izquierda).
1
Pulse y mantenga pulsado SEL
(selección) durante más de 2
segundos para que aparezca uno de
los ítems de PSM en la pantalla.
(PSM: consulte las páginas 36 y 37).
2
Pulse el botón numérico 1 para
seleccionar “MOVIE”—Categoría de
película de los ajustes de PSM.
La pantalla de ajuste “Graphics” aparece en
la pantalla.
3
Seleccione “UserPict.”.
También aparece el
nombre del archivo de la
imagen seleccionada
actualmente.
4
Seleccione el archivo deseado.
ESPAÑOL
Para cancelar todas las visualizaciones
gráficas, seleccione “Off” en el paso 3.
Nota:
Para el ajuste “Graphics”, también se podrá
seleccionar “All Demo”, “Int Demo” y “ImageLink”.
– Consulte las páginas 8 y 38 para “All Demo” y “Int
Demo”.
– Consulte las páginas 17 y 38 para “ImageLink”.
5
Finalice el ajuste.
35
Page 92

OTRAS FUNCIONES PRINCIPALES
Cambio de los ajustes
generales (PSM)
Utilizando el control PSM (Modo de ajustes
preferidos), podrá cambiar las opciones listadas
en la tabla de abajo y en la página 37.
• Las opciones PSM se encuentran agrupadas
en seis categorías—MOVIE, CLOCK, DISP
(visualización), TUNER, AUDIO y COLOR.
Procedimiento básico
ESPAÑOL
1
Pulse y mantenga pulsado SEL
(selección) durante más de 2
segundos para que aparezca uno de
los ítems de PSM en la pantalla.
(Consulte abajo y la página 37).
Los botones del siguiente
paso de la operación
comienzan a parpadear.
2
Pulse un botón numérico para
seleccionar una de las categorías de
PSM.
Aparecerá la opción listada en primer lugar
de la categoría seleccionada.
3
Seleccione la opción PSM que
desea ajustar.
• Pulsando repetidamente ¢ o
4 , podrá desplazarse a otras
categorías.
4
Ajuste la opción PSM seleccionada.
5
De requerirse, repita los pasos 2 a
para ajustar las otras opciones PSM.
6
Finalice el ajuste.
4
Opciones del Modo de ajustes preferidos (PSM)
Las opciones PSM se encuentran agrupadas en seis categorías—MOVIE, CLOCK, DISP
(visualización), TUNER, AUDIO y COLOR.
Indicaciones
Graphics Demostración de
KeyIn CFM Confirmación de
Opening*
MOVIE
Ending*
UserPict.*2Imagen del usuario
*1Se visualiza sólo después que el archivo descargable sea almacenado en la memoria.
*2Se visualiza sólo después de haber almacenado en la memoria un archivo descargable y mientras “UserPict.”
se encuentra seleccionado para “Graphics”.
36
película
pulsación de teclas
1
Animación de
apertura
1
Animación de fin
Valores/opciones Ajustes Consulte
seleccionables de fabrica la página
Para los detalles, consulte la
página 38
On
Default
Default User
Desde los archivos
almacenados
Off
User
All Demo 8, 17, 38
On 38
Default
Default
Almacenado
primero
34
34
35
Page 93

Indicaciones
Clock Hr Ajuste de la hora
Valores/opciones Ajustes Consulte
seleccionables de fabrica la página
1 – 12 (0 – 23)
1 (1:00AM) 9
Clock Min Ajuste de los minutos
CLOCK
24H/12H 24 horas o 12 horas
Scroll Modo de
desplazamiento
Dimmer Modo atenuador luz
From– To*3Ajuste del tiempo de
atenuación de luz
Contrast Contraste
LCD Type Tipo de visualización
DISP (visualización)
Font Type Tipo de fuente
Tag
Visualización de etiqueta
IF Filter Filtro de frecuencia
TUNER
intermedia
Beep Tono de pulsación de
teclas
Ext Input*4Componente externo
AUDIO
Amp.Gain Control de ganancia
del amplificador
All SRC Fuente seleccionada
User Selección de color de
usuario
R Rojo
COLOR
G Verde
00 – 59
12Hours 24Hours
Once
Auto
Off
Auto Off
Time Set
On
Cualquier momento –
Cualquier momento
1 – 10
Auto
Positive
Negative
1
Off
2
On
Wide Auto
Off
Changer
On
Line In*
5
SIRIUS
HighPower
Off*
LowPower
6
Para los detalles, consulte la
página 41
Day Night
00 – 11
00 – 11
00 (1:00AM) 9
12Hours 9
Once 38
Auto 40
6PM – 7AM
5
Auto 38
138
On
Auto 39
On
Changer
HighPower 39
Every 41
Day
Day: 07/Night: 05
Day: 07/Night: 05
ESPAÑOL
40
38
38
39
39
42
42
42
B Azul
SlotLight Luz de la ranura
On
00 – 11
Off
*3Se visualiza sólo cuando “Dimmer” se encuentra ajustado a “Time Set”.
*4No se visualiza cuando la fuente actual es el componente externo.
*5Sólo para KD-LH300
*6Sólo para KD-AR3000
Day: 07/Night: 05
On
42
39
37
Page 94

Para mostrar los gráficos en la pantalla
—Graphics
Podrá cambiar los gráficos en la pantalla. Estos
gráficos aparecen si no se efectúa ninguna
operación durante aproximadamente 20
segundos (excepto para “ImageLink”).
• All Demo: Aparece la demostración en
• Int Demo: La demostración en pantalla
ESPAÑOL
• UserMovie: Aparece la animación editada por
• UserSlide: Las imágenes fijas editadas por
• UserPict.: Aparece una de las imágenes
• ImageLink:
• Off: Todas las visualizaciones gráficas
Nota:
Puede seleccionar “UserMovie”, “UserSlide” y
“UserPict.” sólo después de descargar los archivos
apropiados en la memoria. (Consulte la página 30).
pantalla (animación) (consulte la
página 8).
(animación) y la indicación de
fuente de reproducción aparecen
alternativamente (consulte la
página 8).
usted (consulte las páginas 34 y
35).
usted aparecen secuencialmente
(consulte las páginas 34 y 35).
fijas editadas por usted (consulte
las páginas 34 y 35).
Para mostrar una imagen fija
mientras se reproduce una pista
MP3/WMA (consulte la página 17).
de arriba se cancelan.
Para activar o desactivar la animación de
la fuente en la pantalla—KeyIn CFM
Cuando se cambia de fuente, en la pantalla se
muestra la animación de la fuente. Es posible
activar o desactivar la animación de la fuente en
la pantalla.
• On: La animación de la fuente se
• Off: La animación de la fuente se
activa.
cancela.
Para seleccionar el modo de
desplazamiento—Scroll
Podrá seleccionar el modo de desplazamiento
para la información del disco (cuando el texto
entero no se puede mostrar simultáneamente).
• Once: Desplaza sólo una vez.
• Auto: Repite el desplazamiento (intervalos
• Off: El modo de desplazamiento se
38
de 5 segundos en medio).
cancela.
Nota:
Aunque el modo de desplazamiento esté ajustado a
“Off”, podrá desplazar la pantalla pulsando
D DISP durante más de 1 segundo.
Para ajustar el nivel de contraste de la
indicación—Contrast
Ajuste el contraste de la indicación (1 – 10) para
que las indicaciones en pantalla aparezcan
claras y legibles.
Para seleccionar el patrón de iluminación
de la pantalla—LCD Type
Podrá seleccionar los patrones de iluminación de
la pantalla según sus preferencias.
• Auto: Se seleccionará el patrón positivo
durante el día (dependiendo del
ajuste “Dimmer”); por otra parte, se
usará el patrón negativo durante la
noche (dependiendo del ajuste
“Dimmer”).
• Positive: Patrón positivo (normal) de la
pantalla.
• Negative: Patrón negativo de la pantalla.
Para seleccionar la fuente en la pantalla
—Font Type
Podrá seleccionar los tipos de fuente utilizados
en la pantalla. Seleccione entre “1” o “2”, de
acuerdo con sus preferencias.
Para activar o desactivar la visualización
de la etiqueta (“tag”)—Tag
Un archivo MP3/WMA puede contener
información del pista denominada “ID3 Tag”
(etiqueta ID3), que incluye su nombre de álbum,
de ejecutante, el título de pista, etc.
Existen dos versiones: ID3v1 (ID3 Tag versión 1)
e ID3v2 (ID3 Tag versión 2). Si en un disco se
encuentran grabadas tanto la ID3v1 como la
ID3v2, se mostrará la información de la ID3v2.
• On: La etiqueta ID3 se visualiza
mientras se reproducen pistas
MP3/WMA.
• Si un pista MP3/WMA no
dispone de etiquetas ID3,
aparecerán el nombre de la
carpeta y el nombre de la pista.
• Off: La etiqueta ID3 no se visualiza
mientras se reproducen pistas
MP3/WMA. (Sólo se pueden
mostrar el nombre de la carpeta y
el nombre de la pista).
Page 95

Para cambiar la selectividad del
sintonizador de FM—IF Filter
En algunas áreas, las emisoras adyacentes
podrían interferir entre sí. Este tipo de
interferencias podría producir ruidos.
• Auto: Cuando se produce este tipo de
interferencias, esta unidad aumenta
automáticamente la selectividad del
sintonizador para atenuar los ruidos
parásitos. (Aunque también se
pierde el efecto estereofónico).
• Wide: Se encuentra sujeta a interferencias
de las emisoras adyacentes, pero la
calidad del sonido no se degrada y
el efecto estereofónico se mantiene.
Para activar o desactivar el tono de
pulsación de teclas—Beep
Podrá desactivar el tono de pulsación de teclas
si no desea que suene un pitido cada vez que
pulsa un botón.
• On: Tono de pulsación de teclas
activado.
• Off: Tono de pulsación de teclas
desactivado.
Para seleccionar el componente exterior a
utilizar—Ext Input
Podrá conectar el componente externo al jack
del cambiador de CD de la parte trasera
utilizando un adaptador especialmente diseñado
para el componente externo.
• Changer: Para utilizar un cambiador de CD.
• Line In: Para utilizar un componente exterior
que no sea un cambiador de CD
(sólo para KD-LH300).
• SIRIUS: Para usar la Radio SIRIUS de JVC.
Notas:
• Sólo para KD-LH300: Para conectar el adaptador
de entrada de línea KS-U57 y el componente
exterior, consulte el Manual de instalación/
conexión (volumen separado).
• Para conectar la Radio SIRIUS de JVC, consulte el
Manual de configuración de la radio SIRIUS
(volumen separado).
Para seleccionar el control de ganancia
del amplificador—Amp.Gain
Es posible cambiar el nivel máximo de volumen
de esta unidad. Cuando la potencia máxima de
los altavoces es de menos de 50 W, seleccione
“LowPower” para evitar que se dañen.
• LowPower: Puede ajustar el nivel de volumen
entre “Volume 00” y “Volume 30”.
Nota:
Si cambia el ajuste de “HighPower” a
“LowPower” mientras escucha a un
nivel de volumen superior a 30, la
unidad cambiará automáticamente el
nivel de volumen a 30”.
• HighPower: Puede ajustar el nivel de volumen
entre “Volume 00” y “Volume 50” .
• Off: Sólo para KD-AR3000: El
amplificador incorporado se
desactiva. (El sonido sale sólo a
través de los amplificadores
externos conectados a las clavijas
Line Out).
Para activar o desactivar la luz de la
ranura—SlotLight
Podrá desactivar la luz de la ranura si no desea
que se ilumine cada vez que se inserta/expulsa
el disco o cuando se cambia el ángulo del panel
de control.
• On: La iluminación se activa.
• Off: La iluminación se desactiva.
ESPAÑOL
39
Page 96

Selección del modo atenuador
de luz
Permite oscurecer la pantalla automáticamente
de noche, o mediante el ajuste del temporizador.
Nota:
El modo atenuador de luz automático equipado con
esta unidad podría no funcionar correctamente con
algunos vehículos, especialmente en aquellos que
disponen de un dial de control para la atenuación.
ESPAÑOL
En este caso, seleccione cualquier opción distinta de
“Auto”.
1
Pulse y mantenga pulsado SEL
(selección) durante más de 2
segundos para que aparezca uno de
los ítems de PSM en la pantalla.
(Consulte las páginas 36 y 37).
Los botones del siguiente
paso de la operación
comienzan a parpadear.
2
Pulse el botón numérico 3 para
seleccionar “DISP”—Categoría de
visualización de los ajustes de PSM.
4
Ajuste al modo atenuador de luz
deseado.
• Auto: Se activa el atenuador de luz
• Off: Se cancela el atenuador de
• On: La pantalla siempre se
• Time Set: Se utiliza para programar el
Nota:
Cuando se selecciona “Auto” o “Time Set”, el
patrón de visualización podría cambiar a
“Negative” o “Positive” en caso de que “LCD
Type” se encuentre ajustado a “Auto”.
• Si se selecciona “Time Set”, realice los
pasos siguientes para programar el
temporizador.
• Si se selecciona otra opción distinta de
“Time Set”, vaya al paso 7 para finalizar el
ajuste.
automático.
Al encender los faros del
vehículo, la pantalla se
oscurece automáticamente.
luz automático.
oscurece.
temporizador para la función
de atenuación.
40
3
Pulse ¢ o 4 para
seleccionar “Dimmer”.
5
Seleccione “From– To” para
programar el temporizador del modo
atenuador de luz.
6
Programe el temporizador.
1 Gire el dial de control para seleccionar la
hora de inicio.
2 Pulse ¢ una vez.
3 Gire el dial de control para seleccionar la
hora de fin.
7
Finalice el ajuste.
Page 97

Cambio del color de la pantalla
Permite ajustar el color de la pantalla utilizando
el control PSM. Podrá seleccionar su color
favorito para cada fuente (o para todas las
fuentes).
También podrá crear sus propios colores, y
ajustarlos como color de la pantalla.
Ajuste del color deseado para cada
fuente
Una vez que ajuste el color para cada fuente (o
para todas las fuentes), al seleccionar la fuente,
la pantalla se iluminará con el color seleccionado.
1
Pulse y mantenga pulsado SEL
(selección) durante más de 2
segundos para que aparezca uno de
los ítems de PSM en la pantalla.
(Consulte las páginas 36 y 37).
Los botones del siguiente
paso de la operación
comienzan a parpadear.
2
Pulse el botón numérico 6 para
seleccionar “COLOR”—Categoría de
color de los ajustes de PSM.
Para KD-AR3000:
All SRC* CD
AM
Para KD-LH300:
All SRC* CD
AM
* Cuando se selecciona “All SRC”, podrá
utilizar el mismo color para todas las fuentes.
4
Seleccione el color de la pantalla.
Every*1 O Aqua O Sky O Sea O
Leaves O Grass O Apple O Rose O
Amber O Honey O Violet O Grape O
Pale O User
*1 Cuando se selecciona “Every”, los colores
cambian cada 2 segundos (cambia a cada uno
de los colores listados arriba, excepto
“User”).
*2 Cuando se selecciona “User”, se aplicarán
los colores editados por el usuario “Day” y
“Night”. (Consulte la página 42).
Changer (SIRIUS)
FM
Conforme gira el dial de
control, los colores cambian
de la siguiente manera:
2
*
O (vuelta al comienzo)
Line In
Changer
(o Line In, SIRIUS)
FM
ESPAÑOL
3
Seleccione la fuente para ajustar el
color de la pantalla.
5
Repita los pasos 3 y 4 para
seleccionar el color para cada
fuente (excepto cuando se
selecciona “All SRC” en el paso
6
Finalice el ajuste.
CONTINUA EN LA PÁGINA SIGUIENTE
3
).
41
Page 98

Creación de sus propios colores—User
Podrá crear y almacenar sus propios colores
—“Day” y “Night”, y seleccionarlos como color de
la pantalla para cualquier fuente deseada.
• Day: Se puede usar como color de usuario
• Night: Se puede usar como color de usuario
* Depende del ajuste “Dimmer”.
ESPAÑOL
1
2
durante el día*.
durante la noche*.
Pulse y mantenga pulsado SEL
(selección) durante más de 2
segundos para que aparezca uno de
los ítems de PSM en la pantalla.
(Consulte las páginas 36 y 37).
Los botones del siguiente
paso de la operación
comienzan a parpadear.
Pulse el botón numérico 6 para
seleccionar “COLOR”—Categoría de
color de los ajustes de PSM.
4
Seleccione la pantalla de ajuste de
color de usuario.
Aparece una de las
pantallas de ajuste de
color de usuario.
En el lado izquierdo de la
pantalla, aparece “User
Day” o “User Night”.
5
Seleccione “Day” o “Night”, según el
ajuste que desea realizar.
6
Ajuste el color de usuario
seleccionado.
1) Pulse ¢
seleccionar uno de los tres
colores primarios—“R” (rojo),
“G” (verde) y “B” (azul).
o 4 para
42
3
Seleccione “User” como color.
El color del usuario será
aplicado a la fuente
seleccionada actualmente (la
indicada en la parte superior
de la pantalla. En este
ejemplo, “All SRC”).
Para seleccionar la fuente para la cual se
desea aplicar el color del usuario,
seleccione primero la fuente objetivo
pulsando 5 (arriba) o ∞ (abajo), antes de
seleccionar “User” en este paso.
2) Pulse 5 (arriba) o ∞ (abajo) para
ajustar el color primario
seleccionado.
El ajuste se puede realizar dentro del
margen de 00 a 11.
3) Repita los pasos 1) y 2) para
ajustar los colores primarios.
7
Repita los pasos 5 y 6 para ajustar
los otros colores de usuario—“Day”
y “Night”.
8
Finalice el ajuste.
Page 99

Asignación de nombres a las
fuentes
Permite asignar nombres a las frecuencias de
las emisoras, a los CDs (tanto en esta unidad
como en el cambiador de CD), y al componente
externo (Entrada de línea).
Una vez que se asigne un nombre, el mismo
aparecerá en la pantalla al seleccionar la fuente.
Fuentes
Frecuencias de las hasta 10 caracteres
emisoras (frecuencias de hasta 30
CDs* hasta 32 caracteres
Componente externo hasta 8 caracteres
(Entrada de línea)
* No se podrá asignar nombre a un CD Text ni a un
disco MP3/WMA.
1
Seleccione la fuente a la cual desea
asignar un nombre.
(Para KD-AR3000)
Cuando selecciona una fuente, la unidad se
enciende automáticamente.
Número máximo de
caracteres
emisoras, incluyendo
FM y AM)
(hasta 40 discos)
(Para KD-LH300)
3
Seleccione el juego de caracteres
deseado, mientras parpadea la
posición del primer carácter.
Cada vez que pulsa el botón, el
juego de caracteres cambia de
la siguiente manera:
mayúsculas
(0 – 9:
4
Seleccione un carácter.
• Con respecto a los
caracteres disponibles,
consulte la página 55.
5
Mueva el cursor a la posición del
carácter siguiente (o anterior).
6
Repita los pasos 3 a 5 hasta que
termine de ingresar el nombre.
7
Finalice el procedimiento mientras
está parpadeando el carácter
seleccionado en último término.
(a – z:
)
números y símbolos
minúsculas
)
)(A – Z:
ESPAÑOL
2
Mientras mantiene pulsado D DISP,
pulse y mantenga pulsado SEL
(selección) durante más de 2
segundos.
Los botones del siguiente paso de la
operación comienzan a parpadear.
Ej.: Cuando selecciona CD como fuente
Para borrar los caracteres ingresados
Para borrar simultáneamente todos los
caracteres, pulse y mantenga pulsado D DISP
durante más de 1 segundo, tal como lo descrito
en el procedimiento de arriba.
Notas:
• Cuando usted asigna un nombre al disco 41 o a la
frecuencia de la emisora 31, aparece “Name Full”
y no se podrá acceder al modo de entrada de texto.
En este caso, borre los nombres no deseados antes
de la asignación.
• Cuando está conectado el cambiador de CD, es
posible asignar nombres a los CDs del cambiador
de CD. Estos nombres también pueden visualizarse
en la pantalla si inserta los CDs en esta unidad.
43
Page 100

Cambio del ángulo del panel
de control
El panel de control puede ajustarse a cuatro
ángulos diferentes.
Pulse repetidamente ANGLE para
ajustar el ángulo del panel de control a
la posición deseada.
ESPAÑOL
El ángulo del panel de control cambia de la
siguiente manera:
PRECAUCIÓN:
NUNCA introduzca su
dedo entre el panel de
control y la unidad,
pues podría lastimarse
al quedar aprisionado.
A
B
DC
Nota:
Si desconecta la alimentación, el panel de control volverá automáticamente a la posición cerrada. La próxima
vez que conecte la alimentación, el panel de control se colocará en la posición anterior.
44
 Loading...