

Page 1

HD MEMORY CAMERA
LYT2154-002B
EN
GC-FM1
U/E/AA
Detailed User Guide
ENGLISH
Page 2

2
Safety Precautions
IMPORTANT:
In the event that any of the following occur, make a
request for repair to the dealer.
• Smoke or abnormal odor is emitted.
• Damage from being dropped.
• Water or an object enters inside.
If malfunctioning occurs, stop using the unit
immediately and consult your local JVC dealer.
Caution on camcorder
The camcorder may present a re or chemical burn
hazard if mistreated. Do not disassemble, heat above
100 °C or incinerate.
• Dispose of used camcorder promptly.
• Do not disassemble and do not dispose of in re.
WARNING:
The camcorder shall not be exposed to excessive heat
such as direct sunshine, re or the like.
Declaration of Conformity
(For owners in the U.S.A.)
Model Number : GC-FM1U
Trade Name : JVC
Responsible party : JVC AMERICAS CORP.
Address : 1700 Valley Road Wayne, N. J.
Telephone Number : 973-317–5000
This device complies with Part 15 of FCC Rules.
Operation is subject to the following two conditions:
(1) This device may not cause harmful interference, and
(2) this device must accept any interference received,
including interference that may cause undesired
operation.
(For owners in the U.S.A.)
Changes or modications not approved by JVC could
void the user’s authority to operate the equipment.
This equipment has been tested and found to
comply with the limits for a Class B digital device,
pursuant to Part 15 of the FCC Rules. These limits are
designed to provide reasonable protection against
harmful interference in a residential installation. This
equipment generates, uses, and can radiate radio
frequency energy and, if not installed and used in
accordance with the instructions, may cause harmful
interference to radio communications. However, there
is no guarantee that interference will not occur in a
particular installation. If this equipment does cause
harmful interference to radio or television reception,
which can be determined by turning the equipment
o and on, the user is encouraged to try to correct the
interference by one or more of the following measures:
Reorient or relocate the receiving antenna.
Increase the separation between the equipment and
receiver.
Connect the equipment into an outlet on a circuit
dierent from that to which the receiver is connected.
Consult the dealer or an experienced radio/TV
technician for help.
07470
FCC WARNING
(For owners in the U.S.A.)
This equipment may generate or use radio
frequency energy. Changes or modications to this
equipment may cause harmful interference unless
the modications are expressly approved in the
instruction manual. The user could lose the authority
to operate this equipment if an unauthorized change
or modication is made.
(For owners in the U.S.A.)
• The supplied interface cable must be used with the
equipment in order to comply with the limits for a
digital device pursuant to Subpart B of Part 15 of
FCC Rules.
• Use an HDMI cable with the HDMI logo.
(For owners in Canada)
This Class B digital apparatus complies with Canadian
ICES-003.
Cet appareil numérique de la classe B est conforme à
la norme NMB-003 du Canada.
Information for Users on Disposal of Old
Equipment and Batteries
Products
[European Union]
These symbols indicate that the electrical and
electronic equipment and the battery with this symbol
should not be disposed of as general household
waste at its end-of-life. Instead, the products should
be handed over to the applicable collection points for
the recycling of electrical and electronic equipment
as well as batteries for proper treatment, recovery and
recycling in accordance with your national legislation
and the Directive 2002/96/EC and 2006/66/EC.
By disposing of these products correctly, you will help
to conserve natural resources and will help to prevent
potential negative eects on the environment and
human health which could otherwise be caused by
inappropriate waste handling of these products.
For more information about collection points and
recycling of these products, please contact your local
municipal oce, your household waste disposal
service or the shop where you purchased the product.
Penalties may be applicable for incorrect disposal of
this waste, in accordance with national legislation.
[Business users]
If you wish to dispose of this product, please visit our
web page www.jvc-europe.com to obtain information
about the take-back of the product.
[Other Countries outside the European Union]
These symbols are only valid in the European Union.
If you wish to dispose of these items, please do so in
accordance with applicable national legislation or
other rules in your country for the treatment of old
electrical and electronic equipment and batteries.
Notice:
The sign Pb below the symbol
for batteries indicates that this
battery contains lead.
Battery
Page 3

3
If this symbol is shown, it is only valid in
the European Union.
Dear Customer, [European Union]
This apparatus is in conformance with the valid
European directives and standards regarding
electromagnetic compatibility and electrical safety.
European representative of Victor Company of Japan,
Limited is:
JVC Technical Services Europe GmbH
Postfach 10 05 04
61145 Friedberg
Germany
SOME DO’S AND DON’TS ON THE SAFE USE OF
EQUIPMENT
This equipment has been designed and manufactured
to meet international safety standards but, like any
electrical equipment, care must be taken if you are to
obtain the best results and safety is to be assured.
DO read the operating instructions before you attempt to use
the equipment.
DO ensure that all electrical connections (including the mains
plug, extension leads and interconnections between pieces
of equipment) are properly made and in accordance with
the manufacturer’s instructions. Switch o and withdraw the
mains plug when making or changing connections.
DO consult your dealer if you are ever in doubt about the
installation, operation or safety of your equipment.
DO be careful with glass panels or doors on equipment.
DON’T continue to operate the equipment if you are in any
doubt about it working normally, or if it is damaged in any
way — switch o, withdraw the mains plug and consult your
dealer.
DON’T remove any xed cover as this may expose dangerous
voltages.
DON’T leave equipment switched on when it is unattended
unless it is specically stated that it is designed for
unattended operation or has a standby mode. Switch o
using the switch on the equipment and make sure that your
family knows how to do this. Special arrangements may need
to be made for inrm or handicapped people.
DON’T use equipment such as personal stereos or radios so
that you are distracted from the requirements of road safety.
It is illegal to watch television whilst driving.
DON’T listen to headphones at high volume, as such use can
permanently damage your hearing.
DON’T obstruct the ventilation of the equipment, for example
with curtains or soft furnishings. Overheating will cause
damage and shorten the life of the equipment.
DON’T use makeshift stands and NEVER x legs with
wood screws — to ensure complete safety always t the
manufacturer’s approved stand or legs with the xings
provided according to the instructions.
DON’T allow electrical equipment to be exposed to rain or
moisture.
ABOVE ALL
• NEVER let anyone especially children push anything
into holes, slots or any other opening in the case — this
could result in a fatal electrical shock;
• NEVER guess or take chances with electrical equipment
of any kind — it is better to be safe than sorry!
Safety Precautions for the Camcorder
To reduce the risk of re, electrical shock, and injury to
person, carefully follow these instructions.
• Do not expose this product to liquid, rain, moisture, or
extreme temperatures.
• Do not disassemble this unit.
• Do not insert foreign objects into the this unit - this
may cause damage to internal components or cause
injury to you.
• It is recommended to charge the battery connecting to
PC with the USB cable.
• Do not charge this product if damaged, or has been
immersed in liquids.
• Do not store this unit in extreme cold or high
temperature areas.
• If the LCD breaks, do not touch the glass or liquid.
• Do not attempt to remove or replace the battery.
•
Do not attempt to disassemble or repair the camcorder.
• Do not puncture or incinerate the battery.
• Do not dispose of this unit improperly. Check with local
codes for proper disposal regulations.
• Dispose of batteries according to local and national
regulations.
• Never allow children to play with this unit small parts
may be a choking hazard.
• Observe caution when using this unit strap to prevent
strangulation.
• When using the camcorder with a tripod, attach the
camcorder to the tripod securely.
Product Care
• Operating and storage temperatures 5 °C to +40 °C
• Do not drop this unit or subject it to excessive shock or
vibration.
• Do not use liquid or aerosol cleaners, as they may
damage the unit or the nish of the product.
• KEEP THIS INSTRUCTIONS FOR FUTURE REFERENCE.
CAUTION:
• Dispose of used batteries according to the instructions.
• Risk of explosion if battery is replaced by an incorrect
type.
ATTENTION:
On placing the unit: Some TVs or other appliances
generate strong magnetic elds. Do not place such
appliances on top of the unit as it may cause picture
disturbance.
Remember that this camcorder is intended for
private consumer use only.
Any commercial use without proper permission is prohibited.
(Even if you record an event such as a show, performance
or exhibition for personal enjoyment, it is strongly
recommended that you obtain permission beforehand.)
Trademarks
• HDMI is a trademark of HDMI
Licensing, LLC.
• Windows® is either registered trademark or
trademark of Microsoft Corporation in the United
States and/or other countries.
• Macintosh is a registered trademark of Apple Inc.
• iPod, iTunes are trademarks of Apple Inc., registered
in the U.S. and other countries.
• YouTube and the YouTube logo are trademarks
and/or registered trademarks of YouTube LLC.
• Other product and company names included in
this instruction manual are trademarks and/or
registered trademarks of their respective holders.
Page 4

4
Table of Contents
Names of Components ........................... 5
Accessories
Attaching the Hand Strap
Indications on LCD monitor
Charging
Turning the Power On and O
Inserting an SD Card
Necessary Settings before Use
Setting Date and Time
Setting the Video Output
Viewing the rmware version of the unit
Formatting an SD Card
...................................... 6
......................... 6
....................... 6
........................................ 9
................... 10
............................10
................... 11
! Recording/Playback .......................... 14
Video Recording
Video Playback
# Recording/Playback .......................... 15
Still Image Recording
Still Image Playback
Deleting Files ................................... 16
Viewing Files on TV
............................. 17
Saving Files on a Computer . . . . . . . . . . . . . . . . . . . . . . 18
System Requirements (Windows)
Installing the Supplied Software
Exporting to iTunes®
Uploading to YouTube
Warning Indications
Specications
................................... 24
............................ 21
TM
......................... 22
............................. 23
Customer Support Information
................ 19
.................20
.................. 26
Page 5

5
Names of Components
Focus Switching Lever
Normal Recording [M]
Macro Recording [
Power Button [<]
Power Lamp
Select Button [%]
Recording/Playback
]
LCD Monitor
Charge Lamp
Status (Warning) Lamp
Recording Select Button
Video [!]
Still Image [#]
Delete Button [$]
Hand Strap
Attachment Area
AV Connector
HDMI Connector
USB Connector
Speaker
SD Slot Cover
Tripod Mounting
Socket
, ¢ , £ , ¤ Buttons
¡
Zoom Buttons
Volume Buttons
Index Button [7]
Reset Hole
Recording Start/Stop Button
Shutter Button
Set Button
Lens
Microphone
Page 6

6
Accessories
USB Cable
(WUU102SCP001)
(WPU122SCP001)
Hand StrapAV Cable
Attaching the Hand Strap
To guard against dropping the camcorder, we recommend attaching the
hand strap.
NOTE
• When carrying the camcorder, please be careful
not to drop it. Dropping it may cause injury or a
malfunction of your camcorder.
• When a child uses the camcorder, there must be
parental guidance.
Indications on LCD monitor
Index 8
! Videos / # Still Images
Mode Indicator Folder Number_File Number
Current Page/
Total Number of Pages
To delete/redisplay 8
characters and symbols
on the LCD monitor
Press the 7 button for more
than 2 seconds.
Page 7

1080p
REC
00h59
m
01:11
T
W
8
M
3095
T
W
7
Indications on LCD monitor (Continued)
During Recording 8
! Video
Mode Indicator
1080p/720p/VGA/
QVGA
Macro Recording
Battery Indicator
Display changes depending on
the remaining battery level
# Still image
Remaining Time
CounterVideo Quality
Zoom Bar
W: Wide side, T: Tele side
Mode Indicator Remaining Number of Shots
8M/5M/2M/VGA
Macro Recording
Image Size
Zoom Bar
W: Wide side, T: Tele side
Page 8

1080p
01:48
103_0050
00:20
8
M
103_0050
8
Indications on LCD monitor (Continued)
During Playback 8
! Video
Folder Number_File Number
Video Quality
1080p/720p/VGA/
QVGA
# Still image
Recording Time
Playback Time
(minutes : seconds)
Playback Mode
F : Playback
N : Reverse search
O : Forward search
Q : Pause
Volume Indicator
Folder Number_File Number
8M/5M/2M/VGA
Image Size
Page 9

9
Charging
Charge the battery connecting to the computer with the USB cable.
Charge Lamp
< Button
Power Lamp
To Computer
USB Cable
Press the < button to turn o the camcorder.
1
USB Connector
The power lamp goes out.
Connect the camcorder to a computer.
2
Camcorder’s LCD monitor will turn o when the USB cable is connected.
This occurs during battery charging or when connected to a PC.
Charge lamp
Charging time approx. 180 minutes
turns on: Charging
goes out: Charging nished
When the charging is nished, disconnect the camcorder from the computer.
NOTE
• Charging is not possible while the camcorder is turned on.
• Make sure that the computer is turned on during charging.
• The camcorder is not charged when it is shipped. Charge the camcorder before using it for
the rst time.
• If there is a trouble in charging, the charge lamp/warning lamp blinks in green. Connect the
camcorder to the computer again.
Battery Indicator 8
Blinking
Fully charged
Medium
Very low
Recharge the battery at an early opportunity.
Empty
The camcorder will turn o. Recharge the battery immediately.
Page 10

10
Turning the Power On and O
Press the < button for more than 1 second.
1
The power lamp turns on.
To turn o the power, press the < button again.
2
The power lamp goes o.
NOTE
• To conserve power, the camcorder turns o automatically if there is no operation for
3 minutes.
• If the only operation is turning on the power, the camcorder enters the video recording
ready status.
• When you rst turn on the power after purchasing the camcorder, the [Time setup] screen
appears. Set the date and time before using the camcorder. (Z p. 11)
Inserting an SD Card
Operation-conrmed SD cards
Operations are conrmed on the following SD cards. Panasonic, TOSHIBA, SanDisk, ATP.
Video recording: Class 4 or higher compatible SDHC card (4 GB to 32 GB)
Still image recording: SD card (256 MB to 2 GB) or SDHC card (4 GB to 32 GB)
* If other media are used, they may fail to record data correctly, or they may lose data that had
already been recorded.
Preparation: Turn o the camcorder.
Unlock the SD card slot and open the cover.
1
Insert an SD card.
2
Return the cover of the SD card slot and
3
lock it.
NOTE
• When the SD card is removed or inserted, the power turns o.
Turn o the power before inserting the card.
• When an SD card is inserted, the SD card is prioritized as the destination for data saving.
Page 11

11
Necessary Settings before Use
Setting Date and Time
Preparation:
Turn on the power and select the recording mode.
While pressing the $ button, press the 7 button.
1
Select [Time setup], and then press the
2
set button.
Set the date and time by selecting items
3
with ¡ , ¢ and setting values with £ , ¤.
After completing the setting, press the
4
set button.
To quit the screen 8
Select [Exit], and then press the set button.
NOTE
• [Hour] is displayed in 24 hour format only.
Page 12
12
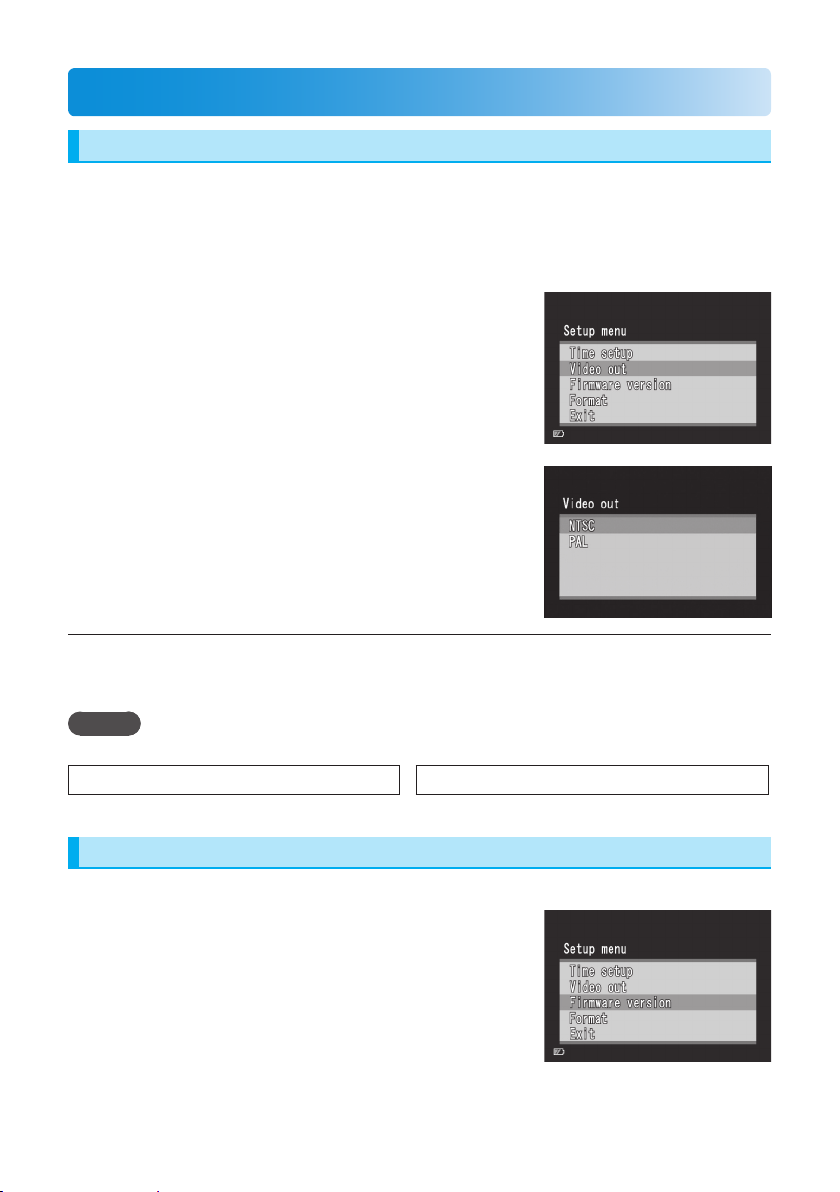
Necessary Settings before Use (Continued)
Setting the Video Output
Preparation:
Turn on the power and select the recording mode.
While pressing the $ button, press the 7 button.
1
Press the ¡ , ¢ buttons to select [Video
2
out], and then press the set button.
Press the ¡ , ¢ buttons to select [NTSC]
3
or [PAL], and then press the set button.
To quit the screen 8
Select [Exit], and then press the set button.
NOTE
• Set the camcorder’s video output to the system that is appropriate for your TV.
NTSC: Japan, USA, South Korea, etc. PAL: Europe, China, etc.
Viewing the rmware version of the unit
You can conrm the rmware version of the unit.
1) While pressing the $ button, press the
7 button.
2) Press the ¡ , ¢ buttons to select
[Firmware version], and then press the
set button.
To quit the screen
8
Select [Exit], and then press the set button.
Page 13

13
Formatting an SD Card
Preparation:
• Insert an SD card.
• Turn on the power and select the recording mode.
While pressing the $ button, press the 7 button.
1
Press the ¡ , ¢ buttons to select
2
[Format], and then press the set button.
Press the £ , ¤ buttons to select [Yes],
3
and then press the set button.
To quit the screen 8
Select [Exit], and then press the set button.
NOTE
• Formatting erases all data (videos and still images) on the SD card.
Page 14

14
! Recording/Playback
Video Recording
Press the < button to turn on the
1
During recording, the screen display
changes to red
pow er.
The camcorder enters the video recording
ready status.
Press the set button.
2
The recording starts.
To stop recording 8
Press the set button again.
To change the quality 8
Press the £ button twice. Each time you press the £ button twice, you can change
the quality.
1080p(default) & 720p & VGA & QVGA
To zoom 8
Press the ¡ , ¢ buttons.
NOTE
• Zoom is performed digitally, therefore image quality degrades when zooming.
Video Playback
Press the % button to select the playback mode.
1
Press the ¡ , ¢,£ , ¤ buttons to select a
2
video.
Press the set button to start playback.
3
Press it again to stop the playback.
To return to the index 8
Press the 7 button.
To change the volume 8
Press the ¡ , ¢ buttons during
playback.
To perform forward search or 8
reverse search
Press and hold the £ , ¤ buttons
during playback. When the button is
released, normal playback resumes.
Page 15

15
# Recording/Playback
Still Image Recording
Press the < button to turn on the power.
1
Press the !/# button to select #.
2
Press the set button.
3
The recorded still image is saved.
To change the image size 8
Press the £ button twice. Each time you press the £ button twice, you can change
the image size.
8M (default) & 5M & 2M & VGA
To zoom 8
Press the ¡ , ¢ buttons.
NOTE
• Zoom is performed digitally, therefore image quality degrades when zooming.
Still Image Playback
Press the % button to select the playback mode.
1
Press the !/# button to select #.
2
Press the ¡ , ¢,£ , ¤ buttons to select a
3
still image.
Press the set button.
4
To return to the index 8
Press the 7 button.
Page 16

16
Deleting Files
Preparation:
Select the playback mode.
Press the 7 button.
1
Press the ¡ ,
2
Press the $ button.
3
Press the £ , ¤ buttons and press the set
4
button to select [Yes].
NOTE
• You can also delete by pressing the $ button while a video is playing back or a still image is
displayed.
• You cannot delete all the les at once.
¢,£
buttons to select a le.
,
¤
Page 17

17
Viewing Files on TV
Preparation:
• Turn on the TV.
• Turn on the camcorder and select the playback mode.
To connect using the AV connector 8
AV Connector
< button
AV cable
To connect using the HDMI mini connector (optional) 8
HDMI Connector
< button
HDMI Cable (optional)
(Mini to full-sized HDMI cable)
Connect the camcorder to a TV.
1
After being connected, the camcorder switches automatically to
monitor display.
TV
TV
Switch to the TV’s external input connector.
2
Press the 7 button.
3
Start the playback.
4
Video (Z p. 14)
Still image (Z p. 15)
NOTE
• When an AV cable and an HDMI cable are connected, output to the HDMI cable is prioritized.
• Also refer to instruction manual of the TV.
• Set the camcorder’s video output to the playback system that is appropriate for your TV.
(Z p. 12)
• We recommend using the Category 2 HDMI cable (High Speed cable).
Page 18

18
Saving Files on a Computer
[FMCAM_SD]
[FMCAM_INT]
[DCIM] [100JVCSO]
[101JVCSO]
[102JVCSO]
PIC_XXXX.MOV
PIC_XXXX.MOV
PIC_XXXX.JPG
PIC_XXXX.JPG
…
…
Preparation:
• Turn on the computer.
• Turn on the camcorder.
You can save recorded videos and still images on a computer.
To Computer
Connect the camcorder to a computer.
1
USB
Connector
USB Cable
Camcorder’s LCD monitor will turn o when the USB cable is connected.
This occurs during battery charging or when connected to a PC.
Windows: Double-click [FMCAM_SD]/[FMCAM_INT] in [My 8
2
Computer].
8
Macintosh: Double-click [NO_NAME] on the desktop.
Copy the video or still image les from the “DCIM” folder.
3
SD Card
Internal Memory
Videos
Still Images
To disconnect the camcorder from a computer (Windows) 8
1) Click the icon in the task tray on the computer screen.
2) The [Safely Remove Hardware] window appears.
3) Select [USB Mass Storage Device] and then click [Stop].
To disconnect the camcorder from a computer (Macintosh) 8
Move [NO_NAME] from the desktop to [Trash], and then disconnect the USB
cable.
Page 19

19
System Requirements (Windows)
The system conguration described below is required in order to use this
software.
OS 8
Microsoft Windows XP Service Pack 3
- Home Edition/-Professional (pre-installed)
Microsoft Windows Vista Service Pack 2 (32 bit)
- Home Basic/-Home Premium (pre-installed)
CPU 8
Memory 8
Intel Core Duo 1.66 GHz or higher
(Intel Core 2 Duo 2.13 GHz or higher recommended)
Windows XP: 1 GB or more
Windows Vista: 2 GB or more
Hard disk 8
250 MB or more disk space is required for software
installation.
Display 8
1024 x 768 pixels, 16 bit (High-color) or more.
(1280 x 1024 pixels, 32 bit or more,
Intel G965 (onboard VGA) or higher recommended)
Others 8
Standard USB 2.0 port
Page 20

20
Installing the Supplied Software
Preparation:
• Turn on the camcorder.
• Connect the camcorder to a computer.
* The screenshots in the steps below are for Windows XP.
[FMCAM_FRM] window appears.
1
Select [MediaBrowser LE Install and
2
User Guide] and click [OK].
Select [MediaBrowser LE].
3
In the [Choose Setup Language], select
4
a language and click [Next].
Follow the on-screen instructions.
Click [Finish].
5
An icon appears on the desktop.
NOTE
• For details about operations in MediaBrowser LE, see its Help.
Page 21

21
Exporting to iTunes®
You can easily transfer videos recorded to iTunes® and play back them on
iPod®, using the supplied MediaBrowser LE software.
For details about iTunes® and iPod®, see the website.
Z http://www.apple.com/itunes/
Preparation:
• Install the supplied MediaBrowser LE software to the computer. (Z p. 20)
• After the software is installed, disconnect the camcorder from the
computer.
• If the software is already installed, turn on the camcorder.
Connect the camcorder to a computer.
1
MediaBrowser LE starts.
Edit the le using MediaBrowser LE if necessary.
2
Transfer les using the [Export] function of MediaBrowser LE.
3
NOTE
• For details about operations in MediaBrowser LE, see its Help.
Page 22

22
Uploading to YouTubeTM
You can easily upload videos to YouTubeTM, the video sharing website, using
the supplied MediaBrowser LE software.
For details about YouTube™, see the website.
Z http://www.youtube.com/
Preparation:
• Install the supplied MediaBrowser LE software to the computer. (Z p. 20)
• Turn on the camcorder.
Connect the camcorder to a computer.
1
MediaBrowser LE starts.
Click the [Device] icon of MediaBrowser LE.
2
: Internal memory
: SD card
Click the date containing video les,
3
then drag and drop the selected les to
[Show all] in the [Library].
The les are imported into MediaBrowser LE.
Disconnect the camcorder from the
4
computer.
Upload les to YouTubeTM using the
5
[YouTube] (uploading) function of
MediaBrowser LE.
NOTE
• When you operate video les using MediaBrowser LE, copy them to the computer from the
camcorder. If you operate the video les in the camcorder directly, they may be damaged
due to battery exhaustion.
• For details about operations in MediaBrowser LE, see its Help.
Page 23

23
Warning Indications
Before requesting service, consult the following chart. If the solutions indicated in the chart do
not solve the problem, consult your nearest JVC dealer or JVC service center for instructions.
Refer also to the FAQ section on JVC’s website
The following phenomena are not malfunctions.
• LCD monitor momentarily become red or black when sunlight is recorded.
• Black spots, or red, green, or blue spots appear on the LCD monitor.
(The LCD monitor contains 99.99% eective pixels, but 0.01% or fewer pixels may be
ineective.)
The camera is a microcomputer-controlled device. Electrostatic discharge, external noise and
interference (from a TV, a radio, etc.) might prevent it from functioning properly. In such a
case, reset the camera.
8
To Reset the Camcorder
If the camcorder malfunctions, push into the reset hole with a pointed object such as a
wire to initialize the camcorder. (Z p. 5)
Indication Action
Memory card is full •
Internal memory is full
Memory card is protected
Delete les or move them to a computer or other storage.
• Replace the SD card with a new one.
• Unlock the write-protect switch of the SD card. –
Z
10, 16,
18
Memory card is low speed
Memory card cannot be
used
No Files
Invalid
This le is protected
Insucient battery. Please
charge it.
Format failed.
Recovery failed.
Delete failed.
The le number reaches a
maximum. Please delete
all les in the memory card
or the internal memory for
recording.
• Replace the SD card with specications one that is
compatible with high-speed transfer.
• Format the SD card.
10, 13
• Replace the SD card with a new one.
• Remove the SD card and check whether the data on the SD
card was recorded using this camcorder.
• Deletion cannot be performed on the camcorder. Cancel the
protection on a computer and then delete the le.
• Recharge the battery. 9
•
Make sure that you used the correct procedure and try again.
• Turn o the camcorder and then turn on again.
• If the actions above do not resolve the issue, replace the SD
card with a new one.
• Move les to a computer, and then format the SD card.
10, 13,
• Replace the SD card with a new one.
• Make sure that you used the correct procedure and try
again.
13, 16
• If the actions above do not resolve the issue, replace the SD
card with a new one.
• Delete all les.
10, 16
• Replace the SD card with a new one.
10
–
–
10
13
18
Page 24

24
Specications
General 8
Power consumption
1.9 W
Dimensions (W × H × D)
53.0 mm × 97.0 mm × 17.0 mm
(2-1/8" × 3-7/8" × 11/16")
Weight
95 g (0.21 lbs)
100 g (0.23 lbs) (Including SD card)
Operating environment
Operating temperature:
5 °C to 40 °C (41 °F to 104 °F)
Storage temperature:
–20 °C to 60 °C (–4 °F to 140 °F)
Operating humidity:
35 % to 85 %
Camera/LCD monitor 8
Pickup
1/3.2" (8,170,000 pixels) progressive CMOS
Lens
F 2.8, f = 3.9 mm
35 mm equivalent
Video: 1080p 55 mm
720p 42 mm
VGA 30 mm
QVGA 30 mm
Still image: 30 mm
LCD monitor
2.0-inch LCD
Zoom
Digital ×4
Video 8
Recording/Playback format
Video: MPEG-4 AVC/H.264
Audio: AAC
Signal format
Digital high denition format
1080/30p
Video quality
1080p (16 : 9) 1440 × 1080p
720p (16 : 9) 1280 × 720p
VGA (4 : 3) 640 × 480p
QVGA (4 : 3) 320 × 240p
Still image 8
Recording format
JPEG
Image size (4 : 3)
8M 3264 × 2448
5M 2592 × 1944
2M 1600 × 1200
VGA 640 × 480
Media 8
Internal
Recordable capacity: approx. 34.5 MB
Commercially available SD cards
Connectors 8
AV connector
ø 3.5 mm
Video output: 1.0 V (p-p), 75 W
Audio output: 300 mV (rms), 1 kW
USB connector
Mini USB type B
(USB 2.0 High Speed compliant)
HDMI connector
HDMI Mini Connector (V1.3)
Output: 1080i
Page 25

25
Approximate recordable time (for video) 8
Recording
Quality
medium
1080p 24 s 41 m 1 h 24 m 2 h 47 m 5 h 42 m
720p 24 s 41 m 1 h 24 m 2 h 47 m 5 h 42 m
VGA 1 m 05 s 2 h 05 m 4 h 14 m 8 h 23 m 17 h 07 m
QVGA 5 m 42 s 10 h 27 m 21 h 17 m 42 h 8 m 85 h 57 m
Internal
memory
4 GB 8 GB 16 GB 32 GB
SDHC Card
h: hour/ m: minute/ s: second
• If you record 29 minutes continuously, it will stop recording automatically.
• When the battery life is too low even if it is in full charge, the battery comes to the end of its
life.
Approximate number of images (for still image) 8
Recording
medium
Quality
3264 × 2448 10 870 1710 3480 6900 9999
2592 × 1944 20 1370 2710 5510 9999 9999
1600 × 1200 60 3560 7010 9999 9999 9999
640 × 480 360 9999 9999 9999 9999 9999
Internal
memory
SD Card SDHC Card
2 GB 4 GB 8 GB 16 GB 32 GB
• The recordable time and the number of still images are approximate and may dier
depending on the recording environment, the SD card, or the remaining battery power.
Design and specications subject to change without notice.
Page 26

26
Customer Support Information
Use of this software is authorized according to the terms of the software license.
JVC
When contacting the nearest JVC oce or agency in your country (refer to the JVC Worldwide
Service Network at http://www.jvc-victor.co.jp/english/worldmap/index-e.html) about this
software, please have the following information ready.
• Product Name, Model, Problem, Error Message
• PC (Manufacturer, Model (Desktop/Laptop), CPU, OS, Memory (MB/GB), Available Hard Disk
Space (GB))
Please note that it may take some time to respond to your questions, depending on their
subject matter.
JVC cannot answer questions regarding basic operation of your PC, or questions regarding
specications or performance of the OS, other applications or drivers.
Pixela
Region Language Phone #
USA and Canada English +1-800-458-4029 (toll-free)
Europe (UK, Germany,
France, and Spain)
Other Countries in
Europe
Asia (Philippines) English +63-2-438-0090
China Chinese 10800-163-0014 (toll-free)
Homepage: http://www.pixela.co.jp/oem/jvc/mediabrowser/e/
Please check our website for latest information and downloading.
English/German/French/
Spanish
English/German/French/
Spanish/Italian/Dutch
+800-1532-4865 (toll-free)
+44-1489-564-764
Page 27

© 2009 Victor Company of Japan, Limited
US/EU/AA 0809FOH-AL-OT1
 Loading...