

Page 1
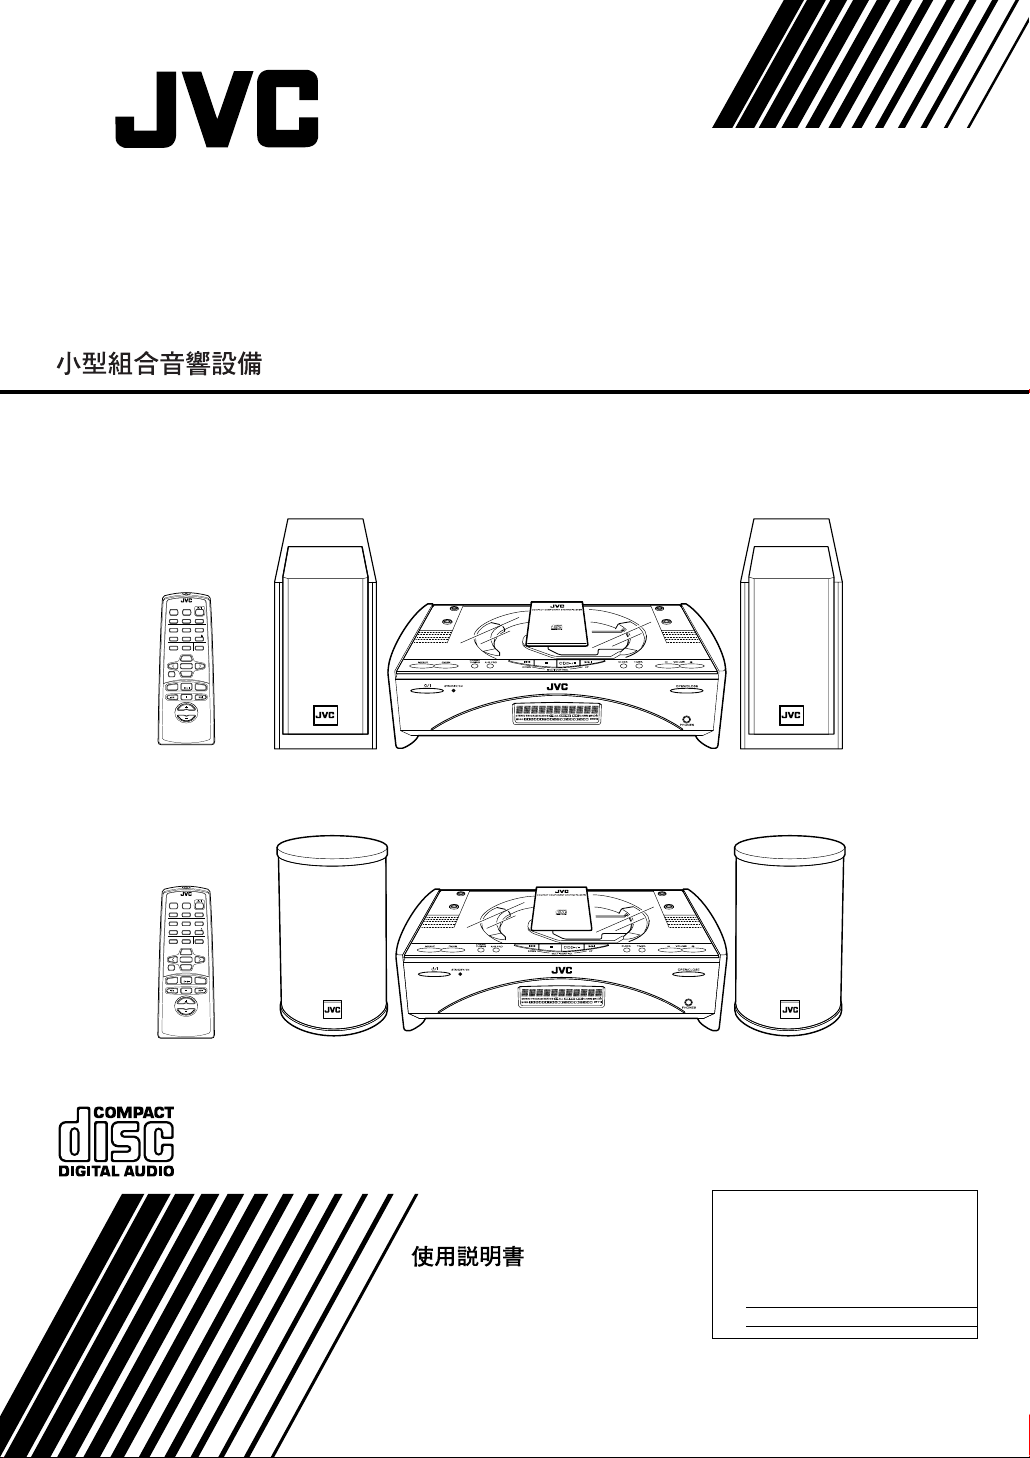
COMPACT COMPONENT SYSTEM
SISTEMAS DE COMPONENTES COMPACTOS
FS-SD5/FS-SD7/FS-SD9
REMOTE CONTROL
DIMMER SLEEP
AUTO
DISPLAY FM MODE
PRESET
PROGRAM
REPEATRANDOM
DOOR
CD
AHB PRO
SLIDE
BASS TREBLE CANCEL
UP
SET
DOWN
FADE MUTING
CD
MD/AUX FM / AM
VOLUME
FS-SD5
REMOTE CONTROL
DIMMER SLEEP
DISPLAY FM MODE
PRESET
PROGRAM
AHB PRO
BASS TREBLE CANCEL
DOWN
FADE MUTING
MD/AUX FM / AM
VOLUME
AUTO
REPEATRANDOM
DOOR
CD
SLIDE
UP
SET
CD
FS-SD7, FS-SD9
INSTRUCTIONS
MANUAL DE INSTR UCCIONES
For Customer Use:
Enter below the Model No. and Serial No.
which are located either on the rear, bottom or side of the cabinet. Retain this
information for future reference .
Model No.
Serial No.
LVT0418-008A
[U/US/UY/UT]
Page 2
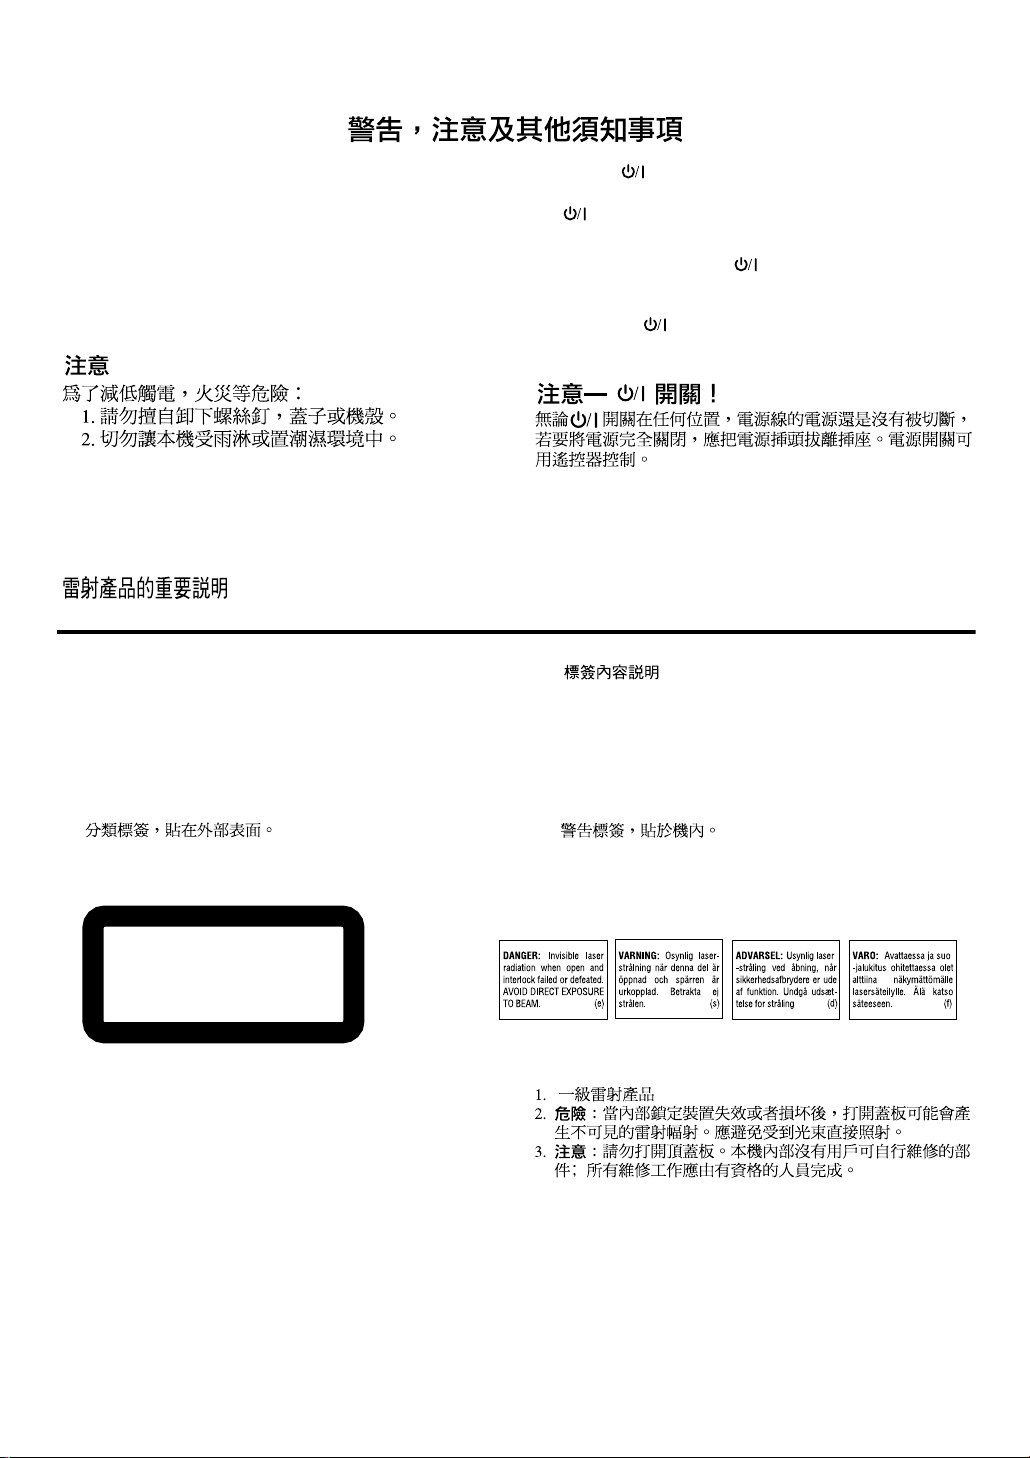
Warnings, Cautions and Others
Avisos, precauciones y otras notas
CAUTION
To reduce the risk of electrical shocks, fire, etc.:
1. Do not remove screws, covers or cabinet.
2. Do not expose this appliance to rain or moisture.
PRECAUCIÓN
Para reducir riesgos de choques eléctricos, incendio, etc.:
1. No extraiga los tornillos, los cubiertas ni la caja.
2. No exponga este aparato a la lluvia o a la humedad.
Caution –– switch!
Disconnect the mains plug to shut the power off completely.
The switch in any position does not disconnect the mains
line. The power can be remote controlled.
Precaución –– Interruptor !
Desconectar el cable de alimentación para desactivar la alimentación totalmente. Cualquier que sea la posición de ajuste
del interruptor , la alimentación no es cortada completamente. La alimentación puede ser controlada remotamente.
IMPORTANT FOR LASER PRODUCTS / IMPORTANTE PARA PRODUCTOS LÁSER /
REPRODUCTION OF LABELS / REPRODUCCIÓN DE ETIQUETAS /
1 CLASSIFICATION LABEL, PLACED ON EXTERIOR SUR-
FACE
2 WARNING LABEL, PLACED INSIDE THE UNIT
1 ETIQUETA DE CLASIFICACION, PROVISTA SOBRE LA
SUPERFICIE EXTERIOR
1
CLASS 1
LASER PRODUCT
1. CLASS 1 LASER PRODUCT
DANGER:
2.
failed or defeated. Avoid direct exposure to beam.
CAUTION:
3.
serviceable parts inside the Unit; leave all servicing to
qualified service personnel.
1. PRODUCTO LÁSER CLASE 1
PELIGRO:
2.
el contacto directo con el haz.
PRECAUCIÓN:
3.
la unidad no existen piezas reparables por el usuario; deje
todo servicio técnico en manos de personal calificado.
Invisible laser radiation when open and interlock
Do not open the top cover. There are no user
En el interior hay radiación láser invisible. Evite
No abra la tapa superior. En el interior de
2 ETIQUETA DE ADVERTENCIA, PEGADA EN EL INTE-
RIOR DE LA UNIDAD
2
G-1
Page 3

Caution: Proper Ventilation
15 cm
15 cm
To avoid risk of electric shock and fire, and to prevent damage, locate the apparatus as follows:
1 Front: No obstructions and open spacing.
2 Sides/ Top/ Back: No obstructions should be placed in the areas shown by the dimensions below.
3 Bottom: Place on the level surface. Maintain an adequate air path for ventilation by placing on a stand with a height of
10 cm or more.
Precaución: el aparato debe estar bien ventilado
Para evitar posibles riesgos de descargas eléctricas e incendios y prevenir cualquier posible daño, coloque el aparato del modo
siguiente:
1 Parte delantera: No ponga nada delante, deje el espacio libre.
2 Laterales/ parte superior/ No se debería colocar nada en las áreas y las distancias que se detallan a continuación.
parte trasera:
3 Parte inferior: Coloque el aparato sobre una superficie recta. Debe haber buena circulación de aire; para ello,
coloque el aparato sobre una base a una altura mínima de 10 cm.
Front view
Vista frontal
CAUTION
About the Internal Cooling Fan
■■■■
This unit includes an internal cooling fan, so as to allow for highpower operation within a small space.
This fan comes on when the sound level is set high, and may also
come on even at low sound levels if the internal temperature rises. To
ensure effective fan operation, please leave at least 15cm clearance
between the rear of the unit and the wall, and at least 1cm clearance
on each side of the unit.
PRECAUCIÓN
Sobre el ventilador de refrigeración interno
■■■■
El equipo incorpora un ventilador de refrigeración interno para
cuando se utiliza a toda potencia.
El ventilador se pone en marcha cuando sube considerablemente el
volumen o incluso a volúmenes bajos si la temperatura del interior
aumenta. Para que el fun cionamiento del v ent ilador sea óptimo, debe
dejar al menos 15 cm de distancia entre el equipo y la pared, y como
mínimo 1 cm a cada lado del equipo.
Side view
Vista lateral
G-2
Page 4

Introduction
Thank you for purchasing the JVC Compact Component System.
We hope it will be a valued addition to your home, giving you years of enjoyment.
Be sure to read this instruction manual carefully before operating your new stereo system.
In it you will find all the information you need to set up and use the system.
English
If you have a query that is not answered by the manual, please contact your dealer.
Features
Here are some of the things that make your System both powerful and simple to use.
■ The controls and operations have been redesigned to make them very easy to use, freeing you to
just enjoy the music.
• With JVC’s COMPU PLAY you can turn on the System and automatically start the Radio or
CD Player with a single touch.
■ The System incorporates Active Hyper Bass PRO circuitry to faithfully reproduce low frequency
sounds.
■ A 45-station preset capability (30 FM and 15 AM ) in addition to auto-seek and manual tuning.
■ CD options that include repeat, random and program play.
■ Timer functions; Daily Timer and Sleep Timer.
■ You can connect various external units, such as an MD recorder.
How This Manual Is Organized
• Basic information that is the same for many different functions - e.g. setting the volume - is gi ven in the section
‘Basic Operations’, and not repeated under each function.
• The names of buttons/controls and display messages are written in all capital letters: e.g. FM/AM, “NO DISC”.
• System functions are written with an initial capital letter only: e.g. Normal Play.
Use the table of contents to look up specific information you require.
We have enjoyed making this manual for you, and hope it serves you in enjoying the many features built into your System.
WARNINGS
• DO NOT PUT ANYTHING ON THE TOP COVER. IF THE SYSTEM IS OPERATED WITH SOMETHING
PUT ON THE TOP COVER, IT WILL BE DAMAGED WHEN YOU TRY TO OPEN THE TOP COVER.
• NEVER REMOVE THE TOP COVER FROM THE UNIT. SERIOUS INJURY MAY OCCUR IF THE SYSTEM IS OPERATED WITHOUT THE TOP COVER.
IMPORTANT CAUTIONS
Installation of the System
1
• Select a place which is level, dry and neither too hot nor too cold. (Between 5°C and 35°C or 41°F and 95°F.)
• Leave sufficient distance between the System and a TV.
• Do not use the System in a place subject to vibrations.
Power cord
2
• Do not handle the power cord with wet hands!
• Some power is always consumed as long as the power cord is connected to the wall outlet.
• When unplugging the System from the wall outlet, always pull the plug, not the power cord.
Malfunctions, etc.
3
• There are no user serviceable parts inside. In case of system failure, unplug the power cord and consult your dealer.
• Do not insert any metallic object into the System.
• Do not insert your hand between the Top C over and the main body when the Top Cover is being closed.
1
Page 5

Table of Contents
Introduction........................................................................................................1
Features ......................................................................................................................................1
How This Manual Is Organized.................................................................................................1
WARNINGS ..............................................................................................................................1
IMPORTANT CAUTIONS .......................................................................................................1
Getting Started...................................................................................................3
Accessories.................................................................................................................................3
Set the VOLTAGE SELECTOR Switch....................................................................................3
How To Put Batteries In the Remote Control............................................................................3
Using the Remote Control..........................................................................................................3
Connecting the FM Antenna......................................................................................................4
Connecting the AM Antenna.................................................................... ..................................5
Connecting the Speakers............................................................................. ...............................6
Attaching the Spacers.................................................................................................................7
Connecting a Subwoofer............................................................................................................7
Connecting External Equipment .............................................................. ..................................7
Connecting an MD Recorder, etc (Digital Output)....................................................................7
Connecting the AC Power Cord.................................................................................................8
COMPU Play.................................... .................................... ..................................... .................8
Automatic Power On..................................................................................................................8
Basic Operations ...............................................................................................9
Turning the Power On and Off...................................................................................................9
Adjusting the Brightness (DIMMER)............................... ..................................... ....................9
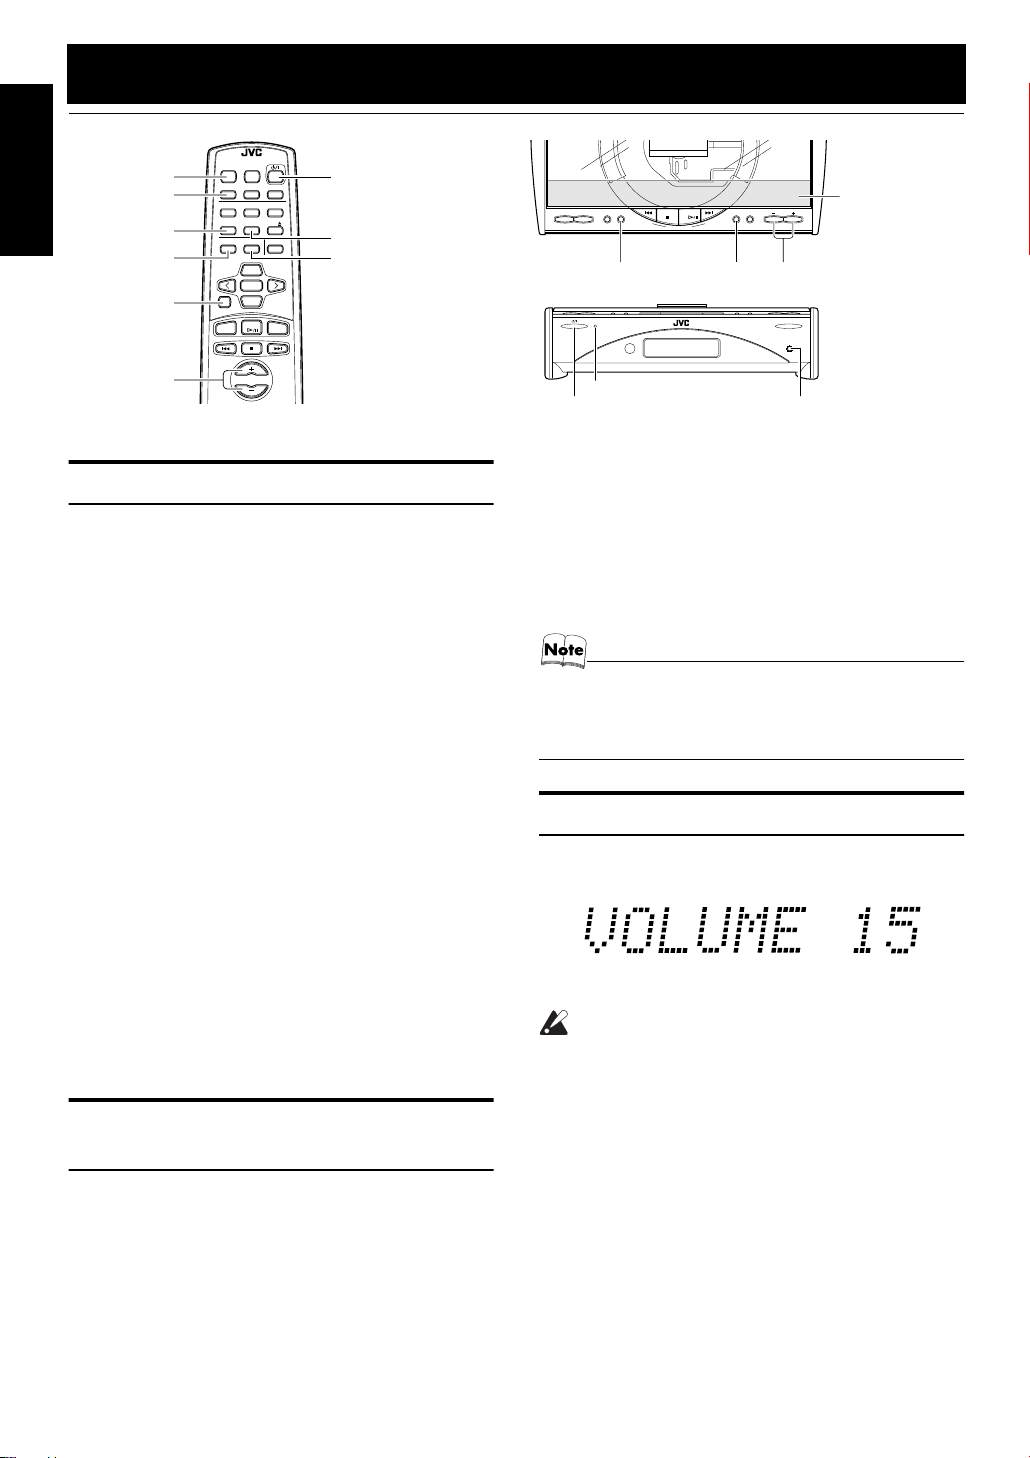
Adjusting the Volume ................................................................ ..................................... ...........9
Fade-out Muting (FADE MUTING)........................................................................................10
Reinforcing the Bass Sound (AHB PRO)................................................................................10
Tone Control (BASS/TREBLE)...............................................................................................10
Showing the Time (CLOCK/DISPLAY).................................................................................10
Sliding the Top Cover (DOOR SLIDE)...................................................................................10
Using the Tuner................................................................................................11
Tuning In a Station...................................................................................................................11
Presetting Stations................................................................... ..................................... ............12
Auto Presetting................... .................................... ..................................... .............................12
To Change the FM Reception Mode.......................................................................................12
Using the CD Player.........................................................................................13
To Insert a CD..........................................................................................................................13
To Unload a CD .......................................................................................................................14
Basics of Using the CD Player-Normal Play...........................................................................14
Programming the Playing Order of the Tracks........................................................................14
Random Play............................................................................................................................15
Repeating Tracks......................................................................................................................15
Using External Equipments ............................................................................16
Listening to External Equipment..............................................................................................16
Recording the System’s Source to External Equipment..........................................................16
Using the Timers..............................................................................................17
Setting the Clock......................................................................................................................17
Setting the Daily Timer............................................................................................................17
Setting the SLEEP Timer.........................................................................................................19
Care And Maintenance ....................................................................................20
Troubleshooting...............................................................................................21
Specifications...................................................................................................22
English
2
Page 6
Getting Started
Accessories
Make sure that you have all of the following items, which are supplied with the System.
English
Power Cord (1)
AM Loop Antenna (1)
Remote Control (1)
Batteries (2)
FM Wire Antenna (1)
Speaker Cords (2)
Spacers (6) (only for FS-SD7 / SD9)
AC Plug Adaptor (except for Argentina) (1)
If any of these items are missing, contact your dealer immediately.
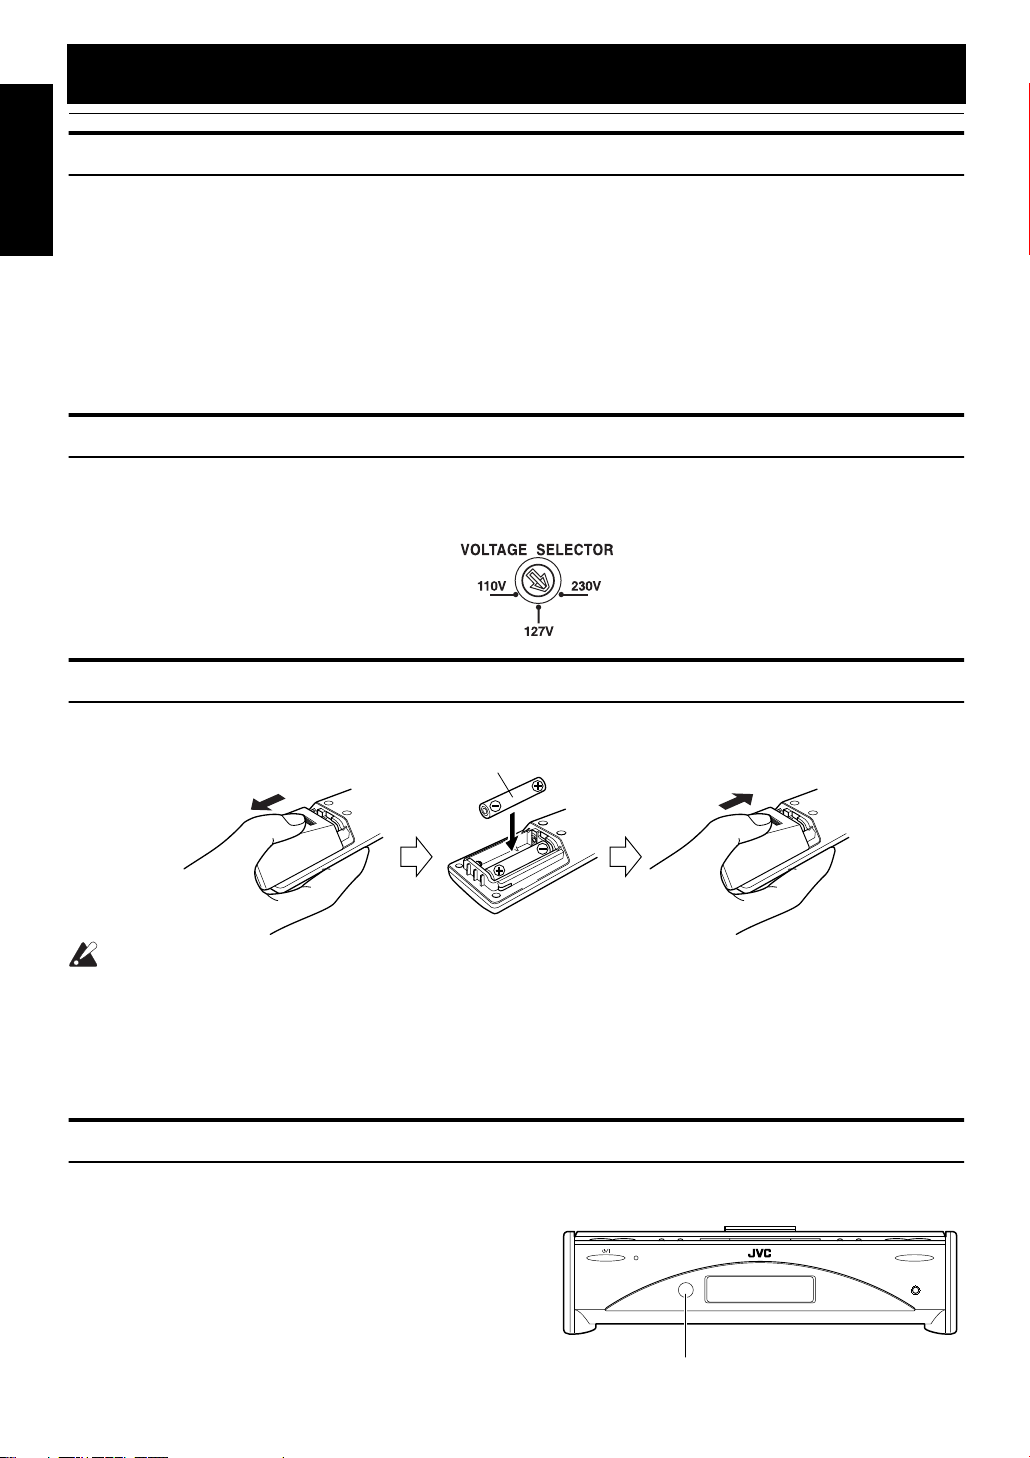
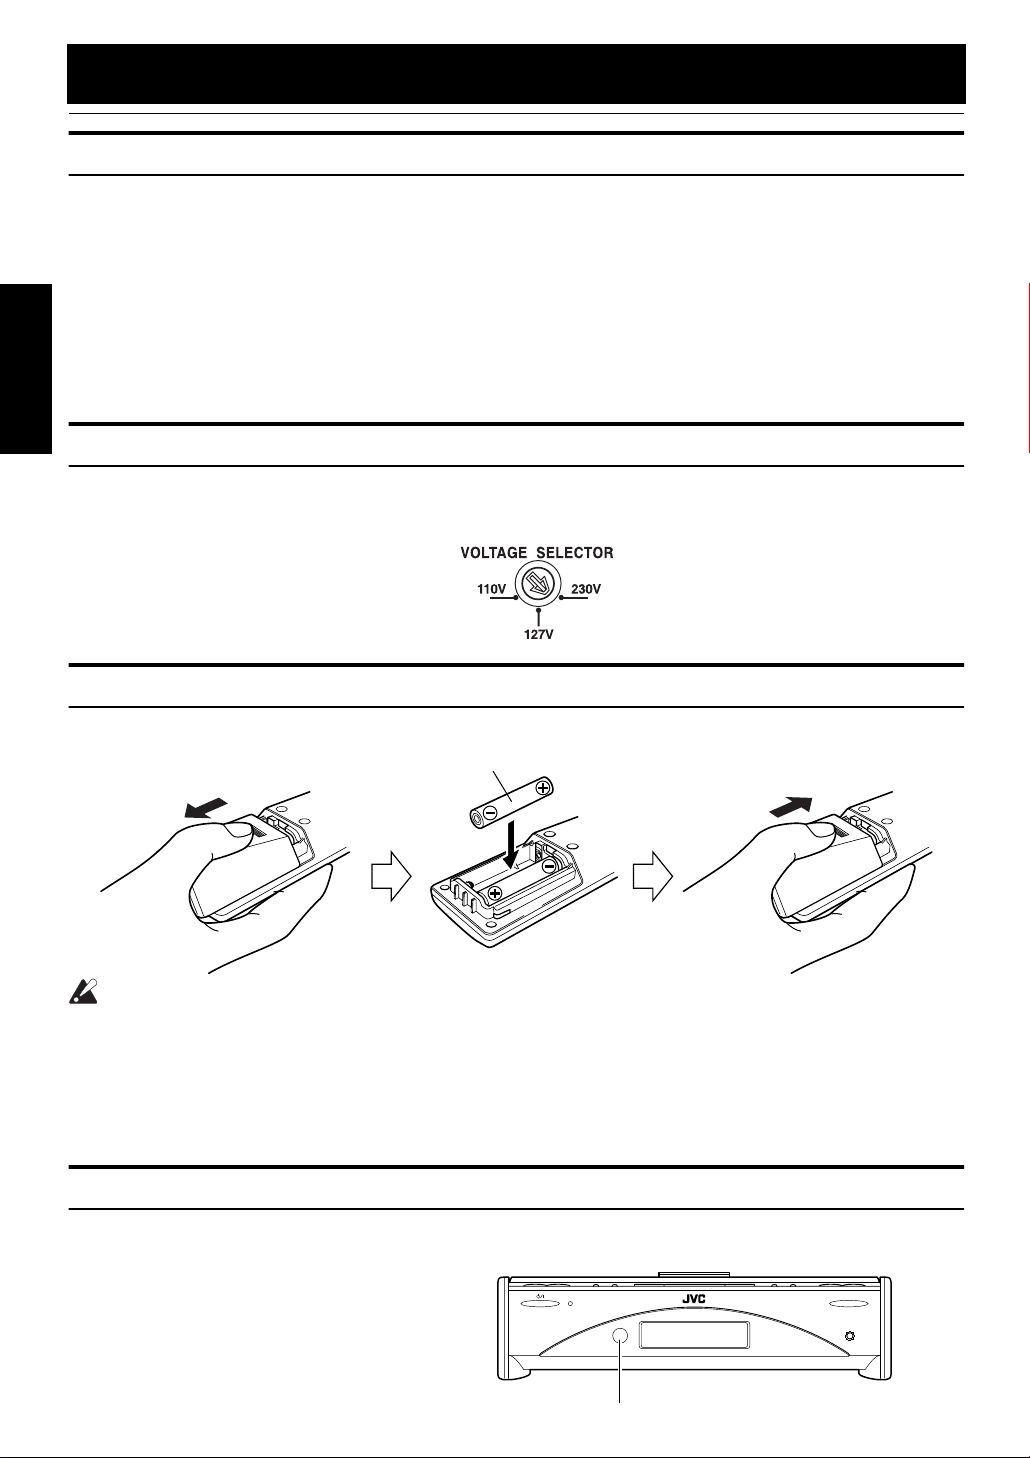
Set the VOLTAGE SELECTOR Switch
To avoid damaging the System, set the voltage before plugging in the System.
Set the correct voltage for your area with the VOLTAGE SELECTOR switch on the back of the Unit. By using a screwdriver,
rotate the VOLTAGE SELECTOR switch so that the arrow mark points the voltage of your area.
How To Put Batteries In the Remote Control
Match the polarity (+ and –) on the batteries with the + and – markings in the battery compartment.
R6P(SUM-3)/AA(15F)
CAUTION:
• Handle batteries properly.
■ To avoid battery leakage or explosion:
• Remove batteries when the Remote Control will not be used for a long time.
• When you need to replace the batteries, replace both batteries at the same time with new ones.
• Do not use an old battery with a new one.
• Do not use different types of batteries together.
Using the Remote Control
The Remote Control makes it easy to use many of the functions of the System from a distance of up to 7m (23 feet) away.
You need to point the Remote Control at the remote sensor on the System’s front panel.
STANDBY/ON
OPEN/CLOSE
3
PHONES
Remote sensor
Page 7
CAUTION:
• Make all connections before plugging the System into an AC power outlet.
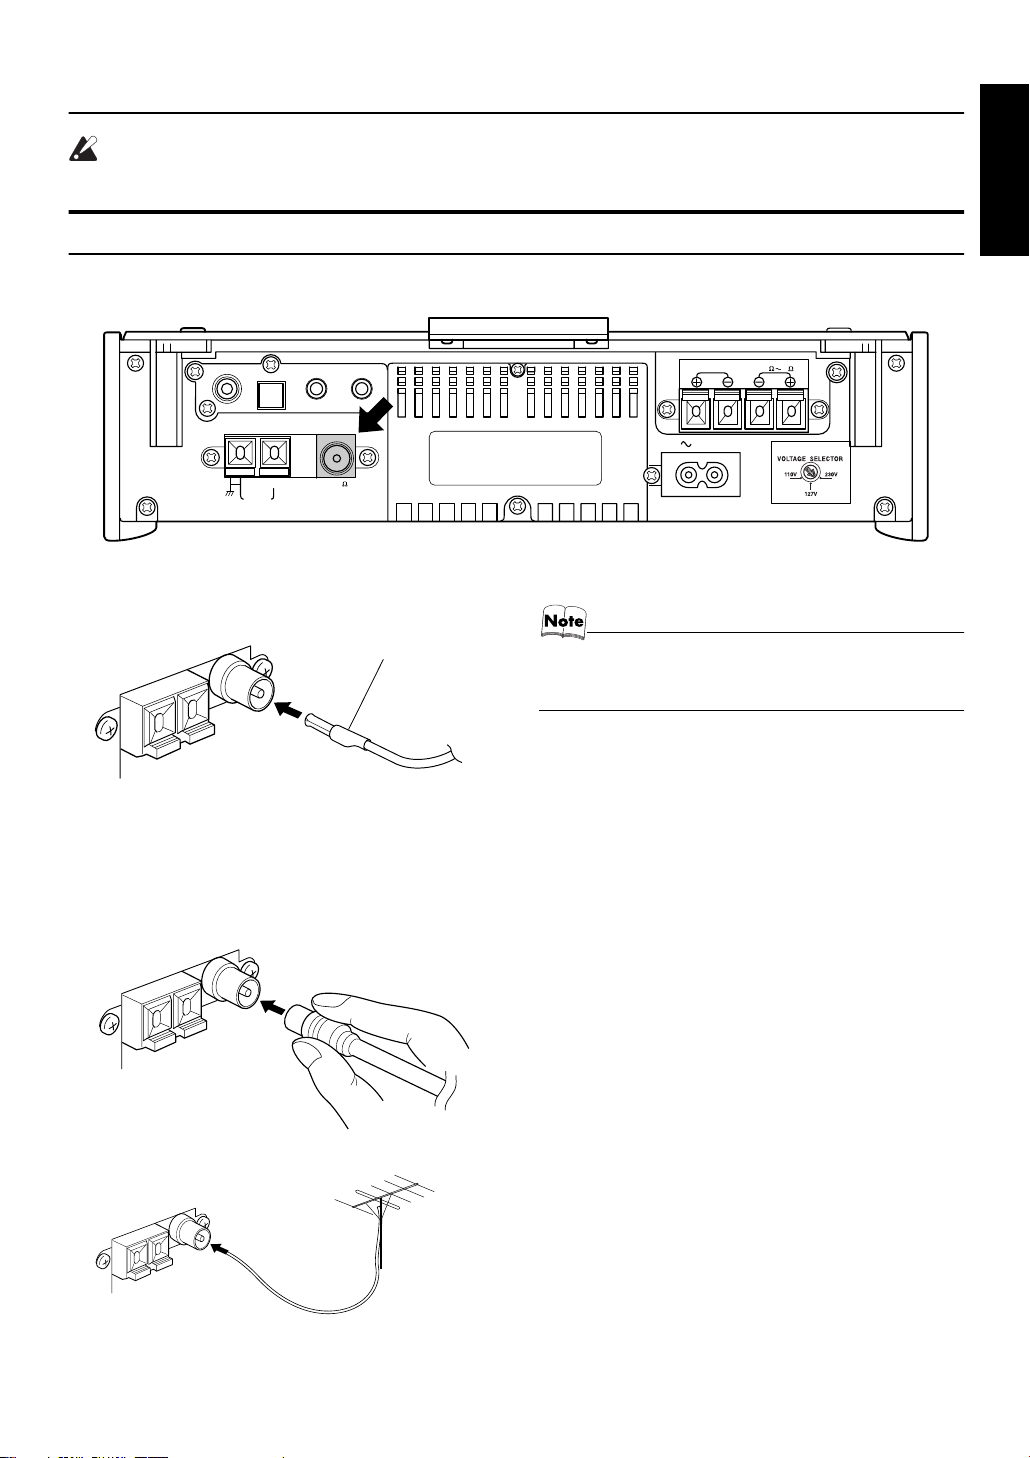
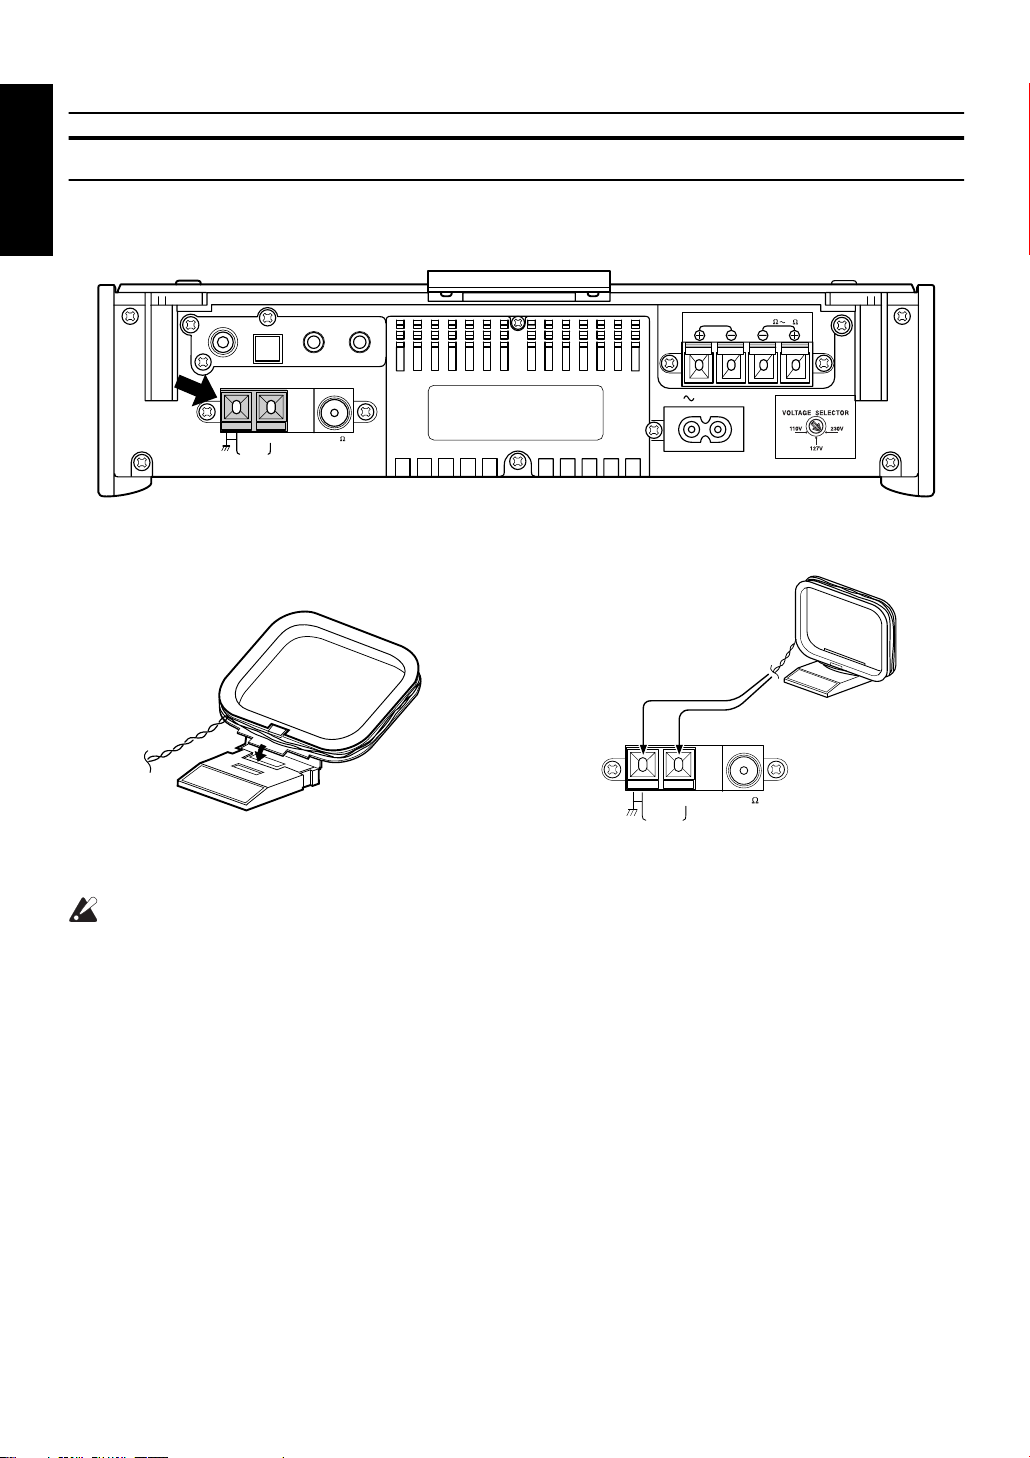
Connecting the FM Antenna
Rear Panel of the Unit
Getting Started
English
SUB WOOFER
CD DIGITAL OUT
AM LOOP
OUT IN
MD
ANTENNA
AM EXT FM(75
COAXIAL
/
AUX
)
Using the Supplied Wire Antenna
FM wire antenna (supplied)
Using the Coaxial Type Connector
(Not Supplied)
A 75-ohm antenna with coaxial type connector (IEC or
DIN45 325) should be connected to the FM 75-ohm COAXIAL terminal.
SPEAKERS IMPEDANCE 4 16
R
AC IN
L
• Before attaching a 75 ohm coaxial lead (the kind with a
round wire going to an outdoor antenna), disconnect the
supplied FM Wire Antenna.
If reception is poor, connect the outdoor antenna.
FM outdoor
antenna
(Not supplied)
Coaxial cable
4
Page 8
Getting Started
Connecting the AM Antenna
Rear Panel of the Unit
English
SUB WOOFER
CD DIGITAL OUT
AM LOOP
OUT IN
MD
ANTENNA
AM EXT FM(75
COAXIAL
/
AUX
)
AM loop antenna (Supplied)
Attach the AM loop to its base by snapping the tabs on
the loop into the slot in the base.
ANTENNA
AM EXT FM(75
AM LOOP
SPEAKERS IMPEDANCE 4 16
R
AC IN
COAXIAL
L
)
Turn the loop until you have the best reception.
CAUTION:
• To avoid noise, keep antennas away from the System, the connecting cord and the AC power
cord.
5
Page 9
CAUTION:
• Make all connections before plugging the System into an AC power outlet.
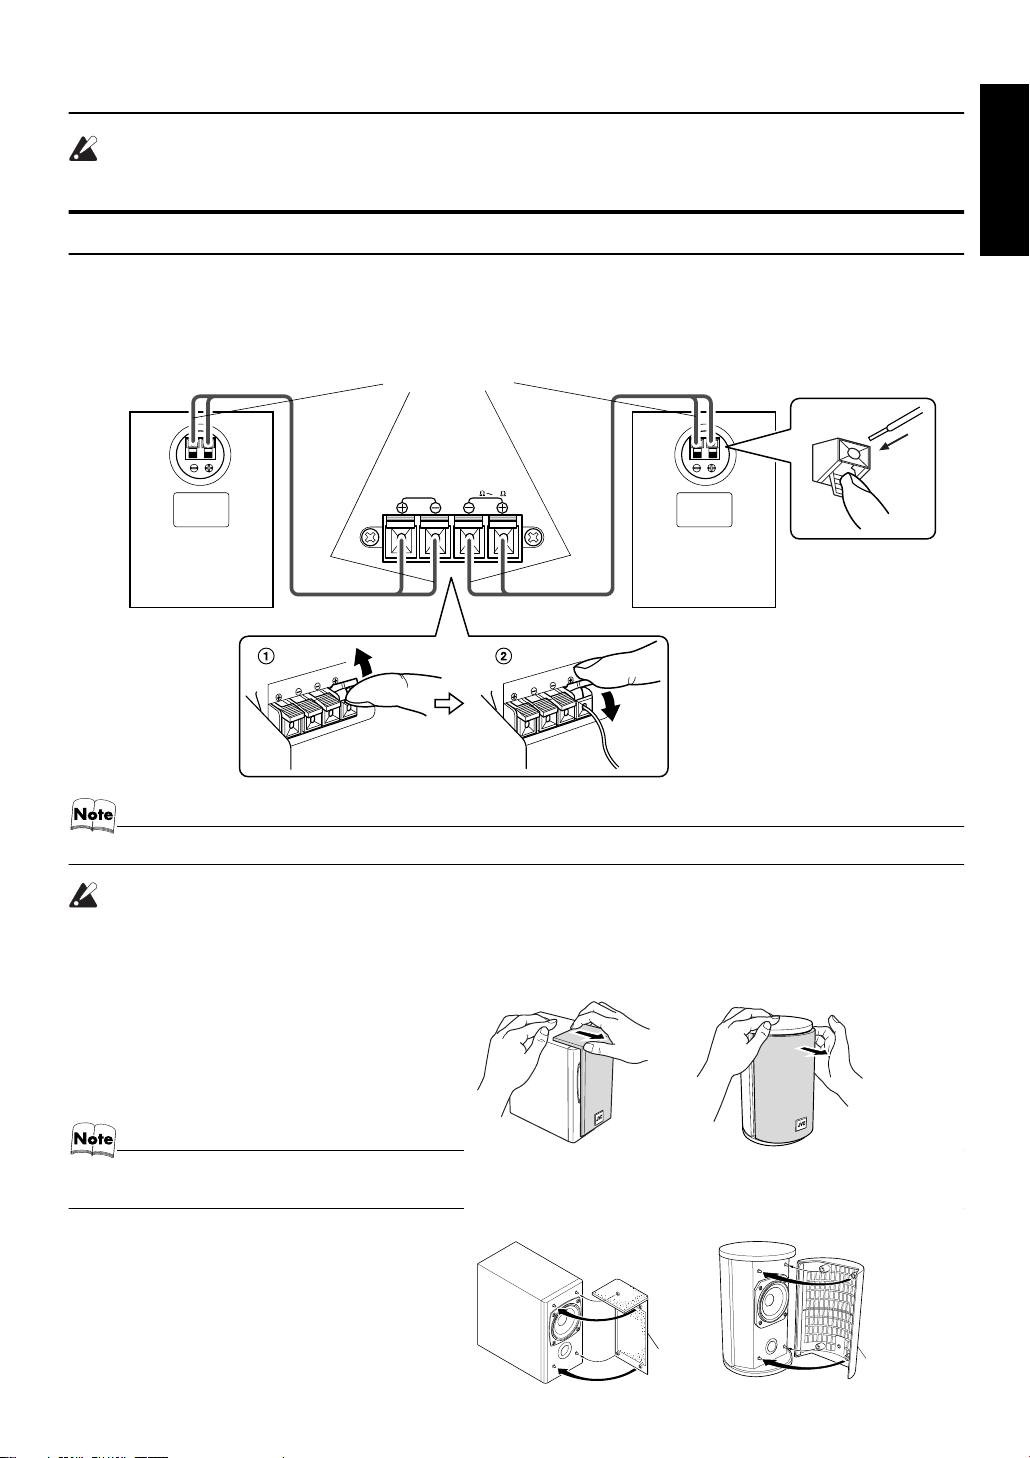
Connecting the Speakers
1. Open each of the terminals to connect the speaker wire leads.
2. Connect the speaker cords between the Speaker terminals of the Unit and the terminals of the Speakers.
Connect the cords with a black line to the (–) terminals and cords without a black line to the (+) terminals.
3. Close each of the terminals to securely connect the cords.
Right side (rear view)
Marked with a black line
SPEAKERS IMPEDANCE 4 16
RL
Left side (rear view)
Getting Started
English
• Since both speakers are the same, you can put either one to the right or left side.
CAUTION:
• A TV may display irregular colors if located near the speakers. If this happens, set the speakers away from the TV.
Removing the speaker grilles
The speaker grilles can be moved.
(FS-SD5)
(FS-SD7 and FS-SD9)
When removing:
1. Pull the top forwards you with your fingers.
2. Also pull the bottom towords you.
• When removing the speaker grille from the FS-SD9’s
speaker, be careful not to damage the cabinet.
When attaching the speaker grille:
(FS-SD5)
Speaker
grille
(FS-SD7 and FS-SD9)
Speaker
grille
6
Page 10
Getting Started
Attaching the Spacers
English
CAUTION:
NNNNooootttte
e ffffoooor
r iiiinnnnssssttttaaaallllllllaaaattttiiiioooonnnn
e e
• Take special care to select an appropriate installation place where an earthquake or shock does not
cause the speaker to collapse or drop on the floor.
r r
Spacer
(FS-SD7)
(FS-SD9)
Spacer
FS-SD7 / SD9
Attach the supplied spacers to the bottom of the speaker to
protect the cabinet, prevent slipping, and absorb the cabinet
vibration. Peel off the backing from a spacer and attach it.
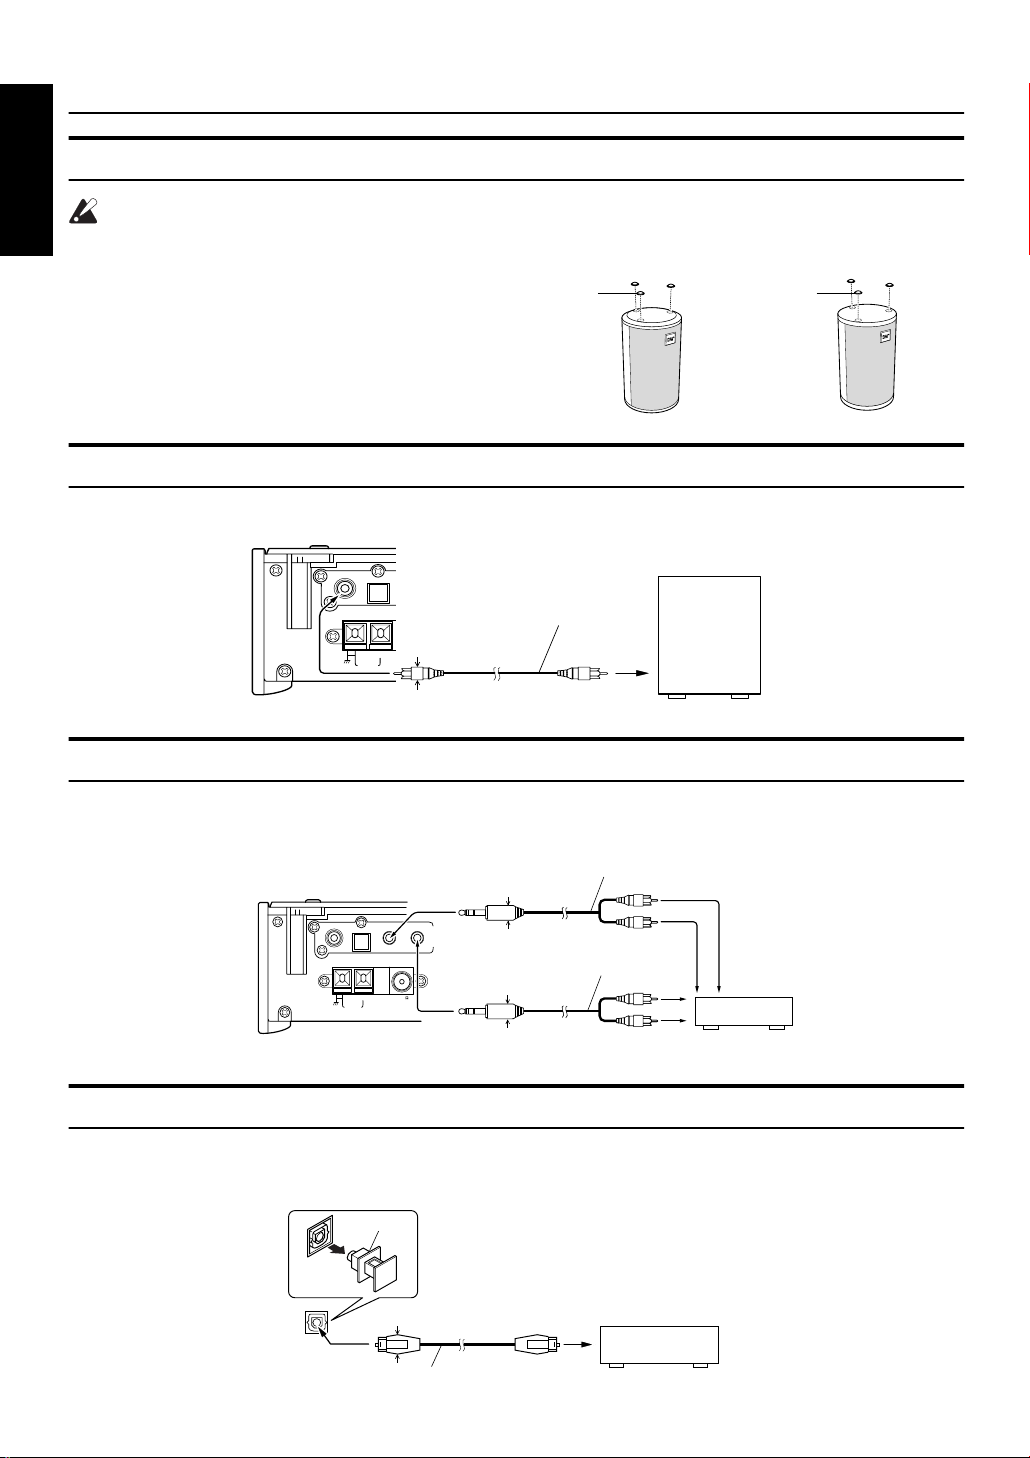
Connecting a Subwoofer
Connect a signal cord (not supplied) between the System’s SUBWOOFER terminal and the input terminal of an external subwoofer.
SUB WOOFER
CD DIGITAL OUT
ANTENNA
AM EXT FM(75 11mm Max/
AM LOOP
*
OUT IN
11mm Max.
COAXIAL
* Use the plug whose diameter is 11mm or less.
/
AUX
MD
Signal cord (not supplied)
)
Subwoofer (not supplied)
Connecting External Equipment
Connect signal cords (not supplied) between the System’s MD/AUX-OUT/IN terminals and the output/input terminals of the
external MD recorder, tape deck, etc.
You can then listen to the external source through the System or record the System’s CD player or tuner to the external unit.
Signal cord (not supplied)
11mm Max.
*
SUB WOOFER
* Use the plug whose diameter is 11mm or less.
CD DIGITAL OUT
ANTENNA
AM EXT FM(75
AM LOOP
OUT IN
/
MD
COAXIAL
AUX
)
Stereo mini-plug
Signal cord (not supplied)
11mm Max.
*
Stereo mini-plug
Pin-plug x 2
MD recorder or tape deck
(not supplied)
Pin-plug x 2
Connecting an MD Recorder, etc (Digital Output)
Unplug the cap and connect an optical digital cord (not supplied) between the System’s CD DIGITAL OUT terminal and the
input terminal of the MD recorder, etc.
You can record the digital output signal from the System’s CD Player to the MD recorder, etc.
Cap
CD DIGITAL OUT
11mm Max.
MD recorder, etc. (not supplied)
*
Optical digital cord (not supplied)
* Use the plug whose diameter is 11mm or less.
7
Page 11
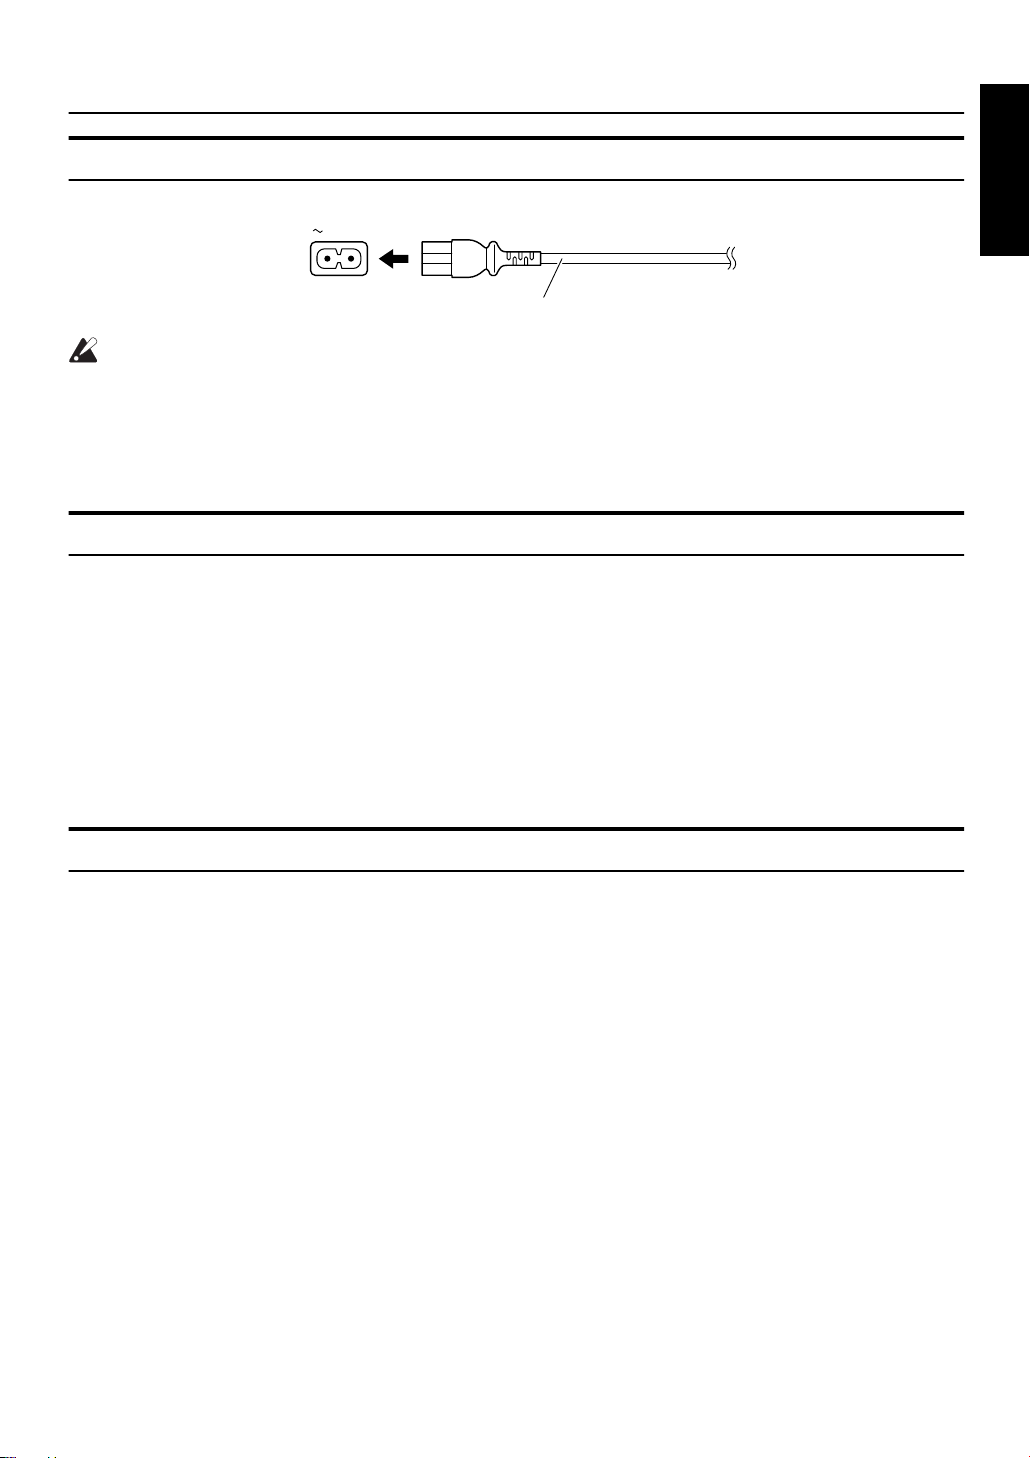
Connecting the AC Power Cord
Getting Started
Firmly insert the supplied AC power cord into the AC inlet on the back of the Unit.
AC IN
Power cord
CAUTIONS:
• ONLY USE THE JVC POWER CORD PROVIDED WITH THIS SYSTEM TO AVOID MALFUNCTION OR DAMAGE TO THE SYSTEM.
• BE SURE TO UNPLUG THE POWER CORD FROM THE OUTLET WHEN GOING OUT OR WHEN
THE SYSTEM IS NOT IN USE FOR AN EXTENDED PERIOD OF TIME.
Now you can plug the AC power cord into the wall outlet, and your System is at your command!
COMPU Play
JVC’s COMPU PLAY feature lets you control the most frequently used System functions with a single touch.
With One Touch Operation you can play a CD, turn on the radio, or listen to an external equipment with a single press of the
play button for that function. One Touch Operation turns the power on for you, then starts the function you have specified. At
the same time, the Top Cover moves backward to allow the Unit’s top button operation. If the System is not ready (no CD in
place), the System still powers on so you can insert a CD.
How One Touch Operation works in each case is explained in the section dealing with that function.
The COMPU PLAY buttons are:
On the Remote Control
CD #/8 button
FM/AM button
MD/AUX button
English
Automatic Power On
The System automatically turns on with the following operation.
• When you press the CD 0 button on the Remote Control or the OPEN/CLOSE button on the Unit, the System automatically
turns on and the Top Cover opens to allo w CD setting. However, this operation does not change the function to CD.
When you press the % button to turn off the System, the Top Cov er will be automatically closed if it is opened.
• When you press the DOOR SLIDE button on the Remote Control, the System automatically turns on and the Top Cov er
moves backwards to allow b utton operation.
When you press the % button to turn off the System, the Top Cov er will automatically mov es back to the original position,
if it is in the backward posi tion .
8
Page 12
Basic Operations
English
DISPLAY
AHB PRO
VOLUME+,–
DIMMER
BASS
FADE
MUTING
REMOTE CONTROL
DIMMER SLEEP
AUTO
DISPLAY FM MODE
PRESET
PROGRAM
DOOR
AHB PRO
SLIDE
BASS TREBLE CANCEL
UP
SET
DOWN
FADE MUTING
CD
MD/AUX FM / AM
VOLUME
%
REPEATRANDOM
CD
DOOR SLIDE
TREBLE
PRESET
TUNINGFM/AMMD/AUX
AHB PRO CLOCK TIMER VOLUME
AHB PRO
STANDBY/ON OPEN/CLOSE
STANDBY/ON indicator
%
MULTI CONTROL
CD
UPDOWN
CLOCK
VOLUME+,–
PHONES
PHONES
Top Cover
Turning the Power On and Off
Turning the System On
Press the % button.
The Top Cover moves backward and the Unit’s top buttons
appear. The display comes on and “HELLO” is displayed
once. The STANDBY/ON indicator lights in green.
The System comes on ready to continue in the mode it was
in when the power was last turned off.
■For example, if the last thing you were doing was listening to a CD, you are now ready to listen to a CD again. If
you wish, you can change to another source.
■If you were listening to the Tuner last, the Tuner comes
on playing the station it was last set to.
Turning the System Off
Press the % button again.
The Top Cover moves back to the original position.
“GOOD BYE” is displayed and the display goes out, except
for the clock display. The STANDBY/ON indicator lights in
red.
■Some power is always consumed even though power is
turned off (called Standby Mode).
■To switch off the System completely, unplug the AC
power cord from the wall outlet. When you unplug the
AC power cord, the clock will be reset to 0:00 after about
20 minutes.
Adjusting the Brightness
(DIMMER)
You can adjust the brightness of the backlighting for the display.
When the System is Turned On
Each time you press the DIMMER button on the Remote
Control, the brightness of the backlighting changes as follows:
Bright = Dark = (back to the beginning)
When the System is Turned Off
(STANDBY MODE)
Each time you press the DIMMER button on the Remote
Control, the brightness of the backlighting changes as follows:
No backlighting = Dark backlighting
= (back to the beginning)
• When the System is turned off again after power on, the
brightness in Standby mode will be restored to the previous one since the brightness setting in Standby mode is
stored in memory.
Adjusting the Volume
Press the VOLUME + button to increase the volume or
press the VOLUME – button to decrease it.
You can adjust the volume level between 0 and 50.
CAUTION:
• DO NOT turn on the System and/or start
playing any source without first setting the
VOLUME control to minimum, as a sudden
blast of sound could damage your hearing,
speakers and/or headphones.
For private listening
Connect a pair of headphones to the PHONES jack. No
sound comes out of the speakers.
Be sure to turn down the volume before connecting or putting on headphones.
9
Page 13
Basic Operations
Fade-out Muting (FADE MUTING)
You can mute the output with one touch operation.
To mute the output, press the FADE MUTING button
on the Remote Control. Then, the output will be faded out
and becomes 0.
To release muting, press the FADE MUTING button once
again. Then, the output will be faded in to the original level.
Reinforcing the Bass Sound
(AHB PRO)
You can reinforce the bass sound to maintain rich, full bass
at low volume.
To get the effect, press the AHB (Active Hyper Bass)
PRO button.
The “AHB PRO” indicator lights up on the display.
To cancel the effect, press the button again.
The “AHB PRO” indicator goes out.
Tone Control (BASS/TREBLE)
You can control the tone by changing the bass and treble.
BASS Control
You can adjust the bass level (low frequency range level)
between –6 and +6. (0: Flat)
Showing the Time
(CLOCK/DISPLAY)
English
You can show the current time on the display.
To display the clock, press the CLOCK button on the
Unit or DISPLAY button on the Remote Control.
To return to the previous mode, press the same button
again.
• To let the clock work, you need to set the clock first. (See
“Setting the Clock” on page 17.)
Sliding the Top Cover
(DOOR SLIDE)
Each time you press the DOOR SLIDE button on the Remote Control, the Top Cover slides back and forth.
Slide the Top Cover backward to allow Unit’s top button
operation. Slide it toward you to cover the buttons.
Press the BASS button on the Remote
1
Control.
Press the UP or DOWN button on the
2
Remote Control to adjust the bass level.
DOWN
BASS
UP
TREBLE Control
You can adjust the treble level (high frequency range level)
between –6 and +6. (0: Flat)
Press the TREBLE button on the
1
Remote Control.
Press the UP or DOWN button on the
2
Remote Control to adjust the treble
level.
DOWN
TREBLE
UP
10
Page 14
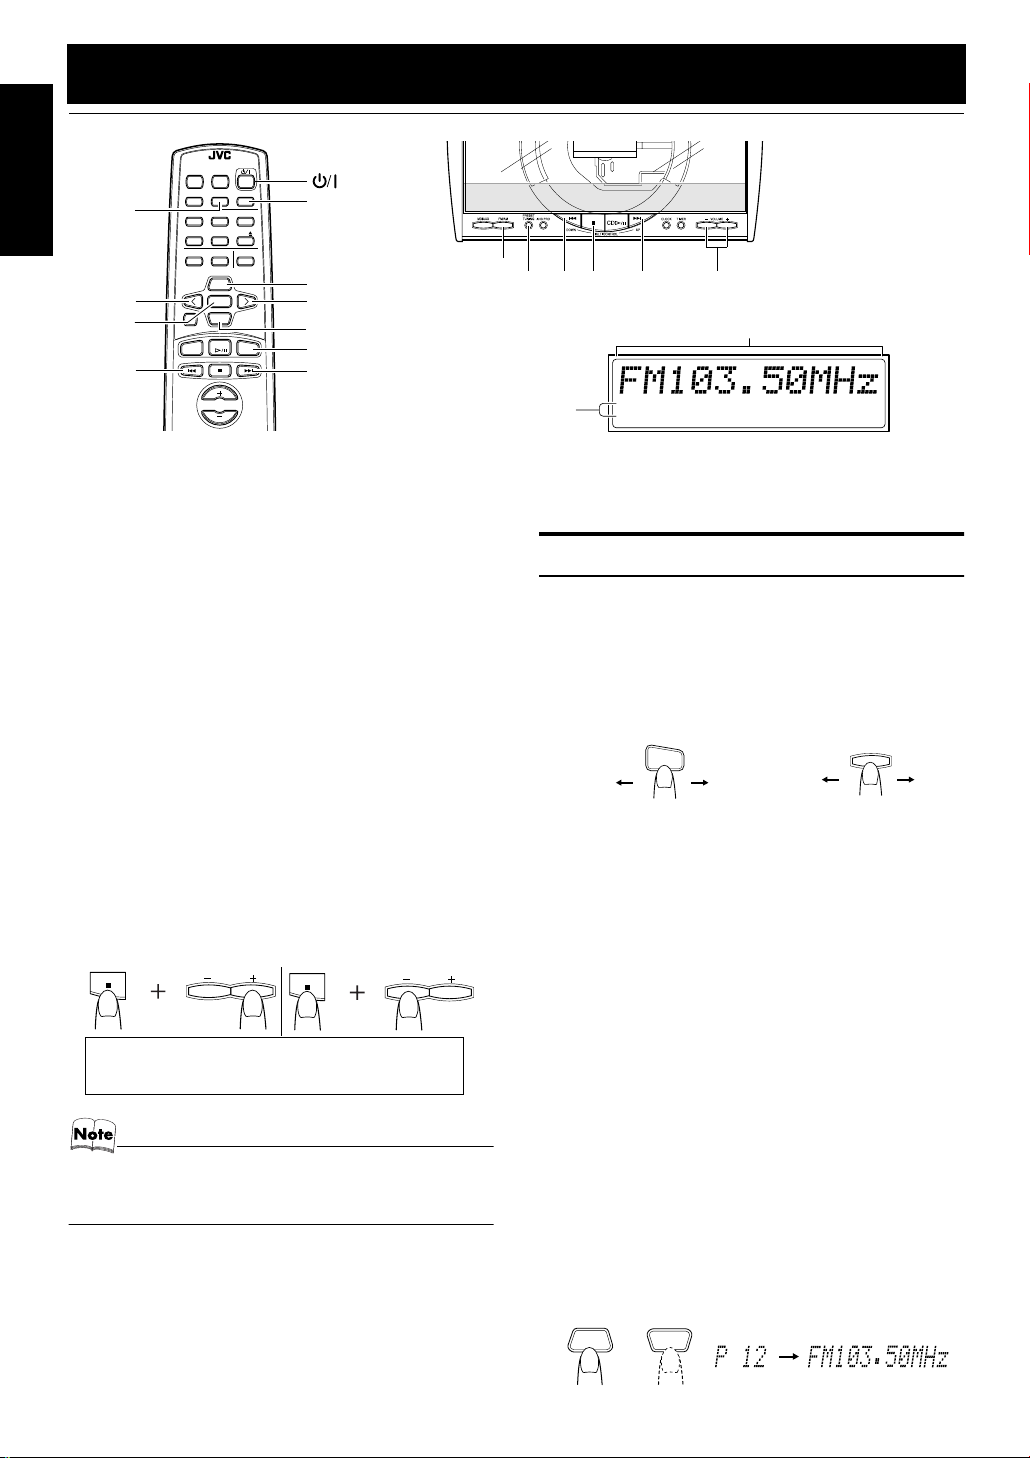
Using the Tuner
REMOTE CONTROL
DIMMER SLEEP
AUTO
DISPLAY FM MODE
AUTO
English
PRESET
<
SET
4
You can listen to FM and AM stations. Stations can be tuned
in manually, automatically, or from preset memory storage.
■Before listening to the radio:
• Make sure that both the FM and AM antennas are correctly connected. (See pages 4 and 5).
Setting the AM Tuner Interval Spacing
When shipped, the AM tuner interval is set to 9 or 10 kHz
spacing (Initial setting : U/UT/US...9 kHz, UY...10 kHz).
You can change it to 10 or 9 kHz spacing.
●Preparation to setting:
Turn on the power and press the FM/AM button to select
FM or AM mode.
To select 10 kHz intervals, while holding down the 7
button on the Unit, press the VOLUME + button on the
Unit. “AM 10kHz” will appear on the display (at the same
time, the 100 kHz spacing is selected for FM broadcast).
To select 9 kHz intervals, while holding down the 7 but-
ton on the Unit, press the VOLUME − button on the Unit.
“AM 9kHz” will appear on the display.
[10 kHz Intervals] [9 kHz Intervals]
UT ... Taiwan ROC
US... Singapore
• When you change the setting, the preset stations are
erased. You will need to preset the stations again. (See
page 12.)
One Touch Radio
Just press the FM/AM button to turn on the System and start
playing the station you were last tuned to.
■You can switch from any other sound source to the radio
by pressing the FM/AM button.
11
PRESET
PROGRAM
DOOR
AHB PRO
SLIDE
BASS TREBLE CANCEL
UP
SET
DOWN
FADE MUTING
CD
MD/AUX FM / AM
VOLUME
REPEATRANDOM
CD
FM MODE
UP
>
DOWN
FM/AM
¢
* When the System is in use, the display shows other items as well.
For simplicity, we show here only the items described in this section.
VOLUME
VOLUME
UY... Argentina
U...Others
FM/AM
PRESET
TUNING
7
4
FM mode
indicators
¢
Band display, Frequency display, Preset channel
STEREO
MONO
VOLUME +, −
Tuning In a Station
Press the FM/AM button.
1
The Band and Frequency you were last tuned to appear
on the display.
(If the last station was selected using the preset number,
the preset number appears first.)
Each time you press the button, the band alternates between FM and AM.
FM / AM
FMAM
(on the Remote Control)
Select a station using one of the follow-
2
ing methods.
●Manual Tuning
Press the 4 or ¢ button on the Unit or the Remote Control repeatedly to move from frequency to
frequency until you find the station you want.
OR
●Auto Tuning
If you press and hold the 4 or ¢ button on the
Unit or the Remote Control for one second or more,
the frequency changes down, or up, automatically until a station is found.
OR
●Preset Tuning using the Remote Control
(Possible only after presetting stations)
Select the desired preset number using the UP,
DOWN, > and < button on the Remote Control. After
1 second the display will show the preset number’s
band and frequency.
Example:
Press the UP button until the preset number 12 “P12”
appears.
UP
DOWN
or
(After 1 second)
(on the Unit)
FM/AM
FMAM
Page 15
Using the Tuner
FM / AM
AUTO
PRESET
MONO
FM MODE
●Preset Tuning using the Unit
Press the PRESET TUNING button to select the desired preset number.
Its band and frequency are displayed.
• In AM broadcast, reception sensitivity will be changed by
turning the AM loop antenna. Turn the AM loop antenna
for best reception.
Presetting Stations
You can preset up to 30 FM stations and up to 15 AM stations using the Remote Control.
• Preset numbers may have been set to factory test frequencies prior to shipment. This is not a malfunction. You
can preset the stations you want into memory by following
one of the presetting methods below.
Manual Presetting
SET STORED
FM / AM
When changing the Band
SET
UP
or
FM = 30, AM = 15
DOWN
SET
Repeat above steps 1 to 5 for each sta-
6
tion you want to store in memory with a
preset number.
To change the preset stations, repeat the same
steps as above.
Auto Presetting
In each band, you can automatically preset FM-30, AM-15
stations. Preset numbers will be allocated as stations are
found, starting from the lowest frequency and moving up
the frequency.
(for 2 seconds)
Select a band by pressing the FM/AM
1
button.
Press the AUTO PRESET button on the
2
Remote Control for more than two seconds.
Repeat steps 1-2 for the other band.
3
■If you want to change the preset stations, carry out the
Manual Presetting for the desired preset numbers.
English
Select a band by pressing the FM/AM
1
button.
Press the 4 or ¢ button to tune in a
2
station.
Press the SET button.
3
“SET” will blink for 5 seconds.
Within 5 seconds, proceed to the next step.
When the display returns to the one set in step 2 after 5
seconds, press the SET button again.
Press the UP, DOWN, >, or < button
4
within 5 seconds to select the preset
number.
UP or DOWN button:Increase or decrease the preset
> or < button: Increase or decrease the preset
Press the SET button within 5 seconds.
5
“STORED” appears and after 2 seconds, the display returns to the broadcast frequency display.
number by 1.
Pressing and holding the button
will continuously increase or decrease the preset number.
number by 1.
Pressing and holding the button
will rapidly increase or decrease
the preset number.
CAUTION:
• Even if the system is unplugged or if the
power failure occurs, the preset stations
will be stored for about 24 hours. However,
in case the preset stations are erased, you
will need to preset the stations again.
To Change the FM
Reception Mode
When you are tuned into an FM stereo broadcast, the
“STEREO” indicator lights up and you can hear stereo effects.
If an FM stereo broadcast is hard to receive or noisy, you
can select Monaural mode. Reception improves, but you
lose stereo effect.
Press the FM MODE button on the Remote Control
so that the “MONO” indicator lights up on the display.
To restore the stereo effect , press the FM MODE button
on the Remote Control so that the “MONO” indicator goes off.
12
Page 16

Using the CD Player
PROGRAM
English
RANDOM
CD #/8
SET
4
REMOTE CONTROL
DIMMER SLEEP
AUTO
DISPLAY FM MODE
PRESET
REPEATRANDOM
PROGRAM
DOOR
SLIDE
BASS TREBLE CANCEL
UP
SET
DOWN
CD
VOLUME
CD
AHB PRO
<
FADE MUTING
MD/AUX FM / AM
REPEAT
CD 0
CANCEL
UP
>
DOWN
¢
7
PRESET
TUNINGFM/AMMD/AUX
AHB PRO CLOCK TIMER VOLUME
Track number, Playing time, Preset number
4
CD
UPDOWN
MULTI CONTROL
¢
7
CD #¥8
STANDBY/ON% OPEN/CLOSE
Top Cover
PHONES
OPEN/CLOSE
* When the System is in use, the display shows other items as well.
For simplicity, we show here only the items described in this section.
You can use Normal, Random, Program or Repeat Play. Repeat Play can repeat all the tracks or just one of the tracks
on the CD.
Here are the basic things you need to know to play a CD and
locate the different tracks on it.
The Quickest Way To Start a CD Is With the One
Touch Operation
■Press the CD #¥8 button on the Remote Control.
• The power is automatically turned on and the Top Cover
moves backward to allo w the Unit’s top button operation. If a CD is already inserted, it will start playing from
the first track.
• If no CD is inserted, “NO DISC” appears on the display
and the CD Player remains in Stop mode.
To Insert a CD
Press the OPEN/CLOSE button on the
1
Unit (or the CD 0 button on the
Remote Control).
The Top Cover opens.
RANDOM ALL
PROGRAM
987654321
Music calendar
Place a CD, with its label side up as
2
2019181716151413121110
Track number exceeding 20 is not
displayed.
Play mode indicators
shown below. Press down on the CD’s
center until you hear a click.
Press the OPEN/CLOSE button (or CD 0
3
button) again to c lose the Top Cover.
• T o close the Top Co ver and play the CD, you can just
press the CD #¥8 button.
■You can place an 8 cm (3'') CD without an adaptor.
■If the CD cannot be read correctly (because it is
scratched, for example), “ 0 0:00” appears on the display.
■You can insert a CD while listening to the other source.
13
CAUTION:
• DO NOT try to open or close the Top Cover
by hands as it will be damaged.
Page 17

To Unload a CD
Take out the CD as shown below.
Basics of Using the
CD Player-Normal Play
Using the CD Player
To pause, press the CD #¥8 button. The playback time
blinks on the display.
To cancel pause, press the same button again. Play continues from the point where it was paused.
To Select a Track or Passage within a Track
During playback, press the 4 or ¢ (< or >) button to select the track you want.
• The selected track starts playing.
• Press the ¢ or > button once to skip to the beginning of the next track.
• Press the 4 or < button to skip to the beginning of
the track being played. Press twice quickly to skip to
the beginning of the previous track.
• When the > or < button on the Remote Control is
kept pressing, the track continuously skips.
Search Play
Holding down the 4 or ¢ button, during playback, will
fast forward/backwards the CD so you can quickly find a
particular passage in the track you are listening to.
Programming the
Playing Order of the Tracks
You can program the playing order of the tracks using the
Remote Control.
■You can program up to 32 tracks in any desired order in-
cluding the same tracks.
■You can only make a program when the CD Player is
stopped.
English
To Play a CD
Insert a CD.
1
Press the CD #¥8 button.
2
The first track of the CD begins playing.
Track number Playback time
• The track number that has already played disappears
from the music calendar.
• The CD Player automatically stops when the last
track of the CD has finished playing.
To stop playing the CD, press the 7 button.
The following information for the CD is displayed.
Total track number Total playback time
To stop playing and remove the CD, press the
OPEN/CLOSE button on the Unit or CD 0 button on the
Remote Control to open the Top Cover.
Insert a CD.
1
Press the CD #/8 button.
2
Press the 7 button to stop the CD.
3
Press the PROGRAM button.
4
The System enters the programming mode and the
“PROGRAM” indicator lights up.
PROGRAM
PROGRAM
Press the UP, DOWN, >, or < button to
5
select the track to program.
UP or > button: Increases the track number by 1.
DOWN or < button:Decreases the track number by 1.
• When the > or < button is kept pressing, the track
number changes rapidly.
(To be continued on the next page)
14
Page 18

Using the CD Player
Press the SET button.
6
UP
Program order number
English
DOWN
Repeat steps 5 and 6 to select the other
7
SET
Total playback time of the programmed tracks
tracks for the program.
You can see the total playback time of programmed
tracks on the display. Also, you can see the programmed
tracks on the music calendar.
Press the CD
8
The System plays the tracks in the order you have programmed them.
■You can skip to a particular program track by pressing the
4 or ¢ button during Program Play.
■To stop playing, press the 7 button once.
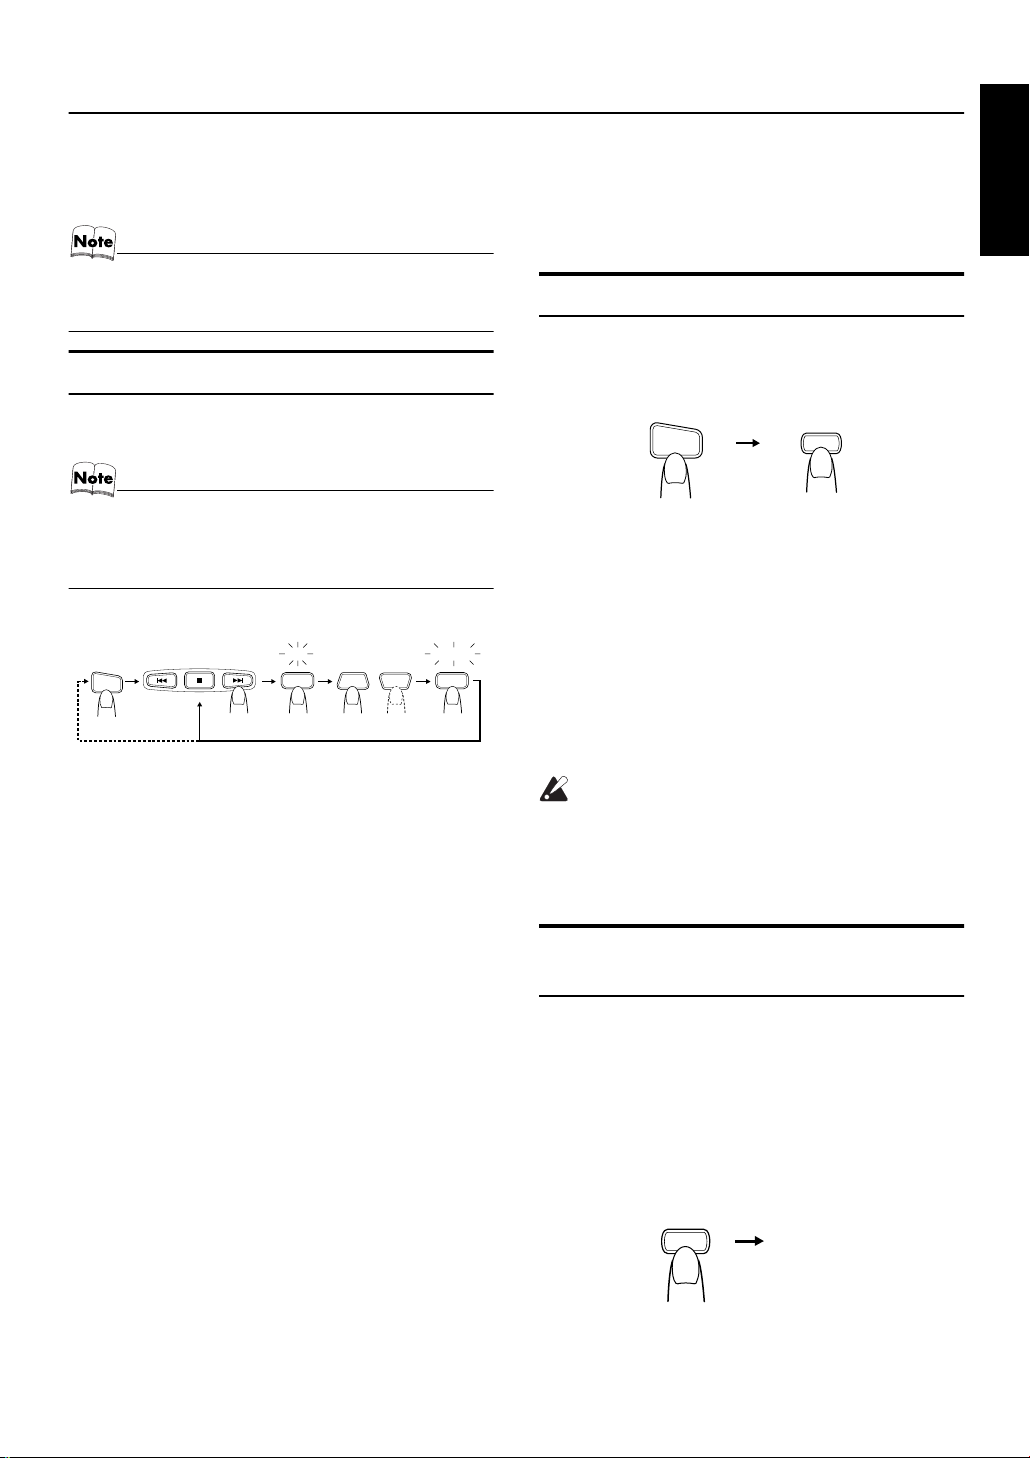
To confirm the programmed tracks while the CD
player is stopped, each time press the 4 or ¢ but-
ton; the tracks making up the program will successively be
displayed in the programmed order.
To delete all the tracks in the program, in stop mode,
press the 7 button. Pressing the CD 0 button to open the
Top Cover will also clear the programmed tracks.
To exit the program mode once, while the CD Player
is stopped, press the PROGRAM button to light off the
“PROGRAM” indicator.
• If the total playback time of the programmed tracks exceeds 99 minutes 59 seconds, the total playback time will
go out on the display.
• If you try to program the 33rd track, “MEMORY FULL” appears on the display for about 2 seconds.
#/8
(After 2 seconds)
button.
Random Play
The tracks will play in no special order when you use this
mode.
Press the RANDOM button on the
1
Remote Control.
The “RANDOM” indicator lights up on the display.
Press the CD #/8 button.
2
The tracks are played in random order.
To skip a track during playback, press the ¢ button
to jump to the next track in the random sequence. Press the
4 button to jump back to the start of a track being played.
To exit Random Play mode, while the CD Player is
stopped, press the RANDOM button to light off the “RANDOM” indicator and carry out Normal Play, or press the CD
0 button to open the Top Cover.
Repeating Tracks
You can repeat all tracks or individual track, as many times
as you like.
Press the REPEAT button on the Remote Control.
The Repeat indicator changes with each press of the button,
as shown below.
= ALL=blank display = (back to the
beginning)
To exit Repeat mode, press the REPEAT button until the
Repeat indicator on the display goes out.
■In Random Play, cannot be selected.
■Repeat mode remains in effect even when you change the
play mode.
: Repeats one track.
ALL: In Normal Play mode, repeats all the tracks.
In Program Play mode, repeats all the tracks
in the program.
In Random Play mode, repeats all the tracks
in random order.
To Modify the Program
Modify the contents of the program while the CD Player is
stopped.
Each time you press the CANCEL button, the last track in
the program is deleted. To add new tracks to the end of the
program, repeat above steps 5 to 7.
15
Page 19

Using External Equipments
REMOTE CONTROL
DIMMER SLEEP
AUTO
DISPLAY FM MODE
PRESET
PROGRAM
REPEATRANDOM
DOOR
CD
AHB PRO
SLIDE
BASS TREBLE CANCEL
MD/AUX
UP
SET
DOWN
FADE MUTING
CD
MD/AUX FM / AM
VOLUME
MD/AUX
PRESET
TUNINGFM/AMMD/AUX
AHB PRO CLOCK TIMER VOLUME
MULTI CONTROL
CD
UPDOWN
English
Listening to External
Equipment
You can listen to external equipment such as MD recorder,
turntable or other auxiliary.
■First make sure that the external equipment is properly
connected to the System. (See page 7).
Set the VOLUME control to the mini-
1
mum position.
Press the MD/AUX button.
2
“MD/AUX” appears on the display.
Start playing the external equipment.
3
Adjust the VOLUME control to the
4
desired listening level.
Apply sound effects, if you wish.
5
■Press the AHB PRO button to reinforce the bass sound.
■Press the BASS/TREBLE button on the Remote Control
to control the tone. (See “Tone Control” on page 10.)
To exit MD/AUX mode, you will automatically switch
out of MD/AUX mode when you select another source.
Recording the System’s Source
to External Equipment
You can record the System’s source to external equipment
which is connected to the MD/AUX-IN/OUT or CD DIGITAL OUT terminals of the System, such as cassette deck or
MD recorder, etc.
■First make sure that the external equipment is properly
connected to the System. (See page 7).
Play the System’s CD Player or tune in to
a station.
■The recording level is not affected by the VOLUME level
set by the System. Also it is not affected by the sound effects.
• For operation of the external equipment, refer to its Instructions.
• For operation of the external equipment, refer to its Instructions.
16
Page 20

Using the Timers
English
SLEEP
REMOTE CONTROL
DIMMER SLEEP
AUTO
DISPLAY FM MODE
PRESET
PROGRAM
DOOR
AHB PRO
SLIDE
BASS TREBLE CANCEL
UP
SET
DOWN
FADE MUTING
CD
MD/AUX FM / AM
PRESET
TUNINGFM/AMMD/AUX
REPEATRANDOM
CD
AHB PRO CLOCK TIMER VOLUME
4
MULTI CONTROL
CD
UPDOWN
TIMER
CLOCK
¢
ON time, OFF time,
Source, Volume
VOLUME
* When the System is in use, the display shows other items as well.
For simplicity, we show here only the items described in this section.
The timers let you control listening functions automatically.
Setting the Clock
• Use the Unit’s button to set the clock.
• When you plug the AC power cord into the wall outlet,
the time indication “0:00” blinks on the display.
• The clock must be correctly set for the timers to work.
• The procedure must be completed within
Otherwise, the setting is cleared and must be repeated
from the beginning.
Press the
1
button.
%%%%
Then, the Unit’s top buttons appear.
CLOCK
(for 2 seconds)
Press the CLOCK button on the Unit for
2
CD
MULTI CONTROL
more than two seconds.
The hour digit of the time indication rapidly blinks on
the display.
Press the ¢ or 4 button on the Unit
3
to set the hour.
Pressing the ¢ button moves the time forwards and
pressing the 4 button moves it backwards. Hold
down the button to move the time rapidly.
two minutes
UPDOWN
.
CLOCK
SLEEP
Press the ¢ or 4 button to set the
5
Timer indicator
SLEEP indicator
minute.
Press the CLOCK button.
6
The selected time is set and the seconds start counting
from 0.
CAUTION:
• If there is a power failure, the clock loses its
setting after about 20 minutes. “0:00”
blinks on the display and the clock must be
reset.
• The clock may gain or lose one to two minutes per month.
Setting the Daily Timer
Once you have set the Daily Timer, the timer will be activated at the same time every day.
The Timer indicator on the display shows that the Daily
Timer you have set is in effect.
• Use the Unit’s button to set the timer.
• Perform each setting within
ting will be cleared and the procedure must be repeated
from the beginning.
30 seconds
. Otherwise, set-
Press the CLOCK button.
4
The minute digits of the time indication rapidly blink on
the display.
17
Page 21

Using the Timers
Setting the ON time (Example: 10:15).
1
1. Press the TIMER button on the Unit for more than
two seconds.
The Timer indicator lights up and the hour digit of the
current ON time blinks on the display.
• When the clock is not set, “CLOCK” and “ ADJUST”
appear alternately on the display. Set the clock first.
Press the ¢ or 4 button on the Unit to set the
hour you want the Unit to come on.
Pressing the ¢ button moves the time forwards and
pressing the 4 button moves it backwards. Hold
down the button to move the time rapidly.
2. Press the TIMER button.
The minute digits of the ON time blink on the display.
Set the minute you want the Unit to come on, using
the ¢ or 4 button.
Set the minute you want the Unit to be turned off, using the ¢ and 4 buttons.
Selecting the music source.
3
1. Press the TIMER button.
The “TUNER” or “CD” blinks on the display.
2. Press the ¢ or 4 button to select the music
source you want to listen to.
The display changes as shown below.
TUNER
Setting the volume level.
4
1. Press the TIMER button.
The current volume setting blinks on the display.
2. Press the ¢ or 4 button to select the volume level.
-- :The current volume level will be used.
0 to 50 :When the timer is turned on, the Volume
Press the TIMER button.
5
The timer setting is completed and the display returns to
the display before you set the Timer. The Timer indicator remains lit.
ÔCDÔ
(back to the beginning)
will be automatically set to the selected
level.
English
Setting the OFF time (Example: 13:30).
2
1. Press the TIMER button.
The hour digit of the OFF time blinks on the display.
(The same time as the ON time will be automatically
set.)
Set the hour you want the Unit to be turned off, using
the ¢ or 4 button.
2. Press the TIMER button.
The minute digits of the OFF time blink on the display.
Before turning off the System, prepare
6
the music source selected in step 3.
TUNER:Tune in to the desired station.
CD: Insert a CD. (Playback will start from the first
Press the %%%% button to turn off the Sys-
7
track at Timer on.)
tem.
In standby mode, you can see the Timer indicator ( )
on the display.
• When the timer turns on, the Timer indicator starts
blinking and the prepared source in step 6 will be
played.
To cancel the timer, press the TIMER button. The
Timer indicator ( ) goes out on the display.
To re-activate the cancelled tim er, press the TIMER button to light the Timer indicator ( ).
At this time, you can see the current timer settings. Each
setting appears on the display for two seconds in the order of ON time, OFF time, music source and volume.
To change the timer setting, repeat the setting procedure from the beginning.
CAUTION:
• If the System is unplugged, or a power failure occurs, the timer setting will be lost.
You will need to reset the clock first, then
the timer.
18
Page 22

Using the Timers
Setting the SLEEP Timer
(Using the Remote Control)
English
Use the Sleep Timer to turn the System off after a certain
number of minutes when it is playing. By setting the Sleep
Timer, you can fall asleep to music and know that your System will turn off by itself rather than play all night.
■You can only set the Sleep Timer when the System is on
and a source is playing.
Play a CD or tune in to the desired sta-
1
tion.
Press the SLEEP button on the Remote
2
Control.
The “SLEEP” indicator lights up.
■When the clock is not set, “CLOCK” and “ADJUST”
appear alternately on the display. Set the clock at first.
Set the length of time you want the
3
source to play before shutting off.
• Each time you press the SLEEP button, it changes
the number of minutes shown on the display in this
sequence:
10
= 20 = 30 = 60 = 90 = 120 = Cancelled =
(back to the beginning)
The selected number of minutes for the Sleep Timer will
stop blinking five seconds later and the display returns to
the original one before setting the Sleep Timer. (The display
is dimmed.)
The System is now set to turn off after the number of minutes you set.
To Confirm the Sleep Time:
When the SLEEP button is pressed, the remaining sleep
time is displayed. Wait until the display returns to the original display.
To Cancel the SLEEP Timer Setting:
Press the SLEEP button until the “SLEEP” indicator goes
out on the display.
Turning off the System also cancels the SLEEP Timer.
■If you are setting the Daily Timer, the System will be
turned on at the set time to wake you up.
19
Page 23

Care And Maintenance
Handle your CDs carefully, and they will last a long time.
Compact Discs
• Only CDs bearing this mark can
be used with this System. However, continued use of irregular
shape CDs (heart-shape, octagonal, etc.) can damage the System.
• Remove the CD from its case by
holding it at the edges while
pressing the case’s center hole
lightly.
• Do not touch the shiny surface of
the CD, or bend the CD.
• Put the CD back in its case after
use to prevent warping.
• Be careful not to scratch the surface of the CD when placing it
back in the case.
• A void exposur e to direct sunlight,
temperature extremes, and moisture.
Cleaning the Lens
If the lens in the CD pickup is dirty, dropout, etc., could degrade sound.
Open the Top Cover and clean the lens as shown.
• Use a blower (available from a camera store) to blow
dust off the lens.
Blower
Lens
• If there are fingerprints, etc. on the lens, gently wipe
clean with a cotton swab .
English
• A dirty CD may not play correctly . If a CD does become dirty,
wipe it with a soft cloth in a
straight line from center to edge.
CAUTION:
• Do not use any solvent (for example, conventional record cleaner, spray thinner,
benzine, etc.) to clean a CD.
General Notes
In general, you will have the best performance by keeping
your CDs and the mechanism clean.
• Store CDs in their cases, and keep them in cabinets or on
shelves.
• Keep the System’s Top Cover closed when not in use.
Moisture Condensation
Moisture may condense on the lens
inside the System in the following
cases:
• After turning on heating in the
room.
• In a damp room.
• If the System is brought directly
from a cold to a warm place.
Should this occur, the System may
malfunction. In this case, leave the
System turned on for a few hours until the moisture evaporates, unplug
the AC power cord, and then plug it
in again.
20
Page 24

Troubleshooting
• If you are having a problem with your System, check this
list for a possible solution before calling for service.
• If you cannot solve the problem from the hints given
here, or the System has been physically damaged, call a
qualified person, such as your dealer, for service.
English
Symptom Possible Cause Action
No sound is heard. • Connections are incorrect, or loose.
• Headphones are connected.
Poor radio reception • The antenna is disconnected.
• The AM Loop Antenna is too close
to the System.
• The FM Wire Antenna is not properly extended and positioned.
The CD skips. The CD is dirty or scratched. Clean or replace the CD.
The CD does not play. The CD is upside down. Put the CD in with the label side up.
Unable to operate the Remote Control. • The path between the Remote Con-
trol and the sensor on the Unit is
blocked.
• The batteries have lost their charge.
Operations are disabled. The built-in microprocessor has mal-
functioned due to external electrical interference.
• Check all connections and make corrections. (See pages 4 to 8.)
• Disconnect the headphones.
• Reconnect the antenna securely.
• Change the position and direction of
the AM Loop Antenna.
• Extend FM Wire Antenna to the best
reception position.
• Remove the obstruction.
• Replace the batteries.
Unplug the System then plug it back in
after a few minutes.
21
Page 25

Specifications
Amplifier
,QSXWý6HQVLWLYLW\î,PSHGDQFHýõìýN+]ô
2XWSXWý6HQVLWLYLW\î,PSHGDQFHýõìýN+]ô
&'ý',*,7$/ý287ýõ2SWLFDOýRXWô –21 dBm - –15 dBm
2XWSXWý3RZHU 32 W (16 W + 16 W) at 4 ohms (Max.)
0'î$8;ý,1 500 mV/47 kohms
0'î$8;ý287 500 mV/5 kohms
6SHDNHUýWHUPLQDOV 4 - 16 ohms
6XEZRRIHUýRXW 230mV/19kohms
3KRQHV 16 ohms - 1 kohm
English
0 - 15 mW/ch output into 32 ohms
6LJQDOð7Rð1RLVHý5DWLR 90 dB
CD Player
:RZý$QGý)OXWWHU Unmeasurable
Tuner
)0ý7XQHU
Tuning Range 87.5 MHz - 108.0 MHz
$0ý7XQHU
7XQLQJý5DQJH 531 kHz – 1, 710kHz (at 9 kHz channel space)
Center Unit (FS-SD5/SD7/SD9)
'LPHQVLRQV 300mm
0DVV Approx. 3.0kg
Speaker Specifications (each unit)
FS-SD5
6SHDNHUV 8 cm cone
,PSHGDQFH 4 ohms
'LPHQVLRQV 100mm ✕ 186mm ✕ 193.5mm (W/H/D)
0DVV 1.5kg
FS-SD7
6SHDNHUV 8 cm cone
,PSHGDQFH 4 ohms
'LPHQVLRQV 137mm ✕ 231mm ✕ 141mm (W/H/D)
0DVV 1.4kg
FS-SD9
6SHDNHUV 8 cm cone
,PSHGDQFH 4 ohms
'LPHQVLRQV 135mm ✕ 231mm ✕ 141mm (W/H/D)
0DVV 1.4kg
530 kHz – 1, 710kHz (at 10 kHz channel space)
✕ 75mm ✕ 215mm (W/H/D)
Accessories
Power Cord (1)
AM Loop Antenna (1)
Remote Control (1)
Batteries R6P (SUM-3)/AA (15F) (2)
FM Wire Antenna (1)
Speaker Cords (2)
Spacers (6) (only for FS-SD7/SD9)
AC Plug Adaptor (except for Argentina) (1)
Power Specifications
3RZHUý5HTXLUHPHQWV AC 110/127/230 V ~ adjustable with the voltage selector, 50/60 Hz
3RZHUý&RQVXPSWLRQ 26 watts (power on mode)
1.6 watts (in Standby mode)
0D[LPXPýSRZHUýFRQVXPSWLRQV 67 watts (power on mode) (for Taiwan ROC only)
'HVLJQýDQGýVSHFLILFDWLRQVýDUHýVXEMHFWýWRýFKDQJHýZLWKRXWýQRWLFHï
22
Page 26

Introducción
Gracias por comprar el Sistema de Componentes Compactos de JVC.
Esperamos que cumpla sus expectativas al cien por cien y que lo disfrute durante muchos años.
Lea detenidamente este manual de instrucciones antes de empezar a utilizarlo.
En él encontrará toda la información que precisa para configurar y utilizar el equipo.
Si tiene alguna duda después de haber leído el manual, póngase en contacto con su distribuidor.
Características
Estas son algunas de las características que hacen que este equipo dé tan buenos resultados y sea tan fácil de utilizar.
■ Los mandos y las funciones han sido rediseñadas para que resulten muy fáciles de utilizar y pueda
dedicarse sólo a disfrutar de la música.
• El sistema COMPU PLAY de JVC permite poner en marcha el equipo y escuchar automática-
mente la radio, o el reproductor de CD pulsando un solo botón.
■ Incorpora el circuito de graves “Active Hyper Bass PRO” para reproducir con fidelidad los sonidos
Español
de frecuencias bajas.
■ Puede memorizar hasta 45 emisoras de radio (30 de FM y 15 de AM), además de incorporar las funciones de autobúsqueda
y sintonización manual.
■ Permite elegir entre tres modos de reproducción de CD: repetida, aleatoria y programada.
■ Incorpora dos funciones de temporizador: Temporizador Diario y Temporizador de Desconexión Automática.
■ Puede conectar varios equipos externos como, por ejemplo, un reproductor de Minidiscs.
Cómo está organizado este manual
• En la sección ‘Funciones básicas’ se ofrece información básica común a numerosas funciones -p. ej. el ajuste del volumen-, que después no se repetirá en la sección dedicada a cada función.
• El nombre de los botones y mandos y los mensajes de la pantalla aparecen todos en mayúsculas (por ejemplo: FM/AM
y “NO DISC”).
• En las funciones del equipo sólo está en mayúscula la letra inicial de cada palabra (por ejemplo: Reproducción Normal).
Utilice el índice para buscar la información que necesite.
Hemos disfrutado mucho haciendo este manual para usted y esperamos sinceramente que le sirva para sacar el máximo
provecho de las funciones que incorpora el equipo.
ADVERTENCIAS
• NO COLOQUE NINGÚN OBJETO SOBRE LA TAPA SUPERIOR. SI LO HICIESE E INTENTASE ABRIR
LA TAPA, EL EQUIPO SE PODRÍA AVERIAR.
• NO DESMONTE NUNCA LA TAPA SUPERIOR. SI UTILIZA EL EQUIPO SIN LA TAPA SUPERIOR
PODRÍA SUFRIR GRAVES DAÑOS.
PRECAUCIONES IMPORTANTES
Instalación
1
• Elija un lugar nivelado, seco y ni demasiado frío ni demasiado caliente. (Entre 5°C y 35°C o 41°F y 95°F.)
• Coloque el equipo a suficiente distancia del televisor.
• No lo utilice en un lugar sujeto a vibraciones.
Cable de alimentación
2
• No manipule el cable de alimentación con las manos mojadas.
• Cuando el cable de alimentación está enchufado siempre se consume algo de electricidad.
• Para desenchufar el equipo de la toma de corriente, tire siempre del enchufe y no del cable.
Fallos o averías
3
• No intente reparar bajo ningún concepto ninguna pieza del interior del aparato. En caso de fallo, desenchufe el cable de
alimentación y contacte con su distribuidor.
• No inserte ningún objeto metálico en el equipo.
• No obstruya la tapa superior con la mano cuando se esté cerrando.
1
Page 27

Índice
Introducción .......................................................................................................1
Características ............................................................................................................................1
Cómo está organizado este manual............................................................................................1
ADVERTENCIAS.....................................................................................................................1
PRECAUCIONES IMPORTANTES.........................................................................................1
Primeros pasos..................................................................................................3
Accesorios..................................................................................................................................3
Ajuste del interruptor VOLTAGE SELECTOR........................................................................3
Cómo colocar las pilas en el mando a distancia.........................................................................3
Cómo utilizar el mando a distancia............................................................................................3
Conexión de la antena de FM.....................................................................................................4
Conexión de la antena de AM....................................................................................................5
Conexión de los altavoces..........................................................................................................6
Colocación de los separadores ...................................................................................................7
Conexión de un sistema subwoofer............................................................................................7
Conexión de equipos externos....................................................................................................7
Cómo conectar un grabador de Minidiscs, etc. (salida digital)..................................................7
Cómo enchufar el cable de alimentación ...................................................................................8
COMPU PLAY........................................................................................... ...............................8
Autoencendido ...........................................................................................................................8
Funciones básicas.............................................................................................9
Cómo encender y apagar el equipo............................................................................................9
Cómo ajustar el brillo de la pantalla (DIMMER o regulador de intensidad).............................9
Cómo ajustar el volumen............................................................................................................9
Disminución gradual del sonido (FADE MUTING)................................................................10
Potenciación de los sonidos graves (AHB PRO).....................................................................10
Control de tonos graves y agudos (BASS/TREBLE)...............................................................10
Cómo ver la hora (CLOCK/DISPLAY)...................................................................................10
Cómo accionar la tapa superior (DOOR SLIDE).....................................................................10
Funcionamiento del sintonizador...................................................................11
Cómo sintonizar una emisora...................................................................................................11
Presintonía de emisoras............................................................................................................12
Presintonización automática.....................................................................................................12
Cómo cambiar el modo de recepción FM................................................................................ 12
Cómo utilizar el reproductor de CD................................................................13
Para insertar un CD..................................................................................................................13
Cómo sacar un CD ...................................................................................................................14
Instrucciones básicas para reproducir un CD (Reproducción Normal)....................................14
Programación del orden de reproducción de las pistas............................................................14
Reproducción Aleatoria............................................................................................................15
Repetición de pistas..................................................................................................................15
Cómo utilizar equipos externos......................................................................16
Cómo escuchar equipos externos.............................................................................................16
Cómo grabar la señal del sistema en el equipo externo...........................................................16
Cómo utilizar los temporizadores ..................................................................17
Ajuste del reloj.........................................................................................................................17
Ajuste del Temporizador Diario...............................................................................................17
Ajuste del temporizador de desconexión SLEEP..................................................................... 19
Cuidado y mantenimiento...............................................................................20
Solución de problemas....................................................................................21
Características técnicas..................................................................................22
Español
2
Page 28
Primeros pasos
Accesorios
Compruebe que le han entregado con el equipo todos los elementos siguientes.
Cable de alimentación (1)
Antena de cuadro para AM (1)
Mando a distancia (1)
Pilas (2)
Antena monofilar de FM (1)
Cables de los altavoces (2)
Separadores (6) (sólo en los modelos FS-SD7 / SD9)
Adaptor de enchufe de CA (Excepto para Argentina) (1)
Si le faltara algún elemento, póngase inmediatamente en contacto con su distribuidor.
Español
Ajuste del interruptor VOLTAGE SELECTOR
Para evitar que se pueda dañar el sistema, ajuste el voltaje antes de enchufar el sistema.
Ajuste al voltaje correcto correspondiente a su área con el interruptor VOLTAGE SELECTOR en la parte posterior de la unidad.
Utilizando un destornillador, gire el interruptor VOLTAGE SELECTOR de forma que la marca de flecha apunte el voltaje de su área.
Cómo colocar las pilas en el mando a distancia
Haga coincidir la polaridad de las pilas (+ y –) con las marcas + y – situadas dentro del compartimento de las pilas.
R6P(SUM-3)/AA(15F)
CUIDADO:
• Utilice las pilas correctamente.
■ Para evitar que las pilas pierdan líquido o exploten:
• Saque las pilas cuando no vaya a utilizar el mando a distancia durante mucho tiempo.
• Cambie siempre las dos pilas al mismo tiempo por pilas nuevas.
• No utilice una pila vieja con otra nueva.
• No utilice al mismo tiempo dos pilas de distinto tipo.
Cómo utilizar el mando a distancia
Con el mando a distancia podrá controlar fácilmente numerosas funciones desde una distancia de hasta 7 m.
Debe apuntar el mando hacia el sensor remoto situado en el panel frontal del equipo.
3
STANDBY/ON
Sensor remoto
OPEN/CLOSE
PHONES
Page 29

CUIDADO:
• Realice todas las conexiones antes de enchufar el equipo a la red.
Conexión de la antena de FM
Panel posterior del aparato
Primeros pasos
SUB WOOFER
AM LOOP
CD DIGITAL OUT
ANTENNA
AM EXT FM(75
OUT IN
/
AUX
MD
)
COAXIAL
Uso de la antena monofilar (incluida)
Antena monofilar FM (incluida)
Uso del conector de tipo coaxial (no incluido)
Se recomienda conectar una antena de 75 ohmios con conector de tipo coaxial (IEC o DIN45 325) al terminal
COAXIAL de FM de 75 ohmios.
SPEAKERS IMPEDANCE 4 16
AC IN
L
R
• Antes de conectar un cable coaxial de 75 ohm (cable redondo que sale hacia una antena exterior), desconecte la
antena monofilar de FM.
Español
Si la recepción es mala, utilice la antena exterior.
Antena exterior FM
(no incluida)
Cable coaxial
4
Page 30

Primeros pasos
Conexión de la antena de AM
Panel posterior del aparato
Español
SUB WOOFER
CD DIGITAL OUT
AM LOOP
OUT IN
MD
ANTENNA
AM EXT FM(75
COAXIAL
/
AUX
)
Antena de cuadro para AM (incluida)
Fije la antena de cuadro para AM a la base encajando
las pestañas del cuadro en las ranuras de la base.
ANTENNA
AM EXT FM(75
AM LOOP
SPEAKERS IMPEDANCE 4 16
R
AC IN
COAXIAL
L
)
Gire la antena de cuadro hasta obtener la mejor recepción.
CUIDADO:
• Para evitar ruidos, mantenga las antenas alejadas del equipo, el cable de conexión y el cable
de alimentación.
5
Page 31

Primeros pasos
CUIDADO:
• Realice todas las conexiones antes de enchufar el equipo a la red.
Conexión de los altavoces
1. Abra cada uno de los terminales e introduzca el cable del altavoz.
2. Conecte los cables de los altavoces empezando por los terminales de altavoz situados en el equipo y luego conéctelos a los
terminales que hay en los altavoces.
Conecte los cables con una línea negra a los terminales (–) y los cables sin línea negra a los terminales (+).
3. Cierre todos los terminales para que los cables queden bien fijados.
Altavoz derecho (parte posterior)
Marcado con una línea negra
SPEAKERS IMPEDANCE 4 16
RL
Altavoz izquierdo (parte posterior)
Español
• Ambos altavoces son iguales, por lo que puede colocar uno a la derecha y otro a la izquierda indistintamente.
CUIDADO:
• El televisor pue de pre se nta r co lores irregula r es si se col oc a ce rca de los al ta voces . Si suce diera esto, aparte los altavoces del televisor.
Extracción de la rejilla de los altavoces
La rejilla de los altavoces es extraíble.
(FS-SD5)
(FS-SD7 y FS-SD9)
Cuando extraiga la rejilla:
1. Tire de ella con los dedos por la parte superior.
2. Tire también del borde inferior hacia fuera.
• Cuando extraiga la del altavoz FS-SD9, vaya con cuidado para no dañar la caja.
(FS-SD5)
(FS-SD7 y FS-SD9)
Cuando vuelva a colocar la rejilla:
Rejilla de
altavoz
Rejilla de
altavoz
6
Page 32

Primeros pasos
Colocación de los separadores
CUIDADO:
OOOObbbbsssseeeerrrrvvvvac
• Elija un lugar seguro donde colocar los altavoces,
FS-SD7 / SD9
Fije los separadores a la base del altavoz para proteger la caja, evitar que se deslice y absorber las vibraciones de la caja.
Retire la protección de los separadores antes de colocarlos.
Español
aciiiión
ón
acac
ónón
de manera que no puedan caer al suelo en caso de
que se les dé un golpe o se produzca un temblor de
tierra.
Separador
(FS-SD7)
Separador
Conexión de un sistema subwoofer
Con un cable de señal (no incluido), conecte el terminal SUBWOOFER del equipo al terminal de entrada de un subwoofer
externo.
(FS-SD9)
SUB WOOFER
* Utilice una clavija de 11 mm de diámetro como máximo.
CD DIGITAL OUT
ANTENNA
AM EXT FM(75 11mm Max/
AM LOOP
*
OUT IN
/
AUX
MD
Cable de señal (no incluido)
11 mm máx.
)
COAXIAL
Subwoofer (no incluido)
Conexión de equipos externos
Con cables de señal (no incluidos) conecte los terminales MD/AUX-OUT/IN del equipo a los terminales de entrada/salida de
un aparato externo tipo reproductor de Minidiscs o reproductor de cintas.
De este modo, podrá escuchar la fuente externa a través del equipo, o grabar la señal del reproductor de CD o del sintonizador
del equipo en el equipo externo.
Cable de señal (no incluido)
11 mm máx.
*
SUB WOOFER
* Utilice una clavija de 11 mm de diámetro como máximo.
CD DIGITAL OUT
ANTENNA
AM EXT FM(75
AM LOOP
OUT IN
Mini clavija estéreo
/
AUX
MD
)
COAXIAL
Mini clavija estéreo
Conector de pins x 2
Cable de señal (no incluido)
11 mm máx.
*
Conector de pins x 2
Grabadora de Minidiscs o
platina (no incluidos)
Cómo conectar un grabador de Minidiscs, etc. (salida digital)
Saque el tapón y conecte un cable óptico digital (no incluido) entre el terminal de salida CD DIGITAL OUT del equipo y el
terminal de entrada del grabador de Minidiscs o de cualquier otro aparato adecuado.
Podrá grabar la señal digital de salida del lector de CD del equipo en el grabador de Minidiscs o el aparato que haya conectado.
Tapón
CD DIGITAL OUT
11 mm máx.
Reproductor de Minidiscs, etc. (no incluido)
*
7
* Utilice una clavija de 11 mm de diámetro como máximo.
Cable óptico de señal digital (no incluido)
Page 33

Primeros pasos
Cómo enchufar el cable de alimentación
Inserte el cable de alimentación suministrado en la toma de CA del panel posterior del equipo de manera que quede fijo.
AC IN
Cable de alimentación
CUIDADO:
• UTILICE SÓLO EL CABLE DE ALIMENTACIÓN SUMINISTRADO POR JVC PARA EVITAR QUE
SE PRODUZCAN ANOMALÍAS O DAÑOS EN EL SISTEMA.
• ASEGÚRESE DE DESENCHUFAR EL CABLE DE ALIMENTACIÓN DE LA TOMA DE CORRIENTE CUANDO VAYA A SALIR O NO VAYA A UTILIZAR EL EQUIPO DURANTE CIERTO TIEMPO.
A continuación, enchufe el cable de alimentación a la red y prepárese para disfrutar de todas
las posibilidades que le ofrece el equipo.
COMPU PLAY
La función COMPU PLAY de JVC le permite controlar las funciones más frecuentes utilizadas en el equipo con un simple
botón.
Podrá reproducir un CD, encender la radio o escuchar una fuente externa con sólo pulsar el botón de reproducción para esa
función. Al pulsarlo, se enciende el equipo y se pone en marcha la función seleccionada. Al mismo tiempo, la tapa superior
se desplaza hacia atrás para que pueda acceder a los botones del panel superior. El equipo se enciende aunque no esté listo
(por ejemplo, no hay CD insertado), para que pueda prepararlo (insertando un CD).
En cada sección se explica cómo activar pulsando un solo botón la función correspondiente a esa sección.
Los botones COMPU PLAY son:
En el mando a distancia
Botón CD #/8
Botón FM/AM
Botón MD/AUX
Español
Autoencendido
Para encender automáticamente el equipo, siga uno de estos pasos:
• Pulse el botón CD 0 del del mando a distancia o el botón OPEN/CLOSE del equipo: el sistema se encenderá automática-
mente y la tapa superior se abrirá para que pueda insertar un disco compacto, aunque el equipo no seleccionará el reproductor
de CD como fuente de audio.
Si pulsa el botón % para apagar el equipo, la tapa superior se cerrará automáticamente si está abierta.
• Pulse el botón DOOR SLIDE del mando a distancia: el equipo se encenderá automáticamente y la tapa superior se desplazará
hacia atrás para que pueda acceder a los botones del panel superior.
Si pulsa el botón % para apagar el equipo, la tapa superior se desplazará de nuev o hacia delante para cerrarse.
8
Page 34

Funciones básicas
DIMMER
DISPLAY
AHB PRO
MUTING
VOLUME+,–
Español
BASS
FADE
REMOTE CONTROL
DIMMER SLEEP
AUTO
DISPLAY FM MODE
PRESET
PROGRAM
DOOR
AHB PRO
SLIDE
BASS TREBLE CANCEL
UP
SET
DOWN
FADE MUTING
CD
MD/AUX FM / AM
VOLUME
%
REPEATRANDOM
CD
DOOR SLIDE
TREBLE
PRESET
TUNINGFM/AMMD/AUX
AHB PRO CLOCK TIMER VOLUME
AHB PRO
STANDBY/ON OPEN/CLOSE
STANDBY/ON
indicador
%
MULTI CONTROL
CD
UPDOWN
CLOCK
(reloj)
VOLUME+,–
PHONES
PHONES (auriculares)
Tapa superior
Cómo encender y apagar el equipo
Cómo encender el equipo
Pulse el botón %.
La tapa superior se desplaza hacia atrás para descubrir los
botones del panel superior. En la pantalla aparece durante
unos instantes el mensaje “HELLO”. El STANDBY/ON indicador de modo de espera se ilumina de color verde.
El equipo se enciende en el modo en el que estaba cuando
se apagó por última vez.
■Por ejemplo, si lo último que hizo fue escuchar un CD,
ahora estará listo para seguir escuchando un CD. Si lo desea, puede cambiar a otra fuente de audio.
■Si la última vez que utilizó el equipo estaba escuchando
la radio, cuando lo encienda se volverá a poner en marcha
la radio y sonará la misma emisora que tenía sintonizada
al apagarlo.
Cómo apagar el equipo
Pulse de nuevo el botón %.
La tapa superior se cierra volviendo a su posición original.
La pantalla muestra el mensaje “GOOD BYE” y luego se apaga, dejando encendido tan sólo el indicador de la hora. El
STANDBY/ON indicador de modo de espera se ilumina de
color rojo.
■Aunque el equipo esté apagado (en modo de espera),
siempre se consume algo de electricidad.
■Para apagar completamente el equipo, desenchufe el cable de alimentación de la toma de corriente. Cuando desenchufe el cable de alimentación, el reloj se reinicializará
a las 0:00 horas al cabo de unos 20 minutos.
Cómo ajustar el brillo de la pantalla
(DIMMER o regulador de intensidad)
Esta función permite modificar la intensidad del sistema de
retroiluminación de la pantalla.
Cuando el equipo está encendido
Cada vez que pulse el botón regulador de intensidad (DIMMER) del mando a distancia, modificará la intensidad del sistema de retroiluminación de la pantalla del siguiente modo:
Clara = Oscura = (vuelta al principio)
Cuando el equipo está apagado
(MODO DE ESPERA)
Cada vez que pulse el botón regulador de intensidad (DIMMER) del mando a distancia, modificará la intensidad del
sistema de retroiluminación de la pantalla del siguiente modo:
Sin retroiluminación = Retroiluminación oscura
= (vuelta al principio)
• La pantalla sólo puede variar de intensidad cuando el
equipo está encendido. Cuando lo apague, la intensidad
de la pantalla del modo de espera será siempre la misma.
Cómo ajustar el volumen
Pulse el botón VOLUME + para subir el volumen y el botón
VOLUME – para bajarlo.
Puede ajustar el nivel del volumen entre 0 y 50.
CUIDADO:
• NO ENCIENDA el equipo ni comience la reproducción de una fuente de audio sin antes haber bajado el volumen al mínimo, ya
que un inicio repentino a muy alto volumen
puede dañarle el oído o dañar los altavoces
o auriculares.
Para una audición privada.
Conecte unos auriculares a la toma PHONES. Dejará de oírse sonido por los altavoces.
Asegúrese de bajar el volumen antes de conectar o de ponerse los auriculares.
9
Page 35

Funciones básicas
Disminución gradual del sonido
(FADE MUTING)
Podrá hacer que el sonido disminuya gradualmente hasta
desaparecer pulsando un solo botón.
Para activar esta función, pulse el botón FADE MUTING del mando a distancia. El volumen empezará a disminuir hasta llegar a 0.
Para restablecer el sonido, vuelva a pulsar el botón
FADE MUTING. El volumen empezará a aumentar hasta recuperar el nivel anterior.
Potenciación de los sonidos graves (AHB PRO)
Esta función permite potenciar los sonidos graves para
mantener un buen nivel de graves incluso a bajo volumen.
Para potenciar los graves, pulse el botón AHB (Active
Hyper Bass) PRO.
En la pantalla se encenderá el indicador “AHB PRO”.
Para cancelar la potenciación de graves, pulse de
nuevo el botón.
El indicador “AHB PRO” de la pantalla se apaga.
Control de tonos graves y agudos (BASS/TREBLE)
Puede controlar el tono cambiando los niveles de graves y
agudos.
Control de graves (BASS)
El nivel de graves (nivel de bajas frecuencias) se puede
ajustar entre –6 y +6. (0: sin efectos)
Pulse el botón BASS del mando a dis-
1
tancia.
Cómo ver la hora
(CLOCK/DISPLAY)
Este botón permite ver la hora en pantalla.
Para ver el reloj, pulse el botón CLOCK (Reloj) situado
en el aparato o el botón DISPLAY (Ver) del mando a distancia.
Para volver al modo anterior, pulse de nuevo el mismo
botón.
Español
• Para que el reloj pueda funcionar deberá fijar la hora antes. (Consulte la sección “Ajuste del reloj” de la página
17.)
Cómo accionar la tapa superior
(DOOR SLIDE)
Pulse el botón DOOR SLIDE (Accionar tapa) del mando a
distancia para desplazar la tapa superior hacia delante o hacia atrás.
Deslice la tapa hacia atrás para acceder a los botones del panel superior. Deslícela hacia delante para cerrarla y cubrir
los botones.
Pulse los botones UP o DOWN del
2
mando a distancia para ajustar el nivel
de graves.
DOWN
BASS
UP
Control de agudos (TREBLE)
El nivel de agudos (nivel de altas frecuencias) se puede
ajustar entre –6 y +6. (0: sin efectos)
Pulse el botón TREBLE del mando a
1
distancia.
Pulse los botones UP o DOWN del
2
mando a distancia para ajustar el nivel
de agudos.
DOWN
TREBLE
UP
10
Page 36

Funcionamiento del sintonizador
REMOTE CONTROL
DIMMER SLEEP
AUTO
DISPLAY FM MODE
AUTO
PRESET
SET
4
<
PRESET
PROGRAM
DOOR
AHB PRO
SLIDE
BASS TREBLE CANCEL
UP
SET
DOWN
FADE MUTING
CD
MD/AUX FM / AM
VOLUME
REPEATRANDOM
CD
Español
* Mientras el equipo está encendido, la pantalla también muestra otros datos.
Con este sintonizador podrá escuchar emisoras de FM y
AM. Las emisoras se pueden sintonizar manualmente, automáticamente o desde las presintonías almacenadas en la
memoria.
■Antes de escuchar la radio:
• Asegúrese de que las antenas de FM y AM están conectadas correctamente. (Vea las páginas 4 y 5).
Ajuste del espaciamiento del intervalo de
sintonía de AM
El intervalo del sintonizador de AM está ajustado en fábrica
con una separación de 9 o 10 kHz (Ajuste inicial: U/UT/
US...9 kHz, UY...10 kHz). Usted podrá cambiar la separación a 10 o 9 kHz.
●Preparaciones para el ajuste:
Conecte la alimentación y presione el botón FM/AM para
seleccionar el modo FM o AM.
Para seleccionar el intervalo de 10 kHz, mantenga
pulsado el botón 7 de la unidad y presione el botón VOLUME + de la unidad. En el visualizador aparecerá “AM
10kHz” (al mismo tiempo, se seleccionará la separación de
100 kHz para la emisión de FM).
Para seleccionar el intervalo de 9 kHz, mantenga pulsado el botón 7 de la unidad y presione el botón VOLUME de la unidad. En el visualizador aparecerá “AM 9kHz”.
[Intervalos de 10 kHz] [Intervalos de 9 kHz]
VOLUME
UT ... Taiwan
US... Singapur
• Cuando cambie el ajuste, las emisoras presintonizadas
se borrarán. Deberá presintonizar las emisoras otra vez.
(Consulte la página 12.)
Encendido de la radio con un solo botón
Con sólo pulsar el botón FM/AM, se encenderá el equipo y
se oirá la emisora que tenía sintonizada cuando lo apagó.
■Pulsando el botón FM/AM, también podrá cambiar desde
cualquier otra fuente de audio a la radio.
FM MODE
UP
>
DOWN
FM/AM
¢
FM/AM
PRESET
TUNING
Indicadores
de modo FM
4
7
¢
Indicador de banda, frecuencia y canal presintonizado
STEREO
MONO
VOLUME +, −
Para mayor claridad, mostramos tan sólo los indicadores descritos en esta sección.
Cómo sintonizar una emisora
Pulse el botón FM/AM.
1
En la pantalla aparecerán la banda y la frecuencia sintonizadas en último lugar.
(Si la última emisora se sintonizó seleccionando una presintonía, el número de presintonía aparecerá primero.)
Cada vez que pulse el botón, la banda cambiará alternativamente entre FM y AM.
FM / AM
FMAM
(en el mando a distancia)
Sintonice las emisoras con uno de los
2
métodos siguientes:
●Sintonización manual
Pulse los botones 4 o ¢ del equipo o el mando a
distancia repetidamente para pasar de una frecuencia
a otra hasta encontrar la emisora deseada.
O
O
(Al cabo de 1 segundo)
UY... Argentina
U...Otras
VOLUME
●Sintonización automática
Si mantiene pulsado el botón 4 o ¢ del equipo
durante al menos un segundo, el sintonizador retrocederá o avanzará automáticamente en la secuencia de
frecuencias hasta encontrar una emisora.
●Sintonización con el mando a distancia de
emisoras programadas (sólo cuando se hayan memorizado emisoras).
Seleccione la presintonía que desee escuchar pulsando los botones UP, DOWN, > y < del mando a distancia. Al cabo de 1 segundo la pantalla mostrará la
banda y la frecuencia de la presintonía.
Ejemplo:
Pulse el botón UP hasta que aparezca el número 12
“P12”.
UP
DOWN
o
FM/AM
FMAM
(en el aparato)
11
Page 37

Funcionamiento del sintonizador
FM / AM
AUTO
PRESET
MONO
FM MODE
●Sintonización con el equipo de emisoras
programadas
Seleccione el número de presintonía que desee escuchar pulsando el botón PRESET TUNING.
La banda y la frecuencia aparecen en pantalla.
• En AM, podrá mejorar la recepción de las emisoras girando la antena de cuadro especial para esta banda. Gírela
hasta que capte bien la señal.
Presintonía de emisoras
Podrá memorizar hasta 30 emisoras de FM y 15 emisoras de
AM con el mando a distancia.
• Puede que se haya memorizado alguna presintonía en fábrica para realizar pruebas. Si encuentra alguna, no se
trata de ninguna anomalía. Para memorizar emisoras,
siga cualquiera de los métodos siguientes:
Presintonización manual
SET STORED
SET
FM / AM
Cuando cambie de banda FM = 30, AM = 15
Seleccione una banda pulsando el
1
UP
o
botón FM/AM.
Pulse el botón 4 o ¢ para sintonizar
2
una emisora.
Pulse el botón SET.
3
En la pantalla el indicador “SET” parpadeará durante 5
segundos. Vaya al paso siguiente antes de que transcurran esos 5 segundos. Transcurridos otros 5 segundos la
pantalla volverá a ser la misma del paso 2; cuando esto
suceda, pulse de nuevo el botón SET.
Seleccione el número de presintonía
4
antes de 5 segundos con los botones
UP, DOWN, >, o <.
Botones UP y DOWN: Aumentan y disminuyen el nú-
Botones > y <: Aumentan y disminuyen el nú-
mero de presintonía en 1 respectivamente.
Si mantiene pulsado alguno de
ellos, el número de presintonía
aumentará o disminuirá rápidamente.
mero de presintonía en 1 respectivamente.
Si mantiene pulsado alguno de
ellos, el número de presintonía
aumentará o disminuirá rápidamente.
DOWN
SET
Pulse el botón SET antes de que trans-
5
curran 5 segundos.
En la pantalla aparece durante 2 segundos el mensaje
“STORED”, tras lo cual vuelve a aparecer indi cada la
frecuencia de la emisora sintonizada.
Repita los pasos 1 a 5 para cada emi-
6
sora que desee memorizar en un
número de presintonía.
Para cambiar las emisoras preprogramadas,
repita los pasos anteriores.
Presintonización automática
En cada banda puede presintonizar automáticamente 30
emisoras en FM y 15 en AM. Los números de presintonía se
asignarán a las emisoras según se vayan encontrando, empezando por la frecuencia más baja.
(durante 2 segundos)
Seleccione una banda pulsando el
1
botón FM/AM.
Pulse el botón AUTO PRESET del
2
mando a distancia durante al menos
dos segundos.
Repita los pasos 1 y 2 para la otra
3
banda.
■Si desea cambiar una presintonía, memorice manualmen-
te una nueva emisora en el número de esa presintonía.
CUIDADO:
• Si desenchufa el equipo o falla la alimentación, las presintonías se conservarán en la
memoria durante unas 24 horas. Si se llegasen
a borrar, deberá presintonizarlas de nuevo.
Cómo cambiar el modo de recepción FM
Cuando sintonice una emisora de FM estéreo, el indicador
“STEREO” se encenderá y podrá oír la emisora en estéreo.
Si una emisora de FM estéreo se recibe mal o con ruidos
puede seleccionar el modo monoaural. La recepción mejora, aunque se pierde el efecto estéreo.
Pulse el botón FM MODE del mando a distancia
para que se encienda el indicador “MONO” en la
pantalla.
Para restablecer el efecto estéreo, vuelva a pulsar el
botón FM MODE del mando a distancia para que desaparezca
el indicador “MONO” de la pantalla.
12
Español
Page 38

Cómo utilizar el reproductor de CD
REMOTE CONTROL
DIMMER SLEEP
AUTO
DISPLAY FM MODE
PROGRAM
RANDOM
CD #/8
Español
SET
4
PRESET
PROGRAM
REPEATRANDOM
DOOR
CD
AHB PRO
SLIDE
BASS TREBLE CANCEL
UP
<
SET
DOWN
FADE MUTING
CD
MD/AUX FM / AM
VOLUME
REPEAT
CD 0
CANCEL
UP
>
DOWN
¢
7
PRESET
TUNINGFM/AMMD/AUX
AHB PRO CLOCK TIMER VOLUME
Número de pista, tiempo de reproducción, número de presintonía
4
CD
UPDOWN
MULTI CONTROL
¢
7
CD #¥8
STANDBY/ON% OPEN/CLOSE
Tapa superior
PHONES
OPEN/CLOSE
* Mientras el equipo está encendido, la pantalla también muestra otros datos.
Para mayor claridad, mostramos tan sólo los indicadores descritos en esta sección.
Puede elegir modo de Reproducción Normal, Aleatoria,
Programada o Repetida. La Reproducción Repetida repite
todas las pistas o sólo una de las pistas del CD.
A continuación se explican las funciones básicas que debe
conocer para reproducir un CD y encontrar las diferentes
pistas que contiene.
La forma más rápida de reproducir un CD es con
la función de un solo boton.
■Pulse el botón CD #¥8 del mando a distancia.
• El equipo se enciende automáticamente y la tapa superior se desplaza hacia atrás para que pueda acceder a los
botones del panel superior. Si ya hay un CD insertado, el
equipo empezará a reproducirlo desde la primera pista.
• Si no se ha introducido un CD, en la pantalla aparecerá
el mensaje “NO DISC” y el reproductor de CD permanecerá parado.
Para insertar un CD
Pulse el botón OPEN/CLOSE del
1
equipo (o el botón CD 0 del mando a
distancia).
La tapa superior se abre.
RANDOM ALL
PROGRAM
987654321
Listado de pistas
Coloque un CD, con la cara impresa
2
2019181716151413121110
Se indica sólo hasta la pista número 20.
Indicadores del modo
de reproducción
hacia arriba, tal como muestra la figura.
Presione ligeramente sobre la parte
central del disco compacto hasta que
oiga un clic.
Pulse nuevamente el botón OPEN/
3
CLOSE (o el botón CD 0) para cerrar la
tapa superior.
• Para cerrar la tapa y empezar la reproducción del
disco, sólo tiene que pulsar el botón CD #¥8.
■Puede insertar un CD de 8 cm (3'') sin necesidad de adap-
tador.
■Si el CD no puede reproducirse correctamente (porque
está rayado, por ejemplo) en la pantalla aparecerá
“0 0:00”.
■Puede introducir un disco compacto mientras se reprodu-
ce otra fuente de audio.
13
CUIDADO:
• NO INTENTE abrir ni cerrar la tapa superior
manualmente, ya que podría estropearla.
Page 39

Cómo sacar un CD
Saque el CD tal como se indica en la ilustración.
Cómo utilizar el reproductor de CD
Para hacer una pausa, pulse el botón CD #¥8. El tiem-
po de reproducción parpadea en la pantalla.
Para cancelar la pausa, pulse de nuevo el mismo botón. Se reanuda la reproducción desde el punto en el que se
activó la pausa.
Para seleccionar una pista o pasaje dentro
de una pista
Durante la reproducción, pulse el botón 4 o ¢ (< o >)
para seleccionar la pista deseada.
• Empieza a oírse la pista seleccionada.
• Pulse los botones ¢ o > para saltar a la pista
siguiente y reproducirla desde el principio.
• Pulse los botones 4 o < para volver al inicio de la
pista que se esté reproduciendo. Si lo pulsa dos veces
rápidamente, retrocederá hasta el inicio de la pista
anterior.
• Si mantiene pulsados los botones > o < del mando a
distancia, el reproductor avanza o retrocede rápidamente de una pista a otra.
Reproducción con búsqueda
Mantenga pulsado los botones 4 o ¢ durante la reproducción para que el lector avance o retroceda rápidamente
hasta que encuentre el pasaje deseado en la pista del CD que
esté escuchando.
Español
Instrucciones básicas para
reproducir un CD (Reproducción
Normal)
Para reproducir un CD
Inserte un CD.
1
Pulse la tecla CD #¥8.
2
Si inicia la reproducción de la primera pista.
Número de pista Tiempo de reproducción
• El número de la pista que ya se haya reproducido
desaparece del listado de pistas.
• El reproductor de CD se para automáticamente
cuando acaba la última pista del CD.
Para detener la reproducción del CD,
En la pantalla aparece la siguiente información sobre el CD.
Número total de pistas Tiempo total de reproducción
Para interrumpir la reproducción y para sacar el
CD, abra la bandeja pulsando el botón OPEN/CLOSE del
equipo o el botón CD 0 del mando a distancia.
pulse el botón 7.
Programación del orden de
reproducción de las pistas
Puede programar el orden de reproducción de las pistas
desde el mando a distancia .
■Puede programar hasta 32 pistas en cualquier orden, in-
cluso repetidas.
■Sólo podrá preparar un programa con el CD parado.
Inserte un CD.
1
Pulse el botón CD #/8.
2
Pulse el botón 7 del CD para pararlo.
3
Pulse el botón PROGRAM.
4
El equipo entra en el modo de programa y se enciende
el indicador “PROGRAM”.
PROGRAM
PROGRAM
Pulse los botones UP, DOWN, >, o < para
5
seleccionar el número de la pista que
quiere programar.
Botones UP o >: Aumenta en 1 el número de pista.
Botones DOWN o <: Reduce en 1 el número de pista.
• Si mantiene pulsados los botones > o <, el número de
pista aumenta o disminuye rápidamente.
(Continúa en la página siguiente.)
14
Page 40

Cómo utilizar el reproductor de CD
Pulse el botón SET.
6
UP
Número de pista del programa
Reproducción Aleatoria
Las pistas se reproducirán en una secuencia aleatoria.
DOWN
7
Español
8
■Durante la Reproducción Programada puede saltar a cual-
quiera de las pistas del programa pulsando los botones
4 o ¢.
■Para parar la reproducción, pulse el botón 7 una vez.
Para confirmar las pistas programadas cuando el
reproductor de CD está detenido, pulse los botones
4 o ¢; las pistas que componen el programa se visualizan en el orden en que fueron programadas.
Para borrar todas las pistas del programa, pulse el
botón 7 con el equipo parado. También se borrarán si pulsa
el botón CD 0 para abrir la tapa superior.
Para salir del modo de programación, pulse el botón
PROGRAM con el reproductor de CD detenido para apagar
el indicador “PROGRAM”.
• Si el total de tiempo de reproducción de las pistas programadas excede los 99 minutos y 59 segundos, el tiempo
total de reproducción desaparecerá de la pantalla.
• Si intenta programar la pista nº 33, el mensaje “MEMORY
FULL” aparecerá en la pantalla durante unos dos segundos.
SET
Tiempo total de reproducción de las pistas programadas
Repita los pasos 5 y 6 para seleccionar
las demás pistas que quiera programar.
Puede ver el total de tiempo de reproducción de las pistas programadas en la pantalla. También puede ver las
pistas programadas en el listado de pistas.
Pulse el botón CD
La unidad reproduce las pistas en el mismo orden en
que se programaron.
(Después de 2 segundos)
#/8
.
Para modificar el programa
Realice las modificaciones del programa con el reproductor
de CD detenido.
Cada vez que pulse el botón CANCEL se borrará la última
de las pistas que componen el programa. Para añadir más
pistas al final del programa repita los pasos anteriores 5 a 7.
Pulse el botón RANDOM del mando a
1
distancia.
En la pantalla se encenderá el indicador “RANDOM”.
Pulse el botón CD #/8.
2
Las pistas se reproducen en orden aleatorio.
Para saltarse una pista durante la reproducción,
pulse el botón ¢; el reproductor saltará a la siguiente pista
de la secuencia aleatoria. Pulse el botón 4 para volver al
inicio de la pista que se esté reproduciendo.
Para salir del modo de Reproducción Aleatoria,
pulse el botón RANDOM con el reproductor de CD detenido para apagar el indicador “RANDOM” y reproducir el
disco en modo de Reproducción Normal, o bien pulse el botón CD 0 para abrir la tapa.
Repetición de pistas
Esta función le permite reproducir tantas veces como quiera
la misma pista o todas las pistas.
Pulse el botón REPEAT del mando a distancia.
El indicador Repeat cambiará, cada vez que pulse el botón,
en el orden siguiente:
= ALL=pantalla en blanco= (vuelta al
principio)
: Repite una pista.
ALL: En modo de Reproducción Normal, repite
Para salir del modo de Reproducción Repetida,
pulse el botón REPEAT para que el indicador correspondiente desaparezca de la pantalla.
■En la Reproducción Aleatoria, no se puede elegir el
modo .
■El modo de Reproducción Repetida permanece activo
aunque cambie el modo de reproducción.
todas las pistas.
En modo de Reproducción Programada, repite todas las pistas del programa.
En modo de Reproducción Aleatoria, repite
todas las pistas en orden aleatorio.
15
Page 41

Cómo utilizar equipos externos
REMOTE CONTROL
DIMMER SLEEP
AUTO
DISPLAY FM MODE
PRESET
PROGRAM
REPEATRANDOM
DOOR
CD
AHB PRO
SLIDE
MD/AUX
BASS TREBLE CANCEL
UP
SET
DOWN
FADE MUTING
CD
MD/AUX FM / AM
MD/AUX
PRESET
TUNINGFM/AMMD/AUX
AHB PRO CLOCK TIMER VOLUME
MULTI CONTROL
CD
UPDOWN
VOLUME
Cómo escuchar equipos
externos
Si lo desea, puede escuchar equipos externos como, por
ejemplo, una grabadora de Minidiscs o un tocadiscos, entre
otros.
■Asegúrese primero de que el equipo externo está correctamente conectado al sistema. (Vea la página 7.)
Baje el volumen al mínimo.
1
Pulse el botón MD/AUX.
2
El indicador “MD/AUX” aparece en la pantalla.
Inicie la reproducción en el equipo
3
externo.
Ajuste el control de volumen al nivel
4
deseado.
Español
Cómo grabar la señal del sistema en el equipo externo
Si lo desea, puede grabar la señal del sistema en un equipo
externo que esté conectado a los terminales MD/AUX-IN/
OUT o CD DIGITAL OUT (por ejemplo, una platina, una
grabadora de Minidiscs, etc.).
■Asegúrese primero de que el equipo externo está cor-
rectamente conectado al sistema. (Vea la página 7.)
Reproduzca un disco compacto o sintonice una emisora.
■El nivel de volumen de la grabación no depende del vol-
umen seleccionado en el equipo en el momento de realizar la grabación. Tampoco se ve afectado por los efectos
sonoros.
• Para saber cómo funciona el equipo externo, consulte el
manual de instrucciones pertinente.
Aplique algún efecto sonoro, si lo
5
desea.
■Pulse el botón AHB PRO para potenciar los sonidos
graves.
■Pulse el botón BASS/TREBLE del mando a distancia
para controlar el tono. (Vea la sección “Control de tonos
graves y agudos” de la página 10.)
Para salir del modo MD/AUX, seleccione otra fuente y
saldrá automáticamente.
• Para saber cómo funciona el equipo externo, consulte el
manual de instrucciones pertinente.
16
Page 42

Cómo utilizar los temporizadores
REMOTE CONTROL
DIMMER SLEEP
AUTO
SLEEP
DISPLAY FM MODE
PRESET
PROGRAM
DOOR
AHB PRO
SLIDE
BASS TREBLE CANCEL
UP
SET
DOWN
FADE MUTING
CD
MD/AUX FM / AM
PRESET
TUNINGFM/AMMD/AUX
REPEATRANDOM
CD
AHB PRO CLOCK TIMER VOLUME
4
CD
UPDOWN
MULTI CONTROL
TIMER
CLOCK
¢
Hora de inicio (ON), hora de
desconexión (OFF),
fuente de audio, volumen
Español
VOLUME
* Mientras el equipo está encendido, la pantalla también muestra otros datos.
Para mayor claridad, mostramos tan sólo los indicadores descritos en esta sección.
Los temporizadores le permiten controlar la reproducción
automáticamente.
Ajuste del reloj
• Ponga en hora el reloj desde el equipo.
• Cuando enchufe el cable de alimentación a la red, el
indicador “0:00” parpadeará en la pantalla.
• Para que funcionen los temporizadores, el reloj debe estar en hora.
• El procedimiento se debe llevar a cabo en un máximo de
dos minutos
seleccionados y deberá repetir la operación desde el
principio.
Pulse el botón
1
dido.
Los botones del panel superior quedan al descubierto.
CLOCK
(durante 2 segundos)
Pulse el botón CLOCK del equipo
2
durante al menos segundos.
La hora parpadea rápidamente en la pantalla.
Pulse los botones ¢ o 4 del equipo
3
para ajustar los dígitos de la hora.
Si pulsa el botón ¢ la hora avanzará; si pulsa 4, la
hora disminuirá. Si mantiene pulsado el botón, la hora
aumentará rápidamente.
. En caso contrario, se borrarán los datos
principal de encen-
%%%%
CD
MULTI CONTROL
UPDOWN
CLOCK
SLEEP
Pulse los botones ¢ y 4 para
5
Indicador del temporizador
Indicador SLEEP
ajustar los dígitos de los minutos.
Pulse el botón CLOCK.
6
La hora queda seleccionada y los segundos comienzan
a contar a partir de 0.
CUIDADO:
• Si se produce un fallo de corriente, se borrará la información del reloj al cabo de unos
20 minutos aproximadamente. El mensaje
“0:00” parpadea en la pantalla; deberá poner el reloj de nuevo en hora.
• El reloj se puede adelantar o retrasar uno o dos de minutos al mes.
Ajuste del Temporizador Diario
Una vez haya ajustado el Temporizador Diario, éste se activará cada día a la misma hora.
El indicador del temporizador en la pantalla muestra si el
Temporizador Diario está activo o no.
• Ajuste el temporizador desde el equipo.
• Realice los ajustes en menos de
contrario, se borrarán los datos seleccionados y deberá
repetir la operación desde el principio.
30 segundos
. En caso
Pulse el botón CLOCK.
4
La hora parpadea rápidamente en la pantalla.
17
Page 43

Cómo utilizar los temporizadores
Cómo ajustar la hora de inicio (por ejem-
1
plo: 10:15).
1. Pulse el botón TIMER del equipo durante al menos
segundos.
El indicador del temporizador se encenderá y la hora
de inicio seleccionada anteriormente parpadeará en la
pantalla.
• Si el reloj no está en hora, los mensajes “CLOCK” y
“ADJUST” aparecerán en la pantalla alternadamente.
Antes de seguir adelante, deberá ponerlo en hora.
Pulse los botones ¢ o 4 del equipo para selec-
cionar la hora a la que quiere que se ponga en marcha.
Si pulsa el botón ¢ la hora avanzará; si pulsa 4,
la hora disminuirá. Si mantiene pulsado el botón, la
hora aumentará rápidamente.
2. Pulse el botón TIMER.
Los dígitos de los minutos de la hora de inicio parpadearán en la pantalla.
Elija los minutos a los que quiere que se desconecte
el equipo utilizando también los botones ¢ y 4.
Para seleccionar la fuente de audio.
3
1. Pulse el botón TIMER.
En la pantalla parpadean los indicadores “TUNER” o
“CD”.
2. Pulse el botón ¢ o 4 para seleccionar la fuente
de audio que desee escuchar.
La pantalla cambia en el orden siguiente:
TUNERÔCDÔ(vuelta al principio)
Cómo ajustar el nivel del volumen.
4
1. Pulse el botón TIMER.
En la pantalla parpadea el nivel de volumen en uso.
2. Pulse el botón ¢ o 4 para seleccionar el nivel del
volumen.
-- : Se utilizará el nivel sele ccionado en ese
momento.
0 a 50 : Cuando se activa el temporizador, el vol-
umen se sitúa automáticamente en la
posición seleccionada.
Español
Indique los minutos a los que quiere que se ponga en
marcha el equipo utilizando los botones ¢ y 4.
Cómo ajustar la hora de desconexión
2
(por ejemplo: 13:30).
1. Pulse el botón TIMER.
En la pantalla parpadea la hora de desconexión OFF
seleccionada. (El equipo selecciona por defecto la
hora de inicio.)
Elija la hora a la que quiere que se desconecte el equipo utilizando los botones ¢ y 4.
2. Pulse el botón TIMER.
En la pantalla parpadean los dígitos de los minutos de
la hora de desconexión.
Pulse el botón TIMER.
5
El ajuste del temporizador ha acabado y la pantalla
vuelve a mostrar la información que tenía antes de pasar
al temporizador. El indicador del temporizador permanece encendido.
Antes de apagar el equipo, prepare la
6
fuente de audio seleccionada en el paso 3.
TUNER: Sintonice la emisora deseada.
CD: Inserte un CD. (Cuando se active el tempori-
Pulse el botón %%%% para apagar el equipo.
7
Mientras el equipo está en modo de espera podrá ver el
indicador del temporizador ( ) en la pantalla.
• Cuando se activa el temporizador, el indicador emp-
Para cancelar el temporizador, pulse el botón
TIMER. El indicador del temporizador ( ) desaparecerá de la pantalla.
Para volver a activar el temporizador, pulse el
botón TIMER para que se encienda el indicador ( ).
Los datos del temporizador se muestran en pantalla en
el orden siguiente: hora de inicio, hora de desconexión,
fuente de audio y volumen. Cada uno de ellos aparece
durante dos segundos.
Para cambiar los ajustes del temporizador,
repita el procedimiento de ajuste desde el principio.
zador, el equipo empezará a reproducir el disco desde el principio.)
ieza a parpadear y se pone en marcha la fuente de
audio seleccionada en el paso 6.
CUIDADO:
• Si el equipo se desenchufa o si falla la alimentación, los datos del temporizador se
perderán. Tendrá que fijar primero la hora y
luego el temporizador de nuevo.
18
Page 44

Cómo utilizar los temporizadores
Ajuste del temporizador de
desconexión SLEEP
(Con mando a distancia)
Utilice el temporizador de desconexión “Sleep” para que el
equipo se apague automáticamente al cabo de unos minutos.
Al ajustar el temporizador “Sleep”, puede dormirse escuchando música con la seguridad de que el equipo se apagará sólo y que no funcionará toda la noche.
■Sólo podrá fijar este temporizador cuando el equipo esté
encendido y esté escuchando música.
Español
Inicie la reproducción de un CD o sin-
1
tonice una emisora.
Pulse el botón SLEEP del mando a dis-
2
tancia.
Se enciende el indicador “SLEEP”.
■Si el reloj no está en hora, los mensajes “CLOCK” y
“ADJUST” aparecerán en la pantalla alternadamente.
Ponga en hora el reloj desde el principio.
Determine el tiempo durante el cual
3
desea que funcione el equipo antes de
apagarse.
• Cada vez que pulsa SLEEP la cantidad de minutos
cambia en el orden siguiente:
10
= 20 = 30 = 60 = 90 = 120 = Cancelado =
(vuelta al principio)
Los minutos del temporizador de desconexión parpadearán
durante 5 segundos después de seleccionarlos y luego la
pantalla volverá a mostrar la misma información que antes
de empezar el ajuste del temporizador. (El brillo de la pantalla disminuye.)
El equipo está ahora listo para apagarse al cabo de los minutos fijados.
Para confirmar la hora de la función Sleep
Si pulsa el botón SLEEP, la pantalla mostrará el tiempo
queda para que se desconecte el equipo. Espere a que el
equipo vuelva a la pantalla inicial.
Para cancelar el ajuste del temporizador SLEEP.
Pulse el botón SLEEP para que se apague el indicador
“SLEEP” en la pantalla.
Al apagar el equipo se desactiva también el temporizador
SLEEP.
■Si ajusta el Temporizador Diario, el equipo se pondrá en
marcha cuando llegue la hora a la que decidió despertarse.
19
Page 45

Cuidado y mantenimiento
Si trata sus CD con cuidado, durarán mucho tiempo.
Discos compactos
• En este equipo sólo se pueden utilizar los CD que lleven este distintivo. El uso continuado de
discos de perfil irregular (en
forma de corazón, octogonales,
etc.) puede dañar el equipo.
• Extraiga los discos de su caja
sosteniéndolos por el borde y
haciendo un poco de presión en la
sujeción central de la caja.
• No toque la superficie brillante
del CD ni lo doble.
• Guarde los CD en sus respectivos
estuches una vez escuchados,
para evitar que se estropeen.
• Procure no rayar la superficie del
CD al guardarlo en el estuche.
• Evite exponerlos a luz solar
directa, altas temperaturas y
humedad.
Limpieza de la lente.
Si la lente de un lector de CD se ensucia o salta, etc. el
sonido perderá calidad.
Abra la tapa superior y limpie la lente como se muestra en
la ilustración.
• Utilice un soplador (en tiendas de fotografía) para eliminar el polvo de la lente.
Soplador
Lente
Español
• Si hay huellas dactilares, etc. en la lente, límpiela suavemente con un bastoncillo de algodón.
• Un CD sucio no se reproducirá
correctamente. Si un CD se ensucia, límpielo con un paño suave
en pasadas desde el centro hacia
fuera.
CUIDADO:
• No utilice disolventes (por ejemplo, limpiadores convencionales de discos, sprays diluyentes, bencina, etc.) para limpiar el CD.
Notas generales
En general, logrará mejores resultados si mantiene los CD y
mecanismos limpios.
• Guarde los CD en sus estuches y archívelos en armarios
o estantes.
• Mantenga cerrada la tapa superior del equipo mientras
no lo utilice.
Condensación
Puede condensarse humedad en las
lentes dentro del equipo en los casos
siguientes:
• Después de poner en marcha la
calefacción.
• En un cuarto húmedo.
• Si se traslada el equipo directamente de una zona fría a otra
caliente.
Si ocurre, el equipo puede funcionar
mal. En ese caso, deje el equipo encendido durante unas horas hasta
que la humedad se evapore, desenchufe el cable de alimentación y
vuélvalo a enchufar.
20
Page 46

Solución de problemas
• Si tiene problemas con el equipo, compruebe en esta
lista la posible solución antes de acudir al servicio técnico.
Síntoma Causa posible Solución
No se oye ningún sonido. • Las conexiones son incorrectas o
La recepción de radio es pobre. • La antena está desconectada.
Español
El CD salta. El CD está sucio o rayado. Limpie o sustituya el CD.
El CD no funciona. El CD está al revés. Coloqu e el CD con la etiqueta hacia arriba.
No se puede utilizar el mando a distancia. • La comunicación entre el mando a
Las funciones están deshabilitadas. El microprocesador incorporado ha
están flojas.
• Están conectados los auriculares.
• La antena de cuadro AM está demasiado cerca del sistema.
• La antena monofilar FM no está
adecuadamente extendida o colocada.
distancia y el sensor del equipo está
bloqueada.
• Las pilas están agotadas.
funcionado mal debido a una interferencia eléctrica externa.
• Si no puede solucionar el problema o si el sistema se ha
dañado físicamente, avise a un técnico cualificado, como
por ejemplo su distribuidor oficial, para que llev e a cabo
la reparación.
• Compruebe todas las conexiones y
haga las correcciones oportunas.
(Vea las páginas 4 a 8.)
• Desconecte los auriculares.
• Vuelva a conectar bien la antena.
• Cambie la posición y la dirección de
la antena de cuadro AM.
• Alargue la antena monofilar FM
hasta que la recepción sea buena.
• Elimine la obstrucción.
• Sustituya las pilas.
Desenchufe el equipo, espere unos
minutos y vuélvalo a enchufar.
21
Page 47

Características técnicas
Amplificador
Sensibilidad de entrada/impedancia (1 kHz)
Sensibilidad de salida/impedancia (1 kHz)
Salida CD DIGITAL OUT (salida óptica) –21 dBm - –15 dBm
Unidad principal (FS-SD5/SD7/SD9)
Potencia de salida 32 W (16 W + 16 W) a 4 ohmios (máx.)
Entrada MD/AUX IN 500 mV/47 kohmios
Salida MD/AUX OUT 500 mV/5 kohmios
Terminales del altavoz 4 - 16 ohmios
Salida de subwoofer 230 mV/19 kohmios
Auriculares 16 ohmios - 1 kohmio
Reproductor de CD
Relación señal/ruido 90 dB
Fluctuación y trémolo
Sintonizador
Sintonizador FM
Intervalo de
sintonización
Sintonizador AM
Intervalo de sintonización 531 kHz – 1, 710kHz (con un espacio de 9 kHz entre emission)
Dimensiones
Altavoces (por unidad)
FS-SD5
Altavoces De cono de 8 cm
Impedancia 4 ohmios
Dimensiones
FS-SD7
Altavoces De cono de 8 cm
Impedancia 4 ohmios
Dimensiones
FS-SD9
Altavoces De cono de 8 cm
Impedancia 4 ohmios
Dimensiones
Accesorios
Salida de 0 - 15 mW/canal en 32 ohmios
Inapreciable
87,5 MHz - 108,0 MHz
530 kHz – 1, 710kHz (con un espacio de 10 kHz entre emission)
300 mm ✕ 75 mm ✕ 215 mm (An/Al/Pr)
Peso Aprox. 3,0 kg
100 mm ✕ 186 mm ✕ 193,5 mm (An/Al/Pr)
Peso 1,5 kg
137 mm ✕ 231 mm ✕ 141 mm (An/Al/Pr)
Peso 1,4 kg
135 mm ✕ 231 mm ✕ 141 mm (An/Al/Pr)
Peso 1,4 kg
Cable de alimentación (1)
Antena de cuadro para AM (1)
Mando a distancia (1)
Pilas R6P (SUM-3)/AA (15F) (2)
Antena monofilar de FM (1)
Cables de los altavoces (2)
Separadores (6) (sólo en los modelos FS-SD7/SD9)
Adaptor de enchufe de CA (Excepto para Argentina) (1)
Español
Características del consumo eléctrico
Requistos eléctricos
Consumos de energía máximos 67 vatios (en modo encendido) para Taiwan
Consumo
CA 110/127/230 V, ajustable desde el selector de tension, 50/60 Hz
26 vatios (en modo encendido)
1,6 vatios (en modo de espera)
(OýGLVHxRý\ýODVýFDUDFWHUtVWLFDVýGHýHVWHýVLVWHPDýSXHGHQýFDPELDUýVLQýSUHYLRýDYLVRïý
22
Page 48

Mains (AC) Line Instruction (not applicable for Europe, U.S.A., Canada, Australia, and U.K.)
Instrucción sobre la línea de la red (CA) (no aplicable para Europa, EE.UU.,
Canadá, Australia, ni el Grã-Bretanha)
SUB WOOFER
CD DIGITAL OUT
AM LOOP
OUT IN
MD
ANTENNA
AM EXT FM(75
COAXIAL
/
AUX
)
IMPORTANT for mains (AC) line
%()25(ý 3/8**,1*ý ,1ñý GRý FKHFNý WKDWý \RXUý PDLQV
õ$&ôýOLQHý YROWDJHýFRUUHVSRQGVýZLWKýWKHýSRVLWLRQý RIýWKH
YROWDJHýVHOHFWRUýVZLWFKýSURYLGHGýRQýWKHýRXWVLGHýRIýWKLV
HTXLSPHQWý DQGñý LIý GLIIHUHQWñý UHVHWý WKHý YROWDJHý VHOHFWRU
VZLWFKñýWRýSUHYHQWýIURPýDýGDPDJHýRUýULVNýRIýILUHîHOHFWULF
VKRFNï
IMPORTANTE para la línea de la red (CA)
$17(6ý'(ý(1&+8)$5ý(/ý(48,32ñýFRPSUXHEHý VL
ODýWHQVLyQýGHýODýOtQHDýGHýODýUHGýõ&$ôýFRUUHVSRQGHýFRQýOD
SRVLFLyQý GHOý VHOHFWRUý GHý WHQVLyQý VLWXDGRý HQý ODý SDUWH
H[WHULRUýGHOýHTXLSRñý\ýVLýHVýGLIHUHQWHñýUHDMXVWHýHOýVHOHFWRU
GHýWHQVLyQýSDUDýHYLWDUýHOýULHVJRýGHýLQFHQGLRVîGHVFDUJDV
HOpFWULFDVï
SPEAKERS IMPEDANCE 4 16
R
AC IN
L
EN, SP, CH
VICTOR COMPANY OF JAPAN, LIMITED
0500MNMCREJSC
 Loading...