

Page 1
WORLDSPACE DIGITAL RECEIVER
FR-DS100
WORLDSPACE ANTF
ON /
STANDBY
VOLUME
PRESET
SOUND
AUTO PRESET
LEARN PTY MULTI/LANG
WS
WORLDSPACE DIGITAL RECEIVER FR - DS100
PASSWORD
TUNING / SELECT
BAND
PHONES
MEMORY
/ CANCEL
INSTRUCTIONS
For Customer Use:
Enter below the Model No. and Serial
No. which are located either on the rear,
bottom or side of the cabinet. Retain this
information for future reference.
Model No.
Serial No.
ID No.
LVT0147-001A
[U]
Page 2
Warnings, Cautions and Others
Caution: switch!
Disconnect the mains plug to shut the power off
completely. The
disconnect the mains line. The power can be remote
controlled.
CAUTION
To reduce the risk of electrical shocks, fire, etc.:
1. Do not remove screws, covers or cabinet.
2. Do not expose this appliance to rain or moisture.
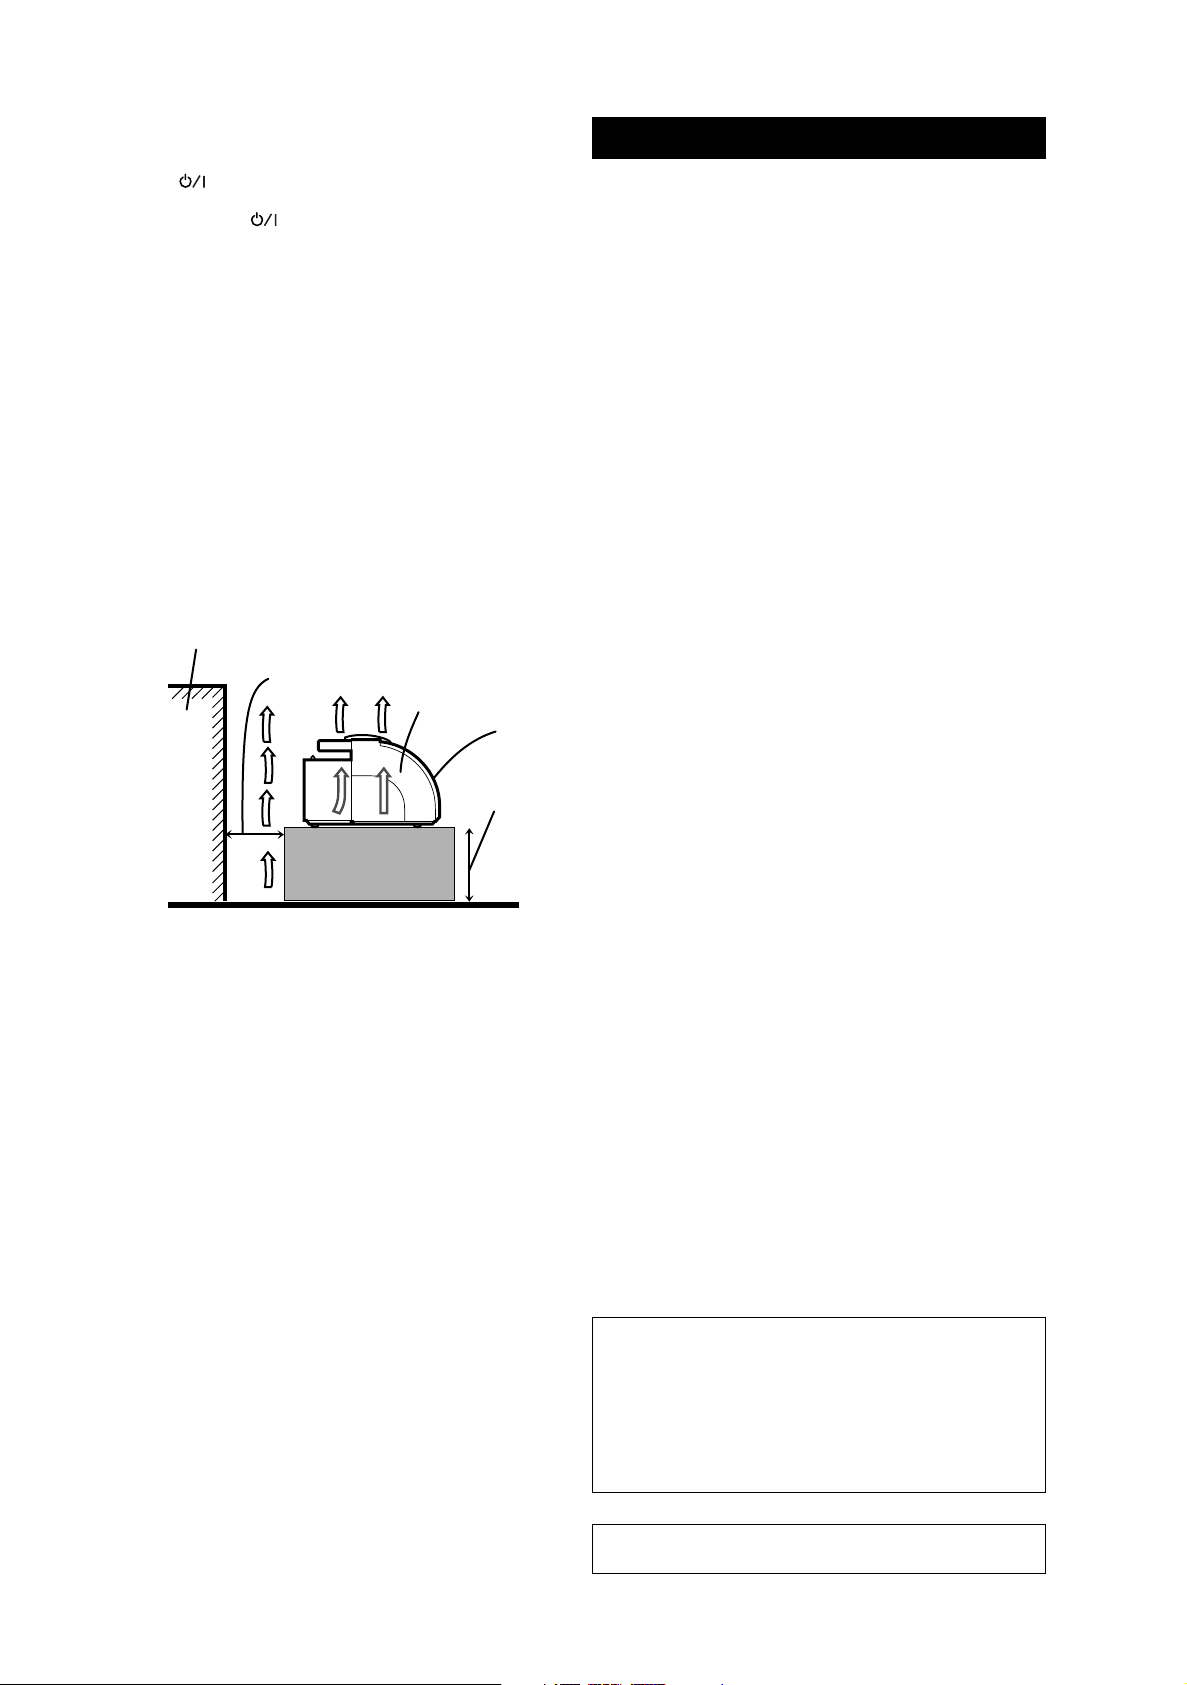
Caution: Proper ventilation
To avoid risk of electric shock and fire and to protect
from damage, locate the apparatus as follows:
Front: No obstructions, open spacing
Sides: No obstructions within 10 cm from the sides
Top: No obstructions within 10 cm from the top
Back: No obstructions within 15 cm from the back
Bottom: No obstructions, level surface
In addition, maintain the best possible air circulation
as illustrated below.
Wall or obstruction
switch in any position does not
Spacing 15 cm or more
FR-DS100
Front
Stand height
15 cm or more
Floor
CONTENTS
Features ..................................................................... 3
Safety Precautions .................................................... 3
Handling Precautions ............................................... 3
Unpacking..................................................................4
Power Supply ............................................................ 4
Connecting the WS antenna .................................... 5
Names of Parts and Their Functions .................6
Front Panel ................................................................ 6
Rear Panel.................................................................. 7
Display Panel ............................................................. 8
Basic Operations ................................................. 9
Setting up for WorldSpace reception ...................... 9
Listening to WorldSpace broadcasters ................. 10
Listening to the radio (FM/AM (MW/SW)) ............ 11
Changing the audio presentation
of the broadcast .................................................... 11
Presetting WS broadcasters
and radio stations ................................................. 12
Clearing WS broadcaster presets .......................... 12
Preset Tuning .......................................................... 13
AC power resume function .................................... 13
Additional Operations ...................................... 14
Searching for a preferred language ...................... 14
Searching for a program type (PTY) ..................... 15
Regarding encrypted broadcaster signals ............ 16
Displaying the unit ID number ............................... 16
Recording a broadcast from the radio
or WS band ........................................................... 16
Tuning the Time Division Multiplex (TDM)
frequencies manually ........................................... 17
Additional Information ..................................... 18
WorldSpace Coverage Area ................................ 18
Troubleshooting ...................................................... 20
Specifications .......................................................... 20
WorldSpace Center Addresses ........................... 21
Regarding WorldSpace broadcast audio quality
Programs broadcast by WorldSpace utilize the
newest technology in data compression (MPEG
LAYER III) enabling audio ranging from telephone
quality to that approaching CD quality.
Audio quality of individual programs, however,
depends on the broadcaster.
WorldSpace is a registered trademark of
Worldspace corporation. All rights reserved
2
Page 3

Features
High quality digital sound
• Listen to near CD-quality broadcasts from all over the
world when listening to the WorldSpace network band.
Detachable WorldSpace satellite antenna
• Freely position the antenna for optimal signal reception
using the supplied WS specified extension cable.
Program and language search
• Easily find the type of program you want to listen to and
the language you want to hear (subject to availability).
Digital synthesizer tuner
• Receive AM (MW/SW) and FM radio stations.
Additionally, the AUTO PRESET function can be used to
automatically create a list of presets for frequencies that
can be received in your area.
LCD Display with back-light
• Read broadcaster information and display messages with
ease. The back-light does not function when using
batteries.
Safety Precautions
Prevention of Electric Shocks, Fire Hazards, and
Damage
1. Even when the
to standby, a very small current will flow. To save
power and for safety reasons, when not using the
unit for an extended period of time, disconnect
the power cord from the AC outlet.
2. Do not handle the power cord with wet hands.
3. When unplugging from the wall outlet, always
grasp and pull the plug, not the power cord.
4. Consult your nearest dealer when damage,
disconnection, or connect failure is found with
the power cord.
5. Do not bend sharply, pull or twist the cord.
6. Do not modify the power cord in any manner.
7. To avoid accidents, do not remove screws to
disassemble the unit and do not touch anything
inside the unit.
8. Do not insert any metallic objects into the unit.
9. Unplug the power cord when there is a
possibility of lightning.
10. If water gets inside the unit, unplug the power
cord from the outlet and consult your dealer.
11. Do not block the ventilation holes of the unit so
that heat can escape. Do not place the unit in a
badly ventilated place.
(STANDBY/ON) button
When the power cord is connected to an AC
outlet, the standby indicator is lit red, when the
unit is in the standby mode (this indicator does
not light when DC power is supplied). When the
power is switched on, the indicator turns off
showing that the power is on.
(STANDBY/ON) button is set
PRECAUTIONS REGARDING WS ANTENNA
SHORT-CIRCUIT
When there is a possible short-circuit in the WS
antenna, the unit will exhibit the following.
1. The WS antenna reception indicator and
WorldSpace band indicator will occasionally
disappear.
2. When the WS band is selected, the WS band
indicator and WS antenna reception indicator will
blink.
3. After broadcaster reception is initiated, the sound
will be muted for about two seconds before
being received.
When these precautionary signs are noted, bring the
unit to an authorized JVC dealer or service station.
Handling Precautions
1. Avoid installing in the following places.
• Where it could be subject to vibrations.
• Where it is excessively humid, such as in a
bathroom.
• Where it could be magnetized by a magnet or
speaker.
2. Do not place cassette tapes, etc. near the
speakers.
Since there are magnets in the speakers, do not
place tapes or magnetic cards on them as
recorded data could be erased.
3. Keep this unit away from your TV.
When this unit is used near a TV, the TV picture
could be distorted. If this happens, move this unit
away from the TV. If this does not correct the
situation, avoid using this unit when the TV is
turned on.
4. Cleaning the cabinet
If the cabinet gets dirty, wipe it with a soft dry
cloth. Never use benzene or thinner as these
could damage the surface finish.
5. When listening with headphones
• Do not listen at high volumes as it could
damage your hearing.
• For safety, do not drive while listening to this
unit on headphones.
6. Carrying handle
• Do not raise or lower the carrying handle with
the telescopic antenna extended, to avoid
damaging the antenna. Place the carrying
handle so that it does not interfere with
operation.
• After connecting the WS antenna cable, be sure
to check that the cable is under and not over
the carrying handle. If the cable is over the
handle, using the handle to carry this unit may
stretch the cable and cause the unit to
malfunction.
When this unit is plugged into an AC outlet, it
consumes a small current to back up the memory
of the microprocessor, even when the
(STANDBY/ON) is set to standby.
3
Page 4
Unpacking
Check that the following items were supplied with the FR-DS100.
WorldSpace (WS) antenna (1)
AC power cord (1)
Plug adapter (1)
WS specified extension cable (1)
ID number sticker sheet (1) *
* The 16-digit ID number is not the serial number. The ID number is necessary when subscribing to
WorldSpace broadcaster services. Using the ID number stickers, keep the ID number of your unit in safe
locations where it can be easily found or referred to if necessary. (Refer to page 16.)
Power Supply
A. Operation on AC power
1. When the FR-DS100 is used in an area where the
supply voltage is different from the preset
voltage, set the voltage selector to the correct
position. For more information, refer to “To set
the voltage selector” below.
2. Insert the AC power cord firmly and completely
into the AC IN jack on the unit.
CAUTIONS:
1. ONLY USE WITH JVC POWER CORD PROVIDED
WITH THIS UNIT TO AVOID MALFUNCTION OR
DAMAGE TO THE UNIT. REMOVE BATTERIES
WHEN USING THE POWER CORD.
2. BE SURE TO UNPLUG THE POWER CORD FROM
THE OUTLET WHEN GOING OUT OR WHEN THE
UNIT IS NOT IN USE FOR AN EXTENDED PERIOD
OF TIME.
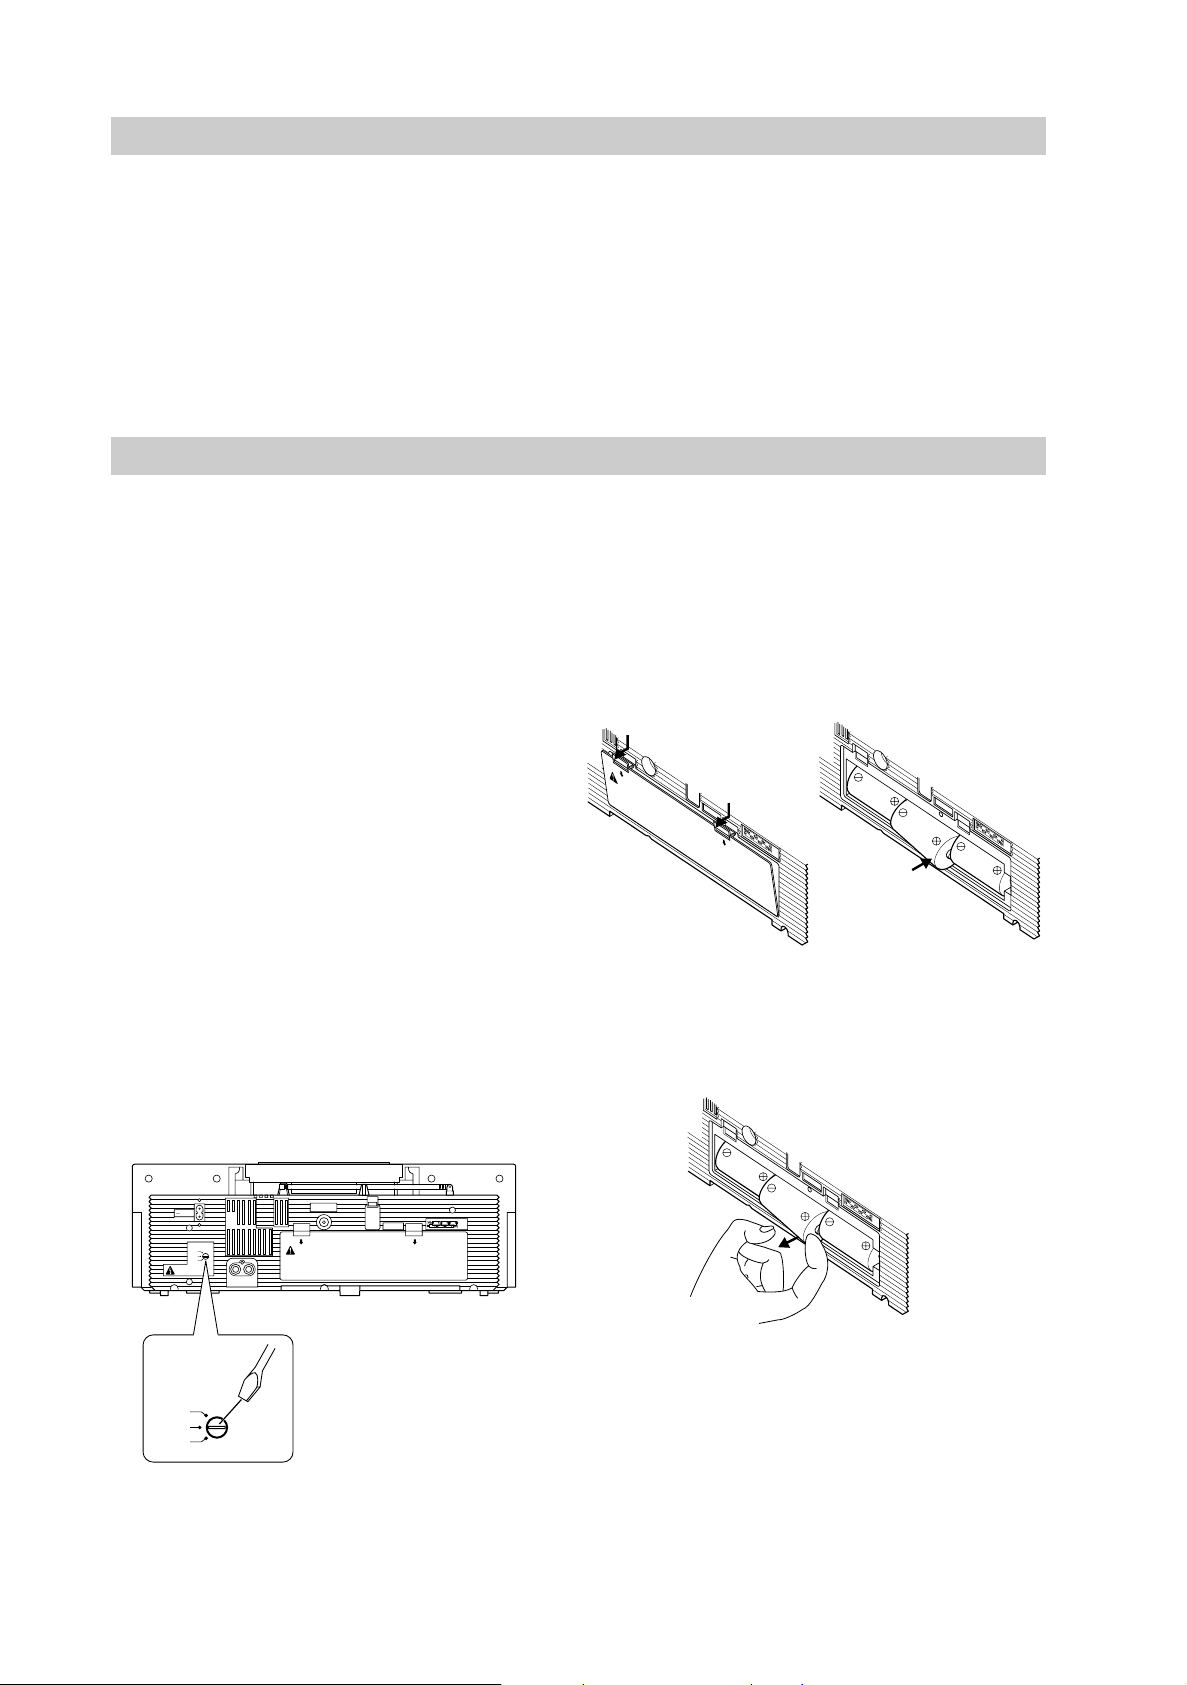
To set the voltage selector
Before attempting to use this unit, check the voltage
selector on the rear panel of this unit to determine if
the selected voltage is appropriate for the power
supply in your area. If you need to change the setting
to match your local power supply, use a screwdriver
to turn the arrow mark until it is pointed at the
appropriate voltage setting.
B. Operation on batteries
Loading batteries
1. Open the battery cover by pulling it toward you
while pressing down on the tabs marked by the
arrows.
2. Insert 6 “D” size/R 20 batteries as shown in the
diagram below. A similar diagram can also be
found on the rear panel of the unit.
* Be careful to insert the batteries with the ª
and · terminals oriented correctly.
3. Replace the cover.
• DO NOT PUT BATTERY IN BACKWARDS, MIX WITH
WARNING
USED OR OTHER BATTERY TYPES-MAY EXPLODE
OR LEAK AND CAUSE PERSONAL INJURY.
• REMOVE THE BATTERIES ("D" SIZE, R20) WHEN
USING THE AC POWER.
• SEE INSTRUCTION MANUAL.
EXTERNAL
=
4
1
6
3
5
2
1.5Vx6
Removing batteries
1. Open the battery cover as indicated above.
2. Remove the center battery by hooking your finger
onto the cusp of the ª side of the battery, and
pulling outward. The other batteries should then
be easily removable.
3. Repeat step 2 with the other row of batteries.
4
EXTERNAL
4
6
1
6
3
5
2
1.5Vx6
5
AC IN
VOLTAGE
SELECTOR
230V
127V
110V
SEE BOTTOM
L
R
OUT
LINE
ANTENNA
WARNING
• DO NOT PUT BATTERY IN BACKWARDS, MIX WITH
USED OR OTHER BATTERY TYPES-MAY EXPLODE
OR LEAK AND CAUSE PERSONAL INJURY.
• REMOVE THE BATTERIES ("D" SIZE, R20) WHEN
USING THE AC POWER.
• SEE INSTRUCTION MANUAL.
EXTERNAL
4 6 5
3
231
1.5Vx6
EXTERNAL
4
1
1
6
3
5
2
1.5Vx6
2
CAUTIONS WHEN USING BATTERIES:
When batteries are used incorrectly, it may result in
VOLTAGE
SELECTOR
230V
127V
110V
the leakage of chemicals from the batteries or they
may explode. If chemicals from the batteries come in
contact with your skin, wash them off immediately
with water. If chemicals leak onto the unit, clean the
unit completely.
The following care should be taken;
• Check that the positive ª and negative · terminals of the
batteries are oriented correctly and load them as shown in
the diagram.
• Do not mix old and new batteries together, or mix
different types of batteries.
4
• Do not try to recharge non-rechargeable batteries.
• Remove the batteries when the unit is not to be used for
an extended period of time.
Page 5
Connecting the WS antenna
For safety reasons, make sure that the unit is not
plugged in and batteries are not installed when
making connections.
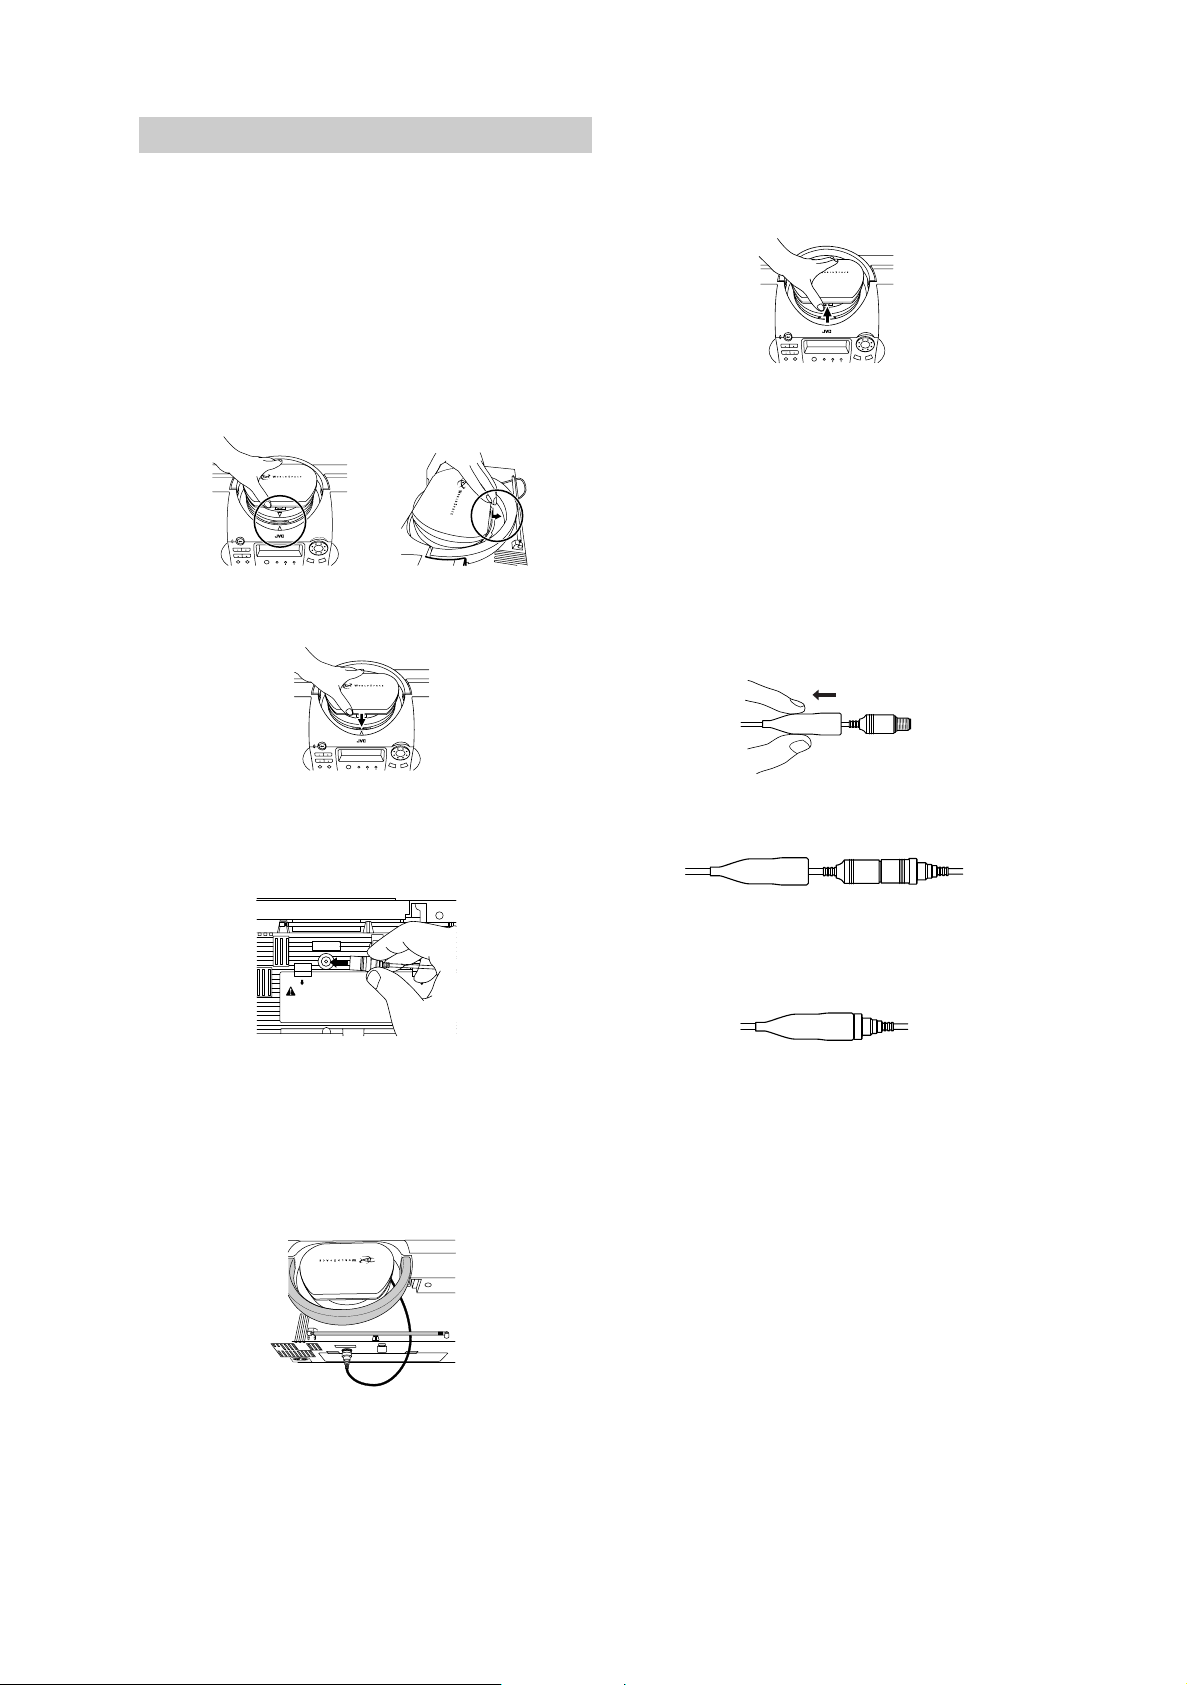
To install the WS antenna
1. To install the WS antenna, orient the antenna by
lining up the arrow marks on the front of the WS
antenna and on the front side of the housing
platform. Slide the antenna into the housing
platform at an angle so that the groove on the
back side of the base of the antenna fits into the
corresponding tab on this unit.
ACE ANTENNA SYSTEM
\
ON /
STANDBY
VOLUME
PRESET
SOUND AUTO PRESET
2. Push down on the front end of the base of the
antenna until it clicks into place.
TUNING / SELECT
LEARN PTY MULTI/LANG
WS
BAND MEMORY
PASSWORD
/ CANCEL
PACE ANTENNA SYSTEM
To remove the WS antenna from the
housing platform
Pull up on the front end of the antenna unit to unlock
the base. The WS antenna should then be easily
removable.
LITE ANTENNA SYSTEM
ON /
STANDBY
VOLUME
PRESET
SOUND AUTO PRESET
TUNING / SELECT
LEARN PTY MULTI/LANG
WS
BAND MEMORY
PASSWORD
/ CANCEL
CAUTION:
DO NOT FORCE THE WS ANTENNA INTO OR OUT
OF THE HOUSING PLATFORM. THIS MAY CAUSE
DAMAGE TO THE WS ANTENNA AND CAUSE THIS
UNIT TO PERFORM IMPROPERLY.
To connect the extension cable.
1. Disconnect the WS antenna from the antenna
jack.
2. Connect the extension cable into the antenna jack
on the rear panel of the unit.
3. Slide the rain protection cover on the extension
cable back so that the connector protrudes.
ON /
STANDBY
VOLUME
PRESET
SOUND AUTO PRESET
TUNING / SELECT
LEARN PTY MULTI/LANG
WS
BAND MEMORY
PASSWORD
/ CANCEL
To connect the antenna cable
Connect the antenna cable to the antenna jack
located on the rear panel of the unit.
ANTENNA
WARNING
• DO NOT PUT BATTERY IN BACKWARDS, MIX WITH
USED OR OTHER BATTERY TYPES-MAY EXPLODE
OR LEAK AND CAUSE PERSONAL INJURY.
• REMOVE THE BATTERIES ("D" SIZE, R20) WHEN
USING THE AC POWER.
• SEE INSTRUCTION MANUAL.
Notes:
• Be sure not to place the back of this unit against a wall or
other surface when the antenna cable is connected as it
may damage the cable and/or antenna jack.
• Be sure to check that the cable under and not over the
handle of the unit. If the cable is over the handle, using
the handle to carry this unit may be the cause of
malfunction.
EXTERNAL
4. Firmly connect the extension cable with the WS
antenna cable.
5. Slide the rain protection cover over the
connected section completely for best
performance.
CAUTION:
The rain protection cover is not intended to be left
out in heavy rain or submerged in water. Please
avoid exposing this section of the cable to excessive
moisture.
Notes:
• To help ensure long-lasting performance of this unit, do
not leave the extension cable and antenna outside or in
direct sunlight for long periods of time. It is
recommended that you restore the WS antenna to the
housing platform when you are finished using the unit.
• The WS specified extension cable supplied with this unit
is specially designed for use with this unit. Should you
use a cable not supplied with this unit nor recommended
by JVC for use with this unit, JVC cannot guarantee the
performance of this unit. For details regarding
compatibility with this unit, please consult with the
manufacturer of the cable.
To adjust the WS antenna
For details on how to position the WS antenna for
best possible reception, refer to page 9.
5
Page 6
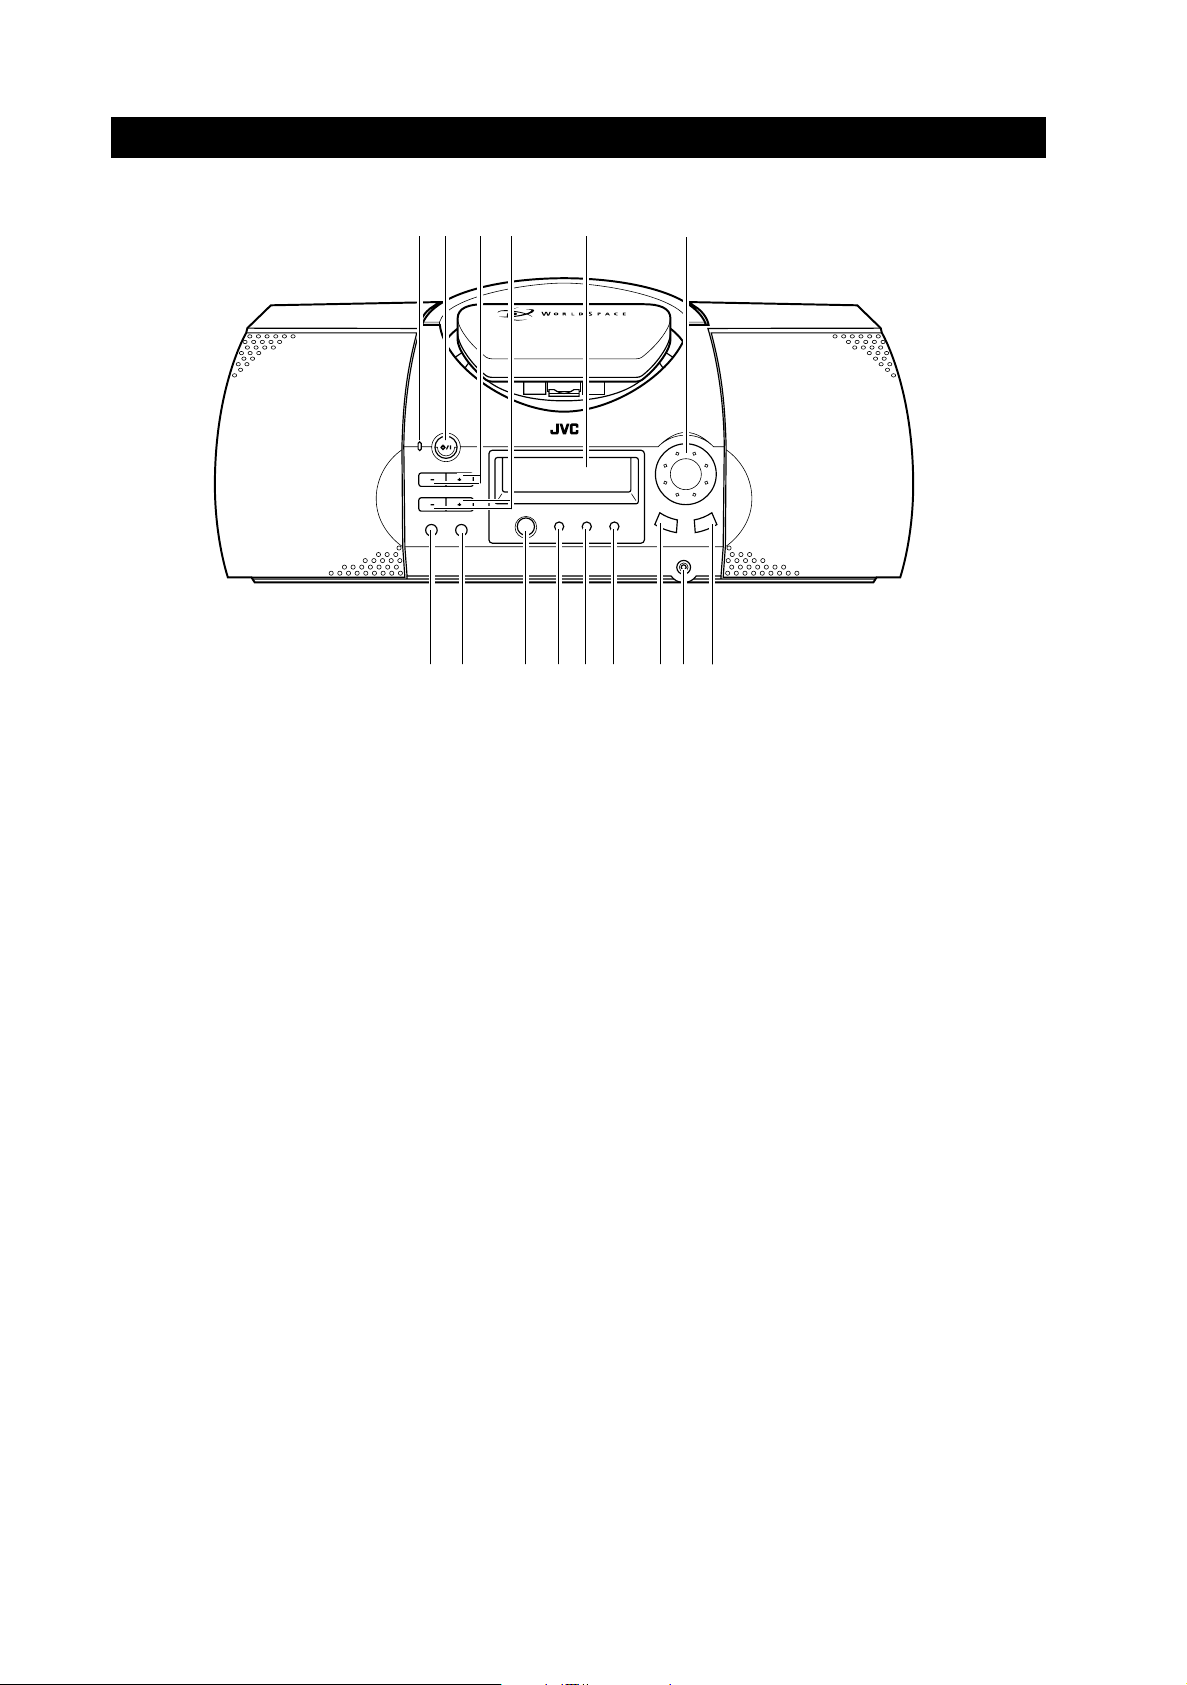
Names of Parts and Their Functions
Front Panel
12 3 4 5 6
ON /
STANDBY
VOLUME
PRESET
SOUND AUTO PRESET
78 9 0-= ~!@
1 STANDBY indicator
Lights red when the power is turned to standby
(does not light when DC power is used).
2 ON/STANDBY button
Press to turn the unit on or to turn to standby.
3 VOLUME –/+ buttons
Use to adjust the volume.
4 PRESET –/+ buttons
Use to select presets to be stored, recalled or
cancelled.
5 Display panel
Displays radio, WS broadcaster, and other
system information. Refer to page 8.
6 TUNING/SELECT dial
Use to tune radio frequencies and select WS
band broadcasters.
7 SOUND button
Press to change the audio presentation of a
broadcast.
8 AUTO PRESET button
Press to automatically preset available stations in
your area within each band (except for WS band).
WORLDSPACE ANTENNA SYSTEM
LEARN PTY MULTI/LANG
WS
WORLDSPACE DIGITAL RECEIVER FR - DS100
PASSWORD
9WS button
0 LEARN button
- PTY button
= MULTI/LANG button
~ BAND button
! PHONES jack
@ MEMORY/CANCEL button
TUNING / SELECT
BAND
MEMORY
/ CANCEL
PHONES
Press to receive the WS band.
Press to adjust this unit to receive the
WorldSpace frequencies available in your region.
Press to search for programs on a particular topic
(WS band only).
Press to select a language in a multi-language
simulcast or to search for a language currently
being broadcast by a broadcaster (WS band
only).
Press repeatedly to select FM AUTO, FM (FM
mono), MW, and SW.
Connect headphones for private listening (the
speakers turn off automatically).
Press to memorize or cancel preset stations and
broadcasters, and to enter password numbers.
6
Page 7
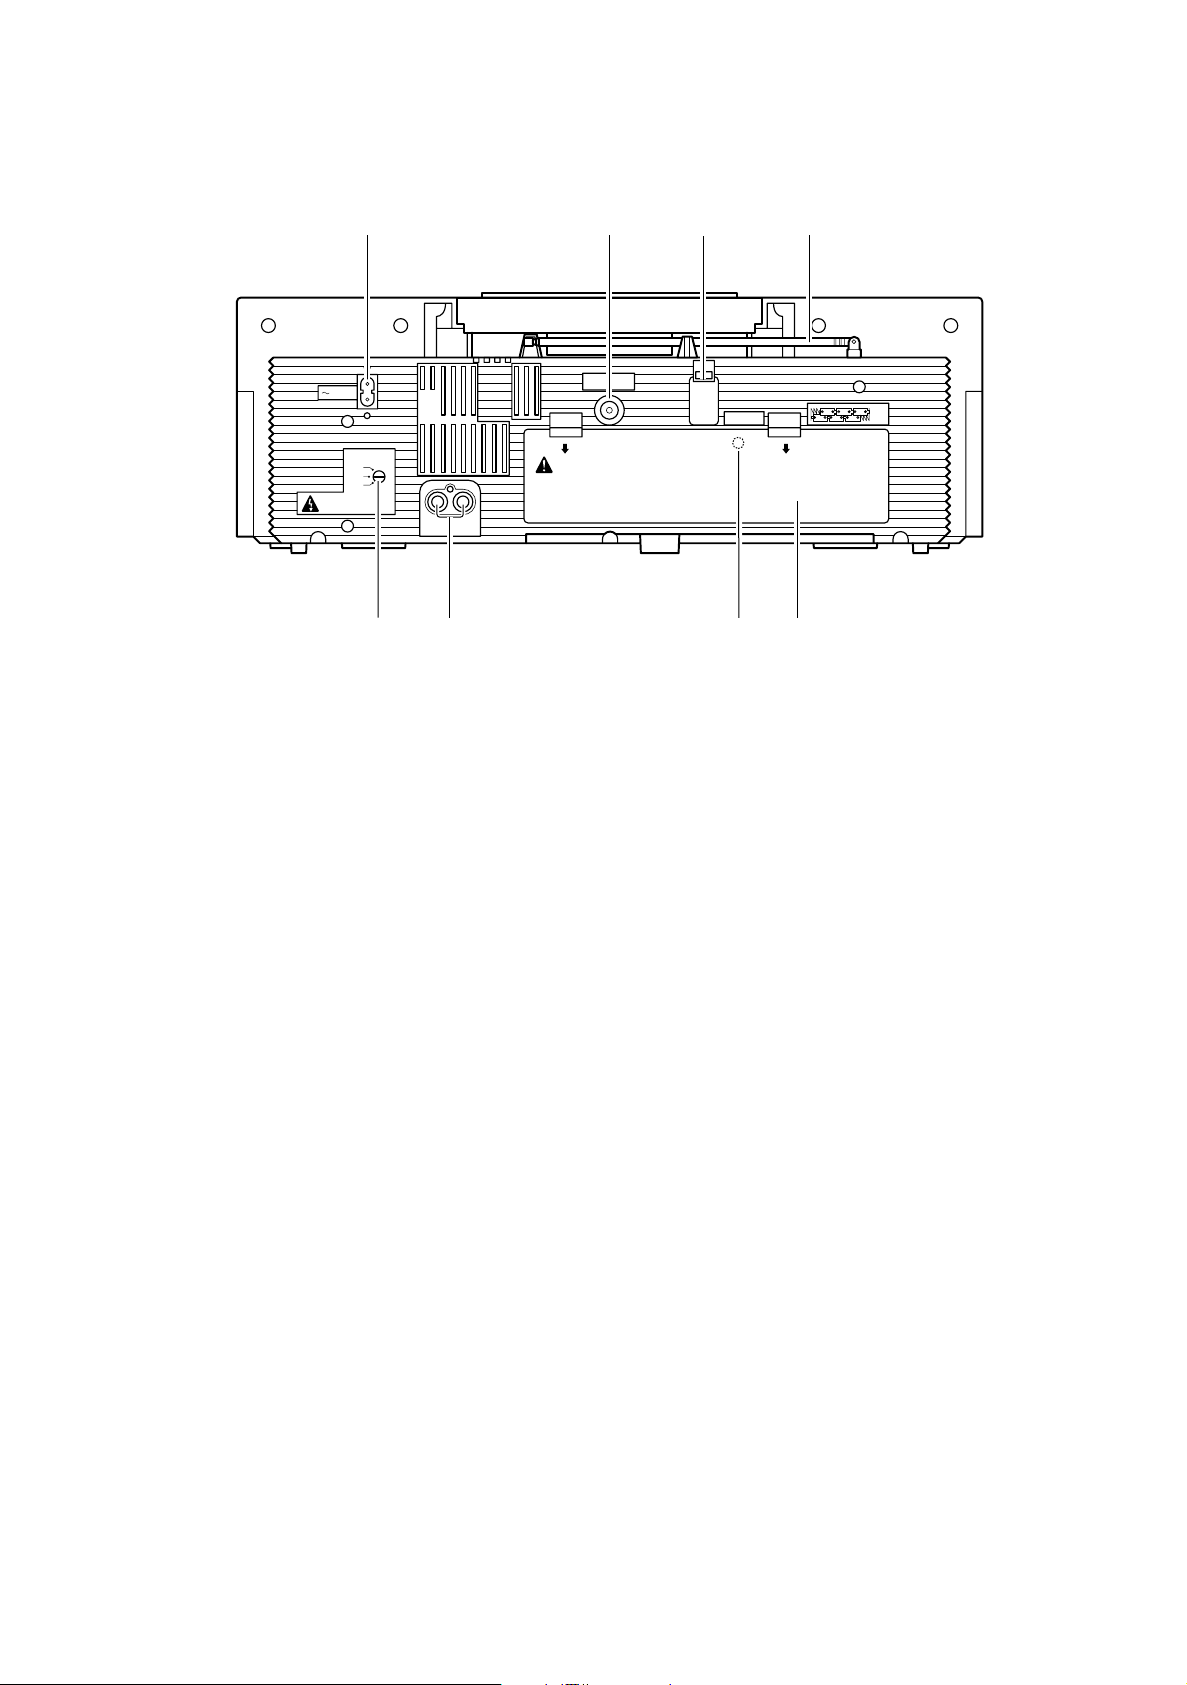
Rear Panel
1234
AC IN
VOLTAGE
SELECTOR
230V
127V
110V
SEE BOTTOM
L
R
OUT
LINE
56 87
1AC IN jack
2 WS antenna jack
Use to connect the WS antenna to this unit.
3 EXTERNAL jack
For future use.
4 FM telescopic antenna
Use to improve reception of FM radio stations.
5 Voltage selector
Use to select the voltage setting appropriate for
your region.
ANTENNA
WARNING
• DO NOT PUT BATTERY IN BACKWARDS, MIX WITH
USED OR OTHER BATTERY TYPES-MAY EXPLODE
OR LEAK AND CAUSE PERSONAL INJURY.
• REMOVE THE BATTERIES ("D" SIZE, R20) WHEN
USING THE AC POWER.
• SEE INSTRUCTION MANUAL.
6 Audio line out jacks
Use to connect to an amplifier, tape deck or other
device.
7 (Manufacturer’s use jack)
This jack is used in the production of this unit
only. For proper use of this unit, DO NOT attempt
to make any connections using this jack.
8 Battery compartment cover
EXTERNAL
4 6 5
231
1.5Vx6
7
Page 8

Display Panel
1
23
4
56 7 8 9
AUTO
WS
1 WS antenna reception indicator
Displays the strength of the signal being received
by the WS antenna.
2 WS indicator
Indicates that the WS band mode is selected.
3 AUTO
Indicates that the FM AUTO mode is selected.
4 MULTI
Indicates that the WS broadcaster being received
is simulcast in multiple languages or with
multiple services.
5 STEREO
Indicates the reception of a stereo broadcast in
both FM AUTO and WS band modes.
6 CODED
Indicates that the WS broadcaster is encoded
using the WorldSpace Encryption Schemes 1 and
2 (ES1 and ES2).
7 MEMORY
Indicates that the preset MEMORY mode is active
and that a selected preset can be assigned.
8 CANCEL
Indicates that the preset CANCEL mode is active
and that a selected preset can be cancelled.
MULTI
0
STEREO MEMORY
CODED CANCEL PRESET
kHz
MHz
-=~
9PRESET
Indicates that a preset number is being displayed
beneath this indicator.
0 Character display
Displays information regarding system
operations, radio frequencies, WS broadcaster
identification (BCID), broadcaster Service Label
(SL), broadcaster program number (PGM) and
other functions.
- MHz
Indicates that an FM or AM (SW) band frequency
is being received.
= kHz
Indicates that an AM (MW) band frequency is
being received.
~ Preset number display
Displays the number of the currently selected
preset.
8
Page 9
WORLDSPACE DIGITAL RECEIVER FR - DS100
WS
LEARN PTY MULTI/LANG
PASSWORD
TUNING / SELECT
BAND
PHONES
MEMORY
/ CANCEL
VOLUME
PRESET
SOUND AUTO PRESET
ON /
STANDBY
WORLDSPACE ANTENNA SYSTEM
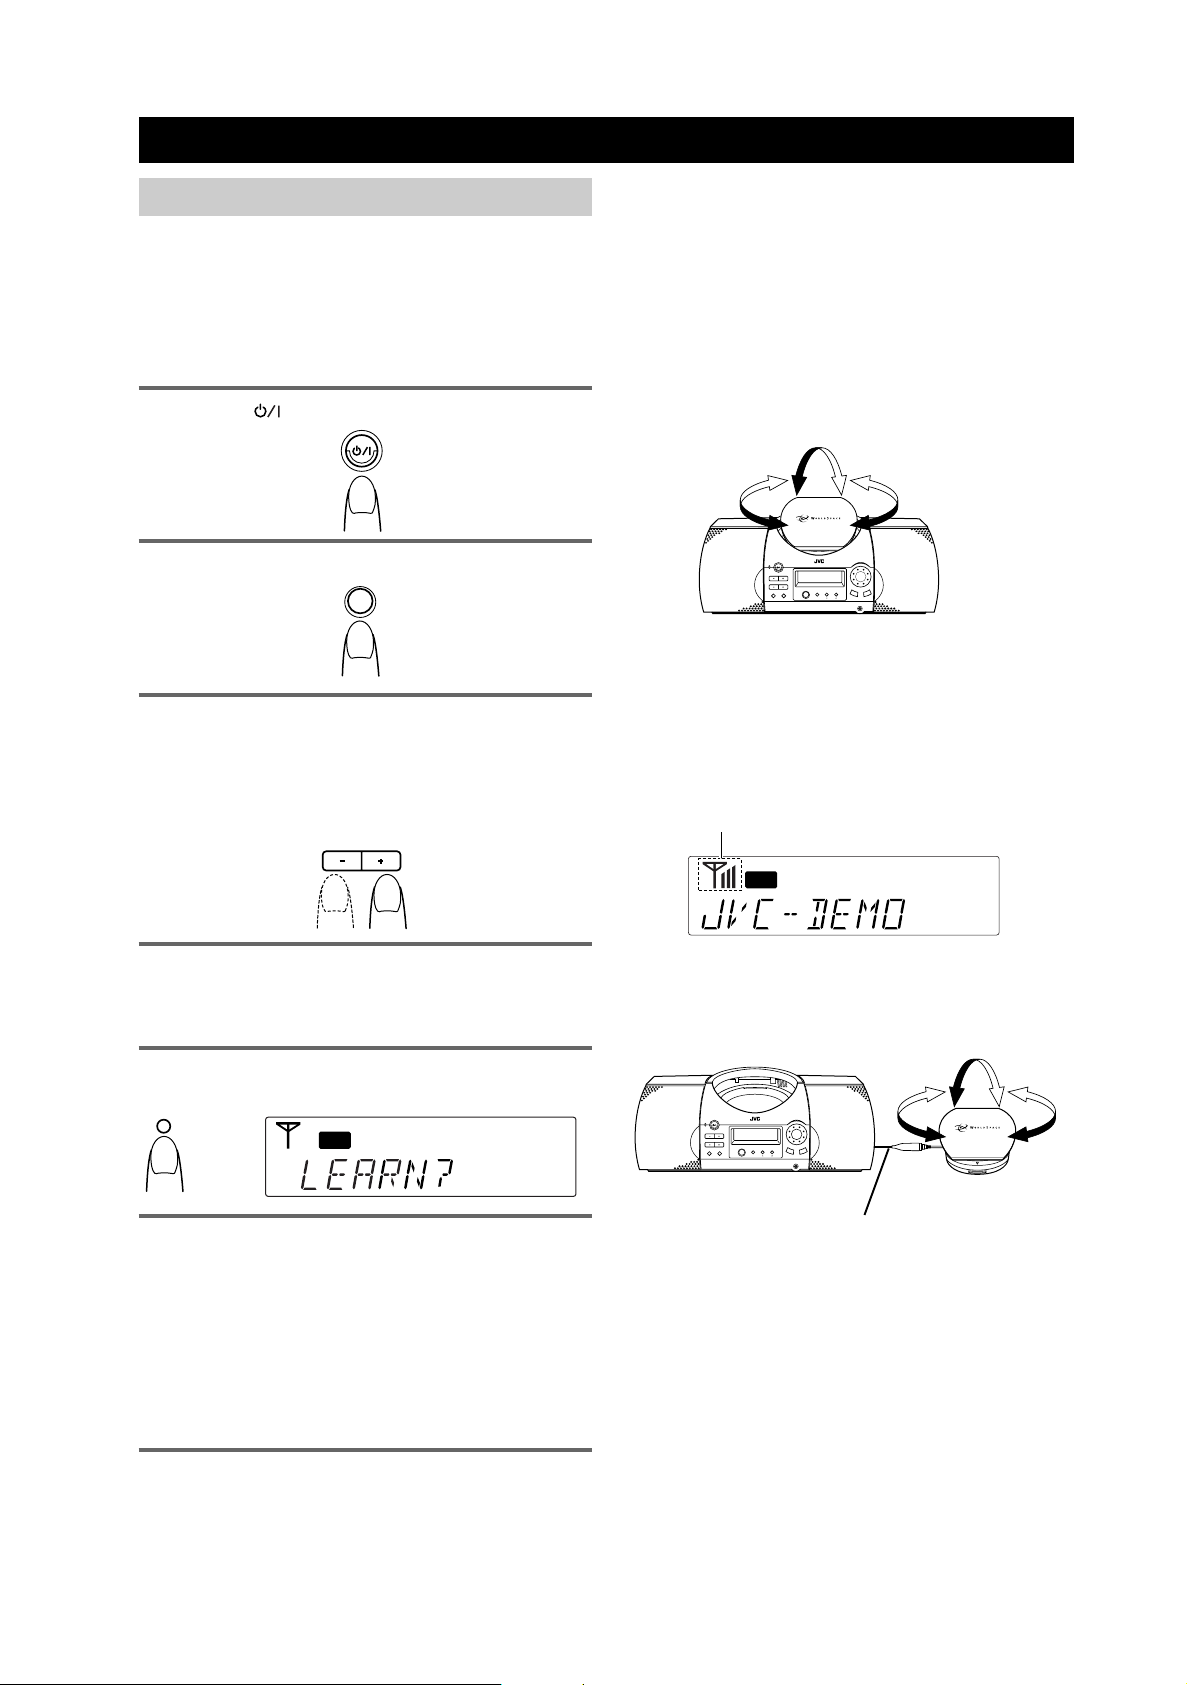
Basic Operations
Setting up for WorldSpace reception
To initiate WorldSpace broadcaster
reception
Before you can begin to receive broadcaster signals,
it is necessary for this unit to establish what
broadcaster range is available in your area. This
operation is easily performed using the LEARN
button.
1 Press the button to turn this unit on.
2 Press the WS button to select the WS band.
WS
3 Press the PRESET– /PRESET+ buttons to select
the appropriate WorldSpace service area.
The region preset numbers appear in the display.
The maps on page 18 contain the preset numbers
for each area of coverage. Select the number
most appropriate for the region that you live in.
PRESET
To adjust the WS antenna
For proper operation of this unit, do not procede to
other WS band operations until you have set up the
WS antenna for satellite signal reception. Using the
WorldSpace service area map and graphs on pages
18 and 19 as a guide, try to position the antenna in a
line of sight with the satellite with as few
obstructions as possible. Adjust the antenna by
rotating and tilting to direct the WS antenna in the
general direction of the satellite broadcasting to
your region. The antenna can also be tilted up to 60º
from the base.
The WS antenna signal indicator in the display
indicates the strength of the satellite signal being
received. When the antenna icon appears alone,
there is no signal being received. As the signal
becomes stronger, bars appear to the right of the
antenna icon. Try to adjust the antenna so that three
bars appear for the strongest signal reception.
WS antenna signal
indicator
WS
STEREO
4 Adjust the WS antenna for optimum reception as
described in “To adjust the WS antenna” on this
page.
If necessary, detach the WS antenna from the mount
as described on page 5, and attach the supplied
extension cable in order to place the antenna in a
location that provides better reception.
5 Press the LEARN button.
“LEARN?” appears in the display.
LEARN
WS
=
6 Press the LEARN button again while “LEARN?”
is displayed.
“LEARN 99” appears in the display and begins
counting down while the unit automatically
searches for the WorldSpace broadcaster range
available in your area. When the search is
complete, “LEARN” disappears from the display.
If the search was successful, sound is produced
and the WorldSpace broadcaster range for your
area is set in memory.
Notes:
• Pressing the WS button while the unit is searching ends
the search and restores the unit to the previous operation
mode.
• If the satellite signal reception in your area is too weak or
for some reason reception is being blocked, the signals
will not be received and “NO BEAM” appears in the
display. Reposition or redirect the WS antenna to
improve reception.
Notes:
• When rotating the WS antenna, be sure to check that the
antenna cable is not being pulled or stretched as that
may cause the antenna to malfunction.
• As glass and tall structures inhibit the transmission of the
signal, try to avoid directing the antenna toward windows
or tall buildings.
• The signal indicator displays the reception of the overall
satellite signal as opposed to actual broadcaster reception. Because of this, even when the strongest signal
indicator is shown, the sound may be intermittent. This is
not a malfunction.
ON /
STANDBY
VOLUME
SOUND AUTO PRESET
PRESET
LEARN PTY MULTI/LANG
WS
WORLDSPACE DIGITAL RECEIVER FR - DS100
TUNING / SELECT
BAND
MEMORY
PASSWORD
/ CANCEL
PHONES
WORLDSPACE ANTENNA SYSTEM
Extension cable
(supplied)
9
Page 10

Listening to WorldSpace broadcasters
1 Press the WS button to select the WS band.
WS
2 Use the TUNING/SELECT dial to search for a
broadcaster.
Turn clockwise for higher program numbers and
counterclockwise for lower program numbers.
During this operation, “BC UP” or “BC DOWN”
appear in the display indicating the direction of
the search.
(counterclockwise)
TUNING/SELECT
(clockwise)
3 When the TUNING/SELECT dial is released,
reception of the program at that location begins.
The broadcaster ID (BCID) of the currently
selected broadcaster appears shortly in the
display and is replaced by the Service Label of
the broadcaster.
Broadcaster ID:
WS
STEREO
4 When the MULTI indicator lights, the broadcaster
is transmitting multiple programs within the
same BCID.
Press the LANG button to select the program
(PGM) you want. By setting the User Preferred
Language and the User Preferred Program Type,
when a BCID with multiple programs is selected,
the program with the selected language or
program type is automatically tuned. For more
information, refer to pages 14 and 15.
Notes:
• When selecting a broadcaster, the information from each
broadcaster may take several seconds to receive. During
this time, “WAIT” appears in the display.
WS
• Occasionally, a WS broadcaster may broadcast a single
program during a certain time period and then broadcast
simultaneous programs in different languages or with
different content at other times. When this type of
program change occurs, “CHANGING” appears in the
display. During this time, if the TUNING/SELECT dial is
turned, ”WAIT” appears in the display. When “CHANGING” disappears, the TUNING/SELECT dial can be used
to select another broadcaster. If “CHANGING” doesn’t
disappear from the display for some time, turn the unit
off and then on again.
WS
STEREO
Service Label of the broadcaster:
WS
STEREO
If the broadcaster has special features, the following
indicators light in the display.
STEREO: The broadcaster you are listening to is in
stereo.
MULTI: The broadcaster you are listening to is
simulcast in multiple languages or with different
services. For more information, refer to page 14.
CODED: The broadcaster is encoded, and cannot be
listened to without a password. For more
information, refer to page 16.
• Occasionally, a selected program may be transmitting
non-audio information. When this occurs, “NO AUDIO”
appears in the display alternately with the broadcaster’s
Service Label (SL).
WS
• Even if a broadcaster is available in the service area
where you live, reception of the signal for that broadcaster may not be possible in all parts of the service area.
This is not a malfunction.
• If the LEARN function has established that more than one
frequency is available in your area, turning the TUNING/
SELECT dial will switch to broadcasters on other
available frequencies automatically.
• When selecting the WS band, be sure that the telescopic
antenna is retracted and locked in its holding position.
Having the telescopic antenna extended may interfere
with WS antenna reception.
One button WS band operation
When this unit is in standby, pressing the WS button
turns the power on, selects the WS band, and tunes
in the last broadcaster received.
10
Page 11

Listening to the radio (FM/AM (MW/SW))
1 Press the BAND button repeatedly to select a
band.
You can select FM AUTO, FM (FM mono), MW,
and SW. The selected band appears in the
display (“FM” appears in the display for both FM
AUTO and FM (FM mono) modes).
AUTO
BAND
STEREO
PRESET
=
MHz
2 Use the TUNING/SELECT dial to tune to a
station.
Turn clockwise for higher frequencies and
counterclockwise for lower frequencies. The
current frequency appears in the display. When
the peak frequency is reached, the progression
returns to the lowest band frequencies.
(counterclockwise)
(clockwise)
Improving radio reception
For FM and AM (higher frequency SW) stations, fully
extend the telescopic antenna and adjust the
direction of the antenna until the station you have
tuned can be received clearly.
WORLDSPACE ANTENNA SYSTEM
ON /
STANDBY
VOLUME
PRESET
SOUND AUTO PRESET
WS
WORLDSPACE DIGITAL RECEIVER FR - DS100
For AM (MW) and AM (lower frequency SW)
stations, the antenna is located within the unit, so it
is necessary to rotate the unit itself to obtain optimal
reception.
LEARN PTY MULTI/LANG
PASSWORD
WORLDSPACE ANTENNA SYSTEM
TUNING / SELECT
BAND
MEMORY
/ CANCEL
PHONES
TUNING/SELECT
3 Release the TUNING/SELECT dial when the
desired frequency has been reached.
The frequency is instantly received.
Notes on FM stereo reception
• Set this unit to FM AUTO to listen to an FM broadcast in
stereo. The STEREO indicator lights in the display when
an FM stereo broadcast is received.
• When FM stereo reception is intermittent, noisy, or when
the signal is weak, pressing the BAND button to select
FM (FM mono) may improve overall reception of the
signal. If another station is tuned while in FM (FM mono)
mode, this unit automatically switches to FM AUTO
mode.
To change the MW channel space mode
When this unit is shipped, the channel space mode is
set to MW–9 kHz (FM-50 kHz).
If the unit is to be used in North or South America,
set it to MW–10 kHz (FM-100 kHz).
When switching to MW-10kHz
While pressing PRESET+, press the
turn the unit on to switch to MW–10 kHz. “MW–STEP
kHz 10” appears in the display. (This enables 10 kHz
increment steps in MW frequencies and 100 kHz
increment steps in FM frequencies.)
PRESET
+
=
button to
kHz
ON /
STANDBY
VOLUME
PRESET
SOUND AUTO PRESET
WS
WORLDSPACE DIGITAL RECEIVER FR - DS100
LEARN PTY MULTI/LANG
PASSWORD
TUNING / SELECT
BAND
MEMORY
/ CANCEL
PHONES
Note:
The built-in ferrite core antenna can pick up interference
from television receivers in the area and thereby disturb
AM (MW/SW) reception.
Changing the audio presentation of
the broadcast
Use the SOUND button to adjust the quality or
presentation of the sound of radio and WS BAND
broadcasts. Press the SOUND button repeatedly to
select one of the following effects.
BEAT: Enhances bass and drums for more dynamic
music presentation.
POP: Enhances the frequencies common in pop
music for better clarity in music presentation.
CLEAR: Filters the sound to remove unwanted noise
from the broadcast. This mode is suitable when
listening to the news or other spoken word
programming.
FLAT: Broadcast is received without any effect added.
SOUND
When switching to AM-9kHz
While pressing PRESET–, press the
button to turn
the unit on to switch to MW–9 kHz. “MW–STEP kHz
9” appears in the display. (This enables 9 kHz
increment steps in MW frequencies and 50 kHz
increment steps in FM frequencies.)
PRESET
+
=
kHz
11
Page 12

Presetting WS broadcasters and radio
stations
20 stations in each radio band and 20 broadcasters in
the WS band can be preset. Radio bands can be
preset either automatically or manually. WS band
broadcasters must be manually preset.
To preset stations automatically (radio
bands only)
This function scans a selected band (AM (MW/SW),
FM) and can automatically store up to 20 presets in
memory for each band.
1 Press BAND to select the frequency band.
BAND
2 Press the AUTO PRESET button to enter the
automatic memory mode.
The MEMORY and the PRESET indicators blink in
the display. If no buttons are pressed for 5
seconds, the mode is exited.
AUTO PRESET
AUTO
STEREO MEMORY
PRESET
=
3 Press PRESET–/ PRESET+ to select the preset
number to begin memorizing presets at.
PRESET
To preset stations and WS broadcasters
manually
This function is necessary to preset WS broadcasters
or radio frequencies that require manual tuning to be
received.
1 Select the station or WS broadcaster program to
be preset.
2 Press MEMORY/CANCEL.
The MEMORY indicator lights in the display and
the PRESET indicators blinks.
AUTO
MEMORY
/ CANCEL
WS
STEREO MEMORY
PRESET
=
3 Press the PRESET–/PRESET+ buttons to select a
preset location.
If neither button is pressed for 5 seconds, the
MEMORY indicator disappears from the display
and the mode is exited.
PRESET
4 Press MEMORY/CANCEL again to memorize the
preset.
The preset is stored in memory, and the mode is
exited.
MEMORY
/ CANCEL
4 Press the AUTO PRESET button again.
The search begins automatically at the currently
selected frequency.
AUTO PRESET
5 When a broadcasting signal is found, the search
pauses and the signal is received for 5 seconds.
At the end of this time, a preset for that
frequency is memorized and the search
continues for the next preset. However, if the
AUTO PRESET button is pressed during this time,
a preset is not memorized and the search
continues to the next available frequency.
When the search is finished, the last preset
frequency stored is tuned.
Notes:
• When the AUTO PRESET function is performed, presets
previously stored will be replaced by the new presets.
• If the signal of a station is not strong enough, the search
may not stop at that frequency when using the AUTO
PRESET function. When this occurs, tune to the station
manually and store the preset using the manual preset
method shown on the next column.
12
Clearing WS broadcaster presets
If you move from one WorldSpace service area to
another, broadcasters that were previously preset
may no longer be received. Follow the procedure
described below to clear broadcaster preset
information in the unit.
While the unit is on, press and hold the WS button
and then the
button for 2 seconds until “INITIAL”
appears in the display. All WS band broadcaster
presets are cleared. Radio station presets are
maintained in memory. Press the button to turn
the unit to standby and then on again to complete
the procedure.
WS
+
Page 13

Preset Tuning
AC power resume function
This function provides instant access to the preset
frequencies or broadcasters stored in memory.
However, it cannot be performed if you do not have
any presets stored in memory. To preset stations,
refer to “Presetting WS broadcasters and radio
stations” on page 12.
1 Select the WS band or a radio band.
WS
or
BAND
2 Press PRESET– or PRESET+ to select a stored
preset.
When pressing PRESET+, if the maximum preset
number is reached, the order starts over again at
PRESET 1. Similarly, when pressing PRESET–,
PRESET 1 continues in reverse order to PRESET
20.
PRESET
When using an AC power supply and the power
supply is turned off during operation, if the power is
turned on again within a period of up to 2 days, the
unit is turned on and the last station received is
instantly tuned. This function is convenient for
making timed recordings of broadcasts using a
commercially available audio timer.
Note
The AC power resume function does not work if the power
is turned off by pulling the AC power cord out of the back of
the unit.
To cancel a preset
1 Select the preset to be cancelled.
2 Press and hold MEMORY/CANCEL for three
seconds or more until the CANCEL indicator
lights in the display and the PRESET indicators
blinks.
MEMORY
/ CANCEL
CANCEL PRESET
=
3 Use PRESET–/PRESET+ to select the preset to be
cancelled.
If neither button is pressed for 5 seconds, the
CANCEL indicator disappears from the display
and the mode is exited.
PRESET
4 PRESS MEMORY/CANCEL again.
“CANCEL” appears in the display. The preset is
cancelled, and the preset number is skipped
during preset tuning.
MEMORY
/ CANCEL
=
PRESET
13
Page 14

Additional Operations
Searching for a preferred language
A single broadcaster is capable of broadcasting up to
8 different programs simultaneously. When multiple
languages are broadcast, the MULTI indicator lights
in the display and the MULTI/LANG button can be
used to select the language. However, by setting the
User Preferred Language (UPL), it is also possible for
this unit to automatically select the program in the
language you normally use.
To establish the UPL, it is first necessary to conduct a
search for a program being broadcast in your
language.
1 Press and hold the MULTI/LANG button for 3
seconds until “SEL-LANG” appears in the
display.
MULTI/LANG
WS
STEREO
PRESET
=
2 Turn the TUNING/SELECT dial to select one of
the 20 languages in the menu.
If the TUNING/SELECT dial position does not
change for 5 seconds, the LANG search mode is
exited.
3 Press the MULTI/LANG button again.
The unit searches for a program in the selected
language. Reception of the program begins as
soon as it is found. Press the MULTI/LANG button
within 15 seconds of receiving a program to
search for another program. If the MULTI/LANG
button is not pushed again, the mode is exited
and the current program will continue to be
received.
Performing this search establishes the UPL. As many
as three UPL can be stored in memory. When
multiple language programming is encountered, the
program in one of the established UPL will be
automatically selected when available. UPL priority
is based on the most recent language search
performed.
Notes:
• To establish three languages as UPL, it is necessary to
perform a language search for each language. Note that
priority is given to the most recent language searched
for.
• If the selected language is not found, “NO PGM” appears
in the display and the unit returns to the previously
received broadcaster.
• Language information is transmitted by the broadcaster.
Therefore, though a program with the specified language
is detected, the language of the actual program may be
different. This is not a malfunction.
• Pressing the WS button during a language search ends
the search and returns to the previously received
broadcaster.
TUNING/SELECT
The languages that can be selected are as follows.
ENGLISH
SPANISH
ARABIC
PORTUG (Portuguese)
FRENCH
MANDARIN
HINDI
BAHASA
TAGALOG
SWAHILI
HAUSA
URDO
KOREAN
THAI
AFRIKAAN
CANTON
CATALAN
ITALIAN
PUNJABI
OTHER
NO LANG
14
Page 15

Searching for a program type (PTY)
With the WS band, you can use the PTY function to
search the available broadcasters for the specific
type of program you are interested in.
1 Press the PTY button.
“SEL-PTY” appears in the display.
PTY
WS
STEREO
PRESET
=
2 Turn the TUNING/SELECT dial to select one of
the PTY menu items.
If the TUNING/SELECT dial position does not
change for 5 seconds, the PTY mode is exited.
The program types that can be selected are as
follows.
3 Press the PTY button again.
The selected program type blinks in the display
and a search is performed.
PTY
WS
=
4 When a program type is found, the broadcaster
ID or the name of the broadcaster blinks in the
display for 15 seconds. To search for another
program, press the PTY button again at this
time.
WS
STEREO
NEWS: for programs carrying regional or
global news.
INFO: for programs on health, culture and
community events
SPORT: for programs featuring sports coverage
of all types of sports
EDUCAT: for educational programs
CHILDREN: for educational and entertaining
programs for children
TALK: for talk shows, spoken word, issue-
oriented shows, call-in shows, religious
or comedy variety programs.
WORD ENT: for storytelling, radio dramas and other
spoken word entertainment .
CLASSIC: for European classical music programs
SOUND T: for programs featuring movie
sound track music
JAZZ: for jazz music programs
COUNTRY: for country music programs
POP: for contemporary popular music, both
regional and global
ROCK: for rock music programs
URBAN: for R&B, soul, rap, and dance music
programs
OTHER: for alternative programs
NO PTYPE: for no specific PTY
Performing a PTY search establishes the User
Preferred Program Type (UPPY). Unlike the UPL, only
one UPPY can be stored in memory. When the
MULTI indicator lights indicating a broadcaster
featuring different types of programs is selected, the
program corresponding to the established UPPY is
automatically selected.
Notes:
• If the selected program type is not found, “NO PGM”
appears in the display and the unit returns to the
previously received broadcaster.
• The program type information is transmitted by the
different broadcasters. Therefore, though a program of
the specified type is detected, the content of the actual
program may be different. This is not a malfunction.
• Pressing the WS button during a PTY search ends the
search and returns to the previously received broadcaster.
15
Page 16

Regarding encrypted broadcaster
signals
Some broadcasters are available by subscription
only, or may not be available in certain areas, and
the signals from these broadcasters are protected by
the WorldSpace Encryption Schemes 1 and 2 (ES1
and ES2). When you try to receive these
broadcasters, the broadcast is scrambled and the
CODED indicator lights in the display. If a
broadcaster carries a service you are interested in,
the steps below describe the process necessary to
decode the broadcast.
1 Contact a WorldSpace center or an authorized
WorldSpace service provider regarding
broadcaster services and rates in your region.
Refer to page 21 for a list of WorldSpace centers
worldwide.
Notes:
• If you make a mistake while entering the password, press
the MEMORY/CANCEL button when the cursor is not
selecting a number to move the cursor back to the
previous number. Continue this procedure until the
cursor has moved back to the incorrectly entered
number. Numbers that you had entered after that number
must be reentered.
• If you wish to reenter the password from the beginning,
press the WS button and the password is erased and the
mode is exited. Repeat the procedure on this page from
step 3 to enter the password in again.
• If “COMPLETE” appears in the display, but you are still
unable to listen to the broadcaster, contact your nearest
WorldSpace center.
• When the password is entered, sound may be intermittent.
• Up to 4 passwords can be stored in memory. Be sure to
keep your passwords in a safe location where they can be
easily found in case they are somehow erased from
memory.
2 Fill out the application form. At this time, the ID
number of the unit is necessary. An ID number
number sheet with 3 stickers is included with
this unit. The ID number can also be found on
the rear panel of this unit.
On the receipt of the application and any
necessary fees, you will receive a password
corresponding to the ID number of your unit. The
password may be as long as 22 digits in the
following format: A12345-B67890...E12
3 Enter the password.
1. Press and hold the PTY and MULTI/LANG
buttons for three seconds until “PWA_”
appears in the display.
PTY
2. Turn the TUNING/SELECT dial to select the first
number in the “A” password from 0-9 and then
press the MEMORY button. Repeat this process
for each number in the “A” sequence of the
password.
TUNING/SELECT
3. Continue the same process until the password
has been completely entered. The unit checks if
the password is correct. If the password was
entered correctly, “COMPLETE” appears in the
display. If the password was entered
incorrectly or is invalid, “PW AGAIN” appears
in the display, and the password must be
entered again from the beginning.
MULTI/LANG
+
=
==
WS
WS
Displaying the unit ID number
Press the PTY button, MULTI/LANG button and
LEARN button at the same time for 3 seconds. “ID”
appears in the display, followed by the first 8
numbers of the serial number, and then the last 8
numbers of the serial number. This pattern repeats
three times and then returns to the previous display.
Pressing any button ends this operation.
Recording a broadcast from the radio
or WS band
This unit is supplied with stereo output jacks that
allow you to make recordings of the programs you
receive. You can also output the audio signal to an
amplifier or similar component with line inputs.
AC IN
VOLTAGE
SELECTOR
230V
127V
110V
MEMORY
/ CANCEL
SEE BOTTOM
L
R
OUT
LINE
LINE OUT
To make connections, use a stereo cable to connect
the output jacks on the FR-DS100 to the input jacks
on the other component. Be sure to match the colors
of the cable plugs with the color of the jacks; red
with red, and white with white.
ANTENNA
WARNING
• DO NOT PUT BATTERY IN BACKWARDS, MIX WITH
USED OR OTHER BATTERY TYPES-MAY EXPLODE
OR LEAK AND CAUSE PERSONAL INJURY.
• REMOVE THE BATTERIES ("D" SIZE, R20) WHEN
USING THE AC POWER.
• SEE INSTRUCTION MANUAL.
EXTERNAL
4 6 5
231
1.5Vx6
16
Page 17

Tuning the Time Division Multiplex
(TDM) frequencies manually
The L-band frequency range used for WorldSpace
broadcasters is divided into a grid comprised of 82
blocks of 460 kHz segments. With this unit, it is
possible to tune the individual grid positions and
polarities manually.
If you are able to receive WS broadcasters, it is NOT
necessary to perform this operation. However, there
may be occasional changes in the transmitted signal
which may require use of this function. Worldspace
will inform you of any alteration in the frequency
range available in your area.
1 When the power is on, press and hold the WS
button for 3 seconds or more.
The currently received TDM grid number and
polarity (L or R) appear in the display.
WS
2 Use the rotary encoder dial to select the TDM
frequency. Turn the rotary encoder dial clockwise
for higher grid numbers, and counterclockwise
for lower grid numbers.
The graph below shows the current grid positions
and polarities corresponding to the area preset
numbers shown in the maps on page 18.
Preset
1
2
3
4
5
6
7
8
9
10
11
12
13
14
15
16
17
18
19
20
Grid
34
39
44
49
55
60
44
49
55
60
76
81
44
49
55
60
76
81
1
82
Polarity
R
L
L
R
R
L
R
L
L
R
R
L
R
L
L
R
R
L
L
R
Frequency (MHz)
1468.564
1470.864
1473.164
1475.464
1478.224
1480.524
1473.164
1475.464
1478.224
1480.524
1487.884
1490.184
1473.164
1475.464
1478.224
1480.524
1487.884
1490.184
1453.384
1490.644
(counterclockwise)
TUNING/SELECT
The order of the TDM frequencies changes in the
display as follows. When the highest grid
position (GRID 82R) is reached, the count will
continue on from the lowest position (GRID 1 L)
and similarly in the reverse direction.
... Ô GRID12 L Ô GRID12 R Ô GRID13 L Ô ...
... Ô GRID82 R Ô GRID 1 L Ô ...
(clockwise)
3 When the correct grid number and polarity is
selected, broadcaster reception begins and
normal operation returns.
This data current as of May 1999. For more details,
contact a WorldSpace service center.
17
Page 18

Additional Information
WorldSpace Coverage Area
The diagrams on this page display the areas of the world that can receive WorldSpace broadcast
transmissions. Refer to the data on this page and the following page when setting the unit up for WorldSpace
broadcast reception.
To read the maps on this page
Each WorldSpace satellite is in geostationary orbit transmitting three beams which,when combined, provide
coverage to the larger part of the continent it services. Each beam area, shown as oval shapes in the maps,
contains preset numbers, shown as “Pn” within each oval area. These numbers are used when first setting up
WorldSpace satellite reception on page 9. Be sure to use the region preset number for the region where you
live. Incorrect preset number entry may cause the unit to operate incorrectly.
AFRISTAR Satellite
1
2
A
B
P5, P6
C
D
P3, P4
E
AMERISTAR Satellite
P1, P2
ASIASTAR Satellite
1
3
P7, P8
2
P11, P12
3
P9, P10
AB C D E
18
1
A
B
C
D
234
P17, P18
P15, P16
P13, P14
Page 19
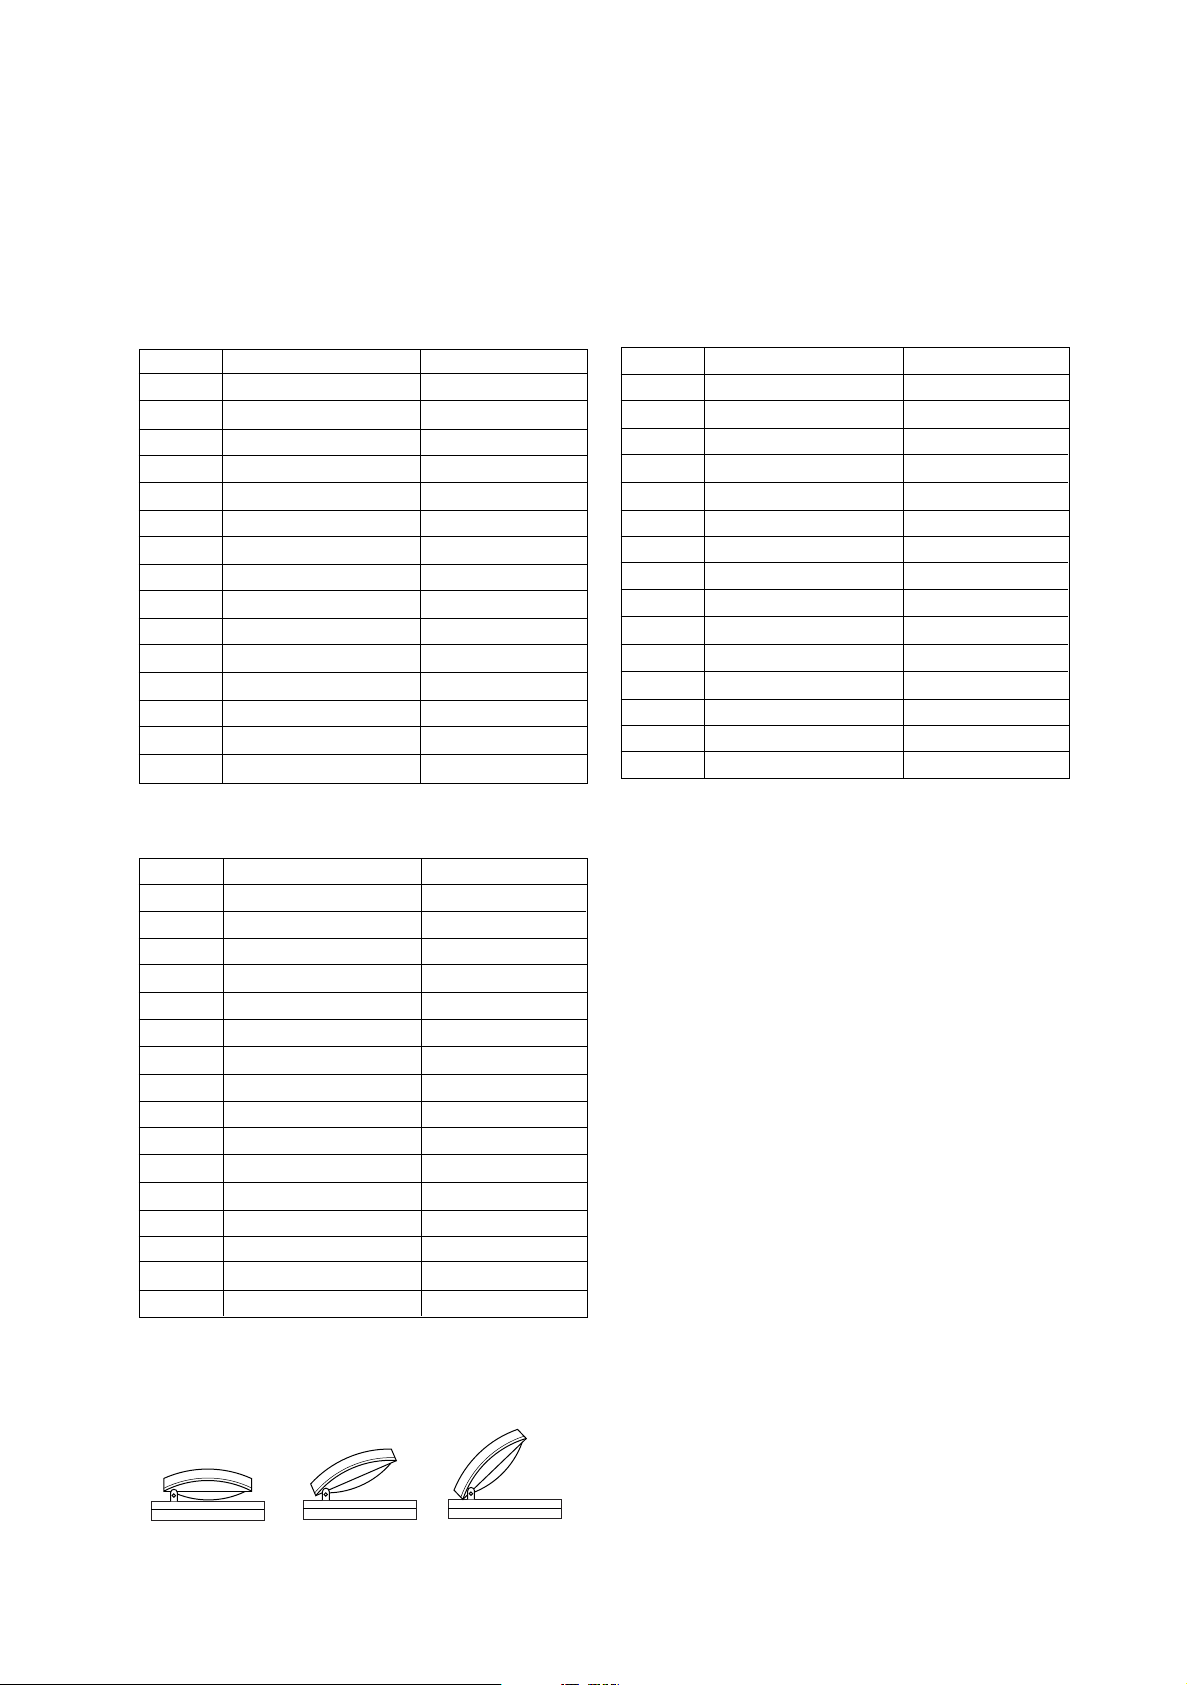
To read the graphs on this page
Proper positioning and placement of the WS antenna is essential to proper reception of the digital signal.
Using the maps on the previous page, determine the two-character coordinates for the region where you live.
With those coordinates, refer to the graphs below. The graphs indicate the ideal directionality and elevation of
the WS antenna for optimal reception. Use this information combined with the signal indicator in the display
to determine the best way to position your WS antenna. For more information on setting up the antenna,
refer to page 9.
AFRISTAR Satellite
Area
A-1
A-2
A-3
B-1
B-2
B-3
C-1
C-2
C-3
D-1
D-2
D-3
E-1
E-2
E-3
Direction
SOUTH-EAST
SOUTH
SOUTH-WEST
SOUTH-EAST
SOUTH
SOUTH-WEST
EAST
FLAT
WEST
NORTH-EAST
NORTH
NORTH-WEST
NORTH-EAST
NORTH
NORTH-WEST
AMERISTAR Satellite
Area
A-1
A-2
A-3
A-4
B-1
B-2
B-3
B-4
C-1
C-2
C-3
C-4
D-1
D-2
D-3
D-4
Direction
SOUTH-EAST
SOUTH
SOUTH-WEST
SOUTH-WEST
SOUTH-EAST
SOUTH
SOUTH-WEST
SOUTH-WEST
EAST
FLAT
WEST
WEST
NORTH-EAST
NORTH
NORTH-WEST
NORTH-WEST
Elevation
HIGH
HIGH
HIGH
MIDDLE
MIDDLE
MIDDLE
MIDDLE
FLAT
MIDDLE
MIDDLE
MIDDLE
MIDDLE
HIGH
HIGH
HIGH
Elevation
HIGH
HIGH
HIGH
HIGH
MIDDLE
MIDDLE
MIDDLE
HIGH
MIDDLE
FLAT
MIDDLE
HIGH
MIDDLE
MIDDLE
MIDDLE
HIGH
ASIASTAR Satellite
Area
A-1
A-2
A-3
B-1
B-2
B-3
C-1
C-2
C-3
D-1
D-2
D-3
E-1
E-2
E-3
Direction
SOUTH-EAST
SOUTH-EAST
EAST
SOUTH-EAST
SOUTH-EAST
EAST
SOUTH
SOUTH
FLAT
SOUTH-WEST
SOUTH-WEST
WEST
SOUTH-WEST
SOUTH-WEST
WEST
Elevation
HIGH
HIGH
HIGH
HIGH
MIDDLE
MIDDLE
HIGH
MIDDLE
FLAT
HIGH
MIDDLE
MIDDLE
HIGH
HIGH
HIGH
The elevation of the WS antenna
The illustrations below correspond to the
recommended elevation settings listed in the graphs on
this page. Set the WS antenna accordingly.
FLAT
MIDDLE
HIGH
19
Page 20

Troubleshooting
Specifications
WorldSpace transmissions are not received.
• Check that the WS antenna is properly connected. If
using the extension cable, make sure that all connections are correct and secure.
• Check that the WS antenna is positioned to receive
satellite transmissions. Refer to page 9.
• Check that there are no obstructions blocking the path
between the antenna and the satellite.
Refer to page
5.
In the WS band, TUNER/SELECT is turned, but no
broadcast is received.
• Make sure that the LEARN function has been performed
to establish the broadcaster frequency available in your
area. Even if the LEARN function was performed, but the
antenna wasn’t correctly oriented, no broadcaster
frequencies will be stored in memory. Refer to page 9.
“BC GONE” appears in the display when you try to
access a specific broadcaster.
• The broadcaster at that location has stopped broadcasting with the WorldSpace network.
The power cannot be turned on.
• Check that the power cable is firmly inserted into the AC
IN jack on the back of the unit and also plugged into an
AC outlet.
Though unlikely to occur, the unit “freezes up” or
becomes unoperable during use.
• When using the AC power cord, unplug the power cord
from the unit or from the wall outlet, then plug it again
to restart the unit.
• When using batteries, remove the batteries, then load
them again.
• When using batteries and the power cord is connected,
unplug the power cord from the unit, then plug it in
again and restart the unit.
There is no sound from the speakers.
• Check that headphones are not plugged in.
• Check that the volume is at an audible level.
• Check that the broadcaster you have selected is not
encrypted (CODED lights in the display).
WorldSpace
Transmitting frequencies
: 1453.384 MHz – 1490.644 MHz
(L-Band 460 kHz step)
Broadcast system : WorldSpace System
Digital modulation system
: QPSK–TDM
Audio coding system
: MPEG 1 / 2 / 2.5 Layer III
Encryption scheme : ES1, ES2
Number of presets : 20
Password memory : 4
Antenna section
Polarization : Left hand circular polarization
(LHCP)
Right hand circular polarization
(RHCP)
Half power width : > 60°
Power consumption : 60 mW
Total gain : 36.8 ± 2 dB
(Element gain: > 6 dBi)
Reception system :
Minimum input sensitivity
Maximum input sensitivity
Double super heterodyne system
: – 85 dBm
: – 55 dBm
Tuner section
• FM
Frequency range : 87.5 MHz – 108.0 MHz
Frequency step : 100 kHz
50 kHz
Number of presets : 20
• MW
Frequency range
(Saudi Arabian model):530 kHz – 1600 kHz (10 kHz step)
531 kHz – 1602 kHz (9 kHz step)
(Except Saudi Arabian model)
:
530 kHz – 1710 kHz (10 kHz step)
531 kHz – 1710 kHz (9 kHz step)
Number of presets : 20
• SW
Frequency range : 5.75 MHz – 17.95 MHz
Number of presets : 20
Radio reception is noisy.
Adjust the antenna appropriate for the band you are
receiving to improve reception. Refer to page 11.
Design and specifications are subject to change
without notice.
20
General
Speaker : 8 cm (3-15/16”) x 2
Power output : Max. 6.8 W (AC 230 V)
(3.4 W + 3.4 W) at 4 Ω
Input jack : WS antenna jack (F-type plug)
Output jack : Headphones (MAX 20 mW/
32 Ω)
: EXTERNAL (WS BAND)
: LINE OUT (Analog audio out)
Power supply : AC 110/127/230 50/60 Hz
DC 9 V (“R20/D (13F)” cell x 6)
Power consumption : 12 W (with
(STANDBY/
ON) button ON)
1.6 W (with
(STANDBY/
ON) button STANDBY)
Dimensions :
450 (W) mm x 158 (H) mm x 250 (D) mm
(17 11/16 (W) x 6 1/4 (H) x 9 13/16 (D) in.)
Mass : Approx. 4.6 kg (10 lb. 2 oz.)
with batteries
Approx. 4.0 kg (8 lb. 13 oz.)
without batteries
Accessories provided : WS antenna x 1
AC power cord x 1
8 m extension cable x 1
ID Number seals x 4
AC plug adapter x 1
Page 21

WorldSpace Center Addresses
WorldSpace Corporate Services
WorldSpace Management Corporation
Am Weichselgarten 23
91058 Erlangen, Germany
Tel: 49 9131 6061 0
Fax: 49 9131 6061 99
WorldSpace Management Corporation
4 - 6 Soho Square
London, England W1V 5DE
Tel: 44 171 494 8200
Fax: 44 171 494 8201
WorldSpace - France
1, Impasse de Candie
31100 Toulouse, France
Tel: 33 5 61 43 82 82
Fax: 33 5 61 43 82 99
WorldSpace Management Corporation
Green House Building 2F
Nihonbashi-Tomisawacho
Chuo-ku, Tokyo 103-0006, Japan
Tel: 81 3 5643 8163
Fax: 81 3 5643 7254
WorldSpace Africa/Middle East
WorldSpace Ghana Ltd.
42 Independence Avenue
P.O. Box C838, Cantonments
Accra, Ghana
Tel: 233 21 22 6667
Fax: 233 21 23 8147
WorldSpace Management Corporation
WISMA 46, Kota Bni
34th FI. Jalan Jend
Sudirman Kav. 1
Jakarta 10220
Indonesia
Tel: 62 21 574 7513
Fax: 62 21 574 7514
WorldSpace Management Corporation
Regus Office 6
C203 Beijing Lufthansa Centre Offices
No. 50 Liangmaqiao Road
Chaoyang District
Beijing 100016 PRC
Tel: 8610 6465 1248
Tel: 8610 6465 1326
Fax: 8610 6465 1240
WorldSpace India
9th Floor, Shankarnarayana Towers
25/2, M.G. Road
Bangalore 560 001
India
Tel: 91 80 559 5183
Fax: 91 80 559 5181
WorldSpace Americas
WorldSpace Americas - Miami
815 NW 57th Avenue, Suite 441
Miami, FL 33126 USA
Tel: 305 265 0750
Fax: 305 265 0790
WorldSpace Southern Africa (Pty.) Ltd.
391 Jan Smuts Avenue
Craighall, 2196, Johannesburg, S.A.
P.O. Box 412466
Craighall, 2024, Johannesburg, S.A.
Tel: 27 11 789 9191
Fax: 27 11 886 6394
WorldSpace Ethiopia
W17, K23 Hse. No. 2173
P.O. Box 986
Addis Ababa, Ethiopia
Tel: 251 1 61 32 80
Fax: 251 1 61 32 99
AfriSpace (Kenya) Limited
16th Floor, Lonrho House
Standard Street
P.O. Box 43305
Nairobi, Kenya
Tel: 254 2 210805
Fax: 254 2 210845
WorldSpace Asia
AsiaSpace Ltd.
Level 4, 6 Riverside Quay
South Bank, Melbourne
Victoria 3006, Australia
Tel: 61 3 9693 8555
Fax: 61 3 9693 8585
WorldSpace Caribbean
1-A Dere Street, Suite 5
Port of Spain
Trinidad & Tobago
Tel: 868 624 0172
Fax: 868 624 0202
Creative Services
Regional Office
Reference Guide
WorldSpace Entity
Technology Brochure 150
11/13/97
21
Page 22

EN.
VICTOR COMPANY OF JAPAN, LIMITED
JVC
0599TTMWSTOZK
 Loading...