

Page 1
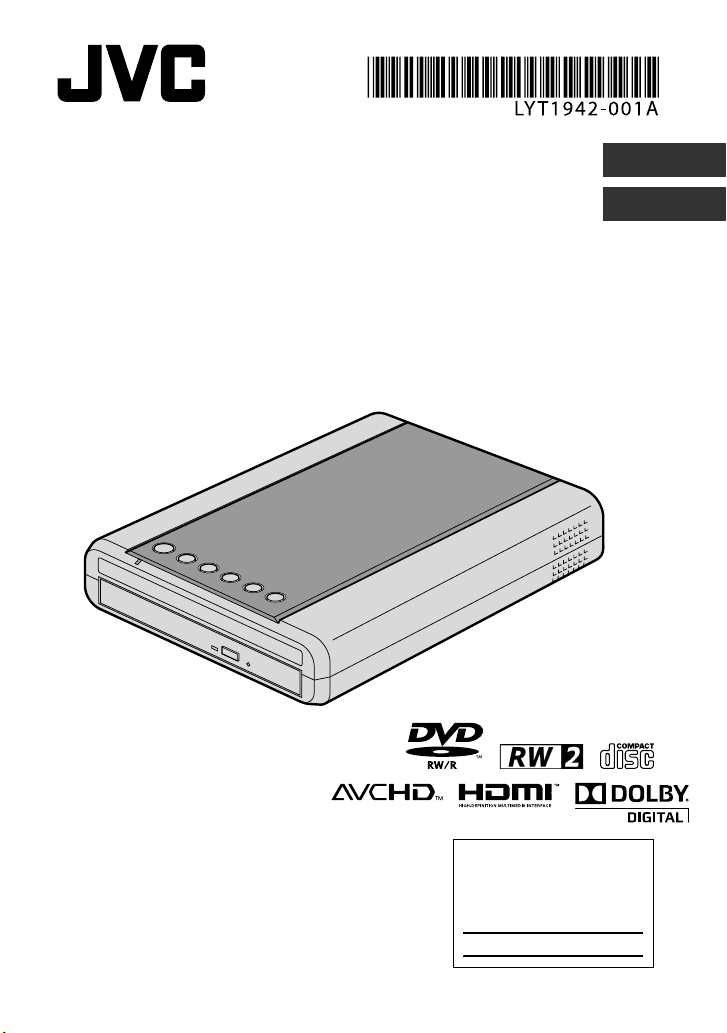
CU-VD50U
DVD Burner
INSTRUCTIONS
Grabador de DVD
MANUAL DE INSTRUCCIONES
ENGLISH
ESPAÑOL
For Customer Use:
Enter the Model No. and Serial
No. (located on the bottom of the
burner) below. Retain this
information for future reference.
Model No.
Serial No.
Page 2
This burner enables DVDs of videos
recorded with the JVC Hard Disk Camera to
be created without using a PC.
• If you want to edit videos recorded with the camera
and create your original DVDs, use the software
provided with the camera for editing and creating
DVD s.
• A provided data writing software Power2Go 5.5 Lite
can be used for writing data. However, it cannot be
used to edit videos or create DVDs.
• The burner does not include support for Macintosh.
Dear Customer,
Thank you for purchasing this burner. Before use,
please read the safety information and precautions
contained in pages 2 and 3 to ensure safe use of this
product.
Safety Precautions
IMPORTANT:
In the event that any of the following occur, remove the
plug and make a request for repair to the dealer.
• Smoke or abnormal odor is emitted
• Damage from being dropped
• Water or an object enters inside
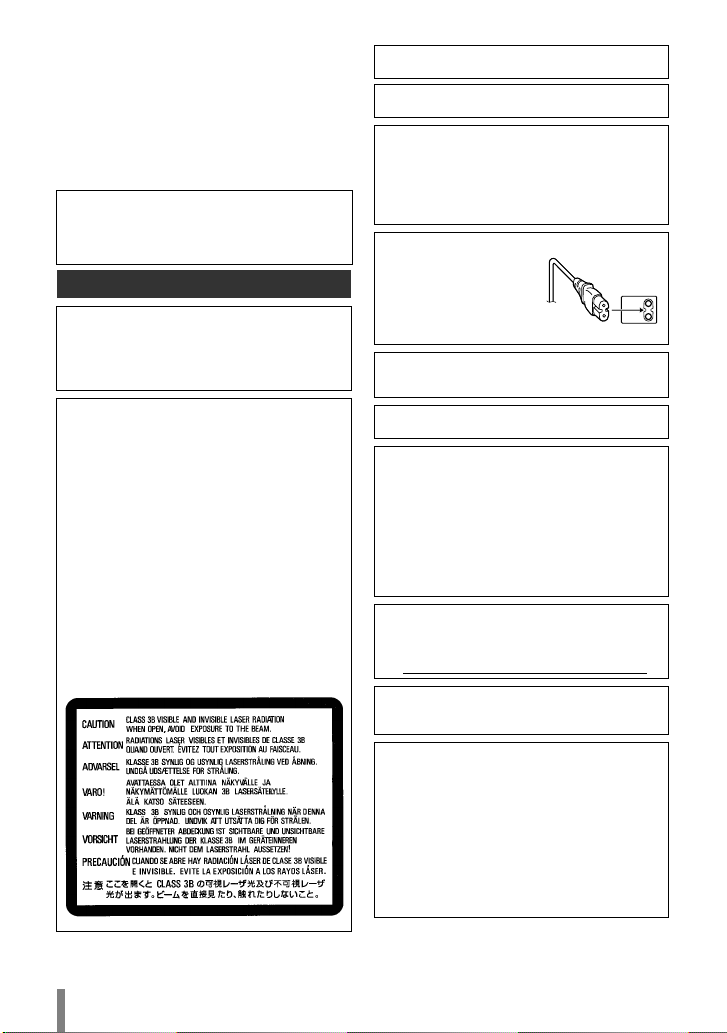
CAUTION:
A UNIT IS A CLASS 1 LASER PRODUCT.
HOWEVER THIS UNIT USES A VISIBLE LASER
BEAM WHICH COULD CAUSE HAZARDOUS
RADIATION EXPOSURE IF DIRECTED. BE SURE
TO OPERATE THE UNIT CORRECTLY AS
INSTRUCTED.
WHEN THIS UNIT IS PLUGGED INTO THE WALL
OUTLET, DO NOT PLACE YOUR EYES CLOSE TO
THE OPENING OF THE DISC TRAY AND OTHER
OPENINGS TO LOOK INTO THE INSIDE OF THIS
UNIT.
USE OF CONTROLS OR ADJUSTMENTS OR
PERFORMANCE OF PROCEDURES OTHER THAN
THOSE SPECIFIED HEREIN MAY RESULT IN
HAZARDOUS RADIATION EXPOSURE.
DO NOT OPEN COVERS AND DO NOT REPAIR
YOU RSELF. REFER SERVICING TO QUALIFIED
PERSONNEL.
CLASS 1 LASER PRODUCT
REPRODUCTION OF LABELS
WARNING LABEL INSIDE OF THE UNIT
This unit applies to the standard “IEC60825-1:2001”
for laser products.
The socket-outlet shall be installed near the
equipment and shall be easily accessible.
ATTENTION:
This unit contains microcomputers. External electronic
noise or interference could cause malfunctioning. In
such cases, switch the unit off and unplug the mains
power cord. Then plug it in again and turn the unit on.
Take out the disc. After checking the disc, operate the
unit as usual.
CAUTION:
To avoid electric shock or
damage to the unit, first firmly
insert the small end of the
power cord into the AC
Adapter until it is no longer
wobbly, and then plug the
larger end of the power cord into an AC outlet.
The mains plug shall remain readily operable.
• Remove the mains plug immediately if the burner
functions abnormally.
If malfunctioning occurs, stop using the unit
immediately and consult your local JVC dealer.
Caution on Replaceable lithium battery
The battery used in this device may present a fire or
chemical burn hazard if mistreated.
Do not recharge, disassemble, heat above 100 C or
incinerate. Replace battery with Panasonic
(Matsushita Electric), Sanyo, Sony or Maxell CR2025.
Danger of explosion or Risk of fire if the battery is
incorrectly replaced.
• Dispose of used battery promptly.
• Keep away from children.
• Do not disassemble and do not dispose of in fire.
For USA-California Only
This product contains a CR Coin Cell Lithium Battery
which contains Per chlo rate Material – special handling
may apply.
See www.dtsc.ca.gov/hazardouswaste/perchlorate
WARNING:
Batteries shall not be exposed to excessive heat such
as direct sunshine, fire or the like.
Declaration of Conformity (for owners in the U.S.A.)
Model Number : CU-VD50U
Tr ade Name : JVC
Responsible party : JVC AMERICAS CORP.
Address : 1700 Valley Road Wayne,
Telephone Number : 973-317–5000
This device complies with Part 15 of FCC Rules.
Operation is subject to the following two conditions: (1)
This device may not cause harmful interference, and
(2) this device must accept any interference received,
including interference that may cause undesired
operation.
N. J. 07470
2
Page 3

(For owners in the U.S.A.)
Changes or modifications not approved by JVC could
void the user’s authority to operate the equipment.
This equipment has been tested and found to comply
with the limits for a Class B digital device, pursuant to
Part 15 of the FCC Rules. These limits are designed
to provide reasonable protection against harmful
interference in a residential installation. This
equipment generates, uses, and can radiate radio
frequency energy and, if not installed and used in
accordance with the instructions, may cause harmful
interference to radio communications. However, there
is no guarantee that interference will not occur in a
particular installation. If this equipment does cause
harmful interference to radio or television reception,
which can be determined by turning the equipment off
and on, the user is encouraged to try to correct the
interference by one or more of the following measures:
Reorient or relocate the receiving antenna.
Increase the separation between the equipment and
receiver.
Connect the equipment into an outlet on a circuit
different from that to which the receiver is connected.
Consult the dealer or an experienced radio/ TV
technician for help.
(For owners in Canada)
• FOR USE WITH MODEL NO. AP-V50U
(AC ADAPTER).
• POUR UTILISER AVEC MODELE AP-V50U
(ADAPTATEUR C.A.).
This Class B digital apparatus complies with Canadian
ICES-003.
Cet appareil numérique de la classe B est conforme à
la norme NMB-003 du Canada.
The C/B button does not completely shut off mains
power from the unit, but switches operating current on
and off. ABB shows electrical power standby and ACB
shows ON.
Safety Precautions for the Burner
Be sure to observe the following precautions. Failing to
do so may result in electric shock, fire, injury, or
malfunction.
• Do not disassemble, dismantle, or modify the
equipment. Requests for repair and inspection should
be made to the dealer.
• Do not insert metal or combustible objects or pour
water or other liquids inside the burner.
• Turn off the power when connecting equipment.
• Remove the plug when the burner will not
a prolonged time or prior to cleaning (electricity flows
through the equipment even when the power is off).
• Do not block the ventilation holes of the burner.
• Do not use where there is condensation. Suddenly
carrying the burner from a cold location to a hot
location may result in the formation of drops, which
may cause a malfunction or failure.
• Do not cause the burner to vibrate when discs are in.
be used for
Safety Precautions for Accessories
• When using the AC adapter, the power cord, and the
USB cable, be sure to observe the following
precautions. Failing to do so may result in electric
shock, fire, injury, or malfunction.
• Do not insert or remove the plug when your hands
are wet.
• Fully insert the plug into the outlet.
• Keep dust and metal objects away from the plug.
• Do not damage the cord.
• Place the cord where it will not trip someone up.
• Do not use when thunder can be heard.
• Do not dismantle.
• Do not use for any product other than this one.
• Do not play the provided CD-ROM with an audio
player. Doing so may damage the circuits or speakers.
Safety Precautions for Discs
Do not use the following discs.
• Cracked discs
• Deeply scratched discs
Installation
Do not install in any of the following locations.
• Humid location
• Location of 60 °C or above
• Location subject to direct sunlight
• Location where overheating is likely
• Dusty or smoky locations
• Locations subject to oily smoke or steam such as a
kitchen counter or beside a humidifier
• Unstable location
• Bathroom
• Dusty places
• Slanted location
ATTENTION:
On placing the unit:
Some TVs or other appliances generate strong
magnetic fields. Do not place such appliances on top
of the unit as it may cause picture disturbance.
When moving the product:
Press C/B to turn off the power, and wait at least 30
seconds before unplugging the power cord. Then, wait
at least 2 minutes before moving the product.
EN
ES
3
Page 4
Basic Guide
Getting Ready to Copy to a DVD!
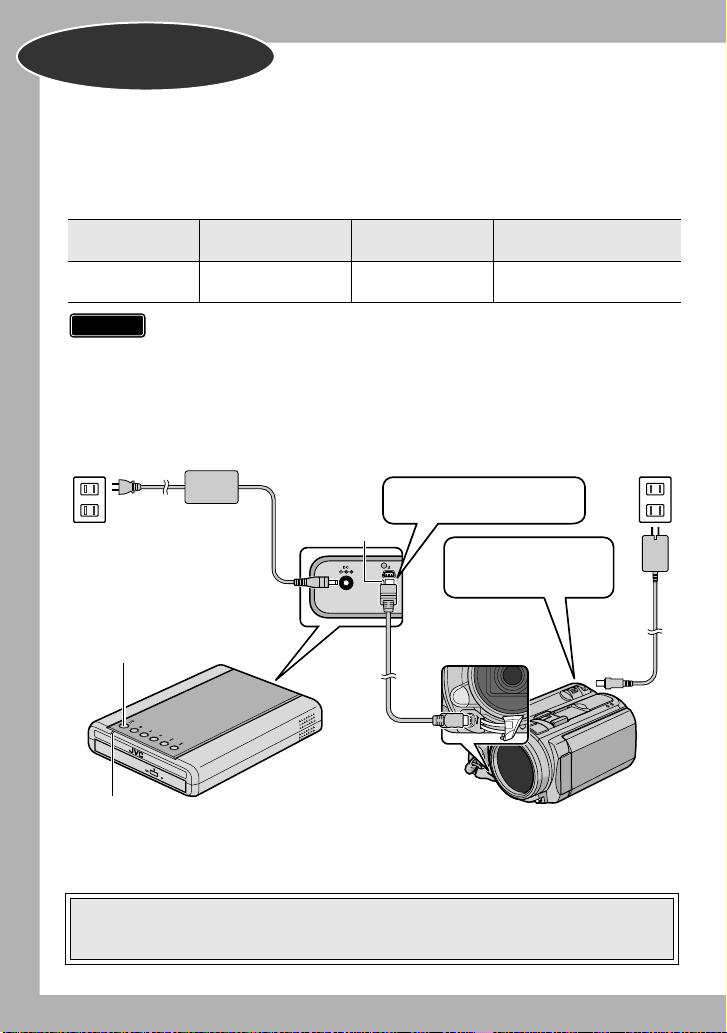
A Get ready a recommended disc
Use DVD-R, DVD-RW or DVD-R DL disc of the brands listed below.
DVD+R, DVD+RW and DVD-RAM discs cannot be used.
DVD-R DL (Single-
sided double layer)
Use the AC adapter to
power on the Everio
camera.
Brand
Caution
•DVD-R DL (single-sided double layer) discs can be used only when the
•Use a commercially available cleaning cloth to wipe the disc gently if
• Do not use discs that are scratched.
B Connect
DVD-R DVD-RW
JVC, TDK,
Verbatim, SONY
burner is connected to a high definition Everio camera.
there are any fingerprints or dirt. Applying too much strength will result in
scratches.
To DC jack
JVC JVC, Verbatim
Insert the connector with the
protrusion to the burner.
Protrusion
Power button
CU-VD50
Power lamp
USB cable
C Press the power button to turn on the burner
• The power lamp changes from blinking orange to steady orange.
• When an AVCHD disc (P. 15) is inserted into a device that is not AVCHDcompatible, you may not be able to eject the disc. To eject the disc, refer to the
instruction manual of your device.
4
To DC jack
Everio
Page 5
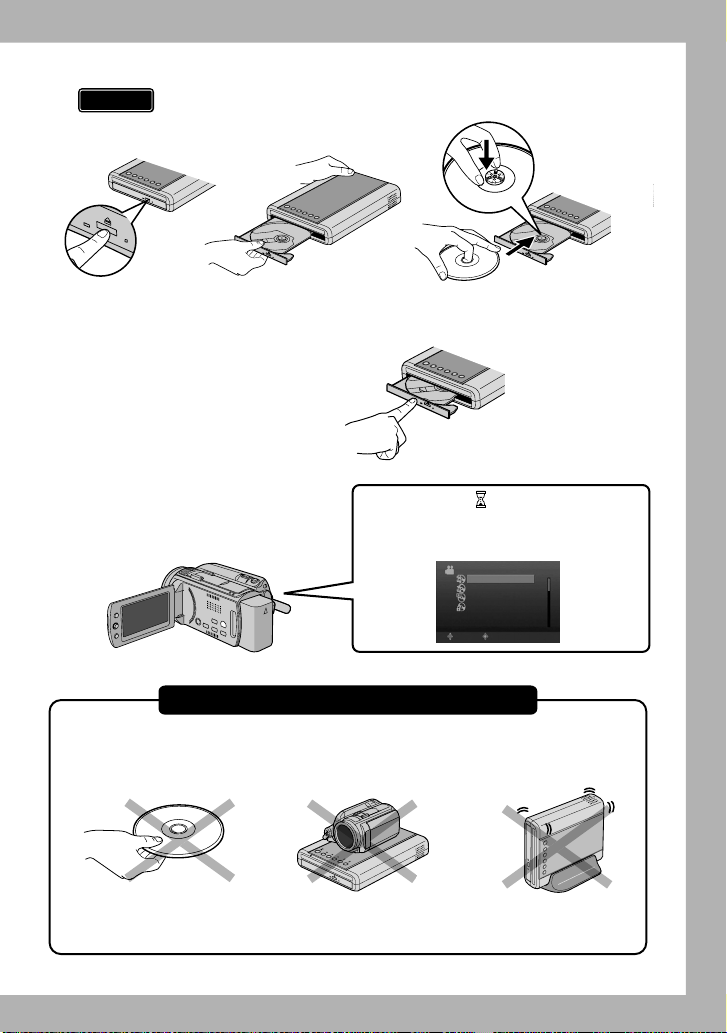
D Open the tray and insert the disc
Caution
• The tray cannot be opened/closed when the burner is off.
A Press the eject
button.
E Close the tray
•Push in until the tray snaps in.
F Open the LCD monitor
• The Everio camera turns on.
• The power lamp on the burner
changes from orange to green light.
Pay attention to the following!
• Do not touch the
recording side
B Pull out
completely.
• Do not place any
objects on top
C Insert firmly into
place.
An hourglass ( ) is displayed when
the burner is recognizing the disc.
When completed, the following screen
appears.
6)$%/
#2%!4%&2/-!,,
3%,%#4!.$#2%!4%
0,!9"!#+
&).!,):%
3%4
3%,%#4
• Do not topple
• Do not subject to
mechanical shock
¹ Recording or playback may not function properly if the disc is scratched
or dirty.
5
Page 6
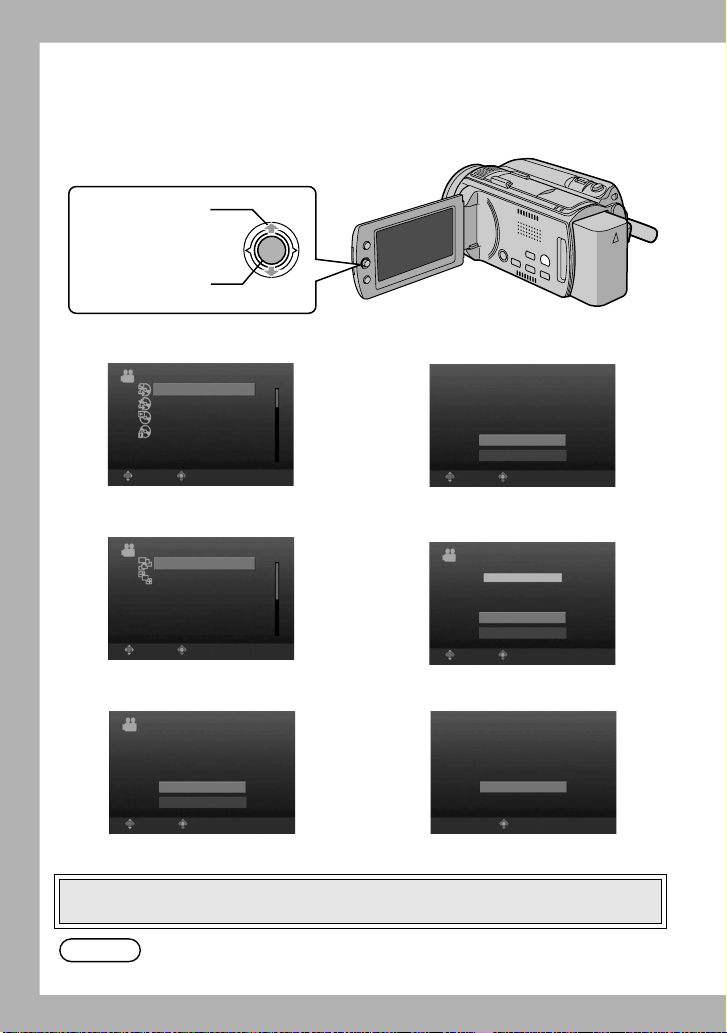
Copying Videos to a DVD
-%.5
$6$
-%.5
Operate on the Everio camera.
¹ Depending on the model connected, the on-screen display may differ from those
shown below.
(move up-down)
Select
Confirm
(push in)
A Select “CREATE FROM ALL”
VIDEO
CREATE FROM ALL
SELECT AND CREATE
PLAYBACK
FINALIZE
SELECT SET
B Select “ALL SCENES”
CREATE FROM ALL
ALL SCENES
UNSAVED SCENES
SELECT SET
-%.5
TOP
C Select “OK”
ALL SCENES
QUANTITY REQUIRED
$6$$6$$,
PREPARE AN EMPTY DISC
OK
RETURN
SELECT SET
-%.5
TOP
D Select “Yes”
ALL SCENES
DO YOU WANT TO MAKE
AN AUTOMATIC HEADLINE ON
THE DISC TOP MENU?
Yes
No
SELECT SET
E Select “EXECUTE”
ALL SCENES
EXECUTE
CANCEL
SELECT SET
F Press “OK”
ALL SCENES
COMPLETED
OK
SET
Copy completed!
TOP
TOP
• Do not turn off the power or remove the USB cable while the the hourglass or the
copy in progress screen is displayed.
Note
6
You can also choose to copy your favorite scenes. For details, refer to the
instruction manual of the Everio camera.
Page 7
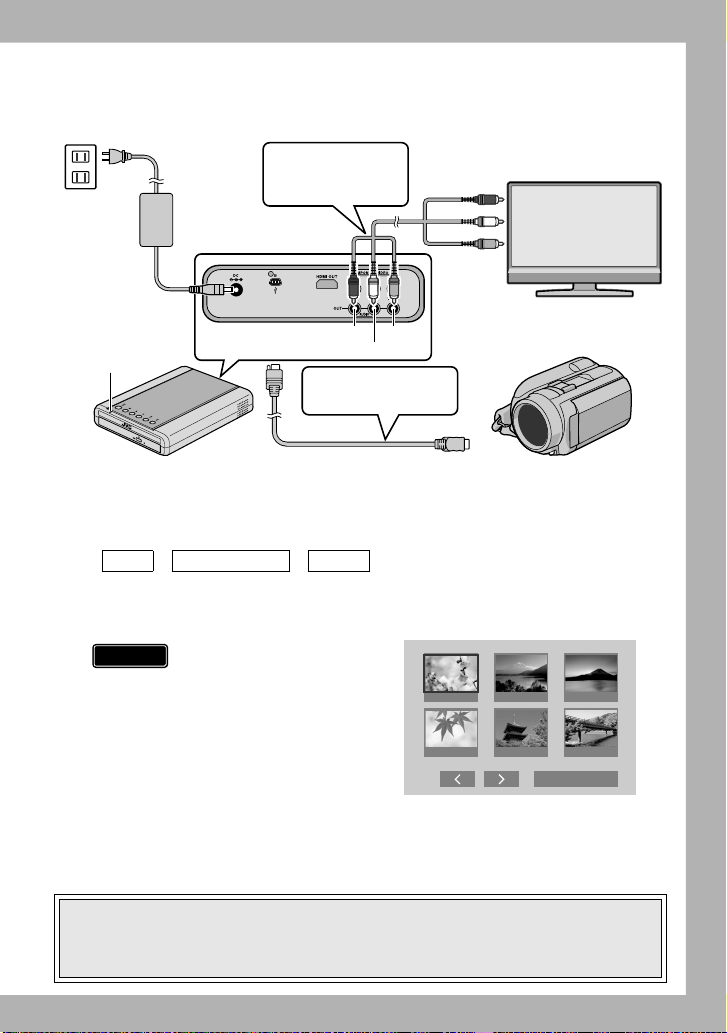
Playing Videos Stored on the DVD
1/2
A Connect this burner to the TV
Power lamp
To DC jack
Connect to the TV
with an Audio/Video
cable.
Red Yellow
White
Remove the USB
cable
Red
White
Yellow
TV
• For details, refer to “Connecting to the TV” (P.12, 13).
B Remove the USB cable
• The power lamp on the burner changes as follows.
Green Blinking orange Orange
• When the USB cable is removed, the playback navigator appears automatically.
(About 40 seconds.)
(Playback navigator screen on the TV)
Caution
•An unfinalized disc
cannot be played back
properly. Refer to the
instruction manual of the
Everio camera and
finalize the disc.
JUN.01.2008 09:51AM JUN.01.2008 11:45AM JUN.01.2008 05:09PM
AUG.01.2008 01:42PM AUG.01.2008 03:15PM AUG.01.2008 05:32PM
DIGEST PLAYBACK
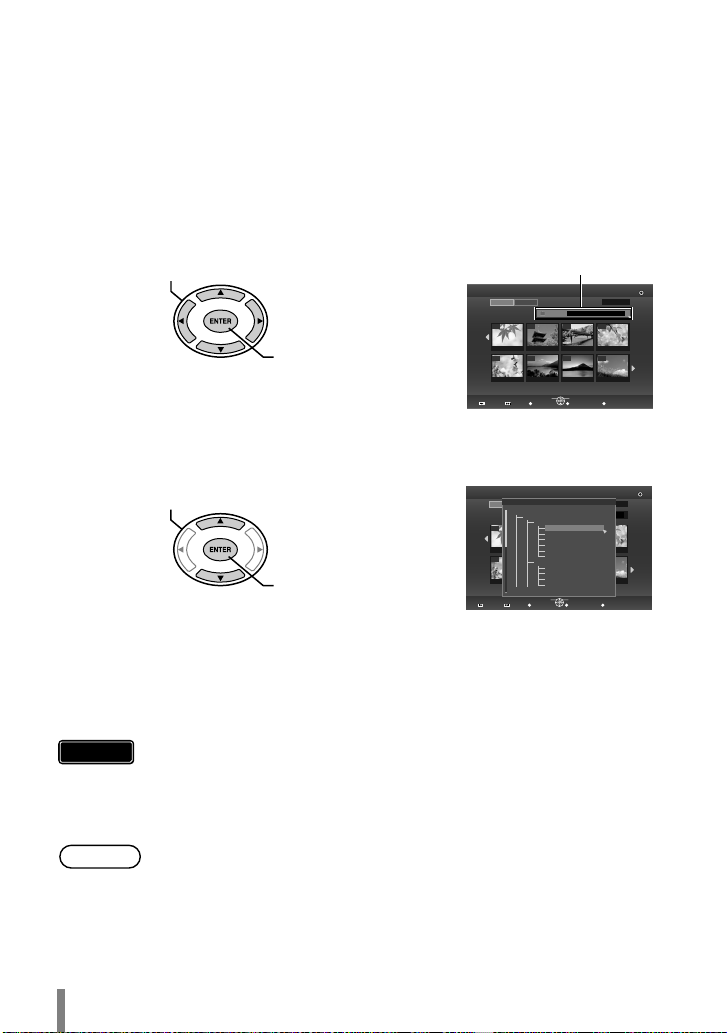
C Use the selection keys on the remote control to select the video to
play back and press the ENTER button.
• When the power lamp blinks slowly in red due to a drop in the burner’s interior
temperature, some functions will not work and there will be no image displayed on
the TV screen. Wait until the power lamp stops blinking in red before operating this
burner.
Playback begins!
7
Page 8

Contents
z Safety Precautions .................................................................................................. 2
z Getting Started......................................................................................................... 9
Accessories ............................................................................................................... 9
Placing the Burner..................................................................................................... 9
z Names and Functions of Each Part ..................................................................... 10
Front and Top Panel................................................................................................ 10
Rear Panel............................................................................................................... 10
Remote Control ....................................................................................................... 11
z Connecting to the TV ............................................................................................ 12
Connecting to a TV with HDMI Input Terminal ........................................................ 12
Connecting to a TV with Component Video Input Connectors ................................ 13
Connecting to a TV with Audio/Video Input Connectors.......................................... 13
z Copying Everio Video to a DVD ........................................................................... 14
Connecting to an Everio Camera ............................................................................ 14
Creating AVCHD Disc/Data Disc/DVD-Video.......................................................... 15
z Copying from PC to DVD ...................................................................................... 16
Connecting to a PC ................................................................................................. 16
Copying to a DVD.................................................................................................... 16
Computers That Can Be Used ................................................................................ 17
In
stalling CyberLink Power2Go 5.5 Lite .................................................................. 18
CyberLink Power2Go 5.5 Lite Contact Information ................................................. 20
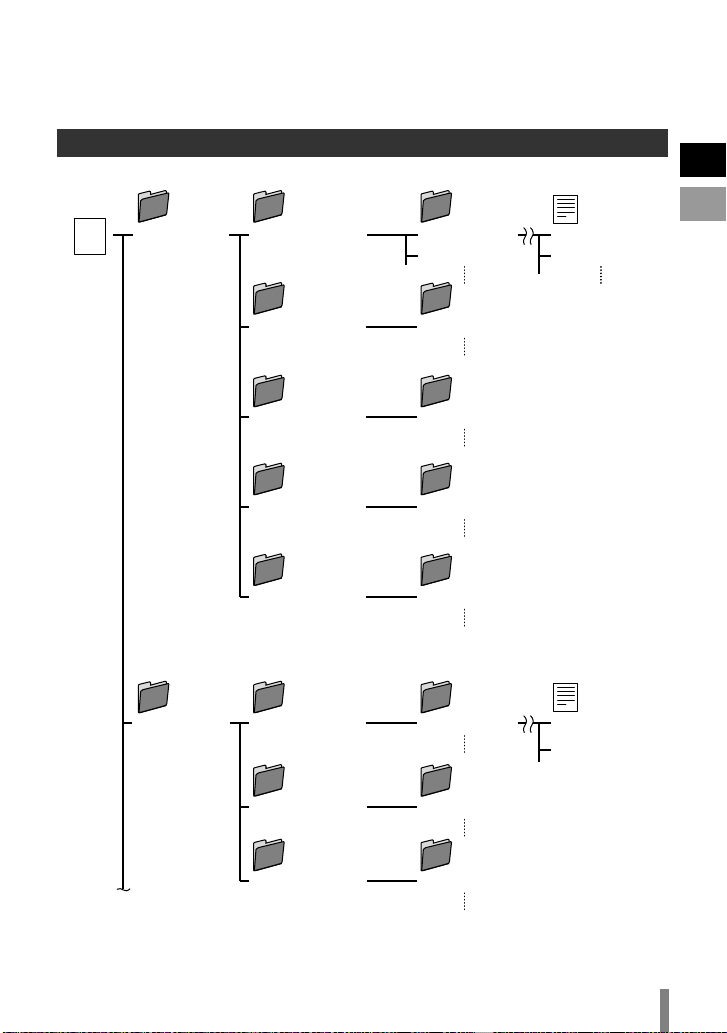
z Folder Configuration ............................................................................................. 21
When Copying from High Definition Everio to Data Disc......................................... 21
When Copying from High Definition Everio to AVCHD Disc.................................... 22
When Creating and Storing Desired Folders and Files on a PC ............................. 22
z Playing Images Stored on the DVD...................................................................... 23
Viewing Images Copied from the High Definition Everio ......................................... 23
Viewing DVD-Video Copied from Everio ................................................................. 27
z Changing the Playback Settings .......................................................................... 29
z Operate in Conjunction with TV via HDMI ........................................................... 31
z Viewing High Quality Images ............................................................................... 33
z Settings Menu ........................................................................................................ 34
Menu Operation Procedures ................................................................................... 34
Settings Menu Items and Descriptions .................................................................... 35
z Screen Display
z Troubleshooting .................................................................................................... 41
z Error Messages...................................................................................................... 45
z Other Information .................................................................................................. 46
z Specifications ........................................................................................................ 48
s..................................................................................................... 39
8
Page 9
Getting Started
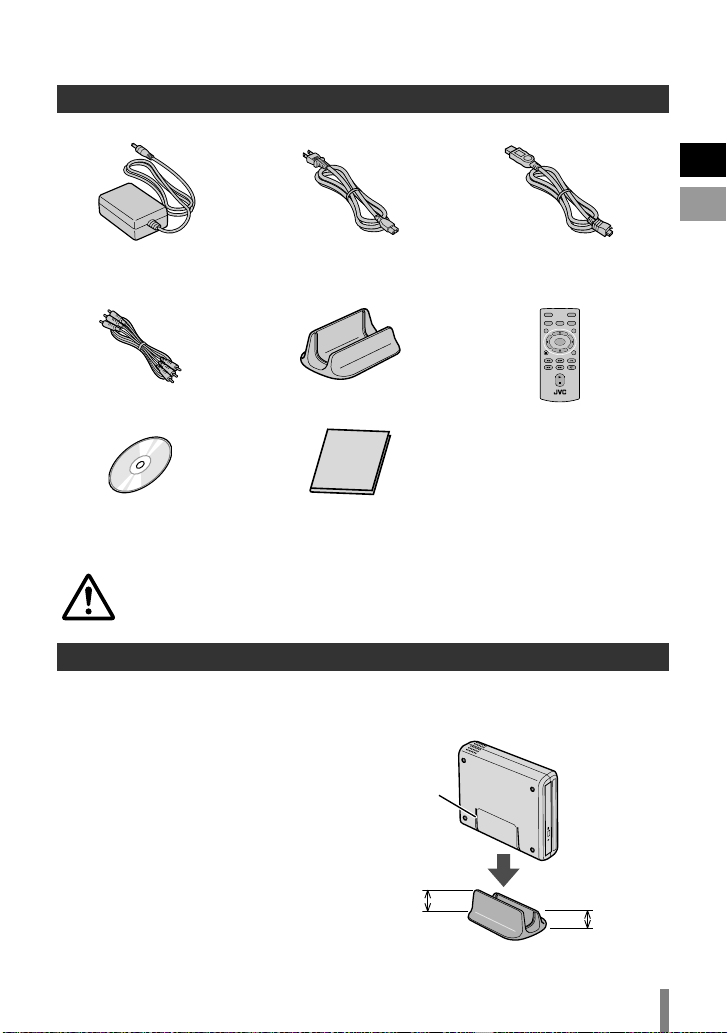
Accessories
If there are any items missing, please consult your authorized dealer.
EN
ES
AC adapter
(AP-V50U)
Audio/Video cable
DVD-R (blank disc) x 1
CD-ROM (data writing
software) x 1
Do not use the provided AC adapter and power cord for other devices. In
addition, do not use AC adapter and power cord other than those provided
with this burner. Doing so may result in electric shock or fire.
Power cord
Stand
Instruction manual
(this manual), other
printed material
USB cable
Mini A – Mini B type
Remote control
(RM-V55U)
Placing the Burner
o Horizontal orientation
Take note of the top and bottom of the burner and place it in the horizontal
orientation.
o Vertical orientation
Align the groove on the bottom of
this burner with the bulge on the
stand and fix the burner securely on
the stand.
Groove
High side
Low side
9
Page 10
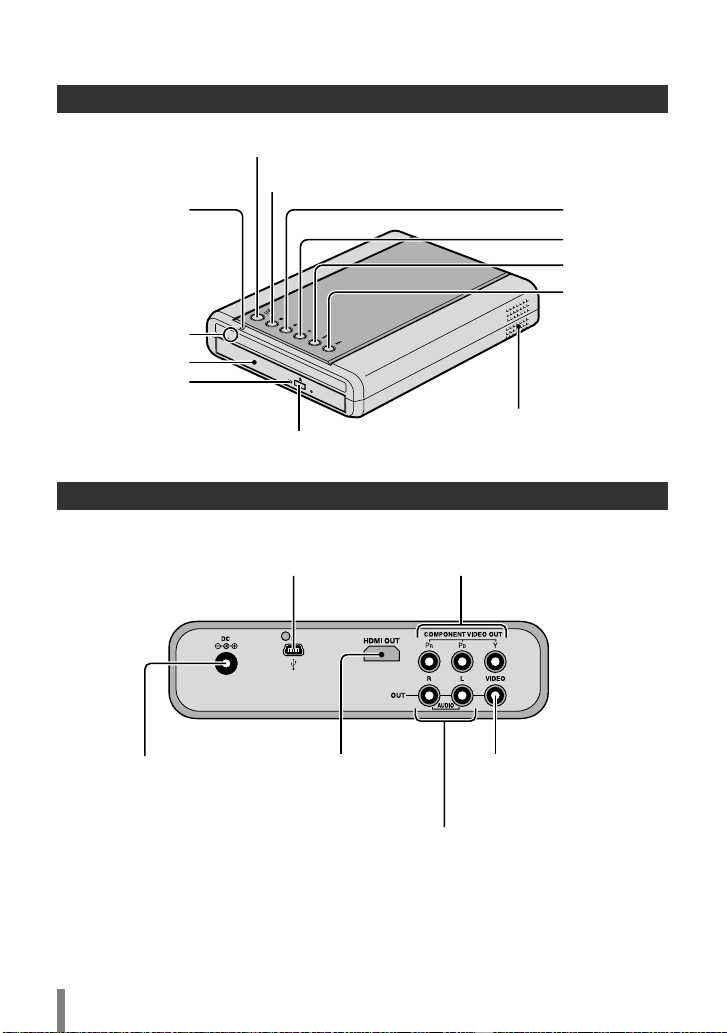
Names and Functions of Each Part
Front and Top Panel
Power (On/Off)
Stop
Power lamp
Power on: orange
USB connected: green
Remote
control sensor
Tray
Access lamp
To eject tray (P. 5)
Rear Panel
Ventilation holes
Do not block these
ventilation holes.
Play
Pause
Reverse skip
Forward skip
Connect to the Everio camera (P. 14)
Connect to the PC (P. 16)
Connect to the
AC adapter
Connect to the TV’s
HDMI input terminal
(P. 12)
10
Connect to the TV’s component
video input connectors (P. 13)
Connect to the TV’s video
input connector (P. 13)
Connect to the TV’s audio input
connectors (P. 13)
Page 11

Power (On/Off)
Remote Control
To display the tool menu (P. 25)
To display the playback menu
(P. 29)
To change the output
resolution of the image (P. 33)
EN
ES
To perform basic setup
(P. 34)
To display the playback
navigator (P. 23)
Basic playback
operations
(P. 25, 28)
Note
• If the burner responds poorly to the remote control, the battery of the
remote control is weak. Replace it with a new battery. Insert correctly
according to the e and d directions indicated.
•If problem occurs while using the remote control, remove the battery
and insert it again before operating the remote control.
o When using the remote
control for the first time
Pull out the insulation sheet
To display information on the
screen (P. 39)
To display the playback
navigator (P. 27)
To select/confirm
To return to the previous
creen
s
o When replacing the battery
Lithium battery
11
Page 12
Connecting to the TV
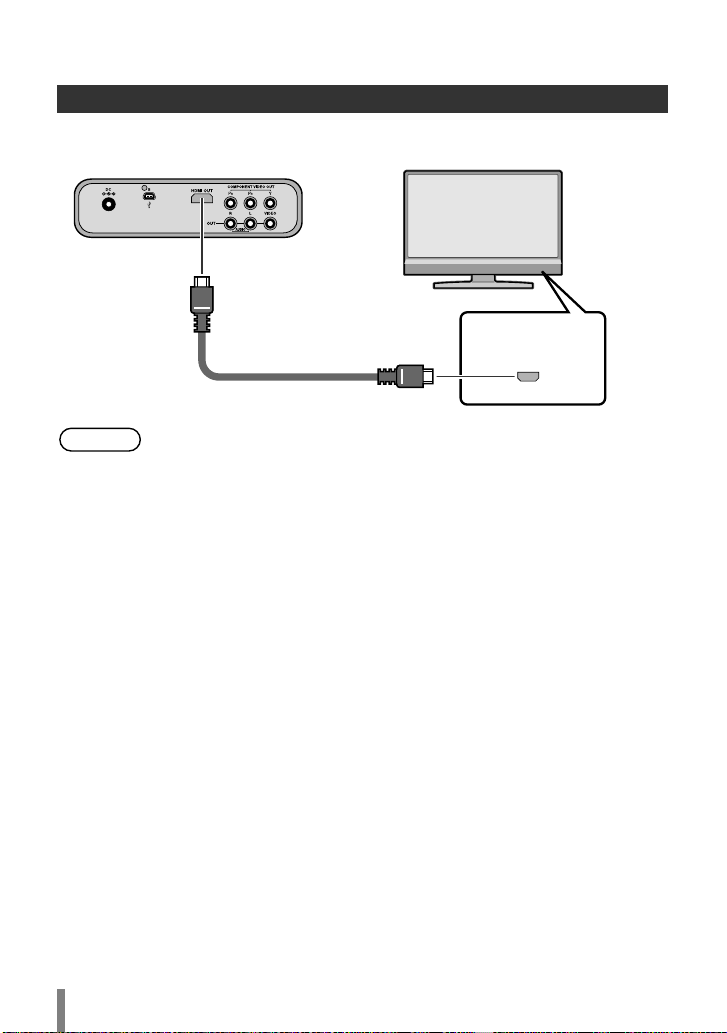
Connecting to a TV with HDMI Input Terminal
This burner
Note
TV
HDMI input
HDMI cable (not provided)
•Images can only be displayed on a High-bandwidth Digital Content
Protection (HDCP) monitor.
• We recommend using the Category 2 HDMI cable (High Speed cable)
for viewing in higher picture quality.
12
Page 13
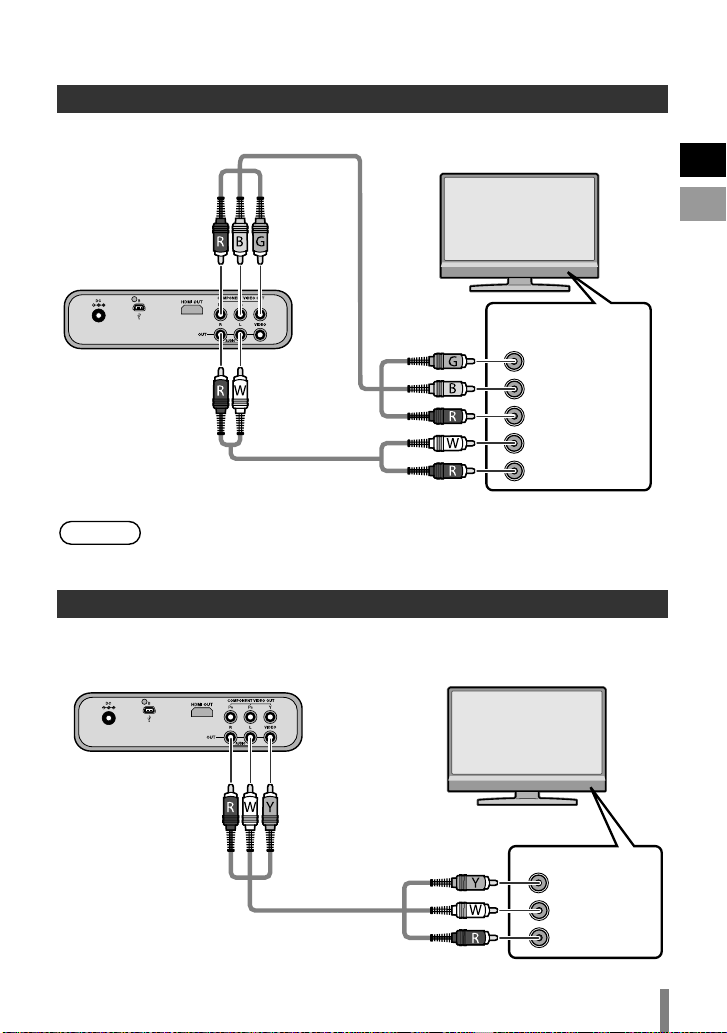
Connecting to a TV with Component Video Input Connectors
Component
video cable
(not provided)
This burner
Note
Audio cable (not provided)
• Connect to a High-bandwidth Digital Content Protection (HDCP)
monitor when using an HDMI-DVI conversion cable.
TV
Component
video input
Y
C
B/PB
CR/PR
Audio in (L)
Audio in (R)
Connecting to a TV with Audio/Video Input Connectors
This burner
TV
EN
ES
Audio/Video cable
(provided)
Video input
Video input
Audio in (L)
Audio in (R)
13
Page 14
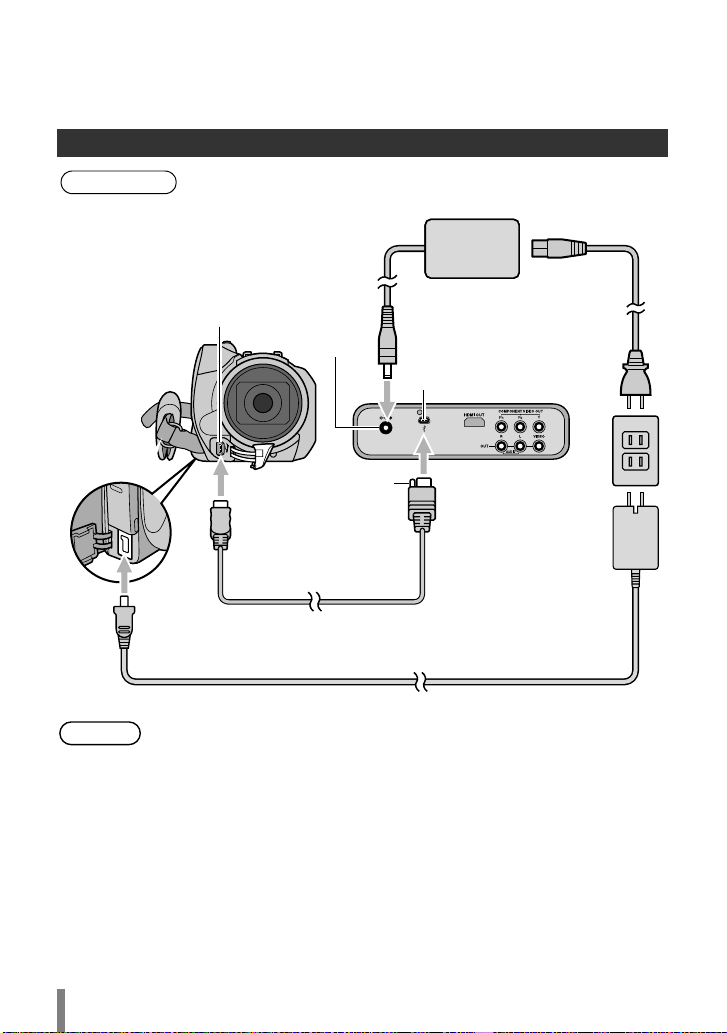
Copying Everio Video to a DVD
By connecting this burner to an Everio camera, you can easily copy recorded images to
a DVD.
Connecting to an Everio Camera
Preparations
To DC jack
Note
•Everio: Off
•This burner: Off
USB connector
DC connector
Protrusion
USB cable (provided
with CU-VD50)
• When the USB cable is connected, all buttons on the remote control of
this burner are not functional except the power button.
AC adapter
USB connector
AC adapter
14
Page 15
Creating AVCHD Disc/Data Disc/DVD-Video
o Discs that can be created on this burner
Copy Playback
AVCHD Disc
Data Disc
DVD-Video
• High definition Everio GZ-HD30/HD40 supports both AVCHD and MPEG-2 format
recording. Other high definition Everio supports MPEG-2 format recording. (As of
May 2008.)
Preparations
High definition videos in
AVCHD format.
High definition videos in
MPEG-2 format.
Standard definition videos
in MPEG-2 format.
• Mode switch on Everio:
or mode (depending on the item to be copied)
•This burner: On
Can be played back on AVCHDcompatible devices (such as Blu-ray
recorder) or this burner. (P. 23)
Play back on this burner. (P. 23)
Cannot be played back on other devices.
Can be played back on DVD recorder,
DVD player or this
burner. (P. 27)
A Turn on Everio
• The Backup menu will appear on the Everio’s LCD monitor.
B Insert a new disc
• Refer to page 5 on how to insert the disc.
• Refer to page 4 for the recommended discs.
C Create a AVCHD disc, data disc or DVD-Video
• Refer to the instruction manual of your Everio camera on how to crea te a
AVCHD disc, data disc or DVD-Video.
Note
• Depending on the model connected, still images cannot be copied. For
details, refer to the instruction manual of the Everio camera.
• Do not turn off this burner while data is being written to the disc. The
disc cannot be ejected during data writing. Wait until writing finishes.
• The remote control is not operable when this burner is connected to the
Everio.
EN
ES
15
Page 16
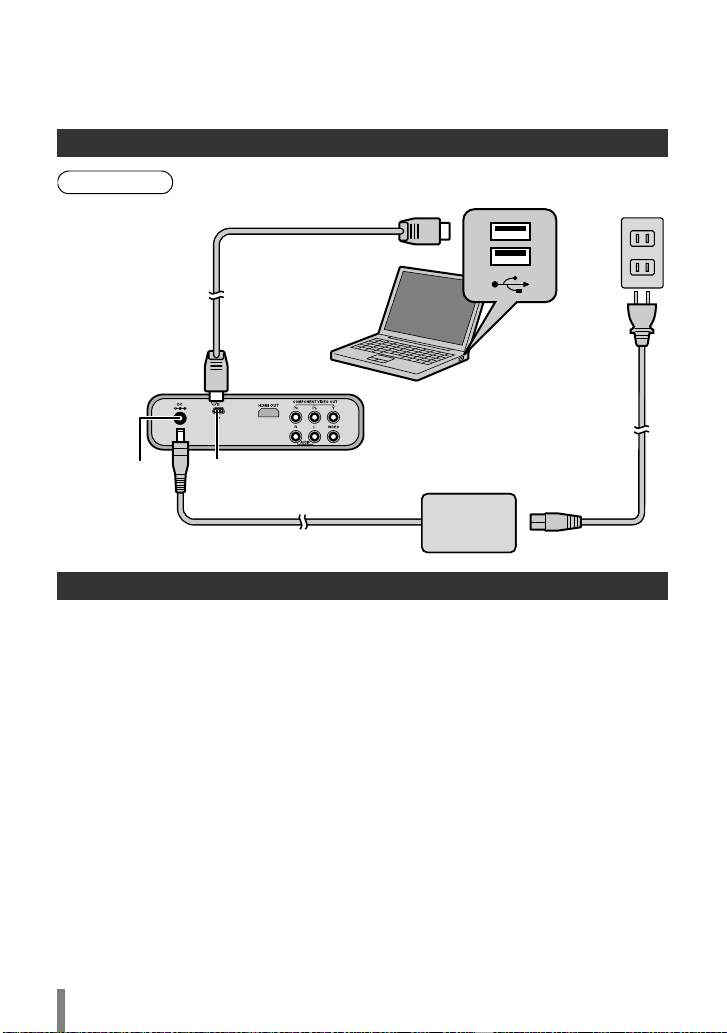
Copying from PC to DVD
This burner can be used as a DVD burner when connected to a PC. And you can use
the provided software to copy to a DVD.
Connecting to a PC
Preparations
DC connector
•Everio: Off
•This burner: Off
USB cable (provided
with Everio)
USB connector
PC
USB connector
AC adapter
Copying to a DVD
A Turn on this burner and the PC
•Install the CyberLink Power2Go 5.5 Lite software if you have not done so.
(P. 18)
B Insert a new disc
• Refer to page 5 on how to insert the disc.
• Refer to page 4 for the recommended discs.
C Use Power2Go to copy to a DVD
A Use Power2Go to create a folder.
•Use alphanumeric characters when entering the folder names or file names.
You can enter up to 40 characters.
B Under the “Burner” tab in the Power2Go “Configuration/Information” menu,
check the box next to “Close disc”. Confirm that the file system under the data
tab is set to “UDF 1.5”. Video playback will not function properly if the disc was
created with the file system
C Copy files such as JTS, TPD and JPG into the folder.
16
set to “ISO9660/Joliet”.
Page 17
Note
• For details on using Power2Go, refer to the User’s guide, Help and
Readme files installed with the software. You can access the User’s
guide, Help and Rea
• To get customer support and to register the software, you need the
following product key (CD-Key):
PXNVM-NWE4G-XQD9Q-CU9DX-3FQFN-NAKUS
•This burner cannot be used to write files into CD-R or CD-RW discs.
Refer to page 51 for the recommended discs.
•This burner does not response to all the functions of Power2Go 5.5 Lite.
• Power2Go 5.5 Lite does not support conversion of audio files to MP3
format.
• When the “Enter Activation Key” screen appears while using Power2Go
5.5 Lite, close the s
dme files from the Start menu on the PC.
creen without entering the activation key.
o Removing USB cable from PC
A Carry out removing of hardware on the PC.
B Remove the USB cable.
EN
ES
Caution
• To play back disc created on a PC on this burner, follow the following
procedure.
Insert the disc into this burner. After disc recognition, press the
NAVIGATION/TOP MENU button to display the playback navigator.
(P. 23)
•For data disc created on a PC, the date and time displayed will not be
accurate.
Computers That Can Be Used
CyberLink Power2Go 5.5 Lite can be used on computers satisfying the following
conditions.
Operating
system
Connector USB 2.0/1.1 connector (*)
CPU
RAM At least 128 MB (at least 256 MB recommended)
Free hard disk
space
Display Must be capable of displaying 800 x 600 dots
* If you use USB 1.1 cable, it will take approximately 3 hours to write one DVD.
Windows XP Home Edition (pre-installed)
Windows XP Professional (pre-installed)
Windows Vista Home Basic (32-bit edition, pre-installed)
Windows Vista Home Premium (32-bit edition, pre-installed)
Intel Pentium III, at least 800 MHz
(Intel Pentium 4, at least 2 GHz recommended)
At least 50 MB for installation
At least 5 GB recommended for creating DVDs
17
Page 18
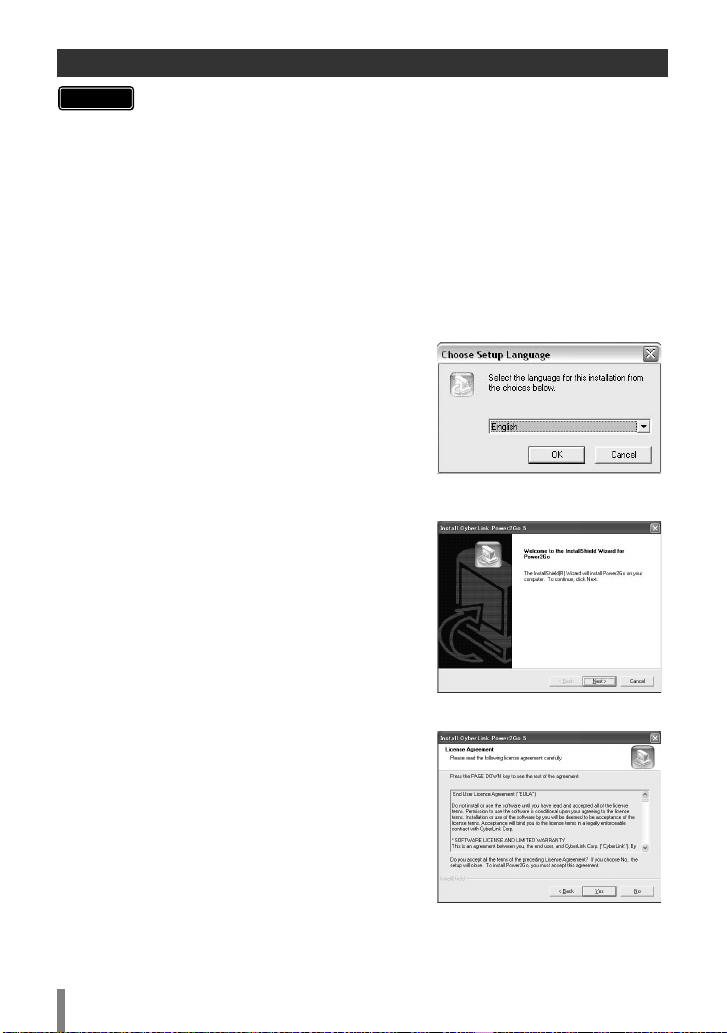
Installing CyberLink Power2Go 5.5 Lite
Caution
• Do not play the provided CD-ROM in an audio player. It is not an audio
CD. Playing this CD-ROM in an audio player will result in a loud high
noise. It may also damage the circuit and speaker.
A Insert the provided CD-ROM in the PC
Windows Vista:
A Click “Run INSTALL.EXE” on the “AutoPlay” screen.
B Click “Continue” on the “User Account Control” screen.
C The “Choose Setup Language” screen appears.
Windows XP:
• After a while, the “Choose Setup Language” screen appears.
B Confirm the language and then click
“OK”
• The following screen appears.
C Click “Next”
• The “License Agreement” screen appears.
D Confirm the contents and then click
“Yes”
• The “Customer Information” screen appears.
18
Page 19
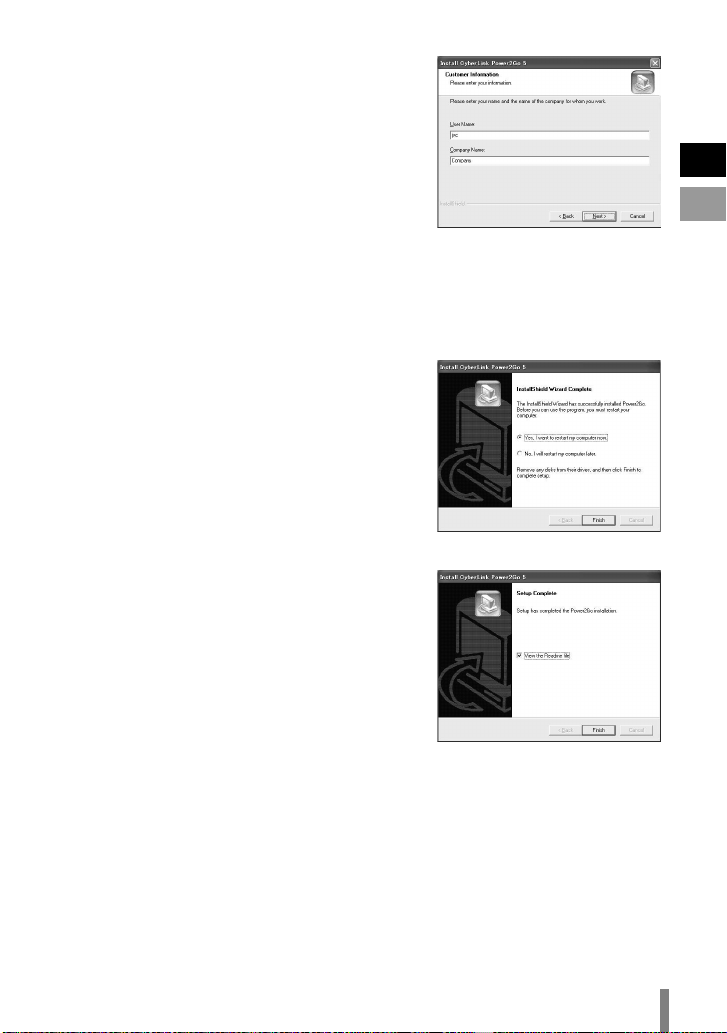
E Enter the “User Name” and “Company
Name” and then click “Next”
F Follow the on-screen intructions
•Installation starts.
After a while, the “InstallShield Wizard Complete” screen appears.
G Click “Finish”
• The computer will restart and installation is
completed.
• If the screen on the right does not appear,
proceed to step
H.
H Click “Finish”
• The “CyberLink Power2Go 5.5” Readme
screen appears.
EN
ES
I Read the contents of the Readme
19
Page 20
CyberLink Power2Go 5.5 Lite Contact Information
For information on CyberLink Power2Go 5.5 Lite or other products, use the following
contact information.
Telephone/fax support
Location Language
Germany
English / French /
Spanish
Office hours
(Mon. to Fri.)
9:00 am to 5:00 pm +49-700-462-92375 +49-241-70525-25
Phone # Fax #
Paid voice support
Location Language Office hours (Mon. to Fri.) URL
U.S.A. English 1:00 pm to 10:00 pm CST
http://www.cyberlink.com/english/
cs/support/
Support web/e-mail
Language URL/e-mail address
English http://www.cyberlink.com/english/cs/support/new_site/support_index.html
French /
Spanish
goCyberlink@aixtema.de
20
Page 21
Folder Configuration
This shows the folder configuration when files are copied from a high definition Everio
camera or a PC to a DVD.
When Copying from High Definition Everio to Data Disc
\
ROOT
*1
[EVERIO_V]
EVERIO VIDEO
(Back-up folders)
[BACKUP]
NORMAL BACK-UP
(Everio: CREATE FROM ALL)
[08060101]
[08060502]
Video files
[MOV001.TOD]
[MOV002.TOD]
EN
ES
*1
[EVERIO_S]
EVERIO IMAGE
[DATE]
DATE BACK-UP
(Everio: CREATE BY DATE)
[EVENT]
EVENT BACK-UP
(Everio: CREATE BY EVENT)
[FILES]
FILE BACK-UP
(Everio: SELECT FROM SCENES)
[PLAYLIST]
PLAYLIST BACK-UP
(Everio: CREATE BY PLAYLIST)
[BACKUP]
NORMAL BACK-UP
[DATE]
DATE BACK-UP
[FILES]
FILE BACK-UP
[08060101]
[08060101]
[08060101]
[08060101]
(Back-up folders)
[08060101]
[08060101]
[08060101]
Still image files
[PIC_0001.JPG]
[PIC_0002.JPG]
*1
Video and still image files recorded on a high definition Everio camera that are
copied to this burner will be stored in the “EVERIO_V” and “EVERIO_S” folders.
21
Page 22
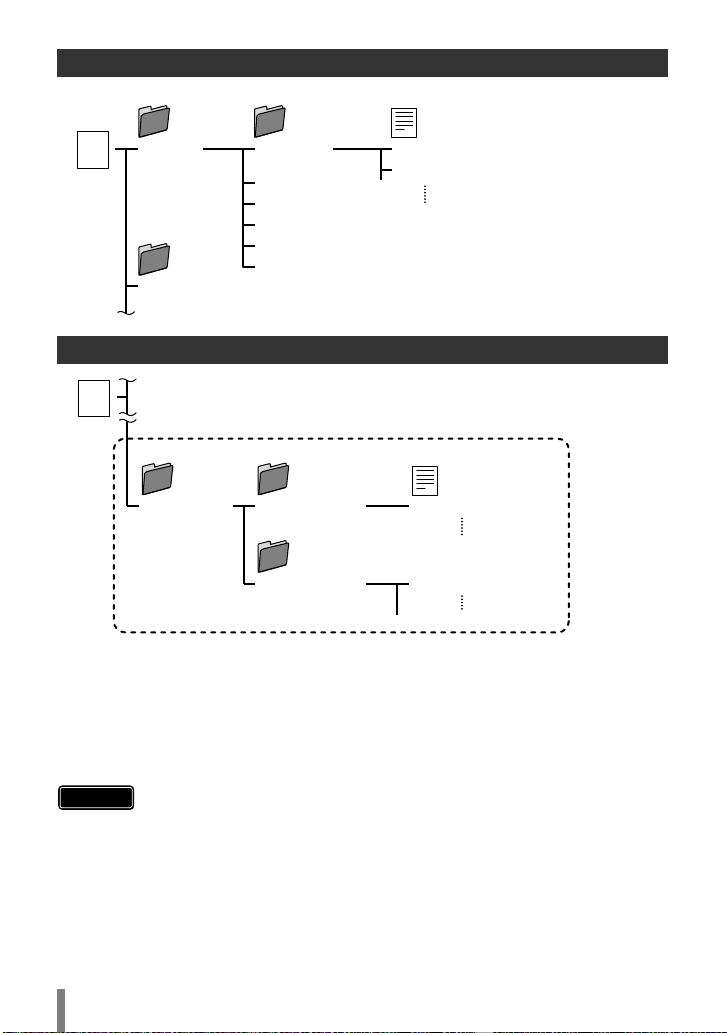
When Copying from High Definition Everio to AVCHD Disc
Video files
\
ROOT
[BDMV]
[EVERIO_I]
[STREAM]
[BACKUP]
[CLIPINF]
[PLAYLIST]
index.bdmv
MovieObject.bdmv
00000.m2ts
00001.m2ts
When Creating and Storing Desired Folders and Files on a PC
\
ROOT
Video/still image files
*2, 3
[USER_DAT] [USER_DAT2]
[USER_DAT3] [USER1.JTS]
[USER2.TPD]
*2 Create folders with Power2Go and copy the desired video and/or still image files
into the folders. You can use any folder names and file names according to your
preference. (Indicated as “USER_DAT” in the illustration.)
*3 Use Power2Go to copy the “USER_DAT” folders to the DVD. (P. 16)
*4 Files with the extension “.TPD” or “.JTS” are high definition Everio video files edited
on the PC.
• Refer also to “Data format (extension)” (P. 49).
Caution
•You can create folders and files with any names according to your
preference; however do not use “EVERIO_V” or “EVERIO_S” as the
folder name.
•Use alphanumeric characters when entering the folder names or file
names. You can enter up to 40 characters.
•You can create up to 6 levels of folders. Playback is not possible if more
than 6 levels are created.
• The total path length of the file is up to 240 characters.
*4
22
Page 23
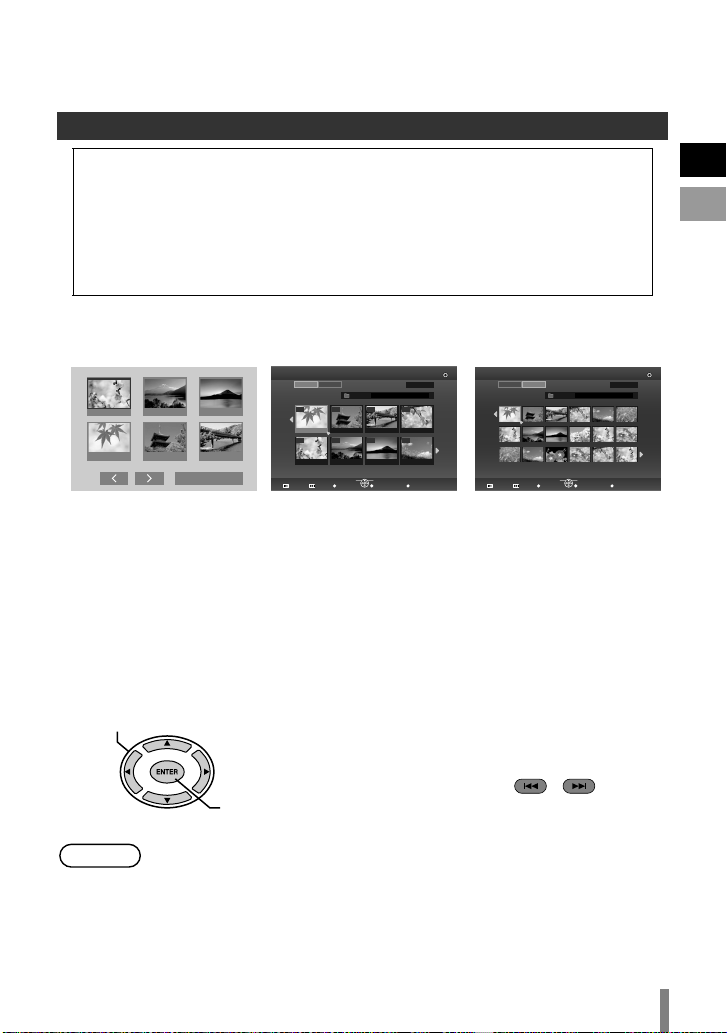
Playing Images Stored on the DVD
You can play back video and still images of Everio stored on a DVD.
Viewing Images Copied from the High Definition Everio
o To start viewing immediately after storing images on a DVD
A Remove the USB cable. (P. 14)
B Connect this burner to the TV.
• For details on connection, refer to “Connecting to the TV” (P. 12, 13).
• Check that the power lamp of this burner lights up in orange.
• After pressing the power button, it will take about 25 seconds to display
the intermediate screen. (P. 34)
A Insert the disc containing the copied images and the playback
navigator will appear
1/2
JUN.01.2008 09:51AM JUN.01.2008 11:45AM JUN.01.2008 05:09PM
AUG.01.2008 01:42PM AUG.01.2008 03:15PM AUG.01.2008 05:32PM
DIGEST PLAYBACK
AVCHD disc
NAVIGATION
IMAGE
VIDEO
FOLDER
001
002 003 004
JUN.01.2008 10:20AM JUN.01.2008 10:35AM JUN.01.2008 11:03AM JUN.01.2008 11:17AM
JUN.01.2008 11:21AM JUN.01.2008 01:34PM JUN.01.2008 03:41PM JUN.01.2008 03:56PM
PREVIOUS NEXT
SELECT
EXIT TOOL MENU
TOP MENU TOOL
Data disc (video images)
08060101
ENTER
RETURN
001/002
PAGE
008007006005
• It will take about 40 seconds to display the playback navigator.
•To alternate between video and still images on a disc that contains video and still
images, switch using the TOOL MENU. (P. 25)
•For data disc (video), the file being selected is played back on its thumbnail.
(Motion thumbnail) It will take several second
s to display all the eight thumbnails.
And a little bit more time to show the motion thumbnail.
• The menu displayed may differ from the menu shown above when an AVCHD
disc created on other devices is inserted.
NAVIGATION
DVD-R
VIDEO
PREVIOUS NEXT
Data disc (still images)
IMAGE
FOLDER
08060101
SELECT
ENTER
EXIT TOOL MENU
TOP MENU TOOL
RETURN
001/002
PAGE
EN
ES
DVD-R
B Select and confirm on the file using the remote control
A Select
Note
B Confirm
•To stop an AVCHD disc during playback, press the STOP button. When
playback stops, the intermediate screen will appear. (P. 34)
To display the playback n
button.
•Playback of the selected file starts.
•You can also press the PLAY button to play
back.
•You can browse the pages using the
PREVIOUS / NEXT ( / ) buttons.
avigator, press the NAVIGATION/TOP MENU
23
Page 24
o Digest Playback (for AVCHD disc only)
•Use the selection keys to select “DIGEST PLAYBACK” and press the ENTER
button. The videos will be played back for several seconds consecutively.
•Press the NAVIGATION/TOP MENU button during playback to display the sub
menu.
TO NORMAL PLAYBACK : Plays back the video normally.
TO INDEX MENU : Returns to the playback navigator screen.
o To play back images in a different folder [for data disc (video/still
images) only]
A Display the folder list
A Select folder name
NAVIGATION
B Confirm
PREVIOUS NEXT
B Select the folder to play back
• The playback navigator appears when the ENTER button is pressed. Select and
confirm on the file to be played back.
A Select
B Confirm
•You can also select the folder from the “TOOL MENU” (P. 25).
•Files are automatically sorted into the folders created depending on the item selected
in the Backup menu of the high definition Everio.
• To play back images copied from the PC, select the edited video files. (P. 22)
• Select a folder name when you have created a folder on the PC according to your
preference. (P. 22)
Caution
• If images do not appear, check the resolution setting. (P. 33)
•For short video clips (less than 3 seconds), the image will freeze for a few
seconds before playing the next file. (P. 44)
•For data disc (video), the image will freeze for a few seconds before
continuing to the next folder.
PREVIOUS NEXT
Folder Name
IMAGE
VIDEO
FOLDER
001
JUN.01.2008 10:20AM JUN.01.2008 10:35AM JUN.01.2008 11:03AM JUN.01.2008 11:17AM
JUN.01.2008 11:21AM JUN.01.2008 01:34PM JUN.01.2008 03:41PM JUN.01.2008 03:56PM
NAVIGATION
VIDEO
ROOT
001
*5.!- *5.!- *5.!- *5.!-
*5.!- *5.0- *5.0- *5.0-
TOP MENU TOOL
08060101
002 003 004
ENTER
SELECT
EXIT TOOL MENU
RETURN
TOP MENU TOOL
FOLDER
08060101
EVERIO VIDEO
NORMAL BACK-UP
002 003 004
08060101
08060102
08060501
08060701
08061301
08061302
DATE BACK-UP
08060101
08060501
08060701
08061301
ENTER
SELECT
EXIT TOOL MENU
RETURN
DVD-R
PAGE
001/002
008007006005
DVD-R
001/002
008007006005
Note
24
• Depending on the still image standards, some ima
ges are displayed
using a “?” thumbnail, and playback may fail in this case.
• Progressive JPEG files and special files created on the PC cannot be
played back. Videos that are not playable are also displayed as “?”.
•It may take some time to display the images if the size is too large or
when there
are too many files.
•For data disc (still images) created on a PC, files with less than 640 x
480 resolution will not be displayed in full screen.
Page 25

o Displaying the TOOL MENU [for data disc (video/still images) only]
001/002
001
06.01 11:17
06.01 15:56
DVD-R
08060101
002 003 004
008007006005
*5.!-
*5.0-
TOP MENU TOOL
You can switch between video/still images or display file details from the TOOL
MENU.
Operate when playback navigator is displayed
A Select
B Confirm
NAVIGATION
PREVIOUS NEXT
TOOL MENU
IMAGE
VIDEO
FOLDER
JUN.01.2008 10:20AM JUN.01.2008 10:35AM JUN.01.2008 11:03AM
JUN.01.2008 11:21AM JUN.01.2008 01:34PM JUN.01.2008 03:41PM
ENTER
SELECT
EXIT TOOL MENU
RETURN
TOOL MENU
BACK
FOLDER SELECT
SWITCH TO IMAGE MODE
SHOW DETAIL
TOOL MENU
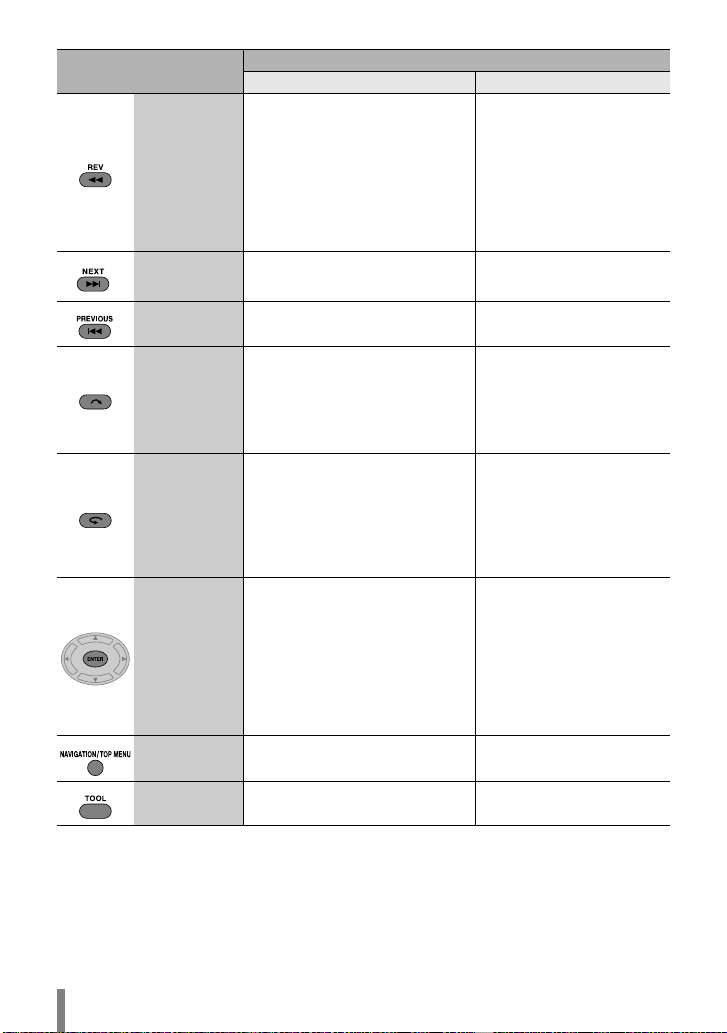
Select an item with the selection keys and press the ENTER button.
• FOLDER SELECT: Displays the folder list.
• SWITCH TO IMAGE MODE : Switches from video to still image.
(SWITCH TO VIDEO MODE: Switches from still image to video.)
• SHOW DETAIL:Displays the file name, folder name, recorded date, and playback
tion (for video) or image size (for still image). The playback
dura
duration display for video will not be available if the file has not been
played back before.
Note
• When the disc contains both videos and still images, the videos will be
displayed first. To view still images, select “SWITCH TO IMAGE MODE”
from the TOOL MENU.
o Buttons that can be used during playback (AVCHD / data disc)
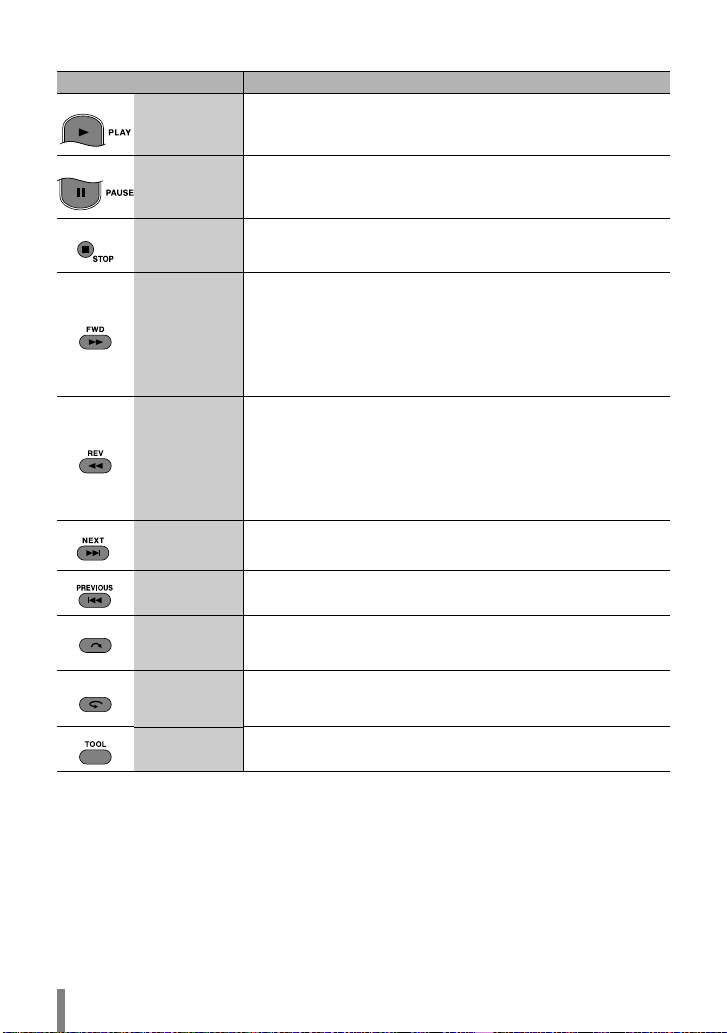
Remote Control Button
PLAY
Video Image Playback Still Image Playback
Pressing this button when in
the paused or variable speed
playback mode resumes
normal playback.
Description
Starts the slide show.
EN
ES
PAUSEPauses playback. Pauses the slide show.
STOP Stops playback. Stops the slide show.
Fast-forwards playback.
Changes in the order of Search
+1 to Search +3 with each
press.
Press the button when in the
FWD
paused mode to enable forward
playback frame by frame.
Press and hold the button to
slow down the playback speed.
Pressing the button each time
changes the playback speed
between 1/16x, 1/4x, and 1/2x.
b
25
Page 26
Remote Control Button
REV
NEXT Displays the next video image.
PREVIOUS
Skip
Replay
ENTER b
NAVIGATION
/TOP MENU
TOOL
Description
Video Image Playback Still Image Playback
Rewinds playback. Changes in
the order of Search b1 to
Search b3 with each press.
Press the button when in the
paused mode to enable reverse
playback frame by frame. (Not
available for AVCHD disc.)
Reverse playback at slow
speed is not possible.
Displays the next still
image.
Displays the beginning of the
video image.
Advances the playback position
by about 30 seconds. Pressing
the button continuously
advances the playback position
by the number of times it is
pressed.
Moves the playback position
backward by about 7 seconds.
Pressing the button
continuously moves the
playback position backward by
the number of times it is
pressed.
Displays the playback
navigator.
Displays the playback menu.
(P. 29)
Displays the previous still
image.
Rotates the still image by
90 degrees in the
clockwise direction.
(When in paused mode.)
Rotates the still image by
90 degrees in the anti-
clockwise direction.
(When in paused mode.)
Enlarges the still image.
(2-step)
You can select the
position to enlarge using
the Up/Down/Left/Right
buttons. Press the
RETURN button to restore
the original size.
(When in paused mode.)
Displays the playback
navigator.
Displays the playback
menu. (P. 29)
b
26
Page 27

Viewing DVD-Video Copied from Everio
o To start viewing immediately after storing images on a DVD
A Remove the USB cable. (P. 14)
B Connect this burner to the TV.
• For details on connection, refer to “Connecting to the TV” (P. 12, 13).
• Check that the power lamp of this burner lights up in orange.
• After pressing the power button, it will take about 25 seconds to display
the intermediate screen. (P. 34)
o To play back the copied files
A Insert the disc containing the copied images
•Playback starts automatically.
o To select and play back a desired file
A Insert the disc containing the copied images
•Playback starts automatically.
B During playback, press the NAVIGATION/TOP MENU button to
display the playback navigator
• Depending on the disc, you can display the playback navigator by pressing the
MENU button.
EN
ES
C Select and confirm on the file to play back
A Select
B Confirm
Note
Caution
•To stop playback, press the STOP button. When playback stops, the
intermediate screen will appear. (P. 34)
To display the playback navigator, press the NAVIGATION/TOP MENU
button.
• If images do not appear, check the resolution setting. (P. 33)
27
Page 28
o Buttons that can be used during playback (DVD-Video)
Remote Control Button Description
PLAY
PAUSEPauses playback.
STOP Stops playback.
FWD
REV
NEXT Displays the next video.
PREVIOUS Displays the previous video.
Skip
Replay
TOOL Displays the playback menu. (P. 29)
Pressing this button when in the paused or variable speed
playback mode resumes normal playback.
Fast-forwards playback. Changes in the order of Search +1
to Search +3 with each press.
Press the button when in the paused mode to enable
forward playback frame by frame.
Press and hold the button to slow down the playback
speed. Pressing the button each time changes the
playback speed between 1/16x, 1/4x, and 1/2x.
Rewinds playback. Changes in the order of Search b1 to
Search b3 with each press.
Press the button when in the paused mode to enable
reverse playback frame by frame.
Press and hold the button to slow down the reverse
playback speed. Pressing the button each time changes
the reverse playback speed between b1/16x and b1/4x.
Advances the playback position by about 30 seconds.
Pressing the button continuously advances the playback
position by the number of times it is pressed.
Moves the playback position backward by about 7 seconds.
Pressing the button continuously moves the playback
position backward by the number of times it is pressed.
28
Page 29
Changing the Playback Settings
You can alter the method for playing back video/still images as well as the image
settings.
Operate during playback
indicates the default settings during purchase of this product.
DISC SETTING If the disc contains more than one audio language, subtitle
language or has multi-angle scenes, you can select with this
setting.
AUDIO LANGUAGE Set the audio language to be played back.
SUBTITLE Set the subtitle language to be displayed.
CHANGE ANGLE Switch the angle (camera) to be played back.
PLAYBACK SETTING
REPEAT
For configuring settings on video playback and repeat playback of slide shows.
OFF Do not repeat.
TITLE Repeats playback of the title. (For video images only.)
CHAPTER
FOLDER
Repeats playback between the chapters. (For AVCHD
discs and DVD-Videos only.)
Repeats playback of files within a folder. (For files
stored on the PC only.)
Repeats playback of all files*. (For data disc stored on
high definition Everio only.)
ALL
* The files in the current folder are played back
repeatedly when you play ba
ck from the playback
navigator.
A-B
Repeats playback between two predetermined points A
and B. (For DVD-Videos only.)
CHANGE TITLE (For AVCHD discs and DVD-Videos only)
Jumps to the specified title.
CHANGE CHAPTER (For AVCHD discs and DVD-Videos only)
Jumps to the specified chapter.
SLIDESHOW INTERVAL (For still images only)
5 SEC /
10 SEC /15 SEC For specifying the time for displaying images.
SLIDESHOW EFFECTS (For still images only)
For specifying the fade effect when switching to another image.
OFF Disable fade effect.
ON Enable fade-in or fade-out from black color.
REPEAT
CHANGE TITLE
CHANGE CHAPTER
PLAYBACK SETTING
OFF
EN
ES
29
Page 30
VIDEO SETTING You can only configure settings for video images.
PICTURE QUALITY
For specifying the video image quality.
NORMAL Set to this value under normal circumstances.
CINEMA Plays back in cinema-like picture quality.
FINE Plays back in clear sharply defined picture quality.
SOFT Plays back in soft textured picture quality.
USER SETTING
DIGITAL NOISE REDUCTION
For specifying whether to enable noise removal from the image.
OFF Disable noise removal.
ON Enable noise removal.
DETAIL SETTING
For specifying the advanced settings when “PICTURE QUALITY” is set to “USER
SETTING”.
CONTRASTFor specifying the image contrast level.
BRIGHTNESS For specifying the image brightness level.
SHARPNESS For specifying the image contour.
COLOR For specifying the color intensity of the image.
GAMMA For specifying the image gray level.
3DNR For specifying the image noise reduction.
PROGRESSIVE OUTPUT
For playing back the source material after converting to an appropriate progressive
video.
AUTO1
AUTO2
VIDEO
Plays back images in the picture quality specified in
“DETAIL SETTING”.
Automatically detects the film material and video material
and converts to the appropriate progressive video.
In addition to “AUTO1”, automatically detects the 30fps
progressive video and converts to the appropriate
progressive video.
Converts the video material to the appropriate progressive
video.
Note
30
•Changing the setting may have no effect on some images.
Page 31

Operate in Conjunction with TV via
HDMI
Connecting this burner to an HDMI-CEC-enabled TV using the HDMI cable allows you
to utilize the following convenient functions.
Preparations
Operation method 1
•Insert a disc.
(Press the PLAY or
NAVIGATION/TOP
MENU button if the
playback navigator does
not appear.)
• Connect an HDMI cable between this
burner and the TV. (P. 12)
•Turn on the TV and set the HDMI-CEC
related setting in its menu to “on”. (For
details, refer to the instruction manual of
the TV.)
•Turn on this burner and set “CONTROL
WITH HDMI” under “CONNECTION
SETTING” in the settings menu to “ON”.
(P. 34, 37)
HDMI cable (not provided)
• The TV automatically
CONNECTION SETTING
SELECT ENTER
EXIT
16:9
480i
RETURN
MONITOR TYPE
COMPONENT OUTPUT
HDMI VIDEO MODE
switches to the HDMI input.
(Turn on the TV
beforehand.)
EN
ES
Operation method 2
•This burner turns off
automatically.
Note
• Some TV will turn on automatically and switch to the HDMI input just by
turning on this burner.
• Depending on the TV connected, the onscreen display language of this
burner will automatically switched to the language that was being
selected for the TV when the burner is turned on.
(This is applicable only if this burner
the TV.)
To use this burner using a language that differs from the onscreen
display language of the TV, set “CONTROL WITH HDMI” to “OFF”.
•Malfunction may occur when devices such as amplifier and selector are
connected. Set “CONTROL WITH HDMI” to “OFF”.
•Turn off the TV.
supports the language selected for
31
Page 32

Note
Caution
• HDMI-CEC (Consumer Electronics Control) is an industry standard that
enables interoperability between HDMI-CEC compliant devices that are
connected via HDMI cables.
•Not all HDMI-compatible devices comply with the HDMI-CEC standard.
The HDMI control function of this burner will not work when connected
to these devices.
•This burner is not guaranteed to operate with all HDMI-CEC-enabled
devices.
• Depending on the specifications of each HDMI-CEC-enabled device,
some functions may not work with this burner. (For details, refer to the
instruction manual of your TV.)
• Unintended operations may occur with some connected devices. In
these cases, set “CONTROL WITH HDMI” to “OFF”.
• HDMI control does not function when the USB cable is connected.
Remove the USB cable if you want to use the HDMI control function.
• HDMI control does not function immediately after inserting the power
cord to the AC outlet. Press the power button on this burner to turn it on.
• If the HDMI cable connection is
operations to allow this burner and the connected devices to recognize
each other.
A With the TV turned on, turn off and on this burner again.
B Set the “CONTROL WITH HDMI” under “CONNECTION SETTING” in
the settings menu to “OFF”, then set to “ON” again.
changed, perform the following
32
Page 33

Viewing High Quality Images
You can change the video output resolution when this burner is connected to a high
definition TV using a HDMI or component video cable.
Operate when in the intermediate screen*
* To display the intermediate screen, refer to page 34.
•Press the button each time to change the output resolution.
o Connection using HDMI cable (“HDMI VIDEO MODE” : “ON”)
(Resolutions not supported by the TV are not displayed.)
AUTO 480p 720p 1080i 1080p
o Connection using component video cable
(“HDMI VIDEO MODE” : “OFF”, HDMI cable not connected)
480i 480p 720p 1080i
o Connection using video cable
Setting is not necessary. “480i” is output regardless of the setting.
Caution
• If this burner is connected to a TV that does not support the preset output
resolution using a HDMI cable, the setting switches automatically to
“AUTO”.
• When this burner is connected using a component video cable with the
output resolution set to “1080i” or “720p”, the output resolution will be set
to “480i” or “480p” if a
DVD-Video disc is inserted.
(Intermediate screen)
Current resolution: AUTO
EN
ES
Note
• When the HDMI cable is connected, the resolution of the component
connectors is fixed at “480i”. (“HDMI VIDEO MODE” : “ON”)
• When the resolution is set to “480p” for the HDMI cable connection, the
“4:3 PAN&SCAN” or “4:3 LETTERBOX” display format under
“MONITOR TYPE” in the settings menu will be selected if the image
size is 4:3. (P. 35)
33
Page 34

Settings Menu
Change the settings of this burner according to the environment of use.
Menu Operation Procedures
Caution
Example: When changing “MONITOR TYPE” under “CONNECTION SETTING” from
A Display the settings menu
B Select “CONNECTION SETTING”
• The SET UP button can only function when the intermediate screen
(screen without image display) is displayed. If the playback navigator is
displayed, press STOP (for AVCHD disc and DVD-Video) or
NAVIGATION/TOP MENU (for data disc) to clear the screen.
“16:9” to “4:3 LETTERBOX”
A Select
MONITOR TYPE
COMPONENT OUTPUT
HDMI VIDEO MODE
CONNECTION SETTING
16:9
480i
B Confirm
C Select “MONITOR TYPE”
A Select
B Confirm
D Select “4:3 LETTERBOX”
A Select
B Confirm
E Close the settings menu
34
EXIT
MONITOR TYPE
COMPONENT OUTPUT
HDMI VIDEO MODE
EXIT
MONITOR TYPE
COMPONENT OUTPUT
HDMI VIDEO MODE
EXIT
SELECT ENTER
CONNECTION SETTING
SELECT ENTER
CONNECTION SETTING
SELECT ENTER
RETURN
16:9
480i
RETURN
16:9
16:9
16:9FULL
480i
4:3 PAN&SCAN
4:3LETT ERBOX
RETURN
Page 35
Settings Menu Items and Descriptions
indicates the default settings during purchase of this product.
¹ Menu items for which setting cannot be changed will appear grayed out on the
screen.
DISC SETTING If the disc contains more than one audio language, subtitle
AUDIO LANGUAGE Set the audio language to be played back.
SUBTITLE Set the subtitle language to be displayed.
CHANGE ANGLE Switch the angle (camera) to be played back.
VIDEO SETTING
BLACK LEVEL CONTROL
For specifying the black level of the video image.
DARKER Set to this value under normal circumstances.
BRIGHTER Set to this value to brighten the dark areas of the video image.
AUDIO SETTING
DYNAMIC RANGE COMPRESSION
For specifying the dynamic range (ratio between strong and weak signals) of audio
sound. Minute sounds may be heard when the dynamic range is compressed.
ON Outputs audio sound after compressing the dynamic range.
OFF Outputs the recorded audio sound without compressing.
CONNECTION SETTING
MONITOR TYPE
Specify the screen size according to the TV connected. (If the screen size of the TV
is fixed, images displayed on the TV will not change even if you change the settings
of the burner.)
16:9
16:9FULL
4:3 PAN&SCAN
4:3 LETTERBOX
language or has multi-angle scenes, you can select with this
setting.
When connecting to a wide-screen TV (16:9)
(A black band will appear on both left and right sides for 4:3
images.)
When connecting to a wide-screen TV (16:9)
(4:3 images will be stretched sideways.)
When connecting to a 4:3 TV
(The left and right sides of 16:9 images will be missing.)
When connecting to a 4:3 TV
(A black band will appear at the top and bottom for 16:9
images.)
EN
ES
Note
•Changing the
setting may have no effect on some images.
35
Page 36

CONNECTION SETTING
COMPONENT OUTPUT
For specifying the output resolution setting of the component connectors. You can
also specify the setting using the remote control. (P. 33)
480i During output in D1 (480i)
480p During output in D2 (480p)
720p During output in D3 (1080i)
1080i During output in D4 (720p)
HDMI SETTING
HDMI VIDEO MODE
Specify this setting when you are using the burner with both the HDMI terminal
and component connectors connected.
ON Outputs with priority given to the HDMI terminal.
OFF Outputs with priority given to the component connectors.
HDMI OUTPUT
For specifying the output resolution setting of the HDMI terminal. You can also
specify the setting using the remote control. (P. 33)
AUTO Set to this value under normal circumstances.
480p During output in D2 (480p)
720p During output in D3 (1080i)
1080i During output in D4 (720p)
1080p During output in D5 (1080p) (P. 12)
24p OUTPUT
JVC camcorders do not support 1080/24p recording. (As of May 2008.)
Specify this setting when viewing video images recorded by other devices in
1080/24p on a TV that supports 1080/24p via HDMI connection.
Select this value to output the image
AUTO
OFF Set to this value under normal circumstances.
x.v.Color
Specify this setting when viewing video images recorded in x.v.Color on a TV that
supports x.v.Color. This enhances viewing through reproducing colors closely to
their natural colors.
AUTO Set to this value under normal circumstances.
OFF
supports 1080/24p. Set to “OFF” if the images cannot be
played back properly.
Set to this value when the video images are distorted or when
the colors are not correctly reproduced.
s in 1080/24p to a TV that
36
Page 37

Deep Color
This function works during playback. Specify this setting when viewing images on
a TV that supports Deep Color. This allows viewing of high definition images of
30-bit and 36-bit color depths that are higher than the full 24-bit color.
AUTO
OFF Set to this value under normal circumstances.
HDMI ENHANCE SETTING
Specify this setting when connected to a TV that comes with the DVI input
terminal using an HDMI-DVI conversion cable.
STANDARD Set to this value under normal circumstances.
ENHANCED
CONTROL WITH HDMI
For specifying whether to use the HDMI-CEC function which allows the TV to
operate in conjunction with this burner. (P. 31)
OFF Do not operate in conjunction with TV.
ON Operate in conjunction with TV.
Select this value to view high definition images on a TV that
supports Deep Color. Set to “OFF” if the images cannot be
played back properly.
Set to this value when the black and white colors of the video
image are not clear.
EN
ES
37
Page 38

OTHER SETTING
RESUME *
For specifying whether to memorize the stop position.
ON Memorize the stop position.
OFF Do not memorize the stop position.
ON SCREEN GUIDE
For specifying whether to display the playback status information.
AUTO Display for 5 seconds.
OFF Do not display.
ON SCREEN LANGUAGE
For specifying the language to be displayed for the settings menu screen and others.
“ENGLISH” is set as the default language.
( / ENGLISH / FRANÇIAS / DEUTSCH / ITALIANO / NEDERLANDS /
PORTUGUÊS / ESPAÑOL / / / / РУССКИЙ)
SCREEN SAVER
For specifying whether to activate the screensaver.
ON
OFF Do not activate the screensaver.
INITIALIZE SETTING
Restores the settings to the default state at the time of purchase.
DATE DISPLAY STYLE (For data disc only)
Sorts the dates in order. (year.month.day / month.day.year / day.month.year)
TIME DISPLAY CHOICE (For data disc only)
For specifying the time display. (12h / 24h)
*For resume function, the stop position will be reset if the burner is connected to an
Everio or a PC via the USB cable, or when the burner is turned off and the disc is
removed.
Activates the screensaver when this burner is not operated for
an interval of 5 minutes.
38
Page 39

Screen Displays
You can display information during playback on the screen.
•Press each time to hide/show information.
o During playback of AVCHD disc copied from a high definition Everio
Chapter Number
C1T2
Playback Time
JUN.01.2008 10:20AM
Playback Time
Disc Type
DVD-R
00:00:25
Dolby D 2ch
Disc Type
DVD-R
00:00:25
MPEG 2ch
Audio Format
Playback Mode
Audio Format
Playback Mode
Title Number
Playback Position
o During playback of video data disc copied from a high definition
Everio
File Date/Time
Playback Position
EN
ES
39
Page 40

o During playback of still image data disc copied from a high definition
Everio
File Date/Time Disc Type
JUN.01.2008 10:20AM
DVD-R
Playback Mode
o During playback of DVD disc copied from Everio
Chapter Number
Title Number
Playback Position
Playback Time
Disc Type
DVD-R
00:00:25
C1T1
Dolby D 2ch
Audio Format
Playback Mode
40
Page 41

Troubleshooting
Trouble Action
Cannot turn the
power on.
Cannot function
properly.
General
The burner or AC
adapter is hot.
The power lamp
blinks slowly in red
while using the
burner.
The burner is not
recognized by the
Everio camera.
The burner is not
recognized by the PC.
Writing fails.
Copy
z Make sure the AC adapter and power cord are
properly connected. (P. 4)
z Press the power button on this burner for more
than 5 seconds to reset the burner. (The burner
will turn off automatically.)
z The burner and AC adapter will become hot
with prolonged use. This is not a malfunction.
z If the burner is abnormally hot, remove the AC
adapter and consult the dealer from which the
burner is purchased.
z The burner cannot function properly due to a
drop in its interior temperature. Wait until the
power lamp stops blinking.
z There is a rise in the burner’s interior
temperature. Turn off the burner, wait for a
while then turn on again.
z Make sure the USB cable is connected
properly. Insert the connector with the
protrusion to the burner, and the other end to
the Everio camera. (P. 14)
z Make sure the USB cable provided with the
Everio camera is connected properly. (P. 16)
z Use discs recommended for the burner. (P. 48)
z Insert the disc with the label facing up.
z Wipe off any dirt that is found on the tray.
z Use discs for which the writing surface is not
damaged.
z Do not use deformed discs.
EN
ES
Cannot open the disc
tray.
Unable to write/read
data at the maximum
speed (when
connected to a PC)
z If disc writing is currently in progress, the disc
tray cannot be opened. Wait till the writing
process ends.
z If the disc cannot be properly ejected after the
burner is dropped or due to other malfunctions,
insert a thin rod into the force eject hole to eject
the disc. (P. 44)
z Use the recommended discs. (P. 48)
41
Page 42

Trouble Action
The remote control is
not working.
Unable to operate.
No images on the TV.
Playback
Images are distorted
during fast-forward/
fast-reverse playback.
The images cannot be
displayed in the
normal aspect ratio.
Reading fails.
z The remote control is not operable when the
disc tray is opened. Close the disc tray.
z If the burner does not work at all, remove the
power plug and insert again. (It may not
function properly due to lightning strike or static
electricity.)
z Connect this burner to a TV. (P. 12, 13)
z Switch to the external output that connects the
burner to the TV with a video/audio input
connectors.
z After pressing the power button, it will take
about 25 seconds to display the intermediate
screen. (P. 34)
z If there are too many recorded files or when a
disc that is not recommended is used, it will
take several minutes to display the playback
vigator.
na
z Check the resolution setting again. (P. 33)
z
Images may be distorted for sections where the
playback speed changes. This is not a
malfunction.
z When both the HDMI terminal and Audio/Video
output connectors are connected, set “HDMI
VIDEO MODE” in the settings menu to “OFF” to
output the images with priority given to the
Audio/Video output connectors. (P. 36)
z Insert the disc with the label facing up.
z Wipe off any dirt that is found on the tray.
z Make sure that the writing surface of the disc is
not damaged.
z Do not use deformed discs.
Playback cannot
function properly.
Digest Playback
starts when the
PREVIOUS / NEXT
button is pressed
repeatedly.
42
z Playback of commercial DVD-Video is not
guaranteed.
z AVCHD disc created on a high definition Everio
is equipped with the Digest Playback function. If
the PREVIOUS / NEXT button is pressed
repeatedly during playback, Digest Playback
will start when the normal playback ends.
(P. 24)
Page 43

Trouble Action
Unable to read the
content of the AVCHD
disc using the PC’s
explorer function.
Unable to play back
images added by a
PC.
Playback
The TV switches input
automatically when
the burner is played.
The TV turns off when
this burner is turned
off.
This burner functions
when the TV’s remote
control is being
operated.
z The PC’s operation system does not support
the AVCHD disc. Install the Power2Go software
provided.
z When playing back a disc (multi-border disc)
containing images added by a PC, the added
images cannot be played back.
z The HDMI-CEC function is enabled. To disable,
set “CONTROL WITH HDMI” in the settings
menu to “OFF”. (P. 37)
EN
ES
43
Page 44

Problems with seamless playback
During continuous playback of multiple files, the image will freeze for a few seconds
while switching the files in the following cases.
• When the recording dates are different:
The image will freeze for a few seconds when switching between files with different
recording dates.
For files with the same date, playback is seamless.
• When files are deleted:
If files are deleted and added after deleting during continuous recording, the ima
will freeze for a few seconds at the part where deleting is done.
When no files are deleted, playback is seamless.
• When the picture quality (XP/SP/EP) is changed during recording:
The image will freeze for a few seconds when switching between files with different
picture quality.
For files recorded in the same picture quality, playback is seamless.
• When the recorded file is less than 3 seconds:
The image will freeze for a few
3 seconds.
• When more than 99 files with the same date are recorded:
The image will freeze for a few seconds when switching between files at every 99 file
recordings.
For continuous 99 files, playback is seamless.
When a disc cannot be ejected with the eject button, use the following procedure to
eject by force.
A Turn off this burner.
B Insert
C Pull out the tray manually and remove the disc.
a thin rod into the force eject hole located
next to the eject button and the tray will be
ejected.
seconds at the end of a file that is less than
Disc cannot be ejected
ge
44
Force eject hole
Page 45
Error Messages
Trouble Action
Unplayable disc
Incompatible disc
Unfinalized disc
Use finalized disc
Disc error z The disc may be dirty. Clean the disc and try again.
Region code error
Cannot execute the
operation
Cannot play back
z The disc may be dirty. Clean the disc and try again.
z The disc or data format is not supported. Check the
disc or data format (extension). (P. 49)
z Insert a disc that can be played on this burner.
(P. 49)
z The “Close disc” check box in Power2Go might have
been unchecked to allow further recording. Under
the “Burner” tab in the Power2Go “Configuration/
Information” menu, check the box to close the disc.
(P. 16)
z Disc is not finalized when it is copied from the high
definition Everio. Make sure to finalize the disc after
copying. (For details, refer to the instruction manual
of the Everio camera.)
z Discs with a region code of “1” or “ALL” can be
played back on this burner. Discs with a different
region code from above cannot be played. (P. 46)
z Operate after stopping playback.
z File data may be missing.
z The disc or data format is not supported. Check the
disc or data format (extension). (P. 49)
EN
ES
No video files
stored
No image files
stored
z You have selected a folder that does not contain any
videos.
Select a folder with video files. (P. 25)
z You have selected a folder that does not contain any
still images.
Select a folder with still image files. (P. 25)
45
Page 46

Other Information
Cleaning Procedure
IMPORTANT:
•Be sure to unplug the burner before beginning cleaning.
• Do not use liquid or aerosol cleaners.
•Ensure that no moisture or liquid comes into contact with the drive during cleaning.
Exterior of the Burner:
Wipe dirt off with a dry cloth.
Disc Tray:
Wipe off dirt with a soft dry cloth.
Do not touch the lens. To clean the lens, use commercially
available lens cleaning blower for cameras. Using a lens cleaning
disc will cause m
Disc:
Use a commercially available cleaning cloth to gently wipe from
the inner edge to the outer edge.
Do not paste any stickers on the label side of the disc. This will cause the center of
rotation to deviate and increase the vibration of the rotating disc thereby affecting
proper playback.
Storage:
Make sure that discs are kept in their cases. If discs are piled on top of one another
without their protective cas
where they may be exposed to direct sunlight, or in a place where the humidity or
temperature is high. Avoid leaving discs in your car!
Region codes are numbers for restricting DVD video playback. The world is separated
into six regions and each region is identified by a number. If the number for
not match the number for the player, the disc cannot be played on the player.
JVC accepts no liability whatsoever for loss of data resulting from inappropriate
connections or handling.
alfunction.
es, they can be damaged. Do not put discs in a location
Region Codes
Disclaimer
Lens
a disc does
Copyrights
Duplicating copyright protected material, for other than personal use, without the
permission of the copyright holder is prohibited by copyright law.
46
Page 47

Registered Trademarks and Trademarks
•Microsoft, Windows, and Windows Vista are is either registered trademarks or
trademarks of Microsoft Corporation in the United States and/or other countries.
•Macintosh and Mac OS are trademarks of Apple, Inc., registered in the United States
and other countries.
• Pentiu m is a registered trademark of Intel Corporation in the United States
•Manufactured under licence from Dolby Laboratories. “Dolby” and the double-D
symbol are trademarks of Dolby Laboratories.
• HDMI, the HDMI logo and high definition multimedia interface are trademarks or
registered trademarks of HDMI Licensing LCC.
• The x.v.Color and x.v.Color logos are trademarks.
• The AVCHD and AVCHD logos are trademarks of Ma
Ltd. and Sony Corporation.
•Other company and product names mentioned herein are registered trademarks and/
or trademarks of their respective holders.
tsushita Electric Industrial Co.,
.
EN
ES
47
Page 48

Specifications
General
Rated current 2.3 A
Dimensions (W x H x D) 152 x 42 x 195 mm (6" x 1-7/10" x 7-7/10")
Mass
Operating environment
Laser power
(wavelength, output)
Power supply AC110 V to 240 V, 50 Hz/60 Hz
Input capacity 0.6 A
Output DC 5.3 V, 3.5 A
Operating temperature 0 C to 40 C (32 F to 104 F)
Dimensions (W x H x D)
Mass Approx. 136 g (0.3 lbs)
Type DC 3 V (CR2025 button battery)
Battery life Approx. 1 year (depending on the frequency of use)
Operating distance Approx. 5 m (face up)
Operating temperature 0 C to 40 C (32 F to 104 F)
Dimensions (W x H x D) 42 x 12 x 100 mm (1-7/10" x 1/2" x 4")
Mass Approx. 32 g (0.1 lbs) (including lithium battery)
DVD-R JVC, TDK, Verbatim, SONY
DVD-R DL *1 JVC *2, Verbatim
DVD-RW JVC
•Use of this burner may not be possible or optimal performance may not be achieved
depending on the disc used. We suggest using the recommended discs.
•Use DVDs for videos.
•This burner supports only 12 cm discs.
• The appearance and specifications of this product may be modified without prior
notice.
*1 DVD-R DL discs can be used when the burner is connected to
Everio and PC.
*2 For DVD-R DL manufactured by JVC, use of discs with the “Also recommended for
high definition Everio” message stated is recommended.
Approx. 920 g (2 lbs)
(excluding AC adapter and connection cables)
Operating temperature: 0 C to 35 C (41 F to 95 F)
Storage temperature: -20 C to 60 C (-4 F to 140 F)
For DVD: 656 to 663 nm, 1.04 mW
For CD: 777 to 788 nm, 1.33 mW
AC adapter (AP-V50U)
1
52 x 31 x 120 mm (2" x 1(excluding power cord)
Remote control (RM-V55U)
Recommended discs
/5" x 4-7/10")
a high definition
48
Page 49

Playback feature
Discs supported DVD-R, DVD-R DL, DVD-RW
Data format
(extension)
Video output 1.0 V 75 K (Pin jack)
Audio output 2.0 Vrms (Pin jack)
Component video
output
HDMI output
terminal
z AVCHD or DVD data disc created by connecting to a high
definition Everio
z DVD video disc created by connecting to Everio
z DVD data disc for which data is recorded using the high
definition Everio, processed using an editing software of
Everio, and written to a specific folder on this burner
• Select the file format for GZ-HD series as the output format
in the PowerDirector output menu.
• Set the file sys
Lite configuration menu to “UDF 1.5”.
•If images created by selecting “SVRT” in the PowerDirector
output menu cannot be played back correctly, deselect
“SVRT” and execute again.
z Extensions recognized by this burner are as follows.
(Extensions that have been changed cannot be played back
properly.)
recorded on Everio (via PC): MTS, TOD, MOD, JPG
•Data
•Data edited on PC: JTS, TPD, JPG
• When playing back a file created on a PC, pressing the
PLAY button after searching may cause the playback
position to deviate.
Y p-p: 1.0 V 75 K (Pin jack)
B/CR, PB/PR p-p: 0.7 V 75 K (Pin jack)
C
19-pin HDCP, x.v.Color, Deep Color compliant
Video: 1080p / 1080i / 720p / 480p / 480i
(We do not provide guarantee for compatibility with DVI-D.)
Audio: 2CH PCM/bit stream
tem under the data tab in the Power2Go 5.5
EN
ES
Caution
•Discs other than those above cannot be played back properly.
49
Page 50

When connected to an Everio camera
Interface USB 2.0
Interface cable USB cable (Mini A type - Mini B type)
Compatible discs for
writing
(8 cm discs cannot
be used)
Recording format Everio DVD-Video (video only)
Recording time Everio Approx. 30 minutes (including time for
• GZ-MC100, GZ-MC200, GZ-MC500, GZ-MG20, GZ-MG40, GZ-MG50, and
GZ-MG70 cannot be used.
Everio DVD-R, DVD-RW
High definition
Everio
High definition
Everio
High definition
Everio
DVD-R, DVD-R DL, DVD-RW
AVCHD disc (video)
Data disc (video, still image)
finalization)
When recording videos for about 90 minutes
in the Fine mode to a 4.7 GB disc. (This may
vary according to conditions such as the
number of titles.)
AVCHD disc:
Approx. 60 minutes (including time for
finalization)
• When recording videos for about 60 minutes
in the XP mode to a 8.5 GB DVD-R DL disc.
(This may vary according to conditions such
as the numb
Data disc:
Approx. 45 minutes (including time for
finalization)
• When recording videos for about 40 minutes
in the FHD mode to a 8.5 GB DVD-R DL
disc. (This may vary according to conditions
such as the number of files.)
er of files.)
50
Page 51

When connected to a PC
Interface USB 2.0, USB 1.1 *1
Interface cable USB cable (USB cable provided with Everio can also be used)
Supported operating
system
Data buffer capacity 2 MB
Data transfer rate
(for USB 2.0)
Compatible discs
(8 cm discs cannot
be used)
Supported software PowerProducer 4 NE (provided with Everio)
*1 If you are using a USB 1.1 cable, it will take approximately 3 hours to write one
DVD.
*2 Any CD recorded using the packet-write method is not supported.
Windows XP Home Edition, Windows XP Professional
Windows Vista Home Basic, Windows Vista Home
Premium
(Macintosh is not supported.)
Writing DVD-R: Maximum 8x
DVD-RW: Maximum 6x
DVD-R DL: Maximum 6x
Reading DVD-R: Maximum 8x
DVD-RW: Maximum 8x
DVD-R DL: Maximum 8x
CD-R: Maximum 24x *2
CD-RW: Maximum 24x *2
CD-ROM: Maximum 24x
Writing DVD-R, DVD-RW, DVD-R DL
Reading DVD-R, DVD-RW, DVD-R DL, CD-ROM, CD-R,
CD-RW
CyberLink Power2Go 5.5 Lite (provided with CU-VD50)
EN
ES
51
Page 52
Este grabador permite crear discos DVD a partir
de los vídeos grabados con la videocámara de
disco duro JVC sin necesidad de utilizar el PC.
• Si desea editar los vídeos grabados con la cámara y
crear sus propios DVD originales, use el software que
acompaña a la cámara.
• El software Power2Go 5.5 Lite que va incluido sirve
para grabar datos. No obstante, no se puede utilizar
para editar vídeos ni crear DVD.
• El grabador no es compatible con Macintosh.
Apreciado cliente,
Gracias por comprar este grabador. Antes de nada, le
rogamos que lea detenidamente la información sobre
seguridad y las precauciones que se indican en las
páginas 2 y 3 para saber cómo utilizar este producto
de forma segura.
Precauciones de seguridad
IMPORTANTE:
En cualquiera de los casos siguientes, debe
desenchufar el grabador y ponerse en contacto con el
distribuidor para reparar el aparato.
• El aparato desprende humo o un olor extraño
• El aparato se ha dañado debido a una caída
• Ha entrado agua o algún objeto en su interior
PRECAUCIÓN:
UNA UNIDAD ES UN PRODUCTO LÁSER DE CLASE 1. NO
OBSTANTE, ESTA UNIDAD UTILIZA UN RAYO LÁSER
VISIBLE QUE PODRÍA CAUSAR UNA EXPOSICIÓN
PELIGROSA A LA RADIACIÓN SI ES DIRIGIDO.
ASEGÚRESE DE OPERAR LA UNIDAD
CORRECTAMENTE CONFORME A LAS INSTRUCCIONES.
CUANDO ESTA UNIDAD ESTÉ ENCHUFADA AL
TOMACORRIENTE DE LA PARED, NO PONGA LOS
OJOS CERCA DE LA ABERTURA DE LA BANDEJA
DEL DISCO NI DE OTRAS ABERTURAS PARA
MIRAR EN EL INTERIOR DEL APARATO.
EL USO DE CONTROLES O DE AJUSTES Y LA
EJECUCIÓN DE PROCEDIMIENTOS DISTINTOS A
LOS ENUNCIADOS AQUÍ PUEDEN OCASIONAR LA
EXPOSICIÓN A RADIACIONES PELIGROSAS.
NO ABRA LAS CUBIERTAS Y NO LO INTENTE
REPARAR USTED MISMO. ENCARGUE EL
SERVICIO DE REPARACIÓN A TÉCNICOS
CUALIFICADOS.
PRODUCTO LÁSER DE CLASE 1
REPRODUCCIÓN DE ETIQUETAS
ETIQUETA DE ADVERTENCIA DENTRO DE LA
UNIDAD
Este aparato cumple la norma “IEC60825-1:2001”
para productos con láser.
El enchufe debe instalarse cerca del equipo para que
sea fácilmente accesible.
ATENCIÓN:
Esta unidad contiene microordenadores. La presencia
de ruido o interferencias electrónicos externos podría
causar fallos de funcionamiento. En tales casos,
apague la unidad y desenchufe el cable de
alimentación de CA. A continuación, enchúfelo de
nuevo y vuelva a encender la unidad. Saque el disco.
Tras comprobar el disco, maneje la unidad
normalmente.
PRECAUCIÓN:
Para evitar choques eléctricos
o daños a la unidad, primero
inserte firmemente el extremo
menor del cordón de
alimentación en el adaptador
de CA para que no se mueva,
y luego enchufe el extremo mayor del cordón de
alimentación en un tomacorriente de CA.
La toma de alimentación debe permanecer lista para
funcionar.
• Quite la toma de alimentación inmediatamente si la
grabadora funciona anormalmente.
Si se produce un fallo de funcionamiento, deje de usar
inmediatamente el aparato y consulte con su
distribuidor local de JVC.
Precaución relacionada con la batería de
litio recambiable
La batería utilizada en este dispositivo presenta
riesgos de incendio y de quemaduras químicas si no
se usa correctamente.
No la recargue, ni la desmonte, ni la caliente por
encima de los 100 C, ni la incinere. Cambie la batería
por una Panasonic (Matsushita Electric), Sanyo, Sony
o Maxell CR2025.
Hay peligro de explosión o riesgo de incendio si la
batería se cambia de manera incorrecta.
• Deshágase de la batería usada sin demora.
• Manténgala lejos del alcance de los niños.
• No la desmonte ni la eche al fuego.
Sólo para EE.UU.-California
Este producto contiene una batería de litio CR de tipo
botón que contiene perclorato (puede requerirse una
manipulación especial).
Visite www.dtsc.ca.gov/hazardouswaste/perchlorate
ADVERTENCIA:
Las baterías no deben dejarse expuestas calor
excesivo directo, como la luz solar o el fuego.
2
Page 53

Declaración de conformidad (Para propietarios de
EE. UU.)
Número de modelo : CU-VD50U
Nombre comercial : JVC
Parte responsable : JVC AMERICAS CORP.
Dirección : 1700 Valley Road Wayne,
Numero de telefono: 973-317–5000
Este dispositivo cumple con el Apartado 15 de la
reglamentación FCC. La operación está sujeta a las
dos condiciones siguientes: (1) Este dispositivo no
debe causar interferencias perjudiciales y (2) este
dispositivo debe aceptar cualquier interferencia
recibida, incluyendo la interferencia que pueda causar
errores de funcionamiento.
(Para propietarios de EE. UU.)
Los cambios o modificaciones no aprobados por JVC
podrian anular la autoridad del usuario para utilizar el
equipo. Este equipo ha sido examinado y cumple con
los limites de dispositivos digitales Clase B, segun el
Apartado 15 de la reglamentacion FCC. Estos limites
estan disenados para suministrar una proteccion
razonable contra interferencias perjudiciales en una
instalacion residencial. Este equipo genera, usa y
puede irradiar radiofrecuencia y si no se instala y
emplea de acuerdo con las instrucciones puede
causar interferencias perjudiciales a las
comunicaciones por radio. Sin embargo, no se
garantiza que no se produzcan interferencias en una
instalacion en particular. Si este equipo causa
interferencias perjudiciales a la recepcion de radio o
television, que pueden determinarse desconectando y
conectando la alimentacion del equipo, el usuario
puede intentar corregir la interferencia por medio de
una o mas de las siguientes medidas:
Reoriente o recoloque la antena de recepcion.
Aumente la separacion entre el equipo y el receptor.
Conecte el equipo a un tomacorriente en un circuito
diferente al del receptor conectado.
Consulte con su distribuidor o con un tecnico
experimentado de radio/TV.
El botón C/B no interrumpe completamente la
alimentación principal, sino que conecta y desconecta
la corriente de funcionamiento. ABB indica la espera
de alimentación eléctrica y ACB indica ON.
Precauciones de seguridad con el
grabador
Tome siempre las medidas de seguridad que se indican
a continuación. De lo contrario, pueden producirse
descargas eléctricas, incendios, lesiones o averías.
• No desmonte, desarme ni modifique el aparato. Las
reparaciones e inspecciones debe realizarlas siempre
el distribuidor.
• No inserte objetos metálicos o inflamables, ni vierta
agua ni ningún otro líquido en el aparato.
• Apáguelo al conectar cualquier equipo.
• Desenchúfelo si no piensa utilizarlo durante un largo
período o antes de limpiarlo (aunque esté apagado,
por el aparato circula electricidad).
• No bloquee los orificios de ventilación del grabador.
• No lo utilice en entornos con condensación. Si
traslada repentinamente el grabador de un entorno
frío a un lugar caliente, pueden formarse gotas y esto
puede ocasionar averías o un mal funcionamiento del
aparato.
• Evite vibraciones en el grabador cuando contenga un
disco.
N. J. 07470
Precauciones de seguridad con los
accesorios
• Al usar el adaptador de CA, el cable de alimentación y
el cable USB, tome siempre las precauciones
siguientes. De lo contrario, pueden producirse
descargas eléctricas, incendios, lesiones o averías.
• No enchufe ni desenchufe el cable si tiene las manos
mojadas.
• El enchufe debe estar completamente insertado en
la toma de corriente.
• Evite que el enchufe entre en contacto con el polvo o
con cualquier objeto metálico.
• El cable debe estar en perfecto estado.
• Coloque el cable de manera que nadie pueda
tropezar con él.
• No los utilice en caso de tormenta.
• No los desmonte.
• No los utilice con ningún producto que no sea éste.
• No reproduzca el CD-ROM suministrado con el
reproductor de audio. De lo contrario, se pueden
dañar los circuitos o los altavoces.
Precauciones de seguridad con los
discos
No utilice los siguientes discos:
• Discos agrietados.
• Discos muy rayados.
Instalación
No instale el aparato en:
• Lugares húmedos
• Lugares con una temperatura de 60 °C o más
• Lugares que reciban luz directa del sol
• Lugares propensos al sobrecalentamiento
• Lugares con humo o polvo
• Lugares con humo de aceite o vapor, como la
encimera de la cocina o junto a un humidificador
• Superficies inestables
• Cuarto de baño
• Lugares con polvo
• Lugares inclinados
ATENCIÓN:
Sobre la colocación de la unidad:
Algunos televisores y otros electrodomésticos
generan fuertes campos magnéticos. No coloque
tales aparatos encima de la unidad, pues podría
ocasionar perturbaciones en las imágenes.
Al mover el producto:
Pulse C/B para apagar la alimentación y esperer al
menos 30 segundos antes de desenchufar el cable de
alimentación. Luego, espere al menos 2 minutos
antes de mover el producto.
EN
ES
3
Page 54

Guía básica
¡Prepararse para grabar en un DVD!
A Prepare un disco recomendado
Utilice un disco DVD-R, DVD-RW o DVD-R DL de las marcas enumeradas a continuación.
Los discos DVD+R, DVD+RW y DVD-RAM no pueden utilizarse.
DVD-R DL (una sola
cara, doble capa)
Utilice el adaptador de
CA para alimentar la
cámara Everio.
Marca
Precaución
B Conectar
DVD-R DVD-RW
JVC, TDK,
Verbatim, SONY
• Se pueden utilizar discos DVD-R DL (una sola cara, doble capa) sólo
cuando la grabadora esté conectada a una cámara Everio de alta
definición.
•Utilice un paño de limpieza disponible en tiendas para limpiar el disco
suavemente si hay alguna huella o suciedad. Si se aplica demasiada
fuerza, se producirán arañazos.
•No utilice discos rayados.
Protuberancia
Al toma de CC
JVC JVC, Verbatim
Introduzca el conector con la
protuberancia hacia la grabadora.
Botón de alimentación
CU-VD50
Luz de alimentación
Cable USB
C Pulse el botón de alimentación para encender la grabadora
•La luz de alimentación cambia de naranja intermitente a naranja fijo.
•Cuando se introduce un disco AVCHD (p. 15) en un aparato que no es compatible
con AVCHD, puede que no sea capaz de expulsar el disco. Para expulsar el disco,
consulte el manual de instrucciones de su aparato.
4
Al toma
de CC
Everio
Page 55
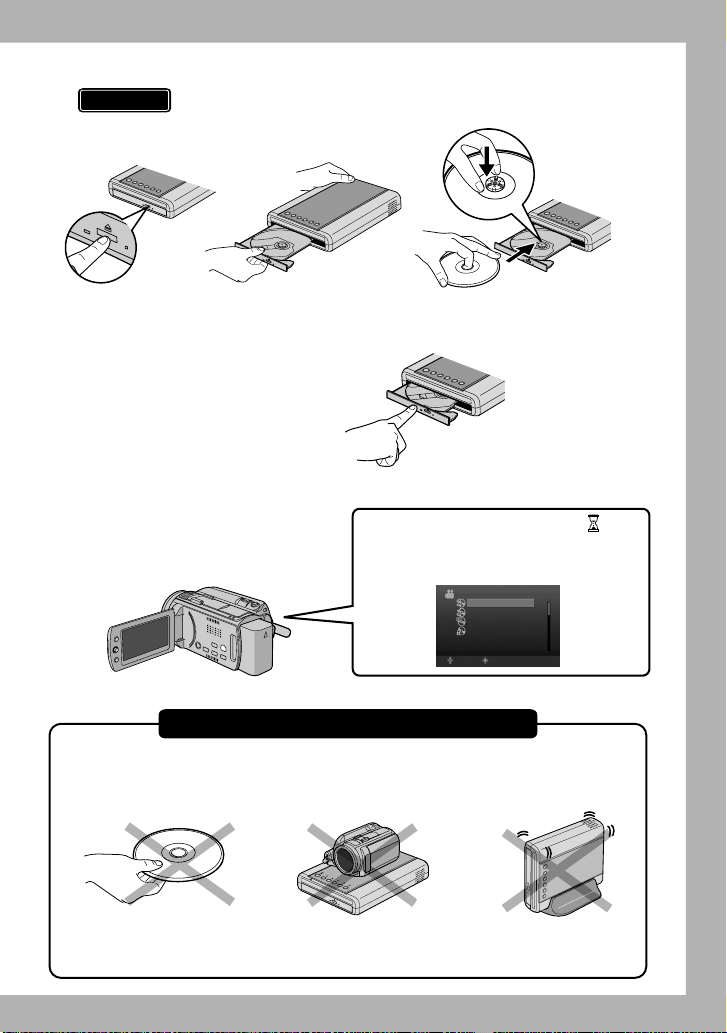
D Abra la bandeja e introduzca el disco
Precaución
•La bandeja no se puede abrir/cerrar cuando la grabadora está
apagada.
A Presione el botón
B Sáquela
de expulsión.
E Cierre la bandeja
•Empuje hasta que la bandeja
encaje.
F Abra el monitor de LCD
•La cámara Everio se enciende.
•La luz de alimentación de la
grabadora cambia de naranja a
verde claro.
¡Preste atención a lo siguiente!
•No toque el lado de
grabación
completamente.
Se muestra un reloj de arena ( )
cuando la grabadora reconoce el disco.
Cuando ha terminado, aparece la
siguiente pantalla.
•No sitúe ningún
objeto encima
C Introdúzcalo firmemente
en su lugar.
6)$%/
3%,%##%.42%4/$/
3%,%##)/.!29#2%!2
2%02/$5##)©.
&).!,):!2
!*534%
3%,%##
•No la vuelque
•No la someta a
golpes mecánicos
¹ La grabación y la reproducción puede que no funcionen correctamente
si el disco está arañado o sucio.
5
Page 56

Copiar vídeos en DVD
-%.5
$6$
-%.5
Funcionar en la cámara Everio.
¹ Dependiendo del modelo de conectado, la visualización en pantalla puede variar de
las mostradas a continuación.
Seleccione
(subir-bajar)
Confirme
(presione)
A Seleccione “SELECC. ENTRE
TODO”
VÍDEO
SELECC. ENTRE TODO
SELECCIONAR Y CREAR
REPRODUCCIÓN
FINALIZAR
SELECC AJUSTE
D Seleccione “Sí”
TODAS LAS ESCENAS
¿DESEA CREAR UN TÍTULO
AUTOMÁTICO EN EL MENÚ
SUPERIOR DEL DISCO?
Sí
No
SELECC AJUS TE
E Seleccione “EJECUTAR”
B Seleccione “TODAS LAS
ESCENAS”
SELECC. ENTRE TODO
TODAS LAS ESCENAS
ESCENAS SIN GUARDAR
SELECC AJUSTE
-%.5
ARRIBA
F Pulse “OK”
C Seleccione “OK”
TODAS LAS ESCENAS
CANTIDAD REQUERIDA
$6$$6$$,
PREPARAR DISCO VACÍO
ACEPTAR
VOLVER
SELECC AJUS TE
-%.5
ARRIBA
•No apague la alimentación ni quite el cable USB mientras se muestre el reloj de
arena o la pantalla de grabación en progreso.
Nota
6
También puede elegir copiar sus escenas favoritas. Para obtener
detalles, consulte el manual de instrucciones de la cámara Everio.
¡Copia completada!
TODAS LAS ESCENAS
EJECUTAR
CANCELAR
SELECC AJUSTE
TODAS LAS ESCENAS
HECHO
ACEPTAR
AJUSTE
ARRIBA
ARRIBA
Page 57

Reproducción de vídeos guardados en el DVD
1/2
A Conecte esta grabadora al TV
Al toma de CC
Conéctelo al TV con
un cable de audio/
vídeo.
Rojo
Blanco
Amarillo
Televisor
Luz de
alimentación
Rojo Amarillo
Blanco
Retire el cable USB
•Para obtener más detalles, consulte la sección “Conexión al
televisor” (P.12, 13).
B Retire el cable USB
•La luz de alimentación de la grabadora cambia como sigue.
Verde Naranja intermitente Naranja
•Cuando se desenchufa el cable USB, aparece automáticamente el navegador
de reproducción. (Unos 40 segundos).
(Pantalla del navegador de
reproducción en el TV)
Precaución
•Los discos no finalizador
no se pueden reproducir
correctamente. Consulte
el manual de instruciones
JUN.01.2008 09:51AM JUN.01.2008 11:45AM JUN.01.2008 05:09PM
de la cámara Everio y
finalice el disco.
AUG.01.2008 01:42PM AUG.01.2008 03:15PM AU G.01.2008 05:32PM
REPR. DE EXTRACTOS
C Utilice los botones de selección del mando a distancia para
seleccionar el archivo a reproducir y pulse el botón ENTER.
¡Comienza la reproducción!
•Cuando la luz de alimentación parpadee lentamente en color rojo debido a un
descenso de la temperatura interior d la grabadora, algunas funciones no
funcionarán y no se mostrará ninguna imagen en la pantalla del televisor. Espere
hasta que la luz de alimentación deje de parpadea
grabadora.
r en color rojo antes de usar la
7
Page 58

Índice
z Precauciones de seguridad.................................................................................... 2
z Procedimientos iniciales ........................................................................................ 9
Accesorios ................................................................................................................. 9
Colocación de la grabadora....................................................................................... 9
z Nombres y funciones de cada pieza.................................................................... 10
Panel delantero y superior....................................................................................... 10
Panel trasero ........................................................................................................... 10
Mando a distancia ................................................................................................... 11
z Conexión al televisor ............................................................................................ 12
Conexión a un televisor mediante el terminal de entrada HDMI ............................. 12
Conexión a un televisor mediante conectores de entrada de vídeo de
componentes ........................................................................................................... 13
Conexión a un televisor mediante conectore
z Copiar vídeos de Everio en DVD .......................................................................... 14
Conexión con la cámara Everio............................................................................... 14
Creación de un Disco AVCHD/Disco de datos/DVD-Vídeo..................................... 15
z Grabar de ordenador a DVD ................................................................................. 16
Conexión al ordenador ............................................................................................ 16
Copiar a DVD .......................................................................................................... 16
Equipos que se pueden utilizar ............................................................................... 17
Instalación de CyberLink Power2Go 5.5 Lite .......................................................... 18
Información de contacto de CyberLink Power2Go 5.5 Lite ..................................... 20
z Configuración de carpetas ................................................................................... 21
Al copiar desde una Everio de alta definición en un disco de datos ....................... 21
ar desde una Everio de alta definición en un disco AVCHD......................... 22
Al copi
Cuando se crear y se guardan carpetas y achivos deseados en un ordenador ..... 22
z Reproducción de imágenes guardadas en el DVD............................................. 23
Visualización de imágenes copiadas desde la Everio de alta definición................. 23
Visualización de DVD-Vídeo copiado desde la Everio ............................................ 27
z Cambio de la configuración de reproducción .................................................... 29
z Hacer funcionar junto con el TV a través del HDMI ........................................... 31
z Visualización de imágenes de alta calidad ......................................................... 33
z Menú de configuración ......................................................................................... 34
Procedimientos de fu
Opciones y descripciones del menú de configuración ............................................ 35
z Visualizaciones de la pantalla .............................................................................. 39
z Guía para solucionar problemas.......................................................................... 41
z Mensajes de error.................................................................................................. 45
z Otra información.................................................................................................... 46
z Especificaciones ................................................................................................... 48
ncionamiento de los menús ................................................... 34
s de entrada de sonido/vídeo ............ 13
8
Page 59

Procedimientos iniciales
Accesorios
Si falta algún elemento, por favor consulte con su distribuidor autorizado.
EN
ES
Adaptador de CA
(AP-V50U)
Cable de audio y vídeo
DVD-R (disco en blanco) x 1
CD-ROM (software para
grabación de datos) x 1
No utilice el adaptador de CA y el cable de alimentación proporcionados con
otros dispositivos. Además, no utilice un adaptador de CA ni un cable de
alimentación que no sean los suministrados con esta grabadora. Si lo hace,
se podrían producir descargas eléctricas o un incendio.
Cable de
alimentación
Base
Manual de instrucciones
(este manual), otro
material impreso
Cable USB
Tipo Mini A - Mini B
Mando a distancia
(RM-V55U)
Colocación de la grabadora
o Posición horizontal
Observe la parte superior e inferior de la grabadora y colóquela en posición
horizontal.
o Posición vertical
Alinee la ranura de la parte inferior
de esta copiadora con la
protuberancia del soporte y fije la
copiadora de manera segura en el
soporte.
Ranura
Lado alto
Lado bajo
9
Page 60
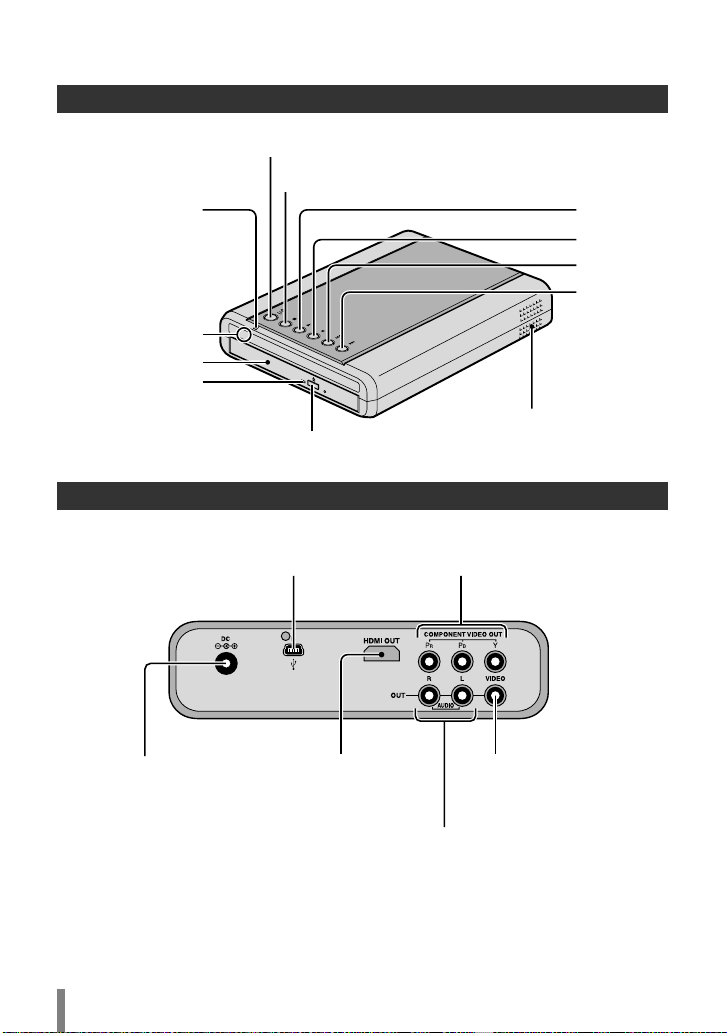
Nombres y funciones de cada pieza
Panel delantero y superior
Alimentación (Encender/Apagar)
Parar
Luz de alimentación
Alimentación
encendida: naranja
USB conectado: verde
Sensor del mando
a distancia
Bandeja
Lámpara de
acceso
Para abrir la bandeja (p. 5)
Conexión con la cámara Everio (p. 14)
Conexión al ordenador (p. 16)
Aguerjos para ventilación
No bloquee estos
agujeros de ventilación.
Panel trasero
Conexión a los conectores de
entrada de vídeo de componente
del TV (p. 13)
Reproducir
Pausa
Salto atrás
Salto
adelante
Conexión al
adaptador de CA
10
Conexión al terminal de
entrada HDMI del TV
(p. 12)
Conexión a los conectores de
entrada de sonido del TV (p. 13)
Conexión al conector de
entrada de vídeo del TV
(p. 13)
Page 61
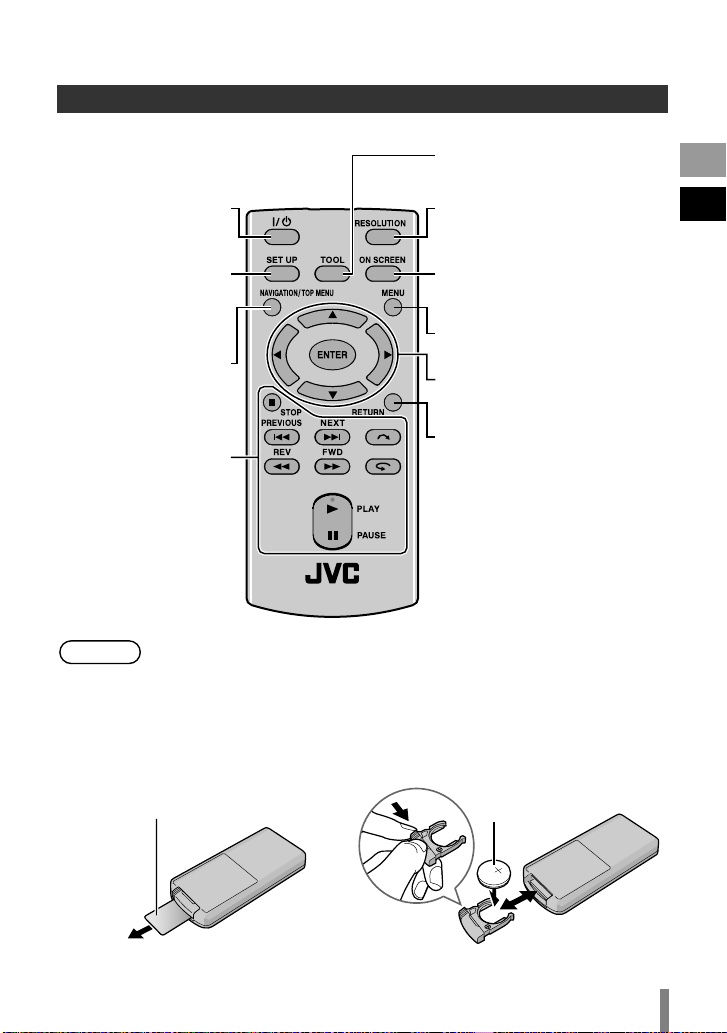
Alimentación
(Encender/Apagar)
Mando a distancia
Para mostrar el menú de
herramientas (p. 25)
Para mostrar el menú de
reproducción (p. 29)
Para cambiar la resolución de
salida de la imagen (p. 33)
EN
ES
Para realizar la
configuración
básica (p. 34)
Mostrar el navegador
de reproducción
(p. 23)
Operaciones básicas
de reproducción
(p. 25, 28)
Nota
• Si la grabadora responde mal al mando a distancia, la pila del mando a
distancia está floja. Cámbiela por una pila nueva. Introdúzcala
correctamente según las direcciones e y d indicadas.
• Si hay algún problema al utilizar el mando a dis
vuelva a meterla antes de hacer funcionar el mando a distancia.
o Al utilizar el mando a
distancia por primera vez
Saque la película de aislamiento
Para mostra información en la
pantalla (p. 39)
Mostrar el navegador de
reproducción (p. 27)
Para seleccionar/confirmar
Para volver a la pantalla
anterior
tancia, quite la pila y
o Al sustituir la pila
Batería de litio
11
Page 62

Conexión al televisor
Conexión a un televisor mediante el terminal de entrada HDMI
Esta grabadora
Nota
•Las imágenes solamente se pueden mostrar en un monitor de
protección de contenido digital de alto ancho de banda ((HDCP),
High-bandwidth Digital Content Protection).
• Recomendamos el uso de cable HDMI de categoría 2 (cable de alta
velocidad) para visualización con mayor calidad de imagen.
Televisor
Entrada HDMI
Cable HDMI (no suministrado)
12
Page 63

Conexión a un televisor mediante conectores de entrada
de vídeo de componentes
Cable de vídeo de
componente
(no suministrado)
Esta grabadora
Cable de audio (no suministrado)
Nota
• Conectar a un monitor de protección de contenido digital de alto ancho
de banda (HDCP) cuando se utilice un cable de conversión HDMI-DVI.
Televisor
Entrada de vídeo
de componente
Y
C
B/PB
CR/PR
Entrada de
sonido (I)
Entrada de
sonido (D)
Conexión a un televisor mediante conectores de entrada
de sonido/vídeo
Esta grabadora
Televisor
EN
ES
Cable de audio y vídeo
(suministrado)
Entrada de vídeo
Entrada de
vídeo
Entrada de
sonido (I)
Entrada de
sonido (D)
13
Page 64

Copiar vídeos de Everio en DVD
Al conectar esta grabadora a una cámara Everio, puede grabar fácilmente imágenes
registradas en un DVD.
Conexión con la cámara Everio
Preparativos
Al toma de CC
Nota
•Everio: Apagado
•Esta grabadora: Apagada
Conector USB
Conector de CC
Protuberancia
Cable USB (incluido
con CU-VD50)
•Cuando está conectado el cable USB, todos los botones del mando a
distancia de esta grabadora están operativos excepto el botón de
alimentación.
Adaptador de CA
Conector USB
Adaptador de CA
14
Page 65

Creación de un Disco AVCHD/Disco de datos/DVD-Vídeo
o Discos que se pueden crear en esta grabadora
Copiar Reproducción
Vídeos de alta definición
Disco AVCHD
Disco de datos
DVD-Vídeo
•La Everio de alta definición GZ-HD30/HD40 admite grabación tanto en formato
AVCHD como MPEG-2. Otras Everio de alta definición admiten grabación en formato
MPEG-2. (a mayo de 2008).
Preparativos
en formato AVCHD.
Vídeos de alta definición
en formato MPEG-2.
Vídeos de definición
estándar en formato
MPEG-2.
•Cambio de modos en la Everio:
modo o (dependiendo del elemento a grabar)
•Esta grabadora: encendido
Se pueden reproducir en aparatos
compatibles con AVCHD (como una
grabadora Blu-ray) o esta grabadora.
(p. 23)
Reproducción en esta grabadora. (p. 23)
No se puede reproducir en otros
atos.
apar
Se pueden reproducir en una grabadora
de DVD, reproductor de DVD o en esta
grabadora. (p. 27)
A Encienda la Everio
•Aparecerá el menú de Copia de seguridad en el monitor de LCD de la Everio.
B Introduzca un disco nuevo
•Consulte la página 5 para ver cómo introducir el disco.
•Consulte la página 4 para ver los discos recomendados.
C Cree un disco AVCHD, un disco de datos o DVD-Vídeo
•Consulte el manual de instrucciones de su cámara Everio para ver cómo crear
un disco AVCHD, un disco de datos o un DVD-Vídeo.
Nota
• Dependiendo del modelo conectado, las imágenes fijas no pueden
copiarse. Para obtener detalles, consulte el manual de instrucciones de
la cámara Everio.
•No apague esta grabadora mientras se están grabando datos en el
disco. El disco no se puede expulsar dur
Espere a que termine la grabación.
•El mando a distancia no se puede hacer funcionar cuando esta
grabadora está conectada a la Everio.
ante la grabación de datos.
EN
ES
15
Page 66

Grabar de ordenador a DVD
Esta grabadora se puede utilizar como grabadora de DVD cuando está conectada a un
ordenador. Y puede utilizar el programa incluido para grabar en DVD.
Conexión al ordenador
Preparativos
Conector de
CC
•Everio: Apagado
•Esta grabadora: Apagada
Cable USB (incluido
con Everio)
PC
Conector USB
Conector USB
Adaptador de CA
Copiar a DVD
A Encienda la grabadora y el ordenador
•Instale el programa CyberLink Power2Go 5.5 Lite si aún no lo ha hecho. (p. 18)
B Introduzca un disco nuevo
•Consulte la página 5 para ver cómo introducir el disco.
•Consulte la página 4 para ver los discos recomendados.
C Utilice Power2Go para grabar en un DVD
A Utilice Power2Go para crear una carpeta.
• Utilice caracteres alfanuméricos para introducir los nombres de carpetas o
archivos. Puede especificar hasta 40 caracteres.
B En la ficha “Grabador” del menú “Configuración/Información” de Power2Go,
active la casilla situada junto a “Cerrar el di
archivos en la ficha de datos está establecido en “UDF 1.5”. La reproducción
de vídeo puede que no funcione correctamente si el disco fue creado con el
sistema de archivos configurado a “ISO9660/Joliet”.
C Copie archivos como JTS, TPD y JPG en la carpeta.
sco”. Confirme que el sistema de
16
Page 67

Nota
•Para obtener detalles sobre el uso de Power2Go, consulte la guía
usuario y los archivos Ayuda y Léame que se instalan con software.
Puede acceder a la guía del usuario y los archivos Ayuda y Léame
desde el menú Inicio del ordenador.
• Si necesita la ayuda del Servicio de atención al cliente o si desea
registrar el software, le hará falt
del CD): PXNVM-NWE4G-XQD9Q-CU9DX-3FQFN-NAKUS
•Esta grabadora no se puede utilizar para grabar archivos en un disco
CD-R o CD-RW. Consulte la página 51 para ver los discos
recomendados.
•Esta grabadora no responde a todas las funciones de Power2Go 5.5
Lite.
• Power2Go 5.5 Lite no admite la conversión de archivos
formato MP3.
•Cuando aparece la pantalla “Escribir clave de activación” mientras
utiliza Power2Go 5.5 Lite, ciérrela sin especificar la clave de activación.
a la siguiente clave del producto (clave
de sonido al
del
o Retirada del cable USB del ordenador
A Retire el hardware de su PC.
B Retire el cable USB.
Precaución
CyberLink Power2Go 5.5 Lite se pude utilizar en equipos que cumplan las siguientes
condiciones.
Sistema
operativo
Conector Conector USB 2.0/1.1 (*)
CPU
RAM Al menos 128 MB (se recomiendan al menos 256 MB)
Espacio libre en
disco
Pantalla Debe ser capaz de mostrar 800 x 600 puntos
* Si utiliza un cable USB 1.1, la grabación de un DVD tardará unas tres horas.
•Para reproducir discos creador en un ordenador en esta grabadora,
siga el procedimiento siguiente.
Introduzca el disco en esta grabador
disco, pulse el botón NAVIGATION/TOP MENU para mostrar el
navegador de reproducción. (p. 23)
•Para discos de datos creados en un ordenador, la fecha y la hora
mostradas no serán exactas.
a. Después del reconocimiento del
Equipos que se pueden utilizar
Windows XP Home Edition (preinstalado)
Windows XP Professional (preinstalado)
Windows Vista Home Basic (edición de 32 bits, preinstalado)
Windows Vista Home Premium (edición de 32 bits,
preinstalado)
Intel Pentium III a 800 MHz como mínimo
(Se recomienda Intel Pentium 4 a 2 GHz como mínimo)
Al menos 50 MB para la instalación
Se recomiendan 5 GB como mínimo para grabar DVD
EN
ES
17
Page 68

Instalación de CyberLink Power2Go 5.5 Lite
Precaución
• No reproduzca el CD-ROM proporcionado en un reproductor de
sonido. No es un CD de sonido. Si reproduce este CD-ROM en un
reproductor de audio se generará un ruido de gran volumen. También
puede dañar los circuitos y el altavoz.
A Inserte el CD-ROM suministrado en el ordenador
Windows Vista:
A Haga clic en “Ejecutar INSTALL.EXE” en la pantalla “Reproducción
automática”.
B Haga clic en “Continuar” en la pantalla “Control de cuentas de usuariol”.
C Aparece la pantalla “Seleccione el idioma de configuración”.
Windows XP:
•Después de un poco, aparece la pantalla “Seleccione el idioma de
configuración”.
B Confirme el idioma y haga clic en
“ACEPTAR”
•Aparecerá la siguiente pantalla.
C Haga clic en “Siguiente”
•Aparece la pantalla “Contrato de licencia”.
D Confirme el contenido y haga clic en
“Sí”
•Aparece la pantalla “Información del cliente”.
18
Page 69

E Escriba los datos de los campos
“Nombre de usuario” y “Nombre de
organización” y haga clic en
“Siguiente”
F Siga las instrucciones que se indican en pantalla
•Empieza la instalación.
Después de un poco, aparece la pantalla “InstallShield Wizard”.
G Haga clic en “Finalizar”
•El equipo se reiniciará y la instalación se
completará.
• Si la pantalla de la derecha no aparece,
continúe con el paso
H.
H Haga clic en “Finalizar”
•Aparecerá la siguiente Léame del programa
“CyberLink Power2Go 5.5”.
EN
ES
I Lea el contenido del archivo Léame
19
Page 70

Información de contacto de CyberLink Power2Go 5.5 Lite
Para obtener información sobre CyberLink Power2Go 5.5 Lite u otros productos, use la
siguiente información de contacto.
Soporte técnico por teléfono o fax
Lugar Idioma
Alemania
Inglés / Francés /
Español
Horario de oficina
(de lunes a viernes)
De 9:00 a. m. a 5:00 p. m. +49-700-462-92375 +49-241-70525-25
N.º de teléfono N.º de fax
Soporte técnico por voz (de pago)
Lugar Idioma
EE. UU. Inglés
Horario de oficina
(de lunes a viernes)
De 1:00 p. m. a 10:00 p. m.
(hora central de EE. UU.)
URL
http://www.cyberlink.com/english/cs/
support/
Soporte técnico por web o correo electrónico
Idioma URL o dirección de correo electrónico
Inglés http://www.cyberlink.com/english/cs/support/new_site/support_index.html
Francés /
Español
goCyberlink@aixtema.de
20
Page 71

Configuración de carpetas
A continuación se muestra la configuración de las carpetas cuando se copian archivos
de una cámara Everio de alta definición o de su ordenador o en un DVD.
Al copiar desde una Everio de alta definición en un disco de datos
\
RAÍZ
*1
[EVERIO_V]
VÍDEO EVERIO
(Carpetas de respaldo)
[BACKUP]
COPIA DE SEGURIDAD NORMAL
(Everio: SELECC. ENTRE TODO)
[08060101]
[08060502]
Archivos de vídeo
[MOV001.TOD]
[MOV002.TOD]
EN
ES
*1
[EVERIO_S]
IMAGEN
EVERIO
[DATE]
COPIA DE SEGURIDAD DE FECHAS
(Everio: CREAR POR FECHA)
[EVENT]
COPIA DE SEGURIDAD DE EVENTOS
(Everio: CREAR POR EVENTO)
[FILES]
COPIA DE SEGURIDAD DE ARCHIVOS
(Everio: SELECC. DE ESCENAS)
[PLAYLIST]
RESPALDO LISTAS DE REPRODUCCIÓN
(Everio: CREAR POR LISTA REPR)
(Carpetas de respaldo)
[BACKUP]
COPIA DE SEGURIDAD NORMAL
[DATE]
COPIA DE SEGURIDAD DE FECHAS
[FILES]
COPIA DE SEGURIDAD DE ARCHIVOS
[08060101]
[08060101]
[08060101]
[08060101]
[08060101]
[08060101]
[08060101]
Archivos de imágenes fijas
[PIC_0001.JPG]
[PIC_0002.JPG]
*1
Los archivos de vídeo e imagen capturados por la cámara Everio de alta definición
que se copian en esta grabadora, se almacenarán en las carpetas “EVERIO_V” y
“EVERIO_S”.
21
Page 72

Al copiar desde una Everio de alta definición en un disco AVCHD
Archivos de vídeo
\
RAÍZ
[BDMV]
[EVERIO_I]
[STREAM]
[BACKUP]
[CLIPINF]
[PLAYLIST]
index.bdmv
MovieObject.bdmv
00000.m2ts
00001.m2ts
Cuando se crear y se guardan carpetas y achivos deseados
en un ordenador
\
RAÍZ
Archivos de vídeo/imágenes fijas
*2, 3
[USER_DAT] [USER_DAT2]
[USER_DAT3] [USER1.JTS]
[USER2.TPD]
*2 Cree carpetas con el programa Power2Go y copie los archivos de vídeo/imagen fija
en las carpetas. Puede utilizar los nombres de carpeta y archivo según su
preferencia. (Se muestra como “USER_DAT” en la ilustración).
*3 Use Power2Go para copiar las carpetas “USER_DAT” en el DVD. (p. 16)
*4 Los archivos con la extensión “.TPD” o “.JTS” son archivo
Everio de alta definición editados en un ordenador.
•Consulte también “Formato de los datos (extensión)” (p. 49).
Precaución
•Usted puede crear carpetas y archivos con cualquier nombre según
prefiera; sin embargo, no utilice “EVERIO_V” ni “EVERIO_S” como
nombre de la carpeta.
•Utilice caracteres alfanuméricos para introducir los nombres de
carpetas o archivos. Puede especificar hasta 40 caracteres.
•Puede crear has
ta 6 niveles de carpetas. La reproducción no es
posible si se crean más de 6 niveles.
•La longitud total de la ruta hasta el archivo tiene un límite de 240
caracteres.
*4
s de vídeo de la cámara
22
Page 73

Reproducción de imágenes
guardadas en el DVD
Puede reproducir vídeo e imágenes fijas de la Everio guardados en un DVD.
Visualización de imágenes copiadas desde la Everio de alta definición
EN
o Para comenzar a ver inmediatamente después de guardar
imágenes en un DVD
A Retire el cable USB. (p. 14)
B Conecte esta grabadora al TV.
•Para obtener más detalles sobre las conexiones, consulte la sección
“Conexión al televisor” (p. 12, 13).
•Compruebe que la luz de alimentación de esta grabadora se enciende de
color naranja.
•Después de pulsar el botón de alimentación, la p
tardará aproximadamente 25 segundos en mostrarse. (p. 34)
antalla intermedia
A Introduzca el disco que contiene las imágenes copiadas y
aparecerá el navegador de reproducción
1/2
JUN.01.2008 09:51AM JUN.01.2008 11:45AM JUN.01.2008 05:09PM
AUG.01.2008 01:42PM AUG.01.2008 03:15PM AUG.01.2008 05:32PM
REPR. DE EXTRACTOS
Disco AVCHD
NAVEGACIÓN
IMAGEN
VÍDEO
CARPETA
001
002 003 004
JUN.01.2008 10:20AM JUN.01.2008 10:35AM JUN.01.2008 11:03AM JUN.01.2008 11:17AM
JUN.01.2008 11:21AM JUN.01.2008 01:34PM JUN.01.2008 03:41PM JUN.01.2008 03:56PM
ANTERIOR SIGUIENTE
SELECC.
SALIR MENÚ HERRAM.
TOP MENU TOOL
Disco de datos
08060101
AJUSTAR
VOLVER
001/002
PÁGINA
008007006005
(imágenes de vídeo)
•Tardará unos 40 segundos en mostrarse el navegador de reproducción.
•Para alternar entre vídeo e imágenes fijas en un disco que contiene vídeo e
imágenes fijas, hágalo utilizando el MENÚ HERRAM.. (p. 25)
•Para discos de datos (vídeo), el archivo que se selecciona se reproduce en su
miniatura. (Miniatura de movimiento) Tarda varios segundos en mostrar las ocho
miniaturas. Y un poco más de tiempo en mostrar la miniatura de movimiento.
• El menú que aparece puede ser distinto del menú mostrado anteriormente
cuando se introduce un disco AVCHD creado en otros aparatos.
DVD-R
NAVEGACIÓN
IMAGEN
VÍDEO
ANTERIOR SIGUIENTE
SELECC.
SALIR MENÚ HERRAM.
TOP MENU TOOL
Disco de datos
(imágenes fijas)
PÁGINA
CARPETA
08060101
AJUSTAR
VOLVER
B Seleccione y confirme el archivo mediante el mando a distancia
ES
DVD-R
001/002
A Seleccione
Nota
•Para detener un disco AVCHD durante la reproducción, pulse el botón STOP.
•La reproducción del archivo seleccionado
comienza.
•También puede pulsar el botón PLAY para
reproducir.
•Puede examinar las páginas utilizando los
B Confirme
botones PREVIOUS / NEXT ( / ).
Cuando la reproducción se detenga aparecerá la pantalla intermedia. (p. 34)
Para mostrar el navegador de reproducción, pulse el botón
NAVIGATION/TOP MENU.
23
Page 74

o Reproducción de compendio (sólo para discos AVCHD)
• Utilice las teclas de selección para seleccionar “REPR. DE EXTRACTOS” y pulse el
botón ENTER. Los vídeos se reproducirán durante varios segundos consecutivamente.
•Pulse el botón NAVIGATION/TOP MENU durante la reproducción para mostrar el submenú.
A REPRODUCCIÓN NORMAL: Reproduce el vídeo normalmente.
A MENÚ DE ÍNDICE : Vuelve a la pantalla del navegador de
reproducción.
o Para reproducir imágenes de una carpeta distinta [sólo para discos
de datos (imágenes de vídeo/fijas)]
A Muestre la lista de carpetas
A Seleccione el nombre de la carpeta
B Confirme
B Seleccione la carpeta a reproducir
•El navegador de reproducción aparece cuando se pulsa el botón ENTER.
Seleccione y confirme el archivo a reproducir.
A Seleccione
B Confirme
•También puede seleccionar la carpeta desde el “MENÚ HERRAM.” (p. 25).
•Los archivos se ordenan automáticamente en las carpetas creadas dependiendo de la
opción seleccionada en el menú Copias de seguridad de la Everio de alta definición.
•Para reproducir imágenes copiadas desde el ordenador, seleccione los archivos de
vídeo editados. (p. 22)
• Seleccione un nombre de carpeta cuando haya creado una carpeta en el ordenador
según sus preferencias. (p. 22)
Precaución
Nota
• Si no aparecen las imágenes, compr
resolución. (p. 33)
•Para vídeos cortos (menos de 3 segundos), la imagen se congelará
durante unos segundos antes de reproducir el siguiente archivo. (p. 44)
•Para discos de datos (vídeo), la imágen se detendrá brevemente antes
de pasar a la sigi
• Depediendo de las calidades de imágenes fijas, algunas imágenes se muestran
utilizando una miniatura “?” y la reproducción puede fallar en ese caso.
•Los archivos JPEG progresivos y archivos especiales creados en un
ordenador no se pueden reproducir. Los vídeos que no son
reproducibles también se muestran como “?”.
•La visualización de una imagen puede tardar cierto tiempo en mostrarse si
el tamaño de archivo es demasiado grande o cuando hay muchos archivos.
•Para discos de datos (imágenes fijas) creadas en un ordenador, los archivos
uente carpeta.
con una resolución menor de 640 x 480 no se visualizarán a pantalla completa.
Nombre de la carpeta
NAVEGACIÓN
IMAGEN
VÍDEO
001
002 003 004
JUN.01.2008 10:20AM JUN.01.2008 10:35AM JUN.01.2008 11:03AM JUN.01.2008 11:17AM
JUN.01.2008 11:21AM JUN.01.2008 01:34PM JUN.01.2008 03:41PM JUN.01.2008 03:56PM
ANTERIOR SIGUIENTE
NAVEGACIÓN
ANTERIOR SIGUIENTE
SELECC.
SALIR MENÚ HERRAM.
TOP MENU TOOL
VIDEO
RAÍZ
VÍDEO EVERIO
COPIA DE SEGURIDAD NORMAL
001
002 003 004
*5.!- *5.!- *5.!- *5.!-
COPIA DE SEGURIDAD DE FECHAS
*5.!- *5.0- *5.0- *5.0-
SELECC.
SALIR MENÚ HERRAM.
TOP MENU TOOL
CARPETA
CARPETA
08060101
08060102
08060501
08060701
08061301
08061302
08060101
08060501
08060701
08061301
08060101
AJUSTAR
VOLVER
08060101
AJUSTAR
VOLVER
PÁGINA
008007006005
008007006005
uebe la configuración de la
DVD-R
001/002
DVD-R
001/002
24
Page 75
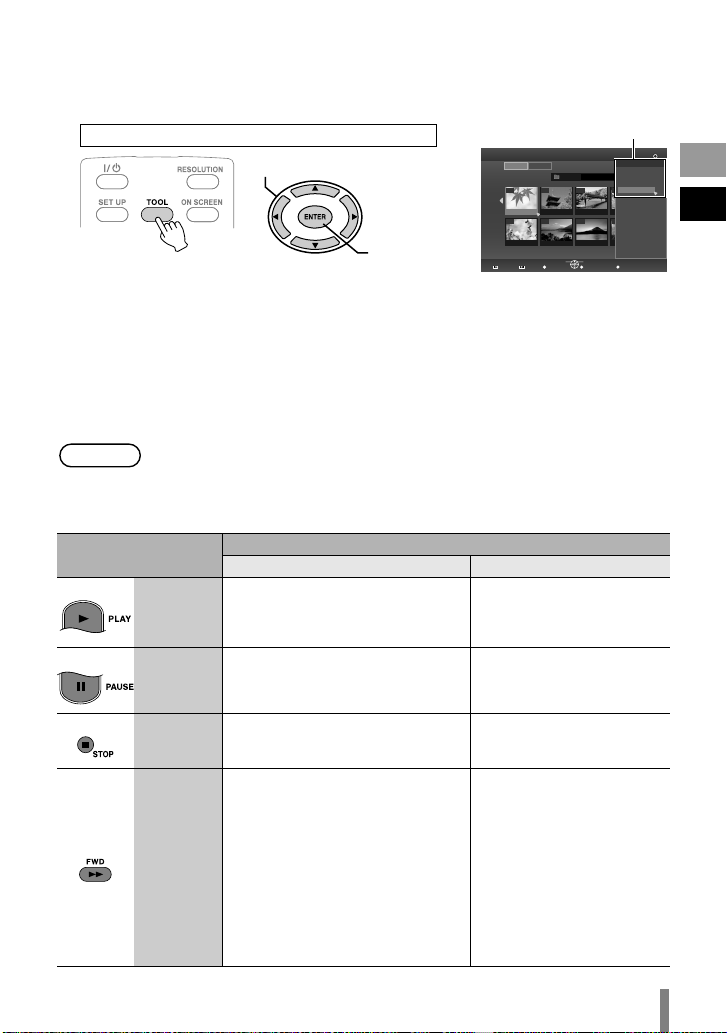
o Visualización del MENÚ HERRAM. [sólo para discos de datos (vídeo/
001/002
001
06.01 11:17
06.01 15:56
DVD-R
08060101
002 003 004
008007006005
*5.!-
*5.0-
TOP MENU TOOL
imágenes fijas)]
Puede cambiar entre vídeo/imágenes fijas o visualizar los detalles del archivo
desde el MENÚ HERRAM..
Haga funcionar cuando se muestra el navegador
A Seleccione
B Confirme
Seleccione un elemento con las teclas de selección y pulse el botón ENTER.
• SELECCIÓN DE CARPETA: Muestra la lista de carpetas.
• CAMBIAR A MODO IMAGEN: Cambia de vídeo a imagen fija.
(CAMBIAR A MODO VÍDEO: Cambia de imagen fija a vídeo).
• MOSTRAR DETALLE:Mue
stra el nombre del archivo, el nombre de la carpeta y la
duración de reproducción (para vídeo) o tamaño de la
imagen (para las imágenes fijas). La visualización de la
duración de reproducción no estará disponible si el archivo
no se ha reproducido antes.
Nota
•Cuando el disco contenga tanto vídeos como imágenes fijas, los vídeos
se mostrarán primero. Para ver imágenes fijas, seleccione “CAMBIAR
A MODO IMAGEN” desde el MENÚ HERRAM..
MENÚ HERRAM.
NAVEGACIÓN
IMAGEN
VÍDEO
JUN.01.2008 10:20AM JUN.01.2008 10:35AM JUN.01.2008 11:03AM
JUN.01.2008 11:21AM JUN.01.2008 01:34PM JUN.01.2008 03:41PM
ANTERIOR SIGUIENTE
SELECC.
SALIR MENÚ HERRAM.
MENÚ HERRAM.
VOLVER
SELECCIÓN DE CARPETA
CARPETA
CAMBIAR A MODO IMAGEN
MOSTRAR DETALLE
AJUSTAR
MENÚ HERRAM.
VOLVER
o Botones que se pueden utilizar durante la reproducción (disco
AVCHD / disco de datos)
Botón del mando a
distancia
PLAY
Reproducción de imagen de vídeo Reproducción de imagen fija
Pulsar este botón cuando está en
modo pausado o reproducción de
velocidad variable reanuda la
reproducción normal.
Descripción
Comienza el carrusel de
diapositivas.
EN
ES
PAUSEPausa la reproducción.
STOP Detiene la reproducción.
Avanza rápidamente la
reproducción. Cambios en el
orden de Búsqueda +1 a
Búsqueda +3 con cada pulsación.
Pulse el botón cuando esté en modo
pausado para habilitar la reproducción
adelante fotograma a fotograma.
Pulse y mantenga pulsado el botón
para reducir la velocidad de
reproducción. Pulse el botón cada
vez que cambie la velocidad de
reproducción entre 1/16x, 1/4x y 1/2x.
FWD
Pausa el carrusel de
diapositivas.
Detiene el carrusel de
diapositivas.
b
25
Page 76
Botón del mando a
distancia
REV
NEXT
PREVIOUS
Saltar
Repetir
ENTER b
NAVIGATION
/TOP MENU
TOOL
Descripción
Reproducción de imagen de vídeo Reproducción de imagen fija
Rebobina la reproducción.
Cambios en el orden de
Búsqueda b1 a Búsqueda b3
con cada pulsación.
Pulse el botón cuando esté en
modo pausado para habilitar la
reproducción atrás fotograma a
fotograma. (No disponible para
AVCHD).
discos
No es posible la reproducción
atrás a velocidad lenta.
Muestra la siguiente imagen de
vídeo.
Muestra el principio de la imagen
de vídeo.
Avanza la posición de
reproducción en unos 30
segundos. Pulsar el botón
continuamente avanza la posición
de reproducción el número de
veces que se pulse.
Atrasa la posición de
reproducción en unos 7
segundos. Pulsar el botón
continuamente atrasa la posición
de reproducción el número de
veces que se pulse.
Muestra el navegador de
reproducción.
Muestra el menú de
reproducción. (p. 29)
Muestra la siguiente
imagen fija.
Muestra la imagen fija
anterior.
Gira la imagen fija 90
grados en sentido horario.
(Cuando está en modo
pausa).
Gira la imagen fija 90
grados en sentido
antihorario.
(Cuando está en modo
pausa).
Aumenta la imagen fija. (2
pasos)
Puede seleccionar la
posición a aumentar
utilizando los botones
Arriba/Abajo/Izquierda/
Derecha. Pulse el
RETURN botón para
restaurar el tamaño
original.
(Cuando está en modo
pausa).
Muestra el navegador de
reproducción.
Muestra el menú de
reproducción. (p. 29)
b
26
Page 77

Visualización de DVD-Vídeo copiado desde la Everio
o Para comenzar a ver inmediatamente después de guardar
imágenes en un DVD
A Retire el cable USB. (p. 14)
B Conecte esta grabadora al TV.
•Para obtener más detalles sobre las conexiones, consulte la sección
“Conexión al televisor” (p. 12, 13).
•Compruebe que la luz de alimentación de esta grabadora se enciende de
color naranja.
•Después de pulsar el botón de alimentación, la p
tardará aproximadamente 25 segundos en mostrarse. (p. 34)
antalla intermedia
o Para reproducir los archivos copiados
A Introduzca el disco que contiene las imágenes copiadas
•La reproducción se iniciará automáticamente.
o Para seleccionar y reproducir un archivo
A Introduzca el disco que contiene las imágenes copiadas
•La reproducción se iniciará automáticamente.
B Durante la reproducción, pulse el botón NAVIGATION/TOP MENU
para mostrar el navegador de reproducción
• Dependiendo del disco, puede mostrar le navegador de reproducción
presionando el botón MENU.
EN
ES
C Seleccione y confirme el archivo a reproducir
A Seleccione
B Confirme
Nota
Precaución
•Para detener la reproducción, pulse el botón STOP. Cuando la
reproducción se detenga aparecerá la pantalla intermedia. (p. 34)
Para mostrar el navegador de reproducción, pulse el botón
NAVIGATION/TOP MENU.
• Si no apa
resolución. (p. 33)
recen las imágenes, compruebe la configuración de la
27
Page 78

o Botones que se pueden utilizar durante la reproducción (DVD-vídeo)
Botón del mando a
distancia
PLAY
PAUSEPausa la reproducción.
STOP Detiene la reproducción.
FWD
REV
NEXT Muestra la siguiente vídeo.
Pulsar este botón cuando está en modo pausado o
reproducción de velocidad variable reanuda la
reproducción normal.
Avanza rápidamente la reproducción. Cambios en el orden
de Búsqueda +1 a Búsqueda +3 con cada pulsación.
Pulse el botón cuando esté en modo pausado para habilitar
la reproducción adelante fotograma a fotograma.
Pulse y mantenga pulsado el botón para redu
velocidad de reproducción. Pulse el botón cada vez que
cambie la velocidad de reproducción entre 1/16x, 1/4x y 1/
2x.
Rebobina la reproducción. Cambios en el orden de
Búsqueda b1 a Búsqueda b3 con cada pulsación.
Pulse el botón cuando esté en modo pausado para habilitar
la reproducción atrás fotograma a fotograma.
Pulse y mantenga pulsado el botón pa
velocidad de reproducción inversa. Pulsar el botón cada
vez cambia la velocidad de reproducción inversa entre b1/
16x y b1/4x.
Descripción
cir la
ra reducir la
28
PREVIOUS Muestra el vídeo anterior.
Saltar
Repetir
TOOL Muestra el menú de reproducción. (p. 29)
Avanza la posición de reproducción en unos 30 segundos.
Pulsar el botón continuamente avanza la posición de
reproducción el número de veces que se pulse.
Atrasa la posición de reproducción en unos 7 segundos.
Pulsar el botón continuamente atrasa la posición de
reproducción el número de veces que se pulse.
Page 79

Cambio de la configuración de reproducción
Puede alterar el método de reproducción de imágenes de vídeo/fijas así como la
configuración de imágenes.
Haga funcionar durante
la reproducción
indica las opciones predeterminadas durante la compra de este producto.
CONF. DE DISCO Si el disco contiene más de un idioma de sonido, idioma de
subtítulos o tiene escenas de múltiples ángulos, puede
seleccionarlos con esta opción.
IDIOMA SONIDO Configure el idioma de sonido a reproducir.
SUBTÍTULO Configure el idioma de subtítulo a mostrar.
CAMBIAR ÁNGULO Cambiar el ángulo (de cámara) a reproducir.
CONF. REPRODUCCIÓN
REPETIR
Para configurar parámetros de reproducción de vídeo y la reproducción de repetición
de carruseles de diapositivas.
OFF No repetir.
TÍTULO
CAPÍTULO
CARPETA
Repite la reproducción del título. (Sólo para imágenes de
vídeo).
Repite la reproducción entre capítulos. (Sólo para discos
AVCHD y DVD-Vídeo).
Repite la reproducción de archivos de una carpeta. (Sólo
para archivos guardados en el ordenador).
Repite la reproducción de todos los archivos*. (Sólo para
s de datos almacenados en cámaras Everio de alta
disco
TODO
definición).
*Los archivos de la carpeta actual se reproducen
repetidamente si se reproducen desde el navegador de
reproducción.
A-B
Repite la reproducción entre dos puntos A y B
predeterminados. (Sólo para DVD de vídeo).
CAMBIAR TÍTULO (Sólo para discos AVCHD y DVD-Vídeo)
Salta al título especificado.
CAMBIAR CAPÍTULO (Sólo para discos AVCHD y DVD-Vídeo)
Salta al capítulo especificado.
INTERVALO DIAPOS. (Sólo para imágenes fijas)
5 SEG / 10 SEG /15 SEG
Para especificar la visualización de la hora para mostrar
mensajes.
REPETIR
CAMBIAR TÍTULO
CAMBIAR CAPÍTULO
CONF. REPRODUCCIÓN
OFF
EN
ES
29
Page 80

CONF. REPRODUCCIÓN
EFECTOS DIAPOS. (Sólo para imágenes fijas)
Para especificar el efecto de fundido al cambiar a otra imagen.
OFF Deshabilitar el efecto de fundido.
ON
CONF. DE VÍDEO Sólo puede configurar parámetros para imágenes de
CALIDAD DE IMAGEN
Para especificar la calidad de la imagen de vídeo.
NORMAL Configure este valor en circunstancias normales.
CINE Reproduce con calidad de imagen similar al cine.
FINO Reproduce con calidad de imagen claramente definida.
SUAVE Reproduce con calidad de imagen de textura suave.
CONF. DE USUARIO
REDUCCIÓN DE RUIDO DIGITAL
Para especificar si habilitar la eliminación de ruido de la imagen.
OFF Deshabilitar la eliminación de ruido.
ON Habilitar la eliminación de ruido.
CONF. DETALLE
Para especificar la configuración avanzada cuando “CALIDAD DE IMAGEN” está
ajustada a “CONF. DE USUARIO”.
CONTRASTE Para especificar el nivel de contraste de la imagen.
BRILLO Para especificar el nivel de brillo de la imagen.
NITIDEZ Para especificar el contorno de la imagen.
COLOR Para especificar la intensidad de color de la
GAMA Para especificar el nivel de gris de la imagen.
3DNR Para especificar la reducción de ruido de la imagen.
SALIDA PROGRESIVA
Para reproducir el material fuente después de convertirlo a un vídeo progresivo
apropiado.
AUTO1
AUTO2
VÍDEO
Nota
•El cambio de la configuración puede que no tenga efecto en algunas
imágenes.
Habilitar el fundido en negro o en blanco desde el color
negro.
vídeo.
Reproduce imágenes con la calidad de imagen especificada
en “CONF. DETALLE”.
imagen.
Detecta automáticamente el material de película y de vídeo
y lo convierte al vídeo progresivo apropiado.
Además de “AUTO1”, detecta automáticamente el vídeo
progresivo de 30 fps y lo convierte al vídeo progresivo
apropiado.
Convierte el material de vídeo al vídeo progresivo
apropiado.
30
Page 81

Hacer funcionar junto con el TV a
través del HDMI
La conexión de esta grabadora a un TV habilitado para HDMI-CEC utilizando el cable
HDMI le permite utilizar las siguientes convenientes funciones.
Preparativos
Método de
funcionamiento 1
•Inserte un disco.
(Pulse el botón PLAY o
NAVIGATION/TOP
MENU si no aparece el
navegador de
reproducción).
• Conecte el cable HDMI entre esta
grabadora y el TV. (p. 12)
• Encienda el TV y configure la opción
relacionada con HDMI-CEC de su menú
a “encendida”. (Para obtener detalles,
consulte el manual de instruccione
s del
TV).
• Encienda esta grabadora y configure
“CONTROL CON HDMI” de “CONF.
CONEXIÓN” del menú de configuración a
“ON”. (p. 34, 37)
Cable HDMI (no suministrado)
CONF. CONEXIÓN
TIPO DE MONITOR
SALIDA COMPONENTES
MODO VÍDEO HDMI
SELECC. AJUSTAR
SALIR
•El TV cambiar
automáticamente a la
entrada HDMI.
(Encienda el TV de
antemano).
16:9
480i
VOLVER
EN
ES
Método de
funcionamiento 2
•Esta grabadora se apaga
automáticamente.
Nota
•Algunos TV se encienden automáticamente y cambian a la entrada de
HDMI simplemente encendiendo esta grabadora.
• Dependiendo del TV conectado, el idioma de pantalla de esta
grabadora cambiará automáticamente al idioma que s
seleccionando para el TV cuando se enciende la grabadora.
(Esto sólo es aplicable si la grabadora admite el idioma seleccionado
para el TV).
Para utilizar esta grabadora utilizando un idioma distinto del idioma de
pantalla, configure “CONTROL CON HDMI” a “OFF”.
•Ocurren fallos
amplificador y selector conectados. Configure “CONTROL CON HDMI”
a “OFF”.
•Apague el TV.
e estaba
de funcionamiento cuando hay aparatos como un
31
Page 82

Nota
Precaución
• El HDMI-CEC (Control de productos electrónicos de consumo) es un
estándar de la industria que hace posible la interoperabilidad entre
aparatos que cumplan con HDMI-CEC que están conectados con
cables HDMI.
• No todos los aparatos compatibles con HDMI cumplen con el estándar
HDMI-CEC. La función de control de HDMI de esta grabador no
funciona cuando está conectada a estos aparatos.
•No se garantiza que esta grabadora funcione con todos los aparatos
habilitados para HDMI-CEC.
• Dependiendo de las especificaciones de cada aparato habilitado para
HDMI-CEC, alg
grabadora. (Para obtener detalles, consulte el manual de instrucciones
de su TV).
•Pueden ocurrir operaciones no intencionadas con algunos dispositivos
conectados. En estos casos, configure “CONTROL CON HDMI” a
“OFF”.
• El control HDMI no funciona cuando el cab
Quite el cable USB si desea utilizar la función de control de HDMI.
• El control de HDMI no funciona inmediatamente después de introducir
el cable de alimentación en el enchufe de CA. Pulse el botón de
alimentación de esta grabadora y enciéndala.
• Si la conexión del cable de HDMI cambia, realice las siguientes
ciones para permitir que es se reconozcan esta grabadora y los
opera
dispositivos conectados.
A Con el TV encendido, apague y encienda de nuevo esta grabadora.
B Configure el “CONTROL CON HDMI” de “CONF. CONEXIÓN” del
menú de configuración a “OFF” y despúes a “ON” de nuevo.
unas de las funciones puede que no funcionen con esta
le USB está conectado.
32
Page 83

Visualización de imágenes de alta
calidad
Puede cambiar la resolución de la salida de vídeo cuando la grabadora esté conectada
a un TV de alta definición a través de un cable HDMI o de vídeo de componentes.
Usar cuando la pantalla intermedia está activada*
*Para mostrar la pantalla intermedia, consulte la
página 34.
•Pulse el botón cada vez que quiera cambiar la resolución de salida.
o Conexión a través de un cable HDMI (“MODO VÍDEO HDMI” : “ON”)
(Las resoluciones no admitidas por el TV se saltan).
AUTO 480p 720p 1080i 1080p
o Conexión a través de un cable de vídeo de componente
(“MODO VÍDEO HDMI” : “OFF”, el cable HDMI no está conectado)
480i 480p 720p 1080i
o Conexión a través de un cable de vídeo
La configuración no es necesaria. Se emite “480i” independientemente de la
configuración.
Precaución
• Si esta grabadora está conectada a un TV que no admite la resolución
de salida predeterminada utilizando un cable HDMI, la configuración
cambia automáticamente a “AUTO”.
•Cuando esta grabadora es
componentes con la resolución de salida configurada a “1080i” o
“720p”, la resolución de salida se configurada a “480i” o “480p” si se
introduce un disco DVD-vídeo.
tá conectada utilizando un cable de vídeo de
(Pantalla intermedia)
Resolución actual: AUTO
EN
ES
Nota
•Cuando el cable HDMI está conectado, la resolución de los conectores
de los componentes está fijada a “480i”. (“MODO VÍDEO HDMI” : “ON”)
•Cuando l
cable HDMI, el formato de visualización “PAN Y SCAN 4:3” o el
“BUZÓN 4:3” de “TIPO DE MONITOR” del menú de configuración será
seleccionado si el tamaño de la imagen es de 4:3. (p. 35)
a resolución está configurada a “480p” para la conexión de
33
Page 84

Menú de configuración
Cambie la configuración de esta grabadora según el entorno de uso.
Procedimientos de funcionamiento de los menús
Precaución
Ejemplo: Al cambiar de “TIPO DE MONITOR” en “CONF. CONEXIÓN” de “16:9” a
A Muestre el menú de configuración
B Seleccione “CONF. CONEXIÓN”
•El botón SET UP solamente funciona cuando se muestra la pantalla
intermedia (pantalla sin visualización de imágenes). Si se visualiza el
navegador de reproducción, pulse STOP (para discos AVCHD y DVDVídeo) o NAVIGATION/TOP MENU (para discos de datos) para borrar
antalla.
la p
“BUZÓN 4:3”
A Seleccione
TIPO DE MONITOR
SALIDA COMPONENTES
MODO VÍDEO HDMI
CONF. CONEXIÓN
16:9
480i
B Confirme
C Seleccione “TIPO DE MONITOR”
A Seleccione
B Confirme
D Seleccione “BUZÓN 4:3”
A Seleccione
B Confirme
E Cierre el menú de configuración
34
SALIR
TIPO DE MONITOR
SALIDA COMPONENTES
MODO VÍDEO HDMI
SALIR
TIPO DE MONITOR
SALIDA COMPONENTES
MODO VÍDEO HDMI
SALIR
SELECC. AJUSTAR
CONF. CONEXIÓN
SELECC. AJUSTAR
CONF. CONEXIÓN
SELECC. AJUSTAR
VOLVER
16:9
480i
VOLVER
16:9
16:9
COMPLETA 16:9
480i
PAN Y SCAN 4:3
BUZÓN 4:3
VOLVER
Page 85

Opciones y descripciones del menú de configuración
indica las opciones predeterminadas durante la compra de este producto.
¹ Las opciones del menú cuya configuración no puede cambiar aparecen de color gris
en la pantalla.
CONF. DE DISCO Si el disco contiene más de un idioma de sonido, idioma de
IDIOMA SONIDO Configure el idioma de sonido a reproducir.
SUBTÍTULO Configure el idioma de subtítulo a mostrar.
CAMBIAR ÁNGULO Cambiar el ángulo (de cámara) a reproducir.
CONF. DE VÍDEO
CONTROL DE NIVEL NEGRO
Para especificar el nivel de negro de la imagen de vídeo.
MÁS OSCURO Configure este valor en circunstancias normales.
MÁS BRILLO
CONF. SONIDO
COMPR. RANGO DINÁMICO
Para especificar el rango dinámico (proporción entre las señales fuertes y débiles) del
sonido del audio. Pueden oírse minúsculos sonidos cuando se comprime el rango dinámico.
ON
OFF Emite el sonido de audio grabado sin comprimir.
CONF. CONEXIÓN
TIPO DE MONITOR
Especifique el tamaño de la pantalla según el TV conectado. (Si el tamaño de
pantalla del TV es fijo, las imágenes que se muestran en el TV no cambiarán aunque
cambie la configuración de la grabadora).
16:9
COMPLETA 16:9
PAN Y SCAN 4:3
BUZÓN 4:3
Nota
•El cambio de la configuración puede que no tenga efecto en algunas
imágenes.
subtítulos o tiene escenas de múltiples ángulos, puede
seleccionarlos con esta opción.
Configure a este valor para iluminar las zonas oscuras de la
imagen de vídeo.
Emite sonido de audio después de comprimir el rango dinámico.
Cuando conecte un televisor panorámico (16:9)
(Aparecerá una banda negra a la izquierda y a la derecha de
las imágenes de 4:3).
Cuando conecte un televisor panorámico (16:9)
(Las imágenes de 4:3 se estirarán hacia los lados).
Al conectar a un TV de 4:3
(Se perderán los lados izquierdo y derecho de las imágenes
de 16:9).
Al conect
(Aparecerá una banda negra encima y debajo de imágenes de
16:9).
ar a un TV de 4:3
EN
ES
35
Page 86

CONF. CONEXIÓN
SALIDA COMPONENTES
Para especificar la configuración de resolución de salida de los conectores de
componentes. También puede especificar la configuración utilizando el mando a
distancia. (p. 33)
480i Durante la emisión en D1 (480i)
480p Durante la emisión en D2 (480p)
720p Durante la emisión en D3 (1080i)
1080i Durante la emisión en D4 (720p)
CONF. HDMI
MODO VÍDEO HDMI
Especifique esta configuración cuando utilice la grabadora con los conectores de
componente y el terminal HDMI conectados.
ON Emite con prioridad dada al terminal HDMI.
OFF Emite con prioridad dada a los conectores de componentes.
SALIDA HDMI
Para especificar la configuración de resolución de salida del terminal HDMI.
También puede especificar la configuración utilizando el mando a distancia.
(p. 33)
AUTO Configure este valor en circunstancias normales.
480p Durante la emisión en D2 (480p)
720p Durante la emisión en D3 (1080i)
1080i Durante la emisión en D4 (720p)
1080p Durante la emisión en D5 (1080p) (p. 12)
SALIDA 24p
Las videocámaras JVC no admiten la grabación 1080/24p. (a mayo de 2008).
Especifique esta configuración al ver imágenes de vídeo grabadas por otros
atos en 1080/24p en un TV que admita 1080/24p a través de una conexión
apar
HDMI.
AUTO
OFF Configure este valor en circunstancias normales.
x.v.Color
Especifique esta configuración al ver imágenes de vídeo grabadas en x.v.Color
en un TV que admita x.v.Color. Esto mejora la visualización gracias a la
reproducción de colores de manera más cercana a sus colores naturales.
AUTO Configure este valor en circunstancias normales.
OFF
Seleccione este valor para emitir las imágenes en 1080/24p a
un TV que admita 1080/24p. Configure a “OFF” si no se
pueden reproducir correctamente las imágenes.
Configure a este valor cuando las imágenes de vídeo estén
distorsionadas o cuando los colores no se reproduzcan
correctamente.
36
Page 87

Deep Color
Esta función funciona durante la reproducción. Especifique esta configuración al
ver imágenes en un TV que admita Deep Color. Esto permite la visualización de
imágenes de alta definición de profundidades de color de 30 y 36 bits que sean
más altas que el color completo de 24 bits.
Seleccione este valor para visua
AUTO
OFF Configure este valor en circunstancias normales.
AJUSTE HDMI MEJORADO
Especifique este valor cuando conecte un televisor que cuente con el terminal de
entrada DVI mediante un cable de conversión HDMI-DVI.
ESTÁNDAR Configure este valor en circunstancias normales.
MEJORADO
CONTROL CON HDMI
Para especificar si utilizar la función HDMI-CEC que permite al TV funcionar junto
con esta grabadora. (p. 31)
OFF No hacer funcionar junto con el TV.
ON Hacer funcionar junto con el TV.
definición en un TV que admita Color profundo. Configure a
“OFF” si no se pueden reproducir correctamente las imágenes.
Configure a este valor cuando los colores blanco y negro de la
imagen de vídeo no estén claros.
lizar imágenes de alta
EN
ES
37
Page 88

OTRA CONF.
REANUDAR *
Para especificar si memorizar la posición de parada.
ON Memorizar la posición de parada.
OFF No memorizar la posición de parada.
GUÍA EN PANTALLA
Para especificar si visualizar la información de estado de reproducción.
AUTO Visualizar durante 5 segundos.
OFF No visualizar.
IDIOMA EN PANTALLA
Para especificar el idioma a mostrar para la pantalla del menú de configuración y
otros. “ENGLISH” se configura como idioma predeterminado.
( / ENGLISH / FRANÇIAS / DEUTSCH / ITALIANO / NEDERLANDS /
PORTUGUÊS / ESPAÑOL / / / / РУССКИЙ)
SALVAPANTALLAS
Para especificar si activar el salvapantallas.
ON
OFF No activar el salvapantallas.
INICIALIZAR CONF.
Restaura la configuración al estado predeterminado en el momento de la compra.
ESTILO INDIC. FECHA (Sólo para discos de datos)
Ordena las fechas. (year.month.day / month.day.year / day.month.year)
OPCIÓN VISUALIZACIÓN HORA (Sólo para discos de datos)
Para especificar la visualización de la hora. (12h / 24h)
*Para la función de reanudación, la posición de parada se restablecerá si la grabadora
está conectada a una Everio o a un ordenador con el cable USB o cuando la
grabadora está apagada y el disco se extrae.
Activa el salvapantallas cuando no se hace funcionar esta
grabadora durante un intervalo de 5 minutos.
38
Page 89

Visualizaciones de la pantalla
Puede visualizar información durante la reproducción en la pantalla.
•Pulse cada vez para ocultar/visualizar información.
o Durante la reproducción de discos AVCHD grabados desde una
Everio de alta definición
Número de capítulo
Número de título
Posición de reproducción
o Durante la reproducción de discos de datos grabados desde una
Everio de alta definición
Fecha/Hora del archivo
Posición de reproducción
Tiempo de reproducción
Tipo de disco
DVD-R
00:00:25
C1T2
Dolby D 2ch
Tiempo de reproducción
Tipo de disco
DVD-R
00:00:25
JUN.01.2008 10:20AM
MPEG 2ch
Formato de audio
Modo de reproducción
Formato de audio
Modo de reproducción
EN
ES
39
Page 90

o Durante la reproducción de discos de imágenes fijas grabadas desde
una Everio de alta definición
Fecha/Hora del archivo Tipo de disco
JUN.01.2008 10:20AM
DVD-R
Modo de reproducción
o Durante la reproducción de un disco DVD copiado desde una Everio
Número de capítulo
Tiempo de reproducción
C1T1
Tipo de disco
DVD-R
00:00:25
Dolby D 2ch
Formato de audio
Modo de reproducción
Número de título
Posición de reproducción
40
Page 91

Guía para solucionar problemas
Problema Acción
El aparato no se
enciende.
No puede funcionar
correctamente.
General
El grabador o el
adaptador de CA se
calientan.
La luz de
alimentación
parpadea lentamente
en color rojo mientras
se utiliza la
grabadora.
La cámara Everio no
reconoce la
grabadora.
El ordenador no
reconoce la
grabadora.
Copiar
El aparato no graba.
z Asegúrese de que el adaptador de CA y el
cable de alimentación están conectados
correctamente. (p. 4)
z Pulse el botón de alimenatación de esta
grabador durante más de 5 segundos para
restablecer la grabadora. (La grabadora se
apagará automáticamente).
z La grabadora y el adaptador de CA se calientan
con su uso prolongado. Esto no es un problema
de funcionamiento.
z Si nota que la grabadora se calienta mucho,
quite el adaptador de CA y consulte a su
distribuidor a quien comprá la grabadora.
z La grabadora no puede funcionar
correctamente debido a una caíd en su
temperatura interior. Espere a que la luz de
alimentación deje de parpadear.
z Hay un aumento en la temperatura interior de la
grabadora. Apague la grabadora, espere u
rato y después enciéndala de nuevo.
z Compruebe que el cable USB esté conectado
correctamente. Introduzca el conector con la
protuberancia hacia la grabadora y el otro
extremo hacia la cámara Everio. (p. 14)
z Compruebe que el cable USB suministrado
para la cámara Everio está conectado
correctamente. (p. 16)
z Use los discos recomendados para el grabador.
(p. 48)
z Inserte el disco con la etiqueta mirando hacia
arriba.
z Limpie la suciedad de la bandeja.
z Utilice discos cuya superficie de grabación no
esté dañada.
z No utilice discos deformados.
n
EN
ES
La bandeja del disco
no se abre.
z
Si hay una grabación en disco actualmente en
progreso, la bandeja de discos no puede abrirse.
Espere a que termine el proceso de grabación.
z Si no se puede expulsar correctamente el disco
después de que se haya caído la grabadora o
por causa de otros fallos de funcionamiento,
introduzca una varilla fina en el agujero para
forzar la expulsión del disco. (p. 44)
41
Page 92
Problema Acción
No puede grabar/leer
Copiar
datos a la velocidad
máxima (cuando está
conectada a un
ordenador)
z Utilice un disco recomendado. (p. 48)
El mando a distancia
no funciona.
No se puede utilizar.
No se muestran
imágenes en el
televisor.
Reproducción
Las imágenes se
distorsionan durante
la reproducción de
avance rápido/
retroceso rápido.
Las imágenes no se
pueden mostrar en la
proporción normal de
aspecto.
z No se puede hacer funcionar el mando a
distancia cuando la bandeja está abierta. Cierre
la bandeja para discos.
z Si la grabadora no funciona, quite la clavija de
alimentación y vuelva a meterla. (Puede que no
funcione por una descarga eléctrica o
electricidad estática).
z Conecte esta grabadora al TV. (p. 12, 13)
z Cambie a la salida externa para la grabadora
conectada a un televisor con los conectores de
entrada de sonido/vídeo.
z Después de pulsar el botón de alimentación, la
pantalla intermedia tardará aproximadamente
25 segundos en mostrarse. (p. 34)
z Si hay demasiados archivos grabados o
cuando se utiliza un disco que no está
recomendado, tardará varios minutos en
mostrar el navegador de reproducción.
z Vuelva a comprobar la configuración de la
resolución. (p. 33)
z Las imágenes pueden aparecer distorsionadas
para secciones en las que la velocidad de
reproducción cambia. Esto no es un problema
de funcionamiento.
z Cuando los conectores del terminal HDMI y de
salida de sonido/vídeo estén conectados,
configure “MODO VÍDEO HDMI” del menú de
configuración a “OFF” para emitir las imágenes
con prioridad dada a los conectores de salida
de sonido/vídeo. (p. 36)
El aparato no lee el
disco.
42
z Inserte el disco con la etiqueta mirando hacia
arriba.
z Limpie la suciedad de la bandeja.
z Compruebe que la superficie de grabación del
disco no esté dañada.
z No utilice discos deformados.
Page 93

Problema Acción
La reproducción no
puede funcionar
correctamente.
La reproducción de
compendia comienza
cuando se pulsa
repetidamente el
botón PREVIOUS /
NEXT.
No se puede leer el
contenido del disco
AVCHD usando la
función del
Reproducción
explorador de su PC.
No puede reproducir
imágenes añadidas
por un ordenador.
El TV cambia la
entrada
automáticamente
cuando se reproduce
la grabadora.
El TV se apaga
cuando se apaga esta
grabadora.
Esta grabadora
funciona cuando se
hace funcionar el
mando a distancia del
TV.
z La reproducción de DVD-vídeo comerciales no
está garantizada.
z Los discos AVCHD creados en una Everio de
alta definición están equipados con la función
Reproducción de compendio. Si se pulsa
repetidamente el botón PREVIOUS / NEXT
durante la reproducción, la Reproducción de
compendio comenzará cuando termine la
reproducción normal. (p. 24)
z El sistema operativo de su PC no admite el
disco AVCHD. Instale la aplicación de software
Power2Go proporcionada.
z Al reproducir un disco (disco con múltiples
bordes) que contenga imágenes añadidas por
un ordenador, las imágenes añadidas no se
pueden reproducir.
z Se habilita la función HDMI-CEC. Para
deshabilitarla, configure “CONTROL CON
HDMI” del menú de configuración a “OFF”.
(p. 37)
EN
ES
43
Page 94

Problemas con la reproducción sin interrupciones
Durante la reproducción continua de archivos múltiples, la imagen se congela durante
unos segundos mientras se cambia de archivo en los casos siguientes.
•Cuando las fechas de grabación son distintas:
La imagen se congela unos segundos al cam
grabación distintas.
Para los archivos con la misma fecha, la reproducción es uniforme.
•Cuando se eliminan archivos:
Si se eliminan y añaden archivos después de la eliminación durante una grabación
continua, la imagen se congela du
la eliminación.
Cuando no se elimina ningún archivo, la reproducción es uniforme.
•Cuando cambia la calidad de la imagen (XP/SP/EP) durante la grabación:
La imagen se congela unos segundos al cambiar entre archivo
imagen distintas.
Para los archivos con la misma calidad de imagen, la reproducción es uniforme.
•Cuando el archivo grabado tiene menos de 3 segundos:
La imagen se congela unos segundos al final de archivos de menos de 3 segundos.
rante unos segundos en la parte en donde se hace
biar entre archivos con fechas de
s con calidades de
•Cuadno se gr
La imagen se congela unos segundos al cambiar entre archivos cada 99
grabaciones.
Para 99 archivos seguidos, la reproducción es uniforme.
Cuando un disco no se puede expulsar con el botón, utilice el sigu
para obligar a expulsarlo.
A Apague la grabadora.
B Introduzca una varilla fina en el aguerjo para
expulsión manual situado junto al botón de
expulsión y se abrirá la bandeja.
C Saque la bandeja manualmente y extr
disco.
aban más de 99 archivos en la misma fecha:
El disco no se puede expulsar
iente procedimiento
aiga el
Agujero de expulsión manual
44
Page 95

Mensajes de error
Problema Acción
z El disco puede estar sucio. Límpielo e inténtelo de
Disco no
reproducible
¡disco
incompatible!
nuevo.
z El disco o el formato de los datos no es compatible.
Compruebe el disco o el formato de los datos
(la extensión). (p. 49)
z Inserte un disco que se pueda reproducir en la
grabadora. (p. 49)
z La casilla “Cerrar el disco” de la aplicación Power2Go
se puede haber desactivado para permitir más
grabaciones. En la ficha “Grabador” del menú
“Configuración/Información” de Power2Go, active la
casilla para cerrar el disco. (p. 16)
EN
ES
Disco no
finalizado.
Utilice un disco
finalizado
Error en disco
Error de código
de región
No se puede
ejecutar la
operación
No se puede
reproducir
¡no hay archivos
de vídeo
almacenados
¡no hay archivos
de imagen
almacenados
z El disco no se finaliza cuando se copia desde la Everio
de alta definición. Asegúrese de finalizar el disco
después de la copia. (Para obtener detalles, consulte el
manual de instrucciones de la cámara Everio).
z El disco puede estar sucio. Límpielo e inténtelo de
nuevo.
z Los discos con código de región de “1” o “ALL” se
pueden reproducir en esta grabadora. Los discos con
un código de región distinto del anterior no se pueden
reproducir. (p. 46)
z Hacer funcionar después de detener la reproducción.
z Pueden faltar datos de archivo.
z El disco o el formato de los datos no es compatible.
Compruebe el disco o el formato de los datos
(la extensión). (p. 49)
z Ha seleccionado una carpeta que no contiene ningún
vídeo.
Seleccione una carpeta con archivos de vídeo. (p. 25)
z Ha seleccionado una carpeta que no contiene ninguna
imagen fija.
Seleccione una carpeta con archivos de imágenes fijas.
(p. 25)
45
Page 96

Otra información
Procedimiento de limpieza
IMPORTANTE:
•Antes de empezar a limpiar el grabador, desenchúfelo siempre.
• No lo rocíe con líquidos ni aerosoles.
•Durante la limpieza, vigile que no entre humedad ni ningún líquido en el aparato.
Exterior del grabador:
Quite la suciedad con un paño seco.
Bandeja del disco:
Quite la suciedad con un paño suave y seco.
No toque la lente. Para limpiar la lente, utilice cua
para limpieza de lentes de cámaras que se encuentra en
tiendas. Utilizar un disco para limpieza de lentes provocará fallos
de funcionamiento.
Disco:
Utilice un paño de limpieza de su tienda para limpiar suavemente desde el borde
interior hacia el borde exterior.
No pegue ningún adhesivo en la cara
centro de rotación se desvíe y aumente la vibración del disco giratorio, afectando así a
la reproducción correcta.
Almacenamiento:
Guarde siempre los discos en las fundas. Si los apila un encima de otro sin las fundas
protectoras, se pueden dañar. No los deje en sitio
directamente la luz del sol, ni en lugares con niveles altos de temperatura o humedad.
No los deje en el coche.
Los códigos regionales son unos números que sirven para restringir la reproducción de
vídeo de los DVD. El mundo se divide en seis regiones, y cada una de ellas se
a mediante un número. Si el número de un disco no coincide con el número del
identific
reproductor, no es posible utilizarlo en ese reproductor.
de la etiqueta del disco. Esto provocará que el
Códigos regionales
lquier soplador
Lente
s donde les pueda tocar
Renuncia de responsabilidades
JVC no se hará responsable en ningún caso de las pérdidas de datos causadas por
conexiones o manipulaciones inadecuadas.
Copyright
Duplicar material protegido con derechos de autor para fines que no sean personales
in el permiso del propietario de los derechos está prohibido por la ley.
s
46
Page 97

Marcas comerciales y marcas registradas
•Microsoft, Windows y Windows Vista son marcas comerciales registradas o marcas
comerciales de Microsoft Corporation en los Estados Unidos y/u otros países.
•Macintosh y Mac OS son marcas comerciales de Apple, Inc., registradas en Estados
Unidos y en otros países
• Pentiu m es una marca registrada de Intel Corporation en Estados Unidos.
•Fabricado con licencia de Dolby Laboratories. “Dolby” y el símbolo de doble D son
marcas comerciales de Dolby Laboratories.
• HDMI, el logo HDMI y la interfaz multimedia de alta definición son marcas de fábrica
o marcas regis
•Los logotipos x.v.Color y x.v.Color son marcas comerciales.
•Los logotipos AVCHD y AVCHD son marcas comerciales de Matsushita Electric
Industrial Co., Ltd. y Sony Corporation.
•El resto de los nombres de productos y empresas mencionados en este documento
son marcas comerciales y/o marcas registradas de sus respectivos propiet
tradas de HDMI Licensing LCC.
.
arios.
EN
ES
47
Page 98

Especificaciones
General
Corriente nominal 2,3 A
Dimensiones (An x Al x P)
Peso
Entorno de
funcionamiento
Potencia del láser
(longitud de onda, salida)
Fuente de alimentación De 110 VCA a 240 VCA, 50 Hz/60 Hz
Capacidad de entrada 0,6 A
Potencia de salida 5,3 VCC, 3,5 A
Temperatura en
funcionamiento
Dimensiones
(An x Al x P)
Peso Aprox. 136 g (0,3 libras)
Tipo 3 VCC (pila tipo botón CR2025)
Ciclo de vida útil de las
pilas
Distancia de uso5 m aproximadamente (boca arriba)
Temperatura en
funcionamiento
Dimensiones (An x Al x P)
Peso Aprox. 32 g (0,1 libras) (incluyendo la pila de litio)
DVD-R JVC, TDK, Verbatim, SONY
DVD-R DL *1 JVC *2, Verbatim
DVD-RW JVC
•El uso de esta grabadora puede no ser posible o puede que no se logre el funcionamiento
óptimo dependiendo del disco utilizado. Sugerimos que utilice los discos recomendados.
•Uso de DVD para vídeo.
•Esta grabadora sólo admite discos de 12 cm.
•Tanto el aspecto como las especificaciones de este producto pueden cambiar sin
previo aviso.
*1 Se pueden utilizar discos DVD-R DL cuando la grabadora esté conectada a una
cámara Everio de alta definición y a u
*2 Para los DVD-R DL fabricados por JVC, se recomienda el uso de discos con el
mensaje “Recomendado también para Everio de alta definición”.
48
152 x 42 x 195 mm (6" x 1-7/10" x 7-7/10")
Aprox. 920 g (2 libras)
(sin el adaptador de CA ni los cables de conexión)
Temperatura de funcionamiento: 0 C a 35 C (41 F a 95 F)
Temperatura de almacenamiento: -20 C a 60 C (-4 F a 140 F)
Para DVD: 656 a 663 nm, 1,04 mW
Para CD: 777 a 788 nm, 1,33 mW
Adaptador de CA (AP-V50U)
0 C a 40 C (32 F a 104 F)
52 x 31 x 120 mm (2" x 1-1/5" x 4-7/10")
(sin el cable de alimentación)
Mando a distancia (RM-V55U)
1 año aproximadamente (dependiendo de la frecuencia de
uso)
0 C a 40 C (32 F a 104 F)
42 x 12 x 100 mm (1-7/10" x 1/2" x 4")
Discos recomendados
n ordenador.
Page 99

Función reproducción
Discos admitidos DVD-R, DVD-R DL, DVD-RW
Formato de los
datos (extensión)
Salida de vídeo 1,0 V 75 K (conector de clavija)
Salida de audio 2,0 Vrms (conector de clavija)
Salida de vídeo de
componentes
Terminal de salida
HDMI
z AVCHD o disco DVD de datos creados al conectarse a una
alta definición Everio
z Disco DVD de vídeo creado al conectarse a Everio
z Discos DVD de datos para los que los datos se graban
utilizando la Everio de alta definición, procesados utilizando
n programa de edición Everio y grabado en una carpeta
u
específica en esta grabadora
• Seleccione el formato de archivo de la serie GZ-HD como
formato de salida en el menú de salida del PowerDirector.
•Establezca el sistema de archivos de la ficha de datos del
menú de configuración de Power2Go 5.5 Lite en “UDF 1.5”.
• Si las imágenes creadas seleccionando “SVRT” en el menú
de salida del PowerDirector no
correctamente, desmarque “SVRT” y vuelva a ejecutar de
nuevo.
z Las extensiones que reconoce esta grabadora son como
sigue. (Las extensiones cambiadas no se peden reproducir
correctamente.)
•Datos grabados en la cámara Everio (a través de PC): MTS,
TOD, MOD, JPG
tos editados en PC: JTS, TPD, JPG
•Da
•Cuando se reproduzcan archivos creados en un ordenador,
al presionar el botón PLAY después de una búsqueda se
puede desviar la posición de reproducción.
Y p-p: 1,0 V 75 K (conector de clavija)
B/CR, PB/PR p-p: 0,7 V 75 K (conector de clavija)
C
Compatibilidad con HDCP, x.v.Color, Deep Color de 19 patillas
Vídeo: 1080p / 1080i / 720p / 480p / 480i
(No damos garantía para compatibilidad con DVI-D.)
Sonido: 2CH PCM/corriente de bits
EN
ES
se pueden reproducir
Precaución
•Los discos distintos a los anteriores no se pueden reproducir
correctamente.
49
Page 100

Cuando se conecta a una cámara Everio
InterfazUSB 2.0
Cable de interfazCable USB (Tipo Mini A - Tipo Mini B)
Discos compatibles
para grabación
(No se pueden usar
discos de 8 cm)
Formato de
grabación
Tiempo de grabación Everio 30 minutos aproximadamente (incluido el
•No se pueden utilizar GZ-MC100, GZ-MC200, GZ-MC500, GZ-MG20, GZ-MG40,
GZ-MG50 ni GZ-MG70.
Everio DVD-R, DVD-RW
Everio de alta
definición
Everio DVD de vídeo (sólo vídeo)
Everio de alta
definición
Everio de alta
definición
DVD-R, DVD-R DL, DVD-RW
Disco AVCHD (vídeo)
Disco de datos (vídeo, imagen fija)
tiempo necesario para la finalización)
Al grabar vídeos durante unos 90 minutos en
modo Fino en un disco de 4,7 GB. (Esto
puede variar de acuerdo con condiciones
como el número de títulos).
Disco AVCHD:
60 minutos aproximadamente (incluido el
tiempo necesario para la fin
•Al grabar vídeos durante unos 60 minutos
en modo XP en un disco DVD-R DL de 8,5
GB. (Esto puede variar de acuerdo con
condiciones como el número de archivos).
Disco de datos:
45 minutos aproximadamente (incluido el
tiempo necesario para la finalización)
•Al grabar vídeos durante unos 40 minutos
en modo FHD en un disco DVD-R DL de 8,5
GB. (Esto puede variar de acuerdo con
condiciones como el número de archivos).
alización)
50
 Loading...