

Page 1

CU-VD3
AA/AG/AC/TW/KR
ENGLISH
DVD Burner
INSTRUCTIONS
DVD
DVD
DVD
DVD
DVD
Page 2
Basic Guide
Getting ready to copy to a DVD!
Get ready a recommended disc
A
Use DVD-R, DVD-RW or DVD-R DL disc of the brands listed below.
DVD+R, DVD+RW and DVD-RAM cannot be used.
Brand
JVC, TDK, Verbatim,
SONY
DVD-R DVD-RW DVD-R DL (Single-sided double layer)
JVC JVC, Verbatim
Caution
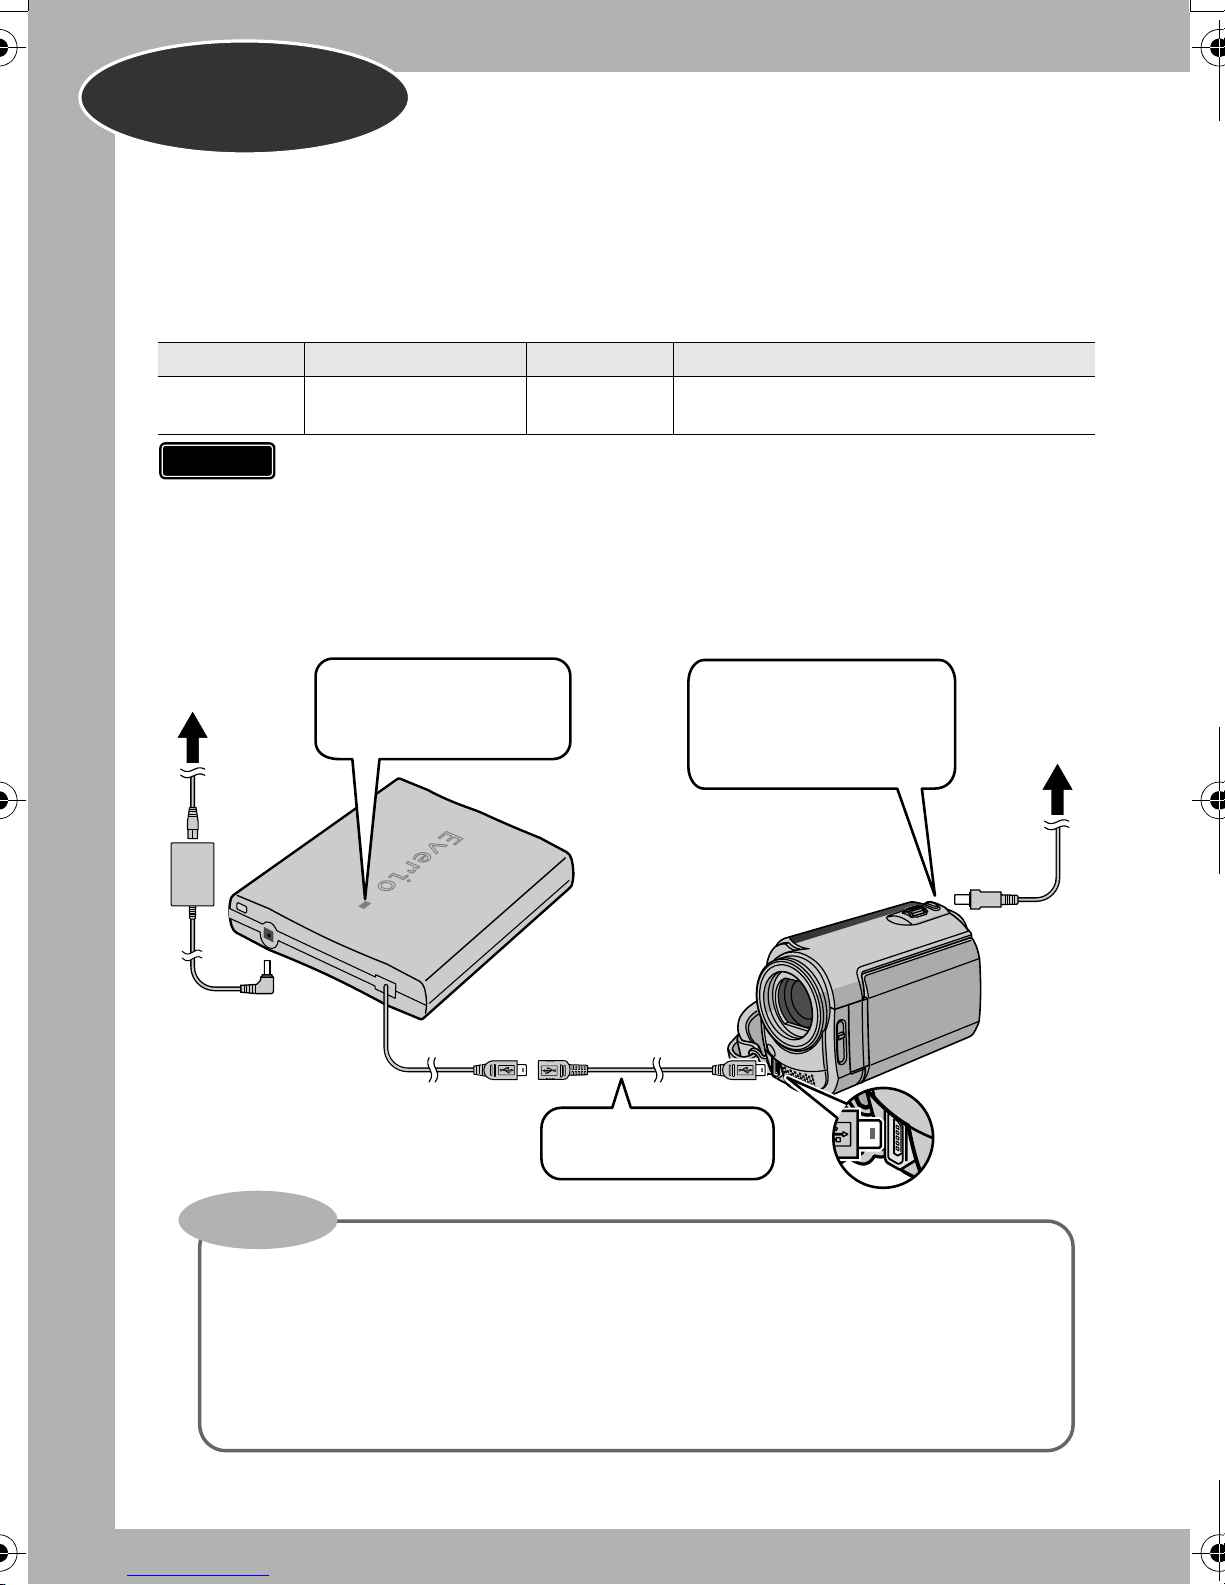
Connect
B
To power
supply outlet
Power input
To DC jack
z Use a commercially available cleaning cloth to wipe the disc gently if there are any
fingerprints or dirt. Applying too much strength will result in scratches.
z Do not use discs that are scratched.
z DVD-R DL discs can be used only when the burner is connected to a high definition
Everio camera.
The power lamp lights
in green.
CU-VD3
USB extension
cable for Everio
Use the AC adapter to
power on the Everio
camera.
To power
supply outlet
To DC jack
USB cable
Important!
z The USB cable cannot be connected to the Everio dock (supplied with Everio
camera).
z When the DVD created on this burner cannot be played on other devices, play
back using this burner. (A P. 8)
z If you encounter any problems, refer to “Troubleshooting”. (A P. 18)
z Follow the instructions in the instruction manual of the Everio camera when
operating the Everio camera.
2
Everio camera
Use if necessary.
Page 3

Open the tray and insert the disc
C
1) Press the eject
button.
Close the tray
D
Push in until the tray
snaps in.
z Do not touch the
recording side
2) Pull out completely.
3) Insert firmly into place.
Open the LCD monitor
E
The Everio camera turns on.
Pay attention to the followings!
z Do not place any
objects on top
Turn the Everio off and on
again if the following display
remains unchanged.
z Do not topple
z Do not subject to
mechanical shock
¹Recording and playback may not function properly if the disc is
scratched or dirty.
Preparations
completed!
To copy images to DVD A P. 8f13
To play back copied images A P. 8
3
Page 4

This burner enables DVDs of videos
recorded with the JVC Hard Disk Camera to
be created without using a PC.
• If you want to edit videos recorded with the camera
and create your original DVDs, use the software
provided with the camera for editing and creating
DVDs.
• The provided data writing software Power2Go 5.5 Lite
can be used for writing data. However, it cannot be
used to edit videos or create DVDs.
• The burner does not include support for Macintosh.
Dear Customer,
Thank you for purchasing this burner. Before use,
please read the safety information and precautions
contained in pages 4 and 5 to ensure safe use of this
product.
ATTENTION:
This unit contains microcomputers. External electronic
noise or interference could cause malfunctioning. In
such cases, switch the unit off and unplug the mains
power cord. Then plug it in again and turn the unit on.
Take out the disc. After checking the disc, operate the
unit as usual.
CAUTION:
To avoid electric shock or
damage to the unit, first firmly
insert the small end of the
power cord into the AC
Adapter until it is no longer
wobbly, and then plug the
larger end of the power cord into an AC outlet.
Safety Precautions
IMPORTANT:
In the event that any of the following occur, remove the
plug and make a request for repair to the dealer.
• Smoke or abnormal odour is emitted
• Damage from being dropped
• Water or an object enters inside
CAUTION:
A UNIT IS A CLASS 1 LASER PRODUCT.
HOWEVER THIS UNIT USES A VISIBLE LASER
BEAM WHICH COULD CAUSE HAZARDOUS
RADIATION EXPOSURE IF DIRECTED. BE SURE
TO OPERATE THE UNIT CORRECTLY AS
INSTRUCTED.
WHEN THIS UNIT IS PLUGGED INTO THE WALL
OUTLET, DO NOT PLACE YOUR EYES CLOSE TO
THE OPENING OF THE DISC TRAY AND OTHER
OPENINGS TO LOOK INTO THE INSIDE OF THIS
UNIT.
USE OF CONTROLS OR ADJUSTMENTS OR
PERFORMANCE OF PROCEDURES OTHER THAN
THOSE SPECIFIED HEREIN MAY RESULT IN
HAZARDOUS RADIATION EXPOSURE.
DO NOT OPEN COVERS AND DO NOT REPAIR
YOURSELF. REFER SERVICING TO QUALIFIED
PERSONNEL.
CLASS 1 LASER PRODUCT
REPRODUCTION OF LABELS
WARNING LABEL INSIDE OF THE UNIT
CAUTION
CLASS 3B VISIBLE AND INVISIBLE LASER RADIATION WHEN OPEN. AVOID EXPOSURE TO THE BEAM.
CLASSE 3B RAYONNEMENT LASER VISIBLE ET INVISIBLE EN CAS D'OUVERTURE.
ATTENTION
EXPOSITION DANGEREUSE AU FAISCEAU.
KLASSE 3B SICHTBARE UND UNSICHTBARE LASERSTRAHLUNG, WENN ABDECKUNG GEÖFFNET.
VORSICHT
NICHT DEM STRAHL AUSSETZEN.
KLASSE 3B SYNLIG OG USYNLIG LASERSTRÅLING VED ÅBNING. UNDGÅ UDSÆTTELSE FOR STRÅLING.
ADVARSEL
KLASSE 3B SYNLIG OG USYNLIG LASERSTRÅLING NÅR DEKSEL ÅPNES. UNNGÅ EKSPONERING FOR STRÅLEN.
ADVARSEL
KLASS 3B SYNLIG OCH OSYNLIG LASERSTRÅLNING NAR DENNA DEL ÄR ÖPPNAD. STRÅLEN ÄR FARLIG.
VARNING
AVATTAESSA OLET ALTTIINA LUOKAN 3B NÄKYVÄLLE JA NÄKYMÄTTÖMÄLLE LASERSÄTEILYLLE.
VARO!
ÄLÄ KATSO SÄTEESEEN.
The mains plug shall remain readily operable.
• Remove the mains plug immediately if the burner
functions abnormally.
If malfunctioning occurs, stop using the unit
immediately and consult your local JVC dealer.
This unit applies to the standard “IEC60825-1:2001”
for laser products.
The socket-outlet shall be installed near the
equipment and shall be easily accessible.
4
Page 5

Safety Precautions for the Burner
Be sure to observe the following precautions. Failing to
do so may result in electric shock, fire, injury, or
malfunction.
• Do not disassemble, dismantle, or modify the
equipment. Requests for repair and inspection should
be made to the dealer.
• Do not insert metal or combustible objects or pour
water or other liquids inside the burner.
• Turn off the power when connecting equipment.
• Remove the plug when the burner will not be used for
a prolonged time or prior to cleaning (electricity flows
through the equipment even when the power is off).
• Do not block the ventilation holes of the burner.
• Do not use where there is condensation. Suddenly
carrying the burner from a cold location to a hot
location may result in the formation of drops, which
may cause a malfunction or failure.
• Do not cause the burner to vibrate when discs are in.
Safety Precautions for Accessories
• When using the AC adapter, the power cord, and the
USB cable, be sure to observe the following
precautions. Failing to do so may result in electric
shock, fire, injury, or malfunction.
• Do not insert or remove the plug when your hands
are wet.
• Fully insert the plug into the outlet.
• Keep dust and metal objects away from the plug.
• Do not damage the cord.
• Place the cord where it will not trip someone up.
• Do not use when thunder can be heard.
• Do not dismantle.
• Do not use for any product other than this one.
• Do not play the provided CD-ROM with an audio
player. Doing so may damage the circuits or speakers.
Safety Precautions for Discs
Do not use the following discs.
• Cracked discs
• Deeply scratched discs
Installation
Do not install in any of the following locations.
• Humid location
• Location of 60 °C or above
• Location subject to direct sunlight
• Location where overheating is likely
• Dusty or smoky locations
• Locations subject to oily smoke or steam such as a
kitchen counter or beside a humidifier
• Unstable location
• Bathroom
• Dusty places
• Slanted location
ATTENTION:
On placing the unit:
Some TVs or other appliances generate strong
magnetic fields. Do not place such appliances on top
of the unit as it may cause picture disturbance.
When moving the product:
Remove the power cord and all connecting cables.
Cleaning Procedure
IMPORTANT:
• Be sure to unplug the burner before beginning
cleaning.
• Do not use liquid or aerosol cleaners.
• Ensure that no moisture or liquid comes into contact
with the drive during cleaning.
Exterior of the Burner:
Wipe dirt off with a dry cloth.
Disc Tray:
Wipe off dirt with a soft dry
cloth.
Do not touch the lens.
To clean the lens, use
commercially available lens
cleaning blower for cameras.
Using a lens cleaning disc will
cause malfunction.
Lens
Disc:
Gently wipe from the inner edge to the outer edge with
a soft cloth.
Storage:
Make sure that discs are kept in their cases. If discs are
piled on top of one another without their protective
cases, they can be damaged. Do not put discs in a
location where they may be exposed to direct sunlight,
or in a place where the humidity or temperature is high.
Avoid leaving discs in your car!
Region Codes
Region codes are numbers for restricting DVD video
playback. The world is separated into six regions and
each region is identified by a number. If the number for
a disc does not match the number for the player, the
disc cannot be played on the player.
Changing the region codes
You can change the region code to play a DVD that
has a different code. (The code cannot be changed for
some playback software.) When you insert the disc,
the Caution screen appears on the PC. Follow the onscreen instructions to change the code.
The region code for the burner can be changed
5times only. The code set the fifth time becomes the
final code, so be sure to set a frequently used code.
Take sufficient care when changing the code.
Disclaimer
JVC accepts no liability whatsoever for loss of data
resulting from inappropriate connections or handling.
Copyrights
Duplicating copyright protected material, for other than
personal use, without the permission of the copyright
holder is prohibited by copyright law.
Registered Trademarks and
Trademarks
• Windows® is either registered trademark or trademark
of Microsoft Corporation in the United States and/or
other countries.
• Macintosh and Mac OS are trademarks of Apple
Computer, Inc., registered in the United States and
other countries.
• Pentium is a registered trademark of Intel Corporation
in the United States.
• Other company and product names mentioned herein
are registered trademarks and/or trademarks of their
respective holders.
EN
CS
CT
KO
PE
AR
5
Page 6

Contents
z Basic Guide.............................................................................................................. 2
z Safety Precautions .................................................................................................. 4
z Getting Started......................................................................................................... 7
Taking out the USB Cable ....................................................................................... 7
Placing the Burner ................................................................................................... 7
z Copying to DVD ....................................................................................................... 8
3 Copy Options........................................................................................................ 8
Playing Back Copied Images................................................................................... 8
Copying All Files to the DVD ................................................................................... 9
Copying by Date .................................................................................................... 10
Copying by Event .................................................................................................. 12
Creating Data DVD from a PC............................................................................... 14
Copying to a DVD ............................................................................................... 14
Computers That Can Be Used ............................................................................ 15
Installing CyberLink Power2Go 5.5 Lite .............................................................. 15
CyberLink Power2Go 5.5 Lite Contact Information............................................. 17
z Troubleshooting .................................................................................................... 18
z Specifications ........................................................................................................ 20
Accessories
If there are any items missing, please consult your authorised dealer.
AC adapter
(AP-V3U)
Power cord
USB extension cable
for Everio
USB extension cable
for PC
Instruction manual (this manual),
other printed material
Caution
z Use the AC adapter, power cord and USB extension cable supplied with
this burner. Using accessories other than those supplied may result in
electric shock or fire.
6
Stand
DVD-R (blank disc) x 1
CD-ROM (data writing software) x 1
Page 7

Getting Started
Taking out the USB Cable
Hook the protruding tip with your finger and
A
pull it towards you
EN
Take out the USB cable
B
• Can be connected to the USB extension cable.
Placing the Burner
o Horizontal orientation
Take note of the top and bottom of the burner and place it in
the horizontal orientation.
¹Do not place any objects on top of the burner.
CS
CT
KO
PE
AR
o Vertical orientation
Face the feet side towards the left and fix securely on the stand.
Feet
Back
High side
Low side
Arrow
Front
7
Page 8

Copying to DVD
3 Copy Options
o Copying All Files to the DVD .................................................................... P. 9
o Copying by Date ........................................................................................P. 10
o Copying by Event ......................................................................................P. 12
Playing Back Copied Images
To AV jack
AV cable
(supplied with Everio)
USB cable
Access lamp
Connect as shown above and turn on
A
each device
• The screen on the right appears on the
Everio camera.
Switch the TV to an appropriate input
B
Select “PLAYBACK” and press
C
• Playback begins automatically.
• To stop, select o using the touch sensor.
Note
To USB jack
Use the AC adapter to
power on the Everio
camera.
To Audio/Video input
terminals
<Everio LCD monitor screen>
CREATE DVD
CREATE TOGETHER
SELECT AND CREATE
CREATE DUPLICATE
PLAYBACK
PLAYBACK CREATED DISC
Select with
touch sensor
z When opening/closing the disc tray or during
copying/playback, the access lamp lights or blinks
in orange.
88
Page 9

Copying All Files to the DVD
Caution
Preparations
Press the [DIRECT DVD] button
A
Select “EXECUTE” and press
B
z If the operation and display of your Everio camera differs from the following
procedures, refer to the instruction manual of your Everio camera.
z For some Everio cameras, still images cannot be copied.
Connect CU-VD3 to the Everio camera according to the procedures on
P. 2f3 and turn on the Everio camera.
Select with
touch sensor
EN
CS
CT
KO
PE
[DIRECT DVD]
AR
<Everio LCD monitor screen>
The “CREATING NOW” screen
C
appears and copying starts
To cancel, select “STOP” and press .
Do not turn off the power or remove the
USB cable while the “CREATING NOW”
screen is displayed.
When “COMPLETED” appears,
D
press to complete copying
UNSAVED SCENES
READY TO CREATE
DVD-R
EXECUTE
RETURN
QUIT
CREATING NOW
ELAPSED: 3 min
30%
STOP
COMPLETED
OK
9
Page 10

Copying by Date
Caution
z If the operation and display of your Everio camera differs from the following
procedures, refer to the instruction manual of your Everio camera.
z For some Everio cameras, still images cannot be copied.
Preparations
Connect CU-VD3 to the Everio camera according to the procedures on
P. 2f3.
The screen in step A appears when the Everio camera is turned on.
Display the “CREATE DVD” screen,
A
select “SELECT AND CREATE” and
press
Select “CREATE BY DATE” and
B
press
<Everio LCD monitor screen>
CREATE DVD
CREATE TOGETHER
SELECT AND CREATE
CREATE DUPLICATE
PLAYBACK
SELECT AND CREATE
SELECT AND CREATE
CREATE BY DATE
CREATE BY EVENT
CREATE BY PLAYLIST
SELECT FROM SCENES
Select the desired dates and
C
press
Select “ALL” and press
D
CREATE DISC BY DATE
CREATE BY DATE
12.10.2008
11.10.2008
DVD CREATION LIST
ALL
DVD1
TOTAL
00h18m
DVD1
QUIT
10
QUITCHECK
Page 11

Select “EXECUTE” and press
E
ALL
READY TO CREATE
DVD-R
The “CREATING NOW” screen
F
appears and copying starts
To cancel, select “STOP” and press .
Do not turn off the power or remove the
USB cable while the “CREATING NOW”
screen is displayed.
When “COMPLETED” appears,
G
press to complete copying
EXECUTE
RETURN
CREATING NOW
ELAPSED: 3 min
30%
STOP
COMPLETED
OK
EN
QUIT
CS
CT
KO
PE
AR
11
Page 12

Copying by Event
Caution
z If the operation and display of your Everio camera differs from the following
procedures, refer to the instruction manual of your Everio camera.
z For some Everio cameras, still images cannot be copied.
Preparations
Register images to events beforehand.
For details, refer to the instruction manual of the Everio camera.
Connect CU-VD3 to the Everio camera according to the procedures on
P. 2f3.
The screen in step A appears when the Everio camera is turned on.
Display the “CREATE DVD” screen,
A
select “SELECT AND CREATE” and
press
<Everio LCD monitor screen>
CREATE DVD
CREATE TOGETHER
SELECT AND CREATE
CREATE DUPLICATE
PLAYBACK
SELECT AND CREATE
Select “CREATE BY EVENT” and
B
press
Select the desired events and
C
press
SELECT AND CREATE
CREATE BY DATE
CREATE BY EVENT
CREATE BY PLAYLIST
SELECT FROM SCENES
CREATE DISC BY EVENT
SEARCH EVENT
SON 1
QUIT
12
Page 13

Select “ALL” and press
D
DVD CREATION LIST
ALL
DVD1
DVD2
DVD3
EN
Select “EXECUTE” and press
E
The “CREATING NOW” screen
F
appears and copying starts
To cancel, select “STOP” and press .
Do not turn off the power or remove the
USB cable while the “CREATING NOW”
screen is displayed.
ALL
READY TO CREATE
DVD-R
EXECUTE
RETURN
CREATING NOW
ELAPSED: 3 min
30%
STOP
QUITCHECK
QUIT
CS
CT
KO
PE
AR
When “COMPLETED” appears,
G
press to complete copying
COMPLETED
OK
13
Page 14

Creating Data DVD from a PC
This burner can be used as a DVD burner by connecting it to a PC. Data DVD can be
created by using the supplied disc writing software.
To power supply outlet
Power cord
USB
CU-VD3
PC
AC adapter
USB cable
¹ During connection, switch off the power supply of CU-VD3.
CU-VD3 is turned on by inserting the AC adapter into the power supply outlet.
Copying to a DVD
..........................................................................................................................................
Turn on the burner and the PC.
A
• Install the CyberLink Power2Go 5.5 Lite software if you have not done so.
Insert a disc.
B
• We recommend you to use a compatible disc. (A P. 2, 20)
Use Power2Go to copy to a DVD.
C
1. Use Power2Go to create a folder.
• You can create the desired folder names; however do not use “EVERIO_V” or
“EVERIO_S” as the folder name.
• Use half-width alphanumeric characters when entering the folder or file names. You can
enter up to 40 half-width characters.
2. Set the file system of the data tab in the Power2Go setup menu to “UDF1.5”.
3. Copy files such as MPEG, JPEG and TPD into the folder.
• For details on how to copy, refer to the Power2Go User’s guide, Help and ReadMe.
You can view User’s guide, Help and ReadMe from the start menu of the PC.
• This burner cannot be used to write files into CD-R or CD-RW. Also, it does not respond
to all the functions of Power2Go 5.5 Lite.
USB extension cable for PC
14
Page 15

• To get customer support and to register the software, you need the following product key
(CD-Key):
PXNVM-NWE4G-XQD9Q-CU9DX-3FQFN-NAKUS
• Power2Go 5.5 Lite does not support conversion of audio files to MP3 format.
• When the “Enter Activation Key” screen appears while using Power2Go 5.5 Lite, close
the screen without entering the activation key.
o Removing USB Cable from PC
1. Carry out removing of hardware on the PC.
2. Remove the USB Cable.
Computers That Can Be Used
..........................................................................................................................................
CyberLink Power2Go 5.5 Lite can be used on computers satisfying the following
conditions.
o Operating system:
Windows XP Home Edition (pre-installed)
Windows XP Home Professional (pre-installed)
Windows Vista Home Basic (32-bit edition, pre-installed)
Windows Vista Home Premium (32-bit edition, pre-installed)
o Connector:
USB 2.0 connector
o CPU:
Intel Pentium III, at least 800 MHz
(Intel Pentium 4, at least 2 GHz recommended)
o RAM:
At least 128 MB (at least 256 MB recommended)
o Free hard disk space:
At least 50 MB for installation
At least 5 GB recommended for creating DVDs
o Display:
Must be capable of displaying 800 c 600 dots
EN
CS
CT
KO
PE
AR
Installing CyberLink Power2Go 5.5 Lite
..........................................................................................................................................
Caution
Insert the provided CD-ROM in the PC.
A
• The “Choose Setup Language” screen appears.
Confirm the language and then click
B
z Do not play the provided CD-ROM in an audio player. It is not an audio CD. Playing
this CD-ROM in an audio player will result in a loud high noise. It may also damage
the circuit and speaker.
“OK”.
• The installation screen appears.
15
Page 16

Click “Next”.
C
• The “License Agreement” screen appears.
Confirm the contents and then click
D
“Yes”.
• The “Customer Information” screen appears.
Enter the “User Name” and
E
“Company Name” and then click
“Next”.
Follow the on-screen instructions.
F
• Installation starts. The “InstallShield Wizard Complete” screen appears.
Click “Finish”.
G
• The computer will restart and installation is
completed.
• If the screen on the right does not appear,
proceed to step H.
16
Page 17

Click “Finish”.
H
• The “CyberLink Power2Go 5.5” Readme
screen appears.
Read the contents of the Readme.
I
EN
CS
CT
CyberLink Power2Go 5.5 Lite Contact Information
..........................................................................................................................................
For information on CyberLink Power2Go 5.5 Lite or other products, use the following
contact information.
o Telephone/fax support
Location Language Office hours
(Mon. to Fri.)
Taiwan Mandarin 9:00 am to 6:00 pm
Phone # Fax #
+886-2-8667-1298
ext. 333
+886-2-8667-1300
KO
PE
AR
17
Page 18

Troubleshooting
Trouble Action
CU-VD3
Cannot turn the power
on.
The burner and AC
adapter is hot.
Cannot open the disc
tray.
Reading fails.
z Make sure the AC adapter and power cord are connected
properly.
z This is not a malfunction.
z If the burner is abnormally hot, remove the AC adapter and
consult your authorised dealer.
z A disc cannot be ejected by pressing the eject button if data
is being written to the disc. Wait until writing finishes.
z If a disc cannot be ejected with the eject button:
• Remove and insert the AC adapter, then press the eject
button again.
• If the disc cannot be ejected using the above method,
remove the AC adapter and all other connections. Insert a
thin rod of about 5 cm into the force eject hole located on
the right side of the eject button. The disc tray will be
ejected for about 1 cm, pull out the disc tray manually and
take out the disc.
z Insert the disc with the label facing up.
z Make sure the disc tray is not dirty.
z Make sure the writing surface of the disc is not damaged.
z Make sure the special-shaped discs are not used.
z Make sure the audio CD complies with the CD-DA standard.
(Copy-control CDs cannot be played.)
z For CD-R or CD-RW, make sure it is not recorded using the
packet-write method.
Writing fails.
The writing time is too
long.
18
z Make sure an appropriate disc is being used. (A P. 2, 20)
z Use discs recommended for the burner. (A P. 2, 20)
z Make sure that a new disc is used for DVD-R.
z Insert the disc with the label facing up.
z Make sure the disc tray is not dirty.
z Make sure the writing surface of the disc is not damaged.
z Make sure the special-shaped discs are not used.
z The time taken for writing may be longer depending on the
usage environment and conditions of usage. This is not a
malfunction. It is the performance of this burner.
Page 19

Everio
Trouble Action
Cannot be recognised
by the Everio camera.
Unable to play DVD
video created on this
burner on other DVD
players.
It is impossible to dub
the DVD discs, which
were written with this
burner, on a HDD-DVD
recorder.
Trouble Action
PC
Cannot play back.
z Make sure the USB cable is connected properly.
z Remove and insert the USB cable again.
z Remove and insert the AC adapter of CU-VD3.
z Connect CU-VD3 to the Everio camera and play back using
the playback function of the Everio camera. (Refer to the
instruction manual of the Everio camera.)
z Connect CU-VD3 to the Everio camera, play back using the
playback function of the camera, and dub the DVD discs
with the DVD recorder. (Refer to the instruction manual of
the Everio camera.)
z If the packet writing software, DLA (Direct Letter Access),
has been installed on the PC, the disc may not be played
back properly due to incompatibility.
In this case, consult the DLA software developer or check
out “DLA” related websites for solutions.
z Confirm the region code and change the region code of
CU-VD3.
z The DVD video created on this burner is region free (“ALL”).
EN
CS
CT
KO
PE
AR
Region code cannot
be changed.
z Follow the instructions on the PC screen to change the
region code.
(The code cannot be changed for some playback software.)
The region code of CU-VD3 can be changed up to 5 times.
The region code cannot be changed anymore as the code is
finalised after changing the fifth time.
19
Page 20

Specifications
General
Rated current 0.9 A
Dimensions (mm)
(W x H x D)
Weight
Operating
environment
Laser power
(wavelength,
output)
141 x 23 x 166
Approx. 380 g
(Excluding AC adapter and
USB extension cable)
Operating temperature:
5 °C to 35 °C
Storing temperature:
-20 °C to 60 °C
For DVD:
661 nm, 0.4 mW
For CD:
785 nm, 0.6 mW
Recommended discs
DVD-R JVC, TDK, Verbatim, SONY
*2
*1
JVC, Verbatim
JVC
DVD-R DL
DVD-RW
AC adapter (AP-V3U)
Power supply
Input capacity 0.26 A
Output DC 5.2 V, 2 A
Operating
temperature
Dimensions (mm)
(W x H x D)
Weight Approx. 136 g
AC110 V to 240 V
50 Hz/60 Hz
0 °C to 40 °C
49 x 28 x 79
(Excluding power cord)
z Optimal performance of the burner may not be possible depending on the disc used. Using discs
of manufacturers for which compatibility has been confirmed is recommended.
z Only 12 cm discs can be used with this burner.
*1 DVD-R DL discs can be used when the burner is connected to a high definition Everio camera or
a PC.
*2 Dual layer DVD-RW discs cannot be used.
When connected to an Everio camera
Interface USB 2.0
Interface cable USB extension cable for Everio
Compatible discs for
writing
(8 cm discs cannot
be used)
Recording format
Recording time
Everio : DVD-R, DVD-RW
High definition
Everio
Everio : DVD video (video only)
High definition
Everio
Everio : Approx. 30 minutes (including time taken for finalization)
High definition
Everio
: DVD-R, DVD-R DL, DVD-RW
: Data DVD (video, still image)
z Approx. 90 minutes of video recorded in fine mode on a
4.7 GB disc. (Varies depending on conditions such as
number of titles.)
: For details, refer to the instruction manual of the Everio
camera.
20
Page 21

When connected to a PC
Interface USB2.0
Interface cable USB extension cable for PC
Supported operating
systems
Data buffer capacity 2 MB
Data transfer rate
(for USB2.0)
Compatible discs
(8 cm discs cannot
be used)
Supported software
Windows XP Home Edition, Windows XP Professional
Windows Vista Home Basic, Windows Vista Home Premium
(Macintosh is not supported.)
Writing : DVD-R : Maximum 8x
DVD-R DL : Maximum 4x
DVD-RW : Maximum 4x
Reading : DVD-R : Maximum 8x
DVD-RW : Maximum 8x
DVD-ROM : Maximum 8x
DVD-R DL : Maximum 8x
CD-R : Maximum 24x
CD-RW : Maximum 24x
CD-ROM : Maximum 24x
Writing : DVD-R, DVD-R DL, DVD-RW
Reading : DVD-R, DVD-R DL, DVD-RW, DVD-ROM, DVD-Video,
CD-ROM, CD-DA
CD-RW
CyberLink PowerCinema NE for Everio/ PowerProducer 3 NE (supplied with
Everio camera)
CyberLink Power2Go 5.5 Lite (supplied)
*1
*1
*2
*3
, CD Extra, Video CD, Mixed CD, CD-R,
EN
CS
CT
KO
PE
AR
*1 Any CD recorded using the packet-write method cannot be played.
*2 Operation is not guaranteed for any CD not compliant with the CD-DA standard (copy control
CD).
*3 It may not be possible to read the audio files depending on the music CDs (CD-DA). In this case,
make use of applications such as Windows Media Player.
21
Page 22

© 2007 Victor Company of Japan, Limited
Printed in Malaysia
1107MNH-SW-VM
 Loading...