

Page 1
DVD Burner
ENGLISH
DEUTSCH
DVD-brenner
INSTRUCTIONS
DVD-Brenner
BEDIENUNGSANLEITUNG
Graveur de DVD
MANUEL D’UTILISATION
DVD-brander
GEBRUIKSAANWIJZING
Grabador de DVD
MANUAL DE INSTRUCCIONES
Masterizzatore di DVD
ISTRUZIONI
DVD-brænder
INSTRUKTIONSBOG
DVD-tallennin
KÄYTTÖOHJE
DVD-brännare
BRUKSANVISNING
BRUKSANVISNING
Записывающее устройство
для дисков DVD
ИНСТРУКЦИЯ ПО ЭКСПЛУАТАЦИИ
Пристрій для запису DVD
ІНСТРУКЦІЯ
Vypalovací jednotka DVD
PŘÍRUČKA K OBSLUZE
Nagrywarka DVD
INSTRUKCJA OBSŁUGI
DVD-író
HASZNÁLATI UTASĺTÁSA
Gravador de DVD
INSTRUÇÕES
DVD 刻录机
使用说明书
DVD 燒錄器
FRANÇAIS
NEDERLANDS
CASTELLANO
ESPAÑOL
ITALIANO
DANSK
SUOMI
SVENSKA
NORSK
РУССКИЙ
УКРАЇНСЬКА
ČEŠTINA
CU-VD20
POLSKI
U/E/EK/ER/AA/AC/AG/AS/TW
MAGYAR
For Customer Use:
Enter the Model No. and Serial
No. (located on the bottom of the
burner) below. Retain this
information for future reference.
Model No.
Serial No.
PORTUGUÊS
LYT1728-001A
Page 2

This burner enables DVDs of videos recorded with the JVC
Hard Disk Camera to be created without using a PC.
● If you want to edit videos recorded with the camera and create
your original DVDs, use the software provided with the camera for
editing and creating DVDs.
● The provided data writing software Power2Go 5.5 Lite can be
used for writing data. However, it cannot be used to edit videos or
create DVDs.
● The burner does not include support for Macintosh.
Dear Customer,
Thank you for purchasing this burner. Before use, please read
the safety information and precautions contained in pages 2 and
3 to ensure safe use of this product.
Safety Precautions
IMPORTANT:
In the event that any of the following occur, remove the plug and make
a request for repair to the dealer.
● Smoke or abnormal odor is emitted
● Damage from being dropped
● Water or an object enters inside
CAUTION:
A UNIT IS A CLASS 1 LASER PRODUCT. HOWEVER THIS UNIT
USES A VISIBLE LASER BEAM WHICH COULD CAUSE
HAZARDOUS RADIATION EXPOSURE IF DIRECTED. BE SURE TO
OPERATE THE UNIT CORRECTLY AS INSTRUCTED.
WHEN THIS UNIT IS PLUGGED INTO THE WALL OUTLET, DO NOT
PLACE YOUR EYES CLOSE TO THE OPENING OF THE DISC TRAY
AND OTHER OPENINGS TO LOOK INTO THE INSIDE OF THIS
UNIT.
USE OF CONTROLS OR ADJUSTMENTS OR PERFORMANCE OF
PROCEDURES OTHER THAN THOSE SPECIFIED HEREIN MAY
RESULT IN HAZARDOUS RADIATION EXPOSURE.
DO NOT OPEN COVERS AND DO NOT REPAIR YOURSELF. REFER
SERVICING TO QUALIFIED PERSONNEL.
CLASS 1 LASER PRODUCT
REPRODUCTION OF LABELS
WARNING LABEL INSIDE OF THE UNIT
This unit applies to the standard “IEC60825-1:2001” for laser
products.
The socket-outlet shall be installed near the equipment and shall be
easily accessible.
ATTENTION:
This unit contains microcomputers. External electronic noise or
interference could cause malfunctioning. In such cases, switch the unit
off and unplug the mains power cord. Then plug it in again and turn the
unit on. Take out the disc. After checking the disc, operate the unit as
usual.
CAUTION:
To avoid electric shock or damage to the unit,
first firmly insert the small end of the power cord
into the AC Adapter until it is no longer wobbly,
and then plug the larger end of the power cord
into an AC outlet.
If malfunctioning occurs, stop using the unit immediately and consult
your local JVC dealer.
Declaration of Conformity (for owners in the U.S.A.)
Model Number : CU-VD20U
Trade Name : JVC
Responsible party : JVC AMERICAS CORP.
Address : 1700 Valley Road Wayne, N. J. 07470
Telephone Number : 973-317–5000
This device complies with Part 15 of FCC Rules. Operation is subject
to the following two conditions: (1) This device may not cause harmful
interference, and (2) this device must accept any interference received,
including interference that may cause undesired operation.
(For owners in the U.S.A.)
Changes or modifications not approved by JVC could void the user’s
authority to operate the equipment. This equipment has been tested
and found to comply with the limits for a Class B digital device,
pursuant to Part 15 of the FCC Rules. These limits are designed to
provide reasonable protection against harmful interference in a
residential installation. This equipment generates, uses, and can
radiate radio frequency energy and, if not installed and used in
accordance with the instructions, may cause harmful interference to
radio communications. However, there is no guarantee that
interference will not occur in a particular installation. If this equipment
does cause harmful interference to radio or television reception, which
can be determined by turning the equipment off and on, the user is
encouraged to try to correct the interference by one or more of the
following measures:
Reorient or relocate the receiving antenna.
Increase the separation between the equipment and receiver.
Connect the equipment into an outlet on a circuit different from that to
which the receiver is connected.
Consult the dealer or an experienced radio/ TV technician for help.
(For owners in Canada)
● FOR USE WITH MODEL NO. AP-V400U (AC ADAPTER).
● 043-124000-I2 (AC Adapter) is also available for customer using
CU-VD20AC/AG/AS.
● POUR UTILISER AVEC MODELE AP-V400U (ADAPTATEUR CA).
● Le 043-124000-I2 (adaptateur CA) est aussi disponible pour les
modèles CU-VD20AC/AG/AS.
This Class B digital apparatus complies with Canadian ICES-003.
Cet appareil numérique de la classe B est conforme à la norme NMB003 du Canada.
Dear Customer,
This apparatus is in conformance with the valid European directives
and standards regarding electromagnetic compatibility and electrical
safety.
European representative of Victor Company of Japan, Limited is:
JVC Technology Centre Europe GmbH
Postfach 10 05 52
61145 Friedberg
Germany
Information for Users on Disposal of Old Equipment
[European Union]
This symbol indicates that the electrical and
electronic equipment should not be disposed
as general household waste at its end-of-life.
Instead, the product should be handed over
to the applicable collection point for the
recycling of electrical and electronic
equipment for proper treatment, recovery and
recycling in accordance with your national
legislation.
By disposing of this product correctly, you will
help to conserve natural resources and will
help prevent potential negative effects on the
environment and human health which could otherwise be caused by
inappropriate waste handling of this product. For more information
about collection point and recycling of this product, please contact your
local municipal office, your household waste disposal service or the
shop where you purchased the product.
Penalties may be applicable for incorrect disposal of this waste, in
accordance with national legislation.
(Business users)
If you wish to dispose of this product, please visit our web page
www.jvc-europe.com
product.
[Other Countries outside the European Union]
If you wish to dispose of this product, please do so in accordance with
applicable national legislation or other rules in your country for the
treatment of old electrical and electronic equipment.
to obtain information about the take-back of the
Attention:
This symbol is only
valid in the European
Union.
SOME DO’S AND DON’TS ON THE SAFE USE OF EQUIPMENT
This equipment has been designed and manufactured to meet
international safety standards but, like any electrical equipment,
care must be taken if you are to obtain the best results and safety
is to be assured.
DO read the operating instructions before you attempt to use the
equipment.
DO ensure that all electrical connections (including the mains plug,
extension leads and interconnections between pieces of
equipment) are properly made and in accordance with the
manufacturer’s instructions. Switch off and withdraw the mains plug
when making or changing connections.
DO consult your dealer if you are ever in doubt about the
installation, operation or safety of your equipment.
2 EN
Page 3
DO be careful with glass panels or doors on equipment.
DON’T continue to operate the equipment if you are in any doubt
about it working normally, or if it is damaged in any way ^ switch
off, withdraw the mains plug and consult your dealer.
DON’T remove any fixed cover as this may expose dangerous
voltages.
DON’T leave equipment switched on when it is unattended unless
it is specifically stated that it is designed for unattended operation
or has a standby mode. Switch off using the switch on the
equipment and make sure that your family knows how to do this.
Special arrangements may need to be made for infirm or
handicapped people.
DON’T use equipment such as personal stereos or radios so that
you are distracted from the requirements of road safety. It is illegal
to watch television whilst driving.
DON’T listen to headphones at high volume, as such use can
permanently damage your hearing.
DON’T obstruct the ventilation of the equipment, for example with
curtains or soft furnishings. Overheating will cause damage and
shorten the life of the equipment.
DON’T use makeshift stands and NEVER fix legs with wood
screws ^ to ensure complete safety always fit the manufacturer’s
approved stand or legs with the fixings provided according to the
instructions.
DON’T allow electrical equipment to be exposed to rain or
moisture.
ABOVE ALL
● NEVER let anyone especially children push anything into holes,
slots or any other opening in the case ^ this could result in a
fatal electrical shock;
● NEVER guess or take chances with electrical equipment of any
kind ^ it is better to be safe than sorry!
IMPORTANT (for owners in the U.K.)
Connection to the mains supply in the United Kingdom.
DO NOT cut off the mains plug from this equipment.
If the plug fitted is not suitable for the power points in your home or the
cable is too short to reach a power point, then obtain an appropriate
safety approved extension lead or consult your dealer.
In the unlikely event of the plug fuse failing be sure to replace the
fuse only with an identical approved type, as originally fitted, and
to replace the fuse cover. If the fuse fails again consult your
nearest JVC dealer.
If nonetheless the mains plug is cut off be sure to remove the fuse and
dispose of the plug immediately, to avoid possible shock hazard by
inadvertent connection to the mains supply.
If this product is not supplied fitted with a mains plug then follow the
instructions given below:
DO NOT make any connection to the Larger Terminal coded E or
Green.
The wires in the mains lead are coloured in accordance with the
following code:
If these colours do not correspond with the terminal identifications of
your plug, connect as follows:
Blue wire to terminal coded N (Neutral) or coloured black.
Brown wire to terminal coded L (Live) or coloured Red.
If in doubt — consult a competent electrician.
The C/B button does not completely shut off mains power from the unit,
but switches operating current on and off. ABB shows electrical power
standby and ACB shows ON.
Blue to N (Neutral) or Black
Brown to L (Live) or Red
Safety Precautions for the Burner
Be sure to observe the following precautions. Failing to do so may
result in electric shock, fire, injury, or malfunction.
● Do not disassemble, dismantle, or modify the equipment.
Requests for repair and inspection should be made to the dealer.
● Do not insert metal or combustible objects or pour water or other
liquids inside the burner.
● Turn off the power when connecting equipment.
● Remove the plug when the burner will not be used for a
prolonged time or prior to cleaning (electricity flows through the
equipment even when the power is off).
● Do not block the ventilation holes of the burner.
● Do not use where there is condensation. Suddenly carrying the
burner from a cold location to a hot location may result in the
formation of drops, which may cause a malfunction or failure.
● Do not cause the burner to vibrate when discs are in.
Safety Precautions for Accessories
● When using the AC adapter, the power cord, and the USB cable,
be sure to observe the following precautions. Failing to do so may
result in electric shock, fire, injury, or malfunction.
• Do not insert or remove the plug when your hands are wet.
• Fully insert the plug into the outlet.
• Keep dust and metal objects away from the plug.
• Do not damage the cord.
• Place the cord where it will not trip someone up.
• Do not use when thunder can be heard.
• Do not dismantle.
• Do not use for any product other than this one.
● Do not play the provided CD-ROM with an audio player. Doing so
may damage the circuits or speakers.
Safety Precautions for Discs
Do not use the following discs.
● Cracked discs
● Deeply scratched discs
Installation
Do not install in any of the following locations.
● Humid location
● Location of 60 °C or above
● Location subject to direct sunlight
● Location where overheating is likely
● Dusty or smoky locations
● Locations subject to oily smoke or steam such as a kitchen
counter or beside a humidifier
● Unstable location
● Bathroom
● Dusty places
● Slanted location
ATTENTION:
On placing the unit:
Some TVs or other appliances generate strong magnetic fields. Do not
place such appliances on top of the unit as it may cause picture
disturbance.
When moving the product:
Press C/B to turn off the power, and wait at least 30 seconds before
unplugging the power cord. Then, wait at least 2 minutes before
moving the product.
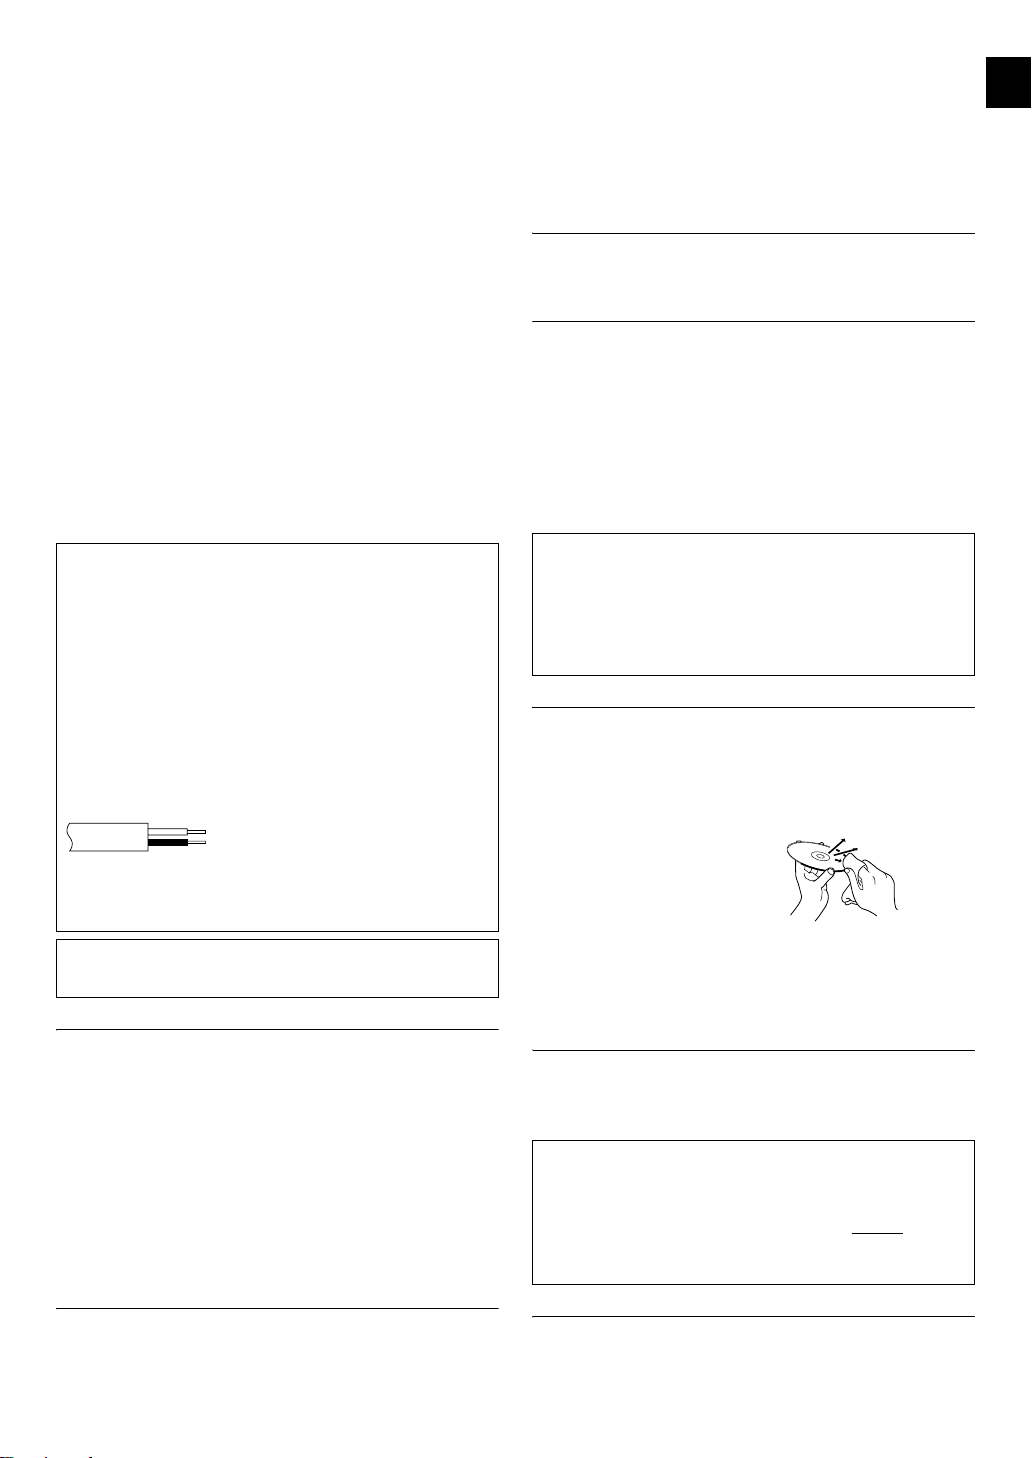
Cleaning Procedure
IMPORTANT:
● Be sure to unplug the burner before beginning cleaning.
● Do not use liquid or aerosol cleaners.
● Ensure that no moisture or liquid comes into contact with the
drive during cleaning.
Exterior of the Burner:
Wipe dirt off with a dry cloth.
Disc Tray:
Wipe off dirt with a soft dry cloth.
Disc:
Gently wipe from the inner edge to
the outer edge with a soft cloth.
Storage:
Make sure that discs are kept in their cases. If discs are piled on
top of one another without their protective cases, they can be
damaged. Do not put discs in a location where they may be
exposed to direct sunlight, or in a place where the humidity or
temperature is high. Avoid leaving discs in your car!
Region Codes
Region codes are numbers for restricting DVD video playback. The
world is separated into six regions and each region is identified by
a number. If the number for a disc does not match the number for
the player, the disc cannot be played on the player. (The initial
region code is indicated on the label on the bottom of the burner.)
Changing the region codes
You can change the region code to play a DVD that has a different
code. (The code cannot be changed for some playback software.)
When you insert the disc, the Caution screen appears. Follow the
on-screen instructions to change the code.
The region code for the burner can be changed 4 times only. The
code set the fourth time becomes the final code, so be sure to set
a frequently used code. Take sufficient care when changing the
code.
Disclaimer
JVC accepts no liability whatsoever for loss of data resulting from
inappropriate connections or handling.
EN 3
Page 4

Accessories
BC
F
AC Adapter (AP-V400U*) Power Cord USB Cable
CD-ROM Blank Disc
CAUTION:
Do not use AC adapter, power cord and USB cable other than those provided with this burner. Doing so may result in electric shock or fire.
NOTE:
043-124000-I2 (AC Adapter) is also available for customer using CU-VD20AC/AG/AS.
*
(DVD-R)
Stand
Guide to Parts and Controls
Front
A
D
A Powe r Button (C/B)
B Eject Button
C Powe r Lamp
D Disc Tray
Rear
E
E DC Connector
F USB Connector
Placing the Burner
This burner can be used either in the horizontal or vertical orientation. When using in the vertical orientation, align the vent of the burner and
the provided stand then place and fix the burner securely on the stand.
Bottom Surface
Stand (provided)
Inserting A Disc
When handling a disc, be sure not to touch the playback/recording side of the disc.
8 Horizontal orientation
4 EN
Vent
8 Vertical orientation
Page 5
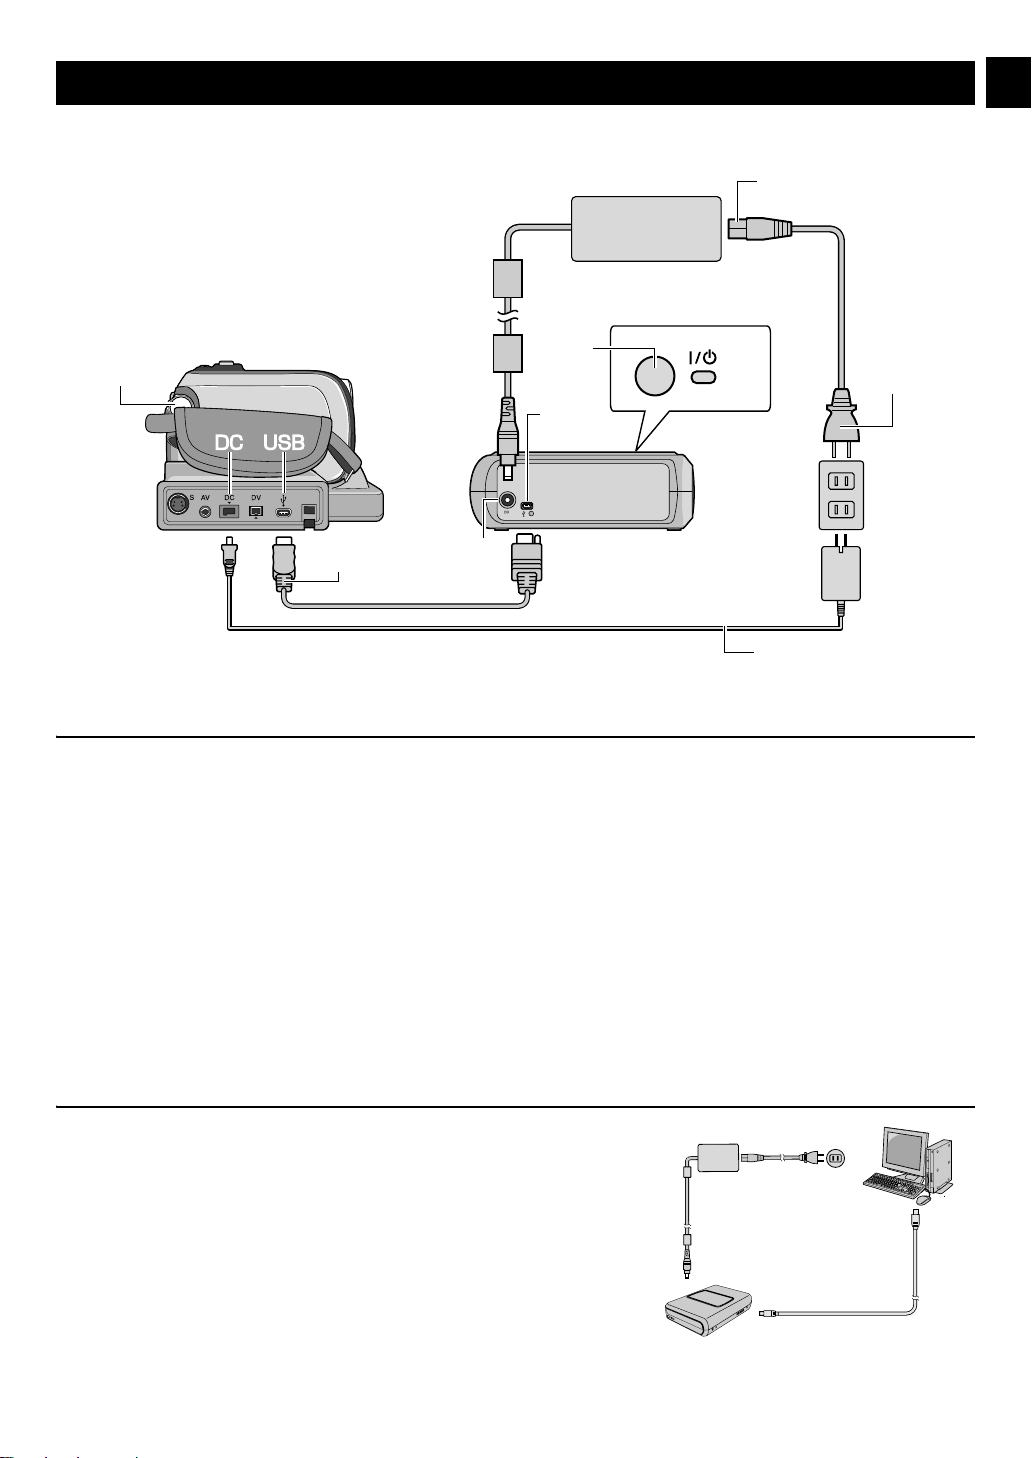
Connections
E
Hard Disk Camera
F
AC Adapter
(provided for the burner)
G
D
B
Power Cord
(Provided)
C
To DC Connector
H
USB Cable (Provided)
AC Adapter (provided for the camera)
A
Rear of burner
To USB Connector
To AC O utlet
Connecting to the Camera
A Connect the AC adapter to the burner.
B Connect the power cord to the AC adapter.
C Connect the power cord to an AC outlet.
D Connect the provided USB cable to the USB connector of the burner.
E Connect the camera to an AC outlet. (墌 Refer to the instruction manual for the camera.)
F Turn on the camera.
G Press the power button
H Connect the provided USB cable to the USB connector of the camera.
NOTES:
● Insert a disc after [INSERT DISC] is displayed on the camera.
● Be sure to use the provided USB cable to connect the burner and the camera.
● When using a camera, make sure the power is provided with the AC adapter, not the battery.
● Do not subject the camera or burner to vibration or mechanical shock while writing to a disc. Be especially careful if the camera is placed
on the burner during writing.
● Refer to “Dubbing Video Files To DVD Discs” in the manual for writing discs.
● The DVD discs that are written with this unit cannot be played with some DVD recorders/players. In that case, use [PLAY DVD] of the
camera to playback discs.
(C/B) on the front to turn on the burner. The power lamp lights in green.
Connecting to PC
A Connect the AC adapter to the burner.
B Connect the power cord to the AC adapter.
C Connect the power cord to an AC outlet.
D Press the power button
The power lamp lights in green.
E Turn on the PC.
F Connect the burner to the PC with the USB cable.
NOTE:
To connect the burner to a PC, use the USB cable provided with the camera.
(C/B) on the front to turn on the burner.
Power Cord
AC Adapter
(provided for the burner)
USB Cable
(provided for the camera)
EN 5
Page 6

Writing Software — CyberLink Power2Go 5.5 Lite —
Power2Go 5.5 Lite is software for writing video, image, audio, and
other data files to data DVDs.
System Requirements
The following shows the system requirements for installation.
Operating
system
CPU
Free hard disk
space
RAM At least 128 MB (at least 256 MB recommended)
Connector USB 2.0/1.1* connector
Display Must be capable of displaying 800 x 600 dots
* If you use USB1.1 cable, it will take approximately 3 hours to write.
Windows® XP Home Edition [XP] (pre-installed) or
®
Windows
Intel
(Intel
At least 50 MB for installation
At least 5 GB recommended for making DVDs
XP Professional [XP] (pre-installed)
®
Pentium® III, at least 800 MHz
®
Pentium® 4, at least 2 GHz recommended)
Installation Procedure
1. Insert the installation CD-ROM in the CD-ROM drive.
2. The language selection screen
appears.
3. The installation start screen
appears.
Click [Next].
5. Enter the user information and
then click [Next].
Follow the on-screen instructions.
6. Installation starts.
7. The screen on the right appears
when the installation is complete.
Select the desired checkbox and
then click [Finish].
● If you select [No, I will restart
my computer later.], the setup
complete screen in step 8.
appears.
8. Click [Finish].
The installation is now finished.
NOTES:
● The above procedure is just a brief explanation on installing the
software. For details on operating Power2Go 5.5 Lite, refer to the
4. Confirm the contents and then
click [Yes].
User’s guide, Help, and ReadMe installed at the same time as the
software. You can view the User’s guide, Help, and ReadMe from
the start menu of the PC.
● This product does not apply to write files into CD-R or CD-RW.
Also, it is not responded to all the functions of Power2Go 5.5 Lite.
● To get customer support and to register the software, you need
the following product key (CD-Key):
PXNVM-NWE4G-XQD9Q-CU9DX-3FQFN-NAKUS
● Power2Go 5.5 Lite does not support conversion of audio files to
MP3 format.
● When the [Enter Activation Key] screen appears while using
Power2Go 5.5 Lite, close the screen without entering the
activation key.
CyberLink Power2Go 5.5 Lite Contact Information
For information on CyberLink Power2Go 5.5 Lite or other products, use the following contact information.
Telephone/fax support
Location Language Office hours (Mon. to Fri.) Phone # Fax #
Germany English / German / French /
Taiwan Mandarin 9:00 am to 6:00 pm +886-2-8667-1298
Paid voice support
Location Language Lines are open (Mon. to Fri.) URL
U.S.A. English 1:00 pm to 10:00 pm CST http://www.cyberlink.com/english/cs/support/
Support web/e-mail
German / French / Spanish / Italian goCyberlink@aixtema.de
Spanish/Italian/Dutch
Language URL/e-mail address
English http://www.cyberlink.com/english/cs/support/new_site/support_index.html
9:00 am to 5:00 pm +49-700-462-92375 +49-241-70525-25
ext. 333
new_site/voice_support.jsp
+886-2-8667-1300
6 EN
Page 7

Troubleshooting
If you think there is a malfunction, first check the following items. If you are still unable to solve the problem, consult your local JVC dealer.
Trouble Cause/Action
Cannot turn the power on. ● Make sure the AC adapter is connected properly.
The camera/PC is not recognized. ● Make sure the USB cable is connected properly.
The burner or AC adapter is hot. ● This is not a malfunction. If the burner is abnormally hot, remove the AC adapter and consult the
Cannot open the disc tray. ● A disc cannot be ejected by pressing the eject button if data is being written to the disc. Wait until
Writing fails. ● Make sure an appropriate disc is being used. (A pg. 3, 8)
Reading fails. ● Insert the disc with the label facing up.
Writing/reading at maximum speed
is not possible.
Commercial DVDs cannot be played
when the burner is connected to PC.
It is impossible to dub the DVD discs,
which were written with this burner,
with DVD recorder with HDD.
dealer from which you purchased the burner.
writing finishes.
● If a disc cannot be ejected with the eject button because of a failure or a malfunction caused by,
for example, the burner being dropped, use the force eject hole to eject the disc. (See below.)
● Use discs recommended for the burner. (A pg. 8)
● Insert the disc with the label facing up.
● Make sure the writing surface of the disc is not damaged.
● Make sure the disc tray is not dirty.
● Writing to irregularly shaped discs such as heart-shaped discs or octagonal discs is not possible.
● Check the writing speed of the disc being used.
● Make sure the writing surface of the disc is not damaged.
● Writing to irregularly shaped discs such as heart-shaped discs or octagonal discs is not possible.
● Any CD recorded using the packet-write method cannot be played.
● Any CD that does not comply with standards such as the CD-DA standard (copy-control CDs)
cannot be played.
● Reading at maximum speed may not be possible if a non-standard disc is used.
● Use discs recommended for the burner. (A pg. 8)
● Check the region code. (A pg. 3)
● Connect the burner to the camera, playback using [PLAY DVD] function of the camera, and dub
the DVD discs with the DVD recorder.
(Refer to “Connecting to a TV, VCR or DVD Recorder” or “Using a DVD Burner for Dubbing” in the
camera’s manual.)
Force Eject Hole
If a disc cannot be ejected with the eject button because of a malfunction, use this hole to eject the disc.
Procedure
A Turn off the burner and disconnect the USB cable and AC adapter.
B Insert a thin rod of about 10 cm long into the force eject hole
located on the left side of the burner. The disc tray will be ejected
for about 10 mm.
C Pull out the disc tray manually and take out the disc.
NOTE:
Be sure to place the burner horizontally.
Force eject hole
Copyrights and Trademarks
Copyrights
Duplicating copyright protected material, for other than personal use, without the permission of the copyright holder is prohibited by
copyright law.
Registered Trademarks and Trademarks
● Windows® is either registered trademark or trademark of Microsoft Corporation in the United States and/or other countries.
● Other company and product names mentioned herein are registered trademarks and/or trademarks of their respective holders.
EN 7
Page 8

Specifications
For general
Power supply DC 12 V
Power consumption (during data transfer) Approx. 5.2 W/1.4 A
Dimensions of main unit (W x H x D) 171 x 56 x 262 mm (6-3/4" x 2-1/5" x 10-3/10")
Weight of main unit Approx. 1.4 kg (3.1 lbs)
Operating temperature 0 °C to 40 °C (32 °F to 104 °F)
Operating humidity 35 % to 80 %
Storage temperature –20 °C to 50 °C (–4 °F to 122 °F)
Laser Power
When connected to the camera
Interface High Speed USB 2.0
Supported discs DVD-R, DVD-RW
Recording format
Recording time
Interface cable Provided USB cable
When connected to a PC
Interface High Speed USB 2.0
Writing speed
(for USB 2.0)
Supported disc
Supported operating systems Windows
Interface cable USB cable provided with the camera
Supported software
Recommended discs
DVD-R JVC, TDK, Verbatim, SONY
DVD-R DL JVC, Verbatim
DVD -RW JV C
Interface cable
Mini USB type A and type B, USB 1.1 and 2.0 compliant
AC adapter (AP-V400U)
Power requirement AC 110 V to 240 Vd, 50 Hz/60 Hz
Output DC 12 V , 4 A
For DVD
For CD
Everio DVD video (motion picture only)
High definition Everio Data DVD (motion picture, still picture)
Everio
(for each 4.7 GB disc)
High definition Everio Refer to the instruction manual for the high definition Everio.
Writing
Reading
DVD
CD Reading CD-ROM, CD-DA, CD Extra, Video-CD, Mixed-CD, CD-R, CD-RW
Provided for the camera CyberLink PowerProducer 3 NE/PowerCinema NE for Everio (Authoring)
Provided for the burner CyberLink Power2Go 5.5 Lite (data writing)
NOTES:
● Only 12 cm discs can be used with this burner.
● DVD-R DL discs can be used when the burner is connected to a high definition Everio or a PC.
● A double-layer DVD-RW disc cannot be used.
● Optimal performance of the burner may not be possible depending on the disc used. Using discs of manufacturers for which compatibility
has been confirmed is recommended.
● The appearance and specifications of the product may change without notice.
● Any CD recorded using the packet-write method cannot be played.
● Operation is not guaranteed for any CD not compliant with the CD-DA standard (copy control CD).
● When connected to the PC, it may not be possible to read the audio files depending on the music CDs (CD-DA). In this case, make use of
applications such as Windows Media Player.
Wavelength 653 to 663 nm
Output 1.0 mW
Wavelength 770 to 810 nm
Output 0.4 mW
Approx. 30 minutes (approx. 90 minutes of video recorded in fine mode)
DVD-R Maximum 8x
DVD-RW Maximum 4x
DVD-R DL Maximum 4x
DVD-R Maximum 12x
DVD-RW Maximum 12x
DVD-R DL Maximum 8x
DVD-ROM Maximum 5x
CD-R/RW/ROM Maximum 10x
Writing DVD-R, DVD-R DL, DVD-RW
Reading DVD-ROM, DVD-VIDEO, DVD-R, DVD-R DL, DVD-RW
®
XP Home Edition/Professional (pre-installed)
8 EN
Page 9

© 2007 Victor Company of Japan, Limited
Printed in China
0107MNH-SW-BJ
 Loading...