

Page 1
ACCESSORY KIT
ZUBEHÖR-SET
KIT D'ACCESSOIRES
ACCESSOIRE-KIT
JUEGO DE ACCESORIOS
KIT DI ACCESSORI
ENGLISHDEUTSCHFRANÇAIS
CU- V70KIT E
INSTRUCTIONS
BEDIENUNGSANLEITUNG
MANUEL D’INSTRUCTIONS
GEBRUIKSAANWIJZING
MANUAL DE INSTRUCCIONES
MANUALE DI INSTRUZIONI
TW
NEDERLANDSCASTELLANO
ITALIANO
LYT0002-0D8A
Page 2

Dear Customer,
Thank you for purchasing this Accessory KIT.
Before use, please read the safety information
and precautions contained in the following
pages to ensure safe use of your new
Accessory KIT.
Using This Instruction Manual
•All major sections and subsections are listed in
the Table Of Contents (Z pg. 9).
•Notes appear after most subsections. Be sure to
read these as well.
It is recommended that you . . .
..... read thoroughly the Safety Precautions that
follow and cautions (Z pgs. 6, 7). They
contain extremely important information
regarding the safe use of your new Accessory
Kit.
EN-2
SAFETY
PRECAUTIONS
WARNING:
TO PREVENT FIRE OR
SHOCK HAZARD, DO NOT
EXPOSE THIS UNIT TO RAIN
OR MOISTURE.
CAUTION:
n To prevent shock, do not open the cabinet.
No user serviceable parts inside. Refer
servicing to qualified personnel.
Page 3

Warning on lithium cell battery
The battery used in this device may present a
fire or chemical burn hazard if mistreated. Do
not recharge, disassemble, heat above 100°C
or incinerate.
Replace battery with Panasonic (Matsushita
Electric), Sanyo or Maxell CR2025; use of
another battery may present a risk of fire or
explosion.
n Dispose of used battery promptly.
n Keep away from children.
n Do not disassemble and do not dispose of
in fire.
CAUTION (applies to the Docking Station):
TO REDUCE THE RISK OF FIRE, DO NOT
REMOVE COVER (OR BACK). NO USER–
SERVICEABLE PARTS INSIDE. REFER SERVICING TO QUALIFIED SERVICE PERSONNEL.
NOTE:
●
The rating plate (serial number plate) of the
Docking Station is on its bottom.
This unit is produced to comply with
Standard IEC Publ. 65.
EN-3
Page 4

CAUTION! Attaching the camcorder to the
Docking Station, connecting cables (AUDIO/
VIDEO, S-VIDEO, Editing, DC) and leaving the
unit on top of the TV is not recommended, as
tripping on the cables will cause the camcorder to
fall, resulting in damage.
EN-4
About Batteries
DANGER! Do not attempt to take the batteries
apart, or expose them to flame or excessive heat,
as there is a risk of fire or explosion.
WARNING! Do not allow the battery terminals,
or the battery itself, to come in contact with
metals, as this can result in a short circuit and
possibly start a fire.
• When transporting, make sure the provided battery cap
is attached to the battery. If you misplace the battery
cap, carry the battery in a plastic bag.
Page 5
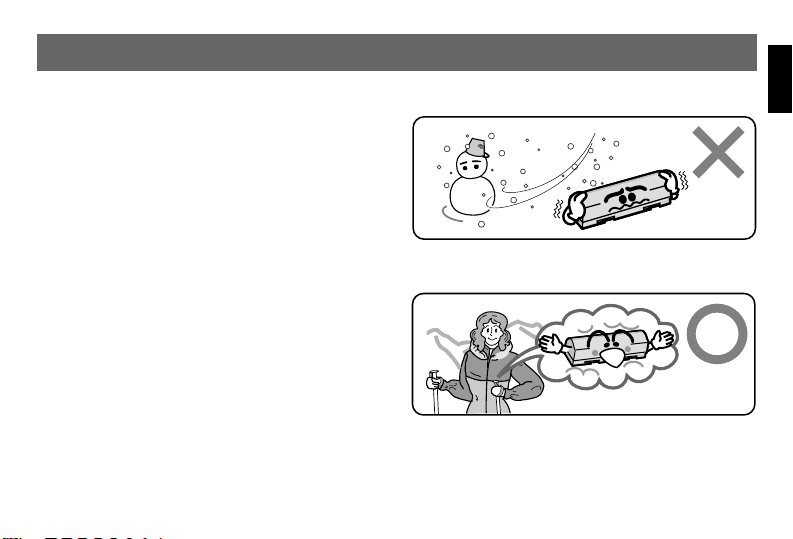
The Benefits Of Lithium-Ion Batteries
Lithium-ion batteries are small yet have a large
power capacity. However, if exposed to extreme
cold (below 10°C), the effective operational time
decreases significantly. Exposure to temperatures
below 0°C will render the battery inoperative. If
you are planning to shoot in an environment at
these temperatures, carry the battery in a pocket
to keep it warm, then attach it just prior to
recording. The provided power grip is also
recommended. It holds two batteries, and keeps
them sufficiently warm even at an outside
temperature of 0°C.
Lithium-ion is vulnerable in colder temperatures.
Keep the battery in a pocket when not in use, or
use the provided power grip.
EN-5
Page 6

CAUTIONS
BEFORE USE
● To avoid malfunctions, short circuits, battery
leakage, excessive heat and possibly fire . . .
.....
DO NOT allow the DC Plug to come in
contact with metal objects or surfaces.
.....
DO NOT use the Power Grip with any
appliance other than the GR-DVJ70.
.....
DO NOT attempt to modify the case in any
way.
.....
DO NOT dispose of the case in excessive
heat or fire with the BN-V714U Battery Packs
inside.
.....
DO NOT store the Power Grip in direct
sunlight or near a radiator or other heatgenerating appliance (where the temperature
is above 80°C).
.....
DO NOT attempt to use the Power Grip if it
or the BN-V714U Battery Packs become wet.
EN-6
DURING USE
● Make sure to remove the battery cap.
● The battery may become warm after charging or
after use. This is normal.
● When attaching the Power Grip to the GR-DVJ70,
make sure the attachment screws are securely
tightened.
WHEN NOT IN USE
● Store the Power Grip in a dry, climatically
stable environment.
● Detach the Power Grip from the GR-DVJ70 and
remove the battery from the case before storing.
Replace the GR-DVJ70’s connector cover.
Battery Packs
The BN-V714U Battery
Pack is a lithium-ion
battery. Before using the
battery pack, be sure
to read the following
cautions:
Battery
Cap
Terminals
Page 7

1. To avoid hazard . . .
..... do not burn.
..... do not short-circuit the terminals.
..... do not modify or disassemble.
..... use only specified chargers.
2.
To prevent damage and prolong service life . . .
..... do not subject to unnecessary shock.
..... charge in an environment where
temperatures are within the tolerances
shown in the chart below. This is a
chemical reaction type battery—cooler
temperatures impede chemical reaction,
while warmer temperatures can prevent
complete charging.
..... store in a cool, dry place. Extended
exposure to high temperatures will
increase natural discharge and shorten
service life.
..... avoid prolonged uncharged storage.
..... remove from charger or powered unit
when not in use, as some machines use
current even when switched off.
3. To prevent damage to the camcorder . . .
..... replace the battery pack when it begins to
deliver less recording time per charge.
NOTES:
●
Recharging time is based on room temperature
of 20°C.
●
The lower the temperature, the longer recharging takes.
●
It is normal for the battery pack to be warm
after charging, or after use.
Temperature Ranges
Charging ................................ 10°C to 35°C
Operation .............................. 0°C to 40°C
Storage .................................. –10°C to 30°C
EN-7
Page 8
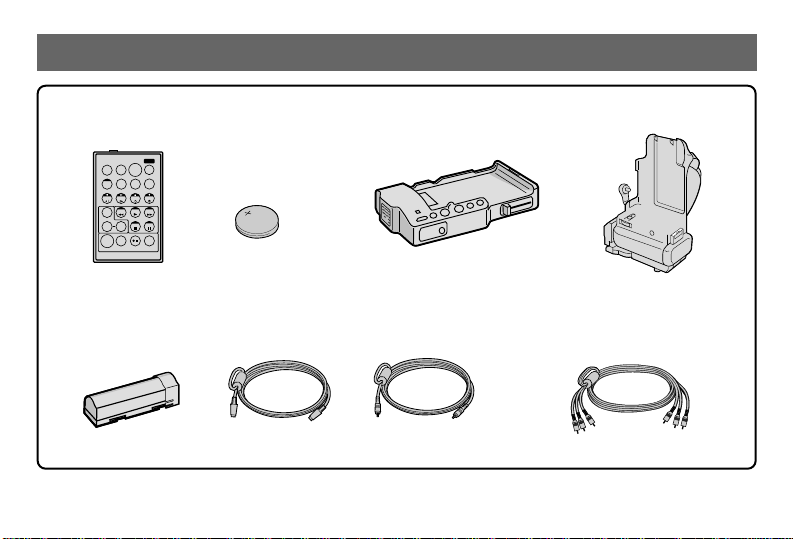
PROVIDED ACCESSORIES
Remote control unit
RM-V708U or RM-V710U
TW
Battery pack
BN-V714U
EN-8
Lithium battery CR2025
(for remote control)
Docking Station
Editing cableS-VIDEO cable
Power Grip CU-V778U
AUDIO and VIDEO cable
(Phono Docking Station TV or VCR)
Page 9

CONTENTS
SAFE PRECAUTIONS
PROVIDED ACCESSORIES
ABOUT THE POWER GRIP
Install Batteries......................................................................................... 11
Attach The Power Grip To The Camcorder........................................................... 12
Adjust The Grip Band .................................................................................. 13
Record A Scene ......................................................................................... 14
Tripod A Mounting...................................................................................... 15
Attaching A Microphone ............................................................................... 16
Specifications ........................................................................................... 17
ABOUT THE REMOTE CONTROL UNIT
ABOUT THE DOCKING STATION
ABOUT THE BATTERY PACK
2
8
10
18
21
24
EN-9
Page 10

ABOUT THE POWER GRIP
The Power Grip enables extended continuous shooting, and makes shooting possible even at 0°C.
Lithium Ion batteries are vulnerable in the colder temperatures of winter. Their effectiveness is drastically
reduced at temperatures below 10°C, and they will normally not function when the temperature is
below 0°C. In such an environment, use the Power Grip.
When using fully charged batteries . . . When using unevenly charged batteries . .
Fully Charged Battery 1
Fully Charged Battery 2
Approximate shooting time — 90 min.
(20 — 25°C)
EN-10
Fully Charged Battery 1
Partially Charged Battery 2
Approximate shooting
time — depends on remaining
charge of Battery 2
Discharged
Portion
Page 11

Install Batteries
1
2
3
Always use two battery packs. The case will not function if only one battery pack is installed.
Press down "PUSH" and open the cover
1
in the direction of the arrow.
“PUSH”
Cover
Battery Pack
/ marks
Cover
Insert two fully charged Battery Packs.
2
• Make sure the / marks on the batteries
are facing each other.
• If two unevenly charged battery packs are
used, the case will stop functioning as soon
as the weaker of the two battery packs run
down.
Close the cover.
3
EN-11
Page 12

2
4
1
2
1
1
4
2
3
3
ABOUT THE POWER GRIP (Cont.)
Attach The Power Grip To The Camcorder
Always use two battery packs. The case will not function if only one battery pack is installed.
EN-12
Connector cover
Screw
When detaching the
Power Grip, turn the
screw opposite the
direction indicated by
the arrow.
Slots
DC Input Jack
DC Plug
DC Cord
Metal Fittings
Page 13
Remove the camcorder’s connector
1
cover as indicated by 1, 2.
• In 2, rotate the cover in the direction
indicated by the arrow, then remove it.
• After use, follow 3, 4 to re-attach the
cover.
Insert the tips of the metal fittings on
2
the Power Grip deep into the corresponding slots on the camcorder (1),
then attach the case (2).
Turn the unit around, then turn the screw
3
in the direction indicated by the arrow.
• Continue turning the screw until it stops.
Connect the DC Plug on the Power
4
Grip to the DC Input Connector on the
camcorder.
• Do not pull on the DC Cord, as this can
result in malfunctions.
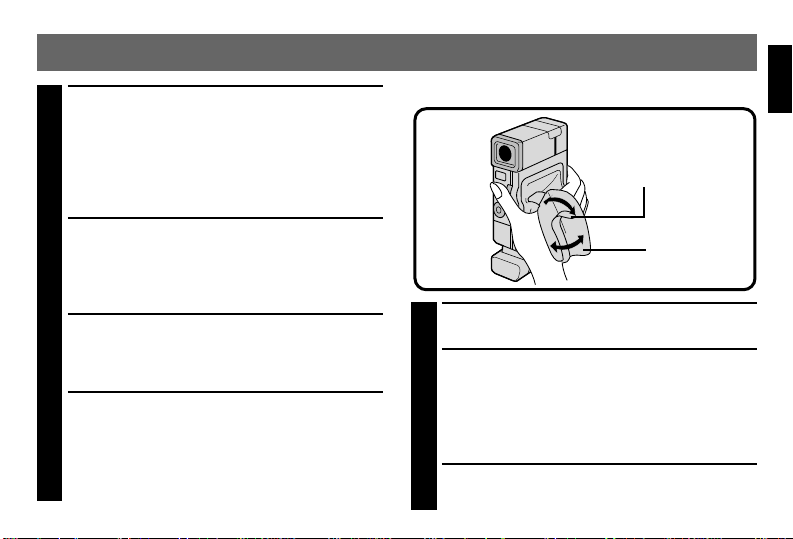
Adjust The Grip Band
Grip Band
Pad
Detach the pad.
1
While holding the camcorder securely,
2
adjust the grip band on the Power Grip.
• Adjust so your thumb can easily reach the
Zoom Lever and the RECORDING START/
STOP button.
Re-attach the pad.
3
EN-13
Page 14

ABOUT THE POWER GRIP (Cont.)
Record A Scene
Insert a cassette and try recording.
13
RECORDING
START/STOP Button
Power Lamp Lights
Power Lamp Lights
OFF
REC
PLAY
5S
Viewfinder
PAUSE
Record/Standby
Mode
2
*Depending on the temperature,
Blinks*
the time from when the Power
Lamp begins blinking to when it
Extinguishes (Batteries
have discharged)
** The camcorder’s battery and the Power Grip battery packs cannot be used at the same time. If both are installed, the
Power Grip battery packs become the power source. When the Power Grip Battery Packs near complete discharge
(when the Power Lamp begins blinking), set the camcorder to RECORD/STANDBY mode, set the Power Dial to
“OFF” and detach the Power Grip DC Cord from the camcorder. Then turn the camcorder’s power back on.
EN-14
goes out will vary (it takes
longer in colder temperatures).
Page 15

Pull out the viewfinder.
1
Set the Power Dial to “REC”.
2
• The Power Lamp lights and the camcorder
enters the Record/Standby mode.
• When the battery packs installed in the
Power Grip become weak, the case’s
Power Lamp begins to blink, and the lamp
goes out when the battery packs have
completely discharged. Replace them with
two fully charged battery packs.
• Be sure to set the Power Dial to "OFF"
before installing charged battery packs.
• While the DC Plug is connected, even as
the battery packs begin to run down, the
Battery Indicator on the camcorder will
show the battery packs to be fully charged
.
Press RECORDING START/STOP.
3
Tripod Mounting
Bottom side of
Power Grip
Align the screw and Power Grip
1
direction stud on the tripod with the
Power Grip’s mounting socket and stud
hole. Then tighten the screw.
• Refer to the tripod's instruction manual for
details on mounting onto tripod.
EN-15
Page 16

2
ABOUT THE POWER GRIP (Cont.)
Attaching A Microphone
You can attach a stereo microphone (commercially available) to the Power Grip.
The camcorder does not supply power to the microphone.
Refer to the microphone's instruction manual for details on attaching.
EN-16
1
Accessory shoe
1
Accessory shoe
2
External MIC
input jack
Shoe
Accessory shoe
Page 17

Pull out the accessory shoe 1 and turn
1
it in the direction of the arrow 2.
Insert the microphone's shoe into the
2
accessory shoe. Then connect the
microphone's ø3.5 mm mini-plug
connector to the external MIC input
jack on the camcorder.
Specifications
Operating temperature 0 — 40°C
Operating humidity 30 — 80%
Storage temperature –20 — 50°C
Continuous shooting time
..... at 20 — 25°C Approx. 90 min.*
Dimensions 96 (W) x 149 (H) x
65 (D) mm
Weight Approx. 151 g
* Based on use of two fully-charged BN-V714U
Battery Packs.
EN-17
Page 18

ABOUT THE REMOTE CONTROL UNIT
For further details, refer to your camcorder's instruction manual.
Controls, Indications And Connectors
You can use the RM-V708U or RM-V710U to control the camcorder when it's attached to
the Docking Station.
321
4
EN-18
5
6
7
8
9
0
!
TW
er
@
#
$
%
^
&
*
(
qw
)
Page 19

1 POWER ON/OFF Button
2 Recording START/STOP Button
3 PAUSE IN connector
4 ZOOM Buttons
5 DISPLAY Button
6 SHIFT Button
7 SLOW Rewind Button/Left Button
8 SLOW Forward Button/Right Button
9 FADE/WIPE Button
0 EFFECT Button
! EFFECT ON/OFF Button
@ AUDIO MONITOR Button
# MBR SET Button
$ A.DUB Button/Down Button
% INSERT Button/Up Button
Operation Buttons
^ FF Button
& PLAY Button
* REW Button
( PAUSE Button
) STOP Button
R.A. EDIT Buttons
q ON/OFF Button
w VCR REC STBY Button
e CANCEL Button
r IN/OUT Button
EN-19
Page 20

ABOUT THE REMOTE CONTROL UNIT (Cont.)
Installing The Battery
The RM-V708U or RM-V710U uses one lithium battery (CR2025).
Pull out in the direction of the arrow
1
while pressing the knob as shown.
With the “+” side up, place the lithium
2
battery (CR2025) in the holder.
Slide the holder back in until you hear
3
a click.
KNOB
Specifications
Power : DC 3 V (Lithium
Battery CR2025)
Battery Life : Approx. 1 year (depend-
ing on usage)
Effective distance : Approx. 5 m (front shaft)
EN-20
Operating temperature
Storage temperature : –20°C — 50°C
Dimensions : 54 mm (W) x 86 mm
Weight : Approx. 26 g (with
: 0°C — 40°C
(H) x 12 mm (D)
battery installed)
Page 21

ABOUT THE DOCKING STATION
For further details, refer to your camcorder's instruction manual.
Controls, Indications And Connectors
12345
6
@! 098 7
1 Fan
Comes on automatically when camcorder is
attached; serves to cool the unit down. Take
care not to interfere with the blades.
2 EDIT Button
3 CHARGE Indicator
4 PAUSE Button
5 PLAY Button
6 RELEASE Button
7 Lock Lever
8 Fast-Forward (FF) Button
9 Rewind (REW) Button
0 STOP Button
! EDIT Jack
@ Remote Control Sensor
EN-21
Page 22

ABOUT THE DOCKING STATION (Cont.)
#$%^ &
)(*
EN-22
# JLIP Jack (Joint Level Interface Protocol)
• It is used to connect the camcorder to a
device such as a personal computer.
For further detail consult your nearest JVC
dealer. Information (in English) is also
available at our home page: http://www.jvcvictor.co.jp/
$ Video Output Jack
% Multi Jack
^ Audio Output Jack [L]
& DC Input Jack
* S-Video Output Jack
( Audio Output Jack [R]
) DC Output Jack
For future use.
Page 23

Specifications
Operating temperature : 0°C — 40°C (when charging, 10°C — 35°C)
Editing connector : ø3.5 mm
S-Video connectors
Y : 1 Vp-p, 75 ¸
C : 0.3 Vp-p, 75 ¸
Video output connector : 1 Vp-p, 75 ¸ (Pin jack)
Audio output connector : –8dBs, 1 k ¸ (Pin jack)
JLIP connector : ø3.5 mm
Multi connector : 34-pin
Dimensions : 112 mm (W) x 48 mm (H) x 203 mm (D)
Weight : Approx. 345 g
* E. & O. E. Design and specifications subject to change without notice.
EN-23
Page 24

ABOUT THE BATTERY PACK
For further details, refer to your camcorder's instruction manual.
CAUTIONS:
●
This is a lithium-ion type battery pack, and is intended for use with the JVC Digital Video Camera
only.
●
Use only the AC Power Adapter/Charger designed exclusively for the Digital Video Camera. Use of
another battery charger may result in incomplete charging, malfunctions and risk of fire.
●
Do not incinerate or disassemble; may explode or release toxic chemicals.
●
Do not short circuit; may cause burns.
●
Lithium-ion battery packs are small yet have a large power capacity. However, if exposed to extreme
cold (below 10°C/50°F), the effective operational time decreases significantly. Exposure to temperatures below 0°/32°F will render the battery inoperative. If you are planning to shoot in an environment
at these temperatures, carry the battery pack in a pocket to keep it warm, then attach it just prior to
recording.
●
When transporting, make sure the provided battery cap is attached to the battery pack. If you misplace
the battery cap, carry the battery pack in a plastic bag.
●
For more details on use of battery packs, please refer to the Digital Video Camera’s instruction
manual.
EN-24
Page 25

Charge Maker
RED
BLACK
CHARGE MARKER
• The charge marker does not move
by itself. After charging or removing
a discharged battery, be sure to set
the marker to the predetermined
position.
The charge marker makes it easy for you to
differentiate between charged and discharged
batteries. Choose RED or BLACK to mean charged
or discharged, and you'll always know the status
of your batteries.
Specifications
Power : DC 3.6 V /1350 mAh
Dimensions : 20 mm (W) x 20 mm (H) x 71 mm (D)
Weight : Approx. 50 g
EN-25
Page 26

VICTOR COMPANY OF JAPAN, LIMITED
COPYRIGHT© 1997 VICTOR COMPANY OF JAPAN, LTD.
Printed in Japan
E
0397MSV*UN*VP
CU-V70KIT E
 Loading...