

Page 1

I I I I I I
JVC
CH-X1500
CD CHANGER
CD
CD J
Instructions
iolnaig
DIGITAL AUDIO
I TEXT I
LI
HI
LVT0975-006A
[U]
ENGLISH
Thank you for purchasing this JVC product. Please read these
instructions carefully before starting operation to be sure to obtain
optimum performance and a longer service life from the unit.
This unit has been designed to play CDs, CD-Rs, and CD-RWs.
• You can also play back your original CD-Rs (Recordable) and
CD-RWs (Rewritable) either in audio CD format or MP3 format.
• You can also play back CD Text.
IMPORTANT FOR LASER PRODUCTS
PRECAUTIONS
1. CLASS 1 LASER PRODUCT
2. CAUTION: Invisible laser radiation when open and interlock
failed or defeated. Avoid direct exposure to beam.
3. CAUTION: Do not open the top cover. There are no user
serviceable parts inside the unit, leave all servicing to
qualified service personnel.
4. Caution: The compact disc player uses invisible laser
radiation and is equipped with safety switches which prevent
emission of radiation when unloading the CD magazine and
the safety interlocks have failed or are defeated. It is
dangerous to defeat the safety switches.
5. CAUTION: Use of controls or adjustments or performance
of procedures other than those specified herein may result
in hazardous radiation exposure.
PLAYBACK
CD ' CD-R CD-RW ”
• ¡mmmm cd mp3 cd-r
) ! CD-RW !")°
• CD Text”
1.
2. a* :
3. a* :
4. a* :
5. a* :
1002MNMMDWJEIN
EN, CH, AR
Ss . JVC 0^
^Jjj jl^^lI sJj
jl^^lI Ij^ 0^ J^^I
iCD ^ ^l\ I^C^VI
.CD-RW ^
aiV^II ^'i^VI (^-L-<iJ <i-LiJI) CD-RW iLjI^^C^VIj
.^4^3 jl CD a ' ^ aJI'^C^.I ^iIaj^àì
. CD aJ IjC^I J'iAi l^Ail . * l^<^ •
^ I ^ AijJ^ ^“flll d' ij|A dA^uI .V
SiaiI'a s 1 * 1^ ^a» ^ Aj V ^l^yi j^'ilaA da'UijI i aaj»
^<^ jl^^ll J^lj s Ij^l V .^jl*II slC«II ^“aj V :
I'^- d^^Al d^^ijll dJ IjC^.yi JxA-a ^
da'Lj ^jjj jl^^ll JIa*“^.I Ij^ jC^II .^^aVI ^'jlaA
,l iLI
^^A“
.CLASS 1 LASER PRODUCT ^ .^
dil'^ ^Il
J ^aaVI ^^l*'tl j^'jla^ jl^^llj
da'Lj 1. aajj jI ^ a*^ ■ CD d^^ijll dJ IjC^.VI
‘j-i-
J|
II Jlft^ l Jft*“^II J<a l^“il'^^
dil'^ ^II
jl L jIj^aII Jlft*“^.l ^l ^<^ *i*J^*
Jl
^ '“<II Ij^ j'^- diJl“II I
Lj I^^C-^VI j(J'^^-lI ^i-LUl) CD-R .
I Ij^ s Ij^^ ^l^- I-*JJ
l'“< I j 2il'«j I - .lft'l«'II
Sj^j sIjI
iJ jl^^lI Ij^ ^ ^aI
Lj Ij
I JLft^L-
CD-R Il^i^^c^vi
Aj LA^I •
. d ijj'lll d^A^I
I ^^I^aV
.^LaVI ^'jlaA
|s|i^1
iJI ^LaA
.^JJ'■
i
Ì
:i .r
:i .1
WARNING
This unit is designed to operate with 12 volt DC, NEGATIVE
ground electrical systems.
When replacing the fuse, use one with the specified rating for
this unit. If the fuse blows frequently, consult your nearest JVC
car audio dealer.
PRECAUTIONS
Car's Internal Temperature
Before listening to CDs after your car has been parked for some
time in low or high temperatures, wait until the temperature
inside the car stabilizes.
Condensation
In the following cases, moisture may condense on the lens, a
critical part of the CD player, making the CD signal unreadable:
- When the heater has just been turned on.
- When the humidity is high.
In these cases, unload the CD magazine and wait for 1 or 2
hours.
Volume Setting
- CDs produce very little noise compared with analog sources.
If the volume level is adjusted for analog sources, the
speakers may be damaged by the sudden increase in the
output level. Therefore, lower the volume before operation
and adjust it as required during playback.
- Adjust the volume so that you can hear sounds occurring
outside the car.
Vm
m JVC
>Ti
S^Sl!^"»$%№'(”«T,W.T®^Sl /0123
-Sgft!”
e maRxE
rn^sa« # $%&«67»+,-s/ffii*’34«fi+
^V DC jAI'a jl'j dC^Ij^ JftA'I jl^^ll Ij^ JaI
.NEGATIVE ^JL^ .jij ^j_L_ij^ d^^Jl j.i
dftlft^ Jft*“^.l ¡(jj'aII) d'_l»j^<II dAlft^II Jj'“^.I
j!<j Ijl dàj^ ^jll ^ il^.l'SIl ^^a» Jft^ t (j^^i^) d'il *j^^
d£IAJ J'^j V
^^^l id^j^l ^-jlj^l *- iiK-j ^| ^<^ i^JJL“JI ^^VL^JI
SjI jL'iIj CD d^^AjII dJIjC^.yi ^j^l i^^VL^JI 6j^
dJLa 'SjLI'“II jjl^iftlI llj'^—A i.j^iIl Sj^ ^j“^A ^L^ Ijl
^j“^i d'^iaii sj^j^i I .ir.ift^lI Ijj^i ^l ^<^
^j“^II 1‘j^iII Sj^ L'^l j^_ij J'iA'II
IaI
ì^aIL^ j I d^—a^'A Sj Ij^ ^^L^jj ‘ ~ <ajII ^^*'I SjI'^II
iCD d^^AjII dJIjC^yi JxaT Ij^ ^mI^^j ^laj sj^
J I jL^AI Ss Ij^ d^uJ^^I ^l^- ^Jj-Ij^l 1- liKj (
dJjIaA Ij^ J'la CD d^^AjII I>lJIjC^VI ^^<j —
J^a i.j^iIl Sja <'^II Ij^I i.j^iIl ^j^
JIj^^yi ^Lft^u ‘*I\<A
¡(jj'aII) d'_l ^J^<II dAlft^II
.S^j^^^^^^U ^
ill
Sjlj^lI djlAljII Sjlj^l d^jj
( fliail ^| iCD d^^AjII I>1JIjC^VI ^^I ^lft~^<yi J^a
SjI'^II J^lj Sj Ij^Jl d^jj ^ ^i'j j.^“jl
d_JIIJI ^ a^*l<"
:CD d^^AjII dJlj-C^yi
d'ajA JLaAI Iaj'^ —
d'Il^. d jjljII ^j<"j Iaj'^ —
. d^L^u V jl ^
t—Sja
sjLI''II jjl^ill
. ^Ift'^VI si'll I jlCII
^ ij^ iII sja ^A Li^ ^l
SjL
.
»»»«
5lj.“-l
JVC
'^^1 cjL^
INSTALLATION
Avoid installing the unit in the following places
- Where it would be exposed to direct sunlight or direct heat
from the heater or in an extremely hot place.
- Where it would be subject to rain, water splashes or excessive
humidity.
- Where it would be subject to dust.
- Where it would be positioned in an unstable place.
- Above connection cords or on the floor under which there is
piping.
- Where it could damage the car's fittings (spare tire, etc.) in
or under the trunk.
Before drilling holes in the trunk to install the unit, make sure
that there is a sufficient space under the trunk so that you do
not drill holes in the fuel tank, etc.
Firmly install the unit using the provided screws.
- !"#$%&'()
-7S7!"#$%&
-«a»e"±'%&«()T+№—fi±”
- («7123)
^6a!№#$”
!si%№"#’%&'«)*3±a±a”
67SiS"#№%&'ffi»*+¥S№/01”
d'IL'Il^ O^LaVI jL^^I
^^i<A jl ^jajII Sj^aL
j^j j
' _<ja'II Jft^- V ‘ SjI'^II ‘ ~ * ^_L^ ^ Ij^ jj^j
SJJJiI
^l ^-Il jL4^
1
j
^^^ìi j1^^
l^“^* J^jj ^^^l ^i^bjVI jl J'^tijl^l ^^^aI —
jj|
I
■ "■* jl jAlj '(.^Il i^'I^'l^VI dlvIl J^a) SjI'^II
J^Lj 'Sjl'^II J^lj jl^UI ^ <'^j“I '_<jai Jft^- J'a
lIlJI J
^^
1 L
4_ Ò1 ^^l °^
1 L
^_ ^
‘ " " .^ijLJl
J
-^-A jL4^1 jj-^ Ò
^^
Sj Ij^JI j I SjAIiII ^^ftAII
Ò1 ^^l °^
.d'JLAJГd_JIIJI jl sLil
■ jl'*lI d^^'j *II o^^aVI
.^ji^uTI j'^- o^LaVI —
1 O
l o^LaVI —
<A ^^
I dC^ Ij^ Sjj^ij jl^UI ^
LaVI —
.Ij^ SjL^
LaVI
SjI'^II
.¿Il iJJa>JI ò1J-^
—
'.jL^UI
Ij
CH-X1500[U]6.0C 24/10/02, 10:04 AM
Page 2
I I I I I I
LI
HI
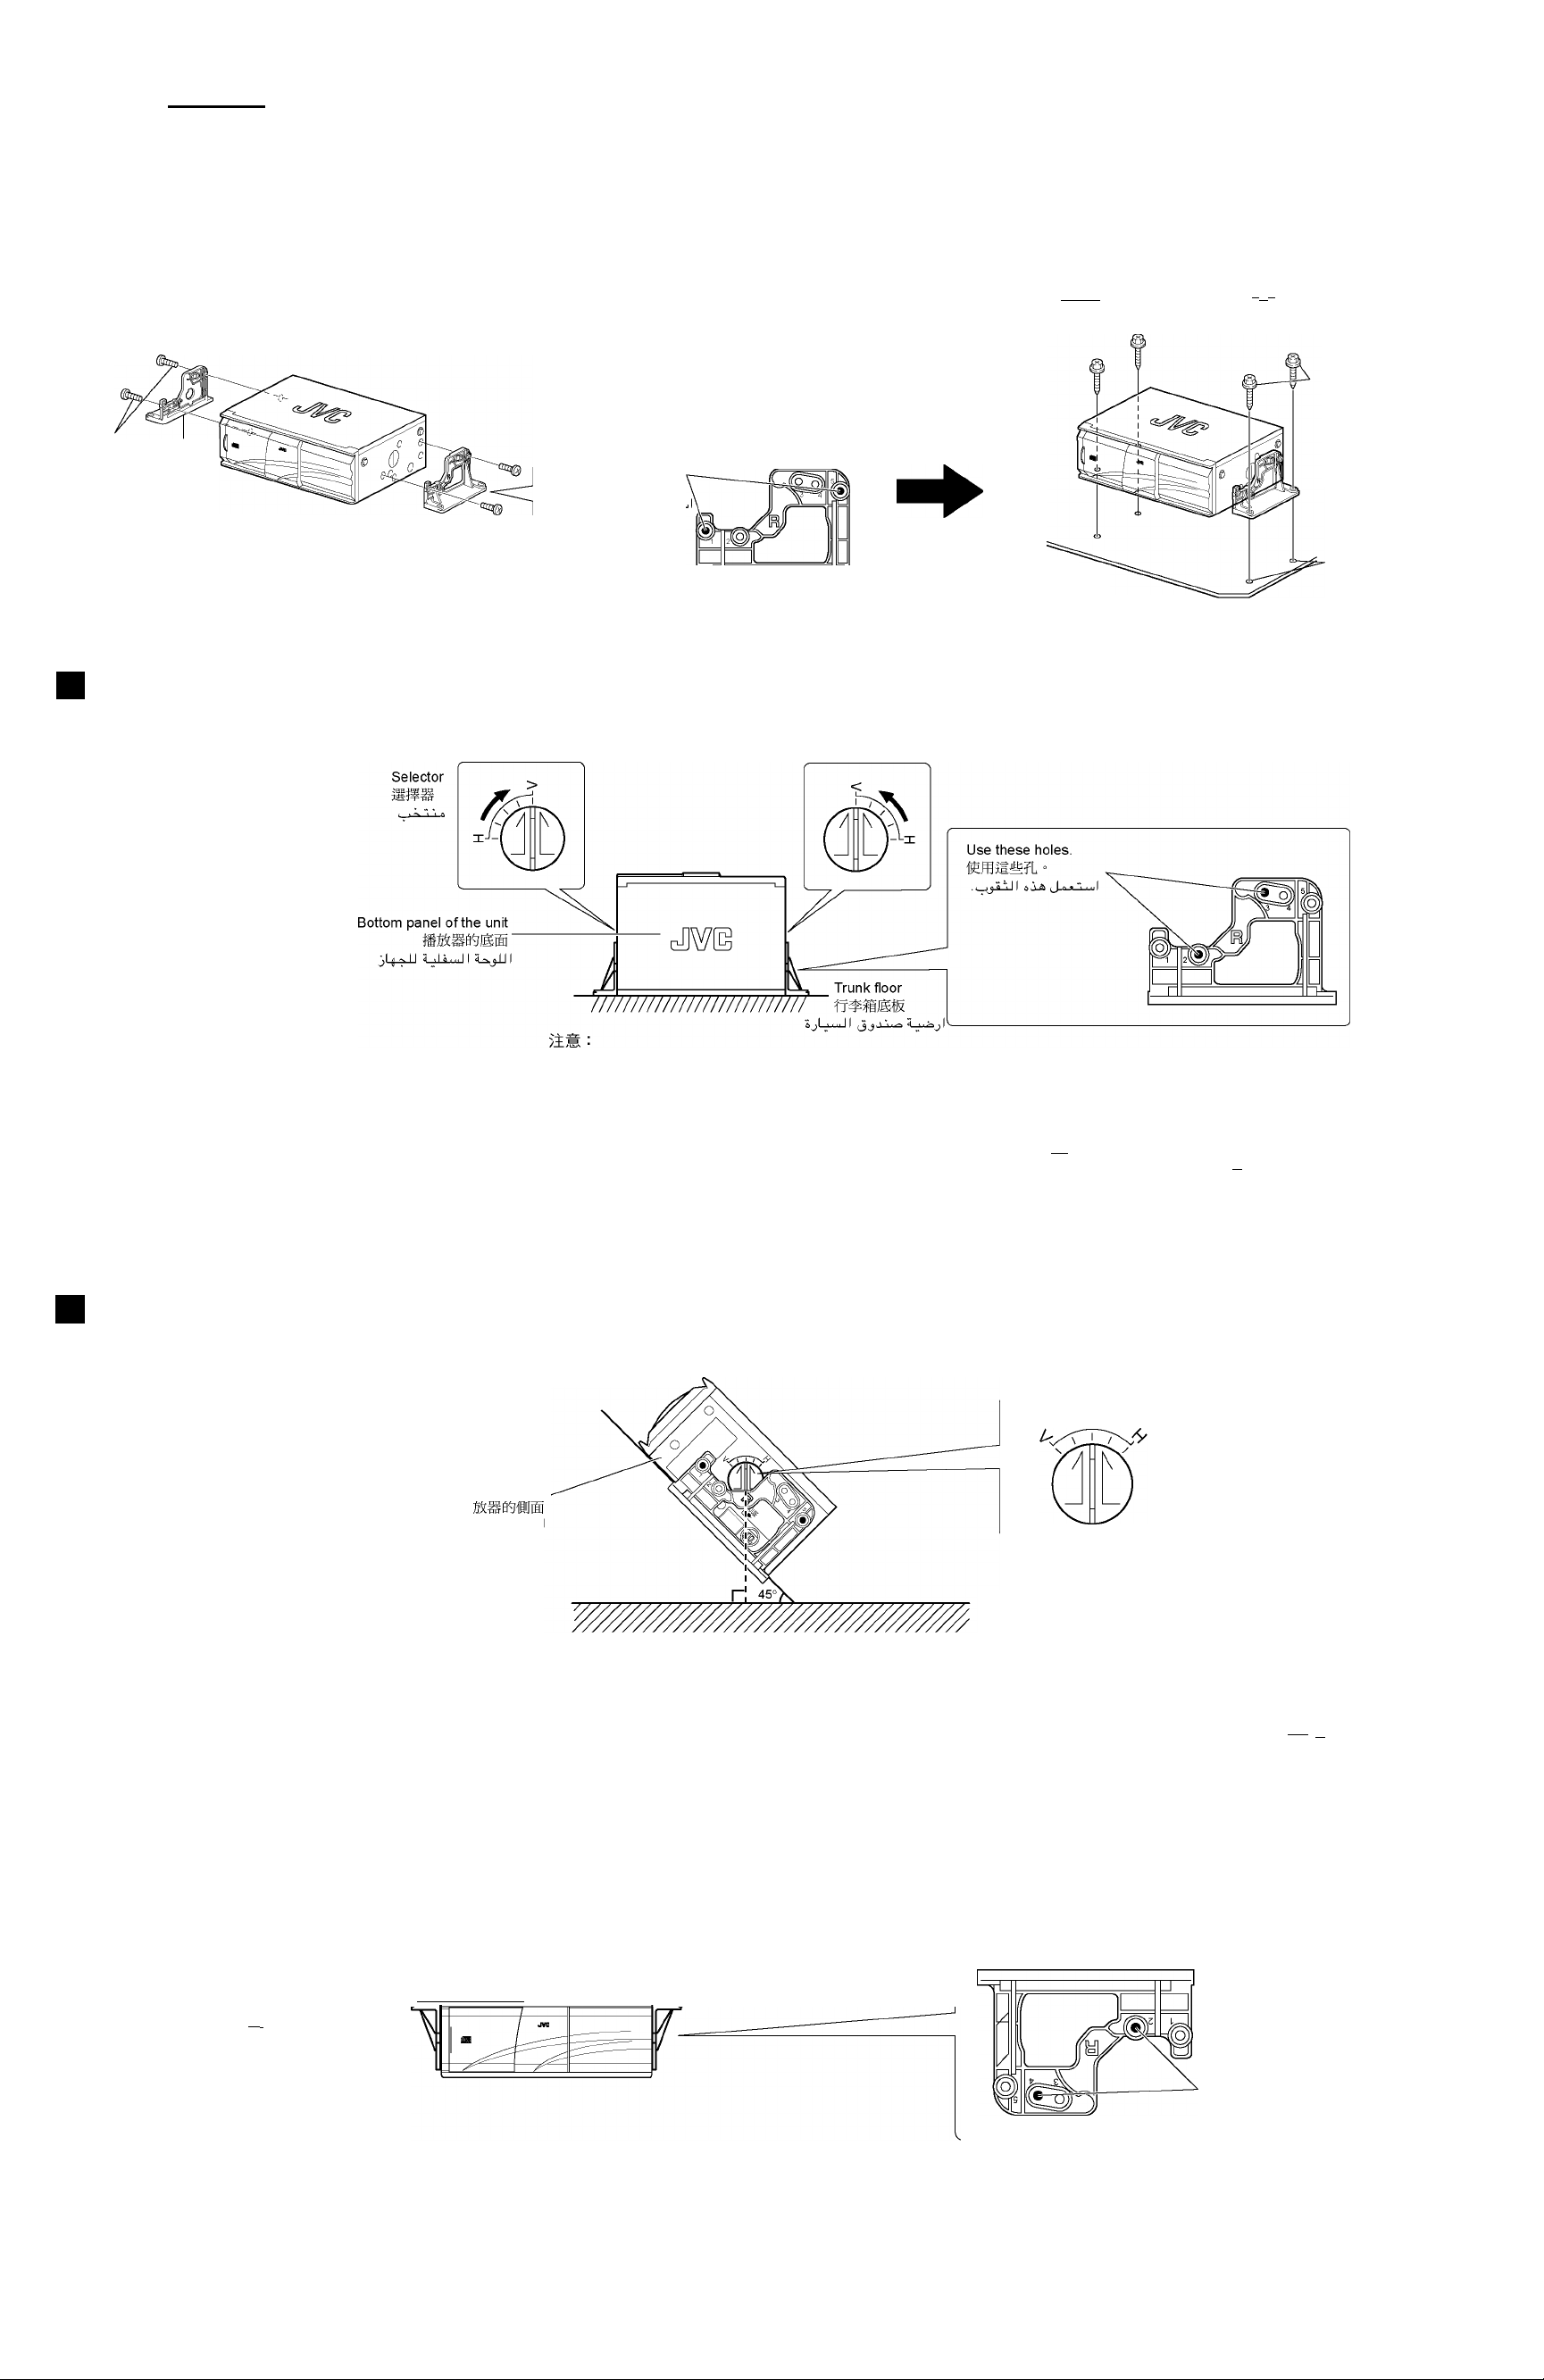
When installing the unit horizontally
1. Attach the mounting brackets on the side panels of the unit using 1. (H a)
screws. (Fig. a) 2. (B b)
2. Install the unit on the floor of the trunk using self-tapping screws.
(Fig. b)
1.
Screw
(M4 x 8 mm)
(M4 x 8 mm)
n X M4
(r
) ft®
Mounting bracket
Fig. a
B a
a
Use these holes.
»u1"ll Jlf"
B
When installing the unit upright (Fig. c)
c
"In — ii d''\i‘i u^Jl yi^ ^ •'^j"ii ell) I J^ji .±
■^'O""11 3j
2.
Trunk floor
i^jl'^ll d'{j 1 Fig. b
B b
(c Jj^) b*£
d'flál Bt ^ *'^j*
(a JJ^)
b*Bl1
d'{jl jL4‘l
viSj .X
Tapping screw
(M5 x 20 mm)
(M5 x 20 mm)
xoo"^l w¿'je
(r X. x M5)
Drill holes
» ui"ii
b Jj^
(b Jj^)
Fig. c
H c
c Jj^
Notes:
• When attaching the unit with the screws, refer to “ H When
installing the unit horizontally” above.
• When installing the unit upright, set the selectors located
on both sides to the “V (vertical)” position. (When it is
installed horizontally, be sure to set the selectors to the “H
(horizontal)” position.)
- When installing the unit upright, securely install to the trunk
floor.
• If you install the unit without setting the selectors correctly, the
symptoms below may occur.
- Sound is intermittent.
- CDs are damaged.
SaS !»#$% ’ “V (S
a) ’ ’ (%&'() ’ +E-ffiS»123 “H (*
¥)’ ’ !"M°)
-«MS
”
■ a«#$”
b*r v^l 1^|l Ij^^Jl dP^ "In‘1 ^ X'..' . •
Sju^u*l ' " .l.^"*ll P.t{l .d.juAr ^jjb. "In‘1 ^ **^jX •
"Ln^1 .
(
."(w1^l) H" ' " »Lt^"\U Ut{ J^Lj (Wol^l
^xtL^ JJ^Aj "In‘I ' (dt.jurtf ^ju^Bt "In‘I! ^ —
^ Sju-^bj ' i .l<^~<ll U<{ "In‘I ^ WJL^ •
■ J^y« ju^Ü1 I'Ií« Sju^j jl4‘
(íjjL£)
V
■^I1'^11 ^'^I
■ ^LUl l ji^l ^l sJi tjL^
■ CD <^^j*l i LaIuD-^i^J
l
1
■ ijlu^yl i-Dij —
C
When installing the unit on an inclined plane S !"#$%&'( (B d)
(Fig. d)
Fig. d
B d
d Jj^
Side panel of the unit
"L^^—IJ ^^jjjL^UI d^^u-lJ
Notes:
• When attaching the unit with the screws, refer to " □ When
installing the unit horizontally” above.
• When installing, five angles can be selected. Be sure to
position the selectors on both sides of the unit pointing
upward, perpendicular (90°) to the earth surface.
• If you install the unit without setting the selector correctly, the
symptoms below may occur.
— Sound is intermittent.
— CDs are damaged.
urn :
i"#M’&'Msa 90
”
• mm#m%
Trunk floor
^jl'^ll B d'{j
i l«^"*ll j{j sA J^Qj ■^Ij" 0 jI*"^I •*^j"ll jji •
y1i^J
(
I B
(d J-j^) JzL^ yli "Ln^I
Selector
v^i i^ji (^¿ij^^i dP^'iu' "In‘H ^X'''' bji •
■y^yi ju^C*I d'l^l Sju-^aj jIn‘I v'^j"
0ujj j1^^
d«{jyi (w^jj n.) íJ^Li JJAJ
Sju^bj i l <^~<ll U<{ "Ln^I ^ ^L^
■ ^LUI I jiyi B^ b ^| s^i ^AL^
1 wjA1> v1i
■ ilu^Byi i-Di" —
■ CD w—^j*l iLa «uP-^xi^J B —
Sju^u*
1
When hanging the unit in the trunk space
(Fig. e)
Fig. e
B e
e JJ^i
Note:
When attaching the unit with the screws, refer to “ Q When installing |AI *¥fc !"#$
the unit horizontally” above. °
CH-X1500[U]6.0C 24/10/02, 10:05 AM
2
///////////////////////////
urn :
2
(B e)
(e Jj^) 6jLjuJI ,jJ*B JAIj jlj‘ll 0*l»j jji
Use these holes.
,»u¿"J| áC^ Jlf"
^ -'^j" jji v^i i^ji (w¿ Ij^^i dP^' «u^ "Ln^i
y1i'yi
■
lu^j*1 <
j1^1
Siu^j "L4‘
''"" jji
|
Page 3

Correct
ШШ
I I I I I I
OK
///////////////////////
0° to +90°
0 ЙШЕ 90 J
LI
Ш
777777 7777 7777 777 77777 b
MmimiiiiJJijfi тшшШттшш
LOCATION OF CONTROLS
TROUBLESHOOTING
“RESET1-RESET8” or “R1-R8” appears on the display of the
connected receiver (or other equipment).
Are the units connected correctly? After checking, press and
hold the 0EJECT button for a few seconds to reset this unit.
If the problem still persists, consult the JVC authorized dealer.
O 0EJECT button
Reset button: When pressing and holding for a few seconds
@ CD magazine slot
! Door
O (0 EJECT) ^
e
_ 0EJECT
I^j^ ddxJ 1^*^^II :U'^^II SjL^I
“RESET1-RESET8”^ “R1-R8”#
(0 EJECT)
Й JVC
‘ ^L^JI©
"R8-R1" jl " RESET8-RESET1 "
’12345Й7МИ
•^L^j 1^*^I lIa^ 2 ^ji^^VI
3
ójLrI J^I ÒIójaJ 0EJECT ^Ij^VI jj ^Ir. Ui^II
j^^aH JVC .<КЛИ pLlt 2JL^ .jL4jIIJ^
JIUrVI
Ij^ (j^VI 'jI^^I jl)
Indication Meaning
RESET1 (or R1) Ejection error
RESET2 (or R2) Lifter error
RESET3 (or R3) Tray error
RESET4 (or R4) Pick up return error RESET4(Ш R4)
RESET5 (or R5)
RESET6 (or R6) Communication error
RESET7 (or R7) Other errors
RESET8 (or R8) Communication error RESET8 (Ш R8)
Sounds are intermittent during play.
Are the selectors on both sides adjusted correctly?
—
SPECIFICATIONS
CD CHANGER SECTION
Frequency response
Dynamic range
S/N ratio
Distortion
Wow & flutter
Output terminal
GENERAL
Power requirement
Operating voltage
Grounding system
Allowable working temperature
Dimensions (W x H x D)
Mass
Design and specifications are subject to change without notice.
5 Hz - 20 000 Hz
99 dB
103 dB
0.005%
Less than measurable limit
Analog (8 pin x 1),
1.5 V (full scale)/less than 1 kQ
DC 14.4 V (11 V - 16 V allowable)
Negative ground
: -10°C to +50°C
252 mm x 88 mm x 174 mm
2.3 kg (excluding accessories)
mm
шштеи
S/N
RESET1(Ш R1)
RESET2(Ш R2)
RESET3 (Ш R3)
RESET5 (Ш R5)
RESET6(Ш R6)
RESET7 (Ш R7)
ШШШ !«№$%§! &'(«*+?
ЙШ1!
й№вВ
шштм
( ! x Й x Ж)
—
ЙШ(!
ШШШШ
5 Hz - 20 000 Hz
99 dB
103 dB
0.005 %
ЖЖеГЯЖ#И
тш ( 8 ^ x 1)
1.5 V (жш) /тт 1 kQ
ЖШ! 14.4 V (ЖШ5И 11 V - 16 V )
Й®Й!
-10°C т +50°C
252 mm x 88 mm x 174 mm
2.3 RR ( !"®$ff)
1
^^a!
^ Ij^l ‘U^
I j^l lU^
2'i'^^II lU^
Ua^II Sjjr lU^
JL^^+I lU^
^j^l dU^I
JL^^+I lU^
.fL^3.^VI gt^iI 4«Ua'A I ~. I^VI
Y.... _ 0
\ .r
^кл11 j^JI J.^1
(1 X Л)
J^I/(JaL£ ^mLaA) j" jJj^ 1,0
"J_^i 11,1 DC j!'» :
(
4j "Jj-
/ .,..0
_
'~A
fj1 Ji'^ 1 0^
i 1
11)
? -
j ,Л^| ^^^_ijL3 :
2 j'A 2^jJ 0. + ^^l 1* — 0^
^ 1V1 X ^ ЛЛ X ^ YoY
(iLl^iH Y,r
jLa^1
.
^jdj
jJ|
ùL'
(R1jl) RESETI
(R2jl) RESET2
(R3jl) RESET3
(R4jl) RESET4
—
2^ajII ^^L^IjU^VI j J'a
CD
U ^ iLa^ ^ IjI I j .
(R5jl) RESET5
(R6jl) RESET6
(R7jl) RESET7
(R8jl) RESET8
jjj"II ^L^.j.^1
^^'aL^^jJI ^jII
S/N j^^^^^II/^Jt^^VI 2i^i
I'LLtj^iJI laLUJI iL.IU^a
Jii^iII 2__'U I
^^_ijL3JI fL^^
L^j Sj IjJI i^jj
JL4JI
(^дг. X jl X jL^^VI
Ji^lj ijLlnJI
^j^1 Osj^
Ùjj
.^Jl
11
How to reset your unit
Having TROUBLE with operation?
jl^^lI ajL^I
Press and hold the 0EJECT button for several seconds. This will reset the built-in
microcomputer.
(0EJECT)
L'^ 'pI^j^VI Ij^ Ijj 6j»I 0EJ^CT ^I^^VI ^j ^Ip- ^lI ^^L^j L*^I
—
0EJECT button
МШ (0EJECT) m
0EJECT ^Ij^VI jj
CH-X1500[U]6.0C 24/10/02, 3:34 PM
3
eject
-i 1 [5]
=1
|
---------------------------------
.^l^IjJI
1 JVC
L- L
3
Please reset your unit
Refer to "How to reset your unit"
Ì7?
#S
JUr ^jJ^ IJl^
jL^^JI X SjLrl
jL^JI U'X SjLrl 2'!'^ 2ai*~II ^^l •^jl
Page 4

I I I I I I
ENGLISH
ELECTRICAL CONNECTIONS
LI
HI
• This changer can be connected to JVC KD-MX, KD-SX, KDLX, KD-SH, KD-LH or KS-FX series receivers that include a
Changer Control function. However, operating procedures and
indications on the display will be different depending on the
connected receiver. For details, refer to manuals supplied with
your receiver. Note that some receivers cannot play back discs
recorded in MP3 format. For detailed information, consult your
nearest JVC car audio dealer.
• To prevent short circuits from occurring while making
connections, keep the battery's negative terminal
disconnected.
We recommend that you make all electrical connections (see
Fig. f) before installing the unit. If you are not sure of your ability
to correctly install this unit, have it installed by a qualified service
technician.
Note:
This unit is designed for 12 volt DC, negative ground. If your vehicle
does not have a 12 volt negative ground electrical system, you
need a voltage inverter which can be bought from a JVC car audio
dealer.
• Be sure to ground this unit to the car's chassis.
When connecting to
JVC KD-MX/KD-SX/KD-LX/KD-SH/KD-LH/KS-
FX series receivers
Fig. f
H f
f
JVC KD-MX' KD-SX ^
KD-LX ' KD-SH ' KD-LH ^ KS-FX
»Ml ” » -«»mi/0»2
a* :
MP3 JVC
(#» B f) ” ’ B23№
12
12
JVC
-./01234/
JVC KD-MX/KD-SX/KD-LX/KD-SH/KD-LH/
KS-FX !"# m
JVC KD-MX U
W^Jl KS-FX jl KD-LH jl KD-SH jl Kd-LX J KD-SX jl
v^1
t^!1 ‘Jj^
J^l .^^P3 L l ^lU^' wl-'ll
J^/C W^jAI J<^^ »
„d^l /. I ._^i^^uill Jl£ ¡Lm^I jZl^jJl' i^l
J'Q ©f jE'l® Wjzl 'j^JIl ' I ‘ ^'^Bu"ll I'L^ Jl^^
^ yl^ L sA j^llll WJL^ "In'I ^
±Y DC j^^l_lA w^l_'j"4^ jl_wD^«u- Jl«'I "I^'II lj^ ^-^^b tal
w^l_'j-4^ ^LUj lI11a' V p-ijl___1.^ ^l WJL^ .‘
Ju^A yJl ^l<^ < ¿^xJu^ ±V DC jAIia jlii< <
<j_jbII . ijli'll ^jN^I J'^^ sA Ju^l ij-^ ¡ ij^^ SJi3 ¿WiD I
JVC W'l^ sA drill'll Ji^auiJI JMX
I ' I .^<a~^ii ^ ■ btii ij^ sJi
( Su-^i iPJj -J ■ b*LlI Wa<U^ <
yl^ 6Ju^u*l LIjl<<<ll^
1^"11
J-^1 Ju^u*1 J;1"'
,I .l\luD^i^l J_
jj^1 (<
^ «<^jill .I.l <lLf 1 "L4'
.jl^:i ij^ 5b"^a^
____
.Sjl '^'JI JJj^ "In'I ©J'^bu"® ^b jI" sa •
^^l il^lj^l
Hi yi^ ij^l^l
,^j1f"JI vjK
U W'"ubII
V
_
iJL^uJI W«|lU«Il
jJL^i ^b ji" j^xlu-^
_
“,IauI«a
jJL^ jB ji"
.JVC "W^J^
KD-MX/KD-SX/KD-LX/KD-SH/KD-LH/KS-FX
1
How to remove the cord
Pull the plug by holding it firmly as in the figure.
After installation and connection...
When loading the magazine for the first time into the CD
changer, press and hold the 0EJECT button for a few
seconds to reset the unit.
Normally do not press and hold the 0EJECT button.
Note:
You may also need to reset the unit in the following cases.
• When the power supply is interrupted such as for replacement
of the car's battery.
• When the unit does not function correctly.
©"In'II iA o^jA® ^"u^J - n IIImi
sic
-mr-!"#$%&'()* (0EJECT)
a* :
«T^IJ 10”
JVC W^jLa CD W-Ajll wJluk^Vl Jj
.JJAJI ^ Wl<^
Do not hold this portion.
issa"#"
0EJECT)
r'lll ij^ ^ v
Ajll WjIuU^VI Jj;a JAlj yJjVl Sjftll ^j<I JL^jI jMf
SjaJ 0EJECT ^Ij^VI j" yi^ jGCIl i^L^j j*{l ^CD
-h:
yJ|
dU^ilu» ^fjLiJI ^ >^^l
... J'^ulllj Vj^jljl JA^
.0EJECT ^IjKVI j" y!^ jGCll i'li"j jGC" V SjL^
W'llill .VKI jIn'J ji{ SjL^V ^li%' ^l IC'l s<i
■ J^A W'Zl'jN<Il WalUlI JbQ Ju
ij Jlfj V jlNil ^l WJL^ w^
jlj'l jj{ 6jLxI J^I sa
-WU^Ma
wJL^
.6jl_i'll W_'jIU'
0EJECT button
0EJECT
Listening to CDs
This unit does not have operation buttons to play CDs. CD
operations can be performed using the JVC CD changer
controller, etc. connected to this unit.
For CD operations, refer to the CD Changer Controller
Instructions.
Mistracking
Mistracking may occur when driving on an extremely rough
road. The unit and compact disc will not be damaged by
mistracking; however, since it is offensive to the ear, stop
playback and restart when you reach a road that's in good
condition.
—
(0EJECT) m
v
tlj^
JVC
M№tf! ” s«%&'(3H+rn-ga« ” 12 ’ H4a
^»/®"#$’&'()»/*’«1-+./0W2.
EJECT
-i 1 B
|
----------------------------------
1 JVC
’ »/0123456
CD W-Ajll . I J'luU^yi yJl ^IaI^VI
. I'luU^iVI y^l ^IaI^iM! J^lgA" jIj"I jIn'^I iJ^ pill V
CD W—^jll W'luU^.yi JjgA" . I'lAr s<i .CD W—^jll
W—^jll W'luU^yi Jji^ Jj
y^l i^jl (W — Ajll W'luU^.yi JoGA' .jI 'Iaf!
yl^ ^jliill ¡l'»l .»IjLd
w — Aj_ll W'luU^yij jIn'I jj
W«UlaA ^| ,
J
1
jL4'
jI n'I iJ^ iA Jubu-II (^1! ‘ JVC W^jLaCD
.CD i-Ajii wjIu.U^VI Jji0 r<^ill jJga-,
> A" t naji
1
Jj
, Wll^tj wIn^ y^l J^B< l Aj'f jIn'H
ill JIa.i^.I wU^I
lIjl
J W«UlaA ^| s<i
B It V I_Su-^i .ij^ Sj-^j
l»IjL^^1I wfUIia ^
(t.
(^.MJ W—di; '
uj
4
CH-X1500[U]6.0C 24/10/02, 10:08 AM
4
Page 5

I I I I I I
LI
HI
HANDLING MAGAZINES AND
COMPACT DISCS
How to handle the magazines
• Care in handling the magazines
- Do not carry the magazine with its inserting slot facing down,
or the CDs may fall out.
- Always keep the twelve disc trays loaded in the magazine.
- When sliding the disc trays out or in to place CDs, hold the
magazine horizontally so as not to drop CDs.
- Do not insert CDs without pulling out the disc trays from the
magazine. Never place CDs directly into the magazine.
- Do not expose the magazine to high temperatures or direct
sunlight.
- Do not disassemble the magazine.
- Take care not to drop or hit the magazine. Do not apply
excessive pressure to the disc trays which have been
removed from the magazine.
- Never apply solvents such as benzine, thinner or insecticide
to the magazine or trays. These solvents may erode their
surfaces.
Note:
If you need additional magazines, purchase XC-M200 magazines.
When playing a CD-R or CD-RW
Before playing back CD-Rs or CD-RWs, read their instructions or
cautions carefully.
• Use only “finalized” CD-Rs or CD-RWs.
• Some CD-Rs or CD-RWs may not play back on this unit because
of their disc characteristics, and for the following reasons:
- Discs are dirty or scratched.
- Moisture condensation on the lens inside the unit.
- The pickup lens inside the unit is dirty.
• CD-RWs may require a longer readout time since the
reflectance of CD-RWs is lower than that of regular CDs.
• CD-Rs or CD-RWs are susceptible to high temperatures or high
humidity, so do not leave them inside your car.
• Do not use following CD-Rs or CD-rWs:
- Discs with stickers, labels, or protective seal stuck to the
surface.
- Discs on which labels can be directly printed by an ink jet
printer.
Using these discs under high temperatures or high humidity
may cause malfunctions or damage to discs. For example,
- Stickers or labels may shrink and warp a disc.
- Stickers or labels may peel off so discs cannot be ejected.
- Print on discs may get sticky.
Read instructions or cautions about labels and printable discs
carefully.
Warped disc
mim
• a**!
- ffi 12
XC-M200
CD-R ^ CD-RW
■■m CD-R m CD-RW
CD-R m CD-RW”
CD-R m CD-RW
TH*:
-
-sA№!"Eg*am()*
CD-RW CD-RW
CD-R ^ CD-RW ®|
!" CD-R ^ CD-RW :
2fta!"ftSS№W'!)*+*-#/012"34+*S
Sticky residue
mmâ!"
W^dJ lilij
$
Disc
w^IëD—'I
.L^luk^ôlj
,bll
Ê"L<l Wià.^
"L<l I J^Lj
◊^1^' jh^i^i ^L^jôl Êe^<l < ô —
.^e^<l J^lœ Cl» Ljlu-D^iôl ^ kà^l I rttlœ —
L*U‘-Ë W<aal Sju
cj P'IuD^'ôl I iIDa ô .Êe^<l c* I ^IjD^ôl w'Ij^^
d'''ll Ë« S'jM'Il J^a <jjC*I J'ir;i sA I__il I iIDa i^C' ô —
.^CC“^M200 JiœuA Êjl^A ¡«d^^ ^^^d^ {W<aI^ {l Êjl^A cc c œi« l—l
JoL—Wl^LlJI W—^b*l WtluL^.VI q>«A.
jl Ij^I ,CD-RW d.L^Iuk^I jl CD-R ci.L^Iuk^I JolA3
J dJj {
CD WjjIfJI cjLjluD—ôl SA CD-RW cjLjIjD—I "IJ*^I JaLfa
WoJLfJI 6dld(l cL^db^ Wl^L^ CD-RW jl CD-R cL^luD—l
A|l'^ll J^Ij ciL^lu^^—ôl „d-Â" ô Ic^l {WoIUfJI W^Ë-^d^l ciL^dœË
"WëIL^JI CD-RW cL^luD—ôl jl CD-R Cl^luD—ôl ô
WlL
ij Ë
Ù l W'Ilr ¿.|
{JLja
3''j"II w^L^ ë« W^d^ ccLjIëD^—ôI WrI'Ull '
W^llJl ‘ c .I\IëD—ôIë ‘ c .M''lll Jë^ ' c ■ ld'C^"ll ëI
J^IjJI Ë« ^|!^KI cjLjluD^^Ô'l ^ 3^" bMf —
Ê« òè^<l J^lœ CD w — Ab*l CiLjlu^^^iôl ô —
^fL^uJI Wf^^ô ë« WoJL^ ûjld^ w^jjJ ê"I^<I ô —
.Êj1^
bII ë« Êe^<l PJ3 ^ Ë« WijAdl ciIjo^*! ë«
.^ë-D^JI J^QJ œlu^l ûC^ ê« sJi'
CD-RW wLl^JJI SjLxV ^LUf jl CD-R
"aJ — Ma" CD-RW jI CD-R d.L^Iuk^I jli Jl.-^I •
CD-RW jI CD-R djUjIjD^I J*"A" V ^I sJi •
"Ln'I J^Ij ôJu^ë*I j^^Jl W^Ë^d^l ‘ n“IJ" —
.^¡IdiiJ Ju^l CD-RW cL^luD—l y1U"" êI SJi
1
dj'l jl {' c .ISbIa ylr îë"% w"ll ' c -I^IëD—ôI —
*d!d^ CL^d
D—dd
:jL.jIë
¿«d^
Êe^<l 'P^aI {CD w—^j*l cj L ^«uD^'ôl
.CD cjLjlu^^^iôl
Ê"I^<l J^lœ ^d^'I*A C^) w—^^*l
ô I^'I^ UëL^% ôë ê"L^<I ô —
1
L4^ld^1
W'Im«' cdjLjIuD^VI J'Ga" ”^IjeC%
^WoJL^JI t
."In'I J^Ij Sjj^j*! j^^Jl —
.Mj'lll W^l sJi w"Jl cL^IëD^—ôI —
bljlu^^—ôl ôc^ JIa«>—.I ^ Ê« sJi
1
-"= c
^^lolJl ëI <
ô
d^iolJl ëI .
Ë
Stick-on label
,Ib.II J''I
.CD W-AbU c:. L^luD^ôl
1 c
— w^
Lj|uD^
_______
“ jI . d «l^IuD^'VI
;jL^IëD^—ô*I ôC^ 'D—l
l WijLâJI wQ WoJL^ W^Ë-^d '•cL^'
"
Lf3^I âLl^^ôI •
^d^'I**l
.Ê"^l ^ ô -
ôl
-WU^^A
.I'^.MIj {(djU^Iu-D^^VI
.Yàj d'^ wf'IU
.ül ,
■IIbIII
lJm" êI
w^IëD—'^i
■1"" êI 3^1 —
cjLjIëD^—ôI
êI —
'B"
c^aIf^JI Id^l
wiImf» d^IiDll
'
ialngfg
DIGTOL AUDIO
In a CD Text, some information about disc (its disc title,
performer and track title) is recorded.
If you connect this unit to a receiver with the CD Text displaying
function, you can show this disc information on the receiver's
display.
Playing a CD Text/ CD Text/ CD w^ljD—l J^i
How to load CDs
1. Slide the disc tray partly out of the magazine until it stops.
2. Place a CD on the disc tray with its label side up.
1.
Magazine (XC-M200)
!®ÎÉ(XC-M200)
(XC-M200) Êd^A
3. Align the disc tray with the grooves in the magazine, and push
the disc tray all the way in.
• Check that the disc tray is securely inserted into the magazine.
If a CD becomes disengaged from the disc tray, reposition it
on the disc tray.
* The inserted CDs are counted as “disc-1,” “disc-2”... from
the bottom to the top.
& ~
2 CD Text
'(#$)*
TT^ /01) WàIë-D—lôl Jë^ Cl ^uIfII {CD ^hM-Jl WjluD—il
s)E mmm$
CD Text
2.
Disc tray
3.
• ”012!"№!
* SAÈ^!"№!%±'“disc-i”’ “disc-2”...!!»”
2.
wl — ^A ©dl^^ll êIëM^ë wMill r—'l {W^IëD—'ôI êIëM^®
wh'Uë yl^ iË~^* iA "In'I Ic-^ J'^ë" WJL^
W^IëD—ôI c I aëI*a dl^-^l ‘{CD WjluD—l ^^d"^
CD icil^luD—ôl J‘*%* w»j»^
D—ô1
|N—~A
WjM
3b|11
Êd^1 ^dL^ ‘iu^j <2|u
Ê« SLxld^ W^luD—ôl W_
l^œl TJj b^JË {Êd^<l J^lœ jjjL^ôI WàIë^^—ôI W'M'^ ^
wiInmII v"^ J^IjJ^ WàIë-D—ôI w
.Êd<l J^Ij waJ^a ^du^Bj wÀluD—ôl W'M'^ Jl^œl S-A jîIj
ô'Ë^Bj Wbu{^A d^^ CD w—Abll wÀluD—ôl x^'^l Ijl
.wÀluD—ôl W'M'^ w^'^^ ô'Ë^Bj I n*{ë bxl {W 'IëD—ôI W'i'^^
JAa LnJL^jI — w^^l CD w — aj1I c LàIë-D—ôI jIj^— r"'
.vlXôl v^l ji—ôl SA ... "disc-2" {"disc-1"
CD w — aj1I W\IëD—ôI ,Y
j^ I
.àL^ ê
1"1
-±
ëJi
ê"Ië -V
___
'M'.
Notes:
• There are openings in the disc trays through which signals are
read from the CDs. These openings leave part of the shiny
side of the CD exposed. Be careful not to touch the shiny surface
of the CD.
• It is not possible to play a CD if placed upside down.
Caution: :
CDs shaped like a heart, flower, etc. (specially-shaped CDs) ' !"
cannot be used with this unit. If this type of CD is loaded, it will
cause problems.
CH-X1500[U]6.0C 24/10/02, 10:09 AM
5
=#$№&'()*+,-№&')/012345
5
-cjLU^Ia
c I ^lill Ic^
^^a!' ô .CD w — aj1I cjLàIë^^—ôI sa ^a^^I '
.WjuIiA xàL^ IjI CD w — aj1I WàIëD—ôI joi
Ë« vlall vlx w^uMbII CD w—ajII cjLàIëD^—ôI JLlfI—jI sJi ô
Ic^ ^A (w^^Dl _ JlJ^.ôl cjIj CD w — aj1I cjLàIëD^—ôI) ‘àJl ‘^JiëJI
{"In'I j^lœ CD w—ajII WàIëD—ôI Sa ÿëMJI Ic^ l^^Ë — i-« ."Ln'I
jLàIuD—ôI w*«U^ ^ j^lœL^I^ SA rii
CD W — aj1I ccjlÀlËp—'ôl Sa CjldL^iôl ^¡Id^
.CD w — aj1I WàIëD—ôI Sa lA.!
."Ln'I wQ JLDxIë J^LAa Jëb^ v^l ìJR-j •ë^ tjLà
.l^ia b^Ë^ •
D^Jl
'D^ll
1 sJi' ô
Page 6

I I I I I I
LI
HI
How to load the magazine
1. Slide the door to the right.
2. Load the magazine.
• Load the magazine into the CD changer with the ) mark on
top and the CD insertion side to the right.
1. ^
the magazine.
Cautions:
• Do not insert your hands or any foreign object into the loading
slot, otherwise you may be injured or cause malfunctions or
damage.
• When a label on the magazine, if any, partly peels off, it may
cause a malfunction. If this happens, remove the label or stick
it on firmly.
1. F
2.
%!^"#A'
2.
ASiE!№#$%&'(SA+A,’A.S/0!1«’$ .J
Êè<l JL^jl
5l'II w^'I t )l iJl 0“^"l *±
.^e^<i q^ij ‘■^L^ iuD^ôi •{ ,v
jl ûL^ld^ CD w-rtbll WjluD^^ôl J q^lj Êe^<l •
UD^'ôl JL^jl <_i^L^Ë wlq ûju^ull ) Êu^*
5l»II w^'I CD w — Ab-ll
._L^JI jLI .V
Êe<i
xjL^ IiIGa
jLj-JI êI _—' ûjL^ •
L^'ll w^'Q J^lj ^L^^^l ^^l ëI J^b* ô •
.jd^ Ë
1
êI
0^1 Ë
1
êI
î^
1-
ib^Ë êI ^w—Ab-ll w\ UD^ôl ju^-ull bIII Êu^i l ^bMr •
l-l JD^ ^ «<^i êI sJi 'Pl- êLq iW* *d^ ûjË*^B^ Ijë^aia
ûjË^ B< <i\IJa ta^ bII ëI bIII Ÿe^l <P-J- J^a
WlJ^A
How to unload the magazine
1. Slide the door to the right.
2. Press the 0 EJECT button.
• The magazine ejects from the loading slot.
Note:
When the magazine cannot be ejected, push in the magazine and
play the 12th disc once more; when play has ended, repeat the
above procedure.
If the above procedure does not work, follow the steps below:
1. Be sure that the selectors are set correctly.
2. Peel off the protective seal over the compulsory eject hole.
(Fig. g)
3. Put a straight stick like a screw driver into the hole. (Fig. h)
* Do not put the stick at an angle, insert it straight.
Fig. g
Should the problem still persists, consult the JVC authorized dealer.
1. ffiA F !!"#$”
2. (0EJECT)
• A*II№"A$%&”
à* :
1. «ES!"#$ŒW”
2. (B g)
3. (B h)
* ASürbi#$fflA’S(fi№SA+,”
JVC №S««aA$%&'”
ui^1 ^ld^
5l'II t
.0EJECT ^IdPôT j" j^l .Y
JI W^'Q
-'
.Jo
Êj^1 •
12 v^l 1-l'^iIë J^lbD Êj<l i^jl iÊj<l ^ij^l ûjbiA ^b^
Ç. ij^ôl b^l iŸlL~^'ôl sA ¡l^'^ôl Ë ±Y r^j luD^ôl
to*1 ‘Ê
j^1
ô v^ô! w
ÛJË-^BJ ËO
il 5
11
^ JË^j*1
w-^lËJl
¡
IDgI1
ÿJ^1 .
!UD)l
(s .íJLo-^ôl ^lj-^ô! _a* ju-^ ji-e-Ë
©h ^ -a'Il J^lj w^ ij^ Pha g^A Wa'S'^A ¡I^ Br J^jl .V
Wa^S'^a ôjË-^û^ J^jl wIMa ^Ël" JJa» I bfII J^b* ô *
^jil JVC Jo^Ë jA'^.l i^L^ WIJAll xpa^ |-|
! WJH
J^
_____)l_
^l 0“l"l *±
.vJ-ôl w-Q jË^cil
Wl Êl wJL^ w-Q
y
-WU^^A
-ioJLUI
How to remove the disc trays
Use the release knob to remove the disc trays when cleaning them.
1. While pulling down the release knob, pull out the disc tray.
2. After cleaning, insert the disc tray into the magazine while pulling
down the release knob.
Handling CD-Rs/CD-RWs
The reflective film of CD-Rs/CD-RWs is less tough than that of
ordinary music CDs. If these discs are damaged, their film may
peel. These media are also susceptible to fingerprints, so use
extreme care when handling them.
Storage
Make sure to keep CDs in their cases. If discs are piled on top
of one another without their cases, they may be damaged. Do
not put CDs where they will be exposed to direct sunlight or in
a place subject to high temperatures and humidity Avoid leaving
CDs in your car.
Hold down the center holder.
STT!"#"
.j^jil JaL^ yJr JowiMI Ug^ {|
2. CD »
#№îr!"#$(CD-R/CD-RW)
MM (CD-R/CD-RW)
sas”"#a%&»()*sas + ,-№/01234 »
un
^A5*!"a« ” &SffiA5*)*+Afi«№/0 ’ 2345
Lift it out without touching the recorded surface.
_
oIa q —^11 'D^ll ^fj W\luU^.yi
wQ
UjLUl /CD-R Jq — ^'II iijLUl
) *+, -ia«/»i234,
■ iloluDwiôl JaIa'II .'Mr jjjAJI jc(l SLrl
wJL^ wQ .l^J w 'BB<| (
^ aaaII w.miI vJI I^'
Insert with the label facing up
SAEg«ffi$T"
jueull ‘__^Lkl êëJi êI sLrijA ¿A J^j
.vir^J l N—'a QbIII t'lr
W^luD^ôl w«M»â Ÿjb w«à»
.L4H0U:
b-Mr
w^iu-â
1
w^l
Ë
^^lli,^^ôlSjËbA ^ l aMo^ .±
,^Pô|SJËbA Jaf
l aM»» W‘j)ll J^lj w^ ^Bjlll J^jl i^ a^UM'Il .Y
.,^^ôl SjËbA ^
5
, J^jl _M—^ ÈË^ôl Sb^ lË^l w^ lË^ bI I kj
sA
bklË jA
bll .LoluD^ôl JaLa'^I
.CD-RW WjLiJJl SjLrô
UjUl /CD-R J
bll ' I .lOluDwi^l W^^lal
iJJ wKjLsJI _ w — Abll , I .loluDwi^l w^^lall waiDll
waiDll S-A ¿ëL^a^ Jbl CD-RW W'l'Jll SjLrô
êI sJi i‘ -I ‘loluDwô
I ^FJj^Ë
C^J J-B^ l-l .^jLaJI W'Q'wiull CD
WwiIa^ L^^üI ' I JoluDwiôl Wa^IaII LnaLsi.^3
' PJcJ
—LoluDwôl Êe^
-.lUaldl CD w — Abll, - .loluDwiôl Êe^ SA b^Lj
ô .JJC
Ê
SJi toLb iÈd^ôl ,uQ ôj^Ië < - .loluDwiôl ^^jbJj
~~I
s^j*'' êI sJi s^LaI w^ CD w — aj1I ,—.iMluPViôl
. - .loluDwiôl „d_
Ë ô .^jJLaJI ^ukjJl ëI ^o^LaJI Sjlj(l ëI Sj-^^j-il
SjI'aII J^lj CD w — aj1I
Press gently on the disc to insert.
!®#A°
.Ln-JL-^jô W'IuDwiôl ylr . aDl' U*{
'^'
1
|j
Maintenance of CDs
- When fingerprints and dirt adhere to a CD, wipe the disc clean
with a soft, dry cloth, wiping from the inside towards the edge.
If it is difficult to clean, wipe the CD with a cloth moistened
with water.
- Do not use record cleaners, benzine, alcohol or antistatic
TE1«"#$%&»()
TEa!"#±№&'”teTE*"#±®fe№./ï
agents.
- Do not damage the label side or stick paper or adhesive to the
surface.
Correct
''^^b
6
CH-X1500[U]6.0C 25/10/02, 11:54 AM
6
Incorrect
TTÏ8 .
CD W — Abll ' - JoluDwVl Wolpâ
IT
WoluDwiôl vir œL^ëI ëI
WatLô ë^Ia^ W*Ds' W—Abll wMluDwôl
Waldl ¿l&l' ^jl)ll v^l JPibJl Sa I '
w — Abll wMluDwôl '^a^aI i^ atUttll
I'l^bI —j I a^b' jue.Ë wb
à U
dPwilu' idal^Ë
____
LlLj V'Iq dlliA '"Iaq waUs' CD
ëI Jë^JJI ëI SojMiJI ëI — LoluU-wôl - .IhUma Ja.'A-, ô
w.J.-.i'wôi b{ jluA
t'Ir o^ bI' ôë W — Abll WoluDwiôl vir ju^ull o^ bI1I jjC' ô
CD W^bH
J W'u*^ b ju^Ë ^L^ w^
ISbI
.,|JË| Ë1 .
a
 Loading...