

Page 1
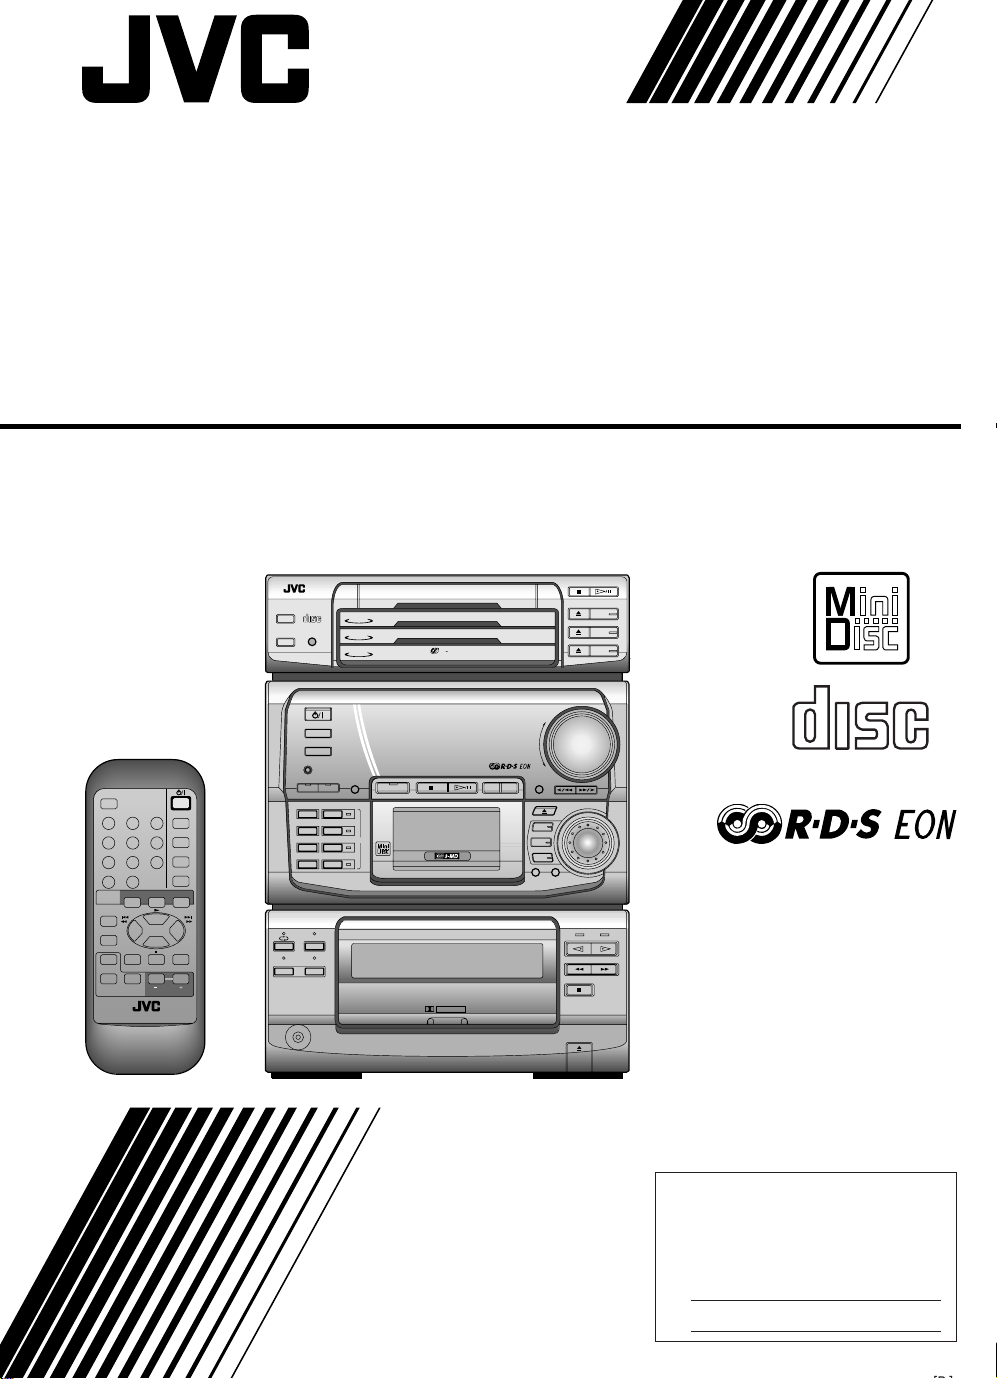
COMPACT COMPONENT MD SYSTEM
CA-MD9R
CD REPEAT
CD PLAY MODE
DIGITAL AUDIO
COMPACT
CD
3
CD
2
CD
1
3
PLAY & EXCHANGE
CD
3
CD
2
CD
1
CD
RDS
CONTROL
PTY
EON ON/OFF
SEARCH
1 2 3
TA/NEWS/
PTY SELECT
INFO
4 5 6
7 8 9
10
+10
TAPE CD MD
MODE
SELECT
TAPE
DIRECTION
REC PAUSE
ACTIVE
DISC 1DISC 2DISC
BASS EX.
SOUND
MUTE
MODE
RM-SEMD9RU REMOTE CONTROL
STANDBY
TUNER
AUX
COMPACT COMPONENT MD SYSTEM MX-MD9R
DEMO
CLOCK
/TIMER
BASS
SOUND
LONG REC
TRIPLE REC
1ST TRACK REC
CD REC
MD
REC PAUSE TITLE EDIT
AUTO REVERSE
AUTO TAPE SELECTOR
DOLBY B NR
REC PAUSE
REPEAT
PLAY MODE
LISTENING
SKIP
DOLBY B NR
CD REC
PHONES
DISPLAY
MODE
SLEEP
FM MODE
MUTE
TUNER
AUX
3
VOLUME
VOLUME
DISPLAY
/CHARA
MD
3
MD
2
1
MD
CANCEL SET
+
–
MULTI JOG
COMPACT
DIGITAL AUDIO
INSTRUCTIONS
For Customer Use:
Enter below the Model No. and Serial
No. which are located either on the rear,
bottom or side of the cabinet. Retain this
information for future reference.
Model No.
Serial No.
LET0070-002A
Page 2
Warnings, Cautions and Others
IMPORTANT for the U.K.
DO NOT cut off the mains plug from this equipment. If the
plug fitted is not suitable for the power points in your
home or the cable is too short to reach a power point,
then obtain an appropriate safety approved extension
lead or consult your dealer.
BE SURE to replace the fuse only with an identical
approved type, as originally fitted.
If nontheless the mains plug is cut off ensure to remove
the fuse and dispose of the plug immediately, to avoid a
possible shock hazard by inadvertent connection to the
mains supply.
If this product is not supplied fitted with a mains plug then
follow the instructions given below:
IMPORTANT:
DO NOT make any connection to the terminal which is
marked with the letter E or by the safety earth symbol or
coloured green or green-and-yellow.
The wires in the mains lead on this product are coloured
in accordance with the following code:
As these colours may not correspond with the coloured
markings identifying the terminals in your plug proceed as
follows:
The wire which is coloured blue must be connected to the
terminal which is marked with the letter N or coloured
black.
The wire which is coloured brown must be connected to
the terminal which is marked with the letter L or coloured
red.
IF IN DOUBT - CONSULT A COMPETENT
ELECTRICIAN.
Blue : Neutral
Brown : Live
Caution –– switch!
Disconnect the mains plug to shut the power off completely. The
switch in any position does not disconnect the mains line. The
power can be remote controlled.
CAUTION
To reduce the r isk of electrical shocks, fire, etc.:
1. Do not remove screws, covers or cabinet.
2. Do not expose this appliance to rain or moisture.
Page 3
IMPORTANT FOR LASER PRODUCTS
REPRODUCTION OF LABELS
1 CLASSIFICATION LABEL, PLACED ON REAR
2 WARNING LABEL, PLACED INSIDE THE UNIT
ENCLOSURE
CLASS 1
LASER PRODUCT
DANGER: Invisible laser
radiation when open and
interlock failed or defeated.
AVOID DIRECT EXPOSURE
TO BEAM. (e)
VARNING: Osynlig laserstrålning när denna del är
öppnad och spärren är
urkopplad. Betrakta ej
strålen. (s)
1. CLASS 1 LASER PRODUCT
2. DANGER: Invisible laser radiation when open and
interlock failed or defeated. Avoid direct exposure to
beam.
3. CAUTION: Do not open the top cover. There are no
user serviceable parts inside the Unit; leave all
servicing to qualified service personnel.
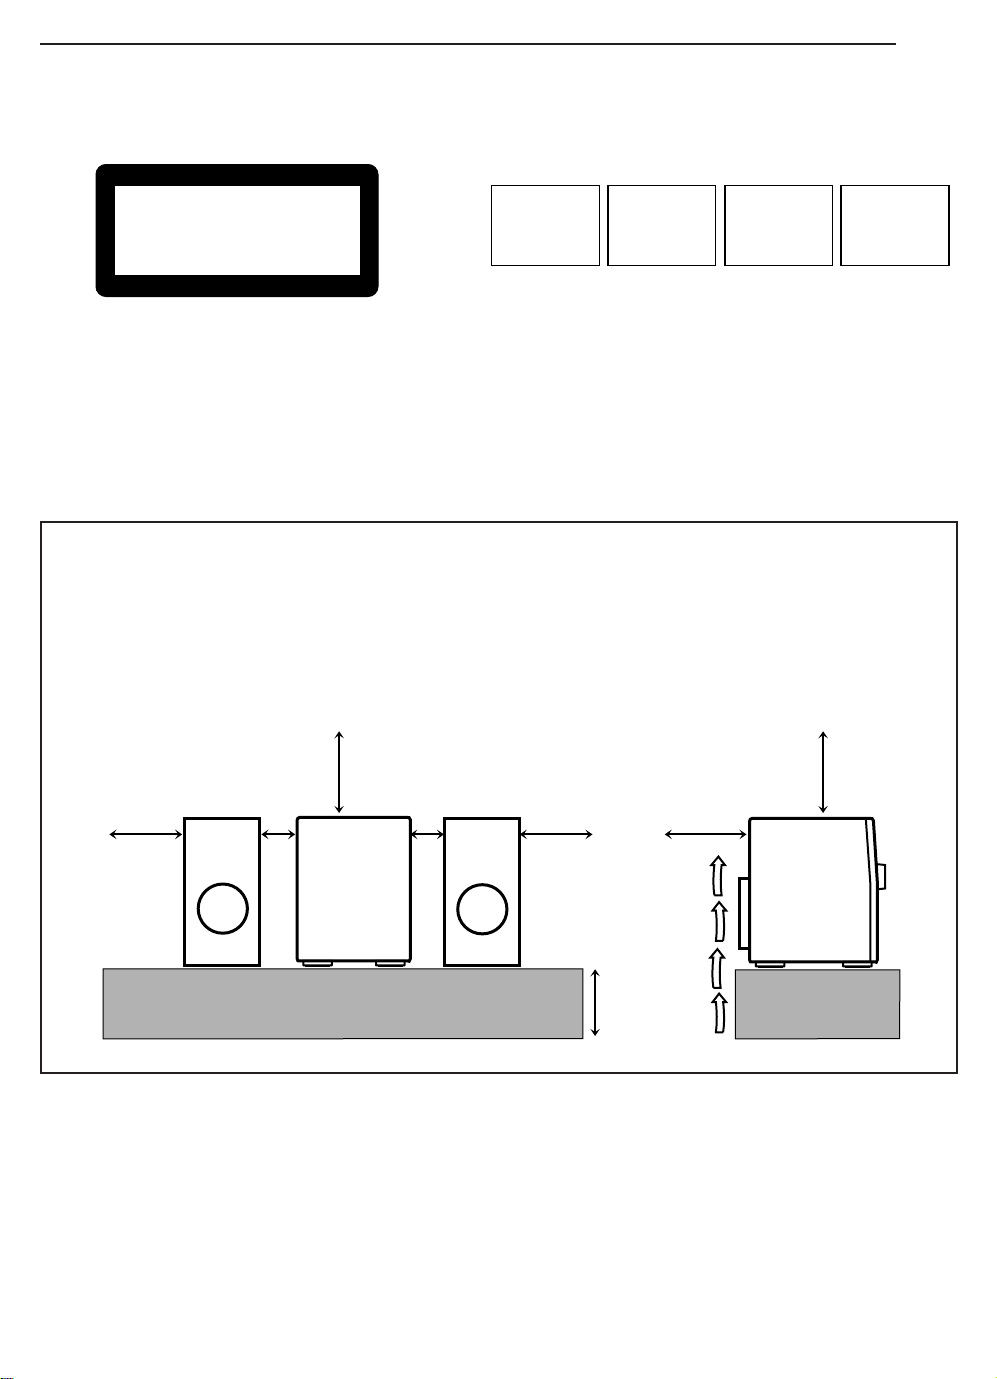
Caution: Proper Ventilation
To avoid risk of electric shock and fire, and to prevent damage, locate the apparatus as follows:
1 Front:
No obstructions and open spacing.
2 Sides/ Top/ Back:
No obstructions should be placed in the areas shown by the
dimensions below.
3 Bottom:
Place on the level surface. Maintain an adequate air path for
ventilation by placing on a stand with a height of 10 cm or more.
ADVARSEL: Usynlig laserstråling ved åbning, når
sikkerhedsafbrydere er ude
af funktion. Undgå udsættelse for stråling (d)
VARO: Avattaessa ja suojalukitus ohitettaessa olet
alttiina näkymättömälle
lasersäteilylle. Älä katso
säteeseen. (f)
Front view Side view
15 cm 15 cm
1 cm1 cm
15 cm 15 cm
15 cm
CA-MD9R CA-MD9R
10 cm
Page 4
Thank you for purchasing the JVC Compact Component MD System.
Be sure to read this instruction manual carefully before operating your new stereo system.
For questions that are not be answered in the manual, contact your dealer.
Features
Here are some of the things that make your CA-MD9R powerful and easy to use.
❏ The controls and operations have been redesigned to make them very easy to use so you can
One Touch Operation
3CD Triple Tray
3MD Changer
Three timers
spend your time listening to music.
• With the One Touch Operation feature of JVC’s you can turn on the CA-MD9R and start the
radio, the Cassette Deck, the CD Player, or the MD Recorder with a single touch.
• You can use the MULTI JOG dial to set the CD Player, MD Recorder, Tuner, Timer, and
Sound Mode operations.
❏ CA-MD9R is compatible with RDS (Radio Data System) broadcasting.
• The EON data enables you to standby for information you want.
• The PTY Search function looks for programs in the category you want.
In addition, Radio Text can be displayed using data sent by station.
❏ 3-Tray CD Player can operate 3 CDs.
• CDs can be changed during play.
• Continuous, random or program play of 3 CDs.
❏ 3-MD changer can operate 3 MDs.
• MDs can be changed during play.
• Continuous, random or program play of 3 MDs.
• Digital recording from CD to MD.
• Easy editing of your favorite songs with the powerful editing functions of your CA-MD9R.
❏ The three timers, Daily Timer, Recording Timer, and Sleep Timer are extremely easy to set.
How This Manual Is Organized
In this manual we have incorporated some special features:
• Basic information that is the same for many different functions is grouped in one place, and not repeated in each
procedure. For instance, in the section on playing a CD, we do not repeat the information about setting the
volume and the sound conditions, which are discussed in the Using the Amplifier section.
• Name of buttons and controls are written in all capital letters like this: SOUND MODE.
IMPORTANT CAUTIONS
1. Installation of the unit
• Select a place which is level, dry and neither too hot nor too cold. (Between 5°C and 35°C or 41°F and 95°F.)
• Leave sufficient distance between the unit and a TV.
• Do not use the unit in a place subject to vibrations.
2. Power cord
• Do not handle the power cord with wet hands!
• Some power (15 watts) is always consumed as long as the power cord is connected to the wall outlet.
• When unplugging the unit from the wall outlet, always pull the plug, not the power cord.
3. Malfunctions, etc.
• There are no user-serviceable parts inside. If anything goes wrong, unplug the power cord and consult your
dealer.
• Do not insert any metallic object into the unit.
1
Page 5

Table of Contents
Features.................................................................. 1
How This Manual Is Organized............................. 1
IMPORTANT CAUTIONS ................................... 1
Getting Started ..............................................................3
Accessories ............................................................ 3
How to Put Batteries in the Remote Control ......... 3
Using the Remote Control ..................................... 3
Connecting the FM Antenna..................................4
Connecting the AM (MW/LW) Antenna ............... 4
Connecting the Speakers .......................................5
Connecting an External Component...................... 5
Demo Mode ........................................................... 6
One Touch Operation ............................................. 6
Using the Amplifier ......................................................7
Turning the Power On and Off .............................. 7
Adjusting the Volume ............................................ 8
Reinforcing the Bass Sound ..................................8
Sound Modes ......................................................... 9
Using an External Component............................. 10
Using the Tuner ...........................................................11
Tuning in a Station............................................... 11
Presetting Stations ...............................................12
Changing the FM Reception Mode .....................13
Receiving FM Stations with RDS .......................13
Using the CD Player ...................................................18
Using the CD Player .....................................................
Programing the Playing Order of the Tracks ....... 21
Random Play ....................................................... 24
Repeating a Selection or CDs.............................. 24
Using the MD Recorder (Playing) ............................25
Using the MD Recorder................................................
Programing the Playing Order of the Tracks ....... 28
Random Play ....................................................... 31
Repeating a Selection or MDs ............................. 31
19
26
Using the MD Recorder (Editing) ............................. 41
DIVIDE Function ......................................................... 42
JOIN Function .............................................................. 44
MOVE Function ........................................................... 45
ERASE Function .......................................................... 47
ALL ERASE Function ................................................. 48
TITLE Function ............................................................ 49
Using the Cassette Deck (Playing) .......................... 51
Regular Play ........................................................52
Music Scan ..........................................................53
Other Useful Features of the Cassette Deck........ 53
Using the Cassette Deck (Recording) ..................... 54
Standard Recording .............................................55
CD Direct Recording ........................................... 56
Using the Timers ......................................................... 57
Setting the Clock .................................................57
Setting the Daily Timer .......................................59
Setting the Recording Timer................................62
Setting the Sleep Timer .......................................64
Timer Priority ...................................................... 65
Disc Lock Function .............................................66
Care and Maintenance .............................................. 67
Troubleshooting .......................................................... 68
MD Error Messages............................................. 69
Specifications .............................................................70
Additional Informations ............................................. 71
Some Words about MDs...................................... 71
ATRAC (Adaptive TRansform Acoustic Coding) .. 71
UTOC (User Table Of Contents) ......................... 71
Serial Copy Management System (SCMS) ......... 72
Sound Skip Guard Memory................................. 72
Using the MD Recorder (Recording) .......................32
Standard Recording ......................................................
Long Recording (LONG REC) ........................... 35
One Touch CD Recording (CD REC) .................36
Three CD Recording (TRIPLE REC).................. 37
Listening Edit Recording (LISTENING) ............ 38
First Track Recording (1ST TRACK REC).........40
34
2
Page 6
Getting Started
Accessories
Check that you have all of the following items, which are supplied with the CA-MD9R.
AM (MW/LW) Loop Antenna (1)
Remote Control (1)
Batteries (2)
FM Antenna (1)
If any of these items is missing, contact your dealer immediately.
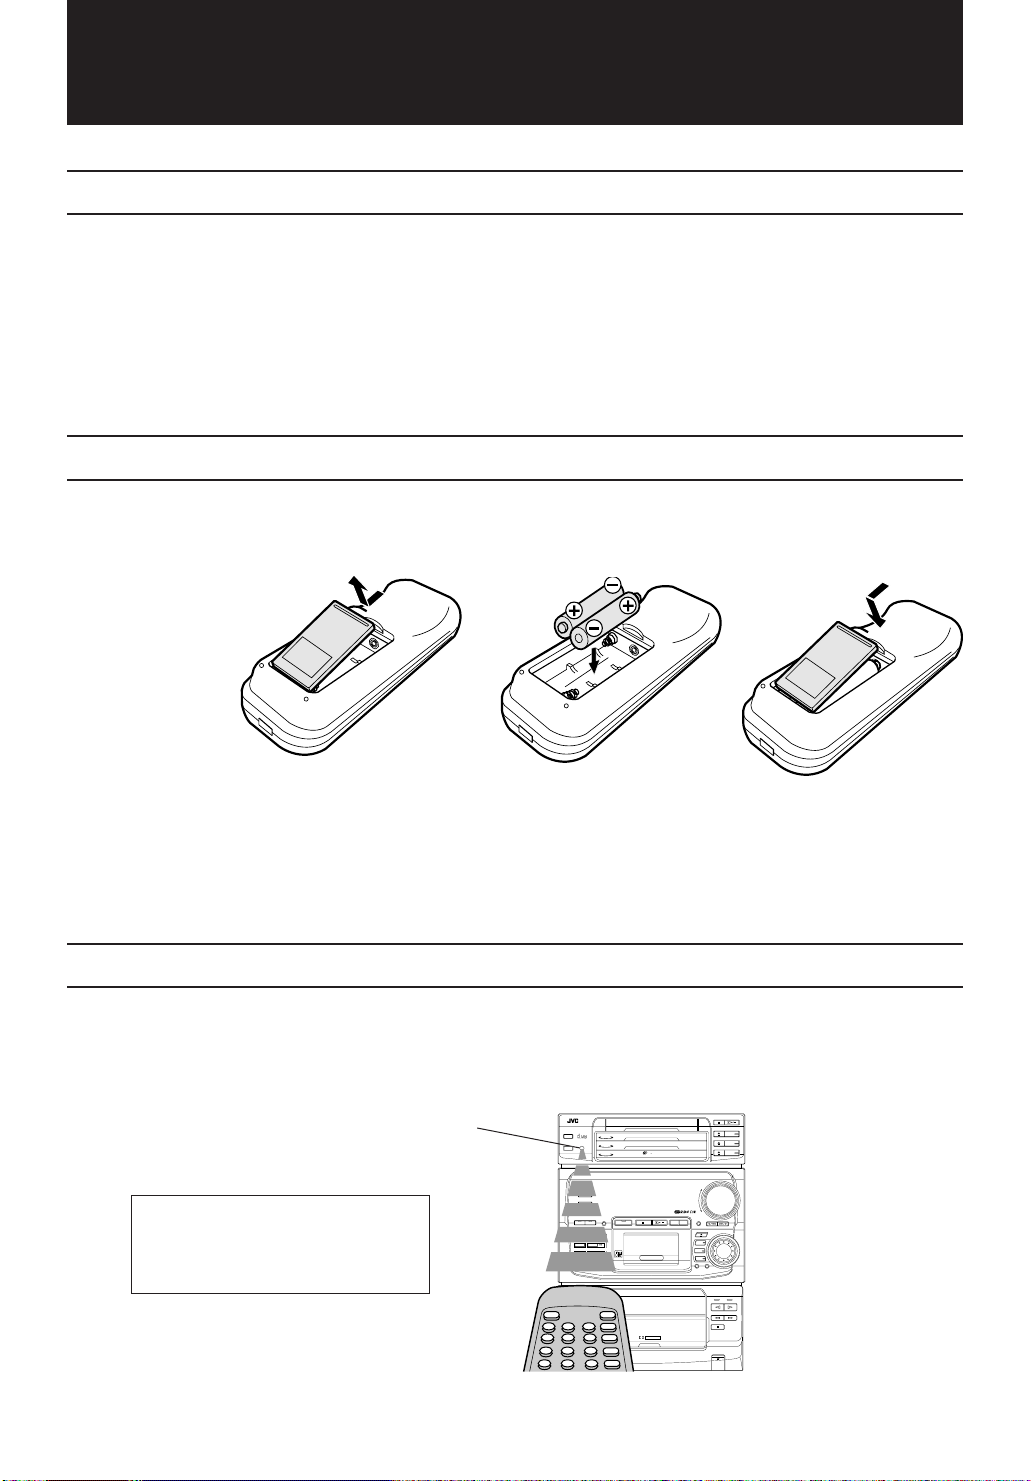
How to Put Batteries in the Remote Control
Match the polarity (+ and –) on the batteries with the + and – markings in the battery compartment.
R6P (SUM-3)/AA (15F)
CAUTION: Handle batteries properly.
To avoid battery leakage or explosion:
• Remove batteries when the Remote Control will not be used for a long time.
• When you need to replace the batteries, replace both batteries at the same time.
• Do not use an old battery with a new one.
• Do not use different types of batteries together.
Using the Remote Control
The Remote Control makes it easy to use many of the functions of the CA-MD9R from a distance of
up to 7 m (23 feet) away.
You need to point the Remote Control at the remote sensor on the CA-MD9R.
IMPORTANT: Before using the Remote
Control for operating this unit, make
sure that the Remote Control is set to
the correct operation mode.
Remote sensor
CD REPEAT
COMPACT
CD
3
DIGITAL AUDIO
CD PLAY MODE
CD
2
CD
1
STANDBY
TUNER
AUX
COMPACT COMPONENT MD SYSTEM MX-MD9R
DEMO
CLOCK
/TIMER
BASS SOUND REC PAUSE TITLE EDIT
REPEAT
LONG REC
TRIPLE REC
PLAY MODE
MD
LISTENING
1ST TRACK REC
SKIP
CD REC
DOLBY B NR
CD RECREC PAUSE
PHONES
AUTO REVERSE
PLAY& EXCHANGE
AUTO TAPE SELECTOR
3
CD
2
CD
1
3
CD
/
DOLBY B NR
CD
VOLUME
+
–
DISPLAY
/CHARA
MD
3
MD
2
MD
1
CANCEL SET
MULTI JOG
3
Page 7
CAUTION: Make all connections before plugging the unit into an AC power outlet.
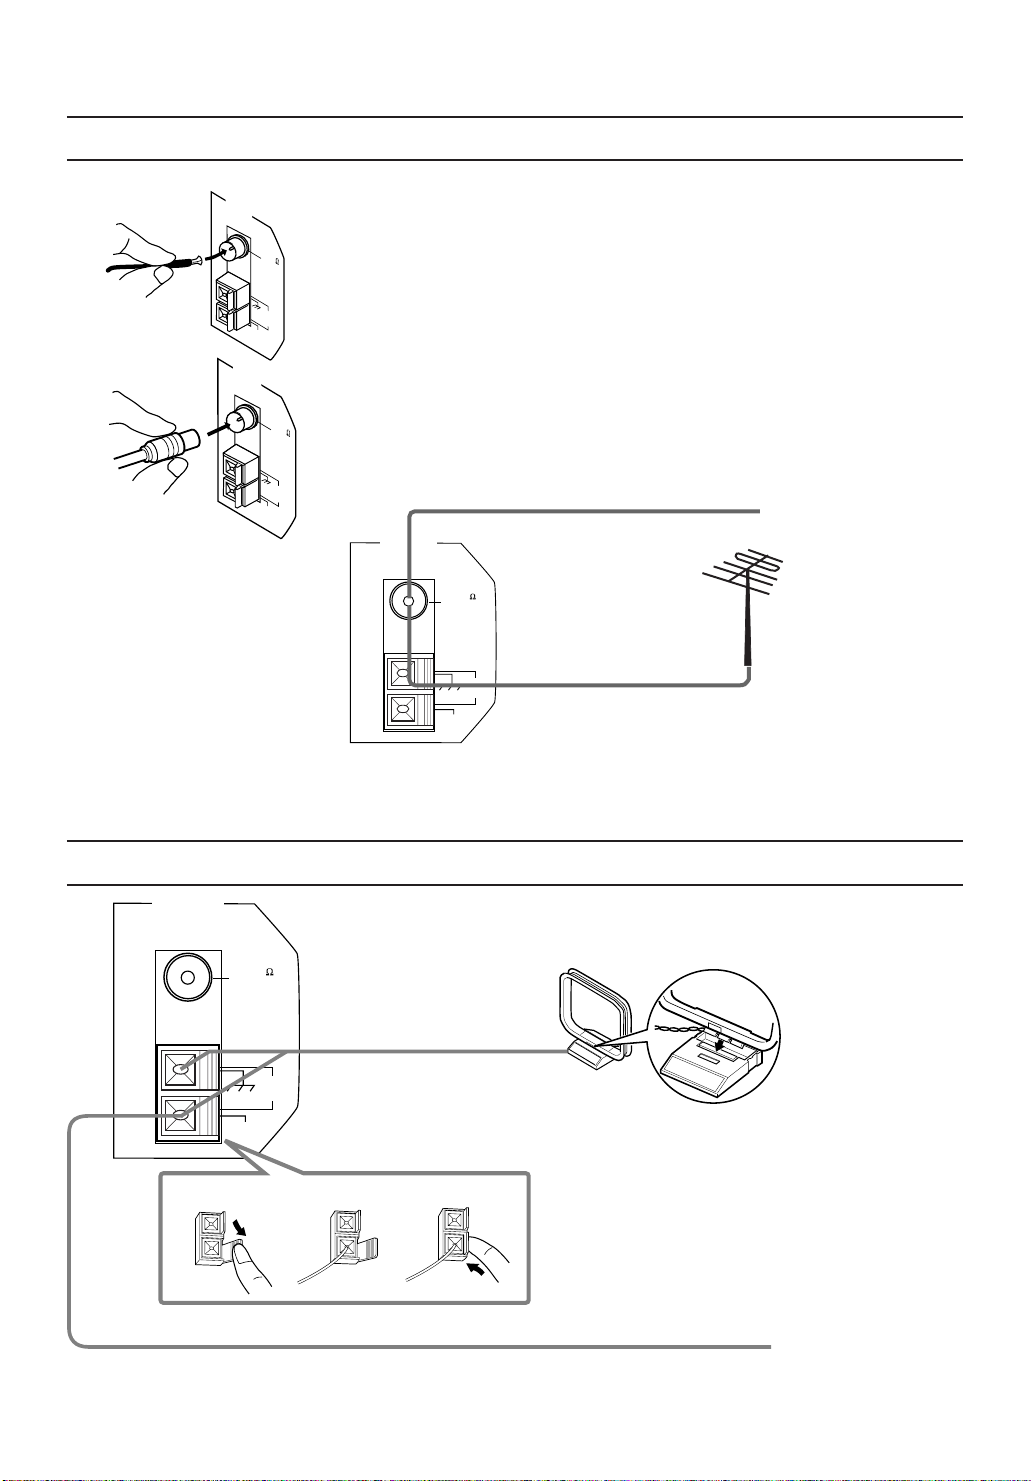
Connecting the FM Antenna
A
ANTENNA
A. Using the Supplied FM Antenna
FM 75
COAXIAL
The FM antenna provided can be connected to the FM 75Ω COAXIAL terminal as
temporary measure.
Extend the supplied FM antenna horizontally.
GND
AM
LOOP
AM EXT
B
ANTENNA
GND
AM EXT
FM 75
COAXIAL
AM
LOOP
B. Using the Coaxial Type Connector (Not Supplied)
A 75Ω antenna with coaxial type connector (DIN 45332) should be connected to
the FM 75Ω COAXIAL terminal.
FM Antenna
ANTENNA
Before attaching a
75 ohm coaxial lead
FM 75
COAXIAL
GND
AM EXT
If reception is poor,
connect the outside
AM
LOOP
antenna.
Outside FM Antenna Wire
(the kind with a
round wire going to
an outside antenna),
disconnect the
supplied FM
antenna.
CAUTION: To avoid noise, keep antennas away from metallic parts of the CA-MD9R, connecting cord and the AC power cord.
Connecting the AM (MW/LW) Antenna
ANTENNA
FM 75
COAXIAL
4
AM
LOOP
GND
AM EXT
1
AM Antenna Wire (not supplied)
AM Loop Antenna
2
3
If reception is poor, connect the outside antenna.
Turn the loop until you
have the best reception
Snap the tabs on the loop
into the slots of the base to
attach the AM Loop.
Note: Even when connecting
an outside AM antenna,
keep the indoor AM loop
connected.
Page 8
CAUTION: Make all connections before plugging the unit into an AC power outlet.
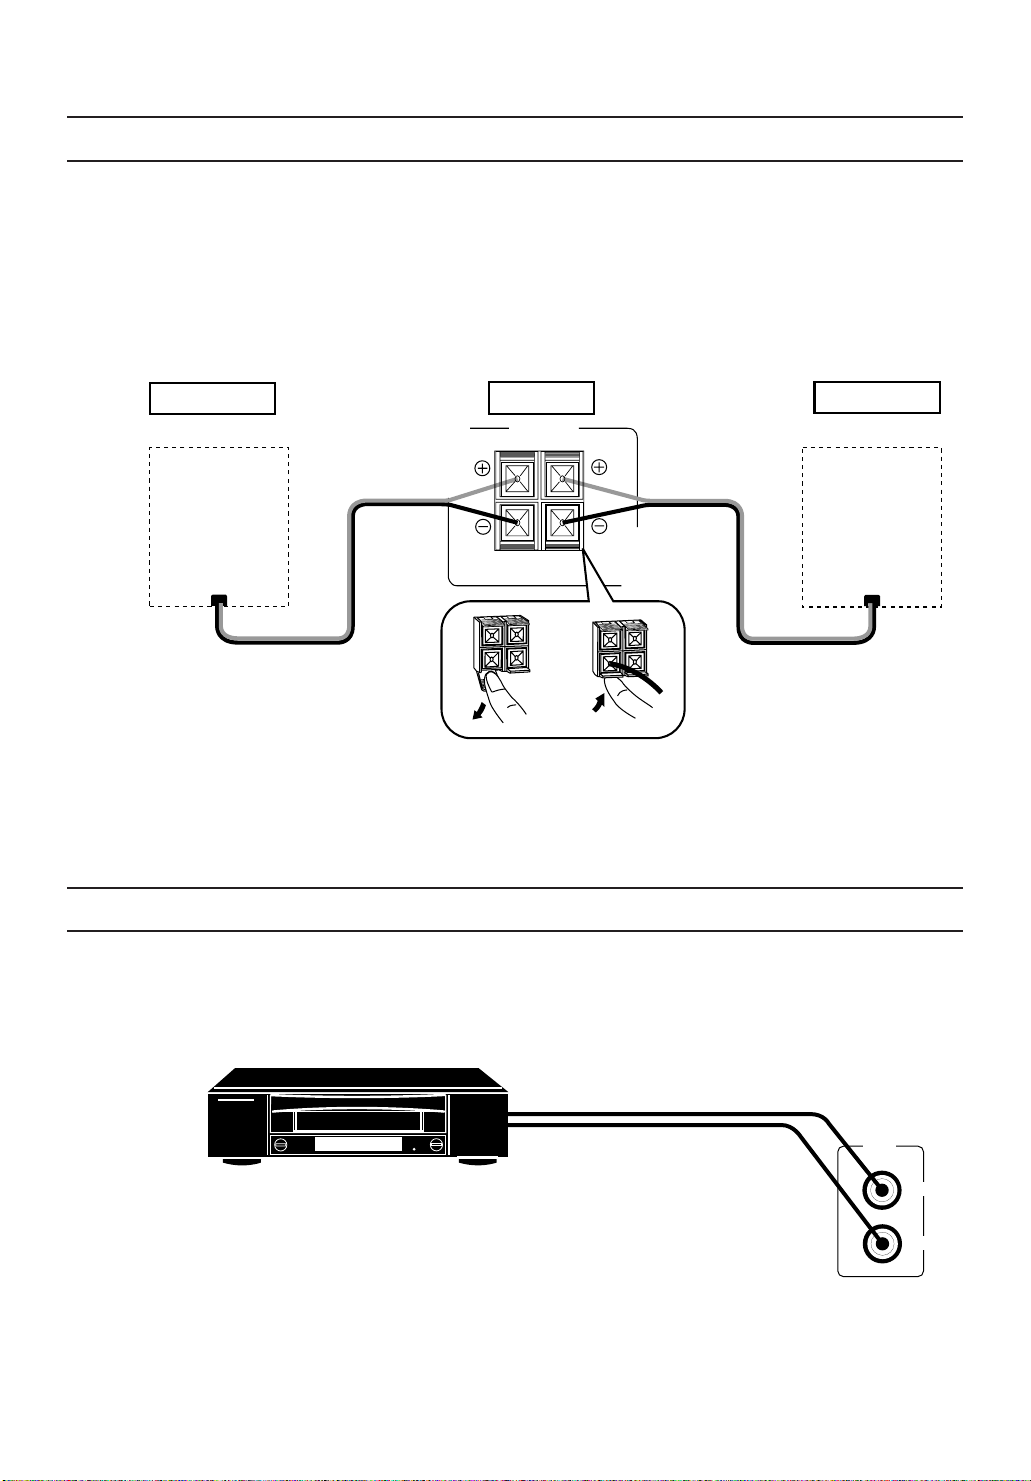
Connecting the Speakers
For each speaker, connect one end of the speaker wire to the speaker terminals on the back of the
CA-MD9R and the other end to the speaker.
1. Open the terminals and insert the speaker wires firmly (be sure to remove the insulation at the
ends of each wire first), then close the terminals.
2. Connect the red (+) and black (–) terminals of the right side speaker to the red (+) and black (–)
terminals marked RIGHT on the CA-MD9R.
Connect the red (+) and black (–) terminals of the left side speaker to the red (+) and black (–)
terminals marked LEFT on the CA-MD9R.
Right speaker
(Refer to instructions for speakers as well.)
Main Unit
SPEAKERS
RIGHT
LEFT
Left speaker
IMPORTANT: Use speakers with the correct impedance only. The correct impedance is indicated on
the back panel.
CAUTION: If a TV is installed near the speakers, the picture on the TV may be distorted. If this
happens, place the speakers away from the TV.
Connecting an External Component
You can connect another component to the AUX jacks, and reproduce the sound of the
component through the CA-MD9R.
VCR (or another component)
Note: When you connect a VCR to the CA-MD9R, connect the VCR and the TV directly using
the video cords to watch a video tape or record a TV program.
To the audio output jacks
AUX
LEFT
RIGHT
5
Page 9

Demo Mode
When the CA-MD9R is connected to an AC power outlet, a Demo automatically starts showing
some of the main features.
To stop the Demo, press any button.
DEMO
“DEMO OFF” appears on the display and the Demo stops.
To restart the Demo, press the DEMO button.
One Touch Operation
One Touch Operation is JVC’s feature that lets you control the most frequently used functions of the
CA-MD9R with a single touch.
One Touch Operation starts playing a CD or a MD, turns on the radio, plays a tape, etc. with a single
press of the play button for that source. What One Touch Operation does for you is to turn the power
on, then start the source you have specified. If the unit is not ready, such as no CD or tape in place,
the unit still powers on so you can insert a CD or tape.
How One Touch Operation works in each case is explained in each related section.
The One Touch Operation buttons are:
On the unit
CD (1 to 3) button
CD Player ‹/8 button
0 (open/close) button for the CD Player
TUNER button
AUX button
MD (1 to 3) buttons
MD Recorder ‹/8 button
0 (open/close) button for the MD Recorder
¤/‹ (Tape play) buttons
6
On the Remote Control
TUNER button
AUX button
Play button (£) (when TAPE, CD or MD is selected on the Remote Control)
DISC (1 to 3) (when CD or MD is selected on the Remote Control)
Page 10
Using the Amplifier
AUX
SOUND
BASS
ACTIVE BASS
EX.(extension)
SOUND MODE
STANDBY
TUNER
AUX
COMPACT COMPONENT MD SYSTEM MX-MD9R
DEMO
CLOCK
LONG REC
TRIPLE REC
1ST TRACK REC
CD REC
RDS
CONTROL
EON ON/OFF
1 2 3
TA/NEWS/
INFO
4 5 6
7 8 9
10
+10
MODE
SELECT
TAPE
DIRECTION
REC PAUSE
ACTIVE
BASS EX.
SOUND
MODE
RM-SEMD9RU REMOTE CONTROL
/TIMER
MD
PTY
DISPLAY
SEARCH
MODE
PTY SELECT
TAPE CD MD
2
DISC DISC DISC
1
MUTE
VOLUME
SLEEP
FM MODE
TUNER
MUTE
AUX
3
AUX
VOLUME +/–
BASS SOUND REC PAUSE TITLE EDIT
REPEAT
PLAY MODE
LISTENING
SKIP
MUTE
VOLUME
+
VOLUME
–
DISPLAY
/
/CHARA
MD
3
MD
2
MD
1
CANCEL SET
MULTI JOG
MULTI JOG dial
SET
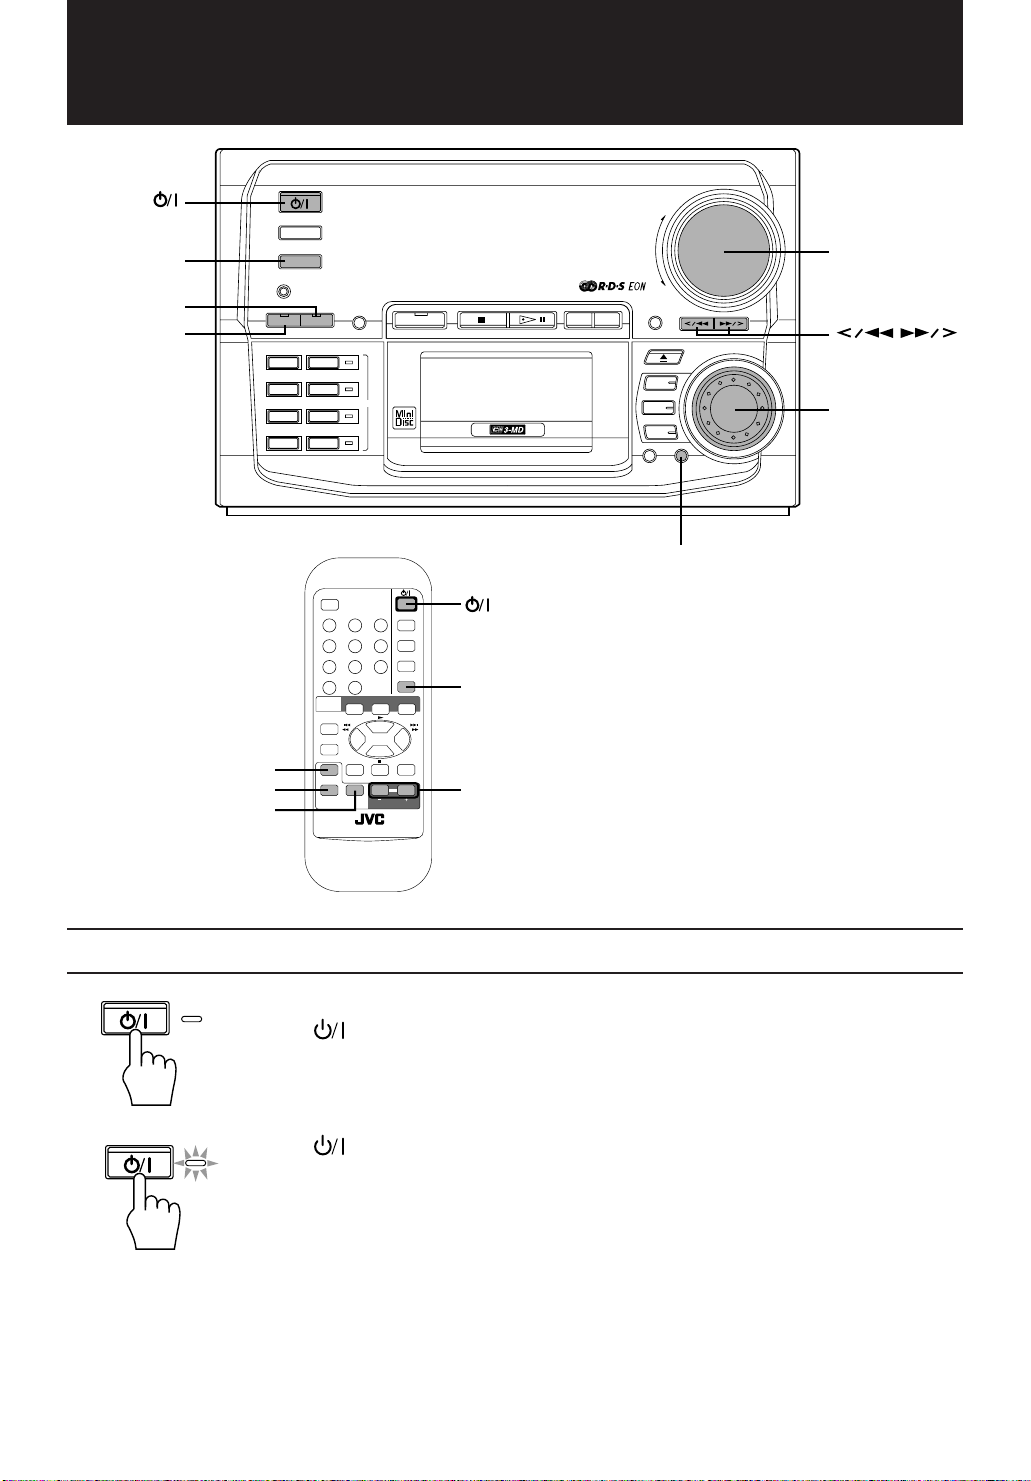
Turning the Power On and Off
STANDBY
Turning the CA-MD9R On ——————————————————————
Press the button.
“HELLO” appears on the display and the STANDBY indicator goes off.
The CA-MD9R comes on ready to play the source it was for when the power was last turned off.
Turning the CA-MD9R Off (Standby)——————————————————
Press the button again.
STANDBY
The STANDBY indicator lights up, “GOOD BYE” appears on the display for a while.
The clock time appears when the unit is in the standby mode.
❏ Some power (15 watts) is always consumed even though the unit is in standby mode.
❏ To switch off the unit completely, unplug the AC power cord from the AC outlet. When you
unplug the AC power cord, the clock will be reset to 0:00 immediately, and preset stations will
be erased in a few days.
7
Page 11
+
–
VOLUME
Adjusting the Volume
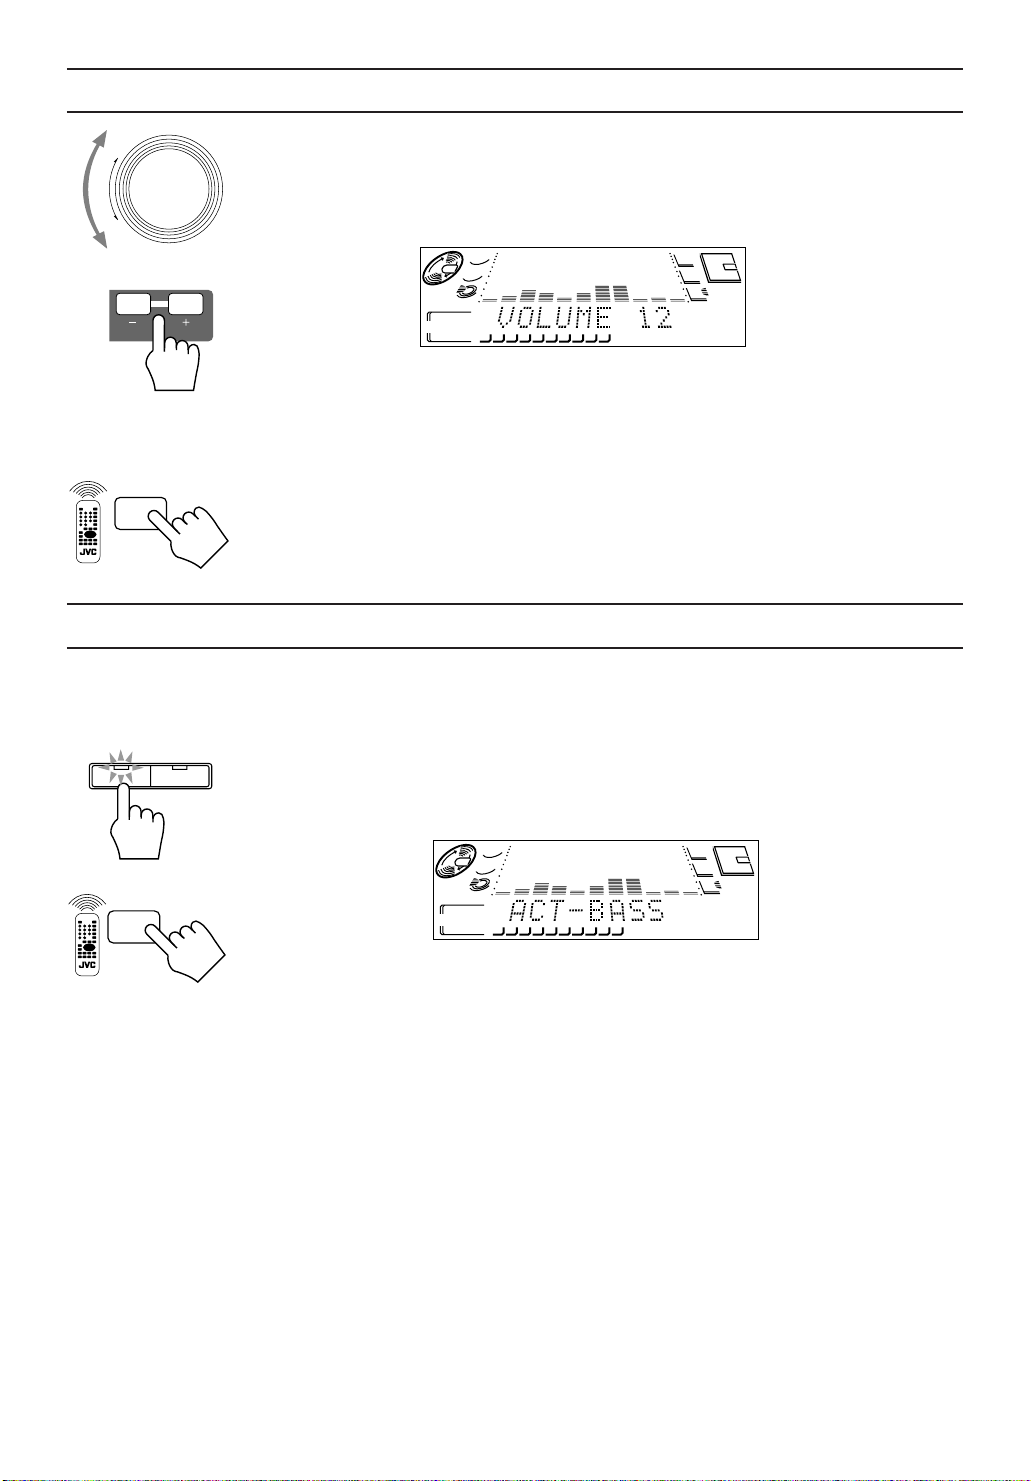
Turn the VOLUME control clockwise to increase the volume or counterclockwise to decrease it.
When using the Remote Control, press the VOLUME + button to increase the volume or press the
VOLUME – button to decrease it.
You can adjust the volume level between 0 (minimum) and 50 (maximum).
or
VOLUME
For private listening
Connect a pair of headphones to the PHONES jack. No sound comes out of the speakers.
Be sure to turn down the volume before connecting or putting on headphones.
MUTING Function ————————————————————————
MUTE
Press the MUTE button on the Remote Control to turn down the volume level to 0.
To restore the volume level to its previous level, press this button again.
Reinforcing the Bass Sound
With the Active Bass Extension, you can maintain the richness and fullness of the bass sound
regardless of how low you set the volume.
You can use this function only for playback.
BASS SOUND
To use this function, press the BASS button on the unit or the ACTIVE BASS EX. (Active Bass
Extension) button on the Remote Control. “ACT-BASS” appears on the display and the indicator on
the BASS button lights up.
3
CD
2
1
CD
12345678910
3
MD
2
1
8
or
ACTIVE
BASS EX.
3
CD
2
1
CD
12345678910
3
MD
2
1
To cancel this function, press the button again. “OFF” appears on the display and the indicator on
the BASS button goes off.
Page 12

Sound Modes
The CA-MD9R has some preset sound effects that give you control of the way your music sounds,
so you can tailor it for your room and for the quality of the source.
You can also create your own customized S.E.A. (Sound Effect Amplifier) settings and store it in the
unit’s memory.
❏ You cannot use the Sound Modes for recording.
Live surround modes
D.(Dance) CLUB Increases resonance and bass.
HALL Adds depth and brilliance to the sound, like in a concert hall.
STADIUM Adds clarity and spreads the sound, like in an outdoor stadium.
S.E.A. effect modes
ROCK Boosts low and high frequencies.
POP Good for vocal music.
CLASSIC Best for classical music.
Selecting a Sound Mode ——————————————————————
BASS SOUND
SOUND
MODE
1. Press the SOUND button on the unit or SOUND MODE button on the Remote Control repeatedly
until the Sound Mode you want appears on the display.
Each time you press the button, the Sound Modes change as follow:
D. CLUB HALL STADIUM ROCK
OFF
(canceled)
When a Sound Mode is selected, the indicator on the SOUND button lights up.
To cancel the Sound Mode, press the SOUND or SOUND MODE button repeatedly until “OFF”
appears on the display.
MANUAL CLASSIC POP
BASS SOUNDBASS SOUND
9
Page 13
BASS SOUND
SET
MULTI JOG
Creating Your Own Customized Sound Mode ——————————————
You can create you own customized Sound Mode and store it in the CA-MD9R’s memory.
To do the following procedure, use the buttons on the unit.
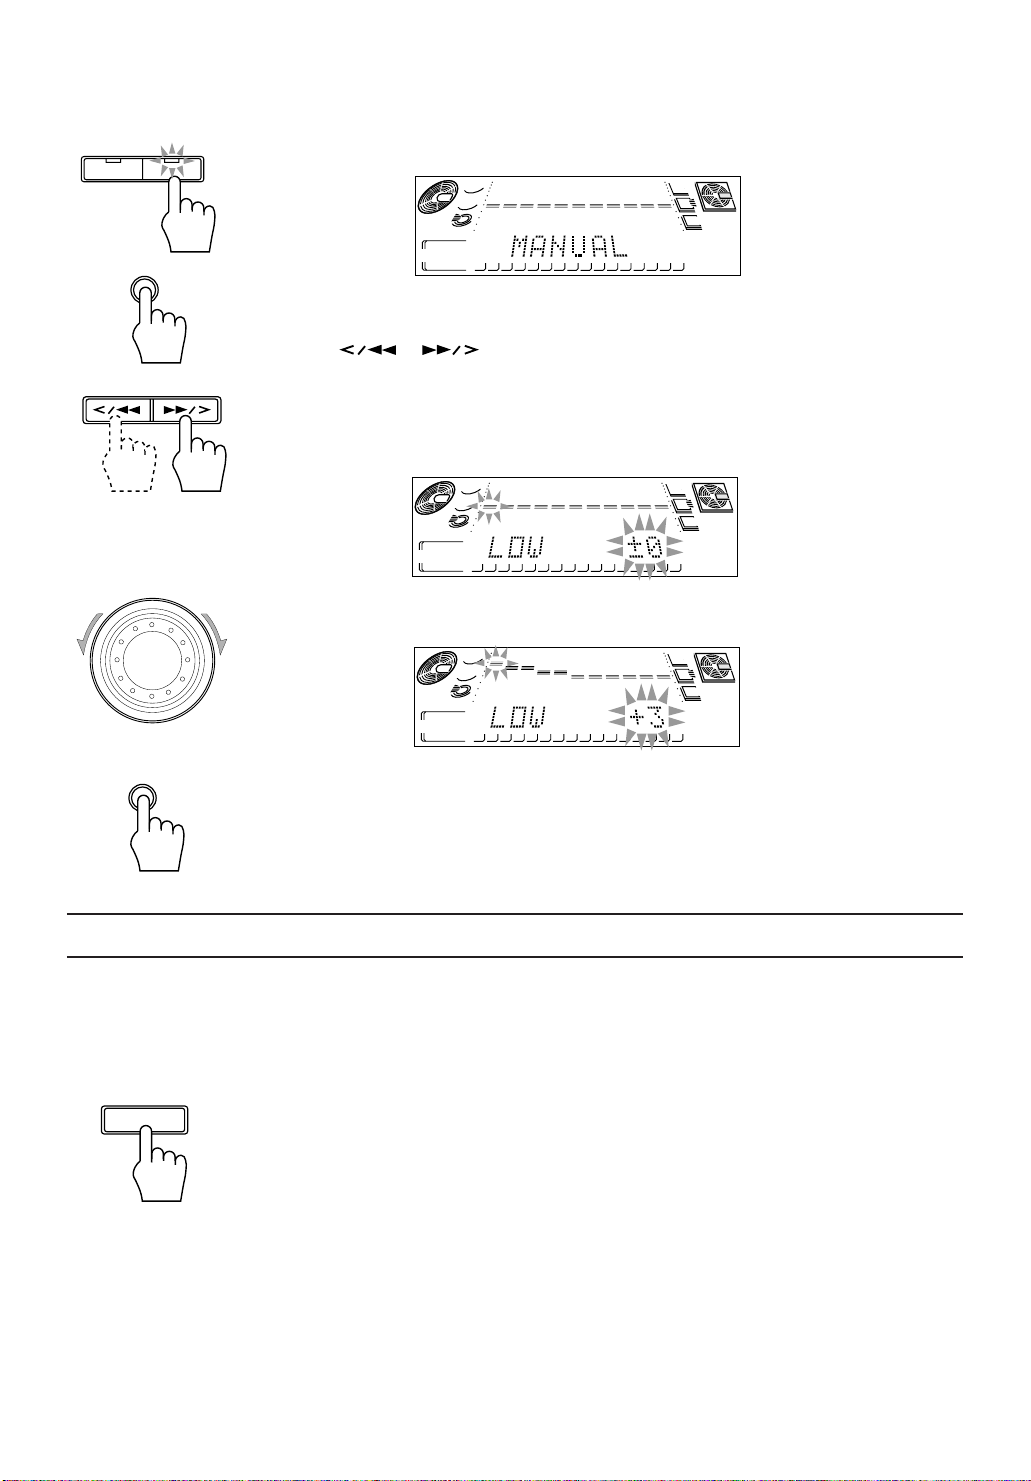
1. Press the SOUND button repeatedly until “MANUAL” appears on the display.
3
CD
2
1
STEREO TUNED
PROGRAM
RANDOM
MD
CD
REPEAT
12345678910111213141516
1 CD MD ALL
3
2
1
R·D·S EON
TA NEWS INFO
TA NEWS INFO
SLEEP
DAILY
REC 1 2 3
MD
EON
2. Press the SET button while “MANUAL” is shown on the display.
3. Press the or button to select the frequency range you want to adjust, while the
adjustable frequency range (LOW, MID, HIGH) in shown on the display.
❏ You can adjust 3 different frequency ranges:
LOW: for the low frequency range
MID: for the middle frequency range
HIGH: for the high frequency range
3
CD
2
1
STEREO TUNED
PROGRAM
RANDOM
MD
CD
REPEAT
12345678910111213141516
1 CD MD ALL
3
2
1
TA NEWS INFO
R·D·S EON
TA NEWS INFO
SLEEP
DAILY
REC 1 2 3
MD
EON
4. Rotate the MULTI JOG dial to adjust the level of the selected range.
❏ The level can be adjusted between +3 and –3 in seven steps.
3
CD
2
1
STEREO TUNED
PROGRAM
RANDOM
MD
CD
REPEAT
12345678910111213141516
1 CD MD ALL
3
2
1
TA NEWS INFO
R·D·S EON
TA NEWS INFO
SLEEP
DAILY
REC 1 2 3
MD
EON
SET
5. Press the SET button again to memorize your settings.
To select your own customized Sound Mode, press the SOUND button repeatedly (or the SOUND
MODE button on the Remote Control) so that “MANUAL” appears on the display.
Using an External Component
Listening to an External Component —————————————————
By playing the sound from an external component through the CA-MD9R, you can gain control
over how the music sounds. Once the connected component is playing through the CA-MD9R, you
can apply the sound effects.
❏ First make sure that the external component is properly connected to the CA-MD9R. (See page 5.)
AUX
1. Press the AUX button on the unit or on the Remote Control.
“AUX” appears on the display.
2. Start playing on the external component.
❏ To operate the external component, refer to the manual supplied with it.
3. Adjust the VOLUME control and select a Sound Mode if you want.
To cancel the setting
Change the source by starting any one of the CA-MD9R’s built-in sound sources, such as the CD
Player or MD Recorder.
10
Page 14
Using the Tuner
TUNER
STANDBY
TUNER
AUX
DEMO
BASS SOUND REC PAUSE TITLE EDIT
REPEAT
LONG REC
TRIPLE REC
PLAY MODE
LISTENING
1ST TRACK REC
SKIP
CD REC
RDS CONTROL
RDS function buttons
Number buttons
COMPACT COMPONENT MD SYSTEM MX-MD9R
CLOCK
/TIMER
MD
RDS
CONTROL
PTY
DISPLAY
EON ON/OFF
SEARCH
MODE
PTY SELECT
TAPE CD MD
2
DISC DISC DISC
1
MUTE
VOLUME
SLEEP
FM MODE
TUNER
MUTE
AUX
3
1 2 3
TA/NEWS/
INFO
4 5 6
7 8 9
10
+10
MODE
SELECT
TAPE
DIRECTION
REC PAUSE
ACTIVE
BASS EX.
SOUND
MODE
RM-SEMD9RU REMOTE CONTROL
VOLUME
+
–
DISPLAY
/
DISPLAY
/CHARA
MD
3
MD
2
MD
1
CANCEL SET
SET
MULTI JOG dial
MULTI JOG
/CHARA
FM MODE MUTE
TUNER
IMPORTANT: Before using the Remote Control for
tuner and RDS operations.
• Set the Remote Control to the tuner operation mode
by pressing the TUNER button. (For the tuner
operations)
• Set the Remote Control to the RDS operation mode
by pressing the RDS CONTROL button. (For the RDS
operations)
You can listen to both FM and AM (MW/LW) stations. Stations can be tuned in manually,
automatically, or from preset memory storage.
❏ Before listening to the radio:
• Check that both the FM and AM (MW/LW) antennas are firmly connected. (See page 4.)
One Touch Radio —————————————————————————
Just press the TUNER button to turn on the unit and start playing the most recent station tuned in.
❏ You can switch from any other sound source to the radio by pressing the TUNER button.
Tuning in a Station
Press the TUNER button to turn on the radio.
TUNER
The frequency of the previously selected station appears on the display.
Switching between Frequency Bands—————————————————
Press the TUNER button on the unit.
Each time you press the button, the band alternates between FM and AM (MW/LW).
❏ If you press the TUNER button on the Remote Control, the band will not alternate.
11
Page 15

Selecting a Radio Station —————————————————————
❏ Press the or button on the unit repeatedly.
The frequency changes in one step increments. “TUNED” appears on the display when a station
is tuned in.
❏ Press and hold the
continuously until a station is tuned in. “TUNED” appears on the display.
❏ Possible only after presetting stations (For presetting methods, see “Presetting Stations” below).
Using the unit
Select a preset channel by rotating the MULTI JOG dial clockwise or counterclockwise.
or button for a few seconds, the frequency changes
MULTI JOG
PTY
EON ON/OFF
SEARCH
1 2 3
TA/NEWS/
PTY SELECT
INFO
4 5 6
7 8 9
10
+10
DISPLAY
MODE
Using the Remote Control
1. Press the TUNER button so that you can receive the most recent station tuned in.
2. Press the number button for the preset station you want.
Presetting Stations
TUNER
You can store up to 30 stations (FM and AM (MW/LW)).
To do the following procedure, use the buttons on the unit.
Note: In some cases, test frequencies have been already memorized for the tuner since the factory
examined the tuner preset function before shipment. This is not a malfunction. You can preset the
stations you want into memory by following the presetting method.
1. Tune to a station you want to preset (see “Tuning in a Station” on page 11).
2. Press the SET button.
SET
On the display, “– –” (preset number position) will flash for 5 seconds.
❏ During these 5 seconds while the indication on the display is flashing, you can assign a
❏ Example: For channel 5, press 5. For channel 15, press +10 then 5. For channel 20, press
+10, then 10. For channel 30, press +10 two times, then 10.
channel number to the station and enter it into the memory.
3
CD
2
1
STEREO TUNED
PROGRAM
RANDOM
MD
CD
REPEAT
12345678910111213141516
1 CD MD ALL
3
2
1
R·D·S EON
TA NEWS INFO
TA NEWS INFO
SLEEP
DAILY
REC 1 2 3
MD
EON
12
MULTI JOG
SET
3. Rotate the MULTI JOG dial clockwise or counterclockwise to select a preset number.
4. Press the SET button again.
“MEMORY” appears on the display and the selected station will be preset in the channel
number you have specified.
CD
STEREO TUNED
PROGRAM
RANDOM
MD
CD
REPEAT
1 CD MD ALL
3
2
1
12345678910111213141516
3
2
1
R·D·S EON
TA NEWS INFO
TA NEWS INFO
SLEEP
DAILY
REC 1 2 3
MD
EON
❏ If a station has been previously stored in the same channel number, it will be erased and the
newly selected station will be stored.
5. Repeat steps 1 to 4 for each station you want to store in memory using different preset numbers.
CAUTION: If the unit is unplugged or if a power failure occurs, the preset stations will be erased in
a few days. If this happens, preset the station again.
Page 16
Changing the FM Reception Mode
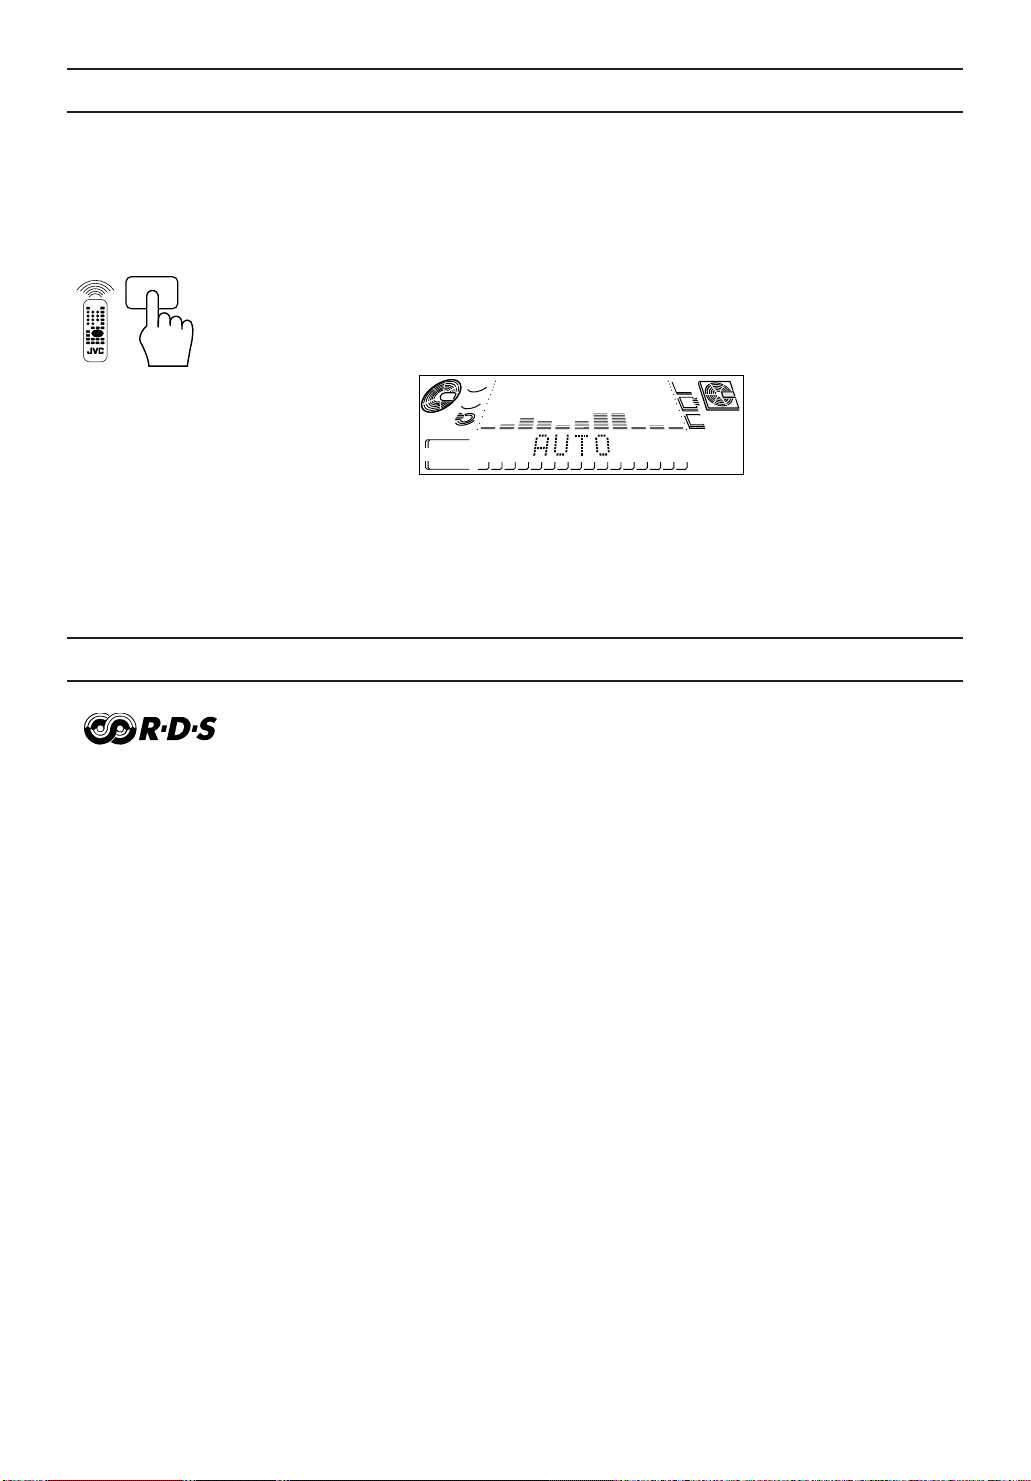
When an FM stereo broadcast is hard to receive or noisy, press the FM MODE MUTE button on the
Remote Control (after pressing the TUNER button on the Remote Control) so that “MONO”
appears on the display. (The STEREO indicator goes off.) Reception improves, but there are no
stereo effects.
In this monaural mode, noise comes out while tuning in stations (since muting is canceled).
FM MODE
MUTE
To restore the stereo effect, press the FM MODE MUTE button again so that “AUTO” appears on
the display.
In this stereo mode, no noise comes out while tuning in stations, and you can hear stereo sounds
when a program is broadcast in stereo (the STEREO indicator lights up).
STEREO TUNED
MD
CD
Receiving FM Stations with RDS
RDS (Radio Data System) allows the FM stations to send additional signals along with their regular
program signals. For example, the stations send their station names and information about what type
of program they broadcast, such as sports or music, etc.
When tuned to an FM station providing the RDS signals, the RDS indicator lights up and the station
name, if sent, is displayed.
One convenient RDS service is “Enhanced Other Networks (EON)” (see page 16). This allows the
unit to automatically switch to a program type of your choice when one starts in your local area.
❏ Not all FM stations provide RDS service, nor do all RDS stations provide the same services. If
in doubt, check with local radio stations for details on RDS services in your area.
❏ RDS may not work correctly if the station you are tuned in is not transmitting the signals
properly or if the signal strength is weak.
3
CD
2
1
PROGRAM
RANDOM
REPEAT
12345678910111213141516
1 CD MD ALL
3
2
1
R·D·S EON
TA NEWS INFO
TA NEWS INFO
SLEEP
DAILY
REC 1 2 3
MD
EON
What Information RDS Can Provide ——————————————————
The CA-MD9R can use the following RDS service.
PS (Program Service name)
Identifies each station by a name.
RT (Radio Text)
Allows the RDS station to send text messages that appear on the display.
PTY (Program Type) (see next page for a description of the PTY codes)
Identifies the type of RDS program. This allows you to locate a specific type of program being
broadcast.
EON (Enhanced Other Networks)
Provides the information about the program types sent by the other RDS stations than the one being
received.
13
Page 17

Description of the PTY codes:
NONE: Undefined.
NEWS: News.
AFFAIRS: Topical program expanding or enlarging upon the news — debate, or analysis.
INFO: Program the purpose of which is to impart advice in the widest sense.
SPORT: Program concerned with any aspect of sports.
EDUCATE: Educational programs.
DRAMA: All radio plays and serials.
CULTURE: Programs concerning any aspect of national or regional culture, including language,
theatre, etc.
SCIENCE: Programs about the natural sciences and technology.
VARIED: Used for mainly speech-based programs like quizzes, panel games and personality
interviews.
POP M: Commercial music of current popular appeal.
ROCK M: Rock music.
M.O.R. M: Current contemporary music considered to be “easy-listening.”
LIGHT M: Instrumental music, and vocal or choral works.
CLASSICS: Performances of major orchestral works, symphonies, chamber music, etc.
OTHER M: Music not fitting into any of the other categories.
WEATHER: Weather reports and forecasts.
FINANCE: Stock Market reports, commerce, trading etc.
CHILDREN: Programs targeted at a young audience.
SOCIAL A: Programs about sociology, history, geography, psychology and society.
RELIGION: Religious programs.
PHONE IN: Involving members of the public expressing their views either by phone or at a
public forum.
TRAVEL: Travel information.
LEISURE: Programs about recreational activities.
JAZZ: Jazz music.
COUNTRY: Songs which originate from, or continue the musical tradition of the American
Southern States.
NATIONAL: Current popular music of the nation or region in that country’s language.
OLDIES: Music from the so-called “golden age” of popular music.
FOLK M: Music which has its roots in the musical culture of a particular nation.
DOCUMENT: Program concerning factual matters, presented in an investigative style.
TEST: Broadcast when testing emergency broadcast equipment or receivers.
ALARM!: Emergency announcement.
Note:
Classification of the PTY codes for some FM stations may be different from the above list.
14
Page 18
RDS
CONTROL
DISPLAY
MODE
3
RDS
CONTROL
Changing the RDS Information————————————————————
You can see RDS information on the display while listening to an FM station.
To view RDS information on the display, press the DISPLAY MODE button after pressing the RDS
CONTROL button on the Remote Control. Each time you press the button the display changes to
show the following information:
3
PS (Program Service): Station names will be displayed. “no PS” appears if no signal is sent.
«
PTY (Program Type): Types of broadcast programs will be displayed. “no PTY” appears if
«
RT (Radio Text): Text message sent by stations will be displayed. “no RT” appears if
«
Station Frequency: Station frequencies. (non-RDS information)
❏ While RDS information is being received from a station, “wait PS”, “wait PTY”, or “wait RT”
may appear on the display.
no signal is sent.
no signal is sent.
Searching for Programs by PTY Codes (PTY Search) ———————————
One of the advantages of the RDS service is that you can locate a particular kind of program by
specifying the PTY codes.
❏ The PTY Search function is applicable to preset stations only.
❏ PTY Search can be used even while AM (MW/LW) broadcasts are being received.
To search for a program using the PTY codes, follow this procedure, using the Remote Control:
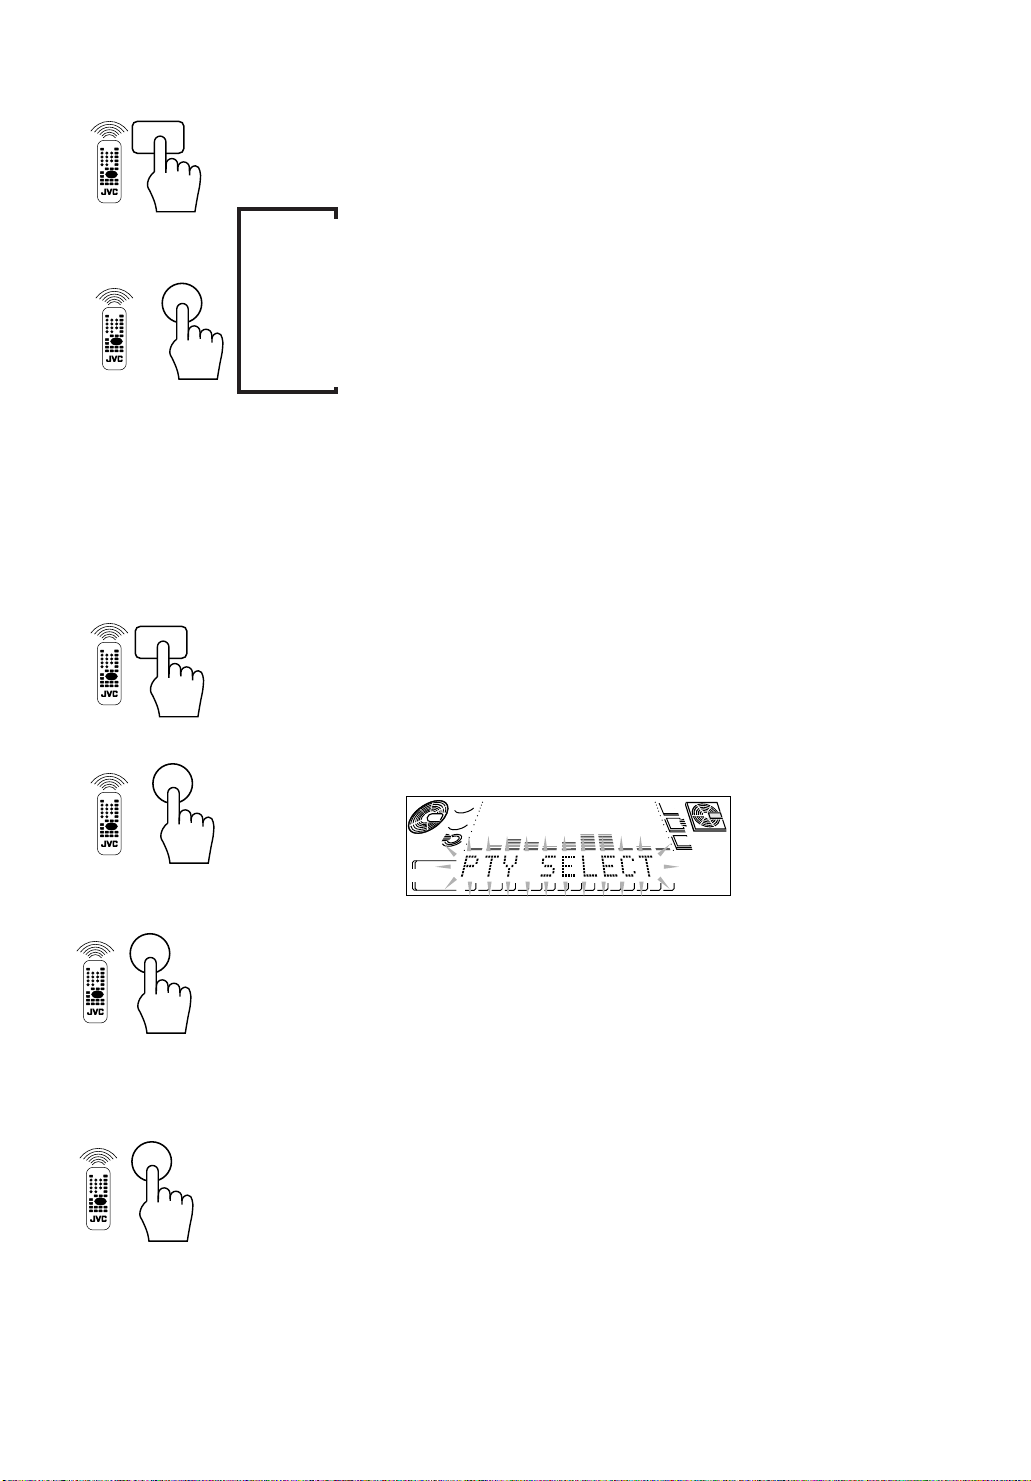
1. Press the RDS CONTROL button.
The number buttons on the Remote Control are set for the RDS operations.
PTY
SEARCH
2
PTY SELECT
5
PTY
SEARCH
2
2. Press the PTY SEARCH button.
“PTY SELECT” flashes on the display.
3
CD
2
1
STEREO TUNED
PROGRAM
RANDOM
MD
CD
REPEAT
12345678910111213141516
1 CD MD ALL
3
2
1
TA NEWS INFO
R·D·S EON
TA NEWS INFO
SLEEP
DAILY
REC 1 2 3
MD
EON
3. Press the PTY SELECT button to select a PTY code while “PTY SELECT” is flashing on the display.
Each time you press the button, the PTY codes change as follows (r efer also to the list on pa ge 14):
NONE = NEWS = AFFAIRS = INFO = SPORT = EDUCATE = DRAMA = CULTURE =
SCIENCE = VARIED = POP M = ROCK M = M.O.R. M = LIGHT M = CLASSICS =
OTHER M = WEATHER = FINANCE = CHILDREN = SOCIAL A = RELIGION = PHONE IN
= TRAVEL = LEISURE = JAZZ = COUNTRY = NATIONAL = OLDIES = FOLK M =
DOCUMENT = TEST = ALARM! = (back to the beginning)
4. Press the PTY SEARCH button again.
While searching, “SEARCH” and the selected PTY code alternate on the display.
The unit searches 30 preset channels, stops when it finds the one you have selected, and tunes in
that station.
To continue searching after the first stop:
Press the PTY SEARCH button again while the indications on the display are flashing.
If no program is found, “NOT FOUND” appears on the display and the unit returns to the last
received station.
To stop searching any time during the process:
Press the PTY SEARCH button while searching.
15
Page 19
RDS
CONTROL
EON ON/OFF
1
TA/NEWS/
INFO
4
EON Function ——————————————————————————
The EON function allows the unit to switch temporarily to a broadcast program of your choice
(NEWS, TA, and/or INFO) from a different station except when you are listening to a non-RDS
stations (all AM (MW/LW) and some FM stations).
❏ The EON indicator lights up while receiving a station with the EON code.
❏ EON Standby reception is applicable for preset stations only.
To set EON Standby reception, use the Remote Control:
1. Press the RDS CONTROL button.
The number buttons on the Remote Control are set for the RDS operations.
2. Press the EON ON/OFF button.
The last EON data type selected — TA/NEWS/INFO — lights up.
3. Press the TA/NEWS/INFO button repeatedly until the EON data type you want is selected.
TA: Identifies that a traffic announcement is being broadcast in your area.
NEWS: News
INFO: Program the purpose of which is to impart advice in the widest sense.
Each time you press the TA/NEWS/INFO button, the EON data types change as follows:
TA NEWS INFO = TA NEWS INFO = TA NEWS INFO =
TA NEWS INFO = TA NEWS INFO = TA NEWS INFO =
TA NEWS INFO = (back to the beginning)
As soon as your selection is entered, the unit goes into EON Standby reception mode.
To cancel the EON function, press the EON ON/OFF button again so that the TA/NEWS/INFO
indicator goes off.
❏ If you cancel the EON function while receiving a program selected by the EON function, the
unit goes back to the previously tuned station.
When this unit carries out EON Standby reception, this unit functions as follows:
CASE 1
If there is no station broadcasting the program
you have selected
The unit continues tuning in the current station.
CASE 2
If there is a station broadcasting the program
you have selected
The unit tunes in the program. The indicator of
received PTY code starts flashing.
«
«
When a station starts broadcasting the program
you have selected, the unit automatically
switches to the station. The indicator of
received PTY code starts flashing.
When the program is over, the unit goes back
to the previously tuned station, but still
remains in EON Standby reception mode.
«
When the program is over, the unit goes back
to the previously tuned station, but still
remains in EON Standby reception mode.
16
Page 20

Notes:
• EON data sent from some stations may not be compatible with this unit.
• While listening to a program tuned in by the EON function, the station does not change even if
another network station starts broadcasting a program of the same EON data.
• While listening to a program tuned in by the EON function, you can only use the EON ON/OFF
and DISPLAY MODE button as the tuner operation buttons.
• If the stations alternate intermittently between the station tuned in by the EON function and the
currently tuned station (“WAITING” flashes on the display), press the EON ON/OFF button to
cancel the EON standby reception mode.
If you do not press the button, the currently tuned station is received finally, and the indication
of the EON data type flashing on the display disappears.
When program of the selected EON data is completed, “EON END” appears and the unit
automatically goes back to the previously tuned station.
Alarm Function——————————————————————————
If an ALARM (Emergency) signal is received from a station while listening to the radio, the unit
automatically switches to the station broadcasting the ALARM signal (“ALARM!” will flash on the
display) except when you are listening to non-RDS stations (all AM (MW/LW) and some FM
stations).
Test Function ——————————————————————————
The TEST signal is used for testing the ALARM function.
Therefore it makes the unit work in the same way as the ALARM signal does. If an TEST signal is
received, the unit automatically switches to the station broadcasting the TEST signal (“TEST” will
flash on the display).
17
Page 21

Using the CD Player
CD REPEAT
CD REPEAT
CD PLAY
MODE
COMPACT
DIGITAL AUDIO
CD PLAY MODE
TUNER
BASS SOUND REC PAUSE TITLE EDIT
RDS
CONTROL
PTY
DISPLAY
EON ON/OFF
SEARCH
MODE
1 2 3
TA/NEWS/
PTY SELECT
INFO
4 5 6
7 8 9
10
+10
TAPE CD MD
MODE
SELECT
TAPE
DIRECTION
REC PAUSE
CD
3
CD
2
CD
1
STANDBY
AUX
COMPACT COMPONENT MD SYSTEM MX-MD9R
DEMO
CLOCK
/TIMER
SLEEP
FM MODE
MUTE
TUNER
AUX
CD
4 / £ / 7 / ¢
3
CD
PLAY & EXCHANGE
7 (Stop)
‹/8
3
CD
2
CD
1
CD
(Play/Pause)
CD (1 to 3)
0 (Eject)
VOLUME
+
–
DISPLAY
/
/CHARA
3
CD
2
CD
1
CD
CD indicators
ACTIVE
DISC DISC DISC
1
BASS EX.
SOUND
MUTE
MODE
RM-SEMD9RU REMOTE CONTROL
2
VOLUME
3
DISC (1 to 3)
IMPORTANT: Before using the Remote Control for the
CD operations, set the Remote Control to the CD
operation mode by pressing the CD button.
CD indicators on the unit
Each of the CD buttons (1 to 3) has the CD indicator.
When a CD is loaded on the tray, the corresponding indicator turns on.
CD indicators on the display
Indicates that this
CD is currently
1
Flashes while playing
selected
Always lights
Lights Lights
11 1
When an 8 cm
CD is on the tray.
When a regular
CD is on the tray.
When no CD is
on the tray.
18
Page 22
The Player built in the CA-MD9R has 3 CD trays. You can use Continuous, Random, Program or
Repeat Play for the CDs on CD1, CD2 and CD3 trays. Repeat Play can repeat all the tracks on all
the CDs, the tracks on one of the CDs or one track on one CD. There is also the Disc Lock function,
prohibiting CD ejection (see page 66.)
The Quickest Way to Start a CD Is with the One Touch Operation ——————
The power comes on, and operations are done automatically.
❏ Press the ‹/8 button (or the £ button on the Remote Control).
• If there is a CD on the currently selected tray, playback begins from the first track of this
• If there is no CD on the currently selected tray, playback begins from the first track of the
• If there is no CD on any of the CD trays, “CD NO DISC” appears on the display for a few
❏ Press one of the CD buttons (1 to 3) (or one of the DISC buttons (1 to 3) on the Remote
Control).
• If there is a CD on the CD tray for the CD number you have selected, playback begins from
❏ Press the 0 button.
• The power comes on, and the corresponding tray comes out automatically.
Using the CD Player
CD.
following CD.
seconds. Put a CD on one of the trays and press the ‹/8 button (or the £ button on the
Remote Control)
the first track of that CD. If there is no CD on the CD tray, “CD NO DISC” appears on the
display for a few seconds. Put a CD on that tray, then press the CD button (1 to 3) for that
tray (or the corresponding DISC button (1 to 3) on the Remote Control).
Loading CDs ———————————————————————————
3
CD
2
CD
1
CD
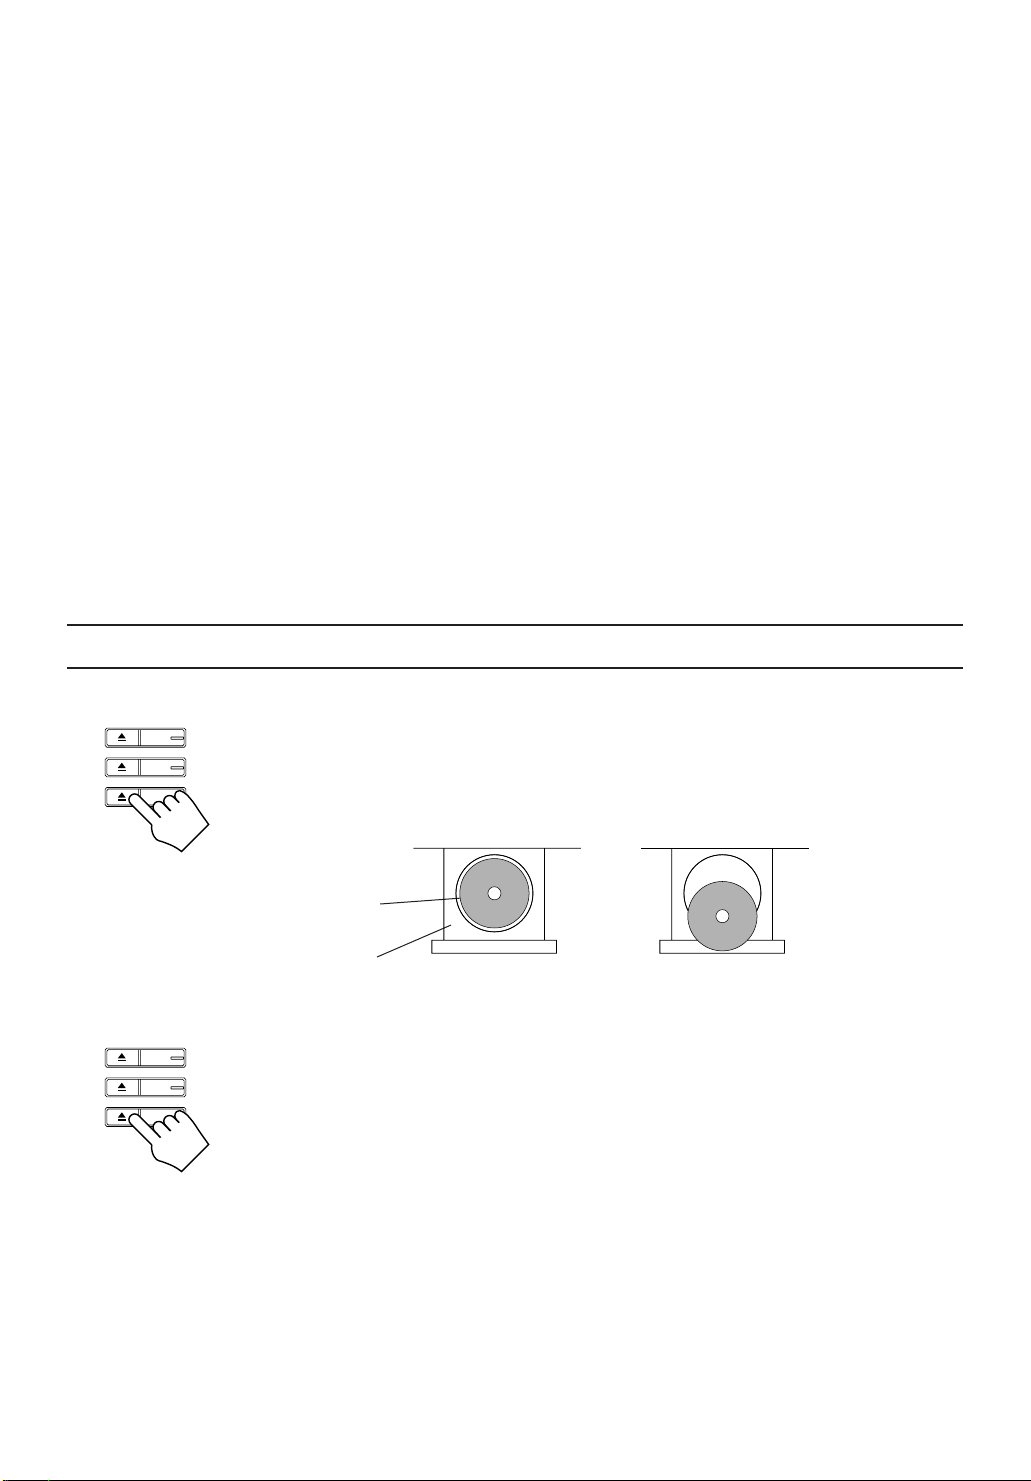
1. Press the 0 button on the CD Player you want to load the CD onto.
The CD tray comes out automatically.
2. Place a CD, with its label side up, onto the tray.
CD
Tray
INCORRECTCORRECT
❏ To put an 8 cm CD on a tray, insert it so that it is aligned with the groove in the tray’s center.
3
CD
2
CD
1
CD
Note: To avoid malfunctions when you play a CD, place the CD in the right place at the center of
the tray.
3. Press the 0 button to close the tray.
4. Repeat steps 1 to 3 to load other CDs on the other trays.
❏ To continue putting CDs on the other trays, even if a tray is open, by pressing the 0 button
of another CD tray, the open tray will close automatically, and the new CD tray will slide
out.
19
Page 23

3
CD
2
CD
1
CD
DISC DISC DISC
2
1
Playing CDs ———————————————————————————
You can play the CDs continuously. (Continuous Play)
1. Prepare the CDs.
2. Press the CD button (1 to 3) (or the DISC button (1 to 3) on the Remote Control) for the CD you
want to play.
The first track of the selected CD will begin playing.
When the selected CD finishes playing, the next CD begins playing automatically.
When the last CD has finished playing, the unit stops playing the CDs.
❏ When you press the CD button (1 to 3) (or DISC button (1 to 3) on the Remote Control) while a
tray is open, the open tray will close automatically and Continuous Play playback begins from
3
the first track of the CD.
To use Continuous Play from the first track of the currently selected CD, just press the ‹/8 button
(or the £ button on the Remote Control).
Playing order of CDs
❏ When playback starts from CD1, the playing order is CD1 = CD2 = CD3. When CD3 has
finished, the CD Player selects CD1 and stops.
❏ When playback starts from CD2, the playing order is CD2 = CD3 = CD1. When CD1 has
finished, the CD Player selects CD2 and stops.
❏ When playback starts from CD3, the playing order is CD3 = CD1 = CD2. When CD2 has
finished, the CD Player selects CD3 and stops.
• If no CD is on a tray, the CD Player skips that tray.
To stop play, press the 7 button.
To remove the CD, press the 0 button for the CD tray you want to open.
To pause, press the ‹/8 button on the unit. The indicator above the tray starts flashing.
To cancel pause, press the ‹/8 button again (or press the £ button on the Remote Control).
Changing CDs while Playing ————————————————————
You can replace a CD not playing, while another CD is playing.
1. Press the 0 button for the CD not playing.
The tray comes out.
2. Replace the CD on the tray.
3. Press the 0 button to close the tray.
20
Page 24

MULTI JOG
Selecting a Track—————————————————————————
Using the unit
Rotate the MULTI JOG dial while playing or pausing.
• Rotate the MULTI JOG dial clockwise to select the next tracks.
• Rotate the MULTI JOG dial counterclockwise to select the previous tracks.
❏ If you rotate the MULTI JOG dial over the last track of the selected CD, the unit jumps to the
first track of the next CD.
Using the Remote Control
Press the 4 or ¢ button while playing or pausing.
❏ Each time you press the 4 or ¢ button, the track changes by one.
• Press the ¢ button to go ahead one track at a time.
• Press the 4 button to go back one track at a time.
❏ Holding down the 4 or ¢ button allows you to change tracks continuously.
Selecting a Passage within a Track (on the unit only) ——————————
Press and hold the or button while playing or pausing.
• Hold the
passage you want to hear.
• Hold the
you want to hear.
button to fast forward the track, and release the button when you reach the
button to reverse the track, and release the button when you reach the passage
CD
Using the number buttons on the Remote Control allows you to go directly to the beginning of any
track.
1. Press the CD button.
Locating a Track with the Remote Control Directly ————————————
2
DISC DISC DISC
1
The Remote Control is set to the CD operation mode.
3
2. Press the DISC button (1 to 3) for the CD containing the track you want to listen to.
PTY
EON ON/OFF
SEARCH
1 2 3
TA/NEWS/
PTY SELECT
INFO
4 5 6
7 8 9
10
+10
DISPLAY
MODE
❏ Example: For the third CD, press DISC 3.
3. Enter the number of the track you want to listen to with the number buttons.
The selected track starts playing.
❏ Example: For track 5, press 5. For track 15, press +10 then 5. For track 20, press +10, then
10. For track 32, press +10 three times, then 2.
Programing the Playing Order of the Tracks
You can change the order in which the CDs and tracks play. (Program Play)
❏ You can program up to 32 steps in any order from among the loaded CDs.
❏ You can only make or change a program when the CD Player is stopped.
Using the unit
CD PLAY MODE
1. Press the CD PLAY MODE button repeatedly on the CD Player until the PROGRAM indicator
lights up on the display.
“CD PROGRAM” also appears on the display.
❏ If you have already made a program, the last step of the previous program is displayed
instead of “CD PROGRAM” unless you have erased the program.
3
CD
2
1
PROGRAM
CD
3
MD
2
1
❏ Each time you press the CD PLAY MODE button, CD play mode changes as follows:
= CD PROGRAM = CD RANDOM = Off (Continuous Play) = (back to the beginning)
21
Page 25

3
CD
2
CD
1
CD
MULTI JOG
SET
2. Press one of the CD buttons (1 to 3) to select a CD.
The CD and track numbers start flashing.
CD
number
3
CD
2
1
PROGRAM
CD
Track
number
Step
number
3
2
1
15
MD
❏ If the CD and track numbers stop flashing, press the CD button (1 to 3) again.
3. Rotate the MULTI JOG dial to select a track.
The track number appears on the display.
3
CD
2
1
PROGRAM
CD
3
MD
2
1
15
4. Press the SET button.
The CD and track numbers stop flashing, and the step number is shown.
3
CD
2
1
PROGRAM
CD
3
MD
2
1
15
CD PLAY MODE
CD
5. Repeat steps 2 to 4 to select the other tracks for the program.
❏ To select another track from the same CD, repeat steps 3 and 4.
❏ To select another track from a different CD, repeat steps 2 and 4.
6. Press the ‹/8 button.
The unit plays the tracks in the order you have programed them.
Using the Remote Control
1. On the unit, press the CD PLAY MODE button repeatedly until the PROGRAM indicator lights up
on the display.
“CD PROGRAM” also appears on the display.
❏ If you have already made a program, the last step of the previous program is displayed
instead of “CD PROGRAM” unless you have erased the program.
3
CD
2
1
PROGRAM
CD
3
MD
2
1
❏ Each time you press the CD PLAY MODE button, CD play mode changes as follows:
= CD PROGRAM = CD RANDOM = Off (Continuous Play) = (back to the beginning)
2. Press the CD button on the Remote Control.
The Remote Control is set to the CD operation mode.
22
Page 26

DISC DISC DISC
2
1
3. Press one of the DISC buttons (1 to 3).
The CD and track numbers start flashing.
3
CD
number
Track
number
Step
number
PTY
EON ON/OFF
SEARCH
1 2 3
TA/NEWS/
PTY SELECT
INFO
4 5 6
7 8 9
10
+10
DISPLAY
MODE
3
CD
2
1
PROGRAM
CD
3
MD
2
1
15
❏ If the CD and track numbers stop flashing, press the DISC button (1 to 3) again.
4. Press the number buttons to select the tracks.
❏ Example: For track 5, press 5. For track 15, press +10 then 5. For track 20, press +10 then
10. For track 32, press +10 three times, then 2.
The CD and track numbers stop flashing, and the step number is displayed.
3
CD
2
1
PROGRAM
CD
3
MD
2
1
15
5. Repeat steps 3 and 4 to select other tracks for the program.
6. Press the £ button.
The unit plays the tracks in the order you have programed them.
❏ If you try to program a 33rd step, “CD FULL” will appear on the display.
❏ If you try to program a track from an empty tray, or a track number that does not exist on the CD
(for example, selecting track 14 on a CD that only has 12 tracks), such entries are ignored.
❏ You can skip to a particular program step during Program Play. Rotate the MULTI JOG dial
clockwise or counterclockwise on the unit, or press the 4 or ¢ buttons on the Remote
Control.
❏ To play the Program Play repeatedly, press the CD REPEAT button. For details, see “Repeating
a Selection or CDs” on page 24.
To stop playing, press the 7 button.
To exit Program Mode, press the CD PLAY MODE button twice to change to Continuous Play mode
while the CD Player is stopped.
Checking the Program ———————————————————————
While the CD Player is stopped, use the 4 or ¢ buttons on the Remote Control to check the
contents of the program.
Each time you press the ¢ button, the program contents are shown on the display in the
programed order. Pressing the 4 button displays the programed steps in the reverse order.
Changing the Program ———————————————————————
Only possible while the CD Player is stopped.
To delete a program, press the CANCEL button on the unit. Each time you press the button, the last
step is erased.
If you eject the CD, the steps programed from that disc are also erased.
To add a track to the program, follow the procedure above (on either the unit or the Remote
Control). The new tracks are added to the end of the program.
23
Page 27

Random Play
CD PLAY MODE
The tracks of all loaded CDs will play at random.
1. While the CD player is stopped, press the CD PLAY MODE button repeatedly until the RANDOM
indicator appears on the display.
“CD RANDOM” also appears on the display.
3
CD
2
1
RANDOM
CD
12345678910111213141516
3
MD
2
1
❏ Each time you press the CD PLAY MODE button, CD play mode changes as follows:
= CD PROGRAM = CD RANDOM = Off (Continuous Play) = (back to the beginning)
2. Press the ‹/8 button on the unit (or the £ button on the Remote Control).
The tracks of all the CDs are played at random.
When all of the tracks have been played, the CD Player stops.
❏ You can skip a particular track during Random Play. Rotate the MULTI JOG dial clockwise, or
press the ¢ button on the Remote Control.
❏ To play the Random Play repeatedly, press the CD REPEAT button. For details, see “Repeating
a Selection or CDs” (below).
To cancel Random Play, press the 7 button, then press the CD PLAY MODE button to select another
mode.
Repeating a Selection or CDs
You can have all the CDs, the program or the individual track currently playing repeat as many times
as you like. (Repeat Play)
CD REPEAT
Press the CD REPEAT button on the unit.
❏ Each time you press the button, the Repeat Modes change as follows:
= REPEAT ALL = REPEAT 1 CD = REPEAT 1 = canceled = (back to the beginning)
RANDOM
CD
REPEAT
1 CD MD ALL
REPEAT ALL: Repeats all the tracks on the CDs, or all the tracks in the program.
REPEAT 1 CD: Repeats all the tracks on one CD.
REPEAT 1: Repeats one track on one CD.
❏ “REPEAT ALL” and “REPEAT 1” remain on the display even when you change the play mode.
❏ The three Repeat Modes above can be selected during Continuous Play, however, during
Program Play and Random Play, you can only select “REPEAT ALL” or “REPEAT 1”
(“REPEAT 1 CD” is not available).
To exit Repeat Mode, press the CD REPEAT button until the Repeat Mode indicator on the display
goes off.
3
CD
2
1
12345678910111213141516
3
MD
2
1
24
Page 28

Using the MD Recorder (Playing)
REPEAT
PLAY MODE
RDS
CONTROL
PTY
EON ON/OFF
SEARCH
1 2 3
TA/NEWS/
PTY SELECT
INFO
4 5 6
7 8 9
10
+10
TAPE CD MD
MODE
SELECT
TAPE
DIRECTION
REC PAUSE
ACTIVE
DISC DISC DISC
1
BASS EX.
SOUND
MUTE
MODE
RM-SEMD9RU REMOTE CONTROL
7 (Stop)
STANDBY
TUNER
AUX
COMPACT COMPONENT MD SYSTEM MX-MD9R
DEMO
CLOCK
LONG REC
TRIPLE REC
1ST TRACK REC
CD REC
/TIMER
MD
BASS SOUND REC PAUSE TITLE EDIT
REPEAT
PLAY MODE
LISTENING
SKIP
DISPLAY
MODE
SLEEP
FM MODE
MUTE
TUNER
AUX
‹ / 8 (Play/Pause)
MD
4 / £ / 7 / ¢
2
VOLUME
3
DISC (1 to 3)
VOLUME
+
–
DISPLAY
/
/CHARA
0 (Eject)
MD
3
MD
2
MD
1
CANCEL SET
MULTI JOG
MULTI JOG dial
MD (1 to 3)
US and foreign patents licensed from Dolby
Laboratories Licensing Corporation.
IMPORTANT: Before using the Remote Control for the
MD operations, set the Remote Control to the MD
operation mode by pressing the MD button.
MD
3
MD
2
MD
1
MD indicators
MD indicator on the unit
Each of the MD buttons (1 to 3) has the MD indicator.
When an MD is loaded in the loading slot, the corresponding indicator turns on.
MD indicators on the display
Flashes while playing.
Lights up
Indicates that this
1
MD is currently
1 1
selected.
When an MD is loaded.
When no MD is loaded.
Always lights up
Page 29

The MD Recorder has 3 MD loading slots. You can use Continuous, Random, Program or Repeat
Play for the MDs in MD1, MD2 and MD3 loading slots. Repeat Play can repeat all the tracks on all
the MDs, the tracks on one of the MDs or one track on one MD. There is also the Disc Lock
function, prohibiting MD ejection (see page 66.)
The Quickest Way to Start a MD Is with the One Touch Operation ——————
The power comes on, and operations are done automatically.
❏ Press the ‹/8 button (or the £ button on the Remote Control).
• If there is an MD in the currently selected loading slot, playback begins from the first track
of this MD.
• If there is no MD on the currently selected loading slot, playback begins from the first track
of the following MD.
• If there is no MD in any of the loading slots, “MD NO DISC” appears on the display for a
few seconds. Put an MD in one of the loading slots and press the ‹/8 button (or the £
button on the Remote Control).
❏ Press one of the MD buttons (1 to 3) (or one of the DISC buttons (1 to 3) on the Remote
Control).
• If there is an MD in the loading slot for the MD number you have selected, playback begins
from the first track of that MD. If there is no MD in the loading slot, “MD NO DISC”
appears on the display for a few seconds. Put an MD in that loading slot, then press the MD
button (1 to 3) for that loading slot (or the corresponding DISC button (1 to 3) on the
Remote Control).
❏ Press the 0 button.
• The power comes on, and the loading slot cover opens automatically.
Using the MD Recorder
Loading MDs ——————————————————————————
1. Press the 0 button to the right of the MD loading slots.
The MD loading slot cover opens automatically.
2. Place up to 3 MDs, into the slots as in the illustration below.
Insert an MD in the same way
as indicated on the MD.
Label side
3. Press the 0 button to close the loading slot cover.
CAUTIONS:
•
DO NOT close the loading slot cover by hand; otherwise, the loading mechanism will be
damaged.
•
DO NOT load an MD incorrectly. Always follow the indication on the MD.
Page 30

MD
3
MD
2
You can play the MDs continuously. (Continuous Play)
1. Prepare the MDs.
2. Press the MD button (1 to 3) (or the DISC button (1 to 3) on the Remote Control) for the MD you
Playing MDs———————————————————————————
MD
1
want to play.
The first track of the selected MD will begin playing.
When the selected MD finishes playing, the next MD will begin playing automatically.
When the last MD has finished playing, the unit will stop playing the MDs.
DISC DISC DISC
2
1
❏ When you press the MD button (1 to 3) (or DISC button (1 to 3) on the Remote Control) while
3
the loading slot cover is open, the cover will close automatically and Continuous Play playback
begins from the first track of the MD.
To use Continuous Play from the first track of the currently selected MD, just press the ‹/8 button
(or £ button on the Remote Control).
Playing order of MDs
❏ When playback starts from MD1, the playing order is MD1 = MD2 = MD3. When MD3 has
finished, the MD Recorder selects MD1 and stops.
❏ When playback starts from MD2, the playing order is MD2 = MD3 = MD1. When MD1 has
finished, the MD Recorder selects MD2 and stops.
❏ When playback starts from MD3, the playing order is MD3 = MD1 = MD2. When MD2 has
finished, the MD Recorder selects MD3 and stops.
• If no MD is in the loading slot, the MD Recorder skips that slot.
To pause, press the ‹/8 button.
To cancel pause, press the ‹/8 button again (or press the £ button on the Remote Control).
To stop play, press the 7 button.
Changing MDs While Playing ————————————————————
You can replace an MD not being played, while another MD is playing.
1. Press the 0 button.
The MD loading slot cover opens.
2. Replace the MD in the loading slot.
3. Press the 0 button to close the loading slot cover.
Note: When you open the MD loading slot cover to replace MDs, the slot of the currently playing
MD appears empty. Do not put any MD in this slot. If you put an MD in this slot and close the
cover, the cover automatically opens after the unit check that there has already been an MD in
this slot and “OCCUPIED” appears on the display.
Page 31

MULTI JOG
MD
DISC DISC DISC
1
PTY
EON ON/OFF
SEARCH
1 2 3
TA/NEWS/
PTY SELECT
INFO
4 5 6
7 8 9
10
+10
DISPLAY
MODE
Selecting a Track—————————————————————————
Using the unit
Rotate the MULTI JOG dial while playing or pausing.
• Rotate the MULTI JOG dial clockwise to select the next tracks.
• Rotate the MULTI JOG dial counterclockwise to select the previous tracks.
❏ If you rotate the MULTI JOG dial over the last track of the selected MD, the unit jumps to the
first track of the next MD.
Using the Remote Control
Press the 4 or ¢ button while playing or pausing.
❏ Each time you press the 4 or ¢ button, the track changes by one.
• Press the ¢ button to go ahead one track at a time.
• Press the 4 button to go back one track at a time.
❏ Holding down the 4 or ¢ button allows you to change tracks continuously.
Selecting a Passage within a Track (on the unit only) ——————————
Press and hold the or button while playing or pausing.
• Hold the
button to fast forward the track, and release the button when you reach the
passage you want to hear.
• Hold the
button to reverse the track, and release the button when you reach the passage
you want to hear.
Locating a Track with the Remote Control Directly ————————————
Using the number buttons on the Remote Control allows you to go directly to the beginning of any
track.
2
3
1. Press the MD button.
The Remote Control is set to the MD operation mode.
2. Press the DISC button (1 to 3) for the MD containing the track you want to listen to.
❏ Example: For the third MD, press DISC 3.
3. Enter the number of the track you want to listen to with the number buttons.
The selected track starts playing.
❏ Example: For track 5, press 5. For track 15, press +10 then 5. For track 20, press +10, then
10. For track 32, press +10 three times, then 2.
Programing the Playing Order of the Tracks
You can change the order in which the MDs and tracks play. (Program Play)
❏ You can program up to 32 steps in any desired order from among the loaded MDs.
❏ You can only make or change a program when the MD Recorder is stopped.
Using the unit
PLAY MODE
1. Press the PLAY MODE button repeatedly on the MD Recorder until the PROGRAM indicator
lights up on the display.
“MD PROGRAM” also appears on the display.
❏ If you have already made a program, the last step of the previous program is displayed
instead of “MD PROGRAM” unless you have erased the program.
3
CD
2
1
PROGRAM
MD
CD
❏ Each time you press the PLAY MODE button, MD play mode changes as follows:
= MD PROGRAM = MD RANDOM = Off (Continuous Play) = (back to the beginning)
3
MD
2
1
Page 32

2. Press one of the MD buttons (1 to 3) to select an MD.
MD
3
MD
2
The MD and track numbers start flashing.
MD
number
Track
number
Step
number
MD
1
MULTI JOG
SET
3
CD
2
1
PROGRAM
MD
CD
❏ If the MD and track numbers stop flashing, press the MD button (1 to 3) again.
3. Rotate the MULTI JOG dial to select a track.
The track number appears on the display.
3
CD
2
1
PROGRAM
MD
CD
4. Press the SET button.
The MD and track numbers stop flashing, and the step number is shown.
3
CD
2
1
PROGRAM
MD
CD
5. Repeat steps 2 to 4 to select the other tracks for the program.
❏ To select another track from the same MD, repeat steps 3 and 4.
/
❏ To select another track from a different MD, repeat steps 2 and 4.
6. Press the ‹/8 button.
The unit plays the tracks in the order you have programed them.
3
MD
2
1
15
3
MD
2
1
15
3
MD
2
1
15
PLAY MODE
MD
Using the Remote Control
1. On the unit, press the PLAY MODE button repeatedly until the PROGRAM indicator lights up on
the display.
“MD PROGRAM” also appears on the display.
❏ If you have already made a program, the last step of the previous program is displayed
instead of “MD PROGRAM” unless you have erased the program.
3
CD
2
1
PROGRAM
MD
CD
3
MD
2
1
❏ Each time you press the PLAY MODE button, MD play mode changes as follows:
= MD PROGRAM = MD RANDOM = Off (Continuous Play) = (back to the beginning)
2. Press the MD button on the Remote Control.
The Remote Control is set to the MD operation mode.
Page 33

DISC DISC DISC
2
1
3. Press one of the DISC buttons (1 to 3).
The MD and track numbers start flashing.
3
MD
number
3
CD
2
1
PROGRAM
MD
CD
Track
number
Step
number
3
2
1
15
MD
❏ If the MD and track numbers stop flashing, press the DISC button (1 to 3) again.
4. Press the number buttons to select the tracks.
❏ Example: For track 5, press 5. For track 15, press +10 then 5. For track 20, press +10 then
10. For track 32, press +10 three times, then 2.
The MD and track numbers stop flashing, and the step number is displayed.
3
CD
2
1
PROGRAM
MD
CD
3
MD
2
1
15
5. Repeat steps 3 and 4 to select other tracks for the program.
6. Press the £ button.
The unit plays the tracks in the order you have programed them.
❏ If you try to program a 33rd step, “MD FULL” will appear on the display.
❏ If you try to program a track from an empty loading slot, or a track number that does not exist
on the MD (for example, selecting track 14 on an MD that only has 12 tracks), such entries are
ignored.
❏ You can skip to a particular program step during Program Play. Rotate the MULTI JOG dial
clockwise or counterclockwise on the unit, or press the 4 or ¢ buttons on the Remote
Control.
❏ To play the Program Play repeatedly, press the REPEAT button. For details, see “Repeating a
Selection or MDs” on page 31.
To stop playing, press the 7 button.
To exit Program Mode, press the PLAY MODE button twice to change to Continuous Play mode
while the MD Recorder is stopped.
Checking the Program ———————————————————————
While the MD Recorder is stopped, use the 4 or ¢ buttons on the Remote Control to check the
contents of the program.
Each time you press the ¢ button, the program contents are shown on the display in the programed order. Pressing the 4 button displays the programed steps in the reverse order.
Changing the Program ———————————————————————
Only possible while the MD recorder is stopped.
To delete a program, press the CANCEL button on the unit. Each time you press the button, the last
step is erased.
If you open the loading slot cover, the program is erased.
To add a track to the program, follow the procedure above (on either the unit or the Remote
Control). The new tracks are added to the end of the program.
Page 34

Random Play
PLAY MODE
/
The tracks of all loaded MDs will play at random.
1. While the MD Recorder is stopped, press the PLAY MODE button repeatedly until the RANDOM
indicator appears on the display.
“MD RANDOM” also appears on the display.
3
CD
2
1
RANDOM
MD
CD
12345678910111213141516
3
MD
2
1
❏ Each time you press the PLAY MODE button, MD play mode changes as follows:
= MD PROGRAM = MD RANDOM = Off (Continuous Play) = (back to the beginning)
2. Press the ‹/8 button on the unit (or the £ button on the Remote Control).
The tracks of all the MDs are played at random.
When all of the tracks have been played, the MD Recorder stops.
❏ You can skip a particular track during Random Play. Rotate the MULTI JOG dial clockwise, or
press the ¢ button on the Remote Control.
❏ To play the Random Play repeatedly, press the REPEAT button. For details, see “Repeating a
Selection or MDs” (below).
To cancel Random Play, press the 7 button, then press the PLAY MODE button to select another
mode.
Repeating a Selection or MDs
You can have all the MDs, the program or the individual selection currently playing repeat as many
times as you like. (Repeat Play)
REPEAT
Press the REPEAT button on the unit.
❏ Each time you press the button, the Repeat Modes change as follows:
= REPEAT ALL = REPEAT 1 MD = REPEAT 1 = Canceled = (back to the beginning)
MD
CD
REPEAT ALL: Repeats all the tracks on the MDs, or all the tracks in the program.
REPEAT 1 MD: Repeats all the tracks on one MD.
REPEAT 1: Repeats one track on one MD.
❏ “REPEAT ALL” and “REPEAT 1” remain on the display even when you change the play mode.
❏ The three Repeat Modes above can be selected during Continuous Play, however, during
Program Play and Random Play, you can only select “REPEAT ALL” or “REPEAT 1”
(“REPEAT 1 MD” is not available).
To exit Repeat Mode, press the REPEAT button until the Repeat Mode indicator on the display goes
off.
3
CD
2
1
RANDOM
REPEAT
12345678910111213141516
1 CD MD ALL
3
MD
2
1
Page 35

Using the MD Recorder (Recording)
LONG REC
TRIPLE REC
LISTENING
SKIP
CD REC
REC
PAUSE
RDS
CONTROL
PTY
EON ON/OFF
SEARCH
1 2 3
TA/NEWS/
PTY SELECT
INFO
4 5 6
7 8 9
10
+10
TAPE CD MD
MODE
SELECT
TAPE
DIRECTION
REC PAUSE
ACTIVE
DISC DISC DISC
1
BASS EX.
SOUND
MUTE
MODE
RM-SEMD9RU REMOTE CONTROL
7
REC PAUSE
STANDBY
TUNER
AUX
COMPACT COMPONENT MD SYSTEM MX-MD9R
DEMO
CLOCK
LONG REC
TRIPLE REC
1ST TRACK REC
CD REC
/TIMER
MD
BASS SOUND REC PAUSE TITLE EDIT
REPEAT
PLAY MODE
LISTENING
SKIP
DISPLAY
MODE
SLEEP
FM MODE
MUTE
TUNER
AUX
(Stop)
MD
4 / £ / 7 / ¢
2
3
VOLUME
DISC (1 to 3)
‹/8
(Play/Pause)
VOLUME
+
–
DISPLAY
/
/CHARA
MD
3
MD
2
MD
1
CANCEL SET
MULTI JOG
DISPLAY
/CHARA
MD (1 to 3)1ST TRACK REC
IMPORTANT: Before using the Remote Control for the
MD operations, set the Remote Control to the MD
operation mode by pressing the MD button.
Your CA-MD9R is supplied with very powerful functions to record on the MDs. (For Editing
functions, see the next chapter from page 41.)
You can do the f ollowing:
• Recording any source
- Standard Recording (just record what you are listening)
- LONG REC: To record a long radio program or another source continuously on 3 MDs.
• Recording CDs
CD REC: To record automatically one CD on an MD by just pressing one button (One Touch
Recording)
TRIPLE REC: To record automatically 3 CDs loaded on the CD trays onto 3 MDs.
LISTENING: Lets you choose which track to record from CDs onto the MD while listening.
1ST TRACK REC: Lets you automatically record the first track of each CD loaded on the CD
trays.
Page 36

Things to Know Before You Start Recording ——————————————
❏ It should be noted that it may be unlawful to re-record pre-recorded tapes, records, or discs
without the consent of the owner of copyright in the sound or video recording, broadcast or
cable programme and in any literary, dramatic, musical, or artistic embodied therein.
❏ Press the DOLBY B NR button — the indicator lights up — to reduce tape hiss.
❏ When you record onto partially recorded MD, its contents are not erased or overwritten. The
recording starts from the point following the last recorded track of the MD.
If you want to record such an MD from the beginning, you have to erase its contents first (see
“ALL ERASE Function” on page 48).
❏ When recording a source using the Standard Recording (see page 34), you can also record the
same source on a tape using the Standard Recording procedure for the Cassette Deck (see page
55).
❏ The recording level is automatically set correctly, so it is not affected by the VOLUME control.
Thus, during recording you can adjust the sound you are actually listening to without affecting
the recording level.
❏ When recording, you can hear Sound Modes through the speakers or headphones. However, the
sound is recorded without Sound Modes (see page 9).
❏ To avoid erasing important recordings
Recordable MDs have an
accidentally erasure prevention
tab so that important recordings
are not accidentally erased. When
you finish recording or editing,
slide open the erasure prevention
tab on the cartridge side surface.
New recording or editing is now
no longer possible. To redo
recording or editing, return the
tab to the closed position.
Erasure prevention tab
Recording/Editing
possible
Disc protected:
Recording/Editing not
possible
About the track marks
When playing an MD, you can move among the tracks using the or button or even select directly a
track using the Remote Control.
You can do that because there is a mark recorded at the front of each track enabling you to locate the track. This
mark is called a “track mark” and the portion between two adjacent track marks is called a “track”.
❏ When recording from a digital source such as the CD Player, a track mark is recorded automatically at the
beginning of each track.
❏ When recording from a analog source such as the radio, no track mark is recorded. This means that, when
playing this MD, the MD Recorder will regard the entire recording as one track (track 1). You will not be able
to select directly a song or navigate through them.
You can put track marks manually.
To put a track mark manually, during the recording, press the SET button at the place you want to put a track mark.
The MD Recorder will also consider a blank of 3 seconds or more as a blank separating 2 tracks and consequently
put a track mark.
Note:
To add track mark afterwards (when the recording is over), you can use the DIVIDE function (see page 42) to
divide a long recording.
Page 37

Standard Recording
/
To record any source currently playing use the following procedure.
❏ You can also record the same source on the tape at the same time. (See page 55 for tape
recording.)
1. Insert a blank or recordable MD into one of the MD loading slots.
MD
3
MD
2
MD
1
REC PAUSE
DISPLAY
/CHARA
2. Press the MD button (1 to 3) (or the DISC button (1 to 3) on the Remote Control) corresponding to
the slot number you put the MD, then press the 7 button.
3. Choose and start playing the source you want to record (CD, Tuner, Cassette Deck or the
external component).
4. Press the REC PAUSE button on the MD Recorder.
The indicator on the button lights up.
5. Press the ‹ / 8 button to start the recording.
❏ If some tracks have been recorded on the MD, this MD Recorder searches for the end point of
/
the previous recording, and starts recording after the end point.
To pause any time during recording process, press the ‹ / 8 button (or the REC PAUSE button on
the Remote Control). The track mark will be recorded.
To cancel the pause, press the ‹ / 8 button again (or the £ on the Remote Control).
To stop recording, press the 7 button.
Changing the Display Mode—————————————————————
You can check the remaining time of the MD while recording.
Press and hold the DISPLAY/CHARA button on the unit. While you are holding the button, the
remaining time of the MD will be shown on the display (as well as the source name you are
recording).
CD
STEREO TUNED
MD
3
2
1
1 2 3 4 5
3
MD
2
1
Page 38

Long Recording (LONG REC)
/
The LONG REC function allows you to record any source continuously onto 3 MDs, enabling you
to make long recording of radio program, or to record three CDs continuously, etc.
The Recording begins on MD1 (MD in the MD1 slot) and continues on MD2, then MD3.
1. Insert the MDs you want to record on into the MD loading slots.
❏ Always use the MD1 loading slot.
If there is no MD in the MD1 slot (or if the MD is not availa ble for recording: play only MD or
full MD), the recording is automatically canceled when you press the LONG REC button in step
3.
2. Prepare the source you want to record from.
For CD recording: Put CD(s) on the CD tray(s). Since the recording begins from CD1, be sure
For recording the other sources (Tuner, Cassette Deck or the external component):
LONG REC
3. Press the LONG REC button.
The indicator next to the LONG REC button lights up and the recording begins automatically.
If you are recording from a CD, the CD on the CD1 tray starts playing automatically.
• If you are recording from a CD:
The display changes as follows:
3
CD
2
1
CD
12345678910111213141516
that a CD is loaded on the CD1 tray.
You need to select the CD Player as the source by pressing the CD1 button
then the 7 button.
Tune in the station or play the source you want to record.
3
MD
2
1
\
3
CD
2
1
CD
12345678910111213141516
3
2
1
MD
DISPLAY
/CHARA
Remaining time of
the current track
Remaining time
of the MD
• If you are recording from another source, “LONG REC” does not appears on the display even
if the unit is recording the source.
To stop recording, press the 7 button.
Note: When an MD is fully recorded, the MD Recorder automatically switches to the next MD.
While switching the MDs, no recording will be made.
Changing the Display Mode—————————————————————
If you press and hold the DISPLAY/CHARA button on the unit while recording, the display shows
the following.
• While recording CDs
CD track number currently playing
3
CD
2
1
MD
123456
MD track number currently being recorded
• While recording the other sources
3
CD
2
1
STEREO TUNED
MD
1 2 3 4 5
3
MD
2
1
3
MD
2
1
Source name
Remaining time of the MD
Page 39

One Touch CD Recording (CD REC)
/
The CD REC function allows you to easily record CDs on the MD1.
1. Prepare CDs and a recordable MD into the MD1 loading slot.
❏ You can load the CDs on any CD trays, but always load the recordable MD into the MD1
loading slot. If not, this function does not work.
2. Be sure that the CD you want to start recording from is selected as the playing source.
❏ If not, select it by pressing the corresponding CD button (1 to 3), then the 7 button.
CD REC
DISPLAY
/CHARA
3. Press the CD REC button on the MD Recorder.
The indicator next to the CD REC button lights up and the recording begins automatically.
Recording will stop when the MD in the MD1 loading slot is fully recorded.
3
CD
2
1
CD
12345678910111213141516
3
MD
2
1
\
❏ If you press the CD REC button while playing a CD, the recording starts from the beginning
of the current track, and only the current track is recorded.
❏ If you press the CD REC button after making a program, you can automatically record the
program.
Changing the Display Mode—————————————————————
You can check the CD track number and the MD track number while recording.
Press and hold the DISPLAY/CHARA on the unit. While holding the button, the following information appears on the display.
CD track number currently playing
MD
CD
1
3
2
123456
3
2
1
3
CD
2
1
CD
12345678910111213141516
Remaining time of
the current track
MD
3
2
1
Remaining time
of the MD
MD
MD track number currently being recorded
To stop recording, press the 7 button.
Page 40

Three CD Recording (TRIPLE REC)
/
The TRIPLE REC function allows you to easily record three CDs onto three MDs.
1. Prepare CDs and recordable MDs.
❏ Always place a CD on the CD1 tray and insert an MD into the MD1 loading slot. If not, this
function does not work.
❏ If you record from two CDs onto two MDs, use CD1 and 2 trays and MD1 and 2 slots.
TRIPLE REC
DISPLAY
/CHARA
2. Press the TRIPLE REC button.
The indicator next to the TRIPLE REC button lights up and the recording begins automatically.
❏ The tracks of the CD1 are recorded onto the MD1, CD2 onto MD2, and CD3 onto MD3.
3
CD
2
1
CD
12345678910111213141516
Changing the Display Mode—————————————————————
You can check the CD track number and the MD track number while recording.
Press and hold the DISPLAY/CHARA on the unit. While holding the button, the following information appears on the display.
CD track number currently playing
3
CD
2
1
MD
12345
3
MD
2
1
\
3
CD
2
1
CD
12345678910111213141516
Remaining time of
the current track
3
MD
2
1
3
2
1
Remaining time
of the MD
MD
MD track number currently being recorded
To stop recording, press the 7 button.
Page 41

Listening Edit Recording (LISTENING)
The LISTENING function allows you to make a program while listening and checking each track of
the loaded CDs, then to start recording the program.
❏ You can program up to 32 tracks.
1. Prepare CDs and a recordable MD into the MD1 loading slot.
❏ Always place a CD on the CD1 tray and insert the MD into the MD1 loading slot. If not, this
function does not work.
LISTENING
LISTENING
SKIP
2. Press the LISTENING button.
“L. EDIT” appears on the display and the unit plays the first track of the CD1.
3
CD
2
1
CD
123456789101112
3
MD
2
1
\
3
CD
2
1
CD
123456789101112
Playing time of the
current track
Remaining time
of the MD
3. Decide if you want to include the current track in the program or skip it.
7 To include the current playing track in the program, press the LISTENING button again.
The current track is programed and the next track starts playing.
Playing time of the current track
3
CD
2
1
CD
23456789101112
The number of the track
already played disappears
7 To skip the current track, press the SKIP button.
The current playing track is not programed and the next track starts playing.
Playing time of the current track
3
MD
2
1
Remaining time of the MD
3
MD
2
1
3
CD
2
1
CD
3456789101112
The number of the track
Remaining time of the MD
3
MD
2
1
already played disappears
❏ If you do not press the LISTENING or SKIP button, the unit will play the current track
repeatedly.
4. Repeat step 3 to program other tracks.
You can check the contents of all loaded CDs.
Page 42

5. When you finish checking all CDs or if there is no more remaining time for recording on the MD,
recording starts automatically.
“L. EDIT” appears on the display and recording starts.
3
CD
2
1
CD
123456789101112
3
MD
2
1
\
3
CD
2
1
CD
123456789101112
3
2
1
MD
DISPLAY
/CHARA
Remaining time of
the current track
Remaining time
of the MD
❏ If the remaining time of the MD becomes short, this unit will search a track fitting into the
remaining time. To include the selected track in the program, press the LISTENING button.
To find another track, press the SKIP button.
To finish programing and to start recording before checking all the tracks of the loaded CDs, press
the CD REC button. “L.EDIT” appears and the recording starts.
To stop recording, press the 7 button.
To erase the program, press the 7 button while checking the contents of the loaded CDs.
Changing the Display Mode—————————————————————
You can check the CD track number and the MD track number while recording.
Press and hold the DISPLAY/CHARA button on the unit. While holding the button, the following
information appears on the display.
CD track number currently playing
3
CD
2
1
MD
1
MD track number currently being recorded
3
MD
2
1
Page 43

First Track Recording (1ST TRACK REC)
The 1ST TRACK REC function allows you to record the first track of each loaded CD. You can, for
example, make a directory of all your best CDs.
1. Prepare CDs, and a recordable MD into the MD1 loading slot.
❏ Always place a CD on the CD1 tray and insert the recordable MD into the MD1 loading
slot. If not, this function does not work.
1ST TRACK REC
2. Press the 1ST TRACK REC button.
The indicator next to the 1ST TRACK REC button lights up and the recording starts.
3
CD
2
1
CD
1
3
MD
2
1
\
3
CD
2
1
CD
1
3
MD
2
1
DISPLAY
/CHARA
Appears only when
using an 8 cm CD
Remaining time of
the current track
Remaining time
of the MD
When the first track of the CD1 is recorded, the first track of the CD2 will be recorded.
Recording continues until the first track of each loaded CD is recorded.
3. Replace the CDs on the trays not selected.
❏ You can change CDs to continue the First Track Recording using more than 3 CDs.
Changing the Display Mode—————————————————————
You can check the CD track number and MD track number while recording.
Press and hold the DISPLAY/CHARA button on the unit. While holding the button, the following
information appears on the display.
CD track number currently playing
3
CD
2
1
MD
123456
MD track number being recorded
3
MD
2
1
Page 44

Using the MD Recorder (Editing)
‹ / 8
7 (Stop)
(Play/Pause)
TITLE
EDIT
STANDBY
TUNER
AUX
COMPACT COMPONENT MD SYSTEM MX-MD9R
DEMO
CLOCK
LONG REC
TRIPLE REC
1ST TRACK REC
CD REC
/TIMER
MD
BASS SOUND REC PAUSE TITLE EDIT
REPEAT
PLAY MODE
LISTENING
SKIP
/
VOLUME
+
–
DISPLAY
/CHARA
MD
3
MD
2
MD
1
CANCEL SET
MULTI JOG
SETCANCEL
One of the great features of the MD is its capacity to be edited freely.
The CA-MD9R offers you the following edit functions.
DIVIDE (see page 42):
To divide one track into two separate tracks.
DISPLAY/CHARA
MULTI JOG dial
JOIN (see page 44):
To join two adjacent tracks into one track.
MOVE (see page 45):
To move one track to another place (within the same disc).
ERASE (see page 47):
To erase one specific track.
ALL ERASE (see page 48):
To erase all the tracks.
Note:
By using the DIVIDE, ERASE, and JOIN functions, you can also erase an unwanted portion of a
track. (see page 48)
TITLE (see page 49):
To put a name to an MD and a track.
Page 45

DIVIDE Function
This function allows you to divide one track into two separate tracks. It is useful, for example, when
you want to add track marks at a certain point within a track or if you want to separate a recording.
1. Be sure that the MD you want to edit is in one of the MD loading slots.
MD
3
MD
2
\
MD
1
/
2. Select the MD you want to edit.
3. Press the EDIT button repeatedly until “DIVIDE” appears on the display.
BASS SOUND
TITLE EDIT
Press the corresponding MD button (1 to 3), then the 7 button.
❏ Each time you press the button, the MD editing functions change as follow:
JOINDIVIDE MOVE ERASE
ALL ERASECanceled
MULTI JOG
SET
3
CD
2
1
MD
123456789101112
3
2
1
4. Press the SET button.
The playing time of the first track of the MD appears on the display.
3
CD
2
1
MD
123456789101112
3
2
1
5. Rotate the MULTI JOG dial to select the track you want to divide.
Ex. When you want to divide track 3.
6. Press the ‹ / 8 button.
/
Playback starts.
❏ If you have selected a wrong track, rotate the MULTI JOG dial to select the correct track.
3
CD
2
1
MD
123456789101112
3
2
1
MD
MD
MD
SET
7. Press the SET button when you find the point where you want to divide the track.
The MD Recorder repeats the selected point — a portion of 3 seconds length following the
dividing point.
3
CD
2
1
MD
123456789101112
❏ If the dividing point is satisfactory, go to step 9.
❏ If the dividing point is not satisfactory, go to step 8.
3
MD
2
1
Page 46

8. Rotate the MULTI JOG dial to precisely adjust the dividing point.
You can shift the dividing point up to ±128. This range (±128) corresponds to approximately ±8
seconds from the original point (Position 0).
Shifted position
MULTI JOG
BASS SOUND
TITLE EDIT
3
CD
2
1
MD
123456789101112
3
MD
2
1
When you stop rotating the MULTI JOG dial, the unit repeats the newly selected dividing point.
When you find the right position, go to step 9.
9. Press the EDIT button.
3
CD
2
1
MD
12345678910111213
Total track number increases.
10
.Press the 0 button to eject the MD.
“WRITING” appears while the modification you have made is being recorded on the MD.
To join the divided track again, see the JOIN function on page 44.
Note: If “TRACK PROTECTED” appears on the display when you select “DIVIDE,” the track is
protected and cannot be modified. To cancel this protection, see page 69.
3
MD
2
1
Page 47

JOIN Function
MD
3
MD
2
\
MD
1
BASS SOUND
TITLE EDIT
MULTI JOG
SET
SET
/
This function allows you to join two adjacent tracks into one track.
1. Be sure that the MD you want to edit is in one of the MD loading slots.
2. Select the MD you want to edit.
Press the corresponding MD button (1 to 3), then the 7 button.
3. Press the EDIT button repeatedly until “JOIN” appears on the display.
❏ Each time you press the button, the MD editing functions change as follow:
JOINDIVIDE MOVE ERASE
ALL ERASECanceled
3
CD
2
1
MD
12345678910111213141516
3
MD
2
1
4. Press the SET button.
3
CD
2
1
MD
12345678910111213141516
3
MD
2
1
5. Rotate the MULTI JOG dial to select the two adjacent tracks you want to join.
3
CD
2
1
MD
12345678910111213141516
3
MD
2
1
Two adjacent tracks selected
6. Press the SET button.
BASS SOUND
TITLE EDIT
MD
12345678910111213141516
Two adjacent tracks selected
❏ If you have selected wrong tracks, press the CANCEL button then select the correct tracks
by rotating the MULTI JOG dial.
❏ If you cancel the editing, press the 0 button.
7. Press the EDIT button.
MD
123456789101112131415
Total track number decreases.
8. Press the 0 button to eject the MD.
“WRITING” appears while the modification you have made is being recorded on the MD.
To divide the joined tracks, see the DIVIDE function on page 42.
Note: If “TRACK PROTECTED” appears on the display when you select “JOIN,” the tracks are
protected and cannot be modified. To cancel this protection, see page 69.
Page 48

MOVE Function
MD
3
MD
2
MD
1
BASS SOUND
TITLE EDIT
\
/
This function allows you to move a track to the position you prefer on the same MD. It is useful to
change the order of the tracks as you like.
1. Be sure that the MD you want to edit is in one of the MD loading slots.
2. Select the MD you want to edit.
Press the corresponding MD button (1 to 3), then the 7 button.
3. Press the EDIT button repeatedly until “MOVE” appears on the display.
❏ Each time you press the button, the MD editing functions change as follow:
JOINDIVIDE MOVE ERASE
ALL ERASECanceled
3
CD
2
1
MD
12345678910111213141516
3
MD
2
1
SET
MULTI JOG
SET
4. Press the SET button.
3
CD
2
1
MD
12345678910111213141516
3
MD
2
1
5. Rotate the MULTI JOG dial to select the track you want to move.
3
CD
2
1
MD
12345678910111213141516
Ex. When you want to move the track 2.
3
MD
2
1
6. Press the SET button.
3
CD
2
1
MD
12345678910111213141516
❏ If you have selected a wrong track number, press the CANCEL button then select the correct
track number again.
3
MD
2
1
7. Rotate the MULTI JOG dial to select the position where you want to move the track.
MULTI JOG
Track number moved to
Track number moved from
3
CD
2
1
MD
12345678910111213141516
3
MD
2
1
Ex. When you want to move track 2 to the track 5 position.
(Continued to the next page)
Page 49

SET
BASS SOUND
TITLE EDIT
8. Press the SET button.
3
CD
2
1
MD
12345678910111213141516
❏ If you have selected wrong track numbers, press the CANCEL button then select the correct
track numbers again.
❏ If you cancel the editing, press the 0 button.
3
MD
2
1
9. Press the EDIT button.
3
CD
2
1
MD
12345678910111213141516
10
.Press the 0 button to eject the MD.
“WRITING” appears while the modification you have made is being recorded on the MD.
Note: If “TRACK PROTECTED” appears on the display when you select “MOVE,” the track is
protected and cannot be modified. To cancel this protection, see page 69.
3
MD
2
1
Page 50

ERASE Function
MD
3
MD
2
\
MD
1
BASS SOUND
TITLE EDIT
/
This function allows you to erase an unwanted track.
1. Be sure that the MD you want to edit is in one of the MD loading slots.
2. Select the MD you want to edit.
Press the corresponding MD button (1 to 3), then the 7 button.
3. Press the EDIT button repeatedly until “ERASE” appears on the display.
❏ Each time you press the button, the MD editing functions change as follow:
JOINDIVIDE MOVE ERASE
ALL ERASECanceled
SET
MULTI JOG
SET
3
CD
2
1
MD
12345678910111213141516
3
MD
2
1
4. Press the SET button.
Track number to be erased
3
CD
2
1
MD
12345678910111213141516
3
MD
2
1
5. Rotate the MULTI JOG dial to select the track you want to erase.
3
CD
2
1
MD
12345678910111213141516
Ex. When you want to erase track 5.
3
MD
2
1
6. Press the SET button.
MD
12345678910111213141516
BASS SOUND
TITLE EDIT
❏ If you have selected a wrong track number, press the CANCEL button then select the correct
track number.
❏ If you want to cancel the editing, press the 0 button.
7. Press the EDIT button.
MD
123456789101112131415
Total track number decreases.
8. Press the 0 button to eject the MD.
“WRITING” appears while the modification you have made is being recorded on the MD.
Note: If “TRACK PROTECTED” appears on the display when you select “ERASE,” the track is
protected and cannot be modified. To cancel the protection, see page 69.
Page 51

ALL ERASE Function
This function allows you to erase all the tracks on an MD.
MD
3
MD
2
\
MD
1
BASS SOUND
TITLE EDIT
1. Be sure that the MD you want to edit is in one of the MD loading slots.
/
2. Select the MD you want to edit.
Press the corresponding MD button (1 to 3), then the 7 button.
3. Press the EDIT button repeatedly until “ALL ERASE” appears on the display.
❏ Each time you press the button, the MD editing functions change as follow:
JOINDIVIDE MOVE ERASE
ALL ERASECanceled
SET
BASS SOUND
TITLE EDIT
3
CD
2
1
MD
12345678910111213141516
3
MD
2
1
4. Press the SET button.
3
CD
2
1
MD
12345678910111213141516
❏ If you want to cancel the editing, press the 0 button.
3
MD
2
1
5. Press the EDIT button.
3
CD
2
1
MD
1 2 3 4 5 6 7 8 9 10 11 12 13 14 15 16
All track numbers disappear.
3
MD
2
1
6. Press the 0 button to eject the MD.
“WRITING” appears while the modification you have made is being recorded on the MD.
Note: If “TRACK PROTECTED” appears on the display when you select “ALL ERASE,” the tracks
are protected and cannot be modified. To cancel the protection, see page 69.
Erasing a Portion of a Track—————————————————————
You can erase just a portion of one track by using the DIVIDE, ERASE and JOIN functions.
1. Be sure that the MD you want to edit is in one of the MD loading slots.
2. Select the MD you want to edit.
Press the corresponding MD button (1 to 3), then the 7 button.
3. Divide a track into 3 portions to isolate the portion to erase.
Use the DIVIDE function by referring to page 42.
4. Erase the middle portion.
Use the ERASE function by referring to page 47.
5. Join the two remaining portions.
Use the JOIN function by referring to page 44.
Page 52

TITLE Function
This function allows you to give a name containing up to 32 characters to each MD and to each track.
MD
3
MD
2
MD
1
BASS SOUND
TITLE EDIT
DISPLAY
/CHARA
\
SET
Giving a Title to an MD ——————————————————————
After putting a name to a disc, it will appear when you play the disc.
/
1. Be sure that the MD you want to edit is in one of the MD loading slots.
2. Select the MD you want to edit.
Press the corresponding MD button (1 to 3), then the 7 button.
3. Press the TITLE button.
3
CD
2
1
MD
12345678910111213141516
3
MD
2
1
4. Press the SET button.
Cursor position flashes
3
CD
2
1
MD
12345678910111213141516
“A” flashes.
3
MD
2
1
5. Press the DISPLAY/CHARA button to select the character set you want.
❏ Each time you press the button, the character sets change as follows:
Capital letters and symbols
«
5
Small letters and symbols
«
Numbers
See page 50 for more information
about these character sets.
MULTI JOG
SET
BASS SOUND
TITLE EDIT
6. Rotate the MULTI JOG dial to select a character you want.
7. Press the SET button to enter the selected character.
❏ If you have entered an incorrect character, press the CANCEL button to cancel the last entry.
8. Repeat steps 5 to 7 to enter up to 32 characters.
Next entry position The characters you can select.
3
CD
2
1
MD
12345678910111213141516
3
MD
2
1
Title you are entering
❏ If you want to cancel the editing, press the 0 button.
9. Press the TITLE button to memorize the title.
“EDITING” appears on the display.
10
.Press the 0 button to eject the MD.
“WRITING” appears while the modification you have made is being recorded on the MD.
Page 53

BASS SOUND
TITLE EDIT
Giving a Title to a Track ——————————————————————
1. Be sure that the MD you want to edit is in one of the MD loading slots.
2. Select the MD you want to edit.
Press the corresponding MD button (1 to 3), then the 7 button.
3. Press the TITLE button.
4. Rotate the MULTI JOG dial to select the track you want to title.
Selected track number appears.
MULTI JOG
3
CD
2
1
MD
12345678910111213141516
3
MD
2
1
5. Follow steps 4 to 10 of page 49.
Changing the Title ————————————————————————
You can change a title afterward:
1. Follow steps 1 to 3 of page 49 to change a MD title or steps 1 to 4 above to change a track title.
2. Press the SET button.
3. Press the
4. Repeat steps 5 to 7 of page 49.
5. Repeat steps 3 and 4 of the current procedure to correct more characters.
6. Repeat steps 9 and 10 of page 49.
To erase all the characters
Press the CANCEL repeatedly in step 3 to erase all the characters, then go to step 6.
Characters Set for Title Editing:
or button to select the character you want to correct.
Capital letters set Small letters set Numbers set
(Blank)(Blank)
Page 54

Using the Cassette Deck (Playing)
PHONES
DOLBY B NR
CD RECREC PAUSE
CONTROL
EON ON/OFF
1 2 3
TA/NEWS/
INFO
4 5 6
7 8 9
10
MODE
SELECT
TAPE
DIRECTION
REC PAUSE
RDS
SEARCH
PTY SELECT
+10
TAPE CD MD
AUTO REVERSE
AUTO TAPE SELECTOR
DOLBY B NR
0 (Eject)
PTY
DISPLAY
MODE
SLEEP
FM MODE
MUTE
TUNER
AUX
1 / £ / 7 / ¡
DOLBY B NR
TAPE
TAPE DIRECTION
Tape
Direction
indicators
¤ ‹ (Play)
1 ¡
7 (Stop)
ACTIVE
BASS EX.
SOUND
MODE
2
DISC DISC DISC
1
MUTE
VOLUME
RM-SEMD9RU REMOTE CONTROL
3
IMPORTANT: Before using the Remote Control for the
tape operations, set the Remote Control to the tape
operation mode by pressing the TAPE button.
Tape
Direction
Indicators
Tape Direction Indicator on the unit
The Tape Direction indicator tells you which direction the tape runs.
During playback, the indicator flashes slowly.
During fast left or fast right, the indicator flashes quickly.
During Music Scan mode, the indicator flashes slowly and quickly alternately.
❏ Most tapes are now recorded with the Dolby NR system, so first check which type of the Dolby
NR system has been used on the tape. Only Dolby B NR is incorporated into the CA-MD9R.
❏ With Automatic Tape Selection, you can listen to type I, II (CrO
2) or IV (Metal) tapes without
changing any settings.
The use of tapes longer than 120 minutes is not recommended, since characteristic deterioration
may occur and these tapes easily jam in the pinch-rollers and the capstans.
Page 55

Regular Play
One Touch Play —————————————————————————
❏ Press the ¤ or ‹ button (or the £ button on the Remote Control).
The power comes on and “TAPE” appears on the display. When a tape is already in the cassette
holder, the tape is played in the direction of the button pressed. If there is no tape in the cassette
holder, the CA-MD9R automatically turns on and “NO TAPE” appears on the display.
If the power is already on, you can use this basic procedure:
1. Press down the 0 button.
2. When the cassette holder opens, put a cassette in, with the exposed part of the tape down,
toward the base of the CA-MD9R.
❏ If the cassette holder does not open, turn off the unit, then back on and press down the 0
button again.
TAPE
TAPE
DIRECTION
3. Close the holder gently.
4. Press the ¤ or ‹ button (or the £ button on the Remote Control).
The tape is played in the direction of the button pressed.
❏ The Cassette Deck automatically stops when one side of a tape has finished playing (except
if the deck is in auto reverse mode: see the next page).
Playing the front side Playing the reverse side
❏ To change the tape direction using the Remote Control, press the TAPE DIRECTION button.
Each time you press the button, the tape direction alternates.
To stop playing, press the 7 button.
To remove the tape, press down the 0 button after stopping the play.
Fast Left and Fast Right ——————————————————————
❏ While the tape is stopped, press the 1 button and the tape will wind rapidly to the left side of
the cassette without playing.
❏ While the tape is stopped, press the ¡ button and the tape will wind rapidly to the right side of
the cassette without playing.
Page 56

Music Scan
To find the beginning of a music track during play, use the Music Scan function. Music Scan
searches for blank portions that usually separate selections, then plays the next selection.
Finding the Beginning of the Current Selection —————————————
Press the 1 or ¡ button during play.
❏ Make sure that you press the 1 or ¡ button in the opposite direction to that in which the
tape is playing. Searching stops at the beginning of the current selection, and the current
selection starts automatically.
Finding the Beginning of the Next Selection ——————————————
Press the 1 or ¡ button during play.
❏ Make sure that you press the 1 or ¡ button in the same direction as that in which the tape is
playing. Searching stops at the beginning of the next selection, and the next selection starts
automatically.
Music Scan works by detecting a 4-second long blank at the beginning of each selection, so it will
not work well if your tape has...
• No blank at the beginning of a selection.
• Noise (often caused by much use or poor quality dubbing) which fills the blank.
• Long, very soft passages or pauses in a selection. The scan will detect these as 4-second
long blanks. If this happens, just scan again until you reach the selection you want.
Other Useful Features of the Cassette Deck
DOLBY B NR
❏ Use the auto reverse mode to make the tape automatically reverse at the end of a side and start
playing the other side.
Each time you press the button, the auto reverse mode turns on (the indicator lights up) and
off (the indicator goes off).
❏ Press the DOLBY B NR button to switch Dolby B NR* on (the indicator lights up) or off (the
indicator goes off).
If a tape is recorded with the Dolby B NR system, playing it back with the Dolby B NR on will
reduce tape noise and improve the clarity of the sound.
*Dolby noise reduction manufactured under license from Dolby Laboratories Licensing
Corporation.
“DOLBY” and the double-D symbol are trademarks of Dolby Laboratories Licensing
Corporation.
Page 57

Using the Cassette Deck (Recording)
DOLBY B NR
DOLBY B NR
¤ ‹ (Play)
REC PAUSE
CD REC
CD RECREC PAUSE
AUTO REVERSE
PHONES
AUTO TAPE SELECTOR
DOLBY B NR
7 (Stop)
IMPORTANT: Before using the Remote Control for the
tape operations, set the Remote Control to the tape
operation mode by pressing the TAPE button.
Things to Know Before You Start Recording ——————————————
❏ It should be noted that it may be unlawful to re-record pre-recorded tapes, records, or discs
without the consent of the owner of copyright in the sound or video recording, broadcast or
cable programme and in any literary, dramatic, musical, or artistic embodied therein.
❏ Press the DOLBY B NR button — the indicator lights up — to reduce tape hiss.
❏ When you want to record onto both sides of a tape, turn on the auto reverse mode. However,
recording automatically stops after recording in the ¤ direction with the auto reverse mode on.
Therefore, make sure that the tape direction is ‹ when recording with the auto reverse mode
on.
❏ The recording level is automatically set correctly, so it is not affected by the VOLUME control.
Thus, during recording you can adjust the sound you are actually listening to without affecting
the recording level.
❏ Two small tabs on the cassette tape, one for side A and
one for side B, can be removed to prevent accidental
erasure or re-recording. To record on a cassette with the
tabs removed, you must cover the holes with adhesive
tape first. However, when a type II tape is used, only
cover part of the hole as shown, since the other part of
the hole is used to detect the tape type.
❏ When recording, you can hear Sound Modes through the speakers or headphones. However, the
sound is recorded without Sound Modes (see page 9).
❏ Type I and Type II tapes can be used for recording.
Note: The first and end portions of the tape are called leader tape, which cannot be recorded onto.
When you start recording, the first part of the recording may not be done because of this
leader tape. Before inserting the cassette, first wind the leader tape.
CAUTION: If recordings you have made have excessive noise or static, the unit may be too close to
a TV which has been on during recording. Either turn off the TV or increase the distance between
the TV and the CA-MD9R.
Page 58

Standard Recording
You can record any sound source on the tape.
❏ You can also record the same source on the MD at the same time. (See page 34.)
Using the unit only
1. Insert a blank or erasable tape into cassette holder.
2. Press the button if you want to record on both sides of the tape.
The indicator above the button lights up.
❏ When using the auto reverse mode, press the ‹ button then the 7 button to start recording
3. Prepare the source, for example, by tuning in a radio station, loading CDs or MDs, or turning on
the external component.
4. Press the REC PAUSE button.
REC PAUSE
The indicator above the button lights up and the CA-MD9R enters recording pause mode.
5. Press the ‹ (or ¤) button to record the front side (or the reverse side).
❏ When using the auto reverse mode to record both sides of a tape, press the ‹ button to
in the forward (‹) direction.
begin the recording from the front side.
To pause, press the REC PAUSE button. Then press either the ¤ or ‹ button to restart recording.
To stop recording, press the 7 button.
To remove the tape, press down the 0 button after stopping the play.
If you are recording an AM (MW/LW) broadcast and you hear
interference, move the BEAT CUT switch on the back panel from
position 1 (the normal mode) to position 2.
1
BEAT
CUT
2
Page 59

CD Direct Recording
Everything on the CD goes onto the tape in the order it is on the CD, or according to the order you
have set in a program. You can even record in Random Play. In this case, the tracks of the 3 CDs are
recorded randomly on the tape.
1. Prepare CDs. (See page 19.)
Check that the CD Player is not playing a CD.
2. Insert a blank or erasable cassette in the cassette holder.
❏ When you want to record on both sides of a tape, press the
3. Press the CD REC button.
CD REC
“CD → TAPE” appears on the display then the unit plays the CD and starts recording.
At the end of the tape, the CA-MD9R automatically goes back to the beginning of the last
selection and re-records it, this time gently fading out at the end. If you have the auto reverse
mode, the reverse side starts with the last selection of the front side. The last selection of the
reverse side will also fade out at the end. (A 10 second blank is created at the beginning of the
reverse side.)
When the recording is finished, the CD Player and Cassette Deck stop.
button to turn on the auto
reverse mode. In this case, press the ‹ button then the 7 button to start recording in the
forward (‹) direction.
Fade out
Front side
Reverse side
To stop recording, press the 7 button on the Cassette Deck or CD Player (or the 7 button on the
Remote Control).
Notes:
• When recording from a CD program (or random play) made from more than one CD, the tape
will pause when the unit switches to another CD. Then, when the CD is ready, the unit releases
the pause and continue the recording.
• When making Sleep Timer setting while doing CD Direct recording, set the time so that there is
enough leeway to finish the recording before the power goes off. If the time is set to about the
length of the CD, the power may go off before recording finishes.
• For CD Direct Recording using more than one CD, use a blank tape. If you use a prerecorded
tape, prerecorded sound may not be erased between newly-recorded tracks.
1
Fade out
234
9
678
10 sec. blank
5
5
Page 60

Using the Timers
CLOCK/TIMER
STANDBY
TUNER
AUX
COMPACT COMPONENT MD SYSTEM MX-MD9R
DEMO
CLOCK
LONG REC
TRIPLE REC
1ST TRACK REC
CD REC
/TIMER
MD
BASS SOUND REC PAUSE TITLE EDIT
REPEAT
PLAY MODE
LISTENING
SKIP
/
VOLUME
+
–
DISPLAY
/CHARA
MD
3
MD
2
MD
1
CANCEL SET
MULTI JOG dial
MULTI JOG
CANCEL
SET
The timers let you control recording and listening functions automatically.
Three types of timers are available:
❏ Daily Timer — Use this timer to set wake up everyday to music from any source.
❏ Recording Timer — Unattended recording of radio broadcasts. You can set the starting time and
length of the recording. You can set up to 3 Recording Timer settings.
❏ Sleep Timer — Fall asleep and have your CA-MD9R turn off automatically after a certain
length of time.
Setting the Clock
The timers depend on the clock: the clock must be right for the timers to work as you expect.
You can set the clock whether the unit is on or off.
Note that the clock must be set, or the timers cannot be set.
CLOCK
/TIMER
1. Press the CLOCK/TIMER button until the clock indication appears and the hour digits starts
flashing on the display.
(Continued to the next page)
Page 61

❏ Each time you press the button, the Clock/Timer setting mode changes as follows:
MULTI JOG
SET
DAILY on/off
DAILY Timer On Time
REC1 on/off
REC1 Timer On Time
REC2 on/off
REC2 Timer On Time
REC3 on/off
REC3 Timer On Time
Clock Setting
Normal Display (current source)
Turn on/off the Daily Timer
Set the Daily Timer
Turn on/off the Recording 1 Timer
Set the Recording 1 Timer
Turn on/off the Recording 2 Timer
Set the Recording 2 Timer
Turn on/off the Recording 3 Timer
Set the Recording 3 Timer
Set the clock
Display before you press the button
These will not
appear when you set
the clock for the first
time.
2. Rotate the MULTI JOG dial clockwise or counterclockwise to adjust the hour.
Rotate the MULTI JOG dial clockwise to advance the hour setting, rotate it counterclockwise to
decrease the setting.
3. Press the SET button.
The minute digits starts flashing on the display.
MULTI JOG
SET
4. Rotate the MULTI JOG dial clockwise or counterclockwise to adjust the minute.
Rotate the MULTI JOG dial clockwise to advance the minute setting, rotate it counterclockwise
to decrease the setting.
5. Press the SET button.
The clock starts at zero seconds from the set time.
Note:
If you press any other button than the specified ones while setting the clock, the procedure will be
canceled and you will have to restart from the beginning.
CAUTION: If there is a power failure, the clock loses its setting. The clock becomes “0:00”, and the
clock must be reset.
Page 62

MULTI JOG
MULTI JOG
Setting the Daily Timer
With this timer you can wake up to music from a CD, a MD, a tape, your favorite radio program, or
the external source.
❏ You can set the Daily Timer whether the unit is on or off.
❏ If the clock has not been set, you cannot select the Daily Timer.
CLOCK
/TIMER
\
Procedure for Setting the Daily Timer
1. Press the CLOCK/TIMER button repeatedly until the Daily Timer On-Time setting mode is selected.
The DAILY indicator starts flashing on the display.
3
CD
2
1
CD
12345678910
❏ Each time you press the button, the Clock/Timer setting mode c hanges as follows:
DAILY on/off
DAILY Timer On Time
REC1 on/off
REC1 Timer On Time
REC2 on/off
REC2 Timer On Time
REC3 on/off
REC3 Timer On Time
Clock Setting
Normal Display (current source)
2. Set the time you want the unit to turn on.
SET
1. Rotate the MULTI JOG dial to select the hour, then press the SET button.
2. Rotate the MULTI JOG dial to select the minute, then press the SET button.
3
CD
2
1
Turn on/off the Daily Timer
Set the Daily Timer
Turn on/off the Recording 1 Timer
Set the Recording 1 Timer
Turn on/off the Recording 2 Timer
Set the Recording 2 Timer
Turn on/off the Recording 3 Timer
Set the Recording 3 Timer
Set the clock
Display before you press the button
3
MD
2
1
DAILY
3
MD
2
1
\
CD
12345678910
3. Set the time you want the unit to turn off.
SET
1. Rotate the MULTI JOG dial to select the hour, then press the SET button.
2. Rotate the MULTI JOG dial to select the minute, then press the SET button.
3
CD
2
1
CD
12345678910
DAILY
3
MD
2
1
DAILY
Page 63

MULTI JOG
MULTI JOG
\
\
4. Select the source you want to listen to.
SET
SET
1. Rotate the MULTI JOG dial clockwise or counterclockwise until the source you want
appears on the display.
The selected source changes as follow:
CD TAPE MD AUXFM AM
2. Press the SET button to enter the source.
5. If you have selected CD or MD as the source in step 4, select a disc to play.
1. Rotate the MULTI JOG dial clockwise or counterclockwise to select a disc.
2. Press the SET button.
6. Set the Volume Level.
Rotate the MULTI JOG dial clockwise or counterclockwise to set the volume level.
MULTI JOG
SET
STANDBY
3
CD
2
1
CD
12345678910
3
MD
2
1
DAILY
Display Volume Level
Current volume level
7. Press the SET button.
The DAILY indicator stops flashing and remains lit. The contents of the timer setting will be
shown on the display for a while.
8. Turn the power off if you set the timer with the power turned on.
❏ A few seconds before the on-time, the CA-MD9R automatically turns on the power, and
“DAILY TIMER” starts flashing on the display. When the on-time comes, playback starts using
the selected source. When the off-time comes, the power is automatically turned off.
Page 64

Before Turning Off the unit
❏ If you have selected “FM” or “AM” as the source, make sure that the station you want is
selected.
If not, select the station you want.
❏ If you have selected “CD” or “MD,” make sure that you have prepared a CD or an MD.
❏ If you have selected “TAPE” as the source:
• Make sure that there is a tape in the cassette holder.
• Check that the tape direction is correct. This is important especially when the auto reverse
mode is off.
• Set the auto reverse mode on if you want to play both sides of the tape.
❏ Select the Sound Mode if you want to listen using a Sound Mode.
To change the Daily Timer setting
To change the settings for the Daily Timer, repeat the setting procedure from the beginning.
Turning the Daily Timer On and Off ——————————————————
Once the Daily Timer has been set it will be activated at the same time every da y until the setting is
turned off.
To turn the Daily Timer off, press the CLOCK/TIMER button repeatedly until “DAILY on/off”
appears on the display. Press the CANCEL button, “on” disappears from the display and the DAILY
indicator goes off.
To turn the Daily Timer on again, press the CLOCK/TIMER button until “DAILY on/off” appears on
the display, then press the SET button. The contents of the Daily Timer setting are shown on the
display.
CAUTION: If the CA-MD9R is unplugged, or a power failure occurs, the timer setting will be erased
in a few days. If the settings are erased, reset the timer settings.
Page 65

MULTI JOG
MULTI JOG
Setting the Recording Timer
With the Recording Timer you can record a radio broadcast automatically whether or not you are
home.
❏ You can set the Recording Timer whether the unit is on or off.
❏ You can set three different Recording Timer settings (REC 1 to 3).
❏ If the clock has not been set, you cannot select the Recording Timer.
Procedure for Setting the Recording Timer
CLOCK
/TIMER
1. Press the CLOCK/TIMER button repeatedly until Recording timer on-time setting mode appears
on the display.
The REC 1, 2 or 3 indicator also lights up on the display.
STEREO TUNED
❏ Each time you press the button, the Clock/Timer setting mode c hanges as follows:
3
CD
2
1
12345678910
3
MD
2
1
REC 1
\
\
DAILY on/off
DAILY Timer On Time
REC1 on/off
REC1 Timer On Time
REC2 on/off
REC2 Timer On Time
REC3 on/off
REC3 Timer On Time
Clock Setting
Normal Display (current source)
SET
2. Set the time you want the unit to be turned on.
Turn on/off the Daily Timer
Set the Daily Timer
Turn on/off the Recording 1 Timer
Set the Recording 1 Timer
Turn on/off the Recording 2 Timer
Set the Recording 2 Timer
Turn on/off the Recording 3 Timer
Set the Recording 3 Timer
Set the clock
Display before you press the button
1. Rotate the MULTI JOG dial to select the hour, then press the SET button.
2. Rotate the MULTI JOG dial to select the minute, then press the SET button.
3
CD
2
1
STEREO TUNED
12345678910
3. Set the time you want the unit to be turned off.
SET
1. Rotate the MULTI JOG dial to select the hour, then press the SET button.
2. Rotate the MULTI JOG dial to select the minute, then press the SET button.
3
MD
2
1
REC 1
3
CD
2
1
STEREO TUNED
12345678910
3
MD
2
1
REC 1
Page 66

MULTI JOG
\
SET
4. Select a preset station you want to record.
1. Rotate the MULTI JOG dial to select a preset station.
2. Press the SET button to enter the preset station.
3
CD
2
1
STEREO TUNED
12345678910111213141516
5. Select the recording equipment.
The recording equipment changes as follows:
3
MD
2
1
REC 1
MULTI JOG
SET
TAPE
MD 1
MD 2
MD 3
MD ALL
: To record on the tape.
: To record on the MD 1.
: To record on the MD 2.
: To record on the MD 3.
: To record on all the three MDs.
6. Press the SET button.
The REC (1 to 3) indicator stops flashing and remains lit. The contents of the Recording Timer
setting are shown on the display fro a while.
7. Press to turn the power off if necessary.
STANDBY
❏ A few seconds before the on-time, the CA-MD9R automatically turns on the power, and “REC
(1 to 3) TIMER” flashes on the display. When the on-times comes, recording starts using the
selected recording equipment. When the off-times comes, the power is automatically turned off
again.
Before Turning Off the unit
❏ Check that tape direction is correct when recording on a tape. This is important especially when
the auto reverse mode is off.
❏ Set the auto reverse mode on if you want to record on both sides of the tape.
❏ Check that an MD is inserted in the selected slot(s).
❏ The VOLUME control is automatically set to 0 when Recording Timer starts recording.
To change the recording timer setting
To change the settings for the Recording Timer, repeat the setting procedure from the beginning.
Turning the Recording Timer On and Off ————————————————
Once the Recording Timer has been used to record a source, the setting is maintained but the Timer
is turned off.
To turn the Recording Timer off, press the CLOCK/TIMER button repeatedly until “REC on/off”
appears in the display, then press the CANCEL button. “on” disappears from the display and the
REC indicator goes off.
To turn the Recording Timer on again, press the CLOCK/TIMER button repeatedly until “REC on/
off” appears on the display, then press the SET button. The contents of the Recording Timer settings
are shown on the display for a while.
CAUTION: If the CA-MD9R is unplugged, or a power failure occurs, the timer setting will be erased
in a few days. If the settings are erased in this way, reset the timer settings.
Page 67

Setting the Sleep Timer
By setting this timer, you can fall asleep to music.
❏ You can only set the Sleep Timer when the unit is on.
SLEEP
Procedure for Setting the Sleep Timer
1. While playing a source, press the SLEEP button on the Remote Control.
“SLEEP” appears on the display.
2. Press the SLEEP button repeatedly to set the length of time you want the source to play before
shutting off.
❏ Each time you press this button while the “SLEEP” indicator is flashing, the number of
minutes shown on the display change as follows:
10
Canceled
CD
STEREO TUNED
When the number of minutes you want is shown on the display, wait 5 seconds until the SLEEP
indicator stops flashing and remains lit.
The unit is now set to turn off after the number of minutes you set.
To change the Sleep Timer setting
Press the SLEEP button repeatedly until the number of minutes you want appears on the display.
To cancel the Sleep Timer setting
Press the SLEEP button repeatedly until the SLEEP indicator goes off on the display.
Turning off the unit also cancels the Sleep Timer.
20 30 60 90
240 180 120
3
2
1
12345678910111213141516
3
MD
2
1
SLEEP
Page 68

Timer Priority
ON OFF
A
B
1:00 2:00
ON
ON
OFF
A
B
6:00 6:30 7:30
Example 1
Recording Timer
Sleep Timer
Since each timer can be set independently, you may wonder what happens if the settings overlap.
Here are the priorities for each timer:
❏ If the Recording Timer is set to come on while another timer is operating, the other timer will
shut off 10 seconds before the Recording Timer is set to turn on, and the Recording Timer will
then take over. (Example 1)
❏ If two Recording Timers overlaps, the one with a late on-time has the priority. (Example 2)
❏ The Sleep Timer has the priority over the Daily Timer. This means that if the Sleep Timer is set
while the Daily Timer is operating, the Sleep Timer will take over. (Example 3)
❏ If you set the Sleep Timer while the Recording Timer is operating, the Recording Timer will be
canceled, but recording continues.
Setting
ON OFF
B
1:00 2:00 2:30
A
OFF
Operation
The Recording Timer has priority.
The sound is cut off a few seconds before the
Recording Timer on-time.
Example 2
Recording Timer 2
Daily Timer
or
Recording Timer 1
Example 3
Daily Timer
Sleep Timer
Setting
ON
B
ON
6:00 6:30 7:00 7:30
ON OFF
B
6:00 6:30 7:00
A
OFF
A
OFF
OFF
Operation
The Recording Timer 2 has priority.
The sound is cut off a few seconds before the
Recording Timer on-time.
OperationSetting
B
The Sleep Timer has priority.
OFF
6:30
Page 69

Disc Lock Function
When the Disc Lock function is on, the CD trays and MD loading slot cover cannot be opened even
if you press the 0 button.
This function can only be possible by using the buttons on the unit.
Locking the Discs ————————————————————————
1. Press the button to turn off the unit (in standby mode).
3
CD
2
CD
1
CD
2. While pressing the 7 button, press the 0 button for CD1 tray.
“LOCKED” appears on the display, and discs are “locked.”
If you press the 0 buttons while the discs are “locked,” “LOCKED” will appear on the display.
Unlocking the Discs————————————————————————
1. Press the button to turn off the unit (in standby mode).
2. While pressing the 7 button, press the 0 button for CD1 tray.
“UNLOCKED” appears on the display, and discs are “unlocked.”
Page 70

Care and Maintenance
General Notes
In general, you will have the best performance by keeping
your tapes, CDs, MDs and the mechanism clean.
• Store tapes, CDs and MDs in their cases, and keep them
in cabinets or on shelves.
• Keep the cassette holder, the CD trays, and the MD
loading slot cover closed when not in use.
Compact Discs
• Remove the CD from the case
by holding it at the edges while
pressing the center hole lightly.
• Do not touch the shiny surface
of the CD, or bend the CD.
• Be careful not to scratch the
surface of the CD when placing
it back in the case.
• Avoid exposure to direct
sunlight, temperature extremes,
and moisture.
• A dirty CD may not play
correctly. If a CD does become
dirty, wipe it with a soft cloth in
a straight line, from center to
edge.
CAUTION: Do not use any solvent (for example, conventional
record cleaner, spray thinner, benzine, etc.) to clean a CD.
Mini Discs
• Do not open the shutter.
- The shutter is locked so that it will not open. Trying to
force it open will break the disc. If the shutter opens
accidentally, close it ag ain quickly without touc hing the
disc inside.
• Do not place discs in the following places:
- High temperatures areas such in direct sunlight or
inside a car.
- High humidity areas, e.g. in a bathroom.
- On a beach or sandy area.
• Clean discs regularly.
- If dust or dirt gets on cartridge, wipe it off with a soft
dry cloth.
Moisture Condensation
Moisture may condense on the lens
inside the unit in the following cases:
• After starting the heating in the room.
• In a damp room.
• If the unit is brought directly from a
cold to a warm place.
Should this occur, the unit may malfunction. In this case, leav e
the unit turned on for a few hours until the moisture evaporates, unplug the A C power cord , and then plug it in again.
Cassette Tapes
• If the tape is loose in its
cassette, take up the slack by
inserting a pencil in one of the
reels and rotating.
• If the tape is loose, it may get
stretched, cut, or caught in the
cassette.
• Do not touch the tape surface.
• Do not store the tape:
- In dusty places
- In direct sunlight or heat
- In moist areas
- On a TV or speaker
- Near a magnet
Cassette Deck
• If the heads, capstans, and pinch-rollers of the Cassette
Deck become dirty, the following will occur:
- Loss of sound quality
- Discontinuous sound
- Fading
- Incomplete erasure
- Difficulty recording
• Clean the heads, capstans, and pinch-rollers using a
cotton swab moistened with alcohol.
Pinch-rollers
Capstans
Heads
• If the heads become magnetized, the unit will produce
noise or lose high frequencies.
• To demagnetize the heads, turn off the unit, and use a
head demagnetizer (available at electronics and record
shops).
Page 71

Troubleshooting
• If you are having a problem with your CA-MD9R, check this list for a possible solution before calling for service.
• If you cannot solve the problem from the hints given here, or the unit has been physically damaged, call a qualified
person, such as your dealer, for service.
Symptom
No sound is heard.
Unable to record on an MD.
Unable to record.
Poor radio reception.
The CD skips.
Unable to operate the Remote Control.
The CD trays or MD loading slot cover
cannot be opened.
The CD does not play.
Operations are disabled.
The cassette holder cannot be opened.
Possible Cause
Connections are incorrect, or loose.
• You are using a prerecorded MD.
• The MD is write-protected.
Cassette record protect tabs are
removed.
• The antenna is not connected
correctly.
• The AM loop antenna is too close
to the unit.
• The FM antenna is not properly
extended and positioned.
The CD is dirty or scratched.
• The path between the Remote
Control and the sensor on the unit
is blocked.
• The batteries have lost their charge.
• The main AC power cord is not
plugged in.
• The Disc Lock function is turned
on.
The CD is upside down.
The built-in microprocessor has
malfunctioned due to external electrical
interference.
During tape playing, the power cord
was unplugged.
Action
Check all connections and make
corrections. (See pages 4 – 5.)
• Change it with a recordable MD.
• Unprotect the MD. (See page 69.)
Cover holes on back edge of cassette
with adhesive tape.
• Reconnect the antenna securely.
• Change the position and direction
of the AM loop antenna.
• Extend FM antenna to the best
reception position.
Clean or replace the CD.
• Remove the obstruction.
• Replace the batteries.
• Plug in the AC power plug.
• Turn off the Disc Lock function.
(See page 66.)
Put the CD in with the label side up.
Unplug the unit then plug it back in.
Plug in the power cord, press the
button, then the 0 button.
Page 72

MD Error Messages
Error Message
BLANK DISC
CANNOT JOIN
DISC ERROR
DISC FULL
EMERGENCY STOP
MD NO DISC
NON-AUDIO
CANNOT COPY
PLAYBACK MD
DISC PROTECTED
TRACK PROTECTED
OCCUPIED
LOAD ERROR
Signification
The disc is blank.
You are trying to join tracks which
cannot be joined.
There is a problem with this disc.
There is no more space on the disc or
there are over 254 tracks.
A malfunction occurs during the
recording.
There is no disc.
You are trying to copy a non-audio disc
like a CD-ROM or a Video CD.
You are trying to edit or record a
playback-only MD
The disc is write-protected.
The track is protected using another
MD recorder.
During playback, you inserted an MD
into the loading slot where another MD
has been inserted.
The MD is not inserted correctly.
Solution
Change the disc with another if you
want to enjoy playback.
This is not a malfunction. (See MD
limitations.)
Change the disc.
Use another recordable MD or erase
some tracks.
Eject the MD and re-insert it.
Put an MD.
Stop the recording.
Use a recordable MD for recording.
Unprotect the disc or use another.
Press the SET button, then the EDIT
button to cancel the track protection.
Remove the MD.
Insert the MD correctly then press the
0 button for the MD Recorder.
MD limitations
The MD records data in an original format that differs from that of conventional cassette tapes or DATs. Since there are
some limitations with this recording format, the following types of symptoms may occur. These symptoms are not
malfunctions.
Symptoms
“DISC FULL” appears, even though there is still enough
remaining time on an MD.
“DISC FULL” appears even though the number of tracks
and recording time do not reach the limit.
The JOIN function sometimes does not work.
The remaining time on the disc does not increase even
when tracks are erased.
The sound drops out during fast forward or fast rewind.
The amount of recorded time on the disc added to the
amount of remaining time is shorter than the disc’s total
possible recording time.
There is a maximum number of tracks which can be
recorded, regardless of time. More than 254 tracks cannot
be recorded on a disc.
• Repeating erasure and recording on the same disc create
many blank portions sparsely on the disc. When recording
on such a disc, a track is recorded on these blank portions
sparsely. If a track is divided and recorded into so many
portions, “DISC FULL” appears.
• If a divided portion of less than 8 seconds is made while a
track is recorded on the MD, that track cannot be joined
to another track using the JOIN function. Furthermore, if
that track is erased, the remaining time of the MD may
not increase exactly by the erased amount.
• If a track has been divided into many portions while being
recorded on the MD, sounds will drop out while fast
forwarding or reversing such an MD.
You cannot record on a blank portion of less than 2 seconds
in the MD. For this reason, the actual recording time of
discs may become shorter.
Cause
Page 73

Specifications
Output Power (IEC 268-3/DIN) 37 watts per channel, min. RMS, both channels driven, into
Input Sensitivity/Impedance (1 kHz)
CD Automatic Changer Section
Amplifier Section
6 ohms at 1 kHz with no more than 0.9% total harmonic
distortion.
Speaker terminals
Main speakers 6 – 16 ohms
Tuner Section
Tuning Range 87.5 – 108.0 MHz
Tuning Range
Timer Section
Clock Display 24 hours cycle display
Cassette Deck Section
Frequency Response
Type II (CrO
Type I (NORMAL) : 30 – 15,000 Hz
Wow And Flutter 0.15% (WRMS)
Dynamic Range 94 dB
Signal-To-Noise Ratio 100 dB
Wow And Flutter Unmeasurable
AUX 400 mV/47 kohms
FM Tuner
AM Tuner
MW 522 – 1,629 kHz
LW 144 – 288 kHz
Rec Timer 1 min. to 23 hours 59 min.
Daily Timer 1 min. to 23 hours 59 min.
Sleep Timer 10 min. to 240 min.
) : 30 – 16,000 Hz
2
CD Capacity 3 CDs
MD Automatic Changer Section
Audio Playing System MiniDisc digital audio system
Recording System Magneto-optical overwrite system
Reading System Non-contact, semiconductor laser pick-up (λ = 780nm)
Error correction System CIRC (Cross Interleave Reed-Solomon Code)
Sampling frequency 44.1 kHz
Audio compression System ATRAC (Adaptive TRansform Acoustic Coding)
Number of channels 2
Wow And Flutter Unmeasurable
General
Dimensions 245 x 345 x 346.5 mm (W/H/D)
Accessories
Power Specifications
Power Requirements AC 230 V
Power Consumption 110 watts
Design and specifications are subject to change without notice.
(9-11/16 x 13-5/8 x 13-5/8 inches)
Mass 9.5 kg (20.9 lbs)
AM (MW/LW) Loop Antenna (1)
Remote Control (1)
Batteries R6P (SUM-3)/AA (15F) (2)
FM Wire Antenna (1)
, 50 Hz
15 watts (in standby mode)
Page 74

Additional Informations
Some Words about MDs
There are two types of MDs: premastered (prerecorded) and recordable (blank).
Premastered MDs
Premastered MDs, which have been recorded at music studio, can be played back like regular CDs.
On an MD of this type, data is recorded as the presence or absence of tiny pits. A laser beam focuses
on the pits on the surface of the MD and reflects the detection back to the lens in the MD Recorder.
The MD Recorder then decodes the signals and plays them back as music. This type of MD is called
an “optical disc.”
Recordable MDs
Recordable MDs, which use magneto-optical technology, can be recorded and played back repeatedly. The laser inside the MD Recorder applies heat to the MD, demagnetizing the magnetic layer of
the MD for recording and playback. This type of MD is called an “magnetic-optical disc.”
ATRAC (Adaptive TRansform Acoustic Coding)
The MD provides 74 minutes recording and playback time, the same as an audio CD, but in a
diameter of only 64 mm. This ability to store such a large amount of data is the result of ATRAC, an
audio compression technique developed for MD. This technology, cuts out faint sounds that would
not be heard by the human beings. This technology, based on human sensitivity to sounds, enabled
the recorded data to be about one-fifth of the original data.
UTOC (User Table Of Contents)
Found only on recordable MDs, this area contains sub-data (track number, recording data etc.)
which can be rewritten by the user.
UTOC enables us to search tracks quickly and edit tracks on the MD.
3:12
4:15
6:05
Page 75

Serial Copy Management System (SCMS)
The MD Recorder integrated to this unit uses the Serial Copy Management System which allows
only first-generation digital copies to be made of premastered software (like CDs or prerecorded
MDs).
1st Generation 2nd Generation
D
ABCDEFG
Sound Skip Guard Memory
The biggest weakness of discs is their susceptibility to vibration. The “Sound Skip Guard Memory”
has been developed to cope with this weakness.
With this function, a few seconds of signals read by the optical read head from the disc are first
stored in memory before being reproduced as audio signals. Thus, even when vibration or shock
interrupts signals being read, these stored signals can continue to reproduce sounds for the few
seconds. Thus, the user will enjoy uninterrupted music.
OK
I
T
I
T
A
G
I
L
D
G
I
A
NO
L
Normally....
When “vibrated”....
Page 76

VICTOR COMPANY OF JAPAN, LIMITED
EN
0398TTMMDWSAN
JVC
 Loading...