

Page 1

COMPACT COMPONENT SYSTEM
For Customer Use:
Enter below the Model No. and Serial No.
which are located either on the rear, bottom or side of the cabinet. Retain this
information for future reference.
Model No.
Serial No.
SISTEMAS DE COMPONENTES COMPACTOS
SISTEMA DE COMPONENTE COMPACTO
CA-HXZ30
CA-HXZ10
English
Español
Português
INSTRUCTIONS
MANUAL DE INSTRUCCIONES
INSTRUÇÕES
GVT0100-012A
[UW, UJ]
Page 2

Warnings, Cautions and Others
Avisos, precauciones y otras notas
Advertências, precauções e outras notas
Caution–– (standby/on) button!
Disconnect the mains plug to shut the power off completely
(all lamps and indications go off). The (standby/on) button
in any position does not disconnect the mains line.
• When the unit is on standby, the STANDBY lamp lights red.
• When the unit is turned on, the STANDBY lamp goes off.
The power can be remote controlled.
Precaución––botón (en espera/encendido)!
Desconecte el enchufe tomacorriente para desconectar la
alimentación completamente (se apagan todas las lámparas e
indicaciones). Ninguna posición del botón (en espera/
encendido) conseguirá desconectar la red de alimentación
eléctrica.
• Cuando la unidad está en espera, la lámpara STANDBY se
enciende en rojo.
• Cuando la unidad está encendida, la lámpara STANDBY se
apaga.
La alimentación puede controlarse mediante control remoto.
Precaução––botão (standby/on)!
Desligue a ficha da tomada da parede para desligar
completamente a alimentação (todas as luzes e indicadores
apagam-se). O botão (standby/on), quer esteja premido ou
solto, não desliga a alimentação principal.
• Quando a unidade estiver em standby, a luz STANDBY fica
vermelha.
• Quando a unidade estiver ligada, a luz STANDBY apaga-se.
A alimentação pode ser controlada à distância.
– G-1 –
Page 3

Caution
To reduce the risk of electrical shocks, fire, etc.:
1. Do not remove screws, covers or cabinet.
2. Do not expose this appliance to rain or
moisture.
Caution
• Do not block the ventilation openings or holes.
(If the ventilation openings or holes are blocked by a
newspaper or cloth, etc., the heat may not be able to get out.)
• Do not place any naked flame sources, such as lighted
candles, on the apparatus.
• When discarding batteries, environmental problems must be
considered and local rules or laws governing the disposal of
these batteries must be followed strictly.
• Do not expose this apparatus to rain, moisture, dripping or
splashing and that no objects filled with liquids, such as
vases, shall be placed on the apparatus.
Precaución
Para reducir riesgos de choques eléctricos,
incendio, etc.:
1. No extraiga los tornillos, los cubiertas ni la
caja.
2. No exponga este aparato a la lluvia o a la
humedad.
Precaução
Para reduzir riscos de choques elétricos,
incêndio, etc.:
1. Não remova parafusos e tampas ou
desmonte a caixa.
2. Não exponha este aparelho à chuva nem
à umidade.
Precaución
• No obstruya las rendijas o los orificios de ventilación.
(Si las rendijas o los orificios de ventilación quedan tapados
con un periódico, un trozo de tela, etc., no se podrá disipar
el calor).
• No ponga sobre el aparato ninguna llama al descubierto,
como velas encendidas.
• Cuando tenga que descartar las pilas, tenga en cuenta los
problemas ambientales y observe estrictamente los
reglamentos o las leyes locales sobre disposición de las
pilas.
• No exponga este aparato a la lluvia, humedad, goteos o
salpicaduras. Tampoco ponga recipientes conteniendo
liquidos, como floreros, encima del aparato.
Precaução
• Não obstrua as aberturas e orifícios de ventilação. (Se os
orifícios ou aberturas de ventilação estiverem obstruídos
por qualquer papel ou tecido, não haverá circulação do ar
quente.)
• Não coloque nenhum objeto com chamas, como velas
acesas, sobre o aparelho.
• Ao descartar as baterias, leve em consideração os
problemas que possam ser causados ao meio ambiente e
os regulamentos e leis locais e governamentais sobre
recolhimento dessas baterias devem ser rigorosamente
seguidos.
• Não exponha este aparelho à chuva, umidade, pingos ou
esguichos de água, nem coloque em cima do mesmo
qualquer tipo de recipiente que contenha líquidos, como por
exemplo vasos.
– G-2 –
Page 4
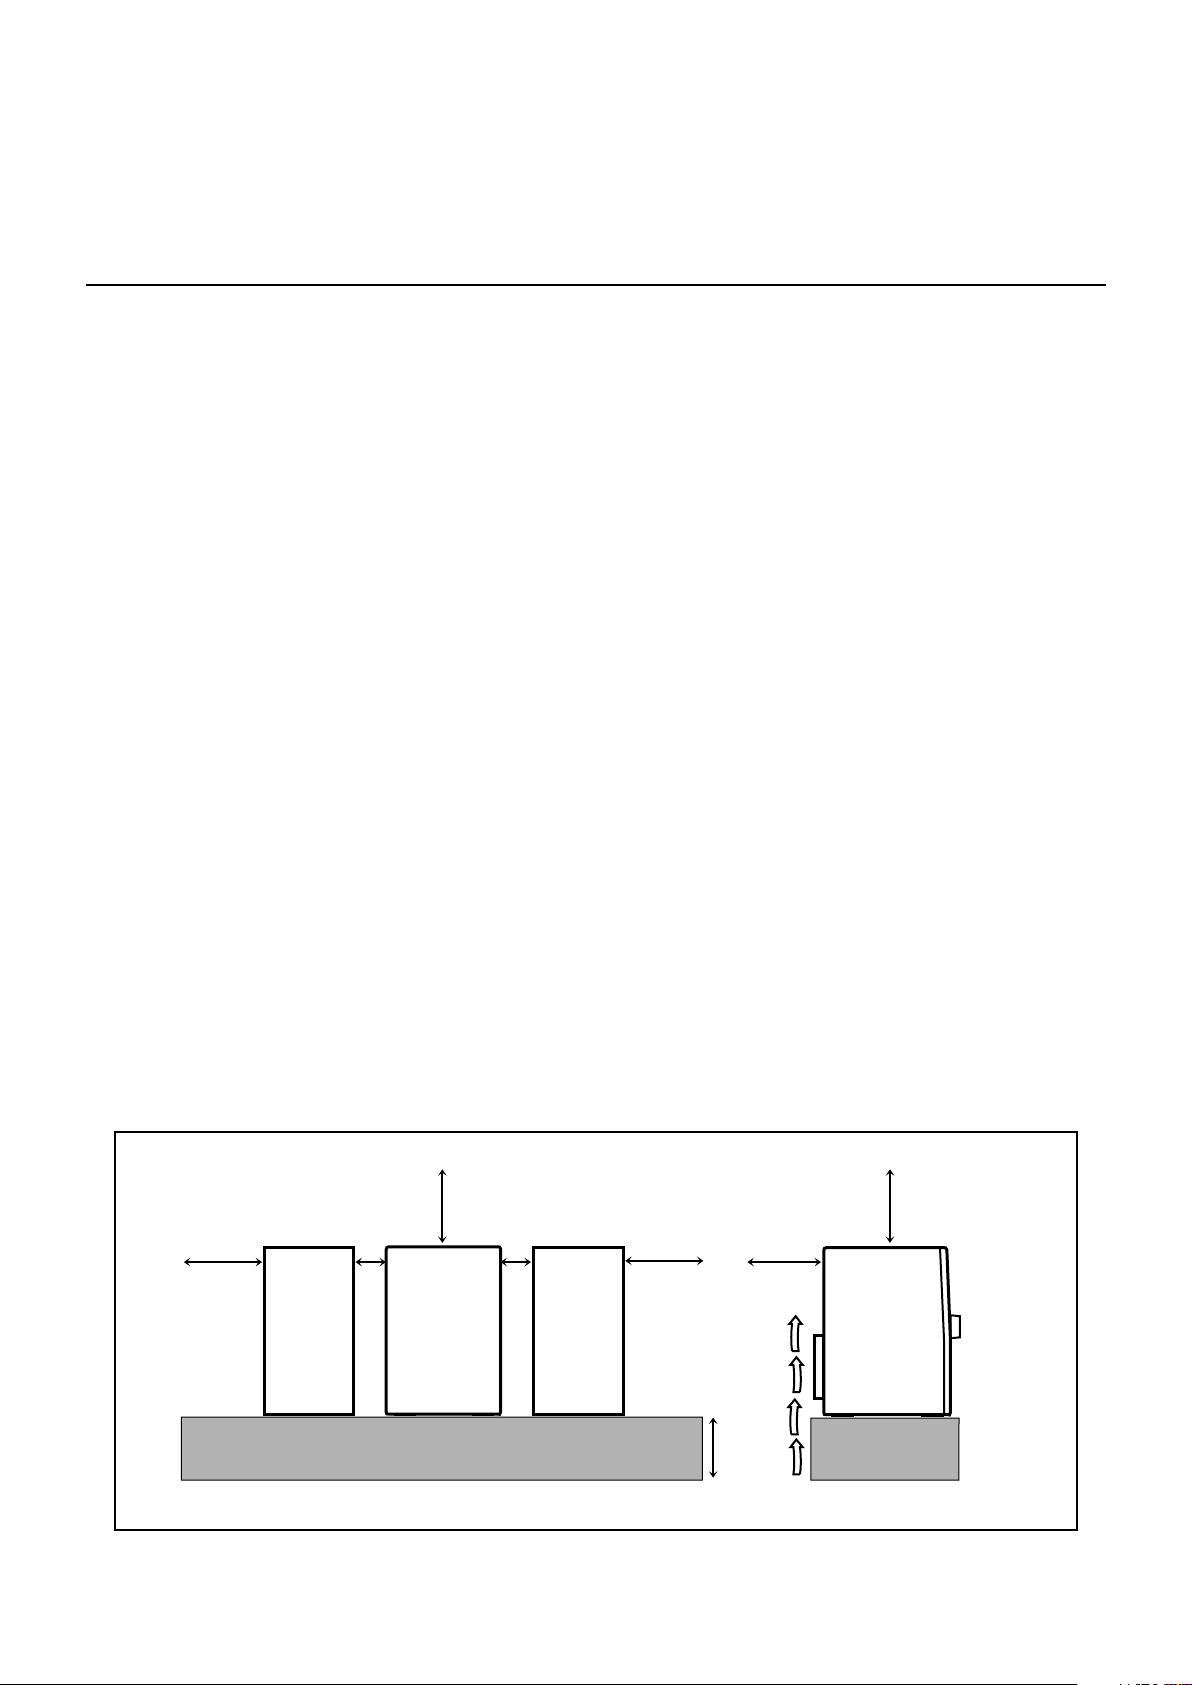
Caution: Proper Ventilation
15 cm
15 cm
15 cm
15 cm
15 cm
10 cm
1 cm
1 cm
CA-HXZ30
CA-HXZ10
To avoid risk of electric shock and fire, and to prevent damage, locate the apparatus as follows:
1 Front: No obstructions and open spacing.
2 Sides/ Top/ Back: No obstructions should be placed in the areas shown by the dimensions below.
3 Bottom: Place on the level surface. Maintain an adequate air path for ventilation by placing on a
stand with a height of 10 cm or more.
Precaución: El aparato debe estar bien ventilado
Para evitar posibles riesgos de descargas eléctricas e incendios y prevenir cualquier posible daño, coloque
el aparato del modo siguiente:
1 Parte delantera: No ponga nada delante, deje el espacio libre.
2 Laterales/ parte superior/ parte trasera:
No se debería colocar nada en las áreas y las distancias que se detallan a continuación.
3 Parte inferior: Coloque el aparato sobre una superficie recta. Debe haber buena circulación de
aire; para ello, coloque el aparato sobre una base a una altura mínima de 10 cm.
Precaução: Ventilação adequada
Para evitar riscos de choques elétricos e incêndios, e prevenir avarias, instale o aparelho como segue:
1 Parte frontal: Sem obstruções e espaços abertos.
2 Partes laterais/ Tampa/ Posterior:
Nenhuma obstrução deverá ser colocada entre as áreas cujas dimensões são indicadas
abaixo.
3 Parte inferior: Instale-o sobre uma superfície plana. Deverá ser mantido espaço suficiente para a
ventilação se este for instalado numa posição que tenha uma altura de 10 cm ou mais.
Front view
Vista frontal
Vista frontal
– G-3 –
Side view
Vista lateral
Vista lateral
Page 5
IMPORTANT FOR LASER PRODUCTS
IMPORTANTE PARA PRODUCTOS LÁSER
IMPOTANTE PARA PRODUTOS LASER
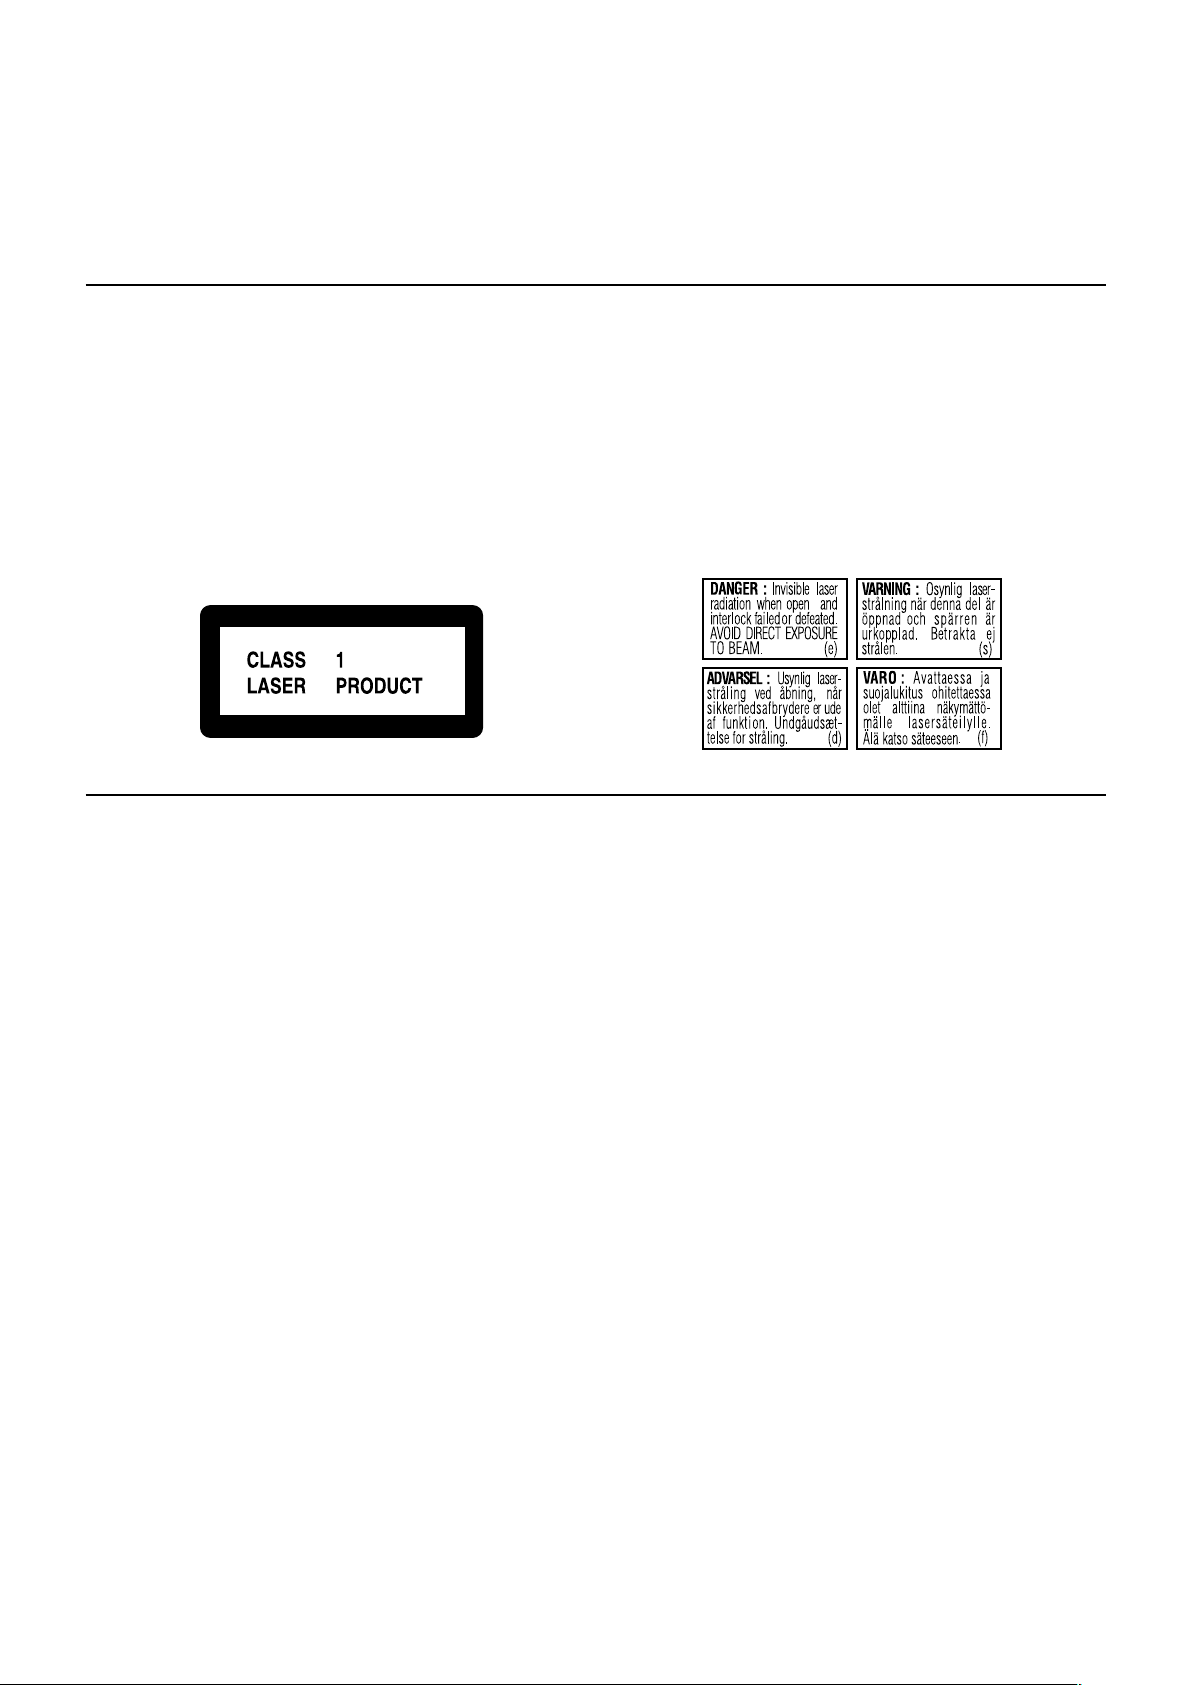
REPRODUCTION OF LABELS / REPRODUCCIÓN DE ETIQUETAS / REPRODUÇÃO DE ETIQUETAS
11
1 CLASSIFICATION LABEL ON EXTERIOR
11
SURFACE
11
1 ETIQUETA DE CLASIFICACIÓN SOBRE LA
11
SUPERFICIE EXTERIOR
11
1 ETIQUETA DE CLASSIFICAÇÃO LOCALIZADA NA
11
SUPERFÍCIE EXTERNA
2 WARNING LABEL INSIDE THE UNIT
2 ETIQUETA DE ADVERTENCIA DEL INTERIOR DE
LA UNIDAD
2 ETIQUETA DE ADVERTÊNCIA LOCALIZADA NA
PARTE INTERNA DA UNIDADE
1. CLASS 1 LASER PRODUCT
2. DANGER: Invisible laser radiation when open and
interlock failed or defeated. Avoid direct exposure to
beam.
3. CAUTION: Do not open the top cover. There are no user
serviceable parts inside the Unit; leave all servicing to
qualified service personnel.
1. PRODUCTO LÁSER CLASE 1
2. PELIGRO: En el interior hay radiación láser invisible.
Evite el contacto directo con el haz.
3. PRECAUCIÓN: No abra la tapa superior. En el interior
de la unidad no existen piezas reparables por el usuario;
deje todo servicio técnico en manos de personal
calificado.
1. PRODUTO LASER CLASSE 1
2. PERIGO: O laser emite uma rediação invisível que é
perigosa, caso o aparelho esteja aberto e a trava
inoperante ou danificada. Evite exposição direta ao feixe
dos raios.
3. CUIDADO: Não abra a caixa do aparelho. Não existem
peças reparáveis pelo usuário na parte interna da
unidade. Solicite assistência técnica somente a pessoal
técnico qualificado.
– G-4 –
Page 6
Introduction
English
We would like to thank you for purchasing one of our JVC products.
Before operating this unit, read this manual carefully and thoroughly to
obtain the best possible performance from your unit, and retain this manual
for future reference.
About This Manual
This manual is organized as follows:
• The manual mainly explains operations using the
buttons and controls on the unit. You can also use the
buttons on the remote control if they have the same or
similar names (or marks) as those on the unit.
If operation using the remote control is different from
that using the unit, it is then explained.
• Basic and common information that is the same for many
functions is grouped in one place, and is not repeated for
each procedure. For instance, we do not repeat the
information about turning on/off the unit, setting the
volume, changing the sound effects, etc., which are
explained in the section “Common Operations” on pages 9
to 11.
• The following symbols are used in this manual:
Gives you warning and caution to prevent
damage or risk of fire/electric shock.
Furthermore, it gives you information about
what is not good for obtaining the best possible
performance from the unit.
Gives you information and hints you should
know.
Precautions
Power sources
• When unplugging the unit from the wall outlet, always pull
on the plug, not the AC power cord.
DO NOT handle the AC power cord with wet hands.
Moisture condensation
Moisture may condense on the lens inside the unit in the
following cases:
• After starting heating in the room
• In a damp room
• If the unit is brought directly from a cold to a warm place
Should condensation occur, the unit may malfunction. In this
case, leave the unit turned on for a few hours until the moisture
evaporates, unplug the AC power cord, then plug it in again.
Internal heat
A cooling fan is mounted on the rear panel to prevent heat
buildup inside the unit.
For safety, observe the following carefully:
• Make sure there is good ventilation around the
unit. Poor ventilation could overheat and damage
the unit.
• DO NOT block the cooling fan and the ventilation
openings or holes. If they are blocked by a
newspaper or cloth, etc., the heat may not be
able to get out.
Installation
• Install in a place which is level, dry and neither too hot nor
too cold—between 5˚C and 35˚C.
• Install the unit in a location with adequate ventilation to
prevent internal heat buildup in the unit.
• Leave sufficient distance between the unit and the TV.
• Keep the speakers away from the TV to avoid interference
with TV.
DO NOT install the unit in a location near heat
sources, or in a place subject to direct sunlight,
excessive dust or vibration.
1
Others
• Should any metallic object or liquid fall into the unit,
unplug the AC power cord and consult your dealer before
operating any further.
• If you are not going to operate the unit for an extended
period of time, unplug the AC power cord from the wall
outlet.
DO NOT disassemble the unit since there are no
user serviceable parts inside.
If anything goes wrong, unplug the AC power cord and
consult your dealer.
Page 7

Contents
English
Location of the Buttons and Controls ....................... 3
Front Panel ................................................................. 3
Remote Control .......................................................... 5
Getting Started ............................................................ 6
Supplied Accessories .................................................. 6
Putting the Batteries into the Remote Control ........... 6
Connecting Antennas ................................................. 6
Connecting Speakers .................................................. 7
Connecting Other Equipment ..................................... 8
Adjusting the Voltage Selector ................................... 8
Canceling the Demonstration ..................................... 8
Common Operations .................................................. 9
Turning On or Off the Power ..................................... 9
Setting the Clock ........................................................ 9
Selecting the Sources ................................................... 9
Adjusting the Volume ............................................... 10
Reinforcing the Bass Sound ..................................... 10
Selecting the Sound Modes ...................................... 10
Creating Your Own Sound Mode—User Mode ....... 11
Turning On or Off the Key-touch Tone .................... 11
Listening to FM and AM Broadcasts ...................... 12
Setting the AM Tuner Interval Spacing .................... 12
Tuning in to a Station ............................................... 12
Presetting Stations .................................................... 12
Tuning in to a Preset Station .................................... 12
REC
Disc Play Introduction.............................................. 13
Playing Back Discs .................................................... 15
Loading Discs ........................................................... 15
Playing Back the Entire Discs—Continuous Play ... 15
Basic Disc Operations .............................................. 16
Programming the Playing Order of the Tracks
—Program Play .................................................. 17
Playing at Random—Random Play ......................... 18
Repeating Tracks or Discs—Repeat Play ................ 19
Prohibiting Disc Ejection—Tray Lock .................... 19
Playing Back Tapes ................................................... 20
Playing Back a Tape ................................................. 20
Locating the Beginning of a Song—Music Scan ..... 20
Recording .................................................................. 21
Recording on a Tape ................................................. 21
Synchronized Recording .......................................... 22
Using the Timers ....................................................... 23
Using Daily Timer.................................................... 23
Using Recording Timer ............................................ 25
Using Sleep Timer.................................................... 26
Timer Priority ........................................................... 26
Maintenance .............................................................. 27
Troubleshooting ........................................................ 28
Specifications............................................................. 29
2
Page 8
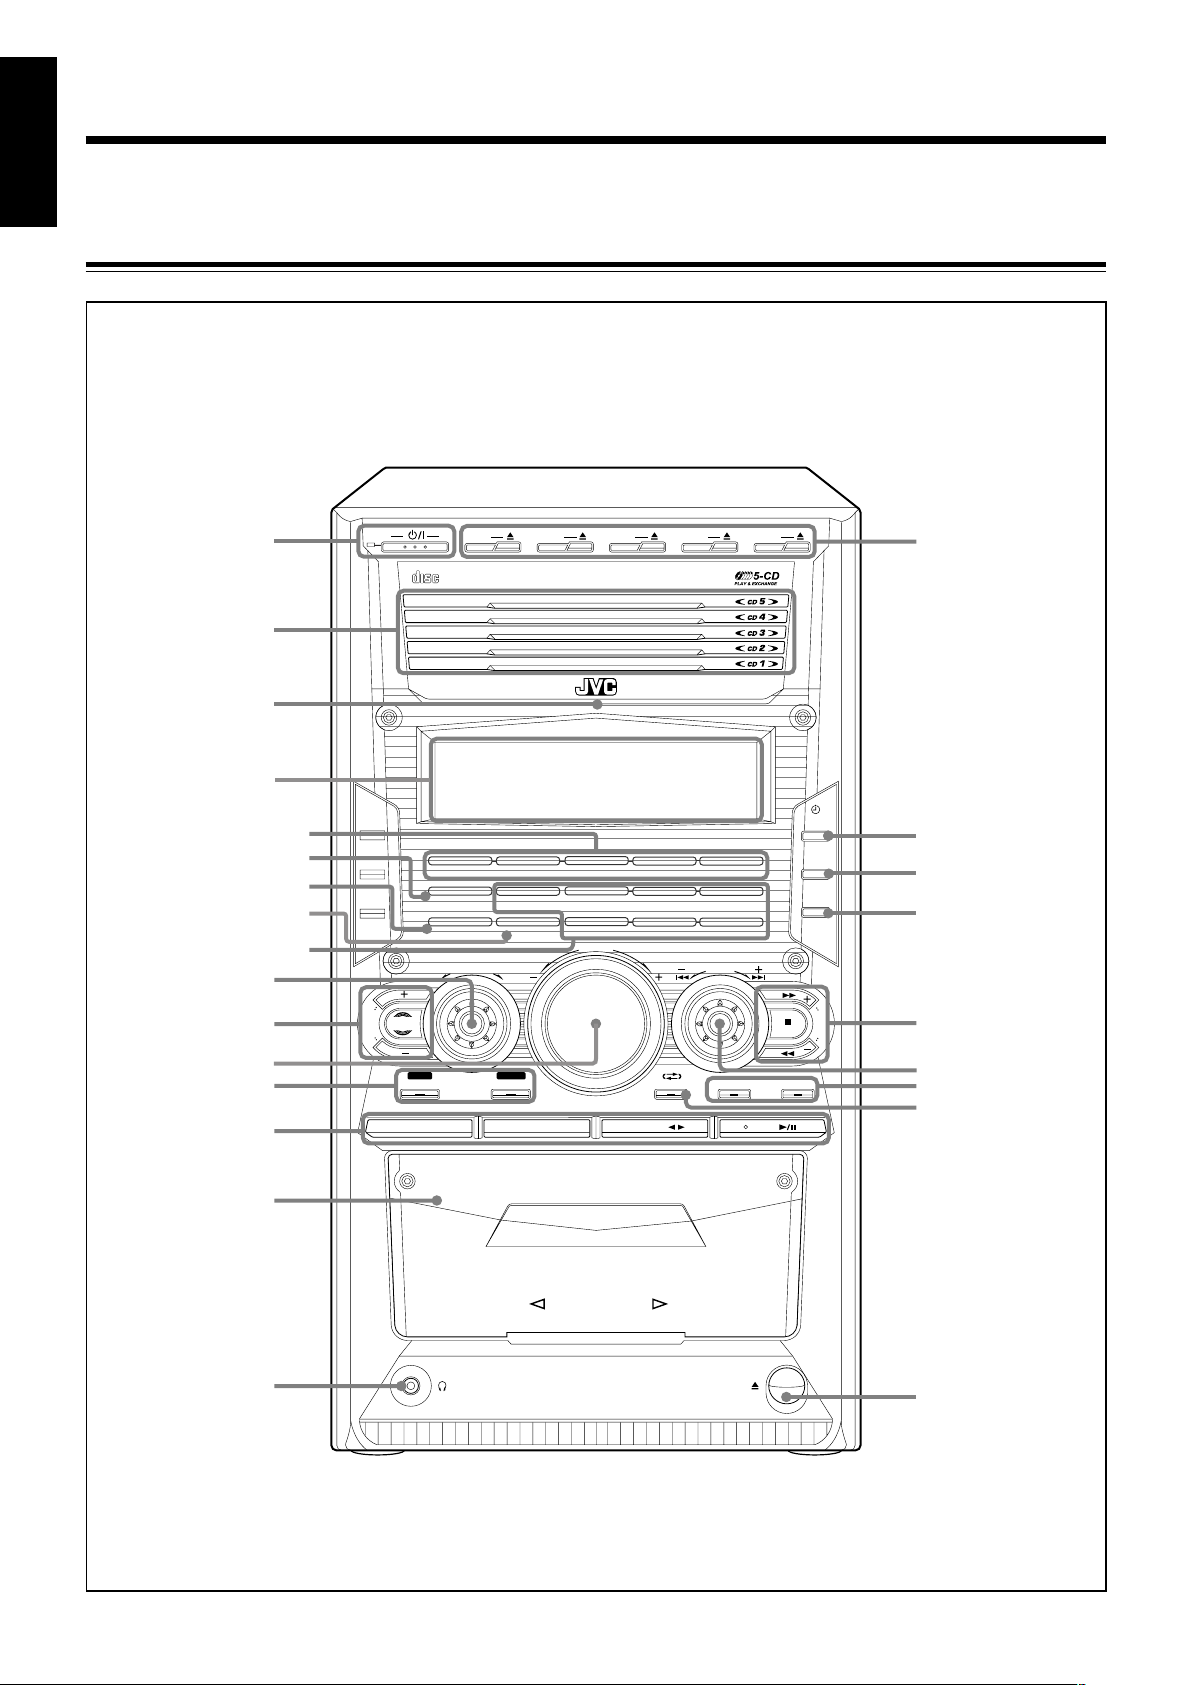
Location of the Buttons and Controls
COMPACT
DIGITAL AUDIO
CD1
COMPACT COMPONENT SYSTEM
STANDBY
CD2 CD3 CD4 CD5
EXTENDED
SUPER BASS
CD-R/RW
PLAYBACK
CD1 READY
SOUND TURBO
SUBWOOFER
SOUND MODE D A N C E HALL
R E C R O C K CLASSICPOP
STADIUM
CD2 READY CD3 READY CD 4 READY CD5 READY
CLOCK
/TIMER
SET
/
DISPLAY
CANCEL
/
DEMO
V
O
L
U
M
E
S
O
U
N
D
M
O
D
E
P
R
E
S
E
T
S
U
B
W
O
O
F
E
R
L
E
V
E
L
T
U
N
I
N
G
SOUND
TURBO
START/STOP
AUX TAPE CD
FM / AM
START REVERSE MODE CD PLAY MODE REPEAT
EJECT
AUTO REVERSE
PHONES
REC
CD REC
/BEEP
1
2
3
5-1
6
7
8
9
5-2
5-3
5-4
p
e
r
t
y
u
o
;
a
4
i
5-5
w
q
English
Become familiar with the buttons and controls on your unit.
Front Panel
Front Panel
3
Page 9
1
3
4
6
7
8
p
w
r
t
y
e
5
2
9
q
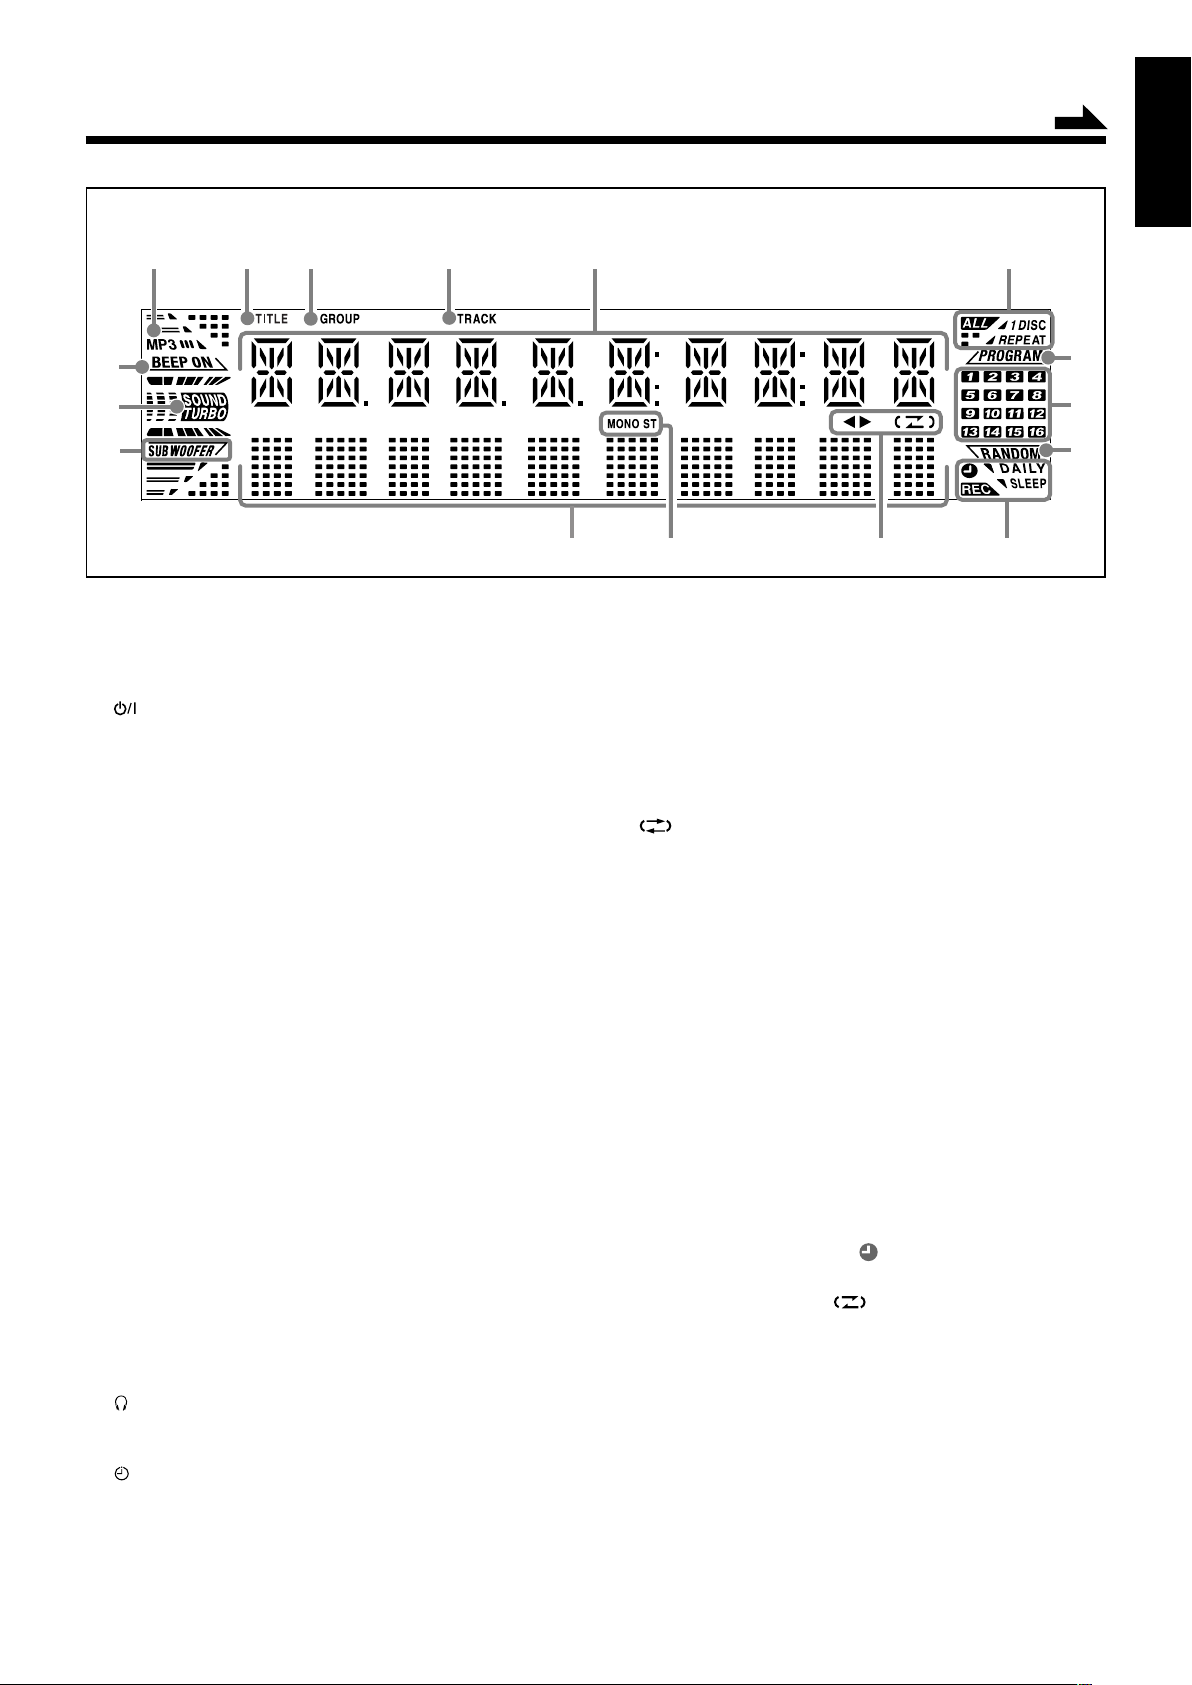
Display Window
See pages in parentheses for details.
Front Panel
1 (standby/on) button and STANDBY lamp
(9, 12, 24, 25)
2 Disc trays (CD1 – CD5)
3 Remote sensor
4 Display window
5 Indication lamp panel
1 CD ready lamps (13)
• CD1 READY, CD2 READY, CD3 READY,
CD4 READY, CD5 READY
2 SOUND TURBO lamp (10)
3 SUBWOOFER lamp (10)
4 REC lamp (21, 22)
5 Sound mode lamps (10)
• SOUND MODE
• Surround mode lamps
DANCE, HALL, STADIUM
• SEA (Sound Effect Amplifier) mode lamps
ROCK, POP, CLASSIC
6 SOUND MODE control (10)
7 SUBWOOFER LEVEL + / – buttons (10)
SOUND TURBO button (10)
8 VOLUME + / – control (10)
9 Recording buttons (21, 22, 25)
• REC START/STOP, CD REC START
p Source buttons (9)
Pressing one of these buttons also turns on the unit.
• AUX, FM/AM (12), TAPE 2 3 (20, 21),
CD 3/8 (16 – 18, 22)
q Cassette holder (20)
w PHONES jack (10)
e Disc number buttons (15 – 17, 18, 22) and 0 (disc tray
open/close) buttons (15, 16, 19) (CD1 – CD5)
r CLOCK/TIMER button (9, 23 – 26)
t SET/DISPLAY button (9, 11, 12, 17, 23 – 26)
y CANCEL/DEMO button (8, 9, 18, 23 – 26)
u TUNING + / – buttons (12)
¡ / 1 (forward search/reverse search) buttons (11, 16, 20)
7 (stop) button
BEEP button (8, 11)
i PRESET + / – control (12)
¢ / 4 (forward skip/reverse skip) control
16
–
18, 22 – 25)
o Disc play mode buttons (17 – 19)
• CD PLAY MODE, REPEAT
; REVERSE MODE button (20 – 22)
a 0 EJECT button for cassette deck (20 – 22)
Display Window
1 MP3 indicator
2 TITLE indicator
3 GROUP indicator
4 TRACK indicator
5 Main display
• Shows the source name, frequency, etc.
6 REPEAT (ALL/1/DISC) indicators (19)
7 PROGRAM indicator (17)
8 Disc track number indicators
9 RANDOM indicator (18)
p Timer indicators (23 – 26)
• DAILY (Daily Timer), SLEEP (Sleep Timer),
REC (Recording Timer), (Timer)
q Tape operation indicators (20 – 22)
• 2 3 (tape direction), (Reverse Mode)
w Tuner operation indicators (12)
• MONO, ST (stereo)
e Audio level indicator
When one of the 6 preset sound modes is activated, this
will function as illumination display. For details, see
“Selecting the Sound Modes” on pages 10 and 11.
r SUBWOOFER indicator (10)
t SOUND TURBO indicator (10)
y BEEP ON indicator (8, 11)
Continued
English
(9, 11,
4
Page 10
English
RM-SHXZ10A REMOTE CONTROL
5
1
3
4
6
7
e
r
t
y
u
i
;
a
2
o
q
w
p
9
8
COMPACT
DIGITAL AUDIO
CD1
COMPACT COMPONENT SYSTEM
STANDBY
CD2 CD3 CD4 CD5
EXTENDED
SUPER BASS
CD-R/RW
PLAYBACK
CD1 READY
SOUND TURBO
SUBWOOFER
SOUND MODE D A N C E HALL
RE C ROCK CLASSICPOP
STADIUM
CD2 READY CD 3 READY CD 4 READY CD5 READY
CLOCK
/TIMER
SET
/
DISPLAY
CANCEL
/
DEMO
V
O
L
U
M
E
S
O
U
N
D
M
O
D
E
P
R
E
S
E
T
S
U
B
W
O
O
F
E
R
L
E
V
E
L
T
U
N
I
N
G
SOUND
TURBO
START/STOP
AUX TAPE CD
FM / AM
START REVERSE MODE CD PLAY MODE REPEAT
REC
CD REC
/BEEP
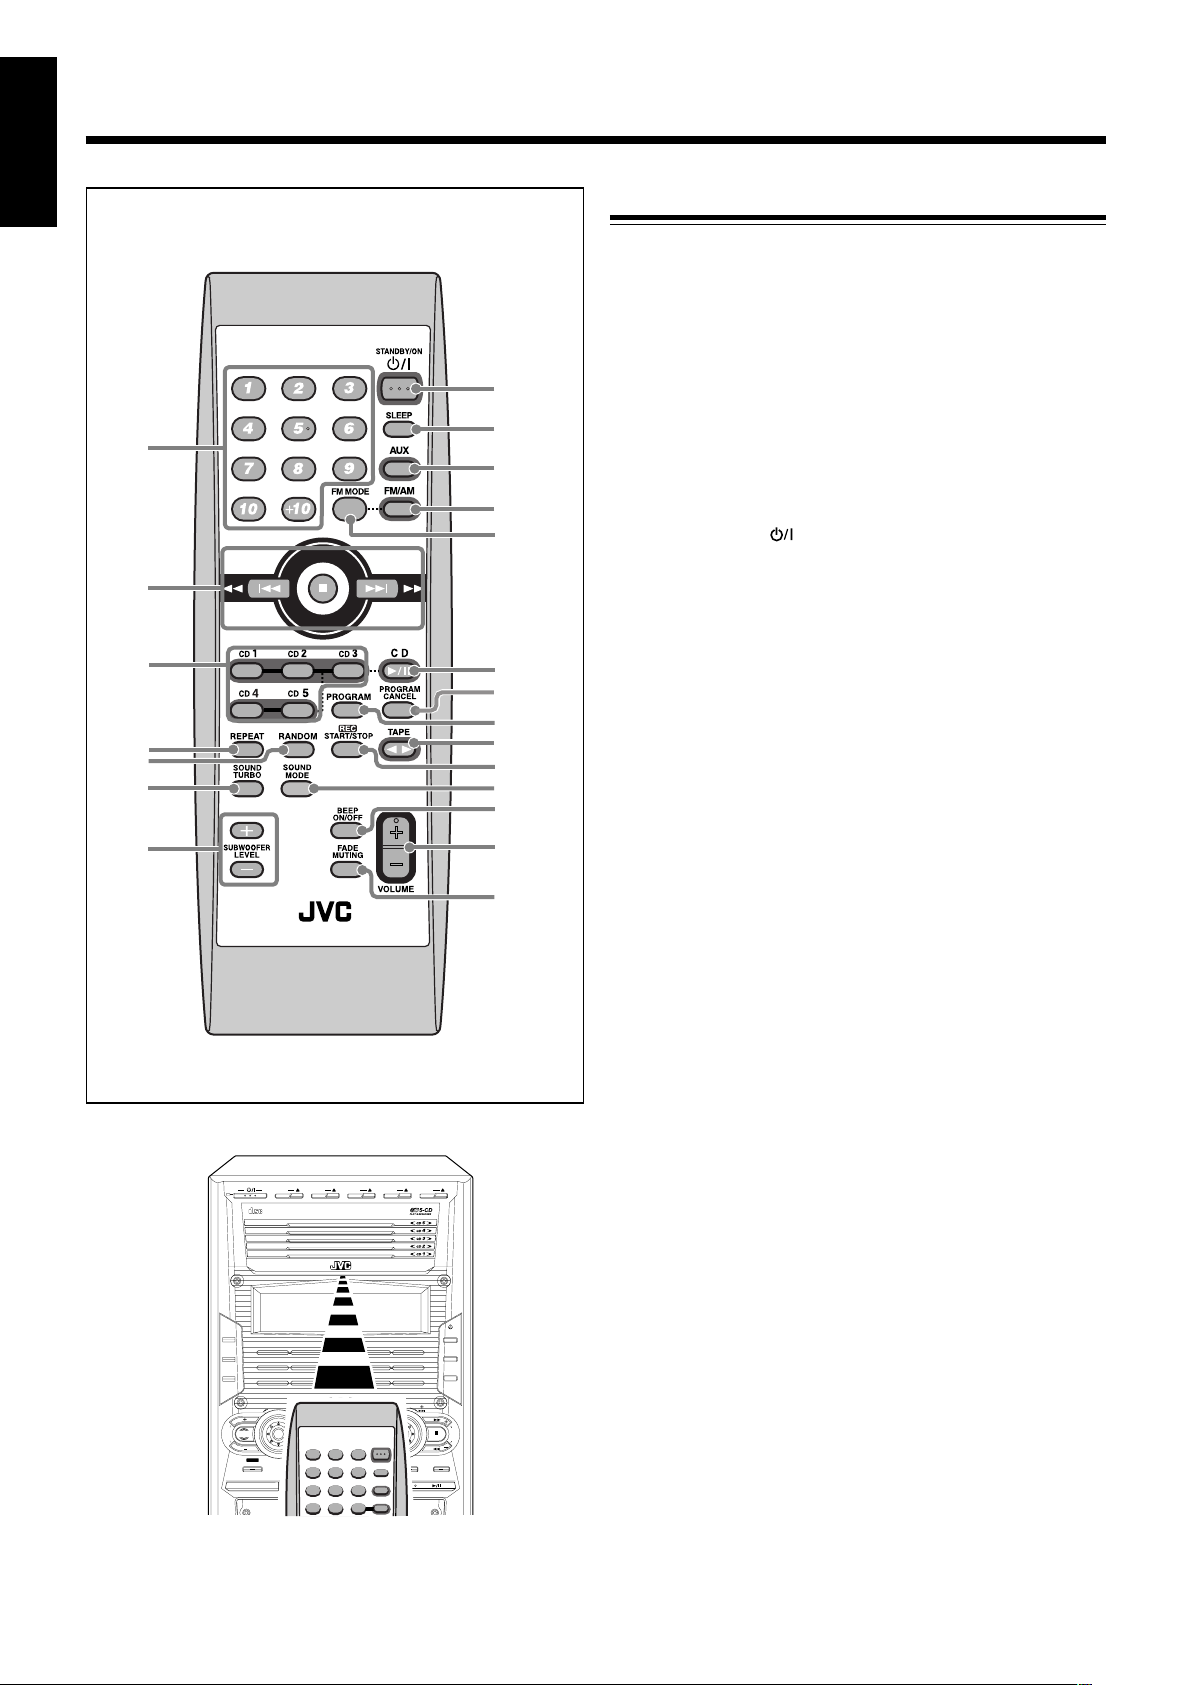
Remote Control
Remote Control
1 Number buttons (12, 16, 17)
2 ¢ (¡) (forward skip/forward search) button
(12, 16, 18, 20)
4 (1) (reverse skip/reverse search) button
(12, 16, 18, 20)
7 (stop) button
3 Disc number buttons (CD1 – CD5) (15, 17, 18)
Pressing one of these buttons also turns on the unit.
4 REPEAT button (19)
5 RANDOM button (18)
6 SOUND TURBO button (10)
7 SUBWOOFER LEVEL + / – buttons (10)
8 STANDBY/ON button (9)
9 SLEEP button (26)
p AUX button (9)
Pressing this button also turns on the unit.
q FM/AM button (9, 12)
Pressing this button also turns on the unit.
w FM MODE button (12)
e CD 3¥8 button (9, 16 – 18)
Pressing this button also turns on the unit.
r PROGRAM CANCEL button (18)
t PROGRAM button (17)
y TAPE 2 3 button (9, 20, 21)
Pressing this button also turns on the unit.
u REC START/STOP button (21)
i SOUND MODE button (10)
o BEEP ON/OFF button (8, 11)
; VOLUME + / – button (10)
a FADE MUTING button (10)
5
When using the remote control, point it
at the remote sensor on the front panel.
Page 11
Getting Started
ANTENNA
AM EXT
AM
LOOP
FM 75
COAXIAL
ANTENNA
AM EXT
AM
LOOP
FM 75
COAXIAL
Supplied Accessories
Continued
English
Connecting Antennas
Make sure that you have all the following items.
The number in parentheses indicates the quantity of each
piece supplied.
• AM loop antenna (1)
• FM antenna (1)
• Remote control (1)
• Batteries (2)
• AC plug adaptor (1)
If anything is missing, consult your dealer immediately.
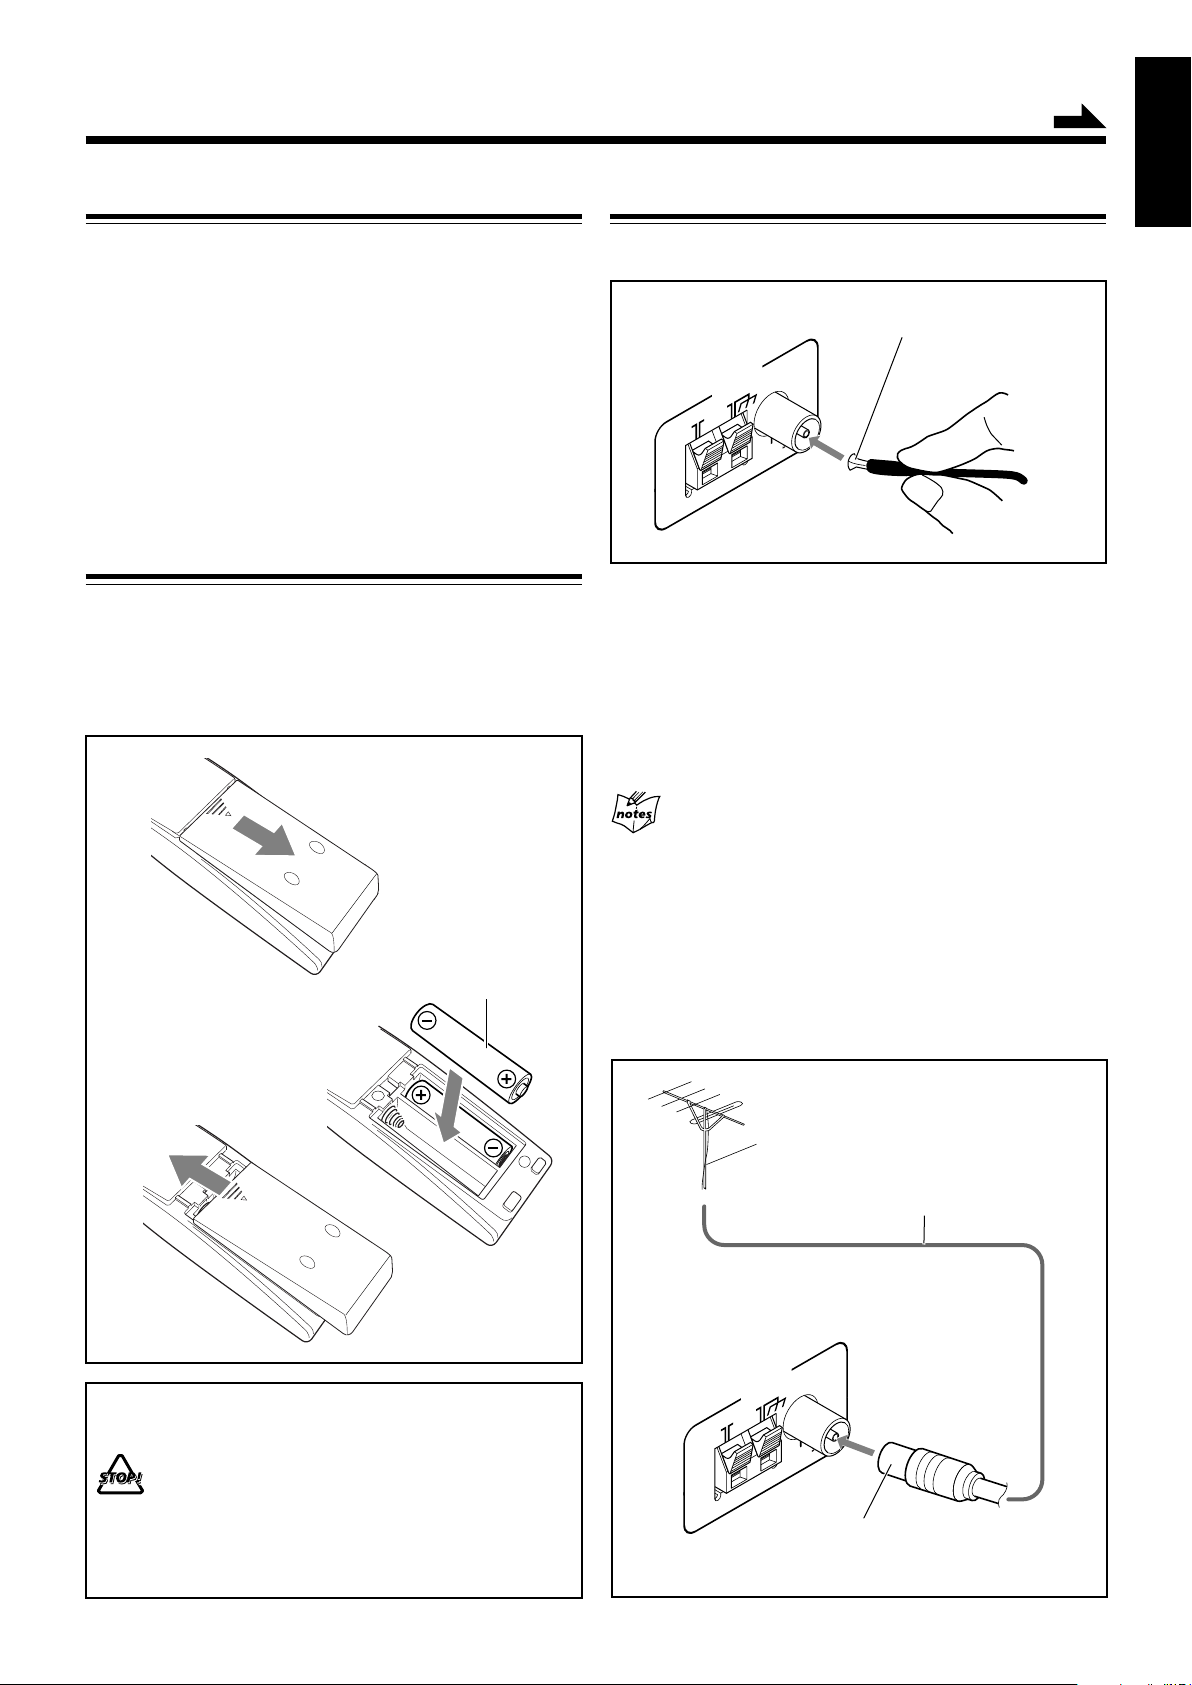
Putting the Batteries into the Remote Control
Insert the batteries—R6(SUM-3)/AA(15F)—into the remote
control, by matching the polarity (+ and –) on the batteries
with the + and – markings on the battery compartment.
When the remote control can no longer operate the unit,
replace both batteries at the same time.
1
FM antenna
FM antenna (supplied)
1 Attach the FM antenna to the FM 75 Ω
COAXIAL terminal.
2 Extend the FM antenna.
3 Fasten it up in the position which gives you
the best reception, then fix it on the wall, etc.
About the supplied FM antenna
The FM antenna supplied with this unit can be used as temporary
measure. If reception is poor, you can connect an outdoor FM
antenna.
R6(SUM-3)/AA(15F)
2
3
• DO NOT use an old battery together with a new
one.
• DO NOT use different types of batteries together.
• DO NOT expose batteries to heat or flame.
• DO NOT leave the batteries in the battery
compartment when you are not going to use the
remote control for an extended period of time.
Otherwise, the remote control will be damaged
from battery leakage.
To connect an outdoor FM antenna
Before connecting the antenna, disconnect the supplied FM
antenna.
Outdoor FM antenna
(not supplied)
Coaxial cable (not supplied)
A 75 Ω antenna with coaxial type connector
(IEC or DIN 45325) should be used.
6
Page 12
English
ANTENNA
AM EXT
AM
LOOP
FM 75
COAXIAL
AM antenna
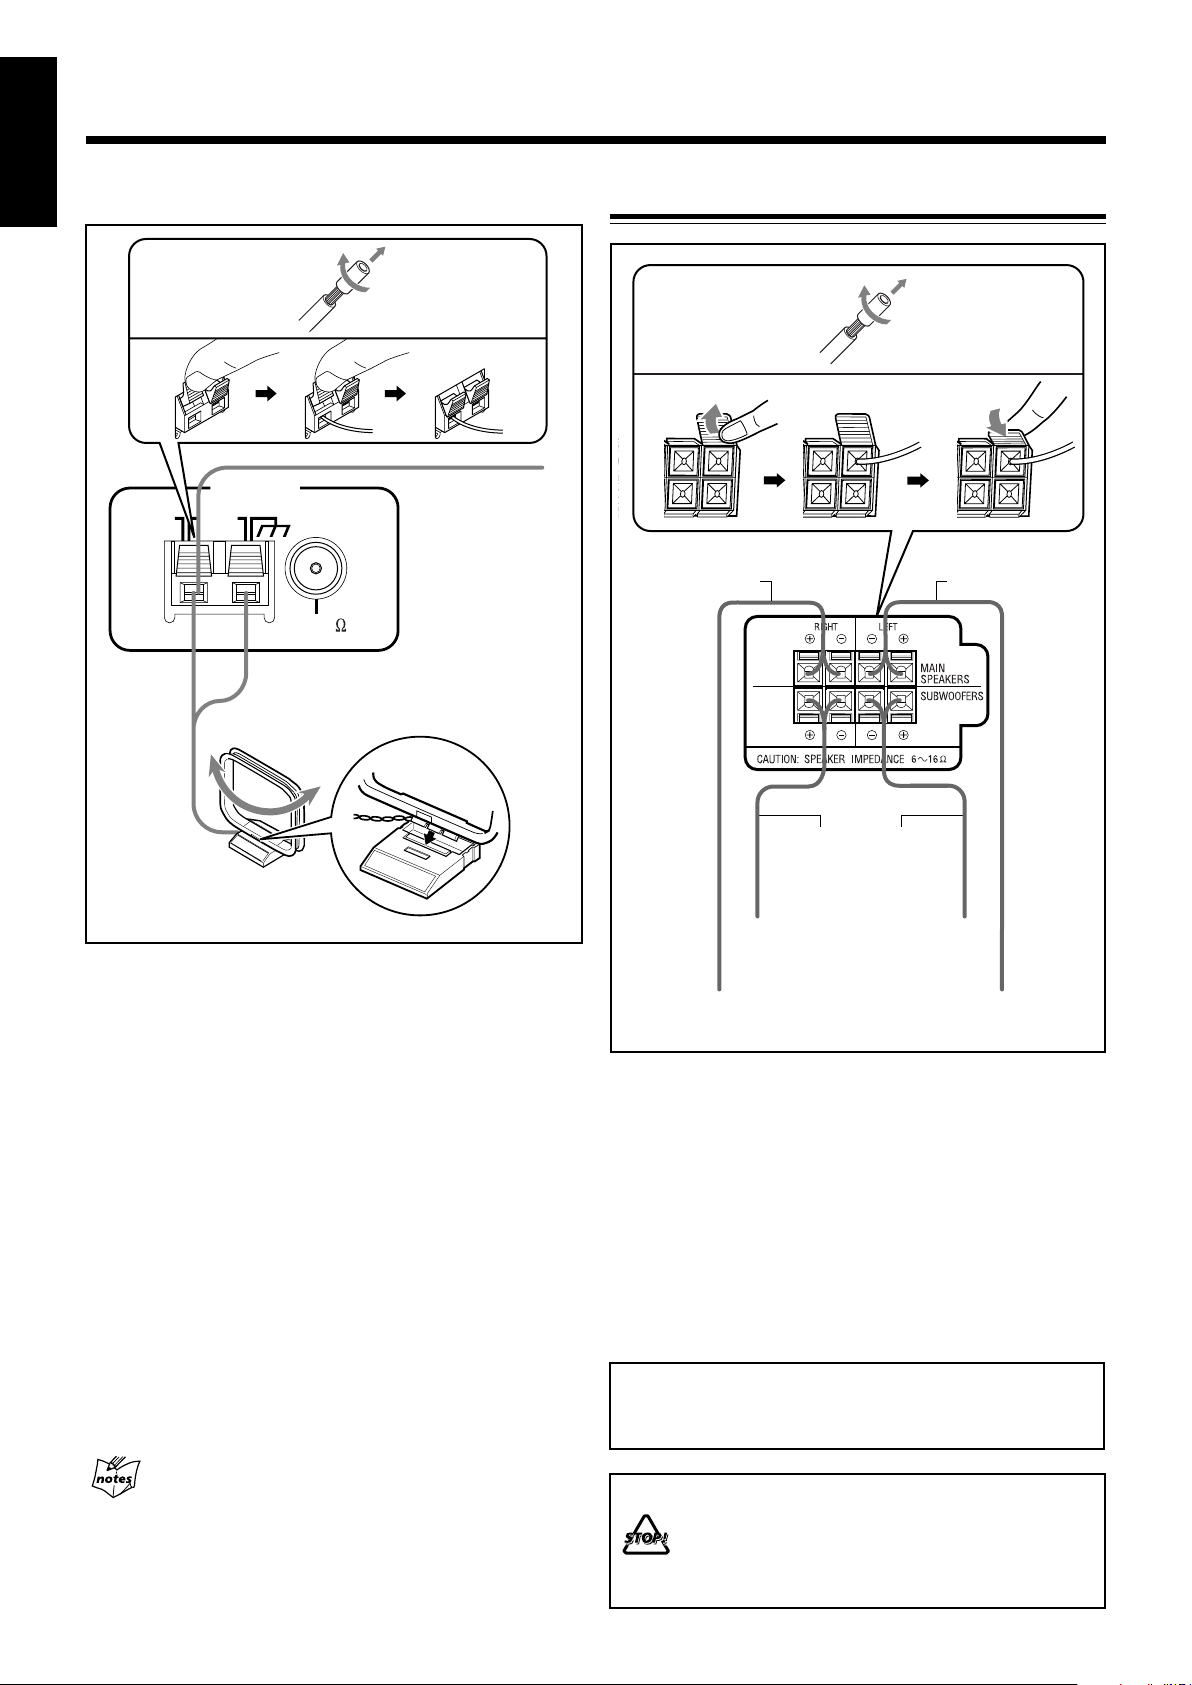
Connecting Speakers
1
1
2
3
4
Vinyl-covered wire
(not supplied)
5
AM loop antenna
(supplied)
1 If the cords are covered with insulation,
remove a short section of insulation at the
end of each cord by twisting and pulling it
off.
2 Press and hold the clamp of the AM LOOP
terminals on the rear of the unit.
3 Insert the AM loop antenna to the AM LOOP
terminals as illustrated.
4 Release your finger from the clamp.
5 Turn the AM loop antenna until you have the
best reception.
To connect an outdoor AM antenna
When reception is poor, connect a single vinyl-covered wire
to the AM EXT terminal and extend it horizontally. The AM
loop antenna must remain connected.
2
Speaker cords
(black/blue)
Speaker cords
(black/red)
From right
subwoofer
terminal
From right main
speaker terminal
3
Speaker cords
(black/blue)
From left
subwoofer
terminal
From left main
speaker terminal
1 If the cords are covered with insulation,
remove a short section of insulation at the
end of each cord by twisting and pulling it
off.
2 Insert the end of the speaker cord into the
terminal as illustrated.
Match the same polarity: (+) to (+) and (–) to (–).
3 Close the speaker terminals.
IMPORTANT: Use only speakers with the same speaker
impedance as indicated by the speaker terminals on the
rear of the unit.
For better reception of both FM and AM
• Make sure the antenna conductors do not touch any other terminals
and connecting cords.
• Keep the antennas away from metallic parts of the unit, connecting
cords, and the AC power cord.
7
• DO NOT connect more than one speaker to
each speaker terminal.
• DO NOT push or pull the speakers as this will
damage the foot spacers at the bottom of the
speakers.
Page 13

Connecting Other Equipment
BEEP
ON/OFF
FADE
MUTING
CANCEL
/
DEMO
T
U
N
I
N
G
/BEEP
You can connect an external audio component used only as a
playback device.
• DO NOT connect any equipment while the power
is on.
• DO NOT plug in any equipment until all connections
are complete.
English
Now, you can plug the AC power cord.
• If the wall outlet does not match the AC plug, use the
supplied AC plug adaptor.
IMPORTANT: Be sure to check that all connections are
done before plugging the AC power cord into a wall outlet.
To connect an external audio component
Be sure that the plugs of the audio cords are colored: White
plugs and jacks are for left audio signals, and red ones for
right audio signals.
To play external audio component through this unit,
connect between the audio output jacks on the other
equipment and AUX jacks by using an audio cord (not
supplied).
Audio equipment
To audio output
Adjusting the Voltage Selector
Canceling the Demonstration
When connecting the AC power cord to a wall outlet, the unit
automatically starts demonstration.
To cancel the demonstration, press and hold
CANCEL/DEMO until “DEMO OFF” appears
on the display.
• To cancel only beep sounds during the
demonstration, press and hold BEEP for more
than 2 seconds or press BEEP ON/OFF on the
remote control.
The BEEP ON indicator goes off from the
display.
When you press other buttons
The demonstration stops temporarily. It will start automatically
again (if no operation is done for 2 minutes) unless you cancel it by
pressing CANCEL/DEMO.
To start demonstration manually
Press and hold CANCEL/DEMO again until “DEMO START”
appears on the display.
Before plugging in the unit, set the correct voltage for your
area with the voltage selector on the rear of the unit.
Voltage mark
Use a screwdriver to rotate the voltage selector so that the
voltage mark is pointing at the same voltage as where you are
plugging in the unit. (See the back cover page.)
DO NOT plug in before setting the voltage selector
on the rear of the unit and all connection
procedures are complete.
8
Page 14

Common Operations
DAILY
Canceled
TIMER
(Daily Timer setting)
TIMER
(Recording Timer setting)
REC
Clock
setting
(The hour digits start flashing.)
CLOCK
/TIMER
SET
/
DISPLAY
P
R
E
S
E
T
T
U
N
I
N
G
CANCEL
/
DEMO
SET
/
DISPLAY
P
R
E
S
E
T
T
U
N
I
N
G
STANDBY
STANDBY
AUX TAPE CD
FM / AM
English
Turning On or Off the Power
To turn on the unit, press (or
STANDBY/ON on the remote
control) so that the STANDBY lamp
goes off.
3
Turn ¢ / 4 to
adjust the
minutes, then
press
SET/DISPLAY.
To turn off the unit (standby), press
(or STANDBY/ON on the
remote control) again so that the
STANDBY lamp lights up.
• A little power is always consumed even while the unit is on
standby.
To switch off the power supply completely, unplug the AC
power cord from the AC outlet.
When you unplug the AC power cord or if a power
failure occurs
The clock is reset to “0:00” immediately, while the tuner preset
stations (see page 12) will be erased in a few days.
Setting the Clock
Before operating the unit any further, first set the clock built
in this unit. “0:00” will flash on the display until you set the
clock.
• You can set the clock whether the unit is on or off.
On the unit ONLY:
To check the clock time while playing a source
Press and hold SET/DISPLAY.
•
Each time you press and hold the button, the source indication
and the clock time alternate on the display.
To adjust the clock again
If you have set the clock before, press CLOCK/TIMER
repeatedly until the clock setting mode is selected.
• Each time you press the button, the clock/timer setting
modes change as follows:
• When you unplug the AC power cord or if a power failure
occurs
The clock loses its setting and is reset to “0:00.” If this happens,
set the clock again.
• The clock may gain or loss 1 to 2 minutes per month
If this happens, reset the clock.
1
Press CLOCK/TIMER.
The hour digits start flashing on the display.
2
Tur n ¢ / 4 to
adjust the hour,
then press
SET/DISPLAY.
The minute digits start
flashing on the
display.
To correct the hour after pressing
SET/DISPLAY, press CANCEL/DEMO.
The hour digits start flashing again.
9
Selecting the Sources
Press one of the source buttons—FM/AM, CD 3¥8,
TAPE 2 3, and AUX.
When you press one of the source buttons (FM/AM,
CD 3/8, TAPE 2 3, and AUX), the unit turns on and starts
playing the source if it is ready.
• To listen to the FM/AM broadcasts, press FM/AM.
(See page 12.)
• To play back discs, press CD 3¥8. (See pages 13 – 19.)
• To play back tapes, press TAPE 2 3. (See page 20.)
•
To select an external component as the source, press AUX.
Page 15

V
O
L
U
M
E
BEEP
ON/OFF
FADE
MUTING
VOLUME
BEEP
ON/OFF
FADE
MUTING
VOLUME
S
U
B
W
O
O
F
E
R
L
E
V
E
L
SOUND
TURBO
RANDOM
REPEAT
SOUND
TURBO
SOUND
MODE
STA
S
O
U
N
D
M
O
D
E
Adjusting the Volume
S
U
B
W
O
O
F
E
R
L
E
V
E
L
SOUND
TURBO
DANCE
OFF
(Canceled)
HALL STADIUM
ROCK
POP
CLASSICUSER 1USER 2
USER 3
SOUND TURBO
SUBWOOFER
SOUND MODE D A N C E HALL
REC ROCK CLASSICPOP
STADIUM
You can adjust the volume level only while the unit is turned
on. The volume level can be adjusted in 32 steps (VOLUME
MIN, VOLUME 1 – VOLUME 30, and VOLUME MAX).
The volume level control does not affect recording.
Turn VOLUME + / – clockwise (+)
to increase the volume or
counterclockwise (–) to decrease it.
When using the remote control, press
VOLUME + to increase the volume or
VOLUME – to decrease it.
• When adjusting the volume, the back color
on the display changes as increasing/
decreasing the level—not lighting ↔ blue
↔ purple ↔ pink ↔ red.
To turn off the volume level temporarily
On the remote control ONLY:
Press FADE MUTING.
The volume level gradually decreases to
“VOLUME MIN.”
To restore the sound, press the button again.
To listen with headphones
Connect a pair of headphones to the PHONES jack on the
unit. The sound will no longer come out of the speakers.
Disconnecting a pair of headphones from the PHONES
jack activates the speakers again.
Continued
English
To enjoy heavy sound
You can enjoy heavy sound by using Sound Turbo. This
function boosts the low and high frequency sound.
• Activating Sound Turbo cancels the sound mode and/or
subwoofer adjustment.
Press SOUND TURBO.
The SOUND TURBO indicator lights up on the
display and the SOUND TURBO lamp also
flashes. The subwoofer level increases to the
maximum level (LEVEL 2).
• Each time you press SOUND TURBO, Sound Turbo is turned on
(subwoofer LEVEL 2) or off (subwoofer LEVEL 0).
If you press SUBWOOFER + / – or select a sound mode
during activating Sound Turbo
Sound Turbo is canceled.
Selecting the Sound Modes
You can select one of the 6 preset sound modes (3 surround
modes and 3 SEA—Sound Effect Amplifier—modes) and 3
user modes. This function only affects the playback sound,
but does not affect recording.
To select the sound modes,
turn SOUND MODE (or
press SOUND MODE on
the remote control) until the
sound mode you want
appears on the display.
• When one of the sound modes is selected, the lamp for the
selected sound mode and the SOUND MODE lamp flash.
• When one of the user modes (USER 1, USER 2, or USER 3) is
selected, only the SOUND MODE lamp flashes.
• DO NOT set the volume to a high level before
connecting or putting on headphones.
•
DO NOT turn off (standby) the unit with the volume
set to an extremely high level; otherwise, a sudden
blast of sound can damage your hearing, speakers
and/or headphones when you turn on the unit or
start playing any source next time.
REMEMBER, you cannot adjust the volume level
while the unit is off (standby).
Reinforcing the Bass Sound
Changing the subwoofer level
You can select one of the 3 subwoofer levels—LEVEL 0
(MIN LEVEL), LEVEL 1, and LEVEL 2 (MAX LEVEL).
This function only affects the playback sound, but does not
affect your recording.
Press SUBWOOFER LEVEL + to increase
the subwoofer level or SUBWOOFER
LEVEL – to decrease it.
The SUBWOOFER indicator lights up on the
display.
The SUBWOOFER lamp also flashes when LEVEL 1 or LEVEL 2
(MAX LEVEL) is selected. The lamp stops flashing when LEVEL 0
(MIN LEVEL) is selected.
SOUND MODE lamp
Surround mode lamps
SEA mode lamps
The sound modes change as follows:
When using the remote control, the sound mode changes only
clockwise in the above sequence.
10
Page 16

English
SET
/
DISPLAY
P
R
E
S
E
T
T
U
N
I
N
G
/BEEP
SET
/
DISPLAY
P
R
E
S
E
T
T
U
N
I
N
G
BEEP
ON/OFF
FADE
MUTING
VOLUME
T
U
N
I
N
G
/BEEP
Surround modes*
DANCE: Increases resonance and bass.
HALL: Adds depth and brilliance to the sound.
STADIUM: Adds clarity and spreads the sound, as in an
outdoor stadium.
SEA (Sound Effect Amplifier) modes
ROCK: Boosts low and high frequency. Good for acoustic
music.
POP: Good for vocal music.
CLASSIC: Good for classical music.
User modes
USER 1/2/3: Your individual mode stored in memory. See
“Creating Your Own Sound Mode—User
Mode” below.
OFF: The sound mode is canceled.
* Surround elements are added to the SEA elements to create a
being-there feeling in your room.
When you turn on Sound Turbo
The sound mode is canceled.
3
Adjust the SEA pattern.
1) Turn ¢ / 4 to select the
frequency range (BASS,
MID or TRE).
2) Press ¡ or 1 to adjust
the level (–3 to +3) of the selected frequency range.
3) Repeat steps 1) and 2) to adjust the level of the other
frequency ranges.
4
Press SET/DISPLAY again.
5
Turn ¢ / 4 to select one
of the user modes (USER 1,
USER 2, or USER 3) in which
you want to store your SEA
pattern.
6
Press SET/DISPLAY again.
Creating Your Own Sound Mode—User Mode
You can change the SEA pattern to suit your preference. The
SEA pattern can be adjusted using 3 frequency ranges—BASS,
MID (middle), and TRE (treble). These changed settings can
be stored as the USER 1, USER 2, and USER 3 modes.
• There is a time limit in doing the following steps. If the setting
is canceled before you finish, start from step 1 again.
On the unit ONLY:
1
Select one of the preset sound modes.
• If you want to add surround elements into your SEA
pattern, select one of the surround modes (DANCE,
HALL, or STADIUM) before starting the procedure
below. (See “Selecting the Sound Modes” on page 10.)
2
Press SET/DISPLAY while the
selected sound mode is still shown
on the display.
Current level appears.
The SEA pattern you have created is stored into the user
mode selected in step 5.
To use your own sound mode
Select USER 1, USER 2, or USER 3 mode when using the
sound modes. See “Selecting the Sound Modes” on page 10.
When you unplug the AC power cord or if a power
failure occurs
The setting will be erased in a few days. If this happens, set the user
modes again.
Turning On or Off the Key-touch Tone
If you do not want the key-touch tone to beep each time you
press a button or turn a control, you can deactivate it.
The BEEP ON indicator goes off from the display.
On the unit:
Press and hold BEEP for more
than 2 seconds.
On the remote control:
Press BEEP ON/OFF.
• Each time you press the button, the keytouch tone turns on and off alternately.
11
Page 17

Listening to FM and AM Broadcasts
FM / AM
T
U
N
I
N
G
/BEEP
AUX
FM/AM
FM MODE
SET
/
DISPLAY
P
R
E
S
E
T
T
U
N
I
N
G
P
R
E
S
E
T
T
U
N
I
N
G
FM / AM
FM MODE
T
U
N
I
N
G
/BEEP
STANDBY
Setting the AM Tuner Interval Spacing
Presetting Stations
English
Some countries space AM stations 10 kHz apart, and some
countries use 9 kHz spacing.
• You can only change the AM tuner interval spacing while
tuning in to an AM station. (10 kHz is the initial setting.)
On the unit ONLY:
Press while holding down 7.
• Each time you press these buttons, the
AM tuner interval spacing alternates
between 9 kHz and 10 kHz.
Tuning in to a Station
1
Press FM/AM.
The unit automatically turns on and
tunes in to the previously received
station (either FM or AM).
• Each time you press the button, the band alternates
between FM and AM.
2
Start searching for stations.
On the unit:
Press and hold TUNING +
or TUNING – for more than 1
second.
On the remote control:
Press and hold ¢ (¡)
or 4 (1) for more
than 1 second.
The unit starts searching for
stations and stops when a station of sufficient signal
strength is tuned in.
• If a program is broadcast in stereo, the ST (stereo)
indicator lights up.
You can preset 30 FM and 15 AM stations.
In some cases, test frequencies have been already memorized
for the tuner since the factory examined the tuner preset
function before shipment. This is not a malfunction. You can
preset the stations you want into memory by following the
presetting method.
• There is a time limit in doing the following steps. If the setting
is canceled before you finish, start from step 2 again.
On the unit ONLY:
1
Tune in to the station you want to preset.
• See “Tuning in to a Station.”
2
Press SET/DISPLAY.
3
Turn PRESET + / – to select a
preset number.
4
Press SET/DISPLAY again.
The tuned station in step 1 is stored in the preset number
selected in step 3.
• Storing a new station on a number already used erases
the previously stored one.
When you unplug the AC power cord or if a power
failure occurs
The preset stations will be erased in a few days. If this happens,
preset the stations again.
Tuning in to a Preset Station
To stop searching, press TUNING + or TUNING – (or
¢ (¡) / 4 (1) on the remote control).
When you press TUNING + or TUNING – (or ¢ (¡) /
4 (1) on the remote control) briefly and repeatedly
The frequency changes step by step.
To change the FM reception mode
On the remote control ONLY:
When an FM stereo broadcast is hard to
receive or noisy, press FM MODE so that the
MONO indicator lights up on the display.
Reception will improve.
To restore the stereo effect, press FM MODE again so that
the MONO indicator goes off. In this stereo mode, you can
hear stereo sounds when a program is broadcasted.
1
Press FM/AM.
The unit automatically turns on and tunes in to the
previously received station (either FM or AM).
• Each time you press the button, the band alternates
between FM and AM.
2
Select a preset number.
On the unit:
Turn PRESET + / –.
On the remote control:
Press the number buttons.
Ex.: For preset number 5, press 5.
For preset number 15, press
+10, then 5.
For preset number 25, press
+10, +10, then 5.
For preset number 30, press
+10, +10, then 10.
12
Page 18

Disc Play Introduction
CD 1 READY
CD 2 READY CD 3 READY C D4 READY CD 5 READY
English
This unit has been designed to play back the following discs:
• CD (Audio CD)/CD-R (CD-Recordable)/CD-RW (CDReWritable)
• MP3 disc (MP3 files recorded on a CD-R or CD-RW)*
When playing a CD-R or CD-RW
User-edited CD-Rs (CD-Recordable) and CD-RWs
(CD-ReWritable) can be played back only if they have been
“finalized.”
• You can play back your original CD-Rs or CD-RWs recorded
in music CD format or in MP3 format. However, they may
not be played back depending on their characteristics or
recording conditions.
• Before playing back CD-Rs or CD-RWs, read their
instructions or cautions carefully.
• Some CD-Rs or CD-RWs may not play back on this unit
because of their disc characteristics, damage or stain on
them, or if the player’s lens is dirty.
• CD-RWs may require a longer readout time. This is caused
by the fact that the reflectance of CD-RWs is lower than for
regular discs.
*About MP3
MP3 is an abbreviation of Motion Picture Experts Group 1
(or MPEG-1) Audio Layer 3. MP3 is simply a file format
with a data compression ratio of 1:10 (128 kbps*). By using
MP3 format, one CD-R or CD-RW can contains 10 times as
much data volume as a regular CD can.
* Bit rate is the average number of bits that one second of audio
data will consume. The basic unit of measurement for bitrate is
kbps (1,024 bits per second). To get a better audio quality, choose
a higher bit rate. The most popular bit rate for encoding
(recording) is 128 kbps.
MP3 disc structure
On an MP3 disc, each song (material) is recorded as a file.
Files are grouped into a folder. Folders can also include other
folders, creating hierarchical directory layers. (See “How are
MP3 files recorded and played back?” on page 14.)
This unit manages files and folders as “tracks” and “groups.”
This unit can recognize up to 255 groups per disc (up to 999
tracks). The unit ignores those exceeding the maximum
numbers and cannot play them back.
About the CD ready lamps
Each CD ready lamp shows the status of a disc placed on
each corresponding disc tray (CD1 – CD5).
• CD ready lamps light up
When the disc is loaded and currently selected.
• CD ready lamps light slightly
When the disc is loaded, but not currently selected.
• CD ready lamp flashes
When the disc is played back or paused.
• CD ready lamps goes off
When the unit detects there is no disc loaded on a
certain tray. (“NO DISC # (number)” appears on the
display.)
If the loaded disc is an MP3 disc
The corresponding CD ready lamp and the MP3 indicator will
light up.
More about MP3 discs
• MP3 discs (either CD-R or CD-RW) require a longer readout time.
(It varies due to the complexity of the recording configuration.)
• When making an MP3 disc, select ISO 9660 Level 1 or Level 2 as
the disc format.
• This unit does not support multisession recording.
• This unit can play MP3 files only with the following file extensions—
“.MP3,” “.Mp3,” “.mP3,” and “.mp3.”
• Files other than MP3 are ignored.
• Some MP3 discs may not be played back because of their disc
characteristics or recording conditions.
13
Page 19

How are MP3 files recorded and played back?
1 (Root)
2
(3)*
5
6
7
8
9
10
(11)*
12
(4)*
MP3 “tracks (files)” can be recorded in “group”—folders in
PC terminology.
During recording, the tracks and groups can be arranged
similarly to the tracks and folders of computer data. “Root” is
similar to the root of a tree. Every track and group can be
linked to the root.
In compliance with ISO 9660, the maximum allowable depth
of nested folders—so called “hierarchy”—is eight (inclusive
of the root).
Playback order, track search order, and group search order of
the MP3 tracks recorded on a disc are determined by the
writing (or encoding) application; therefore, playback order
may be different from the one you have intended while
recording the groups and the tracks.
The illustration shows an example of how MP3 tracks are
recorded on a CD-R or CD-RW, how they are played back
and how they are searched for on this unit.
• The numbers in circles next to the MP3 tracks (
the playback order and search order of the MP3 tracks.
Normally this unit plays back MP3 tracks in the recorded
order.
• The numbers inside the groups indicate the playback order
and search order of the groups on an MP3 disc. Normally
this unit plays back MP3 tracks in the groups in the
recorded order.
The groups marked with asterisk (*) will be skipped since
they do not include any MP3 tracks.
) indicate
English
MP3 group/track configuration:
14
Page 20

CD1 CD2 CD3 CD4 CD5
CD1 CD2 CD3 CD4 CD5
Playing Back Discs
CD1 CD2 CD3 CD4 CD5
English
Loading Discs
Playing Back the Entire Discs—Continuous Play
On the unit ONLY:
1
Press 0 for the disc tray (CD1 – CD5) you
want to load a disc onto.
The unit automatically turns on and the disc tray comes
out.
2
Place a disc correctly on the circle of the disc
tray, with its label side up.
CORRECT
• When using a CD single (8 cm), place it on the inner
circle of the disc tray.
3
Press the same 0 you have pressed in step 1.
The disc tray closes.
INCORRECT
You can play discs continuously.
• If you start Continuous Play with an MP3 disc, you can
select a track to start playback.
7 For audio CDs
1
Load discs.
2
Press one of the corresponding disc number
buttons (CD1 – CD5) for the disc you want to
play.
The unit searches for the disc, and starts playing with the
first track of the selected disc.
Track number
Tracks of the currently playing CD (Track
numbers exceeding 16 are not displayed.)
Elapsed playing time
7 For MP3 discs
When loading more than one disc
When you press 0 for the next tray you want to place another disc
onto, the first disc tray automatically closes and then the next tray
comes out.
1
Load discs.
2
Press one of the corresponding disc number
buttons (CD1 – CD5) you load discs in step 1.
The unit searches for the disc (it may take time), and
starts playing the first track of the disc.
• The MP3 indicator lights up on the display.
3
Press 7.
The group title of the 1st group appears on the display,
then the group number starts flashing.
Group title of the 1st group*
15
Group number flashes
* If the entire group title cannot be shown (exceeds
10 characters), the title scrolls.
Page 21

P
R
E
S
E
T
T
U
N
I
N
G
CD
CD
P
R
E
S
E
T
T
U
N
I
N
G
T
U
N
I
N
G
/BEEP
4
CD1 CD2 CD3 CD4 CD5
FM MODE
Select a group and track to start
playing.
1) Turn ¢ / 4 (or press ¢ (¡) /
4 (1) on the remote control) to
select a group you want, then press
CD 3¥8.
The track number starts flashing.
Continued
English
Basic Disc Operations
While playing a disc, you can do the following operations.
To exchange discs during playback of another disc
Press 0 corresponding to a disc (CD1 – CD5), not playing or
selected currently, to eject and exchange the disc.
If you exchange discs during play, the current play will not
stop until all discs you have exchanged are played.
Track number flashes
2) Turn ¢ / 4 (or press ¢ (¡) / 4 (1) on
the remote control) to select a track you want to start
playback with, then press CD 3¥8.
Track title**
Group number
Elapsed playing time
Track number
** If the entire track title cannot be shown (exceeds
10 characters), the title scrolls.
Playback starts with the selected track of the selected group.
To stop playing, press 7.
To remove the disc, press 0 for the corresponding disc tray.
To stop play for a moment
Press CD 3¥8.
While pausing, the elapsed playing time
flashes on the display.
To resume playing, press CD 3¥8 again.
To go to another track
For audio CDs: Before or during play
For MP3 discs: During play
Turn ¢ / 4 (or press ¢ (¡) /
4 (1) on the remote control).
• ¢ (or ¢ (¡)):
Skips to the beginning of the next
or succeeding tracks.
• 4 (or 4 (1)):
Goes back to the beginning of the current or previous
tracks.
To locate a particular point in a track
During play, press and hold ¡ or
1 (or ¢ (¡) / 4 (1) on
the remote control).
• ¡ (or ¢ (¡)): Fast-forwards the
disc.
• 1 (or 4 (1)): Fast-reverses the disc.
Disc playback sequence
When discs* in more than one tray are loaded on the disc
trays, they are played in sequence as follows:
Ex.: When CD2 is pressed:
CD2 ] CD3 ] CD4 ] CD5 ] CD1 (then stops)
* When no disc is loaded on the tray, that disc number is
skipped.
To go to another track directly using the number
buttons
On the remote control ONLY:
Pressing the number button(s) before or
during play allows you to start playing the
track number you want.
Ex.: For track number 5, press 5.
For track number 15, press +10,
then 5.
For track number 20, press +10,
then 10.
For track number 32, press +10
three times, then 2.
For track number 132, press +10
thirteen times, then 2.
16
Page 22

English
CD PROGRAM
Total track number and
total playing time (Continuous Play)
CD RANDOM
CD PLAY MODE
PROGRAM
PROGRAM
CANCEL
TAPE
REC
START/STOP
5
SET
/
DISPLAY
P
R
E
S
E
T
T
U
N
I
N
G
CD
CD1 CD2 CD3 CD4 CD5
FM MODE
Programming the Playing Order of the Tracks
—Program Play
You can arrange the playing order of the tracks before you
start playing. You can program up to 100 tracks.
• To use Repeat Play (see page 19) for Program Play, press
REPEAT after starting Program Play. Only REPEAT 1 and
REPEAT ALL can be selected for Program Play.
• There is a time limit in doing the following steps. If the setting
is canceled before you finish, start from step 2 again.
1
Load discs.
• If the current playing source is not the CD player, press
CD 3¥8, then 7 before going to the next step.
4
Select a track from the selected disc in step 3.
• Program step numbers exceeding 100 cannot be
programed.
• When making programs from MP3 discs, the unit only
recognizes tracks like audio CD. You cannot make
programs using group numbers.
On the unit:
Turn ¢ / 4
to select the
track number,
then press
SET/DISPLAY.
2
Activate Program Play.
On the unit:
Press CD PLAY MODE repeatedly
until “CD PROGRAM” appears
on the display.
• Each time you press the button, the play
mode changes as follows:
On the remote control:
Press PROGRAM so that
“CD PROGRAM” appears
on the display.
The PROGRAM indicator lights up on the display.
• If a program has been stored in memory, the program is
called up.
On the remote control:
Press the number buttons.
• For how to use the number buttons,
see “To go to another track directly
using the number buttons” on page
16.
5
Program other tracks you want.
• To program tracks from the same disc, repeat step 4.
• To program tracks from a different disc, repeat steps
and 4.
6
Press CD 3¥8.
The tracks are played in the order you
have programed.
• If the playing disc is an MP3 disc, the MP3 indicator
lights up.
To stop playing, press 7.
To exit from Program Play, press CD PLAY MODE
repeatedly until the PROGRAM indicator goes off (or press
PROGRAM on the remote control) after playback stops.
3
3
Press one of the disc number buttons (CD1 –
CD5) to select the disc you want.
Track number
Disc number
17
Program step number
• If you try to program a 101st track, “CD FULL” appears on the
display.
• If you have tried to program a track from an empty tray, “NO
READ # (number)” or “NO DISC # (number)” will appear on the
display for 2 seconds.
• If you have tried to program a track number that does not
exist, it is ignored.
• If you try to open a disc tray during Program Play, the disc
tray does not come out. Open disc trays after canceling Program
Play.
Page 23

CD PROGRAM
Total track number and
total playing time (Continuous Play)
CD RANDOM
CD1 CD2 CD3 CD4 CD5
T
U
N
I
N
G
/BEEP
CD PLAY MODE
RANDOM
PRO
REPEAT
SOUND
TURBO
SOUND
MODE
R
STAR
CD
4
CD 5
CD
To check the program contents
PROGRAM
PROGRAM
CANCEL
TAPE
REC
START/STOP
CD
3
CD
CANCEL
/
DEMO
On the remote control ONLY:
Before playing, you can check the
program contents by pressing
¢ (¡) or 4 (1).
• ¢ (¡) : Shows them in the
programed order.
• 4 (1) : Shows the programed tracks in the reverse
order.
To modify the program
To erase the last programed tracks, press
CANCEL/DEMO (or press PROGRAM
CANCEL on the remote control).
• Each time you press the button, the last
programed track is erased from the
program.
To add tracks into the program before playing, simply
select the track numbers you want to add by following step
of the programming procedure. If you want to add tracks
from another disc, follow steps 3 and 4.
To erase the entire program before or after playing, press
7 until “CD PROGRAM” appears on the display.
• The program you have made will be erased:
– when you unplug the AC power cord, or
– when a power failure occurs.
Continued
Playing at Random—Random Play
The tracks of all the loaded discs will be played at random.
• To use Repeat Play (see page 19) for Random Play, press
REPEAT after starting Random Play. Only REPEAT 1 and
REPEAT ALL can be selected for Random Play.
1
Load a disc.
2
Press the corresponding disc number button
(CD1 – CD5) where a disc is loaded in step 1,
then press 7.
3
Activate Random Play.
On the unit:
4
Press CD PLAY MODE repeatedly
until “CD RANDOM” appears on
the display.
• Each time you press the button, the play mode changes
as follows:
English
On the remote control:
Press RANDOM so that “CD
RANDOM” appears on the
display.
• The RANDOM indicator also lights up on the display.
4
Press CD 3¥8.
The tracks are played randomly.
Random Play ends when all the tracks of the all loaded
discs are played once.
To skip the currently playing track, turn 4 / ¢ to the
right (or press ¢ (¡) on the remote control).
If you turn 4 / ¢ to the left (or press 4 (1) on
the remote control)
You cannot go back to the previous tracks during Random Play.
To stop playing, press 7.
To exit from Random Play, press CD PLAY MODE
repeatedly until the RANDOM indicator goes off (or press
RANDOM on the remote control) after playback stops.
18
Page 24

English
REPEAT
REPEAT ALL REPEAT 1DISC
REPEAT 1Canceled
CD1 CD2 CD3 CD4 CD5
T
U
N
I
N
G
/BEEP
Repeating Tracks or Discs—Repeat Play
Prohibiting Disc Ejection—Tray Lock
You can have all the discs, the program or the individual track
currently playing repeat as many times as you like.
Press REPEAT during or before play.
• Each time you press the button, Repeat Play
mode changes as follows:
The Repeat Play mode indicators (REPEAT ALL, REPEAT
1DISC or REPEAT 1) light up on the display.
For audio CDs:
For MP3 discs:
You can prohibit disc ejection from the unit and lock discs.
• This operation is possible only when the source is the CD
player.
On the unit ONLY:
To prohibit disc ejection, press 0 for any disc tray while
holding down 7. (If any disc tray is opened, close it first.)
“LOCKED” appears for a while on the display, and all the loaded
discs are locked.
To cancel the prohibition and unlock the discs, press 0 for
any disc tray while holding down 7.
“UNLOCKED” appears for a while on the display, and all the
loaded discs are unlocked.
REPEAT ALL: During Continuous Play
Repeats all the tracks on all the loaded
discs continuously.
During Program Play
Repeats the program you have made.
During Random Play
Repeats all the tracks of all the loaded
discs randomly.
REPEAT 1DISC: Repeats all the tracks on the current disc
continuously.
REPEAT 1: Repeats the track currently playing.
To cancel Repeat Play, press REPEAT repeatedly until the
Repeat Play mode indicators go off from the display.
“REPEAT 1DISC” cannot be selected for Program Play
or Random Play
It is also canceled when you select Program Play or Random Play.
• If you try to eject discs while Tray Lock is in use, “LOCKED”
appears to inform you that the disc trays are locked.
• Each time you press and hold 7 for more than 2 seconds with
0 to lock or unlock the disc trays, key-touch tone also activates
and deactivates (see page 11).
19
Page 25

TAPE
REVERSE MODE
T
U
N
I
N
G
/BEEP
T
U
N
I
N
G
/BEEP
Playing Back Tapes
You can play back type I tapes.
Playing Back a Tape
English
To play both sides repeatedly—Reverse Mode
When using Reverse Mode, the tape automatically reverses at
the end of one side, starts playing the other side of the tape,
and repeats the same process.
1
Press 0 EJECT for the cassette deck.
2
Insert a cassette with the exposed part of the
tape down.
3
Close the cassette holder gently.
4
Press TAPE 2 3.
The tape play starts and the tape
direction indicator (3 or 2) starts flashing slowly to
indicate the tape’s running direction.
• Each time you press the button, the tape direction changes
and “REVERSE” appears for a while on the display.
33
3 : plays the front side.
33
22
2 : plays the reverse side.
22
• If no cassette is inserted, “NO TAPE” appears on the
display.
When the tape plays to the end, the deck automatically
stops if the Reverse Mode is off. (See “To play both sides
repeatedly—Reverse Mode.”)
To stop playing, press 7.
To fast-wind to the left or to the right, press ¡ or 1 (or
¢ (¡) / 4 (1) on the remote control) while the tape
is not running.
The tape direction indicator (3 or 2) starts flashing quickly
on the display.
To remove the cassette, press 0 EJECT to open the cassette
holder.
On the unit ONLY:
To use Reverse Mode, press REVERSE
MODE so that the Reverse Mode indicator
lights up on the display like— .
To cancel Reverse Mode, press the button again so that the
Reverse Mode indicator lights up on the display like— .
Locating the Beginning of a Song—Music Scan
You can use Music Scan to locate the beginning of a song.
Music Scan searches for blank portions that usually separate
recorded songs, then plays the next song.
To find the beginning of the current song
During play, press ¡ or 1
(or ¢ (¡) / 4 (1) on the remote
control) in the opposite direction to the tape
play.
The tape direction indicator of the
opposite direction to the tape play starts flashing intermittently.
Searching stops automatically at the beginning of the current
song, and it starts automatically.
To find the beginning of the next song
During play, press ¡ or 1
(or ¢ (¡) / 4 (1) on the remote
control) in the same direction as the tape is
playing.
The tape direction indicator of the same
direction as the tape is playing starts flashing intermittently.
Searching stops automatically at the beginning of the next
song, and the song starts automatically.
Music Scan works by detecting a 4-second long blank
between each song, so it will not work well in the
following cases
• No blank at the beginning of a song.
• Noise (often caused by much use or poor quality dubbing) which
fills the blank.
• Long, very soft passages or pauses in a song.
The use of C-120 or thinner tape is not
recommended, since characteristic deterioration
may occur and this tape easily jams in the pinchrollers and the capstans.
20
Page 26

Recording
REVERSE MODE
CC
TAPE
REC
START/STOP
START/STOP
REC
English
IMPORTANT:
• It may be unlawful to record or play back copyrighted
material without the consent of the copyright owner.
• The recording level is automatically set correctly, so it is
not affected by the VOLUME, the SUBWOOFER LEVEL,
and the SOUND MODE controls, or the SOUND TURBO
button. Thus, during recording you can adjust the sound
you are actually listening to without affecting the recording
level.
• If there are excessive noise or static in the recording you
have made, the unit may be too close to a TV. Increase the
distance between the TV and the unit.
• You can only use type I tape for recording.
To protect your recording
Cassettes have two small tabs
on the back to protect from
unexpected erasure or rerecording.
To protect your recording,
remove these tabs.
To re-record on a protected tape, cover the holes with
adhesive tape.
To keep the best recording and playback sound
quality
If the heads, capstans, and pinch rollers of the cassette deck
become dirty, the following will occur:
• Impaired sound quality
• Discontinuous sound
• Fading
• Incomplete erasure
• Difficulty in recording
To clean the heads, capstans, and pinch rollers
Use a cotton swab moistened with alcohol.
Pinch rollers
Capstans
Recording on a Tape
1
Press 0 EJECT and insert a recordable cassette
with the exposed part of the tape down.
2
Close the cassette holder gently.
• If you want to record on both sides of a tape, see “To
record on both sides—Reverse Mode.”
3
Check the tape direction of the cassette deck.
• If the tape direction is not correct, press TAPE 2 3 twice
then 7 to change the tape direction.
4
Start playing the source—FM, AM, CD player,
or auxiliary equipment connected to AUX jacks.
• When the source is the CD player, you can also use
Synchronized Recording—(see page 22).
5
Start recording.
On the unit:
Press REC START/STOP.
On the remote control:
Press and hold REC START/
STOP for more than 1 second.
The REC (recording) lamp flashes when recording starts, and
the tape direction indicator (3 or 2) starts flashing slowly.
• If no cassette is inserted, “NO TAPE” appears on the
display. If a protected tape is inserted, “NO REC”
appears on the display.
To stop recording immediately, press REC START/STOP or
7 (or press and hold REC START/STOP on the remote control
for more than 1 second).
Heads
To demagnetize the heads
Turn off the unit, and use a head demagnetizer (available at
electronics and audio shops).
21
To remove the cassette, press 0 EJECT to open the cassette
holder.
To record on both sides—Reverse Mode
On the unit ONLY:
Press REVERSE MODE so that the
Reverse Mode indicator lights up on the
display like— .
• When using the Reverse Mode for recording, start
recording in the forward (3) direction first. Otherwise,
recording will stop when only one side (reverse) of the tape
is recorded.
To cancel Reverse Mode, press the button again so that the
Reverse Mode indicator lights up on the display like— .
Page 27

Synchronized Recording
CD1 CD2 CD3 CD4 CD5
T
U
N
I
N
G
/BEEP
CD
P
R
E
S
E
T
T
U
N
I
N
G
START
CD REC
T
U
N
I
N
G
/BEEP
REVERSE MODE
CD1 CD2 CD3 CD4 CD5
By using Synchronized Recording, you can start and stop
both disc play and tape recording at the same time.
Everything on the disc goes onto the tape in the order it is on
the disc, or according to the order you have made for
Program Play.
On the unit ONLY:
1
Press 0 EJECT and insert a recordable
cassette with the exposed part of the tape down.
2
Load a disc.
3
Select a disc.
For audio CDs:
Press the corresponding disc number button (CD1 –
CD5) where a disc is loaded in step 2, then press 7.
4
Press CD REC START.
“CD REC” appears on the display and the
REC (recording) lamp flashes when
recording starts.
The cassette deck starts recording when the
CD player starts playing.
When the recording is done, “CD REC FINISHED”
scrolls on the display, and the REC (recording) lamp turns
off. Both the cassette deck and the CD player stop
automatically.
To stop recording, press 7 to create a 4-second
blank portion on the recording tape. (Remember a
4-second blank is important when using Music
Scan—see page 20.)
To record on both sides—Reverse Mode
On the unit ONLY:
Press REVERSE MODE so that the
Reverse Mode indicator on the display lights
up like— .
• When using the Reverse Mode for Synchronized
Recording, start recording in the forward (3) direction
first. When the tape reaches its end while recording a song
in the forward direction (3), the last song will be re-
recorded at the beginning of the reverse side (2).
If you start recording on the reverse side (2) first, recording
will stop when only one (reverse) side of the tape is recorded.
To cancel Reverse Mode, press the button again so that the
Reverse Mode indicator lights up on the display like— .
English
For MP3 discs:
You can select a track to start recording with.
1) Press the corresponding disc number button (CD1 –
CD5) where a disc is loaded in step 2, then press 7.
2) Turn ¢ / 4 to select the group, then press CD 3¥8.
3) Turn ¢ / 4 to select the track.
When making Sleep Timer settings while doing
Synchronized Recording
Set enough time to allow for the disc to finish playing; otherwise,
the power will go off before recording is completed.
22
Page 28

DAILY
Canceled
TIMER
(Daily Timer setting)
TIMER
(Recording Timer setting)
REC
Clock
setting
(The hour digits start flashing.)
CLOCK
/TIMER
SET
/
DISPLAY
P
R
E
S
E
T
T
U
N
I
N
G
Using the Timers
CLOCK
/TIMER
English
There are three timers available—DAILY (Daily Timer), REC
(Recording Timer), and SLEEP (Sleep Timer).
• Before using the timers, set the clock built in the unit. (See
page 9.)
Using Daily Timer
With Daily Timer, you can wake up to your favorite music or
radio program.
• You can set the timers whether the unit is on or off.
How Daily Timer actually works
The unit automatically turns on, sets the volume level to the
preset level, and starts playing the specified source when the
on-time comes. (“DAILY” and the DAILY indicator on the
display flash just before the on-time. The DAILY indicator
continues flashing while the timer is operating.) Then, when
the off-time comes (“DAILY OFF” appears on the display
just before the off-time), the unit automatically turns off
(standby).
The Daily Timer works everyday automatically. If you do not
want to use the Daily Timer, turn it off. (See “To turn on or
off Daily Timer after it has been set” on page 24.) The timer
setting remains in memory until you change it.
• There is a time limit in doing the following steps. If the setting
is canceled before you finish, start from step
• To correct a misentry while setting the timer, press
CANCEL/DEMO.
Before you start...
• When using a disc as the source to play:
– Make sure there is a disc on the selected disc tray.
• When using a tape as the source to play:
– Make sure that a tape is in the cassette deck.
– Make sure that the tape direction is correct.
• When using an external component as the source to
play:
– Set the timer equipped on the external component to
the same time.
1
again.
On the unit ONLY:
1
Press CLOCK/TIMER repeatedly
until “DAILY” appears on the
display.
The (Timer) indicator lights up and the DAILY (Daily
Timer) indicator also starts flashing on the display.
• Each time you press the button, the timer setting modes
change as follows:
2
Press CLOCK/TIMER again.
“TIMER” appears for about 2 seconds, then
the unit enters on-time setting mode.
3
Set the on-time you want the unit to turn on at.
1) Turn ¢ / 4 to set the hour,
then press SET/DISPLAY.
2) Turn ¢ / 4 to set the minute,
then press SET/DISPLAY.
“SET” appears for about 1
second, then the unit enters offtime setting mode.
23
4
Set the off-time you want the unit to turn off
(standby) at.
1) Turn ¢ / 4 to set the hour, then press
SET/DISPLAY.
2) Turn ¢ / 4 to set the minute, then press
SET/DISPLAY.
“SET” appears for about 1 second, then the unit enters
source selecting mode.
Page 29

1 CD -- 1
TAPEAUX IN
TUNER FM TUNER AM
SET
/
DISPLAY
CLOCK
/TIMER
SET
/
DISPLAY
CANCEL
/
DEMO
P
R
E
S
E
T
T
U
N
I
N
G
5
STANDBY
VOLUME 10VOLUME 15
VOLUME
VOLUME 5
Tur n ¢ / 4 to select the source to play,
then press SET/DISPLAY.
“SET” appears for about 1 second.
• As you turn ¢ / 4, the source changes as follows:
Continued
8
Press SET/DISPLAY to complete
the Daily Timer setting.
The DAILY (Daily Timer) indicator stops flashing and
remains lit. “OK ” appears on the display for about 2
seconds.
The settings you have done are shown on the
display in sequence for your confirmation.
English
TUNER FM: tunes in to a specified preset FM station.
= Go to step 6.
TUNER AM: tunes in to a specified preset AM station.
= Go to step 6.
1 CD-- 1: plays from a specified track of a specified
disc. = Go to step 6.
TAPE: plays a tape in the cassette deck.
= Go to step 7.
AUX IN: plays an external source. = Go to step 7.
6
When selecting “TUNER FM” or “TUNER AM”
Turn ¢ / 4 to select the preset station number, then
press SET/DISPLAY.
The unit enters volume setting mode.
When selecting “1 CD-- 1”
1) Turn ¢ / 4 to select the disc number, then press
SET/DISPLAY.
“SET” appears for about 1 second.
2) Turn ¢ / 4 to set the track number, then press
SET/DISPLAY.
“SET” appears for about 1 second, then the unit enters
volume setting mode.
7
Tur n ¢ / 4 to set the
volume level.
• The volume level changes as follows:
9
Press to turn off the unit
(standby) if you have set the
Daily Timer with the unit turned on.
• If the unit is turned on before the on-time comes
Daily Timer does not work.
• Even if you unplug the AC power cord or if a power failure
occurs
Once you set the timer, the timer setting may remain stored in
memory in a few days. Check whether the timer setting still
remains or not.
To turn on or off Daily Timer after it has been set
1 Press CLOCK/TIMER repeatedly until
“DAILY” appears on the display.
The DAILY (Daily Timer) indicator starts
flashing on the display and the (Timer)
indicator remains lit.
2 To turn off the Daily Timer, press
CANCEL/DEMO.
The DAILY (Daily Timer) and the (Timer)
indicators go off from the display (“DAILY
OFF” appears for a while).
The Daily Timer is canceled, but the setting for the Daily
Timer remains in memory.
• If you select “VOLUME – –,” the volume is set to the
last level when the unit has been turned off.
— Or —
To turn on the Daily Timer, press
SET/DISPLAY.
“OK ” appears on the display for about 2
seconds.
The settings you have done are shown on the display in
sequence for your confirmation.
24
Page 30

English
DAILY
Canceled
TIMER
(Daily Timer setting)
TIMER
(Recording Timer setting)
REC
Clock
setting
(The hour digits start flashing.)
CLOCK
/TIMER
SET
/
DISPLAY
P
R
E
S
E
T
T
U
N
I
N
G
STANDBY
CLOCK
/TIMER
Using Recording Timer
With Recording Timer, you can make a tape of a radio
broadcast automatically.
• You can set the timers whether the unit is on or off.
How Recording Timer actually works
The unit automatically turns on, tunes in to the specified
station, sets the volume level to “VOLUME MIN,” and starts
recording when the on-time comes. (“REC” and the REC
indicator on the display flash just before the on-time. The
REC indicator continues flashing while the timer is
operating). Then, when the off-time comes (“REC OFF”
appears on the display just before the off-time), the unit
automatically turns off (standby).
The timer setting remains in memory until you change it.
• There is a time limit in doing the following steps. If the setting
is canceled before you finish, start from step 2 again.
• To correct a mistake while setting the timer, press
CANCEL/DEMO.
On the unit ONLY:
1
Insert a recordable cassette with the exposed
part of the tape down.
4
Set the on-time you want the unit to turn on
at.
1) Turn ¢ / 4 to set the hour,
then press SET/DISPLAY.
2) Turn ¢ / 4 to set the minute,
then press SET/DISPLAY.
“SET” appears for about 1
second, then the unit enters offtime setting mode.
5
Set the off-time you want the unit to turn off
(standby) at.
1) Turn ¢ / 4 to set the hour, then press
SET/DISPLAY.
2) Turn ¢ / 4 to set the minute, then press
SET/DISPLAY.
“SET” appears for about 1 second, then the unit enters
preset station selecting mode.
2
Press CLOCK/TIMER repeatedly
until “REC” appears on the display.
The (Timer) indicator lights up and the REC
(Recording Timer) indicator also starts flashing
on the display.
• Each time you press the button, the timer setting modes
change as follows:
3
Press CLOCK/TIMER again.
“TIMER” appears for about 2 seconds, then
the unit enters on-time setting mode.
6
Select the preset station.
1) Turn ¢ / 4 to select the band (“TUNER FM” or
“TUNER AM”), then press SET/DISPLAY.
“SET” appears for about 1 second.
2) Turn ¢ / 4 to select a preset channel number,
then press SET/DISPLAY.
The REC (Recording Timer) indicator stops flashing
and remains lit. “OK ” appears on the display for
about 2 seconds.
The settings you have done are shown on the display
in sequence for your confirmation.
7
Press to turn off the unit
(standby) if necessary.
• If you want to listen to another source while recording
Press REC START/STOP or 7 to stop recording. Without
stopping it, you cannot change the source.
• Even if you unplug the AC power cord or if a power failure
occurs
Once you set the timer, the timer setting may remain stored in
memory for a few days. Check whether or not the timer setting
still remains.
25
Page 31

SLEEP 10 SLEEP 60SLEEP 30SLEEP 20
Canceled SLEEP 120 SLEEP 90
CANCEL
/
DEMO
SET
/
DISPLAY
CLOCK
/TIMER
AUX
SLEEP
To turn on or off Recording Timer after it has been
6:00 6:30 7:00 7:30
does not work.
6:00 6:30 7:00 7:30
canceled.
6:00 6:30 7:00 7:30
does not work.
set
1 Press CLOCK/TIMER repeatedly until
“REC” appears on the display.
The REC (Recording Timer) indicator starts
flashing on the display and the (Timer)
indicator remains lit.
2 To turn off the Recording Timer, press
CANCEL/DEMO.
The REC (Recording Timer) indicator goes off
from the display (“REC OFF” appears on the
display for about 2 seconds).
The Recording Timer is canceled, but the setting for the
Recording Timer remains in memory.
— Or —
To turn on the Recording Timer, press
SET/DISPLAY.
“OK ” appears on the display for about 2
seconds.
The settings you have done are shown on the display in
sequence for your confirmation.
English
To check the remaining time until the shut-off time, press
SLEEP once so that the remaining time (minutes) until the
shut-off time appears for about 5 seconds.
To change the shut-off time, press SLEEP repeatedly until
the desired time length appears on the display.
To cancel the setting, press SLEEP repeatedly so that the
SLEEP indicator goes off.
• Sleep Timer is also canceled when you turn off the unit.
Timer Priority
Since each timer can be set separately, you may wonder what
happens if the settings for these timers overlap.
Recording Timer has priority over Daily Timer and Sleep Timer.
Below are some examples.
• If Daily Timer is set to come on while Recording Timer is
operating, Daily Timer will not come on at all.
Recording Timer
Daily Timer
Using Sleep Timer
With Sleep Timer, you can fall asleep to music. You can set
Sleep Timer only while the unit is turned on.
How Sleep Timer actually works
The unit automatically turns off after the specified time
length passes.
On the remote control ONLY:
1
Press SLEEP.
The time length until the shut-off time
appears and the SLEEP indicator starts
flashing on the display.
• Each time you press the button, the time length changes
as follows:
• If the built-in clock has not been set, “CLOCK ADJUST”
appears on the display.
• If Sleep Timer is set to come on while Recording Timer is
operating, Sleep Timer will not come on at all.
Recording Timer
Sleep Timer
• If Recording Timer and Daily Timer are set to come on at
the same time, Recording Timer will activate.
Recording Timer
Daily Timer
2
Wait for about 5 seconds after specifying the
time length.
The SLEEP indicator flashes slowly until Sleep Timer
activates.
26
Page 32

Maintenance
English
To get the best performance from the unit, keep your discs, tapes, and mechanism clean.
General Notes
In general, you will have the best performance by keeping
your discs and the mechanism clean.
• Store discs in their cases, and keep them in cabinets or on
shelves.
• Keep the unit’s disc trays closed when not in use.
Handling discs
• Remove the disc from its case by
holding it at the edge while pressing
the center hole lightly.
• Do not touch the shiny surface of the
disc, or bend the disc.
• Put the disc back in its case after use
to prevent warping.
• Be careful not to scratch the surface
of the disc when placing it back in its
case.
• Avoid exposure to direct sunlight,
temperature extremes, and moisture.
Handling cassette tapes
• If the tape is loose in its cassette, take
up the slack by inserting a pencil in one
of the reels and rotating.
• If the tape is loose, it may get stretched,
cut, or caught in the cassette.
• Be careful not to touch the tape surface.
• Avoid the following places to store the
tape:
— In dusty places
— In direct sunlight or heat
— In moist areas
— Near a magnet
Cleaning the unit
• Stains on the unit
Should be wiped off with a soft cloth. If the unit is heavily
stained, wipe it with a cloth soaked in water diluted neutral
detergent and wrung well, then wipe clean with a dry cloth.
To clean the disc
Wipe the disc with a soft cloth in a
straight line from center to edge.
Continued use of irregular shape discs
(heart-shape, octagonal, etc.) can
damage the unit.
DO NOT use any solvent—such as conventional
record cleaner, spray, thinner, or benzine—to clean
the disc.
• Since the unit may deteriorate in quality, become
damaged or get its paint peeled off, be careful about the
following:
— DO NOT wipe it with a hard cloth.
— DO NOT wipe it strong.
— DO NOT wipe it with thinner or benzine.
— DO NOT apply any volatile substance such as
insecticides to it.
— DO NOT allow any rubber or plastic to remain in
contact with it for a long time.
27
Page 33

Troubleshooting
If you are having a problem with your unit, check this list for a possible solution before calling for service.
If you cannot solve the problem from the hints given here, or the unit has been physically damaged, call a qualified person, such
as your dealer, for service.
English
Symptom
Unable to cancel the demonstration.
No sound is heard.
Operations are disabled.
GENERAL
Unable to operate the unit from the
remote control.
Hard to listen to broadcasts
because of noise.
TUNERAUDIO CD
The disc sound is discontinuous.
The disc trays will not open or
close.
The disc does not play.
The disc does not play.
MP3 DISCS
The disc readout time is too long.
The cassette holders cannot be
opened.
TAPE
Impossible to record.
REC
Cause
A button other than CANCEL/DEMO
has been pressed to cancel the
demonstration temporarily.
Connections are incorrect or loose.
The built-in microprocessor may
malfunction due to external electrical
interference.
• The path between the remote control
and the remote sensor on the unit is
blocked.
• The batteries are used up.
• Antennas are disconnected.
• The AM loop antenna is too close to
the unit.
• The FM antenna is not properly
extended and positioned.
The disc is scratched or dirty.
• The AC power cord is not plugged in.
• Trays are locked.
The disc is placed upside down.
• No MP3 files are recorded on the disc.
• MP3 files do not have the file
extension—.MP3, .Mp3, .mP3, or
.mp3, in their file names.
• MP3 files are not recorded in a
format compliant with ISO 9660
Level 1 or Level 2.
The readout time varies with the
complexity of the recording
configuration.
Power supply from the AC power cord
has been cut off while the tape was
running.
Small tabs on the back of the cassette
are removed.
Action
Press CANCEL/DEMO on the unit.
(See page 8.)
Check all connections and make
corrections. (See pages 6 to 8.)
Unplug the AC power cord and then
plug it back in.
• Remove the obstruction.
• Replace the batteries.
• Reconnect the antennas correctly and
securely.
• Change the position and direction of
the AM loop antenna.
• Extend the FM antenna to the best
position.
Clean or replace the disc. (See page 27.)
• Plug in the AC power cord.
• Unlock the trays. (See page 19.)
Place the disc with the label side up.
Replace the disc.
Do not use too many hierarchies and
folders when recording. Also, do not
record any other types of audio tracks
together with MP3 files.
Turn on the unit.
Cover the holes with adhesive tape.
(See page 21.)
28
Page 34

Specifications
English
CA-HXZ30
Amplifier section
Output Power (IEC 268-3)
SUBWOOFERS: 135 W per channel, min. RMS, driven into
6 Ω at 63 Hz with no more than 10% total
harmonic distortion.
MAIN SPEAKERS: 55 W per channel, min. RMS, driven into
6 Ω at 1 kHz with no more than 10% total
harmonic distortion.
Audio input sensitivity/impedance
(Measured at 1 kHz, with tape recording signal 300 mV)
AUX: 300 mV/47 kΩ
Speakers/impedance:
SUBWOOFERS: 6 Ω – 16 Ω
MAIN SPEAKERS: 6 Ω – 16 Ω
Tuner
FM tuning range: 87.50 MHz – 108.00 MHz
AM tuning range: At 9 kHz intervals: 531 kHz – 1 710 kHz
At 10 kHz intervals: 530 kHz – 1 710 kHz
CD player
Disc capacity: 5 discs
Dynamic range: 87 dB
Signal-to-noise ratio: 90 dB
Wow and flutter: Immeasurable
MP3 recording format: MPEG 1/2 Audio Layer 3
Max. Bit rate: 320 kbps
Cassette deck
Frequency response
Normal (type I): 50 Hz – 14 000 Hz
Wow and flutter: 0.15% (WRMS)
General
Power requirement: AC 110 V/AC 127 V/AC 220 V/
AC 230 V – AC 240 V
voltage selector), 50 Hz / 60 Hz
Power consumption: 210 W (in operation)
28 W (on standby)
Dimensions (approx.): 205 mm x 370 mm x 380.5 mm (W/H/D)
Mass (approx.): 10.5 kg
(adjustable with the
Supplied accessories
See page 6.
29
Design and specifications are subject to change without notice.
Page 35

CA-HXZ10
Amplifier section
Output Power (IEC 268-3)
SUBWOOFERS: 125 W per channel, min. RMS, driven into
6 Ω at 63 Hz with no more than 10% total
harmonic distortion.
MAIN SPEAKERS: 35 W per channel, min. RMS, driven into
6 Ω at 1 kHz with no more than 10% total
harmonic distortion.
Audio input sensitivity/impedance
(Measured at 1 kHz, with tape recording signal 300 mV)
AUX: 300 mV/47 kΩ
Speakers/impedance:
SUBWOOFERS: 6 Ω – 16 Ω
MAIN SPEAKERS: 6 Ω – 16 Ω
Tuner
FM tuning range: 87.50 MHz – 108.00 MHz
AM tuning range: At 9 kHz intervals: 531 kHz – 1 710 kHz
At 10 kHz intervals: 530 kHz – 1 710 kHz
CD player
Disc capacity: 5 discs
Dynamic range: 87 dB
Signal-to-noise ratio: 90 dB
Wow and flutter: Immeasurable
MP3 recording format: MPEG 1/2 Audio Layer 3
Max. Bit rate: 320 kbps
English
Cassette deck
Frequency response
Normal (type I): 50 Hz – 14 000 Hz
Wow and flutter: 0.15% (WRMS)
General
Power requirement: AC 110 V/AC 127 V/AC 220 V/
AC 230 V – AC 240 V
voltage selector), 50 Hz / 60 Hz
Power consumption: 165 W (in operation)
27 W (on standby)
Dimensions (approx.): 205 mm x 370 mm x 380.5 mm (W/H/D)
Mass (approx.): 10.5 kg
(adjustable with the
Supplied accessories
See page 6.
Design and specifications are subject to change without notice.
30
Page 36

VICTOR COMPANY OF JAPAN, LIMITED
Mains (AC) Line Instruction (not applicable for Europe, U.S.A., Canada,
FM
IN
Australia, and U.K.)
Instrucción sobre la línea de la red (CA) (no aplicable para Europa, EE.UU.,
Canadá, Australia, ni el Grã-Bretanha)
Instrução sobre a tensão da rede eléctrica (CA) (não aplicável para a
Europa, os E.U.A., o Canadá, a Austrália e o Reino Unido)
IMPORTANT for mains (AC) line
BEFORE PLUGGING IN, do check that your mains (AC)
line voltage corresponds with the position of the voltage
selector switch provided on the outside of this equipment and,
if different, reset the voltage selector switch, to prevent from
damage or risk of fire/electric shock.
IMPORTANTE para la línea de la red (CA)
ANTES DE ENCHUFAR EL EQUIPO, compruebe si la
tensión de la línea de la red (CA) corresponde con la posición
del selector de tensión situado en la parte exterior del equipo,
y si es diferente, reajuste el selector de tensión para evitar el
riesgo de incendios/descargas eléctricas.
IMPORTANTE para a ligação à tensão da rede (CA)
ANTES DE LIGAR O APARELHO A UMA TOMADA DA
REDE, verifique se a tensão da rede CA corresponde à
posição do seletor de voltagem localizado na parte externa
deste equipamento. Caso não corresponda, reajuste o seletor
de voltagem a fim de evitar avarias ou riscos de incêndio e
choque elétrico.
EN, SP, PR
2003 VICTOR COMPANY OF JAPAN, LIMITED
0403MWMMDWJEM
Page 37

INSTRUCTIONS
SPEAKER SYSTEM
SP-HXZ10
MANUAL DE INSTRUCCIONES: SISTEMA DE ALTAVOCES
INSTRUÇÒES: SISTEMA DE ALTIFALANTES
!"#$%&
UUL« ÂUEM ∫ULOKF« qOœ
Thank you for purchasing JVC speakers.
Before you begin using them, please read the instructions carefully
to be sure you get the best possible performance. If you have any
questions, consult your JVC dealer.
Le estamos muy agradecidos por haber adquirido estos altavoces
de JVC. Antes de utilizarlos, sirvase leer las instrucciones
detenidamente a fin de obtener el mejor rendimiento posible. Si
tienenaluna pregunta, acuda a su agente de JVC.
— SAFETY INSTRUCTIONS —
“SOME DOS AND DON’TS ON THE SAFE USE OF EQUIPMENT”
This equipment has been designed and manufactured to meet
international safety standards but, like any electrical equipment,
care must be taken if you are to obtain the best results and safety
is to be assured.
Do read the operating instructions before you attempt to use the
equipment.
Do ensure that all electrical connections (including the mains
plug, extension leads and interconnections between pieces of
equipment) are properly made and in accordance with the
manufacturer’s instructions. Switch off and withdraw the mains
plug when making or changing connections.
Do consult your dealer if you are ever in doubt about the installation, operation or safety of your equipment.
Do be careful with glass panels or doors on equipment.
DON’T continue to operate the equipment if you are in any doubt
about it working normally, or if it is damaged in any way — switch
off, withdraw the mains plug and consult your dealer.
DON’T remove any fixed cover as this may expose dangerous
voltages.
DON’T leave equipment switched on when it is unattended unless it is specifically stated that it is designed for unattended operation or has a standby mode.
Gratos pela aquisição dos altifalantes JVC.
Antes de desfrutar este sistema, leia atentamente as instruções
que o acompanham, de modo a assegurar-se da obtenção do
melhor desempenho possível. Caso surjam dúvidas concernentes
a este sistema, consulte o seu agente JVC.
!"=gs`=
!"#$ !"#$%&'() !"#$%
!"# !=gs`= !"#$
ﻲﺳ ﻲﻓ ﻲﺟ تﺎﻋﺎﻤﺳ ءاﺮﺷ ﻰﻠﻋ كﺮﻜﺸﻧ
JVC
.
ﻰﻠﻋ ﻚﻟﻮﺼﺣ ﻦﻣ ﺪﻛﺄﺘﺗ ﻰﺘﺣ ﺔﻳﺎﻨﻌﺑ تﺎﻤﻴﻠﻌﺘﻟا هﺬﻫ ةءاﺮﻗ ﻰﺟﺮﻳ ،ﺎﻬﻟﺎﻤﻌﺘﺳا أﺪﺒﺗ نأ ﻞﺒﻗ
JVC
.ﻚﻳﺪﻟ
Switch off using the switch on the equipment and make sure that
your family know how to do this.
Special arrangements may need to be made for infirm of
handicapped people.
DON’T use equipment such as personal stereos or radios so that
you are distracted from the requirements of traffic safety. It is
illegal to watch television whilst driving.
DON’T listen to headphones at high volume as such use can
permanently damage your hearing.
DON’T obstruct the ventilation of the equipment, for example with
curtains or soft furnishing.
Overheating will cause damage and shorten the life of the
equipment.
DON’T use makeshift stands and NEVER fix legs with wood
screws — to ensure complete safety always fit the manufacturer’s
approved stand or legs with the fixings provided according to the
instructions.
DON’T allow electrical equipment to be exposed to rain or
moisture.
ABOVE ALL
– NEVER let anyone, especially children, push anything into
holes, slots or any other opening in the case.
– this could result in a fatal electrical shock;
– NEVER guess or take chances with electrical equipment of
any kind
– it is better to be safe than sorry!
عزﻮﻣ ﻊﺟار ﺎﻫﺪﻨﻋ ،ﺔﻠﺌﺳأ ﺔﻳأ كﺪﻨﻋ نﺎﻛ اذإ .ﻦﻜﳑ ءادأ ﻞﻀﻓأ
GVT0110-001A
[U/UJ]
1
Page 38

Connection
Conexión
Ligaçao
qOu«
Right speaker
Altavoz derecho
Altifalante direito
!
ﻰﻨﻤﻴﻟا ﺔﻋﺎﻤﺴﻟا
Black
Negra
Preto
دﻮﺳأ
BLUE
AZUL
AZUL
قرزأ
Left speaker
Altavoz izquierdo
Altifalante esquerdo
!
ﺮﺴﻴﻟا ﺔﻋﺎﻤﺴﻟاى
RED
ROJO
VERMELHO
ﺮﻤﺣأ
CAUTION : SPEAKER IMPEDANCE 6 16
Black
Negra
Preto
دﻮﺳأ
BLUE
AZUL
AZUL
قرزأ
CONNECTION
• DON’T use other amplifier to operate this speaker system except
for CA-HXZ10.
• Turn off power to the whole system before connecting the speakers to the amplifier.
• The maximum power handling capacity of the SP-HXZ10 main
speaker is 75 W/Subwoofer is 165 W. Excessive input will result
in abnormal noise and possible damage.
In cases where the signals described below are applied to the
speakers, even if the signals are below the maximum allowable
input, they may cause an overload and burn the wiring of the
speakers. Be sure to lower the amplifier volume beforehand.
1) Noise during FM tuning.
2) High level signals containing high frequency components pro-
duced by a tape deck in the fast forward mode.
3) Click noise produced when turning power of other components
on and off.
4) Click noise produced when connecting or disconnecting cords
with the power on.
5) Click noise produced when the cartridge is replaced with the
power on.
6) Click noise produced when operating amplifier switches.
7) Continuous high frequency oscillation or high pitch electroni-
cally produced musical instrument sound.
8) Howling when using a microphones.
CAUTION
Do not drag or push the speakers on the floor or table.
Otherwise, the four feet at the bottom side of each speaker may
peel off or drop from the speaker.
Amplifier output terminals
Terminales de salida de amplificador
Terminais de saida do amplificador
!"#$
ﺨﻀﳌا جﺮﺧ تﺎﻳﺎﻬﻧ
SPECIFICATIONS
Type : 3-way 4-speaker Bass-Reflex Type
Twin Hyper Power-Drive Subwoofer
and Front Twin Woofer
Speakers
Subwoofer : 16.0 cm (6-5/16 in.) cone × 1
Main woofer : 10.0 cm (3-15/16 in.) cone × 2
Tweeter : 5.0 cm (2 in.) cone × 1
Power Handling Capacity
Subwoofer : 165 W
Main Speaker : 75 W
Impedance
Subwoofer : 6 Ω
Main Speaker : 6 Ω
Frequency Range
Subwoofer : 30 Hz ~ 325 Hz
Main Speaker : 70 Hz ~ 32 000 Hz
Sound Pressure Level
Subwoofer : 78 dB/W·m
Main Speaker : 86 dB/W·m
Dimensions (W × H × D) : 220 mm × 432 mm × 357 mm
(8-11/16 in. × 17-1/16 in. × 14-1/16 in.)
Mass : 8.2 kg (18.1 lbs) each
Design and specifications subject to change without notice.
2
Page 39

CONEXIÓN
• NO utilice ningún otro amplificador para operar este sistema de
altavoces excepto CA-HXZ10.
• Desactive la alimentación de todo el sistema antes de conectar
los altavoces al amplificador.
• La capacidad máxima de potencia del altavoz principal del SPHXZ10 es de 75 W y la del altavoz de subgraves es de 165 W.
En casos donde las señales descritas más abajo se apliquen a
los altavoces, aunque las mismas resulten menores que la
entrada máxima permisible, pueden causar una sobrecarga y
quemar el cableado de los altavoces. Asegúrese de disminuir el
volumen del amplificador con anterioridad.
1) Ruido durante la sintonía en FM.
2) Señales de alto nivel que contengan componentes de alta
frecuencia producidos por un magnetófono en el modo de
avance rápido.
3) Ruidos de conmutación provocados al encender y apagar otros
componentes.
4) Ruido de conmutación al conectar o desconectar cables con
los componentes encendidos.
5) Ruido de conmutación cuando se reemplaza la cápsula con
los componentes encendidos.
6) Ruido de conmutación provocados por la operación de los
selectores del amplificador.
7) Continua oscllación de alta fracuencia o de sonidos de tonos
altos provocados por instrumentos electrónicos.
8) Aullidos al utilizar micrófonos.
PRECAUCIÓN
No arrastre ni empuje los altavoces sobre el piso o la mesa. De
lo contrario, las cuatro patas del lado inferior de cada altavoz se
podrían desprender o salir del altavoz.
LIGAÇÃO
• NÃO use outro amplificador para operar este sistema de
altifalantes à excepção do CA-HXZ10.
• Desligue a alimentação de todo o sistema antes de iniciar as
ligações dos altifalantes ao amplificador.
• A potência efectiva máxima do altifalante principal do SP-HXZ10
é de 75 W; a do subwoofer é de 165 W.
Uma entrada excessiva resultará em ruídos anormais e possíveis
avarias.
Nos casos em que os sinais descritos abaixo apresentem-se nos
altifalantes, mesmo que os sinais estejam abaixo do nível de
entrada permissível, poderão causar uma sobrecarga e o curtocircuito dos fios dos altifalantes. Certifique-se de reduzir o volume do amplificador de antemão.
1) Interferências durante a sintonia de FM.
2) Sinais com níveis elevados e com componentes de alta
frequência produzidos pelo deck de cassetes durante o modo
do avanço rápido.
3) Estalidos produzidos quando do ligar/desligar da alimentação
de outros componentes.
4) Estalidos produzidos ao se ligar/desligar cabos de ligação com
a alimentação ligada.
5) Estalidos produzidos quando da troca da célula fonocaptadora
com a alimentação ligada.
6) Estalidos produzidos quando do activar/desactivar dos
interruptores do amplificador.
7) Oscilação contínua das altas frequências ou altas tonalidades
electronicamente produzidas por sons de músicas
instrumentais.
8) Efeito de realimentação acústica (microfonia) quando da
utilização de microfone.
PRECAUÇÃO
Não arraste nem empurre as caixas acústicas no chão ou na
mesa, do contrário os quatro pés da parte inferior de cada uma
delas podem se desprender ou cair.
ESPECIFICACIONES
Tipo : Reflex bajo con 4-altavoces y 3 vias
Twin Hyper Power-Drive Subwoofer
and Front Twin Woofer
Altavoces
De subgraves : Tipo cónico de 16,0 cm × 1
Principal : Tipo cónico de 10,0 cm × 2
De agudos : Tipo cónico de 5,0 cm × 1
Capacidad de potencia
De subgraves : 165 W
Principal : 75 W
Impedancia
De subgraves : 6 Ω
Principal : 6 Ω
Gama de frecuencias
De subgraves : 30 Hz – 325 Hz
Principal : 70 Hz – 32 000 Hz
Nivel de presión acústica
De subgraves : 78 dB/W·m
Principal : 86 dB/W·m
Dimensiones (An × Al × Prf) : 220 mm × 432 mm × 357 mm
Peso : 8,2 kg cada uno
El diseño y las especificaciones están sujetos a cambio sin
previo aviso.
ESPECIFICAÇÕES
Tipo : Reflector de graves de 3 vías e 4
altifalantes
Twin Hyper Power-Drive Subwoofer
and Front Twin Woofer
Altifalantes
Subwoofer : Cónico de 16,0 cm × 1
Woofer principal : Cónico de 10,0 cm × 2
Tweeter : Cónico de 5,0 cm × 1
Potência efectiva
Subwoofer : 165 W
Altifalante principal : 75 W
Impedância
Subwoofer : 6 Ω
Altifalante principal : 6 Ω
Amplitude de frequência
Subwoofer : 30 Hz – 325 Hz
Altifalante principal : 70 Hz – 32 000 Hz
Nível da pressão sonora
Subwoofer : 78 dB/W·m
Altifalante principal : 86 dB/W·m
Dimensões
Peso : 8,2 kg cada
Desenho e especificações sob reserva de alterações sem aviso
prévio.
(larg. × alt. × prof.)
: 220 mm × 432 mm × 357 mm
3
Page 40

!"#$%&'(=`^JeuwNM= !"#$%&
!"#$%&'"()*+,-./012345
pmJeuwNM= !"#$%&'()*+=TR t !"
!"#=NSR t !"#$%&'()*+,-.'/
!"#$%&'()*+!"#,-./0()1234
!"#$%&'()*+,-./012"345678
!"#$%&'()*+
N=cj= !"#$%&
O !"#$%&'()*+$,-./01$.23456
P !"#$%&'()*+,-./01
Q !"#$%&'(&)*+,-./01
R !"#$%&'()*+&,-./
S !"#$%&'()*+,-.
T !"#$%&'"()*+,-./!0123
U !"#$%&'()*
!"#$%&'()*+,-.
!"#$%&'()*+,-./01234
qOu«
•ﻮﺻ ﻢﺨﻀﻣ ﻞﻤﻌﺘﺴﺗ ﻻﻮﻤﻠﻟ ءﺎﻨﺜﺘﺳﺎﺑ اﺬﻫ تﺎﻋﺎﻤﺴﻟا مﺎﻈﻧ ﻞﻴﻐﺸﺘﻟ ﺮﺧآ تﻞﻳد
CA-HXZ10
.
•.ﻢﺨﻀﳌﺎﺑ تﺎﻋﺎﻤﺴﻟا ﻞﻴﺻﻮﺗ ﻞﺒﻗ مﺎﻈﻨﻟا ﻞﻜﻟ ﺔﻗﺎﻄﻟا ﻞﺼﻓا
•رﺪﻘﻠﻟ ﺔﻌﺳ ﻰﺼﻗأﺮﻟا ﺔﻋﺎﻤﺴﻟا ﻞﻴﻐﺸﺘﻟ ةتﺎﻋﺎﻤﺴﻟا مﺎﻈﻨﻟ ﺔﻴﺴﻴﺋ
و ٧٥ ﻲﻫ و طاﺮﻔﻟا رﺎﻬﺠﻤﻠﻟﺮﺘﻠﻟ ﻲﻋو ١٦٥ ﻲﻫ ﺔﻀﻔﺨﻨﳌا تادد.طا
SP-HXZ10
ﺰﻟا ﻞﺧﺪﻟاﺆﻴﺳ ﺪﺋاﻮﺸﺗ ﻰﻟا يدو ذﺎﺷ ﺶﻳوﺪﺣ ﺔﻴﻧﺎﻜﻣا.ﻒﻠﺗ ث
رﺎﺷﻻا ﺎﻬﻴﻓ ﻖﺒﻄﻨﺗ ﻲﺘﻟا تﻻﺎﳊا ﻲﻓﻮﺻﻮﳌا تاﻮﻟ ﻰﺘﺣ ،تﺎﻋﺎﻤﺴﻟا ﻰﻠﻋ هﺎﻧدأ ﺔﻓ
رﺎﺷﻻا ﺖﻧﺎﻛﻼﻤﺣ ﺐﺒﺴﺗ ﺪﻗ ﺎﻬﻧﺎﻓ ،ﻪﺑ حﻮﻤﺴﻣ ﻞﺧد ﻰﺼﻗأ نود تاًز اﺪﺋاًو قﺮﺣ
رﺎﻬﺟ ﺾﻴﻔﺨﺗ ﻦﻣ ﺪﻛﺄﺗ اﺬﻬﻟ .تﺎﻋﺎﻤﺴﻟا كﻼﺳاﻮﺻ ةﺎﻣﺪﻘﻣ ﻢﺨﻀﳌا تً.
FM
.
(١ﻮﺸﺗﻮﻣ ءﺎﻨﺛأ ﺶﻳ ﺚﺒﻟا ﺔﻔﻟا
(٢رﺎﺷاﻮﺘﺴﻣ تاذ تاﺮﻣ ىﻮﲢ ﻊﻔﺗﺮﻣ يﺮﺗ تﺎﺒﻛزﺎﻬﺟ ﻦﻋ ﺔﲡﺎﻧ لﺎﻋ دد
و ﻲﻓ ﺖﻴﺳﺎﻛﺮﺴﻟا ﱘﺪﻘﺘﻟا ﻊﺿ.ﻊﻳ
(٣ﻮﺻو ﻞﻴﻐﺸﺗ ﺪﻨﻋ ﺞﺘﻨﻳ ﺔﻘﻄﻘﻃ تﺰﻬﺟﻻا ﻰﻠﻋ ﺔﻗﺎﻄﻟا فﺎﻘﻳاﺮﺧﻻا ة.ى
(٤ﻮﺻ.ﺔﻠﺻﻮﻣ ﺔﻗﺎﻄﻟا نﻮﻜﺗ ﺎﻤﻨﻴﺑ كﻼﺳﻻا ﻞﺼﻓ وأ ﻞﺻو ﺪﻨﻋ ﺞﺘﻨﻳ ﺔﻘﻄﻘﻃ ت
(٥ﻮﺻرﺎﻜﻟا لﺎﺒﻘﺘﺳا ﺪﻨﻋ ﺞﺘﻨﻳ ﺔﻘﻄﻘﻃ تﺮﺗ.ﺔﻠﺻﻮﻣ ﺔﻗﺎﻄﻟا نﻮﻜﺗ ﺎﻤﻨﻴﺑ جﺪﻳ
(٦ﻮﺻ.ﻢﺨﻀﳌا ﺢﻴﺗﺎﻔﻣ ﻞﻴﻐﺸﺗ ﺪﻨﻋ ﺞﺘﻨﻳ ﺔﻘﻄﻘﻃ ت
(٧ﺮﻤﺘﺴﻣ ﺔﺑﺬﺑذﺮﺗ تاذ ةﺮﻣ ددوﺮﺘﻜﻟا ﺔﲡﺎﻧ ﺔﻴﻟﺎﻋ ﺔﻤﻐﻧ وأ ﻊﻔﺗﺎﻴﻧًﻮﺻ ﻦﻋ ﺔﻟآ ت
ﻮﻣ.ﺔﻴﻘﻴﺳ
(٨زوﺮﻜﻴﻣ ماﺪﺨﺘﺳا ﺪﻨﻋ ﻖﻴﻋ.نﻮﻓ
tOM
رﻷا ﻰﻠﻋ تﺎﻋﺎﻤﺴﻟا ﻊﻓد وأ ﺮﺟ ﻰﻟا ﺪﻤﻌﺗ ﻻوﺎﻃ ﻰﻠﻋ وأ ﺔﻴﺿ.ﺔﻟ
رﻷا ماﺪﻗﻷا ﺖﻠﻔﻨﺗ ﺪﻘﻓ ﻚﻟذ ﺖﻠﻌﻓ اذإﻮﳌا ﺔﻌﺑﻮﺟﻞﻛ عﺎﻘﻟ ﺔﻴﺒﻧﺎﳉا ﺔﻬﳉا ﻰﻠﻋ ةد
ﻮﻣ ﻦﻣ ﻂﻘﺴﺗ وأ ﺔﻋﺎﻤﺳ.ﺔﻋﺎﻤﺴﻟا ﻰﻠﻋ ﺎﻬﻌﺿ
P==Q= !"#$%
qпбе=eуйЙк=mзпЙкJaкбоЙ=pмДпззСЙк
~еЗ=cкзен=qпбе=tззСЙк
!" =NSKM Åã==N
=NMKM Åã==O
= RKM Åã==N
!
!" NSR t
! =TR t
!" S !"
! S !"
!
!" PM eò==POR eò
! TM eò==PO MMM eò
!" TU Ç_Ltã
! US Ç_Ltã
tea OOM ãã==QPO ãã==PRT ãã
=UKO âÖ
Twin Hyper Power-Drive Subwoofer
and Front Twin Woofer
UH«u*«
عﻮﻨﻟا:رﺎﺴﻣ ٣ ـﺑ تﺎﻋﺎﻤﺳ ٤ﺮﻴﻬﳉ ﺔﺴﻛﺎﻋ تا
تﺎﻋﺎﻤﺴﻟا
:وﺮﺨﻣ عﻮﻧ١ × ﻢﺳ ١٦٫٠ ﻲﻃ
:وﺮﺨﻣ عﻮﻧ٢ × ﻢﺳ ١٠٫٠ ﻲﻃ
ﺮﻔﻟا رﺎﻬاﺮﺘﻠﻟ ﻲﻋﺔﻀﻔﺨﻨﳌا تادد
ﺮﻟا رﺎﻬاﺮﺘﻠﻟ ﻲﺴﻴﺋﺔﻀﻔﺨﻨﳌا تادد
ﺮﺘﻟا رﺎﻬﺠﻣﺔﻴﻟﺎﻌﻟا تادد:وﺮﺨﻣ عﻮﻧ١ × ﻢﺳ ٥٫٠ ﻲﻃ
رﺪﻘﻟا ﻞﻴﻐﺸﺗ ﺔﻌﺳة
:و ١٦٥طا
ﺮﻔﻟا رﺎﻬاﺮﺘﻠﻟ ﻲﻋﺔﻀﻔﺨﻨﳌا تادد
ﺮﻟا ﺔﻋﺎﻤﺴﻟاﺔﻴﺴﻴﺋ:و ٧٥طا
وﺎﻘﳌاﺔﻣ
ﺮﻔﻟا رﺎﻬاﻲﻋ:وأ ٦م
ﺮﻟا ﺔﻋﺎﻤﺴﻟاﺔﻴﺴﻴﺋ:وأ ٦م
ﺮﺘﻟا لﺎﺠﻣتادد
ﺮﻔﻟا رﺎﻬاﻲﻋ:ﺮﻫ ٣٢٥ - ٣٠ﺰﺗ
ﺮﻟا ﺔﻋﺎﻤﺴﻟاﺔﻴﺴﻴﺋ:ﺮﻫ ٣٢٠٠٠ - ٧٠ﺰﺗ
ﻮﺘﺴﻣﻮﺼﻟا ﻂﻐﺿ ىت
ﺮﻔﻟا رﺎﻬاﻲﻋ:و/ﻞﻴﺒﻴﺴﻳد ٧٨ﺮﺘﻣ-طا
ﺮﻟا ﺔﻋﺎﻤﺴﻟاﺔﻴﺴﻴﺋ:و/ﻞﻴﺒﻴﺴﻳد ٨٦ﺮﺘﻣ-طا
دﺎﻌﺑﻻا:ﱈ ٣٥٧ × ﱈ ٤٣٢ × ﱈ ٢٢٠
نزﻮﻟا:و ﻞﻜﻟ ﻢﺠﻛ ٨٬٢ةﺪﺣ
!"#$%& !"#
EN. SP. PR. CH. AR.
VICTOR COMPANY OF JAPAN, LIMITED
4
.رﺎﻌﺷإ نود ﺮﻴﻴﻐﺘﻠﻟ ﺔﺿﺮﻋ تﺎﻔﺻاﻮﳌاو ﻢﻴﻤﺼﺘﻟا
0203FSKMAMTAS
 Loading...