

Page 1

DIGITAL PRESENTER
MANUEL D’INSTRUCTIONS
BEDIENUNGSANLEITUNG
MANUALE DI ISTRUZIONI
: PRESENTOIR NUMERIQUE
: DIGITALEN VORFÜHRERS
: DIGITAL PRESENTER
AV-P960E
EnglishItaliano Deutsch Français
INSTRUCTIONS
(R)
LWT0149-001C-H
Page 2
Safety Precautions
For Europe
IMPORTANT
The wires in this mains lead are coloured in accordance
with the following code:
GREEN - and - YELLOW: EARTH
BLUE: NEUTRAL
BROWN: LIVE
As the colours of the wires in the mains lead of this apparatus may not correspond with the coloured markings identifying the terminals in your plug, proceed as follows. The
wire which is coloured GREEN-AND-YELLOW must be connected to the terminal in the plug which is marked with the
letter E or the safety earth symbol
or GREEN-AND-YELLOW. The wire which is coloured BLUE
must be connected to the terminal which is marked with
the letter N or which is coloured BLACK. The wire which is
coloured BROWN must be connected to the terminal which
is marked with the letter L or coloured RED.
WARNING–THIS APPARATUS
MUST BE EARTHED
or coloured GREEN
WARNING:
TO PREVENT FIRE OR SHOCK HAZARDS, DO NOT EXPOSE THIS APPLIANCE TO RAIN OR MOISTURE.
Warning
This is a Class A product. In a domestic environment this product may cause radio interference in which case the user may be required to take adequate measures.
Machine noise information regulation 3. GSGV, 18.01.1991:
The highest sound pressure level amounts to 70 railway
(A) less or in accordance with ISO/EN 7779
Features
Thank you for purchasing this JVC product. Before operating this unit, please read these instructions carefully to ensure the best
possible performance.
These instructions are for AV-P960E.
Smooth, High Resolution Images
XGA output with high frame rate of 20 fps enabling
smooth high resolution image display.
High Definition and High Power Zoom
16x Optical Zoom (lens 12x, extensible arm 1.4x) and
6x Digital Zoom built-in.
Small, Lightweight and Slim Design
Depth of less than 50 cm and lightweight at 5.6 kg, yet
equipped with a maximum field angle equivalent to A3
landscape (400 mm x 300 mm).
Built-in SD Card Slot
The storage of the camera image, the output (Exif format) of camera image captured by digital still camera
and multiple types of presentation can be achieved with
the built-in high capacity, high speed SD card compatible memory slot. (SD card is sold separately)
Versatile Interface
Equipped with USB and RS-232 connector.
Concave reflector light built in
Built-in Concave reflector, which is able to achieve even
lighting through out the stage with side illuminations.
E-2
Page 3

Table of Content
Safety Precautions .................................................................... 2
Features ..................................................................................... 2
Table of Content ........................................................................ 3
Getting Started
Preparation
Operation
(Basic)
Precautions................................................................................ 4
Names and Functions ............................................................... 5
Overall View ....................................................................................... 5
Control Panel ..................................................................................... 6
Rear Panel.......................................................................................... 8
Before Using .............................................................................. 9
Connection .............................................................................. 10
Presenting Printed Materials.................................................. 11
Presenting 3-dimensional Objects ........................................ 12
Shooting Surrounding Objects .............................................. 13
Presenting Slide Films............................................................ 14
Presenting Films and Other Transparent Materials ............. 15
Saving Images in the Picture Memory .................................. 16
Adjusting the White Balance .................................................. 17
Saving the Settings (User Setting Registration) .................. 18
English
Storing Images in SD Card ..................................................... 19
Operation
(Application)
Others
Viewing Image Data Stored in SD Card................................. 20
Image size/position adjustment of the SD card ................... 21
Connecting to Computer via the USB Connector ................ 22
Operating the Remote Control Unit ....................................... 23
Installing LCD Monitor ............................................................ 24
Troubleshooting ...................................................................... 25
Specifications .......................................................................... 26
How to Read this Manual
䡵 Symbols used in this manual
Caution
Note
States precautions to be taken during operations.
States restrictions on the functions or use of this equipment. For reference purposes.
☞ Indicates the page numbers or items to refer to.
䡵 Contents of this manual
● The copyright of this manual belongs to JVC. Unauthorized reproduction of this manual whether in full or in part is
prohibited.
● All product names stated in this manual are trademarks or registered trademarks of their respective companies.
Marks such as ™,
● The design, specifications and other contents of this manual are subject to change for improvements without prior
notice.
● Windows is the trademark of Microsoft Corporation in the United States.
●
: SD logo is a trademark.
®
and © are omitted in this manual.
E-3
Page 4

Precautions
䡵 Handling of Equipment
● Use the handle on the side to carry this unit.
Carrying this unit by its camera head, camera arm or its side illumination lamps might cause them to be deformed or damaged.
● Pull out the handle slowly in a straight manner.
䡵 Conduct prior functional checks before important shooting events.
䡵 Compensation for the shooting contents
● JVC will not be in anyway liable for any failure to take or playback images due to problems arising from this product or the card
used, and no compensation will be offered for the loss of contents.
䡵 Copyright
● You may take pictures for your own leisure or uses. However, you must not use any materials protected by copyright law
without the owner's consent.
䡵 SD Card
SD card is made from precision electronic components. Do not attempt to carry out any of the following actions as it may cause
the card to malfunction or damage.
● Do not touch the edge of the card with your bare hand or metal.
It may be damaged by static charges produced.
● Do not bend, drop or cause the card to suffer great impacts.
● When using and storing the card, avoid heat, water, direct sunlight and humid areas.
● Do not attempt to disassemble or modify the card.
䡵 Routine maintenance
Switch off the power, pull out the plug and perform the following tasks.
● Use a dry and soft piece of cloth to wipe off any dirt or stain on the equipment.
● For severe stains, immerse a piece of cloth into a diluted cleaning detergent, wring and use it to wipe off the stains on the
equipment. Thereafter, use a piece of dry cloth to wipe off the water drops.
Caution
● Do not use benzene or thinner. The equipment may malfunction and its casing may be damaged.
● When using a chemical wrap or detergent, read its product brochures carefully and take note of any precautions
stated.
䡵 Auto Focus
This unit is equipped with Auto Focus function. However, depending on the object and the camera setting, it might be out of
focus. In this case, please adjust the focus manually.
Objects which are difficult to be focused automatically
● When the brightness of the image plane is extremely high (bright).
● When the brightness of the image plane is extremely low (dim).
● When the brightness of the image plane is constantly changing (for example, a blinking light).
● When there is almost no contrasts.
● When there are repetitive vertical striped patterns on the image plane.
● When there are graphics or printings on both sides or the upper and lower portions of the screen.
䡵 Power Cord
● Use only the power cord specified (supplied).
Use of power cord other than designated, or damaged power cord may result in fire and electrical shocks.
● Do not use the power cord supplied with this unit on other devices.
䡵 Power Saving
To save power, turn off the unit when not in use.
E-4
Page 5
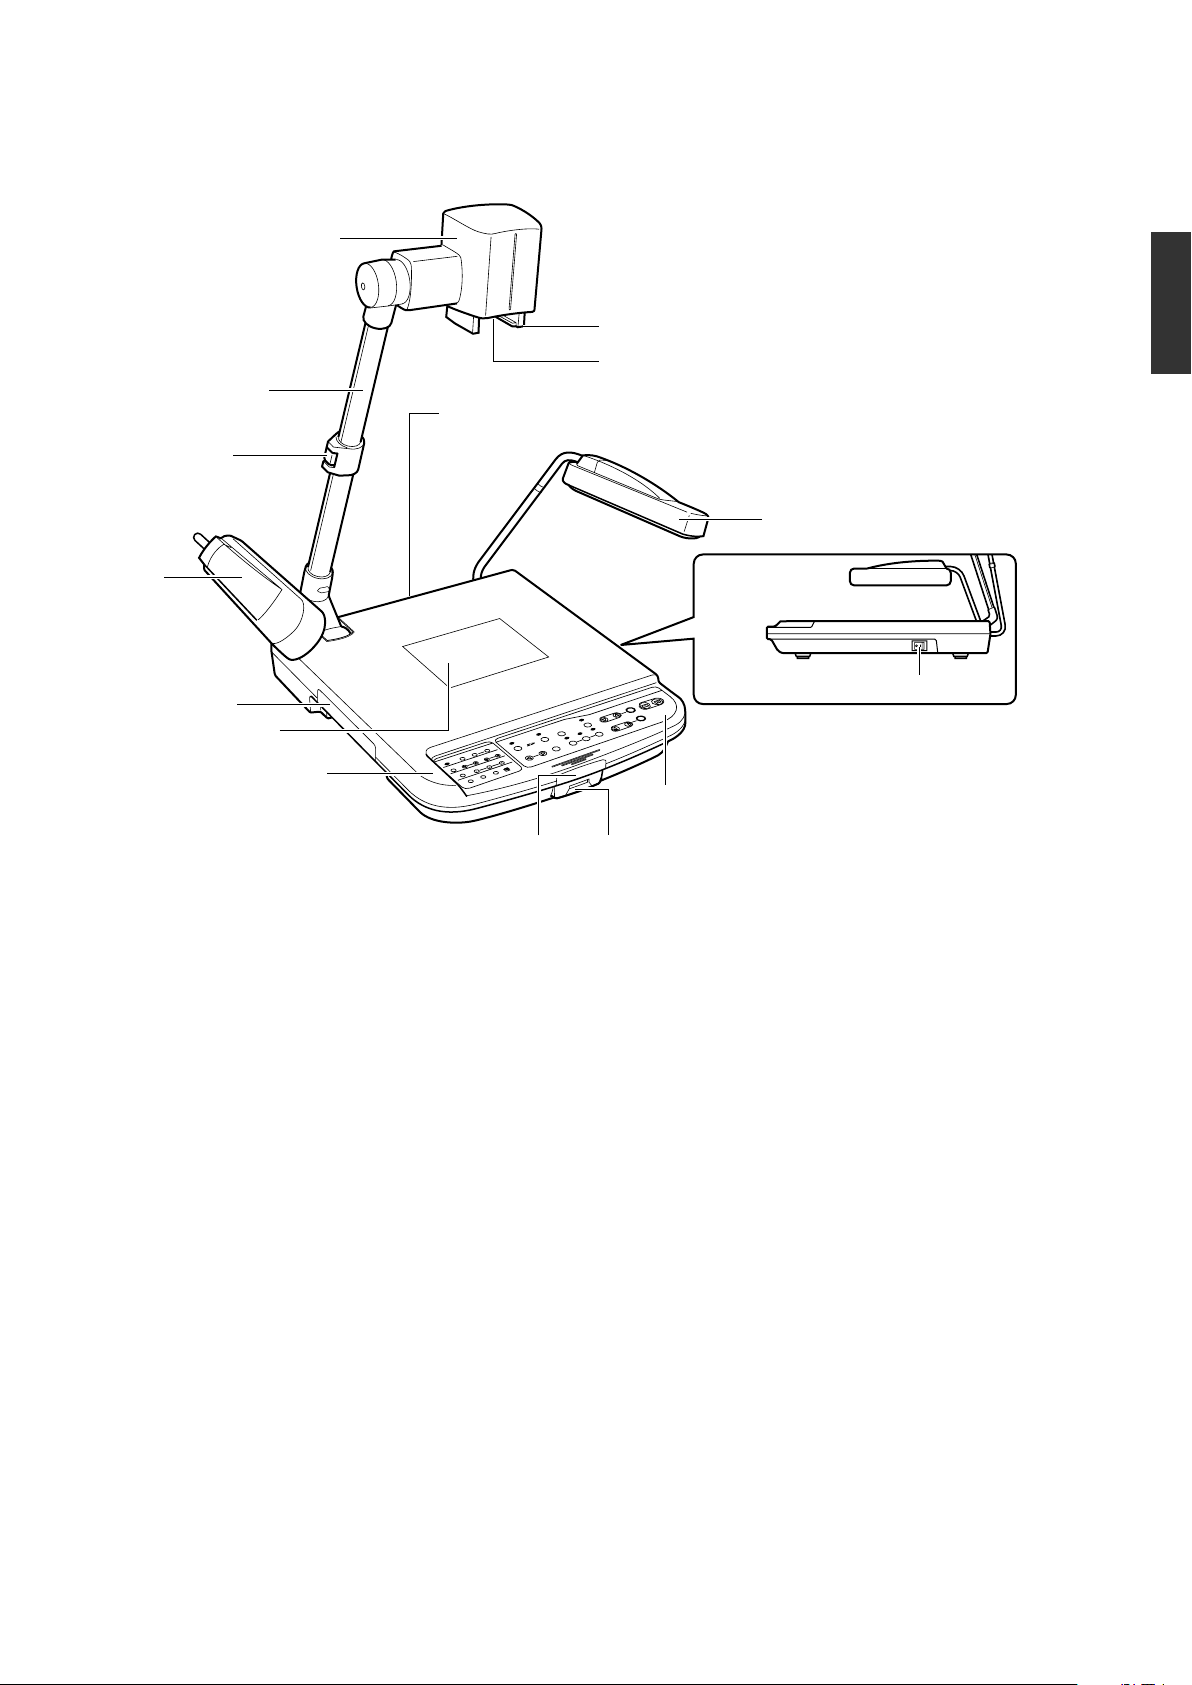
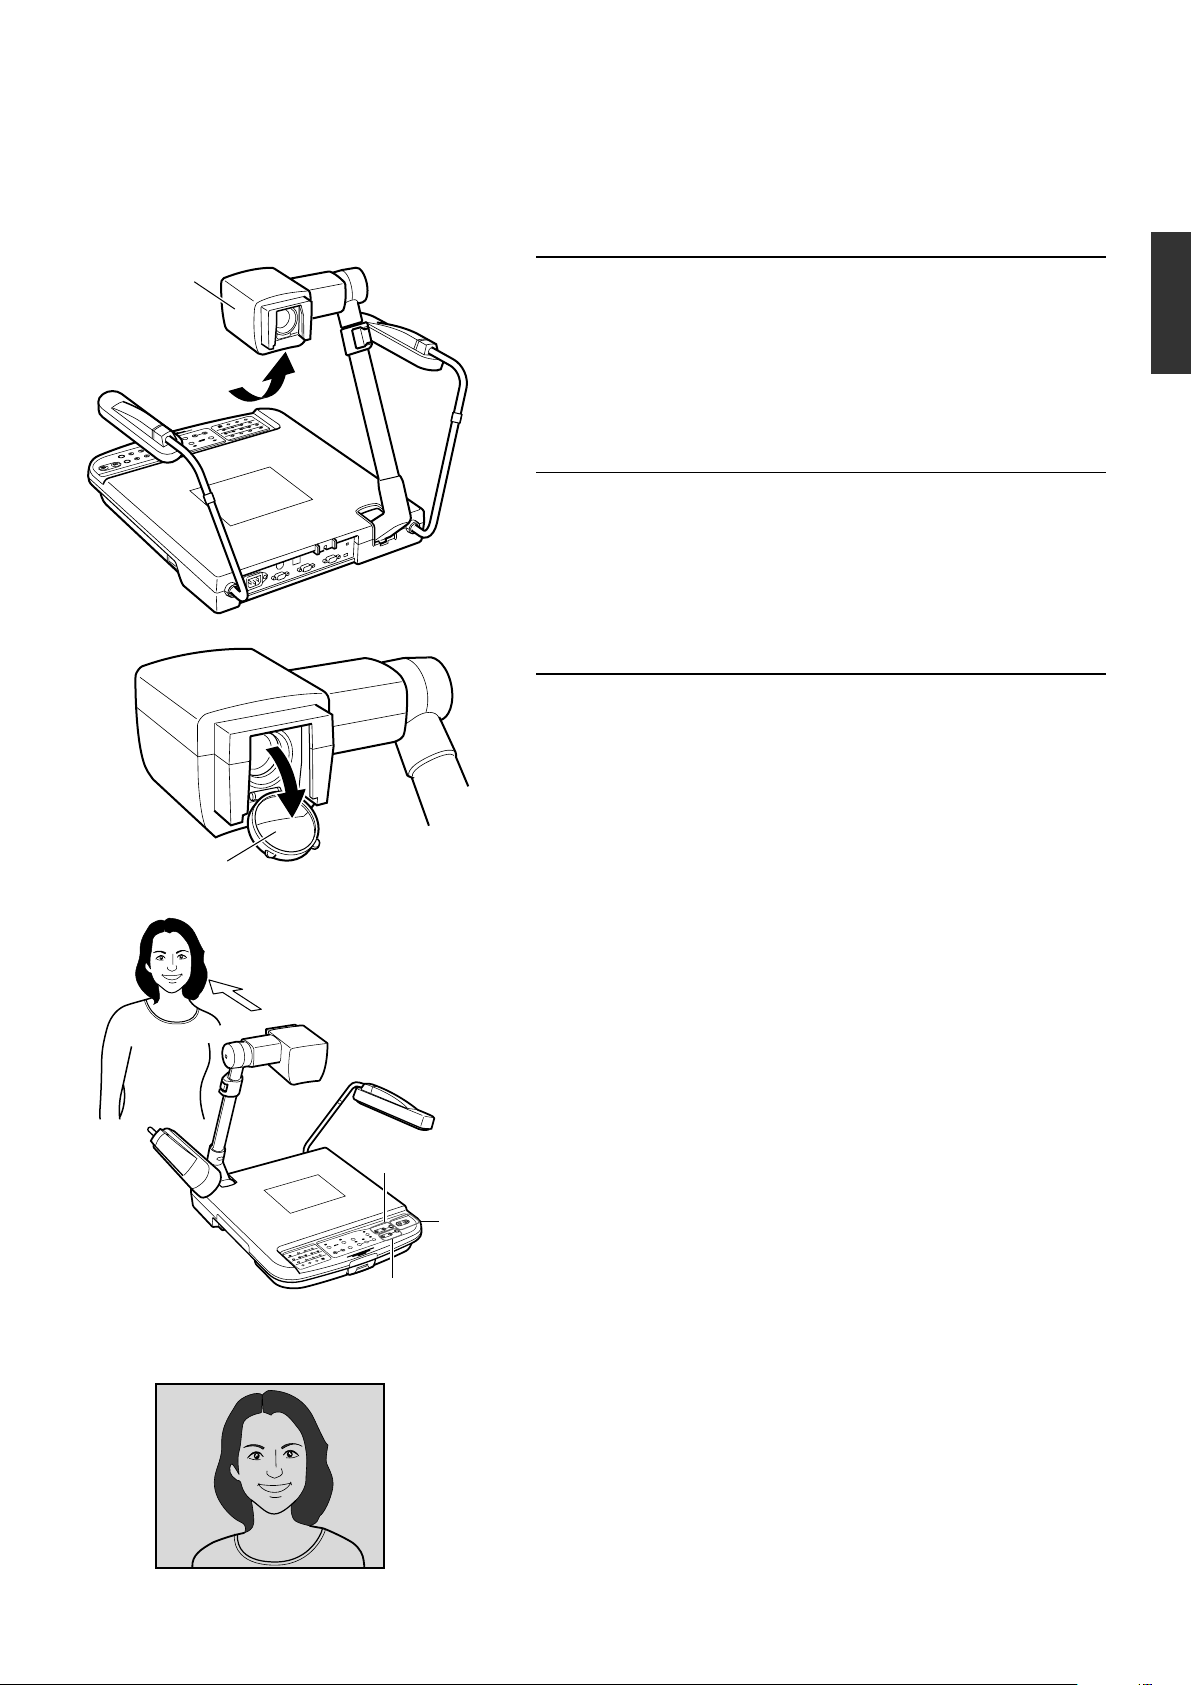
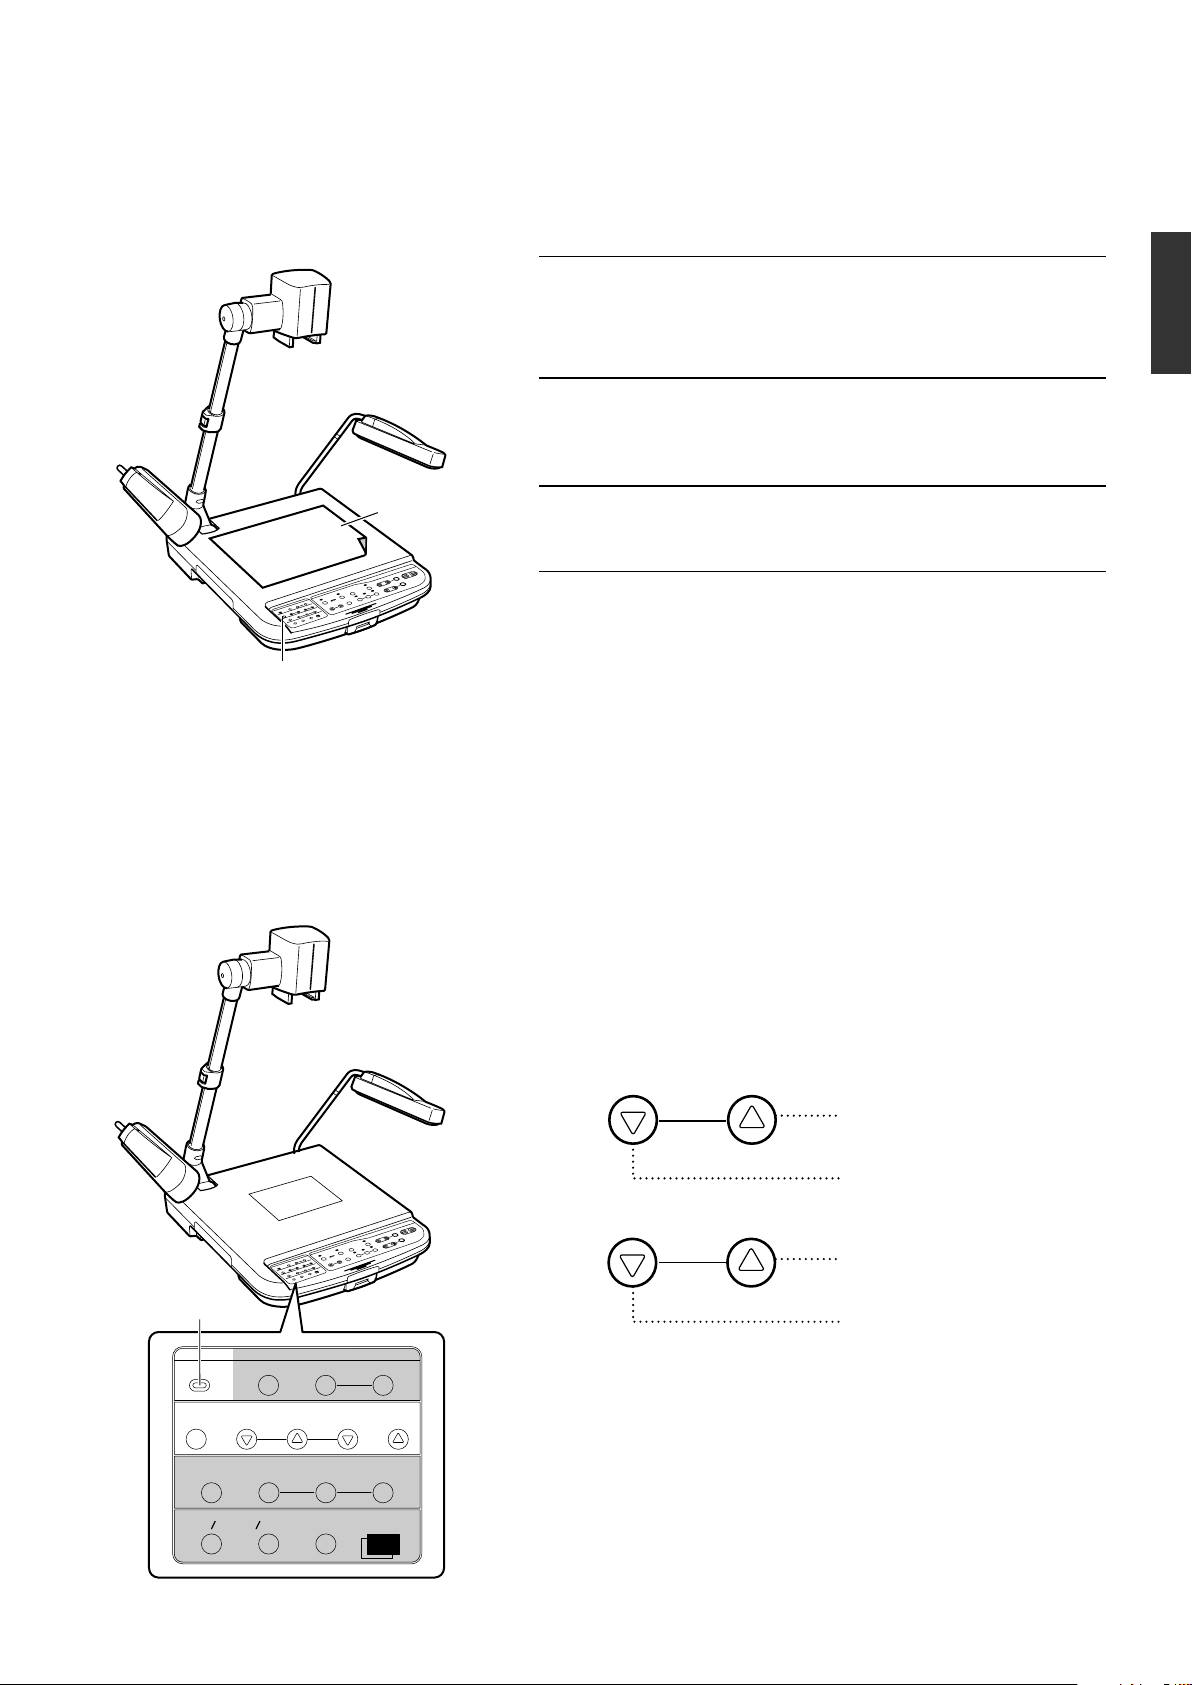
Names and Functions
Overall View
1
4
3
5
2
6
7
0
!
Rear Panel ☞ Page 8
89
English
4
Right Side
@
Control Panel ☞ Page 6
1 Camera Head
For capturing images of objects on the stage or surrounding areas.
2 Camera Arm
Supporting arm for the camera head. Adjust its angle when
shooting 3-dimensional objects.
3 Arm Lock
For adjusting the length of camera. Release the lock when
retracting or extending the camera arm and lock it at the
adjusted position.
4 Side Illuminations
Adjust to ensure that the stage is evenly lighted.
5 Handle
Pull out this handle to carry the unit. Put the handle away
when not in use.
6 Back Illumination
Use this lighting when viewing transparent materials such
as films.
☞ Page 15 ‘Presenting Films and Other Transparent Ma-
terials’
7 Stage
For placing objects (or materials).
Up to A3 landscape equivalent (400 mm x 300 mm) can
be captured.
8 Remote Sensor
For receiving signals from the remote control unit.
☞ Page 23 ‘Operating the Remote Control Unit’
9 SD Slot
Slot for inserting the SD card.
☞ Page 19 ‘Storing Images in SD Card’
0 Slide Film Holder
Use this when viewing slide films.
☞ Page 14 ‘Presenting Slide Films’
! Close-up Lens
Remove this lens when shooting surrounding objects.
☞ Page 13 ‘Shooting Surrounding Objects’
@ Power Switch
To turn on/off the power.
E-5
Page 6
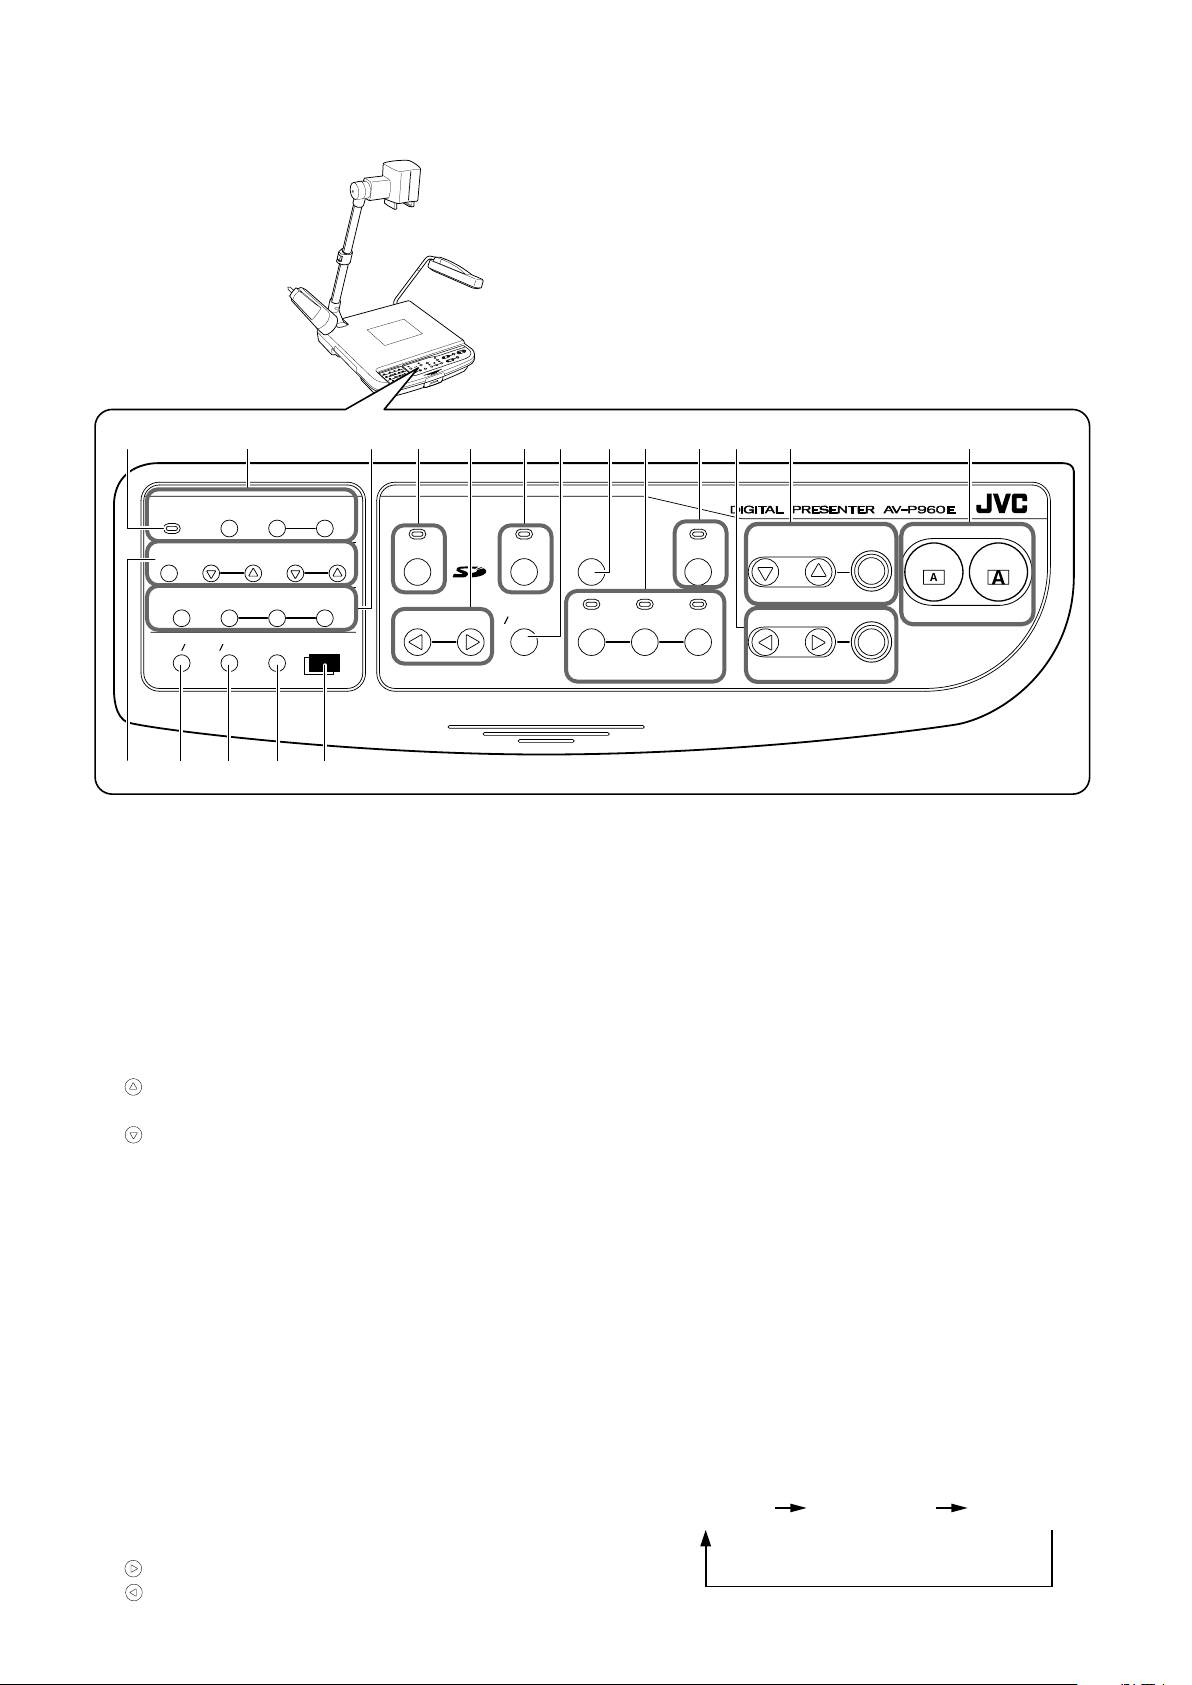
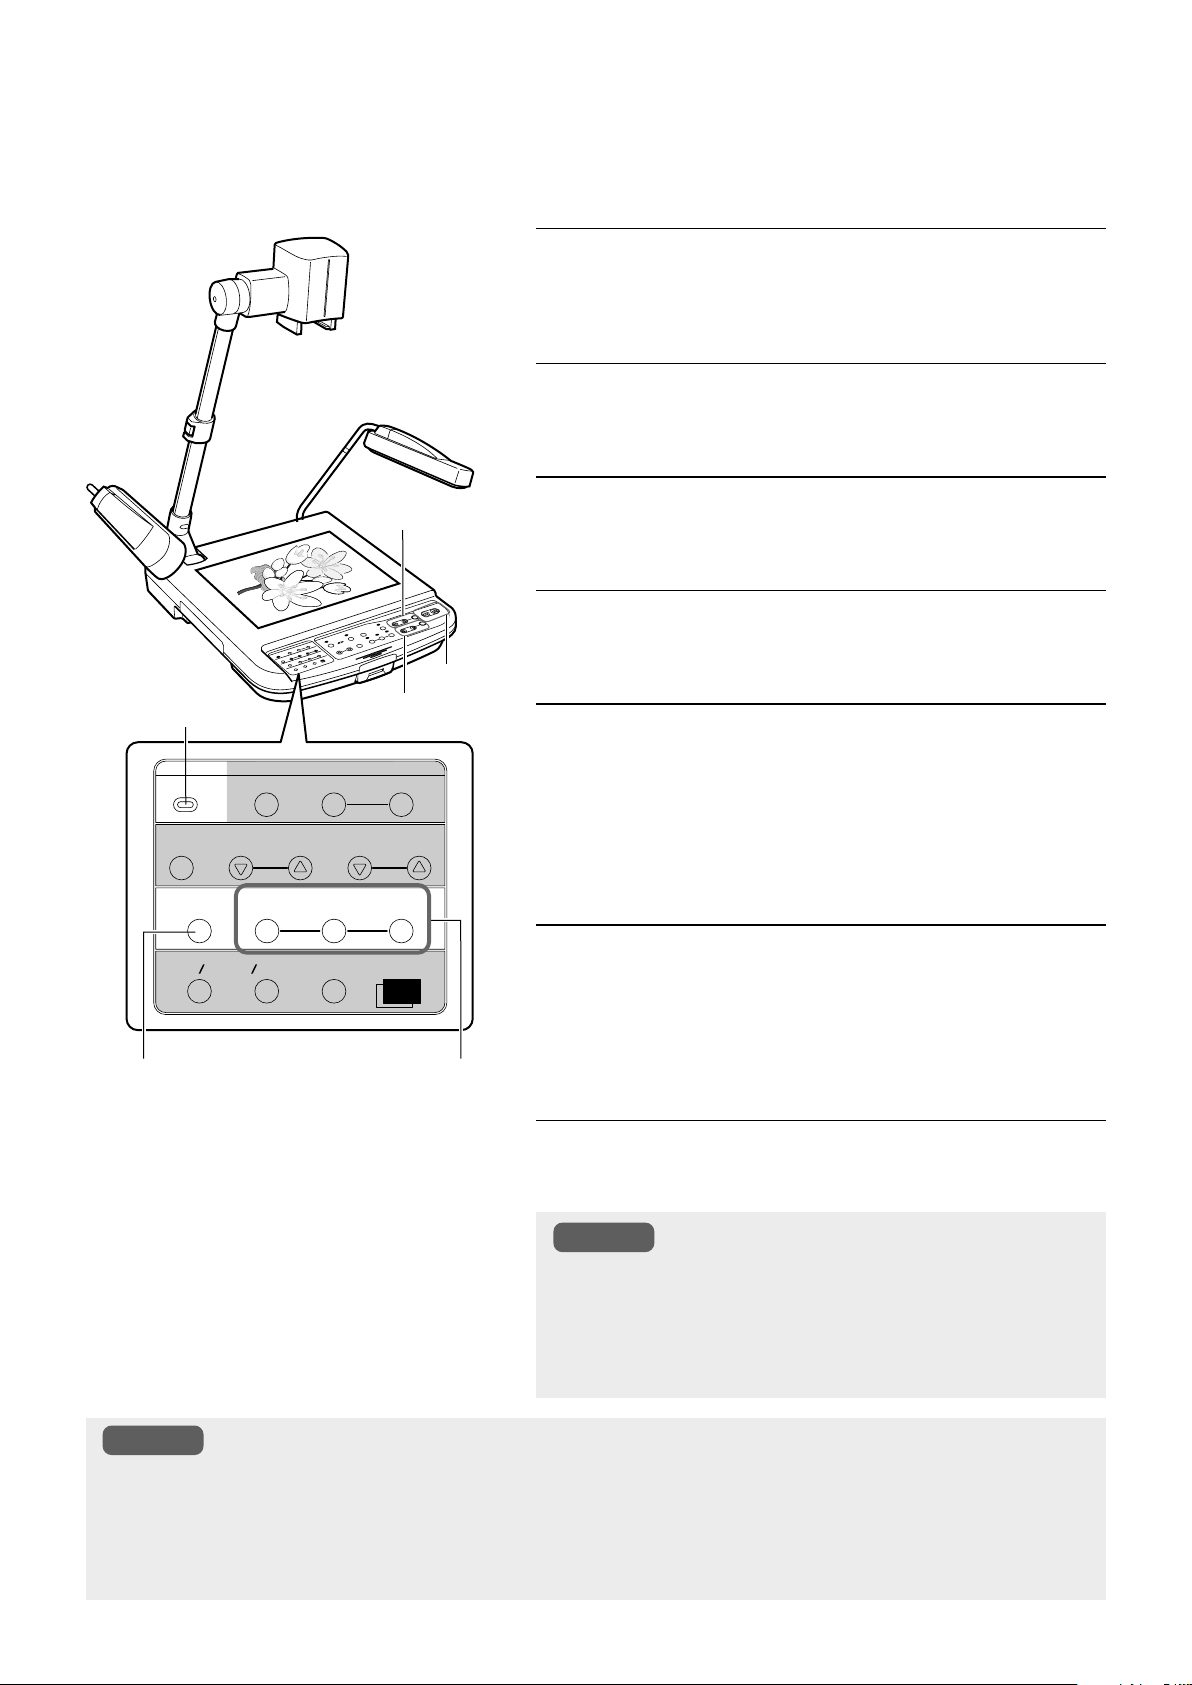
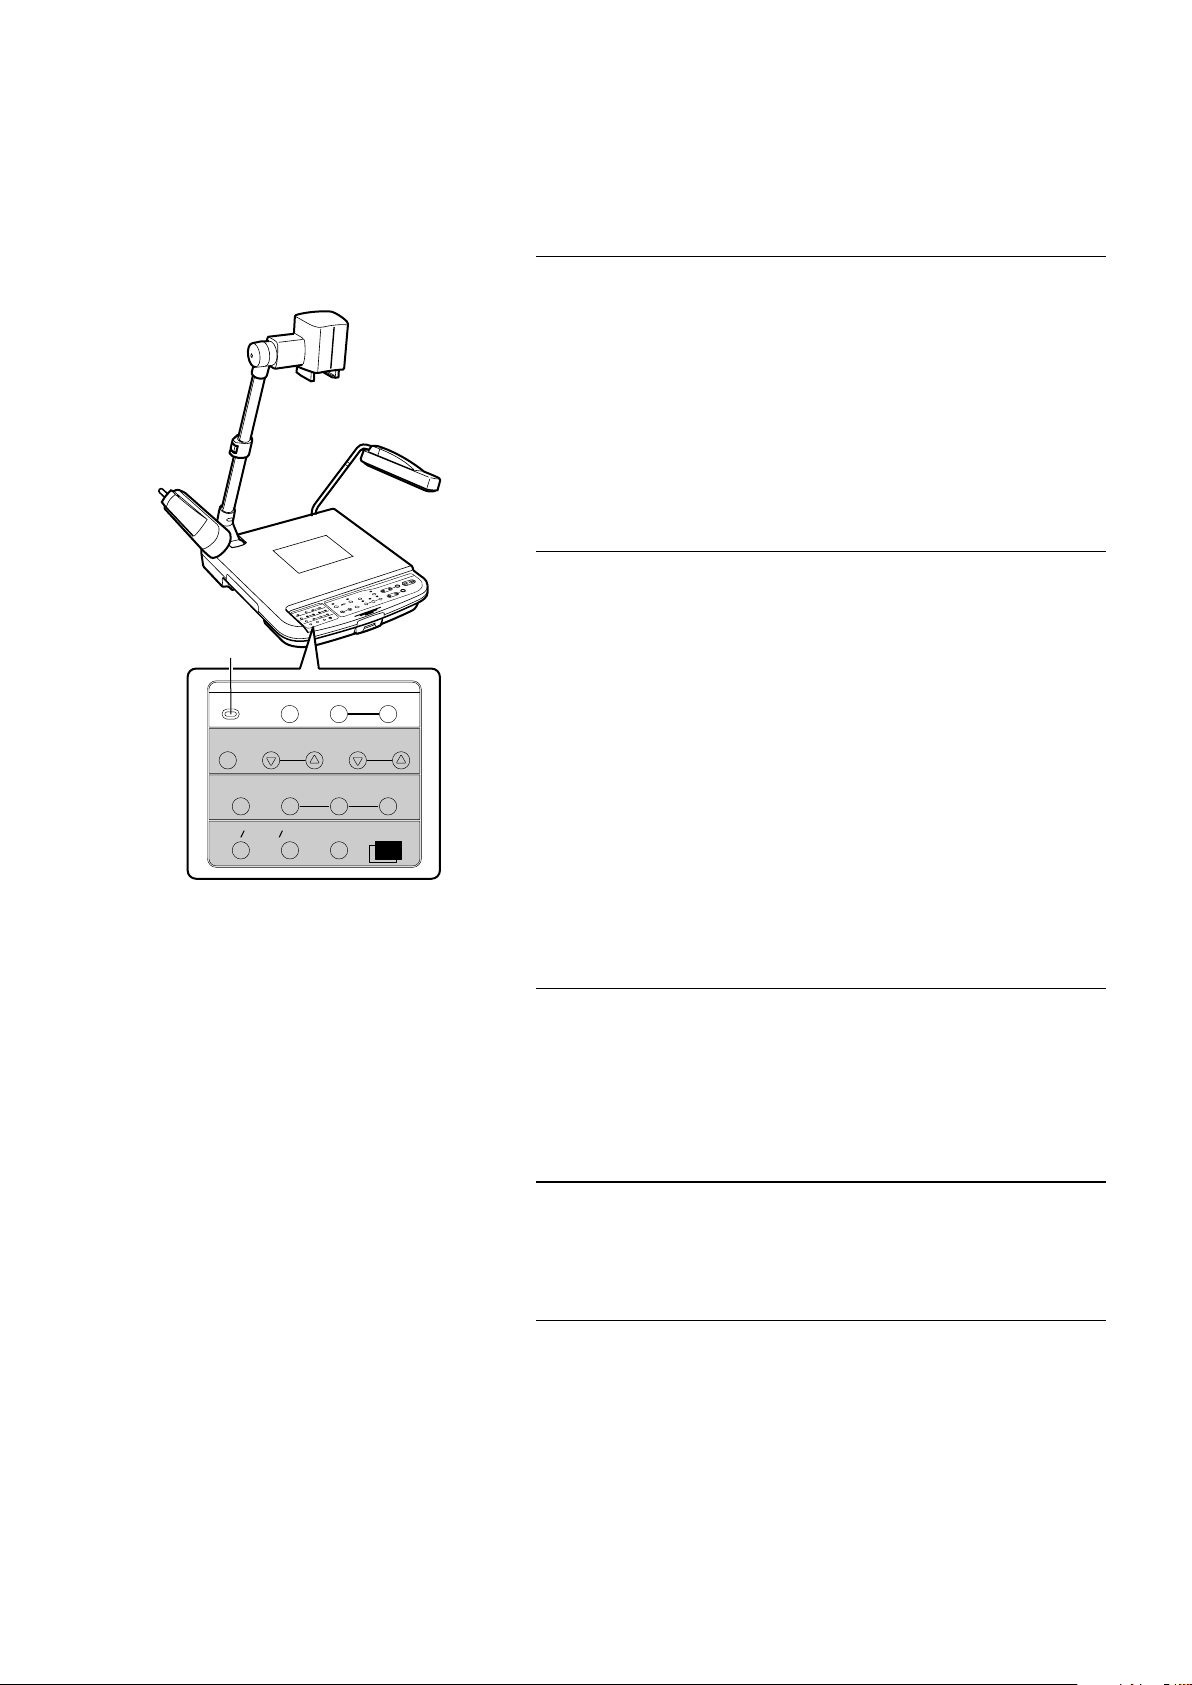
Names and Functions (continued)
Control Panel
$
AUTO
CAMERA
NEGA POSI
%
@
USER SETUPDEFAULT
WHITE BALANCE
RED BLUE
PICTURE MEMORY
123
BW COLOUR
TEXT
^ & *
SAVE
IMAGE OFF
! 0 9 8 6 4 2 1357#
DELETE
PAG E
SD
CARD SYSTEM
1 [ZOOM] Adjustment Buttons
Adjust in accordance with the object.
[IN] : To shoot objects (materials) in an enlarged form.
If this button is pressed continuously, the image
will stop enlarging at the optical zoom tele end
and thereafter digital zoom will be activated.
(Optical zoom: 12x, Digital zoom: 6x)
[OUT] : To shoot objects (materials) in a reduced form.
2 [FOCUS] Adjustment Buttons
For adjusting the focus of the camera.
[
]:To adjust the focus of the object (material) which
is far away from the camera.
[
]:To adjust the focus of the object (material) which
is close to the camera.
[AUTO] : When this button is pressed, the CAMERA lamp
at the SOURCE SELECT section will blink and
the focus will be adjusted automatically.The indicator lamp will go off once the adjustment is completed.
Depending on the object (material), it may be difficult to adjust the focus.
☞ Page 4 ‘Auto Focus’
IMAGE
SAVE
SELECT
ENTER
EXT
FREEZE
IN
CAMERA
SELECTSOURCE
FOCUS
SD UP&DOWN
BRIGHT
SD LEFT&RIGHT
AUTO
AUTO
SD DEFAULT
OUT IN
ZOOM
LIGHT
SD CARD
4 [FREEZE] Button
When this button is pressed, the camera image freezes
and is displayed as a still image, and the indicator lamp
lights up. When the button is pressed again while the indicator lamp is light up, the indicator lamp will go off, still
image will be released and the moving image will be restored.
5 [SOURCE SELECT] Buttons for Select-
ing Output Image
To select the image to be outputted from the [RGB OUTPUT] terminal and the [MONITOR OUTPUT] terminal located at the rear panel. The indicator lamp of the input
source selected for outputting will light up. Depending on
the types of monitor connected , it may take some times
for the images to be displayed.
[CAMERA] : To output the camera images.
[EXT IN] : To output signals inputted to the [EXT INT]
terminal located at the rear panel. External
input signals will not be output through the
[MONITOR OUTPUT] terminal.
[SD CARD] : To output images from the SD card inserted
in the slot.
☞ Page 20 ‘Viewing Image Data Stored in SD Card’
3 [BRIGHT] Adjustment Buttons
For adjusting the brightness of the camera image.
[AUTO] : When this button is pressed, the CAMERA lamp
at the SOURCE SELECT section will blink and
the brightness will be adjusted automatically.The
indicator lamp will go off once the adjustment is
completed.
[
]:To increase the brightness of the camera image.
[
]:To reduce the brightness of the camera image.
E-6
6 [LIGHT] Button for Switching Lighting
To switch between different lighting sources.
The lighting source changes whenever the button is
pressed.
Side
illuminations
Back
illumination
All
illuminations off
Page 7

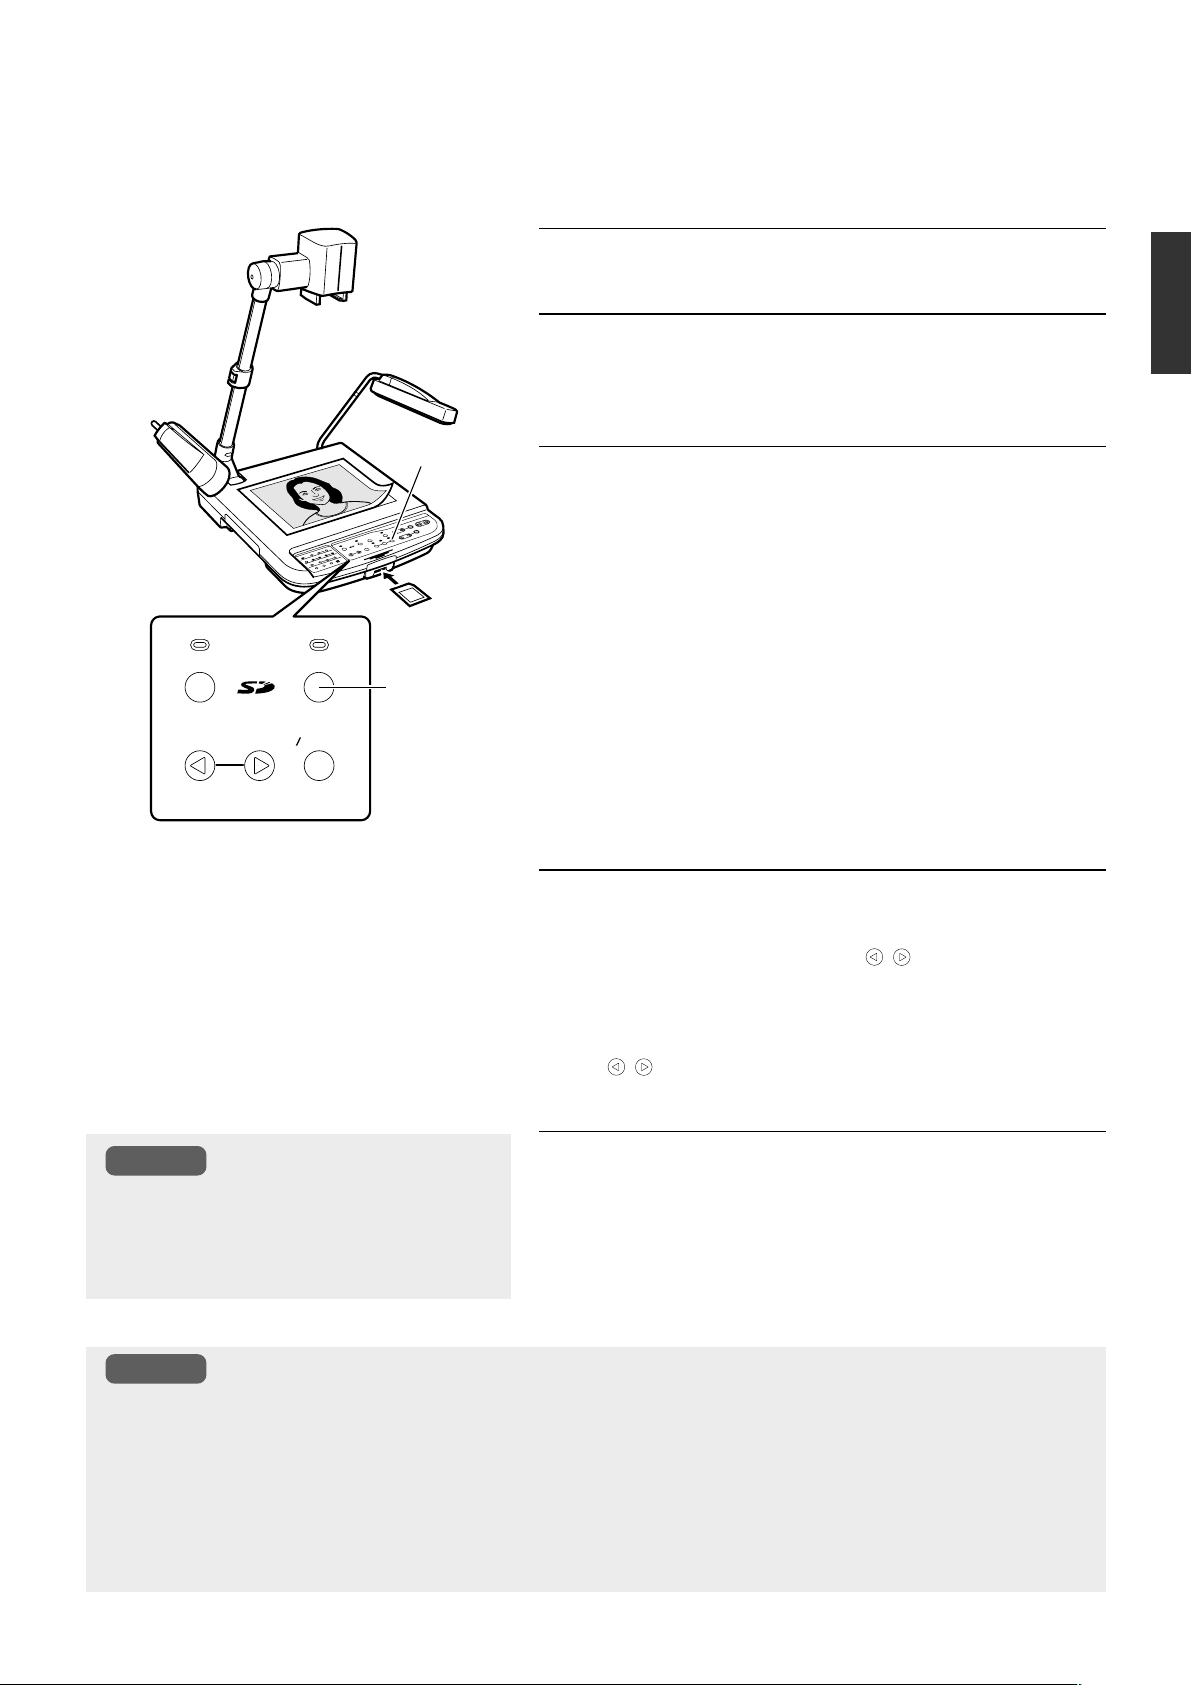
SD CARD SYSTEM
7 ~ 0 are functional only if SD card is inserted into the SD
Slot.
7 [IMAGE SELECT/ENTER] Button for
Selecting Images
Displays the miniature images of the SD card in a view of
16.
☞ Page 20 ‘Viewing Image Data Stored in SD Card’
8 [SAVE] Button for Saving SD Card
While selecting images from the camera, if this button is
pressed and hold, the indicator lamp will blink and the image currently displayed will be stored in the SD card.
☞ Page 19 ‘Storing Images in SD Card’
9 [PAGE] Buttons
To select and display images stored in the SD card.
[
]:To view the previous image.
[
]:To view the next image.
0 [DELETE] Button for Deleting SD Card
To delete selected images stored in the SD card.
When the [SD CARD] has been selected by the [SOURCE
SELECT] button 5, pressing this button for more than 2
seconds, the indicator lamp will blink and the selected image will be deleted.
☞ Page 19 ‘Deleting images’
! [PICTURE MEMORY] Buttons
To store the output image in the internal picture memory
or to select and display the images stored in the picture
memory.
[1] ~ [3]:Press the button for more than 2 seconds,
the button indicator lamp # will blink and the
image will be stored in the picture memory.
Press this button to output the stored image.
[CAMERA] : To select the camera image.
☞ Page 16 ‘Saving Images in the Picture Memory’
@ [USER SETUP] Buttons for Setting
Registration
To perform settings related to value setting.
[SAVE] : The present user settings will be regis-
tered.
[USER SETUP] : The registered settings will be activated.
[DEFAULT ]:Setting reverts back to default (factory)
setting.
☞ Page 18 ‘Saving the settings (User Setting Registra-
tion)’
# Button Indicator Lamps
Indicator lamps will blink when button ! ~ * has been
operated and the various settings are in the process of
being changed.
$ [WHITE BALANCE] Adjustment Buttons
To perform settings related to white balance.
[AUTO] : If this button is pressed, the indicator lamp
will blink while the white balance is being readjusted.
[RED
[RED ]:Decrease the red component of the entire
[BLUE ]:Increase the blue component of the entire
[BLUE
☞ Page 17 ‘Adjusting White Balance’
]:Increase the red component of the entire
screen.
screen.
screen.
]:Decrease the blue component of the entire
screen.
% [NEGA/POSI] Button for Switching
between Negative/Positive Film
Set to Nega when viewing negative films.
Negative will be selected when the button is pressed.
Press the button again, positive will be selected.
☞ Page 15 ‘Presenting Films and Other Transparent Ma-
terials’
^ [BW/COLOUR] Button for Switching
between Black & White and Colour
To switch the output image between Black & White and
Colour display.
Black & White image will be selected when the button is
pressed. Press the button again, Colour image will be selected.
& [TEXT] Button
To make the character clearer and sharper.
Te xt mode will be activated when the button is pressed. To
deactivate, press the button again.
* [IMAGE OFF] Button to turn off image
Use this button to hide the output image temporarily such
as before the presentation.
When this button is pressed, the screen will switch to image off mode (black screen) and the lamp at the SOURCE
SELECT section selected as output will blink. When the
IMAGE OFF button or either one of the buttons at the
SOURCE SELECT section is pressed again, the mode will
be canceled and the selected image will be displayed.
English
E-7
Page 8
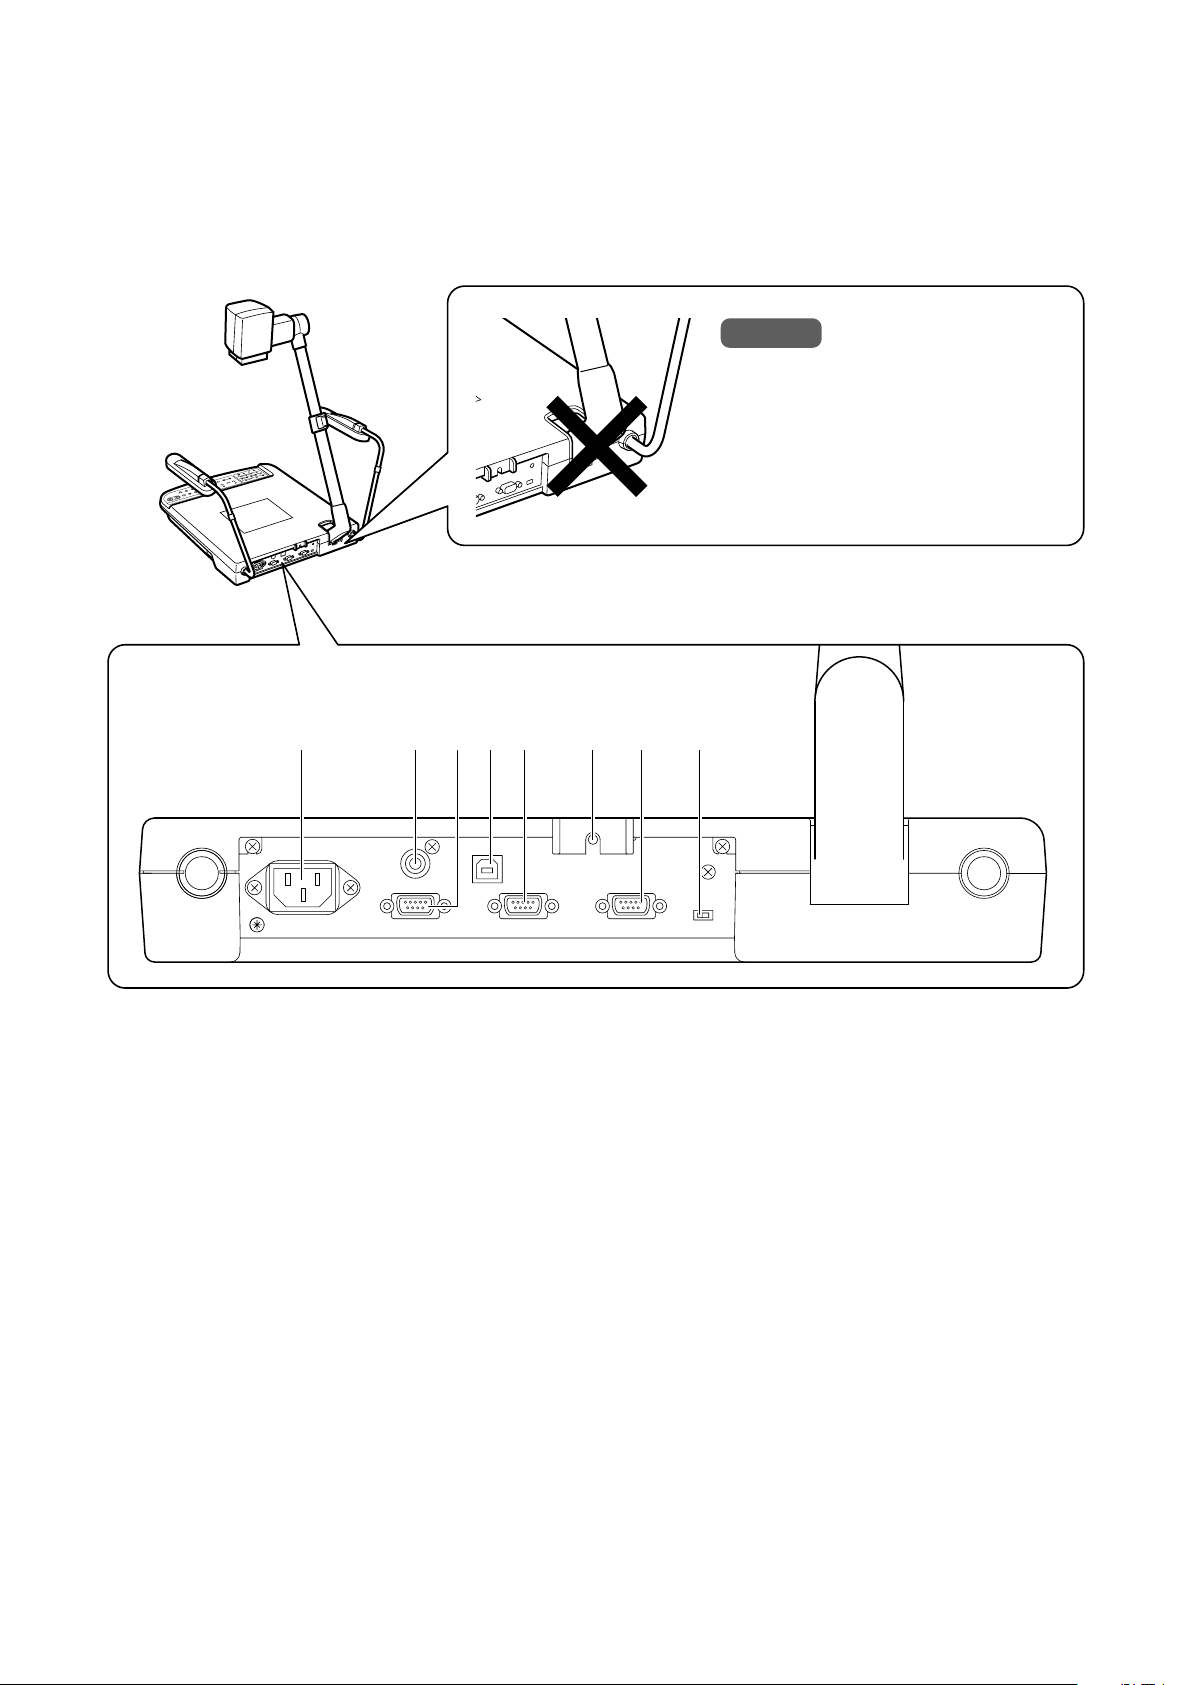
Names and Functions (continued)
Rear Panel
Refer to page 10 ‘Connection’ for details on connecting with other devices.
Caution
Do not open the cover at the bottom of the
arm and put your finger or insert object into
it. This may cause malfunction or injury.
1 2 4 6 7 853
AC IN
MONITOR
OUTPUT
RGB
OUTPUT
1 [AC IN] Power Inlet
Connect using the power cord supplied to an AC 100 V to
AC 240 V power source.
2 [MONITOR OUTPUT] Terminal
Image signal output terminal for confirming viewing angle.
3 [RGB OUTPUT] Terminal
RGB signal output terminal. Connect to the RGB input terminal of a projector or monitor.
4 [USB] Connector
For connecting to devices such as computer. Image data
or image memory stored in the SD card as well as image
data stored in this unit can be downloaded to the computer.
☞ Page 22 ‘Connecting to Computer via the USB Con-
nector’
USB
INPUT
REMOTE
(
EXT
INPUT
RS-232C
)
NTSC PAL
5 [EXT INPUT] Terminal for External Sig-
nal Input
For connecting to external devices such as computer. When
using the [SOURCE SELECT] button to select the external
input, the signals will be output through the [RGB OUTPUT]
terminal. In this case, output through the [MONITOR OUTPUT] terminal is not possible.
6 LCD Monitor Mounting Screw Hole
Use when mounting the LCD Monitor (sold separately) to
this unit.
☞ Page 24 ‘Installing LCD Monitor’
7 [REMOTE INPUT (RS-232C)] Terminal
Connect when controlling this unit via the PC using the
control software created by customer. For communication
method and command, read [RS-232C External control
communication commands (command. pdf)] in the provided
CD-ROM.
E-8
8 [NTSC/PAL] Switch
Set according to the monitor to be used.
Page 9
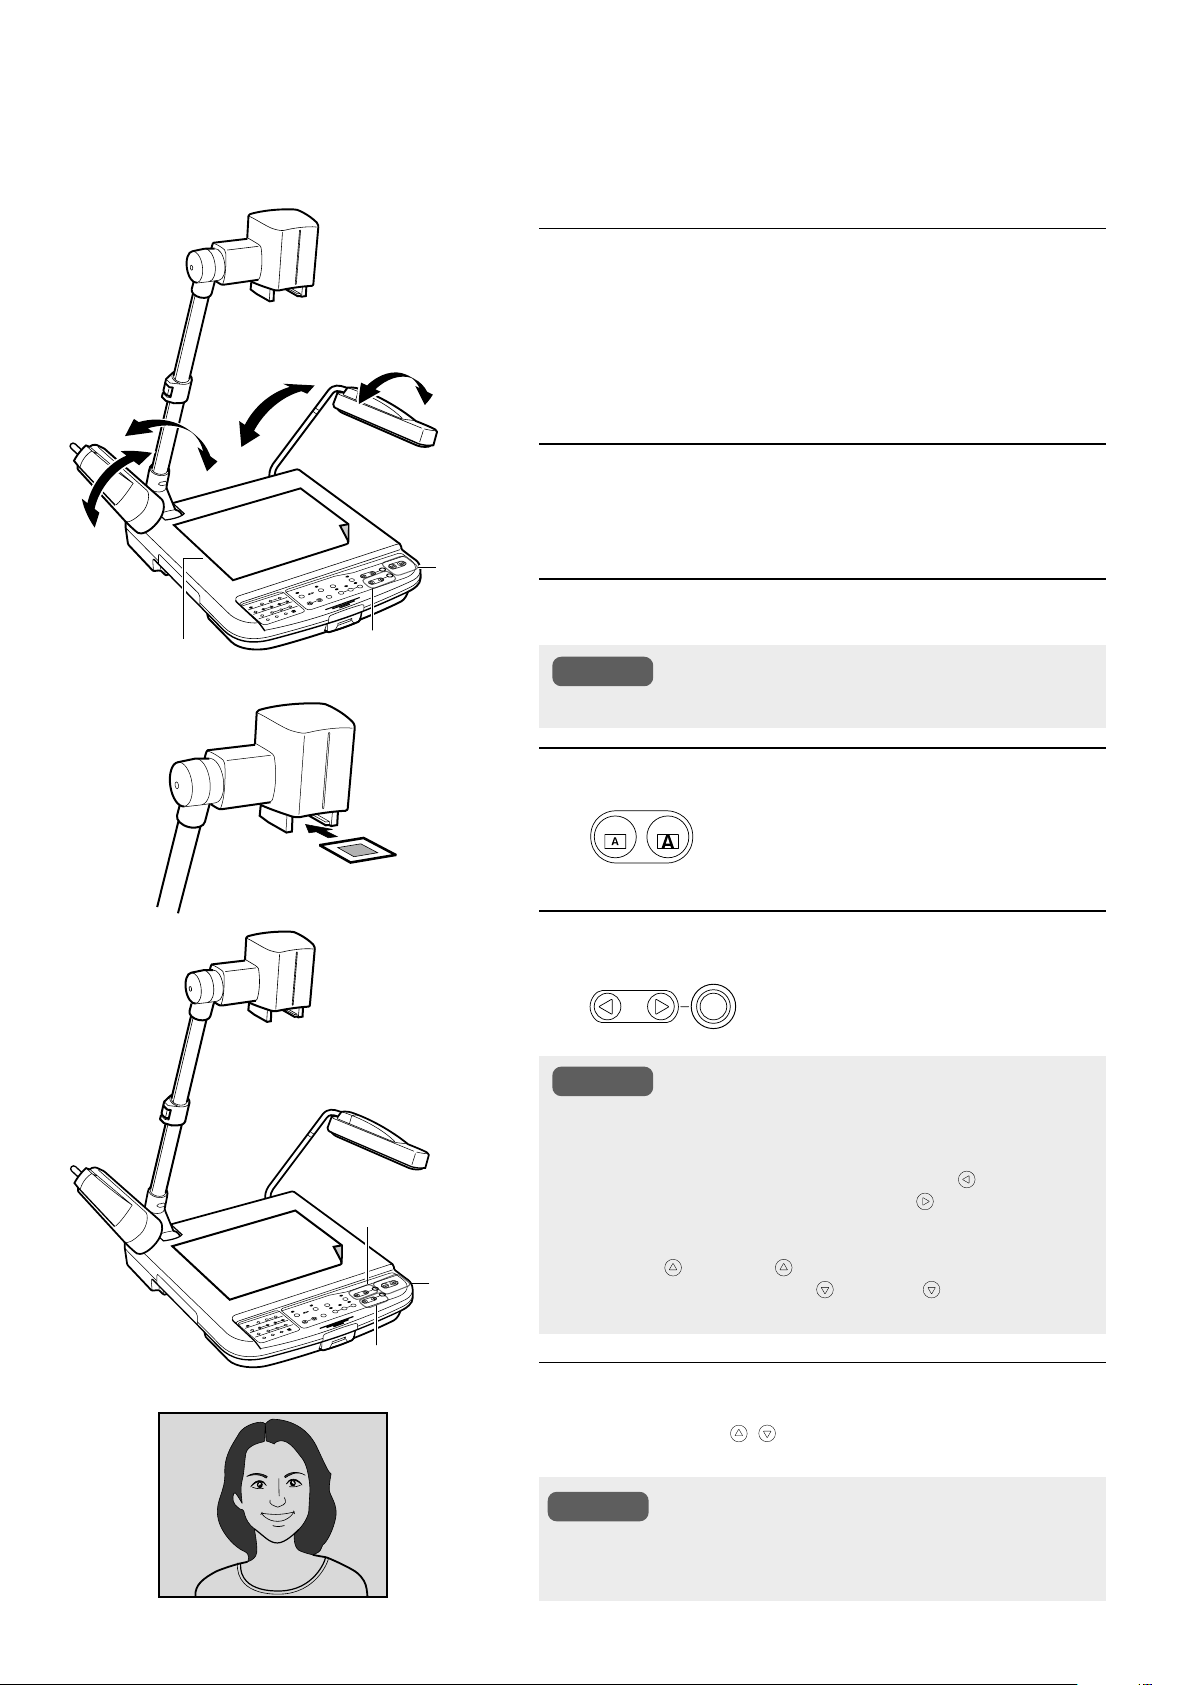
Before Using
Install according to the following steps.
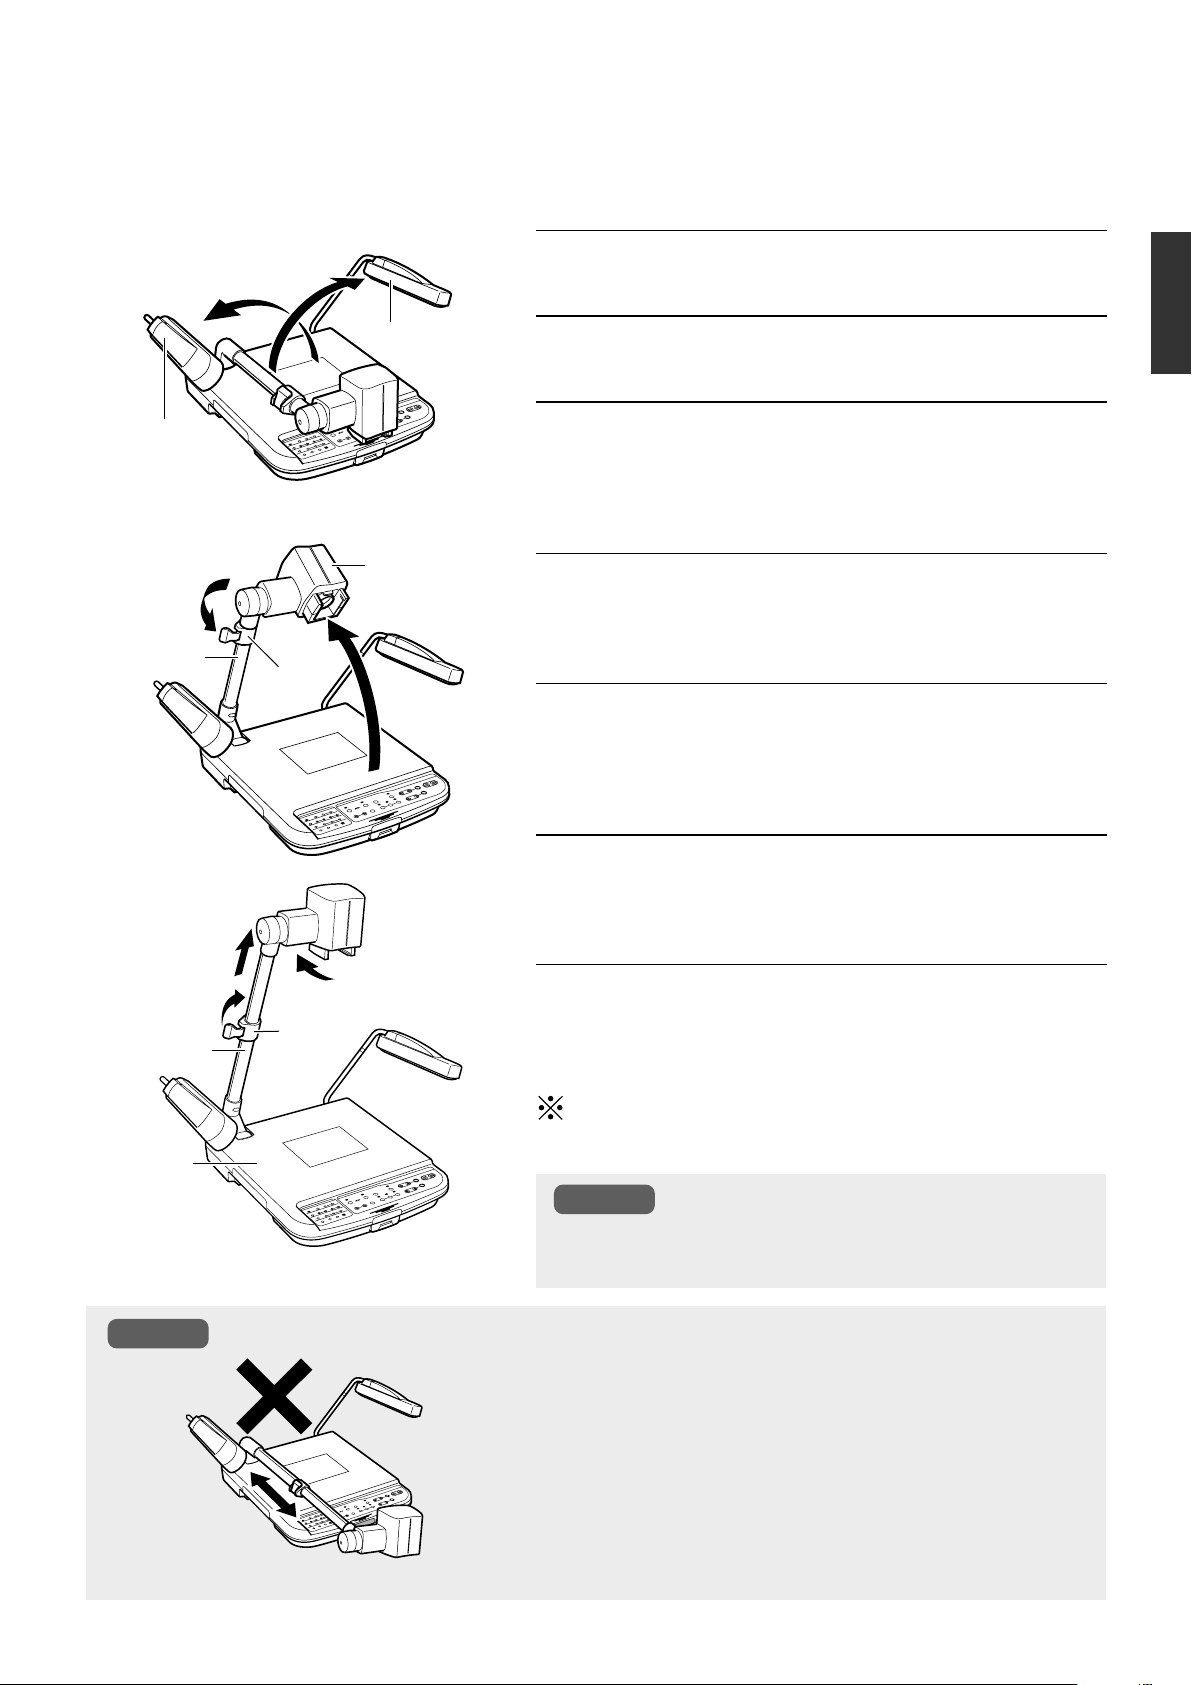
Left Illumination
4.
Camera Arm
2.
Arm
Lock
1.
Right Illumination
Camera Head
3.
1.
Lift up the right illumination
2.
Lift up the left illumination
3.
Lift up the camera head (camera arm)
Hold the camera arm and hold down the unit firmly while slowly
lifting the camera head until it reaches its maximum position and
stops.
4.
Releasing the arm lock
Pull the lever of the arm lock in the direction of the arrow as
shown in the figure to release the lock.
5.
Extending the camera arm
Hold down the lower portion of the camera arm or the unit firmly
while holding the upper portion of the camera arm and slowly extend
the camera arm until it reaches its maximum position and stops.
English
6.
Camera Arm
Stage
Caution
5.
Arm
Lock
7.
6.
Securing the camera arm
Return the lever of the arm lock in the direction of the arrow to
lock the arm.
7.
Turn the camera head towards the
stage
Carry out the reverse steps to fold up.
If the steps are carried out wrongly, the camera head and arm may
be damaged.
Caution
● When retracting the camera arm, do not hold the connecting
portion of the camera arm with your hand. It might get caught
resulting in injury.
● Do not try to retract or extend the camera arm when it has been
folded forward.
The interior of the camera arm may be damaged if excessive force is
applied.
Make sure that the camera head (camera arm) has been lifted up as
3.
described in Step
before retracting or extending the camera arm.
● Do not hold the camera head when lifting, folding, retracting or
extending the camera arm.
The camera head and the interior of camera arm may be damaged if
excessive force is applied. Make sure to hold the camera arm when
3.
performing steps
and 5..
E-9
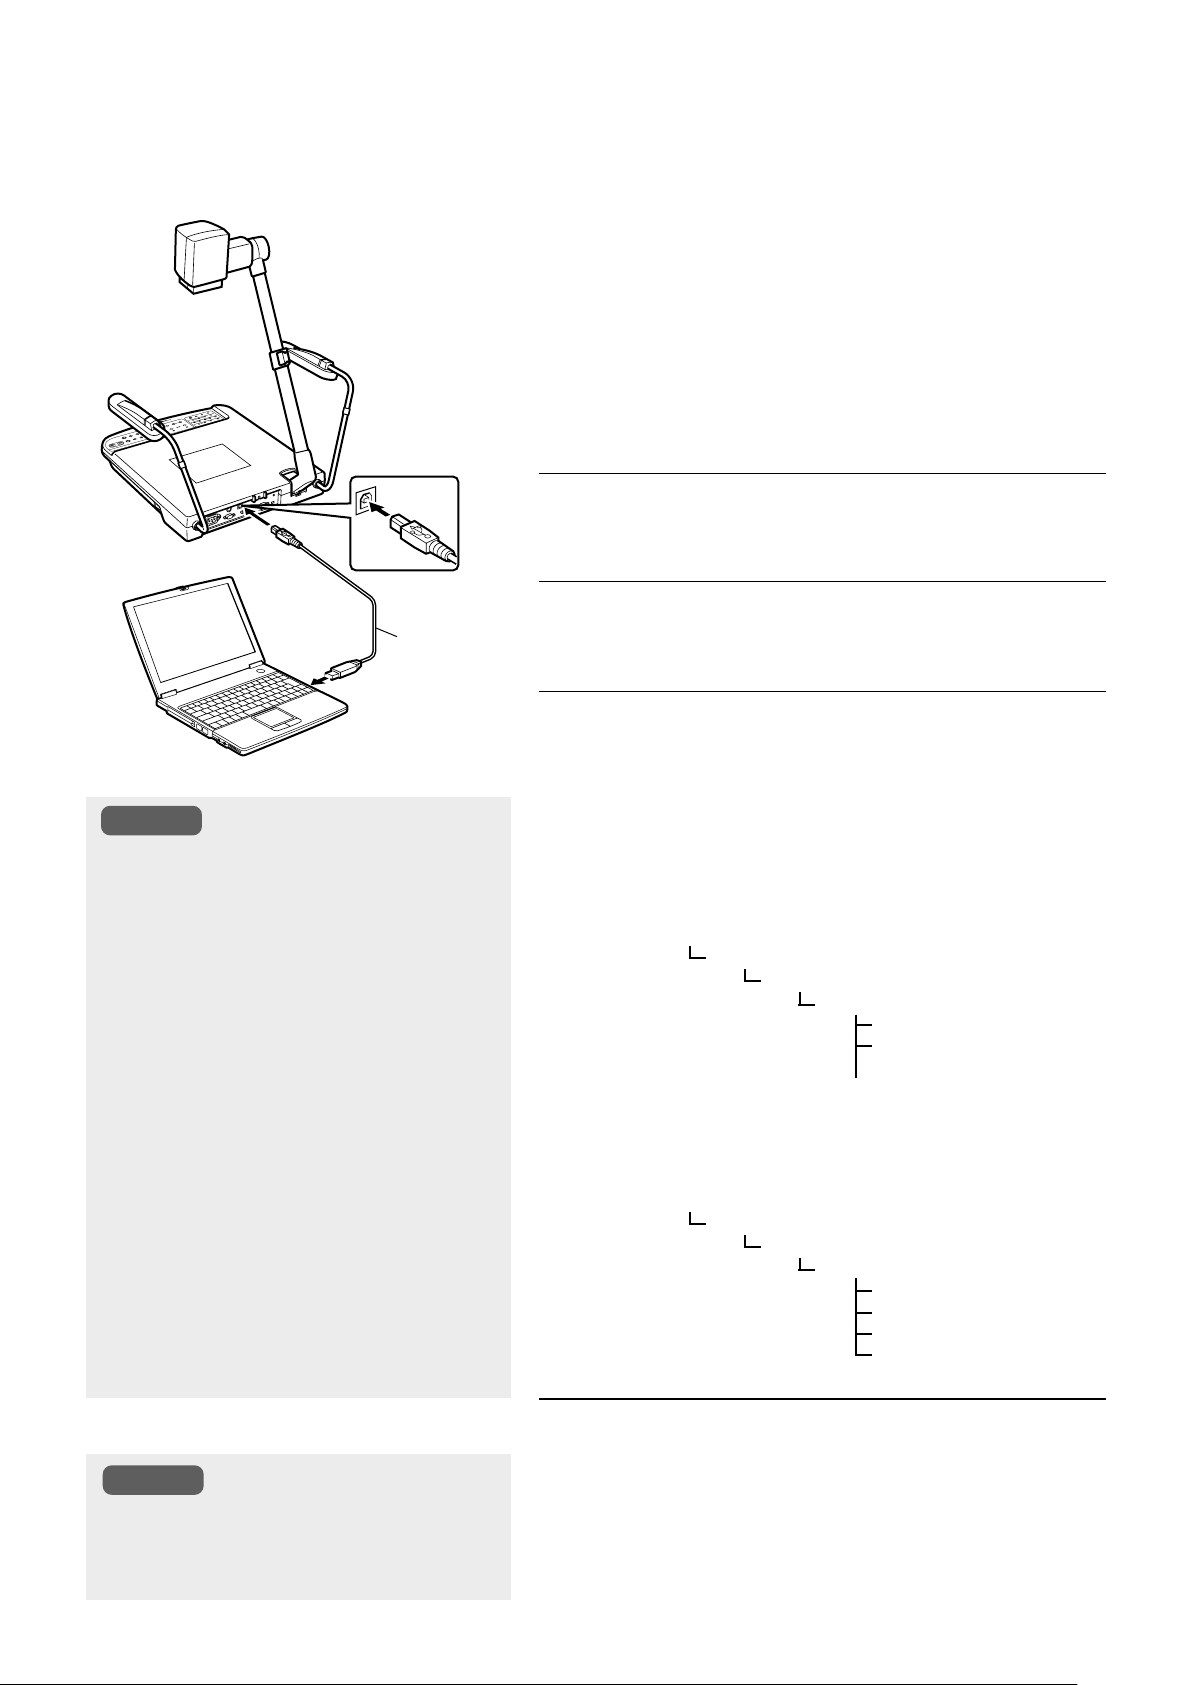
Page 10
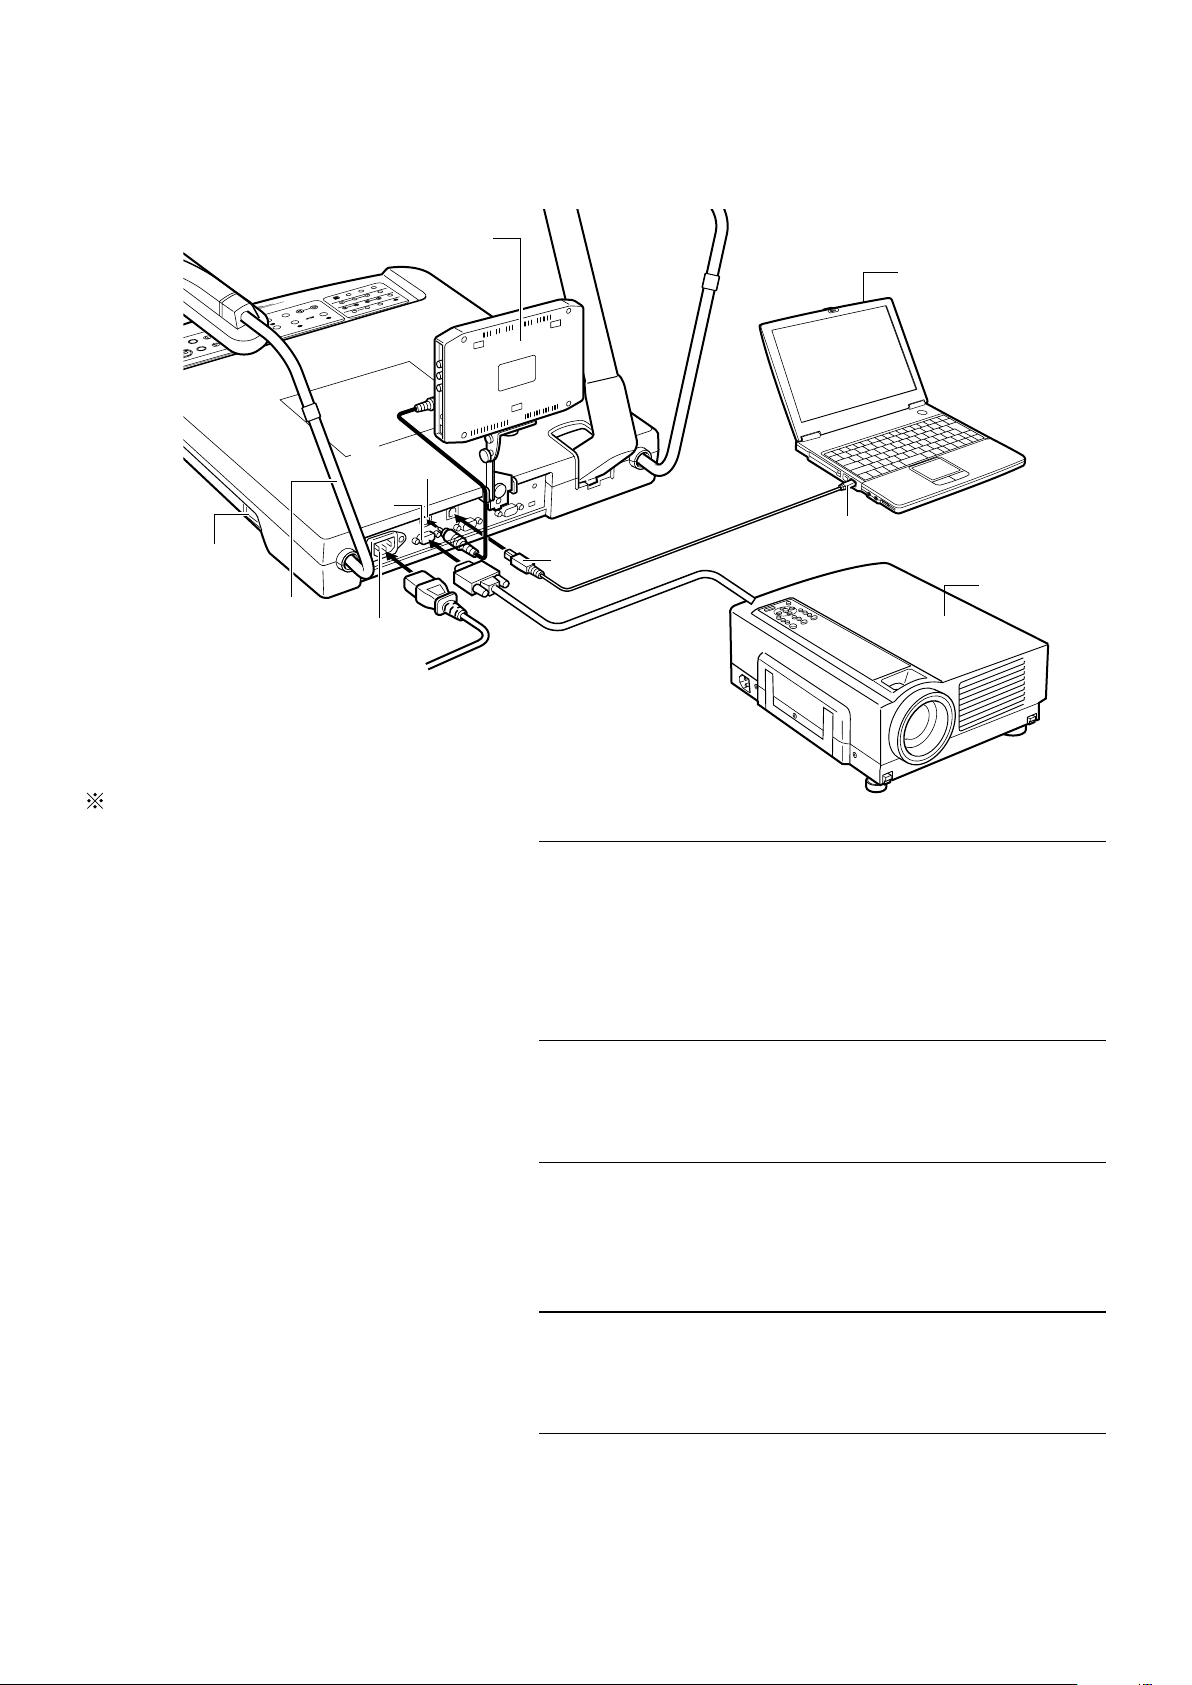
Connection
Install according to the following steps. The [MONITOR OUTPUT] terminal is use to confirm the images.
LCD Monitor
2.
[MONITOR OUT]
[RGB
OUT]
5.
Power Switch
Left Illumination
[AC IN]
AC Power
4.
1.
(supplied power cord)
3.
[USB]
Te r minal
USB Terminal
Computer
Projector
The LCD monitor, computer and projector are sold separately.
1.
2.
3.
4.
Connect the [RGB OUTPUT] terminal
to a projector or display.
● The output of this unit is XGA, connect it to a compatible device.
● Commercially available D-sub 15 pin cable (below 3 m) is rec-
ommended.
If necessary, connect the [MONITOR
OUTPUT] terminal to a monitor etc.
If necessary, connect the USB connector to a computer.
☞ Page 22 ‘Connecting to Computer via the USB Connector’
Connect to the AC power source with
E-10
the power cord supplied.
5.
Turn on the power.
Page 11
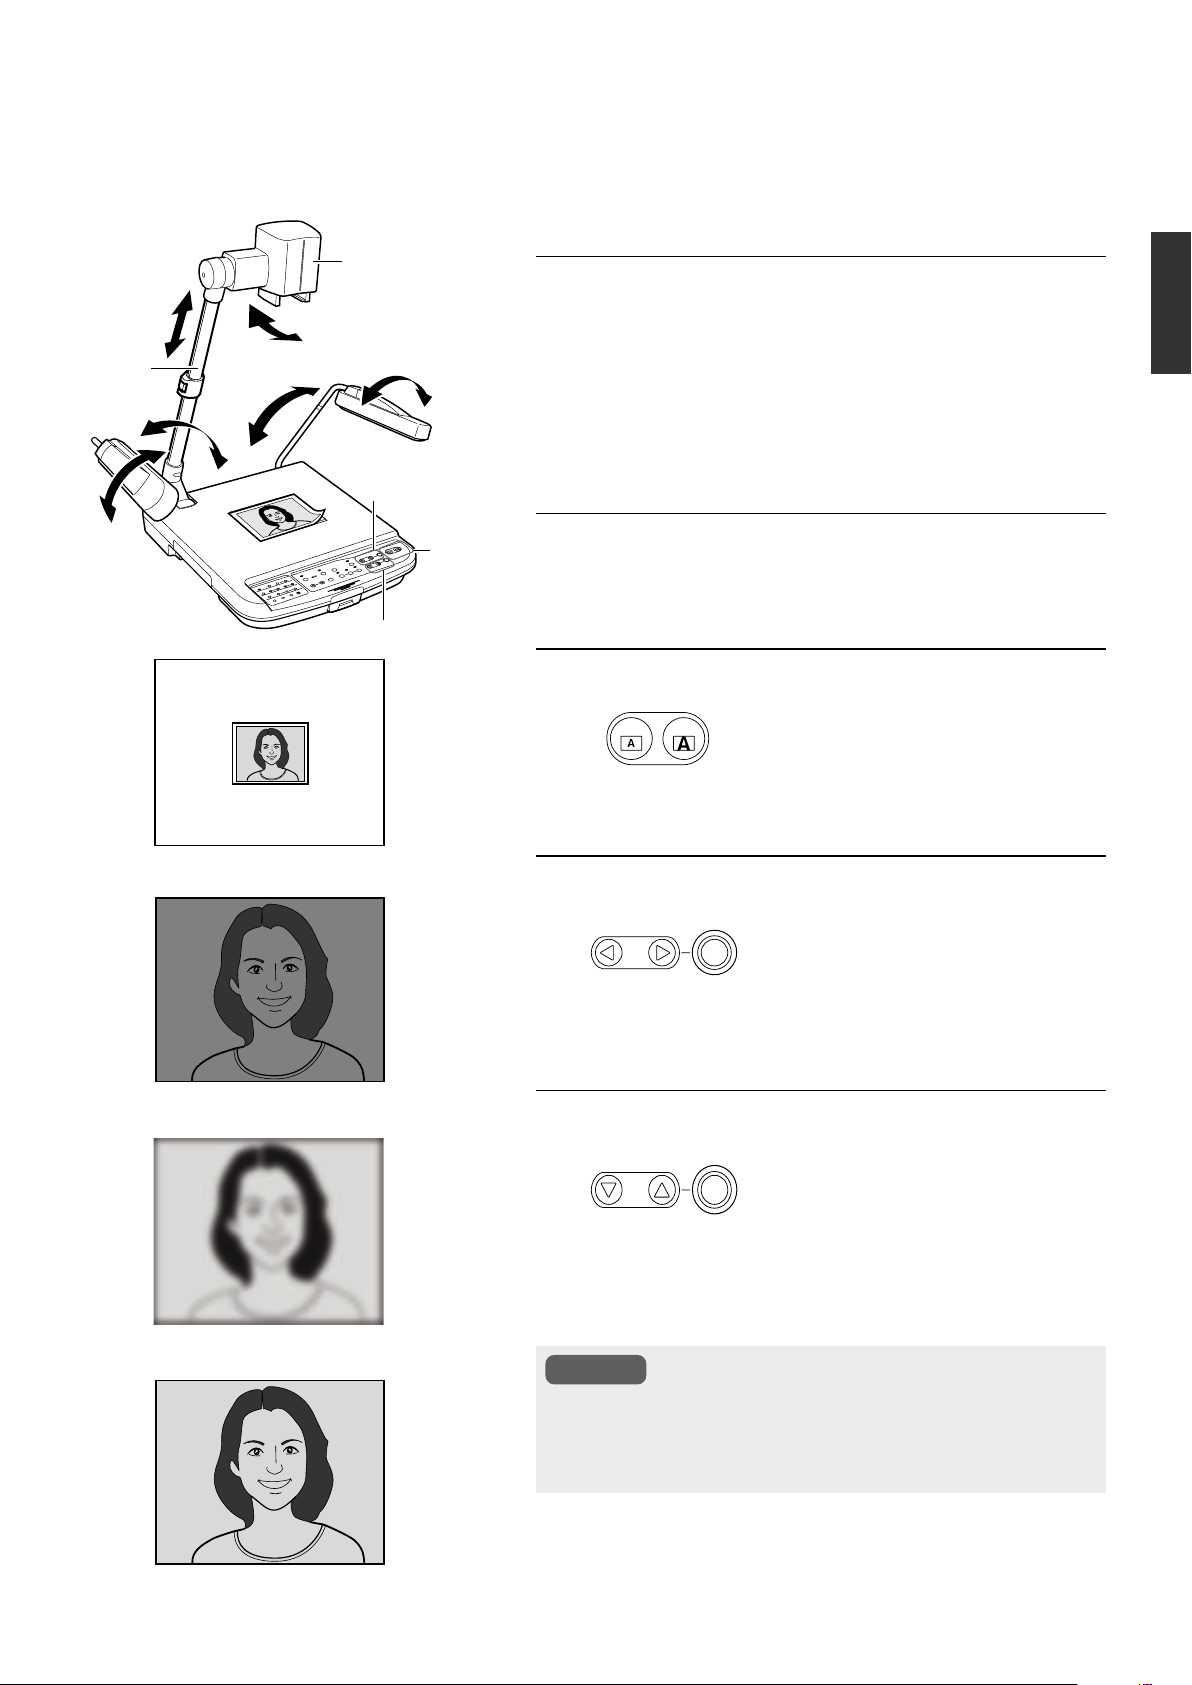
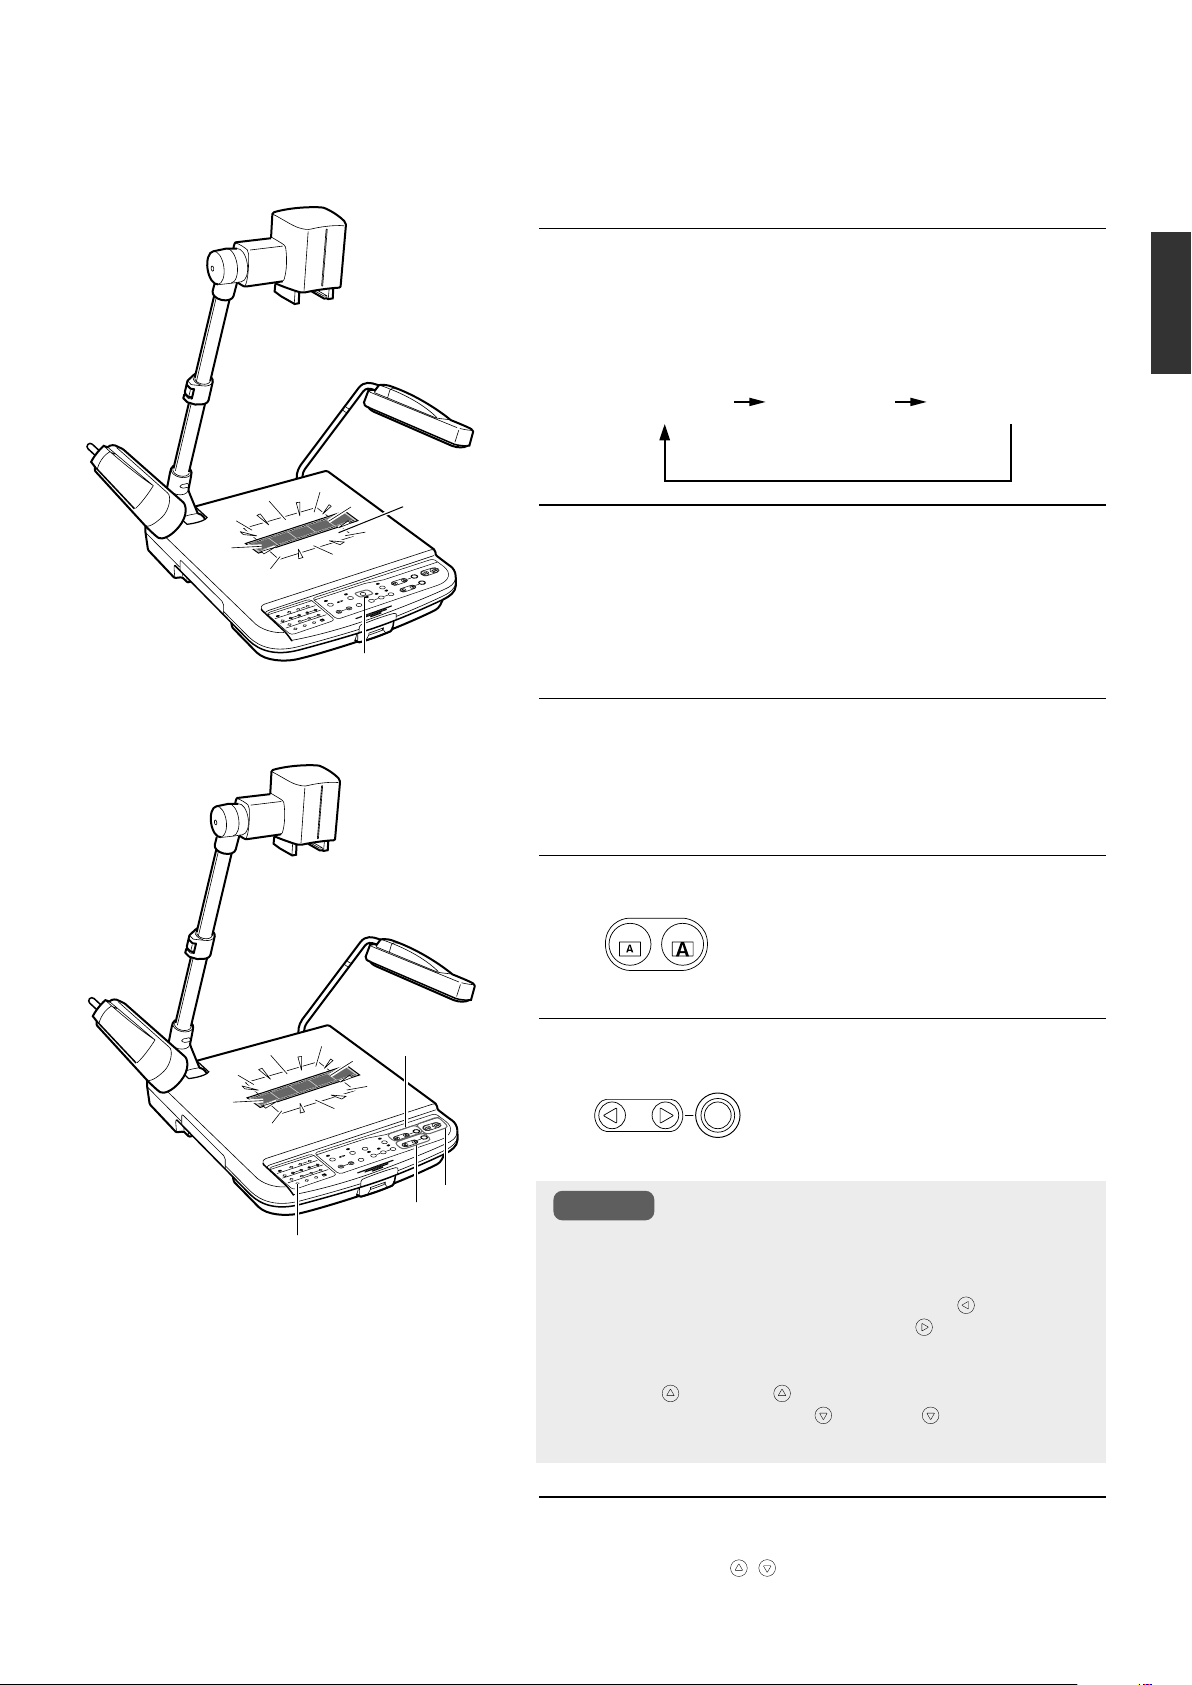
Presenting Printed Materials
Up to A3 landscape equivalent (400 mm x 300 mm) printed materials can be captured.
Camera Head
1.
Adjusting the arm and camera head
Adjust the arm and camera head in accordance with the size of
the object.
● Ensure that the camera head is positioned at the centre of the
object.
● The arm is catered to capture an A3 landscape equivalent object
when fully extended.
Arm
2.
1.
1.
2.
[FOCUS] button
English
[BRIGHT] button
(Example) Too little zooming.
(Example) Poor lighting.
[ZOOM]
button
2.
Adjusting lighting
Adjust such that the object is evenly lighted.
3.
Adjusting zoom
OUT IN
ZOOM
4.
Adjusting brightness
BRIGHT
AUTO
SD LEFT&RIGHT
5.
Adjusting focus
FOCUS
SD UP&DOWN
SD DEFAULT
AUTO
Adjust such that the portion of the object to
be captured occupies the full screen.
Adjust when the screen is too bright or too
dim.
Press the [AUTO] button and the appropriate brightness will be adjusted automatically.
To adjust the focus when it is out.
Press the [AUTO] button and the focus will
be adjusted automatically.
(Example) Focus is out.
(Example) Correctly adjusted.
Note
● For materials with a mixture of portrait and landscape printed
materials, it may be more convenient to save either one of the
orientations under the user setting. (☞ Page 18 ‘Saving the Set-
tings (User Setting Registration)’)
E-11
Page 12
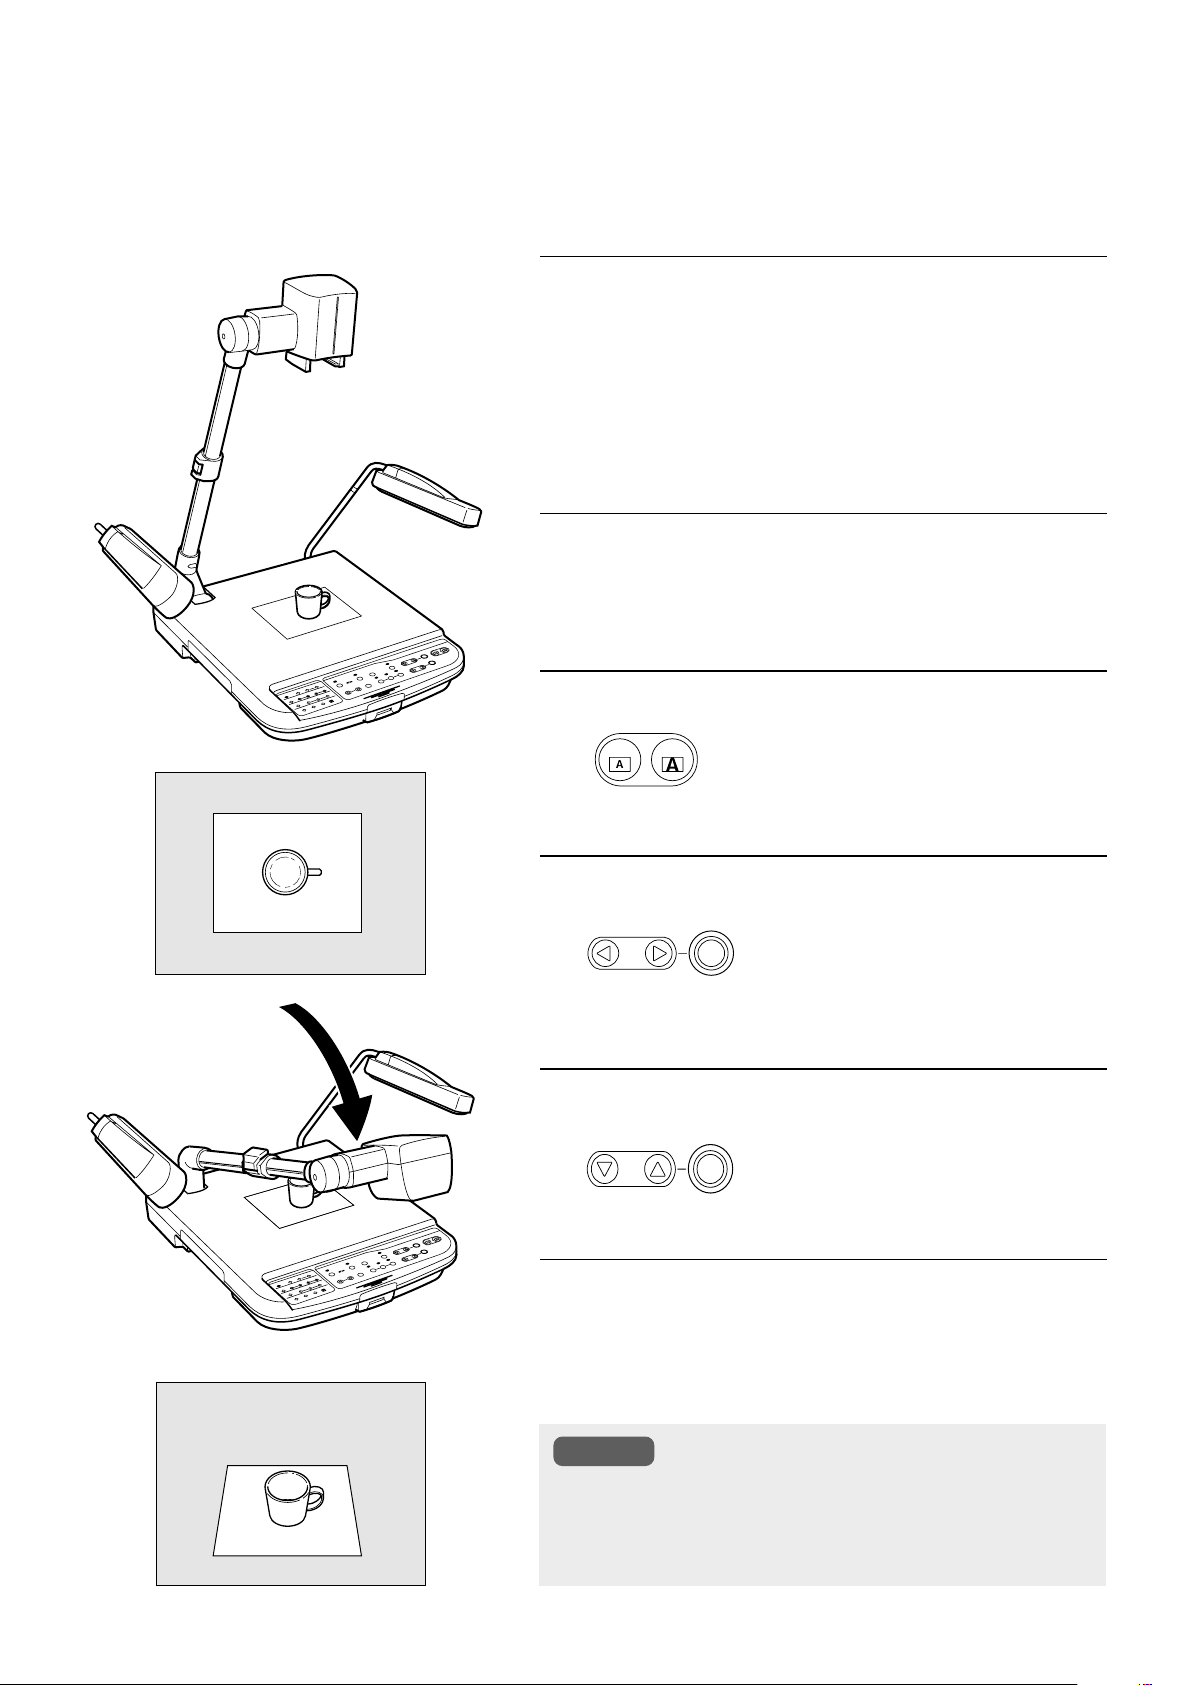
Presenting 3-dimensional Objects
3-D object placed on the stage can be captured. In addition, by adjusting the angle of the arm, the 3-D object can be captured at
various angles.
2.
1.
2.
1.
Adjusting the arm and camera head
Adjust the arm and camera head in accordance with the size of
the object.
● Ensure that the camera head is positioned at the centre of the
object.
● The arm is catered to capture an A3 landscape equivalent ob-
ject when fully extended.
2.
Adjusting lighting
Adjust such that the portion of the object to be captured is evenly
lighted.
3.
Adjusting zoom
OUT IN
ZOOM
Adjust such that the portion of the object to
be captured occupies the full screen.
6.
4.
Adjusting brightness
BRIGHT
AUTO
SD LEFT&RIGHT
5.
Adjusting focus
FOCUS
SD UP&DOWN
6.
Tilt the arm at an angle to capture
Note
● 3-D objects if taken from a slanting angle provides realistic
images.
● The focus might not be adjusted when shooting enlarged 3-
dimensional objects with the camera arm folded. In such case,
extend the arm until the focus is adjusted.
SD DEFAULT
AUTO
Adjust when the screen is too bright or too
dim.
Press the [AUTO] button and the appropriate brightness will be adjusted automatically.
To adjust the focus when it is out.
Press the [AUTO] button and the focus will
be adjusted automatically.
E-12
Page 13
Shooting Surrounding Objects
The camera head can be turned to shoot the surrounding objects.
Camera Head
1.
Turn the camera head towards the
1.
Close-up lens
2.
object
2.
Remove the close-up lens
Press and hold the claws while pulling out the lens.
3.
Adjusting the image
Adjust the zoom, brightness and focus.
English
3.
[FOCUS] button
[ZOOM]
button
[BRIGHT] button
E-13
Page 14
Presenting Slide Films
Slide films with frame can be inserted directly into the camera head for presentation.
1.
Place a piece of white paper on the
stage
As the slide film makes use of the reflecting light from the stage
surface, place a highly reflective white paper (B4 size or A3 size)
on the stage.
2.
Adjusting side illuminations
Adjust such that the stage surface is evenly lighted.
3.
Insert the slide film
Note
Use only slide films with mounting frame.
2.
Stage
2.
White
paper
[ZOOM]
button
[BRIGHT] button
1.
3.
[FOCUS] button
6.
[BRIGHT] button
5.
4.
[ZOOM]
button
4.
Adjusting zoom
OUT IN
ZOOM
5.
Adjusting brightness
BRIGHT
AUTO
SD LEFT&RIGHT
Notes
● Automatic brightness adjustment will be disabled whenever
Nega is selected. The indicator lamp blinks rapidly to indicate
that operation is not possible.
● Under negative mode, pressing the [BRIGHT
the images while pressing the [BRIGHT
the images.
● Under negative mode, pressing the [WHITE BALANCE] but-
tons [RED
nent while pressing the [RED
the red or blue component.
6.
Adjust focus
Use the [FOCUS , ] buttons to adjust the focus.
SD DEFAULT
] or [BLUE ] decreases the red or blue compo-
Adjust such that the portion of the object to
be captured occupies the full screen.
Adjust the brightness while looking at the
image displayed on the monitor.
] button dims
] button brightens
] or [BLUE ] button increases
E-14
Note
If the slide film is inserted vertically, zooming in (enlarging) until the mounting frame cannot be seen may cause the focus to
be out. In this case, set zoom to [OUT].
Page 15
Presenting Films and Other Transparent Materials
Films can be placed on the stage for presentation.
1.
Press the [LIGHT] button to turn on
the back illumination
The lighting source changes whenever the [LIGHT] button is
pressed.
English
Back
illumination
[LIGHT] button
1.
Side
illuminations
2.
Place the films and other transparent
Back
illumination
illuminations off
materials on the stage
Place the film at the centre of the stage and adjust the camera
head directly on top of the film.
3.
Setting Nega/Posi
In the case of a negative film, press the [NEGA/POSI] button to
set to negative mode.
4.
Adjusting zoom
OUT IN
ZOOM
Adjust such that the portion of the object to
be captured occupies the full screen.
All
3.
6.
5.
4.
5.
Adjusting brightness
BRIGHT
AUTO
SD LEFT&RIGHT
Notes
● Automatic brightness adjustment will be disabled whenever
Nega is selected. The indicator lamp blinks rapidly to indicate
that operation is not possible.
● Under negative mode, pressing the [BRIGHT
the images while pressing the [BRIGHT
the images.
● Under negative mode, pressing the [WHITE BALANCE] but-
tons [RED
nent while pressing the [RED
the red or blue component.
6.
Adjust focus
Use the [FOCUS , ] buttons to adjust the focus.
SD DEFAULT
] or [BLUE ] decreases the red or blue compo-
Adjust the brightness while looking at the
image displayed on the monitor.
] button dims
] button brightens
] or [BLUE ] button increases
E-15
Page 16
Saving Images in the Picture Memory
Frequently used images can be saved in the picture memory of this unit. Switching between camera images and images from the
picture memory is possible while presentation is in progress. Up to 3 images can be saved.
1.
Press the [CAMERA] button
The camera image is outputted.
2.
Adjusting zoom
Button
Indicator
Lamp
AUTO
CAMERA
NEGA POSI
USER SETUPDEFAULT
WHITE BALANCE
RED BLUE
PICTURE MEMORY
1
BW COLOUR
2
TEXT
[FOCUS]
button
[BRIGHT]
button
SAVE
3
IMAGE OFF
[ZOOM]
button
3.
Adjusting brightness
4.
Adjusting focus
5.
Press [PICTURE MEMORY 1] button for
more than 2 seconds
● The button indicator lamp will light up initially before blinking. It
will go off once the image has been saved.
● The image will become still image.
6.
Repeat Steps 1. ~
Perform the same procedures for picture memory 2 and 3.
5.
1.
䡵 Retrieving Stored Images
Notes
● This unit is designed to display A4 portrait in full with the camera arm fully extended. For materials with a mixture
of portrait and landscape pages, it may be convenient to save either one of the orientations in the picture memory
before presenting.
● Contents of the picture memory are lost if the power is turned off.
● Existing images stored in the picture memory will be overwrite whenever new images are being stored.
● SD images cannot be stored in this unit.
E-16
5.
1.
Press the [PICTURE MEMORY] button
The stored images in this unit will be displayed.
Note
● When retrieving the images stored in this unit, do not press
the [PICTURE MEMORY] buttons for more than 2 seconds. The
image will be stored.
● If no image is stored in the picture memory, the screen will
turn black and nothing will be displayed when the [PICTURE
MEMORY] button is pressed.
Page 17
Adjusting the White Balance
䡵 Adjusting the White Balance Automatically
This unit is adjusted to display the natural colour. However, the white balance can be re-adjusted with the following steps.
1.
Place a piece of white paper on the
stage
2.
Adjusting zoom
Adjust till the full screen becomes white.
White paper
3.
Adjusting brightness
4.
Press the [WHITE BALANCE AUTO]
button
[WHITE BALANCE
AUTO] button
The white balance will be re-adjusted in about 5 seconds.
● The button indicator lamp will blink initially, and goes off once
the white balance adjustment has been completed.
䡵 Adjusting the White Balance Manually
Depending on the object, if the images appear reddish, bluish or the overall colour tone appears to be bad even after the
automatic white balance adjustment has been performed, adjust the colour balance manually.
English
Button
Indicator
Lamp
AUTO
CAMERA
NEGA POSI
USER SETUPDEFAULT
WHITE BALANCE
RED BLUE
PICTURE MEMORY
1
2
BW COLOUR
TEXT
SAVE
3
IMAGE OFF
RED
BLUE
Increase the red
component
Decrease the red
component
Increase the blue
component
Decrease the blue
component
E-17
Page 18
Saving the Settings (User Setting Registration)
The recalled settings upon power up or when the [USER SETUP] button is pressed can be registered.
䡵 Registration
Button Indicator
Lamp
AUTO
CAMERA
NEGA POSI
BW COLOUR
USER SETUPDEFAULT
WHITE BALANCE
RED BLUE
PICTURE MEMORY
1
2
TEXT
SAVE
3
IMAGE OFF
1.
Adjusting the camera
● Adjust the camera to the settings to be registered.
● The following user settings are possible. ( ) are factory settings.
• Zoom position (Approximately A4 portrait position)
• Lighting status (Both side illuminations light up)
• White Balance (Value corresponding to side illumination)
• Nega/Posi (Posi)
• Black & White/Colour (Colour)
•Text (OFF)
2.
Press the [SAVE] button for more than
2 seconds
● The button indicator lamp will light up initially before blinking. It
will go off once the writing process has been completed.
● The written settings will be retained even if the power is turned
off.
䡵 Recalling the settings
䡵 Undo the settings
(Restoring the factory settings)
1.
Press the [USER SETUP] button
● The registered settings will be activated.
1.
Press the [DEFAULT] button
● The factory settings will be restored.
2.
Press the [SAVE] button for more than
2 seconds
● The button indicator lamp will light up initially before blinking. It
will go off once the writing process has been completed.
E-18
Page 19
Storing Images in SD Card
Images taken can be stored in the SD card (sold separately).
1.
Press the [CAMERA] button
IMAGE
SAVE
SELECT
ENTER
DELETE
SD
PAGE
CARD SYSTEM
䡵 Deleting images
3.
1.
2.
2.
Insert the SD card
● To remove the SD card, push in the card before removing it from
the card slot.
3.
Press and hold the SAVE button.
● The save indicator lamp lights up ➞ Blinks while saving is in
progress. Blinks ➞ Lights up ➞ Light goes off once saving is
completed.
● Saving is not possible if the SD card switch has been turned on
to write-protect. In this case, the save indicator lamp will not blink.
● If the SD card is full and additional images cannot be stored, the
save indicator lamp will not blink. In this case, delete unwanted
images or use a new card.
1.
Select the image to delete
● <Normal screen>
To delete image, use the [PAGE , ] buttons to select the
image to be deleted.
English
● <Thumbnail screen>
When the thumbnail screen is being displayed, use the [PAGE
, ] buttons to move the cursor to select the image to be
deleted.
Notes
● If an image is deleted in the thumbnail screen,
the next image will shift up and be displayed
in its position.
● The cursor will move to the next image fol-
lowing the deleted image.
Notes
● When removing or inserting the SD card or when powering off, make sure to press the [CAMERA] button and
confirm that the output image is a camera image. Otherwise, the data in the card may be corrupted or this unit may
not function properly.
● The SD card is made from parts that are susceptible to static charges. Malfunction might occur and the contents of
the card might be damaged due to static charges. As such, make sure to handle with extra care.
● Do not leave the SD card in the card slot. Remove the SD card for safe keeping after use.
● Number of images that can be stored:
64 MB: about 120 images, 128 MB: about 240 images, 256 MB: about 480 images
● 64MB,128 MB or 256 MB SD card from Panasonic is recommended.
2.
Press the [DELETE] button for more
than 2 seconds
● The delete indicator lamp lights up ➞ Blinks while deleting is in
progress. Blinks ➞ Lights up ➞ Light goes off once deleting pro-
cess is completed. (about 2 seconds)
E-19
Page 20
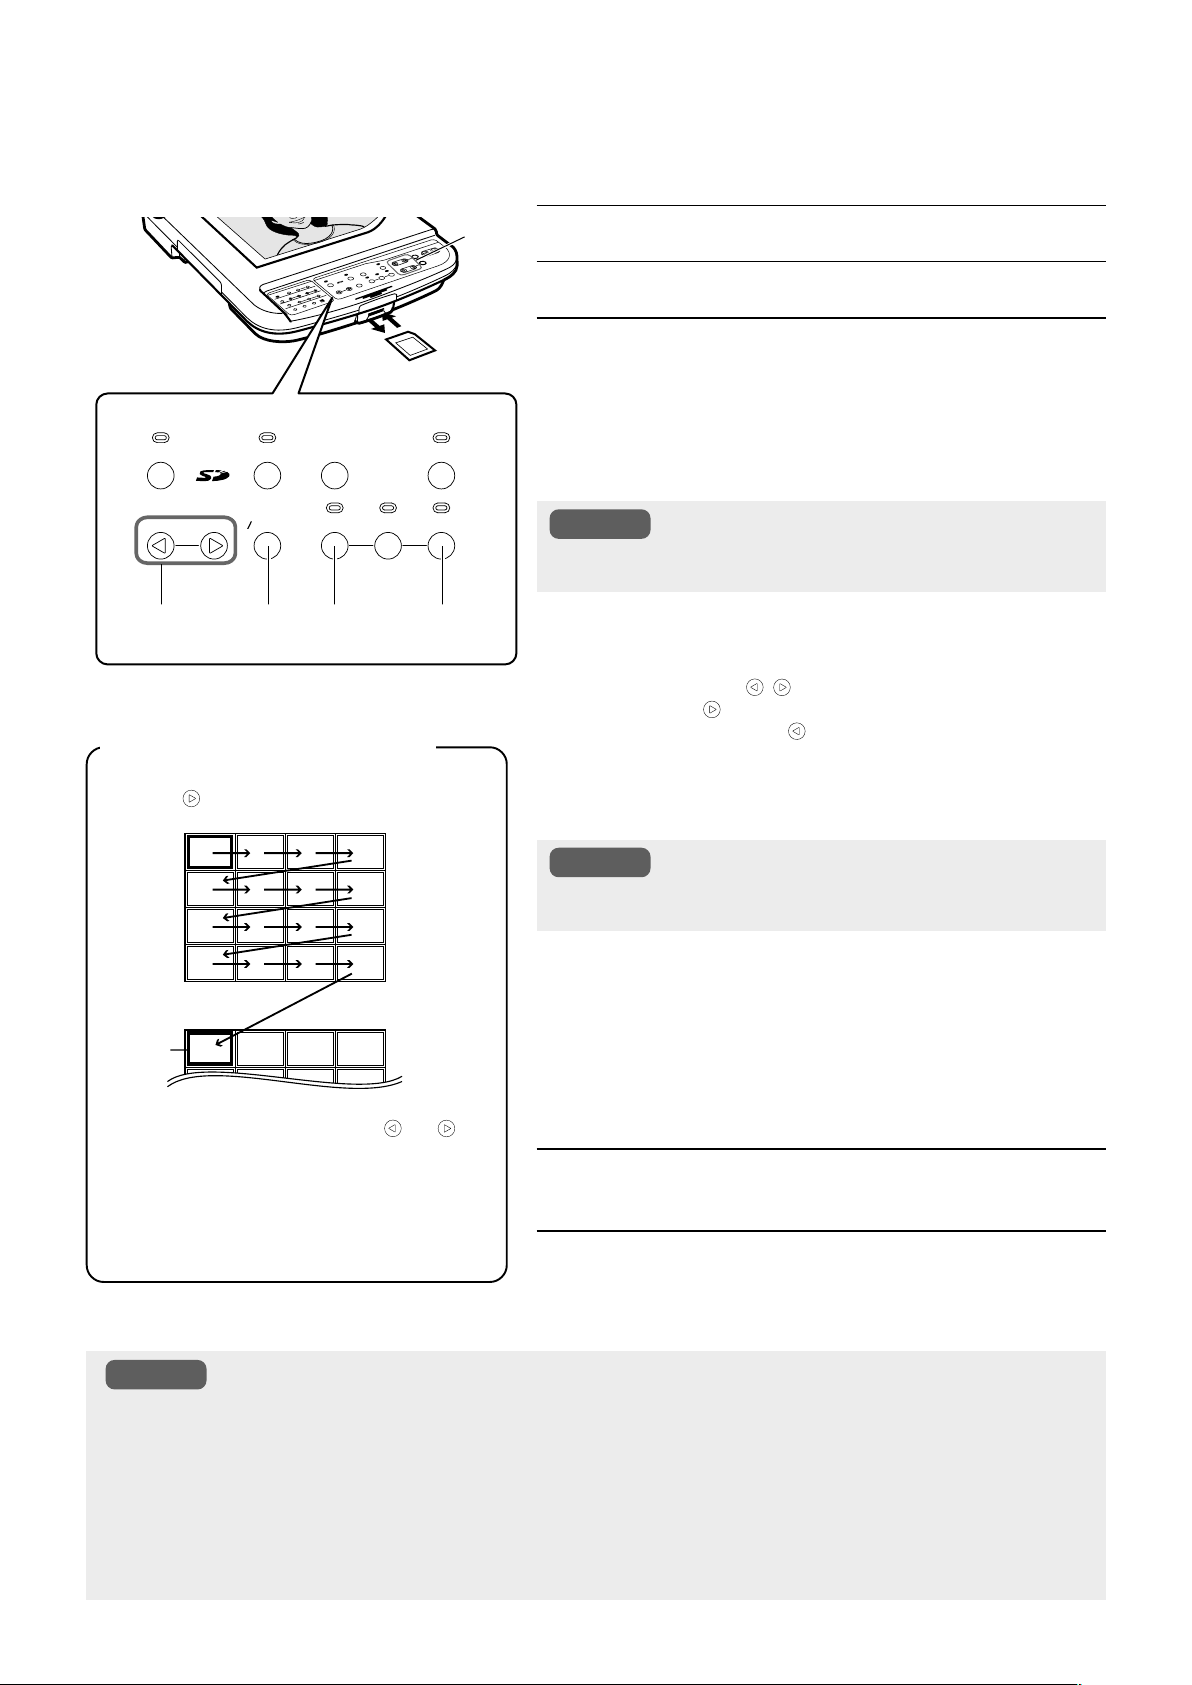
Viewing Image Data Stored in SD Card
Images stored in the SD card can be viewed.
3.
1.
5.
EXT
FREEZE
IN
CAMERA
SELECTSOURCE
DELETE
SD
PAG E
CARD SYSTEM
IMAGE
SAVE
SELECT
ENTER
LIGHT
SD CARD
3. 3. 4.2.,3.
<Thumbnail display screen>
● The cursor will move as shown below when the
[PAGE
] button is pressed.
1.
Insert the SD card
2.
Press the [SD CARD SYSTEM] buttons
3.
Viewing images
<Viewing images one at a time>
Press the [PAGE] buttons
● The image switches whenever the button is pressed.
● The image will switch continuously if the button is pressed and
held. (at an interval of about 0.5 seconds)
Note
● The first image of the SD card will be displayed if the [IMAGE SE-
LECT/ENTER] button is pressed for more than 2 seconds.
<Viewing images at one time (thumbnail)>
Press the [IMAGE SELECT/ENTER] button
● 16 images are displayed in a view.
● Use the [PAGE
● Pressing [
page while pressing [
the previous page.
● If the [IMAGE SELECT/ENTER] button is pressed when the
image has been selected by the cursor, the selected image
will be displayed on the screen in full size.
, ] buttons to move the cursor.
] at the last image of the page displays the next
] at the first image of the page displays
Note
● The cursors can also be moved using SD UP&DOWN/SD LEFT&RIGHT
buttons.
<Viewing images one at a time automatically (slide show)>
While holding down the [SD CARD SYSTEM] buttons, press
Next page
Cursor
● Pressing and holding either the [ ] or [ ] button moves the cursor continuously (at an interval of 0.1 second). If the last image of the current page is reached, the next page will be displayed.
● The image selected by the cursor can be deleted. (☞ Page 19 ‘Deleting images’)
Notes
● This unit supports the output (Exif format) of the image taken by the digital still camera. (Not all types of Exif
formats are supported.)
● JPEG data taken with digital camera and JPEG data downloaded via Web may be converted to image data viewable
on this unit by using [JPEG conversion software (Exif Conv.exe)] in the CD-ROM provided with this unit. For details,
read JPEG conversion software’s Instruction [Exif Cnv.pdf] in the CD-ROM.
(The software [JPEG conversion software (Exif Conv.exe)] can also be downloaded from http://www.jvc-victor.co.jp/
english/pro/prodv/down-load/index.html.)
● If SD card image is selected without inserting the card, the output image will turn black.
● The brightness and focus operations are not applicable for images stored in the SD card.
4.
5.
the [IMAGE SELECT/ENTER] buttons within 1 second.
● From the image currently displayed, the following images will
be displayed in sequence automatically. (at an interval of about
2 seconds)
● When the [IMAGE SELECT/ENTER] or [PAGE] buttons are
pressed once again, the image being played back will be selected and the operation stops.
Press the [CAMERA] button
● Confirm that the output image is a camera image.
Removing the SD card
● To remove the SD card, push in the card before removing it from
the card slot.
E-20
Page 21
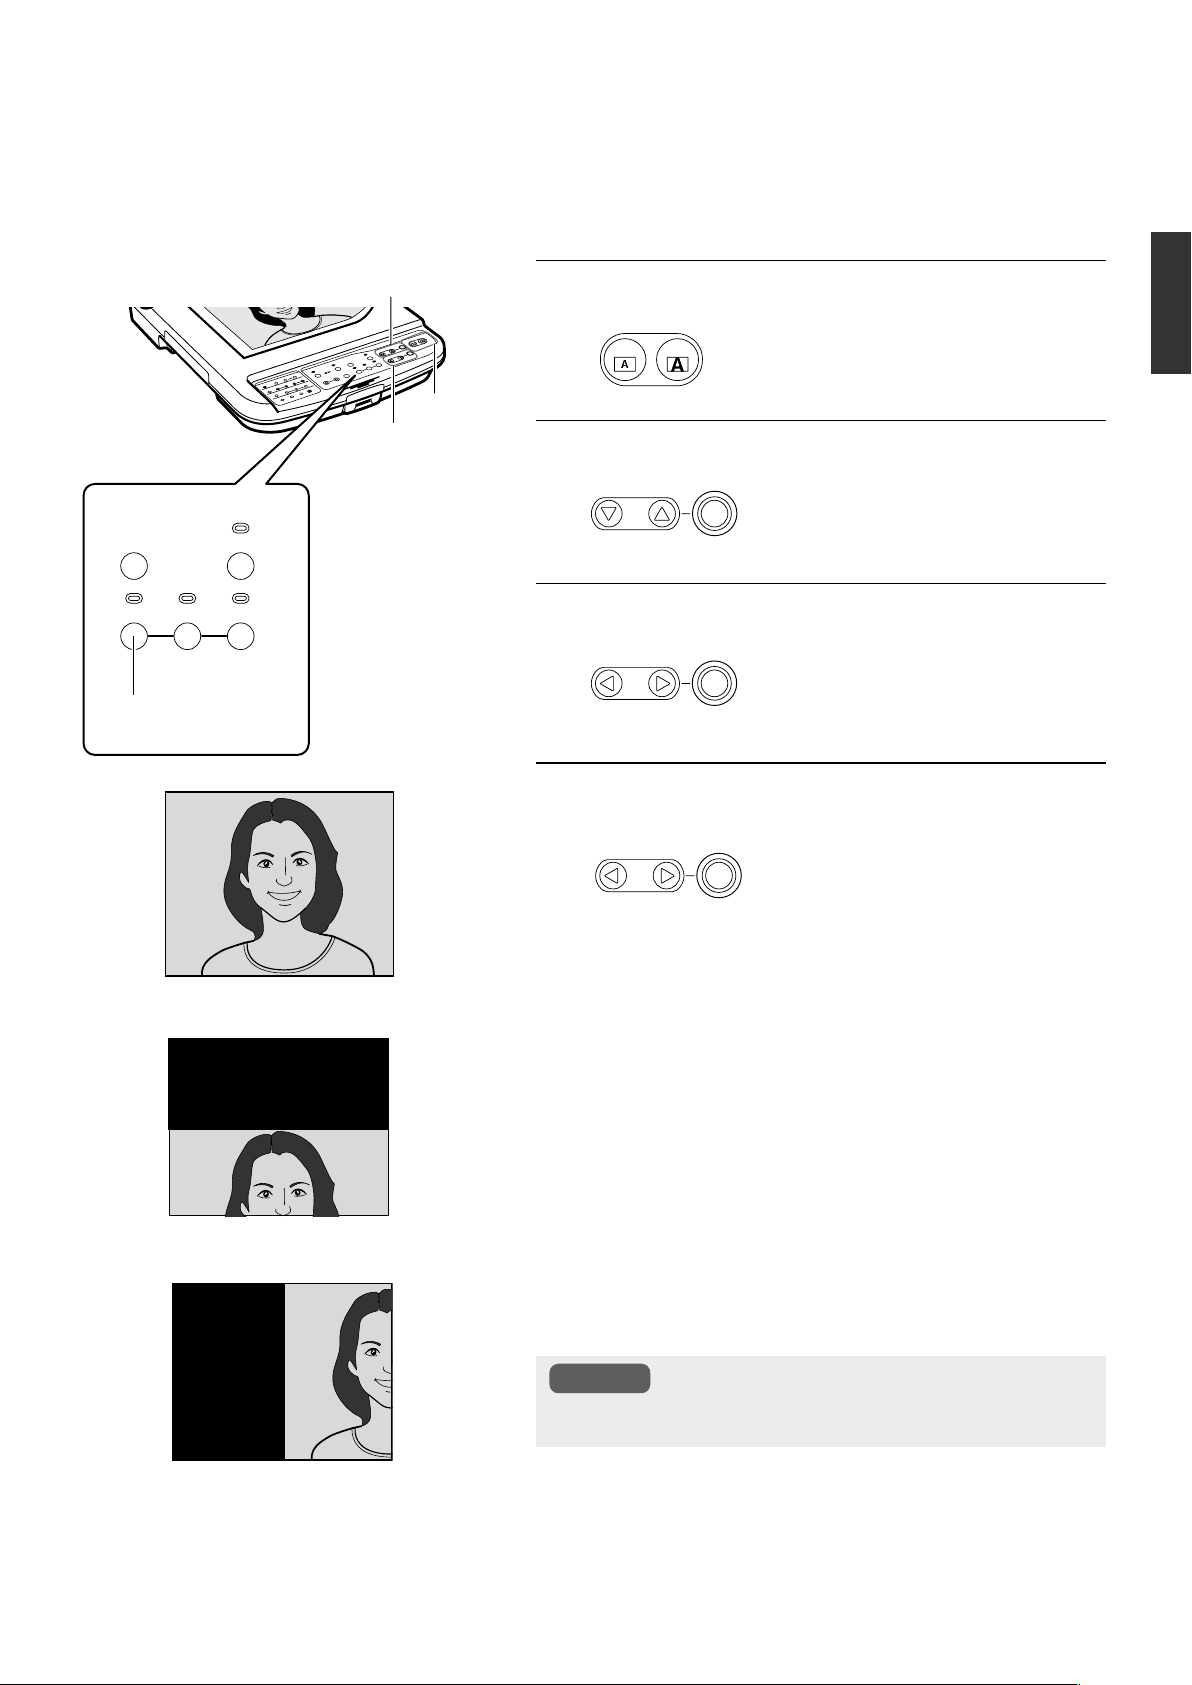
Image size/position adjustment of the SD card
The image of the SD card can be enlarged/reduced (6x digital zoom) and moved to left, right, top and bottom.
[SD UP&DOWN]
buttons
1.
Size adjustment
OUT IN
Use the ZOOM buttons to adjust the portion
of the image to be viewed.
English
1.
LIGHT
SD CARD
4.
EXT
[ZOOM] buttons
[SD LEFT&RIGHT]
buttons
FREEZE
IN
CAMERA
SELECTSOURCE
2.
3.
4.
ZOOM
Shift the image upward/downward
FOCUS
SD UP&DOWN
AUTO
Use the SD UP&DOWN buttons to adjust the
portion of the image to be viewed.
Shift the image to left/right
BRIGHT
SD LEFT&RIGHT
AUTO
SD DEFAULT
Use the SD LEFT&RIGHT buttons to adjust
the portion of the image to be viewed.
Restore the original size of the image
BRIGHT
SD LEFT&RIGHT
SD DEFAULT
When the AUTO button is pressed, the image will be restored to its actual size.
AUTO
Or press the SD CARD button to restore the
image to its actual size.
2.
3.
(Example: Enlarge)
(Example: Shift to top)
Note
● The procedures same as above can be operated for the im-
ages in the image memory.
(Example: Shift to left)
E-21
Page 22
Connecting to Computer via the USB Connector
By connecting to the computer, image data or image memory stored in the SD card as well as image data stored in this unit can be
downloaded to the computer.
䡵 Compatible Computers
OS: Windows Me/2000/XP
䡵 When connecting for the first time
With the Windows’ plug and play capability, the necessary driver will be
installed automatically for this unit to be recognized by the computer.
Install according to the instructions displayed on the screen. (These
instructions will not be shown when the computer is connected again
subsequently.)
䡵 Operating Methods
1.
Tur n on the power
Tu rn on the power of this unit and the computer.
2.
Connect using the USB cable
USB Cable
● Pull out and insert the cable slowly and securely.
Caution
●
Formatting or writing of data into the SD card from the
computer through this unit is not possible.
●
As this unit is not equipped with clock function, the date
and time of all the image files created will be 0.00 am,
January 1, 2006.
●
When USB cable is connected, even if the SD card is
removed and inserted again, the image data on the computer
screen remain unchanged. To change the display, disconnect
the USB cable, remove and insert the SD card before
reconnecting the USB cable.
•
The image files in the removable disk connected to
computer can be changed with the following opera-
tions.
(SD card/Image memory)
When switching to the image file in the SD card
¥ While pressing the SD CARD button, press the DE-
FAULT button for about 1 second.
•
When switching to the image file in the image memory
¥ While pressing the CAMERA button, press the DE-
FAULT button for about 1 second.
● Do not remove or insert the USB or switch the image
data display on the computer screen while the buttons,
the remote control unit or the computer is being operated. This might cause malfunction such as warnings
appearing on the computer screen.
3.
Confirming the image data
The image data will be stored as JPEG images in the folder
“100JVCAV”. When the USB cable is connected as in step 2, the
display on the screen varies as follows, depending on whether the
SD card is inserted or not.
<When SD card is inserted>
● The image data stored in the SD card will be displayed.
“My Computer”
“Removable Disk”
“DCIM”
“100JVCAV”
“IMAG0001.JPG”
“IMAG0002.JPG”
···
<When SD card is not inserted>
● The image data stored in this unit will be displayed.
(Picture memory 1~3, still image)
“My Computer”
“Removable Disk”
“DCIM”
“100JVCAV”
“MEMORY1.JPG”
“MEMORY2.JPG”
“MEMORY3.JPG”
“STILL.JPG”
Note
Example) When using Windows XP
Click according to the following sequence: “Start” ➞ “My Computer” ➞
“Removable Disk”
E-22
4.
Downloading the image data
Use the viewer software on the computer to confirm the image
data before downloading to the computer.
Refer to instruction manual of the computer for the downloading
method.
Page 23
Operating the Remote Control Unit
The following functions are available with the use of the remote control unit.
[CAMERA]
1
To output the camera images.
(☞ Page 6 5 [SOURCE SELECT] Buttons)
[FREEZE]
2
To make the camera image still.
(☞ Page 6 4 [FREEZE] Button)
[EXT-IN]
3
The images of the device connected to the [EXT INPUT] terminal
will be outputted.
(☞ Page 6 5 [SOURCE SELECT] Buttons)
[SD CARD]
4
To perform functions related to SD card.
● While displaying images from other sources, SD selection mode
will be activated if this button is pressed.
(☞ Page 6 5 [SOURCE SELECT] Buttons)
8
CAMERA
AUTO
AUTO
AUTO
WHITE
FREEZE
IMAGE SEL.
SD CARD
BRIGHT
FOCUS
ZOOM
OUT IN
31 2
EXT IN
4
5
6
7
English
[BRIGHT]
5
To adjust the brightness of the camera image.
(☞ Page 6 2 [BRIGHT] Adjustment Buttons)
[FOCUS]
6
To adjust the focus of the camera image.
(☞ Page 6 3 [FOCUS] Button)
[ZOOM]
7
To reduce or enlarge the camera image.
(☞ Page 6 1 [ZOOM] Adjustment Buttons)
[AUTO WHITE]
8
To adjust the white balance automatically.
(☞ Page 7 $ [WHITE BALANCE] Adjustment Buttons)
*For details on the various functions, refer to page 6.
䡵 Remote control receiving range
The receiving range is about 5m.
The vertical plane is ± 15˚ and the horizontal plane is ± 30˚.
5m
Up down ± 15˚
Left right ± 30˚
E-23
Page 24
Installing LCD Monitor
Connect commercially available LCD monitor to the [MONITOR OUTPUT] terminal. It is convenient for adjusting viewing angle.
1.
Mount the LCD monitor mounting
LCD monitor
Screw for
adjusting angle
1.
2.
LCD monitor-mounting
bracket
(AV-ZK20, sold separately)
bracket (AV-ZK20, sold separately) to
the LCD monitor using the screw supplied with the bracket.
2.
Mount the LCD monitor mounting
bracket (AV-ZK20, sold separately) to
this unit using the screw supplied with
the bracket.
3.
Connect the LCD monitor to the
[MONITOR OUTPUT] terminal of this
unit with a video cable
4.
Turn on the power of the LCD monitor
(Refer to the instruction manual of the LCD monitor used for details.)
5.
Adjust the angle adjusting screw for
the best viewing angle
E-24
Page 25
Troubleshooting
When you encounter a problem, check the following points for a solution. If the problem persists, stop using this unit and consult
your nearest JVC dealer.
Symptoms Verify the following points
No image appears.
Focusing is not possible.
The image is blurred.
Dust is visible.
The image is dark.
● Is the power plug connected to an AC outlet?
● Is the power switch turned on?
● Is this unit connected correctly to the projector or display?
● Is the brightness set to the optimum level?
● Is the unit in the image off mode?
● Are you sure that the pictures have been stored to memory? First store the
pictures to memory and then recall them.
● Is [EXT IN] or [SD CARD] of [SOURCE SELECTION] being selected? Select
[CAMERA].
● Is a XGA compatible projector or display used?
● Is the close-up lens attached?
● Is the object too close to the lens or is the top of the object at a height of more
than 50 mm from the stage surface?
● Did you shoot the surrounding objects with close-up lens attached? When shooting surrounding objects, remove the close-up lens.
● Did you enlarge the image size with the zoom after focusing was achieved?
Perform focusing after enlarging the image with zoom.
● With [FOCUS AUTO], focusing may be difficult depending on the object. Adjust
the focus using [FOCUS
● If the unit is connected to the projector, make sure that the projector is focused
correctly. Refer to the projector's instruction manual for focusing procedure.
● Is the close-up lens or camera lens dirty? Clean it with a commercially available cleaner.
● Is the unit being used under low temperature environment? When the room
temperature is low, it may take a few minutes before the side illuminations are
brightly lighted.
● Are the side illuminations lighted?
● Is the brightness set appropriately?
, ] buttons.
Refer to Page
10
10
6
7
16
6
10
5
13
6
3
6
English
Stripe pattern appears on
the image of printed
material.
The colour tone doesn’t
seem right.
Beats appear in the image.
The image flickers.
The image cannot be
adjusted.
This unit does not operate
even when the button is
pressed.
The remote control unit
does not work.
● Dots in the printed matter may interfere with the pixels in the camera image
device resulting in colour stripes. In this case, change the image size slightly
with the [ZOOM] buttons.
● Have you adjusted the tone with the [WHITE BALANCE]?
● Make sure that the negative mode is not engaged.
● When this unit is used near equipment generating a strong electric wave, beats
may occur in the image. Keep this unit away from such equipment.
● In areas where the 50 Hz power frequency is used, flickering may occur on the
screen when a fluorescent light or mercury-vapour lamp is used. Use this unit
with the side illuminations lighted.
● When the [FREEZE], [PICTURE MEMORY], [EXT IN] or [SD CARD] is selected, the camera image cannot be adjusted. Return to [CAMERA] image to
adjust.
● When brightness is insufficient, this unit may not work properly even if you
adjust the brightness. Press the [LIGHT] button to turn on the side illuminations.
● When two buttons are pressed simultaneously, or a button is repeatedly pressed
without pauses, the unit may not operate correctly. When operating the buttons, do it one at a time with intervals between each press.
● Are there batteries in the remote control unit?
● Are the batteries exhausted?
The batteries provided are for operation check only. Install commercially available batteries for actual usage.
● Is the remote control unit being operated outside the effective range?
11
7
7
6,7
7
11
23
The camera image has
white or black spots.
● Black or white spots may occasionally appear due to the characteristics of the
high-pixel CCD for graphics. If the image is enlarged with the digital zoom
function, spots may be particularly noticeable.
E-25
Page 26

Specifications
䡵 GENERAL
Power requirements :
Current consumption :
Mass :
䡵 OPTICAL
Lens :
Shooting area :
Focal distance adjustable range :
Zoom :
Focus :
Brightness :
䡵 LIGHTING
Side illumination :
Back illumination :
䡵 CAMERA HEAD
Output operation mode :
Image pickup device :
Number of pixels (total) :
Resolution :
Frame rate :
Synchronization system :
White balance :
INPUT/OUTPUT :
AC 100 V to 240 V 50 Hz / 60 Hz
0.5 A
5.6 kg (12.3 lbs.)
F1.8 to F2.8, f = 5.4 mm to 64.8 mm (12 times)
Max.: 400 mm x 300 mm (A3 landscape equivalent)
From the stage surface to a height of 50 mm from the stage surface (the camera directed
downward, with close-up lens)
⬁ to 0.8 m (2.6 ft) (the camera directed to the side, without close-up lens)
16x Optical Zoom (lens 12x ⳯ extensible arm 1.4x), Digital zoom: 6x
Auto/manual
Auto/manual
6 W x 2 (inverter lighting)
4 W x 1 (inverter lighting, area size 127 mm x 100 mm)
Progressive mode
• 1024 dots x 768 dots H: 48.4 kHz / V: 60.0 Hz
Interlace mode NTSC/PAL Switching
• NTSC H: 15.734 kHz / V: 59.94 Hz
•PAL H: 15.625 kHz / V: 50 Hz
1/3" CCD
850,000 pixels (H1077 x V788)
RGB Output:
Ver tical: More than 600 lines Horizontal: More than 600 lines
Monitor output:
Ver tical: More than 350 lines Horizontal: More than 500 lines
20 fps
Internal
Auto/manual
Camera/External input/SD card
䡵 INPUT/OUTPUT
Input connectors :
Output connectors :
Control connectors :
䡵 ENVIRONMENTAL CONDITIONS
Operating temperature :
Humidity :
䡵 ACCESSORIES
Instructions x 1
Video cable (5 m) x 1
Power cord (2.5 m) x 1
USB cable (1.5 m) x 1
CD-ROM x 1
Remote control unit x 1
AA batteries x 2
䡵 OPTIONS
LCD monitor mounting bracket (AV-ZK20)
External input (D-sub 15-pin, female) x 1
RGB (D-sub 15-pin, 0.7 V(p-p), 75 ¸, female) x 1
MONITOR (RCA pin, 1 V(p-p), 75 ¸)x 1
USB (Series B) x 1
SD card system x 1
Remote input (D-sub 9-pin, RS-232C, male) x 1
5 ˚C to 40 ˚C
30 % to 85 %
E-26
Page 27
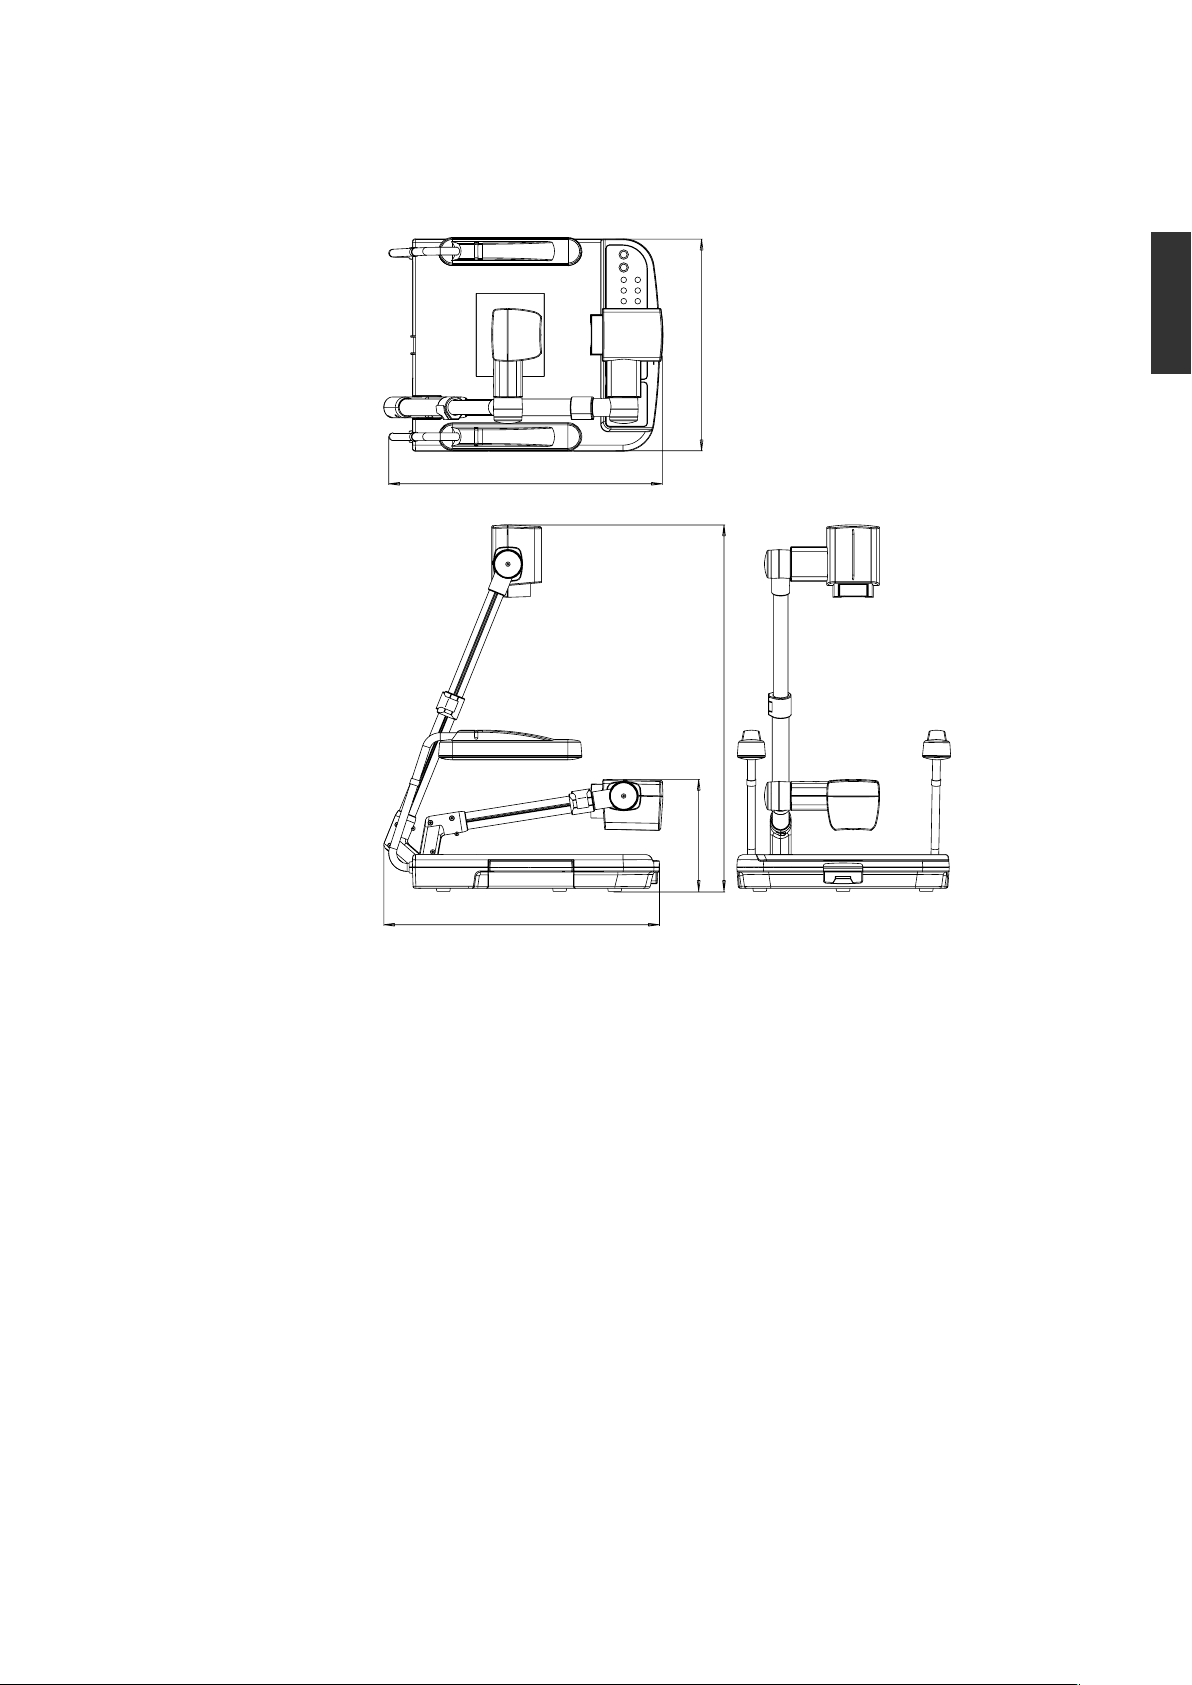
䡵 Dimensions (WHD) (unit: mm)
English
378
495 (When folded)
653 (When extended to A3)
190 (When folded)
491 (When extended)
Specifications and appearance of this unit are subject to change for improvements without prior notice.
E-27
Page 28

PRESENTOIR NUMERIQUE
MANUEL D’ INSTRUCTIONS
AV-P960E
(R)
Français
Page 29
Pour votre sécurité
AVERTISSEMENT–CET APPAREIL DOIT
ETRE MIS A LA TERRE.
AVERTISSEMENT:
POUR ÉVITER LES RISQUES D’INCENDIE OU D’ÉLECTROCUTION, NE PAS EXPOSER L’APPAREIL À LA
PLUIE NI À L’HUMIDITÉ.
AVERTISSEMENT
Ceci est un appareil de Classe A. Dans un
environnement domestique cet appareil peut
causer une interférence radio dans quel cas
l’utilisateur peut avoir à prendre des mesures adéquates à ses propres frais.
Caractéristiques
Nous vous remercions de votre achat de ce produit JVC. Pour garantir la performance optimale de l’appareil, prière de lire soigneusement
ces instructions avant la mise en marche.
Ces instructions sont destinés au modèle AV-P960E.
Images régulières, haute résolution
Sortie XGA avec un taux raff. élevé de 20 IPS favorisant
un affichage régulier des images à haute résolution.
Définition supérieure et zoom haute
puissance
Zoom optique de 16x (objectif de 2x, multiplié par bras
extensible de 1,4x) et zoom numérique de 6X intégrés.
Conception compacte et légère
Mesure moins de 50 cm et pèse moins de 5,6 kg, tout en
étant doté d’un angle visuel maximal équivalent au format
paysage A3 (400 mm x 300 mm).
Logement carte SD intégrée
L’enregistrement de l’image de l’appareil photographique,
la sortie (en format Exif) de l’image captée par l’appareil
numérique à images fixes et de nombreux autres types
de présentation sont réalisables grâce au lecteur intégré
de mémoire compatible avec carte SD à haute vitesse et
à haute capacité. (Carte SD vendue séparément.)
Interface conviviale
Equipé d’un connecteur USB et d’un connecteur RS-232.
Éclairage par réflecteur concave intégré
Éclairage par réflecteur concave intégré
Réflecteur concave intégré, capable d’obtenir un éclairage
uniforme sur toute la scène au moyen d’éclairages
latéraux.
F-2
Page 30

Table des matières
Pour votre sécurité.................................................................... 2
Caractéristiques ........................................................................ 2
Table des matières .................................................................... 3
Mise en Route
Préparation
Fonctionnement
(Elémentaire)
Précautions................................................................................ 4
Noms et fonctions ..................................................................... 5
Vue d’ensemble .................................................................................5
Panneau de commande ....................................................................6
Panneau arrière .................................................................................8
Avant d’utiliser .......................................................................... 9
Connexion................................................................................ 10
Présentation des matériaux imprimés .................................. 11
Présentation des objets 3D .................................................... 12
Prise d’objets environnants ................................................... 13
Présentation des diapositives ............................................... 14
Présentation de films et d’autres matériaux transparents .. 15
Enregistrement des images dans la mémoire d’images ..... 16
Réglage de l’équilibre des blancs ......................................... 17
Enregistrement du paramétrage
(enregistrement des paramètres de l’utilisateur) ................. 18
Français
Enregistrement d’images sur la carte SD ............................. 19
Fonctionnement
(Application)
Divers
Visualisation des données d’images enregistrées
sur la carte SD ......................................................................... 20
Réglage de la taille et de la position de l’image sur la carte SD.
Connexion d’un ordinateur via le connecteur USB ............. 22
Utilisation de la télécommande ............................................. 23
Installation du moniteur LCD ................................................. 24
Résolution des problèmes ..................................................... 25
Caractéristiques techniques .................................................. 26
Comment utiliser ce manuel
䡵 Symboles utilisés dans le présent manuel
Attention
Remarque
☞
䡵 Sommaire du manuel
● Les droits d’auteur du présent manuel appartiennent à JVC. Toute reproduction du présent manuel, qu’elle soit partielle ou
intégrale, est strictement interdite.
● Les noms des produits mentionnés dans le présent manuel sont des marques de commerce ou des marques déposées de
leurs sociétés respectives. Les symboles tels que ™,
● La conception, les caractéristiques techniques et autre contenu dans le présent manuel peuvent subir des modifications
sans préavis aux fins d’amélioration.
● Windows est une marque de commerce de Microsoft Corporation aux Etats-Unis.
●
Signale des précautions à prendre pendant le fonctionnement.
Signale des restrictions sur les fonctions ou l’exploitation de cet équipement. À titre de référence.
Indique les numéros de pages ou les éléments à référencer.
®
et © e figurent pas dans le présent manuel.
: Le logo SD est une marque de commerce.
.. 21
F-3
Page 31

Précautions
䡵 Manipulation de l’équipement
● Utilisez la poignée latérale pour transporter l’appareil.
Le transport de l’appareil par la tête de la caméra, le bras de la caméra ou ses lampes d’éclairage latérales risque d’entraîner des
déformations voire des dommages.
● Tirez lentement tout droit sur la poignée.
䡵 Effectuez les vérifications fonctionnelles préalables avant de prendre tout emploi
important.
䡵 Compensation pour le contenu des prises
● JVC ne peut en aucun cas être tenu responsable des échecs de prise ou de lecture d’images survenus suite à des problèmes
inhérents à ce produit ou à la carte utilisée. Par ailleurs, aucune compensation n’est offerte pour la perte du contenu.
䡵 Copyright
● Vo us êtes libre les photos que vous souhaitez. Toutefois, vous ne pouvez pas utiliser les matériaux protégés par des droits d’auteurs
sans le consentement préalable de l’auteur.
䡵 Carte SD
La carte SD contient des composants électroniques très délicats. La liste ci-dessous représente les actions que vous ne devez pas
exécuter sous risque d’affecter le fonctionnement de la carte ou de l’endommager.
● Ne touchez pas les bords de la carte à mains nues ou avec des objets métalliques.
La carte peut subir des dommages résultant des décharges statiques.
● Ne pliez pas la carte, ne la faites pas tomber ou ne lui faites pas subir d’impacts violents.
● Lorsque vous utilisez et placez la carte, évitez la chaleur, l’eau, la lumière directe du jour ainsi que les zones humides
● N’essayez pas de démonter ou de modifier la carte.
䡵 Maintenance de routine
Coupez le courant, débranchez la prise et exécutez les tâches suivantes.
● Utilisez un tissu sec et doux pour nettoyer toute impureté ou tache sur l’équipement.
● Pour les taches plus sérieuses : trempez le tissu dans un détergent de nettoyage dilué, rincez et enlevez les taches sur l’équipement.
Utilisez ensuite un tissu sec pour absorber les gouttes d’eau.
Attention
● N’utilisez pas de benzol ou de diluant. Le fonctionnement de l’équipement risque d’être affecté et son enceinte
peut subir des dommages.
● Si vous utilisez des produits chimiques ou détergents, prière de lire les brochures des produits et de respecter
les précautions qui y sont stipulées.
䡵 Auto-focus
Cet appareil est muni d’une fonction Auto-focus. Toutefois, en fonction de l’objet et des réglages de la caméra, vous devez peut-être
remettre l’appareil au point. Dans cas, vous devez ajuster le focus manuellement.
Objets difficiles à mettre au point automatiquement
● Lorsque la luminosité du plan d’image est particulièrement élevée (vive).
● Lorsque la luminosité du plan d’image est particulièrement faible (estompée).
● Lorsque la luminosité du plan d’image change constamment (par exemple, une lumière clignotante).
● Lorsque les contrastes sont pratiquement inexistants.
● Lorsque le plan d’image comporte des raies verticales répétitives.
● Lorsque les parties inférieure et supérieure de l’écran contiennent des graphiques ou des impressions des deux côtés.
䡵 Cordon d’alimentation
● Utilisez uniquement le cordon d’alimentation spécifié (fourni).
Toute utilisation de cordon d’alimentation autre que celui désigné ou, toute utilisation de cordon endommagé risque de provoquer un
incendie et des chocs électriques.
● N’utilisez pas la rallonge fournie sur d’autres appareils.
䡵 Economie d’énergie
Pour économiser de l’énergie, mettez l’appareil hors tension lorsque vous ne l’utilisez pas.
F-4
Page 32

Noms et fonctions
Vue d’ensemble
1
0
!
2
3
Panneau arrière ☞ Page 8
4
5
6
7
1 Tête de la caméra
Pour la capture d’images d’objet sur scène ou dans les environs.
2 Bras de la caméra
Bras de support pour la tête de la caméra. Réglez son angle
pour la prise d’objets 3D.
3 Verrouillage du bras
Pour le réglage de la longueur de la caméra. Ouvrez le verrou
lors de la rétraction ou extension du bras de la caméra et
verrouillez-le dans la position souhaitée.
Panneau de commande ☞ Page 6
89
7 Stage
Pour l’emplacement d’objets (ou matériaux).
Capture de format équivalent au format paysage A3
(400 x 300 mm).
8 Capteur à distance
Pour la réception des signaux émis par la télécommande.
☞ Page 23 ‘Utilisation de la télécommande’
9 Fente SD
Fente réservée à la carte SD.
☞ Page 19 ‘Enregistrement d’images sur la carte SD’
4
Côté droit
Français
@
4 Eclairages latéraux
Réglez afin de garantir que l’éclairage de la scène est uniforme.
5 Poignée
Tirez sur la poignée pour transporter l’appareil. Rangez la
poignée lorsqu’elle n’est pas utilisée.
6 Rétroéclairages
Utilisez cet éclairage pour visualiser des matériaux transparents tels que les films.
☞ Page 15 ‘Présentation de films et d’autres matériaux trans-
parents’
0 Porte-diapositive
Utilisez le porte-diapositive pour visualiser les diapositives.
☞ Page 14 ‘Présentation des diapositives’
! Objectif gros plan
Enlevez cet objectif pour la prise d’objets environnants.
☞ Page 13 ‘Prise d’objets environnants’
@ Interrupteur d’alimentation
Pour mettre en marche ou arrêter l’alimentation.
F-5
Page 33

Noms et fonctions (suite)
Panneau de commande
$
AUTO
CAMERA
NEGA POSI
%
@
USER SETUPDEFAULT
WHITE BALANCE
RED BLUE
PICTURE MEMORY
123
BW COLOUR
TEXT
^ & *
SAVE
IMAGE OFF
! 0 9 8 6 4 2 1357#
DELETE
PAG E
SD
CARD SYSTEM
1 Boutons de réglage [ZOOM]
Effectuez les réglages en fonction de l’objet.
[IN]:Pour prendre des objets (matériaux) dans un for-
mat agrandi.
Si ce bouton est enfoncé en continu, l’image ne
s’agrandira plus à l’extrémité télé du zoom optique
et par conséquent, ce dernier sera activé.
(Zoom optique : 12x, Zoom numérique : 6x)
[OUT] : Pour prendre des objets (matériaux) dans un for-
mat réduit.
2 Boutons de réglage [FOCUS]
Pour le réglage de la mise au point de la caméra.
]:Pour régler la mise au point de l’objet (matériau) se
[
trouvant loin de la caméra.
]:Pour régler la mise au point de l’objet (matériau) se
[
trouvant près de la caméra.
[AUTO] : Lorsque vous appuyez sur ce bouton, le voyant
CAMERA à la section SOURCE SELECT clignote
et la mise au point est réglée automatiquement. Le
voyant lumineux s’éteint une fois le réglage terminé.
La mise à point de certains objets peut être plus
difficile à régler.
☞ Page 4 ‘Auto-focus’
3 Boutons de réglage [BRIGHT]
Pour le réglage de la luminosité de l’image de la caméra.
[AUTO] : Lorsque vous appuyez sur ce bouton, le voyant
[
[
CAMERA à la section SOURCE SELECT clignote
et la luminosité est réglée automatiquement. Le
voyant lumineux s’éteint une fois le réglage terminé.
]:Pour augmenter la luminosité de l’image de la ca-
méra.
]:Pour réduire la luminosité de l’image de la caméra.
IMAGE
SAVE
SELECT
ENTER
EXT
FREEZE
IN
CAMERA
SELECTSOURCE
FOCUS
SD UP&DOWN
BRIGHT
SD LEFT&RIGHT
AUTO
AUTO
SD DEFAULT
OUT IN
ZOOM
LIGHT
SD CARD
4 Bouton [FREEZE]
Lorsque vous appuyez sur ce bouton, l’image de la caméra
gèle et s’affiche comme une image fixe. Le voyant lumineux
s’allume. Lorsque vous appuyez à nouveau sur le bouton alors
que le voyant lumineux est allumé, le voyant lumineux s’éteint,
l’image fixe est libérée et l’image mobile est restaurée.
5 Boutons [SOURCE SELECT] pour la
sélection de sortie d’image
Pour sélectionner l’image à sortir du terminal [RGB OUTPUT]
et du terminal [MONITOR OUTPUT] situé sur le panneau arrière. Le voyant lumineux de la source d’entrée sélectionnée
pour la sortie s’allume. En fonction des types de moniteur connectés, les délais d’affichage des images peuvent être longs.
[CAMERA] : Pour sortir les images de la caméra.
[EXT IN] : Pour sortir les signaux entrés dans le terminal
[EXT INT] situé sur le panneau arrière. Les signaux d’entrée externes ne sortiront pas via le
terminal [MONITOR OUTPUT].
[SD CARD] : Pour sortir les images de la carte SD insérée
dans la fente.
☞ Page 20 ‘Visualisation des données d’images enregistrées
sur la carte SD’
6 Bouton [LIGHT] pour la permutation
d’éclairage
Pour permuter entre les différentes sources d’éclairage.
La source d’éclairage change chaque fois que vous appuyez
sur ce bouton.
Eclairages
latéraux
Rétroéclairage
Tous les éclairages
éteints
F-6
Page 34

[SD CARD SYSTEM] SYSTEME DE CARTE SD
7 ~ 0 ne sont fonctionnels que si la carte SD est insérée dans le
logement SD.
# Voyants lumineux des boutons
Les voyants lumineux clignotent lorsque vous appuyez sur le
bouton ! ~ * et que divers paramètres sont modifiés.
7 Bouton [IMAGE SELECT/ENTER] pour
la sélection d’images
Affiche les images miniatures de la carte SD en vue de 16.
☞ Page 20 ‘Visualisation des données d’images enregistrées
sur la carte SD’
8 Bouton [SAVE] pour enregistrement
d’images sur la carte SD
Lorsque vous sélectionnez des images de l’appareil, si vous
maintenez ce bouton enfoncé , le voyant lumineux clignote et
l’image en cours d’affichage est enregistrée sur la carte SD.
☞ Page 19 ‘Enregistrement d’images sur la carte SD’
9 Boutons [PAGE]
Pour sélectionner et afficher les images enregistrées sur la
carte SD.
]:Pour visualiser l’image précédente.
[
]:Pour visualiser l’image suivante.
[
0 Bouton [DELETE] de suppression
d’images sur la carte SD
Pour supprimer des images enregistrées sur la carte SD.
Lorsque vous avez sélectionné [SD CARD] via le bouton de
[SOURCE SELECT] 5, appuyez sur ce bouton pendant plus
de 2 secondes pour supprimer l’image sélectionnée (le voyant
lumineux clignote)
☞ Page 19 ‘Suppression d’images’
! Boutons [PICTURE MEMORY]
Pour enregistrer l’image sortie dans la mémoire interne d’images ou pour sélectionner et afficher les images enregistrées
dans la mémoire d’images.
[1] ~ [3] : Appuyez sur le bouton pendant pus de 2 se-
[CAMERA] : Pour sélectionner l’image de la caméra.
☞ Page 16 ‘Enregistrement des images dans la mémoire
d’images’
condes, le voyant lumineux du bouton # clignote
et l’image est enregistrée dans la mémoire
d’images.
Appuyez sur ce bouton pour sortir l’image enregistrée.
@ Boutons [USER SETUP] de
paramétrage
Pour paramétrer l’appareil.
[SAVE] : Les paramètres courants de l’utilisateur sont
[USER SETUP] : Les paramètres enregistrés sont activés.
[DEFAULT] : Les paramètres par défaut sont restaurés.
☞ Page 18 ‘Enregistrement du paramétrage (enregistrement
des paramètres de l’utilisateur)’
enregistrés.
$ Boutons de réglage [WHITE BALANCE]
Pour exécuter les paramètres connexes à l’équilibre des blancs.
[AUTO] : Lorsque vous appuyez sur ce bouton, le voyant
lumineux clignote pendant le réajustement de
l’équilibre des blancs.
[RED
[RED
[BLUE
[BLUE
☞ Page 17 ‘Réglage de l’équilibre des blancs’
]:Permet d’augmenter le composant rouge sur
tout l’écran.
]:Permet de réduire le composant rouge sur tout
l’écran.
]:Permet d’augmenter le composant bleu sur tout
l’écran.
]:Permet de réduire le composant bleu sur tout
l’écran.
% [NEGA/POSI] Bouton de permutation
entre le film négatif/positif
Définissez sur Néga lorsque vous visualisez des films négatifs.
Appuyez sur le bouton pour sélectionner le film négatif.
Appuyez à nouveau sur le bouton pour sélectionner le film
positif.
☞ Page 15 ‘Présentation de films et d’autres matériaux trans-
parents’
^ [BW/COLOUR] Bouton de permutation
entre Noir et blanc et Couleur
Pour permuter la sortie d’image entre une affichage Noir et
blanc et un affichage Couleur.
Appuyez sur le bouton pour sélectionner l’image en Noir et
blanc. Appuyez à nouveau sur le bouton pour sélectionner
l’image en Couleur.
& Bouton [TEXT]
Pour optimiser la précision du caractère.
Appuyez sur le bouton pour activer le mode Texte. Pour le
désactiver, appuyez à nouveau sur le bouton.
* Bouton de cache IMAGE OFF Bouton
pour cacher l’image
Utilisez ce bouton pour cacher temporairement l’image de
sortie, avant une présentation, par exemple.
Lorsque vous appuyez sur ce bouton, l’écran change pour le
mode image off (écran noir) et le voyant à la section SOURCE
SELECT sélectionnée comme sortie, clignote. Lorsque le
bouton IMAGE OFF ou un des boutons de la section SOURCE
SELECT est appuyé à nouveau, le mode sera annulé et l'image
sélectionnée sera affichée.
Français
F-7
Page 35

Noms et fonctions (suite)
Panneau arrière
Voir page 10 ‘Connexion’ pour de plus amples informations sur la connexion à d’autres
périphériques.
Attention
N’ouvrez pas le couvercle en bas du bras. Ne
placez ni votre doigt ni un objet. Vous risquez
d’entraîner un dysfonctionnement de l’appareil ou des blessures.
1 2 4 6 7 853
AC IN
MONITOR
OUTPUT
RGB
OUTPUT
1 Entrée d’alimentation [AC IN]
Connectez via le cordon d’alimentation branché à une source
d’alimentation CA 100 V ~ CA 240 V.
2 Terminal [MONITOR OUTPUT]
Te r minal de sortie du signal d’image permettant la confirmation de l’angle de vue.
3 Terminal [RGB OUTPUT]
Te rminal de sortie du signal RGB. Se connecte au terminal
d’entrée RGB d’un projecteur ou d’un moniteur.
4 Connecteur [USB]
Pour la connexion aux périphériques (ordinateur par exemple). Les données d’image ou la mémoire d’images enregistrées sur la carte SD ainsi que les données d’image enregistrées dans cet appareil peuvent être téléchargées vers un ordinateur.
☞ Page 22 ‘Connexion d’un ordinateur via le connecteur USB’
USB
INPUT
REMOTE
(
EXT
INPUT
RS-232C
)
NTSC PAL
5 Terminal [EXT INPUT] pour l’entrée du
signal externe
Pour la connexion aux périphériques externes (ordinateur par
exemple). Lorsque vous appuyez sur le bouton [SOURCE SELECT] pour sélectionner l’entrée externe, les signaux sont
transmis via la terminal [RGB OUTPUT]. Dans ce cas, la sortie via le terminal [MONITOR OUTPUT] n’est pas possible.
6 Trou pour la vis de montage du moni-
teur LCD
Utilisez lors du montage du moniteur LCD (vendu séparément)
sur cet appareil.
☞ Page 24 ‘Installation du moniteur LCD’
7 Terminal [REMOTE INPUT (RS-232C)]
Connectez lorsque vous contrôlez cette unité via le PC à l’aide
du logiciel de contrôle créé par le client. Pour la méthode de
communication et la commande, veuillez lire [RS-232C
External control communication commands (command. pdf)]
dans le CD-ROM fourni.
F-8
8 Interrupteur [NTSC/PAL]
Réglez selon le moniteur devant être utilisé.
Page 36

Avant d’utiliser
Procédez à l’installation selon les étapes suivantes.
Eclairage gauche
4.
Bras de la
caméra
2.
Verrouillage
du bras
1.
Eclairage droit
Tête de la caméra
3.
1.
Soulèvement de l’éclairage droit
2.
Soulèvement de l’éclairage gauche
3.
Soulèvement de la tête de la caméra
(bras de la caméra)
Tenez le bras de la caméra et maintenez fermement l’appareil tout
en soulevant lentement la tête de la caméra jusqu’à ce qu’elle
atteigne sa position maximum et se bloque.
4.
Déclenchement du verrouillage de bras
Tirez sur le levier de verrouillage du bras dans la direction de la
flèche (voir la figure) pour déclencher le verrouillage.
5.
Extension du bras de la caméra
Tenez fermement la partie inférieure du bras de la caméra ou
l’appareil tout en tenant la partie supérieure du bras de la caméra et
étendez lentement le bras de la caméra jusqu’à ce qu’il atteigne sa
position maximum et se bloque.
Français
Bras de la
caméra
Scène
Attention
5.
6.
7.
Verrouillage
du bras
6.
Fixation du bras de la caméra
Replacez le levier de verrouillage du bras dans la direction de la
flèche pour verrouiller le bras.
7.
Tête de la caméra tournée en direction
de la scène
Exécutez les étapes dans le sens inverse
pour le rangement.
Si les étapes sont exécutées incorrectement, la tête et le bras de la caméra peuvent subir des dommages.
Attention
● Lors de la rétraction du bras de la caméra, ne tenez pas la section
de raccordement du bras de la caméra avec vos mains. Vous risqueriez de la coincer et de vous blesser.
● N’essayez pas de rétracter ou d’étendre le bras de la caméra après
l’avoir plié.
Vous risquez d’endommager l’intérieur du bras de la caméra si vous exercez une trop de force.
Assurez-vous que la tête de la caméra (bras de la caméra) a été soulevée
conformément aux instructions de l’étape
dre le bras de la caméra.
● Ne tenez pas la tête de la caméra lorsque vous soulevez, pliez, rétractez ou étendez le bras de la caméra.
Vous risquez d’endommager la tête et l’intérieur de la caméra si vous
exercez trop de force. Assurez-vous de tenir le bras de la caméra lorsque
3.
vous exécutez les étapes
et 5..
3.
avant de rétracter ou d’éten-
F-9
Page 37

Connexion
Procédez à l’installation selon les étapes suivantes. Le terminal [MONITOR OUTPUT] permet de confirmer les images.
Moniteur LCD
Ordinateur
2.
[MONITOR OUT]
[RGB
OUT]
5.
Interrupteur
d’alimentation
Eclairage gauche
[AC IN]
ENTRÉE CA
Alimentation CA
4.
Te r minal
3.
[USB]
1.
(cordon
d’alimentation
fourni)
Te r minal USB
Projecteur
Le moniteur LCD, l’ordinateur et le projecteur sont vendus séparément.
1.
Connectez le terminal [RGB OUTPUT]
à un projecteur ou un affichage.
● La sortie de cet appareil est XGA, connectez-la à un périphérique
compatible.
● Nous recommandons le câble à 15 broches D-sub en vente dans le
commerce (moins de à 3 m).
2.
Si besoin, connectez le terminal
[MONITOR OUTPUT] à un moniteur,
etc.
3.
Si besoin, raccordez le connecteur
USB à un ordinateur.
☞ Page 22 ‘Connexion d’un ordinateur via le connecteur USB’
4.
Connectez la source d’alimentation
F-10
CA avec le cordon fourni.
5.
Mise sous tension.
Page 38

Présentation des matériaux imprimés
Capture de matériaux imprimés en format équivalent au format paysage A3 (400 x 300 mm).
Tête de la caméra
1.
Réglage du bras et de la tête de la
1.
Bras
2.
(Exemple) Zoom insuffisant.
1.
2.
Bouton [FOCUS]
Bouton [BRIGHT]
Bouton
[ZOOM]
caméra
Réglez le bras et la tête de la caméra en fonction de la taille de
l’objet.
● Assurez-vous que la tête de la caméra est placée au centre de l’objet.
● En position totalement étendue, le bras est capable de capturer un
objet en format paysage équivalent à A3.
2.
Réglage de l’éclairage
Réglez afin de garantir que l’éclairage de l’objet est uniforme.
3.
Réglage du zoom
OUT IN
ZOOM
4.
Réglage de la luminosité
BRIGHT
AUTO
SD LEFT&RIGHT
SD DEFAULT
Réglez de sorte que la partie de l’objet à capturer occupe tout l’écran.
Réglez la luminosité lorsque l’écran est trop
brillant ou trop sombre.
Appuyez sur le bouton [AUTO] pour régler automatiquement la luminosité.
Français
(Exemple) Mauvaises conditions d’éclairage.
(Exemple) Image floue.
(Exemple) Réglage correct.
5.
Réglage de la mise au point
Pour régler la mise au point lorsque l’image est
FOCUS
AUTO
SD UP&DOWN
Remarque
● Pour les matériaux comportant un mélange de formats, portrait et
paysage, nous recommandons d’enregistrer l’un des formats dans
le paramétrage de l’utilisateur. (☞ Page 18 ‘Enregistrement du
paramétrage (enregistrement des paramètres de l’utilisateur)’)
floue.
Appuyez sur le bouton [AUTO] pour régler auto-
matiquement la mise au point.
F-11
Page 39

Présentation des objets 3D
Un objet 3D placé sur la scène peut être capturé. En outre, si vous réglez l’angle du bras, l’objet 3D peut être capturé à divers angles.
2.
1.
2.
1.
Réglage du bras et de la tête de la
caméra
Réglez le bras et la tête de la caméra en fonction de la taille de
l’objet.
● Assurez-vous que la tête de la caméra est placée au centre de l’objet.
● En position totalement étendue, le bras est capable de capturer un
objet en format équivalent à A3.
2.
Réglage de l’éclairage
Réglez de sorte que la partie de l’objet à capturer soit éclairé
uniformément.
3.
Réglage du zoom
OUT IN
ZOOM
4.
Réglage de la luminosité
BRIGHT
AUTO
SD LEFT&RIGHT
SD DEFAULT
Réglez de sorte que la partie de l’objet à capturer occupe tout l’écran.
Réglez la luminosité lorsque l’écran est trop
brillant ou trop sombre.
Appuyez sur le bouton [AUTO] pour régler automatiquement la luminosité.
F-12
6.
5.
Réglage de la mise au point
FOCUS
AUTO
SD UP&DOWN
6.
Inclinaison du bras à un angle de cap-
Pour régler la mise au point lorsque l’image
est floue.
Appuyez sur le bouton [AUTO] pour régler automatiquement la mise au point.
ture
Remarques
● Les objets 3D pris dans un angle oblique permettent d’obtenir
des images réalistes.
● Il se peut que la mise au point ne soit pas tout à fait réglée pour
une prise de vue des objets à trois dimensions en format agrandi
pendant que le bras de l’appareil est replié. En pareil cas, étendez
le bras de la caméra pour régler la mise au point.
Page 40

Prise d’objets environnants
Vous pouvez tourner la tête de la caméra pour prendre les objets environnants.
Tête de la caméra
1.
Tête de la caméra tournée en direction
de l’objet
1.
2.
Objectif gros plan enlevé
Appuyez sur les pattes que vous maintenez enfoncées tout en tirant
sur l’objectif.
3.
Réglage de l’image
Réglez le zoom, la luminosité et la mise au point.
Français
Objectif gros plan
2.
3.
Bouton [FOCUS]
Bouton
[ZOOM]
Bouton [BRIGHT]
F-13
Page 41

Présentation des diapositives
Les films de diapositive avec cadre peuvent être insérées directement dans la tête de la caméra pour présentation.
1.
Papier blanc placé sur la scène
Dans la mesure où le film pour diapositive se sert de la lumière
réfléchissante de la surface de la scène, placez un papier blanc
réflecteur (taille B4 ou A3) sur la scène.
2.
2.
Scène
Papier
blanc
Bouton [BRIGHT]
1.
3.
Bouton
[ZOOM]
2.
Réglage des éclairages latéraux
Réglez afin de garantir que l’éclairage de la surface de la scène est
uniforme.
3.
Insertion de la diapositive
Remarque
Utilisez uniquement les films de diapositive avec cadre de montage.
4.
Réglage du zoom
Réglez de sorte que la partie de l’objet à cap-
OUT IN
ZOOM
5.
Réglage de la luminosité
BRIGHT
AUTO
SD LEFT&RIGHT
SD DEFAULT
turer occupe tout l’écran.
Réglez la luminosité tout en regardant l’image
affichée sur le moniteur.
Bouton [FOCUS]
6.
Bouton [BRIGHT]
5.
4.
Bouton
[ZOOM]
Remarques
● Le réglage automatique de la luminosité est désactivé chaque
fois que l’option Néga est sélectionnée. Le voyant lumineux clignote rapidement pour indiquer que l’opération est impossible.
● En mode Négatif, appuyez sur le bouton [BRIGHT
sombrir les images et sur le bouton [BRIGHT
les images.
● En mode Négatif, appuyez sur les boutons [WHITE BALANCE]
[RED
et appuyez sur le bouton [RED
le composant rouge ou bleu.
6.
Remarque
Si le film de diapositive est inséré verticalement, l’agrandissement
au-delà du cadre de montage peut affecter la mise au point. Dans
ce cas, réglez le zoom sur [OUT].
] ou [BLUE ] pour réduire le composant rouge ou bleu
] ou [BLUE ] pour augmenter
Réglage de la mise au point
Utilisez les boutons [FOCUS , ] pour ajuster la mise au point.
] pour as-
] pour éclaircir
F-14
Page 42

Présentation de films et d’autres matériaux transparents
Vous pouvez placer des films sur la scène pour présentation.
1.
Bouton [LIGHT] appuyé pour l’activation du rétroéclairage
La source d’éclairage change chaque fois que vous appuyez sur le
bouton [LIGHT].
Eclairages
latéraux
Rétroéclairage
Tous les éclairages
éteints
Rétroéclairage
Bouton
1.
[LIGHT]
6.
2.
Placement des films et autres matériaux transparents sur la scène
Placez le film sur le centre de la scène et réglez la tête de la caméra
directement sur le film.
3.
Réglage des options Néga/Posi
Avec un film négatif, appuyez sur le bouton [NEGA/POSI] pour
sélectionner le mode négatif.
4.
Réglage du zoom
OUT IN
ZOOM
5.
Réglage de la luminosité
BRIGHT
AUTO
SD LEFT&RIGHT
SD DEFAULT
Réglez de sorte que la partie de l’objet à capturer occupe tout l’écran.
Réglez la luminosité tout en regardant l’image
affichée sur le moniteur.
Français
3.
5.
4.
Remarques
● Le réglage automatique de la luminosité est désactivé chaque fois
que l’option Néga est sélectionnée. Le voyant lumineux clignote
rapidement pour indiquer que l’opération est impossible.
● En mode Négatif, appuyez sur le bouton [BRIGHT
sombrir les images et sur le bouton [BRIGHT
images.
● En mode Négatif, appuyez sur les boutons [WHITE BALANCE]
[RED
et appuyez sur le bouton [RED
le composant rouge ou bleu.
6.
] ou [BLUE ] pour réduire le composant rouge ou bleu
] ou [BLUE ] pour augmenter
Réglage de la mise au point
Utilisez les boutons [FOCUS , ] pour ajuster la mise au point.
] pour éclaircir les
] pour as-
F-15
Page 43

Enregistrement des images dans la mémoire d’images
Vous pouvez enregistrer les images utilisées fréquemment dans la mémoire d’images de cet appareil. La permutation entre les images de
la caméra et celle de la mémoire d’image est possible pendant la présentation. Vous pouvez enregistrer 3 images.
1.
Bouton [CAMERA] appuyé
L’image de la caméra est sortie.
2.
Réglage du zoom
Bouton
[FOCUS]
3.
Réglage de la luminosité
4.
Réglage de la mise au point
Voyant
lumineux de
bouton
Bouton
[BRIGHT]
Bouton
[ZOOM]
USER SETUPDEFAULT
WHITE BALANCE
AUTO
CAMERA
NEGA POSI
RED BLUE
PICTURE MEMORY
1
BW COLOUR
2
TEXT
1.
䡵
Extraction des images enregistrées
SAVE
3
IMAGE OFF
5.
5.
Bouton [PICTURE MEMORY 1] appuyé
pendant plus de 2 secondes
● Le voyant lumineux du bouton commence par s’allumer avant de
clignoter. Il s’éteint une fois que l’image est enregistrée.
● L’image devient une image fixe.
6.
Répétition des étapes 1. ~
Procédez de la même façon pour la mémore d’image 2 et 3.
1.
Bouton [PICTURE MEMORY] appuyé
Les images enregistrées dans cet appareil s’affichent.
Remarque
● Lors de l’extraction des images enregistrées dans cette unité, n’appuyez pas sur les boutons [PICTURE MEMORY] pendant plus de
2 secondes. L’image sera enregistrée.
● Si aucune image n’est enregistrée dans la mémoire d’images,
l’écran est vide et rien ne s’affiche lorsque vous appuyez sur le
bouton [PICTURE MEMORY].
5.
Remarques
● Cet appareil est conçu pour afficher un format portait A4 avec le bras de la caméra totalement étendu. Pour les matériaux
comportant un mélange de formats, portrait et paysage, nous recommandons d’enregistrer l’une ou l’autre orientations
dans la mémoire d’image avant la présentation.
● En cas de coupure de courant, le contenu de la mémoire d’images est perdu.
● Les images enregistrées dans la mémoire d’images sont remplacées par de nouvelles images.
● Vous ne pouvez pas enregistrer d’images SD dans cet appareil.
F-16
Page 44

Réglage de l’équilibre des blancs
䡵 Réglage automatique de l’équilibre des blancs
Vous pouvez régler cet appareil pour qu’il affiche les couleurs naturelles. Toutefois, l’équlibre des blancs peut être réajusté en
procédant comme suit.
1.
Papier blanc placé sur la scène
2.
Réglage du zoom
Continuez de régler jusqu’à ce que l’écran soit totalement blanc.
3.
Réglage de la luminosité
Papier blanc
4.
Bouton [WHITE BALANCE AUTO] appuyé
L’équlibre des blancs est réajusté en 5 secondes.
● Le voyant lumineux du bouton commence par clignoter; Il s’éteint
Bouton [WHITE BALANCE AUTO]
une fois que le réglage de l’équilibre des blancs est terminé.
Français
䡵 Réglage manuel de l’équilibre des blancs
En fonction de l’objet, si les images s’affichent rougeâtres, bleuâtres ou que le ton global des couleurs semble médiocre même
après le réglage automatique de l’équilibre des blancs, réglez manuellement l’équilibre des couleurs.
Voy ant
lumineux de
bouton
AUTO
USER SETUPDEFAULT
WHITE BALANCE
RED BLUE
RED
BLUE
SAVE
Augmenter le composant rouge
Réduire le composant rouge
Augmenter le composant bleu
Réduire le composant bleu
CAMERA
NEGA POSI
PICTURE MEMORY
1
BW COLOUR
2
TEXT
3
IMAGE OFF
F-17
Page 45

Enregistrement du paramétrage (enregistrement des paramètres de l’utilisateur)
Les paramétrages rappelés lors de la mise sous tension ou lorsque le bouton [USER SETUP] est enfoncé peuvent être enregistrés.
䡵 Enregistrement
Voyant
lumineux de
bouton
WHITE BALANCE
CAMERA
BW COLOUR
RED BLUE
PICTURE MEMORY
1
AUTO
NEGA POSI
1.
Réglage de la caméra
● Ajustez la caméra aux paramètres devant être enregistrés.
● Vous pouvez régler les paramètres suivants. ( ) sont des paramètres
par défaut.
•Position zoom (équivalente à la position portrait A4)
• Statut de l’éclairage (les deux éclairages latéraux s’allument)
• Equilibre des blancs (valeur correspondant à l’éclairage latéral)
• Néga/Posi (Posi)
• Noir et blanc/couleur (couleur)
•Texte (désactivé)
2.
Appuyez sur le bouton [SAVE] pendant
plus de 2 secondes
● Le voyant lumineux du bouton commence par s’allumer avant de
clignoter. Il s’éteint une fois que le processus d’écriture est terminé.
USER SETUPDEFAULT
TEXT
2
SAVE
3
IMAGE OFF
● Le paramétrage d’écriture est conservé même en cas de coupure
de courant.
䡵 Rappel des paramètres
䡵 Annulation des paramètres
(Restauration des paramètres par défaut)
F-18
1.
Bouton [USER SETUP] appuyé
● Les paramètres enregistrés sont activés.
1.
Bouton [DEFAULT] appuyé
● Les valeurs par défaut sont restaurées.
2.
Appuyez sur le bouton [SAVE] pendant
plus de 2 secondes
● Le voyant lumineux du bouton commence par s’allumer avant de
clignoter. Il s’éteint une fois que le processus d’écriture est terminé.
Page 46

Enregistrement d’images sur la carte SD
Les images prises peuvent être enregistrées sur la carte SD (vendue séparément).
1.
Bouton [CAMERA] appuyé
2.
Insertion de la carte SD
● Pour enlever la carte SD, appuyez sur la carte pour pouvoir la déloger de la fente de la carte.
DELETE
SAVE
3.
SELECT
PAGE
SD
䡵 Suppression d’images
IMAGE
ENTER
CARD SYSTEM
1.
2.
3.
Appuyez sur le bouton SAVE
(sauvegarde) et maintenez-le enfoncé.
● Le voyant lumineux d’enregistrement s’allume ➞ Clignote pendant
que l’enregistrement est en cours. Clignote ➞ S’allume ➞ S’éteint
une fois que l’enregistrement est terminé.
● L’enregistrement est impossible si le commutateur de la carte SD
est sur protection en écriture. Dans ce cas, le voyant d’enregistrement ne clignote pas.
● Si la carte SD est pleine, aucune image additionnelle ne peut être
enregistrée. Le voyant lumineux d’enregistrement ne clignote pas.
Dans ce cas, supprimez les images inutiles ou utilisez une nouvelle
carte.
1.
Sélection de l’image à supprimer
● <Ecran normal>
Pour supprimer l’image, utilisez les boutons [PAGE , ] pour
sélectionner l’image à supprimer.
● <Ecran miniature>
Lorsque l’écran miniature s’affiche, utilisez les boutons [PAGE ,
] pour déplacer le curseur et sélectionner l’image à supprimer.
Français
Remarques
● Si une image est supprimée dans un écran miniature, l’image suivante prend sa place.
● Le curseur passe à l’image suivante.
Remarques
● Lorsque vous enlevez ou insérez la carte SD ou pendant la mise hors tension, assurez-vous d’appuyer sur le bouton
[CAMERA] et de confirmer que l’image sortie est bien une image de la caméra. Si ce n’est pas le cas, les données enregistrées sur la carte sont corrompues ou l’appareil risque de ne pas fonctionner correctement.
● La carte SD est fabriquée à partir de pièces sensibles aux décharges statiques. Les décharges statiques risquent de
causer un dysfonctionnement ou d’endommager les contenus de la carte. Par conséquent, veillez à manipuler avec beaucoup de soin.
● Ne laissez pas la carte SD dans le logement. Enlevez la carte SD après chaque utilisation.
● Nombre d’images pouvant être enregistré :
64 Mo: environ 120 images, 128 Mo: environ 240 images, 256 Mo: environ 480 images
● La carte SD 64 Mo, 128 Mo ou 256 Mo de Panasonic est recommandée.
2.
Appuyez sur le bouton [DELETE] pendant plus de 2 secondes.
● Le voyant lumineux d’enregistrement s’allume ➞ Clignote pendant
que l’enregistrement est en cours. Clignote ➞ S’allume ➞ S’éteint
une fois que la suppression est terminée. (environ 2 secondes)
F-19
Page 47

Visualisation des données d’images enregistrées sur la carte SD
Vous pouvez visualiser les images enregistrées sur la carte SD.
3.
1.
Insertion de la carte SD
2.
Boutons [SD CARD SYSTEM] SYSTEME DE CARTE SD appuyés
3.
Visualisation des images
<Visualiation des images une à la fois>
Appuyez sur les boutons [PAGE]
● L’image change chaque fois que vous appuyez sur le bouton.
● L’image change en continu si vous appuyez sur le bouton et le
maintenez enfoncé. (à un intervalle d’environ 0,5 secondes)
Remarque
●
La première image de la carte SD s’affiche si vous appuyez sur le
bouton [IMAGE SELECT/ENTER] pendant plus de deux secondes.
DELETE
SD
PAG E
CARD SYSTEM
IMAGE
SAVE
SELECT
ENTER
5.
LIGHT
SD CARD
EXT
1.
FREEZE
IN
CAMERA
SELECTSOURCE
3. 3. 4.2.,3.
<Ecran miniature>
● Le curseur se déplace tel qu’indiqué ci-dessous
lorsque vous appuyez sur le bouton [PAGE
Page suivante
Curseur
● Appuyez sur le bouton [ ] ou [ ] que vous maintenez enfoncé pour déplacer le curseur en continu (à
un intervalle d’environ 0.1 seconde). Si la dernière
image de la page courante est atteinte, la page suivante s’affiche.
● Vous pouvez supprimer l’image sélectionnée par le
curseur. (☞ Page 19 ‘Suppression des images’)
].
<Visualisation d’images en une seule fois (miniature)>
Appuyez sur le bouton [IMAGE SELECT/ENTER]
● 16 images sont affichées dans une vue.
● Utilisez les boutons [PAGE
● Appuyez sur [
page suivante et appuyez sur [
la page précédente.
● Si vous appuyez sur le bouton [IMAGE SELECT/ENTER] lorsque
l’image a été sélectionnée par le curseur, l’image choisie s’affiche
plein écran.
Remarque
●
On peut également déplacer les curseurs vers le haut ou le bas, et vers la gauche
ou la droite, en utilisant respectivement les boutons SD UP&DOWN/SD LEFT&RIGH.
] sur la dernière image de la page pour afficher la
, ] pour déplacer le curseur.
] sur la première image pour afficher
<Visualisation automatique des images en une seule fois (diaporama)>
Tout en maintenant les boutons [SD CARD SYSTEM] enfoncés, appuyez sur les boutons [IMAGE SELECT/ENTER] au bout de 1 seconde.
● A partir de l’image affichée, les images suivantes apparaissent automatiquement en séquence. (à un intervalle d’environ 2 secondes)
● Lorsque les boutons [IMAGE SELECT/ENTER] ou [PAGE] sont enfoncés encore une fois, l’image en cours de lecture sera sélectionnée et l’opération s’arrête.
4.
Bouton [CAMERA] appuyé
● Assurez-vous que l’image sortie est une image de la caméra.
5.
Délogement de la carte SD
● Pour enlever la carte SD, appuyez sur la carte pour pouvoir la délo-
ger de la fente de la carte.
Remarques
● Cet appareil se charge de la sortie (en format Exif) d’une image prise par l’appareil numérique à images fixes. (Certains
types de formats Exif ne sont pris en charge.)
● Si vous essayez d’afficher des image enregistrées via d’autres sources, les images sorties seront noires ou grises.
● Les données JPEG prises avec une caméra numérique et les données JPEG téléchargées sur le Web peuvent être conver-
ties en données image visibles sur cette unité à l’aide du logiciel de conversion [JPEG conversion software (Exif Conv.exe)]
dans le CD-ROM fourni avec cette unité. Pour plus de détails, veuillez lire les instructions relatives au logiciel de conversion JPEG [Exif Cnv.pdf] sur le CD-ROM.
(Le logiciel [JPEG conversion software (Exif Conv.exe)] peut aussi être téléchargé à partir du site http://www.jvc-victor.co.jp/
english/pro/prodv/download/index.html.)
● Si l’image de la carte SD est sélectionnée sans que la carte soit insérée, l’image sortie noircit.
● Les opérations de luminosité et focus ne s’appliquent pas aux images enregistrées en format SD.
F-20
Page 48

Réglage de la taille et de la position de l’image sur la carte SD
On peut agrandir ou réduire l’image enregistrée sur la carte SD (par zoom numérique de 6X) et la déplacer vers la gauche, la
droite, le haut ou le bas.
Boutons
SD UP&DOWN
1.
Réglage de la taille de l’image
OUT IN
Utilisez les boutons ZOOM pour régler la
taille de la partie de l’image à visualiser.
1.
2.
EXT
FREEZE
IN
CAMERA
SELECTSOURCE
LIGHT
SD CARD
4.
(Exemple : Agrandir)
Boutons
Boutons
SD LEFT&RIGHT
ZOOM
ZOOM
2.
Déplacement de l’image vers le haut
ou le bas.
FOCUS
AUTO
SD UP&DOWN
3.
Déplacement de l’image vers la
Utilisez les boutons SD UP&DOWN pour
déplacer la partie de l’image à visualiser vers
le haut ou le bas.
gauche ou la droite
BRIGHT
AUTO
SD LEFT&RIGHT
4.
Restauration de l’image à sa taille
SD DEFAULT
Utilisez les boutons SD LEFT&RIGHT pour
déplacer la partie de l’image à visualiser
vers la gauche ou la droite.
initiale
BRIGHT
SD LEFT&RIGHT
SD DEFAULT
Si vous enfoncez le bouton AUTO, l’image
sera restaurée à sa taille réelle.
AUTO
Ou bien enfoncez le bouton SD CARD pour
ramener l’image à sa taille réelle.
Français
3.
(Exemple : Déplacer vers le haut)
Remarque
● On peut également utiliser les fonctions ci-dessus pour les
appliquer aux images dans la mémoire d’images.
(Exemple : Déplacer vers la gauche)
F-21
Page 49

Connexion d’un ordinateur via le connecteur USB
Les données d’image ou la mémoire d’images enregistrées sur la carte SD ainsi que les données d’image enregistrées dans cet appareil
peuvent être téléchargées vers un ordinateur.
䡵 Ordinateurs compatibles
SE: Windows Me/2000/XP
䡵 Connexion initiale
La capacité “plug and play” de Windows permet d’installer automatiquement le pilote nécessaire à cet appareil que l’ordinateur reconnaît aussitôt.
Exéctuez l’installation selon les instructions affichées à l’écran. (Ces instructions ne s’affichent pas pour les connexions ultérieures de l’ordinateur).
䡵 Méthodes d’exploitation
1.
Mise sous tension
Mise sous tension de cet appareil et de l’ordinateur.
2.
Connexion via le câble USB
Câble USB
● Sortez le câble que vous insérez soigneusement et fermement.
Attention
●
Vous ne pouvez pas formater ou écrire de données sur la carte SD à partir de l’ordinateur via
cet appareil.
●
Dans la mesure où cet appareil n’est pas doté
d’horloge, la date et l’heure des fichiers d’image
créés est 0 h 00, 1 janvier 2006.
●
Lorsque le câble USB est connecté, si la carte SD
est enlevée et réintroduite, les données de l’image
affichées à l’écran de l’ordinateur restent
inchangées. Pour changer l’affichage,
déconnectez le cable USB, puis retirez et réinsérez
la carte SD avant de reconnecter le cable USB.
●
On peut modifier les fichiers d’images sur le
disque amovible relié à l’ordinateur en effectuant
les opérations suivantes :
(Carte SD/Mémoire d’images)
•
Lors d’un passage au fichier d’fimages sur la
carte SD :
Tout en pesant sur le bouton SD CARD,
enfoncez le bouton DEFAULT pendant environ
1 seconde.
•
Lors d’un passage au fichier d’images dans la
mémoire d’images :
Tout en pesant sur le bouton CAMERA,
enfoncez le bouton DEFAULT pendant environ
1 seconde.
●
N’enlevez pas ou n’insérez par l’USB et ne basculez pas l’affichage des données de l’image à
l’écran de l’ordinateur pendant l’utilisation des
touches, de la télécommande ou de l’ordinateur.
Ceci risque de causer un dysfonctionnement et
de provoquer l’apparition de messages d’avertissement à l’écran de l’ordinateur.
Remarque
Exemple : Avec Windows XP
Cliquez selon la séquence suivante :
“Démarrage” ➞ “Poste de travail” ➞
“Disque amovible”
3.
Confirmation des données de l’image
Les données d’image seront enmagasinées sous forme d’images JPEG
dans le dossier “100JVCAV”. Lorsque le câble USB est connecté
comme à l’étape 2, l’affichage à l’écran varie comme suit, selon si la
carte SD a été insérée ou non.
<Lorsque la carte SD est insérée>
● Les données d’image enregistrées sur la carte SD s’affichent.
“Poste de travail”
“Disque amovible”
“DCIM”
“100JVCAV”
“IMAG0001.JPG”
“IMAG0002.JPG”
···
<Lorsque la carte SD n’est pas insérée>
● Les données de l’image enregistrées dans cet appareil seront affichées. (Mémoire d’image 1 à 3, image fixe)
“Poste de travail”
4.
Téléchargement des données de
“Disque amovible”
“DCIM”
“100JVCAV”
“MEMORY1.JPG”
“MEMORY2.JPG”
“MEMORY3.JPG”
“STILL.JPG”
l’image
Utilisez le logiciel de visualisation installé sur l’ordinateur pour confirmer les données d’image avant le téléchargement vers l’ordinateur.
Reportez-vous au manuel d’instruction de l’ordinateur pour de plus
amples informations sur le téléchargement.
F-22
Page 50

Utilisation de la télécommande
Les fonctions suivantes sont disponibles avec la télécommande.
[CAMERA]
1
Pour sortir les images de la caméra.
(☞ Page 6 5 Boutons [SOURCE SELECT])
[FREEZE]
2
Pour geler l’image de la caméra.
(☞ Page 6 4 Bouton [FREEZE])
[EXT-IN]
3
Les image des l’appareil connectées au terminal [EXT INPUT] sont sorties.
(☞ Page 6 5 Boutons [SOURCE SELECT])
[SD CARD]
4
Pour exécuter les fonctions liées à la carte SD.
● Lors de l’affichage d’images provenant d’autres sources, le mode de
sélection SD est activé si vous appuyez sur ce bouton.
(☞ Page 6 5 Boutons [SOURCE SELECT])
[BRIGHT]
5
Pour régler la luminosité de l’image de la caméra.
(☞ Page 6 2 Boutons de réglage [BRIGHT])
8
CAMERA
AUTO
AUTO
AUTO
WHITE
FREEZE
IMAGE SEL.
SD CARD
BRIGHT
FOCUS
ZOOM
OUT IN
31 2
EXT IN
4
5
6
7
Français
Haut bas ± 15 ˚
Gauche droite ± 30 ˚
[FOCUS]
6
Pour régler la mise au point de l’image de la caméra.
(☞ Page 6 3 Bouton [FOCUS])
[ZOOM]
7
Pour réduire ou agrandir l’image de la caméra.
(☞ Page 6 1 Boutons de réglage [ZOOM])
[AUTO WHITE]
8
Pour régler automatiquement l’équilibre des blancs.
(☞ Page 7 $ Boutons de réglage [WHITE BALANCE])
*Pour de plus amples informations sur les diverses fonctions, voir la page 6.
䡵 Plage de réception de la télécommande
La plage de réception est d’environ 5 m.
Le plan vertical est ± 15 ˚ et le plan horizontal est ± 30 ˚.
5 m
F-23
Page 51

Installation du moniteur LCD
Connectez le moniteur LCD vendu dans le commerce au terminal [MONITOR OUTPUT]. Pratique pour le réglage de l’angle de visée.
1.
Fixez le support de montage (AV-ZK20,
vendu séparément) au moniteur LCD
Moniteur LCD
Vis de réglage de l’angle
Support de montage du moniteur LCD
(AV-ZK20, vendu séparément)
1.
2.
avec la vis fournie avec le support.
2.
Fixez le support de montage du moniteur LCD (AV-ZK20, vendu séparément) à l’appareil avec la vis fournie
avec le support.
3.
Connexion du moniteur LCD au terminal [MONITOR OUTPUT] de cet appareil avec un câble vidéo
4.
Mise sous tension du moniteur LCD
(Reportez-vous au manuel d’instruction du moniteur LCD pour de plus
amples informations).
F-24
5.
Ajustement de la vis de réglage d’angle pour optimisation de l’angle de
visée
Page 52

Résolution des problèmes
Lorsque vous êtes confronté à un problème, vérifiez les points suivants pour trouver une solution. Si le problème persiste, n’utilisez pas
l’appareil et consultez votre revendeur JVC.
Symptômes Vérifiez les points suivants Voir page
Pas d’images affichées.
● La fiche est-elle bien branchée dans la prise CA ?
● L’interrupteur est-il mis sous tension ?
● La connexion de l’appareil au projecteur ou à l’écran est correcte ?
● La luminosité est définie au niveau optimal ?
● L’unité est-elle en mode d’image cachée (Image off) ?
● Vous êtes sûr(e) que les images ont été enregistrées dans la mémoire ? Enregis-
trez d’abord les images dans la mémoire pour pouvoir les rappeler ensuite.
● L’option [EXT IN] ou [SD CARD] de [SOURCE SELECTION] est sélectionnée ?
Sélectionnez [CAMERA].
● Un projecteur ou un écran compatible XGA est utilisé ?
10
10
6
7
17
6
10
La mise au point est impossible.
L’image est floue.
La poussière est visible.
L’image est foncée.
Des raies apparaissent sur
l’image du matériau imprimé.
Le ton semble incorrect.
Des battements s’affichent
sur l’image.
● L’objectif gros plan est installé ?
● L’objet est trop près de l’objectif ou la partie supérieure de l’objet est à une hauteur
supérieure à 50 mm de la surface de la scène ?
● Avez-vous pris les objets environnants avec l’objectif gros plan installé ? Lorsque
vous prenez des objets environnants, vous devez enlever l’objectif gros plan.
● Avez-vous agrandi la taille de l’image avec le zoom après la mise au point ? Effectuez la mise au point après l’agrandissement de l’image avec le zoom.
● Avec [FOCUS AUTO], la mise au point peut être difficile puisqu’elle dépend de
l’objet. Réglez la mise au point avec les boutons [FOCUS
● Si l’appareil est connecté au projecteur, veillez à ce que le projecteur soit correctement mis au point. Reportez-vous au manuel d’instruction du projecteur pour de
plus amples informations sur la procédure de mise au point.
● L’ objectif gros plan ou celui de la caméra doivent être nettoyés ? Nettoyez avec un
produit vendu dans le commerce.
● L’appareil est-il utilisé dans une pièce où la température est basse ? Si la température
de la pièce est basse, il faudra peut-être attendre quelques minutes avant que les
éclairages latéraux atteignent leur plein régime.
● Les éclairages latéraux sont allumés ?
● La luminosité est définie correctement ?
● Les points du matériau imprimé peuvent interférer avec les pixels de l’appareil de
l’image de la caméra ce qui entraîne des bandes en couleur. Dans ce cas, changez
légèrement la taille de l’image avec les boutons [ZOOM].
● Avez-vous réglé le ton avec l’option [WHITE BALANCE] ?
● Assurez-vous que le mode négatif n’est pas activé.
● Lorsque cet appareil est utilisé près d’un équipement générant une forte vague
électrique, des battements peuvent se produire sur l’image. Tenez l’appareil à l’écart
d’équipement de ce type.
, ].
5
Français
13
6
3
6
11
7
7
L’image papillote.
Impossible de régler l’image.
L’appareil ne fonctionne pas
même lorsqu’on appuie sur
le bouton.
La télécommande ne marche
pas.
L’image de la caméra est
dotée de points blancs ou
noirs.
● Lorsqu’une fréquence de 50 Hz est utilisée dans l’environnement, des papillotements peuvent se produire sur l’écran si vous utilisez une lumière fluorescente ou
une lampe à vapeur de mercure. Utilisez cet appareil avec les éclairages latéraux
allumés.
● Lorsque vous utilisez l’option [FREEZE], [PICTURE MEMORY], [EXT IN] ou [SD
CARD], vous ne pouvez pas régler l’image de la caméra. Revenez à l’image [CAMERA] pour pouvoir effectuer le réglage.
● Si la luminosité est insuffisante, cet appareil risque de ne pas fonctionner correctement et cela même si vous réglez la luminosité. Appuyez sur le bouton [LIGHT]
pour activer les éclairages latéraux.
● Lorsque vous appuyez sur deux boutons en même temps ou plusieurs fois sur un
bouton sans marquer de pause, l’appareil risque de ne pas fonctionner correctement. Lorsque vous utilisez les boutons, procédez un bouton à la fois en marquant
une pause avant d’appuyer sur d’autres boutons.
● Les piles sont installées dans la télécommande ?
● Les piles sont épuisées ?
Les piles fournies sont réservées uniquement à la vérification des opérations. Installez des piles vendues dans le commerce pour utiliser l’appareil.
● La télécommande est utilisée au-delà de la plage ?
● Les points noirs ou blancs qui peuvent apparaître parfois, proviennent des caracté-
ristiques de CCD à pixel élevé pour les graphiques. Si vous agrandissez l’image
avec la fonction du zoom numérique, les points risquent d’être plus remarquables.
6,7
7
11
23
F-25
Page 53

Caractéristiques techniques
䡵 GENERALITES
Alimentation :
Consommation électrique :
Masse :
䡵 OPTIQUE
Objectif :
Champ de prise de vue :
Plage réglable de la distance focale :
Zoom :
Focus :
Luminosité :
䡵 ECLAIRAGE
Eclairage latéral :
Rétroéclairage :
䡵 TETE DE LA CAMERA
Mode d’opération de sortie :
Appareil de reprise d’image :
Nbre de pixels (total) :
Résolution :
Taux raff :
Système de synchronisation :
Équilibre des blancs :
ENTREE/SORTIE :
CA 100 V à 240 V 50 Hz / 60 Hz
0,5 A
5,6 kg (12,3 lb)
F1,8 à F2,8, f = 5,4 mm à 64,8 mm (12 fois)
Max: 400 x 300 mm (format paysage A3 équivalent)
De la surface de la scène à une hauteur de 50 mm (la caméra dirigée vers le bas avec un
objectif gros plan)
⬁ à 0,8 m (2,6 pi) (la caméra dirigée sur le côté, sans objectif gros plan)
Zoom optique de 16x (objectif de 12x multiplié par bras extensible de 1,4x), Zoom numérique: 6x
Auto/manuel
Auto/manuel
6 W x 2 (éclairage inverseur)
4 W x 1 (éclairage inverseur, zone de 127 x 100 mm)
Mode progressif
• 1024 x 768 points H: 48,4 kHz / V: 60,0 Hz
Permutation du mode d’entrelacement NTSC/PAL
• NTSC H: 15,734 kHz / V: 59,94 Hz
•PAL H: 15,625 kHz / V: 50 Hz
1/3 po CCD
850 000 pixels (H1077 x V788)
Sortie RGB
À la verticale : Plus de 600 lignes À l’horizontal : Plus de 600 lignes
Sortie du moniteur
À la verticale : Plus de 350 lignes À l’horizontal : Plus de 500 lignes
20 IPS
Interne
Auto/manuel
Caméra/Entrée externe/Carte SD
䡵 ENTREE/SORTIE
Connecteur d’entrée :
Connecteur de sortie :
Connecteurs de contrôle :
䡵 CONDITIONS AMBIANTES
Température de fonctionnement :
Humidité :
䡵 ACCESSOIRES
Instructions x 1
Câble vidéo (5 m) x 1
Cordon d’alimentation (2,5 m) x 1
Câble USB (1,5 m) x 1
CD-ROM x 1
Télécommande x 1
Piles AA x 2
䡵 OPTIONS
Support de montage du moniteur LCD (AV-ZK20)
Entrée externe (D-sub 15 broches, femelle) x 1
RGB (D-sub 15 broches, 0,7 V(p-p), 75 ¸, femelle) x 1
MONITOR (broche RCA, 1 V(p-p), 75 ¸)x 1
USB (série B) x 1
Système carte SD x 1
Entrée à distance (D-sub 9 broches, RS-232C, mâle) x 1
5 ˚C à 40 ˚C
De 30 % à 85 %
F-26
Page 54

䡵 Dimensions (LHP) (unité: mm)
378
495 (plié)
Français
653 (étendu pour format A3)
190 (plié)
491 (étendu)
Les caractéristiques techniques et le design du produit peuvent être modifiés sans préavis à des fins d’amélioration.
F-27
Page 55

DIGITALES VORFÜHRGERÄT
BEDIENUNGSANLEITUNG
AV-P960E
(R)
Deutsch
Page 56

Sicherheitshinweise
WARNUNG–DIESES GERÄT MUSS
GEERDET WERDEN.
ACHTUNG:
SCHÜTZEN SIE DIESES GERÄT VOR NÄSSE UND FEUCHTIGKEIT, DAMIT ES NICHT IN BRAND GERÄT UND KEIN
KURZSCHLUSS ENTSTEHT.
WARNUNG
Dies ist ein Klasse-A-Produkt. In einer Wohngegend kann dieses Gerät Störungen verursachen, die der Bediener auf eigene Kosten beheben muss.
Merkmale
Vielen Dank dafür, dass Sie sich für dieses JVC-Produkt entschieden haben. Bitte lesen Sie diese Dokumentation sorgfältig durch, bevor
Sie das Gerät in Betrieb nehmen, denn nur so können Sie seine Leistungsfähigkeit optimal nutzen.
Diese Dokumentation bezieht sich auf das Modell AV-P960E.
Feine, hochauflösende Bilder
Die XGA-Ausgabe mit hoher Übertragungsrate von 20
Bilder/s zeigt feine, hochauflösende Bilder an.
Hochauflösender, leistungsfähiger Zoom
Integrierter optischer 16x-Zoom (12x-Objektiv, 1,4xTe leskoparm) und digitaler 6x-Zoom.
Handliches, leichtes und schlankes Design
Weniger als 50 cm tief, geringes Gewicht von unter 5,6
kg, bietet das Gerät trotzdem einen Feldwinkel im A3Querformat (400 ⳯ 300 mm).
Integrierter Steckplatz für SD-Karte
Der integrierte Steckplatz für schnelle SD-Karten mit
hoher Speicherkapazität ermöglicht Funktionen wie das
Speichern des Kamerabildes, die Ausgabe des von einer
digitalen Standbildkamera aufgenommenen Kamerabildes
(Exif-Format) und verschiedene Arten der Präsentation.
(SD-Karte nicht im Lieferumfang enthalten.)
Vielseitige Anschlussmöglichkeiten
Mit USB- und RS232-Anschluss.
Integrierter Konkavspiegel
Der integrierte Konkavspiegel ermöglicht dank der
Seitenlampen eine gleichmäßige Beleuchtung über die
gesamte Auflage hinweg.
G-2
Page 57

Inhaltsverzeichnis
Sicherheitshinweise.................................................................. 2
Merkmale.................................................................................... 2
Inhaltsverzeichnis ..................................................................... 3
Grundlagen
Vorbereitung
Betrieb
(Einstieg)
Vorsichtsmaßnahmen ............................................................... 4
Bedienelemente und Funktionen............................................. 5
Gesamtansicht .................................................................................. 5
Bedienfeld .......................................................................................... 6
Rückseite ........................................................................................... 8
Vor Inbetriebnahme ................................................................... 9
Anschließen ............................................................................. 10
Bedruckte Medien zeigen ....................................................... 11
Dreidimensionale Objekte zeigen .......................................... 12
Umgebungsobjekte aufnehmen............................................. 13
Dias zeigen .............................................................................. 14
Filme und andere transparente Medien zeigen .................... 15
Bilder im Bildspeicher sichern .............................................. 16
Weißabgleich einstellen.......................................................... 17
Einstellungen speichern (Benutzereinstellungen registrieren)
.. 18
Deutsch
Bilder auf der SD-Karte speichern......................................... 19
Betrieb
(Anwendung)
Sonstiges
Auf der SD-Karte gespeicherte Bilddaten anzeigen ............ 20
Einstellung der Bildgröße und -position auf der SD-Karte ......
Computer über USB anschließen .......................................... 22
Fernbedienung benutzen ....................................................... 23
LCD-Monitor installieren ........................................................ 24
Problembehebung................................................................... 25
Technische Daten .................................................................... 26
Hinweise zu diesem Handbuch
䡵 In diesem Handbuch verwendete Symbole
Vorsicht
Hinweis
Verweist auf Sicherheitsmaßregeln, die während des Betriebs zu beachten sind.
Bezeichnet Funktions- oder Einsatzbeschränkungen dieses Geräts. Diese Hinweise haben lediglich informieren-
den Charakter.
☞ Verweist auf Seitenzahlen oder Bedienelemente.
䡵 Inhalt dieses Handbuchs
● Urheberrecht für dieses Handbuch: JVC. Eine unautorisierte Reproduktion dieses Handbuchs ist auch in Auszügen unter-
sagt.
● Alle in diesem Handbuch aufgeführten Produktnamen sind Warenzeichen oder eingetragene Warenzeichen der jeweiligen
Unternehmen. Symbole wie ™,
● Im Sinne einer stetigen Produktverbesserung können äußeres Erscheinungsbild, technische Daten und andere in diesem
Handbuch vermittelte Informationen ohne Ankündigung geändert werden.
● Windows ist ein Warenzeichen der Microsoft Corporation in den Vereinigten Staaten von Amerika.
●
: Das SD-Logo ist ein Warenzeichen.
®
und © sind in diesem Handbuch nicht aufgeführt.
21
G-3
Page 58

Vorsichtsmaßnahmen
䡵 Umgang mit dem Gerät
● Tr agen Sie das Gerät nur am seitlichen Griff.
Das Tragen des Geräts an Kamerakopf, Kameraarm oder Seitenlampen kann zu Verformungen oder Beschädigungen führen.
● Ziehen Sie den Griff langsam und gerade heraus.
䡵 Führen Sie vor der Anfertigung wichtiger Aufnahmen immer eine Funktionsprüfung
durch.
䡵 Haftungsausschluss
● JVC lehnt jede Verantwortung für die misslungene Aufnahme oder Wiedergabe von Bildern aufgrund von Problemen ab, die durch
dieses Produkt oder die verwendete Karte entstehen. Eine Haftung für den Verlust von Bilddaten und anderen Inhalten ist ausgeschlossen.
䡵 Informationen zum Urheberrecht
● Sie können Aufnahmen zur eigenen Verwendung und zu Ihrem Vergnügen anfertigen. Beachten Sie jedoch, dass Sie keine Medien
verwenden dürfen, die urheberrechtlich geschützt sind, sofern nicht die Zustimmung des Urhebers vorliegt.
䡵 SD-Karte
Die SD-Karte besteht aus elektronischen Präzisionskomponenten. Beachten Sie, dass die Nichtbeachtung der folgenden Hinweise zu
Fehlfunktionen oder Schäden an der Karte führen kann.
● Berühren Sie den Rand der Karte nicht mit bloßen Händen und achten Sie darauf, dass keine Metallgegenstände mit ihm in Berührung kommen.
Es besteht die Gefahr von Schäden durch elektrostatische Entladung.
● Knicken Sie die Karte nicht, lassen Sie sie nicht fallen, und vermeiden Sie hohe Krafteinwirkung.
● Achten Sie bei Gebrauch und Lagerung der Karte darauf, Umgebungen zu meiden, in denen Hitze oder Wasser vorhanden sind,
oder die direkter Sonneneinstrahlung und Feuchtigkeitseinwirkung ausgesetzt sind.
● Versuchen Sie nicht, die Karte auseinander zu nehmen oder zu modifizieren.
䡵 Wartung und Pflege
Schalten Sie das Gerät ab, trennen Sie es vom Netz und führen Sie dann die nachfolgend aufgeführten Vorgänge durch.
● Wischen Sie Schmutz oder Staub mit einem trockenen, weichen Tuch vom Gerät ab.
● Bei hartnäckigen Verschmutzungen tauchen Sie ein Tuch in eine Lösung aus Wasser und Reinigungsmittel, wringen es gut aus und
entfernen die Verschmutzungen vom Gerät. Wischen Sie Restflüssigkeit dann mit einem trockenen Tuch ab.
Vorsicht
● Verwenden Sie niemals Reinigungsbenzin oder Verdünner. Dies kann zu Fehlfunktionen am Gerät und zu einer
Beschädigung des Gehäuses führen.
● Wenn Sie chemische Reiniger verwenden, lesen Sie die Produktbeilage sorgfältig durch und beachten Sie
insbesondere dort angegebene Vorsichtsmaßnahmen.
䡵 Autofokus
Dieses Gerät bietet eine Autofokus-Funktion. Allerdings kann es abhängig vom Objekt und von der Kameraeinstellung vorkommen,
dass keine zufriedenstellende Fokussierung erfolgt. Stellen Sie das Bild in diesem Fall manuell scharf.
Die Autofokus-Funktion kann Objekte nur unter Schwierigkeiten scharf stellen, wenn
● die Helligkeit der Bildfläche sehr hoch (hell) ist,
● die Helligkeit der Bildfläche sehr niedrig (dunkel) ist,
● sich die Helligkeit der Bildfläche fortwährend ändert (z. B. bei einem blinkenden Licht),
● praktisch keine Kontraste vorhanden sind,
● auf der Bildfläche sich wiederholende senkrechte Streifenmuster vorhanden sind,
● auf beiden Seiten oder auf der Ober- und der Unterseite des Bildschirms Grafiken oder Aufdrucke vorhanden sind.
䡵 Netzkabel
● Verwenden Sie ausschließlich das beiliegende Netzkabel.
Die Verwendung anderer, nicht spezifikationsgemäßer oder aber beschädigter Netzkabel erhöht das Risiko von Brand und Stromschlag.
● Verwenden Sie das beiliegende Netzkabel nicht an anderen Geräten.
䡵 Energieeinsparung
Schalten Sie das Gerät ab, wenn Sie es nicht verwenden, um Strom zu sparen.
G-4
Page 59

Bedienelemente und Funktionen
Gesamtansicht
1
0
!
2
3
Rückseite ☞ Seite 8
4
4
5
6
7
1 Kamerakopf
Zur Aufnahme von Bildern von Objekten auf der Auflage oder
Umgebungsbereichen.
2 Kameraarm
Haltearm für den Kamerakopf. Der Neigungswinkel kann zur
Aufnahme dreidimensionaler Objekte geändert werden.
3 Arretierung
Hiermit stellen Sie die Kamerahöhe ein. Lösen Sie die Arretierung, wenn Sie den Kameraarm auseinander ziehen oder
zusammen schieben, und stellen Sie sie fest, wenn die gewünschte Höhe eingestellt ist.
4 Seitenlampen
Stellen Sie die Lampen so ein, dass die Auflage gleichmäßig
ausgeleuchtet ist.
5 Griff
Ziehen Sie diesen Griff heraus, um das Gerät zu tragen. Wenn
Sie den Griff nicht benötigen, schieben Sie ihn ein.
Bedienfeld ☞ Seite 6
89
7 Auflage
Hier werden Objekte (oder Medien) aufgelegt.
Der Aufnahmebereich entspricht dem A3-Querformat
(400 x 300 mm).
8 Fernbedienungssensor
Hier werden die Signale der Fernbedienung empfangen.
☞ Seite 23, ,Fernbedienung benutzen‘
9 SD-Steckplatz
Steckplatz zur Aufnahme einer SD-Karte.
☞ Seite 19, ,Bilder auf der SD-Karte speichern‘
0 Diahalter
Wird zur Anzeige von Dias benötigt.
☞ Seite 14, ,Dias zeigen‘
! Nahaufnahmeobjektiv
Entfernen Sie dieses Objektiv, wenn Sie Umgebungsaufnahmen
machen wollen.
☞ Seite 13, ,Umgebungsobjekte aufnehmen‘
Rechte Seite
@
Deutsch
6 Hintergrundlampe
Verwenden Sie diese Lampe zur Anzeige transparenter Medien wie etwa Filme.
☞ Seite 15, ,Filme und andere transparente Medien zeigen‘
@ Netzschalter
Hiermit schalten Sie das Gerät ein bzw aus.
G-5
Page 60

Bedienelemente und Funktionen (Fortsetzung)
Bedienfeld
$
AUTO
CAMERA
NEGA POSI
%
@
USER SETUPDEFAULT
WHITE BALANCE
RED BLUE
PICTURE MEMORY
123
BW COLOUR
TEXT
^ & *
SAVE
IMAGE OFF
! 0 9 8 6 4 2 1357#
DELETE
PAG E
SD
CARD SYSTEM
1 [ZOOM]-Einstelltasten
Werden entsprechend dem aufzunehmenden Objekt eingestellt.
[IN] : Zur Aufnahme von Objekten (Medien) in vergrößer-
ter Form.
Wenn diese Taste konstant betätigt wird, endet die
Vergrößerung des Bildes bei maximalem optischem
Te lezoom, woraufhin die digitale Zoomfunktion aktiviert wird.
(optischer Zoom: 12fach, digitaler Zoom: 6fach)
[OUT] : Zur Aufnahme von Objekten (Medien) in verkleiner-
ter Form.
2 [FOCUS]-Einstelltasten
Hiermit stellen Sie die Bildschärfe ein.
]:Hiermit stellen Sie Objekte (Medien) scharf, die weit
[
von der Kamera entfernt sind.
]:Hiermit stellen Sie Objekte (Medien) scharf, die sich
[
nah vor der Kamera befinden.
[AUTO] :Wenn diese Taste betätigt wird, blinkt die CAMERA-
Anzeige unter SOURCE SELECT, und der Fokus
wird automatisch eingestellt. Wenn die Einstellung
abgeschlossen ist, erlischt die Anzeige automatisch.
Abhängig vom jeweiligen Objekt (Medium) kann es
schwierig sein, den Fokus einzustellen.
☞ Seite 4, ,Autofokus‘
3 [BRIGHT]-Einstelltasten
Stellt die Helligkeit des Kamerabildes ein.
[AUTO] :Wenn diese Taste betätigt wird, blinkt die CAMERA-
[
[
Anzeige unter SOURCE SELECT, und die Helligkeit
wird automatisch eingestellt. Wenn die Einstellung
abgeschlossen ist, erlischt die Anzeige automatisch.
]:Erhöht die Helligkeit des Kamerabild.
]:Verringert die Helligkeit des Kamerabild.
IMAGE
SAVE
SELECT
ENTER
EXT
FREEZE
IN
CAMERA
SELECTSOURCE
FOCUS
SD UP&DOWN
BRIGHT
SD LEFT&RIGHT
AUTO
AUTO
SD DEFAULT
OUT IN
ZOOM
LIGHT
SD CARD
4 [FREEZE]-Taste
Wenn diese Taste betätigt wird, wird das Kamerabild eingefroren und als Standbild angezeigt. Die Anzeige leuchtet. Wird
die Taste erneut betätigt, während die Anzeige leuchtet, dann
erlischt diese, und das tatsächliche Bild wird wieder angezeigt.
5 [SOURCE SELECT]-Tasten zur Anwahl
des Ausgabebildes
Dienen der Ausgabe des Bildes über den [RGB OUTPUT]sowie den [MONITOR OUTPUT]-Anschluss auf der Rückseite. Die Anzeige der für die Ausgabe gewählten Bildquelle leuchtet. Je nach angeschlossenem Anzeigegerät kann es eine
Zeitlang dauern, bis die Bilder angezeigt werden.
[CAMERA] : Zeigt das Kamerabild an.
[EXT IN] : Zeigt die Bildsignale an, die am [EXT INT]-An-
schluss auf der Rückseite anliegen. Es ist nicht
möglich, externe Signale über den [MONITOR
OUTPUT]-Anschluss wiederzugeben.
[SD CARD] : Hiermit wählen Sie Bilder zur Anzeige aus, die
auf der eingelegten SD-Karte gespeichert sind.
☞ Seite 20, ,Auf der SD-Karte gespeicherte Bilddaten anzei-
gen‘
6 [LIGHT]-Taste zum Einschalten der
Beleuchtung
Hiermit schalten Sie zwischen verschiedenen Lichtquellen um.
Die Umschaltung erfolgt dabei in der nachfolgend abgebildeten Reihenfolge.
Seitenlampen
Hintergrundlampe
Alle Lampen
aus
G-6
Page 61

Das [SD CARD SYSTEM] SD-Kartensystem
Die Bedienelemente 7 bis 0 sind nur bedienbar, wenn eine SDKarte in den SD-Steckplatz eingelegt ist.
# Anzeigelampe
Die Anzeige blinkt nach Betätigung einer Tasten ! bis * ,
während die jeweiligen Einstellungen geändert werden.
7 [IMAGE SELECT/ENTER]-Tasten zur
Auswahl von Bildern
Zeigt 16 Miniaturen der auf der SD-Karte gespeicherten Bilder als Übersicht an.
☞ Seite 20, ,Auf der SD-Karte gespeicherte Bilddaten anzei-
gen‘
8 [SAVE]-Taste zur Speicherung auf SD-
Karte
Wenn Sie diese Taste bei der Auswahl von mit der Kamera
aufgenommenen Bildern länger betätigen, blinkt die Anzeige,
und das derzeit angezeigte Bild wird auf der SD-Karte
gespeichert.
☞ Seite 19, ,Bilder auf der SD-Karte speichern‘
9 [PAGE]-Tasten
Hiermit wählen Sie auf der SD-Karte gespeicherte Bilder zur
Anzeige aus.
]:Ruft das vorhergehende Bild auf.
[
]:Ruft das nächste Bild auf.
[
0 [DELETE]-Taste zum Löschen von
Bildern auf der SD-Karte
Hiermit löschen Sie auf der SD-Karte gespeicherte Bilder.
Wenn mit den [SOURCE SELECT]-Tasten 5 [SD CARD] als
Quelle für die Bildausgabe gewählt wurde und Sie diese
[DELETE]-Taste länger als zwei Sekunden betätigen, blinkt
die Anzeige, und das gewählte Bild wird gelöscht.
☞ Seite 19, ,Bilder löschen‘
$ [WHITE BALANCE]-Einstelltasten
Hiermit stellen Sie verschiedene Parameter in Bezug auf den
Weißabgleich ein.
[AUTO] :Wenn diese Taste betätigt wird, blinkt die An-
[RED
[RED
[BLUE
[BLUE
☞ Seite 17, ,Weißabgleich einstellen‘
zeige, während der Weißabgleich neu einge-
stellt wird.
]:Erhöht den Rotanteil im Gesamtbild.
]:Verringert den Rotanteil im Gesamtbild.
]:Erhöht den Blauanteil im Gesamtbild.
]:Verringert den Blauanteil im Gesamtbild.
% [NEGA/POSI]-Taste zur Umschalten
zwischen Negativ- und Positivdarstellung
Hier können Sie bei Betrachten von Negativfilmen auf eine
negative Darstellung umschalten.
Die Umschaltung erfolgt, wenn die Taste betätigt wird.
Betätigen Sie die Taste erneut, um die positive Darstellung
auszuwählen.
☞ Seite 15, ,Filme und andere transparente Medien zeigen‘
^ [BW/COLOUR]-Taste zur Umschaltung
zwischen Schwarzweiß- und Farbdarstellung
Hiermit schalten Sie das Ausgabebild zwischen schwarzweißer und farbiger Darstellung um.
Die Umschaltung auf Schwarzweißdarstellung erfolgt, wenn
die Taste betätigt wird. Betätigen Sie die Taste erneut, um die
Farbdarstellung auszuwählen.
Deutsch
! [PICTURE MEMORY]-Tasten
Hiermit können Sie das Ausgabebild im internen Bildspeicher
ablegen oder dort gespeicherte Bilder auswählen und anzeigen.
[1] ~ [3] : Wenn Sie die Taste länger als zwei Sekunden
betätigen, blinkt die Anzeige #, und das Bild
wird im Bildspeicher abgelegt.
Um das gespeicherte Bild anzuzeigen, betäti-
gen Sie die Taste kurz.
[CAMERA] : Dient der Auswahl des Kamerabildes.
☞ Seite 16, ,Bilder im Bildspeicher sichern‘
@ [USER SETUP]-Tasten für Benutzerein-
stellungen
Hiermit können Sie verschiedene Parameter speichern und
wiederherstellen.
[SAVE] : Die aktuellen Benutzereinstellungen werden
gesichert.
[USER SETUP] : Die gesicherten Einstellungen werden wie-
derhergestellt.
[DEFAULT] : Stellt die Werkseinstellungen wieder her.
☞ Seite 18, ,Einstellungen speichern (Benutzereinstellungen
registrieren)‘
& [TEXT]-Taste
Hiermit werden Zeichen schärfer und deutlicher dargestellt.
Dieser Textmodus wird aktiviert, wenn die Taste betätigt wird.
Um ihn zu deaktivieren, betätigen Sie die Taste erneut.
* [IMAGE OFF]-Taste zum Abschalten
des Bildes
Mit dieser Taste können Sie das Ausgabebild vorübergehend
abschalten (z. B. vor Beginn einer Präsentation).
Wird die Taste betätigt, dann wechselt der Bildschirm in den
Bildabschaltmodus (schwarzer Bildschirm), und die Anzeige
des zugehörigen Ausgangs unter SOURCE SELECT blinkt.
Wenn die IMAGE OFF-Taste oder eine der Tasten unter
SOURCE SELECT erneut betätigt werden, wird der Modus
aufgehoben, und das gewählte Bild wird angezeigt.
G-7
Page 62

Bedienelemente und Funktionen (Fortsetzung)
Rückseite
Informationen zum Anschluss anderer Geräte finden Sie unter der Überschrift ,Anschließen‘ auf Seite 10.
Vorsicht
Öffnen Sie niemals die Abdeckung am Fuß des
Kameraarms. Führen Sie niemals Ihre Finger
oder Gegenstände in diese Öffnung ein.
Andernfalls kann dies Fehlfunktionen auslösen,
ferner besteht Verletzungsgefahr.
1 2 4 6 7 853
AC IN
MONITOR
OUTPUT
RGB
OUTPUT
1 [AC IN]-Netzanschluss
Schließen Sie hier das Netzkabel an und verbinden Sie das
Gerät so mit einer Netzsteckdose (100V bis 240 VAC).
2 [MONITOR OUTPUT]-Anschluss
Bildsignalausgang zur Einstellung des Betrachtungswinkels.
3 [RGB OUTPUT]-Anschluss
RGB-Signalausgang. Verbinden Sie diesen Ausgang mit dem
RGB-Eingang eines Projektors oder Monitors.
4 [USB]-Anschluss
Hier können Sie Geräte wie beispielsweise einen Computer
anschließen. Sie können dann Bilddaten, die auf der SD-Karte oder im Gerät selbst gespeichert sind, zum Computer übertragen.
☞ Seite 22, ,Computer über USB anschließen‘
USB
INPUT
REMOTE
(
EXT
INPUT
RS-232C
)
NTSC PAL
5 [EXT INPUT]-Anschluss zum Einspei-
sen externer Signale
Hier können Sie externe Geräte wie beispielsweise einen
Computer anschließen. Wenn Sie mit den [SOURCE
SELECT]-Tasten diesen externen Eingang ausgewählt haben,
werden die hier anliegenden Signale über den [RGB OUTPUT]-Anschluss ausgegeben. In diesem Fall ist eine Ausgabe über den [MONITOR OUTPUT]-Anschluss nicht möglich.
6 Montagebohrung für den LCD-Monitor
Diese Bohrung dient der Befestigung des LCD-Monitors
(optional erhältlich) an diesem Gerät.
☞ Seite 24, ,LCD-Monitor installieren‘
7 [REMOTE INPUT (RS-232C)]-Anschluss
Über diesen Anschluss können Sie das Gerät mithilfe eines
PC steuern, auf dem eine kundenseitig erstellte Steuersoftware läuft. Hinweise zur Kommunikationsmethode und zum
Befehlsschatz finden Sie im Dokument „[RS-232C External
control communication commands (command.pdf)]“ auf der
beiliegenden CD-ROM.
G-8
8 [NTSC/PAL]-Schalter
Nehmen Sie die Einstellung entsprechend dem verwendeten
Monitor vor.
Page 63

Vor Inbetriebnahme
Stellen Sie die Verbindungen entsprechend den folgenden Anweisungen her.
1.
1.
2.
Rechte Lampe
Linke Lampe
Stellen Sie die rechte Lampe auf
2.
Stellen Sie die linke Lampe auf
3.
Stellen Sie den Kamerakopf (Kameraarm) auf
Greifen Sie zu diesem Zweck den Kameraarm und halten Sie das
Gerät mit der anderen Hand fest, während Sie den Kameraarm
langsam aufstellen, bis er seine Maximalstellung erreicht hat.
Kameraarm
Kameraarm
Auflage
4.
6.
5.
Arretierung
Arretierung
Kamerakopf
3.
7.
4.
Lösen Sie die Arretierung
Ziehen Sie den Arretierhebel wie abgebildet in Pfeilrichtung, um die
Arretierung zu lösen.
5.
Ziehen Sie den Kameraarm aus
Halten Sie das Gerät oder den Fuß des Kameraarm mit der einen
Hand fest, während Sie mit der anderen den oberen Teil des
Kameraarm greifen. Ziehen Sie den Kameraarm nun langsam nach
oben, bis er seine Maximalstellung erreicht hat.
6.
Sichern Sie den Kameraarm
Bringen Sie den Arretierhebel wieder in die Ausgangsstellung, um
den Kameraarm festzustellen.
7.
Drehen Sie den Kamerakopf in Richtung der Auflage
Um das System wieder zusammenzulegen, führen Sie die aufgeführten Schritte
in umgekehrter Reihenfolge aus.
Wenn die Schritte nicht korrekt ausgeführt werden, besteht für Kamerakopf und -arm die Gefahr einer Beschädigung.
Deutsch
Vorsicht
Vorsicht
● Wenn Sie den Kameraarm zusammenschieben, halten Sie den
Kameraarm nicht an den Verbindungsteilen fest. Dies könnte zu
Verletzungen führen.
● Ziehen Sie den Kameraarm niemals auseinander und schieben Sie
ihn niemals zusammen, wenn er eingeklappt ist.
Bei übermäßigem Kraftaufwand können Komponenten im Innern des Arms
beschädigt werden.
Vergewissern Sie sich, dass der Kamerakopf (Kameraarm) wie in Schritt
3
beschrieben ordnungsgemäß aufgestellt ist, bevor Sie ihn ausziehen
oder zusammenschieben.
● Greifen Sie beim Aufstellen, Zusammenklappen, Auseinanderziehen
und Zusammenschieben niemals den Kamerakopf, sondern immer
nur den Kameraarm.
Bei übermäßigem Kraftaufwand können der Kamerakopf sowie Komponenten im Innern des Arms beschädigt werden. Greifen Sie bei Durchführen der Schritte
3
und 5 immer den Kameraarm.
G-9
Page 64

Anschließen
Stellen Sie die Verbindungen entsprechend den folgenden Anweisungen her. Der [MONITOR OUTPUT]-Anschluss dient der Überprüfung
der Bilder.
LCD Monitor
Computer
2.
[MONITOR OUT]
[RGB
OUT]
5.
Netzschalter
Linke Lampe
Netzkabeleingang
[AC IN]
Netzverbindung
4.
[USB]-
3.
Anschluss
1.
(beiliegende Netzkabel)
USB-Anschluss
Projektor
LCD-Monitor, Computer und Projektor sind separat erhältlich.
1.
2.
3.
Schließen Sie den [RGB OUTPUT]Anschluss an einen Projektor oder ein
Anzeigegerät an.
● Dieses Gerät gibt XGA-Signale aus. Achten Sie darauf, nur kompatible Anzeigegeräte anzuschließen.
● Wir empfehlen die Verwendung eines handelsüblichen 15-poligen
D-Sub-Kabels (Länge unter 3 Meter).
Schließen Sie bei Bedarf den [MONITOR OUTPUT]-Anschluss an einen
Monitor o. ä. an.
Verbinden Sie bei Bedarf den USBAnschluss mit einem Computer.
☞ Seite 22, ,Computer über USB anschließen‘
G-10
4.
Schließen Sie das Gerät mithilfe des
beiliegenden Netzkabels an eine Netzsteckdose an.
5.
Einschalten.
Page 65

Bedruckte Medien zeigen
Der Aufnahmebereich für bedruckte Medien entspricht dem A3-Querformat (400 x 300 mm).
Kamerakopf
1.
Kameraarm und -kopf einstellen
Stellen Sie den Kameraarm und -kopf entsprechend der Größe des
Objekts ein.
● Vergewissern Sie sich, dass der Kamerakopf zentral über dem Objekt positioniert ist.
● Der Arm ist so ausgelegt, dass, wenn er vollständig ausgezogen ist,
ein Objekt erfasst werden kann, dessen Größe dem A3-Querformat
entspricht.
Arm
2.
1.
1.
2.
[FOCUS]-Taste
[BRIGHT]-Taste
(Beispiel) Zu kleine Zoomeinstellung.
(Beispiel) Unpassende
Helligkeitseinstellung.
[ZOOM]Taste
2.
Beleuchtung einstellen
Stellen Sie die Beleuchtung so ein, dass das Objekt gleichmäßig
ausgeleuchtet ist.
3.
Zoom einstellen
OUT IN
ZOOM
4.
Helligkeit einstellen
BRIGHT
AUTO
SD LEFT&RIGHT
5.
Fokus einstellen
FOCUS
SD UP&DOWN
SD DEFAULT
AUTO
Stellen Sie den Zoom so ein, dass der Teil des
Objekts, der aufgenommen werden soll,
bildschirmfüllend angezeigt wird.
Wenn die Bildschirmdarstellung zu hell oder zu
dunkel ist, korrigieren Sie ggf. die Helligkeit.
Wenn Sie die [AUTO]-Taste betätigen, wird die
Helligkeit automatisch passend eingestellt.
Stellen Sie ggf. die Bildschärfe ein.
Wenn Sie die [AUTO]-Taste betätigen, wird die
Bildschärfe automatisch eingestellt.
Deutsch
(Beispiel) Unscharfes Bild.
(Beispiel) Korrekte Einstellung.
Hinweis
● Bei gemischten Medien (d. h. Medien im Hoch- und Querformat)
bietet es sich an, für beide Formate Benutzereinstellungen zu speichern. (☞ Seite 18, ,Einstellungen speichern (Benutzereinstellungen
registrieren)‘)
G-11
Page 66

Dreidimensionale Objekte zeigen
Räumliche Objekte, die auf der Auflage stehen, können aufgenommen werden. Durch entsprechende Einstellung des Kameraarms lassen
sich unterschiedliche Aufnahmewinkel realisieren.
2.
1.
2.
1.
Kameraarm und -kopf einstellen
Stellen Sie den Kameraarm und -kopf entsprechend der Größe des
Objekts ein.
● Ve rgewissern Sie sich, dass der Kamerakopf zentral über dem Objekt positioniert ist.
● Der Arm ist so ausgelegt, dass, wenn er vollständig ausgezogen ist,
ein Objekt erfasst werden kann, dessen Größe dem A3-Querformat
entspricht.
2.
Beleuchtung einstellen
Stellen Sie die Beleuchtung so ein, dass der Teil des Objekts, der
aufgenommen werden soll, gleichmäßig ausgeleuchtet wird.
3.
Zoom einstellen
OUT IN
ZOOM
Stellen Sie den Zoom so ein, dass der Teil des
Objekts, der aufgenommen werden soll,
bildschirmfüllend angezeigt wird.
6.
4.
Helligkeit einstellen
BRIGHT
AUTO
SD LEFT&RIGHT
5.
Fokus einstellen
FOCUS
SD UP&DOWN
6.
Arm im gewünschten Winkel neigen,
SD DEFAULT
AUTO
Wenn die Bildschirmdarstellung zu hell oder
zu dunkel ist, korrigieren Sie ggf. die Helligkeit.
Wenn Sie die [AUTO]-Taste betätigen, wird die
Helligkeit automatisch passend eingestellt.
Stellen Sie ggf. die Bildschärfe ein.
Wenn Sie die [AUTO]-Taste betätigen, wird die
Bildschärfe automatisch eingestellt.
um die Aufnahme zu machen
Hinweise
● Die Aufnahme dreidimensionaler Objekte aus einem schrägen
Winkel hat sehr realistische Bilder zum Ergebnis.
● Der Fokus kann unter Umständen nicht justiert werden, wenn
vergrößerte dreidimensionale Objekte mit zusammengelegtem
Kameraarm aufgenommen werden. Ziehen Sie den Kameraarm
in diesem Fall auseinander, bis der Fokus eingestellt wird.
G-12
Page 67

Umgebungsobjekte aufnehmen
Der Kamerakopf kann gedreht werden, um die Umgebung aufzunehmen.
Kamerakopf
1.
Kamerakopf in Richtung des Objekts
neigen
1.
2.
Nahaufnahmeobjektiv entfernen
Drücken Sie die Halteklammern zusammen, während Sie das
Objektiv herausziehen.
Deutsch
Nahaufnahmeobjektiv
2.
3.
[FOCUS]-Taste
[ZOOM]Taste
3.
Bild einstellen
Stellen Sie Zoom, Helligkeit und Bildschärfe ein.
[BRIGHT]-Taste
G-13
Page 68

Dias zeigen
Gerahmte Dias können zur Präsentation direkt in den Kamerakopf eingelegt werden.
1.
Ein Blatt Papier auf die Auflage legen
Da bei der Diadarstellung das von der Auflage reflektierte Licht
genutzt wird, legen Sie ein Blatt stark reflektierenden Papiers
2.
2.
Weißes
Papier
[ZOOM]Taste
(Größe B4 oder A3) auf die Auflage.
2.
Seitenlampen einstellen
Stellen Sie die Lampen so ein, dass die Auflage gleichmäßig
ausgeleuchtet ist.
3.
Dia einlegen
Auflage
[BRIGHT]-Taste
1.
3.
[FOCUS]-Taste
6.
4.
[ZOOM]Taste
Hinweis
Verwenden Sie ausschließlich gerahmte Dias.
4.
Zoom einstellen
Stellen Sie den Zoom so ein, dass der Teil des
OUT IN
ZOOM
5.
Helligkeit einstellen
BRIGHT
AUTO
SD LEFT&RIGHT
Hinweise
● Die automatische Helligkeitseinstellung ist deaktiviert, wenn mit
der [NEGA/POSI]-Taste die negative Darstellung aktiviert wurde.
Die Anzeige blinkt in diesem Fall schnell, um zu signalisieren,
dass die Funktion nicht verfügbar ist.
● Bei aktivierter Negativdarstellung können Sie die Bildhelligkeit
mit der Taste [BRIGHT
] erhöhen.
Wenn Sie bei aktivierter Negativdarstellung die [WHITE BALANCE]-
●
Tasten [RED
bzw. Blauanteil, während durch Betätigung der Tasten [RED
[BLUE
SD DEFAULT
] oder [BLUE ] betätigen, verringern Sie den Rot-
] der Rot- bzw. Blauanteil erhöht wird.
Objekts, der aufgenommen werden soll,
bildschirmfüllend angezeigt wird.
Betrachten Sie das auf dem Monitor angezeigte Bild und stellen Sie die Helligkeit wie gewünscht ein.
] verringern und mit der Taste [BRIGHT
] oder
G-14
5.
[BRIGHT]Taste
6.
Fokus einstellen
Stellen Sie den Fokus mit den Tasten [FOCUS , ] ein.
Hinweis
Wenn das Dia vertikal gerahmt ist, kann es sein, dass, wenn Sie das
Bild so stark vergrößern, dass der Rahmen nicht mehr zu sehen ist,
eine Scharfstellung nicht möglich ist. Verwenden Sie in diesem Fall
die Zoomtaste [OUT], um die Vergrößerung zurückzunehmen.
Page 69

Filme und andere transparente Medien zeigen
Sie können Filme zur Präsentation auf die Auflage legen.
1.
Betätigen Sie die [LIGHT]-Taste, um
die Hintergrundlampe einzuschalten
Bei jeder Betätigung der [LIGHT]-Taste wird zwischen den Lichtquellen umgeschaltet.
Alle Lampen
aus
Hintergrundlampe
Seitenlampen
2.
Legen Sie Filme oder andere transpa-
Hintergrundlampe
rente Medien auf die Auflage
Legen Sie den Film in die Mitte der Auflage und platzieren Sie den
Kamerakopf direkt über dem Film.
3.
1.
[LIGHT]Taste
6.
5.
4.
3.
Wählen Sie die negative oder positive
Darstellung
Betätigen Sie im Falle eines Negativs die [NEGA/POSI]-Taste, um
auf negative Darstellung umzuschalten.
4.
Zoom einstellen
OUT IN
ZOOM
5.
Helligkeit einstellen
BRIGHT
AUTO
SD LEFT&RIGHT
Hinweise
● Die automatische Helligkeitseinstellung ist deaktiviert, wenn mit
der [NEGA/POSI]-Taste die negative Darstellung aktiviert wurde.
Die Anzeige blinkt in diesem Fall schnell, um zu signalisieren, dass
die Funktion nicht verfügbar ist.
● Bei aktivierter Negativdarstellung können Sie die Bildhelligkeit
mit der Taste [BRIGHT
] erhöhen.
Wenn Sie bei aktivierter Negativdarstellung die [WHITE BALANCE]-
●
Tasten [RED
bzw. Blauanteil, während durch Betätigung der Tasten [RED
[BLUE
SD DEFAULT
] oder [BLUE ] betätigen, verringern Sie den Rot-
] der Rot- bzw. Blauanteil erhöht wird.
Stellen Sie den Zoom so ein, dass der Teil des
Objekts, der aufgenommen werden soll,
bildschirmfüllend angezeigt wird.
Betrachten Sie das auf dem Monitor angezeigte Bild und stellen Sie die Helligkeit wie gewünscht ein.
] verringern und mit der Taste [BRIGHT
] oder
Deutsch
6.
Fokus einstellen
Stellen Sie den Fokus mit den Tasten [FOCUS , ] ein.
G-15
Page 70

Bilder im Bildspeicher sichern
Häufig benutzte Bilder können im Bildspeicher dieses Geräts abgelegt werden. Zwischen den Bildern im Bildspeicher und dem Kamerabild
kann während einer Präsentation umgeschaltet werden. Es lassen sich bis zu drei Bilder abspeichern.
1.
Betätigen Sie die [CAMERA]-Taste
Das Kamerabild wird ausgegeben.
2.
Zoom einstellen
[FOCUS]-Taste
3.
Helligkeit einstellen
4.
Fokus einstellen
Anzeigelampe
[ZOOM]-Taste
[BRIGHT]-Taste
1.
AUTO
CAMERA
NEGA POSI
USER SETUPDEFAULT
WHITE BALANCE
RED BLUE
PICTURE MEMORY
1
BW COLOUR
2
TEXT
SAVE
3
IMAGE OFF
5.
䡵 Gespeicherte Bilder abrufen
5.
Drücken Sie die Taste [PICTURE MEMORY 1]
für mindestens zwei Sekunden
● Die Tastenanzeige leuchtet zunächst, dann blinkt sie. Wenn das Bild
gespeichert ist, erlischt die Anzeige.
● Das Bild wird zum Standbild.
6.
Wiederholen Sie die Schritte 1 bis
Führen Sie für die Bildspeicher 2 und 3 die gleichen Schritte durch.
1.
Drücken Sie auf die Taste [PICTURE
MEMORY]
Die gespeicherten Bilder werden angezeigt.
Hinweis
● Wenn Sie die Bilder, die in diesem Gerät gespeichert sind, abrufen wollen, achten Sie darauf, die [PICTURE MEMORY]-Taste nicht
länger als zwei Sekunden zu drücken. Das Bild wird gespeichert.
● Befindet sich im Bildspeicher kein Bild, dann wird der Bildschirm
bei Betätigung der [PICTURE MEMORY]-Taste schwarz, d. h. es
erfolgt keine Anzeige.
5
Hinweise
● Das Gerät ist so konzipiert, dass das jeweilige Bild bei vollständig ausgezogenem Kameraarm im A4-Hochformat angezeigt wird. Bei gemischten Medien (d. h. Medien im Hoch- und Querformat) bietet es sich an, vor der Präsentation eines der
Formate im Bildspeicher abzulegen.
● Wenn das Gerät abgeschaltet wird, geht der Inhalt des Bildspeichers verloren.
● Werden neue Bilder im Bildspeicher abgelegt, so werden ggf. vorhandene Bilddaten überschrieben.
● Bilder der SD-Karte können in diesem Gerät nicht gespeichert werden.
G-16
Page 71

Weißabgleich einstellen
䡵 Automatische Einstellung des Weißabgleichs
Das Gerät ist so eingestellt, dass die Farben natürlich wiedergegeben werden. Der Weißabgleich lässt sich allerdings einstellen.
Gehen Sie dazu wie folgt vor:
1.
Legen Sie ein Blatt Papier auf die Auflage
2.
Zoom einstellen
Stellen Sie den Zoom so ein, dass der gesamte Bildschirm weiß ist.
Weißes Papier
3.
Helligkeit einstellen
4.
Betätigen Sie die Taste [WHITE BALANCE AUTO]
[WHITE BALANCE AUTO]-Taste
Der Weißabgleich wird innerhalb von etwa fünf Sekunden neu eingestellt.
● Wenn der Abgleichsvorgang abgeschlossen ist, blinkt die Lampe
zunächst, danach erlischt sie.
䡵 Manuelle Einstellung des Weißabgleichs
Je nach Objekt kann es, wenn die Bilder auch nach Durchführung eines automatischen Weißabgleichs rötlich, bläulich oder auf
andere Weise nicht zufriedenstellend angezeigt werden, notwendig sein, die Farbbalance manuell einzustellen.
Deutsch
Anzeigelampe
AUTO
CAMERA
NEGA POSI
USER SETUPDEFAULT
WHITE BALANCE
RED BLUE
PICTURE MEMORY
1
2
BW COLOUR
TEXT
SAVE
3
IMAGE OFF
RED
BLUE
Erhöht den Rotanteil
Verringert den Rotanteil
Erhöht den Blauanteil
Verringert den Blauanteil
G-17
Page 72

Einstellungen speichern (Benutzereinstellungen registrieren)
Die Einstellungen des Geräts nach dem Einschalten oder nach Betätigung der [USER SETUP]-Taste können gespeichert werden.
䡵 Einstellungen speichern
1.
Kamera einstellen
● Nehmen Sie die gewünschten Einstellungen an der Kamera vor.
● Die nachfolgend genannten Parameterwerte können gespeichert
werden. Werte in Klammern sind Werkseinstellungen.
• Zoomposition (etwa A4-Hochformat)
• Lampenstatus (die beiden Seitenlampen sind eingeschaltet)
•Weißabgleich (Wert entsprechend den Seitenlampen)
• Negativ-/Positivdarstellung (positiv)
•Schwarzweiß-/Farbdarstellung (Farbe)
•Text (AUS)
2.
Drücken Sie die Taste [SAVE] für
mindestens zwei Sekunden
Anzeigelampe
USER SETUPDEFAULT
SAVE
● Die Tastenanzeige leuchtet zunächst, dann blinkt sie. Wenn der
Speichervorgang abgeschlossen ist, erlischt die Anzeige.
● Die gespeicherten Einstellungen bleiben auch nach den Ausschalten erhalten.
WHITE BALANCE
CAMERA
BW COLOUR
RED BLUE
PICTURE MEMORY
1
2
TEXT
3
IMAGE OFF
AUTO
NEGA POSI
䡵
Einstellungen wiederherstellen
䡵
Einstellungen rückgängig machen
(Werkseinstellungen wiederherstellen)
1.
Drücken Sie auf die Taste [USER SETUP]
● Die gesicherten Einstellungen werden wiederhergestellt.
1.
Drücken Sie auf die Taste [DEFAULT]
● Die Werkseinstellungen werden wiederhergestellt.
G-18
2.
Drücken Sie die Taste [SAVE] für
mindestens zwei Sekunden
● Die Tastenanzeige leuchtet zunächst, dann blinkt sie. Wenn der
Speichervorgang abgeschlossen ist, erlischt die Anzeige.
Page 73

Bilder auf der SD-Karte speichern
Aufgenommene Bilder können auf einer SD-Karte (optional erhältlich) abgelegt werden.
1.
Drücken Sie auf die Taste [CAMERA]
2.
Führen Sie die SD-Karte
● Um die SD-Karte zu entnehmen, drücken Sie sie kurz in das Gerät
hinein, um sie zu entsperren, bevor Sie sie herausziehen.
IMAGE
SAVE
ENTER
DELETE
SD
PAGE
CARD SYSTEM
䡵 Bilder löschen
SELECT
3.
1.
2.
3.
Drücken Sie die SAVE-Taste länger.
● Die Speicheranzeige leuchtet auf. ➞ Sie blinkt während des Speicher-
vorgangs. Während des Speicherns läuft folgende Sequenz ab: Die
Anzeige blinkt. ➞ Sie leuchtet. ➞ Sie erlischt nach Abschluss des
Speichervorgan.
● Das Speichern ist nicht möglich, wenn der Schreibschutz der SDKarte aktiviert ist. In diesem Fall leuchtet die Speicheranzeige nicht.
● Ferner blinkt die Anzeige auch dann nicht, wenn die Kapazität der
SD-Karte erschöpft ist und keine weiteren Bilder darauf gespeichert
werden können. Löschen Sie in diesem Fall nicht mehr benötigte
Bilder oder verwenden Sie eine neue Karte.
1.
Auswählen des zu löschenden Bildes
● <Normale Bildschirmanzeige>
Wählen Sie das zu löschende Bild mit den Tasten [PAGE , ]
aus.
● <Übersichtsbildschirm>
Bei Anzeige des Übersichtsbildschirms mit den Miniaturbildern
bewegen Sie den Cursor mit den Tasten [PAGE
löschende Bild.
, ] auf das zu
Deutsch
Hinweise
● Wenn ein Bild in der Übersicht gelöscht wurde,
wird das nächste Bild vorgezogen und an seiner Stelle angezeigt.
● Der Cursor springt dann gleichfalls zu dem Bild,
welches auf das gelöschte Bild folgte.
Hinweise
● Bevor Sie eine SD-Karte entnehmen oder einsetzen oder das Gerät abschalten, vergessen Sie nicht, die [CAMERA]-Taste
zu betätigen und sich zu vergewissern, dass das Ausgabebild ein Kamerabild ist. Andernfalls können die Daten auf der
SD-Karte beschädigt werden, oder das Gerät funktioniert nicht einwandfrei.
● Die SD-Karte besteht aus Komponenten, die für statische Entladungen anfällig sind. Insofern kann es aufgrund statischer
Entladungen zu Fehlfunktionen und einer Beschädigung der Daten auf der Karte kommen. Behandeln Sie sie aus diesem
Grund mit erhöhter Sorgfalt.
● Lassen Sie die SD-Karte nicht im Steckplatz. Entnehmen Sie sie nach Gebrauch und lagern Sie sie an einem sicheren Ort.
● Anzahl der zu speichernden Bilder je Kapazität:
ca. 120 Bilder bei 64 BM Kapazität, ca. 240 Bilder bei 128 BM Kapazität, ca. 480 Bilder bei 256 BM Kapazität
● Wir empfehlen SD-Karten von Panasonic mit einer Kapazität von 64 , 128 oder 256 MB.
2.
Drücken Sie die Taste [DELETE] für
mindestens zwei Sekunden
● Die Speicheranzeige leuchtet auf. ➞ Sie blinkt während des Lösch-
vorgangs. Während des Löschens läuft folgende Sequenz ab: Die
Anzeige blinkt. ➞ Sie leuchtet. ➞ Sie erlischt nach Abschluss des
Löschvorgangs (d. h. nach etwa zwei Sekunden).
G-19
Page 74

Auf der SD-Karte gespeicherte Bilddaten anzeigen
Die auf der SD-Karte gespeicherten Bilder können Sie anzeigen lassen.
3.
1.
5.
EXT
FREEZE
IN
CAMERA
SELECTSOURCE
DELETE
SD
PAG E
CARD SYSTEM
IMAGE
SAVE
SELECT
ENTER
LIGHT
SD CARD
3. 3. 4.2.,3.
<Übersichtsbildschirm mit Miniaturen>
● Bei Betätigung der [PAGE ]-Taste bewegt sich
der Cursor wie nachfolgend dargestellt.
1.
Führen Sie die SD-Karte ein
2.
Betätigen Sie die [SD CARD SYSTEM]
SD-Kartensystem-Tasten
3.
Betrachten Sie die Bilder
<Alle Bilder nacheinander betrachten>
Betätigen Sie die [PAGE]-Tasten
● Das Bild schaltet bei jeder Tastenbetätigung weiter bzw. zurück.
● Wird eine Taste betätigt und nicht wieder losgelassen, dann wer-
den die Bilder kontinuierlich alle 0,5 Sekunden weitergeschaltet.
Hinweis
●
Wenn die Taste [IMAGE SELECT/ENTER] für mindestens zwei Sekunden betätigt wird, wird das erste Bild auf der SD-Karte angezeigt.
<Mehrere Bilder gleichzeitig betrachten (Übersichtsansicht)>
Betätigen Sie die [IMAGE SELECT/ENTER]-Taste
● 16 Bilder werden in einer Übersicht angezeigt.
● Den Cursor können Sie mit den [PAGE
● Wenn Sie bei Anwahl des letzten Bildes einer Seite die Taste [
betätigen, wird die nächste Seite aufgerufen. Entsprechend wird,
wenn Sie bei Anwahl des letzten Bildes einer Seite die Taste [
betätigen, die vorhergehende Seite aufgerufen.
● Haben Sie ein Bild ausgewählt und betätigen nun die [IMAGE
SELECT/ENTER]-Taste, dann wird das ausgewählte Bild in voller
Größe auf dem Bildschirm angezeigt.
, ]-Tasten bewegen.
]
]
Hinweis
●
Die Cursor können auch mithilfe der Tasten SD UP&DOWN/SD
LEFT&RIGHT bewegt werden.
<Alle Bilder automatisch nacheinander betrachten (Diashow)>
Betätigen Sie, während Sie die [SD CARD SYSTEM]-Tasten
Nächste Seite
Cursor
●
Wenn Sie eine der Tasten [ ] oder [ ] dauerhaft betätigen, bewegt sich der Cursor kontinuierlich weiter (Intervall: 0,1 Sekunden). Wird das letzte Bild einer Seite
erreicht, dann wird zur nächsten Seite gesprungen.
●
Das mit dem Cursor gewählte Bild kann gelöscht
werden. (☞ Seite 19, ,Bilder löschen‘)
4.
5.
Hinweise
●
Dieses Gerät unterstützt die Ausgabe des von der digitalen Standbildkamera aufgenommenen Bildes im Exif-Format.
(Beachten Sie, dass nicht alle Exif-Formattypen unterstützt werden.)
●
Wenn Sie versuchen, Bilder darzustellen, die mit anderen Geräten abgespeichert wurden, ist nur ein schwarzer oder grauer Bildschirm zu sehen.
●
Mit einer Digitalkamera aufgezeichnete oder aus dem Internet heruntergeladene JPEG-Daten können in Bilddateien umgewandelt werden, die mit diesem Gerät angezeigt werden können. Hierzu ist die JPEG-Konvertierungssoftware (Exif Conv.exe)
auf der beiliegenden CD-ROM zu verwenden. Weitere Informationen finden Sie in der Anleitung zur JPEGKonvertierungssoftware [Exif Cnv.pdf] auf der CD-ROM.
(Die Software kann auch im Internet unter http://www.jvc-victor.co.jp/english/pro/prodv/download/index.html heruntergeladen werden.)
●
Wenn Sie die SD-Karte aufzurufen versuchen, ohne dass tatsächlich eine Karte in den Steckplatz eingeführt ist, wird ein
schwarzes Ausgabebild angezeigt.
●
Die Parameter Helligkeit und Fokus lassen sich für Bilder, die auf der SD-Karte gespeichert sind, nicht einstellen.
drücken, innerhalb von einer Sekunde die [IMAGE SELECT/
ENTER]-Taste.
●
Beginnend mit dem derzeit angezeigten Bild werden alle nachfolgenden Bilder automatisch in der entsprechenden Reihenfolge und in einem Intervall
von etwa zwei Sekunden angezeigt.
●
Wenn Sie die Taste [IMAGE SELECT/ENTER] oder [PAGE] betätigen, wird
das wiedergegebene Bild selektiert, und der Vorgang wird beendet.
Drücken Sie auf die Taste [CAMERA]
● Vergewissern Sie sich, dass das angezeigte Bild ein Kamerabild ist.
Entfernen Sie die SD-Karte
● Um die SD-Karte zu entnehmen, drücken Sie sie kurz in das Gerät
hinein, um sie zu entsperren, bevor Sie sie herausziehen.
G-20
Page 75

Einstellung der Bildgröße und -position auf der SD-Karte
Das Bild auf der SD-Karte kann vergrößert oder verkleinert (6x-Digitalzoom) und nach links, rechts, oben und unten verschoben
werden.
Tasten
SD UP&DOWN
1.
Bild vergrößern
OUT IN
Wählen Sie den anzuzeigenden Bildbereich
mit der Tasten ZOOM aus.
1.
2.
EXT
FREEZE
IN
CAMERA
SELECTSOURCE
LIGHT
SD CARD
4.
(Beispiel: Vergrößern)
Tasten ZOOM
Tasten
SD LEFT&RIGHT
ZOOM
2.
Bild nach oben oder unten
verschieben
FOCUS
AUTO
SD UP&DOWN
3.
Bild nach links oder rechts
Wählen Sie den anzuzeigenden Bildbereich
mit der Tasten SD UP&DOWN aus.
verschieben
BRIGHT
AUTO
SD LEFT&RIGHT
4.
Ursprüngliche Bildgröße
SD DEFAULT
Wählen Sie den anzuzeigenden Bildbereich
mit der Tasten SD LEFT&RIGHT aus.
wiederherstellen
BRIGHT
SD LEFT&RIGHT
SD DEFAULT
Wenn Sie die AUTO-Taste betätigen, wird
die ursprüngliche Bildgröße wieder-
AUTO
hergestellt.
Alternativ betätigen Sie die SD CARD-Taste,
um die ursprüngliche Bildgröße wiederherzustellen.
Deutsch
3.
(Beispiel: Nach oben verschieben)
Hinweise
● Die oben beschriebenen Vorgänge können ebenfalls für Bilder
im Bildspeicher ausgeführt werden.
(Beispiel: Nach links verschieben)
G-21
Page 76

Computer über USB anschließen
Wenn Sie einen Computer an das System anschließen, können Sie Bilddaten, die auf der SD-Karte oder im Gerät selbst gespeichert sind, zu diesem übertragen.
䡵 Kompatible Computer
Betriebssystem: Windows ME/2000/XP
䡵 Hinweis zum ersten Anschlussvorgang
Dank der Plug & Play-Funktionalität von Windows wird das Gerät vom
Computer erkannt, und der hierfür benötigte Treiber wird automatisch
installiert.
Folgen Sie bei der Installation den Anweisungen auf dem Bildschirm.
(Diese Anweisungen werden nicht mehr angezeigt, wenn Sie den Computer beim nächsten Mal anschließen.)
䡵 Betrieb
1.
Einschalten
USB-Kabel
Vorsicht
●
Das Formatieren der SD-Karte oder das Hochladen von Bildern vom Computer über dieses
Gerät auf die Karte wird nicht unterstützt.
●
Da dieses Gerät nicht über eine Uhrzeitfunktion
verfügt, haben alle Bilddateien die folgenden Werte für die Erstellung: 1. Januar 2006, 00:00 Uhr.
●
Bei angeschlossenem USB-Kabel aktualisieren
sich die auf dem Computermonitor gezeigten
Bilder nicht, wenn die SD-Karte entnommen oder
ausgetauscht wird. Um die Anzeige zu
aktualisieren, trennen Sie das USB-Kabel,
entfernen die SD-Karte oder tauschen sie aus und
schließen das USB-Kabel abschließend wieder an.
●
Die Bilddateien auf dem Wechseldatenträger,
der an den Computer angeschlossen ist,
können mit den folgenden Bedienschritten
geändert werden.
(SD-Karte/Bildspeicher)
•Beim Wechseln zur Bilddatei auf der SDKarte
Betätigen Sie die SD CARD-Taste und
drücken Sie dabei für ca. eine Sekunde die
DEFAULT-Taste.
•Beim Wechseln zur Bilddatei im Bildspeicher
Betätigen Sie die CAMERA-Taste und
drücken Sie dabei für ca. eine Sekunde die
DEFAULT-Taste.
Bei Bedienung der Fernbedienung oder durch
●
den Computer darf eine USB-Verbindung weder hergestellt noch getrennt werden, noch d
fen die auf dem
fen Bilddafen umgeschaltet werden. Andernfalls
können Fehlfunktionen auftreten, die Warnhinweise auf dem Computerbildschirm auslösen.
Hinweis
Beispiel) Wenn Sie Windows XP einsetzen
Computerbildschirm angezeig-
Wählen Sie die folgenden Menüeinträge in der entsprechenden Reihenfolge: „Start“ ➞ „Arbeitsplatz“ ➞
„Wechseldatenträger“
ür-
Schalten Sie dieses Gerät und den Computer ein.
2.
USB-Verbindung herstellen
● Rollen Sie das USB-Kabel aus und schließen Sie die Stecker an.
Prüfen Sie auf sicheren Sitz.
3.
Bilddaten überprüfen
Die Bilddaten werden als JPEG-Dateien im Ordner „100JVCAV“ gespeichert. Wenn das USB-Kabel wie in Schritt 2 beschrieben angeschlossen wird, ändert sich der Bildschirminhalt wie nachfolgend dargestellt abhängig davon, ob eine SD-Karte eingesetzt ist oder nicht.
<Bei eingesteckter SD-Karte>
● Die auf der SD-Karte gespeicherten Bilder werden wie folgt angezeigt:
„Arbeitsplatz“
„Wechseldatenträger“
„DCIM“
„100JVCAV“
„IMAG0001.JPG“
„IMAG0002.JPG“
···
<Bei nicht eingesteckter SD-Karte>
● Die in diesem Gerät gespeicherten Bilddaten werden angezeigt:
(Bildspeicher 1 bis 3, Standbild)
„Arbeitsplatz“
4.
Bilddaten herunterladen
Verwenden Sie die Anzeigesoftware des Computers, um die Bilder
vor dem Herunterladen zu prüfen.
Hinweise zum Herunterladen finden Sie in der Dokumentation zum
Computer.
„Wechseldatenträger“
„DCIM“
„100JVCAV“
„MEMORY1.JPG“
„MEMORY2.JPG“
„MEMORY3.JPG“
„STILL.JPG“
G-22
Page 77

Fernbedienung benutzen
Die Fernbedienung bietet die nachfolgend beschriebenen Funktionen.
[CAMERA]
1
Zeigt das Kamerabildes an.
(☞ Seite 6 5 [SOURCE SELECT]-Taste)
[FREEZE]
2
Friert das Kamerabild ein.
(☞ Seite 6 4 [FREEZE]-Taste)
CAMERA
FREEZE
31 2
EXT IN
8
AUTO
AUTO
AUTO
WHITE
IMAGE SEL.
SD CARD
BRIGHT
FOCUS
ZOOM
OUT IN
4
5
6
7
[EXT-IN]
3
Gibt die Bildsignale aus, die am [EXT INPUT]-Anschluss anliegen.
(☞ Seite 6 5 [SOURCE SELECT]-Tasten)
[SD CARD]
4
Bedient Funktionen für die SD-Karte.
● Wenn Sie Bilder anderer Quellen anzeigen, können Sie durch Betätigung dieser Taste den Auswahlmodus für die SD-Karte aktivieren.
(☞ Seite 6 5 [SOURCE SELECT]-Tasten)
[BRIGHT]
5
Stellt die Helligkeit des Kamerabild ein.
(☞ Seite 6 2 [BRIGHT]-Einstelltasten)
[FOCUS]
6
Stellt den Fokus des Kamerabild ein.
(☞ Seite 6 3 [FOCUS]-Taste)
[ZOOM]
7
Vergrößert oder verkleinert das Kamerabild.
(☞ Seite 6 1 [ZOOM]-Einstelltasten)
[AUTO WHITE]
8
Führt einen automatischen Weißabgleich durch.
(☞ Seite 7 $ [WHITE BALANCE]-Einstelltasten)
Deutsch
5 m
vertikal: ±15˚
horizontal: ±30˚
*
Weitere Informationen zu den verschiedenen Funktionen finden Sie auf Seite 6.
䡵 Reichweite der Fernbedienung
Die Reichweite liegt bei etwa 5 m.
Die vertikale Abweichung darf bei ±15˚ liegen, die horizontale Abweichung bei ±30˚.
G-23
Page 78

LCD-Monitor installieren
Sie können einen handelsüblichen LCD-Monitor an den [MONITOR OUTPUT]-Ausgang anschließen. Der Neigungswinkel lässt sich einstellen.
1.
Montieren Sie die LCD Monitorhalterung
AV-ZK20 (optional erhältlich) mithilfe der
LCD-Monitor
Neigungsstellschraube
Halterung für LCD-Monitor
(AV-ZK20, optional erhältlich)
1.
2.
der Halterung beiliegenden Schraube an
den LCD-Monitor.
2.
Montieren Sie die Halterung für den
LCD-Monitor AV-ZK20 (optional erhältlich) mithilfe der der Halterung beiliegenden Schraube an dieses Gerät.
3.
Schließen Sie den LCD-Monitor mit
einem Videokabel an den [MONITOR
OUTPUT]-Ausgang dieses Geräts an
4.
Schalten Sie den LCD-Monitor ein
(Weitere Informationen hierzu finden Sie in der Bedienungsanleitung
zum LCD-Monitor.)
G-24
5.
Stellen Sie die Neigungsstellschraube
so ein, dass der LCD-Monitor im optimalen Sichtwinkel steht
Page 79

Problembehebung
Wenn ein Problem auftritt, überprüfen Sie zunächst die folgende Liste. Sollte das Problem fortbestehen, dann beenden Sie die Verwendung des Geräts und wenden Sie sich an Ihren JVC-Fachhändler.
Symptome Lösungsvorschläge
Es erscheint kein Bild.
● Ist das Netzkabel an eine Netzsteckdose angeschlossen?
● Ist der Netzschalter eingeschaltet?
Ist das Gerät korrekt an einen Projektor oder ein Anzeigegerät angeschlossen?
●
● Ist die Helligkeit optimal eingestellt?
● Befindet sich das Gerät im Bildabschaltmodus?
● Sind Sie sicher, dass die Bilder im Speicher abgelegt wurden? Speichern Sie die
Bilder zuerst und rufen Sie sie dann erneut auf.
● Wurde unter [SOURCE SELECTION] die Einstellung [EXT IN] oder [SD CARD]
gewählt? Wählen Sie [CAMERA].
Ist der verwendete Projektor bzw. das verwendete Anzeigegerät XGA-kompatibel?
●
Siehe Seite
10
10
6
7
16
6
10
Das Bild kann nicht scharf
gestellt werden.
Das Bild ist verschwommen.
Staub ist erkennbar.
Das Bild ist dunkel.
Ein Streifenmuster erscheint
auf dem Abbild eines bedruckten Mediums.
Der Farbton scheint nicht
korrekt zu sein.
● Ist das Nahaufnahmeobjektiv montiert?
● Befindet sich das Objekt zu nah vor dem Objektiv, oder liegt der obere Rand des
Objekts höher als 50 mm über der Auflagenoberfläche?
● Haben Sie Umgebungsobjekte mit montiertem Nahaufnahmeobjektiv aufgenommen? Vor der Aufnahme von Umgebungsobjekten muss das Nahaufnahmeobjektiv
entfernt werden.
● Haben Sie die Bildgröße mit der Zoomfunktion geändert, nachdem das Bild scharfgestellt worden war? Nehmen Sie zuerst die gewünschte Vergrößerung vor und
stellen Sie das Bild erst dann scharf.
● Mit der [FOCUS AUTO]-Funktion kann die Scharfstellung je nach Objekt schwierig
sein. Fokussieren Sie das Bild mit den [FOCUS
● Wenn das Gerät an den Projektor angeschlossen ist, vergewissern Sie sich, dass
auch der Projektor korrekt scharfgestellt ist. Hinweise zur Scharfeinstellung des
Projektors finden Sie in der dortigen Bedienungsanleitung.
● Sind das Nahaufnahmeobjektiv oder das Kameraobjektiv verschmutzt? Reinigen
Sie das verschmutzte Objektiv mit handelsüblichen Reiniger.
● Wird das Gerät in einer Umgebung mit niedrigen Temperaturen verwendet? Wenn
die Raumtemperatur niedrig ist, kann es einige Minuten dauern, bis die Seitenlampen
ihre endgültige Helligkeit erreicht haben.
● Sind die Seitenlampen eingeschaltet?
● Ist die Helligkeit angemessen eingestellt?
● Punkte auf einem bedruckten Medium können sich mit den Bildpunkten des Kamera-
bildes überlagen. Die Folge können Farbstreifen sein. Ändern Sie das Anzeigebild
in diesem Fall leicht mit den [ZOOM]-Tasten.
● Haben Sie den Farbton mit der Funktion [WHITE BALANCE] eingestellt?
● Vergewissern Sie sich, dass nicht versehentlich der negative Darstellungsmodus
aktiviert wurde.
, ]-Tasten.
5
13
6
Deutsch
3
6
11
7
7
Wellenbewegungen erscheinen im Bild.
Das Bild flackert.
Das Bild kann nicht eingestellt werden.
Das Gerät reagiert nicht wie
erwartet auf einen Tastendruck.
Die Fernbedienung funktioniert nicht.
Das Kamerabild weist weiße
oder schwarze Punkte auf.
● Wenn das Gerät in der Nähe von Einrichtungen betrieben wird, die starke elektrische Wellen aussenden, können diese das Bild auf diese Weise beeinträchtigen.
Betreiben Sie das Gerät aus diesem Grund nicht in der Nähe solcher Einrichtungen.
● In Ländern, in denen die Netzfrequenz von 50 Hz verwendet wird, kann der Bildschirm flackern, wenn eine Leuchtstoffröhre oder eine Quecksilberdampflampe zur
Ausleuchtung verwendet werden. Verwenden Sie zur Ausleuchtung die Seitenlampen.
● Wenn eine der Funktionen [FREEZE], [PICTURE MEMORY], [EXT IN] oder [SD
CARD] benutzt wird, kann das Kamerabild nicht eingestellt werden. Aktivieren Sie
wieder den Modus [CAMERA], um die Einstellungen vorzunehmen.
● Wenn die Umgebungshelligkeit nicht ausreichend ist, ist eine geeignete Helligkeitseinstellung häufig nicht möglich. Betätigen Sie die [LIGHT]-Taste, um die Seitenlampen einzuschalten.
● Wenn zwei Tasten gleichzeitig oder aber eine Taste ohne Pause betätigt werden,
kann es zu Fehlfunktionen am Gerät kommen. Achten Sie bei der Bedienung des
Geräts darauf, immer nur eine Taste gleichzeitig zu betätigen und zwischen den
Betätigungen Abstände einzuhalten.
● Befinden sich Batterien in der Fernbedienung?
● Sind die Batterien möglicherweise leer?
Die mitgelieferten Batterien dienen lediglich der Funktionsprüfung. Legen Sie handelsübliche Batterien ein, wenn Sie die Fernbedienung benutzen wollen.
● Wird die Fernbedienung außerhalb der zulässigen Reichweite benutzt?
Schwarze oder weiße Punkte können gelegentlich auftreten. Es handelt sich hier um
●
einen typischen Nebeneffekt von Grafik-CCDs mit vielen Bildpunkten. Punkte fallen
insbesondere dann auf, wenn das Bild mit der digitalen Zoomfunktion vergrößert wird.
6,7
7
11
23
G-25
Page 80

Technische Daten
䡵 ALLGEMEIN
Stromversorgung :
Leistungsaufnahme :
Gewicht :
䡵 OPTISCH
Objektiv :
Aufnahmebereich :
Einstellbereich Fokussierung :
Zoom :
Fokus :
Helligkeit :
䡵 BELEUCHTUNG
Seitenlampen :
Hintergrundlampe :
䡵 KAMERAKOPF
Betriebsmodus Signalausgabe :
Optisches Aufnahmegerät :
Gesamtanzahl Bildpunkte
Auflösung :
Bildrate :
Synchronisierung :
Weißabgleich :
EINGABE/AUSGABE :
100 V bis 240 VAC, 50/60 Hz
0,5 A
5,6 kg
F1.8 bis F2.8; f = 5,4 bis 64,8 mm (12-fach)
400 x 300 mm (entspricht A3-Querformat) maximal
Von der Auflagenoberfläche bis zu einer Höhe von 50 mm darüber (Kamera direkt nach unten
gerichtet, mit Nahaufnahmeobjektiv)
⬁ bis 0,8 m (Kamera seitwärts ausgerichtet, ohne Nahaufnahmeobjektiv)
Integrierter optischer 16x-Zoom (12x-Objektiv, 1,4x-Teleskoparm); digitaler Zoom: 6-fach
Automatisch/manuell
Automatisch/manuell
6 W x 2 (Inverterlampe)
4 W x 1 (Inverterlampe, Auflagebereich 127 x 100 mm)
Progressiver Modus
• 1024 x 768 Bildpunkte H: 48,4 kHz / V: 60,0 Hz
Zwischenzeilenmodus, NTSC/PAL-Umschaltung
• NTSC H: 15,734 kHz / V: 59,94 Hz
•PAL H: 15,625 kHz / V: 50 Hz
1/3"-CCD
850.000 (1077 x 788) Bildpunkte
AuflösungRGB-Ausgang:
Ver tikal: >600 Zeilen Horizontal: >600 Zeilen
Monitorausgang:
Ver tikal: >350 Zeilen Horizontal: >500 Zeilen
20 Frames/s
Intern
Automatisch/manuell
Kameraeingang, externer Eingang, Steckplatz SD-Karte
䡵 EINGABE/AUSGABE
Eingangsanschlüsse :
Ausgangsanschlüsse :
Steuerungsanschlüsse :
䡵 UMGEBUNGSBEDINGUNGEN
Betriebstemperatur :
Luftfeuchtigkeit :
䡵 ZUBEHÖR
Bedienungsanleitung x 1
Videokabel (5 m) x 1
Netzkabel (2,5 m) x 1
USB-Kabel (1,5 m) x 1
CD-ROM x 1
Fernbedienung x 1
AA-Batterien x 2
䡵 OPTIONEN
Halterung für LCD-Monitor (AV-ZK20)
Externer Eingang (D-Sub 15-polig, female) x 1
RGB (D-Sub 15-polig, 0,7 V(p-p), 75 ¸, female) x 1
MONITOR (Cinch, 1 V(p-p), 75 ¸)x 1
USB (Serie B) x 1
SD-Kartensystem x 1
Fernbedienungseingang (D-Sub 9-polig, RS-232C, male) x 1
5 ˚C bis 40˚C
30 % bis 85 %
G-26
Page 81

䡵 Abmessungen (B x H x T) (Einheit: mm)
378
495 (zusammengelegt)
Deutsch
653 (ausgezogen auf A3)
190 (zusammengelegt)
491 (ausgezogen)
Technische Daten und äußeres Erscheinungsbild dieses Geräts können im Sinne technischer Verbesserung jederzeit ohne
Vorankündigung geändert werden.
G-27
Page 82

DIGITAL PRESENTER
MANUALE DI ISTRUZIONI
AV-P960E
(R)
Italiano
Page 83

Precauzioni di sicurezza
AVVERTENZA–QUESTO APPARECCHIO DEVE
ESSERE COLLEGATO A TERRA.
AVVERTENZA:
PER EVITARE INCENDI O SCOSSE ELETTRICHE, NON
ESPORRE QUESTO APPARECCHIO A PIOGGIA O UMIDITÀ.
Avvertenza
Questo è un prodotto di categoria A. In ambienti
domestici, questo prodotto può causare interferenze radio, nel qual caso l’utente può dover
adottare misure adeguate.
Caratteristiche
Grazie per aver acquistato un prodotto JVC. Per ottenere le migliori prestazioni possibili, prima di utilizzare il prodotto, si raccomanda di
leggere attentamente queste istruzioni.
Le presenti istruzioni sono per il prodotto AV-P960E.
Immagini nitide, ad alta risoluzione
Output XGA con frame rate elevato di 20 fps, che
consente di visualizzare immagini nitide, ad alta risoluzione.
Alta definizione e Power Zoom elevato
Zoom Ottico 16x (lente 12x, braccio estendibile 1,4x) e
Zoom Digitale 6x incorporati.
Compatto, leggero e sottile
È profondo meno di 50 cm e pesa 5,6 kg, ma è dotato di
un angolo di campo massimo equivalente al formato A3
orizzontale (400 mm x 300 mm).
Slot per schede SD incorporato
La memorizzazione dell’immagine della videocamera,
l’uscita (formato Exif) della videocamera, catturata da
videocamera fissa digitale, ed i molteplici tipi di
presentazione, possono essere ottenuti con lo slot di
memoria compatibile di scheda SD ad alta velocità e
capacità. (Scheda SD venduta separatamente)
Interfaccia versatile
Dotato di connettori USB e RS-232.
Luce del riflettore concava incorporata
Riflettore concavo incorporato, che garantisce
l’illuminazione dell’intero piano di visualizzazione perfino
con luci laterali.
I-2
Page 84

Indice
Operazioni
Precauzioni di sicurezza................................................................. 2
Caratteristiche .................................................................................2
Indice ................................................................................................3
Precauzioni ......................................................................................4
preliminari
Preparazione
Funzionamento
(basilare)
Nomi e funzioni ............................................................................... 5
Prodotto completo .................................................................................. 5
Pannello di controllo .............................................................................. 6
Pannello posteriore ................................................................................. 8
Prima dell’uso.................................................................................. 9
Connessione.................................................................................. 10
Presentazione di stampati ............................................................11
Presentazione di oggetti tridimensionali ....................................12
Ripresa di oggetti circostanti....................................................... 13
Presentazione di diapositive ........................................................14
Presentazione di pellicole e trasparenze ....................................15
Salvataggio di immagini nella memoria immagini .....................16
Bilanciamento del bianco .............................................................17
Salvataggio delle impostazioni (registrazione delle
impostazioni selezionate dall’utente).......................................... 18
Italiano
Memorizzazione di immagini sulla scheda SD ...........................19
Funzionamento
(applicazioni)
Altro
Visualizzazione delle immagini memorizzate sulla scheda SD
Regolazione della dimensione/posizione della scheda SD....... 21
Collegamento a un computer mediante connettore USB.......... 22
Utilizzo del telecomando .............................................................. 23
Installazione del monitor LCD...................................................... 24
Diagnostica ....................................................................................25
Dati tecnici .....................................................................................26
Come leggere questo manuale
䡵 Simboli utilizzati in questo manuale
Attenzione
Nota
☞
䡵 Contenuto del presente manuale
● I diritti di copyright di questo manuale appartengono alla JVC. È vietata qualsiasi riproduzione di questo manuale, tutto o in
parte.
● Tutti i nomi di prodotti contenuti in questo manuale sono marchi commerciali o marchi registrati dai rispettivi titolari. I marchi
come ™,
● Il design, i dati tecnici e il contenuto di questo manuale sono soggetti a modifiche e miglioramenti senza preavviso.
● Windows è un marchio commerciale della Microsoft Corporation negli Stati Uniti.
●
Indica le precauzioni da osservare durante il funzionamento del prodotto.
Indica le limitazioni relative alle funzioni o all’uso del prodotto. Esclusivamente a scopo di riferimento.
Indica i numeri di pagina o le voci a cui si fa riferimento.
®
e © sono omessi nel presente manuale.
: il logo SD è un marchio commerciale.
.. 20
I-3
Page 85

Precauzioni
䡵 Trasporto dell’apparecchio
● Per trasportare questo prodotto, utilizzare la maniglia laterale.
Se durante il trasporto il prodotto viene sorretto per la testa, per il braccio della telecamera o per le luci laterali, questi componenti si
possono danneggiare o deformare.
● Estrarre la maniglia lentamente e senza piegarla.
䡵 Prima di effettuare riprese importanti, controllare che l’apparecchio funzioni cor-
rettamente.
䡵 Indennizzi per la perdita dei contenuti
● La JVC non è in alcun modo responsabile per la mancata registrazione o riproduzione di immagini a causa di problemi correlati a
questo prodotto o alla scheda usata e pertanto non sarà offerto alcun indennizzo per la perdita dei contenuti.
䡵 Copyright
● È consentito scattare fotografie per diletto o a proprio uso. È tuttavia vietato utilizzare materiale protetto dalle leggi sul copyright
senza il consenso dei proprietari.
䡵 Scheda SD
La scheda SD contiene componenti elettronici di precisione. Osservare scrupolosamente le precauzioni sotto indicate, altrimenti la
scheda potrebbe malfunzionare o danneggiarsi.
● Non toccare il bordo della scheda a mani nude o con oggetti metallici,
poiché le cariche statiche generate potrebbero danneggiarla.
● Non piegare o far cadere la scheda, né sottoporla a forti urti.
● Non esporre la scheda a calore, acqua, luce del sole diretta o umidità, né durante l’uso, né durante l’immagazzinaggio.
● Non smontare né modificare la scheda.
䡵 Manutenzione di routine
Spegnere l’alimentazione, scollegare il cavo ed eseguire le seguenti operazioni.
● Eliminare ogni traccia di sporcizia e macchie usando un panno morbido e asciutto.
● Per le macchie più difficili, immergere un panno in un detergente diluito, strizzarlo e utilizzarlo per eliminare le macchie dall’apparec-
chio. Usare quindi un panno asciutto per asciugare le tracce di acqua.
Attenzione
● Non utilizzare benzene o solventi, altrimenti il prodotto potrebbe malfunzionare e il rivestimento esterno potrebbe danneggiarsi.
● Prima di utilizzare sostanze chimiche o detergenti, leggere attentamente la documentazione allegata e osservare
tutte le precauzioni indicate.
䡵 Messa a fuoco automatica
Questo prodotto è dotato di una funzione di messa a fuoco automatica. Tuttavia, può essere necessario regolare la messa a fuoco a
seconda dell’oggetto ripreso e delle impostazioni selezionate. Se necessario, regolare la messa a fuoco manualmente.
Oggetti difficili da mettere a fuoco automaticamente
● Quando la luminosità del piano dell’immagine è estremamente elevata (piena luce).
● Quando la luminosità del piano dell’immagine è estremamente bassa (luce bassa).
● Quando la luminosità del piano dell’immagine cambia costantemente (ad esempio, in caso di luce lampeggiante).
● Quando c’è pochissimo contrasto.
● Quando sul piano dell’immagine sono presenti strisce verticali ripetute.
● Quando sono presenti grafica o stampa su entrambi i lati o sulla parte superiore e inferiore dello schermo.
䡵 Cavo di alimentazione
● Utilizzare esclusivamente il cavo di alimentazione qui indicato (fornito in dotazione).
L’uso di qualsiasi altro cavo di alimentazione o di un cavo danneggiato potrebbe causare incendi e scosse elettriche.
● Non usare il cavo di alimentazione fornito con questo prodotto con altri dispositivi.
䡵 Risparmio energetico
Per risparmiare energia, spegnere l’apparecchio quando non è in uso.
I-4
Page 86

Nomi e funzioni
Prodotto completo
1
2
Pannello posteriore ☞ Pagina 8
3
0
!
4
4
5
6
7
1 Telecamera
Serve a catturare le immagini di oggetti poggiati sull’area di
ripresa o nell’area circostante.
2 Braccio della telecamera
Braccio di supporto per la telecamera. Regolarne l’angolazione
per riprendere oggetti tridimensionali.
3 Blocco braccio
Serve a regolare la lunghezza del braccio della telecamera.
Rilasciare il blocco per ritrarre o estendere il braccio della telecamera o bloccarlo una volta raggiunta la posizione desiderata.
4 Luci laterali
Regolarle per assicurarsi che l’area di ripresa sia illuminata in
modo uniforme.
5 Maniglia
Estrarre la maniglia per trasportare l’apparecchio. Riporre la
maniglia quando non viene utilizzata.
Pannello di controllo ☞ Pagina 6
89
7 Area di ripresa
Per l’appoggio di oggetti (o materiale) da riprendere.
È possibile catturare oggetti di dimensioni equivalenti al formato A3 orizzontale (400 mm x 300 mm).
8 Sensore telecomando
Per la ricezione dei segnali provenienti dal telecomando.
☞ Pagina 23 ‘Utilizzo del telecomando’
9 Slot per scheda SD
Per l’inserimento della scheda SD.
☞ Pagina 19 ‘Memorizzazione di immagini sulla scheda SD’
0 Portadiapositive
Utilizzarlo per la visualizzazione di diapositive.
☞ Pagina 14 ‘Presentazione di diapositive’
! Obiettivo per primi piani
Rimuovere questo obiettivo per le riprese di oggetti circostanti.
☞ Pagina 13 ‘Ripresa di oggetti circostanti’
Lato destro
@
Italiano
6 Retroilluminazione
Utilizzare questa luce per visualizzare trasparenze e pellicole.
☞ Pagina 15 ‘Presentazione di pellicole e trasparenze’
@ Interruttore di alimentazione
Per accendere e spegnere l’apparecchio.
I-5
Page 87

Nomi e funzioni (seguito)
Pannello di controllo
$
AUTO
CAMERA
NEGA POSI
%
@
USER SETUPDEFAULT
WHITE BALANCE
RED BLUE
PICTURE MEMORY
123
BW COLOUR
TEXT
^ & *
SAVE
IMAGE OFF
! 0 9 8 6 4 2 1357#
DELETE
PAG E
SD
CARD SYSTEM
1 Tasti di regolazione [ZOOM]
Regolare lo zoom a seconda dell’oggetto da riprendere.
[IN] : Per riprendere oggetti (o materiale) ingranditi.
Se questo tasto viene tenuto premuto costantemente, si interrompe l’ingrandimento dell’immagine al
teleobiettivo ottico e viene attivato lo zoom digitale.
(Zoom ottico: 12x, zoom digitale: 6x)
[OUT] : Per riprendere oggetti (o materiale) rimpiccioliti.
2 Tasti di regolazione [FOCUS]
Per regolare la messa a fuoco.
]:Per regolare la messa a fuoco di un oggetto (o di
[
materiale) che si trova lontano dalla telecamera.
]:Per regolare la messa a fuoco di un oggetto (o di
[
materiale) che si trova vicino alla telecamera.
[AUTO] : Quando si preme questo tasto, la spia luminosa della
CAMERA nella sezione SOURCE SELECT
lampeggia e la messa a fuoco viene regolata
automaticamente. La spia luminosa si spegne non
appena la regolazione è terminata.
La regolazione della messa a fuoco può essere difficoltosa, a seconda dell’oggetto (o del materiale)
da riprendere.
☞ Pagina 4 ‘Messa a fuoco automatica’
3 Tasti di regolazione [BRIGHT]
Per regolare la luminosità dell’immagine.
[AUTO] : Quando si preme questo tasto, la spia luminosa della
[
[
CAMERA nella sezione SOURCE SELECT
lampeggia e la luminosità viene regolata
automaticamente. La spia luminosa si spegne non
appena la regolazione è terminata.
]:Per aumentare la luminosità dell’immagine.
]:Per diminuire la luminosità dell’immagine.
IMAGE
SAVE
SELECT
ENTER
EXT
FREEZE
IN
CAMERA
SELECTSOURCE
FOCUS
SD UP&DOWN
BRIGHT
SD LEFT&RIGHT
AUTO
AUTO
SD DEFAULT
OUT IN
ZOOM
LIGHT
SD CARD
4 Tasto [FREEZE]
Quando viene premuto questo tasto, l’immagine si blocca e
viene visualizzata come immagine fissa e la spia luminosa si
illumina. Se questo tasto viene premuto nuovamente quando
la spia luminosa è accesa, la spia si spegne, l’immagine fissa
scompare e riappare l’immagine in movimento.
5 Tasti [SOURCE SELECT] di selezione
dell’immagine in uscita
Per selezionare l’immagine che deve essere emessa dal
connettore [RGB OUTPUT] e dal connettore [MONITOR
OUTPUT] situati sul pannello posteriore. La spia luminosa della
sorgente di input selezionata per l’output si illumina. A seconda del tipo di monitor collegato, può trascorrere un po’ di tempo prima che l’immagine venga visualizzata.
[CAMERA] : Per l’output delle immagini della telecamera.
[EXT IN] : Per l’output del segnale in ingresso dal
connettore [EXT INT] situato sul pannello posteriore. I segnali di input esterni non vengono
emessi tramite il connettore [MONITOR
OUTPUT].
[SD CARD] : Per l’output delle immagini memorizzate sulla
scheda SD inserita nello slot.
☞ Pagina 20 ‘Visualizzazione delle immagini memorizzate
sulla scheda SD’
6 Tasto [LIGHT] per la selezione della
fonte luminosa
Per selezionare varie fonti luminose.
Ogni volta che viene premuto questo tasto cambia la fonte
luminosa.
Luci laterali
Retroilluminazione
Tutte le fonti
luminose spente
I-6
Page 88

[SD CARD SYSTEM] SISTEMA A SCHEDA SD
I tasti 7 ~ 0 funzionano soltanto quando la scheda è inserita nello
slot SD.
# Spie luminose
Le spie luminose lampeggiano quando vengono premuti i tasti ! ~ * e durante la modifica delle varie impostazioni.
7 Tasto [IMAGE SELECT/ENTER] di sele-
zione immagini
Visualizza le immagini in miniatura della scheda SD 16 alla
volta.
☞ Pagina 20 ‘Visualizzazione delle immagini memorizzate
sulla scheda SD’
8 Tasto [SAVE] per il salvataggio sulla
scheda SD
Se si tiene premuto questo tasto, durante la selezione di
immagini dalla videocamera, la spia luminosa lampeggia e
l’immagine visualizzata viene memorizzata sulla scheda SD.
☞ Pagina 19 ‘Memorizzazione di immagini sulla scheda SD’
9 Tasti [PAGE]
Consentono di selezionare e visualizzare le immagini memorizzate sulla scheda SD.
]:Per visualizzare l’immagine precedente.
[
]:Per visualizzare l’immagine successiva.
[
0 Tasto [DELETE] per la cancellazione di
immagini dalla scheda SD
Consente di cancellare le immagini memorizzate sulla scheda SD.
Se si tiene premuto questo tasto per oltre 2 secondi dopo
aver selezionato [SD CARD] mediante il tasto 5 di [SOURCE
SELECT], la spia luminosa lampeggia e l’immagine selezionata viene cancellata.
☞ Pagina 19 ‘Cancellazione di immagini’
! Tasti [PICTURE MEMORY]
Per memorizzare l’immagine in uscita nella memoria immagini interna o per selezionare e visualizzare le immagini memorizzate nella memoria immagini.
[1] ~ [3] : Se si tengono premuti per oltre 2 secondi, la
spia luminosa del tasto # lampeggia e l’immagine viene memorizzata nella memoria interna.
Premere questo tasto per trasferire l’immagine
[CAMERA] : Per selezionare l’immagine della telecamera.
☞ Pagina 16 ‘Salvataggio di immagini nella memoria immagi-
ni’
memorizzata.
@ Tasti [USER SETUP] per l’impostazione
della registrazione
Per selezionare le impostazioni modificabili dall’utente.
[SAVE] :Per registrare le impostazioni utente
correnti.
[USER SETUP] : Per attivare le impostazioni registrate.
[DEFAULT] : Per ripristinare le impostazioni predefinite.
☞ Pagina 18 ‘Salvataggio delle impostazioni (registrazione
delle impostazioni selezionate dall’utente)’
$ Tasti di regolazione [WHITE BALANCE]
Per regolare le impostazioni relative al bilanciamento del bianco.
[AUTO] : Quando si preme questo tasto, la spia lumino-
[RED
[RED
[BLUE
[BLUE
☞ Pagina 17 ‘Bilanciamento del bianco’
sa lampeggia mentre viene eseguito un nuovo
bilanciamento del bianco.
]:Aumenta la componente rosso per l’intero
schermo.
]:Diminuisce la componente rosso per l’intero
schermo.
]:Aumenta la componente blu per l’intero scher-
mo.
]:Diminuisce la componente blu per l’intero scher-
mo.
% Tasto [NEGA/POSI] per il passaggio
negativo/positivo e viceversa
Impostarlo su Nega per la visualizzazione di negativi.
Premendo questo tasto, viene selezionata la modalità Negativo.
Se si preme nuovamente il tasto, viene selezionata la modalità Positivo.
☞ Pagina 15 ‘Presentazione di pellicole e trasparenze’
^ Tasto [BW/COLOUR] per il passaggio
bianco-nero/colore e viceversa
Consente di visualizzare l’immagine in uscita in bianco e nero
o a colori.
Premendo questo tasto, viene selezionata l’opzione Bianco e
nero. Se si preme nuovamente il tasto, viene selezionata l’opzione Colore.
& Tasto [TEXT]
Serve a rendere i caratteri più chiari e nitidi.
Se si preme questo tasto, viene attivata la modalità Testo. Per
disattivarla, premere nuovamente il tasto.
* Tasto [IMAGE OFF] per spegnere
l’immagine
Usare questo tasto per nascondere temporaneamente
l’immagine di uscita, come prima della presentazione.
Quando si preme questo tasto, lo schermo passa alla modalità
di immagine spenta (schermo nero) e la spia luminosa, nella
sezione SOURCE SELECT selezionata come uscita,
lampeggia. Quando si preme di nuovo il tasto IMAGE OFF o
uno dei tasti nella sezione SOURCE SELECT, la modalità
viene annullata ed appare l'immagine selezionata.
Italiano
I-7
Page 89

Nomi e funzioni (seguito)
Pannello posteriore
Per informazioni dettagliate sulla connessione ad altri dispositivi, vedere ‘Connessione’ a
pagina 10.
Attenzione
Non aprire il coperchio situato sotto il braccio,
né inserirvi le dita o altri oggetti, altrimenti si
potrebbero causare malfunzionamenti o subire lesioni.
1 2 4 6 7 853
AC IN
MONITOR
OUTPUT
RGB
OUTPUT
1 Ingresso alimentazione [AC IN]
Collegare ad una fonte di alimentazione c.a. 100 V ~ 240 V
usando il cavo di alimentazione fornito.
2 Connettore [MONITOR OUTPUT]
Connettore di uscita segnale immagine per la conferma dell’angolo di visualizzazione.
3 Connettore [RGB OUTPUT]
Connettore di uscita del segnale RGB. Da collegare al
connettore di ingresso RGB del proiettore o del monitor.
4 Connettore [USB]
Per il collegamento a un computer o ad altri dispositivi. È possibile trasferire ad un computer le immagini o la memoria immagini memorizzate nella scheda SD, nonché le immagini
memorizzate nell’apparecchio.
☞ Pagina 22 ‘Collegamento a un computer mediante
connettore USB’
USB
INPUT
REMOTE
(
EXT
INPUT
RS-232C
)
NTSC PAL
5 Connettore [EXT INPUT] per l’ingresso
di segnali esterni
Per il collegamento a un computer o ad altri dispositivi esterni.
Se si usa il tasto [SOURCE SELECT] per selezionare l’ingresso esterno, i segnali vengono emessi mediante il
connettore [RGB OUTPUT]. In tal caso, i segnali non possono uscire tramite il connettore [MONITOR OUTPUT].
6 Foro per vite di montaggio monitor LCD
Da utilizzare per montare il monitor LCD (venduto
separatamente) sull’apparecchio.
☞ Pagina 24 ‘Installazione del monitor LCD’
7 Connettore [REMOTE INPUT (RS-232C)]
Collegarsi quando si controlla questa unità tramite PC usando il software di controllo creato dal cliente. Per maggiori dettagli sui metodi e sui comandi di comunicazione fare riferimento a [RS-232C External control communication commands
(command. pdf)] nel CD-ROM fornito.
I-8
8 Interruttore [NTSC/PAL]
Impostare conformemente al monitor da utilizzare.
Page 90

Prima dell’uso
Per l’installazione, osservare la procedura seguente.
Luce sinistra
4.
Braccio della
telecamera
2.
Blocco
braccio
1.
Luce destra
Telecamera
3.
1.
Sollevare la luce destra
2.
Sollevare la luce sinistra
3.
Sollevare la telecamera (il braccio della telecamera)
Reggendo il braccio della telecamera, afferrare saldamente l’apparecchio e sollevare la telecamera fino a che raggiunga la posizione
più elevata.
4.
Rilasciare il blocco del braccio
Per rilasciare il blocco, tirare la leva di blocco del braccio nella
direzione della freccia come illustrato.
5.
Estendere il braccio della telecamera
Reggere la parte inferiore del braccio della telecamera, o reggere
saldamente l’apparecchio ed estendere la parte superiore del
braccio fino a che venga raggiunta la massima elevazione.
Italiano
Braccio della
telecamera
Area di
ripresa
Attenzione
5.
6.
Blocco
braccio
7.
6.
Bloccare in posizione il braccio della telecamera
Per bloccare in posizione alzata il braccio della telecamera, riportare
la leva di blocco nella direzione della freccia.
7.
Ruotare la telecamera verso l’area di ripresa
Per richiudere l’apparecchio, eseguire
questa procedura in ordine inverso.
Se la procedura non viene osservata correttamente, la telecamera e il
braccio potrebbero danneggiarsi.
Attenzione
● Quando si ritrae il braccio della telecamera, non reggere con
le mani il punto di articolazione del braccio della telecamera,
altrimenti ci si potrebbe ferire.
● Non ritrarre o estendere il braccio della telecamera quando è ripiegato sull’area di ripresa.
Qualora venga esercitata forza eccessiva, le parti interne del braccio potrebbero danneggiarsi.
Prima di ritrarre o estendere il braccio della telecamera, assicurarsi che
3.
sia stato sollevato come descritto al punto
● Non sollevare, ripiegare, ritrarre o estendere il braccio della telecamera reggendolo per la telecamera.
Qualora venga esercitata forza eccessiva, la telecamera e le parti interne
del braccio potrebbero danneggiarsi. Durante l’esecuzione di quanto indicato ai punti
3.
e 5. reggere sempre il braccio della telecamera.
.
I-9
Page 91

Connessione
Per l’installazione, osservare la procedura seguente. Il connettore [MONITOR OUTPUT] serve per la conferma delle immagini.
Monitor LCD
Computer
2.
[MONITOR OUT]
[RGB
OUT]
5.
Interruttore di
alimentazione
Luce sinistra
[AC IN]
4.
1.
3.
Connettore
[USB]
Connettore USB
Proiettore
Alimentazione c.a.
Il monitor LCD, il computer e il proiettore sono venduti separatamente.
(cavo fornito di
alimentazione)
1.
Collegare il connettore [RGB OUTPUT]
a un proiettore o a un visualizzatore.
● L’output di questo apparecchio è XGA e pertanto deve essere collegato a dispositivi compatibili.
● Si raccomanda di utilizzare il cavo D-sub a 15 piedini (di lunghezza
inferiore a 3 m) disponibile in commercio.
2.
Se necessario, collegare il connettore
[MONITOR OUTPUT] a un monitor.
I-10
3.
Se necessario, collegare il connettore
USB a un computer.
☞ Pagina 22 ‘Collegamento a un computer mediante connettore USB’
4.
Collegare il cavo di alimentazione fornito ad una fonte di alimentazione c.a.
5.
Accendere l’alimentazione.
Page 92

Presentazione di stampati
È possibile catturare stampati di dimensioni equivalenti al formato A3 orizzontale (400 mm x 300 mm).
Te l e camera
1.
Regolare il braccio e la telecamera
1.
Braccio
2.
1.
2.
Tasto [FOCUS]
Tasto
[ZOOM]
Regolare il braccio e la telecamera in relazione alle dimensioni
dell’oggetto da riprendere.
● Assicurarsi che la telecamera sia posizionata al centro dell’oggetto.
● Il braccio è orientato per catturare oggetti di dimensioni equivalenti
al formato A3 orizzontale quando è completamente esteso.
2.
Regolare l’illuminazione
Regolare le luci in modo che l’oggetto sia illuminato uniformemente.
Tasto [BRIGHT]
(Esempio) Ingrandimento
insufficiente.
(Esempio) Illuminazione
insufficiente.
3.
Regolare lo zoom
OUT IN
ZOOM
4.
Regolare la luminosità
BRIGHT
SD LEFT&RIGHT
5.
Regolare la messa a fuoco
FOCUS
SD UP&DOWN
AUTO
SD DEFAULT
AUTO
Regolare lo zoom in modo che la porzione di
oggetto che si intende catturare occupi l’intero
schermo.
Regolare la luminosità solo se lo schermo è
troppo luminoso o se l’illuminazione è insufficiente.
Per regolare automaticamente la luminosità,
premere il tasto [AUTO].
Regolare la messa a fuoco se l’immagine è
sfuocata.
Per regolare automaticamente la messa a fuoco, premere il tasto [AUTO].
Italiano
(Esempio) Immagine sfuocata.
(Esempio) Regolazione giusta.
Nota
● Se si devono riprendere vari stampati in formato verticale e orizzontale, potrebbe essere conveniente salvare uno dei formati nelle
impostazioni dell’utente. (☞ Pagina 18 ‘Salvataggio delle
impostazioni (registrazione delle impostazioni selezionate dall’utente)’)
I-11
Page 93

Presentazione di oggetti tridimensionali
È possibile catturare oggetti tridimensionali poggiati sull’area di ripresa. Inoltre, regolando l’angolazione del braccio, si possono catturare
gli oggetti tridimensionali a varie angolazioni.
2.
1.
2.
1.
Regolare il braccio e la telecamera
Regolare il braccio e la telecamera in relazione alle dimensioni
dell’oggetto da riprendere.
● Assicurarsi che la telecamera sia posizionata al centro dell’oggetto.
● Il braccio è orientato per catturare oggetti di dimensioni equivalenti
al formato A3 orizzontale quando è completamente esteso.
2.
Regolare l’illuminazione
Regolare l’illuminazione in modo che la porzione di oggetto che si
intende catturare sia illuminata uniformemente.
3.
Regolare lo zoom
OUT IN
ZOOM
4.
Regolare la luminosità
BRIGHT
AUTO
SD LEFT&RIGHT
SD DEFAULT
Regolare lo zoom in modo che la porzione di
oggetto che si intende catturare occupi l’intero
schermo.
Regolare la luminosità solo se lo schermo è
troppo luminoso o se l’illuminazione è insufficiente.
Per regolare automaticamente la luminosità,
premere il tasto [AUTO].
I-12
6.
5.
Regolare la messa a fuoco
FOCUS
AUTO
SD UP&DOWN
6.
Inclinare il braccio all’angolazione
Regolare la messa a fuoco se l’immagine è
sfuocata.
Per regolare automaticamente la messa a fuoco, premere il tasto [AUTO].
necessaria per la cattura
Note
● Gli oggetti tridimensionali ripresi ad angolo inclinato consentono di ottenere immagini realistiche.
● La messa a fuoco potrebbe non essere regolata quando si
riprendono oggetti tridimensionali ingranditi con il braccio della
videocamera piegato. In tal caso, stendere il braccio fino a quando
la messa a fuoco sarà regolata.
Page 94

Ripresa di oggetti circostanti
La telecamera può essere ruotata come necessario per riprendere gli oggetti circostanti.
Te le camera
1.
Ruotare la telecamera verso l’oggetto
da riprendere
1.
2.
Rimuovere l’obiettivo per primi piani
Per estrarre l’obiettivo, tenere premute le graffette.
3.
Regolare l’immagine
Regolare lo zoom, la luminosità e la messa a fuoco.
Obiettivo per primi piani
2.
Italiano
3.
Tasto [FOCUS]
Tasto [ZOOM]
Tasto [BRIGHT]
I-13
Page 95

Presentazione di diapositive
Le diapositive con cornice possono essere inserite direttamente nella telecamera per le presentazioni.
1.
Poggiare un foglio di carta bianco
sull’area di ripresa
Poiché la pellicola utilizza la luce riflettente dell’area di ripresa,
occorre posizionare un foglio di carta bianca altamente riflettente
(formato B4 o A3) sull’area di ripresa.
2.
Regolare le luci laterali
Regolare le luci in modo che l’area di ripresa sia illuminata uniformemente.
3.
Inserire la pellicola
Nota
Utilizzare esclusivamente diapositive con cornice.
2.
ripresa
Carta
bianca
1.
2.
Tasto
[ZOOM]
Tasto [BRIGHT]Area di
3.
Tasto [FOCUS]
6.
Tasto
5.
[BRIGHT]
4.
Tasto
[ZOOM]
4.
Regolare lo zoom
OUT IN
ZOOM
5.
Regolare la luminosità
BRIGHT
SD LEFT&RIGHT
Note
● Quando viene selezionata la modalità Negativo, la regolazione
automatica della luminosità si disattiva. La spia luminosa lampeggia rapidamente per indicare che non è possibile utilizzare la
funzione.
● Nella modalità Negativo, se si preme il tasto [BRIGHT
gine viene oscurata, mentre se si preme il tasto [BRIGHT
magine viene illuminata.
● Nella modalità Negativo, se si premono i tasti [WHITE BALANCE]
[RED
tre se si premono i tasti [RED
nente rosso o blu.
] o [BLUE ] diminuisce la componente rosso o blu, men-
AUTO
SD DEFAULT
Regolare lo zoom in modo che la porzione di
oggetto che si intende catturare occupi l’intero
schermo.
Regolare la luminosità osservando l’immagine visualizzata sul monitor.
] l’imma-
] o [BLUE ] aumenta la compo-
] l’im-
I-14
6.
Regolare la messa a fuoco
Per regolare la messa a fuoco, utilizzare i tasti [FOCUS , ].
Nota
Se la diapositiva viene inserita verticalmente e si tenta di ingrandire l’immagine prima che venga visualizzata la cornice, l’immagine
può risultare sfuocata. In tal caso, impostare lo zoom su [OUT].
Page 96

Presentazione di pellicole e trasparenze
Le pellicole possono essere collocate sul piano di visualizzazione per le presentazioni.
1.
Premere il tasto [LIGHT] per accendere la retroilluminazione
La fonte luminosa cambia ogni volta che viene premuto il tasto
[LIGHT].
Tutte le fonti
luminose spente
Retroilluminazione
Tasto
1.
[LIGHT]
Luci laterali
2.
Posizionare le pellicole o le trasparen-
Retroilluminazione
ze sull’area di ripresa
Collocare la pellicola al centro dell’area di ripresa e posizionare la
telecamera direttamente sopra la pellicola.
3.
Impostazione della modalità Nega/Posi
Per la ripresa di negativi, premere il tasto [NEGA/POSI] per impostare la modalità Negativo.
3.
6.
5.
4.
4.
Regolare lo zoom
OUT IN
ZOOM
5.
Regolare la luminosità
BRIGHT
AUTO
SD LEFT&RIGHT
Note
● Quando viene selezionata la modalità Negativo, la regolazione
automatica della luminosità si disattiva. La spia luminosa lampeggia rapidamente per indicare che non è possibile utilizzare la
funzione.
● Nella modalità Negativo, se si preme il tasto [BRIGHT
gine viene oscurata, mentre se si preme il tasto [BRIGHT
magine viene illuminata.
● Nella modalità Negativo, se si premono i tasti [WHITE BALANCE]
[RED
tre se si premono i tasti [RED
nente rosso o blu.
] o [BLUE ] diminuisce la componente rosso o blu, men-
SD DEFAULT
Regolare lo zoom in modo che la porzione di
oggetto che si intende catturare occupi l’intero
schermo.
Regolare la luminosità osservando l’immagine visualizzata sul monitor.
] l’imma-
] l’im-
] o [BLUE ] aumenta la compo-
Italiano
6.
Regolare la messa a fuoco
Per regolare la messa a fuoco, utilizzare i tasti [FOCUS , ].
I-15
Page 97

Salvataggio di immagini nella memoria immagini
Le immagini usate di frequente possono essere memorizzate nella memoria immagini dell’apparecchio. È possibile effettuare il passaggio
dalle immagini della telecamera alle immagini della memoria nel corso di una presentazione. Si possono memorizzare fino a 3 immagini.
1.
Premere il tasto [CAMERA]
Inizierà la trasmissione dell’immagine della telecamera.
2.
Regolare lo zoom
Spia luminosa
AUTO
CAMERA
NEGA POSI
1.
Tasto [BRIGHT]
USER SETUPDEFAULT
WHITE BALANCE
RED BLUE
PICTURE MEMORY
1
BW COLOUR
2
TEXT
Tasto [FOCUS]
Tasto [ZOOM]
SAVE
3
IMAGE OFF
5.
3.
Regolare la luminosità
4.
Regolare la messa a fuoco
5.
Premere il tasto [PICTURE MEMORY 1]
per oltre 2 secondi
● La spia luminosa si illumina prima di iniziare a lampeggiare. Si spegnerà una volta terminato il salvataggio dell’immagine.
● A tal punto, l’immagine rimarrà fissa.
6.
Ripetere quanto indicati ai punti 1. ~
Ripetere la procedura per la memoria immagini 2 e 3.
5.
䡵 Recupero di immagini memorizzate
1.
Premere il tasto [PICTURE MEMORY]
Si visualizzeranno le immagini memorizzate nell’apparecchio.
Nota
● Durante il recupero di immagini memorizzate in questo apparecchio, non premere i tasti [PICTURE MEMORY] per oltre 2 secondi.
L’immagine verrà memorizzata.
● Se non sono memorizzate immagini nella memoria, quando viene
premuto il tasto [PICTURE MEMORY] lo schermo si oscura e non
viene visualizzata alcuna immagine.
Note
● Questa lavagna luminosa elettronica è concepita per visualizzare il formato A4 verticale con il braccio della telecamera
completamente esteso. Per i materiali contenenti sia pagine con orientamento verticale che pagine con orientamento
orizzontale, potrebbe essere preferibile salvare uno dei due orientamenti nella memoria immagini prima di effettuare una
presentazione.
● Se si spegne l’alimentazione, il contenuto della memoria immagini viene perso.
● Le immagini salvate nella memoria vengono sovrascritte quando vengono memorizzate nuove immagini.
● Non è possibile memorizzare immagini SD in questo apparecchio.
I-16
Page 98

Bilanciamento del bianco
䡵 Bilanciamento automatico del bianco
Questo apparecchio è regolato in modo da visualizzare il colore naturale. Tuttavia, si può eseguire un bilanciamento del bianco
osservando la seguente procedura.
1.
Poggiare un foglio di carta bianco
sull’area di ripresa
2.
Regolare lo zoom
Regolare fino a che tutto lo schermo diventi bianco.
Carta bianca
3.
Regolare la luminosità
4.
Premere il tasto [WHITE BALANCE
AUTO]
Tasto [WHITE BALANCE AUTO]
Entro 5 secondi il sistema effettua un nuovo bilanciamento del bianco.
● La spia luminosa inizia a lampeggiare e si spegne non appena terminato il bilanciamento del bianco.
䡵 Bilanciamento manuale del bianco
A seconda dell’oggetto da catturare, dopo il bilanciamento automatico del bianco l’immagine può apparire rossastra, bluastra o può
avere una tonalità di colore innaturale; in tal caso, si può bilanciare il bianco manualmente.
Italiano
Spia luminosa
AUTO
CAMERA
NEGA POSI
USER SETUPDEFAULT
WHITE BALANCE
RED BLUE
PICTURE MEMORY
1
2
BW COLOUR
TEXT
SAVE
3
IMAGE OFF
RED
BLUE
Aumenta la componente rosso
Diminuisce la componente rosso
Aumenta la componente blu
Diminuisce la componente blu
I-17
Page 99

Salvataggio delle impostazioni (registrazione delle impostazioni selezionate dall’utente)
Le impostazioni richiamate all’accensione o quando viene premuto il tasto [USER SETUP] possono essere memorizzate.
䡵 Registrazione
Spia luminosa
WHITE BALANCE
CAMERA
BW COLOUR
RED BLUE
PICTURE MEMORY
AUTO
NEGA POSI
1.
Regolare la telecamera
● Regolare la telecamera sulle impostazioni da memorizzare.
● Le seguenti impostazioni sono regolabili dall’utente. Le impostazioni
tra ( ) sono predefinite.
•Posizione zoom (equivalente circa al formato A4 verticale)
• Stato illuminazione (Entrambe le luci laterali accese)
• Bilanciamento del bianco (valore corrispondente all’illuminazione
laterale)
•Modalità Nega/Posi (Posi)
• Bianco e nero/Colore (Colore)
•Testo (OFF)
2.
Premere il tasto [SAVE] per oltre 2
secondi
USER SETUPDEFAULT
1
TEXT
2
SAVE
3
IMAGE OFF
● La spia luminosa si illumina prima di iniziare a lampeggiare. La spia
si spegne non appena termina il processo di registrazione delle
impostazioni.
● Le impostazioni registrate rimangono in effetto fino allo spegnimento dell’alimentazione.
䡵 Recupero delle impostazioni
Annullamento delle impostazioni
䡵
(Ripristino delle impostazioni predefinite)
1.
Premere il tasto [USER SETUP]
● Premendo questo tasto vengono attivate le impostazioni registrate.
1.
Premere il tasto [DEFAULT]
● Premendo questo tasto vengono ripristinate le impostazioni
predefinite.
2.
Premere il tasto [SAVE] per oltre 2
secondi
● La spia luminosa si illumina prima di iniziare a lampeggiare. La spia
si spegne non appena termina il processo di registrazione delle
impostazioni.
I-18
Page 100

Memorizzazione di immagini sulla scheda SD
Le immagini catturate possono essere memorizzate sulla scheda SD (venduta separatamente).
1.
Premere il tasto [CAMERA]
2.
Inserire la scheda SD
● Per estrarre la scheda SD, spingerla verso l’interno prima di rimuoverla dallo slot.
1.
3.
Premere e tenere premuto il tasto
SAVE (SALVA).
● La spia luminosa del tasto di salvataggio si illumina ➞ lampeggia
durante la fase di salvataggio. Lampeggia ➞ Rimane illuminata ➞
Si spegne al termine del salvataggio.
● Non è possibile eseguire il salvataggio se l’interruttore della scheda
SD è sulla posizione di protezione da scrittura. In tal caso, la spia
luminosa di salvataggio non lampeggia.
● Se la scheda SD è piena e non è possibile memorizzare ulteriori
immagini, la spia luminosa di salvataggio non lampeggia. In tal caso,
cancellare alcune immagini non desiderate o utilizzare una nuova
scheda.
DELETE
PAGE
IMAGE
SAVE
SELECT
ENTER
2.
3.
SD
CARD SYSTEM
䡵 Cancellazione di immagini
1.
Selezionare l’immagine da cancellare
● <Schermo normale>
Per selezionare l’immagine da cancellare, usare i tasti [PAGE ,
].
● <Schermo immagini in miniatura>
Quando sono visualizzate le immagini in miniatura, posizionare il
cursore sull’immagine da cancellare usando i tasti [PAGE
Note
● Se viene cancellata un’immagine dallo schermo delle immagini in miniatura, l’immagine successiva viene spostata e visualizzata al posto
di quella cancellata.
● Il cursore si sposta all’immagine immediatamente successiva a quella cancellata.
Note
● Durante l’estrazione o l’inserimento della scheda SD o durante lo spegnimento dell’apparecchio, premere il tasto [CAMERA] e confermare che l’immagine in uscita sia l’immagine della telecamera. Altrimenti, i dati contenuti nella scheda si
possono corrompere o l’apparecchio può malfunzionare.
● La scheda SD è fabbricata con materiali suscettibili alle cariche statiche. Il verificarsi di cariche statiche può causare
malfunzionamenti e danneggiare il contenuto della scheda. Per tal motivo, occorre maneggiarla con molta cautela.
● Non lasciare la scheda SD inserita nello slot. Dopo l’uso, estrarre la scheda SD e custodirla.
● Numero di immagini memorizzabili:
64 MB: 120 immagini circa, 128 MB: 240 immagini circa, 256 MB: 480 immagini circa
● Si raccomanda di usare una scheda SD Panasonic da 64 MB, 128 MB o 256 MB.
2.
Premere il tasto [DELETE] per oltre 2
secondi
● La spia luminosa del tasto di cancellazione si illumina ➞ Lampeggia
durante la fase di cancellazione. Lampeggia ➞ Rimane illuminata
➞ Si spegne al termine della cancellazione. (2 secondi circa)
Italiano
, ].
I-19
 Loading...