

Page 1
ENGLISH
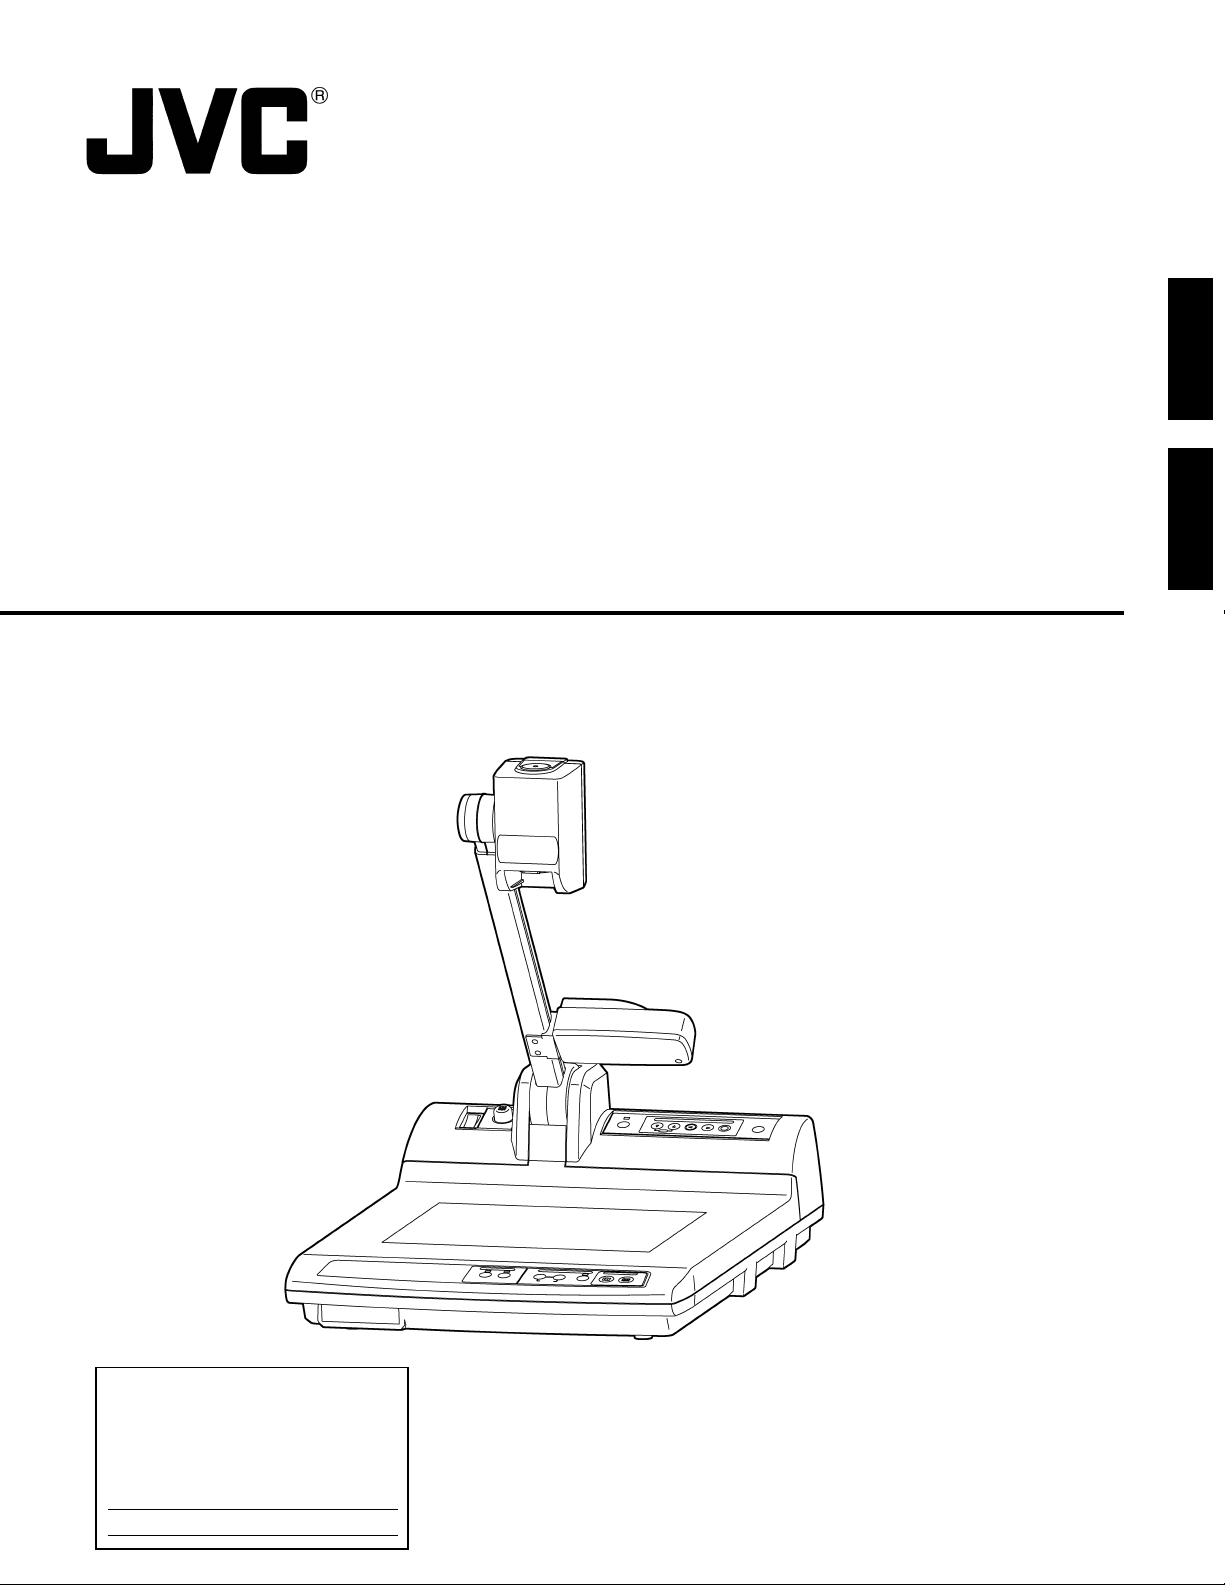
VISUAL PRESENTER
MANUEL D’INSTRUCTIONS : PRÉSENTOIR DE VISUALISATION
AV-P720U
Before beginning to operate this unit,
please read the INSTRUCTIONS MANUAL
carefully in order to make sure that the best
possible performance is obtained.
FRANÇAIS
INSTRUCTIONS
For Customer Use:
Enter below the Serial No. which
are located on the fram.
Retain this information for future
reference.
Model No. AV-P720U
Serial No.
SS961572H-001
Page 2
CAUTION
RISK OF ELECTRIC SHOCK
DO NOT OPEN
CAUTION: TO REDUCE THE RISK OF ELECTRIC SHOCK.
DO NOT REMOVE COVER (OR BACK).
NO USER SERVICEABLE PARTS INSIDE.
REFER SERVICING TO QUALIFIED SERVICE PERSONNEL.
The lightning flash with arrowhead symbol,
within an equilateral triangle is intended to alert
the user to the presence of uninsulated “dangerous voltage” within the product’s enclosure
that maybe of sufficient magnitude to constitute a risk of electric shock to persons.
The exclamation point within an equilateral
triangle is intended to alert the user to the
presence of important operating and maintenance (servicing) instructions in the literature accompanying the appliance.
The instructions are given in two languages :
English from page 2 to 14 and French from page 15 to 26
Les instructions sont donnés en deux langues :
En anglais de la page 2 à 14 et en français de la page 15 à 26.
NOTE:
The rating plate (serial number plate) and safety caution
are on the bottom and/or the back of the main unit.
WARNING:
TO PREVENT FIRE OR SHOCK HAZARD, DO NOT
EXPOSE THIS UNIT TO RAIN OR MOISTURE.
AVERTISSEMENT:
DE PREVENTION D'INCENDIE OU D'ELECTROCUTION,
NE PAS EXPOSER CET APPAREIL A LA PLUIE OU
L'HUMIDITE.
WARNING:
THIS IS A CLASS A PRODUCT. IN A DOMESTIC ENVIRONMENT THIS PRODUCT MAY CAUSE RADIO
INTERFERENCE IN WHICH CASE THE USER MAY
BE REQUIRED TO TAKE ADEQUATE MEASURES AT
HIS OWN EXPENSE.
AVERTISSEMENT:
CECI EST UN APPAREIL DE CLASSE A. DANS UN
ENVIRONNEMENT DOMESTIQUE CET APPAREIL PEUT
CAUSER UNE INTERFÉRENCE RADIO DANS QUEL CAS
L'UTILISATEUR PEUT AVOIR À PRENDRE DES
MESURES ADÉQUATES À SES PROPRES FRAIS.
WARNING: This equipment generates, uses, and can radiate
radio frequency energy. If not installed and used in accordance
with the instruction manual, it may cause interference to radio
communications. The rules with which it must comply afford reasonable protection against such interference when it is used in
a commercial environment. Operation of this equipment in a residential area is likely to cause interference, in which case the
user will be required to correct the interference at his own expense.
2
Information for Canada
This Class A digital apparatus meets all requirements of
the Canadian Interference-Causing Equipment Regulations.
Informations pour le Canada
Cet appareil numérique de la class A respecte toutes les
exigences du Réglement sur le matériel brouilleur du
Canada.
Page 3

Thank you for purchasing the JVC AV-P720 Visual Presenter. To make the most of this unit’s many features, please read this booklet
carefully. After reading, keep it handy for future reference.
TABLE OF CONTENTS
SAFETY PRECAUTIONS ............................................................................................................................................................................................ 2
CONTENTS
CHARACTERISTICS ................................................................................................................................................................................................... 3
OPERATIONAL PRECAUTIONS ................................................................................................................................................................................ 3
PARTS NAMES ........................................................................................................................................................................................................... 4
Main Unit .................................................................................................................................................................................................................... 4
Front Operation Panel ................................................................................................................................................................................................ 4
Rear Operation Panel ................................................................................................................................................................................................ 5
Back Panel ................................................................................................................................................................................................................. 5
BEFORE STARTING ................................................................................................................................................................................................... 6
STORING THE EQUIPMENT ....................................................................................................................................................................................... 7
PRESENTATIONS ...................................................................................................................................................................................................... .8
1. Presentation of Printed Matter and Three-dimensional Materials .......................................................................................................................... 8
2. Presentation of Slides ............................................................................................................................................................................................ 8
3.
Filming Peripheral Subjects ................................................................................................................................................................................... 8
OPERATION ................................................................................................................................................................................................................ 9
Zooming ..................................................................................................................................................................................................................... 9
Focusing..................................................................................................................................................................................................................... 9
Input Select ................................................................................................................................................................................................................ 9
Lighting .................................................................................................................................................................................................................... 10
Brightness ................................................................................................................................................................................................................ 10
Auto White Set ......................................................................................................................................................................................................... 10
On Screen Adjustment ............................................................................................................................................................................................. 11
Function ................................................................................................................................................................................................................... 12
TROUBLESHOOTING............................................................................................................................................................................................... 13
SPECIFICATIONS ..................................................................................................................................................................................................... 14
............................................................................................................................................................................................
3
ENGLISH
CHARACTERISTICS
This equipment is a presentation device that enables presentation materials such as slides to be shown on a monitor screen.
•
Auto focus function automatically adjusts and corrects focus as required.
•
The x 16 electric zoom lens enables materials of varying size from a 35mm slide to a lateral B4 size paper to be presented on a
•
screen.
OPERATIONAL PRECAUTIONS
Do not leave the equipment in direct sunshine or close to heating appliances.
•
During operation do not cover the lighting device with flammable materials such as fabric or paper.
•
When the main unit needs cleaning, wipe it first with a damp cloth that had been soaked in solution of neutral detergent and tightly
•
wrung; then dry it off with clean cloth. Never use volatile solvents such as paint thinner, benzine, insecticide, etc. on the unit as they
may deform, discolour and damage it. Also do not immerse the unit in water, as it will result in breakdown.
3
Page 4
PARTS NAMES
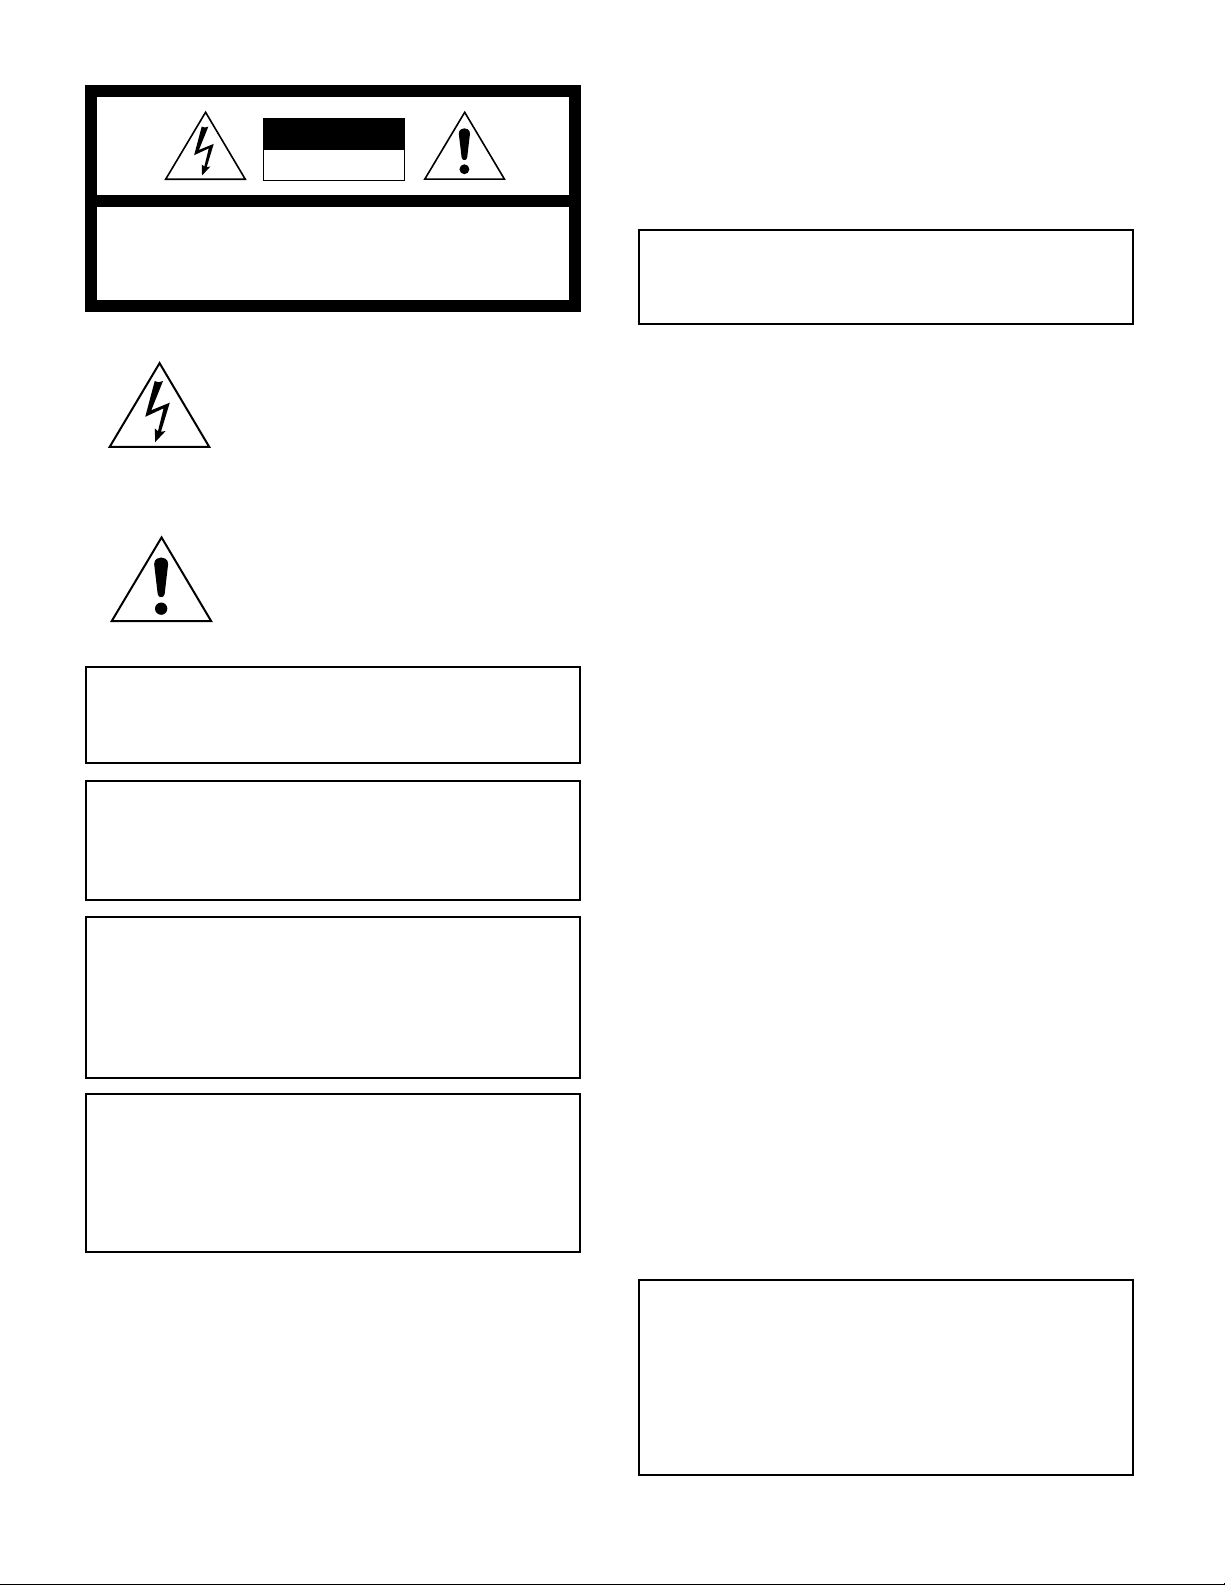
Main Unit
Camera Head
Camera Arm
POWER Switch
Close-up Lens
Slide Film Holder (P. 8)
Lighting
Rear Panel
UNLOCK Button
Rear Control Panel
Stage
Front Control Panel
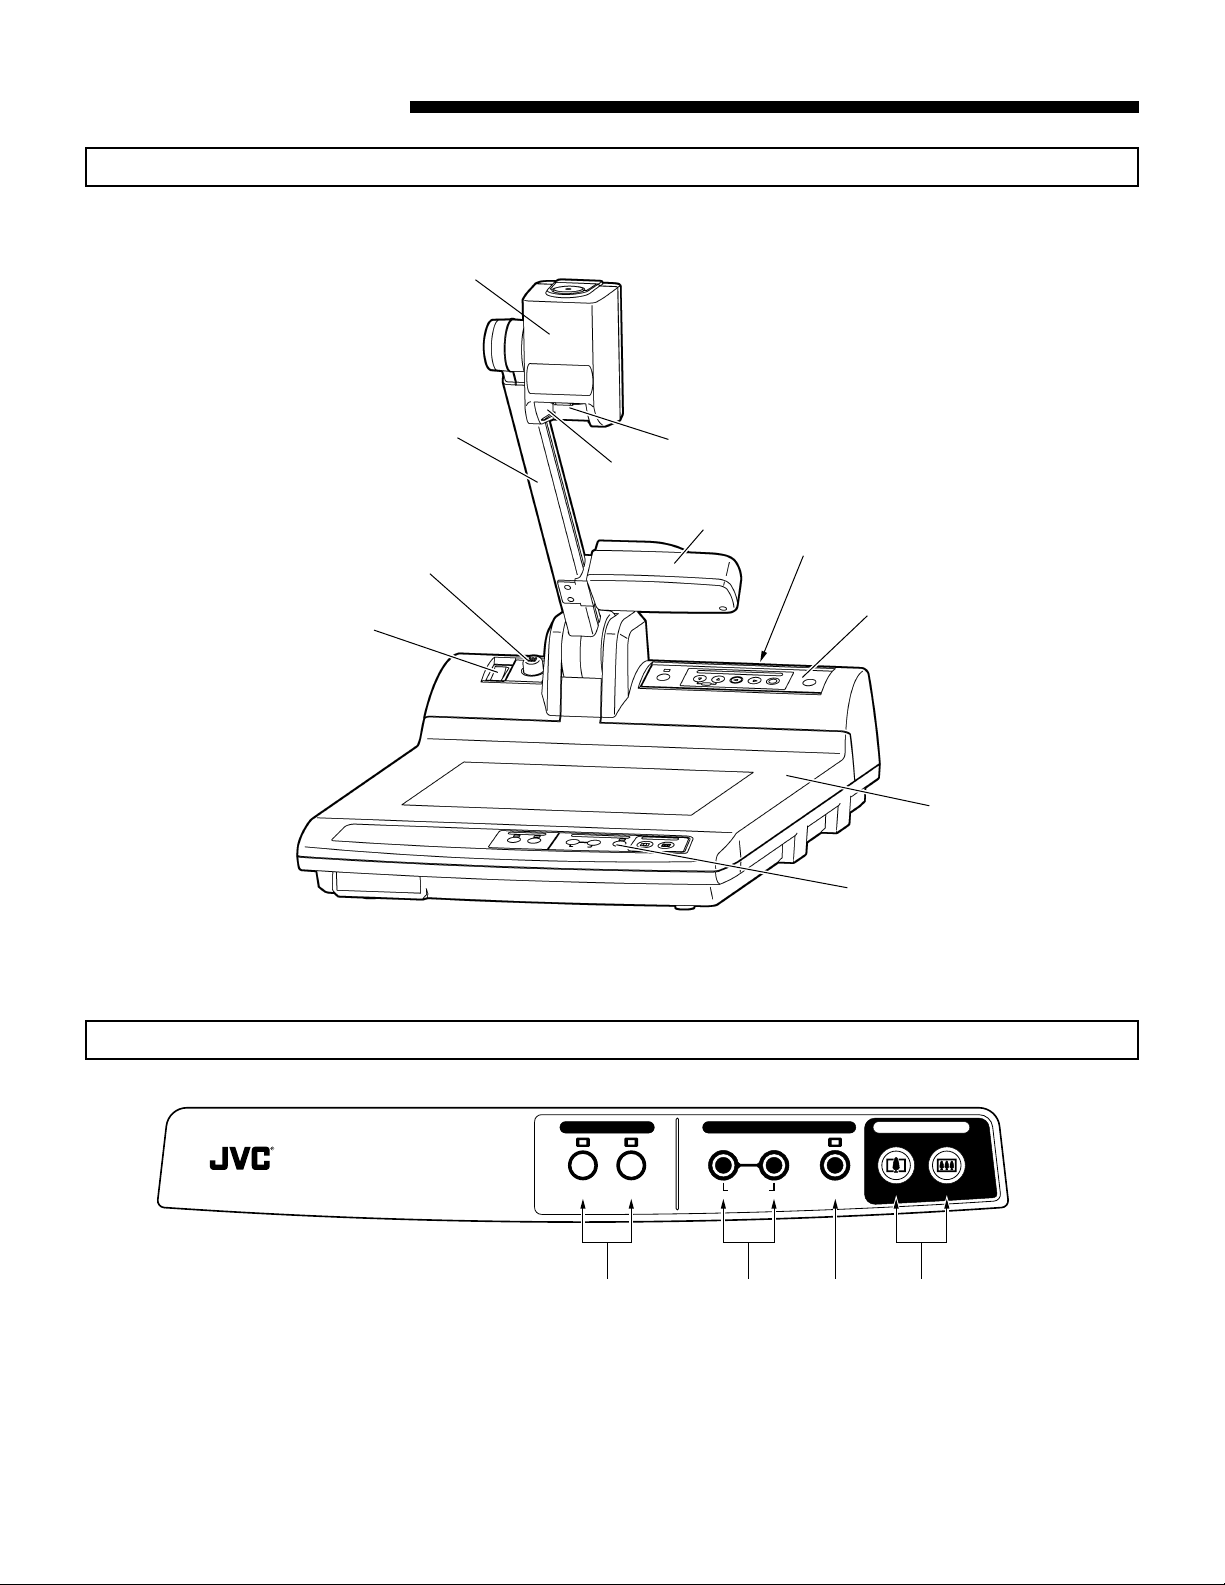
Front Operation Panel
NEAR
FOCUS
FAR
AUTOMANUAL
TELE
VISUAL PRESENTER AV-P720
INPUT SELECT
CAMERA
VIDEO
3 421
INPUT SELECT button : changes the input system to the camera or video terminals. (P9)
1
MANUAL FOCUS button : manually adjusts the camera focus. (P9)
2
AUTO FOCUS buttons : automatically adjusts the camera focus. (P9)
3
ZOOM button : changes the size of the material to be presented on a monitor screen. (P9)
4
4
ZOOM
WIDE
Page 5
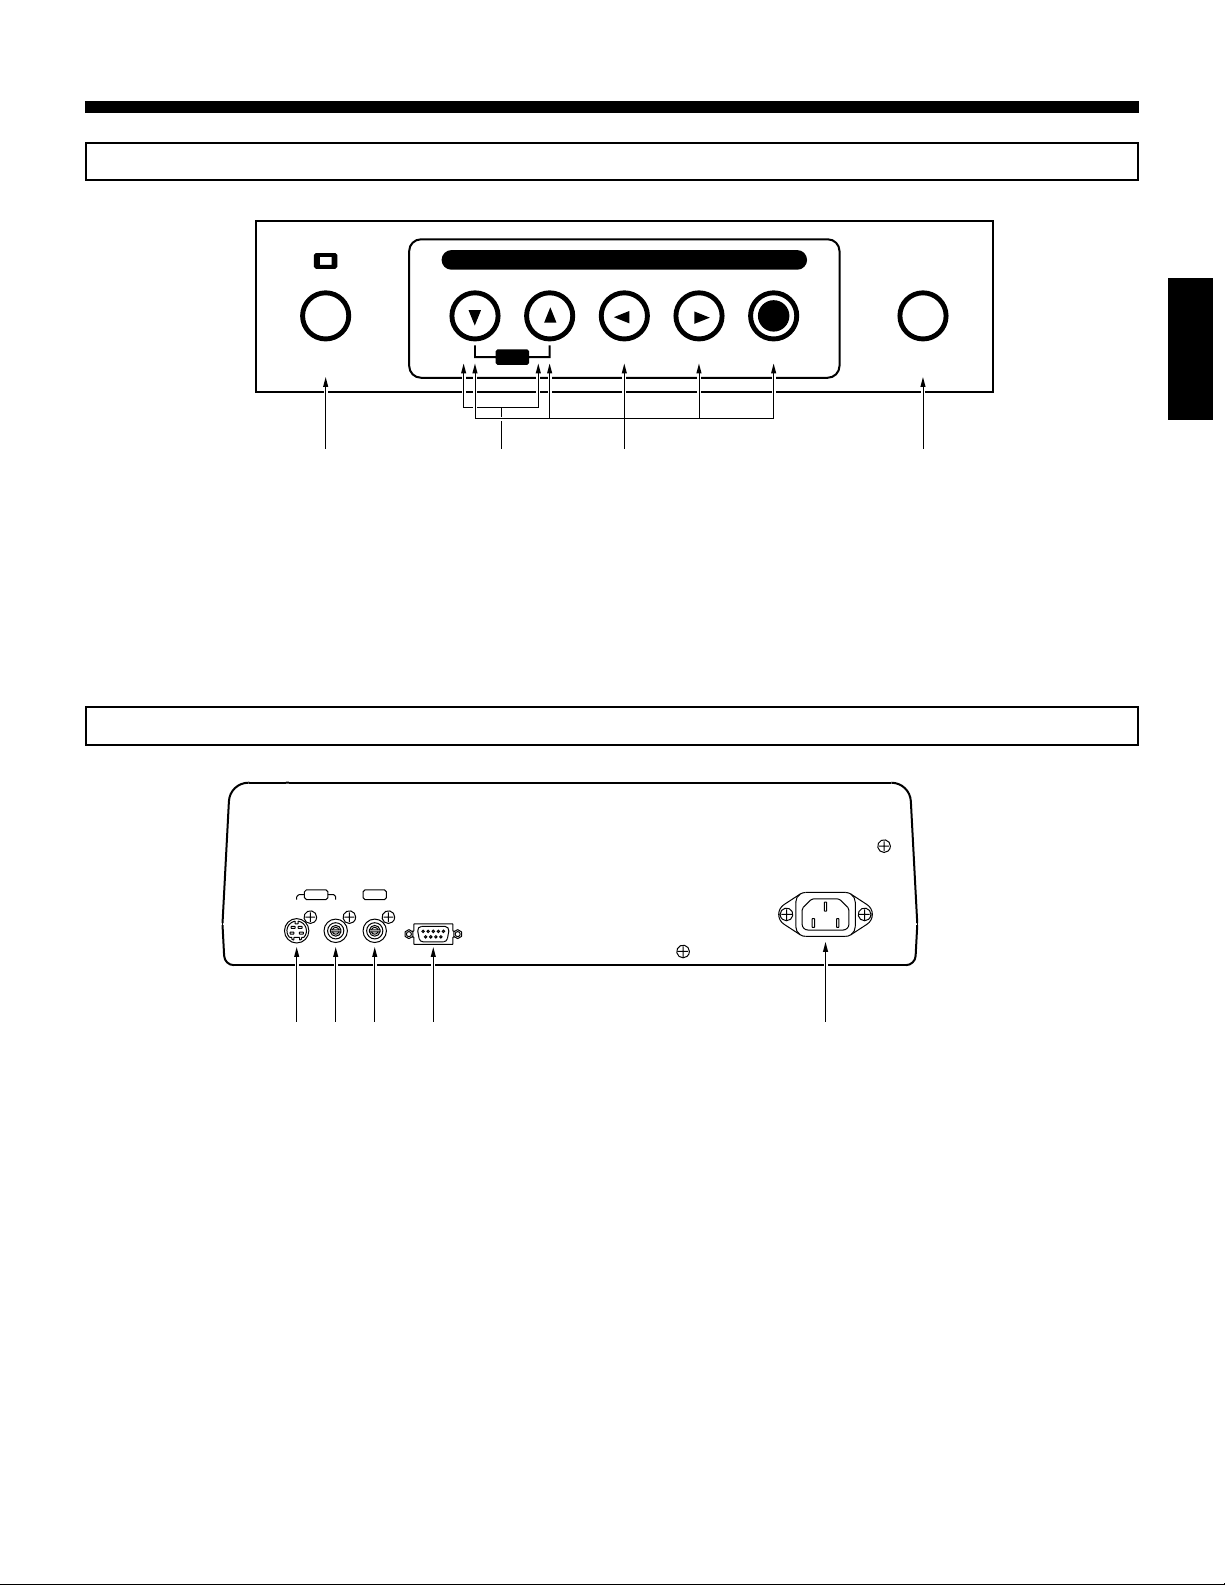
Rear Operation Panel
ON-SCREEN ADJUSTMENT
AUTO WH ITE
SET
IRIS
MENU/ENTER LIGHTING
1 42 3
AUTO WHITE SET button : selects the AUTO WHITE BALANCE ADJUSTMENT mode. (P10)
1
IRIS button : adjusts brightness of the material presented on the monitor screen. (P10)
2
ON SCREEN ADJUSTMENT button : operates the ON SCREEN ADJUSTMENT function. (P11)
3
LIGHTING button : turns LIGHTING on/off. (P10)
4
Back Panel
AC 100V – 120V
OUT IN
CAMERA VIDEOVIDEO
REMOTE IN
(RS-232C)
COMMERCIAL USE ONLY
50Hz/60Hz 17W
ENGLISH
54321
CAMERA OUTPUT terminal : outputs camera image signals from the body regardless of setting of the INPUT SELECT
1
VIDEO OUTPUT terminal : outputs image signals that have been selected by the INPUT SELECT button.
2
VIDEO INPUT terminal : is an input terminal for image signals from the external equipment. The signals that enter
3
REMOTE INPUT terminal : is a RS-232C terminal that allows external functions, for instance by a PC, to control the
4
AC IN connector : connects the power cord. Please only use the power cord supplied.
5
button.
this terminal when ‘VIDEO’ was selected on the INPUT SELECT button will go out via the
VIDEO OUTPUT terminal.
operations. Information on communication protocols and commands is available separately.
For details, consult your JVC dealer.
5
Page 6

BEFORE STARTING
12
1.
Pull up the camera arm slightly towards the direction of
while pressing the camera arm lock release button1. Release the lock release button; then pull up the camera arm
until the locking system engages completely.
Note:
• Do not let go of the camera arm while the lock release button is depressed. The camera arm section
will drop down of its own weight and this could result
in breakdown and/or injury.
• When pulling up the camera arm, make sure to pull
it up by holding the arm section. If you try to pull up
by holding either the camera section or the lighting
section, it may cause breakdown.
2.
Rotate the camera head towards the direction of3until
you hear a click and then let the lens section face towards
the stage which is located directly below.
3.
Carry out one or the other of the following connections depending on the type of a TV monitor image input terminal in
use.
*We recommend the use of a S-image output because it
can reduce bleeding at color borders.
Note:
• Signals that entered the VIDEO INPUT terminal can
only come out of the VIDEO OUTPUT terminal. If
you would like to use the VIDEO INPUT terminal
make sure to connect the signals to the VIDEO OUTPUT terminal.
2
3
Stage
● Connecting to the apparatus equipped with a composite video (C-video) input terminal
Video connection cable provided
To VIDEO OUT
terminal of AV-P720
OUT
VIDEO
4.
Connect the power cord connector to the AC IN connector
and plug the other end into an AC outlet. Press the power
switch to turn the power on.
Note:
• In order to protect this equipment and also other connected devices, make sure to turn off the power switch
whenever you carry out connections.
To Video input
terminal
TV Monitor
● Connecting to the apparatus equipped with a S-image
(S-video) input terminal
S-Video connection cable (optional)
To CAMERA OUT
terminal of AV-P720
CAMERA
To S-Video input
terminal
OUT
TV Monitor
6
Page 7

STORING THE EQUIPMENT
1
2
3
4
1.
Turn the power switch OFF, and then remove the power
cord and the video cable from the terminals.
Note:
• Hold the plug sections of the power cord and the
video cable when unplugging them from the terminals.
2.
Rotate the camera head towards the direction of1until
you hear a click.
3.
Press the lock release button3while moving the camera
arm to the direction of
arm towards the direction of
button and continue to push down the camera arm until
you hear a click. Check and confirm that the camera arm is
securely locked by trying to move it up and down slightly.
Note:
• Do not let go of the camera arm if it is not locked.
Also hold the arm securely when pushing down the
camera arm. Otherwise, the camera arm section will
drop down of its own weight and this could result in
breakdown and/or injury.
• If the camera arm is locked, do not apply extra force
on the camera arm. This may result in breakdown.
• When storing, do not leave the equipment leaning
against, for instance, a wall. The equipment may fall
down causing breakdown and/or injury.
• When carrying around the equipment, make sure to
hold it by the base section
era arm or the lighting device will put too much strain
on these parts. As a result the main unit may drop to
the floor and cause breakdown or injury.
. Then push down the camera
2
. Release the lock release
4
. Holding it by the cam-
5
ENGLISH
34
5
5
7
Page 8

PRESENTATION
1. Presentation of Printed and ThreeDimensional Materials
INPUT SELECT
NEAR
FOCUS
FAR
ZOOM
• Place a subject on the stage, and adjust the subject size
using the ZOOM button
screen. (Focusing will be adjusted automatically.)
* When using the equipment indoors, we recommend the use
of lighting (see page 10 for lighting)
Note:
• The LIGHTING section will be hot while in use or immediately afterwards. Be careful not to touch it because it could cause burns.
by looking at the monitor
1
2. Presentation of Slide Films
1.
Switch on lighting, insert a slide into the slide film holder
and adjust the image size with the ZOOM button.
2.
Adjust the direction of lighting so that the stage will be at its
brightest
3.
Use the ZOOM at the WIDE setting. When the slide is a
portrait, if you magnify it until the slide’s frame is not visible,
the image will be out of focus.
3
.
2
VIDEO
CAMERA
Front Control Panel
2
AUTOMANUAL
TELE
1
Slide film holder
3
Adjust the direction to
make the stage the
brightest
WIDE
Stage
Note:
• Reflective light from the stage is used in this operation. Do not place any other materials on the stage.
• Depending on the slide, the image may become darker
or acquire grittiness. In these cases, use a commercially available light box.
3. Filming peripheral subjects
When filming subjects such as faces or a blackboard that
are not on the stage, remove the CLOSE-UP lens as shown
in the diagram on the right of this page and then rotate the
camera head towards the direction of
Note:
• Avoid fingerprints or dust getting onto the close-up
lens.
• When filming the subjects on the stage, the close-up
lens needs to be fitted again. The camera head should
be returned to the original position.
4
.
AUTO WHITE
SET
Rear Control Panel
4
ON-SCREEN ADJUSTMENT
IRIS
MENU/ENTER LIGHTING
LIGHTING button
Close-up lens
Rear Panel side
(Back of the body)
8
Page 9

OPERATION
TELE
WIDE
CAMERA
VIDEO
INPUT SELECT
FOCUS
ZOOM
AUTOMANUAL
FAR
NEAR
Front Control Panel
Zoom
• When the ZOOM button “TEL” is pressed, the image on the
monitor screen will become gradually bigger; when the
ZOOM button “WIDE” is pressed the image will become
gradually smaller.
• Every time the ZOOM button is pressed, focusing will be
automatically re-adjusted.
• When the ZOOM button is continually pressed, the zoom
speed will increase after a while.
Focusing
INPUT SELECT
VIDEO
CAMERA
Front Control Panel
NEAR
FOCUS
FAR
ZOOM
WIDE
AUTOMANUAL
TELE
ENGLISH
AUTO FOCUSING
• When the AUTO button is pressed, focusing on the subject
will be carried out automatically.
• Once auto focusing is completed, this particular function
will be suspended and the focusing on the subject will remain constant.(The indicator lamp will blink while the auto
focusing is in operation; once completed the lamp will remain lit for one second and then go out.)
Note:
Auto focusing may not work on the following subjects. If so, use manual focusing instead.
•
• Subjects with minimal contrasts or shiny surfaces.
• Subjects with detailed and repetitive patterns such as horizontal stripes, checked patterns, etc.
• Three-dimensional or moving subjects
• The subject is not centred on the screen.
• The screen is dark.
AUTO FOCUS will not operate while ‘ON SCREEN ADJUSTMENT’ is selected.
•
MANUAL FOCUSING
• When you wish to focus on a particular part of a threedimensional object, adjust focusing by pressing the
MANUAL FOCUS button.
• When the NEAR button of manual focusing is selected, focus will be on the higher part of the three-dimensional object; and when the FAR button is selected focus will be on
the lower part of the three-dimensional object.
INPUT SELECT
VIDEO
CAMERA
Front Control Panel
NEAR
FOCUS
FAR
ZOOM
WIDE
AUTOMANUAL
TELE
Input Select
The INPUT SELECT button can change the signals of the
•
main unit’s CAMERA IMAGE SIGNAL terminal and VIDEO
INPUT terminal, and send them to the VIDEO OUTPUT
terminal. Once selected, the indicator lamp will light up.
When CAMERA is selected, image signals from the unit’s
•
camera will be used.
When VIDEO is selected, signals from the VIDEO INPUT
•
terminal will be sent to the VIDEO OUTPUT terminal.
• Image signals from the VIDEO INPUT terminal can-
Note:
not be sent to the CAMERA OUTPUT terminal.
INPUT SELECT
VIDEO
CAMERA
Front Control Panel
CAMERA
video signal
INPUT SELECT
FOCUS
FAR
NEAR
S-Video signal
Composite
signal
Composite signal
AUTOMANUAL
ZOOM
WIDE
TELE
CAMERA
VIDEO
VIDEO
OUT
IN
9
Page 10

Lighting
ON-SCREEN ADJUSTMENT
MENU/ENTER LIGHTING
AUTO WHITE
SET
IRIS
Rear Control Panel
• This button turns lighting ON/OFF.
• If you press this button while lighting is turned OFF, light
will come on; if you push this button while lighting is turned
ON, light will go out.
Note:
• Because a fluorescent lamp is used for lighting, it will
take a few seconds to come on.
Brightness
• This function is used to adjust brightness of the material
shown on the monitor screen.
• Adjustment is made with pressing the brightness adjustment
buttons and , and the level of adjustment can be confirmed with the values (+10 to -10) indicated at the upper
right corner of the monitor screen. The initial setting is ‘0’.
Note:
If brightness is lacking while IRIS is set at AUTO with the ON
•
SCREEN ADJUSTMENT, the AUTO IRIS function may not
start at all or take time before starting to operate.
•
If you wish to fix the brightness, change the IRIS mode to
MANUAL on the ON SCREEN ADJUSTMENT. (See page 11)
AUTO WHITE
SET
Rear Control Panel
ON-SCREEN ADJUSTMENT
IRIS
MENU/ENTER LIGHTING
Auto White Set
• This function temporarily maintains the AUTO WHITE BALANCE adjustment. This will be particularly effective when
filming a single color material.
[How to use AUTO WHITE SET]
Press the AUTO WHITE SET button while filling the screen
1
with colorless subject (e.g., the stage’s white section).
The indicator lamp will start blinking and the AUTO WHITE
2
BALANCE adjustment will begin.
As soon as the AUTO WHITE BALANCE adjustment is com-
3
pleted, the indicator lamp will stop blinking and remain lit.
To return to the original setting, press the AUTO WHITE
4
button. This will cancel the AUTO WHITE SET function and
the indicator lamp will go out.
Note:
• Every time lighting on a subject changes, you must repeat the AUTO WHITE SET function.
• In order to adjust WHITE BALANCE manually set the
WHITE BALANCE mode to MANUAL on the ON
SCREEN ADJUSTMENT and then fine tune the balance using the RED LEVEL and the BLUE LEVEL.
• While the ON SCREEN ADJUSTMENT is shown on the
monitor or the MANUAL setting is indicated, the AUTO
WHITE SET button will not function.
OFF
1
AUTO WHITE
SET
Rear Control Panel
Blinking
2
AUTO WHITE
SET
ON
3
AUTO WHITE
SET
OFF
4
ON-SCREEN ADJUSTMENT
IRIS
ON-SCREEN ADJUSTMENT
IRIS
ON-SCREEN ADJUSTMENT
IRIS
ON-SCREEN ADJUSTMENT
MENU/ENTER LIGHTING
MENU/ENTER LIGHTING
MENU/ENTER LIGHTING
10
AUTO WHITE
SET
IRIS
MENU/ENTER LIGHTING
Page 11

On-Screen Adjustments
ON-SCREEN ADJUSTMENT
MENU/ENTER LIGHTING
AUTO WHITE
SET
IRIS
12345
This function will enable manual adjustment of the camera section and select settings such as NEG/POSI and/or BW/COLOUR when presenting the negative film.
Operation Procedure
• The ON SCREEN Adjustment is performed using five different buttons : MENU/ENTER
, button 3 and button 4.
2
, button 1, button
5
ENGLISH
(Example)
When changing screen brightness
adjustment to MANUAL setting:
1.
Press the MENU/ENTER button. The ON SCREEN ADJUSTMENT screen will appear on the monitor.
2.
Line up the cursor with IRIS MODE by pressing the
button
, button 2.
1
Cursor
Move the
cursor
Item Setting value
WHITE BALANCE AUTO
IRIS MODE AUTO
Menu screen
Item Setting value
WHITE BALANCE AUTO
IRIS MODE AUTO
3.
Change setting values using the button 3 and button
.
4
Select MANUAL for setting value adjustment. At this point,
the lowest line on the screen should be indicating the
choices and variable range.
4.
If the MENU/ENTER button 5 is pressed again, the ON
SCREEN ADJUSTMENT screen will disappear from the
monitor and the ON SCREEN ADJUSTMENT function will
end.
Cursor
Item Setting value
WHITE BALANCE AUTO
IRIS MODE AUTO
Info [AUTO, MANUAL]
Setting contents
and the available
value range
11
Page 12

Functions
Functions and setting values of the ON SCREEN ADJUSTMENT are as follows:
Item Function
AUTO : Automatically corrects tone of the image whenever
WHITE BALANCE
MODE
RED LEVEL
BLUE LEVEL
IRIS MODE
IRIS LEVEL
NEGA/POSI
BW/COLOR
MANUAL : Manually adjusts the image tone using the RED
If MANUAL is selected, the red level is adjusted.
If MANUAL is selected, the blue level is adjusted.
AUTO : Automatically corrects brightness of the image when-
MANUAL : Fix the image brightness.
If AUTO is selected, finely adjusts brightness within ±F2.
If MANUAL is selected, manually adjusts brightness.
Reverses tone and contrast of an image. This is used when presenting negative film.
BW : Creates B/W images. Use it with B/W text presenta-
COLOR : Creates color images.
the colour temperature changes in the environment
where the equipment is used.
LEVEL and BLUE LEVEL.
ever brightness of the surroundings and/or the subject changes.
tion, as it will enhance the sharpness of the image.
The Choices and
Variable Range
AUTO,
MANUAL
–50 ~ +50
–50 ~ +50
AUTO,
MANUAL
–10 ~ +10
–50 ~ +50
POSI, NEGA
COLOR, B/W
Initial Value
AUTO
0
0
AUTO
0
0
POSI
COLOR
DETAIL
AGC
GAMMA
SHUTTER
• If VIDEO is selected on the INPUT SELECT button, the ON SCREEN ADJUSTMENT cannot be used.
• Under normal circumstances, it is recommended to use the lighting device and keep the AGC turned off. The images on the
monitor will be less gritty than those from the image signals that are electronically amplified.
• When the power is turned off, all settings go back to the initial values.
• When presenting negative film, please use a commercially available light box.
Modifies the contours of images.
ON : Amplifies image level and automatically corrects brightness
when used with little light.
OFF : Is a normal setting.
ON : Is a normal setting.
OFF : The monitor tone adjustment will not be modified. It is used
when adjustments such as visual analysis are not necessary.
Changes shutter speed. If the shutter speed of 1/100 is selected,
this reduces flickering of the screen by fluorescent lights in the
50Hz regions.
NORMAL, SHARP,
SOFT
OFF, ON
ON, OFF
1/60, 1/100
NORMAL
OFF
ON
1/60
12
Page 13

TROUBLE SHOOTING
IPlease check the following list of possible problems and their solutions first. If you cannot solve the problem(s) after consulting the list,
stop using the product at once and contact your retailer or the nearest JVC customer service.
Problem Check points
No images
Images are out of focus.
Images are hazy.
Dust is visible
Dark images
Stripe patterns appear on
images of printed text.
Abnormal tone
Check the power cord is properly plugged in.
•
Is the power switch ON?
•
Are all the cables correctly connected?
•
Is the camera head set at the correct position?
•
Is the setting value of IRIS LEVEL suitable?
•
Is the correct signal chosen by the INPUT SELECT button?
•
Is the close-up lens correctly attached?
•
Isn’t the text material too close to the lens; is it placed more than 90mm above the stage?
•
Is the slide in the slide film holder over-magnified?
•
Auto focusing may at times cause difficulty in focusing. (See page 9)
•
Check the close-up lens or camera lens for dirt. If so, clean them using commercially available
•
lens cleaning products.
Is the lighting device turned on?
•
Is the setting value for IRIS suitable?
•
The halftone dot of printed text and the pixel of the microelectronics devices of the filmed
•
images by the camera may interfere with each other to cause coloured stripes. In such a case,
change the image size slightly using the ZOOM button.
If AUTO WHITE BALANCE is used: in the case of single color materials it may be difficult to
•
obtain correct white balance. If so, use the AUTO WHITE SET button to correct the tone.
If MANUAL WHITE BALANCE is used: correct the tone by increasing the setting values of
•
‘RED LEVEL’ and ‘BLUE LEVEL’ on the ON SCREEN ADJUSTMENT screen.
ENGLISH
Gritty images
Beats appear in images
Pressing buttons will not
operate the equipment
Tinting around letter edges
If the surrounding area is dark, images may become gritty as the image signals are amplified
•
electronically by AGC. Use the lighting device.
If the equipment is used near any appliance that emits strong radio waves, beats may appear in
•
the images. In that case, move the equipment away from the offending appliance.
If two buttons are pressed at the same time or a button is tapped on continuously, they may not
•
operate correctly. Press buttons one at a time.
Depending on the materials you want to present, using the ZOOM function at its maximum or
•
near maximum capacity may cause coloring around the edges of letters and lines in the materials. In that case the problem can be minimized by reducing the image size using the ZOOM
WIDE button or changing the image to B/W. Use the ON SCREEN Adjustment function to
change the image to B/W (See pages 11 & 12).
13
Page 14

SPECIFICATIONS
GENERAL
Power supply : AC100V – 120V, 50 Hz/60 Hz
Power consumption : 17W
Dimensions : During normal use: 450 × 605 × 585 mm
(w/d/h)
During storage : 450 × 605 × 230 mm
(w/d/h)
Mass : 5.9 kg
OPTICS SECTION
Photographic lens : F1.6 ~ F2.6, f = 4.0mm ~ 64mm ( ×16)
Range : Max. 350 × 260mm and over (equiva
lent of B4 landscape)
Min. 24 × 18mm and below
Focusing limit : Stage surface to up to 90mm above the
stage (with camera looking downwards
and close-up lens in use) ~ 0.9 m
(camera looking sideways and no
close-up lens in use)
Size(zoom) : Electric operation
Focus : Automatic/electric operation
Iris : Automatic(with fine adjustment)/
manual
LIGHTING SECTION
Light source : 6W (fluorescent lamp)
INPUT/OUTPUT TERMINALS
Input terminal :
Video input : RCA pin × 1 (1 Vp.p, 75 Ω)
Output terminals :
Video output : RCA pins × 1 (1 Vp.p, 75 Ω)
Camera output : Mini DIN4 connector × 1
(1 Vp.p, 75 Ω),
(C:0.3 Vp.p, 75 Ω)
Control terminal :
Remote input : D-SUB 9P (RS-232C) × 1
Operating environment
Temperature : +5°C ~ +40°C
Humidity : 30% ~ 85%
ACCESSORIES
Video cable (5 m) × 1
Instruction manual × 1
Power cord (2.5 m) × 1
* Design and specifications are subject to change without notice.
To reduce power consumption, turn off the power when not using the Presenter.
CAMERA
TV system : NTSC
Camera elemental device : Interline transfer _ inch CCD
Active pixel number : 768 (H) × 494 (V)
Synchronous system : Internal synchronous
Horizontal resolution : 450 TV standard (mainly Y-signals)
Vertical resolution : 350 TV standard
S/N : Over 46 dB
Electronic shutter : 1/60, 1/100
White balance : Auto/Auto White Set/Manual
AGC : ON/OFF
Contour adjustmen : Soft/Normal/Sharp
Gamma adjustment : ON/OFF
Neg/Pos reversal : Neg/Pos
BW/Colour reversal : Colour/BW
Input selection : Camera/video
SECTION
14
Page 15

AV-P720U VISUAL PRESENTER
is a registered Trademark owned by VICTOR COMPANY OF JAPAN, LTD.
is a registered Trademark in Japan, the U.S.A., the U.K. and many other countries.
© 2001 VICTOR COMPANY OF JAPAN, LIMITED
VICTOR COMPANY OF JAPAN, LIMITED
Printed in THAILAND
SS961572H-001
 Loading...