

Page 1

AV-29FH1SUG
AV-29FH1BUG
ENGLISH
DEUTSCH
FRANÇAIS
NEDERLANDS
CASTELLANO
ITALIANO
COLOUR TELEVISION
FARBFERNSEHGERÄT
TELEVISEUR COULEUR
KLEURENTELEVISIE
TELEVISOR A COLOR
TELEVISORE A COLORI
TELEVISOR A CORES
INSTRUCTIONS
BEDIENUNGSANLEITUNG
MANUEL D’INSTRUCTIONS
GEBRUIKSAANWIJZING
MANUAL DE INSTRUCCIONES
ISTRUZIONI
INSTRUÇÕES
Page 2

Thank you for buying this JVC colour television.
To make sure you understand how to use your new TV, please read this manual thoroughly
before you begin.
WATER AND MOISTURE
1.
The apparatus shall not be exposed to dripping or splashing water and no object filled with liquids, such as vases , should
be placed on the apparatus.
HEAT
2.
Never place the set near heat sources.
Never put a naked flame, such as a candle, on the top of TV set.
VENTILATION
3.
Do not cover the ventilation openings in the cabinet and never place the set in a confined space such as in a bookcase or
built-in cabinet unless proper ventilation is provided. Leave a minimum 10 cm gap all around the unit.
OBJECT ENTRY
4.
Do not insert foreign objects, such as needles and coins, in the ventilation openings.
LIGHTNING STRIKE
5.
You should disconnect the set from the mains and the aerial system during thunderstorms.
CLEANING
6.
Unplug the set from the mains while cleaning.
AFTER MOVING THE SET
7.
If the set is moved or turned, the MAIN POWER button must be switched off for at least 15 minutes in order to take out
colour patches on the screen.
CAUTION
8.
There is danger of choking or suffocation if the cap which is removed from the TV is accidentally swallowed by children.
Store the cap out of the reach of children.
TV-LINK FUNCTION
1
2
3
3
4
7
12
14
15
16
8
Page 3
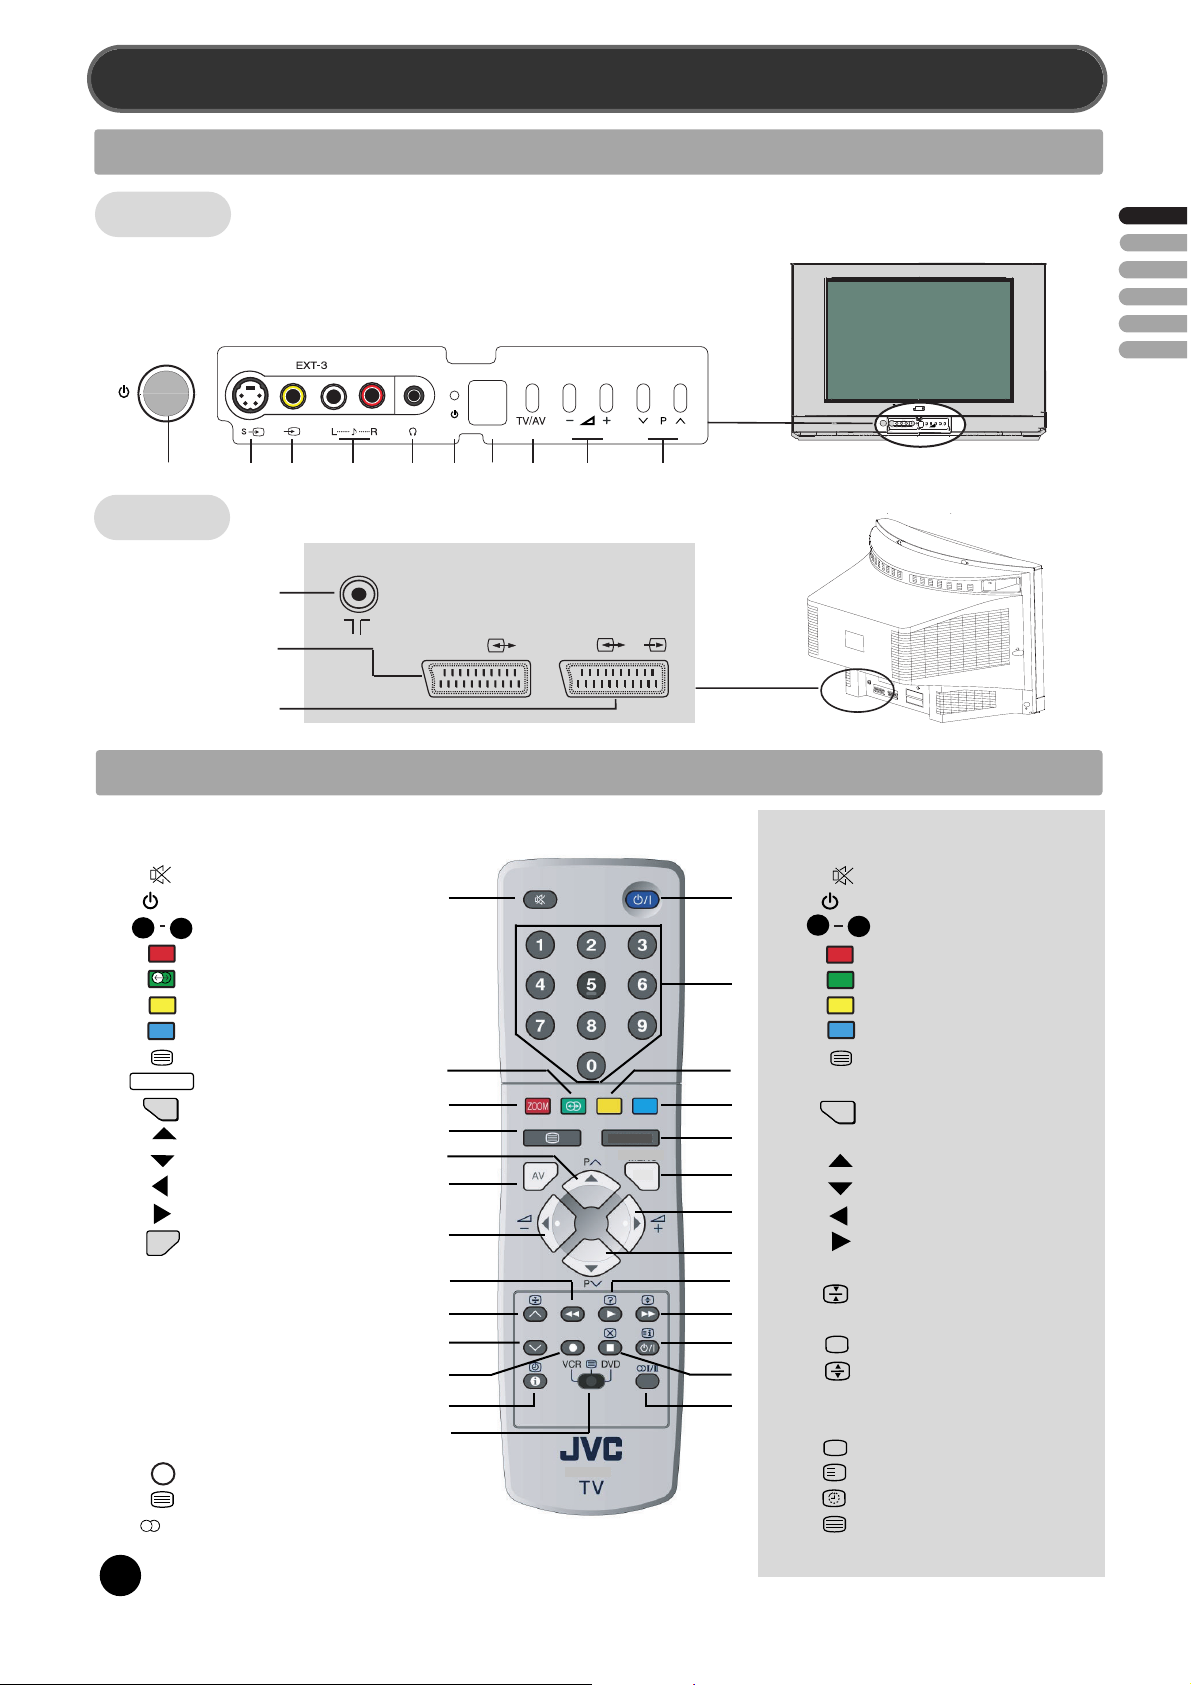
IDENTITY OF LOCAL & REMOTE CONTROL
LOCAL CONTROL
Front
B1
MAIN POWER button
B2
FRONT S-VIDEO INPUT socket Ext-3
B3
FRONT VIDEO INPUT socket Ext-3
B4
FRONT AUDIO INPUT socket Ext-3
B5
HEADPHONE socket
B1 B2 B3 B4 B5 B6 B7 B8 B9 B10
Rear
AERIAL socket
ANT
B6
STAND-BY indicator
B7
REMOTE sensor
B8
TV / AV button
B9
VOLUME UP/DOWN buttons
B10
PROGRAM UP/DOWN buttons
ENGLISH
SCART 1 socket EXT-1
SCART 2 socket EXT-2
REMOTE CONTROL
TV mode
A1
A2
A3
A4
A5
A6
A7
A8
A9
A10
A11
A12
A13
A14
A15
A16
A17
A18
A19
A20
A21
A22
A23
A24
A25
A26
0
PICTURE/OK
V
2
SOUND MUTE
/I
POWER
9
NUMBER 0..9
zoom
ZOOM / SKIP
SOUND EFFECT / MOVE
SLEEP / DELETE
Not used
TV > TELETEXT
PICTURE / OK
MENU
MENU
PROGRAM UP (CURSOR UP)
PROGRAM DOWN (CURSOR DOWN)
VOLUME DOWN (CURSOR LEFT)
VOLUME UP (CURSOR RIGHT)
AV
TV / AV
Not used
Not used
Not used
Not used
Not used
Not used
Not used
Not used
i
INFORMATION
D
VCR / TELETEXT / DVD switch
I / II
MODE Stereo/Mono
Dual language
I / II
EXT-1
A1
A5
1
A4
A8
A11
A15
A13
A17
A16
A20
A21
A24
A25
EXT-2
( S )
RM-C1514
PICTURE/OK
MENU
RM-C1514
A2
A3
A6
A7
A9
A10
A14
A12
A18
A19
A23
A22
A26
TELETEXT mode
A1
A2
A3
A4
A5
A6
A7
A8
A9
A10
A11
A12
A13
A14
A15
A16
A17
A18
A19
A20
A21
A22
A23
A24
A25
A26
0
SOUND MUTE
/I
POWER
9
NUMBER 0..9
RED
GREEN
YELLOW
CYAN
TELETEXT > TV
Not used
MENU
VOL / BRIGHTNESS /CONTRAST
MENU
PAGE UP
PAGE DOWN
VOL / BRIGHTNESS / CONTRAST DOWN
VOL / BRIGHTNESS / CONTRAST UP
Not used
PAGE HOLD
Not used
?
REVEAL
DOUBLE SIZE
Not used
Not used
X
CANCEL
i
INDEX
SUBPAGE
VCR / TELETEXT / DVD switch
Not used
SELECTION
Page 4
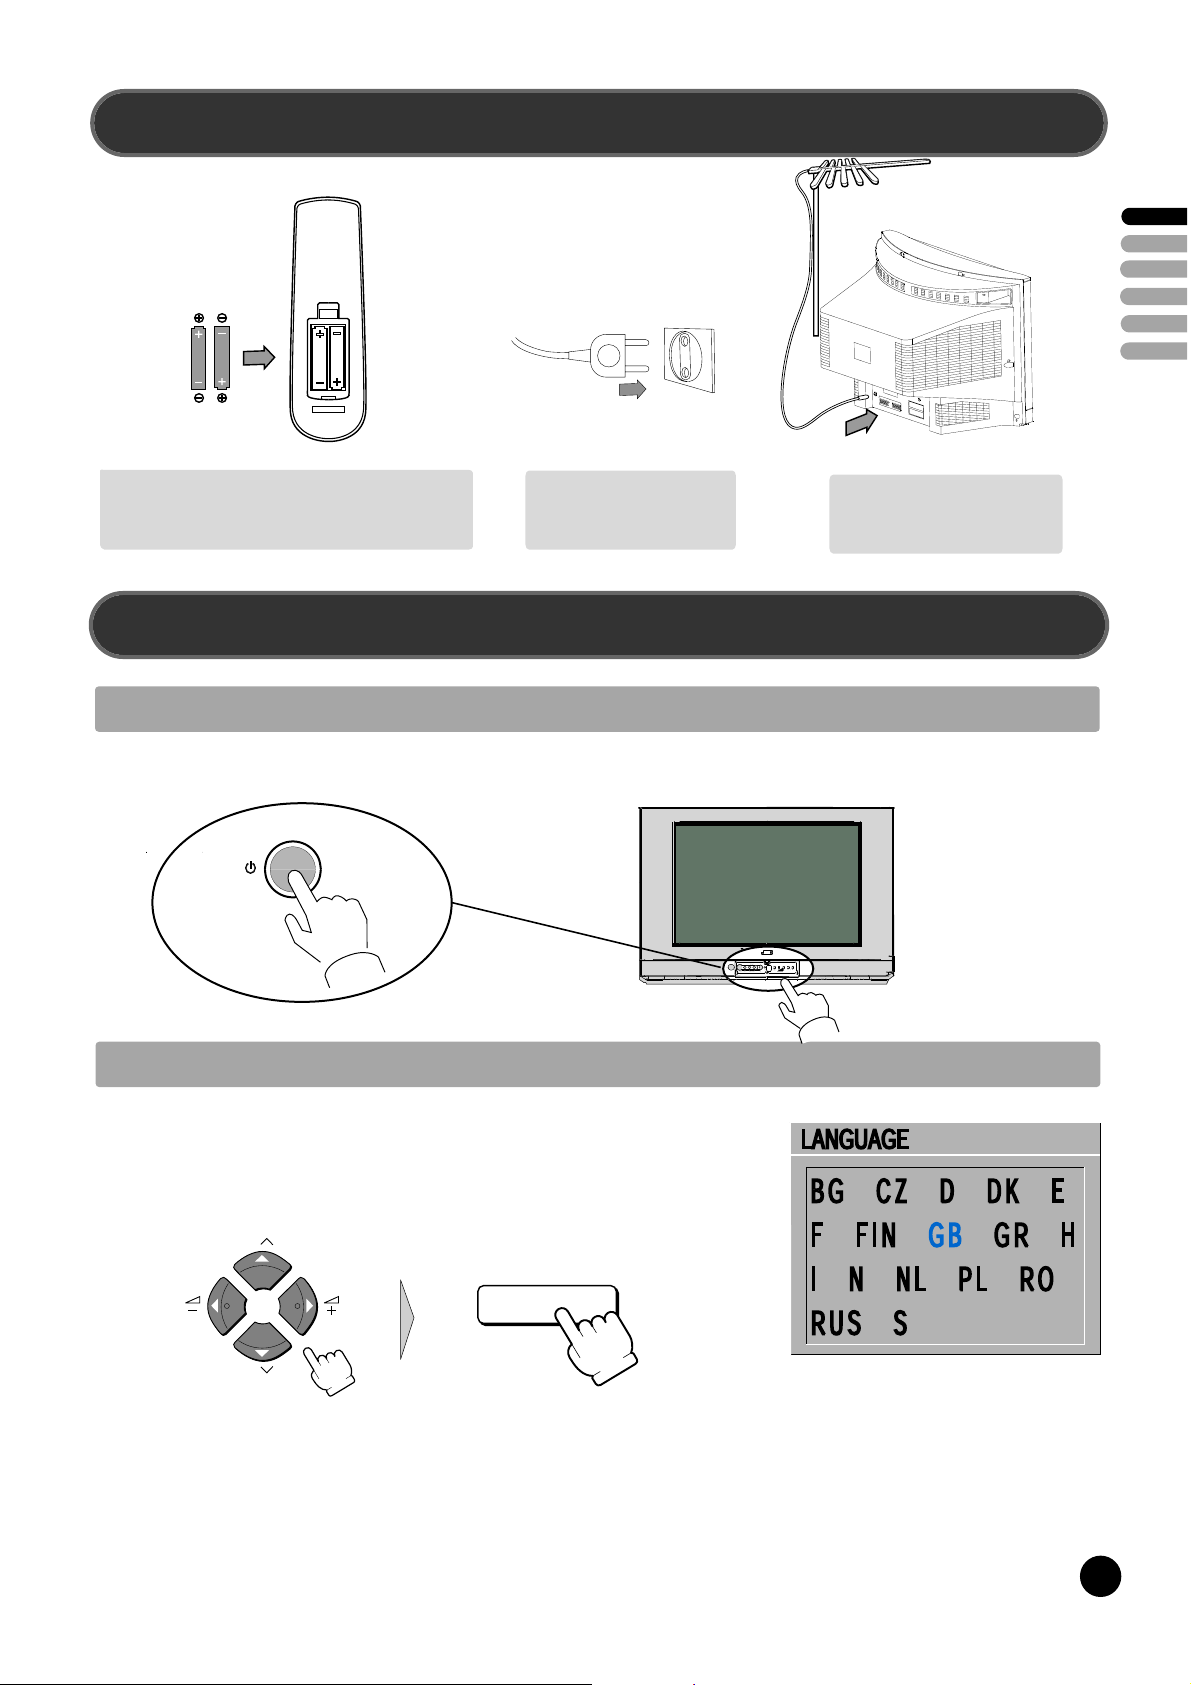
SETTING UP
Batteries
ENGLISH
Open remote control battery compartment (at the
rear) and insert two 1.5V type AA / R6 batteries.
Warning: be careful to respect battery polarities.
START UP
SWITCHING ON
Switch the TV set on with the MAIN POWER button (B1).
Insert the main plug into a
220 - 240V 50Hz AC
power socket.
Connect aerial to aerial jack.
It is usually connected by
means of a 75 ohm cable.
LANGUAGE MENU
The very first time that you turn on the TV, the LANGUAGE menu will appear on the screen.
Its purpose is to enable you to select the language that will be used for all the OSD (On
Screen Display) menus. The user must enter a choice of language before proceeding further.
The descriptions used in the menu are those of the country code (e.g. GB = English, NL =
Holland etc).
P
PICTURE/OK
P
Selection is made by use of the remote control CURSOR UP (A11) / CURSOR DOWN (A12) buttons and CURSOR LEFT (A13) /
RIGHT (A14) buttons. Once you are satisfied with your selection, push the OK button (A9) to confirm your choice, and then the menu
will disappear.
The language entered at this stage can still be modified at any later time, by entering the LANGUAGE selection (accessed from the
FEATURES menu page 11).
Note : The languages shown are subject to modification without prior notice.
3
3
Page 5
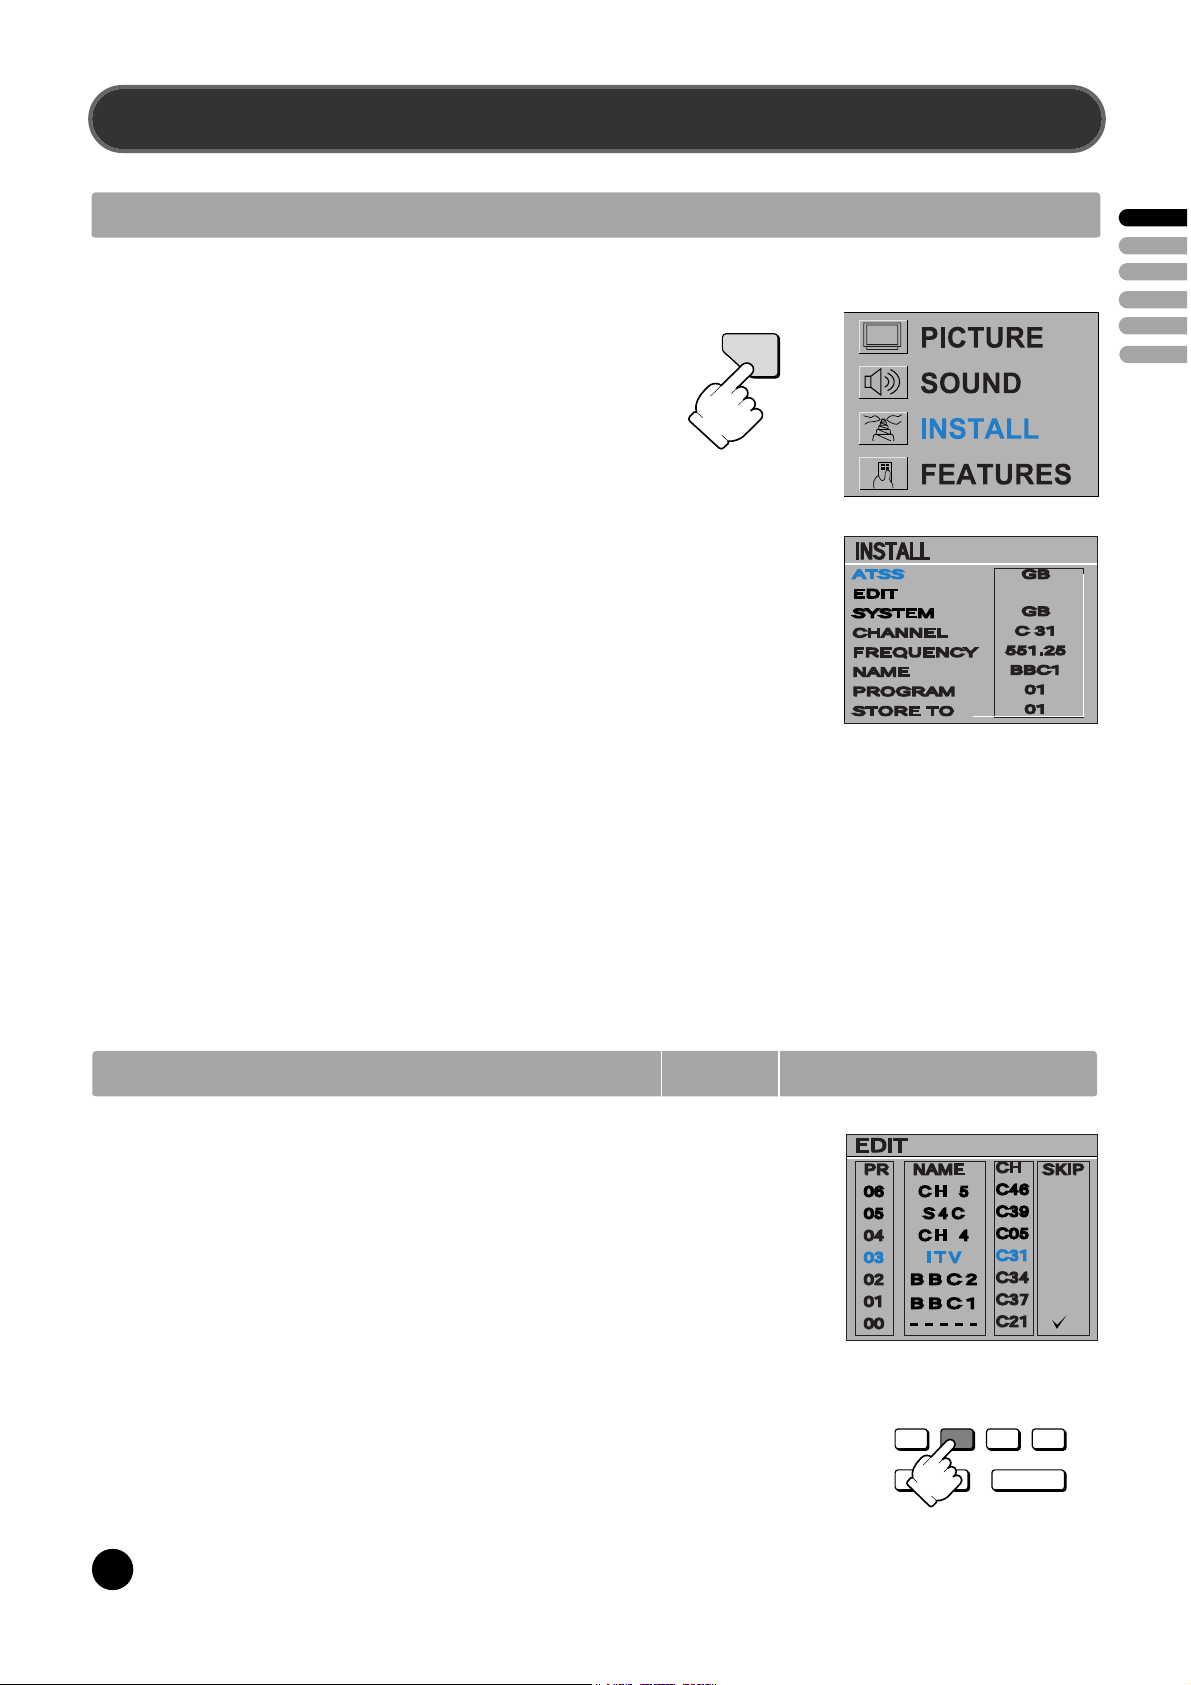
INSTALLATION
AUTO TUNING SYSTEM
MENU SELECTION
Press remote control MENU button (A10) to display the MAIN MENU.
Move the cursor to INSTALL by using the remote control CURSOR
UP (A11),DOWN(A12) buttons.
Then press the remote control OK button (A9).
Note: All menus are removed within 60 seconds if you don't press
any button.
COUNTRY SELECTION
Position the cursor at ATSS Menu and select country code where TV is
used by pressing the remote control CURSOR LEFT (A13), RIGHT(A14)
buttons.
The following countries can be selected.
A, B, CH, CZ, D, DK
E, F, FIN, GB, H, I, IRL,
N, NL, P, PL, S, SK, Others
MENU
ENGLISH
ATSS - Auto Tuning and Sorting System
After selecting country code, press and hold OK button for 3 - 4 seconds until "Please wait!" is displayed, then auto program
tuning starts searching all the available TV stations in your area. When auto tuning and sorting is completed, the EDIT menu
with the recorded programs appears on the screen.
You can proceed to edit the the program numbers using the EDIT functions. For details, see "EDIT MENU" below.
If you do not need to use the EDIT functions, go to next step to download the data to VCR with the T-V LINK function.
To exit the EDIT menu, press MENU button 3 times, then the menu display will disappear from TV screen. Now you can select
program using the remote control UP (A11) or DOWN (A12) buttons.
EDIT MENU
The EDIT menu shows you the programme position assignment. When
using the AUTO TUNING method, the broadcasts may not be found and
stored in the order you desired. For example, BBC1 may not be allocated to
programme number 01, and BBC2 may not be allocated to programme
number 02, etc. The EDIT menu enables you to change the programme
position assignment according to your personal preference.
To reach the EDIT menu you have to first select INSTALL menu from the
MAIN menu.
CHANGING ORDER OF CHANNELS
Position the cursor to the programme number you want to move and press the
remote control GREEN (A5) MOVE button. The programme turns to red colour.
Then use the UP (A11) or DOWN (A12) buttons to move the programme
number you wish to store it to and press MOVE button again to confirm the
operation. Press MENU to return to INSTALL menu.
4
PICTURE/OK
Page 6

DELETE PROGRAMME POSITION DATA
Position the cursor to the programme number you wish to delete using the
remote control UP (A11) or DOWN (A12) buttons. Press the YELLOW/DELETE
(A6) button.
The delete programme is instantly moved to programme N° 99. The programme
which was located at N° 99 will automatically move to N° 98.
PICTURE/OK
P
SKIPPING THE CHANNELS
Position the cursor to the programme number you wish to skip, then press the
RED (SKIP) (A4) button. A skipped programme is marked with the sign " "
at its right end. The channel corresponding to a skipped programme will not
appear on screen when changing channels using PROGRAM UP (A11) /
DOWN (A12) buttons.
PICTURE/OK
USING THE DECODER (EXT -2) FUNCTION WITH T-V LINK:
When connecting a T-V lINK compatible VCR to the EXT-2 terminal, be sure to connect the Decoder to the VCR.
If not the T-V LINK function may not work properly.
Position the cursor to the channel capable of being unscrambled with the decoder on EXT-2, then press the
"CYAN" (A7) button. A channel functioning with a decoder is marked with the icon of a key beside the program
number.
Even if the decoder is functioning a scrambled picture appears at this time. The decoded signal won't be visible
until you exit EDIT and INSTALL menus.
ENGLISH
DOWNLOADING THE DATA TO VCR WITH T-V LINK
In the EDIT menu, you can transmit the latest Program number data to the VCR with the T-V LINK function. To
start the data transfer, you must press and hold OK button for 3-4 seconds until "TV VCR" is displayed
flashing in the header of EDIT menu.
Caution : This operation will only be succesful if a T-V LINK compatible VCR is connected to the EXT-2
terminal, and if the VCR is ON.
Once the data transmission ends, the "TV VCR" indicator disappear and the EDIT menu
vanishes after 3 sec.
Note : If the TV is unable to transfer the data, the feature not available is displayed in the header of EDIT
menu in red to indicate an error. In such case, ensure the following three items are correct.
- Has the T-V LINK compatible VCR been connected to the EXT-2 terminal?
- Has the VCR power been turned ON?
- Does the SCART cable that is connected to the EXT-2 terminal to T-V LINK compatible VCR have all
proper connections?
If above is OK, then press and hold 3-4 seconds again.
MANUAL CHANNEL TUNING
Tuning by ATSS (Auto Tuning Sorting System) is recommendable, as it is the easiest tuning method. But Manual Tuning is
also possible using the following procedure.
5
Page 7

BROADCASTING SYSTEM SELECTION
Select INSTALL menu and using the remote control CURSOR UP (A11) / DOWN
(A12) buttons, move the cursor to SYSTEM menu and select the appropriate system
by the LEFT (A13) or RIGHT (A14) button.
"FRANCE" France SECAM L/L'
"GB" Great Britain / Ireland PAL-I/I'
"EURO" Westen Europe PAL-SECAM B/G
"E/EURO" Eastern Europe PAL-SECAM D/K
ACTIVATING MANUAL TUNING
Move the cursor to FREQUENCY (channel frequency) menu and press and hold for more than 2 seconds the remote control
CURSOR LEFT (A13) or RIGHT (A14) buttons. When one channel is tuned, the corresponding station name is indicated
automatically in NAME menu.
To tune the next channel, press the remote control CURSOR LEFT (A13) or RIGHT (A14) buttons again.
CHANNEL AND FREQUENCY MENU
If you know the channel or frenquency number you want to search, enter the data by 0...9 buttons. TV will tune that channel
quickly.
PERFORM FINE TUNING
If you are unable to obtain good picture or reasonable sound volume due to poor reception it is possible to perform fine tuning.
- Select the "FREQUENCY" menu.
- Press for less than 2 seconds, the remote control CURSOR LEFT (A13) and CURSOR RIGHT (A14) buttons to activate
FINE TUNING in steps of 0.05 MHz(50kHz).
STORING CHANNEL NAME
When one channel is tuned, the corresponding station NAME will be detected automatically. But in some cases, NAME will
not be detected due to the broadcasting situation. You may put in the channel NAME yourself.
ENGLISH
Position the cursor to NAME menu and press the remote control CURSOR RIGHT(A14) button. A cursor appears on the left
end of NAME line ("-----"). Then press CURSOR UP (A11) or DOWN (A12) buttons untill you get the right letter or symbol.
Move the cursor to the next position by using CURSOR LEFT (A13) or RIGHT (A14) buttons and repeat the operation.
Press OK (A9) button to store the NAME.
PROGRAM MENU
The number on the right side of the PROGRAM menu indicates the program number of the currently displayed channel.
STORE TO MENU
Select STORE TO menu and select the program number by 0....9 buttons or CURSOR LEFT (A13) or RIGHT (A14)
buttonsto which you want to store the currently displayed channel then press OK button.
Warning ! If you store the number already programmed, the previous programmes will be erased automatically.
CAUTION TO T-V LINK COMPATIBLE VCR USER :
After any channel arrangement modification you must also update the data memorised in your VCR. This can be done easily
with the T-V LINK. See page 5 : DOWNLOADING THE DATA TO VCR.
6
Page 8

T-V LINK FUNCTIONS
When a T-V LINK compatible VCR is connected to the EXT-2 Terminal on the TV, it is easier to set up the VCR and to view videos. T-V LINK
uses the following features:
TO USE T-V LINK FUNCTIONS:
A T-V LINK compatible VCR is necessary.
The VCR must be connected to the EXT-2 terminal on the TV by a fully wired SCART cable.
Note: A "T-V LINK compatible VCR means a JVC VCR with the T-V LINK logo or a VCR with one of the following logos. However, these
VCRs may support some or all of the features described below. For details, refer to your VCR insturction manual.
"Q-LINK" (a trademark of Panasonic Corporation)
"Data Logic" (a trademark of Metz Corporation)
"Easy Link" (a trademark of philips Corporation)
"Megalogic" (a trademark of Grundig Corporation)
"SMARTLINK" (a trademark of Sony Corporation)
PRE-SET DOWNLOAD
Download the registred data on the TV channels from the TV to the VCR.
The Preset Download function must be used when the initial setting is complete or whenever the AUTO PROGRAM or EDIT/MANUAL
operations are performed.
Note: This function can be operated via VCR operation.
ENGLISH
When "TV VCR" is displayed in red :
If "TV VCR" is displayed in red, the download was not performed correctly. Before trying to download again, ensure the following :
- The VCR power is turned on.
- The VCR is T-V LINK compatible
- The VCR is connected to the EXT-2 terminal
- The SCART cable is fully wired.
If all points are OK, please press and hold OK button 3-4 seconds.
DIRECT REC.
"What You See is What You Record"
You can record to VCR the images that you are currently viewing on TV by a simple operation.
For detalis, read the manual for your VCR.
The recording is initialed by the VCR.
Caution: When recording images from an external device connected to the TV, the VCR will stop recording if the TV is turned off or if the input
is switched.
The direct recording is not possible under following condition :
- When INSTALL or EDIT menu are on screen.
- When watching teletext
Note: - Operation via the TV is not possible
- Generally, the VCR cannot record a TV channel that cannot be received properly by the VCR's tuner, even though you can view
that TV channel on the TV. However, some VCR's can record a TV channel by using the TV's output if that channel can be viewed
on the TV, even though the TV channel cannot be received properly by the VCR's tuner. For details, refer to your VCR instruction
manual.
- When the signal source is RGB, direct recording function may not operate properly. To check if the TV signal source is RGB, press
'i' key, the program status display will indicate "EXT-1 RGB".
TV AUTO POWER ON/VCR IMAGE VIEW
When the VCR starts playing, the TV automatically turns on and the images from EXT-2 terminal are displayed on the screen.
When the VCR menu is operated, th TV automatically turns on and the image from EXT-2 terminal are displayed on the screen.
Note: This function does not operate if your TV's main power is turned off. Set your TV's main power to on (standby mode).
7
Page 9

DAILY USE
SWITCHING ON AND OFF TV SET
SWITCHING ON
If stand-by indicator (B6) is not lit, then the TV set is powered off.
Switch the set ON with POWER (ON/OFF) Button (B1), then, stand-by
indicator turns to red.
Press again PROGRAM UP or DOWN buttons (B10) on the front of the set, or
POWER button (A2) or UP/DOWN button (A11) or, one of the NUMBER 0...9
button on the remote control, then stand-by indicator turn to green and picture
appears on the screen.
If stand-by indicator (B6) is flashing red and green, TV set is in CHILD LOCK
mode. To deblock CHILD LOCK, press the remote control POWER button (A2) or
one of NUMBER 0...9 buttons (A3) or PROGRAM UP (A11) / DOWN (A12)
buttons.
Note : The front panel PROGRAM UP or DOWN (B10) button will not function
when CHILD LOCK is ON.
SWITCHING OFF
Press POWER button (A2) on the remote control to return the set to its STAND BY
mode. If you don't use the set for an extanded period of time, turn it off with MAIN
POWER button (B1) on the set.
ENGLISH
PROGRAM SELECTION (FROM 0 TO 99)
11
-------
10
------09
08
07
06
05
04
03
02
01
00
99
98
97
96
95
94
93
92
91
-------
-------
-------
CHANNEL 5
S4C
CHANNEL 4
ITV
BBC2
BBC1
-------
-------
-------
-------
-------
-------
-------
-------
-------
-------
Direct selection
Use the remote control NUMBER 0..9
buttons (A3). For two digit program
numbers, enter the second digit within
2 seconds.
Up / Down selection
Use the remote control PROGRAM UP
(A11) / DOWN (A12) buttons or the TV
set front panel PROGRAM UP / DOWN
buttons (B10).
LIST menu
Press on the CYAN button (A7) to display the LIST menu. Then use the CURSOR UP (A11) or DOWN (A12) buttons
to browse the list and find a program, with the aid of the program numbers plus associated names (see section
Manual Channel Tuning pages 5/6 for how to add or modify program names).
When you have found a program you want to select (the highlighted line in the middle of the menu), press on the OK
button (A9) to tune this program. The LIST menu will disappear at the same time.
If you decide to keep the current program, the menu can be cancelled at any time by pressing on the CYAN button
(A7).
1 2 3
4 5 6
7 8 9
0
P
P
8
Page 10

SPATIAL
STEREO
18:20
SOUND CONTROL
Volume adjustment
Use the remote control VOLUME
UP (A14) / DOWN (A13) buttons
or the TV set front panel
VOLUME UP / DOWN buttons
(B9).
Mono forcing, dual language
- If you are unable to get good sound quality for a
program due to poor reception, you can force a
change from stereo to mono transmission by
pressing the remote control MODE button (A26).
Then the program status display will indicate
"MONO" with a ( ) icon.
P
P
Mute
- Mute the sound by pressing the remote control SOUND
MUTE button (A1).
- Then, logo is displayed. The previous sound setting is
returned after pressing the same button a second time.
- If a sound related function is used (e.g. VOLUME, ) then
the MUTE will also be cancelled.
Sound effects
A SPATIAL sound effect is available, by using the remote
control (A5) button.
PICTURE/OK
The following display appears:
Spatial sound effect
Sound transmission mode
Clock
ENGLISH
I/II
- On the other hand, during a program with dual
language transmission, the MODE button (A26)
allows you to toggle between the first and second
language. The program status display will indicate
"DUAL 1" or "DUAL 2" (plus NICAM according to the
received signal) instead of Stereo or Mono.
- To return to initial state, press again the MODE
button (A26).
To return to initial sound effect, press again the (A5) button.
The following display appears:
OFF
STEREO
18:20
For other adjustments such as BALANCE, BASS or TREBLE
use the SOUND menu (here under).
SOUND MENU
Select SOUND menu from the MAIN menu.
- Select VOLUME function to adjust the volume level.
- Select BALANCE function to adjust sound balance between the left
and right speakers. If the indicator is highlighted in red, then the
central balance position has been found.
- Select the BASS and TREBLE functions to adjust the tone levels.
No sound effect
Sound transmission mode
Clock
S O UND
V OLU ME
B ALA NC E
B AS S
T R E BL E
9
Page 11

PICTURE CONTROL
Select PICTURE menu from the MAIN menu.
- Select and adjust the level of each function: BRIGHTNESS, CONTRAST, COLOUR,
SHARPNESS, TINT (if available) and NOISE REDUCTION.
- The above modified values are automatically stored in FAVOURITE mode.
- NOISE REDUCTION feature has 4 levels according to your preference.
- The FAVOURITE preset contains the settings that you lastly entered.
If the NTSC standard is detected (eg from VHS player connected to EXT-1), then TINT
will be available. Otherwise, TINT will be displayed but not selectable.
PICTURE/OK
01 BBC1
NOR MAL I
18: 20
You can select three pictures settings, by pressing repeatedly the remote control
PICTURE/OK button (A9) :
- NORMAL I (standard hard picture)
- NORMAL II (standard soft picture)
- FAVORITE.
01 BBC1
NOR MAL II
18: 20
PROGRAM STATUS DISPLAY (INFORMATION)
P ICT UR E
B R IGHTNE S S
C ONTR AS T
C OL OUR
S HARPN ESS
TINT
NO IS E R E D.
F AVOUR IT E
01 BBC1
FAVOURITE
18: 20
S TRONG
ENGLISH
Use the remote control button (A24) to
display (for 4 seconds only) program status
information. This display appears also after
a program selection or after switching on
the TV set.
i
Channel number
01 BBC1
Channel name
MONO
Clock
18:20
Sound transmission
Mode: Displayed with
forced icon ( ) only if
forced to mono by MODE
SLEEP FUNCTION
The set will turn off (to stand-by mode) after a period of time that you can select. By pressing repeatedly the remote control
YELLOW button (A6), you can enter one of the following settings :
OFF > 20 min > 40 min > 60 min > 80 min > 100 min > 120 min > OFF
The SLEEP time remaining (before TV turn-off) can be seen
again at any time by one touch on the remote control YELLOW
button (A6). A second touch (while the status display is on
screen) will modify the SLEEP time remaining.
01 BB C1
NICA M S TE R E O
20
R emaining time (in minutes)
before the T V swit ches off
FORMAT SELECTION
AUTO setting: If picture format signalling data is received, then the most appropriate ZOOM format will be automatically
selected.
Otherwise, the preferred mode of the user can be forced by repeated pressing of the remote control ZOOM button (A4): The
following picture formats are available:
AUTO > 14:9 > 16:9 > FULL SCREEN > AUTO.
10
Page 12

FEATURES MENU
Select the FEATURES MENU from the main MENU as follows :
P
ME NU
P
Press on the button MENU Position cursor on FEATURES menu Press on the OK button
FEATURES menu content the following sub-menus.
PICTURE/OK
ENGLISH
1. When switched to ON:
Prevents the use of the TV set without remote
control.
2. Wake up function
This function is only selectable when the clock is
set. The TV set turns on from stand-by at the
WAKE TIME and with the programme entered on
the WAKE PROG. line. Put the TV set on stand-by
with the remote control.
3. Shared with WAKE TIME.
4. TV clock setting
This function allows user to enter the time
manually.
Note : If you turn off the set with the main power
button, the clock setting is lost. An automatic
attempt is made to set the clock again at power on.
5. Programme Information function
This status information is under the editorial control
of the transmitting station, and can contain the
programme title.
6. This function is only selectable when the default
picture format is currently active (see also
FORMAT SELECTION, AUTO setting, page 8).
This selects the default format to be used only
when the format selected with the ZOOM button
(A4) is AUTO, and no picture format signalling data
is received.
7. LANGUAGE menu entry
F E AT UR E S
C HIL D LO C K
W AKE T IME
W AKE P R O G.
C LO CK
C LO CK P R OG
P R OG . IN FO
ZO OM AU TO
LA NG UAG E
OF F
OF F
04
-- :- -
01
ON
4: 3
G B
1. Adjust this value ON or OFF.
- In stand-by mode, the stand-by indicator flashes
red and green to indicate the CHILD LOCK is set.
- The front panel TV buttons (B7, B8, B9) become
inactive and the TV will only respond to the
remote control.
2. - Switch the WAKE UP function 'OFF' or 'ON' (the
time will be shown e.g. 07:15) with the remote
control CURSOR LEFT (A13) / RIGHT (A14)
buttons.
- Enter the wake up time with the remote control
0..9 NUMBER (A3) buttons.
3. Adjust TV turn-on program number.
4. Adjust TV clock. Clock will start at 00 seconds
upon entry of the 4th figure.
The prog. no. which is used to automatically seize
the time at turn on should be entered here.
5. Adjust this value ON or OFF.
- When ON, the information (if available) is
displayed upon change of channel.
- When OFF, no information is displayed.
6. Choose your preferred default format with the
remote control CURSOR LEFT (A13) / RIGHT
(A14) buttons.
Note: FULL SCREEN is represented here by 4:3.
7. The currently selected LANGUAGE is displayed.
Press the OK button (A9) to access the menu and
change the selection.
.
LANGUAGE MENU
Select LANGUAGE menu from the FEATURES menu.
- Select the preferred LANGUAGE by use of the CURSOR LEFT (A13),
RIGHT (A14) buttons, and the CURSOR UP (A11) or DOWN (A12)
buttons.
- Press the OK button (A9) to confirm the selection (the choice will be
highlighted in red).
Note : The languages shown are subject to modification without prior
notice.
LAN G U AG E
B G C Z D D K E
F F I N G B G R H
I N N L P L R O
R U S S
11
9
Page 13

TELETEXT
ENTERING/LEAVING TELETEXT MODE
- Set the VCR / / DVD switch (A25) to the (teletext) position.
- Press the remote control TELETEXT ( ) button (A8) to select teletext mode.
- To return to TV mode, press again the TELETEXT ( ) button (A8).
- Note : Some of the buttons may not work if the VCR / / DVD) switch is not set to
the (teletext) position.
PAGE SELECTION
- You can directly enter the 3 figure page number by using the remote control NUMBER 0..9 buttons (A3).
- You can sequentially select teletext pages by pressing the remote control PAGE UP (A11) / DOWN (A12) buttons.
COLOUR buttons FOR TELETEXT
- A red, green, yellow, and blue field is shown at the bottom of the screen. If TOP or FLOF teletext (FASTTEXT) is transmitted
by the station, pressing the corresponding colour button on the remote controller, you can select the desired page easily.
Once a request is made, the page number is shown in the extreme top left corner of the screen. If the requested page is not
immediately available the rolling header will be active until the page arrives.
PICTURE/OK
ENGLISH
USEFUL TELETEXT FUNCTIONS
INDEX button (A23):
Allows you to return directly to the initial teletext page.
PAGE HOLD button (A16)
Several sub pages can be combined under a page number and are scrolled at an interval determined by the television station.
The presence of sub pages is indicated by, for example, 3/6 beneath the time, which means that you are looking at the 3rd page
of a total of 6 pages. If you want to look at a subpage for a longer period of time, press the HOLD button. " " appears at the
top of the screen and the contents of the subpage shown are kept on the screen and no longer updated or switched to other
subpages. Pressing the HOLD button again, the current subpage appear
SUBPAGE button (A24):
Allows you to request a specific subpage:
- Press the SUBPAGE button. At the base of the screen a SUBPAGE menu will appear. This has a red subpage minus link, a
green subpage plus link, plus a white background showing (example for page 110), 110 / 0001. This is ready to accept the
subpage number.
- Enter directly the subpage number you want with the remote control NUMBER 0..9 buttons (A3): for example to request the
2nd subpage, type 0002.
- Alternatively, use the red subpage minus link or the green subpage plus link.
- The subpage number entered is shown at the base of the screen.
- If the requested page is not immediately available the rolling header will be active until the page arrives.
Warning: If the subpage is not available (does not exist), then the header will roll continuously and no new page will be found.
- To exit subpage mode, press the SUBPAGE button (A24) again.
Note: Teletext specification allows for subpage numbers 0000 to 3979 (the first figure is limited to the range 0..3, and the third
figure 0..7).
i
.
12
Page 14

DOUBLE SIZE button
Repeadly pressing the SIZE button doubles the character size in the following order :
Upper half of the page > Lower half of the page > Return to normal size
If the page is in UP or DOWN mode, then normal size is automatically set if
- A new page request is made (e.g CYAN, INDIX or PAGE UP /DOWN).
-ACANCEL mode (A22) function is used.
- VOLUME menu is activated with the MENU button (A10)
Note ; The menu at the base of the screen is always visible.
(A19)
REVEAL ANSWER button
This fonction can be used on certain pages to reveal the solution of riddles. Press the REVEAL button to reveal a hidden
answer and press again to hide it.
?
(A18)
VOLUME, BRIGHTNESS & CONTRAST CONTROL
VOLUME (and sound MUTE), BRIGHNESS and CONTRAST controls are all possible in teletext mode. The BRIGHTNESS and
CONTRAST controls are dedicated to the teletext display.
- Access the VOLUME control by pressing the MENU button (A10) in teletext mode. A bargraph will appear in the lower part of
the screen (as in TV mode). If MUTE is active, a mute icon is also shown.
- A second press on the MENU button (A10) will access the BRIGHTNESS control, and a third press the CONTRAST control.
- The active bargraph will timeout after 3-4 seconds (as in TV mode VOLUME control) or by pressing on the MENU button (A10)
a fourth time (after CONTRAST control).
P
MENU
P
- Each control can be adjusted by using the remote control CURSOR LEFT (A13) / RIGHT (A14) buttons.
- Mute can always be activated by pressing the SOUND MUTE button (A1).
- Any change to the VOLUME level will cancel the SOUND MUTE.
ENGLISH
WATCHING TV WHILE PAGE SEARCHING
The CANCEL function can be used to make the teletext page transparent, thus revealing the TV
picture:
- To enter cancel mode, press the CANCEL button (A22) while in teletext mode. The TV
program will reappear on the screen, while only the teletext page number remains at the top and
left corner of the screen.
- You can enter a new page number in this mode only by using the remote control NUMBER 0..9
buttons (A3), or with the INDEX button (A23).
- If a page has been requested, but has not yet arrived, "???" flashing characters will be displayed
until the page arrives. Otherwise, the same characters will be displayed without flashing until the
next arrival of the page in the transmission cycle. Once arrived the page number will be
displayed.
- The teletext page can be made visible again by pressing the CANCEL button (A22).
- It should be noted that the TV program cannot be changed while in cancel mode.
i
X
X
X
WATCHING TV WITH TELETEXT SUBTITLES
If the actual teletext page is a news flash or subtitle page, then most of the TV picture becomes visible. In this situation the
ZOOM format chosen in TV mode is reactivated, where possible.
13
Page 15

CONNECTING EXTERNAL EQUIPMENT
The rear Scart EXT-1, Scart EXT-2 sockets, the front EXT -3 socket are three dedicated sockets to connect audio-video equipment.
TV/AV SELECTION
AV
Allows to switch between TV and external modes. By repeatedly pressing the remote control AV (A15) or the
TV front panel TV /AV button (B8), the on-screen display is changed as shown :
EXT-1 > EXT-2 > EXT-2 S > EXT-3 > EXT-3 S > TV
Remark: If the signal source from the rear SCART socket (EXT-1) is RGB (e.g.normally from a DVD player)
then EXT-1 RGB will be displayed. You can return to TV mode also by pressing number buttons or PROGRAM
UP/DOWN buttons
Rear
VCR / DVD / Video Game / Pay-TV decoder
Important: If your video equipment does not have SCART socket(s), or if you wish to
use only the aerial (RF) connection (not recommended), then you should make use
of program number 00 on the TV set for best performance.
AERIAL socket
REAR SCART SOCKET (EXT-1)
This socket has video / audio inputs and outputs. It is
recommended to connect to this socket automatic AV
switching equipment such as pay-TV decoders, video games,
DVD players and most VCR's.
This SCART socket doesn't support T-V LINK function. For
correct operation, you should not connect any T-V LINK
compatible device to this terminal.
In most cases, when connecting powered equipment to this
socket, the TV set switches automatically to AV mode. If
not, then use the AV buttons (A15 or B8) to select EXT-1.
ANT
EXT- 1
EXT- 2
( S )
REAR SCART SOCKET (EXT-2)
This socket has video / audio inputs and outputs. Automatic
AV swi tching equipment (for example most VCR's) can be
connected to this socket. In most cases, when connecting powered
equipment to this socket, the TV set switches automatically to AV
mode. If not, then use the AV buttons (A15 or B8) to select EXT-2.
You can also receive an S-VHS signal by selecting
EXT-2 S with the AV buttons (A15 or B8).
RGB mode is not available on this SCART T-V LINK compatible
device must be connected to this terminal.
When a decoder is connected to a T-V LINK compatible VCR, set
the DECORDER function to ON. For details,
see "Using the DECORDER (EXT-2) function" on page 5
Otherwise, you will not be able to view scambled channels.
ENGLISH
Front
FRONT AV SOCKET (EXT-3)
The front AV socket has audio and video inputs. To switch from TV to these inputs,
use the AV buttons (A15 or B8) and select EXT-3.
FRONT S-VHS JACK
The front S-VHS jack (B2) has
video inputs only. It is necessary to
connect the audio inputs to socket
(B4) in order to have audio and
video. To watch S-VHS from these
inputs, use the AV buttons (A15 or
B8) and select EXT-3 S.
CAMCORDER OR VIDEO GAME
14
HEADPHONE SOCKET
To hear TV sound with headphones, insert a 3.5mm
headphone plug into the headphone socket. The
speaker's sound will be automatically cut off.
Page 16

15
TROUBLESHOOTING
l I f the plug is disconnected from the AC socket, or the TV aerial has problems, you may think there is a problem with the TV itself. Be
sure to check the following before calling for service.
IMP OR T AN T
l Review all instruction in this manual
P R OB L E M
A C TION
n GENERAL
n PICTURE
The TV cannot be turned on.
No picture or sound.
The TV shuts off automatically.
The TV turns on automatically.
Inoperable remote control.
Poor colour.
.
l Insert the plug in an AC socket.
l Turn the main power on. (See page 3)
l The buttons on the front panel of the TV will not work if the CHILD LOCK
is operating (see FEATURES menu, on page 11). Use the POWER
button on the remote control to turn the TV on.
l Check aerial connections. (See page 3).
l Select the correct input source (See page 14).
l Change the SYSTEM setting manually (see Manual Channel Tuning on
pages 5/6).
l Did you set the SLEEP function? (See page 10).
l If the broadcast signal is not present for about 30 minutes, the set will be
automatically turned off.
l For safety reasons, the TV will automatically turn off if no operations are
made within approximately 3 hours after the TV is turned on with the
WAKE UP function.
l Did you set the WAKE UP function? (See page 11).
l Replace the batteries. (See page 3).
l Insert the batteries correctly. (See page 3).
l Use the remote control within about 7 metres of the TV.
l Change the SYSTEM setting manually (see Manual Channel Tuning on
pages 5/6).
ENGLISH
l Move any external equipment away until the interference is eliminated.
l Reposition the aerial.
l Reposition the aerial.
l Replace with an aerial with better directionality.
l Reposition the aerial.
l Replace with an aerial with better directionality.
l Check aerial connections.
l Redirect the aerial.
l Replace or repair the aerial.
l Disconnect the headphones.
n SOUND
Lines or streaks in picture
(interference)
Spots (crosstalk)
Double pictures (ghosts)
Snowy pictures (noise)
No sound from the TV's
speakers
The following are normal and are NOT malfunctions:
l When touching the picture tube surface, you might feel a slight charge of static electricity. This is because the picture tube contains
static electricity; it does not affect the human body.
l The TV may emit a crackling sound due to a sudden change of temperature. There is no problem unless the picture or sound is
abnormal.
l When a still, bright image (of a white dress, for example) appears on the screen, the image may be coloured. This problem occurs in all
picture tubes, and as the bright image disappears, the colour also disappears.
l This TV is equipped with a microcomputer that may operate abnormally due to interference from external equipment. If this happens,
turn off the main power and disconnect the power cord from the AC socket. Then reconnect the power cord to the AC socket and turn on
the main power again.
Page 17

16
SPECIFICATIONS
Item
Broad casting systems
Colour systems
Channels and frequencies
Sound-multiplex systems
Teletext systems
Power requirements
Power consumption
Picture tube size
Audio output
Ext-1 terminal
Ext-2 terminal
Ext-3 terminal
Headphone jack
Dimensions (W x H x D)
Weight
Remote control unit
Model
CCIR B/G, I ,D/K, L/L'
PAL, SECAM
The EXT terminals also support the NTSC 3.58/4.43 MHz system.
* E2-E12, E21-E70, S1-S41, X, Y, Z, Z+1, Z+2, ITALY A-H, ITALY H+1, ITALY H+2, F2-F10,
F21-F70, R1-R12, R21-R70
* French cable TV channel of broadcast frequencies 116 - 172 MHz and 220 - 469 MHz
A2 (B/G, D/K), NICAM (B/G, D/K, I, L) systems
FLOF (Fastext) / TOP / WST (World standard system
AC 220-240V, 50 Hz
84W, stand-by 3W
Visible area 68cm (measured diagonally
Rated Power output: 7W + 7W
Euroconnector (21-pin, SCART)
* Video
* TV broadcast outputs (Video and Audio L/R) are available.
Euroconnector (21-pin, SCART)
* Video input, S-VIDEO (Y/C) input, Audio L/R inputs are available
* Video and Audio L/R outputs are available
* T-V LINK functions are available
RCA connerctors x 3
S-VIDEO connector x 1
* Video input, S-VIDEO (Y/C) input and Audio L/R inputs are available.
Stereo mini-jack (3.5mm in diameter)
812 mm x 600 mm x 522 mm
40 kg
RM-C1514, battery AA / R6 x 2
AV-29FH1SUG / AV-29FH1BUG
)
input, Audio L/R inputs and RGB inputs are available
)
ENGLISH
Design and specifications are subject to change without notice
Pictures displayed on the screen using this TV's image processing functions should not be shown for any commercial or demonstration
purpose in public places (tearooms and halls in hotels, etc.) without the consent of the owners of copyright of the original picture sources,
as this constitutes an infringement of copyright.
 Loading...