

Page 1

INSTRUCTIONS
GGT0067-001B-H
Contents
Knowing your TV’s features ....................................................... 3
Remote control buttons and basic functions .............................. 4
TV buttons and functions ........................................................... 6
Setting up your TV ..................................................................... 7
Basic setting for picture .............................................................. 9
Advanced setting for picture ..................................................... 11
Original features for picture ...................................................... 12
Basic setting for sound ............................................................. 14
Advanced setting for sound ..................................................... 15
DVD Function ........................................................................... 16
Customized setting .................................................................. 17
TV channel presetting .............................................................. 19
Additional preparation .............................................................. 22
Troubleshooting ....................................................................... 23
Specifications .............................................................. Back cover
Page 2

7 If you are not going to use this TV for a long period of time, be sure to
disconnect the AC plug from the AC socket.
8 The apparatus shall not be exposed to dripping or splashing and that
no objects filled with liquids, such as vases, shall be placed on the
apparatus.
WARNING: <AV-21WX25 only>
A REMOVABLE PLASTIC COVER IS FIXED TO THE
TELEVISION’S FRONT AUDIO/VIDEO CONNECTOR. TO
PREVENT THIS COVER FROM BEING ACCIDENTALLY
SWALLOWED BY BABIES OR CHILDREN, REMOVE IT
FROM THE TELEVISION AND STORE IT IN A SAFE
PLACE. IF THE COVER IS SWALLOWED SEEK THE
ADVICE OF A DOCTOR IMMEDIATELY.
<AV-21M, AV-25M, AV-29M Series>
YOU CAN DETACH THE PROTECT SHEET ON THE TOP
AND BOTTOM OF FRONT FRAME IF YOU NEEDED.
THE FRONT BUTTON DOOR OF THE TV SHOULD BE
PULLED OUT FROM ITS BOTTOM. DO NOT PRESS THE
UPPER PART, OR YOUR FINGER MAY BE PINCHED.
✘
✓
PULL PULL
Page 3
3
AV-29VX15
AV-29VX25
AV-29WX25
AV-29JS25
AV-29MS25
AV-29MX55
AV-29MX75
AV-25VX15
AV-25MS25
AV-25MX55
AV-25MX75
AV-21VX15
AV-21WX25
AV-21MS25
AV-21MX55
AV-21MX75
Page 4
1
6
3
7
9
5
8
2
!
4
EXIT
Page 5

5
–
–
Top menu 2nd menu Location 3rd menu Location
MENU PICTURE PICTURE MODE P.9 – –
PICTURE SETTING P.10 CONTRAST P.10
BRIGHT P.10
SHARP P.10
COLOUR P.10
TINT P.10
WHITE BALANCE P.10 – –
VNR P.17
SOUND STEREO/
I■II
P.15 – –
AI VOLUME P.15 – –
SOUND MODE P.14 – –
EQUALIZER P.15 – –
BALANCE P.14 – –
CINEMA SURROUND
P.15 – –
FEATURES DVD MENU P.16
AUTO SIGNAL DETECT
P.16
DVD PICTURE MODE
P.16
TINT COLOUR
P.16
WHITE BALANCE
P.16
SOUND MODE
P.16
CINEMA SURROUND
P.16
OFF TIMER P.17 – –
CHILD LOCK P.17 – –
COMPRESS (16:9)
P.11 – –
AI ECO SENSOR P.11 – –
INSTALL SETUP TOUR P.18 – –
AUTO PROGRAM P.19 – –
EDIT/MANUAL P.19 DELETE, MOVE, P.19-
MANUAL, INSERT P.20
COLOUR SYSTEM P.9 – –
LANGUAGE P.17 LANGUAGE P.17
TEXT LANGUAGE P.13 TEXT LANGUAGE P.13
VIDEO-2 SETTING P.18 – –
BLUE BACK P.11 – –
PICTURE TILT P.11 – –
EXIT – – – –
Page 6
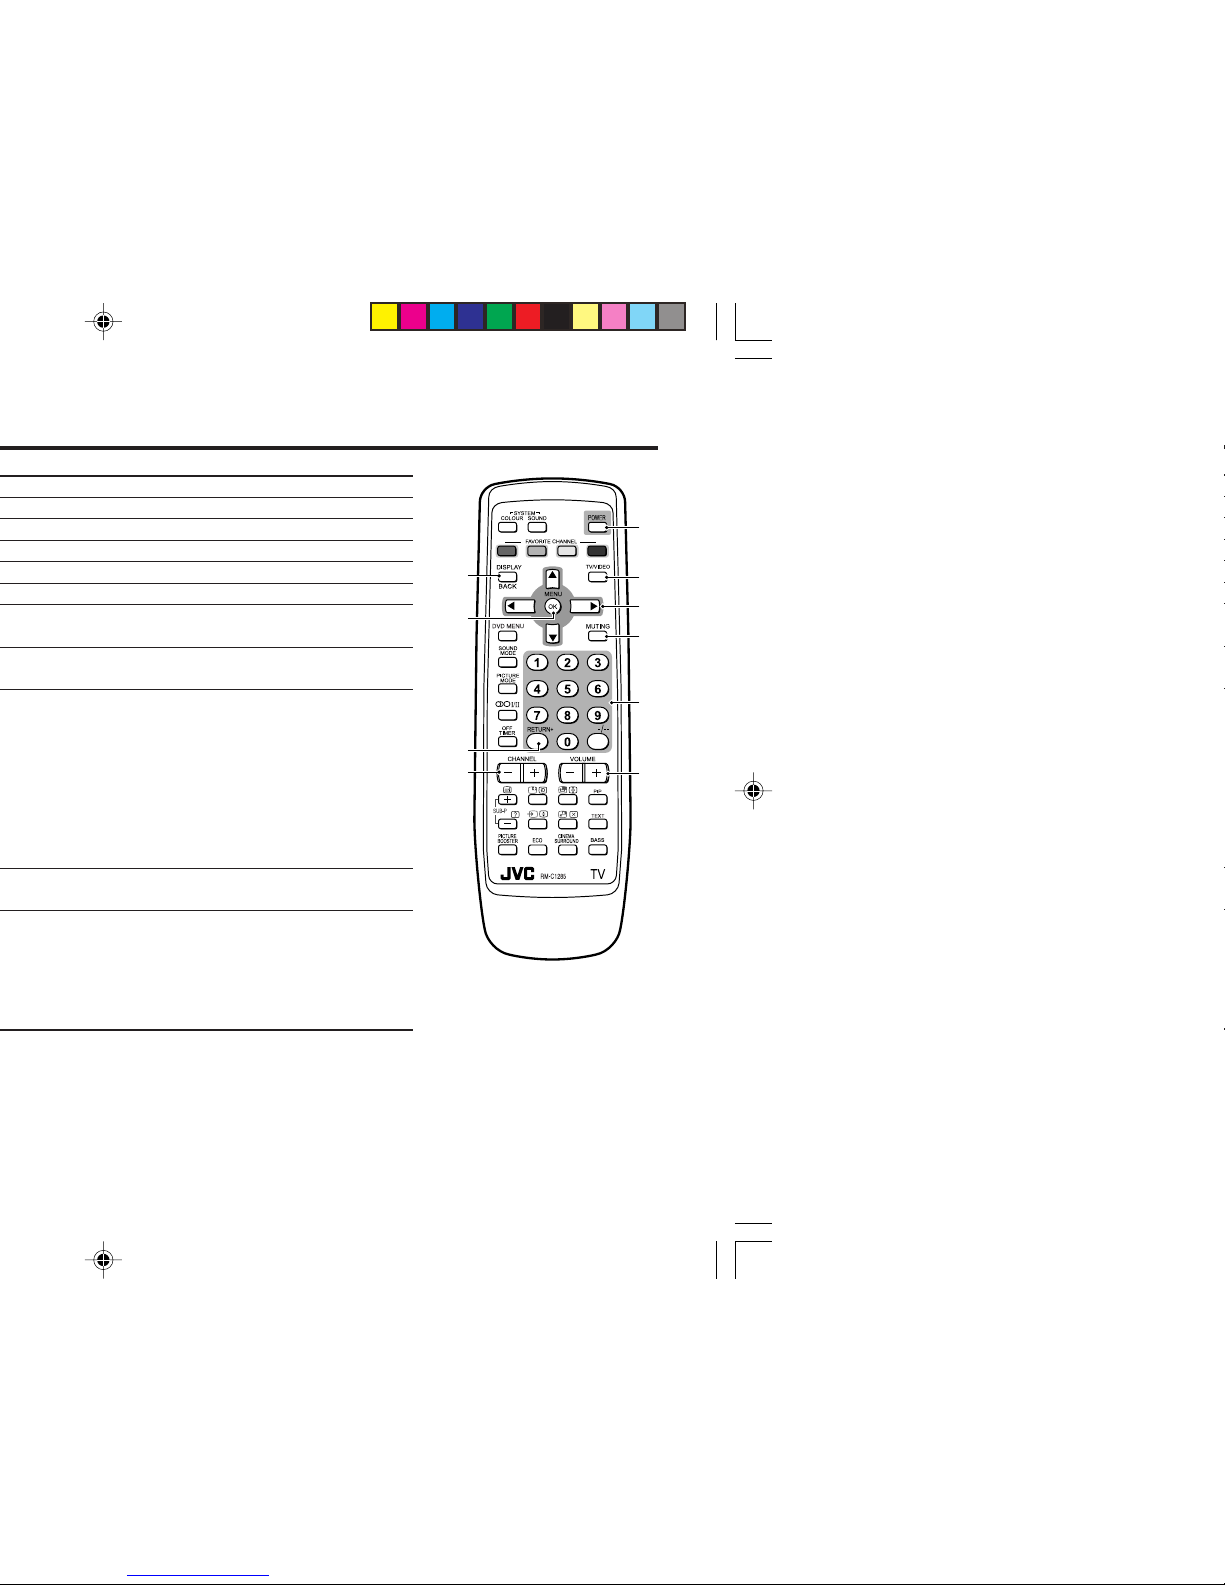
No. Button/terminal Description Page
1 L (main power) Press to turn on or turn off the TV’s main power. –
2 POWER lamp Indicate the TV is being turned on or off. –
No colour : TV’s main power is being turned off.
Red : TV’s main power is being turned on.
Note: When you turn off the power switch while TV is in standby
mode, the light of power lamp will be off in 10 -15 seconds.
3 ECO sensor –
4 Remote control sensor –
5 TV/VIDEO/EXIT
Press to select TV or Video terminal input or exit from menu.
–
6 VOLUME -/+ Press to adjust the volume level. –
7 CHANNEL -/+ Press to select the desired channel. –
8 MENU Press to display the menu. –
9 IN (VIDEO-3) Video and audio input jacks for VIDEO-3 mode. 22
! Headphone jack. 22
" Aerial socket. 7
# OUTPUT Video and audio output jacks. (The component video 22
signal cannot be output.)
$ COMPONENT Video or component video, and audio input jacks for 22
(VIDEO-2) INPUT VIDEO-2 mode. You can select the input signal by setting
the “VIDEO-2 SETTING” function (see page 18).
% VIDEO-1 INPUT Video or S-VIDEO, and audio input jacks for VIDEO-1 7
mode
How to operate the menus with the TV button
TV button
Work as same as the button on the
Note
remote control unit
MENU MENU/OK button To display main menu and exit
menu after finish setting.
CHANNEL -/+ ∞/5 button To select menu function.
VOLUME -/+ 2/3 button To adjust the desired function.
Page 7
7
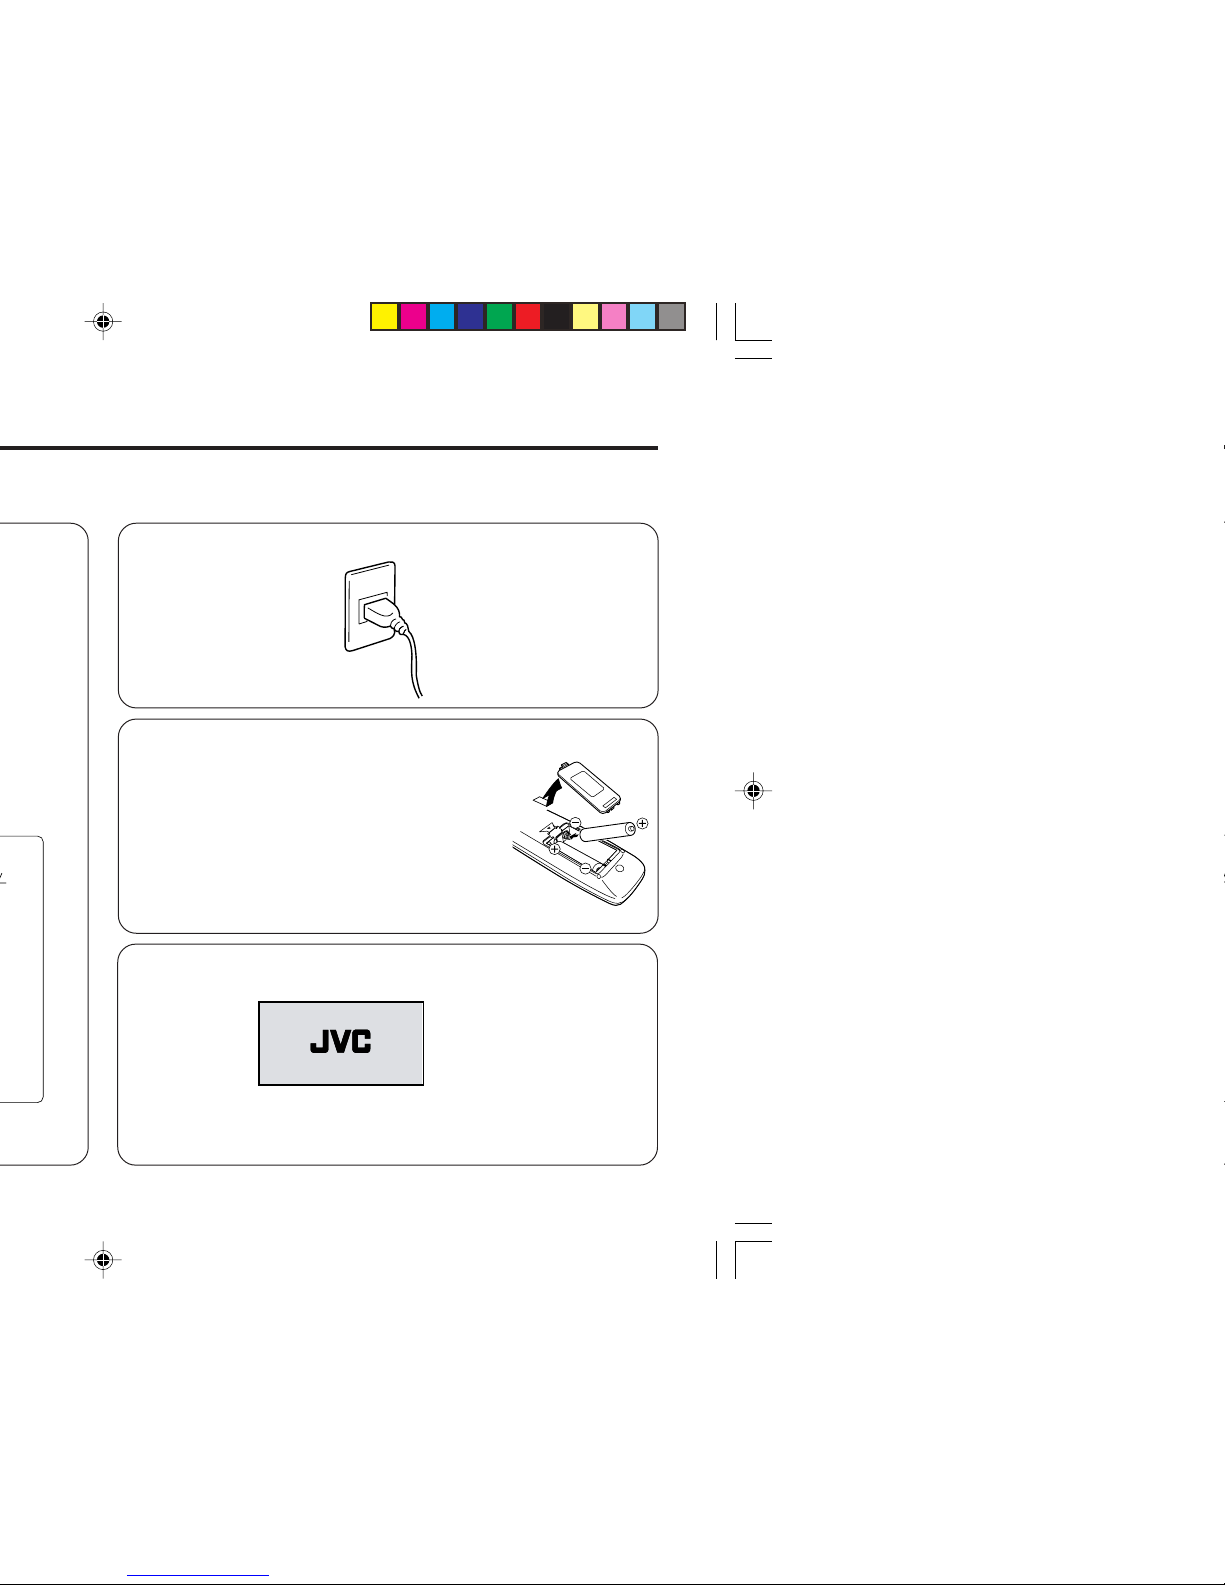
2 Connecting the compatible main plug to the AC outlet.
3 Inserting batteries into the remote control.
Insert two batteries by following the + and polarities and inserting the - end first.
CAUTION:
Follow the cautions printed on the batteries.
Notes:
• Use AA/R6/UM-3 dry cell batteries.
• If the remote control does not work properly, fit
new batteries. The supplied batteries are for testing,
not regular use.
4 Turn on the TV by pressing the main power button.
JVC logo appears on the screen.
JVC logo will appear on the screen again at the phase of “SETUP
TOUR RESTART?” function. Then the initial setting can be
performed according to page 8.
Page 8
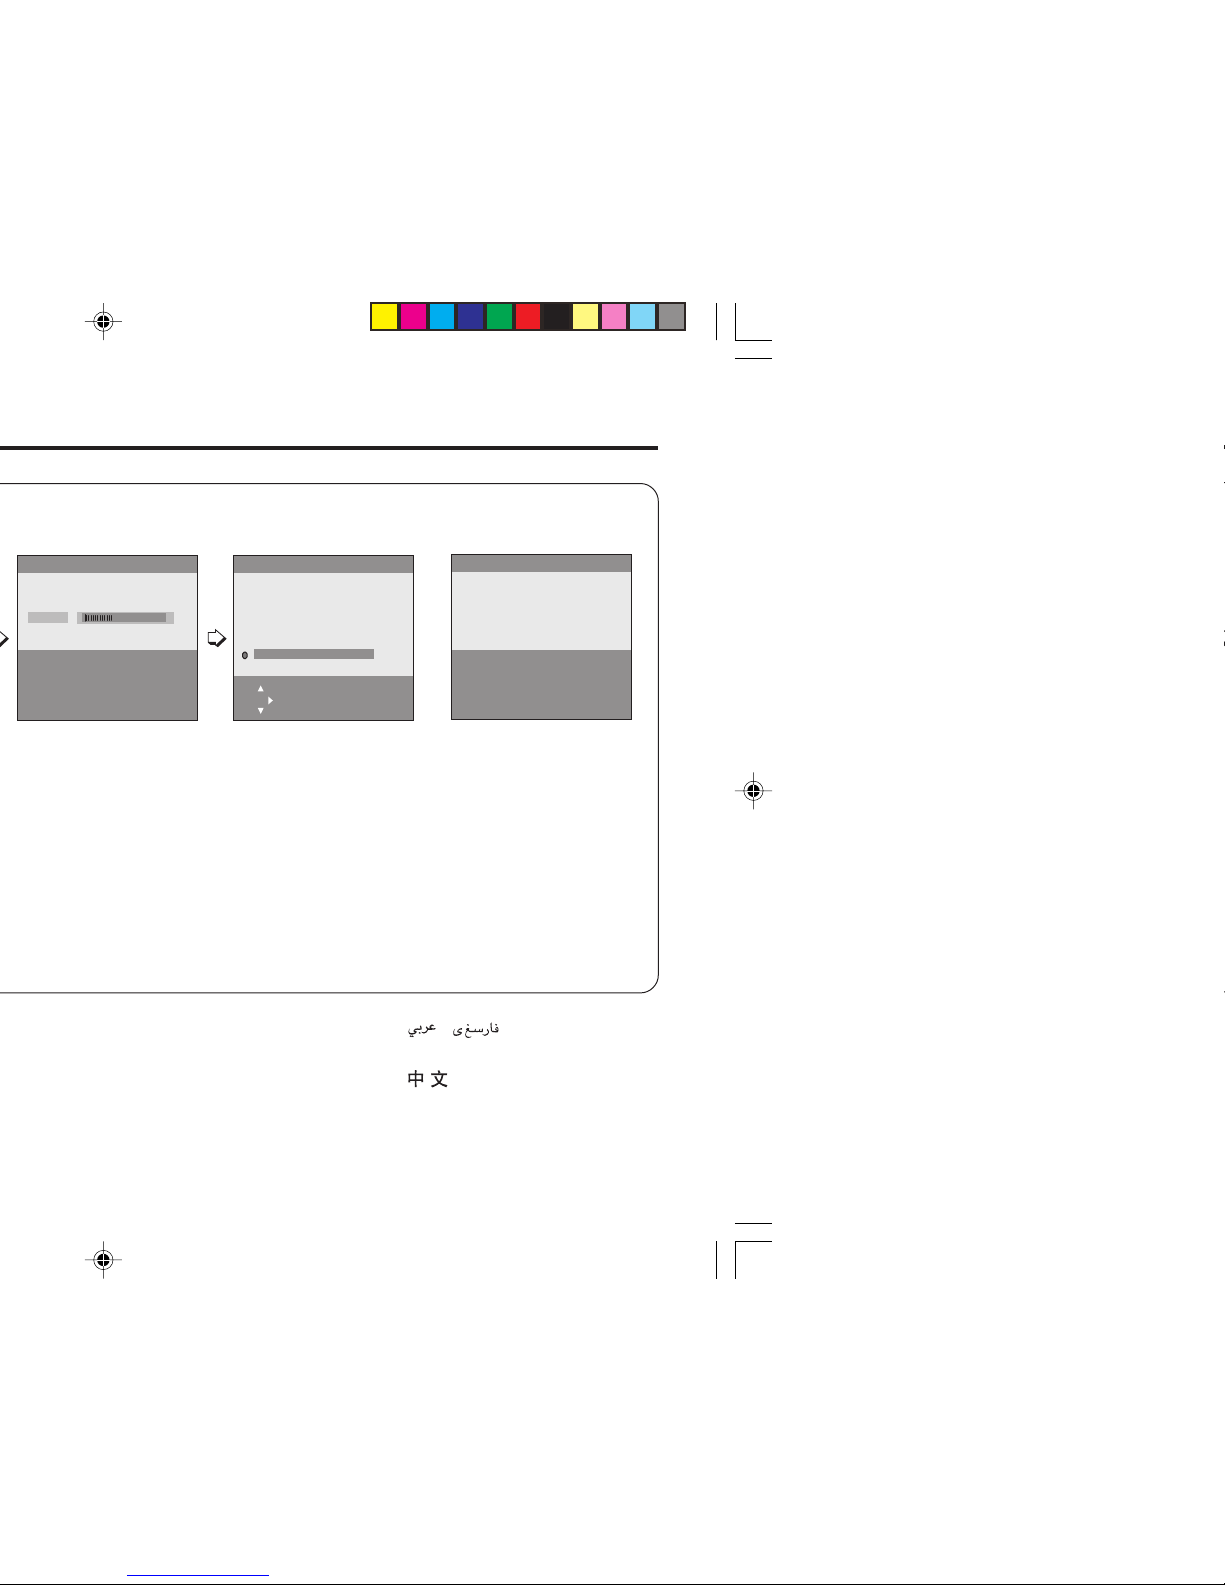
• TV will start searching
for the channels.
To stop AUTO
PROGRAM, press
MENU/OK button.
• To complete the initial
setting, press the
MENU/OK button. To
edit the channel list,
see page 19.
/MELAYU/INDONESIA,
• After that, when turn on the
TV at the next time.
“SETUP TOUR
RESTART?” will be
displayed.
Press the MENU/OK button
to cancel the SETUP
TOUR RESTART function.
If you want to make initial
settings again when the
next time you turn on the
TV, press the Red button to
activate the SETUP TOUR
RESTART function.
CC 12
AUTO PROGRAM
MENU : OK
22%
EDIT
MENU : OK
MOVE
■
INSERT
■
DELETE
■
MANUAL
■
■
■
■
PR CH/CC
AV
1 CH 04
2 CH 76
3 CH 78
4 CH 05
5 CH 28
3
6 CH 10
AUTO PROGRAM
MENU : NO
SETUP TOUR RESTART?
■
: YES
Page 9

9
PICTURE MODE
You can choose the desired picture setting with one-touch.
Press the PICTURE MODE button to select a setting.
SOFT Softens contrast and sharpness.
BRIGHT Heightens contrast and sharpness.
STANDARD Standard picture setting.
USER You can change this picture setting as you like.
Select USER and adjust following items in the
PICTURE SETTING menu. (CONTRAST, BRIGHT,
SHARP, COLOUR, TINT*)
When you select to VIDEO-2 Mode. You can not adjust SHARP
and TINT.
*TINT can only be adjusted in NTSC system.
To operate this function with a menu:
To return the USER setting to the default, press the blue button
when the PICTURE SETTING menu appears.
❇ About the basic operations of the menu, please see the “How
to operate menus and menus locations” on page 5.
MENU PICTURE menu
PICTURE MODE
❇
Page 10

WHITE BALANCE
You can change the white balance of the picture to better match
the type of video being viewed.
Select the WHITE BALANCE in the PICTURE menu, then choose
the desired setting.
NORMAL Normal white balance.
COOL Bluish white.
WARM Reddish white.
When you select to VIDEO-2. You can not adjust WHITE BALANCE.
You can adjust it in DVD Menu.
❇ About the basic operations of the menu, please see the “How
to operate menus and menus locations” on page 5.
MENU
PICTURE menu
WHITE BALANCE
❇
Page 11
11
2 Press the 5/∞ buttons until the picture become level. Then
press the MENU/OK button.
COMPRESS (16:9)
You can convert a normal picture (4:3 aspect ratio) into a wide
picture (16:9 aspect ratio).
Select the COMPRESS (16:9) in the FEATURES menu, then
choose ON or OFF.
BLUE BACK
You can set the TV to automatically change to a blue screen and
mute the sound if the signal is weak or absent, or when there is
no input from an antenna.
Select the BLUE BACK in the INSTALL menu, then choose ON or
OFF.
If you wish to continue viewing the poor picture, cancel the BLUE
BACK function.
❇ About the basic operations of the menu, please see the “How
to operate menus and menus locations” on page 5.
MENU
FEATURES menu
COMPRESS (16:9)
MENU INSTALL menu
BLUE BACK
❇
❇
Page 12

When VIDEO-2 is set to component, if the input source of main
picture is set to VIDEO-2 with component, PIP button is disabled
and sub picture can’t be displayed.
TELETEXT
You can watch the Teletext broadcast channel with TEXT function.
1 Press the TEXT button to select the desired mode as follows:
2 Press the CHANNEL -/+ buttons, number buttons or colour
buttons to select other Teletext pages.
3 Press TEXT or TV/VIDEO button to return to TV mode.
You can also operate the teletext using the following buttons:
(Hold) Hold a teletext page.
The (Hold) are displayed at the top left of the screen.
To cancel, press (Hold) button again.
(Reveal) Display the hidden text (e.g. answers to a quiz).
To cancel, press (Reveal) button again.
(Size) Enlarge the teletext display.
(Index) Return to the index page instantly.
(Cancel) Watch TV programme while waiting for a teletext page.
When the teletext page is found, a page number
appears at the upper left of the screen.
Press (Cancel) to view the teletext page.
(Sub-page) Operate the (Sub-page) function.
Sub-page numbers are displayed at the left of the
screen.
To cancel sub-page function, press (Sub-page)
button again.
❇ About the basic operations of the menu, please see the “How
to operate menus and menus locations” on page 5.
TV mode TEXT twin mode TEXT mode
Page 13

13
Page 14
SOUND MODE
You can choose the desired sound setting.
Select the SOUND MODE in SOUND menu, then choose the
setting.
USER You can change this sound setting as you like.
Select USER and adjust the frequencies in EQUALIZER
(100, 300, 1K, 3K, 8K Hz).
For details, see “EQUALIZER” on page 15.
SOUND TURBO
Emphasize on low and high frequency levels.
THEATER
Emphasize on movie sound.
MUSIC Emphasize on music effect.
NEWS Emphasize on vocal sound.
When you select to VIDEO-2. You can not adjust SOUND MODE
function. You can adjust it in DVD Menu.
BALANCE
You can adjust the volume balance between the left and right
speakers.
Select the BALANCE in SOUND menu, then adjust the setting.
❇ About the basic operations of the menu, please see the “How to
operate menus and menus locations” on page 5.
MENU SOUND menu
SOUND MODE
MENU
SOUND menu
BALANCE
❇
❇
Page 15

15
EQUALIZER
You can adjust the sound level of each frequencies when selecting
USER mode in SOUND MODE.
1 Select the USER in SOUND MODE under SOUND menu.
2 Select the EQUALIZER in SOUND menu.
The following display appears.
3 Select and adjust the desired frequencies.
4 Press the MENU/OK button to exit the menu.
Adjust high frequency will affect higher pitch sound and vice versa.
AI VOLUME
You can adjust the volume of all the channels and video inputs to
the same level automatically depends on the strength of signal of
the sources.
Select the AI VOLUME in SOUND menu, then choose ON or OFF.
❇ About the basic operations of the menu, please see the “How
to operate menus and menus locations” on page 5.
MENU
SOUND menu
SOUND MODE USER
MENU
SOUND menu
EQUALIZER
IIIIIII
IIIIIIIIIIIIIIII
IIIIIIII
100 300 1K 3K 8K Hz
EQUALIZER
MENU : OK
DISPLAY : BACK
TV/VIDEO : EXIT
IIIIIIIIIIIIIIII
MENU
SOUND menu
AI VOLUME
❇
❇
❇
Page 16

WHITE BALANCE
You can change the white balance of the DVD picture.
Select the WHITE BALANCE in DVD MENU under FEATURES menu,
then choose the desired setting.
For details, see “WHITE BALANCE” on page 10.
SOUND MODE
You can choose the desired sound setting for the DVD.
Select the SOUND MODE in DVD MENU under FEATURES menu,
then choose the desired setting.
For details, see “SOUND MODE” on page 14.
CINEMA SURROUND
You can enjoy an enhanced sound for the DVD.
Select the CINEMA SURROUND in DVD MENU under FEATURES
menu, then choose the desired setting.
For details, see “CINEMA SURROUND” on page 15.
This function is not available when the SOUND MODE is set to
SOUND TURBO.
❇❇ When you use VIDEO-2 to display the DVD signal or Video
signal then WHITE BALANCE, VNR function in PICTURE
menu/SHARP, TINT function in PICTURE SETTING menu/
SOUND MODE, CINEMA SURROUND function in SOUND
menu can’t operate.
❇ About the basic operations of the menu, please see the “How
to operate menus and menus locations” on page 5.
CINEMA SURROUND
MENU FEATURES menu
❇
SOUND MODE
MENU FEATURES menu
❇
WHITE BALANCE
MENU
FEATURES menu
❇
DVD MENU
DVD MENU
DVD MENU
Page 17

17
❇ About the basic operations of the menu, please see the “How
to operate menus and menus locations” on page 5.
OFF TIMER
You can set the TV to turn off automatically to standby mode after
a set time.
Press the OFF TIMER button to select a desired period of time.
You can set the period of time
to a maximum of 120 minutes
in 10 minutes step.
To operate this function with a menu:
When the elapsed of time left one minute, “GOOD NIGHT!”
appears on the screen.
You can display the OFF TIMER menu again to confirm or
change the remaining time.
0 120
OFF TIMER
20
MENU : OK
DISPLAY : BACK
TV/VIDEO : EXIT
MENU
FEATURES menu
OFF TIMER
❇
Page 18

DISPLAY
You can display the programme number, video terminal number
and PR list on the screen.
Press the DISPLAY button to select the desired mode:
Choose a TV channel or a VIDEO terminal.
1 Press the DISPLAY button to display the PR LIST.
2 Select a programme number or video terminal by pressing the
5/∞ button to move up/down on the programme number or
press the 2/3 button to skip for each 7 programme numbers,
then press MENU/OK button.
❇ About the basic operations of the menu, please see the “How
to operate menus and menus locations” on page 5.
ON OFF PR LIST
PR CH/CC
V1
V2
V3
AV
1
2
3
CH 09
CC 76
CC 78
PR LIST
MENU : OK
-7 +7
■
■
■
Page 19

19
2 Choose EDIT/MANUAL, then press the MENU/OK button.
EDIT menu appears.
3 Choose the channel which you want to register.
4 Press the blue button to activate the MANUAL function.
The sound system of the channel appears at the right of the
CH//CC number.
5 Press the 3 button to choose an appropriate sound system.
For details, see “SOUND SYSTEM” on page 14.
6 Press the green or red button to search for the TV channel.
Searching stops when a channel is found and displayed.
7 Repeat step 5 until your desired TV channel appears.
If the reception is poor Press the blue or yellow button to fine tune
the TV channel.
If noisy sound is heard Press the 3 button to choose an appropriate
sound system.
8 Press the MENU/OK button to exit the menu.
❇ About the basic operations of the menu, please see the “How
to operate menus and menus locations” on page 5.
EDIT
MENU : OK
MOVE
■
INSERT
■
DELETE
■
MANUAL
■
■
■
■
PR CH/CC
AV
1 CH 04
2 CH 76
3 CH 78
4 CH 05
5 CH 28
3
6 CH 10
Page 20

To add in the new channel
(INSERT in the EDIT menu)
You can add in the new channel in the TV channel list as you like.
You need to find the “CH/CC” number for the TV channel. Find the
“CH/CC” number corresponding to the channel number of the TV
channel from the attached sheet “CH/CC number list” on page 21.
1 Display the INSTALL menu.
2 Choose EDIT/MANUAL, then press the MENU/OK button.
EDIT menu appears.
3 Choose the PR number for which you will register a new TV
channel. When you add a new TV channel of NTSC-M system,
press the SOUND SYSTEM button to change the sound
system to M. Then proceed to the next step.
4 Press the green button, then press 3 buttons to choose “CC”
or “CH”.
5 Press the number button to enter the remaining CH/CC
number.
The TV starts to search the TV channel, and the picture of the
TV channel appears. If the TV finds no TV channel, a noisy
picture appears.
When a TV channel has already been registered in PR99, using
the INSERT function deletes that TV channel.
❇ About the basic operations of the menu, please see the “How
to operate menus and menus locations” on page 5.
MENU
INSTALL menu
❇
Page 21

21
CC US CCIR OIRT AUSTRALIA
CC 18 E S-18
CC 19 F S-19
CC 20 G S-20
CC 21 H S-21
CC 22 I S-22
CC 23 J S-23
CC 24 K S-24
CC 25 L S-25
CC 26 M S-26
CC 27 N S-27
CC 28 O S-28
CC 29 P S-29
CC 30 Q S-30
CC 31 R S-31
CC 32 S S-32
CC 33 T S-33
CC 34 U S-34
CC 35 V S-35
CC 36 W S-36
CC 37 W+1 S-37
CC 38 W+2 S-38
CC 39 W+3 S-39
CC 40 W+4 S-40
CC 41 W+5 S-41
CC 42 W+6
CC 43 W+7
CC 44 W+8
CC 45 W+9
CC 46 W+10
CC 47 W+11
CC 48 W+12
CC 49 W+13
CC 50 W+14
CC 51 W+15
CC 52 W+16
CC 53 W+17
CC 54 W+18
CC 55 W+19
CC 56 W+20
CC 57 W+21
CC 58 W+22
CC 59 W+23
CC 60 W+24
CC 61 W+25
CC 62 W+26
CC 63 W+27
CC 64 W+28
CC 75 X
CC 76 Y R3
CC 77 Z R4 AU-3
CC 78 Z+1 R5
CC 79 Z+2 AU-4
CC 95 A-5
CC 96 A-4
CC 97 A-3
CC 98 A-2
CC 99 A-1
Page 22

V
LRRL
/
MONO
Y
C
B
C
R
/
V
V
S
OVER
L
R
/
MONO
OUTPUT
VIDEO-1
INPUT
COMPONENT
(VIDEO-2)
INPUT
Connecting to rear component/video input
terminal and output terminal
When you use VIDEO-1 INPUT, you should choose to connect
S-VIDEO or video input. If S-VIDEO connector and video input
are connected at the same time, no picture displays on the
screen and the message “PLEASE DISCONNECT VIDEO-1
CABLE!” appears. In this case, you should disconnect either
S-VIDEO or video input.
When connecting to COMPONENT (VIDEO-2) input, depending
on the connection, choose the appropriate video input using the
menu (see page 18).
Rear of TV
AV-29VX15
VCR (for playing)
DVD player (composite signals)
VCR (for recording)
DVD player
(component video signals)
Page 23

23
• This may due to the magnetized device such as a
speaker near to your TV. Keep the device apart from
your TV. Alternately, you can also use the magneticshielded speaker.
• This may due to the earth magnetism. Refer to
“PICTURE TILT” on page 11 to correct the tilt.
• Image required time to stabilize before display. This
is not a malfunction.
• This is due to a sudden change in temperature and it
is not a malfunction. If the crackling sound is too
frequent, request your service technician for
inspection.
• This is due to the static electricity of the picture tube
and it will not harm the human body. This is not a
malfunction.
• Please check that the AUTO SIGNAL DETECT
function is on or off.
• Press button (VCR or DVD Player) to turn the
machine off and turn it on again; do not turn the
machine off and on suddenly.
• Inspect the video cable connection on VIDEO-2 that
they are connected properly.
• Inspect the video cable connection on VIDEO-2 that
they are connected properly.
• In a certain VCR or DVD Player, the function might
operate by the discontinuity of the signal.
• In a certain VCR or DVD Player, the function might
operate by the discontinuity of the signal.
• Video signal from VCR or DVD Player cause the
function run properly to indicate that there are video
signal on VIDEO-2 channel.
• Colour patches appear
at the corner of the
screen
• Picture is tilted
• Image takes a short
period to be displayed
• TV may emitted
crackling sound
• Feel a slight electric
shock when touching
the TV screen
• After you connect the
signal to VIDEO-2 and
playback VCR or DVD
Player, the Auto Detect
does not work.
•
When you are watching
another channel that is
not VIDEO-2, AUTO
SIGNAL DETECT
works while
VCR or
DVD Player
was on.
•
While you are watching
TV on the other
channels, AUTO SIGNAL
DETECT work when you
press 1,7,3,¡ or 8 on
the front panel of VCR or
DVD Player.
• After TV was on,
AUTO
SIGNAL DETECT
work.
Page 24

0405-FLE-JMT
B/CR
) input
Page 25

INSTRUCTIONS
GGT0086-001A-H
Contents
Knowing your TV’s features ....................................................... 3
Remote control buttons and basic functions .............................. 4
TV buttons and functions ........................................................... 6
Setting up your TV ..................................................................... 7
Basic setting for picture .............................................................. 9
Advanced setting for picture ..................................................... 11
Original features for picture ...................................................... 12
Basic setting for sound ............................................................. 14
Advanced setting for sound ..................................................... 15
DVD function ............................................................................ 16
Customized setting .................................................................. 17
TV channel presetting .............................................................. 19
Additional preparation .............................................................. 22
Troubleshooting ....................................................................... 23
Specifications .............................................................. Back cover
Page 26

7 If you are not going to use this TV for a long period of time, be sure to
disconnect the AC plug from the AC socket.
8 The apparatus shall not be exposed to dripping or splashing and that
no objects filled with liquids, such as vases, shall be placed on the
apparatus.
WARNING: <AV-2155WE only>
A REMOVABLE PLASTIC COVER IS FIXED TO THE
TELEVISION’S FRONT AUDIO/VIDEO CONNECTOR. TO
PREVENT THIS COVER FROM BEING ACCIDENTALLY
SWALLOWED BY BABIES OR CHILDREN, REMOVE IT
FROM THE TELEVISION AND STORE IT IN A SAFE
PLACE. IF THE COVER IS SWALLOWED SEEK THE
ADVICE OF A DOCTOR IMMEDIATELY.
<AV-21M, AV-25M, AV-29M Series>
YOU CAN DETACH THE PROTECT SHEET ON THE TOP
AND BOTTOM OF FRONT FRAME IF YOU NEEDED.
THE FRONT BUTTON DOOR OF THE TV SHOULD BE
PULLED OUT FROM ITS BOTTOM. DO NOT PRESS THE
UPPER PART, OR YOUR FINGER MAY BE PINCHED.
✘
✓
PULL PULL
Page 27

3
AV-2987ME
AV-2985ME
AV-2955VE
AV-2585ME
AV-2557VE
AV-2555VE
AV-2185ME
AV-2157VE
AV-2155VE
AV-2155WE
AV-25LS25
Page 28

1
6
3
7
9
5
8
2
!
4
EXIT
"
Page 29

5
–
–
Top menu 2nd menu Location 3rd menu Location
MENU PICTURE PICTURE MODE P.9 – –
PICTURE SETTING P.10
CONTRAST
P.10
BRIGHT
P.10
SHARP
P.10
COLOUR
P.10
TINT
P.10
WHITE BALANCE P.10 – –
VNR P.17
SOUND STEREO/
I■II
P.15 – –
AI VOLUME P.15 – –
SOUND MODE P.14 – –
EQUALIZER P.15 – –
BALANCE P.14 – –
CINEMA SURROUND
P.15 – –
FEATURES DVD MENU P.16
AUTO SIGNAL DETECT
P.16
DVD PICTURE MODE
P.16
TINT COLOUR
P.16
WHITE BALANCE
P.16
SOUND MODE
P.16
CINEMA SURROUND
P.16
OFF TIMER P.17 – –
CHILD LOCK P.17 – –
COMPRESS (16:9)
P.11 – –
AI ECO SENSOR P.11 – –
INSTALL SETUP TOUR P.18 – –
AUTO PROGRAM P.19 – –
EDIT/MANUAL P.19 DELETE, MOVE, P.19-
MANUAL, INSERT P.20
COLOUR SYSTEM P.9 – –
LANGUAGE P.17 LANGUAGE P.17
TEXT LANGUAGE P.13 TEXT LANGUAGE P.13
VIDEO-2 SETTING P.18 – –
BLUE BACK P.11 – –
PICTURE TILT P.11 – –
EXIT – – – –
Page 30

No. Button/terminal Description Page
1 L (main power) Press to turn on or turn off the TV’s main power. –
2 POWER lamp Indicate the TV is being turned on or off. –
No colour : TV’s main power is being turned off.
Red : TV’s main power is being turned on.
Note: When you turn off the power switch while TV is in standby
mode, the light of power lamp will be off in 10 -15 seconds.
3 ECO sensor –
4 Remote control sensor –
5 TV/VIDEO/EXIT
Press to select TV or Video terminal input or exit from menu.
–
6 VOLUME -/+ Press to adjust the volume level. –
7 CHANNEL -/+ Press to select the desired channel. –
8 MENU Press to display the menu. –
9 IN (VIDEO-3) Video and audio input jacks for VIDEO-3 mode. 22
! Headphone jack. 22
" Aerial socket. 7
# OUTPUT Video and audio output jacks. (The component video 22
signal cannot be output.)
$ COMPONENT Video or component video, and audio input jacks for 22
(VIDEO-2) INPUT VIDEO-2 mode. You can select the input signal by setting
the “VIDEO-2 SETTING” function (see page 18).
% VIDEO-1 INPUT Video or S-VIDEO, and audio input jacks for VIDEO-1 7
mode
How to operate the menus with the TV button
TV button
Work as same as the button on the
Note
remote control unit
MENU MENU/OK button To display main menu and exit
menu after finish setting.
CHANNEL -/+ ∞/5 button To select menu function.
VOLUME -/+ 2/3 button To adjust the desired function.
Page 31

7
2 Connecting the compatible main plug to the AC outlet.
3 Inserting batteries into the remote control.
Insert two batteries by following the + and polarities and inserting the - end first.
CAUTION:
Follow the cautions printed on the batteries.
Notes:
• Use AA/R6/UM-3 dry cell batteries.
• If the remote control does not work properly, fit
new batteries. The supplied batteries are for testing,
not regular use.
4 Turn on the TV by pressing the main power button.
JVC logo appears on the screen.
JVC logo will appear on the screen again at the phase of “SETUP
TOUR RESTART?” function. Then the initial setting can be
performed according to page 8.
Page 32

• TV will start searching
for the channels.
To stop AUTO
PROGRAM, press
MENU/OK button.
• To complete the initial
setting, press the
MENU/OK button. To
edit the channel list,
see page 19.
• After that, when turn
on the TV at the next
time. “SETUP TOUR
RESTART?” will be
displayed.
Press the MENU/OK
button to cancel the
SETUP TOUR
RESTART function.
If you want to make
initial settings again
when the next time
you turn on the TV,
press the Red button
to activate the SETUP
TOUR RESTART
function.
CC 12
AUTO PROGRAM
MENU : OK
22%
EDIT
MENU : OK
MOVE
■
INSERT
■
DELETE
■
MANUAL
■
■
■
■
PR CH/CC
AV
1 CH 04
2 CH 76
3 CH 78
4 CH 05
5 CH 28
3
6 CH 10
AUTO PROGRAM
MENU : NO
SETUP TOUR RESTART?
■
: YES
Page 33

9
PICTURE MODE
You can choose the desired picture setting with one-touch.
Press the PICTURE MODE button to select a setting.
SOFT Softens contrast and sharpness.
BRIGHT Heightens contrast and sharpness.
STANDARD Standard picture setting.
USER You can change this picture setting as you like.
Select USER and adjust following items in the
PICTURE SETTING menu. (CONTRAST, BRIGHT,
SHARP, COLOUR, TINT*)
When you select to VIDEO-2 Mode. You cannot adjust SHARP
and TINT.
*TINT can only be adjusted in NTSC system.
To operate this function with a menu:
To return the USER setting to the default, press the blue button
when the PICTURE SETTING menu appears.
❇ About the basic operations of the menu, please see the “How
to operate menus and menus locations” on page 5.
MENU PICTURE menu
PICTURE MODE
❇
Page 34

WHITE BALANCE
You can change the white balance of the picture to better match
the type of video being viewed.
Select the WHITE BALANCE in the PICTURE menu, then choose
the desired setting.
NORMAL Normal white balance.
COOL Bluish white.
WARM Reddish white.
When you select to VIDEO-2. You cannot adjust WHITE BALANCE.
You can adjust it in DVD Menu.
❇ About the basic operations of the menu, please see the “How
to operate menus and menus locations” on page 5.
MENU
PICTURE menu
WHITE BALANCE
❇
Page 35

11
2 Press the 5/∞ buttons until the picture become level. Then
press the MENU/OK button.
COMPRESS (16:9)
You can convert a normal picture (4:3 aspect ratio) into a wide
picture (16:9 aspect ratio).
Select the COMPRESS (16:9) in the FEATURES menu, then
choose ON or OFF.
BLUE BACK
You can set the TV to automatically change to a blue screen and
mute the sound if the signal is weak or absent, or when there is
no input from an antenna.
Select the BLUE BACK in the INSTALL menu, then choose ON or
OFF.
If you wish to continue viewing the poor picture, cancel the BLUE
BACK function.
❇ About the basic operations of the menu, please see the “How
to operate menus and menus locations” on page 5.
MENU
FEATURES menu
COMPRESS (16:9)
MENU INSTALL menu
BLUE BACK
❇
❇
Page 36

When VIDEO-2 is set to component, if the input source of main
picture is set to VIDEO-2 with component, PIP button is disabled
and sub picture can’t be displayed.
TELETEXT
You can watch the Teletext broadcast channel with TEXT function.
1 Press the TEXT button to select the desired mode as follows:
2 Press the CHANNEL -/+ buttons, number buttons or colour
buttons to select other Teletext pages.
3 Press TEXT or TV/VIDEO button to return to TV mode.
You can also operate the teletext using the following buttons:
(Hold) Hold a teletext page.
The (Hold) are displayed at the top left of the screen.
To cancel, press (Hold) button again.
(Reveal) Display the hidden text (e.g. answers to a quiz).
To cancel, press (Reveal) button again.
(Size) Enlarge the teletext display.
(Index) Return to the index page instantly.
(Cancel) Watch TV programme while waiting for a teletext page.
When the teletext page is found, a page number
appears at the upper left of the screen.
Press (Cancel) to view the teletext page.
(Sub-page) Operate the (Sub-page) function.
Sub-page numbers are displayed at the left of the
screen.
To cancel sub-page function, press (Sub-page)
button again.
❇ About the basic operations of the menu, please see the “How
to operate menus and menus locations” on page 5.
TV mode TEXT twin mode TEXT mode
Page 37

13
Page 38

SOUND MODE
You can choose the desired sound setting.
Select the SOUND MODE in SOUND menu, then choose the
setting.
USER You can change this sound setting as you like.
Select USER and adjust the frequencies in EQUALIZER
(100, 300, 1K, 3K, 8K Hz).
For details, see “EQUALIZER” on page 15.
SOUND TURBO
Emphasize on low and high frequency levels.
THEATER
Emphasize on movie sound.
MUSIC Emphasize on music effect.
NEWS Emphasize on vocal sound.
When you select to VIDEO-2. You cannot adjust SOUND MODE
function. You can adjust it in DVD Menu.
BALANCE
You can adjust the volume balance between the left and right
speakers.
Select the BALANCE in SOUND menu, then adjust the setting.
❇ About the basic operations of the menu, please see the “How to
operate menus and menus locations” on page 5.
MENU SOUND menu
SOUND MODE
MENU SOUND menu
BALANCE
❇
❇
Page 39

15
EQUALIZER
You can adjust the sound level of each frequencies when selecting
USER mode in SOUND MODE.
1 Select the USER in SOUND MODE under SOUND menu.
2 Select the EQUALIZER in SOUND menu.
The following display appears.
3 Select and adjust the desired frequencies.
4 Press the MENU/OK button to exit the menu.
Adjust high frequency will affect higher pitch sound and vice versa.
AI VOLUME
You can adjust the volume of all the channels and video inputs to
the same level automatically depends on the strength of signal of
the sources.
Select the AI VOLUME in SOUND menu, then choose ON or OFF.
❇ About the basic operations of the menu, please see the “How
to operate menus and menus locations” on page 5.
MENU
SOUND menu
SOUND MODE USER
MENU
SOUND menu
EQUALIZER
IIIIIII
IIIIIIIIIIIIIIII
IIIIIIII
100 300 1K 3K 8K Hz
EQUALIZER
MENU : OK
DISPLAY : BACK
TV/VIDEO : EXIT
IIIIIIIIIIIIIIII
MENU
SOUND menu
AI VOLUME
❇
❇
❇
Page 40

WHITE BALANCE
You can change the white balance of the DVD picture.
Select the WHITE BALANCE in DVD MENU under FEATURES menu,
then choose the desired setting.
For details, see “WHITE BALANCE” on page 10.
SOUND MODE
You can choose the desired sound setting for the DVD.
Select the SOUND MODE in DVD MENU under FEATURES menu,
then choose the desired setting.
For details, see “SOUND MODE” on page 14.
CINEMA SURROUND
You can enjoy an enhanced sound for the DVD.
Select the CINEMA SURROUND in DVD MENU under FEATURES
menu, then choose the desired setting.
For details, see “CINEMA SURROUND” on page 15.
This function is not available when the SOUND MODE is set to
SOUND TURBO.
❇❇ When you use VIDEO-2 to display the DVD signal or Video
signal then WHITE BALANCE, VNR function in PICTURE
menu/SHARP, TINT function in PICTURE SETTING menu/
SOUND MODE, CINEMA SURROUND function in SOUND
menu cannot operate.
❇ About the basic operations of the menu, please see the “How
to operate menus and menus locations” on page 5.
CINEMA SURROUND
MENU FEATURES menu
❇
SOUND MODE
MENU FEATURES menu
❇
WHITE BALANCE
MENU
FEATURES menu
❇
DVD MENU
DVD MENU
DVD MENU
Page 41

17
❇ About the basic operations of the menu, please see the “How
to operate menus and menus locations” on page 5.
OFF TIMER
You can set the TV to turn off automatically to standby mode after
a set time.
Press the OFF TIMER button to select a desired period of time.
You can set the period of time
to a maximum of 120 minutes
in 10 minutes step.
To operate this function with a menu:
When the elapsed of time left one minute, “GOOD NIGHT!”
appears on the screen.
You can display the OFF TIMER menu again to confirm or
change the remaining time.
0 120
OFF TIMER
20
MENU : OK
DISPLAY : BACK
TV/VIDEO : EXIT
MENU
FEATURES menu
OFF TIMER
❇
Page 42

DISPLAY
You can display the programme number, video terminal number
and PR list on the screen.
Press the DISPLAY button to select the desired mode:
Choose a TV channel or a VIDEO terminal.
1 Press the DISPLAY button to display the PR LIST.
2 Select a programme number or video terminal by pressing the
5/∞ button to move up/down on the programme number or
press the 2/3 button to skip for each 7 programme numbers,
then press MENU/OK button.
❇ About the basic operations of the menu, please see the “How
to operate menus and menus locations” on page 5.
ON OFF PR LIST
PR CH/CC
V1
V2
V3
AV
1
2
3
CH 09
CC 76
CC 78
PR LIST
MENU : OK
-7 +7
■
■
■
Page 43

19
2 Choose EDIT/MANUAL, then press the MENU/OK button.
EDIT menu appears.
3 Choose the channel which you want to register.
4 Press the blue button to activate the MANUAL function.
The sound system of the channel appears at the right of the
CH/CC number.
5 Press the 3 button to choose an appropriate sound system.
For details, see “SOUND SYSTEM” on page 14.
6 Press the green or red button to search for the TV channel.
Searching stops when a channel is found and displayed.
7 Repeat step 5 until your desired TV channel appears.
If the reception is poor Press the blue or yellow button to fine tune
the TV channel.
If noisy sound is heard Press the 3 button to choose an appropriate
sound system.
8 Press the MENU/OK button to exit the menu.
❇ About the basic operations of the menu, please see the “How
to operate menus and menus locations” on page 5.
EDIT
MENU : OK
MOVE
■
INSERT
■
DELETE
■
MANUAL
■
■
■
■
PR CH/CC
AV
1 CH 04
2 CH 76
3 CH 78
4 CH 05
5 CH 28
3
6 CH 10
Page 44

To add in the new channel
(INSERT in the EDIT menu)
You can add in the new channel in the TV channel list as you like.
You need to find the “CH/CC” number for the TV channel. Find the
“CH/CC” number corresponding to the channel number of the TV
channel from the attached sheet “CH/CC number list” on page 21.
1 Display the INSTALL menu.
2 Choose EDIT/MANUAL, then press the MENU/OK button.
EDIT menu appears.
3 Choose the PR number for which you will register a new TV
channel. When you add a new TV channel of NTSC-M system,
press the SOUND SYSTEM button to change the sound
system to M. Then proceed to the next step.
4 Press the green button, then press 3 buttons to choose “CC”
or “CH”.
5 Press the number button to enter the remaining CH/CC
number.
The TV starts to search the TV channel, and the picture of the
TV channel appears. If the TV finds no TV channel, a noisy
picture appears.
When a TV channel has already been registered in PR99, using
the INSERT function deletes that TV channel.
❇ About the basic operations of the menu, please see the “How
to operate menus and menus locations” on page 5.
MENU
INSTALL menu
❇
Page 45

21
CC US CCIR OIRT AUSTRALIA
CC 18 E S-18
CC 19 F S-19
CC 20 G S-20
CC 21 H S-21
CC 22 I S-22
CC 23 J S-23
CC 24 K S-24
CC 25 L S-25
CC 26 M S-26
CC 27 N S-27
CC 28 O S-28
CC 29 P S-29
CC 30 Q S-30
CC 31 R S-31
CC 32 S S-32
CC 33 T S-33
CC 34 U S-34
CC 35 V S-35
CC 36 W S-36
CC 37 W+1 S-37
CC 38 W+2 S-38
CC 39 W+3 S-39
CC 40 W+4 S-40
CC 41 W+5 S-41
CC 42 W+6
CC 43 W+7
CC 44 W+8
CC 45 W+9
CC 46 W+10
CC 47 W+11
CC 48 W+12
CC 49 W+13
CC 50 W+14
CC 51 W+15
CC 52 W+16
CC 53 W+17
CC 54 W+18
CC 55 W+19
CC 56 W+20
CC 57 W+21
CC 58 W+22
CC 59 W+23
CC 60 W+24
CC 61 W+25
CC 62 W+26
CC 63 W+27
CC 64 W+28
CC 75 X
CC 76 Y R3
CC 77 Z R4 AU-3
CC 78 Z+1 R5
CC 79 Z+2 AU-4
CC 95 A-5
CC 96 A-4
CC 97 A-3
CC 98 A-2
CC 99 A-1
Page 46

V
LRRL
/
MONO
Y
C
B
C
R
/
V
V
S
OVER
L
R
/
MONO
OUTPUT
VIDEO-1
INPUT
COMPONENT
(VIDEO-2)
INPUT
Connecting to rear component/video input
terminal and output terminal
When you use VIDEO-1 INPUT, you should choose to connect
S-VIDEO or video input. If S-VIDEO connector and video input
are connected at the same time, no picture displays on the
screen and the message “PLEASE DISCONNECT VIDEO-1
CABLE!” appears. In this case, you should disconnect either
S-VIDEO or video input.
When connecting to COMPONENT (VIDEO-2) input, depending
on the connection, choose the appropriate video input using the
menu (see page 18).
Rear of TV
AV-2185ME/AV-2955VE
VCR (for playing)
DVD player (composite signals)
VCR (for recording)
DVD player
(component video signals)
Page 47

23
• This may due to the magnetized device such as a
speaker near to your TV. Keep the device apart from
your TV. Alternately, you can also use the magneticshielded speaker.
• This may due to the earth magnetism. Refer to
“PICTURE TILT” on page 11 to correct the tilt.
• Image required time to stabilize before display. This
is not a malfunction.
• This is due to a sudden change in temperature and it
is not a malfunction. If the crackling sound is too
frequent, request your service technician for
inspection.
• This is due to the static electricity of the picture tube
and it will not harm the human body. This is not a
malfunction.
• Please check that the AUTO SIGNAL DETECT
function is on or off.
• Press button (VCR or DVD Player) to turn the
machine off and turn it on again; do not turn the
machine off and on suddenly.
• Inspect the video cable connection on VIDEO-2 that
they are connected properly.
• Inspect the video cable connection on VIDEO-2 that
they are connected properly.
• In a certain VCR or DVD Player, the function might
operate by the discontinuity of the signal.
• In a certain VCR or DVD Player, the function might
operate by the discontinuity of the signal.
• Video signal from VCR or DVD Player cause the
function runs properly to indicate that there are video
signal on VIDEO-2 channel.
• Colour patches appear
at the corner of the
screen
• Picture is tilted
• Image takes a short
period to be displayed
• TV may emitted
crackling sound
• Feel a slight electric
shock when touching
the TV screen
• After you connect the
signal to VIDEO-2 and
playback VCR or DVD
Player, the Auto Detect
does not work.
•
When you are watching
another channel that is
not VIDEO-2, AUTO
SIGNAL DETECT
works while
VCR or
DVD Player
was on.
•
While you are watching
TV on the other
channels, AUTO SIGNAL
DETECT works when
you press 1,7,3,
¡
or 8 on the front panel of
VCR or DVD Player.
• After TV was on,
AUTO
SIGNAL DETECT
works.
Page 48

0305-FLE-JMT
B/CR
) input
 Loading...