

Page 1

AV-14JT5EU / AV-21JT5EU
AV-14JT5EU
AV-21JT5EU
VICTOR COMPANY OF JAPAN, LIMITED
COLOUR TELEVISION
P TV/AV
VIDEO AUDIO
INSTRUCTIONS
2000 VICTOR COMPANY OF JAPAN, LIMITED
PMJV1V2022
0500-T-CR-DW
Page 2

ADDITIONAL INFORMATIONS FOR THE SET SOLD IN GREAT BRITAIN
The appliance is supplied with a moulded three pin main plug fitted with 5Amp fuse.
Should the fuse require replacement, it must be replaced with a fuse rated at 5 amp
and approved by ASTA or BSI to BS1362.
The plug contains a removable fuse cover that must be refitted when the fuse is
replaced.In the event of the fuse cover being lost or damaged, the plug must not be
used until a replacement cover has been obtained.Replacement fuse covers can be
purchased from your nearest electrical dealer and must be the same colour as the
original.
If the moulded means plug is unsuitable for the socket outlet in your home or is
removed for any other reasons, then the fuse should be removed and the cut off plug
dispose of safely to prevent the hazard of electric shock.
There is a danger of electric shock if the cut off plug is inserted into any socket outlet.
If a replacement plug is to be fitted, please observe the wiring code shown below.The
wires in the mains lead are are coloured in the accordance with the following code:
Blue-neutral Brown-live
As the colours of the wires in the main lead of this appliance may not correspond with
the coloured markings identifying the terminals in your plug, proceed as follows:
The wire which is coloured blue must be connected to the terminal which is marked
with theletter N or coloured black.The wire which is coloured brown must be connected
to the terminal which is marked with the letter E or coloured red.
Do not make any connections to the terminal in the plug which is marked by the letter
E by the safety earth symbol or coloured green or green and yellow.
Page 3
CONTENTS
IMPORTANT SAFEGUARDS................................ 2
BEFORE LAUNCHING ......................................... 3
CONNECTING THE EXTERNAL EQUIPMENT.... 4
IDENTITY OF FEATURES ON LOCAL AND
REMOTE CONTROL ............................................ 6
INSTALLATION...................................................... 8
DAILY USE ............................................................ 16
TELETEXT ............................................................ 24
TROUBLESHOOTING .......................................... 26
SPECIFICATIONS................................................. 27
1
Page 4
IMPORTANT SAFEGUARDS
WATER AND MOISTURE
Never install the set in the following places; In a wet basement, bathroom. Do not place any container with liquid on the set.
HEAT
Never place the set near heat sources.
VENTILATION
Do not cover the ventilation opening in the cabinet and never place
the set in a confined space such as bookcase or built-in unless
proper ventilation is provided.
Leave a minimum 10cm gap all around the unit.
OBJECT ENTRY
Do not insert foreign objects, such as needles and coins, in the ventilation openings.
LIGHTNING STRIKING
You should disconnect the set from the mains and the aerial system
during thunderstorms.
CLEANING
Unplug the set from the mains during cleaning.
AFTER MOVING THE SET
If the set is moved in a different direction, the MAIN POWER button
must be switched off for at least 15 minutes in order to take out a
colour strain on the screen.
2
Page 5
BEFORE LAUNCHING
INSERTING BATTERIES INTO THE CONTROL UNIT
Insert the batteries (two 1.5V, type AAA(R03))
MAINS CONNECTION
Plug the mains cable into the power socket with
230V/50Hz AC.
AERIAL CONNECTION
When using an outdoor aerial, it is usually connected to the set by means of 75 ohms.
SWITCHING ON AND OFF
Switching on
Switch the set on with the MAIN POWER button ( ), and
then PR UP or DOWN button (8P9) on the front of the set.
Or POWER button ( / I ) or the UP/DOWN button or one of
the NUMBER buttons on the remote control.
P TV/AV
Switching off
Press POWER button ( / I ) on the remote control to return
the set to its stand by mode.
If you do not use the set for an extended period of time, turn
it off with MAIN POWER button ( ) on the set.
3
31 2
64 5
97 8
0
P.MODE / OK
P
AV
MENU
Page 6
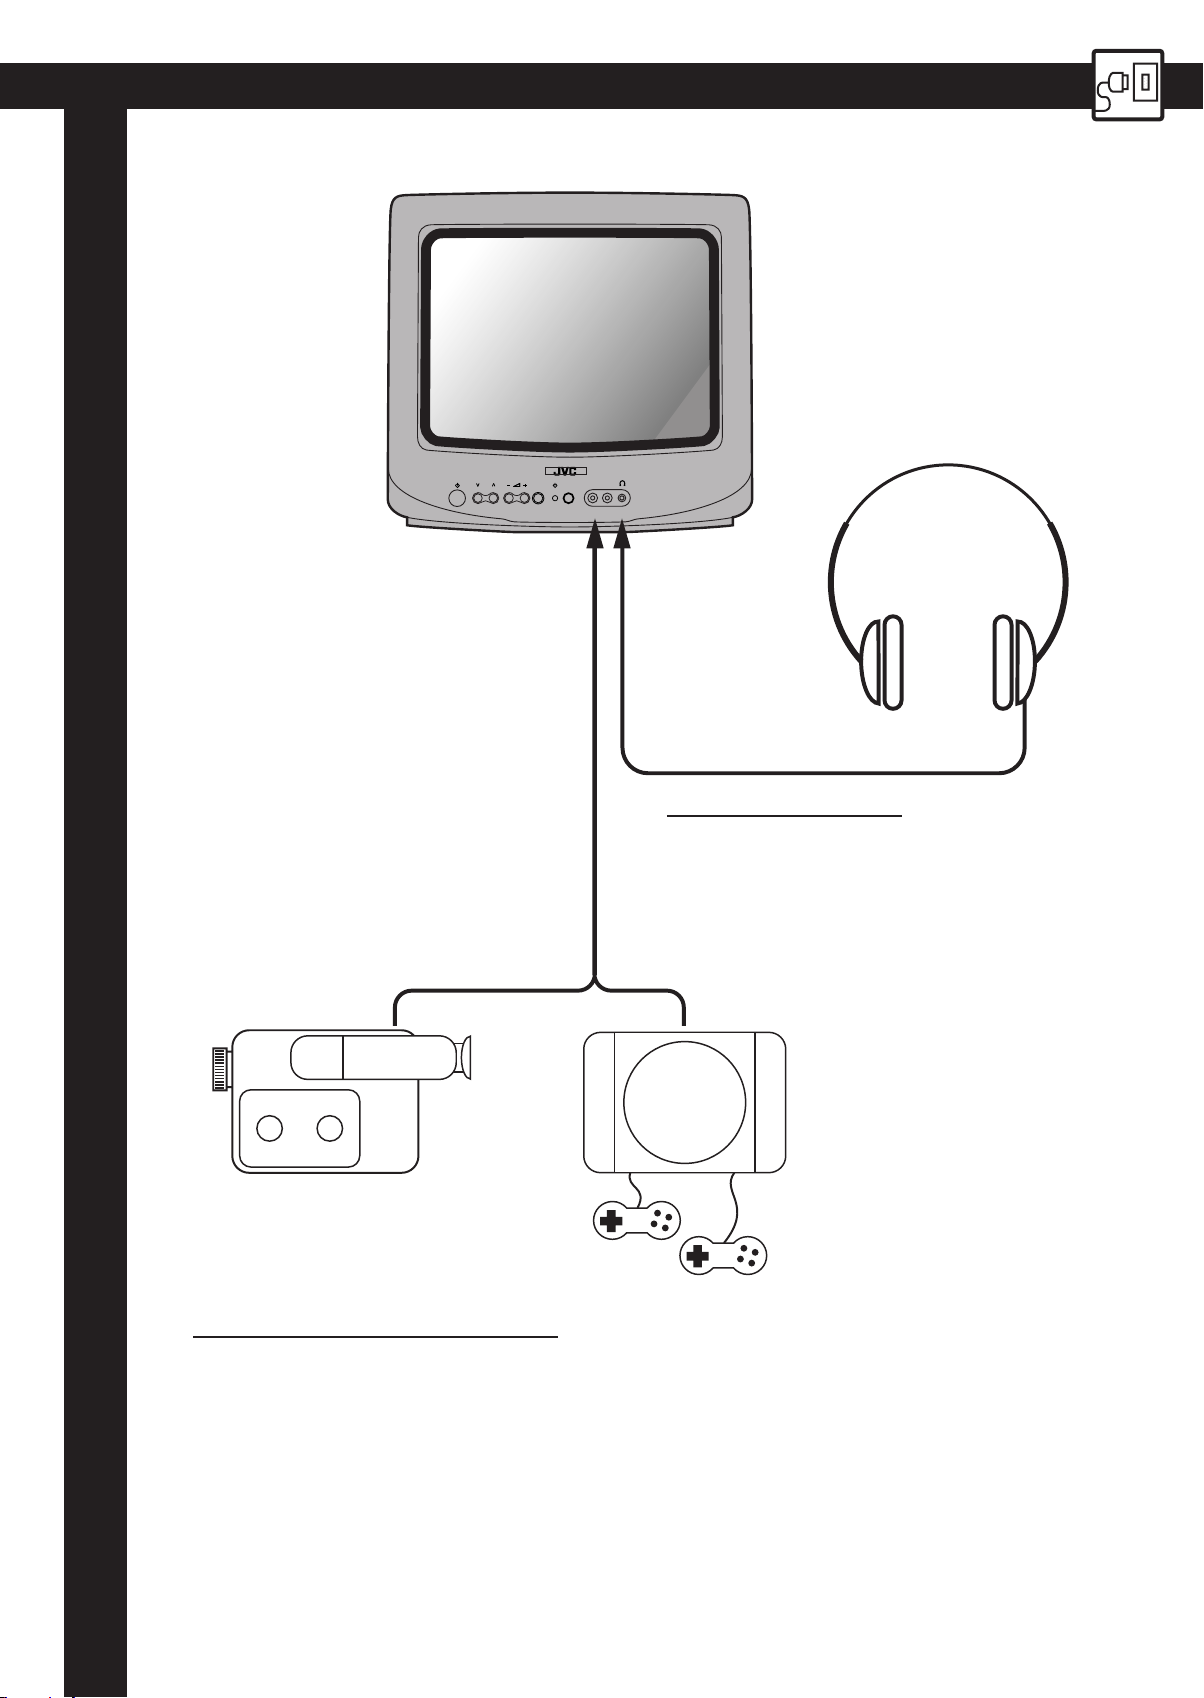
CONNECTING THE EXTERNAL EQUIPMENT
TV and AV
Use the AV button on the remote control, or on the front of the set to select one of the
three options. Whenever the AV button is pressed, on the on-screen display will be
changed as shown: AV S-VHS TV
SCART JACK ( ):
This is used to connect a VCR 1, a PERI-TV decoder 2, a
Camcoder or a video game console.
In most case, the set changes automatically to AV when the
VCR connected is in display mode.
If not, press the AV button on the remote control or on the
front of the set. You must turn the external equipment off to
return to the TV mode.
1
2
1
4
Page 7
P TV/AV
VIDEO AUDIO
HEADPHONES JACK
Insert the headphones plug (3,5 mm) into
the headphones socket.
The sound from the speaker will be cut off.
VIDEO GAME
OR
CAMCODER
FRONT AV JACK (AUDIO/VIDEO)
Connect the AV (Audio/Video) socket with an appreciate cable to the corresponding
socket of the external equipment.
Select AV mode by pressing the AV button.
Press the AV button to return to the TV mode.
Note that you can play only one apparatus, if two apparatuses are connected FRONT AV
JACK and SCART JACK.
5
Page 8
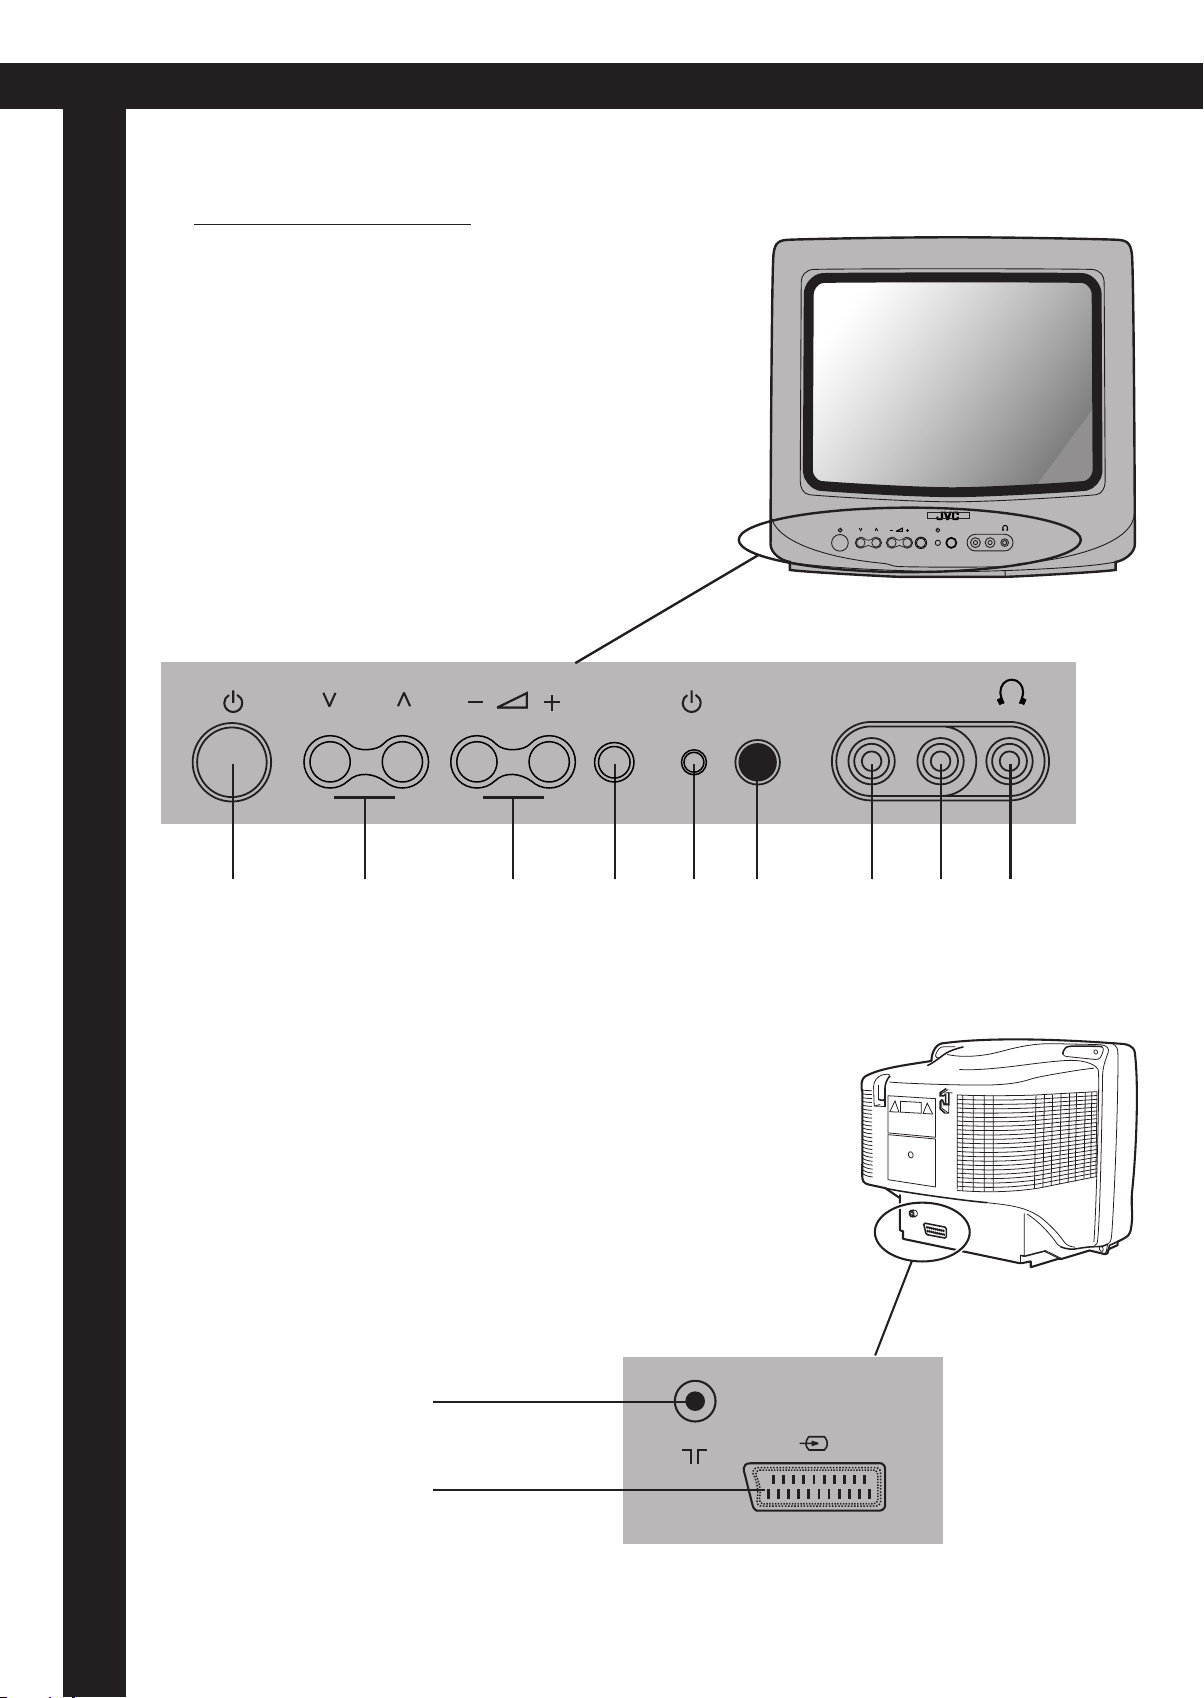
IDENTITY OF FEATURES ON LOCAL AND REMOTE CONTROL
LOCAL CONTROL
Front
MAIN
POWER
BUTTON
P TV/AV
PROGRAMME
DOWN/UP
BUTTONS
VOLUME
DOWN/UP
BUTTONS
AV
BUTTON
STAND-BY
INDICATOR
REMOTE
SENSOR
P TV/AV
VIDEO AUDIO
VIDEO
INPUT
AUDIO
INPUT
VIDEO AUDIO
HEAD
PHONE
Back
AERIAL TERMINAL
SCART JACK
ANT
6
Page 9
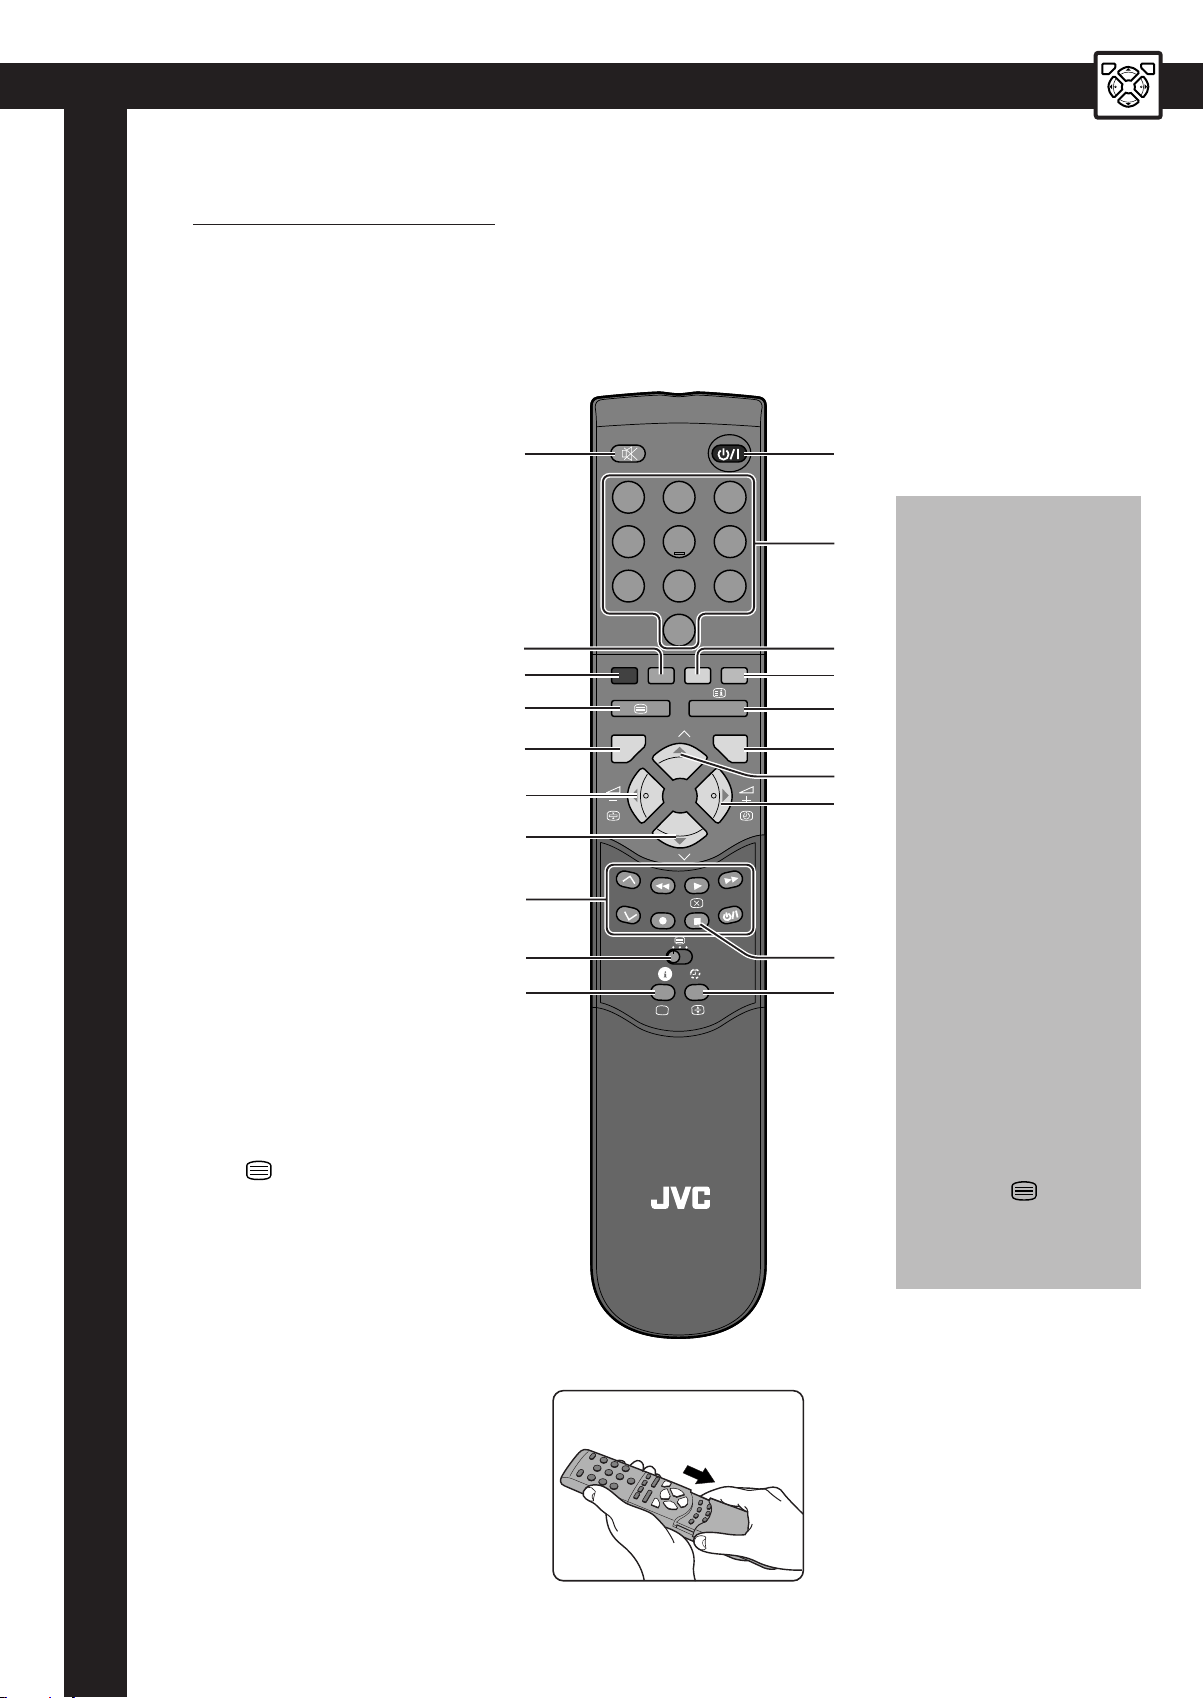
REMOTE CONTROL
TV mode
1 POWER
2 NUMBER 0-9
3 P. MODE/OK
4AV
5 (PR/CURSOR) UP
6 VOLUME UP (CURSOR RIGHT)
7 MENU
8 (PR/CURSOR) DOWN
9 VOLUME DOWN (CURSOR LEFT)
10 MUTING
11 RECALL
12 SLEEP
13 Not used
14 MOVE
15 SKIP
16 TV/TEXT
17 DELETE
18 MODE
19 VCR/
20 VCR/DVD Control buttons
/DVD switch
10
14
15
16
20
19
11
1
31 2
64 5
97 8
0
2
17
18
P.MODE / OK
4
P
AV
MENU
3
7
5
9
6
8
P
VCR DVD
13
12
?
RM-C71
TELETEXT mode
1 POWER
2 NUMBER 0-9
3 INDEX
4 Not used
5 PAGE UP
6 SUBPAGE
7 MENU
8 PAGE DOWN
9 HOLD
10 MUTE
11 REVEAL
12 SIZE
13 CANCEL
14 GREEN KEY
15 RED KEY
16 TV/TEXT
17 YELLOW KEY
18 CYAN KEY
19 VCR/
switch
/DVD
7
TV
20 Not used
Page 10

INSTALLATION
Read this “INSTALLATION” before using the TV for the first time.
1
Press the MENU button to display the MENU.
To exit the MENU, press the
MENU button again.
USING THE MENU
1
Select INSTALL from the MENU
with the UP/DOWN buttons, then
press the RIGHT button.
MENU
Menu
Picture
Timer
Language
Install
2
Select the sub-menu title with the UP/
DOWN buttons, then press the RIGHT
button to display the sub-menu.
To return to the MENU, press the
MENU button.
P
P
Menu
Picture
Timer
Language
Install
P
P
Install
Auto setup
Manual tune
Fine tune
Edit
2
Press the RIGHT button.
Menu
Picture
Timer
Language
Install
4
AUTO SETUP
When the AUTO SETUP has been completed, the EDIT menu is displayed.
When not editing the programmes, press the MENU button 3 times and exit
from the MENU.
When you want to edit the programmes, proceed to “USING THE EDIT
MENU”.
Edit
Pr Name Ch Picture Sound Skip
01 ----- C01 Euro BG No
02 ----- C07 Euro BG No
03 ----- C25 Euro BG No
04 ----- C35 Euro I No
05 ----- C50 Euro I No
06 ----- C63 Euro BG No
07 ----- C72 France LL' No
08 ----- C77 E/Euro DK No
P
P
Menu
Picture
Timer
Language
Install
P
P
Install
Auto setup
Manual tune
Fine tune
Edit
P
P
8
Page 11

1
Select LANGUAGE from the
MENU with the UP/DOWN buttons, then press the RIGHT button.
2
Select the required language with the
UP/DOWN buttons.
Menu
Picture
Timer
LANGUAGE SELECTION
Language
Install
3
Choose the appropriate country with the UP/DOWN buttons, then press the
RIGHT button.
Note:
• You should choose FRANCE to view a French broadcast (SECAM-L system).
• The country determines the teletext character set.
Deutschland
France
Great Britain
Italia
Sverige
Schweiz
Nederland
Ireland
Espana
East Europe
Others
English
P
P
Menu
Picture
Timer
Language
Install
P
P
P
P
Deutschland
France
Great Britain
Italia
Sverige
Schweiz
Nederland
Ireland
Espana
East Europe
Others
Francais
Deutsch
Italiano
Espanol
Nederlands
Svenska
P
P
P
Auto setup
P
English
Francais
Deutsch
Italiano
Espanol
Nederlands
Svenska
C10 Pr05
Note:
• If the channel you want to watch is not registered, use the MANUAL TUNE function to
register that channel.
• If the picture is not displayed correctly, use the PICTURE function from the EDIT menu
to change the settings. If the picture is still not displayed correctly, use the FINE TUNE
function to finely tune the channel.
• If the sound is not correct, use the SOUND function from the EDIT menu to change the
settings.
9
Page 12

INSTALLATION
1
Select INSTALL from the MENU with the UP/DOWN buttons, then press the
RIGHT button.
3
USING THE EDIT MENUSKIP
Menu
Picture
Timer
Language
Install
P
P
Menu
Picture
Timer
Language
Install
P
P
Install
Auto setup
Manual tune
Fine tune
Edit
Use the UP/DOWN buttons to select the number of the programme you want
to edit.
P
P
Edit
Pr Name Ch Picture Sound Skip
01 ----- C01 Euro BG No
02 ----- C07 Euro BG No
03 ----- C25 Euro BG No
04 ----- C35 Euro I No
05 ----- C50 Euro I No
06 ----- C63 Euro BG No
07 ----- C72 France LL' No
08 ----- C77 E/Euro DK No
You can select SKIP “YES” or “NO” with the SKIP button.
A prog. marked with SKIP “YES” is skipped when changing channel using the
UP/DOWN button.
Edit
Pr Name Ch Picture Sound Skip
01 ----- C01 Euro BG No
02 ----- C07 Euro BG Yes
P .MODE / OK
03 ----- C25 Euro BG No
04 ----- C35 Euro I No
05 ----- C50 Euro I No
06 ----- C63 Euro BG No
07 ----- C72 France LL' No
08 ----- C77 E/Euro DK No
10
Page 13

2
Select EDIT with the UP/DOWN buttons, then press the RIGHT button.
P
P
Install
Auto setup
Manual tuneu
Fine tune
Edit
P
P
Edit
Pr Name Ch Picture Sound Skip
01 ----- C01 Euro BG No
02 ----- C07 Euro BG No
03 ----- C25 Euro BG No
04 ----- C35 Euro I No
05 ----- C50 Euro I No
06 ----- C63 Euro BG No
07 ----- C72 France LL' No
08 ----- C77 E/Euro DK No
4
Edit the programme in accordance with the explanations of SKIP, DELETE,
MOVE, NAME, CH., PICTURE and SOUND.
When the editing has been completed, press the MENU button 3 times and
exit from the MENU.
When you want to continue to edit another program, use the LEFT/RIGHT buttons to move the cursor below “PR.” (programme) and then return to step 3.
When the DELETE button is pressed, the selected channel is deleted. The
deleted channel is automatically moved to PR. 99 and the SKIP function is set
to YES. If a channel is deleted, the programme numbers of the following channels are all lowered by one.
DELETE
P .MODE / OK
Edit
Pr Name Ch Picture Sound Skip
01 ----- C01 Euro BG No
02 ----- C25 Euro BG No
03 ----- C35 Euro I No
04 ----- C50 Euro I No
05 ----- C63 Euro BG No
06 ----- C72 France LL' No
07 ----- C77 E/Euro DK No
08 ----- C80 Euro BG No
11
Page 14

INSTALLATION
Edit
Pr Name Ch Picture Sound Skip
01 ----- C01 Euro BG No
02 ----- C07 Euro BG No
03 ----- C25 Euro BG No
Edit
Pr Name Ch Picture Sound Skip
01 ----- C01 Euro BG No
02 M---- C07 Euro BG No
03 ----- C25 Euro BG No
Edit
Pr Name Ch Picture Sound Skip
01 ----- C01 Euro BG No
02 M---- C07 Euro BG No
03 ----- C25 Euro BG No
1
The MOVE function can be used
to move a channel to a different
programme number. Press the
MOVE button to start the MOVE
function.
MOVECH. (CHANNEL)
P .MODE / OK
1
Names can be registered to
channels.
Use the LEFT/RIGHT buttons to
move the cursor to below
“NAME”.
Edit
Pr Name Ch Picture Sound Skip
01 ----- C01 Euro BG No
02 ----- C07 Euro BG No
03 ----- C25 Euro BG No
04 ----- C35 Euro I No
05 ----- C50 Euro I No
06 ----- C63 Euro BG No
07 ----- C72 France LL' No
08 ----- C77 E/Euro DK No
2
Use the UP/DOWN buttons to select
the programme number to which you
want to move the channel and press
the MOVE button again.
Edit
P
P
Pr Name Ch Picture Sound Skip
01 ----- C01 Euro BG No
02 ----- C07 Euro BG No
03 ----- C25 Euro BG No
04 ----- C35 Euro I No
05 ----- C50 Euro I No
06 ----- C63 Euro BG No
07 ----- C72 France LL' No
08 ----- C77 E/Euro DK No
P .MODE / OK
Edit
Pr Name Ch Picture Sound Skip
01 ----- C01 Euro BG No
02 ----- C25 Euro BG No
03 ----- C35 Euro I No
04 ----- C07 Euro BG No
05 ----- C50 Euro I No
06 ----- C63 Euro BG No
07 ----- C72 France LL' No
08 ----- C77 E/Euro DK No
2
Use the UP/DOWN buttons to select a
character and use the LEFT/RIGHT
buttons to move the cursor. Repeat this
operation to create the name.
NAME
1
The channel registered to a programme number can be changed
to another channel. Use the
LEFT/RIGHT buttons to move the
cursor to below “CH.”.
P
P
ABCDEFGHIJKLMNOPQRST
UVWXYZ+- . 0123456789
P
P
ABCDEFGHIJKLM NOPQRST
UVWXYZ+-. 0123456789
P
P
ABCDEFGHIJKLMNOPQRST
UVWXYZ+- . 0123456789
2
Use the UP/DOWN buttons to change
the channel.
Edit
P
P
Pr Name Ch Picture Sound Skip
01 ----- C01 Euro BG No
02 ----- C07 Euro BG No
03 ----- C25 Euro BG No
04 ----- C35 Euro I No
05 ----- C50 Euro I No
06 ----- C63 Euro BG No
07 ----- C72 France LL' No
08 ----- C77 E/Euro DK No
P
P
Edit
Pr Name Ch Picture Sound Skip
01 ----- C01 Euro BG No
02 ----- C55 Euro BG No
03 ----- C25 Euro BG No
04 ----- C35 Euro I No
05 ----- C50 Euro I No
06 ----- C63 Euro BG No
07 ----- C72 France LL' No
08 ----- C77 E/Euro DK No
12
Page 15

1
If the picture is not displayed
correctly, use the PICTURE function to change the colour system.
Use the LEFT/RIGHT buttons to
move the cursor to below “PICTURE”.
2
Use the UP/DOWN buttons to select
the colour system which displays the
picture correctly.
P
P
Edit
Pr Name Ch Picture Sound Skip
01 ----- C01 Euro BG No
02 ----- C07 Euro BG No
03 ----- C25 Euro BG No
04 ----- C35 Euro I No
05 ----- C50 Euro I No
06 ----- C63 Euro BG No
07 ----- C72 France LL' No
08 ----- C77 E/Euro DK No
P
P
Edit
Pr Name Ch Picture Sound Skip
01 ----- C01 Euro BG No
02 ----- C07 E/Euro BG No
03 ----- C25 Euro BG No
04 ----- C35 Euro I No
05 ----- C50 Euro I No
06 ----- C63 Euro BG No
07 ----- C72 France LL' No
08 ----- C77 E/Euro DK No
1
If the sound is not correct, use the SOUND function to change the sound system.
Use the LEFT/RIGHT buttons to move the cursor to below “SOUND”.
P
P
Edit
Pr Name Ch Picture Sound Skip
01 ----- C01 Euro BG No
02 ----- C07 Euro BG No
03 ----- C25 Euro BG No
04 ----- C35 Euro I No
05 ----- C50 Euro I No
06 ----- C63 Euro BG No
07 ----- C72 France LL' No
08 ----- C77 E/Euro DK No
2
SOUND PICTURE
Use the UP/DOWN buttons to select the sound system which gives the correct
sound.
P
P
Edit
Pr Name Ch Picture Sound Skip
01 ----- C01 Euro BG No
02 ----- C07 Euro I No
03 ----- C25 Euro BG No
04 ----- C35 Euro I No
05 ----- C50 Euro I No
06 ----- C63 Euro BG No
07 ----- C72 France LL' No
08 ----- C77 E/Euro DK No
13
Page 16

INSTALLATION
1
Manually register the channel to
a programme number. When no
menu is displayed, use the UP/
DOWN buttons or the NUMBER
0-9 buttons to select the program
number to which you want to
register the channel.
5
Press the LEFT/RIGHT buttons
MANUAL TUNEFINE TUNE
repeatedly until the channel you
want is displayed.
MENU
Menu
Picture
Timer
Language
Install
2
Display the MENU with the MENU button, then select INSTALL with the UP/
DOWN buttons and press the RIGHT
button.
P
P
Menu
Picture
Timer
Language
Install
P
P
Install
Auto setup
Manual tune
Fine tune
Edit
P
Manual tune
P
1
When the channel reception is
poor, use the FINE TUNE function to fine-tune the channel.
When no menu is displayed, use
the UP/DOWN buttons or the
NUMBER 0-9 buttons to display
the channel that you want to finetune.
MENU
Menu
Picture
Timer
Language
Install
C50 Pr01
P
P
2
Display the MENU with the MENU button, then select INSTALL with the UP/
DOWN buttons and press the RIGHT
button.
Menu
Picture
Timer
Language
Install
P
P
Install
Auto setup
Manual tune
Fine tune
Edit
14
Page 17

3
Select MANUAL TUNE with the
UP/DOWN buttons.
4
Press the LEFT/RIGHT buttons to
search for a channel. Scanning stops
when the TV finds a channel. The channel is then displayed.
P
P
Install
Auto set
Manual tune
Fine tune
Edit
P
Manual tune
P
C32 Pr01
Note:
• If the sound is not correct even when the picture of the channel is displayed correctly,
press the MODE button to select the sound system that has the correct sound.
• If the TV cannot search for the channel you want, press the MODE button, change to a
different mode and then repeat the operation from step 4.
Euro
P .MODE / OK
E/Euro
3
Select FINE TUNE with the UP/
DOWN buttons.
P
P
Install
Auto set
Manual tune
Fine tune
Edit
15
4
Keep the LEFT/RIGHT buttons pressed
to fine-tune the channel.
P
Fine tune
P
568,45 Mhz
Page 18

DAILY USE
The set has a total of 100 programme numbers, 0...99. The NUMBER button
0...9 are used for direct programme selection. In order two digit programme,
press the second numbered button within two seconds. Switch through the
programme number step by step with the UP/DOWN buttons (P 8/9).
NUMBER
SELECTING A PROGRAMME
VOLUME CONTROL
Adjust the volume with the VOLUME DOWN/UP buttons (– r +) on the front
of the set, or with the LEFT/RIGHT buttons on the remote control.
P
P
Pressing the MUTING button (
) once turns the sound off. The sound returns
if the button is pressed once more. The volume is adjusted with the VOLUME
DOWN/UP (– r +) or with the LEFT/RIGHT button.
MUTE
16
Page 19

The RECALL button is used to display the current status: programme number,
station name, clock. This display appears for 5 seconds unless any button is
pressed.
RECALL
?
By pressing the SLEEP button repeatedly, you can select one of the following
settings:
0:00 0:20 0:40 1:00 1:20 1:40 2:00
The set will turn off after time you select.
Automatic Switch-Off in No Broadcast Signal:
If broadcast signal is not present for about 30 minutes, the set will be auto-
SLEEP
matically turned off.
In AV mode, however, this function does not operate.
By pressing the P.MODE/OK button, you can select one of three picture settings (PICTURE MODEs); NORMAL I, NORMAL II or FAVOURITE.
PICTURE MODE
P.MODE / OK
17
Page 20

DAILY USE
1
Press the MENU button, then
press the RIGHT button.
MENU
PICTURE ADJUSTMENT
Menu
Picture
Timer
Language
Install
1
You can control your JVC brand
VCR or DVD player with the TV
remote control.
2
Select an item with the UP/DOWN
buttons, then adjust it with the LEFT/
RIGHT buttons.
P
P
Picture
Brightness
Contrast
Colour
Sharpness
P
P
Picture
Brightness
Contrast
Colour
Sharpness
P
P
2
Press the VCR/DVD Control button to
control your VCR or DVD player.
VCR/DVD CONTROL BUTTONS
1
Set the VCR/
/DVD switch to
the VCR or DVD position.
Note:
Some of the buttons may not work depending
on the device.
VCR DVD VCR DVD
You can operate the menus with the buttons on the front panel of the TV.
Press and hold the AV button (TV/AV) until the MENU appears.
THE REMOTE CONTROL
USING THE MENUS WITHOUT
18
Page 21

3
When the adjustments have been
completed, press the MENU
button twice and exit from the
MENU.
Note:
Your adjustments are automatically stored in the
FAVOURITE mode of PICTURE MODEs.
Contrast 38
If you press the RECALL button with the MENU displayed on the screen, the
OSD, except text will be half-toned. If you want to return to the normal OSD,
press the RECALL button again.
OSD HALF TONE FUNCTION
MENU
MENU
2
Use the following buttons to operate the menus.
Use the AV button (TV/AV) instead of the MENU button.
Use the PROGRAMME UP/DOWN button (8P9) instead of the UP/DOWN
button.
Use the VOLUME UP/DOWN button (–r+) instead of the LEFT/RIGHT
button.
19
Page 22

DAILY USE
1
Select TIMER from the MENU
with the UP/DOWN buttons, then
press the RIGHT button.
Menu
Picture
Timer
Language
USING THE TIMER MENUCLOCK
Install
1
Setting the TV clock.
Select CLOCK from the TIMER
menu with the UP/DOWN buttons
and press the RIGHT button.
2
Use the UP/DOWN buttons to select
the item and use the RIGHT button to
move the cursor to the setting position.
P
P
Menu
Picture
Timer
Language
Install
P
P
Clock
Wake up
Time
Prog.
Auto Clock
Prog.
--:--
No
--:-Pr01
No
Pr01
P
P
2
Use the UP/DOWN buttons to set the
hours, then press the RIGHT button.
1
If the AUTO CLOCK function is set to
a channel which broadcasts a teletext
programme, the TV clock is automatically set with the time information
which is included in the teletext data.
Select AUTO CLOCK from the TIMER
menu with the UP/DOWN buttons,
then press the RIGHT button.
AUTO CLOCK
P
P
P
P
Clock
Wake up
Time
Prog.
Auto Clock
Prog.
Clock
Wake up
Time
Prog.
Auto Clock
Prog.
--:-No
--:-Pr01
No
Pr01
--:--
No
--:-Pr01
No
Pr01
P
P
Clock
Wake up
Time
Prog.
Auto Clock
Prog.
--:--
No
--:-Pr01
No
Pr01
P
P
Clock
Wake up
Time
Prog.
Auto Clock
Prog.
17:--
No
--:-Pr01
No
Pr01
2
Select YES with the UP/DOWN buttons, then press the RIGHT button.
P
P
Clock
Wake up
Time
Prog.
Auto Clock
Prog.
--:-No
--:-Pr01
No
Pr01
P
P
Clock
Wake up
Time
Prog.
Auto Clock
Prog.
--:-No
--:-Pr01
Yes
Pr01
P
P
20
Page 23

3
Perform the settings in accordance with the explanations of
CLOCK, WAKE UP and AUTO
CLOCK.
4
When the operation has been completed,
press the MENU button twice and exit
from the MENU.
When you want to continue and perform
some more settings, return to step 2 after
using the LEFT/RIGHT buttons and move
the cursor back to the left of the menu.
Clock
Wake up
Time
Prog.
Auto Clock
Prog.
--:-No
--:-Pr01
No
Pr01
P
P
3
Use the UP/DOWN buttons to set
the minutes. The TV clock starts.
P
P
Clock
Wake up
Time
Prog.
Auto Clock
Prog.
17:--
No
--:-Pr01
No
Pr01
Clock
Wake up
Time
Prog.
Auto Clock
Prog.
P
P
--:-No
--:-Pr01
No
Pr01
Note:
• You can use the AUTO CLOCK function to
set the TV clock.
• If you turn off the TV’s power with the MAIN
POWER button, the clock setting is cancelled.
Clock
Wake up
Time
Prog.
Auto Clock
Prog.
17:30
No
--:-Pr01
No
Pr01
3
Select PROG. with the UP/
DOWN buttons, then press the
RIGHT button.
4
Use the UP/DOWN buttons to select
the channel for the AUTO CLOCK function. If the channel is watched for 30
seconds or longer after exiting from the
menu, the TV clock is automatically set.
Note:
• If you turn off the TV’s power with the MAIN POWER button, the clock setting is cancelled. In this case, if
you watch the channel which is set for the AUTO CLOCK function, the TV clock is automatically set and the
clock starts.
• If there is no time information in the teletext data, the AUTO CLOCK function will not work.
Clock
Wake up
Time
Prog.
Auto Clock
Prog.
--:-No
--:-Pr01
Yes
Pr01
P
P
Clock
Wake up
Time
Prog.
Auto Clock
Prog.
--:-No
--:-Pr01
Yes
Pr01
P
P
Clock
Wake up
Time
Prog.
Auto Clock
Prog.
--:-No
--:-Pr01
Yes
Pr01
P
P
Clock
Wake up
Time
Prog.
Auto Clock
Prog.
21
--:-No
--:-Pr01
Yes
Pr03
Page 24

DAILY USE
1
You can use the WAKE UP function to automatically turn the TV
on at a set time. You can also
select the channel to be displayed
when the TV is turned on.
Select WAKE UP from the TIMER
menu with the UP/DOWN buttons,
then press the RIGHT button.
P
P
5
WAKE UPCHILD LOCK
Select PROG. with the UP/
DOWN buttons, then press the
RIGHT button.
Clock
Wake up
Time
Prog.
Auto Clock
Prog.
17:30
No
--:-Pr01
No
Pr01
2
Select YES with the UP/DOWN buttons, then press the RIGHT button.
P
P
Clock
Wake up
Time
Prog.
Auto Clock
Prog.
17:30
No
--:-Pr01
No
Pr01
P
P
Clock
Wake up
Time
Prog.
Auto Clock
Prog.
17:30
Yes
--:-Pr01
No
Pr01
P
P
6
Use the UP/DOWN buttons to select
the channel to be displayed when the
TV is turned on.
Clock
Wake up
Time
Prog.
Auto Clock
Prog.
17:30
Yes
07:--
Pr01
No
Pr01
P
P
Clock
Wake up
Time
Prog.
Auto Clock
Prog.
17:30
Yes
07:30
Pr01
No
Pr01
P
P
Clock
Wake up
Time
Prog.
Auto Clock
Prog.
17:30
Yes
07:30
Pr01
No
Pr01
1
You can prevent the TV from being used without the remote control.
Set the VCR/
VCR DVD
/DVD switch to the (text) position.
P
P
22
Page 25

3
Select TIME with the UP/DOWN
buttons, then press the RIGHT
button.
4
Use the UP/DOWN buttons and RIGHT
button to set the time at which you want
the TV to be turned on. When the setting is completed, press the RIGHT
button.
Clock
Wake up
Time
Prog.
Auto Clock
Prog.
7
Clock
Wake up
Time
Prog.
Auto Clock
Prog.
17:30
Yes
--:-Pr01
No
Pr01
P
P
Clock
Wake up
Time
Prog.
Auto Clock
Prog.
17:30
Yes
--:--
Pr01
No
Pr01
After exiting from the menu by
pressing the MENU button twice,
press the POWER button on the
remote control and turn the TV
off. The TV will be turned on at
the set time.
17:30
Yes
07:30
Pr01
No
Pr01
P
P
Clock
Wake up
Time
Prog.
Auto Clock
Prog.
17:30
Yes
07:30
Pr01No
Pr01
P
P
Clock
Wake up
Time
Prog.
Auto Clock
Prog.
17:30
Yes
--:--
Pr01
No
Pr01
P
P
Note:
• If the WAKE UP function is set to YES, the
TV will be turned on every time the set time
is reached. To cancel the WAKE UP function, set the WAKE UP function to NO.
• The WAKE UP function will not work unless
the TV clock is working.
• The WAKE UP function will not work if you
turn off the TV’s power with the MAIN
POWER button.
• For safety reasons, the TV will automatically
turn off if no operations are made within
approximately 3 hours after the TV is turned
on with the WAKE UP function.
P
P
Clock
Wake up
Time
Prog.
Auto Clock
Prog.
17:30
Yes
07:30
Pr03
No
Pr01
MENU MENU
2
Press the remote control buttons in the following order within 5 seconds and
turn the TV off: RED button
The CHILD LOCK function will operate and you will not be able to turn the TV
on without using the remote control. The STAND-BY INDICATOR flashes while
the CHILD LOCK function is operating.
Note:
The CHILD LOCK function has priority over the WAKE UP function.
P .MODE / OK
P .MODE / OK P .MODE / OK
Green button Y ellow b utton POWER button.
23
Page 26

TELETEXT
1-SWITCHING TELETEXT ON/OFF
Set the VCR/
( ). To return to the TV mode, press the TELETEXT button again.
Note:
Some of the buttons may not work if the VCR/ /DVD switch is not set to the (text)
position.
2-COLOUR BUTTONS IN TOP/FLOF TELETEXT
A red, green, yellow and blue field is shown at the bottom of the screen. If TOP or FLOF
teletext (FASTEXT) is transmitted by the station, pressing the corresponding colour button
on the remote controller, you can select the desired page easily.
3-SELECTING PAGES
The NUMBER button 0...9 are used to enter a page number. The selected page number
appears at the top of the screen and the page appears after a short time.
The UP/DOWN buttons increase or decrease the current page number by 1.
/DVD switch to the (text) position, then press the TELETEXT button
4-INDEX PAGE
You can switch directly to the programme preview, (with TOP text), or the overview page of
the station you are currently viewing by pressing the INDEX, ( ), button.
5-PAGE HOLD
Several sub pages can be combined under a page number and are scrolled at an interval
determined by the television station. The presence of sub pages is indicated by, for example,
3/6 beneath the time, which means that you are looking at the 3rd page of a total of 6 pages.
If you want to look at a subpage for a longer period of time, press the HOLD, ( ), button.
“STOP!” appears at the top of the screen and the contents of the subpage shown are kept
on the screen and no longer updated or switched to other subpages. Pressing the HOLD
button again, the current subpage appear.
24
Page 27

6-CALLING UP SUBPAGE DIRECTLY
Pressing the SUBPAGE, ( ), button, “Sub-Code – – – –” appears beside page number.
Enter the subpage number that you want to call up with the NUMBER button 0...9, for example, the 2nd page, sequence 0002. The desired subpage is sought and displayed.
7-W ATCHING TELEVISION DURING TELETEXT MODE
Some pages are continually updated, for example, stock market reports, sports announcement and the latest news. If you want to watch television and stay informed at the same
time, press CANCEL, ( ), button. The regular programme is still visible and the teletext
page number appears at the top. Pressing the CANCEL button, the teletext page appears
with the updated information.
8-REVEAL ANSWER
This function can be used on certain pages to reveal the solution of riddles. Press the REVEAL button, ( ? ), to reveal a hidden answer and press again to hide it.
9-DOUBLING CHARACTER SIZE
Repeatedly pressing the SIZE button, ( ), doubles the character size in the following
order: Upper half of the page Lower half of the page Return to normal size.
10-VOLUME AND BRIGHTNESS CONTROL IN TELETEXT MODE
Pressing the MENU button in the teletext mode displays the volume and brightness control
menu at the bottom of the screen.
You can adjust volume and brightness using the LEFT/RIGHT button.
25
Page 28

TROUBLESHOOTING
• If the plug is disconnected from the AC socket, or the TV aerial has problems, you may think there is a
problem with the TV itself. Be sure to check the following before calling for service.
IMPORTANT
• Review all instructions in this manual
■ GENERAL
Problem
The TV cannot be turned on.
No picture or sound.
The TV shuts off automatically.
The TV turns on automatically.
Inoperable remote control.
Action
• Insert the plug in an AC socket.
• Turn the main power on. (See page 3)
• The buttons on the front panel of the TV will not work if the
CHILD LOCK is operating. The CHILD LOCK function is
operating if STAND-BY indicator blinks.
Use the POWER button on the remote control to turn the TV
on.
• Check aerial connections. (See page 4)
• Choose the correct input mode. (See page 4)
• Choose the correct sound system manually. (See “SOUND” on
page 13.)
• Did you set the SLEEP function? (See page 17)
• If broadcast signal is not present for about 30 minutes, the set
will be automatically turned off.
• For safety reasons, the TV will automatically turn off if no
operations are made within approximately 3 hours after the TV
is turned on with the WAKE UP function.
• Did you set the WAKE UP function? (See page 22)
• Replace the batteries. (See page 3)
• Insert the batteries correctly. (See page 3)
• Use the remote control within about 7 metres of the TV.
■ PICTURE
■ SOUND
The following are normal and are NOT malfunctions:
• When touching the picture tube surface, you might feel a slight charge of static electricity. This is because
the picture tube contains static electricity; it does not affect the human body.
• The TV may emit a crackling sound due to a sudden change in temperature. There is no problem unless the
picture or sound is abnormal.
•
When a still, bright image (of a white dress, for e xample) appears on the screen, the image may be coloured.
This problem occurs in all picture tubes, and as the bright image disappears, the colour also disappears.
• This TV is equipped with a microcomputer that may operate abnormally due to interference from external
components. If this happens, turn off the main power and disconnect the power cord from the AC socket.
Then reconnect the power cord to the AC socket and turn on the main power again.
Poor colour.
Lines or streaks in picture
(interference).
Spots (crosstalk).
Double pictures (ghosts).
Snowy pictures (noise)
No sound from the TV’s
speakers.
• Choose the correct colour system manually . (See “PICTURE”
on page 13)
• Move the components apart until the interference is eliminated.
• Reposition the aerial.
• Reposition the aerial.
• Replace with an aerial with better directionality.
• Reposition the aerial.
• Replace with an aerial with better directionality.
• Check aerial connections.
• Redirect the aerial.
• Replace or repair the aerial.
• Disconnect the headphones.
26
Page 29

SPECIFICATIONS
Item AV-14JT5EU AV-21JT5EU
TV RF systems CCIR B/G, I, D/K, L
Colour systems PAL, SECAM (NTSC 3.58 / 4.43 MHz only in AV modes)
Channels and frequencies E2-E12, E-21-E69, S1-S41, X, Y, Z, Z+1, Z+2, A-H, H+1, H+2, F2-F10, F21-F69,
R1-R12, R21-R69
Teletext systems FLOF (Fastext) / TOP / WST (standard system)
Power requirements AC 230 V, 50 Hz
Power consumption
Picture tube size Visible area 34 cm (measured diagonally) Visible area 51 cm (measured diagonally)
Audio output Rated Power output: 3 W
External input / output 21-pin Euroconnector (SCART)
Dimensions (W × H × D) 366 mm × 338 mm × 385 mm 516 mm × 466.5 mm × 476 mm
Weight 9 kg 19.5 kg
Remote control unit RM-C71
Design and specifications subject to change without notice.
Model
Maximum 57 W, Average 37 W, Standby 2 W Maximum 73 W, Average 53 W, Standby 2 W
VIDEO IN (RCA)
AUDIO IN (RCA)
Headphone jack (mini jack, dia. 3.5 mm)
27
 Loading...