


IMPRESSA F90/F9
Instructions for use
Art. Nr. 65382
3/05

JURA IMPRESSA F90/F9
Legend:
 DISPLAY: serves as information.
 DISPLAY: please follow the instructions shown.
|
|
|
|
|
|
|
JURA Elektroapparate AG, CH-4626 Niederbuchsiten, |
|
|
|
|
|
|
|
|
|
|
= Note |
|
= Important |
|
= Tip |
Internet http://www.jura.com |
|
|
|
|
||||
|
|
|
|

|
Fig. 1 |
|
|
Fig. 2 |
|
|
Fig. 3 |
|
|
Fig. 4 |
||||
|
|
|
|
|
|
|
|
|
|
|
|
|
|
|
|
Fig. 5 |
|
|
Fig. 6 |
|
|
Fig. 7 |
|
|
Fig. 8 |
||||
|
|
|
|
|
|
|
|
|
|
|
|
|
|
|
|
Fig. 9 |
|
|
Fig. 10 |
|
|
Fig. 11 |
|
|
Fig. 12 |
||||
|
|
|
|
|
|
|
|
|
|
|
|
|
|
|
Fig. 13 |
|
Fig. 14 |
|
Fig. 15 |
|
Fig. 16 |
2
1
3
7 |
8 |
9 |
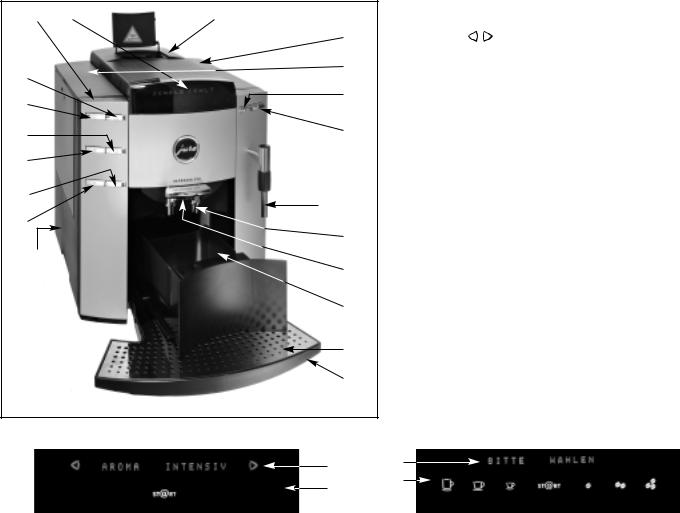
Control elements |
|||
A) |
Display dialog system |
|||||
|
|
10 |
||||
|
|
B) |
Symbols |
(navigation in programming mode) |
||
|
|
11 |
C) |
Large cup |
|
|
6 |
|
D) |
Coffee |
|
||
|
|
E) |
Espresso |
|
||
5 |
|
12 |
F) |
Start (to start the draw-off operation) |
||
|
G) |
Coffee strength «mild» |
||||
|
|
|||||
|
|
13 |
H) |
Coffee strength «Normal» |
||
4 |
|
I) |
Coffee strength «strong» |
|||
|
|
1 |
Programming key |
|||
3 |
|
|
||||
|
|
2 |
Selection key for pre-ground coffee |
|||
|
|
|
3 |
Draw-off key 1 cup |
||
2 |
|
|
4 |
Draw-off key 2 cups |
||
|
14/15 |
5 |
ON/OFF key |
|
||
|
|
|
||||
1 |
|
|
6 |
Maintenance key |
||
|
16 |
7 |
Connectivity socket |
|||
|
|
8 |
Control panel |
|
||
21 |
|
17 |
9 |
Filler funnel key for pre-ground coffee |
||
|
10 |
Bean tank cover |
||||
|
|
|||||
|
|
|
11 |
Water tank with handle |
||
|
|
18 |
12 |
Water portion draw-off key |
||
|
|
13 |
Steam portion draw-off key |
|||
|
|
|
14 |
2-stage frothing jet (Fig. 7) |
||
|
|
19 |
15 |
Replaceable hot water jet |
||
|
|
16 |
Height-adjustable coffee spout |
|||
|
|
20 |
17 |
Cup illumination (Fig. 10) |
||
|
|
18 |
Coffee grounds container |
|||
|
|
|
19 |
Drip grate |
|
|
|
|
|
20 |
Drip tray |
|
|
|
|
|
21 |
Power switch |
|
|
|
|
PROGRAMMATION |
|
Sensitive Touch Screen Technology |
||
|
|
B) |
A) |
|
|
|
|
|
|
|
|
||
|
|
8 |
8 |
|
|
|
|
|
|
|
|
||
C) D) E) F) G) H) I)
Contents |
|
|
13. |
Programming ................................................ |
page 13 |
|
|
|||
JURA IMPRESSA |
|
|
|
13.1 |
Programming the filter ........................... |
page 14 |
|
|
||
|
|
|
13.2 |
Programming the water hardness |
page 14 |
|
|
|||
1. |
Description of control panel |
page |
6 |
|
|
|
||||
|
13.3 |
Programming the aroma INTENSIVE |
|
|
|
|||||
2. |
Safety information .......................................... |
page |
6 |
|
|
or STANDARD...................................... |
page 14 |
|
|
|
|
2.1 |
Warning................................................. |
page |
6 |
|
13.4 |
Programming the temperature .................. |
page 14 |
|
|
|
2.2 |
Precautions ............................................. |
page |
6 |
|
13.5 |
Programming the water quantity ............... |
page 14 |
|
|
|
2.3 |
Power Switch .......................................... |
page |
7 |
|
13.6 |
Programming 1 cup ............................... |
page 15 |
|
|
3. |
Preparing the coffee machine for use................... |
page |
7 |
|
13.7 |
Programming the steam portion ................ |
page 15 |
|
|
|
|
3.1 |
Check the mains voltage............................. |
page |
7 |
|
13.8 |
Programming the water portion ................ |
page 16 |
|
|
|
3.2 |
Check electrical fuse ................................. |
page |
7 |
|
13.9 |
Programming the time ............................ |
page 16 |
|
|
|
3.3 |
Refill water............................................. |
page |
7 |
|
13.10 |
Programming the automatic switch-on |
|
|
|
|
3.4 |
Filling the bean tank ................................. |
page |
7 |
|
|
time ................................................... |
page 16 |
|
|
|
3.5 |
Adjusting the grinding gear......................... |
page |
7 |
|
13.11 |
Programming the automatic switch-off |
|
|
|
4. |
First use....................................................... |
page |
7 |
|
|
time ................................................... |
page 16 |
|
|
|
|
4.1 |
Cup illumination |
page |
8 |
|
13.12 |
Cup counter |
page 17 |
|
|
|
|
|
|
|||||||
5. |
Adjustment of water hardness ............................ |
page |
8 |
|
13.13 |
Programming the language ...................... |
page 17 |
|
E |
|
6. |
.........Installation of CLARIS plus filter cartridges |
page |
9 |
|
13.14 |
.........................................Connectivity |
page 18 |
|
||
|
6.1 |
Installing the filter.................................... |
page |
9 |
14. |
Maintenance |
page 18 |
|
||
|
6.2 |
Replacing the filter ................................... |
page |
9 |
|
|||||
|
|
14.1 |
Refilling water ...................................... |
page 18 |
|
|
||||
7. |
Rinsing the coffee machine................................ |
page 10 |
|
14.2 |
Emptying the coffee grounds container........ |
page 18 |
|
|
||
8. |
..........................................Drawing off coffee |
page 10 |
|
14.3 |
.........................................No Drip tray |
page 18 |
|
|
||
|
8.1 |
Drawing off espresso ................................. |
page 10 |
|
14.4 |
Filling the bean tank .............................. |
page 18 |
|
|
|
|
8.2 |
Drawing off a large cup of coffee ................. |
page 10 |
|
14.5 |
Replacing the filter ................................ |
page 18 |
|
|
|
|
8.3 |
Drawing off pre-ground coffee ..................... |
page 11 |
|
14.6 |
Cleaning the coffee machine ..................... |
page 19 |
|
|
|
9. |
Drawing off hot water...................................... |
page 11 |
|
14.7 |
Coffee machine calcified .......................... |
page 19 |
|
|
||
10. Drawing off steam .......................................... |
page 12 |
|
14.8 |
General cleaning instructions .................... |
page 19 |
|
|
|||
11 |
Drawing off steam with the |
|
|
|
14.9 |
Emptying the system .............................. |
page 19 |
|
|
|
|
Professional-Cappuccino Frother ........................ |
page 12 |
15. |
Cleaning ....................................................... |
page 19 |
|
|
|||
|
11.1 |
Connecting the Professional-Cappuccino |
|
|
16. |
De-scaling..................................................... |
page 20 |
|
|
|
|
|
Frother to the F90/F9............................. |
page 12 |
17. |
Disposal ....................................................... |
page 21 |
|
|
||
|
11.2 Drawing off cappuccino and hot milk with |
|
|
18. |
Tips for perfect coffee...................................... |
page 21 |
|
|
||
|
|
the Professional-Cappuccino Frother .......... |
page 12 |
19. |
Messages ...................................................... |
page 22 |
|
|
||
|
11.3 |
Cleaning the Professional-Cappuccino |
|
|
20. |
Problems ...................................................... |
page 23 |
|
|
|
|
|
Frother ............................................... |
page 13 |
21. |
Legal information ........................................... |
page 24 |
|
|
||
12. Switching off the coffee machine ........................ |
page 13 |
22. |
Technical data ............................................... |
page 24 |
|
|
||||
5

Important information
Thank you very much for purchasing this IMPRESSA coffee machine.
Before using your new coffee machine for the first time, carefully read this operating manual and keep it for future reference. Should you need more information or if you meet with particular problems not specified in these operating instructions in sufficient detail, either contact us directly or contact your local authorized dealer.
You will also find useful tips on operation and maintenance of your IMPRESSA on the website at www.jura.com. Don’t forget to check out the Knowledge Builder our animated operating instructions. LEO, our assistant, will take you through all the functions.
1. Description of control panel
A gentle push on the control panel will do, and the sensors will read your wish from your fingertips. The IMPRESSA offers Café à la Carte, coffee to the taste of everybody. You can select one of the programmed coffee specialities at a gentle touch on the touch screen.
As a result of high electromagnetic interference, the touch screen may become inactive. All the remaining draw-off keys, the selection key for pre-ground coffee, draw-off key 1 cup, draw-off key 2 cups, can still be used.
2. Safety information
2.1 Warning
Children do not realize the dangers involved in using electric appliances, for this reason always keep an eye on children when they use electric appliances.
The coffee machine may only be used by instructed persons.
Never use a defective coffee machine or a machine with a defective mains cable.
Never immerse the coffee machine in water.
Never repair or open the coffee machine yourself. Any repairs may only be carried out by authorized service shops using original spare parts and accessories.
2.2 Precautions
Never expose the coffee machine to weather (rain, snow, frost), never touch the machine when your hands are wet.
Place the IMPRESSA on a firm, level base that is resistant to any water that may leak. Never stand on hot or warm surfaces (oven hobs). Keep out of the reach of children.
If you don’t use the machine for a longer time (holidays, etc.) always disconnect the mains cable.
Always disconnect mains cable before cleaning the machine.
When disconnecting the mains cable never pull on the mains cable or the machine itself.
The coffee machine is connected to mains supply via a mains cable. Make sure nobody can trip over the mains cable. Make sure children and pets cannot reach the machine
Never put the coffee machine or individual parts of it into a dishwasher.
Make sure to install the machine at a place with sufficient air circulation, to prevent overheating of the machine.
6

2.3 Power switch
Actuate the power switch (21) on your IMPRESSA before using the machine for the first time.
We recommend that you switch off your IMPRESSA with the power switch (21) if you intend not to use the machine for longer periods of time (e.g.during holidays)
3. Preparing the coffee machine for use
3.1 Check the mains voltage
The coffee machine is preset in the factory to the correct mains voltage. Check if your local mains supply voltage complies with the information given on the type plate on the underside of the coffee machine.
3.2 Check electrical fuse
The coffee machine is designed for an electric current of 10 Ampères. Check if the electrical fuse has sufficient capacity.
3.3 Refill water
Only use fresh, cold water. Never fill in milk, mineral water or other liquids.
Take out the water tank and thoroughly rinse it with cold tap water (Fig. 1).
Then fill the water tank and re-install it in the coffee machine. Make sure the tank is installed correctly and that it engages properly.
3.4 Filling the bean tank
To ensure that your machine will work perfectly for a long time and to avoid damage, please note that the grinding gear of your JURA coffee machine is not suitable for coffee beans which were treated, during or after roasting, with additives (e.g. sugar). Such coffee blends may damage the grinding gear. Any repair costs resulting from the use of such blends are not covered by warranty.
Open the cover of the bean tank (10).
Remove any dirt or foreign matter from the bean tank.
Fill coffee beans in the bean tank and close the cover.
3.5Adjusting the grinding gear
You can adjust the grinding gear to the roast of your coffee. We |
|
||
recommend that you use |
E |
||
a fine adjustment |
(the smaller the dots, the finer the |
||
|
|||
grinding is) for a light roast
a coarse adjustment (the bigger the dots, the coarser the grinding is) for a dark roast
The grinding degree may only be adjusted while the grinding gear is running.
Open the cover of the bean tank (10).
To adjust the grinding degree turn the rotary switch (Fig. 2) to the required position.
4. First use
Fill coffee beans in the bean tank (10).
Fill water tank.
Switch on your coffee machine using the key  .
.
7
 WWW.IMPRESSA-F-LINE.COM
 HELLO, MACHINE HEATING UP
 FILL SYSTEM / WATER PORTION
Place an empty cup under the hot water jet (15).
Press water portion draw-off key 
 SYSTEM FILLING
 MACHINE HEATING UP
 PRESS MAINTENANCE
 MACHINE RINSING
 PLEASE SELECT
Press symbol 


 .
.
 COFFEE NORMAL
If FILL BEANS is displayed, touch the symbol again. The mill was still empty.
To get an excellent froth, adjust the coffee spout (16) to the size of your cup (Fig. 3 ).
4.1 Cup illumination
The cup illumination puts your coffee in a good light, making it a treat for the eyes.
When you plug in or switch on the machine or press any key, the cup illumination is activated for 1 minute. To switch on the cup illumination, with the machine switched off, press any key (Fig. 10).
5. Adjustment of water hardness
In the coffee machine water is heated up. As a result, calcification occurs during normal use and is indicated automatically. Before using the machine for the first time the hardness of the water used must be adjusted. Use the supplied test sticks for this.
1° German hardness is equivalent to 1.79° French hardness.
The coffee machine has 5 hardness degrees which can be used and are displayed while you are adjusting the water hardness.
The displayed information means the following:
WATER |
|
HARDNESS –– |
Water hardness function switched off |
WATER |
German water hardness degree 1 to 7° |
HARDNESS 1 |
French Water hardness degree 1.79 – 12.53° |
WATER |
German water hardness degree 8 to 15° |
HARDNESS 2 |
French Water hardness degree 14.32 – 26.85° |
WATER |
German water hardness degree 16 to 23° |
HARDNESS 3 |
French Water hardness degree 28.64 – 41.14° |
WATER |
German water hardness degree 24 to 30° |
HARDNESS 4 |
French Water hardness degree 42.96 – 53.7° |
When the machine leaves the factory it is adjusted to WATER HARDNESS 3. You can adjust another hardness. To do this, proceed as follows:
Pull out the mains cable from the cable box on the rear side of the coffee machine and connect the machine to mains supply.
Press the key  to switch on the coffee machine.
 WWW.IMPRESSA-F-LINE.COM
Your coffee machine is switched to start-up position.
 HELLO, MACHINE HEATING UP
 PRESS MAINTENANCE
 MACHINE RINSING
 PLEASE SELECT
Press programming key 

 until you hear an acoustic signal.
 FILTER NO
8
 Loading...