

Jura 579 Instructions For Use Manual
Payment Box / Compact Payment Box
Bedienungsanleitung
Payment box / Compact payment box
Instructions for use
Boîtier de paiement / Boîtier de paiement compact
Mode d’emploi
Box di pagamento / Box di pagamento compatto
Istruzioni per l’uso
Betaalbox / Compacte betaalbox
Gebruiksaanwijzing
Caja de pago / Caja compacta de pago
Modo de empleo
Caixa de pagamento / Caixa de pagamento compacta
Manual de instruções
Betalningslåda / Kompakt betalningslåda
Bruksanvisning
Ящик оплаты / Компактный ящик оплаты
Руководство по эксплуатации
Systemu płatności / Kompaktowego systemu płatności
Instrukcja obsługi
JURA Type 579
ru
pl
sv
pt
es
nl
it
fr
en
de
2
Compact Payment Box
Inhaltsverzeichnis
Wichtige Hinweise 3
Bestimmungsgemäße Verwendung .................................................................................................................. 3
Zu Ihrer Sicherheit ................................................................................................................................................. 3
1 Ihre Payment Box 4
Lieferumfang .......................................................................................................................................................... 4
Kompatibilität ......................................................................................................................................................... 4
Pflege ....................................................................................................................................................................... 4
2 Payment Box installieren 4
Anschließen an Gerät ohne intelligentes Frischwasser-Kit ............................................................................. 4
Anschließen an Gerät mit intelligentem Frischwasser-Kit .............................................................................. 4
3 Payment Box konfigurieren 4
4 Payment Box deinstallieren 5
Deinstallation von Gerät ohne intelligentes Frischwasser-Kit ........................................................................5
Deinstallation von Gerät mit intelligentem Frischwasser-Kit .........................................................................5
5 Abrechnungsmodus 5
6 LED-Anzeigen 5
7 Technische Daten 5
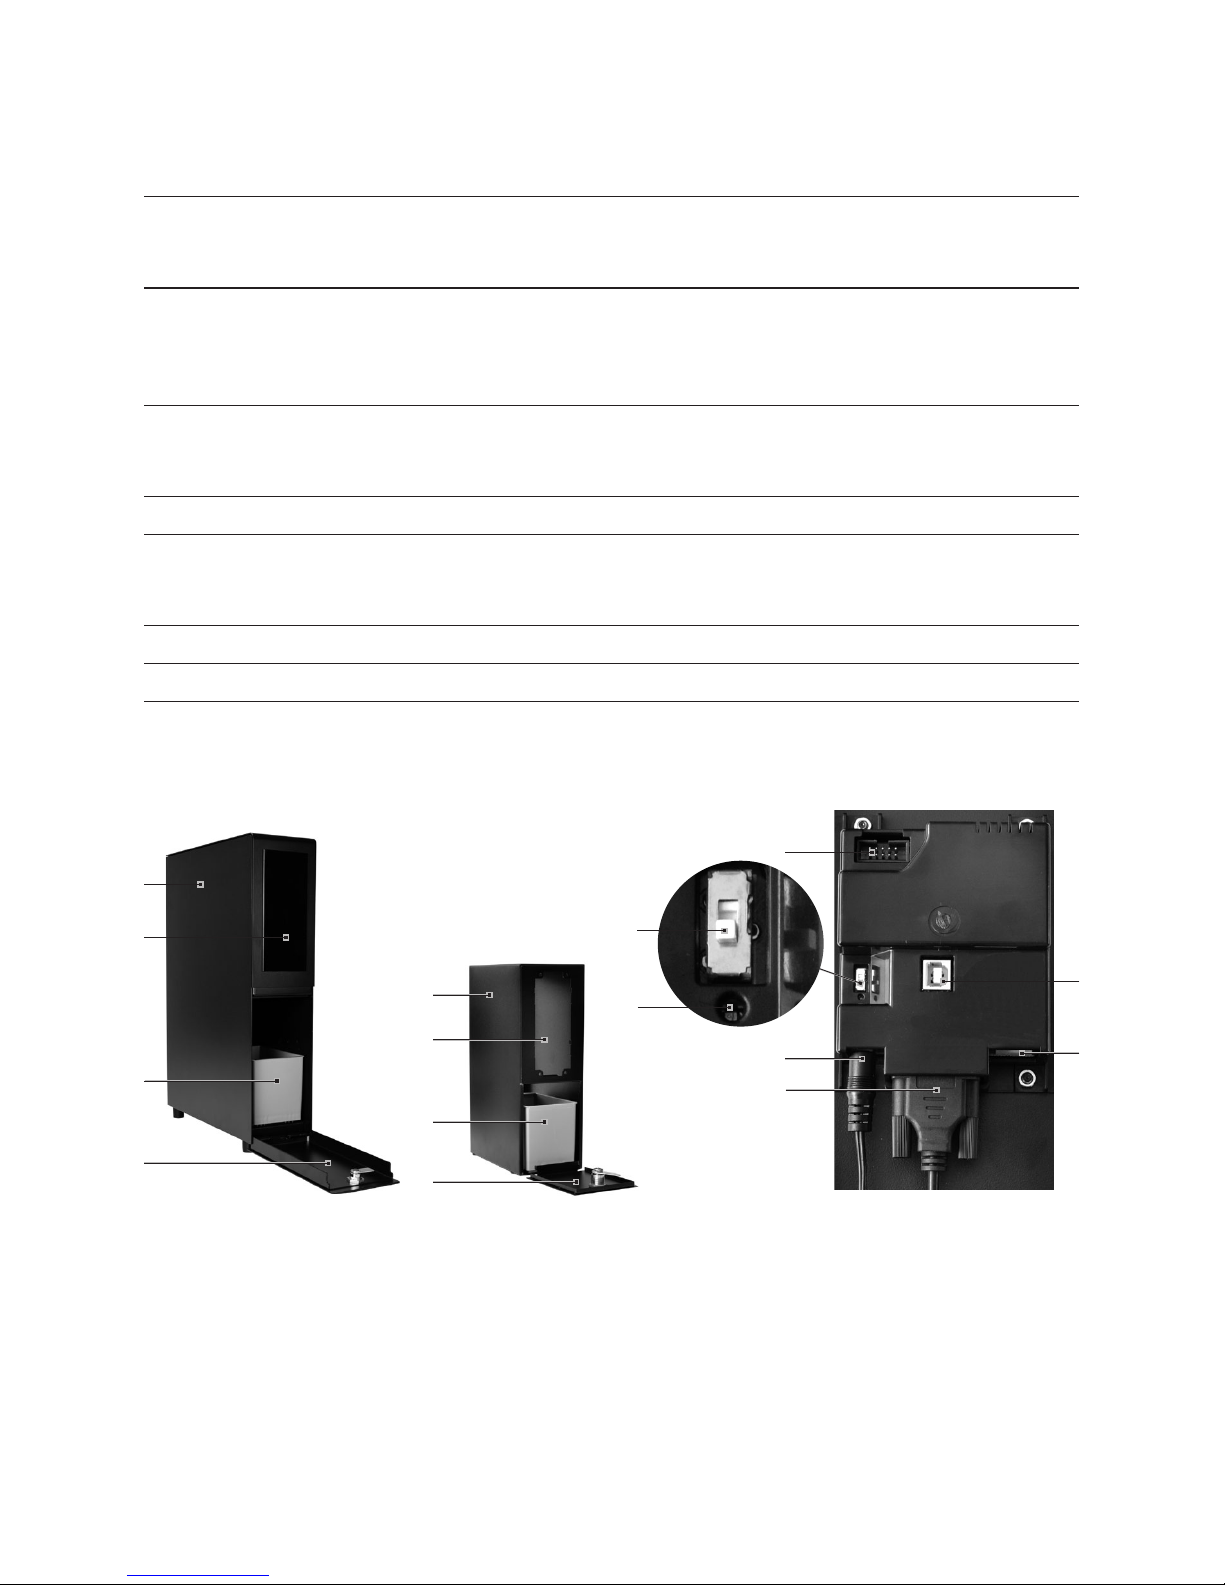
Bedienelemente
MDB-Schnittstelle
(in Gehäuse)
1 Gehäuse
2 Aufnahme für Abrechnungssystem
3 Münzbox
4 Abdeckung (abschließbar)
5 Schnittstelle für Abrechnungssystem NRI G-13
6 Schalter für Abrechnungsmodus
U Obere Position: Gratisbetrieb
U Untere Position: Bezahlmodus
7 Status-LED
8 Anschluss Netzadpater
9 Anschluss RS232-Kabel
10 USB-Anschluss (für PC)
11 MDB-Anschluss
Payment Box Compact Payment Box
2
1
3
4
5
8
9
6
7
10
11
4
3
1
2

3
Payment Box / Compact Payment Box
Wichtige Hinweise
Bestimmungsgemäße Verwendung
Die Payment Box dient nur dazu,
zusammen mit einem von JURA
getesteten Abrechnungssystemen
verwendet zu werden. Jede andere
Verwendung gilt als nicht bestimmungsgemäß. JURA übernimmt
keine Haftung für Folgen aus nicht
bestimmungsgemäßer Verwendung.
Lesen und beachten Sie diese Bedienungsanleitung vollständig vor
Gebrauch des Geräts. Eine Garantieleistung entfällt für Schäden oder
Mängel, die durch Nichtbeachten der
Bedienungsanleitung entstanden
sind. Halten Sie diese Bedienungsanleitung beim Gerät verfügbar und
geben Sie sie an nachfolgende
Anwender weiter.
Zu Ihrer Sicherheit
Z Gerät nur mit mitgeliefertem
Netzadapter betreiben.
Z Kinder dürfen nicht mit dem Gerät
spielen.
Z Kinder dürfen Reinigungs- und
Wartungsarbeiten nicht ohne
Aufsicht durch eine verantwortliche Person durchführen.
Z Kinder ab acht Jahren dürfen das
Gerät nur ohne Aufsicht bedienen, wenn sie über den sicheren
Umgang damit aufgeklärt wurden. Kinder müssen mögliche
Gefahren einer falschen Bedienung erkennen und verstehen
können.
Z Personen, einschließlich Kindern,
die aufgrund ihrer
U physischen, sensorischen oder
geistigen Fähigkeiten oder
U Unerfahrenheit oder Unkenntnis
nicht in der Lage sind, das Gerät
sicher zu bedienen, dürfen das
Gerät nicht ohne Aufsicht oder
Anweisung durch eine verantwortliche Person nutzen.
ru
pl
sv
pt
es
nl
it
fr
en
de

4
Payment Box / Compact Payment Box
1 Ihre Payment Box
Lieferumfang
Z
Gehäuse (mit integrierter MDB-Schnittstelle)
Z 2 Schlüssel
Z Münzbox
Z Netzadapter
Z Netzkabel mit Netzstecker
Z RS232-Kabel
Z USB-Kabel
Z PC-Software Compact Payment Box / Payment
Box
Kompatibilität
Die Payment Box ist kompatibel mit allen Professional-Geräten der GIGA- und IMPRESSA-X-Linie
(außer IMPRESSA X30/X7/X70/X95/X90 und X
s
95/
X
s
90 avantgarde).
Beachten Sie bitte, dass nicht alle erhältlichen
Abrechnungssysteme mit der Payment Box
kompatibel sind. Die Payment Box ist mit folgenden Abrechnungssystemen getestet:
Z NRI G-13 Münzprüfer
Z Hug-Witschi DIVA2
Z PBV Kaufmann Mifare-Vending-Reader VR1
Z Microtronic Mlight5-Leser
Z Fage Oscar/Giody
Z Evis Legic Gecko
E Die aktuellste Liste finden Sie immer auf
unserer Website (www.jura.com).
Pflege
Verwenden Sie zur Reinigung des Geräts keine
scharfen, scheuernden Reinigungsmittel oder
harten Gegenstände. Dies kann die Beschichtung
des Gehäuses beschädigen.
2 Payment Box installieren
E Um die Payment Box am Kaffeevollautoma-
ten anzuschließen, muss ein funktionierendes Abrechnungssystem installiert sein.
E Die Installation am Kaffeevollautomaten
unterscheidet sich je nachdem, ob Sie das
intelligente Frischwasser-Kit einsetzen oder
nicht.
E Entfernen Sie die Rückwand der Payment
Box, um die verschiedenen Kabel an der
MDB-Schnittstelle anzuschließen. Im
Lieferumfang finden Sie Schrauben, um die
Rückwand nach dem Anschließen der Kabel
von innen festzuschrauben.
Anschließen an Gerät ohne intelligentes
Frischwasser-Kit
T
Kaffeevollautomat am Netzschalter ausschalten.
T Schalter für Abrechnungsmodus auf untere
Position (Bezahlmodus) stellen.
T RS232-Kabel am Kaffeevollautomaten
anschließen.
T Netzstecker in Netzsteckdose stecken.
T Kaffeevollautomat einschalten.
Die Payment Box und der Kaffeevollautomat
sind betriebsbereit.
Anschließen an Gerät mit intelligentem
Frischwasser-Kit
T
Kaffeevollautomat am Netzschalter ausschalten.
T Schalter für Abrechnungsmodus auf untere
Position (Bezahlmodus) stellen.
T RS232-Kabel am Mini-Hub des intelligenten
Frischwasser-Kits anschließen.
T Netzstecker in Netzsteckdose stecken.
T Kaffeevollautomat einschalten.
Die Payment Box und der Kaffeevollautomat
sind betriebsbereit.
3 Payment Box konfigurieren
Der folgende Ablauf zeigt die Konfiguration der
Payment Box (z.B. Geräteauswahl).
Voraussetzung: PC-Software der Payment Box ist
installiert.
T Kaffeevollautomat am Netzschalter ausschal-
ten.
T Netzstecker der Payment Box aus Netzsteck-
dose ziehen.
T RS232-Kabel entfernen.
T Payment Box mit dem USB-Kabel am PC
anschließen.

5
Payment Box / Compact Payment Box
T Netzstecker der Payment Box in Netzsteck-
dose stecken.
Die Payment Box schaltet sich ein.
T Payment Box mit der PC-Software konfigu-
rieren.
E Die Bedienungsanleitung der PC-Software
ist in der Software enthalten.
T USB-Kabel entfernen.
Die Payment Box schaltet sich wieder aus.
Die Änderungen werden beim nächsten
Einschalten übernommen.
T RS232-Kabel wieder anschließen.
T Kaffeevollautomat einschalten.
E Preiseinstellungen können Sie jederzeit
vornehmen. Hierzu müssen der Kaffeevollautomat und die Payment Box nicht ausgeschaltet werden.
4 Payment Box deinstallieren
Deinstallation von Gerät ohne intelligentes
Frischwasser-Kit
T
Schalter für Abrechnungsmodus auf obere
Position (Gratisbetrieb) stellen.
T Ca. 5 Sekunden warten.
T Kaffeevollautomat am Netzschalter ausschal-
ten.
T Netzstecker ziehen.
T RS232-Kabel am Kaffeevollautomaten
entfernen.
Deinstallation von Gerät mit intelligentem
Frischwasser-Kit
T
Schalter für Abrechnungsmodus auf obere
Position (Gratisbetrieb) stellen.
T Ca. 5 Sekunden warten.
T Kaffeevollautomat am Netzschalter ausschal-
ten.
T Netzstecker ziehen.
T RS232-Kabel am Mini-Hub des intelligenten
Frischwasser-Kits entfernen.
5 Abrechnungsmodus
Schalter für Abrechnungsmodus:
Z Obere Position:
U Gerät befindet sich im Gratisbetrieb
U Status LED blinkt
Z Untere Position:
U Gerät befindet sich im Bezahlmodus
U Status LED leuchtet
E Der Abrechnungsmodus darf nicht während
einer Zubereitung geändert werden.
E Wird im Bezahlmodus die Verbindung
zwischen Payment Box und Kaffeevollautomat getrennt, so werden alle Produkte
gesperrt. Keine Zubereitung möglich.
6 LED-Anzeigen
Status-LED (9):
Z leuchtet: keine Fehler; Compact Payment
System in Betrieb
Z leuchtet nicht: Fehler (Netzstecker nicht
eingesteckt, nicht angeschlossen an Kaffeevollautomat oder defekte LED)
Z blinkt (1 s an / 1 s aus): kein Fehler; Gratisbetrieb
ist aktiv
Z blinkt schnell: kein Fehler; ein externes Abrech-
nungssystem ist angeschlossen und aktiv;
Gerät befindet sich im Bezahlmodus.
ru
pl
sv
pt
es
nl
it
fr
en
de

6
Payment Box / Compact Payment Box
7 Technische Daten
Spannung 100–240 V ~, 50/60 Hz
Stromstärke 300 mA
Konformitätszeichen
A
Umgebungsbedingungen
Luftfeuchtigkeit max. 80 %,
Umgebungstemperatur
10–35 °C
Länge Netzkabel ca. 2 m
Länge RS232-Kabel ca. 1,1 m
Gewicht (ohne
eingebautes
Abrechnungssystem)
Payment Box: 6,4 kg
Compact Payment Box:
ca. 2,5 kg
Maße (B × H × T) Payment Box:
10 × 45 × 32 cm
Compact Payment Box:
10,4 × 30,4 × 19,5 cm
Richtlinien
Das Gerät entspricht den folgenden Richtlinien:
Z 2002/95/EG (RoHS)
Z 1907/2006/EG (REACH)
Z 2006/95/EG (Niederspannungsrichtlinie)
Z 2004/108/EG (Elektromagnetische Verträglich-
keit)
Z 2009/125/EG (Energierichtlinie)
7
Payment box / Compact payment box
Table of contents
Important information 8
Proper use ............................................................................................................................................................... 8
For your safety .......................................................................................................................................................8
1 The payment box 9
Supplied as standard.............................................................................................................................................9
Compatibility ..........................................................................................................................................................9
Maintenance ........................................................................................................................................................... 9
2 Installing the payment box 9
Connecting to the machine without the Intelligent Fresh Water Kit ........................................................... 9
Connecting to the machine with the Intelligent Fresh Water Kit ................................................................. 9
3 Configuring the payment box 9
4 Removing the payment box 10
Removing from a machine without the Intelligent Fresh Water Kit ...........................................................10
Removing from a machine with the Intelligent Fresh Water Kit .................................................................. 10
5 Accounting mode 10
6 LED indicators 10
7 Technical data 10
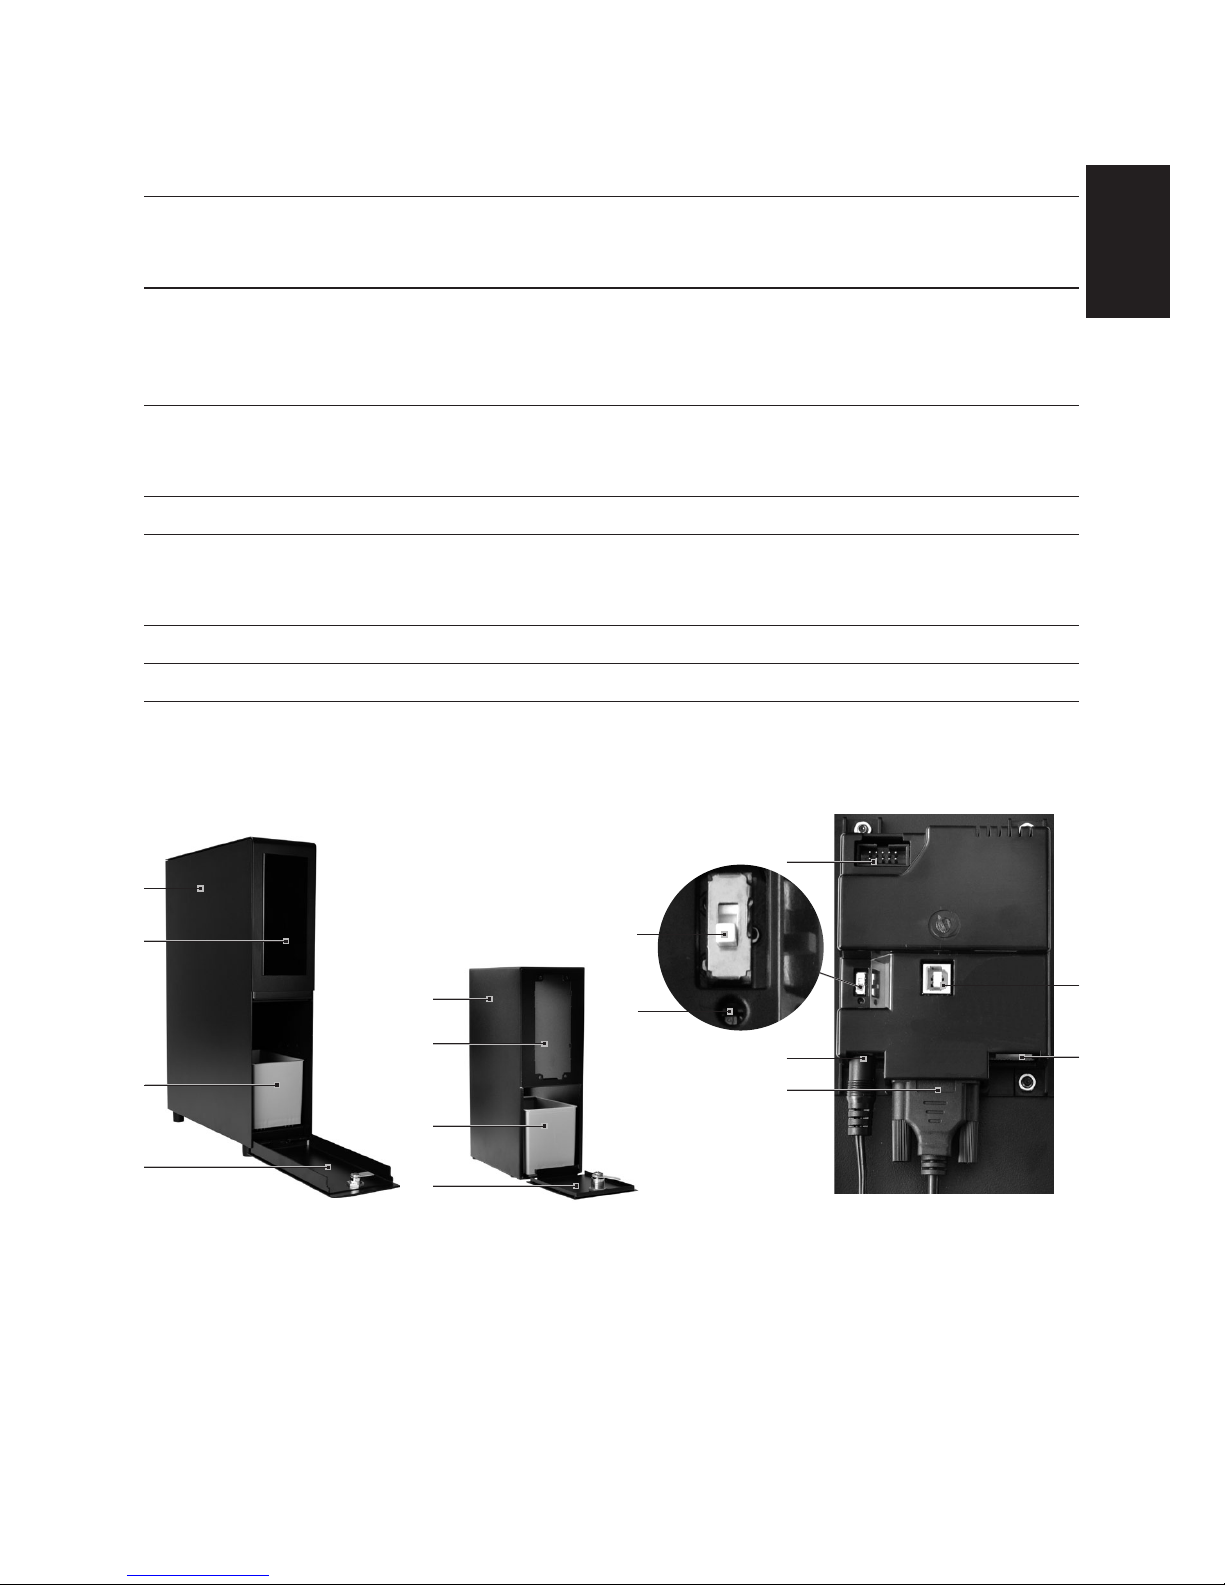
MDB interface
(inside housing)
1 Housing
2 Holder for accounting system
3 Coin box
4 Cover (lockable)
5 Interface for NRI G-13 accounting system
6 Switch for accounting mode
U Top position: Non-payment mode
U Bottom position: Payment mode
7 Status LED
8 Mains adapter port
9 RS232 cable port
10 USB port (for PC)
11 MDB port
Payment box Compact payment box
2
1
3
4
5
8
9
6
7
10
11
4
3
1
2
Control elements
ru
pl
sv
pt
es
nl
it
fr
en
de

8
Payment box / Compact payment box
Important information
Proper use
The payment box is only intended to
be used with an accounting system
tested by JURA. Use for any other
purpose will be deemed improper.
JURA cannot accept any responsibility for the consequences of improper
use.
Before using the machine read these
instructions for use thoroughly and
completely and comply with the
instructions they contain. A warranty
service is not applicable for damage
or defects caused by non-compliance with the instructions for use.
Keep these instructions for use close
to the machine and pass them on to
the next user.
For your safety
Z Only operate the machine with
the mains adapter provided.
Z Do not allow children to play with
the machine.
Z Children may not clean or service
the machine unless supervised by
a responsible person.
Z Children aged 8 and over may
only operate the machine without supervision if they have been
instructed in how to use it safely.
Children must be able to recognise and understand the potential
dangers arising from incorrect
use.
Z People, including children, who
U do not have the physical, sen-
sory or mental capabilities to
use the machine safely or
U are inexperienced or lack knowl-
edge in how to use the machine
safely
must be supervised by a responsible person when using it, or
must be instructed in how to use
it correctly.

9
Payment box / Compact payment box
1 The payment box
Supplied as standard
Z
Housing (with built-in MDB interface)
Z 2 keys
Z Coin box
Z Mains adapter
Z Mains cable with mains plug
Z RS232 cable
Z USB cable
Z PC software payment box / compact payment
box
Compatibility
The payment box is compatible with all professional models in the GIGA and IMPRESSA X lines
(except IMPRESSA X30/X7/X70/X95/X90 and X
s
95/
X
s
90 avantgarde).
Please note that not all available accounting
systems are compatible with the payment box. The
payment box has been tested with the following
accounting systems:
Z NRI G-13 Coin Validator
Z Hug-Witschi DIVA2
Z PBV Kaufmann Mifare-Vending-Reader VR1
Z Microtronic Mlight5-Leser
Z Fage Oscar/Giody
Z Evis Legic Gecko
E You can always find the most up-to-date list
on our website (www.jura.com).
Maintenance
Do not use harsh or abrasive cleaning agents or
hard objects to clean the machine. These may
damage the coating of the housing.
2 Installing the payment box
E To connect the payment box to the coffee
machine, a functioning accounting system
must be installed.
E The steps for installation in the coffee
machine depend on whether you are using
the Intelligent Fresh Water Kit or not.
E Remove the rear wall of the payment box to
connect the various cables to the MDB
interface. Screws for attaching the rear wall
from the inside after connecting the cables
are supplied with the unit.
Connecting to the machine without the
Intelligent Fresh Water Kit
T
Switch off the coffee machine at the power
switch.
T Move switch for accounting mode to
bottom position (payment mode).
T Connect RS232 cable to coffee machine.
T Insert the mains plug into a power socket.
T Switch on coffee machine.
The payment box and automatic coffee
machine are ready for use.
Connecting to the machine with the Intelligent Fresh Water Kit
T
Switch off the coffee machine at the power
switch.
T Move switch for accounting mode to
bottom position (payment mode).
T Connect RS232 cable to Mini Hub of Intelli-
gent Fresh Water Kit.
T Insert the mains plug into a power socket.
T Switch on coffee machine.
The payment box and automatic coffee
machine are ready for use.
3 Configuring the payment box
Follow the steps below to configure the payment
box (e.g. select the machine type).
Precondition: the PC software of the payment
box is installed.
T Switch off the coffee machine at the power
switch.
T Unplug the payment box from the power
socket.
T Remove the RS232 cable.
T Connect the payment box to the PC with the
USB cable.
T Insert the mains plug of the payment box
into a power socket.
The payment box will switch on.
T Configure the payment box with the PC
software.
E The instructions for use for the PC software
are contained in the software.
ru
pl
sv
pt
es
nl
it
fr
en
de

10
Payment box / Compact payment box
T Remove the USB cable.
The payment box will switch off again. The
changes will be applied the next time it is
switched on.
T Reconnect the RS232 cable.
T Switch on coffee machine.
E Prices can be set or changed at any time.
There is no need to switch off the coffee
machine or payment box.
4 Removing the payment box
Removing from a machine without the
Intelligent Fresh Water Kit
T
Move switch for accounting mode to top
position (non-payment mode).
T Wait approximately 5 seconds.
T Switch off the coffee machine at the power
switch.
T Disconnect the mains plug.
T Remove RS232 cable from coffee machine.
Removing from a machine with the Intelligent
Fresh Water Kit
T
Move switch for accounting mode to top
position (non-payment mode).
T Wait approximately 5 seconds.
T Switch off the coffee machine at the power
switch.
T Disconnect the mains plug.
T Remove RS232 cable from Mini Hub of
Intelligent Fresh Water Kit.
5 Accounting mode
Switch for accounting mode:
Z Top position:
U Machine is in non-payment mode
U Status LED flashes
Z Bottom position:
U Machine is in payment mode
U Status LED on continuously
E The accounting mode must not be changed
while a drink is being prepared.
E If the connection between the payment box
and the coffee machine is broken in payment mode, all products are locked. No
products can be prepared.
6 LED indicators
Status LED (9):
Z On: No errors; compact payment system
functioning
Z Off: Error (mains plug not plugged in, unit not
connected to coffee machine or faulty LED)
Z Flashing (1 s on / 1 s off): No errors; non-pay-
ment mode is active
Z Flashing rapidly: No errors; external accounting
system connected and active; machine is in
payment mode
7 Technical data
Voltage 100–240 V ~, 50/60 Hz
Current 300 mA
Conformity symbol
A
Ambient conditions Air humidity max. 80%,
ambient temperature
10–35°C
Length of mains cable approx. 2 m
Length of RS232 cable approx. 1,1 m
Weight (without
accounting system)
Payment box: 6,4 kg
Compact payment box:
approx. 2,5 kg
Dimensions (W × H × D) Payment box:
10 × 45 × 32 cm
Compact payment box:
10,4 × 30,4 × 19,5 cm
Directives
The machine complies with the following directives:
Z 2002/95/EC (RoHS)
Z 1907/2006/EC (REACH)
Z 2006/95/EC (Low Voltage Directive)
Z 2004/108/EC (Electromagnetic Compatibility)
Z 2009/125/EC (Ecodesign Directive)
11
Boîtier de paiement / Boîtier de paiement compact
Table des matières
Remarques importantes 12
Utilisation conforme ............................................................................................................................................12
Pour votre sécurité ...............................................................................................................................................12
1 Votre boîtier de paiement 13
Matériel fourni .......................................................................................................................................................13
Compatibilité ......................................................................................................................................................... 13
Entretien ................................................................................................................................................................. 13
2 Montage du boîtier de paiement 13
Raccordement à l'appareil sans kit d'eau fraîche intelligent ......................................................................... 13
Raccordement à l'appareil avec le kit d'eau fraîche intelligent ..................................................................... 13
3 Configuration du boîtier de paiement 13
4 Démontage du boîtier de paiement 14
Démontage de l'appareil sans kit d'eau fraîche intelligent ...........................................................................14
Démontage de l'appareil avec le kit d'eau fraîche intelligent .......................................................................14
5 Mode de facturation 14
6 Indications de la LED 14
7 Caractéristiques techniques 15
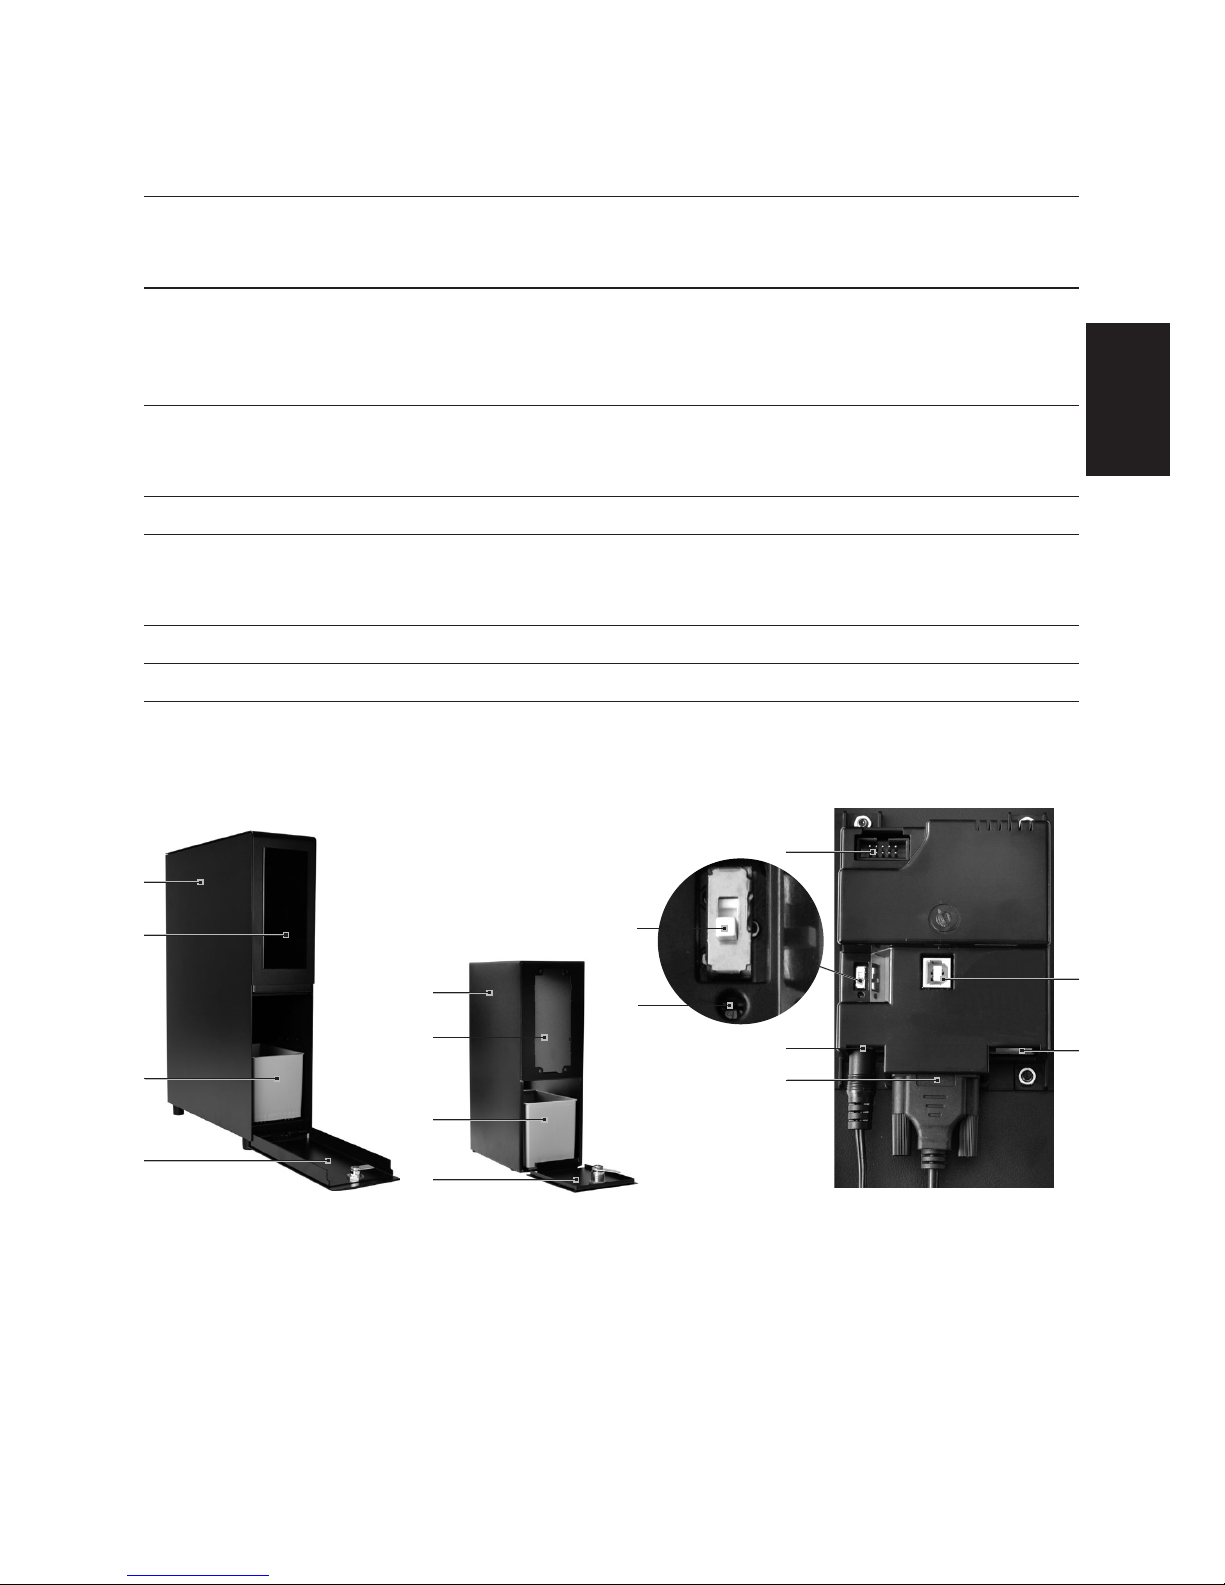
Eléments de commande
Port MDB
(dans le boîtier)
1 Boîtier
2 Logement pour système de facturation
3 Récipient à pièces
4 Couvercle (verrouillable)
5 Interface pour système de facturation NRI G-13
6 Commutateur du mode de facturation
U Position supérieure : mode gratuit
U Position inférieure : mode payant
7 LED d'état
8 Raccord de l'adaptateur secteur
9 Raccord du câble RS232
10 Raccord USB (pour PC)
11 Raccord MDB
Boîtier de paiement Boîtier de paiement compact
2
1
3
4
5
8
9
6
7
10
11
4
3
1
2
ru
pl
sv
pt
es
nl
it
fr
en
de

12
Boîtier de paiement / Boîtier de paiement compact
Remarques importantes
Utilisation conforme
Le boîtier de paiement est exclusivement conçu pour être utilisé avec un
système de facturation testé par
JURA. Toute autre utilisation est
considérée comme non conforme.
JURA décline toute responsabilité
relative aux conséquences d'une utilisation non conforme.
Lisez entièrement ce mode d'emploi
avant d'utiliser l'appareil et respectez-le scrupuleusement. Aucune
prestation de garantie ne pourra être
invoquée pour des dommages ou
défauts résultant du non-respect du
mode d'emploi. Conservez ce mode
d'emploi à proximité de l'appareil et
remettez-le aux utilisateurs suivants.
Pour votre sécurité
Z Utilisez uniquement l'appareil
avec l'adaptateur secteur fourni.
Z Les enfants ne doivent pas jouer
avec l'appareil.
Z Les enfants ne doivent pas effec-
tuer de travaux de nettoyage et
de maintenance sans la surveillance d'une personne responsable.
Z Les enfants à partir de huit ans
peuvent faire fonctionner l'appareil sans surveillance uniquement
s'ils ont reçu des explications
quant à son utilisation sûre. Ils
doivent être en mesure d'identifier et de comprendre les risques
d'une mauvaise utilisation.
Z Les personnes, y compris les
enfants, qui, en raison de leurs
U capacités physiques, senso-
rielles ou cognitives, ou
U de leur inexpérience ou mécon-
naissance,
ne sont pas en mesure d'utiliser
l'appareil en toute sécurité, ne
sont autorisées à faire fonctionner ce dernier que sous la surveillance ou sur l'ordre d'une personne responsable.

13
Boîtier de paiement / Boîtier de paiement compact
1 Votre boîtier de paiement
Matériel fourni
Z
Boîtier (avec port MDB intégré)
Z 2 clés
Z Récipient à pièces
Z Adaptateur secteur
Z Câble secteur avec fiche secteur
Z Câble RS232
Z Câble USB
Z Logiciel PC boîtier de paiement / boîtier de
paiement compact
Compatibilité
Le boîtier de paiement est compatible avec toutes
les machines professionnelles des lignes GIGA et
IMPRESSA X (sauf l'IMPRESSA X30/X7/X70/X95/X90
et X
s
95/Xs90 avantgarde).
Veuillez noter que tous les systèmes de facturation
disponibles ne sont pas compatibles avec le boîtier
de paiement. Le boîtier de paiement est testé avec
les systèmes de facturation suivants :
Z Monnayeur G-13 NRI
Z Hug-Witschi DIVA2
Z PBV Kaufmann Mifare-Vending-Reader VR1
Z Microtronic Mlight5-Leser
Z Fage Oscar/Giody
Z Evis Legic Gecko
E La liste la plus récente est disponible sur
notre site Internet (www.jura.com).
Entretien
Pour nettoyer l'appareil, n'utilisez pas de détergent
corrosif ou abrasif ni d'objets durs. Le revêtement
du boîtier pourrait être endommagé.
2 Montage du boîtier de paiement
E Pour pouvoir raccorder le boîtier de paie-
ment à la machine à café, un système de
facturation fonctionnel doit être monté.
E Le montage sur la machine à café diffère
selon si vous utilisez le kit d'eau fraîche
intelligent ou non.
E Retirez le panneau arrière du boîtier de
paiement pour raccorder les différents
câbles au port MDB. Le matériel fourni inclut
des vis permettant de refixer le panneau
arrière de l'intérieur après avoir raccordé les
câbles.
Raccordement à l'appareil sans kit d'eau
fraîche intelligent
T
Eteignez la machine à café à l'aide de
l'interrupteur d'alimentation.
T Placez le commutateur du mode de factura-
tion en position inférieure (mode payant).
T Raccordez le câble RS232 à la machine à
café.
T Branchez la fiche secteur dans la prise de
courant.
T Allumez la machine à café.
Le boîtier de paiement et la machine à café
sont prêts à l’emploi.
Raccordement à l'appareil avec le kit d'eau
fraîche intelligent
T
Eteignez la machine à café à l'aide de
l'interrupteur d'alimentation.
T Placez le commutateur du mode de factura-
tion en position inférieure (mode payant).
T Raccordez le câble RS232 au mini-hub du kit
d'eau fraîche intelligent.
T Branchez la fiche secteur dans la prise de
courant.
T Allumez la machine à café.
Le boîtier de paiement et la machine à café
sont prêts à l’emploi.
3 Configuration du boîtier de paiement
La procédure suivante présente la configuration du
boîtier de paiement (p. ex. sélection de la
machine).
Condition : Le logiciel PC du boîtier de paiement
est installé.
T Eteignez la machine à café à l'aide de
l'interrupteur d'alimentation.
T Débranchez la fiche secteur du boîtier de
paiement de la prise de courant.
ru
pl
sv
pt
es
nl
it
fr
en
de

14
Boîtier de paiement / Boîtier de paiement compact
T Retirez le câble RS232.
T Raccordez le boîtier de paiement au PC avec
le câble USB.
T Branchez la fiche secteur du boîtier de
paiement dans la prise de courant.
Le boîtier de paiement s'allume.
T Configurez le boîtier de paiement avec le
logiciel PC.
E Le mode d’emploi du logiciel pour PC est
intégré au logiciel.
T Retirez le câble USB.
Le boîtier de paiement s'éteint. Les modifications seront prises en compte à la prochaine
mise en marche.
T Raccordez à nouveau le câble RS232.
T Allumez la machine à café.
E Vous pouvez effectuer des réglages de prix
à tout moment. Pour ce faire, la machine à
café et le boîtier de paiement doivent être
allumés.
4 Démontage du boîtier de paiement
Démontage de l'appareil sans kit d'eau fraîche
intelligent
T
Placez le commutateur du mode de facturation en position supérieure (mode gratuit).
T Attendez 5 secondes environ.
T Eteignez la machine à café à l'aide de
l'interrupteur d'alimentation.
T Débranchez la fiche secteur.
T Retirez le câble RS232 de la machine à café.
Démontage de l'appareil avec le kit d'eau
fraîche intelligent
T
Placez le commutateur du mode de facturation en position supérieure (mode gratuit).
T Attendez 5 secondes environ.
T Eteignez la machine à café à l'aide de
l'interrupteur d'alimentation.
T Débranchez la fiche secteur.
T Retirez le câble RS232 du mini-hub du kit
d'eau fraîche intelligent.
5 Mode de facturation
Commutateur du mode de facturation :
Z Position supérieure :
U L'appareil se trouve en mode gratuit.
U La LED d'état clignote.
Z Position inférieure :
U L'appareil se trouve en mode payant.
U La LED d'état s'allume.
E Le mode de facturation ne doit pas être
modifié pendant une préparation.
E Si la liaison entre le boîtier de paiement et la
machine à café est rompue en mode payant,
tous les produits sont verrouillés. Aucune
préparation n'est possible.
6 Indications de la LED
La LED d'état (9) :
Z s'allume : aucune erreur ; système de paie-
ment compact en service
Z ne s'allume pas : erreur (fiche secteur non
branchée, système non raccordé à la machine
à café ou LED défectueuse)
Z clignote (1 s allumée / 1 s éteinte) : aucune
erreur ; mode gratuit activé
Z clignote rapidement : aucune erreur ; un
système de facturation externe est raccordé et
activé ; l'appareil se trouve en mode payant.

15
Boîtier de paiement / Boîtier de paiement compact
7 Caractéristiques techniques
Tension 100–240 V ~, 50/60 Hz
Intensité du courant 300 mA
Marque de conformité
A
Conditions ambiantes Hygrométrie max.
80 %, température
ambiante 10–35 °C
Longueur du câble
secteur
2 m environ
Longueur du câble RS232 1,1 m environ
Poids (sans système de
facturation)
Boîtier de paiement:
6,4 kg
Boîtier de paiement
compact: 2,5 kg
environ
Dimensions (l × h × p) Boîtier de paiement:
10 × 45 × 32 cm
Boîtier de paiement
compact:
10,4 × 30,4 × 19,5 cm
Directives
Cet appareil est conforme aux directives suivantes :
Z 2002/95/CE (RoHS)
Z 1907/2006/CE (REACH)
Z 2006/95/CE (directive basse tension)
Z 2004/108/CE (compatibilité électromagnétique)
Z 2009/125/CE (directive sur les produits
consommateurs d'énergie)
ru
pl
sv
pt
es
nl
it
fr
en
de

16
Box di pagamento / Box di pagamento compatto
Indice
Avvertenze importanti 17
Uso conforme ........................................................................................................................................................ 17
Norme di sicurezza ............................................................................................................................................... 17
1 La vostra box di pagamento 18
Dotazione ............................................................................................................................................................... 18
Compatibilità ......................................................................................................................................................... 18
Manutenzione .......................................................................................................................................................18
2 Installare la box di pagamento 18
Collegamento all'apparecchio senza kit acqua fresca intelligente ..............................................................18
Collegamento all'apparecchio con kit acqua fresca intelligente ..................................................................18
3 Configurare la box di pagamento 18
4 Disinstallare la box di pagamento 19
Disinstallazione dell'apparecchio senza kit acqua fresca intelligente .........................................................19
Disinstallazione dell'apparecchio con kit acqua fresca intelligente .............................................................19
5 Modo di fatturazione 19
6 Indicatori LED 19
7 Dati tecnici 20
Elementi di comando
Interfaccia MDB
(nell'involucro)
1 Involucro
2 Alloggiamento per il sistema di fatturazione
3 Cassa portamonete
4 Coperchio (chiudibile)
5 Interfaccia per il sistema di fatturazione
NRI G-13
6 Interruttore per modo di fatturazione
U Posizione superiore: funzionamento gratuito
U Posizione inferiore: modo di pagamento
7 LED di stato
8 Presa adattatore di rete
9 Presa cavo RS232
10 Presa USB (per PC)
11 Presa MDB
Box di pagamento Box di pagamento compatto
2
1
3
4
5
8
9
6
7
10
11
4
3
1
2
 Loading...