

Page 1
Z6 – Quick Reference Guide
Page 2

Z6 – Quick Reference Guide
Z6 – Quick Reference Guide
J
These short instructions do not replace the ‘Z6 Instructions for Use’.
Make sure you read and observe the safety information and warnings first in order to avoid hazards.
Rinsing the machine
Automatic milk system
rinsing
Cleaning the milk system
You can initiate the rinse operation manually at any time.
Precondition: ‘Please select product’ is displayed.
T Place a receptacle under the dual spout.
T Press the Rotary Switch.
‘Maintenance status’
T Press the Rotary Switch.
‘Clean’
T Turn the Rotary Switch until ‘Rinse’ is displayed.
T Press the Rotary Switch to initiate the rinse operation.
‘Machine is rinsing’, ‘Milk system is being rinsed’, water
flows out of the dual spout.
The rinse stops automatically. ‘Please select product’
appears on the display.
15 minutes after milk preparation, the milk system is automatically
rinsed. Therefore always place a receptacle under the dual spout
after preparing milk.
15 minutes after milk preparation, ‘Milk system is being rinsed’
appears, water flows out of the dual spout. The rinse stops automatically. Your Z6 is once more ready for use.
To ensure that the milk system in the dual spout always works properly, you must clean it daily when you have been preparing milk.
2
Page 3
Z6 – Quick Reference Guide
CAUTION
If the wrong cleaning agent is used, the machine could be damaged
and/or traces could be left behind in the water.
T Use only original JURA maintenance products.
E JURA milk system cleaner is available from specialised dealers.
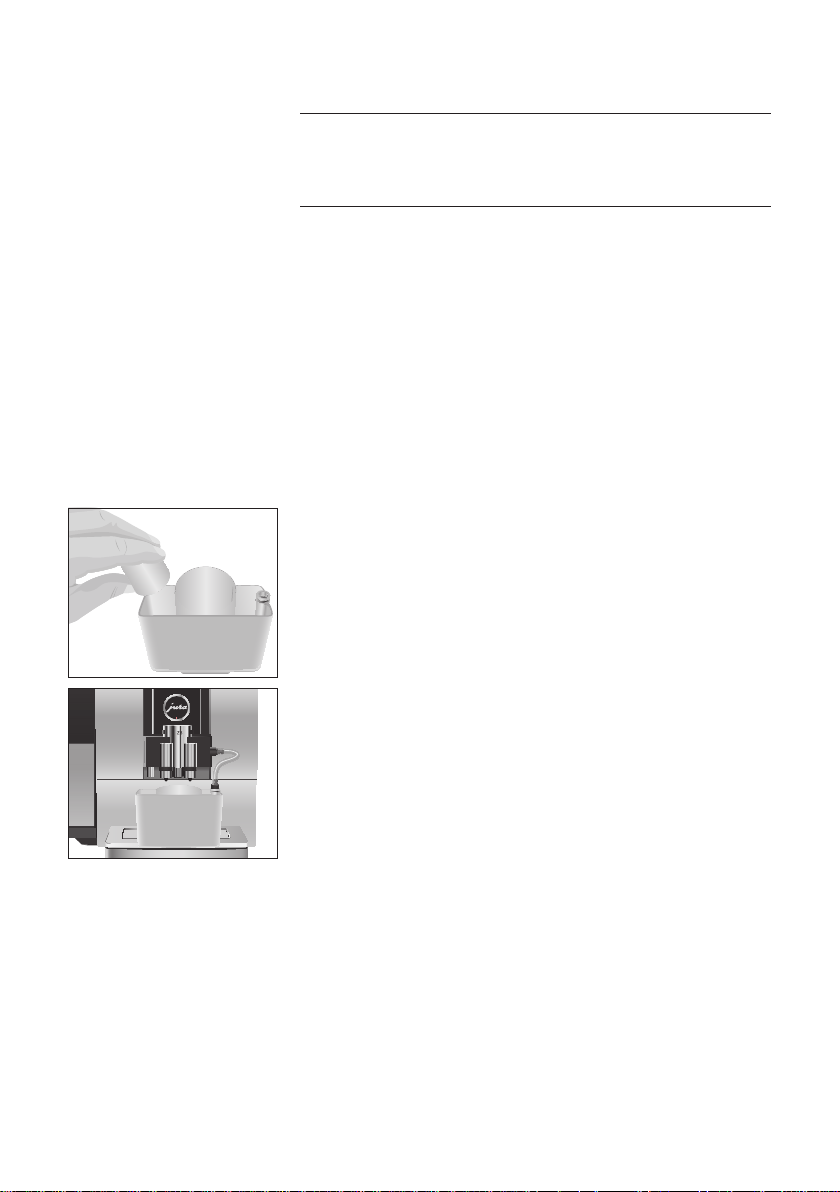
E To clean the milk system, use the container supplied.
Precondition: ‘Clean the milk system’ is displayed.
T Press the Rotary Switch.
‘Clean the milk system’
T Press the Rotary Switch again.
T Press the ‘Start’ button.
T Press the ‘Start’ button again.
‘Cleaning agent for milk system’
T Remove the milk pipe from the milk container or carton.
T Add 1 capful of milk system cleaner to the outer, rectangular
part of the container.
T Place the container under the dual spout.
T Connect the milk pipe to the container.
E To connect the milk pipe to the container correctly, the pipe
must be fitted with a connector.
T Slide the dual spout down to fix the container in place.
T Press the ‘Next’ button.
‘Milk system is being cleaned’, the dual spout and the pipe
are cleaned. Water flows out of the dual spout.
The operation stops automatically. ‘Milk system cleaning
complete’ appears briefly on the display.
The dual spout must be dismantled and rinsed daily if milk has been
prepared to make sure it functions perfectly and also in the interests
of hygiene.
3
Page 4

Z6 – Quick Reference Guide
T Remove the milk pipe and rinse it thoroughly under running
water.
T Press the releasing devices and pull the cover of the dual
spout up and off.
T Remove the milk system from the dual spout.
T Dismantle the milk system into its individual parts.
T Rinse all the parts under running water. If there are severely
dried-on milk residues, firstly immerse the individual parts
in a solution of 250 ml cold water and 1 capful of JURA milk
system cleaner. Then rinse the parts thoroughly.
T Reassemble the milk system.
4
Page 5

Z6 – Quick Reference Guide
T Fit the assembled individual parts back in the dual spout and
press it firmly.
T Fit the cover of the dual spout. Make sure the cover of the
dual spout is correctly fitted.
T Connect the milk pipe to the dual spout.
Inserting the filter
Your Z6 no longer has to be descaled if you are using the CLARIS
Smart filter cartridge. If you did not insert the filter cartridge the first
time you used the machine, you can do this now as follows.
Precondition: ‘Please select product’ is displayed.
T Remove and empty the water tank.
T Fit the filter cartridge extension supplied on top of a CLARIS
Smart filter cartridge.
T Insert the filter cartridge with its extension into the water
tank.
T Turn the filter cartridge clockwise until it audibly clicks into
place.
T Fill the water tank with fresh, cold water and reinsert the
tank.
E The machine automatically detects that you have just inserted
the filter cartridge.
‘Use filter’ / ‘Saved’
‘Filter is being rinsed’, the filter is rinsed. The water flows
directly into the drip tray.
5
Page 6

Z6 – Quick Reference Guide
‘Empty drip tray’
T Empty the drip tray and put it back into the machine.
‘Use filter’, ‘Filter rinsing complete’
‘Please select product’ appears on the display. Your Z6 is
once more ready for use.
Changing the filter
E Once the filter cartridge stops working (depending on the
water hardness setting), the Z6 will prompt you to change the
filter.
E CLARIS Smart filter cartridges are available from specialised
dealers.
Precondition: ‘Change filter’ is displayed.
T Press the Rotary Switch.
‘Change the filter’
T Press the Rotary Switch again.
T Remove and empty the water tank.
T Turn the filter cartridge anticlockwise and remove it along
with the extension from the water tank.
T Fit the filter cartridge extension on top of a new CLARIS
Smart filter cartridge.
T Insert the filter cartridge with its extension into the water
tank.
T Turn the filter cartridge clockwise until it audibly clicks into
place.
T Fill the water tank with fresh, cold water and reinsert the
tank.
E The machine automatically detects that you have just chan-
ged the filter cartridge.
‘Change the filter’ / ‘Saved’
6
Page 7

Z6 – Quick Reference Guide
‘Filter is being rinsed’, the filter cartridge is rinsed. The water
flows directly into the drip tray.
‘Empty drip tray’
T Empty the drip tray and put it back into the machine.
‘Change the filter’, ‘Filter rinsing complete’
‘Please select product’ appears on the display. Your Z6 is
once more ready for use.
Cleaning the machine
CAUTION
After 180 preparations or 80 switch-on rinses, the Z6 will prompt you
to clean it.
If the wrong cleaning agent is used, the machine could be damaged
and/or traces could be left behind in the water.
T Use only original JURA maintenance products.
E The cleaning programme lasts approximately 20 minutes.
E Do not interrupt the cleaning programme. The quality of
cleaning will be impaired if you do so.
E JURA cleaning tablets are available from specialised dealers.
Precondition: ‘Clean machine’ is displayed.
T Press the Rotary Switch.
‘Clean’
T Press the Rotary Switch again.
‘Clean’
T Press the ‘Start’ button.
T Press the ‘Start’ button again.
‘Empty coffee grounds container’
T Empty the drip tray and coffee grounds container and put
them back into the machine.
‘Press the Rotary Switch’
T Place a receptacle under the dual spout.
T Press the Rotary Switch.
‘Machine is being cleaned’, water flows out of the dual spout.
The operation is interrupted, ‘Add cleaning tablet’.
T Open the cover of the filler funnel for ground coffee.
7
Page 8

Z6 – Quick Reference Guide
T Insert a JURA cleaning tablet into the filler funnel.
T Close the cover of the filler funnel.
‘Press the Rotary Switch’
T Press the Rotary Switch.
‘Machine is being cleaned’, water flows out of the dual spout
repeatedly.
The operation stops automatically.
‘Empty coffee grounds container’
T Empty the drip tray and coffee grounds container and put
them back into the machine.
‘Please select product’ appears on the display. Cleaning is
now complete.
Descaling the machine
J
CAUTION
CAUTION
CAUTION
CAUTION
The Z6 builds up deposits of limescale over time and automatically
prompts you to descale it when necessary. The degree of calcification depends on the hardness of your water.
E If you are using a CLARIS Smart filter cartridge, you will not be
prompted to descale.
If the descaling agent comes into contact with the skin or eyes, this
can cause irritation.
T Avoid contact with the skin or eyes.
T Rinse off the descaling agent with clean water. Should you get
any descaling agent in your eye, see a doctor.
If the wrong descaling agent is used, the machine could be damaged and/or traces could be left behind in the water.
T Use only original JURA maintenance products.
If the descaling operation is interrupted, there may be damage to
the machine.
T Allow the descaling programme to run to the end.
If the descaling agent comes into contact with sensitive surfaces
(e.g. marble), damage cannot be ruled out.
T Clean up any splashes immediately.
8
Page 9

Z6 – Quick Reference Guide
E The descaling programme lasts approximately 45 minutes.
E JURA descaling tablets are available from specialised dealers.
Precondition: ‘Decalcify machine’ is displayed.
T Press the Rotary Switch.
‘Descale’
T Press the Rotary Switch again.
‘Descale’
T Press the ‘Start’ button.
T Press the ‘Start’ button again.
‘Empty drip tray’
T Empty the drip tray and coffee grounds container and put
them back into the machine.
‘Pour descaling agent into water tank’
T Remove and empty the water tank.
T Completely dissolve the contents of one blister (3 JURA des-
caling tablets) in a receptacle holding 600 ml of lukewarm
water. This may take several minutes.
T Pour the solution into the empty water tank and insert it into
the machine.
‘Press the Rotary Switch’
T Place a receptacle under the hot water spout.
T Press the Rotary Switch.
‘Machine is being descaled’, water flows out of the hot water
spout repeatedly.
The operation is interrupted, ‘Empty drip tray’.
T Empty the drip tray and coffee grounds container and put
them back into the machine.
‘Fill water tank’
9
Page 10

Z6 – Quick Reference Guide
T Empty the receptacle and place it under the hot water and
dual spouts.
T Remove the water tank and rinse it thoroughly.
T Fill the water tank with fresh, cold water and reinsert the
tank.
‘Press the Rotary Switch’
T Press the Rotary Switch.
‘Machine is being descaled’, the descaling operation is con-
tinued, water flows out of the dual spout and the hot water
spout.
‘Empty drip tray’
T Empty the drip tray and coffee grounds container and put
them back into the machine.
‘Please select product’ appears on the display. Descaling is
now complete.
E If the descaling operation stops unexpectedly, rinse the water
tank thoroughly.
10
 Loading...