

Page 1
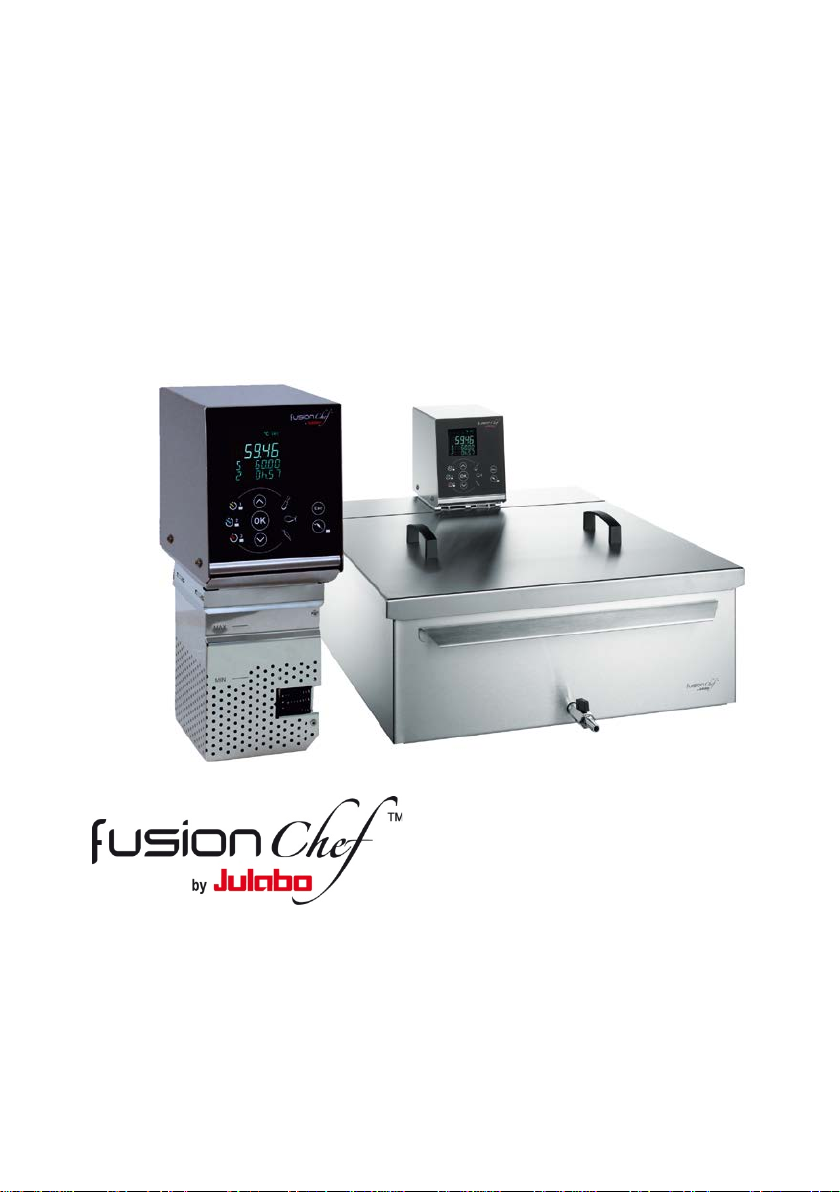
Operating manual
English
fusionchef
1.951.0550-V6 06/16 17.06.16
diamond
premium sous vide collection
Printed in Germany
Changes without prior notification reserved
Julabo GmbH
Gerhard-Juchheim-Strasse 1
77960 Seelbach / Germany
Tel. +49 (0) 7823 / 51-170
Fax +49 (0) 7823 / 2491
www.fusionchef.de
Page 2

Table of contents
Table of contents
Sous Vide basics ............................................................................ 5
Safety ............................................................................................. 7
Proper use ....................................................................... 7
Safety notices for your Diamond .................................. 7
Safety notices for Sous Vide cooking ......................... 11
Description of your Diamond .................................................... 13
Front and rear views .................................................... 13
Display and keypad ....................................................... 14
Accessories.................................................................................. 16
Attachments ................................................................. 16
Accessories for cooking containers ............................ 16
Temperature sensor .................................................... 18
Other accessories ......................................................... 19
Installation and initial operation ............................................... 21
Unpacking and inspecting the unit ............................. 21
Installing your Diamond combination ........................ 21
Installing your Diamond .............................................. 21
Adding water to tank ................................................... 23
Beginning initial circulator operation ........................ 24
First steps .................................................................................... 25
Prep work ..................................................................... 25
Starting the unit ........................................................... 26
Enjoying the first results... ........................................... 27
2
Page 3

Table of contents
Improving the results ................................................... 28
Working with your Diamond .................................................... 30
Gaining experience ...................................................... 30
Switching on and starting the unit ............................................... 30
Operating the unit ........................................................................... 30
Setting the desired temperature ................................................. 31
Using the quick keys ....................................................................... 31
Changing the stored temperatures ............................................. 32
Working with the timer ................................................................ 33
A closer look ................................................................. 37
Working with the core temperature sensor ........................... 37
Connecting the core temperature sensor ................................ 38
Inserting the core temperature sensor ..................................... 39
Setting the alarm for the core temperature sensor ............... 39
Switching off the temp. sensor alarm ......................................... 40
Automating processes ................................................. 41
Using automatic cooking time detection ................................... 41
Activating automatic cooking time detection .......................... 41
Starting automatic cooking time detection ............................... 42
Storing the cooking time ............................................................... 42
Retrieving the cooking time.......................................................... 44
What exactly will be stored? ........................................................ 44
Special functions ........................................................... 46
Automatic temperature monitoring ........................................... 46
Recording and exporting data ...................................................... 48
Additional menu settings ............................................................... 52
Care and maintenance ............................................................... 55
Changing the water ...................................................... 55
Decalcifying ................................................................... 56
Cleaning the unit .......................................................... 56
3
Page 4

Table of contents
Confirming temperature accuracy ............................. 59
Checking temperature accuracy .................................................. 59
Calibrating the external sensor ................................................... 59
Calibrating the unit in an ice water bath ................................... 61
Error messages ........................................................................... 64
Basic troubleshooting .................................................. 64
Error messages ............................................................. 65
Information about the unit ........................................................ 66
Technical data .............................................................. 66
EC compliance .............................................................. 69
Repairs ........................................................................... 69
Disposal ......................................................................... 70
Warranty ...................................................................... 71
4
Page 5

Sous Vide basics
Important!
1. Preparation
2. Vacuuming
3. Cooking
4. Cooling
Proper use
tain hygienic conditions at all times.
Use only fresh ingredients of the highest possible
Always exercise the greatest possible care and main-
quality. Prepare raw ingredients properly.
Place the raw, refrigerated ingredients into special
bags suitable for Sous Vide. Vacuum them with a suitable vacuum device.
Fill the bath tank with hot water and use your Dia-
mond to heat the water to the desired temperature.
When the desired temperature has been reached,
place the bag with the food into the water bath. Cook
gently at low temperatures but for an extended period of time.
If you are unsure about the appropriate temperatures
and cooking times, you must consult a Sous Vide
cookbook.
If you will not serve the cooked food immediately,
you can allow the food to cool down and store it in a
refrigerator.
To do this, interrupt the cooking process shortly
before the normal ending time and cool the food to 3
°C (37 °F) within 90 minutes. The best way to do this
is with an ice water bath or a shock freezer.
5
Page 6

Sous Vide basics
5. Refrigerated
6. Regeneration
storage
Remove the cooled bag from the ice water and store
it at 3 °C (37 °F) or colder.
Warm the cooled bag in a water bath shortly before
serving. Complete the cooking process and serve the
food.
Enjoy your meal!
6
Page 7
Safety
Proper use
Proper use
This product is designed to control the temperature
of water in a bath tank. The product is used to prepare food in this water bath according to the Sous
Vide technique (low-temperature, slow cooking of
food in vacuum-sealed packaging).
This product is designed exclusively for commercial use.
Carefully observe hygienic standards and legally stipulated minimum cooking times/minimum temperatures
at all times.
This product is not designed for direct cooking of
food (such as soups or sauces).
Direct cooking means: unprotected contact of the
food with the cooking fluid (water) and parts of the
device.
Safety notices for your Diamond
Cautions and warnings!
These operating instructions contain safety notices.
They are identified by the triangle with exclamation
point shown here.
Carefully read and observe all instructions!
It is important that you follow all safety instructions in
order to avoid personal injury and property damage.
7
Page 8
Safety
This device is not intended for use by persons (including children) with reduced physical, sensory or mental
capabilities, or lack of experience and knowledge
unless they have been given supervision or instruction
concerning the use of the device by a person responsible for their safety.
Children should be supervised to ensure that they do
not play with the appliance.
Caution!
This device may be attached only to power sup-
plies with proper grounding and FI fuses!
If a grounded power supply is not available, the
customer is obligated to contract an authorized
technician to install one.
The power plug serves as a protective separator
and must be easily accessible at all times.
Caution!
Parts of the bath tank and the stainless steel cov-
er may become hot to the touch during continuous operation. Exercise caution when touching
these parts! Use a hot pad or hot gloves!
Do not drain the water while it is hot! Check the
temperature of the water before draining; this
may be done by briefly switching on the unit.
8
Page 9
Safety notices for your Diamond
It is essential that you read the operating instruc-
tions before initial operation.
Install the stainless steel bath tank indoors only
and on a level, noncombustible surface.
Do not use this unit outdoors!
Never operate the unit without water! Depend-
ing on the hardness of the water, we recommend
the use of soft/decalcified water. Change the water every day. Other fluids may become combustible, flammable, or explosive when vaporizing.
Use water only!
Completely drain the stainless steel bath tank
before moving the unit. Transport the unit carefully!
Do not carry the unit on the protection grid!
Shaking or dropping may damage the inside of the
unit.
Warning!
Do not touch the power plug or power cord with
wet hands!
Switch off the unit at the mains switch and pull
out the power plug
- before performing cleaning tasks.
- before moving the unit.
9
Page 10
Safety
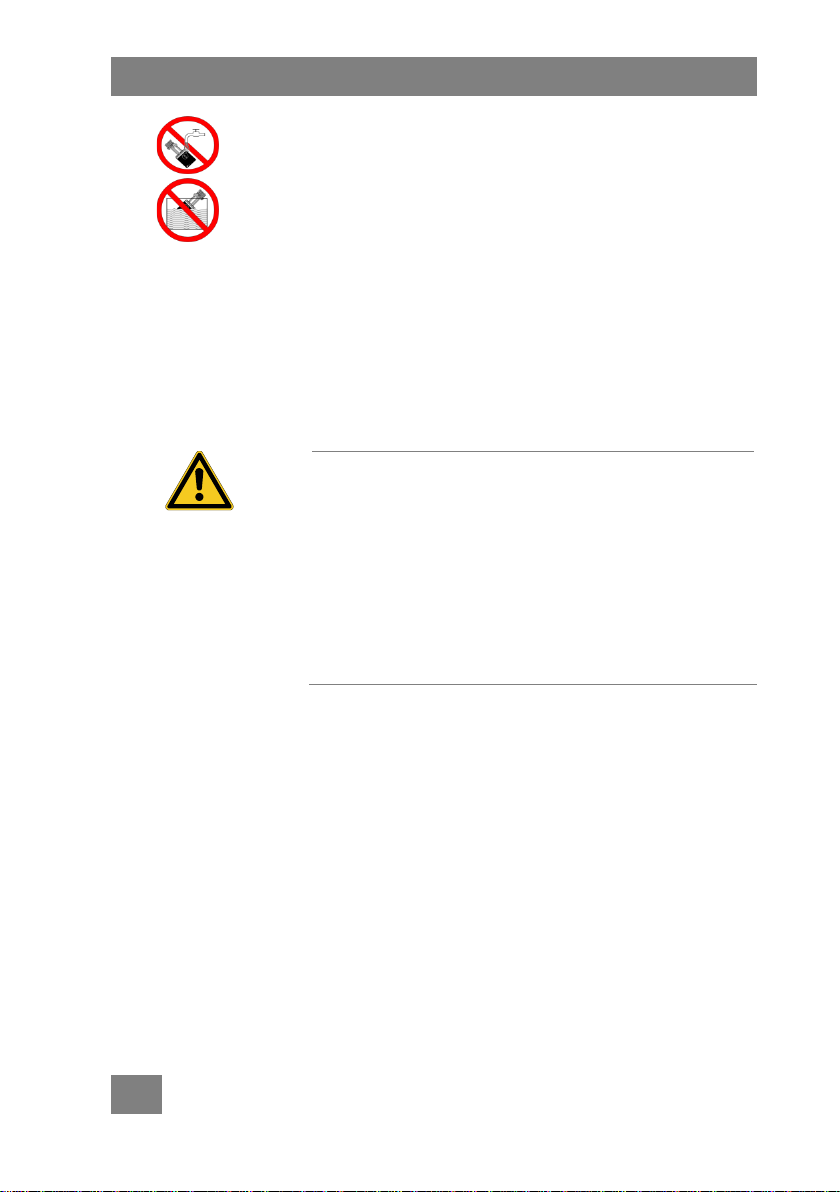
Never allow water to penetrate inside the circu-
lator.
The appliance shall not be cleaned with water jet.
Do not immerse the appliance under water.
Never operate a damaged or leaking unit!
Do not attempt to use the unit if the power cord
is damaged! For safety reasons a damaged power
cord may only be replaced by the manufacturer, a
fusionchef by Julabo service representative or a
similarly qualified person
Allow only authorized technicians to perform
service and repair tasks.
Low bath fluid safety float
This unit includes a low bath fluid safety switch.
Switching off this safety device (by blocking the
float) can result in a hazardous situation.
Always inspect the low bath fluid safety float
before using the unit. You can check the functionality of the float by manually holding down the
unit's float switch with a tool.
10
Page 11

Safety notices for Sous Vide cooking
Safety notices for Sous Vide cooking
Only trained experts should attempt the Sous Vide
cooking technique. It is important to follow precise
and uniform work steps and maintain a hygienic environment in order to ensure adequate safety during
food preparation.
It is critically important to follow procedures that
minimize the risk of the growth of anaerobic bacteria,
such as clostridium botulinum.
Make sure that you are using Sous Vide techniques
from a trained expert or from a technical culinary
manual.
Notice
Please remember to observe the following
Use high-quality ingredients from reputable manu-
facturers only.
Separate the areas for raw and cooked food.
Observe the appropriate minimum temperature
when cooking food.
Observe the maximum storage temperatures and
storage times recommended by experts or technical journals.
Label food with the date of cooking and the date
of expiration.
Always work in a sterile environment and use
sterile gloves when filling the Sous Vide bags.
Use separate devices for vacuuming raw and
cooked food.
11
Page 12

Safety
Observe HACCP
Monitor water qual-
Ensure a
Check core
regulations
ity
proper cold chain
temperature
It is also important that kitchen personnel employ an
appropriate HACCP (Hazards Analysis and Critical
Control Points) system in order to monitor and document every step the food takes from delivery to
serving.
Monitor the quality of the water in the Sous Vide bath
and change it regularly. Depending on the hardness of
the water, we recommend decalcifying the unit regularly. To do this, use a food-compatible decalcifier.
Be aware of potential breaks in the cold chain or
unnecessary food storage time.
Also make sure that the cooked food cools down
within the proper time before placing it into storage
(maximum temperature 3 °C (
37° F)).
To achieve pasteurization, food cooked according to
the Sous Vide process must reach a core temperature
of at least 65 °C (149 °F). It is advisable to use a temperature sensor or other thermometer to check the
core temperature.
In all cases, you are responsible for following Sous
Vide regulations enacted by your local health agency
as well as all food-safety directives that apply to your
area of responsibility.
12
Page 13
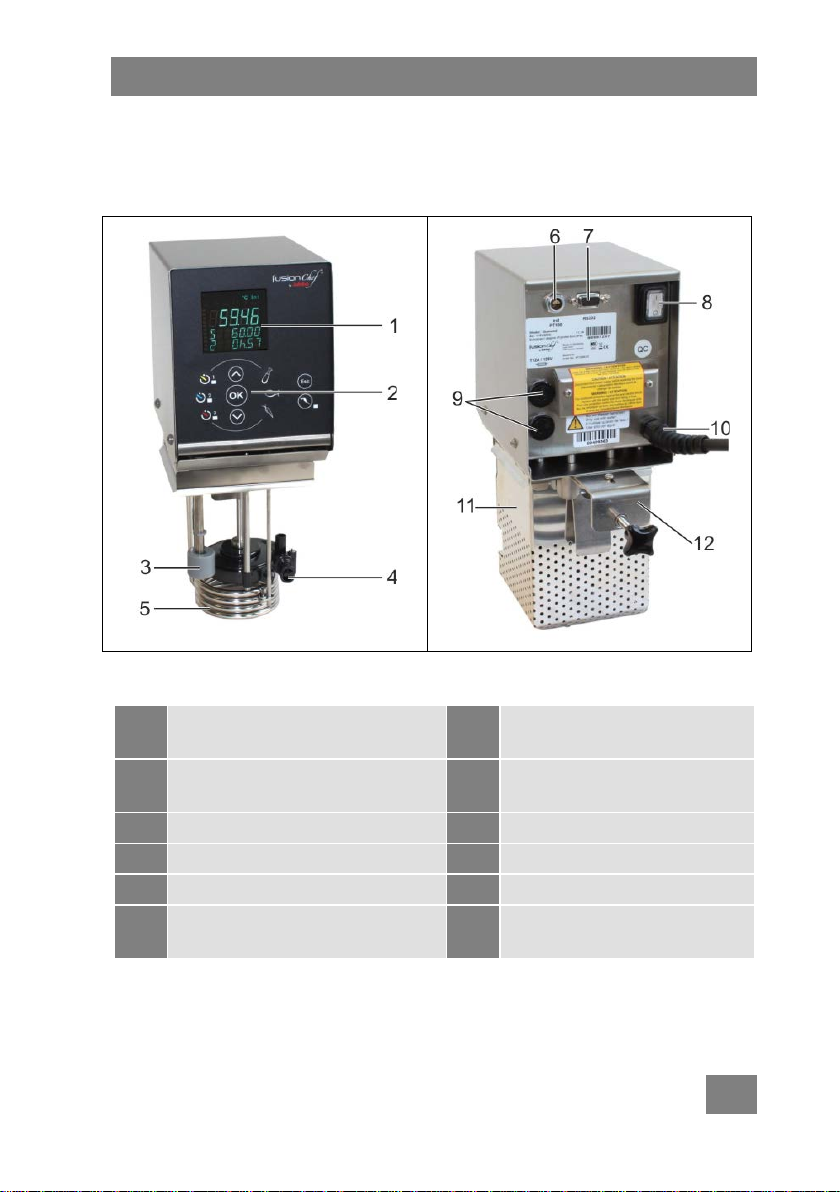
Front and rear views
1
VFD display (see next page)
7
RS232 interface for
2
Keypad (see next page)
8
Mains switch, illumi-
3
Safety float switch
9
Micro fuses
4
Pump discharge
10
Power cord with plug
5
Heating coil
11
Protection grid
6
Pt100 connection socket for
12
Bath attachment clamp
Description of your Diamond
Front and rear views
Front without protection grid Rear with protection grid
core temperature sensor
computer connection
nated
13
Page 14
Description of your Diamond
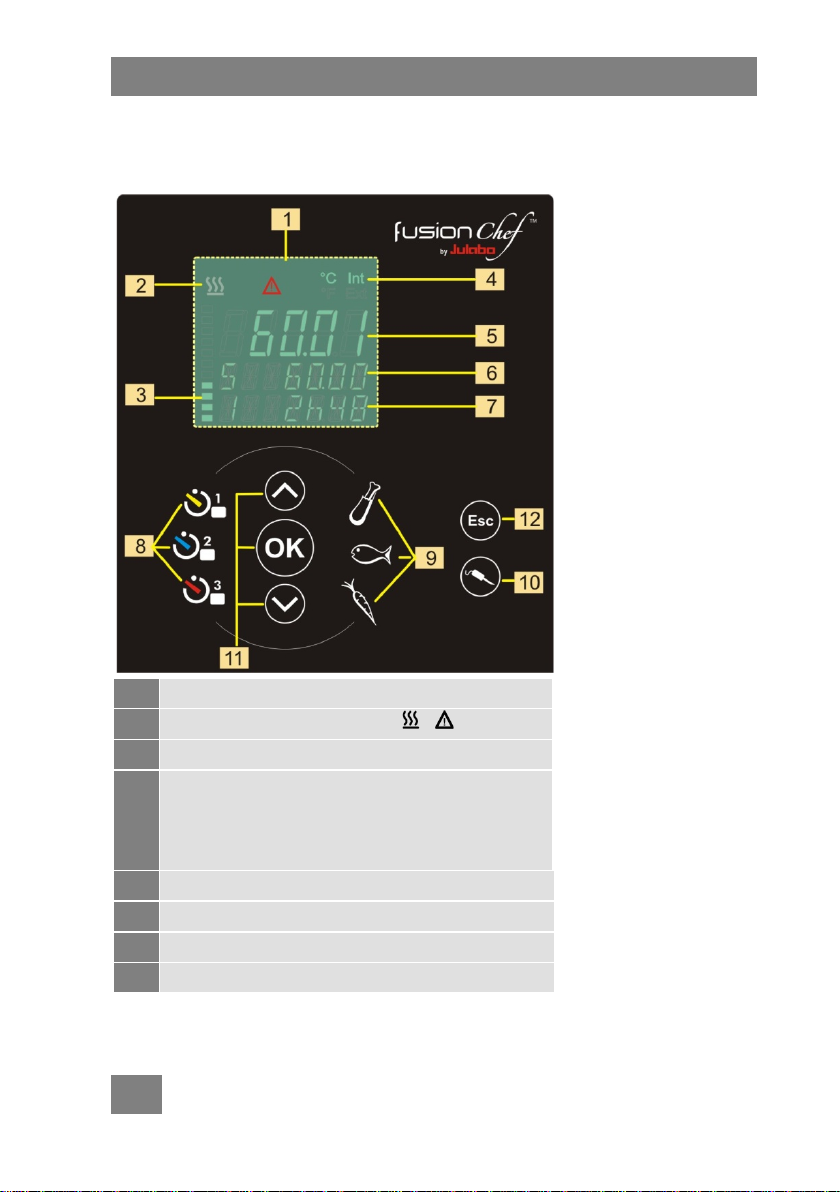
1
VFD display
2
Status icons: Heating/Alarm
3
Datalogger activation indicator
4
Temperature unit display (°C or °F) and
5
Main display for current temperature value
6
Display line 1 for set point value
7
Display line 2 for time value
8
Timer buttons 1-3
Display and keypad
temperature sensor for current temperature:
Int for temperature sensor in water bath
Ext for attached core temperature sensor
14
Page 15

9
Quick keys for
MEAT,
10
Core temperature sensor button
11
Keypad:
12
Key to correct settings, stop functions or
FISH,
VEG
Arrow keys to set temperature and
timer
key to confirm the values
enter a menu (press together with key 10)
Display and keypad
15
Page 16
Accessories
Max. wall thickness
Order No.
Attach. clamp
30 mm
9FX1118
Order No.
Separation grid for bath tank XS
9FX1120
Separation grid for bath tank S
9FX1121
Separation grid for bath tank M
9FX1122
Separation grid for bath tank L
9FX1123
Separation grid for bath tank XL
9FX1124
Accessories
The following accessories are available for your Diamond.
Attachments
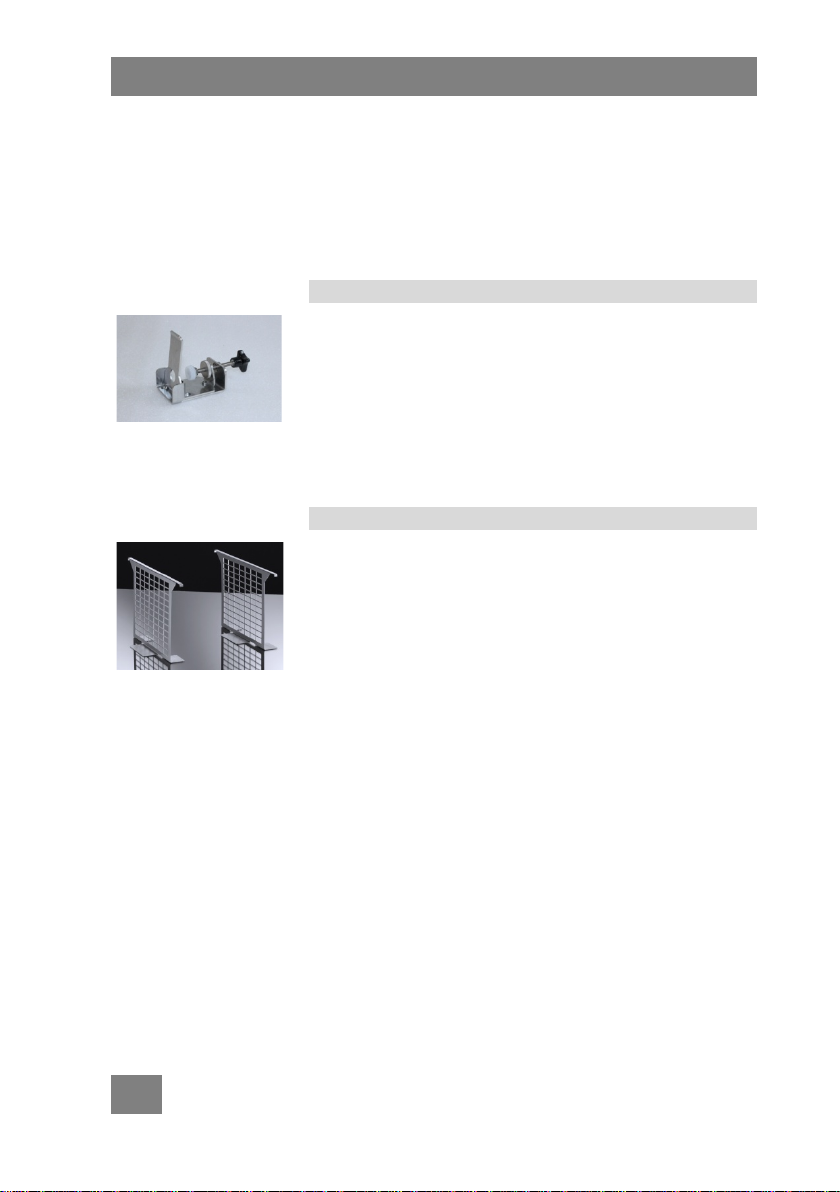
Bath attachment clamp
Use the bath attachment clamp to secure the Diamond to the wall of a cooking container.
Accessories for cooking containers
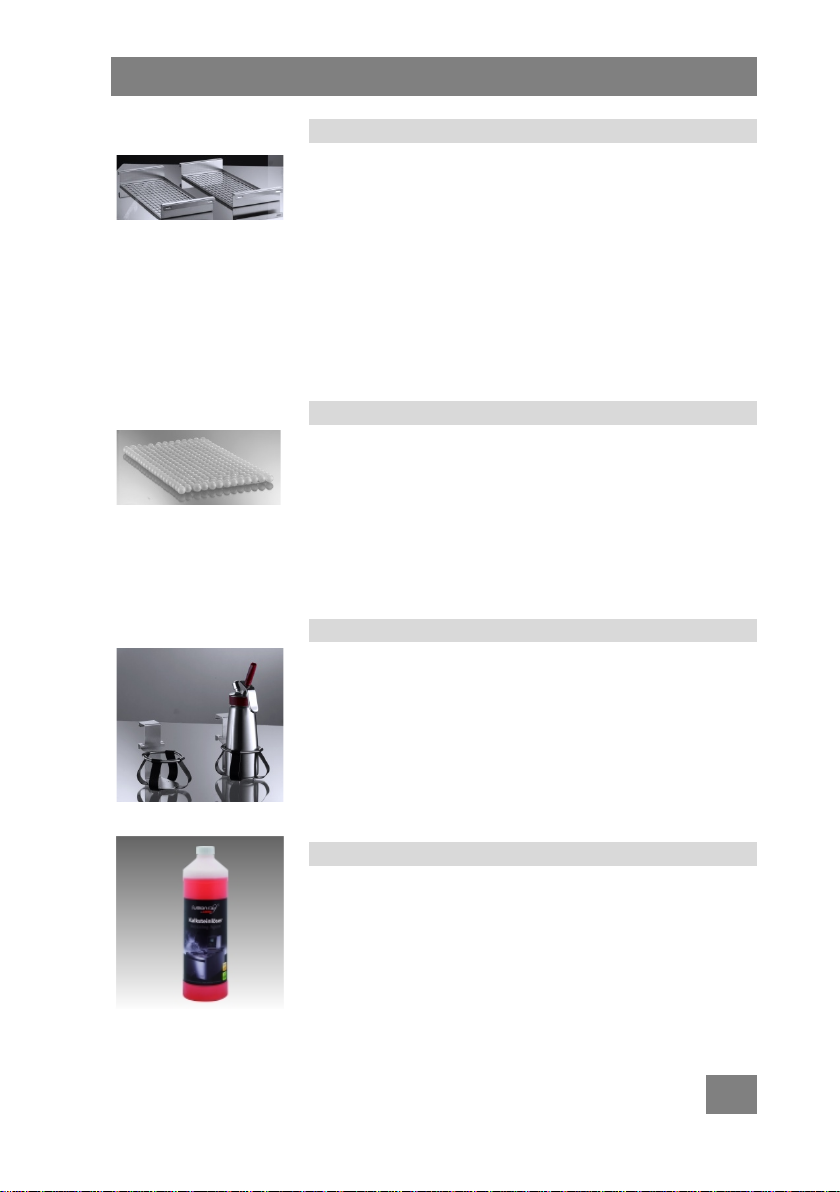
Separation grid
The separation grid is used to divide bath tanks into
smaller compartments in order to keep food items
apart. They are particularly useful when cooking a
variety of items that must be removed from the container at different times.
Separation grids are available for bath tanks of all
sizes.
16
Page 17
Accessories for cooking containers
Order No.
1 retaining grid for bath XS
9FX1127
2 retaining grids for baths S, M
9FX1125
2 retaining grids for baths L, XL
9FX1126
Order No.
Steam trapping balls
9FX1142
Order No.
iSi 0.5 l clamp
9FX1130
iSi 1.0 l clamp
9FX1131
Order No.
Descaling Agent, 1 L
9FX1171
Retaining grids
Retaining grids are inserted into the bath tank from
above and are used to keep vacuum bags underwater.
They help ensure that the food is cooked evenly from
all sides.
Steam trapping balls
To maximize insulation of the water bath, use these
steam trapping balls. Distribute these balls on the
surface of the water to minimize the amount of heat
that is lost.
iSi Gourmet clamp
Use the special clamps to securely hold an iSi Gourmet Whip in the water bath. Indispensable when
preparing espumas and sauces.
Descaling Agent
Descaling Agent to help keep your circulator performing at its peak. Dilute 1 part concentrate with 10
parts water.
17
Page 18
Accessories
Order No.
Core temperature sensor Pt100
9FX1150
Order No.
Handheld core temperature sensor
9FX1151
Order No.
Adhesive sealing tape 4 m
9FX1141
Temperature sensor
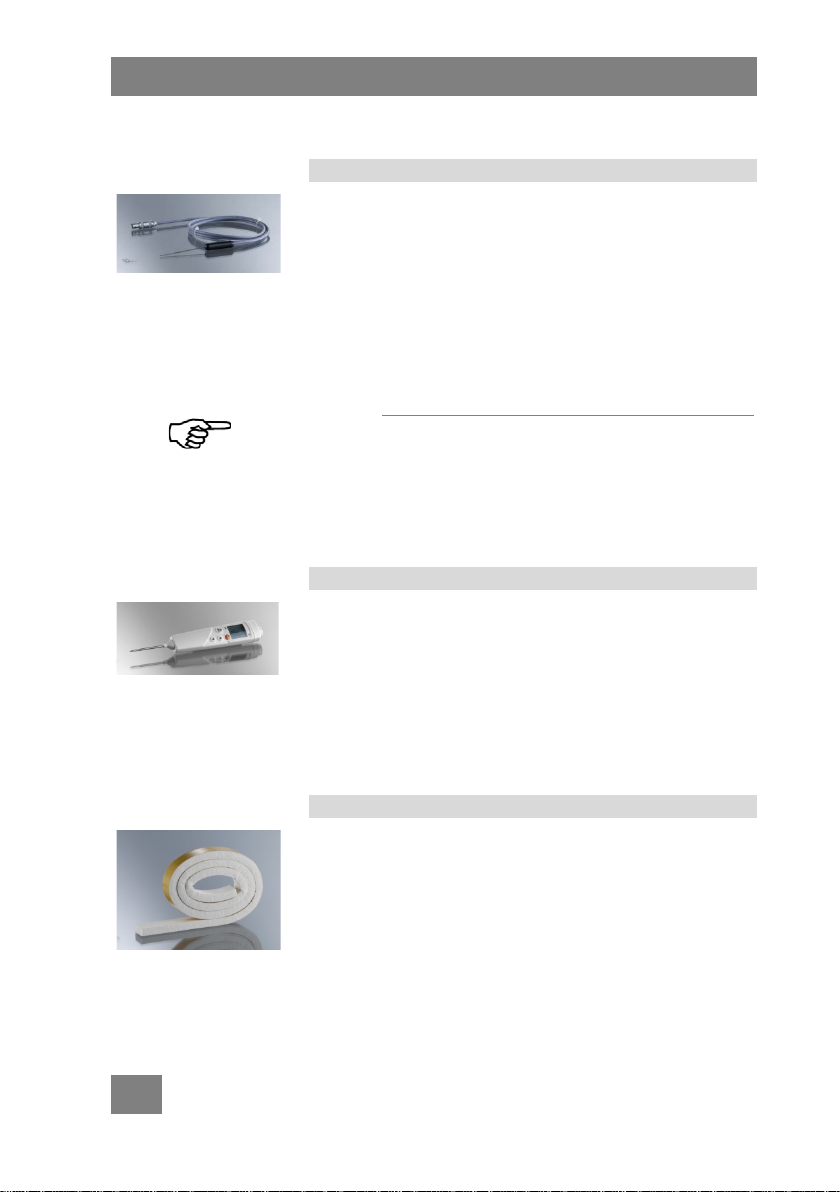
Core temperature sensor
Use the core temperature sensor to achieve optimal
results when cooking meat or fish. Refer to the chapter A closer look starting on page 37 for more details on how to use the Diamond with the core temperature sensor.
Notice
The food that is cooked with the inserted temperature sensor may serve only as a reference or retention sample. It is not advisable to consume the food
once the vacuum bag has been penetrated.
Handheld core temperature sensor (external)
A handheld measurement device is useful for monitoring the core temperature of the
cooked food. This device is designed to be precise
and reliable.
18
Adhesive sealing tape
Place the adhesive sealing tape onto the vacuum bag
before inserting the core temperature sensor. This
will help maintain much of the vacuum.
Page 19
Other accessories
Order No.
Travel case
9FX1190
Order No.
Soft Travel Case (Polyester)
9FX1191
Order No.
Timer tape, red, 5 m
9FX1145
Timer tape, blue, 5 m
9FX1146
Timer tape, yellow, 5 m
9FX1147
Order No.
Easy fusionchef software
9FX1160
Other accessories
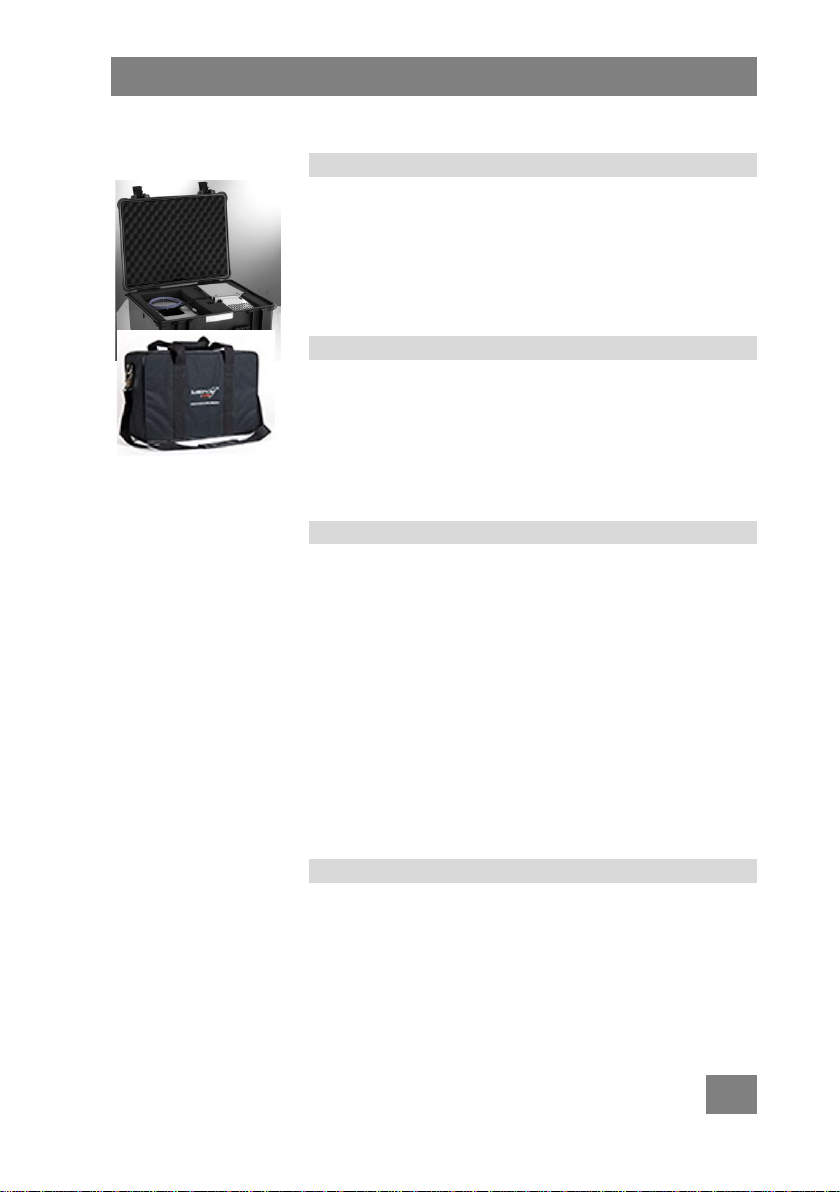
Travel case
The travel case is designed to hold your Diamond
and accessories.
Soft Travel case (Polyester)
Sturdy soft travel case made of polyester, with carrying straps and removable shoulder strap.
Timer tape
Place timer tape of a particular color on the vacuum
bags that are being monitored by the timer of the
same color.
When the red timer triggers, for example, you will
know that all vacuum bags with red timer tape are
finished.
Easy fusionchef software
The Easy fusionchef software records data and visualizes cooking processes.
19
Page 20
Accessories
Order No.
RS232 interface cable
9FX1162
Order No.
USB adapter cable
9FX1161
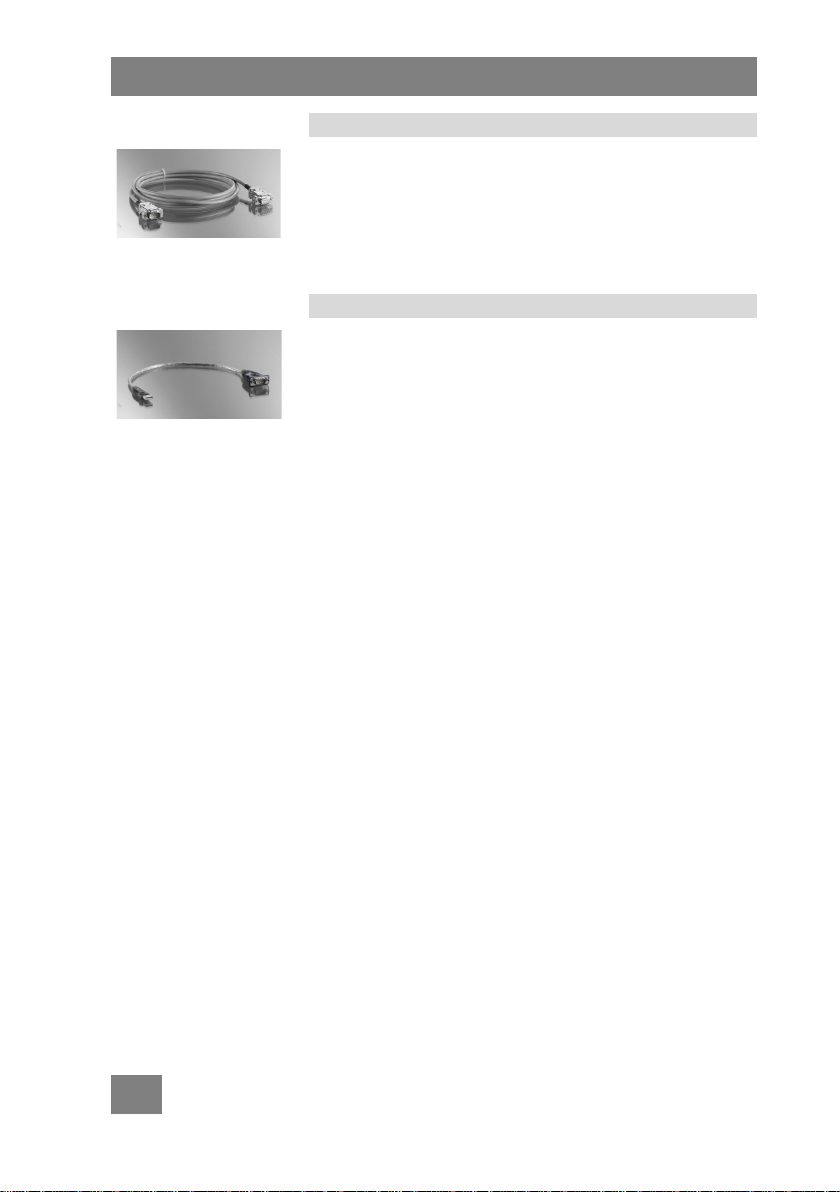
RS232 interface cable
Use the RS232 interface to connect the
Diamond to a computer.
USB adapter cable
Use the USB adapter to connect the
Diamond to a computer.
20
Page 21

Unpacking and inspecting the unit
Installation and initial operation
Unpacking and inspecting the unit
Unpack the unit and accessories and immediately
check the items for any damage that may have occurred during transport. Even if only the packing has
been damaged, please notify the shipping provider,
railway company, or postal service so they can file a
damage report.
Then check to see if the unit and all accessories are
complete.
Installing your Diamond combination
Install your Diamond Edition XS, S, M, L, or XL
combi unit on an even, noncombustible surface.
Install drain tap on combination units
Proceed as follows to install the drain tap onto the
cooking container:
1. Remove the drain's screw plug.
2. Screw the included tap into the drain port and
use the counternut to fix the tap in place.
Installing your Diamond
If, instead of a combi unit, you purchased a single unit,
install the unit as follows:
Prepare the cooking container
Place a suitable cooking container onto an even, noncombustible surface.
21
Page 22
Installation and initial operation
Fasten the unit in place
Warning!
Danger of electric shock!
Carefully fasten the unit in place!
If the unit is installed or fastened improperly, it may
fall into the cooking container. If this happens:
Pull the power plug from the power socket.
Lift the unit from the cooking container only after
pulling the plug.
Ask a service technician to inspect the unit before
using it again.
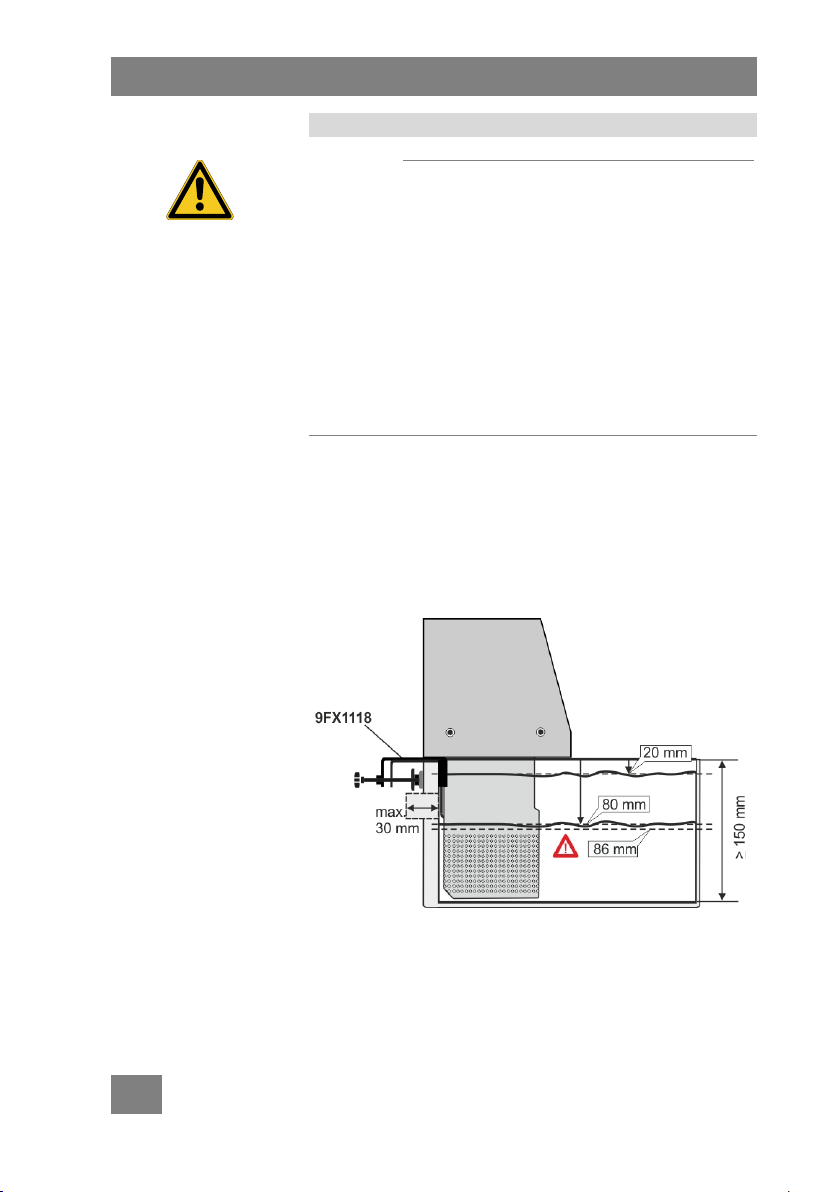
Properly fasten the unit with the included bath attachment clamp
Use the bath attachment clamp to fasten the immersion circulator to a suitable bath tank (maximum wall
thickness of bath tank is 30 mm(~ 1 ⅜ inches)).
22
Page 23
Adding water to tank
max. wall
Order No.
Attachm.
60 mm
9FX1119
clamp
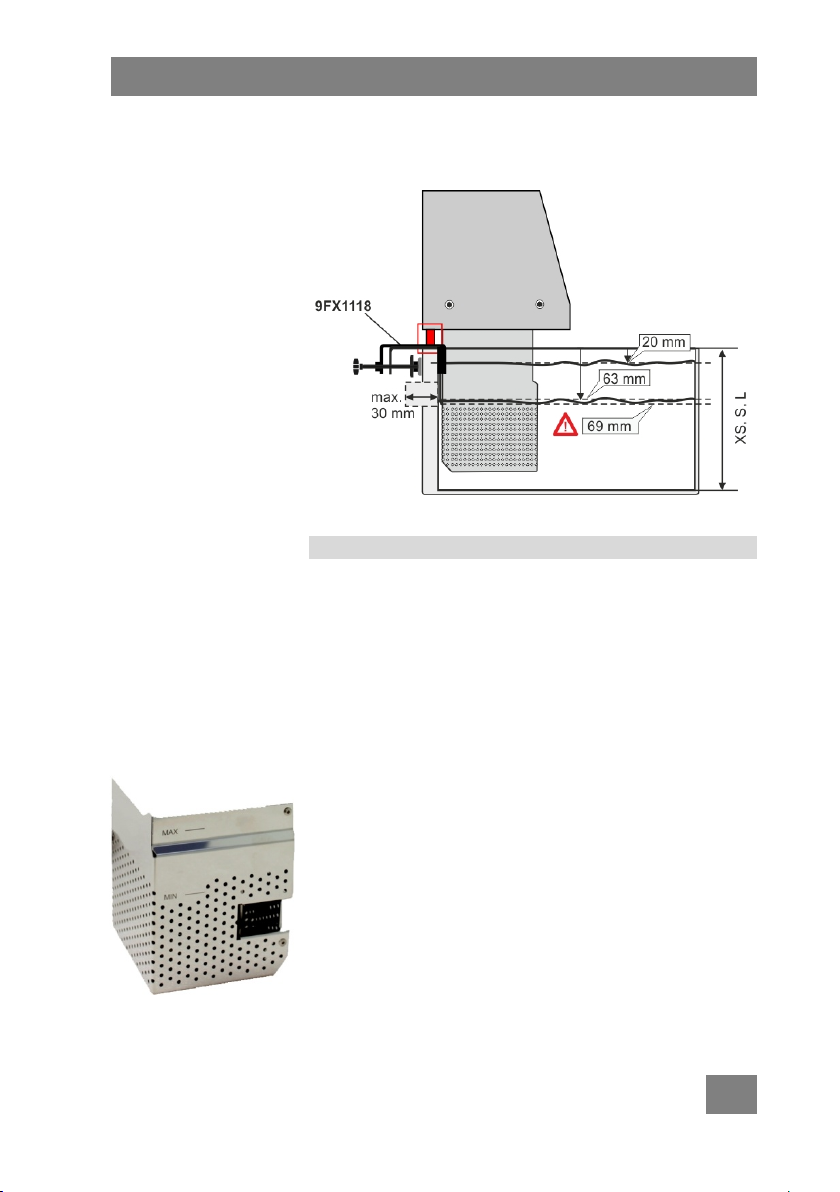
Please insert the enclosed distance sleeves (∅ 8 mm x
17 mm) into the combination units Diamond Edi-
tion XS, S and L.
Optionally
Bath attachment clamp for wall thickness > 30 mm:
thickness
Adding water to tank
Fill the bath tank with softened/decalcified water.
Observe the minimum and maximum filling height
according to the marks on the protection grid.
Observe MIN, MAX
23
Page 24

Installation and initial operation
Beginning initial circulator operation
Caution!
Compare the available power voltage and fre-
quency with the specifications on the type label.
This device may be attached only to power out-
lets with an grounding contact!
The power plug serves as a protective separator
and must be easily accessible at all times.
Do not touch the power plug or power cable
with wet hands!
Never operate a damaged or leaking unit!
Do not attempt to use the unit if the power cable
is damaged!
Attach the unit and switch it on (power switch located on rear of unit).
The unit will perform a short self-test (versions of the
unit and software will be displayed). It then goes into
standby mode the first time the unit is turned on. This
is indicated on the display by OFF.
24
Page 25

First steps
Prep work
Prep work
This chapter is intended for users with little or no
experience with the Sous Vide cooking technique. If
you are an experienced Sous Vide cook or professional chef, you may skip this and continue with page
30 „Working with your Diamond“.
After installing, connecting, and turning on your Di-
amond, you are probably anxious to obtain your first
results with the unit. The following example includes
step-by-step instructions to ensure that you will be
successful even if you are not yet familiar with the
Sous Vide method.
1. Obtain from your butcher a piece of very high
quality beef (ideally a filet).
2. Cut the filet into slices no more than 4 cm (1 ½
inches) in thickness and vacuum them individually.
TIP
Most butchers have professional vacuum equipment.
For this reason, the easiest approach is to ask your
butcher to cut and vacuum the meat for you.
3. Store the meat at no higher than 3 °C (37 °F)
until you are ready to start
cooking.
25
Page 26
First steps
Starting the unit
Setting the
desired temp.
Retrieving stored
temperature
values
After all preparations have been completed, you can
begin the cooking process.
1. Make sure that the cooking container is properly
filled and the Diamond is correctly installed and
connected.
2. Switch on the Diamond at the rear of the unit.
The unit will go into standby.
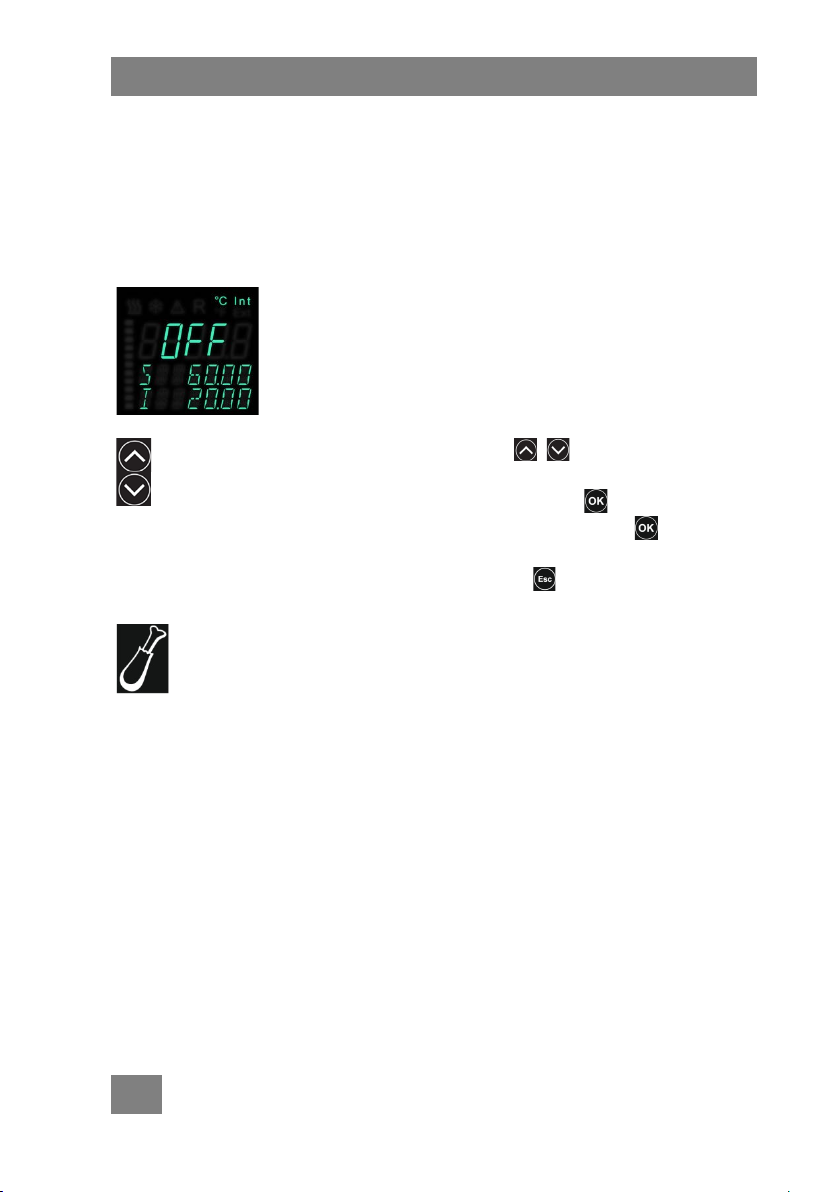
During standby mode, two temperatures are
displayed: The top line shows the selected target
temperature (S); the bottom line shows the temperature (I) currently measured in the water bath.
3. Use the arrow keys to set the target
temperature. First set the whole number digit.
Confirm your selection with . Then set the
decimal places. Confirm again with and the
entered value will be used as the target temperature. Pressing the Esc key will take you one
step back into the main view.
4. You may also use one of the preset values to
obtain an adequate temperature for your beef. To
do this, press the "Meat" temperature symbol.
The word MEAT will appear on the display; below that you will see preset temperature value 1.
Five different values are stored under each quick
key. Each time you press the quick key it will advance to the next value.
26
Page 27
Well done
Starting the unit
Enjoying the first results...
Enjoying the first results...
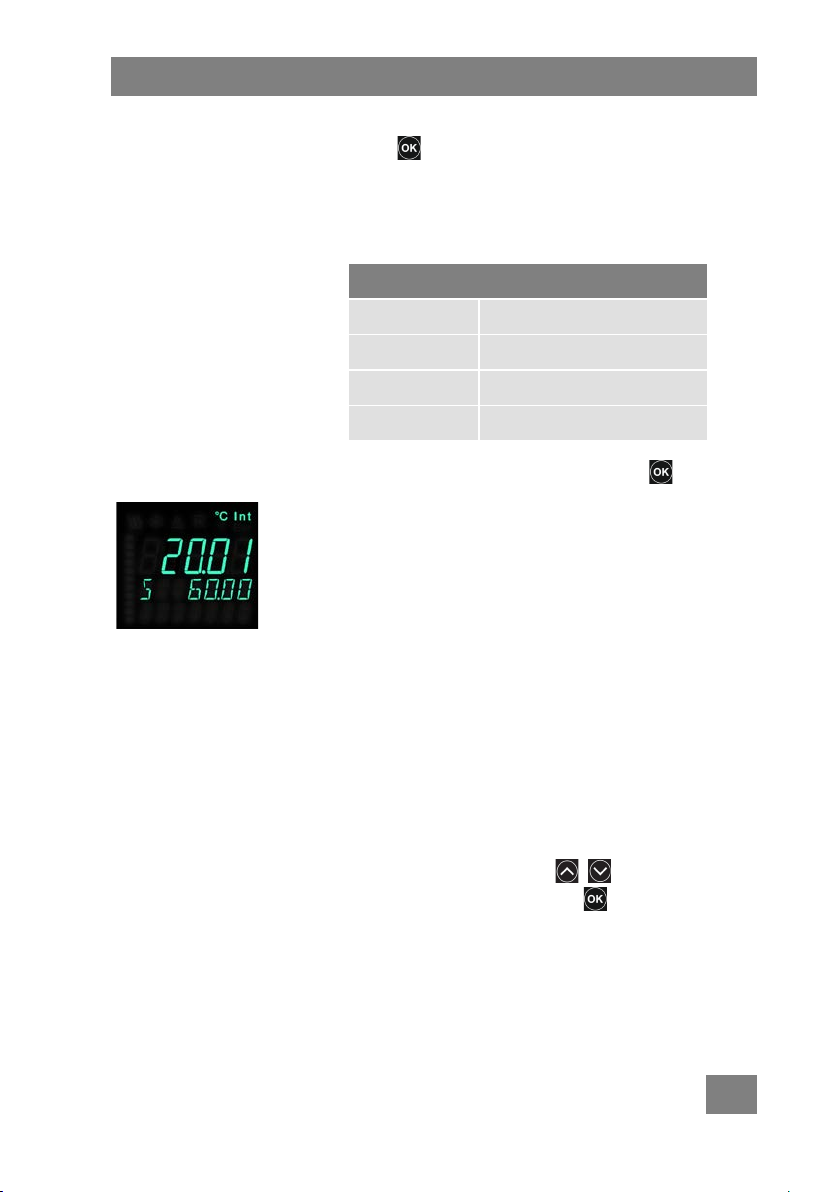
5. When you have found the desired temperature,
press in order to adopt it as the target tem-
perature. We recommend starting at a temperature of 62 °C (144 °F), but you can also select
your own values. The following table provides a
few guidelines.
Temperature guidelines for beef
English 56- 58 °C (132.8-136.4°F)
Medium 58-60 °C (136.4…140 °F)
Medium well 60-62°C (140…143,6 °F)
> 62 °C (143.6 °F)
6. To start the unit, press and hold the key for
about 2 sec. The Diamond will start, i.e. the circulation pump and heater will function to heat the
water bath to the target temperature.
The display will change while the unit is in opera-
tion: In the center you will see the current temperature of the water bath in large digits; the line
below this displays the selected target temperature.
1. After the Diamond has heated the water bath to
the desired temperature, place the meat into the
cooking container.
2. Using the timer function cook the meat for at
least 60 minutes.
Use the timer function: Press one of the timer
keys, use the arrow keys to select the desired time, and confirm with .
3. After the time has elapsed, remove the meat from
the cooking container.
4. Open the vacuum package, remove and dry the
meat somewhat allowing it to rest for a few
minutes.
27
Page 28

First steps
How did it
5. Sear the meat briefly at high temperature on both
Enjoy your meal!
Improving the results
The results of the cooking process are influenced by
many factors, including:
• The quality of the meat
• The cut of meat
• The thickness of the individual pieces of meat
• The precise temperature, cooking time, and
• Your own preferences
taste?
What can I do
better?
For these reasons, it is unlikely that you will achieve
optimal results the first time you use the unit. To
improve the results over time, you should ask your
guests for their honest opinions and request their
suggestions for improvement, for example: Was the
meat too rare? Was it overcooked? You will have to
experiment to achieve the best possible results.
The best way to do this is to take accurate notes on
your preparations and cooking conditions. This will
allow you to successfully reproduce dishes and avoid
making the same mistakes twice.
sides in order to achieve an attractive brown color. Then serve.
28
Page 29

Improving the results
How can I
influence the
results?
Now that you know how to use your Diamond,
careful manipulation of two major variables can influence the cooking process:
Cooking temperature
Cooking time.
The following chapter explains how to adjust the
temperature and monitor cooking time. This information will allow you to gather a few initial experiences. We also recommend referencing a comprehensive Sous Vide cookbook in order to more fully
understand the relationships between temperature,
time, and results.
If you wish to precisely monitor the cooking process
and your results, try using a core temperature sensor.
This is described in more detail in the chapter titled
A closer look starting on page 37.
29
Page 30

Working with your Diamond
Working with your Diamond
Gaining experience
Switching on and starting the unit
Caution!
Never operate a damaged or leaking unit!
Do not attempt to use the unit if the power cord
is damaged!
1. Use the power switch on the rear of the unit to
turn the unit on.
The unit will perform a self test and then begin
operating in the mode it was in before being
switched off: Standby or regular operation. If the
unit had been inoperating mode prior to being
switched off, it will begin to heat up to the most
recently selected target temperature.
2. To start using the unit, i.e. to heat up to the target temperature, press and hold the key for
at least 2 seconds. If you press and hold again,
your Diamond will return to Standby mode.
As soon as you have started your unit, it will begin
heating up to the target temperature.
Operating the unit
30
Basic operation of the unit is the same for all functions:
Use the arrow keys to adjust the set-
tings or select the desired setting from a list.
Confirm your selection by pressing .
Press the Esc key to go back one step in
order to correct the previous entry or to cancel
the function.
Page 31
Setting the desired temperature
58°
60°
62°
66°
80°
45°
52°
54°
56°
65°
80°
82°
85°
92°
95°
You can change the target temperature from the main
view while in standby or during regular operation.
1. Press the arrow keys in order to change
the temperature. The whole digits will change
first. Confirm your selection by pressing .
2. Then adjust the decimal points. Confirm your
selection by pressing .
This temperature will now be adopted as the new set
point.
Using the quick keys
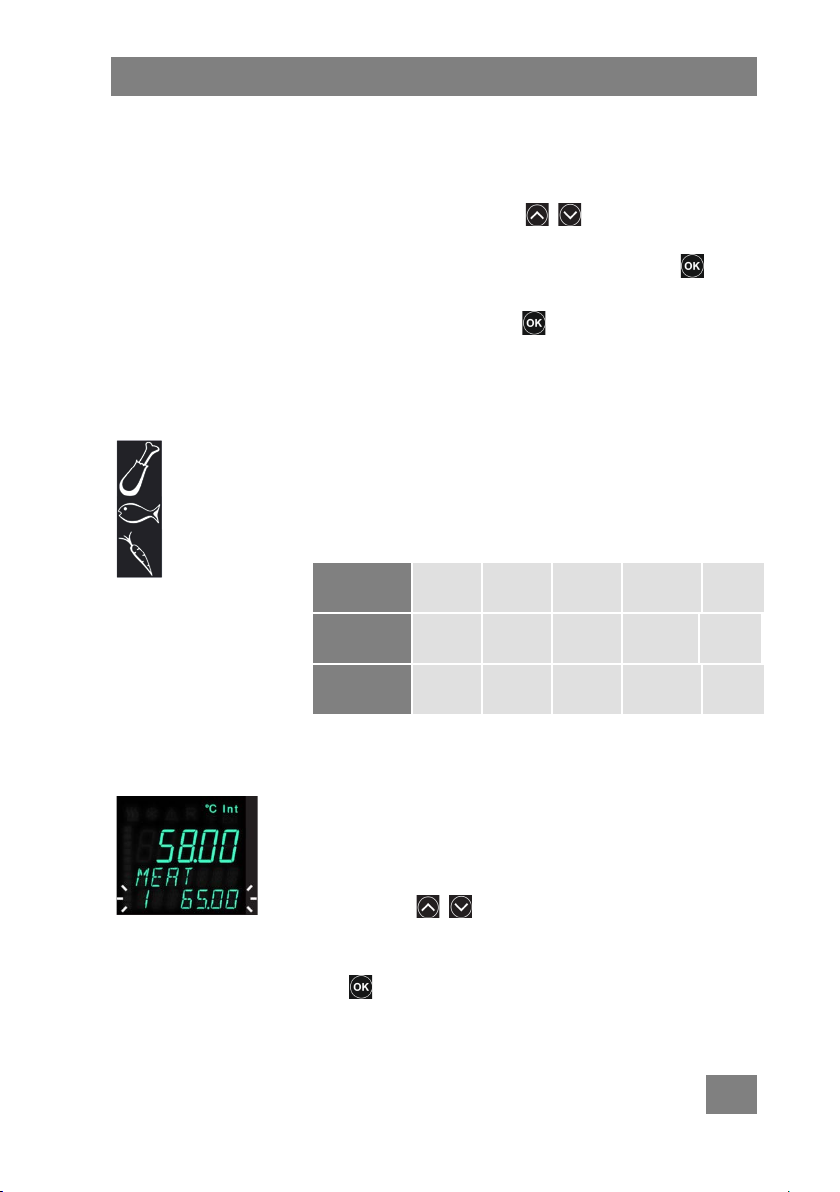
The unit has a total of 15 quick keys that are programmed temperature values. The stored temperature values can be retrieved via the three quick keys
for meat, fish, and vegetables. Each of the three
keys stores five values.
Gaining experience
Meat
Fish
Vegetabl.
136.4°
113°
176°
140°
125.6°
179.6°
143.6°
129.2°
185°
150.8°
132.8°
197.6°
176°
149°
203°
The values in the second line are in °F.
You can retrieve the stored temperatures and use
them as the new target value.
1. Press the desired quick key briefly in order to
retrieve the stored temperatures. The first stored
value will start blinking.
2. Continue pressing the quick key or use the arrow
buttons to scroll through the tempera-
ture values stored under that quick key.
3. When you reach the desired temperature, press
.
31
Page 32

Working with your Diamond
1 63.50
This displayed temperature will be adopted as the
new set point.
Changing the stored temperatures
After you have more experience, you may wish to
store your own temperature values. You can do this
in two ways:
Retrieve the stored values and adjust them or
Store the current target value in the
desired location, thereby overwriting the old value.
Adjusting stored temperature values
Adjust a stored temperature value as follows:
1. Press the quick key under which you wish to
store a value.
2. Select the desired location by repeatedly pressing
the quick key or by pressing the arrow keys
.
3. Press and hold for at least two seconds to
confirm the selection.
4. Use the arrow keys to select the desired temperature value and adopt that value by pressing .
The new value will be stored at the selected location.
Doing this will not change the current set point.
32
Storing the current set point
If your current set point is the optimal
temperature, you can easily store this temperature so
it can be retrieved later.
Assume, for example, that you have determined that a
temperature of 59.6 °C
perature for your beef filet and you wish to store this
temperature in the unit's memory. The temperature is
still selected as the set point.
(139.3 °F) is the perfect tem-
Page 33

1. While in the main view, press and hold the de-
1 59.60
sired quick key for at least two seconds (in this
example: the Meat key).
Quick key 1 will be displayed; only the number
will blink.
2. Use the arrow keys to select the desired
storage space and then press .
The current temperature set point will be
stored at the selected location.
Working with the timer
The Diamond has three timers that operate completely independently of each other. If a timer is active, the corresponding key will illuminate. All timers
continue to run even when the unit is in standby
mode until the audible signal is triggered or until the
timer is cancelled. As soon as a timer alarm triggers,
an audible signal will be emitted and the corresponding timer key will blink until the signal is cancelled by
pressing .
Gaining experience
33
Page 34
Working with your Diamond
Setting the timers
Proceed as follows to set one of the timer:
1. Press and hold the timer key for at least two
seconds.
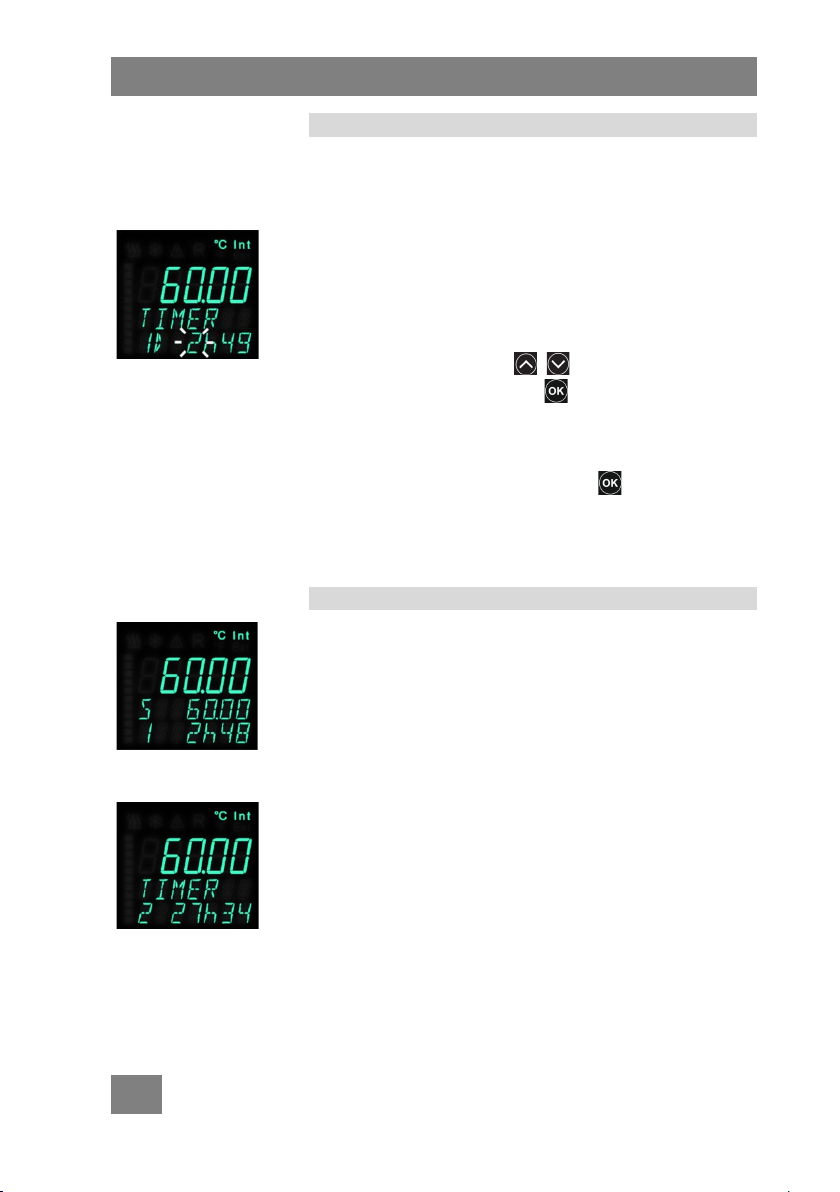
The timer view will appear and the most recently
set timer value will blink on the bottom line. The
timer's value is always preset with the most recently used time. A timer with no preset temperature will display bars.
2. Use the arrow keys to set the number of
hours and confirm with .
3. Use the arrow keys to set the number of minutes.
The timer's upper limit is 99 hours 59 minutes.
4. Activate the timer by pressing .
The timer will be activated with the selected time.
The timer key's LED will be illuminated whenever the
timer is active.
Displaying the timer
While the unit is in operation, the active timer will be
shown in the main view underneath the target temperature (with timer number and remaining time).
If several timers are active at the same time, the timer
with the least amount of remaining time will be
shown.
To view a different timer, press the desired timer key
once.
That timer will then be shown on the lower line.
After a few moments the display will automatically
switch back to the timer with the least amount of
remaining time.
34
Page 35
Gaining experience
Adjusting a timer
You can adjust a timer at any time while the unit is in
operation, even if the signal has already triggered.
1. Press the desired timer key to display the timer.
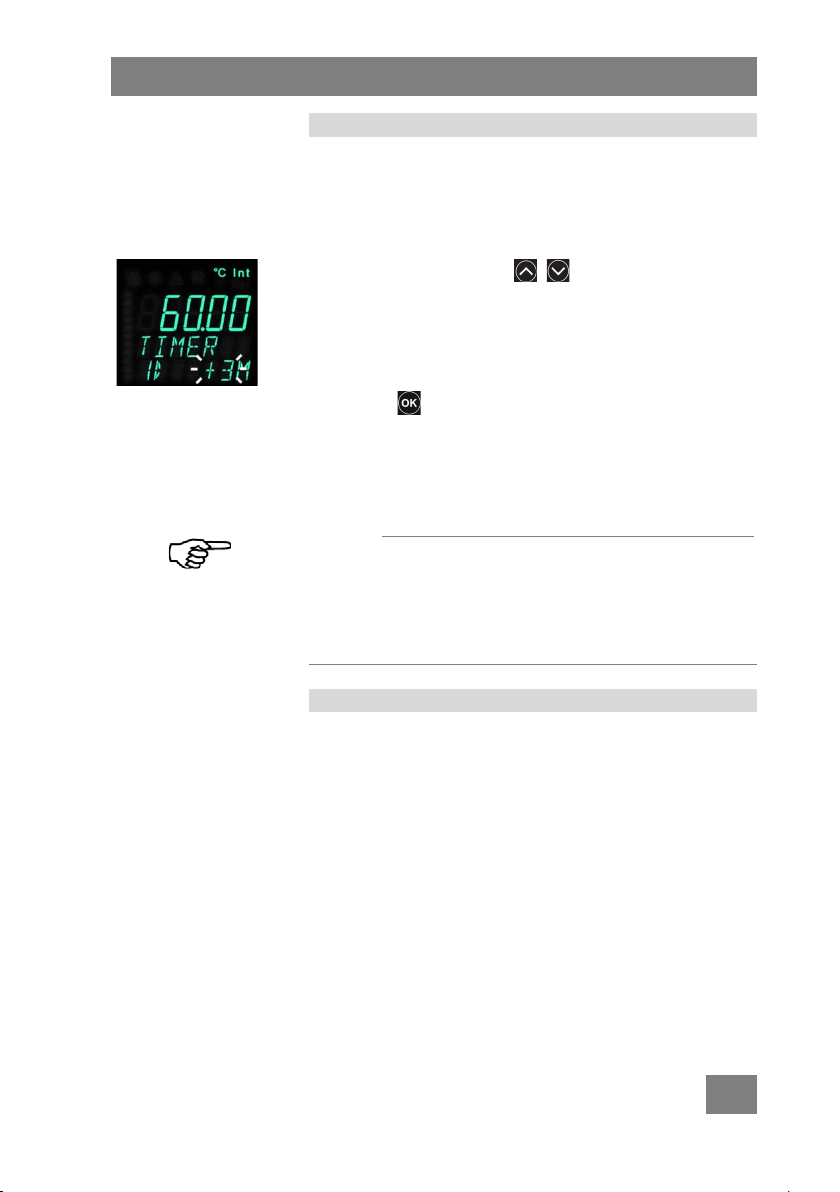
2. Use the arrow keys to add (+) or subtract (-) minutes from the timer.
The maximum adjustable time is 999 minutes.
You can subtract up to the same number of
minutes that are remaining on the timer.
3. Press to change the timer duration by the
entered value.
The timer's new total running time will be
stored; it will be displayed as the preset value the
next time the timer is programmed.
Notice
There are upper and lower limits for adjusting the
timer: The stored value (the timer's total running
time) may not exceed the upper limit of 99 hours 59
minutes.
Switching off the timer
You can switch off a timer at any time while the unit
is in operation by pressing and holding the corresponding timer key for at least two seconds.
However, the used timer value will be stored and
becomes the preset value the next time the timer is
set.
35
Page 36

Working with your Diamond
Muting the
Switching
Adjusting the
When the timer triggers
An audible signal (loud beeping noise) is emitted when
a timer has run out. The corresponding timer key
blinks at the same time.
The timer will continue to run even while the signal is
active and display the number of minutes that have
passed since the signal was triggered as a negative
number. This shows you at a glance how long beyond
the selected time the food has been in the water bath.
audible signal
You can mute the audible signal by pressing once.
However, this will not switch off the signal itself. The
timer button will continue to blink for as long as the
signal is active and the
timer continues to run. The number of minutes to
pass since the signal was triggered will be displayed as
a negative number.
After a set length of time (by default 10 minutes)
passes, the audible signal will be reactivated.
To permanently switch off the signal, press and hold
off the signal
the corresponding timer key for at least 2 seconds.
The time covered by the timer will be stored and
used as the preset value the next time the timer is
activated.
You can adjust the timer as described above even
timer after the
signal is triggered
after the timer has run down and the signal has triggered.
36
Page 37

For example, let us assume that your filet has not
been adequately cooked after the timer has run down
and you wish to keep it in the water bath for another
10 minutes.
1. Press the timer key.
2. Use the arrow key to select the value
+10M and then press .
Starting at that moment, the timer will run for 10
additional minutes and reactivate the signal when that
time has passed.
A closer look
Working with the core temperature sensor
To achieve the most precise results possible with the
Sous Vide technique, you will need to use the optional
core temperature sensor. Simply connect the core
temperature sensor to the socket on the rear of your
Diamond. Then insert the tip of the core temperature sensor into the food being cooked, so you will
know the exact core temperature of the food at all
times.
There are two different ways to approach this method:
1. As soon as the meat reaches your desired core
temperature, you can consider it fully cooked and
serve it immediately.
2. Once the core temperature has been reached,
the meat must be cooked for an additional specified time in order to comply with the relevant
HACCP safety regulations.
A closer look
37
Page 38
Working with your Diamond
Switching the view
The sensor alarm monitors the core temperature for
you. You should set a separate alarm for the core
temperature sensor: The alarm will be activated when
the desired core temperature is reached; you can
then continue preparing the cooked food.
Connecting the core temperature sensor
We recommend using only the fusionchef by Julabo
core temperature sensor, which has been calibrated
at our factory and is designed to work with precision.
1. Plug the core temperature sensor's cable into the
proper Pt100 socket on the rear of the unit.
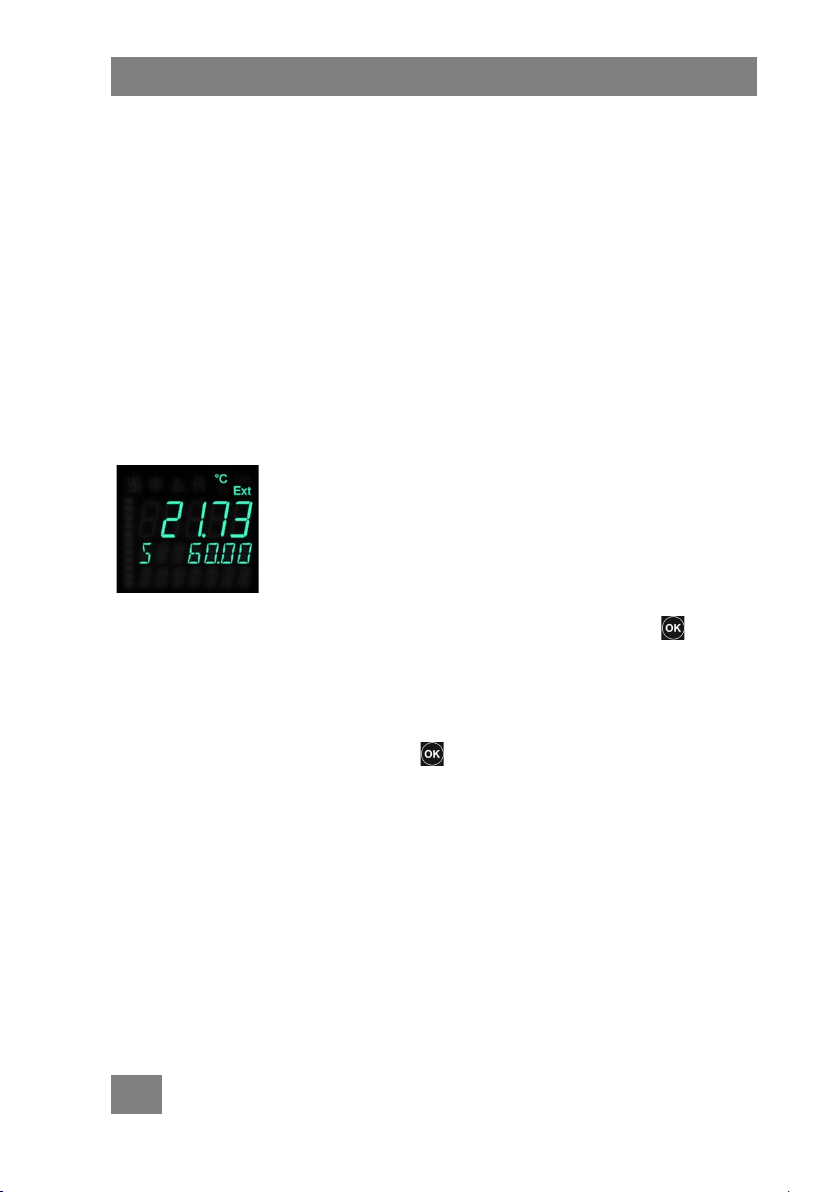
The main view display will change as soon as the
sensor is inserted:
The temperature measured by the sensor will
now display instead of the temperature in the water bath. This is indicated by the Ext symbol on
the top line.
manually
2. To switch to the main view, press the key
once. You will now see the temperature measured inside the water bath.
This is indicated by the Int symbol on the top
line.
3. Pressing once again will switch back to the
core food temperature sensor Ext.
38
Page 39

Inserting the core temperature sensor
Setting and activat-
Notice
Although the core temperature sensor is inserted
into the vacuum bag through the special adhesive
sealing tape, we cannot exclude the possibility that the
food will come into contact with liquid from the water bath. For reasons of hygiene, do not serve food
from the bag into which the core temperature sensor
has been inserted. Instead, use this food as a reference or retention sample only for pieces of the same
food of equal size.
1. Place a piece of adhesive sealing tape onto the
vacuum bag.
2. Insert the sensor through the sealing tape and
into the food so that the tip of the sensor is at
the center of the food.
Exercise caution in order to avoid puncturing the
other side of the bag.
Setting the alarm for the core temperature sensor
A closer look
ing
the alarm
You can activate a temperature sensor alarm in addition to the timers. Set this alarm to the desired core
temperature of the food. As soon as the sensor detects this core temperature, the alarm will trigger.
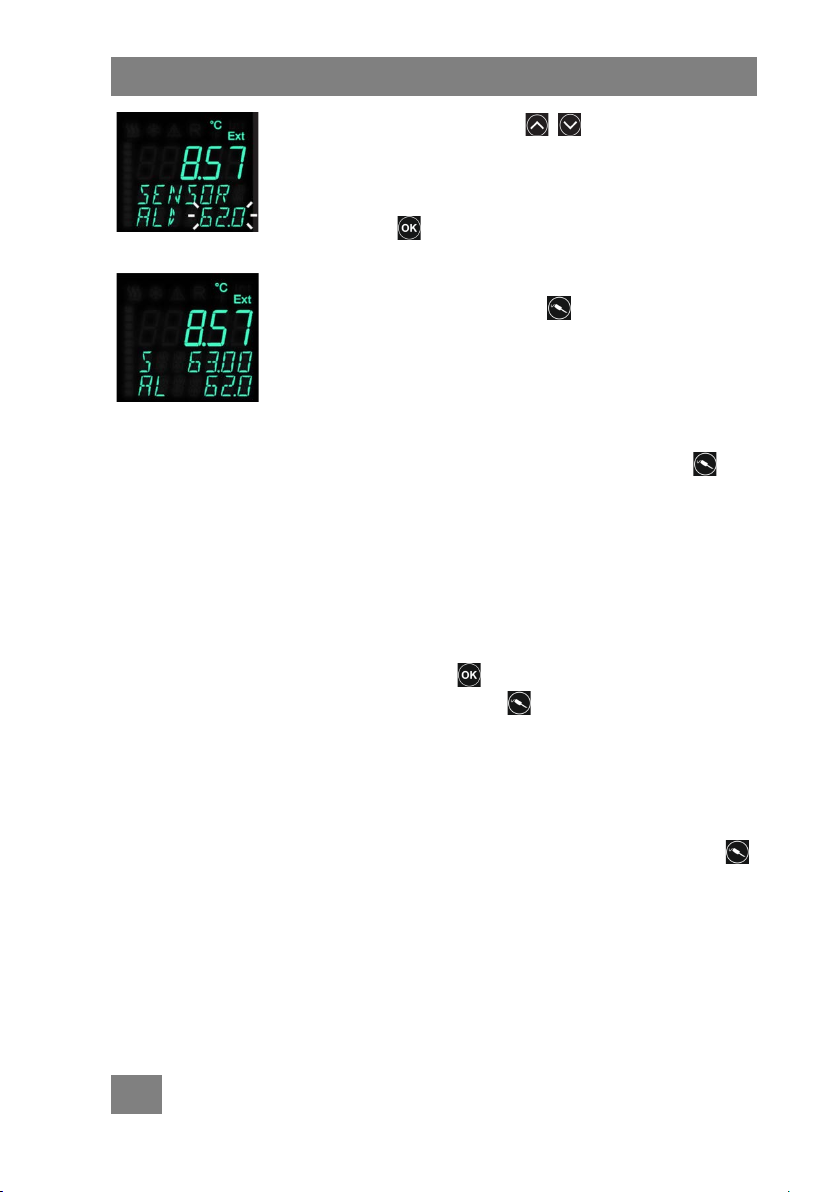
1. To set the alarm, press and hold the Core tem-
perature sensor key for about 2 seconds. The
sensor alarm will be displayed and the alarm temperature will blink.
39
Page 40
Working with your Diamond
Display the
Muting
Switching
2. Use the arrow keys to set the desired
core temperature. The alarm will signal when the
temperature reaches 1 °C (33.8 °F) below the
target temperature.
3. Press to activate the temperature sensor
alarm.
As soon as the temperature sensor alarm is activated,
the temperature sensor key will illuminate and the
selected alarm value will be shown on the bottom line
of the main display.
However, if another timer is also activated, this timer
will be shown in the main view instead.
In this case, you can show the temperature sensor
temp. sensor
alarm
alarm by pressing the temperature sensor key
once.
Switching off the temp. sensor alarm
the alarm
off the alarm
As with the timer alarm, you can also temporarily
mute the temperature sensor alarm.
To do this, press once. The alarm will continue to
run and the sensor key will blink. The audible
signal will be reactivated after a preset period of time
(standard setting 5 Min.)). Refer to the "Alarm delay"
chapter beginning on page 52 for more information
on this topic.
To permanently switch off the temperature sensor
alarm, press and hold the temperature sensor key
for at least two seconds. The alarm is now cancelled.
40
Page 41

Automating processes
Temperature sen-
sor removed
or connection
separated
pulled out or the connection separated in any other
way while the temperature sensor alarm is activated,
the Diamond will display an alarm and error message.
The unit will beep and display CODE 15:
EXTERNAL SENSOR WARNING - CHECK EXTER-
NAL SENSOR
If this occurs, make sure the temperature sensor is
properly inserted or check for a broken connection.
Eliminate the problem.
Automating processes
Using automatic cooking time detection
If you are a professional chef and would like to
achieve consistent results with the Sous Vide technique, you will benefit from cooking time detection.
Cooking time detection utilizes a temperature sensor
alarm that you have recorded set. As soon as you
have determined the optimal cooking time (with the
aid of the core temperature sensor), you can store
the required cooking time under any of the timers.
This will make the time accessible whenever you use
that timer.
By using this stored cooking time you will produce
consistent results for that item without using the core
temperature sensor. You simply use the cooking time
that you stored in the timer.
If the core temperature sensor's plug is accidentally
Activating automatic cooking time detection
Access the configuration menu to use the automatic
cooking time feature.
1. To access the menu, press the Esc and sen-
sor keys simultaneously.
41
Page 42

Working with your Diamond
CONFIG
CDETECT
ON
2. Use the arrow keys to select the CONFIG menu entry and confirm with .
3. Select CDETECT (Cooking Time Detection)
and confirm with .
4. Select ON and press .
Automatic cooking time detection has been activated.
Starting automatic cooking time detection
Once automatic cooking time detection has been
activated in the menu, you can start using this feature
by activating setting the temperature sensor alarm.
1. Activate the temperature sensor alarm as described above.
2. Press and hold the sensor key .
3. Use the arrow keys to select the desired core temperature.
4. Confirm your selection by pressing .
The temperature sensor alarm is now set and the
required time will be recorded.
Storing the cooking time
As soon as the selected core temperature has been
reached, the alarm will signal as usual. As soon as you
switch off the alarm, you will have the option to store
the required cooking time in one of the timers.
42
Page 43
Automating processes
Not storing
Extending
1. When the food reaches its optimal temperature,
trigger the alarm by pressing and holding the
temperature sensor key for at least 2 seconds.
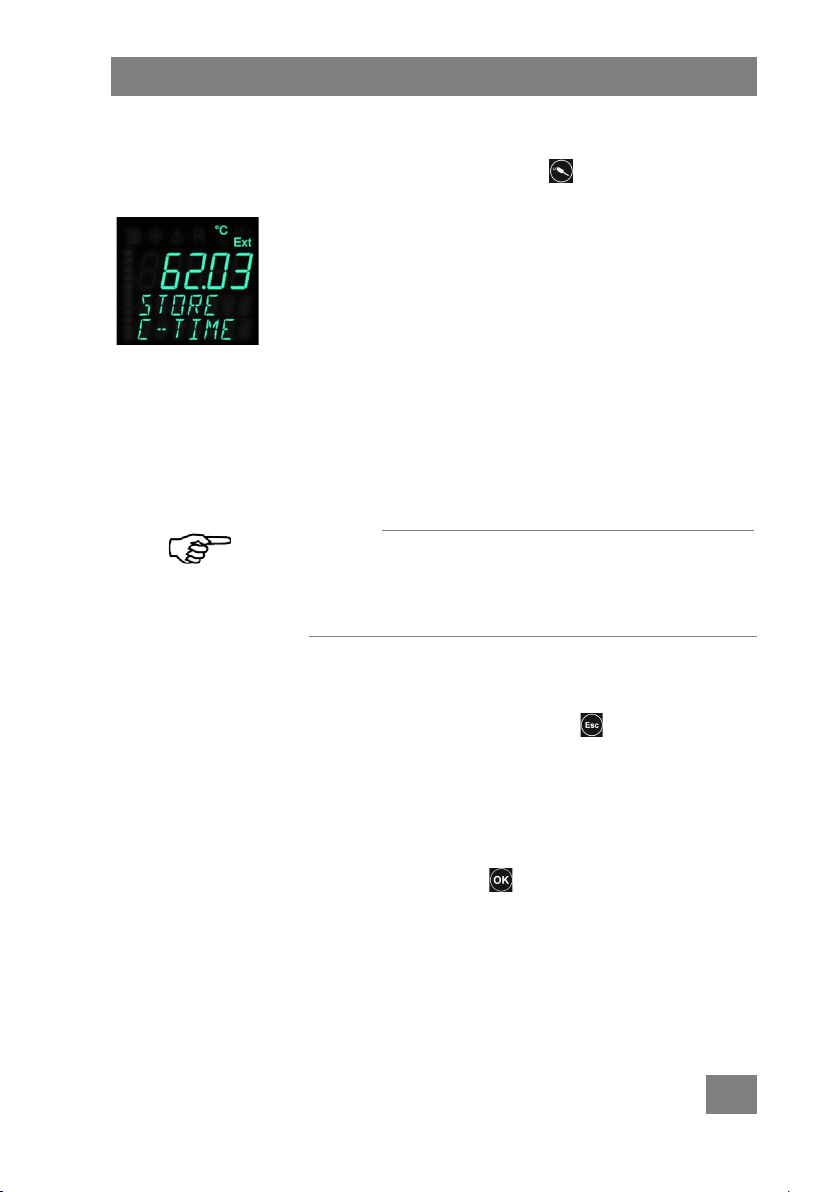
As soon as the alarm has triggered, the unit will
give you the option of storing the cooking time in
whichever timer you choose. The message
STORE C-TIME will appear on the display and
all three timer keys will blink.
2. To store the cooking time, choose any of the
timers and press the corresponding timer key.
The cooking time will be adopted as the new preset
value of the selected timer. The next time you activate the selected timer, the most recently stored
cooking time will be displayed as the preset value.
Notice
You can also store the cooking time in to a timer that
is currently active. The active timer will be unaffected
and will continue to run.
the cooking time
the cooking time
If you do not wish to store the cooking time on any
of the timers, press the Esc key -once. This will
take you back to the main view without any changes.
If the food has not reached the optimal temperature
after the alarm has been triggered, you can extend the
cooking time. Do this by temporarily muting the audi-
ble signal by pressing once. The time that passes
until the alarm activates again will be added to the
cooking time (see below).
43
Page 44

Working with your Diamond
Retrieving the cooking time
Retrieving a stored cooking time is very easy.
1. Press and hold the timer key with the desired
time for at least two seconds. The timer view will
appear and your preset cooking time will be displayed.
2. Use the arrow keys to adjust the time desired.
Then press and hold for at least two seconds
in order to set your new cooking time as the timer. Alternatively, you can adjust the time even
with the arrow keys .
Your desired cooking time is now activated.
What exactly will be stored?
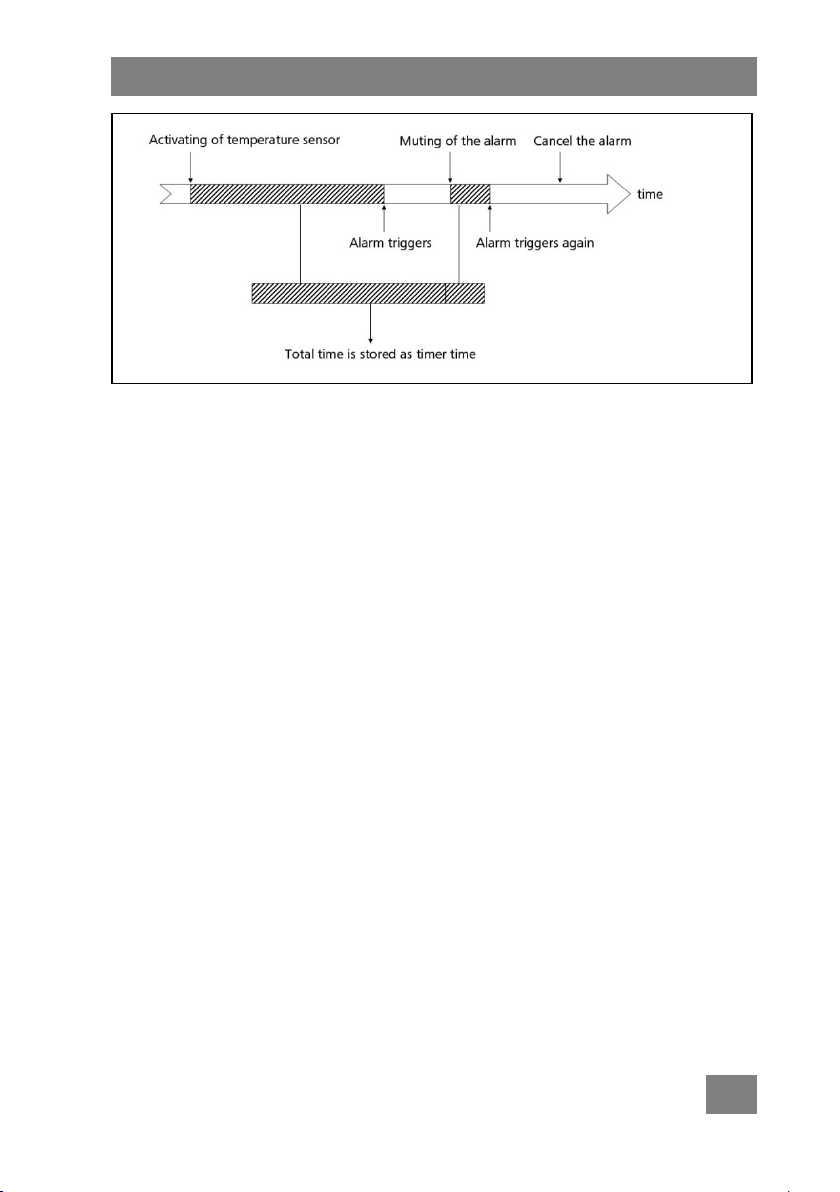
The time that is stored during cooking time detection is the sum of the following times:
• The time from activating setting of the tempera-
ture sensor until alarm is triggered.
• The time from muting of the alarm until re-
activation of the alarm.
44
Page 45
Automating processes
Consider the following example:
1. You activate automatic cooking time detection in
the menu.
2. You set the temperature sensor alarm to the
desired core temperature.
3. As soon as the core temperature is
reached, the alarm activates. The time that passed
between these two events is stored as your cooking time.
4. However, you decide that the meat has not been
adequately cooked. Therefore, you temporarily
mute the alarm.
5. After the specified time passes, the alarm activates once again. The time that passes between
muting and re-activation of the alarm will also be
added to the cooking time. The same applies to
every subsequent muting of the alarm.
6. Cancel the alarm in order to assign the total
cooking time to any of the timers.
45
Page 46
Working with your Diamond
CONFIG
TEMPMON
Special functions
Automatic temperature monitoring
Using automatic temperature monitoring
Our units are designed to achieve a precise target
temperature in the water bath. Temperature changes,
like those caused by the addition of refrigerated food,
are quickly compensated for. However, certain conditions such as the adding cold water to the water bath
may result in larger temperature fluctuations.
Automatic temperature monitoring gives you the
ability to precisely monitor the target temperature
and stay informed of any temperature deviations. An
alarm will activate when the temperature in the water
bath deviates from the target temperature by a specified amount.
Setting temperature limits
1. To access the menu, press the Esc and sensor keys simultaneously.
2. Use the arrow keys to select the CONFIG menu entry and confirm with .
3. Select TEMPMON and confirm with .
4. Instead of the OFF entry, select the specified
number of degrees.
The number of degrees indicates the
range in which the water temperature may fluctuate above and below the preset value before triggering an alarm. For example, if the target temperature is
60 °C (140 °F) and the range is set at 0.5 °C
(33 °F), then the temperature may fluctuate from
59.5 °C to 60.5 °C (139.1 to 140.9 °F).
46
Page 47

Temperature
monitoring
triggers
Special functions
5. Use the arrow keys to set the appropriate temperature limits. Then confirm your selec-
tion by pressing .
Temperature monitoring is now activated.
Notice
Guidelines for temperature limits:
If using a larger cooking container, set the limit
from 0.5 °C to 1 °C (33 °F to 34 °F (; in smaller
containers, choose a larger range.
Activating temperature monitoring
Temperature monitoring is switched on as soon as
you set the temperature limits in the menu. However,
it is fully activated only once the specified target temperature has been reached. Temperature monitoring
is deactivated while the unit is heating up (or cooling
down).
This applies also when the target temperature is
changed:
If a new target value is entered, temperature monitoring will be deactivated until the new target temperature has been reached.
Once the target temperature has been reached with
the temperature monitoring activated an audible signal
and alarm message will display every time the temperature exceeds the specified range.
47
Page 48
Working with your Diamond
CODE 03:
CODE 04:
LOW WATER TEMPERATURE WARNING -
You may also mute this alarm. Do this the same way
you mute other alarms - by pressing once. The
alarm message will still be visible.
The alarm will switch off automatically as soon as the
current temperature is back within the tolerance
range.
Recording and exporting data
The Diamond contains an integrated datalogger that
allows you to record temperature values from the
core temperature sensor. This facilitates documenting
all cooking processes in compliance with HACCP
guidelines. You can define the intervals at which
measurements will be taken. You can export the data
to a PC for archiving or further processing.
Notice
EXCESS WATER TEMPERATURE WARNING -
The datalogger can record temperatures only when
the core temperature sensor is attached.
48
Page 49
Special functions
CONFIG
TIME/DT
LOGGER
MODE
Setting the date and time
You must set the date and time in order for the datalogger to record the correct data.
1. Access the menu by pressing the Esc and
sensor keys simultaneously.
2. Use the arrow keys to select the CON-
FIG menu entry and confirm with .
3. Select TIME/DT and confirm with .
4. Set the time, date, and year and confirm with .
Activating the datalogger
The datalogger has three different recording modes.
You select the desired recording mode when activating the datalogger.
1. Access the menu by pressing the Esc and
sensor keys simultaneously.
2. Use the arrow keys to select the LOG-
GER menu entry and confirm with .
3. Select MODE and confirm with .
4. Select the desired recording mode and confirm
with .
The datalogger is now activated and will store data as
specified in its settings.
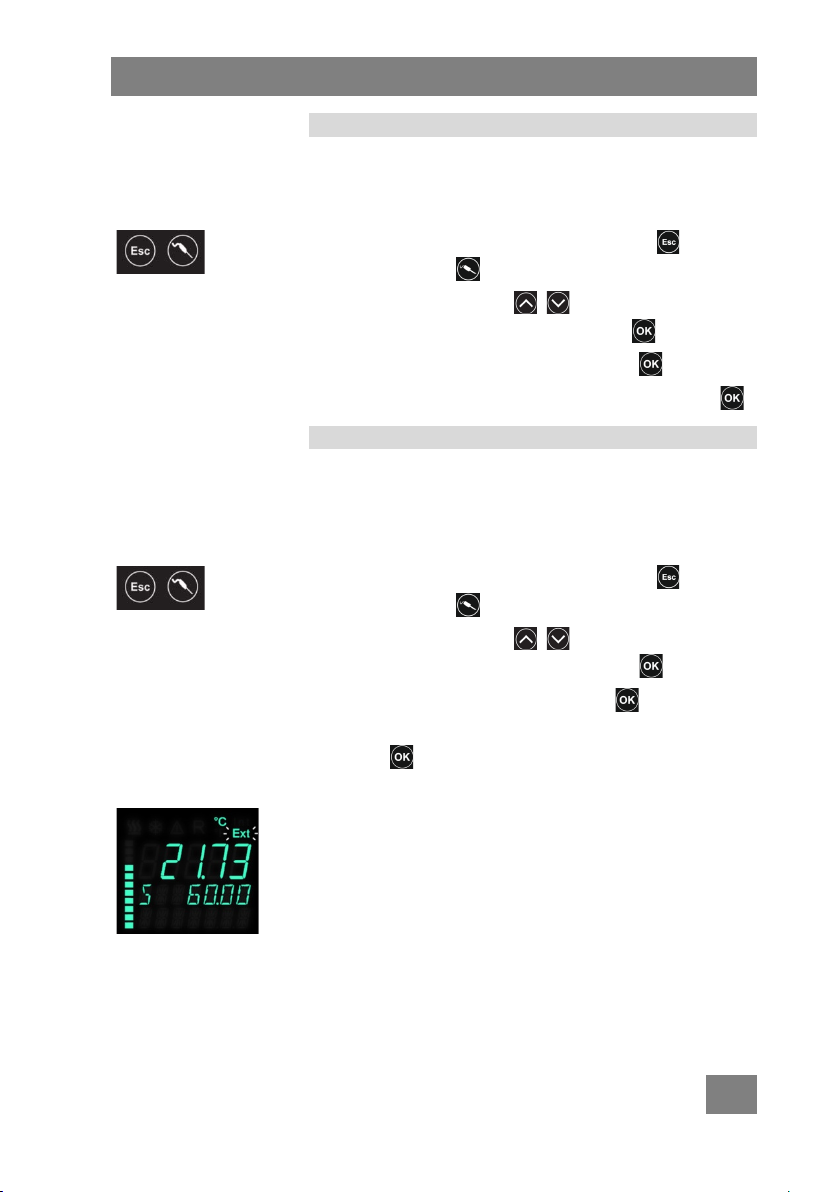
The Ext symbol blinks while the datalogger is active.
The amount of memory space used is indicated by the
bars on the left side.
49
Page 50

Working with your Diamond
OFF
Datalogger is switched off
ALWAYS
The datalogger will record at all times.
MEMFULL
The datalogger will record whenever a
S-ALARM
The datalogger will record only while
Internal datalogger modes
When the memory is full, the oldest
data will be overwritten. The memory
space will not be displayed and the
memory will not be deleted when the
data is exported.
temperature sensor is attached. This
mode will record only until the
memory is full. The bars on the left
side of the display indicate how much
memory has been used. When the
memory is full, an error message will
display. You must then export or delete the contents of the memory in
order to continue recording.
the core temperature sensor is activated. In this mode, the amount as well,
the amount of used memory is displayed and an error message will tell
you when the memory is full. However,
the memory will be automatically deleted whenever the temperature sensor alarm is reprogrammed.
50
Page 51
Special functions
LOGGER
RANGE
Adjusting the recording interval
The datalogger records data at specified time intervals. This ensures that important data will be recorded without unnecessarily filling up the memory. The
factory default recording interval is five minute.
You can adjust this interval if you require shorter
recording intervals or if the memory fills up too fast.
1. Access the menu by pressing the Esc and
sensor keys simultaneously.
2. Use the arrow keys to select the LOG-
GER menu entry and confirm with .
3. Select RANGE and confirm with .
4. Set the desired recording interval between 1 and
240 minutes and confirm with .
The datalogger will now record at the specified intervals.
Deleting the memory
When the Diamond is operated in the MEMFUL or
S-ALARM modes and the data memory becomes
full, it will emit the following error message:
DATALOGGER MEMORY FULL - CLEAR OR
READOUT DATALOGGER
In order for the datalogger to continue recording, you
must either export or manually delete the data.
51
Page 52

Working with your Diamond
LOGGER
CLR MEM
CONFIG
Delete the contents of the memory as follows:
1. Access the menu by pressing the Esc and
sensor keys simultaneously.
2. Use the arrow keys to select the LOG-
GER menu entry and confirm with .
3. Select CLR MEM and confirm with .
The internal data memory will now be
deleted.
Exporting data from memory
The Easy fusionchef software (Order No. 9FX1160)
makes it effortless to export the contents of the internal memory.
Additional menu settings
You can adjust additional settings in the
Diamond configuration menu.
Setting the alarm delay
If you mute a timer alarm or a temperature sensor
alarm, it will automatically reactivate after a specified
length of time. This time delay is set at the factory to
10 minutes (600 seconds), but you can adjust the time
as required.
Adjust the alarm activation delay as follows:
1. Access the menu by pressing the Esc and
sensor keys simultaneously.
2. Use the arrow keys to select the CON-
FIG menu entry and confirm with .
52
Page 53
Special functions
NEVER
No key tones will be emitted.
CONFIRM
Key tones will be emitted for con-
ALWAYS
A tone will be emitted every time
ALDELAY
CONFIG
KEYSNDS
3. Select ALDELAY and confirm with .
4. Set the desired alarm delay in seconds (10 to 999)
and confirm with .
The time delay that you set will now be adopted.
Switching key tones on and off
If desired, the unit will emit a short beep every time
you press a key. You can select whether the unit will
emit a beep every time you press a key or only for
confirmations, such as temperature entries.
1. Access the menu by pressing the Esc and
sensor keys simultaneously.
2. Use the arrow keys to select the CON-
FIG menu entry and confirm with .
3. Select KEYSNDS and confirm with .
4. Select whether and when a key tone will be emitted:
firmations.
you press a key.
5. Confirm your selection by pressing .
The key tones will be switched on or off according to
your selections.
53
Page 54

Working with your Diamond
CONFIG
UNIT
CONFIG
RESET
Setting the temperature units
You can choose to display the temperature in either
degrees Celsius or degrees Fahrenheit.
Change the temperature units as follows:
1. Access the menu by pressing the Esc and
sensor keys simultaneously.
2. Use the arrow keys to select the CON-
FIG menu entry and confirm with .
3. Select UNIT and confirm with .
4. Select the desired temperature unit °C or °F and
confirm with .
The unit will now convert all temperatures to the
desired units.
Reset to factory settings
You can reset the unit's settings to the original factory
settings. This will cause you to lose all of your stored
values. However, the datalogger memory and the
selected temperature units will remain intact.
1. Put the unit into standby mode by pressing and
holding for at least 2 seconds.
2. Then access the menu by pressing the Esc
and sensor keys simultaneously.
3. Use the arrow keys to select the CON-
FIG menu entry and confirm with .
4. Use the arrow keys to select the RE-
SET menu entry and confirm with .
The unit will now be reset to the factory settings.
Only the data memory and the temperature units will
be retained
54
Page 55

Care and maintenance
The circulator is designed for continuous operation
under normal conditions. Regular maintenance is not
required. A particle filter protects the circulation
pump from large contaminants in the thermal bath
fluid. However, you should perform the following
cleaning tasks each day.
Changing the water
The circulator is suitable only for use with softened/decalcified water. The water in the stainless
steel bath should be changed regularly.
Our recommendation:
Change the water daily
for the following reasons:
• Frequent refilling increases the concentration of
minerals in the water, which can form a crusty
deposit inside the bath and on immersed parts of
the circulator.
• Dirty vacuum packaging can release particles into
the warm bath water.
Changing the water
Draining combi units
Use the integrated drain tap to empty a Diamond
XS, S, M, L, or XL combi unit.
1. Switch off the unit and pull the mains plug.
2. Place the unit over a sink or a container large
enough to hold all of the water.
3. Open the drain tap and allow the water to flow
out.
55
Page 56
Care and maintenance
Draining bath tanks with single units
Single units must be disassembled before draining the
bath tank.
1. Switch off the unit and pull the power plug.
2. Unscrew the bath attachment clamp and remove
3. Now drain the bath tank.
Decalcifying
Depending on the hardness of the water, we recommend decalcifying the circulator regularly. To do this,
use a food-compatible decalcifier. Please refer to the
manufacturer's instructions for the exact procedure.
Cleaning the unit
Clean the unit every day.
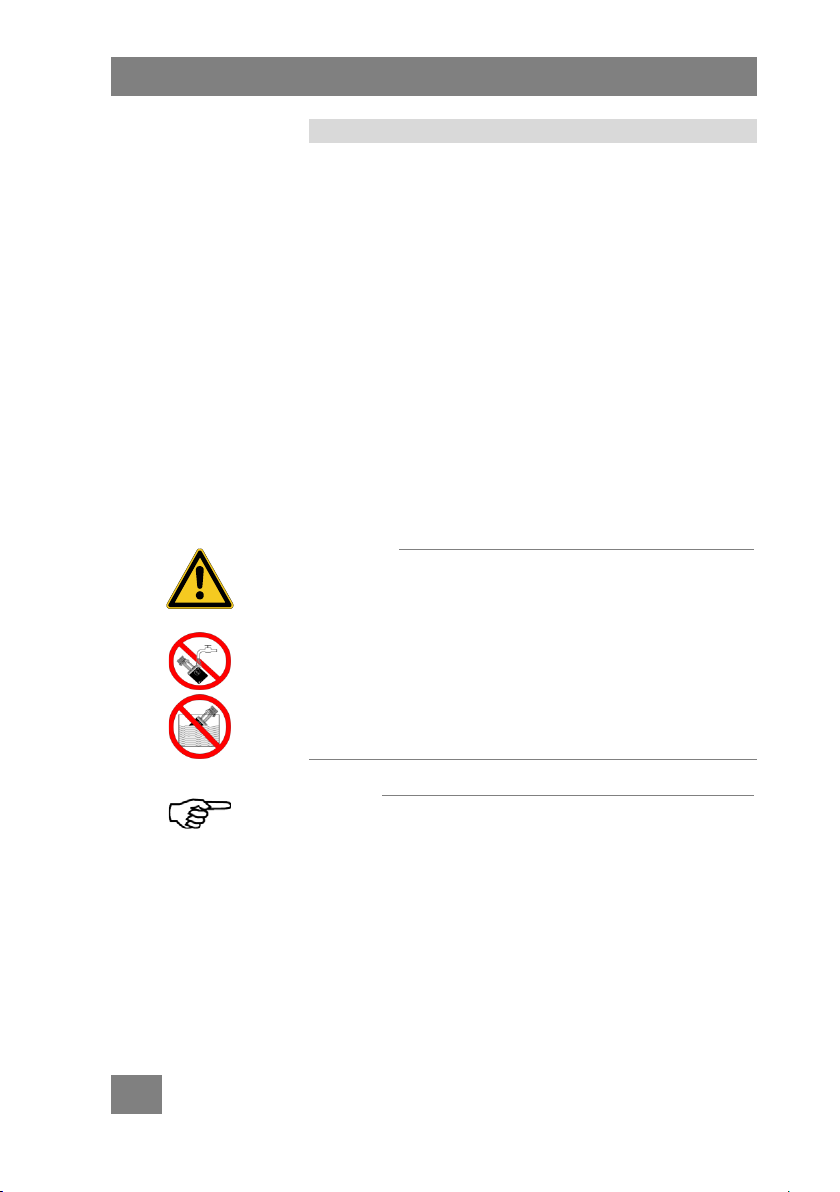
Caution!
Switch off the unit at the power switch and pull
Never allow water to penetrate inside the circu-
The appliance shall not be cleaned with
the unit from the bath tank.
the power plug
lator.
water jet. Do not immerse the appliance
under water.
56
Notice
Even stainless steel can corrode. Please observe the
following in order to protect your unit and bath tank
from rust and corrosion:
Do not clean the unit and bath with steel wool.
Do not add salt to the water.
Chlorine in drinking water can result in corro-
sion.
Page 57
Cleaning the unit
Iron in drinking water will precipitate and result
in rust formation
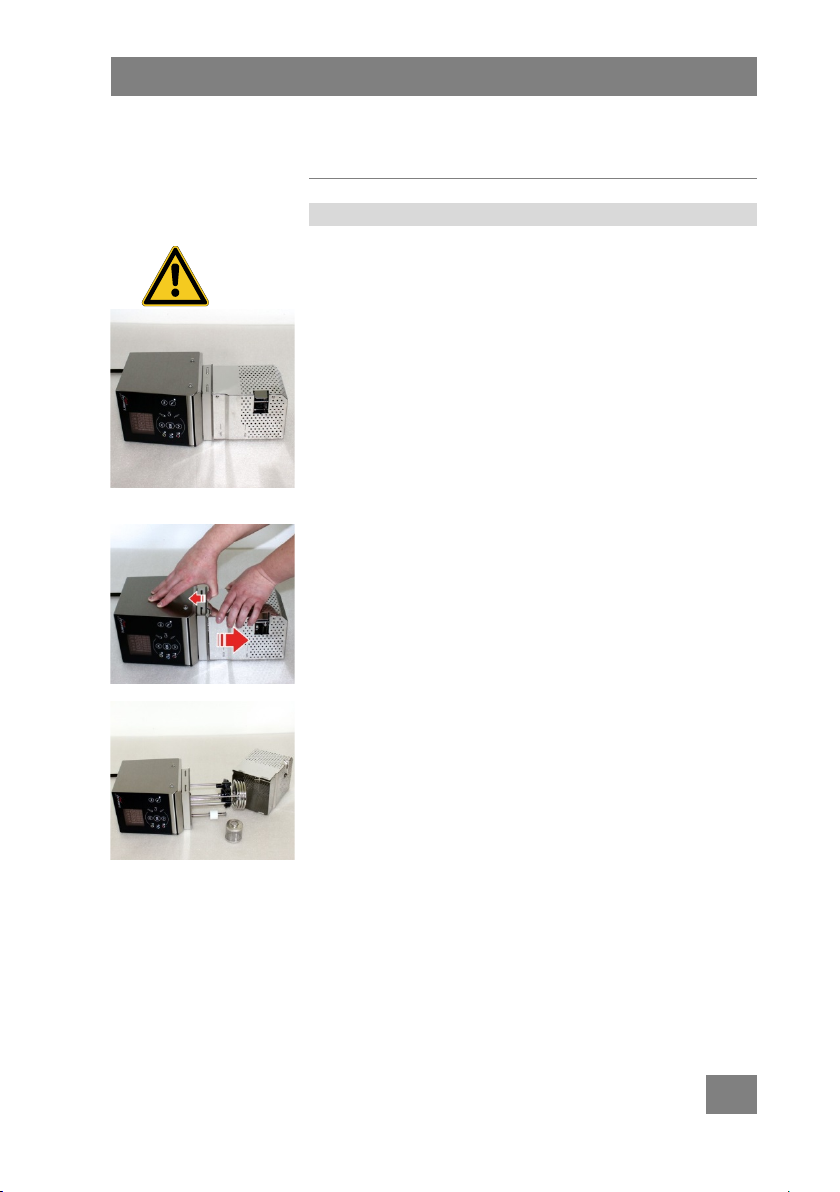
Removing/installing the protection grid
To properly clean the unit and the particle filter and
to check the low-level protection device, it is necessary to remove the protection grid. Do this as follows:
1. Switch off the unit and pull the power plug.
2. Remove the unit from the bath tank.
3. Important: Dry the unit carefully to prevent the
ingress of moisture into the interior.
4. Turn the unit on its side and push the edge of the
grid slightly to the side.
5. Remove the grid by pulling downwards.
.
6. Remove the p
7. Clean
8. Clean the external parts of the unit with a towel
9. Use water with a low surface tension. Use a soap
the filter in the dishwasher or with a soft
brush.
and soapy water.
solution to rinse the stainless steel bath tank and
immersed functional parts of the unit (circulation
pump, float switch, and heater).
article filter.
57
Page 58
Care and maintenance
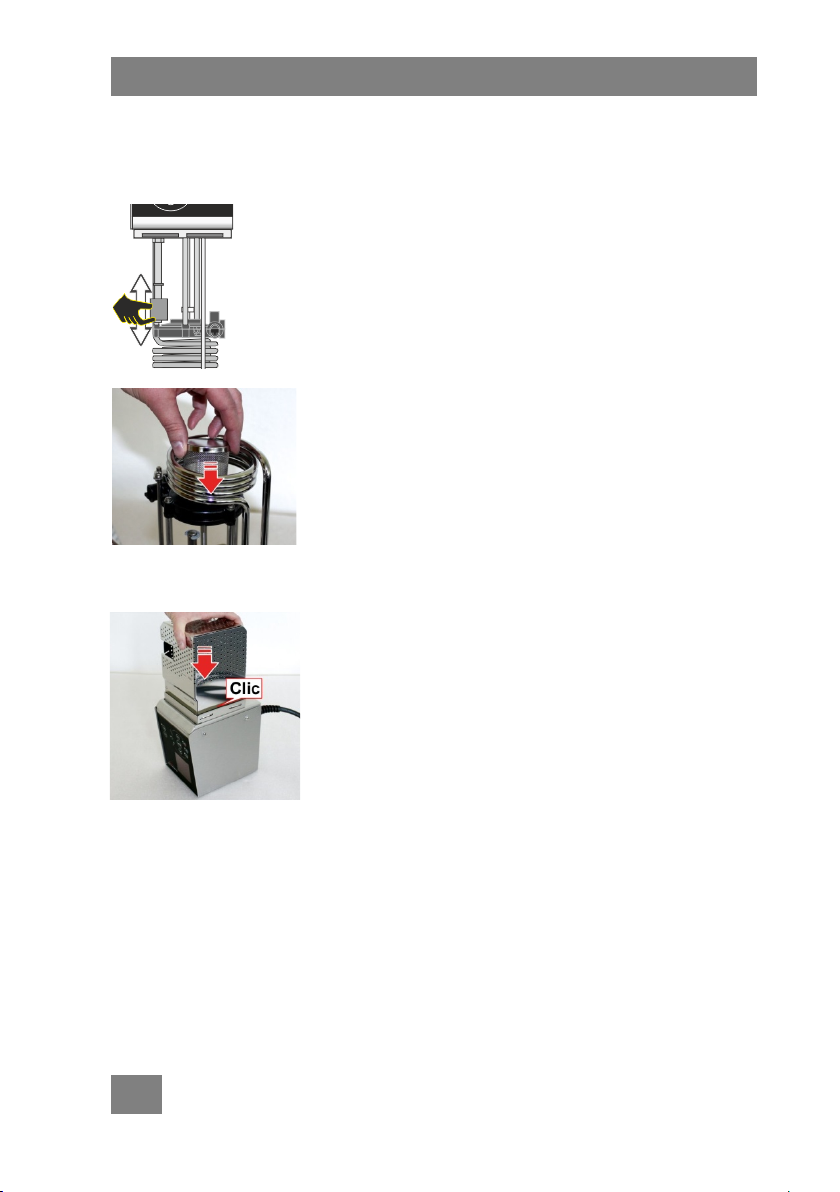
10. Then rinse well with water and dry the parts with
11. Check the low-level protection float switch
While cleaning the unit, make sure the low-level
12. Dry the unit carefully to prevent the ingress of
a soft towel. Do not turn the unit upside down.
When drying the unit, hold it in such away that
the water does not run into the interior of the
circulator.
protection device is working. To do this, hold the
unit vertically and use your finger to confirm that
the float moves effortlessly.
moisture into the interior. After having cleaned
the unit install the particle filter and the protection grid in reverse order.
Then check the function of the low-level
protection. Take a thin pin to confirm that the
float moves effortlessly.
58
Page 59

Confirming temperature accuracy
Calibrating
Calibrating the
Confirming temperature accuracy
Checking temperature accuracy
Fusionchef by Julabo units are precisely calibrated and
inspected before leaving our factory. The units are
designed for highly precise temperature control in
continuous operation. Even over long periods of
time, the sensors will retain their accuracy or become
only marginally inaccurate. You may notice slight deviations only after several years of use. In other words,
it is normally un-necessary to perform a calibration.
Diamond in ice
water bath
external sensor
Nevertheless, it is possible to recalibrate the Diamond. In the unlikely event that it is necessary to
recalibrate the unit, you can calibrate it as follows in
an ice water bath.
Like the unit itself, the core temperature sensors are
calibrated precisely before delivery. However, if after
long periods of use you notice imprecise or improbable values, you can check its accuracy. To do this,
place the sensor into a water bath and compare the
internal and external temperatures. If the two temperatures deviate from each other, calibrate the external sensor as described below.
Calibrating the external sensor
Starting sensor calibration
1. Make sure that the unit is running and that the
temperature has stabilized for at least three
minutes.
2. Place the external sensor near the pump discharge and fix it in place.
59
Page 60

Care and maintenance
SENSCAL
EXECUTE
3. Access the menu by pressing the Esc and
4. Use the arrow keys to select the
5. Select EXECUTE and confirm with .
Sensor calibration will now start. The necessary steps
will be shown on the display. Please follow these instructions.
Performing sensor calibration
All safety functions will remain operational. The procedure can be interrupted at any time by pressing the
Esc key.
1. If you have not done so already, position the
Calibration will now perform automatically. The
2. As soon as the unit indicates that calibration had
The values for calibrating the temperature sensor will
now be saved.
sensor keys simultaneously.
SENSCAL menu entry and confirm with .
external sensor in the bath. Wait until appears.
bath temperature is used as the reference value
for calibrating the external sensor.
completed, press .
Deleting the most recent calibration
If you have determined that a calibration is unnecessary or faulty, you can delete the most recent calibration.
60
Page 61
Confirming temperature accuracy
SENSCAL
ERASE
1. Access the menu by pressing the Esc and
sensor keys simultaneously.
2. Use the arrow keys to select the SENSCAL
menu entry and confirm with .
3. Select ERASE and confirm with .
The most recent calibration of the temperature sensor will be deleted.
Calibrating the unit in an ice water bath
Notice
Perform calibration only if absolutely necessary or if
multiple external control measurements have confirmed that the unit's measurements are inaccurate.
Check for proper conditions
The bath temperature must not be too high when
calibrating the unit. Therefore, make sure that the
temperature of the water bath is not above 20 °C
(68 °F)
You will need large quantities of ice for calibration.
Make sure you have plenty of ice cubes available.
The unit must be in standby mode.
Note that ice-water calibration requires approximate-
ly 30 minutes.
61
Page 62

Care and maintenance
AUTOCAL
EXECUTE
Starting calibration
1. Access the menu by pressing the Esc and
2. Use the arrow keys to select the AU-
3. Select EXECUTE and confirm with .
Calibration will now start. During calibration, all functions will be blocked and the warning symbol will
illuminate.
Performing calibration
The necessary steps will be shown on the display.
Please follow these instructions.
1. Drain water from the bath tank until OK starts
2. Fill the bath tank with ice water up to the maxi-
The pump will start operating and circulate the
When the temperature in the bath stabilizes, 0 °C
3. As soon as the reference value is
4. Switch off the unit. Wait at least ten seconds
Calibration has been completed successfully.
If an error message appears, follow the instructions
on the display.
sensor keys simultaneously.
TOCAL menu entry and confirm with .
blinking (fluid level sensor = low-level warning).
Confirm by pressing .
mum level and confirm with .
bath water after you confirm with . This will
melt the ice and the bath temperature will slowly
drop to 0 °C.
(32 °F) has been reached. This serves as the reference value for calibration.
reached, will blink in the display. Confirm this
message. Calibration is now complete.
before switching the unit back on.
62
Page 63

Confirming temperature accuracy
AUTOCAL
ERASE
Deleting the most recent calibration
If you have determined that a calibration is unnecessary or faulty, you can delete the most recent calibration.
1. Access the menu by pressing the Esc and
sensor keys simultaneously.
2. Use the arrow keys to select the AU-
TOCAL menu entry and confirm with .
3. Select ERASE and confirm with .
The unit's most recent calibration will be deleted and
the original factory settings will be restored.
63
Page 64

Error messages
DATALOGGER MEMORY
The datalogger's memory is full.
CODE 15: EXTERNAL SEN-
The connection to the external temperature
CODE 03: EXCESS WATER
The bath temperature is either above or be-
CODE 40: LOW WATER
The level of the water in the bath is too low.
Error messages
The following table contains some of the possible
error messages with the associated warnings messages and resolutions.
All warning messages are indicated on the display and
accompanied by an audible signal. To mute the audible
signal, press once. The error message will still be
visible.
Basic troubleshooting
You may encounter the following situations, but these
are usually quickly resolved.
Shown on the display What should I do?
FULL
SOR WARNING
TEMPERATURE WARNING
CODE 04: LOW WATER
TEMPERATURE WARNING
LEVEL WARNING
64
Export the contents of the memory to a PC
or delete the data via the menu.
sensor has been interrupted.
Check the connection: Insert the sensor back
into the socket or return it if the cable is
defective.
low the selected temperature limits.
Check the temperature limit values. Wait
until the bath temperature is within the limits
or turn temperature monitoring off.
Add additional water.
Page 65

Error messages
CODE 01: LOW WATER
Not enough water in the bath tank.
CODE 05: WORKING
Please contact our service department.
CODE 06: SENSOR DIFFE-
Please contact our service department.
CODE 07: INTERNAL
Please contact our service department.
CODE 12: TEMPERATURE
Please contact our service department.
CODE 14: EXCESS TEM-
Please contact our service department.
CODE 33: SAFETY SENSOR
Please contact our service department.
When the following error messages appear, the unit
(heater and circulation pump) will shut off. You must
remove the cause of the problem before you can
switch the unit back on.
Shown on the display What should I do?
Error messages
LEVEL ALARM
SENSOR ALARM
RENCE ALARM
HARDWARE ERROR
MEASUREMENT ALARM
PERATURE PROTECTOR
ALARM
ALARM
Switch off the unit at the power switch, add
water, and switch it back on.
If there is enough water in the bath tank:
The float switch is defective (transport dam-
age, etc.). Sent the unit to an authorized
fusionchef by Julabo repair facility.
65
Page 66

Information about the unit
Unit type
Diamond
Diamond Z
Order No.
9FT2000
9FT2113
Working temperature range
20°C…95°C (68 °F …203 °F)
Operating temperature range
0°C…95°C (32 °F …203 °F)
Temperature stability
+/- 0.01K
Temperature setting
digital
Connections
Computer interface
RS232
Internal temperature sensor
Pt100
Circulating pump
Flow rate at 0 bar
14 l/min(3.7 gal/min)
Pressure at 0 liter
0.3 bar (4.267 psi)
Overall dimensions (WxLxH) mm
133x212x330
335(680)x190x330
Overall dimens. (WxLxH) inches
5.24x8.35x13
13.2(26.77)x7.5x13
Immersion depth
165 mm [6.5 in.]
150 mm [5.91 in.]
(Empty) weight in kg
5.0 (11.0 lbs)
6.3 (13.9 lbs)
Standards
NSF® component*, CE, RoHs,
Warning and safety equipment
High temperature cut-off
fixed at 105 °C (221 °F)
Low fluid protection
float switch
Monitoring of the working/safety
Error message
optical and audible
Permissible ambient temperature
+ 5 °C…+ 40 °C (41…104 °F)
Mains connection
Available for all unit types
Mains connection
115 V /60 Hz*
200 V/50-60 Hz
230 V/50-60 Hz
Heating capacity
1.2 kW
1.5 kW
2.0 kW
Information about the unit
Technical data
Temperature display VFD-Display
Display resolution 0.01°C (0.01 °F)
Temperature control PID
temp. sensors
Temperature differential monitoring
working/safety temp. sensors
Current consumption 11.1 A 8.0 A 9.2 A
* NSF® component for 9FT2000, 115 V / 60 Hz units
66
Plausibility control
Difference > 35K
Page 67

Technical data
Unit type
Diamond XS
Diamond S
Order No.
9FT2B13
9FT2B20
Working temperature range
20°C…95°C (68 °F …203 °F)
Operating temperature range
0°C…95°C (32 °F …203 °F)
Temperature stability
+/- 0.01K
Temperature setting
digital
Temperature display
VFD-Display
Display resolution
0,01 °C
Temperature control
PID
Connections
Computer interface
RS232
Internal temperature sensor
Pt100
Circulating pump
Flow rate at 0 bar
14 l/min(3.7 gal/min)
Pressure at 0 liter
0.3 bar (4.267 psi)
Overall dimensions (WxLxH) mm
332x398x374
332x577x374
Overall dimens. (WxLxH) inches
13.1x15.7x14.7
13.1x22.7x14.7
(Empty) weight in kg
11,8 (26.0 lbs)
14.0 (30.9 lbs)
Filling volume
13 Liter (3.4 gal)
19 l (5 gal)
Usable bath opening (WxLxH) mm
292x195x132
292x366x132
Usable bath open. (WxLxH) inches
11.5x7.7x5.2
11.5x14.4x5.2
Standards
CE, RoHs
Warning and safety equipment
High temperature cut-off
fixed at 105 °C (221 °F)
Low fluid protection
float switch
Monitoring of the working
Error message
optical and audible
Permissible ambient temperature
+ 5 °C…+ 40 °C (41…104 °F)
Mains connection
Available for all unit types
Mains connection
115 V /60 Hz
200 V/50-60 Hz
230 V/50-60 Hz
Heating capacity
1.2 kW
1.5 kW
2.0 kW
temp. sensor
Temperature differential monitoring
working/safety temp. sensors
Current consumption 11.1 A 8.0 A 9.2 A
Plausibility control
Difference > 35K
67
Page 68

Information about the unit
Unit type
Diamond M
Diamond L
Diamond XL
Order No.
9FT2B27
9FT2B44
9FT2B58
Working temperature range
20°C…95°C(68 °F …203 °F)
Operating temperature range
0°C…95°C (32 °F …203 °F)
Temperature stability
+/- 0.01K
Temperature setting
Digital
Temperature display
VFD display
Display resolution
0.01 °C (0.01 °F)
Temperature control
PID
Connections
Computer interface
RS232
Internal temperature sensor
Pt100
Circulating pump
Flow rate at 0 bar
14 l/min (3.7 gal/min)
Pressure at 0 liter
0.3 bar (4.267 psi)
Overall dimensions (WxLxH) mm
332x577x424
537x697x374
537x697x424
Overall dim. (WxLxH) inches
13.1x22.7x16.7
21.1x27.4x14.7
21.1x27.4x16.7
(Empty) weight in kg
15.3 (33.7 lbs)
21.0 (46.3 lbs)
22.5 (49.6 lbs)
Filling volume
27 l (7.1 gal)
44 l (11.6 gal)
58 l (15.32 gal)
Usable bath opening (WxLxH) mm
292x366x182
492x486x132
492x486x182
Usable bath open. (WxLxH) inches
11.5x14.4x7.2
19.4x19.1x5.2
19.4x19.1x7.2
Standards
CE, RoHs
Warning and safety equipment
High temperature cut-off
fixed at 105 °C (221 °F)
Low fluid protection
float switch
Monitoring of the
Temperature differential monitoring
Error message
optical and audible
Permissible ambient temperature
+ 5°C…+ 40°C (41…104°F)
Mains connection
Available for all unit types
Mains connection
115 V /60 Hz
200 V/ 50-60 Hz
230 V/ 50-60 Hz
Current consumption
11.1 A
8.0 A
9.2 A
Heating capacity
1.2 kW
1.5 kW
2.0 kW
working temperature sensor
working/safety temp. sensors
All data assume rated voltage and rated frequency
Operating temperature: 70 °C (158°F), ambient temperature: 20 °C (68°F),
heat transfer fluid: water. Information subject to technical changes.
68
Plausibility control
Difference > 35K
Page 69

EC compliance
fusionchef by Julabo
Repairs
Technical Service
EC compliance
The products named in the operating instructions
comply with the regulations of the following European
directives:
Low-voltage directive for harmonizing the legal
regulations of the member states in terms of electrical equipment for use within certain voltage
limitations.
EMC directive for harmonizing the legal regula-
tions of the member states regarding electromagnetic compatibility.
Directive on the restriction of the use of certain
hazardous substances in electrical and electronic
equipment.
We recommend that you speak with our technical
service department before requesting a service technician or sending a fusionchef by Julabo device in for
repair.
Telephone: 07823 / 51-66
Fax: 07823 / 51-99
E-mail: [email protected]
If sending a product to fusionchef :
Please clean the device in order to avoid endan-
gering the service personnel.
Prepare the device for shipment with careful and
proper packaging.
Always include a brief description of the problem.
If you must send your fusionchef by Julabo product
back to us, please include a Service Request Form,
which you can download at our website
www.fusionchef.de.
Please fill out this form and include it with the device
or fax or e-mail it to us in advance.
69
Page 70
Information about the unit
fusionchef by Julabo will not be liable for any damage
caused by improper packaging.
Notice
During the repair process fusionchef by Julabo reserves the right to perform any technical changes
necessary to ensure flawless operation of the device.
Disposal
A European Community directive stipulates that electrical and electronic devices must be disposed in an
environmentally friendly manner via a separate collection.
Please contact an authorized disposal company in
your country. It is not permissible to dispose of the
device in regular (unsorted) garbage or similar facilities intended for collecting household waste!
70
Page 71

Warranty
Warranty
fusionchef by Julabo warrants flawless functionality of
this unit, assuming it has been installed and used
properly and in accordance with the directives contained in these operating instructions.
The warranty time period is two years.
The warranty is limited to our choice of improvement, no-charge repair, or replacement in response
to customer complaint. Defective parts will be replaced or repaired at no charge to the extent that a
disturbance or imperfection is demonstrably due to a
material or manufacturing error.
More extensive claims for damages are excluded!
71
 Loading...