

Page 1
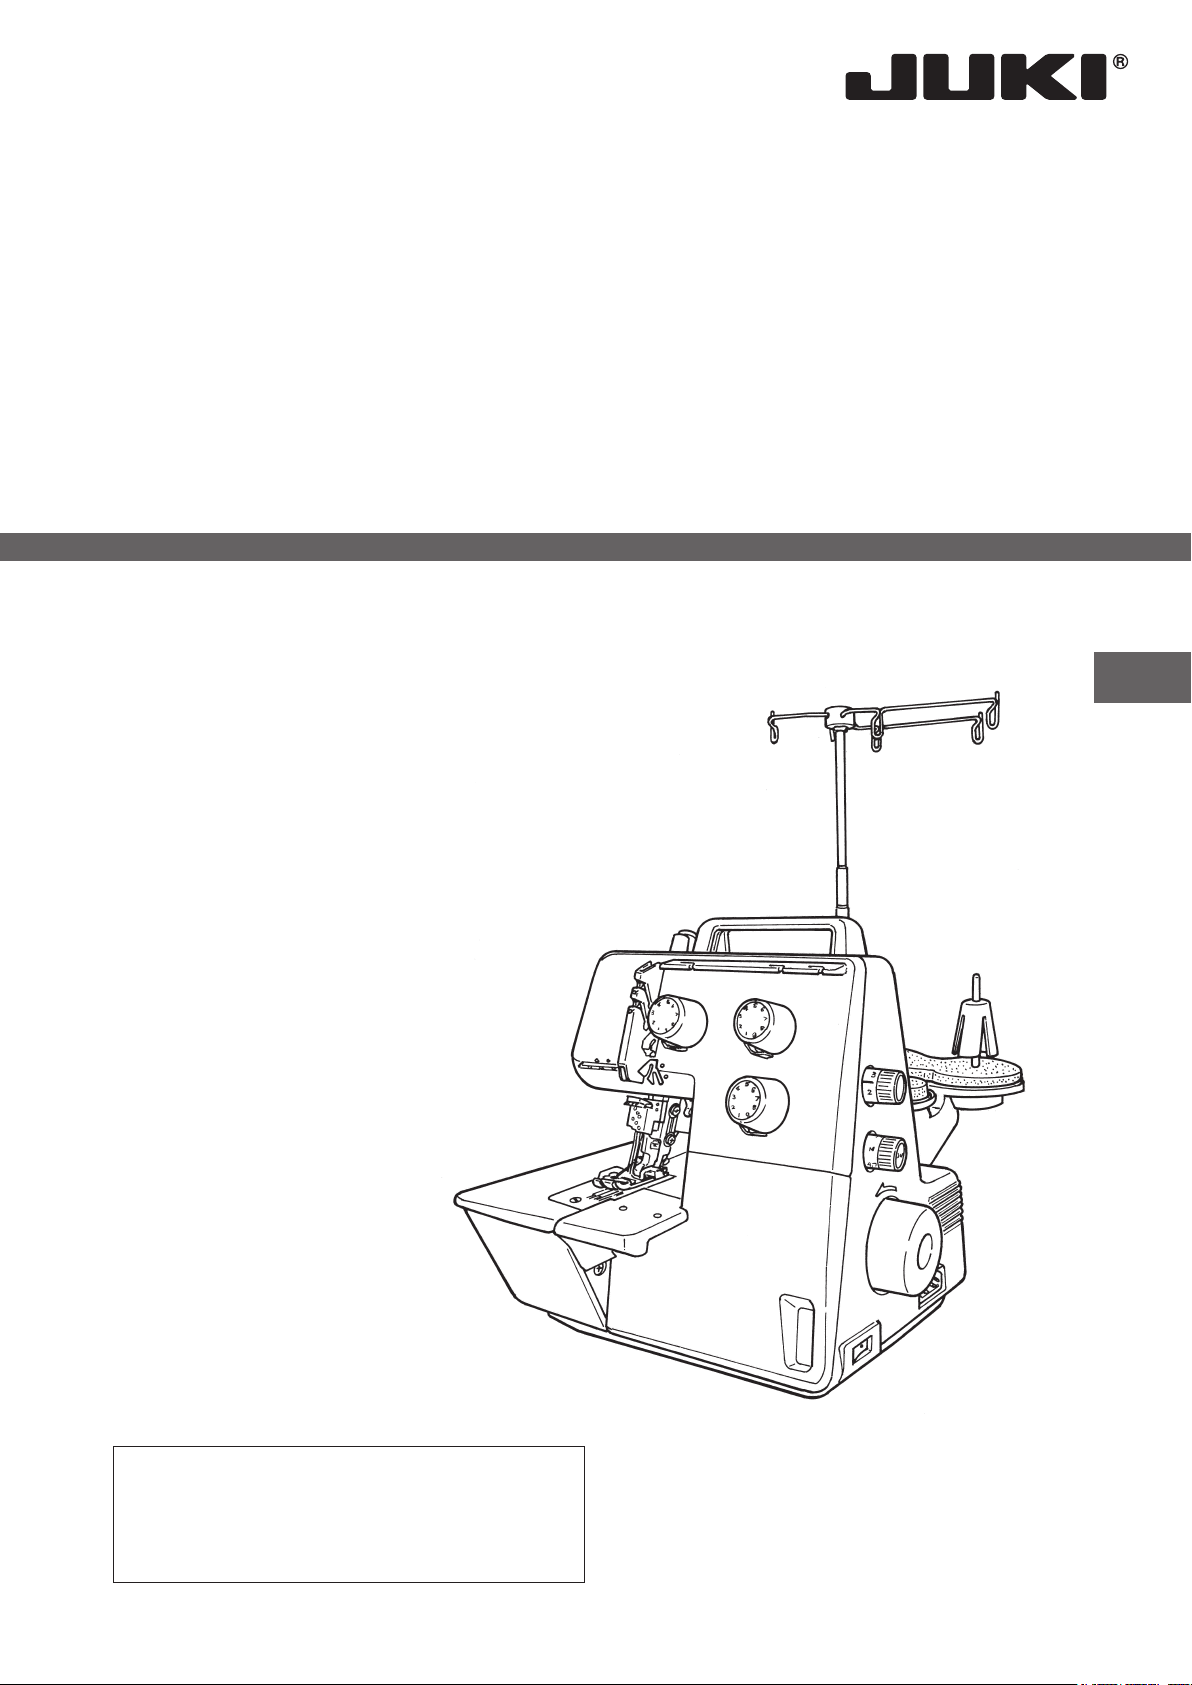
3-Needle, 2/3/4-Thread Cover Stitch Sewing Machine
MCS-1500
INSTRUCTION MANUAL
EN
IMPORTANT:
Read all safety regulations carefully and understand them before using your sewing machine.
Retain this instruction manual for future reference.
Page 2

“IMPORTANT SAFETY INSTRUCTIONS”
When using an electrical appliance, basic safety precautions should always be followed, including
the following: Read all instructions before using this sewing machine.
____
“DANGER
1. The appliance should never be left unattended when plugged in.
Always unplug this appliance from the electric outlet immediately after using and before cleaning.
2.
“WARNING
1. Do not use the appliance as a toy. Caution is advised when the appliance is used by children, or
near children. This sewing machine can be used by children aged from 8 years and above and
persons with reduced physical, sensory or mental capabilities or lack of experience and knowledge if they have been given supervision or instruction concerning use of the sewing machine
in a safe way and understand the hazards involved. Children shall not play with the sewing machine. Cleaning and user maintenance shall not be made by children without supervision.
2. Use this appliance only for its intended use as described in this manual. Use only attachments
recommended by the manufacturer as contained in this manual.
3. Never operate this appliance if it has a damaged cord or plug, if it is not working properly, if it
has been dropped or damaged, or dropped into water. Return the appliance to the nearest authorized dealer or service center for examination, repair, electrical or mechanical adjustment.
4. Never operate the appliance with any air openings blocked. Keep ventilation openings of the
sewing machine and foot control free from the accumulation of lint, dust, and loose cloth.
Keep ngers away from all moving parts. Special care is required around the sewing machine needle.
5.
6. Always use the proper stitch plate. The wrong plate can cause the needle to break.
7. Do not use bent needles.
8. Do not pull or push fabric while stitching. It may deect the needle causing it to break.
9. Do not carry out sewing with a marking pin stuck in the material since doing so can cause knife/
needle breakage. In addition, do not attempt to cut anything other than fabric and thread with
the upper/lower knives.
10. Switch the sewing machine off “O” when making any adjustments in the needle area, such as
threading needle, changing needle, threading looper, or changing presser foot and the like.
11. Always unplug the machine from the electrical outlet when removing covers, when covers are
opened to thread the loopers, when lubricating or when making any other user servicing adjustments mentioned in the instruction manual.
12. Never drop or insert any object into any opening.
13. Do not use outdoors.
Do not operate where aerosol (spray) products are being used or where oxygen is being administered.
14.
15. To disconnect, turn all controls to the off “O” position, then remove plug from outlet.
16. Do not unplug by pulling on cord. To unplug, grasp the plug, not the cord.
17. Basically, the machine should be disconnected from the electricity supply when not in use.
18. If the power cord of this appliance is damaged, it must be replaced with a special cord by your
nearest authorized dealer or service center.
19. (Except USA/Canada) This machine is provided with double insulation.
Use only identical replacement parts. See instructions for servicing Double-Insulated machine.
To reduce the risk of electric shock:”
____
To reduce the risk of burns, re, electric shock, or injury to persons:”
“SERVICING DOUBLE-INSULATED PRODUCTS
(Except USA / Canada)”
In a double-insulated product, two systems of insulation are provided instead of grounding. No
grounding means is provided on a double-insulated product nor should a means for grounding be
added to the product. Servicing a double-insulated product requires extreme care and knowledge
of the system and should only be done by qualied service personnel. Replacement parts for a
double-insulated product must be identical to those parts in the product. A double-insulated product
is marked with the words DOUBLE INSULATION or DOUBLE INSULATED.
The symbol
may also be marked on the product.
“SAVE THESE INSTRUCTIONS”
“This overlock sewing machine is intended for household use only.”
1
Page 3
Congratulations on your purchase of a JUKI sewing machine.
Please be sure to read safety precautions in “To use the sewing machine safely” in the Instruction
Manual before use to fully understand the functions and operating procedures of the sewing
machine so as to use the sewing machine for a long time.
After you have read the Instruction Manual, please be sure to keep it together with the warranty so
that you can read it whenever necessary.
To use the sewing machine safely
Marks and pictographs included in the Instruction Manual and shown on the sewing machine are
used so as to ensure safe operation of the sewing machine and to prevent possible risk of injury to
the user and other people.
Warning marks are used for different purposes as described below.
WARNING
CAUTION
Indicates that there is a possible risk of death or serious injury if this mark is
ignored and the sewing machine is used in a wrong manner.
Indicates the operation, etc. which can cause a possible risk of personal injury
and/or physical damage if this mark is ignored and the sewing machine is used in
a wrong manner.
Pictographs mean the following:
Danger warning which is
not specied
Prohibited
matter which
is not specied
Generally re-
quired behavior
There is a
risk of electrical shock
Disassem-
bly/alteration
is prohibited
Disconnect
the power
plug
There is a
risk of re
Do not
place ngers under
the needle
There is a
risk of injury
to hands, etc.
Do not pour
oil, etc.
2
Page 4
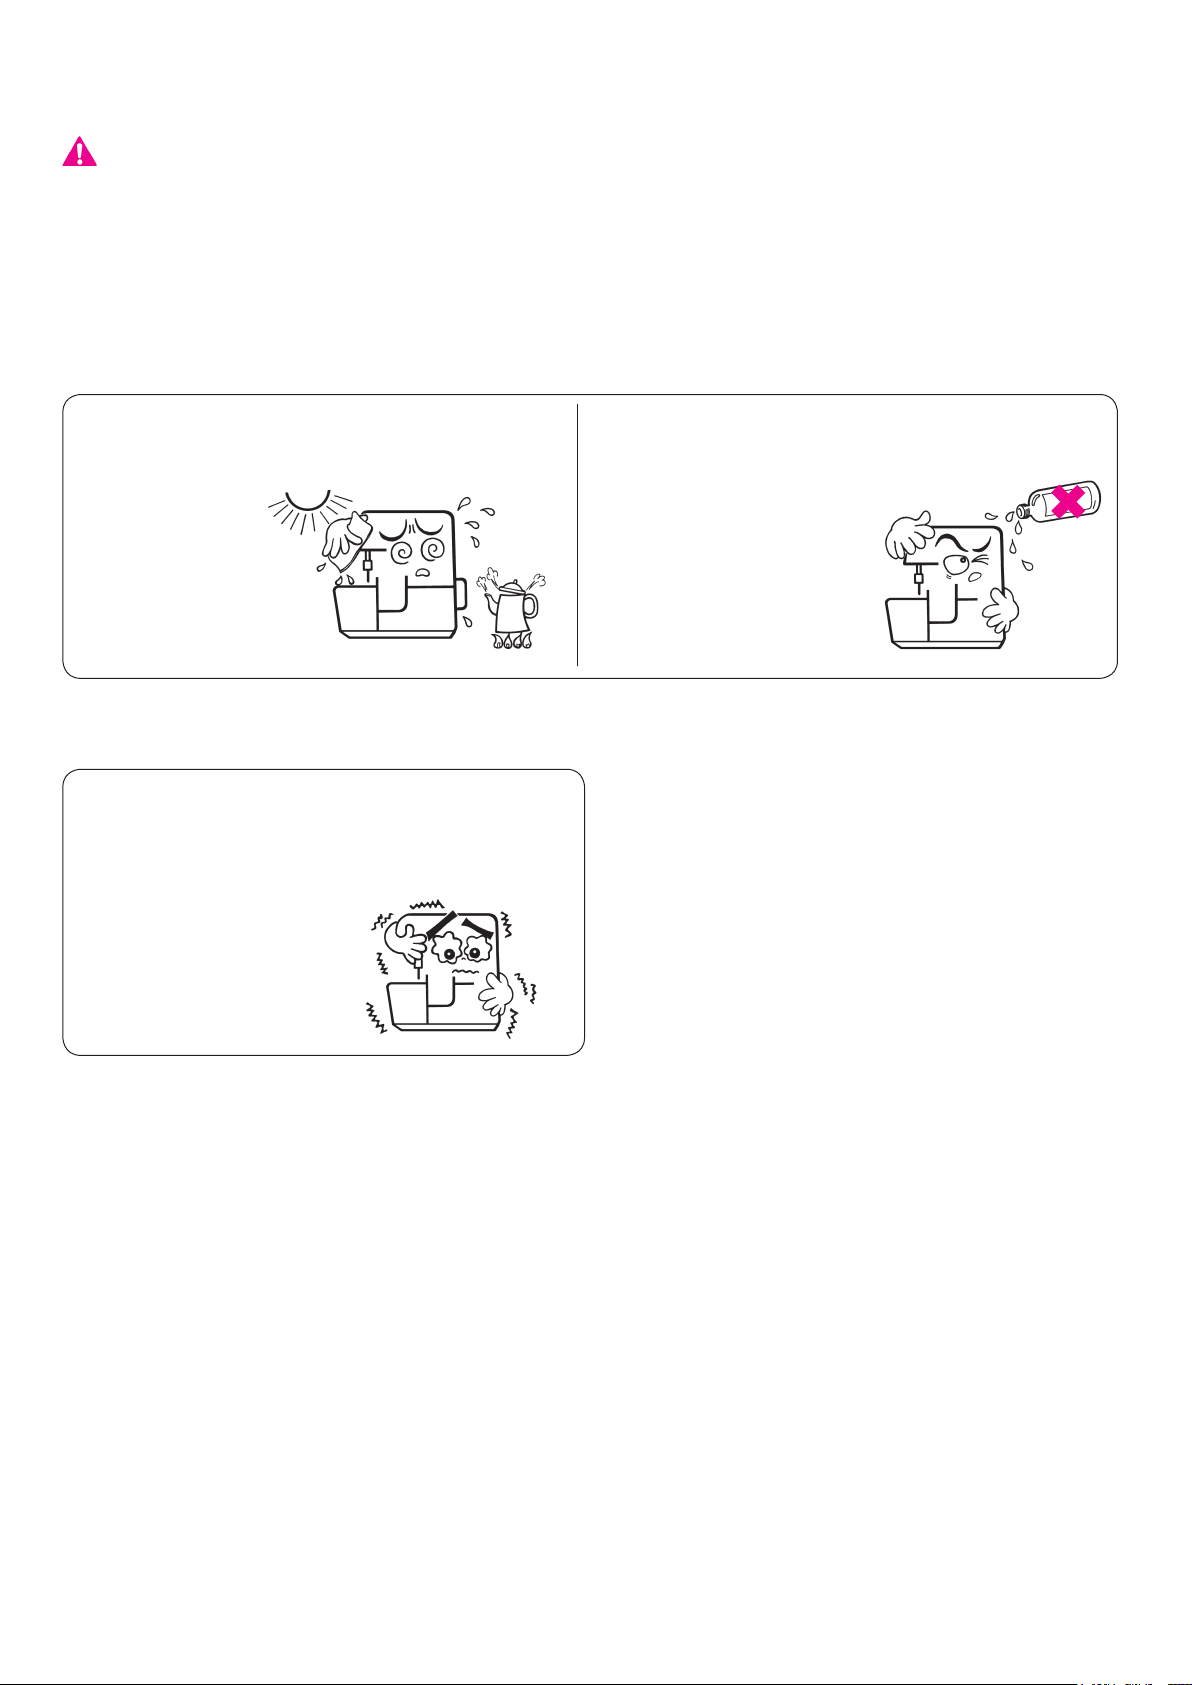
WARNING
For the combination of the material and the thread and needle, in particular, refer to the explanation
table in “Replacement of the needle”.
If the needle or thread does not match the material used such as in the case that an extra heavyweight material (e.g., denim) is sewn with a thin needle (#11 or higher), the needle can break resulting in an unexpected personal injury.
Other precautions
● Do not put the sewing machine under the
direct sunlight or in a humid place.
Be aware that the following state can take place since the sewing machine incorporates semi-conductor electronic parts and precise electronic circuits.
● Be sure to use the sewing machine in the
temperature range from 5ºC to 40ºC.
If the temperature is excessively low, the
machine can fail to operate normally.
● Do not wipe the sewing machine with solvent
such as thinner.
When the sewing
machine is soiled, put a
small quantity of neutral
detergent on a piece of
soft cloth and carefully
wipe off the sewing
machine with it.
* The operating temperature of the sewing machine is between 5ºC and 40ºC. Do not use the
sewing machine under the direct sunlight, near the burning things such as a stove and candle, or
in a humid place. By so doing, the temperature in the interior portion of the sewing machine can
rise or the coating of the power cord can melt, causing re or electrical shock.
3
Page 5

Contents
Safety instructions ·································· 1-3
Contents··················································4
Details of the machine ···························· 5, 6
• Accessories ··········································· 6
Preparing the machine
• Thread guide ·········································7
• Attaching the spool holders ·······················7
• Thread, cones, spools ·····························7
• Large spools ·········································· 7
• Household spools ··································· 7
• Thread net ············································7
• Attaching the foot control ··························8
Using the machine
• Power/light switch ··································· 8
• Two-step presser foot lifter ·······················9
• Changing the presser foot ························9
• Looper cover ······································· 10
• Cloth plate ·········································· 10
• Handwheel ·········································· 10
• Inserting needles ·································· 11
• Needle system ····································· 11
Threading
• Threading preparation / Tips ··················· 12
• Thread guide bar ·································· 12
• Thread tension ····································· 12
Trial sewing, Thread tension
• Sewing test ········································· 20
• Tension adjustments ····························· 21
• Thread tension ····································· 21
Adjustments and settings
• Stitch length ········································ 22
• Presser foot pressure ···························· 22
• Differential feed ···································· 23
• Adjusting the differential feed ·················· 24
Stitch chart············································· 25
Practical sewing cover stitch
• Securing the seam end ·························· 26
• Unpicking seams ·································· 26
• Extension plate with seam guide lines ······· 26
• Simple hem ········································· 27
• Flat joining seam ·································· 27
• Edges with elastic ································· 28
• Binding ··············································· 28
• Top stitching seams / ribbing / yokes ········· 29
• Decorative stitching ······························· 29
Practical sewing chainstitch
• Securing the seam end ·························· 30
• Unpicking seams ·································· 30
• Extension plate with seam guide lines ······· 30
• Gathering with chainstitch ······················ 31
Threading cover stitch
• Threading 4 thread cover stitch ···········13-16
Threading cover stitch looper ················ 13
Threading right cover stitch needle ········ 14
Threading center cover stitch needle ······ 15
Threading left cover stitch needle ·········· 16
• Threading 3 thread cover stitch (wide) ······ 17
• Threading 3 thread cover stitch (narrow) ··· 18
Threading chain stitch
• Threading chain stitch ··························· 19
• Binding ··············································· 31
• Tape guide ·········································· 31
Maintenance
• Replacing the bulb ································ 32
• Cleaning ············································· 32
Trouble shooting guide ····························· 33
Technical data ········································ 34
Optional accessories ································ 35
4
Page 6

Details of the machine
13
11
9
8
27
7
6
5
4
3
24
2
1
25
23
26
12
10
18
15
14
19
22
21
20
16
17
Details of the machine
1. Looper cover
2. Extension plate
3. Cloth plate
4. Sewing plate
5. Presser foot
6. Sewing light
7. Thread take-up cover
8. Left needle thread tension dial
9. Center needle thread tension dial
10. Right needle thread tension dial
11. Retractable support rod
12. Thread guide
13. Open thread guide
14. Spool holder pin
15. Anti-vibration cone
16. Foam pad
17. Spool holders
18. Stitch length dial
19. Differential feed dial
20. Handwheel
21. Machine socket
22. Power/Light switch
23. Presser foot lifter
24. Needle clamp
25. Carrying handle
26. Threading diagram
27. Presser foot pressure adjusting screw
4
3
View with cloth plate open
1. Looper auto-threader
2. Looper thread tension dial
3. Threading diagram for looper thread
4. Thread cutter
2
1
5
Page 7
Details of the machine
1
7
8
2
9
3
4
5
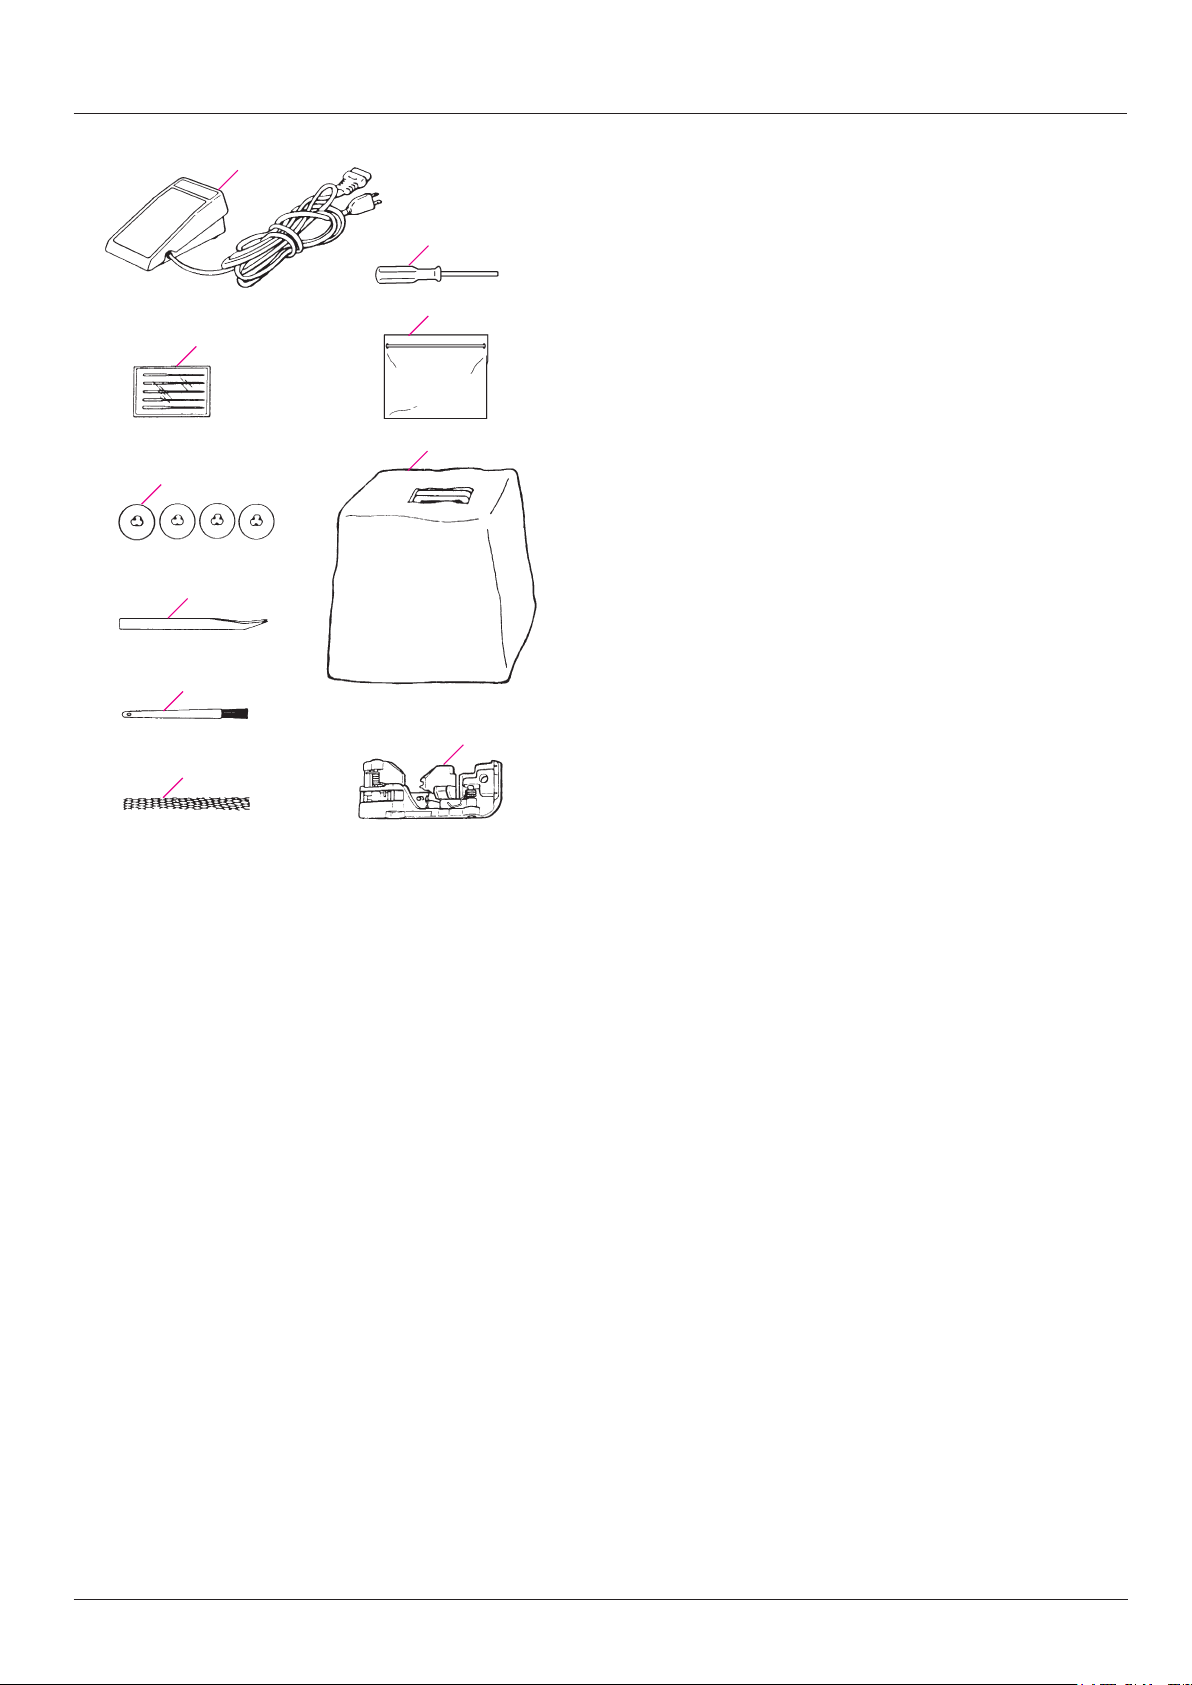
Accessories
1. Electronic foot control
2. Needle set 130/705H
3. Spool caps
4. Tweezers
5. Brush/needle inserter
6. Net
7. Hexagonal screwdriver
8. Accessory bag
9. Dust cover
10. Chainstitch presser foot (Optional Accessory)
10
6
6
Page 8
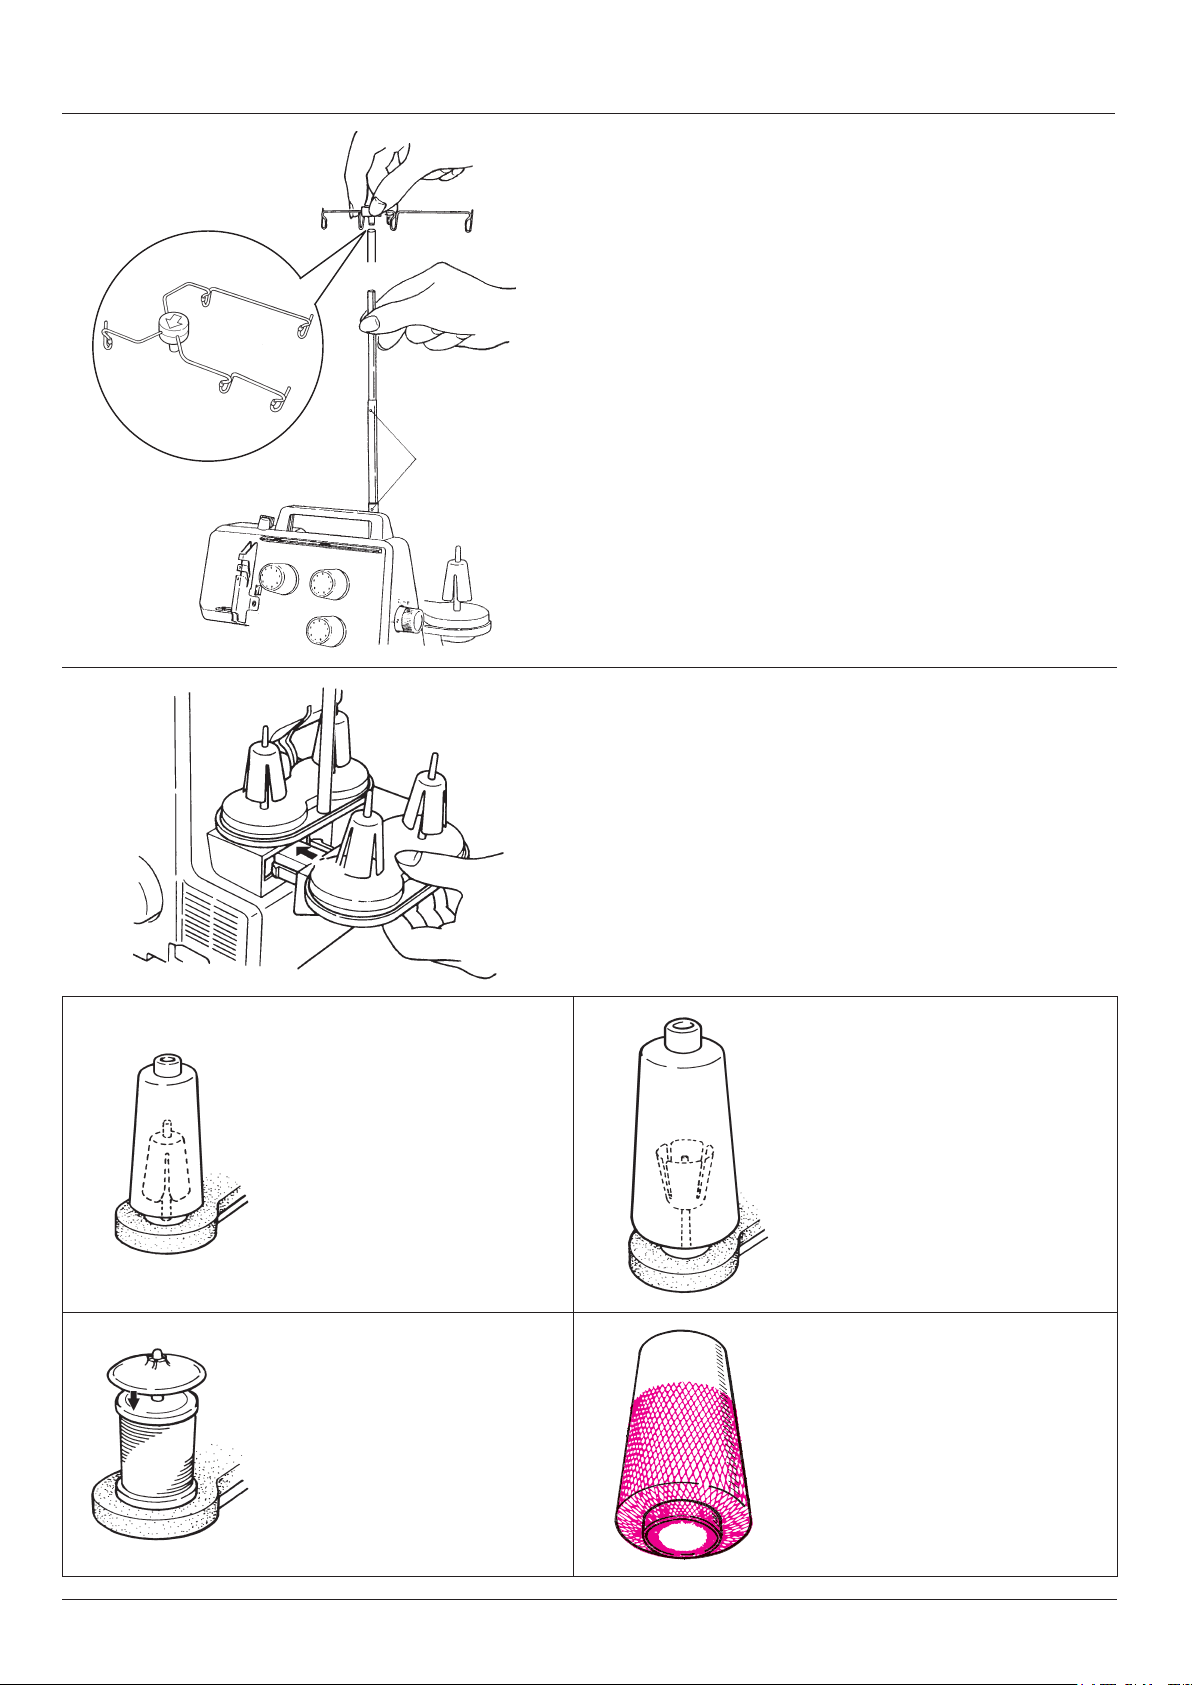
Preparing the machine
B
Thread guide
Raise the support rod fully, turning slightly until the positioning
catches engage (A). Position the thread guide on the thread
stand so that the arrow is to the front (B).
A
Thread / cones / spools
The anti-vibration cone should
be used with the wider edge at
the bottom on the spool holder
pin when sewing with cones.
Attaching the spool holders
Attach the separately packed spool holder (equipped with two
spool holders pins) to the xed spool holder, by pushing until it
snaps in place.
Large spools
If large industrial spools are used,
position the anti-vibration cone up-
side down on the spool holder pin,
i.e. with the wider edge at the top.
Household spools
Remove the anti-vibration
cones. Place spools on spool
holder pins and push the spool
caps on with the rounded side
downwards.
Thread nets
If the threads slip and gets twist-
ed, cover the spools of upper and
lower looper with the nets supplied
in the accessory bag.
7
Page 9
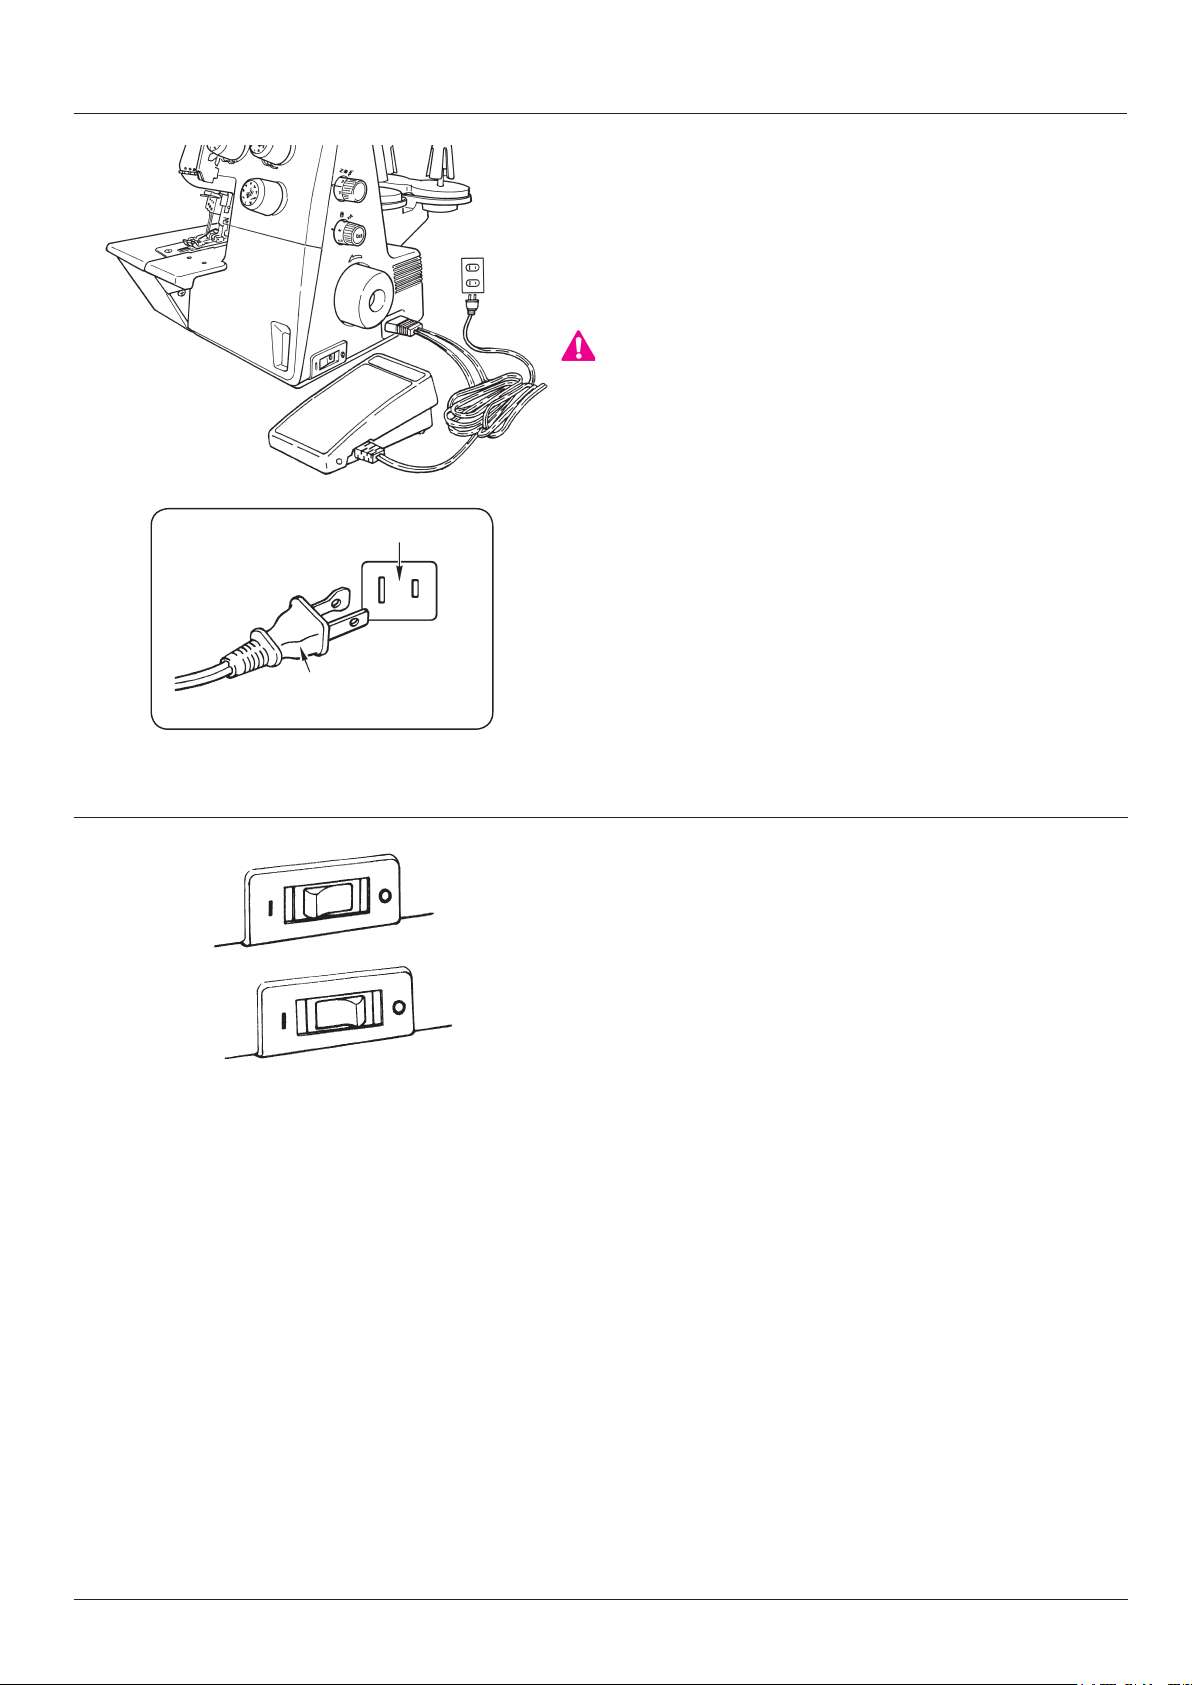
Preparing the machine
Attaching the foot control
Plug foot control into the machine socket (A) and then into the
main socket (B). The foot control regulates the sewing speed.
The sewing speed can be adjusted by increasing or decreasing
B
the pressure on the foot control.
A
Polarized For UL, CSA
Polarized power
supply socket
“WARNING”
This appliance has a polarized plug (for USA and Canada only,
one blade wider than the other).
To reduce the risk of electric shock, this plug is intended to t in
a polarized main socket only one way.
If the plug does not t fully in the polarized main socket, reverse
the plug. If it still does not t, contact a qualied electrician to
install the proper polarized main socket. Do not modify the plug
in any way. (for USA, Canada only)
* Use only the foot control model YC-482 (USA, Canada), YC-
483N (220-240V).
Power/light switch
The power/light switch is on the handwheel side of the machine
in front of the plug socket.
0 = off
I = power and light on
8
Page 10
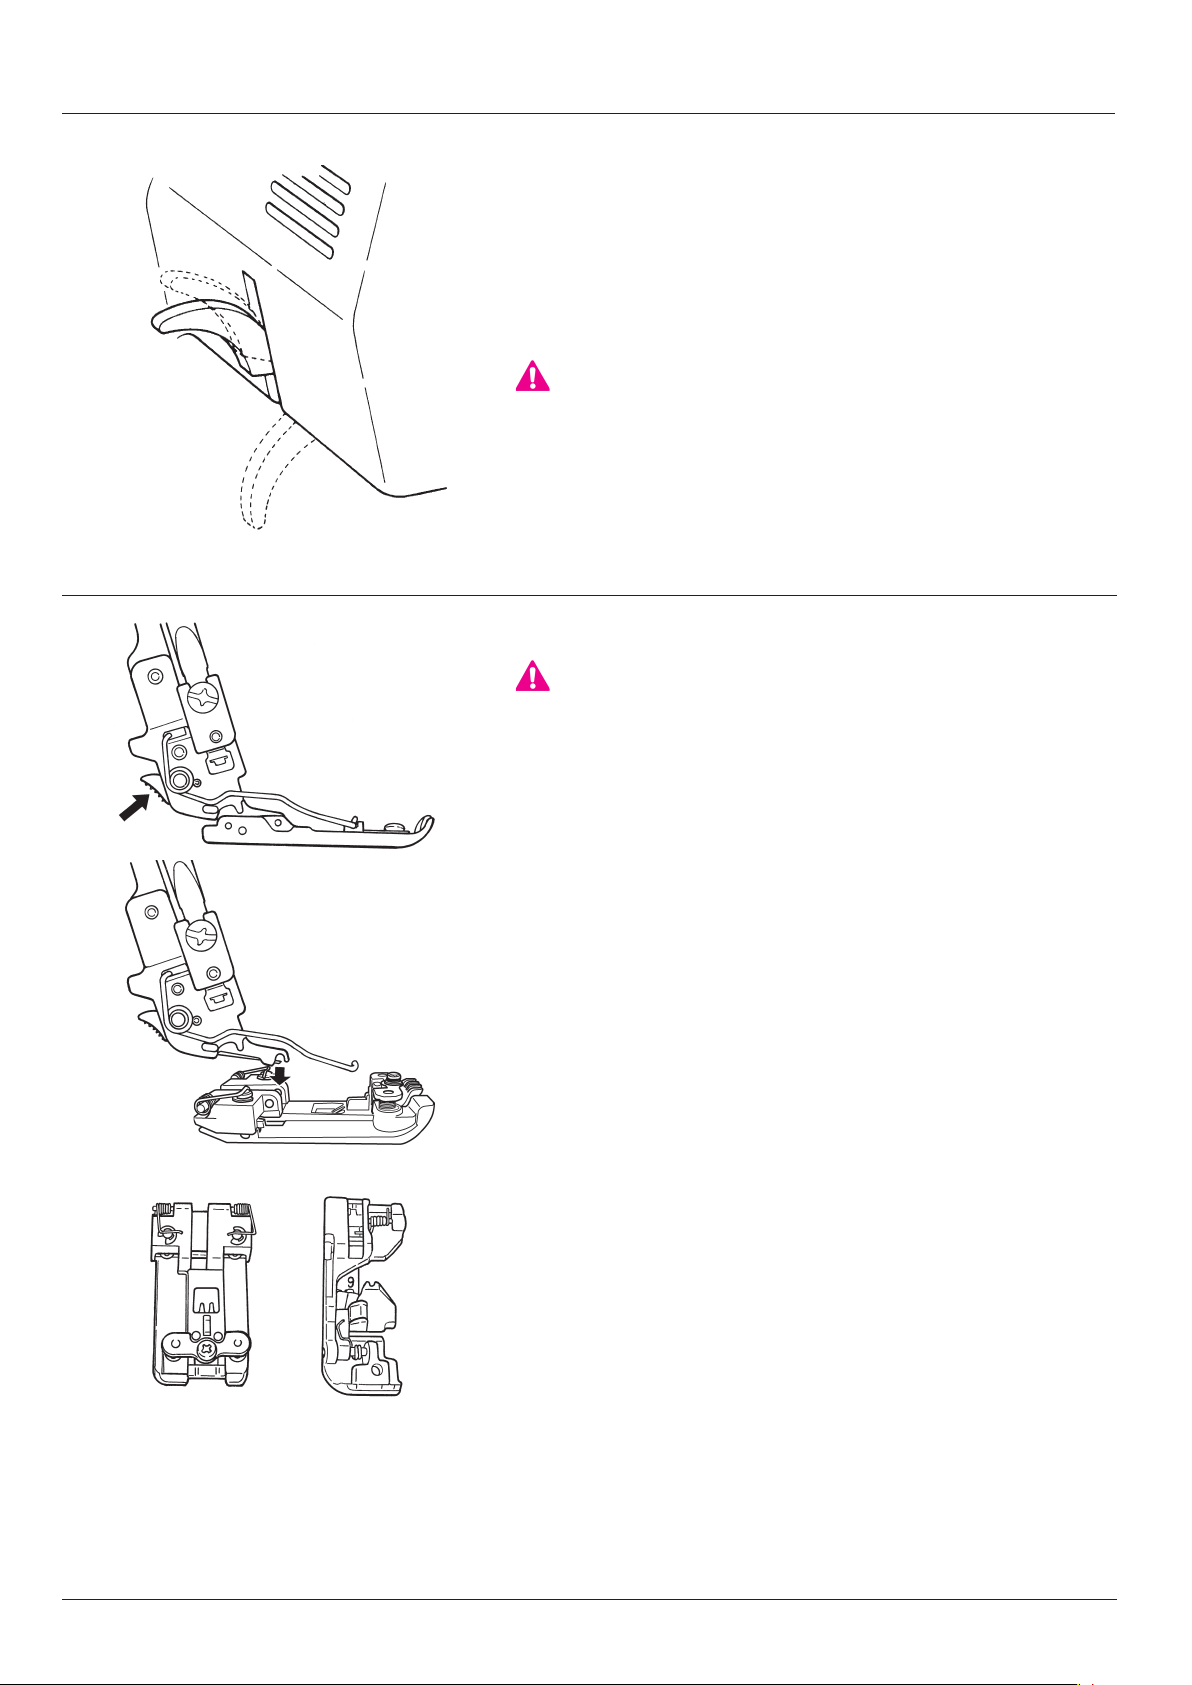
Using the machine
B
A
C
Two-step presser foot lifter
To raise the presser foot push the presser foot lifter up until it en-
gages (A).
It can be raised again to maximum height and held in this position to
provide more space between presser foot and stitch plate for bulky
items (B). To lower the presser foot press the lifter down (C).
“WARNING”
When using the extra lift (B), do not run the machine or turn the
handwheel.
Changing the presser foot
Switch the machine off (power switch "0").
・
Turn the handwheel to raise the needles.
・
Raise the presser foot.
・
To release the presser foot, press the catch (D).
・
Raise the presser foot shaft to its highest position (B) and remove
・
D
E
F G
the presser foot to the left.
To attach the foot, place it under the shank, so that the groove in
・
the shank lines up exactly with the presser foot pin (E).
Lower the shank and the presser foot will engage automatically.
・
Lower the presser foot lifting lever and check that the groove in
*
the shank should line up exactly with the presser foot pin (E). If it
is not lined up, press the catch (D) to line up.
- Cover stitch presser foot (F)
- Chain stitch presser foot (G) (Optional Accessory)
1009
(Optional Accessory)
9
Page 11
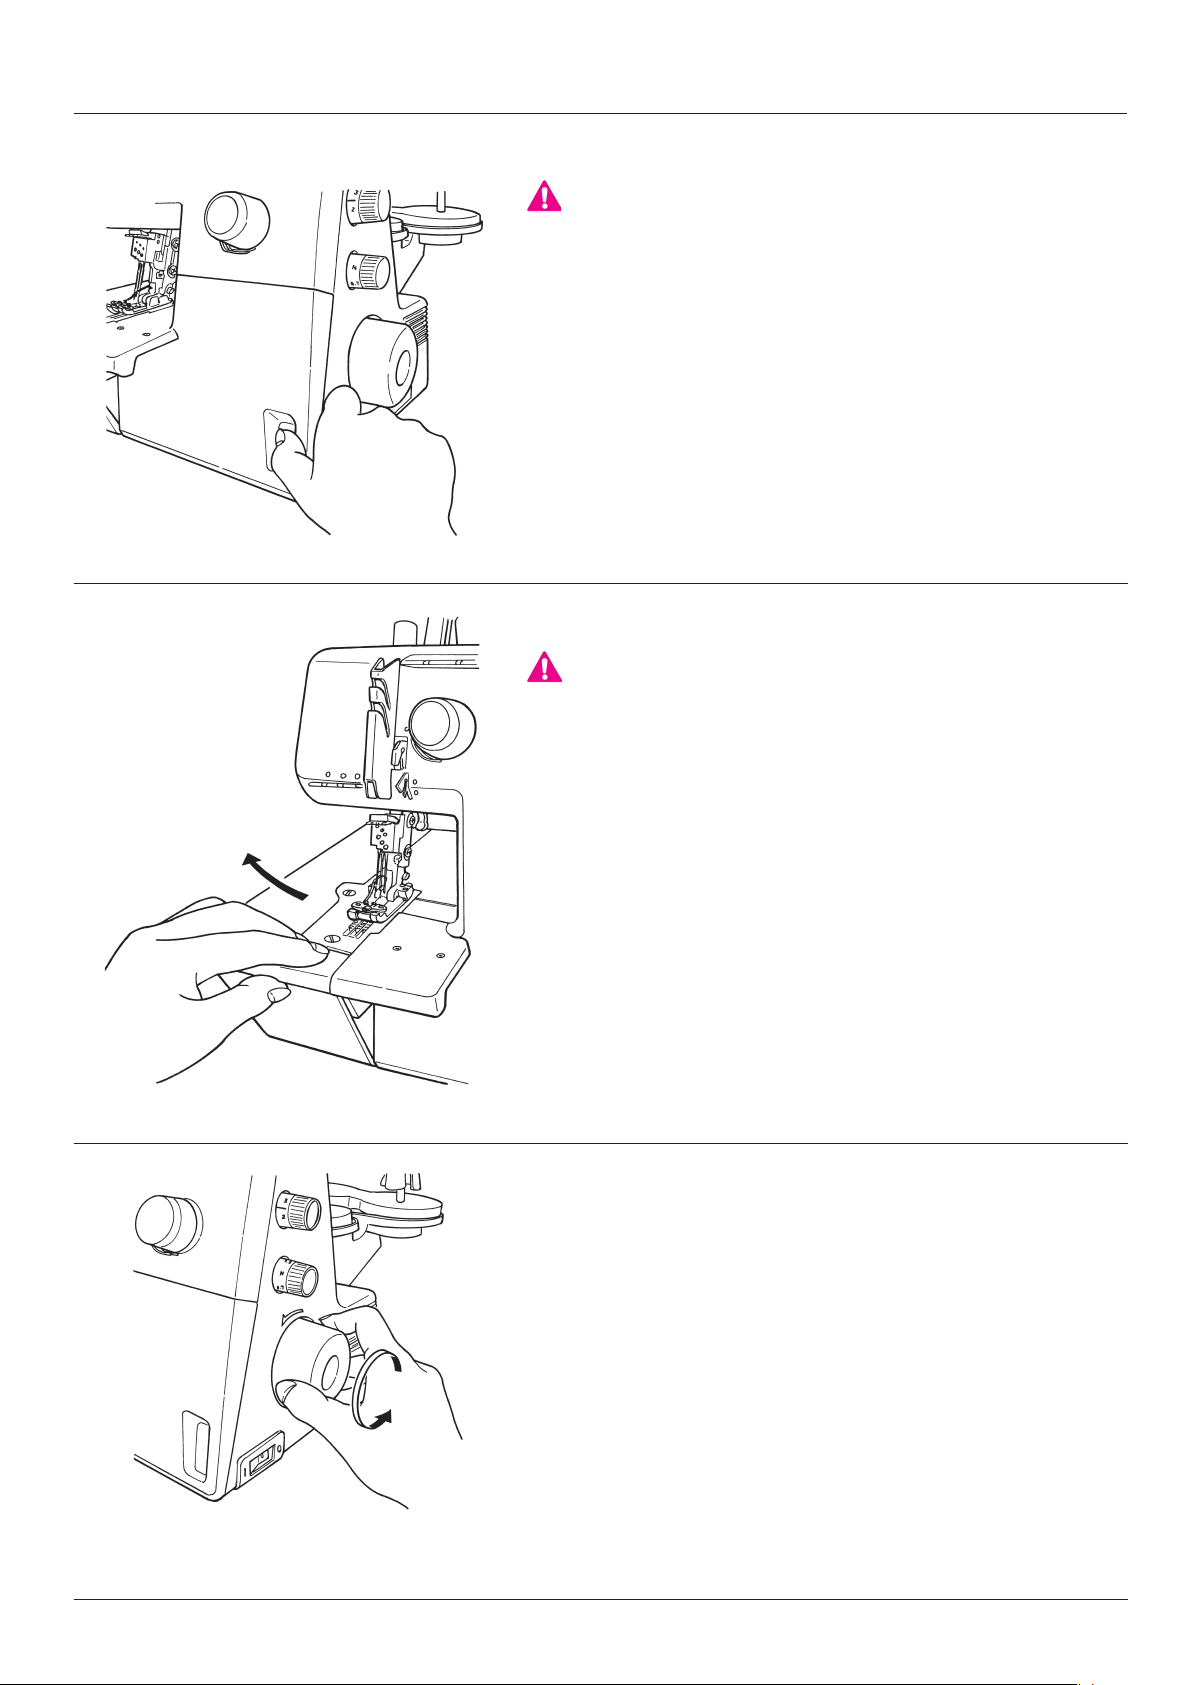
Using the machine
Looper cover
Caution, moving parts, switch the machine off (power
switch "0").
To open, push to the right and tilt the cover towards you.
To close, push it up.
Cloth plate
Caution, moving parts, switch the machine off (power
switch "0").
To open, push the cloth plate to the left.
To close, push it towards the machine and press gently until it en-
gages.
Handwheel
The handwheel turns forward (counterclockwise) when sewing.
10
Page 12
Using the machine
A
B
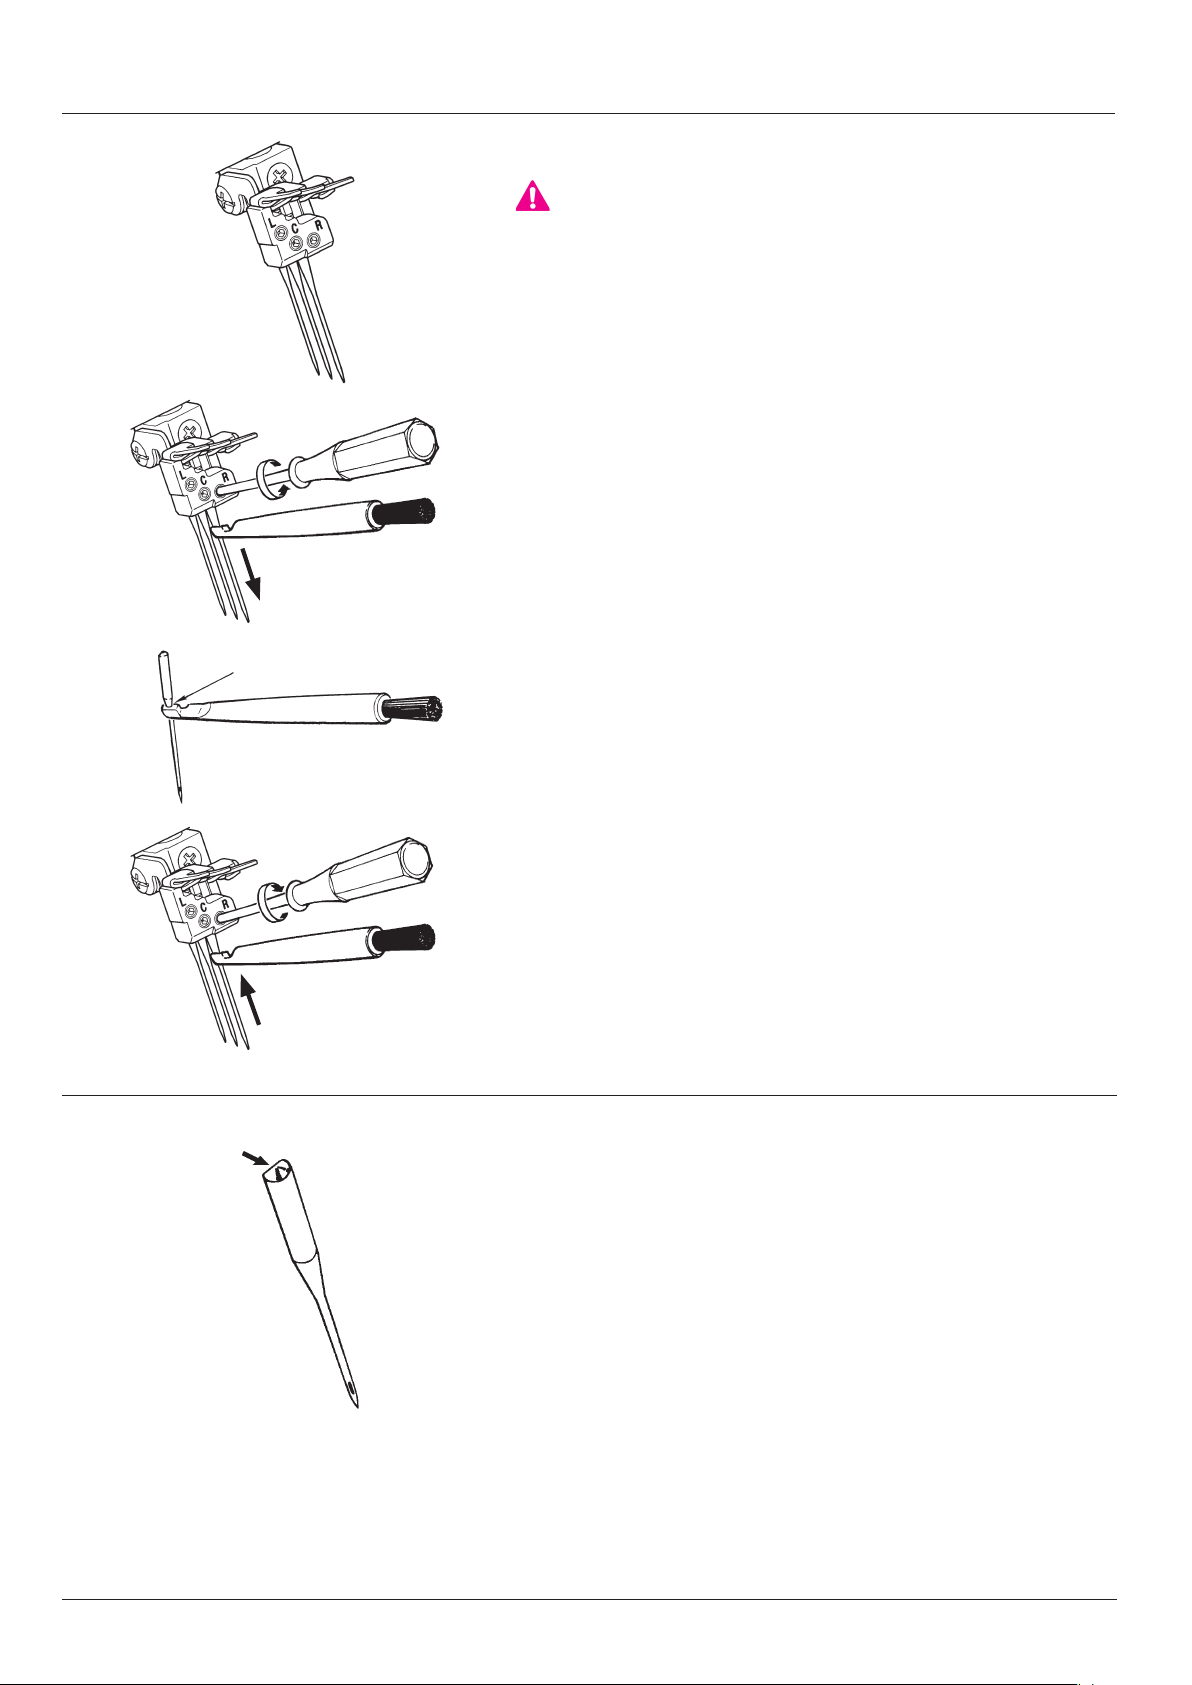
Inserting needles
Switch the machine off (power switch "0").
・
Raise the needles fully by turning the handwheel.
・
Lower the presser foot.
・
To remove the needles loosen the needle set screws (A).
・
Place a needle, at side towards the back into the hole of the nee-
・
dle inserter (B).
Insert the needle into the needle clamp (C).
・
Tighten the needle set screws.
・
C
Needle system
130/705H (Household needles)
・
Use needles size No.70-90 (11-14).
・
11
Page 13

Threading
Threading preparation / TIPS
Switch the machine off (power switch "0").
・
Fully raise support rod with thread guide.
・
Open the looper cover and cloth plate.
・
Turn handwheel until the looper is at its leftmost position.
・
Raise the presser foot to release the tensions.
・
Thread the looper rst and then the needle(s).
・
Thread guide bar
Slide thread into the two slits to form an S-loop.
Thread tension
The thread must lie correctly between the tension discs
for perfect stitch formation. When a slight resistance is
felt on the thread, it is lying correctly between the tension
discs.
12
Page 14

Threading 4 thread cover stitch
1
2
3
1. Threading cover stitch looper (purple)
• Switch the machine off (Power switch to “0”).
Place the spool on the spool holder pin as illustrated.
(1) Bring the thread up from the spool and lay it from the
back to the front into the guides.
(2, 3) Thread the guides.
(4) Thread the tension dial.
(5, 6, 7) Thread the guides.
(8) Place the thread horizontally in the guide.
(9) Thread the guide.
Bring the needle into the lowest position. Turn handwheel.
(10) Thread the guide.
(11) Push the looper auto-threader (white) up towards the
chainlooper and press them down together.
(12) Thread the rst looper eye back to front.
(13) Thread the looper eye front to back and cut thread to
about 10cm (4”).
(14) Push the looper auto-threader back up to sewing po-
sition.
Raise the needle to highest position (turn handwheel)
Note:
I
f the looper thread has to be re-threaded, cut the needle
threads above the needle eye and remove. Thread the
2
9
13
12
10
5
3
6
4
3
5
6
4
12
13
8
7
11
looper rst and then the needles.
13
14
Page 15

Threading 4 thread cover stitch
1
2
3
7
8
6
9
5
4
2. Threading right cover stitch needle
(blue)
• Switch the machine off (Power switch to “0”).
Place the spool on the spool holder pin as illustrated.
(1) Bring the thread up from the spool and lay it from the
back to the front into the guides.
(2, 3) Make an S-loop around thread guide bar.
(4) Thread the tension dial.
(5, 6) Thread the guides.
(7) Thread the take up.
(8) Thread the guide.
(9) Thread the needle clamp guide.
(10) Thread the right needle eye from front to back and
lay the thread over the presser foot to the left. Cut the
thread to about 7 cm (3”).
(11) Check that the cover stitch presser foot is attached
for cover stitch sewing.
Note:
If the looper thread has to be re-threaded, cut the needle
threads above the needle eye and remove. Thread the
looper rst and then the needles.
10
4
5
6
9
10
1009
14
Page 16

Threading 4 thread cover stitch
1
3. Threading center cover stitch needle
(green)
• Switch the machine off (Power switch to “0”).
Place the spool on the spool holder pin as illustrated.
(1) Bring the thread up and take it from back to front
through the guide.
(2, 3) Make an S-loop around thread guide bar.
(4) Thread the tension dial.
(5, 6) Thread the guides.
(7) Thread the take up.
(8) Thread the guide.
(9) Thread the needle clamp guide.
(10) Thread the center needle eye from front to back and
lay the thread over the presser foot to the left. Cut the
thread to about 7 cm (3”).
2
3
7
8
9
6
10
6
5
4
4
5
9
Note:
If the looper thread has to be re-threaded, cut the needle
threads above the needle eye and remove. Thread the
looper rst and then the needles.
15
10
Page 17

Threading 4 thread cover stitch
1
4. Threading left cover stitch needle
(yellow)
• Switch the machine off (Power switch to “0”).
Place the spool on the spool holder pin as illustrated.
(1) Bring the thread up and take it from back to front
through the guide.
(2, 3) Make an S-loop around thread guide bar.
(4) Thread the tension dial.
(5, 6) Thread the guides.
(7) Thread the take up.
(8) Thread the guide.
(9) Thread the needle clamp guide.
(10) Thread the left needle eye from front to back and lay
the thread over the presser foot to the left. Cut the
thread to about 7 cm (3”).
2
10
3
5
6
6
4
4
5
9
7
8
9
Note:
I
f the looper thread has to be re-threaded, cut the needle
threads above the needle eye and remove. Thread the
looper rst and then the needles.
10
16
Page 18

Threading 3 thread cover stitch (wide)
Preparation 3 thread cover stitch (wide)
1
• Switch the machine off (Power switch to “0”).
Right cover stitch needle (blue)
Left cover stitch needle (yellow)
2
3
2
5
3
6
4
8
7
13
12
9
10
3
5
6
4
13
12
14
11
7
8
9
9
10
1
2
3
5
4
6
2
5
1
3
4
17
10
Page 19

Threading 3 thread cover stitch (narrow)
Preparation 3 thread cover stitch (narrow)
1
• Switch the machine off (Power switch to “0”).
Left cover stitch needle (yellow)
Center cover stitch needle (green)
2
3
2
5
3
6
4
8
7
13
9
12
10
3
5
6
4
13
12
14
11
7
9
8
9
10
1
2
3
5
6
4
1
2
3
5
4
10
18
Page 20

Threading chain stitch
Preparation chain stitch
1
• Switch the machine off (Power switch to “0”).
Left chainstitch needle (yellow)
2
3
2
5
3
6
4
8
7
13
9
12
10
3
5
6
4
13
12
14
11
7
9
8
9
10
1
2
3
5
4
6
19
10
Page 21

Sewing Test
A
B
Sewing Test
After threading make a sewing test on a double layer of fabric to check
the stitch formation and the thread tension.
Cover stitch sewing test
Plug the machine in and switch it on (power switch to “I”).
・
Set the tensions to 3-5.
・
Set the stitch length to 3.
・
Set the differential feed to N.
・
Raise the presser foot and place the fabric under foot and needles (A).
・
Lower the presser foot.
・
Turn the handwheel counterclockwise for the rst stitch.
・
Sew
・
When sewing is completed (still inside the work), turn the handwheel
・
counterclockwise to bring the needles into their lowest position (B).
Then turn the handwheel clockwise to raise the needles to their highest
position. This releases the needle threads from the looper and stitching
can unravel easily.
Raise the presser foot.
・
Remove the work carefully towards the left.
・
Cut the threads over the thread cutter (C).
・
Chainstitch sewing test
C
D
Plug the machine in and switch it on (power switch to “I”).
・
Set the tensions to 3-5.
・
Set the stitch length to 2.5.
・
Set the differential feed to N.
・
Raise the presser foot and place the fabric under foot and needle (A).
・
Lower the presser foot.
・
Turn the handwheel counterclockwise for the rst stitch.
・
Sew
・
If seam ends in the fabric:
When sewing is completed, turn the handwheel counterclockwise to
bring the needles into their lowest position (D).
Then turn the handwheel clockwise to raise the needles to their highest
position. This releases the needle thread from the looper.
Raise the presser foot.
・
Remove the work carefully towards the left.
・
Cut the threads over the thread cutter (C).
・
20
Page 22

Tension adjustments
A B C
E
Tension adjustments Cover stitch
The right needle thread forms loops on the wrong side:
Tighten the right needle tension (blue, C)
The center needle thread forms loops on the wrong side:
D
Tighten the center needle tension (green, B)
The left needle thread forms loops on the wrong side:
Tighten the left needle tension (yellow, A)
The looper thread is loose on the wrong side:
Tighten the looper tension (inside cloth plate, D) (purple)
Chainstitch
F
The needle thread forms loose loops on the wrong side:
Tighten the left needle tension (yellow, F)
The looper thread is loose on the wrong side:
Tighten the looper tension (inside cloth plate, E) (purple)
Thread tension
The thread tension can be adjusted to suit the various types of thread.
Basic needle tensions: 3-5
To increase the tensions: 6-9
To decrease the tensions: 2-1
Basic looper tensions: M
To increase the tensions: H
To decrease the tensions: L (When seam becomes like A)
The looper tension dial is inside cloth plate.
21
A
Page 23

Adjustments and settings
Stitch length
The stitch length is innitely variable from 1-4 mm. It can be
adjusted while sewing. Recommended basic stitch length:
Cover stitch: 3
・
Chainstitch: 2.5
・
M
Presser foot pressure
The presser foot pressure is adjusted to a medium setting,
suitable for most sewing applications.
For adjustments, simply turn the knob.
Basic position for normal pressure (M).
H
M
H
H
L
・
Higher pressure for thick, stiff fabrics or sewing elastics (H).
・
Less pressure for lightweight fabrics or soft knits (L).
・
H
M
L
22
Page 24

Adjustments and settings
Differential feed
There are two feed dogs: one front (A) and one rear (B). The two
feed dogs move independently and the distance each feed dog
travels during one complete movement can be adjusted.
The differential feed prevents fluting or waving in knits or stretch
fabrics and movement between the layers of fabric. It also ensures
pucker-free seams in smooth fabrics such as nylon or closely wo-
ven fabrics.
Perfectly at seams in knits or stretch fabrics.
The distance travelled by the front feed dog should be bigger than
that of the rear feed dog. The front feed dog, therefore, feeds an
amount of fabric which the rear feed dog can take up behind the
needle without stretching the fabric (C).
Pucker-free seams in nylon or closely woven fabrics.
The distance travelled by the rear feed dog should be bigger than
that of the front feed dog. The front feed dog, therefore, holds the
fabric back so that the rear feed dog can take it up behind the nee-
dle without any puckering (D).
AB
2
C
1.5
N(1)
D
0.7
23
Page 25

Adjustments and settings
A B
C D
Adjusting the differential feed
The differential feed can be adjusted by simply turning the differen-
tial feed adjustment knob in the direction desired.
Always make a trial run. The differential feed is innitely variable
and can be adjusted while sewing.
Differential feed adjustments
Setting 2 1.5 N 0.7
Effect Pushing
effect, no
uting
Cover
stitch ap-
plications
Chain-
stitch ap-
plications
Thick or
loose knits,
handknits
Photo A Photo B Photo C Photo D
Thick or
loose knits,
handknits
Photo E Photo F Photo G Photo H
Pushing
effect, no
uting
Fine to
medium
jerseys
Fine to
medium
jerseys
Normal feed Stretching
effect, no
puckering
Knits and
jerseys with
the grain
Wovens,
jerseys with
the grain
Sewing over
seams
Fine jerseys,
closely wo-
vens, lining,
satin, poplin
E F
G H
24
Page 26

Stitch chart
Stitch Tension Settings Basic Settings Applications
4 thread cover stitch
3 thread cover stitch
(wide)
3 thread cover stitch
(narrow)
Right needle thread (blue): 3-5
Center needle thread (green): 3-5
Left needle thread (yellow): 3-5
Looper thread (purple): M
Right needle thread (blue): 3-5
Left needle thread (yellow): 3-5
Looper thread (purple): M
If you experience tunneling with light-weight elastic material,
we recommend the following.
1. Presser foot pressure: L
2. Chain looper tension dial: L
3. Differential feed ratio: N-0.7
4. No threading to the thread guide at chain looper
Center needle thread (green): 3-5
Left needle thread (yellow): 3-5
Looper thread (purple): M
Stitch length: 3
Differential feed: N
Stitch length: 3
Differential feed: N
Stitch length: 3
Differential feed: N
Garments made from very
stretchy fabrics.
Hems, hems with elastic, at
joining seams, stretchy lace,
bindings, decorative seams.
Very stretchy fabrics, knits and
jerseys.
Flat hem for all stretch fabrics,
sewing and nishing with elas-
tic,
binding edges in stretch fab-
rics, decorative seams
Stretchy fabrics
Flat hem, sewing and nishing
with elastic, binding, decorative
seams
2 thread chainstitch
Left needle thread (yellow): 3-5
Looper thread (purple): M
Stitch length: 2.5
Differential feed: N
Wovens or fabrics with very
little elasticity.
Bindings, seams, securing
seams, gathering, decorative
seams.
25
Page 27

Practical Sewing Cover Stitch
1
2
Securing the seam end
Secure the seam end by pulling the loop (1) to the left. If the
looper thread is subsequently pulled upwards, the needle
threads (2) appear and can be pulled through to the wrong side
and knotted.
Note:
The seam begin is secured because the rst stitch is automati-
cally knotted by the subsequent stitches.
Unpicking seams
The cover stitch (chain formation) can be unpicked from the
seam end by pulling the looper thread (3). The needle threads
can be removed from the right side.
3
Extension plate with seam guide lines
The seam guide lines on the extension plate are a valuable aid
for sewing hems, bindings and for topstitching.
26
Page 28

Practical Sewing Cover Stitch
Simple hem
Stitch length: 3-4 mm
Differential: N-2 (depending on fabric)
- Mark hem depth and fold or press.
- Place fabric under the foot and guide the folded edge along a line on
The hem is sewn and the raw edge on the wrong side is neatened si-
multaneously. Surplus seam allowance can be trimmed closed to the
stitches if desired.
Ideal for all stretch fabrics.
the stitch plate.
Flat joining seam
Stitch length: 3-4 mm
Differential: N-2 (depending on fabric)
- Mark seam allowances.
- Turn or press under the edge of the upper fabric (if not already neat-
ened).
- Place edges on top of one another.
- Guide fabric edge along one of the side sections of the foot.
When sewing on elastic or lace, place it on the fabric and cover with
the seam allowance. The underside (raw edge) will be neatened. If the
seam allowance is more than 6 mm (1/4”), it can be trimmed close to
the stitches after sewing.
Ideal for all hems and edges with elastic in jerseys, knits and stretch
fabrics. Suitable for shaped pieces such as raglan sleeves, curved in-
serts and bindings.
27
Page 29

Practical Sewing Cover Stitch
Edges with elastic
Stitch length: 3-4 mm
Differential: 0.7-N
- Turn the raw edge to the width of the elastic and topstitch from the
Guide the fold along the right section of the foot or use one of the lines
on the stitch plate as a guide.
The hem is stretchy, durable and regains its shape after stretching.
Ideal for swimwear, gymwear, children’s clothing, skirt and trouser
waistbands.
right side.
Binding
Stitch length: 3-4 mm
Differential: N
Cut bias binding or bias cut strips to the desired width, mark if wanted
and press or pin. Lay the binding round the fabric edge and sew. Guide
the edge of the binding on the right of the fabric along the left side sec-
tion of the foot.
The edge of the binding on the wrong side (raw edge) is neatened by
the looper thread. Trim surplus binding close to stitches.
Ideal for neck edges on stretch fabrics, armholes and nishes on tubu-
lar items.
28
Page 30

Practical Sewing Cover Stitch
Top stitching seams / ribbing /yokes
Stitch length :3-4 mm
Differential: 0.7-N
- Fold or press seam to one side.
- Edge stitch (or at distance desired) from the right.
- Guide the edge of the fabric along the side sections of the foot.
Cover stitch is perfect for topstitching and decorative nishes.
Ideal for sweatshirts, all garments made from jersey such as dress,
jackets, coats and garments made with the patch-work technique.
Decorative stitching
Stitch length: 3-4 mm
Differential: 0.7-N
The additional space to the right of the needle allows you to sew deco-
rative seams in the fabric.
The wrong side of the stitch can be used on the right side of the fabric.
It is particularly effective if ne decorative threads are used in the looper.
- Draw pattern lines on the left side of the fabric.
- Sew.
Tip: Use a double layer of fabric or stabilizer. Remove or trim after
sewing.
29
Page 31

Practical Sewing Chainstitch
1
2
Securing the seam end
Secure the seam end by pulling the looper thread loop open (1).
If the looper thread is subsequently pulled upwards, the needle
thread (2) appears and can be pulled through to the wrong side
and knotted.
Note:
The seam begin is secured because the rst stitch is automati-
cally knotted by the subsequent stitches.
Chainstitch
presser foot
(Optional
Accessory)
Unpicking seams
The chainstitch formation can be unpicked from the seam end
by pulling the looper thread (3). The needle thread can then be
removed from the right side.
3
Extension plate with seam guide lines
The seam guide lines on the extension plate are a valuable aid
for sewing seams along a fabric edge and for parallel lines of
topstitching.
30
Page 32

Practical Sewing Chainstitch
Gathering with chainstitch
A single layer of lightweight fabric can be gathered with differential
feed.
Differential: 2
Stitch length: 4 mm
Thread tensions: Basic
Binding
Stitch length: 3-4 mm
Differential: N
Cut bias binding or bias cut strips four times the width of the desired
width, mark if wanted or press. Place right side of binding on wrong
side of item, pin if wanted and sew together. Lay bias round the fabric
edge and topstitch from the right side.
Chainstitch presser foot
(Optional Accessory)
Chainstitch presser foot
(Optional Accessory)
Tape guide
The chainstitch presser foot is equipped with a guide for
tapes and elastics up to a width of 8 mm.
Raise the needle.
・
Raise the presser foot.
・
Place the tape under the foot and slip it into the guide from
・
the right.
Lower the presser foot.
・
Sew a few stitches on the tape.
・
Raise the tip of the presser foot, place work underneath the
・
tape / elastic and sew.
31
Page 33

Maintenance
WARNING
Please refer to the safety instructions.
Replacing the bulb
Switch machine off. (Power switch to „0“). Discon-
nect machine from electricity supply.
Unscrew the bulb and replace it with a new one.
120V areas: 15 Watt
230/240V areas: 10 Watt
Bulbs are available from your local dealer.
Cleaning
Switch the machine off (power switch to “O”). Dis-
connect machine from electricity supply.
Dust and uff collect on and in the machine.
This should be removed regularly.
Please refer to safety instructions on page 1.
32
Page 34

Trouble shooting guide
Problem Cause Solution Page
Fabric does not feed
evenly
Thread breaks
Needle breaks
Skipped stitches
Poor stitch forma-
tion
Presser foot pressure is too low.
・
The thread tension is too tight for thread
・
being used.
The machine is not threaded correctly.
・
Needles are not inserted correctly.
・
Wrong needles used.
・
Needles are bent, blunt, points are
・
damaged.
Needles are not inserted correctly.
・
Fabric was pulled while sewing.
・
Needles are bent or blunt.
・
Wrong needles used.
・
The presser foot pressure is too low.
・
Thread is not wound correctly around
・
the tension dials.
Thread got caught.
・
Adjust the presser foot pressure. 22
・
Reduce the thread tension.
・
Check the threading.
・
Insert needles fully into the needle
・
clamp with at side to the back.
Use needle system 130/705H.
・
Replace needles.
・
Insert needles fully into the needle
・
clamp with at side to the back.
Guide fabric gently with both hands.
・
Replace the needles.
・
Use needles of system 130/705H.
・
Increase the presser foot pressure.
・
Check if thread is lying between the
・
tension discs.
Check the threading path of each
・
thread.
21
13-19
11
11
11
11
-
11
11
22
12
13-19
Seam ute or wave,
especially when
sewing knits
Seam pucker
Fabric edges curl
Fabric was pulled while sewing.
・
The presser foot pressure is too tight.
・
The differential feed is not set correctly.
・
The thread tension is too tight.
・
The differential feed is not set correctly.
・
The thread tension is too tight.
・
Guide fabric gently.
・
Reduce the presser foot pressure.
・
Adjust the differential feed to N-2.
・
Reduce the thread tension.
・
Adjust the differential feed to 0.7-N.
・
Reduce the thread tension. 21
・
-
22
23, 24
21
23, 24
33
Page 35

Technical data
Stitch choice Cover stitch: 3 needles, 1 looper: 5 mm (0.2”)
2 needles, 1 looper: 5 mm (0.2”)
2 needles, 1 looper: 2.5 mm (0.1”)
Chainstitch: 1 needle, 1 looper
Needle system 130/705H
Stitch width Cover stitch: 5 mm (0.2”)
Stitch length 1-4 mm
Differential feed no waving in knits N-2
no puckering 0.7-N
Presser foot lift 8 mm / 10 mm
Presser feet Cover stitch (compensating foot), snap on sole
Chainstitch (Optional Accessories), with tape guide, snap on sole
Handwheel Rotates counterclockwise
Sewing speed up to 1350 sti/min
Weight 6.8 kg
Dimensions 280 (L) x 335 (W) x 285 (H) mm
Foot control model No. YC-482 (USA and Canada only)
YC-483N (220-240V)
We reserve the rights to make changes in the interest of technical progress.
34
Page 36

Optional Accessories
1
3
2
4
6
7
8
5
Hemmer Guide for Coverstitch
Supplies
1 Cloth Guide (1)
1 Folded Edge Guide (2)
2 Fixation Screws (3)
Additionally required
Cover Stitch Compensation foot (= standard accessory with every CS machine)
Application
The Hemmer Guide helps folding the hem and assures perfect placement
of the upper hem edge during cover stitching. It can be used with different
fabrics, knits or wovens, and is suitable for light to medium weight materials.
The materials need to be slid trough the guide without resistance.
For your safety
Before using the accessory, please read the instruction manual of the overlock machine and the accessory.
Assembly
➢
Place the Cloth Guide onto the CS Insert (4)
➢
Place the Folded Edge Guide on top of it.
➢
Fit the two Fixation Screws through the two parts and tighten slightly.
Adjustment
➢
The Cutting Edge Guide (5, left guide) is lined up with the left Coverstitch
needle.
➢
By loosening the upper adjustment screw (6) adjust the Outer Folded
Edge Guide (7) to the desired seam width in a range of 15 - 23mm (1/2” 7/8”).
➢
Adjust the Cloth Guide (8) into the Folded Edge Guide, leaving 2 to 4mm
(approx. 1/8”) open, depending on the thickness of the fabric.
➢
Tighten the Fixation Screws and the adjustment screw securely.
➢
The fabric needs to move freely without resistance! Consider cross-seams
if applicable.
Contact your local dealer.
35
Stitches, Threading, Settings
➢
Thread the Overlocker for 3-Needle or 2-Needle Coverstitch wide or nar-
row. Always use the left needle.
➢
Set the stitch length to 3 – 4.
➢
Attach the Coverstitch Compensating foot.
Procedure
➢
Pre-fold the seam and slide it into the guide by placing the cutting edge at
its guide, having the folded edge fed softly in the hemmer guide.
➢
Lower presser foot and sew while guiding the fabric cutting edge neatly
along its guide and supporting the fabric in front of the Hemmer Guide.
➢
Before the end of the seam in a curve or tube, stop before the rst stitches
reaches the Hemmer Guide.
➢
Remove the fabric from the guide. By guiding the fabric manually, contin-
ue stitching until some stitches are sewn over the rst stitches.
➢
Raise the presser foot and remove the seam.
➢
Secure as project requires.
Page 37

Page 38

Page 39

Page 40

2-11-1, TSURUMAKI, TAMA-SHI,
TOKYO, 206-8551, JAPAN
PHONE : (81)42-357-2341
FAX : (81)42-357-2379
Copyright © 2016 JUKI CORPORATION
All rights reserved throughout the world.
00041640174081
 Loading...