

Page 1
1\llodel/ Modell/ Modele I Modelo
babv lotk
INSTRUCTION
BOOKLET
/BEDIENUNGSANWEISUNG/
LIVRET
D'INSTRUCTIONS/
MANUAL
EA-605
DE
INSTRUCCIONES
Page 2
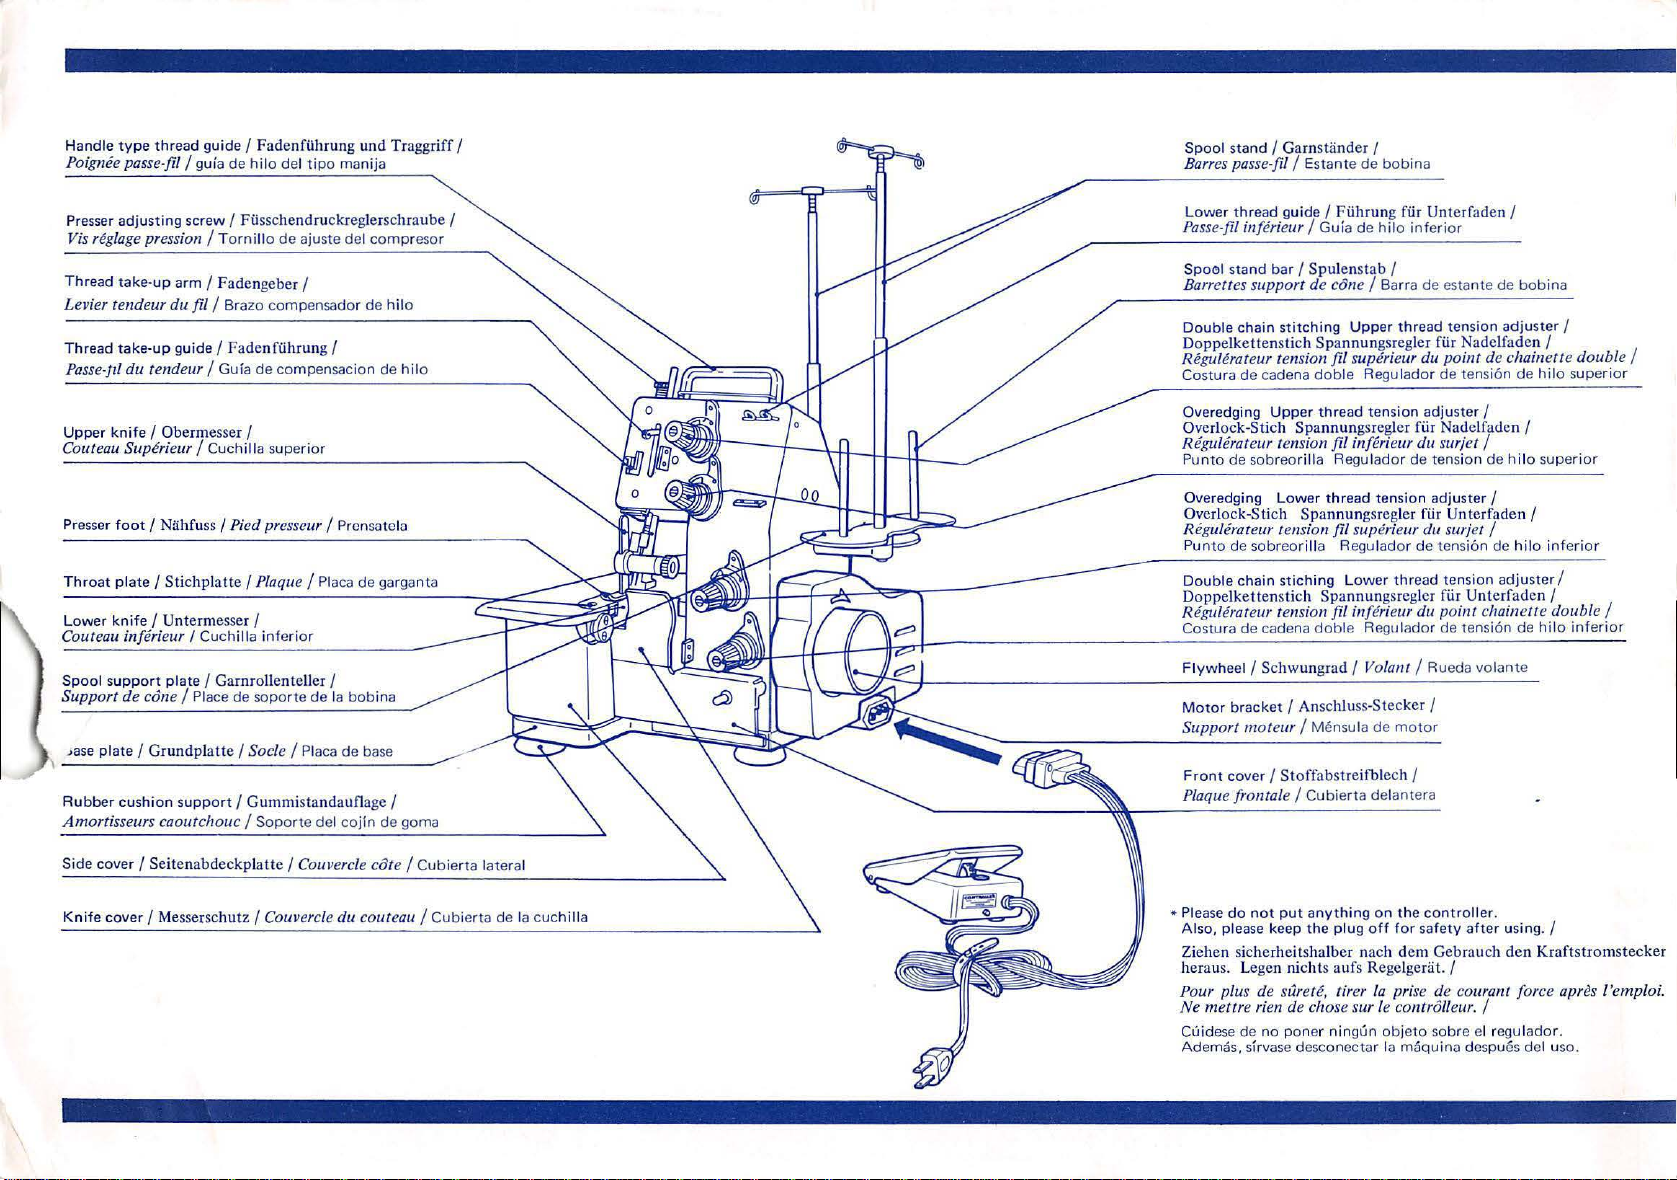
H
and
le
type
Poignee pa
Presser adjusting screw
Vis
r~gla
Thr
ead
thread guide I Fadenfilhrun g und Traggriff I
sse-fi
l l guia
de
hilo del t i
I Filssche
ge
pression /
take-up
Tornillo de
arm I Fadengeber I
Levier tendeur du fil / Brazo c
Th
read take-up guide I Fadenfilh
Pa
sse-jzl du te
nd
eur I Gu
fa
de
po mani
ja
ndru
ckreglerschraub e I
ajuste del
ompensador
run
compensacion de hilo
g I
comp
de h ilo
resor
Spool
sta
nd
I Garnst
iinde
Barres
pa
sse-fil I
Lower
thr
Passe-fil in[erieur / Guia
Sp
Barrettes support de cane I Barra
Double chain
Doppelkettensti
Regu/erateur tensi
Costura
ead guide I F iih
oG
I stand bar I Spul
stitc
de
cadena
ch Spannungsreg l
r I
Estante
de
bobina
rung fii
de hil
o inferior
ensta
b I
hing
Upp
er
thr
on
fil superieur du point de clzainette double /
dob
le Regulador
r Unterfaden I
de
estante
de
ead tension
er fur Nade lfad
de
adju
tensi6n
bob
ina
ste
r I
en
I
de hilo superior
pp
er knife I
U
Couteau Superieur I Cuchilla su
Presser
Throat
L
owe
Coute
Spoo
l s
Support de c
,ase plate I G
\----------
Rubber
Amor
Side
co
Knife c
Oberm
esser I
foot I Nah
plate
r knife I
au
inf
uppo
cushion supp
ti
sseurs caoutchouc I Sop
ver I S
over
fuss I
Pi
I Stichpla
Unt
erie
rt plate I Ga
on
rund platte
eitenabdeckpl
I Messersc
tt
e I Plaque I Placa
ermesser I
ur
I Cuc hi
ll
e I Place
--~--~--~------------,
rnrollent
de
I Socle I Placa
ort I
hu
tz
pe
rior
ed pr
es
seur I Prcnsate lo
de
a inferi
or
eUer I
soporte
de
Ia bobina
de
Gum
mistanda
orte del cojln
atte
I
Co
ull
uvercle
I Couvercle du collte
gargan
base
age I
de
c8
goma
te I
au
ta
Cubierta
/
Cubierta
lateral
de
Overedging Uppe r thread te nsion adjuster
Overloc
k-Stich Spannungsreglcr fiir Nadelfad
Regulerateur tension jil in[erieur
Punto
de
sob
reorilla Regulador de tension
Ov
eredging Lower
O~crlock-Stich
Regulerateur tension fil superieur du s
Punto de
Double chain stiching Lower thread tension
Doppelke
Regulerateur tensi
Costura
Fl
M
Support
Fron
P
Ia
cuc
hilla
* Please do not p
Al
Ziehen sicherheitshalber nach d
h
Pour plus de siirete, firer Ia prise de courant force apr
Ne
Cuidese
Ademas, sfrvase
sobreorilla
tte
de
cadena
yw
heel I Schwungrad I Volan t I Rueda vola
ot
or
brac k
moteur
t cover I
la
que [ron tale I
so, please keep the plug off for safety after using. I
eraus.
Leg
en
me
ttr
e rien
de
no
thr
ead te nsion adju ster I
Spa
nnun
Regulador
nstich
Span
on
jil
inf
dob
le Regulador de tensi6n
et
I Anschluss-
I Mensula
Stoffabstre
Cubiert
ut anything on
nich ts aufs Regelgeriit. I
de
chose sur le co
pone
r ningun obj
desconectar
du
gsreglcr fiir
de tensi6n
nungsrcgl
ifblech I
a delantera
cr
erieur du poi
Stecker
de
motor
the controller.
em
nt
eto
lo
maquino despues del uso.
I
en
sur jet I
Unt
ur
fiir Un
1lt
I
de
hilo superio r
erfaden I
jet I
de hilo inferior
ad
juster I
terfa
den I
clzaine
de
nt
e
I
Gebrauch den Kr
rol/eur. I
sobre el regul
tte
doub
hilo inferior
aftst
es l'em
ado
r.
le I
romstecker
ploi.
Page 3
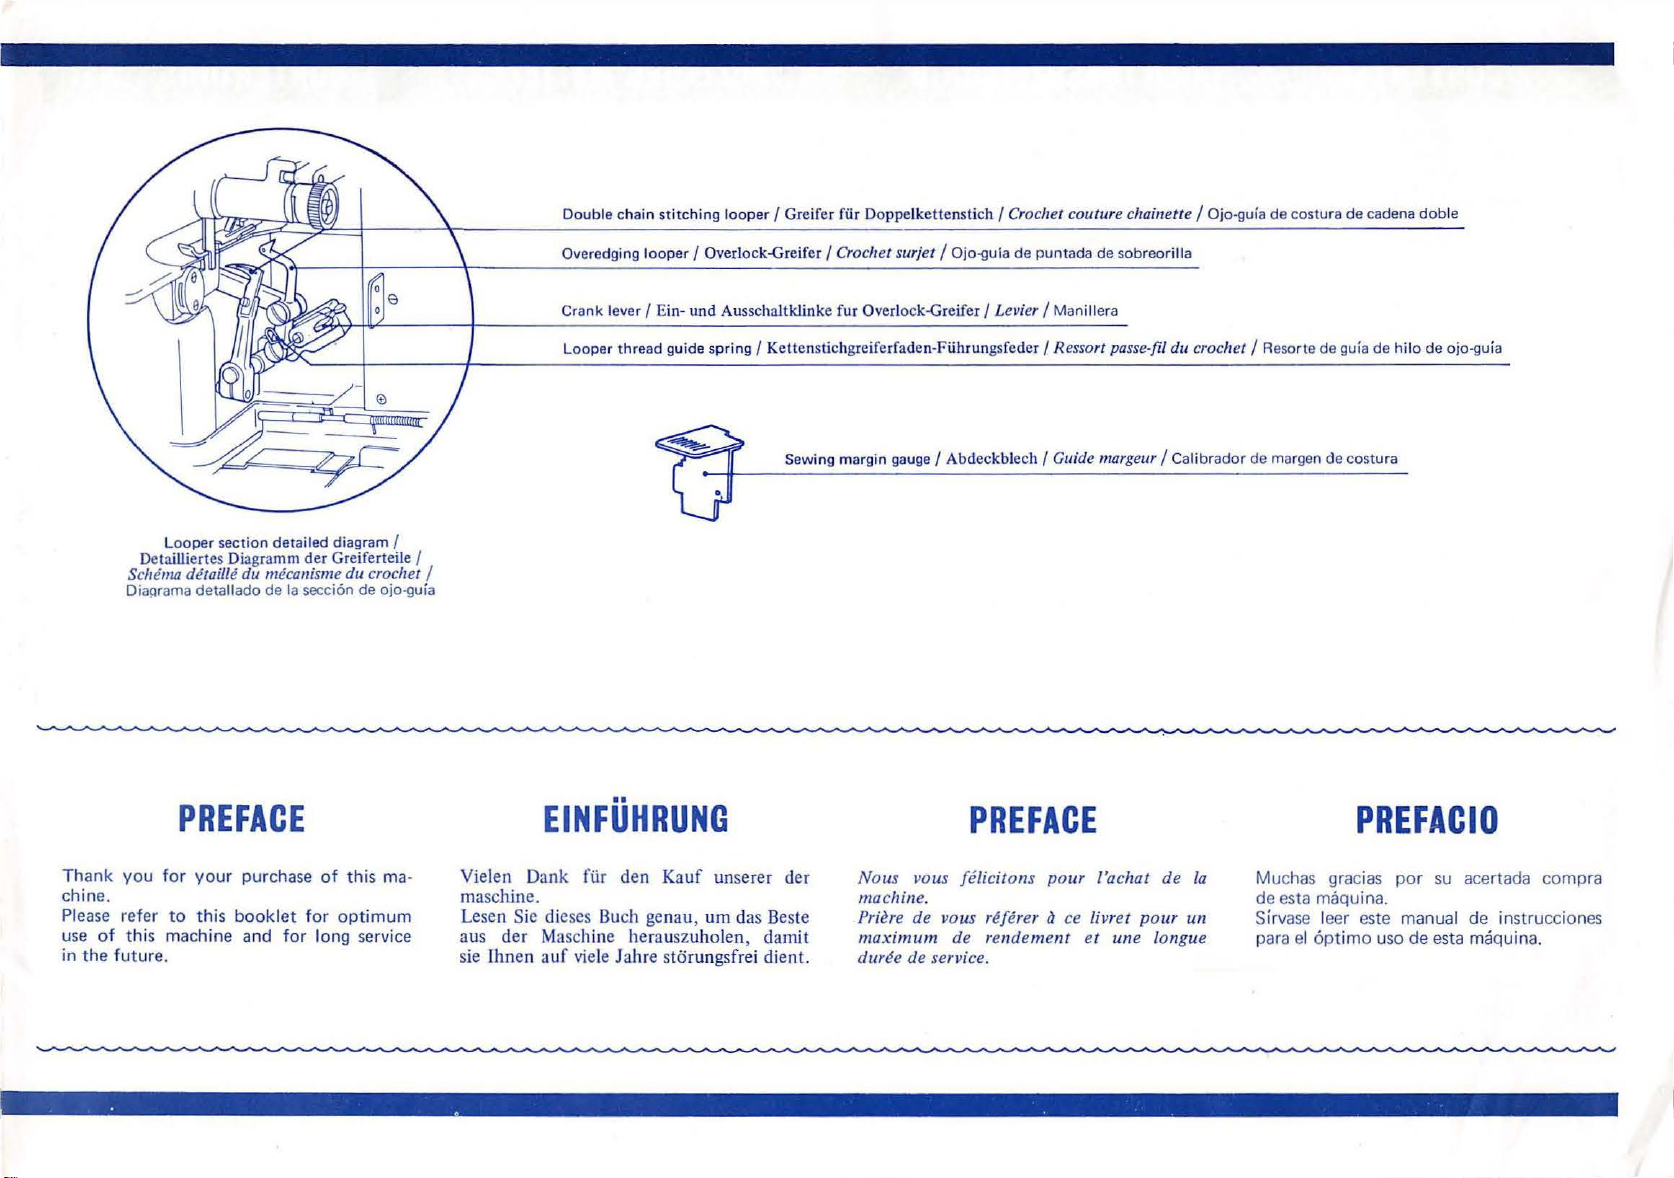
Double chain stitching l
Over
edg
ing lo
op
er I Overl
Cr
ank
lever I Ein-
L
oo
per thread guide spring I Ke
und
oop
ock
Aussch
er I Grei
fer fU
r Doppelkettenst
-G
reifer I
Croc
het surjet I Ojo-gula
al
tklinke fur Overlock-Greifer I Le
tt
enstichgreiferfaden-F iihrungsfe
ich I Crochet couture cha
de
puntada de
vi
er I Ma
der
I Resso
nillera
rr
sobreor
passe-
inett
e I Ojo -guia
ill
a
fil du crochet I Resorte
de
cos
tura
de
de
guia de hilo
caden a doble
de
ojo-guia
L
oo
per section detailed diagram I
Detaillie
Scluf
Oia~ra
rte
ma
detaille du mecanisme du crochet I
ma
detall
PREFACE
Thank you
chine.
Please refer
use of this mach i
th
e f
in
utur
for your
to this
e.
s Diagramm
ado
de
purchase
booklet for
ne
and f
de
r Greiferteile I
Ia
secci6n
of
optim
or
long service
de
ojo-guia
this ma-
um
Sewing margin gauge I A
EINFUHRUNG
Vielen Da
masc
Lesen Sie dieses Buch g
aus
sie Ihnen auf viele Jah re stOrungsfrei dient.
nk
hin
fi.ir den Kauf uns
e.
ena
u, um das Beste
der Maschine hera uszuholen,
erer
der
damit
bd
ec
kblech I
Guide
margeur I Calibra
PREFACE
No
us vous [eli
machin
e.
Priere d e vous re[erer a ce li vret
maximum
du
ree de service.
cito
ns pour
de rendem e
nt
l'achat de
et une
pour
longue
Ia
un
dor
de
margen
de costura
PRE
Mu
chas gracias por su acertada
st
a maquina.
de e
va
se leer este manual
Sir
para el 6ptimo u
so
FACIO
de instrucci
de es
ta maquin
a.
com
pra
ones
Page 4
CONTENTS
1.
Setting
2. Overedging I Overl
3.
Doub
Couture droite do
4. Interlocking (Safety
5.
Thread
6. Presser f
7. Adjusting s
8. Sewing speed I Nahgeschwindigkeit I Vites
9. H
10. Replacing
11
. Lubrica
12. Checking
13.
Applicational notes
14. S
15. Ch anging the c
16.
Specif
17. T
Tableau comparat1j
up
the
machine I
1-1 Co
1-2
2-1 H
2-2 Preparation
2-3 Sewing I Ni:ihen I
3-1 Changing
3-2 H
3-3 Sewing I
4-1
4-2 How
4-3 Sewing I Ni:ihen I Couture I
5-1
-2
5
ow
13-1 H
13-2 Loosening
upplement
ab
le show
rrect
Connecting
Pr
le chain stitching (straight
Changement
Changing
Cllangement
tension adju
H
H
Reg/age co uture double chainette I
oot
to
insta
tion
Reg/age
Modo
Desserrage du
ica
tions I Spe
installation
ow
to
thread
eparati[s
ow
to
thread
to
thread
ow
to adju
ow
to adju
adju
stme
titch length
ll
the
the cutting
I Sc
hmi
and adju
ow
to
set
du
de
I Ge
li
arbon
ing relationship
Zusammenset
the
ock
and
et
ubl
e poi
from
Nahen
st
from
stme
of
controller
(Ueberwendlung
correct
ly I K
checking
verific
ati
ons avant /e
Fonctionnement
nt
de chain
overedgi ng
du
point
surjet
correct
ly I
I Co
ut
ure I
itching) I
double
du
point
chainette en
correctly
nt
I Regulier
st
th
e overedging seams I Regulierung
st
the
double
nt
I Regulie
I Regulierung
needle I Einsetzen
knives I
erung I Lubri[icati
stmen
I Anwen
the
pied pour couture
regular
the
eferte
brushes
zifika
du
Monta
t I Ueberpn1fung
dung der
presser
Ia
prensate
seams
of
poi
nt
double
Teile I
Supplement
of
ti
onen I
between thr
tissu
et
du
the
moto
to
the
orrektes
prior
seam
ing) I D
ette
to
en
Korrekte
Costura · · · · · · · · · · · · · · · · · · · · · · · · · · · · · · · · · · · · · · · · · · · · · · · · · · · · · · · · · · · · · · · · · · · · · · · · · · · · · · · · · · · · · · · · 13
Interl
ock
chain stitching
I Richtiges Einfadeln
Costura
ung der
chain sti
run
g des Ftisschendruckes I Reglage
der
der
ge
on
versc
foot
for
la
double
chainette I Deshilado
the moto
Sp
ec
i[ica tions I Especi
fil I
Tab
INHALTSVERZEICHNIS
zen
der
Maschine I Installati
r I Ric
htig
motor
stic
h)
to
sewing I Vo
e Montage
I Anschluss des Anlass
I Surfilage I
Einfiideln I t:n[i/age de
fo
nctionnement I Prep
Puntada
rbereitung
on
de
des Motors
erkabels an
de
sobreo
Ia
und
Ueberprtifung vor Niihbeginn I
ar
aci6n e inspecci
la
machine I Regulacion
I Installation
den Moto
rilla · · · · · · · · · · · · · · · · · · · · · · · · · · · · · · · · · · · · · · · · · · · · - · · · - · · · · · · · · · · · · · · · 3
machine I
Modo
6n
du
moteur
de
antes
r I Branch
enhemb
de
TABLE
de
I
Correcta
rar · · · · · · · · · · · · · · · · · · · · · · · · · · · · · · · · · · · · · · · · · · · · - · · · · 3
Ia
cos
DES
Ia
maquina
eme
nt
tura · · · · · · · · · · · · · · · · · · · · · · · · · · · · · · · · ·· · · · · · · · · · · · · · · 6
MATIERES
. . . . . . . . . . . . . . . . . . . . . . . . . . . . . . . . . . . . . . . . . . . 1
instalaci6n del
du
mo
teur I
motor
Conexi6n del regulado r
· · · · · · · · · · · · · · · · · · · · · · · · · · · · · · · 1
CONTENIDOS
al
motor
· · · · · · · · · · · · · · · 2
I Costu ra · · · · · · · · · · · · · · · · · · · · · · · · · · · · · · · · · · · · · · · · · · · · · · · · · · · · · · · · · · · · · · · · · · · · · - · · - · · · · · · · · · 7
oppelket
I Pu
ntada de
doub
le chain stit
point chainette I
s Ein f
(Doppelkettens
point
· · · · · · · · - · · · · · · · · · · · · · · · · · · · · · · · · · · · · · · · · · · · · · · · · · · · · · · · · · · · · · · · · · · · · · · · · · · · · · · · · - · · · · · · 16
Fadenspannung
tching
Modo
Sti
chlange I Reg/age de
se
de
Niihnadel I Fixation
des
Ober-und
I Lubri
und
h.i
ede
sewing
ti
ssu a mail/e (utilise se
para
materiales
cha
in sti tching I
I
Suplemento · · · · · · · · · · · · · · · · · · · · · · · · · · · · · · · · · · · · · · · · · · · · · · · · · · · · · · · · · · - · · · · · · · · · · · · · · · · · · · ·
r I Auswechseln
ead
and clot
la
de
tenstich (gerades Ni:ihen o
cadena doble (c
ching I Wechseln von
Cambia
ade
ln I En[ilage I
tich Ni:ihen
to
inter
locking I Ueberwechseln
surjetlchainette I
der
Ni:ihfaden I En[ilage I Modo
ostura recta) · · · · · · · · · · · · · · · · · · · · · · · · · · · · · · · · · · · · · · · · · · · · · · · · · · · · · · · · · · · · · · 8
de
puntada de
Modo
und
Camb
I Reg/age de
der
Overlo
seams I Reguli
de
regular las
couture I
caci6n
Regulierung I Venfication
nen
knitted
relacion e
Veloc
de
Unte
rm
essers I
· · · · · · · · · · · · · · · · · · · · · · · · · · · · · · · · · · · · · · · · · · · · · · · · · · · · · · : · · · · · · · · · · · · · · · · · · · · · · · · · ·
Zusatztei!
de
h I
Fadentabelle
e I
material (used
ulement
tejido
Auftrennen
de
costu
der
Motor
fi
cac
i6nes · · · · · · · · · · · · · · · · · · · · · · · · · · · · · · · · · · · · · · · · · · · · · · · · · · · · · · · · · · · · · · · · · · · · · · · · · ·
ntre
el hi lo y Ia tela · · · · · · · · · · · · · · · · · · · · · · · · · · · · · · · · · · · · · · · · · · · · · · · · · · · · · · · · · · · · · · · · · ·
ckn
er
ung
der Dop
costuras
du
Ia
longueur du po
idad
de cost
l'aiguille I Modo
Remp/acement
Notes
only
en
(Usados
der Doppelkettenst
ra
de
schleifk
fur
hne
Overl
ock)
I
Overlock z
de
enh
gleichzeitiges overlockeri)l Surjet avec couture
~
ia
de
pun
Ia
tension
ah
t I Reg/age couture surjet I
pelkett
de
puntada
pied
presseur I
ura · · · · · · · · · · · · · · · · · · · · · · · · · · · · · · · · · · · · · · · · · · · · · • · · · · · · · · · · · · · · · · · · ·
et
reg/age I lnspeccion y ajuste · · · · · · · · · · · · · · · · · · · · · · · · · · · · · · · · · · · · · · · · · · · · · · · · 27
d'application I
for
doub
couture
solamente
puntada
ohlen
verschiedene St
um
Doppe
lke
tt
enstich I
sobreorilla a
embra
om
D
oppelkettens
tada de
du
enstich
de
int
I Ajuste
de
colocar
des
le chain stit
double
para
de
cadena
I R
emplacement du charbon
puntada
r · · · · · · · · · · · · · · · · · · · · · · · · · · · · · · · · · · · · · · · · · · · · · · · · · · · · · · · · · · · 1 0
cadena
de
enhembrar
fil I
Adjuste
nah
cadena
Ajuste
de
Ia
Couteaux
Notas
sob
chain
ette)
puntada
ich
naht
doble
offe
I
de
cadena
tich
zum Interlock
doble a interblo
· · · · · · · · · · · · · · · - · · · · · · · · · · · · · · · · · · · · · · · · · · · · · · · · · · 16
de
Ia
Modo
t I
doble
· · · · · · · · · · · · · · · · · · · · · · · · · · · · · · · · · · · ·· · · · · · · · · · · · · · · 19
de
Ia prensatela · · · · · · · · · · · · · · · · · · · · · · · · · · · · · · · · · · · · · · · · · · · ·
Ia long
itud
aguja · · · · · · · · · · · · · · · · · · · · · · · · · · · · · · · · · · · · · · · · · · · · · · · · · · ·
I
Reemplazo
re aplicaciones · · · · · · · · - · · · · · · · · · · · · · · · · · · · - · · · · · · · · · · · · · ·
ching) I Auswechseln
tension
de
de pun
dob
le · · · · · · · · · · · · · · · · · · · · · · · · · · · · · · · · · · · · · · · 8
de
ren[ort I
lnterbloqueo
(Puntada
de
seguridad) · · · · · 14
I
queo
· · · · · · · · · · · · · · · · · · · · · · · · - · · - · · · · · · · · · · 14
del hilo · · · · · · · · · · · · · · · · · · · · · · · · · · · · · · · · · · · · · 17
regular las
tada
de
las
costuras
· · · · · · · · · · · · · · · · · · · · · · · · · · · · · · · · · · · · · ·
cuchillas ·
der
Na.hflisse I
de
sobreorilla
·,.
· · · · · · · · · · · · ·. · · · · · · · · · · · · · · · · ·
· · · · · · · · · · · · · · · · · · · · 17
I
de
cadena
doble) · · · · · · · · · · · - · · · · · · · · · · · · · · - · · · · · · · · · · · · · · ·
I
· · · · · · · · · · · · · · · · · · · · · · · · · · · · · · · · · · · · · · · · · · · · · · · · · · · · ·
du mot
eur
I
Camb
ia
de
escobill
as
de
carbo
n del
moto
r · · · · · · · 31
21
22
23
24
25
26
28
28
29
30
32
33
Page 5
'
1
It
is
important that
in
the
correct
1·1
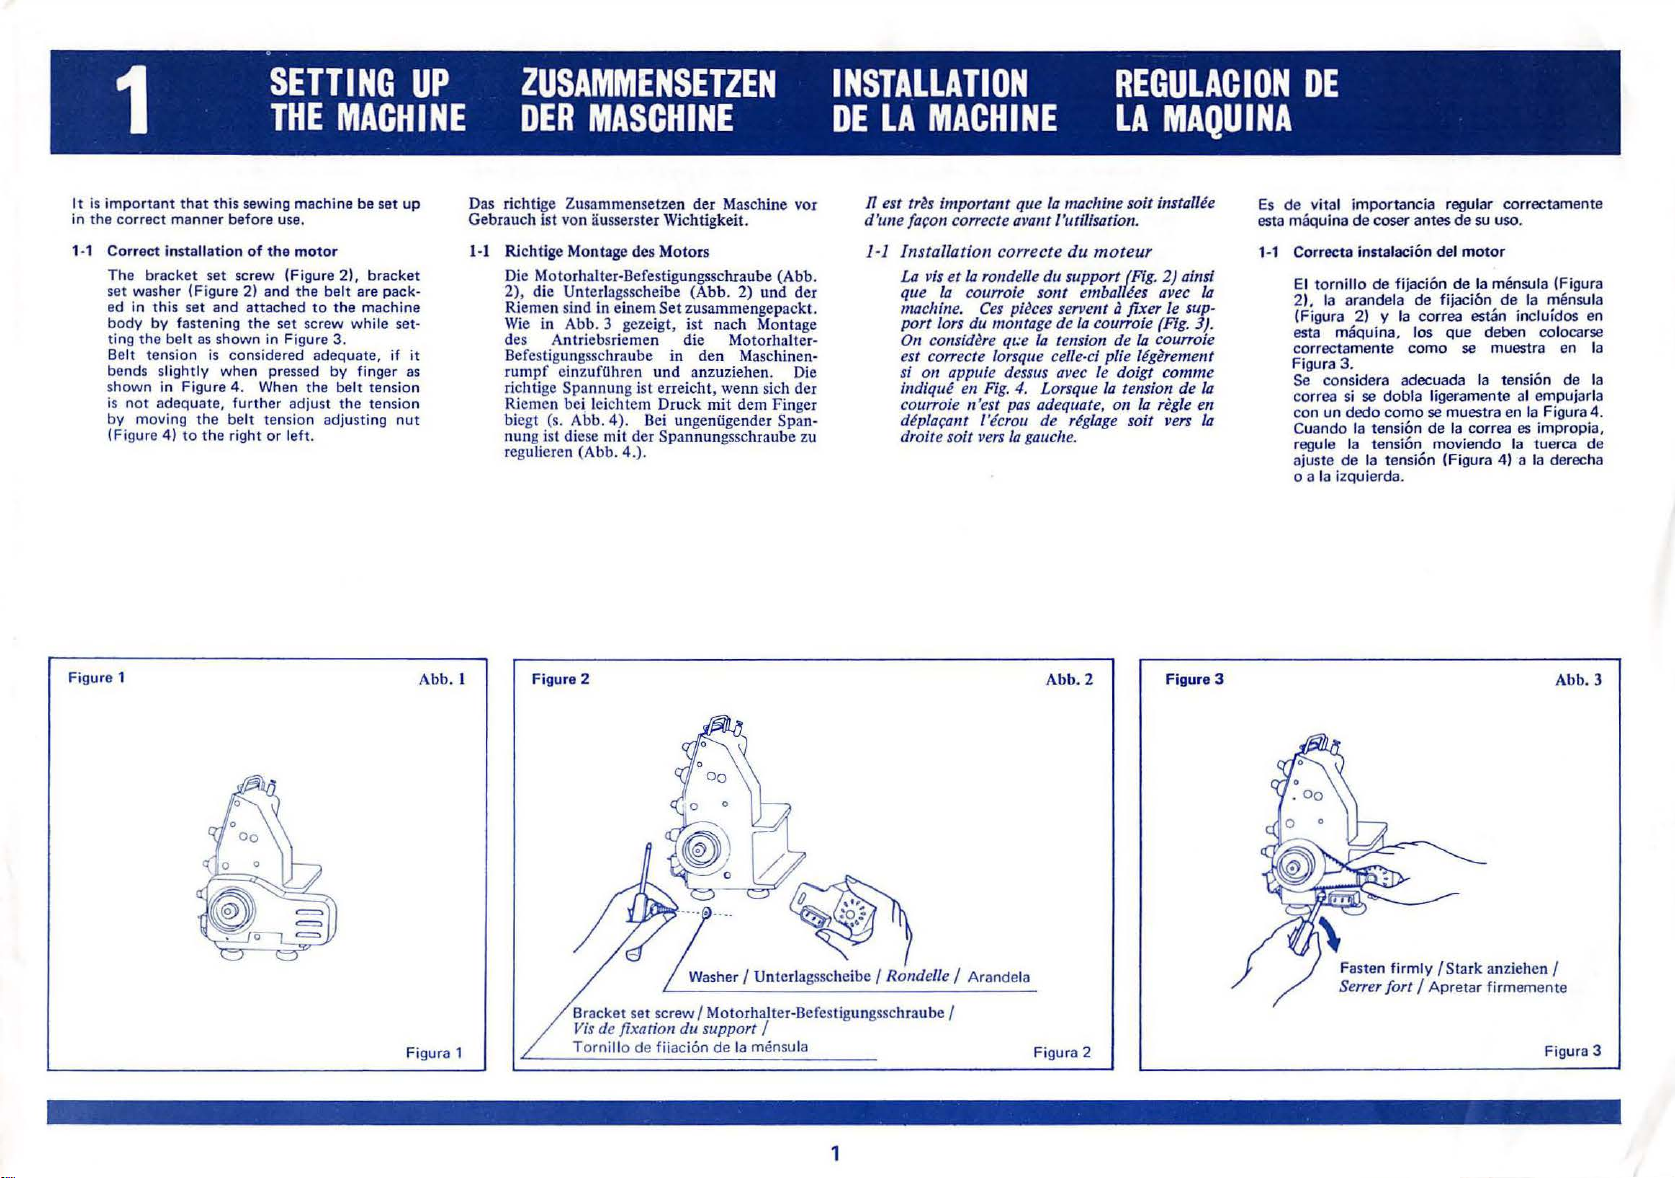
Correct installati
The
bracket
set washer (Figure
ed
in
this set and
bo
dy by fastening
ti
ng
the belt as shown in Figure 3 .
Belt tension
bends
slightly wh
ow
n in Figure 4. When
sh
is n
ot adeq
by
moving
(Figure
SETTING
THE
this sewing machi ne
manner
before use.
on
of
the m
set
screw (Figure
2)
and
the belt are pack·
attached
the
set
screw while set·
is
considered adequate, if it
en
pressed by finger as
uate, further adjust
the belt tension adjusting
4)
to
the
right
the belt tension
or left.
UP
MACHINE
be
set
up
otor
2).
bracket
to
the
machine
the ten
sion
nut
ZUSAMMENSETZEN
DER
Das richtige Zusammensetzen
Gebrauch
1·1
Richtige Montage des
Die M
2)
, die Unterlagsscheibe (Abb.
Riemen sind in einem
Wie in Abb. 3 gezeigt , i
des Antriebsriemen
Bef
est
rumpf ein
richt
Riem
biegt (s. Abb.
nun
regu
MASCHINE
ist von ausserster Wichtigkei
oto
rhalter·Befestigungsschraube (Abb.
igungssc
hraube
zufOhren
ige
Spannun
en
bei leichtem
g i
st
diese mit
li
eren (Abb. 4.).
g ist erreich
4).
der Spannun
der
Moto
rs
Set
zusammengepackt.
st
nach Montage
die
in den Masch
und anzuz
t,
Druck
Bei ungeniigender
wenn sich
mit
gsschraube zu
Maschlne vor
t.
2)
Motorhalter·
iehen. Die
dem Finger
und
INSTALLATION
DE
LA
MACHINE
n est
tr~s
important que Ia machine soit installee
La
vis
et
que
machine. C
port lors du mont
On
est co"ecte lorsque celle-ci plie llgerement
si on appuie dessus avec
indique en
co
depl
Ia
Ia
cou"oie sont emballees avec
consid~re
u"oi
e n 'est
a~an
t
droite soit
der
ine
n·
der
Span·
d'm1e fa(:on co"ect
1·1 Installation correcte du moteur
REGULACION
LA
e avant ['utilisation.
rondelle du support
es
pi
~ces
servent a fixer le sup-
age
de
qt:e
Ia
tension de
Fig
. 4. Lorsque Ia tension de
pas
adequate, 011 Ia regie en
l'icrou de reg/a
vers
Ia gauch
Ia
e.
cou"oie
le
ge
(Fig.
doigt comme
soit vers
MAQUINA
Es
esta miiquina
1·1 Correcta instalaci
2) ainsi
Ia
(Fig.
3).
Ia
cou"oie
Ia
Ia
DE
de
vital importan
de
El
tornillo
2).
Ia arandela de fijaci6n
(Figura
esta maquina. los que deben colocarse
c
orrectamente como
Figura 3.
Se considera adecuada Ia tension
c
orr
ea
si se
con
un
dedo
Cuando
regula Ia
ajuste
de
Ia izquierda.
o a
cia
coser
de
2)
Ia
tension
tension
Ia tensi
y Ia c
dob
como
regular corr
antes
de su uso.
on
del mot
or
fijacion de Ia mensu la (Figura
orr
la ligeramente al empujarla
se
de
moviendo Ia tuerca de
on
de
ea
estan incluidos
se muestra
muestra
en
Ia correa es impropia,
(Figura 4 ) a
ectament
Ia mensula
en
de
Ia
Figura 4.
Ia
derecha
e
en
Ia
Ia
Figure 1
Abb. l
Fi
gura 1
Figure 2
Br
Vis
Tornillo
acket
set scr
de
ew I Motor
fiiaci6n
de
de fixation du support I
halter-Befestigungssc h raube I
Ia mensu la
1
Abb. 2
Figura 2
Figure 3
Fast
en
firmly I Stark anziehen I
Se"er
fort I
Apretar
firme
Abb. 3
mente
Figura 3
Page 6
1-2 Connecting the
Connect the
Figure 5.
Next
, insert the
Thi
s machine runs faster when the
ler pedal is depressed
and the speed decreases when the
pedal is
lightly
controller
controlle
plug into
depressed.
to
the
motor
r socket
as shown
the power source.
with
strong force,
controller
control-
in
1-2 Anschluss des Anlasser (Fusspedal) an den
Motor
Der Stecker des Anlassers ist, wie
gezeigt,einzufUhren.
Anschliess
netz
Je nach
tigt wird, steigert
Nahgeschwindigkei
end
ist
der
anzuschliessen 220 Volt
dem
Stecker an das Strom-
wie stark da s Fusspeda
oder ver
t.
.
mind
auf
ert
Abb. 5
l betli-
sich die
1-2
Branch
moteur
Brancher
indique en Fi
Brancher
secteur.
trolee par
ment
reduite
it
v
eme
nt
de
Ia
Ia
prise [emelle du rheostat
g.
5.
Ia
prise male de
La v
it
esse de
Ia
pMale. En appuya
Ia
machine tourne a une v
et
e.
en appuyant fort elle tourne
pedale Pheostatau
comme
Ia
Ia
pedale au
machine est con·
nt
Iegere·
it
esse
1-2 Conexi6n del regulador al
Conecte el
muestra en Ia Figura 5.
Seguidamente, inserte
electrica. Es
mente
fuerza. y baja
mente.
enchuf
cuando
e del regulador
ta
Ia
maqui
na
se pisa
este pedal
su
velocidad al pisarlo ligera·
motor
clavija
trabaja
en
mas
con
como
Ia
fuente
riipida
mayor
se
·
Figure 4
B
elt
tension adj usting
Reglerschraube fiir Riemenspannung I
Ecrou
de dgl
Tuerca
de
Bracket set screw
Motorhalterbefestigun
Vis
de
fi
xation du support I
Torn
illo de
I
fijaci6n
age
ajuste
gs..Sc
de
Ia mensula
de
de
hraub
nut
I
Ia
tension de
Ia tensi6n
e I
Ia
de
Ia correa
Abb.4
courroie I
Figura 4
Figur
e 5
Abb. 5
Figura 5
2
Page 7

2
OVEREDGING
OVERLOCK
(UEBERWENDLUNGSTICH)
SURFILAGE
PUNTADA
DE
SOBREORILLA
2-1
How
to
( 1)
Spool setting
Cheese spool thr
used
for
to
use
well.
bobbin
wind
ing
Figure 6
spool thread
Cheese
Faden der konis
Fit en c
on
de
e I
bobina
Hi
lo
thread
correctly
this machine,
bobbin
this
spoo
stop
chen
plana
spool thread
case,
l
be
groove is
/
Garnsp
In
ead
set
it
in
ule I
(Figure
6)
however, it
(Figu
is
required
such
a way
on
the
bottom.
is generally
is
possible
re
6) as
that the
that
the
Bobbin spool
Faden der
Fil
Hi
en bobine
lo
de
carrete
Standardgarn
thread
I
de
bobina
2-1
Korrektes
(I)
Spulcnb
Im
roUe
jedo
wend
werden, dass
aullicgt.
Abb.
/
spule f
Einfiideln
cfcstigung
AIJgemeinen
wie
ch eine
et,
dann
6 Figure 7
wird die konische
Abb
. 6 zeigt, verwen
Standardspu
muss diese
die
Fade
Oberedging (Needle
Oberlock Nadelfaden I
Surjetage (fil d'aigui/le) I
Pu
(Hilo
det.
le
Abb.
so
de
aguja)
aufgesteckt
de
sobreorilla
nverschlussrille
ntada
Gam
Wird
6 ver-
unt
en
th
-
read) I
2-1
Einfilage
( 1) Pose du cone
Pour
e/lement des
utiliser une bobine (
cas
if
fa~on
bas.
Overedging
Overlock
Surjetage (fil de crochet) I
P
untada
(Hilo de
ou
de
ce genre de machine,
con
es,
e
st
necessaire
a ce
que
Ia
(Looper thread) /
Gr
eiferfaden I
de sobr
eorilla
ojo
-gufa )
Ia
bobil1e
on
11~anmoins
Fig.
de
fente
utilise habitu-
6)
dans ce demier
placer
d'a"et
Abb.
7
on peut aussi
Ia
se trouve en
bobine de
Figure 9
2-1 Modo
Colocaci6n
(1)
hilo
El
generalmente
posible usar
(Figura
el
carrete
que
Ia
en
de
Ia
ranura
parte
anhembra
de
Ia bobina
de
bobina
tambie
6).
En
de
inferior.
r
plana (Figura
en
esta
maquina,
n el hilo
este
caso, es
bobina
se
de
tope
de enrollado quede
Tensi
Spannun
Disques de tension I
Disc
regule
on
os
de tensi
6)
se usa
pero
de bobina
necesario q
de
manera
Ab
discs /
gsscheibe I
6n
es
ue
b. 9
Wind ing
Fe
ll(e d
stop
groove /
'arr
il
t d 'embobinage I Ra
Fadenverschlu
nura de
ssrille /
tope
de enroll
ado
Figura 6
Spool
setting
Anordnung
Posi
ti
Posicion de instalar al
positi
der
on des cones I
Spu
3
on
len /
/
carrete
de
hilo
Figura 7
Pass
thread
Der
scheiben
Pass
Pasar el hilo
between two tensi
Faden
ist zwischen die
durchzuziehen
er le fil entre les 2 disques de ten sion I
entre
los
dos
I
discos
on
beiden
discs /
Spannung
de
tensi
s-
on
Figura 9
Page 8
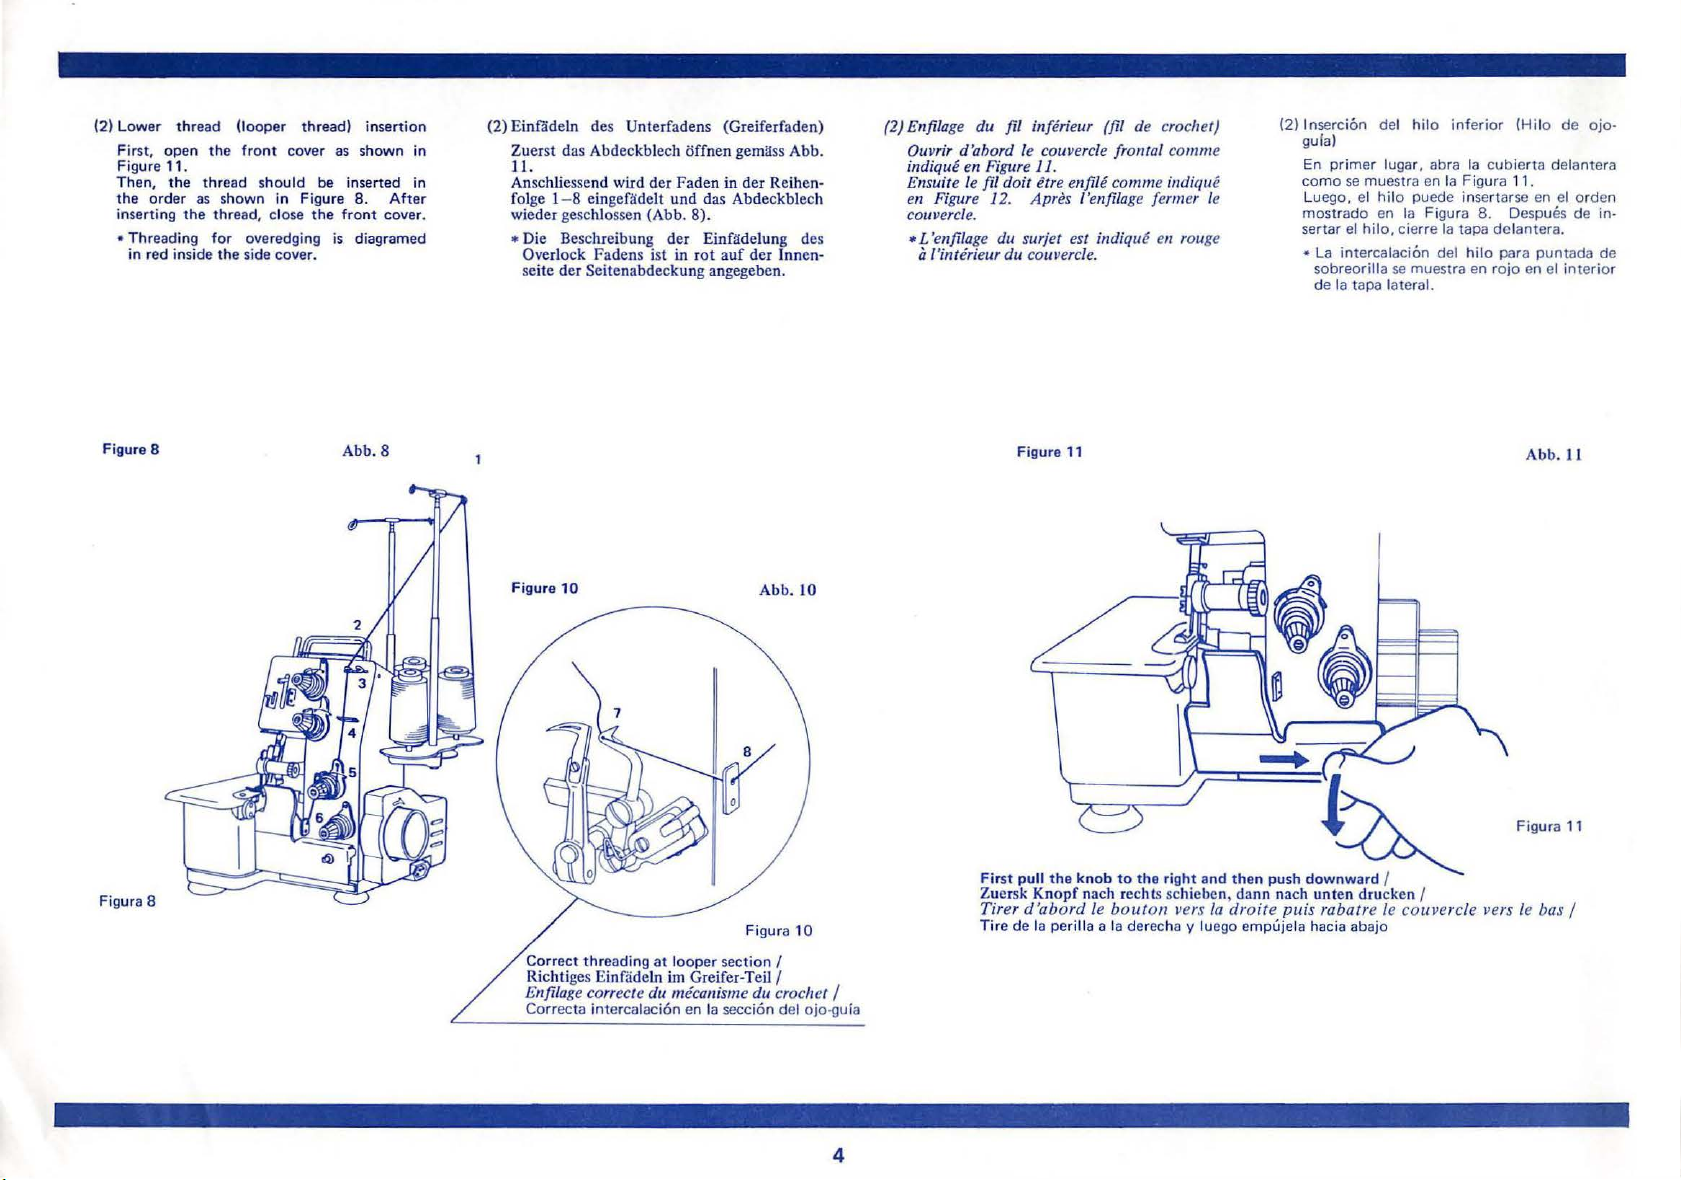
(2)
Lower thread (looper thread) insertion
the
First, open
Figure 1 1.
Then,
the
the
order
inserting
• Threading for overedging
in
red inside
8
Figure
front cover as shown
thread
sho
as shown in Figure
the
thread, close
the
uld be inserted
side cover.
8.
the
front cover.
is
diagramed
Abb. 8
in
in
After
(2)
Einfadeln des Unterfadens (Greiferfaden)
Zuerst das Abdeckblech offnen gemllss Abb.
11.
Anschliessend wird der Faden
folge 1
-8
eingef~delt
er
geschJossen (Abb. 8).
wied
* Die Beschreibung
Overlock Fadens ist in
seite
der
Seitenabdeckung angegeben.
10
Figure
in
und das Abdeckblech
der
der
Einfildelung des
rot
auf
der
Abb. 10
Reihen·
lnnen·
(2) Enfilage
Ouvrir d'ahord
indique en Figure 11.
Ensuite le fil doit
en Figure 12. A pres I 'enfilage fermer le
couvercle.
• L 'enfilage du surjet est indique en rouge
du
fil inferieur (fil de crochet)
le
couvercle frontal comme
etre enfil€ com me indique
a l'interieur du couvercle.
Figure
11
(2) lnserci6n del hilo inferior (Hilo
gulal
En primer
como
Luego, el hilo puede insertarse
mostrado
sertar el hilo. ci
•
La
sobreorilla se muestra
de
Iugar, abra Ia
se muestra en
en
Ia
Figura
erre
intercalaci6n del hilo para
Ia
tapa lateral.
cubierta
Ia
Figura
8.
Ia
tapa dclantera.
en
rojo
11.
en
Despues
puntada
en
Abb.
de
ojo-
delantera
el orden
de
el inter i
II
in-
de
or
Figura 8
Correct threading
Ri
cht
iges Einfiideln irn Greifer
Enfilage correcte du mecanisme du crochet I
Correcta interca laci6n
at
looper section I
en
Ia secci6n del ojo-guia
Figura
-Teil/
10
4
Fir
st
pull
the
Zuersk
Tirer d'abord le
Tire de Ia perilla a Ia
knob
Knopf
nach rechls schieben, dann nach
bouton
to
the right and then push
vers
Ia
der
echa y luego empujela hacia abajo
droite puis rabatre
down
~
~
ward /
unt
en drucken f
le
couvercle vers
"'"""
le
bas I
Page 9
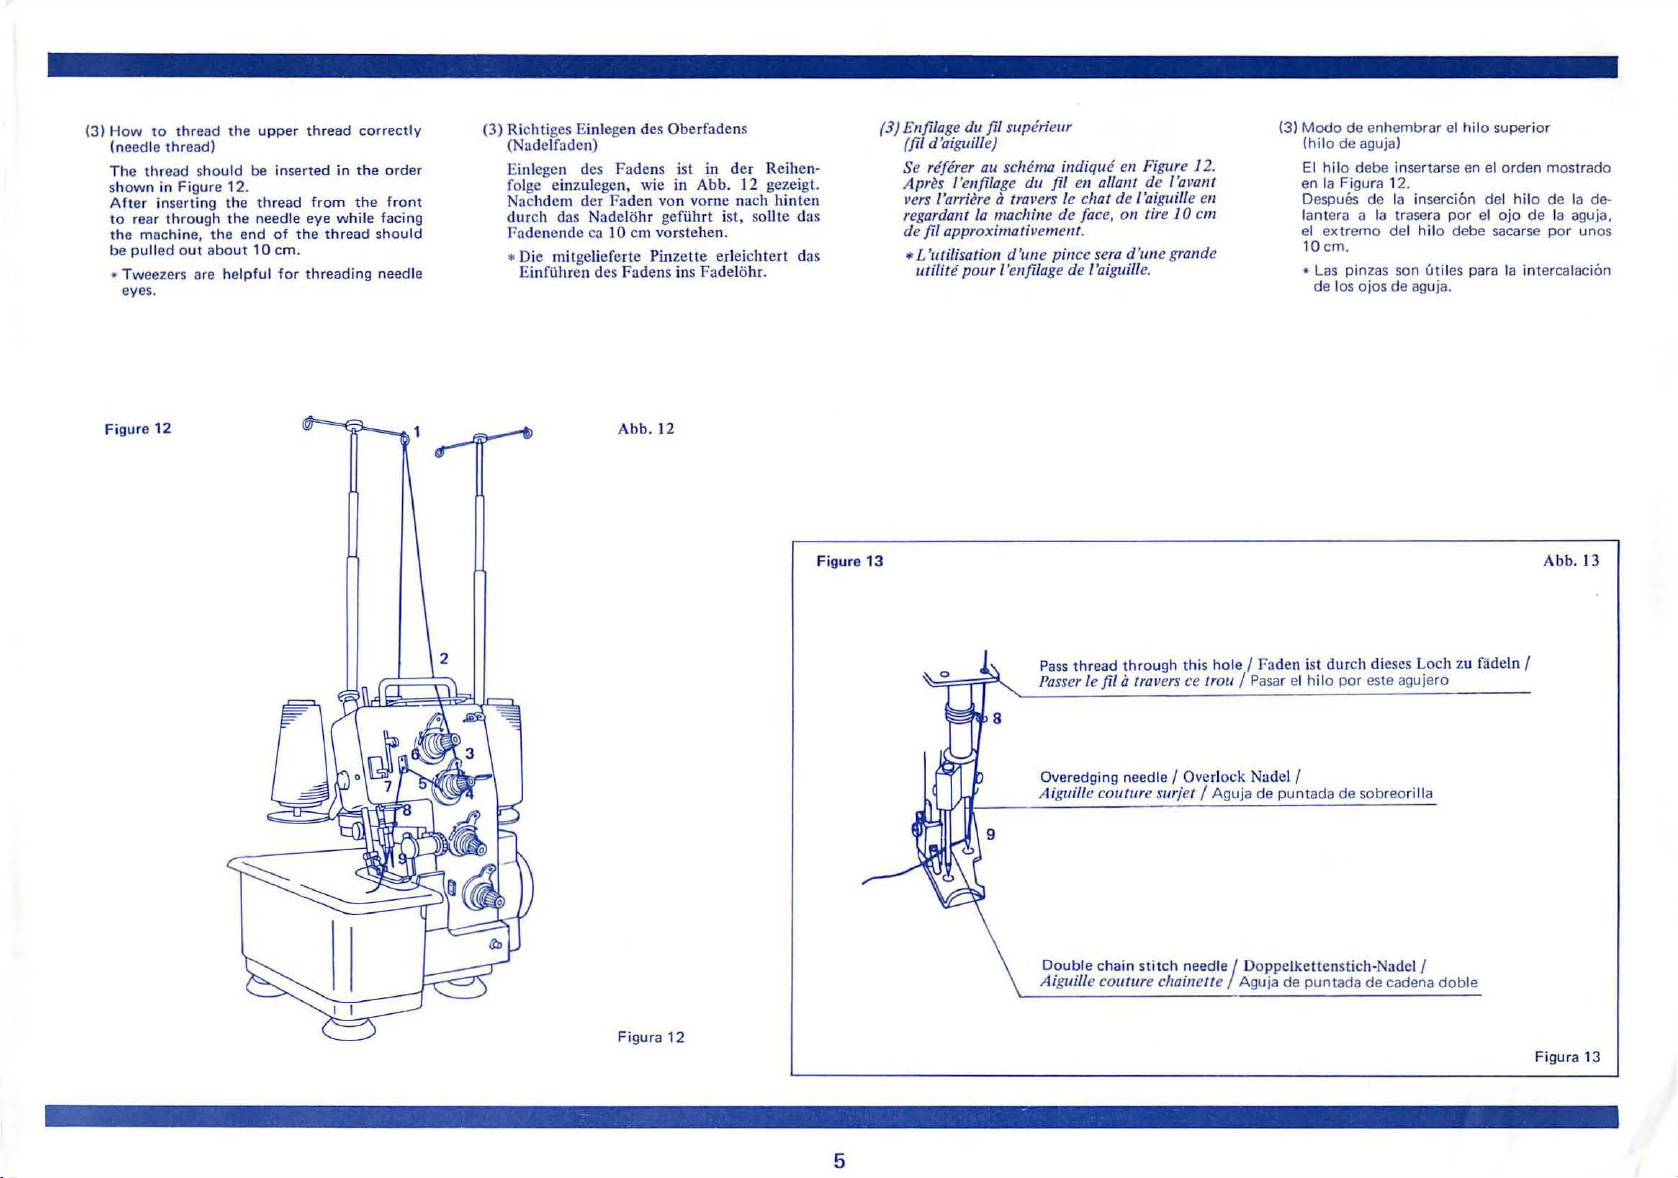
(3) How
to
thre
ad the
upper
thread
in
from
eye whil
ead shou ld
correctly
the
the
(needle
thre
ad)
The
thre
s
Aft
to
the machine,
be
• Tweezers are helpful for threading needle
Figure
ad should
hown
in
Figure 12.
er inserting the
rear through the needle
pulled o
ut about
eyes.
12
the
be
thread
end
10
inserted
of
the thr
em.
order
front
e facin g
(3) Richti ges Einleg
(N
adclfaden)
Einlegcn
folgc einzulegcn,
Nachdcm
du rch das Nadeltihr gefiihrt ist, sollte das
r ndenc nde ca
* Die mitgelieferte
EinfUhren des Fadens ins
en
des Oberfaden s
de
s Fadens ist in
dcr
wie in Abb. 12 gezeigt.
Faden
von vornc nach
10
em vorstehen.
Pinzette erleichte
bb.
12
A
Fadelti
der
hr.
Reihen-
hint
cn
rt
das
Figure
(3) Enfi/a
(/i
f d'aigu ille)
Se
rr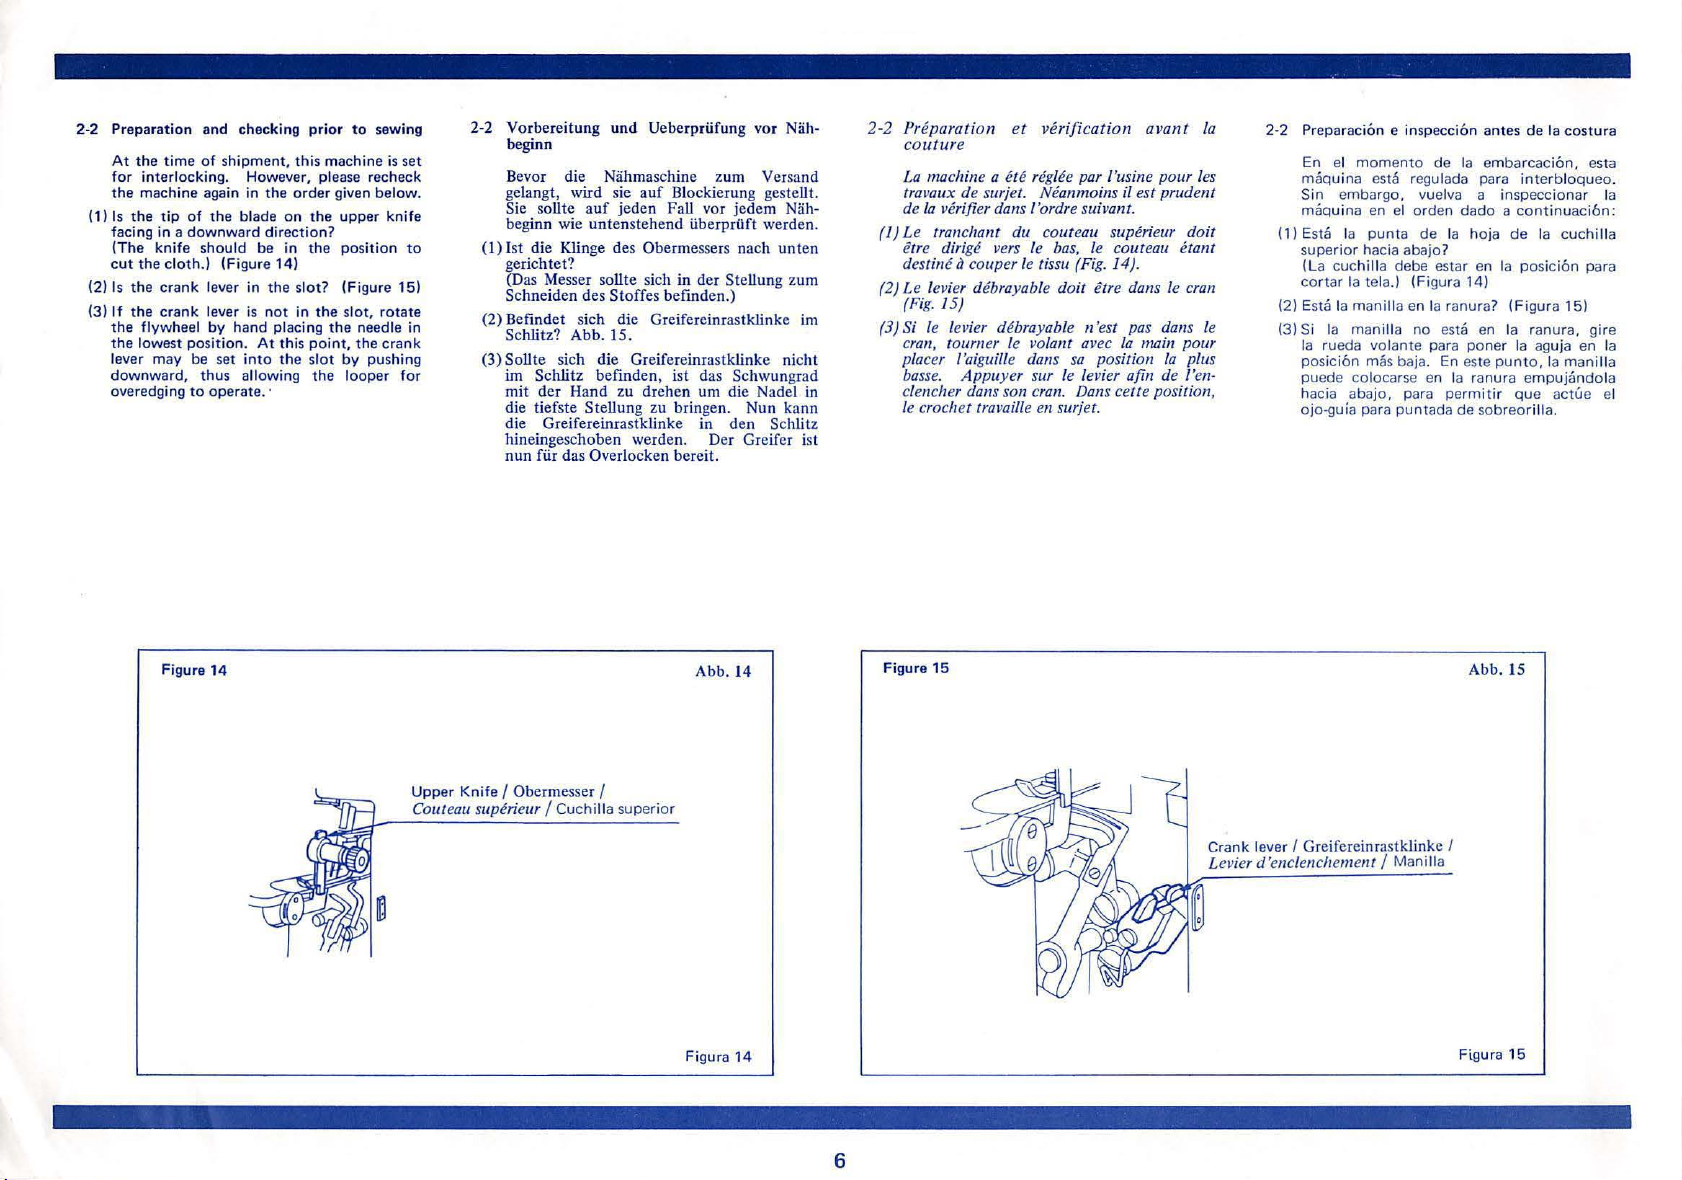
2-2 Preparation
At
the
fo
r interlocking. Howe ve
the
machine again in
(1)
Is
the
facing in a
(The knife should be in
cut
the
(2)
Is
the
If
the
(3)
the
the
lowest position.
lever may be
downward,
overedging
and
time
of
tip
of
the
downward
cloth.) (Figure 14)
crank
lever in
crank
to
Figure
lever is n
by
thus
operate.·
14
flywheel
checking
shipment,
the
blade
on
direction?
the
ot
hand
placing the needle in
At
set
this
into
the slot
allowing the l
prior
to
sewing
this
machine
r,
please recheck
order
the
the
slot? (Figure 15)
in
the
point,
is
set
given below.
upper knife
position
slot,
rotate
the
crank
by
pushing
ooper
for
to
2-2
Vorbereitung
beginn
Bevor die Nahmaschine
ge
lan
gt,
Sie so
beginn
(I)
Ist
die Klinge des Obermessers nach u
gerichtet?
(Das Messer sollte sich
Schneiden des
(2) Befindet sich
Schlitz? Abb. 15.
(3)
Sollte sich
im
Schlitz
mit der H
die tief
die
Greifereinrastklinke in d
hineingesc
nun
fiir das Overlocken
und Ueberpriifung vor Nah-
wird sie
llte
auf
wie
untenstehend
Stoffes befmden.)
die
befmden
and
ste
Stellung zu bringen.
hob
en
auf
jeden
die
Greifereinrastklinke im
Greifereinrastklinke
zu
drehen
werden. D
zum
Blockierung gestellt.
Fall vor jede m Nah-
iiberprtift
in
der
Stellung
, ist
das
Schw
urn die Nadel in
er
bereit.
Abb. 14
Versand
werden
nten
zum
nicht
ungrad
Nun
kan
en
Schlitz
Greifer ist
2-2 Preparation
.
n
couture
La machine a e
travaux de surje
de
Ia
verifier dans l'ordre suivant.
(1)
Le
tranchant du couteau superieur doit
etre dirige vers le bas,
destine
le
(2) Le
(3)
vier de
(Fig. 15)
Si
le levi
c
ran, toum
pla
cer l'aiguille dans
bass
e. Appuyer sur /e levier ajin de l'e
clencher dans son c
le cr
oc
het tr
Figure
15
et verification avant
re rt!g/ee par l'usine pour les
t. Nt!anmoins il est prude
iJ
couper
le
tissu (Fig. 14).
bra
yable doit etre
er debrayable n 'e
er le vola
ava
nt avec Ia
sa
ran.
Dans cette position,
ille en surjet.
le
couteau eta
dan
st
pas dans le
main pour
position
s le c
Ia
Ia
nt
nt
ran
plus
n-
2-2 Preparaci6n e inspecci6n antes
En el mo m
ma
quina esta regulada para
Sin embargo , vuelva a inspeccionar Ia
m
aqu
( 1) Esta Ia punta
super
(La
cortar
Es
ta Ia
(2)
Si Ia manilla
(3)
Ia
rueda volan
posici
p
uede
hacia
ojo-guia para
enta
de
ina
en
el o r
den dado a
io r hac ia abajo?
cuchilla debe
Ia tela.) (Figura 14)
man
6n
colocarse en
aba
de
estar
illa en
Ia ran
no
esta
te
mas baja.
para
En
jo, para permitir
puntada
Ia
Ia hoja
este
Ia
de
emb
de
en
Ia
ura? (Fi
en
Ia
poner
pun to,
ranura
sobreorilla
Abb. 15
de
arca
interbloqueo
cont
posicion para
gura
ranura, gire
Ia aguja
empujandola
que
Ia
ci6n,
inuaci
Ia
Ia
actue
.
costura
est
6n:
cuchi
15)
en
manilla
lla
el
a
.
Ia
Upper Knife
Couteau superieur I Cuchi
I Obermesser I
lla super
io r
Figura 14
6
Crank
lever I Greifcrc
Levier d'enclenchem
inrastklin
en
t I
Manilla
ke
I
Figura
15
Page 11
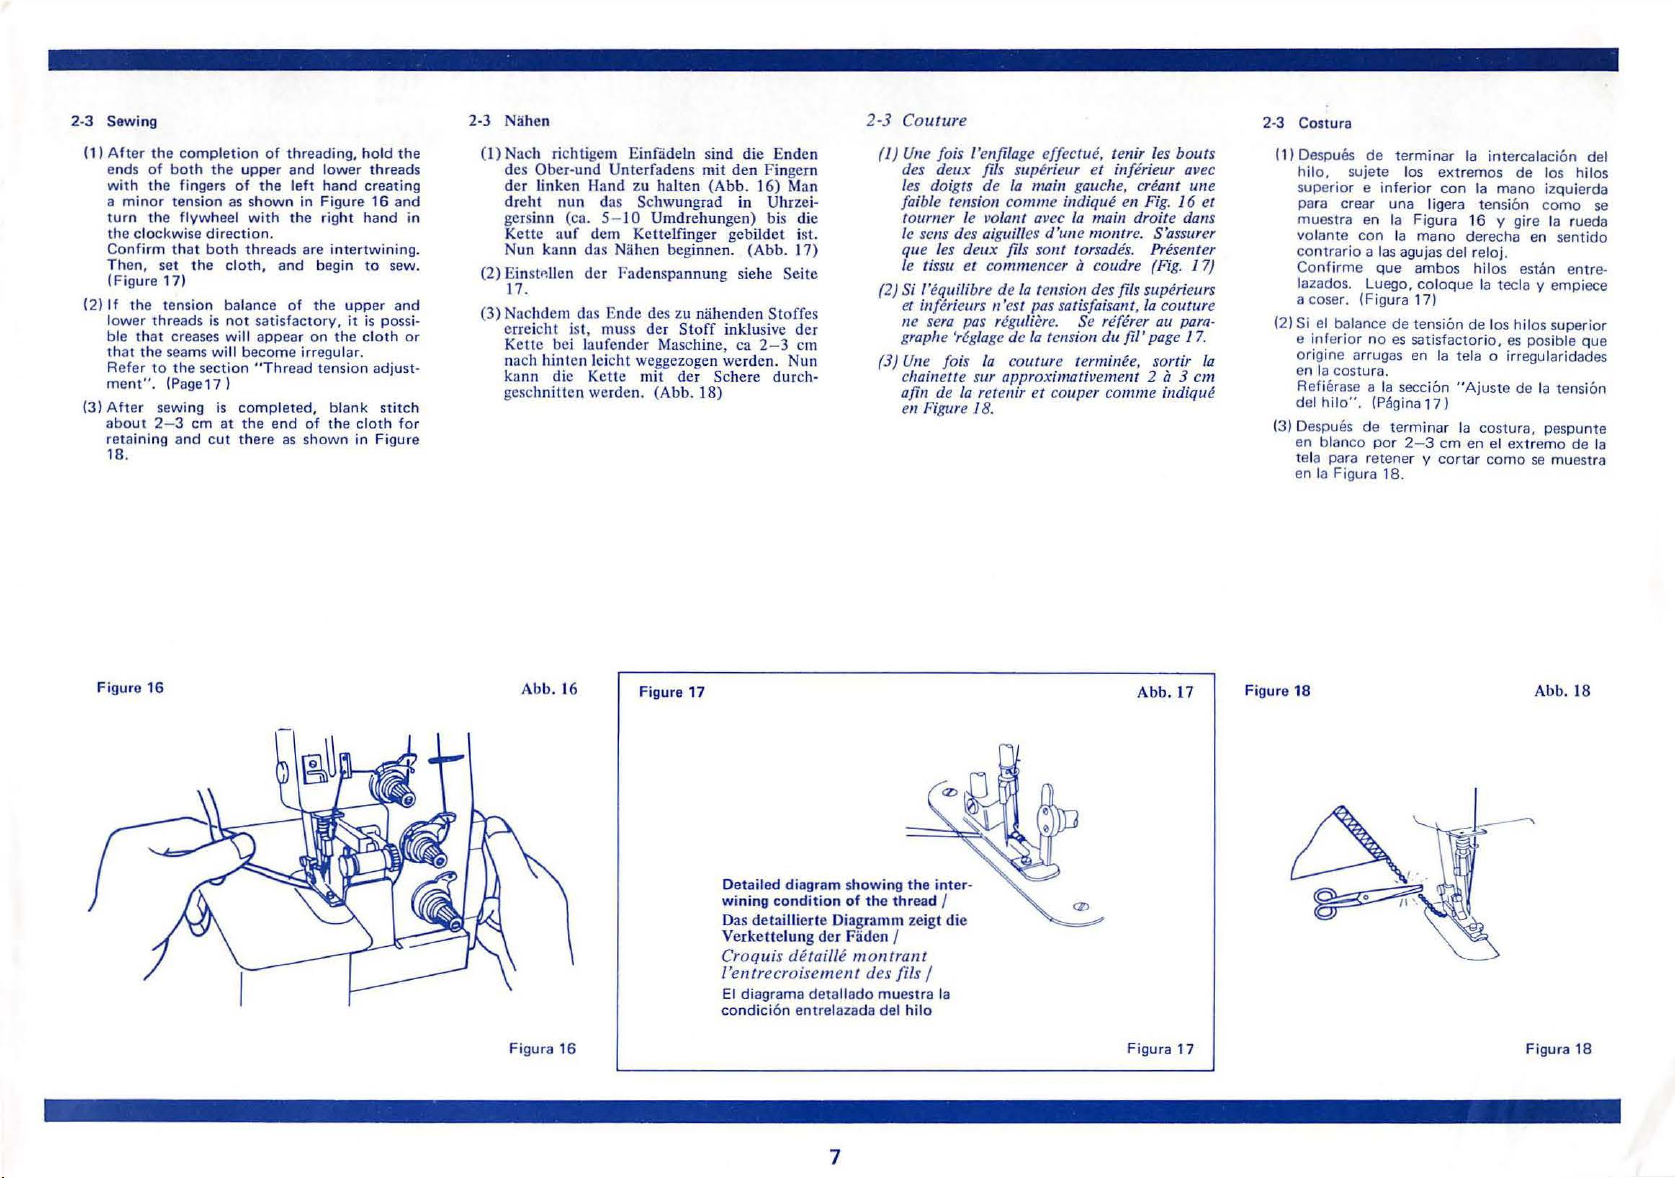
2-3 Sewi ng
(1)
After
the comp
of bot
ends
wi
th the fingers o f the l
a
min
or tensi
turn the flywheel wi
the
clockw i
Confirm that b
he
n, set the c
T
(Figur
e 17)
(
2)
If the tension balance of the
l
owe
r threa
ble that cr
that the
Refer to the
men
t". (Page17)
(3
) A
ft
er sewing is c
abo
ut
2-3
reta
inin
18.
Figu
re
16
let
ion
h the
upp
on
as shown in Figure
se
direction
oth threads are intertw
lot
ds is
not sati
eases will
sea
ms will become
section "Th
ompl
em
at the end of the
g and c
ut there as shown in Fi
of thr
eading, h
er and l
ower thr
eft
hand creating
th the rig
.
h, and begin
appear on the clo
ht hand
sfactor
read tens
eted, blank s
upp
y,
it
irregular.
ion adju
clot
old the
eads
16 and
ining
to sew.
er a
nd
is p
oss
th
or
st-
tit
ch
h for
gur
in
.
i-
e
2-3 Nahen
(I)
Nach rich tigem Einfadeln sind die En den
Obe
r-und Unterfadens mit den Fingem
des
der linken Ha nd
dreht nun
gersinn (ca. 5- 10 Umdreh unge
Ket
tc
auf dem Kctt
Nun kann das
(2)
Ei n
st<~Lie
n
17.
(3) Nac h
de
m das Endc des zu n
erreicht ist, muss der St
Kette bci laufc nd
nach hintcn Ieicht weggezoge n werden. Nun
kann die K
geschni
ttc
Abb. 16
zu halt
en
das Schwungrad in Uhrzei-
Nahen begi
der T'adenspa
er
ette
n werden. (Abb. 18)
mil der Schere
Figure 17
(Abb. 16) Man
elfinger
Maschine, ca 2- 3 em
gebildel ist.
nne
n. (A
nnu
ng siehe Seite
ahenden Steffes
off
inklusive der
n)
bis die
bb.
17)
dur
ch-
2-3
Cout
ure
1)
Une
fois l'enfil
(
des deux fils
les doigts de Ia ma
fo
ible tension comme indique en
rn
er le vola
tou
le sens des aiguilles
que les deux
le
ti
ss
u et commencer a coudre (
(2)
Si /'equilibre de Ia tension des fils superieurs
et
inferieurs n
ne sera
graphe
(3)
Une
fois fa couture terminee, sortir fa
cha
in
ette sur approximati
de
afin
en
Figu
age
effectue, tenir l
sup~rieur
nt
fi
ls sont
'es
t p
pas
regulier
'r6glage
de Ia ten
Ia retenir et couper comme indique
re
18.
et inferieur avec
in gauch
avec fa main droite dans
d'
une mont
e,
re. S'assu
torsades. Presenter
as sati
sfaisant, Ia couture
e.
Se
re(erer au pam-
sio
n du fi/' pa
ve
ment 2 a 3 em
es bout
creant une
Fig
. 16 et
rer
Fi
g. 17)
ge 17.
Abb. 17
s
2-
3 Cos
tu
ra
(1) Despues
hilo,
superior e infer
para crear una ligera tension
muestra en Ia Figura 16 y gire Ia rueda
volante
con
Confirme
lazados. Luego, coloque Ia tec ta y empiece
a coser. (Figura 17)
(2
) Si el balance de tension
e
origine
en
Refierase a Ia
del hil
(3
) Despues
en blanco
te
en Ia Figura 18.
Figure 18
de terminar
sujete los
con
trar io a las aguj
inferior no
Ia
la para retener y
Ia mano derecha
que
es
arrugas en Ia tela o irregularidades
costura.
a".
(Pagina17 l
de ter
por
seccion
2-3
Ia intercalacion del
ext
remes
ior
con
Ia
as
del reloj.
ambos
hiles
de
satisfactori
"Ajuste
minar Ia
costu ra, pespunte
em
en el
cortar como
los hi los super
o.
de
mano
en
estan
es
posible
de
extrema
se
los hilos
izquierda
como
sentido
entre·
Ia tensi
de
muestra
Abb. 18
se
ior
que
on
Ia
De
wining condit
Das detaillierte Diag
Verkettelun
Croquis detai/le
l
Et diagrama
co
Figura 16
tai
led diagram s
howi
ion of the t
g der Fa
ramm
de
montra
'entrecroisement des
detall
ado
ndici6n
ent
relazada del hila
muestra Ia
7
ng the inter-
hr
ead I
zeigt die
n I
nt
fi
ls I
Fi
gura 17
Figura 18
Page 12
DOUBLE
CHAIN
STITCHING
DOPPELKETTENSTICH
3
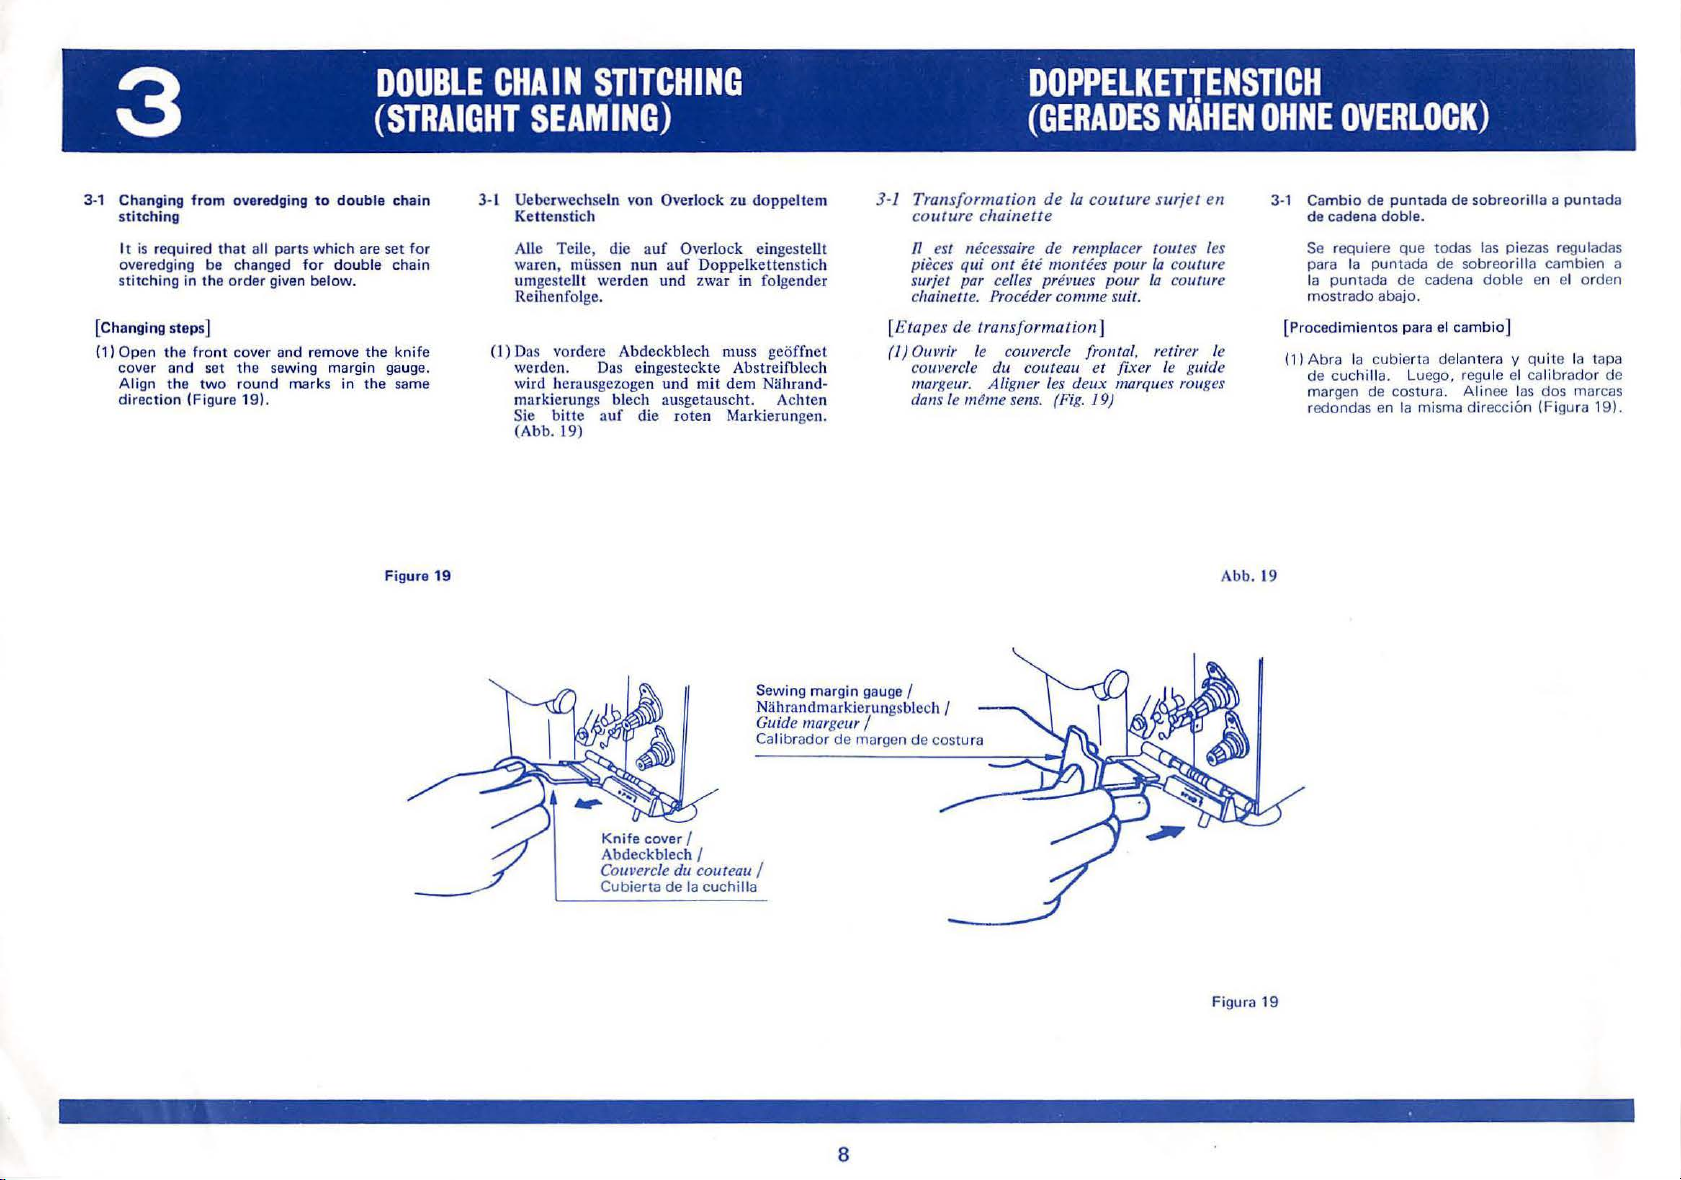
3-1 Changi
[Changing steps]
(11
ng from
s
tit
ching
It is requir
overedging
stitc
hing in the
Open the fro
cover a
Align the t
directi
on
overedging
ed that all
be
changed for double chain
order
nt
cover and remove the knife
nd
set the sewing margin gauge.
wo
round marks in
(Figure 1
9L
to
double chain
parts
which are se t fo r
given below.
(STRAIGHT
the same
Figure 19
SEAMING)
3- 1 Uebcrwechseln von Overl
Ke
tt
Al1e
waren , miisscn
um
Reihenfo lge.
( I) Das vordere
werden . Das eingesteckte Abs
wird he
markieru ngs blech ausgetaus
Sie
(Abb.
ock
zu d
enstich
Tei
le, die auf Overl
gestcll t werden und zwar in folg
ra
bitte auf
19)
nun auf
Abdec
usgezogen und mit dem Ntihrand-
die r
Doppe
kblech muss geOffncl
oten Markierungen.
oppeltem
ock
eingestellt
lkettenstich
tre
cht.
Sewing margi n gauge I
Niihran
G
uid
Calibr
end
er
ifb lech
Achten
dm
arkierungsblcch I
e m
arge
ur I
ador
de margen de costu ra
(GERADES
3
-1 Tran
[E
(I)
sformation de
co
utu
re c
hainett
n est m
pi
surjet par celles prevues pour Ia COIIIL/
chaine
ta pes de tr
Ouvrir le couvercle fron tal, retirer le
couve
ma
dans le
fcess
eces q
rgeur. Aligner les de
aire de remplacer toutes les
ui ont
ll
e.
Pro
ansformati
rc/
e du c
mt!
me sen
Ia couture su
e
ete
mont
ees pour
ceder comme sui
on ]
out
eau et fixer le g
ux
s.
(Fi
marques rouges
g.
19)
t.
NAHEN
rjet
en
Ia
couture
re
uid
e
Abb. 19
OHNE
3-1 Cambia
OVERLOCK)
de
de c
Se requiere
para
Ia pu
mostrado
[Procedi
(
11
A bra Ia cubierta delantera y quite Ia
de
margen de
redondas
puntada de
aden
a dobl
que
Ia puntada
nta
da
de
abajo .
mientos
cuchilla. Luego, regu le el calibr
en
para el
costu
Ia
sobreorilla a puntada
e.
todas las piezas reguladas
de
sobreo
cadena
camb
ra. Alinee las
misma direcci6n (Figura 1
rilla
doble
ia ]
cambien
en el
ador de
dos
arden
tap
mar
cas
91.
a
a
Knife cover
Abdec
Co
uvercle du couteau I
Cubierta
I
kblech I
de
Ia cuchilla
Figura 19
8
Page 13

COUTURE
DROITE
DOUBLE
POINT
DE
PUNTADA
DE
CADENA
~HAINETTE
(2) As shown
holder
rota
upward with
the finger and
right hand unt
stop
(
3) Rota
the needle reaches its lowest point, remove
the
overedging l
21)
Figure
in
Figure
with
te the
crank lever from
a finger
upp
the
with a click.
te the flywheel by h
ooper
20
20, press
of
er knife holder knob slightly
rig
ht hand. Then
rot
ate
il
the
rot
the slo
will
not
the
left hand and
the knob
ati
on
comes
and and
t.
ope
rate. (Figure
the
with
Then, the
(COUTURE
knife
release
the
to
when
a
(2) Wie Abb.
Finger
gehausc so dnss der Kno
Messergehtluses mit d
obe
n gebrcht werden kann. Das Messer
soweit nach
einrastet.
(3)
Das Sc
hintcn gcdrcht,
d
er
Grcifcrcinra
kl
appe
Grcifer aus. (Abb. 21)
DROITE)
20
zeigt , drtic
dcr
tinken Hand gegcn das Messer-
eben drehen
hwungrad wird mit
ticfstcn Positi on ist, kann man die
st
klinke aus dem Schlit z
n und schaltet
kt
man
pf
er
rechten Hand nach
bis es automatisch
und
der
sobald die Nadel in
somit den Overlock
mit
einem
des
obcrcn
Hand nach
Abb.
20
DOBLE
(2) Com me indique en
le support
main gauche et toum er avec Ia mailr droite
l
ege
superieur
toumer
jusqu'a
avec decli
(3)
Toumer le volant
l'aigu
retirer le l
cran, a ce
est ho
Figure
du
rement le bout
vers
le
bowon
ce
que
c.
ille atteint sa position
ev
mome
rs
de fonctionnemefll.
21
Fig.
couteau avec le doigt de
on du support de couteau
le haw. Relacher le doigt et
Ia
ier d'enclencheme
20, appuyer sur
avec
Ia
rotation atteigne l'arrllt
11
Ia
nt
le crochet de surjet
main droite
main et, lorsque
Ia
plus basse,
nt
(Fig.
(COSTURA
(2)
Ia
de son
21)
Como
sujetador
y gire
superior ligeramente hacia ariba
de
recha. Luego
gire
que
sonido
(3) Gire Ia rueda vol
Ia aguja llega a su
mani
p
erante
(Figura 21)
RECTA)
se muestra
Ia
Ia perilla
Ia rotaci6n llegue a un
metalico.
ll
a de Ia ranura. Con esto, queda ino·
el oio·guia
en
Ia
de
cuch
perilla del sujetador
Figura
illa con el
de
esto, suel
con
Ia
mane
ante con Ia mano, y
punto
mas baj
de
puntada
Abb.21
20.
presione el
dedo
izquierdo
de
cuchilla
con
Ia
mano
te
el
dedo
derecha hasta
tope
con
cuando
o,
qui
te
de sobreorilla.
y
un
Ia
Ro
tate
while pressing
Mit cincm Finger dcr Unkcn Hand nach rechts prcsscn und
glcichzcitig
Toumer
Girar mie
mit
en
qppuyant
ntr
as presiona con
dcr
wit
h a f inger
rcchten H
avec
of
the
and
gegen vern
Ia
main
el
dedo izquierdo
left
hand
e drchen I
gauche/
I
Fig
ura 20
9
ve
Crank le
Levier d 'enclenchemem
r I Greifereinrastktinke I
/Ma
nilla
Fi
gura
21
Page 14

3-2
How
(1) Meth
Open
in
the
of
the
out
thread, close the
In this case,
out
may be l
to
pull it
plate.
to
thread
correctly
od
for inserting lower thread
the
front
cove
r,
order as shown in Figure 22. The end
lower thread also should be pulled
about
10
the
eft
out
then insert
em. After inserting
front
cover.
thread
that
as it is. There is
to
the sur
the
has been pulled
face
of
the
thread
no need
throat
the
Konektes
3-2
(1)
Einfiideln des Greiferfadens
Das vordere Abdeckblech
der
flideln. D
herausgezogen werden. Anschliessend kann
das Abdeckblech wieder geschlossen
den. Der herausgezogene Faden
verbleiben wie er ist, es ist ni
derlich ihn
zuziehen.
Einfiideln
Reihenfol
as
ge
wie in Abb.
En
de
des
durch
Offnen und in
22
Fade
ns soil
die Stichpl
gezeigt ein-
ca.l
0 em
wer-
kann
so
cht
erfor-
atte hoch
-
3-2 . En[ilage
Methode d'enfilage du fil inferieur
(1)
Ouvir le couvercle frontal, enfiler dans
l'ordre
indiqu~
tremite
mativement. Fermer le couvercle frontal.
Dans ce
fil qui a
a
Ia
sortir
en Figure 22. Tirer l'ex-
du fil
inf
erieur de 10 em approxi-
cas
on peut laisser tel qu 'il est le
ete tire, il n y a
surface a travers
Ia
plaque.
pas
lieu de le
3-2 Modo de enh
(1)
M~todo
de
Ia
Abra
en
del hilo, cierre
caso, el hilo
dejarse tal
de
garganta.
tapa delantera, luego inserte el hilo
el
orden
El
extreme
tambi~n
por 10
extraerlo hasta Ia superf i
embrar
inserci6n del hilo inferior
mostrado
del hilo inferior
em.
Ia tapa delantera. En
que
como
en
Ia
Figura
debe
Despues de
ha sido
estli. No hay necesidad
extraldo
cie
de
Ia
Ia placa
22.
extraerse
inserci6n
este
puede
de
Figure 22
Abb. 22
Figura 22
•
Thr
eading for double chain stitching is u>dgramed
Einflideln des Faden s
Le schema d'enfilage de
La intercalaci6n para Ia
fil
r Doppelkett
Ia
couture chainette
pun
tada de cad
ensti ch ist
in
blue also inside
auf
der
lnn
enseite
es
t imprime a l'interieur du couvercle de
ena
doble esta indicada en el interior
der
10
the
side cover I
Seitenabdeckung in blau beschrieben I
de
cote/
Ia
cubierta lateral
Page 15

Figure
24
Abb. 24
Figure 23
ct
threading
Corre
En[ilage correcte
Correcta
intercalaci
at looper
section I Richtiges Einfadeln im Greiferteil I
du
mecanisme
6n
en
Ia secci6n del ojo-guia
du
cro
chet
I
aguja)
~
Spool setting position I
Anordnung
Positionnement
Posici6n
der
Spulen I
de
des
colocaci6n de Ia
Abb.23
Double chain stitch (Needle thread)
Doppellcettenstich (Nadelfaden) I
Couture double chainette (fil d'aiguille) I
Puntada
de
cadena
dob
le (Hilo de
I
Figura
23
Double chain
Doppelkettenstich (Greiferfaden) I
Couture double chainette (fil de crochet) I
Puntada
...
cones
I
bobina
Tension discs I
Fadens
pannungs~cheiben
Disques de tension I
Discos
de
stitc
de
cadena doble (Hilo
tension
h (Loope r thread) I
de
ojoiJuial
I
11
Pass
thread
Dur
chfiihre n
Pas
ser
le
Pasar el hilo
between
fit
two
des
Fadens zwischen beiden
entre
les 2 disques I
entre
dos
discos
tension discs I
de
tensi6n
Sc
heiben I
Figura
24
Page 16

(2)
Method
It
is
required
in
the
ord
After
inserting
to
the rear
end
of
for
abo
• Tweezers are
eyes.
for
the
ut
inserting
er
shown
while
thread s
10
em from
that
in
the
facing
helpful
upper
thread
the
thread
Figure
thread
the
hould
the
needle eye.
for
threading needle
be
25.
from
machine,
be
pulled
inserted
the
front
the
out
(2)
Einlcgen des Oberfadens
er
Faden ist, wie in Abb. 25 gezeigt,
D
einzufiideln
nach hinten eingefadelt werden. Man
beacht
vern
* Die mitgeliefe
da
s Einfiideln ins Nadelohr.
Bei
der
Nadel muss von verne
e, dass die lange Rille der Nadel
e ist. Abb. 26.
rte
Pinzette
erlei
chtert
Ihnen
(2) Methode pour l'enji/age
Pro
ceder
comme
[ois /'enfi/age
vers
I 'arriere en regardant
on
face,
d'approximntivement
chat
de
/'aiguille.
indique en Figure 25. Une
effectue en partant de
tire
une
longueur
/0
• Utiliser une pince pour /'enfi/ag
du
fil superieur
Ia
machine de
de
em
ii
e.
/'a
vant
chainette
tr
avers le
(2) Met
oda
de
insercion del hi
lnserte
el
Figura
Despues
tera a Ia trasera. el
extraerse por
aguja.
• Las pinzas son
por
hilo
25.
de
los djales
tal
insertar
unos
de
lo
como
se
el
hila
de
extreme
10
em
utiles
para pasar el hilo
agujas.
superior
muestra
Ia
parte
del
hil
del
ojal
en
delan·
o.
debe
de
Ia
Ia
Figure 25
Abb. 25
Figura
25
12
Page 17

3-3
Sewing
(1)
Set
the cloth
)Nhen beginning
sho
uld
be
mad
(2)
If
the
tension balance between
and lower
w
ill
become
Please refer
adjustment"
· (3)
After
stitch
of
cutting.
blank
edge
knitted mater
a crochet
In case the seam needs
the
in a parallel line.
threads
result in
irregular.
complet
ing should
the
cloth
With regard
stitches, ei
of
the cloth or,
needle.
same position
as shown in Figure 27.
to
sew,
the
e slowly .
is not
the
cloth
to
the
. (Page 17)
ing sewing, 3
be
as shown in Figure
ther
ial, fold
first few stitches
satisfactory, creases
or
the
section
"Thread
-5
retained from
tie
sho
em
to
disposal
the
thread
if
the
back
and
to
be
strengthened,
uld be sewn
the
seams w
tension
of blank
the
28
befo
of
at
cloth
fix
uppe
end
the
the
is
of
with
twice
3-3 Nahen
(J)
An
setzen de
gezeigt. Bei
Stiche sehr Iangsam erfolgen.
r
ill
re
(2)
Wenn das Spannungsverhiiltnis zw ische n
dem
ri
chtig ist, ents
die
Stiche
Faile se
Fade
(3) 1
st
das
erreicht,
3- 5
gut
gemass
entweder
Knoten zu
Slrickstoff
einer
Naht
zur er
s Stoffes, wie
Niihbeginn sollten
Ober-und
nspannung a
em
mit einer
Htikelnadel
versttirkt
ste
tehen
werden
hen
Sie
uf
Ende des
lassen
weiternahen. Nun
Abb
n Na
. 28
am Ra
schlingen
handelt
werden,
ht noch
Schere
Der
nde
in
Abb
. 27
die ers ten
dem
Unterfaden
Falten
unregelmiissig. In diesem
unter
Seite
zu
Sie
verbleibende Faden ist
, zuriickzufalten
zu
befestigen.
im
Regulierung
17
nach
bearbeitenden
dei Maschine noch
kann
get
rennt
des
Stoffes
oder
wenn
kann
eine zwei
Stoff
.
Stoffes
die
werden
zu
einem
es sich urn
und
Sollte
man
paralell
te
nahen.
nicht
und
Kette
der
mit
die
3-3
Couture
( 1) Engager
27
Piquer
le
.
travail com me indique
a vitesse reduite pour les premiers
points.
(2)
Si
l'
equilibre
superieur
satisfaisant, il se produira soil des points
irreguliers soit un
referer au paragraphe "Reg/age
Se
tension du
(3)
Une fois
une longueur de chainette
avant
de
28
.
En ce qui conceme le surplus de chainette,
peut
on
du vetement ou, si le vetement est
moille, plier
une
aigu
Au
cas
on peut repasser une seconde fois
ment a Ia
de
Ia
et
le fil
fronr;age
fi/". (Page
Ia
couture terminee,
17)
tension
inf
h ieur n 'est
du
tissu.
if
de
ent
couper comme indique
ou bien le prendre dans l'ourlet
Ia
cha
inette
et
ille a crochet.
au
/'on desire renforcer
Ia
premiere couture.
en
Figure
re le fil
pas
de
Ia
[aut laisser
3 a 5 em
en
Figure
en tissu
fixer avec
Ia
couture,
parallele-
3-3 Costura
(
1)
Ponga Ia tela
27
.
AI
iniciar Ia
deben efectuarse
(
2)
Si el balance
superior
de
presenta
irregular. Sirvase referirse a Ia secci
"Ajuste
(3) Despues
Ia
puntada
extrema
Figura
arreglo
el hilo
es
de
con
una
En
caso
Ia
misma posici6n
en
una
como
se muestra en Ia Figura
costura
, las primeras
lentamente
de
e inferior no es
rse arrugas en Ia tela o costura
de
Ia
tension del hilo". (Pagina 1 7)
de
terminar
en blanco
de
Ia tela
28
antes del
de
las puntadas en blanc
en
el
borde
material
de
aguja
que
linea paralela.
teji
de
crochet
Ia
costura requi era r
tension
sat
Ia costu
debe
como
cor
te. En cu
de
Ia
do, doble
.
debe
coserse
.
entre
mantenerse del
se muestra
tela
puntadas
los
isf
actorio,
ra,
3-
5 em
en
anto
o.
amarre
o,
si
Ia tela
las y y fijelas
efo
rzarse,
dos
veces
hi
pue
los
on
de
Ia
al
-
Figure
26
Fi
bb
A
gura
.26
26
Figure
27
13
Abb
Figura
Figure
.
27
27
28
Abb
Figura
. 28
28
Page 18

4
4-1 Changing from
interlocking
All
parts which are s
stitching must be changed
the
order
in
[Changing s
(1) Open the
sewing margin gauge
cover. Align
the
in
given below.
teps]
front
same dir
th
double
chain stitching
et
for double chain
cover
and
and
e two round
ect
ion (Figure
INTERLOCKING
(SAFETY
to
to
interlocking
remove t
set
he
the knife
red marks
29 & 30).
STITCHING)
4·1
Doppe
I
ocken.
Umstellen
sti
ch auf Interlock un d zwar in fol
Reihenfolge:
(!)
Vorderes Abdeckb lec h
steckte
streiblech auswechseln wobei die
Markierungen
und
lkett enstich
der Maschine von Do ppelk
Markierungsblech
30)
zu
und
beach
gleich
offnen
mit
ten sind
zeit
ig over·
ette
n·
gender
, das einge·
dem
Ab·
roten
. (Abb.
29
INTERLOCK
UNO
4·1
Tran
chainette
Tout
cl!ainette doit etre remp/ace par le montage
surjeteuse piqueus
Pro
[
Eta
pes
(1)
Ouvrir le capo! frontal et reti
margeur, fixer le couvercle du coute
Aligner
meme sens.
GLEICHZEITIGES
sformation
en
surjeteuselpiqueuse
le
montage pour coutllre point de
ceder com me suit:
de
transformation]
/es
2 marques rouges rondes dans le
(Fig.
(DOPPELKETTENSTICH
de couture point
e.
29 et 30)
rer
de
le guide
au
..
NAHEN
OVERLOCKEN)
4·
1 Cambio
a interbloqueo en
[Procedimientos para
-
(1) Abra
cubierta
bl
oqueo
Todas las
puntadas
Ia
brado
r de margen
rojas
redondas
(Figums
de
puntada
partes
de
cadena
cubierta
de
cuch
29
y 30)
que han si
ill
de
cadena
dob
do
doble
el
orden
el
cambio]
delantera y quite
de
a. Ali
en
reguladas para
deben
mostrado
costura.
Ia
Luego , fije Ia
nee las
misma direcci6n
cambiarse
dos
le a i
el calimarcas
nter·
abajo.
Figure
29
Sewing margin gauge I
Markie
run
Guide margeur I
Calibr
gsblech I
ador de margen
de
costura
Abb.29
Figura 29
14
Figure
30
Knife cover I
Abdeckb
Couvercle du couteau I
Cubierta
lech I
de
Ia cuchi lla
A
bb.
Figura
30
30
Page 19

.
SURJET
AVEC
INTERBLOQUEO
(2) As
(3)
Figure
shown
holder
with
the
upper
ward
with
the finger
until
it
comes
tip
of
the
downwa
It
will
then be
Rotate
the fl
needle is
and
set the
Thu
s, the looper
o
perational.
31
in
a finger
knife hol
the
of
blade
rd and
ywheel by
at
crank
(Figur
COUTURE
Figure 31,
right hand.
the
to a stop
on
is
in a position
its
pressing t he
of
the left
der
knob slightly
left hand,
in
lowest poi
lever.
for
e 32)
rot
with a click. The
the
knife
the
operating
to
hand and
nt, pull
overedging becomes
is
cut
DE
knife
hand,
rotate
the
then
position.
the
when
for-
knob
facing
cloth.
the
down
Then release
ate
RENFORT
(2)
Wie
Abb.
einra
nach
hwun
31
des Ste
einem r-inger der
hts und
rec
bi
s es
nun
Sc
hneiden
(3
) Das Sc
hinten gedreht bis
tiefsten Pos
einrastklinke herunterklappen
Overlock-Greifer niihb
zeigt,
klappt
ste
t. Die M
unt
en
grad
wird
iti
on be
ffe
driickt
linken Hand
das Messer nach
und ermoglicht
s.
mit
die
Nadel sich
findet.
ereit ist.
man
ess
erkarHe zeigt
der
Hand nach
Die
damit
Abb.31
mi t
nach
unten
das
in
der
Greifer-
der
(PUNTADA
(2)
Com me indique en Figure 31, Appuyer sur
le
support couteau avec le doigt de
ga
uch
e, toum
bouton du support de co
avec
Ia
main gauche, toumer le bouton jusqu'
qu'il se
tran
Le
ve
rs
le b
couper le tissu.
(3)
Tourner le
/'aiguille
baisse r le levier d'embrayage. De
et
croch
(
Fi
g.
32)
Figure 32
cr
l
eg~reme
m
vers
ut
eau superieur
main droite. Lticher le doigt de
pla
ce
dan
s son c
ran ave
challt du couteau doit l t
as
en pos
iti
on de
vo
lant a
atteint sa position
de sur
jet
Ia
age
entre en fonction.
c
tra
vail et po
main et lorsque
Ia
plus b
Ia
main
l'avam le
tl
ce
1111
declic.
re
diri
ge
urra
asse,
ce
fait, le
DE
SEGURIDAD)
Como
(2)
Ia
(3)
se
sionando el sujetador de
dedo
izquierdo
de
cuchi
adelante
suelte
el
hasta
que pare
La
punta
hacia ab
Lu
Ia tela.
Gire Ia rueda vo l
Ia aguja estll en
r
De esta
sobreorilla queda
ego. est
egu
le Ia
ajo
manilla.
mane
muestra en Ia Figura 3
, gire Ia
lla
superior ligeramente hacla
con
Ia mano derecha. Luego,
dedo izquierdo
con
de
Ia
hoja
en Ia posi
ar<\
en
una posici6n para cor
ante
su punto
ra. el
operante. (Figu
perilla
un
de
con
ojo
-gu(a para
cuchilla
y gire Ia
sonido
Ia
ci6n
Ia
mano
mas
del
cuch
de
bajo,
1,
pre-
con
sujetador
perilla
metlllico
illa queda
operaci6n.
tar
y,
cuando
baje y
puntada
ra 32)
Abb. 32
un
.
de
Rotate while pressing
M
esse
r nach
der Bcs
Appuyer
Girar m ientras pres
unten
chreibun
sur
g v
le
bouton
with a fing
dreh
en.
on
Abb.
iona con
er of t he le
lm
iibrigcn die gcgentc
20
Seite 9 (Me
rotatif
avec
un
dedo isq
U/1
uie
ft hand
sse
rdo
./
ili
r hochklapp
doigt
de
ge
Hand
Ia
habung
cn) I
main gau
che
I
Fi
gura
31
15
Crank lever I
Grcifcre
inra
Levier d'enclenchement I
stklinke
Manilla
I
F
ig
ura
32
Page 20

4-2 How
4-3 Sewing
to
thread
correctly
Overedging
be
threads as shown in Figure 33.
• Concerning threading, refer
"How
overedging and
(P
age 3 & 10)
The sewi ng
overedging and
Refer
edging and double chain s
(P
age 7 & 13)
• Concerning thread tension, refer to
section
(Page 17 1
and
done
to
double
simultaneously by using
to
thread
double chain stitching.
of
interlocki
the
double chain stitc hin
section "Sewing"
"Thr
ead tension adjustment" .
cha
correctly"
ng
in stitching
all
to
the
section
for both
is
the same as
of
both over-
titchin
can
four
g.
g.
the
4-2
Richtiges Einfadeln
Overlock u
gleichzeitig eingeflidelt werden indem man
4 Faden verwendet. Abb .
* Das richtige E
Doppelke
Seiten 3
4-3 Niihen
Das
Weise wie
dur
chgefiihrt. Auf den Seiten 7 und 13 kann
unter
geseh
• Ueber die Fadenspannung kann
unter
nachgeles
nd
Doppelk
ettensti
33
.
inf
lideln fiir Overlock und
tte
nst ich k6nnen Sie
und
10 nachsc
Interlo
ck
nlihen wird in
Overlock und Doppelkettenstich
den
entsprechenden Rubriken nach-
en
werden.
" Regulierung
en
werden.
hl
agen.
der
Fadenspann
der
ch kiinnen
auf
den
gleichen
auf
Seite 17
ung"
4-2
Enfilage
On pell( surjeter et piquer simultaneme
utilisant
graphe 33.
*En
4-3 Co
Le
travail
Se
deux opt!
(Page 7 et
*En
/es
4 fils c
omme
ce
qui conc
para
graphe enfilage pour les
Surjet et chaine
utur
e
travail
de
referer au paragraphe couture pour les
erne /'enfi/ag
tt
de
surfi.lage est le
surjetage/
e.
(Pag
piquage.
e 3
rations de surjet
13).
ce
qui con
rt!ferer
fil" (
Pag
cem e Ia tension de fi/, se
au
para
graphe "Re
e 17).
indique en
e,
se rt!ferer
deux
coutures:
et 10)
meme qu
et
chainette
g/ag
e tension
nt
para
e le
en
a11
du
4-2 Modo de enhembrar
-
La
pueden ef
los cuatro hilos como se m uestra
Figura 33.
• En cuanto al enh
secci6n "Modo
punt
(Paginas 3 y 1 Ol
4-3
Costura
La
puntada de sobreorilla y de cadena
Refierase a Ia secci6n "Costura"
de
sob
7 y 13)
• En
fierase a Ia secci
del hilo".
punt
ada de sobreorilla y de cadena doble
ect
uarse simultaneamente usando
emb
rado, refit:!rase a
de enh
loq
ensi6n
6n
embrar"
de
cadena
ueo
es igual
ena
doble. (Paginas
de Ia aguja, re·
"Ajuste
de
de
ada
cos
tura de int
reor
cuanto
de
sobreorilla y
erb
ill
a y de ca d
a Ia t
(Pagina 17)
en
para
doble
que
dob
puntada
Ia
tensi6n
le.
Ia
Ia
Ia
.
Ia
Figure 33
Abb. 33
Figura
33
16
Page 21

THREAD
TENSION
REGULIERUNG
DER
REGLAGE
DE
LA
ADJUSTE
DE
LA
5
5·1 How
Thread tension
cording
thread
Adjust
lower
ing t
Thre
turning
to
adjust
the
overedging seams
to
being used.
the
thread
he
seams. (Figure 34)
ad
in
adjustment
the
type
tension using the
tension adjusters while watch·
tension may
a cloc kwise direction.
ADJUSTMENT
of
will differ ac·
cloth,
thickness,
upper
be
strengthened by
34
Figure
and
and
FADENSPANNUNG
5·1 Regulierung
Die Fadenspannung lindert
des
Nlihmaterials und
ist
mit
regler einzusteUen. Bei Drehung im Uhrzei·
gersinn erhti
gegengesetzter Drchrichtung verringert sie
sich. Es ist
dem
niedrigsten Spannungsdruck beginnt.
der
Overlocknaht
dem
Oberfaden·Unterfadenspa
ht
zu
Faden.
sich
die
beach ten, dass
Overedging: Upper
Point surjet:
tension del hilo superior
sich
je
nach Art
Die
Spannung
Spannung,
man
immer
thread
Re
gulerateur tension fi/ superieur I Puntada
TENSION
5
·1
R eg/age
Ce
reglage
/'epaisseur du tissu ainsi que du fil utilise.
nnun
gs·
bei
ent·
mit
Abb
tension adjuster I Overlock: Spannungsregler
Regier
teurs de tensi
couture
La tension peut
rlfgullfrateur dans le sens des aiguilles
/e
montre.
d'une
. 34
DU
du
point
varie d'apres
Ia
tension en manipulant les regullfra·
on
(Fig.
34).
~tre
de
sob
FIL
surjet:
tou t en surveillant
renforcee
reorilla: Regulador
TENSION
1o
qualite
en
toumant
fUr
Nadelf
et
Ia
aden I
de
Ia
DEL
5· 1 Modo
El
ajuste
el
tipo
Regule
de
tension mientras observa las costuras.
(Figura
La
girando
HILO
de
regular las
de
Ia
de tela, espesor e hilo usado.
Ia
tensi6n usando los regu ladores
34
)
tensi6n del hilo puede
en
senti
costur
as
tension del hilo difiere segun
do
de
las agujas del relo
de
sobreonlla
aumenta
rse
j.
Overedging: Lower
Point surjer: Rlfgultfrateur tension fi/ in[lfrieur I Puntada
thread
tension adjus ter I Overl
Figura
17
34
oc
k: Spannungsregler
de
sobreorilla: Regulador
fii
r Greiferfaden I
de
Ia
tensi6n del hilo inferio r
Page 22

(
1)
When the t
too
overedging
(2) When
too
overedging
When the stitching seams
in Figure 37, the tensions are satisfactory.
ens
ion
of
stro
ng (Figure
thr
ead tension adjuster.
the
tension of the upper
strong (Figure 36), loosen t he
thre
ad tension adju
(A)
When the tension
(A) Nahtbild bei zu s
(A) Lorsque
(A)
Cuando Ia tensi6n del hila infe rior es muy fuerte
the lower thr
35),
loosen the lower
appear
of
tar
ke r Einstellung des Greiferfadens.
Ia
tens
ion
ster
the
du
thread
.
as shown
lower
fil
ead
upper
thread
inf
is
is
erie
ur
(I)
Wenn die
stark
Spannungsregler zu l
(2)
\Venn
s
tark
Spannu
Die ric
die
we
is
too
strong
est
trop
Spannung
ist
(Abb. 35), ist der
die
Spannu
ist
(Abb
ngsregfer zu lockern.
hti
ge Einstellung ist erreicht ,
Naht
das
ist.
.
ockern.
ng des Nadelfadens
. 36), i
Bild gemass
forte
des Greiferfadens
entsprechende
st
der
dazugch
orende
Abb.
37 auf-
(B)
Wh
en
(B) Nalltbild bci
(B) Lorsque Ia r
(B
) Cuando
zu
zu
wcnn
tho
tension
Ia
tansi6n del hi
( 1) Lorsque
forte (Fig. 35)
tension du fil surjet inNrieur.
(2) Lorsque
crop
de ten
L
obtient
en Fig. 40.
of
upper
zu
starker Einstellung des Nadelfadens.
ension du
Ia
tension du fil
d~sserrer
Ia
forte (
es
thread
fil su
la
superior es
tension du fi l superieur est
Fig
sio
tensions sont bien
. 36) desserrer le reg
n du fil surjet
une couture telle que celle indiqu
is
too
strong.
perieur
est
muy
trop
fuerte
infhi
eur est crop
le
reguMra
teur
r~!gtees
.
uMrat
lorqu'on
sup~rieur.
forte
.
de
eur
ee
(
l)C
uando
Ia
fuer te (Figura
tensi6 n del hilo
inferior.
(2
) Cuan
fue
tensi
superior.
Si
las costuras
se muestran
las tensiones
(C) Ideal stitching seam.
(C)
(C)
(C)
tensi6n del hilo inferior es
35), afl
do
Ia tens i6n del hila
rte
(Figura 36), afloje el regul
6n del hilo
de
en
son
Gulc
Stichnaht.
Points
pafaits.
Costura
de
puntada
oje
de
puntada
de
pun tada
puntadas
Ia
Figura
sa
tisfactorias.
el regulador
de
superior
de
aparecen
37,
significa
idea
l.
muy
de
sobreorilla
es
muy
ador de
sobreorilla
como
que
Figure
35
lo
wer
th
read I
Greifer faden I
Pi/ in[erie
ur
I Hilo inferior
Upper thread I Nadelfaden I
Fil
sup~rieur
I Hila superior
Abb
Figura
. 35
35
Figure
36
18
Abb. 36
Figura
36
Figura
37
Abb.
Figura
37
37
Page 23

5-2 H
ow
to adj
sea
ms
Thread tension adjust m
cording
and thread being u
Adj
ust the tension using the upper and
ower
l
ing the
Thread tension
turning
ust t he doub
to
thread tension adjusters wh
seams.
in a clockwise directi
the type
se
d.
(Figure
may
le
chain
ent will
of
cloth, t hickness,
38)
be
st
rengthened
on.
stit
ching
differ ac-
ile
watch-
by
5-2 Regulier
ung der Doppc
Die fadenspannung andert sich
des Na.hmaterials und des Fadens.
ie
Regulierung der Spann
D
dem Nadel-und Greifcrspannu ngsregler.
Abb.
38
* EinsteUu
Scite 17.
ng
der
lkettenstich Nah
ung
Spannungsrcgler siehe
je
nach
erfolgt
Art
mit
te
5-2 R
eg/
age
du
point
de
chainette
Le reg/age de
Ia
qualite du tissu,
utilis
e.
On
utilise les regulerateurs de tension des
inferieur et superieur tout en surveil/all(
fils
Ia
couture (Fig. 38).
On
augmem e
reguterateur dans
montre.
Ia
tension du fil varie suivant
SO/I
epaisseur
Ia
tension en roumant le
le
sens des aiguill
double
et
le fil
es d'u
ne
!'
-2
Modo
de regular l
de cadena
El ajuste de
el t
Regule
tensi6n del
observa las
La tensi6n del
girando el regulador en sentido de l
de
dob
ipo
de
tela, espesor. e
Ia
tensi6n usando los reguladores
cost
l relo
j.
as
le
Ia
tensi6n del
hilo
superior e
uras. (Figura
hilo
costuras de puntada
hilo
difiere
hilo
usado.
inferio
381
puede intensif icarse
segun
de
r mientras
as
agujas
Figure 38
Abb
. 38
Double chain st
Doppelkettenstich:
Regullrateur tension fil superieur de
Puntada
Doub
le chain stitch:
Dop~elket
Regulirateur tension fil
Puntada
de
cadena
ten
de
cadena
Figura
itch:
Upper thread tens
Grci
dob
Lower
slic
h: Nadel faden
doble:
38
fcrfadcnspannungsregler I
le: Regulador
thread tension adjuste r I
spannu
inf
erieur de
Regulador
ion
adjuster I
Ia
couture cllaine
de
Ia
tension del hilo
ngsregler I
Ia
couture cllainet te I
de
Ia
tensi6n del
tt
hilo
e I
superior
inferior
19
Page 24

When sew
knitted
finished if p
with
materia
the left hand
ing thin
or
l,
the work can be n
art
of
the
. (Figure 41)
thi
cloth
ck
cloth such
is s
lightly pull
eat
as
ly
ed
Be
im
Nallen
Wirkstoffen
saube
rer
Abb. 41)
ausgefiihrt
nd
linken Ha
(
von
diinnen
kann
die Arbeit· besser
das Nah
w()rden, wenn mit
gut
Steffen
, sow ie bei
Iei
cht gezogen wi
und
der
rd.
Lorsqu 'on travail/e sur tissu
tel
que tis
su
tt
ne
Ia main gauche
a maille, on obtient une
e en tirant legerement sur le tissu avec
(Fig.
41).
Ieger
ou epa is
fi
nition
En
Ia
cos
tura
de
una
pu
el trabajo
llevando ligeramente Ia tela
Ia fl
echa con Ia
ede
tela delgada o gruesa.
realizarse
mano
izquierda. (Fi
excelentemente
en
sentido
de
gura
41)
(A)
Figure
39
Front I Vo
When
the
Lorsque
rderansic
tension
of
Ia
tension
ht
I I'endroit I Del
the
lower
du
[il superieur
antera
thread
is
too
loose I Wenn die
est
trop
faible I
Back I
Figure 41
Spannung
Cuando
Ia
Hinteransicht
Upper thre
des Nadelfadens zu l
tensi6n del hil o inferior es
I I'envers I
ad
Tr
I Nadelfaden I Fill superieur I
ocker
asera
ist I
muy
debil
Hilo superior
Abb. 39
Abb.
Fi
gura 41
41
Figure
(B) Ideal stitching seam l ldeale s
Points parfaits I Costura
40
Ba
ck/
Hinteransic
Stic
de
hbild I
puntada
ideal
ht
I
l'
envers I Trasera
Abb.40
Lower
thread
I Greiferfaden I
Fil
in[erieur I
Hi
lo inferior
20
Figura
39
Front I Vordera
nsi
cht
I l'endroit I Del
antera
Fi
gura
40
Page 25

PRESSER
FOOT
R~GULIERUNG
DES
REGLAGE
DU
PIED
AJUSTE
DE
LA
6
The presse r
is adj usted for standard (medium)
Ad
just only in the case when very thin
very thick clot
Sew thin clo
thi
ck
• Tighten presser adjusting screw for thi
cloth. Loosen the screw for thi n cloth.
clo
th with
foot adjustment
h is being sewn.
th with
a s
tronger pressur
ADJUSTMENT
of
this
machine
thi
ckness.
a weak
er
pressure, and,
e.
Figure
42
or
ck
FUSSCHENDRUCKES
Das
Nii
hfii
Stan
\Ve
zum Nahen verwen
gulierung des Pressdruckes
Diinn
di
cker Sto
* Bei
regulierun
diinn
How
sschen ist
dar
dstiirke
nn
besonders schwerer od
er
di
em Mate
to adjust
(mittl
Stoff ist mit
ff mit stiirkerem
ckem
Stof
gsschrau
riali
the
pressure. I Rcgulie
auf ein
en Pressdru
ere
Starke)
det
wird, ist ei
erfo
geringer
f ist die Pressdruck-
be
festeranzuziehen. Bei
st
sie
zu
losen.
eingestellt.
er
dunn
rderlich .
em
Dru ck und
Druck zu
run
g des
er
ck
Sto
ne
Re-
niihen.
Drucke
PRESSEUR
fiir
ff
s I R eg/age de Ia /e
·
PRENSATELA
Le pied presseur de cette machine est regie po ur
aux moye
trav
lors
qu
tres lourds.
Pour l
Pour l
•Don
e 011 serre Ia vis de reg/age lorqu 'il s'agit
de de tissus lords et on
s 'agit de tissus
ns. Ne toucher au reg/age que
'il s'agit de travailler aur tissus tres fins ou
es
tissus leger
es
tissus lourd
s,
if [aut une tension Iegere.
s,
if [aut une tension for te.
fins.
Ia
tr
es
li
sion I Modo de reg
desserre lors
ul
ar
Ia presi6n
qu 'il
La prensatela
ra tela de espes
pa
Ia
prensate la sol
te
la
muy
te
la del gada de
La
y
Ia tela gruesa
• Apri
ete
para
tela delgada.
.
de esta maquina esta regulada
or
normal (mediano). Regule
amente
en
Ia
costu
ra
delgada o muy gruesa.
te
la gruesa. Y afloje el torn illo para
be
coserse
con
una
presi6n
el tornillo de ajuste
Abb.42
con
mayor
de
de
menor presi6n
.
Ia prensatela
una
Very t
hi
ck clot
uy
h I
delgada
cloth I
Ma
ji
11
s I
Medium th ick clo
mi
tissus mo
Te
terial I
tte
l starkes Mater
ye
la de espesor media
Tt
"]
13
se
hr
di
ckes Material I
tissus tres lourds I
Tela m
ery
thin
V
sehr diinnes
cissus tres
Te
la
muy delgada
ns I
th
I
ial I
no
21
Weak I schwac h I faible I Deb
Presser adjusting scr
Druckregulie
Vis de reg
To
rn illo·
run
gsschrau
/a
ge de pression I
de ajuste
Stro
ng I stark I forte I
ew
I
be
I
de
Ia presatela
Fuer
il
~
te •
Figu ra 4 2
Page 26

7
ADJUSTING
STITCH
LENGTH
REGULIERUNG
DER
STICHLANGE
REGLAGE
LONGUEUR
DE
DU
LA
POINT
AJUSTE
LONGITUD
DE
DE
LA
PUNTADA
(1 l Holding the
grasp the hea
ries
box
the feed regul
regulator
turning
direction
wit
h the heart-shaped driver.
(2)
Set the gradu
knob
number
larger the
(3)
Afte
r com
tighten the feed regulator
fly
wheel
rt-sha
wit
h the
ator
fixing
the
flywheel
while pressing the
atio
to
the
indic
on the feed regulat
sea
ms
will
pletin
with
the ri
ped driver
left
fixing
screw can
in
a counterclockwise
n on the feed
ator. The larger the
be.
g adjustments,
ght
in the accesso-
hand and loosen
screw. The feed
be
loosened
fixing
regulator
or
knob, the
fixi
ng screw.
hand,
by
screw
firmly
Figure
(1)
Das Handrad in der
den herzformigen
fiihren
und mit
43). Nun kann die Stichs
(Abb.
durch Drehen des Schwungrades nach
rechts gelost werden.
(2) Der Anzeiger am Stichstellerknopf i
die gewiinsc
Die
auf dem Anzeiger eingestellten
(3) Nach erfolgter Regulierung ist die Stich-
stellerscluaube wieder fest anzuziehen.
43
hte
Lange der Stiche ric
rechten
Schraubenschl
der
linken Hand festhalte n
Gradeinteilung zu stellen.
htet
Hand halten,
iis
sel ein-
teUsclu
aube
st
auf
sich nach der
Zahl.
43
Abb.
( 1) En tenant le v
prendre /e to
Ia
main gauche et d
-
La
vis de fixation du regulate
griffe pew erre desserree en
volam dans le sens des aiguilles d 'une
nt
re row en appuyanr sur le
mo
eg
ier
(2) R
(3)
Ia
Ia
gri
ffe vers
de
point augme
Bloquer
Ia
grif
fe.
Figure
44
ola111
avec
Ia
umevi
s en forme de coeur avec
esse
graduation du bouton regulateur
l'indicateur.
nt
e par rapport au numero.
Ia vis de fixation du regulateur
rrer
main droite,
Ia vis
de fixation
roumam
toum
La
longueur du
ur
de
evis.
Ia
le
de
(1
) Sujetando Ia rueda
derecha.
ubicado en
tornillo
El
avance puede aflojarse girando
volante en sentido
del reloj mien tras sujeta el
fijaci6n
(2) Regule
gulador de avance al
mayor el n
de avance.
(3 )
Despu(ls del ajuste,
t
ornillo
Abb.
44
tome
Ia
de
fijaci6n del regulador
tornillo
Graduation
Gradein teilungsanzeiger I
Bouton gradue I
I ndicador
Feed regul
Stichreglerkno
Bouton regulare
Perilla del regulador
de
con
Ia
Ia graduaci6n
umero
Ia
costura ser
de fijaci6n
de
volante
Ia llave
en
caja
de
accesorios y
fijaci6n
contrario
llave en forma
en
ind
en
Ia perilla
f!
apr
del regulador
indicator
graduaci6n
ator
knob
pf
I
ur
I
I
de gr
de
forma
del regulador
icador.
mas
iete
avance
con
de
de
tornillo
de
coraz6n.
Ia
perilla
del
grande.
firmemente
iffe
I
Ia
mano
coraz6n
afloje
de
avance.
Ia
rueda
las agujas
del re-
Cuando
regulador
de
avance.
el
de
de
es
el
Heart-shaped
Herzformiger Schraubensch
Vis en forme de coeur /
Llave en
for
driver
ma
de
I
coraz6 n
li.l
ssel I
Figura
43
22
Figura
Feed regul
Stichregler-Bef..Schraube I
Vis
Tornillo de
44
ator
de
fixation du regulateur de gr
fijaci6n del regu lador
fixing
scr
ew
I
iffe/
de
avance
Page 27

'
8
The
machine
SPM. The speed can be
depression
•
The
special
machine and
purposes.
on
electric
motor
has a maximum
the
controller
motor
used for this machine
designed for
should
not
SEWING
0
speed
controlled
.
use
only
be
used
SPEED
of 1,5
00
by
pedal
is
with
this
for
othe
NAHGESCHWINDIGKEIT
Die Maschine hat eine maximale Geschwindigkeit von 1,500 Stichen pro Minute. Die
Geschwindigkeit der Maschine kann mittels
Fussanlasser reguliert werden.
* Der an diese Maschine montierte elektrische
r
M
otor
ist ein Spezialmotor, der nur fiir diese
und keine andere Maschine verwendet werden
kann.
VITESSE
La vit
esse maxima/e
P/M Cette vitesse est contro/ee par pression de
pedale sur le
•
Le
specialement pour
etre utilise pour d'autres usages.
rh
moteur electrique de
eostat.
DE
COUTURE
de
Ia
machine est
fa
machine est concu
Ia
machine
et
ne doit pas
de
1,500
VELOCIDAD
La maquina ofrece una velocidad maxi
1
,5
00
SPM. La velocidad puede ser controlada
por pisado del pedal ubicado
• El
moto
otros
r el
prop6sitos.
esta especialmente disei'iado para usarse
solamente con esta maquina y
para
DE
COSTURA
ectrico
usado en esta maquina
en
el
contro
no
debe usarse
ma
lad
de
or.
23
Page 28

9
HOW
THE
TO
NEEDLE
INSTALL
EINSETZEN
DER
NIHNADEL
FIXATION
DE
L'AIGUILLE
MODO
LA
DE
AGUJA
COLOCAR
With regard
machine,
can be used for both
overedging.
(1)
For
wheel
as
(2
) Next, loosen
45)
need le
first,
pletely deep in
ne
edle clamp.
(
3)
Firmly t
•
For
is
a way so
facing
as
to
the
BL
x 1
or
needle installation,
so
as
to
it will
, insert the
and
the
requested
shown
Needle
Nadelstange I
Support d 'aigui/le I
Abr
Needle
Na
delbefestigungssc
Vis
Tornil lo
Ia aguja
raise
go.
the
dr
op hole (Figure
secondly insert
ighten the need le
direct ion
that
that
the
front
in Firure 46.
clamp I
azadera
de
clamp screw I
du suppo
de
Ia abrazadera
needles for this
DB
x 1, No.
double
chain stitching
first
the
needle
needle c la
tip
to
the
Ia aguja
rt d
mp
of
the
45)
the
needle hole of
clamp
of
inserting the need l
the
needle be
thr
ead guide groove is
when facing
hra
ub
'a
igui/le I
14
and
turn
the fly-
bar
up as far
screw (Figure
needle i
nto the
on
the
the
needle com-
screw.
set
the
machi
e I
de
sewing
No.
11
and
presser
the
e,
in such
ne
FUr di
ese Maschine wird
17
38,
Starke
80
fUr
den
verwendet
(1)
(
(3)
it
Figure
Overl
Zum
n
tic
hst das Schwungrad , urn die Nadelstange
so hoch wie
2)
Die Nadel
45)
die
loch cinfUhrcn
in die Nadclhalterun g stossen.
Es
ist
fliluungsrille
ist. Nun kann die Nadelbefestig
schrau
(Abb.
45
oder
ock
werden.
Einse tzen
zu
bc wieder
46)
und
mtiglich .
befe
stigungsschraube losen, (Abb.
Spitze
der
und ansc
b
eac
h ten, dass
der
angezogen werden .
das
90 verwendet.
den
Doppelkettenstich
der
Nadel
zu
ste
llen.
Nadel
in
hliesse
Nadel auf
die
Nadel S
dreht man
das
Stichplatt
nd nach
lange
der
Vorderseite
Abb.
45
ystem
Es
Fade
kann
zu-
en-
eben
un
gs-
En ce
qui
conceme les
on
chine
pour les deux
(I)
(2) Desserrer
n-
(3)
Figure
pelll utiliser des Aiguilles
co
Pour
fix
rei ever Ia barre-aigui/le le plus
45)
aiguil/e.
er /'aiguille, t
Ia
introduire l'aiguille d'abord dans le trou
du presseur
pletement
8/oqu
*En
de
fil, soit dirigee vers l'operatri
Ne
edle cla
chain stitching
Nadclbcfesti
Overlock-Nadel {
Vis
serre-ai,gt
chaine
Tornillo de
aguja
vis de serrage
(Fig.
dans /e trou
er Ia
vis
de serrag
ce
qui
concem e le sens de /'inserti
l'aigui/le,
46
mp
gu n
tille du point de
tte
I
Ia
para punt
aiguil/es
utures surj
oumer
45) et puis l'inserer com-
il
[aut
screw for
de
et
et chainette.
/e volant pour
haw
de
/'aiguille (Fig.
de
Ia
tete
de
e de l'aiguil/e.
que
Ia
rainure guide
ce.
doub
le
16
I
~sschraub
abrazadera
ada
de
e
ftir
de
cadena
Ia
doble
cette
ma-
x 231
possible.
Ia
barre-
on
(Fig. 46) .
En
cuanto
co
ser,
No.
doble y puntada
( 1) Para
Ia rueda
a Ia posicion mas alta.
(2)
Seguidamente, afloje el tornillo
de
Ia aguja en el agujero
(Figura
luego in
el aguje
aguja.
(3
)
Ap
dera
• Para Ia direcci6n d e inserci6n d e
Needle cla
edging ne
Nadelbcfest igungssc hraub
Doppelkettenstich
Tornillo de
para aguja
a las agujas
pueden
14
se recomien
manera
quede
esta como
Vis
usarse las agujas
y No. 11. para Ia
de
Ia colocaci
volante para elevar
Ia aguja (Figura
45) ubica
serte
ro
de
rietc firmemente el tornillo
de aguja.
que
hacia
mp
ed
le I
serre-il
igui/le du
Ia abrazadcra
de
para
de
Ia
45).
do
en
etamen
de
muestra
puntada
aguja , gire
inserte
de
cuando
e fiir
sobreorilla.
6n
compl
aguja
da regular
Ia ranura
adelante
se
screw for over-
I
poi
nt
surjet I
de
de
sob
puntada
esta
maquina
BL
x 1 o
DB
de
cadena
Ia
Ia prensatela y
Ia
Ia
de
en
primero
barra
de
aguja
de
abra
zadera
Ia
punta
calda de aguja
te
Ia
aguja en
abrazadera
de
Ia
abraza·
Ia
aguja,
aguja
de
guia del hila
Ia
maquina
Ia
Figura
A
bb.
46
Ia aguja
reorilla
de
x 1.
de
de
tal
46.
Needle d rop hole/
Stichplattenloc
Trou
de
Agujero
h
Ia plaque-iligu
de
cai
da
de
ille I
aguja
Figura
45
24
Ne
ed
le eye I Nadeltihr I
Cha
t de l
'a
iguille I Ojal d e Ia aguja
Thread
guide gr
Fadenfiihrungsrille I
Rainure guide-fi/ I
Ranura
oove
de
guia del hilo
I
In
dent I Hohlkc
hle I Bosselage I Muesca
Figura
46
Page 29

REPLACING
1
0
The
knife
sho
uld
ing the el
(1)
(2) The position of th e low
(
3)
Fi
ectr
The uppe
loosening the upper knife set screw and t
low
er
th
e lower knife hold
lower knife set screw as shown
arranged
in
the indentation for the knife
plate as sh
The norma l position for fixing t
knife can be determined wh
knife reach es its lowest po
tion. T
upper
again st the surface of
edge on t he lower knife. (Figure
gure
47
be
ic powe r source.
r knife may
knife may be changed after loosenin g
in
such a way so that
ow
n in Figure
he front
knife will
tip
CUTTING
changed
only
be
er
set screw and the
er knife must
48.
in
of
the cutt
drop
abou
the
tip
changed
en
t during opera-
ing edge of
t 0 .5- 1
of
in
in
afte
r remov-
Figure 47.
it can
the
he
the uppe
.0
the
cuttin
48)
KNIVES
after
he
be
be
set
throat
upper
r
the
mm
g
THE
~
MONTAGE
UND
Vor Auswechseln der Messer ist
Sle
eker aus der Steckdose zu ziehe n. (Unter-
brec
hun
g zum
Str
(I
) D
ur
ch Losen der Befestigungssc
bb.
4 7) kann
(A
o
der
Untermesser entfe rnl werden.
(2)
Einsetz
en des Untermesscrs
Be
i Montage des Untcrmessers ist die link e
Seite dieses Messers in die Stic
einzufiih ren. Das Messer ist so zu
rcn, dass die Kli ngenkante mit der O
ka
nte dcr Stichplatte abs chliesst.
(3) Einsetzen des Obcrmcsse rs
Am Ha
nd
halter seine tiefste Position
Das Ober
cinzuf
rec
0.5 - 1.0 mm ti
ka
(Abb . 48)
rad drchen bis der obere Messer-
messer ist nun so in den Halter
iihren, dass dessen Schneidkante
ht
s der Untermesserschnei
nn
das Oberme ss
UNTERMESSERS
omnelz)
je
nach Bedarf das Ober-
efer li
egt. Anschliesse nd
cr bloc
Abb. 4 7 Figure
DES
der
Strom
hraube
hplatt
enkerbe
bl
err
eic
ht
dkante
kie
rt
werden.
OBER-
-
n
ock
ie-
ber
-
hat.
ca.
48
REMPLACEMENT
DES
On
ne do
debrancher le courant.
( 1) Pour remplacer le couteau superie
desserre Ia vis de
Po
ur temp/acer le couteau inferieur,
desserre Ia vis de fixation du support de
ou
teau i
c
du couteau in[eri
(2) Le cout eau
rainure de Ia plaq
(Fig. 48)
La
position 11ormale de fixatioll du couteau
(3)
sue
erieur e
pleteme/11 le coute
tranchallt du cow e
a e
11
l'extr
ferie,ur (Fig.
COUTEAUX
it pas
remplacer les c
fiXa
11[
erieur ainsi que
eur. (Fig
in
ferieur
st
determin
viron
0.5-J.O
b nite du tranchant du c
48).
out
tion.
Ia
. 47)
doi
t etre insere dans Ia
ue
prevue a cet e
ee
en bais
au. L 'e
xtrbnite ava11t
au
superieur doit tomber
mm
c
ontre Ia
eaux avant de
vis
de
san
surface de
outeau
REEMPLAZO
ur
, on
011
fixation
ffe
r com-
du
ill-
LAS
t.
CUCHILLAS
La
cuc
de
desconectar Ia f
(
1)
La cuchilla super ior pue
pues de aflojar el tornillo
cuchilla
despues
del sujetador
fij
aci6n
mue
(2) La posicion
regularse de tal manera que pue
en Ia mue sca para Ia cuch illa en Ia placa
garganta como se muestra en Ia Figura 48.
(3) La
cuchilla supe
Ia
cuchilla superior llega a su
bajo
lantera del filo cort
superior cae por 0
superficie
cuchill
DE
hilla debe cambiarse solamente desp ues
stra
pos
duran
uente elect
superi
or y Ia cuch
de
aflojar el tornillo de
de
de
Ia cuchilla . inferior como se
en Ia Figura 4 7.
de
ici6n normal para Ia fijaci6n
rio r pued e determinarse cuando
te Ia operaci6n. La
de
Ia
a inferior.
punta del fil o cort
rica.
de camb
de
fij
aci6n
ill
a inferior.
cuchilla y el tornillo de
Ia cuch illa inferior debe
ante
.5
-1.
(Figura 48)
0
de
mm
da
punto
punta de-
Ia cuchilla
Ab
iarse des-
de
fijaci6
colocarse
de
mas
con
tra Ia
ante
en Ia
b.
48
Ia
de
n
Ia
L
owe
r knife s
B
ef
estigungssc
Vis
de fixation du cow
Torn
ill
o de
fij
Lower knife holder se t scre
Befestigungss
Vis
de fixation du support de coute
Tornillo
et scr
ew /
hraube fiir das unt
aci6n
ea
u inf erieur I
de
Ia
cuch
de
fijaci6n del sujetador
ill
a inferior
Upper knife s
Befestigungsschraube
Vi
s de fixation du cow
Tornillo
cluaube
ere
fiir Halterung des
Me
sser I
et screw/
de fij
aci6n de Ia cuchillo
w/
au
de
Ia
fii
r das obere Mess
ea
u superieur I
unt
eren Messers I
inferieur I
cuch
ill
a inferior
er
superior
Figura 47
I
Figure showing upper knife
Abbildung des
Figure m o
sa posi
La Figura muestra la·cuchilla sup
mas alta
Upper knife /
·Obermess
Couteau superieur I
Cuchill a super ior
ti
ntrant
on
er
Oberme
Ia
plus
I
at
ssers in der
le couteau superieur
hau
te I
25
its highest position/
obe
rst
en
Lage I
dan
s
er
ior
en
su
posicion
Thro
at pl
ate
/
te
e-a
iguille I
de
er
fe
ill
a inferior
I
garganta
I
rieur I
Stichplat
Plaqu
Placa
L
ower knife/
Untermess
Couteau in
Cuch
Figure showi
Abbil
Figure montrant
po
siti
La
Figura muestra
ng
dung
on
upper knife
de
s Obermessers in der niedrigsten Lage I
Ia
plus
at
its lowest posi
/e co
uteau
bas
se I
Ia
cuchilla en su posici
inferieur
dans
6n
mas baj a
Figura
tion
/
sa
48
Page 30

11
LUBRICATION
SCHMIERUNG
LUBRIFICATION
LUBRICACION
As specia l materials (oil impregnated
are
used for parts
ti
onal lubrica
oil wick
sho
per
in red which can be seen from
the
;it
s suffic ie
is
uld be provided
month
machine, in
ions) s
hown
nt
of
tion
is
provid
to
for
negligible. However, since
ed
no
tho
se parts
add
ition
in Figure 49. 1
one
oilin
this mac
hine
act
for the inner sections, oil
more
than
once
(6
Positions) marked
the
those
-2
outside
parts
drops
to
g.
meta
ual addi·
or
twi
ce
of
(5
Po·
of oil
Figure
l)
Da die
Material sind, ist
kaum
Sc
hmi
cinem
ten
Tcile,
kcnnzcichnel
rnonatlich mit ein
verschen
49
WeU
enlager aus spez ieU olimpra
eine
erford
erlich. Die Teile,
erung schlec
Schmie
rdo
die
in
sind, ·solten ein-bis zweimal
wer
dcn .
zusatzlich
ht
zugiingig s
cht versehen. Die
der
Abb.
ode
die
ind, wu
49
mit Pfeilen ge·
r zwei T r
Five/ ten
5-10 Tr
s a 10
Se r
gniertem
Schmi
erun
g
fiir e inc
rden mit
rot
markier-
opfc
n 01
drops
..
of
opfen
01
coutt
equ
es d'lwite dans c
ie ren cinco/d iez gotas
Les pieces de cette machine sont fabriquees
avec
des
d 'lmle).
mau!riau
que tres peu de lubrification. Neanmoins
certains secteurs intern
dotes de meches
ou
deux [ois par mois.
ff
A cet e
en
mac
de
Met tre une ou
et il existe 6 trous de graissage marques
rouge. !Is sont
hi11
e.
graissa
ge (Fi
x speciaux (me
Par cons
equent elles ne necessaitellt
et doive
Par
vis
ail/eurs, il existe 5
g.
49).
deux
gout
es
de
nt
ibles
iJ
res
d '/wile dans e
10/
Ia
machine so
etr
e graises une
l'
exterieur de Ia
mar
de ces trous.
oil f
or
one
bci einer Schrni
oilling are necessary
ha
de
eru
ng gen
cun de ces rrous I
acei
te
pa r
only
Uge
n fiir dies
cada lubricaci
in th
en
6n
impregne
es po
lla
is
portio
Teil I
de esta porci
nt
i11t
s
cull
Abb.49
n I
Como los
pregnado
esta
maquina, puede
ad
ic ional. Sin em bargo,
pabilo
ace
el
ace
ite no
veces por mes a tal
marca
das
ex terna de
partes (5 posic i
1
-2 gotas
lubricac i6n.
6n.
mate
riales especiales (metal im·
de
acei te)
se
usan
para
omitir
se
itad
or
debe
en rojo
Ia maquina,
ones) mostradas
de ac
como
para las secc i
sumi nistrar se mas
es
par
que
eit
e son suficientes
tes (6 posic iones)
pueden ver
ademas
las piezas
Ia lubricacion
esta provisto un
ones interiores.
se
de
de aquellas
en Ia F igura 49.
de
de
dos
Ia
part e
para cada
26
Figura
49
Page 31

12
This
machine
lutely
me
nts.
The
following
ble
instances where
occur
ments
.
The
se
when operating
A)
When the
Is the el
the
Is
there
the motor?
Is the
B)
When
Have
Is the thread tension too strong?
Is
the
Is t he presser press
Are there any proble
type
H
as
C) When the needle br
Is the needle t
plate
Has the needle been inserted corr
D)
When the
Is the needle
H
as
Have the threads been inse
Is t he presser
E)
When the
Is the tens
lower th reads satis
Have the
is so designed
no
need
for complex
five
examples are
through
points should
machine
ectric
plug
receptacle?
any s
belt
loose?
the thre
the
threads been inserted
needle
of
thread being used?
the needle been inserted
or
pre
sea
the needle been inserted cor
sea
thre
difficulties
lack
of
fundamental
be
machine.
does
cord
properly
in
ure adeq
ms wi
eaks-
ouc
liing
irregular
or
the
not
factory?
correct
carefully
uffici
this
lipping
ad breaks -
bent?
sser foot?
ms are
bent
pressure s
ms are
ion adjustment
ads been
CHECKING
AND
ADJUSTMENT
that
there
professional
the
only
are
considered
not
operate -
inserted
the set posit
correctly
uate
?
th
regard
correctly?
against the
ectly
-
point worn ?
rectly?
rted
correctly?
ent?
sati
sfactory
of
the
upper a
ly inserted?
is abso·
adjust·
possi·
likely
adjust
ion
to
throat
?
-
to
·
into
of
?
the
nd
Di
ese Maschine ist so
komplizierte technische Einstellungen
gulierungen eriibrigen.
In den
sind Fehlerquellen
vorsichtige Behandlung oder unri chtige Ein-
stellen verschiedener Teile
hen kiinnen. Es ist zu empfchlen , sich mit
dicsen vertraut zu machen.
A)
B)
C) Die Nadel bricht,
D) Uberspringen von
E) Unregelmiissi
UEBERPRUFUNG
UNO
na
Di
e Maschine funktioniert nicht, wenn
Stecker falsch angebrac
der
der elektrische M
der Antriebsri emen zu lose eingelegt ist.
Der
Fade
falscher Einfadelung,
zu sta
rk
verbogener Nadel,
ungeniigendem Fiisschendruck,
fal
sc
h g
falschem Einsetzen d
Na
del die Stichplatte o
streift,
Nadel falsch eingesetzt ist.
gebogencr Nadel
spitze
falsch eingesetzter
fa
lschem Einfadeln
zu schwacher Fiisschendru
Spa
nn
ung des Ober- u
richtig eingestellt ist,
falsch eingefiidelt ist.
REGULIERUNG
kon
struier
t, dass sich
uod
chstehend aufgefiihrten 5 Punkten
er Fadenspannung,
ewahlt
auf
otor
n rcisst, bei
em Faden,
wenn
Stichen bei
oder abgc
Na
ge
Nahte, wenn
gefiihrt , die
dur
der Maschine entste-
ht
ist,
falsch
montiert ist,
er
Nade
l.
der
den Niihfuss
nutzt
cr Nadel-
del
ck
nd
Unterfadens nicht
Re·
ch un·
VERIFICATION
ET
REGLAGE Y AJUSTE
Cette machine
reg
/age prof
Les seuls ennuis
i!tre causes
mental.
Ci-dessous so
peuvent causer des ennuis.
Ces points
lors de
Ia
A)
Lorsque
Ve
rifier si
secteur.
S'il y a w1 patine
moteur.
Si
Ia
B) Lorsque le fil casse:
Verifier si l'enfilage a
Si Ia tension du fil
Si /'aiguille
Si
Ia
Si le fil est con
C)
Lorsque l'aiguille casse:
Verifier si l'aiguille touche
pied.
Si l
'a
D) Lorsque
Verifi
emousse
Si l'aiguille a ete bien inseree.
Si le
Si
Ia
E)
Lorsque Ia couture n
Verifier
superieurs et injerieurs est satisfaisante.
Si l
es
ne
11ecessite absolument pas de
essionnel comp/exe.
qui
que
doivent etr
couture:
Ia
puissent surgir
par manque
nt
signales les 5 seuls cas
machine ne toune pas:
Ia
prise est bien branchee
ment
courroie est desserree .
es
11
'est pas courbee.
pression du pied e
ve
nable.
iguille a ete inseree correctement.
Ia cou/Lire
er
si l'aiguille est cou rbee ou
e.
fila
ete e
nfi
le
pression
si
fils
ant
correctement.
du
pied est suffisante.
/e reg/age
ete correctemem enfiles.
INSPECCION
ne
de
e pris en consid
dans /e montage du
e
te fait
t trap forte.
st
adequate.
est irreguliere:
'es
t pas satisfaisante:
de
Ia tension des fi ls
peuvent
reg/age fonda-
era
correctemen t.
Ia
plaque ou le
Ia
qui
tion
au
pointe
Esta maqu ina esta disenada d.: manera
hay nin
guna necesidad de ajustes profesionales
com
pi icados
Los siguientes c
cuando
ajust
Estos
mente
A)
Cua
l Esta
i nsertado en el enchufe?
l No hay deslizamient o en Ia posic
colocac
l
B)
Cuando
lSe
l
lNo
l
l
usado?
l Esta co
C) Cua
lToca
prensatela ?
lSe
D) Cua
lNo
punta?
lSe
lSe
lEs suf
E)
Cuando
lEs corr
e
lSe
.
in
co
ocurr
es
No
No
No
No
inferior?
e algun problema por falta
fundamentales.
punt
os deben considerarse c
en Ia operaci6n de esta maquina.
ndo
Ia maquina no
el
cord6n
i6n
esta f
loja
se
rompe
ha insertado corr
es muy
esta torcida Ia aguja?
es
adecuada Ia presi6n
hay
rr
ectamente insertada Ia aguja?
ndo
se
romp
Ia
agu
ha inse
rtado co
ndo
Ia
costura
esta
dob
insertado
ha insertado
iciente Ia presi6n
Ia costura
ecta Ia
ha insertado
ejemplos son
elec
del
motor?
Ia correa?
el
hil
ectamente
fuerte
Ia
problema
e Ia aguja -
ja Ia pla
rrectame
es irregular -
lada
Ia
correctamente
correctamente
noes
tensi6n
correctamente
funcion
trico correcta
·
o -
tensi6n del
de
con
el
ca
de
nte
aguja o desgastada
Ia
de
Ia prensatel
satisfactoria -
de
los h i los superior
a-
el hilo?
hil
Ia prensatela?
tipo
garganta o
Ia aguj
aguja?
el hilo?
el hilo?
que
apli
uidad
o?
del
cabl
ment
ion
a?
a?
no
es
de
osa·
de
hilo
e
Ia
Ia
27
Page 32

13
APPLICATIONAL
NOTES
ANWENDUNG
VERSCHIEDENEN
DER
ZUSATZTEILE
NOTES
D'APPLICATION
NOTAS
APLICACIONES
SOBRE
13
·1 H
ow
to set
te
d materia ls
(us
ed onl
This presser foot
cloth parts with many curves.
(1
) First, raise the presser bar lifter, th en re·
move the presser set scr
(2) After changing the presser foot firmly tight·
en the set screw aft er confirming that the
needle dr
Figure
Presser
Nahfuss bei Einsatz von Stricksto
Pi
Prensatela para coser material
the presser
y for double chain stitchi
is very conve nient f
op
holes are in the p
50
foot
for sewing kn
ed presseur pour couture tissu a maille I
foot
for sewing knit·
ew
(Figure 51).
rop
itted
de
ng)
or
sewing
er pos ition.
material /
ff
I
teji
do
13· 1 Auswechseln der Nahfiisse
Beim Verarbeiten von Strickstoffen od
Material
in Abb.
Mit diescm Fuss kann nur
genaht
(l)
(2) Nach Auswechseln des Niihfusses ist die
mit
extrem
50
gezeigte F uss verwendet werde n.
werden.
Nlihfusshebel hochk l
befestigungs-Sch
Befestigungsschrau
Das Fiisschenstichl
richtigen Lage
scharfen Ecken soUte d
raube entfe
be
beftnde
Abb.
50
Doppelkettcnsti
appe
n, dann Na hfuss-
rnen (Abb. 5 J ).
wieder
och
muss sich in dcr
n.
anzuz
ichen.
/3-/
er
er
ch
Ce pied convi
arrondi
( 1)
(2) A
Figur e 51
Pres
ser
Levier de Ia barre du
Fixation du pied presseur
sur article
(U
tilisee seulement
chainette double)
Sou/ever le levier
du pied (Fig.
pres avoir remplace le pied, verifi
trous de
bloquer
bar
ii
mail/e.
ent
es
.
lifter/
pour /'assemblage des pieces
51).
Ia
plaque
Ia
vis
de fixation.
Fiisschenliifterhebell
pied
du
sont bien en place
I Elevador
pour
en couture
pied, retirer
de
couture
er
Ia
barr a
Ia
si les
de
vis
et
prensa tela
13-1 Modo
Esta prensatela es
partes
1)
(
(2) Despues
de
ales
(Usados solamente para
doble)
Primeramente, levante
barra
de fijaci6n
firmemente
de
aguja
regular
de
tejido
de
tela
con
de
prensatela, luego quite el tornillo
de
de
con
firmar
est~n
en
Ia
prensatela para materi·
puntada
muy
conveniente
muchas curvas.
el
Ia prensatela (Figura 51).
camb
iar Ia
el tornillo
que
Ia correcta pos icion.
prensatela,
de
los agujeros de cat
para
elevador
fijaci6n despues
Abb.
5 1
de
cadena
coser
de
apriete
da
de
Ia
Figura
50
Presser set screw I Niihfussbefestigungsschiaube I
Vis
de fixation du pied I Tornillo
de
fijaci6n
28
de
Ia
prensatela
Figura 51
Page 33

13
-2
Loosening seams
When loosening seams, remove
the reverse direction
Figure 52.
of
double
of
sewing as shown in
chain stitching
the
threads in
Figure
52
13-2
Auftrcnnen
Beim Auftrennen von
in
entgegen
Nahl
zu
dcr Doppe
gesetzte r Richtung der gen!ihten
losen wie Abb.
lkcttenstic
Naht
en, sind die
52
zeigt.
hnaht
Faden
13-2Point
Si
les fils dans le sens
com me
Jdche de
le po
int
n'est pas sufjisamme
indique en Figure 52.
Ia coutur
oppos~
a celui de
e c
hainett
nt
serr~
Ia
e
retirer
couture
Abb.
13-2 Deshilado
En el desh
sentido inverso
en
52
doble
il
ado
Ia Figura 52.
de
de
de
costura
de
Ia costura,
Ia
costura
puntada
quite
como
de
cadena
los hilos en
se muestra
Finishing / Nadelfaden
Finissage I Acabado
mit
Schere trennen /
Upp
er
cloth/
Tissu
superieur I Tela
Lo
wer
cloth/ Stoffunterkante
Tissu
inferieur I Tela inf
Pull
off
as
shown {Ripper) / Ent
Tirer com me indiqu€ I Sacar
Sto
ffoberkannte I
kett
eln des Oberfadens /
como
se
muestra
2
superior
er
ior
(Descosedo
/
r)
Lower
thread
/ Unt
erer
Faden / Pi/ in[erieur I H
29
3
il
o inferior
Figura
52
Page 34

14
.
SUPPLEMENT
GELJEFERTE
TEILE
SUPPLEMENT
SUPLEMENTO
.
Detailed list
1. Machine
2. Mo
3. Controller set
4. Vinyl cover
5.
Instruction booklet
6. Accessory box
(Contents)
Screw driver
Spanner (for motor bracket)
Needles
Upper knife
Tweezers
Cleaning brush
Oi
Hea
(for adju
Sewing margin gauge
Presser
It
is recommended that
cover be used for securing
time
of
contents
tor
I receptacle
rt
-shaped driver
st
ing stitch length)
foot
for
knitted material
the
pocket on
of
using the machine as shown in Figure 53.
the
accessories
the
at
side
the
Detaillierte Liste
1. Maschine
2. Motor
3.
Fussanlasser
4. Plastikhaube
5. Bedienungsanweisung
6. ZubeMrschachtel mit folgendem
Schraubenanzieh
Sechskantschlilsse1 {fUr
Nadeln
Obermesser
Pinzette
Reinigungsbilrste
Oel-FHischen Onha
Henformi
(filr Regulierung d
Niihfu
Der schatullenartige
ec
kplatte
Abd
die U
nterbrin
werden.
Figure
53
der
gelieferten Teile
mit
Kabel
er
System
1738
lt
hraub
er
Strickstoff
Abb. 53
gung der Zubehorteile benutzt
Accessory
Pochette d'accessoir
ss
ger Sc
filr
, wie
Motorkonsole)
starke
90
3
)
30
cm
enschlilssel
Sti
chllinge)
Raum
in d
gezeigt, kann fiir
pocket
Inhalt
:
er
seitlichen
I Zubeho rteikasten I
es
/ Caja
de
accesorios
Liste
detaillee du contenu
1. Machine
2. Moteur
3. PMale/
4.
5.
6.
Jl
couvercle pour le rangement des accessoires
lors de !'utilisation de
Rheo
stat
et
Couvercle en platique
Li
vret d'instruction
B
oite d'a
ccessoires
(Con tenant)
Toumevis
Clef pour moteur
Aiguilles
Couteau
Pi
Pinceau
Fl
Toumevis
(pour reglage longueur du point)
Guide margeur
Pi
est recommande d'utiliser
nee
ac
ed
on
pour
superieur
d'huile
en form e de coeur
ti
cablage
ssu a maille
Ia
machine.
Ia
poch
ette
du
Lista detallada de
1. Maquina
2. Motor
3.
Juego de
4. Cubierta
5. Manual de instrucciones
6.
Caja
de
(Contenido)
Destor
Uave (Para mensula del motor)
Agujas
Cuchil
Pinzas
Cepi
ll
o limpiador
Rece
pta
Llave
en
(Para ajus
li
brado r
Ca
Prensatela para mater ial de tejido
Se
recom i
en
Ia
tapa l
memento
b.53
Ab
contenido
controlador
de
vinilo
accesorios
nillador
la
superior
culo
de
aceite
forma de coraz6n
te
de
Ia
largura de puntada)
de
margen
enda
usar Ia caja de accesorios ubicada
atera
l para
del uso de
Ia
de
costura
conten
maquina.
er accesor i
os
en
el
30
Figura
53
Page 35

CHANGING
THE
CARBON
AUSWECHSELN
DER
REMPLACEMENT
DES
CAMBIO
DE
ESCOBILLAS
15
I
Two
carbon brushes (in
ed
to
be used for
ch
ine.
The
carbon brushes should be changed
to
according
worn away
A) Pe
The carbon brushes
th
ey have
carbon brush figure).
B) First remove
caps
brushes.
• The car
the brush se
p
• Carbon brushes may be
sewing machine s
shop.
Note:
Speci
to the afore
to chan
emitting from
quentl y further damage
the
afte
r long hours
ri
od for changing carbon brushes
worn
(s
ee figure of
bon
ro
ximately 3
al
care should be taken with rega
ge
the brushes may result in sparks
BRUSHES
two
the
following
the
brushes should be changed when
ction
mentioned
the
positions) are
motor
on
this sewing ma-
method,
of
use.
shou ld be changed when
too
short
for
motor.
mm
Remove
motor),
hop
motor
and replace
has worn down
as shown in the figure.
purch
ased from a
or
electric
points as failure
which will
the motor
OF
attach
as they are
contact
the
brush
to
al
appliance
cons
.
(see
the
ap-
ny
rd
e-
THE
-
MOTOR
Im
Motor sind 2 Schleifkohlen (an zwei Stellen)
installiert. Die Scltleifkohlen mOssen wie nachstehend
werden:
A) Die Schleifkohlen milss
B) Der Mo to r ist zuerst
of
Figure
Abb. Schl
Figure
Figura de Ia escobilla de carbon
aufgefillut
wenn sie so
sie zu kurz sind urn einen
stellen. (siehe Abb.
der
Konsolenbefestigung
heiden
neue auswec hsc
* Es empfiehJt sich die Schleifkohlen aus-
* Schle
Ac
Beachten
nicht rechtzeitiges Auswechseln
kohlen filhrt zur Beschiidig
montrant
ab~e
zuwechseln wenn sie sich bis
abgcschliffen habcn. (siehe Abbildung)
ifk
ma
schinen-
werden.
htun
g:
car
bon
eifkohle/
MOTORSCHLEIFKOHLEN
, regelmiissig auswechselt
stark abgeschliffen sind, dass
niltzten
lt
ohl en kiinnen in
ode
Si
e obge nannte
brush/
/'empla ceme
en
der
Schleifkohle)
zu demontieren
s-S
Kohlen milssen
werdcn.
r Ele
ktr
ogescha
Punkt
nt
chraube).
ung
des charbons I
ersetzt werden,
Kontakt
herzu-
Oo
Die
gegen
auf
ca. 3
mm
jedem
Na.h-
ft gekauft
e genau1 ein
der
Schleif-
des Motors!
sen
CHARBON
Le moteur de cette machine est dote de 2
chorbons,
doivent etre remplocls toutes
us
ls
A)
B)
Brush
2 bouchons de charbon I Tapa de escobilla (
1111
de chaque cote.
en procedont comme suit.
On
remploce l
trop courts pour
schlma du charbon)
(voir
Retirer d'abord
capuchons
rem place
• Les chorbons doive
leur section
men I comme
dessus.
• L
es
chorbons so
do
ns le commer
No
ta:
Sui
vre
rispue d'endomoger le m
cap
(two) I Sc
es
chorbons lorsqu
le
contact.
le
des
chorbons (voir figure) et
r.
est us
ee a 3 mm approximative-
indiqu
nt
ce.
ces indicati
ons foute de quoi on
ltJeifk
DU
MOTEUR
Ces
les
moteur - Retirer les
nt
etre remploces lorsque
~
dons le croquis
standar
ote
ur.
oltlenkappen I
chorbons
fois qu'ils sont
'ils
ds
et se trouve
sont
dos
les
ci-
nt
)
DE
CARBON
Estan provistas
posiciones) en
coser. Las escobillas
cu
erdo
de a
elias
se
A)
Perlo
Las escobillas
ndo
cua
(
V~ase
B)
Quite el moto
ll
as (Vease
las
escob
• Las escobillas
cuando
desgasta
co
mo se muestra en
• Las esco billas de car bon pueden adquirirse
en establecimie
o establecimie
dos
con
desgastan despulls
do
para cambio
se ac
ort
Ia figura de
Ia figura del motor). y ree mplace
ill
as.
Ia secci6n de Ia escob
do
DEL
escobillas
el
motor de
de
carb6
el siguiente mlltodo,
de
carbOn
an excesivamente por desgaste
Ia
r.
Separe las tapas
de
carbon d
por aproximadamente 3
nto de
nt
os
MOTOR
de carbon
esta
m~quina
n deben cambiarse
de
de
escobillas
escobilla de carb6n).
Ia
figura.
de
arte
pues
largas horas d e uso .
de
deb
en cambiarse
de
ebe
n cambiarse
ill
moi
quinas
de
factos
el~tri
(en dos
de
to
que
carb6n
escobi-
a se ha
mm
coser
cos.
10mm
'-
i
'-\\<11
et
Bracket s
Vis de
screw I Kon
fixation du support I
31
so
lenbefestigungs.Schraube /
Tornillo de
fijacion de Ia mensula
Page 36

16
SPECIFICATIONS
SPEZIFI
KATIONEN
SPECIFICATIONS
ESPECIFICACIONES
Item
Overedging
Distance between
needl
Stitch
Needle bar stroke
Kn
ife
Presser
(upward volume)
Feed
Needl
Number
Meth
lubrication
Machine dimensions
Weight
widt
es
length (feed)
movement
lift
dog
height
es
of
threads
od
of
of
machine
h
4mm
3
mm
1 -
5mm
27
mm
7.5
mm
4mm
0.7
mm
BL
x 1
No.
11,
4
Semi-
automatic oil
lub
rication
Le
ngth
250
mm
9.5kg
Specification
(standard)
(or
DB
x 1)
No.
14
250
mm
x Brea
x Heig
ht
(with motor)
wick
280
dth
mm
Teil
Overl
ock
-Breite
Abs
tand
den
zwischen
Nadeln
Stichlange l
Nadelstangenhub
Me
sser
hub
Fiissc
henhub
Htihe
des
Tra
po
rteur
ns-
s
Nadeln
Anza
hJ
der Faden 4 Nombre de fils 4
Schmie
run
g
Abmessung
en
Gewicht
Spe
zifikation !
4mm
3 mm
-5mm
27
mm
7
.5
mm
4mm
0.7 mm
(normalc Holte)
System 1
80
738
oder 90
Star
ke
Halbautomatische
Oeldoch tschmierung
Liin
ge
250
250
9.5k
mm x Brcite
mm x Holte 280 mm
g (inkl. Moto
r)
Lorgeur du surjet 4 lllln
Distance e
l
es
oig
uill
Longueur du point
Jet
~e
de
aiguille
Mouveme
couteou
Haute
ur
du pi
ed
Ha
uteur
Aiguilles
Systetne de Semi· A lltoma tique -
graissage Lubrijicati
Dimensions de
m
achi
ne hauteur 280 mm
Poids d e
re
m Specification
ntr
e
es
Ia Borre
nt
du
d'elevotion
de
Ia
griffe
3
/ll/11
J-
5 mm
27 1/l/11
7.5 mm
4 1/l
//l
0.
7
mm(houteur standard)
"ORGAN" DB
11, No.
14
on
par ineches
/ll/11 X 250
avec moreur
Ia
machine
Ia
No .
250
9.
5kg
X 1
111111
Item Especificaci6n
Ancho
de punt
ada
4m
m
Distancia e
agujas
Largura de
(avance)
Ca
de
Mov
cuc
Elevaci
prensatela
(Grado
A l
tura
de avance
Agujas
Numer
Metoda
lub
Dim
maquina
Peso
ntr
e
3mm
pun
tad a
1-5mm
rrera de Ia barra
aguja
imiento de Ia
hilla
6n
de
Ia
de
elevaci6n)
del re ten
o
de
hi los
de
ricaci6n aceitadora
ensiones
de
Ia
maquina
de
27mm
7.5
4mm
0.7
BL
No. 11, No. 14
4
Lubricaci6n
Ia
250
(Ancho
9.5 kg (con
mm
mm
x 1 (o
(no
rmal)
DB
por
semi·automatica
mm
(Largo) x 250
) x
280
motor)
x 1)
mecha
mm
mm
(Alto)
32
Page 37

TABLE
SHOWING
RELATIONSHIP
FADENTABELLE
FUR
1
No.
Type
Thin cloth
(organdy, thin
1
tricot,
silk, crepe ,
uit
s
Ordinary
(
co
2
linen, sat in,
cloth
Thick
(tweed,
oat cloth,
c
3
denim,
su
it
7
of
cloth
taffeta
lining)
cloth
tton,
tricot
in
general)
cloth
over-
thick
cloth)
BETWEEN
Use Type
Double
ing (straight seaming)
,
Overedging
Double
st
,
Overedgi
Double
stitching
Overedging
chain sti
chain
itching
ng
chain
THREAD
tch
-
Cotton
Silk No.
Cotton
Silk
Cotton
Silk No.
Cotton
Silk No.
Cotton
Si
lk No.
Tetro
nylon threads
Cotton
Si
lk No.
Tetron
nylon
AND
of
thread
No.
80~
No. 100
80
~No.
No.
80~
80~
60~
50~
60~
50
~
40~
40~
40~
40~
No. 100
No. 100
No. 100
No. 100
No. 100
No. 100
No.
No.
No.
No.
No.
No.
No.
No.
n and woolly
No.
and woolly
threads
CLOTH
Length
2.0
3.0
2.0
3.0
2.0
3.0
mm~
mm
mm
mm ~
mm
m
m~
100
60
60
60
60
of stitch Nr.
3.0
mm
~
4 .0 mm
~
3.0
mm
4.0
mm
~
4.0 mm
5.0
mm
A
rt
des
Stoff
Dunner Stof
(O
rga
ndy,
Lei
ch
tes,
1
Tafft
Krepp,
Anzul!fu t ter)
Ge
Stof
2 (Baumwolle,
Tri
Satin)
Dicker
(Tweed,
Man
Baum-
3
wo
Schwerer
Kos
Trikot
e, Seide,
wo
hnli
cher
f
ko
t, Leinen,
Stoff
telstoff,
lldrillich,
tUmstoff)
es
f
VERSCHIEDENE
Verwe
ndun
g Art des Fadens Stichlan
Doppelk
(gerades
,
Overlo ck
Do
ppelkettenst
O
verloc
D
opp
Overlock
ettenstich
Saumen)
k
elke
ttenst
Baumwolle Nr.
Seide
Baumwolle N
Seide
Ba
ich
Seide
Baumwolle Nr.
Seide
Baumwolle N
Seide Nr.
ich
etron
T
Nylo ngarn
Baumwolle N
Seide Nr.
Tetron-und
Nylon
umwolle Nr.
STOFFE
8
0~
N
r.
8
0~
r.
80~
Nr.
80~
6
0~
N
r.
so~
6
0~
Nr.
s
o~
r.
4
0~
-und wolliges
ga
rn
40~
r.
40~
40~
wollinges
N
r.
100
N
r.
100
N
r.
100
Nr. I
N
r. 100
N
r. 100
Nr.
100
Nr. 1
Nr. 60
N
r.
60
N
r.
60
Nr.
60
00
oo
2.0
3.0
2.0
3.0
2.0
3.0
mm~
mm
~
mm~
mm
~ 4.0
mm~
m m
~
ge
3.0 mm
4.0
mm
3.0
mm
mm
4.0
mm
5.0
mm
Knitt
4 (kn
k
nitt
ed
clo
itt
ed goods,
ed cloth)
Double chain
stitching
th
Ovenidging *Very
Cotton
Si
Tetr
transparent
Wo
te
No.
40~
lk
No.
on, woolly nylon and
olly ny lon
tron
threads
thin
thread
may be used
as
the
low
No.
30~
No.
ny lon
and
woollen
er
thread
thre
50
40
.
ads
2.0
3.0
m
m
~ 4.0 mm
mm
~
5.0
mm
33
4
S tri
ckma
(St
rickwaren,
Stricksto
terial
ff)
D
op
Overl
pelke
ock
ttenst
Baumwolle Nr.
Sei
ich
de
T
etron
, wolliges Nylon-
transparentes Nylongarn
Wollinges Ny longarn
Tetrongarn
* Sehr di.innes Wollgarn
nn
als Greifer Faden
ka
verwend
et
40~
Nr.
30~
werden.
Nr.
50
Nr. 40
und
un
d
2.0
3.0
mm~
mm~
4.0
5.0
mm
mm
Page 38

TABLEAU
COMPARATIF
DU
TABLA
DE
RELACION
ENTRE
TISSU
NO.
Qualite du tissu Utilisation
Tissu fin (organdi
tricot fin, taffetas,
1
soie, crepe,
doublure)
Tissu ordinaire
(coton, tricot, lin,
2
sa
tin, tous tissus)
Tissu epais tissu
de
3
4 Article en tissu
manteau de
costume etc.
Tissu a maille
a maille
Couture cha
piqure droite
Surjet
Cou
Surjet
Couture chaine
Surjet
Couture chain
Surjet
tur
ET
e chain
inett
ette
ette
DU
e
tte
Fl
L
Qualite et
Coton
N080-NO
N080-NOJ00
Soie
NO
Co ton
NO
Soie
Co t
on
NO
NO
Soie
Co
ton
NO
NO
Soie
NO
Cot
on
NO
Soie
rg
al
et
Te
Co ton
So
Tergal
Coton
So
Tergal, Iaine
fit
Fit
Fit
etre utilise
inf
fit mousse
NO
NO
ie
et
fil
N040-N050
NO
ie
nyl
on transparant
nyl
on
Iain
e tres fin pe
i rieur
NO
du
80-NO
80-NO 100
60-NO 100
50-NO 100
60-NO
50
-NO
40-NO
40-NO
40-
NO
40-
NO
mou
se
30-NO
et
nylon -
et
Iaine -
pour
ut
fit
fil Longueur
100
100
100
100
60
60
60
60
40
2.0
3.0
2.0
3.0
2.0
3.0
2.0
3.0
mm-
mm-
mm-
mm-
mm-
mm-
mm-
mm-
du
3.0
4.0
3.0
4.0
4.0
5.0
4.0
5.0
point
mm
mm
mm
mm
mm
mm
mm
mm
No.
Ti
Te
rg
(o
delgado,
1
sed
rr
fo
Tela ordinaria
(a
fgod6n, tricot,
ge
nera de fino,
2
saten, tela
en general)
Tela gr
(" twee
de sobretodo.
3
brin, tela
gr
uesa para
traje)
Tela de teji
(Genera de
4
tejido, Tela de
ji
te
po de tela
la
delgada
andi, tri cot
tafetan,
a,
crep
e,
o de traj
uesa
d".
do)
EL
Pu
dob
Puntada
sobreorilla
e)
Puntada de cade
dobfe
Puntad
sobreori
Puntada
dob
tela
P
sob
Pu
do
do
Punta
sobreorilla
HILO Y LA
Uso
ntada de cadena Algod6n No. 8
le (costu
fe
unt
ada
reorilla
ntada de cadena
bfe
ra
de
a de
I
fa
de cadena Sed a No. 40- No. 60
de
da
de
rect
na
TELA
Ti
po
a)
Sed
a No. 8
Algod6n No.
Sed a No.
Al
god6n No. 60-No. 100
Se
d a No. 50-N
Afgod6n No.
Sed a No. 5
Afgod6n No.
Hil
a de
tet
nif6n f
an
udo
Afgod6n No.
Sed
a No.
Hifo de
nif6n fanudo
Afgod6n No. 40-No.
Sed
Hila de
nif6n fanudo e hila de
nif6n transparente
H
hil
*
tetro
a No.
te
ilo
de nif6n fanudo e
a de tetron
Pu
ede
usarse
fanudo defgado como
inf
erior
hifo
.
del hilo
0-N
o. 100
0-N
o. 100
80-
No. 100
80-
No. 100
o. 100
6
0-N
o. 100
0-N
o. 100
40-N
o. 60
ron e hifo de
40-No.
40-No.
n e hifo de
30-No.
tron, h
ifo
de 2.0
ef hifo
Largo de puntada
mm
2.0
3.0 mm- 4.0 mm
mm
2.0
3.0
mm-
mm-4.0
2.0
60
60
3.0
mm-5.0
50
40
mm-4.0
3.0
mm-
- 3.0 mm
- 3.0 mm
4.0 mm
mm
mm
mm
5.0
mm
34
Page 39

Printed in Japan J
uly 1977
 Loading...