

Page 1

SIMPLIFIED
MANUAL
Page 2
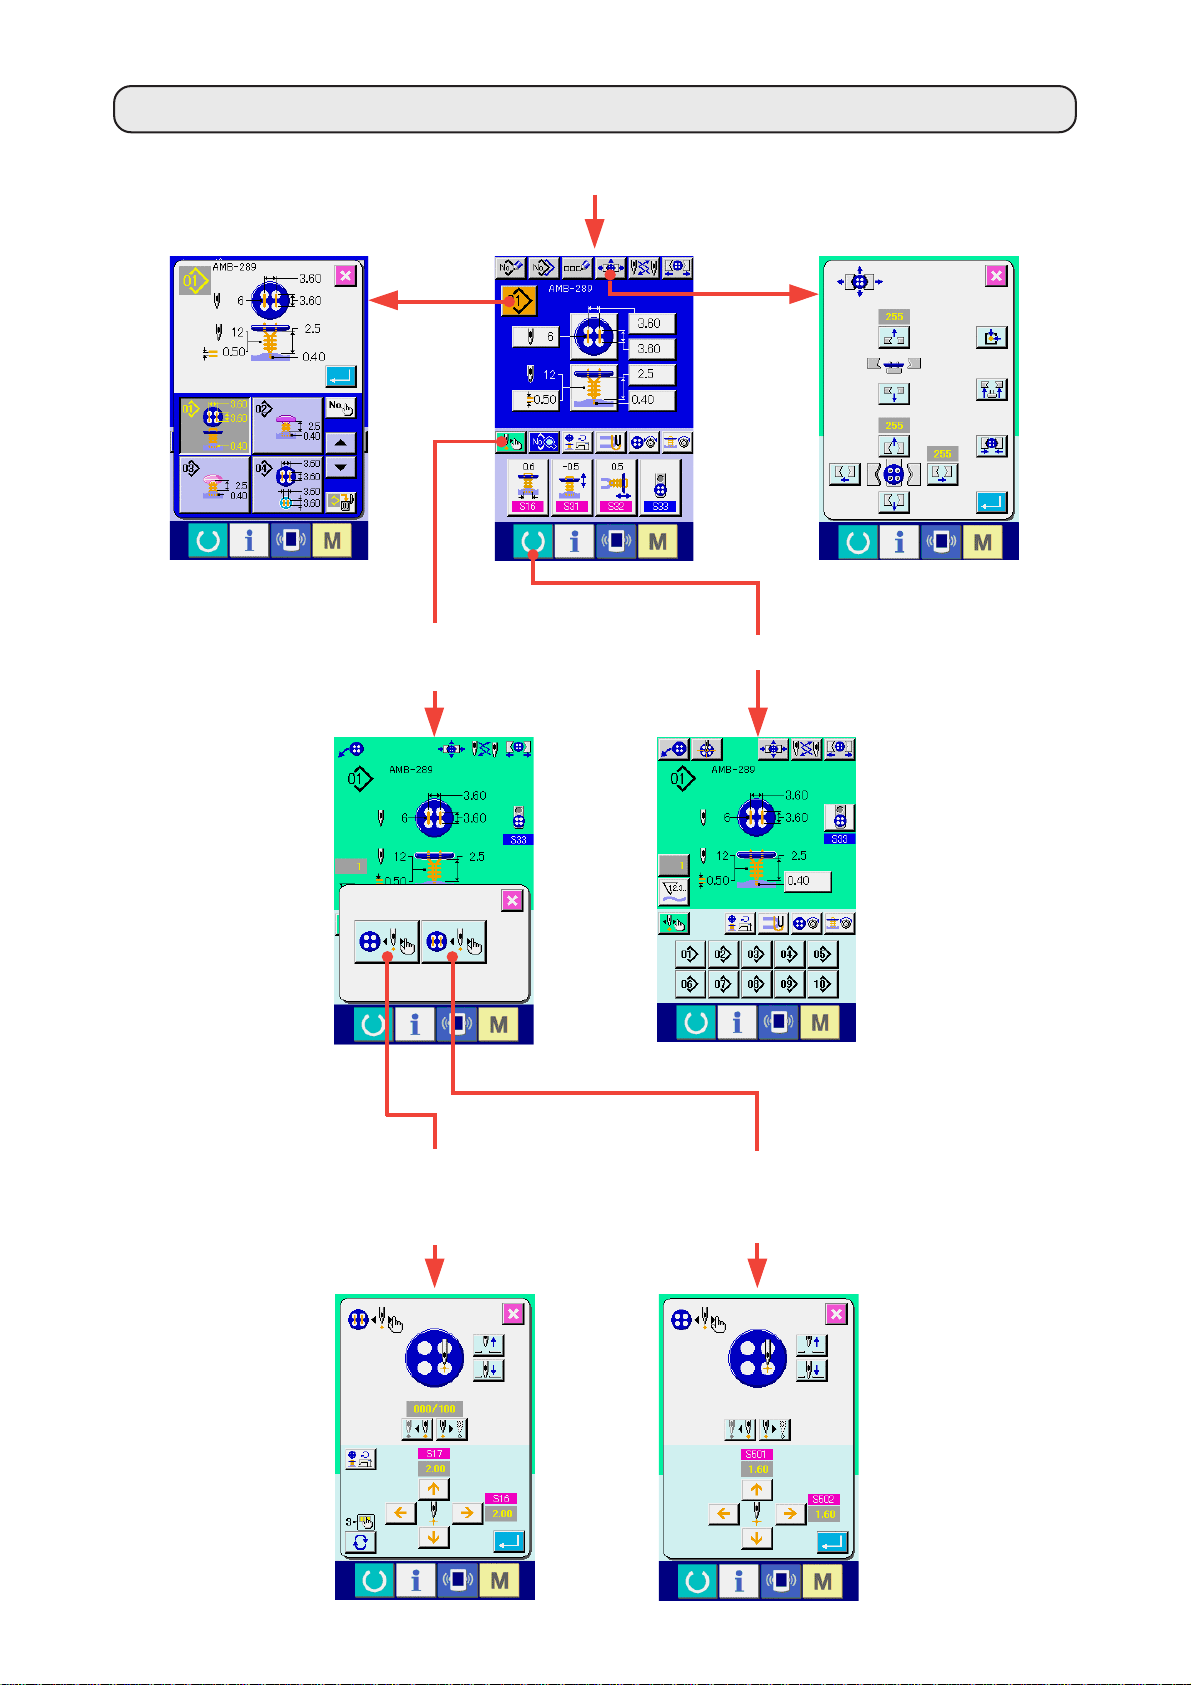
1. BASIC OPERATION OF THE SEWING MACHINE
Power switch ON
Sewing pattern selection screen Button loader adjustment screen
Needle entry point input
and check with step motion
Point setting mode
Necessary needle entry points are
set in order.
Start of sewing
Sewing motion step mode
Needle entry points are inputted
while performing sewing.
– 1 –
Page 3

<Explanation of the display at the time of independent sewing>
1) Data input screen
O
A B C
E
F
G
D
H
J
P
I
L
M
K
N
Symbol Display Description
A
B
C
D
E
F
G
H
I
J
K
L
M
N
O
P
PATTERN NEW REGISTER
button
PATTERN COPY button
PATTERN NAME SETTING
button
PATTERN NAME display
NEEDLE CHANGE button
CHUCK CLOSE/OPEN button
PATTERN SELECTION button
CONTENTS OF PATTERN
display
SEWING DATA CHANGE
button
NUMBER OF REVOLUTIONS
SETTING button
STAY THREAD SETTING
button
BUTTON SEWING THREAD
TENSION SETTING button
NECK WRAPPING THREAD
TENSION SETTING button
CUSTOMIZE button
CHUCK ADJUSTMENT button
STEP SEWING button
Pattern No. new register screen is displayed.
→Refer to "21. PERFORMING NEW REGISTER OF SEWING PATTERN" in Operation section of INSTRUCTION MANUAL.
Sewing pattern copy screen is displayed.
→Refer to "22. COPYING SEWING PATTERN" in Operation section of INSTRUCTION MANUAL.
Sewing pattern name input screen is displayed.
→Refer to "5. NAMING THE PATTERN" in Operation section of INSTRUCTION MANUAL.
Name which has been inputted to the sewing pattern being selected is displayed.
This button performs origin retrieval, makes needle come down, and displays the needle change screen.
→Refer to "33. PERFORMING CHANGE OF NEEDLE" in Operation section of INSTRUCTION MANUAL.
This button performs close/open of the chuck. Chuck is opened as long as the button is pressed.
Pattern No. being selected at present is displayed on this button and when the button is
pressed, the pattern No. change screen is displayed.
→Refer to "4. PERFORMING PATTERN No. SELECTION" in Operation section of INSTRUCTION MANUAL.
Contents of the pattern which is registered to the pattern No. being selected at present
are displayed. The respective display sections consist of buttons and can be changed.
The contents of display differ in accordance with the sewing method.
* Sewing flat/wrapped-around button with blindstitch
→
Refer to "7. PERFORMING DATA SETTING OF SEWING BUTTON WITH BLINDSTITCH (SHANK/MARBLE BUTTON)" and
"8. PERFORMING DATA SETTING OF SEWING BUTTON WITH BLINDSTITCH (FLAT BUTTON)" in Operation section of INSTRUCTION MANUAL.
* Sewing flat button directly to cloth
→Refer to "9. PERFORMING DATA SETTING OF SEWING FLAT BUTTON DIRECTLY TO CLOTH" in Operation section of INSTRUCTION MANUAL.
* Sewing flat button with blindstitch
→Refer to "10. PERFORMING DATA SETTING OF SEWING FLAT BUTTON WITH BLINDSTITCH" in Operation section of INSTRUCTION MANUAL.
* Counter/stay button
→Refer to "11. PERFORMING SETTING OF COUNTER/STAY BUTTONS" in Operation section of INSTRUCTION MANUAL.
* Neck wrapping sewing
→Refer to "12. PERFORMING DATA SETTING OF NECK WRAPPING SEWING DATA" in Operation section of INSTRUCTION MANUAL.
Sewing data list screen is displayed.
→Refer to "20. CHANGING SEWING DATA" in Operation section of INSTRUCTION MANUAL.
Number of revolutions setting screen is displayed. Change of number of revolutions of
sewing machine for button sewing and that for neck wrapping can be performed.
→Refer to "15. PERFORMING SETTING NUMBER OF REVOLUTIONS OF SEWING MACHINE" in
Operation section of INSTRUCTION MANUAL.
Stay thread setting screen is displayed.This screen is displayed only in case of sewing
flat/wrapped-around button with blindstitch or flat button with blindstitch, and setting of
stay thread is possible.
→Refer to "16. PERFORMING SETTING STAY THREAD" in Operation section of INSTRUCTION MANUAL.
Button sewing thread tension setting screen is displayed.
→Refer to "17. PERFORMING INPUT OF BUTTON SEWING THREAD TENSION" in Operation section of INSTRUCTION MANUAL.
Neck wrapping thread tension setting screen is displayed. This screen is displayed only
in case of sewing flat/wrapped-around button with blindstitch or neck wrapping sewing.
→Refer to "18. PERFORMING INPUT OF NECK WRAP THREAD TENSION" in Operation section of INSTRUCTION MANUAL.
Sewing data which are more frequently used can be laid out to four buttons. When this
button is pressed, the laid-out sewing data change screen is displayed.
→Refer to "35. CUSTOMIZING DATA INPUT SCREEN" in Operation section of INSTRUCTION MANUAL.
Chuck adjustment screen is displayed.
→Refer to "23. PERFORMING CHUCK ADJUSTMENT" in Operation section of INSTRUCTION MANUAL.
When this button is pressed, the step sewing screen which performs input and check of
needle entry point is displayed.
→Refer to "25. PERFORMING INPUT AND CHECK OF DATA WITH STEP MOTION"
in Operation section of INSTRUCTION MANUAL.
– 2 –
Page 4
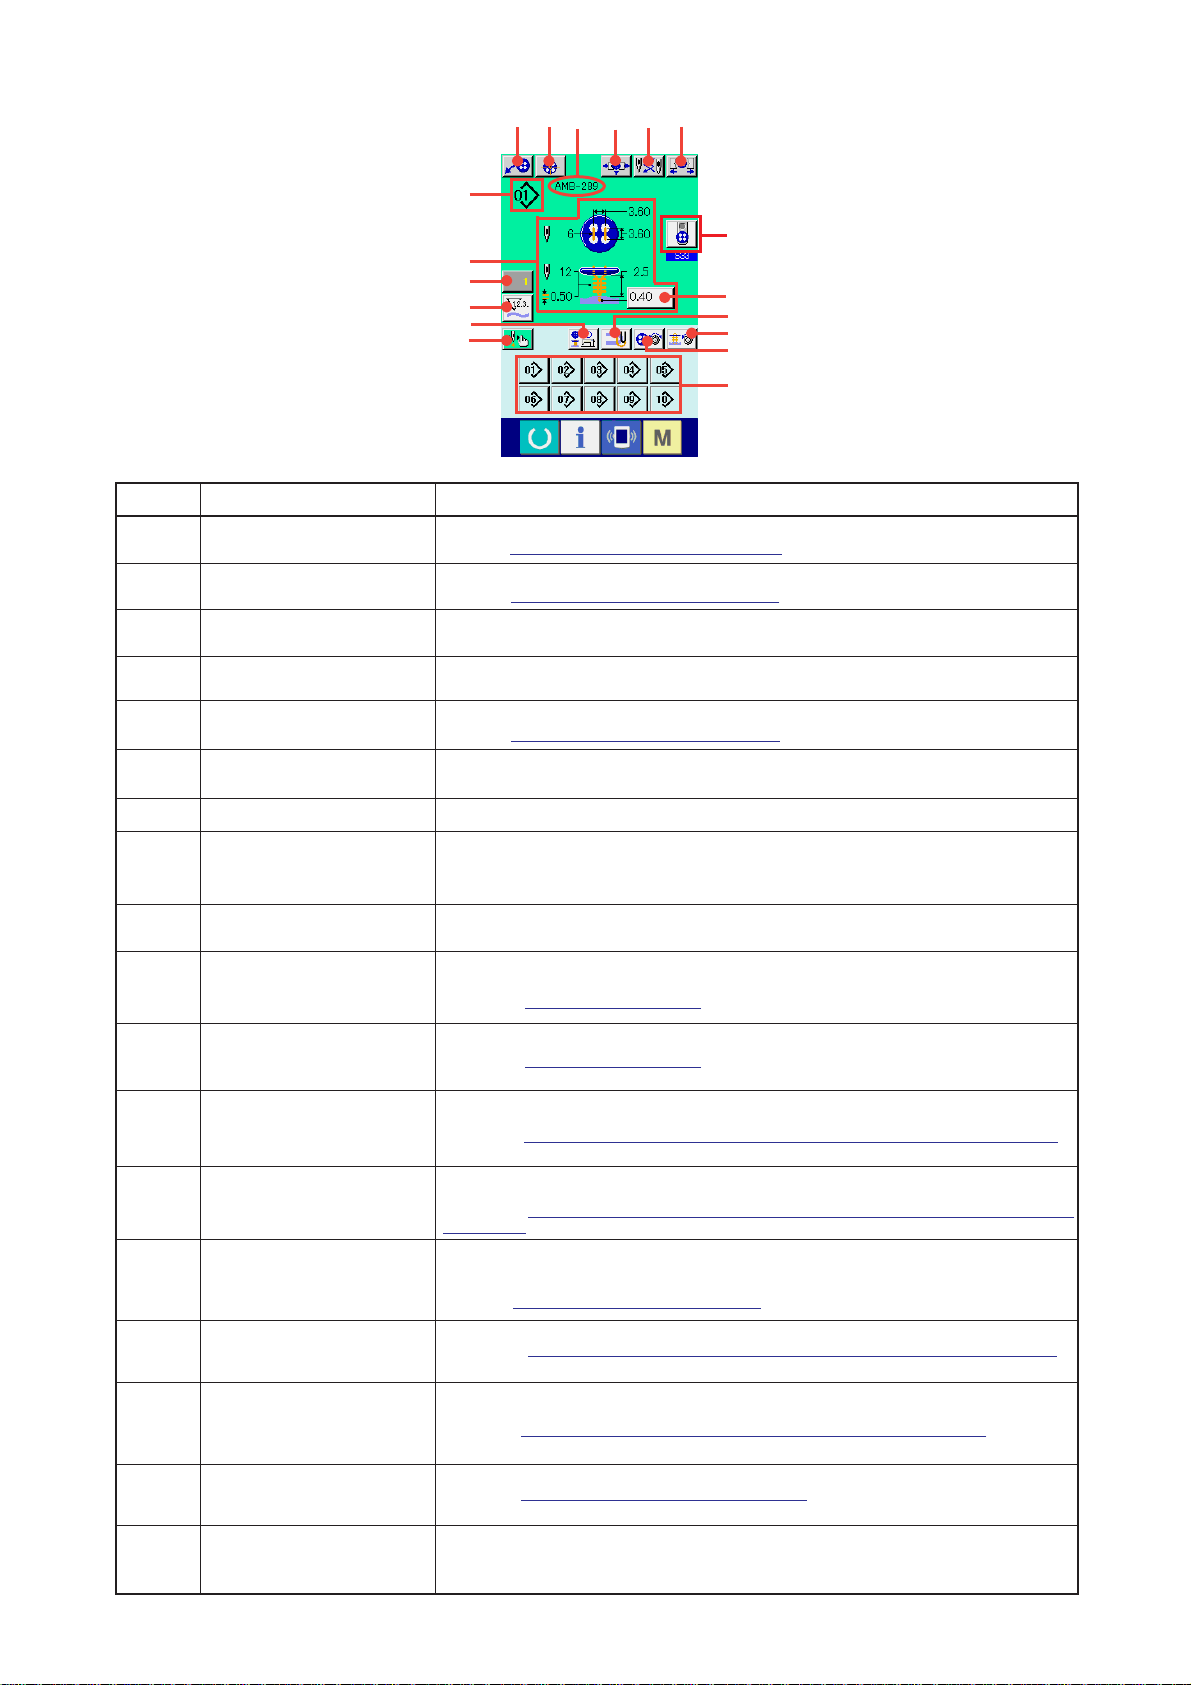
2) Sewing screen
D B A
G
H
J
K
M
L
Symbol Display Description
CHUCK ADJUSTMENT button
A
BUTTON CENTERING button
B
PATTERN NAME display
C
Chuck adjustment screen is displayed.
→ Refer to "23. PERFORMING CHUCK ADJUSTMENT" in Operation section of INSTRUCTION MANUAL.
This is not displayed in the initial state.
→ Refer to "24. PERFORMING BUTTON CENTERING" in Operation section of INSTRUCTION MANUAL.
Pattern name which is set in the pattern data during sewing is displayed.
C
E F
R
I
N
P
O
Q
LOADER MOTION button
D
NEEDLE CHANGE button
E
CHUCK CLOSE/OPEN button
F
PATTERN NO. display
G
PATTERN CONTENTS display
H
BLINDSTITCH AMOUNT SETTING button
I
COUNTER VALUE CHANGE
J
button
K
COUNTER CHANGE OVER button
STEP SEWING button
L
NUMBER OF REVOLUTIONS
M
SETTING button
STAY THREAD SETTING button
N
BUTTON SEWING THREAD
O
TENSION SETTING button
NECK WRAPPING THREAD
P
TENSION SETTING button
DIRECT button
Q
BUTTON LOADER SELECTION button
R
When this button is pressed, loader works and sets button to the chuck.
This button makes needle come down, and the needle change screen is displayed.
→ Refer to "33. PERFORMING CHANGE OF NEEDLE" in Operation section of INSTRUCTION MANUAL.
This button performs close/open of the chuck.
Chuck is opened as long as the button is pressed.
Pattern No. during sewing is displayed.
Contents of pattern registered to pattern No. during sewing are displayed. Contents of
display depend on the sewing method. Blindstitch amount only can be set in the sewing
screen.
Setting of blindstitch amount is possible.
* This is displayed only in case of sewing flat/wrapped-around button with blindstitch or flat button with blindstitch.
Existing counter value is displayed on this button. When the button is pressed, the counter
value change screen is displayed.
→ Refer to "31. USING COUNTER" in Operation section of INSTRUCTION MANUAL.
Display of sewing counter/No. of pcs. counter can be changed over.
→ Refer to "31. USING COUNTER" in Operation section of INSTRUCTION MANUAL.
When this button is pressed, the step sewing screen which performs input and check of
needle entry point is displayed.
→ Refer to "25. PERFORMING INPUT AND CHECK OF DATA WITH STEP MOTION" in
Operation section of INSTRUCTION MANUAL.
Number of revolutions setting screen is displayed. Change of number of revolutions of the
sewing machine for button sewing and that for neck wrapping can be performed.
→ Refer to "15. PERFORMING SETTING NUMBER OF REVOLUTIONS OF SEWING
MACHINE" in Operation section of INSTRUCTION MANUAL.
Stay thread setting screen is displayed. This screen is displayed only in case of sewing flat/
wrapped-around button with blindstitch or flat button with blindstitch, and setting of stay
thread is possible.
→ Refer to "16. PERFORMING SETTING STAY THREAD" in Operation section of INSTRUCTION MANUAL.
Button sewing thread tension setting screen is displayed.
→ Refer to "17. PERFORMING INPUT OF BUTTON SEWING THREAD TENSION" in
Operation section of INSTRUCTION MANUAL.
Neck wrap thread tension setting screen is displayed. This screen is displayed only in case
of sewing flat/wrapped-around button with blindstitch or neck wrapping sewing.
→ Refer to "18. PERFORMING INPUT OF NECK WRAP THREAD TENSION" in Operation
section of INSTRUCTION MANUAL.
Pattern No. is changed over to pattern No. which is registered to the button.
→ Refer to "36. CUSTOMIZING SEWING SCREEN" in Operation section of INSTRUCTION
MANUAL.
Button loader being selected at present is displayed on the button.
When the button is pressed, the state of button loader can be changed.
– 3 –
Page 5

2. SETTING PROCEDURE OF SEWING PRODUCT
<In case of sewing flat/wrapped-around button with blindstitch or sewing flat button with blindstitch>
2
1
3
6
4
5
7
<In case of sewing flat button directly to cloth>
2
1
3
4
7
5
Set button 1 to button loader 2 and depress the back part of
the pedal to insert the button into button chucks 3. (When the
button loader is not used, insert the button by hand since the
chuck is opened by depressing the back part of the pedal.)
↓
Set cloth 4 to tongue 5 and make it come in contact with tongue
stopper 6. (Release of the tongue is performed by depressing
the back part of the pedal.)
↓
When the front part of the pedal is depressed, the button chuck
comes down to the sewing position where the sewing is possible.
* By setting the pedal motion mode of memory switch data
, the button chuck automatically comes down to the
sewing position.
→For the details of the memory switch data,
refer to "32. (2) Memory switch data list" in Operation section
of INSTRUCTION MANUAL.
↓
Sewing starts when start switch 7 is turned ON.
Set button 1 to button loader 2 and depress the back part of the
pedal to insert the button into button chucks 3. (When the button
loader is not used, insert the button by hand since the chuck is
opened by depressing the back part of the pedal.)
↓
Set cloth 4 under the needle, make the tongue come in contact
with the tongue stopper, and make cloth presser 5 come down by
depressing the front part of the pedal to fix the cloth. (By depressing
the pedal reversely, the cloth presser is released.)
↓
When depressing the front part of the pedal again, the button chuck
comes down to the sewing position where the sewing is possible.
* By setting the pedal motion mode of memory switch data
, the button chuck automatically comes down to the sewing position.
→ For the details of the memory switch data,
refer to "32. (2) Memory switch data list" in Operation section of
INSTRUCTION MANUAL.
↓
Sewing starts when start switch 7 is turned ON.
<In case of counter/stay button>
2
1
4
3
8
6
7
5
Set upper button 1 to button loader 2 and depress the back part of
the pedal to insert the button into button chucks 3. (When the button
loader is not used, insert the button by hand since the chuck is opened
by depressing the back part of the pedal.)
↓
Insert lower button 4 into button setting section 5 of the feed plate.
↓
Set cloth 6 under the needle, make the tongue come in contact with
the tongue stopper, and make cloth presser 7 come down by
depressing the front part of the pedal to fix the cloth. (By depressing
the pedal reversely, the cloth presser is released.)
↓
When the front part of the pedal is depressed, the button chuck comes
down to the sewing position where the sewing is possible.
* By setting the pedal motion mode of memory switch data ,
the button chuck automatically comes down to the sewing position.
→ For the details of the memory switch data,
refer to "32. (2) Memory switch data list" in Operation section of
INSTRUCTION MANUAL.
↓
Sewing starts when start switch 8 is turned ON.
– 4 –
Page 6

3. STITCHING DIAGRAM OF SEWING FLAT/WRAPPED-AROUND BUTTON WITH BLINDSTITCH
Needle entry to button
C
A
B
D
A
B 1st stitch hole position of upper button (lateral)
C Upper buttonhole interval (longitudinal)
D Upper buttonhole interval (lateral)
1st stitch hole position of upper button (longitudinal)
Needle entry of neck wrapping
Needle entry to cloth
F
G
H
E Blindstitch amount
F Blindstitch width
G Compensation of lower left position of upper button
H Amount of stay thread
N
E
L
P
J
I Button sewing height (only neck wrapping of sewing flat/wrapped-around button with blindstitch)
Button sewing height (shank and marble buttons)
J Tie stitch position at the start of sewing of neck wrapping (longitudinal)
Tie stitch position at the start of sewing of neck wrapping (lateral)
K Start position of neck wrapping
Stitch width of neck wrapping (right side)
L Top position of neck wrapping
Stitch width of neck wrapping (left side)
M Tie stitch position at the end of sewing of neck wrapping (longitudinal)
Tie stitch position at the end of sewing of neck wrapping (lateral)
N Whole compensation of button holding position (lateral)
P Neck wrapping pitch
I
M
K
to can select the step motion mode and only.
– 5 –
Page 7

4. SEWING DATA LIST
Sewing data are those that can be inputted to 99 patterns from pattern 1 to 99 and can be inputted to each pattern.However,
the sewing data that can be inputted differ according to the selected sewing method or sewing shape.
No. Item
Sewing method
This item sets the sewing method.
: Sewing flat/wrapped-around button with
blindstitch
: Sewing flat button
with blindstitch
Stitch shape (sewing flat/wrapped-around button with blindstitch)
This item sets the stitch shape of sewing flat/wrappedaround button with
blindstitch.
Stitch shape (sewing flat button directly to cloth)
This item sets the stitch shape of sewing flat button directly to cloth.
Stitch shape (sewing flat button with blindstitch)
This item sets the stitch shape of sewing flat button with blindstitch.
: Neck wrapping
: Sewing flat button
directly to cloth
: Counter/stay
button sewing
Setting range
– – –
– – –
– – –
Edit unit
– – –
– – –
– – –
Initial display
Sewing flat/
wrappedaround
button with
blindstitch
4-holed button
without cross-
over stitches
(longitudinal)
4-holed button
without cross-
over stitches
(longitudinal)
Remarks
Stitch shape (counter/stay button sewing)
This item sets the stitch shape of counter/stay button sewing.
* Selection of the shape of lower button is performed with .
Upper buttonhole interval (longitudinal)
This item sets the needle entry interval of top feed.
Upper buttonhole interval (lateral)
This item sets the needle entry interval of top feed.
Needle entry interval of bottom feed (longitudinal)
This item sets the needle entry interval of bottom feed.
– – –
– – –
0.10 to
6.00
0.10 to
6.00
0.10 to
6.00
– – –
– – –
0.05mm
0.05mm
0.05mm
4-holed button
without cross-
over stitches
(longitudinal)
Front : 4- holed
button without
cross-over
stitches
(longitudinal)
Rear : 4- holed
button without
cross-over
stitches
(longitudinal)
3.60
3.60
3.60
Needle entry interval of bottom feed (lateral)
This item sets the needle entry interval of bottom feed.
Number of stitches for button sewing
This item sets the number of stitches for button sewing.
Number of stitches at the start of button sewing (1 to 3 stitches)
This item sets the number of stitches at the start of button sewing.
– 6 –
0.10 to
6.00
2 to 32
1 to 3
0.05mm
2 stitches
1stich
3.60
6
1
Page 8

No. Item
Compensation of lower left position of upper button
This item is set when cloth is pulled and the amount of blindstitch
on the left side is different from that on the right side.
Compensation of 3rd stitch at the start of sewing
This item compensates the position of 3rd stitch at the start of sewing
to prevent thread from slipping off at the start of button sewing
Blindstitch width
This item has to be set within the range where needle and tongue
do not come in contact with each other.
Blindstitch amount
This item sets the blindstitch amount to cloth.
Buttonhole height of shank/marble button sewing
(Height from the feed plate)
This item is set to prevent the contact of needle and buttonhole.
Thinning level of the stay button
This item decreases the number of cross-over stitches of the lower side button
at the time of stay button sewing.
: Without thinning
: Thinning level 2
: Thinning level 1
: Thinning level 3
Setting range
–1.00 to
1.00
0 to 0.5
0.0 to K05
–1.00 to 5.00
0.0 to 10.0
– – –
Edit unit
0.05mm
0.05mm
0.2mm
0.05mm
0.1mm
– – –
Initial display
0
0
0.6
0.40
3.0
Without
thinning
Remarks
*1
Lateral compensation of needle entry of lower button at the
time of sewing counter button (front : 4 holes, rear : 2 holes)
Perform compensation to such an extent that needle does not come
in contact with buttonhole within the range of lower buttonhole.
Number of stitches of tie stitch at the end of sewing flat button directly to cloth.
This item sets the number of stitches of tie stitch at the end of sewing flat button
directly to cloth.
Number of stitches of tie stitch at the end of counter sewing
This item sets the number of stitches of tie stitch at the end of
counter sewing.
Button sewing height (only neck wrapping of sewing flat/
wrapped-around button with blindstitch)
This item sets the button holding height (finished height)
in the neck wrapping process.
Button height (shank/marble)
This item sets the button holding height (finished height)
in the neck wrapping process.
Button height (counter button)
This item sets the button holding height (finished height)
in the button sewing process.
Number of stitches at the start of sewing of neck wrapping
This item sets the number of stitches at the start of sewing of
neck wrapping.
Number of stitches of tie stitch at the end of sewing of neck
wrapping
This item sets the number of stitches of tie stitch
at the end of sewing in the neck wrapping process.
0 to 0.30
0.5 to 15.0
0 to 15.0
0 to 20.0
2 to 3
1 to 3
1 to 3
2 to 3
0.05mm
1 stitch
1 stitch
0.1mm
0.1mm
0.1mm
1 stitch
1 stitch
0
2
2
2.5
4.0
6.0
2
2
Compensation of the button holding height at the time
of sewing flat/wrapped-around button with blindstitch
This item sets when compensating the button holding height in the
button sewing process and desiring to give slackness between
button and neck wrapping section.
Thread release compensation
This item is the compensation value of the button holding height
in the button sewing process. Sewing is performed in the neck
wrapping process by gradually returning the compensation value to
the former one. This item is set when desiring to tightly wrap up
to the root of the button.
–5.0 to 5.0
–5.0 to 5.0
* 1 The maximum value of the range of data editing depends on the setting of K05.
– 7 –
0.1mm
0.1mm
–0.5
0.5
Page 9

No. Item
Button loader selection
<In case of shank/marble button>
: Loader OFF : Loader ON
<In case of normal button>
:
Loader OFF
Number of times of wrapping
This item sets the number of times of thread wrapping sewing
in the neck wrapping process.
Number of stitches of thread air-blow
This item sets the number of stitches of thread air-blow in the neck
wrapping process.
Compensation of button height in the neck wrapping process
This item compensates the button holding height in the
neck wrapping process and adjusts the wrapped condition.
Button positioning motion With/without
: With : Without
This item sets whether the compensation motion of button positioning is
performed at the time of operation by operator before driving the sewing
machine. It is convenient to use this item when sewing buttons which are
uneven in shape.
* Compensation value which has been set here is applied to one button sewing
only and the compensation value returns to 0 after completion of sewing.
:
Loader ON
Setting range
– – –
0 to 5
0 to 20
–5.0 to 5.0
– – –
Edit unit
– – –
1 time
1 stitch
0.1mm
– – –
Initial display
Loader used
(Front side)
0
6
0
Without
Remarks
Needle height at the time of button positioning
This item sets the angle which automatically lowers needle at the
time of button positioning motion.
Set the angle which is easy to perform positioning according to
kinds of buttons, neck wrapping height, etc.
Thread drawing motor start position in the button sewing process
This item sets the thread slack amount at the start of sewing to
stabilize thread remaining amount at the start of sewing.
Number of stitches to start thread drawing motor operation in
the button sewing process
This item sets number of stitches to hold the thread slack amount
set in No. S39.
Compensation of tension timing on cloth side and
rear side in the button sewing process
This item changes the tension changeover timing at the needle
entry on cloth side and rear side, and shifts the knotting position.
1st stitch hole position of upper button (longitudinal)
1st stitch hole position of upper button (lateral)
1st stitch hole position of lower button (longitudinal)
1st stitch hole position of lower button (lateral)
0 to 130
0 to 100
1 to 2
–90 to 90
–
2.00
to
–
2.00
to
–
13.00
to
–
2.00
to
4.00
4.00
4.00
4.00
1˚
1 pulse
1 stitch
1˚
0.05
0.05
0.05
0.05
80
30
1
0
1.80
1.80
1.80
1.80
Whole compensation of button holding position (lateral)
Compensation of shank/marble blindstitch position (left)
Hole position of shank/marble button
Tie stitch position of 1st stitch at the start of sewing of neck wrapping
(longitudinal)
– 8 –
–3.0 to 3.0
–2.0 to 2.0
–5.0 to 5.0
–4.0 to 4.0
0.1
0.1
0.1
0.1
0
0
0.3
0
Page 10

No. Item
Tie stitch position of 1st stitch at the start of sewing of neck wrapping
(lateral)
Tie stitch position of 2nd stitch at the start of sewing of neck wrapping
(longitudinal)
Tie stitch position of 2nd stitch at the start of sewing of neck wrapping
(lateral)
Setting range
–4.0 to 4.0
–4.0 to 4.0
–4.0 to 4.0
Edit unit
0.1
0.1
0.1
Initial display
–
0.3
1.0
0.3
Remarks
Stitch width of neck wrapping (right side)
Stitch width of neck wrapping (left side)
Start position of neck wrapping
Top position of neck wrapping
1st stitch of first compensation of tie stitch position at the end of button
sewing (longitudinal)
1st stitch of first compensation of tie stitch position at the end of button
sewing (lateral)
2nd stitch of first compensation of tie stitch position at the end of button
sewing (longitudinal)
2nd stitch of first compensation of tie stitch position at the end of button
sewing (lateral)
3rd stitch of first compensation of tie stitch position at the end of button
sewing (longitudinal)
3rd stitch of first compensation of tie stitch position at the end of button
sewing (lateral)
1st stitch of second compensation of tie stitch position at the end of
button sewing (longitudinal)
1st stitch of second compensation of tie stitch position at the end of
button sewing (lateral)
2nd stitch of second compensation of tie stitch position at the end of
button sewing (longitudinal)
2nd stitch of second compensation of tie stitch position at the end of
button sewing (lateral)
3rd stitch of second compensation of tie stitch position at the end of
button sewing (longitudinal)
3rd stitch of second compensation of tie stitch position at the end of
button sewing (lateral)
Tie stitch position at the end of sewing of neck wrapping (longitudinal)
0 to 5.0
0 to 5.0
–1.0 to 3.0
–1.0 to 5.0
–1.0 to 1.0
–1.0 to 1.0
–1.0 to 1.0
–1.0 to 1.0
–1.0 to 1.0
–1.0 to 1.0
–1.0 to 1.0
–1.0 to 1.0
–1.0 to 1.0
–1.0 to 1.0
–1.0 to 1.0
–1.0 to 1.0
–4.0 to 4.0
0.1
0.1
0.1
0.1
0.1
0.1
0.1
0.1
0.1
0.1
0.1
0.1
0.1
0.1
0.1
0.1
0.1
3.0
3.0
0
0
0
1.2
3.0
–1.0
–0.5
0.3
0.3
1.0
0.5
0
0
0
0
Tie stitch position at the end of sewing of neck wrapping (lateral)
Longitudinal position of thread trimming of button sewing
Longitudinal position of thread trimming of neck wrapping sewing
Blindstitch width of shank/marble (right)
Blindstitch width of shank/marble (left)
– 9 –
–4.0 to 4.0
–4.0 to 8.0
–4.0 to 8.0
–2.0 to 5.0
–2.0 to 5.0
0.1
0.1
0.1
0.1
0.1
0
0
0
0
0
Page 11

5. ERROR CODE LIST
Error code
E023
E031
E050
E099
E302
E394
Pictograph
Description of error
Detection of step-out of presser lifting motor error
This error occurs when step-out of presser lifting motor is
detected. Check whether the mechanical load is heavy.
Air pressure drop
Check whether the air pressure dropped.
Stop switch
This error occurs when stop switch is pressed.
Button loader motor step-out detection error
This error occurs when step-out of button loader motor is
detected.
Confirmation of tilt of machine head
Check whether tilt of machine head sensor is OFF.
Feed plate lowering sensor undone error
This error occurs when feed plate lowering sensor fails to
work during sewing machine operation. Check whether a
button or the like is put under the feed plate.
How to recover
P o s s i b l e t o
recover by
reset.
P o s s i b l e t o
recover by
reset.
P o s s i b l e t o
recover by
reset.
P o s s i b l e t o
recover by
reset.
P o s s i b l e t o
recover by
reset.
P o s s i b l e t o
recover by
reset.
Place of recovery
Data input
screen
Data input
screen
Data input
screen
Data input
screen
Data input
screen
Data input
screen
E395
E396
E397
E398
E399
E497
E498
Feed plate lifting sensor undone error
This error occurs when feed plate lifting sensor fails to work
during sewing machine operation.
Tongue close/open sensor undone error
This error occurs when sensor is not ON or OFF at the time
of tongue close/open operation.
Chuck close/open sensor undone error
This error occurs when a button is not in the chuck at the
time of sewing machine operation.
Chuck level sensor undone error
This error occurs when sensor fails to work at the time of chuck
level operation. Perform confirmation of the sensor position.
Chuck inversion sensor undone error
This error occurs when sensor fails to work at the time of chuck
inversion operation. Perform confirmation of the sensor position.
Tongue type error
This error occurs when "AMB289" type tongue and
"AMB189" type one are mixedly used in the cycle data.
P o s s i b l e t o
recover by
reset.
P o s s i b l e t o
recover by
reset.
P o s s i b l e t o
recover by
reset.
P o s s i b l e t o
recover by
reset.
P o s s i b l e t o
recover by
reset.
P o s s i b l e t o
recover by
reset.
Change the cycle data.
Button holding height over at the time of sewing
This error occurs when button holding height (22.0 mm) is
over and sewing cannot be performed at the time of button
sewing. Change the sewing data.
P o s s i b l e t o
recover by
reset.
Data input
screen
Data input
screen
Data input
screen
Data input
screen
Data input
screen
Data input
screen
Data input
screen
E499
Y feed motor move limit value over
This error occurs when input data of the button height of
shank/marble sewing exceeded the maximum (15 mm) of
Y feed move amount. Change the sewing data.
* For errors other than these errors, refer to the Instruction Manual.
– 10 –
P o s s i b l e t o
recover by
reset.
Data input
screen
 Loading...